175
TIBCO iProcess ® Web Services Plug-in User’s Guide Software Release 11.3 October 2011
TIBCO iProcess® Web Services Plug-in
User’s GuideSoftware Release 11.3October 2011

Important Information
SOME TIBCO SOFTWARE EMBEDS OR BUNDLES OTHER TIBCO SOFTWARE. USE OF SUCH EMBEDDED OR BUNDLED TIBCO SOFTWARE IS SOLELY TO ENABLE THE FUNCTIONALITY (OR PROVIDE LIMITED ADD-ON FUNCTIONALITY) OF THE LICENSED TIBCO SOFTWARE. THE EMBEDDED OR BUNDLED SOFTWARE IS NOT LICENSED TO BE USED OR ACCESSED BY ANY OTHER TIBCO SOFTWARE OR FOR ANY OTHER PURPOSE.USE OF TIBCO SOFTWARE AND THIS DOCUMENT IS SUBJECT TO THE TERMS AND CONDITIONS OF A LICENSE AGREEMENT FOUND IN EITHER A SEPARATELY EXECUTED SOFTWARE LICENSE AGREEMENT, OR, IF THERE IS NO SUCH SEPARATE AGREEMENT, THE CLICKWRAP END USER LICENSE AGREEMENT WHICH IS DISPLAYED DURING DOWNLOAD OR INSTALLATION OF THE SOFTWARE (AND WHICH IS DUPLICATED IN TIBCO IPROCESS WEB SERVICES PLUG-IN INSTALLATION GUIDE) OR IF THERE IS NO SUCH SOFTWARE LICENSE AGREEMENT OR CLICKWRAP END USER LICENSE AGREEMENT, THE LICENSE(S) LOCATED IN THE “LICENSE” FILE(S) OF THE SOFTWARE. USE OF THIS DOCUMENT IS SUBJECT TO THOSE TERMS AND CONDITIONS, AND YOUR USE HEREOF SHALL CONSTITUTE ACCEPTANCE OF AND AN AGREEMENT TO BE BOUND BY THE SAME.This document contains confidential information that is subject to U.S. and international copyright laws and treaties. No part of this document may be reproduced in any form without the written authorization of TIBCO Software Inc.TIBCO, The Power of Now, TIBCO Enterprise Message Service and TIBCO ActiveMatrix are either registered trademarks or trademarks of TIBCO Software Inc. in the United States and/or other countries.All other product and company names and marks mentioned in this document are the property of their respective owners and are mentioned for identification purposes only.
THIS SOFTWARE MAY BE AVAILABLE ON MULTIPLE OPERATING SYSTEMS. HOWEVER, NOT ALL OPERATING SYSTEM PLATFORMS FOR A SPECIFIC SOFTWARE VERSION ARE RELEASED AT THE SAME TIME. PLEASE SEE THE README.TXT FILE FOR THE AVAILABILITY OF THIS SOFTWARE VERSION ON A SPECIFIC OPERATING SYSTEM PLATFORM.
THIS DOCUMENT IS PROVIDED “AS IS” WITHOUT WARRANTY OF ANY KIND, EITHER EXPRESS OR IMPLIED, INCLUDING, BUT NOT LIMITED TO, THE IMPLIED WARRANTIES OF MERCHANTABILITY, FITNESS FOR A PARTICULAR PURPOSE, OR NON-INFRINGEMENT.THIS DOCUMENT COULD INCLUDE TECHNICAL INACCURACIES OR TYPOGRAPHICAL ERRORS. CHANGES ARE PERIODICALLY ADDED TO THE INFORMATION HEREIN; THESE CHANGES WILL BE INCORPORATED IN NEW EDITIONS OF THIS DOCUMENT. TIBCO SOFTWARE INC. MAY MAKE IMPROVEMENTS AND/OR CHANGES IN THE PRODUCT(S) AND/OR THE PROGRAM(S) DESCRIBED IN THIS DOCUMENT AT ANY TIME.THE CONTENTS OF THIS DOCUMENT MAY BE MODIFIED AND/OR QUALIFIED, DIRECTLY OR INDIRECTLY, BY OTHER DOCUMENTATION WHICH ACCOMPANIES THIS SOFTWARE, INCLUDING BUT NOT LIMITED TO ANY RELEASE NOTES AND "READ ME" FILES.Copyright © 2003-2011 TIBCO Software Inc. ALL RIGHTS RESERVED.
TIBCO Software Inc. Confidential Information
| i
Bac
k to
Lib
rary
Contents
Preface . . . . . . . . . . . . . . . . . . . . . . . . . . . . . . . . . . . . . . . . . . . . . . . . . . . . . . . . . . . . . . . . . . . . . . . . v
How to Use This Guide . . . . . . . . . . . . . . . . . . . . . . . . . . . . . . . . . . . . . . . . . . . . . . . . . . . . . . . . . . . . . . . . . . . . . vi
Target Audience . . . . . . . . . . . . . . . . . . . . . . . . . . . . . . . . . . . . . . . . . . . . . . . . . . . . . . . . . . . . . . . . . . . . . . . . . . . vii
Changes From the Previous Issue. . . . . . . . . . . . . . . . . . . . . . . . . . . . . . . . . . . . . . . . . . . . . . . . . . . . . . . . . . . . viiiUsing Security Profiles to Send iProcess Field Data . . . . . . . . . . . . . . . . . . . . . . . . . . . . . . . . . . . . . . . . . . viii
Connecting with TIBCO Resources . . . . . . . . . . . . . . . . . . . . . . . . . . . . . . . . . . . . . . . . . . . . . . . . . . . . . . . . . . . . ixHow to Join TIBCOmmunity . . . . . . . . . . . . . . . . . . . . . . . . . . . . . . . . . . . . . . . . . . . . . . . . . . . . . . . . . . . . . . ixHow to Access All TIBCO Documentation . . . . . . . . . . . . . . . . . . . . . . . . . . . . . . . . . . . . . . . . . . . . . . . . . . . ix
Documentation Conventions . . . . . . . . . . . . . . . . . . . . . . . . . . . . . . . . . . . . . . . . . . . . . . . . . . . . . . . . . . . . . . . . . x
Chapter 1 Introduction to the iProcess Web Services Plug-in . . . . . . . . . . . . . . . . . . . . . . . . . . 1
What is the iProcess Web Services Plug-in?. . . . . . . . . . . . . . . . . . . . . . . . . . . . . . . . . . . . . . . . . . . . . . . . . . . . . 2
Prerequisites for Using the iProcess Web Services Plug-in . . . . . . . . . . . . . . . . . . . . . . . . . . . . . . . . . . . . . . . . . 3Deciding Which Data Transport Mechanism to Use . . . . . . . . . . . . . . . . . . . . . . . . . . . . . . . . . . . . . . . . . . . . 3
Using the SOAP/HTTP Data Transport Mechanism . . . . . . . . . . . . . . . . . . . . . . . . . . . . . . . . . . . . . . . . . . . . . . . 5Prerequisites for Using SOAP/HTTP . . . . . . . . . . . . . . . . . . . . . . . . . . . . . . . . . . . . . . . . . . . . . . . . . . . . . . . 5Web Service Call Styles . . . . . . . . . . . . . . . . . . . . . . . . . . . . . . . . . . . . . . . . . . . . . . . . . . . . . . . . . . . . . . . . . 6
Using the XML/JMS Data Transport Mechanism . . . . . . . . . . . . . . . . . . . . . . . . . . . . . . . . . . . . . . . . . . . . . . . . . . 7Prerequisites for Using XML/JMS. . . . . . . . . . . . . . . . . . . . . . . . . . . . . . . . . . . . . . . . . . . . . . . . . . . . . . . . . . 7
Creating Secure Web Service Operations . . . . . . . . . . . . . . . . . . . . . . . . . . . . . . . . . . . . . . . . . . . . . . . . . . . . . . . 8
Chapter 2 Understanding the iProcess Web Services Plug-in Architecture . . . . . . . . . . . . . . . 9
Overview . . . . . . . . . . . . . . . . . . . . . . . . . . . . . . . . . . . . . . . . . . . . . . . . . . . . . . . . . . . . . . . . . . . . . . . . . . . . . . . 10
Understanding Inbound Calls Using SOAP/HTTP. . . . . . . . . . . . . . . . . . . . . . . . . . . . . . . . . . . . . . . . . . . . . . . . 12
Understanding Outbound Calls Using SOAP/HTTP . . . . . . . . . . . . . . . . . . . . . . . . . . . . . . . . . . . . . . . . . . . . . . 14
Understanding Inbound Calls Using XML/JMS . . . . . . . . . . . . . . . . . . . . . . . . . . . . . . . . . . . . . . . . . . . . . . . . . . 16
Understanding Outbound Calls Using XML/JMS. . . . . . . . . . . . . . . . . . . . . . . . . . . . . . . . . . . . . . . . . . . . . . . . . 18
Configuring a High Availability iProcess Web Services Plug-in . . . . . . . . . . . . . . . . . . . . . . . . . . . . . . . . . . . . . . 20
About iProcess Web Services Plug-in Deployment . . . . . . . . . . . . . . . . . . . . . . . . . . . . . . . . . . . . . . . . . . . . . . . 22High Availability Deployment . . . . . . . . . . . . . . . . . . . . . . . . . . . . . . . . . . . . . . . . . . . . . . . . . . . . . . . . . . . . 23High Availability Message Handling . . . . . . . . . . . . . . . . . . . . . . . . . . . . . . . . . . . . . . . . . . . . . . . . . . . . . . . 23
URL Alias Management . . . . . . . . . . . . . . . . . . . . . . . . . . . . . . . . . . . . . . . . . . . . . . . . . . . . . . . . . . . . . . . . . . . . 25
TIBCO iProcess Web Services Plug-in: User’s Guide
ii | Contents
Bac
k to
Lib
rary
Chapter 3 Understanding iProcess Web Services Plug-in Security . . . . . . . . . . . . . . . . . . . . . 27
Overview . . . . . . . . . . . . . . . . . . . . . . . . . . . . . . . . . . . . . . . . . . . . . . . . . . . . . . . . . . . . . . . . . . . . . . . . . . . . . . . . 28
About the Security Profile Administrator . . . . . . . . . . . . . . . . . . . . . . . . . . . . . . . . . . . . . . . . . . . . . . . . . . . . . . . . 30
Types of Security. . . . . . . . . . . . . . . . . . . . . . . . . . . . . . . . . . . . . . . . . . . . . . . . . . . . . . . . . . . . . . . . . . . . . . . . . . 32Transport Layer Security (SSL) . . . . . . . . . . . . . . . . . . . . . . . . . . . . . . . . . . . . . . . . . . . . . . . . . . . . . . . . . . . 32SOAP Authentication . . . . . . . . . . . . . . . . . . . . . . . . . . . . . . . . . . . . . . . . . . . . . . . . . . . . . . . . . . . . . . . . . . . 34Digital Signatures and Certificates. . . . . . . . . . . . . . . . . . . . . . . . . . . . . . . . . . . . . . . . . . . . . . . . . . . . . . . . . 35Timestamps . . . . . . . . . . . . . . . . . . . . . . . . . . . . . . . . . . . . . . . . . . . . . . . . . . . . . . . . . . . . . . . . . . . . . . . . . . 36Encryption - Ensuring Privacy . . . . . . . . . . . . . . . . . . . . . . . . . . . . . . . . . . . . . . . . . . . . . . . . . . . . . . . . . . . . 37Securing iProcess Engine Inbound Web Services . . . . . . . . . . . . . . . . . . . . . . . . . . . . . . . . . . . . . . . . . . . . 38
Combining Security Types . . . . . . . . . . . . . . . . . . . . . . . . . . . . . . . . . . . . . . . . . . . . . . . . . . . . . . . . . . . . . . . . . . 39Using WS Policy Files . . . . . . . . . . . . . . . . . . . . . . . . . . . . . . . . . . . . . . . . . . . . . . . . . . . . . . . . . . . . . . . . . . 39Using the Security Manager . . . . . . . . . . . . . . . . . . . . . . . . . . . . . . . . . . . . . . . . . . . . . . . . . . . . . . . . . . . . . 39
Using Custom Headers . . . . . . . . . . . . . . . . . . . . . . . . . . . . . . . . . . . . . . . . . . . . . . . . . . . . . . . . . . . . . . . . . . . . . 40Example of a Custom Header . . . . . . . . . . . . . . . . . . . . . . . . . . . . . . . . . . . . . . . . . . . . . . . . . . . . . . . . . . . . 40
Using Security Profiles to Send iProcess Field Data . . . . . . . . . . . . . . . . . . . . . . . . . . . . . . . . . . . . . . . . . . . . . . 41
Chapter 4 Creating a Web Services Step . . . . . . . . . . . . . . . . . . . . . . . . . . . . . . . . . . . . . . . . . . . 43
Overview . . . . . . . . . . . . . . . . . . . . . . . . . . . . . . . . . . . . . . . . . . . . . . . . . . . . . . . . . . . . . . . . . . . . . . . . . . . . . . . . 44
Defining Basic Web Services Step Information. . . . . . . . . . . . . . . . . . . . . . . . . . . . . . . . . . . . . . . . . . . . . . . . . . . 45
Defining the Call to the External Application. . . . . . . . . . . . . . . . . . . . . . . . . . . . . . . . . . . . . . . . . . . . . . . . . . . . . 46Select the Data Transport Mechanism and Invocation Style . . . . . . . . . . . . . . . . . . . . . . . . . . . . . . . . . . . . . 48Select the WSDL Source . . . . . . . . . . . . . . . . . . . . . . . . . . . . . . . . . . . . . . . . . . . . . . . . . . . . . . . . . . . . . . . . 49Select Web Service Operation. . . . . . . . . . . . . . . . . . . . . . . . . . . . . . . . . . . . . . . . . . . . . . . . . . . . . . . . . . . . 54Use the XML Mapper to Define the Input/Output Mappings (Optional) . . . . . . . . . . . . . . . . . . . . . . . . . . . . . 56Select XSLT Files for Input of Data . . . . . . . . . . . . . . . . . . . . . . . . . . . . . . . . . . . . . . . . . . . . . . . . . . . . . . . . 59Select XSLT Files for Output of Data (Optional) . . . . . . . . . . . . . . . . . . . . . . . . . . . . . . . . . . . . . . . . . . . . . . 61Mark iProcess Fields for Export. . . . . . . . . . . . . . . . . . . . . . . . . . . . . . . . . . . . . . . . . . . . . . . . . . . . . . . . . . . 63Map iProcess Fields to Web Service Fields. . . . . . . . . . . . . . . . . . . . . . . . . . . . . . . . . . . . . . . . . . . . . . . . . . 65Map Web Service Fields to iProcess Fields. . . . . . . . . . . . . . . . . . . . . . . . . . . . . . . . . . . . . . . . . . . . . . . . . . 66
Editing an EAI Web Service Step . . . . . . . . . . . . . . . . . . . . . . . . . . . . . . . . . . . . . . . . . . . . . . . . . . . . . . . . . . . . . 67Deleting a Withdraw Action . . . . . . . . . . . . . . . . . . . . . . . . . . . . . . . . . . . . . . . . . . . . . . . . . . . . . . . . . . . . . . 67
Chapter 5 Examples . . . . . . . . . . . . . . . . . . . . . . . . . . . . . . . . . . . . . . . . . . . . . . . . . . . . . . . . . . . . 69
Overview . . . . . . . . . . . . . . . . . . . . . . . . . . . . . . . . . . . . . . . . . . . . . . . . . . . . . . . . . . . . . . . . . . . . . . . . . . . . . . . . 70
About Integrating the iProcess Engine with Business Works . . . . . . . . . . . . . . . . . . . . . . . . . . . . . . . . . . . . . . . . 71
Pre-requisite Tasks . . . . . . . . . . . . . . . . . . . . . . . . . . . . . . . . . . . . . . . . . . . . . . . . . . . . . . . . . . . . . . . . . . . . . . . . 72Task 1: Configure TIBCO EMS . . . . . . . . . . . . . . . . . . . . . . . . . . . . . . . . . . . . . . . . . . . . . . . . . . . . . . . . . . . 72Task 2: Import the BusinessWorks Project . . . . . . . . . . . . . . . . . . . . . . . . . . . . . . . . . . . . . . . . . . . . . . . . . . 72Task 3: Review the Schema. . . . . . . . . . . . . . . . . . . . . . . . . . . . . . . . . . . . . . . . . . . . . . . . . . . . . . . . . . . . . . 74Task 4: Review the HTTP and JMS Connections . . . . . . . . . . . . . . . . . . . . . . . . . . . . . . . . . . . . . . . . . . . . . 75
TIBCO iProcess Web Services Plug-in: User’s Guide

Contents | iii
Bac
k to
Lib
rary
Task 5: Import the iProcess Procedures. . . . . . . . . . . . . . . . . . . . . . . . . . . . . . . . . . . . . . . . . . . . . . . . . . . . 75Task 6: Import the Example Security Profiles . . . . . . . . . . . . . . . . . . . . . . . . . . . . . . . . . . . . . . . . . . . . . . . . 76
Creating Working Examples . . . . . . . . . . . . . . . . . . . . . . . . . . . . . . . . . . . . . . . . . . . . . . . . . . . . . . . . . . . . . . . . 77Example 1- Calling an Inbound Web Service Operation Using SOAP/HTTP. . . . . . . . . . . . . . . . . . . . . . . . 77Example 2- Calling an Inbound Web Service Operation Using SOAP/HTTP and Basic Authentication . . . 80Example 3- Calling an Inbound Web Service Operation Using XML Over JMS. . . . . . . . . . . . . . . . . . . . . . 84Example 4- Calling an Outbound Web Service using SOAP/HTTP . . . . . . . . . . . . . . . . . . . . . . . . . . . . . . . 88Example 5- Calling an Outbound Web Service using XML/JMS . . . . . . . . . . . . . . . . . . . . . . . . . . . . . . . . . 94
Chapter 6 Web Services Configuration and Administration . . . . . . . . . . . . . . . . . . . . . . . . . . 101
Web Services Configuration File . . . . . . . . . . . . . . . . . . . . . . . . . . . . . . . . . . . . . . . . . . . . . . . . . . . . . . . . . . . . 102Keystore Location . . . . . . . . . . . . . . . . . . . . . . . . . . . . . . . . . . . . . . . . . . . . . . . . . . . . . . . . . . . . . . . . . . . . 102JDBC Connection details . . . . . . . . . . . . . . . . . . . . . . . . . . . . . . . . . . . . . . . . . . . . . . . . . . . . . . . . . . . . . . 102Date Formats . . . . . . . . . . . . . . . . . . . . . . . . . . . . . . . . . . . . . . . . . . . . . . . . . . . . . . . . . . . . . . . . . . . . . . . 103JMS Message Timeout . . . . . . . . . . . . . . . . . . . . . . . . . . . . . . . . . . . . . . . . . . . . . . . . . . . . . . . . . . . . . . . . 103SOAP/HTTP Timeout . . . . . . . . . . . . . . . . . . . . . . . . . . . . . . . . . . . . . . . . . . . . . . . . . . . . . . . . . . . . . . . . . 104AXIS Concurrent Connections . . . . . . . . . . . . . . . . . . . . . . . . . . . . . . . . . . . . . . . . . . . . . . . . . . . . . . . . . . 104Asynchronous With Reply Timeout. . . . . . . . . . . . . . . . . . . . . . . . . . . . . . . . . . . . . . . . . . . . . . . . . . . . . . . 104Field Cache Timeout . . . . . . . . . . . . . . . . . . . . . . . . . . . . . . . . . . . . . . . . . . . . . . . . . . . . . . . . . . . . . . . . . 105Security Profile Tokenization. . . . . . . . . . . . . . . . . . . . . . . . . . . . . . . . . . . . . . . . . . . . . . . . . . . . . . . . . . . . 105Configuring Ports for Web Services . . . . . . . . . . . . . . . . . . . . . . . . . . . . . . . . . . . . . . . . . . . . . . . . . . . . . . 106Configuring Encoding . . . . . . . . . . . . . . . . . . . . . . . . . . . . . . . . . . . . . . . . . . . . . . . . . . . . . . . . . . . . . . . . . 106Configuring Pooling . . . . . . . . . . . . . . . . . . . . . . . . . . . . . . . . . . . . . . . . . . . . . . . . . . . . . . . . . . . . . . . . . . 107
Using the Password Manager . . . . . . . . . . . . . . . . . . . . . . . . . . . . . . . . . . . . . . . . . . . . . . . . . . . . . . . . . . . . . . 108
Setting Up and Managing Security Profiles . . . . . . . . . . . . . . . . . . . . . . . . . . . . . . . . . . . . . . . . . . . . . . . . . . . . 111Starting the Security Profile Administrator . . . . . . . . . . . . . . . . . . . . . . . . . . . . . . . . . . . . . . . . . . . . . . . . . 111Creating a New Profile . . . . . . . . . . . . . . . . . . . . . . . . . . . . . . . . . . . . . . . . . . . . . . . . . . . . . . . . . . . . . . . . 113Specifying a WS Policy File . . . . . . . . . . . . . . . . . . . . . . . . . . . . . . . . . . . . . . . . . . . . . . . . . . . . . . . . . . . . 118Copying a Profile . . . . . . . . . . . . . . . . . . . . . . . . . . . . . . . . . . . . . . . . . . . . . . . . . . . . . . . . . . . . . . . . . . . . 120Modifying a Profile . . . . . . . . . . . . . . . . . . . . . . . . . . . . . . . . . . . . . . . . . . . . . . . . . . . . . . . . . . . . . . . . . . . 120Disabling an Inbound Profile. . . . . . . . . . . . . . . . . . . . . . . . . . . . . . . . . . . . . . . . . . . . . . . . . . . . . . . . . . . . 120
Administering URL Aliases and Security Profiles . . . . . . . . . . . . . . . . . . . . . . . . . . . . . . . . . . . . . . . . . . . . . . . 121The EAIWS_URL_ALIAS Table . . . . . . . . . . . . . . . . . . . . . . . . . . . . . . . . . . . . . . . . . . . . . . . . . . . . . . . . . 121The EAIWS_SECURITY_PROFILE Table . . . . . . . . . . . . . . . . . . . . . . . . . . . . . . . . . . . . . . . . . . . . . . . . . 122Using the Command Line Interface to URL Aliases . . . . . . . . . . . . . . . . . . . . . . . . . . . . . . . . . . . . . . . . . . 122Using the Command Line Interface to Security Profiles . . . . . . . . . . . . . . . . . . . . . . . . . . . . . . . . . . . . . . . 123
Configuring JMS Provider Aliases . . . . . . . . . . . . . . . . . . . . . . . . . . . . . . . . . . . . . . . . . . . . . . . . . . . . . . . . . . . 125
Setting Logging Properties . . . . . . . . . . . . . . . . . . . . . . . . . . . . . . . . . . . . . . . . . . . . . . . . . . . . . . . . . . . . . . . . 126
Monitoring the System . . . . . . . . . . . . . . . . . . . . . . . . . . . . . . . . . . . . . . . . . . . . . . . . . . . . . . . . . . . . . . . . . . . . 127
Configuring High Availability . . . . . . . . . . . . . . . . . . . . . . . . . . . . . . . . . . . . . . . . . . . . . . . . . . . . . . . . . . . . . . . 128
Configuring UDDI Repositories . . . . . . . . . . . . . . . . . . . . . . . . . . . . . . . . . . . . . . . . . . . . . . . . . . . . . . . . . . . . . 129Specifying a Default UDDI Repository . . . . . . . . . . . . . . . . . . . . . . . . . . . . . . . . . . . . . . . . . . . . . . . . . . . . 129
TIBCO iProcess Web Services Plug-in: User’s Guide
iv | Contents
Bac
k to
Lib
rary
Adding a New UDDI Repository . . . . . . . . . . . . . . . . . . . . . . . . . . . . . . . . . . . . . . . . . . . . . . . . . . . . . . . . . 129
Manually Configuring the Location of the Java Executable. . . . . . . . . . . . . . . . . . . . . . . . . . . . . . . . . . . . . . . . . 131
Manually Configuring the HTTP Proxy Server Settings . . . . . . . . . . . . . . . . . . . . . . . . . . . . . . . . . . . . . . . . . . . 132
Chapter 7 iProcess Web Service Operations. . . . . . . . . . . . . . . . . . . . . . . . . . . . . . . . . . . . . . . 133
Accessing the iProcess Web Service Operations . . . . . . . . . . . . . . . . . . . . . . . . . . . . . . . . . . . . . . . . . . . . . . . . 134
getNodeName . . . . . . . . . . . . . . . . . . . . . . . . . . . . . . . . . . . . . . . . . . . . . . . . . . . . . . . . . . . . . . . . . . . . . . . . . . 135
doDelayedRelease . . . . . . . . . . . . . . . . . . . . . . . . . . . . . . . . . . . . . . . . . . . . . . . . . . . . . . . . . . . . . . . . . . . . . . . 136
doCaseStart . . . . . . . . . . . . . . . . . . . . . . . . . . . . . . . . . . . . . . . . . . . . . . . . . . . . . . . . . . . . . . . . . . . . . . . . . . . . 139
doSuspend . . . . . . . . . . . . . . . . . . . . . . . . . . . . . . . . . . . . . . . . . . . . . . . . . . . . . . . . . . . . . . . . . . . . . . . . . . . . . 140
doGraftCount . . . . . . . . . . . . . . . . . . . . . . . . . . . . . . . . . . . . . . . . . . . . . . . . . . . . . . . . . . . . . . . . . . . . . . . . . . . 141
doGraft . . . . . . . . . . . . . . . . . . . . . . . . . . . . . . . . . . . . . . . . . . . . . . . . . . . . . . . . . . . . . . . . . . . . . . . . . . . . . . . . 142
doSuspendSub . . . . . . . . . . . . . . . . . . . . . . . . . . . . . . . . . . . . . . . . . . . . . . . . . . . . . . . . . . . . . . . . . . . . . . . . . 143
doJumpTo . . . . . . . . . . . . . . . . . . . . . . . . . . . . . . . . . . . . . . . . . . . . . . . . . . . . . . . . . . . . . . . . . . . . . . . . . . . . . . 144
doActivateSub . . . . . . . . . . . . . . . . . . . . . . . . . . . . . . . . . . . . . . . . . . . . . . . . . . . . . . . . . . . . . . . . . . . . . . . . . . 145
doActivate . . . . . . . . . . . . . . . . . . . . . . . . . . . . . . . . . . . . . . . . . . . . . . . . . . . . . . . . . . . . . . . . . . . . . . . . . . . . . 146
doEvent . . . . . . . . . . . . . . . . . . . . . . . . . . . . . . . . . . . . . . . . . . . . . . . . . . . . . . . . . . . . . . . . . . . . . . . . . . . . . . . 147
Appendix A Troubleshooting . . . . . . . . . . . . . . . . . . . . . . . . . . . . . . . . . . . . . . . . . . . . . . . . . . . 149
Log Files . . . . . . . . . . . . . . . . . . . . . . . . . . . . . . . . . . . . . . . . . . . . . . . . . . . . . . . . . . . . . . . . . . . . . . . . . . . . . . . 150
Unable to Look Up Queue. . . . . . . . . . . . . . . . . . . . . . . . . . . . . . . . . . . . . . . . . . . . . . . . . . . . . . . . . . . . . . . . . . 151
Step Fails to Release Due to Lack of Return Value . . . . . . . . . . . . . . . . . . . . . . . . . . . . . . . . . . . . . . . . . . . . . . 152
EAI Plug-in Not Accessible . . . . . . . . . . . . . . . . . . . . . . . . . . . . . . . . . . . . . . . . . . . . . . . . . . . . . . . . . . . . . . . . . 153
Step Fails to Release Due to Missing iProcess Engine Field Data . . . . . . . . . . . . . . . . . . . . . . . . . . . . . . . . . . . 154
Appendix B Data Type Mapping . . . . . . . . . . . . . . . . . . . . . . . . . . . . . . . . . . . . . . . . . . . . . . . . . 155
Data Type Mapping Conversion Process . . . . . . . . . . . . . . . . . . . . . . . . . . . . . . . . . . . . . . . . . . . . . . . . . . . . . . 156
Using iProcess Date and Time Fields in Web Services . . . . . . . . . . . . . . . . . . . . . . . . . . . . . . . . . . . . . . . . . . . 157
Index . . . . . . . . . . . . . . . . . . . . . . . . . . . . . . . . . . . . . . . . . . . . . . . . . . . . . . . . . . . . . . . . . . . . . . . . 159
TIBCO iProcess Web Services Plug-in: User’s Guide
| v
Bac
k to
Lib
rary
Preface
This guide explains how to define and use the TIBCO iProcess™ Web Services Plug-in to integrate external applications with the TIBCO iProcess™ Engine.
Topics
• How to Use This Guide, page vi
• Target Audience, page vii
• Changes From the Previous Issue, page viii
• Connecting with TIBCO Resources, page ix
• http://docs.tibco.com/TibcoDoc, page ix
• Documentation Conventions, page x
TIBCO iProcess Web Services Plug-in: User’s Guide
vi | Preface
Bac
k to
Lib
rary
How to Use This Guide
This guide contains the following chapters:
• Chapter 1 provides an overview of the iProcess Web Services Plug-in
• Chapter 2 describes the iProcess Web Services Plug-in architecture, high-availability configurations and deployment.
• Chapter 3 describes the different types of Web Services security that are available.
• Chapter 4 describes how to create an iProcess Web Services step in your iProcess procedure.
• Chapter 5 contains some examples that show how to use the TIBCO iProcess Web Services Plug-in.
• Chapter 6 describes iProcess Web Services Plug-in configuration files that you can modify.
• Chapter 7 describes the iProcess Web Services operations that can be called by third-party applications.
• Appendix A contains information about the WebServicesStaffwareData.xsd schema that is provided for field mapping to iProcess Engine fields.
• Appendix A describes how to troubleshoot problems using the iProcess Web Services Plug-in.
• Appendix B describes how iProcess field data is converted to XML data types.
TIBCO iProcess Web Services Plug-in: User’s Guide
Target Audience | vii
Bac
k to
Lib
rary
Target Audience
This guide is aimed at system integrators and procedure definers who need to implement web services with iProcess procedures.
It assumes that:
• you have prior knowledge of iProcess concepts. You should be familiar with the concepts described in the TIBCO iProcess™ Modeler set of guides.
• you have a detailed understanding of Java Message Service (JMS) and how to administer your JMS Provider as well as web service technologies and Java.
• you have some understanding of Extensible Markup Language (XML) and Extensible Stylesheet Language Transformations (XSLT).
• (Optional) you have some understanding of TIBCO BusinessWorks™ or other target applications.
TIBCO iProcess Web Services Plug-in: User’s Guide
viii | Preface
Bac
k to
Lib
rary
Changes From the Previous Issue
The major technical change from the information presented in the previous issue of this guide is:
Using Security Profiles to Send iProcess Field DataUsing the Security Profile Administrator, you can include iProcess field data in your SOAP header to outbound web services at runtime. For example, you could use custom headers to send context-sensitive iProcess field data that could be used in the web service at runtime. This is achieved by inserting a token into any field in the main dialog of the Security Profile Administrator. The fields can contain both SOAP and security information, see Using Security Profiles to Send iProcess Field Data, page 41.
TIBCO iProcess Web Services Plug-in: User’s Guide
Connecting with TIBCO Resources | ix
Bac
k to
Lib
rary
Connecting with TIBCO Resources
How to Join TIBCOmmunityTIBCOmmunity is an online destination for TIBCO customers, partners, and resident experts, a place to share and access the collective experience of the TIBCO community. TIBCOmmunity offers forums, blogs, and access to a variety of resources. To register, go to http://www.tibcommunity.com.
How to Access All TIBCO DocumentationAfter you join TIBCOmmunity, you can access the documentation for all supported product versions here:
http://docs.tibco.com/TibcoDoc
TIBCO iProcess Web Services Plug-in: User’s Guide

x | Preface
Bac
k to
Lib
rary
Documentation Conventions
Because this guide covers both Windows and UNIX versions of the iProcess Web Services Plug-in, this guide uses the Windows convention of a backslash (\). The equivalent pathname on a UNIX system is the same, but using the forward slash (/) as a separator character.
The following typographical conventions are used in this manual.
UNIX pathnames are occasionally shown explicitly, using forward slashes as separators, where a UNIX-specific example or syntax is required.
Table 1 General Typographical Conventions
Convention Use
code font Code font identifies commands, code examples, filenames, pathnames, and output displayed in a command window. For example:
Use MyCommand to start the foo process.
bold code
font Bold code font is used in the following ways:
• In procedures, to indicate what a user types. For example: Type admin.
• In large code samples, to indicate the parts of the sample that are of particular interest.
• In command syntax, to indicate the default parameter for a command. For example, if no parameter is specified, MyCommand is enabled: MyCommand [enable | disable]
italic font Italic font is used in the following ways:
• To indicate a document title. For example: See TIBCO BusinessWorks Concepts.
• To introduce new terms For example: A portal page may contain several portlets. Portlets are mini-applications that run in a portal.
• To indicate a variable in a command or code syntax that you must replace. For example: MyCommand pathname
Key combinations
Key name separated by a plus sign indicate keys pressed simultaneously. For example: Ctrl+C.
Key names separated by a comma and space indicate keys pressed one after the other. For example: Esc, Ctrl+Q.
TIBCO iProcess Web Services Plug-in: User’s Guide
Documentation Conventions | xi
Bac
k to
Lib
rary
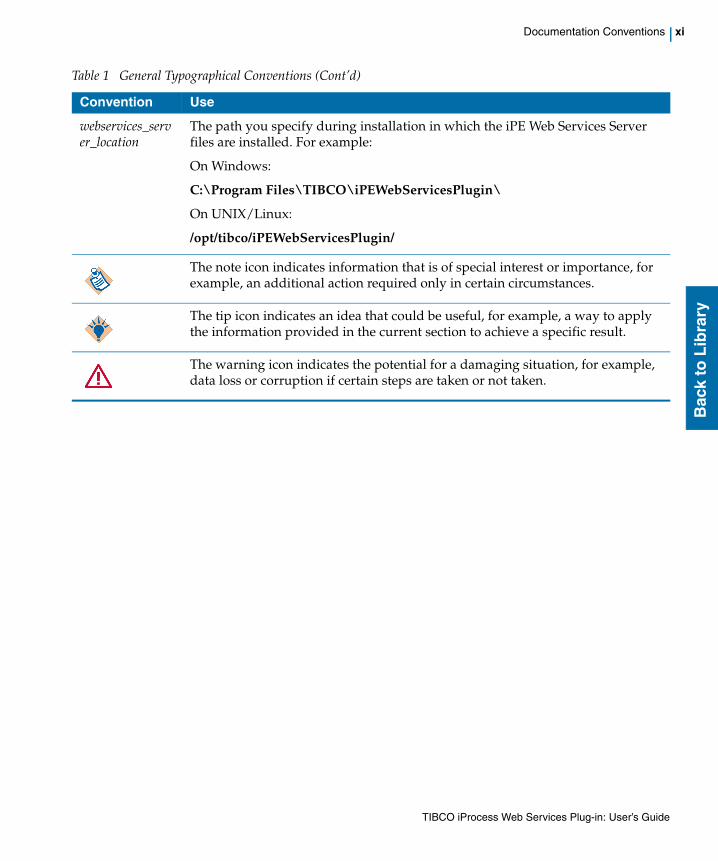
webservices_server_location
The path you specify during installation in which the iPE Web Services Server files are installed. For example:
On Windows:
C:\Program Files\TIBCO\iPEWebServicesPlugin\
On UNIX/Linux:
/opt/tibco/iPEWebServicesPlugin/
The note icon indicates information that is of special interest or importance, for example, an additional action required only in certain circumstances.
The tip icon indicates an idea that could be useful, for example, a way to apply the information provided in the current section to achieve a specific result.
The warning icon indicates the potential for a damaging situation, for example, data loss or corruption if certain steps are taken or not taken.
Table 1 General Typographical Conventions (Cont’d)
Convention Use
TIBCO iProcess Web Services Plug-in: User’s Guide
xii | Preface
Bac
k to
Lib
rary
TIBCO iProcess Web Services Plug-in: User’s Guide
| 1
Bac
k to
Lib
rary
Chapter 1 Introduction to the iProcess Web Services Plug-in
This chapter provides an introduction to the iProcess Web Services Plug-in and provides an overview of how it works.
Topics
• What is the iProcess Web Services Plug-in?, page 2
• Prerequisites for Using the iProcess Web Services Plug-in, page 3
• Using the SOAP/HTTP Data Transport Mechanism, page 5
• Using the XML/JMS Data Transport Mechanism, page 7
• Creating Secure Web Service Operations, page 8
TIBCO iProcess Web Services Plug-in: User’s Guide
2 | Chapter 1 Introduction to the iProcess Web Services Plug-in
Bac
k to
Lib
rary
What is the iProcess Web Services Plug-in?
The main function of the iProcess Web Services Plug-in is to provide an interface for both inbound and outbound communication between the iProcess Engine and external applications:
• Outbound - EAI steps in iProcess procedures make calls to external applications using Web Services to perform some operation.
• Inbound - External applications make calls to iProcess to perform iProcess Web Service operations such as starting cases, triggering events or suspending cases.
The iProcess Web Services Plug-in consists of three components:
• Web Services Engine - this consists of an Inbound Engine (to handle calls from external applications to iProcess operations using Web Services) and an Outbound Engine (to handle calls to external web services). Both of these engines are hosted by Jetty which is used as a JMX/servlet container.
• iProcess Engine Interface Component - This consists of an EAI Plug-in. It allows the iProcess background processes to communicate with the Web Services Engine.
• TIBCO iProcess Web Services Client Plug-in - This plug-in needs to be installed on your client machine that hosts your iProcess Workspace and iProcess Modeler. This plug-in enables you to define EAI Web Service steps in your iProcess procedures.
For more information about how these components interact, see Chapter 2.
TIBCO iProcess Web Services Plug-in: User’s Guide
Prerequisites for Using the iProcess Web Services Plug-in | 3
Bac
k to
Lib
rary
Prerequisites for Using the iProcess Web Services Plug-in
Before using the iProcess Web Services Plug-in, you need to decide which data transport mechanism you are going to use.
There are two data transport mechanisms you can use to send data between the iProcess Engine and an external application.
• Simple Object Access Protocol (SOAP) requests over the Hypertext Transfer Protocol (HTTP) - (SOAP/HTTP)
• Extensible Markup Language (XML) text using a Java Message Server (JMS) - (XML/JMS).
The main difference between using SOAP/HTTP and XML/JMS is that SOAP/HTTP uses Web Services Description Language (WSDL) source to determine how the text is sent. However, when using XML/JMS you must define your own XML schema for sending data between an iProcess Engine and an external application. Whether the XML data is validated against any such schema is optional.
Deciding Which Data Transport Mechanism to Use There are advantages to using both the SOAP/HTTP and XML/JMS data transport mechanisms.
Advantages of the SOAP/HTTP Data Transport Mechanism
The advantages to consider when using the SOAP/HTTP data transport mechancism are:
• It is a more recognised standard than XML/JMS.
• It is simpler to use than the XML/JMS data transport mechanism as it does not require an XML schema. When using XML/JMS you must define your own XML schema for sending text whereas using SOAP/HTTP, you use WSDL source to define how text is sent.
• You can use security profiles with the SOAP/HTTP data transport mechanism. You cannot use Security profiles with the XML/JMS data transport mechanism.
TIBCO iProcess Web Services Plug-in: User’s Guide
4 | Chapter 1 Introduction to the iProcess Web Services Plug-in
Bac
k to
Lib
rary
Advantages of the XML/JMS Data Transport Mechanism
The advantages to consider when using the XML/JMS data transport mechanism are:
• Less data is sent using XML/JMS than SOAP/HTTP. This is because when data is sent using SOAP over HTTP, it is sent in a SOAP container which consists of two parts, a header and the body. The body is the message payload and the header contains system level information. However, when using XML/JMS, although the message still has a header, the amount of information that is contained in the header is smaller. Therefore, because there is less data, XML/JMS tends to be a faster data transport mechanism than SOAP/HTTP.
• The XML/JMS data transport mechanism can be more reliable because the JMS server has transactional capability. This means that if the connection is lost between the JMS Server and the iProcess Web Services Plug-in, then the data requests are retried. With SOAP/HTTP, if the connection between the external application and the iProcess Web Services Plug-in is lost, the SOAP requests are also lost.
Note that XML/JMS support only applies to queues. Topics are not supported using the XML/JMS data transport mechanism.
TIBCO iProcess Web Services Plug-in: User’s Guide
Using the SOAP/HTTP Data Transport Mechanism | 5
Bac
k to
Lib
rary
Using the SOAP/HTTP Data Transport Mechanism
This section describes:
• Prerequisites for Using SOAP/HTTP on page 5
• Web Service Call Styles on page 6
Prerequisites for Using SOAP/HTTPIf you are using SOAP/HTTP, you need to be familiar with using web services and have access to the appropriate Web Services Definition Language (WSDL) source for the Web Service you want to call. The WSDL source can be either static, at a specific URL, or via a UDDI (Universal Description, Discovery and Integration) repository.
Information about a Web Service is stored in the WSDL source. The WSDL source describes all the methods that a Web Service exposes (in the form of XML messages it can accept and send), as well as the protocols over which the Web Service is available. The WSDL source provides all the information a client application needs to use the Web Service. For information about calling iProcess Engine Web Services, see Chapter 7.
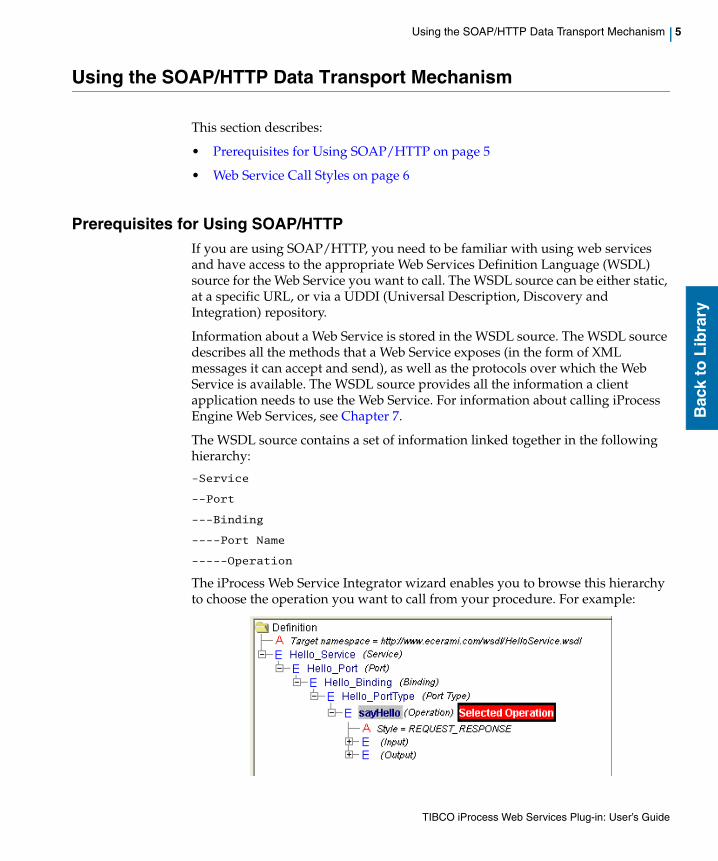
The WSDL source contains a set of information linked together in the following hierarchy:
-Service
--Port
---Binding
----Port Name
-----Operation
The iProcess Web Service Integrator wizard enables you to browse this hierarchy to choose the operation you want to call from your procedure. For example:
TIBCO iProcess Web Services Plug-in: User’s Guide
6 | Chapter 1 Introduction to the iProcess Web Services Plug-in
Bac
k to
Lib
rary
Web Service Call StylesWhen a Web Service call is made from iProcess, a message is sent to the Web Service. There are two types of messages: Remote Procedure Call (RPC) style or Document style.
• An RPC style message specifies the name of the procedure to call and contains a set of input parameters for the Web Service. An RPC style output message is received containing a return value and any output parameters returned from the Web service. The messages can be defined using an XML schema so that custom data types can be used.
• Document style messages enable more loosely coupled communication between two applications in that the sender does not need to know anything about the implementation of the service. The Web Service determines how to process the message based on the contents of the message. The format of the message is defined by XML schema definitions, which can be defined in the WSDL or in a separate schema.
The style used for your Web Service call is decided when you choose the Web Service operation from the WSDL source:
• A Document style message is used when a Document style WSDL operation is selected or custom data types are used.
• A RPC style message is used when there are no custom data types and the WSDL operation is not Document style.
When the Document style messages are required, iProcess uses Extensible Stylesheet Language Transformation (XSLT) to generate XML based on iProcess fields. The resulting XML data is used when calling the Web Service operation.
TIBCO iProcess Web Services Plug-in: User’s Guide
Using the XML/JMS Data Transport Mechanism | 7
Bac
k to
Lib
rary
Using the XML/JMS Data Transport Mechanism
There are many different JMS Providers that you can use to integrate between the iProcess Engine and external applications. You need to know how to configure the iProcess Web Services Plug-in for the JMS providers you want to use.
Prerequisites for Using XML/JMSIf you are using XML/JMS, you need to be familiar with using XML and have access to the appropriate XML for the external application you want to call. This means that you must configure the following:
• XML Schema: You need to understand the XML schema of the external application you are sending data to and define an XML Schema for the data you are passing between the iProcess Engine and the external application.
• JMS Target Name: You need to identify a JMS target queue name when you define an iProcess Web Services step in a procedure. The JMS target name is the alias of a JMS queue that has already been associated with a particular JMS Provider. You must define aliases for the queues that the client is allowed to access. This is because you may use more than one JMS provider and each provider has its own unique way of connecting to its queues. Specifying a JMS target means you do not have to provide the specific connection details for a particular JMS provider. See Configuring JMS Provider Aliases on page 125 for more information about creating different JMS targets for different JMS providers.
• Input/output mappings. You map the input and output data by creating an XSLT so that the data can be passed correctly between iProcess and the Web Service operation you are using.
Note that XML/JMS support only applies to queues. Topics are not supported in iProcess Web Services Plug-in.
TIBCO iProcess Web Services Plug-in: User’s Guide
8 | Chapter 1 Introduction to the iProcess Web Services Plug-in
Bac
k to
Lib
rary
Creating Secure Web Service Operations
The TIBCO iProcess Web Services Plug-in supports transport layer security using Secure Socket Layer (SSL), and SOAP security features.
You can create "security profiles" that contain settings for SOAP security so that the settings can be reused for different web services steps at design time. The security profile can also be associated with a URL alias so that at design time, when you subsequently select the URL alias, the associated security profile is displayed as well (for more information, see URL Alias Management on page 25).
TIBCO iProcess Web Services Plug-in: User’s Guide
| 9
Bac
k to
Lib
rary
Chapter 2 Understanding the iProcess Web Services Plug-in Architecture
This chapter describes the iProcess Web Services Plug-in architecture.
Topics
• Overview, page 10
• Understanding Inbound Calls Using SOAP/HTTP, page 12
• Understanding Inbound Calls Using XML/JMS, page 16
• Configuring a High Availability iProcess Web Services Plug-in, page 20
• About iProcess Web Services Plug-in Deployment, page 22
• URL Alias Management, page 25
TIBCO iProcess Web Services Plug-in: User’s Guide
10 | Chapter 2 Understanding the iProcess Web Services Plug-in Architecture
Bac
k to
Lib
rary
Overview
Communication between the iProcess Engine and external applications is enabled by the iProcess Web Services Plug-in which provides the interface for both inbound and outbound calls. The data is sent using either of the following data transport mechanisms:
• a Simple Object Access Protocol (SOAP) request over the HTTP protocol to the Web Service, or
• as XML text using the JMS Server.
The iProcess Web Services Plug-in is different from other TIBCO plug-ins in several respects:
• It runs as a standalone process (unlike for example EAI Java, which is in process with the iProcess Engine background), as well as an iProcess Engine interface.
• It has an Inbound Engine (to handle calls from external Web Services to iProcess operations) and an Outbound Engine (to handle calls to external web services). Both of these engines are hosted by Jetty which is used as a JMX/servlet container.
TIBCO iProcess Web Services Plug-in: User’s Guide
Overview | 11
Bac
k to
Lib
rary
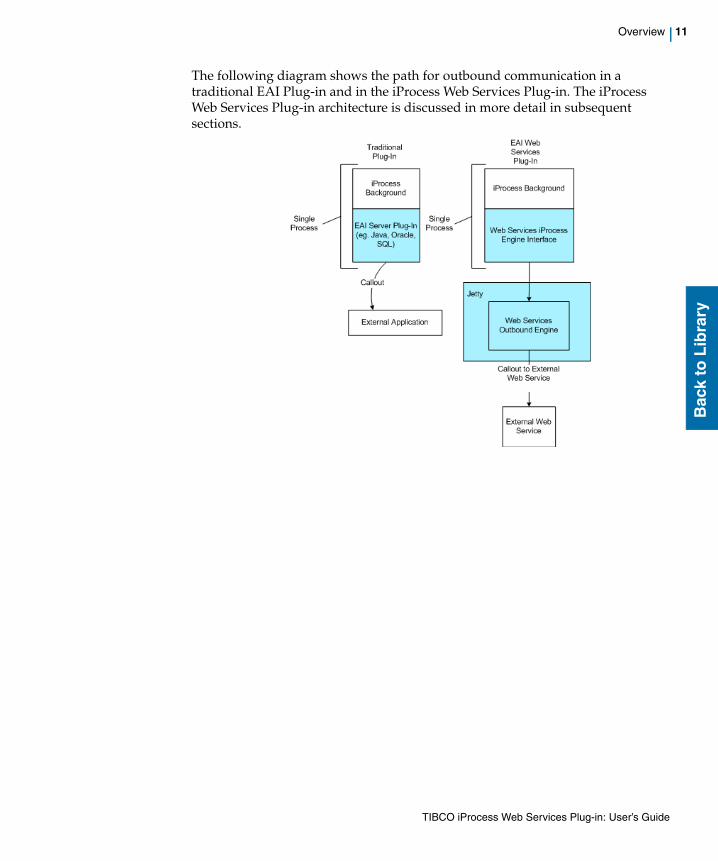
The following diagram shows the path for outbound communication in a traditional EAI Plug-in and in the iProcess Web Services Plug-in. The iProcess Web Services Plug-in architecture is discussed in more detail in subsequent sections.
TIBCO iProcess Web Services Plug-in: User’s Guide
12 | Chapter 2 Understanding the iProcess Web Services Plug-in Architecture
Bac
k to
Lib
rary
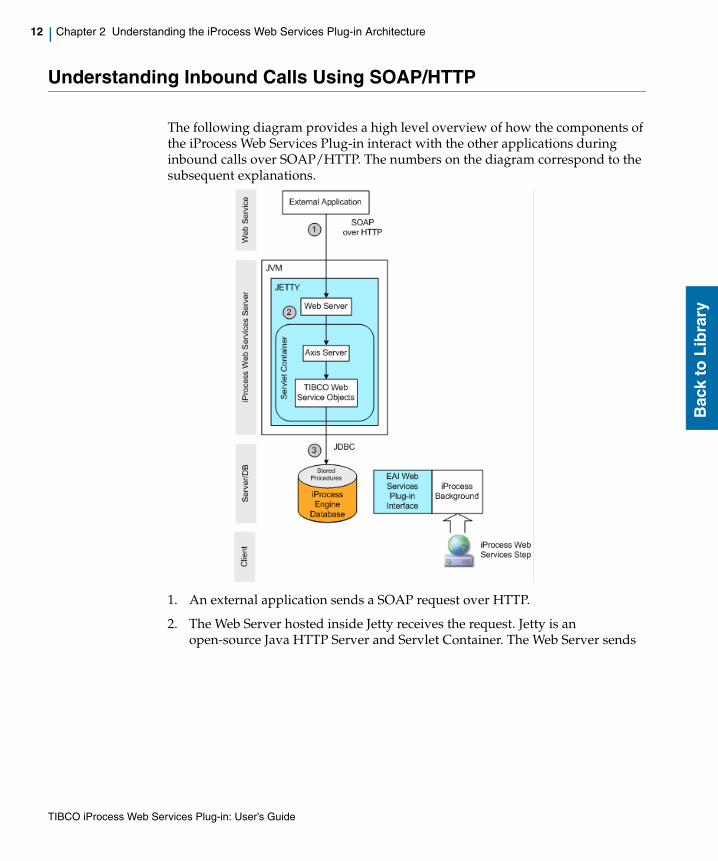
Understanding Inbound Calls Using SOAP/HTTP
The following diagram provides a high level overview of how the components of the iProcess Web Services Plug-in interact with the other applications during inbound calls over SOAP/HTTP. The numbers on the diagram correspond to the subsequent explanations.
1. An external application sends a SOAP request over HTTP.
2. The Web Server hosted inside Jetty receives the request. Jetty is an open-source Java HTTP Server and Servlet Container. The Web Server sends
TIBCO iProcess Web Services Plug-in: User’s Guide
Understanding Inbound Calls Using SOAP/HTTP | 13
Bac
k to
Lib
rary
the request to the Axis Server which sends it to the TIBCO Web Service Objects.
3. The TIBCO Web Service Objects connect to the TIBCO iProcess database using Java Database Connectivity (JDBC) and run stored procedures to perform actions (for example, a case start).
Prior to version 10.6, in the WSDL file that the iProcess Web Services Plug-in presents, the endpoint address for iProcess Web Services Plug-in inbound web services was http://localhost:8090/axis2/services/WebiPE. This release of the iProcess Web Services Plug-in has been upgraded to use Axis2, which has caused the endpoints to change. The new endpoints are:
— for SOAP 1.1; http://localhost:8090/axis2/services/WebiPE.WebiPEHttpSoap11Endpoint/ for SOAP 1.1
— for SOAP 1.2; http://localhost:8090/axis2/services/WebiPE.WebiPEHttpSoap12Endpoint/ for SOAP 1.2.
However, you can still access the iProcess Web Services Plug-in using the old endpoint.
TIBCO iProcess Web Services Plug-in: User’s Guide
14 | Chapter 2 Understanding the iProcess Web Services Plug-in Architecture
Bac
k to
Lib
rary
Understanding Outbound Calls Using SOAP/HTTP
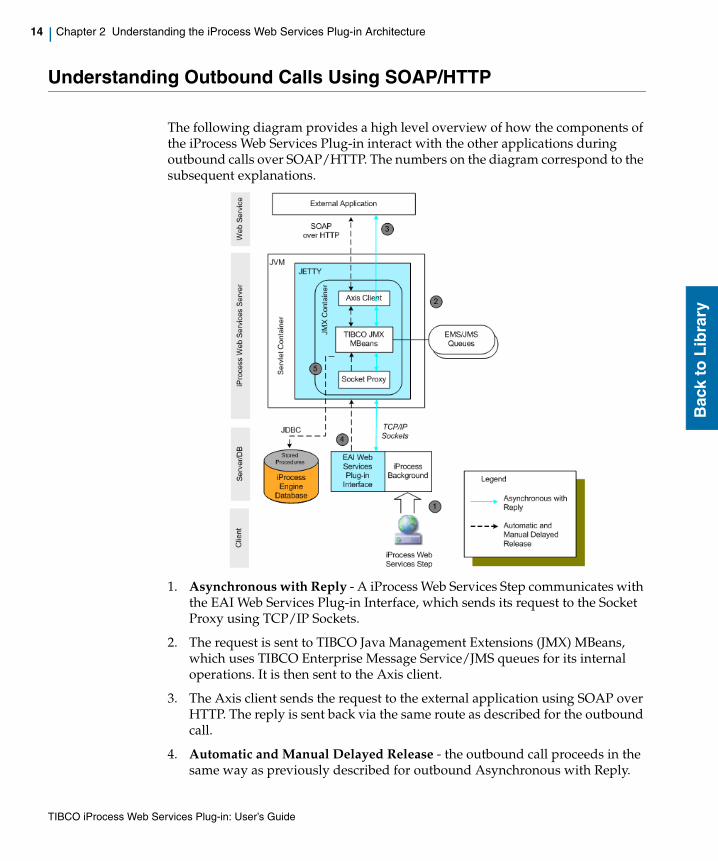
The following diagram provides a high level overview of how the components of the iProcess Web Services Plug-in interact with the other applications during outbound calls over SOAP/HTTP. The numbers on the diagram correspond to the subsequent explanations.
1. Asynchronous with Reply - A iProcess Web Services Step communicates with the EAI Web Services Plug-in Interface, which sends its request to the Socket Proxy using TCP/IP Sockets.
2. The request is sent to TIBCO Java Management Extensions (JMX) MBeans, which uses TIBCO Enterprise Message Service/JMS queues for its internal operations. It is then sent to the Axis client.
3. The Axis client sends the request to the external application using SOAP over HTTP. The reply is sent back via the same route as described for the outbound call.
4. Automatic and Manual Delayed Release - the outbound call proceeds in the same way as previously described for outbound Asynchronous with Reply.
TIBCO iProcess Web Services Plug-in: User’s Guide
Understanding Outbound Calls Using SOAP/HTTP | 15
Bac
k to
Lib
rary
5. The reply depends on the invocation style:
— For a Manual Delayed Release step, the reply is initiated from an external application.
— For an Automatic Delayed Release step, the release is accomplished by using JDBC to connect to the iProcess database to run a stored procedure.
— For an Asynchronous with Reply step, the external application responds directly to the iProcess background.
TIBCO iProcess Web Services Plug-in: User’s Guide
16 | Chapter 2 Understanding the iProcess Web Services Plug-in Architecture
Bac
k to
Lib
rary
Understanding Inbound Calls Using XML/JMS
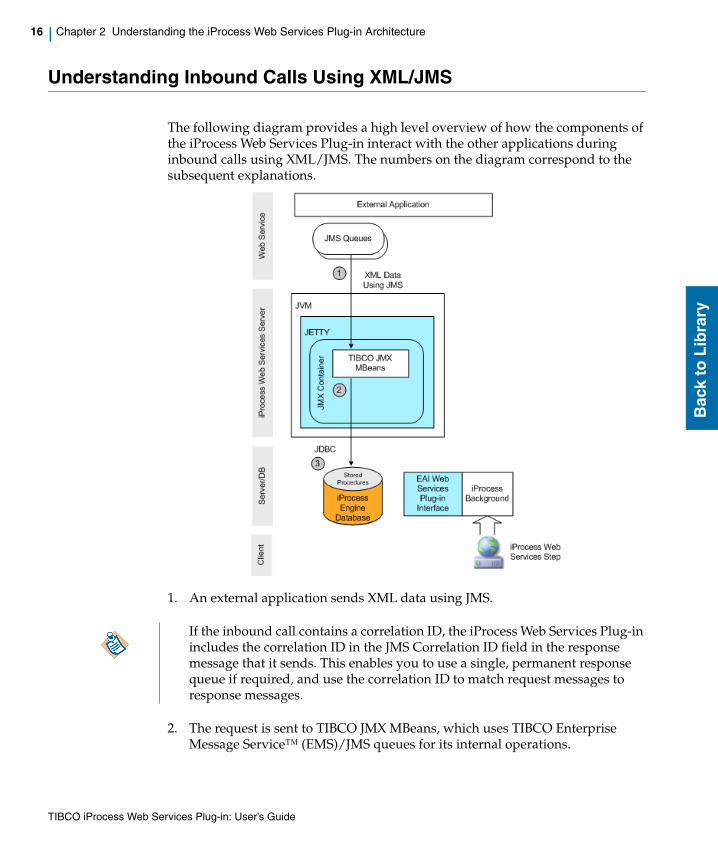
The following diagram provides a high level overview of how the components of the iProcess Web Services Plug-in interact with the other applications during inbound calls using XML/JMS. The numbers on the diagram correspond to the subsequent explanations.
1. An external application sends XML data using JMS.
2. The request is sent to TIBCO JMX MBeans, which uses TIBCO Enterprise Message Service™ (EMS)/JMS queues for its internal operations.
If the inbound call contains a correlation ID, the iProcess Web Services Plug-in includes the correlation ID in the JMS Correlation ID field in the response message that it sends. This enables you to use a single, permanent response queue if required, and use the correlation ID to match request messages to response messages.
TIBCO iProcess Web Services Plug-in: User’s Guide
Understanding Inbound Calls Using XML/JMS | 17
Bac
k to
Lib
rary
3. TIBCO JMX MBeans connects to the TIBCO iProcess database using JDBC and run stored procedures to perform actions (for example, a case start).
TIBCO iProcess Web Services Plug-in: User’s Guide
18 | Chapter 2 Understanding the iProcess Web Services Plug-in Architecture
Bac
k to
Lib
rary
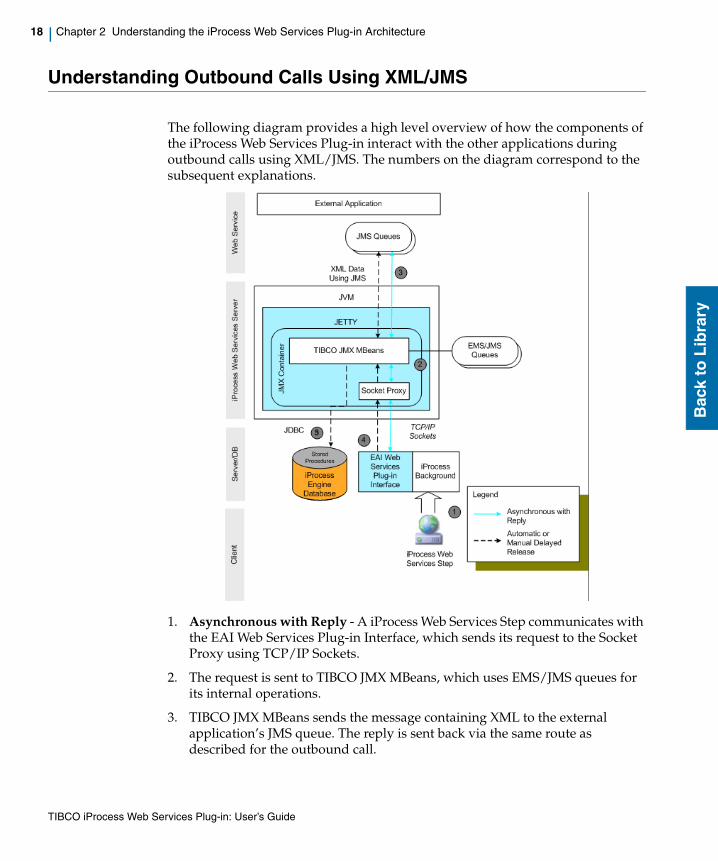
Understanding Outbound Calls Using XML/JMS
The following diagram provides a high level overview of how the components of the iProcess Web Services Plug-in interact with the other applications during outbound calls using XML/JMS. The numbers on the diagram correspond to the subsequent explanations.
1. Asynchronous with Reply - A iProcess Web Services Step communicates with the EAI Web Services Plug-in Interface, which sends its request to the Socket Proxy using TCP/IP Sockets.
2. The request is sent to TIBCO JMX MBeans, which uses EMS/JMS queues for its internal operations.
3. TIBCO JMX MBeans sends the message containing XML to the external application’s JMS queue. The reply is sent back via the same route as described for the outbound call.
TIBCO iProcess Web Services Plug-in: User’s Guide
Understanding Outbound Calls Using XML/JMS | 19
Bac
k to
Lib
rary
4. Automatic and Manual Delayed Release - the outbound call proceeds in the same way as previously described for outbound Asynchronous with Reply.
5. The reply for a delayed release step uses TIBCO JMX MBeans to connect to the TIBCO iProcess database using JDBC and run stored procedures to perform actions (for example, a case start).
TIBCO iProcess Web Services Plug-in: User’s Guide
20 | Chapter 2 Understanding the iProcess Web Services Plug-in Architecture
Bac
k to
Lib
rary
Configuring a High Availability iProcess Web Services Plug-in
Either during installation or afterwards, you can create a high availability configuration. This type of configuration uses multiple Jetty servers to provide redundancy in case one Jetty Server fails.
The iProcess Web Services Plug-in is able to:
• Detect failures.
• Preserve the integrity of in-progress transactions.
• Seamlessly continue working when the Jetty Server returns.
In a high availability configuration, JMS queues are shared by Jetty Servers. This means that if a failure occurs, another instance of the Jetty Server takes over immediately with no or minimal impact on service.
The iProcess Web Services Plug-in High Availability configuration does not support Asynchronous with Reply. When a procedure with these types of steps is processed, they are treated as Automatic Delayed Release steps.
TIBCO iProcess Web Services Plug-in: User’s Guide
Configuring a High Availability iProcess Web Services Plug-in | 21
Bac
k to
Lib
rary
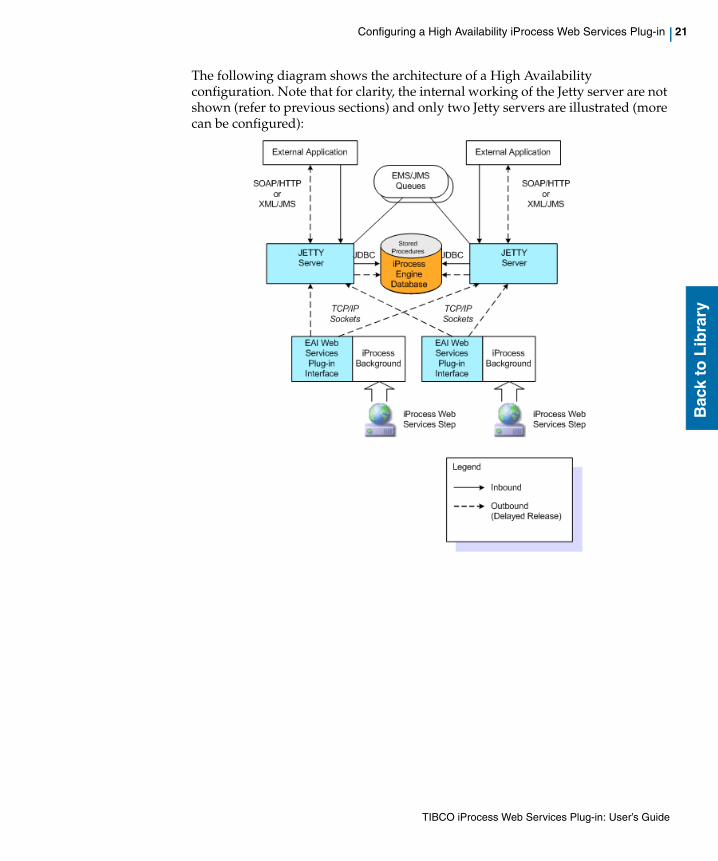
The following diagram shows the architecture of a High Availability configuration. Note that for clarity, the internal working of the Jetty server are not shown (refer to previous sections) and only two Jetty servers are illustrated (more can be configured):
TIBCO iProcess Web Services Plug-in: User’s Guide

22 | Chapter 2 Understanding the iProcess Web Services Plug-in Architecture
Bac
k to
Lib
rary
About iProcess Web Services Plug-in Deployment
Because it uses XML/JMS and SOAP/HTTP for data transport, the components of the iProcess Web Services Plug-in can be deployed on a variety of platforms. For example:
TIBCO have not tested multi-platform combinations. This means that, although there are no technical reasons why you could not have, for example, your Jetty on a Windows server and your iProcess Engine on a Solaris server, TIBCO have not tested this combination.
TIBCO iProcess Web Services Plug-in: User’s Guide
About iProcess Web Services Plug-in Deployment | 23
Bac
k to
Lib
rary
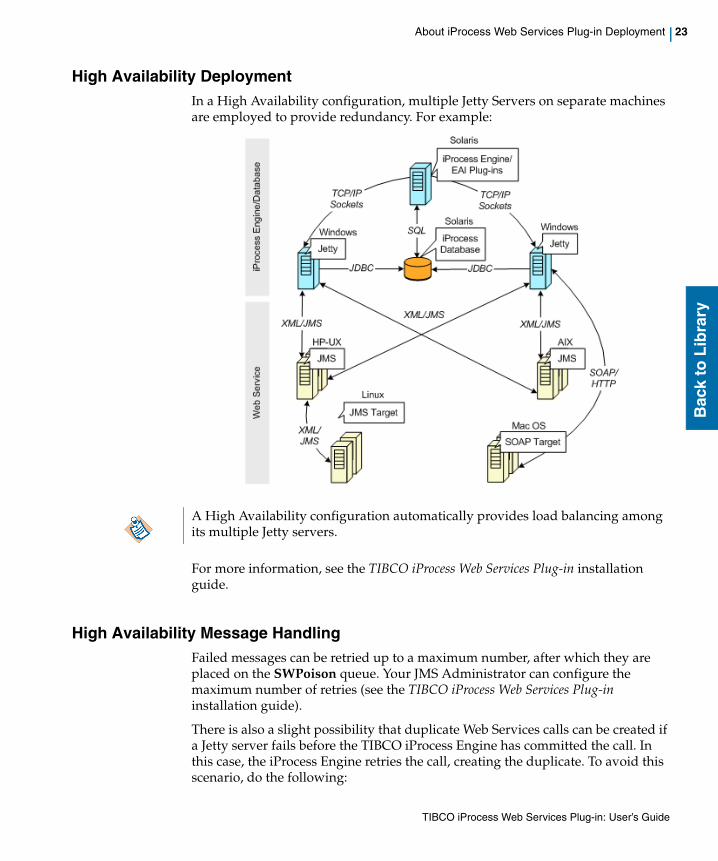
High Availability DeploymentIn a High Availability configuration, multiple Jetty Servers on separate machines are employed to provide redundancy. For example:
For more information, see the TIBCO iProcess Web Services Plug-in installation guide.
High Availability Message HandlingFailed messages can be retried up to a maximum number, after which they are placed on the SWPoison queue. Your JMS Administrator can configure the maximum number of retries (see the TIBCO iProcess Web Services Plug-in installation guide).
There is also a slight possibility that duplicate Web Services calls can be created if a Jetty server fails before the TIBCO iProcess Engine has committed the call. In this case, the iProcess Engine retries the call, creating the duplicate. To avoid this scenario, do the following:
A High Availability configuration automatically provides load balancing among its multiple Jetty servers.
TIBCO iProcess Web Services Plug-in: User’s Guide
24 | Chapter 2 Understanding the iProcess Web Services Plug-in Architecture
Bac
k to
Lib
rary
1. Monitor the sw_warn and sw_error files, jetty_home/tibco/log.txt file (where jetty_home is the location where Jetty is installed) and the SWException queue for any potential problems with Web Services transactions or Jetty servers.
2. If you cannot determine the cause of the failure, check to SWPoison queue for failed messages. Correct the problem and consider modifying the process to cater for failed messages.
TIBCO iProcess Web Services Plug-in: User’s Guide
URL Alias Management | 25
Bac
k to
Lib
rary
URL Alias Management
The TIBCO iProcess Web Services Plug-in allows you to defer the location of the WSDL used to call the Web Service at runtime. This is achieved using URL Aliases. The aliases are stored as an entry in a database table which is used to locate the WSDL URL which will be used at runtime.
The aliases can be configured either with the command line utility or when you define your Web Services step. This allows you to change the location of the WSDL file or the WSDL endpoint without having to modify the Web Services step. For example, when a procedure is migrated from a test environment to a live environment, the URL alias can be updated to point to the new location of the WSDL file, see Administering URL Aliases and Security Profiles on page 121.
You can also associate a security profile with a URL alias by selecting the security profile when you define the step and URL alias. Then, when you next define a step and select the URL alias, the corresponding security profile is displayed.
TIBCO iProcess Web Services Plug-in: User’s Guide

26 | Chapter 2 Understanding the iProcess Web Services Plug-in Architecture
Bac
k to
Lib
rary
TIBCO iProcess Web Services Plug-in: User’s Guide
| 27
Bac
k to
Lib
rary
Chapter 3 Understanding iProcess Web Services Plug-in Security
This chapter describes the iProcess Web Services Plug-in security mechanisms.
Topics
• Overview, page 28
• About the Security Profile Administrator, page 30
• Types of Security, page 32
• Combining Security Types, page 39
• Using Custom Headers, page 40
• Using Security Profiles to Send iProcess Field Data, page 41
TIBCO iProcess Web Services Plug-in: User’s Guide
28 | Chapter 3 Understanding iProcess Web Services Plug-in Security
Bac
k to
Lib
rary
Overview
The TIBCO iProcess Web Services Plug-in supports transport layer security using Secure Socket Layer (SSL), and SOAP security features.
Security Profiles
You can create "security profiles" that contain settings for SOAP security so that the settings can be reused for different web services steps at design time. The security profile can also be associated with a URL alias at design time, so that when you subsequently select the URL alias, the associated security profile is displayed as well.
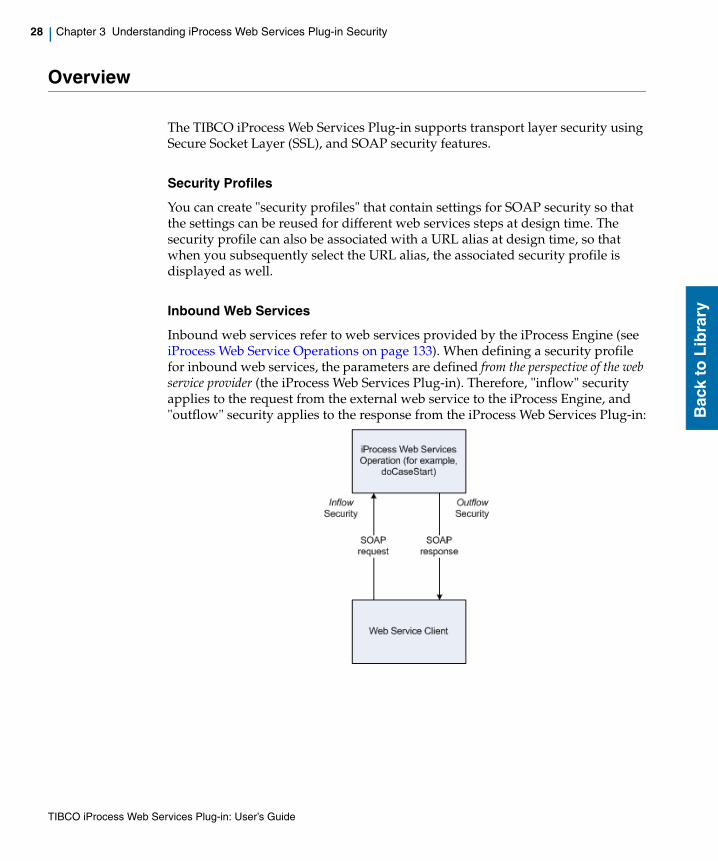
Inbound Web Services
Inbound web services refer to web services provided by the iProcess Engine (see iProcess Web Service Operations on page 133). When defining a security profile for inbound web services, the parameters are defined from the perspective of the web service provider (the iProcess Web Services Plug-in). Therefore, "inflow" security applies to the request from the external web service to the iProcess Engine, and "outflow" security applies to the response from the iProcess Web Services Plug-in:
TIBCO iProcess Web Services Plug-in: User’s Guide
Overview | 29
Bac
k to
Lib
rary
Outbound Web Services
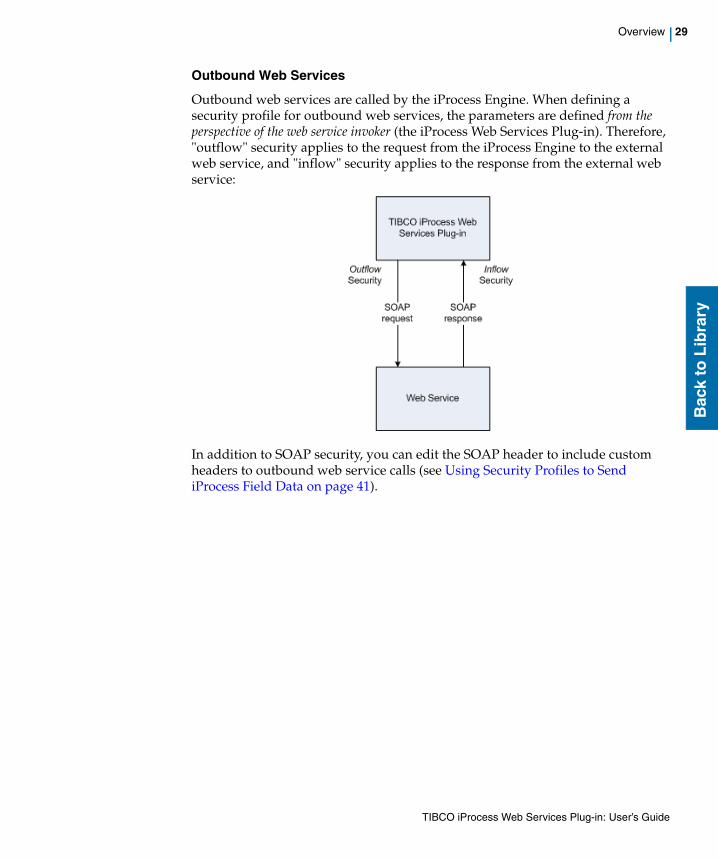
Outbound web services are called by the iProcess Engine. When defining a security profile for outbound web services, the parameters are defined from the perspective of the web service invoker (the iProcess Web Services Plug-in). Therefore, "outflow" security applies to the request from the iProcess Engine to the external web service, and "inflow" security applies to the response from the external web service:
In addition to SOAP security, you can edit the SOAP header to include custom headers to outbound web service calls (see Using Security Profiles to Send iProcess Field Data on page 41).
TIBCO iProcess Web Services Plug-in: User’s Guide
30 | Chapter 3 Understanding iProcess Web Services Plug-in Security
Bac
k to
Lib
rary
About the Security Profile Administrator
The Security Profile Administrator is an application that allows you to configure the following types of security for use with the TIBCO iProcess Web Services Plug-in:
• Security applied to SOAP requests and responses from and to an external web service.
• iProcess Engine Inbound Web Services security - inflow and outflow security applied to requests from external web services to the iProcess Web Services listed in iProcess Web Service Operations on page 133, and responses to those requests. The security profile for Inbound web services is called Inbound and is created at installation. Note however that the Inbound profile does not specify any security by default.
As an advanced alternative to specifying SOAP security settings in the dialog of the Security Profile Administrator, you can use a WS Policy File to define SOAP Security settings for your environment. For more information, see Combining Security Types on page 39.
• You must start the Jetty server before you can run the Security Profile Administrator.
• The options available differ depending on whether you have Inflow or Outflow selected.
TIBCO iProcess Web Services Plug-in: User’s Guide
About the Security Profile Administrator | 31
Bac
k to
Lib
rary
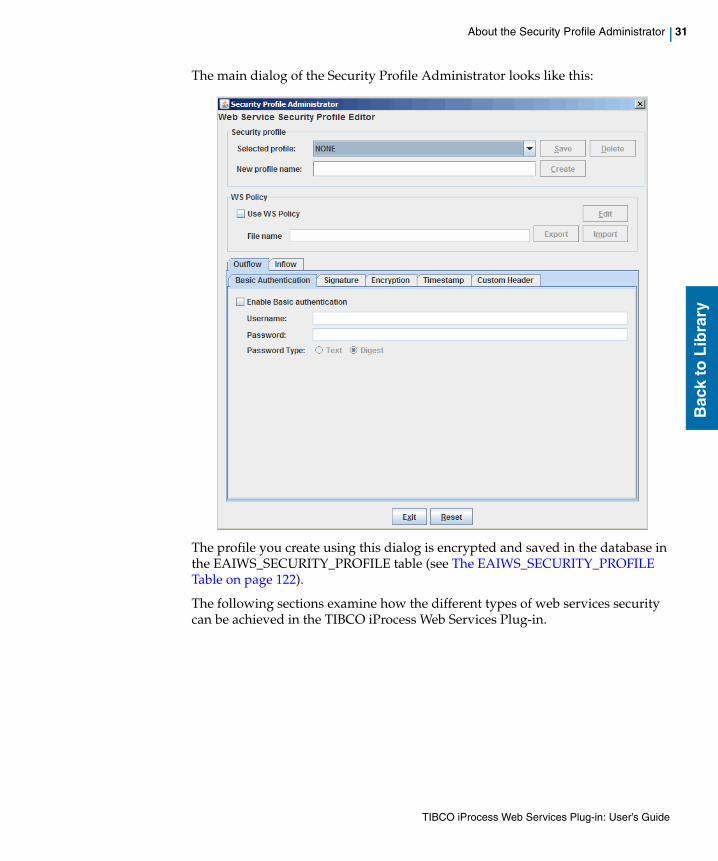
The main dialog of the Security Profile Administrator looks like this:
The profile you create using this dialog is encrypted and saved in the database in the EAIWS_SECURITY_PROFILE table (see The EAIWS_SECURITY_PROFILE Table on page 122).
The following sections examine how the different types of web services security can be achieved in the TIBCO iProcess Web Services Plug-in.
TIBCO iProcess Web Services Plug-in: User’s Guide
32 | Chapter 3 Understanding iProcess Web Services Plug-in Security
Bac
k to
Lib
rary
Types of Security
This section provides an overview of the various types of Web Services security, which provide the following types of protection:
• Authentication
• Integrity
• Confidentiality
• Non-repudiation
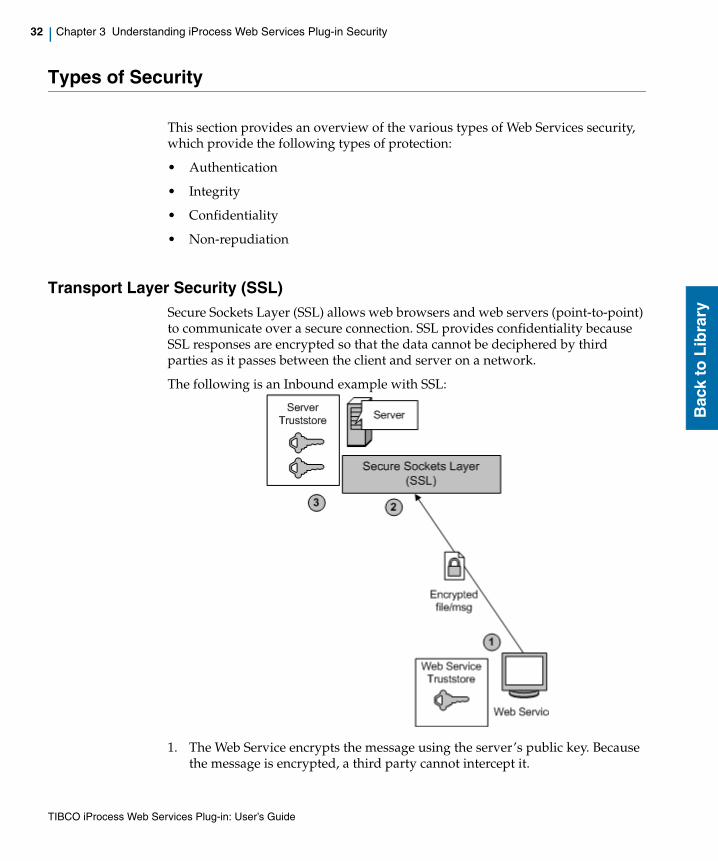
Transport Layer Security (SSL)Secure Sockets Layer (SSL) allows web browsers and web servers (point-to-point) to communicate over a secure connection. SSL provides confidentiality because SSL responses are encrypted so that the data cannot be deciphered by third parties as it passes between the client and server on a network.
The following is an Inbound example with SSL:
1. The Web Service encrypts the message using the server’s public key. Because the message is encrypted, a third party cannot intercept it.
TIBCO iProcess Web Services Plug-in: User’s Guide
Types of Security | 33
Bac
k to
Lib
rary
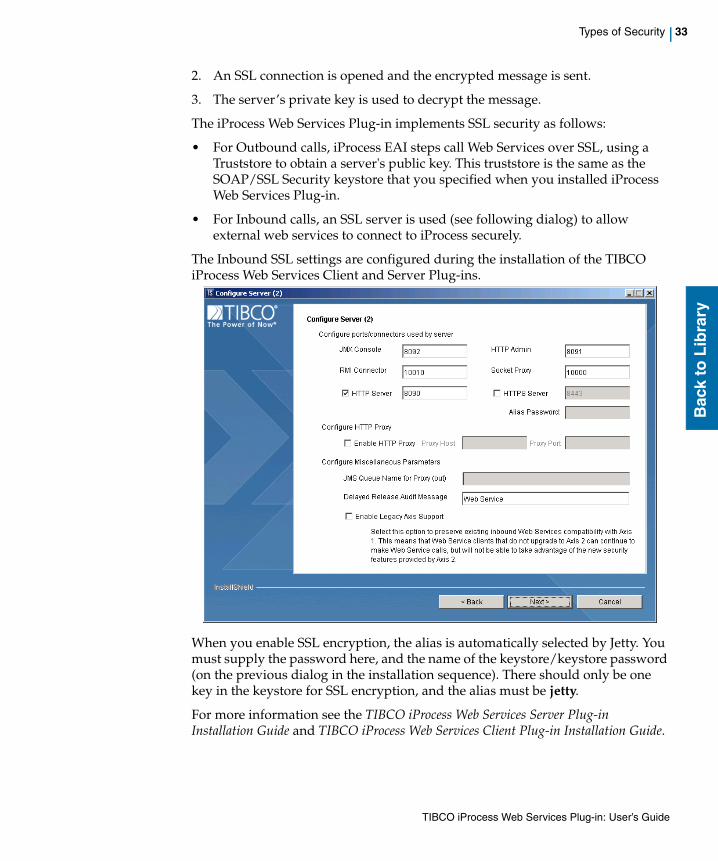
2. An SSL connection is opened and the encrypted message is sent.
3. The server’s private key is used to decrypt the message.
The iProcess Web Services Plug-in implements SSL security as follows:
• For Outbound calls, iProcess EAI steps call Web Services over SSL, using a Truststore to obtain a server's public key. This truststore is the same as the SOAP/SSL Security keystore that you specified when you installed iProcess Web Services Plug-in.
• For Inbound calls, an SSL server is used (see following dialog) to allow external web services to connect to iProcess securely.
The Inbound SSL settings are configured during the installation of the TIBCO iProcess Web Services Client and Server Plug-ins.
When you enable SSL encryption, the alias is automatically selected by Jetty. You must supply the password here, and the name of the keystore/keystore password (on the previous dialog in the installation sequence). There should only be one key in the keystore for SSL encryption, and the alias must be jetty.
For more information see the TIBCO iProcess Web Services Server Plug-in Installation Guide and TIBCO iProcess Web Services Client Plug-in Installation Guide.
TIBCO iProcess Web Services Plug-in: User’s Guide
34 | Chapter 3 Understanding iProcess Web Services Plug-in Security
Bac
k to
Lib
rary
SOAP AuthenticationThe purpose of authentication is to verify that the originator of the message is a trusted partner.
This is done by inserting the following tokens in the SOAP message header:
• Username Password token (basic authentication)
• X.509 certificates
• Digital signature
• Timestamp token
Username - Password Token (Basic Authentication)
This form of authentication consists of a a simple XML description of the username the service claims to represent, and optionally, a password. The password can be a plain text password or for better security, a password digest.
<S11:Envelope xmlns:S11="..." xmlns:wsse="..."> <S11:Header> ... <wsse:Security> <wsse:UsernameToken> <wsse:Username>Tibco</wsse:Username> <wsse:Password>secure</wsse:Password> </wsse:UsernameToken> </wsse:Security> ... </S11:Header> ...</S11:Envelope>
Suppose that you specify basic authentication for outflow security (a SOAP request). When the web service call is made, the token is inserted into the SOAP header. The recipient of the request will authenticate the username/password token in the SOAP header, verifying that you are a trusted partner. Similarly if you specify basic authentication for outflow security (SOAP responses), when the response comes in, it must have the specified user/password token or it is rejected.
How to accomplish this with the TIBCO iProcess Web Services Plug-in
Refer to Example 2- Calling an Inbound Web Service Operation Using SOAP/HTTP and Basic Authentication on page 80 to see how this works in practice.
TIBCO iProcess Web Services Plug-in: User’s Guide
Types of Security | 35
Bac
k to
Lib
rary
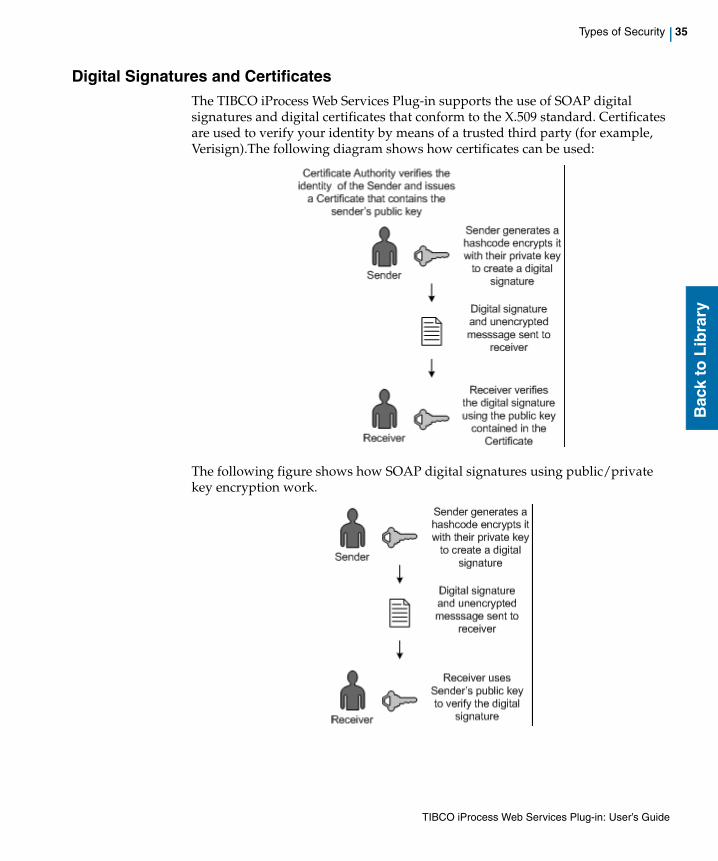
Digital Signatures and CertificatesThe TIBCO iProcess Web Services Plug-in supports the use of SOAP digital signatures and digital certificates that conform to the X.509 standard. Certificates are used to verify your identity by means of a trusted third party (for example, Verisign).The following diagram shows how certificates can be used:
The following figure shows how SOAP digital signatures using public/private key encryption work.
TIBCO iProcess Web Services Plug-in: User’s Guide
36 | Chapter 3 Understanding iProcess Web Services Plug-in Security
Bac
k to
Lib
rary
How to accomplish this with the TIBCO iProcess Web Services Plug-in
1. Certificates - in a test environment, generate the certificate using your preferred tool. In a production environment, you should obtain a signed certificate from a trusted third party. Put the certificate in the SOAP/SSL Security keystore that you specified when you installed iProcess Web Services Plug-in. For more information see the TIBCO iProcess Web Services Server Plug-in Installation Guide and TIBCO iProcess Web Services Client Plug-in Installation Guide.
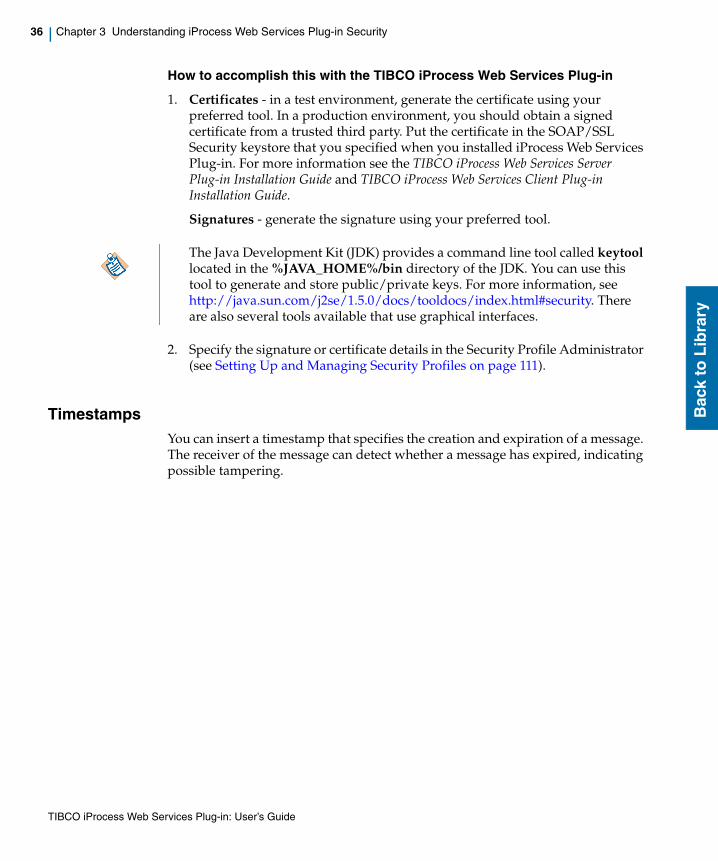
Signatures - generate the signature using your preferred tool.
2. Specify the signature or certificate details in the Security Profile Administrator (see Setting Up and Managing Security Profiles on page 111).
TimestampsYou can insert a timestamp that specifies the creation and expiration of a message. The receiver of the message can detect whether a message has expired, indicating possible tampering.
The Java Development Kit (JDK) provides a command line tool called keytool located in the %JAVA_HOME%/bin directory of the JDK. You can use this tool to generate and store public/private keys. For more information, see http://java.sun.com/j2se/1.5.0/docs/tooldocs/index.html#security. There are also several tools available that use graphical interfaces.
TIBCO iProcess Web Services Plug-in: User’s Guide
Types of Security | 37
Bac
k to
Lib
rary
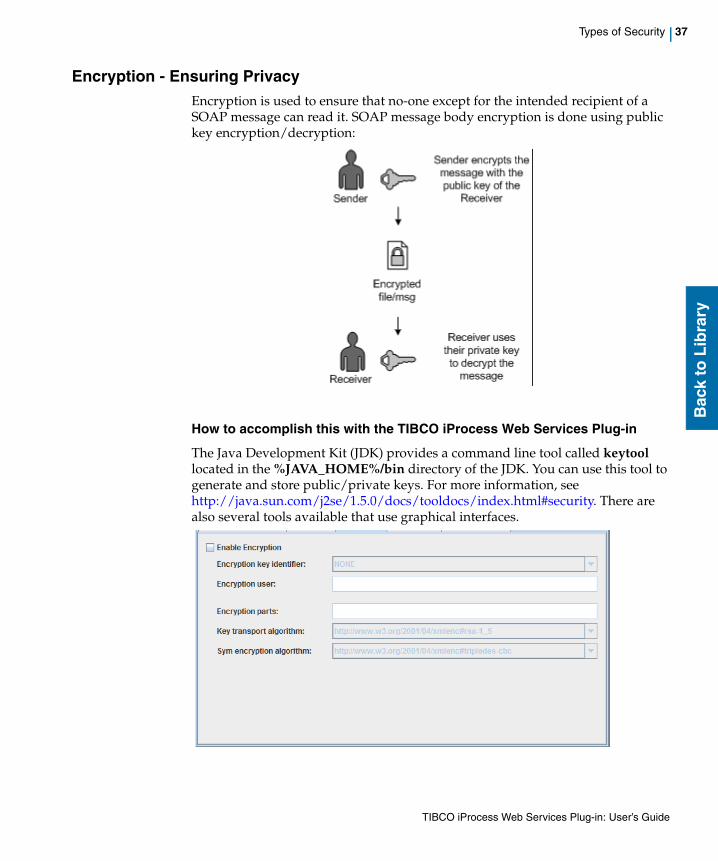
Encryption - Ensuring PrivacyEncryption is used to ensure that no-one except for the intended recipient of a SOAP message can read it. SOAP message body encryption is done using public key encryption/decryption:
How to accomplish this with the TIBCO iProcess Web Services Plug-in
The Java Development Kit (JDK) provides a command line tool called keytool located in the %JAVA_HOME%/bin directory of the JDK. You can use this tool to generate and store public/private keys. For more information, see http://java.sun.com/j2se/1.5.0/docs/tooldocs/index.html#security. There are also several tools available that use graphical interfaces.
TIBCO iProcess Web Services Plug-in: User’s Guide
38 | Chapter 3 Understanding iProcess Web Services Plug-in Security
Bac
k to
Lib
rary
Securing iProcess Engine Inbound Web ServicesThe Security Profile Administrator allows you to apply security to calls from external applications to the iProcess Web Services listed in iProcess Web Service Operations on page 133. This is done by modifying the Inbound profile in the Security Manager (see Setting Up and Managing Security Profiles on page 111).
Deployment
Inbound web services (iProcess Web Services located on your server) are implemented by an Axis2 service. The service is deployed to Axis2 in the form of an .aar archive file.
If you modify inbound security profile using the Security Profile Administrator, you need to restart Jetty for the changes to take effect.
Deployment in a High Availability Environment
If you have created a high availability environment with multiple Jetty servers, each would need a re-deployment of the iProcess Engine Web Service. You do not have to do this manually, the new security profile is picked up automatically when the Jetty server restarts. For more information see the TIBCO iProcess Web Services Plug-in Server Installation Guide.
TIBCO iProcess Web Services Plug-in: User’s Guide
Combining Security Types | 39
Bac
k to
Lib
rary
Combining Security Types
There are two ways that you can combine the security types described in this chapter: either by using the Security Manager or by using WS Policy files.
Using WS Policy FilesApache Axis2 Rampart allows SOAP security settings to be customized and deployed using a special file called a WS Policy File. The WS Policy file defines the security contract between two web services for both inflow and outflow security. The specifics of how this contract is implemented is defined by settings you make in the Security Manager.
Creating a policy file is outside the scope of this document; refer to any of the available web resources for more information.
Using the Security ManagerIf you use the Security Manager to apply various types of security, you should be aware that tokens are inserted into messages in the following order:
• Timestamp
• Basic authentication
• Encryption
• Digital signatures
When reading a message, the reverse order is enforced.
TIBCO iProcess Web Services Plug-in: User’s Guide
40 | Chapter 3 Understanding iProcess Web Services Plug-in Security
Bac
k to
Lib
rary
Using Custom Headers
The Security Profile Administrator provides a custom header field that you can use to send any additional data that you want to include in your SOAP header to outbound web services at runtime. You may want to send user ID or User Type information as well as the username when authenticating for example.
This is achieved by inserting the data into the custom header field in the main dialog of the Security Profile Administrator. The field can contain both SOAP and security information.
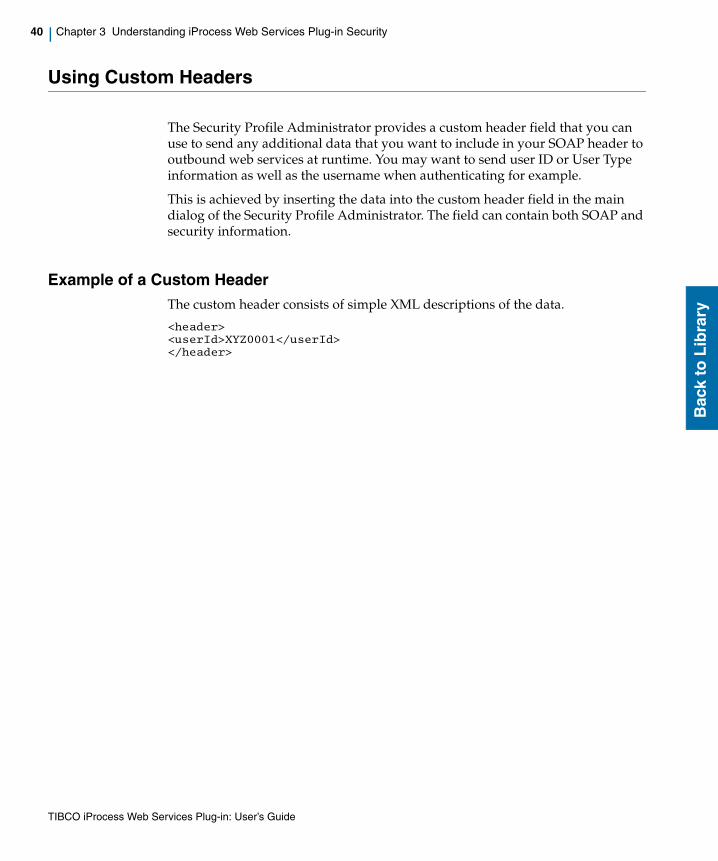
Example of a Custom Header The custom header consists of simple XML descriptions of the data.
<header><userId>XYZ0001</userId></header>
TIBCO iProcess Web Services Plug-in: User’s Guide
Using Security Profiles to Send iProcess Field Data | 41
Bac
k to
Lib
rary
Using Security Profiles to Send iProcess Field Data
Using the Security Profile Administrator, you can include iProcess field data in your SOAP header to outbound web services at runtime. You may want to send user or organization identity, for example, to allow referencing of a user across multiple service invocations or you could use custom headers to send context-sensitive iProcess field data that could be used in the web service at runtime.
This is achieved by inserting a token into any field in the main dialog of the Security Profile Administrator. The fields can contain both SOAP and security information.
By default, the token has the following format %%_customtoken_%% where customtoken is the name of the custom token you have defined. The format of the token is stored in the Web Services configuration file (wsconfig.properties) but you can change it if you wish, see Security Profile Tokenization, page 105. You can also insert iProcess field names in tokens. For example, if you wanted to include the username of the user who started the process in the custom header, you could insert %%_sw_starter_%%.
By creating a security profile for outflow security (a SOAP request), when the web service call is made, the token is inserted into the SOAP header. The recipient of the request will take the token from the SOAP header, and use the data in the web service. For example, you could insert the token %%_SW_STARTER_%% in the Username field in the Security Profile Administrator dialog and add a password field to the first step in your process. At runtime, when the web service starts, it enables the user who has started the web service to enter their password at that point.
Any iProcess fields used in the Security Profile must be defined in the Export iProcess Fields dialog, see Mark iProcess Fields for Export, page 63. The iProcess fields will not be automatically poplulated in the Security Profile Administrator. You must manually select them. As there is no validation available at designtime, any errors are only apparent at runtime.
TIBCO iProcess Web Services Plug-in: User’s Guide

42 | Chapter 3 Understanding iProcess Web Services Plug-in Security
Bac
k to
Lib
rary
TIBCO iProcess Web Services Plug-in: User’s Guide
| 43
Bac
k to
Lib
rary
Chapter 4 Creating a Web Services Step
This chapter describes how to define an iProcess Web Services step in your iProcess procedure to integrate your procedure with external applications.
Topics
• Overview, page 44
• Defining Basic Web Services Step Information, page 45
• Defining the Call to the External Application, page 46
• Editing an EAI Web Service Step, page 67
TIBCO iProcess Web Services Plug-in: User’s Guide
44 | Chapter 4 Creating a Web Services Step
Bac
k to
Lib
rary
Overview
To create an iProcess Engine Web Services step in your procedure, you need to perform the following steps:
1. Defining Basic Web Services Step Information (step name, description, type, deadline and audit trail information).
2. Defining the Call to the External Application. Use the Web Service Integrator wizard to define the necessary information required for the operation.
You can specify that a web service is invoked as part of a Withdraw action. Doing so means that after defining the main web service call, the wizard allows you to perform the same steps to define the web service call for the Withdraw action.
When you have completed these steps, the step type is defined as an iPE Web Service step and the following icon is displayed: .
The invocation style: Asynchronous with Reply, Manual Delayed Release or Automatic Delayed Release is configured using the Web Service Integrator wizard. The options on the Delayed Release tab in the Step Definition dialog are grayed out.
TIBCO iProcess Web Services Plug-in: User’s Guide
Defining Basic Web Services Step Information | 45
Bac
k to
Lib
rary
Defining Basic Web Services Step Information
To define the basic iProcess Web Services step information, do the following:
1. Start the iProcess Modeler, click the EAI Step tool and click in the window where you want to place the EAI Step.
2. In the Step Definition dialog, enter the Name and Description for the step.
3. In the EAI Type drop-down list, select EAI_WEBSERVICES - TIBCO iProcess Web Services Step Plug-in.
You must select the step type when you first create the step; it cannot be changed later. The list box displays EAI step types that have been installed as client EAI plug-ins.
(Optional) Select the Don’t delete work items on withdraw option. If this option is selected, and the deadline on an outstanding step expires or it is withdrawn as an action (release or deadline expire) of another step:
— the deadline actions are processed.
— the step remains outstanding (the step remains in the workqueue or the sub-procedure case is not purged).
4. (Optional) Click the Ignore Case Suspend checkbox if you want the step to still be processed as normal while a case is suspended.
If Ignore Case Suspend is not checked (the default option), the step is not processed while the case is suspended.
5. Click the Audit Trail tab to define custom audit trail entry expressions that are inserted into the audit entry when the step is processed. For more information about customizing the audit trail, see "Audit Trails" in the TIBCO iProcess swutil and swbatch Reference Guide.
6. Click the Deadlines button if you want to enter deadline information for this step. You can also enter the step duration if you are using case prediction. Refer to “Using Deadlines” in the TIBCO iProcess Modeler - Basic Design Guide for an explanation of defining deadlines and using case prediction.
7. Click the General tab, then click EAI Call-Out Definition. The Web Service Integrator wizard is displayed.
When the step is released (or the sub-procedure case completes) the normal release actions are not processed but the case field data associated with the release step (e.g. the field values set in a normal step whilst in a work queue or the output parameters of a sub-case) is applied to the main case data.
TIBCO iProcess Web Services Plug-in: User’s Guide
46 | Chapter 4 Creating a Web Services Step
Bac
k to
Lib
rary
Defining the Call to the External Application
Click the General tab, then click EAI Call-Out Definition. The Web Service Integrator wizard is displayed. The Web Service Integrator wizard enables you to define the calls to the external application you want to integrate with to specify the case data that is passed to the external application and (optionally) the data that is passed back to the iProcess case.
TIBCO iProcess Web Services Plug-in: User’s Guide
Defining the Call to the External Application | 47
Bac
k to
Lib
rary
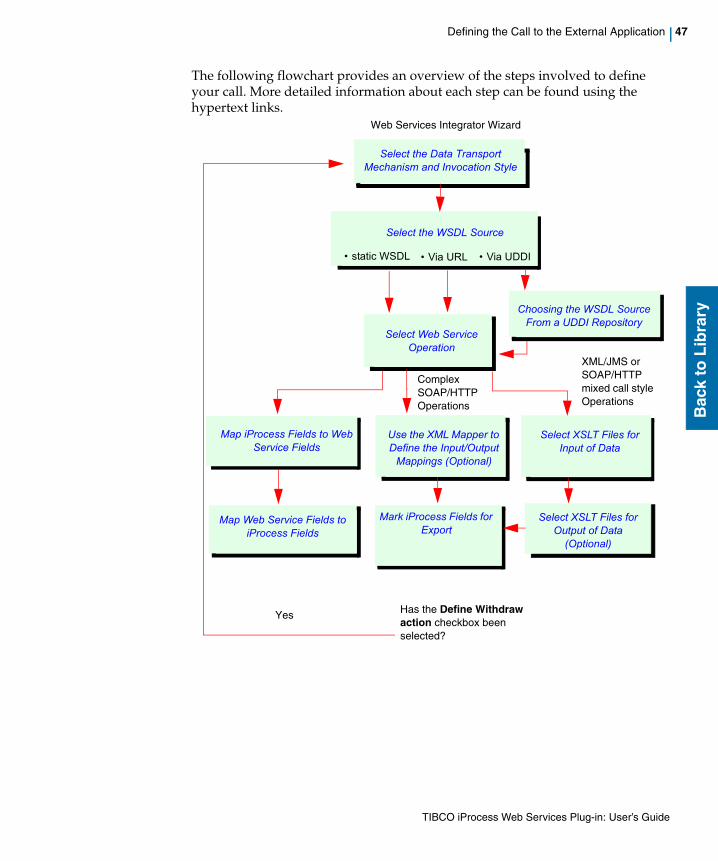
The following flowchart provides an overview of the steps involved to define your call. More detailed information about each step can be found using the hypertext links.
Select the WSDL Source
• static WSDL • Via URL • Via UDDI
Choosing the WSDL Source From a UDDI Repository
Select Web Service Operation
Use the XML Mapper to Define the Input/Output
Mappings (Optional)
Mark iProcess Fields for Export
Map iProcess Fields to Web Service Fields
Map Web Service Fields to iProcess Fields
Web Services Integrator Wizard
Select the Data Transport Mechanism and Invocation Style
Select XSLT Files for Input of Data
Select XSLT Files for Output of Data
(Optional)
Complex SOAP/HTTP Operations
XML/JMS or SOAP/HTTP mixed call style Operations
Has the Define Withdraw action checkbox been selected?
Yes
TIBCO iProcess Web Services Plug-in: User’s Guide
48 | Chapter 4 Creating a Web Services Step
Bac
k to
Lib
rary
Select the Data Transport Mechanism and Invocation Style1. Choose which data transport mechanism you want to use, select either:
— SOAP/HTTP
— XML/JMS - If you select XML/JMS, the JMS target field is enabled. Specify the name of the JMS target you have configured. This should have been done during installation. For more information about aliases and JMS targets, see the TIBCO iProcess Web Services Plug-in Installation Guide.
2. Select the Invocation Style:
— Automatic Delayed Release
Once the call has been made, the iProcess background process carries on processing so that iProcess can continue processing other cases.
The Web Service needs to restart the case when required.
— Manual Delayed Release
Once the call has been made, the iProcess background process carries on so that iProcess can continue processing other cases.
User intervention is required to restart the case.
— Asynchronous with Reply (Deprecated)
Select this option so that the request and response calls are de-coupled into separate requests from the iProcess Background process. If a procedure is designed with multiple, parallel steps, they can be invoked asynchronously and allowed to run simultaneously but the Background process will be blocked until all of the responses are received. This means that no other processing can occur by that Background process. However if the response time is too slow, then the iProcess Web Services Plug-in will automatically switch to Delayed Release. For information about setting the timeout value for the Asynchronous with Reply invocation style, see Asynchronous With Reply Timeout on page 104.
For more information about invocation styles and transaction scope, refer to the TIBCO iProcess Modeler - Integration Techniques Guide.
TIBCO iProcess Web Services Plug-in: User’s Guide
Defining the Call to the External Application | 49
Bac
k to
Lib
rary
3. Select the Withdraw action:
— Define Withdraw action - selecting this option means that after defining the main web service, you can define a web service that is invoked when the step is withdrawn.
— Edit only the Withdraw action - Use this option when editing a step. It allows you to skip the dialogs related to the main web service and proceed directly to the dialogs for the Withdraw action web service. For more information, see Editing an EAI Web Service Step on page 67.
4. Continue with the next section.
Select the WSDL SourceYou must select the location of the WSDL source:
Web services invoked from Withdraw actions cannot return data. If you select a WSDL operation with a return parameter, the wizard displays an error dialog and you cannot proceed with the next dialog.
If this option is used with the Asynchronous with Reply invocation mode, the wizard displays a warning that the withdraw action can only be invoked at run time when a timeout occurs, and the step becomes Delayed Release. For information about setting the timeout value for the Asynchronous with Reply invocation style, see Asynchronous With Reply Timeout on page 104.
Option Use to:
Static WSDL Specify that you have a WSDL template that you want to use. You can paste the WSDL contents into the WSDL Data/Location text area (see the following section).
TIBCO iProcess Web Services Plug-in: User’s Guide

50 | Chapter 4 Creating a Web Services Step
Bac
k to
Lib
rary
Specifying a Static WSDL
1. Select the Static WSDL option.
URL Choose this option if you want to specify the location of your WSDL code using a URL. You must then enter the URL of the WSDL template in the WSDL Data/Location text area. You can leave the WSDL Data/Location text area empty if you are planning to use an existing alias for the URL (see Specifying a URL or Alias on page 51).
You can also acquire the WSDL using SSL. For example:
https://myserver:8443/axis2/services/WebiPE?wsdl
This assumes that you specified the location and password of your key store during the installation. This is stored in: eai_websvcs/truststore.properties.
UDDI Select UDDI to select a Web Service from a UDDI repository. This means you can search for a Web Service that is listed in the UDDI registry (see Choosing the WSDL Source From a UDDI Repository on page 53).
Option Use to:
TIBCO iProcess Web Services Plug-in: User’s Guide
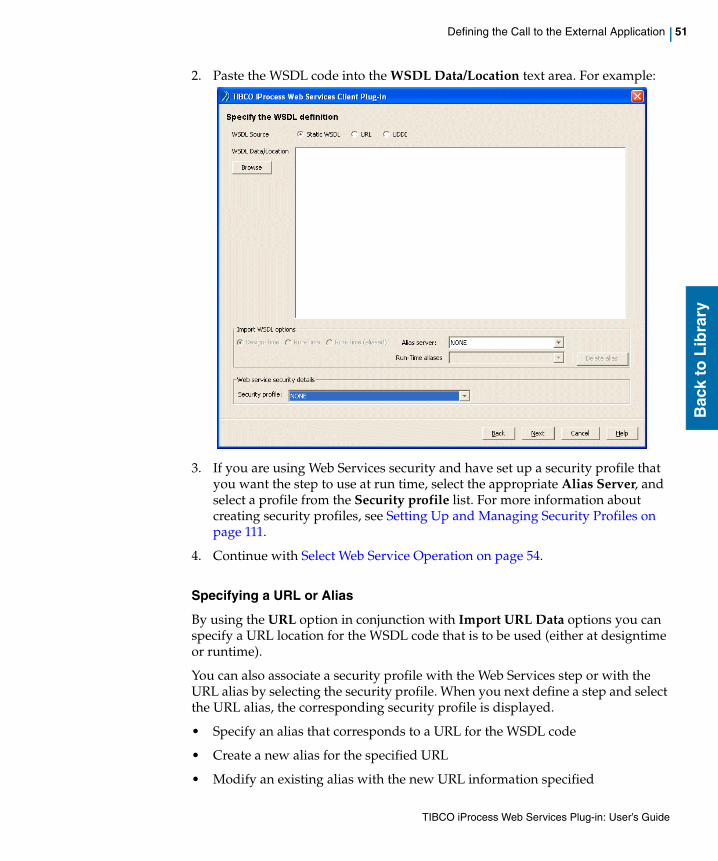
Defining the Call to the External Application | 51
Bac
k to
Lib
rary
2. Paste the WSDL code into the WSDL Data/Location text area. For example:
3. If you are using Web Services security and have set up a security profile that you want the step to use at run time, select the appropriate Alias Server, and select a profile from the Security profile list. For more information about creating security profiles, see Setting Up and Managing Security Profiles on page 111.
4. Continue with Select Web Service Operation on page 54.
Specifying a URL or Alias
By using the URL option in conjunction with Import URL Data options you can specify a URL location for the WSDL code that is to be used (either at designtime or runtime).
You can also associate a security profile with the Web Services step or with the URL alias by selecting the security profile. When you next define a step and select the URL alias, the corresponding security profile is displayed.
• Specify an alias that corresponds to a URL for the WSDL code
• Create a new alias for the specified URL
• Modify an existing alias with the new URL information specified
TIBCO iProcess Web Services Plug-in: User’s Guide
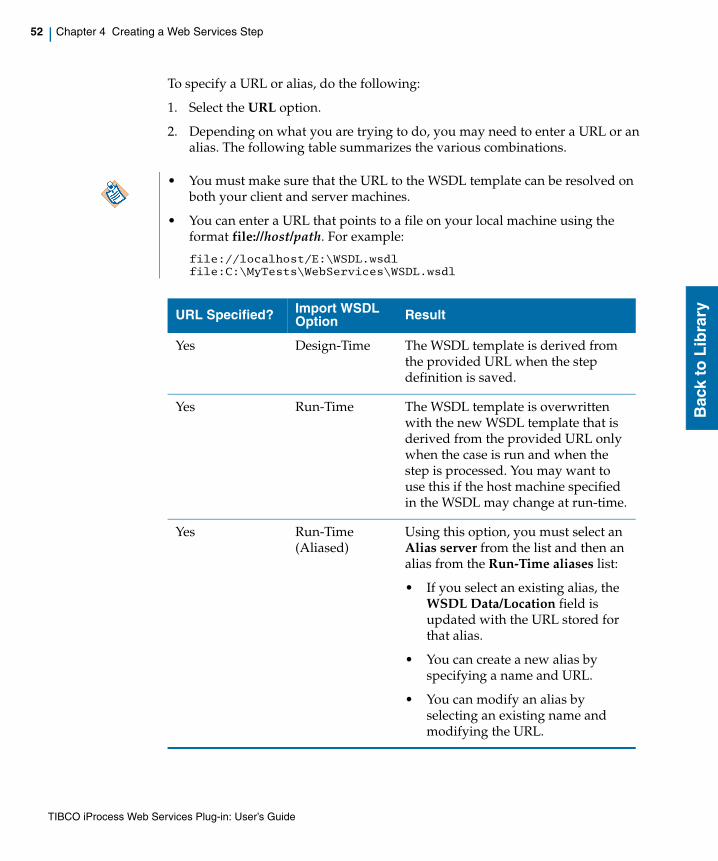
52 | Chapter 4 Creating a Web Services Step
Bac
k to
Lib
rary
To specify a URL or alias, do the following:
1. Select the URL option.
2. Depending on what you are trying to do, you may need to enter a URL or an alias. The following table summarizes the various combinations.
• You must make sure that the URL to the WSDL template can be resolved on both your client and server machines.
• You can enter a URL that points to a file on your local machine using the format file://host/path. For example:
file://localhost/E:\WSDL.wsdl file:C:\MyTests\WebServices\WSDL.wsdl
URL Specified? Import WSDL Option Result
Yes Design-Time The WSDL template is derived from the provided URL when the step definition is saved.
Yes Run-Time The WSDL template is overwritten with the new WSDL template that is derived from the provided URL only when the case is run and when the step is processed. You may want to use this if the host machine specified in the WSDL may change at run-time.
Yes Run-Time (Aliased)
Using this option, you must select an Alias server from the list and then an alias from the Run-Time aliases list:
• If you select an existing alias, the WSDL Data/Location field is updated with the URL stored for that alias.
• You can create a new alias by specifying a name and URL.
• You can modify an alias by selecting an existing name and modifying the URL.
TIBCO iProcess Web Services Plug-in: User’s Guide
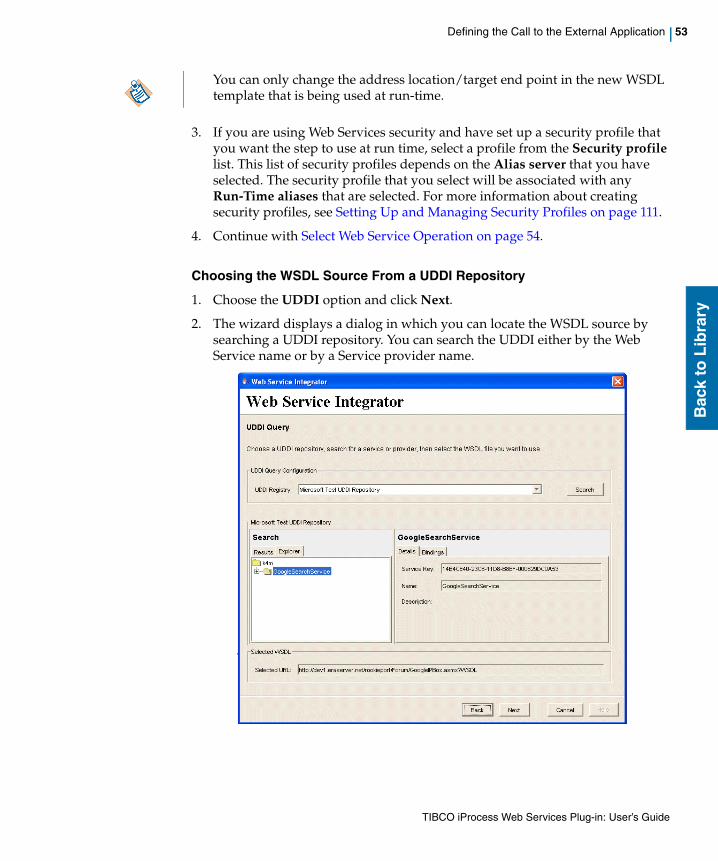
Defining the Call to the External Application | 53
Bac
k to
Lib
rary
3. If you are using Web Services security and have set up a security profile that you want the step to use at run time, select a profile from the Security profile list. This list of security profiles depends on the Alias server that you have selected. The security profile that you select will be associated with any Run-Time aliases that are selected. For more information about creating security profiles, see Setting Up and Managing Security Profiles on page 111.
4. Continue with Select Web Service Operation on page 54.
Choosing the WSDL Source From a UDDI Repository
1. Choose the UDDI option and click Next.
2. The wizard displays a dialog in which you can locate the WSDL source by searching a UDDI repository. You can search the UDDI either by the Web Service name or by a Service provider name.
You can only change the address location/target end point in the new WSDL template that is being used at run-time.
TIBCO iProcess Web Services Plug-in: User’s Guide
54 | Chapter 4 Creating a Web Services Step
Bac
k to
Lib
rary
3. From the UDDI Registry drop-down list, select the UDDI repository in which to search for a Web Service or Service Provider.
4. Click the Service or Provider tab accordingly depending on how you want to search the UDDI. In the Search field enter the name of the service or provider you want to find. If you only know part of the name, you can use % as a wildcard. Click Search.
5. The left hand pane displays the Search results for your query. Select the Web Service you require.
When you click on a service, the right hand pane displays the properties of the service. You can use the tabs to view the properties.
The chosen WSDL source is displayed in the Selected URL field.
6. If you are using Web Services security and have set up a security profile that you want the step to use at run time, select the appropriate Alias Server, and select a profile from the Security profile list. For more information about creating security profiles, see Setting Up and Managing Security Profiles on page 111.
7. Continue with Select Web Service Operation on page 54.
Select Web Service OperationSelect the Web Service operation from your WSDL source. The wizard displays a graphical tree view of the Web Service operations available.
The list of UDDI repositories can be edited using the uddiconfig.xml configuration file - refer to Configuring UDDI Repositories on page 129 for more information.
TIBCO iProcess Web Services Plug-in: User’s Guide
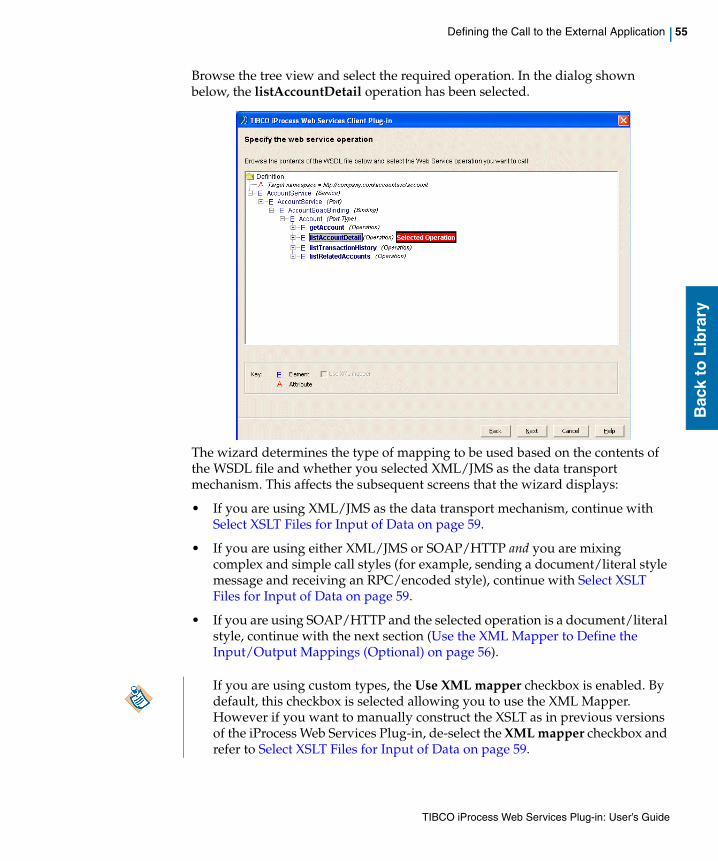
Defining the Call to the External Application | 55
Bac
k to
Lib
rary
Browse the tree view and select the required operation. In the dialog shown below, the listAccountDetail operation has been selected.
The wizard determines the type of mapping to be used based on the contents of the WSDL file and whether you selected XML/JMS as the data transport mechanism. This affects the subsequent screens that the wizard displays:
• If you are using XML/JMS as the data transport mechanism, continue with Select XSLT Files for Input of Data on page 59.
• If you are using either XML/JMS or SOAP/HTTP and you are mixing complex and simple call styles (for example, sending a document/literal style message and receiving an RPC/encoded style), continue with Select XSLT Files for Input of Data on page 59.
• If you are using SOAP/HTTP and the selected operation is a document/literal style, continue with the next section (Use the XML Mapper to Define the Input/Output Mappings (Optional) on page 56).
If you are using custom types, the Use XML mapper checkbox is enabled. By default, this checkbox is selected allowing you to use the XML Mapper. However if you want to manually construct the XSLT as in previous versions of the iProcess Web Services Plug-in, de-select the XML mapper checkbox and refer to Select XSLT Files for Input of Data on page 59.
TIBCO iProcess Web Services Plug-in: User’s Guide
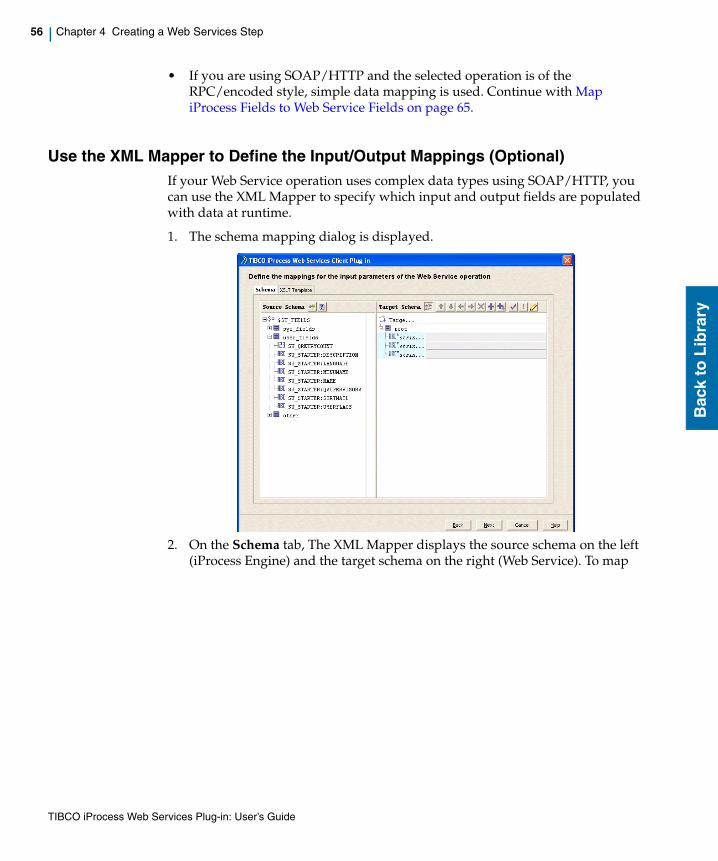
56 | Chapter 4 Creating a Web Services Step
Bac
k to
Lib
rary
• If you are using SOAP/HTTP and the selected operation is of the RPC/encoded style, simple data mapping is used. Continue with Map iProcess Fields to Web Service Fields on page 65.
Use the XML Mapper to Define the Input/Output Mappings (Optional)If your Web Service operation uses complex data types using SOAP/HTTP, you can use the XML Mapper to specify which input and output fields are populated with data at runtime.
1. The schema mapping dialog is displayed.
2. On the Schema tab, The XML Mapper displays the source schema on the left (iProcess Engine) and the target schema on the right (Web Service). To map
TIBCO iProcess Web Services Plug-in: User’s Guide

Defining the Call to the External Application | 57
Bac
k to
Lib
rary
fields, expand the fields and simply drag the iProcess Engine field to the Web Services field to create the mapping.
The XML Mapper automatically generates the XSLT based on the mappings that you select.
Note the following points that also apply when mapping from a Web Service to the iProcess Engine:
— Mapping must be completed correctly because if there are any errors you will not be able to proceed with the next dialog (any errors are displayed in a dialog when you click Next). The XML Mapper highlights in yellow mappings that can cause problems at runtime. Similarly, mandatory elements that have not mapped are shown in red. You can also click the button to check and repair any errors.
— Elements in iProcess Engine array fields start at 0. However, XML arrays start at 1. This means that if you map an iProcess Engine array field to a Web Service field, the 0 array field element from the iProcess Engine array field is mapped to the 1 array field element in the Web Service field.
— Dates must be entered in XML format and not in iProcess format.
— When mapping date and time iProcess fields, the data mapper will show these yellow to indicate a possible error. This, and date/time errors in the Mapper Check and Repair dialog, can be ignored as, at runtime, the mappings are interpreted correctly.
TIBCO iProcess Web Services Plug-in: User’s Guide
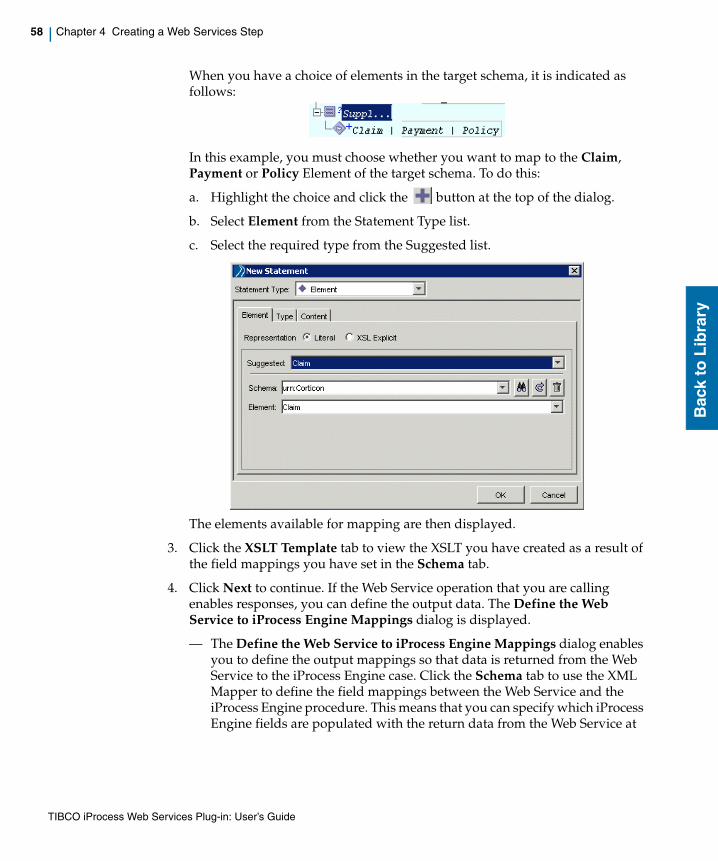
58 | Chapter 4 Creating a Web Services Step
Bac
k to
Lib
rary
When you have a choice of elements in the target schema, it is indicated as follows:
In this example, you must choose whether you want to map to the Claim, Payment or Policy Element of the target schema. To do this:
a. Highlight the choice and click the button at the top of the dialog.
b. Select Element from the Statement Type list.
c. Select the required type from the Suggested list.
The elements available for mapping are then displayed.
3. Click the XSLT Template tab to view the XSLT you have created as a result of the field mappings you have set in the Schema tab.
4. Click Next to continue. If the Web Service operation that you are calling enables responses, you can define the output data. The Define the Web Service to iProcess Engine Mappings dialog is displayed.
— The Define the Web Service to iProcess Engine Mappings dialog enables you to define the output mappings so that data is returned from the Web Service to the iProcess Engine case. Click the Schema tab to use the XML Mapper to define the field mappings between the Web Service and the iProcess Engine procedure. This means that you can specify which iProcess Engine fields are populated with the return data from the Web Service at
TIBCO iProcess Web Services Plug-in: User’s Guide
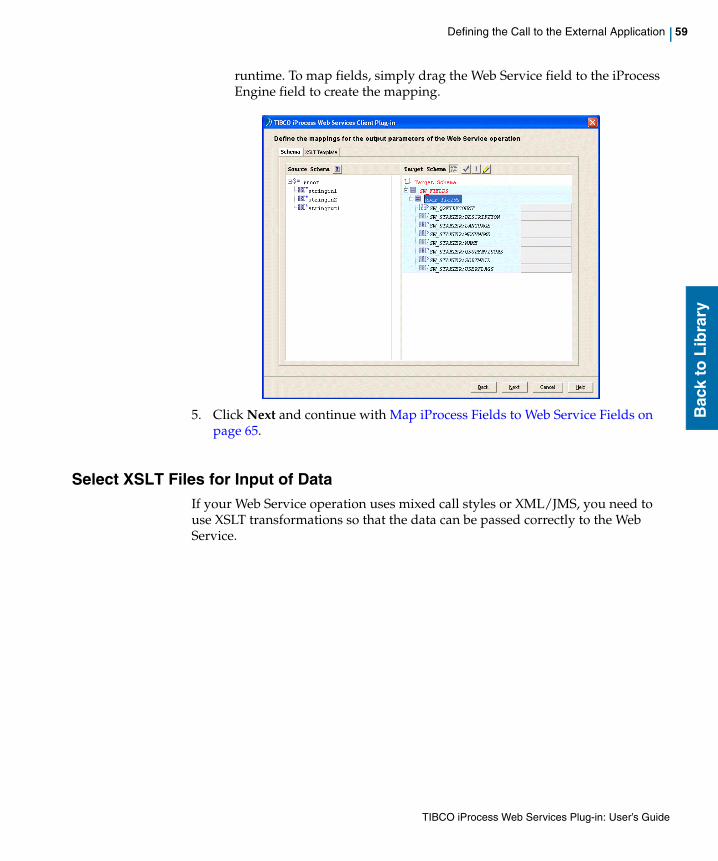
Defining the Call to the External Application | 59
Bac
k to
Lib
rary
runtime. To map fields, simply drag the Web Service field to the iProcess Engine field to create the mapping.
5. Click Next and continue with Map iProcess Fields to Web Service Fields on page 65.
Select XSLT Files for Input of DataIf your Web Service operation uses mixed call styles or XML/JMS, you need to use XSLT transformations so that the data can be passed correctly to the Web Service.
TIBCO iProcess Web Services Plug-in: User’s Guide
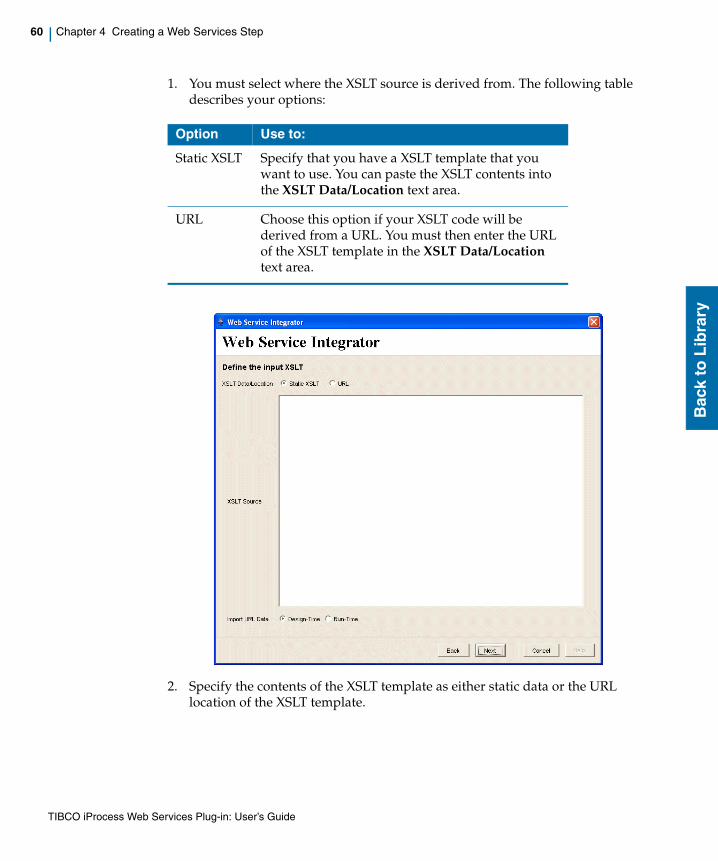
60 | Chapter 4 Creating a Web Services Step
Bac
k to
Lib
rary
1. You must select where the XSLT source is derived from. The following table describes your options:
2. Specify the contents of the XSLT template as either static data or the URL location of the XSLT template.
Option Use to:
Static XSLT Specify that you have a XSLT template that you want to use. You can paste the XSLT contents into the XSLT Data/Location text area.
URL Choose this option if your XSLT code will be derived from a URL. You must then enter the URL of the XSLT template in the XSLT Data/Location text area.
TIBCO iProcess Web Services Plug-in: User’s Guide
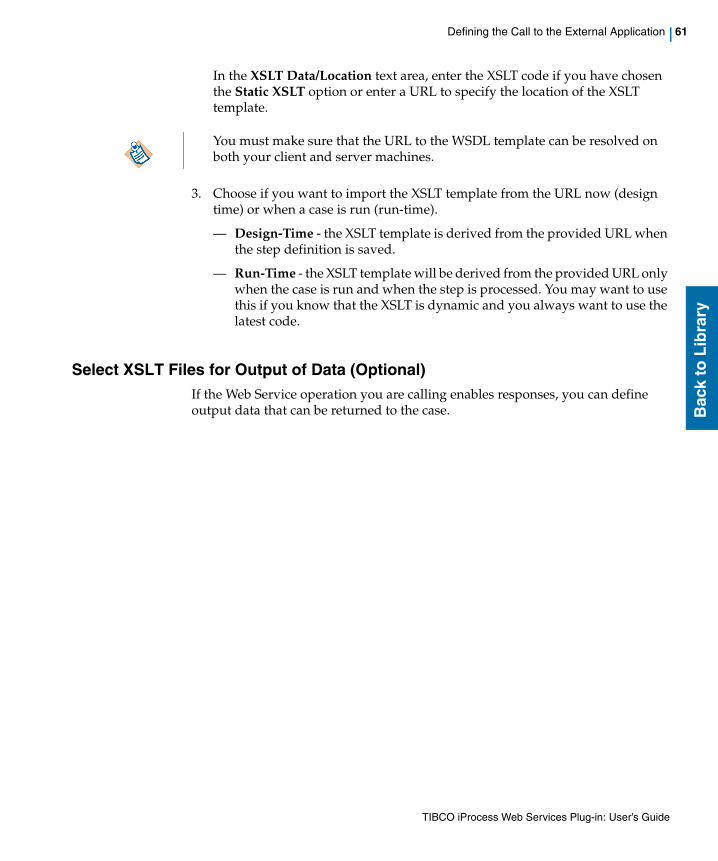
Defining the Call to the External Application | 61
Bac
k to
Lib
rary
In the XSLT Data/Location text area, enter the XSLT code if you have chosen the Static XSLT option or enter a URL to specify the location of the XSLT template.
3. Choose if you want to import the XSLT template from the URL now (design time) or when a case is run (run-time).
— Design-Time - the XSLT template is derived from the provided URL when the step definition is saved.
— Run-Time - the XSLT template will be derived from the provided URL only when the case is run and when the step is processed. You may want to use this if you know that the XSLT is dynamic and you always want to use the latest code.
Select XSLT Files for Output of Data (Optional)If the Web Service operation you are calling enables responses, you can define output data that can be returned to the case.
You must make sure that the URL to the WSDL template can be resolved on both your client and server machines.
TIBCO iProcess Web Services Plug-in: User’s Guide
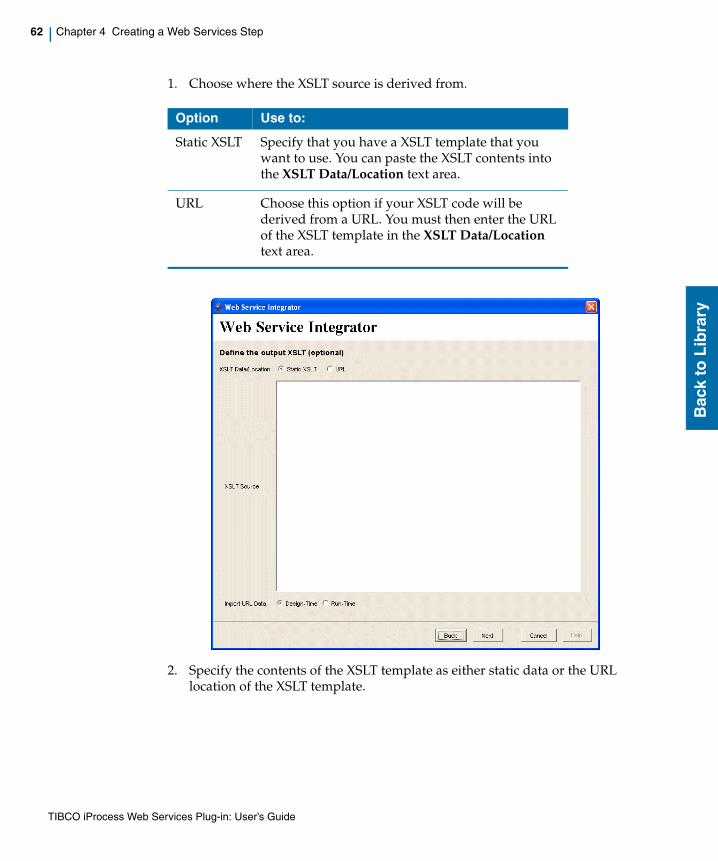
62 | Chapter 4 Creating a Web Services Step
Bac
k to
Lib
rary
1. Choose where the XSLT source is derived from.
2. Specify the contents of the XSLT template as either static data or the URL location of the XSLT template.
Option Use to:
Static XSLT Specify that you have a XSLT template that you want to use. You can paste the XSLT contents into the XSLT Data/Location text area.
URL Choose this option if your XSLT code will be derived from a URL. You must then enter the URL of the XSLT template in the XSLT Data/Location text area.
TIBCO iProcess Web Services Plug-in: User’s Guide
Defining the Call to the External Application | 63
Bac
k to
Lib
rary
In the XSLT Data/Location text area, enter the XSLT code if you have chosen the Static XSLT option or enter a URL to specify the location of the XSLT template.
3. Choose if you want to import the XSLT template from the URL now (design time) or when a case is run (run-time).
— Design-Time - the XSLT template is derived from the provided URL when the step definition is saved.
— Run-Time - the XSLT template will be derived from the provided URL only when the case is run and when the step is processed. You may want to use this if you know that the XSLT is dynamic and you always want to use the latest code.
Mark iProcess Fields for ExportThe iProcess fields that you used to define mappings with the XML mapper should be automatically selected in the Export iProcess Fields dialog. However, you should confirm that each iProcess field you want to export is selected. The XSLT fields will be used to generate XML based on the iProcess fields. The resulting XML definitions are used when calling the Web Service.
You must make sure that the URL to the WSDL template can be resolved on both your client and server machines.
Any mappings of iProcess fields involving XPath formulas that contain arithmetic expressions or functions can result in the list of pre-selected fields in the Export iProcess Fields dialog being incomplete. You should therefore carefully check the list against your mappings, and manually select any missing fields that you need to export.
Any iProcess fields used as security profile tokens in the Security Profile must be defined in the Export iProcess Fields dialog, see Using Security Profiles to Send iProcess Field Data, page 41. Errors are only identified at runtime, not designtime.
TIBCO iProcess Web Services Plug-in: User’s Guide
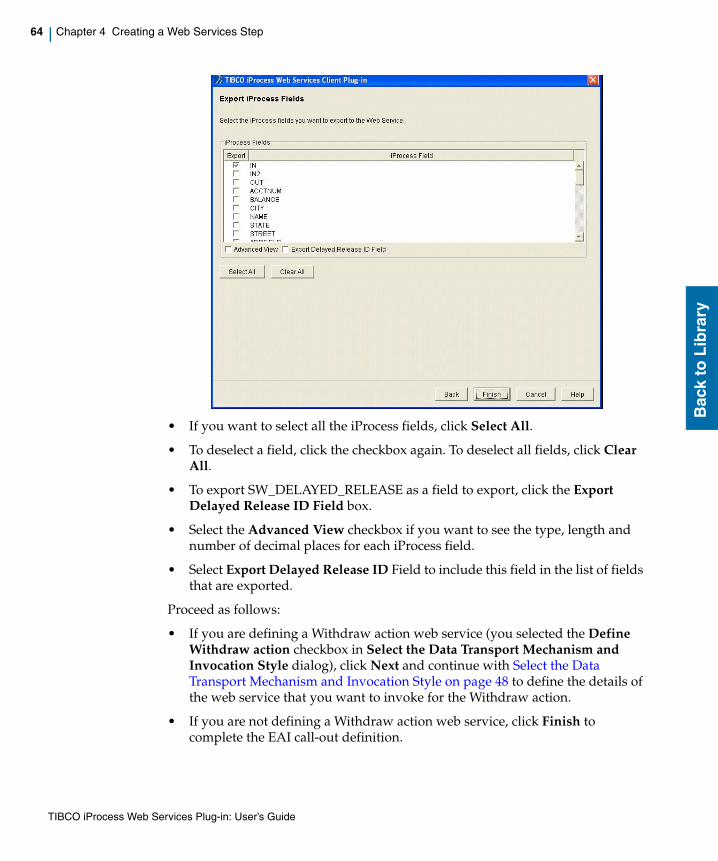
64 | Chapter 4 Creating a Web Services Step
Bac
k to
Lib
rary
• If you want to select all the iProcess fields, click Select All.
• To deselect a field, click the checkbox again. To deselect all fields, click Clear All.
• To export SW_DELAYED_RELEASE as a field to export, click the Export Delayed Release ID Field box.
• Select the Advanced View checkbox if you want to see the type, length and number of decimal places for each iProcess field.
• Select Export Delayed Release ID Field to include this field in the list of fields that are exported.
Proceed as follows:
• If you are defining a Withdraw action web service (you selected the Define Withdraw action checkbox in Select the Data Transport Mechanism and Invocation Style dialog), click Next and continue with Select the Data Transport Mechanism and Invocation Style on page 48 to define the details of the web service that you want to invoke for the Withdraw action.
• If you are not defining a Withdraw action web service, click Finish to complete the EAI call-out definition.
TIBCO iProcess Web Services Plug-in: User’s Guide
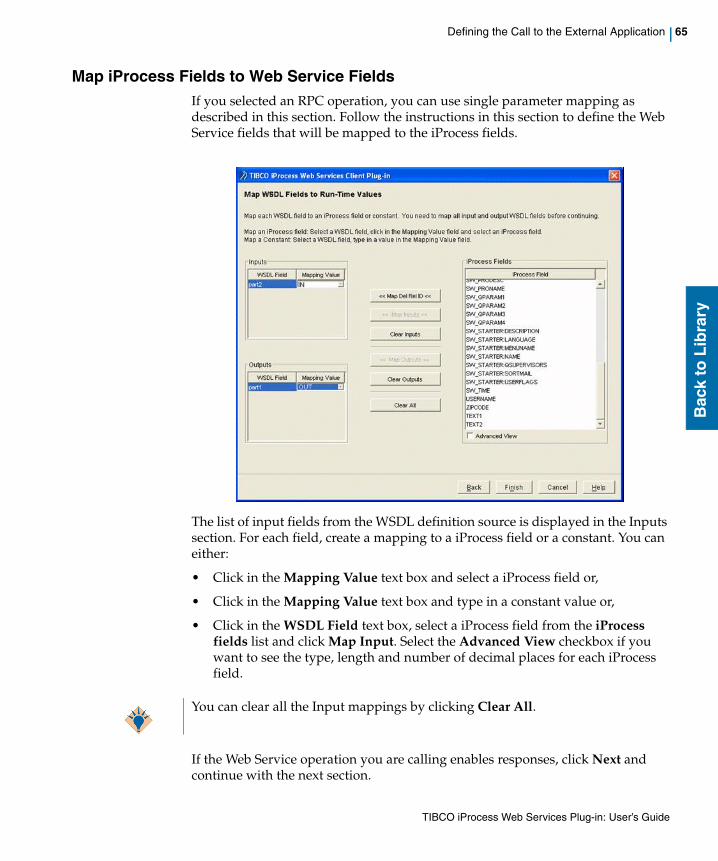
Defining the Call to the External Application | 65
Bac
k to
Lib
rary
Map iProcess Fields to Web Service FieldsIf you selected an RPC operation, you can use single parameter mapping as described in this section. Follow the instructions in this section to define the Web Service fields that will be mapped to the iProcess fields.
The list of input fields from the WSDL definition source is displayed in the Inputs section. For each field, create a mapping to a iProcess field or a constant. You can either:
• Click in the Mapping Value text box and select a iProcess field or,
• Click in the Mapping Value text box and type in a constant value or,
• Click in the WSDL Field text box, select a iProcess field from the iProcess fields list and click Map Input. Select the Advanced View checkbox if you want to see the type, length and number of decimal places for each iProcess field.
If the Web Service operation you are calling enables responses, click Next and continue with the next section.
You can clear all the Input mappings by clicking Clear All.
TIBCO iProcess Web Services Plug-in: User’s Guide
66 | Chapter 4 Creating a Web Services Step
Bac
k to
Lib
rary
If the Web Service operation that you are calling does not enable responses, proceed as follows:
• If you are defining a Withdraw action web service (you selected the Define Withdraw action checkbox in Select the Data Transport Mechanism and Invocation Style dialog), click Next and continue with Select the Data Transport Mechanism and Invocation Style on page 48 to define the details of the web service that you want to invoke for the Withdraw action.
• If you are not defining a Withdraw action web service, click Finish to complete the EAI call-out definition.
Map Web Service Fields to iProcess Fields(Optional) If the Web Service operation you are calling enables responses, you can define the output mappings so that data is returned to the case.
In the Outputs section, repeat the mapping process described in Map iProcess Fields to Web Service Fields on page 65 so that all the Web Service output fields are mapped to iProcess fields. Then, proceed as follows:
• If you are defining a Withdraw action web service (you selected the Define Withdraw action checkbox in Select the Data Transport Mechanism and Invocation Style dialog), click Next and continue with Select the Data Transport Mechanism and Invocation Style on page 48 to define the details of the web service that you want to invoke for the Withdraw action.
• If you are not defining a Withdraw action web service, click Finish to complete the EAI call-out definition.
Calling Web Service operations that supply multiple parameters (parts) as a response, as per the general conventions for SOAP RPC/encoded invocations, is not supported in this release. To work around this, you should do the following:
1. Pass the parameters back as a single string using delimiters.
2. Call a iProcess script to parse the string and map the resulting values to iProcess fields. How you do this depends on your data and application.
TIBCO iProcess Web Services Plug-in: User’s Guide
Editing an EAI Web Service Step | 67
Bac
k to
Lib
rary
Editing an EAI Web Service Step
To edit an EAI Web Service step, do the following:
1. Double-click the Web Service step in your procedure.
2. The EAI Step Definition dialog is displayed.
3. Click EAI Call-Out Definition.The Web Service Integrator wizard is displayed.
4. Continue through the wizard and modify any settings as required.
5. Click Finish to save your new settings.
Deleting a Withdraw ActionA Web Service that has been defined for a Withdraw action can be deleted by simply editing the step as described previously, and deselecting the Define Withdraw action checkbox. Then, when you save the step, the Web Service selection for the Withdraw action is deleted.
• If you are editing a step that has a web service defined for a Withdraw action, you can select the Edit only the Withdraw action checkbox to skip the dialogs related to the main web service and proceed directly to the dialogs for the Withdraw action web service. Do not deselect the Define Withdraw action checkbox unless you want to delete the web service that has been specified for the Withdraw action (see Deleting a Withdraw Action on page 67).
• If you are editing an EAI Web Service step created with a previous version of the TIBCO iProcess Web Services Plug-in, it will not contain security information, to apply SOAP security features, you must re-edit the step and select a security profile.
If when the step was created, the WSDL was obtained from a UDDI repository, when you edit the step, the WSDL that was obtained is presented as a static WSDL. You can re-retrieve the WSDL by selecting UDDI and searching again. If the WSDL in the repository has changed since the step was created, the displayed WSDL is updated.
TIBCO iProcess Web Services Plug-in: User’s Guide
68 | Chapter 4 Creating a Web Services Step
Bac
k to
Lib
rary
TIBCO iProcess Web Services Plug-in: User’s Guide
| 69
Bac
k to
Lib
rary
Chapter 5 Examples
This chapter contains some examples of using the TIBCO iProcess Web Services Plug-in. The schemas, iProcess procedures, and BusinessWorks processes can all be found in the examples folder on the TIBCO iProcess Engine Web Services Server Plug-in product physical media.
Topics
• Overview, page 70
• About Integrating the iProcess Engine with Business Works, page 71
• Pre-requisite Tasks, page 72
• Example 1- Calling an Inbound Web Service Operation Using SOAP/HTTP, page 77
• Example 2- Calling an Inbound Web Service Operation Using SOAP/HTTP and Basic Authentication, page 80
• Example 3- Calling an Inbound Web Service Operation Using XML Over JMS, page 84
• Example 4- Calling an Outbound Web Service using SOAP/HTTP, page 88
• Example 5- Calling an Outbound Web Service using XML/JMS, page 94
These examples are subject to change. Checkhttp://www.tibcommunity.com for updates or to find further examples.
TIBCO iProcess Web Services Plug-in: User’s Guide
70 | Chapter 5 Examples
Bac
k to
Lib
rary
Overview
The aim of this chapter is to demonstrate how to make outbound and inbound web service calls. BusinessWorks is used to host an external web service, and to call an Inbound web service. Although each integration project is different, the following sections should provide you with an overview of the integration process that you can adapt to your own requirements.
The preferred method of integrating the TIBCO iProcess Engine with TIBCO BusinessWorks is to use the TIBCO BusinessWorks iProcess Connector.
The iProcess BusinessWorks Connector allows applications designed using either BusinessWorks or the TIBCO iProcess suite of products to communicate easily. For more information about using the BusinessWorks Connector, see the TIBCO iProcess BusinessWorks Connector User’s Guide.
TIBCO iProcess Web Services Plug-in: User’s Guide
About Integrating the iProcess Engine with Business Works | 71
Bac
k to
Lib
rary
About Integrating the iProcess Engine with Business Works
These examples demonstrate the following iProcess Engine and BusinessWorks integration concepts:
• Outbound - iProcess procedures make calls to BusinessWorks processes.
• Inbound - BusinessWorks makes calls to the iProcess Engine to perform operations such as starting cases, triggering events or suspending cases.
There are two data transport mechanisms you can use to implement these integration scenarios:
• Simple Object Access Protocol (SOAP) requests over the Hyper text Transfer Protocol (HTTP) - (SOAP/HTTP).
• Extensible Markup Language (XML) text using a Java Message Server (JMS) - (XML/JMS).
For an overview of the components used, the transport protocols involved and how each component interacts with each other, see Introduction to the iProcess Web Services Plug-in on page 1.
TIBCO iProcess Web Services Plug-in: User’s Guide
72 | Chapter 5 Examples
Bac
k to
Lib
rary
Pre-requisite Tasks
You need to perform the following pre-requisite tasks to configure the iProcess Engine and BusinessWorks for integration:
• Task 1: Configure TIBCO EMS on page 72
• Task 2: Import the BusinessWorks Project on page 72
• Task 3: Review the Schema on page 74
• Task 4: Review the HTTP and JMS Connections on page 75
• Task 5: Import the iProcess Procedures on page 75
Task 1: Configure TIBCO EMS These examples assume that you are using TIBCO Enterprise Message Service as your JMS Provider. To configure Enterprise Message Service, you must create the following in the TIBCO EMS Administration Tool:
1. Create the following queue and a JNDI name for it (the queue is used by the XML/JMS example):
queue.Bank
2. Ensure that the new queue that you created is configured in the file jettydirectory/tibco/alias.xml. For example:
<Alias name="Bank" id="ems" topic="false" topicorqueuename="queue.Bank"/>
3. Restart Jetty.
Task 2: Import the BusinessWorks ProjectThe TIBCO BusinessWorks Project contains all the necessary BusinessWorks schemas, processes and connection objects necessary for these examples. Import the Project as follows:
1. Copy the examples folder from the physical distribution media to a local directory.
Refer to the documentation supplied with TIBCO EMS for information on how to do this.
TIBCO iProcess Web Services Plug-in: User’s Guide
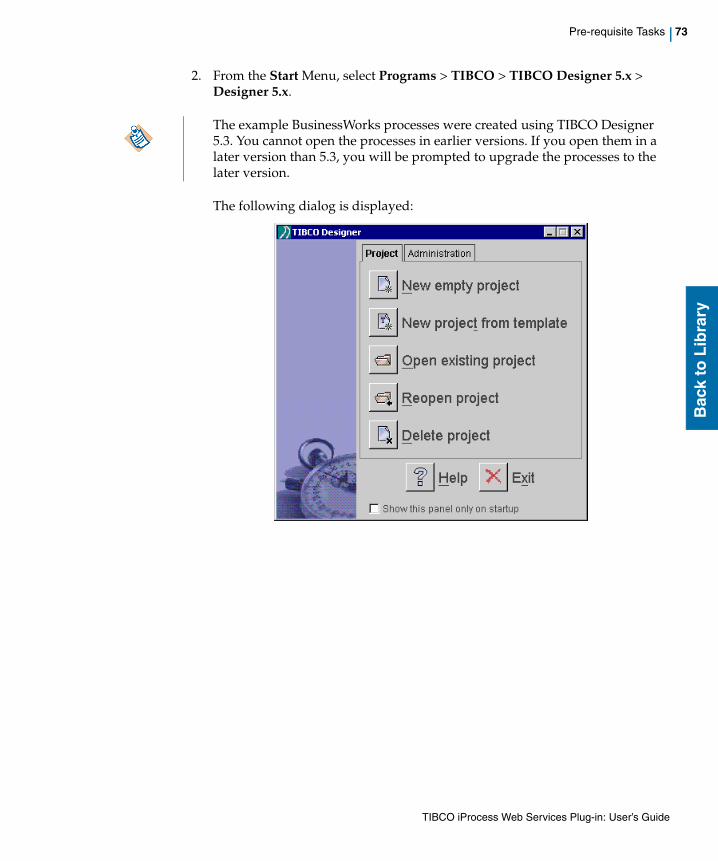
Pre-requisite Tasks | 73
Bac
k to
Lib
rary
2. From the Start Menu, select Programs > TIBCO > TIBCO Designer 5.x > Designer 5.x.
The following dialog is displayed:
The example BusinessWorks processes were created using TIBCO Designer 5.3. You cannot open the processes in earlier versions. If you open them in a later version than 5.3, you will be prompted to upgrade the processes to the later version.
TIBCO iProcess Web Services Plug-in: User’s Guide
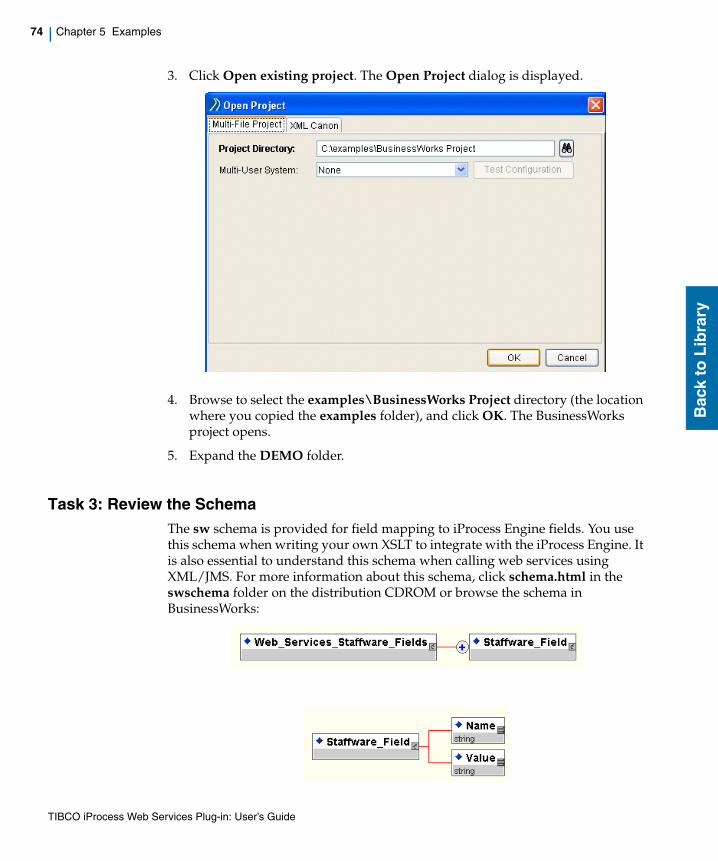
74 | Chapter 5 Examples
Bac
k to
Lib
rary
3. Click Open existing project. The Open Project dialog is displayed.
4. Browse to select the examples\BusinessWorks Project directory (the location where you copied the examples folder), and click OK. The BusinessWorks project opens.
5. Expand the DEMO folder.
Task 3: Review the SchemaThe sw schema is provided for field mapping to iProcess Engine fields. You use this schema when writing your own XSLT to integrate with the iProcess Engine. It is also essential to understand this schema when calling web services using XML/JMS. For more information about this schema, click schema.html in the swschema folder on the distribution CDROM or browse the schema in BusinessWorks:
TIBCO iProcess Web Services Plug-in: User’s Guide
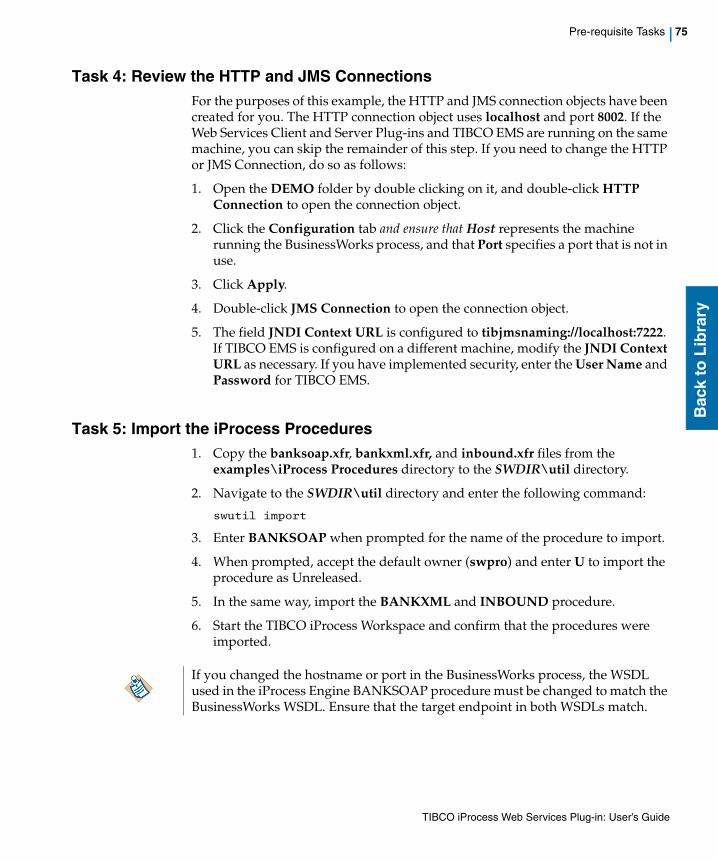
Pre-requisite Tasks | 75
Bac
k to
Lib
rary
Task 4: Review the HTTP and JMS ConnectionsFor the purposes of this example, the HTTP and JMS connection objects have been created for you. The HTTP connection object uses localhost and port 8002. If the Web Services Client and Server Plug-ins and TIBCO EMS are running on the same machine, you can skip the remainder of this step. If you need to change the HTTP or JMS Connection, do so as follows:
1. Open the DEMO folder by double clicking on it, and double-click HTTP Connection to open the connection object.
2. Click the Configuration tab and ensure that Host represents the machine running the BusinessWorks process, and that Port specifies a port that is not in use.
3. Click Apply.
4. Double-click JMS Connection to open the connection object.
5. The field JNDI Context URL is configured to tibjmsnaming://localhost:7222. If TIBCO EMS is configured on a different machine, modify the JNDI Context URL as necessary. If you have implemented security, enter the User Name and Password for TIBCO EMS.
Task 5: Import the iProcess Procedures1. Copy the banksoap.xfr, bankxml.xfr, and inbound.xfr files from the
examples\iProcess Procedures directory to the SWDIR\util directory.
2. Navigate to the SWDIR\util directory and enter the following command:
swutil import
3. Enter BANKSOAP when prompted for the name of the procedure to import.
4. When prompted, accept the default owner (swpro) and enter U to import the procedure as Unreleased.
5. In the same way, import the BANKXML and INBOUND procedure.
6. Start the TIBCO iProcess Workspace and confirm that the procedures were imported.
If you changed the hostname or port in the BusinessWorks process, the WSDL used in the iProcess Engine BANKSOAP procedure must be changed to match the BusinessWorks WSDL. Ensure that the target endpoint in both WSDLs match.
TIBCO iProcess Web Services Plug-in: User’s Guide
76 | Chapter 5 Examples
Bac
k to
Lib
rary
Task 6: Import the Example Security ProfilesImport the example security profiles as follows:
1. Copy example_profiles.xml file from the examples folder on the TIBCO iProcess Engine Web Services Server Plug-in product physical media to the webservices_server_location/jetty-6.1.25 directory.
2. Navigate to the webservices_server_location/jetty-6.1.25 directory and enter the following command:
urladmin imp_security example_profiles.xml
You will be prompted to overwrite the Inbound profile. Click Yes to do so.
3. Restart the Jetty server.
TIBCO iProcess Web Services Plug-in: User’s Guide
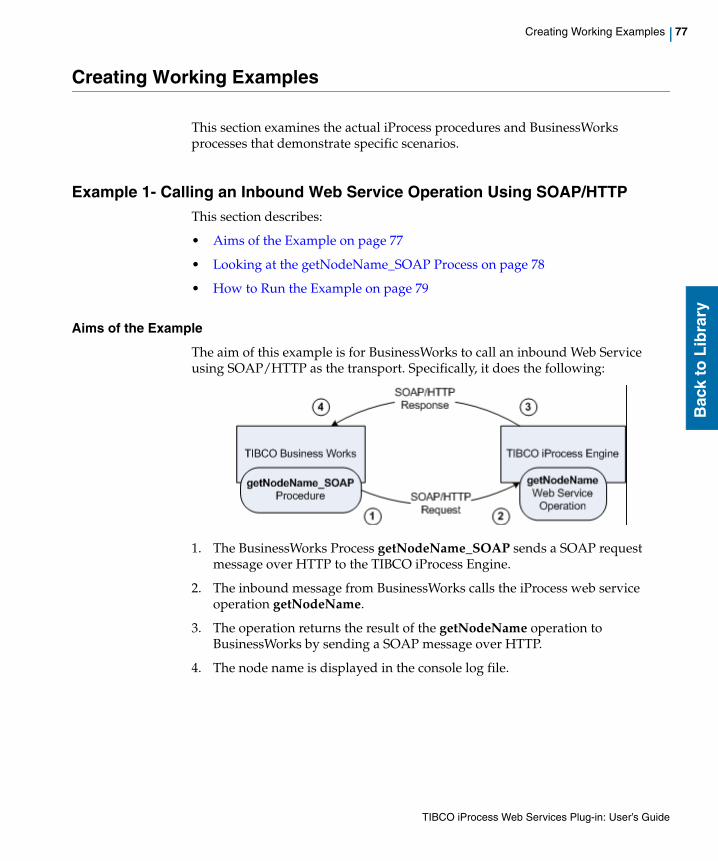
Creating Working Examples | 77
Bac
k to
Lib
rary
Creating Working Examples
This section examines the actual iProcess procedures and BusinessWorks processes that demonstrate specific scenarios.
Example 1- Calling an Inbound Web Service Operation Using SOAP/HTTPThis section describes:
• Aims of the Example on page 77
• Looking at the getNodeName_SOAP Process on page 78
• How to Run the Example on page 79
Aims of the Example
The aim of this example is for BusinessWorks to call an inbound Web Service using SOAP/HTTP as the transport. Specifically, it does the following:
1. The BusinessWorks Process getNodeName_SOAP sends a SOAP request message over HTTP to the TIBCO iProcess Engine.
2. The inbound message from BusinessWorks calls the iProcess web service operation getNodeName.
3. The operation returns the result of the getNodeName operation to BusinessWorks by sending a SOAP message over HTTP.
4. The node name is displayed in the console log file.
TIBCO iProcess Web Services Plug-in: User’s Guide
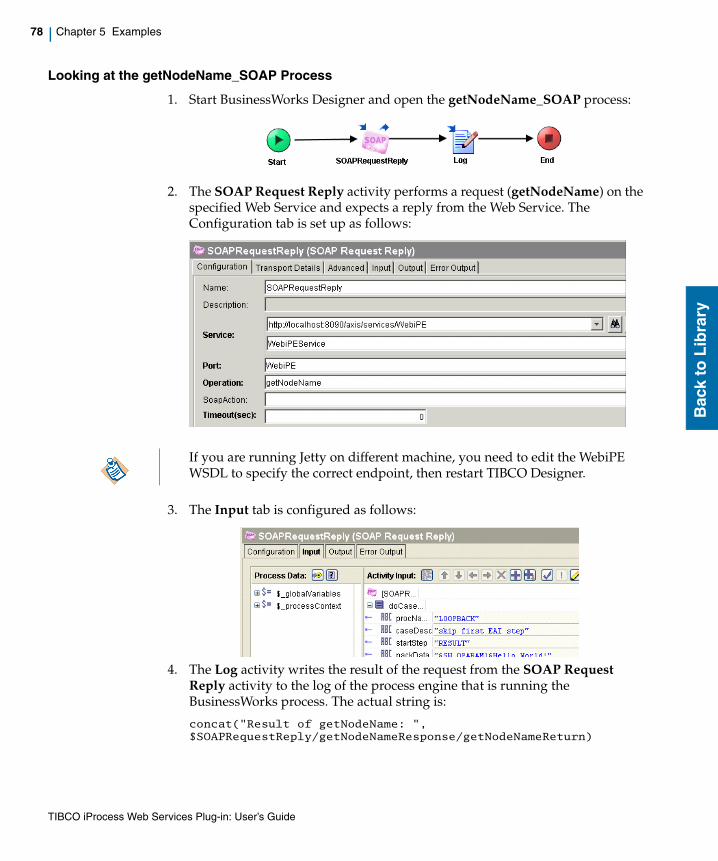
78 | Chapter 5 Examples
Bac
k to
Lib
rary
Looking at the getNodeName_SOAP Process
1. Start BusinessWorks Designer and open the getNodeName_SOAP process:
2. The SOAP Request Reply activity performs a request (getNodeName) on the specified Web Service and expects a reply from the Web Service. The Configuration tab is set up as follows:
3. The Input tab is configured as follows:
4. The Log activity writes the result of the request from the SOAP Request Reply activity to the log of the process engine that is running the BusinessWorks process. The actual string is:
concat("Result of getNodeName: ", $SOAPRequestReply/getNodeNameResponse/getNodeNameReturn)
If you are running Jetty on different machine, you need to edit the WebiPE WSDL to specify the correct endpoint, then restart TIBCO Designer.
TIBCO iProcess Web Services Plug-in: User’s Guide
Creating Working Examples | 79
Bac
k to
Lib
rary
It is configured as follows:
How to Run the Example
To run this example, do the following:
1. Start TIBCO Designer.
2. Start Jetty.
3. On the Project Panel, select the Tester tab.
4. Press F9 to display the Select Processes to Load dialog.
5. Select getNodeName_SOAP and click Load Selected:
TIBCO iProcess Web Services Plug-in: User’s Guide
80 | Chapter 5 Examples
Bac
k to
Lib
rary
6. Select Windows > Show Console to view the Console Log to verify that the getNodeName operation has performed correctly. If it has performed correctly, the log should contain lines similar to the following:
2007 Jul 02 11:58:44:020 GMT +1 BW.WebServices_Examples Info [BW-Core] BWENGINE-300002 Engine WebServices_Examples started
2007 Jul 02 11:58:46:020 GMT +1 BW.WebServices_Examples User [BW-User] - Job-32000 [DEMO/getNodeName_SOAP.process/Log]: Result of getNodeName: staffw_nod1
Example 2- Calling an Inbound Web Service Operation Using SOAP/HTTP and Basic Authentication
This section describes:
• Aims of the Example on page 77
• Looking at the getNodeName_SOAP Process on page 78
• How to Run the Example on page 79
Aims of the Example
The following example shows a loopback test that demonstrates how basic authentication works when enabled for both inflow and outflow:
1. The Web Service Client has a security profile callinbound that specifies a username and password for outflow security. The username - password token is inserted into the SOAP request to the Server.
2. The Server has a security profile Inbound to deal with SOAP requests. The username and password in the SOAP Request must match the username and password specified for Inflow security defined in the Inbound profile.
3. The Server sends the SOAP response with the username - password token specified for Outflow Security defined in the Inbound profile.
TIBCO iProcess Web Services Plug-in: User’s Guide
Creating Working Examples | 81
Bac
k to
Lib
rary
4. The Client receives the SOAP response and compares the received username and password to those specified for Inflow Security in the callinbound security profile. The usernames and passwords must match.
Looking at the INBOUND Procedure
1. The INBOUND Procedure has three steps:
2. The first step, RELEASE displays a form stating that the Procedure will next call Inbound web service getNodeName. The Web Services step GETNODE performs the call, and OUTPUT displays the result.
3. Double-click GETNODE to see how the call-out is defined.
TIBCO iProcess Web Services Plug-in: User’s Guide
82 | Chapter 5 Examples
Bac
k to
Lib
rary
4. Note that in the Specify the WSDL definition dialog, the WSDL is obtained via URL from localhost. If this is not the case for your environment, modify the URL as necessary. Also make sure that you have the correct Alias server selected (if you do not, you will not be able to see the example security profile that you imported in Task 6: Import the Example Security Profiles. Note that the security profile is defined as callinbound.
5. Examine the callinbound security profile by starting the Security Profile Administrator - run the JETTY_HOME\securitymanager script (on Windows, securitymanager.cmd, on UNIX, securitymanager.sh).
TIBCO iProcess Web Services Plug-in: User’s Guide
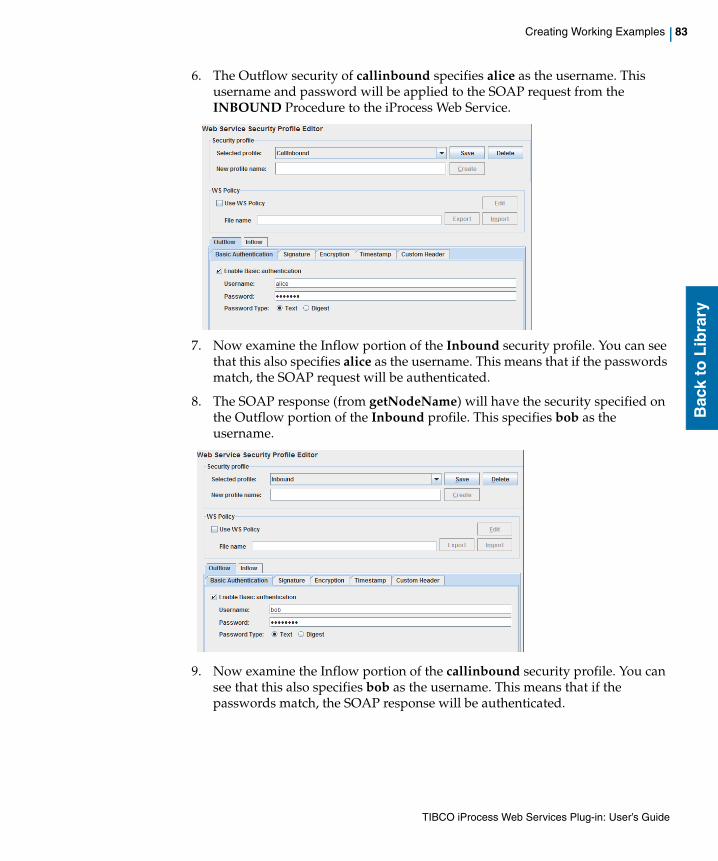
Creating Working Examples | 83
Bac
k to
Lib
rary
6. The Outflow security of callinbound specifies alice as the username. This username and password will be applied to the SOAP request from the INBOUND Procedure to the iProcess Web Service.
7. Now examine the Inflow portion of the Inbound security profile. You can see that this also specifies alice as the username. This means that if the passwords match, the SOAP request will be authenticated.
8. The SOAP response (from getNodeName) will have the security specified on the Outflow portion of the Inbound profile. This specifies bob as the username.
9. Now examine the Inflow portion of the callinbound security profile. You can see that this also specifies bob as the username. This means that if the passwords match, the SOAP response will be authenticated.
TIBCO iProcess Web Services Plug-in: User’s Guide
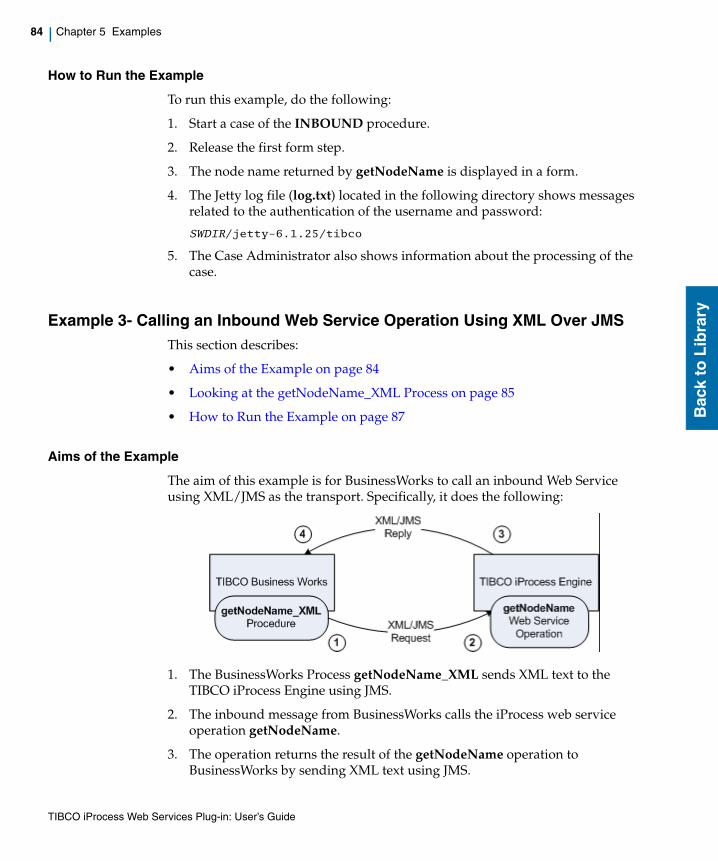
84 | Chapter 5 Examples
Bac
k to
Lib
rary
How to Run the Example
To run this example, do the following:
1. Start a case of the INBOUND procedure.
2. Release the first form step.
3. The node name returned by getNodeName is displayed in a form.
4. The Jetty log file (log.txt) located in the following directory shows messages related to the authentication of the username and password:
SWDIR/jetty-6.1.25/tibco
5. The Case Administrator also shows information about the processing of the case.
Example 3- Calling an Inbound Web Service Operation Using XML Over JMSThis section describes:
• Aims of the Example on page 84
• Looking at the getNodeName_XML Process on page 85
• How to Run the Example on page 87
Aims of the Example
The aim of this example is for BusinessWorks to call an inbound Web Service using XML/JMS as the transport. Specifically, it does the following:
1. The BusinessWorks Process getNodeName_XML sends XML text to the TIBCO iProcess Engine using JMS.
2. The inbound message from BusinessWorks calls the iProcess web service operation getNodeName.
3. The operation returns the result of the getNodeName operation to BusinessWorks by sending XML text using JMS.
TIBCO iProcess Web Services Plug-in: User’s Guide
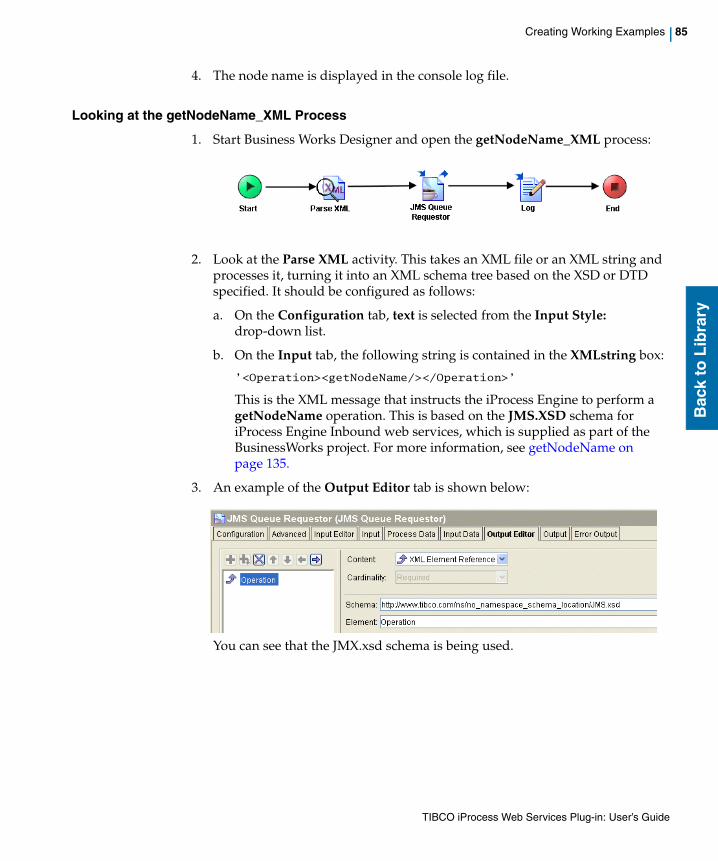
Creating Working Examples | 85
Bac
k to
Lib
rary
4. The node name is displayed in the console log file.
Looking at the getNodeName_XML Process
1. Start Business Works Designer and open the getNodeName_XML process:
2. Look at the Parse XML activity. This takes an XML file or an XML string and processes it, turning it into an XML schema tree based on the XSD or DTD specified. It should be configured as follows:
a. On the Configuration tab, text is selected from the Input Style: drop-down list.
b. On the Input tab, the following string is contained in the XMLstring box:
’<Operation><getNodeName/></Operation>’
This is the XML message that instructs the iProcess Engine to perform a getNodeName operation. This is based on the JMS.XSD schema for iProcess Engine Inbound web services, which is supplied as part of the BusinessWorks project. For more information, see getNodeName on page 135.
3. An example of the Output Editor tab is shown below:
You can see that the JMX.xsd schema is being used.
TIBCO iProcess Web Services Plug-in: User’s Guide
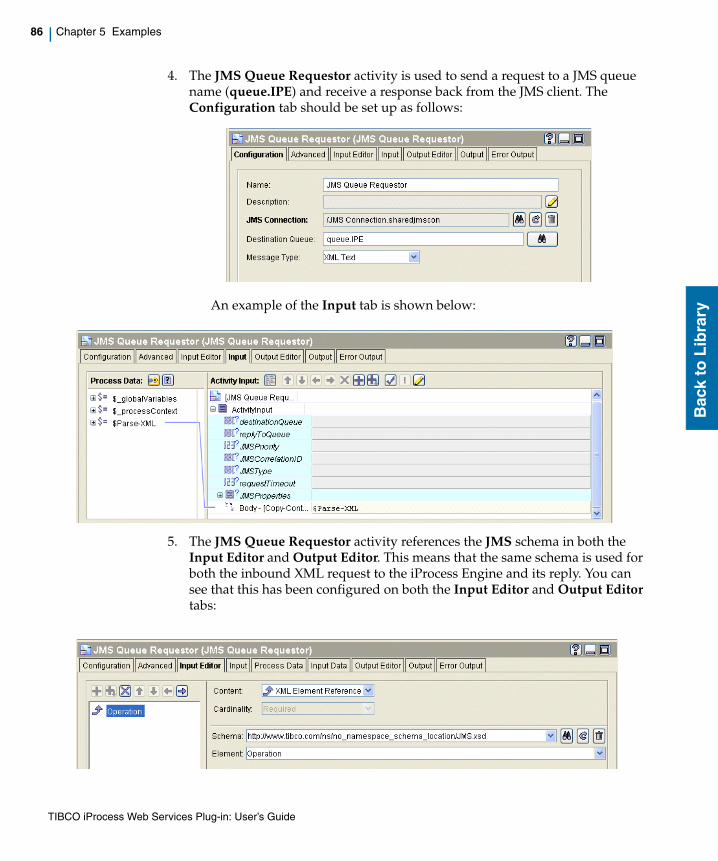
86 | Chapter 5 Examples
Bac
k to
Lib
rary
4. The JMS Queue Requestor activity is used to send a request to a JMS queue name (queue.IPE) and receive a response back from the JMS client. The Configuration tab should be set up as follows:
An example of the Input tab is shown below:
5. The JMS Queue Requestor activity references the JMS schema in both the Input Editor and Output Editor. This means that the same schema is used for both the inbound XML request to the iProcess Engine and its reply. You can see that this has been configured on both the Input Editor and Output Editor tabs:
TIBCO iProcess Web Services Plug-in: User’s Guide
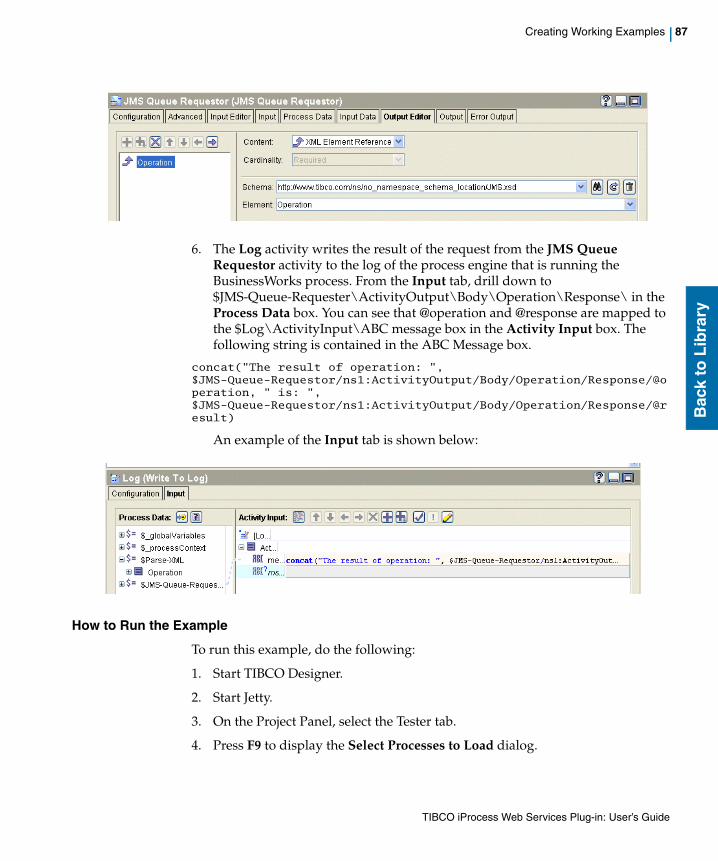
Creating Working Examples | 87
Bac
k to
Lib
rary
6. The Log activity writes the result of the request from the JMS Queue Requestor activity to the log of the process engine that is running the BusinessWorks process. From the Input tab, drill down to $JMS-Queue-Requester\ActivityOutput\Body\Operation\Response\ in the Process Data box. You can see that @operation and @response are mapped to the $Log\ActivityInput\ABC message box in the Activity Input box. The following string is contained in the ABC Message box.
concat("The result of operation: ", $JMS-Queue-Requestor/ns1:ActivityOutput/Body/Operation/Response/@operation, " is: ", $JMS-Queue-Requestor/ns1:ActivityOutput/Body/Operation/Response/@result)
An example of the Input tab is shown below:
How to Run the Example
To run this example, do the following:
1. Start TIBCO Designer.
2. Start Jetty.
3. On the Project Panel, select the Tester tab.
4. Press F9 to display the Select Processes to Load dialog.
TIBCO iProcess Web Services Plug-in: User’s Guide
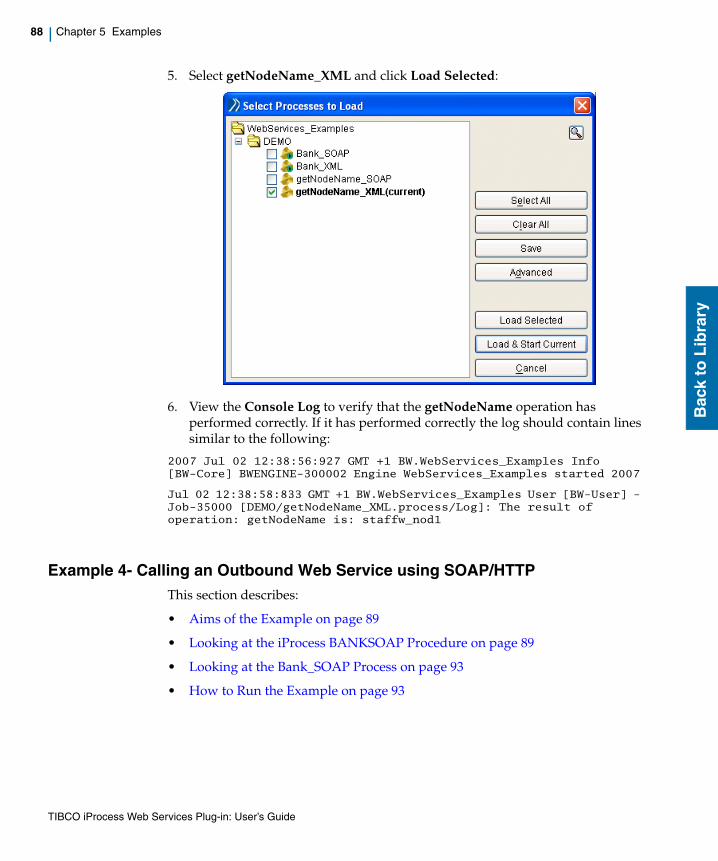
88 | Chapter 5 Examples
Bac
k to
Lib
rary
5. Select getNodeName_XML and click Load Selected:
6. View the Console Log to verify that the getNodeName operation has performed correctly. If it has performed correctly the log should contain lines similar to the following:
2007 Jul 02 12:38:56:927 GMT +1 BW.WebServices_Examples Info [BW-Core] BWENGINE-300002 Engine WebServices_Examples started 2007
Jul 02 12:38:58:833 GMT +1 BW.WebServices_Examples User [BW-User] - Job-35000 [DEMO/getNodeName_XML.process/Log]: The result of operation: getNodeName is: staffw_nod1
Example 4- Calling an Outbound Web Service using SOAP/HTTPThis section describes:
• Aims of the Example on page 89
• Looking at the iProcess BANKSOAP Procedure on page 89
• Looking at the Bank_SOAP Process on page 93
• How to Run the Example on page 93
TIBCO iProcess Web Services Plug-in: User’s Guide
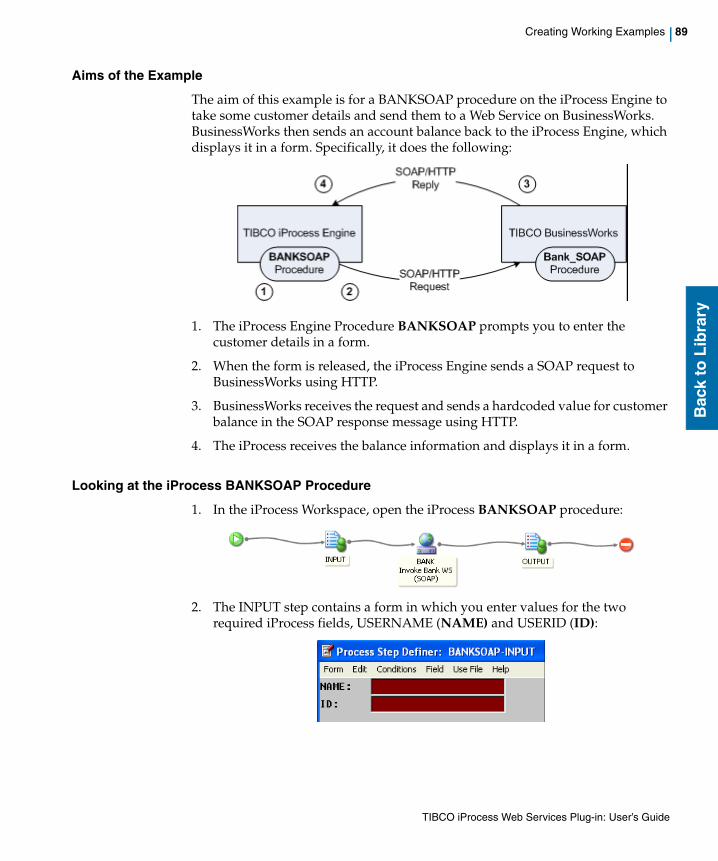
Creating Working Examples | 89
Bac
k to
Lib
rary
Aims of the Example
The aim of this example is for a BANKSOAP procedure on the iProcess Engine to take some customer details and send them to a Web Service on BusinessWorks. BusinessWorks then sends an account balance back to the iProcess Engine, which displays it in a form. Specifically, it does the following:
1. The iProcess Engine Procedure BANKSOAP prompts you to enter the customer details in a form.
2. When the form is released, the iProcess Engine sends a SOAP request to BusinessWorks using HTTP.
3. BusinessWorks receives the request and sends a hardcoded value for customer balance in the SOAP response message using HTTP.
4. The iProcess receives the balance information and displays it in a form.
Looking at the iProcess BANKSOAP Procedure
1. In the iProcess Workspace, open the iProcess BANKSOAP procedure:
2. The INPUT step contains a form in which you enter values for the two required iProcess fields, USERNAME (NAME) and USERID (ID):
TIBCO iProcess Web Services Plug-in: User’s Guide
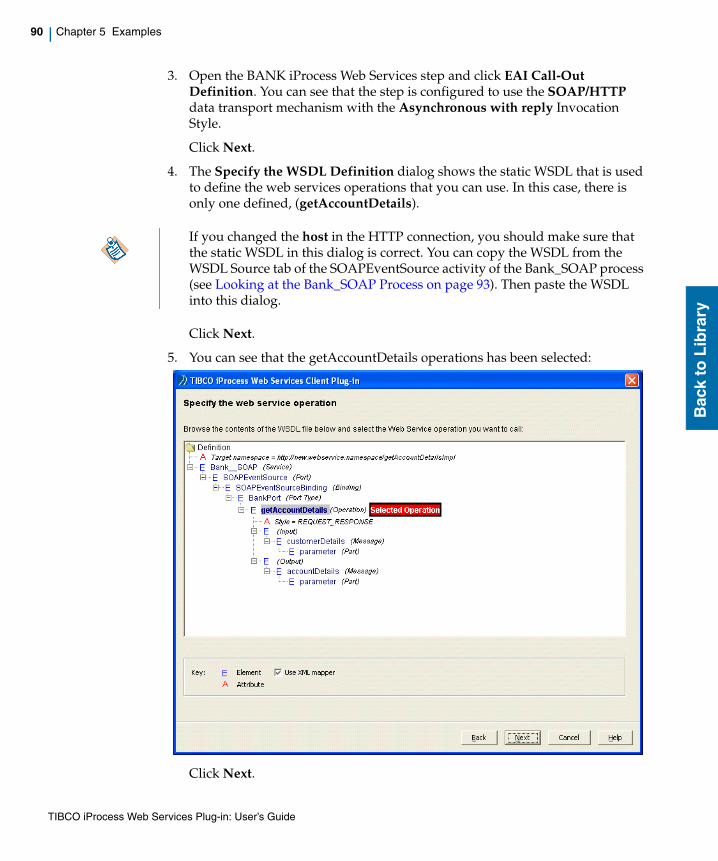
90 | Chapter 5 Examples
Bac
k to
Lib
rary
3. Open the BANK iProcess Web Services step and click EAI Call-Out Definition. You can see that the step is configured to use the SOAP/HTTP data transport mechanism with the Asynchronous with reply Invocation Style.
Click Next.
4. The Specify the WSDL Definition dialog shows the static WSDL that is used to define the web services operations that you can use. In this case, there is only one defined, (getAccountDetails).
Click Next.
5. You can see that the getAccountDetails operations has been selected:
Click Next.
If you changed the host in the HTTP connection, you should make sure that the static WSDL in this dialog is correct. You can copy the WSDL from the WSDL Source tab of the SOAPEventSource activity of the Bank_SOAP process (see Looking at the Bank_SOAP Process on page 93). Then paste the WSDL into this dialog.
TIBCO iProcess Web Services Plug-in: User’s Guide
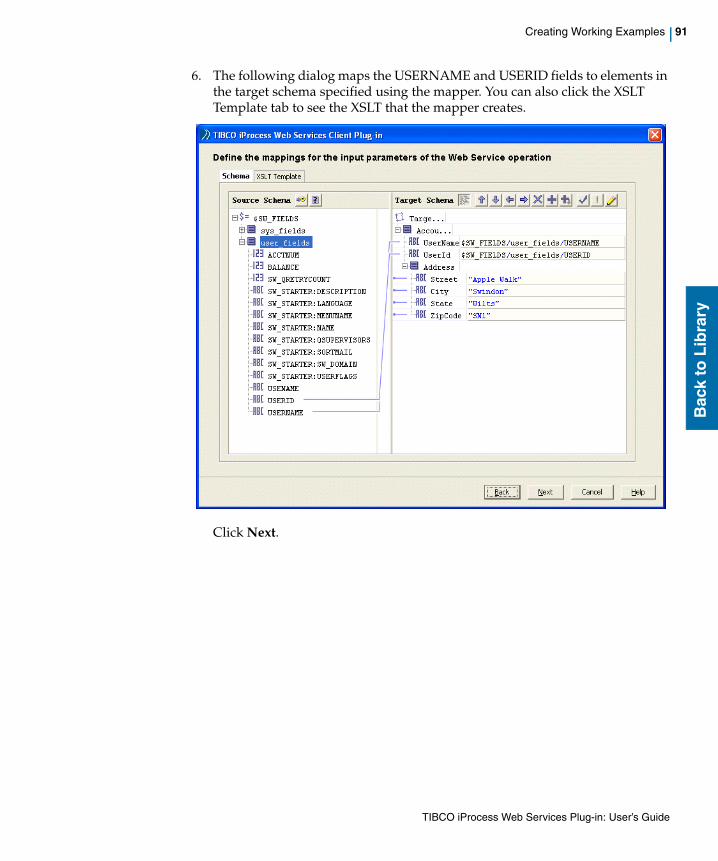
Creating Working Examples | 91
Bac
k to
Lib
rary
6. The following dialog maps the USERNAME and USERID fields to elements in the target schema specified using the mapper. You can also click the XSLT Template tab to see the XSLT that the mapper creates.
Click Next.
TIBCO iProcess Web Services Plug-in: User’s Guide
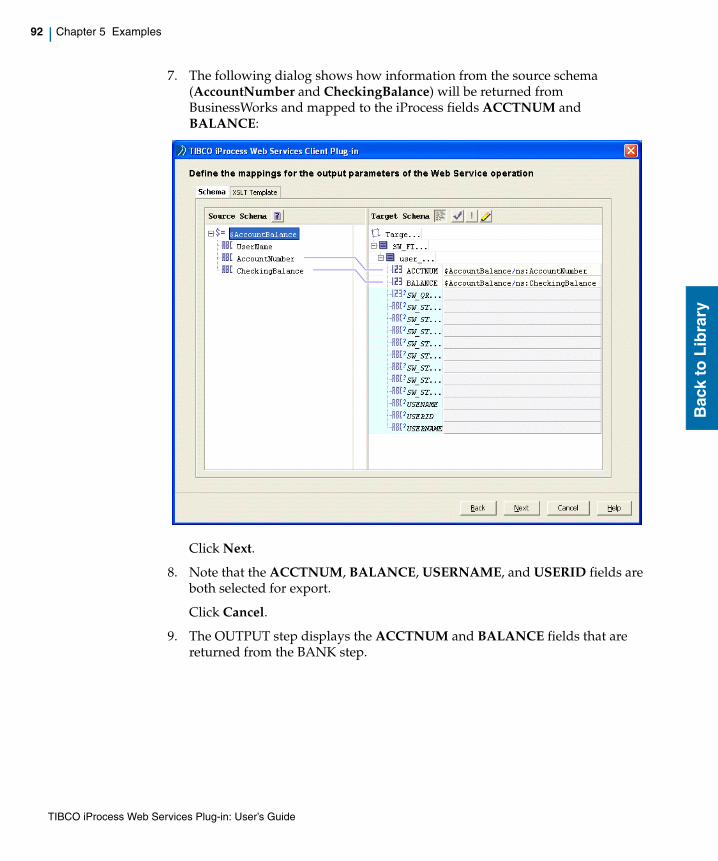
92 | Chapter 5 Examples
Bac
k to
Lib
rary
7. The following dialog shows how information from the source schema (AccountNumber and CheckingBalance) will be returned from BusinessWorks and mapped to the iProcess fields ACCTNUM and BALANCE:
Click Next.
8. Note that the ACCTNUM, BALANCE, USERNAME, and USERID fields are both selected for export.
Click Cancel.
9. The OUTPUT step displays the ACCTNUM and BALANCE fields that are returned from the BANK step.
TIBCO iProcess Web Services Plug-in: User’s Guide
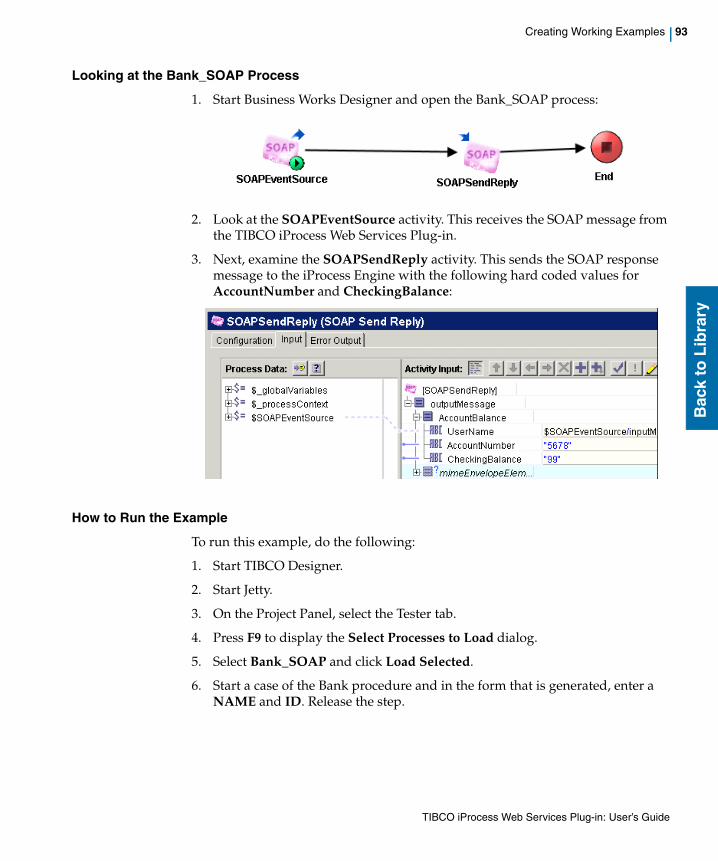
Creating Working Examples | 93
Bac
k to
Lib
rary
Looking at the Bank_SOAP Process
1. Start Business Works Designer and open the Bank_SOAP process:
2. Look at the SOAPEventSource activity. This receives the SOAP message from the TIBCO iProcess Web Services Plug-in.
3. Next, examine the SOAPSendReply activity. This sends the SOAP response message to the iProcess Engine with the following hard coded values for AccountNumber and CheckingBalance:
How to Run the Example
To run this example, do the following:
1. Start TIBCO Designer.
2. Start Jetty.
3. On the Project Panel, select the Tester tab.
4. Press F9 to display the Select Processes to Load dialog.
5. Select Bank_SOAP and click Load Selected.
6. Start a case of the Bank procedure and in the form that is generated, enter a NAME and ID. Release the step.
TIBCO iProcess Web Services Plug-in: User’s Guide
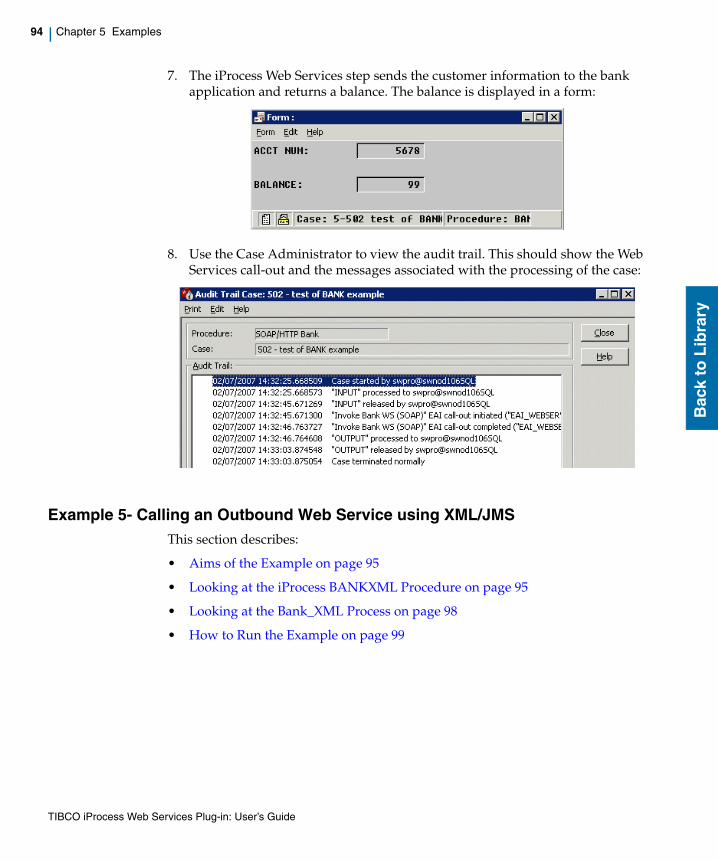
94 | Chapter 5 Examples
Bac
k to
Lib
rary
7. The iProcess Web Services step sends the customer information to the bank application and returns a balance. The balance is displayed in a form:
8. Use the Case Administrator to view the audit trail. This should show the Web Services call-out and the messages associated with the processing of the case:
Example 5- Calling an Outbound Web Service using XML/JMSThis section describes:
• Aims of the Example on page 95
• Looking at the iProcess BANKXML Procedure on page 95
• Looking at the Bank_XML Process on page 98
• How to Run the Example on page 99
TIBCO iProcess Web Services Plug-in: User’s Guide
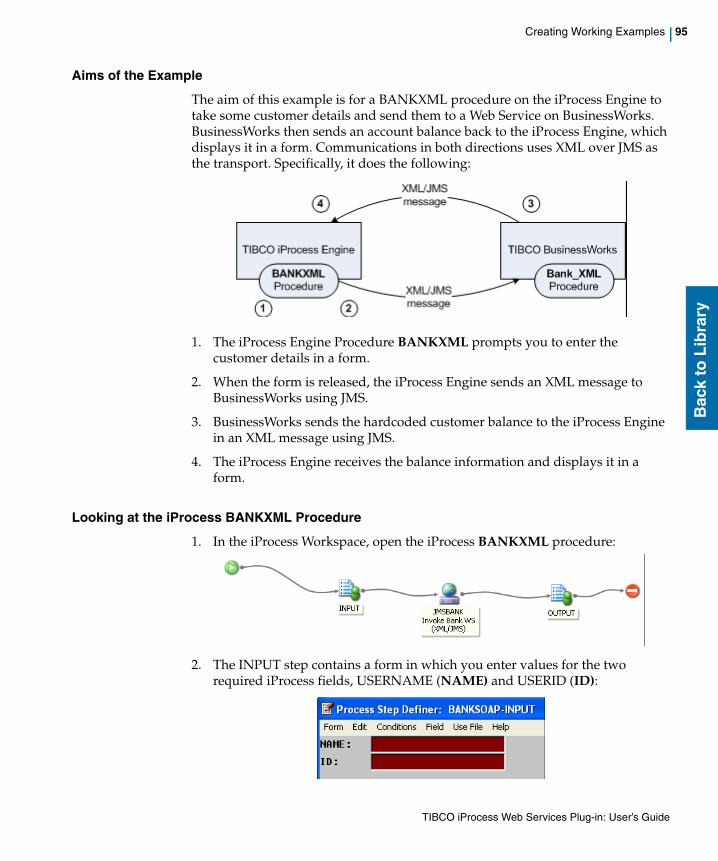
Creating Working Examples | 95
Bac
k to
Lib
rary
Aims of the Example
The aim of this example is for a BANKXML procedure on the iProcess Engine to take some customer details and send them to a Web Service on BusinessWorks. BusinessWorks then sends an account balance back to the iProcess Engine, which displays it in a form. Communications in both directions uses XML over JMS as the transport. Specifically, it does the following:
1. The iProcess Engine Procedure BANKXML prompts you to enter the customer details in a form.
2. When the form is released, the iProcess Engine sends an XML message to BusinessWorks using JMS.
3. BusinessWorks sends the hardcoded customer balance to the iProcess Engine in an XML message using JMS.
4. The iProcess Engine receives the balance information and displays it in a form.
Looking at the iProcess BANKXML Procedure
1. In the iProcess Workspace, open the iProcess BANKXML procedure:
2. The INPUT step contains a form in which you enter values for the two required iProcess fields, USERNAME (NAME) and USERID (ID):
TIBCO iProcess Web Services Plug-in: User’s Guide
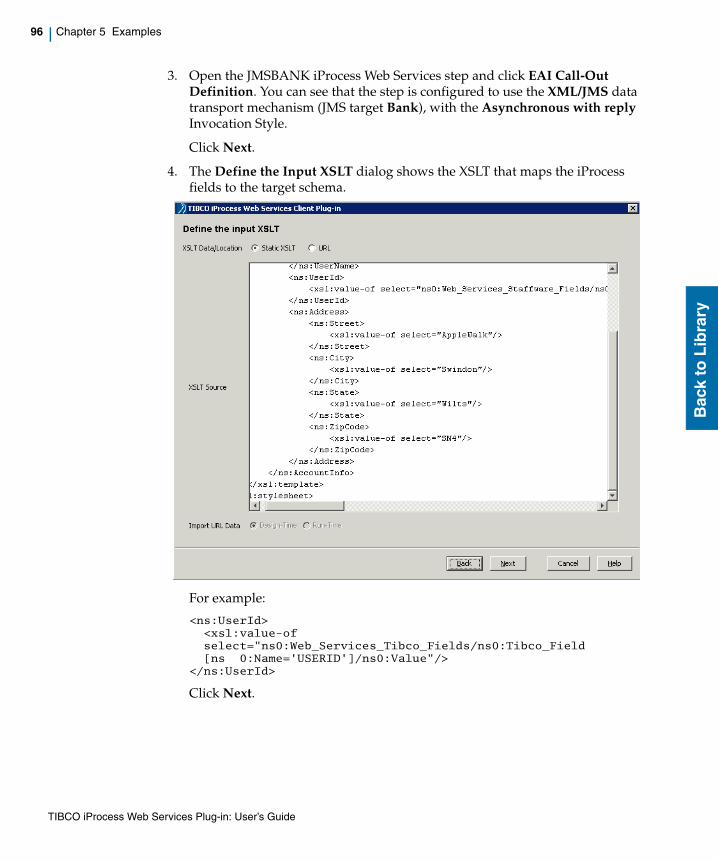
96 | Chapter 5 Examples
Bac
k to
Lib
rary
3. Open the JMSBANK iProcess Web Services step and click EAI Call-Out Definition. You can see that the step is configured to use the XML/JMS data transport mechanism (JMS target Bank), with the Asynchronous with reply Invocation Style.
Click Next.
4. The Define the Input XSLT dialog shows the XSLT that maps the iProcess fields to the target schema.
For example:
<ns:UserId><xsl:value-ofselect="ns0:Web_Services_Tibco_Fields/ns0:Tibco_Field[ns 0:Name='USERID']/ns0:Value"/>
</ns:UserId>
Click Next.
TIBCO iProcess Web Services Plug-in: User’s Guide
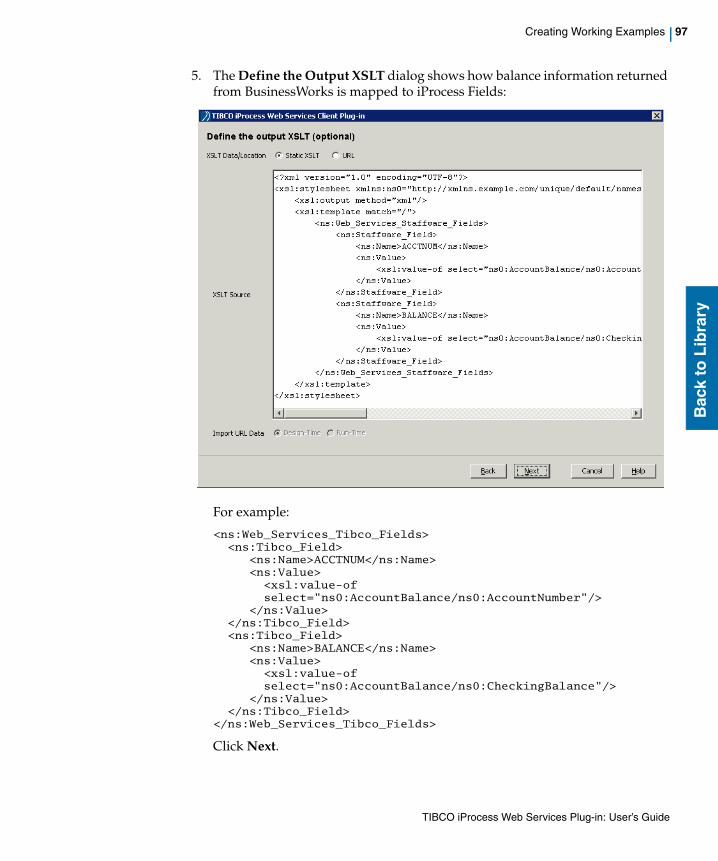
Creating Working Examples | 97
Bac
k to
Lib
rary
5. The Define the Output XSLT dialog shows how balance information returned from BusinessWorks is mapped to iProcess Fields:
For example:
<ns:Web_Services_Tibco_Fields><ns:Tibco_Field>
<ns:Name>ACCTNUM</ns:Name><ns:Value>
<xsl:value-ofselect="ns0:AccountBalance/ns0:AccountNumber"/>
</ns:Value></ns:Tibco_Field><ns:Tibco_Field>
<ns:Name>BALANCE</ns:Name><ns:Value>
<xsl:value-ofselect="ns0:AccountBalance/ns0:CheckingBalance"/>
</ns:Value></ns:Tibco_Field>
</ns:Web_Services_Tibco_Fields>
Click Next.
TIBCO iProcess Web Services Plug-in: User’s Guide
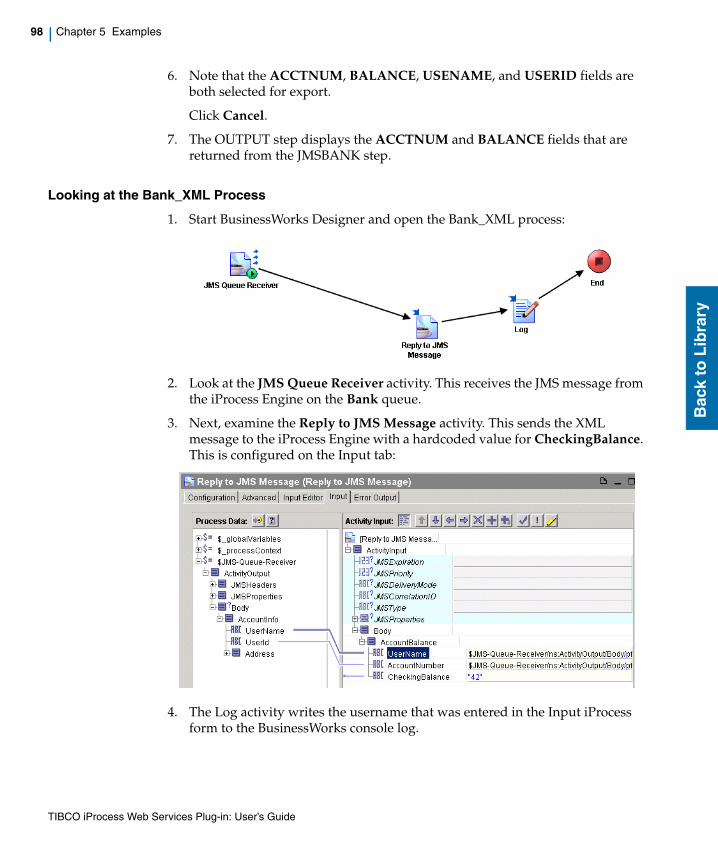
98 | Chapter 5 Examples
Bac
k to
Lib
rary
6. Note that the ACCTNUM, BALANCE, USENAME, and USERID fields are both selected for export.
Click Cancel.
7. The OUTPUT step displays the ACCTNUM and BALANCE fields that are returned from the JMSBANK step.
Looking at the Bank_XML Process
1. Start BusinessWorks Designer and open the Bank_XML process:
2. Look at the JMS Queue Receiver activity. This receives the JMS message from the iProcess Engine on the Bank queue.
3. Next, examine the Reply to JMS Message activity. This sends the XML message to the iProcess Engine with a hardcoded value for CheckingBalance. This is configured on the Input tab:
4. The Log activity writes the username that was entered in the Input iProcess form to the BusinessWorks console log.
TIBCO iProcess Web Services Plug-in: User’s Guide
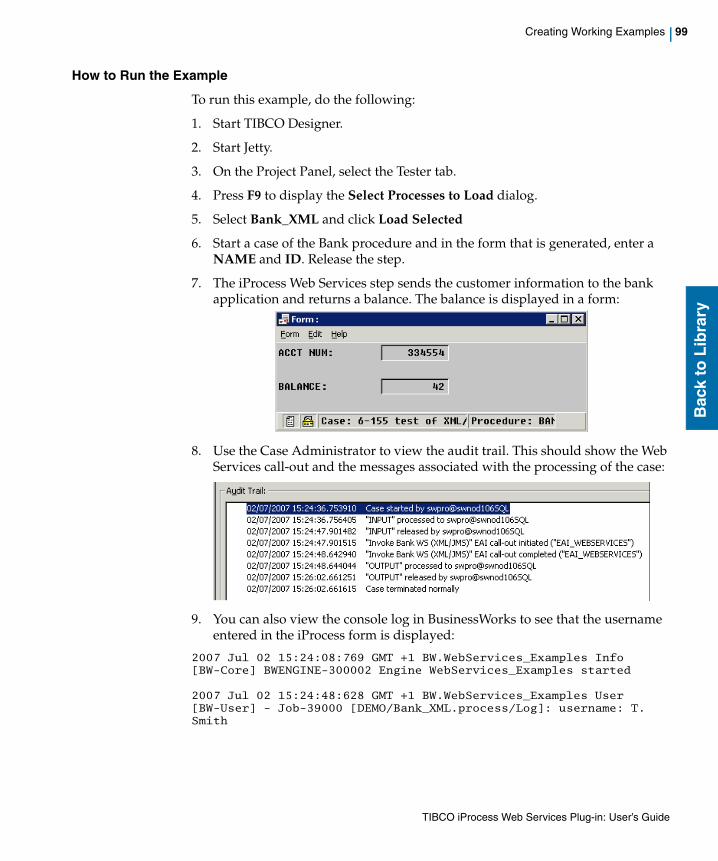
Creating Working Examples | 99
Bac
k to
Lib
rary
How to Run the Example
To run this example, do the following:
1. Start TIBCO Designer.
2. Start Jetty.
3. On the Project Panel, select the Tester tab.
4. Press F9 to display the Select Processes to Load dialog.
5. Select Bank_XML and click Load Selected
6. Start a case of the Bank procedure and in the form that is generated, enter a NAME and ID. Release the step.
7. The iProcess Web Services step sends the customer information to the bank application and returns a balance. The balance is displayed in a form:
8. Use the Case Administrator to view the audit trail. This should show the Web Services call-out and the messages associated with the processing of the case:
9. You can also view the console log in BusinessWorks to see that the username entered in the iProcess form is displayed:
2007 Jul 02 15:24:08:769 GMT +1 BW.WebServices_Examples Info [BW-Core] BWENGINE-300002 Engine WebServices_Examples started
2007 Jul 02 15:24:48:628 GMT +1 BW.WebServices_Examples User [BW-User] - Job-39000 [DEMO/Bank_XML.process/Log]: username: T. Smith
TIBCO iProcess Web Services Plug-in: User’s Guide

100 | Chapter 5 Examples
Bac
k to
Lib
rary
TIBCO iProcess Web Services Plug-in: User’s Guide
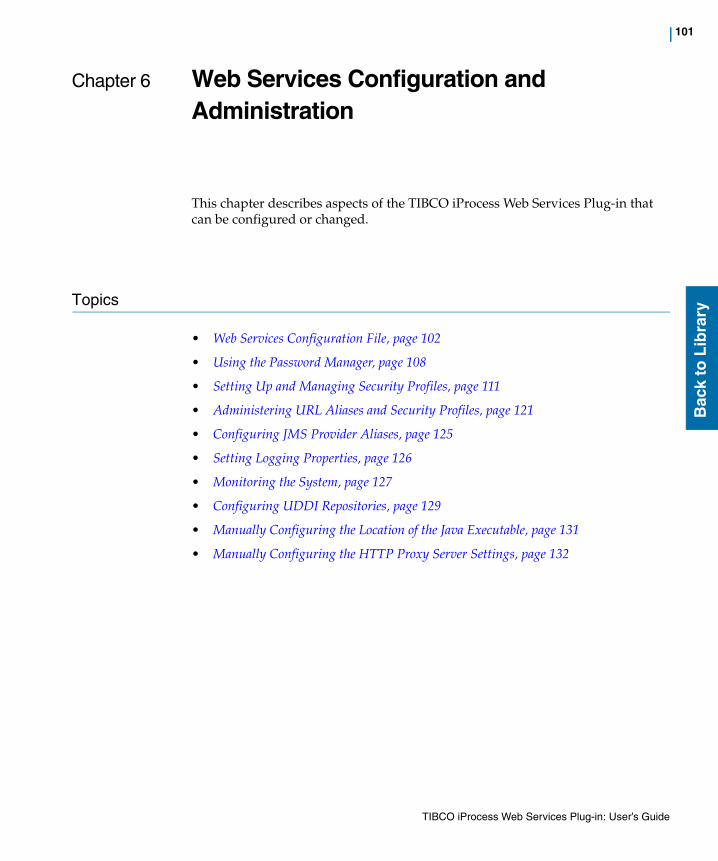
| 101
Bac
k to
Lib
rary
Chapter 6 Web Services Configuration and Administration
This chapter describes aspects of the TIBCO iProcess Web Services Plug-in that can be configured or changed.
Topics
• Web Services Configuration File, page 102
• Using the Password Manager, page 108
• Setting Up and Managing Security Profiles, page 111
• Administering URL Aliases and Security Profiles, page 121
• Configuring JMS Provider Aliases, page 125
• Setting Logging Properties, page 126
• Monitoring the System, page 127
• Configuring UDDI Repositories, page 129
• Manually Configuring the Location of the Java Executable, page 131
• Manually Configuring the HTTP Proxy Server Settings, page 132
TIBCO iProcess Web Services Plug-in: User’s Guide
102 | Chapter 6 Web Services Configuration and Administration
Bac
k to
Lib
rary
Web Services Configuration File
The Web Services configuration file (wsconfig.properties) allows you to perform most of the ongoing administration and configuration tasks related to the iProcess Web Services Plug-in. It is located in:
webservices_server_location\jetty-6.1.25\tibco
Keystore LocationThe keystore location is usually specified during the installation; however if you need to change it, you can do so by modifying the following line:
ServerEngineConfigMBean.KeyStore=
JDBC Connection detailsThe JDBC connection details are specified during the installation. If you need to, you can change the settings using the following section of the configuration file:
# JDBC Connection URIDBPoolMBean.ConnectionURI=jdbc:oracle:thin:@host:port:service;SelectMethod=cursor
# JDBC Driver NameDBPoolMBean.DriverName=oracle.jdbc.driver.OracleDriver
# JDBC Jar File locationsDBPoolMBean.CustomPath=;C:/Microsoft SQL Server JDBC Driver 3.0/sqljdbc_3.0/enu/sqljdbc4.jar
# JDBC User to Connect AsDBPoolMBean.UserName=swpro
# JDBC Password for user # NOTE: This entry is encrypted and should only be modified using the PasswordManagerDBPoolMBean.Password=password
# The username used when creating Audit Messages
Take care when editing this file as it is possible to render the iProcess Web Services Plug-in inoperable by incorrectly editing certain settings. TIBCO recommends making a backup copy of the configuration file as a safeguard.
Although there is an entry in the configuration file for KeyStorePassword, do not modify it directly. Use the password manager to change this password (see Using the Password Manager on page 108).
TIBCO iProcess Web Services Plug-in: User’s Guide
Web Services Configuration File | 103
Bac
k to
Lib
rary
DelayedReleaseHandler.userName=swadmin
# The message used when creating Audit MessagesDelayedReleaseHandler.auditMessage=Web Services
# The Database TypeDelayedReleaseHandler.dbType=SQLServer
# The schema owner for the iPE DatabaseDelayedReleaseHandler.dbUserName=swproX15
Date FormatsYou can modify the format and separators of the date format used for communicating with the iProcess Engine by using the following lines:
eaiws.iPEdateFormat dd/mm/yyyyeaiws.iPEdateSeparator /eaiws.iPEtimeFormat hh:mmeaiws.iPEtimeSeparator \:
JMS Message TimeoutPreviously, XML over JMS messages did not timeout. This sometimes led to a situation where if the remote system was not running, or there was an error, a message remained waiting indefinitely for a response on the replyTo queue.
New timeout functionality has been introduced that can be controlled by setting the following four parameters (all times are in milliseconds):
• ServerEngineConfigMBean.ResponseTimeout (Default: 20000) - This timeout controls how long a Web Service response should be awaited before dropping into one of the scenarios below.
• ServerEngineConfigMBean.ConsumeTimeout (Default: 500) - In a scenario where a JMS Message fails to respond in a timely fashion (before the responseTimeout), the outgoing message is reconsumed in an attempt to keep iProcess Engine and the remote system in sync about which calls have been made. This timeout controls how long the TIBCO iProcess Web Services Plug-in waits to reconsume this message.
• ServerEngineConfigMBean.DeadlockTimeout (Default: 240000) - In a scenario where the outgoing message could not be reconsumed, it is assumed
The format that you specify should be consistent with the format specified in the SWDIR\etc\staffpms file. For more information, see the TIBCO iProcess Engine Administrator’s Guide.
TIBCO iProcess Web Services Plug-in: User’s Guide
104 | Chapter 6 Web Services Configuration and Administration
Bac
k to
Lib
rary
that the remote system is working on the call but is very slow. This timeout controls how long the response is awaited in this scenario.
• ServerEngineConfigMBean.ExpiryTimeout (Default: 0, off) - As an additional fail-safe, the outgoing JMS Message can have an expiry set on it, which will cause it to be removed from the queue if it is not processed by that time.
SOAP/HTTP TimeoutThis property allows you to specify the timeout period for a Web Services call. The default is 30000 milliseconds, and the provided value must be a multiple of 100:
Axis.SOAPTimeout=30000
AXIS Concurrent Connections
This property allows you to specify the number of concurrent HTTP connections that Axis can make. Normally, this setting should not need to be changed. However, in a slow environment it may be necessary to increase this. The default is:
Axis.maxConcurrentConnections=64
Asynchronous With Reply TimeoutIf the response to a callout made with the Asynchronous with Reply invocation style exceeds the timeout value, the call is converted to Automatic Delayed Release. The timeout value after which this conversion occurs is set with the following line in the configuration file:
WSDocumentController.timeout=30000
This functionality requires that the server running Jetty and the JMS Provider have synchronized clocks. Ignoring this requirement can cause undesirable behavior.
Do not modify this setting unless you have consulted with TIBCO Support.
TIBCO iProcess Web Services Plug-in: User’s Guide
Web Services Configuration File | 105
Bac
k to
Lib
rary
Field Cache TimeoutThe following property controls how long items are allowed to remain in the Field Cache before being purged as old (dirty) items. The default value is 600 milliseconds and any provided value should be longer than you expect any transactions to last, including potential Jetty restarts.
FieldCache.DirtyItemTimeout=600
Security Profile TokenizationThis section controls how security profile tokenization is specified. By specifying a token in any field in the Security Profile Administrator, you can include static data in your SOAP header to outbound web services at runtime. You could include one or more iProcess fields in a token (for example, %%_SW_CASEDESC_%%). By default, security profile tokenization is enabled. To disable, modify the following property as shown below:SecurityProfileDetails.disableTokenization=false
The format of the token is set with the following lines in the configuration file, but you can change the format of them if you wish:
SecurityProfileDetails.startToken=%%_SecurityProfileDetails.endToken=_%%
The final property in this section defines a delayed release id token.
SecurityProfileDetails.delayedReleaseIdToken=SW_DELAYED_RELEASE_ID
This means if you inserted the following token %%_SW_DELAYED_RELEASE_ID_%% in a field in the Security Profile Administrator, the delayed release id would be passed in the SOAP header to the outbound web services at runtime.
Error Handling for Security Profile Tokenization
The Error Handling Configuration section controls how errors are handled when defining security profile tokens. There are two paremeters in this section:
• ErrorHandling.continueOnTokenFieldNotFound=false This parameter allows you to specify whether a web service call should abort if a field token
The following should not be used in a security profile token:
• $
• *
• Anything that can be used as a regular expression.
• A character that is already being used in the header should not be used as a token.
TIBCO iProcess Web Services Plug-in: User’s Guide

106 | Chapter 6 Web Services Configuration and Administration
Bac
k to
Lib
rary
used in a Security Profile/Custom Header has not been found. By default this is set to false.
• ErrorHandling.continueOnsecurityProfileNotFound=true This parameter allows you to specify whether web service should continue or abort if the specified security profile cannot be found. By default, this is set to true.
Configuring Ports for Web ServicesThere are several ports that must be configured for various features of the iProcess Web Services Plug-in. If the configuration of these ports changes from that specified during the installation, you can modify the configuration file as described in this section.
• RMIConnector.port=10010 - The Security Profile Administrator and URLAliasManager (iProcess Web Services Client Plug-in) listen on this port.
• SocketProxyMBean.doc0=5555|com.staffware.integration.socketproxy.library.handlers.WSDocumentController - This string is used to configure the connection from the Web Services Outbound Engine to the iProcess Engine Plug-in. The number between the equals sign (=) and the (|) symbol specifies the port used for the connection (in this example, 5555).
• The following information is used by the Security Profile Administrator to connect to the Security Profile Administrator service. With the exception of high availability environments, the port setting is typically the same as that for RMIConnector.port.
SecurityProfileManager.host=localhostSecurityProfileManager.port=10010
Configuring EncodingThe following parameter is used to define the Java-compliant encoding scheme used when communicating with the iProcess Engine:
WSDocumentHandler.Encoding=8859_1
TIBCO iProcess Web Services Plug-in: User’s Guide
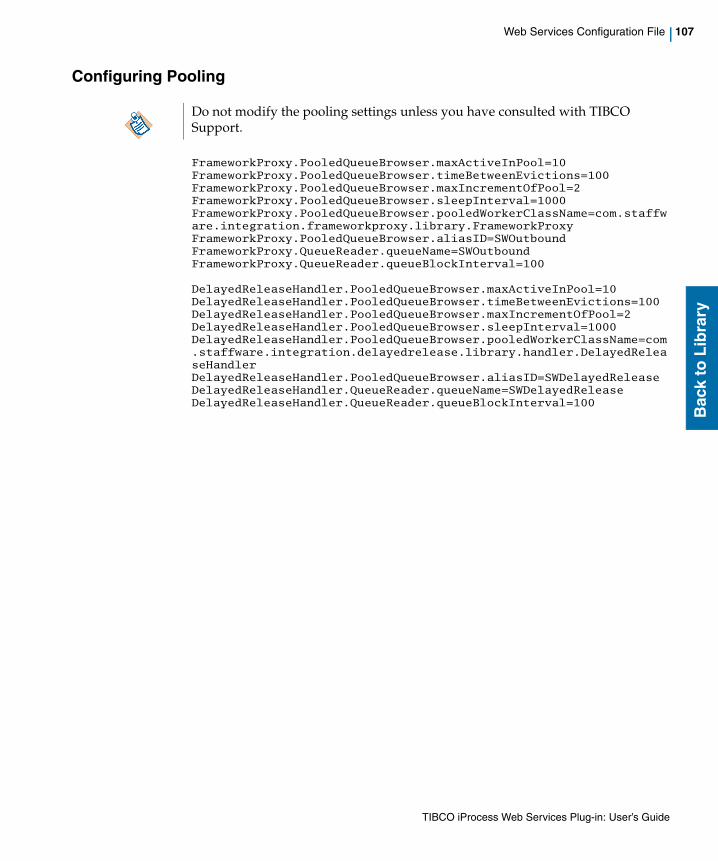
Web Services Configuration File | 107
Bac
k to
Lib
rary
Configuring Pooling
FrameworkProxy.PooledQueueBrowser.maxActiveInPool=10FrameworkProxy.PooledQueueBrowser.timeBetweenEvictions=100FrameworkProxy.PooledQueueBrowser.maxIncrementOfPool=2FrameworkProxy.PooledQueueBrowser.sleepInterval=1000FrameworkProxy.PooledQueueBrowser.pooledWorkerClassName=com.staffware.integration.frameworkproxy.library.FrameworkProxyFrameworkProxy.PooledQueueBrowser.aliasID=SWOutboundFrameworkProxy.QueueReader.queueName=SWOutboundFrameworkProxy.QueueReader.queueBlockInterval=100
DelayedReleaseHandler.PooledQueueBrowser.maxActiveInPool=10DelayedReleaseHandler.PooledQueueBrowser.timeBetweenEvictions=100DelayedReleaseHandler.PooledQueueBrowser.maxIncrementOfPool=2DelayedReleaseHandler.PooledQueueBrowser.sleepInterval=1000DelayedReleaseHandler.PooledQueueBrowser.pooledWorkerClassName=com.staffware.integration.delayedrelease.library.handler.DelayedReleaseHandlerDelayedReleaseHandler.PooledQueueBrowser.aliasID=SWDelayedReleaseDelayedReleaseHandler.QueueReader.queueName=SWDelayedReleaseDelayedReleaseHandler.QueueReader.queueBlockInterval=100
Do not modify the pooling settings unless you have consulted with TIBCO Support.
TIBCO iProcess Web Services Plug-in: User’s Guide
108 | Chapter 6 Web Services Configuration and Administration
Bac
k to
Lib
rary
Using the Password Manager
The iProcess Web Services Plug-in provides a Password Manager that allows you to change and manage the various passwords required to use the client and server plug-ins such as the keystore password, JDBC password, and so on.
To start the Password Manager:
• Server Plug-in - Run the JETTY_HOME\passwordmanager script (on Windows, passwordmanager.cmd, on UNIX, passwordmanager.sh).
• Client Plug-in - Run the webservices_client_location\eai_websvcs\passwordmanager.cmd script.
Running the Password Manager from the client allows you to change passwords for properties and files that pertain to the iProcess Web Services Client Plug-in. Similarly different files and properties are available when running the Password Manager on the server.
TIBCO iProcess Web Services Plug-in: User’s Guide
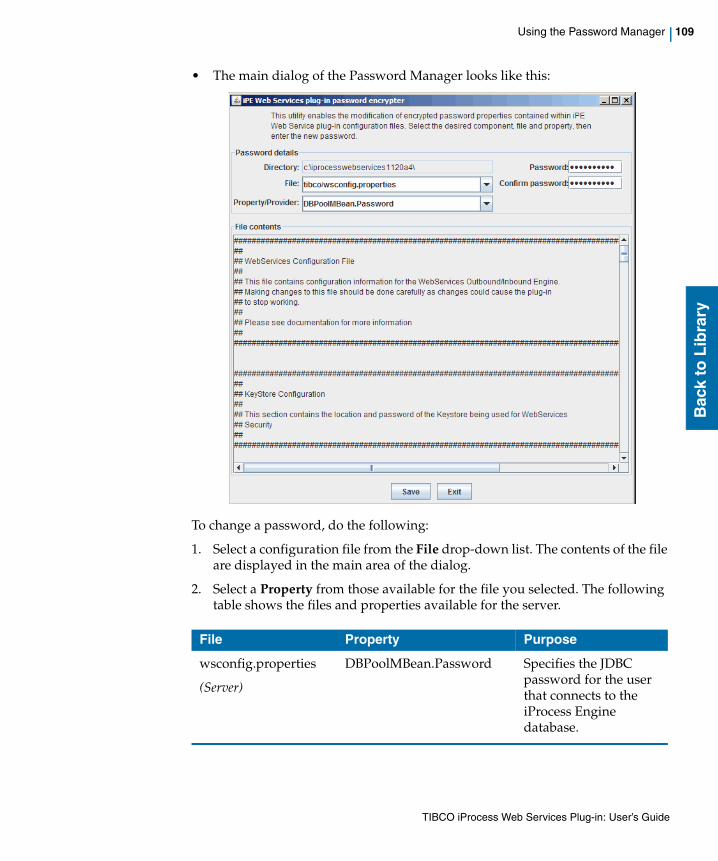
Using the Password Manager | 109
Bac
k to
Lib
rary
• The main dialog of the Password Manager looks like this:
To change a password, do the following:
1. Select a configuration file from the File drop-down list. The contents of the file are displayed in the main area of the dialog.
2. Select a Property from those available for the file you selected. The following table shows the files and properties available for the server.
File Property Purpose
wsconfig.properties
(Server)
DBPoolMBean.Password Specifies the JDBC password for the user that connects to the iProcess Engine database.
TIBCO iProcess Web Services Plug-in: User’s Guide
110 | Chapter 6 Web Services Configuration and Administration
Bac
k to
Lib
rary
3. For the selected property, enter a new password and confirm the password in the fields provided.
4. Click Save.
5. When you have finished changing and saving passwords, click Exit.
6. Restart Jetty.
ServerEngineConfigMBean.KeyStorePassword
Specifies the password of the keystore used for web services security.
jetty-ssl.xml
(Server)
password Specifies the keystore password used for configuring SSL security with Jetty.
trustPassword Specifies the truststore password used for configuring SSL security with Jetty.
alias.xml
(Server)
jmsprovider Allows you to change the JNDI password for each jmsprovider configured on your system.
truststore.properties
(Client)
javax.net.ssl.trustStorePassword
Allows you to change the password of the truststore.
File Property Purpose
You must click Save after entering the new password. If you change the property, select a different file, or click Exit without clicking Save, the password change will be lost.
TIBCO iProcess Web Services Plug-in: User’s Guide
Setting Up and Managing Security Profiles | 111
Bac
k to
Lib
rary
Setting Up and Managing Security Profiles
As mentioned in previous sections, the Security Profile Administrator allows you to create and manage the SOAP security profiles that you want to use when your Web Services steps are invoked. This section describes how to create and manage these profiles.
Starting the Security Profile AdministratorStart the Security Profile Administrator by running the JETTY_HOME\securitymanager script (on Windows, securitymanager.cmd, on UNIX, securitymanager.sh).
• You must start the Jetty server before you can run the Security Profile Administrator.
• Custom headers are not applicable for inbound components of outbound security profiles.
TIBCO iProcess Web Services Plug-in: User’s Guide
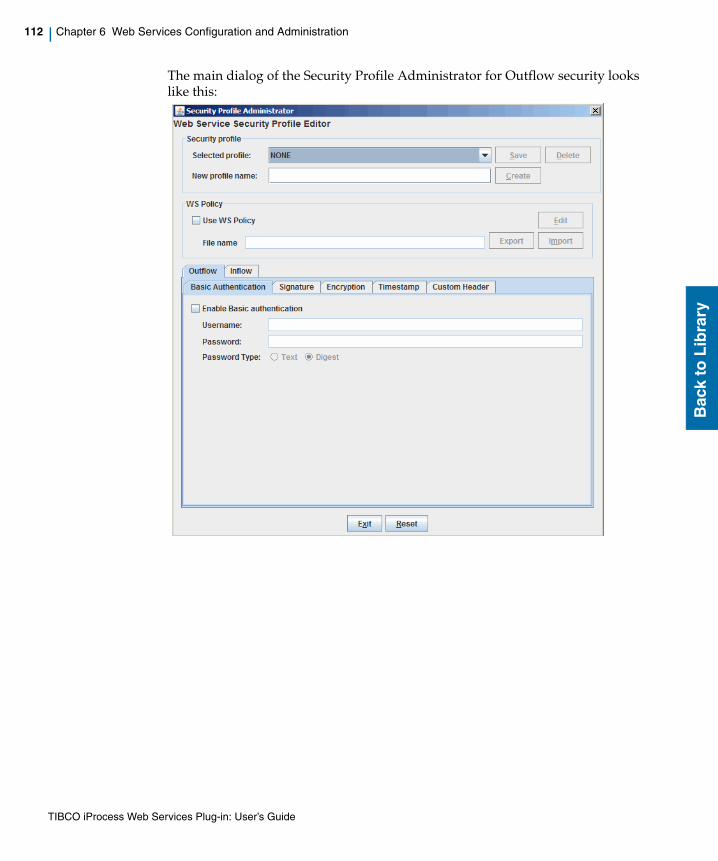
112 | Chapter 6 Web Services Configuration and Administration
Bac
k to
Lib
rary
The main dialog of the Security Profile Administrator for Outflow security looks like this:
TIBCO iProcess Web Services Plug-in: User’s Guide
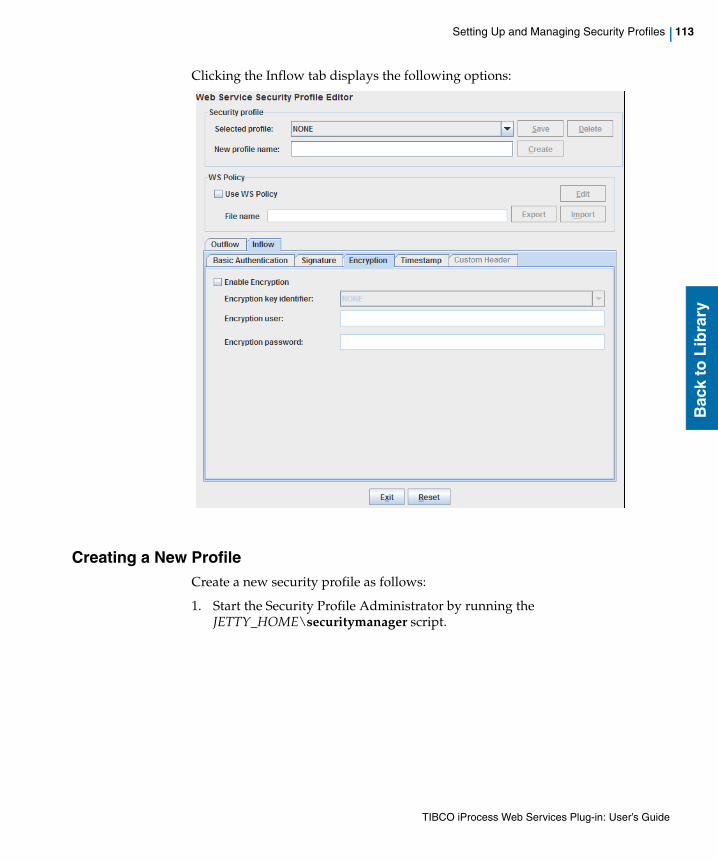
Setting Up and Managing Security Profiles | 113
Bac
k to
Lib
rary
Clicking the Inflow tab displays the following options:
Creating a New ProfileCreate a new security profile as follows:
1. Start the Security Profile Administrator by running the JETTY_HOME\securitymanager script.
TIBCO iProcess Web Services Plug-in: User’s Guide

114 | Chapter 6 Web Services Configuration and Administration
Bac
k to
Lib
rary
2. Enter the security options as follows. Note that for each profile you can specify security options for Outflow security and Inflow security. The profile for iProcess Engine Inbound Web Services is called Inbound. (The Inbound security profile is unique from other profiles because it is used to determine how security is provided for the web services that the iProcess Engine provides i.e. case start. The Inbound security profile is used when Jetty starts to determine the security. This is different from how the outbound profiles are used. See Understanding iProcess Web Services Plug-in Security on page 27 for more information). Additional options for Outflow security are noted.
Option You specify... Effect
Use WS Policy File File name of a XML policy file that specifies the web services security options that you want to implement. (see Combining Security Types on page 39).
Click Import to browse for an existing WS Policy file to use for SOAP security. In the WS Policy Editor, select Actions > Merge to add the Rampart sections (for more information, see Specifying a WS Policy File on page 118).
Click Edit to add security assertions to an existing policy file.
TIBCO iProcess Web Services Plug-in: User’s Guide

Setting Up and Managing Security Profiles | 115
Bac
k to
Lib
rary
Basic Authentication
(for an overview, see Username - Password Token (Basic Authentication) on page 34)
Outflow security
...you can specify the Username, Password, and Password Type, either Text or Digest.
Inflow security
...the Username, Password.
Outflow: The specified username - password token is inserted into the SOAP message. For Outflow security you can specify whether the password that is inserted into the SOAP message is in text format or a password digest. Password digests are recommended because of their inherent security advantage.
Inflow: The recipient of a message must verify the username/password in the received message against the username/password in the Inflow security profile to establish that the message comes from a trusted partner.
Option You specify... Effect
TIBCO iProcess Web Services Plug-in: User’s Guide
116 | Chapter 6 Web Services Configuration and Administration
Bac
k to
Lib
rary
Digital Signature
(for an overview, see Digital Signatures and Certificates on page 35)
Outflow security
...the Signature key identifier associated with the digital signature, as well as the Signature user and Signature password that has been set up for the signature. The Signature user must match the Username specified for Basic authentication.
If Signature Confirmation is selected, the Web Service verifies the signature of the sender. This means that the SOAP response message contains a signature confirmation token. For example:
<wsse11:SignatureConfirmation wsu:Id="SigConf"Value="fNa57H35Xm/14dDK3wBJ1pkW6i4=" />
Advanced users can also choose to specify which parts of the message to digitally sign (Signature Parts). By default, the following is used for the signature:
<signatureParts>{}{http://schemas.xmlsoap.org/soap/envelope/}Body</signatureParts>
You can also specify whether to sign just the body or the body and headers, by selecting either Sign body or Sign body and headers (these are mutually exclusive options).
Inflow security
...the Signature key identifier (the method used to encode the signature key in the SOAP header).
If Signature Confirmation is selected, the Web Service verifies the signature of the sender. This means that the SOAP response message contains a signature confirmation token.
Outflow security
When the web service step is invoked by the specified user, the associated digital signature is inserted in the message. The receiver of the request or response must then verify the message using the provided public key.
For the Inbound security profile, the Signature Confirmation checkbox is only applicable to the outflow (response) direction.
Inflow security
The alias is decoded from the incoming message. The corresponding alias must exist in the keystore.
For security profiles besides Inbound, the Signature Confirmation is only applicable to the inflow direction. This means that the external web service must be configured to insert the signature confirmation token into its response message.
Option You specify... Effect
TIBCO iProcess Web Services Plug-in: User’s Guide
Setting Up and Managing Security Profiles | 117
Bac
k to
Lib
rary
3. Once you have specified the security options you want to implement, enter a New Profile Name for the profile.
4. Click Create.
Encryption
(for an overview, see Encryption - Ensuring Privacy on page 37)
Outflow security
...the Encryption user associated with the encryption key and the Encryption key identifier (the method used to encrypt the alias).
Advanced users may wish to specify which parts (Encryption Parts) of the message are to be encrypted as well as the Key transport algorithm and Symmetrical transport algorithm.By default, the following is used for the encryption:
<encryptionParts>{}{http://schemas.xmlsoap.org/soap/envelope/}Body</encriptionParts>
Inflow security
...the Encryption key identifier (the method used to encrypt the alias), as well as the Encryption user and Encryption password that have been set up for the encryption key.
Outflow security
When the web service step is invoked by the specified user, the SOAP message body (or the specified Part) is encrypted. The receiver of the request or response must then decrypt the message using their private key.
Inflow security
The alias is decoded from the incoming message. The corresponding alias and password must exist in the keystore. The encryption key is then used to decrypt the message.
Timestamp Select the checkbox. Inserts a timestamp in the message that indicates the creation and expiration of the message. The receiver can then verify whether the message has expired.
Custom Headers ...custom security (not displayed for Inbound profile or Inflow security)
Allows you to insert any custom security you have defined.
Option You specify... Effect
TIBCO iProcess Web Services Plug-in: User’s Guide
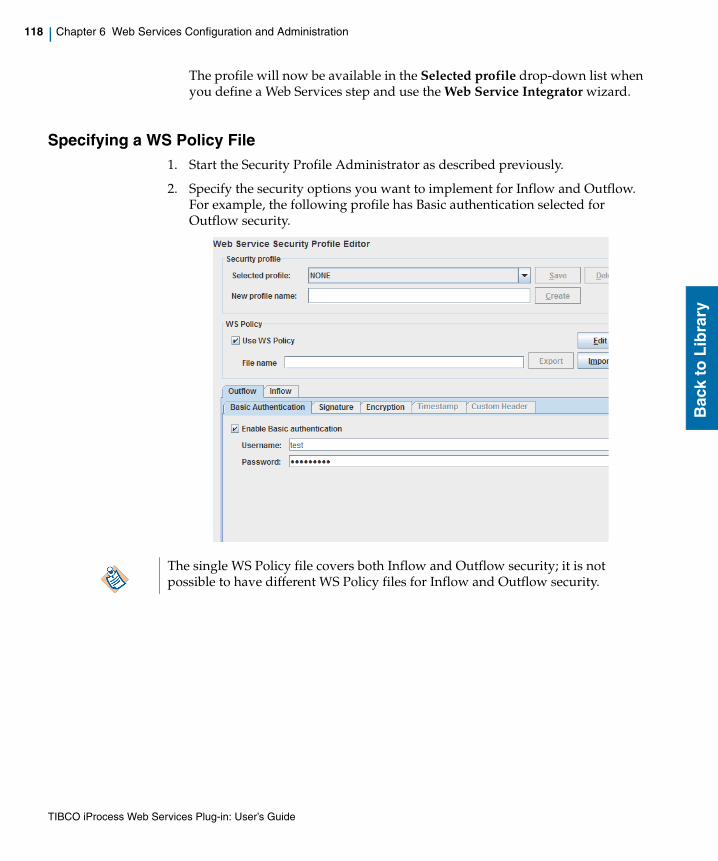
118 | Chapter 6 Web Services Configuration and Administration
Bac
k to
Lib
rary
The profile will now be available in the Selected profile drop-down list when you define a Web Services step and use the Web Service Integrator wizard.
Specifying a WS Policy File1. Start the Security Profile Administrator as described previously.
2. Specify the security options you want to implement for Inflow and Outflow. For example, the following profile has Basic authentication selected for Outflow security.
The single WS Policy file covers both Inflow and Outflow security; it is not possible to have different WS Policy files for Inflow and Outflow security.
TIBCO iProcess Web Services Plug-in: User’s Guide
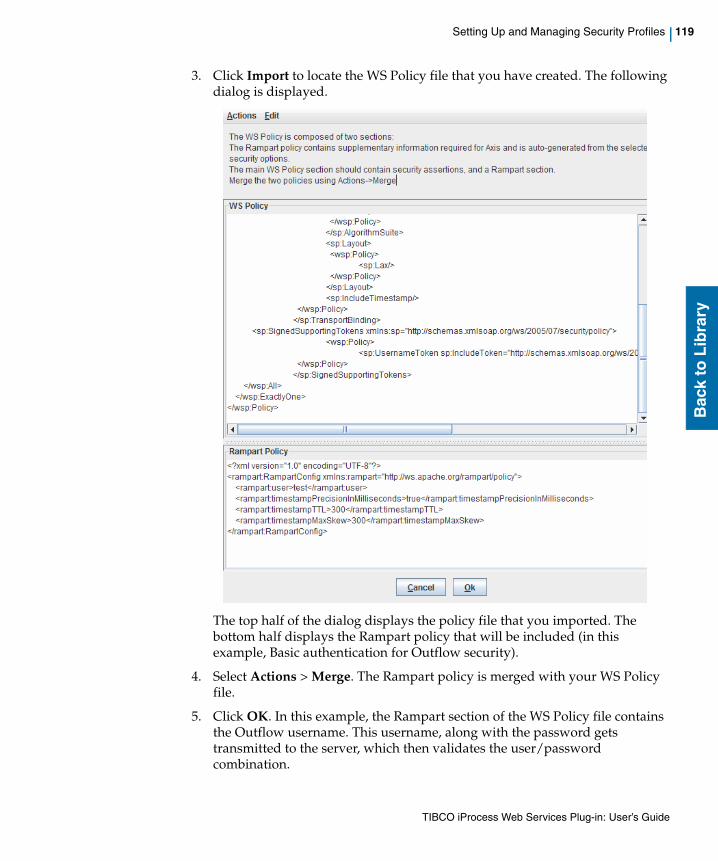
Setting Up and Managing Security Profiles | 119
Bac
k to
Lib
rary
3. Click Import to locate the WS Policy file that you have created. The following dialog is displayed.
The top half of the dialog displays the policy file that you imported. The bottom half displays the Rampart policy that will be included (in this example, Basic authentication for Outflow security).
4. Select Actions > Merge. The Rampart policy is merged with your WS Policy file.
5. Click OK. In this example, the Rampart section of the WS Policy file contains the Outflow username. This username, along with the password gets transmitted to the server, which then validates the user/password combination.
TIBCO iProcess Web Services Plug-in: User’s Guide
120 | Chapter 6 Web Services Configuration and Administration
Bac
k to
Lib
rary
For the response message (inflow), the SOAP message contains the server user and password. The client's callback handler return a password that is compared to the one received in the SOAP message. If the password match, the response message is valid.
Copying a ProfileCopy an existing security profile as follows:
1. Select the security profile that you want to copy from the Selected profile drop-down list. This populates security options with the settings defined in the selected profile.
2. Enter the name of the new profile in the New profile name field.
3. Click Create.
Modifying a ProfileModify an existing security profile as follows:
1. Select the security profile that you want to modify from the Selected profile drop-down list. This populates security options with the settings defined in the selected profile.
2. Modify the security options as necessary.
3. Click Save.
Disabling an Inbound ProfileDisable the inbound security profile as follows:
1. Select the Inbound security profile from the Selected profile drop-down list. This populates security options with the settings defined for the inbound security profile.
2. Deselect the security options for both inflow and outflow.
3. Click Save.
4. Restart Jetty.
It is not possible to delete the inbound security profile; however you can modify it to have no effect as shown in this section.
TIBCO iProcess Web Services Plug-in: User’s Guide
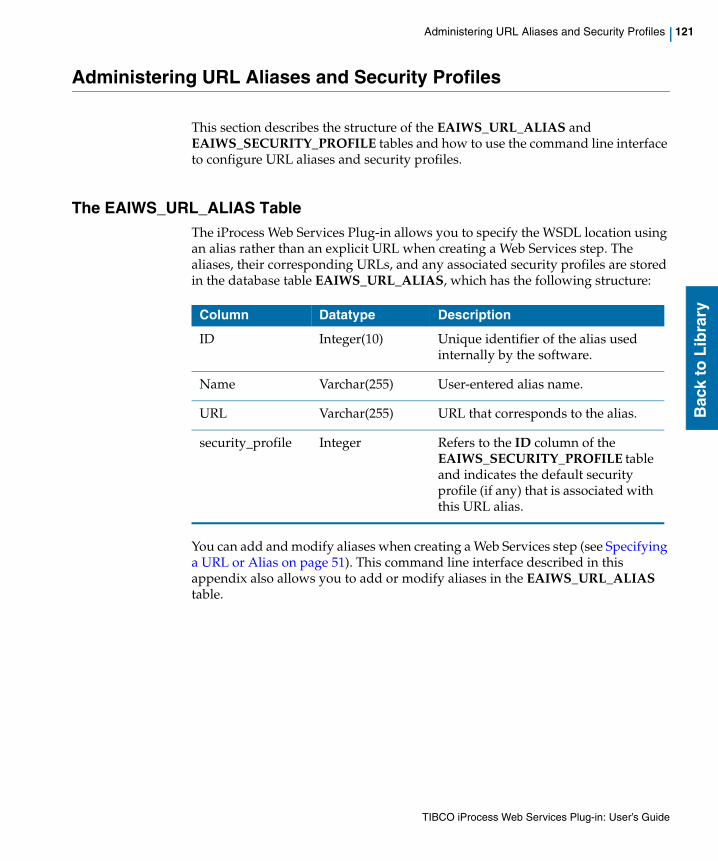
Administering URL Aliases and Security Profiles | 121
Bac
k to
Lib
rary
Administering URL Aliases and Security Profiles
This section describes the structure of the EAIWS_URL_ALIAS and EAIWS_SECURITY_PROFILE tables and how to use the command line interface to configure URL aliases and security profiles.
The EAIWS_URL_ALIAS TableThe iProcess Web Services Plug-in allows you to specify the WSDL location using an alias rather than an explicit URL when creating a Web Services step. The aliases, their corresponding URLs, and any associated security profiles are stored in the database table EAIWS_URL_ALIAS, which has the following structure:
You can add and modify aliases when creating a Web Services step (see Specifying a URL or Alias on page 51). This command line interface described in this appendix also allows you to add or modify aliases in the EAIWS_URL_ALIAS table.
Column Datatype Description
ID Integer(10) Unique identifier of the alias used internally by the software.
Name Varchar(255) User-entered alias name.
URL Varchar(255) URL that corresponds to the alias.
security_profile Integer Refers to the ID column of the EAIWS_SECURITY_PROFILE table and indicates the default security profile (if any) that is associated with this URL alias.
TIBCO iProcess Web Services Plug-in: User’s Guide
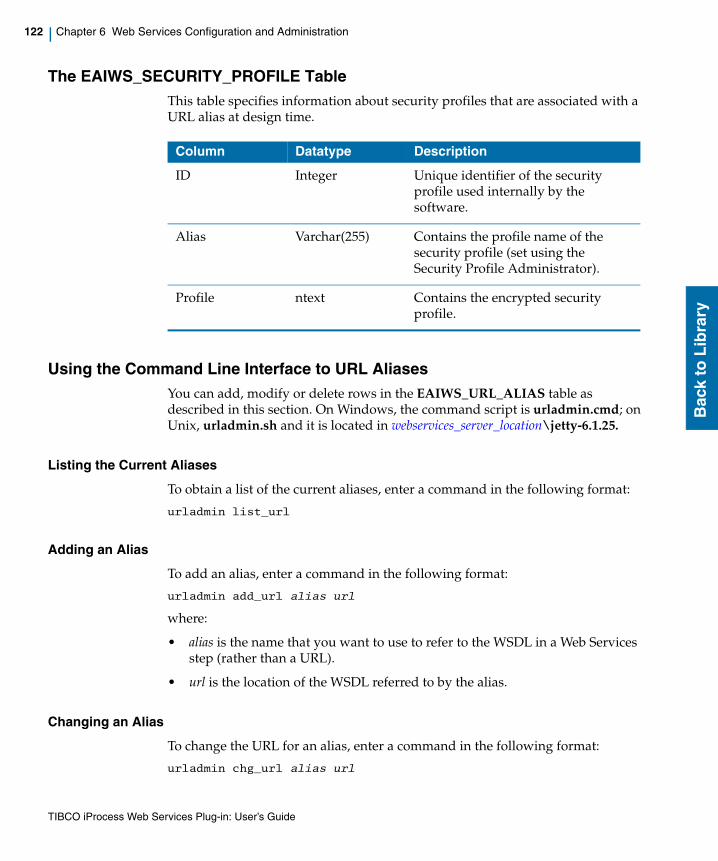
122 | Chapter 6 Web Services Configuration and Administration
Bac
k to
Lib
rary
The EAIWS_SECURITY_PROFILE TableThis table specifies information about security profiles that are associated with a URL alias at design time.
Using the Command Line Interface to URL AliasesYou can add, modify or delete rows in the EAIWS_URL_ALIAS table as described in this section. On Windows, the command script is urladmin.cmd; on Unix, urladmin.sh and it is located in webservices_server_location\jetty-6.1.25.
Listing the Current Aliases
To obtain a list of the current aliases, enter a command in the following format:
urladmin list_url
Adding an Alias
To add an alias, enter a command in the following format:
urladmin add_url alias url
where:
• alias is the name that you want to use to refer to the WSDL in a Web Services step (rather than a URL).
• url is the location of the WSDL referred to by the alias.
Changing an Alias
To change the URL for an alias, enter a command in the following format:
urladmin chg_url alias url
Column Datatype Description
ID Integer Unique identifier of the security profile used internally by the software.
Alias Varchar(255) Contains the profile name of the security profile (set using the Security Profile Administrator).
Profile ntext Contains the encrypted security profile.
TIBCO iProcess Web Services Plug-in: User’s Guide
Administering URL Aliases and Security Profiles | 123
Bac
k to
Lib
rary
where:
• alias is name whose URL you want to modify.
• url is the new location of the WSDL referred to by the alias.
Deleting an Alias
To delete an alias, enter a command in the following format:
urladmin del_url alias
where alias is the name that you want to delete.
Exporting Aliases
To export aliases to a text file, enter a command in the following format:
urladmin exp_url [path]filename
where [path]filename is the location where you want to create the text file.
Importing Aliases
To import aliases from a text file, enter a command in the following format:
urladmin imp_url [path]filename
where [path]filename is the location of the text file that contains the aliases. Each line of the text file must contain an alias name and URL separated by a space.
Using the Command Line Interface to Security ProfilesYou can also manipulate security profiles using the urladmin script. On Windows, the command script is urladmin.cmd; on Unix, urladmin.sh and it is located in webservices_server_location\jetty-6.1.25.
Listing Security Profiles
To obtain a list of security profiles, enter a command in the following format:
urladmin list_security
The utility displays the ID, Alias, and the Profile (in encrypted form) of each profile.
You cannot change the security profile associated with a URL using the command line. You must do this Step Definer.
TIBCO iProcess Web Services Plug-in: User’s Guide
124 | Chapter 6 Web Services Configuration and Administration
Bac
k to
Lib
rary
Exporting Security Profiles
To export security profiles to a text file, enter a command in the following format:
urladmin exp_security [path]filename
where [path]filename is the location where you want to create the text file.
Importing Security Profiles
To import security profiles from a text file, enter a command in the following format:
urladmin imp_security [path]filename
where [path]filename is the location of the text file that contains the security profiles. Each line of the text file must contain the alias of the profile and profile in encrypted form, each separated by a space.
TIBCO iProcess Web Services Plug-in: User’s Guide
Configuring JMS Provider Aliases | 125
Bac
k to
Lib
rary
Configuring JMS Provider Aliases
The jettydirectory/tibco/alias.xml file is where you specify the provider and queue information that Jetty requires. You should modify this file if for example you add a new JMS provider or create new JMS queues on your system. The Provider information is specified in the following section:
<Providers> <Provider id="internal" url="tibjmsnaming://localhost:7222" factory="com.tibco.tibjms.naming.TibjmsInitialContextFactory" jar="c:/tibco/ems/5.1/lib/tibjms.jar" jndiuser="" jndipassword="" extraenv="" /> </Providers>
If you have multiple providers, they are set up as follows:
<Providers><Provider id="internal" url="tcp://localhost:7222" factory="com.tibco.tibjms.naming.TibjmsInitialContextFactory" jar="c:/tibco/ems/5.1/lib/tibjms.jar" jndiuser="admin" jndipassword="" extraenv="" />
<Provider id="external_1" url="tcp://main:7222" factory="com.tibco.tibjms.naming.TibjmsInitialContextFactory" jar="c:/tibco/ems/5.1/lib/tibjms.jar" jndiuser="admin" jndipassword="" extraenv="" />
<Provider id="external_2" url="tcp://backup:7222" factory="com.tibco.tibjms.naming.TibjmsInitialContextFactory" jar="c:/tibco/ems/5.1/lib/tibjms.jar" jndiuser="admin" jndipassword="" extraenv="" /></Providers>
If you add new JMS queues to the system, add entries to the following section:
<Destinations inbound="default" outbound="SWOutbound"><Alias name="SWDelayedRelease" id="internal" topic="false"topicorqueuename="queue.SWDelayedRelease"/><Alias name="SWFieldCache" id="internal" topic="false"topicorqueuename="queue.SWFieldCache"/><Alias name="SWInbound" id="internal" topic="false"topicorqueuename="queue.SWInbound"/>
.
.
.<Alias name="SWTimeout" id="internal" topic="false"topicorqueuename="queue.SWTimeout"/><Alias name="default" id="internal" topic="false"topicorqueuename="queue.IPE"/><Alias name="XMLOUT1" id="external_1" topic="false"topicorqueuename="queue.XMLOUT1"/><Alias name="XMLOUT2" id="external_2" topic="false"topicorqueuename="queue.XMLOUT2"/>
</Destinations>
TIBCO iProcess Web Services Plug-in: User’s Guide
126 | Chapter 6 Web Services Configuration and Administration
Bac
k to
Lib
rary
Setting Logging Properties
The following logs are captured by iProcess Web Services Plug-in:
• iProcess Web Services Plug-in Command Tool Logging Information. Information from the iProcess Web Services Plug-in command tool is located in webservices_server_location\jetty-6.1.25\tibco\log.txt
• Jetty Logging Information Jetty logging information is located in: webservices_server_location\jetty-6.1.25\tibco\log.txt
If you are troubleshooting a problem, it can be useful to turn on extra debug messages. To do this, modify the file log4j.properties (in the same directory as the log file) and change the line:
log4j.rootLogger=warn, EAIJAVA
to
log4j.rootLogger=debug, EAIJAVA
For more information about Log4j, see http://logging.apache.org/log4j/docs/index.html.
TIBCO iProcess Web Services Plug-in: User’s Guide
Monitoring the System | 127
Bac
k to
Lib
rary
Monitoring the System
During normal operation, you should monitor the following files and queues:
1. Monitor the sw_warn and sw_error files and the SWException and SWPoison queues for any potential problems with Web Services transactions or Jetty servers.
2. If you cannot determine the cause of the failure, check the SWPoison and SWException queue for failed messages. Correct the problem and resend the step using SWDIR\bin\swutil (see the chapter on "Work Items" in the TIBCO iProcess swutil and swbatch Reference Guide).
TIBCO iProcess Web Services Plug-in: User’s Guide
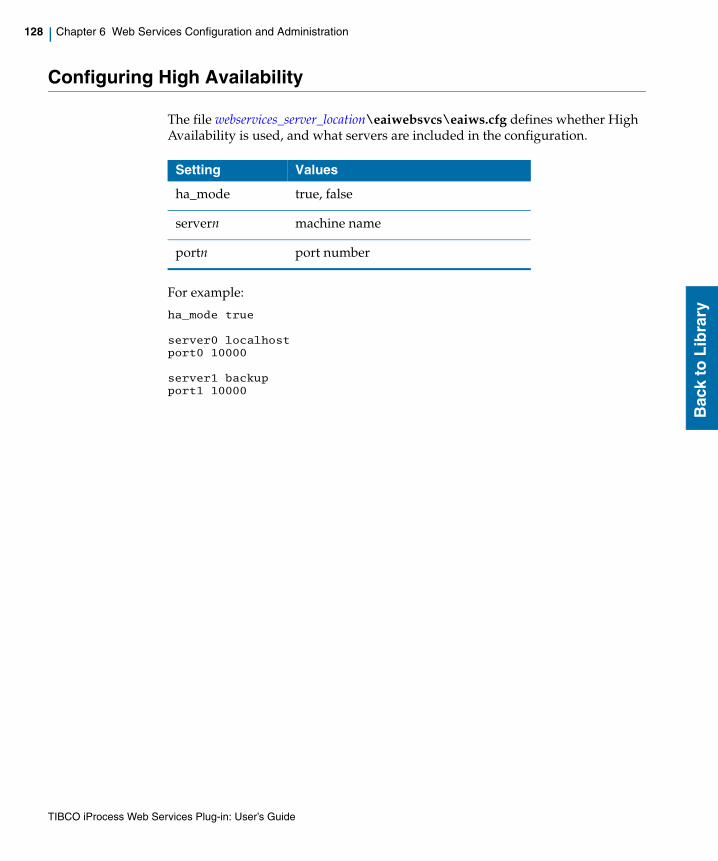
128 | Chapter 6 Web Services Configuration and Administration
Bac
k to
Lib
rary
Configuring High Availability
The file webservices_server_location\eaiwebsvcs\eaiws.cfg defines whether High Availability is used, and what servers are included in the configuration.
For example:
ha_mode true
server0 localhostport0 10000
server1 backupport1 10000
Setting Values
ha_mode true, false
servern machine name
portn port number
TIBCO iProcess Web Services Plug-in: User’s Guide
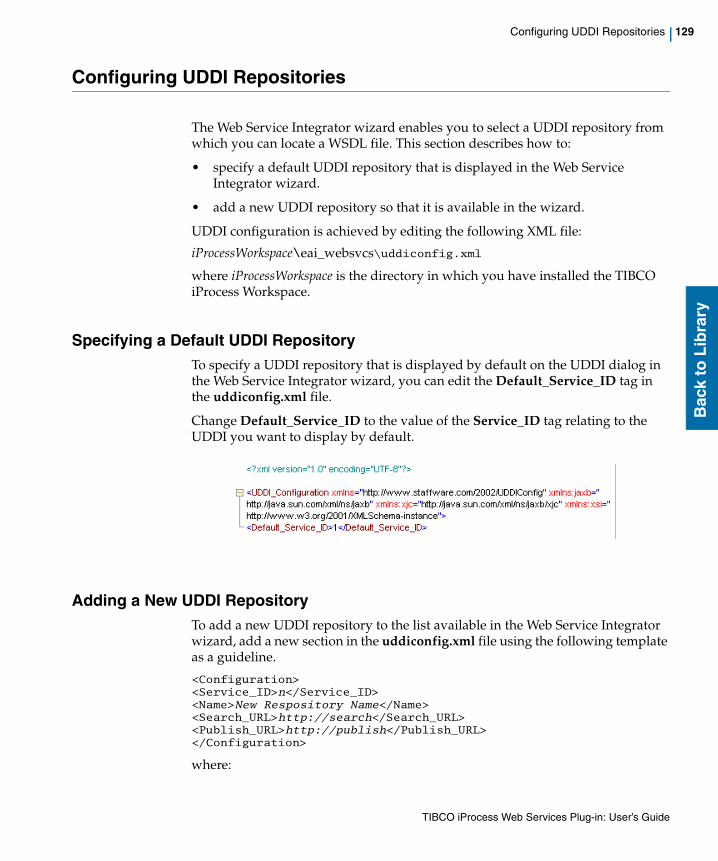
Configuring UDDI Repositories | 129
Bac
k to
Lib
rary
Configuring UDDI Repositories
The Web Service Integrator wizard enables you to select a UDDI repository from which you can locate a WSDL file. This section describes how to:
• specify a default UDDI repository that is displayed in the Web Service Integrator wizard.
• add a new UDDI repository so that it is available in the wizard.
UDDI configuration is achieved by editing the following XML file:
iProcessWorkspace\eai_websvcs\uddiconfig.xml
where iProcessWorkspace is the directory in which you have installed the TIBCO iProcess Workspace.
Specifying a Default UDDI RepositoryTo specify a UDDI repository that is displayed by default on the UDDI dialog in the Web Service Integrator wizard, you can edit the Default_Service_ID tag in the uddiconfig.xml file.
Change Default_Service_ID to the value of the Service_ID tag relating to the UDDI you want to display by default.
Adding a New UDDI RepositoryTo add a new UDDI repository to the list available in the Web Service Integrator wizard, add a new section in the uddiconfig.xml file using the following template as a guideline.
<Configuration><Service_ID>n</Service_ID><Name>New Respository Name</Name><Search_URL>http://search</Search_URL><Publish_URL>http://publish</Publish_URL></Configuration>
where:
TIBCO iProcess Web Services Plug-in: User’s Guide
130 | Chapter 6 Web Services Configuration and Administration
Bac
k to
Lib
rary
• n is a unique value in the uddiconfig.xml file. The Default_Service_ID tag can cross-reference this number to make it the default UDDI repository displayed in the wizard.
• new repository name is the name of the UDDI repository.
• http://search is the URL to search for Web Services
• http://publish is the URL of your published UDDI repository site.
TIBCO iProcess Web Services Plug-in: User’s Guide
Manually Configuring the Location of the Java Executable | 131
Bac
k to
Lib
rary
Manually Configuring the Location of the Java Executable
You can manually configure (or edit an existing configuration) the location of the Java executable. For example, if you upgrade your JRE, you must modify the scripts related to web services as described in this section.
• If you are using UNIX, edit the webservices_server_location/jetty-6.1.25/jetty.sh file in a suitable text editor.
• If you are using Windows, edit the webservices_server_location\jetty-6.1.25\jetty.cmd file in a suitable text editor.
The following entry can be changed:
JAVA_HOME_BIN=pathname
where pathname is the path to your Java executable. For example, c:/program files/java/jre1.6.1_25/jre/bin/.
You should also change the urladmin script. On Windows, the command script is urladmin.cmd; on UNIX, urladmin.sh and it is located in webservices_server_location\jetty-6.1.25.
The following entry can be changed:
JAVA_BIN=pathname
where pathname is the path to your java executable. For example, c:\program files\java\jre1.6.1_25\jre\bin\.
You should also edit the Security Manager and Password Manager scripts in a similar manner as these both refer to Java.
TIBCO iProcess Web Services Plug-in: User’s Guide

132 | Chapter 6 Web Services Configuration and Administration
Bac
k to
Lib
rary
Manually Configuring the HTTP Proxy Server Settings
You can manually configure (or edit an existing configuration) the HTTP Proxy server details that are used for HTTP requests.
• If you are using UNIX, edit the webservices_server_location/jetty-6.1.25/jetty.sh file in a suitable text editor.
• If you are using Windows, edit the webservices_server_location\jetty-6.1.25\jetty.cmd file in a suitable text editor.
The following entries can be changed:
PROXY_HOST=-Dhttp.proxyHost=name-Dhttp.proxyPort=portnumber
where:
• name is the machine name of your Proxy server.
• portnumber is the port number for your Proxy server.
TIBCO iProcess Web Services Plug-in: User’s Guide
| 133
Bac
k to
Lib
rary
Chapter 7 iProcess Web Service Operations
This chapter describes the iProcess Web Service operations that can be called by third party applications using either Web Service SOAP requests or as XML text using JMS.
Topics
• Accessing the iProcess Web Service Operations, page 134
• getNodeName, page 135
• doDelayedRelease, page 136
• doCaseStart, page 139
• doSuspend, page 140
• doGraftCount, page 141
• doGraft, page 142
• doSuspendSub, page 143
• doJumpTo, page 144
• doActivateSub, page 145
• doActivate, page 146
• doEvent, page 147
TIBCO iProcess Web Services Plug-in: User’s Guide
134 | Chapter 7 iProcess Web Service Operations
Bac
k to
Lib
rary
Accessing the iProcess Web Service Operations
To access the operations described in this appendix, when you create your iProcess Web Services step, specify the location of the WSDL as a URL:
http://hostname:port/axis2/services/WebiPE?wsdl
where:
• host is the name of the computer where you installed Jetty.
• port is the port number used to access the machine where you installed Jetty.
If you are using SSL, specify https instead of http in the URL.
Examples
http://merlin:8090/axis2/services/WebiPE?wsdlhttps://merlin:8443/axis2/services/WebiPE?wsdl
Access to iProcess Web Service operations is either via Axis 1 or Axis2. This was configured during installation. If you enabled Axis2 support and need to restore Axis 1 support, see Monitoring the System on page 127. If you use Axis 1, replace axis2 with axis in the previous example URLs.
TIBCO iProcess Web Services Plug-in: User’s Guide
getNodeName | 135
Bac
k to
Lib
rary
getNodeName
This operation can be used to check that the correct nodename is being used for the operations you want to do. If you are not receiving a nodename, it can mean there are other problems such as a database connection problem.
Input None.
Output getNodeNameResponse
Outputs the result of the getNodeName operation.
Parameter Description
result Indicates the result of the getNodeName operation, which can either be:
• a text string containing the nodename or,
• an empty string if an error occurs such as a database connection problem.
TIBCO iProcess Web Services Plug-in: User’s Guide
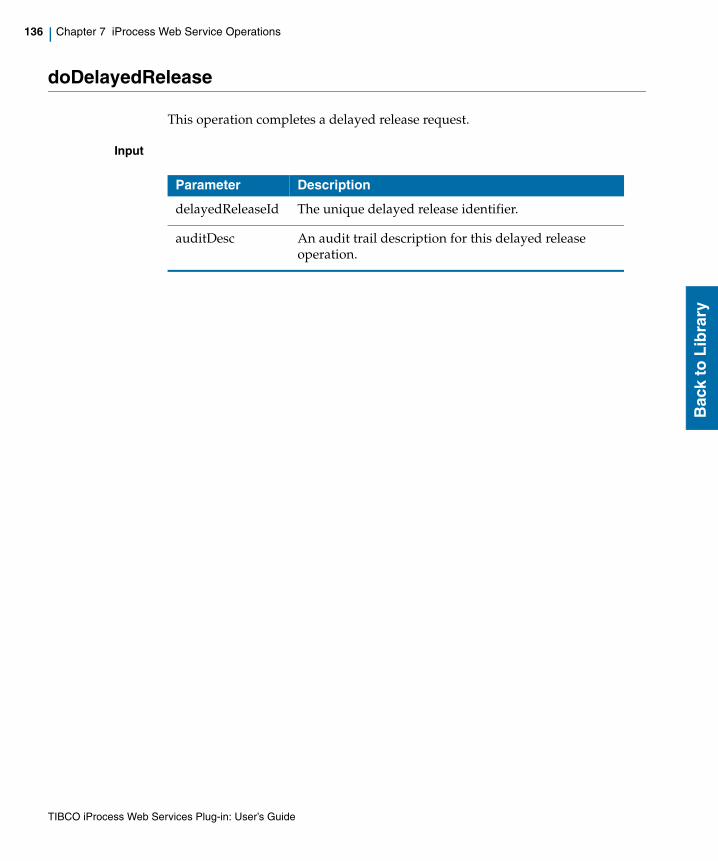
136 | Chapter 7 iProcess Web Service Operations
Bac
k to
Lib
rary
doDelayedRelease
This operation completes a delayed release request.
Input
Parameter Description
delayedReleaseId The unique delayed release identifier.
auditDesc An audit trail description for this delayed release operation.
TIBCO iProcess Web Services Plug-in: User’s Guide
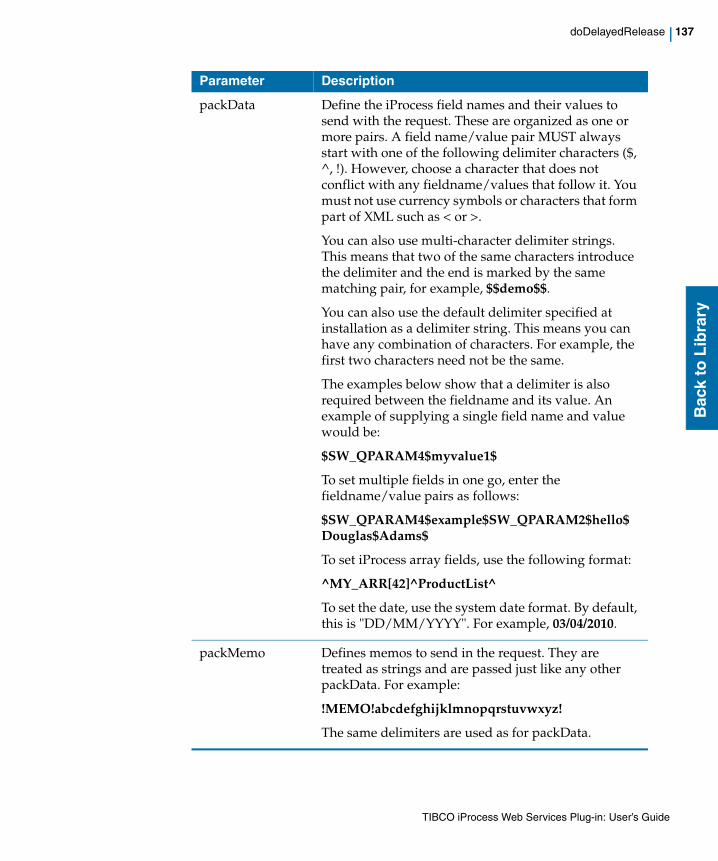
doDelayedRelease | 137
Bac
k to
Lib
rary
packData Define the iProcess field names and their values to send with the request. These are organized as one or more pairs. A field name/value pair MUST always start with one of the following delimiter characters ($, ^, !). However, choose a character that does not conflict with any fieldname/values that follow it. You must not use currency symbols or characters that form part of XML such as < or >.
You can also use multi-character delimiter strings. This means that two of the same characters introduce the delimiter and the end is marked by the same matching pair, for example, $$demo$$.
You can also use the default delimiter specified at installation as a delimiter string. This means you can have any combination of characters. For example, the first two characters need not be the same.
The examples below show that a delimiter is also required between the fieldname and its value. An example of supplying a single field name and value would be:
$SW_QPARAM4$myvalue1$
To set multiple fields in one go, enter the fieldname/value pairs as follows:
$SW_QPARAM4$example$SW_QPARAM2$hello$Douglas$Adams$
To set iProcess array fields, use the following format:
^MY_ARR[42]^ProductList^
To set the date, use the system date format. By default, this is "DD/MM/YYYY". For example, 03/04/2010.
packMemo Defines memos to send in the request. They are treated as strings and are passed just like any other packData. For example:
!MEMO!abcdefghijklmnopqrstuvwxyz!
The same delimiters are used as for packData.
Parameter Description
TIBCO iProcess Web Services Plug-in: User’s Guide
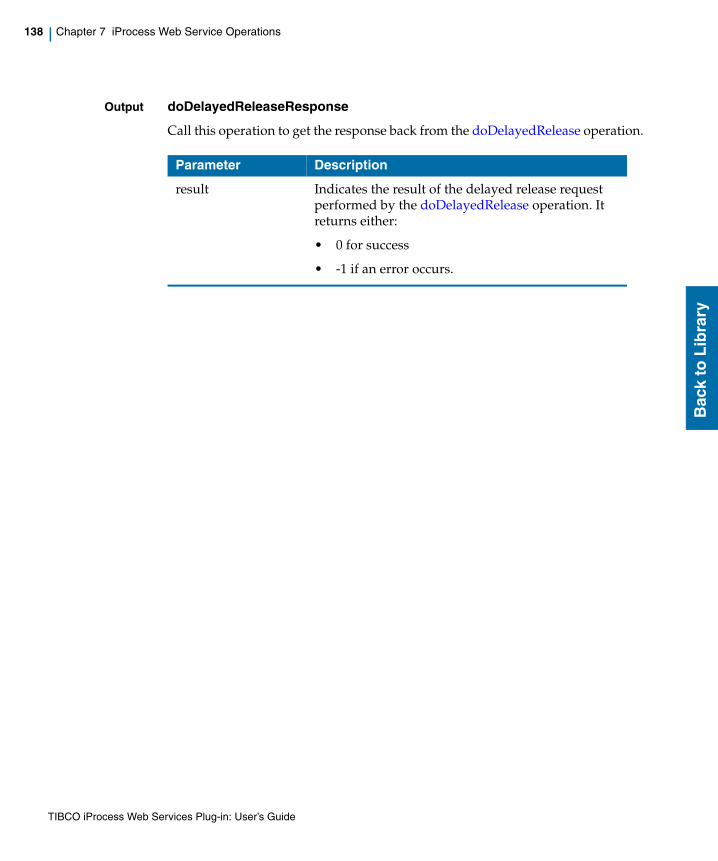
138 | Chapter 7 iProcess Web Service Operations
Bac
k to
Lib
rary
Output doDelayedReleaseResponse
Call this operation to get the response back from the doDelayedRelease operation.
Parameter Description
result Indicates the result of the delayed release request performed by the doDelayedRelease operation. It returns either:
• 0 for success
• -1 if an error occurs.
TIBCO iProcess Web Services Plug-in: User’s Guide

doCaseStart | 139
Bac
k to
Lib
rary
doCaseStart
This operation enables you to start a case of a procedure on the iProcess system.
Input
Output doCaseStartResponse
Get a response back from your case start operation performed by the doCaseStart operation.
Parameter Description
procName The iProcess procedure name e.g. order.
caseDesc The case description e.g. order hire car.
Note: The case description must be 24 characters or less. If the case description is more than 24 characters long, then the case start fails.
startStep Defines the step to start the case at.
packData Refer to the packData description in doDelayed Release for more information.
packMemo Defines memos to send in the request. They are treated as strings and are passed just like any other packData. For example:
!MEMO!abcdefghijklmnopqrstuvwxyz!
The same delimiters are used as for packData.
Parameter Description
result Indicates the result of the case start request performed by the doCaseStart operation. It returns either:
• a positive integer, or
• -1 if an error occurs.
TIBCO iProcess Web Services Plug-in: User’s Guide
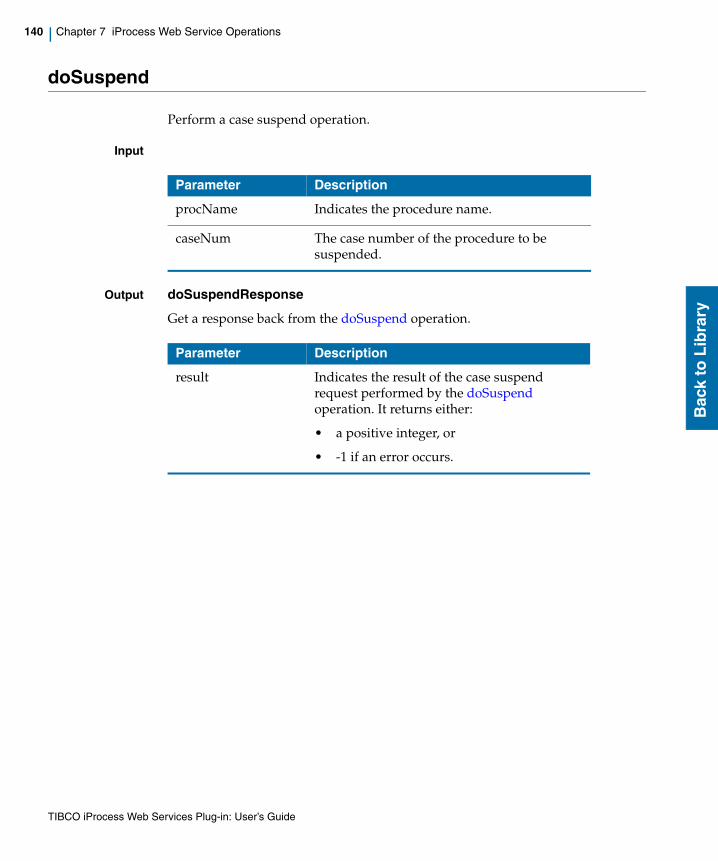
140 | Chapter 7 iProcess Web Service Operations
Bac
k to
Lib
rary
doSuspend
Perform a case suspend operation.
Input
Output doSuspendResponse
Get a response back from the doSuspend operation.
Parameter Description
procName Indicates the procedure name.
caseNum The case number of the procedure to be suspended.
Parameter Description
result Indicates the result of the case suspend request performed by the doSuspend operation. It returns either:
• a positive integer, or
• -1 if an error occurs.
TIBCO iProcess Web Services Plug-in: User’s Guide

doGraftCount | 141
Bac
k to
Lib
rary
doGraftCount
Enables the graft count to be set.
Input
Output doGraftCountResponse
Request a response back from the doGraftCount operation.
Parameter Description
procName Procedure name you want to graft to
graftStep Name of the step to graft the sub-procedure to
caseNum Case number
graftId Unique identifier for this graft step process
count Graft count value
Parameter Description
result Indicates the result of the doGraftCount operation. It returns either:
• a positive integer, or
• -1 if an error occurs.
TIBCO iProcess Web Services Plug-in: User’s Guide
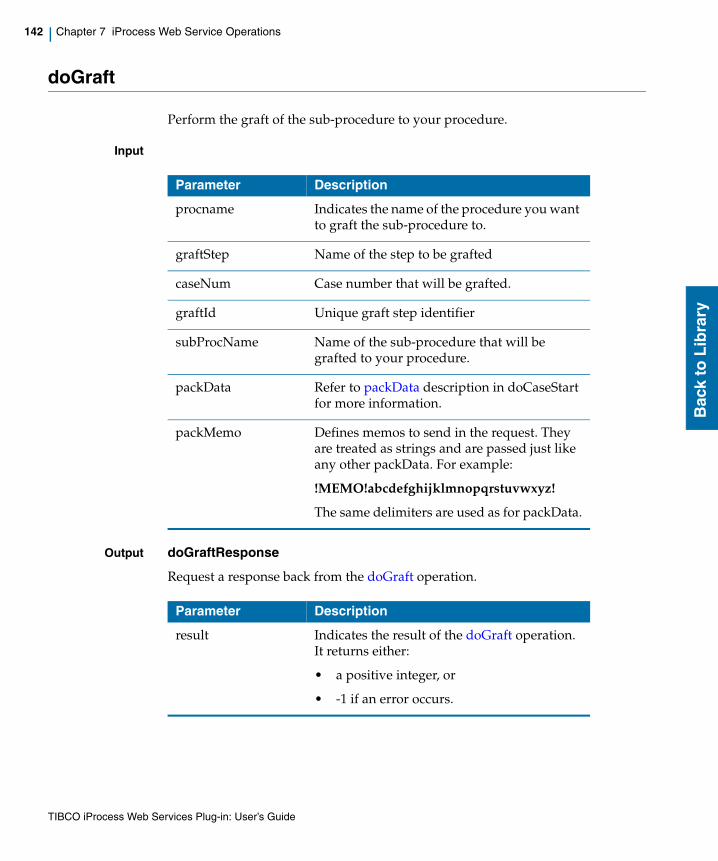
142 | Chapter 7 iProcess Web Service Operations
Bac
k to
Lib
rary
doGraft
Perform the graft of the sub-procedure to your procedure.
Input
Output doGraftResponse
Request a response back from the doGraft operation.
Parameter Description
procname Indicates the name of the procedure you want to graft the sub-procedure to.
graftStep Name of the step to be grafted
caseNum Case number that will be grafted.
graftId Unique graft step identifier
subProcName Name of the sub-procedure that will be grafted to your procedure.
packData Refer to packData description in doCaseStart for more information.
packMemo Defines memos to send in the request. They are treated as strings and are passed just like any other packData. For example:
!MEMO!abcdefghijklmnopqrstuvwxyz!
The same delimiters are used as for packData.
Parameter Description
result Indicates the result of the doGraft operation. It returns either:
• a positive integer, or
• -1 if an error occurs.
TIBCO iProcess Web Services Plug-in: User’s Guide

doSuspendSub | 143
Bac
k to
Lib
rary
doSuspendSub
Suspend an iProcess sub-procedure or multiple sub-procedures that are the result of graft steps.
Input
Output doSuspendSubResponse
Request a response back from the doSuspendSub operation.
Parameter Description
procName Parent procedure name you are working with.
caseNum Number of the main case whose sub-cases you want to suspend.
subProcName Name of the sub-procedure to call.
subProcStep Name of the step in the parent procedure that calls the sub-procedure.
Parameter Description
result Indicates the result of the doSuspendSub operation. It returns either:
• a positive integer, or
• -1 if an error occurs.
TIBCO iProcess Web Services Plug-in: User’s Guide
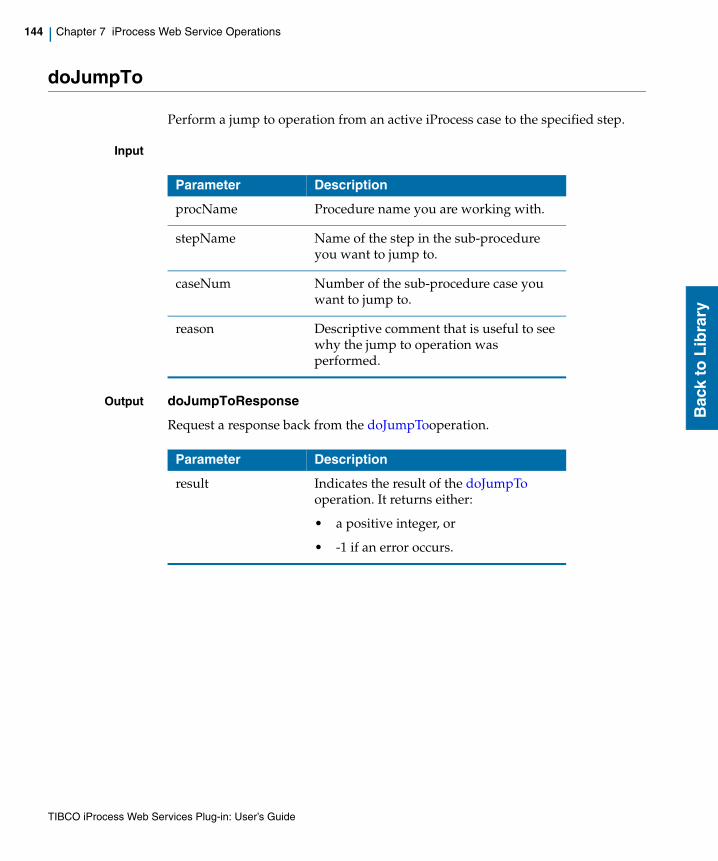
144 | Chapter 7 iProcess Web Service Operations
Bac
k to
Lib
rary
doJumpTo
Perform a jump to operation from an active iProcess case to the specified step.
Input
Output doJumpToResponse
Request a response back from the doJumpTooperation.
Parameter Description
procName Procedure name you are working with.
stepName Name of the step in the sub-procedure you want to jump to.
caseNum Number of the sub-procedure case you want to jump to.
reason Descriptive comment that is useful to see why the jump to operation was performed.
Parameter Description
result Indicates the result of the doJumpTo operation. It returns either:
• a positive integer, or
• -1 if an error occurs.
TIBCO iProcess Web Services Plug-in: User’s Guide
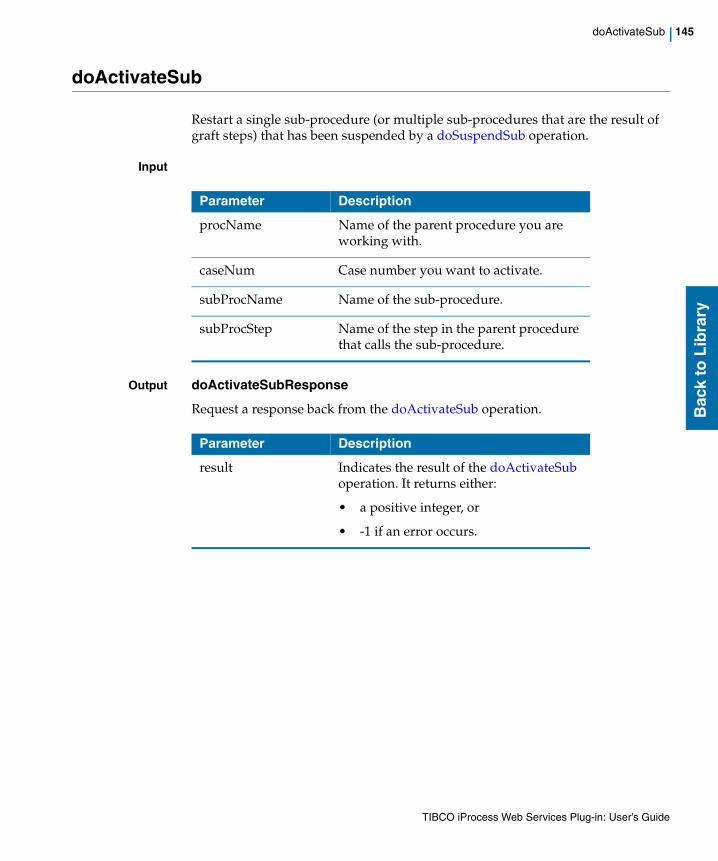
doActivateSub | 145
Bac
k to
Lib
rary
doActivateSub
Restart a single sub-procedure (or multiple sub-procedures that are the result of graft steps) that has been suspended by a doSuspendSub operation.
Input
Output doActivateSubResponse
Request a response back from the doActivateSub operation.
Parameter Description
procName Name of the parent procedure you are working with.
caseNum Case number you want to activate.
subProcName Name of the sub-procedure.
subProcStep Name of the step in the parent procedure that calls the sub-procedure.
Parameter Description
result Indicates the result of the doActivateSub operation. It returns either:
• a positive integer, or
• -1 if an error occurs.
TIBCO iProcess Web Services Plug-in: User’s Guide
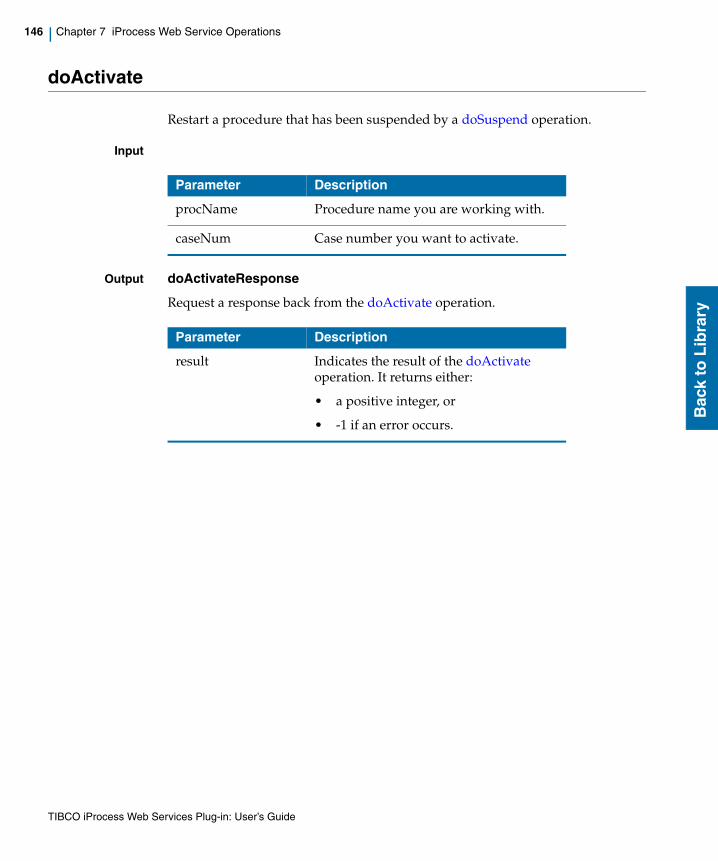
146 | Chapter 7 iProcess Web Service Operations
Bac
k to
Lib
rary
doActivate
Restart a procedure that has been suspended by a doSuspend operation.
Input
Output doActivateResponse
Request a response back from the doActivate operation.
Parameter Description
procName Procedure name you are working with.
caseNum Case number you want to activate.
Parameter Description
result Indicates the result of the doActivate operation. It returns either:
• a positive integer, or
• -1 if an error occurs.
TIBCO iProcess Web Services Plug-in: User’s Guide
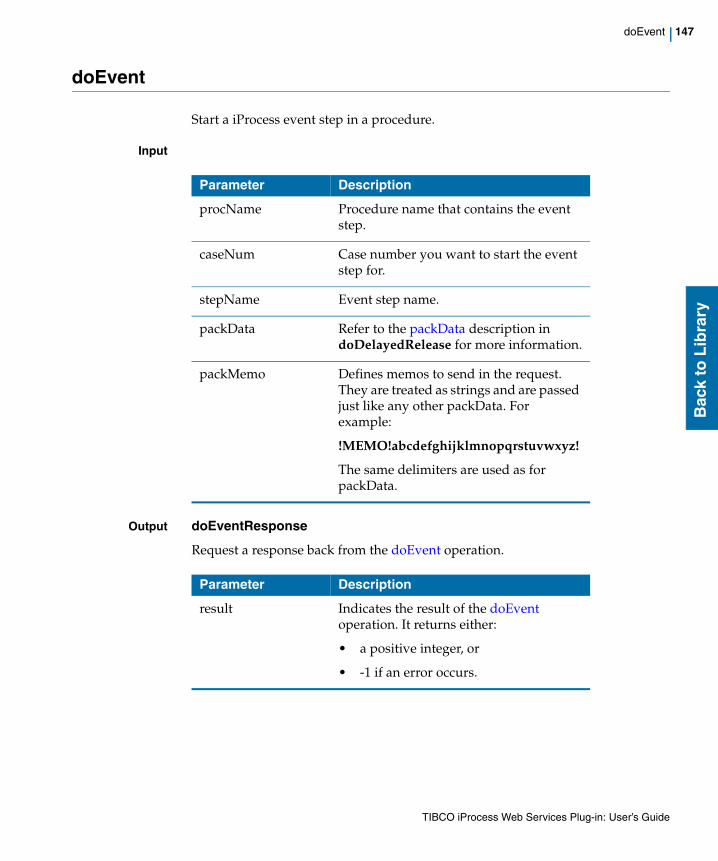
doEvent | 147
Bac
k to
Lib
rary
doEvent
Start a iProcess event step in a procedure.
Input
Output doEventResponse
Request a response back from the doEvent operation.
Parameter Description
procName Procedure name that contains the event step.
caseNum Case number you want to start the event step for.
stepName Event step name.
packData Refer to the packData description in doDelayedRelease for more information.
packMemo Defines memos to send in the request. They are treated as strings and are passed just like any other packData. For example:
!MEMO!abcdefghijklmnopqrstuvwxyz!
The same delimiters are used as for packData.
Parameter Description
result Indicates the result of the doEvent operation. It returns either:
• a positive integer, or
• -1 if an error occurs.
TIBCO iProcess Web Services Plug-in: User’s Guide

148 | Chapter 7 iProcess Web Service Operations
Bac
k to
Lib
rary
TIBCO iProcess Web Services Plug-in: User’s Guide
| 149
Bac
k to
Lib
rary
Appendix A Troubleshooting
This appendix describes problems you might encounter when using the iProcess Web Services Plug-in and recommended courses of action to resolve them.
Topics
• Log Files, page 150
• Unable to Look Up Queue, page 151
• Step Fails to Release Due to Lack of Return Value, page 152
• EAI Plug-in Not Accessible, page 153
TIBCO iProcess Web Services Plug-in: User’s Guide
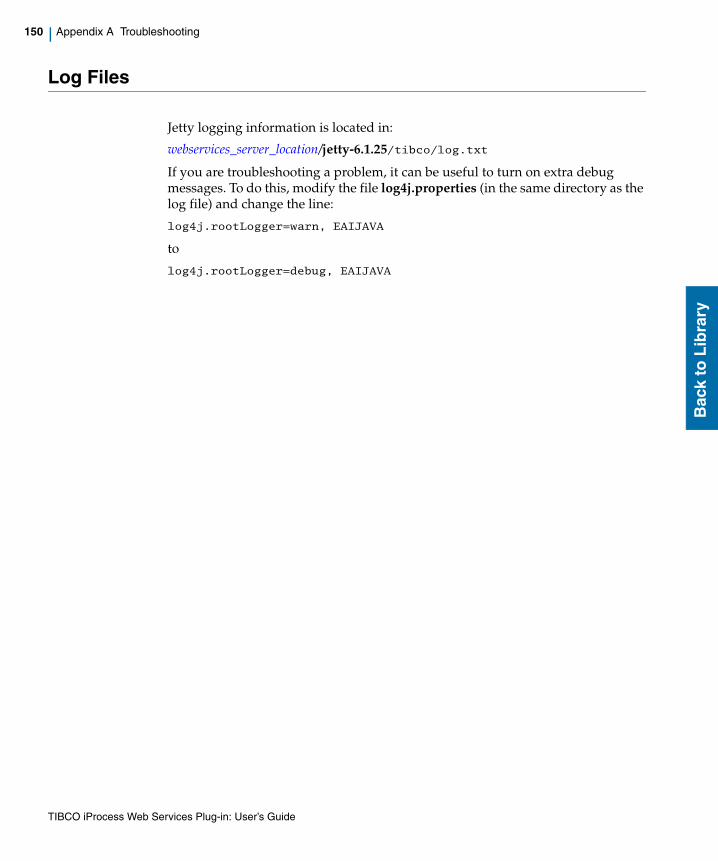
150 | Appendix A Troubleshooting
Bac
k to
Lib
rary
Log Files
Jetty logging information is located in:
webservices_server_location/jetty-6.1.25/tibco/log.txt
If you are troubleshooting a problem, it can be useful to turn on extra debug messages. To do this, modify the file log4j.properties (in the same directory as the log file) and change the line:
log4j.rootLogger=warn, EAIJAVA
to
log4j.rootLogger=debug, EAIJAVA
TIBCO iProcess Web Services Plug-in: User’s Guide
Unable to Look Up Queue | 151
Bac
k to
Lib
rary
Unable to Look Up Queue
Problem New JMS alias (in alias.xml file) created without the corresponding objects in the JMS provider configuration (queue and JNDI Name). When a case of the procedure containing the Web Services step is run, an error is written to the Jetty log file (see Log Files on page 150). For example:
2006-06-23 15:11:27,374 [DEBUG] [Thread-36] FieldCache - Looking up queue: 'queue.SWFieldCache'2006-06-23 15:11:27,374 [FATAL] [Thread-36] FieldCache - Unable to lookup queue
What to do Create the correct queue and JNDI Name in your JMS configuration (in the preceding example, queue.SWFieldCache).
TIBCO iProcess Web Services Plug-in: User’s Guide
152 | Appendix A Troubleshooting
Bac
k to
Lib
rary
Step Fails to Release Due to Lack of Return Value
Problem An EAI Web Services step calls a web service that should provide a return value, but at runtime, the web service does not provide a return value. The EAI step does not release and error messages similar to the following are written to the log file:
org.xml.sax.SAXParseException: Element type "ns0:root" must be followed by either attribute specifications, ">" or "/>".
What to do Contact the implementer of the web service to ensure that a return value is always provided.
TIBCO iProcess Web Services Plug-in: User’s Guide
EAI Plug-in Not Accessible | 153
Bac
k to
Lib
rary
EAI Plug-in Not Accessible
Problem When defining an EAI step, the iProcess Web Services Client Plug-in is not listed in the EAI Type drop-down list.
What to do Make sure the iProcess Web Services Client Plug-in is located in the following path:
swclient\eai_plugins\EAI_webservices
where swclient is the location of your iProcess Workspace. Refer to the TIBCO iProcess Web Services Plug-in Installation Guide for more information about installing the iProcess Web Services Client Plug-in.
If the plug-in still fails to load, make sure that the path to your jvm.dll is in your system path. Refer to the TIBCO iProcess Web Services Client Plug-in Installation Guide for more information.
TIBCO iProcess Web Services Plug-in: User’s Guide
154 | Appendix A Troubleshooting
Bac
k to
Lib
rary
Step Fails to Release Due to Missing iProcess Engine Field Data
Problem An EAI Web Services step calls a web service that specifys iProcess Engine field data in the custom header of the security profile, but at runtime, the web service does not provide the iProcess Engine field data. The EAI step does not release and error messages similar to the following are written to the log file:
SecurityProfileTokenizer - Couldn't locate a field required for substitution, couldn't find field: MYTOKEN
If you have the ErrorHandling.continueOnTokenFieldNotFound property set to true, the following message is displayed:tokens were not substituted into the security profile as they were not found - but due to configuration settings, continuing anyway
If you have the ErrorHandling.continueOnTokenFieldNotFound property set to False, the following message is displayed:Some tokens were not substituted as they could not be found - aborting this transaction
What to do Makes sure that the iProcess Engine field data specified in the custom header exist in the process.
TIBCO iProcess Web Services Plug-in: User’s Guide
| 155
Bac
k to
Lib
rary
Appendix B Data Type Mapping
This section describes the data type mapping conversion process that happens when making calls from iProcess - see Data Type Mapping Conversion Process on page 156.
Topics
• Data Type Mapping Conversion Process, page 156
• Using iProcess Date and Time Fields in Web Services, page 157
TIBCO iProcess Web Services Plug-in: User’s Guide
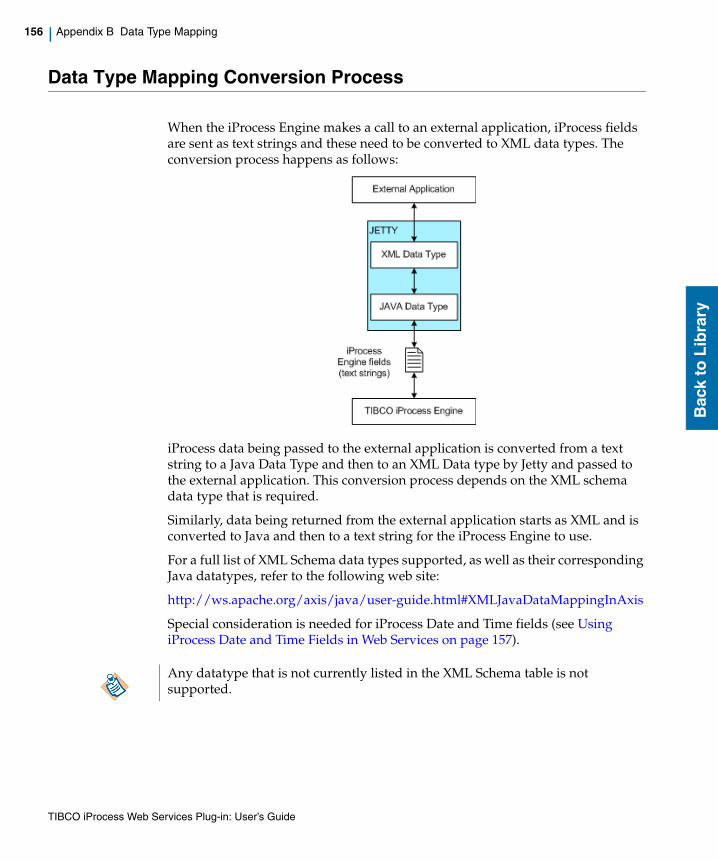
156 | Appendix B Data Type Mapping
Bac
k to
Lib
rary
Data Type Mapping Conversion Process
When the iProcess Engine makes a call to an external application, iProcess fields are sent as text strings and these need to be converted to XML data types. The conversion process happens as follows:
iProcess data being passed to the external application is converted from a text string to a Java Data Type and then to an XML Data type by Jetty and passed to the external application. This conversion process depends on the XML schema data type that is required.
Similarly, data being returned from the external application starts as XML and is converted to Java and then to a text string for the iProcess Engine to use.
For a full list of XML Schema data types supported, as well as their corresponding Java datatypes, refer to the following web site:
http://ws.apache.org/axis/java/user-guide.html#XMLJavaDataMappingInAxis
Special consideration is needed for iProcess Date and Time fields (see Using iProcess Date and Time Fields in Web Services on page 157).
Any datatype that is not currently listed in the XML Schema table is not supported.
TIBCO iProcess Web Services Plug-in: User’s Guide
Using iProcess Date and Time Fields in Web Services | 157
Bac
k to
Lib
rary
Using iProcess Date and Time Fields in Web Services
iProcess Date and Time fields are text strings that cannot easily be converted to Java data types because the Java data type requires that a date and time is concatenated as one field.
If you need to use date and time fields in your external application calls, you can do the following:
1. Create a third field in iProcess and use a iProcess script to merge the date and time fields and populate the third field with the results. Therefore you have a field containing the date and time similar to the Java calendar data type.
2. This field can then be converted to a Java calendar data type (by Jetty).
3. Jetty then converts the Java data type into the required XML data type.
If a date/time is a required result from the external application, you will need to extract the data from the external application into two separate Date and Time fields using a script.
• If the mapper is displayed when you create your step, you can use Xpath expressions to concatenate two fields (for example, yyyy-mm-ddThh:mm).
• You can modify the date format as described in Date Formats on page 103.
TIBCO iProcess Web Services Plug-in: User’s Guide

158 | Appendix B Data Type Mapping
Bac
k to
Lib
rary
TIBCO iProcess Web Services Plug-in: User’s Guide
| 159
Bac
k to
Lib
rary
Index
C
Case suspend 45Creating an EAI Web Service step 43customer support ix
D
data typesiProcess and XML 156Java and XML 156
Date field 157Deadlines, setting for an EAI Web Service step 45Defining
basic EAI step information 45Web Service call details 46
Defining EAI Web Service step deadlines 45Document style message 6
E
EAI stepprerequisites 5
EAIWS_SECURITY_PROFILE database table 121EAIWS_URL_ALIAS database table 121Editing an EAI Web Service step 67
H
High availability configuration 20
TIBCO iProcess Web Services Plug-in: User’s Guide
160 | Index
Bac
k to
Lib
rary
I
Ignore case suspend 45iProcess
mapping Date and Time fields 157Web Service operations 133
iProcess fieldexporting 63
J
Jettylog file 150
L
log filefor Jetty 150
M
Message handlingin high availability configuration 23
P
Prerequisites for using EAI Web Services steps 5
R
Remote Procedure Call (RPC) style message 6
TIBCO iProcess Web Services Plug-in: User’s Guide
Index | 161
Bac
k to
Lib
rary
S
support, contacting ix
T
technical support ixTime field 157
U
UDDI repositoryadding 129default 129
URL aliasconfiguring 121
Using the Web Service Integrator wizard 46
W
Web Servicescall details, defining 46call styles 6step, editing 67
Web Services Plug-indeployment 22
X
XML mapper 56XSLT file
for input 59for output 61
TIBCO iProcess Web Services Plug-in: User’s Guide


