95
TIBCO LogLogic ® Universal Collector User's Guide Software Release 2.7 January 2016 Two-Second Advantage ®
TIBCO LogLogic® Universal CollectorUser's GuideSoftware Release 2.7January 2016
Two-Second Advantage®
Important Information
SOME TIBCO SOFTWARE EMBEDS OR BUNDLES OTHER TIBCO SOFTWARE. USE OF SUCHEMBEDDED OR BUNDLED TIBCO SOFTWARE IS SOLELY TO ENABLE THE FUNCTIONALITY(OR PROVIDE LIMITED ADD-ON FUNCTIONALITY) OF THE LICENSED TIBCO SOFTWARE. THEEMBEDDED OR BUNDLED SOFTWARE IS NOT LICENSED TO BE USED OR ACCESSED BY ANYOTHER TIBCO SOFTWARE OR FOR ANY OTHER PURPOSE.
USE OF TIBCO SOFTWARE AND THIS DOCUMENT IS SUBJECT TO THE TERMS ANDCONDITIONS OF A LICENSE AGREEMENT FOUND IN EITHER A SEPARATELY EXECUTEDSOFTWARE LICENSE AGREEMENT, OR, IF THERE IS NO SUCH SEPARATE AGREEMENT, THECLICKWRAP END USER LICENSE AGREEMENT WHICH IS DISPLAYED DURING DOWNLOADOR INSTALLATION OF THE SOFTWARE (AND WHICH IS DUPLICATED IN THE LICENSE FILE)OR IF THERE IS NO SUCH SOFTWARE LICENSE AGREEMENT OR CLICKWRAP END USERLICENSE AGREEMENT, THE LICENSE(S) LOCATED IN THE “LICENSE” FILE(S) OF THESOFTWARE. USE OF THIS DOCUMENT IS SUBJECT TO THOSE TERMS AND CONDITIONS, ANDYOUR USE HEREOF SHALL CONSTITUTE ACCEPTANCE OF AND AN AGREEMENT TO BEBOUND BY THE SAME.
This document contains confidential information that is subject to U.S. and international copyright lawsand treaties. No part of this document may be reproduced in any form without the writtenauthorization of TIBCO Software Inc.
TIBCO, Two-Second Advantage, and LogLogic are either registered trademarks or trademarks ofTIBCO Software Inc. in the United States and/or other countries.
Enterprise Java Beans (EJB), Java Platform Enterprise Edition (Java EE), Java 2 Platform EnterpriseEdition (J2EE), and all Java-based trademarks and logos are trademarks or registered trademarks ofOracle Corporation in the U.S. and other countries.
All other product and company names and marks mentioned in this document are the property of theirrespective owners and are mentioned for identification purposes only.
THIS SOFTWARE MAY BE AVAILABLE ON MULTIPLE OPERATING SYSTEMS. HOWEVER, NOTALL OPERATING SYSTEM PLATFORMS FOR A SPECIFIC SOFTWARE VERSION ARE RELEASEDAT THE SAME TIME. SEE THE README FILE FOR THE AVAILABILITY OF THIS SOFTWAREVERSION ON A SPECIFIC OPERATING SYSTEM PLATFORM.
THIS DOCUMENT IS PROVIDED “AS IS” WITHOUT WARRANTY OF ANY KIND, EITHEREXPRESS OR IMPLIED, INCLUDING, BUT NOT LIMITED TO, THE IMPLIED WARRANTIES OFMERCHANTABILITY, FITNESS FOR A PARTICULAR PURPOSE, OR NON-INFRINGEMENT.
THIS DOCUMENT COULD INCLUDE TECHNICAL INACCURACIES OR TYPOGRAPHICALERRORS. CHANGES ARE PERIODICALLY ADDED TO THE INFORMATION HEREIN; THESECHANGES WILL BE INCORPORATED IN NEW EDITIONS OF THIS DOCUMENT. TIBCOSOFTWARE INC. MAY MAKE IMPROVEMENTS AND/OR CHANGES IN THE PRODUCT(S)AND/OR THE PROGRAM(S) DESCRIBED IN THIS DOCUMENT AT ANY TIME.
THE CONTENTS OF THIS DOCUMENT MAY BE MODIFIED AND/OR QUALIFIED, DIRECTLY ORINDIRECTLY, BY OTHER DOCUMENTATION WHICH ACCOMPANIES THIS SOFTWARE,INCLUDING BUT NOT LIMITED TO ANY RELEASE NOTES AND "READ ME" FILES.
Copyright © 2002-2016 TIBCO Software Inc. ALL RIGHTS RESERVED.
TIBCO Software Inc. Confidential Information
2
TIBCO LogLogic® Universal Collector User's Guide

Contents
TIBCO Documentation and Support Services . . . . . . . . . . . . . . . . . . . . . . . . . . . . . . . . . . . . . . . . . . . . . . . . . . . . . . . . .6
Introduction . . . . . . . . . . . . . . . . . . . . . . . . . . . . . . . . . . . . . . . . . . . . . . . . . . . . . . . . . . . . . . . . . . . . . . . . . . . . . . . . . . . . . . . 7
Overview . . . . . . . . . . . . . . . . . . . . . . . . . . . . . . . . . . . . . . . . . . . . . . . . . . . . . . . . . . . . . . . . . . . . . . . . . . . . . . . . . . . . . . . . . . . . . . . . . . . . . . . . . . . . . . 7
Collecting Logs . . . . . . . . . . . . . . . . . . . . . . . . . . . . . . . . . . . . . . . . . . . . . . . . . . . . . . . . . . . . . . . . . . . . . . . . . . . . . . . . . . . . 8
Real-Time File Logs . . . . . . . . . . . . . . . . . . . . . . . . . . . . . . . . . . . . . . . . . . . . . . . . . . . . . . . . . . . . . . . . . . . . . . . . . . . . . . . . . . . . . . . . . . . . . . . . . . . 8
Collecting Single-line Messages . . . . . . . . . . . . . . . . . . . . . . . . . . . . . . . . . . . . . . . . . . . . . . . . . . . . . . . . . . . . . . . . . . . . . . . . . . . . . . . . . . . 8
Log File Rotation . . . . . . . . . . . . . . . . . . . . . . . . . . . . . . . . . . . . . . . . . . . . . . . . . . . . . . . . . . . . . . . . . . . . . . . . . . . . . . . . . . . . . . . . . . . . . 9
Collecting Multi-line Messages . . . . . . . . . . . . . . . . . . . . . . . . . . . . . . . . . . . . . . . . . . . . . . . . . . . . . . . . . . . . . . . . . . . . . . . . . . . . . . . . . . . 10
Custom Multi-line Log Sources . . . . . . . . . . . . . . . . . . . . . . . . . . . . . . . . . . . . . . . . . . . . . . . . . . . . . . . . . . . . . . . . . . . . . . . . . . . . . . 11
Windows Event Logs . . . . . . . . . . . . . . . . . . . . . . . . . . . . . . . . . . . . . . . . . . . . . . . . . . . . . . . . . . . . . . . . . . . . . . . . . . . . . . . . . . . . . . . . . . . . . . . . . 12
Local Collection . . . . . . . . . . . . . . . . . . . . . . . . . . . . . . . . . . . . . . . . . . . . . . . . . . . . . . . . . . . . . . . . . . . . . . . . . . . . . . . . . . . . . . . . . . . . . . . . . .12
Remote Collection . . . . . . . . . . . . . . . . . . . . . . . . . . . . . . . . . . . . . . . . . . . . . . . . . . . . . . . . . . . . . . . . . . . . . . . . . . . . . . . . . . . . . . . . . . . . . . . 12
Filtering Windows Event Logs . . . . . . . . . . . . . . . . . . . . . . . . . . . . . . . . . . . . . . . . . . . . . . . . . . . . . . . . . . . . . . . . . . . . . . . . . . . . . . . . . . . . 12
Syslog Logs . . . . . . . . . . . . . . . . . . . . . . . . . . . . . . . . . . . . . . . . . . . . . . . . . . . . . . . . . . . . . . . . . . . . . . . . . . . . . . . . . . . . . . . . . . . . . . . . . . . . . . . . . . 13
Filtering Syslog Logs . . . . . . . . . . . . . . . . . . . . . . . . . . . . . . . . . . . . . . . . . . . . . . . . . . . . . . . . . . . . . . . . . . . . . . . . . . . . . . . . . . . . . . . . . . . . .14
Remote Files . . . . . . . . . . . . . . . . . . . . . . . . . . . . . . . . . . . . . . . . . . . . . . . . . . . . . . . . . . . . . . . . . . . . . . . . . . . . . . . . . . . . . . . . . . . . . . . . . . . . . . . . . 14
UC Internal Logs . . . . . . . . . . . . . . . . . . . . . . . . . . . . . . . . . . . . . . . . . . . . . . . . . . . . . . . . . . . . . . . . . . . . . . . . . . . . . . . . . . . . . . . . . . . . . . . . . . . . . 14
Creating and Configuring Log Sources . . . . . . . . . . . . . . . . . . . . . . . . . . . . . . . . . . . . . . . . . . . . . . . . . . . . . . . . . . . . . . . . . . . . . . . . . . . . . . . . 15
Add a New Log Source . . . . . . . . . . . . . . . . . . . . . . . . . . . . . . . . . . . . . . . . . . . . . . . . . . . . . . . . . . . . . . . . . . . . . . . . . . . . . . . . . . . . . . . . . . 15
Copy a Log Source . . . . . . . . . . . . . . . . . . . . . . . . . . . . . . . . . . . . . . . . . . . . . . . . . . . . . . . . . . . . . . . . . . . . . . . . . . . . . . . . . . . . . . . . . . . . . . 15
Delete a Log Source . . . . . . . . . . . . . . . . . . . . . . . . . . . . . . . . . . . . . . . . . . . . . . . . . . . . . . . . . . . . . . . . . . . . . . . . . . . . . . . . . . . . . . . . . . . . . 15
Creating Multiple Log Sources . . . . . . . . . . . . . . . . . . . . . . . . . . . . . . . . . . . . . . . . . . . . . . . . . . . . . . . . . . . . . . . . . . . . . . . . . . . . . . . . . . . 16
Create a CSV File . . . . . . . . . . . . . . . . . . . . . . . . . . . . . . . . . . . . . . . . . . . . . . . . . . . . . . . . . . . . . . . . . . . . . . . . . . . . . . . . . . . . . . . . . . . 16
Import Log Sources . . . . . . . . . . . . . . . . . . . . . . . . . . . . . . . . . . . . . . . . . . . . . . . . . . . . . . . . . . . . . . . . . . . . . . . . . . . . . . . . . . . . . . . . . 17
Creating a Complete Configuration . . . . . . . . . . . . . . . . . . . . . . . . . . . . . . . . . . . . . . . . . . . . . . . . . . . . . . . . . . . . . . . . . . . . . . . . . . . . . . . . . . . 17
Edit Configuration General Settings . . . . . . . . . . . . . . . . . . . . . . . . . . . . . . . . . . . . . . . . . . . . . . . . . . . . . . . . . . . . . . . . . . . . . . . . . . . . . . 17
Add a New Configuration . . . . . . . . . . . . . . . . . . . . . . . . . . . . . . . . . . . . . . . . . . . . . . . . . . . . . . . . . . . . . . . . . . . . . . . . . . . . . . . . . . . . . . . . .18
Open a Stored Configuration . . . . . . . . . . . . . . . . . . . . . . . . . . . . . . . . . . . . . . . . . . . . . . . . . . . . . . . . . . . . . . . . . . . . . . . . . . . . . . . . . . . . . 19
Activate the Configuration . . . . . . . . . . . . . . . . . . . . . . . . . . . . . . . . . . . . . . . . . . . . . . . . . . . . . . . . . . . . . . . . . . . . . . . . . . . . . . . . . . . . . . . . 19
Save a Configuration . . . . . . . . . . . . . . . . . . . . . . . . . . . . . . . . . . . . . . . . . . . . . . . . . . . . . . . . . . . . . . . . . . . . . . . . . . . . . . . . . . . . . . . . . . . . .19
Editing Log Sources . . . . . . . . . . . . . . . . . . . . . . . . . . . . . . . . . . . . . . . . . . . . . . . . . . . . . . . . . . . . . . . . . . . . . . . . . . . . . . . . . . . . . . . . . . . . . . . . . . 19
Edit a Real-Time File Log Source . . . . . . . . . . . . . . . . . . . . . . . . . . . . . . . . . . . . . . . . . . . . . . . . . . . . . . . . . . . . . . . . . . . . . . . . . . . . . . . . 20
Edit Multiple Real-Time Log Sources . . . . . . . . . . . . . . . . . . . . . . . . . . . . . . . . . . . . . . . . . . . . . . . . . . . . . . . . . . . . . . . . . . . . . . . . . . . . . 23
Edit a Windows Event Log Source . . . . . . . . . . . . . . . . . . . . . . . . . . . . . . . . . . . . . . . . . . . . . . . . . . . . . . . . . . . . . . . . . . . . . . . . . . . . . . . .23
Edit Multiple Windows Event Log Sources . . . . . . . . . . . . . . . . . . . . . . . . . . . . . . . . . . . . . . . . . . . . . . . . . . . . . . . . . . . . . . . . . . . . . . . . 26
Edit a Syslog Log Source . . . . . . . . . . . . . . . . . . . . . . . . . . . . . . . . . . . . . . . . . . . . . . . . . . . . . . . . . . . . . . . . . . . . . . . . . . . . . . . . . . . . . . . . 26
Edit Multiple Syslog Log Sources . . . . . . . . . . . . . . . . . . . . . . . . . . . . . . . . . . . . . . . . . . . . . . . . . . . . . . . . . . . . . . . . . . . . . . . . . . . . . . . . .30
Edit a Remote File Log Source . . . . . . . . . . . . . . . . . . . . . . . . . . . . . . . . . . . . . . . . . . . . . . . . . . . . . . . . . . . . . . . . . . . . . . . . . . . . . . . . . . . 30
3
TIBCO LogLogic® Universal Collector User's Guide

Edit Multiple Remote File Log Sources . . . . . . . . . . . . . . . . . . . . . . . . . . . . . . . . . . . . . . . . . . . . . . . . . . . . . . . . . . . . . . . . . . . . . . . . . . . 33
Edit Different Types of Log Sources . . . . . . . . . . . . . . . . . . . . . . . . . . . . . . . . . . . . . . . . . . . . . . . . . . . . . . . . . . . . . . . . . . . . . . . . . . . . . . 33
Edit a Log Source using the Command Line . . . . . . . . . . . . . . . . . . . . . . . . . . . . . . . . . . . . . . . . . . . . . . . . . . . . . . . . . . . . . . . . . . . . . . 34
Sorting Log Sources . . . . . . . . . . . . . . . . . . . . . . . . . . . . . . . . . . . . . . . . . . . . . . . . . . . . . . . . . . . . . . . . . . . . . . . . . . . . . . . . . . . . . . . . . . . . . . . . . .36
Create a New Tag . . . . . . . . . . . . . . . . . . . . . . . . . . . . . . . . . . . . . . . . . . . . . . . . . . . . . . . . . . . . . . . . . . . . . . . . . . . . . . . . . . . . . . . . . . . . . . . 36
Apply a Tag . . . . . . . . . . . . . . . . . . . . . . . . . . . . . . . . . . . . . . . . . . . . . . . . . . . . . . . . . . . . . . . . . . . . . . . . . . . . . . . . . . . . . . . . . . . . . . . . . . . . . .36
Remove a Tag . . . . . . . . . . . . . . . . . . . . . . . . . . . . . . . . . . . . . . . . . . . . . . . . . . . . . . . . . . . . . . . . . . . . . . . . . . . . . . . . . . . . . . . . . . . . . . . . . . . 36
Sort Log Sources . . . . . . . . . . . . . . . . . . . . . . . . . . . . . . . . . . . . . . . . . . . . . . . . . . . . . . . . . . . . . . . . . . . . . . . . . . . . . . . . . . . . . . . . . . . . . . . . 36
Forwarding Logs . . . . . . . . . . . . . . . . . . . . . . . . . . . . . . . . . . . . . . . . . . . . . . . . . . . . . . . . . . . . . . . . . . . . . . . . . . . . . . . . . .38
Creating a Syslog TCP or UDP Connection . . . . . . . . . . . . . . . . . . . . . . . . . . . . . . . . . . . . . . . . . . . . . . . . . . . . . . . . . . . . . . . . . . . . . . . . . . . 38
Creating an LMI Connection . . . . . . . . . . . . . . . . . . . . . . . . . . . . . . . . . . . . . . . . . . . . . . . . . . . . . . . . . . . . . . . . . . . . . . . . . . . . . . . . . . . . . . . . . . 40
Creating a Connection in Authentication and or Encryption Mode . . . . . . . . . . . . . . . . . . . . . . . . . . . . . . . . . . . . . . . . . . . . . . . . . . . . . . 41
Step 1 Get a Root Certificate Authority from your PKI . . . . . . . . . . . . . . . . . . . . . . . . . . . . . . . . . . . . . . . . . . . . . . . . . . . . . . . . . . . . . 42
Step 2 Create a Certificate Signing Request . . . . . . . . . . . . . . . . . . . . . . . . . . . . . . . . . . . . . . . . . . . . . . . . . . . . . . . . . . . . . . . . . . . . . . 43
Using the Internal Tool . . . . . . . . . . . . . . . . . . . . . . . . . . . . . . . . . . . . . . . . . . . . . . . . . . . . . . . . . . . . . . . . . . . . . . . . . . . . . . . . . . . . . . 43
Using the OpenSSL . . . . . . . . . . . . . . . . . . . . . . . . . . . . . . . . . . . . . . . . . . . . . . . . . . . . . . . . . . . . . . . . . . . . . . . . . . . . . . . . . . . . . . . . . 44
Step 3 Create a Valid UC Certificate using a CA and OpenSSL . . . . . . . . . . . . . . . . . . . . . . . . . . . . . . . . . . . . . . . . . . . . . . . . . . . 44
Step 4 Import the Certificate into *.ks or *.p12 . . . . . . . . . . . . . . . . . . . . . . . . . . . . . . . . . . . . . . . . . . . . . . . . . . . . . . . . . . . . . . . . . . . . 45
Step 5 Configure the Forwarding Process . . . . . . . . . . . . . . . . . . . . . . . . . . . . . . . . . . . . . . . . . . . . . . . . . . . . . . . . . . . . . . . . . . . . . . . . 45
For *.ks . . . . . . . . . . . . . . . . . . . . . . . . . . . . . . . . . . . . . . . . . . . . . . . . . . . . . . . . . . . . . . . . . . . . . . . . . . . . . . . . . . . . . . . . . . . . . . . . . . . . . 46
For *.p12 . . . . . . . . . . . . . . . . . . . . . . . . . . . . . . . . . . . . . . . . . . . . . . . . . . . . . . . . . . . . . . . . . . . . . . . . . . . . . . . . . . . . . . . . . . . . . . . . . . . . 46
For *.pem . . . . . . . . . . . . . . . . . . . . . . . . . . . . . . . . . . . . . . . . . . . . . . . . . . . . . . . . . . . . . . . . . . . . . . . . . . . . . . . . . . . . . . . . . . . . . . . . . . . 47
Configure the Forwarding Process . . . . . . . . . . . . . . . . . . . . . . . . . . . . . . . . . . . . . . . . . . . . . . . . . . . . . . . . . . . . . . . . . . . . . . . . . . . 47
Step 6 Enable Secure Connection . . . . . . . . . . . . . . . . . . . . . . . . . . . . . . . . . . . . . . . . . . . . . . . . . . . . . . . . . . . . . . . . . . . . . . . . . . . . . . . .48
Managing the list of Forwardings . . . . . . . . . . . . . . . . . . . . . . . . . . . . . . . . . . . . . . . . . . . . . . . . . . . . . . . . . . . . . . . . . . . . . . . . . . . . . . . . . . . . . .50
Copying a Forwarding . . . . . . . . . . . . . . . . . . . . . . . . . . . . . . . . . . . . . . . . . . . . . . . . . . . . . . . . . . . . . . . . . . . . . . . . . . . . . . . . . . . . . . . . . . . .50
Deleting a Forwarding . . . . . . . . . . . . . . . . . . . . . . . . . . . . . . . . . . . . . . . . . . . . . . . . . . . . . . . . . . . . . . . . . . . . . . . . . . . . . . . . . . . . . . . . . . . .51
Monitoring UC Activities . . . . . . . . . . . . . . . . . . . . . . . . . . . . . . . . . . . . . . . . . . . . . . . . . . . . . . . . . . . . . . . . . . . . . . . . . . .52
Starting UCMon Tool . . . . . . . . . . . . . . . . . . . . . . . . . . . . . . . . . . . . . . . . . . . . . . . . . . . . . . . . . . . . . . . . . . . . . . . . . . . . . . . . . . . . . . . . . . . . . . . . . 52
To start UCMon from UC Console . . . . . . . . . . . . . . . . . . . . . . . . . . . . . . . . . . . . . . . . . . . . . . . . . . . . . . . . . . . . . . . . . . . . . . . . . . . . . . . . 52
To start UCMon manually . . . . . . . . . . . . . . . . . . . . . . . . . . . . . . . . . . . . . . . . . . . . . . . . . . . . . . . . . . . . . . . . . . . . . . . . . . . . . . . . . . . . . . . . 52
Summary Screen . . . . . . . . . . . . . . . . . . . . . . . . . . . . . . . . . . . . . . . . . . . . . . . . . . . . . . . . . . . . . . . . . . . . . . . . . . . . . . . . . . . . . . . . . . . . . . . . . . . . .52
Status Screen . . . . . . . . . . . . . . . . . . . . . . . . . . . . . . . . . . . . . . . . . . . . . . . . . . . . . . . . . . . . . . . . . . . . . . . . . . . . . . . . . . . . . . . . . . . . . . . . . . . . . . . . 54
Log Source Status . . . . . . . . . . . . . . . . . . . . . . . . . . . . . . . . . . . . . . . . . . . . . . . . . . . . . . . . . . . . . . . . . . . . . . . . . . . . . . . . . . . . . . . . . . . . . . . 54
Forwarding Connection Status . . . . . . . . . . . . . . . . . . . . . . . . . . . . . . . . . . . . . . . . . . . . . . . . . . . . . . . . . . . . . . . . . . . . . . . . . . . . . . . . . . . 55
Metrics Screen . . . . . . . . . . . . . . . . . . . . . . . . . . . . . . . . . . . . . . . . . . . . . . . . . . . . . . . . . . . . . . . . . . . . . . . . . . . . . . . . . . . . . . . . . . . . . . . . . . . . . . . 56
Log Source Metrics . . . . . . . . . . . . . . . . . . . . . . . . . . . . . . . . . . . . . . . . . . . . . . . . . . . . . . . . . . . . . . . . . . . . . . . . . . . . . . . . . . . . . . . . . . . . . . 56
Forwarding Connection Metrics . . . . . . . . . . . . . . . . . . . . . . . . . . . . . . . . . . . . . . . . . . . . . . . . . . . . . . . . . . . . . . . . . . . . . . . . . . . . . . . . . . 58
Trends Screen . . . . . . . . . . . . . . . . . . . . . . . . . . . . . . . . . . . . . . . . . . . . . . . . . . . . . . . . . . . . . . . . . . . . . . . . . . . . . . . . . . . . . . . . . . . . . . . . . . . . . . . 59
Log Source Trends . . . . . . . . . . . . . . . . . . . . . . . . . . . . . . . . . . . . . . . . . . . . . . . . . . . . . . . . . . . . . . . . . . . . . . . . . . . . . . . . . . . . . . . . . . . . . . 59
4
TIBCO LogLogic® Universal Collector User's Guide

Forwarding Connection Trends . . . . . . . . . . . . . . . . . . . . . . . . . . . . . . . . . . . . . . . . . . . . . . . . . . . . . . . . . . . . . . . . . . . . . . . . . . . . . . . . . . .60
RealTime Screen . . . . . . . . . . . . . . . . . . . . . . . . . . . . . . . . . . . . . . . . . . . . . . . . . . . . . . . . . . . . . . . . . . . . . . . . . . . . . . . . . . . . . . . . . . . . . . . . . . . . .61
Log Sources RealTime . . . . . . . . . . . . . . . . . . . . . . . . . . . . . . . . . . . . . . . . . . . . . . . . . . . . . . . . . . . . . . . . . . . . . . . . . . . . . . . . . . . . . . . . . . .61
Forwarding Connection RealTime . . . . . . . . . . . . . . . . . . . . . . . . . . . . . . . . . . . . . . . . . . . . . . . . . . . . . . . . . . . . . . . . . . . . . . . . . . . . . . . . 62
Command Line Interface . . . . . . . . . . . . . . . . . . . . . . . . . . . . . . . . . . . . . . . . . . . . . . . . . . . . . . . . . . . . . . . . . . . . . . . . . . .64
cert_mgt Manage the Security Certificates . . . . . . . . . . . . . . . . . . . . . . . . . . . . . . . . . . . . . . . . . . . . . . . . . . . . . . . . . . . . . . . . . . . . . . . . . . . . 64
uc_checkConf Check the Current Configuration . . . . . . . . . . . . . . . . . . . . . . . . . . . . . . . . . . . . . . . . . . . . . . . . . . . . . . . . . . . . . . . . . . . . . . . 65
uc_createLogSources Import and Create Several Log Sources at a time . . . . . . . . . . . . . . . . . . . . . . . . . . . . . . . . . . . . . . . . . . . . . . .65
uc_decodePwd Decode Passwords for Windows Files . . . . . . . . . . . . . . . . . . . . . . . . . . . . . . . . . . . . . . . . . . . . . . . . . . . . . . . . . . . . . . . . 66
uc_encryptPwd Encrypt Passwords for Windows Files . . . . . . . . . . . . . . . . . . . . . . . . . . . . . . . . . . . . . . . . . . . . . . . . . . . . . . . . . . . . . . . . 66
uc_monitor UCMon Tool . . . . . . . . . . . . . . . . . . . . . . . . . . . . . . . . . . . . . . . . . . . . . . . . . . . . . . . . . . . . . . . . . . . . . . . . . . . . . . . . . . . . . . . . . . . . . .66
uc_reload Reload Configuration . . . . . . . . . . . . . . . . . . . . . . . . . . . . . . . . . . . . . . . . . . . . . . . . . . . . . . . . . . . . . . . . . . . . . . . . . . . . . . . . . . . . . . 66
uc_saveActiveConfAs Save an Active Configuration . . . . . . . . . . . . . . . . . . . . . . . . . . . . . . . . . . . . . . . . . . . . . . . . . . . . . . . . . . . . . . . . . . .67
uc_switchTo Make Configuration Active . . . . . . . . . . . . . . . . . . . . . . . . . . . . . . . . . . . . . . . . . . . . . . . . . . . . . . . . . . . . . . . . . . . . . . . . . . . . . . .67
Sample Configuration Files . . . . . . . . . . . . . . . . . . . . . . . . . . . . . . . . . . . . . . . . . . . . . . . . . . . . . . . . . . . . . . . . . . . . . . . . 70
UC Configuration uc.xml . . . . . . . . . . . . . . . . . . . . . . . . . . . . . . . . . . . . . . . . . . . . . . . . . . . . . . . . . . . . . . . . . . . . . . . . . . . . . . . . . . . . . . . . . . . . . .70
LMI Connection uldp-sampleCommented.uldp.xml . . . . . . . . . . . . . . . . . . . . . . . . . . . . . . . . . . . . . . . . . . . . . . . . . . . . . . . . . . . . . . . . . . . . 71
LMI Connection uldp-sampleCommentedAuthJks.uldp.xml . . . . . . . . . . . . . . . . . . . . . . . . . . . . . . . . . . . . . . . . . . . . . . . . . . . . . . . . . . . . 72
LMI Connection uldp-sampleCommentedAuthPem.uldp.xml . . . . . . . . . . . . . . . . . . . . . . . . . . . . . . . . . . . . . . . . . . . . . . . . . . . . . . . . . . . 74
LMI Connection uldp-sampleCommentedAuthPks12.uldp.xml . . . . . . . . . . . . . . . . . . . . . . . . . . . . . . . . . . . . . . . . . . . . . . . . . . . . . . . . . 76
Log Sources file-sampleCommented.ls.xml . . . . . . . . . . . . . . . . . . . . . . . . . . . . . . . . . . . . . . . . . . . . . . . . . . . . . . . . . . . . . . . . . . . . . . . . . . . 78
Log Sources syslog-sampleCommented.ls.xml . . . . . . . . . . . . . . . . . . . . . . . . . . . . . . . . . . . . . . . . . . . . . . . . . . . . . . . . . . . . . . . . . . . . . . . . 81
Log Sources wmi-sampleCommented.ls.xml . . . . . . . . . . . . . . . . . . . . . . . . . . . . . . . . . . . . . . . . . . . . . . . . . . . . . . . . . . . . . . . . . . . . . . . . . . 83
Regular Expressions . . . . . . . . . . . . . . . . . . . . . . . . . . . . . . . . . . . . . . . . . . . . . . . . . . . . . . . . . . . . . . . . . . . . . . . . . . . . . . 87
Event Output Format . . . . . . . . . . . . . . . . . . . . . . . . . . . . . . . . . . . . . . . . . . . . . . . . . . . . . . . . . . . . . . . . . . . . . . . . . . . . . . 92
IPv6 Support Matrix . . . . . . . . . . . . . . . . . . . . . . . . . . . . . . . . . . . . . . . . . . . . . . . . . . . . . . . . . . . . . . . . . . . . . . . . . . . . . . . 95
5
TIBCO LogLogic® Universal Collector User's Guide

TIBCO Documentation and Support Services
Documentation for this and other TIBCO products is available on the TIBCO Documentation site. Thissite is updated more frequently than any documentation that might be included with the product. Toensure that you are accessing the latest available help topics, please visit:
https://docs.tibco.com
Product-Specific Documentation
Documentation for TIBCO products is not bundled with the software. Instead, it is available on theTIBCO Documentation site. To directly access documentation for this product, double-click thefollowing file:
TIBCO_HOME/release_notes/TIB_loguc_version_docinfo.html
where TIBCO_HOME is the top-level directory in which TIBCO products are installed. On Windows,the default TIBCO_HOME is C:\tibco. On UNIX systems, the default TIBCO_HOME is /opt/tibco.
The following documents for this product can be found on the TIBCO Documentation site:
● TIBCO LogLogic® Universal Collector Installation Guide
● TIBCO LogLogic® Universal Collector User's Guide
How to Contact TIBCO Support
For comments or problems with this manual or the software it addresses, contact TIBCO Support:
● For an overview of TIBCO Support, and information about getting started with TIBCO Support,visit this site:
http://www.tibco.com/services/support
● If you already have a valid maintenance or support contract, visit this site:
https://support.tibco.com
Entry to this site requires a user name and password. If you do not have a user name, you canrequest one.
How to Join TIBCOmmunity
TIBCOmmunity is an online destination for TIBCO customers, partners, and resident experts. It is aplace to share and access the collective experience of the TIBCO community. TIBCOmmunity offersforums, blogs, and access to a variety of resources. To register, go to the following web address:
https://www.tibcommunity.com
6
TIBCO LogLogic® Universal Collector User's Guide

Introduction
UC collects the information from four types of log sources: Syslog, Windows Event Logs, Real-TimeFile pull, or Remote File pull. Several UC agents can be deployed on a dedicated/shared appliance orphysical/virtual hardware to remotely collect hundreds of log sources located at the same site.
OverviewUC can seamlessly collect and forward logs to multiple log sources.
Collecting Logs — UC allows you to gather data from several types of log sources while ensuringintegrity of the logs. You can easily collect event logs from local or remote instances of MS Windows,including time-stamped or rotated files. The UC agent works as a Syslog listener.
Forwarding Logs — UC has the ability to forward secure and authenticated data to an LMI server via aULDP protocol without the need for a dedicated appliance. UC also forwards to Syslog server usingeither UDP or TCP protocols.
Monitoring Activity — A UCMon tool is also available to monitor the internal process of the UC whichensures that your collection and forwarding processes are correctly responding.
Easy Configuration — A UC configuration is composed of Log Sources, Forwarding connections, andUC general parameters. UC configuration must be created and updated via the GUI or the CommandLine Interface. You can create, save, and store a configuration.
A stored configuration is useful:
● to create a configuration and then activate it whenever you want, even if an active configuration isopen, i.e. another configuration is running on the system.
● to create several configurations and deploy them rapidly on other UCs.
Easy Management — Multiple UCs can be remotely managed using TIBCO LogLogic ManagementCenter (MC) and MC Agent configured and running on each UC Asset. MC is a software solution thatallows you to manage Assets, schedule batch upgrade for Assets, monitor system health check, andbackup and restore Asset data.
Adaptability — UC is a software program with a small footprint and low memory usage on yourDomain Controllers, or application servers. It is highly adaptable and can be customized easily. Itslightweight and reliable configuration helps you to manage changes according to your particular needs.
7
TIBCO LogLogic® Universal Collector User's Guide

Collecting Logs
UC handles file collection from four different types of files.
Real-Time File LogsUC reads logs from local files - i.e. logs from files generated on the machine where UC is installed andforwards them to either an LMI or a Syslog server.
UC can collect single and multi-line messages.
Collecting Single-line Messages
When a file is collected, only the newly added logs at the end of the file are collected. Logs alreadyavailable in a file before the UC log source creation will not be collected.
UC operates by monitoring specified text files that are receiving log output from log sources. The logsources append new logs to the end of the text file as events occur.
As new records appear at the tail of the monitored file, they are instantly taken into account by UC.
UC forwards single-line log messages to an LMI or Syslog server. By default, UC sends a maximum of64000 characters per line.
UC uses cursors to track the monitored files and to resume continuously after having stopped.
The cursors have information about the file positions at which to restart - called metadata - as well asfile identification information.
It can determine whether the file to be resumed is the file to which the saved position applies.
In other terms, even if the UC is stopped for a while, all messages contained in the file will be collectedusing the position cursors, no messages will be lost.
8
TIBCO LogLogic® Universal Collector User's Guide

Log File Rotation
In the case of log file rotation, a log file is retired and renamed to a “rotated” name, and the monitoredfile is replaced by a new log file. Therefore, periodically during the monitoring of a log file that isrotated, the file is replaced by a fresh log file.
UC is able to manage rotation files in two different ways.
1. The log file name contains a date that changes during the rotation process
UC handles the rotation process of logs that contain a date in their name provided you correctlyconfigured the File Log Source configuration file.
If you enter the parameter [date] in the file path you must:
a. Activate the file rotation.
Enable and enter a date format for the date pattern such as yyyyMMdd.
For example,
Filenames: logFile.20110521.log, logFile.20110522.log
Absolute path: c:\logDir\logFile.[date].log
2. The log file name contains an id that changes during the rotation
UC handles the rotation process of logs that contain an Id in their name provided you correctlyconfigured the File Log Source configuration file.
If you enter the parameter [id] in the file path you must:
1. Activate the file rotation.
2. Enable and enter the number of digits expected (1-9) for the nbDigit parameter.
For example,
Filenames: logFile.1.log, logFile.2.log
Absolute path: c:\logDir\logFile.[id].log
You can combine the two examples to allow the use of both [id] and [date] parameters in the filepath.
Recommendations
● In the case of resuming after having been stopped, if the log file has been rotated during the periodin which the collector was stopped, some log data will be missed. Therefore, you must ensure thatthe collector is not temporarily stopped during an interval in which a rotation occurs.
● To be collected, a file must have been modified after the latest collected file.● The log file name does not change during the rotation. The UC records the “identity” of a log file in
the cursor as a hash of the first several bytes of the file. When the file is rotated and replaced with afresh one, the hash will be different. File identity checking is performed throughout the log filemonitoring process to detect log rotation.
● If a log file needs to be replaced and enriched while UC is running, do not copy content in the filebut move it on the same partition.
9
TIBCO LogLogic® Universal Collector User's Guide

Collecting Multi-line Messages
UC can combine multiple consecutive related lines or multi-lines in a source log file into a single linewhich will be sent to the LMI. Multi-line message groups may require analysis to determine the correctexpression to use if the format is complex. UC supports Java regular expressions.
Before sending, groups of lines that represent a logical message are converted to a single-line format.All of the original messages' data is kept intact – nothing is altered.
UC can collect multi-line messages from default application sources or custom ones:
Log Source Description
Tomcat / ServletContainer
Default log location is CATALINA_BASE/logs. Tomcat and applicationlogs unless configured otherwise. The default format is multi-line, withthe first line beginning with a timestamp. It may change due tolocalization. Logs are rotated daily by default
WebLogic ApplicationServer
Default log location is under the server root DOMAIN_NAME/servers/ADMIN_SERVER_NAME/logs/. Each server or cluster maintains a serverlog and selected events are forwarded to a domain log. Most of theentries are single line, but can contain java exceptions. Each messagebegins with '####'. There may also be a web access log
WebSphere ApplicationServer
Default log location is under the WebSphere directory APPSERVER/profiles/PROFILENAME/logs/SERVERNAME/. There is no default logrotation. There are server start and stop logs (SystemErr.log,SystemOut.log), JVM log files (native_stderr.log, native_stdout.log),and process log files (startServer.log, stopServer.log). All of these logscontain entries describing the system environment that do not have atimestamp. The error logs do not contain any timestamps.Continuation lines are indented
JBoss Application Server Default log location is JBOSS_HOME/server/NAME/log. The boot logrecords startup events prior to the initialization of the logging service.The server.log file records activity while the server is running. Theboot.log file entries begin with a time with no date. The server.log fileentries start with a timestamp in the form 'YYYY-MM-DDHH:MI:SS,FFF'. Log messages can be multi-line and the continuationlines are sometimes indented, but frequently not. Messages start with atimestamp.
Note: The regex format for these default applications are indicated in <InstallationFolder>\runtime\conf\static\line_combiner.xml file.
Custom multi-line Custom regex can be defined for custom multiline logs. You need todefine
- the header regex pattern.
- whether you keep orphaned lines, i.e UC sends messages that do notmatch the Header Regexp
- the timeout after which messages are sent even if the regex is notfound again.
10
TIBCO LogLogic® Universal Collector User's Guide

Custom Multi-line Log Sources
Custom regex can be defined for custom multiline logs.
● the header regex pattern.● whether you keep orphaned lines, i.e UC sends messages that do not match the Header Regexp● the timeout after which messages are sent even if the regex is not found again.
An example of a custom application log is as follows:
2010-03-19 16:09:41,344 WARN [main] file.FileImportSqlDao (?(think)) - File not
found (/home/exaprotect/conf/TBSMP6/report/etc/export.properties)
2010-03-19 16:09:41,344 WARN [main] config.ConfigurationFactory
(ConfigurationFactory.java:127) - No configuration found. Configuring ehcache from
ehcache-failsafe.xml found in the classpath: jar:file:/home/exaprotect/
report_TBSMP6/webapps/ExaReport/WEB-INF/lib/ehcache-1.2.2.jar!/ehcache-failsafe.xml
java version "1.6.0_18"
Java(TM) SE Runtime Environment (build 1.6.0_18-b07)
2010-03-19 16:09:50,723 INFO [main] config.FacesConfigurator
(FacesConfigurator.java:151) - Reading standard config org/apache/myfaces/resource/
standard-faces-config.xml
Java HotSpot(TM) 64-Bit Server VM (build 16.0-b13, mixed mode)
In the UC Console, you can create a regex like:
^\d+-\d+-\d+\s\d+:\d+:\d+,\d+\s[^\s]+\s+\[[^\]]+\]\s
with a timeout of 3 seconds and indicating that orphaned lines are kept.
It will match the header of the multiline log (date and level), which is:
2010-03-19 16:09:41,344 WARN [main]
All the lines will be aggregated and then forwarded as a single log to LMI. The \r and \n will bereplaced by escaped ones \\r and\\n), until UC finds another regex header.
You can obtain something like:
2010-03-19 16:09:41,344 WARN [main] file.FileImportSqlDao (?(think)) - File not
found (/home/exaprotect/conf/TBSMP6/report/etc/export.properties)
2010-03-19 16:09:41,344 WARN [main] config.ConfigurationFactory
(ConfigurationFactory.java:127) - No configuration found. Configuring ehcache from
ehcache-failsafe.xml found in the classpath: jar:file:/home/exaprotect/
report_TBSMP6/webapps/ExaReport/WEB-INF/lib/ehcache-1.2.2.jar!/ehcache-failsafe.xml
\r\njava version "1.6.0_18"\r\nJava(TM) SE Runtime Environment (build 1.6.0_18-b07)
2010-03-19 16:09:50,723 INFO [main] config.FacesConfigurator
(FacesConfigurator.java:151) - Reading standard config org/apache/myfaces/resource/
standard-faces-config.xml\r\n
Java HotSpot(TM) 64-Bit Server VM (build 16.0-b13, mixed mode)
Refer to Appendix to get the full content of the Real-Time File Log Source commented file.
11
TIBCO LogLogic® Universal Collector User's Guide

Windows Event LogsUC can collect Windows Event Logs on Windows systems. However, it is not supported on Linuxsystems.
The supported Windows versions for remote collection are Windows 2003 R2 (32/64-bit), Windows2008 (32/64-bit), Windows 2008 R2 (64-bit), Windows 7 (32/64-bit), and Windows 2012 (64-bit).
UC forwards Windows logs to the LMI appliance by using the ULDP. Windows logs collected from UCare forwarded in a format which is based upon the Snare over Syslog format. Although Snare overSyslog and Snare formats are not 100% similar, a subtle difference may exist for certain messages. Fordetails, see Event Output Format on page 92.
Non-administrator user accounts can collect Windows Event Logs from remote event host. Foradministrator user accounts, UC auto-discovers the platform family and language type of the remoteevent host. For non-administrator user accounts, you should manually set the platform and languagetype on each Windows event host using the advanced option and must set the following configurationsettings:
● Enable the Remote Registry Service on the remote event host● On Windows 2008, Windows 7, and Windows 2012 Domain Controller systems, the non-
administrator domain user must be created and added to the Event Log Readers Group. On domainmember systems, the local user must be created on each local host and added to the local Event LogReaders Group. However, the domain user created on the Domain Controller system will not beable to access the event logs on the domain member system. On Windows 2003, refer to:http://blogs.technet.com/b/janelewis/archive/2010/04/30/giving-non-administrators-permission-to-read-event-logs-windows-2003-and-windows-2008.aspx.
Local CollectionThis section explains how to prepare a Windows host for local collection.
Enable the following Windows services:
● Windows Management Instrumentation● (For Windows 2003 only) Remote Registry
Remote CollectionThis section explains how to prepare a Windows host for remote collection.
Enable the following Windows services:
● Windows Management Instrumentation● (For Windows 2003 only) Remote Registry
If Windows Firewall is enabled, run the following command to enable access to the above services:
netsh firewall set service RemoteAdmin enable
Filtering Windows Event LogsIt may be required to minimize Windows Audit events generated by certain UC activities via one of thefollowing methods:
Procedure
1. Removal of “Object Access/ Success” from the audit policy on Windows log sources. (For furtherdetails, reference Audit Policy Management on Windows below.)
12
TIBCO LogLogic® Universal Collector User's Guide

2. Review the current Security Access Control List (SACL) settings for the Windows Event Logsnamespace \\root\CIMV2, and verify that Enable Account/Successful is not checked for accounts/group to which the UC is connected. If necessary, create a new policy for the UC for which theEnable Account/Successful is not checked.
If necessary, inheritance of SACL may have to be disabled for that namespace.
Platform Description
Windows 2003 R2/Windows 2008
The audit policy in Windows is configured via local policies and/orGPO linked to domain/OU/Site. A good way to understand theresulting policy is to use ‘Resulting set of policy’ snap-in of MMC.Check the current resulting policy is set to generate results for local hostonly. The current resulting policy can be found under ComputerConfiguration > Windows Settings > Local Policies > Audit Policy.
Windows 2008 only On Windows 2008 more granular settings are possible, named “sub-category”. Based on the solution used, you can check the preciseauditing policy with: auditpol /get /category:*
For more information on sub-category audit capabilities, please refer tothe Microsoft documentation.
http://support.microsoft.com/kb/921468
http://support.microsoft.com/kb/921469
Also review the article on Windows Event Logs namespacesmentioning specifically Windows Event Logs auditing:
http://msdn.microsoft.com/en-us/library/aa822575(v=vs.85).aspx
Syslog LogsUC reads logs sent via the Syslog protocol. The syslog logs will be collected using the TCP or UDP.
UC will not start up a syslog listener on the desired port until at least one syslog collector exists.
If you want to use both protocols, you must define two Log Sources.
Protocol Description
UDP Default configuration. It specifies that the syslog logs should be collectedvia UDP protocol. When modifying the UC’s status (such as updating orstopping it) or when the UC is not running during the collection,messages may be lost. Indeed, contrary to the TCP protocol, the UDPprotocol avoids the overhead of checking whether every packet actuallyarrived, which may lead to data loss.
TCP Specify that the syslog logs should be collected via TCP protocol. Ifanother Syslog log is running on the server where the UC is installed, theUC and syslog will not have the same port, IP and protocols. In that case,you must either stop the syslog or make the UC listen on another port.
13
TIBCO LogLogic® Universal Collector User's Guide

Filtering Syslog Logs
The Syslog logs can be filtered, before being forwarded, according to their severity and facility.
● facility - type of message that must be collected.● severity - levels of severity that will be reported.
If a message has neither severity nor facility, UC automatically allocates the local use 7 facility and thedebug severity to the message. Then, it will be automatically filtered.
Remote FilesUC can collect files remotely and forwards them to LMI.
By default, UC pulls every 1 hour but it can also pull every X minutes, every X hour, daily at X time,weekly on Y day on X time.
It is highly recommended to use a physical machine for remote file collection. It is not recommended touse the UC's remote file collection to collect large remote files (above 1GB) on Virtual Machine systemsas it will slow down the system significantly.
Remote File with Rotation
In the case of log file rotation, a log file is retired and renamed to a “rotated” name, and the monitoredfile is replaced by a new log file. Therefore, periodically during the monitoring of a log file that isrotated, the file is replaced by a new log file.
When the date field is checked for rotation, UC will only collect files that are modified after the remotefile log source creation time.
UC is able to manage file rotation in two different ways. For more information, refer to Log FileRotation on page 9.
Remote File with No Rotation
● Single Files
Make sure that you gave the correct file path on the remote file system to pull the file correctly.● Directory
Directory pull allows you to choose a directory and pull files from that directory based on the‘include’ or ‘exclude’ options provided to you. Directory pull does not support file rotation.
Example: /loglogic/ directory has three files: a.txt, b.txt, c.txt
Scenario 1: if users put * for include, it will pull a.txt, b.txt, c.txt
Scenario 2: if users put *.txt for include and put a.txt for exclude, it will pull b.txt and c.txt
Scenario 3: if users put a.txt for include and nothing for exclude, it will only pull a.txt.
UC Internal LogsUC generates its own logs when it is subjected to changes or errors (for example, starting of the UC,creation of a Log Source, disconnection of the UC, etc.). These internal logs are also sent to the LMI andcan be used to repair or troubleshoot the UC.
Collecting UC Internal Logs
The UC internal logs are automatically generated in the uc.log file, which is located in the UCinstallation folder in \LogLogic\UniversalCollector\logs (for Windows).
14
TIBCO LogLogic® Universal Collector User's Guide

The uc.log is forwarded to the LMI provided you correctly configured the forwarding process (LMIconnection).
The LMI connection used to forward the UC internal logs can be the same as any log source LMIconnection.
Creating and Configuring Log SourcesYou can add, copy, and delete Log Sources.
Add a New Log SourceYou can add a new Log Source.
Procedure
1. Open the UC Console by clicking on the shortcut and click the Collection tab.
2. Click New and select the type of Log Sources you want to add; Real Time File, Syslog, WindowsEvent Log, Remote Files, or Cmd.
3. In the Edition screen, enter the relevant information as explained in Editing Log Sources on page19.
4. Click Save to save the Log Source.A new log source is added in the list of Log Sources.
Copy a Log SourceYou can copy one or multiple Log Source configurations.
Procedure
1. Open the UC Console by clicking on the shortcut and click the Collection tab.
2. Select one or several Log Sources (Ctrl + click to select more than one Log Source) from the list oflog sources.
3. Click Copy and confirm.The new log source(s) is/are displayed below the list of log sources. You can edit and modify as anyother log source.
By default, the log source configuration is not enabled.
Delete a Log SourceYou can delete one or multiple log sources.
Procedure
1. Open the UC Console by clicking on the shortcut and click the Collection tab.
2. Select one or several Log Sources (Ctrl + click to select more than one Log Source) from the list oflog sources.
3. Click Delete.The Log Source list is automatically refreshed.
15
TIBCO LogLogic® Universal Collector User's Guide

Creating Multiple Log SourcesYou can import and create multiple Log Sources of the same type at the same time.
Make sure that a CSV file with Log Source information must be available.
Create a CSV File
Procedure
1. Open a program such as Notepad.
2. In the header, on the first line, enter the following field names according to the type of Log Sourceyou want to create:
Log Source Fields
File name, description, lmi_connection*, enabled, timeInUtc,message_filter, match_filter, file_path*, useDateRolling,date_pattern, useIdRolling, nbDigit, useFileChangeNotification,multiline_active, multiline_header_type, multiline_custom_regex,multiline_orphaned_lines, multiline_lineTimeout, appName*,hostname*, maxLineLength, charset
Syslog name, description, lmi_connection*, enabled, timeInUtc, protocol, ip,port, severity, facilities, source_ip
Windows name, description, lmi_connection*, enabled, timeInUtc,event_id_filter, filter_operator, source_filter, address*, domain,login, password, include_eventlogs, eventlogs_list, polling_period,win_type, lang_type
Remote File name, description ,lmi_connection, enabled, ip, protocol, time_zone,file_system_type, user_id, password, domain, share_name,path_type, path, include, exclude, device_type, original_name,useDateRolling, date_pattern, useIdRolling, nbDigit,useFileChangeNotification, useUcIP, uc_ip, deleteInactiveFile,inactiveDays, every_minutes, every_hours, daily_at_time,weekly_at_time, weekly_at_day
16
TIBCO LogLogic® Universal Collector User's Guide

Log Source Fields
Cmd name, description, lmi_connection, enabled, timeInUtc, command,multiline_active, multiline_lineTimeout, appName, hostname,maxLineLength, run_once, schedule_active, every_minutes,every_hours, daily_at_time, weekly_at_time, weekly_at_day
* mandatory fields
1.LMI connection is mandatory only if there is more than one existing connectionsavailable. The sole connection will be taken by default. 2. Name is not mandatory as aname will be automatically created, such as Real Time File #n or Windows Event Log#n or Syslog #n.
3. On the lines below, fill in the fields with the correct values and save in CSV format.The CSV file format example:
name,description,lmi_connection,timeInUtc
Log Source A, Windows Log Sources, LMI_Connection, true
A detailed example of the fields and values to enter in the CSV file is available from UCConsole when importing the CSV file.
Import Log Sources
Procedure
1. Open the UC Console by clicking on the shortcut.
2. In the Collection tab, click New > Batch import.The Batch Import tab is displayed.
3. In the drop-down list, select the type of Log Sources you are going to import.
4. Browse the CSV file and click OK.
5. Click Import.The Log Sources are created under the Collection tab, for example, Import #1 - LS #1
Creating a Complete ConfigurationA configuration contains general settings, a list of Log Sources, and one or several Forwardingconnections.
All of these items are configured via the Graphical User Interface and are stored in a UC Configurationfile (*.ucc) that you can unzip to explore the content.
Edit Configuration General SettingsYou can modify the default configuration at any time.
Procedure
1. Open the UC Console by clicking on the shortcut.
2. Click .
17
TIBCO LogLogic® Universal Collector User's Guide

3. Modify the following information:
Option Description
Name Name of the configuration.
Communication Port Port used by the UC to get information (for example, status,metrics, memory used...) via the CLI. Make sure this port is notalready used. Otherwise UC will not work.
Collector Domain An identification name used to identify each message sent from aspecific UC. This field can be empty. If defined, it must have aunique name with maximum 256 characters. This field is casesensitive. Do not include special characters, for example, \|/"?'*:%
TCP/UDP socket buffersize
TCP/UDP parameter and socket buffer size (in kilobytes) - thisparameter applies to all the Syslog Log Sources associated to theUC.
UDP max packet size UDP parameter and max packet size (in kilobytes) - this parameterapplies to all the Syslog Log Sources associated to the UC. Themaximum size is 64KB.
Notes for Red Hat and SUSE Linux Enterprise
If you obtain a log message saying “Syslog Unable to set the required socket buffer size”, then it isrecommended to increase the maximum size of the buffer on your RHEL, SUSE, and Solarissystems.
On RHEL, SUSE or Solaris, the default maximum TCP/UDP buffer size is 128 KB.
In the UC configuration file, the default value of the buffer socket size is 1MB. These parametersapply to all the Syslog Log Sources related to UC. Therefore, you must increase the maximum valueof the Syslog buffer already set with a specific command.
To change the maximum value of the buffer:
1. Log in as root on the system.
2. Enter the following command (example with 1 Megabyte):
sysctl -w net.core.rmem_max=1048576 (this value is expressed in bytes)
The modification of the system parameter will impact the maximum limitations for allsockets.
4. Click Apply.The configuration is updated.
Add a New ConfigurationYou can easily add a new configuration. After adding a new configuration, you must activate it.
Procedure
1. Open the UC Console by clicking on the shortcut.
2. Go to Manage Configuration > New.
18
TIBCO LogLogic® Universal Collector User's Guide
3. In the Browsing window, select a folder where you will store your configuration.
4. Enter a configuration name with a *.ucc extension in the Filename field and click Save.The new configuration is automatically displayed in the UC console, but it is not active.
Open a Stored ConfigurationYou can edit an existing or stored configuration other than the one running on the local UC at any time.
Procedure
1. Open the UC Console by clicking on the shortcut.
2. Under Manage Configuration, click Open and browse the UC configuration file (*.ucc).
3. Click Open.The configuration is displayed in the GUI. However, this configuration is neither applied norrunning.
You can display back your active configuration at any time by selecting ManageConfiguration > Open Active Configuration in the drop-down menu.
Activate the ConfigurationYou can make a stored configuration active at any time. Then, all the modifications applied on the freshactive configuration will be automatically saved and updated each time you validate the changes.
Procedure
1. Open the UC Console by clicking on the shortcut.
2. Display the configuration that you want to activate in the UC Console.
3. Click .A warning message is displayed which indicates that the active configuration will be overwritten ifyou continue.
4. Click Continue to accept. If you do not want the active configuration to be erased, click Cancel andmake a copy of it before activating another configuration.The configuration is now active and can be modified.
Save a ConfigurationYou should save an active or stored configuration on the local system.
Procedure
1. Open the UC Console by clicking on the shortcut.
2. To copy a configuration, select Manage Configuration > Save as.
3. In the Browsing window, select the folder where you want to save the configuration. You can createa new folder.
4. Name the configuration and click Save.A UC Configuration file with the *.ucc extension is created.
Editing Log SourcesYou can edit a single Log Source configuration. Similarly, you can update parameters for multiple LogSources of the same type at a time.
19
TIBCO LogLogic® Universal Collector User's Guide

Edit a Real-Time File Log Source
Procedure
1. Under the Collection tab, double-click on the selected Log Source or just select it and click the Editbutton.The RT File Edition tab is displayed.
2. In the General part of the screen, you can modify the following information:
Option Description
Log Source Enabled Click ON or OFF to define whether the current Log Source is enabled ordisabled.
Name Name of the Log Source.
Description Description of the Log Source.
3. In the Forwarding Connection part of the screen, you can modify the following information:
Option Description
Name Select the Forwarding connection to which you want to forwardcollected RT File logs. A Log Source must be linked to an existingForwarding connection, which can be edited under the Forwarding tab.
UC Collection date Define whether the log message sent to the LMI server remains in a localsystem time zone or is converted into UTC time zone.
4. In the Message Filtering part of the screen, you can modify the following information:
UC supports Java regular expressions.
Option Description
[Filtering] Click ON or OFF to activate or deactivate the option.
Collect messages Define whether you collect messages that:
- match the regex (other logs are filtered)
- do not match the regex (i.e. filter the logs that match the regex)
20
TIBCO LogLogic® Universal Collector User's Guide
Option Description
Filter Enter a case insensitive regular expression to specify the messages to bematched.
For example, if “Not matching regex is selected”:
"packet accepted" means that all the lines containing packet accepted arefiltered.
"^64\.242" means that all the lines that are beginning exactly with 64.242are filtered
"846$" means that all the lines that are ending exactly with 846 arefiltered.
For example, if “Matching regex is selected”:
"packet accepted" means that only the lines containing packet acceptedare kept.
"^64\.242" means that only the lines that are beginning exactly with64.242 are kept.
"846$" means that only the lines that are ending exactly with 846 arekept.
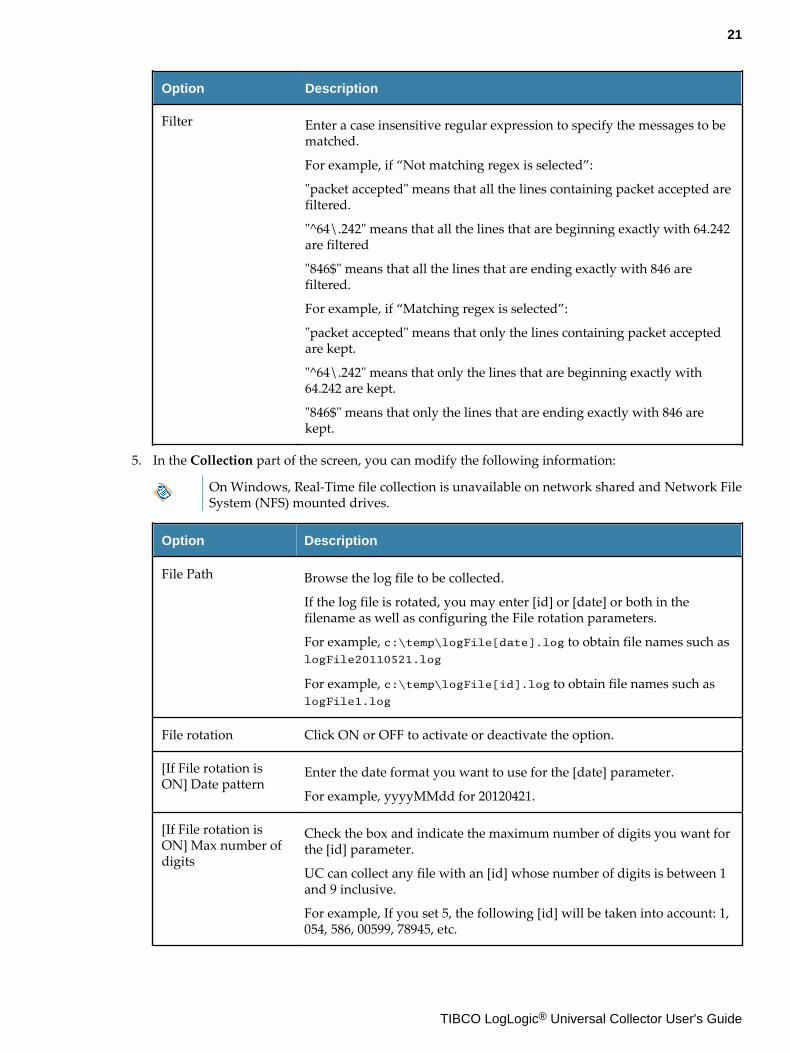
5. In the Collection part of the screen, you can modify the following information:
On Windows, Real-Time file collection is unavailable on network shared and Network FileSystem (NFS) mounted drives.
Option Description
File Path Browse the log file to be collected.
If the log file is rotated, you may enter [id] or [date] or both in thefilename as well as configuring the File rotation parameters.
For example, c:\temp\logFile[date].log to obtain file names such aslogFile20110521.log
For example, c:\temp\logFile[id].log to obtain file names such aslogFile1.log
File rotation Click ON or OFF to activate or deactivate the option.
[If File rotation isON] Date pattern
Enter the date format you want to use for the [date] parameter.
For example, yyyyMMdd for 20120421.
[If File rotation isON] Max number ofdigits
Check the box and indicate the maximum number of digits you want forthe [id] parameter.
UC can collect any file with an [id] whose number of digits is between 1and 9 inclusive.
For example, If you set 5, the following [id] will be taken into account: 1,054, 586, 00599, 78945, etc.
21
TIBCO LogLogic® Universal Collector User's Guide

Option Description
File changenotification
Click ON or OFF to activate or deactivate the option. This option allowsyou to monitor file changes. If set ON, a notification will be sent to LMIvia uc.log file when the specified file's modified date changes. Thenotification includes the changed content and time. A new log isrecorded for the notification when UC internal logs are forwarded toLMI. The file changes are not monitored for rotated files. In this case, theFile change notification option is disabled.
The specified file size should be less than the default size (10MB). If thefile size is more than 10MB, the notification does not include changedcontent.
Before activating this monitoring option, make sure to set theLMI Connection > Forwarding > Forward UC Internal Logsoption to ON.
[Multiline messages] Click ON or OFF to activate or deactivate the option to define whetherthe single message has several lines.
[If Multilinemessages is ON]Multiline headertype
Select the type of multi-line logs.
For example, 'jboss', 'tomcat', 'weblogic', 'websphere' or 'custom'.
[If Multilinemessages is ON]Custom header regex
Set a regular expression matching the header of the first line of a log.
[If Multilinemessages is ON]Send orphaned lines
Indicate whether you want the UC to send messages that do not matchthe Header Regexp.
[If Multilinemessages is ON]Multiline timeoutafter detected header
Indicate the number of seconds after which the multi-line logs are readyto be sent.
[Advanced] Click the drop-down menu to display advanced parameters.
Host name Enter the name of the host used to pair logs on the LMI server.
For example, customHostname.com
If you enter an IPv4 / IPv6 address, the device to be displayed in LMIwill be referred with this IP address.
Application name Enter the name of the application used to identify logs on the LMIserver.
For example, customApplicationName
Maximum messageslength
Indicate the possible maximum length for the message (in bytes).
Default value: 64000
22
TIBCO LogLogic® Universal Collector User's Guide

Option Description
[Collected file]
Charset
Select the data format.
Default value: Use local system charset
6. Click Apply to validate the changes.
Edit Multiple Real-Time Log Sources
Procedure
1. Under the Collection tab, select the Log Sources and click the Edit button.The RT File Edition tab is displayed.
2. Check the boxes in front of the set of RT File parameters you want to change.
3. Modify the parameters as explained in Edit a Real-Time File Log Source on page 20.
Edit a Windows Event Log Source
Procedure
1. Under the Collection tab, double-click on the selected Log Source or just select it and click the Editbutton.The Windows Events Log Source Edition tab is displayed.
2. In the General part of the screen, you can modify the following information:
Option Description
Log Source Enabled Click ON or OFF to define whether the current Log Source is enabled ordisabled.
Name Name of the Log Source.
For example, ls-win-template
Description Description of the Log Source.
3. In the Forwarding Connection part of the screen, you can modify the following information:
Option Description
Name Select the Forwarding connection to which you want to forwardcollected RT File logs. A Log Source must be linked to an existingForwarding connection, which can be edited under the Forwarding tab.
UC Collection date Define whether the log message sent to the LMI server remains in a localsystem time zone or is converted into UTC time zone.
4. In the Message Filtering part of the screen, you can modify the following information:
23
TIBCO LogLogic® Universal Collector User's Guide

Option Description
[Filtering] Click ON or OFF to activate or deactivate the option.
Event ID Filter Regular expression to filter the Windows event ID.
For example,
“567|^58[1-9]” means that the events with an Event ID containing 567but also those from 581 to 589 inclusive are collected.
“^(8.*)|^(5[2-9].*)” means that the events with an ID starting with 8 butalso those starting with 52 to 59 inclusive are collected.
If the field is empty or .* is set means that no filter is set.
Refer to Regular Expressions on page 87 to get the list of charactersused in regular expressions.
and/or Select if you want to use both filters at the same time or one or another
Source Filter Enter a regular expression to filter Windows events on source field.
For example,
“Security” means that all the events with a Security source field arefiltered.
“DNS Client Events” means that all the events with a DNS Client Eventssource field are filtered.
“Time-Service” means that all the events with a time-Service source fieldare filtered.
If the field is empty or .* is set means that no filter is set.
Refer to Regular Expressions on page 87 to get the list of charactersused in regular expressions.
5. In the Collection part of the screen, you can modify the following information:
Option Description
[Location]
Local/Remote host Indicate whether the Windows host from which to poll logs is the localmachine or a remote host.
Host name Enter the IPv4 / IPv6 address to connect to the remote Windows server.
[Credentials]
Use UC servicecredentials/Usecustom credentials
Select the relevant options to use the correct Windows credentials.
If you have configured credentials in the UC WindowsServices Control Panel, you can use those credentials to createmultiple Windows Event Log Collections. To do this, selectthe UC service credentials option.
24
TIBCO LogLogic® Universal Collector User's Guide

Option Description
Domain (if Usecustom credentials isset)
Enter the domain name to access the Windows server.
For example, domain.company
Login (if Use customcredentials is set)
Enter the login to connect to the Windows server. If the user has non-administrator privileges, make sure to satisfy the prerequisites specifiedin the section Windows Event Logs on page 12.
If the login belongs to a local user with administratorprivileges, the User Account Control (UAC) needs to beturned off at the event host.
Password (if Usecustom credentials isset)
To connect to the Windows server, enter a password
[Windows Event Logs]
Collect Define the Windows Event Logs journals to include. It can be either:
- all event logs = all current and logs to come are collected
- all event logs except the following ones = all current and event logs tocome are collected except the one indicated in the List form.
- only the following event logs = only the following event logs indicatedin the List form are collected
List List of Event Logs to include or exclude.
Edit List Displays the Edit List window to select the event logs to be collected:
1 - In the Available Event Logs pane, select an event log and click Add.This will add the logs to the list.
2 - If you want to remove them from the list, select them and clickRemove.
3 - If you want to manually add an Event Log, enter the name and clickAdd. Make sure you entered the name correctly as it is case-sensitive.
4 - Click OK.
If you want to display all the Event Logs available, click theDiscover Event Logs button.
[Advanced]
Polling Period Enter the time period (in seconds) after which UC checks for newWindows events.
Default value: 10
25
TIBCO LogLogic® Universal Collector User's Guide

Option Description
Windows type Specify the platform from the drop-down list.
If you do not specify the platform type, UC will try to auto-discover the platform type. However, if the user has non-administrator privileges, UC will fail to auto-discover theplatform type.
Language type Specify the language type from the drop-down list.
If you do not specify the type, by default it will be assigned asEnglish.
6. Click Apply to validate the changes.
Edit Multiple Windows Event Log Sources
Procedure
1. Under the Collection tab, select the Log Sources and click the Edit button.The Windows Event Log Edition tab is displayed.
2. Check the boxes in front of the set of Windows Event Logs parameters you want to change.
3. Modify the parameters as explained in Edit a Windows Event Log Source.
Edit a Syslog Log Source
Procedure
1. Under the Collection tab, double-click on the selected Log Source or just select it and click the Editbutton.The Syslog Log Source Edition tab is displayed.
2. In the General part of the screen, you can modify the following information:
Option Description
Log Source Enabled Click ON or OFF to define whether the current Log Source is enabled ordisabled.
Name Name of the Log Source.
Description Description of the Log Source.
3. In the Forwarding Connection part of the screen, you can modify the following information:
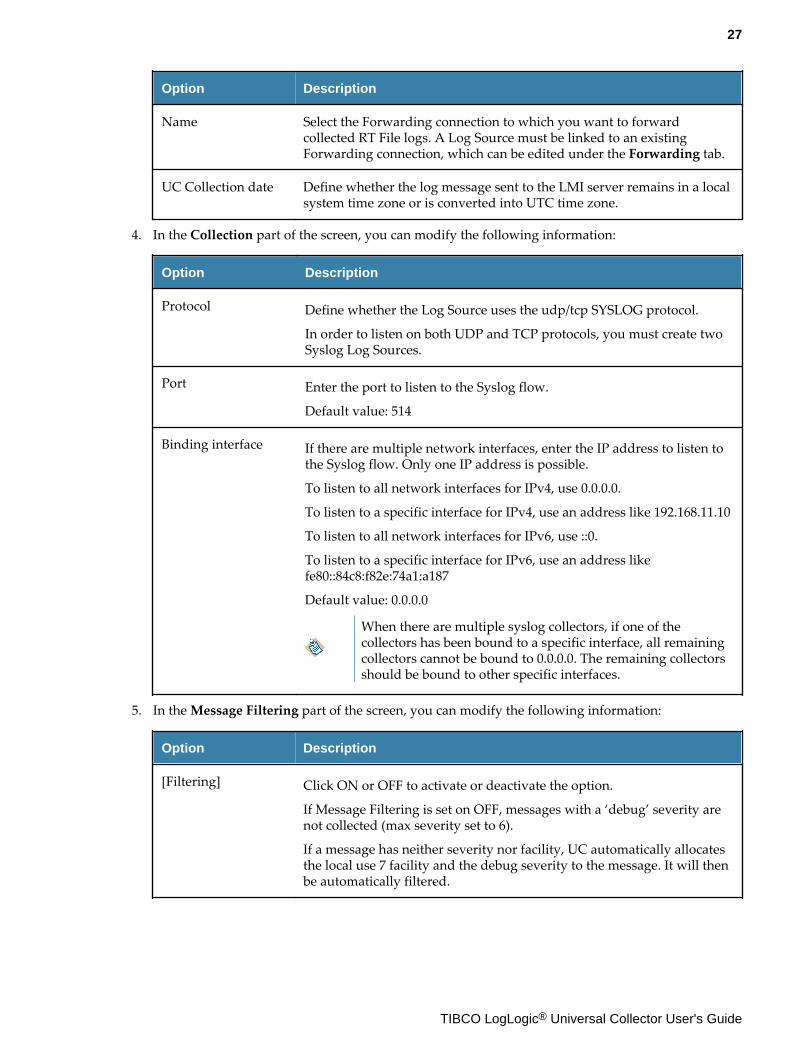
26
TIBCO LogLogic® Universal Collector User's Guide
Option Description
Name Select the Forwarding connection to which you want to forwardcollected RT File logs. A Log Source must be linked to an existingForwarding connection, which can be edited under the Forwarding tab.
UC Collection date Define whether the log message sent to the LMI server remains in a localsystem time zone or is converted into UTC time zone.
4. In the Collection part of the screen, you can modify the following information:
Option Description
Protocol Define whether the Log Source uses the udp/tcp SYSLOG protocol.
In order to listen on both UDP and TCP protocols, you must create twoSyslog Log Sources.
Port Enter the port to listen to the Syslog flow.
Default value: 514
Binding interface If there are multiple network interfaces, enter the IP address to listen tothe Syslog flow. Only one IP address is possible.
To listen to all network interfaces for IPv4, use 0.0.0.0.
To listen to a specific interface for IPv4, use an address like 192.168.11.10
To listen to all network interfaces for IPv6, use ::0.
To listen to a specific interface for IPv6, use an address likefe80::84c8:f82e:74a1:a187
Default value: 0.0.0.0
When there are multiple syslog collectors, if one of thecollectors has been bound to a specific interface, all remainingcollectors cannot be bound to 0.0.0.0. The remaining collectorsshould be bound to other specific interfaces.
5. In the Message Filtering part of the screen, you can modify the following information:
Option Description
[Filtering] Click ON or OFF to activate or deactivate the option.
If Message Filtering is set on OFF, messages with a ‘debug’ severity arenot collected (max severity set to 6).
If a message has neither severity nor facility, UC automatically allocatesthe local use 7 facility and the debug severity to the message. It will thenbe automatically filtered.
27
TIBCO LogLogic® Universal Collector User's Guide

Option Description
Maximum Severity Select the maximum accepted severity (numerical code, see RFC 3164)
0 - Emergency: system is unusable
1 - Alert: action must be taken immediately
2 - Critical: critical conditions
3 - Error: error conditions
4 - Warning: warning conditions
5 - Notice: normal but significant condition
6 - Informational: informational messages
7 - Debug: debug-level messages
Default value: 6 - Informational: informational messages
28
TIBCO LogLogic® Universal Collector User's Guide
Option Description
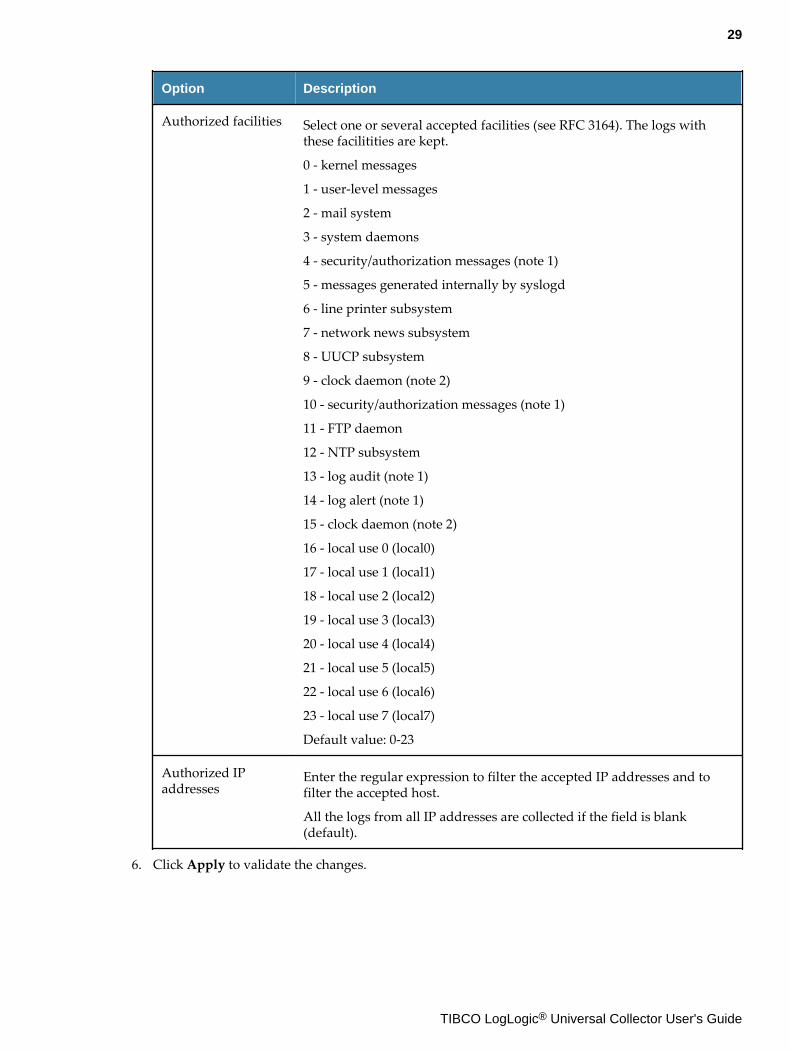
Authorized facilities Select one or several accepted facilities (see RFC 3164). The logs withthese facilitities are kept.
0 - kernel messages
1 - user-level messages
2 - mail system
3 - system daemons
4 - security/authorization messages (note 1)
5 - messages generated internally by syslogd
6 - line printer subsystem
7 - network news subsystem
8 - UUCP subsystem
9 - clock daemon (note 2)
10 - security/authorization messages (note 1)
11 - FTP daemon
12 - NTP subsystem
13 - log audit (note 1)
14 - log alert (note 1)
15 - clock daemon (note 2)
16 - local use 0 (local0)
17 - local use 1 (local1)
18 - local use 2 (local2)
19 - local use 3 (local3)
20 - local use 4 (local4)
21 - local use 5 (local5)
22 - local use 6 (local6)
23 - local use 7 (local7)
Default value: 0-23
Authorized IPaddresses
Enter the regular expression to filter the accepted IP addresses and tofilter the accepted host.
All the logs from all IP addresses are collected if the field is blank(default).
6. Click Apply to validate the changes.
29
TIBCO LogLogic® Universal Collector User's Guide

Edit Multiple Syslog Log Sources
Procedure
1. Under the Collection tab, select the Log Sources and click the Edit button.The Syslog Log Source Edition tab is displayed.
2. Check the boxes in front of the set of Syslog parameters you want to change.
3. Modify the parameters as explained in Edit a Syslog Log Source on page 26.
Edit a Remote File Log Source
Procedure
1. Under the Collection tab, double-click on the selected Log Source or just select it and click the Editbutton.The Remote File Log Source Edition tab is displayed.
2. In the General part of the screen, you can modify the following information:
Option Description
Log Source Enabled Click ON or OFF to define whether the current Log Source is enabled ordisabled.
Name Name of the Log Source.
Description Description of the Log Source.
3. In the Forwarding Connection part of the screen, you can modify the following information:
Option Description
Name Select the Forwarding connection to which you want to forwardcollected RT File logs. A Log Source must be linked to an existingForwarding connection, which can be edited under the Forwarding tab.
Remote File Collection is only supported by LMI v5.4 or above and can only be forwardedto LMI, not generic syslog servers.
4. In the Collection part of the screen, you can modify the following information:
Option Description
Host IP/Name Enter the IP or name of the remote log source.
Protocol Define whether the Log Source uses the ftp, sftp, cifs or file protocol.
On Windows, Remote file collection using file protocol isunavailable on network shared and Network File System(NFS) mounted drives.
30
TIBCO LogLogic® Universal Collector User's Guide
Option Description
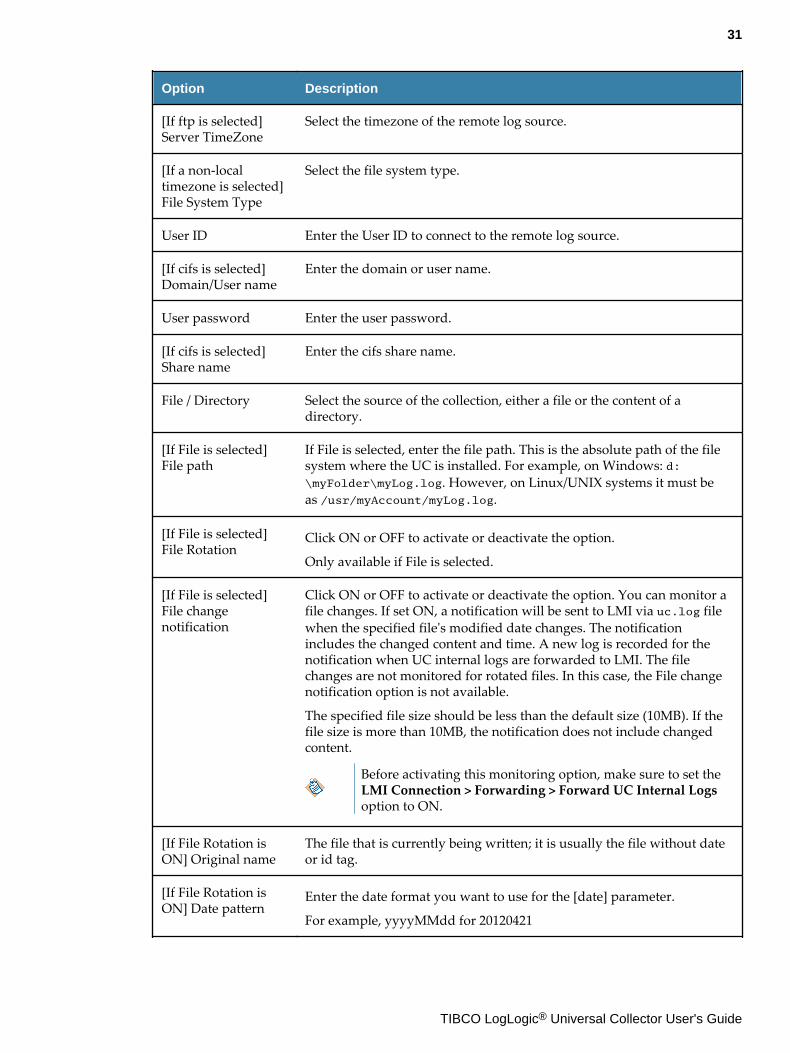
[If ftp is selected]Server TimeZone
Select the timezone of the remote log source.
[If a non-localtimezone is selected]File System Type
Select the file system type.
User ID Enter the User ID to connect to the remote log source.
[If cifs is selected]Domain/User name
Enter the domain or user name.
User password Enter the user password.
[If cifs is selected]Share name
Enter the cifs share name.
File / Directory Select the source of the collection, either a file or the content of adirectory.
[If File is selected]File path
If File is selected, enter the file path. This is the absolute path of the filesystem where the UC is installed. For example, on Windows: d:\myFolder\myLog.log. However, on Linux/UNIX systems it must beas /usr/myAccount/myLog.log.
[If File is selected]File Rotation
Click ON or OFF to activate or deactivate the option.
Only available if File is selected.
[If File is selected]File changenotification
Click ON or OFF to activate or deactivate the option. You can monitor afile changes. If set ON, a notification will be sent to LMI via uc.log filewhen the specified file's modified date changes. The notificationincludes the changed content and time. A new log is recorded for thenotification when UC internal logs are forwarded to LMI. The filechanges are not monitored for rotated files. In this case, the File changenotification option is not available.
The specified file size should be less than the default size (10MB). If thefile size is more than 10MB, the notification does not include changedcontent.
Before activating this monitoring option, make sure to set theLMI Connection > Forwarding > Forward UC Internal Logsoption to ON.
[If File Rotation isON] Original name
The file that is currently being written; it is usually the file without dateor id tag.
[If File Rotation isON] Date pattern
Enter the date format you want to use for the [date] parameter.
For example, yyyyMMdd for 20120421
31
TIBCO LogLogic® Universal Collector User's Guide

Option Description
[If File Rotation isON] Max number ofdigits
Check the box and indicate the maximum number of digits you want forthe [id] parameter.
UC can collect any file with an [id] whose number of digits is between 1and 9 inclusive.
For example, If you set 5, the following [id] will be taken into account: 1,054, 586, 00599, 78945, etc.
[If Directory isselected] Directorypath
If Directory is selected, enter the directory pathname.
[If Directory isselected] File(s)Include
Enter the files that must be included in the collection. The field supportsthe standard common wildcard characters for matching file names (*and ?).
[If Directory isselected] File(s)Exclude
Enter the files that must be excluded from the collection. The fieldsupports the standard common wildcard characters for matching filenames (* and ?).
[If Directory isselected] File changenotification
Click ON or OFF to activate or deactivate the option. You can monitor adirectory changes. If set ON, a notification will be sent to LMI viauc.log file when the specified directory's modified date changes. Thenotification includes the changed content and time. A new log isrecorded for the notification when UC internal logs are forwarded toLMI.
Before activating this monitoring option, make sure to set theLMI Connection > Forwarding > Forward UC Internal Logsoption to ON.
Device type Select the type of logs to be collected.
Test connection Click this button to check if the connection to the remote log source isworking.
[Advanced]
Log Source IP
Select an option:
- Remote file server: selected by default. The IP is grabbed from the hostIP that you previously entered.
This option is not available when the file protocol is selected.
- UC: IP address of the workstation where UC is installed. You canchange it as you want.
The IP address will be set as the host IP address when the fileprotocol is selected.
Delete inactive file Click ON or OFF to activate or deactivate the option. You can purge filesthat are older than certain time based on the modified time.
32
TIBCO LogLogic® Universal Collector User's Guide
Option Description
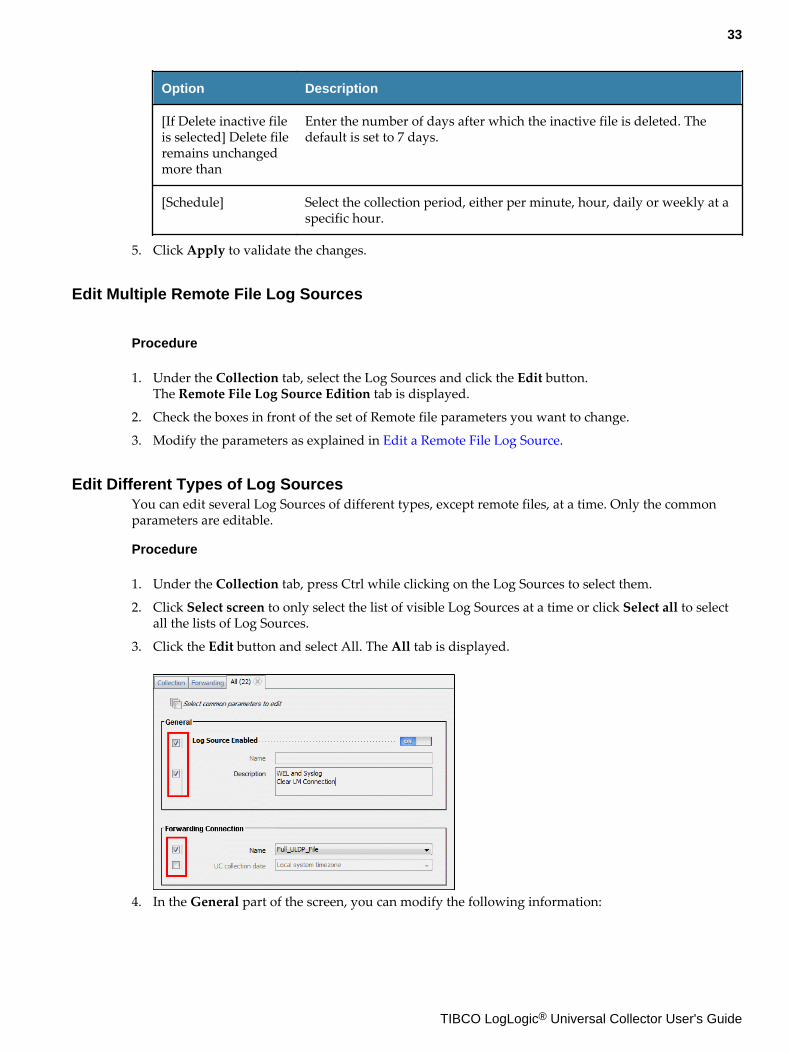
[If Delete inactive fileis selected] Delete fileremains unchangedmore than
Enter the number of days after which the inactive file is deleted. Thedefault is set to 7 days.
[Schedule] Select the collection period, either per minute, hour, daily or weekly at aspecific hour.
5. Click Apply to validate the changes.
Edit Multiple Remote File Log Sources
Procedure
1. Under the Collection tab, select the Log Sources and click the Edit button.The Remote File Log Source Edition tab is displayed.
2. Check the boxes in front of the set of Remote file parameters you want to change.
3. Modify the parameters as explained in Edit a Remote File Log Source.
Edit Different Types of Log SourcesYou can edit several Log Sources of different types, except remote files, at a time. Only the commonparameters are editable.
Procedure
1. Under the Collection tab, press Ctrl while clicking on the Log Sources to select them.
2. Click Select screen to only select the list of visible Log Sources at a time or click Select all to selectall the lists of Log Sources.
3. Click the Edit button and select All. The All tab is displayed.
4. In the General part of the screen, you can modify the following information:
33
TIBCO LogLogic® Universal Collector User's Guide
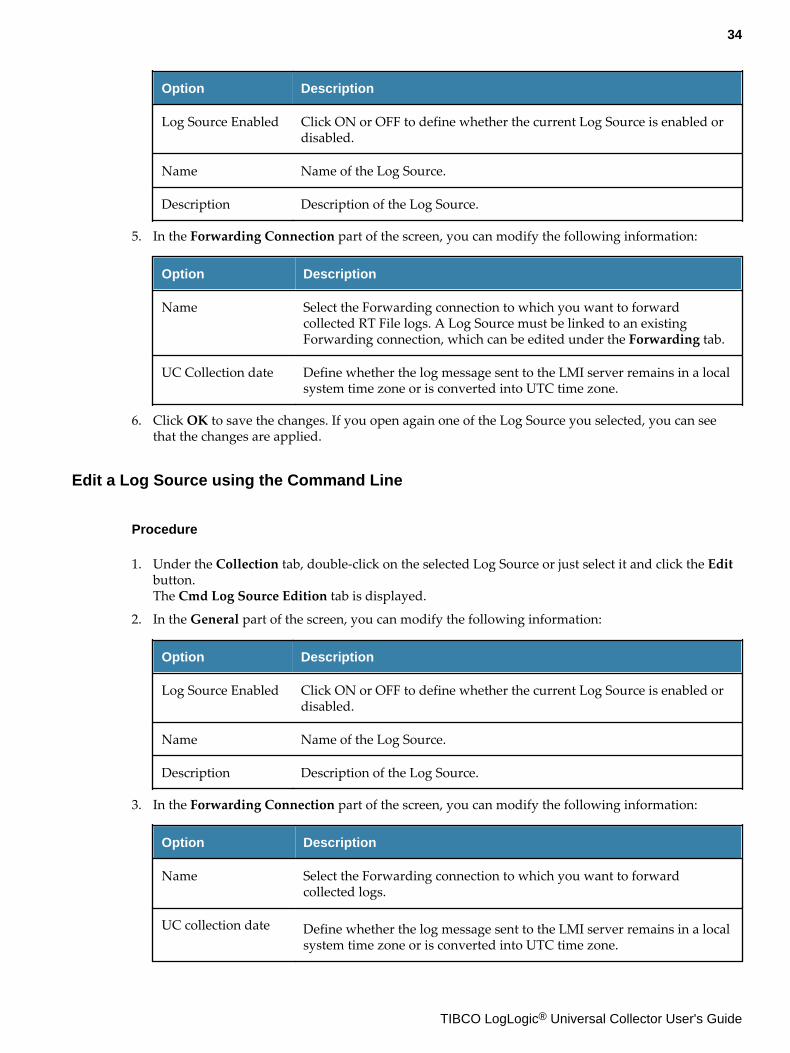
Option Description
Log Source Enabled Click ON or OFF to define whether the current Log Source is enabled ordisabled.
Name Name of the Log Source.
Description Description of the Log Source.
5. In the Forwarding Connection part of the screen, you can modify the following information:
Option Description
Name Select the Forwarding connection to which you want to forwardcollected RT File logs. A Log Source must be linked to an existingForwarding connection, which can be edited under the Forwarding tab.
UC Collection date Define whether the log message sent to the LMI server remains in a localsystem time zone or is converted into UTC time zone.
6. Click OK to save the changes. If you open again one of the Log Source you selected, you can seethat the changes are applied.
Edit a Log Source using the Command Line
Procedure
1. Under the Collection tab, double-click on the selected Log Source or just select it and click the Editbutton.The Cmd Log Source Edition tab is displayed.
2. In the General part of the screen, you can modify the following information:
Option Description
Log Source Enabled Click ON or OFF to define whether the current Log Source is enabled ordisabled.
Name Name of the Log Source.
Description Description of the Log Source.
3. In the Forwarding Connection part of the screen, you can modify the following information:
Option Description
Name Select the Forwarding connection to which you want to forwardcollected logs.
UC collection date Define whether the log message sent to the LMI server remains in a localsystem time zone or is converted into UTC time zone.
34
TIBCO LogLogic® Universal Collector User's Guide
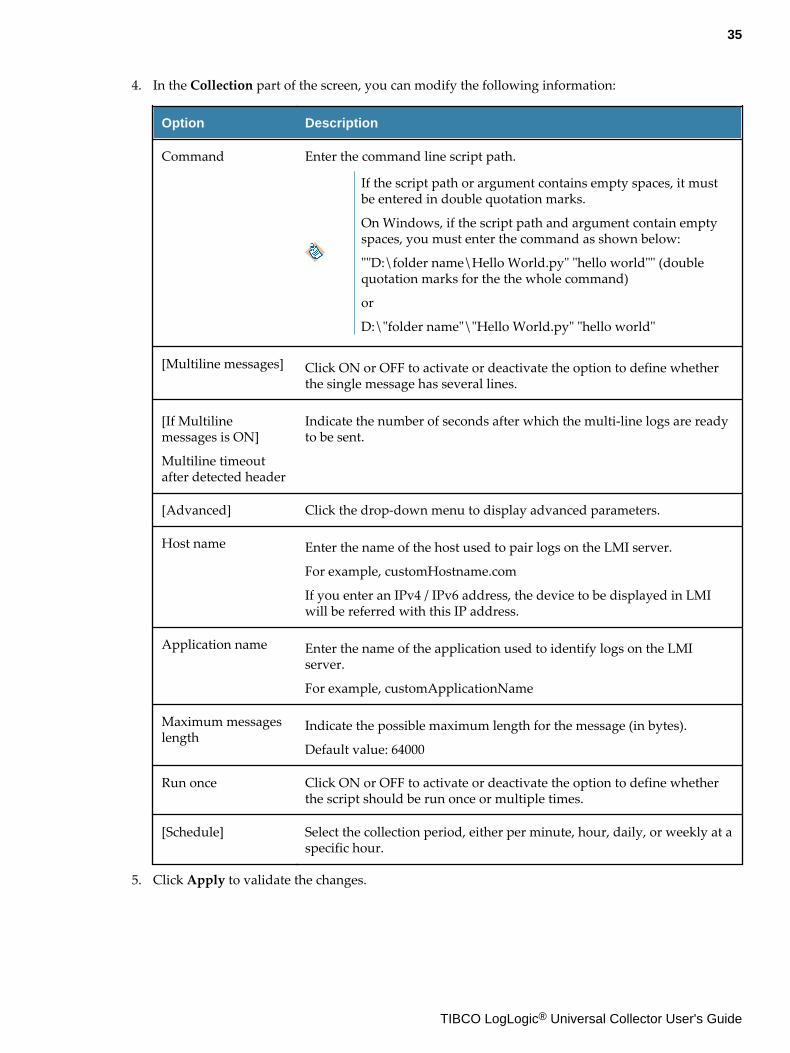
4. In the Collection part of the screen, you can modify the following information:
Option Description
Command Enter the command line script path.
If the script path or argument contains empty spaces, it mustbe entered in double quotation marks.
On Windows, if the script path and argument contain emptyspaces, you must enter the command as shown below:
""D:\folder name\Hello World.py" "hello world"" (doublequotation marks for the the whole command)
or
D:\"folder name"\"Hello World.py" "hello world"
[Multiline messages] Click ON or OFF to activate or deactivate the option to define whetherthe single message has several lines.
[If Multilinemessages is ON]
Multiline timeoutafter detected header
Indicate the number of seconds after which the multi-line logs are readyto be sent.
[Advanced] Click the drop-down menu to display advanced parameters.
Host name Enter the name of the host used to pair logs on the LMI server.
For example, customHostname.com
If you enter an IPv4 / IPv6 address, the device to be displayed in LMIwill be referred with this IP address.
Application name Enter the name of the application used to identify logs on the LMIserver.
For example, customApplicationName
Maximum messageslength
Indicate the possible maximum length for the message (in bytes).
Default value: 64000
Run once Click ON or OFF to activate or deactivate the option to define whetherthe script should be run once or multiple times.
[Schedule] Select the collection period, either per minute, hour, daily, or weekly at aspecific hour.
5. Click Apply to validate the changes.
35
TIBCO LogLogic® Universal Collector User's Guide
Sorting Log SourcesTags are useful to store, sort, and search for Log Sources in a list.
For example, if you want to easily find the logs coming from Windows server A to which theadministrator has logged. You can create tags such as Server A, Connection, Administrator, and thensearch based on tags.
You can create and apply up to 10 filters.
Create a New Tag
Procedure
1. Under the Collection tab, select one or several log sources.
2. In the Tag edition panel on the right, enter a tag in the combo box and click Add Tag.The tag is automatically saved.
Apply a TagOnce you have created tags, you can apply them to one or several log sources.
Procedure
1. Under the Collection tab, select the log source(s) to which you want to apply a tag.
2. In the combo box in the right hand panel, select the tag you want to apply and click Add Tag.The tag is displayed under the Tags column.
Remove a Tag
Procedure
1. Under the Collection tab, select the log source for which you want to remove the tag.
2. In the Tag edition panel, click the cross of the tag you want to remove.The list is updated automatically.
Sort Log SourcesYou can sort the list of log sources to display only the relevant items.
Procedure
1. In the left hand part of the configuration panel, click the + Add Filter button.Two drop-down list boxes are displayed.
2. In the first drop down list, select the type of information you want to filter. The options are:Enabled, Name, Forwarder, Type, Collection or Tags.
3. Based on the type, select the relevant values.
36
TIBCO LogLogic® Universal Collector User's Guide
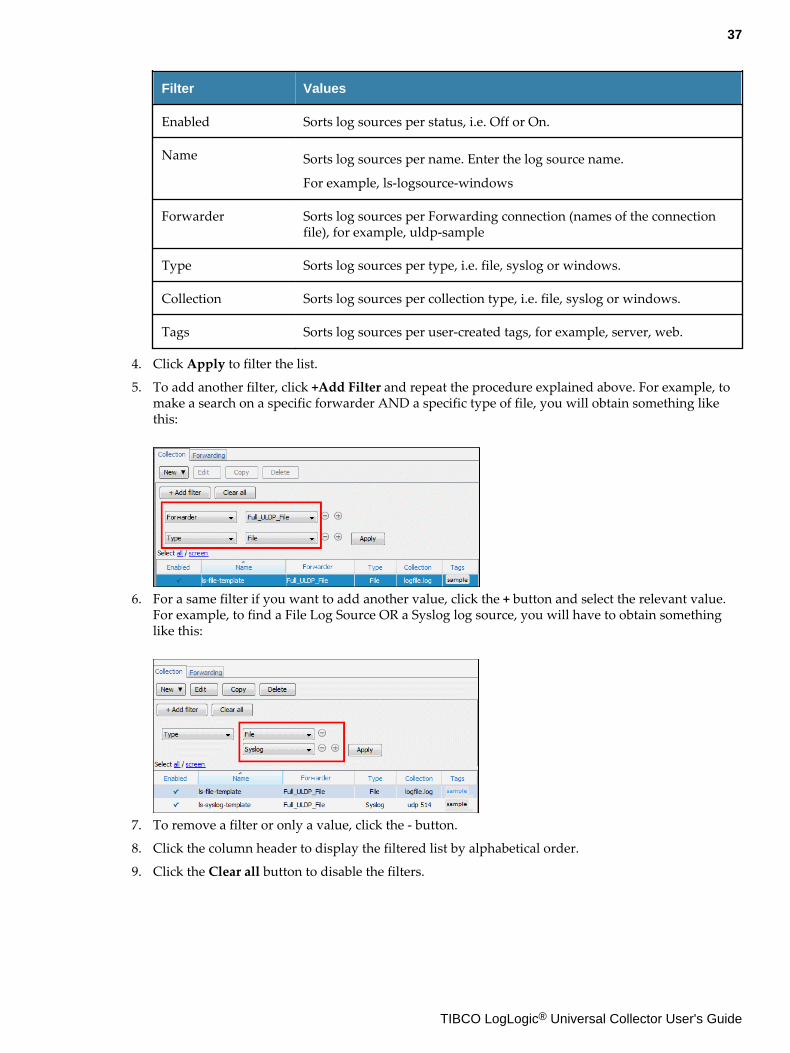
Filter Values
Enabled Sorts log sources per status, i.e. Off or On.
Name Sorts log sources per name. Enter the log source name.
For example, ls-logsource-windows
Forwarder Sorts log sources per Forwarding connection (names of the connectionfile), for example, uldp-sample
Type Sorts log sources per type, i.e. file, syslog or windows.
Collection Sorts log sources per collection type, i.e. file, syslog or windows.
Tags Sorts log sources per user-created tags, for example, server, web.
4. Click Apply to filter the list.
5. To add another filter, click +Add Filter and repeat the procedure explained above. For example, tomake a search on a specific forwarder AND a specific type of file, you will obtain something likethis:
6. For a same filter if you want to add another value, click the + button and select the relevant value.For example, to find a File Log Source OR a Syslog log source, you will have to obtain somethinglike this:
7. To remove a filter or only a value, click the - button.
8. Click the column header to display the filtered list by alphabetical order.
9. Click the Clear all button to disable the filters.
37
TIBCO LogLogic® Universal Collector User's Guide

Forwarding Logs
UC collects the information from various types of log sources and forwards them to an LMI server.
The logs are forwarded to an LMI server via the proprietary ULDP protocol or to a Syslog server usingUDP or TCP protocols for the communication between the UC and the LMI server or syslog server.
You must select the UDP when forwarding syslog to LMI server.
A file is identified by a file identifier usually a string representing the path name of the file in the sourcedevice.
Creating a Syslog TCP or UDP ConnectionYou can add up to 10 Forwarding Connections.
Procedure
1. Open the UC Console and click the Forwarding tab.
2. Select the New > TCP (Syslog) or UDP (Syslog) menu.
3. In the General section, modify the name of the connection.
4. In the Security section, make sure the button is set to OFF.
5. In the Forwarding section, modify the following values:
Forwarding
Address Enter the IPv4 / IPv6 address or host name of the TCP /UDP server.
Port Enter a port number. (Default: 514)
[TCP Only] TestConnection
Test the connection between UC and the server.
Message Format
38
TIBCO LogLogic® Universal Collector User's Guide

Facility Select the facility to be applied to the log:
0 - kernel messages
1 - user-level messages
2 - mail system
3 - system daemons
4 - security/authorization messages (note 1)
5 - messages generated internally by syslog
6 - line printer subsystem
7 - network news subsystem
8 - UUCP subsystem
9 - clock daemon (note 2)
10 - security/authorization messages (note 1)
11 - FTP daemon
12 - NTP subsystem
13 - log audit (note 1)
14 - log alert (note 1)
15 - clock daemon (note 2)
16 - local use 0 (local0)
17 - local use 1 (local1)
18 - local use 2 (local2)
19 - local use 3 (local3)
20 - local use 4 (local4)
21 - local use 5 (local5)
22 - local use 6 (local6)
23 - local use 7 (local7)
Severity Select the severity to be applied to the log:
0 - Emergency: system is unusable
1 - Alert: action must be taken immediately.
2 - Critical: critical conditions.
3- Error: error conditions.
4 - Warning: warning conditions.
5 - Notice: normal but significant condition.
6 - Informational: informational messages.
7 - Debug: debug-level messages.
Custom Header Indicate the header of the message.
Advanced
39
TIBCO LogLogic® Universal Collector User's Guide
[TCP only] Sessiontimeout
Enter the session timeout (in seconds)
UC Binding interface If there are multiple network interfaces, enter the IP address that theUC uses when establishing the connection.
Default: 0.0.0.0
6. In the Message Buffering section, modify the following values:
Message Buffering
Buffer size (MB) Enter the buffer size in megabytes. (Default: 100 MB)
7. Click OK to save and close the screen.The list of connections is updated.
Creating an LMI Connection
Procedure
1. Open the UC Console and click the Forwarding tab.
2. Select the New > ULDP to open the LMI Connection tab.
3. In the General section, modify the name of the connection.
4. In the Security section, make sure the button is set to OFF.
5. In the Forwarding section, modify the following values:
Forwarding
Address Enter the IPv4 / IPv6 address or host name of the LMI.
Port Select the LMI port or enter a port.
- 5514 for connection with LMI 5.0 and 5.1 (default value)
- 5515 for secured connection with LMI 5.0 or later (configurable inLMI)
- 5516 for connection with LMI 5.2 or later
Test connection Test the connection between UC and LMI.
Forward UC InternalLogs
Define whether the UC internal logs are sent to the remote LMI byselecting ON.
Compress Messages If the connection is slow, you can configure the logs to be compressedfor a more rapid flow of data. Define whether the logs arecompressed by selecting ON.
Advanced
40
TIBCO LogLogic® Universal Collector User's Guide

Reconnection Enter the reconnection frequency to the LMI (in seconds)
Session timeout Enter the session timeout to LMI (in seconds)
UC Binding interface If there are multiple network interfaces, enter the IP address that UCuses when establishing the connection to LMI.
Default: 0.0.0.0
6. In the Message Buffering part of the screen, modify the following values:
Message Buffering
Buffer size (MB) Enter the buffer size in megabytes. (Default: 100 MB)
Scheduled Forwarding Define the period of time during which the logs are sent to the LMI(time window) by selecting ON.
Schedule forwarding is not recommended for pulling largefiles via remote file collection.
Daily Start Define the beginning of the time window. If sendingWindow = truein the above parameter, define the time (hour and minute) when theevent starts to be sent (default value = 23:00)
Daily Stop Define the end of the time window. If you set sendingWindow = truein the above parameter, define the time (hour and minute) when theevent stops to be sent (default value = 05:00).
7. Click OK to save and close the screen.The list of LMI connections is updated.
Creating a Connection in Authentication and or Encryption ModeThe information is delivered through the communication between the UC and LMI server or syslogserver can be encrypted.
To secure communications between the UC and LMI or syslog servers, the following information willbe checked: LMI or a syslog server and UC identities and encryption of communication between UCand LMI or a syslog server (public and private key mechanism).
If you need to use AES192 or AES256 key, you must install the Java Cryptography Extension (JCE)Unlimited Strength Jurisdiction Policy Files 7 package from Oracle. The 2 JAR files included in thispackage must be loaded into the lib/security directory of the Java instance that UC uses in order toutilize AES192 or AES256 key ciphers. If you do not have JCE installed, then the UC Console will failwhen you try to import an AES192 or AES256 key.
As a requirement, you need a PKI and OpenSSL or another compatible tool.
This section is intended for advanced users with the necessary encryption and secure communicationskills.
41
TIBCO LogLogic® Universal Collector User's Guide
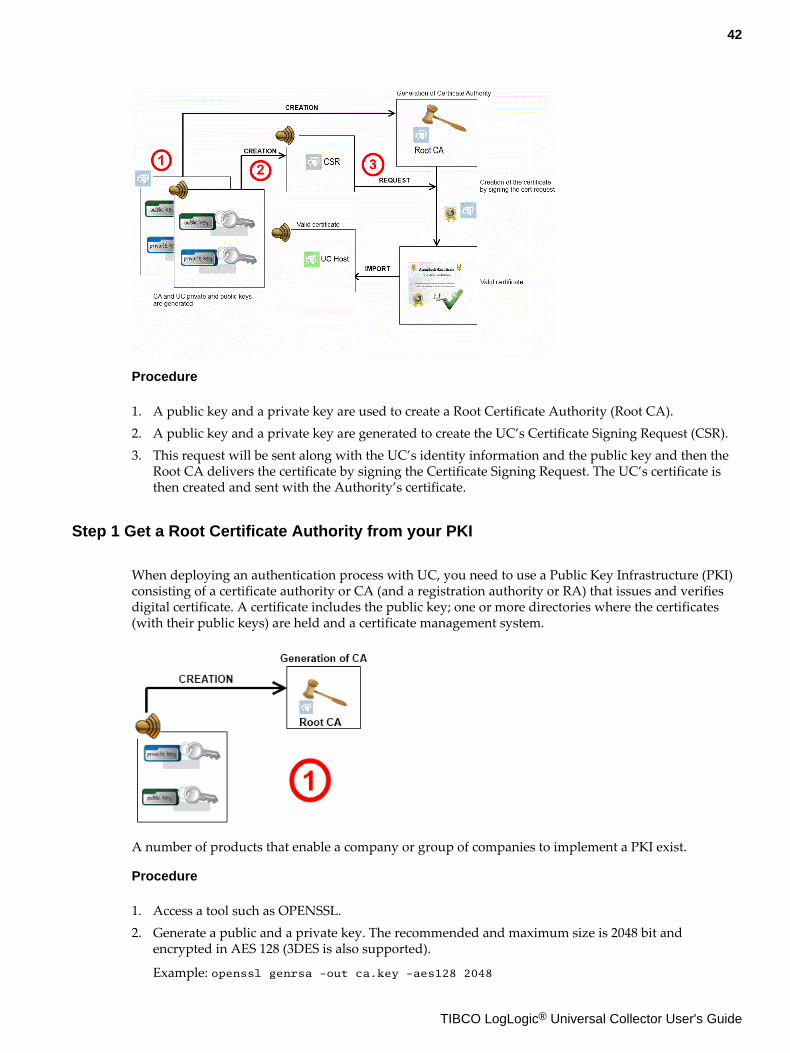
Procedure
1. A public key and a private key are used to create a Root Certificate Authority (Root CA).2. A public key and a private key are generated to create the UC’s Certificate Signing Request (CSR).3. This request will be sent along with the UC’s identity information and the public key and then the
Root CA delivers the certificate by signing the Certificate Signing Request. The UC’s certificate isthen created and sent with the Authority’s certificate.
Step 1 Get a Root Certificate Authority from your PKI
When deploying an authentication process with UC, you need to use a Public Key Infrastructure (PKI)consisting of a certificate authority or CA (and a registration authority or RA) that issues and verifiesdigital certificate. A certificate includes the public key; one or more directories where the certificates(with their public keys) are held and a certificate management system.
A number of products that enable a company or group of companies to implement a PKI exist.
Procedure
1. Access a tool such as OPENSSL.2. Generate a public and a private key. The recommended and maximum size is 2048 bit and
encrypted in AES 128 (3DES is also supported).
Example: openssl genrsa -out ca.key -aes128 2048
42
TIBCO LogLogic® Universal Collector User's Guide

3. Generate the CA (valid for 7305 days)Example: openssl req -new -x509 -days 7305 -key ca.key -out ca.pem
What to do next
Refer to the SSL Certificates HOWTO documentation to know how to create your Certificate Authority:
http://www.gtlib.gatech.edu/pub/linux/docs/HOWTO/other-formats/html_single/SSL-Certificates-HOWTO.html
Step 2 Create a Certificate Signing Request
Prerequisites
You must now generate a Certificate Signing Request in a UC to be able to create a Certificate on aCertificate Authority. You will obtain a file with the *.csr extension.
Using the Internal Tool
The tool is located in <INSTALL_DIR>/tools folder.
Procedure
1. Enter the following command to start the tool:
Windows:cert_mgt.bat
RHEL, SUSE, Solaris:cert_mgt
2. Enter the following command:<script-name> request
3. Enter the command to indicate the file path of the file to be generated. You have three possibilitiesaccording to the type of your certificates.
[ -jks <file path of the generated *.ks containing the private key> ]
[ -p12 <file path of the generated *.p12 certificate containing the private
key> ]
[ -pem <file path of the generated *.pem private key> ]
-csr <file path of the generated Certificate Signing Request>
[ -dn <CSR Distinguished Name> ]
43
TIBCO LogLogic® Universal Collector User's Guide

-pwd <mandatory password for the file containing the private key>
This command generates 2 files containing the private key (i.e. a *.ks or *.p12 or *.pem) and aCertificate Signing Request (CSR).
If it is not specified in the command line, by default, the DN of the CSR is:
CN=<UC-IP>, O=loglogic
For example: cert_mgt request -jks uc.ks -pwd loglogic -csr uc.csr
Using the OpenSSL
You need UC's public and private keys and OpenSSL.
Procedure
1. Generate the public and private keys. The recommended and maximum size is 2048 bit andencrypted in AES 128 (3DES is also supported):openssl genrsa -out uc.key -aes128 2048
2. Create the CSR like:openssl req -new -key uc.key -out uc.csr
What to do next
Refer to the SSL Certificates HOWTO documentation to know how to create your Certificate Authority.
Step 3 Create a Valid UC Certificate using a CA and OpenSSLYou must create the valid Certificate issued by a Certificate Authority in the UC configuration.
Procedure
● Enter the following command:openssl ca -config ”conf_file.txt” -days 730 -in uc.csr -out uc.pem -notext
In this example, a file has been defined (conf_file.txt). If no configuration file has beenspecified, then OpenSSL takes /usr/local/ssl/openssl.cnf by default. Make sure thatthe path /usr/local/ssl/openssl.cnf is created and configured in advance.
You will get a *.pem certificate that contains the UC’s certificate.
Refer to the SSL Certificates HOWTO documentation to know how to create your CertificateAuthority.
44
TIBCO LogLogic® Universal Collector User's Guide

Step 4 Import the Certificate into *.ks or *.p12This step is not required if you work with a *.pem certificate.
Prerequisites
This command allows you to import the UC certificate and/or the root CA certificate in a *.ks or the UCcertificate in a *.p12 certificate.
Procedure
● Using the CLI provided by LogLogic, enter the command to format the file:
<script-name> import
[ -jks <file path of the *.ks> ]
[ -p12 <file path of the *.p12 certificate> ]
-pwd <mandatory password>
[ -cert <file path of the UC certificate in *.pem format> ]
[ -rootcert <file path of the root CA certificate in *.pem format> ]
This command imports the UC certificate and/or the root CA.
You can obtain a *.ks certificate file that contains a Certificate Authority, private key and theUC’s certificate or a *.p12 certificate binary code, which contains the UC’s certificate and aprivate key encrypted by a passphrase.
For example: cert_mgt import -jks uc.ks -pwd loglogic -cert uc-cert.pem -rootcertca.pem
Step 5 Configure the Forwarding ProcessIf the connection is authenticated or encrypted, the necessary cryptographic elements must beimported.
The three supported formats are:
● *.ks--A keystore in the JKS format containing the root CA, the private key and the associated UCcertificate.
Associated configuration elements are a keystore filename and a password for the keystore(mandatory)
● *.p12--A keystore in the PKCS#12 format, containing the private key and the associated UCcertificate and the root CA (in *.pem format) as a separate file.
Associated configuration elements are a PKCS#12 (.p12) file, a password protected PKCS#12 file(mandatory) and a root CA file.
45
TIBCO LogLogic® Universal Collector User's Guide
● *.pem--A private key (encrypted or not), a certificate to be used by UC in PEM format, a root CAcertificate in PEM format. Associated configuration elements are a private key file, a password if theprivate key is encrypted (mandatory), a UC certificate file, a root CA certificate file.
The Certificate Authority’s certificate allows to check the validity of the LMI or syslog server’scertificate towards the UC.
The UC Valid certificate allows you to identify the UC from the LMI.
The Certificate Authority must be the one you previously used to validate the LMI or syslog servercertificate.
Procedure
1. Open the UC Console and click the Forwarding tab.
2. Click the New Connection button to open the Edition tab.
3. In the Description part of the screen, modify the name of the LMI or syslog server connection.
4. In the Security part of the screen, activate the following options:
Value Description
Authentication Activates the authenticated communication when the button isON
Encryption Activates the encrypted communication when the button is ON
Certificate Displays the certificate imported in UC
Initialize Secured Connection Displays the screens to import the certificates
For *.ks
Procedure
1. In the Secured Connection Initialization screen, select JKS and click Continue.
2. In the Java Keystore section, click Import and select the UC JKS Certificate in *.jks format.
3. Enter the certificate password and click OK.
4. Click OK to close the window.The screen is automatically updated.
For *.p12
Procedure
1. In the Secured Connection Initialization screen, select P12 and click Continue.
2. In the UC Certificate section, click Import and select the UC PKCS#12 Certificate in *.p12 format.
3. Enter the certificate password and click OK.
46
TIBCO LogLogic® Universal Collector User's Guide

4. In the Root CA Certificate section, click Import and select the root CA certificate stored in *.p12format.
5. Click OK to close the window.The screen is automatically updated.
For *.pem
Procedure
1. In the Secured Connection Initialization screen, select PEM and click Continue.
2. In the UC Certificate section, click Import and select the UC Certificate in *.pem format.
3. In the new small window, click Import Private Key and select the file in .pem format.
4. Enter the private key password and click OK.
5. In the Root CA Certificate section, click Import and select the root CA certificate stored in *.pemformat.
6. Click OK to close the window.The screen is automatically updated.
Configure the Forwarding Process
Procedure
1. In the Forwarding part of the screen, modify the following values:
Forwarding
Address Enter the IPv4 / IPv6 address or host name of the LMI.
Port Select the LMI port or enter a port.
- 5514 for connection with LMI 5.0 and 5.1 (default value)
- 5515 for secured connection with LMI 5.0 or later (configurable inLMI)
- 5516 for connection with LMI 5.2 or later
Test connection Test the connection between UC and LMI.
Forward UC InternalLogs
Define whether the UC internal logs are sent to the remote LMI byselecting ON.
Compress Messages If the connection is slow, you can configure the logs to be compressedfor a more rapid flow of data. Define whether the logs arecompressed by selecting ON.
Advanced
47
TIBCO LogLogic® Universal Collector User's Guide

Reconnection Enter the reconnection frequency to the LMI (in seconds)
Session timeout Enter the session timeout to LMI (in seconds)
UC Binding interface If there are multiple network interfaces, enter the IP address that theUC uses when establishing the connection to LMI.
Default: 0.0.0.0
2. In the Message Buffering part of the screen, modify the following values:
Message Buffering
Buffer size (MB) Enter the buffer size in megabytes. (Default: 100 MB)
Scheduled Forwarding Define the period of time during which the logs are sent to the LMI(time window) by selecting ON.
Daily Start Define the beginning of the time window. If sendingWindow = truein the above parameter, define the time (hour and minute) when theevent starts to be sent (Default: 23:00)
Daily Stop Define the end of the time window. If you set sendingWindow = truein the above parameter, define the time (hour and minute) when theevent stops to be sent (Default: 05:00).
3. Click OK to save and close the screen.The list of LMI connections is updated.
The configuration of UC has finished. When the certificate has expired, you must followthe procedure from the beginning. You can use the same CSR you used if you have storedit earlier.
Step 6 Enable Secure Connection
As for LMI, two certificates are needed:
● The root CA can be retrieved from your certificate authority server or from your organization's PKIadministrators. It will check the UC’s identity.
● A certificate signing request or CSR. In order to generate the signed certificate, manual steps arerequired unlike UC.
48
TIBCO LogLogic® Universal Collector User's Guide

Procedure
1. Using the LogLogic CLI, create a Certificate Signing Request:
system secureuldp create csr
This will generate a private key as well as the CSR.
The CSR is the value between the Begin Certificate and End Certificate lines.
2. If you have already created your CSR and just want to display it again, enter:system secureuldp show csr
3. Copy the CSR and sign the CSR. Once the CA signs the CSR, it will generate a signed certificate.Alternatively, you can create a CSR as per your desired option, sign it, and then import thecertificate using the Administration > SSL certificate > Certificate Import menu.
4. Install this signed certificate back to the LMI Appliance by entering:system secureuldp install certificate
5. Paste the certificate in. Make sure to include the Begin Certificate and End Certificate lines whenpasting it in
6. Install the root CA certificate which will be the common certificate used for validation between theLMI and UC. To do so, enter:system secureuldp install rootCA
7. Paste it in the root CA certificate.
8. You may need to restart the ULDP collector:mtask -s engine_uldpcollector stop ; mtask -s engine_uldpcollector start
9. Once you have created all the certificates, you must go to Administration > System Settings >General and check the Yes radio button associated with Enable Secure ULDP.
Result
The communication between UC and LMI is now secured.
49
TIBCO LogLogic® Universal Collector User's Guide
Managing the list of ForwardingsYou can easily copy or delete Forwardings.
Prerequisites
Label/Button Description
Name Label of the configuration
Address IPv4 / IPv6 address or host name of the server
Port Forwarding port
[ULDP only] UCLogs
Indicates whether the UC internal logs are sent to the remote LMI or not
[ULDP only]Comp.
Indicates whether the logs are compressed or not
Auth. Communication authenticated or not
Encrypt Communication encrypted or not
Buffer (MB) Buffer size in megabytes (100 MB - default value, 50 GB - maximum value)
[ULDP only]Sched.
Indicate if the messages are sending to the server during a specified timewindow
New Allows you to add new Forwardings to the list (Maximum 10)
Edit Allows you to edit Forwardings one by one
Copy Allows you to copy Forwardings to the list
Delete Allows you to delete Forwardings from the list
Copying a ForwardingYou can copy a Forwarding one by one. The copied Forwardings keep the same configuration and thesame name with the _Copy suffix.
Procedure
1. Select the Forwarding that you want to copy.
2. Click Copy.The new Forwarding is displayed in the Forwarding list. Double-click on the row to edit or modifythe configuration.
By default, the Forwarding is linked with no Log Source.
50
TIBCO LogLogic® Universal Collector User's Guide

Deleting a ForwardingYou can delete Forwardings one by one.
Procedure
1. Make sure that the Log sources linked to the Forwarding are removed or disabled.
2. Select a row from the list and click Delete. Click Yes to confirm.The list is automatically refreshed.
51
TIBCO LogLogic® Universal Collector User's Guide

Monitoring UC Activities
A UCMon tool is also available to monitor the internal process of the UC.
This section provides instructions for quickly checking that UC is working properly, troubleshootingUC, Forwarding connection configuration, and monitoring the activities of the different log sources
Starting UCMon Tool
To start UCMon from UC Console
Procedure
● Open the UC Console and go to Manage Configuration > Monitor Active Configuration.
To start UCMon manually
Procedure
● Open the UC installation folder and launch the executable file located in the tools folder:
uc_monitor.exe (Windows) also available by clicking on the uc_monitor shortcut
uc_monitor (RHEL, SUSE or Solaris)
The UCMon is displayed.
Summary Screen
Label Description
Uptime Time when the UC has been started
Current Time Current date and time are automatically refreshed
Totals for the UC
Collected Total number of collected message for a given period of time
Between brackets, number of collected message per second
Filtered Total number of filtered message for a given period of time
Between brackets, number of filtered message per second
52
TIBCO LogLogic® Universal Collector User's Guide

Label Description
To Buffer Total number of forwarded message for a given period of time
Between brackets, number of forwarded message per second
UC Mem Current memory used / Total memory (Java Heap Size)
Config Current configuration name
Forwarding Connections and Log Sources
All Forwarding Conn. Forwarding connection status
● Active: the Forwarding connection works correctly● Idle: Forwarding connection is OK but the connection is NOT
established● Error: there is an error on the Forwarding connection● Off: indicates when the Forwarding connection is not used● Total: total number of enabled Forwarding connections
All Log Sources/Syslog/Windows Event Log/RTFile/Remote File
Log Sources status
● Active: the Log Sources are answering correctly● Idle: Log Source not active at the moment● Error: there is an error on the Log Source● Off: indicates when a Log Source is inactive● Total: total number of Log Sources
Interactive menu
< C > Changes the time value of the “Totals for UC” metrics.
Each time you enter C, the value switches as follows:
● current value● 1 minute● 5 minutes● 15 minutes● 24 hours● time when the UCMon has been started
< M > Displays additional information
< 1 > Displays the Summary view
< 2 > Displays the Status view
53
TIBCO LogLogic® Universal Collector User's Guide
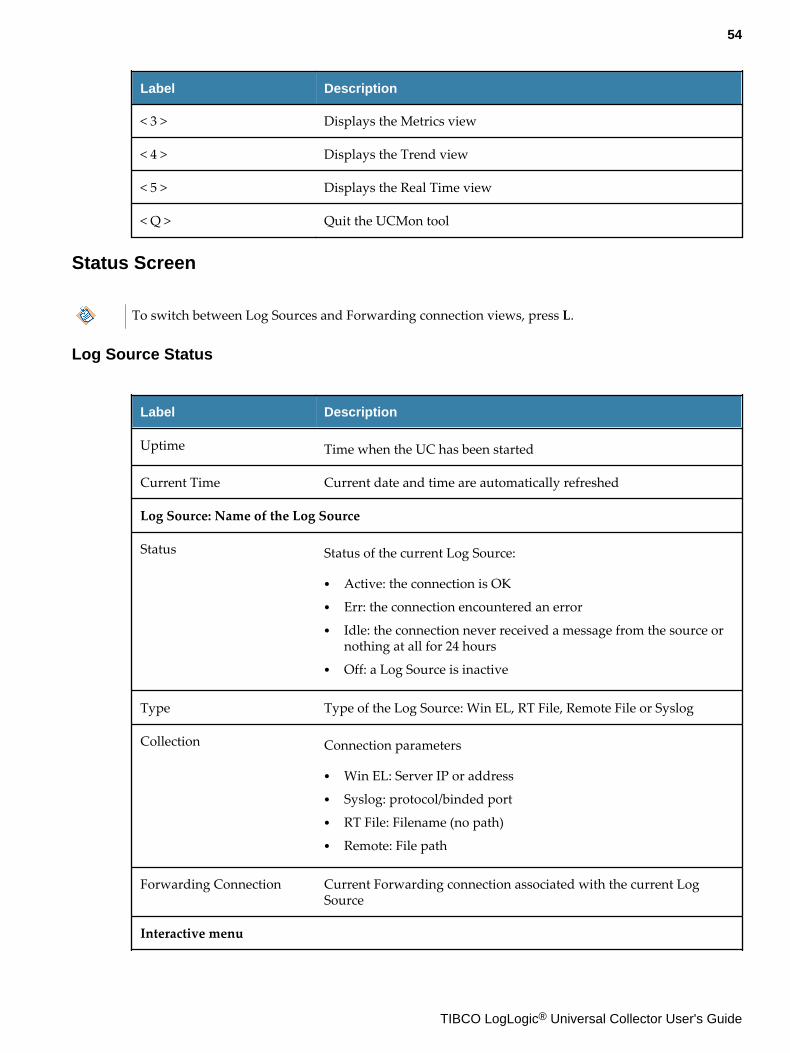
Label Description
< 3 > Displays the Metrics view
< 4 > Displays the Trend view
< 5 > Displays the Real Time view
< Q > Quit the UCMon tool
Status Screen
To switch between Log Sources and Forwarding connection views, press L.
Log Source Status
Label Description
Uptime Time when the UC has been started
Current Time Current date and time are automatically refreshed
Log Source: Name of the Log Source
Status Status of the current Log Source:
● Active: the connection is OK● Err: the connection encountered an error● Idle: the connection never received a message from the source or
nothing at all for 24 hours● Off: a Log Source is inactive
Type Type of the Log Source: Win EL, RT File, Remote File or Syslog
Collection Connection parameters
● Win EL: Server IP or address● Syslog: protocol/binded port● RT File: Filename (no path)● Remote: File path
Forwarding Connection Current Forwarding connection associated with the current LogSource
Interactive menu
54
TIBCO LogLogic® Universal Collector User's Guide
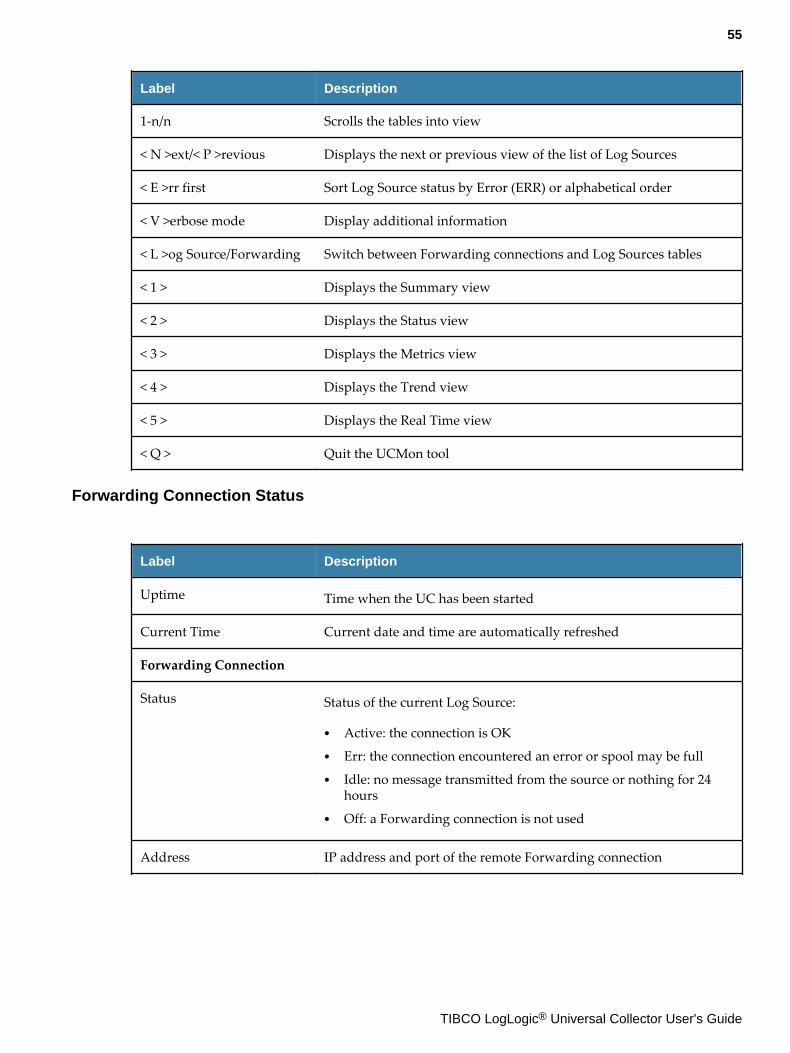
Label Description
1-n/n Scrolls the tables into view
< N >ext/< P >revious Displays the next or previous view of the list of Log Sources
< E >rr first Sort Log Source status by Error (ERR) or alphabetical order
< V >erbose mode Display additional information
< L >og Source/Forwarding Switch between Forwarding connections and Log Sources tables
< 1 > Displays the Summary view
< 2 > Displays the Status view
< 3 > Displays the Metrics view
< 4 > Displays the Trend view
< 5 > Displays the Real Time view
< Q > Quit the UCMon tool
Forwarding Connection Status
Label Description
Uptime Time when the UC has been started
Current Time Current date and time are automatically refreshed
Forwarding Connection
Status Status of the current Log Source:
● Active: the connection is OK● Err: the connection encountered an error or spool may be full● Idle: no message transmitted from the source or nothing for 24
hours● Off: a Forwarding connection is not used
Address IP address and port of the remote Forwarding connection
55
TIBCO LogLogic® Universal Collector User's Guide

Label Description
S C A E Current Forwarding connection settings:
● S: Scheduled● C: Compression● A: Authentication● E: Encryption
Usage Spool load of the current Forwarding connection in %
Interactive menu
1-n/n Scrolls the tables into view
< N >ext/< P >revious Displays the next or previous view of the list of Forwardingconnections
< E >rr first Sort Log Source status by Error (ERR) or alphabetical order
< V >erbose mode Display additional information
< L >og Source/Forwarding Switch between Forwarding connections and Log Sources tables
< 1 > Displays the Summary view
< 2 > Displays the Status view
< 3 > Displays the Metrics view
< 4 > Displays the Trend view
< 5 > Displays the Real Time view
< Q > Quit the UCMon tool
Metrics Screen
To switch between Log Sources and Forwarding connection views, press L.
Log Source Metrics
To switch between Log Sources and Forwarding connection views, press L.
Label Description
Uptime Time when the UC has been started
56
TIBCO LogLogic® Universal Collector User's Guide
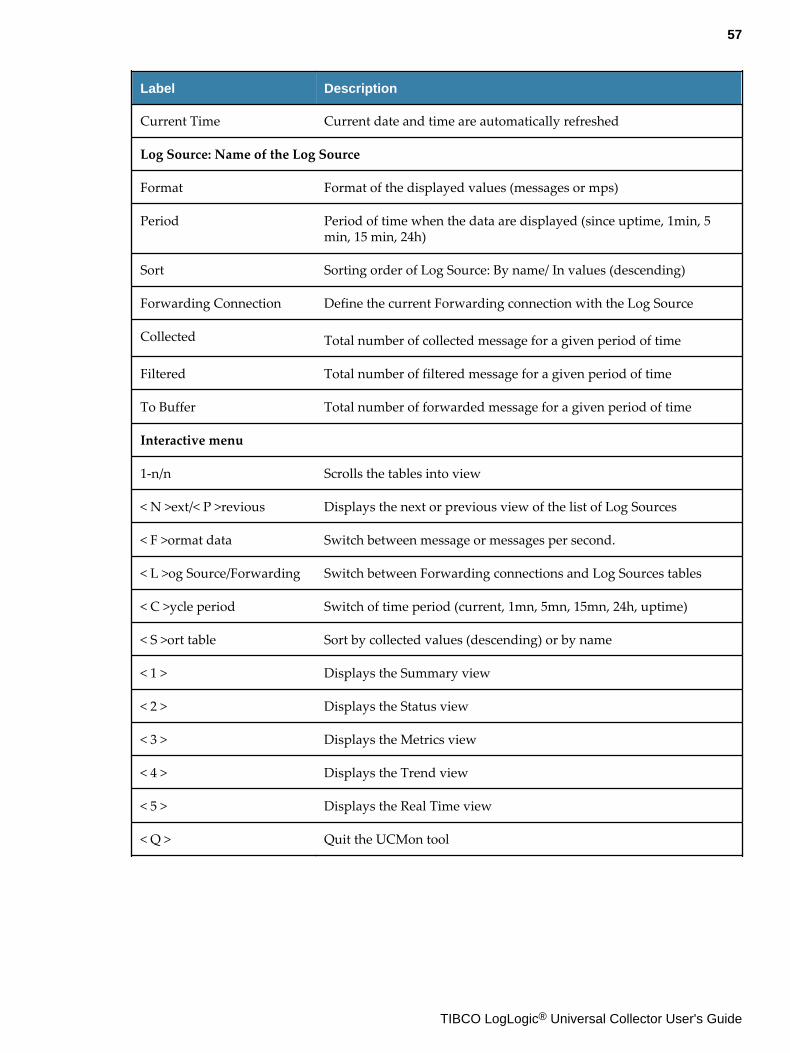
Label Description
Current Time Current date and time are automatically refreshed
Log Source: Name of the Log Source
Format Format of the displayed values (messages or mps)
Period Period of time when the data are displayed (since uptime, 1min, 5min, 15 min, 24h)
Sort Sorting order of Log Source: By name/ In values (descending)
Forwarding Connection Define the current Forwarding connection with the Log Source
Collected Total number of collected message for a given period of time
Filtered Total number of filtered message for a given period of time
To Buffer Total number of forwarded message for a given period of time
Interactive menu
1-n/n Scrolls the tables into view
< N >ext/< P >revious Displays the next or previous view of the list of Log Sources
< F >ormat data Switch between message or messages per second.
< L >og Source/Forwarding Switch between Forwarding connections and Log Sources tables
< C >ycle period Switch of time period (current, 1mn, 5mn, 15mn, 24h, uptime)
< S >ort table Sort by collected values (descending) or by name
< 1 > Displays the Summary view
< 2 > Displays the Status view
< 3 > Displays the Metrics view
< 4 > Displays the Trend view
< 5 > Displays the Real Time view
< Q > Quit the UCMon tool
57
TIBCO LogLogic® Universal Collector User's Guide

Forwarding Connection Metrics
Label Description
Uptime Time when the UC has been started
Current Time Current date and time are automatically refreshed
Forwarding Connection
Format Format of the displayed values (messages or mps)
Period Period of time when the data are displayed (since uptime, 1min, 5min, 15 min, 24h)
Sort Sorting order of Forwarding connection: By name/ In values(descending)
IN Input log rate
OUT Number of forwarded logs coming out from the spool
Usage Current Forwarding connection spool load
Interactive menu
1-n/n Scrolls the tables into view
< N >ext/< P >revious Displays the next or previous view of the list of Log Sources
< F> omat data Switch between message or messages per seconds
< L >og Source/Forwarding Switch between Forwarding connections and Log Sources tables
< C >ycle period Switch of time period (current, 1mn, 5mn, 15mn, 24h, uptime)
< S >ort table Sort by IN (descending) or by name
< 1 > Displays the Summary view
< 2 > Displays the Status view
< 3 > Displays the Metrics view
< 4 > Displays the Trend view
< 5 > Displays the Real Time view
< Q > Quit the UCMon tool
58
TIBCO LogLogic® Universal Collector User's Guide

Trends Screen
To switch between Log Sources and Forwarding connection views, press L.
Log Source Trends
Label Description
Uptime Time when the UC has been started
Current Time Current date and time are automatically refreshed
Log Source: Name of the Log Source
Format Format of the displayed values (messages or mps)
Display Type of display. The possible values are:
● Collected● Filtered● Forwarded
Forwarding Conn. Name of the Forwarding connection
current, 1min, 5min, 1h,24h, since uptime
Log rate over different time periods:
● n/a: value not available
Interactive menu
1-n/n Scrolls the tables into view
< N >ext/< P >revious Displays the next or previous view of the list of Log Sources
< F >ormat data Switch between message or messages per seconds
< L >og Source/Forwarding Switch between Forwarding connections and Log Sources tables
< D >isplay Displays the values for different probes:
Forwarding connection data type: IN or OUT
Log Source data type (Collected, Filtered, Forwarded)
< 1 > Displays the Summary view
< 2 > Displays the Status view
59
TIBCO LogLogic® Universal Collector User's Guide

Label Description
< 3 > Displays the Metrics view
< 4 > Displays the Trend view
< 5 > Displays the Real Time view
< Q > Quit the UCMon tool
Forwarding Connection Trends
Label Description
Uptime Time when the UC has been started
Current Time Current date and time are automatically refreshed
Forward Connection
Format Format of the displayed values (messages or mps)
Display Type of display. The possible values are:
● IN● OUT
current, 1min, 5min, 1h,24h, since uptime
Log rate over different time periods:
● n/a: value not available
Interactive menu
1-n/n Scrolls the tables into view
< N >ext/< P >revious Displays the next or previous Forwarding connection and LogSources
< F >ormat data Switch between message or messages per seconds
< L >og Source/Forwarding Switch between Forwarding connections and Log Sources tables
< D >isplay Displays the values for different probes:
Forwarding connection data type: IN or OUT
Log Source data type (Collected, Filtered, Forwarded)
< 1 > Displays the Summary view
< 2 > Displays the Status view
60
TIBCO LogLogic® Universal Collector User's Guide

Label Description
< 3 > Displays the Metrics view
< 4 > Displays the Trend view
< 5 > Displays the Real Time view
< Q > Quit the UCMon tool
RealTime Screen
To switch between Log Sources and Forwarding connection views, press L.
Log Sources RealTime
Label Description
Uptime Time when the UC has been started
Current Time Current date and time are automatically refreshed
Log Source: Name of the Log Source
Display Type of display. The possible values are:
● Collected● Filtered● Forwarded
current, 1min, 5min, 1h,24h, since uptime
Log rate over different time periods:
● n/a: value not available
Interactive menu
1-n/n Scrolls the tables into view
< N >ext/< P >revious Displays the next or previous Forwarding connection and LogSources
< L >og Source/Forwarding Switch between Forwarding connections and Log Sources tables
< D >isplay Displays the values for different probes:
Forwarding connection data type: IN or OUT
Log Source data type (Collected, Filtered, Forwarded)
61
TIBCO LogLogic® Universal Collector User's Guide

Label Description
< 1 > Displays the Summary view
< 2 > Displays the Status view
< 3 > Displays the Metrics view
< 4 > Displays the Trend view
< 5 > Displays the Real Time view
< Q > Quit the UCMon tool
Forwarding Connection RealTime
Label Description
Uptime Time when the UC has been started
Current Time Current date and time are automatically refreshed
Forwarding Connection
Display Type of display. The possible values are:
● IN● OUT
current, 1min, 5min, 1h,24h, since uptime
Log rate over different time periods:
● n/a: value not available
Interactive menu
1-n/n Scrolls the tables into view
< N >ext/< P >revious Displays the next or previous Forwarding connection and LogSources
< L >og Source/Forwarding Switch between Forwarding connections and Log Sources tables
< D >isplay Displays the values for different probes:
Forwarding connection data type: IN or OUT
Log Source data type (Collected, Filtered, Forwarded)
< 1 > Displays the Summary view
62
TIBCO LogLogic® Universal Collector User's Guide
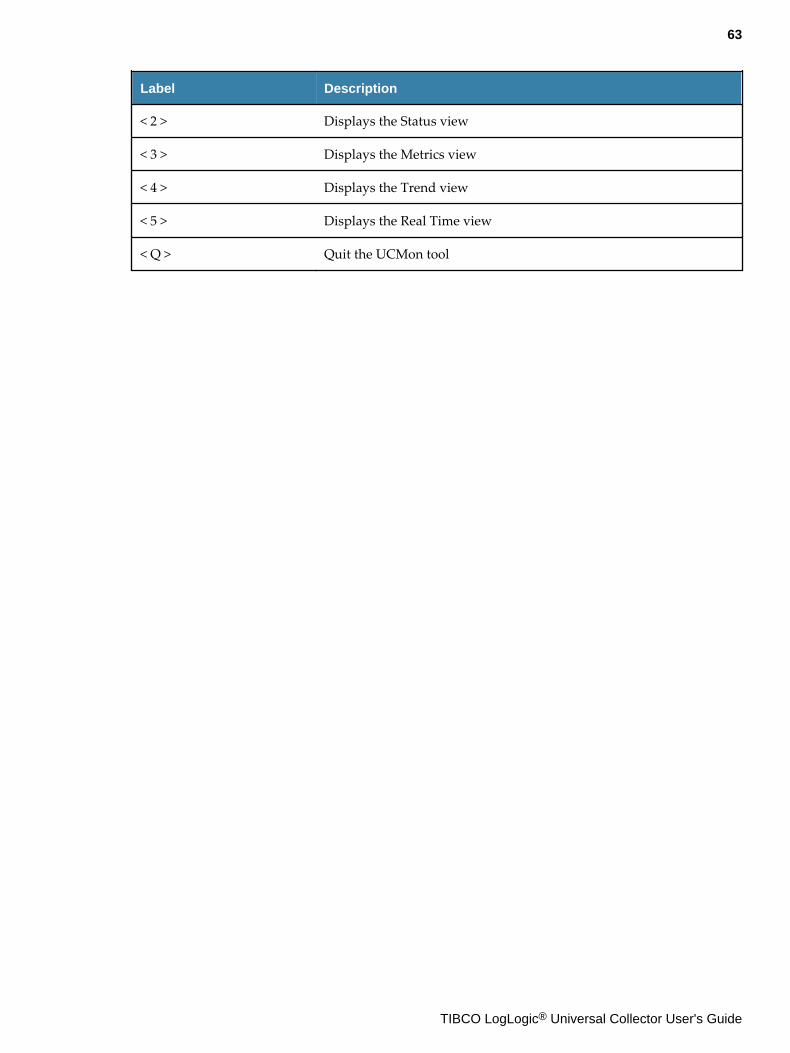
Label Description
< 2 > Displays the Status view
< 3 > Displays the Metrics view
< 4 > Displays the Trend view
< 5 > Displays the Real Time view
< Q > Quit the UCMon tool
63
TIBCO LogLogic® Universal Collector User's Guide

Command Line Interface
The Command Line Interface (CLI) interacts with the local Universal Collector.
You can make a configuration active and reload the current configuration, check the currentconfiguration, manage the security certificates, encrypt password or import several Log Sources in arow.
To start a Command Line Interface, open a shell into the following path:
Operating System CLI
Windows C:\Program Files\LogLogic\Universal Collector\tools\
RHEL, SUSE, Solaris /opt/LogLogic/Universal_Collector/tools/
The extension of the file to execute in order to run the commands differs on each UC supported OS:
Windows: uc_*.bat
RHEL, SUSE, Solaris: no extension
All the samples are given for RHEL, SUSE and Solaris environments. For Windows environment, usethe same command with *.bat.
cert_mgt Manage the Security Certificates
UC does not have to be started.
Goal Syntax Options
Request for *.pem cert_mgt request -pem <certfile> -csr
<fileresult> -pwd <password>
Request for *.ks cert_mgt request -jks <file.ks> -pwd
<password> -csr <fileresult.csr>
Request for *.p12 cert_mgt request -p12 <file.p12> -pwd
<password> -csr <fileresult.csr>
Import for *.ks cert_mgt import -jks <file.ks> -pwd
<password> -cert <certToImport> -rootcert
<rootcertificate>
Import for *.p12 cert_mgt import -p12 <file.p12> -pwd
<password> -cert <certToimport>
Get help on thecertificates
cert_mgt
cert_mgt request
cert_mgt import
-h
64
TIBCO LogLogic® Universal Collector User's Guide

Goal Syntax Options
Get information onthe tool version
cert_mgt -v <nameofconf>
uc_checkConf Check the Current Configuration
UC must be started.
Goal Syntax Options
Indicate validity ofthe configurationand displayspotential errors andwarnings
uc_checkConf -ucc <nameofconf>
Get help on the tool uc_checkConf -h
Indicate the port toconnect to the UC
uc_checkConf -ucc <nameofconf> -p <portnumber>
Get information onthe tool version
uc_checkConf -v
uc_createLogSources Import and Create Several Log Sources at a time
UC does not have to be started.
Goal Syntax Options
Indicate the type ofLog Sources toimport (WindowsEvent Log, syslog,file, remotefile)
uc_createLogSources -t <windows,
syslog, file,
remotefile>
Import a CSV filewith Log Sourceinformation tocreate a Log Source
uc_createLogSources -in <pathname>
Indicate the *.uccfile where to exportthe Log Sourceinformation
uc_createLogSources -out
<pathname>
65
TIBCO LogLogic® Universal Collector User's Guide
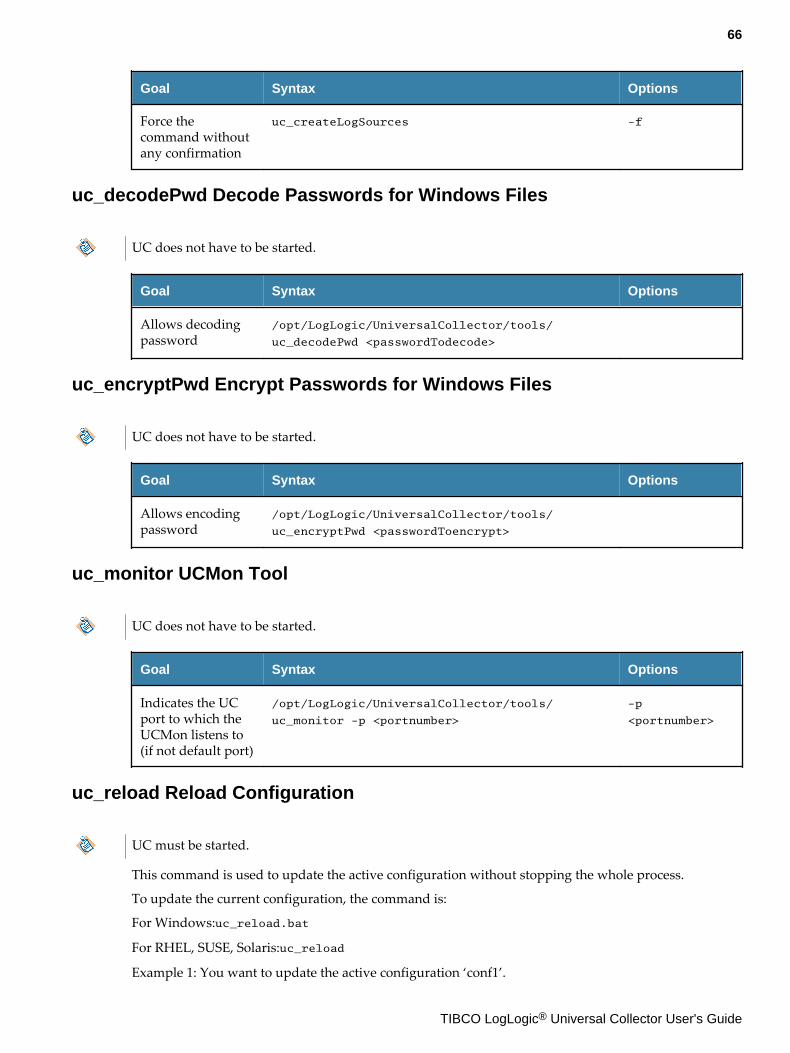
Goal Syntax Options
Force thecommand withoutany confirmation
uc_createLogSources -f
uc_decodePwd Decode Passwords for Windows Files
UC does not have to be started.
Goal Syntax Options
Allows decodingpassword
/opt/LogLogic/UniversalCollector/tools/
uc_decodePwd <passwordTodecode>
uc_encryptPwd Encrypt Passwords for Windows Files
UC does not have to be started.
Goal Syntax Options
Allows encodingpassword
/opt/LogLogic/UniversalCollector/tools/
uc_encryptPwd <passwordToencrypt>
uc_monitor UCMon Tool
UC does not have to be started.
Goal Syntax Options
Indicates the UCport to which theUCMon listens to(if not default port)
/opt/LogLogic/UniversalCollector/tools/
uc_monitor -p <portnumber>
-p
<portnumber>
uc_reload Reload Configuration
UC must be started.
This command is used to update the active configuration without stopping the whole process.
To update the current configuration, the command is:
For Windows:uc_reload.bat
For RHEL, SUSE, Solaris:uc_reload
Example 1: You want to update the active configuration ‘conf1’.
66
TIBCO LogLogic® Universal Collector User's Guide

Enter the command to apply a new configuration to the UC via the CLI located in <INSTALL_DIR>/tools.
\uc_reload.bat
The active configuration is updated.
Example 2: You want to check the impacted process during an update of the configuration.
Enter the following command:
uc_reload.bat -dryrun -vb
Goal Syntax Options
Reload the currentconfiguration toapply changes
uc_reload
There is no need to enter the name of the configuration as it is the current configuration, which isautomatically updated.
uc_saveActiveConfAs Save an Active Configuration
UC does not have to be started.
Goal Syntax Options
Save aconfigurationcurrently in use
uc_saveActiveConfAs <pathname\confname.ucc>
Force to save aconfigurationcurrently in useeven if it alreadyexists
uc_saveActiveConfAs <pathname\confname.ucc> -f
uc_switchTo Make Configuration Active
UC must be started.
Goal Syntax Options
Activate UC Configuration uc_switchTo -ucc <nameofconf>
67
TIBCO LogLogic® Universal Collector User's Guide
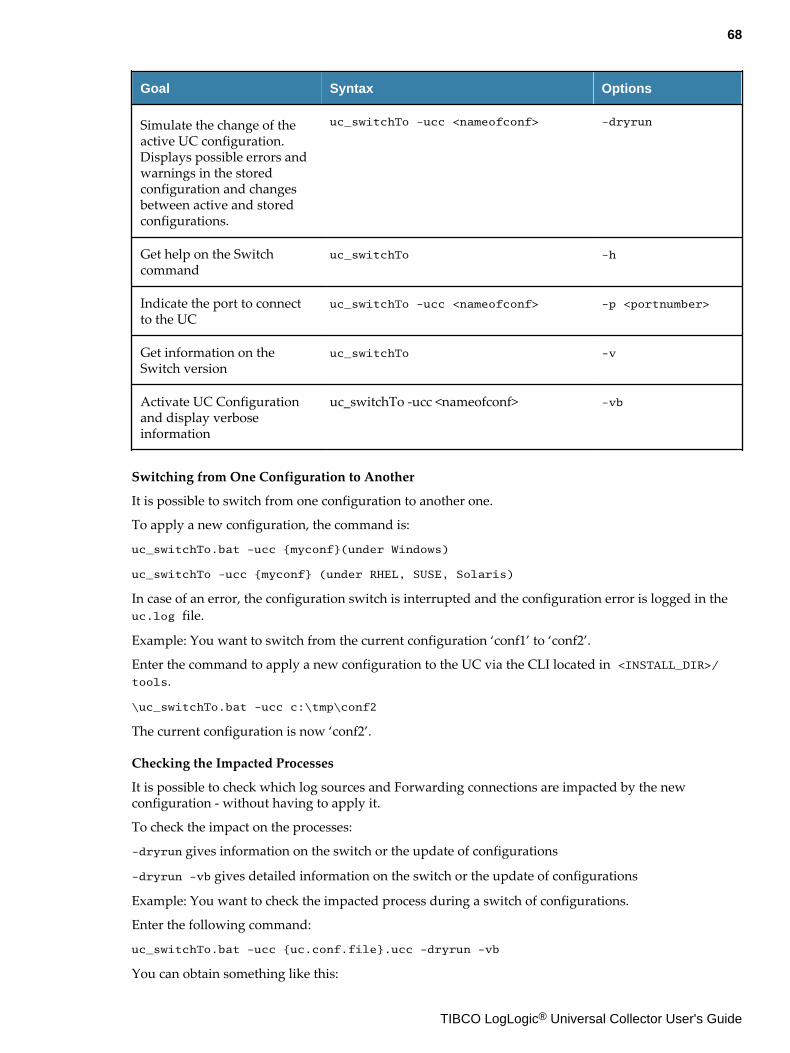
Goal Syntax Options
Simulate the change of theactive UC configuration.Displays possible errors andwarnings in the storedconfiguration and changesbetween active and storedconfigurations.
uc_switchTo -ucc <nameofconf> -dryrun
Get help on the Switchcommand
uc_switchTo -h
Indicate the port to connectto the UC
uc_switchTo -ucc <nameofconf> -p <portnumber>
Get information on theSwitch version
uc_switchTo -v
Activate UC Configurationand display verboseinformation
uc_switchTo -ucc <nameofconf> -vb
Switching from One Configuration to Another
It is possible to switch from one configuration to another one.
To apply a new configuration, the command is:
uc_switchTo.bat -ucc {myconf}(under Windows)
uc_switchTo -ucc {myconf} (under RHEL, SUSE, Solaris)
In case of an error, the configuration switch is interrupted and the configuration error is logged in theuc.log file.
Example: You want to switch from the current configuration ‘conf1’ to ‘conf2’.
Enter the command to apply a new configuration to the UC via the CLI located in <INSTALL_DIR>/tools.
\uc_switchTo.bat -ucc c:\tmp\conf2
The current configuration is now ‘conf2’.
Checking the Impacted Processes
It is possible to check which log sources and Forwarding connections are impacted by the newconfiguration - without having to apply it.
To check the impact on the processes:
-dryrun gives information on the switch or the update of configurations
-dryrun -vb gives detailed information on the switch or the update of configurations
Example: You want to check the impacted process during a switch of configurations.
Enter the following command:
uc_switchTo.bat -ucc {uc.conf.file}.ucc -dryrun -vb
You can obtain something like this:
68
TIBCO LogLogic® Universal Collector User's Guide

3 configuration files checked
1 Log Source config updated
1 SYSLOG Log Source config updated
2 Forwarding connection updated (1 created, 1 removed)
1 LS Config Updated
============================================================
syslog.1 UPDATE
2 Forwarding Config Updated
============================================================
MyCuteLmi2 REMOVE
MyCuteLmi CREATE
WARNING data may not have been collected during the switch configuration operation,
the log sources [syslog.1] may have been impacted
WARNING data contained in Forwarding connection spool of [MyCuteLmi2] may have been
lost if remote Forwarding connection was not available
SUCCESS-[conf3] DryRun mode : No change has been applied to the running
configuration
Limitations
During a switch process, some limitations may occur.
● First case--If you remove or update a Syslog Log Source, you may stop the flow and lose some data.
● Second case--If you switch from a Forwarding connection to another one for a given Syslog LogSource, you may lose a few events. This behavior is rare though.
● Third case--If you remove a Forwarding connection or modify the values of the buffer size while theconnection to the Forwarding connection is not available (for example, network failure), theForwarding connection buffer will try to empty itself by sending the remaining data to theForwarding connection. This will cause the loss of the buffer content during the time-out.
69
TIBCO LogLogic® Universal Collector User's Guide

Sample Configuration Files
In the installation directory, the folder <config-samples> contains the templates you can copy tocreate a complete configuration manually without using UC Console.
● sample-commented.ucc contains documented XML files.
● sample-lite.ucc contains XML files with mandatory tags only without documentation.
● sample.ucc contains XML files with all the tags without documentation.
When you unzip one of them, you obtain:
● uc.xml file: allows the configuration of the UC’s general information.
● log-sources sub-folder: contains documented templates to define a log source, it is what you canfind under the Collection tab in the GUI.
● uldp sub-folder: contains documented templates to define the Forwarding connections. It is whatyou can find under the Forwarding tab or when editing a Forwarding Connection in the GUI.
UC Configuration uc.xml
You must unzip sample.ucc to display the uc.xml file, which contains the information you can findunder the General Settings tab in the GUI.
<!-- This is the Universal Collector configuration file. The uc.xml file contains
the Universal Collector general parameters. --> <uc schemaVersion="2.0">
<!-- Enter the UC configuration label. This value is mandatory -->
<configurationName>sampleCommented</configurationName>
<!-- Enter the UC domainName label. This value is not mandatory -->
<domainName>sampleDomainName</domainName>
<!-- Enter the port used by the UC to get information (for example, status, metrics,
memory used...) via the CLI. Make sure this port is not already used. Otherwise the
UC cannot work. -->
<ucCommunicationPort>1099</ucCommunicationPort>
<!-- If a Syslog Log Source is used, enter general information about the Syslog
collection process -->
<syslogCollection>
<!-- Enter the TCP/UDP parameter and socket buffer size (in kilobytes) - this
parameter applies to all the Syslog Log Sources associated to the UC -->
<socketBufferSize>1024</socketBufferSize>
<!-- UDP parameter and max packet size (in kilobytes) - this parameter applies to
all the Syslog Log Sources associated to the UC -->
<udpMaxPacketSize>8</udpMaxPacketSize>
</syslogCollection>
</uc>
70
TIBCO LogLogic® Universal Collector User's Guide

LMI Connection uldp-sampleCommented.uldp.xml
<!-- The LMI Connection Configuration file defines the properties for connecting the
Universal Collector (UC) with an LMI server. Log source logs are sent from the UC to
the LMI server.
IMPORTANT: this file is linked with the LMI Connection Configuration files and
its name must be composed of:
- an ID, for example, uldp-sample
- an extension, i.e. *.uldp.xml. -->
<uldpConnection schemaVersion="2.0">
<!-- Enter the label of the LMI connection -->
<name>Full_ULDP_File</name>
<!-- Enter the information about the modification of the LMI connection -->
<revision>
<!-- Enter the version number of the current LMI Connection file -->
<version>12</version>
<!-- Enter the name of the LMI connection author -->
<author>admin</author>
<!-- Enter the date and time of the LMI connection creation -->
<creationDate>2011-04-22T01:00:00-05:00</creationDate>
<!-- Enter the name of the user who last modified the LMI connection -->
<lastModifiedBy>admin</lastModifiedBy>
<!-- Enter the date and time of the LMI connection last modification -->
<lastModifiedDate>2011-04-22T01:00:00-05:00</lastModifiedDate>
</revision>
<!-- Enter the IPv4 / IPv6 address or host name of the LMI -->
<address>192.198.12.16</address>
<!-- Enter the LMI port (either encrypted or not).
- 5514 for connection with LMI 5.0 and 5.1 (default value)
- 5515 for secured connection with LMI 5.0 or later
- 5516 for connection with LMI 5.2 or later -->
<port>5514</port>
<!-- If the connection is slow, you can configure the logs to be compressed for a
more rapid flow of data. Define whether the logs are compressed (true) or not (false
- default value). -->
<compression>true</compression>
71
TIBCO LogLogic® Universal Collector User's Guide
<!-- Define whether the logs are sent to the LMI during a certain period of time
(true) - called a time window - or not (false - default value) -->
<sendingWindow>true</sendingWindow>
<!-- Define the beginning of the time window. If sendingWindow = true in the above
parameter, define the time (hour and minute) when the event starts to be sent
(default value = 22:00). -->
<sendingWindowStart>22:00</sendingWindowStart>
<!-- Define the end of the time window. If you set sendingWindow = true in the above
parameter, define the time (hour and minute) when the event stops to be sent
(default value = 05:00). -->
<sendingWindowStop>05:00</sendingWindowStop>
<!-- Define whether the communication is authenticated (true) or not (false -
default value) -->
<authentication>false</authentication>
<!-- Define whether the communication is encrypted (true) or not (false - default
value) -->
<encryption>false</encryption>
<!-- Enter the general LMI connection properties -->
<uldpForwarder>
<!-- If there are multiple network interfaces, enter the IP address that the UC uses
when establishing the connection to LMI. -->
<ucBindingIp>0.0.0.0</ucBindingIp>
<!-- Enter the spooler size in megabytes (100 MB - default value, 50 GB - maximum
value) -->
<spoolerSize>100</spoolerSize>
<!-- Enter the reconnection frequency to the LMI (in seconds) -->
<reconnectionFrequency>60</reconnectionFrequency>
<!-- Enter the session timeout to LMI (in seconds) -->
<sessionTimeout>600</sessionTimeout>
<!-- Define whether the UC internal logs are sent to the remote LMI (true) or not
(false - default value) -->
<internalUcLogs>false</internalUcLogs>
</uldpForwarder>
</uldpConnection>
LMI Connection uldp-sampleCommentedAuthJks.uldp.xml
<!-- The LMI Connection file defines the properties for connecting the Universal
Collector (UC) with an LMI server. Log source logs are sent from the UC to the LMI
server.
IMPORTANT: this file is linked with the LMI connection files and
72
TIBCO LogLogic® Universal Collector User's Guide

its name must be composed of:
- an ID, for example, uldp-sample
- an extension, i.e. *.uldp.xml.
-->
<uldpConnection schemaVersion="2.0">
<!-- Enter the label of the LMI connection -->
<name>Full_ULDP_File</name>
<!-- Enter the information about the modification of the LMI connection -->
<revision>
<!-- Enter the version number of the current LMI connection -->
<version>12</version>
<!-- Enter the name of the LMI connection author -->
<author>admin</author>
<!-- Enter the date and time of the LMI connection creation -->
<creationDate>2011-04-22T01:00:00-05:00</creationDate>
<!-- Enter the name of the user who last modified the LMI connection -->
<lastModifiedBy>admin</lastModifiedBy>
<!-- Enter the date and time of the LMI connection last modification -->
<lastModifiedDate>2011-04-22T01:00:00-05:00</lastModifiedDate>
</revision>
<!-- Enter the IPv4 / IPv6 address or host name of the LMI -->
<address>192.198.12.16</address>
<!-- Enter the LMI port (either encrypted or not).
- 5514 for connection with LMI 5.0 and 5.1 (default value)
- 5515 for secured connection LMI 5.0 or later
- 5516 for connection with LMI 5.2 or later -->
<port>5515</port>
<!-- If the connection is slow, you can configure the logs to be compressed for a
more rapid flow of data. Define whether the logs are compressed (true) or not (false
- default value). -->
<compression>true</compression>
<!-- Define whether the logs are sent to the LMI during a certain period of time
(true) - called a time window - or not (false - default value) -->
<sendingWindow>true</sendingWindow>
<!-- Define the beginning of the time window. If sendingWindow = true in the above
parameter, define the time (hour and minute) when the event starts to be sent
(default value = 22:00). -->
<sendingWindowStart>22:00</sendingWindowStart>
73
TIBCO LogLogic® Universal Collector User's Guide

<!-- Define the end of the time window. If you set sendingWindow = true in the above
parameter, define the time (hour and minute) when the event stops to be sent
(default value = 05:00). -->
<sendingWindowStop>05:00</sendingWindowStop>
<!-- Define whether the communication is authenticated (true) or not (false -
default value) -->
<authentication>true</authentication>
<!-- Define whether the communication is encrypted (true) or not (false - default
value) -->
<encryption>false</encryption>
<!-- Define the options of the certificate used for LMI connection -->
<certificate>
<jks>
<!-- Enter the filename where the UC Java keystore will be generated -->
<jksFile>sample.jks</jksFile>
<!-- Enter the UC Java keystore mandatory password you have encrypted with the UC
password encryption tool, e.g. "LSKS9bw/t01FqNd4P3l3pgeOy/N/qqqlEzG+QC/
kfDq0LVXTPVgziQ==" is the encrypted password for "jdoepassword".-->
<password>LSKS9bw/t01FqNd4P3l3pgeOy/N/qqqlEzG+QC/kfDq0LVXTPVgziQ==</password>
<!-- Define whether the UC internal logs are sent to the remote LMI (true) or not
(false - default value) -->
<internalUcLogs>false</internalUcLogs>
</jks>
</certificate>
</uldpConnection>
LMI Connection uldp-sampleCommentedAuthPem.uldp.xml
<!-- The LMI Connection Configuration file defines the properties for connecting the
Universal Collector (UC) with an LMI server. Log source logs are sent from the UC to
the LMI server.
IMPORTANT: this file is linked with the LMI Connection Configuration files and
its name must be composed of:
- an ID, for example, uldp-sample
- an extension, i.e. *.uldp.xml.
-->
<uldpConnection schemaVersion="2.0">
<!-- Enter the label of the LMI connection -->
<name>Full_ULDP_File</name>
<!-- Enter the information about the modification of the LMI connection -->
74
TIBCO LogLogic® Universal Collector User's Guide

<revision>
<!-- Enter the version number of the current LMI Connection Configuration file -->
<version>12</version>
<!-- Enter the name of the LMI connection author -->
<author>admin</author>
<!-- Enter the date and time of the LMI connection creation -->
<creationDate>2011-04-22T01:00:00-05:00</creationDate>
<!-- Enter the name of the user who last modified the LMI connection -->
<lastModifiedBy>admin</lastModifiedBy>
<!-- Enter the date and time of the LMI connection last modification -->
<lastModifiedDate>2011-04-22T01:00:00-05:00</lastModifiedDate>
</revision>
<!-- Enter the IPv4 / IPv6 address or host name of the LMI -->
<address>192.198.12.16</address>
<!-- Enter the LMI port (either encrypted or not).
- 5514 for connection with LMI 5.0 and 5.1 (default value)
- 5515 for secured connection LMI 5.0 or later
- 5516 for connection with LMI 5.2 or later -->
<port>5515</port>
<!-- If the connection is slow, you can configure the logs to be compressed for a
more rapid flow of data. Define whether the logs are compressed (true) or not (false
- default value). -->
<compression>true</compression>
<!-- Define whether the logs are sent to the LMI during a certain period of time
(true) - called a time window - or not (false - default value) -->
<sendingWindow>true</sendingWindow>
<!-- Define the beginning of the time window. If sendingWindow = true in the above
parameter, define the time (hour and minute) when the event starts to be sent
(default value = 22:00). -->
<sendingWindowStart>22:00</sendingWindowStart>
<!-- Define the end of the time window. If you set sendingWindow = true in the above
parameter, define the time (hour and minute) when the event stops to be sent
(default value = 05:00). -->
<sendingWindowStop>05:00</sendingWindowStop>
<!-- Define whether the communication is authenticated (true) or not (false -
default value) -->
<authentication>true</authentication>
<!-- Define whether the communication is encrypted (true) or not (false - default
value) -->
75
TIBCO LogLogic® Universal Collector User's Guide

<encryption>false</encryption>
<!--Define the options of the certificate used for LMI connection-->
<certificate>
<!-- Define whether the UC internal logs are sent to the remote LMI (true) or not
(false - default value) -->
<internalUcLogs>false</internalUcLogs>
<pem>
<!-- Enter the filename of the UC private key stored in PEM format -->
<pemPrivKeyFile>pemPrivKeyFile</pemPrivKeyFile>
<!-- Enter the private key mandatory password you have encrypted with the UC
password encryption tool, e.g. "LSKS9bw/t01FqNd4P3l3pgeOy/N/qqqlEzG+QC/
kfDq0LVXTPVgziQ==" is the encrypted password for "jdoepassword".-->
<password>LSKS9bw/t01FqNd4P3l3pgeOy/N/qqqlEzG+QC/kfDq0LVXTPVgziQ==</password>
<!-- Enter the filename of the UC certificate stored in PEM format -->
<pemCertFile>pemCertFile</pemCertFile>
<!-- Enter the filename of the root CA certificate stored in PEM format -->
<pemRootCertFile>pemRootCertFile</pemRootCertFile>
</pem>
</certificate>
</uldpConnection>
LMI Connection uldp-sampleCommentedAuthPks12.uldp.xml
<!-- The LMI Connection Configuration file defines the properties for connecting the
Universal Collector (UC) with an LMI server. Log source logs are sent from the UC to
the LMI server.
IMPORTANT: this file is linked with the LMI Connection Configuration files and
its name must be composed of:
- an ID, for example, uldp-sample
- an extension, i.e. *.uldp.xml.
-->
<uldpConnection schemaVersion="2.0">
<!-- Enter the label of the LMI connection -->
<name>Full_ULDP_File</name>
<!-- Enter the information about the modification of the LMI connection -->
<revision>
<!-- Enter the version number of the current LMI Connection Configuration file -->
<version>12</version>
<!-- Enter the name of the LMI connection author -->
76
TIBCO LogLogic® Universal Collector User's Guide

<author>admin</author>
<!-- Enter the date and time of the LMI connection creation -->
<creationDate>2011-04-22T01:00:00-05:00</creationDate>
<!-- Enter the name of the user who last modified the LMI connection -->
<lastModifiedBy>admin</lastModifiedBy>
<!-- Enter the date and time of the LMI connection last modification -->
<lastModifiedDate>2011-04-22T01:00:00-05:00</lastModifiedDate>
</revision>
<!-- Enter the IPv4 / IPv6 address or host name of the LMI -->
<address>192.198.12.16</address>
<!-- Enter the LMI port (either encrypted or not).
- 5514 for connection with LMI 5.0 and 5.1 (default value)
- 5515 for secured connection LMI 5.0 or later
- 5516 for connection with LMI 5.2 or later -->
<port>5515</port>
<!-- If the connection is slow, you can configure the logs to be compressed for a
more rapid flow of data. Define whether the logs are compressed (true) or not (false
- default value). -->
<compression>true</compression>
<!-- Define whether the logs are sent to the LMI during a certain period of time
(true) - called a time window - or not (false - default value) -->
<sendingWindow>true</sendingWindow>
<!-- Define the beginning of the time window. If sendingWindow = true in the above
parameter, define the time (hour and minute) when the event starts to be sent
(default value = 22:00). -->
<sendingWindowStart>22:00</sendingWindowStart>
<!-- Define the end of the time window. If you set sendingWindow = true in the above
parameter, define the time (hour and minute) when the event stops to be sent
(default value = 05:00). -->
<sendingWindowStop>05:00</sendingWindowStop>
<!-- Define whether the communication is authenticated (true) or not (false -
default value) -->
<authentication>true</authentication>
<!-- Define whether the communication is encrypted (true) or not (false - default
value) -->
<encryption>false</encryption>
<!-- Define the options of the certificate used for LMI connection -->
<certificate>
<pkcs12>
77
TIBCO LogLogic® Universal Collector User's Guide

<!-- Enter the UC PKCS#12 certificate's filename -->
<p12CertFile>p12CertFile</p12CertFile>
<!-- Enter the PKCS#12 certificate's mandatory password you have encrypted with the
UC password encryption tool, e.g. "LSKS9bw/t01FqNd4P3l3pgeOy/N/qqqlEzG+QC/
kfDq0LVXTPVgziQ==" is the encrypted password for "jdoepassword".-->
<password>LSKS9bw/t01FqNd4P3l3pgeOy/N/qqqlEzG+QC/kfDq0LVXTPVgziQ==</password>
<!-- Enter the filename of the root CA certificate stored in PEM format -->
<pemRootCertFile>pemRootCertFile</pemRootCertFile>
<!-- Define whether the UC internal logs are sent to the remote LMI (true) or not
(false - default value) -->
<internalUcLogs>false</internalUcLogs>
</pkcs12>
</certificate>
</uldpConnection>
This file is located in <InstallFolder>\config-samples\.
You must unzip sample.ucc and open the log-sources folder.
Log Sources file-sampleCommented.ls.xml
<!-- This is the FILE Log Source configuration file.
The logs will be directly forwarded to the LMI appliance.
IMPORTANT: The file name must be composed of:
- an ID, for example, file-sample
- an extension, i.e. *.ls.xml.
-->
<!-- The Type refers to the type of Log Source. -->
<logsource type="file" schemaVersion="2.0">
<general>
<!-- Define whether the current Log Source is active (true - default value) or
inactive (false) -->
<active>true</active>
<!-- Enter the FILE configuration label -->
<name>ls-file-template</name>
<!-- Enter the FILE configuration description -->
<description>Comment of the ls-file-template</description>
<!-- Enter the modification of the FILE configuration -->
<revision>
<!-- Enter the current FILE configuration file version number -->
78
TIBCO LogLogic® Universal Collector User's Guide

<version>12</version>
<!-- Enter the FILE file author's name -->
<author>admin</author>
<!-- Enter the name of the user who last modified the file -->
<lastModifiedBy>admin</lastModifiedBy>
<!-- Enter the date and time of the FILE creation -->
<creationDate>2011-01-20T01:00:00-01:00</creationDate>
<!-- Enter the FILE last modification date and time -->
<lastModifiedDate>2011-01-25T03:40:10-01:00</lastModifiedDate>
</revision>
</general>
<!-- Enter log forwarding information -->
<forwarding>
<!-- Enter the information about the LMI connection necessary to send logs from the
UC to the LMI server -->
<uldp>
<!-- Enter the LMI connection ID without the extension, e.g. uldp-sample -->
<connectionId>uldp-sampleCommented</connectionId>
<!-- Define whether the log message sent to the LMI server remains in a local time
zone (false - default value) or is converted into UTC (true) time zone -->
<timeInUtc>false</timeInUtc>
</uldp>
</forwarding>
<!-- Enter log collection information -->
<collection>
<!-- Enter the possible maximum length for the message (65000 - default value) -->
<maxLineLength>65000</maxLineLength>
<!-- Enter the data format, for example, UTF8 -->
<charsetName></charsetName>
<!-- Enter general information about the file where the logs are located-->
<fileName>
<!-- Enter the absolute path of the log file to collect. If the log file is rotated,
you may enter [id] or [date] in the filename.
for example, c:\temp\logFile[id].log to obtain file names such as logFile1.log or c:
\temp\logFile[date].log to obtain file names such as logFile20110521.log-->
<absolutePath>c:\temp\logfile.log</absolutePath>
79
TIBCO LogLogic® Universal Collector User's Guide

<!-- If you have entered [date] for the tag <absolutePath> above (e.g. c:\temp
\logFile[date].log) , you must set this parameter to true (false - default value) --
>
<useDateRolling>false</useDateRolling>
<!-- If you have set the tag <useDateRolling> to true, you must enter a date format,
e.g. yyyyMMdd (see http://docs.oracle.com/javase/7/docs/api/java/text/
SimpleDateFormat.html ) -->
<dateFormat>yyyyMMdd</dateFormat>
<!-- If you have entered [id] for the tag <absolutePath> above (e.g. c:\temp
\logFile[id].log), you must set this parameter to true (false - default value) -->
<useIdRolling>false</useIdRolling>
<!-- If you have set the tag <useIdRolling> to true, you must enter the number of
digits expected (1-9). UC can collect any file with an [id] whose number of digits
is between 1 and 9 inclusive.
E.g. If you set 5, the following [id] will be taken into account: 1, 054, 586,
00599, 78945, etc.-->
<nbDigit>2</nbDigit>
</fileName>
</collection>
<!-- Enter log processing information -->
<processing>
<!-- Define whether the single message has several lines -->
<multiLine>
<!-- Define whether the current multi-line function is active (true) or inactive
(false - default value) -->
<active>false</active>
<!-- Enter the type of multi-line logs, (jboss - default value) 'jboss', 'tomcat',
'weblogic', 'websphere' or 'custom' -->
<lineCombinerId>jboss</lineCombinerId>
<!-- If you set 'custom' in the <lineCombinerId> parameter above, you must set a
regular expression matching the header of the first line of a log -->
<userDefinedRegExp></userDefinedRegExp>
<!-- Enter whether you want the UC to send messages that do not match the Header
Regexp (true) or not (false - default value)-->
<keepHeadlessLog>false</keepHeadlessLog>
<!-- Enter the number of ms after which the multi-line logs are ready to be sent -->
<lineTimeout>3000</lineTimeout>
</multiLine>
<!-- Enter the name of the host used to pair logs on the LMI server -->
<hostname>customHostname.com</hostname>
80
TIBCO LogLogic® Universal Collector User's Guide
<!-- Enter the name of the application used to pair logs on the LMI server -->
<appName>customApplicationName</appName>
</processing>
<!-- Enter log filtering information -->
<filter>
<!-- Enter a case insensitive regular expression to specify the messages to be
matched. E.g.
"packet accepted" means that all the lines containing packet accepted are filtered
"^64\.242" means that all the lines that are beginning exactly with 64.242 are
filtered
"846$" means that all the lines that are ending exactly with 846 are filtered -->
<messageFilter>packet accepted</messageFilter>
<!-- Define whether the matched messages are filtered (false - default value) or not
(true) -->
<matchAcceptedMessage>false</matchAcceptedMessage>
</filter>
<!-- Enter a tag to filter, sort and search for log sources. Tags are case
sensitive. -->
<tags>
<!-- You can enter as many tags as you need. The possible values are ._A-Za-z0-9 and
blank space. -->
<tag>sample</tag>
<tag>commented</tag>
</tags>
</logsource>
Log Sources syslog-sampleCommented.ls.xml
<!-- This is the SYSLOG Log Source configuration file.
The source of logs to be forwarded is a SYSLOG message.
IMPORTANT: The file name must be composed of:
- an ID, for example, syslog-sample
- an extension, i.e. *.ls.xml.
-->
<!-- The Type refers to the type of Log Source. -->
<logsource type="syslog" schemaVersion="2.0">
<general>
<!-- Define whether the current Log Source is active (true - default value) or
inactive (false) -->
81
TIBCO LogLogic® Universal Collector User's Guide

<active>true</active>
<!-- Enter the SYSLOG configuration label -->
<name>ls-syslog-template</name>
<!-- Enter the SYSLOG file description information -->
<description>Comment of the ls-syslog-template</description>
<!-- Enter the information about the modification of the SYSLOG configuration -->
<revision>
<!-- Enter the SYSLOG file author's name -->
<author>admin</author>
<!-- Enter the name of the user who last modified the SYSLOG file -->
<lastModifiedBy>admin</lastModifiedBy>
<!-- Enter the date and time of the SYSLOG file creation -->
<creationDate>2011-01-20T01:00:00-01:00</creationDate>
<!-- Enter the SYSLOG file last modification date and time -->
<lastModifiedDate>2011-01-25T03:40:10-01:00</lastModifiedDate>
</revision>
</general>
<!-- Enter log forwarding information -->
<forwarding>
<!-- Enter the information about the LMI connection necessary to send logs from the
UC to the LMI server -->
<uldp>
<!-- Enter the LMI connection ID without the extension, e.g. uldp-sample -->
<connectionId>uldp-sample</connectionId>
<!-- Define whether the log message sent to the LMI server remains in a local time
zone (false - default value) or is converted into UTC (true) time zone -->
<timeInUtc>false</timeInUtc>
</uldp>
</forwarding>
<!-- Enter log collection information -->
<collection>
<!-- If there are multiple network interfaces, enter the IP address to listen to the
logs.Otherwise, all the IP addresses are listened to. -->
<ip>0.0.0.0</ip>
<!-- Enter the port to listen to logs -->
<port>514</port>
<!-- Define whether the Log Source uses the udp (default value) or tcp SYSLOG
protocol. Attention: 'udp' or 'tcp' must be in lower case -->
82
TIBCO LogLogic® Universal Collector User's Guide

<protocol>udp</protocol>
</collection>
<!-- Enter log filtering information -->
<filter>
<!-- Enter the minimum accepted severity (see RFC 3164) -->
<severity>6</severity>
<!-- Enter the accepted facilities (see RFC 3164)
To indicate what are the facilities to be accepted:
- use a '-' to indicate a range, e.g. 0-22
- use a ';' to indicate the exact facilities, e.g. 1;8;23
- use '-' and ';' to indicate the exact facilities and a range, e.g. 1;8-23
Note: 0-23 is the default value-->
<facilities>0-23</facilities>
<!-- Enter the regular expression to filter the accepted source host. All the logs
from all the IP addresses are collected if .* (default value) is set. -->
<sourceIp>.*</sourceIp>
</filter>
<!-- Enter a tag to filter, sort and search for log sources. Tags are case
sensitive. -->
<tags>
<!-- You can enter as many tags as you need. The possible values are ._A-Za-z0-9 and
blank space. -->
<tag>sample</tag>
<tag>commented</tag>
</tags>
</logsource>
Log Sources wmi-sampleCommented.ls.xml
<!-- This is the WEL Log Source configuration file.
All the events about the machine’s Windows journals will be forwarded.
IMPORTANT: The file name must be composed of:
- an ID, for example, wmi-sample
- an extension, i.e. *.ls.xml.-->
<!-- The Type refers to the type of Log Source. -->
<logsource type="wmi" schemaVersion="2.0">
<general>
83
TIBCO LogLogic® Universal Collector User's Guide

<!-- Define whether the current Log Source is active (true - default value) or
inactive (false) -->
<active>true</active>
<!-- Enter the WEL configuration label -->
<name>ls-win-template</name>
<!-- Enter the WEL configuration file description -->
<description>Comment of the ls-win-template</description>
<!-- Enter the modification of the WEL configuration -->
<revision>
<!-- Enter the current WEL configuration file version number -->
<version>12</version>
<!-- Enter the WEL file author's name -->
<author>admin</author>
<!-- Enter the name of the user who last modified the WEL file -->
<lastModifiedBy>admin</lastModifiedBy>
<!-- Enter the date and time of the WEL file creation -->
<creationDate>2011-01-20T01:00:00-01:00</creationDate>
<!-- Enter the WEL file last modification date and time -->
<lastModifiedDate>2011-01-25T03:40:10-01:00</lastModifiedDate>
</revision>
</general>
<!-- Enter log forwarding information -->
<forwarding>
<!-- Enter the information about the LMI connection necessary to send logs from the
UC to the LMI server -->
<uldp>
<!-- Enter the LMI connection ID without the extension, e.g. uldp-sample -->
<connectionId>uldp-sampleCommented</connectionId>
<!-- Define whether the log message sent to the LMI server remains in a local time
zone (false - default value) or is converted into UTC (true) time zone -->
<timeInUtc>false</timeInUtc>
</uldp>
</forwarding>
<!-- Enter log collection information -->
<collection>
<!-- Enter the domain name to access the Windows server -->
<domain>domain.company</domain>
84
TIBCO LogLogic® Universal Collector User's Guide
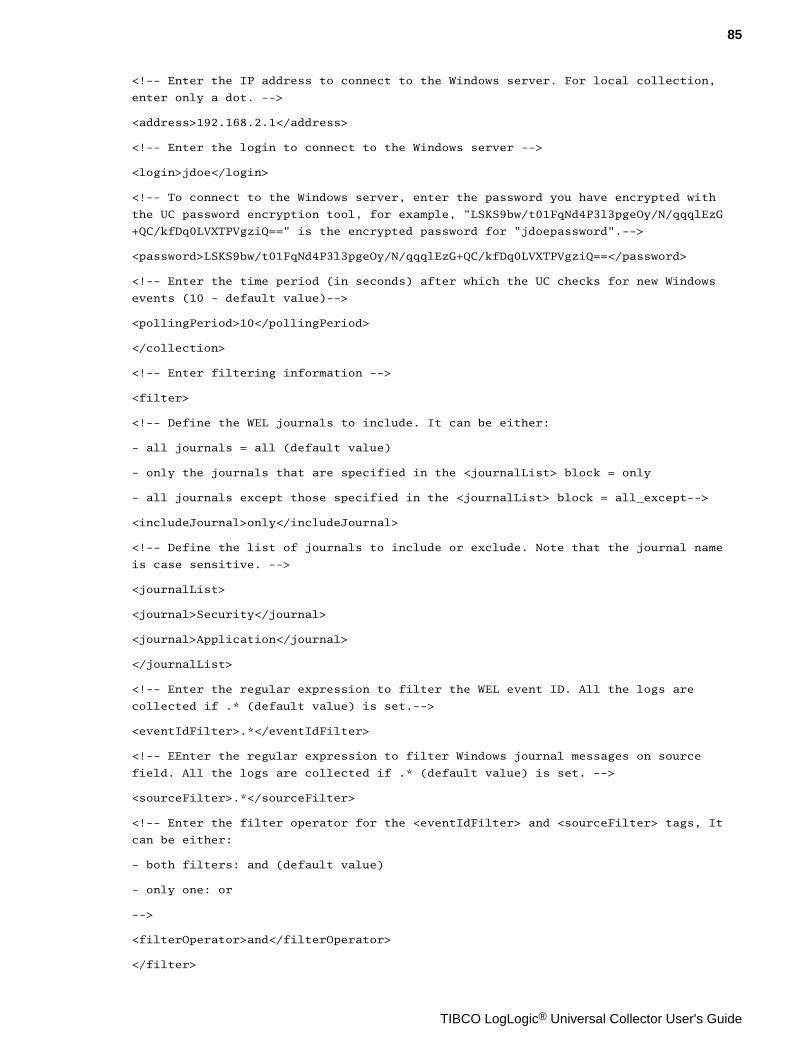
<!-- Enter the IP address to connect to the Windows server. For local collection,
enter only a dot. -->
<address>192.168.2.1</address>
<!-- Enter the login to connect to the Windows server -->
<login>jdoe</login>
<!-- To connect to the Windows server, enter the password you have encrypted with
the UC password encryption tool, for example, "LSKS9bw/t01FqNd4P3l3pgeOy/N/qqqlEzG
+QC/kfDq0LVXTPVgziQ==" is the encrypted password for "jdoepassword".-->
<password>LSKS9bw/t01FqNd4P3l3pgeOy/N/qqqlEzG+QC/kfDq0LVXTPVgziQ==</password>
<!-- Enter the time period (in seconds) after which the UC checks for new Windows
events (10 - default value)-->
<pollingPeriod>10</pollingPeriod>
</collection>
<!-- Enter filtering information -->
<filter>
<!-- Define the WEL journals to include. It can be either:
- all journals = all (default value)
- only the journals that are specified in the <journalList> block = only
- all journals except those specified in the <journalList> block = all_except-->
<includeJournal>only</includeJournal>
<!-- Define the list of journals to include or exclude. Note that the journal name
is case sensitive. -->
<journalList>
<journal>Security</journal>
<journal>Application</journal>
</journalList>
<!-- Enter the regular expression to filter the WEL event ID. All the logs are
collected if .* (default value) is set.-->
<eventIdFilter>.*</eventIdFilter>
<!-- EEnter the regular expression to filter Windows journal messages on source
field. All the logs are collected if .* (default value) is set. -->
<sourceFilter>.*</sourceFilter>
<!-- Enter the filter operator for the <eventIdFilter> and <sourceFilter> tags, It
can be either:
- both filters: and (default value)
- only one: or
-->
<filterOperator>and</filterOperator>
</filter>
85
TIBCO LogLogic® Universal Collector User's Guide

<!-- Enter a tag to filter, sort and search for log sources. Tags are case
sensitive. -->
<tags>
<!-- You can enter as many tags as you need. The possible values are ._A-Za-z0-9 and
blank space. -->
<tag>sample</tag>
<tag>commented</tag>
</tags>
</logsource>
86
TIBCO LogLogic® Universal Collector User's Guide
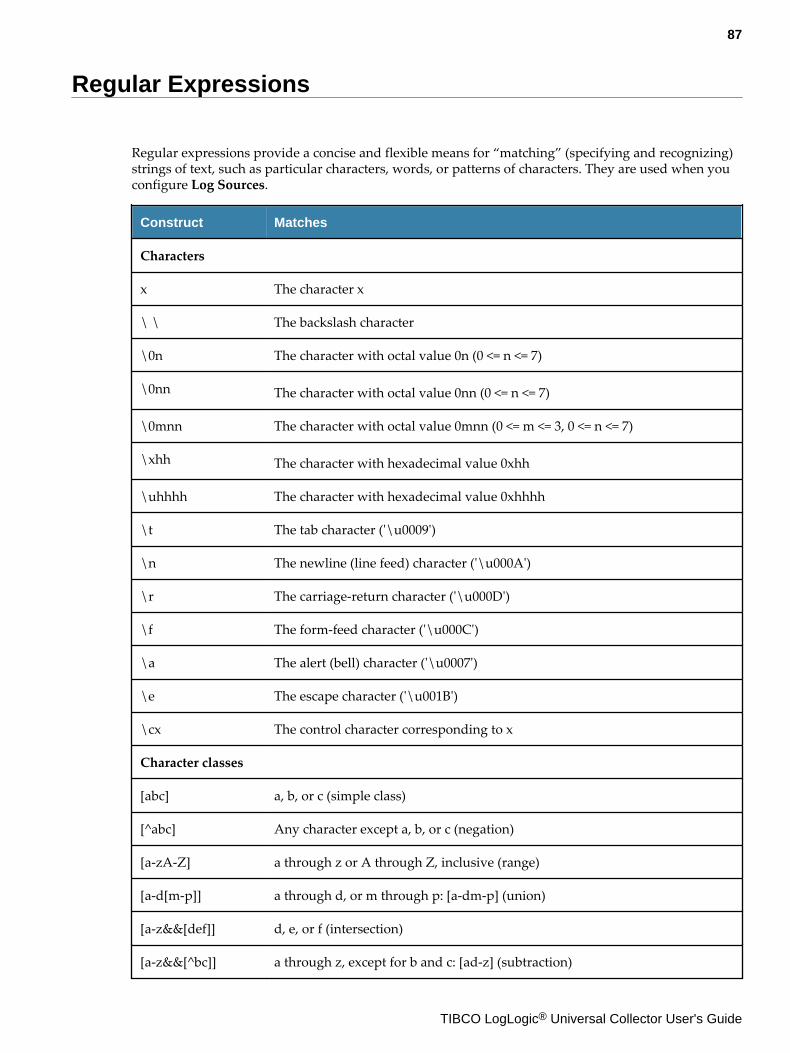
Regular Expressions
Regular expressions provide a concise and flexible means for “matching” (specifying and recognizing)strings of text, such as particular characters, words, or patterns of characters. They are used when youconfigure Log Sources.
Construct Matches
Characters
x The character x
\ \ The backslash character
\0n The character with octal value 0n (0 <= n <= 7)
\0nn The character with octal value 0nn (0 <= n <= 7)
\0mnn The character with octal value 0mnn (0 <= m <= 3, 0 <= n <= 7)
\xhh The character with hexadecimal value 0xhh
\uhhhh The character with hexadecimal value 0xhhhh
\t The tab character ('\u0009')
\n The newline (line feed) character ('\u000A')
\r The carriage-return character ('\u000D')
\f The form-feed character ('\u000C')
\a The alert (bell) character ('\u0007')
\e The escape character ('\u001B')
\cx The control character corresponding to x
Character classes
[abc] a, b, or c (simple class)
[^abc] Any character except a, b, or c (negation)
[a-zA-Z] a through z or A through Z, inclusive (range)
[a-d[m-p]] a through d, or m through p: [a-dm-p] (union)
[a-z&&[def]] d, e, or f (intersection)
[a-z&&[^bc]] a through z, except for b and c: [ad-z] (subtraction)
87
TIBCO LogLogic® Universal Collector User's Guide

Construct Matches
[a-z&&[^m-p]] a through z, and not m through p: [a-lq-z] (subtraction)
Predefined character classes
. Any character (may or may not match line terminators)
\d A digit: [0-9]
\D A non-digit: [^0-9]
\s A whitespace character: [\t\n\x0B\f\r]
\S A non-whitespace character: [^\s]
\w A word character: [a-zA-Z_0-9]
\W A non-word character: [^\w]
POSIX character classes (US-ASCII only)
\p{Lower} A lower-case alphabetic character: [a-z]
\p{Upper} An upper-case alphabetic character:[A-Z]
\p{ASCII} All ASCII:[\x00-\x7F]
\p{Alpha} An alphabetic character: [\p{Lower}\p{Upper}]
\p{Digit} A decimal digit: [0-9]
\p{Alnum} An alphanumeric character: [\p{Alpha}\p{Digit}]
\p{Punct} Punctuation: One of !"#$%&'()*+,-./:;<=>?@[\]^_`{|}~
\p{Graph} A visible character: [\p{Alnum}\p{Punct}]
\p{Print} A printable character: [\p{Graph}]
\p{Blank} A space or a tab: [\t]
\p{Cntrl} A control character: [\x00-\x1F\x7F]
\p{XDigit} A hexadecimal digit: [0-9a-fA-F]
\p{Space} A whitespace character: [\t\n\x0B\f\r]
Classes for Unicode blocks and categories
\p{InGreek} A character in the Greek block (simple block)
\p{Lu} An uppercase letter (simple category)
88
TIBCO LogLogic® Universal Collector User's Guide

Construct Matches
\p{Sc} A currency symbol
\P{InGreek} Any character except one in the Greek block (negation)
[\p{L}&&[^\p{Lu}]]
Any letter except an uppercase letter (subtraction)
Boundary matchers
^ The beginning of a line
$ The end of a line
\b A word boundary
\B A non-word boundary
\A The beginning of the input
\G The end of the previous match
\Z The end of the input except for the final terminator, if any
\z The end of the input
Greedy quantifiers
X? X, once or not at all
X* X, zero or more times
X+ X, one or more times
X{n} X, exactly n times
X{n,} X, at least n times
X{n,m} X, at least n but not more than m times
Reluctant quantifiers
X?? X, once or not at all
X*? X, zero or more times
X+? X, one or more times
X{n}? X, exactly n times
X{n,}? X, at least n times
89
TIBCO LogLogic® Universal Collector User's Guide
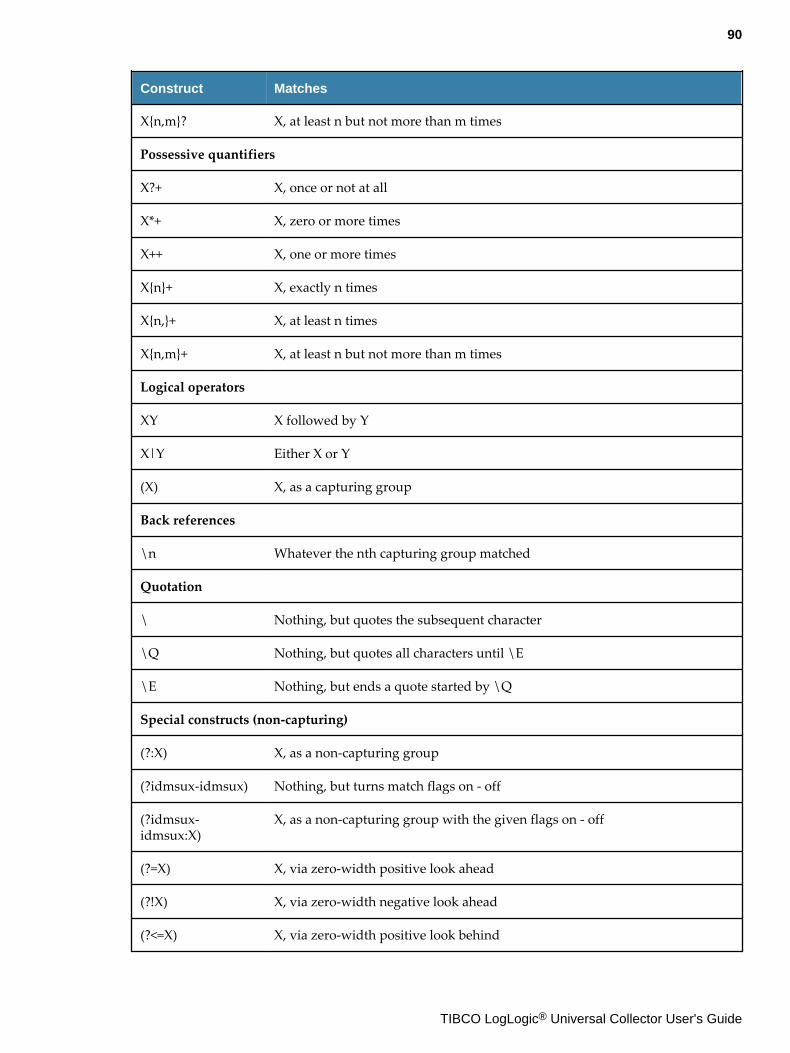
Construct Matches
X{n,m}? X, at least n but not more than m times
Possessive quantifiers
X?+ X, once or not at all
X*+ X, zero or more times
X++ X, one or more times
X{n}+ X, exactly n times
X{n,}+ X, at least n times
X{n,m}+ X, at least n but not more than m times
Logical operators
XY X followed by Y
X|Y Either X or Y
(X) X, as a capturing group
Back references
\n Whatever the nth capturing group matched
Quotation
\ Nothing, but quotes the subsequent character
\Q Nothing, but quotes all characters until \E
\E Nothing, but ends a quote started by \Q
Special constructs (non-capturing)
(?:X) X, as a non-capturing group
(?idmsux-idmsux) Nothing, but turns match flags on - off
(?idmsux-idmsux:X)
X, as a non-capturing group with the given flags on - off
(?=X) X, via zero-width positive look ahead
(?!X) X, via zero-width negative look ahead
(?<=X) X, via zero-width positive look behind
90
TIBCO LogLogic® Universal Collector User's Guide

Construct Matches
(?<!X) X, via zero-width negative look behind
(?>X) X, as an independent, non-capturing group
91
TIBCO LogLogic® Universal Collector User's Guide

Event Output Format
UC collects Windows Event logs and forwards them in Snare over syslog format.
For details about the Snare over Syslog format, see http://wiki.rsyslog.com/index.php/Snare_and_rsyslog.
Snare over Syslog format<SYSLOGNUM>CurrentDate<SPACE>HostName<SPACE>MSWinEventLog<TAB>Criticality<TAB>Criticality<TAB>Security<TAB>SnareCounter<TAB>SubmitTime<TAB>EventID<TAB>SourceName<TAB>UserName<TAB>SIDType<TAB>EventLogType<TAB>ComputerName<TAB>CategoryString<TAB>DataString<TAB>ExpandedString<TAB>MD5 checksum (optional)
The following table describes the differences between data elements passed in a typical Snare format vsSnare over Syslog format:
Field Snare formatSnare over Syslogformat Description
ID The <SYSLOGNUM>is the appropriatenumeric syslogfacility/prioritycombination for theobjective, as defined inthe snareconfiguration.
Date and Time The CurrentDate is thesyslog timestamp.
Host name Hostname the assigned hostnameof the machine or theoverride value enteredusing the Snare front.
Hostname The host name forsyslog is the syslog IPaddress.
Event Log Type MSWINEventLog MSWINEventLog Fixed value of'MSWinEventLog'.
Criticality Criticality Criticality This is determined bythe Alert level given tothe objective by theuser and is a numberbetween 0 and 4, UCuses fixed value of 0.
92
TIBCO LogLogic® Universal Collector User's Guide

Field Snare formatSnare over Syslogformat Description
SourceName EventLogSource EventLogSource This is the WindowsEvent Log from whichthe event record wasderived, In the aboveexample, the eventrecord was derivedfrom the 'security'event log.
Snare Event Counter SnareCounter SnareCounter SnareCounter is asequential eventcounter, designed toassist the process ofdetermining deliverypercentages whenusing non-guaranteedtransmissionprotocols.GlobalCounter is the same meanwith SnareCounter, ucuses fixed value of 0.
DateTime SubmitTime SubmitTime This is the date timestamp of the eventrecord. UC uses theUTC format.
EventID EventID EventID This is the WindowsEvent ID.
SourceName SourceName SourceName This is the WindowsEvent Log from whichthe event record wasderived, In the aboveexample, the eventrecord was derivedfrom the 'security'event log.
UserName UserName UserName This is the Window'suser name.
SIDType SIDType SIDType This is the type of SIDused.
EventLogType EventLogType EventLogType This can be anyone of'Success Audit','Failure Audit', 'Error','Information', or'Warning'.
93
TIBCO LogLogic® Universal Collector User's Guide

Field Snare formatSnare over Syslogformat Description
ComputerName ComputerName ComputerName This is the Windowscomputer name.
CategoryStrint Category Category This is the category ofaudit event, asdetailed by theWindows eventlogging system
DataString Data Data This contains the datastrings.
ExpandedString Expanded EventRecordID This contains theexpanded data strings.
In UC, it contains theevent record id.
MD5 Checksum MD5Checksum <Optional> An md5 checksum ofthe event canoptionally be includedwith each event sentover the network bythe Snare for WindowsAgent. Note that theapplication thatevaluates each recordwill need to strip thefinal delimiter, plusthe checksum, prior toevaluating the event.
Snare over Syslog format is slightly different than the regular Snare format.
The regular Snare format is shown below for reference:HostName<TAB>MSWinEventLog<TAB>Criticality<TAB>EventLogSource<TAB>SnareCounter<TAB>SubmitTime<TAB>EventID<TAB>SourceName<TAB>UserName<TAB>SIDType<TAB>EventLogType<TAB>ComputerName<TAB>CategoryString<TAB>DataString<TAB>ExpandedString<TAB>MD5 checksum (optional)
94
TIBCO LogLogic® Universal Collector User's Guide

IPv6 Support Matrix
The IPv6 support matrix is as shown below:
Log SourceAddress UC LMI Supported UC Version
IPv4 IPv4 IPv4 v2.7.0 and below
IPv6 IPv6 IPv6 v2.6.0 and v2.7.0
IPv4 IPv6 IPv6 v2.6.0 and v2.7.0
95
TIBCO LogLogic® Universal Collector User's Guide


