120
TIBCO OpenSpirit ® Adapter for Petrel User’s Guide Software Release 21.1.0 February 2013

TIBCO OpenSpirit® Adapter for Petrel User’s Guide
Software Release 21.1.0
February 2013

Important Information SOME TIBCO SOFTWARE EMBEDS OR BUNDLES OTHER TIBCO SOFTWARE. USE OF SUCH EMBEDDED OR BUNDLED TIBCO SOFTWARE IS SOLELY TO ENABLE THE FUNCTIONALITY (OR PROVIDE LIMITED ADD-ON FUNCTIONALITY) OF THE LICENSED TIBCO SOFTWARE. THE EMBEDDED OR BUNDLED SOFTWARE IS NOT LICENSED TO BE USED OR ACCESSED BY ANY OTHER TIBCO SOFTWARE OR FOR ANY OTHER PURPOSE.
USE OF TIBCO SOFTWARE AND THIS DOCUMENTIS SUBJECT TO THE TERMS AND CONDITIONS OF A LICENSE AGREEMENT FOUND IN EITHER A SEPARATELY EXECUTED SOFTWARE LICENSE AGREEMENT, OR, IF THERE IS NO SUCH SEPARATE AGREEMENT, THE CLICKWRAP END USER LICENSE AGREEMENT WHICH IS DISPLAYED DURING DOWNLOAD OR INSTALLATION OF THE SOFTWARE (AND WHICH IS DUPLICATED IN THE LICENSE FILE) OR IF THERE IS NO SUCH SOFTWARE LICENSE AGREEMENT OR CLICKWRAP END USER LICENSE AGREEMENT, THE LICENSE(S) LOCATED IN THE “LICENSE” FILE(S) OF THE SOFTWARE. USE OF THIS DOCUMENT IS SUBJECT TO THOSE TERMS AND CONDITIONS, AND YOUR USE HEREOF SHALL CONSTITUTE ACCEPTANCE OF AND AN AGREEMENT TO BE BOUND BY THE SAME.
This document contains confidential information that is subject to U.S. and international copyright laws and treaties. No part of this document may be reproduced in any form without the written authorization of TIBCO Software Inc.
TIBCO OpenSpirit, TIBCO OpenSpirit Adapter for Petrel are either registered trademarks or trademarks of TIBCO Software Inc. in the United States and/or other countries.
All other product and company names and marks mentioned in this document are the property of their respective owners and are mentioned for identification purposes only.
THIS SOFTWARE MAY BE AVAILABLE ON MULTIPLE OPERATING SYSTEMS. HOWEVER, NOT ALL OPERATING SYSTEM PLATFORMS FOR A SPECIFIC SOFTWARE VERSION ARE RELEASED AT THE SAME TIME. SEE THE RELEASE NOTES FOR THE AVAILABILITY OF THIS SOFTWARE VERSIONON A SPECIFIC OPERATING SYSTEM PLATFORM.
THIS DOCUMENT IS PROVIDED “AS IS” WITHOUT WARRANTY OF ANY KIND, EITHER EXPRESS OR IMPLIED, INCLUDING, BUT NOT LIMITED TO, THE IMPLIED WARRANTIES OF MERCHANTABILITY, FITNESS FOR A PARTICULAR PURPOSE, OR NON-INFRINGEMENT.
THIS DOCUMENT COULD INCLUDE TECHNICAL INACCURACIES OR TYPOGRAPHICAL ERRORS. CHANGES ARE PERIODICALLY ADDED TO THE INFORMATION HEREIN; THESE CHANGES WILL BE INCORPORATED IN NEW EDITIONS OF THIS DOCUMENT. TIBCO SOFTWARE INC. MAY MAKE IMPROVEMENTS AND/OR CHANGES IN THE PRODUCT(S) AND/OR THE PROGRAM(S) DESCRIBED IN THIS DOCUMENT AT ANY TIME.
THE CONTENTS OF THIS DOCUMENT MAY BE MODIFIED AND/OR QUALIFIED, DIRECTLY OR INDIRECTLY, BY OTHER DOCUMENTATION WHICH ACCOMPANIES THIS SOFTWARE, INCLUDING BUT NOT LIMITED TO ANY RELEASE NOTES AND "READ ME" FILES.
Copyright©2000-2013 TIBCO Software Inc. ALL RIGHTS RESERVED. TIBCO Software Inc. Confidential Information

Table of Contents | iii
OpenSpirit Adapter from Petrel User Guide
Table of Contents Welcome to the TIBCO OpenSpirit Adapter for Petrel..................................................... 7
Installation ....................................................................................................................... 8
Installation Prerequisites .............................................................................................. 8
Installation Steps .......................................................................................................... 8
Getting Started .............................................................................................................. 11
The TIBCO OpenSpirit Adapter for Petrel Tool Bar .................................................... 11
User Setup Wizard ..................................................................................................... 12
Enter Host Account Settings.................................................................................... 13
Enter Data Source Settings ..................................................................................... 14
Project Initiation Wizard ................................................................................................. 16
Setting the Project CRS (Coordinate Reference System) ......................................... 16
Select from external OpenSpirit data source... ........................................................ 16
Select from existing OpenSpirit Session... .............................................................. 17
Select from OpenSpirit EPSG list... ......................................................................... 18
Select from Petrel list... ........................................................................................... 21
Confirming CRS Choice .......................................................................................... 23
Setting the Project CRS (Coordinate Reference System) .......................................... 24
Select from external OpenSpirit data source... ........................................................ 25
Select from existing OpenSpirit Session... .............................................................. 26
Select from OpenSpirit EPSG list... ......................................................................... 27
Select from Petrel list... ........................................................................................... 30
Confirming CRS Choice .......................................................................................... 32
Setting the Project Units ............................................................................................. 33
Setting the Project SRD (Seismic Reference Datum)................................................. 35
Import Data ................................................................................................................... 37
Import Overview ......................................................................................................... 37
Data imported from external data store ................................................................... 37
Data imported from another application using GIS events ...................................... 45
OpenSpirit Properties .............................................................................................. 45
Import Match and Merge ............................................................................................ 47
Refresh from External.... ............................................................................................ 49
Seismic Datum Adjustments ...................................................................................... 50

iv | Table of Contents
OpenSpirit Adapter from Petrel User Guide
Checkshot Import Options .......................................................................................... 51
Well Log Import Options ............................................................................................. 53
Original Coordinate System ....................................................................................... 55
Export Data ................................................................................................................... 57
Export Overview ......................................................................................................... 57
Export data to external data store ........................................................................... 57
Export data to another application by sending a data full event .............................. 58
Restricting Export ....................................................................................................... 58
OpenSpirit Data Manager .............................................................................................. 60
OpenSpirit Data Manager Overview ........................................................................... 60
Data Summary ........................................................................................................... 61
Check Data Source Accessibility ................................................................................ 63
Check Datakey Validity .............................................................................................. 65
Save objects to source project ................................................................................... 66
Export Objects ............................................................................................................ 67
Refresh Objects.......................................................................................................... 68
Link (or Relink) to External Project ............................................................................. 70
Clear Datakeys ........................................................................................................... 71
OpenWorks 2003 to R5000 Migration Workflow ........................................................ 73
Live-link Manager .......................................................................................................... 75
Live-link Manager Overview ....................................................................................... 75
Live-link Manager Workflow .................................................................................... 75
Live-link Manager Window ...................................................................................... 76
Live-Link Status ....................................................................................................... 77
Setting Seismic Files Directory ................................................................................... 78
Live-Link Manager Tool Bar ....................................................................................... 79
Using the Live-Link Manager ...................................................................................... 80
Using the ZGY Queue Manager ................................................................................. 83
ZGY Queue Manager Tool Bar................................................................................ 84
Studio Find Search ........................................................................................................ 86
Studio Find Search ..................................................................................................... 86
Finding Data ............................................................................................................ 86
Loading Data from Search Results .......................................................................... 88
GIS Integration .............................................................................................................. 91
Table of Contents | v
OpenSpirit Adapter from Petrel User Guide
GIS Integration ........................................................................................................... 91
Import data from ArcSDE ........................................................................................ 91
Receive GIS or Grid events ..................................................................................... 91
Receive Map Image events ..................................................................................... 93
Send GIS or Grid events ......................................................................................... 94
Send and receive Map View events ........................................................................ 95
Event Interaction ........................................................................................................... 96
Event Overview .......................................................................................................... 96
Event Types ............................................................................................................ 96
Enabling Events ...................................................................................................... 96
Data Selection Events ............................................................................................. 96
GIS Events .............................................................................................................. 97
Grid Events.............................................................................................................. 97
Map View Events ..................................................................................................... 97
Map Image Events .................................................................................................. 98
OpenSpirit settings ........................................................................................................ 99
OpenSpirit Settings Overview .................................................................................... 99
Export Defaults ........................................................................................................... 99
General Options ....................................................................................................... 105
Events ................................................................................................................... 106
Well ....................................................................................................................... 107
Seismic .................................................................................................................. 108
Miscellaneous........................................................................................................ 109
Data Management Options ...................................................................................... 109
Match Merge Options ............................................................................................ 110
Attribute Refresh Options ...................................................................................... 111
Data Key Clear Options ......................................................................................... 111
Groupings ................................................................................................................. 112
Help and Support Options ........................................................................................ 114
Configuration Files ...................................................................................................... 116
Support File .............................................................................................................. 116
XML Mapping Files................................................................................................... 117
Glossary ...................................................................................................................... 119


Welcome to the TIBCO OpenSpirit Adapter for Petrel | 7
OpenSpirit Adapter from Petrel User Guide
Welcome to the TIBCO OpenSpirit Adapter for Petrel The TIBCO OpenSpirit Adapter for Petrel is an Ocean plug-in for Petrel. This may be used to:
• Import data from OpenSpirit enabled data stores. • Export data to OpenSpirit enabled data stores. • Maintain data consistency between Petrel project data and external OpenSpirit
enabled data stores for selected data items using customizable match and merge rules.
• Send and receive GIS and Grid spatial features between Petrel and other OpenSpirit enabled applications (e.g. Esri's ArcMap)
• Track cursor positions between OpenSpirit enabled applications.

8 | Installation
OpenSpirit Adapter from Petrel User Guide
Installation Installation Prerequisites The TIBCO OpenSpirit Adapter for Petrel requires the following software be installed prior to installation:
• Petrel 2012.x • OpenSpirit runtime v4.0.0 (or newer)
The supported Windows versions are those that Petrel supports. Refer to the Petrel application documentation for operating system and hardware requirements. The TIBCO OpenSpirit Adapter for Petrel requires an Ocean plug-in license feature named "OCEAN_TIB_OPENSPIRITADAPTER" to be available. The public key token for the TIBCO OpenSpirit Adapter for Petrel is 6fff63412f6928a6.
Installation Steps 1. Download the plug-in installer and unzip to a convenient directory: 2. Double click the TIBCO_OpenSpirit_Adapter_for_Petrel*.msi file 3. Follow the installation wizard and click the "Next>" Button when prompted

Installation | 9
OpenSpirit Adapter from Petrel User Guide
4. At this step you will indicate where you want the configuration file to go. By default, it will be placed in the OpenSpirit extension directory in the Petrel installation directory. The field is editable and any visible directory may be entered. The field may be user specific or point to a common shared directory so that all Petrel users in a site get the same business rules for importing and exporting data.

10 | Installation
OpenSpirit Adapter from Petrel User Guide
5. After a successful installation the OpenSpirit tool bar should appear in Petrel the next time it is launched.
The OpenSpirit Adapter should now appear in the Windows Control Panel's Program and Features list as shown in the following image. The adapter can be removed by selecting it from the list and clicking on the Uninstall option.

Getting Started | 11
OpenSpirit Adapter from Petrel User Guide
Getting Started The TIBCO OpenSpirit Adapter for Petrel Tool Bar After installation of the TIBCO OpenSpirit Adapter for Petrel you will see an entry in the Petrel license package selection window that is displayed when launching the Petrel application. Check the TIBCO OpenSpirit Adapter for Petrel option to enable the OpenSpirit Adapter tool bar in Petrel.
The OpenSpirit Adapter tool bar will appear in the Petrel main tool bar if the TIBCO OpenSpirit Adapter for Petrel license package was selected at startup.
The starting state of the tool bar indicates that Petrel is not connected to OpenSpirit: the on/off button is in the off state as symbolized by the red icon. In order to connect to OpenSpirit simply click on the red on/off button. If you have a Petrel project open that already has a coordinate reference system (CRS), unit preferences, and a SRD (Seismic Reference Datum) assigned then the connection button turns green and all the tool bar icons are enabled like this:
If, however, you have not opened a project, or the project has no assigned CRS then you will see the Project Initiation Wizard appear. After walking through this wizard all the OpenSpirit tool bar icons should be active.
12 | Getting Started
OpenSpirit Adapter from Petrel User Guide
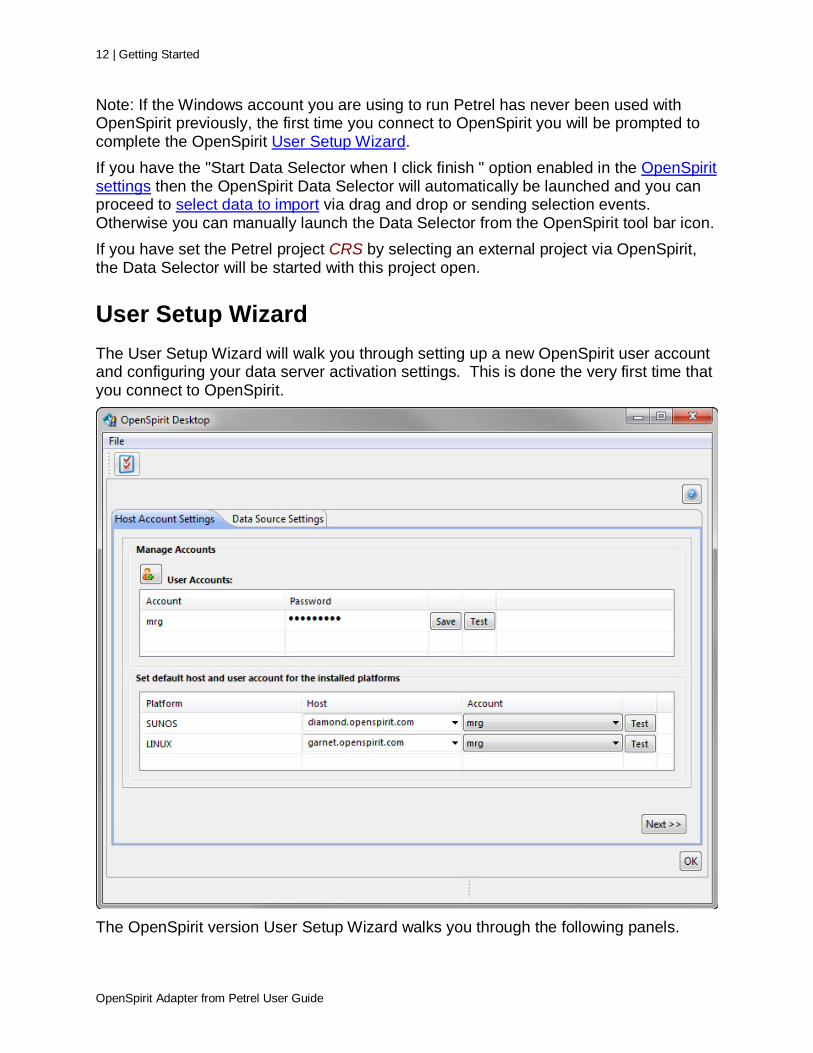
Note: If the Windows account you are using to run Petrel has never been used with OpenSpirit previously, the first time you connect to OpenSpirit you will be prompted to complete the OpenSpirit User Setup Wizard. If you have the "Start Data Selector when I click finish " option enabled in the OpenSpirit settings then the OpenSpirit Data Selector will automatically be launched and you can proceed to select data to import via drag and drop or sending selection events. Otherwise you can manually launch the Data Selector from the OpenSpirit tool bar icon. If you have set the Petrel project CRS by selecting an external project via OpenSpirit, the Data Selector will be started with this project open.
User Setup Wizard The User Setup Wizard will walk you through setting up a new OpenSpirit user account and configuring your data server activation settings. This is done the very first time that you connect to OpenSpirit.
The OpenSpirit version User Setup Wizard walks you through the following panels.

Getting Started | 13
OpenSpirit Adapter from Petrel User Guide
Enter Host Account Settings OpenSpirit has the capability to remotely start application data connectors (GeoFrame, OpenWorks, Finder, etc.) across different operating systems such as Solaris and Linux. This capability is commonly used when running applications on Windows, like the TIBCO OpenSpirit Adapter for Petrel, that need access to data that is only available on Solaris or Linux. The Host Account Settings panel is used to provide OpenSpirit with the host, account, and password information needed to start data connector processes to service requests for data made by OpenSpirit enabled applications. The information is encrypted and stored as part of your user preference data in the OpenSpirit proprietary database (unless your company has disabled this feature). Windows data connectors can only be run on a Windows host that is running your OpenSpirit Launcher or DataSelector. No data connector setup is needed for Windows data connectors (Kingdom, Petra, etc.). The Data Server Setup allows you to enter a SunOS (Solaris), or Linux host, user account and password. This will become the default host for any OpenSpirit data connector that runs on the associated platform. The User Accounts section of the panel is used to enter, save, and test your account password. Your Windows account name appears as the only entry in the account list based on an assumption that your Linux or Solaris account has the same name. The
add account button can be used to add additional account names to the account list. Enter the account password next to the account name and press the Save button. The Test button will enable and can then be used to test the account password. You will be prompted to select a host to use to test the account name and password. The password entry field does not appear if your OpenSpirit installation was configured to not allow passwords to be saved by OpenSpirit. The bottom section of the Host Account Settings panel is used to select the host and account to use as your default for Linux and/or Solaris. OpenSpirit must be installed on at least one Linux host in order for LINUX to appear in the defaults list. OpenSpirit must be installed on at least one Solaris host in order for SUNOS to appear in the defaults list. Select the host and account you would like to use as your default for each of the platforms that appear in the defaults list. Press the Test button next to each default to verify the information is correct. Press the Next button to advance to the Data Source Settings panel.

14 | Getting Started
OpenSpirit Adapter from Petrel User Guide
Enter Data Source Settings The Data Source Settings panel can be used to override the default host and/or account used to start the data connector process for a specific data source. Click on the <Default> hyper link next to a data source to change the host and/or account to use for that data source.
A red circle icon in the Settings column next to a data source indicates that one or more mandatory settings needed to connect to the data source is missing. Click on the red circle icon to open a window that can be used to enter the required data source settings. The required settings differ by type of data source. Following is a list of required data source settings.
• OpenWorks, Recall, EPOS, Managed Segy and Petra - no account or password is required.
• GeoFrame - A project password may be required if your company does not use the project name as the project password. Defaulting the password to the project name can be enabled by the OpenSpirit administrator that configures your GeoFrame data source.
• Finder - Oracle account and password. Externally authenticated Finder accounts cannot be used.

Getting Started | 15
OpenSpirit Adapter from Petrel User Guide
• PPDM - Oracle user and password may be required if the OpenSpirit administrator that configures your PPDM data source did not provide a default Oracle account and password.
• Kingdom - An author is required for each Kingdom project accessed through OpenSpirit. A project user name and password are shown as optional. User name and password are required if the Kingdom project database is Oracle, the user name should be the Oracle database login user and the password should be the Oracle database login user password.
• SDE - Oracle SDE user and associated Oracle password may be required if the OpenSpirit administrator that configures your SDE data source did not provide a default SDE account and password.

16 | Project Initiation Wizard
OpenSpirit Adapter from Petrel User Guide
Project Initiation Wizard Setting the Project CRS (Coordinate Reference System) The Project Initiation wizard forces you to choose a coordinate reference system (CRS) to use for the Petrel project. As shown in the Project Initiation wizard, you have four different methods of selecting the CRS. A CRS must be set before importing or exporting data via OpenSpirit as OpenSpirit automatically does any required coordinate transformations and must know the CRS of the Petrel project.
Select from external OpenSpirit data source... In this option you select an existing external project (e.g. an OpenWorks, GeoFrame, Kingdom, etc... project) and then OpenSpirit will connect to this project and read its CRS details. This CRS will then be used as the Petrel project CRS. This option allows you to use any standard predefined or custom CRS that may be defined in the external project.

Project Initiation Wizard | 17
OpenSpirit Adapter from Petrel User Guide
Notes:
1. Petrel requires a CRS that is a map projection system. Some external data stores may allow a user to set a project CRS as a geographic system- these projects can not be used to define the Petrel project CRS.
2. In addition, when an external project is chosen to define the Petrel project CRS the preferred datum shift to WGS84 that is defined in the chosen project will also be set as the preferred datum shift to WGS84 in Petrel. This datum shift will then be used by the OpenSpirit Adapter when exchanging data between a Petrel project and an external data store if they have differing geodetic datums.
Select from existing OpenSpirit Session... In this option you select an existing OpenSpirit session that has a preferred CRS already set on it. The OpenSpirit Session CRS is, in turn, obtained from a selected external project (e.g. OpenWorks, GeoFrame, Kingdom, etc...) that was chosen in the OpenSpirit session wizard.

18 | Project Initiation Wizard
OpenSpirit Adapter from Petrel User Guide
Select from OpenSpirit EPSG list... In this option you select a predefined EPSG CRS from the OpenSpirit catalog that is referenced by your OpenSpirit installation.

Project Initiation Wizard | 19
OpenSpirit Adapter from Petrel User Guide
To select a CRS and an associated preferred datum shift you should follow these steps.
1. Optionally filter the list of available CRS names by entering a text fragment (case insensitive)
20 | Project Initiation Wizard
OpenSpirit Adapter from Petrel User Guide
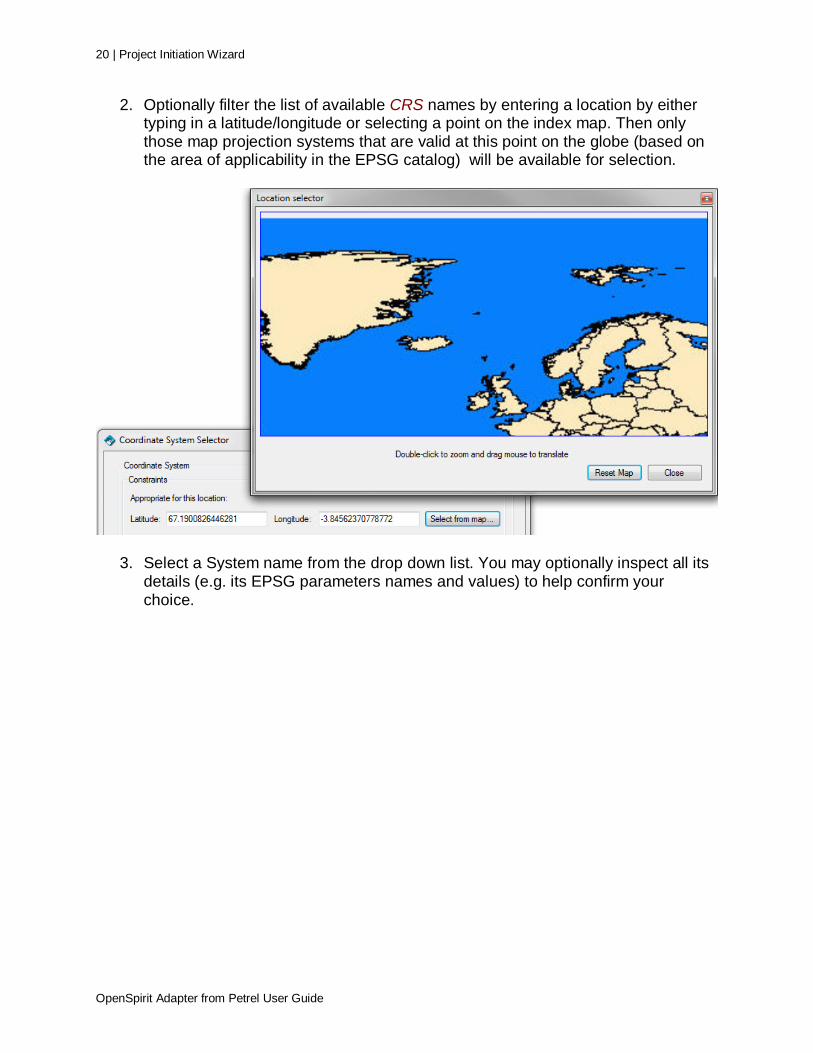
2. Optionally filter the list of available CRS names by entering a location by either typing in a latitude/longitude or selecting a point on the index map. Then only those map projection systems that are valid at this point on the globe (based on the area of applicability in the EPSG catalog) will be available for selection.
3. Select a System name from the drop down list. You may optionally inspect all its details (e.g. its EPSG parameters names and values) to help confirm your choice.

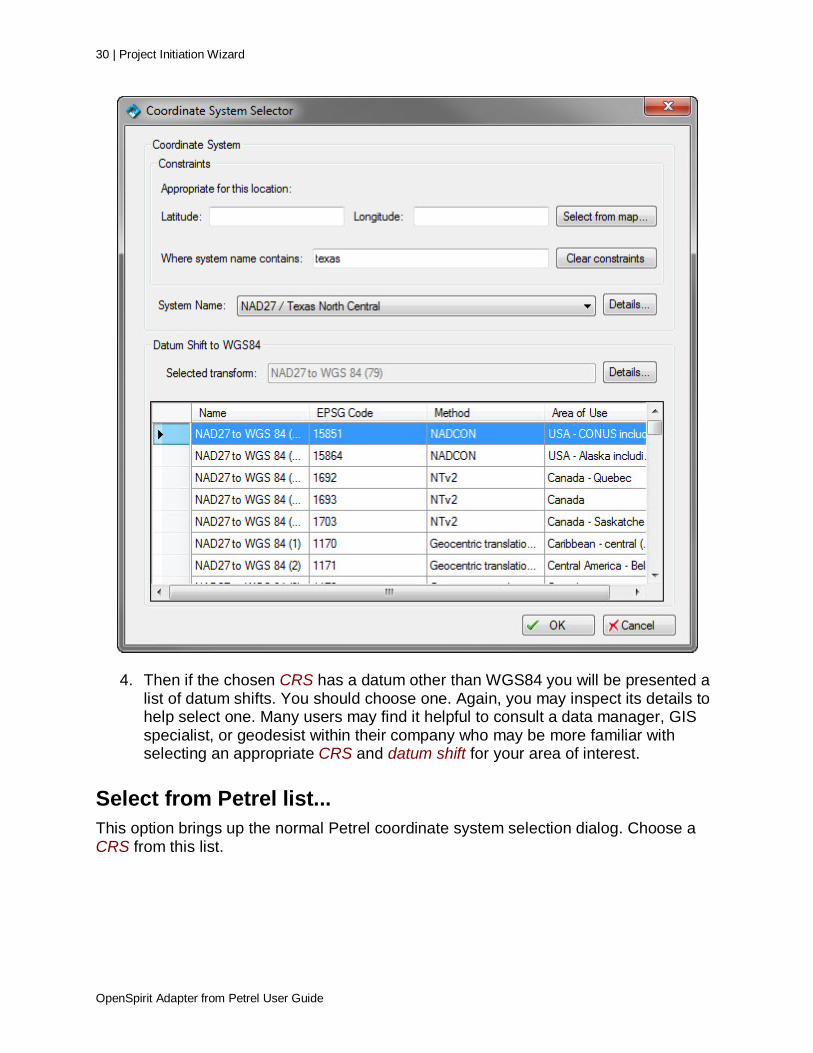
Project Initiation Wizard | 21
OpenSpirit Adapter from Petrel User Guide
4. Then if the chosen CRS has a datum other than WGS84 you will be presented a list of datum shifts. You should choose one. Again, you may inspect its details to help select one. Many users may find it helpful to consult a data manager, GIS specialist, or geodesist within their company who may be more familiar with selecting an appropriate CRS and datum shift for your area of interest.
Select from Petrel list... This option brings up the normal Petrel coordinate system selection dialog. Choose a CRS from this list.

22 | Project Initiation Wizard
OpenSpirit Adapter from Petrel User Guide

Project Initiation Wizard | 23
OpenSpirit Adapter from Petrel User Guide
Confirming CRS Choice Regardless of which method was used to select a CRS you will see the choice reflected in the Project initiation wizard and have one last chance to inspect its details before advancing to the next step in the wizard by clicking the Next button.

24 | Project Initiation Wizard
OpenSpirit Adapter from Petrel User Guide
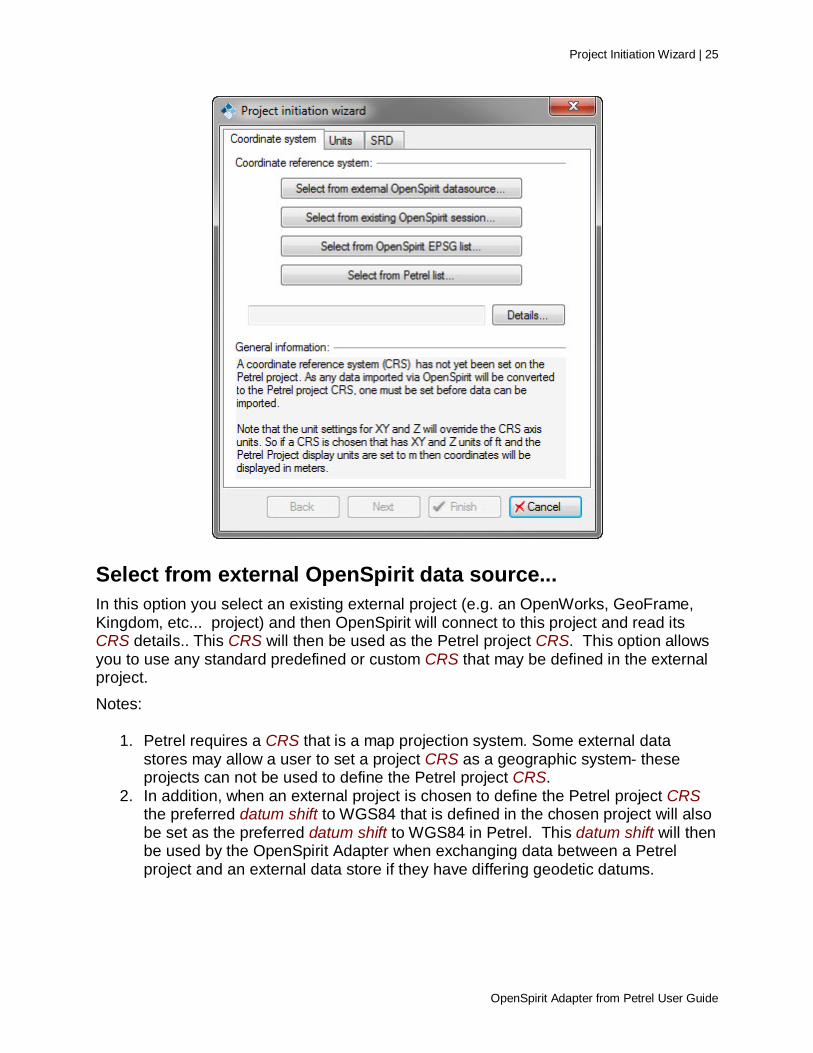
Setting the Project CRS (Coordinate Reference System) The Project Initiation wizard forces you to choose a coordinate reference system (CRS) to use for the Petrel project. As shown in the Project Initiation wizard, you have four different methods of selecting the CRS. A CRS must be set before importing or exporting data via OpenSpirit as OpenSpirit automatically does any required coordinate transformations and must know the CRS of the Petrel project.
Project Initiation Wizard | 25
OpenSpirit Adapter from Petrel User Guide
Select from external OpenSpirit data source... In this option you select an existing external project (e.g. an OpenWorks, GeoFrame, Kingdom, etc... project) and then OpenSpirit will connect to this project and read its CRS details.. This CRS will then be used as the Petrel project CRS. This option allows you to use any standard predefined or custom CRS that may be defined in the external project. Notes:
1. Petrel requires a CRS that is a map projection system. Some external data stores may allow a user to set a project CRS as a geographic system- these projects can not be used to define the Petrel project CRS.
2. In addition, when an external project is chosen to define the Petrel project CRS the preferred datum shift to WGS84 that is defined in the chosen project will also be set as the preferred datum shift to WGS84 in Petrel. This datum shift will then be used by the OpenSpirit Adapter when exchanging data between a Petrel project and an external data store if they have differing geodetic datums.

26 | Project Initiation Wizard
OpenSpirit Adapter from Petrel User Guide
Select from existing OpenSpirit Session... In this option you select an existing OpenSpirit session that has a preferred CRS already set on it. The OpenSpirit Session CRS is, in turn, obtained from a selected external project (e.g. OpenWorks, GeoFrame, Kingdom, etc...) that was chosen in the OpenSpirit session wizard.

Project Initiation Wizard | 27
OpenSpirit Adapter from Petrel User Guide
Select from OpenSpirit EPSG list... In this option you select a predefined EPSG CRS from the OpenSpirit catalog that is referenced by your OpenSpirit installation.

28 | Project Initiation Wizard
OpenSpirit Adapter from Petrel User Guide
To select a CRS and an associated preferred datum shift you should follow these steps.
1. Optionally filter the list of available CRS names by entering a text fragment (case insensitive)

Project Initiation Wizard | 29
OpenSpirit Adapter from Petrel User Guide
2. Optionally filter the list of available CRS names by entering a location by either typing in a latitude/longitude or selecting a point on the index map. Then only those map projection systems that are valid at this point on the globe (based on the area of applicability in the EPSG catalog) will be available for selection.
3. Select a System name from the drop down list. You may optionally inspect all its details (e.g. its EPSG parameters names and values) to help confirm your choice.
30 | Project Initiation Wizard
OpenSpirit Adapter from Petrel User Guide
4. Then if the chosen CRS has a datum other than WGS84 you will be presented a list of datum shifts. You should choose one. Again, you may inspect its details to help select one. Many users may find it helpful to consult a data manager, GIS specialist, or geodesist within their company who may be more familiar with selecting an appropriate CRS and datum shift for your area of interest.
Select from Petrel list... This option brings up the normal Petrel coordinate system selection dialog. Choose a CRS from this list.

Project Initiation Wizard | 31
OpenSpirit Adapter from Petrel User Guide

32 | Project Initiation Wizard
OpenSpirit Adapter from Petrel User Guide
Confirming CRS Choice Regardless of which method was used to select a CRS you will see the choice reflected in the Project initiation wizard and have one last chance to inspect its details before advancing to the next step in the wizard by clicking the Next button.

Project Initiation Wizard | 33
OpenSpirit Adapter from Petrel User Guide
Setting the Project Units The next step in initializing a project is to set the desired display units. This dialog mimics the Units dialog in the Petrel project setting dialog and provides a mechanism for the user to set their preferences at project creation time. If a Coordinate System was selected from either an OpenSpirit data source or session, then the Units tab will be pre-populated with the project/session units. The pre-populated units may be overwritten by subsequently selecting a unit system in the Units tab.

34 | Project Initiation Wizard
OpenSpirit Adapter from Petrel User Guide
If you select to customize the project unit system you may individually select the preferred units for different measurements and also have additional XY and Z units available.
Notes:
1. The choice of the XY units will override the units on the chosen CRS. So if a UTM CRS is chosen which has meters as its units for X and Y and a user chooses ft as the preferred XY unit then all locations in Petrel will be shown in the chosen UTM CRS but the X, Y values will be converted to feet.
Project Initiation Wizard | 35
OpenSpirit Adapter from Petrel User Guide
2. The TIBCO OpenSpirit Adapter for Petrel distinguishes between three types of feet:
• ft = International foot • ft(US) = US survey foot - commonly used in the USA for State Plane systems • ft(Sears) = Sears foot - used for a CRS commonly used in Sarawak, Malaysia
After choosing your unit preferences advance to the next tab in the wizard by clicking on the Next button.
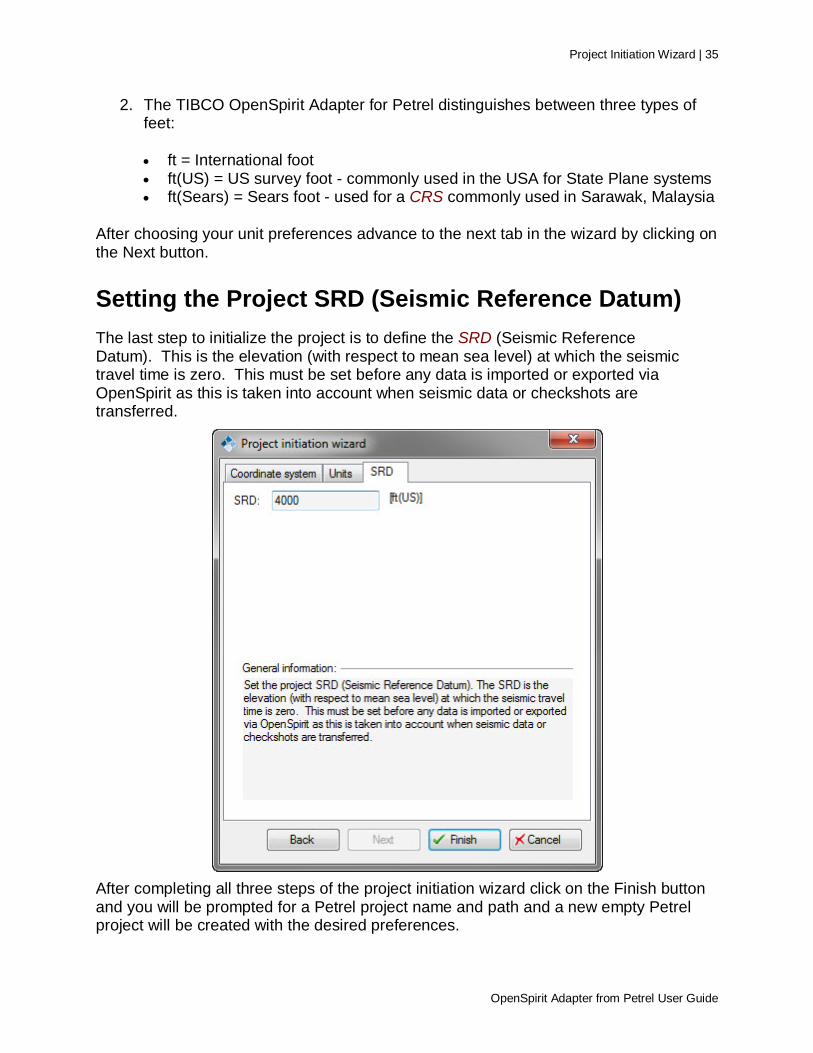
Setting the Project SRD (Seismic Reference Datum) The last step to initialize the project is to define the SRD (Seismic Reference Datum). This is the elevation (with respect to mean sea level) at which the seismic travel time is zero. This must be set before any data is imported or exported via OpenSpirit as this is taken into account when seismic data or checkshots are transferred.
After completing all three steps of the project initiation wizard click on the Finish button and you will be prompted for a Petrel project name and path and a new empty Petrel project will be created with the desired preferences.

36 | Project Initiation Wizard
OpenSpirit Adapter from Petrel User Guide
If the OpenSpirit settings option is enabled to "Start data selector when I click finish" then the OpenSpirit Data Selector will be launched. The Data Selector may then be used to select the desired projects and selected wells, seismic, interpretation and culture data.
Import Data | 37
OpenSpirit Adapter from Petrel User Guide
Import Data Import Overview Data may be imported into Petrel via OpenSpirit by several mechanisms:
Data imported from external data store
• Data may be imported using the Load feature in a Studio Find search result. See the Studio Find Search section of this guide for information about loading data using Studio Find search results.
• Data may be imported in reaction to a received data selection event. This may be initiated from the OpenSpirit Data Selector, OpenSpirit ArcGIS Extension, OpenSpirit viewers, or other third party OpenSpirit enabled applications.
• Data may be imported in reaction to a drag and drop event (containing a data selection event). This may be initiated from the OpenSpirit Data Selector or other third party OpenSpirit enabled applications.
• Data that is imported is placed in an appropriate spot in the Petrel input tree. For the following data types you can control which folder imported data will be inserted into by selecting the target folder (highlight the folder before sending a data selection event):
• wells into selected well sub folder • well tops into selected well tops folder • well logs into selected global log template sub-folder • 2d/3d survey into selected seismic or survey folder • 2d seismic datasets into selected 2d survey sub-folder • 3d seismic datasets into selected 3d survey sub-folder • 3d seismic interpretation grid into selected interpretation folder • 2d seismic interpretation into selected interpretation folder • faults into selected interpretation folder • non-seismic grids, horizon/fault points, and horizon fault boundaries into
selected generic folder • Imported data can optionally be grouped into sub folders based on a “group
by” attribute. Grouping is controlled using the Groupings tab in the OpenSpirit Settings dialog.

38 | Import Data
OpenSpirit Adapter from Petrel User Guide
OpenSpirit DataSelector Tab Name
Screen shot from Petrel Input Tree
Petrel Object Type Created Comments
Well group
Well
Well
When a wellbore selection is received a Petrel well is created and if the source wellbore has a preferred checkshot this is also imported and set as the active checkshot on the Petrel well (and a General time log created). Wellbores that are missing a well reference datum (e.g. a KB elevation) are not imported (unless you have selected the option to assume 0.0 for the datum) and wellbores missing an azimuth north reference are also skipped (unless you have set a default north reference in the OpenSpirit settings dialog). Skipped data is noted in the log file.
Pick
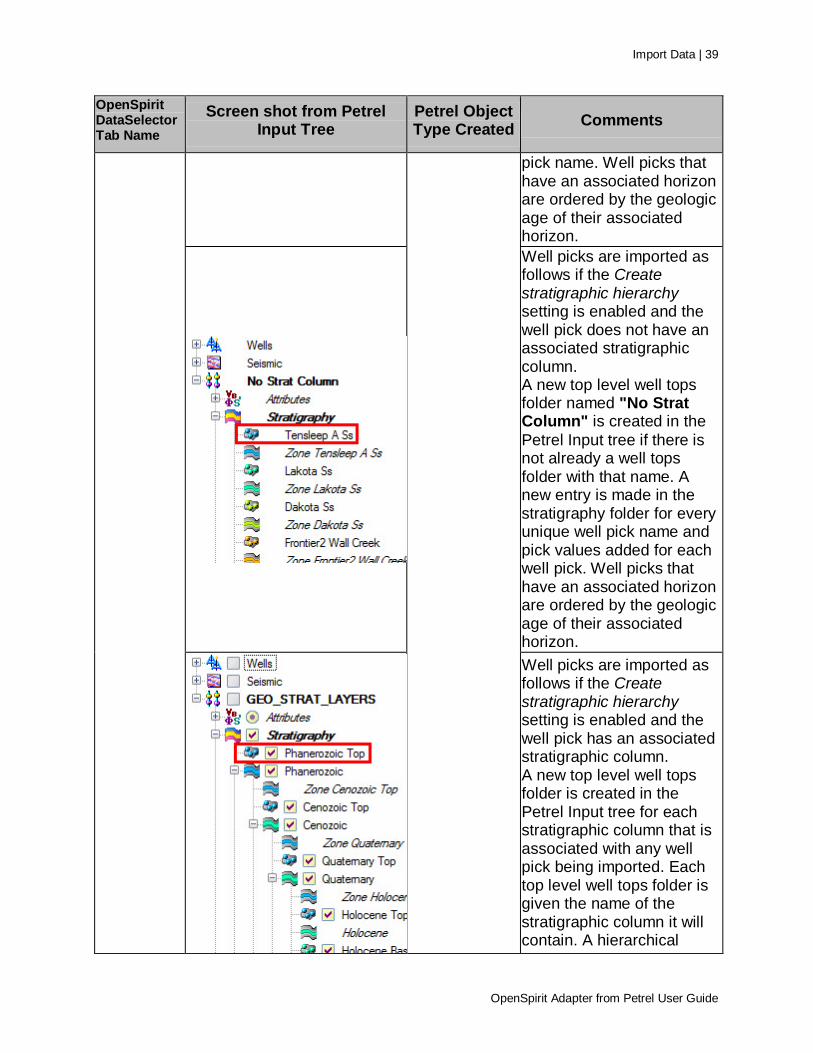
Well Tops
Well picks are imported one of three ways based on the Create stratigraphic hierarchy setting and the existence of a stratigraphic column association with the well picks. Well picks are imported as follows if the Create stratigraphic hierarchy setting is not enabled. A new top level well tops folder named "Well Tops 1" is created in the Petrel Input tree if there is not already a well tops folder in the input tree. A new horizon and zone entry is made in the stratigraphy folder for every unique well
Import Data | 39
OpenSpirit Adapter from Petrel User Guide
OpenSpirit DataSelector Tab Name
Screen shot from Petrel Input Tree
Petrel Object Type Created Comments
pick name. Well picks that have an associated horizon are ordered by the geologic age of their associated horizon.
Well picks are imported as follows if the Create stratigraphic hierarchy setting is enabled and the well pick does not have an associated stratigraphic column. A new top level well tops folder named "No Strat Column" is created in the Petrel Input tree if there is not already a well tops folder with that name. A new entry is made in the stratigraphy folder for every unique well pick name and pick values added for each well pick. Well picks that have an associated horizon are ordered by the geologic age of their associated horizon.
Well picks are imported as follows if the Create stratigraphic hierarchy setting is enabled and the well pick has an associated stratigraphic column. A new top level well tops folder is created in the Petrel Input tree for each stratigraphic column that is associated with any well pick being imported. Each top level well tops folder is given the name of the stratigraphic column it will contain. A hierarchical

40 | Import Data
OpenSpirit Adapter from Petrel User Guide
OpenSpirit DataSelector Tab Name
Screen shot from Petrel Input Tree
Petrel Object Type Created Comments
stratigraphy is created under the well tops folder to represent the stratigraphic column. A hierarchy of top, zone, and base horizon is created for all stratigraphic layers defined in the stratigraphic column even if some layers are not associated with any of the well picks being imported.
Log
Well Log
The OpenSpirit log kind is used to find the corresponding Petrel log template and an entry made in the Global logs section. If multiple versions of the same log kind are added to the same well, a number is appended to the log kind name to distinguish them. Duplicate measured depth values will be discarded unless you have selected the option to allow the import of duplicates.
Checkshot
Checkshot
The preferred checkshot is automatically imported when a well is created via OpenSpirit. You may also send additional checkshots. A user must then select which to use as the active checkshot. If the checkshot datum differs from the Petrel SRD then you are prompted to either supply a replacement velocity (to be used to shift the checkshot times) or to skip importing the checkshot.
Seismic group
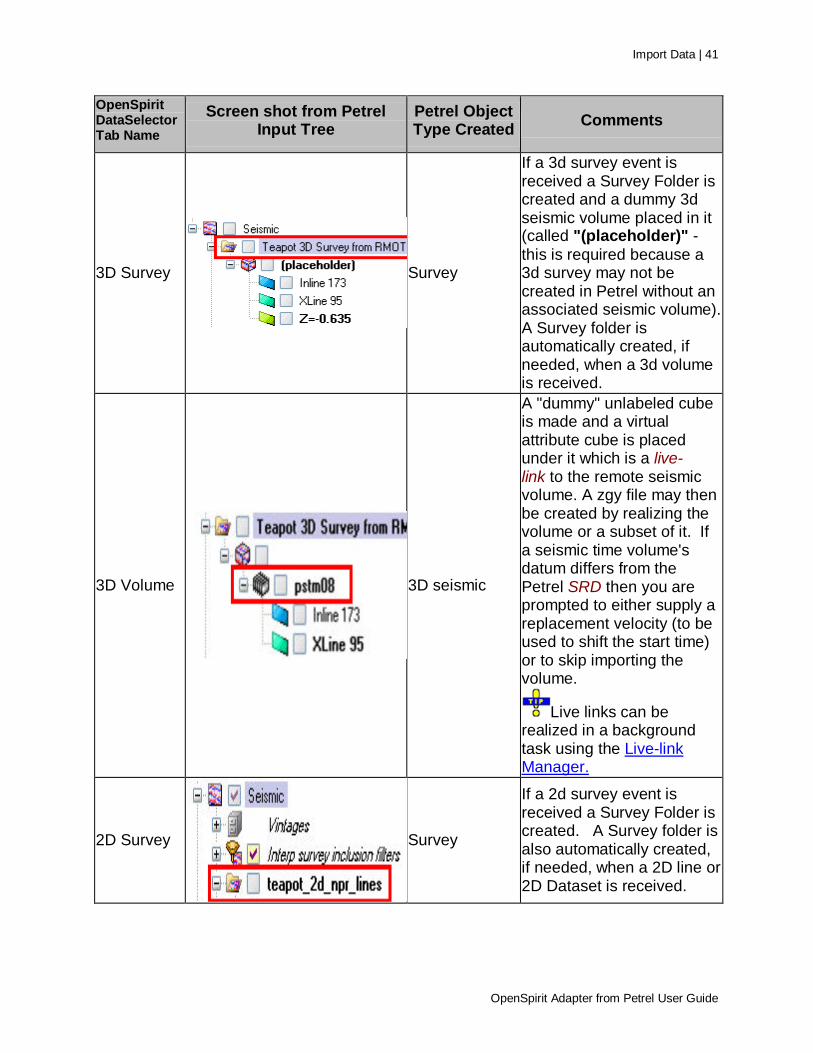
Import Data | 41
OpenSpirit Adapter from Petrel User Guide
OpenSpirit DataSelector Tab Name
Screen shot from Petrel Input Tree
Petrel Object Type Created Comments
3D Survey
Survey
If a 3d survey event is received a Survey Folder is created and a dummy 3d seismic volume placed in it (called "(placeholder)" - this is required because a 3d survey may not be created in Petrel without an associated seismic volume). A Survey folder is automatically created, if needed, when a 3d volume is received.
3D Volume
3D seismic
A "dummy" unlabeled cube is made and a virtual attribute cube is placed under it which is a live-link to the remote seismic volume. A zgy file may then be created by realizing the volume or a subset of it. If a seismic time volume's datum differs from the Petrel SRD then you are prompted to either supply a replacement velocity (to be used to shift the start time) or to skip importing the volume.
Live links can be realized in a background task using the Live-link Manager.
2D Survey
Survey
If a 2d survey event is received a Survey Folder is created. A Survey folder is also automatically created, if needed, when a 2D line or 2D Dataset is received.
42 | Import Data
OpenSpirit Adapter from Petrel User Guide
OpenSpirit DataSelector Tab Name
Screen shot from Petrel Input Tree
Petrel Object Type Created Comments
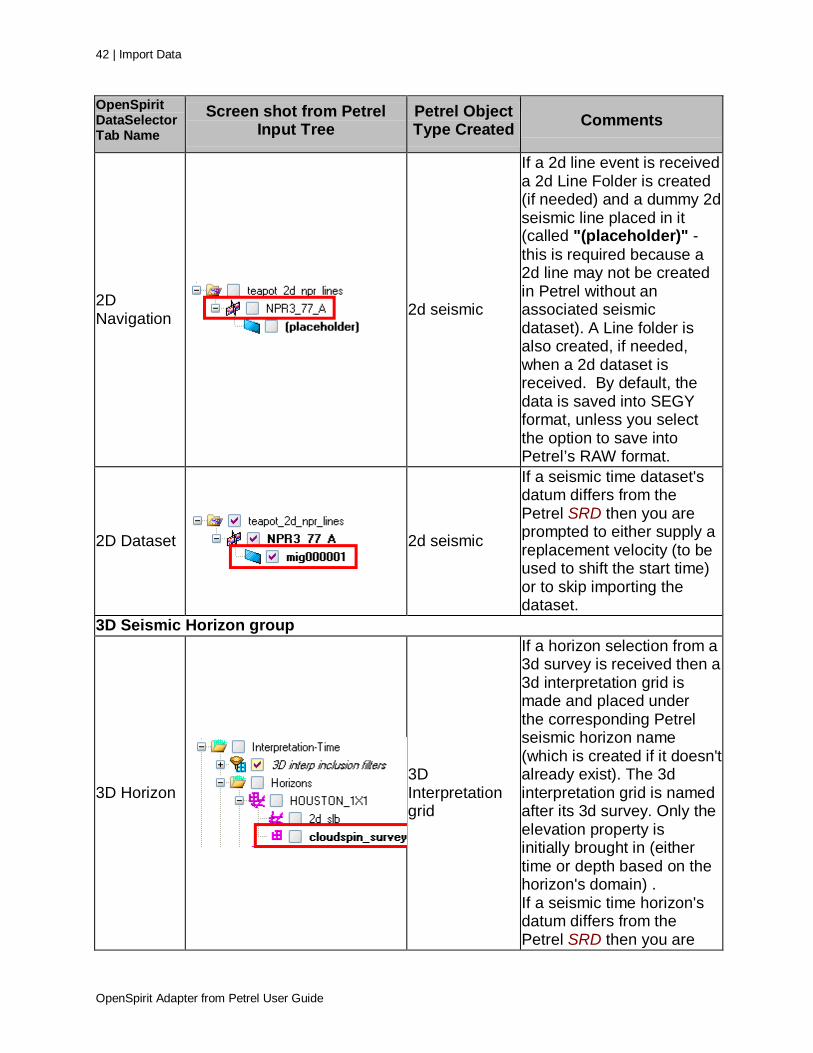
2D Navigation
2d seismic
If a 2d line event is received a 2d Line Folder is created (if needed) and a dummy 2d seismic line placed in it (called "(placeholder)" - this is required because a 2d line may not be created in Petrel without an associated seismic dataset). A Line folder is also created, if needed, when a 2d dataset is received. By default, the data is saved into SEGY format, unless you select the option to save into Petrel’s RAW format.
2D Dataset
2d seismic
If a seismic time dataset's datum differs from the Petrel SRD then you are prompted to either supply a replacement velocity (to be used to shift the start time) or to skip importing the dataset.
3D Seismic Horizon group
3D Horizon
3D Interpretation grid
If a horizon selection from a 3d survey is received then a 3d interpretation grid is made and placed under the corresponding Petrel seismic horizon name (which is created if it doesn't already exist). The 3d interpretation grid is named after its 3d survey. Only the elevation property is initially brought in (either time or depth based on the horizon's domain) . If a seismic time horizon's datum differs from the Petrel SRD then you are

Import Data | 43
OpenSpirit Adapter from Petrel User Guide
OpenSpirit DataSelector Tab Name
Screen shot from Petrel Input Tree
Petrel Object Type Created Comments
prompted to either supply a replacement velocity (to be used to shift the times) or to skip importing the horizon.
Horizon Properties
Continuous attribute
When a horizon property event is received and there is no corresponding 3D interpretation grid already in Petrel then the 3d interpretation grid will automatically be created so that the property may be attached to it. If the horizon's domain is time, Z will be set to 0. If domain is depth, Z will be set to Petrel project SRD.
Horizon Fault Boundaries
Lines/polygons
2D Seismic Horizon group
2D Horizon
2D Interpretation
When a horizon selection from a 2d seismic interpretation is received a 2d interpretation is made and placed under the corresponding Petrel seismic horizon name (which is created if it doesn't already exist). The 2d interpretation is named after its 2d survey. If a seismic time horizon's datum differs from the Petrel SRD then you are prompted to either supply a replacement velocity (to be used to shift the times) or to skip importing the horizon.
Non-seismic Horizon group

44 | Import Data
OpenSpirit Adapter from Petrel User Guide
OpenSpirit DataSelector Tab Name
Screen shot from Petrel Input Tree
Petrel Object Type Created Comments
Grid
Surface
When a non-seismic horizon selection is received a Petrel surface will be created. If the grid is not rectangular (in the Petrel project CRS) it will not be imported
Point Set
Points
Received horizon PointSets are placed in a folder named “Surfaces -Time" or "Surfaces-Depth" - based on domain.
Fault group
Fault (type= PolylineSet)
Fault interpretation
Fault (type= PointSet)
Points
Received fault PointSets are placed in a folder named “Faults -Time" or "Faults-Depth" - based on domain.
Culture group
Point Feature
Points
Creates a feature whose name comes from the feature column that is called "name" or has "name" in it. If no such column exists the featureid is used as the Petrel object name. Automatically imports all associated Point Feature attributes with Point features
Polyline Feature
Lines/polygons
Creates a feature whose name comes from the feature column that is called "name" or has "name" in it. If no such column exists the featureid is used as the

Import Data | 45
OpenSpirit Adapter from Petrel User Guide
OpenSpirit DataSelector Tab Name
Screen shot from Petrel Input Tree
Petrel Object Type Created Comments
Petrel object name. Automatically imports all associated Polyline Feature attributes with Polyline features
Polygon Feature
Lines/polygons
Creates a feature whose name comes from the feature column that is called "name" or has "name" in it. If no such column exists the featureid is used as the Petrel object name. Automatically imports all associated Polygon Feature attributes with Polygon features
In either case the OpenSpirit Adapter will use the received datakeys to query for data from the referenced data stores and then compare to data already in the Petrel project. If matching data exists in the project you will have a chance to indicate whether you wish to skip importing the matching data item, update it, or add a duplicate item. This import behavior is controlled in the import dialog. The attributes used to determine a match are set in the configuration file.
Data imported from another application using GIS events Data may be imported in reaction to a received GIS or Grid event. This may be initiated from the OpenSpirit ArcGIS Extension or other third party OpenSpirit enabled applications. See the GIS Integration section of this guide for more information about importing data via GIS events.
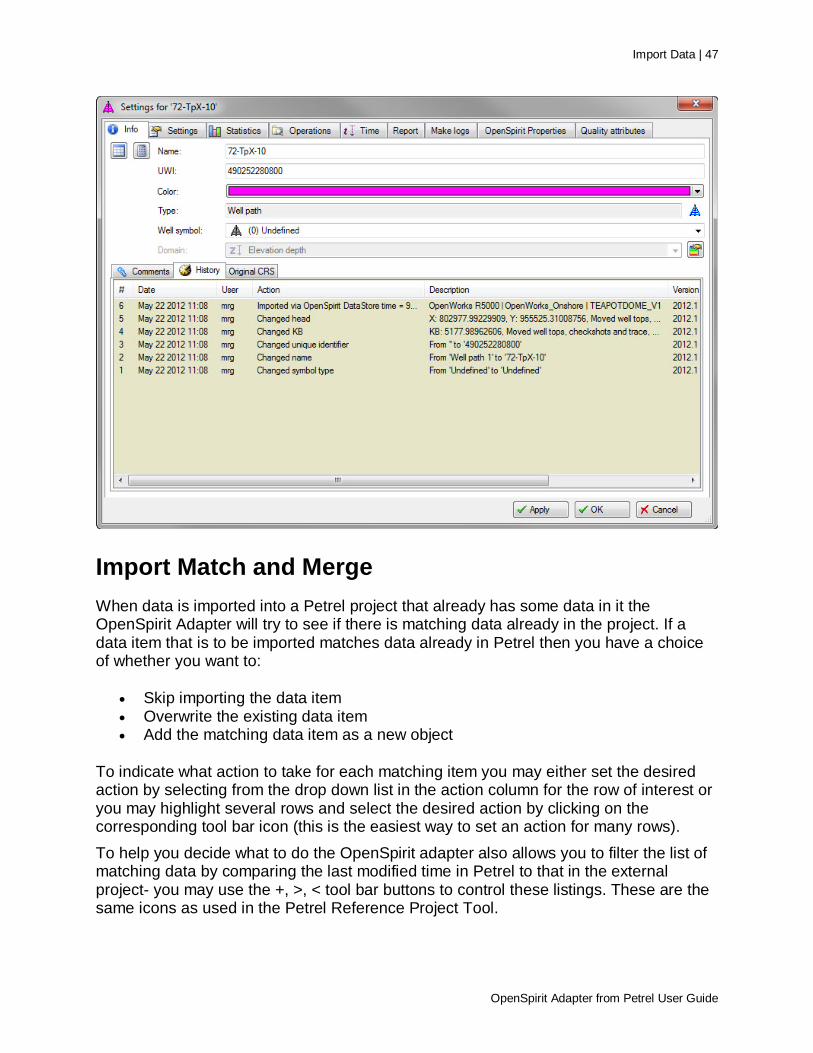
OpenSpirit Properties If data is imported via this mechanism the Petrel objects that are created are "tagged" with the OpenSpirit datakey and the last modified date from the source data store. This will allow synchronization with the external data source. In addition, based on settings in the configuration file, additional attributes, beyond what is mappable to the Petrel data model, will be added to the Petrel object. These extended attributes may be viewed in the Settings dialog of any imported object in the OpenSpirit Properties tab (as illustrated below).

46 | Import Data
OpenSpirit Adapter from Petrel User Guide
When data is imported entries are made in the Petrel object history to document from where the data was imported and what assumptions may have been made during import (see example below)
Import Data | 47
OpenSpirit Adapter from Petrel User Guide
Import Match and Merge When data is imported into a Petrel project that already has some data in it the OpenSpirit Adapter will try to see if there is matching data already in the project. If a data item that is to be imported matches data already in Petrel then you have a choice of whether you want to:
• Skip importing the data item • Overwrite the existing data item • Add the matching data item as a new object
To indicate what action to take for each matching item you may either set the desired action by selecting from the drop down list in the action column for the row of interest or you may highlight several rows and select the desired action by clicking on the corresponding tool bar icon (this is the easiest way to set an action for many rows). To help you decide what to do the OpenSpirit adapter also allows you to filter the list of matching data by comparing the last modified time in Petrel to that in the external project- you may use the +, >, < tool bar buttons to control these listings. These are the same icons as used in the Petrel Reference Project Tool.

48 | Import Data
OpenSpirit Adapter from Petrel User Guide
The attribute(s) that are used to determine a match are shown in the green column(s) and the choice of which attribute(s) to use are controlled by the OpenSpirit adapter configuration file.

Import Data | 49
OpenSpirit Adapter from Petrel User Guide
Clicking the "Details" button will cause the dialog to display all the available attributes of the data items to be imported. Once you have made your choices click on the OK button to begin the import (or proceed to another Import dialog for additional data types). If you click cancel then none of the data will be imported. Data dependent on the data you are canceling import of will also be canceled- e.g. if you cancel a well import then logs, picks, and checkshots associated with these wells will also be cancelled.
The Match Merge Options setting can be used to pre-select the match merge action which will prevent the match merge window from appearing during import.
Refresh from External.... If an object in the Petrel tree was imported or exported via OpenSpirit, then a right-click action on that object (or a set of selected objects) will produce a context menu similar to the one below. The OpenSpirit options available in the context menu depend on the data type selected.
Selecting the "Refresh from external" menu item causes all the selected the Petrel objects to be reread from the external source via OpenSpirit.
Refresh can only be performed on 3D seismic volumes when the "Refresh Natural Keys and Extended Attributes" option is selected in the Data Management settings. If you want a chance to review the data that is to be refreshed and use the last modified date to control whether the Petrel objects are updated from the external source or not

50 | Import Data
OpenSpirit Adapter from Petrel User Guide
then you can turn the "List data before matching" option in the OpenSpirit settings dialog (as shown below) .
Seismic Datum Adjustments If the source project has a SRD (Seismic Reference Datum) that is different from the Petrel SRD then the following data types will be shifted during import:
• Checkshots • 2d seismic data sets (time domain) • 3d seismic volumes (time domain) • Seismic horizons (time domain)
Import Data | 51
OpenSpirit Adapter from Petrel User Guide
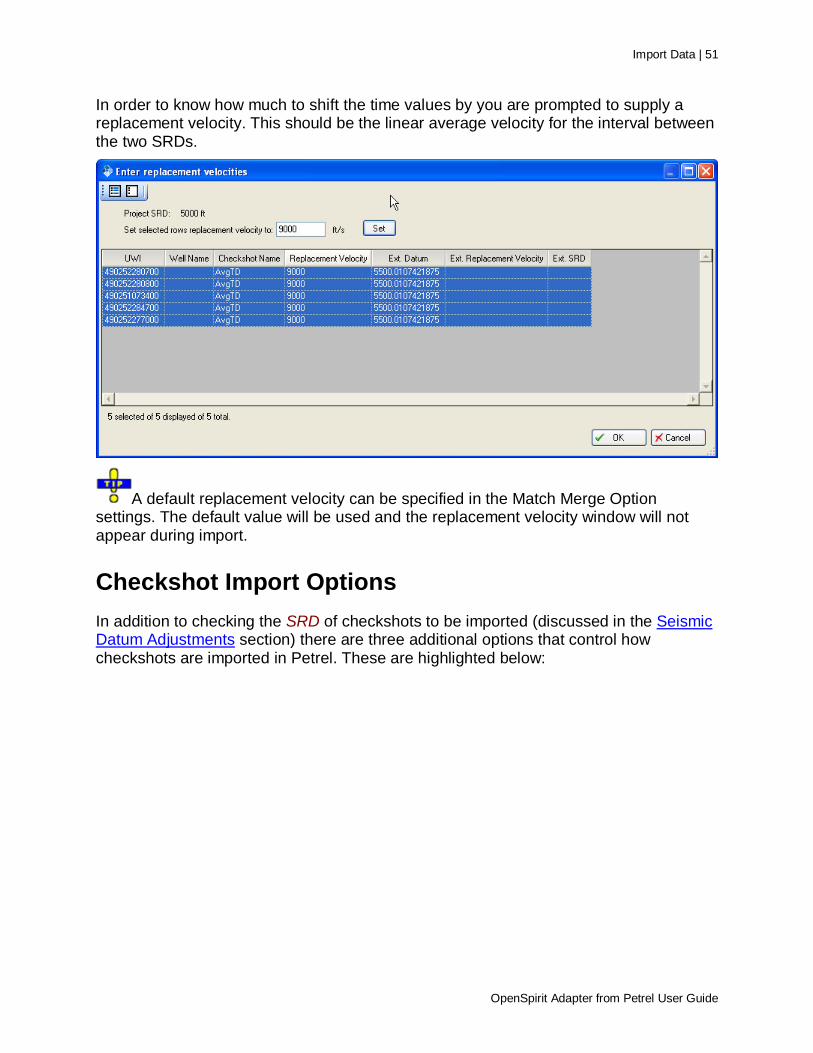
In order to know how much to shift the time values by you are prompted to supply a replacement velocity. This should be the linear average velocity for the interval between the two SRDs.
A default replacement velocity can be specified in the Match Merge Option settings. The default value will be used and the replacement velocity window will not appear during import.
Checkshot Import Options In addition to checking the SRD of checkshots to be imported (discussed in the Seismic Datum Adjustments section) there are three additional options that control how checkshots are imported in Petrel. These are highlighted below:
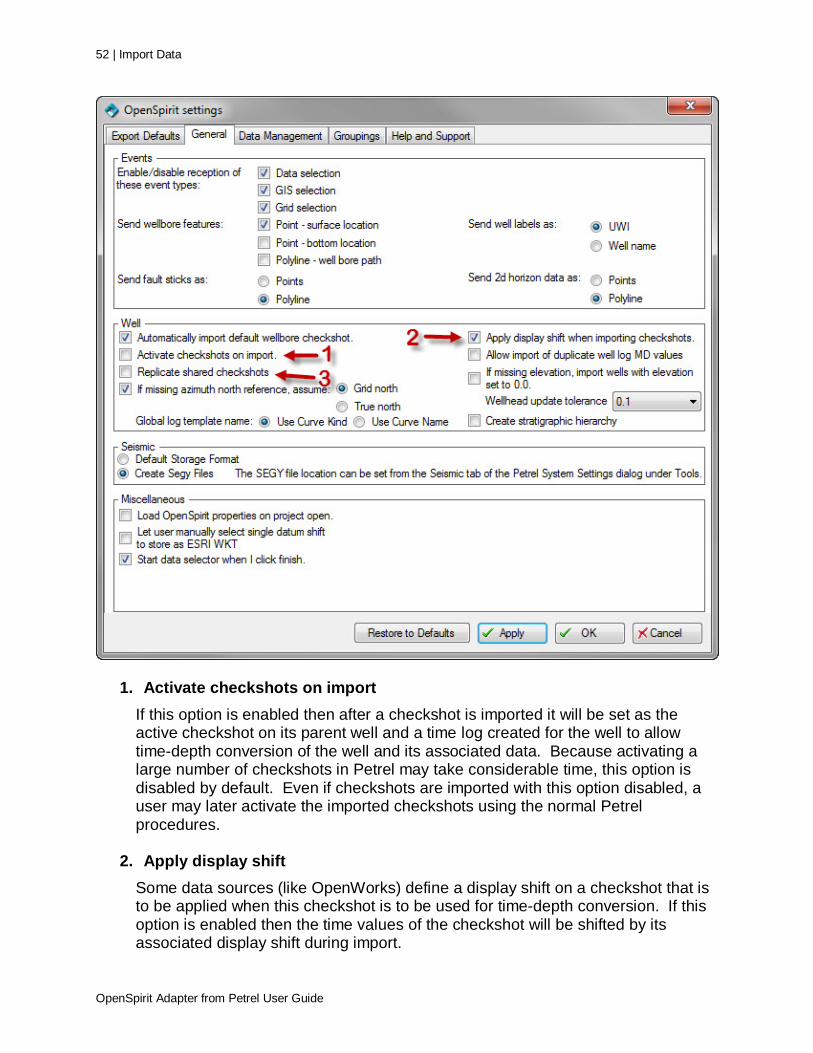
52 | Import Data
OpenSpirit Adapter from Petrel User Guide
1. Activate checkshots on import If this option is enabled then after a checkshot is imported it will be set as the active checkshot on its parent well and a time log created for the well to allow time-depth conversion of the well and its associated data. Because activating a large number of checkshots in Petrel may take considerable time, this option is disabled by default. Even if checkshots are imported with this option disabled, a user may later activate the imported checkshots using the normal Petrel procedures.
2. Apply display shift Some data sources (like OpenWorks) define a display shift on a checkshot that is to be applied when this checkshot is to be used for time-depth conversion. If this option is enabled then the time values of the checkshot will be shifted by its associated display shift during import.

Import Data | 53
OpenSpirit Adapter from Petrel User Guide
Note: If such a checkshot is then edited in Petrel and saved back to its source project this display shift will be backed out during the export process. If, however, the checkshot is exported to some other project then the checkshot is exported without undoing the display shift (and the DisplayShift attribute is set to 0 on export).
3. Replicate shared checkshots Some data sources (like GeoFrame) allow a checkshot that exists on one well to be "shared" to other wells. This means that the time-depth relationship defined by the shared checkshot will be used by all wells that "share" this checkshot. Normally, the OpenSpirit Adapter preserves this sharing concept when importing shared checkshots - only checkshots that are "owned" by its parent well will appear in the Global well logs folder in the Petrel Input tree and if this checkshot is "shared" to other wells then the shared checkshot will be used to calculate the time logs for these other wells. This is the default behavior in the OpenSpirit Adapter. If this option is enabled, however, a shared checkshot will be copied to the wells that are sharing another well's checkshot so that it appears that every well has its own checkshot. This option may be useful if you wish to make a copy of the shared checkshot in order to use as a starting point for editing of the checkshots on individual wells to better match an observed time -depth relationship (e.g. well-seismic correlation).
Well Log Import Options The name given to the Petrel log comes from either the OpenSpirit log Kind value or from the OpenSpirit log Name value. The Global log template name setting determines which OpenSpirit value is used for the log name. For example, logs that appear in the OpenSpirit Data Selector as:

54 | Import Data
OpenSpirit Adapter from Petrel User Guide
When using Global log template name setting Use Curve Kind appear in Petrel as:
When using Global log template name setting Use Curve Name appear in Petrel as:
Well logs are imported into Petrel as continuous logs, as discrete logs, or as synthetic logs. The OpenSpirit log's Kind attribute value determines which type of log is created in Petrel. OpenSpirit logs that have a Kind value that matches the name of a Petrel discrete log template are imported as a discrete log. OpenSpirit logs that have a Kind value that matches the name of a Petrel synthetic log template are imported as a synthetic log. OpenSpirit logs that have a Kind value that does not match a Petrel discrete log template or synthetic log template are imported as a continuous log. The general log template is assigned to a continuous log if the log Kind does not match any Petrel log template. The LogNamesToPropertyTypeCatalog.xml file which is located in the xml folder under the Petrel software installation directory controls the mapping of log Kind value to log template name. The following flow chart illustrates the Kind and Name mappings that occur during well log import.
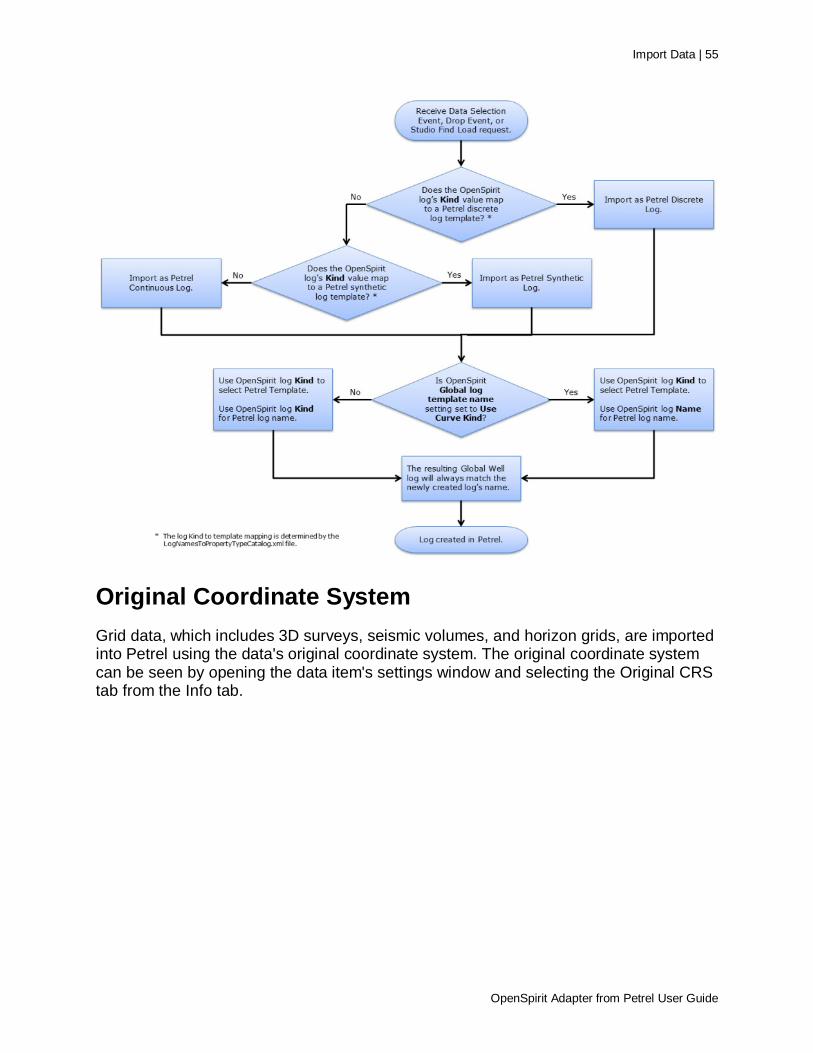
Import Data | 55
OpenSpirit Adapter from Petrel User Guide
Original Coordinate System Grid data, which includes 3D surveys, seismic volumes, and horizon grids, are imported into Petrel using the data's original coordinate system. The original coordinate system can be seen by opening the data item's settings window and selecting the Original CRS tab from the Info tab.

56 | Import Data
OpenSpirit Adapter from Petrel User Guide

Export Data | 57
OpenSpirit Adapter from Petrel User Guide
Export Data Export Overview Data may be exported from Petrel via OpenSpirit by either saving it to a data store that has an OpenSpirit data connector (e.g. OpenWorks, GeoFrame, Kingdom, etc...) or by sending a data full event (e.g. a GIS or Grid event) to another OpenSpirit enabled application (e.g. ArcGIS)
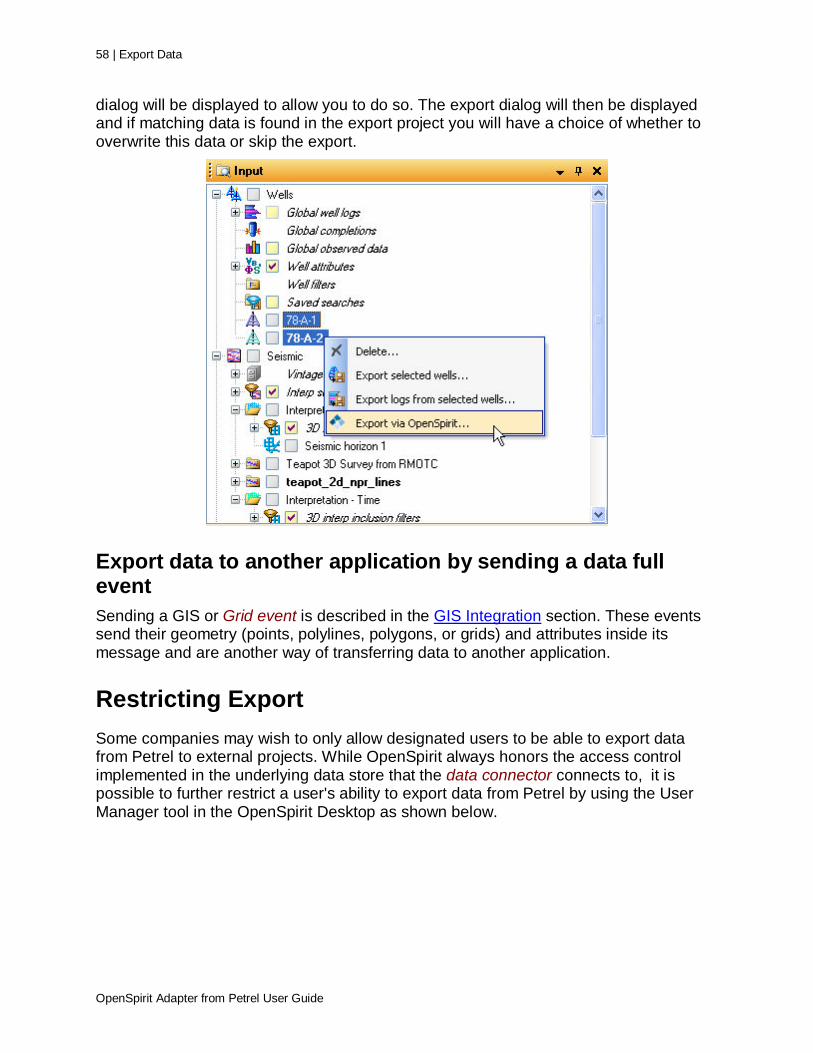
Export data to external data store If an object in the Petrel tree was imported or exported via OpenSpirit, then the right-click action on that object (or a set of selected objects) will produce a context menu similar to the one below. The OpenSpirit options available in the context menu depend on the data type selected. For many objects, as illustrated below, you have a choice of saving it back to the external data store it is tied to ("Save to external..."). The export dialog will then be displayed and you can review the items that will be saved back to their linked external data stores. The export dialog will also allow you just to export those items that are newer in Petrel than in their external counterpart.
If a data item has not been imported or exported via OpenSpirit then it will not have an associated OpenSpirit datakey and in order to export it you will need to select the "Export via OpenSpirit ..." and ensure that you have set the default export project. If the default export project has not been set prior to this export then the OpenSpirit setting
58 | Export Data
OpenSpirit Adapter from Petrel User Guide
dialog will be displayed to allow you to do so. The export dialog will then be displayed and if matching data is found in the export project you will have a choice of whether to overwrite this data or skip the export.
Export data to another application by sending a data full event Sending a GIS or Grid event is described in the GIS Integration section. These events send their geometry (points, polylines, polygons, or grids) and attributes inside its message and are another way of transferring data to another application.
Restricting Export Some companies may wish to only allow designated users to be able to export data from Petrel to external projects. While OpenSpirit always honors the access control implemented in the underlying data store that the data connector connects to, it is possible to further restrict a user's ability to export data from Petrel by using the User Manager tool in the OpenSpirit Desktop as shown below.

Export Data | 59
OpenSpirit Adapter from Petrel User Guide
60 | OpenSpirit Data Manager
OpenSpirit Adapter from Petrel User Guide
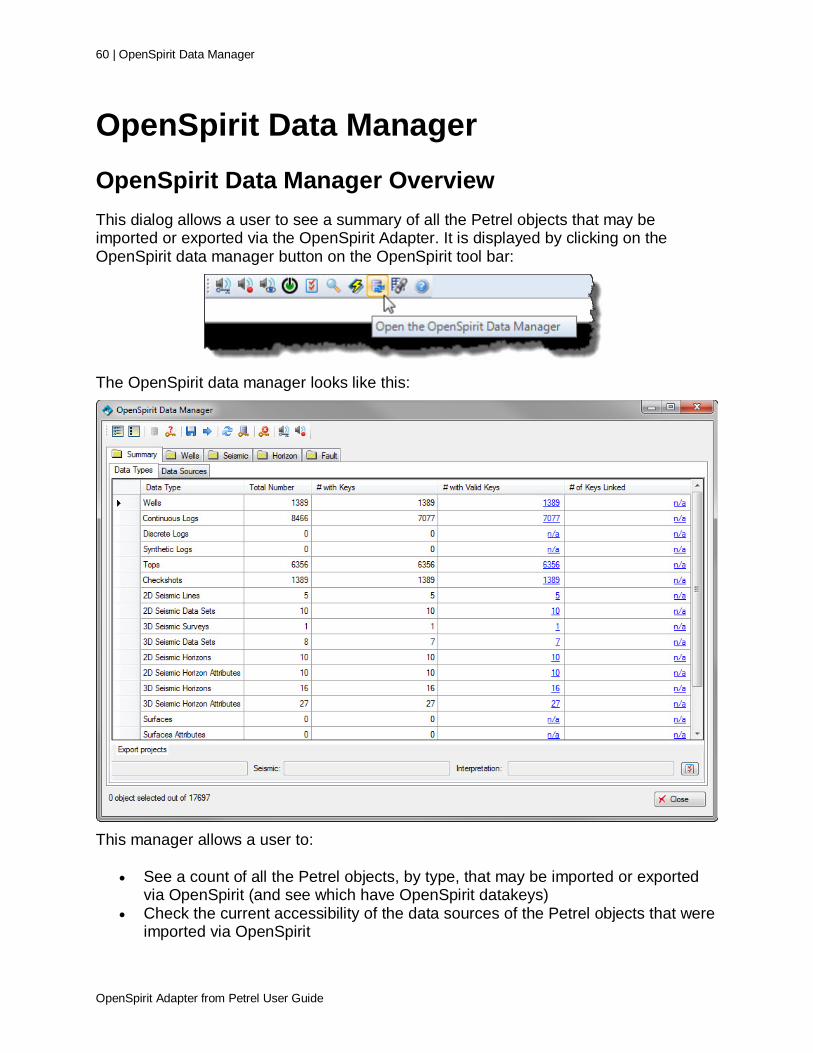
OpenSpirit Data Manager OpenSpirit Data Manager Overview This dialog allows a user to see a summary of all the Petrel objects that may be imported or exported via the OpenSpirit Adapter. It is displayed by clicking on the OpenSpirit data manager button on the OpenSpirit tool bar:
The OpenSpirit data manager looks like this:
This manager allows a user to:
• See a count of all the Petrel objects, by type, that may be imported or exported via OpenSpirit (and see which have OpenSpirit datakeys)
• Check the current accessibility of the data sources of the Petrel objects that were imported via OpenSpirit

OpenSpirit Data Manager | 61
OpenSpirit Adapter from Petrel User Guide
• Check which datakeys are still valid • Save Petrel objects, or a selected subset, to source project(s) • Export all objects, or a selected subset, to a chosen external project • "Refresh" objects with valid datakeys (from the linked external project) for all
objects or a selected subset • Link Petrel objects to an external project (based on matching selected attributes) • Clear invalid datakeys • Send data selection event to OpenSpirit • Send GIS feature/grid event to OpenSpirit
This functionality is accessed via the tool bar shown below and described in detail in the following linked sections.
(Click on tool bar button. or description below or above, to see more details)
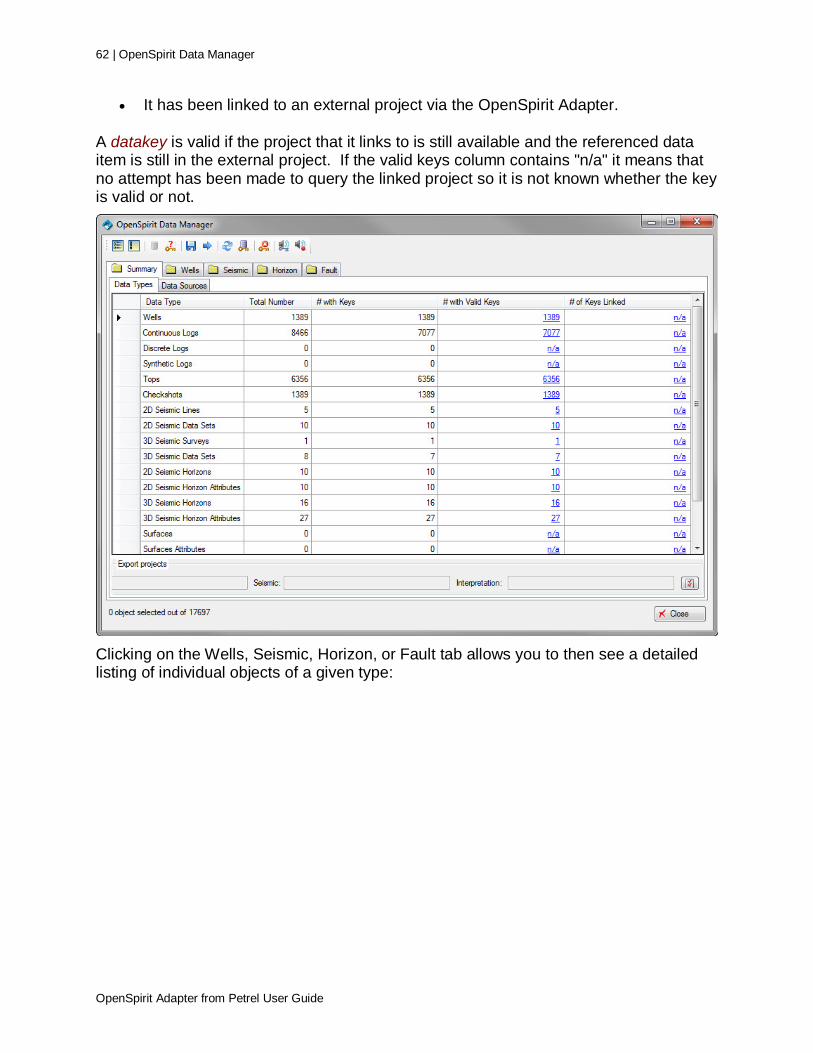
Data Summary When the OpenSpirit Data Manager dialog is first opened it displays the summary tab which shows a summary of the Petrel object types that are supported by the OpenSpirit Adapter. As illustrated in the window below, you can see the total number of objects, by type, within the current Petrel project as well as the number which have OpenSpirit datakeys. An OpenSpirit datakey is a link between a Petrel object and an external project. A Petrel object will have an OpenSpirit datakey if:
• It has been created via the OpenSpirit Adapter by receiving a data selection event.
• It has been exported to an external project via the OpenSpirit Adapter.
62 | OpenSpirit Data Manager
OpenSpirit Adapter from Petrel User Guide
• It has been linked to an external project via the OpenSpirit Adapter.
A datakey is valid if the project that it links to is still available and the referenced data item is still in the external project. If the valid keys column contains "n/a" it means that no attempt has been made to query the linked project so it is not known whether the key is valid or not.
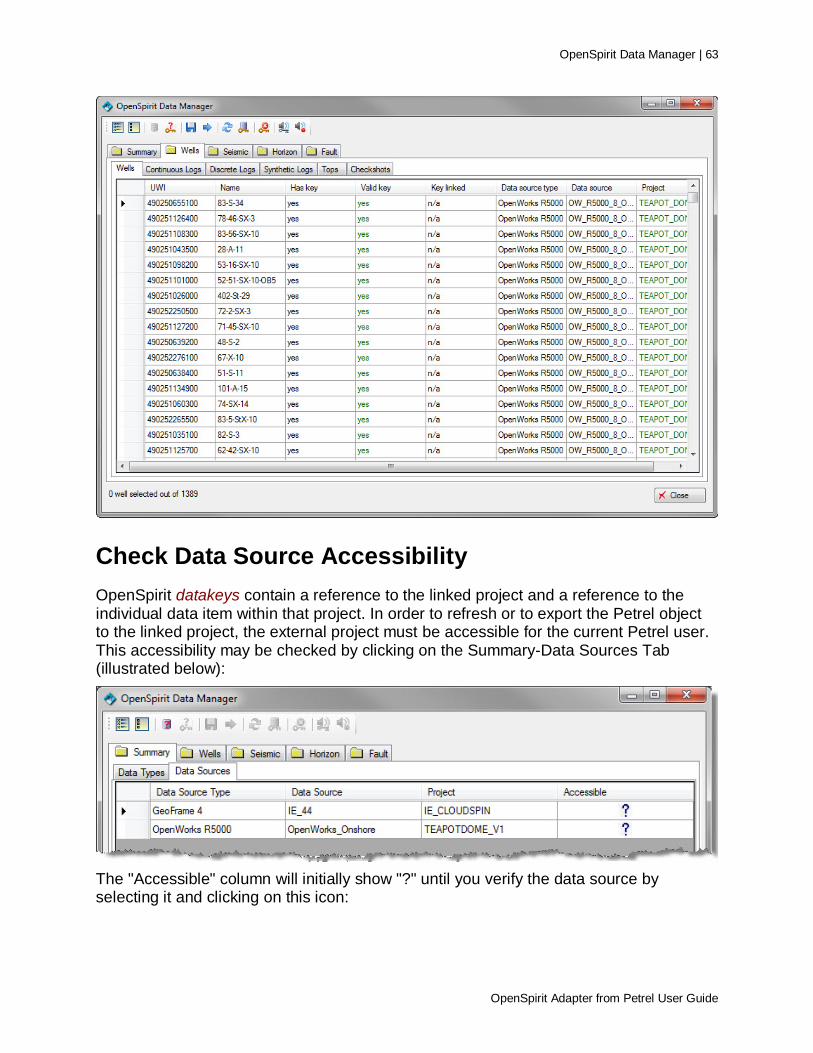
Clicking on the Wells, Seismic, Horizon, or Fault tab allows you to then see a detailed listing of individual objects of a given type:
OpenSpirit Data Manager | 63
OpenSpirit Adapter from Petrel User Guide
Check Data Source Accessibility OpenSpirit datakeys contain a reference to the linked project and a reference to the individual data item within that project. In order to refresh or to export the Petrel object to the linked project, the external project must be accessible for the current Petrel user. This accessibility may be checked by clicking on the Summary-Data Sources Tab (illustrated below):
The "Accessible" column will initially show "?" until you verify the data source by selecting it and clicking on this icon:

64 | OpenSpirit Data Manager
OpenSpirit Adapter from Petrel User Guide
When this icon is clicked, the OpenSpirit Adapter will make a simple query to the referenced project to verify that it is still accessible. Note: It may take 10-60 seconds to execute this query if this is the first time this project has been accessed in this Petrel session as a remote OpenSpirit data connector process will need to be started. The project will be shown with a green check if it is verified as being accessible:
The project will be shown with a red X if it is not accessible:
The likely causes of this are listed in the tool tip as:

OpenSpirit Data Manager | 65
OpenSpirit Adapter from Petrel User Guide
If the project is not accessible then you will not be able to refresh from, link to, or export to this data source.
Check Datakey Validity If the data source is accessible (see Check Data Source Accessibility) then you may check to see if the datakeys referenced by Petrel objects are still valid. When the OpenSpirit data manager is first displayed the "# with Valid Keys" column will contain "n/a" (unless the data was just imported/exported in the current Petrel session). In order to check the validity of the datakeys, select some or all data types and click on this icon: This example would check the for the eight highlighted data types…
This will then cause the OpenSpirit Adapter to issue a query that validates that the datakeys still reference data items that exist in the external project(s). Note: The time to validate datakeys will increase with the number of objects being validated and for large projects may take minutes. After validation the display looks like this (in this example all keys were valid):

66 | OpenSpirit Data Manager
OpenSpirit Adapter from Petrel User Guide
Keys will be invalid if the data source is not accessible or if the referenced data items have been deleted from the data source. Note: You may also validate datakeys from the detailed Well, Seismic, Horizon, or Fault tabs. This allows you to just validate selected objects, if desired.
Save objects to source project Petrel objects that have valid datakeys may be saved back to the linked external project by clicking on this button:

OpenSpirit Data Manager | 67
OpenSpirit Adapter from Petrel User Guide
You may select a single data type (as shown above) or multiple data types. This allows a user to save objects that have been edited in Petrel back to their source project. This may also be done from the Petrel Input tree (see Export Overview). Notes:
• You may also save objects from the detailed Well, Seismic, Horizon, or Fault tabs. This allows you to just save selected objects, if desired.
• The time to save objects will increase with the number of objects being saved and for a large number of objects may take minutes.
• The Save tool bar button is always enabled in the OpenSpirit Data Manager. However, the process will simply skip any objects that don't support the save to external operation (e.g. they don't have a datakey).
Export Objects Regardless of whether a Petrel object has a datakey or not, it may be saved to an external project. Select one or more data types (or individual objects from the Well, Seismic, Horizon, or Fault tabs) and click on this button: This example would export all the wells, logs, tops, and checkshots…
If you have not previously selected export projects you will be prompted to do so (see OpenSpirit Settings). Notes:
• If you export a Petrel object that has an OpenSpirit datakey , this datakey will be replaced with the datakey referencing the project you export the object to.

68 | OpenSpirit Data Manager
OpenSpirit Adapter from Petrel User Guide
• The time to export objects will increase with the number of objects being exported and for a large number of objects may take minutes.
Refresh Objects If a Petrel object has a valid datakey then it may be "refreshed" from the linked external data source. Select one or more data types (or individual objects from the Well, Seismic, Horizon, or Fault tabs) and click on this button: This example would re-read the 134 well markers, aka tops, from their linked data source…
When refreshing data you have an option whether you want to update all Petrel object attributes or just the natural key (the attributes that will be used to match Petrel objects to an external source) and OpenSpirit extended attributes (attributes that don't map to the standard Petrel attributes but are saved with the Petrel object as OpenSpirit attributes). This behavior is controlled by the OpenSpirit settings dialog (as shown below):

OpenSpirit Data Manager | 69
OpenSpirit Adapter from Petrel User Guide
Refresh can only be performed on 3D seismic volumes when the "Refresh Natural Keys and Extended Attributes" option is selected. This attribute refresh option may be very useful when the Petrel object was originally created with the Schlumberger OpenSpirit plug-in (available in Petrel 2009.2 and earlier). In this case, no OpenSpirit extended attributes, other than the datakey, are stored with the Petrel object. By executing this refresh operation the additional attributes available via the OpenSpirit Adapter are added to existing Petrel objects. Notes:
• The time to refresh objects will increase with the number of objects being validated and for large projects may take minutes.
• You may also validate datakeys from the detailed Well, Seismic, Horizon, or Fault tabs. This allows you to just validate selected objects, if desired.
• The Refresh tool bar button is always enabled in the OpenSpirit Data Manager. However, the process will simply skip any objects that don't support refresh (e.g. they don't have a datakey).

70 | OpenSpirit Data Manager
OpenSpirit Adapter from Petrel User Guide
Link (or Relink) to External Project Regardless of whether a Petrel object has a datakey or not, it may be linked to an external project. Select one or more data types (or individual objects from the Well, Seismic, Horizon, or Fault tabs) and click on this button: This example will attempt to link the 1389 wells in the project…
This linking operation will then attempt to match the Petrel objects' natural key attributes to data in the chosen export project. If a match is found then the matching datakey will be saved with the Petrel object. If matches are found then the selected data rows will be updated as appropriate: In this example 1389 wells were successfully linked…
The default matching natural keys are defined in the OpenSpiritPlugin.config file in the MatchMergeRules element for each data type. The default attributes that are used are summarized in this table:
Data Type Attributes Used to Find Matches Wells uwi Continuous Logs well uwi, log kind (Petrel log version name - not mapped to Petrel
discrete template or synthetic template), sum of non-null log samples (if other attributes match)
Discrete Logs well uwi, log kind (Petrel log version name - mapped to Petrel discrete template), sum of non-null log samples (if other attributes match)

OpenSpirit Data Manager | 71
OpenSpirit Adapter from Petrel User Guide
Synthetic Logs well uwi, log kind (Petrel log version name - mapped to Petrel synthetic template), sum of non-null log samples (if other attributes match)
Tops well uwi, top name, interpreter, occurrence Checkshots well uwi, checkshot name 2D Seismic Lines survey name, line name 2D Seismic Data Sets line name, name, domain 3D Seismic Surveys survey name 3D Seismic Data Sets survey name, name, domain, storage organization (e.g. trace, slice,
etc..) 2D Seismic Horizons name, line name, domain 2D Seismic Horizon Attributes
name, line name, domain
3D Seismic Horizons name, 3d survey name, domain 3D Seismic Horizon Attributes
horizon name, attribute name
Surfaces name, domain Surfaces Attributes surface name, attribute name Fault Interpretation name, domain Fault Point Set name, domain
Fault Polygons name, domain These default values are appropriate for matching data stored in OW that has been migrated from OW 2003 to R5000. The matching attributes may be altered by editing the OpenSpiritPlugin.config XML file. Warning: editing this file without taking great care may cause undesirable results. Note: If the Petrel object has an existing datakey and a match is found the new matching datakey will replace the existing datakey. The original source project may still be determined by examining the Petrel object history.
Clear Datakeys Select one or more data types (or individual objects from the Well, Seismic, Horizon, or Fault tabs) and click on this button: This example would either clear all 1389 checkshot datakeys or just those that were invalid - based upon the Data Management Options settings:

72 | OpenSpirit Data Manager
OpenSpirit Adapter from Petrel User Guide
This setting in the Data Management tab of the OpenSpirit settings dialog determine whether all datakeys for the selected objects will be cleared or just the invalid keys (the default).

OpenSpirit Data Manager | 73
OpenSpirit Adapter from Petrel User Guide
Notes:
• Clearing datakeys is irreversible! It does not remove any Petrel object attributes but does remove the link to the external data source. If this data source is no longer available (it is invalid) then this is normally a desirable thing to do. Even if datakeys are cleared, the Petrel object history carries information on which projects the object was created from or exported to.
• You may also validate datakeys from the detailed Well, Seismic, Horizon, or Fault tabs. This allows you to just validate selected objects, if desired.
OpenWorks 2003 to R5000 Migration Workflow Many users of Petrel use the Landmark OpenWorks product to store their multi-user project data. Many of these users are migrating from the 2003.12 version to the R5000 version of OpenWorks. As these projects are upgraded the links stored in the

74 | OpenSpirit Data Manager
OpenSpirit Adapter from Petrel User Guide
OpenSpirit datakeys in Petrel projects created via OpenSpirit become invalid. This is caused by:
• changing names of the OpenSpirit data source associated with the OpenWorks installations
• substantive changes in the OpenWorks data model and changing primary keys (especially in the seismic and interpretation areas)
• splitting and combining of projects as data is migrated
The OpenSpirit Data Manager capabilities described in this section may be combined in a multi-step workflow to re-link a Petrel project that was originally linked to an OpenWorks 2003 project to a migrated R5000 project. To do this, follow these steps:
1. If the Petrel project was created via the Schlumberger OpenSpirit plug-in then the Petrel objects will not have as many attributes as if the objects had been imported via the OpenSpirit Adapter. In order to add these additional attributes, which aid in matching, you can refresh all the objects. Note that this step must be done while the OW2003 project is still available. This step is not required if the Petrel project was created using the OpenSpirit Adapter.
2. During the migration from OW2003 to R5000 keep track of which OW2003 and SeisWorks projects migrate to which R5000 projects.
3. After the new R5000 projects are created you can open up each Petrel project and use the OpenSpirit Data Manager to view which OW 2003 projects were used in the project (use the Summary - Data Sources tab but don't attempt to validate the data sources). Then, using the information gathered in step 2, determine which R5000 project(s) you will want to link the Petrel project to.
4. Set the default export project to the R5000 project determined in step 3 and then link the desired data types. Repeat this step for every project identified in step 3.
5. After successfully linking the Petrel project to the new R5000 project(s) some Petrel objects may still have invalid keys (e.g. perhaps the linked OW2003 data item was not migrated). So to avoid future confusion, you may wish to clear all invalid keys (the OW 2003 datakey will have no use in the future without the original OW2003 project being available).

Live-link Manager | 75
OpenSpirit Adapter from Petrel User Guide
Live-link Manager Live-link Manager Overview A live-link can be converted to ZGY using the realize option in the pop-up menu of a 3D seismic object in the Petrel tree (see the 3D Volume section of the Import Overview chapter for more information about live-links). However, it can be tedious realizing many live-links one by one using this technique. Also, the Petrel application cannot be used for other purposes while a live-link is being realized using this approach. The live-link manager was introduced to address these problems. The live-link manager is used to realize multiple OpenSpirit 3D seismic live-links into Petrel 3D seismic ZGY files using a background process to avoid tying up the Petrel application during the realization process. The live-link manager also reduces the number of manual steps required when realizing live-links individually. Individual live-link realization may still need to be performed if there is a need to modify settings, such as changing the data type precision of the samples, or performing any clipping or scaling.
Live-link Manager Workflow The following diagram illustrates the live-link realization workflow. First 3D seismic volumes are imported from OpenSpirit into the Petrel input tree by selecting volumes using the OpenSpirit Data Selector or any other OpenSpirit enabled data selection tool (diagram step #1). The live-link manager can then be opened by clicking on the live-link manager open button in the OpenSpirit Adapter tool bar. Select the live-links to be realized from the live-link manager window and click on submit for realization button (diagram step #2). The live-links will be added to a realization queue and the ZGY queue manager window will appear permitting you to monitor and control the progress of the realization queue. The ZGY file creation process will begin (diagram step #3). When ZGY files have been created you can go back to the live-link manager window and refresh it to see the newly created ZGY files. The live-link manager can then be used to add the new ZGY files to the Petrel input tree, optionally replacing the live-links that were used to generate the ZGY files (diagram step #4).

76 | Live-link Manager
OpenSpirit Adapter from Petrel User Guide
Live-link Manager Window The live-link manager window displays a table of all the 3D seismic live-links that exist in the Petrel input tree. The tool bar located above the live link list contains buttons that operate on the live-link list. The tool bar buttons are described in Live-Link Manager Tool Bar section of this guide. The default seismic files directory setting is also displayed above the table of live-links. The default seismic files directory indicates the directory that the ZGY files will be created in. See the Setting Seismic Files Directory section of this guide for information about how to set the seismic files directory.

Live-link Manager | 77
OpenSpirit Adapter from Petrel User Guide
Live-Link Status The Status column in the table of live-links can contain one of seven possible values. The status values will change as a live-link progresses through the realization workflow.
Click on the refresh button to update the table to show the current live-link status. The possible status values are:
Status Description
Live-link A live-link that has not yet been submitted to the queue for realization. Live links that have a status of Live-link can be submitted to the realization queue.
Name Conflict
A live-link that has a name that conflicts with the name of a ZGY file that already exists in the seismic directory. The live-link must be renamed, or the ZGY file must be removed or renamed in order to make the live-link eligible for submission to the realization queue.
Potential Conflict
Two or more live-links have the same name and therefore would result in the same ZGY file name when realized. One of the live-links can be submitted to the queue, but the remaining like named live-links must be renamed in order to be submitted to the realization queue.
Pending The live-link has been submitted to the realization queue and is waiting its turn to be realized.
Running The live-link was submitted to the queue and is currently being realized.
Completed The live-link has been realized and the ZGY file is ready to be added to the Petrel project.

78 | Live-link Manager
OpenSpirit Adapter from Petrel User Guide
Status Description
Failed
An attempt was made to realize the live-link, but the realization failed. View the log file for information about the failure. The live-link can be resubmitted to the queue once the cause of the failure has been corrected. You must select the failed live-link and click on the remove button to remove any partial ZGY file that may have been created. This will change the status back to Live-link which will enable it to be selected and resubmitted to the realization queue.
The remaining sections of this chapter provide instructions in the use of the live-link manager and the ZGY queue manager.
Setting Seismic Files Directory The ZGY files created by the live-link manager during the realization process are created in the Petrel default seismic files directory. The default seismic files directory is set using the Seismic tab of the Petrel System settings dialog. The System settings dialog is opened using the System settings... option in the Petrel Tools menu.
Click on the Create external ZGY and SEGY files by default option to enable the Default directory selection option. Select the directory you want the ZGY files to be created in when using the live-link manager. Note, the directory will also be used to store SEGY files that are created when importing 2D seismic data using the Petrel adapter. The directory will also be used when realizing seismic data that was imported using Petrel's native seismic import features.
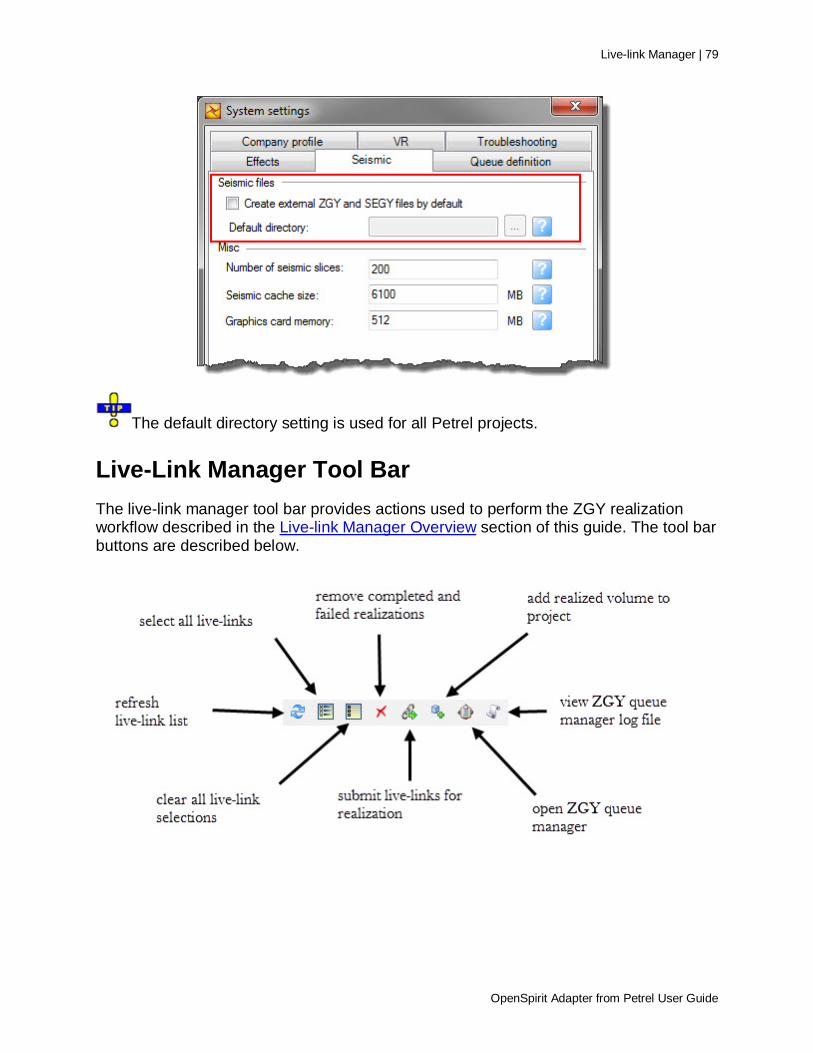
Live-link Manager | 79
OpenSpirit Adapter from Petrel User Guide
The default directory setting is used for all Petrel projects.
Live-Link Manager Tool Bar The live-link manager tool bar provides actions used to perform the ZGY realization workflow described in the Live-link Manager Overview section of this guide. The tool bar buttons are described below.

80 | Live-link Manager
OpenSpirit Adapter from Petrel User Guide
• Refresh Refresh the information shown in the table of live-links.
• Select All Select all rows in the live-link table.
• Clear Selections De-select all selected rows in the live-link table.
• Remove Remove all selected rows that have a status of Completed or Failed. Selected rows that do not have a Completed or Failed status are not removed.
• Submit Submits all selected rows with a status of Live-link to the ZGY realization queue. The status of the submitted rows will change to Pending.
• Add The add action is performed on all selected live-links that have a status of Completed. The realized ZGY files created from the selected live-links are added to the Petrel input tree. The live-link is removed from the Petrel input tree if the Replace Live-link option is checked, which is the default.
• Open Queue Manager Opens the ZGY Queue Manager window. See the Using the ZGY Queue Manager section of this guide for information about the queue manager.
• View Log File Opens the ZGY realization queue's log file. Click on the link in the View Log column to view the realization log file for a specific live-link.
Using the Live-Link Manager
The live-link manager is opened by clicking on the live-link manager button in the adapter's tool bar. All live-links that have been created by importing 3D seismic volumes into Petrel using the OpenSpirit Adapter are displayed. A message is displayed in red

Live-link Manager | 81
OpenSpirit Adapter from Petrel User Guide
above the list of live-links if the Petrel seismic files directory has not been set. The live-link manager tool bar is disabled until the seismic files directory is set. See the Setting Seismic Files Directory section of this guide for instructions in how to set the seismic file directory.
The live-link manager lists all live-links that exist in the Petrel project's input tree. Live-links initially appear with a status of Live-link. Select the live-links that you would like to
realize and press the submit button .
The selected live-links will be submitted to the queue for realization. The status will change from Live-link to Running for the live-link that is first in the queue. The Running status indicates the live-link is being realized. A hyperlink to the log file will appear in the View Log column. You can click on the hyperlink to view the log file being generated during the realization process. The status of the other submitted live-links will appear as Pending to indicate they are in the queue waiting to be realized.
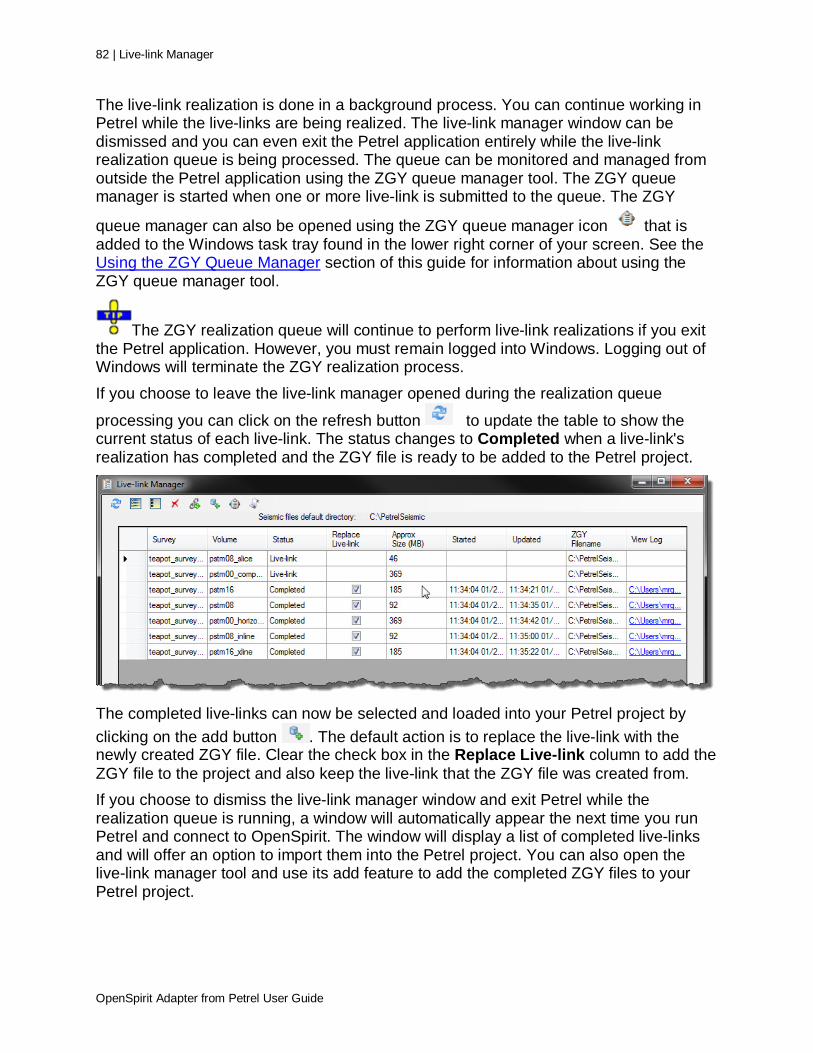
82 | Live-link Manager
OpenSpirit Adapter from Petrel User Guide
The live-link realization is done in a background process. You can continue working in Petrel while the live-links are being realized. The live-link manager window can be dismissed and you can even exit the Petrel application entirely while the live-link realization queue is being processed. The queue can be monitored and managed from outside the Petrel application using the ZGY queue manager tool. The ZGY queue manager is started when one or more live-link is submitted to the queue. The ZGY
queue manager can also be opened using the ZGY queue manager icon that is added to the Windows task tray found in the lower right corner of your screen. See the Using the ZGY Queue Manager section of this guide for information about using the ZGY queue manager tool.
The ZGY realization queue will continue to perform live-link realizations if you exit the Petrel application. However, you must remain logged into Windows. Logging out of Windows will terminate the ZGY realization process. If you choose to leave the live-link manager opened during the realization queue
processing you can click on the refresh button to update the table to show the current status of each live-link. The status changes to Completed when a live-link's realization has completed and the ZGY file is ready to be added to the Petrel project.
The completed live-links can now be selected and loaded into your Petrel project by clicking on the add button . The default action is to replace the live-link with the newly created ZGY file. Clear the check box in the Replace Live-link column to add the ZGY file to the project and also keep the live-link that the ZGY file was created from. If you choose to dismiss the live-link manager window and exit Petrel while the realization queue is running, a window will automatically appear the next time you run Petrel and connect to OpenSpirit. The window will display a list of completed live-links and will offer an option to import them into the Petrel project. You can also open the live-link manager tool and use its add feature to add the completed ZGY files to your Petrel project.

Live-link Manager | 83
OpenSpirit Adapter from Petrel User Guide
Using the ZGY Queue Manager The ZGY Queue Manager tool can be used to monitor and manage the queue of live-links that have been submitted for realization using the Live-link Manager tool. See the Live-link Manager Overview section of this guide for an overview of the live-link ZGY realization workflow. The ZGY Queue Manager can be opened by clicking on the ZGY Queue Manager icon
in the Live-link Manager tool bar or in the Windows task tray. The task tray icon is provided so that the queue manager can be opened when Petrel is not running. The ZGY Queue Manager shows all of the pending live-links and the currently running live-link realization. Entries disappear from the list when the running live-link's ZGY file has been generated. The next pending live-link will then change to a running status.
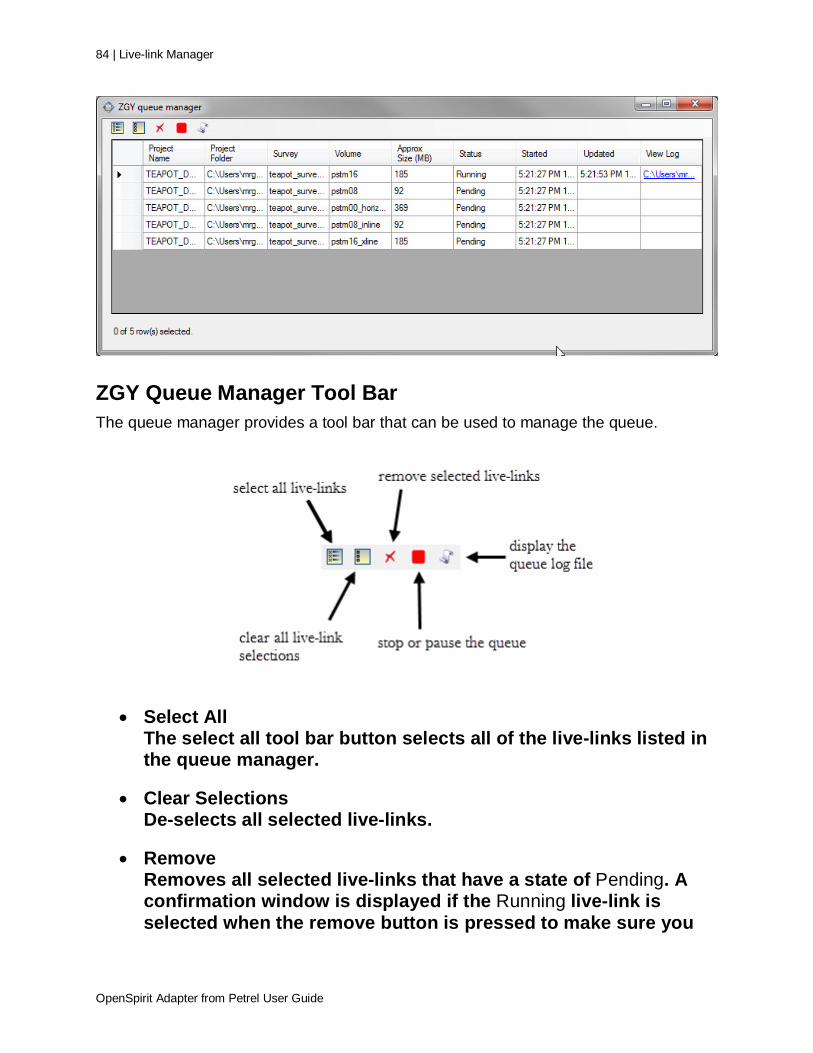
84 | Live-link Manager
OpenSpirit Adapter from Petrel User Guide
ZGY Queue Manager Tool Bar The queue manager provides a tool bar that can be used to manage the queue.
• Select All The select all tool bar button selects all of the live-links listed in the queue manager.
• Clear Selections De-selects all selected live-links.
• Remove Removes all selected live-links that have a state of Pending. A confirmation window is displayed if the Running live-link is selected when the remove button is pressed to make sure you

Live-link Manager | 85
OpenSpirit Adapter from Petrel User Guide
want to abort the realization that is currently underway. Aborting the running live-link will remove the partially written ZGY file.
• Stop Clicking on the stop button displays a window asking if you want to clear out the entire queue or if you just want to temporarily pause the queue.
Click on the Yes button to remove all of the queue entries and abort the currently running live-link realization. Click on the No button to leave the entries in place and suspend the queue processing after the currently running live-link has completed. Click on the Cancel button to dismiss the prompt and continue processing the queue.
• Display Log File Opens the queue's log file.
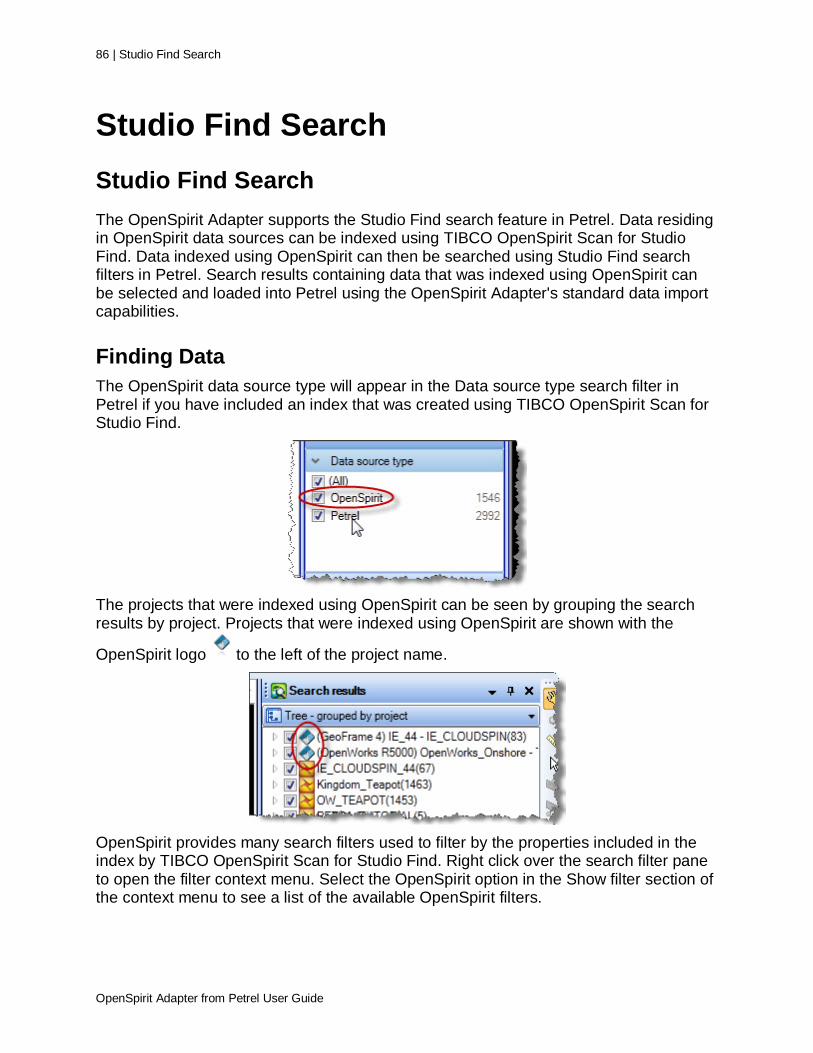
86 | Studio Find Search
OpenSpirit Adapter from Petrel User Guide
Studio Find Search Studio Find Search The OpenSpirit Adapter supports the Studio Find search feature in Petrel. Data residing in OpenSpirit data sources can be indexed using TIBCO OpenSpirit Scan for Studio Find. Data indexed using OpenSpirit can then be searched using Studio Find search filters in Petrel. Search results containing data that was indexed using OpenSpirit can be selected and loaded into Petrel using the OpenSpirit Adapter's standard data import capabilities.
Finding Data The OpenSpirit data source type will appear in the Data source type search filter in Petrel if you have included an index that was created using TIBCO OpenSpirit Scan for Studio Find.
The projects that were indexed using OpenSpirit can be seen by grouping the search results by project. Projects that were indexed using OpenSpirit are shown with the
OpenSpirit logo to the left of the project name.
OpenSpirit provides many search filters used to filter by the properties included in the index by TIBCO OpenSpirit Scan for Studio Find. Right click over the search filter pane to open the filter context menu. Select the OpenSpirit option in the Show filter section of the context menu to see a list of the available OpenSpirit filters.

Studio Find Search | 87
OpenSpirit Adapter from Petrel User Guide
Petrel enables a project area spatial search filter by default. Click on the X next to the spatial filter header to remove the filter if you would like to search for data that may reside outside the geographic bounds of your Petrel project or to see data that does not have spatial information in the Studio Find index.
Consider applying some other filters before removing the spatial filter to avoid including too many items in your search result.
Items that have no spatial information can appear in the Studio Find search result when all spatial filters have been removed, including the World option. Items without spatial information are shown without a check box because they cannot be shown in a map window or 3D window. The following image shows an example of a well without location information that appears in the search results. Notice the lack of a display selection check box.

88 | Studio Find Search
OpenSpirit Adapter from Petrel User Guide
The lack of spatial information in the Studio Find index does not necessarily mean the data item will not have spatial information if it is loaded into the Petrel project. The spatial information may be missing from the Studio Find index because it could not be transformed to the WGS-84 coordinate system. Spatial information may be available after a load if the Petrel project coordinate system has the same datum as the data store the data item will be loaded from. In this case there will be no need to transform the spatial data to WGS-84 and it might be able to be loaded if it is within the bounds of the Petrel project's coordinate system.
Loading Data from Search Results Data may be imported using the Load feature in a Studio Find search result. Select items in a search result, right click to bring up the context menu, and select the Load... option. The Studio Find search index must have been created using the TIBCO OpenSpirit Scan for Studio Find product for the data to be loaded using the OpenSpirit Adapter.

Studio Find Search | 89
OpenSpirit Adapter from Petrel User Guide
This will open the Load data wizard. Options are provided to load children of the selected data types.
Clicking the Next button will start the load process. A Load completed message will appear almost immediately.
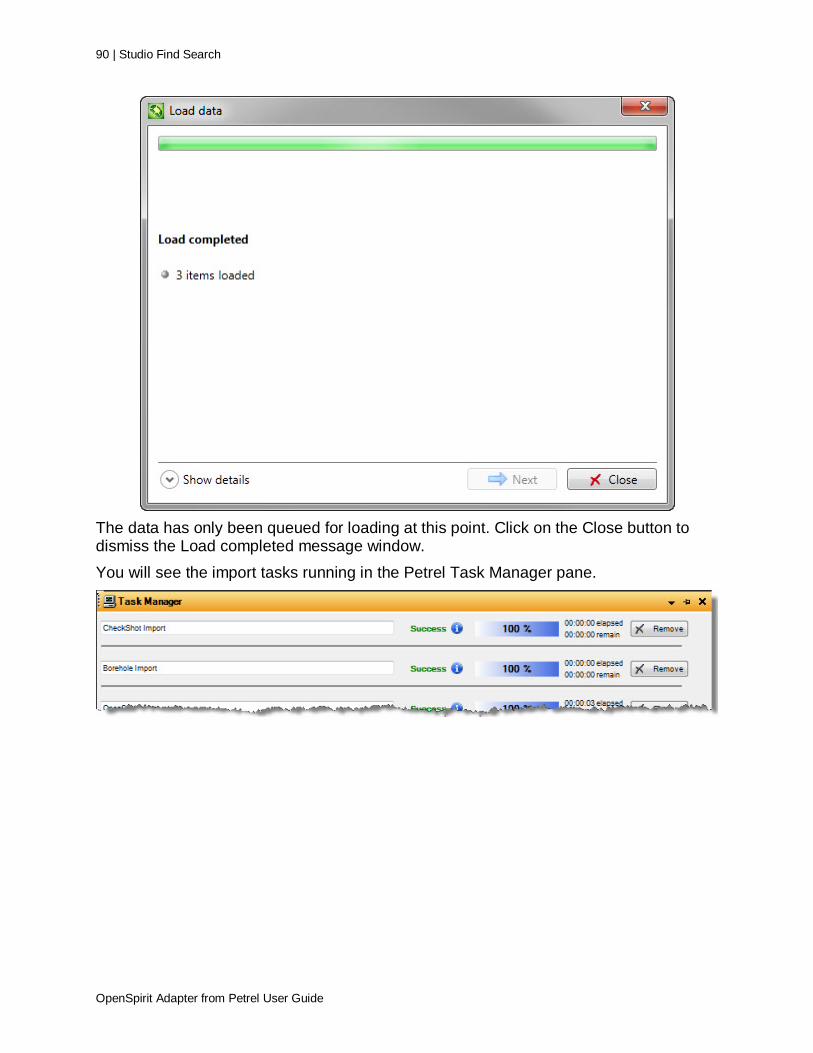
90 | Studio Find Search
OpenSpirit Adapter from Petrel User Guide
The data has only been queued for loading at this point. Click on the Close button to dismiss the Load completed message window. You will see the import tasks running in the Petrel Task Manager pane.
GIS Integration | 91
OpenSpirit Adapter from Petrel User Guide
GIS Integration GIS Integration The TIBCO OpenSpirit Adapter for Petrel allows Petrel to be integrated with your GIS data and applications in a variety of ways. The TIBCO OpenSpirit ArcGIS Extension is the most common application used to send and receive GIS events, however other applications are available that are capable of sending and receiving OpenSpirit GIS events.
Import data from ArcSDE By utilizing the OpenSpirit SDE data connector and the Data Selector you can send data selection events for point, polyline, and polygon features to Petrel. Corresponding Petrel point and polyline objects will be created in the Petrel input tree under a folder named "OpenSpirit Culture". This is described in the Culture group section of the Import Overview chapter.
Receive GIS or Grid events GIS events containing selected point, polyline, and polygon features can be sent from Esri's ArcGIS application to Petrel. New point and polyline objects are created in the Petrel Input tree under a new folder named "OpenSpirit Culture". You can also send ESRI raster features from ArcGIS which will create corresponding Petrel surfaces. The following table shows the information that can be transferred from ArcGIS to Petrel using GIS events.
ArcGIS Petrel
A feature class (e.g. Cities)
A Petrel object (either a point or polyline/polgon object based on feature class geometry type) of the same name
An individual feature (e.g. Paris, London, New York)
A Petrel object belonging to the parent Petrel object.
Fields on a feature (e.g. population, area, rank, etc.)
Transferred as Petrel attributes that may be posted on a map and used to control the Petrel object display properties.*
Following is an example of how received GIS features appear in the Petrel Input tree and in a Petrel map window.

92 | GIS Integration
OpenSpirit Adapter from Petrel User Guide

GIS Integration | 93
OpenSpirit Adapter from Petrel User Guide
A received grid event (as may be sent from a selected raster feature in ArcGIS) creates a corresponding Petrel surface. Received GIS and Grid events contains the data itself and no query is made to a data store. No datakey is stored with the Petrel object that is made in response to a GIS or grid event. When these events are received they are converted to the Petrel project CRS.
Receive Map Image events Map image events are an event containing a georeferenced image. The TIBCO OpenSpirit Extension for ArcGIS can create an image of the currently displayed map and send the image to Petrel. The image appears as a Petrel Bitmap image in the Petrel input tree under a folder named "Georeferenced images". Following is an example of how a received Map Image appears in the Petrel Input tree and in a Petrel map window.

94 | GIS Integration
OpenSpirit Adapter from Petrel User Guide
The map image can be displayed in a Petrel map window or in a 3D window. The map Z is set to the Petrel project's SRD.
Send GIS or Grid events You may send GIS events based on the geometry of selected Petrel objects. You may also send a Petrel surface as a grid event. Then other applications (like ArcMap with the TIBCO OpenSpirit Extension for ArcGIS) will receive these features and add them to them to its current map. This is discussed in more detail in the Event Overview.

GIS Integration | 95
OpenSpirit Adapter from Petrel User Guide
Send and receive Map View events Map view events can be sent from and received into the current Petrel map window. See the Map_View_Events section of this guide for more information about map view events.

96 | Event Interaction
OpenSpirit Adapter from Petrel User Guide
Event Interaction Event Overview In the OpenSpirit integration framework events are messages that are shared between applications. By registering with OpenSpirit to send and receive various event types, applications can coordinate their actions with other applications without having to know anything about the other applications. This allows users to put together various applications to best accomplish their own workflows.
Event Types The TIBCO OpenSpirit Adapter for Petrel uses the following OpenSpirit events
Event Type
Send or Receive? Description
Data Selection send/receive send / receive datakeys which represent references to data
in OpenSpirit enabled data stores
GIS send/receive send / receive point, polyline, or polygon features (geometry plus attributes) with their associated CRS
Grid send/receive send / receive a grid of z values along with their associated unit & CRS
Map View send/receive send / receive the current viewport of a map window
Map image receive receive a georeferenced map image
Enabling Events In order to receive events you must:
• Make sure Petrel is connected to OpenSpirit (the OpenSpirit tool bar connection icon should be green)
• Make sure that events are turned on for listening o The lightning bolt is visible on the OpenSpirit logo on the OpenSpirit tool bar
( like this ) o The OpenSpirit settings dialog has the events type of interest enabled
(see OpenSpirit Settings Overview)
Data Selection Events Receiving data selection events is discussed in the Import Overview chapter.

Event Interaction | 97
OpenSpirit Adapter from Petrel User Guide
If a Petrel object has been imported or exported via OpenSpirit then it has an OpenSpirit datakey stored with it and you may then send a data selection event that references the data in the external data store. Select one or more objects in the Petrel tree and then
click on the send data selection tool bar button: . When the event is sent any other application, run by the same user, that is registered for listening for data selection events of this type will receive the event and read the data from the referenced data store.
GIS Events Receiving GIS events is discussed in the GIS Integration chapter. Virtually any Petrel object with a geometry that can be expressed as a set of points, polylines, or polygons may be sent as a GIS event. Select one or more objects in the
Petrel tree and then click on the send GIS/Grid tool bar button: . When the event is sent any other application that is registered for listening for GIS events will receive the event and make use of the selected features included in the event (e.g. ArcMap will add these features to its current map)
Grid Events Receiving Grid events is discussed in the GIS Integration chapter. Petrel surfaces are represented as regular grids and may be sent as a grid events. Select a single Petrel surface in the Petrel tree and then click on the send GIS/Grid tool
bar button: .
Map View Events Map view events are used to set the zoom viewport of a mapping application to the current viewport of another mapping application. For example, a map view event can be sent from an ArcGIS map to Petrel in order to have Petrel's map window zoom to the same geographic location that is currently being viewed in the ArcGIS map. A map view event contains information about the current viewport of a map display. The event contains the geographic locations of the corners of the portion of a map that is currently being viewed along with the coordinate system used by the map display. The Petrel adapter can send and receive map view events. The map view send button found in the Petrel Adapter tool bar and in the ArcGIS Extension tool bar is used to send a map view event. Clicking on the send button in Petrel while currently viewing a map window will send a map view event. Any application that listens for map view events, such as ArcGIS using the OpenSpirit ArcGIS xtension, will set its current map viewport to match the viewport of the Petrel map window. The current height and width of the receiving application's viewport will not change, but the view limits will be set to the same geographic locations as the sending application.

98 | Event Interaction
OpenSpirit Adapter from Petrel User Guide
The Petrel Adapter will only respond to map view events sent by another application if the currently active window is a map window. The Petrel Adapter will send map view events when the currently selected window is a map window and the map view event send button is pressed.
Map Image Events Map image events are a map view event with a georeferenced image attached to it. The Petrel Adapter can receive map image events, but it cannot send map image events. Map image events can be sent from ArcGIS using the ArcGIS Extension by pressing the map image send button in the ArcGIS Extension tool bar. Map image events are discussed in more detail in the GIS Integration chapter of this guide.
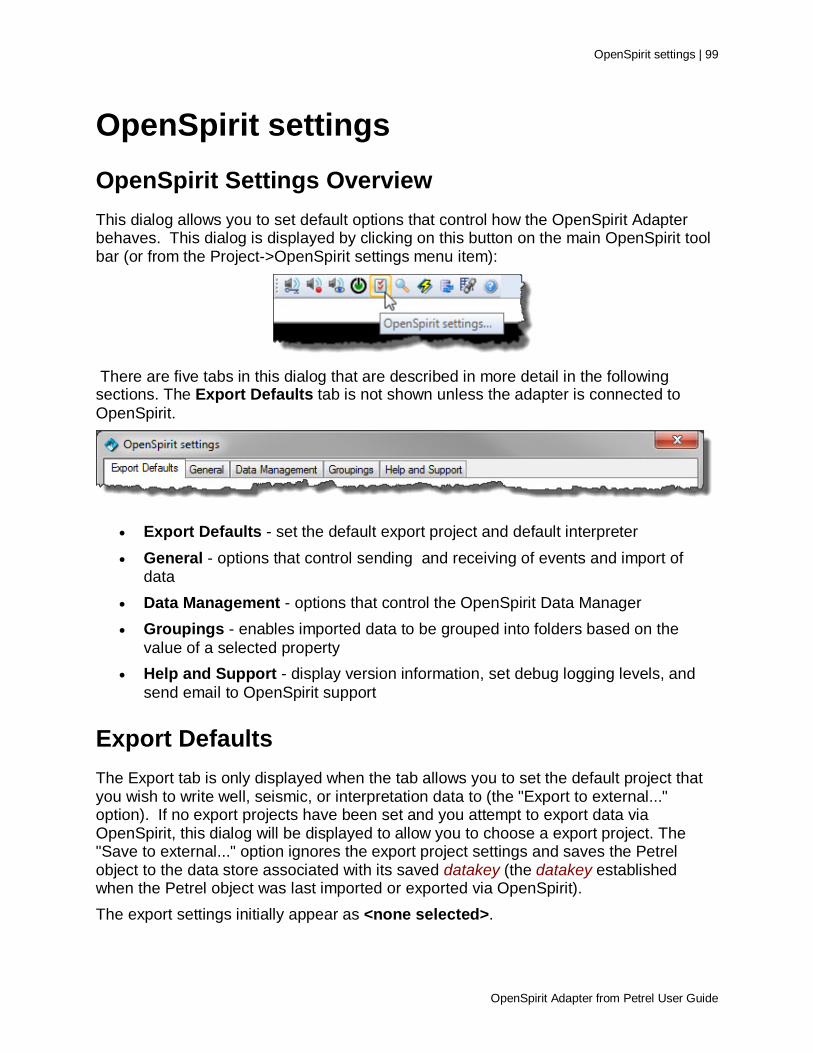
OpenSpirit settings | 99
OpenSpirit Adapter from Petrel User Guide
OpenSpirit settings OpenSpirit Settings Overview This dialog allows you to set default options that control how the OpenSpirit Adapter behaves. This dialog is displayed by clicking on this button on the main OpenSpirit tool bar (or from the Project->OpenSpirit settings menu item):
There are five tabs in this dialog that are described in more detail in the following sections. The Export Defaults tab is not shown unless the adapter is connected to OpenSpirit.
• Export Defaults - set the default export project and default interpreter • General - options that control sending and receiving of events and import of
data • Data Management - options that control the OpenSpirit Data Manager • Groupings - enables imported data to be grouped into folders based on the
value of a selected property • Help and Support - display version information, set debug logging levels, and
send email to OpenSpirit support
Export Defaults The Export tab is only displayed when the tab allows you to set the default project that you wish to write well, seismic, or interpretation data to (the "Export to external..." option). If no export projects have been set and you attempt to export data via OpenSpirit, this dialog will be displayed to allow you to choose a export project. The "Save to external..." option ignores the export project settings and saves the Petrel object to the data store associated with its saved datakey (the datakey established when the Petrel object was last imported or exported via OpenSpirit). The export settings initially appear as <none selected>.
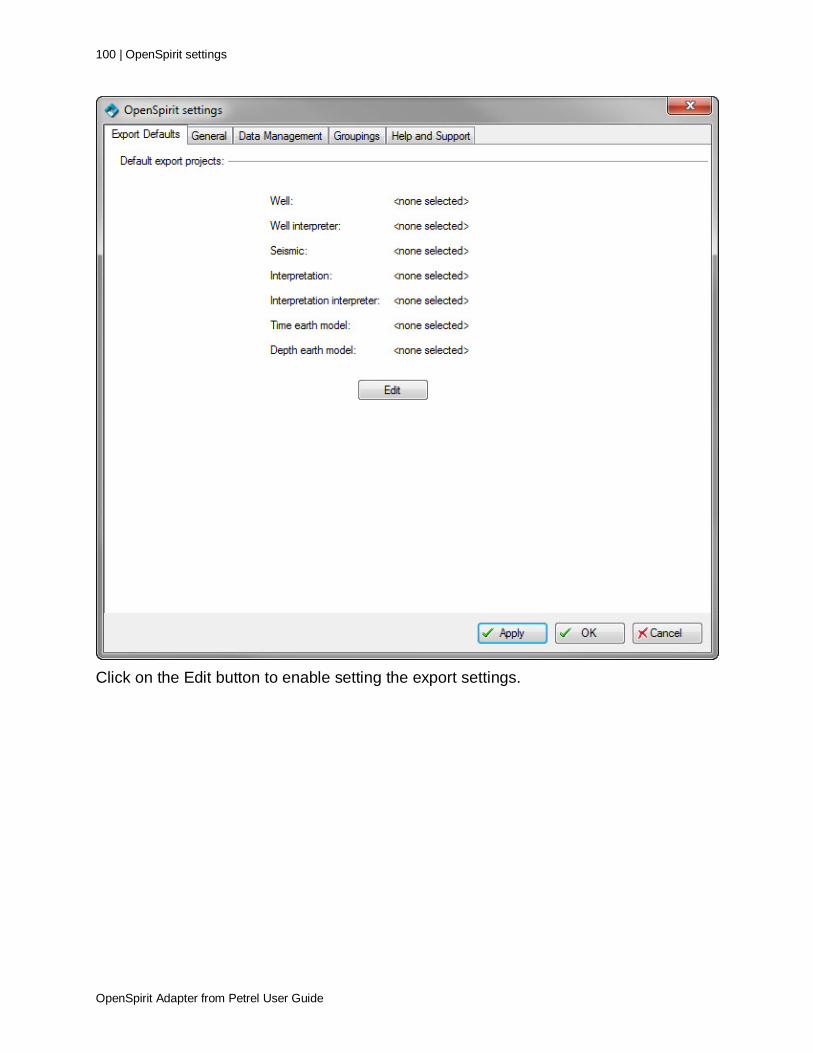
100 | OpenSpirit settings
OpenSpirit Adapter from Petrel User Guide
Click on the Edit button to enable setting the export settings.
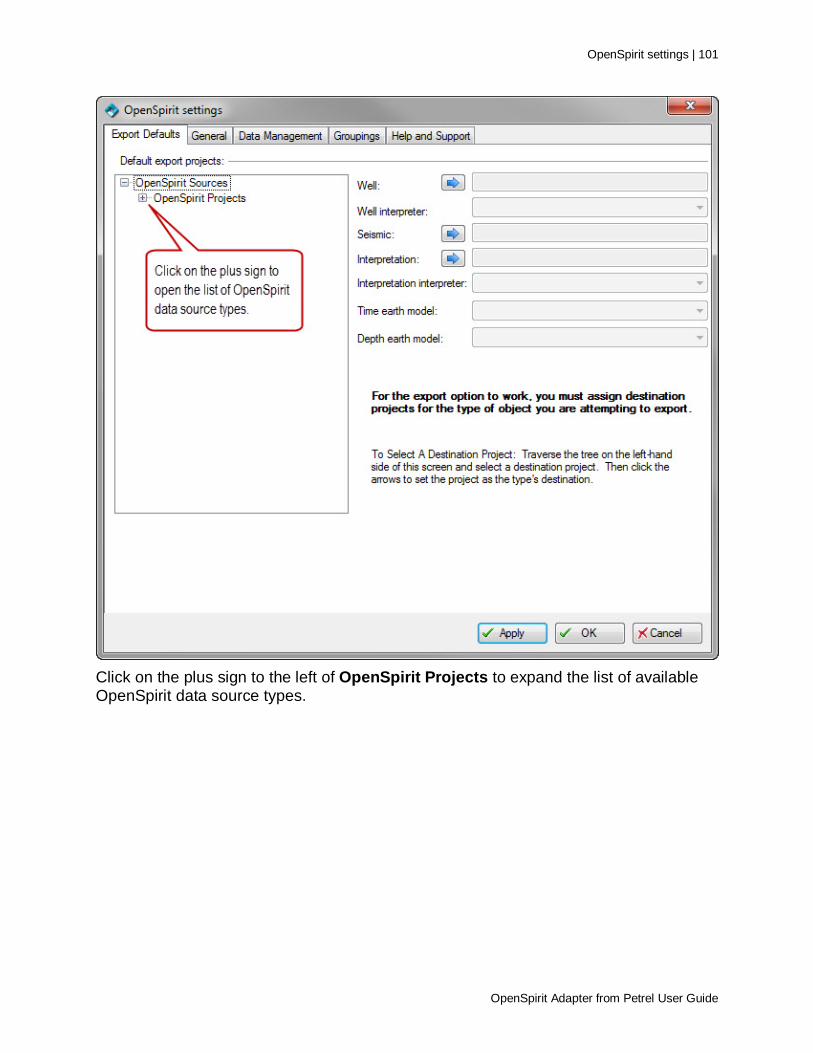
OpenSpirit settings | 101
OpenSpirit Adapter from Petrel User Guide
Click on the plus sign to the left of OpenSpirit Projects to expand the list of available OpenSpirit data source types.

102 | OpenSpirit settings
OpenSpirit Adapter from Petrel User Guide
Click on the plus sign to the left of a data source to expand the list of projects in the data source.
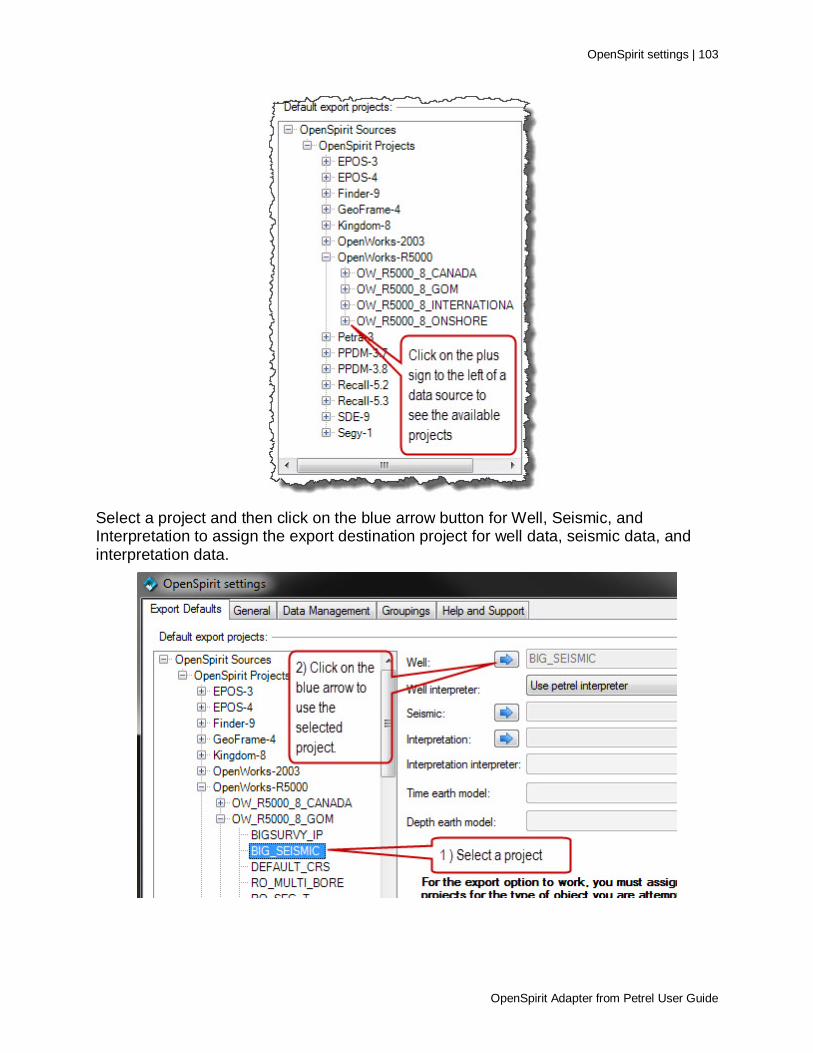
OpenSpirit settings | 103
OpenSpirit Adapter from Petrel User Guide
Select a project and then click on the blue arrow button for Well, Seismic, and Interpretation to assign the export destination project for well data, seismic data, and interpretation data.
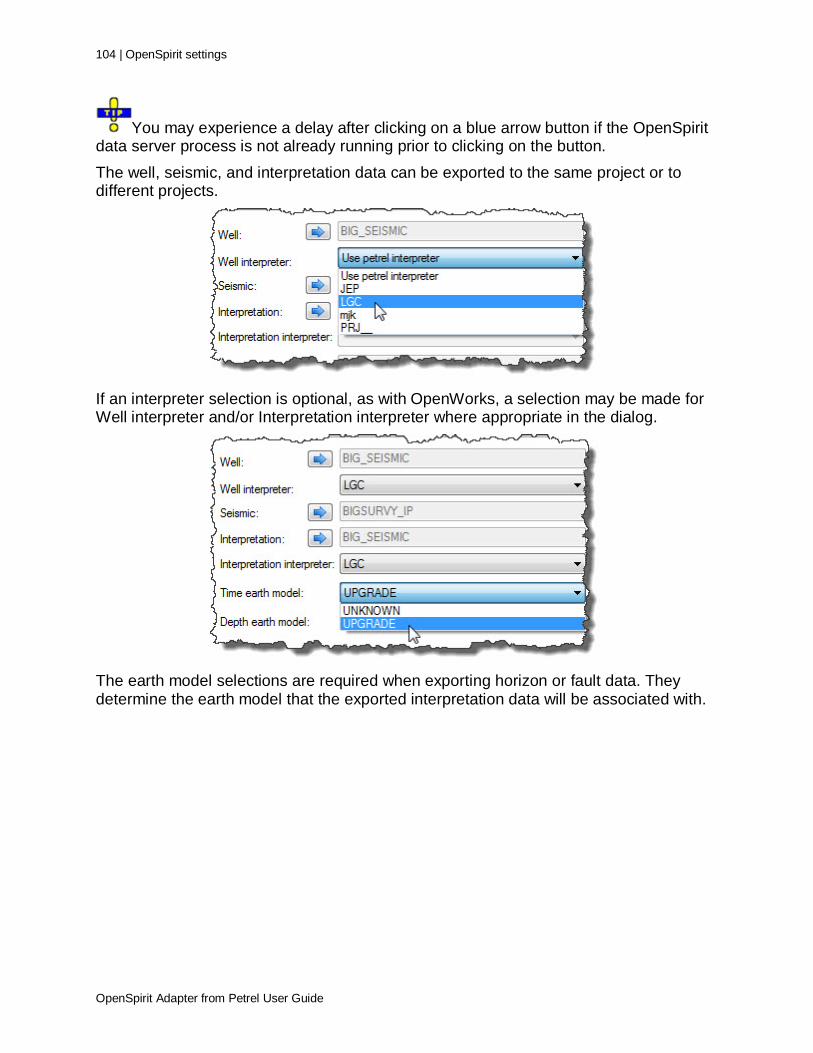
104 | OpenSpirit settings
OpenSpirit Adapter from Petrel User Guide
You may experience a delay after clicking on a blue arrow button if the OpenSpirit data server process is not already running prior to clicking on the button. The well, seismic, and interpretation data can be exported to the same project or to different projects.
If an interpreter selection is optional, as with OpenWorks, a selection may be made for Well interpreter and/or Interpretation interpreter where appropriate in the dialog.
The earth model selections are required when exporting horizon or fault data. They determine the earth model that the exported interpretation data will be associated with.
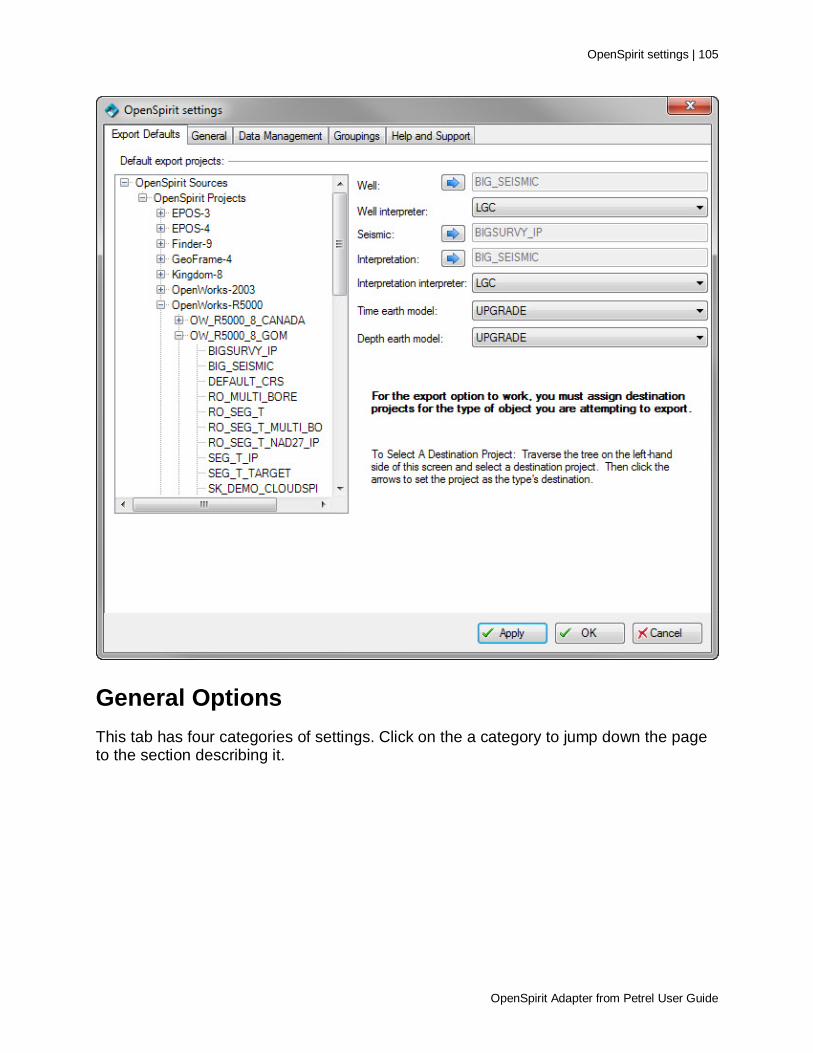
OpenSpirit settings | 105
OpenSpirit Adapter from Petrel User Guide
General Options This tab has four categories of settings. Click on the a category to jump down the page to the section describing it.

106 | OpenSpirit settings
OpenSpirit Adapter from Petrel User Guide
Click on the Restore to Defaults button to restore all of the General settings to their default values.
Events
Enable/disable reception of these event types: These checkboxes determine whether these types of events we be listened for. If a checkbox is not checked the corresponding event type will be ignored.
Send wellbore features: Enable checkboxes to determine which feature(s) will be sent when a wellbore is selected and a GIS event broadcast. Each feature type will be sent in a separate layer.

OpenSpirit settings | 107
OpenSpirit Adapter from Petrel User Guide
Send fault sticks as: Choose whether to send Petrel fault polylines as point or polyline features. If sent as points to ArcGIS then the z values may be posted and symbolized by a variable color.
Send well labels as: Choose whether to label the well GIS features that will be broadcast with the Petrel well UWI or its name.
Send 2d horizon data as: Choose whether to send Petrel 2d seismic horizons as point or polyline features. If sent as points to ArcGIS then the z values may be posted and symbolized by a variable color.
Well
Automatically import default wellbore checkshot If this checkbox is checked (the default) then the default (aka preferred) checkshot, if available, will automatically be imported when a wellbore is imported.
Activate checkshots on import If this checkbox is not checked (the default) then checkshots will not get activated automatically upon import. They can be activated later by explicitly activating one or many in Petrel. If this checkbox is checked, then checkshots will be automatically activated upon import.
Activating checkshots on import significantly increases the import time.
Replicate shared checkshots Option to make a copy of a checkshot when an imported well checkshot is shared from another well (see Checkshot Import Options for more details). The default, box unchecked, does not replicate shared checkshots.
If missing azimuth north reference assume: If this checkbox is not checked (the default) then wellbores that are missing an azimuth north reference for their deviation survey will not be imported. If checked then a missing north reference will be assumed to be either true north (line of longitude) or grid north (line of constant false Easting) based on the radio button choice.
Global log template name: This option determines which OpenSpirit well log attribute is used for the well log name. Select Use Curve Kind to use the OpenSpirit log's Kind attribute for the log name.

108 | OpenSpirit settings
OpenSpirit Adapter from Petrel User Guide
Select Use Curve Name to use the OpenSpirit log's Curve Name attribute for the log name.
Apply display shift when importing checkshots If this checkbox is checked (the default) then checkshot times that are to be imported will be shifted by the checkshot Display Shift times. Not all data stores have the concept of a display shift for checkshots (OpenWorks does...), but if the source data has a non-null display shift set and this checkbox is enabled then the time values of the time-depth pairs will be shifted by this amount.
Allow import of duplicate well log MD values If this checkbox is checked, duplicate MD values will be slightly adjusted instead of being thrown away.
If missing elevation, import wells with elevation set to 0.0 If this checkbox is checked, wells with missing elevation will be imported, and their elevation will be set to kelly bushing with a value of 0.0.
Wellhead update tolerance This option is used to skip updating a well's wellhead location unless the distance between the current value and the new value is more than the tolerance. The tolerance values are distance expressed in the Petrel project's XY unit. Updating the wellhead is an expensive operation in Petrel, so this option can significantly improve performance when updating large numbers of wells.
Create stratigraphic hierarchy Enabling this option causes stratigraphic column hierarchies to be created in Petrel for imported OpenSpirit well picks that have associated strat columns.
Enabling this option will increase the well import time when importing large numbers of well picks that are associated with many stratigraphic columns.
The OpenWorks OpenSpirit data connector is the only data connector that exposes the well pick - strat column association.
Seismic
Default Storage Format Choose this option to have imported 2D seismic data realized as Petrel RAW format in the Petrel project directory.
OpenSpirit settings | 109
OpenSpirit Adapter from Petrel User Guide
Create Segy Files Choose this option to have imported 2D seismic data stored as Segy format. The Segy files are created in the default Petrel seismic directory which can be set using the Seismic tab on the Petrel System settings dialog available from the Petrel Tools menu.
Segy Folder: This setting controls where Segy files are written when importing seismic data using the Create Segy Files option. Leave this setting blank to realize Segy files to the Petrel project folder. Select a file folder to realize the Segy files in a folder external to the Petrel project.
Miscellaneous
Load OpenSpirit properties on project open If checked then the OpenSpirit extended properties will be loaded when the Petrel project is opened. This then allows a user to see these properties in the Petrel object settings dialog without needing to first connect to OpenSpirit. For projects with many objects in it (especially well tops) this may significantly add to the project opening time. The default, box unchecked, is to delay restoring the extended properties until the connection to OpenSpirit is activated.
Let user manually select single datum shift to store as ESRI WKT An option for advanced users that applies when a Petrel CRS is chosen, via OpenSpirit, from an external project that has a series of datum shifts associated with its project CRS (like GeoFrame for NAD27). The ESRI WKT that Petrel stores only allows a single datum shift to be set. This option allows the user to manually pick the desired datum shift. Otherwise the OpenSpirit adapter will automatically pick a datum shift. In any case the full set of datum shifts are stored with the Petrel project and visible via the Coordinate System Details tab on the Petrel project settings dialog.
Start data selector when I click finish Option to automatically start the OpenSpirit data Selector after the Project Initiation Wizard is finished or after connecting to OpenSpirit from an existing Petrel project. The OpenSpirit adapter will either use an existing or create a new OpenSpirit session called Petrel_ProjectName that has its CRS and units set to the Petrel project preferences.
Data Management Options This tab controls the behavior of the OpenSpirit Data Manager.

110 | OpenSpirit settings
OpenSpirit Adapter from Petrel User Guide
Match Merge Options The match merge options control the match merge behavior when processing received data selection events, drop events, or loads from a Studio Find index search result.
Show matching data Selecting this option causes the Import Match and Merge window to display matches when attempting to import data that matches data that is already in the Petrel project.
Apply default import action and replacement velocity on matches Selecting this option prevents the Import Match and Merge window from appearing. The default match and merge action selected on this same panel is applied to all the imported data that matches data already in the project. The default replacement velocity
OpenSpirit settings | 111
OpenSpirit Adapter from Petrel User Guide
entered on this same panel is also used to adjust any seismic reference datum mismatches.
List data before matching Selecting this option causes the Import Match and Merge window to display all data to be imported. All data to be imported is displayed whether it matches data already in the project or not.
Attribute Refresh Options The attribute refresh options control behavior of the refresh feature in the OpenSpirit Data Manager and in the context menus for data items in the Petrel input tree that were imported using the OpenSpirit adapter.
Refresh Natural Keys and Extended Attributes Selecting this option causes a refresh to only change the attributes of the Petrel objects that are used for import matching, and any OpenSpirit Properties that are not part of the Petrel data model. Refresh can only be performed on 3D seismic volumes when this option is selected.
Refresh All Attributes Selecting this option causes a refresh to change all the information maintained in the Petrel object, including any unsaved changes made to the Petrel object.
Data Key Clear Options The data key clear options control the behavior of the Remove OpenSpirit Keys operation in the OpenSpirit Data Manager.
Clear Only Invalid Keys Selecting this option causes only invalid data keys to be removed even if data items with valid keys are selected when the remove icon is pressed. Keys are not removed from selected data items that have valid keys.
Clear All Selected Data Keys Selecting this option causes data keys to be removed from all selected data items without regard to the validity of the keys. Keys are removed from selected data items that have valid keys.

112 | OpenSpirit settings
OpenSpirit Adapter from Petrel User Guide
Groupings This tab can be used group imported data items into sub-folders during import based on the value of one of the data items' attributes. Groupings can be performed using any attribute of any of the data types that can be imported by the OpenSpirit Adapter.
The None option indicates that grouping should not be performed. All other options in the drop down lists correspond to the attributes of that data type that can be used to perform grouping. For example, selecting the well bore's Bore Status attribute will cause imported well bores to be grouped by bore status.

OpenSpirit settings | 113
OpenSpirit Adapter from Petrel User Guide
The imported well bores will appear in the Petrel input tree grouped into sub-folders named for each bore status value. The following image shows well bore groupings by bore status. The shut in, active, abandoned, UNKNOWN, suspended, and temporarily abandoned folders each contain the well bores that have a status indicated by the folder name.
Avoid selecting an attribute that is likely to have a large number of distinct values, such as well bore UWI. This can result in a large number of sub-folders that contain few or possibly a single object.
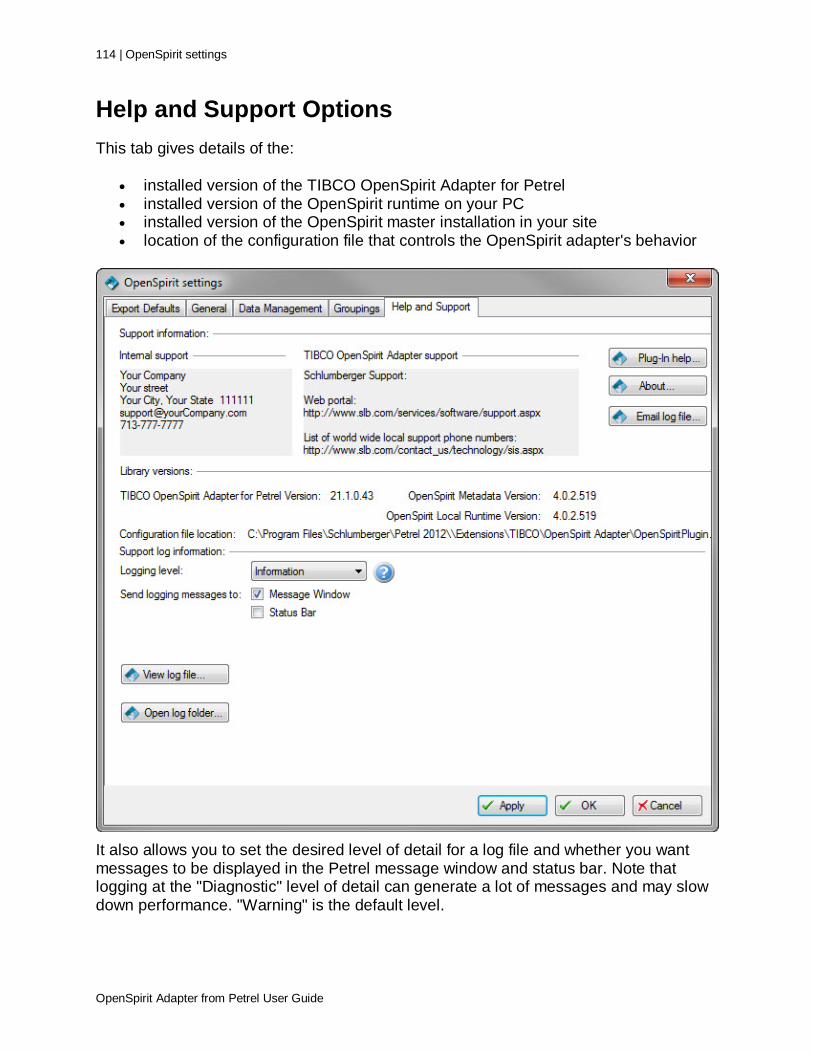
114 | OpenSpirit settings
OpenSpirit Adapter from Petrel User Guide
Help and Support Options This tab gives details of the:
• installed version of the TIBCO OpenSpirit Adapter for Petrel • installed version of the OpenSpirit runtime on your PC • installed version of the OpenSpirit master installation in your site • location of the configuration file that controls the OpenSpirit adapter's behavior
It also allows you to set the desired level of detail for a log file and whether you want messages to be displayed in the Petrel message window and status bar. Note that logging at the "Diagnostic" level of detail can generate a lot of messages and may slow down performance. "Warning" is the default level.
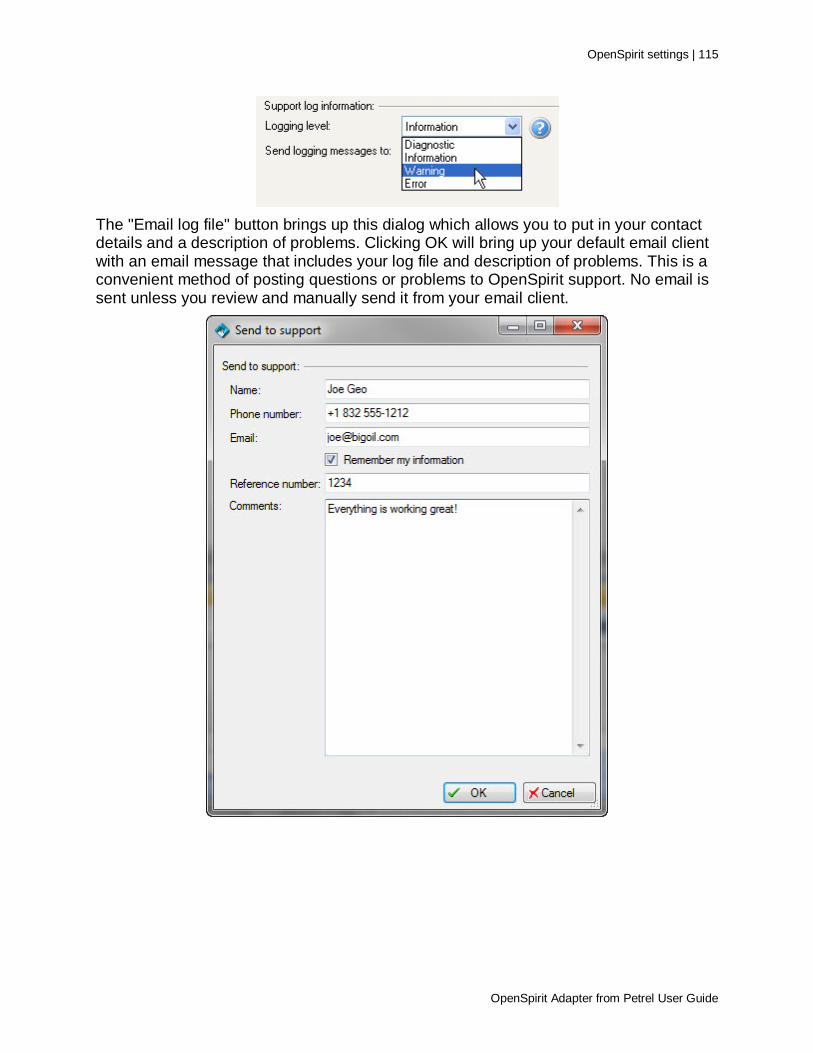
OpenSpirit settings | 115
OpenSpirit Adapter from Petrel User Guide
The "Email log file" button brings up this dialog which allows you to put in your contact details and a description of problems. Clicking OK will bring up your default email client with an email message that includes your log file and description of problems. This is a convenient method of posting questions or problems to OpenSpirit support. No email is sent unless you review and manually send it from your email client.

116 | Configuration Files
OpenSpirit Adapter from Petrel User Guide
Configuration Files Support File The Support.config file may be found in either its default location in the OpenSpirit directory under the Extensions directory of the Petrel installation directory (e.g. C:\Program Files\Schlumberger\Petrel 2012\Extensions\TIBCO\OpenSpirit Adapter) or in the directory specified during the OpenSpirit adapter installation. This XML file controls:
• The display of your internal support contact for OpenSpirit support • The display of the TIBCO Software Inc. contact for OpenSpirit support
This information is displayed in the OpenSpirit settings dialog and is used to email support issues to OpenSpirit. You may edit this file (create a backup first) to add your companies details. Its default contents are: <?xml version="1.0" encoding="utf-8" ?>
<configuration>
<Environment>
<add key="InternalSupport" value="Your Company
Your street
Your City, Your State 111111
713-777-7777" />
<add key="OpenSpiritSupport" value="TIBCO Software Inc.
281-295-1400
</Environment>
<SupportForm>
<add key="Remember" value="true"></add>
<add key="Name" value="Your name"></add>
<add key="Phone" value="Your phone"></add>
<add key="Email" value="Your email"></add>
</SupportForm>
</configuration>

Configuration Files | 117
OpenSpirit Adapter from Petrel User Guide
XML Mapping Files The following table lists XML files used to map OpenSpirit values to values recognized by Petrel. The XML files are located in the OpenSpirit Adapter installation directory (e.g. C:\Program Files\Schlumberger\Petrel 2012\Extensions\TIBCO\OpenSpirit Adapter) or in the configuration file directory entered during the OpenSpirit adapter installation.
XML Mapping File Description
LogNameToLogMnemonic.xml This XML file is used to map Petrel well log names to OpenSpirit well log kind values.
OpenSpiritWellSymbolsToWellType.xml
This XML file is used to map combinations of OpenSpirit BoreStatus, FlowDirection, FluidType, and ShowType well and well bore attribute values to Petrel well symbols.
WellTypesToOpenSpiritWellSymbol.xml
This XML file is used to map Petrel well symbols to combinations of OpenSpirit BoreStatus, FlowDirection, FluidType, and ShowType well and well bore attribute values.
OpenSpiritHorizonTypeAndPetrelTemplate.xml
This XML file is used to map the OpenSpirit horizon PropertyType attribute to the Petrel template used as the Seismic horizon Domain attribute. The mappings in this file are used when importing and exporting horizons.
Add a new row in HorizonTypeToPetrelTemplate section:
<Map HorizonType="Horizon type name" Template="Petrel template name"></Map>
Add a new row in PetrelTemplateToHorizonType section:
<Map Template="Petrel template name" HorizonType="Horizon type name"></Map>

118 | Configuration Files
OpenSpirit Adapter from Petrel User Guide
Editing these files without exercising great care may have undesirable consequences.
Glossary | 119
OpenSpirit Adapter from Petrel User Guide
Glossary A
application adapter: A piece of software that allows an application to connect to OpenSpirit in order to read/write data from any data store with an OpenSpirit data connector or to exchange events (messages) with other OpenSpirit enabled applications.
C CRS: A Coordinate Reference System. In Petrel, a project has a CRS which is a map
projection system with a reference geographic system which has an associated datum. In addition, a preferred datum shift to WGS84 is defined.
D data connector: A piece of software that connects a data store to OpenSpirit to allow
applications that connect to OpenSpirit to read/write data from this store. data selection event: A message passed between applications, via OpenSpirit, that
contains datakeys that refer to data in data stores accessible via an OpenSpirit data connector.
datakey: Link that connects a Petrel object (e.g. a well, seismic volume, or horizon) to a data item in an external data store.
datakeys: Links that connect a Petrel object (e.g. a well, seismic volume, or horizon) to a data item in an external data store. Given a datakey OpenSpirit can read or write any updates to/from Petrel.
datum shift: A transformation from one geographic system (and its associated datum) to another. There are different algorithms use to accomplish this transformation including: geocentric translation (3 parameters) Molodensky (5 parameters), Bursa/Wolfe (7 parameters) , and grid based approach such a NADCON or NTv2
G gis event: A message passed between applications, via OpenSpirit, that contains the
geometry. attributes, and CRS of point, polyline, or polygon features that belong to GIS layers. Such messages are normally used to exchange data between applications that is posted as culture data in a basemap.
grid event: A message passed between applications, via OpenSpirit, that contains the grid definition, grid values, CRS and z units of a grid representing the elevation of a geologic surface or some other attribute defined on a grid. A Petrel surface may be sent as a grid event.

120 | Glossary
OpenSpirit Adapter from Petrel User Guide
L live-link: A 3D seismic virtual attribute cube created when importing a 3D seismic
volume using OpenSpirit. A live-link does not contain seismic data; it points to seismic data that resides in the database it was selected from (e.g. OpenWorks, GeoFrame, etc.). Seismic data is dynamically read from the source database when a Petrel window or process requests data from the live-link. Live-links can be converted into a normal 3D seismic object by realizing the live-link.
M MSL: mean sea level
S SRD: A seismic reference datum (SRD) is the elevation (with respect to MSL) at which
the seismic travel time equals zero.


