255
TIBCO® Reward User’s Guide Software Release 15.2.0 May 2015 Two-Second Advantage ®
Two-Second Adv
TIBCO® Reward
User’s GuideSoftware Release 15.2.0May 2015
antage®
Important Information
SOME TIBCO SOFTWARE EMBEDS OR BUNDLES OTHER TIBCO SOFTWARE. USE OF SUCH EMBEDDED OR BUNDLED TIBCO SOFTWARE IS SOLELY TO ENABLE THE FUNCTIONALITY (OR PROVIDE LIMITED ADD-ON FUNCTIONALITY) OF THE LICENSED TIBCO SOFTWARE. THE EMBEDDED OR BUNDLED SOFTWARE IS NOT LICENSED TO BE USED OR ACCESSED BY ANY OTHER TIBCO SOFTWARE OR FOR ANY OTHER PURPOSE.USE OF TIBCO SOFTWARE AND THIS DOCUMENT IS SUBJECT TO THE TERMS AND CONDITIONS OF A LICENSE AGREEMENT FOUND IN EITHER A SEPARATELY EXECUTED SOFTWARE LICENSE AGREEMENT, OR, IF THERE IS NO SUCH SEPARATE AGREEMENT, THE CLICKWRAP END USER LICENSE AGREEMENT WHICH IS DISPLAYED DURING DOWNLOAD OR INSTALLATION OF THE SOFTWARE (AND WHICH IS DUPLICATED IN THE LICENSE FILE) OR IF THERE IS NO SUCH SOFTWARE LICENSE AGREEMENT OR CLICKWRAP END USER LICENSE AGREEMENT, THE LICENSE(S) LOCATED IN THE “LICENSE” FILE(S) OF THE SOFTWARE. USE OF THIS DOCUMENT IS SUBJECT TO THOSE TERMS AND CONDITIONS, AND YOUR USE HEREOF SHALL CONSTITUTE ACCEPTANCE OF AND AN AGREEMENT TO BE BOUND BY THE SAME.This document contains confidential information that is subject to U.S. and international copyright laws and treaties. No part of this document may be reproduced in any form without the written authorization of TIBCO Software Inc.TIBCO, Two-Second Advantage, Reward are either registered trademarks or trademarks of TIBCO Software Inc. in the United States and/or other countries.All other product and company names and marks mentioned in this document are the property of their respective owners and are mentioned for identification purposes only.THIS DOCUMENT IS PROVIDED “AS IS” WITHOUT WARRANTY OF ANY KIND, EITHER EXPRESS OR IMPLIED, INCLUDING, BUT NOT LIMITED TO, THE IMPLIED WARRANTIES OF MERCHANTABILITY, FITNESS FOR A PARTICULAR PURPOSE, OR NON-INFRINGEMENT.THIS DOCUMENT COULD INCLUDE TECHNICAL INACCURACIES OR TYPOGRAPHICAL ERRORS. CHANGES ARE PERIODICALLY ADDED TO THE INFORMATION HEREIN; THESE CHANGES WILL BE INCORPORATED IN NEW EDITIONS OF THIS DOCUMENT. TIBCO SOFTWARE INC. MAY MAKE IMPROVEMENTS AND/OR CHANGES IN THE PRODUCT(S) AND/OR THE PROGRAM(S) DESCRIBED IN THIS DOCUMENT AT ANY TIME.THE CONTENTS OF THIS DOCUMENT MAY BE MODIFIED AND/OR QUALIFIED, DIRECTLY OR INDIRECTLY, BY OTHER DOCUMENTATION, INCLUDING BUT NOT LIMITED TO ANY RELEASE NOTES AND "READ ME" FILES.Copyright © 1999-2015 TIBCO Software Inc. ALL RIGHTS RESERVED.TIBCO Software Inc. Confidential Information
| 1
Contents
Related Documentation . . . . . . . . . . . . . . . . . . . . . . . . . . . . . . . . . . . . . . . . . . . . . . . . . . . . . . . . . . . . . . . . . . . . . . 8
Typographical Conventions . . . . . . . . . . . . . . . . . . . . . . . . . . . . . . . . . . . . . . . . . . . . . . . . . . . . . . . . . . . . . . . . . . . 9
Connecting with TIBCO Resources . . . . . . . . . . . . . . . . . . . . . . . . . . . . . . . . . . . . . . . . . . . . . . . . . . . . . . . . . . . . 11How to Join TIBCOmmunity . . . . . . . . . . . . . . . . . . . . . . . . . . . . . . . . . . . . . . . . . . . . . . . . . . . . . . . . . . . . . . 11How to Access TIBCO Documentation. . . . . . . . . . . . . . . . . . . . . . . . . . . . . . . . . . . . . . . . . . . . . . . . . . . . . . 11How to Contact TIBCO Support . . . . . . . . . . . . . . . . . . . . . . . . . . . . . . . . . . . . . . . . . . . . . . . . . . . . . . . . . . . 11
Chapter 1 TIBCO Reward CRMS Overview . . . . . . . . . . . . . . . . . . . . . . . . . . . . . . . . . . . . . . . . . . .1
Software as a Service (SaaS) . . . . . . . . . . . . . . . . . . . . . . . . . . . . . . . . . . . . . . . . . . . . . . . . . . . . . . . . . . . . . . . . . 2Features and Benefits. . . . . . . . . . . . . . . . . . . . . . . . . . . . . . . . . . . . . . . . . . . . . . . . . . . . . . . . . . . . . . . . . . . . 2
Chapter 2 GUI Overview and Navigation . . . . . . . . . . . . . . . . . . . . . . . . . . . . . . . . . . . . . . . . . . . . .5
CRMS Home Page . . . . . . . . . . . . . . . . . . . . . . . . . . . . . . . . . . . . . . . . . . . . . . . . . . . . . . . . . . . . . . . . . . . . . . . . . 6Menu. . . . . . . . . . . . . . . . . . . . . . . . . . . . . . . . . . . . . . . . . . . . . . . . . . . . . . . . . . . . . . . . . . . . . . . . . . . . . . . . . 6Navigation. . . . . . . . . . . . . . . . . . . . . . . . . . . . . . . . . . . . . . . . . . . . . . . . . . . . . . . . . . . . . . . . . . . . . . . . . . . . . 8Saving Your Work on the Current Page . . . . . . . . . . . . . . . . . . . . . . . . . . . . . . . . . . . . . . . . . . . . . . . . . . . . . . 9
Chapter 3 Offers . . . . . . . . . . . . . . . . . . . . . . . . . . . . . . . . . . . . . . . . . . . . . . . . . . . . . . . . . . . . . . . .11
About Offers. . . . . . . . . . . . . . . . . . . . . . . . . . . . . . . . . . . . . . . . . . . . . . . . . . . . . . . . . . . . . . . . . . . . . . . . . . . . . . 12Prerequisites for Creating an Offer . . . . . . . . . . . . . . . . . . . . . . . . . . . . . . . . . . . . . . . . . . . . . . . . . . . . . . . . . 12Offer Lifecycle Overview . . . . . . . . . . . . . . . . . . . . . . . . . . . . . . . . . . . . . . . . . . . . . . . . . . . . . . . . . . . . . . . . . 14Offers Page Overview. . . . . . . . . . . . . . . . . . . . . . . . . . . . . . . . . . . . . . . . . . . . . . . . . . . . . . . . . . . . . . . . . . . 14Creating an Offer with the Offer Setup Wizard . . . . . . . . . . . . . . . . . . . . . . . . . . . . . . . . . . . . . . . . . . . . . . . . 16Targeting . . . . . . . . . . . . . . . . . . . . . . . . . . . . . . . . . . . . . . . . . . . . . . . . . . . . . . . . . . . . . . . . . . . . . . . . . . . . . 21Offer Status. . . . . . . . . . . . . . . . . . . . . . . . . . . . . . . . . . . . . . . . . . . . . . . . . . . . . . . . . . . . . . . . . . . . . . . . . . . 29Offer Status Roadmap . . . . . . . . . . . . . . . . . . . . . . . . . . . . . . . . . . . . . . . . . . . . . . . . . . . . . . . . . . . . . . . . . . 32Cloning an Offer . . . . . . . . . . . . . . . . . . . . . . . . . . . . . . . . . . . . . . . . . . . . . . . . . . . . . . . . . . . . . . . . . . . . . . . 33Deleting an Offer. . . . . . . . . . . . . . . . . . . . . . . . . . . . . . . . . . . . . . . . . . . . . . . . . . . . . . . . . . . . . . . . . . . . . . . 34Offer Schedule Page. . . . . . . . . . . . . . . . . . . . . . . . . . . . . . . . . . . . . . . . . . . . . . . . . . . . . . . . . . . . . . . . . . . . 35
Chapter 4 Customer Profiles. . . . . . . . . . . . . . . . . . . . . . . . . . . . . . . . . . . . . . . . . . . . . . . . . . . . . .37
Customer Profiles page . . . . . . . . . . . . . . . . . . . . . . . . . . . . . . . . . . . . . . . . . . . . . . . . . . . . . . . . . . . . . . . . . . . . . 38About Customer Profiles. . . . . . . . . . . . . . . . . . . . . . . . . . . . . . . . . . . . . . . . . . . . . . . . . . . . . . . . . . . . . . . . . 40Creating a Customer profile . . . . . . . . . . . . . . . . . . . . . . . . . . . . . . . . . . . . . . . . . . . . . . . . . . . . . . . . . . . . . . 40Editing an Customer Profile . . . . . . . . . . . . . . . . . . . . . . . . . . . . . . . . . . . . . . . . . . . . . . . . . . . . . . . . . . . . . . 42Cloning a Customer Profile. . . . . . . . . . . . . . . . . . . . . . . . . . . . . . . . . . . . . . . . . . . . . . . . . . . . . . . . . . . . . . . 44
TIBCO Reward User’s Guide
2 | Contents
Export Email List based on Customer Profile . . . . . . . . . . . . . . . . . . . . . . . . . . . . . . . . . . . . . . . . . . . . . . . . 45Deleting a Customer Profile . . . . . . . . . . . . . . . . . . . . . . . . . . . . . . . . . . . . . . . . . . . . . . . . . . . . . . . . . . . . . . 49
Chapter 5 Basket Profiles . . . . . . . . . . . . . . . . . . . . . . . . . . . . . . . . . . . . . . . . . . . . . . . . . . . . . . . 51
About Basket Profiles . . . . . . . . . . . . . . . . . . . . . . . . . . . . . . . . . . . . . . . . . . . . . . . . . . . . . . . . . . . . . . . . . . . . . . 52Basket Profiles Page Overview . . . . . . . . . . . . . . . . . . . . . . . . . . . . . . . . . . . . . . . . . . . . . . . . . . . . . . . . . . . 52Creating a Basket profile . . . . . . . . . . . . . . . . . . . . . . . . . . . . . . . . . . . . . . . . . . . . . . . . . . . . . . . . . . . . . . . . 54Basket Evaluation . . . . . . . . . . . . . . . . . . . . . . . . . . . . . . . . . . . . . . . . . . . . . . . . . . . . . . . . . . . . . . . . . . . . . 54Editing a Basket Profile . . . . . . . . . . . . . . . . . . . . . . . . . . . . . . . . . . . . . . . . . . . . . . . . . . . . . . . . . . . . . . . . . 57Cloning a Basket Profile. . . . . . . . . . . . . . . . . . . . . . . . . . . . . . . . . . . . . . . . . . . . . . . . . . . . . . . . . . . . . . . . . 57Deleting a Basket Profile . . . . . . . . . . . . . . . . . . . . . . . . . . . . . . . . . . . . . . . . . . . . . . . . . . . . . . . . . . . . . . . . 58Basket Level vs. Line Item Evaluation in Offers . . . . . . . . . . . . . . . . . . . . . . . . . . . . . . . . . . . . . . . . . . . . . . . 58
Chapter 6 Mobile Geolocations (beta) . . . . . . . . . . . . . . . . . . . . . . . . . . . . . . . . . . . . . . . . . . . . . 63About Mobile Geolocations . . . . . . . . . . . . . . . . . . . . . . . . . . . . . . . . . . . . . . . . . . . . . . . . . . . . . . . . . . . . . . 64Creating a Mobile Geolocation. . . . . . . . . . . . . . . . . . . . . . . . . . . . . . . . . . . . . . . . . . . . . . . . . . . . . . . . . . . . 65Editing a Mobile Geolocation . . . . . . . . . . . . . . . . . . . . . . . . . . . . . . . . . . . . . . . . . . . . . . . . . . . . . . . . . . . . . 65Deleting a Mobile Geolocation. . . . . . . . . . . . . . . . . . . . . . . . . . . . . . . . . . . . . . . . . . . . . . . . . . . . . . . . . . . . 66
Chapter 7 Dimensions . . . . . . . . . . . . . . . . . . . . . . . . . . . . . . . . . . . . . . . . . . . . . . . . . . . . . . . . . . 67
About Dimensions. . . . . . . . . . . . . . . . . . . . . . . . . . . . . . . . . . . . . . . . . . . . . . . . . . . . . . . . . . . . . . . . . . . . . . . . . 68
Profiles, Dimensions, and Conditions . . . . . . . . . . . . . . . . . . . . . . . . . . . . . . . . . . . . . . . . . . . . . . . . . . . . . . . . . . 69
Defining a Target Profile Dimension . . . . . . . . . . . . . . . . . . . . . . . . . . . . . . . . . . . . . . . . . . . . . . . . . . . . . . . . . . . 71
About the "MUST Match" Requirement. . . . . . . . . . . . . . . . . . . . . . . . . . . . . . . . . . . . . . . . . . . . . . . . . . . . . . . . . 72
About the Population Reach Display. . . . . . . . . . . . . . . . . . . . . . . . . . . . . . . . . . . . . . . . . . . . . . . . . . . . . . . . . . . 73
Dimension Definitions . . . . . . . . . . . . . . . . . . . . . . . . . . . . . . . . . . . . . . . . . . . . . . . . . . . . . . . . . . . . . . . . . . . . . . 77
Chapter 8 Email . . . . . . . . . . . . . . . . . . . . . . . . . . . . . . . . . . . . . . . . . . . . . . . . . . . . . . . . . . . . . . . 93
About Email Communications . . . . . . . . . . . . . . . . . . . . . . . . . . . . . . . . . . . . . . . . . . . . . . . . . . . . . . . . . . . . . . . . 94
Email Communication Lifecycle Overview . . . . . . . . . . . . . . . . . . . . . . . . . . . . . . . . . . . . . . . . . . . . . . . . . . . . . . 96Define the email communication with the Edit Email Communication wizard . . . . . . . . . . . . . . . . . . . . . . . . 96
Email Communications Page . . . . . . . . . . . . . . . . . . . . . . . . . . . . . . . . . . . . . . . . . . . . . . . . . . . . . . . . . . . . . . . . 98
Cloning an Email Communication . . . . . . . . . . . . . . . . . . . . . . . . . . . . . . . . . . . . . . . . . . . . . . . . . . . . . . . . . . . . 100
Edit Email Communication Wizard . . . . . . . . . . . . . . . . . . . . . . . . . . . . . . . . . . . . . . . . . . . . . . . . . . . . . . . . . . . 101Email Communication Template . . . . . . . . . . . . . . . . . . . . . . . . . . . . . . . . . . . . . . . . . . . . . . . . . . . . . . . . . 102Email Communication Properties . . . . . . . . . . . . . . . . . . . . . . . . . . . . . . . . . . . . . . . . . . . . . . . . . . . . . . . . 103
Email Communication Targeting . . . . . . . . . . . . . . . . . . . . . . . . . . . . . . . . . . . . . . . . . . . . . . . . . . . . . . . . . . . . . 108Email Communication Rich Content . . . . . . . . . . . . . . . . . . . . . . . . . . . . . . . . . . . . . . . . . . . . . . . . . . . . . . 109Email Communication Text-Only . . . . . . . . . . . . . . . . . . . . . . . . . . . . . . . . . . . . . . . . . . . . . . . . . . . . . . . . . 112Email Communication Summary . . . . . . . . . . . . . . . . . . . . . . . . . . . . . . . . . . . . . . . . . . . . . . . . . . . . . . . . . 113
TIBCO Reward User’s Guide
Contents | 3
Changing the Status of an Email Communication . . . . . . . . . . . . . . . . . . . . . . . . . . . . . . . . . . . . . . . . . . . . . . . . 115Email>Campaigns Page . . . . . . . . . . . . . . . . . . . . . . . . . . . . . . . . . . . . . . . . . . . . . . . . . . . . . . . . . . . . . . . . 115
Creating an Email Campaign. . . . . . . . . . . . . . . . . . . . . . . . . . . . . . . . . . . . . . . . . . . . . . . . . . . . . . . . . . . . . . . . 118Email Campaign Properties Page. . . . . . . . . . . . . . . . . . . . . . . . . . . . . . . . . . . . . . . . . . . . . . . . . . . . . . . . . 118Email Campaign Details Page . . . . . . . . . . . . . . . . . . . . . . . . . . . . . . . . . . . . . . . . . . . . . . . . . . . . . . . . . . . 119
Trigger Events . . . . . . . . . . . . . . . . . . . . . . . . . . . . . . . . . . . . . . . . . . . . . . . . . . . . . . . . . . . . . . . . . . . . . . . . . . . 121Email>Trigger Events Page Overview . . . . . . . . . . . . . . . . . . . . . . . . . . . . . . . . . . . . . . . . . . . . . . . . . . . . . 123Managing a Trigger Event. . . . . . . . . . . . . . . . . . . . . . . . . . . . . . . . . . . . . . . . . . . . . . . . . . . . . . . . . . . . . . . 125
Email Test and Seed Lists Page . . . . . . . . . . . . . . . . . . . . . . . . . . . . . . . . . . . . . . . . . . . . . . . . . . . . . . . . . . . . . 127
Email Guidelines for New Clients. . . . . . . . . . . . . . . . . . . . . . . . . . . . . . . . . . . . . . . . . . . . . . . . . . . . . . . . . . . . . 128
Email Address Requirements and Validation Rules. . . . . . . . . . . . . . . . . . . . . . . . . . . . . . . . . . . . . . . . . . . . . . . 133
Chapter 9 Target Lists . . . . . . . . . . . . . . . . . . . . . . . . . . . . . . . . . . . . . . . . . . . . . . . . . . . . . . . . . .135
About Target Lists . . . . . . . . . . . . . . . . . . . . . . . . . . . . . . . . . . . . . . . . . . . . . . . . . . . . . . . . . . . . . . . . . . . . . . . . 136Lists Page Overview . . . . . . . . . . . . . . . . . . . . . . . . . . . . . . . . . . . . . . . . . . . . . . . . . . . . . . . . . . . . . . . . . . . 138Target List Creation Overview. . . . . . . . . . . . . . . . . . . . . . . . . . . . . . . . . . . . . . . . . . . . . . . . . . . . . . . . . . . . 139Creating a Target List From Import Wizard. . . . . . . . . . . . . . . . . . . . . . . . . . . . . . . . . . . . . . . . . . . . . . . . . . 140Creating a Target List from an imported file . . . . . . . . . . . . . . . . . . . . . . . . . . . . . . . . . . . . . . . . . . . . . . . . . 142Creating a Target List from a Profile . . . . . . . . . . . . . . . . . . . . . . . . . . . . . . . . . . . . . . . . . . . . . . . . . . . . . . . 144
Chapter 10 Rewards. . . . . . . . . . . . . . . . . . . . . . . . . . . . . . . . . . . . . . . . . . . . . . . . . . . . . . . . . . . .147
Reward Codes . . . . . . . . . . . . . . . . . . . . . . . . . . . . . . . . . . . . . . . . . . . . . . . . . . . . . . . . . . . . . . . . . . . . . . . . . . . 148
Reward Items. . . . . . . . . . . . . . . . . . . . . . . . . . . . . . . . . . . . . . . . . . . . . . . . . . . . . . . . . . . . . . . . . . . . . . . . . . . . 150
Reward Catalogs . . . . . . . . . . . . . . . . . . . . . . . . . . . . . . . . . . . . . . . . . . . . . . . . . . . . . . . . . . . . . . . . . . . . . . . . . 153
Chapter 11 Custom Attributes . . . . . . . . . . . . . . . . . . . . . . . . . . . . . . . . . . . . . . . . . . . . . . . . . . .155
About Custom Attributes . . . . . . . . . . . . . . . . . . . . . . . . . . . . . . . . . . . . . . . . . . . . . . . . . . . . . . . . . . . . . . . . . . . 156
Custom Attributes Page Overview . . . . . . . . . . . . . . . . . . . . . . . . . . . . . . . . . . . . . . . . . . . . . . . . . . . . . . . . . . . . 159
Adding Custom Attribute Tags . . . . . . . . . . . . . . . . . . . . . . . . . . . . . . . . . . . . . . . . . . . . . . . . . . . . . . . . . . . . . . . 161
Prerequisites to Creating Custom Attributes . . . . . . . . . . . . . . . . . . . . . . . . . . . . . . . . . . . . . . . . . . . . . . . . . . . . 162
Creating a Custom Attribute. . . . . . . . . . . . . . . . . . . . . . . . . . . . . . . . . . . . . . . . . . . . . . . . . . . . . . . . . . . . . . . . . 170
Chapter 12 Generic Events . . . . . . . . . . . . . . . . . . . . . . . . . . . . . . . . . . . . . . . . . . . . . . . . . . . . . .173
About Generic Events . . . . . . . . . . . . . . . . . . . . . . . . . . . . . . . . . . . . . . . . . . . . . . . . . . . . . . . . . . . . . . . . . . . . . 174Generic Event Tasks Overview. . . . . . . . . . . . . . . . . . . . . . . . . . . . . . . . . . . . . . . . . . . . . . . . . . . . . . . . . . . 176Generic Events Page Overview . . . . . . . . . . . . . . . . . . . . . . . . . . . . . . . . . . . . . . . . . . . . . . . . . . . . . . . . . . 176Creating a Generic Event Definition . . . . . . . . . . . . . . . . . . . . . . . . . . . . . . . . . . . . . . . . . . . . . . . . . . . . . . . 178
TIBCO Reward User’s Guide
4 | Contents
Chapter 13 Reports . . . . . . . . . . . . . . . . . . . . . . . . . . . . . . . . . . . . . . . . . . . . . . . . . . . . . . . . . . . 181
About Reports . . . . . . . . . . . . . . . . . . . . . . . . . . . . . . . . . . . . . . . . . . . . . . . . . . . . . . . . . . . . . . . . . . . . . . . . . . . 182Reports: Parameter Settings . . . . . . . . . . . . . . . . . . . . . . . . . . . . . . . . . . . . . . . . . . . . . . . . . . . . . . . . . . . . 182Report: Graphic Data Display . . . . . . . . . . . . . . . . . . . . . . . . . . . . . . . . . . . . . . . . . . . . . . . . . . . . . . . . . . . 183Report: Data Table. . . . . . . . . . . . . . . . . . . . . . . . . . . . . . . . . . . . . . . . . . . . . . . . . . . . . . . . . . . . . . . . . . . . 183
Reports: Customer . . . . . . . . . . . . . . . . . . . . . . . . . . . . . . . . . . . . . . . . . . . . . . . . . . . . . . . . . . . . . . . . . . . . . . . 186Sales Performance by Customer States (Time Series Analysis) . . . . . . . . . . . . . . . . . . . . . . . . . . . . . . . . . 186Customer Purchase Activity Report. . . . . . . . . . . . . . . . . . . . . . . . . . . . . . . . . . . . . . . . . . . . . . . . . . . . . . . 186Customer Activity by Channel Report . . . . . . . . . . . . . . . . . . . . . . . . . . . . . . . . . . . . . . . . . . . . . . . . . . . . . 187Sales Performance Comparison (Time Series Analysis) . . . . . . . . . . . . . . . . . . . . . . . . . . . . . . . . . . . . . . . 187Sales Performance by Customer States . . . . . . . . . . . . . . . . . . . . . . . . . . . . . . . . . . . . . . . . . . . . . . . . . . . 187Gender Breakdown Report . . . . . . . . . . . . . . . . . . . . . . . . . . . . . . . . . . . . . . . . . . . . . . . . . . . . . . . . . . . . . 189Sales Performance by Customer Stated Category Preference . . . . . . . . . . . . . . . . . . . . . . . . . . . . . . . . . . 189
Reports: Offer . . . . . . . . . . . . . . . . . . . . . . . . . . . . . . . . . . . . . . . . . . . . . . . . . . . . . . . . . . . . . . . . . . . . . . . . . . . 192All Offer Performance Report. . . . . . . . . . . . . . . . . . . . . . . . . . . . . . . . . . . . . . . . . . . . . . . . . . . . . . . . . . . . 192
Reports: Email . . . . . . . . . . . . . . . . . . . . . . . . . . . . . . . . . . . . . . . . . . . . . . . . . . . . . . . . . . . . . . . . . . . . . . . . . . 193Campaign Summary Report . . . . . . . . . . . . . . . . . . . . . . . . . . . . . . . . . . . . . . . . . . . . . . . . . . . . . . . . . . . . 193Campaign Detail Executive Report . . . . . . . . . . . . . . . . . . . . . . . . . . . . . . . . . . . . . . . . . . . . . . . . . . . . . . . 194Campaign Detail Extended Report . . . . . . . . . . . . . . . . . . . . . . . . . . . . . . . . . . . . . . . . . . . . . . . . . . . . . . . 196Email Performance Executive Report . . . . . . . . . . . . . . . . . . . . . . . . . . . . . . . . . . . . . . . . . . . . . . . . . . . . . 197Email Peroformance Extended Report . . . . . . . . . . . . . . . . . . . . . . . . . . . . . . . . . . . . . . . . . . . . . . . . . . . . 198Clickthrough Analysis by Email . . . . . . . . . . . . . . . . . . . . . . . . . . . . . . . . . . . . . . . . . . . . . . . . . . . . . . . . . . 199Email Performance Over Time. . . . . . . . . . . . . . . . . . . . . . . . . . . . . . . . . . . . . . . . . . . . . . . . . . . . . . . . . . . 200Email Report: Email Bounce Analysis . . . . . . . . . . . . . . . . . . . . . . . . . . . . . . . . . . . . . . . . . . . . . . . . . . . . . 201List Performance Summary Report . . . . . . . . . . . . . . . . . . . . . . . . . . . . . . . . . . . . . . . . . . . . . . . . . . . . . . . 204List Performance Time Series Report . . . . . . . . . . . . . . . . . . . . . . . . . . . . . . . . . . . . . . . . . . . . . . . . . . . . . 205
Reports: Specialized . . . . . . . . . . . . . . . . . . . . . . . . . . . . . . . . . . . . . . . . . . . . . . . . . . . . . . . . . . . . . . . . . . . . . . 207Signup and Membership Report . . . . . . . . . . . . . . . . . . . . . . . . . . . . . . . . . . . . . . . . . . . . . . . . . . . . . . . . . 208Custom Question Detail Report . . . . . . . . . . . . . . . . . . . . . . . . . . . . . . . . . . . . . . . . . . . . . . . . . . . . . . . . . . 209Report: Signage. . . . . . . . . . . . . . . . . . . . . . . . . . . . . . . . . . . . . . . . . . . . . . . . . . . . . . . . . . . . . . . . . . . . . . 211Report: Activity. . . . . . . . . . . . . . . . . . . . . . . . . . . . . . . . . . . . . . . . . . . . . . . . . . . . . . . . . . . . . . . . . . . . . . . 213Report: CSR Activity . . . . . . . . . . . . . . . . . . . . . . . . . . . . . . . . . . . . . . . . . . . . . . . . . . . . . . . . . . . . . . . . . . 215
Reports: Point Expiration . . . . . . . . . . . . . . . . . . . . . . . . . . . . . . . . . . . . . . . . . . . . . . . . . . . . . . . . . . . . . . . . . . 217Point Expiration Forecast Report . . . . . . . . . . . . . . . . . . . . . . . . . . . . . . . . . . . . . . . . . . . . . . . . . . . . . . . . . 217
Reports: Ad-hoc Reporting . . . . . . . . . . . . . . . . . . . . . . . . . . . . . . . . . . . . . . . . . . . . . . . . . . . . . . . . . . . . . . . . . 219Configuring Jaspersoft Reporting . . . . . . . . . . . . . . . . . . . . . . . . . . . . . . . . . . . . . . . . . . . . . . . . . . . . . . . . 219
Chapter 14 CRMS Administration . . . . . . . . . . . . . . . . . . . . . . . . . . . . . . . . . . . . . . . . . . . . . . . . 221
User Roles and Privileges. . . . . . . . . . . . . . . . . . . . . . . . . . . . . . . . . . . . . . . . . . . . . . . . . . . . . . . . . . . . . . . . . . 222
Admin>Main Settings Page Overview. . . . . . . . . . . . . . . . . . . . . . . . . . . . . . . . . . . . . . . . . . . . . . . . . . . . . . . . . 224
Admin>CRMS Users Page . . . . . . . . . . . . . . . . . . . . . . . . . . . . . . . . . . . . . . . . . . . . . . . . . . . . . . . . . . . . . . . . . 230CRMS User privileges . . . . . . . . . . . . . . . . . . . . . . . . . . . . . . . . . . . . . . . . . . . . . . . . . . . . . . . . . . . . . . . . . 230
TIBCO Reward User’s Guide
Contents | 5
Adding a New User . . . . . . . . . . . . . . . . . . . . . . . . . . . . . . . . . . . . . . . . . . . . . . . . . . . . . . . . . . . . . . . . . . . . . . . 232Merging Customers . . . . . . . . . . . . . . . . . . . . . . . . . . . . . . . . . . . . . . . . . . . . . . . . . . . . . . . . . . . . . . . . . . . 232
Transferring Customer Points. . . . . . . . . . . . . . . . . . . . . . . . . . . . . . . . . . . . . . . . . . . . . . . . . . . . . . . . . . . . . . . . 235
TIBCO Reward User’s Guide

6 | Contents
TIBCO Reward User’s Guide
| 7
Preface
This document provides an introduction to the TIBCO Reward platform.
Topics
• Related Documentation, page 8
• Typographical Conventions, page 9
• Connecting with TIBCO Resources, page 11
TIBCO Reward User’s Guide
Preface | 8
Related Documentation
The following documents form the TIBCO Reward documentation set:
• TIBCO Reward User’s Guide This manual provides instructions on using the Reward platform.
• TIBCO Reward Integration Guide This book serves as a guide for exchanging customer, product, and transaction information with TIBCO Reward.
• TIBCO Reward API Reference This document explains how to use TIBCO Reward API calls, including authentication, and provides useful information about the entities involved.
• TIBCO Release Notes Read the release notes for a list of new and changed features.
These documents are located on TIBCO’s Product Documentation site:
https://docs.tibco.com/products/tibco-loyalty-lab-reward
TIBCO Reward User’s Guide
Preface | 9
Typographical Conventions
The following typographical conventions are used in this manual.
Table 1 General Typographical Conventions
Convention Use
ENV_NAME
TIBCO_HOME
<ProductAcronym>_HOME
TIBCO products are installed into an installation environment. A product installed into an installation environment does not access components in other installation environments. Incompatible products and multiple instances of the same product must be installed into different installation environments.
An installation environment consists of the following properties:
• Name Identifies the installation environment. This name is referenced in documentation as ENV_NAME. On Microsoft Windows, the name is appended to the name of Windows services created by the installer and is a component of the path to the product shortcut in the Windows Start > All Programs menu.
• Path The folder into which the product is installed. This folder is referenced in documentation as TIBCO_HOME.
TIBCO <ProductName> installs into a directory within a TIBCO_HOME. This directory is referenced in documentation as <ProductAcronym>_HOME. The default value of <ProductAcronym>_HOME depends on the operating system. For example on Windows systems, the default value is C:\tibco\<ProductAcronym>\<ReleaseNumber>.
code font Code font identifies commands, code examples, filenames, path names, and output displayed in a command window. For example:
Use MyCommand to start the foo process.
bold code
font Bold code font is used in the following ways:
• In procedures, to indicate what a user types. For example: Type admin.
• In large code samples, to indicate the parts of the sample that are of particular interest.
• In command syntax, to indicate the default parameter for a command. For example, if no parameter is specified, MyCommand is enabled: MyCommand [enable | disable]
TIBCO Reward User’s Guide
Preface | 10
italic font Italic font is used in the following ways:
• To indicate a document title. For example: See TIBCO ActiveMatrix BusinessWorks Concepts.
• To introduce new terms For example: A portal page may contain several portlets. Portlets are mini-applications that run in a portal.
• To indicate a variable in a command or code syntax that you must replace. For example: MyCommand PathName
Key combinations
Key name separated by a plus sign indicate keys pressed simultaneously. For example: Ctrl+C.
Key names separated by a comma and space indicate keys pressed one after the other. For example: Esc, Ctrl+Q.
The note icon indicates information that is of special interest or importance, for example, an additional action required only in certain circumstances.
The tip icon indicates an idea that could be useful, for example, a way to apply the information provided in the current section to achieve a specific result.
The warning icon indicates the potential for a damaging situation, for example, data loss or corruption if certain steps are taken or not taken.
Table 1 General Typographical Conventions (Cont’d)
Convention Use
TIBCO Reward User’s Guide
Preface | 11
Connecting with TIBCO Resources
How to Join TIBCOmmunityTIBCOmmunity is an online destination for TIBCO customers, partners, and resident experts. It is a place to share and access the collective experience of the TIBCO community. TIBCOmmunity offers forums, blogs, and access to a variety of resources. To register, go to http://www.tibcommunity.com.
How to Access TIBCO DocumentationYou can access TIBCO documentation here:
http://docs.tibco.com
How to Contact TIBCO SupportFor comments or problems with this manual or the software it addresses, please contact TIBCO Support as follows.
• For an overview of TIBCO Support, and information about getting started with TIBCO Support, visit this site:
http://www.tibco.com/services/support
• If you already have a valid maintenance or support contract, visit this site:
https://support.tibco.com
Entry to this site requires a user name and password. If you do not have a user name, you can request one.
• For TIBCO Reward-specific Support:
http://extranet.loyaltylab.com/loyaltylab/support
Entry to this site requires a user name and password. If you do not have a user name, you can request one.
TIBCO Reward User’s Guide
TIBCO Reward CRMS Overview | 1
Chapter 1 TIBCO Reward CRMS Overview
This chapter gives an overview of TIBCO Reward’s Customer Relationship Management Suite (CRMS).
Topics
• Software as a Service (SaaS), page 2
• Features and Benefits, page 2
TIBCO Reward User’s Guide
2 | Chapter 1 TIBCO Reward CRMS Overview
Software as a Service (SaaS)
Designed from the ground up as a Software-as-a-Service (SaaS) solution, TIBCO Reward does not license its software for installation on corporate servers. Instead our clients rent the complete solution, including all normally required hardware, storage, application hosting, upgrades, quality assurance, site hosting, and integration. Because TIBCO Reward provides a SaaS solution, rather than a packaged enterprise software application, there is no need to purchase, deploy, and maintain additional hardware and software. This approach dramatically reduces complexity and costs.
TIBCO Reward’s SaaS solution provides your company with a hosted application. This software delivery method provides remote access to software and its functions as a web-based service. Your company enjoys the use and benefits of the TIBCO Reward solution without the outright purchase of a licensed software application.
Because TIBCO Reward performs the data processing and maintains the database, you do not need extensive knowledge of the software to establish your own TIBCO Reward CRMS and your own customer microsite (the loyalty site that your company’s customers will use). You provide the data. We provide the software and the service. This leaves you free to apply strategy and creativity.
Features and BenefitsClients use TIBCO Reward to build and strengthen customer relationships in several distinct ways, including:
• loyalty programs
• targeted customer email
• campaign management
• relationship marketing
Each of these avenues is defined below.
Loyalty Program:
• Rewards customers with points and other retention-oriented incentives.
• Manages accruals, redemptions, reward catalogs, customer tiers, rules-based promotional offers, and includes support email and a customer service application.
• Includes campaign and support email messaging.
TIBCO Reward User’s Guide

Software as a Service (SaaS) | 3
Email:
• A full email service provider platform for developing and delivering targeted, relevant messages to whomever you want, whenever you want.
• Leverages the available customer database for improved targeting and personalization.
• Includes deliverability reporting, personalization, WYSIWYG editor, event-based messaging, optimized delivery by ISP, and more.
Campaign Management:
• Generates and helps manage highly targeted and automated campaigns based on your transaction, demographic, and preference data.
• A dynamic customer profiling system triggers messages as customers change their behavior.
Relationship Marketing:
• Applies dynamic targeting to promotions and incentives to ensure relevance and avoid fraud.
• Includes a collection of smaller applications including site personalization, clubs, refer a friend, hosted account management, questionnaires, and real-time cart integration.
For more information about TIBCO Reward’s features and benefits, see our website, www.loyaltylab.com.
TIBCO Reward User’s Guide

4 | Chapter 1 TIBCO Reward CRMS Overview
TIBCO Reward User’s Guide
GUI Overview and Navigation | 5
Chapter 2 GUI Overview and Navigation
This chapter provides information about the components of the Reward graphical user interface (GUI).
Topics
• CRMS Home Page, page 6
• Menu, page 6
• Navigation, page 8
• Saving Your Work on the Current Page, page 9
TIBCO Reward User’s Guide
6 | Chapter 2 GUI Overview and Navigation
CRMS Home Page
The TIBCO Reward Customer Relationship Management Suite (CRMS) home page appears when you first open the CRMS application. The home page is the initial point of access to the CRMS and its capabilities.
The Dashboard section provides tables and graphs indicating the level of customer response to your loyalty program. It includes information on the status of Offers generated by the CRMS. Try setting the time to different periods to see performance over the past year, quarter, month, or week.
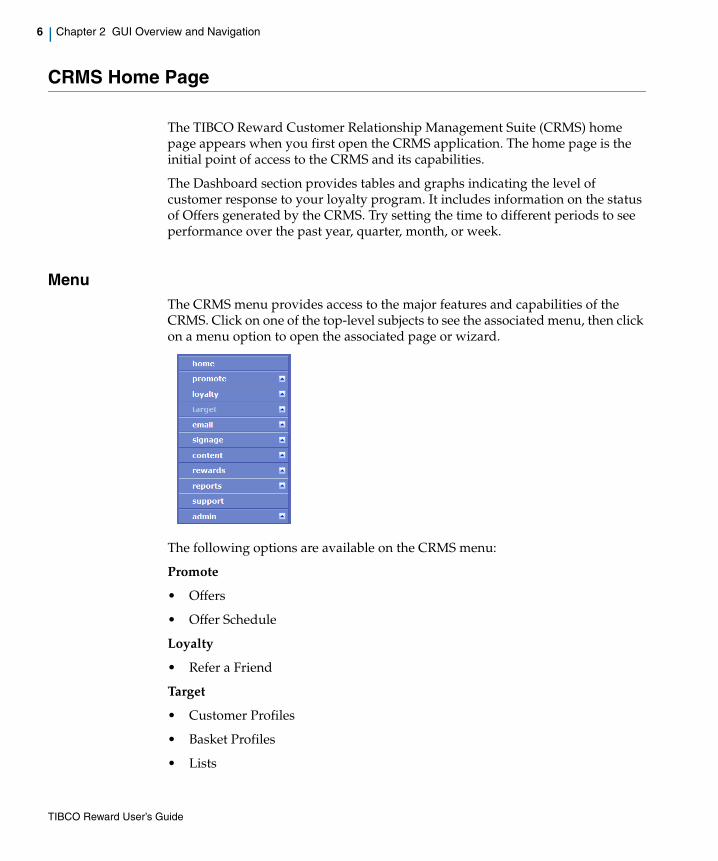
MenuThe CRMS menu provides access to the major features and capabilities of the CRMS. Click on one of the top-level subjects to see the associated menu, then click on a menu option to open the associated page or wizard.
The following options are available on the CRMS menu:
Promote
• Offers
• Offer Schedule
Loyalty
• Refer a Friend
Target
• Customer Profiles
• Basket Profiles
• Lists
TIBCO Reward User’s Guide
CRMS Home Page | 7
• Postal Codes
• Custom Questions
• Custom Entity Lookup Set
• Mobile Geolocations
• Communications
• Campaigns
• Trigger Events
• Stationery
• Test & Seed Lists
• Settings
Signage
• Signage
• Domains
Content
• Content Items
• Content Rule sets
Rewards
• Reward codes
• Reward items
• Reward catalogs
Reports
• Customer
• Offer
• Specialized
• Point expiration
Support
• Admin
• Main Settings
TIBCO Reward User’s Guide
8 | Chapter 2 GUI Overview and Navigation
• CRMS users
• Advanced Reporting Users
• Partners
• Announcement
• Activities
• Custom Attributes
• Generic Events
• Points
• Reminders
• Tiers
NavigationFrom the Menu, when you click each major heading (promote, loyalty, email, etc.), a list of options drops down. Click one of these options to open the associated page.
Sometimes an option starts a wizard (for example, "Create New Offer"). When you work with a wizard, the CRMS provides a sequence of pages that correspond to the steps for completing a task. After you complete each page, you can click Next Step to open the next page and complete the next step.
Clicking a menu option may open a page that displays labeled tabs, each corresponding to a different page. You can navigate from one page to another by clicking the tab for the page you want to see.
Each page includes simple controls that allow you to perform basic functions. Instructions for using many of these controls are embedded in the application.
Standard controls such as the following appear on many pages:
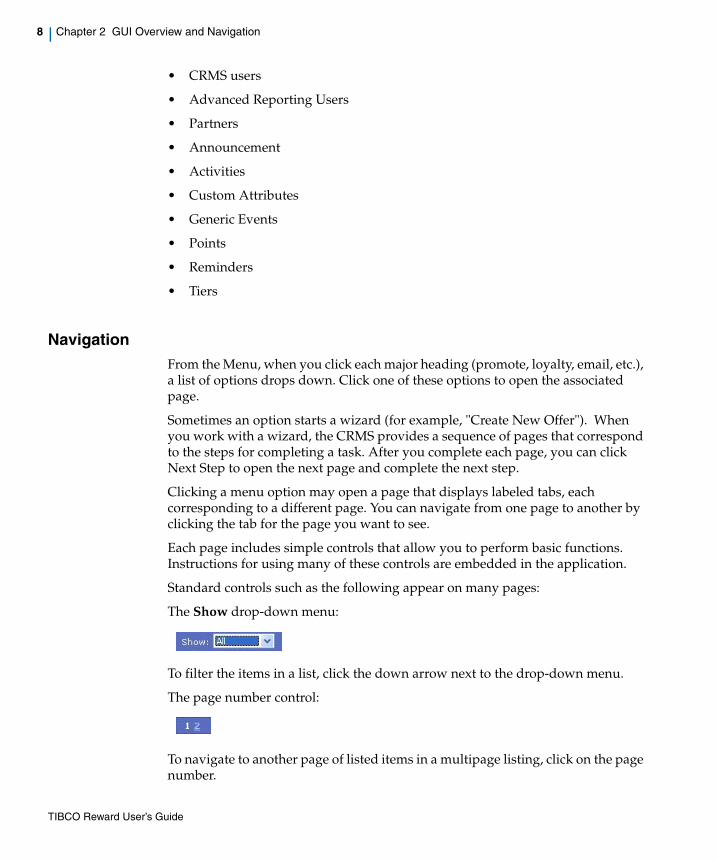
The Show drop-down menu:
To filter the items in a list, click the down arrow next to the drop-down menu.
The page number control:
To navigate to another page of listed items in a multipage listing, click on the page number.
TIBCO Reward User’s Guide
CRMS Home Page | 9
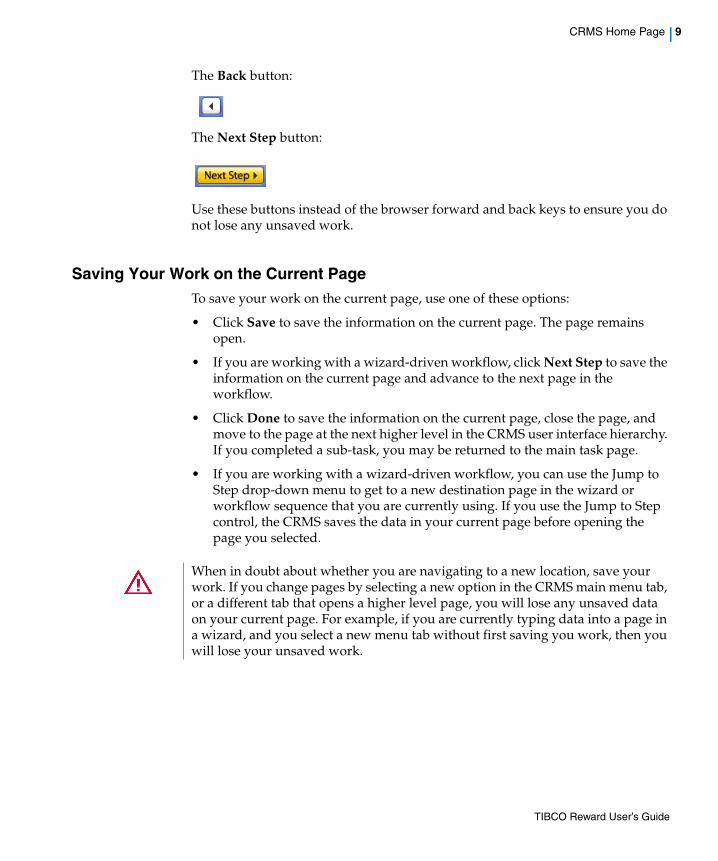
The Back button:
The Next Step button:
Use these buttons instead of the browser forward and back keys to ensure you do not lose any unsaved work.
Saving Your Work on the Current PageTo save your work on the current page, use one of these options:
• Click Save to save the information on the current page. The page remains open.
• If you are working with a wizard-driven workflow, click Next Step to save the information on the current page and advance to the next page in the workflow.
• Click Done to save the information on the current page, close the page, and move to the page at the next higher level in the CRMS user interface hierarchy. If you completed a sub-task, you may be returned to the main task page.
• If you are working with a wizard-driven workflow, you can use the Jump to Step drop-down menu to get to a new destination page in the wizard or workflow sequence that you are currently using. If you use the Jump to Step control, the CRMS saves the data in your current page before opening the page you selected.
When in doubt about whether you are navigating to a new location, save your work. If you change pages by selecting a new option in the CRMS main menu tab, or a different tab that opens a higher level page, you will lose any unsaved data on your current page. For example, if you are currently typing data into a page in a wizard, and you select a new menu tab without first saving you work, then you will lose your unsaved work.
TIBCO Reward User’s Guide

10 | Chapter 2 GUI Overview and Navigation
TIBCO Reward User’s Guide
Offers | 11
Chapter 3 Offers
This chapter provides information about offers.
Topics
• About Offers, page 12
• Prerequisites for Creating an Offer, page 12
• Offer Lifecycle Overview, page 14
• Offers Page Overview, page 14
• Creating an Offer with the Offer Setup Wizard, page 16
• Offer Status, page 29
• Offer Status Roadmap, page 32
• Cloning an Offer, page 33
• Deleting an Offer, page 34
• Offer Schedule Page, page 35
TIBCO Reward User’s Guide
12 | Chapter 3 Offers
About Offers
TIBCO Reward Clients often use CRMS to create an offer that awards their loyalty program members with points for every dollar they spend at the Client's store. Another popular offer awards bonus points for signing up for the program.
The Edit Offer Details wizard helps you create offers. After you finish each step, the wizard simplifies the remaining steps by displaying only the options that still make sense for you to use. These options are selected based on the choices you have already made.
To create an offer, select Promote>Offers>Create New Offer. (See Creating an Offer with the Offer Setup Wizard on page 16 for more information.)
To edit an existing offer, select Promote>Offers to open the Offer page. Click the name of the offer you want to change. This opens the Edit Offer Details wizard, which guides you through defining an offer by completing a sequence of pages.
The steps required to create or edit an offer involve the following Offer pages:
• Description
• Qualification and Award
• Basket Targeting
• Customer Targeting
• Presentation
• Schedule and Rules
• Summary and Preview
• What's Next? --Go to Offers
After completing each page, click Next Step to advance to the next page until the offer is finished.
Prerequisites for Creating an OfferCertain types of offers can only be defined if your company has provided the required data to TIBCO Reward. For example, if you want to award an offer based on purchases within a category, TIBCO Reward must receive a product file that indicates which categories you have defined and which products are in each category.
Prerequisites for any given offer typically depend on:
• how you want to qualify a customer
TIBCO Reward User’s Guide
About Offers | 13
• the profile(s) of your targeted customers
• the type of award you want to provide
• whether you want to restrict offer redemption to specific stores
Fundamental Requirements for Setting Up Offers:
• If you want to create offers that require a purchase, your company must provide TIBCO Reward with your transactions files. Transactions files provide the data necessary to track purchases and to give awards for purchases.
• If you want to create offers that require the purchase of a specified products or category of product, you need to give TIBCO Rewardyour product file and your transaction files.
• If you want to restrict redemptions to stores, you need to give TIBCO Reward your store file.
• If you want to use percent off (%off) or dollar off ($off) awards, you need to have real time processes implemented with your e-commerce or POS system.
• If you want to create an offer based on an activity or activities, you need to set up the activities first in the CRMS. Note, however, that the signup activity is always available and does not require setup.
Notes on Data Integration requirements
Many types of offers depend on some level of data integration, that is, the collection and processing of corporate data for use in the CRMS system. If your company has already implemented the necessary technology and processing, then the data integration requirement is not a concern when you create offers. However, if this is not the case, and you want to build offers that are based on a type of data integration that your company does not yet support, please contact your Customer Service Representative to discuss the improvement.
Some types of data integration are more common than others, and some are easier to implement. As a rule of thumb, do not assume that your company does not or cannot support some type of data integration. The transfer of Transaction files is quite common, for example; if your company sells products or services, it may already have set up this processing, and in any case, the transfer of Transaction files is relatively easy to set up. Product/Catalog and Store file transfers are also quick to arrange.
TIBCO Reward User’s Guide
14 | Chapter 3 Offers
Offer Lifecycle OverviewYou start an offer by creating, defining, and saving an offer record, using the process described above. As the definition of an offer progresses from a saved record with basic contents to an approved, live offer, the formal status of the offer changes accordingly.
At any point in the creative process, CRMS users can review and modify a "saved" offer.
When all requirements are met, the status can be changed from "saved" to "pending". If approved, the offer's status can be reset to make it "live."
Live offers are made available to the targeted customers through the TIBCO Reward- hosted Offer Showcase, or through at your store-site or through the TIBCO Reward microsite, or both, according to the schedule that you define.
After an offer goes live, all customer responses to the offer are captured, analyzed, and summarized for the CRMS user. The information is displayed on the Summary and Preview page for both live and completed offers.
Offers Page OverviewThe Offers page under the Promote tab provides access to all offer records. The Offers page lists all offer records that have been defined or are in the process of being defined.
The Offers page includes the following features:
• The Create > New Offer option
• The Current Offers panel, which consists of
— standard navigation controls (for example, the Show... filter and the 1 2 3 ... page control)
— the complete list of Offer records.
Each row in the Offers page represents an offer record. Column headings (described below) identify the offer record fields displayed in this list. Click on a column heading to sort all of the offers in the listing by that field.
• Status - this control allows you to see the current status of the offer record, and to change the status of the offer when appropriate.
• # - the unique Offer record ID number, automatically assigned by the CRMS when the record is created.
• Offer Name - the name of the offer as defined in CRMS, and set up as a hyperlink to the offer record. Click the Offer Name to open the record in the Edit Offer Details wizard.
TIBCO Reward User’s Guide
About Offers | 15
• Award - the type of award associated with the offer.
• Start - the date when the offer is or was scheduled to start. This is the field used by default to sort the offer records. When you open the Offers page, records are in order by start date, from latest to earliest.
• End - the date when the offer is scheduled to end.
• Clone - allows you to clone the associated offer record.
• Delete - allows you to delete the associated offer record.
Use the Offer page to:
• Create a New Offer
• Find an Existing Offer
• Edit Existing Offer Details
• Change the Status of an Offer
• Clone an Offer Record
• Delete an Offer
TIBCO Reward User’s Guide
16 | Chapter 3 Offers
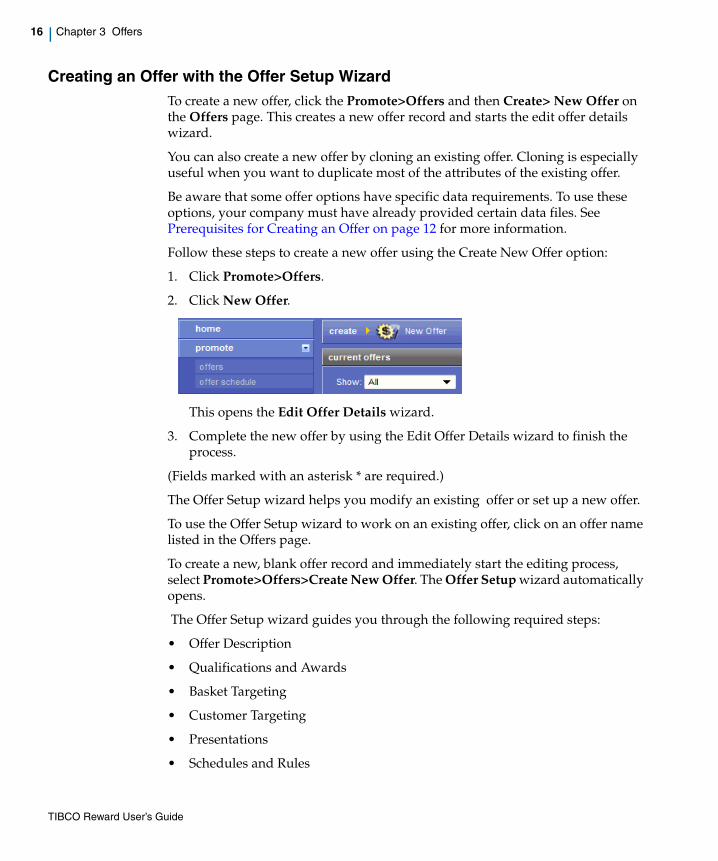
Creating an Offer with the Offer Setup WizardTo create a new offer, click the Promote>Offers and then Create> New Offer on the Offers page. This creates a new offer record and starts the edit offer details wizard.
You can also create a new offer by cloning an existing offer. Cloning is especially useful when you want to duplicate most of the attributes of the existing offer.
Be aware that some offer options have specific data requirements. To use these options, your company must have already provided certain data files. See Prerequisites for Creating an Offer on page 12 for more information.
Follow these steps to create a new offer using the Create New Offer option:
1. Click Promote>Offers.
2. Click New Offer.
This opens the Edit Offer Details wizard.
3. Complete the new offer by using the Edit Offer Details wizard to finish the process.
(Fields marked with an asterisk * are required.)
The Offer Setup wizard helps you modify an existing offer or set up a new offer.
To use the Offer Setup wizard to work on an existing offer, click on an offer name listed in the Offers page.
To create a new, blank offer record and immediately start the editing process, select Promote>Offers>Create New Offer. The Offer Setup wizard automatically opens.
The Offer Setup wizard guides you through the following required steps:
• Offer Description
• Qualifications and Awards
• Basket Targeting
• Customer Targeting
• Presentations
• Schedules and Rules
TIBCO Reward User’s Guide
About Offers | 17
• Summary and Previews
• What's Next? -->Go to Offers
After you finish each step, the wizard simplifies the remaining steps by displaying only the options that still make sense, based on the choices you have already made.
The Offer Setup wizard lets you work at your own pace. You can complete the details of an offer one step at a time, saving information in stages as you go.
CRMS workflow management features help in several ways: Before you finish the definition of an offer and make it live (available for redemption by your customers), you may want to do some planning with, or get approvals from, the associates who will support your offer. Or, you may decide that you want to stop and do some additional preparations. This is normal, and the CRMS makes it easy and safe to save your work, submit it for review, and change it as necessary.
Be aware that an offer does not become available to customers until you determine it is ready, and it has been approved by a CRMS Administrator. This means you can experiment with the offer creation process and learn how to define different types of offers on your own, with no worries about an offer going live by accident.
The last step, clicking Go to Offers in the What's Next page, submits the offer for approval by placing it in pending status.
Offer Description Page Overview
The Offer Description page records the Offer Name and other crucial information used to identify the Offer and its purpose. Some of this Description information is displayed to users. Defining and saving the offer description is the first step in creating a new offer or editing an existing offer.
The Description page opens when you create a new offer, clone an offer, or open an existing offer record for editing.
Fields
The Offer Description page allows you to describe an offer by recording data in the following fields:
• Offer Name is an internally used name that the customer does not see. It serves to identify and describe the offer record in the Offers page; choose a name that is descriptive and unique. Ideally, the new name should indicate the basic type of customer qualification you will require and the type of award you will give. Mentioning the target or date also makes the name more descriptive.
TIBCO Reward User’s Guide
18 | Chapter 3 Offers
• Headline is the title text for the offer that the customer will see in the TIBCO Reward-hosted Offer Showcase. It is also used to describe the offer in the customer's My Account and Shopping List displays. It may also appear in email communications and signage that mention this offer.
• Description text appears to the customer in the TIBCO Reward-hosted-host Offer Showcase and provides more information about how the offer works. It may also appear in email communications and signage that mention this offer. Use this text to explain the offer to the customer.
• Online Product Page URL to "Buy Now" contains the URL (optional) of the product page where the customer can buy the product immediately. This field is part of the Showcase display of the offer, giving the customer the opportunity to act on impulse.
• Terms & Conditions contains rules of the offer, disclaimers, and other legal conditions. This text, if present, will be included the Showcase display to the customer. It may also appear in email communications and signage that mention this offer.
• Internal Note is text used internally in the CRMS, and only appears on this page.
Follow these steps to define the description of an offer:
1. Start the Edit Offer Details wizard.
When you create a new offer record or edit an existing offer record, the Edit Offer Details wizard starts automatically, and the Description page opens first. A new offer record contains no data except for a unique offer ID number and a sample offer name, which should be replaced immediately.
2. Replace the offer name with a unique, specific name.
3. Enter or edit the Headline text.
The headline text will be used as the headline for the offer in the Offer Showcase. It may also appear in email communications and signage that mention this offer.
4. Enter or edit the Description field text.
5. Enter a new URL string in the Online Product Page URL to "Buy Now" field.
6. Enter or edit text in the Terms & Conditions field.
7. Enter or edit text in the Internal Note field.
After finishing work on this page, click Next Step. This saves your work and advances the wizard to the Qualification and Award page, the next step in the Edit Offer Details workflow.
TIBCO Reward User’s Guide
About Offers | 19
8. Enter a new URL string in the Online Product Page URL to "Buy Now" field. This information can be provided to customers, allowing them to open a site that allows them to purchase the product.
9. Click Next Step.
This saves your work and opens the next page in the Edit Offer Details workflow, Qualification and Award.
Offer Qualification and Award
The Award page is part of the Edit Offer Details wizard. Use it to define two categories of data in an offer record:
• Qualification - How a targeted customer qualifies for the offer.
• Award - What award is given to a targeted customer who qualifies for redemption of an offer.
To display this page, click Next Step in the Offer Description page.
Qualification Action Fields and Features
In the Qualification Action section of the edit offer details page, there are several pull-down menus to specify the requirements to qualify for award.
To receive this award, targeted members:
• must make a transaction
• perform an activity
• complete an event
• complete an event that uses Event Value
• don't need to do anything
Sub fields
Entering different requirements to qualify for the award causes different options to appear in the Qualification Action section. These sub fields further determine requirements for award qualification.
• must make a transaction
Selecting this option means you are requiring a customer to make a transaction to qualify for the award.
When you open the Description page, ALWAYS review all default data and pre-existing data. Remove unwanted data and add correct new data.
TIBCO Reward User’s Guide
20 | Chapter 3 Offers
To complete this answer, select transaction type:
• purchase any number of items of any products
• purchase any number of items of select products
• purchase any number of items in select categories
• purchase any number of items of select brands
• purchase a number of items of select brands
• purchase a number of items of select products - If you choose this option, you must also use the Select Products procedure to add to the list below. Click Add Products to get started.
• purchase a number of items in select categories - If you choose this option, you must also use the Select Categories procedure to add to the list below. Click Add Categories to get started.
• purchase a number of items of any products
• purchase using select tender types
• spend a number of $ on any products
• spend a number of $ on select products
• spend a number of $ in select categories
• spend a number of $ on select brands
• make a daily visit *
Evaluate this to determine of offer qualification is met:
• each line item in basket
• all basket contents
perform an activity
To complete this answer, select Activity and enter number of times the Activity must be performed.
complete an event
To complete this answer, select Event and enter number of times this Event must be completed.
complete an event that uses Event Value
To see and select products or categories, your company must already have supplied TIBCO Reward with a product catalog list. See Prerequisites for Creating an Offer, page 12 for related information.
TIBCO Reward User’s Guide
About Offers | 21
To complete this answer, select Event and click the check box to only allow events where Event Value is within specific range.
don't need to do anything
Additional Conditions
Depending on the general option you selected above, respond to one of the following:
• To answer the question, Are there any additional conditions to qualify for this offer?, select one of the following:
— No
— Yes, Offer must be viewed in Offer Showcase.
— Yes, offer must be accepted in Offer Showcase
TargetingUse the Targeting page of the Edit Offer Details wizard to specify the set of customers who should be informed about this offer and allowed to redeem this offer.
The Targeting page also provides an estimate of the number of customers in the currently defined target for the offer.
Defining the Target for an Offer
To make the offer available to all registered customers, use the default settings, All registered customers, and No (i.e., no profiles should be excluded); then click Next Step.
To refine the customer target for this offer, defining specific targets who will be informed about and eligible for this offer, respond to one or both of these questions on the Offer Targeting page:
• "Which profiles should this offer be targeted to?"
To limit targeting to one or more selected profiles, refer to the instructions for defining the target of an offer by adding customer profiles.
• "Should anyone be excluded from this offer?"
To choose one or more profiles for exclusion, refer to the instructions for defining the target of an offer by excluding customer profiles.
TIBCO Reward User’s Guide
22 | Chapter 3 Offers
When you have completed the target definition, or want to end your targeting session, click Next Step. This saves your work and advances to the next step in the Edit Offer Details workflow, the Offer Presentation page.
To define the target of an offer by adding customer profiles:
In response to the question, "Which profiles should this offer be targeted to?", follow these instructions:
1. Click Only selected profiles or lists.
The Targeting page changes to show two options, Add Profiles and Create and Add Lists.
2. Add a customer profile, using one of the following options.
• To add a customer profile (previously defined) to the list of target:
Click Add Profiles to open the Select Profiles page. The profiles you select with this process will be added to the Selected Profiles list.
3. Click Save.
4. To add another customer profile to the exclude list, follow the instructions in Step 2.
5. If you do not want to add more profiles or exclude profiles, click Next Step.
This saves your work and opens the next page in the Edit Offer Details wizard, Offer Presentation.
To define the target of an offer by excluding customer profiles:
In response to the question, "Should anyone be excluded from this offer?", follow these instructions:
1. Click Yes, exclude from selected profiles or lists.
• Any customers that match the profiles selected for exclusion will be excluded from the targeted set of customers, which can include either "All registered customers" or all the profiles you've chosen to target above.
• Unregistered customers should not be targeted for offers that require access to the Showcase.
You can select and add profiles to build a target and then refine the target further by excluding specific customer profiles from it.
TIBCO Reward User’s Guide
About Offers | 23
The Targeting page changes to show two options, Add Profiles and Add Lists; and also an embedded list of any profiles that have already been excluded from this offer. (This is a different instance of a Selected Profiles list).
2. Add a customer profile, using one of the following options.
• To add a customer profile (previously defined) to the list of excluded profiles:
Click Add Profiles to open the Select Profiles page.
• To start the process of creating a new profile and adding it to the list of excluded profiles:
Click the check box next to the profile you want to exclude and then click Add Checked.
3. Add a targeted list:
• Click Add List to open the Select Lists page.
• Click the check box next to the list you want to exclude and then click Add Checked.
4. Click Save or Next Step after defining profiles and/or lists to exclude.
5. If you do not want to add or exclude more profiles, click Next Step.
This saves your work and opens the next page in the Edit Offer Details wizard, Offer Presentation.
Notes on defining the target of an offer:
• If you are not familiar with the purpose and definition of a specific profile, use the CRMS Target/Profiles page to check the logical filters applied by the profile and other profile characteristics.
• The default target for an offer is "all registered customers".
• If customers must qualify for an offer by performing an activity, then the offer's target must include all registered customers (the default).
• Excluded profiles take precedence over targeted profiles, regardless of the order in which they were created or added.
• You can view, create and edit profiles by using the features available in the Target/Profiles page.
When you exclude profiles, only the dimensions of those profiles that have "Customer MUST match above criteria..." checked will affect the exclusion calculation. The profile chooser window will show you whether a profile has a "MUST match" dimension defined. Although you can choose to exclude a profile that does not have a "MUST match" dimension, it will have no effect on the exclusion calculation.
TIBCO Reward User’s Guide
24 | Chapter 3 Offers
• To make all registered customers targets for an offer, use the default selections.
• To reset the targeting options to the defaults:
— Respond to the question, "Who do you want to target this offer to?" by selecting All registered customers.
— Respond to the question, "Should anyone be excluded from this offer?" by selecting No.
Offer Presentation
You can specify an image to be associated with the Offer in the Presentation page of the Edit Offer Details wizard.
This image will appear in the Offers section of the Customer's microsite.
Click the Display this offer in hosted microsite Offer Showcase and Signage widgets check box.
You can associate a specific image with an Offer by using one of the following methods:
• Selecting an existing product image
• Uploading an image.
Each of these methods is explained below.
Follow these steps to select an image from the product database:
1. Type a search keyword into the field and click search to return a list of product images available in the database.
The list will be limited to products with that keyword in their name.
2. Click the radio button next to a product in the list to associate the image with your offer.
3. Click Next Step.
This saves your work and opens the next page in the Edit Offer Details workflow, Schedule and Rules.
Follow these steps to select a local image (an image already in your computer or network):
1. Click Browse under Browse and upload new media.
2. Navigate to the image and select it.
3. Click Upload.
The image is uploaded and processed for correct sizing by the system, and is then displayed in the matrix of uploaded graphics at the bottom of the page.
TIBCO Reward User’s Guide
About Offers | 25
Note: When uploading your own files, you must select images that are:
• Roughly square
• At least 400 pixels by 400 pixels
• In JPEG, PNG, or BMP format.
GIFs are acceptable, but will produce lower image quality.
4. Click Next Step.
This saves your work and opens the next page in the Edit Offer Details workflow, Schedule and Rules.
Follow these steps to choose an existing offer Image
1. To select a previously uploaded graphic, click on the radio button associated with a displayed image.
2. Click Next Step.
This saves your work and opens the next page in the Edit Offer Details workflow, Schedule and Rules.
Offer Schedule & Rules
In the Schedules & Rules page, you can define the following for the offer:
• redemption limits
• eligibility date
• qualification dates
• stores to include or exclude from an offer
Rules defined for the offer
Total redemption limit per member - specify the number of redemptions of this offer allowed to each customer.
Restrict redemptions to stores - By default, offers are valid for all store locations. You can which stores to include or exclude from an offer. For each store, the list includes a check box, the store number, name, and its City and State.
TIBCO Reward strongly recommends that you limit redemptions. Specifying a limit prevents you from accidentally awarding customers with multiple redemptions. This is especially important when an offer does not require any actions or purchases.
Defining Schedule and Rules
1. Specify how many times a customer can redeem this offer.
TIBCO Reward User’s Guide
26 | Chapter 3 Offers
The default limit is one. Leaving this field blank allows customers to redeem this offer as many times as they wish - there is no limit.
2. Define the Evaluation and Qualification dates.
3. Specify the retail locations where this Offer is valid, using the Restrict redemption to stores option.
By default offers are valid for all store locations, so if no retail locations are checked, the Offer will be valid in all locations.
4. Click Next Step.
This saves your work and opens the next page in the Edit Offer Details workflow, Summary and Preview.
Offer Summary & Preview
The Summary & Preview page has several functions:
• The Summary provides an at-a-glance review of the offer that summarizes progress on the development and usage of an offer record.
• The Preview displays the offer information in the presentation format used by the Reward hosted Offer Showcase.
• When completed (when no error messages appear), click Next Step in the Summary & Preview page advances to the What's Next? page.
• In the What's Next? page, select Go to Offers, which advances the offer to pending status.
If the status of an offer is live or completed, the CRMS directly opens to the Summary & Preview page when you open that offer.
In such cases, the Summary & Preview page also displays an offer response graph that shows how customers have responded to the offer.
By default, transactions will continue to be evaluated 30 days after the offer completion date in order to cover any delay in processing. If the transaction is sent after the offer end date and the transaction qualifies for the award based on the transaction date, the award will still be given. (Contact your account manager if you need to change this default.)
The Summary & Preview page checks and validates the offer data you have entered so far, and provides error messages about missing or invalid data that help you identify the page with the problem.
TIBCO Reward User’s Guide
About Offers | 27
Summary & Preview page features
• Standard Edit Offer Details navigation tools options.
• Error report space, where advisory warnings appear if the offer requires significant corrections.
• Summary bars corresponding to each page in the Edit Offer Details sequence. The bar corresponding to a page may include an error message if there is a problem with the page.
— To open and edit each page, click Edit.
— To see more summary details, click the down arrow next to Edit.
When an offer record is processed for display in the Summary & Preview page, the CRMS performs a set of tests, checks, and validations.
This behind-the-scenes processing generates messages and a preview to inform you about any outstanding technical problems with the record. A typical problem is a required field that has been left empty (null). A field that includes invalid data can also trigger an error message.
If the CRMS does not report any errors in an offer record in the Summary & Preview page, then the technical requirements for that record have been satisfied, and the offer record is technically ready to be submitted for approval.
Pending status signals that the offer is ready for a review by the stakeholders responsible for the redemption of the offer as it is defined.
To use the Summary & Preview page
1. Review the Summary & Preview page, including each row of summary information, for any error messages. Each row corresponds to a page in the Edit Offer Details process.
2. If an error message appears, click Edit in the first Summary bar corresponding to a page with a problem. Fix the problem, then, as necessary, click Next Step to proceed to the next page with a problem, until all problems are resolved.
3. Then click Next Step, or use the Jump to Step control to re-open the Summary & Preview page.
You must correct any problems reported in the Summary & Preview page before you can change the status of an offer from saved to pending, which is a required step. For more details on this step, see Changing the Status of an Offer on page 29.
An offer that meets CRMS technical requirements should be thoroughly reviewed before it is approved. An offer in saved status that passes the tests imposed by the Summary & Preview page is eligible for pending status.
TIBCO Reward User’s Guide
28 | Chapter 3 Offers
4. If no error messages appear, click Next Step.
This saves your work and opens the next page in the Edit Offer Details workflow, the What's Next page.
Selecting Go to Offers changes the status of the offer to pending; and the offer must be in pending status before it can be approved to go live.
What's Next? - Go to Offers
When the definition of an offer passes the basic CRMS error tests and is ready for a review, the next possible steps are presented in a the What's Next? page.
This page includes three options:
• Create Another Offer - re-opens the Edit Offer Details wizard.
• Go to Schedule - opens a graphic display of all currently scheduled offers.
• Go to Offers - submits the offer record and changes its status to pending.
Clicking Go to Offers is the last step in defining a new offer. (The next step, approving or denying the pending offer, does not change the editable details of an offer.)
If the CRMS does not find any errors in an offer record during the final Summary & Preview step of the offer creation or offer details editing process, then the technical requirements for that record have been satisfied.
The What's Next? page includes the Go to Offers option, which effectively submits an offer for approval.
• Go to Offers is a crucial step in the process of creating an offer. You have to use this option to change the status of an offer from saved to pending. In effect, this option submits a saved offer for approval.
• Only a CRMS Administrator can approve or deny a pending offer.
TIBCO Reward User’s Guide
About Offers | 29
Offer StatusThe status of an offer indicates what how far the offer has progressed in its normal lifecycle, and how it can be used next.
The current status of each offer is displayed in the Current Offers page, in a control box that appears in the left-most column:
A successful offer progresses through the following changes in its status:
saved - The offer record has been saved, but work on the offer has not been completed.
pending - The offer has been submitted for approval. It met CRMS technical requirements.
scheduled - The offer has been approved, and is scheduled to go "live". CRMS will automatically launch the offer and change its status to "live" when the Offer Qualify start date arrives.
live - The approved offer is now live. Customers are currently allowed to qualify for this offer. CRMS will automatically end the offer and change its status to "completed" at the end of the Offer Qualify end date. In a live offer, some data cannot be edited or changed.
completed - The offer is no longer live, and the record is maintained for reference and potential cloning. The time period in which customers were allowed to qualify for this offer has ended.
Changing the Status of an Offer
The current status of each offer is displayed in the offer status control that appears in the left-most column of each offer record in the Current Offers page.
You also use this control to change the status of an offer record. Clicking the down arrow in the offer status control box displays a set of currently available options in a drop-down list.
There are different ways to change the status of an offer record.
TIBCO Reward User’s Guide
30 | Chapter 3 Offers
Converting a saved offer into a pending offer
1. Open an offer and navigate to the Summary & Preview page.
For an offer in the Edit Offer Details workflow. Click Jump to Step pull-down menu and select Summary & Preview.
2. Click Next Step.
The What's Next? page opens.
3. Click Go to Offers.
The Offer page opens, listing the status of the offer record you just processed changes to pending.
Using the offer status control to change offer status
After an offer has reached pending status, you can use the offer status control box to change the offer status.
1. In the Offer page, find the offer whose status you want to change.
2. Click the offer status control box to see a list of your current options for changing the status of this offer.
3. Select the appropriate option.
The options available in the Status control box will change depending on the current status of an offer.
If any step in the offer definition process is not complete, the Summary & Preview page displays an error message. See the listing of each step for a message similar to this: "NOT COMPLETE This step must be completed prior to submission." Click on the associated Edit button and complete the step as required.
TIBCO Reward User’s Guide

About Offers | 31
Offer Status options
Definitions of the Available Options
If the current status is pending, then you can either approve or deny the offer:
• Selecting approve changes the offer status to pending.
• Selecting deny changes the offer record to inactive.
If the current status is scheduled, then you can either unapprove or launch the offer:
• Selecting unapprove changes the offer status back to pending.
• Selecting launch changes the status to live, depending on your scheduled Offer Qualify dates.*
* If, and only if, the Offer Evaluation start date is today's date (because you manually re-set it), then you can select launch to request CRMS to make the offer live immediately.
If the current status is live, then you can complete the offer. Note that the CRMS will complete the offer automatically, according to the Offer Qualify end date.
• Selecting complete causes the offer to end immediately.*
* The CRMS changes both the Publish end date and the Offer Qualify end date to the current date, and changes the status of the offer to completed.
Normally, the CRMS automatically ends the offer at the close of day on the defined Offer Qualify end date. When the CRMS ends an offer, it changes the offer status to completed and automatically prevents customers from qualifying for offers.
If Status is... ...you can select:
pending approve or deny
scheduled unapprove or launch
live complete
inactive saved
If, previous to the current date, you had defined the start date as today's date, then the CRMS would have automatically made the offer go live as soon as the current day began.
TIBCO Reward User’s Guide
32 | Chapter 3 Offers
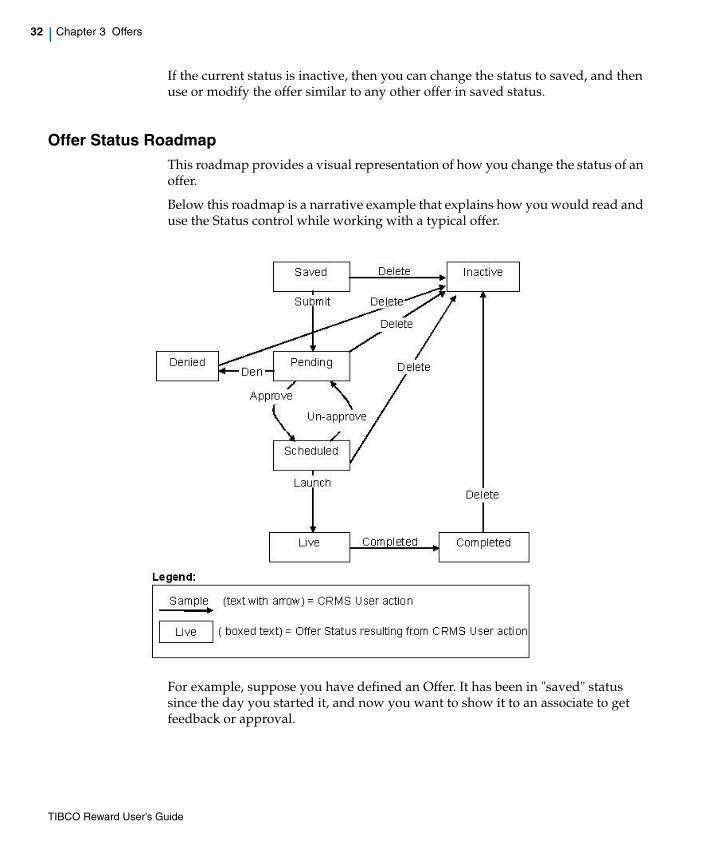
If the current status is inactive, then you can change the status to saved, and then use or modify the offer similar to any other offer in saved status.
Offer Status RoadmapThis roadmap provides a visual representation of how you change the status of an offer.
Below this roadmap is a narrative example that explains how you would read and use the Status control while working with a typical offer.
For example, suppose you have defined an Offer. It has been in "saved" status since the day you started it, and now you want to show it to an associate to get feedback or approval.
TIBCO Reward User’s Guide
About Offers | 33
From the Edit Offer Details - Summary/Preview page, you review all the details with your associate and use the Preview option to get a sense of how the offer will look and work. You agree that everything is great, so you click Next Step at the top of the page. The Edit Offer Details - What's Next? page opens.
To submit the Offer, you click Go to Offers. The Offer page opens, and the Status control box shows that your offer's status has changed to "Pending". At this point, if you click on the Status control, it allows you to "approve" or "deny" your offer. If you approve the offer, the CRMS checks the dates you entered for this offer, and changes the status to "scheduled".
When an offer is scheduled, you can still unapprove it, which will send it back to pending status.
If the scheduled launch date for the offer is the current date or before, and the Offer Publish and Offer Qualify Stop Dates are in still the future (as defined in the Schedule step for this offer), you can change the status to "launch" to start the offer immediately. The CRMS changes the status to "live" to signal that the offer has gone live.
If the Offer Qualify Start Date is still in the future, then the CRMS system will automatically make the offer go live and change the status to "live" when the specified date arrives.
At the end of the Offer Qualify Stop Date (that evening), the status changes to "completed".
At any time, a CRMS user can click the Delete button on the Offer record. This changes the status to "inactive", and the offer is effectively deleted.
Cloning an OfferCloning an offer record creates a copy of the record.
To clone an offer:
• Find the offer record in the Offers page.
• Click Clone in the row of the Offer you want to clone.
• This opens the edit offer details wizard
The cloned copy of an offer record includes all of the data in the original, with the exceptions noted below:
• The clone has a new, unique numerical ID. This is a system requirement.
• The clone of a record named "XXX" is automatically renamed "Copy of XXX." (Note that if you make multiple clones of "XXX", they all will be named "Copy of XXX.")
TIBCO Reward User’s Guide
34 | Chapter 3 Offers
• The Offer Evaluation Start Date is, by default, re-set to the date following the day when you create the clone.
• The Offer Evaluation End Date is, by default, always set to a date three months after the initial Offer Evaluation Start date, so this date is also reset.
• The Current Offer Image, which is normally selected in the Edit Offer Details>Presentation step, is typically left blank in the clone. You must select the image to be associated with the cloned offer record.
Here are some tips for using a cloned offer record to create a new offer:
• Start by assigning the cloned copy its own new, unique, descriptive name.
• Start work on a clone with the first page, and update all existing fields to clearly distinguish the new offer from the source material offer.
• Review every field.
• You must add a new image since any image associated with the original offer has been deleted.
• Check the Publish and Qualify dates; in a clone, these will be set to default dates.
Deleting an OfferTo delete an offer record:
1. In the current offers page, click Delete in the row of the offer record you want to delete.
This opens a dialog box asking "Are you sure you want to delete this offer?"
2. Click OK.
This automatically changes the status of the offer to inactive. The status of such inactivated records can be changed to "saved", and then the record behaves as any other with saved status.
The record does not disappear: inactive records are retained. You can change the status of an inactive record to saved, and then the record can be used just as any other in saved status.
The Offer Status Roadmap shows how an offer can be processed, depending on its status.
Deleting or modifying a published offer may cause unexpected consequences. Consult TIBCO Reward account management for your specific needs.
TIBCO Reward User’s Guide
About Offers | 35
Deleting an offer automatically changes the status of the offer to "inactive."
Offer Schedule PageThe Promote>Offer Schedule page displays an overview of all scheduled offers in a timetable chart format. The chart displays the schedule for each offer according to its Offer Qualification Start and End dates, and provides offer status information.
To change the time period covered in the Schedule display, click on the drop-down menu on the upper right of the timetable. Select the time period you want to display. The timetable is re-drawn accordingly.
To see scheduled offers further into the past or future, use the scroll bars at the bottom and right-hand side of the timetable.
You cannot delete a live offer until the status is completed or until the Eligibility Evaluation period has ended (that is, the offer has expired).
TIBCO Reward User’s Guide

36 | Chapter 3 Offers
TIBCO Reward User’s Guide
Customer Profiles | 37
Chapter 4 Customer Profiles
This chapter explains Customer Profiles.
Topics
• Customer Profiles page, page 38
• About Customer Profiles, page 40
• Creating a Customer profile, page 40
• Editing an Customer Profile, page 42
• Cloning a Customer Profile, page 44
• Export Email List based on Customer Profile, page 45
• Deleting a Customer Profile, page 49
TIBCO Reward User’s Guide
38 | Chapter 4 Customer Profiles
Customer Profiles page
Select Target> Customer Profiles to open the Manage Customer Profiles page. The Customer Profiles page provides access to all Customer Profiles, and helps you create/edit each profile.
Profiles page features
• Clicking Create>New Target Customer Profile starts the Create New Target Profile process
• The Manage Customer Profiles panel includes:
— standard navigation controls (the Show... filter and the 1 2 3 ... page control)
— the complete list of customer profile records.
Each row in the list represents a customer profile record, and displays a few key fields in that record. Click a column heading to sort all of the profiles in the listing by that field.
The following fields are displayed:
• # (the unique profile ID number) - the CRMS assigns a unique ID number to every customer profile record. If two or more profiles names (which are defined by CRMS users) are similar or identical, this number is the unique identifier.
• Profile Name - the name of the customer profile as defined in CRMS, and set up as a hyperlink to the customer profile record. Click Customer Profile Name to open the record, either to see or edit its details.
• Attributes - this column usually shows abbreviations for the dimensions used to define the profile. For example, if you define a customer profile to use gender and category interests as criteria, the abbreviations GND and CAT would be listed as attributes for that profile record.
• Updated - the date when the customer profile was created or most recently changed. This is the field used by default to sort the profile records. When you open the Manage Customer Profiles page, the most recently updated customer profile records appear first.
The following functions are supported:
• Clone - allows you to clone the associated customer profile record.
• Export Email - allows you to generate a CSV list of opted-in customers with valid email addresses who meet the logical requirements of the associated customer profile.
TIBCO Reward User’s Guide
Customer Profiles page | 39
• Delete - allows you to delete the associated customer profile record.
Use the Profiles page to:
• Create a New Customer Profile
• Clone a Customer Profile
• Delete a Customer Profile
• Edit an Existing Customer Profile
• Export an Email List based on a Customer Profile
TIBCO Reward User’s Guide
40 | Chapter 4 Customer Profiles
About Customer ProfilesA Customer profile defines a segment of the customer population, and each profile is composed of one or more dimensions specified with the CRMS targeting features. Profiles are used to target offers, emails, and club-related information to the appropriate customers.
A Customer profile applies logical filtering criteria to the customer population. These criteria are based on demographics, purchasing records, customer surveys, email behavior, and other sources.
Components of a Customer Profile
A Customer profile is defined by a set of dimensions. For each Customer profile, you can select the dimension(s) to use, and then set the parameters for each dimension.
One dimension is always selected by default: the Customer Type.
Customer profiles are often composed of multiple dimensions that are used in concert with each other. You can use multiple dimensions to define a profile that includes more conditions and represents a more specific segment.
To understand exactly how any given profile targets customers, you must understand which dimensions it uses and how these dimensions are defined for that profile. For more information about dimensions, see About Dimensions on page 68.
Creating a Customer profileFrom the Target>Customer Profiles page, click Create New Target Customer Profile.
This generates a new customer profile record and opens that record in the Profile editor.
You can also open this editor from the Edit Offer Details wizard Targeting page or the Email Edit Communication wizard Targeting page.
When the Profile editor opens, it displays the following:
• In the left-hand column, a complete list of the dimensions you can use to define a customer profile. The dimension(s) defined for the current customer
Each CRMS Customer Profile yields a dynamically defined list of customers. The logical conditions associated with any given Customer profile are applied to customer data that is updated nightly. This means that Customer profiles always represent up-to-date results. It also means that using the same profile on two different days can yield two different target lists.
TIBCO Reward User’s Guide
Customer Profiles page | 41
profile are highlighted with a small green button. Dimensions with a black button are not used in the profile as it is currently defined.
(There is one exception: the Customer Type is always applied, even though the button remains black when the default type, Registered customers only, is selected. Customer Type defines the population that is used as the starting basis. If no other selections are made during customer profile creation, registered customers are targeted by default.)
• At the bottom of the left-hand column, the Population Reach display. For more information on this display, click here.
• The Profile Name is the unique name for this customer profile that appears on the Target>Customer Profiles page.
• The Internal Description for the customer profile. This summarizes the crucial dimensions of the customer profile so that potential users can quickly determine its purpose without opening each currently defined customer profile dimension to see how it is set up.
Follow these steps to Create a Customer Profile:
1. Click Create New Target Customer Profile wizard.
When the new page opens, a new Customer profile record has been created, the Profile Description option is selected, and the Profile Description configuration panel is open.
2. Specify a name and description for the new customer profile record.
— Enter a Name that is unique and succinct.
— Provide an Internal Description (optional).
3. Click Save.
4. Click on the name of a profile dimension that you wish to apply with the current customer profile, and define the details of that dimension.
When you click on the name of a dimension, the corresponding dimension configuration panel opens. This panel provides the tools you can use to define the details of the dimension (also known as the "conditions" of the dimension).
Each dimension configuration panel provides different tools. For details about the different dimensions, their configuration tools, and how to apply them, see Defining a Target Profile Dimension on page 71.
For more information about dimensions and how to use them effectively, see About Dimensions on page 68.
TIBCO Reward User’s Guide
42 | Chapter 4 Customer Profiles
5. When you finish defining a dimension, ALWAYS click Save.
6. Check the Population Reach display.
This helpful display appears at the lower left of the page. It is activated when you click Save after defining a dimension.
It may give you a sense of whether the dimensions you have defined for the profile yield an acceptable estimated target. If the estimates are unsatisfactory, you may wish to redefine the dimension(s) used in the profile. See About the Population Reach Display on page 73 for more information.
7. Repeat steps 4 through 6 for each dimension you want to define for the profile.
8. When you finish defining all the dimensions for the profile, click Done to save and close the profile.
Editing an Customer ProfileTo open an existing Profile record for editing, start from the Target>Customer Profiles page, and click the Profile Name associated with the record. The Profile editor opens, displaying:
• In the left-hand column, a complete list of the dimensions you can use to define a profile. The dimension(s) defined for the current profile are highlighted with a small green button. Dimensions with a black button are not used in the profiles as it is currently defined. See Defining a Target Profile Dimension on page 71 for detailed information about each listed dimension and how to work with it.
• At the bottom of the left-hand column, the Population Reach display. For more information on this display, click here.
• The Profile Name. This is the unique name for this profile that appears on the Target>Profile page.
It is a best practice to click Save after defining each condition associated with a dimension, that is, after you complete any sub-task in the definition of a dimension. Do NOT click on another dimension until you have clicked Save, or you will lose any unsaved work on a dimension. Do not click Done unless you want to save and close the current profile with all dimensions in their current state.
Do not click Done until you have finished the process of defining all dimensions or you want to end the session in its current state.
TIBCO Reward User’s Guide
Customer Profiles page | 43
• The Internal Description for the profile. This summarizes the crucial dimensions of the profile so that potential users can quickly determine its purpose without opening each currently defined profile dimension to see how it is set up.
Follow these steps to edit a Customer profile:
1. In the Target>Customer Profiles page, click on the Profile Name of the Profile record you want to edit.
When the Profile record opens, the Profile Description option is selected, and the Profile Description configuration panel is open.
2. Change the name or description or both, as appropriate, to reflect the purpose of the Profile record.
• Enter a Name that is unique and succinct.
• Provide an Internal Description (optional).
3. Click Save.
4. Click on the name of a profile dimension that you wish to define for the current profile, and specify the details of that dimension.
When you click on the name of a dimension, the corresponding dimension configuration panel opens. This panel provides the tools you can use to define the details of the dimension (also known as the "conditions" of the dimension).
Each dimension configuration panel provides different tools. For details about the different dimensions, their configuration panels and tools, and how to apply them, see Defining a Target Profile Dimension on page 71.
For general information about dimensions and how to use them effectively, see About Dimensions on page 68.
5. When you finish defining a dimension, click Save.
6. Check the Population Reach display.
It is a best practice to click Save after defining each condition associated with a dimension, that is, after you complete any sub-task in the definition of a dimension. Do NOT click on another dimension until you have clicked Save, or you will lose any unsaved work on a dimension. Do not click Done unless you want to save and close the current profile with all dimensions in their current state.
TIBCO Reward User’s Guide
44 | Chapter 4 Customer Profiles
This helpful display appears at the lower left of the page. It is activated when you click Save after defining a dimension. It may give you a sense of whether the dimensions you have defined for the profile yield an acceptable estimated target. If the estimates are unsatisfactory, you may wish to redefine the dimension(s) used in the profile.
Repeat steps 4 through 6 for each dimension you want to define for the profile.
7. When you finish defining all the dimensions for the profile, click Done to save and close the profile.
The Target>Customer Profiles page reappears, and the Profile Attributes column reflects any new or deleted dimensions in the profile that you worked on.
Cloning a Customer ProfileFollow these steps to clone a Customer profile:
1. Find the profile record in the Target>Customer Profiles page.
2. Click Clone in the row of the desired profile record.
This creates a copy of the original profile. The cloned copy of a profile record includes all of the data in the original, with the exceptions noted below:
• The clone is assigned a new, unique numerical ID. This is a system requirement.
• The clone of a record named "XXX" is automatically renamed "Copy of XXX". Note, however, that if you make multiple clones of "XXX", they will all be named "Copy of XXX".
• The Profile Updated date is, by default, re-set to the date when you create the clone.
Here are some tips for using a cloned Customer profile record to create a new Customer profile:
• Start by assigning the cloned copy its own new, unique, descriptive Profile Name and Internal Description.
• As you edit a clone, make sure the Internal Description accurately reflects the dimensions and parameters you have defined. Before you click Done, review and update the Profile Name and Internal Description to ensure that they reflect the purpose and contents of the new profile.
Do not click Done until you have finished the process of defining all dimensions or you want to end the session in its current state.
TIBCO Reward User’s Guide
Customer Profiles page | 45
• If you need to stop working on a profile before it is completely defined, you may want to note its status. Applying even an informal system of version and revision tracking can help you save time and improve your profiles.
Export Email List based on Customer ProfileEach Profile record listed in the Target>Customer Profiles page includes the Export Email option.
This option allows you to generate a CSV list of opted-in customers with valid email addresses who meet the logical requirements of the associated profile.
Immediately after you select this option, a message appears, advising you of the details, and asking for your confirmation to continue with process. If you indicate that you want to continue, the list is sent to your organization's FTP site.
The confirmation message advises you of the following proviso: Only profiles that contain at least one parameter with "MUST Match" checked can be exported. Be aware that only the Must Match parameters are used to select email addresses.
File format
The Export Email file that you generate has the following format (except that the actual list includes no spaces between values, only commas):
FileExportId, RegistrationDate, LoyaltyLabCreationDate, ShopperStatus, LoyaltyMember, SourceOfChange, ShopperId,
LoyaltyLabShopperId, FirstName, MiddleName, LastName, AddressLine1l, AddressLine2, City, State, PostalCode, Email,
EmailOptIn, PhoneNumber, LoyaltyCardNumber, TierName, TierJoinDate, StatusUpdateDateTime, PointBalance
• If you add a new zip code set today and target to that zip code, the email addresses corresponding to that zip code set will not be included in an export file until the next day. Email Export files do not include the results of zip code sets added within the last 24 hours.
• TIBCO Reward supports export files of up to one million records in size. If you suspect that your Export Email files for a profile will be over this size, contact your TIBCO Reward Client Services Representative to assure correct processing.
TIBCO Reward User’s Guide
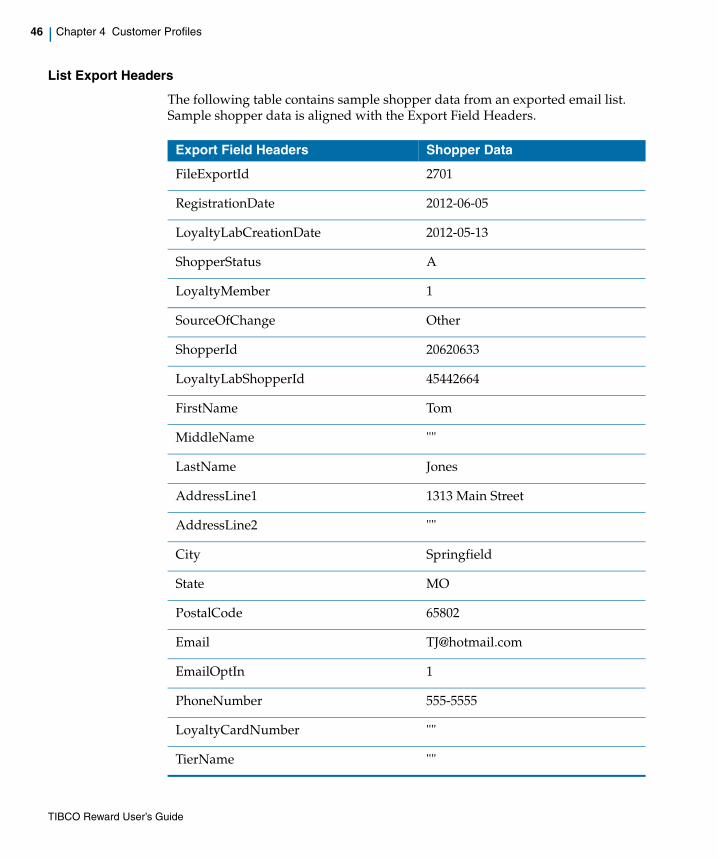
46 | Chapter 4 Customer Profiles
List Export Headers
The following table contains sample shopper data from an exported email list. Sample shopper data is aligned with the Export Field Headers.
Export Field Headers Shopper Data
FileExportId 2701
RegistrationDate 2012-06-05
LoyaltyLabCreationDate 2012-05-13
ShopperStatus A
LoyaltyMember 1
SourceOfChange Other
ShopperId 20620633
LoyaltyLabShopperId 45442664
FirstName Tom
MiddleName ""
LastName Jones
AddressLine1 1313 Main Street
AddressLine2 ""
City Springfield
State MO
PostalCode 65802
Email [email protected]
EmailOptIn 1
PhoneNumber 555-5555
LoyaltyCardNumber ""
TierName ""
TIBCO Reward User’s Guide
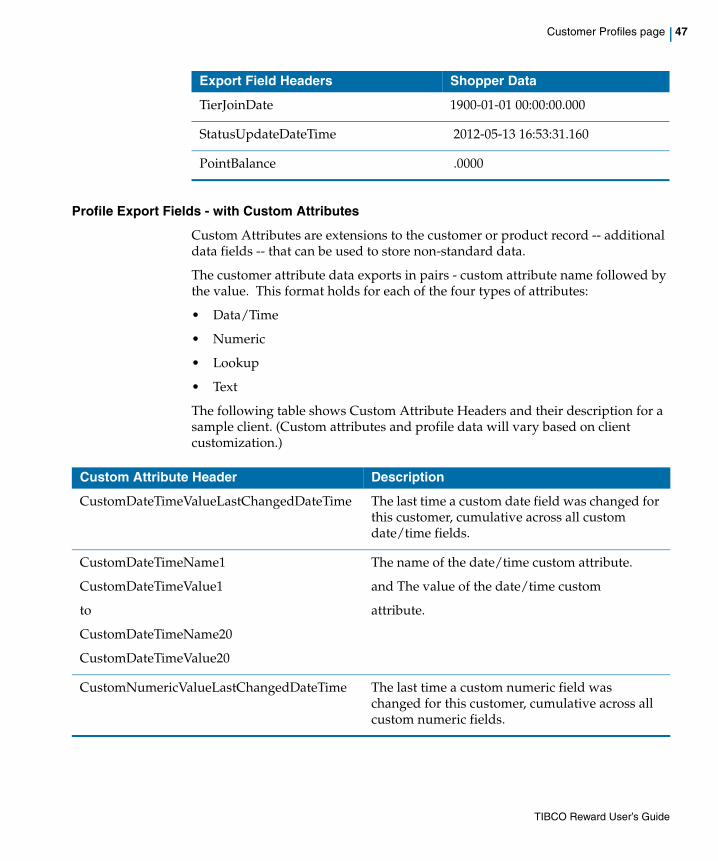
Customer Profiles page | 47
Profile Export Fields - with Custom Attributes
Custom Attributes are extensions to the customer or product record -- additional data fields -- that can be used to store non-standard data.
The customer attribute data exports in pairs - custom attribute name followed by the value. This format holds for each of the four types of attributes:
• Data/Time
• Numeric
• Lookup
• Text
The following table shows Custom Attribute Headers and their description for a sample client. (Custom attributes and profile data will vary based on client customization.)
TierJoinDate 1900-01-01 00:00:00.000
StatusUpdateDateTime 2012-05-13 16:53:31.160
PointBalance .0000
Export Field Headers Shopper Data
Custom Attribute Header Description
CustomDateTimeValueLastChangedDateTime The last time a custom date field was changed for this customer, cumulative across all custom date/time fields.
CustomDateTimeName1
CustomDateTimeValue1
to
CustomDateTimeName20
CustomDateTimeValue20
The name of the date/time custom attribute.
and The value of the date/time custom
attribute.
CustomNumericValueLastChangedDateTime The last time a custom numeric field was changed for this customer, cumulative across all custom numeric fields.
TIBCO Reward User’s Guide
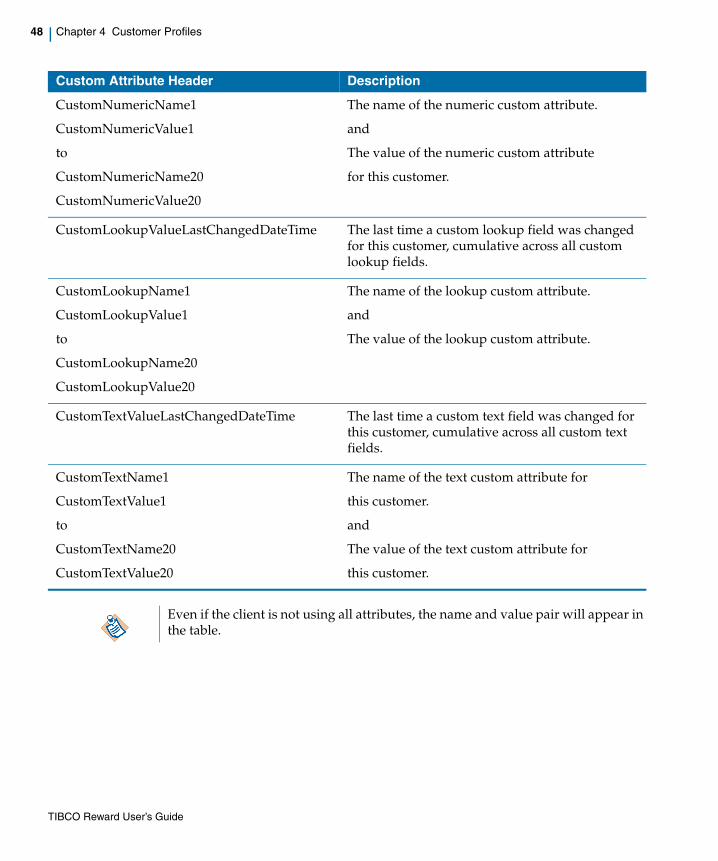
48 | Chapter 4 Customer Profiles
CustomNumericName1
CustomNumericValue1
to
CustomNumericName20
CustomNumericValue20
The name of the numeric custom attribute.
and
The value of the numeric custom attribute
for this customer.
CustomLookupValueLastChangedDateTime The last time a custom lookup field was changed for this customer, cumulative across all custom lookup fields.
CustomLookupName1
CustomLookupValue1
to
CustomLookupName20
CustomLookupValue20
The name of the lookup custom attribute.
and
The value of the lookup custom attribute.
CustomTextValueLastChangedDateTime The last time a custom text field was changed for this customer, cumulative across all custom text fields.
CustomTextName1
CustomTextValue1
to
CustomTextName20
CustomTextValue20
The name of the text custom attribute for
this customer.
and
The value of the text custom attribute for
this customer.
Even if the client is not using all attributes, the name and value pair will appear in the table.
Custom Attribute Header Description
TIBCO Reward User’s Guide
Customer Profiles page | 49
Deleting a Customer ProfileDeleting a Customer profile removes a profile record from the listing in the Target>Customer Profiles page.
Follow these steps to delete a Customer Profile:
1. Find the profile record in the Target>Customer Profiles page.
Click Delete in the row of the profile record.
A dialog box appears, asking "Are you sure you want to delete this profile?".
Click OK to delete the selected record.
The Profile record no longer appears in the list on the Target>Customer Profiles page.
There is no way to recover a profile that has been deleted.
TIBCO Reward User’s Guide

50 | Chapter 4 Customer Profiles
TIBCO Reward User’s Guide
Basket Profiles | 51
Chapter 5 Basket Profiles
This chapter explains Basket Profiles.
Topics
• About Basket Profiles, page 52
• Basket Profiles Page Overview, page 52
• Creating a Basket profile, page 54
• Basket Evaluation, page 54
• Editing a Basket Profile, page 57
• Cloning a Basket Profile, page 57
• Deleting a Basket Profile, page 58
• Basket Level vs. Line Item Evaluation in Offers, page 58
TIBCO Reward User’s Guide
52 | Chapter 5 Basket Profiles
About Basket Profiles
Basket profile targeting allows you to set up conditions (basket profiles) that must be met in order for the items in a customer’s shopping basket to qualify for an offer. If a basket passes, then the items in the basket are evaluated for a reward. If the basket does not pass, the items in the basket are not evaluated and no reward is given, even if specific items would otherwise qualify for a reward. This allows you to set up specific conditions that a basket must pass before the items in the basket are evaluated.
Basket Profiles Page OverviewSelect Target> Basket Profiles to open the Manage Basket Profiles page. The Manage Basket Profiles page provides access to all Basket Profiles, and helps you create/edit each basket profile.
Profiles page features
Clicking Create>New Target Basket Profile starts the Create New Basket Profile process
The Manage Basket Profiles panel includes:
• standard navigation controls (the Show... filter and the 1 2 3 ... page control)
• the complete list of basket profile records.
Each row in the list represents a basket profile record, and displays a few key fields in that record. Click a column heading to sort all of the profiles in the listing by that field.
The following fields are displayed:
• # (the unique profile ID number) - the CRMS assigns a unique ID number to every basket profile record. If two or more profiles names (which are defined by CRMS users) are similar or identical, this number is the unique identifier.
• Profile Name - the name of the basket profile as defined in CRMS, and set up as a hyperlink to the basket profile record. Click the Basket Profile Name to open the record, either to see or edit its details.
• Attributes - this column usually shows abbreviations for the attributes used to define the basket profile.
• Updated - the date when the basket profile was created or most recently changed. This is the field used by default to sort the profile records. When you
TIBCO Reward User’s Guide
About Basket Profiles | 53
open the Manage Basket Profiles page, the most recently updated basket profile records appear first.
The following functions are supported:
• Clone - allows you to clone the associated basket profile record.
• Delete - allows you to delete the associated customer profile record.
Use the Basket Profiles page to:
• Create a New Basket Profile
• Edit an Existing Basket Profile
• Delete a Basket Profile
TIBCO Reward User’s Guide
54 | Chapter 5 Basket Profiles
Creating a Basket profileFollow these steps to create a basket profile:
1. Go to Target>Basket Profiles.
2. Click Create New Target Basket Profile. This opens the Basket Targeting wizard.
3. Enter Basket Profile Name in that field.
4. Enter Internal Description in that field (optional).
5. Click Next Step.
This opens the basket qualification conditions page.
6. From the Add a basket condition to evaluate pull-down menu, select one of the following:
— Products
— Categories
— Brands
— Tenders
— Custom Attributes
7. Click Add.
Follow the appropriate steps based on the basket condition you selected as explained in Basket_Evaluation.
Basket EvaluationThere are several evaluation criteria that determine the basket profile which you create:
• Products
• Categories
• Brands
• Product Custom Attributes
To set up a basket exclusion condition, such as “basket cannot include product XYZ” simply create a basket qualification condition using “exactly 0”. For example: “basket must include exactly 0 of product XYZ.”
TIBCO Reward User’s Guide
About Basket Profiles | 55
Evaluate Based on Products
Follow these steps when using Product as the condition to evaluate a basket:
1. Complete this statement by selecting the appropriate values from the pull-down menus:Manage baskets that contain (exactly, less than or equal to, greater than or equal to, between or equal to) (quantity) (items, $ spend) in selected products.
2. Click Add Products. (This opens the Select Products screen.)
3. Select a Product by clicking the check box next to the product(s) you want to add.
4. Click Add Checked.
5. Close the Select Products screen.
The selected products you chose now appear in the basket qualification conditions screen for the basket profile you are creating.
Evaluate Based on Categories
Follow these steps when using Categories as the condition to evaluate a basket:
1. Complete this statement by selecting the appropriate values from the pull-down menus:Manage baskets that contain (exactly, less than or equal to, greater than or equal to, between or equal to) (quantity) (items, $ spend) in selected categories.
2. Click Add Categories. (This opens the Select Categories screen.)
3. Select a Category by clicking the check box next to the category you want to add.
4. Click Add Checked to add the products.
5. Click Done.
The selected categories you chose now appear in the basket qualification conditions screen for the basket profile you are creating.
Evaluate Based on Brands
Follow these steps when using Brands as the condition to evaluate a basket:
1. Complete this statement by selecting the appropriate values from the pull-down menus:Match baskets that contain (exactly, less than or equal to, greater than or equal to, between or equal to) (quantity) (items, $ spend) in selected brands.
TIBCO Reward User’s Guide
56 | Chapter 5 Basket Profiles
2. Click Add Brands. (This opens the Select Brands screen.)
3. Select Brand(s) by clicking the check box next to the brand(s) you want.
4. Or, find brands by entering brand name and clicking Go.
5. Click Add Checked.
6. Click Done.
The selected brands you chose now appear in the basket qualification conditions screen for the basket profile you are creating.
Evaluate Based on Tenders
Follow these steps when using Tenders as the condition to evaluate a basket:
1. Complete this statement by selecting the appropriate values from the pull-down menus:Manage baskets that contain (exactly, less than or equal to, greater than or equal to, between or equal to) (quantity) (items, $ spend) in selected tenders.
2. Click Add Tender. (This opens the Select Tender Types screen.)
3. Select Tender by clicking the check box next to the Tender you want.
4. Click Add Checked.
5. Click Done.
The selected tenders you chose now appear in the basket qualification conditions screen for the basket profile you are creating.
Evaluate Based on Product Custom Attributes
Follow these steps when using Custom Attributes as the condition to evaluate a basket:
1. Complete this statement by selecting the appropriate values from the pull-down menus:Manage baskets that contain (exactly, less than or equal to, greater than or equal to, between or equal to) (quantity) (items, $ spend) in selected attribute.
2. Select a Product Custom Attribute.
3. Select all that are (less than or equal to, greater than or equal to, between or equal to)
4. Enter a Number.
5. Click Add.
TIBCO Reward User’s Guide
About Basket Profiles | 57
6. Click Done.
The selected custom attributes you chose now appear in the basket qualification conditions screen for the basket profile you are creating.
Editing a Basket Profile1. In the Target>Basket Profiles page, click on the Basket Profile Name of the
Profile record you want to edit.
2. Change the name or description or both, as appropriate, to reflect the purpose of the Profile record.
— Enter a Name that is unique and succinct.
— Provide an Internal Description (optional).
3. Click Save or Next Step.
4. Change the Basket Qualification Condition as needed.
5. Change Evaluation conditions if appropriate.
6. When you finished making changes, click Save to save your changes.
7. Click Done to save and close the profile.
The Target>Manage Basket Profiles page reappears.
Cloning a Basket ProfileCloning a profile record creates a copy of the record.
Follow these steps to clone a basket profile:
1. Find the profile record in the Target>Basket Profiles page.
2. Click Clone in the row of the desired profile record.
This creates a copy of the original profile. The cloned copy of a profile record includes all of the data in the original, with the exceptions noted below:
— The clone is assigned a new, unique numerical ID. This is a system requirement.
— The clone of a record named "XXX" is automatically renamed "Copy of XXX". Note, however, that if you make multiple clones of "XXX", they will all be named "Copy of XXX".
— The Profile Updated date is, by default, re-set to the date when you create the clone.
TIBCO Reward User’s Guide
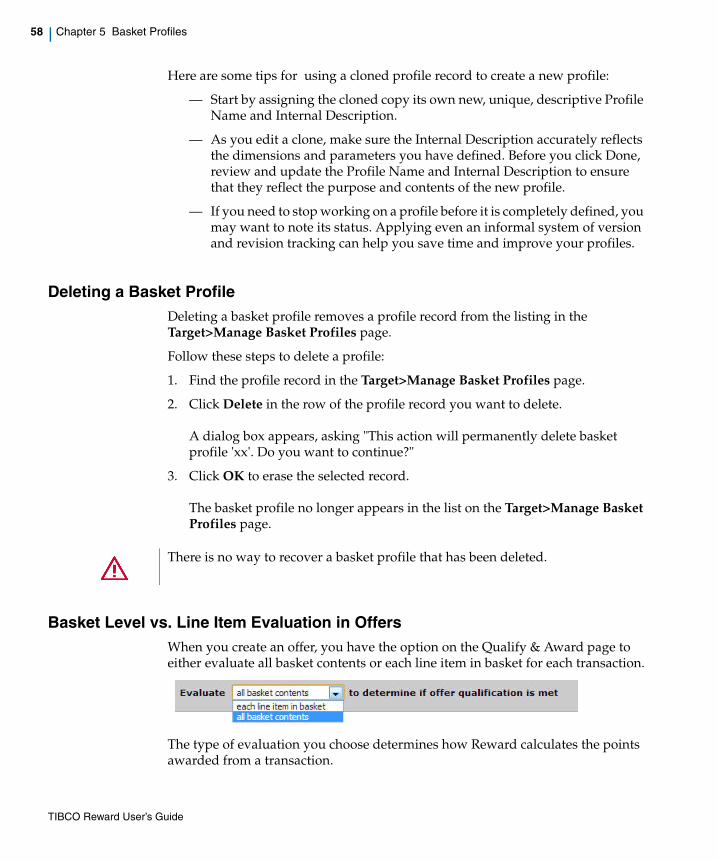
58 | Chapter 5 Basket Profiles
Here are some tips for using a cloned profile record to create a new profile:
— Start by assigning the cloned copy its own new, unique, descriptive Profile Name and Internal Description.
— As you edit a clone, make sure the Internal Description accurately reflects the dimensions and parameters you have defined. Before you click Done, review and update the Profile Name and Internal Description to ensure that they reflect the purpose and contents of the new profile.
— If you need to stop working on a profile before it is completely defined, you may want to note its status. Applying even an informal system of version and revision tracking can help you save time and improve your profiles.
Deleting a Basket ProfileDeleting a basket profile removes a profile record from the listing in the Target>Manage Basket Profiles page.
Follow these steps to delete a profile:
1. Find the profile record in the Target>Manage Basket Profiles page.
2. Click Delete in the row of the profile record you want to delete.
A dialog box appears, asking "This action will permanently delete basket profile 'xx'. Do you want to continue?"
3. Click OK to erase the selected record.
The basket profile no longer appears in the list on the Target>Manage Basket Profiles page.
Basket Level vs. Line Item Evaluation in OffersWhen you create an offer, you have the option on the Qualify & Award page to either evaluate all basket contents or each line item in basket for each transaction.
The type of evaluation you choose determines how Reward calculates the points awarded from a transaction.
There is no way to recover a basket profile that has been deleted.
TIBCO Reward User’s Guide
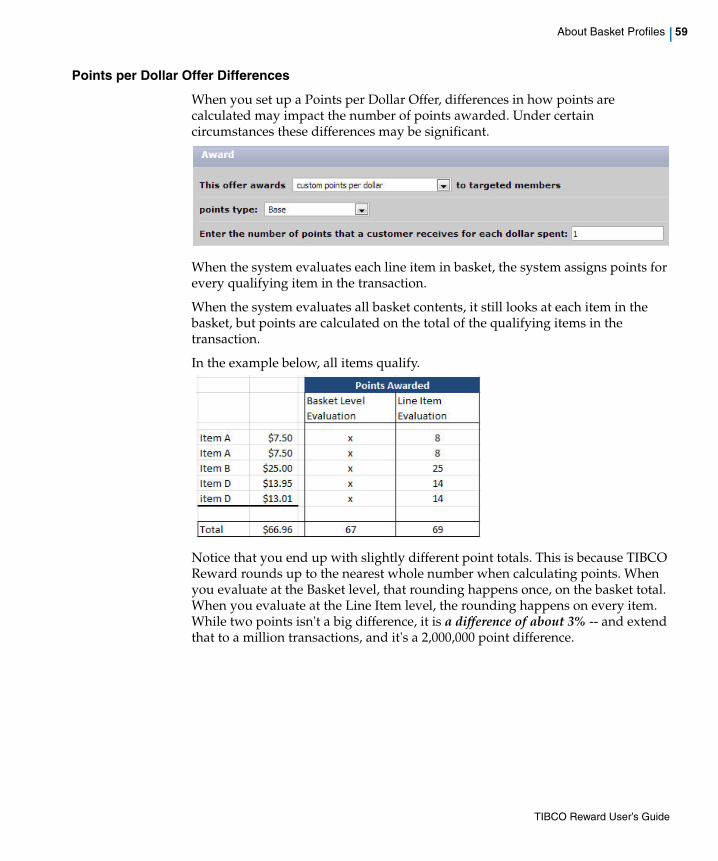
About Basket Profiles | 59
Points per Dollar Offer Differences
When you set up a Points per Dollar Offer, differences in how points are calculated may impact the number of points awarded. Under certain circumstances these differences may be significant.
When the system evaluates each line item in basket, the system assigns points for every qualifying item in the transaction.
When the system evaluates all basket contents, it still looks at each item in the basket, but points are calculated on the total of the qualifying items in the transaction.
In the example below, all items qualify.
Notice that you end up with slightly different point totals. This is because TIBCO Reward rounds up to the nearest whole number when calculating points. When you evaluate at the Basket level, that rounding happens once, on the basket total. When you evaluate at the Line Item level, the rounding happens on every item. While two points isn't a big difference, it is a difference of about 3% -- and extend that to a million transactions, and it's a 2,000,000 point difference.
TIBCO Reward User’s Guide
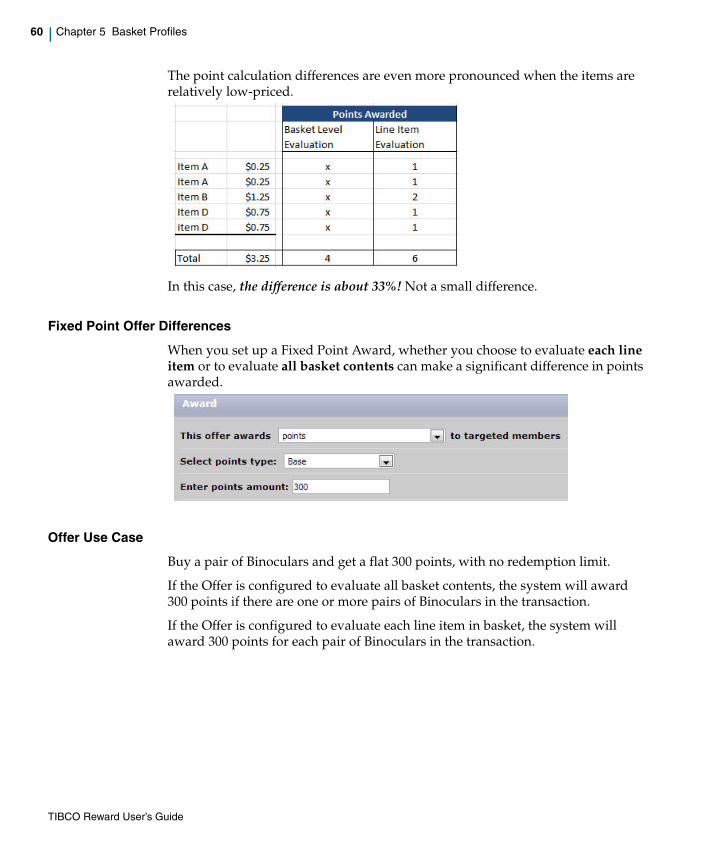
60 | Chapter 5 Basket Profiles
The point calculation differences are even more pronounced when the items are relatively low-priced.
In this case, the difference is about 33%! Not a small difference.
Fixed Point Offer Differences
When you set up a Fixed Point Award, whether you choose to evaluate each line item or to evaluate all basket contents can make a significant difference in points awarded.
Offer Use Case
Buy a pair of Binoculars and get a flat 300 points, with no redemption limit.
If the Offer is configured to evaluate all basket contents, the system will award 300 points if there are one or more pairs of Binoculars in the transaction.
If the Offer is configured to evaluate each line item in basket, the system will award 300 points for each pair of Binoculars in the transaction.
TIBCO Reward User’s Guide
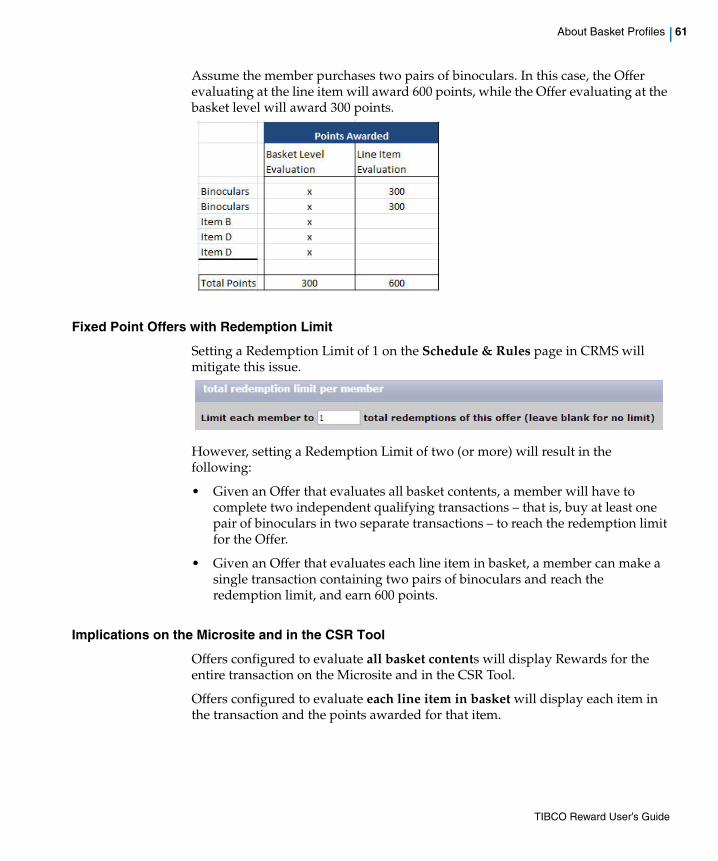
About Basket Profiles | 61
Assume the member purchases two pairs of binoculars. In this case, the Offer evaluating at the line item will award 600 points, while the Offer evaluating at the basket level will award 300 points.
Fixed Point Offers with Redemption Limit
Setting a Redemption Limit of 1 on the Schedule & Rules page in CRMS will mitigate this issue.
However, setting a Redemption Limit of two (or more) will result in the following:
• Given an Offer that evaluates all basket contents, a member will have to complete two independent qualifying transactions – that is, buy at least one pair of binoculars in two separate transactions – to reach the redemption limit for the Offer.
• Given an Offer that evaluates each line item in basket, a member can make a single transaction containing two pairs of binoculars and reach the redemption limit, and earn 600 points.
Implications on the Microsite and in the CSR Tool
Offers configured to evaluate all basket contents will display Rewards for the entire transaction on the Microsite and in the CSR Tool.
Offers configured to evaluate each line item in basket will display each item in the transaction and the points awarded for that item.
TIBCO Reward User’s Guide

62 | Chapter 5 Basket Profiles
TIBCO Reward User’s Guide
Mobile Geolocations (beta) | 63
Chapter 6 Mobile Geolocations (beta)
This chapter explains Mobile Geolocations.
Topics
• About Mobile Geolocations, page 64
• Creating a Mobile Geolocation, page 65
• Editing a Mobile Geolocation, page 65
• Deleting a Mobile Geolocation, page 66
TIBCO Reward User’s Guide
64 | Chapter 6 Mobile Geolocations (beta)
About Mobile GeolocationsMobile Geolocations allow marketers to define customer profiles based on proximity to store locations. This will enable marketers to issue offers through communication channels that are relevant to the customer profiles. With the implementation of a mobile loyalty application on a GPS-enabled smartphone, program members can receive location-based messages and calls-to-action when they enable location services and opt-in to mobile messaging.
Mobile Geolocations Use Case
A marketer sets up a shopper profile that includes mobile geolocation targeting with a radius of 50 feet around each retail store location.
When a shopper comes within the defined radius, offers and messages that use the shopper profile are instantly delivered:
• On the retailer’s mobile application
• Via SMS and/or email messaging
The shopper visits the nearby retail location and takes advantage of the offer that was just presented on their mobile device.
• Geolocation capabilities delivered in the 12.3 release lay the groundwork for future geolocation-based functions. Beta capabilities enable the configuration of mobile geolocations that can be included in shopper profile targeting dimensions. Beta capabilities do not currently support delivery of geolocation targeted offers or messages to a customer’s mobile device.
• Important: Because geolocation features are not complete (beta), if mobile geolocation targeting dimensions are included in a shopper profile, no shoppers will qualify for offers or messages that use the shopper profile.
• Your use of the TIBCO® Reward mobile geolocation mapping functionality is subject to your compliance with the following policies: Google Terms of Service, Google Maps Terms of Service, Google Maps Legal Notices, and Google Maps Acceptable Use Policy (collectively, the “Google Policies”). If you do not agree to comply with the Google Policies, do not activate or use the TIBCO Reward mobile geolocation mapping functionality. TIBCO may, at its discretion, terminate or suspend your access to or use of the TIBCO Reward mobile geolocation mapping functionality if your use fails to comply with the Google Policies.
TIBCO Reward User’s Guide
Mobile Geolocations (beta) | 65
Creating a Mobile GeolocationGeolocations allow you to define locations that are used to trigger offers and messages when a customer enters the geolocation. Geolocations are most commonly defined around your existing retail locations.
Follow these steps to create a mobile geolocation:
1. Go to Target>Mobile Geolocations.
2. Click Create New Mobile Geolocation. This opens the mobile geolocation details page.
3. Enter required address fields (marked by an asterisk).
4. Enter a radius value (measured in meters). This defines the area around the geolocation.
5. When a customer enters the area (geofence) they can trigger relevant offers and messages.
6. Click Preview. This opens a map showing the mobile geolocation and fence (set by the radius value entered).
7. Click Save.
8. Click Done. The new geolocation appears in the manage mobile gelocations list.
Editing a Mobile GeolocationYou may want to edit a mobile geolocation to correct an error, or when a geolocation needs to be changed such as when a store moves to a different location within a retail mall.
Follow these steps to edit geolocations:
1. Go to Target>Mobile Geolocations.
2. Click the Geolocation Name of the mobile geolocation that you want to edit. This opens the geolocation description page.
3. Edit fields.
When creating Mobile Geolocations, you must click Preview before clicking Save or Done.
Mobile geolocations in use by shopper profiles cannot be edited. To edit a mobile geolocation you must first remove from the associated shopper profile.
TIBCO Reward User’s Guide
66 | Chapter 6 Mobile Geolocations (beta)
4. Click Preview. Your changes appear in the geolocation description page.
5. Click Save to save the changes to the mobile geolocation, or click Done to save the changes and display the list of mobile geolocations.
Deleting a Mobile GeolocationYou may want to delete a mobile geolocation when one of your retail stores has closed or moved.
Follow these steps to delete a mobile geolocation:
1. Go to Target>Mobile Geolocations.
2. Click delete next to the mobile geolocation you want to delete. A dialog box appears indicating "This action will delete this mobile geolocation. Do you want to continue?"
3. Click OK to delete the mobile geolocation.
TIBCO Reward User’s Guide
Dimensions | 67
Chapter 7 Dimensions
This chapter provides information about dimensions.
Topics
• About Dimensions, page 68
• Profiles, Dimensions, and Conditions, page 69
• Defining a Target Profile Dimension, page 71
• About the "MUST Match" Requirement, page 72
• About the Population Reach Display, page 73
• Dimension Definitions, page 77
TIBCO Reward User’s Guide
68 | Chapter 7 Dimensions
About Dimensions
A dimension is a set of logical conditions that is used to filter a customer population for targeting purposes. Dimensions are used to define a customer profile.
The CRMS allows you to use many different types of dimensions, including: Past Purchases, RFM, Category Interests, Geographic Location, Gender, Custom Questions, Lifestyles, Buystyles, Clubs, Tiers, Activity Events, Customers types, Customer Attributes, and Prior Responses. For details about each dimension and how to use it, see Defining a Target Profile Dimension on page 71.
When defined and activated, a dimension tests the customer-related data made available by transaction files, customer profiles, and customer email behavior records. Because this data changes over time, the list of customers selected by any given dimension also changes over time. The targeted segment is defined dynamically.
The Changing Set of Selected Customers
Ultimately, the defined dimension represents a set of related logical conditions used to select sets of customers. Because Reward performs data updates every night, applying the same profile on two different days can yield two different sets of results.
If the set of customers selected by a profile does change after an offer is sent to the initially qualified set of targeted customers, then the CRMS will send offers to the customers added to the set on subsequent days, for as long as the offer is open.
Be aware that different dimensions use data from different specific sources, which update the database at different times. For extensive technical details about the data sources used by dimensions and the times when data become available, click here.
Note on dynamic customer segmentation: When you define a dimension in CRMS, it serves as a dynamic customer segmentation tool. When defined and applied as part of a target profile, a defined dimension can be applied repeatedly to an evolving current customer population base. Each time the dimension defined in a profile is applied, it automatically selects customers based on the most recent customer data that is currently available in the Reward database.
TIBCO Reward User’s Guide
Profiles, Dimensions, and Conditions | 69
Profiles, Dimensions, and Conditions
Profiles are composed of one to many dimensions, and they are often composed of multiple Dimensions that are used in concert with each other. A multi-dimension profile includes more conditions and has the potential to represent a more specific segment.
When setting up a profile, you click on the name of a dimension you want to use in that profile, and the corresponding dimension configuration panel opens. This panel provides the tools you use to define the details of the dimension (also known as the "conditions" of the dimension).
A dimension can have one or many conditions. Each defined condition constrains the dimension, just as each dimension constrains the profile. If you define many conditions, a dimension can become too narrowly limited. Use the Population Reach display to see estimates based on the conditions you define.
Each dimension configuration panel provides different tools. For details about the different dimensions, their configuration panels and tools, and how to apply them, see Defining a Target Profile Dimension on page 71.
The Default Dimension: Customer Type = Registered Customers Only
To establish the broad customer population that the profile will use as its basis, one dimension is always applied by default: Customer Types. By default, too, the customer type selection is always set to Registered Customers Only. Other customer types can be selected.
The Customer Types dimension does not appear to be selected when the default population, Registered Customers Only, is selected. However, this default category type does constitute a logical selection that is applied as a MUST match dimension to filter the population.
The MUST Match setting
Some dimensions can be applied in two ways: either as a hard requirement that customers "MUST match" in order to be selected OR as a soft requirement that is used to select customers according to their relative success in meeting many logical criteria (the fuzzy logic alternative).
TIBCO Reward User’s Guide
70 | Chapter 7 Dimensions
Dimensions and the Population Reach display
To get a sense of how strictly a dimension filters the current population, check the Population Reach display, which normally appears at the lower left of the Target profile page used to select dimensions. This will help you determine whether the dimensions you have defined for the profile yield an acceptable estimated target. If the estimates are unsatisfactory, you may wish to redefine the dimension(s) used in the profile.
TIBCO Reward User’s Guide
Defining a Target Profile Dimension | 71
Defining a Target Profile Dimension
When you create a new profile or edit an existing target profile, you must select and define the dimensions that this profile will use.
Clicking on a Customer Profile Name in the Target>Customer Profiles page opens that profile and provides access to the specific dimension settings associated with that profile.
For general information about dimensions and how to use them, see About Dimensions, page 68.
After you click on the name of a dimension in the profile editor, the corresponding dimension configuration panel opens. This panel provides the tools you can use to define the details of the dimension (also known as the "conditions" of the dimension). Each configuration panel provides different tools.
Click Save frequently. If you are working with a given dimension definition and attempt to open a different dimension without first saving your work, the unsaved work will be lost. If you are working on the definition of one condition in a dimension and attempt to open a different condition, your unsaved work on that condition will be lost. Always click Save before moving away from a piece of work that is worth saving.
TIBCO Reward User’s Guide
72 | Chapter 7 Dimensions
About the "MUST Match" Requirement
At the bottom of a dimension configuration panel, there is sometimes a check box labeled: "Customer MUST match above criteria to receive the offer."
When this "MUST Match" check box is selected, only the customers who exactly match the specified dimension definition are included in the profile segment. For example, if Texas is selected as a condition in the Geographic dimension and MUST Match is selected, this profile will never target anyone who is not known to have a Texas address. That is, those with any other state address and those whose state is unknown will not be included on this profile.
When the MUST Match check box is not selected, the results of using the dimension depend on where the profile is used, as follows:
• When used for Offers and Clubs, the selected profile dimensions are processed by a system that applies "fuzzy logic" to select a list of customers who qualify. Note, however, that dimensions that are not labeled as "Must Match" cannot be used to exclude anyone from receiving an offer.
• When used for the purposes of Email, all dimensions are treated as MUST Match, as if this check box were always selected.
Checked and unchecked dimensions can be mixed to fine-tune offer targeting. For example, if used with offers, setting state = Texas as MUST match, and gender = male as not MUST match will result in only Texans receiving an offer, with men scoring high and women scoring low. If the same profile is used for email, only male Texans will receive the email.
To exclude a profile from a Target, use MUST Match Dimensions. When you exclude profiles, only the dimensions of those profiles that have "Customer MUST match above criteria..." checked will affect the exclusion calculation. The Select Profile dialog box shows you whether a profile has a "MUST match" dimension defined. Although you can choose to exclude a profile that does not have a "MUST match" dimension, it will have no effect on the exclusion calculation.
TIBCO Reward User’s Guide
About the Population Reach Display | 73
About the Population Reach Display
To get a sense of how strictly a dimension filters the current population, check the Population Reach display. This display normally appears at the lower left of the Target Profile page used to select dimensions or at the lower left of the Profile record editor that you use to create or edit a profile.
The Population Reach display is a dynamic page element that changes each time a targeting parameter is saved. It displays an approximation of the total number of customers eligible for targeting, along with estimates of the percentage and number of customers included in this particular profile.
Be aware that the Population Reach display provides only rough estimates. Other data displays are more accurate.
Note that the calculated population reach values only take dimensions marked as "MUST match" into consideration. This is useful for estimating the number of customers that will receive email, since email only uses "must match" parameters into consideration. Note, however, that other uses of profiles and dimensions may apply fuzzy logic to the selection process, yielding numbers of selected customers that are significantly different from those based on "MUST match" dimensions.
The Population Reach display may help you determine whether the dimensions you have defined for the profile yield an acceptable estimated target. If the estimates are unsatisfactory, you may wish to redefine the dimension(s) used in the profile.
TIBCO Reward User’s Guide
74 | Chapter 7 Dimensions
Features and Fields
Percentage Reach - The percentage displayed represents the approximate portion of your available customer base that will be included in this profile.
Population Reach - The yellow quantity represents the approximate count of your available customers that will be included in this profile.
Total Customers Population - The white quantity represents the count of current total customers. Note that this number includes unregistered customers: customers who are not members of the loyalty program and have not provided much data about themselves.
Be aware that the Population Reach figures are only estimates. These estimates are based on samples of data from the Transaction files, Customer Profiles, and Email Behavior data most recently processed by TIBCO Reward. TIBCO Reward performs data updates every night, but the process of extrapolating data from a fractional sample automatically reduces the credibility of the results.
Why don't Population Reach estimates match expectations?
Many CRMS users are surprised to see Percentage Reach and Population Reach numbers that vary from their expectations by a significant amount.
Population Reach estimates vary from expectations for many reasons, most of which have to do an incomplete understanding of the data sources and the selection processes involved. This is a complicated subject area.
The Population Reach figures may reveal unexpected features of the customer information database, or these figures may show skewed data because of the data collection, selection, or measurement processes.
Some dimensions require data that is only available from a limited population. This logically limits the number of customers who can possibly be selected.
In general, Data is only as accurate as the collection, selection, or presentation processes require it to be. The collection process is complicated by peoples' resistance to volunteering personal information and the time and effort required to provide it.
If a yellow triangle with an exclamation point appears below the pie chart, your profile still includes at least 99% of your population. This suggests that the profile has not excluded very many people. Unless this was your goal, you should reconsider the logical selection conditions you have applied.
TIBCO Reward User’s Guide
About the Population Reach Display | 75
Common Misconceptions Regarding Populations and Selection Criteria
One common misconception is that a Target Profile dimension always selects from the number of customers identified as the Total Customer Population. In fact, the Total Customer Population is often much larger than the population that a dimension or profile actually tests. Consider the logical conditions that a dimension applies and the data that it requires.
Many profiles select from only the loyalty program membership, the "Registered Customers" population. These are the loyal customers who have supplied extra data about themselves; and their numbers typically represent only a fraction of the total customer population.
Registered Customers (loyalty members) are selected as the Default population. Some CRMS users do not change this Customer Type selection, even when it make sense to do so. As a result, no other dimension in a profile can select from the All Customers population. See Dimension>Custom Attributes on page 89 for details, particularly the information under the heading, Some dimensions select only Registered Customers.
Sometimes the type of data that a dimension requires is not available. If customers have not provided some type of data, then tests based on this data are never going to yield accurate numbers. Here is an example: Gender data is incomplete or entirely missing in many customer and transaction files, so when you select customer data by gender (e.g., "male"), you often get a far lower population reach number than you would expect. This is because only a fraction of males or females indicate their gender at all, and if there is no explicit gender data, the gender selection logic has only a fraction of the population to select from.
Sometimes the customer data collection process is not simple and straightforward, so the data is not provided by customers. If some category of data is missing for customers, this rules out the selection of such customers. For example, in data obtained from signup forms and survey responses, the gender of a customer is typically determined from the salutation that the customer selects: Mr., Mrs., Miss, Ms, etc. This is not always defined as a required field in surveys and sign-up forms, so the gender of many people in a population remains undefined in any corresponding list or database. If many registered customers decline to provide this information and thereby fail to indicate their gender, the Population Reach data seems to indicate that only a tiny fraction of the loyalty program membership is male, whereas it was really the case that only a tiny fraction explicitly asked to be addressed as "Mr.".
Sometimes the data is not as up-to-date as you think, so a dimension that selects on the basis of very recent events, behavior or other time-sensitive phenomena is skewed. Refer to Customer Data Updates for extensive details about the dates and times when new data becomes available for specific CRMS processes.
TIBCO Reward User’s Guide
76 | Chapter 7 Dimensions
The general solution is to set up your data collections and collection processes so that more customers provide the data you want to use.
TIBCO Reward User’s Guide
Dimension Definitions | 77
Dimension Definitions
Dimensions are defined below.
Dimension>Past Purchases
Use the Past Purchases dimension to select customers who have made purchases of specified products or purchases within specified categories within specified times. You can add multiple selection requirements, mixing both product and category purchases.
The logical conditions used in the Past Purchases dimension are based on the data provided to TIBCO Reward by your company in its most recent Product Catalog file. If this file has never been provided, then this dimension cannot function.
For each condition, three drop-down selection boxes appear. The default values for each are displayed:
• Any Purchase - Use this first control to select the number of purchases.
Note that zero purchases ("0 purchase") is not a valid response, and that "any purchase" means one or multiple purchases (any number greater than zero).
• in categories... - Change this to of products, as appropriate. The list format below this selection box changes accordingly.
Use in categories to select customers who have purchased a product or products within a specific category or set of categories. Use the Add Categories>> button to open the Select Category dialog box, then add one or many categories.
Use of products to select customers who have purchased a specific product (a product with a unique SKU) or some selection from a set of products. Use the Add Products>> button to open the Select Product dialog box, then add one or many specific products.
• In the last 3 months - Change this to the time period in which purchases must have been made. The time limitations range from "In the last week" to "In the last 2 years".
Follow these steps to select customers based on their past purchases:
1. Select the first purchase condition.
The first Past Purchase condition panel appears by default, but you can add more by clicking Add Another Condition.
2. Specify the number of purchases, using the first drop-down list.
3. Select either in categories or of products, using the second drop-down menu.
TIBCO Reward User’s Guide
78 | Chapter 7 Dimensions
Depending on your selection of in categories or of products, the appropriate list box and related controls appear in the list panel.
4. Specify the time limitation, using the third drop-down menu.
5. In accordance with the setting and changes described in step 3, click either Add Categories or Add Products to add categories or products.
If you use the Products dialog box, you must manually close it.
6. Click Save after every addition or change.
7. To add another condition based on past purchases, click Add Another Condition, and repeat steps 2 through 6.
8. Select or de-select the Customer MUST match... check box, as appropriate.
9. Click Save.
Dimension>RFM (Recency, Frequency, Monetary Value)
RFM (Recency, Frequency, Monetary value) is one of the fundamental segmentation systems applied to retail markets. TIBCO Reward enables RFM-based profiles, which in a well-planned system can be used to manage sophisticated models of customer lifecycles.
The RFM tab allows you to filter customers based on any or all of the following conditions and your settings for each condition:
• Recency - Weeks since the customer last purchased (positive transaction).
• Frequency - How often the customer made a transaction within the chosen time frame.
• Monetary - The net spending of the customer within the chosen time frame.
• Lifespan - How many weeks it has been since the customer enrolled in the loyalty program.
• Lifetime Spend - The net spending of the customer since enrollment in the loyalty program.
Note on the Slider: You can set the parameters for each of these conditions using the corresponding tools in the RFM configuration panel. One notable feature of these tools is the slider. Note the small, blue, triangular arrowhead on each slider. Clicking and dragging on this triangle allows you to move the slider and set lower and upper boundaries, thereby defining the range of values that will satisfy the condition. As you move the slider, the range display above the tool will show the selected values.
TIBCO Reward User’s Guide
Dimension Definitions | 79
RFM Features, Tools, and Fields
The lower and upper boundaries for the data displayed in each parameter are determined from your underlying data. The darker grey within the targeting area represents the underlying data, and is meant to guide your choice of settings. (The grey changes to dark green when you activate a condition.)
Set Parameters for the conditions
Follow these steps to set the parameters for the conditions:
1. For each condition you wish to apply, click Activate.
The display area will change from grey to green, indicating this condition is in use. Use the right and left slider tools to define ranges. Click the blue arrowhead pointer on either slider and drag the slider to the desired setting to define the lower or upper boundary.
2. If appropriate, change the time scale.
See Modifying Frequency or Monetary on page 79 for more information.
3. Click and drag the sliders on either end of the range to set an upper or lower boundary, as appropriate.
4. Click Save.
5. Check the Population Reach display. If necessary, re-adjust settings and click Save.
6. Repeat the above process for each condition you wish to apply.
Disabling a parameter setting for a condition
Follow these steps to remove/disable a parameter or undo a parameter setting for a condition:
1. Click Reset.
Your settings will be removed and the display area will turn from green to gray.
2. Click Save.
Modifying Frequency or Monetary
Follow these steps to change a time scale for Frequency or Monetary:
1. In the time frame control drop-down menu, click the down arrow.
From the options that appear in the list, choose one of the options: last 4 weeks, last 13 weeks, last 26 weeks, or last 52 weeks.
TIBCO Reward User’s Guide
80 | Chapter 7 Dimensions
2. Click Save.
Dimension>Category Interests
Specify product categories in which the customer has expressed interest (for example, in the survey). Clicking Add Categories brings up the Select Categories dialog box. The categories are derived from the product file sent to TIBCO Reward. This is the same list that customers use to identify their category interests.
Follow these steps to target customers who expressed an interest in categories:
1. Click Add Categories.
The Select Categories dialog box appears.
2. Select all of the categories in which the targeted customers should have expressed interest and click Add Checked.
The Category Interests configuration panel reappears with the selected categories listed.
3. Select or de-select the Customer MUST match... check box, as appropriate.
4. Click Save.
Dimension>Geographic
Designate the desired geographic location for customers. The Define Geographic Targeting drop-down menu offers these options for selecting geographic areas:
Zip Code Sets
Zip Code sets are sets of zip codes that have been uploaded from files and named with the Target>Zip Code options. These zip code sets can represent any area or set of areas, although regional trade areas are common. The list of groups appears when Zip Code Sets is chosen from the drop-down menu.
U.S. Map
U.S. states may be added to the profile by clicking each state individually. A selected state appears light green. A state may be removed by clicking it again. To expand the map of the Northeast U.S., click the magnifying glass in the lower right of the highlighted square over this area.
Stores
To exclude states: Click Select All, then click on each state to be excluded. Selected states are shown in light green; de-selected (excluded) states are dark green.
TIBCO Reward User’s Guide

Dimension Definitions | 81
Individual stores may be selected as geographic criteria to be considered for the profile. If a store is selected, then any customer residing in a zip code within 25 miles of that store's zip code satisfies this condition. To use stores, your company must have supplied TIBCO Reward with a stores list file. If a change is required, please contact your TIBCO Reward Client Services Manager. Store Manager Users will only see content that includes their store in the targeting profile.
Metro Area
Metro Areas are collections of zip codes as determined by the Office of Management and Budget and used by the U.S. Census Bureau. They generally represent Metropolitan and Micropolitan Statistical Areas.
Geographically target customers by Zip Code Sets, Stores, or Metro Areas
1. Select a basic geographic targeting strategy from the Define Geographic Targeting drop-down menu.
2. The corresponding configuration panel appears with a list of zip code sets, stores, or metropolitan areas.
Follow these steps to select a geographic target using the U.S. Map:
1. Choose one or more check boxes next to the geographic area selectors you want to apply.
2. Click Save.
3. Select or de-select the Customer must match... check box, as appropriate.
4. Click Save.
Geographically target customers using the U.S. Map
1. Select U.S. Map from the Define geographic targeting using... drop-down menu.
2. The corresponding configuration panel appears, displaying a map of the U.S.
3. Click Save.
4. Select or de-select the Customer must match check box, as appropriate.
5. Click Save.
Geographically target customers using mobile geolocation
1. Select Mobile Geolocation from the Define Geographic Targeting drop-down menu.
TIBCO Reward User’s Guide
82 | Chapter 7 Dimensions
2. Click Add Mobile Geolocations. This opens the Select Mobile Geolocation list.
3. Click the check box next to the appropriate geolocation.
4. Click Add Checked.
5. Click Save.
Dimension>Gender
Use the Gender dimension to select customers according to their gender attribute.
TIBCO Reward can collect the gender data for a Client's customers from different sources: the data files provided by the Client, the loyalty program sign up forms, and the data provided by customers in their My Account forms.
Gender is commonly determined from sign up or My Account forms by interpreting the salutation data (Mr., Mrs., Miss, Ms., etc.) provided by the customer in the Signup process. If the salutation is not defined as a required field, then gender information may not be available for many customers.
If no source of gender data other than the Signup and My Account forms data has been made available to TIBCO Reward, then only those customers who have indicated their gender in their salutation can meet a gender-based condition. Note, however, that a gender attribute may be included in customer files or transaction files provided to TIBCO Reward.
Follow these steps to select customers by gender:
1. Select one gender or either by clicking on the associated radio button.
2. Click Save.
3. Select or de-select the Customer MUST match... check box, as appropriate.
4. Click Save.
• Geolocation capabilities delivered in the 12.3 release lay the groundwork for future geolocation-based functions. Beta capabilities enable the configuration of mobile geolocations that can be included in shopper profile targeting dimensions. Beta capabilities do not currently support delivery of geolocation targeted offers or messages to a customer's mobile device.
• Because geolocation features are not complete (beta), if mobile geolocation targeting dimensions are included in a shopper profile, no shoppers will qualify for offers or messages that use the shopper profile.
TIBCO Reward User’s Guide
Dimension Definitions | 83
Dimension>Custom Questions
Your company can survey customers by presenting them with Custom Questions in the My Account section. If a customer responded to a custom question, you can define the Custom Question dimension such that the response satisfies a condition. You can use one or many questions to set up one or many conditions for this dimension.
This dimension allows you to process customer responses to Custom Questions in several different ways.
Note the following general guidelines about Custom Questions:
• You can set up required responses to one or more questions.
• You must set up a required response to at least one question in order to create a valid dimension. If you do not define any required response to any question at any level, then this dimension has no conditions and serves no purpose.
• You can satisfy the condition associated with any question at two different levels. See details about Level I and Level II below.
• For each question, you can set up the required response at either level.
Level I
To require only some response to a question, allow the customer to respond to the question in any way, as follows:
1. Click the check box in front of the question, at the top level.
When this box is checked AND no details about responses are provided, then a customer automatically satisfies the condition by responding to this question in any way. To verify that no specific customer choices need to be provided, click the Show Answers button to see the question response details. If all responses are checked Disabled, then you have required no specific response. This means that a customer automatically satisfies the condition if that customer makes any selection in response to this question.
Example:
Suppose you want to use this dimension to determine if a customer has children. If customers provide any response to a custom question regarding the characteristics of their children, this can taken as an indication that they have children. Any response satisfies the implicit condition (customer has child or children), and specific details are not significant, given your level of interest.
2. Click Save.
3. Advance to the next question that you want to use as a condition.
TIBCO Reward User’s Guide
84 | Chapter 7 Dimensions
Note that you can define the required response at either Level I or II. Refer to the instructions below for defining a required response at Level II.
4. When you finish defining the desired responses to the custom questions of interest to you, click Save.
5. Select or de-select the Customer MUST match... check box, as appropriate.
6. Click Save.
Level II
To require some specific response to a question, set up one or more possible responses for a custom question, as follows:
1. At the right-hand side of the bar containing the custom question, click Show Answers. The question response details appear at a lower level.
Each possible question response option is listed. (Multiple option selections are normal in a survey question.
2. Select the question response(s) you want to use.
• If an unselected response to a line item is significant and should satisfy the condition, check the Unselected box.
Example:
Suppose you want to set up a condition to help determine whether its appropriate to call a set of customers about a new offer. You can use the Custom Question dimension to determine whether the customer has explicitly asked not to be contacted about new offers.
For the sake of this example, assume that one of your custom questions asks "How would you like to be contacted?" and that one of the possible responses is "Do not contact me." (This is a standard questions and response pair among customer questions.)
Your set-up for this Custom Question stipulates the condition that this "Do not contact" response is NOT selected. Thus, when the customer has not used this specific method to direct you not to call, the customer meets the condition.
• If a selected response to a line item is significant and should satisfy the condition, check the Selected box.
Example:
Suppose you want to use this dimension to determine if a customer has children who might use infant diapers. There is a custom question that surveys customers about the ages of their children, so you select the option labeled "Birth - 2 years". The customers who select this response meet the condition. Other responses are not of interest, so you do not need to select any response or even enable the response.
TIBCO Reward User’s Guide
Dimension Definitions | 85
• If any response to a line item should satisfy the condition, you can click Either. The Enable box may be automatically selected. If you decide that a response to this line item is not a factor, uncheck the Enable box, or leave a Disable box checked. Selecting "Either" as a line item response is usually equivalent to not using that response, so consider leaving Enable unchecked, or Disable checked.
3. Click Save.
4. Advance to the next question that you want to use as a condition.
Note that you can define the required response at either Level I or II. Refer to the instructions above for defining a required response at Level I.
5. When you finish defining the desired responses to the custom questions of interest to you, click the Save button.
6. Select or de-select the Customer MUST match... check box, as appropriate.
7. Click Save.
Because all conditions based on Custom Question responses are linked with logical AND operator, the outcome of this dimension is the set of customers who meet all of your question response requirements. Requiring specific responses to multiple custom questions can yield a very narrow customer segment. Note also that, if a customer response to a custom question is not strictly required, only a subset of the population may provide any response.
It is possible to set up a condition based a Custom Question response that does not make sense. The CRMS cannot interpret questions, possible responses, and your application of the dimension logic, so you need to test the logical condition you are defining.
Dimension>Lifestyles
To display the Lifestyle page, click Lifestyle in the left navigation bar.
Specify the desired demographics of the targeted customer. Predefined Lifestyles are provided for your selection. Images, tag lines, and demographic indicators help you to distinguish among the different Lifestyles.
To narrow the provided Lifestyle options, adjust the bars for the individual demographics to match your criteria (i.e., Age, Income, Net Worth, Urbanicity, Children, Home Ownership and Marital Status.). The Lifestyles that no longer match these demographics are grayed out.
To choose a Lifestyle, click and drag the Lifestyle icon from the Available Lifestyles group in the lower half of the screen, to the Selected Lifestyles section above. Specify at the bottom of the page whether the customer MUST match the criteria in order to receive the Offer.
TIBCO Reward User’s Guide
86 | Chapter 7 Dimensions
Dimension>Buystyles
To display the Buystyle page click Buystyle in the left navigation bar.
Specify the desired buying style of the targeted shopper. Predefined Buystyles are provided for your selection. Images, tag lines, and indicators help you to distinguish among the different Buystyles. To narrow the provided Buystyle options, adjust the bars for the individual style values to match your. The Buystyles that no longer match these values are grayed out.
To choose a Buystyle, click and drag the Buystyle icon from the Available Buystyles group in the lower half of the screen, to the Selected Buystyles section above. Specify at the bottom of the page whether the shopper MUST match the criteria in order to receive the Offer.
Dimension>Tiers
If you have implemented tiers in your loyalty program, then this dimension allows you to use tiers to target customers who belong to each tier.
Tiers define segments of the loyalty program membership according to the point accruals of the members, so using a tier membership to select customers effectively selects customers according to the points they have accrued.
TIBCO Reward evaluates customers for their tier memberships every night based on their point accruals. A change in a customer's tier level may not take place until 36 to 48 hours after TIBCO Reward receives the transaction data file that qualifies the customer for a tier-change.
Example of Tiers:
You can have three tiers: base, silver and gold. Everyone who signs up is in the base tier. Customers who accrue 200 points get into silver. Customers who accrue 400 points get into gold. The decision to implement tiers is one of the basic program design decisions that a company typically considers when setting up its loyalty program.
Follow these steps to add Tier level as a condition for being included in a profile:
1. Choose at least one Tier by selecting its check box.
2. Select or unselect the check box
3. Click Save.
4. Select or de-select the Customer MUST match... check box, as appropriate.
5. Click Save.
TIBCO Reward User’s Guide
Dimension Definitions | 87
Dimension>Activity Events
Use this dimension to select customers based on whether they did or did not perform an activity.
This dimension configuration panel lists all the activities currently defined in the Admin>Activities page. Refer to this page for details of the definition of each activity.
If a customer either performed or did not perform a defined activity, you can define the Activity Events dimension such that either alternative satisfies a condition. You can use one or many activities to set up one or many conditions for this dimension.
You can create a valid Activity Events dimension by setting up one or many requirements. Before you define this dimension, review the logical case for targeting customers on the basis of activity events.
Follow these steps to define activity-based conditions:
1. Click the check box in front of the first activity you want to test for.
When this box is checked, the default requirement, Performed, is selected and the radio button in the Performed column is selected.
• If you want to select customers who performed this activity, leave the Performed button selected.
• If you specifically want to select customers who did not perform this activity, click the radio button in the Did Not Perform column.
2. If you do not want to test for either performance or non-performance of an activity, make sure the check box in front of the Activity name is not selected.
3. Click Save.
4. Advance to the next activity that you want to use as a condition and repeat steps 1 through 3, until you have finished defining the desired behavior with respect to all activities of interest.
5. Select or de-select the Customer MUST match... check box, as appropriate.
6. Click Save.
Note that no time limitation is applied to activities. If a customer performed an activity at any time, it is considered valid.
Dimension>Customer Types
This dimension allows you to target the following broad categories of customers:
• All Customers - If selected, this profile will not be restricted by customer type.
TIBCO Reward User’s Guide
88 | Chapter 7 Dimensions
• Registered customers only (also known as loyalty program members) (always selected by default) - Only registered customers will be included when this profile is used. In general this represents customers who have opted in to your loyalty program.
• Unregistered customers only (customers who are not loyalty program members) - Only unregistered customers will be included when this profile is used. In general this represents customers who have not opted in to your loyalty program, but who have provided enough information to be tracked by the TIBCO Reward system. Note that unregistered customers are not included in the targeting estimate display to your left, but will appear in the actual customer counts on the targeting page.
• Unsubscribed customers only (includes registered and unregistered customers). These are customers who have opted out of email. - Only customers who have opted-out of commercial email will be included when this profile is used. This should only be used for changes to terms and conditions, or other legally required contacts that are not commercial emails.
Be aware that the Customer Type selection is always administered as a MUST Match requirement.
To select a customer type:
1. Select one type by clicking on the associated radio button.
2. Click Save.
Notes:
• If you click Registered Customers Only, the CRMS does not indicate that you have selected a Customer Type. If you click any other option, the normal dimension indicators are activated.
• This dimension is always defined as a MUST Match condition, by default.
• Do not choose Unsubscribed Customers Only unless you have validated that you have a legal rationale for targeting this customer group.
• Some dimensions select only Registered Customers.
Some dimensions apply logical conditions that require data provided only by registered customers. The following dimensions ONLY function with registered customers:
• RFM
• Categories of Interest
• Gender (from Sign up and My Account)*
• Customer Questions
TIBCO Reward User’s Guide
Dimension Definitions | 89
• Lifestyles
• Buystyles
• Clubs
• Tiers
Although it is possible to apply the dimensions listed above when Customer Type is set to All Customers, selecting that option would not increase or change the customers selected, because all of the listed dimensions are based on data provided only by Registered Customers.
Dimension>Custom Attributes
You can use the Custom Attributes dimension to specify conditions based on the custom attribute values.
After selecting a custom attribute, you can specify a set or range of values that the dimension uses as logical matching criteria. If the value stored in the custom attribute field associated with a customer matches the values or logical test that you define, then the customer meets a logical condition defined for the dimension.
These custom attributes are special fields made available for use within the CRMS, although they are not normally defined in the standard version of the CRMS database.
You can target customers whose Custom Attributes match the values that you designate. Custom Attributes can be created within the Admin>Custom Attributes tab. You can target as many of your custom attributes as you like, but you can only target each once within a given Profile. The relationship between each attribute is an AND, which means that customers must match all attributes, and their criteria, in order to be selected.
To define dimension conditions based on custom attributes:
1. From the Add a Custom Attribute drop-down menu, choose the attribute you want to use for the current profile.
Gender-dimension-based targeting can also select unregistered customers identified in files supplied by Clients to Reward (e.g., customer or transaction files) IF those files include gender data and if appropriate Reward system integration has been completed.
If you apply any of the dimensions listed above when Customer Type is set to Unregistered Customers Only, then zero (0) customers will be selected by that dimension because the logical result is a null set.
TIBCO Reward User’s Guide
90 | Chapter 7 Dimensions
All the attributes that you have defined will appear in this menu, with the exception of Lookup type attributes that have no Lookup codes defined. Also, because you can target each one attribute only once within any given profile, once you add an attribute to target to, it will be removed from the menu.
When added, each attribute is displayed within its own configuration panel. When you initially add an attribute to target, it appears in expanded mode.
2. Configure the values associated with the attribute and click Update to save your changes.
To save your work, click Save. Your input is saved and the page is refreshed, displaying the attribute panel in collapsed mode.
3. If you want to define another custom attribute condition, choose another attribute from the Add a Custom Attribute drop-down menu, and repeat step 2.
To edit a condition based on a custom attribute:
1. Click Save to save any existing work.
2. Click the Edit button associated with the custom attribute.
The collapsed panel expands. Only one attribute can be expanded and edited at a time. If you expand a block while editing another, you'll lose any input in the one you were previously editing.
3. Configure the values associated with the attribute and click the Update to save your changes.
Refer to Chapter 11, Custom Attributes, on page 155 for more information about Custom Attributes.
Dimension>Prior Responses (to Email)
Prior response targeting allows you to target customers based on their responses - or lack thereof - to email communications generated and sent to them by CRMS features. Once you've added a targeting condition, you can specify the criteria to apply against a specific set of email communications.
To define a dimension that targets customers who responded to CRMS email communications:
1. Click Add a Condition.
If you attempt to set up a new attribute while editing one, your work will be lost as well. Before adding a new attribute, be sure to click Update or Save.
TIBCO Reward User’s Guide
Dimension Definitions | 91
A new condition configuration panel opens, asking you to "Select all who were" sent or NOT sent emails that were handled in one of the following ways:
• delivered
• and opened
• and clicked
• and did not click
• and did not open
• soft bounced
• hard bounced
• soft or hard bounced.
2. Specify the email processing configuration to meet your requirements.
You can choose to target simply by choosing all customers who were sent an email, or you can drill all the way down to those who were sent, delivered, opened and clicked one or more emails (specifically, the email(s) listed selected and displayed in the list in this condition configuration panel). As you make choices in the "Select all who were" drop-down menus, the choices that entail more options end with this character: ">".
3. Add emails to the list by clicking Select Emails...
The Select Emails dialog box opens.
4. Click Update or Save to save your work.
5. To set up another condition, click Add a Condition and repeat steps 2 through 4.
6. When finished, click Done.
Selecting emails in a condition
When you select more than one email using the "Select Emails..." button, the resulting set of customers is the union of all customers who meet the criteria you specify for the emails that you have selected.
For example, if you select all who were sent two different emails in a single condition, the resulting set will include all customers who were sent either of the two emails.
TIBCO Reward User’s Guide
92 | Chapter 7 Dimensions
Multiple conditions
Only one condition can be edited at a time. To save any changes you make when configuring a condition, click its Update button. To discard any changes made since the last time you clicked Update or Save above, click Cancel. To edit a condition in its "collapsed" state, click its Edit button. When you add and configure more than one condition, the resulting set of customers will be derived from the intersection of the set of customers within each condition.
For example, if you select two different conditions, both of which define all who were sent a single specific email, the resulting set will only include customers who were sent both emails.
TIBCO Reward User’s Guide
Email | 93
Chapter 8 Email
This chapter has information about Email features and functionality in CRMS.
Topics
• About Email Communications, page 94
• Email Communications Page on page 98
• Cloning an Email Communication on page 100
• Edit Email Communication Wizard on page 101
• Email Communication Targeting on page 108
• Changing the Status of an Email Communication on page 115
• Creating an Email Campaign on page 118
• Trigger Events on page 121
• Email Test and Seed Lists Page on page 127
• Email Guidelines for New Clients on page 128
• Email Address Requirements and Validation Rules on page 133
TIBCO Reward User’s Guide
94 | Chapter 8 Email
About Email Communications
An Email Communication is a mass mailing that applies email technology. It consists of a single email message and the profiles or lists to which it is addressed. The single message may include personalization tags and dynamic fields, that is to say, variations in content that are dynamically selected and inserted into the message, depending on the profile of the recipient. The message may also include rich content, which typically consists of HTML-based page design elements.
Email communications are often sent to a target audience or to club members for promotional purposes. TIBCO Reward provides a large library of email templates for that frame your content for these purposes. Note, however, that there are no restrictions or limitations to the possible uses of an email communication.
Typical email communications include announcements, offers, invitations, newsletters, and postcards. These messages are often sent to promote products, to announce offer s, or to invite customers to take advantage of a special event. Email communications may be sent to potential customers, new customers, good customers, high value customers, at risk customers, or any other list you can define.
You can associate email communications with a campaign. This causes the data regarding the associated email communications to be associated with and tracked by the campaign reports.
CRMS provides a wizard to help you create and edit email communications. After you finish each step, the wizard saves your work and performs basic tests to identify un met requirements.
To create an email communication, select Email>Create New Email Message. See Email Guidelines for New Clients on page 128 for more information.
To edit an existing email communication, select Email>Communications to open the Email Communications page. Click on the name of the email communication you want to change. This opens Edit Email Communications wizard, which guides you through the steps of defining an email communication by completing a sequence of pages.
The Edit Communication wizard guides you through the completion of the following pages:
• Properties
• Targeting
• Club and Offer
• Rich Content
TIBCO Reward User’s Guide
About Email Communications | 95
• Text-Only
• Summary
After completing each page, click Next Step to advance to the next page until the offer is finished. After reviewing the information on the Summary page and making any necessary corrections, the next step is to change the status of the email communication from saved to submit. At this point, the email communication information is ready for review by your associates or for any formal approval process that your organization may have defined.
TIBCO Reward User’s Guide
96 | Chapter 8 Email
Email Communication Lifecycle Overview
Provide Prerequisites
Before you can complete the definition of an email communication, you may need to develop some or all of the following data components:
• Test list and/or Seed list. For more information, see Email Test and Seed Lists Page on page 127.
• A high-quality list or a well-reviewed customer profile that targets receptive customers. (To avoid common email targeting mistakes, see the Email Communications Page on page 98.)
• Offers and back-up offers that will be live and available to your email recipients at the time when the email communication is being published.
Define the email communication with the Edit Email Communication wizardAn email communication is configured, designed, and scheduled using the Edit Email Communication wizard. This is a multi-step process that ensures all elements of the email are properly established before the email is approved and sent.
When all requirements are met, the status of an email communication can be changed from saved to pending. If approved, the status of the email communication status will be changed to scheduled. On the date and time of the scheduled send, the status will change to live and the email will be sent. If the email is only sent once, its status will then change to completed. An email set up to send over multiple days will stay live until the end of the publish window (that is, until the Pub End date).
If your organization has implemented a formal review process for email communications, you might decide that the change to approved status should depend on satisfactory completion of a final review or a formal approval process while the email is in pending status. Although the design of the CRMS supports such procedural guidelines, such processes are not required or enforced by the CRMS.
Different practical factors can affect the dates when an offer starts and ends. For the purposes of analyzing the success of an email communication or a campaign, the dates of the live offers should fit within a distinct time frame. When you choose an email communication template, you may want to consider both practical and analytical constraints.
TIBCO Reward User’s Guide
Email Communication Lifecycle Overview | 97
Email communications can be sent to either a list of customers, which is static, or to a profile. (For details about lists, see About Target Lists on page 136.) A profile dynamically generates a revised list every day. On the first publishing date, an email communications is sent to the current static list or to the profile-generated list. Thereafter, if sent to a profile, then the communication is sent to any customers who have been added to the profile-generated list; and this incremental mailing occurs every day when the email communication is being published.
Live offers mentioned in an email communication are made available to the targeted customers by links to the TIBCO Reward-hosted Offer Showcase, or through at your store-site or through the TIBCO Reward microsite, or both, according to the schedule that you define.
After an email communication is published, delivery data about the email communication is gathered, analyzed, and summarized for the CRMS user. For each live or completed email communication, a dashboard display appears in the Email Communication Details Summary page, showing the number and percentage of emails delivered, opened, clicked and bounced.
This email communication reporting data is calculated on a nightly basis. Please allow up to 24 hours for data to be updated.
TIBCO Reward User’s Guide
98 | Chapter 8 Email
Email Communications Page
A Communication is a single email message, including any rich content, and the profiles or lists to which it is addressed.
The purpose of the Communications page is to provide access to all Communication records and to help you create and work with Communications.
The Communications page lists all Communications that have been defined or are in the process of being defined.
To open the Communications page, select Email>Communications from the CRMS menu.
Features and Fields
The Communications page includes the following features:
• The Create > New Email Communication option, which starts the Create New Email Communication process.
• The Existing Communications panel includes:
• Standard navigation controls - the Show… filter and the 1 2 3 … page controls
• Date filter - Filters the communication view by Publish Start date Publish End date. This allows you to list all communications that were being published within the time period defined by the publishing start and end dates you select.
• The complete list of Existing Communications
Each row in the list represents an email communication and displays a few key fields. These fields are lined up in columns. Click on a column heading to sort all of the communications in the list by that field.
The following communication fields are displayed:
• Status - this control allows you to see the current status of a communication, and to change the status of the communication when appropriate. For details, see Changing the Status of an Email Communication on page 115.
• # - the unique Communication record ID number, automatically assigned by the CRMS when the record is created.
• Communication Name - the name of the communication as defined by the most recent update. The name is a hyperlink to the communication record, and opens the record in the Edit Communication Details wizard.
TIBCO Reward User’s Guide
Email Communications Page | 99
• Offer Status - If an offer and/or club has been defined for this communication, this value reports whether or not there is a problem with any of the offers or clubs. If there is a problem, there will be a hyperlink ed Problem value in this column. Clicking on Problem will open a pop-up window and display the offers) and/or club that is causing the problem.
• In Campaign - Identifies a campaign to which a communication has been assigned. Shows the default value, No, if a communication has not been assigned to any campaign. See Email>Campaigns Page on page 115 for more details.
• Pub Start - The publish start date of the communication. This is the first date on which the message can be sent to the defined recipients. A communication must be in scheduled status for it to be sent, so for an email to be sent on the publish start date, it must be approved on or before the publish start date. If an email is approved after the publish start date but before the publish end date, it will be sent as soon as possible after the approval.
• Pub End - The publish end date of the communication. This is the last date on which the message will be sent to the define recipients. For one-time message delivery, this date will be the same as the publish start date. If the publish end date is different than the publish start date, each day the same message will be send to new recipients who match the targeting definition, and who were not previously sent the message.
• Open - Displays the open rate of the communication as a percent. Shows n/a if the communication was never sent or if there are zero recipients.
• Extract Stats - Allows you to generate a CSV file containing statistics on the responses for this email.
• Clone - Allows you to clone the associated communication. All attributes of the original email communication, including targeting, are cloned to the copy. For details, see Cloning an Email Communication on page 100.
• Delete - Allows you to inactivate the associated communication. The record remains listed, but it's status is set to inactive.
The most common problem: dates for the offer are not compatible with the dates for the email. To avoid this, make sure that the offer is live within the publishing window defined by the start and end dates of the email.
TIBCO Reward User’s Guide

100 | Chapter 8 Email
Cloning an Email Communication
Cloning an email communication record creates a copy of the record.
To clone an email communication:
• Find the email communication record you want to copy in the Email>Communications page.
• Click Clone in the row of the communication record that you want. This opens the Edit Communication wizard.
The cloned copy of an email communication record includes all of the data in the original, including the template selection and the targeting data, with the exceptions noted below:
• The clone is assigned a new, unique numerical ID (which is listed in the "#" column). This is a system requirement.
• The clone of a record named "XXX" is automatically renamed "Copy of XXX."
• The Pub Start date is, by default, re-set to the date following day when you create the clone.
• The Pub End date is, by default, always reset to a date one week and a day after the initial Publish Start date.
• The status of the new clone is saved.
Tips for using a cloned offer record to create a new offer:
• Check the Pub Start and Pub End dates; in a clone, these will be set to default dates.
• Assign the cloned copy its own new, unique, descriptive name.
• Review every field, and update fields to clearly distinguish the new clone from the original. Add an Internal Note to the clone, contrasting it from the original.
If you make multiple clones of "XXX," they will all be named "Copy of XXX."
TIBCO Reward User’s Guide
Edit Email Communication Wizard | 101
Edit Email Communication Wizard
Use the Edit Communication wizard to create a new email communication (sometimes called an "email message" for short) or to edit the details of an existing email communication.
To use the Edit Communication wizard on an existing communication, click on an existing communication listed in the Communication Name column in the Email Communications page.
To start the Email Communication wizard and create a new email communication record:
• Select Email>Communications in the CRMS menu.
• Click Create New Email Communications.
The Edit Communication wizard guides you through the completion of the pages listed below. For specific instructions, refer to the instructions for completing these pages:
Template (This wizard page appears only when you are first creating a new email communication.)
• Schedule
• Tracking
• Properties
• Targeting
• Club and Offer
• Rich Content
• Text-Only
• Summary
You can also create a new email communication by cloning an existing email communication. Cloning is especially useful when you want to duplicate most of the attributes of the existing email message.
CRMS also sends out another form of email: the Trigger Event Response Email, sometimes called Trigger Email or Response Email. Response Email responds to trigger events. In general, Trigger Event Response Emails are used for customer service purposes and not so much for promotional purposes, as Email
There may be prerequisites for creating your email communication. See About Email Communications on page 94 for details.
TIBCO Reward User’s Guide
102 | Chapter 8 Email
Communications are. However, both are forms of email, and there are similarities in the way they are composed, so the two can easily be confused by new CRMS users. See Trigger Events on page 121 for an overview that will clarify the distinct features and purposes of Response Email.
Email Communication TemplateThe Email Communication Template page allows you to select an email template for your email message from a selection provided by TIBCO RewardReward. This page also gives you the option to use a blank template and insert your own content.
The first step in creating a new email communication is to choose an email template using the Email Communication Template page. To open this Template, select Email>Communications>Create New Email Communication.
Choose Template
The tab names on this page indicate the type of templates they contain:
• Basic - This tab includes two template options: Blank HTML and Text-Only.
• Newsletters - For communicating articles and other content of interest to your recipients.
• Offers - Designed to present multiple offers; also provides room for several additional messages. Some Offer templates are designed to serve a specific strategic function.
• Invitations - Used to invite customers to store or other events.
• Postcards - Similar in shape and size to a printed postcard, this is the most commonly used format for single message emails. Creative elements fit well in the space, and the format leverages the benefits of a single message-per-email approach. High impact with minimal complication.
Selecting an Email Template
Below the image of each template is its name and a brief comment on the associated template design, including its basic strengths and the best ways to use it to your advantage.
1. Review the template options.
You cannot go back to this template page after you have clicked Next Step. This means that you cannot switch to a different email communication template after you have chosen a template to use for an email communication.
TIBCO Reward User’s Guide
Edit Email Communication Wizard | 103
2. Match your goals and constraints to the best option. Review the text description for the template.
3. Select the template.
4. Click Next Step to commit to the selected template.
Email Communication PropertiesIf you are editing an existing email communication, the template has already been selected, and the wizard opens with the Properties page; otherwise, for new email message, the wizard opens first with the Templates page.
The Properties page allows you to define email data under three headings:
• Schedule
• Tracking
• Properties.
Use the Properties page of the Edit Email Communication wizard to establish when the email communication will be sent and when it will be tracked, and to assign the email a name, subject line, and any address data that will remain the same on all emails (the From Name and Address, and the Reply to Address).
You can also use the Properties page to set up various properties of the email that are useful for administering, monitoring and assessing an email communication.
• If you are using the Text-Only template, ensure that there is information to comply with CAN-SPAM Act of 2003 requirements.
• You can navigate within this Templates page, from tab to tab, selecting and re-selecting templates, until you find the right choice. However, when you click Next Step, your template selection is irreversibly established in the current new email communication creation process. To use a different template, you must start over.
• Be aware that your selection of a template suggests a default name for your email communication. For example, if you select the Offer Newsletter template, your email communication is automatically assigned the default title, "email communication (Offer Newsletter)." You should overwrite this title or add text to make it more specific and meaningful at a later date.
TIBCO Reward User’s Guide
104 | Chapter 8 Email
Fields and Features
Schedule section
Specify when to send the email by responding to the following question in the Schedule section:
When do you want to send this email?
• When a customer enters a mobile geolocation radius
• Today
• On a specific date
Geolocation Trigger Events
If you click radio button next to When a customer enters a mobile geolocation radius, then you must specify Time of day to send this email:
• Today
• On a specific date
Time of day to send this email
Note: If you choose Today and select As soon as possible from the pull-down menu, then each email will be sent from the CRMS system as it is built (customized) for each recipient. If you choose a time of day, the set of email messages will be built in advance of the send time. At the send time, the process of sending the individual emails will begin. Depending on the quantity of email, this may take some time. As soon as possible usually means that sending starts in about 20 minutes. As soon as possible on a future date means that sending starts at 12 a.m .Eastern time (9 p.m. Pacific Standard time on the day before the specified date.)
• Geolocation capabilities delivered in the 12.3 release lay the groundwork for future geolocation-based functions. Beta capabilities enable the configuration of mobile geolocations that can be included in shopper profile targeting dimensions. Beta capabilities do not currently support delivery of geolocation targeted offers or messages to a customer's mobile device.
• Important: Because geolocation features are not complete (beta), if mobile geolocation targeting dimensions are included in a shopper profile, no shoppers will qualify for offers or messages that use the shopper profile.
TIBCO Reward User’s Guide
Edit Email Communication Wizard | 105
Keep evaluating and sending this email?
Tracking section
The Tracking section allows you to specify a range of dates (inclusive) when customer clicks on the URLs in an email communication will be recorded.
Tracking Dates - These start and end dates define a period during which the links in the emails are monitored. Full tracking results are included in the clickthrough reports. Some tracking data, Opens and Clicks, are summarized in the Email Communication Summary page's Dashboard section, which is displayed for live and completed email communications.
If the CRMS user selects the Track all links check box in the Properties section of this page, the reports cover all links in an email; otherwise the reports cover only the links that are marked as trackable.
Properties section
The following fields are used assign to the email certain elements that will be the same on all email communications:
• Email Internal Name - This is the name used to identify a specific email communication record in the CRMS system. It is displayed in the Communication Name field in the Email Communication page. Use this field to assign or modify this name. (Although the CRMS assigns a name by default, you and your associates should always customize this name to make it unique and easily identifiable. TIBCO Reward recommends that your organization should develop its own naming convention for these names.
• From Name - This is the name that will appear in the From field in the address lines at the top of an email communication.*
• From Email Address - This is the name that will appear in the From Email field in the address lines at the top of an email.*
• Reply Email Address - This is the name that will appear in the Reply field in the address lines at the top of an email.*
• If you choose "Yes, once a day until a specific date", the system will re-evaluate all of your target customer profiles every day to see if someone new matches the targeting profile. Each day, the system will send your email to these new customers, until the date specified.
• Important: If you are editing an existing email communication, the template has already been selected, and the wizard opens with the properties page. After an email template has been selected for an email communication, you cannot switch to a different template.
TIBCO Reward User’s Guide
106 | Chapter 8 Email
* Note: Different email systems, and different options available in the same email system, can change the amount of information and types of information displayed to the email recipient at the beginning of each email. Some of these fields may not appear on an email recipient's emails, depending on the system and system settings in use by the individual.
Subject - This is the text that will appear in the Subject line on email messages sent as part of this email communication.
The following fields are used to set up lists, campaign associations, link tracking, and outgoing the email an internal name, address data that will remain the same on all emails (the From Name and Address, and the Reply to Address), and a subject line:
• Test List - Use this drop-down field to specify which test list to use (optional). For details, see Email Test and Seed Lists Page on page 127.
• Seed List - Use this drop-down field to specify which seed list to use (optional). For details, see Email Test and Seed Lists Page on page 127.
• Part of a Campaign - Use this drop-down menu to specify which campaign (if any) this email communication is associated with.
If you associate an email communication with a campaign, all of the tracking data collected for the email communication will be rolled up to the campaign reports. Several email communications can be associated with a campaign, and the campaign report may provide indications of how well each email communication succeeded in different ways.
TIBCO Reward recommends adding every communication to a campaign, even if there is only one message in the campaign. Reporting on control group behavior is currently only available for communications in a campaign.
Track All Links - Use this option to track clickthrough on all links contained in your email. This tracks all links in an email and displays the results in clickthrough reports. Some tracking data, Opens and Clicks, are also summarized in the Email Communication Summary page's Dashboard section, which is displayed for live and completed email communications.
Note that certain links cannot be properly tracked at this time. These include:
• Links with CSS or inline-style information - if your link has the form <a class="classname [etc.] or <a style="color: [etc.] then it will not convert properly.
• Area tags - If your link has the form <area [etc.] then it will not convert properly.
• Links with line breaks in the href - While hrefs should not contain line breaks, it is technically possible for them to occur. These will not convert to tracked links.
TIBCO Reward User’s Guide
Edit Email Communication Wizard | 107
You can test which links are converted by examining your HTML preview. Any link that is not represented with a "http://click.instorecard.com/[etc.]" URL was not converted.
It is not necessary to name all of your links, but it is recommended if you wish to create clearer, easier to read reports. If you do not name your links, their URLs (some of them long and awkward to decipher) will appear in reports instead.
To name links, use the "title" property in your links. For example, <a href=http://www.loyaltylab.com title='TIBCO Reward'>Reward Link</a> will display 'TIBCO Reward' as the name for this link in reports.
When Track All Links is enabled on a URL that includes personalization, the report shows the link before the tag is resolved.
TIBCO Reward strongly recommends leaving the Track All Links options checked for every single message you send.
Multipart MIME - When this box is checked, each email will be sent as a multipart MIME message. This means each recipient will be sent in both a text and an HTML version. Their email client will display one or the other, depending on their local preferences.
Checking the multipart MIME box is strongly recommended, as it will improve email delivery rates.
Control Group - Control groups are used in conjunction with Campaigns to determine and report incremental sales and response. The CRMS system randomly selects a control group composed of 5% of the target population, up to maximum of 10,000 email addresses. This control group does not receive the email message, and their behavior with respect to the contents of the email is used as a control for the purposes of evaluating the email's effectiveness.
Control Groups are only valid for communications targeted to at least 10,000 recipients, and then they make sense only if you link the email communication to a Campaign. A control group serves largely as a basis for comparing sales information, and you cannot report sales information and sales lift information unless you include the communication in a campaign.
Internal Note - Use this space to record notes to yourself and any associates who might work with this email communication.
TIBCO Reward User’s Guide
108 | Chapter 8 Email
Email Communication Targeting
The Targeting page displays estimated data about the emails in the currently defined target, and allows you to define that target by specifying profiles to be included and excluded.
Use the Targeting page of the Edit Email Communication wizard to establish to whom the email communication should be sent.
Fields and Features
Target Estimates
The Target Estimates component displays estimates based on your currently defined target. This information is just an estimate, as both targeting profile populations and list populations are calculated and updated on a nightly basis. To view all detailed estimates (explained below), click More Details to expand the display and show the following data:
• Included Registered: The number of registered customers that are targeted to receive this email.
• Excluded Registered: The number of registered customers that will be excluded, based on Profiles or Lists set for exclusion below.
• Included Unregistered: The number of unregistered customers that are targeted to receive this communication.
• Excluded Unregistered: The number of unregistered customers that will be excluded, based on Profiles or Lists set for exclusion below.
• Offer Present: The number of unregistered customers that will be removed from the targeted set if the email includes an offer. This is due to the fact that offers cannot be sent to unregistered customers.
• Invalid Email Addresses: If there are malformed or invalid email addresses in the target pool, those addresses will be removed from the final Emails to Send estimate.
• Control Group: If there is a Control Group defined for this communication, those customers will be removed from the final Emails to Send estimate.
• Emails to Send: The sum of all the estimates above, this is effectively an estimate of the number of emails that will be sent with the current settings.
To whom do you want to send this communication?
You can choose to target to all registered customers, or choose to limit targeting to one or more selected Profiles and/or Lists.
TIBCO Reward User’s Guide
Email Communication Targeting | 109
To target all registered customers: choose All customers.
To target to selected Profiles or Lists: choose "Only selected Profiles or Lists" The screen changes significantly: a list appears, allowing you to select and add the profiles and lists to target (that is, to which the email message should be sent). You can also create a new profile and add it to this list.
For information about selecting and adding targeting information, either to add include or exclude targets, which uses the same methods.
Should anyone be excluded from this communication?
When one or more Profiles or Lists are chosen for exclusion, any customers that match any of those Profiles or Lists will be excluded from the targeted set of customers, which is either "All customers" or the Profiles or Lists you've chosen to include above.
To exclude Profiles or Lists: choose Yes, selected Profiles and/or Lists. Then click Exclude Profiles or Exclude Lists to launch the appropriate dialog box.
Email Communication Rich ContentThe Rich Content page allows you to see and edit the HTML code for the selected email template. It also allows you to generate and add several different types of Client- and customer-specific elements to the email template.
The Rich Content page allows you to specify the dynamic fields and elements you want to add to an email, and then generates the personalization tag for these. You can then insert the personalization tag for each dynamic field into your email in the appropriate locations. These dynamic fields enable your email to extract data from the extensive database of information maintained for your company by TIBCO Reward. The appropriate data is extracted and inserted into the email message for each customer, where it displays information selected for that customer.
For example, you can insert such elements as a field displaying the customer's first name, point balance, last award or award date; or elements of one of the offers that you selected in the Clubs and Offers page of the Email Communications wizard, including an image; or a URL that links this customer to a questionnaire or to a refer-a-friend site (assuming you have set up the options to support these elements).
When you exclude Profiles, only the dimensions of those profiles that have "Customer MUST match above criteria..." checked will affect the exclusion calculation. The Profile chooser window will show you whether a profile has a "MUST match" dimension defined. Although you can choose to exclude a Profile that does not have a "MUST match" dimension, it will have no effect on the exclusion calculation. Lists will always exclude all of their membership.
TIBCO Reward User’s Guide
110 | Chapter 8 Email
If you want to customize an email communication, the Rich Content page provides the basic code display and text editing environment that you need.
Fields and Features
Preview [button] - Click this button to see a rendering of the displayed code for this email, as it currently appears in this Rich Content page. This rendering appears in the Email Preview dialog box. Be aware that, without a link to an real email recipient, it is impossible to address much of the content, and only a few elements of the template may appear.
• Current Personalization and Default Personalization. In the Email Preview dialog box, you can click on Current Personalization to get a slightly better sense of how the text will appear when an individual customer is associated with the email. Similarly, you can click on Default Personalization to get a sense of how the text will appear when no individual customer is associated with the email and the default values are displayed.
Field Type - Use this drop-down menu to choose the type of field code you want to generate. By first selecting the type of field you want to use, you narrow down the list of fields from which you can select. Your selection of Field Type may also change the other field selections you need to use, as follows:
• If you choose General, a Default data entry field appears in addition to the Fields drop-down menu. You can use this Default text entry field to specify some default text to be used if specific field data is not available for a specific customer.
• If you choose Offers, another (untitled) drop-down selection box appears after Fields. From this selection, choose each piece of Offer data to be generated; for example, the offer headline, description, qualification End date or expiration date.
• If you choose Programs, another (untitled) drop-down selection box appears after Fields. From this selection, choose a piece of fundamental main program data to be generated.
• If you choose Trackable URL, both a Name and a URL field appear. Use these to assign a name to the trackable field and the URL for that field, respectively.
Field - Use this drop-down menu to choose the field you want to generate. The Fields displayed are of the Field Type you selected.
If you have created a Custom Attribute field that records some unique piece of data about your customers, you can personalize your emails for each customer by adding this unique attribute to each email. Although Custom Attribute fields that you define in CRMS are not listed in the standard drop-down menus, they can be added to an email communication.
TIBCO Reward User’s Guide
Email Communication Targeting | 111
Generate [button] - Click this button to generate a personalization tag that you can insert into the email template.
Generated - This field contains the generated personalization tag, which represents the field, default data, program data, or name and URL that you selected. Copy the generated field and paste it into the template in the appropriate location.
Adding Custom Attribute Tags
You can define a Custom Attribute for a shopper (customer) in the CRMS, and then add a custom attribute tag to an email communication so that the custom attribute field value for a specific shopper is added to an email communication. For example, you could define "birthday" as a custom attribute for your shopper, collect birthday data for shoppers, and then insert a custom attribute tag into the email that would add a shopper's birthday data into each email.
Because you define customer attributes in the CRMS, custom attribute fields are not listed in the standard drop-down selection boxes. To add a custom attribute tag, you must know the tag name (the name of the CustomAttributeDefinition ReferenceTag field) that your organization defined and uses to refer to the custom attribute. Usually this is something simple, like "birthday".
Custom attribute tags for shoppers are named according to the following convention:
@(shopper:customattrib:<reference_tag_name>)
where: the reference_tag_name maps to the CustomAttributeDefinition ReferenceTag field.
So, if a CRMS user creates a (shopper) custom attribute with ReferenceTag = "Birthday", the corresponding tag would be:
@(shopper:customattrib:birthday)
• JavaScript is not allowed in email. Email clients will not allow the use of JavaScript within email due to security concerns. If you copy and paste HTML from a web page, be aware that it may contain JavaScript or other tags, such as Flash EMBED and OBJECT tags, that may not render as expected or may cause failure or rejection of the email.
• Few email clients will correctly support CSS in email. TIBCO Reward recommends formatting be done with inline style definitions, not classes.
• You can substitute "s" for shopper, so the following also works:
@(s:customattrib:birthday)
• Make sure there are no spaces within the tag.
TIBCO Reward User’s Guide
112 | Chapter 8 Email
Email Communication Text-OnlyThe Text-Only page allows you to see and edit the text only version of your email template.
The Text-Only page also allows you to generate and add several different types of Client- and customer-specific elements to the email template.
Before using the Text-Only page, you will typically want to click Update from HTML to bring in text from the HTML (Rich Content) version. This option strips out all of the HTML formatting and includes just the text from your rich content version.
The Text-Only page allows you to specify the dynamic fields and elements you want to add to an email, and then generates the code for these -- as appropriate for email rendered in text-only format. You can then insert the code for each dynamic field.
Dynamic fields enable your email to extract data from the extensive database of information maintained for your company by TIBCO Reward. The appropriate data is extracted and inserted into the email message for each customer, where it displays text information selected for that customer.
For example, you can insert such elements as a field displaying the customer's first name, point balance, last award or award date; or text associated with one of the offers that you selected in the Clubs and Offers page of the Email Communications wizard; or a URL that links this customer to a questionnaire or to a refer a friend site (assuming you have set up the options to support these elements). You cannot insert images or formatted text.
Fields and Features
Preview [button] - Click this button to see a rendering of the displayed code for this email, as it currently appears in this Text-Only page. This rendering appears in the Email Preview dialog box. Be aware that, without a link to an individual email recipient, it is impossible to address much of the content, and only a few elements of the template may appear.
In the Email Preview dialog box, you can click on Current Personalization to get a slightly better sense of how the text will appear when an individual customer is associated with the email. Similarly, you can you can click Default Personalization to get a slightly better sense of how the text will appear when no individual customer is associated with the email and the default values are displayed.
Field Type - Use this drop-down menu to choose the type of field code you want to generate. This narrows down to a reasonable number the list of fields from which you can select. Your selection of Field Type may also change the other field selections you need to use, as follows:
TIBCO Reward User’s Guide
Email Communication Targeting | 113
• If you choose General, a Default data entry field appears after the Fields drop-down menu. Use this Default to supply default text to be used if specific field data is not available for a specific customer.
• If you choose Offers, another (untitled) drop-down selection box appears after Fields. From this selection, choose each piece of Offer data to be generated; for example, the offer headline, description, qualification End date or expiration date.
• If you choose Programs, another (untitled) drop-down menu appears after Fields. From this selection, choose a piece of fundamental main program data to be generated.
Field - Use this drop-down menu to choose the field you want to generate. The Fields displayed are of the Field Type you selected.
Generate [button] - Click this button to generate personalization tags that you can insert into the email template.
Generated - This field contains the generated personalization tag, which represents the field, default data, program data, or URL that you selected. Copy the generated field and paste it into the template in the appropriate location.
Email Communication SummaryThe Summary page performs several functions:
• Provides an at-a-glance review of the email communication. This review summarizes progress on its development and allows you to see a one-click review of the data entered for each page in the wizard.
• Allows you to see the email communication in the either HTML or text-only presentation format.
• Helps you with email test-related activities, such as sending the email to the Test List, sending the email to a Spam Filter monitor (Return Path®), and logging into the Return Path® site to see results.
Fields and Features
Send to Test List
Click this button to send copies of the email message to the Test List. (Tests lists are defined using the Email Test and Seed Lists page.) Be aware that, when you send emails to your test list, the dynamically rendered URL Field tags in your email messages do not link correctly in the received emails.
Send to Spam Filter Monitor
TIBCO Reward User’s Guide
114 | Chapter 8 Email
Click this button to send copies of the email message to the Spam Filter Monitor of Return Path® (described below). Usually, you must wait at least ten minutes for Return Path to receive and process email data.
Login to Return Path
This button is a link to the website of Return Path®, which provides email client monitoring services. All TIBCO Reward clients are subscribed to this system when they come onboard with TIBCO Reward, so you should automatically be logged into a Return Path site that monitors your emails.
A short time after you send your email to the Spam Filter Monitor, you can click Login to Return Path to open the Return Path site, then navigate to its Campaign Preview tab to get information about your email message, e.g., how your email message appears on different browsers, and how well it performs against the most commonly used spam content filters.
Summary bars (blue bars) corresponding to each page in the Edit Email Communication wizard page sequence. The bar corresponding to a page may include an error message if there is a problem with the page.
• To see more page details, click on the (down arrow) button to expand the summary display.
• To open and edit each page, click Edit.
TIBCO Reward User’s Guide
Changing the Status of an Email Communication | 115
Changing the Status of an Email Communication
The current status of each email communication is displayed in the Existing Communications table on the Email>Communications page, in the email communication status control that appears in the left-most column:
You also use this control to change the status of an email communication. If you click on the down arrow in the offer status control box, the currently available option(s) appears in a drop-down list. Select the new status; unless the change is blocked (for example, because some requirement has not been met), the email communication will take on the status you have selected.
Email Communication Status Table
Depending on the current status of an email communication, the options available to you in the Status control box will change, as indicated in this table:
For example, if an email communication is in pending status, then you can either approve or deny the email communication. An approved offer will automatically be published on its specified publish date, and the status will change to live at that time.
Email>Campaigns PageA campaign allows you to define a set of related email communications associated with a marketing campaign and to track the responses and sales associated with this set of emails.
The results of a campaign are summarized in the campaign dashboard, and details are provided in an extensive set of campaign reports.
If Status is... ...you can select:
saved submit
pending approve or deny
scheduled unapprove or launch
live complete
inactive saved
TIBCO Reward User’s Guide
116 | Chapter 8 Email
Campaign Management reporting data is calculated on a nightly basis. Please allow up to 36 hours for Population data to be updated after it has reached TIBCO Reward.
To open the Campaigns page, select Email>Campaigns.
Features and Fields
The Campaigns page includes the following features:
• The Create > New Campaign option, which starts the Create New Campaign process.
• The Existing Campaigns panel consists of:
— Standard navigation controls - the Show… filter and the 1 2 3 … page controls
— The complete list of Existing Campaigns.
Each row in the list represents a campaign record and displays a few key fields. These fields are lined up in columns. Click on a column heading to sort all of the campaign in the list by that field.
The following campaign fields are displayed:
• Status - this control allows you to see the current status of a campaign, and to change the status of the campaign when appropriate.
• # - the unique campaign record ID number, automatically assigned by the CRMS when the record is created.
• Campaign Name - the name of the campaign as defined by the most recent update. The name is a hyperlink to the campaign record, and opens the record, usually displaying the Email Campaign Details Page.
• Communication Status - If an email communication has been associated with this campaign, this value reports whether or not there is a problem with the email. If the word "problem" appears, click the linked Campaign Name in this row to open the Campaign Summary page, then address the problem in the email. For example, if the offer in the email ends before the campaign starts, you would want to change the offer or select a different offer.
• Pub Start, Pub End - The Pub Start date and Pub End date define the start and end of the campaign. All email communications to be included in a campaign must be published within these start and end dates. An email communication that is part of a campaign may not start before the campaign's Pub Start date or end after the Pub End date.
TIBCO Reward User’s Guide
Changing the Status of an Email Communication | 117
You define the Pub Start and Pub End dates in the Campaign Properties page, in the "Dates" start and end fields. The Campaign Properties page appears immediately after you click Create New Campaign. Note that the Pub (Dates) Start and End dates may be different than the Campaign Tracking dates. Sales summaries for a campaign (e.g., Campaign Summary Reports) show sales data for the period defined by the tracking dates.
• Author - Displays the name of the CRMS user who authored the campaign (the user who was logged in).
• Delete - Allows you to inactivate the associated campaign. The record remains listed, but its status is set to inactive.
TIBCO Reward User’s Guide
118 | Chapter 8 Email
Creating an Email Campaign
A campaign allows you to define a set of related email communications and to track the sales that result from these email communications.
The results of a campaign are summarized in the campaign dashboard, and details are provided in an extensive set of campaign reports.
To create a new email Campaign, open the Email>Campaigns page and click the Create > New Campaign link. This opens the Edit Campaign page, which you use to define the name and important dates for the campaign, along with notes on the campaign for internal use.
After you click Done, you can create email communications to be associated with the campaign.
You can also create a new campaign by cloning an existing Campaign. Cloning is especially useful when you want to duplicate attributes or features of an existing campaign.
Email Campaign Properties PageUse the Campaign Properties page to define the name of the campaign and to establish key dates for the campaign. The date indicate when the email communications that are part of this campaign can be sent, and when the campaign will formally start and end for the purposes of reporting.
Fields and Features
The Campaign Properties section includes the following:
• Campaign Name - This is the internal name used to identify a campaign in the CRMS system. It is displayed in the Campaign Name field in the Email>Campaign page. Use this field to assign or modify this name. --Although the CRMS may assign a name by default, you and your associates should always customize this name to make it unique and easy to distinguish from others. TIBCO Reward recommends that Clients develop their own naming conventions for campaign names. Campaign Name example: 2012 Q1WinterCloseOut1 Snowflake.
• Dates - These dates are displayed as the Pub Start and Pub End Dates on the initial Email>Communication page. All emails to be included in a campaign must be published (sent) within these campaign dates. These dates thus provide an indication of which emails were included in the campaign. To enter a date, click on a calendar icon to open the calendar date selector, then click on a date to select it. The Pub (Dates) Start and End dates can be different
TIBCO Reward User’s Guide
Creating an Email Campaign | 119
than the Campaign Tracking dates, although they are typically set to be the same by default.
• Tracking Dates - The tracking dates define the time period for which sales are tracked for this campaign. Sales during the campaign tracking period are summarized in the Campaign Summary Reports. To enter a date, click on a calendar icon to open the calendar date selector, then click on a date to select it.
The Campaign Summary Report include summary data for all the campaigns with any tracking dates within a specified time frame, for example, the month of May. (You specify the time frame when you request the report.)
• Internal Notes - Use the Internal Notes to record notes about the campaign.
Email Campaign Details PageThe Campaign Details page provides basic information and status updates about a campaign, including any email communications currently associated with the campaign. It also allows you to add a new email communication directly to the campaign using the Edit Email Communication wizard.
The Campaign Details page opens immediately after you successfully complete the Campaign Properties page and click Next Step.
If you have already provided the Campaign data required by the Campaign Properties page, then the Campaign Details page opens immediately when you click on the name of a campaign in the Email>Campaigns page.
Features
The Campaign Details page includes the following features, each of which is accessible by clicking on a down arrow located on the right edge of the blue summary bar:
• The Dashboard view displays key information and a status update about the campaign that include response and sales data.
• The Properties view presents a quick review of the data you entered in the Properties page. To edit this information, click Edit. For information about the data in this view, refer to the help on the Email Campaign Properties Page.
• The Communications view lists the email communications currently associated with the campaign and also allows you to add a new email communication directly to the campaign. If the Communications summary bar indicates that you have "No Communications", then this campaign is incompletely defined.
TIBCO Reward User’s Guide
120 | Chapter 8 Email
To add an email communication to the campaign immediately, click Add a New Communication>Email. This opens the Edit Email Communication wizard. You can use this wizard to create a new email communication. When you finish defining the new email communication, re-open the Campaign.
If you prefer to add an email communication in a separate session, including an existing email communication, you can create or edit an email by starting from the Email>Communications page. To add an existing email communication to a campaign, click on the email to open it in the Edit Email Communications wizard. The Email Communication Properties Page opens. Use the Part of Campaign drop-down menu (near the bottom of the page). Select the campaign to which the communication should be added, then click Save.
Confirm that each email communication has been correctly added to the campaign by opening the Communications view in the Campaign Details page.
TIBCO Reward User’s Guide
Trigger Events | 121
Trigger Events
About Trigger Events, Response Email, and Stationery
Trigger Events, Trigger Event Response Emails (a.k.a., response email or trigger emails), and Stationery are the basic components of a CRMS feature that uses email for to deliver customer support messages. These email messages are generated in response to trigger events.
Trigger Events
A trigger event is an event that can be addressed with a customer service email.
The trigger event may be a customer registration, a request, a confirmation of the completion of a process or arrival at a threshold, an availability or expiration date, a reminder date, or any of several other events to which a Client wants to respond automatically.
For example, the "Forgot Password" response email message is set up and administered by using the Trigger Events system. These emails are automatically sent out when the triggering event occurs (a customer signals that he forgot his password). In addition, Reminder emails are controlled by the Trigger Event system.
For a list of the Trigger Events currently available, including a description of each trigger event, see Email Trigger Event Descriptions on page 122.
Trigger event response emails are NOT the same as Email Communications. (This is a distinction that confuses some new clients.) Email Communications are typically marketing emails that are sent to a targeted group of customers on dates that you explicitly choose, often in connection with a Campaign. Although some Trigger event response email behaves similarly to Email Communications, these different classes of email are managed separately.
Avoid disabling a trigger event that is currently enabled! Currently enabled trigger events may be crucial for the smooth and continuous operations of your loyalty system.
Trigger Event Response Email
TIBCO Reward User’s Guide
122 | Chapter 8 Email
Using the CRMS, you have the option to set up a response email to respond to a trigger event. The CRMS provides a standard Response Email that you can clone, customize and personalize in several ways. For example, many Clients set up their own alternate response email in the CRMS by designing their own corporate Stationery format and assigning this Stationery to their response email.
To change either the Response Email associated with a trigger event OR the Stationery associated with such a (live) Response Email, create a clone of the response email associated with the currently enabled trigger event, then work with the clone and test it until it is ready to go live. Then substitute it for the current response email without disabling the trigger event. Although you can "disable" the trigger event and work on the current response email, this approach effectively stops all email responses to this trigger event, which has potentially harmful results.
What is Stationery?
Stationery allows you to change elements of a trigger event response email, such as the header and footer or a graphic element, without touching the content of the email itself. Stationery is used solely with Trigger Events. It Note that stationery formats are NOT available as templates in Email Communications.
Email Trigger Event Descriptions
The following email trigger events are available:
• Welcome - A new customer has signed up for your program online on the Microsite or through APIs. This email welcomes the new customer. This can include a reiteration of program benefits.
• External Registration - A new customer has signed up for your program at a store or during a transaction. Importing transaction or shopper files triggers this email, which welcomes the new member. This message can include a reiteration of program benefits.
• New Offer Available - No longer supported. Do not use.
• Accepted Offer Expiring - No longer supported. Do not use.
• Award Earned - The customer has earned a new award. This email informs the customer of the award.
• New Password Request - The customer has forgotten their password. This email sends a new random password to the customer. The customer can change their password after signing in.
All email generated and sent by the CRMS includes From and Reply To fields. Before you set up any email, define the text to be used in these fields, using the Email>Settings page.
TIBCO Reward User’s Guide
Trigger Events | 123
• Award Reversed - The customer no longer qualifies for an award previously earned. This email informs the customer of the award reversal.
• Multiple Awards - No longer supported. Do not use.
• Registered Card Expiring - A members registered card (credit, loyalty, debit, or other) expires at the end of the month. This email asks the member to visit the member portal and update the card information.
• Partial Registration - A new customer has partially registered for your program. This email requests they visit the customer portal and complete their registration. No longer supported. Do not use.
• Shopper Information Updated - The customer has changed one or more elements of their profile. This email confirms the change(s) and includes the specific elements changed.
• Email Address Change Requested - The customer has requested a change to their email address. This email is sent to the new email address to confirm the change. The email address does not change until the customer clicks on a link within the email.
• Friend Referred - A customer has referred a friend to join your program. This email invites the friend to join your program.
• Partial Registration via Cell Phone - No longer supported. Do not use.
• Next Tier - The customer has changed tiers. The customer now belongs to the next
• tier up. This email informs the customer of their new tier association.
• Previous Tier - No longer supported. Do not use.
• First Reminder - This email reminds the shopper of an occasion.
• Second Reminder - This email reminds the shopper of an occasion.
Email>Trigger Events Page OverviewUse this page to set up email messages (trigger event response emails) that your customers receive when certain trigger events take place (e.g., new password request, new offer available). These response emails are automatically sent out when the triggering event occurs.
This page:
• lists the standard trigger events that can generate response emails
• allows you to enable or disable specific response emails
• provides access to response email viewing and editing capabilities
TIBCO Reward User’s Guide
124 | Chapter 8 Email
• allows you to send a response email to a test list.
The CRMS identifies 18 trigger events that are commonly associated with these customer service emails. There is no limit to how many of these trigger events can be enabled or disabled at any one time. However, at least one message must be assigned before the event can be enabled.
To open this page, select Email>Trigger Events.
Features and Fields
The Trigger Events page includes the following features:
The Edit Address Settings option, labeled: Click here to edit your From, To, and Reply email. Clicking this link opens the Email>Settings page, which allows you to define the following email settings that will be suggested, by default, for each email response:
• "From" Email Address
• "From" Name
• "Reply" Email Address.
• The Trigger Events panel, which displays a list of all trigger events that have been defined or are in the process of being defined.
Each row in the Trigger Events list represents a trigger event and displays a few key fields. These fields are lined up in columns. Click on a column heading to sort all of the trigger events in the list by that field.
The following Trigger Events fields are displayed:
• Enabled/Disabled Status - This control allows you to see the current status of a trigger event, and to change the status of the event when appropriate. Be aware that changing the status from enabled to disabled has potentially harmful consequences!
To enable or disable a trigger event, change the status setting in the drop-down list to the left of each Event name. When an Event takes place, and the event is enabled, the Response Email assigned to this event is sent to the customer. If the Event is disabled, no email is sent when the event occurs.
Avoid disabling a trigger event that is currently enabled! Some trigger events are crucial for the smooth and continuous operations of your loyalty system. See the topic titled How to Modify Response Emails without Disabling Trigger Events.
TIBCO Reward strongly recommends that you send the response email assigned a trigger event to a test list prior to enabling that trigger event.
TIBCO Reward User’s Guide
Trigger Events | 125
• Trigger Event - The name of each trigger event available in the CRMS. Click this name to change or view the properties of a trigger event: the Manage a Trigger Event page appears. You can create a new response email for the event or choose from existing response emails.
Note that some trigger events in this list may no longer be supported. For an updated list of the trigger events, including information on their current availability and a brief explanation of the purpose of each, click on this link: Email Trigger Event Descriptions.
• Assigned Response Email - This is the response email that the customer will receive when the event takes place.
• Preview - Click this link to preview the email for a trigger event.
• Send to Test List - Clicking this button automatically sends the assigned message to a pre-selected list. You are NOT asked to confirm this action. For details, see Email Test and Seed Lists.
Managing a Trigger EventUse this page to create, assign and manage response email message content for an trigger event.
To open this page, click the Event name in the Email>Trigger Events page. The Manage a Trigger Event page opens with the current data for that trigger event.
Note that some trigger events in this list may no longer be supported.
For an updated list of the trigger events, including information on their current availability and a brief explanation of the purpose of each, click on this link: Email Trigger Event Descriptions.
Features and Fields
Properties:
• Description - This explains the specified trigger event that triggers the email message you assign. This description may also describe the kind of information typically included in the response email.
• Event Status - Reflects the current status: a reminder indicating whether the Event is currently enabled or disabled.
Avoid disabling a trigger event that is currently enabled! Some trigger events are crucial for the smooth and continuous operations of your loyalty system.
• Bulk Email - Includes notes regarding response emails and customers' bulk email settings. Some events observe these bulk email settings and some do
TIBCO Reward User’s Guide

126 | Chapter 8 Email
not. This is a reminder that the Event Response email is a Service email and not subject to Bulk Email settings.
TIBCO Reward User’s Guide
Email Test and Seed Lists Page | 127
Email Test and Seed Lists Page
Test Lists and Seed lists are collections of email addresses that are used for the purpose of assuring the quality of outgoing emails. Test lists and seed lists are managed under the Email tab of the CRMS menu.
You use a test list to test the appearance and behavior of an email communication or a trigger event response email. The email communication or trigger event response email is sent to the test list, providing copies of the email for testing and QA purposes before it is sent to customers. Note: Because many personalizations and variations are possible in email communications, the emails sent to a test list do not represent a comprehensive sampling.
A seed list is added to the normal email address lists of an email communication to assure that a specific set of email addresses (e.g., the addresses of the manager and staff working on the campaign, the associated marketing managers, and the CEO) receive a copy of the email sent out.
For email communications sent out over multiple days (as in the case where a profile is used as the target), the email is sent to the seed list only on the first day.
Test or Seed List Requirements
To use a test list or seed list, you must first create the file containing the list, then find and upload the file from the Test and Seed List page.
Your file must be in one of the following formats:
• Comma delimited (.csv)
• Text Tab delimited (.txt)
• Text with line breaks between addresses (.txt)
To add a new test or seed list:
1. Create a list of email addresses conforming to the Test or Seed List Requirements above, and save it to your computer.
2. Select Email>Test & Seed Lists. This opens the manage test & seed lists page.
3. In the Name field, type in a descriptive name for your list.
Microsoft Excel® can save comma delimited and tab delimited files; Microsoft Word® can be used to create a text file with line breaks.
TIBCO Reward User’s Guide
128 | Chapter 8 Email
Email Guidelines for New Clients
Reputation is Everything
The main algorithms used by ISPs to identify spam are based on the sender's reputation. Reputation is measured differently by every ISP, but some basic principles hold for all ISPs:
1. The customer complaint rate is the primary input. That is, every time someone clicks on the "This is Spam" button, your reputation takes a hit. As long as complaints are below 0.1%, your reputation will be safe. Anything higher and your reputation starts to suffer.
2. It takes time to gain the ISPs trust. Some senders will require time before the ISPs will allow their mail to reach the inbox. Live Mail from Microsoft (see below) currently has the most stringent rules about bulk mailings until they trust you.
3. Spam traps are the second most important input. ISPs use abandoned accounts (see Brightmail and SpamCop below) to watch for unsolicited email. As a result, you should not email any address that has not had activity in 90-180 days, preferably 90. While this is unfair to legitimate senders (perfectly legitimate addresses can suddenly become spam traps), it is a standard practice in today's email world.
4. Consistent mailings help maintain reputation. Mailings of similar size and with regular frequency will help maintain your reputation. Inconsistency can reduce your overall reputation.
5. Overmailing will hurt your reputation. Mailing too frequently will hurt your reputation. There does not appear to be a "magic number", but twice per week does not appear to hurt reputation, and four times per week does.
One Bad Message Can Hurt You
It is crucial that you understand this point. Even a single message sent to an old or suspect list can do lasting and substantial damage to your reputation and your ability to deliver.
We want you to have long and productive relationships with your customers. Maintaining a high level of vigilance regarding email quality will greatly improve your short and long term success. If you are in doubt about anything regarding email practices, talk to your Client Services Manager before you send another message.
Brightmail
TIBCO Reward User’s Guide
Email Guidelines for New Clients | 129
Brightmail is a spam filter service from Symantec used by many large ISPs, including Optimum Online (Cablevision), Mac.com, Roadrunner, and Verizon. Brightmail uses their Probe Network to monitor hundreds of thousands of abandoned email accounts across all the ISPs. When Brightmail sees the same message in several of its Probe accounts, it flags the message as spam. It then updates the filter used by ISPs in real time, and all additional copies of the flagged message go to the bulk folder. If enough messages from the same source are flagged as spam, Brghtmail will identify elements in the message that identify the sender, and all future messages will be flagged as spam. These monitored addresses are also known as spam traps, and they exist at every ISP.
ISPs provide the addresses to Brightmail after customers abandon the accounts. So an account that was collected legitimately, opted in properly, and had responded at one point can suddenly become a spam trap.
Brightmail provides some very basic guidelines to avoid their filters:
• Make sure your database does not contain older email addresses of those who do not want to receive your promotional or marketing email. Send confirmation emails to determine who should remain on your list and who to remove.
• Do not accept email addresses from third party marketers, unless you can assure that such email addresses are legitimate and that such subscribers want to receive your promotional or marketing email.
• Remove email addresses of those who do not open your email messages.
Our experience shows that clients should follow the following precautions to help prevent Brightmail filtering:
1. Email addresses that have not responded in 90 days may have been converted into the Probe Network and should be removed from future mailings. 180 days should be the absolute maximum before an account is inactivated.
2. Mailing to spam trap addresses on even a single message will have a negative impact on deliverability. When you begin sending through Reward, start with addresses of recent customers or where you have history showing the address has been active within the last 90 days.
3. If you see any delivery issues at the four ISPs listed above, you should make immediate changes to your sending practices and eliminate older, inactive accounts.
Once flagged by Brightmail it is very, very difficult to remove your IP from their list. Switching IPs is not an option, since your reputation may be just fine at other ISPs, and whitelisting and feedback loops are set up by IP address. Please contact us if you see consistent missing or bulk email from the four key ISPs above and we will work on your behalf to remove you from their filters.
TIBCO Reward User’s Guide
130 | Chapter 8 Email
Spamcop
Spamcop is a real-time blacklist used by many ISPs as part of their spam-detection algorithms. Spamcop is a user-reported service with a combination of automated spam traps and human reporting. Generally the same issues that cause problems with Brightmail will cause problems with Spamcop.
Hotmail/MSN/Live Revised New IP Practices
Microsoft has essentially admitted that it will bulk email from a new IP address until the send volume reaches about 50,000 messages. This is very unfair to companies migrating from one company to another, but it is the only way that Microsoft can stay ahead of spammers who are shifting IP addresses rapidly to avoid real-time blocks.
In addition, Microsoft reports on its use of spam traps and we find that many clients hit spam traps with their initial mailings, putting themselves in trouble from the beginning. Again, starting with a clean list is the best way to avoid problems.
The one piece of good news with Windows Live is that the delay before an account is considered abandoned has been increased from 30 to 120 days. Until this change, a legitimate address could become a spam trap in just one month.
Windows Live also now asks 1 in 20,000 (or so) message recipients whether the message is spam or not, and uses the responses to monitor the reputation of the sender. We are finding this to have a very high complaint rate, even for legitimate senders. Adhere to the general guidelines presented here and you will improve your results.
Goodmail/Sender Score Certified
These are both trusted sender services, greatly improving inbox delivery at the major ISPs. Goodmail has partnerships with AOL and Yahoo, who account for approximately 47% of a typical consumer base. Sender Score Certified has partnerships with MSN/Hotmail/Live and Roadrunner, who account for approximately 18% of a typical consumer base.
Clients would benefit from ensuring that 65% of their mail is highly likely to reach the inbox, especially at MSN/Hotmail/Live.
ISP Profiles
When accessing the reporting at Return Path, take the time to read the profiles of the monitored ISPs. This will provide an intimate look at how ISPs are managing their spam folders.
The latest estimate is that 93% of all email traffic is spam, so clients should be very aware of how aggressive ISPs have become at managing and filtering spam.
TIBCO Reward User’s Guide
Email Guidelines for New Clients | 131
Email Source Issues
Email collected from any source other than your own website is fraught with peril. If you cannot pass a basic audit on an email address (requesting IP and date of request), you will expose yourself to issues if you are ever called out under the CAN-SPAM act. Even if you can, the quality of emails from outside sources is substantially lower than those collected internally.
In addition, emails collected via sweepstakes, in store events, partner events, and other locales where providing the address in order to receive an incentive are of much lower quality.
Why is this important? Because bad addresses cause hard bounces, which are a signal to ISPs that a sender is a spammer. If you have not been opting out hard bounces, or soft bounces after a series of consecutive bounces, you are behaving like a spammer would, which will be noticed by the ISPs spam filter algorithms very quickly.
In addition, if you are harvesting email from anywhere, for any reason, you are both violating CAN-SPAM (no opt in) as well as picking up spam trap addresses that are seeded all over the Internet to spot this exact practice.
Personal Whitelists
When a recipient indicates that a sending domain is safe or known, the ISP creates what is known as a personal whitelist. Future email from that domain will be delivered to the In box. Over time, this will improve overall delivery, as more and more individuals add you to their safe sender list.
When you first start sending email through Reward, none of your recipients will have you added to their personal whitelist. This will take time to overcome, and will reduce your In box delivery and overall open and clickthrough rates.
Basic checks for a clean list
It is important to start emailing on a new IP address with a clean list. Customers that use a clean list see over 90% of their emails delivered in the In box. While maintaining a clean list is an ongoing effort, there are a few simple steps you can do before you start sending with TIBCO Reward. The most basic check is to verify that the list of addresses does not include addresses that start with any of the following:
• noe (for noemail)
• spam
• nos (for nospam)
• post (for postmaster)
TIBCO Reward User’s Guide
132 | Chapter 8 Email
• abuse
• support
• zzz
• xxx
• and potentially a lot of the triple letters.
This simple step will give you a better understanding of the quality of your list before you start sending with TIBCO Reward.
TIBCO Reward User’s Guide
Email Address Requirements and Validation Rules | 133
Email Address Requirements and Validation Rules
• These characters cannot be the last character:
@ (at sign)
. (period)
• These characters cannot be the first character:
@ (at sign)
# (pound sign)
+ (plus sign)
& (ampersand)
, (comma)
/ (slash)
• Only one "@" (at sign) character is allowed.
• The domain name should end with two or more characters after the last period; for example: ".au" or ".com" or ".net"
• These characters and character combinations are not allowed:
.@
//
@.
..
"
--
• There must be a "."' (period) character somewhere in the string following the "@" (at sign) character.
TIBCO Reward User’s Guide

134 | Chapter 8 Email
TIBCO Reward User’s Guide
Target Lists | 135
Chapter 9 Target Lists
This chapter provides information about Target Lists.
Topics
• About Target Lists, page 136
• Lists Page Overview, page 138
• Target List Creation Overview, page 139
• Creating a Target List From Import Wizard, page 140
• Creating a Target List from an imported file, page 142
• Creating a Target List from a Profile, page 144
TIBCO Reward User’s Guide
136 | Chapter 9 Target Lists
About Target Lists
A Target List is a list of customers used for targeting email communications. Such lists are composed of customer email addresses that are stored in your TIBCO Reward customer database. These lists are managed by means of the CRMS, and are listed in the Target>Lists page. A valid Target List consists of a list of valid email addresses, and must contain at least one such address.
Creating a List and Importing a List
There are several methods to create a Target list in the CRMS. Several of these methods create new lists by sorting and selecting email addresses from existing lists. Existing lists have been stored in your TIBCO Reward customer database, and have already passed tests for data quality (valid format, no duplications, etc.).
One method of creating a CRMS Target List is Importing a target list (that is, uploading a file from your desktop). Importing a list (typically a list that was created outside the CRMS) makes that list available for use within the CRMS.
When you import a new target list, the CRMS performs standard tests to ensure the quality of the data, and to ensure that it meets the rules established in your list import settings.
During an import, the CRMS also checks for matches between imported email addresses and existing email addresses within your current Reward customer database. If there is a match, then the complete existing record is used, which may make additional customer data available. Existing data is not changed.
How Lists are Used in the CRMS
Target Lists are used as address lists for emails sent by a CRMS email communication. CRMS Target Lists are virtually equivalent to the email i ng lists that are use everywhere in current-day ecommerce marketing, and that are bought, sold, traded, imported and exported. A list is a flat file containing a specific set of customers who are identified by their email addresses.
Unlike CRMS Profiles, which dynamically define a population segment that can evolve from day to day, and which are also used to target email communications, Target lists are static and unchanging, and have the advantages of being simple and widely available as a commercial product. In the CRMS, a Target list is still treated as a flat file containing a specific set of customers, but once it is assigned a unique ID in the CRMS, that CRMS list of customers cannot be edited. To change the content of a list, you must use it to create a new list and give it a new name.
TIBCO Reward User’s Guide
About Target Lists | 137
Components of a List
An existing CRMS target list includes a set of unique email addresses with a valid format. These email addresses already exist in the TIBCO Reward customer database, where they serve as a key identifier for customer records. Other data may also be associated with a customer record.
Import List Format: The CRMS allows you to import the simplest form of target list: a list that is just a .txt file containing one or more properly formed email addresses, separated by line breaks.
For example:
[email protected]@[email protected]
You can import, manage and use such lists using the CRMS Target>Lists page.
Export List Format: When you use the CRMS Target>Lists page to export a target list, you are actually exporting the CRMS customer records associated with the email addresses. You still generate a file of the CSV type, but the file has the following format*:
ShopperID, InStorecardShopperID, RegistrationDate, FirstName, LastName, Address1, Address2, City, State, PostalCode, CountryCode, EMail, PhoneNumber, LoyaltyID
Here is a row of sample customer data from the exported email list (spaces added)*:
"9900000000000019", "53542359", "2007-01-30T13:50:17", "Dawn","Cristopher", "412 Midland Avenue", "Apt 4E", "Emeryville", "CA", "94608", "US", "[email protected]", "5105551234", "9876543210000019"
If the database includes any of the customer record data identified above, this data is included in the export file. Missing data values are indicated by the absence of any character or space between the two commas that indicate the normal location of the data (,,).
If you were to export a list that had no other data than the customer email address (which might well be the case if you had just imported the list, for example), only the email address would be included in each record, and commas would indicate that other data was missing.
* Note: Actual lists include no spaces between values, only commas.
TIBCO Reward User’s Guide
138 | Chapter 9 Target Lists
Data Validation and Import Settings
During import, all email addresses are checked for validity. If the number of badly formed addresses exceeds the allowed threshold, your import will fail. If your list is imported successfully, it will be processed according to rules specified in Admin>Main Settings>List Import. You may wish to check these rules, and change them if they do not suit your purposes.
Lists Page OverviewThe Lists page provides access to all Target Lists and to help you create and work with Lists. The Lists page provides a table including all currently defined Target Lists in the CRMS.
Features and Fields
• The Create New List option allows you to start one of the Create New List processes. Refer to the Create a New List topic for more information.
• The Manage Lists panel consists of:
— standard navigation controls (e.g., the 1 2 3 ... page control)
— the first page of the Manage Lists table, which includes all lists currently defined in the CRMS.
Each row in the Manage Lists table represents a Target List, and displays a few key fields of data about that list. These fields are lined up in columns. Click on a column heading to sort all of the Lists in the table by that field.
The following list data fields are displayed:
• ID (the unique list ID number) - the CRMS assigns a unique ID number to every list. If two or more list names (which are defined by CRMS users) are similar or identical, this number is the unique identifier.
• Name - the name of the list as defined in CRMS. This is set up as a hyperlink to the list properties data: the list's Name, Source, and Internal Note text fields. Click the List Name to open the list properties data, either to see or edit its details.
• Status - the status of each list can be either Ready, In Progress, or Failed. Only lists whose Status is Ready are currently available to see or use. The In Progress indicator should appear only for the period when a list is being processed. A list marked as Failed represents a failed attempt at creating a list. Failed lists should be deleted.
• Reporting - provides list import details.
TIBCO Reward User’s Guide
About Target Lists | 139
• Created - the date when the list was originally assigned an ID. This date may be different than the date when the customer data was last updated.
• Total - the total number of customer records in the list.
• New List... drop-down menu - a control that allows you to use the current list as the basis for creating a new list. When you click on the down arrow, a list of the following options appears:
— Using split
— Using subtraction
— Using merge
— Using intersection
Selecting any one of these options starts the process of generating a unique new list, using the selected method and starting with the current file as the basis. Each method creates a new list file and initiates the New from Existing List wizard, which assists you with the process of populating the new file with a new list.
• Export - allows you to generate a comma separated value (CSV) file containing the existing TIBCO Reward customer data for the customers included in this list. The Export function delivers this file to the FTP location that your company uses to exchange files with TIBCO Reward. The default name of the file is "ListExport"_<List Name>_<your CRMS user name> _<date when list file was generated/exported>. See About Target Lists on page 136 for the data format of the exported lists.
• Delete - allows you to permanently delete the associated list.
Target List Creation OverviewListed below are the methods for creating a new list, but before you use any of them, you may want to consider how to create lists more efficiently, and how you will manage a large number of them after you have worked with them for a longer period of time.
You can create a new list using one of the following methods:
• From File Import - that is, by importing into the CRMS a customer list file (e.g., a list produced by a third party) so that it can be used and managed as an existing CRMS list.
• From Profile - that is, by applying a profile to a customer population to generate a new list. This list includes the customers whose data matched the profile definition.
TIBCO Reward User’s Guide
140 | Chapter 9 Target Lists
• From Existing Lists - by working with target lists already saved in the CRMS, using one of the following methods:
— Subtraction - Create a new List by subtracting one or more Lists from a starting List
— Merge - Create a new List by combining two or more Lists
— Intersection - Create a new List from the intersection of two or more Lists
• By Splitting an Existing List - by dividing up the set of customers in an existing CRMS list into subsets, each of which constitutes a new list.
To help you create new lists based on the existing target lists, the CRMS provides wizards to guide you through the steps and stages of the creation processes.
Quick Start to Creating a Target List
• If you are creating a new list that will be based on an existing list, start from the Target>Lists page.
• Find the existing list in a row in the Manage Lists table,
• Click the appropriate option under the New List... drop-down menu.
• Otherwise, starting from the Target>Lists page, click on a list-creation method from the bar just above the Manage List table.
Creating a Target List From Import Wizard
Creating a List from Import File
To work with a list of customers generated by a source outside the CRMS, you must import the list into the CRMS. Importing a target list (that is, uploading a customer list file from your desktop) is considered one method of creating a CRMS Target List. Importing a list file (typically a list that was created outside the CRMS) makes that list available for use within the CRMS. For example, you might purchase such a list from a third party, or develop it in-house using other analytic tools.
How CRMS processes an imported list
When you import a new target list, the CRMS performs standard tests to ensure the quality of the data, and to ensure that it meets the rules established in your list import settings. By default, the CRMS expects an imported customer list file to be a text file containing a simple list of customer email addresses separated by line breaks.
TIBCO Reward User’s Guide
About Target Lists | 141
During an import, the CRMS also checks for matches between imported email addresses and existing email addresses within your current TIBCO Reward customer database. If there is a match, then the complete existing record is used, which may make additional customer data available. Existing data is not changed. See About Target Lists on page 136 for more information about lists.
Note on Data Validation: During import, all email addresses are checked for validity. If the number of badly formed addresses exceeds the allowed threshold, your import will fail.
After you import a list, the CRMS treats it as an "existing" list, and you can store, manage and manipulate it by using the CRMS options that allow you to Create a New List from Existing Lists. These list creation options allow you to work with existing imported lists by: subtracting the contents of other lists, merging lists, splitting lists, or intersecting (selecting the customers that a list has in common with other existing lists).
TIBCO Reward User’s Guide
142 | Chapter 9 Target Lists
Features and Fields
List Properties section
The List Properties fields are the same for every list creation method.
Source File section
• Source File - This is used to specify the path and filename of the customer file to be imported.
• "I Agree" check box - This requires you to verify that the customers in the list to be imported meet the "opt-in" requirement.
Import Settings section
If your list is imported successfully, each email address will be added to your customer database according to the rules named below.
• Updates
• Import As
• Email Opt-In
You may wish to check these rules—and change them if necessary—if they do not suit your purposes. As a rule, it is better to check these rules, and change them if necessary, before you start the process of creating a new list by importing.
Email Notification
If you import a file, you can elect to receive notifications when the import has started, and when it completes. The only requirement is your email address.
Creating a Target List from an imported file1. From the Target>Lists page, select Create New List >From File Import.
The New List from Import wizard appears.
2. Define the List Properties: Enter text in the three fields: Name, Source, and Internal Note.
3. Select the Source File.
• Click Browse.
A standard dialog box appears, titled "Choose file", allowing you to navigate to the location of the list file you want to import.
TIBCO Reward User’s Guide

About Target Lists | 143
• Double-click on one list, in .txt file format, from your computer. The dialog box closes.
4. Read the text starting, "You must read the following..." and respond. This text concerns the requirement that persons in a list to be imported have opted in. Verify whether the list you are uploading meets the criteria. If it does, select the "I Agree" check box.
5. Verify whether the selected Import Settings (Updates, Import As, Email Opt-In) are correct for your purposes.
• If the rules that appear do not suit your purposes, you can change them.
• To change the import settings, you can click the linked text, Click here to cancel your file import and change these settings. Note, however, that this closes the current wizard without saving your data.
6. To receive an Email Notification when your import has started, and again when it completes, enter an email address.
7. Click Next Step at the top of the page.
The CRMS opens the next page of the wizard, titled Request Status, and displays the message, "Your List import has been scheduled", along with a table of information about this list.
8. Click Done to complete the process.
The CRMS processes the list creation information you have provided, opens the Target>List page, and displays a new row of information for this list in the Manage Lists table. The Status field for a newly created list is very important, because it indicates whether the list was successfully created.
• If the list import succeeds, the Status field is gray and displays the word Ready. If this status appears, the list is ready to use.
Your list must contain one or more properly formed email addresses, separated by line breaks. If the selected file passes the validation checks, its name reappears in the Source file text field.
If the list includes email addresses from customers that have NOT provided permission to send them email, do NOT select the I Agree check box. Click Cancel to stop working on this list import. Make the necessary changes outside of the CRMS platform.
You can copy and save the table of information from this page. Pasting this table information into a document file outside of the CRMS allows you to retain a record of parameters and specifications you used to create the associated list.
TIBCO Reward User’s Guide
144 | Chapter 9 Target Lists
• If the list import fails, the Status field turns red and displays the word Failed. The list creation process failed and the list is not available.
• Depending on the complexity of the list creation task processing, the Status field for the new list may be yellow and may display the label "In Progress" for a few minutes until the processing is completed.
Creating a Target List from a ProfileThis section explains how to create a target list by applying an existing profile to a customer population. The basic procedure is simple: you pick a profile, and the CRMS applies the selection criteria defined in that profile to Reward's most up-to-date customer information database. This process yields a list composed of the customers who currently fit the profile.
The first step in creating any target list is to name it and record the properties of the list. Immediately after you click on any Create New List option, the first page in each list creation wizard opens, showing the List Properties panel.
Features and Fields
List Properties section
The List Properties fields are the same for every list creation method.
Source Profile section
• Source Profile: Clicking this button opens the Select Profile dialog box, which allows you to select the profile to be used to create the new list. After you select the profile from a dialog box, its name appears here, and a Change Selection button replaces the Select Profile button. The Change Selection button allows you to re-open the Select Profile dialog box, and any profile you then select replaces the existing selection.
• Profile Selection dialog box: This dialog box allows you to select one of the existing profiles from a list of all currently defined profiles. The selected profile is applied to the current customer data to select the set of customers in the list. This dialog box includes a Find button and other standard dialog box features.
Follow these steps to create a target list from a profile:
1. From the Target>Lists page, select Create New List >From Profile.
The New List from Profile wizard appears.
2. Define the List Properties:
Enter text in the three fields: Name, Source, and Internal Note. For details, refer to the help that explains how to Define Target List Properties.
TIBCO Reward User’s Guide
About Target Lists | 145
3. Select the Source Profile.
• Click Select Profile. The Select Profile dialog box appears.
• Find the profile you want to use. You can re-sort the profiles by Profile ID number, name, date of last update, number of registered or unregistered customers size.
• Click the corresponding Select link. The selected profile name is added to the profile box in the New List from Profile wizard. The Change Selection button appears next to the profile selection box.
4. To change your profile selection, click Change Selection, then repeat the previous step.
5. Click Next Step to save your work and advance to the next step of the wizard.The Request Status section of the wizard opens, displaying the message, "Your list is being created."
6. Click Done.
When the list creation process is completed, the Target>Lists page reappears. In the Manage Lists table, a row shows information for the list you have just worked on, including the Status and other standard information.
TIBCO Reward User’s Guide

146 | Chapter 9 Target Lists
TIBCO Reward User’s Guide
Rewards | 147
Chapter 10 Rewards
This chapter explains Rewards pages in the CRMS platform.
Topics
• Reward Codes, page 148
• Reward Items, page 150
• Reward Catalogs, page 153
TIBCO Reward User’s Guide
148 | Chapter 10 Rewards
Reward Codes
Reward code functionality allows you to create offers that issue codes as awards.
From the Reward Codes page, select either:
• Create New > Unique Reward Code
• Create New > Non-Unique Reward Code
Unique Reward Codes
Unique Reward Codes use an inventory of code values, each of which is issued once to a customer.
• Members who earn Reward get an unique Reward Code.
• Valid codes are uploaded in CRMS.
• TIBCO Reward will only issues a unique code once.
Non-Unique Reward Code
Non-unique Reward Codes allow you to define a single code value that is issued to multiple customers. The code is issued an unlimited number of times by default; optionally, you can define a limit by entering a number in the Issue Limit field.
• Members who earn Reward get the same Reward Code (e.g. FREESHIP, 20%OFF).
• Code is defined in CRMS.
• Can limit number of codes issued in CRMS.
Properties section
Define properties for this Reward Code. (Note that none of these values is visible to end customers.)
• Name: Create a descriptive name for this Reward Code. This value appears in the grid of codes on the Reward Codes landing page.
• Reference Tag: Enter a unique identifier for this code. This value is the primary identifier for this code used by the Reward hosted microsite, as well as TIBCO Reward API's. Note that this value must be unique among all other Reward Codes.
TIBCO Reward User’s Guide
Reward Codes | 149
• Stored Value: Can be None, $, $ off, % off or Other. Depending on your integration with TIBCO Reward, this value can be passed to you or a third party via the TIBCO Rewards File. This value is not visible to end customers.
• Enable Dynamic Expiration Date check box: Expiration may be static (all codes expire on the same day) or dynamic (code expires X days after Award Date or Offer Start Date).
Code Inventory section
Upload unique code values for this Reward Code in the Code Inventory section.
• Current Inventory - Unique Reward Codes use an inventory pool of code values, each of which is issued once to a customer. If you have uploaded codes, you will see an indication of the remaining inventory, plus the status of all prior uploads.
• Upload Codes File - Search for and upload a codes file.
• Expiration Date - An expiration date can be set on all uploaded codes using the Expiration Date value or left empty for no expiration.
File Details & Requirements
Codes must be uploaded from a file on your computer. Your list must contain one or more codes, separated by line breaks. The file type should be .txt.
Here is a sample file:
090034000001090034000002090034000003090034000004090034000005
TIBCO Reward User’s Guide
150 | Chapter 10 Rewards
Reward Items
The Reward Items page allows you to create Reward items and also shows existing Rewards.
Creating a Reward
Follow these steps to create a Reward Item and then match it with a Reward Code.
1. Click Reward Items > Create New Reward.
This opens the Manage Reward Item page.
2. Fill in required values in the Properties section:
• Name – This is the name used to identify this Reward in the CRMS. It is displayed as the title of the reward in the Showcase (a.k.a., the Member Portal). Although the CRMS does not require this text string to be unique, a unique name serves to prevent confusion and is generally recommended.
• Reward ID – This field allows you to assign an ID to this reward. This ID is for internal use; it is displayed only in the CRMS. It does not appear in the Showcase. Although the CRMS does not require this text string to be unique ID, a unique Reward ID is strongly recommended.
• Redeem Value – This is the number of points required to obtain this reward. Enter an integer numerical value. This value appears in the showcase.
• Description – This description text is for internal use; it is displayed only in the CRMS. It does not appear in the showcase.
• Internal Note – This Internal Note text is for internal use; it is displayed only in the CRMS. It does not appear in the showcase.
3. Click Select Code.
4. Configure the graphical representation of the Reward Item in the Presentation section:
Current Reward Image – This image is required. If you do not have an image of the reward item, provide a suitable placeholder image as a substitute. Once you have selected the path and file name, click Upload. The image you selected appears at the left, immediately beneath the label, "Current Reward Image".
The CRMS provides two ways to identify the image file to display with the reward:
TIBCO Reward User’s Guide
Reward Items | 151
• Select an existing product image... Search images using product name or SKU. You can use the product name or SKU to search for the product image.
OR
• Select from uploaded media – Click Browse to open a standard "Choose File" navigation tool. Use this to navigate through your local and network file hierarchies and select the path and file name for the image you want to use. Double-click the image file, or select it and click Open. The navigation tool closes and the path and filename are inserted into the correct text box.
5. When you have completed this page, click Done.
You can also create a new reward by cloning an existing reward. This creates a duplicate of the reward, which can be easily modified to define a different award. Cloning is especially useful when you want to duplicate most of the attributes of the existing reward.
Upload Rewards File
Instead of manually entering your Reward Items, you can upload a file containing multiple Reward Items. Your file must be in one of the following formats:
• CSV Comma delimited
• Text Tab delimited
Follow these steps to upload a Reward file:
1. Click Reward Items > Upload Rewards file.
2. Click Browse to open a standard "Choose File" navigation tool.
3. Navigate through your local and network file hierarchies and select the path and file name for the image you want to use.
4. Double-click the image file, or select it and click Open. The navigation tool closes and the path and filename are inserted into the correct text box.
5. Click Upload after the path and name of the image are selected.
6. When you have completed this page, click Done.
Your Rewards Items file must include the following columns, in this exact order:
• Reward ID
• Reward Name
Be sure to click Upload after the path and name of the image are selected.
TIBCO Reward User’s Guide
152 | Chapter 10 Rewards
• Description (optional)
• Redeem Value
• Image URL
Column headers are optional in the file. Data for all columns is required, with the exception of the Description field.
Here is an excerpt from a sample file:
GC-009328-5 $5.00 Gift Card This Gift Card can be used in-store and online! 5000 http://www.example.com/images/gift_cards/card_5_150x150.jpgGC-009328-10 $10.00 Gift Card This Gift Card can be used in-store and online! 10000 http://www.example.com/images/gift_cards/card_10_150x150.jpgGC-009328-20 $20.00 Gift Card This Gift Card can be used in-store and online! 20000 http://www.example.com/images/gift_cards/card_20_150x150.jpg
Next to the More About This icon, there is a small link titled Download Sample Files, for sample files that you can use as a format template for your own rewards file. Click this link to obtain a zip file containing two samples of a rewards file.
TIBCO Reward User’s Guide
Reward Catalogs | 153
Reward Catalogs
The Reward Catalogs page displays Catalog Settings and Existing Reward Catalogs.
Catalog Settings:
• Redeem Value Ascending – This arranges all of the reward items in order (left to right, top to bottom) according to the redemption value assigned to the item, with the lowest-valued items appearing first.
• Redeem Value Descending – This arranges all of the reward items in order (left to right, top to bottom) according to the redemption value assigned to the item, with the highest-valued items appearing first.
• Date Modified, Newest First – This arranges all of the reward items in order (left to right, top to bottom) according to the redemption value assigned to the item, with the newest (most recently added) items appearing first.
• Date Modified, Oldest First – This arranges all of the reward items in order (left to right, top to bottom) according to the redemption value assigned to the item, with the oldest items (those added longest back in the past) appearing first.
Creating a Reward Catalog
1. Select Reward Catalogs > Create New Reward Catalog.
2. In the Reward Catalog Details page, enter:
— Name: A name for this catalog.
— Reference ID: If you intend to access your reward catalogs via TIBCO Reward APIs, enter an identifier for this catalog.
— This Reference ID must be a unique value among your other Reward Catalogs.
— Internal Note: Add notes or comments about this catalog.
3. Click Next Step.
4. Click Add Reward Items, which opens the Select Reward Items page.
5. Click the check box next to the Reward Items to be included in the Catalog.
6. Click Add Checked.
7. Click Next Step, which opens the Reward Catalog Details page.
TIBCO Reward User’s Guide
154 | Chapter 10 Rewards
8. Add Reward Items to Reward Catalog.
9. When you have completed this page, click Done.
TIBCO Reward User’s Guide
Custom Attributes | 155
Chapter 11 Custom Attributes
This chapter explains Custom Attributes in CRMS.
Topics
• About Custom Attributes, page 156
• Custom Attributes Page Overview, page 159
• Adding Custom Attribute Tags, page 161
• Prerequisites to Creating Custom Attributes, page 162
• Creating a Custom Attribute, page 170
TIBCO Reward User’s Guide
156 | Chapter 11 Custom Attributes
About Custom Attributes
Custom Attributes are extensions to the customer or product record – additional data fields – that can be used to store non-standard data. It is often possible to use this data in profiles to target customers. See Dimension>Custom Attributes on page 89 for details about targeting by custom attributes.
Custom attributes for customers can be used to dynamically insert customer attribute data in email communications by using reference tags.
Custom attributes for products enable you to search for products and groups of products according to criteria that are important for you. Custom attributes allow you to create product classifications other than those provided by formal product catalog categories and brands.
Custom Attribute fields can be used in many different ways. Some suggestions and examples include:
• Set up a Product Custom Attribute titled "InventoryPushed" and using this attribute to search for items marked as Closeout, Overstocked, etc. when creating an offer. (Custom attribute for Products.)
• Collect and use customers' birthdays or anniversaries. (Custom attribute for Customers.)
• Store customer lifetime value (which you recalculate at update regularly) and target customers on the basis of this value. (Custom attribute for Customers.)
• Store customer churn propensity (which you recalculate and update regularly) and target customers on the basis of this value. (Custom attribute for Customers.)
• Store external segment codes, such as PRIZM NE, for use in targeting customers. (Custom attribute for Customers.)
• Search for products by characteristics that are not encoded in their SKUs. Custom attributes can store characteristics such as a theme or a sub-brand or a quality that links a product to a market niche. Using product custom attributes, for example, you could characterize an item as Winter Collection, ChecksAndPlaids, and WrinkleResistant-Travel and search for it using any of these attributes. (Custom attribute for Products.)
Many of these applications of custom attributes require some level of professional services, but the expense is generally nominal.
Constraints on Custom Attribute Usage
• You can create up to ten custom attributes for each type.
TIBCO Reward User’s Guide
About Custom Attributes | 157
• You cannot delete a custom attribute, once you create it.
• Once you reach your maximum for a given attribute type, you will not be allowed to create any more of that type.
• If your company has implemented a non-standard design for its loyalty program, Reward may use some of the custom attribute slots to help manage your program.
In some cases, Reward can find creative solutions that get around these rules. Please contact Reward Client Services if you need to:
• Use more than your allotted number of custom attributes
• Delete a custom attribute
• Start using a custom attribute for a different purpose.
Using Custom Attributes
Custom Attributes allow you to define custom data fields in which you can store additional types of data about your customers or about your products.
1. Indicate whether you want to create a custom attribute for customers or for products.
2. Create your custom attribute by clicking on one of the data types.
See Prerequisites to Creating Custom Attributes on page 162 for more details on this process.
3. Once the custom attribute is defined, modify the corresponding batch file appro pi rat ely:
— Populate the custom attribute for customers by adding the attribute data to your shopper transaction file,
OR
— Add custom attribute for products by adding the attribute data to your product file. You may also be able to use an API to provide or update custom attribute data in real time.
4. After populating the appropriate file with custom attribute values, use your customer custom attribute values when targeting offers, clubs and communications; or use your product custom attribute values when selecting or sorting products.
TIBCO Reward User’s Guide
158 | Chapter 11 Custom Attributes
• Be sure to work in coordination with your IT department and with Reward when implementing a new Custom Attribute. Your IT Department can help set up the Transaction file format or Product file format so that it conveys the new Custom Attribute data.
• If you use Transaction or Product files in Reward's standardized XML format, then the change in the file format is relatively trivial. However, if the file is in flat file format, Reward will need to change its file transformation processes before files that include custom attribute data can be processed correctly.
TIBCO Reward User’s Guide
Custom Attributes Page Overview | 159
Custom Attributes Page Overview
The purpose of the Custom Attributes page is to provide access to Custom Attribute records and to help you create and work with custom attributes.
To open the Custom Attributes page, select Admin>Custom Attributes.
The Custom Attributes page includes the following features:
• The Create > New Attribute option, which allows you to open a data entry page and define data for any one of the five different types of Custom Attributes.
• The Manage Custom Attributes panel, which consists of:
— The Show... filter, which allows you to sort Custom Attributes by their type, and by its application to either customer or product
— The 1 2 3 ... page control, which allows you to navigate to any page in the current Manage Custom Attributes panel.
— The complete list of Custom Attribute records.
The following Custom Attribute record fields are displayed:
• ID - (the unique Custom Attribute ID number) The CRMS assigns a unique ID number to every Custom Attribute record. If two or more Custom Attribute names (which are defined by CRMS users) were similar or identical, this number would be the unique identifier.
• Name - the name of the Custom Attribute as defined in CRMS, and set up as a hyperlink to the Custom Attribute record. Click the Custom Attribute Name to open the record, either to see or edit its details.
• Applies to - the associated data entity modified by the Custom Attribute: either Products or Customers.
• Type - the type of the associated Custom Attribute: one of the five possible types.
• Reference Tag - the text string used to create the reference tag for this data field. Enter a text string that is unique with respect to other reference tags. You can use the specified reference tag string in API calls for custom attribute data
This name string text is the exact text string that must be used, character for character, in XML formatted Transaction files to identify this Custom Attribute. After a custom attribute has come into use, do not change its name in any way until you have consulted with TIBCO Reward's Client Services department. Name changes may result in lost and/or corrupted data.
TIBCO Reward User’s Guide
160 | Chapter 11 Custom Attributes
or to insert the custom attribute data into email or if the custom attribute is being displayed to the customer in the microsite.
• Last Modified - the date when this Custom Attribute record data was most recently changed. This is the field used by default to sort the Custom Attribute records. When you open the Custom Attributes page, the most recently updated Custom Attribute records appear first.
• Clone - allows you to clone the associated Custom Attribute record. The clone is assigned a slightly different name, usually called "Copy of <original name>". Because you are limited to defining a maximum of ten Custom Attributes of any given type, take care not to create custom attributes unless you are sure you will use them.
Use the Custom Attributes page to:
• Find the Name, Reference Tag, or Type specification associated with a Custom Attribute.
• Open a Custom Attribute record to see specific details about the Custom Attribute that are maintained in that record.
• Create a Custom Attribute. (This includes updating lists of custom attribute values.)
After you have started to use the custom attribute, never change the name or reference tag, unless you have made special arrangements with TIBCO Reward's Client Services department. If you change this text string after the associated custom attribute has come into use, any reference tags based on the former string will fail to function properly.
TIBCO Reward User’s Guide
Adding Custom Attribute Tags | 161
Adding Custom Attribute Tags
You can define a Custom Attribute for a shopper (customer) in the CRMS, and then add a custom attribute reference tag to an email communication so that the custom attribute field value for a specific shopper is added to an email communication. For example, you could define "Shopper Birthday" as a custom attribute for your shopper, collect birthday data for shoppers, and then insert a custom attribute tag into the email that would add a shopper's birthday data into each email.
Because you define custom attributes in the CRMS (using the Admin>Custom Attributes page), custom attribute fields are not listed in the standard drop-down menus. To add a custom attribute tag, you must know the tag name (the name of the Custom Attribute Definition Reference Tag field that your organization defined and uses) to refer to the custom attribute. Usually this is something simple, like "shopperbirthday".
Custom attribute tags for shoppers are named according to the following convention:
@(shopper:customattrib:<reference_tag_name>)
where: the reference_tag_name maps to the CustomAttributeDefinition ReferenceTag field.
So, if a CRMS user creates a (shopper) custom attribute with ReferenceTag = “shopperbirthday”, the corresponding tag would be:
@(shopper:customattrib:shopperbirthday)
To see the reference tag name assigned to a custom attribute, open the Admin>Custom Attributes page, look in the Manage Custom Attributes table, and find the custom attribute you want to use. The table lists the reference tag name for custom attribute.
• You can substitute "s" for shopper, so the following also works:
@(s:customattrib:shopperbirthday)
• Make sure there are no spaces within the tag.
• Custom attributes that are supposed to display dates also include specific time data (hours and minutes). Regardless of the data entered, the displayed "date" fields have the following format: MM/DD/YYYY:HH/MM
• Custom attributes that are supposed to display integer Numbers actually display numbers with two decimal digits, regardless of the data originally entered.
TIBCO Reward User’s Guide
162 | Chapter 11 Custom Attributes
Prerequisites to Creating Custom Attributes
Setting up the processing and transmission of the Custom Attribute data involves more effort and coordination of resources than simply defining the Custom Attribute in the CRMS. If you wish to add a custom attribute, contact your IT department and involve them in the process. In some cases, this will involve coordination with the Reward Account Management department.
If you are going to create profiles that use a custom attribute for targeting purposes, you may want to figure out how you will define and use these profile during your planning phase: this will help you define some practical requirements for your custom attribute so that it better serves your specific purpose.
TIBCO Reward User’s Guide
Prerequisites to Creating Custom Attributes | 163
Adding customer custom attribute data
These are the prerequisites for data transfer if you are adding a customer custom attribute:
• If you use Transaction batch files in XML format to convey data to Reward, your company must modify this file, adding the Name of the Custom Attribute field to the XML schema.
• If you use Transaction batch files in any non-XML format (flat file format) to convey data to Reward, your company (your IT Department, in particular) must work with Reward to adjust the transform processes applied to the file so that the custom attribute field can be correctly processed.
• Make sure that your corresponding, in-house file-creation processes add the custom attribute data to the transaction files.
• To use APIs to convey Custom Attribute data in real time, the API call must use the Reference Tag of the Custom Attribute.
Adding product custom attribute data
These are the prerequisites for data transfer if you are adding a product custom attribute:
• If you use Product batch files in XML format to convey product data to Reward, your company must modify this file, adding the Name of the Custom Attribute field to the XML schema.
• If you use Product batch files in any non-XML format (flat file format) to convey data to Reward, your company (your IT Department, in particular) must work with Reward to adjust the transform processes applied to the file so that the custom attribute field can be correctly processed.
• Make sure that your corresponding, in-house file-creation processes add the custom attribute data to the Product files.
• Define the Reference Tag used in API calls when you define the Custom Attribute data in the CRMS.
• If your company wants the custom attribute values included in Shopper files or profile-list export files, be sure to request this from Reward.
TIBCO Reward User’s Guide
164 | Chapter 11 Custom Attributes
• To use APIs to convey Custom Attribute data in real time, the API call must use the Reference Tag of the Custom Attribute.
Defining a Numeric Custom Attribute
1. Navigate to the Custom Attributes tab by clicking Admin>Custom Attributes or by hovering your mouse over the Admin tab and clicking Custom Attributes in the roll-over menu.
2. Create a new Number Custom Attribute by clicking the Number link next to Create a New Attribute. Select Product or Customer, as appropriate.
3. Set the attribute parameters:
— Give the attribute a name
— Choose a display format:
a. Number – stores and displays whole numbers. (Note that the number 1 is expressed as 1.000.)
b. Percentage – stores and displays percentages with up to two decimal places.
c. Currency – stores and displays US currency format with up to two decimal places.
— Set an internal note, which is only displayed on this page.
4. Click Save at any time to save the current setting.
5. Click Done to save your work and return to the Custom Attributes tab.
Defining a Month/Day Custom Attribute
This attribute allows storage of a month/day combination, without a year. This can be used in circumstances where collecting age is not desired, but birthday is desired.
• Define the Reference Tag used in API calls when you define the Custom Attribute data in the CRMS.
• Always work in concert with your company's IT Department to implement a custom attribute. A custom attribute must be fully supported by your Transaction files or Product files. And if you use Loyalty API calls, it must also be supported by your API processes. Provide your IT professionals with the information in this topic and also with the information in Custom Attributes Technical Information. IT professionals will also want to refer to the Reward Integration Guide for documentation on the required changes to your files.
TIBCO Reward User’s Guide
Prerequisites to Creating Custom Attributes | 165
1. Navigate to the Custom Attributes tab by clicking on Admin>Custom Attributes or by hovering your mouse over the Admin tab and clicking Custom Attributes in the roll-over menu.
2. Create a new Month/Day Custom Attribute by clicking the Month/Day link next to Create a New Attribute. Select Product or Customer, as appropriate.
3. Set the attribute parameters.
4. Give the attribute a name.
5. Set an internal note, which is only displayed on this page.
6. Click Save at any time to save the current setting.
7. Click Done to save your work and return to the Custom Attributes tab.
Defining a Date/Time Custom Attribute
This attribute allows fully formed date and time values. If year is an element of the custom attribute, you must use the date/time attribute instead of month/day.
For birthdays or anniversaries, use the month day type.
1. Navigate to the Custom Attributes tab by clicking Admin>Custom Attributes or by hovering your mouse over the Admin tab and clicking Custom Attributes in the roll-over menu.
2. Create a new Month/Day Custom Attribute by clicking the Day/Time link next to Create a New Attribute. Select Product or Customer, as appropriate.
• You can use a time-sensitive custom attribute, such as Month/Day or Date/Time, to target an offer to a particular set of customers, based on some time-oriented criteria. For example, if you capture the customer's birthday or anniversary as a Month/Day custom attribute, you can create a profile that selects customers who have a birthday that occurs on the current date, or that is some specified number of days in the future, or that occurs within some range of days in the future. For more information on the subject of creating a profile dimension that targets on a custom attribute, click this link: Dimension>Custom Attributes.
• Unless you use a time-sensitive profile with a no-clip offer, a targeted customer can use the offer outside of the profile-driven time-frame when you present it.
TIBCO Reward User’s Guide
166 | Chapter 11 Custom Attributes
3. Set the attribute parameters.
— Give the attribute a Name.
— Choose a display format, which defines how this attribute is represented within the targeting interface in Profiles.
— Set an Internal Note, which is only displayed on this page.
4. Click Save at any time to save the current setting.
5. Click Done to save your work and return to the Custom Attributes tab.
Defining a Lookup Code Custom Attribute
This attribute allows storage of a code that represents a segment or other piece of information. The three letter airport code system is an example, where SFO stand for San Francisco International Airport. Other lists of codes, numeric or alphanumeric, are well-suited for conversion to lookup codes.
Look-up codes have the following advantages:
• Lookup codes are very useful for short-to-moderate length strings, and the resulting drop-down lists of lookup codes are user-friendly.
• Unlike numeric-type custom attribute values, lookup codes can include leading zeroes, and are not displayed with additional decimal-place data. (Custom Attributes of the numeric type delete leading zeroes and add multiple levels of decimal accuracy, which may be distracting and inappropriate.)
• Unlike text-type custom attribute values, lookup codes are searchable.
To set up a custom attribute that uses look up codes:
1. Navigate to the Custom Attributes tab by clicking Admin>Custom Attributes or by hovering your mouse over the Admin tab and clicking Custom Attributes in the roll-over menu.
2. Create a new Lookup Code Custom Attribute by clicking the Lookup Code link next to Create a New Attribute. Select Product or Customer, as appropriate.
3. Set the attribute parameters
4. Give the attribute a name
5. Upload a list of lookup codes.
Without the uploaded file, the pick list will be empty and it will not be possible to select values.
TIBCO Reward User’s Guide
Prerequisites to Creating Custom Attributes | 167
6. Set an internal note, which is only displayed on this page
7. Click Save at any time to save the current setting
8. Click Done to save your work and return to the Custom Attributes tab
Add a Set of Lookup Code definitions
The only way to define Lookup Code Values is via a file upload.
1. Using a sample file as a template, define the two columns necessary for Lookup Code in CSV or Tab delimited format.
2. Click Browse in the File section of the Edit Lookup Attribute page.
3. Navigate to the location with the Lookup Code file.
4. When you click Upload & Save, your codes will be added to the attribute.
Troubleshooting: If there is an error in your file format, a message will be displayed and an error log made available.
Update a Set of Lookup Code Definitions
The only way to update Lookup Codes is via a file upload.
1. Using a sample file as a template, define the two columns necessary for Lookup Code in CSV or Tab delimited format.
2. Click Browse in the File section of the Edit Lookup Attribute page.
3. Navigate to the location with the Lookup Code file.
4. When you click Upload & Save, your codes will update the existing codes in the attribute.
— If the code already exists, the description in the latest upload will replace the previous description.
— If the code does not exist, it will be added with its description to the Lookup Code list.
Uploading does not delete codes. It only adds new codes or updates the description of existing codes.
TIBCO Reward User’s Guide
168 | Chapter 11 Custom Attributes
Defining a Text Custom Attribute
A Text Custom Attribute allows you to work with text-field values, including relatively long strings (up to 1,000 characters). For example, you might use a text custom attribute to allow a customer to record a message or a long description.
To use a text custom attribute:
1. Navigate to the Custom Attributes tab by clicking on Admin>Custom Attributes or by hovering your mouse over the Admin tab and clicking Custom Attributes in the roll-over menu.
2. Create a new Text Custom Attribute by clicking the Text link. Select Product or Customer, as appropriate.
3. Set the attribute parameters:
— Give the attribute a Name.
— Choose a display format, which defines how this attribute is represented within the targeting interface in Profiles.
— Set an Internal Note, which is only displayed on this page.
4. Click Save at any time to save the current setting.
5. Click Done to save your work and return to the Custom Attributes tab.
• Text Custom Attributes are not searchable. This limits their value as customer profiling criteria. Custom attributes of the Lookup code type can include text, and are searchable, so Lookup codes represent a better alternative in many cases where an alphanumeric attribute value is meant to be searched and sorted.
• TIBCO Reward limits Text Custom Attributes to 1000 characters per text field within the transaction files.
• Only the first 1,000 characters of the text custom attribute field appear in an email communication when the text of the attribute is inserted using the custom attribute tag. Additional characters will not appear.
TIBCO Reward User’s Guide
Prerequisites to Creating Custom Attributes | 169
Text Custom Attribute Constraints
• As a general rule, special reserved XML characters, such as apostrophes, ampersands, and greater-than/less-than symbols (,&,’,%,<,>), cannot be used in text custom attributes.
• When importing text custom attributes, maximum length is 1,000 characters.
• If the length is more than 2,000 characters, the transaction file import fails with the following reason: “Incorrect file format”
• When a reference tag for a text custom attribute is included in an email, the rendered text that is inserted into the email includes only the first 1000 characters.
• Input for text custom attributes in the user interface of the customer portal is 1,000 characters.
• Text custom attribute values exported as part of the shopper export only include the first 100 characters.
• A given text custom attribute should be populated either through the import or through the CRMS user interface, but not both, because the last used method may overwrite the file.
— To work around this constraint, these reserved characters can be “escaped” or contained within a CDATA section.
— Here is an example of an escaped ampersand (&) character: &
— CDATA allows special reserved XML characters such as apostrophes, ampersands, and greater-than/less-than symbols to be passed without being escaped by turning off the XML validation for text that is contained with the CDATA brackets.
— Your IT professionals can help you apply these techniques.
TIBCO Reward User’s Guide
170 | Chapter 11 Custom Attributes
Creating a Custom Attribute
Create a Custom Attribute to add a new data field to customer records or to product records. You can then work with the data stored in this field to find, filter, and sort customers or products, respectively.
The Customer custom attribute data extends the standard customer record data and allows you to target customers and extend personalization by using data that is not available in the standard CRMS system.
The Product custom attribute data extends the standard product record and allows you to identify, select or sort products according to your custom (i.e., non-standard for CRMS) product attributes.
Follow these steps to create a Custom Attribute:
1. Click Admin>Custom Attributes.
2. Select the category of data that you want to modify with a new custom attribute:
— Customer
— Product
— Store
— Reward Item
— Redemption
— Order Tender
— Offer
3. Select one of the Custom Attribute type options listed after Create New Attribute (number, date/time, month/day, lookup, or text).
This creates a new Custom Attribute record of the selected type and opens the Edit Custom Attribute page.
TIBCO Reward User’s Guide
Creating a Custom Attribute | 171
When you create a Custom Attribute, you will have to define it as one of the following types:
• Numeric Custom Attribute
• Month/Day Custom Attribute
• Date/Time Custom Attribute
• Lookup Code Custom Attribute
• Text Custom Attribute
You can only create ten custom attributes of one given type; the CRMS will not allow you to create another of that type.
TIBCO Reward User’s Guide

172 | Chapter 11 Custom Attributes
TIBCO Reward User’s Guide
Generic Events | 173
Chapter 12 Generic Events
This chapter provides information about Generic Events in CRMS.
Topics
• About Generic Events, page 174
• Generic Event Tasks Overview, page 176
• Generic Events Page Overview, page 176
• Creating a Generic Event Definition, page 178
TIBCO Reward User’s Guide
174 | Chapter 12 Generic Events
About Generic Events
TIBCO Reward's Generic Events framework enables you to capture data about customer actions and behavior by reaching beyond the existing limits of transactional data processing. The Generic Event framework employs a generic event-based model that gives you the flexibility to look at entirely new types of customer data, and helps you target the customers by applying logical test criteria that work with an adaptable event-syntax format.
Typical examples of generic events include such customer actions as writing a product review, abandoning a product in an online shopping cart, or adding a reward item to a wishlist. Because Reward can accept event data from your company, from web analytics companies, or from other third parties, the range of possible data sources is extremely wide.
Generic Events options also extend the types of data you can capture. A fundamental purpose of the Generic Events framework is to extend the reach of your marketing intelligence beyond your normal transaction data. The generic events model is explicitly designed to receive and process data about customer activities external to the TIBCO Reward system.
TIBCO Reward can collect event via Generic Event batch files or real-time Generic Event API processing.
What is an Event?
In this context, an Event is defined as "an action taken by a subject (currently always a customer) on an object (e.g., a product or person) at a given time". For example, you might define a customer's addition to his or her wishlist as an event. Referring to this event, the basic definition is: Customer X (subject) AddsToWishlist (action) Product Y (object) on date (time). If you define a customer reviewing a product as an event, the event-based definition is: Customer X (subject) Reviews (action) Product Y (object) on date (time).
The Generic Event framework is used to process data about customers' actions and behavior other than those normally monitored by TIBCO Reward. For example, TIBCO Reward always processes customer sales transactions, so transaction data is not considered a candidate for generic event processing. Similarly, data about customer activities in a TIBCO Reward-administered microsite page can be captured directly by TIBCO Reward, so that data would not be processed with the generic event framework. Aside from these pragmatic limitations, there are few limits to the kinds of data that the Generic Event framework can work with.
TIBCO Reward User’s Guide
About Generic Events | 175
A wide range of customer web actions can constitute an event. Actions can include, for example, wishlisting (as described above), browsing products, completing surveys, abandoning a shopping cart, or adding or abandoning one specific product in a shopping cart.
Broadly speaking, the Generic Events framework allows you to collect more information about your customers than just transactional data. You can capture information not only on customers' purchases and loyalty program attributes, but on their behavior in other environments. Game playing, sweepstake entries, activities in social networks, in-store activities (e.g., trying new products) can all be defined as events. If you can provide customer data in the event-based syntax, it can probably be processed by the Generic Event framework.
If the behavior yields a quantitative attribute, you can also define the event to capture that data. For example, reviewing a product is an definable event, but you can go even further by capturing the customer's one to five star rating of the product as a "master value".
What do you do with Event Data?
The data collected from these events can be used in CRMS Profiles to target customers. Profiles based on Generic Event data can be used to target email or offers to customers.
In addition to collecting data that indicates a type of event has occurred, you can use the Generic Events options define events a according to whether very specific numbers occurred. This allows you to target customers based on the occurrence of crucial pieces of numeric data associated with the event. These are called "Master Values." You can create more specific targeting rules based on these specific master values.
For example, an event-based profile can identify customers who abandoned a shopping cart last week with a specified product in it. Another event-based profile could identify customers who reviewed a product in a specified category within the last 90 days and assigned it a three star rating (assuming the rating is stored as the numeric value 3).
As with any action that you wish to track and use for targeting purposes, the best practice is to devise a specific plan for using the event data you collect, and how you will apply this. This helps you identify the specific data attributes of the event that you want to capture, and how the Profile logic will test this data.
To work with generic event data, you must first collaborate with TIBCO Reward's Client Services department to set up the data integration processes. Depending on your needs and capabilities, you can transmit event data to TIBCO Reward by batch files or via API.
TIBCO Reward User’s Guide
176 | Chapter 12 Generic Events
Generic Event Tasks OverviewFollow these steps to use a Generic Event definition in the CRMS:
1. Identify the event and its subject (actor), action, object, any master value that you wish to use, and the reversing event (if one should exist).
2. Determine which piece or pieces of event data you will use, and how your profile logic will logically test this data to select customers.
3. Resolve the generic event data integration issues with TIBCO Reward. Contact your Client Services representative to get started.
4. Define the event. (Refer to Creating a Generic Event Definition, on page 178.)
5. Define a profile that tests the data collected by the event you defined. If you defined a reversing event, also test that it correctly modifies the event data.
6. Test and confirm that the profile selects the expected customers. Modify the event definition and profile as necessary.
Reversing Events
In some cases, the effects of an event can be reversed by another event. For example, a Client can define both an “add to the wishlist” event and a “remove from the wishlist” event; and in this scenario, the "remove" event reverses the "add" event. When defining an event in the CRMS, the Client using the CRMS to define the primary event specifies that another specific event is the "Reversing Event".
In the CRMS, the Reversing Event should be defined first, so that it is available for selection when you define the primary event.
Then (using the example mentioned above), when you define the primary event in the CRMS, you can select "Remove" as the reverse of "Add".
Generic Events Page OverviewThe events listed on the Generic Events page refer to specific web events. Data collected from generic events can be used in CRMS Profiles to target customers.
You can identify one master value in an individual generic event definition.
Be aware that reciprocation is not required and is NOT allowed. This means that you would NOT define "Add" as the Reversing Event for "Remove". Setting up the reversing event is a one-time, one-way process.
TIBCO Reward User’s Guide
About Generic Events | 177
The Generic Events page lists all Generic Events by name. Click on the name of a Generic Event to see or change the event definition details. The Generic Events page also allows you to:
• define an event for CRMS purposes.
• manage existing events that have been (or are being) defined.
• clone or delete an existing event definition.
To work with generic event data, you must first collaborate with TIBCO Reward's Client Services department to set up the data integration processes. TIBCO Reward modifies data structures to accommodate the event data that you want to save and use. Depending on your needs and capabilities, you can transmit event data to TIBCO Reward by batch files or via API.
TIBCO Reward User’s Guide
178 | Chapter 12 Generic Events
Fields and Features
The Generic Events page includes the following features:
• The Create a New Generic Event Definition option, which starts the Create a New Generic Event process.
• The Manage Your Generic Events panel which consists of:
— Standard navigation controls – the Show… filter and the 123 … page controls
— The complete list of existing Generic Events.
Each row in the list represents an Event record and displays a few key fields. These fields are lined up in columns. Click on a column heading to sort all of the custom questions in the list by that field.
The following Generic Event fields are displayed:
• Name – The name of the event as defined in CRMS, and set up as a hyperlink to the CRMS event record. Click the Event Name to open the record, either to see or edit its details.
• Reference Tag – A text string that you assign to this event. This tag is used as an internal reference and identifier at the data processing level. For example, an API would refer to this event using this reference tag. Must be unique with respect to other Reference Tags.
• Update – The date when this event record was last modified. Set by the CRMS.
• Clone – Click this link to generate a duplicate of the associated Generic Event record. Note that the only obvious difference will the re-named Reference Tag, which will be changed to "Copy of <original name>". Be sure to change other data as appropriate.
• Delete – Click this link to delete the entire record for the event.
Creating a Generic Event Definition
Follow these steps to create a Generic Event record:
1. Navigate to the Admin>Generic Events page.
To work with Generic Event data, you must first collaborate with TIBCO Reward's Client Services department to set up the data integration processes. TIBCO Reward updates a database to include the event data that you want to save and use. Depending on your needs and capabilities, you can transmit event data to TIBCO Reward by batch files or via API.
TIBCO Reward User’s Guide
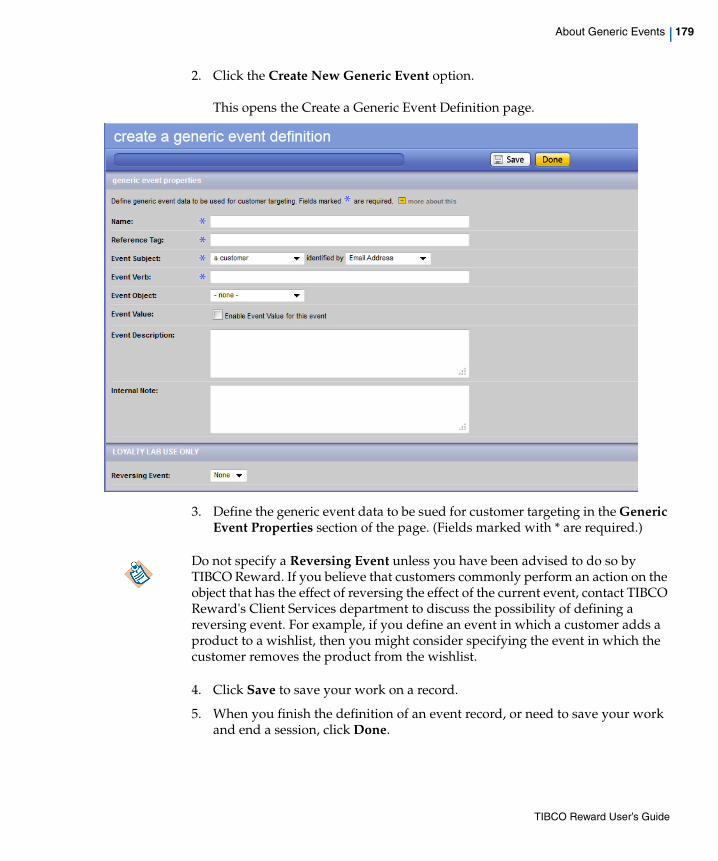
About Generic Events | 179
2. Click the Create New Generic Event option.
This opens the Create a Generic Event Definition page.
3. Define the generic event data to be sued for customer targeting in the Generic Event Properties section of the page. (Fields marked with * are required.)
4. Click Save to save your work on a record.
5. When you finish the definition of an event record, or need to save your work and end a session, click Done.
Do not specify a Reversing Event unless you have been advised to do so by TIBCO Reward. If you believe that customers commonly perform an action on the object that has the effect of reversing the effect of the current event, contact TIBCO Reward's Client Services department to discuss the possibility of defining a reversing event. For example, if you define an event in which a customer adds a product to a wishlist, then you might consider specifying the event in which the customer removes the product from the wishlist.
TIBCO Reward User’s Guide

180 | Chapter 12 Generic Events
TIBCO Reward User’s Guide
Reports | 181
Chapter 13 Reports
This chapter details reports available in CRMS.
TIBCO Reward User’s Guide
182 | Chapter 13 Reports
About Reports
CRMS Reports provide access to specific sets of reports, including the following:
• Customer
• Offer
• Specialized
• Point Expiration
Note: Reports reflect the Reward database, which is typically updated nightly with batch files. If the specified period for a report (the report time frame) is not yet over, the data in the report may reflect only the most recent nightly update of the database.
Standard Format and General Information
Most reports include three components:
• Report parameter settings
• Graphic data display
• Data table
Reports: Parameter SettingsMost reports include a short section at the top of the page that allows you to adjust some of the parameters of the report. The time period covered by the report is the most common parameter setting, for example. Some reports allow you to specify the status of the customers whose data is reported (e.g., Registered, UnRegistered, or All). Changing the report parameters causes the graphics to be re-drawn and the report data to be revised.
Note: If a report or a line in a report is based on a specified period of time, but that period of time has not yet ended, then the current date is used as the end date. This affects values that represent time duration or values based on calculations in which duration is a factor.
TIBCO Reward User’s Guide
About Reports | 183
Report: Graphic Data DisplayDepending on the types of data represented, the graphic may take the form of a line chart, bar chart, pie chart, etc. Note that the graphic display may have a label or subtitle somewhat different than the name of the report overall. The graphic may in fact illustrate only one aspect of the data made available in the report, using only a small subset of the total data.
Note: The graphic data display may be augmented by a short table that supplies supportive details. Be aware that a longer table—the one that fulfills the primary purpose of the report—may appear below the table that supports the graphic. Always scroll through the entire report and check for additional tables and row data.
Report: Data TableThe table presenting the report data can be extensive and may include linked items that open additional detail-oriented reports. A data table often includes multiple sections, and may supply sub-total or summary information at the bottom of a section.
Note: Data tables often include data that is not updated in real time. For example, the Membership Report may be based on the most recent nightly update of the membership count.
Specifying the Time Period
Most reports present information for at least one time period: either a week, month, quarter or year; or a time period defined by a set of "custom dates" that you define using calendar date controls. This is also known as the "reporting time frame". A few reports also let you request data for another time period so that you can compare data for the two different periods.
To specify a custom date range, enter a start date and an end date.
• The Start date is defaulted to a month earlier than current date.
• The End date is defaulted to today.
When you change the time period covered by a report, the report is re-processed. Note: As a rule, you should specify the time period for the report (the "reporting timeframe") as soon as the report opens, to avoid waiting for a default report to be processed.
TIBCO Reward User’s Guide
184 | Chapter 13 Reports
Using custom dates, you can specify the exact date range that a report should cover. The data displayed on the report will be based on the range selected. If you pick the current week, current month, current quarter, etc., some of the most recent data may not be available. The delay varies, depending on the type of data, how it is transmitted and processed, and how your company has set up its data transfers and processing with TIBCO Rewards.
You can sometimes improve the accuracy of a recent, short-term report (e.g., the most recent week) by setting the end date to a date two or more days earlier than the current date.
Terminology Used in Reports
Certain terms are used repeatedly to identify different types of data in the reports. Here are definitions of those terms:
• Customer state/provinces – enrollment status. Usually the reports compare data about Registered versus Unregistered customers (i.e., enrolled versus unenrolled customers. Sometimes these reports refer to"anonymous" Customer data, that is, transaction file data collected that is not associated with a loyalty program member.
• Registered [customer] – Enrolled = registered as a member of your Loyalty Program
• Unregistered [customer] – current customer for whom a customer database record exists, but who is not currently enrolled as a loyalty member.
• Unique – refers to different individual customers. For example, the same customer can never be counted twice if the label refers to a "unique customer".
Note: In some reports, the term "active" refers to customers who made a purchase during the time period covered by the report. An active registered customer is a customer who is registered (enrolled in your loyalty program) and who has completed a transaction during the reporting timeframe.
• Customer Count – the quantity of unique (individual) customers in the report time frame, or in a level of a report, who meet the stated criteria.
• Net Transactions – the quantity of transactions occurring within a report time frame or report level. Returns (transactions with negative value) are counted as a negative transaction. Even exchanges (zero valuetransactions) are not counted as a transaction.
TIBCO Reward User’s Guide
About Reports | 185
Note: The Net Transactions count can easily be misinterpreted if your POS system does not match item return transactions to item purchase transactions. For example, if a customer buys multiple items in one transaction, that counts as one transaction. If the same customer returns just one of the items on a subsequent day, the return transaction may count as one negative transaction. With respect to the Net Transaction value, the return of the one item in this scenario effectively cancels the purchase of several items. (Note, however, that some POS systems match the purchase and return transactions, which eliminates this problem.)
• Net Monetary Unit Sales – the sum of the monetary unit value of all transactions occurring within a report time frame or report level.
• Average Sales – the ratio of net sales to customer count at the end of each report time frame or period.
• Net Unit Sales – the sum of the unit quantity in all transactions occurring within a report time frame or report level.
• Customer Count – quantity of unique customers making a purchase in each time frame level
TIBCO Reward User’s Guide
186 | Chapter 13 Reports
Reports: Customer
The Customer Reports page provides access to reports in the following categories:
• Customer Reports
• Tier Reports
For general information about setting up, reading and using reports, including details about their standard format, contents, column and row headings, refer to About Reports, page 182.
Sales Performance by Customer States (Time Series Analysis)This report analyzes spending amount and transaction quantity by customer type by individual store or by All stores combined. Customer type refers to account Status and includes unregistered (Not enrolled) customers, Registered (Enrolled) customers, and Total customers (enrolled and not enrolled).
It also provides a good representation of the distribution of business by store, or by all stores combined. Graphical comparison shows spending by customer type over time, and can be used to spot short and long term trends in spending behavior with variations by customer status.
Customer Purchase Activity ReportThis report lists the number of customers who performed a transaction over the specified periods of time.
It also allows you to compare customer purchases over two comparable periods of time. It provides two graphics and two corresponding sets of customer activity data. You can select or define the two periods. For each period, the report lists the number of customers who have made a transaction during two specified periods (usually of the same length of time). This allows you to compare customer numbers for these two similar periods.
Note that the reported numbers refer only to the entire customer transaction, i.e., to the checkout, the visits resulting in a purchase of some kind. There is no differentiation among channels, stores, etc. Two sets of customer numbers are reported: Anonymous customers (any customer who completed a transaction) and Registered customers (enrolled customers).
TIBCO Reward User’s Guide
Reports: Customer | 187
Customer Activity by Channel ReportThis report actually provides a Channel Activity report. It shows how many customers are using each channel (retails stores, eCommerce site, third party channels, call-center, etc.) during a specified period of time.
Note: In order for channel data to be included in this report, your company must be reporting data for the channel to TIBCO Reward.
A pie-chart graphically shows the relative proportions of the customers using each channel during the specified time period. Below the chart, numbers in a table further break down the customer data into quantities of anonymous and registered (enrolled) customers.
Channel Data Listed in Rows
Each row shows information about a different channel, as defined by your company. The order in which channels are listed is normally based on the number of customers, starting with the highest number and continuing in descending order.
Note: In each row meant to contain store data, the row displays the store name unless the store ID provided by the retailer is not defined in the TIBCO Reward system. In that case, the display lists stores by the ID provided by the retailer. If the store ID column is null, the label "Unknown" appears.
Sales Performance Comparison (Time Series Analysis)At the top of this report, before the data table, this report features a set of store-oriented graphics that can compare the sales performances of two stores over time, or compare the sales average of one store against the sales average of all stores.
This report shows how the spending behavior of customers varies over time by store and customer status. It can indicate whether certain stores and/or enrollments are leading to higher spending levels over time, or indicate whether sales are shifting based on store attributes or initiatives. The data table breaks the numbers down into registered, unregistered, and total customer categories for further analysis.
Sales Performance by Customer StatesThis report presents customer, transaction, sales totals and sales averages in tabular form for all stores and channels, by customer type (Registered, Unregistered, and Total/Both).
TIBCO Reward User’s Guide
188 | Chapter 13 Reports
When you first open this report, it also displays, on the first page, a bar chart showing data for your top ten sales channels. This bar chart shows the average sales for both registered and unregistered customers at some of your most successful stores and/or channels.
This report is useful when you want to see basic sales figures for registered versus unregistered customers. It also provides sales numbers for your channels, and allows you to compare channels and their loyalty program enrollment levels. The report helps you to see which loyalty program initiatives lead to higher spending levels over time, or if sales are shifting from one store to another.
Each report covers a period of time that you specify, either by selecting a standard option (e.g., this week, last week, this month, last month, this quarter, last quarter, YTD, etc.) or by using calendar controls to specify any range of dates that interests you.
Individual Channel/Store Sales Performance Detail Report
If your site includes store data, and you click on the name of an individual store (which is set up as a link), another more detailed level of reporting may appear, showing details about the sales performance of the selected channel or store over smaller segments of time within the specified period.
Rows containing Web, Catalog, and other channel data do not necessarily have linked names, and corresponding detail reports for these channels are not necessarily available through this report (Sales Performance by Customer States).
At the detail report level, Unregistered versus Registered customer data appears in the bar chart, and a table lists data for unregistered (Not enrolled), Registered (Enrolled), and Total (both) customers.
Notes on column headings and how values in columns are derived.
• Customer Count – quantity of unique customers making a purchase through the specified channel. This number is not mutually exclusive across channels. For example, a customer who buys in two channels will show up in both columns. This means that the Total column is not the sum of the Channel columns.
• Net Transactions – quantity of transactions occurring within this channel. Returns (transactions with negative value) counted as a negative transaction. Even exchanges (zero value transactions) not counted as a transaction. Mutually exclusive across channels
• Net Monetary Unit Sales – Sum of the monetary unit value of all transactions occurring within this channel
TIBCO Reward User’s Guide
Reports: Customer | 189
• Average Sales – Net sales divided by customer count at the end of each period
• Net Unit Sales – Sum of the unit quantity in all transactions occurring within this channel
Notes on Channel data listed in rows.
This report includes rows of information about all stores and channels. Stores are listed first, then other categories (Web, Catalog, Customer-defined). Stores are listed in order by total sales; the store with the highest total sales for the specified period is listed first; the store with the lowest is last.
In each row containing store data, the row displays the store name unless the store ID provided by the retailer is not defined in the Reward system. In that case, the display lists stores by the ID provided by the retailer. If the store ID column is null, the label "Unknown" appears.
The last row contains the grand totals for all channels.
Gender Breakdown ReportThis report, also known as Total Customer Breakdown by Gender, includes a pie chart depicting the customer population, with segments identified as Male, Female, and Unknown (gender not stated).
The data is not broken out into channels, customer types, or any other subcategory other than gender.
Sales Performance by Customer Stated Category PreferenceThis report shows sales performance data (net sales, transactions, units) for customers who expressed preferences for one or more product categories. At their sign up, Customers are asked to select their product category preferences. The product categories listed in this report are the same product categories presented to customers at that time.
This report includes a horizontal bar chart and a data table. The bar chart shows the net sales, within the dates selected, for the customers who selected a category preference from one of the top ten categories. The data table provides more types of sales data, and also provides data about the customers who did not express a category preference. The data table also allows you to see data for more product categories.
TIBCO Reward User’s Guide
190 | Chapter 13 Reports
You select the period of time from which the sales performance data is drawn. You also select one of the following options from a dropdown field to select the number of categories included in the report:
• Top 10 Categories by Total Net Sales (selected by default). Note: The bar chart always shows the top ten product categories.
• Top 20 Categories by Total Net Sales
• Top 50 Categories by Total Net Sales
• Top 100 Categories by Total Net Sales
Retailers can use this data to understand what categories their customers are most interested in, and how sales correspond to a customer’s preferences.
Notes on column headings and how values in columns are derived.
All data is current as of the date the report is run.
• Categories: list of categories. Note that this includes the catch-all category for customers who did not specify a category preference; this is titled, "No Stated Category Preference."
This list also includes a "Total" category.
Note: The number in each column of the Total row is not a sum of the values in that column. Each row refers broadly to a category, but some customers specified preferences for multiple categories, so the customer counts don't add up. The sales, transactions, and units in the category rows do not add up to the corresponding total numbers either, because they reflect the total sales (in any category) associated with any customer who purchased within that category.
• Registered (enrolled) customer count in each category, as of date the report is run. Registered Customer Count is the count of registered customers as of end date of selected period.
• Active customers in each category (i.e., individual customers who expressed preferences within the category within the specified time period).
• Total Net Sales is total net sales in any category, within the dates selected, for the customers who selected the category preference.
• Net Transactions is net transactions in any category, within the dates selected, for the customers who selected the category preference.
• Net Units is net units purchased, within the dates selected, by the customers who selected the category preference.
TIBCO Reward User’s Guide
Reports: Customer | 191
Notes on Channel data listed in rows.
• Categories: The number of listed categories is based on your selection. Categories are sorted by total net sales (high to low) and displayed in a flat list
• No Stated Category Preference: This row includes sales data for customers who did not provide category preferences.
• Total: Totals of the net sales for all customers (regardless of their category preferences) over the time selected. This data covers both the customers who did and did not express a category preference. Note that this is not the sum of data in the above rows (because customers can select more than one category and their data can appear in more than one row).
TIBCO Reward User’s Guide
192 | Chapter 13 Reports
Reports: Offer
The sole Offer report provided on this page is the All Offer Performance Report.
All Offer Performance ReportThe All Offer Performance Report provides, for each offer made available during the specified time period (the reporting timeframe), a line graph and a table.
This report shows, for every offer open over the selected timeframe, the key metrics used to compare the performance of offers.
The line graph shows the Views, Accepts, and Total Redeems of all Offers published during the specified time period (the reporting timeframe).
The table provides data describing each offer that was made live during the reporting timeframe. Each row includes the Views, Accepts, and Total Redeems; and also the Unique Redeems and the Redemption value of the redeemed offers.
Notes on graph labels, table headings and how values are derived
Views – number of times the offer has been viewed. If, because of the page design, the customer does not need to open a separate view page, this number may be low or zero.
Accepts – number of times the offer has been accepted (according to click records).
Unique Redeems – number of unique customers who have redeemed the offer.
Total Redeems – number of times the offer has been redeemed.
Redemption Revenue – amount of revenue associated with the redemptions.
Note: Please ignore the Refer a Friend (RAF) data in this report. Refer a Friend data appears in this report because Refer a Friend is fundamentally a special type of offer, albeit one that has special qualification logic and award rules. Note, however, that because of its special characteristics and essential differences from normal offers, Reward does not support the Refer a Friend (RAF) data in this report.
TIBCO Reward User’s Guide
Reports: Email | 193
Reports: Email
Under the Reports tab, CRMS offers the Email Reports page. This Email Reports page provides access to reports in the following categories:
• Campaign Reports
• List Management Reports
This Reports page provides a brief description of each Email report, including details about specific features and definitions of each type of data in the report.
Campaign Summary ReportThis report provides information about CRMS campaigns, including:
• the campaign’s start and end dates
• the number people who received the sent emails
• the response to the email campaign
• the quantitative value of the response?
The report lists the campaigns that took place during the time period you specify (the reporting time frame).
For detailed reports that include data about each campaign, click the name of the campaign under the Campaign Name heading. (Campaign names are set up as links.) The Campaign Detail Report opens, showing data for the selected campaign.
You can also see Campaign Detail Reports for any Campaign by clicking on the link to the Campaign Detail Executive Report. You must know the name of the campaign for which you want details.
Notes on column headings and how values are derived.
Tracking Start Date – This is the tracking start date that was defined for the campaign. This is the first date when information about sales associated with the campaign is tracked. The Tracking Start and End dates define the period for which sales is tracked: the tracked period.
• Tracking End Date – This is the tracking end date that was defined for the campaign. This is the last date when information about sales associated with the campaign is tracked.
• Sent – Sum of individual emails sent during the tracked period.
TIBCO Reward User’s Guide
194 | Chapter 13 Reports
• Recipients – The number of unique customers who received an email communication during the campaign's tracked period. This is based on a simple difference calculation: Sent emails minus Bounced emails.
• Respondents – The number of Recipients who made a purchase during the campaign's tracked period.
• Response Rate – A ratio: Respondents divided by Recipients, expressed as a percentage.
• Response (Rate) Lift – This equates to the following: (Promoted Group Response Rate - Control Group Response Rate)/Control Group Response Rate; where Control group response rate is the numbers of customers in the control group who made a purchase during the tracking period divided by the total number of members of the control group).
Note: This value is set to "N/A" if one or more communications within the campaign do not have a control group.
• Tracked Sales – Sales from Promoted Group during the tracked time frame.
• Sales Per Recipient – This equates to the following: Tracked Sales/Recipients.
• Sales Per Respondent – This equates to the following: Tracked Sales/Respondents.
• Incremental Sales monetary units (vs. control Group) – This equates to the following: Recipients * (Promoted Group Sales per Recipient – Control Group Sales per control group population). Note: This value is set to "N/A" if one or more of the communications within the campaign does not have a control group.
• Duration in Days – This is the number of days tracked, based on a difference calculation: the end date minus the start date. Note: If the campaign is still in progress, the current date is used as the end date.
• Incremental Sales monetary units per Day – This equates to the following: Incremental Sales monetary units / Duration. Note: This value is set to "N/A" if one or more of the communications within the campaign does not have a control group.
Campaign Detail Executive ReportThis report includes data about each email communication associated with a campaign.
To open this report, navigate to the Reports>Email page and click on the link to this report. Then select the name of the campaign from the drop-down list.
TIBCO Reward User’s Guide
Reports: Email | 195
Notes on column headings and how values are derived
• Sent – Sum of individual emails sent during the tracked period.
• Recipients – The number of unique customers who received an email communication during the campaign's tracked period. This is based on a simple difference calculation: Sent emails minus Bounced emails.
• Respondents – The number of Recipients who made a purchase during the campaign's tracked period.
• Response Rate – A ratio: Respondents divided by Recipients, expressed as a percentage.
• Response (Rate) Lift – This equates to the following: (Promoted Group Response Rate - Control Group Response Rate)/Control Group Response Rate; where Control group response rate is the numbers of customers in the control group who made a purchase during the tracking period divided by the total number of members of the control group).
Note: This value is set to "N/A" if one or more communications within the campaign do not have a control group.
• Tracked Sales – Sales from Promoted Group during the tracked time frame.
• Sales Per Recipient – This equates to the following: Tracked Sales/Recipients.
• Sales Per Respondent – This equates to the following: Tracked Sales/Respondents.
• Incremental Sales monetary units (vs. control Group) – This equates to the following: Recipients * (Promoted Group Sales per Recipient – Control Group Sales per control group population).
Note: This value is set to "N/A" if one or more of the communications within the campaign does not have a control group.
Duration in Days – This is the number of days tracked, based on a difference calculation: the end date minus the start date. Note: If the campaign is still in progress, the current date is used as the end date.
Incremental Sales monetary units per Day – This equates to the following: Incremental Sales monetary units / Duration. Note: This value is set to "N/A" if one or more of the communications within the campaign does not have a control group.
TIBCO Reward User’s Guide
196 | Chapter 13 Reports
Lack of Control Group Results in "N/A" values
If even one email communication associated with the campaign is not assigned a control group, then all values that rely on control group numbers become invalid, and are omitted from the reports for a campaign. They are replaced with the value "N/A". Specifically, values in the following columns are omitted: Response (Rate) Lift, Incremental Sales monetary units (vs. control Group), and Incremental Sales monetary units per Day. To see these values, EVERY email communication associated with a campaign must have a control group.
Campaign Detail Extended ReportThis report includes data about each email communication associated with a campaign. It provides all of the data supplied by the Campaign Details Executive Report and also provides the following data about the control group:
• Control Group Population
• Control Group Respondents
• Control Group Response Rate
• Control Group Tracked Sales
• Sales Per Control Group Member
To open this report, navigate to the Reports>Email page and click on the link to this report. Then select the name of the campaign from the dropdown list.
Note Control groups required for all email communications in a campaign
If even one email communication associated with the campaign is not assigned a control group, then none of the values that are based on comparisons with a control group are provided in the reports; they are all replaced with the value "N/A". To see values in the columns listed, or in the other columns that depend on control group, all email communications associated with a campaign must have a control group.
Columns/values that depend on control group include the control group values and also the following:
• Response (Rate) Lift
• Incremental Sales monetary units (vs. control Group)
• Incremental Sales monetary units per Day.
TIBCO Reward User’s Guide
Reports: Email | 197
Email Performance Executive ReportThis report provides information about the success of the email in terms of the numbers of recipients who received, opened, and used the email. View email delivery, open, click-through rates and other results for all emails sent during the reporting time frame that you specify.
Notes on column headings and how values are derived
• Publish Start Date – The publishing start date for the email communication: the first day that published information about the offer became available to customers.
• Publish End Date – The publishing end date for the email communication: the last day that published information about the offer was available to customers.
• Quantity Sent – The number of emails assigned and sent to a unique address for this email communication.
• Delivery Rate – The percentage of sent emails that arrived at their addresses. In other words, this is the ratio of delivered to sent emails.
• Quantity Bounced – The number of unique sent emails that were bounced. The reason may be a hard bounce or a soft bounce.
• Bounce Rate – The percentage of sent emails sent that were not delivered. In other words, this is the ratio of unique bounced emails to unique sent emails. The reason may be a hard bounce or a soft bounce.
• Quantity Delivered – The number of sent emails that arrived at their address for this email communication.
Note: The Bounce Rate plus the Delivery Rate = 100%.
• Opens Unique – The number of individual emails with a unique address that were opened.
Regarding Open-Related Values in this Report: The embedded image used to track the opening of an email is not accessible in text-based emails, and some email providers block this image so that link associate with the image is not triggered. The result is that a view (i.e., an "open," which is an individual viewing of an email) is not tracked by the most direct means available, and the opening of the email may not be counted. However, if the customer clicks on any trackable link in the email and if the email was not already tracked (i.e., counted as a viewed email), then Reward will assume that the email was in fact opened and viewed, and the email will be reported as an opened email.
• Opens – The total number of times that recipients of an email communication opened the email, including repeated openings of the same unique mail. For
TIBCO Reward User’s Guide
198 | Chapter 13 Reports
example, if the same recipient opens one individual email three times, each of these three instances of opening are included in this count.
• Unique Open Rate – The ratio of individual emails with a unique address that were opened divided by the number of such emails that were delivered. In other words, this is the ratio of unique opened emails to unique delivered emails.
• Unique Clicks – The total number of individual emails with a unique address that were delivered and that the recipient interacted with, by clicking at least one tracked link.
• Unique Click Rate – The ration of clicked emails to delivered emails; that is, the ratio of emails with which the recipient interacted by clicking a tracked link divided by the number of emails that were delivered.
Email Peroformance Extended ReportThis report provides information about the success of the email in terms of the numbers of recipients who received, opened, and used the email. View email delivery, open, bounce-data, click-through rates and other results for all emails sent during the reporting time frame.
This report includes three types of values that are set up as links to additional detail reports
Notes on column headings and how values are derived
• Communication Name – The name of the email communication. All data in the row references this email communication. The name links to the Email Communication Report.
• Publish Start Date – The publishing start date for the email communication: the first day that published information about the offer became available to customers.
• Publish End Date – The publishing end date for the email communication: the last day that published information about the offer was available to customers.
• Quantity Sent – The number of emails assigned and sent to a unique address for this email communication.
• Delivery Rate – The percentage of sent emails that arrived at their addresses. In other words, this is the ratio of delivered to sent emails.
• Quantity Bounced – The number of unique sent emails that were bounced. The reason may be a hard bounce or a soft bounce.
TIBCO Reward User’s Guide
Reports: Email | 199
• Bounce Rate – The percentage of sent emails sent that were not delivered. In other words, this is the ratio of unique bounced emails to unique sent emails. The reason may be a hard bounce or a soft bounce.
• Quantity Delivered – The number of sent emails that arrived at their address for this email communication.
Note that the Bounce Rate plus the Delivery Rate = 100%.
• Opens Unique – The number of individual emails with a unique address that were opened.
• Opens – The total number of times that recipients of an email communication opened the email, including repeated openings of the same unique mail. For example, if the same recipient opens one individual email three times, each of these three instances of opening are included in this count.
• Unique Open Rate – The ratio of individual emails with a unique address that were opened divided by the number of such emails that were delivered. In other words, this is the ratio of unique opened emails to unique delivered emails.
• Unique Clicks – The total number of individual emails with a unique address that were delivered and that the recipient interacted with, by clicking at least one tracked link.
• Unique Click Rate – The ration of clicked emails to delivered emails; that is, the ratio of emails with which the recipient interacted by clicking a tracked link divided by the number of emails that were delivered.
• Unsubscribed – The total number of unique emails to which the recipient responded by unsubscribing (clicking the link that results in a customer opt-out).
• Unsubscribed Rate – The rate of unsubscribe requests (generated by a clicks from within this email communication) to delivered unique emails.
Clickthrough Analysis by EmailThis report provides the click-through results for all trackable links in an email communication. You select the email communication to be the subject of this report, and the resulting report lists the following data for each trackable link:
• Link – Link text strings are listed, not necessarily in alphanumeric order.
Be aware that you have the option to assign a name to a link. This name is an alternate to the entire text of the link, and may be shorter and easier to recognize and interpret than the full-length link text.
TIBCO Reward User’s Guide
200 | Chapter 13 Reports
• Unique clicks – The number of unique customers who clicked on a link in an email communication.
• % (percent) of delivered – The ratio of clicks on a link to unique emails delivered. More specifically, the total number of clicks on the link in an email communication as a percentage of the unique emails delivered for that communication.
• % (percent) of opens – The ratio of clicks on a link to unique emails opened. More precisely, this is the total number of clicks on the link in an email communication expressed as a percentage of the unique emails in that communication that were opened.
Email Performance Over TimeThis report provides hourly updates about opens of an email and clicks on links in the email. For the purposes of this report, an "open" is an instance of a recipient opening a unique email; any click on a tracked link in the email is considered a "click".
Note: This report covers the first three days after the Publish Start Date.
This report includes a line graph and a table; both show unique opens and unique clicks on an hour-by-hour basis for the first three days from the Offer publish date. This data is refreshed nightly.
The graph shows when larger numbers of emails are being opened during the first three days.
The table provides supporting numerical detail -- also hourly, and also for the first three days -- for unique opens count repeated opens and clicks within the same unique email.
Notes on graphics labels, column heading, and how the values are derived.
• Opens Unique – The number of individual emails with a unique address that were opened.
• Opens – The total number of times that recipients of an email communication opened the email, including repeated openings of the same unique mail. For example, if the same recipient opens one individual email three times, each of these three instances of opening are included in this count.
• Unique Clicks – The total number of individual emails with a unique address that were delivered and that the recipient interacted with, by clicking at least one tracked link.
• Clicks – The total number of clicks on a tracked link in opened individual emails with a unique address.
TIBCO Reward User’s Guide
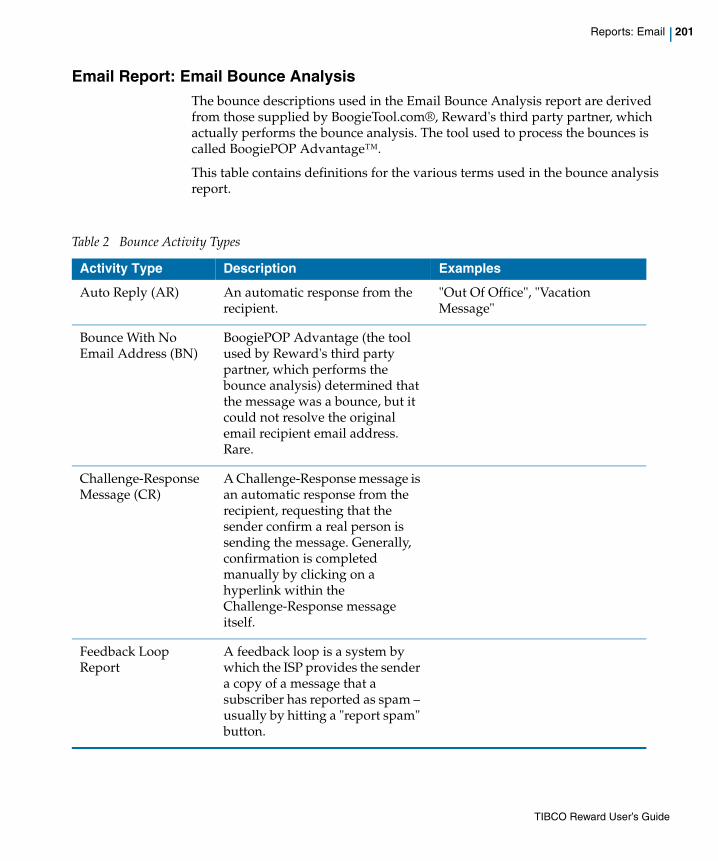
Reports: Email | 201
Email Report: Email Bounce AnalysisThe bounce descriptions used in the Email Bounce Analysis report are derived from those supplied by BoogieTool.com®, Reward's third party partner, which actually performs the bounce analysis. The tool used to process the bounces is called BoogiePOP Advantage™.
This table contains definitions for the various terms used in the bounce analysis report.
Table 2 Bounce Activity Types
Activity Type Description Examples
Auto Reply (AR) An automatic response from the recipient.
"Out Of Office", "Vacation Message"
Bounce With No Email Address (BN)
BoogiePOP Advantage (the tool used by Reward's third party partner, which performs the bounce analysis) determined that the message was a bounce, but it could not resolve the original email recipient email address. Rare.
Challenge-Response Message (CR)
A Challenge-Response message is an automatic response from the recipient, requesting that the sender confirm a real person is sending the message. Generally, confirmation is completed manually by clicking on a hyperlink within the Challenge-Response message itself.
Feedback Loop Report
A feedback loop is a system by which the ISP provides the sender a copy of a message that a subscriber has reported as spam – usually by hitting a "report spam" button.
TIBCO Reward User’s Guide
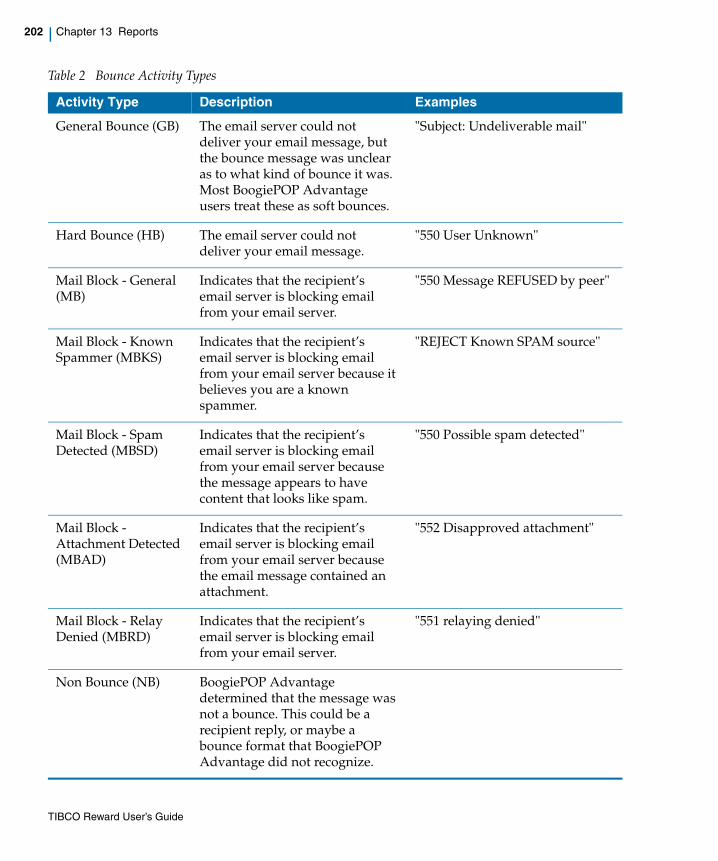
202 | Chapter 13 Reports
General Bounce (GB) The email server could not deliver your email message, but the bounce message was unclear as to what kind of bounce it was. Most BoogiePOP Advantage users treat these as soft bounces.
"Subject: Undeliverable mail"
Hard Bounce (HB) The email server could not deliver your email message.
"550 User Unknown"
Mail Block - General (MB)
Indicates that the recipient’s email server is blocking email from your email server.
"550 Message REFUSED by peer"
Mail Block - Known Spammer (MBKS)
Indicates that the recipient’s email server is blocking email from your email server because it believes you are a known spammer.
"REJECT Known SPAM source"
Mail Block - Spam Detected (MBSD)
Indicates that the recipient’s email server is blocking email from your email server because the message appears to have content that looks like spam.
"550 Possible spam detected"
Mail Block - Attachment Detected (MBAD)
Indicates that the recipient’s email server is blocking email from your email server because the email message contained an attachment.
"552 Disapproved attachment"
Mail Block - Relay Denied (MBRD)
Indicates that the recipient’s email server is blocking email from your email server.
"551 relaying denied"
Non Bounce (NB) BoogiePOP Advantage determined that the message was not a bounce. This could be a recipient reply, or maybe a bounce format that BoogiePOP Advantage did not recognize.
Table 2 Bounce Activity Types
Activity Type Description Examples
TIBCO Reward User’s Guide
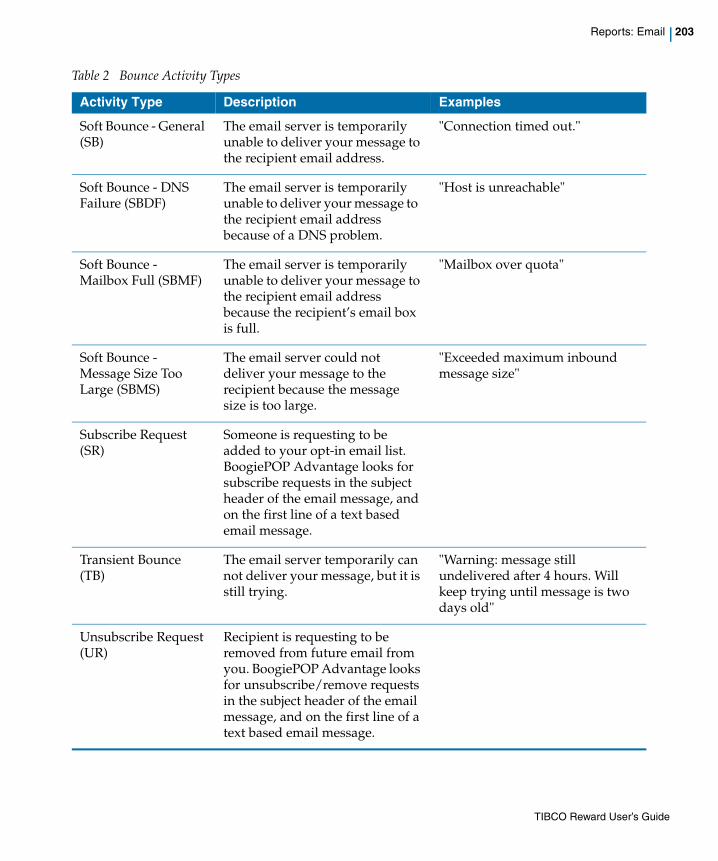
Reports: Email | 203
Soft Bounce - General (SB)
The email server is temporarily unable to deliver your message to the recipient email address.
"Connection timed out."
Soft Bounce - DNS Failure (SBDF)
The email server is temporarily unable to deliver your message to the recipient email address because of a DNS problem.
"Host is unreachable"
Soft Bounce - Mailbox Full (SBMF)
The email server is temporarily unable to deliver your message to the recipient email address because the recipient’s email box is full.
"Mailbox over quota"
Soft Bounce - Message Size Too Large (SBMS)
The email server could not deliver your message to the recipient because the message size is too large.
"Exceeded maximum inbound message size"
Subscribe Request (SR)
Someone is requesting to be added to your opt-in email list. BoogiePOP Advantage looks for subscribe requests in the subject header of the email message, and on the first line of a text based email message.
Transient Bounce (TB)
The email server temporarily can not deliver your message, but it is still trying.
"Warning: message still undelivered after 4 hours. Will keep trying until message is two days old"
Unsubscribe Request (UR)
Recipient is requesting to be removed from future email from you. BoogiePOP Advantage looks for unsubscribe/remove requests in the subject header of the email message, and on the first line of a text based email message.
Table 2 Bounce Activity Types
Activity Type Description Examples
TIBCO Reward User’s Guide
204 | Chapter 13 Reports
List Performance Summary ReportThis report provides data concerning the performance of a selected set of your lists based on sale data for a specified time period. You specify one time period from which the lists are selected and another time period from which the sales totals are collected. (The two periods may of course overlap or be exactly the same.)
This report includes a horizontal bar chart and a data table.
The bar chart shows the top ten lists from your selection, rated according to their net sales for the specified period.
The data table provides a row of data for each list. Each row includes the following data for each list:
• List Name – This is the name assigned to the list by CRMS user who created it.
• List ID – The CRMS-assigned identification number assigned to each list, which serves to provide a unique ID for each list.
• List Creation Date – The date when the list was created in or introduced into CRMS. Although the list may have existed earlier in another environment, this date refers to the creation of the list with respect to
• CRMS list management system.
• Customer Count – The total number of customers in each list. More accurately, this is the Customer Count for each list -- based on the customer count when the list was created. Be aware that the names in each list are validated for format when they are created, i.e., when they are imported into CRMS. This tends to reduce the size of some externally generated lists by a small percentage.
Note: The Total customer count is the count of ALL unique customers -- not just those on a list – as of the end of the specified period.
• Active Customer Count – The total number of customers in each list who made a purchase within the sales dates selected.
• Total Net Sales Monetary Units – The total number of sales monetary units produced as income by active customers in a list within the dates selected. This number accounts for returns.
• Net Transactions – The total number of net transactions by active customers in a list within the dates selected. Refunds and returns (transactions with negative value) are counted as a negative transaction. Even exchanges (zero value transactions) are not counted as a transaction.
TIBCO Reward User’s Guide
Reports: Email | 205
Note: The Net Transactions count can easily be misinterpreted if your POS system does not match item return transactions to item purchase transactions. Consider: If a customer buys multiple items in one transaction, that counts as one transaction. If the same customer returns just one of the items on a subsequent day, the return transaction may count as one negative transaction. With respect to the Net Transaction value, the return of the one item in this scenario effectively cancels the purchase of several items. (Note, however, that some POS systems match the purchase and return transactions, which eliminates this problem.) Thus, the Net Transactions value may be skewed towards a conservative measure, depending on how your POS system processes returns.
• Net Units – The total number of net units sold during the dates selected.
Note: The totals on the bottom line are not totals of the numbers listed directly above in the same columns; rather, they are totals of the unique customers, unique active customers, and their related data. (Because multiple lists inevitably overlap each other, a simple total of the listed numbers would count the same customer data multiple times, which would yield incorrect figures.) The Total value for Net Sales Monetary Units is simply the Total sales over the time selected. This value does not apply to list names, list ID and list creation date; it is simply the total sales over the time selected.
List Performance Time Series ReportThis report provides data showing the performance of a list over time. You select the list and the time period. You can also select the time frames or increments into which the report data will be divided; for example, you can specify that you wish to see a month's worth of data presented in weekly increments.
This report provides a line graph and a data table.
The line graph shows, for the specified time period, the performance of the list in terms of the sales generated by the list members, on a week-to-week basis.
The data table includes a row for each time increment in the report (of a length determined by your specification). Each row includes data under the column headings.
Notes on column headings and how values are derived.
• Registered Customer Count – Quantity of unique registered customers (Loyalty Program members) in the list. This Customer Count is the count of Registered customers as of the end date of the period for each row.
• Unregistered Customer Count – Quantity of unique non-registered customers (non-Loyalty Program members) in the list. This Customer Count is the count of non-Registered customers as of the end date of the period for each row.
TIBCO Reward User’s Guide
206 | Chapter 13 Reports
• Active Registered Customer Count – Quantity of unique registered customers in the list who made a purchase in the time frame level.
• Active Unregistered Customer Count – Quantity of unique unregistered customers in the list who made a purchase in the time frame level.
• Net Sales Monetary Units (Registered Customers) – Total sales to Registered customers in the list, for transactions occurring within the time frame level.
• Net Sales Monetary Units (Unregistered Customers) – Total sales to non-Registered customers in the list, for transactions occurring within the time frame level.
• Net Transactions (Registered Customers) – Quantity of transactions by registered customers occurring within the time frame level. Returns (transactions with negative value) are counted as a negative transaction. Even exchanges (zero value transactions) are not counted as a transaction.
• Net Transactions (Unregistered Customers) – Quantity of transactions by non-registered customers occurring within the time frame level. Returns (transactions with negative value) are counted as a negative transaction. Even exchanges (zero value transactions) are not counted as a transaction.
• Net Unit Sales (Registered Customers) – Sum of the unit quantity in all net transactions by registered customers occurring within the time frame level.
• Net Unit Sales (Unregistered Customers) – Sum of the unit quantity in all net transactions by non-registered customers occurring within the time frame level.
TIBCO Reward User’s Guide
Reports: Specialized | 207
Reports: Specialized
The Specialized Reports page actually includes reports in several categories:
• Specialized Reports
• Signage Reports
• Activity Reports
• CSR Activity Reports
General rules:
Click on the name of a report to generate it. You can customize the contents and format of most reports. As soon as the report opens, select the subject of the report and specify the time period(s) that you want the report to cover.
• Specialized Reports
• Customer Recency Report
Both the graph and the table in this report show how many customers (both registered and anonymous customers) made a purchase every week in the past year. This report shows the most recent purchase made by your customers.
A registered customer is a customer enrolled in your loyalty program. An anonymous customer is a non-registered customer who performed a transaction.
Note: Anonymous customers cannot be distinguished from one another or from one transaction to the next, so it is possible that individuals who make multiple purchases (without identifying themselves) are counted multiple times as anonymous customers.
This report does not provide calendar dates.
Points Time Series Report
Also known as the Points Summary Report, this report shows points earnings and redemption data over time.
This report shows your outstanding points liability, i.e., the number of points your company has awarded that have not been redeemed.
To set up this report, select the total report timeframe that the report covers, and the smaller time increments (periods) for which data is reported.
TIBCO Reward User’s Guide
208 | Chapter 13 Reports
For each incremental period of time covered by the report, the following data is provided:
• # Customers Earning Points (No Offers) – Number of unique customers who earned points outside of an offer (i.e., points awarded by the main program, Tiers, Clubs, or by CSR agents).
• Total Points Earned (No Offers) – Total number of points earned by unique customers who earned points outside of an offer (i.e., points awarded by the main program, Tiers, Clubs, or by CSR agents).
• # Customers Earning Points (Offers) – Number of unique customers who earned points through an offer.
• Total Points Earned (Offers) – Total number of points earned by unique customers who earned points through an offer.
• Total Points Used (Awards) – Total number of points used (i.e., redeemed, spent, "burned") by customers in exchange for rewards.
• Total Awards Earned (monetary units) – The monetary unit value of the total points earned by customers.
• Number of Awards Earned – The number of awarded units earned by customers.
• Outstanding Points – The total number of points earned by customers that currently remain unused/unredeemed (and unexpired, if your company causes points to expire). Note that there is not total shown on the bottom line in the Outstanding Points column; this is because each row shows a running total for the given time period.
Totals for each of these values over the entire report timeframe are also provided (except for the Outstanding Points values, which already take the form of running totals).
Signup and Membership ReportThis report shows the number of signups and closed accounts for a selected reporting timeframe, and also the number of currently registered members. You select the total report timeframe that the report covers, and the time increments (periods) for which data is reported.
Included in the report are two line graphs and a data table. The first report indicates the number of new signups and account closures per reporting period.
The second report indicates the membership over time.
The data table shows, for each reporting period, the following data:
TIBCO Reward User’s Guide
Reports: Specialized | 209
• New Signups (in time period) – The number of new loyalty program enrollments during an increment of time.
• Closed Accounts (in time period) – The number of loyalty program un-enrollments during an increment of time.
• Total Active Accounts – The number of currently enrolled loyalty program members at the end of a reporting time period.
This report is a good indicator of the effectiveness of recruiting new members. A decline in signups may warrant an initiative or drive to sign up more members.
Custom Question Detail ReportThis report shows how customers responded to a selected Custom Question and provides sales data for customers based on their response (including non-response) to that custom question. Sales data is supplied for each category of customers, where the categories are defined as the customers who gave the same response to the question.
The report includes a bar chart and a data table.
The bar chart shows the percentage of customers who gave one answer or another, or no answer; and the percentage of total sales (from the population exposed to the question) that came from each customer category.
Note: The numbers returned from customer responses can add up in different ways. Many questions allow just one answer, that is, one alternative. One customer supplies one answer to one of these kinds of question, and this counts as one "Unique Customer Response. However, some questions allow multiple responses; for example, any question whose instructions say, "Check all that apply." For questions such as these, one customer can supply multiple responses to one of these kinds of question. For these questions, each selected check box or button counts as one "Unique Customer Response".
Notes on Custom Question data listed in rows.
The data table addresses the total population that was asked to respond to the question. Sales data is provided for:
• the total population, including those who answered and those who didn't; labeled "Total"
• each group of customers that clicked on a particular response
• the population subgroup that clicked on any of the possible responses; labeled "Total for any Answer"
TIBCO Reward User’s Guide
210 | Chapter 13 Reports
• the population subgroup that did not click on any response; labeled "No Answer"
Notes on column headings and how values in columns are derived.
• Unique Customer-Responders – The number of unique (different) customers responding to the custom question.
• Net Transactions – Total number of transactions associated with the unique customers during the specified time period.
• Net Sales – Sum of the sales associated with the unique customers during the specified time period.
• Net Units – Sum of the units sold in transactions associated with the unique customers during the specified time period
• % of total customers – The percentage the total number of customers asked to respond to this custom question. For the Total row, this is always 100%.
• % of total sales – The percentage the total sales associated with the customers asked to respond to this custom question. For the Total row, this is always 100%.
• Sales per customer – The net sales figure divided by the number of Unique Customer-Responders.
File Import Report
The File Import Summary report provides status updates and other useful information about the outcome of their batch imports or list file uploads. It also provides access to details about each import file.
To set up this report, use the controls at the top of the report.
• To select a time frame for the report, choose from the dropdown list of standard options, or customize the time frame by specifying a range of dates. If you change the time frame, click the button labeled View Report to be sure that the report is regenerated.
• Navigate through the report by using the arrow controls. You can also find data by searching for strings that occur in the report: use the data entry box in front of the Find control.
• To create another copy of the report with a different format, select a formatting option from the Select a Format dropdown box, then click Export.
• Click the printer icon to initiate the printing of the current report.
TIBCO Reward User’s Guide
Reports: Specialized | 211
For each file imported within the time period that you specify, the File Import Summary report lists the following fields:
• File Import ID – This is a file ID assigned by the system in accession order. Each new file is assigned the next number, so higher numbers indicate a more recent file. Files are listed from highest ID to lowest (within the specified time frame for the report)
• File Name – Name composed of standard filename elements, including date.
• Start Date – The start-date of the file generation.
• End Date – The end-date of the file generation.
• File Type – The type of file that was imported, for example: TransactionImport, StoreImport, ProductImport, etc.
• Status – Successful or Failed
Details link – Click this link in the File Import Summary report to see the File Import Details report for the associated file.
The File Import Details report has two variations:
If the file import failed, the File Import Details report lists information in fields titled Failure Reason and Suggested Action.
If the file import succeeded, then the File Import Details report lists file data and statistics, including the record type, the number of records in the file, and the number of records that were successfully transmitted.
Note: In the case of certain files, a file import may partially succeed (some records are transmitted but others are not) and the file import is considered a success. In this case this report will specify the number of records successfully transmitted, and the number of records that failed to be transmitted.
Report: Signage
Web Signage Summary Report
For each web signage that you have defined, this report provides data about the usage of the signage, including information about how much it has been viewed and how much it has been used.
The report allows you to create a table of summary usage data about All Signages, or just the Live, Paused or Saved Signages. The table includes summary data for each signage, and totals for all signage data listed in the table.
TIBCO Reward User’s Guide
212 | Chapter 13 Reports
Notes on Web Signage data listed in rows.
The data table lists data for each web signage defined in your system. Each web signage is listed on a separate row. To see details about a particular piece of web signage, double-click on the name of the signage. The name is set up as a link; clicking opens the web-signage detail report for that signage.
Data totals are displayed for all of the web signage in the current table.
Notes on column headings and how values in columns are derived.
• Views – The number of separate views of a signage (or the total of all views of the listed signage).
• Customers – The number of unique (different) customers who clicked on the signage.
• Views per Customer – The number of separate views of a signage per customer. This is the average number of views per customer.
• Total Clicks – The total number of clicks on the selected signage.
• Total Unique Clicks – The total number of customers who clicked on this signage.
• Unique Click Through Rate – A ratio: the customers who clicked on the signage divided by the number of customers who viewed the signage.
When you specify the parameters of this report, you can filter your view of the available signage by selecting just the Live, Paused or Saved Signages from the dropdown selector box. You may wish to compare the usage of Live signage against signage that has been put into Paused or Saved mode because, for example, such signage represents seasonal or otherwise temporary signage that has been retired or taken out of use.
Web Signage Detailed Report
For a selected piece of web signage and a selected period of time, this report provides data about the usage of the signage.
To use this report, you select one piece of web signage from a dropdown list of all signage defined in your system. Then you specify the time period to be covered by the report.
TIBCO Reward User’s Guide
Reports: Specialized | 213
Notes on Web Signage data listed in rows.
The rows list usage of the selected signage by Registered customers, by Unregistered customers, and by all (Total) customers. Each row includes information about how much the signage has been viewed and how much it has been used (clicked on) during the specified time period.
Notes on column headings and how values in columns are derived.
• Views – The number of separate views of a signage (or the total of all views of the selected signage).
• Customers – The number of unique (different) customers who clicked on the signage.
• Views per Customer – The number of separate views of a signage per customer. This is the average number of views per customer.
• Total Clicks – The total number of clicks on the selected signage.
• Total Unique Clicks – The total number of customers who clicked on this signage.
• Unique Click Through Rate – A ratio: the customers who clicked on the signage divided by the number of customers who viewed the signage.
Report: ActivityAn activity is a task that can be completed on a web site. The successful completion of an activity can monitored over the web, so a customer's completion of an activity can be used to qualify that customer for an Offer.
Activity Analysis Report
This report indicates the performance of current and past activities and provides data. For each activity, two rows are displayed: one for customers who performed the activity, and one for customers who did not.
The data table shows, for each row corresponding to an activity, the following data:
• Performed – Y (Yes) or N (No). N refers to "Not Performed", which is used to refer to customers who did not perform a specified activity. Be aware that not performing an activity can be selected and used as anactivity-based criterion.
• Activity Count – The number of times this activity is completed over a period of time. Be aware that some activities can be completed multiple times by the same customer; others can be completed just once by each customer. The
TIBCO Reward User’s Guide
214 | Chapter 13 Reports
activity count is simply based on instances of the completion of the activity. Multiple completions are counted multiple times.
• Customer Count – The number of customers who are counted as satisfying the activity-based criterion during a time period, as defined by your report set-up parameters.
• Monetary units Sales – The total sales over the specified time period to the specified customers.
• Unit Sales – The number of separate units sold over a specified time period to the specified customers.
• Txn – The transactions over the specified time period performed by the specified customers.
Note: Click the linked name of the activity to open the Activity Time Series Report and see detailed data for the activity. You will have to define all parameters for this more detailed report.
Activity Time Series Report
This report shows the spending of customers who performed (or did not perform) a specified activity over a specified period of time. The report includes both a line graph and a data table.
You specify data in both the activity and spending categories.
With respect to the activity, you select:
• The customer activity to be used as a test criteria.
• Whether the test will check for performance or non-performance of the selected activity.
• The report timeframe for the activity data to be covered in this report.
With respect to the spending, you select:
• The time increment that each row of report data will address.
• The report time frame spending data to be covered in this report.
Note: You can specify different time periods for an activity and for spending. Always check both specified periods to make sure that you get precisely the results that you need to compare.
The line graph show, for each incremental period, two types of data:
• The Activity Count, i.e., the number of times the activity was completed. Specifying "not performed" during the report set up does not change this count.
TIBCO Reward User’s Guide
Reports: Specialized | 215
• The Customer Count, i.e., the number of customers who are counted as satisfying the activity-based criterion during a time period: those who did or did NOT perform a specific activity, as defined by your report set-up parameters. Specifying "not performed" during the report set up can completely change this count.
The data table shows, for each row corresponding to an incremental period, the following data:
• <Time period> Ending – The end date of your selected incremental reporting period: daily, weekly, monthly, quarterly, annually.
• Activity Count – The number of times this activity is completed over a period of time. Be aware that some activities can reasonably be completed multiple times by the same customer; others are completed just once by each customer. The activity count is simply based on the completion of the activity. Specifying "not performed" during the report set up always changes this count to zero (0).
• Customer Count – The number of customers who are counted as satisfying the activity-based criterion during a time period, as defined by your report set-up parameters.
• Monetary units Sales – The total sales over the specified time period to the specified customers, as defined by your report set-up parameters.
• Unit Sales – The number of separate units sold over a specified time period to the specified customers, as defined by your report set-up parameters.
• Txn – The transactions over the specified time period performed by the specified customers, as defined by your report set-up parameters.
Report: CSR Activity
CSR Activity Breakdown Report
For a specified period (the report timeframe), this report provides a data table that lists each Customer service activity for one selected CSR or for all CSRs, along with associated activity-related data.
If you have the privileges to see this report, for example, if you are a CSR Administrator, you select the User (CSR) whose data you want to see, or you can select All to see data for all CSRs. Click on the down arrow at the right of the Users dropdown selection field to see the comprehensive list of CSR users from which you can select.
You can also set the timeframe for the report, the period of time that the report data will cover.
TIBCO Reward User’s Guide
216 | Chapter 13 Reports
The data table shows, for each activity completed by a CSR, the following data:
• Date/Time – The date and time of the CSR activity
• CSR Name – The name of the CSR. Note that the names of all who perform a CSR activity are recorded, regardless of their assigned role or privileges.
• Customer First Name – The first name of the customer whose record is affected by an activity, based on the record data. (May be abbreviated or absent.)
• Customer Last Name – The last name of the customer whose record is affected by an activity, based on the record data. (May be abbreviated or absent.)
• Customer Email – The email of the customer whose record is affected by an activity, based on the record data.
• Activity Id – The unique, CRMS-assigned identification number for the activity.
• Value – For some -- not all -- activity actions (see next field description), a value is added.
• For Deactivate account, the Value column will display an I
• For Reactivate account, the Value column will display an A
• For Added customer points, the Value column will display the number of points
• Activity Action Note – The name of the activity performed by the CSR. Here is a partial list (samples) of possible CSR activities:
• Deactivate Account
• Reactive Account
• Added customer points
• Updated customer info
• Added loyalty card
• Enrolled Customer
• Unenrolled Customer
• Added customer points
• Created customer info
TIBCO Reward User’s Guide
Reports: Point Expiration | 217
Reports: Point Expiration
Point Expiration Forecast Report
Report information and format:
Column Headings
• Customer Email Address
• Point Balance – as the End Date selected.
• Potential Points Burned – how many points were or will be burned (redeemed/spent) during the conversion process. Based on current point balance and current autoconversion rule or reward catalog items, these are the points that will be converted into rewards.
• Potential Award Value – award value as aggregate for customer. If the monetary units value is not defined, show N/A.
• Points to be Expired – how many points were/will be left after the conversion took/takes place and would be expired/lost. Any remaining points that cannot be automatically converted into rewards would be
• expired on the set expiration date.
Row Headings
• Customers –
• Total (for all columns except Email Address)
Sort Order
• Based on Point Balance (high to low)
Notes on Totals:
• Totals are aggregate numbers.
• Point Balance is the aggregate point outstanding for the retails as of the end date.
• Points Burned is how many points were burned for all customers.
• Total Award value: aggregate for all customers. If it is not defined for all customers, display NA.
TIBCO Reward User’s Guide

218 | Chapter 13 Reports
• Point Balance after burning points: how many points are left and would be burned out/lost for all customers.
Sample Contents:
TIBCO Reward User’s Guide
Reports: Ad-hoc Reporting | 219
Reports: Ad-hoc Reporting
You can now leverage the power of Jaspersoft reporting in ad-hoc reporting to create robust static and interactive reporting using the advanced data analysis capabilities of Jaspersoft.
Configuring Jaspersoft Reporting
Creating Users for Jaspersoft Reporting
Follow these steps to add CRMS Users who can access Ad-hoc reporting:
• Navigate to the Admin>CRMS Users page.
• Select the User Type.
• Click Add.
• Check Allow Ad-hoc Reporting in the Create New User page.
• Click Done.
Editing Users for Jaspersoft Reporting
Follow these steps to edit CRMS Users so they can access Ad-hoc reporting:
• Navigate to the Admin>CRMS Users page.
• Select the User that you want to edit.
• Click Edit.
• Check Allow Ad-hoc Reporting in the Edit User page.
• Click Done.
Access Jaspersoft Reporting
Once you have created users with Ad-hoc Reporting capabilities, follow these steps to access Ad-hoc reporting:
• Navigate to the Reports>Ad-hoc Reports page.
• This opens the Ad-hoc Reporting User Interface.
Contact your Customer Loyalty Manager about enabling Ad-hoc Reporting functionality.
TIBCO Reward User’s Guide

220 | Chapter 13 Reports
TIBCO Reward User’s Guide
CRMS Administration | 221
Chapter 14 CRMS Administration
This chapter provides information about CRMS Administration.
Topics
• User Roles and Privileges, page 222
• Admin>Main Settings Page Overview, page 224
• Admin>CRMS Users Page, page 230
• Adding a New User, page 232
• Merging Customers, page 232
• Transferring Customer Points, page 235
TIBCO Reward User’s Guide
222 | Chapter 14 CRMS Administration
User Roles and Privileges
TIBCO Reward's CRMS system supports three types of users who have access to customer service records:
• CRMS Administrators, who have access to all of the functionality in the CRMS, including full rights to all of the CSR tools in the Support pages.
• CSR Administrators, who have access to all of the CSR tools in the Support pages and to the CSR report.
• CSR Users, who have access only to a limited set CSR tools. CSR Users do not have access to particularly sensitive customer information, nor can they perform certain operations on customers, such as merging accounts or transferring points.
Access to Customer Data and the CSR Role:
Customer Service Representative (CSR) Roles and Privileges. If your company maintains the "system of record", then you cannot add or change customer data via the CRMS using the standard instructions provided in this help system. Click the CSR Roles and Privileges link for details.
Two Types of Customers: Active and Enrolled
You can create two basic types of customers in the CRMS: Active and Enrolled:
Active customers. Many companies import lists of persons who are automatically defined as Active customers, that is, their status is set to Active. To create new active customers one at a time using the CRMS, use the Create a New Active Customer link in the main Support page. Active customers are not members of the loyalty program.
They are usually added to the system so that they can be sent emails or so that their transaction data can be used for customer data analyses. Customers who are members of the loyalty program are considered "enrolled" (see below). There is usually much less data available for active customers than enrolled customers. Active customers can be converted into Enrolled customers.
Enrolled Customers are full loyalty program members, and can be engaged in all aspects of the loyalty program. For example: they may accrue points or credit; if opted-in, they may be sent email; they may be targeted for offers; etc. You can add and enroll a new customer using the Create a New Enrolled Customer link in the main Support page.
You must be a CSR Administrator to perform certain Support functions. CSR Administrators have privileges and permission to work with all aspects of the system.
TIBCO Reward User’s Guide
User Roles and Privileges | 223
You can also convert (enroll) an existing active customer into an enrolled customer by using the Enroll option in a Customer Details page.
If for some reason you need to suspend the account of an enrolled customer without deleting data or unenrolling the customer), you can "Deactivate" the customer, which stops all account activity. Later, such deactivated customers can be "Reactivated".
Once you create the basic customer record, you can add and change many details associated with that record.
The Support page that initially opens when you click the Support tab helps you find existing customers or create new individual customer records. If you find an existing customer, the Customer Details page provides access to most of the data associated with that customer.
Even if you don’t currently have a loyalty program, you can still have Enrolled customers. You can have enrolled customers based on your program design and implementation.
Even if you don’t currently have a loyalty program, you can still have Enrolled customers.
TIBCO Reward User’s Guide
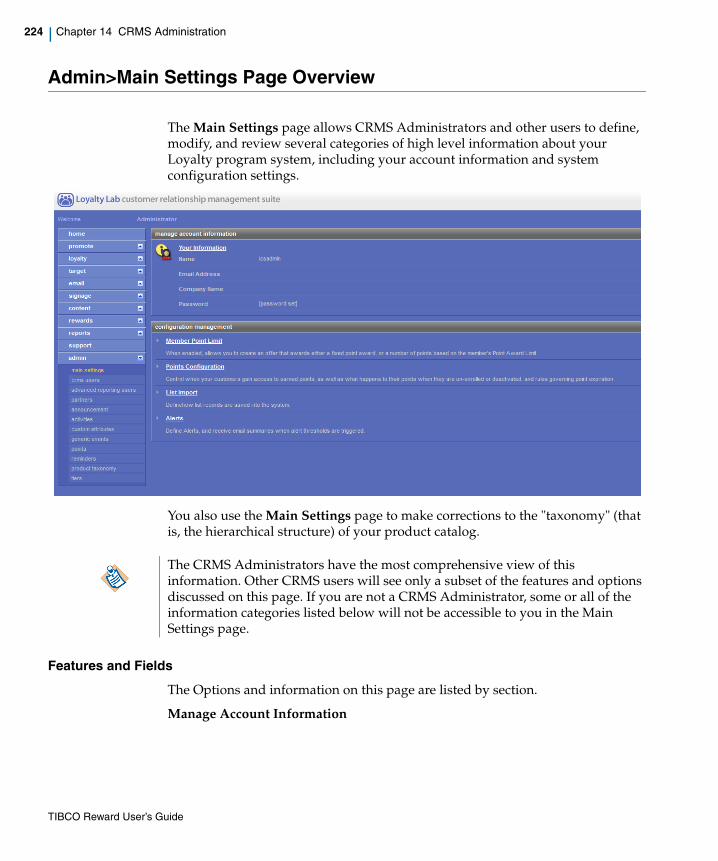
224 | Chapter 14 CRMS Administration
Admin>Main Settings Page Overview
The Main Settings page allows CRMS Administrators and other users to define, modify, and review several categories of high level information about your Loyalty program system, including your account information and system configuration settings.
You also use the Main Settings page to make corrections to the "taxonomy" (that is, the hierarchical structure) of your product catalog.
Features and Fields
The Options and information on this page are listed by section.
Manage Account Information
The CRMS Administrators have the most comprehensive view of this information. Other CRMS users will see only a subset of the features and options discussed on this page. If you are not a CRMS Administrator, some or all of the information categories listed below will not be accessible to you in the Main Settings page.
TIBCO Reward User’s Guide
Admin>Main Settings Page Overview | 225
Your Information lists the current user's name, email address and Company. Click the Your Information link to open a corresponding page that allows you to edit the name and address information, and also the associated password. Use this to modify your information; for example, to change your password.
Configuration Management
Member Point Limit allows you to create an offer that awards either a fixed point award, or a number of points based on the member's Point Award Limit. The member's Point Award Limit is defined by you in the transaction import file that you exchange with TIBCO Reward.
Points Configuration options allow you to configure the following:
• Point Vesting Configuration allows you to define an amount of time between when a member earns a Point award, and when those points become available for them to redeem ("vested"). If point vesting is enabled, the member will be able to view their available points balance, as well as their pending points balance, in their My Account pages.
• Point Reset Configuration controls what happen to a customer's points when their account is deactivated, or they are un-enrolled.
List Import Settings allows administrators to define settings that determine how list records are saved into the CRMS system.
Alerts (also known as Customer and Aggregate Threshold Alerts) allow you to define thresholds for a variety of metrics. When a threshold is exceeded, an alert email will be sent to an address entered in this section.
• Send alerts to email address(es) - Enter one or more comma-separated email addresses in this field. The best practice is to include the email address of each person responsible for reacting to a checked threshold alert.
• Customer Threshold Alerts
TIBCO Reward User’s Guide
226 | Chapter 14 CRMS Administration
The following alerts are triggered when a customer's behavior exceeds entered values:
— Single transaction dollars: Triggered when the dollar amount in a single transaction is greater than this setting.
— Single transaction points awarded: With bonuses and accelerations, a single transaction may generate a large point total.
— Single transaction items purchased: Allows you to receive an alert when the number of items per transaction exceeds the specified amount.
— Daily total dollars: Dollars spent between 3 A.M. yesterday and 3 A.M. today Pacific time.
— Daily total points: Points earned in a day, including bonuses and accelerations, but excluding CSR adjustments.
— Daily total items: A single customer purchases more individual SKUs in a day than this setting.
— Rolling 7 day period total dollars: A single customer spends more than this setting in the prior 7 day period.
— Rolling 7 day period total points: Earns more points than this setting in the prior 7 day period.
— Rolling 7 day period total line items: Triggered if, in the last 7 days, a purchase of a number of individual SKUs exceeds the entered amount.
• Aggregate Threshold Alerts
The following aggregate threshold alerts are triggered when overall activity for a day exceeds the chosen value:
— Daily total dollars: The sum of all dollars spent between 3 A.M. yesterday and 3 A.M. today Pacific time.
— Daily total points awarded: The sum of all points awarded between 3 A.M. yesterday and 3 A.M. today Pacific time.
Member Point Limit Configuration
The Member Point Limit allows you to create an offer that awards either a fixed point award, or a number of points based on the member's Point Award Limit – whichever is lowest. The member's Point Award Limit is set in the transaction import file that is exchanged with TIBCO Reward. You can set limits, per customer, that determine what the customer gets versus what is earned, as well as when the customer can accept and redeem an offer.
TIBCO Reward User’s Guide
Admin>Main Settings Page Overview | 227
Enabling the Member Point Limit will allow a new award type to be available to you during offer creation: “Points up to member point limit”. Offers that use this award type will either award (a) a fixed number of points as specified at the time of offer creation, or (b) the number of points as specified by you, for this customer, in the transaction import file.
The loyalty program must be in place for this setting to be valid.
To enable the Member Point Limit:
• Member point limitation transaction data must be imported. Contact the TIBCO Reward Data Integration team for details.
• The Enable Member Point Limit check box must be checked.
• If the Member Point Limit is disabled after having been enabled, all New, Saved, and/or Pending offers that use it will convert to regular fixed-offers.
• Click Done.
List Import Settings
The List Import Settings page, which is accessible through the Admin>Main Settings page, allows you to define settings that determine how list records are saved into the CRMS system. The settings are explained below.
Features and Fields
Allow updates
This control offers two options: Existing customer records either will or will not be updated when importing a list. Will not is the default setting.
This control only applies to existing customers.
Reward strongly recommends that you leave this option set to "WILL NOT" at all times. Please contact Client Services before touching this setting, or to resolve any related questions.
Import and create new record as
This control offers two options: Unregistered Customers or Registered Customers, described below. Unregistered customers is the default setting.
This control only applies to new customers.
• Unregistered Customers - If importing as Unregistered Customers, all new email addresses will be added as unregistered customers. If an imported
This feature is not supported at the current time, and changing its settings will not have any effect on existing records or data.
TIBCO Reward User’s Guide
228 | Chapter 14 CRMS Administration
email address already exists in the database, no existing customer record will be modified. This means that if an existing customer is currently a member of the loyalty program (registered), and if that existing customer is imported, then that customer will stay registered.
• Registered Customer - If importing as Registered Customers, all new email addresses will be added as registered members. Note that these new members will be treated immediately as such,; for example, the CRMS will send any enabled Welcome trigger emails to them. If an imported email address already exists in the database, no existing customer record will be modified.
Email Opt-In
This control offers two options: Import and set the Email Opt-In flag for new records either to Opted-In or to Opted-Out when that value is not defined.
This control only applies to new customers. This means that the email opt-in value for existing customers will not be changed.
List email addresses can either be imported as Opted-In to receive email, or Opted Out. As most users will be importing a list for the express purpose of sending emails, the default setting is Opted-In.
Be aware that email addresses in Test lists receive test emails, regardless of the email opt-in status of customers in the test list.
Note on Email Address Validation
Email addresses are validated when they are imported. The fundamental email address requirements and validation rules cannot be changed.
Changing the List Import Settings
To navigate to the List Import page, click Admin>Main Settings. Then, in the Configuration Management section, click List Import. The List Import Settings page opens. Each setting uses a drop-down menu as the control.
1. Do not change the Allow update control unless you have been directed to do so by TIBCO Reward Client Services.
2. To reset the selection following, "Import and create new record as,", click the down arrow in the drop-down selection box and click on the correct value.
3. See the information above for details about this option.
You will be asked to confirm the "opt-in" status each and every time you import a list with this setting set to "opted-in". Importing or updating the email addresses of customers who have not provided their expressed and verifiable permission to receive your email, and characterizing these addresses as "opted -in", could cause your company to violate the CAN-SPAM Act.
TIBCO Reward User’s Guide
Admin>Main Settings Page Overview | 229
4. To reset the selection following, "Email Opt-in,", click the down arrow in the drop-down menu and click on the correct value.
Member Point Limit
The Member Point Limit allows you to create an offer that awards either a fixed point award, or a number of points based on the member's Point Award Limit - whichever is lowest. The member's Point Award Limit is set in the transaction import file that is exchanged with TIBCO Reward. You can set limits, per customer, that determine what the customer gets versus what is earned, as well as when the customer can accept and redeem an offer.
Enabling the Member Point Limit will allow a new award type to be available to you during offer creation: "Points up to member point limit". Offers that use this award type will either award (a) a fixed number of points as specified at the time of offer creation, or (b) the number of points as specified by you, for this customer, in the transaction import file.
The loyalty program must be in place for this setting to be valid.
To enable the Member Point Limit:
Before you start this process, the Member point limitation transaction data must be imported. Contact the TIBCO Reward Data Integration team for details.
1. The Enable Member Point Limit check box must be checked.
If the Member Point Limit is disabled after having been enabled, all New, Saved, and/or Pending offers that use it will convert to regular fixed-offers.
2. Click Done.
TIBCO Reward User’s Guide
230 | Chapter 14 CRMS Administration
Admin>CRMS Users Page
Open the CRMS Users page to add and manage CRMS users of different roles.
Only Administrators are allowed to add new users to the system, with one exception: a CSR Administrator can add CSR Users.
Users fall into one of these categories: Administrator, Publisher, Store Manager, Category Manager, CSR Administrator, CSR User, API User.
CRMS User privileges• Administrators have "Super User" privileges: they can create new users and
assign privileges. They are also authorized to create, publish, approve, and schedule Offers and Loyalty Programs.
• Publishers can only schedule Offers; they cannot create users.
• Store Managers - if this user role is enabled - can create Offers for their store, but the Offers must be approved by an Administrator or Publisher. Contact TIBCO Reward's Client Services before attempting to assign this role to a CRMS user.
• Category Managers - if this user role is enabled - can create Offers in their product category, for any store, but the Offers must be approved by an Administrator or Publisher. Contact TIBCO Reward's Client Services before attempting to assign this role to a CRMS user.
• CSR Admins can access certain features under the CRMS Reports, Support, and Admin menus. For example, under the Reports menu, only the CSR Activity Report is made available to a CSR Admin. Under the Admin menu, a CSR Admin can work with only one Admin tab feature: an option that adds users with the "CSR User" role. The CSR User constitutes a unique and distinct subset of CRMS users.
• CSR Users can only access certain features under the CRMS Support menu.
• API Users is a category reserved for API specialists, who cannot access the CRMS.
To add or manage Advanced Reporting Users (also known as Ad Hoc Reporting users), navigate to the Admin>Advanced Reporting Users page.
Notes on New Users and Account Retirement:
TIBCO Reward User’s Guide

Admin>CRMS Users Page | 231
When new users are created, if adequate information is provided in the User creation page, then an email is sent to them with a password for accessing their account. Until they log into the system, their account is marked as In Progress. Once they have logged in, their account is then marked Active. Administrators can use the Last Logged In column to determine if an account is in use any longer. Accounts not in use should be deleted.
TIBCO Reward User’s Guide
232 | Chapter 14 CRMS Administration
Adding a New User
Follow these steps to add CRMS Users:
1. Navigate to the Admin>CRMS Users page.
2. Select User Type from the pull-down menu.
3. Click Add.
The Create CRMS User page opens.
4. Fill in the following:
• First Name - This is the first name that will be used to identify and greet this CRMS user in the CRMS system.
• Last Name - This is the last name that will be used to identify and greet this CRMS user in the CRMS system.
• Email Address - The must be a valid email address. It is the email address that the CRMS system typically uses to send confirmation email to users. Some CRMS features automatically send email information to confirm that a task has been completed (e.g., files, reports). In such cases, the email address specified in the feature is used.
• Password - This user password must be confirmed.
• Send account info to user - As a general rule, you will want to select the check box and send any new or changed account information to the user, as a confirmation.
5. Click Done.
Merging CustomersYou can merge one customer record into another, effectively emptying one account's most significant customer data into another account. The account that is merged into another can belong to either an active or an enrolled customer.
Starting with one customer record selected, you have two merge options:
• A password can only be changed by an Administrator. A CSR Administrator is limited to changing the passwords of CSR Users.
• All users can request that new password. By clicking on the Forgot Password link on the CRMS login screen, a customer can ask that a password be sent directly to them.
TIBCO Reward User’s Guide
Adding a New User | 233
• You can merge another customer record into the currently selected (enrolled) customer account, OR...
• You can merge the currently selected customer record into the a different (enrolled) customer account.
Either option allows you to merge the record of an active (un-enrolled) customer into the receiving record of an enrolled customer, but never vice-versa. The merged customer's accrued points and reward-producing transaction records, up to the time of the merge, are transferred into the receiving customer account, the merged account is zeroed out (emptied), and this emptied record is assigned the "Merged" status.
Note that a merge is not a continuing operation nor does it implement an ongoing merge in any way. Transactions for the merged customer that are processed after the merge are not transferred to, or associated in any way with, the receiving customer identified during the merge; those transactions are associated only with the original customer. Neither transactions nor points nor any other attributes of the merged customer are automatically merged to another customer after the one-time merge operation is completed.
Note that Savings-to-Date, Rewards, and Cards and Clubs data values are not transferred/merged into the receiving record and that this data is not retained.
A note about the merge is added to the Change History section in the receiving record. All other data attributes of the receiving account remain the same.
After a Merge: After being merged into another record, the merged record is effectively an inactive record. Although the customer history information has been deleted from the merged customer record, the customer's name and address information remain, and you have the option to enroll this customer using the merged customer record. The deleted data cannot all be replaced, although using the Merge option again, in reverse, can replace some of it.
Merging Customer Accounts
Before using the Merge Customer option, you must first select one customer record to be used on the merge process. This customer's data must be currently displayed in the Customer Details page. If enrolled, this customer record can be the one from which data is drawn or the one into which data is merged.
If the current customer is active, you can only merge the current data into another customer record, and the search will return only enrolled customers.
Follow these steps to merge customer accounts:
1. With a customer to be merged selected in the Customer Details page, click Merge Customer.
TIBCO Reward User’s Guide
234 | Chapter 14 CRMS Administration
The Merge Customers page appears.
2. Select one of the following values for the first field, Merge, from the drop-down menu:
— Current -> into another customer
— Another customer -> into current
Other elements of the page may be instantly re-drawn to reflect the merge option you have chosen.
If the currently selected customer is active (unenrolled), then you cannot merge data into the current customer.
3. Enter text in the Description field that can be displayed to the Customer. This should summarize the merge.
4. Optional: Add an internal note, which is not displayed to the customer, to convey any important info about the merge. For example, you could use this text field to record the reason for the merge and any justification or authorization for it. Since some data may be lost, you should have a rationale for performing a merge.
5. Search for the customer. Depending on the merge option you selected in the first step, the record you identify with your search will belong to either the receiving customer or the customer being merged.
6. Click Next Step. The confirmation page appears, displaying the data you just entered.
7. If the data is correct, click Merge Customers. A confirmation dialog box appears, advising you that the merge cannot be undone, and asking if you want to continue.
Note: To end the merge process, you can click Cancel.
8. Click OK to confirm that you want to complete the merge process. The Merge Status confirmation page appears.
9. Click Done to finish the merge process and go back to the Customer Detail screen.
TIBCO Reward User’s Guide
Transferring Customer Points | 235
Transferring Customer Points
You can transfer points to or from a customer currently selected in the Customer Details page. Both the customer to whom the points are transferred and from whom the points are drawn must be active and enrolled. Points are subtracted from one customer's account and added to the other customer's.
Follow these steps to transfer customer points:
1. From the More Options... drop-down list at the top of the Customer Details page, select Transfer Points.
The Transfer Points dialog box appears. Note that the Transfer Points field is set up as a selection box.
2. Click the down arrow at the right-hand edge of the Transfer Points field and choose whether to transfer points from the currently selected customer or to the current customer.
The dialog box may be re-drawn to accommodate your preference.
3. Complete the Transfer Points dialog box by specifying:
— the number of points to transfer
— a description of the transfer that will be shown to the customer
— a note about the transfer that will be shown only to CRMS users
— the customer to whom the current user's points should be transferred, or from whom the points should be drawn.
Unless you are 100% certain of the email address of the customers from whom or to whom the points should be transferred, you should use the Search mechanism, as described below. This allows you to confirm that other information about the customer matches up, which decreases the opportunities for fraud or mistake.
The ID of the CRMS user who transfers the points is permanently associated with the transfer action, and this transfer information is maintained on record.
TIBCO Reward User’s Guide

236 | Chapter 14 CRMS Administration
TIBCO Reward User’s Guide
Index | 237
Index
A
About Basket Profiles 44, 44About Custom Attributes 133, 133About Customer Profiles 34, 34About Dimensions 58, 58About Email Communications 81About Generic Events 147, 147About Mobile Geolocations 55, 55About Offers 8, 8About Target Lists 117, 117About the "MUST Match" Requirement 61, 61About the Population Reach Display 62, 62Adding a New User 162, 162Adding Custom Attribute Tags 137, 137Admin>CRMS Users Page 160, 160Admin>Main Settings Page Overview 155, 155Alerts 156
B
Basket Evaluation 46, 46Basket Level vs. Line Item Evaluation in Offers 50, 50Basket Profiles 44Basket Profiles Page Overview 44, 44
C
Changing the Status of an Email Communication 100Cloning a Basket Profile 49, 49Cloning a Customer Profile 38, 38Cloning an Email Communication 86Cloning an Offer 29, 29conditions 59Connecting with TIBCO Resources ix, ixCreating a Basket profile 46, 46Creating a Custom Attribute 145, 145
TIBCO Reward User’s Guide
238 | Index
Creating a Customer profile 34, 34Creating a Generic Event Definition 151, 151Creating a Mobile Geolocation 56, 56Creating a Target List from a Profile 125, 125Creating a Target List from an imported file 123, 123Creating a Target List From Import Wizard 122, 122Creating an Email Campaign 103Creating an Offer with the Offer Setup Wizard 12, 12CRMS 3CRMS Administration 153CRMS Home Page 3, 3Custom Attributes 133Custom Attributes Page Overview 135, 135Customer Profiles 32Customer Profiles page 32, 32
D
dashboard 3Defining a Target Profile Dimension 60, 60Deleting a Basket Profile 50, 50Deleting a Customer Profile 43, 43Deleting a Mobile Geolocation 57, 57Deleting an Offer 30, 30Dimension Definitions 65, 65Dimensions 58
E
Edit Email Communication Wizard 87Editing a Basket Profile 49, 49Editing a Mobile Geolocation 56, 56Editing an Customer Profile 36, 36Email 81Email Campaign Details Page 104Email Campaign Properties Page 103Email Communication Properties 89Email Communication Rich Content 95Email Communication Summary 99Email Communication Targeting 94Email Communication Template 88Email Communication Text-Only 98Email Communications Page 84
TIBCO Reward User’s Guide
Index | 239
Email Guidelines for New Clients 111Email Opt-In 159Email Test and Seed Lists Page 110Email>Campaigns Page 101Email>Trigger Events Page Overview 108event-based messaging 2Executive Summary
The TIBCO Reward Solution 81Export Email List based on Customer Profile 39, 39Export List 118
F
Features and Benefits 2, 2
G
generic event 151Generic Event Tasks Overview 149, 149Generic Events 147Generic Events Page Overview 150, 150geographic targeting 69GPS 55GUI Overview and Navigation 3
H
How to Access TIBCO Documentation ix, ixHow to Contact TIBCO Support ix, ixHow to Join TIBCOmmunity ix, ix
L
list creation 121List Import Settings 156, 158Lists Page Overview 119, 119
M
Managing a Trigger Event 109
TIBCO Reward User’s Guide
240 | Index
master values 149Menu 4, 4Mobile Geolocations (beta) 54Multi-Channel Marketing 2MUST Match 60
N
Navigation 6, 6
O
Offer Lifecycle Overview 10, 10Offer Schedule Page 31, 31Offer Status 25, 25Offer Status Roadmap 28, 28Offers 8Offers Page Overview 11, 11
P
Point Award Limit 160Point Reset Configuration 156Point Vesting Configuration 156Population Reach 60, 62, 63, 63Preface vPrerequisites for Creating an Offer 9, 9Prerequisites to Creating Custom Attributes 138, 138Profiles, Dimensions, and Conditions 59, 59
R
Recency, Frequency, Monetary value 66Related Documentation vi, viResponse Email 87Reversing Events 150Reward Catalogs 131, 131Reward Codes 127, 127reward codes
unique 127Reward Items 129, 129
TIBCO Reward User’s Guide
Index | 241
Rewards 127RFM 66
S
SaaS 1Saving Your Work on the Current Page 7, 7Software as a Service (SaaS) 1, 1
T
Target List Creation Overview 121, 121Target Lists 117Targeting 17, 17Threshold Alerts 156TIBCO Reward CRMS Overview 1Track All Links 93Trigger Event Response Email 87Trigger Events 105Typographical Conventions vii, vii
U
upload a Reward file 130user privileges 161
X
XML 135
TIBCO Reward User’s Guide

242 | Index
TIBCO Reward User’s Guide


