26
TIBCO Spotfire ® Operations Analytics 1.1 Installation and Configuration Manual Revision date: 23 June 2009

TIBCO Spotfire® Operations Analytics 1.1
Installation and Configuration Manual
Revision date: 23 June 2009

Important InformationSOME TIBCO SOFTWARE EMBEDS OR BUNDLES OTHER TIBCO SOFTWARE. USE OF SUCH EMBEDDED OR BUNDLED TIBCO SOFTWARE IS SOLELY TO ENABLE THE FUNCTIONALITY (OR PROVIDE LIMITED ADD-ON FUNCTIONALITY) OF THE LICENSED TIBCO SOFTWARE. THE EMBEDDED OR BUNDLED SOFTWARE IS NOT LICENSED TO BE USED OR ACCESSED BY ANY OTHER TIBCO SOFTWARE OR FOR ANY OTHER PURPOSE. USE OF TIBCO SOFTWARE AND THIS DOCUMENT IS SUBJECT TO THE TERMS AND CONDITIONS OF A LICENSE AGREEMENT FOUND IN EITHER A SEPARATELY EXECUTED SOFTWARE LICENSE AGREEMENT, OR, IF THERE IS NO SUCH SEPARATE AGREEMENT, THE CLICKWRAP END USER LICENSE AGREEMENT WHICH IS DISPLAYED DURING DOWNLOAD OR INSTALLATION OF THE SOFTWARE OR IF THERE IS NO SUCH SOFTWARE LICENSE AGREEMENT OR CLICKWRAP END USER LICENSE AGREEMENT, THE LICENSE(S) LOCATED IN THE "LICENSE" FILE(S) OF THE SOFTWARE. USE OF THIS DOCUMENT IS SUBJECT TO THOSE TERMS AND CONDITIONS, AND YOUR USE HEREOF SHALL CONSTITUTE ACCEPTANCE OF AND AN AGREEMENT TO BE BOUND BY THE SAME. This document contains confidential information that is subject to U.S. and international copyright laws and treaties. No part of this document may be reproduced in any form without the written authorization of TIBCO Software Inc. TIBCO and Spotfire are either registered trademarks or trademarks of TIBCO Software Inc. and/or subsidiaries of TIBCO Software Inc. in the United States and/or other countries. All other product and company names and marks mentioned in this document are the property of their respective owners and are mentioned for identification purposes only. This software may be available on multiple operating systems. However, not all operating system platforms for a specific software version are released at the same time. Please see the readme.txt file for the availability of this software version on a specific operating system platform. THIS DOCUMENT IS PROVIDED "AS IS" WITHOUT WARRANTY OF ANY KIND, EITHER EXPRESS OR IMPLIED, INCLUDING, BUT NOT LIMITED TO, THE IMPLIED WARRANTIES OF MERCHANTABILITY, FITNESS FOR A PARTICULAR PURPOSE, OR NON-INFRINGEMENT. THIS DOCUMENT COULD INCLUDE TECHNICAL INACCURACIES OR TYPOGRAPHICAL ERRORS. CHANGES ARE PERIODICALLY ADDED TO THE INFORMATION HEREIN; THESE CHANGES WILL BE INCORPORATED IN NEW EDITIONS OF THIS DOCUMENT. TIBCO SOFTWARE INC. MAY MAKE IMPROVEMENTS AND/OR CHANGES IN THE PRODUCT(S) AND/OR THE PROGRAM(S) DESCRIBED IN THIS DOCUMENT AT ANY TIME. Copyright © 1996- 2009 TIBCO Software Inc. ALL RIGHTS RESERVED. THE CONTENTS OF THIS DOCUMENT MAY BE MODIFIED AND/OR QUALIFIED, DIRECTLY OR INDIRECTLY, BY OTHER DOCUMENTATION WHICH ACCOMPANIES THIS SOFTWARE, INCLUDING BUT NOT LIMITED TO ANY RELEASE NOTES AND "READ ME" FILES. TIBCO Spotfire is covered by U.S. Patent No. 6,014,661 and U.S. Patent No. 7, 216,116. Other patent(s) pending. TIBCO Software Inc. Confidential Information
2 (26) TIBCO Spotfire® Operations Analytics 1.1
Contents1 Introduction 41.1 Prerequisites 41.2 System Architecture Overview 5
2 Installation 62.1 Installation of Supporting Software 62.2 Installation of the Limits Database Schema 82.3 Implementation and Deployment of BE/BW Components 8
3 Configuration 103.1 To Enable the Operations Analytics Tools 113.2 To Create an Information Model 123.3 To Create an Analysis Template 123.4 To Create a Default Template Job File 133.5 To Configure a Default Server for Publish Limits 143.6 To Implement a Data Normalizer 153.7 To Implement a Custom Rule Set (OPTIONAL) 163.8 To Implement a Custom Extension Point (OPTIONAL) 163.9 To Create a Rule Breach Log Analysis Template (OPTIONAL) 173.10 To Configure Parameters of Interest to Monitor 17
4 Appendix 184.1 Example Custom Rule Set 184.2 Example Custom Extension Point 194.3 Example Deployment Scenario 194.4 Example EMS Measurement Message 234.5 Configuration Parameters 234.6 Troubleshooting 26
TIBCO Spotfire® Operations Analytics 1.1 3 (26)

Introduction
1 Introduction
1.1 PrerequisitesTarget AudienceIt is assumed that the reader of this manual is knowledgeable in administrating the bundled and required software components as well as developing components for the same. Hence, this manual will not in any detail describe how these parts are performed. For details on administration of, or development for, these components, please refer to the respective component’s manual.
SoftwareYou need the following software installed as described in their respective manuals:
1 TIBCO Spotfire Server 3.0, as described in the TIBCO Spotfire Server 3.0 – Installation and Configuration Manual.
2 TIBCO Spotfire 3.0, as described in the TIBCO Spotfire 3.0 – Deployment and Administration Manual.
3 TIBCO Runtime Agent 5.6.1, as described in the TIBCO Runtime Agent Installation Manual.
4 TIBCO ActiveMatrix BusinessWorks 5.7.1, as described in the TIBCO ActiveMatrix BusinessWorks Installation Manual.
5 TIBCO BusinessEvents 3.0.1, as described in the TIBCO BusinessEvents Installation Manual.
6 TIBCO EMS 5.1.2, as described in the TIBCO Enterprise Message Service Installation Manual.
7 TIBCO Administrator 5.6.0, as described in the TIBCO Administrator Installation Manual.
8 TIBCO Spotfire Automation Services 3.0, as described in the TIBCO Spotfire Automation Services 3.0 – Deployment and Administration Manual.
For details on hardware prerequisites, please refer to the respective components manual.
OtherAccess to an email server.
4 (26) TIBCO Spotfire® Operations Analytics 1.1

Introduction
1.2 System Architecture OverviewTIBCO Spotfire Operations Analytics consists of four main parts:
1 Client-side outliers & limits tool to be used in TIBCO Spotfire 3.0.
2 TIBCO Spotfire Server 3.0.
3 TIBCO Spotfire Automation Services 3.0.
4 TIBCO Spotfire Operations Analytics rule engine.
The rule evaluators monitor the message bus to evaluate all measurements and see if any rules are breached. If so, the rule breach notifier logs the incident and invokes Automation Services which typically sends the users an email containing a report of the rule breach.
Configuration PointsTIBCO Spotfire Operations Analytics exposes the following configuration points:
1 BusinessEvents rules.
2 Custom extension point.
The custom extension point is used to evaluate if and how Automation Services will be invoked in the event of a rule breach.
TIBCO Spotfire® Operations Analytics 1.1 5 (26)
Installation
2 InstallationInstallation of TIBCO Spotfire Operations Analytics consists of the following steps:
1 Installing the required supporting software.
2 Installation of the Limits database schema.
3 Installation of the Rule breach log database schema (OPTIONAL).
4 Implementation and deployment of a data normalizer, BusinessEvents rules and the custom extension point.
5 Configurations (covered in “Configuration” on page 10).
2.1 Installation of Supporting SoftwareTo Install TIBCO Products:Note: The order of installation is important:
1 TIBCO Runtime Agent 5.6.1, as described in the TIBCO Runtime Agent Installation Manual.
2 TIBCO ActiveMatrix BusinessWorks 5.7.1, as described in the TIBCO ActiveMatrix BusinessWorks Installation Manual.
3 TIBCO BusinessEvents 3.0.1, as described in the TIBCO BusinessEvents Installation Manual.
4 TIBCO EMS 5.1.2, as described in the TIBCO Enterprise Message Service Installation Manual.
5 TIBCO Administrator 5.6.0, as described in the TIBCO Administrator Installation Manual.
6 Deploy the TIBCO Spotfire Operations Analytics – Outlier & Limits Tool to the Spotfire Server.
7 Deploy TIBCO Spotfire Automation Services 3.0, as described in the TIBCO Spotfire Automation Services 3.0 – Deployment and Administration Manual.
6 (26) TIBCO Spotfire® Operations Analytics 1.1
Installation
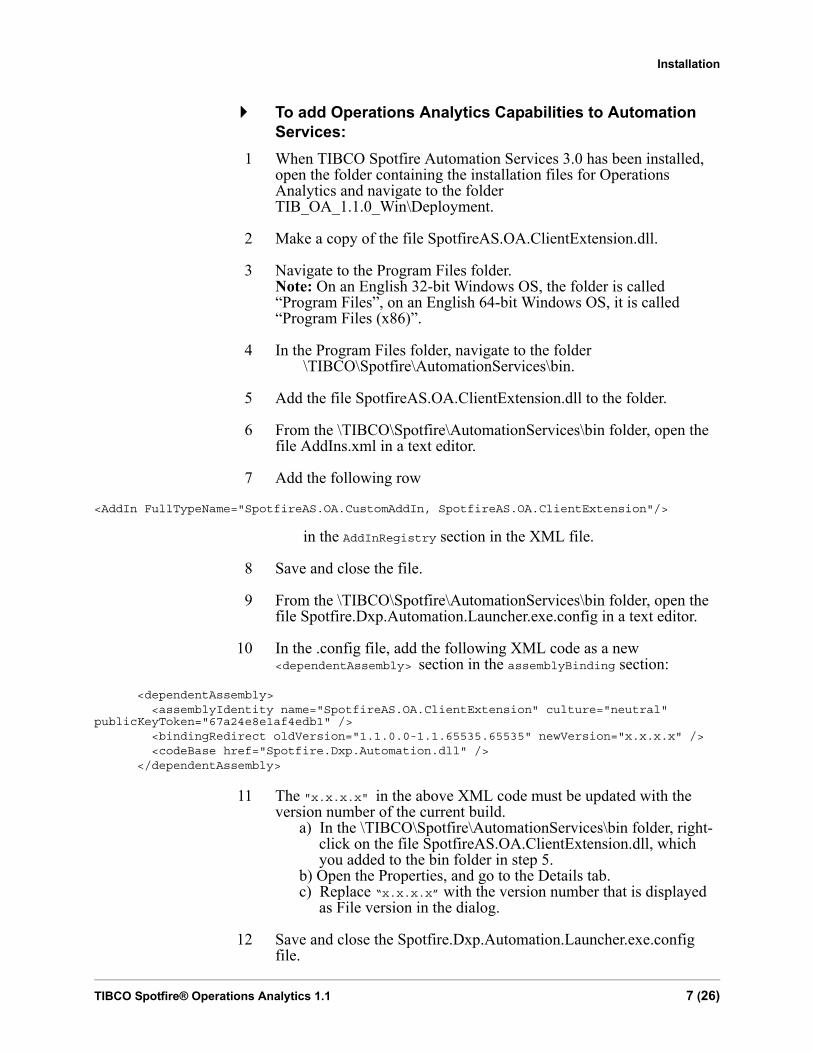
To add Operations Analytics Capabilities to Automation Services:
1 When TIBCO Spotfire Automation Services 3.0 has been installed, open the folder containing the installation files for Operations Analytics and navigate to the folder TIB_OA_1.1.0_Win\Deployment.
2 Make a copy of the file SpotfireAS.OA.ClientExtension.dll.
3 Navigate to the Program Files folder. Note: On an English 32-bit Windows OS, the folder is called “Program Files”, on an English 64-bit Windows OS, it is called “Program Files (x86)”.
4 In the Program Files folder, navigate to the folder \TIBCO\Spotfire\AutomationServices\bin.
5 Add the file SpotfireAS.OA.ClientExtension.dll to the folder.
6 From the \TIBCO\Spotfire\AutomationServices\bin folder, open the file AddIns.xml in a text editor.
7 Add the following row
<AddIn FullTypeName="SpotfireAS.OA.CustomAddIn, SpotfireAS.OA.ClientExtension"/>
in the AddInRegistry section in the XML file.
8 Save and close the file.
9 From the \TIBCO\Spotfire\AutomationServices\bin folder, open the file Spotfire.Dxp.Automation.Launcher.exe.config in a text editor.
10 In the .config file, add the following XML code as a new <dependentAssembly> section in the assemblyBinding section:
<dependentAssembly> <assemblyIdentity name="SpotfireAS.OA.ClientExtension" culture="neutral" publicKeyToken="67a24e8e1af4edb1" /> <bindingRedirect oldVersion="1.1.0.0-1.1.65535.65535" newVersion="x.x.x.x" /> <codeBase href="Spotfire.Dxp.Automation.dll" /> </dependentAssembly>
11 The "x.x.x.x" in the above XML code must be updated with the version number of the current build. a) In the \TIBCO\Spotfire\AutomationServices\bin folder, right- click on the file SpotfireAS.OA.ClientExtension.dll, which you added to the bin folder in step 5. b) Open the Properties, and go to the Details tab. c) Replace “x.x.x.x” with the version number that is displayed as File version in the dialog.
12 Save and close the Spotfire.Dxp.Automation.Launcher.exe.config file.
TIBCO Spotfire® Operations Analytics 1.1 7 (26)

Installation
2.2 Installation of the Limits Database Schema
Operations Analytics needs to be configured with a database for storing the parameter limits. The folder containing the installation files for Operations Analytics includes database creation scripts. These scripts are located in the folder \TIB_OA_1.1.0_Win\ Deployment\Database Scripts. These scripts are designed to create a database and add a Limits data table to that database. In the Database Scripts folder, you need to choose between Microsoft SQL Server scripts or Oracle scripts. Note: Before you run any of the scripts, open and edit each of them according to the instructions in the script file. Note: You can change the database name to something other than the default name, but if you do so, remember to change the name in the configuration as well.
To Install the Sample Database Schema:1 Open the folder containing the scripts you want to use, either
Microsoft SQL Server or Oracle.
2 Run the CreateDB.sql script to create the database. Note: If you want to use an already existing database, you can skip this step and go directly to step 3.
3 Run the CreateLimitsTable.sql script to add the limits table to the database.
To install the Rule Breach Log Database Schema:Optionally, Operations Analytics can be configured with database logging of rule breaches. Add the rule breach log table to the database by running the CreateRuleBreachLogTable.sql script.
2.3 Implementation and Deployment of BE/BW Components
An example TIBCO Designer project is delivered with Operations Analytics. This project contains examples of the BusinessEvents rules and the custom extension point, that can be used to create custom solutions. You also need to implement a data normalizer. First you need to build an enterprise library in TIBCO Designer, then deploy it using TIBCO Administrator as described below.
To Build the Archive Using TIBCO Designer:1 Implement a data normalizer which sends measurement messages
onto the TIBCO message bus.
8 (26) TIBCO Spotfire® Operations Analytics 1.1

Installation
2 Implement a set of BusinessEvents rules.
3 Implement a custom extension point.
4 Add all components from OperationsAnalytics.projlib to an enterprise archive. The OperationsAnalytics.projlib is located in the folder \TIB_OA_1.1.0_Win\Deployment. Also include any data normalizers, custom extension points and rule sets, as desired.
5 Build the archive.
To Deploy the Archive Using TIBCO Administrator:1 Deploy the archive.
2 Make all required configurations before starting the deployed package. The full list of available configuration options are available in “Configuration Parameters” on page 23.
3 Start the services.
TIBCO Spotfire® Operations Analytics 1.1 9 (26)
Configuration
3 ConfigurationConfiguration of Operations Analytics consists of the following steps:
1 Enable the Operations Analytics tools.
2 Create an information model.
3 Create an analysis template.
4 Create a default template job file.
5 Configure a default server for publish limits.
6 Implement a data normalizer.
7 Implement a custom rule set (OPTIONAL).
8 Implement a custom extension point (OPTIONAL).
9 Create a rule breach log analysis template (OPTIONAL).
10 Configure parameters of interest to monitor.
11 Start the system.
10 (26) TIBCO Spotfire® Operations Analytics 1.1

Configuration
3.1 To Enable the Operations Analytics ToolsAccess to the Operations Analytics client extensions tools is restricted by two levels of licensing.
The Operations Analytics license provides access to all functionality extensions, while the Operations Analytics Publish Limits license allows the user to publish new or modified limits to the server.
1 In TIBCO Spotfire, select Tools > Administration Manager…
2 Click the Groups and Licenses tab.
3 Select the group you wish to set licenses for.
4 Click the Licenses tab.
5 Click Edit.
6 Expand TIBCO Spotfire Extensions and mark the desired licenses.
Note: For any extensions to be available in the UI, the user must be given the Access to Extensions license as well as the desired Operations Analytics license.
TIBCO Spotfire® Operations Analytics 1.1 11 (26)

Configuration
3.2 To Create an Information ModelThere are two ways to set up an information model. One is to connect to an existing information model. If this is not possible, a new information model must be created.
The information model can be used by the data normalizer and in TIBCO Spotfire through the creation of information links.
An information model must fulfil some general requirements to work with Operations Analytics. These are:
The information model must contain the limits data table with five columns, one for each of the following; maximum value, minimum value, target value, the type of calculation used for the limits, and a ParameterID.
A limits information link should be created with the following mappings: Column; Should contain the data from the ParameterID column. Type; Should contain the data from the Type column. Lower; Should contain the data from the LowerValue column. Target; Should contain the data from the Target column. Upper; Should contain the data from the UpperValue column.
The information model must contain a data table with process data. This table should contain the measurements that the data normalizer has sent onto the TIBCO message bus.
3.3 To Create an Analysis TemplateIn order to view reports of rule violations, an analysis template must be defined. This template defines the look of the generated report as well as from where the report generator will retrieve the correct process data.
1 Make sure to use TIBCO Spotfire 3.0.
2 Create the information link to use for retrieving the corresponding process data when a rule violation occurs. It is a good idea to limit the amount of data retrieved to a subset around the point in time of the rule violation.
3 Create the analysis file template that defines the look of the generated report by opening the information link created in step 2, and then set up the visualizations of interest and their layout.
4 Save the template to the Spotfire Library.
An example analysis template named Example_OA_Report.dxp is located in the folder TIB_OA_1.1.0_Win\Examples. You can use this example to create your own analysis templates. Just open the example
12 (26) TIBCO Spotfire® Operations Analytics 1.1
Configuration
analysis in TIBCO Spotfire and replace the embedded data in the analysis with the information links you want to use for retrieving your own process data. Then save the analysis to the library at a location of your choice. Note: The data in the analysis must be linked to the source. However, the data in the example is embedded, and therefore you must change this setting when you save to the library. In the Save as Library Item dialog, do not click Finish right away, since that will save the analysis with the current settings. Instead, click on the Next button twice to see the settings for the data tables in the analysis. Click on the Edit button to open the Data Table Properties Dialog and select to store data as Linked to source by clicking the corresponding radio button. Then click OK in the Data Table Properties dialog, and Finish in the Save as Library Item dialog.
3.4 To Create a Default Template Job FileThe job file is an XML file that defines what should be done in the event of a rule violation. The job file is where you define which analysis file template that should be used when reporting the rule violation, as well as how that analysis file should be updated to contain information about the rule violation. The easiest way to create a job.xml file is to open the Automation Services Job Builder from the Tools menu in TIBCO Spotfire. See Automation Services 3.0 – Deployment and Administration Manual to learn how to set up job files.
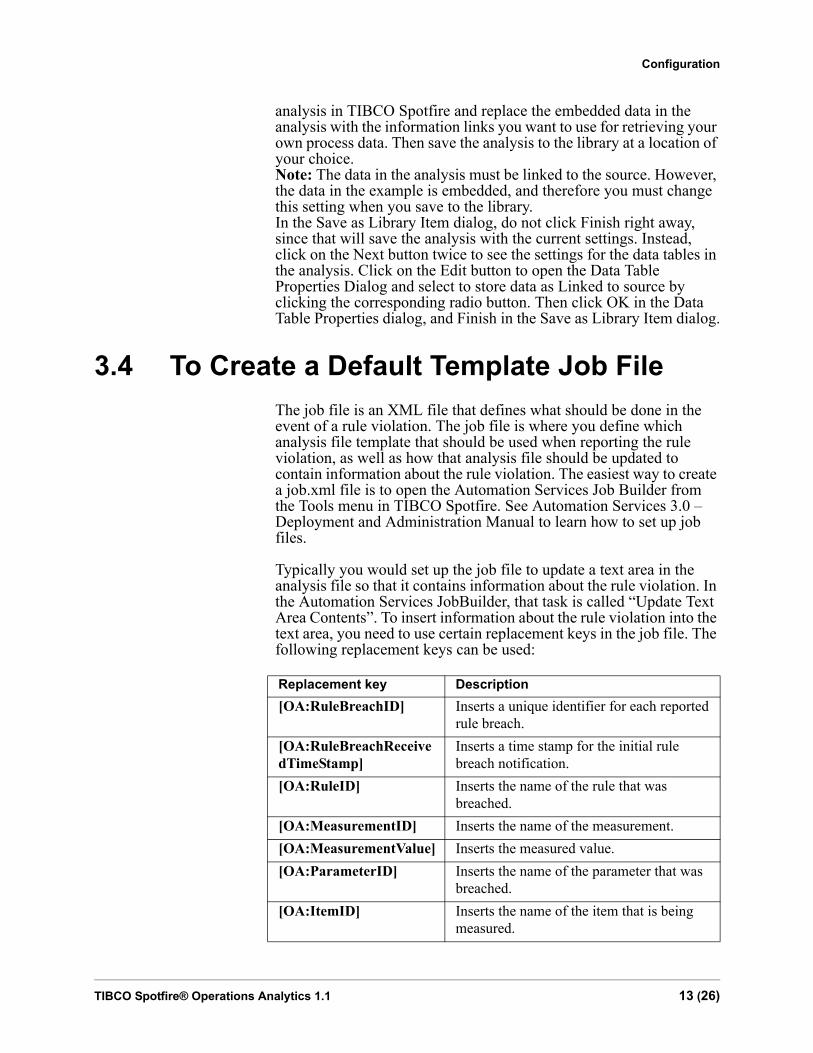
Typically you would set up the job file to update a text area in the analysis file so that it contains information about the rule violation. In the Automation Services JobBuilder, that task is called “Update Text Area Contents”. To insert information about the rule violation into the text area, you need to use certain replacement keys in the job file. The following replacement keys can be used:
Replacement key Description[OA:RuleBreachID] Inserts a unique identifier for each reported
rule breach.[OA:RuleBreachReceivedTimeStamp]
Inserts a time stamp for the initial rule breach notification.
[OA:RuleID] Inserts the name of the rule that was breached.
[OA:MeasurementID] Inserts the name of the measurement.[OA:MeasurementValue] Inserts the measured value.[OA:ParameterID] Inserts the name of the parameter that was
breached.[OA:ItemID] Inserts the name of the item that is being
measured.
TIBCO Spotfire® Operations Analytics 1.1 13 (26)
Configuration
If you add the task “Send Email”, the job file will also contain information that is necessary for sending an email to notify when a rule breach occurs. For example, which recipients should receive an email about a rule breach, and what should be included in such an email.
An example job file named Example_Automation_Services_job.xml is located in the folder TIB_OA_1.1.0_Win\Examples.
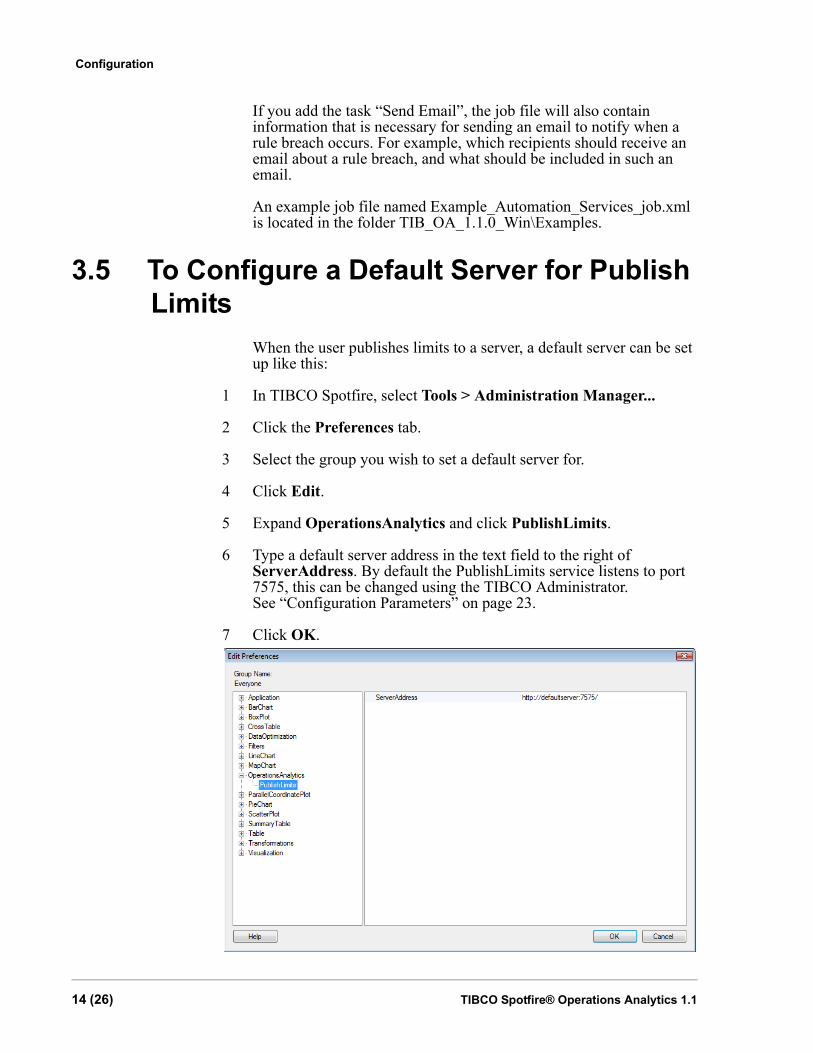
3.5 To Configure a Default Server for Publish Limits
When the user publishes limits to a server, a default server can be set up like this:
1 In TIBCO Spotfire, select Tools > Administration Manager...
2 Click the Preferences tab.
3 Select the group you wish to set a default server for.
4 Click Edit.
5 Expand OperationsAnalytics and click PublishLimits.
6 Type a default server address in the text field to the right of ServerAddress. By default the PublishLimits service listens to port 7575, this can be changed using the TIBCO Administrator. See “Configuration Parameters” on page 23.
7 Click OK.
14 (26) TIBCO Spotfire® Operations Analytics 1.1
Configuration
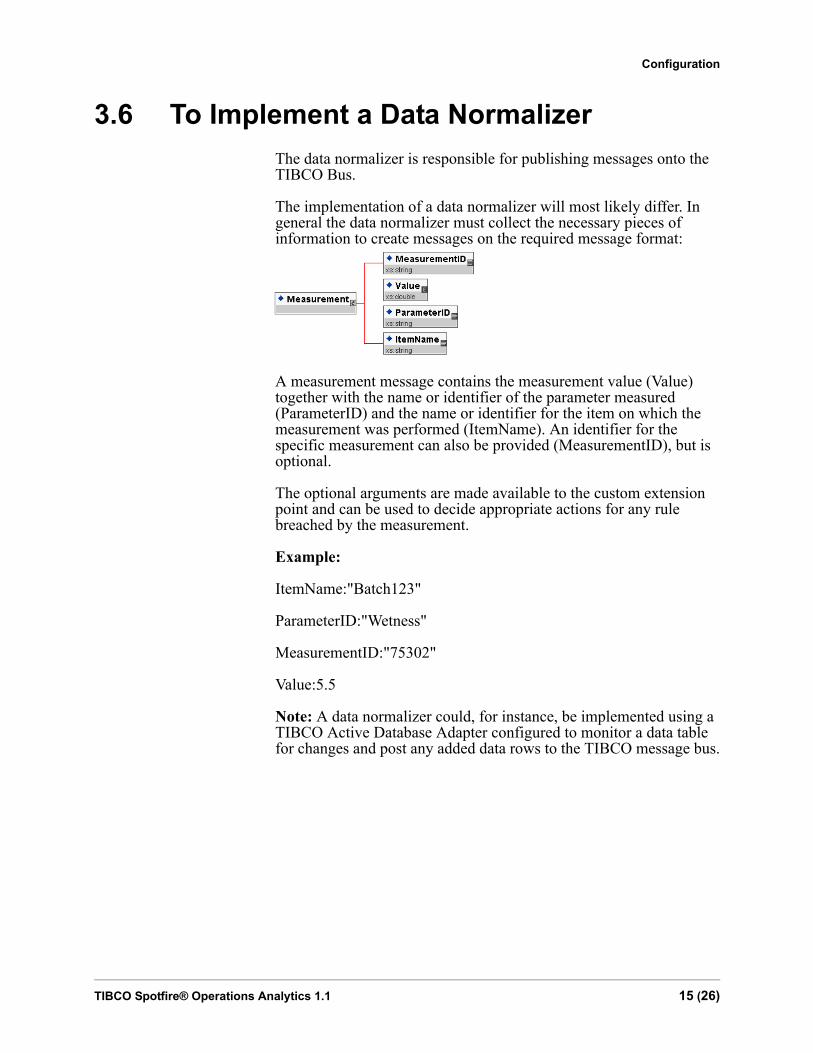
3.6 To Implement a Data NormalizerThe data normalizer is responsible for publishing messages onto the TIBCO Bus.
The implementation of a data normalizer will most likely differ. In general the data normalizer must collect the necessary pieces of information to create messages on the required message format:
A measurement message contains the measurement value (Value) together with the name or identifier of the parameter measured (ParameterID) and the name or identifier for the item on which the measurement was performed (ItemName). An identifier for the specific measurement can also be provided (MeasurementID), but is optional.
The optional arguments are made available to the custom extension point and can be used to decide appropriate actions for any rule breached by the measurement.
Example:
ItemName:"Batch123"
ParameterID:"Wetness"
MeasurementID:"75302"
Value:5.5
Note: A data normalizer could, for instance, be implemented using a TIBCO Active Database Adapter configured to monitor a data table for changes and post any added data rows to the TIBCO message bus.
TIBCO Spotfire® Operations Analytics 1.1 15 (26)

Configuration
3.7 To Implement a Custom Rule Set (OPTIONAL)
A rule set depends on the current rule parameters as well as a short cache of measurements. When a measurement is received by Operations Analytics it is stored in the cache, and any rules depending on the cache will be evaluated.
If a rule is violated, information about the rule violation is passed back onto the TIBCO message bus in an OA notification message which the rule breach notifier listens for.
During the startup of the OA system, the rule parameters are read from the limits database.
The rule parameters can be changed during runtime by using the Publish Limits tool in TIBCO Spotfire.
The rule sets, of which there can be more than one in an OA deployment, can be modified by TIBCO Spotfire Professional Services or the customer to match specific needs.
The custom rule sets are implemented in BusinessEvents using the TIBCO Designer.
For an example of an implementation of a custom rule set, see “Example Custom Rule Set” on page 18.
3.8 To Implement a Custom Extension Point (OPTIONAL)
The custom extension point is an optional component which is developed during the deployment process. It receives information about the rule violation and a globally configured Automation Services job XML. It is implemented as listening to an EMS queue and posting the result back.
The report can be suppressed by the custom extension point, for instance if the violation was already reported.
The rule violation information can also be modified if needed; this will affect the actual report sent out. An example would be to modify or substitute the Automation Services job XML content to use when generating the report, or to make changes to the actual measurement or rule violation data.
If no custom extension point is connected, or if the extension point fails to respond within a configurable time, the globally configured template job XML content is always used to generate the report.
16 (26) TIBCO Spotfire® Operations Analytics 1.1

Configuration
The custom extension point is used to customize how the rule violation reports are generated by Automation Services. For example, by creating a custom extension point, it is possible to produce rule violation reports for different parameters using different analysis file templates. For an example on how to implement a custom extension point, see “Example Custom Extension Point” on page 19.
3.9 To Create a Rule Breach Log Analysis Template (OPTIONAL)
An example rule breach log analysis template named Example_RuleBreachLog_Report.dxp is located in the folder TIB_OA_1.1.0_Win\Examples. You can use this example to create your own rule breach log analysis templates. Just open the example analysis in TIBCO Spotfire and replace the data in the analysis with the information links you want to use for retrieving your own process data. Then save the analysis to the library at a location of your choice.
3.10 To Configure Parameters of Interest to Monitor
Operations Analytics can monitor an arbitrary number of process parameters. However, only measurement messages containing a parameter name for which limits have been published are analyzed by the rules engine.
It is essential that the parameter names produced by the data normalizer are exactly the same as the column names created by the information links used by the analysis template.
In the “Example Deployment Scenario” on page 19 one way of retrieving parameter identifiers for measurements is shown.
TIBCO Spotfire® Operations Analytics 1.1 17 (26)

Appendix
4 Appendix
4.1 Example Custom Rule SetThe image below shows the example implementation of the Western Electric 3 sigma rule. An easy way to create your own custom rule sets is to open the delivered example TIBCO Designer project and modify it.
18 (26) TIBCO Spotfire® Operations Analytics 1.1
Appendix
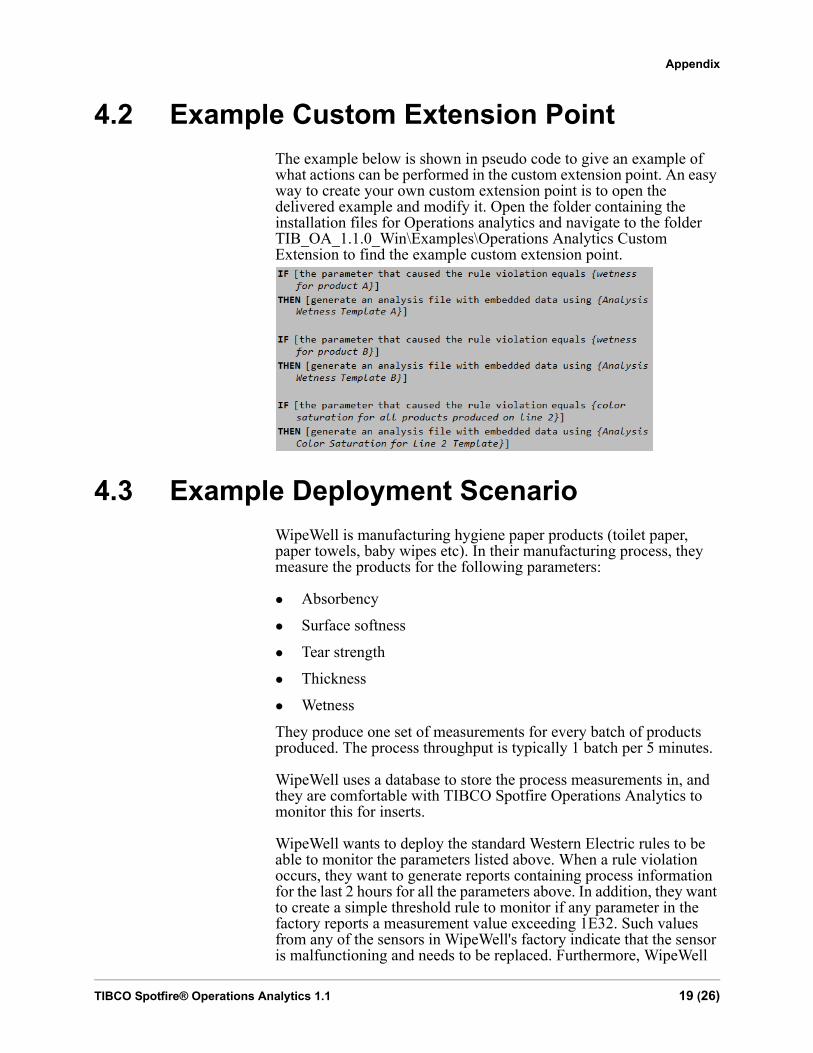
4.2 Example Custom Extension PointThe example below is shown in pseudo code to give an example of what actions can be performed in the custom extension point. An easy way to create your own custom extension point is to open the delivered example and modify it. Open the folder containing the installation files for Operations analytics and navigate to the folder TIB_OA_1.1.0_Win\Examples\Operations Analytics Custom Extension to find the example custom extension point.
4.3 Example Deployment ScenarioWipeWell is manufacturing hygiene paper products (toilet paper, paper towels, baby wipes etc). In their manufacturing process, they measure the products for the following parameters:
Absorbency
Surface softness
Tear strength
Thickness
Wetness
They produce one set of measurements for every batch of products produced. The process throughput is typically 1 batch per 5 minutes.
WipeWell uses a database to store the process measurements in, and they are comfortable with TIBCO Spotfire Operations Analytics to monitor this for inserts.
WipeWell wants to deploy the standard Western Electric rules to be able to monitor the parameters listed above. When a rule violation occurs, they want to generate reports containing process information for the last 2 hours for all the parameters above. In addition, they want to create a simple threshold rule to monitor if any parameter in the factory reports a measurement value exceeding 1E32. Such values from any of the sensors in WipeWell's factory indicate that the sensor is malfunctioning and needs to be replaced. Furthermore, WipeWell
TIBCO Spotfire® Operations Analytics 1.1 19 (26)
Appendix
wants to generate an analysis file every night that contains the raw data from all the parameters recorded during the last 24 hours. WipeWell monitors the rule violation reporting by setting up a custom rule breach log analysis template. This way they can monitor the Operations Analytics process to discover bottle necks and discrepancies. It also lets them keep track of the process history.
SolutionInformation Model
An information model that represents the columns of interest for the process database should be developed (Parameter, MeasurementName, MeasurementValue, Product, BatchNo):
Parameter: A concatenated column: "MeasurementName"_"Product" This should generate values like "Absorbency_ToiletPaper", "Absorbency_BabyWipes", etc
MeasurementName
MeasurementValue
Product
BatchNo
Information links that retrieve the following should be developed:
ViolationIL: Product, BatchNo, MeasurementName, MeasurementValue Pivoted as ID: BatchNo Category: Parameter Values: MeasurementValue Other: MeasurementName, Product Column Naming: %C% Limited to retrieve the last 2 hours of data
24hIL
SensorErrorIL
Analysis Templates
The following templates should be defined:
Template for analyzing malfunctioning sensors.
Template for analyzing 24 hour process data.
20 (26) TIBCO Spotfire® Operations Analytics 1.1

Appendix
Template for performing root-cause analysis of a rule violation.
Data Normalizer
The data normalizer must be set up so that the parameterID in the TIBCO Bus messages matches the column names created in the developed information links.
Custom Rule Evaluators
Two custom rule evaluators must be implemented. The first is for simple threshold (Sensor Failure Rule).
A violation report should be generated if any incoming measurement message has a value that exceed 1E32. This threshold value should be made configurable.
The second is one that triggers once every 24 hours (Normal Process Analysis Rule).
A custom rule must be implemented and deployed to generate a violation report at a specific, configurable time of day.
Custom Extension Point
A custom extension point must be implemented to make sure that different rule violations uses different analysis templates when generating the rule violation report.
The custom extension point needs to make sure that:
When a Sensor Failure Rule violation is generated, the Sensor Malfunction analysis template is used to generate a report.
When a Normal Process Analysis Rule violation is generated, the Process analysis template is used to generate a report.
Custom Rule Breach Log Template
A custom rule breach log template must be implemented to keep track of the Operations Analytics process.
TIBCO Spotfire® Operations Analytics 1.1 21 (26)

Appendix
Automation Services Job XML
A job file should be set up in Automation Services Job Builder. It should contain the tasks Open Analysis from Library, Update Text Area Contents, Save Analysis to Library, and Send Email.
Open Analysis from Library – This task must include the path to the analysis file in the library.
Path: /Users/OA/Templates/OATemplate
Update Text Area Contents – This task should be set up so that the new content of the text area includes information about the rule violation. The new content in the text area will say when the rule breach occurred, which rule was violated, as well as how the rule was violated.
New content: On [OA:RuleBreachReceivedTimeStamp]
The Rule [OA:RuleID] was violated with
Measurement [OA:MeasurementID]: [OA:ParameterID] = [OA:MeasurementValue] for item "[OA:ItemID]"
Rule Breach Unique ID: [OA:RuleBreachID]
Save Analysis to Library – This task should contain a path to the library and the desired file name.
Save as: /Users/OA/Reports/OA Report on {date} at {time}
By including the timestamps {date} and {time} in the file name a new analysis will be saved every time instead of overwriting existing ones.
Send Email – This task should be set up to send an email when a rule breach occurs. The email should include a message body text, a library link to the report analysis, the report analysis attached in the email, and a visualization showing the interesting rule breach information.
22 (26) TIBCO Spotfire® Operations Analytics 1.1
Appendix
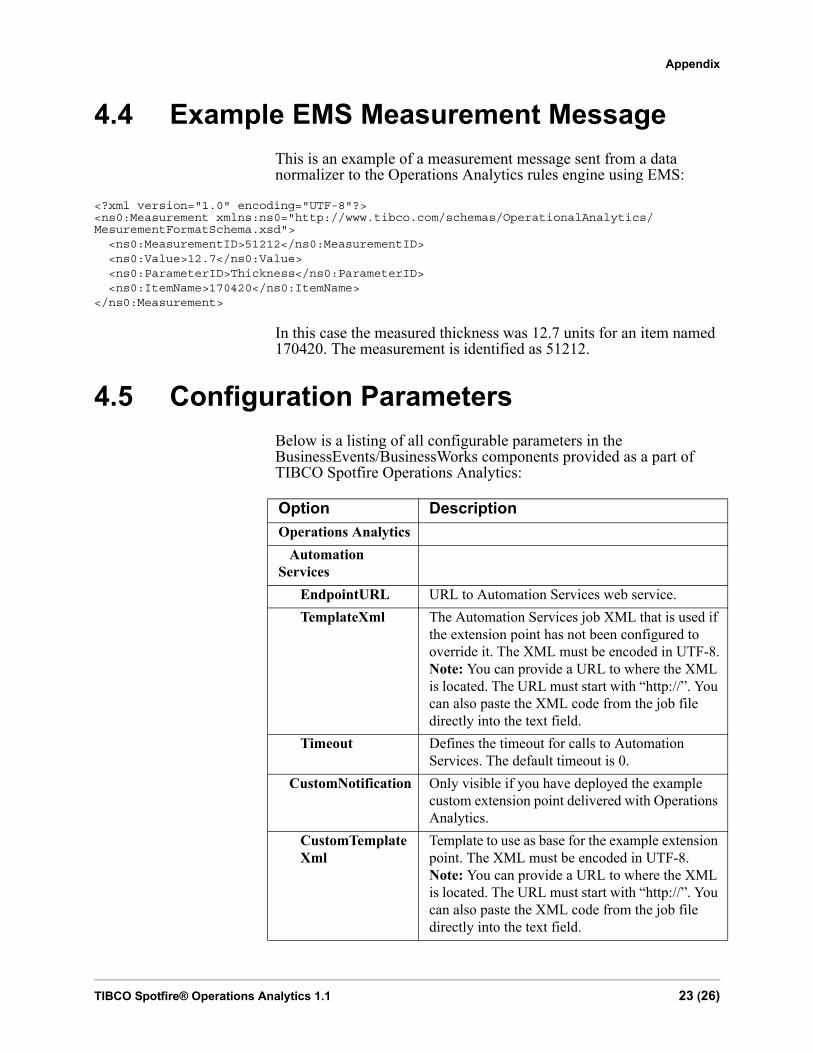
4.4 Example EMS Measurement MessageThis is an example of a measurement message sent from a data normalizer to the Operations Analytics rules engine using EMS:
<?xml version="1.0" encoding="UTF-8"?> <ns0:Measurement xmlns:ns0="http://www.tibco.com/schemas/OperationalAnalytics/MesurementFormatSchema.xsd"> <ns0:MeasurementID>51212</ns0:MeasurementID> <ns0:Value>12.7</ns0:Value> <ns0:ParameterID>Thickness</ns0:ParameterID> <ns0:ItemName>170420</ns0:ItemName></ns0:Measurement>
In this case the measured thickness was 12.7 units for an item named 170420. The measurement is identified as 51212.
4.5 Configuration ParametersBelow is a listing of all configurable parameters in the BusinessEvents/BusinessWorks components provided as a part of TIBCO Spotfire Operations Analytics:
Option DescriptionOperations Analytics Automation Services EndpointURL URL to Automation Services web service. TemplateXml The Automation Services job XML that is used if
the extension point has not been configured to override it. The XML must be encoded in UTF-8. Note: You can provide a URL to where the XML is located. The URL must start with “http://”. You can also paste the XML code from the job file directly into the text field.
Timeout Defines the timeout for calls to Automation Services. The default timeout is 0.
CustomNotification Only visible if you have deployed the example custom extension point delivered with Operations Analytics.
CustomTemplate Xml
Template to use as base for the example extension point. The XML must be encoded in UTF-8. Note: You can provide a URL to where the XML is located. The URL must start with “http://”. You can also paste the XML code from the job file directly into the text field.
TIBCO Spotfire® Operations Analytics 1.1 23 (26)
Appendix
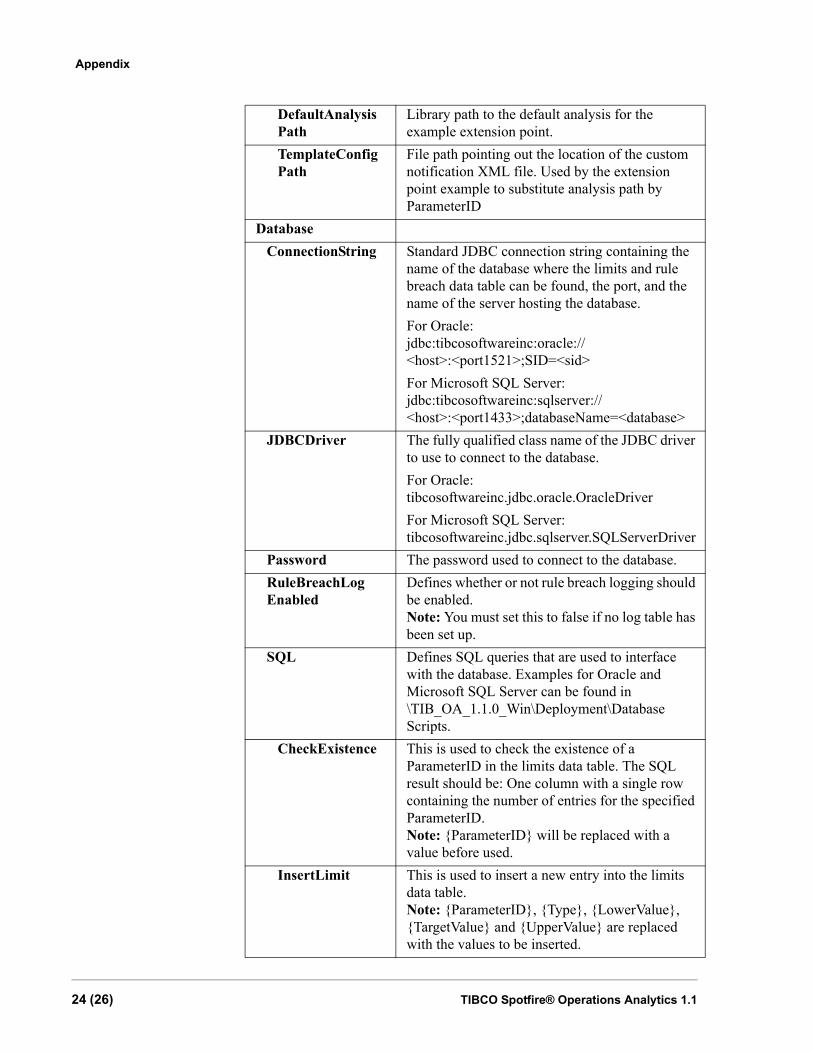
DefaultAnalysis Path
Library path to the default analysis for the example extension point.
TemplateConfig Path
File path pointing out the location of the custom notification XML file. Used by the extension point example to substitute analysis path by ParameterID
Database ConnectionString Standard JDBC connection string containing the
name of the database where the limits and rule breach data table can be found, the port, and the name of the server hosting the database.For Oracle: jdbc:tibcosoftwareinc:oracle://<host>:<port1521>;SID=<sid>For Microsoft SQL Server: jdbc:tibcosoftwareinc:sqlserver://<host>:<port1433>;databaseName=<database>
JDBCDriver The fully qualified class name of the JDBC driver to use to connect to the database.For Oracle: tibcosoftwareinc.jdbc.oracle.OracleDriverFor Microsoft SQL Server: tibcosoftwareinc.jdbc.sqlserver.SQLServerDriver
Password The password used to connect to the database. RuleBreachLog Enabled
Defines whether or not rule breach logging should be enabled. Note: You must set this to false if no log table has been set up.
SQL Defines SQL queries that are used to interface with the database. Examples for Oracle and Microsoft SQL Server can be found in \TIB_OA_1.1.0_Win\Deployment\Database Scripts.
CheckExistence This is used to check the existence of a ParameterID in the limits data table. The SQL result should be: One column with a single row containing the number of entries for the specified ParameterID. Note: {ParameterID} will be replaced with a value before used.
InsertLimit This is used to insert a new entry into the limits data table. Note: {ParameterID}, {Type}, {LowerValue}, {TargetValue} and {UpperValue} are replaced with the values to be inserted.
24 (26) TIBCO Spotfire® Operations Analytics 1.1
Appendix
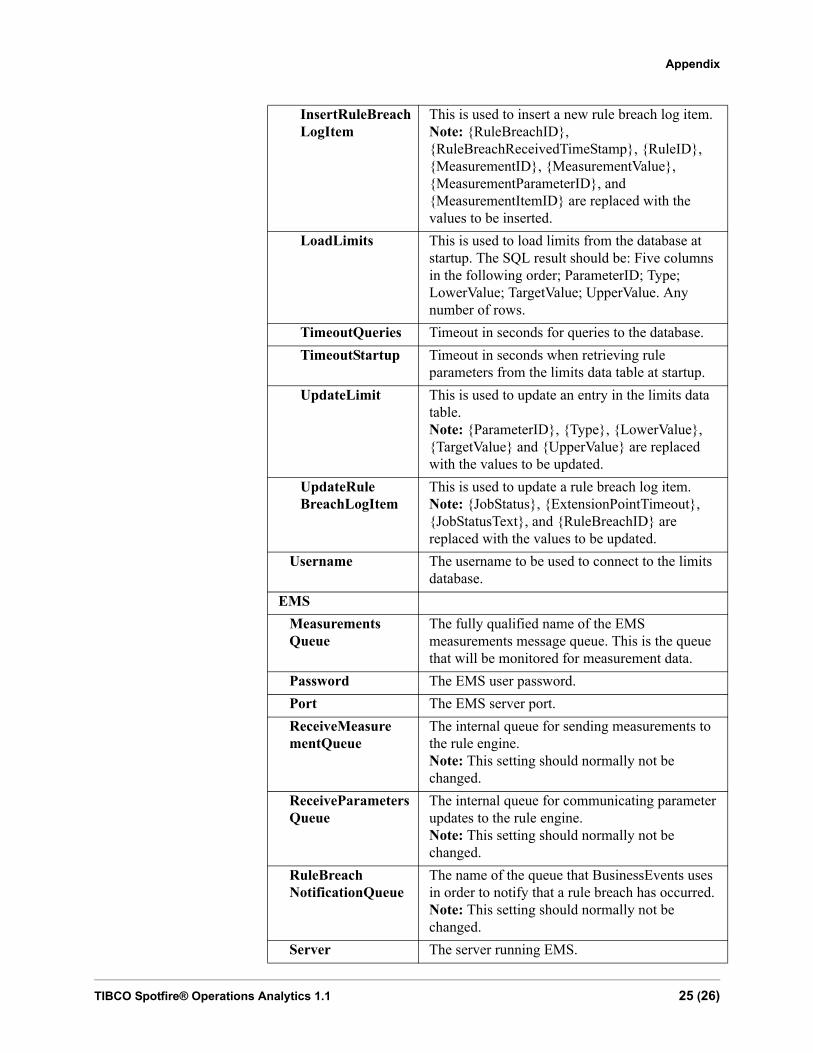
InsertRuleBreach LogItem
This is used to insert a new rule breach log item. Note: {RuleBreachID}, {RuleBreachReceivedTimeStamp}, {RuleID}, {MeasurementID}, {MeasurementValue}, {MeasurementParameterID}, and {MeasurementItemID} are replaced with the values to be inserted.
LoadLimits This is used to load limits from the database at startup. The SQL result should be: Five columns in the following order; ParameterID; Type; LowerValue; TargetValue; UpperValue. Any number of rows.
TimeoutQueries Timeout in seconds for queries to the database. TimeoutStartup Timeout in seconds when retrieving rule
parameters from the limits data table at startup. UpdateLimit This is used to update an entry in the limits data
table. Note: {ParameterID}, {Type}, {LowerValue}, {TargetValue} and {UpperValue} are replaced with the values to be updated.
UpdateRule BreachLogItem
This is used to update a rule breach log item. Note: {JobStatus}, {ExtensionPointTimeout}, {JobStatusText}, and {RuleBreachID} are replaced with the values to be updated.
Username The username to be used to connect to the limits database.
EMS Measurements Queue
The fully qualified name of the EMS measurements message queue. This is the queue that will be monitored for measurement data.
Password The EMS user password. Port The EMS server port. ReceiveMeasure mentQueue
The internal queue for sending measurements to the rule engine. Note: This setting should normally not be changed.
ReceiveParameters Queue
The internal queue for communicating parameter updates to the rule engine. Note: This setting should normally not be changed.
RuleBreach NotificationQueue
The name of the queue that BusinessEvents uses in order to notify that a rule breach has occurred. Note: This setting should normally not be changed.
Server The server running EMS.
TIBCO Spotfire® Operations Analytics 1.1 25 (26)
Appendix
4.6 TroubleshootingThere are four different places where errors are logged:
BusinessWorks trace log:From the TIBCO Administrator user interface, check the trace logs in BusinessWorks process archive.
BusinessEvents trace log:From the TIBCO Administrator user interface, check the trace logs in BusinessEvents process archive.
Automation Services log file:Open the Program Files folder and navigate to the \TIBCO\Spotfire\AutomationServices\bin\TIBCO folder. Then open the Spotfire.Dxp.Automation.log in a text editor to view the Automation Services log.
Rule Breach Log database:If rule breach logging is enabled, all the incoming rule breaches can be viewed in the rule breach log table.
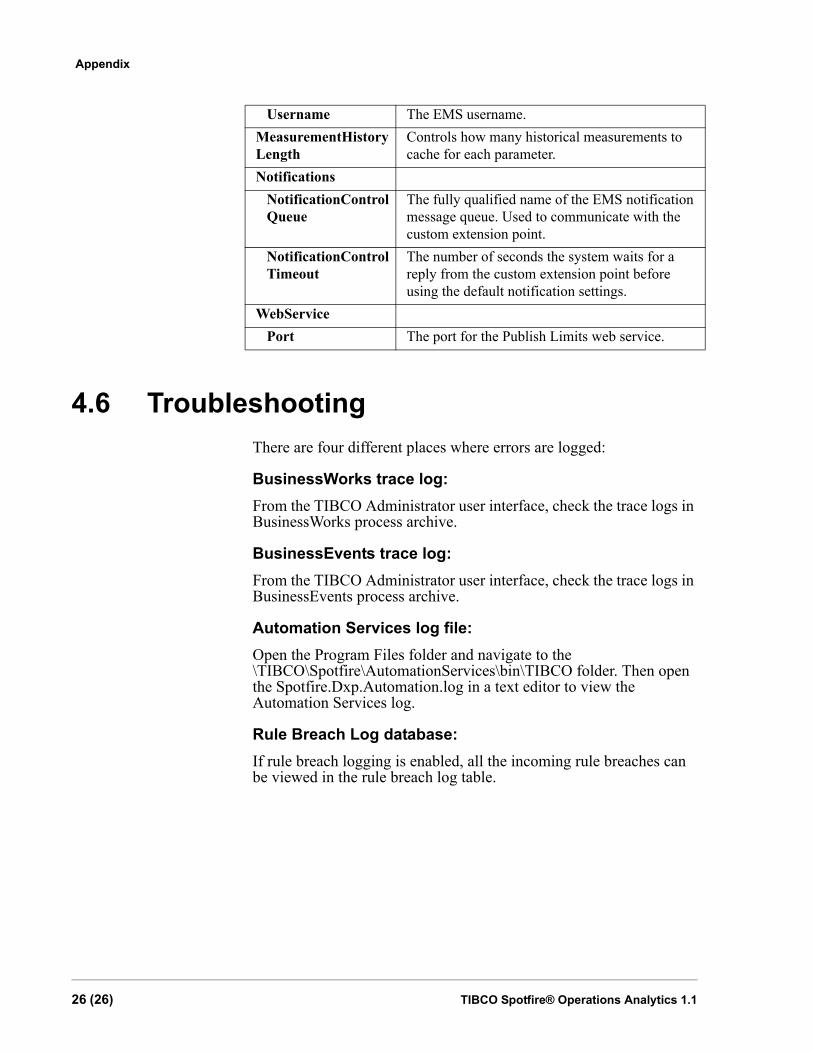
Username The EMS username.MeasurementHistoryLength
Controls how many historical measurements to cache for each parameter.
Notifications NotificationControl Queue
The fully qualified name of the EMS notification message queue. Used to communicate with the custom extension point.
NotificationControl Timeout
The number of seconds the system waits for a reply from the custom extension point before using the default notification settings.
WebService Port The port for the Publish Limits web service.
26 (26) TIBCO Spotfire® Operations Analytics 1.1


