570
TIBCO Spotfire ® Server and Environment Installation and Administration Software Release 7.11 LTS Document Updated: August 2019
TIBCO Spotfire® Server and EnvironmentInstallation and AdministrationSoftware Release 7.11 LTSDocument Updated: August 2019

Important Information
SOME TIBCO SOFTWARE EMBEDS OR BUNDLES OTHER TIBCO SOFTWARE. USE OF SUCHEMBEDDED OR BUNDLED TIBCO SOFTWARE IS SOLELY TO ENABLE THE FUNCTIONALITY (ORPROVIDE LIMITED ADD-ON FUNCTIONALITY) OF THE LICENSED TIBCO SOFTWARE. THEEMBEDDED OR BUNDLED SOFTWARE IS NOT LICENSED TO BE USED OR ACCESSED BY ANYOTHER TIBCO SOFTWARE OR FOR ANY OTHER PURPOSE.
USE OF TIBCO SOFTWARE AND THIS DOCUMENT IS SUBJECT TO THE TERMS ANDCONDITIONS OF A LICENSE AGREEMENT FOUND IN EITHER A SEPARATELY EXECUTEDSOFTWARE LICENSE AGREEMENT, OR, IF THERE IS NO SUCH SEPARATE AGREEMENT, THECLICKWRAP END USER LICENSE AGREEMENT WHICH IS DISPLAYED DURING DOWNLOADOR INSTALLATION OF THE SOFTWARE (AND WHICH IS DUPLICATED IN THE LICENSE FILE)OR IF THERE IS NO SUCH SOFTWARE LICENSE AGREEMENT OR CLICKWRAP END USERLICENSE AGREEMENT, THE LICENSE(S) LOCATED IN THE “LICENSE” FILE(S) OF THESOFTWARE. USE OF THIS DOCUMENT IS SUBJECT TO THOSE TERMS AND CONDITIONS, ANDYOUR USE HEREOF SHALL CONSTITUTE ACCEPTANCE OF AND AN AGREEMENT TO BEBOUND BY THE SAME.
ANY SOFTWARE ITEM IDENTIFIED AS THIRD PARTY LIBRARY IS AVAILABLE UNDERSEPARATE SOFTWARE LICENSE TERMS AND IS NOT PART OF A TIBCO PRODUCT. AS SUCH,THESE SOFTWARE ITEMS ARE NOT COVERED BY THE TERMS OF YOUR AGREEMENT WITHTIBCO, INCLUDING ANY TERMS CONCERNING SUPPORT, MAINTENANCE, WARRANTIES,AND INDEMNITIES. DOWNLOAD AND USE THESE ITEMS IS SOLELY AT YOUR OWNDISCRETION AND SUBJECT TO THE LICENSE TERMS APPLICABLE TO THEM. BY PROCEEDINGTO DOWNLOAD, INSTALL OR USE ANY OF THESE ITEMS, YOU ACKNOWLEDGE THEFOREGOING DISTINCTIONS BETWEEN THESE ITEMS AND TIBCO PRODUCTS.
This document contains confidential information that is subject to U.S. and international copyright lawsand treaties. No part of this document may be reproduced in any form without the writtenauthorization of TIBCO Software Inc.
TIBCO, the TIBCO logo, the TIBCO O logo, TIBCO Spotfire, TIBCO Spotfire Analyst, TIBCO SpotfireAutomation Services, TIBCO Spotfire Server, TIBCO Spotfire Web Player, TIBCO Spotfire Developer,TIBCO Enterprise Message Service, TIBCO Enterprise Runtime for R, TIBCO Enterprise Runtime for R -Server Edition, TERR, TERR Server Edition, TIBCO Hawk, and TIBCO Spotfire Statistics Services areeither registered trademarks or trademarks of TIBCO Software Inc. in the United States and/or othercountries.
Java and all Java based trademarks and logos are trademarks or registered trademarks of Oracle and/orits affiliates.
All other product and company names and marks mentioned in this document are the property of theirrespective owners and are mentioned for identification purposes only.
THIS SOFTWARE MAY BE AVAILABLE ON MULTIPLE OPERATING SYSTEMS. HOWEVER, NOTALL OPERATING SYSTEM PLATFORMS FOR A SPECIFIC SOFTWARE VERSION ARE RELEASEDAT THE SAME TIME. SEE THE README FILE FOR THE AVAILABILITY OF THIS SOFTWAREVERSION ON A SPECIFIC OPERATING SYSTEM PLATFORM.
THIS DOCUMENT IS PROVIDED “AS IS” WITHOUT WARRANTY OF ANY KIND, EITHER EXPRESSOR IMPLIED, INCLUDING, BUT NOT LIMITED TO, THE IMPLIED WARRANTIES OFMERCHANTABILITY, FITNESS FOR A PARTICULAR PURPOSE, OR NON-INFRINGEMENT.
THIS DOCUMENT COULD INCLUDE TECHNICAL INACCURACIES OR TYPOGRAPHICALERRORS. CHANGES ARE PERIODICALLY ADDED TO THE INFORMATION HEREIN; THESECHANGES WILL BE INCORPORATED IN NEW EDITIONS OF THIS DOCUMENT. TIBCOSOFTWARE INC. MAY MAKE IMPROVEMENTS AND/OR CHANGES IN THE PRODUCT(S)AND/OR THE PROGRAM(S) DESCRIBED IN THIS DOCUMENT AT ANY TIME.
2
TIBCO Spotfire® Server and Environment Installation and Administration

THE CONTENTS OF THIS DOCUMENT MAY BE MODIFIED AND/OR QUALIFIED, DIRECTLY ORINDIRECTLY, BY OTHER DOCUMENTATION WHICH ACCOMPANIES THIS SOFTWARE,INCLUDING BUT NOT LIMITED TO ANY RELEASE NOTES AND "READ ME" FILES.
Copyright © 1994-2019. TIBCO Software Inc. All Rights Reserved.
3
TIBCO Spotfire® Server and Environment Installation and Administration
Contents
TIBCO Spotfire Server Documentation and Support Services . . . . . . . . . . . . . . . . . . . . . . . . . . . . . . . . . . . . . . . . .21
Getting started . . . . . . . . . . . . . . . . . . . . . . . . . . . . . . . . . . . . . . . . . . . . . . . . . . . . . . . . . . . . . . . . . . . . . . . . . . . . . . . . . . . .23
Introduction to the TIBCO Spotfire environment . . . . . . . . . . . . . . . . . . . . . . . . . . . . . . . . . . . . . . . . . . . . . . . . . . . . . 24
Spotfire Server introduction . . . . . . . . . . . . . . . . . . . . . . . . . . . . . . . . . . . . . . . . . . . . . . . . . . . . . . . . . . . . . . . . . . . . . . . . . . . . . . . . . . . . . . . . . . . 24
Spotfire database introduction . . . . . . . . . . . . . . . . . . . . . . . . . . . . . . . . . . . . . . . . . . . . . . . . . . . . . . . . . . . . . . . . . . . . . . . . . . . . . . . . . . . . . . . . 25
Nodes and services introduction . . . . . . . . . . . . . . . . . . . . . . . . . . . . . . . . . . . . . . . . . . . . . . . . . . . . . . . . . . . . . . . . . . . . . . . . . . . . . . . . . . . . . . 25
Spotfire clients introduction . . . . . . . . . . . . . . . . . . . . . . . . . . . . . . . . . . . . . . . . . . . . . . . . . . . . . . . . . . . . . . . . . . . . . . . . . . . . . . . . . . . . . . . . . . . 25
Environment communication introduction . . . . . . . . . . . . . . . . . . . . . . . . . . . . . . . . . . . . . . . . . . . . . . . . . . . . . . . . . . . . . . . . . . . . . . . . . . . . . .25
Authentication and user directory introduction . . . . . . . . . . . . . . . . . . . . . . . . . . . . . . . . . . . . . . . . . . . . . . . . . . . . . . . . . . . . . . . . . . . . . . . . . 26
Users and groups introduction . . . . . . . . . . . . . . . . . . . . . . . . . . . . . . . . . . . . . . . . . . . . . . . . . . . . . . . . . . . . . . . . . . . . . . . . . . . . . . . . . . . . . . . . 27
Licenses and preferences introduction . . . . . . . . . . . . . . . . . . . . . . . . . . . . . . . . . . . . . . . . . . . . . . . . . . . . . . . . . . . . . . . . . . . . . . . . . . . . . . . . 28
Deployment introduction . . . . . . . . . . . . . . . . . . . . . . . . . . . . . . . . . . . . . . . . . . . . . . . . . . . . . . . . . . . . . . . . . . . . . . . . . . . . . . . . . . . . . . . . . . . . . . 28
Spotfire library introduction . . . . . . . . . . . . . . . . . . . . . . . . . . . . . . . . . . . . . . . . . . . . . . . . . . . . . . . . . . . . . . . . . . . . . . . . . . . . . . . . . . . . . . . . . . . 28
Routing introduction . . . . . . . . . . . . . . . . . . . . . . . . . . . . . . . . . . . . . . . . . . . . . . . . . . . . . . . . . . . . . . . . . . . . . . . . . . . . . . . . . . . . . . . . . . . . . . . . . . 28
Data sources introduction . . . . . . . . . . . . . . . . . . . . . . . . . . . . . . . . . . . . . . . . . . . . . . . . . . . . . . . . . . . . . . . . . . . . . . . . . . . . . . . . . . . . . . . . . . . . .29
Logging introduction . . . . . . . . . . . . . . . . . . . . . . . . . . . . . . . . . . . . . . . . . . . . . . . . . . . . . . . . . . . . . . . . . . . . . . . . . . . . . . . . . . . . . . . . . . . . . . . . . . 30
Administration interface introduction . . . . . . . . . . . . . . . . . . . . . . . . . . . . . . . . . . . . . . . . . . . . . . . . . . . . . . . . . . . . . . . . . . . . . . . . . . . . . . . . . . 30
Example scenario . . . . . . . . . . . . . . . . . . . . . . . . . . . . . . . . . . . . . . . . . . . . . . . . . . . . . . . . . . . . . . . . . . . . . . . . . . . . . . . . . . . . . . . . . . . . . . . . . . . . 31
Upgrading from Spotfire 7.0 or earlier – an introduction . . . . . . . . . . . . . . . . . . . . . . . . . . . . . . . . . . . . . . . . . . . . . .32
Basic installation process for Spotfire . . . . . . . . . . . . . . . . . . . . . . . . . . . . . . . . . . . . . . . . . . . . . . . . . . . . . . . . . . . . . . 34
Installation and configuration . . . . . . . . . . . . . . . . . . . . . . . . . . . . . . . . . . . . . . . . . . . . . . . . . . . . . . . . . . . . . . . . . . . . . . 35
Preparation . . . . . . . . . . . . . . . . . . . . . . . . . . . . . . . . . . . . . . . . . . . . . . . . . . . . . . . . . . . . . . . . . . . . . . . . . . . . . . . . . . . . . . . . . . . . . . . . . . . . . . . . . . .35
Downloading required software . . . . . . . . . . . . . . . . . . . . . . . . . . . . . . . . . . . . . . . . . . . . . . . . . . . . . . . . . . . . . . . . . . . . . . . . . . . . . . . . . . .35
Collecting required information . . . . . . . . . . . . . . . . . . . . . . . . . . . . . . . . . . . . . . . . . . . . . . . . . . . . . . . . . . . . . . . . . . . . . . . . . . . . . . . . . . . 36
Setting up the Spotfire database (Oracle) . . . . . . . . . . . . . . . . . . . . . . . . . . . . . . . . . . . . . . . . . . . . . . . . . . . . . . . . . . . . . . . . . . . . . . . . .39
Setting up the Spotfire database (SQL Server) . . . . . . . . . . . . . . . . . . . . . . . . . . . . . . . . . . . . . . . . . . . . . . . . . . . . . . . . . . . . . . . . . . . .42
Setting up the Spotfire database (SQL Server with Integrated Windows authentication) . . . . . . . . . . . . . . . . . . . . . . . . . . . . 44
Running database preparation scripts manually . . . . . . . . . . . . . . . . . . . . . . . . . . . . . . . . . . . . . . . . . . . . . . . . . . . . . . . . . . . . . . . . . . .47
Installation . . . . . . . . . . . . . . . . . . . . . . . . . . . . . . . . . . . . . . . . . . . . . . . . . . . . . . . . . . . . . . . . . . . . . . . . . . . . . . . . . . . . . . . . . . . . . . . . . . . . . . . . . . . 48
Installing the Spotfire Server files (interactively on Windows) . . . . . . . . . . . . . . . . . . . . . . . . . . . . . . . . . . . . . . . . . . . . . . . . . . . . . . 48
Installing the Spotfire Server files (silently on Windows) . . . . . . . . . . . . . . . . . . . . . . . . . . . . . . . . . . . . . . . . . . . . . . . . . . . . . . . . . . . 49
Installing the Spotfire Server files (RPM Linux) . . . . . . . . . . . . . . . . . . . . . . . . . . . . . . . . . . . . . . . . . . . . . . . . . . . . . . . . . . . . . . . . . . . .50
Installing the Spotfire Server files (Tarball Linux) . . . . . . . . . . . . . . . . . . . . . . . . . . . . . . . . . . . . . . . . . . . . . . . . . . . . . . . . . . . . . . . . . . 51
Database drivers . . . . . . . . . . . . . . . . . . . . . . . . . . . . . . . . . . . . . . . . . . . . . . . . . . . . . . . . . . . . . . . . . . . . . . . . . . . . . . . . . . . . . . . . . . . . . . . . . . . . . 51
Installing the Oracle database driver . . . . . . . . . . . . . . . . . . . . . . . . . . . . . . . . . . . . . . . . . . . . . . . . . . . . . . . . . . . . . . . . . . . . . . . . . . . . . .52
Installing database drivers for Information Designer . . . . . . . . . . . . . . . . . . . . . . . . . . . . . . . . . . . . . . . . . . . . . . . . . . . . . . . . . . . . . . . 52
4
TIBCO Spotfire® Server and Environment Installation and Administration
Applying hotfixes to the server . . . . . . . . . . . . . . . . . . . . . . . . . . . . . . . . . . . . . . . . . . . . . . . . . . . . . . . . . . . . . . . . . . . . . . . . . . . . . . . . . . . . . . . . 52
Initial configuration . . . . . . . . . . . . . . . . . . . . . . . . . . . . . . . . . . . . . . . . . . . . . . . . . . . . . . . . . . . . . . . . . . . . . . . . . . . . . . . . . . . . . . . . . . . . . . . . . . . 53
Configuration using the configuration tool . . . . . . . . . . . . . . . . . . . . . . . . . . . . . . . . . . . . . . . . . . . . . . . . . . . . . . . . . . . . . . . . . . . . . . . . .53
Opening the configuration tool . . . . . . . . . . . . . . . . . . . . . . . . . . . . . . . . . . . . . . . . . . . . . . . . . . . . . . . . . . . . . . . . . . . . . . . . . . . . . . . 53
Running the configuration tool on a local computer . . . . . . . . . . . . . . . . . . . . . . . . . . . . . . . . . . . . . . . . . . . . . . . . . . . . . . 53
Creating the bootstrap.xml file . . . . . . . . . . . . . . . . . . . . . . . . . . . . . . . . . . . . . . . . . . . . . . . . . . . . . . . . . . . . . . . . . . . . . . . . . . . . . . . 54
Setting up the Spotfire Server bootstrap file for Integrated Windows authentication . . . . . . . . . . . . . . . . . . . . . . . 55
Saving basic configuration data (authentication towards Spotfire database) . . . . . . . . . . . . . . . . . . . . . . . . . . . . . . . . . . . 56
Creating an administrator user . . . . . . . . . . . . . . . . . . . . . . . . . . . . . . . . . . . . . . . . . . . . . . . . . . . . . . . . . . . . . . . . . . . . . . . . . . . . . . . 57
Configuration using the command line . . . . . . . . . . . . . . . . . . . . . . . . . . . . . . . . . . . . . . . . . . . . . . . . . . . . . . . . . . . . . . . . . . . . . . . . . . . . 57
Executing commands on the command line . . . . . . . . . . . . . . . . . . . . . . . . . . . . . . . . . . . . . . . . . . . . . . . . . . . . . . . . . . . . . . . . . . 57
Executing commands on a local computer . . . . . . . . . . . . . . . . . . . . . . . . . . . . . . . . . . . . . . . . . . . . . . . . . . . . . . . . . . . . . . . 58
Viewing help on configuration commands . . . . . . . . . . . . . . . . . . . . . . . . . . . . . . . . . . . . . . . . . . . . . . . . . . . . . . . . . . . . . . . . . . . . 58
Configuration and administration commands by function . . . . . . . . . . . . . . . . . . . . . . . . . . . . . . . . . . . . . . . . . . . . . . . . . . . . . .58
Action log configuration commands . . . . . . . . . . . . . . . . . . . . . . . . . . . . . . . . . . . . . . . . . . . . . . . . . . . . . . . . . . . . . . . . . . . . . .59
Administration commands . . . . . . . . . . . . . . . . . . . . . . . . . . . . . . . . . . . . . . . . . . . . . . . . . . . . . . . . . . . . . . . . . . . . . . . . . . . . . . .59
Authentication commands . . . . . . . . . . . . . . . . . . . . . . . . . . . . . . . . . . . . . . . . . . . . . . . . . . . . . . . . . . . . . . . . . . . . . . . . . . . . . . .61
Client configuration command . . . . . . . . . . . . . . . . . . . . . . . . . . . . . . . . . . . . . . . . . . . . . . . . . . . . . . . . . . . . . . . . . . . . . . . . . . . 62
Information Services commands . . . . . . . . . . . . . . . . . . . . . . . . . . . . . . . . . . . . . . . . . . . . . . . . . . . . . . . . . . . . . . . . . . . . . . . . 62
JAAS commands . . . . . . . . . . . . . . . . . . . . . . . . . . . . . . . . . . . . . . . . . . . . . . . . . . . . . . . . . . . . . . . . . . . . . . . . . . . . . . . . . . . . . . . 63
LDAP commands . . . . . . . . . . . . . . . . . . . . . . . . . . . . . . . . . . . . . . . . . . . . . . . . . . . . . . . . . . . . . . . . . . . . . . . . . . . . . . . . . . . . . . . 63
Library commands . . . . . . . . . . . . . . . . . . . . . . . . . . . . . . . . . . . . . . . . . . . . . . . . . . . . . . . . . . . . . . . . . . . . . . . . . . . . . . . . . . . . . . 63
Monitoring commands . . . . . . . . . . . . . . . . . . . . . . . . . . . . . . . . . . . . . . . . . . . . . . . . . . . . . . . . . . . . . . . . . . . . . . . . . . . . . . . . . . 64
Server configuration commands . . . . . . . . . . . . . . . . . . . . . . . . . . . . . . . . . . . . . . . . . . . . . . . . . . . . . . . . . . . . . . . . . . . . . . . . . 64
Server database commands . . . . . . . . . . . . . . . . . . . . . . . . . . . . . . . . . . . . . . . . . . . . . . . . . . . . . . . . . . . . . . . . . . . . . . . . . . . . 65
Services commands . . . . . . . . . . . . . . . . . . . . . . . . . . . . . . . . . . . . . . . . . . . . . . . . . . . . . . . . . . . . . . . . . . . . . . . . . . . . . . . . . . . . 65
Spotfire collective commands . . . . . . . . . . . . . . . . . . . . . . . . . . . . . . . . . . . . . . . . . . . . . . . . . . . . . . . . . . . . . . . . . . . . . . . . . . . 66
User directory commands . . . . . . . . . . . . . . . . . . . . . . . . . . . . . . . . . . . . . . . . . . . . . . . . . . . . . . . . . . . . . . . . . . . . . . . . . . . . . . . 67
Miscellaneous configuration commands . . . . . . . . . . . . . . . . . . . . . . . . . . . . . . . . . . . . . . . . . . . . . . . . . . . . . . . . . . . . . . . . . 67
Manually creating a simple configuration . . . . . . . . . . . . . . . . . . . . . . . . . . . . . . . . . . . . . . . . . . . . . . . . . . . . . . . . . . . . . . . . . . . . . 67
Scripting a configuration . . . . . . . . . . . . . . . . . . . . . . . . . . . . . . . . . . . . . . . . . . . . . . . . . . . . . . . . . . . . . . . . . . . . . . . . . . . . . . . . . . . . . . . . . 69
Editing and running a basic configuration script . . . . . . . . . . . . . . . . . . . . . . . . . . . . . . . . . . . . . . . . . . . . . . . . . . . . . . . . . . . . . . 70
Script language . . . . . . . . . . . . . . . . . . . . . . . . . . . . . . . . . . . . . . . . . . . . . . . . . . . . . . . . . . . . . . . . . . . . . . . . . . . . . . . . . . . . . . . . . . . . . 71
Configuration.xml file . . . . . . . . . . . . . . . . . . . . . . . . . . . . . . . . . . . . . . . . . . . . . . . . . . . . . . . . . . . . . . . . . . . . . . . . . . . . . . . . . . . . . . . . . . . . .72
Manually editing the Spotfire Server configuration file . . . . . . . . . . . . . . . . . . . . . . . . . . . . . . . . . . . . . . . . . . . . . . . . . . . . . . . . .72
Start or stop Spotfire Server . . . . . . . . . . . . . . . . . . . . . . . . . . . . . . . . . . . . . . . . . . . . . . . . . . . . . . . . . . . . . . . . . . . . . . . . . . . . . . . . . . . . . . . . . . 72
Starting or stopping Spotfire Server (as a Windows service) . . . . . . . . . . . . . . . . . . . . . . . . . . . . . . . . . . . . . . . . . . . . . . . . . . . . . . 73
Starting or stopping Spotfire Server (Windows, no service) . . . . . . . . . . . . . . . . . . . . . . . . . . . . . . . . . . . . . . . . . . . . . . . . . . . . . . . .73
Starting or stopping Spotfire Server (Windows, service exists, Integrated Authentication for SQL Server) . . . . . . . . . . .74
5
TIBCO Spotfire® Server and Environment Installation and Administration
Starting or stopping Spotfire Server (Windows, no service, Integrated Authentication for SQL Server) . . . . . . . . . . . . . . 74
Starting or stopping Spotfire Server (Linux) . . . . . . . . . . . . . . . . . . . . . . . . . . . . . . . . . . . . . . . . . . . . . . . . . . . . . . . . . . . . . . . . . . . . . . . 74
Clustered server deployments . . . . . . . . . . . . . . . . . . . . . . . . . . . . . . . . . . . . . . . . . . . . . . . . . . . . . . . . . . . . . . . . . . . . . . . . . . . . . . . . . . . . . . . . 75
Setting up a cluster of Spotfire Servers . . . . . . . . . . . . . . . . . . . . . . . . . . . . . . . . . . . . . . . . . . . . . . . . . . . . . . . . . . . . . . . . . . . . . . . . . . . 75
Using Hazelcast for clustering . . . . . . . . . . . . . . . . . . . . . . . . . . . . . . . . . . . . . . . . . . . . . . . . . . . . . . . . . . . . . . . . . . . . . . . . . . . . . . . . . . . . 77
Using ActiveSpaces for clustering . . . . . . . . . . . . . . . . . . . . . . . . . . . . . . . . . . . . . . . . . . . . . . . . . . . . . . . . . . . . . . . . . . . . . . . . . . . . . . . . 78
Installing ActiveSpaces . . . . . . . . . . . . . . . . . . . . . . . . . . . . . . . . . . . . . . . . . . . . . . . . . . . . . . . . . . . . . . . . . . . . . . . . . . . . . . . . . . . . . . 78
Configuring a server cluster with ActiveSpaces (Windows) . . . . . . . . . . . . . . . . . . . . . . . . . . . . . . . . . . . . . . . . . . . . . . . . . . . .79
Configuring a server cluster with ActiveSpaces (Linux) . . . . . . . . . . . . . . . . . . . . . . . . . . . . . . . . . . . . . . . . . . . . . . . . . . . . . . . 80
Enabling secure transport for ActiveSpaces . . . . . . . . . . . . . . . . . . . . . . . . . . . . . . . . . . . . . . . . . . . . . . . . . . . . . . . . . . . . . . . . . . 82
Using Apache Ignite for clustering . . . . . . . . . . . . . . . . . . . . . . . . . . . . . . . . . . . . . . . . . . . . . . . . . . . . . . . . . . . . . . . . . . . . . . . . . . . . . . . . 83
Configuring NTLM for a cluster of Spotfire Servers . . . . . . . . . . . . . . . . . . . . . . . . . . . . . . . . . . . . . . . . . . . . . . . . . . . . . . . . . . . . . . . .83
Enabling health check URL for load balanced servers . . . . . . . . . . . . . . . . . . . . . . . . . . . . . . . . . . . . . . . . . . . . . . . . . . . . . . . . . . . . .84
Kerberos authentication for clustered servers with load balancer . . . . . . . . . . . . . . . . . . . . . . . . . . . . . . . . . . . . . . . . . . . . . . . . . . 84
X.509 client certificates for clustered servers with load balancer . . . . . . . . . . . . . . . . . . . . . . . . . . . . . . . . . . . . . . . . . . . . . . . . . . .84
Configuring shared import and export folders for clustered deployments . . . . . . . . . . . . . . . . . . . . . . . . . . . . . . . . . . . . . . . . . . .85
Deploying client packages to Spotfire Server . . . . . . . . . . . . . . . . . . . . . . . . . . . . . . . . . . . . . . . . . . . . . . . . . . . . . . . . . . . . . . . . . . . . . . . . . . 85
User authentication . . . . . . . . . . . . . . . . . . . . . . . . . . . . . . . . . . . . . . . . . . . . . . . . . . . . . . . . . . . . . . . . . . . . . . . . . . . . . . . . . . . . . . . . . . . . . . . . . . .85
User name and password authentication methods . . . . . . . . . . . . . . . . . . . . . . . . . . . . . . . . . . . . . . . . . . . . . . . . . . . . . . . . . . . . . . . . 86
Authentication towards the Spotfire database . . . . . . . . . . . . . . . . . . . . . . . . . . . . . . . . . . . . . . . . . . . . . . . . . . . . . . . . . . . . . . . . 86
Authentication towards LDAP . . . . . . . . . . . . . . . . . . . . . . . . . . . . . . . . . . . . . . . . . . . . . . . . . . . . . . . . . . . . . . . . . . . . . . . . . . . . . . . . 86
Configuring LDAP . . . . . . . . . . . . . . . . . . . . . . . . . . . . . . . . . . . . . . . . . . . . . . . . . . . . . . . . . . . . . . . . . . . . . . . . . . . . . . . . . . . . . . .87
Configuring LDAPS . . . . . . . . . . . . . . . . . . . . . . . . . . . . . . . . . . . . . . . . . . . . . . . . . . . . . . . . . . . . . . . . . . . . . . . . . . . . . . . . . . . . . 90
SASL authentication for LDAP . . . . . . . . . . . . . . . . . . . . . . . . . . . . . . . . . . . . . . . . . . . . . . . . . . . . . . . . . . . . . . . . . . . . . . . . . . .90
Configuring Spotfire Server for DIGEST-MD5 authentication of LDAP . . . . . . . . . . . . . . . . . . . . . . . . . . . . . . . . . . . . .90
Configuring Spotfire Server for GSSAPI authentication of LDAP . . . . . . . . . . . . . . . . . . . . . . . . . . . . . . . . . . . . . . . . . .91
Authentication towards Windows NT Domain (legacy) . . . . . . . . . . . . . . . . . . . . . . . . . . . . . . . . . . . . . . . . . . . . . . . . . . . . . . . . 92
Combination of LDAP and Spotfire database authentication . . . . . . . . . . . . . . . . . . . . . . . . . . . . . . . . . . . . . . . . . . . . . . . . . . 92
Disabling adding database users when using LDAP . . . . . . . . . . . . . . . . . . . . . . . . . . . . . . . . . . . . . . . . . . . . . . . . . . . . . .92
Authentication towards a custom JAAS module . . . . . . . . . . . . . . . . . . . . . . . . . . . . . . . . . . . . . . . . . . . . . . . . . . . . . . . . . . . . . . .92
Single sign-on authentication methods . . . . . . . . . . . . . . . . . . . . . . . . . . . . . . . . . . . . . . . . . . . . . . . . . . . . . . . . . . . . . . . . . . . . . . . . . . . 93
NTLM authentication . . . . . . . . . . . . . . . . . . . . . . . . . . . . . . . . . . . . . . . . . . . . . . . . . . . . . . . . . . . . . . . . . . . . . . . . . . . . . . . . . . . . . . . . 93
Downloading third-party components (JCIFS) for NTLM authentication . . . . . . . . . . . . . . . . . . . . . . . . . . . . . . . . . . . 94
Creating a computer service account in your Windows domain . . . . . . . . . . . . . . . . . . . . . . . . . . . . . . . . . . . . . . . . . . . 94
Creating a computer service account manually . . . . . . . . . . . . . . . . . . . . . . . . . . . . . . . . . . . . . . . . . . . . . . . . . . . . . . . . . . 95
Configuring NTLM authentication for a single server . . . . . . . . . . . . . . . . . . . . . . . . . . . . . . . . . . . . . . . . . . . . . . . . . . . . . 95
Kerberos authentication . . . . . . . . . . . . . . . . . . . . . . . . . . . . . . . . . . . . . . . . . . . . . . . . . . . . . . . . . . . . . . . . . . . . . . . . . . . . . . . . . . . . . 97
Setting up Kerberos authentication on Spotfire Server . . . . . . . . . . . . . . . . . . . . . . . . . . . . . . . . . . . . . . . . . . . . . . . . . . . 97
Creating a Kerberos service account . . . . . . . . . . . . . . . . . . . . . . . . . . . . . . . . . . . . . . . . . . . . . . . . . . . . . . . . . . . . . . . .97
6
TIBCO Spotfire® Server and Environment Installation and Administration
Registering Service Principal Names . . . . . . . . . . . . . . . . . . . . . . . . . . . . . . . . . . . . . . . . . . . . . . . . . . . . . . . . . . . . . . . 98
Creating a keytab file for the Kerberos service account . . . . . . . . . . . . . . . . . . . . . . . . . . . . . . . . . . . . . . . . . . . . . . 99
Configuring Kerberos for Java . . . . . . . . . . . . . . . . . . . . . . . . . . . . . . . . . . . . . . . . . . . . . . . . . . . . . . . . . . . . . . . . . . . . . 101
Copying the Kerberos service account’s keytab file to Spotfire Server . . . . . . . . . . . . . . . . . . . . . . . . . . . . . . .102
Using Kerberos authentication with delegated credentials . . . . . . . . . . . . . . . . . . . . . . . . . . . . . . . . . . . . . . . . . . 102
Enabling constrained delegation . . . . . . . . . . . . . . . . . . . . . . . . . . . . . . . . . . . . . . . . . . . . . . . . . . . . . . . . . . . . . . 103
Enabling unconstrained delegation on a domain controller in Windows Server 2003 mode . . . . . 103
Enabling unconstrained delegation for an account on a domain controller in Windows 2000 mixed or native mode. . . . . . . . . . . . . . . . . . . . . . . . . . . . . . . . . . . . . . . . . . . . . . . . . . . . . . . . . . . . . . . . . . . . . . . . . . . . . . . . . . . . . . . . . . . . . . . 104
Selecting Kerberos as the Spotfire login method . . . . . . . . . . . . . . . . . . . . . . . . . . . . . . . . . . . . . . . . . . . . . . . . . . . 104
Disabling the username and password fields in the Spotfire Analyst login dialog . . . . . . . . . . . . . . . . . . . . 105
Kerberos authentication for clustered servers with load balancer . . . . . . . . . . . . . . . . . . . . . . . . . . . . . . . . . . . 105
Setting up Kerberos authentication on nodes . . . . . . . . . . . . . . . . . . . . . . . . . . . . . . . . . . . . . . . . . . . . . . . . . . . . . . . . . . . 105
Enabling constrained delegation on nodes . . . . . . . . . . . . . . . . . . . . . . . . . . . . . . . . . . . . . . . . . . . . . . . . . . . . . . . . . 106
Enable Kerberos authentication for end-users . . . . . . . . . . . . . . . . . . . . . . . . . . . . . . . . . . . . . . . . . . . . . . . . . . . . . . . . . . 106
Enabling Kerberos for Internet Explorer and Spotfire Analyst . . . . . . . . . . . . . . . . . . . . . . . . . . . . . . . . . . . . . . . 107
Enabling delegated Kerberos for Google Chrome . . . . . . . . . . . . . . . . . . . . . . . . . . . . . . . . . . . . . . . . . . . . . . . . . . 107
Enabling Kerberos for Mozilla Firefox . . . . . . . . . . . . . . . . . . . . . . . . . . . . . . . . . . . . . . . . . . . . . . . . . . . . . . . . . . . . . . 107
Using Kerberos to log in to the Spotfire database . . . . . . . . . . . . . . . . . . . . . . . . . . . . . . . . . . . . . . . . . . . . . . . . . . . . . . . 108
Creating a Windows domain account for the Spotfire database . . . . . . . . . . . . . . . . . . . . . . . . . . . . . . . . . . . . . 109
Configuring the Spotfire database account to the Windows domain account . . . . . . . . . . . . . . . . . . . . . . . . 109
Keytab file for the Kerberos service account . . . . . . . . . . . . . . . . . . . . . . . . . . . . . . . . . . . . . . . . . . . . . . . . . . . . . . . .110
Creating a keytab file for the Kerberos service account (using the ktpass.exe command from Microsoft Support Tools). . . . . . . . . . . . . . . . . . . . . . . . . . . . . . . . . . . . . . . . . . . . . . . . . . . . . . . . . . . . . . . . . . . . . . . . . . . . . . . . . . . . . . . . . . . . . . . 110
Creating a keytab file for the Kerberos service account (using the ktpass.exe command from the bundled JDK). . . . . . . . . . . . . . . . . . . . . . . . . . . . . . . . . . . . . . . . . . . . . . . . . . . . . . . . . . . . . . . . . . . . . . . . . . . . . . . . . . . . . . . . . . . . . . . 110
Creating a keytab file for the Kerberos service account (using the ktutil command on Linux) . . . . 111
Creating a JAAS application configuration for the Spotfire database connection pool . . . . . . . . . . . . . . . . 112
Acquiring a Kerberos ticket by using a keytab file . . . . . . . . . . . . . . . . . . . . . . . . . . . . . . . . . . . . . . . . . . . . . . 113
Acquiring a Kerberos ticket by using a username and password . . . . . . . . . . . . . . . . . . . . . . . . . . . . . . . .113
Acquiring a Kerberos ticket by using the identity of the account running the Spotfire Server process. . . . . . . . . . . . . . . . . . . . . . . . . . . . . . . . . . . . . . . . . . . . . . . . . . . . . . . . . . . . . . . . . . . . . . . . . . . . . . . . . . . . . . . . . . . . . . . 113
Registering the JAAS application configuration file with Java . . . . . . . . . . . . . . . . . . . . . . . . . . . . . . . . . . . . . . . 114
Configuring the database connection for Spotfire Server using Kerberos (Oracle) . . . . . . . . . . . . . . . . . . . 114
Configuring the database connection for Spotfire Server using Kerberos (SQL Server) . . . . . . . . . . . . . 114
Authentication using X.509 client certificates . . . . . . . . . . . . . . . . . . . . . . . . . . . . . . . . . . . . . . . . . . . . . . . . . . . . . . . . . . . . . . . . 115
Installing CA certificates . . . . . . . . . . . . . . . . . . . . . . . . . . . . . . . . . . . . . . . . . . . . . . . . . . . . . . . . . . . . . . . . . . . . . . . . . . . . . . . 115
Configuring Spotfire Server to require client certificates for HTTPS . . . . . . . . . . . . . . . . . . . . . . . . . . . . . . . . . . . . . .115
Configuring Spotfire Server to use X.509 client certificates to authenticate users . . . . . . . . . . . . . . . . . . . . . . . . 116
Configuring anonymous authentication . . . . . . . . . . . . . . . . . . . . . . . . . . . . . . . . . . . . . . . . . . . . . . . . . . . . . . . . . . . . . . . . . . . . . 117
7
TIBCO Spotfire® Server and Environment Installation and Administration
Web authentication . . . . . . . . . . . . . . . . . . . . . . . . . . . . . . . . . . . . . . . . . . . . . . . . . . . . . . . . . . . . . . . . . . . . . . . . . . . . . . . . . . . . . . . . .117
Configuring OpenID Connect . . . . . . . . . . . . . . . . . . . . . . . . . . . . . . . . . . . . . . . . . . . . . . . . . . . . . . . . . . . . . . . . . . . . . . . . . . 117
Advanced OpenID Connect settings . . . . . . . . . . . . . . . . . . . . . . . . . . . . . . . . . . . . . . . . . . . . . . . . . . . . . . . . . . . . . . . . . . . .118
Configuring custom web authentication . . . . . . . . . . . . . . . . . . . . . . . . . . . . . . . . . . . . . . . . . . . . . . . . . . . . . . . . . . . . . . . . .119
Two-factor authentication . . . . . . . . . . . . . . . . . . . . . . . . . . . . . . . . . . . . . . . . . . . . . . . . . . . . . . . . . . . . . . . . . . . . . . . . . . . . . . . . . . . . . . . 120
Configuring two-factor authentication . . . . . . . . . . . . . . . . . . . . . . . . . . . . . . . . . . . . . . . . . . . . . . . . . . . . . . . . . . . . . . . . . . . . . . . 120
Configuring two-factor authentication using the command line . . . . . . . . . . . . . . . . . . . . . . . . . . . . . . . . . . . . . . . . . . 120
External authentication . . . . . . . . . . . . . . . . . . . . . . . . . . . . . . . . . . . . . . . . . . . . . . . . . . . . . . . . . . . . . . . . . . . . . . . . . . . . . . . . . . . . . . . . . 120
Configuring external authentication . . . . . . . . . . . . . . . . . . . . . . . . . . . . . . . . . . . . . . . . . . . . . . . . . . . . . . . . . . . . . . . . . . . . . . . . . 121
External directories and domains . . . . . . . . . . . . . . . . . . . . . . . . . . . . . . . . . . . . . . . . . . . . . . . . . . . . . . . . . . . . . . . . . . . . . . . . . . . . . . . .123
LDAP synchronizations . . . . . . . . . . . . . . . . . . . . . . . . . . . . . . . . . . . . . . . . . . . . . . . . . . . . . . . . . . . . . . . . . . . . . . . . . . . . . . . . . . . . . . . . . 125
User synchronization . . . . . . . . . . . . . . . . . . . . . . . . . . . . . . . . . . . . . . . . . . . . . . . . . . . . . . . . . . . . . . . . . . . . . . . . . . . . . . . . . . . . . . . 125
Group synchronization . . . . . . . . . . . . . . . . . . . . . . . . . . . . . . . . . . . . . . . . . . . . . . . . . . . . . . . . . . . . . . . . . . . . . . . . . . . . . . . . . . . . . 126
Group-based and role-based synchronization . . . . . . . . . . . . . . . . . . . . . . . . . . . . . . . . . . . . . . . . . . . . . . . . . . . . . . . . . . . . . . . 126
LDAP authentication and user directory settings . . . . . . . . . . . . . . . . . . . . . . . . . . . . . . . . . . . . . . . . . . . . . . . . . . . . . . . . . . . . . . . . . 129
Post-authentication filter . . . . . . . . . . . . . . . . . . . . . . . . . . . . . . . . . . . . . . . . . . . . . . . . . . . . . . . . . . . . . . . . . . . . . . . . . . . . . . . . . . . . . . . . 136
HTTPS . . . . . . . . . . . . . . . . . . . . . . . . . . . . . . . . . . . . . . . . . . . . . . . . . . . . . . . . . . . . . . . . . . . . . . . . . . . . . . . . . . . . . . . . . . . . . . . . . . . . . . . . . . . . . 136
Configuring HTTPS . . . . . . . . . . . . . . . . . . . . . . . . . . . . . . . . . . . . . . . . . . . . . . . . . . . . . . . . . . . . . . . . . . . . . . . . . . . . . . . . . . . . . . . . . . . . . 137
Node manager installation . . . . . . . . . . . . . . . . . . . . . . . . . . . . . . . . . . . . . . . . . . . . . . . . . . . . . . . . . . . . . . . . . . . . . . . . . . . . . . . . . . . . . . . . . . .138
Installing a node manager interactively . . . . . . . . . . . . . . . . . . . . . . . . . . . . . . . . . . . . . . . . . . . . . . . . . . . . . . . . . . . . . . . . . . . . . . . . . . 139
Installing a node manager silently . . . . . . . . . . . . . . . . . . . . . . . . . . . . . . . . . . . . . . . . . . . . . . . . . . . . . . . . . . . . . . . . . . . . . . . . . . . . . . . 140
Starting or stopping a node manager (as a Windows service) . . . . . . . . . . . . . . . . . . . . . . . . . . . . . . . . . . . . . . . . . . . . . . . . . . . . 142
Trusting a node . . . . . . . . . . . . . . . . . . . . . . . . . . . . . . . . . . . . . . . . . . . . . . . . . . . . . . . . . . . . . . . . . . . . . . . . . . . . . . . . . . . . . . . . . . . . . . . . . 143
Automatically trusting new nodes . . . . . . . . . . . . . . . . . . . . . . . . . . . . . . . . . . . . . . . . . . . . . . . . . . . . . . . . . . . . . . . . . . . . . . . . . . . . . . . .143
Automatically installing services and instances . . . . . . . . . . . . . . . . . . . . . . . . . . . . . . . . . . . . . . . . . . . . . . . . . . . . . . . . . . . . . . . . . . 144
Login behavior configuration . . . . . . . . . . . . . . . . . . . . . . . . . . . . . . . . . . . . . . . . . . . . . . . . . . . . . . . . . . . . . . . . . . . . . . . . . . . . . . . . . . . . . . . . .146
Enabling an RSS feed in the Spotfire login dialog . . . . . . . . . . . . . . . . . . . . . . . . . . . . . . . . . . . . . . . . . . . . . . . . . . . . . . . . . . . . . . . . 146
Service installation on a node . . . . . . . . . . . . . . . . . . . . . . . . . . . . . . . . . . . . . . . . . . . . . . . . . . . . . . . . . . . . . . . . . . . . . . . . . . . . . . . . . . . . . . . 147
Preconfiguring Spotfire Web Player services (optional) . . . . . . . . . . . . . . . . . . . . . . . . . . . . . . . . . . . . . . . . . . . . . . . . . . . . . . . . . . 147
Installing Spotfire Web Player instances . . . . . . . . . . . . . . . . . . . . . . . . . . . . . . . . . . . . . . . . . . . . . . . . . . . . . . . . . . . . . . . . . . . . . . . . . 148
Multiple service instances on one node . . . . . . . . . . . . . . . . . . . . . . . . . . . . . . . . . . . . . . . . . . . . . . . . . . . . . . . . . . . . . . . . . . . . . . . . . .149
Preconfiguring Spotfire Automation Services (optional) . . . . . . . . . . . . . . . . . . . . . . . . . . . . . . . . . . . . . . . . . . . . . . . . . . . . . . . . . . 149
Installing Spotfire Automation Services instances . . . . . . . . . . . . . . . . . . . . . . . . . . . . . . . . . . . . . . . . . . . . . . . . . . . . . . . . . . . . . . . .149
Automation Services Job Builder and Client Job Sender . . . . . . . . . . . . . . . . . . . . . . . . . . . . . . . . . . . . . . . . . . . . . . . . . . . . . . . . . 150
Sites . . . . . . . . . . . . . . . . . . . . . . . . . . . . . . . . . . . . . . . . . . . . . . . . . . . . . . . . . . . . . . . . . . . . . . . . . . . . . . . . . . . . . . . . . . . . . . . . . . . . . . . . . . . . . . . . 151
Creating sites . . . . . . . . . . . . . . . . . . . . . . . . . . . . . . . . . . . . . . . . . . . . . . . . . . . . . . . . . . . . . . . . . . . . . . . . . . . . . . . . . . . . . . . . . . . . . . . . . . .152
Setting different authentication methods and user directories for sites . . . . . . . . . . . . . . . . . . . . . . . . . . . . . . . . . . . . . . . . . . . . 152
Moving a server and its nodes to a different site . . . . . . . . . . . . . . . . . . . . . . . . . . . . . . . . . . . . . . . . . . . . . . . . . . . . . . . . . . . . . . . . . 153
Sites administration . . . . . . . . . . . . . . . . . . . . . . . . . . . . . . . . . . . . . . . . . . . . . . . . . . . . . . . . . . . . . . . . . . . . . . . . . . . . . . . . . . . . . . . . . . . . .154
8
TIBCO Spotfire® Server and Environment Installation and Administration
Deleting sites . . . . . . . . . . . . . . . . . . . . . . . . . . . . . . . . . . . . . . . . . . . . . . . . . . . . . . . . . . . . . . . . . . . . . . . . . . . . . . . . . . . . . . . . . . . . . . . . . . . 155
Connectors . . . . . . . . . . . . . . . . . . . . . . . . . . . . . . . . . . . . . . . . . . . . . . . . . . . . . . . . . . . . . . . . . . . . . . . . . . . . . . . . . . . . . . . . . . . . . . . . . . . . . . . . . 155
Setting up connectors . . . . . . . . . . . . . . . . . . . . . . . . . . . . . . . . . . . . . . . . . . . . . . . . . . . . . . . . . . . . . . . . . . . . . . . . . . . . . . . . . . . . . . . . . . .156
Configuring connectors for use with web clients and Spotfire Automation Services . . . . . . . . . . . . . . . . . . . . . . . . . . . . . . . 156
Authentication modes . . . . . . . . . . . . . . . . . . . . . . . . . . . . . . . . . . . . . . . . . . . . . . . . . . . . . . . . . . . . . . . . . . . . . . . . . . . . . . . . . . . . . . 157
Connector configuration examples . . . . . . . . . . . . . . . . . . . . . . . . . . . . . . . . . . . . . . . . . . . . . . . . . . . . . . . . . . . . . . . . . . . . . . . . . . 158
Connector names in configuration file . . . . . . . . . . . . . . . . . . . . . . . . . . . . . . . . . . . . . . . . . . . . . . . . . . . . . . . . . . . . . . . . . . . . . . .160
Access to the connectors . . . . . . . . . . . . . . . . . . . . . . . . . . . . . . . . . . . . . . . . . . . . . . . . . . . . . . . . . . . . . . . . . . . . . . . . . . . . . . . . . . . . . . . 161
Installing Oracle Essbase Client on client computers . . . . . . . . . . . . . . . . . . . . . . . . . . . . . . . . . . . . . . . . . . . . . . . . . . . . . . . . . . . . .162
Creating environment variables . . . . . . . . . . . . . . . . . . . . . . . . . . . . . . . . . . . . . . . . . . . . . . . . . . . . . . . . . . . . . . . . . . . . . . . . . . . . . 162
Configuring the Google Analytics connector . . . . . . . . . . . . . . . . . . . . . . . . . . . . . . . . . . . . . . . . . . . . . . . . . . . . . . . . . . . . . . . . . . . . . 163
Additional configuration . . . . . . . . . . . . . . . . . . . . . . . . . . . . . . . . . . . . . . . . . . . . . . . . . . . . . . . . . . . . . . . . . . . . . . . . . . . . . . . . . . . . . . . . . . . . . .163
Updating a server configuration in the configuration tool . . . . . . . . . . . . . . . . . . . . . . . . . . . . . . . . . . . . . . . . . . . . . . . . . . . . . . . . . 164
Updating a server configuration on the command line . . . . . . . . . . . . . . . . . . . . . . . . . . . . . . . . . . . . . . . . . . . . . . . . . . . . . . . . . . . .164
Manually editing the Spotfire Server configuration file . . . . . . . . . . . . . . . . . . . . . . . . . . . . . . . . . . . . . . . . . . . . . . . . . . . . . . . . . . . .164
Manually editing the service configuration files . . . . . . . . . . . . . . . . . . . . . . . . . . . . . . . . . . . . . . . . . . . . . . . . . . . . . . . . . . . . . . . . . . 165
Viewing the name of the active service configuration . . . . . . . . . . . . . . . . . . . . . . . . . . . . . . . . . . . . . . . . . . . . . . . . . . . . . . . . 166
Service configuration files . . . . . . . . . . . . . . . . . . . . . . . . . . . . . . . . . . . . . . . . . . . . . . . . . . . . . . . . . . . . . . . . . . . . . . . . . . . . . . . . . . 167
Spotfire.Dxp.Worker.Automation.config file . . . . . . . . . . . . . . . . . . . . . . . . . . . . . . . . . . . . . . . . . . . . . . . . . . . . . . . . . . . . . 167
Spotfire.Dxp.Worker.Core.config file . . . . . . . . . . . . . . . . . . . . . . . . . . . . . . . . . . . . . . . . . . . . . . . . . . . . . . . . . . . . . . . . . . . . 170
Spotfire.Dxp.Worker.Host.exe.config file . . . . . . . . . . . . . . . . . . . . . . . . . . . . . . . . . . . . . . . . . . . . . . . . . . . . . . . . . . . . . . . . 172
Spotfire.Dxp.Worker.Web.config file . . . . . . . . . . . . . . . . . . . . . . . . . . . . . . . . . . . . . . . . . . . . . . . . . . . . . . . . . . . . . . . . . . . . 177
Customizing the service logging configuration . . . . . . . . . . . . . . . . . . . . . . . . . . . . . . . . . . . . . . . . . . . . . . . . . . . . . . . . . . . . . . . . . . . 191
Customize statistics and performance counter logging . . . . . . . . . . . . . . . . . . . . . . . . . . . . . . . . . . . . . . . . . . . . . . . . . . . . . . 193
Service log levels . . . . . . . . . . . . . . . . . . . . . . . . . . . . . . . . . . . . . . . . . . . . . . . . . . . . . . . . . . . . . . . . . . . . . . . . . . . . . . . . . . . . . . . . . . 193
Configuring a specific directory for library import and export . . . . . . . . . . . . . . . . . . . . . . . . . . . . . . . . . . . . . . . . . . . . . . . . . . . . . 194
Enabling cached and precomputed data for scheduled update files . . . . . . . . . . . . . . . . . . . . . . . . . . . . . . . . . . . . . . . . . . . . . . 194
Disabling the attachment manager cache . . . . . . . . . . . . . . . . . . . . . . . . . . . . . . . . . . . . . . . . . . . . . . . . . . . . . . . . . . . . . . . . . . . . . . . .195
Post-installation steps . . . . . . . . . . . . . . . . . . . . . . . . . . . . . . . . . . . . . . . . . . . . . . . . . . . . . . . . . . . . . . . . . . . . . . . . . . . .196
Enabling demo database use . . . . . . . . . . . . . . . . . . . . . . . . . . . . . . . . . . . . . . . . . . . . . . . . . . . . . . . . . . . . . . . . . . . . . . . . . . . . . . . . . . . . . . . .196
Enabling geocoding tables for map charts . . . . . . . . . . . . . . . . . . . . . . . . . . . . . . . . . . . . . . . . . . . . . . . . . . . . . . . . . . . . . . . . . . . . . . . . . . . .196
Administration . . . . . . . . . . . . . . . . . . . . . . . . . . . . . . . . . . . . . . . . . . . . . . . . . . . . . . . . . . . . . . . . . . . . . . . . . . . . . . . . . . .198
Opening Spotfire Server . . . . . . . . . . . . . . . . . . . . . . . . . . . . . . . . . . . . . . . . . . . . . . . . . . . . . . . . . . . . . . . . . . . . . . . . . . . . . . . . . . . . . . . . . . . . .198
Nodes, services, and resource pools . . . . . . . . . . . . . . . . . . . . . . . . . . . . . . . . . . . . . . . . . . . . . . . . . . . . . . . . . . . . . . . . . . . . . . . . . . . . . . . . 198
Creating resource pools . . . . . . . . . . . . . . . . . . . . . . . . . . . . . . . . . . . . . . . . . . . . . . . . . . . . . . . . . . . . . . . . . . . . . . . . . . . . . . . . . . . . . . . . 198
Adding resources to resource pools . . . . . . . . . . . . . . . . . . . . . . . . . . . . . . . . . . . . . . . . . . . . . . . . . . . . . . . . . . . . . . . . . . . . . . . . . . . . . 199
Removing resources from resource pools . . . . . . . . . . . . . . . . . . . . . . . . . . . . . . . . . . . . . . . . . . . . . . . . . . . . . . . . . . . . . . . . . . . . . . . 199
Changing the name of a resource pool . . . . . . . . . . . . . . . . . . . . . . . . . . . . . . . . . . . . . . . . . . . . . . . . . . . . . . . . . . . . . . . . . . . . . . . . . . 199
Deleting resource pools . . . . . . . . . . . . . . . . . . . . . . . . . . . . . . . . . . . . . . . . . . . . . . . . . . . . . . . . . . . . . . . . . . . . . . . . . . . . . . . . . . . . . . . . .199
9
TIBCO Spotfire® Server and Environment Installation and Administration
Updating node managers . . . . . . . . . . . . . . . . . . . . . . . . . . . . . . . . . . . . . . . . . . . . . . . . . . . . . . . . . . . . . . . . . . . . . . . . . . . . . . . . . . . . . . . 200
Rolling back a node manager update . . . . . . . . . . . . . . . . . . . . . . . . . . . . . . . . . . . . . . . . . . . . . . . . . . . . . . . . . . . . . . . . . . . . . . . . . . . .200
Updating services . . . . . . . . . . . . . . . . . . . . . . . . . . . . . . . . . . . . . . . . . . . . . . . . . . . . . . . . . . . . . . . . . . . . . . . . . . . . . . . . . . . . . . . . . . . . . . 201
Rolling back a service update . . . . . . . . . . . . . . . . . . . . . . . . . . . . . . . . . . . . . . . . . . . . . . . . . . . . . . . . . . . . . . . . . . . . . . . . . . . . . . . . . . . 201
Shutting down a service instance . . . . . . . . . . . . . . . . . . . . . . . . . . . . . . . . . . . . . . . . . . . . . . . . . . . . . . . . . . . . . . . . . . . . . . . . . . . . . . . 202
Revoking trust of a node . . . . . . . . . . . . . . . . . . . . . . . . . . . . . . . . . . . . . . . . . . . . . . . . . . . . . . . . . . . . . . . . . . . . . . . . . . . . . . . . . . . . . . . . 202
User administration . . . . . . . . . . . . . . . . . . . . . . . . . . . . . . . . . . . . . . . . . . . . . . . . . . . . . . . . . . . . . . . . . . . . . . . . . . . . . . . . . . . . . . . . . . . . . . . . . .203
Creating new Spotfire users . . . . . . . . . . . . . . . . . . . . . . . . . . . . . . . . . . . . . . . . . . . . . . . . . . . . . . . . . . . . . . . . . . . . . . . . . . . . . . . . . . . . .203
Adding a user to one or more groups . . . . . . . . . . . . . . . . . . . . . . . . . . . . . . . . . . . . . . . . . . . . . . . . . . . . . . . . . . . . . . . . . . . . . . . . . . . .203
Removing a user from one or more groups . . . . . . . . . . . . . . . . . . . . . . . . . . . . . . . . . . . . . . . . . . . . . . . . . . . . . . . . . . . . . . . . . . . . . . 204
Changing a user's name, password, or email . . . . . . . . . . . . . . . . . . . . . . . . . . . . . . . . . . . . . . . . . . . . . . . . . . . . . . . . . . . . . . . . . . . . 204
Disabling a user account . . . . . . . . . . . . . . . . . . . . . . . . . . . . . . . . . . . . . . . . . . . . . . . . . . . . . . . . . . . . . . . . . . . . . . . . . . . . . . . . . . . . . . . .204
Deleting users from the system . . . . . . . . . . . . . . . . . . . . . . . . . . . . . . . . . . . . . . . . . . . . . . . . . . . . . . . . . . . . . . . . . . . . . . . . . . . . . . . . . 205
Group administration . . . . . . . . . . . . . . . . . . . . . . . . . . . . . . . . . . . . . . . . . . . . . . . . . . . . . . . . . . . . . . . . . . . . . . . . . . . . . . . . . . . . . . . . . . . . . . . . 205
Roles and special groups . . . . . . . . . . . . . . . . . . . . . . . . . . . . . . . . . . . . . . . . . . . . . . . . . . . . . . . . . . . . . . . . . . . . . . . . . . . . . . . . . . . . . . . 205
Creating a new group . . . . . . . . . . . . . . . . . . . . . . . . . . . . . . . . . . . . . . . . . . . . . . . . . . . . . . . . . . . . . . . . . . . . . . . . . . . . . . . . . . . . . . . . . . . 207
Adding users to a group . . . . . . . . . . . . . . . . . . . . . . . . . . . . . . . . . . . . . . . . . . . . . . . . . . . . . . . . . . . . . . . . . . . . . . . . . . . . . . . . . . . . . . . . .207
Adding groups to a group . . . . . . . . . . . . . . . . . . . . . . . . . . . . . . . . . . . . . . . . . . . . . . . . . . . . . . . . . . . . . . . . . . . . . . . . . . . . . . . . . . . . . . . 208
Assigning a primary group to a subgroup . . . . . . . . . . . . . . . . . . . . . . . . . . . . . . . . . . . . . . . . . . . . . . . . . . . . . . . . . . . . . . . . . . . . . . . .208
Assigning a deployment area to a group . . . . . . . . . . . . . . . . . . . . . . . . . . . . . . . . . . . . . . . . . . . . . . . . . . . . . . . . . . . . . . . . . . . . . . . . .208
Renaming a group . . . . . . . . . . . . . . . . . . . . . . . . . . . . . . . . . . . . . . . . . . . . . . . . . . . . . . . . . . . . . . . . . . . . . . . . . . . . . . . . . . . . . . . . . . . . . . 209
Removing members from a group . . . . . . . . . . . . . . . . . . . . . . . . . . . . . . . . . . . . . . . . . . . . . . . . . . . . . . . . . . . . . . . . . . . . . . . . . . . . . . . 209
Deleting groups from the system . . . . . . . . . . . . . . . . . . . . . . . . . . . . . . . . . . . . . . . . . . . . . . . . . . . . . . . . . . . . . . . . . . . . . . . . . . . . . . . . 210
Deployments and deployment areas . . . . . . . . . . . . . . . . . . . . . . . . . . . . . . . . . . . . . . . . . . . . . . . . . . . . . . . . . . . . . . . . . . . . . . . . . . . . . . . . . 210
Creating a new deployment area . . . . . . . . . . . . . . . . . . . . . . . . . . . . . . . . . . . . . . . . . . . . . . . . . . . . . . . . . . . . . . . . . . . . . . . . . . . . . . . . 211
Adding software packages to a deployment area . . . . . . . . . . . . . . . . . . . . . . . . . . . . . . . . . . . . . . . . . . . . . . . . . . . . . . . . . . . . . . . . 211
Copying a distribution to another deployment area . . . . . . . . . . . . . . . . . . . . . . . . . . . . . . . . . . . . . . . . . . . . . . . . . . . . . . . . . . . . . . .212
Exporting a distribution . . . . . . . . . . . . . . . . . . . . . . . . . . . . . . . . . . . . . . . . . . . . . . . . . . . . . . . . . . . . . . . . . . . . . . . . . . . . . . . . . . . . . . . . . 212
Changing the default deployment area . . . . . . . . . . . . . . . . . . . . . . . . . . . . . . . . . . . . . . . . . . . . . . . . . . . . . . . . . . . . . . . . . . . . . . . . . . 212
Renaming a deployment area . . . . . . . . . . . . . . . . . . . . . . . . . . . . . . . . . . . . . . . . . . . . . . . . . . . . . . . . . . . . . . . . . . . . . . . . . . . . . . . . . . . 213
Removing packages from a deployment area . . . . . . . . . . . . . . . . . . . . . . . . . . . . . . . . . . . . . . . . . . . . . . . . . . . . . . . . . . . . . . . . . . . .213
Clearing a deployment area . . . . . . . . . . . . . . . . . . . . . . . . . . . . . . . . . . . . . . . . . . . . . . . . . . . . . . . . . . . . . . . . . . . . . . . . . . . . . . . . . . . . .213
Deleting a deployment area . . . . . . . . . . . . . . . . . . . . . . . . . . . . . . . . . . . . . . . . . . . . . . . . . . . . . . . . . . . . . . . . . . . . . . . . . . . . . . . . . . . . . 214
Scheduled updates to analyses . . . . . . . . . . . . . . . . . . . . . . . . . . . . . . . . . . . . . . . . . . . . . . . . . . . . . . . . . . . . . . . . . . . . . . . . . . . . . . . . . . . . . .214
Creating a scheduled update by using Spotfire Server . . . . . . . . . . . . . . . . . . . . . . . . . . . . . . . . . . . . . . . . . . . . . . . . . . . . . . . . . . . 215
Additional settings for scheduled updates . . . . . . . . . . . . . . . . . . . . . . . . . . . . . . . . . . . . . . . . . . . . . . . . . . . . . . . . . . . . . . . . . . . 216
Setting the number of Spotfire Web Player instances to make available for a scheduled update . . . . . . . . . . 216
Switching the scheduled update method from automatic to manual . . . . . . . . . . . . . . . . . . . . . . . . . . . . . . . . . . . . . 217
Disallowing cached and precomputed data in individual scheduled update files . . . . . . . . . . . . . . . . . . . . . . . . . .217
10
TIBCO Spotfire® Server and Environment Installation and Administration
Scheduled updates with prompted or personalized information links . . . . . . . . . . . . . . . . . . . . . . . . . . . . . . . . . . . . . . . . . 218
Editing a scheduled update . . . . . . . . . . . . . . . . . . . . . . . . . . . . . . . . . . . . . . . . . . . . . . . . . . . . . . . . . . . . . . . . . . . . . . . . . . . . . . . . .218
Creating a reusable schedule . . . . . . . . . . . . . . . . . . . . . . . . . . . . . . . . . . . . . . . . . . . . . . . . . . . . . . . . . . . . . . . . . . . . . . . . . . . . . . .218
Manually updating a file outside of its update schedule . . . . . . . . . . . . . . . . . . . . . . . . . . . . . . . . . . . . . . . . . . . . . . . . . . . . . . 219
Copying routing rules and schedules from one site to another . . . . . . . . . . . . . . . . . . . . . . . . . . . . . . . . . . . . . . . . . . . . . . . 219
Exporting routing rules and schedules for import in a different Spotfire environment . . . . . . . . . . . . . . . . . . . . . . . . . .220
Importing routing rules and schedules from a different Spotfire environment . . . . . . . . . . . . . . . . . . . . . . . . . . . . . . . . . 220
Disabling or deleting scheduled updates and routing rules . . . . . . . . . . . . . . . . . . . . . . . . . . . . . . . . . . . . . . . . . . . . . . . . . . .221
Deleting schedules . . . . . . . . . . . . . . . . . . . . . . . . . . . . . . . . . . . . . . . . . . . . . . . . . . . . . . . . . . . . . . . . . . . . . . . . . . . . . . . . . . . . . . . . . 221
Creating a scheduled update by using TIBCO EMS . . . . . . . . . . . . . . . . . . . . . . . . . . . . . . . . . . . . . . . . . . . . . . . . . . . . . . . . . . . . . .221
Creating a scheduled update by using a SOAP web service . . . . . . . . . . . . . . . . . . . . . . . . . . . . . . . . . . . . . . . . . . . . . . . . . . . . . 223
Scheduled updates monitoring . . . . . . . . . . . . . . . . . . . . . . . . . . . . . . . . . . . . . . . . . . . . . . . . . . . . . . . . . . . . . . . . . . . . . . . . . . . . . . . . . . 224
Changing the priority of a rule . . . . . . . . . . . . . . . . . . . . . . . . . . . . . . . . . . . . . . . . . . . . . . . . . . . . . . . . . . . . . . . . . . . . . . . . . . . . . . . . . . .226
Changing the number of retries for failed scheduled updates . . . . . . . . . . . . . . . . . . . . . . . . . . . . . . . . . . . . . . . . . . . . . . . . . . . . .226
Changing how often the scheduled update history is cleared . . . . . . . . . . . . . . . . . . . . . . . . . . . . . . . . . . . . . . . . . . . . . . . . . . . . .227
Common analysis loading errors . . . . . . . . . . . . . . . . . . . . . . . . . . . . . . . . . . . . . . . . . . . . . . . . . . . . . . . . . . . . . . . . . . . . . . . . . . . . . . . . 227
Routing rules . . . . . . . . . . . . . . . . . . . . . . . . . . . . . . . . . . . . . . . . . . . . . . . . . . . . . . . . . . . . . . . . . . . . . . . . . . . . . . . . . . . . . . . . . . . . . . . . . . . . . . . .228
The default routing rule . . . . . . . . . . . . . . . . . . . . . . . . . . . . . . . . . . . . . . . . . . . . . . . . . . . . . . . . . . . . . . . . . . . . . . . . . . . . . . . . . . . . . . . . . 228
Creating a routing rule . . . . . . . . . . . . . . . . . . . . . . . . . . . . . . . . . . . . . . . . . . . . . . . . . . . . . . . . . . . . . . . . . . . . . . . . . . . . . . . . . . . . . . . . . . 228
Monitoring and diagnostics . . . . . . . . . . . . . . . . . . . . . . . . . . . . . . . . . . . . . . . . . . . . . . . . . . . . . . . . . . . . . . . . . . . . . . . . . . . . . . . . . . . . . . . . . . 229
Server and node logging levels . . . . . . . . . . . . . . . . . . . . . . . . . . . . . . . . . . . . . . . . . . . . . . . . . . . . . . . . . . . . . . . . . . . . . . . . . . . . . . . . . .229
Changing server and node logging levels . . . . . . . . . . . . . . . . . . . . . . . . . . . . . . . . . . . . . . . . . . . . . . . . . . . . . . . . . . . . . . . . . . . 230
Changing the logging level for a server or node that is not running . . . . . . . . . . . . . . . . . . . . . . . . . . . . . . . . . . . . . . . . . . .231
Switching back to the Standard (default) logging level . . . . . . . . . . . . . . . . . . . . . . . . . . . . . . . . . . . . . . . . . . . . . . . . . . . . . . . 231
Accessing Spotfire Server and node logs . . . . . . . . . . . . . . . . . . . . . . . . . . . . . . . . . . . . . . . . . . . . . . . . . . . . . . . . . . . . . . . . . . . . . . . .232
Spotfire Server logs . . . . . . . . . . . . . . . . . . . . . . . . . . . . . . . . . . . . . . . . . . . . . . . . . . . . . . . . . . . . . . . . . . . . . . . . . . . . . . . . . . . . . . . . 232
Location of server logs . . . . . . . . . . . . . . . . . . . . . . . . . . . . . . . . . . . . . . . . . . . . . . . . . . . . . . . . . . . . . . . . . . . . . . . . . . . . . . . . .233
Changing the default location of server logs . . . . . . . . . . . . . . . . . . . . . . . . . . . . . . . . . . . . . . . . . . . . . . . . . . . . . . . .234
Node logs . . . . . . . . . . . . . . . . . . . . . . . . . . . . . . . . . . . . . . . . . . . . . . . . . . . . . . . . . . . . . . . . . . . . . . . . . . . . . . . . . . . . . . . . . . . . . . . . . .234
Enabling Kerberos debug logging . . . . . . . . . . . . . . . . . . . . . . . . . . . . . . . . . . . . . . . . . . . . . . . . . . . . . . . . . . . . . . . . . . . . . . . . . . . . . . .235
Accessing services logs . . . . . . . . . . . . . . . . . . . . . . . . . . . . . . . . . . . . . . . . . . . . . . . . . . . . . . . . . . . . . . . . . . . . . . . . . . . . . . . . . . . . . . . . 237
Service logs . . . . . . . . . . . . . . . . . . . . . . . . . . . . . . . . . . . . . . . . . . . . . . . . . . . . . . . . . . . . . . . . . . . . . . . . . . . . . . . . . . . . . . . . . . . . . . . .237
General logging properties . . . . . . . . . . . . . . . . . . . . . . . . . . . . . . . . . . . . . . . . . . . . . . . . . . . . . . . . . . . . . . . . . . . . . . . . . . . . .239
Auditlog . . . . . . . . . . . . . . . . . . . . . . . . . . . . . . . . . . . . . . . . . . . . . . . . . . . . . . . . . . . . . . . . . . . . . . . . . . . . . . . . . . . . . . . . . . . . . . . 239
DateTimesLog . . . . . . . . . . . . . . . . . . . . . . . . . . . . . . . . . . . . . . . . . . . . . . . . . . . . . . . . . . . . . . . . . . . . . . . . . . . . . . . . . . . . . . . . .239
DocumentCacheStatisticsLog . . . . . . . . . . . . . . . . . . . . . . . . . . . . . . . . . . . . . . . . . . . . . . . . . . . . . . . . . . . . . . . . . . . . . . . . . . 240
MemoryStatisticsLog . . . . . . . . . . . . . . . . . . . . . . . . . . . . . . . . . . . . . . . . . . . . . . . . . . . . . . . . . . . . . . . . . . . . . . . . . . . . . . . . . . 240
MonitoringEventsLog . . . . . . . . . . . . . . . . . . . . . . . . . . . . . . . . . . . . . . . . . . . . . . . . . . . . . . . . . . . . . . . . . . . . . . . . . . . . . . . . . . 240
OpenFilesStatisticsLog . . . . . . . . . . . . . . . . . . . . . . . . . . . . . . . . . . . . . . . . . . . . . . . . . . . . . . . . . . . . . . . . . . . . . . . . . . . . . . . . 241
11
TIBCO Spotfire® Server and Environment Installation and Administration
PerformanceCounterLog . . . . . . . . . . . . . . . . . . . . . . . . . . . . . . . . . . . . . . . . . . . . . . . . . . . . . . . . . . . . . . . . . . . . . . . . . . . . . . . 241
Spotfire.Dxp.Worker.Host and Spotfire.Dxp.Worker.Host.Debug . . . . . . . . . . . . . . . . . . . . . . . . . . . . . . . . . . . . . . . . .241
TimingLog . . . . . . . . . . . . . . . . . . . . . . . . . . . . . . . . . . . . . . . . . . . . . . . . . . . . . . . . . . . . . . . . . . . . . . . . . . . . . . . . . . . . . . . . . . . . . 242
UserSessionStatisticsLog . . . . . . . . . . . . . . . . . . . . . . . . . . . . . . . . . . . . . . . . . . . . . . . . . . . . . . . . . . . . . . . . . . . . . . . . . . . . . . 242
Action logs and system monitoring . . . . . . . . . . . . . . . . . . . . . . . . . . . . . . . . . . . . . . . . . . . . . . . . . . . . . . . . . . . . . . . . . . . . . . . . . . . . . . 243
Configure action logging from the command line . . . . . . . . . . . . . . . . . . . . . . . . . . . . . . . . . . . . . . . . . . . . . . . . . . . . . . . . . . . . 244
Enabling action logging and system monitoring from the command line . . . . . . . . . . . . . . . . . . . . . . . . . . . . . . . . . 244
Configuring logging to a Microsoft SQL Server database with the command line . . . . . . . . . . . . . . . . . . . . . . . . .245
Configuring logging to an Oracle database with the command line . . . . . . . . . . . . . . . . . . . . . . . . . . . . . . . . . . . . . . 246
Configuring the action log web service from the command line . . . . . . . . . . . . . . . . . . . . . . . . . . . . . . . . . . . . . . . . . .248
Configure action logging using the configuration tool . . . . . . . . . . . . . . . . . . . . . . . . . . . . . . . . . . . . . . . . . . . . . . . . . . . . . . . . 249
Setting action logging to write to a file from the configuration tool . . . . . . . . . . . . . . . . . . . . . . . . . . . . . . . . . . . . . . . 249
Setting action logging to write to a database from the configuration tool . . . . . . . . . . . . . . . . . . . . . . . . . . . . . . . . . 250
Configuring the action log web service from the configuration tool . . . . . . . . . . . . . . . . . . . . . . . . . . . . . . . . . . . . . . .250
Importing a library to Spotfire Analyst for analyzing action logs . . . . . . . . . . . . . . . . . . . . . . . . . . . . . . . . . . . . . . . . . . . . . . 251
Setting the action log interval . . . . . . . . . . . . . . . . . . . . . . . . . . . . . . . . . . . . . . . . . . . . . . . . . . . . . . . . . . . . . . . . . . . . . . . . . . . . . . . 252
Database logging . . . . . . . . . . . . . . . . . . . . . . . . . . . . . . . . . . . . . . . . . . . . . . . . . . . . . . . . . . . . . . . . . . . . . . . . . . . . . . . . . . . . . . . . . . 252
Action log reference . . . . . . . . . . . . . . . . . . . . . . . . . . . . . . . . . . . . . . . . . . . . . . . . . . . . . . . . . . . . . . . . . . . . . . . . . . . . . . . . . . . . . . . . 256
Action log data collected . . . . . . . . . . . . . . . . . . . . . . . . . . . . . . . . . . . . . . . . . . . . . . . . . . . . . . . . . . . . . . . . . . . . . . . . . . . . . . . 256
Action log generic entries . . . . . . . . . . . . . . . . . . . . . . . . . . . . . . . . . . . . . . . . . . . . . . . . . . . . . . . . . . . . . . . . . . . . . . . . . . . . . . 257
Action log categories . . . . . . . . . . . . . . . . . . . . . . . . . . . . . . . . . . . . . . . . . . . . . . . . . . . . . . . . . . . . . . . . . . . . . . . . . . . . . . . . . . 257
admin actions logged on Spotfire Server . . . . . . . . . . . . . . . . . . . . . . . . . . . . . . . . . . . . . . . . . . . . . . . . . . . . . . . . . . . 259
auth actions logged from Spotfire Server . . . . . . . . . . . . . . . . . . . . . . . . . . . . . . . . . . . . . . . . . . . . . . . . . . . . . . . . . . .259
dblogging actions logged from the database . . . . . . . . . . . . . . . . . . . . . . . . . . . . . . . . . . . . . . . . . . . . . . . . . . . . . . . 260
ems action logged from Spotfire Server . . . . . . . . . . . . . . . . . . . . . . . . . . . . . . . . . . . . . . . . . . . . . . . . . . . . . . . . . . . . 260
info_link actions logged from Spotfire Server . . . . . . . . . . . . . . . . . . . . . . . . . . . . . . . . . . . . . . . . . . . . . . . . . . . . . . .260
library actions logged from Spotfire Server . . . . . . . . . . . . . . . . . . . . . . . . . . . . . . . . . . . . . . . . . . . . . . . . . . . . . . . . .261
routing_rules actions logged from Spotfire Server . . . . . . . . . . . . . . . . . . . . . . . . . . . . . . . . . . . . . . . . . . . . . . . . . . 261
scheduled_updates actions logged from Spotfire Server . . . . . . . . . . . . . . . . . . . . . . . . . . . . . . . . . . . . . . . . . . . 262
Automation Services actions logged from the web service . . . . . . . . . . . . . . . . . . . . . . . . . . . . . . . . . . . . . . . . . .263
Spotfire Analyst actions logged from the web service . . . . . . . . . . . . . . . . . . . . . . . . . . . . . . . . . . . . . . . . . . . . . . .264
Web Player actions logged from the web service . . . . . . . . . . . . . . . . . . . . . . . . . . . . . . . . . . . . . . . . . . . . . . . . . . . 266
Action log actions . . . . . . . . . . . . . . . . . . . . . . . . . . . . . . . . . . . . . . . . . . . . . . . . . . . . . . . . . . . . . . . . . . . . . . . . . . . . . . . . . . . . . .267
Action log properties . . . . . . . . . . . . . . . . . . . . . . . . . . . . . . . . . . . . . . . . . . . . . . . . . . . . . . . . . . . . . . . . . . . . . . . . . . . . . . . . . . .273
Action log entries . . . . . . . . . . . . . . . . . . . . . . . . . . . . . . . . . . . . . . . . . . . . . . . . . . . . . . . . . . . . . . . . . . . . . . . . . . . . . . . . . . . . . . 280
Sample action log output . . . . . . . . . . . . . . . . . . . . . . . . . . . . . . . . . . . . . . . . . . . . . . . . . . . . . . . . . . . . . . . . . . . . . . . . . . . . . . .293
System monitoring reference . . . . . . . . . . . . . . . . . . . . . . . . . . . . . . . . . . . . . . . . . . . . . . . . . . . . . . . . . . . . . . . . . . . . . . . . . . . . . . . 295
System monitoring entries . . . . . . . . . . . . . . . . . . . . . . . . . . . . . . . . . . . . . . . . . . . . . . . . . . . . . . . . . . . . . . . . . . . . . . . . . . . . . 295
System monitoring properties . . . . . . . . . . . . . . . . . . . . . . . . . . . . . . . . . . . . . . . . . . . . . . . . . . . . . . . . . . . . . . . . . . . . . . . . . . 295
12
TIBCO Spotfire® Server and Environment Installation and Administration
Update action logs and system monitoring . . . . . . . . . . . . . . . . . . . . . . . . . . . . . . . . . . . . . . . . . . . . . . . . . . . . . . . . . . . . . . . . . . 296
Updating the Oracle database . . . . . . . . . . . . . . . . . . . . . . . . . . . . . . . . . . . . . . . . . . . . . . . . . . . . . . . . . . . . . . . . . . . . . . . . . .297
Updating the Microsoft SQL Server database . . . . . . . . . . . . . . . . . . . . . . . . . . . . . . . . . . . . . . . . . . . . . . . . . . . . . . . . . . .298
Server monitoring using JMX . . . . . . . . . . . . . . . . . . . . . . . . . . . . . . . . . . . . . . . . . . . . . . . . . . . . . . . . . . . . . . . . . . . . . . . . . . . . . . . . . . . 298
Spotfire Server instrumentation . . . . . . . . . . . . . . . . . . . . . . . . . . . . . . . . . . . . . . . . . . . . . . . . . . . . . . . . . . . . . . . . . . . . . . . . . . . . . 299
JMX configuration security features . . . . . . . . . . . . . . . . . . . . . . . . . . . . . . . . . . . . . . . . . . . . . . . . . . . . . . . . . . . . . . . . . . . . . . . . .300
JMX configuration commands . . . . . . . . . . . . . . . . . . . . . . . . . . . . . . . . . . . . . . . . . . . . . . . . . . . . . . . . . . . . . . . . . . . . . . . . . . . . . . 301
JMX levels . . . . . . . . . . . . . . . . . . . . . . . . . . . . . . . . . . . . . . . . . . . . . . . . . . . . . . . . . . . . . . . . . . . . . . . . . . . . . . . . . . . . . . . . . . . . . . . . . 301
Enabling the JMX logging appender . . . . . . . . . . . . . . . . . . . . . . . . . . . . . . . . . . . . . . . . . . . . . . . . . . . . . . . . . . . . . . . . . . . . . . . . 302
Setting up JMX monitoring for JConsole . . . . . . . . . . . . . . . . . . . . . . . . . . . . . . . . . . . . . . . . . . . . . . . . . . . . . . . . . . . . . . . . . . . . 302
Services monitoring . . . . . . . . . . . . . . . . . . . . . . . . . . . . . . . . . . . . . . . . . . . . . . . . . . . . . . . . . . . . . . . . . . . . . . . . . . . . . . . . . . . . . . . . . . . . .303
Accessing performance data . . . . . . . . . . . . . . . . . . . . . . . . . . . . . . . . . . . . . . . . . . . . . . . . . . . . . . . . . . . . . . . . . . . . . . . . . . . . . . . 303
Web Player analyses information - Overview . . . . . . . . . . . . . . . . . . . . . . . . . . . . . . . . . . . . . . . . . . . . . . . . . . . . . . . . . . . 304
Web Player analysis information - Details . . . . . . . . . . . . . . . . . . . . . . . . . . . . . . . . . . . . . . . . . . . . . . . . . . . . . . . . . . . . . . .305
Web Player service performance counters . . . . . . . . . . . . . . . . . . . . . . . . . . . . . . . . . . . . . . . . . . . . . . . . . . . . . . . . . . . . . .306
Automation Services instance performance counters . . . . . . . . . . . . . . . . . . . . . . . . . . . . . . . . . . . . . . . . . . . . . . . . . . . 310
Performance troubleshooting . . . . . . . . . . . . . . . . . . . . . . . . . . . . . . . . . . . . . . . . . . . . . . . . . . . . . . . . . . . . . . . . . . . . . . . . . . 313
Examining the statistics of an individual analysis . . . . . . . . . . . . . . . . . . . . . . . . . . . . . . . . . . . . . . . . . . . . . . . . . . . . . . . . . . . . 314
Logging and exporting monitoring diagnostics . . . . . . . . . . . . . . . . . . . . . . . . . . . . . . . . . . . . . . . . . . . . . . . . . . . . . . . . . . . . . . .314
Viewing node information . . . . . . . . . . . . . . . . . . . . . . . . . . . . . . . . . . . . . . . . . . . . . . . . . . . . . . . . . . . . . . . . . . . . . . . . . . . . . . . . . . .315
Viewing service configuration information . . . . . . . . . . . . . . . . . . . . . . . . . . . . . . . . . . . . . . . . . . . . . . . . . . . . . . . . . . . . . . . . . . . 316
Monitoring CPU usage by instances . . . . . . . . . . . . . . . . . . . . . . . . . . . . . . . . . . . . . . . . . . . . . . . . . . . . . . . . . . . . . . . . . . . . . . . . 316
Viewing assemblies information . . . . . . . . . . . . . . . . . . . . . . . . . . . . . . . . . . . . . . . . . . . . . . . . . . . . . . . . . . . . . . . . . . . . . . . . . . . . 317
Viewing site information . . . . . . . . . . . . . . . . . . . . . . . . . . . . . . . . . . . . . . . . . . . . . . . . . . . . . . . . . . . . . . . . . . . . . . . . . . . . . . . . . . . . 317
Site diagnostics . . . . . . . . . . . . . . . . . . . . . . . . . . . . . . . . . . . . . . . . . . . . . . . . . . . . . . . . . . . . . . . . . . . . . . . . . . . . . . . . . . . . . . . .317
Viewing routing . . . . . . . . . . . . . . . . . . . . . . . . . . . . . . . . . . . . . . . . . . . . . . . . . . . . . . . . . . . . . . . . . . . . . . . . . . . . . . . . . . . . . . . . . . . . .318
Enabling automatic dump capture from non-responsive Web Players . . . . . . . . . . . . . . . . . . . . . . . . . . . . . . . . . . . . . . . . 319
Basic troubleshooting . . . . . . . . . . . . . . . . . . . . . . . . . . . . . . . . . . . . . . . . . . . . . . . . . . . . . . . . . . . . . . . . . . . . . . . . . . . . . . . . . . . . . . . . . . . 320
Troubleshooting Spotfire Server . . . . . . . . . . . . . . . . . . . . . . . . . . . . . . . . . . . . . . . . . . . . . . . . . . . . . . . . . . . . . . . . . . . . . . . . . . . . 320
Spotfire Server fails to start . . . . . . . . . . . . . . . . . . . . . . . . . . . . . . . . . . . . . . . . . . . . . . . . . . . . . . . . . . . . . . . . . . . . . . . . . . . . 321
Spotfire Server runs out of JVM memory . . . . . . . . . . . . . . . . . . . . . . . . . . . . . . . . . . . . . . . . . . . . . . . . . . . . . . . . . . . . . . . 321
Users cannot log in . . . . . . . . . . . . . . . . . . . . . . . . . . . . . . . . . . . . . . . . . . . . . . . . . . . . . . . . . . . . . . . . . . . . . . . . . . . . . . . . . . . . 322
Troubleshooting the Spotfire database . . . . . . . . . . . . . . . . . . . . . . . . . . . . . . . . . . . . . . . . . . . . . . . . . . . . . . . . . . . . . . . . . . . . . . 322
Creating a thread dump . . . . . . . . . . . . . . . . . . . . . . . . . . . . . . . . . . . . . . . . . . . . . . . . . . . . . . . . . . . . . . . . . . . . . . . . . . . . . . . . . . . . 323
Memory exhaustion . . . . . . . . . . . . . . . . . . . . . . . . . . . . . . . . . . . . . . . . . . . . . . . . . . . . . . . . . . . . . . . . . . . . . . . . . . . . . . . . . . . . . . . . 323
Creating a memory dump . . . . . . . . . . . . . . . . . . . . . . . . . . . . . . . . . . . . . . . . . . . . . . . . . . . . . . . . . . . . . . . . . . . . . . . . . . . . . . 323
Disabling the memory dump feature . . . . . . . . . . . . . . . . . . . . . . . . . . . . . . . . . . . . . . . . . . . . . . . . . . . . . . . . . . . . . . . . . . . .324
Creating a troubleshooting bundle . . . . . . . . . . . . . . . . . . . . . . . . . . . . . . . . . . . . . . . . . . . . . . . . . . . . . . . . . . . . . . . . . . . . . . . . . . 325
Command-based library administration tasks . . . . . . . . . . . . . . . . . . . . . . . . . . . . . . . . . . . . . . . . . . . . . . . . . . . . . . . . . . . . . . . . . . . . . . . . 325
13
TIBCO Spotfire® Server and Environment Installation and Administration
Importing library content by using the command line . . . . . . . . . . . . . . . . . . . . . . . . . . . . . . . . . . . . . . . . . . . . . . . . . . . . . . . . . . . . .326
Exporting library content by using the command line . . . . . . . . . . . . . . . . . . . . . . . . . . . . . . . . . . . . . . . . . . . . . . . . . . . . . . . . . . . . .326
Library content storage outside of the Spotfire database . . . . . . . . . . . . . . . . . . . . . . . . . . . . . . . . . . . . . . . . . . . . . . . . . . . . . . . . . 327
Configuring external library storage in AWS . . . . . . . . . . . . . . . . . . . . . . . . . . . . . . . . . . . . . . . . . . . . . . . . . . . . . . . . . . . . . . . . .327
Configuring external library storage in a file system . . . . . . . . . . . . . . . . . . . . . . . . . . . . . . . . . . . . . . . . . . . . . . . . . . . . . . . . . 328
Monitoring external library storage and fixing inconsistencies . . . . . . . . . . . . . . . . . . . . . . . . . . . . . . . . . . . . . . . . . . . . . . . .328
Forcing Java to use Internet Protocol version 4 . . . . . . . . . . . . . . . . . . . . . . . . . . . . . . . . . . . . . . . . . . . . . . . . . . . . . . . . . 329
Upgrading Spotfire . . . . . . . . . . . . . . . . . . . . . . . . . . . . . . . . . . . . . . . . . . . . . . . . . . . . . . . . . . . . . . . . . . . . . . . . . . . . . . .330
Upgrading from Spotfire 7.0 or earlier . . . . . . . . . . . . . . . . . . . . . . . . . . . . . . . . . . . . . . . . . . . . . . . . . . . . . . . . . . . . . . . . . . . . . . . . . . . . . . . .330
Setting up the test environment . . . . . . . . . . . . . . . . . . . . . . . . . . . . . . . . . . . . . . . . . . . . . . . . . . . . . . . . . . . . . . . . . . . . . . . . . . . . . . . . . 330
Upgrading Spotfire Server . . . . . . . . . . . . . . . . . . . . . . . . . . . . . . . . . . . . . . . . . . . . . . . . . . . . . . . . . . . . . . . . . . . . . . . . . . . . . . . . . . . . . . 331
Installation of Spotfire Server during upgrade . . . . . . . . . . . . . . . . . . . . . . . . . . . . . . . . . . . . . . . . . . . . . . . . . . . . . . . . . . . . . . . 331
Applying hotfixes to the server . . . . . . . . . . . . . . . . . . . . . . . . . . . . . . . . . . . . . . . . . . . . . . . . . . . . . . . . . . . . . . . . . . . . . . . . . . . . . .331
Run the Spotfire Server upgrade tool . . . . . . . . . . . . . . . . . . . . . . . . . . . . . . . . . . . . . . . . . . . . . . . . . . . . . . . . . . . . . . . . . . . . . . . 332
Running the Spotfire Server upgrade tool interactively . . . . . . . . . . . . . . . . . . . . . . . . . . . . . . . . . . . . . . . . . . . . . . . . . . 332
Running the Spotfire Server upgrade tool silently . . . . . . . . . . . . . . . . . . . . . . . . . . . . . . . . . . . . . . . . . . . . . . . . . . . . . . . 333
Start Spotfire Server . . . . . . . . . . . . . . . . . . . . . . . . . . . . . . . . . . . . . . . . . . . . . . . . . . . . . . . . . . . . . . . . . . . . . . . . . . . . . . . . . . . . . . . 334
Upgrading a cluster of Spotfire Servers . . . . . . . . . . . . . . . . . . . . . . . . . . . . . . . . . . . . . . . . . . . . . . . . . . . . . . . . . . . . . . . . . . . . . . . . . .334
Upgrading Spotfire Analyst clients . . . . . . . . . . . . . . . . . . . . . . . . . . . . . . . . . . . . . . . . . . . . . . . . . . . . . . . . . . . . . . . . . . . . . . . . . . . . . . .335
Deploy client packages . . . . . . . . . . . . . . . . . . . . . . . . . . . . . . . . . . . . . . . . . . . . . . . . . . . . . . . . . . . . . . . . . . . . . . . . . . . . . . . . . . . . . 335
Upgrading Spotfire Web Player . . . . . . . . . . . . . . . . . . . . . . . . . . . . . . . . . . . . . . . . . . . . . . . . . . . . . . . . . . . . . . . . . . . . . . . . . . . . . . . . . .335
Mapping content of old configuration files to new service configuration files . . . . . . . . . . . . . . . . . . . . . . . . . . . . . . . . . . 336
Upgrading scheduled updates . . . . . . . . . . . . . . . . . . . . . . . . . . . . . . . . . . . . . . . . . . . . . . . . . . . . . . . . . . . . . . . . . . . . . . . . . . . . . . 337
Upgrading Spotfire Automation Services . . . . . . . . . . . . . . . . . . . . . . . . . . . . . . . . . . . . . . . . . . . . . . . . . . . . . . . . . . . . . . . . . . . . . . . . 337
Upgrading authentication method . . . . . . . . . . . . . . . . . . . . . . . . . . . . . . . . . . . . . . . . . . . . . . . . . . . . . . . . . . . . . . . . . . . . . . . . . . . . . . . 338
Anonymous combined with other authentication method . . . . . . . . . . . . . . . . . . . . . . . . . . . . . . . . . . . . . . . . . . . . . . . . . . . . .338
Different authentication methods for Spotfire Server and Web Player . . . . . . . . . . . . . . . . . . . . . . . . . . . . . . . . . . . . . . . . 339
Upgrading load balancing . . . . . . . . . . . . . . . . . . . . . . . . . . . . . . . . . . . . . . . . . . . . . . . . . . . . . . . . . . . . . . . . . . . . . . . . . . . . . . . . . . . . . . . 339
Upgrading analysis links . . . . . . . . . . . . . . . . . . . . . . . . . . . . . . . . . . . . . . . . . . . . . . . . . . . . . . . . . . . . . . . . . . . . . . . . . . . . . . . . . . . . . . . . 339
Upgrading Web Services API clients . . . . . . . . . . . . . . . . . . . . . . . . . . . . . . . . . . . . . . . . . . . . . . . . . . . . . . . . . . . . . . . . . . . . . . . . . . . . 339
Upgrading customizations . . . . . . . . . . . . . . . . . . . . . . . . . . . . . . . . . . . . . . . . . . . . . . . . . . . . . . . . . . . . . . . . . . . . . . . . . . . . . . . . . . . . . . .340
Upgrading custom visualizations . . . . . . . . . . . . . . . . . . . . . . . . . . . . . . . . . . . . . . . . . . . . . . . . . . . . . . . . . . . . . . . . . . . . . . . . . . . .340
Upgrading cobranding . . . . . . . . . . . . . . . . . . . . . . . . . . . . . . . . . . . . . . . . . . . . . . . . . . . . . . . . . . . . . . . . . . . . . . . . . . . . . . . . . . . . . .340
Upgrading from Spotfire 7.5 or later . . . . . . . . . . . . . . . . . . . . . . . . . . . . . . . . . . . . . . . . . . . . . . . . . . . . . . . . . . . . . . . . . . . . . . . . . . . . . . . . . .340
Installation of Spotfire Server during upgrade . . . . . . . . . . . . . . . . . . . . . . . . . . . . . . . . . . . . . . . . . . . . . . . . . . . . . . . . . . . . . . . . . . . .341
Preventing Spotfire Servers and node managers from starting automatically . . . . . . . . . . . . . . . . . . . . . . . . . . . . . . . . . 341
Applying hotfixes to the server . . . . . . . . . . . . . . . . . . . . . . . . . . . . . . . . . . . . . . . . . . . . . . . . . . . . . . . . . . . . . . . . . . . . . . . . . . . . . . . . . . 342
Run the Spotfire Server upgrade tool . . . . . . . . . . . . . . . . . . . . . . . . . . . . . . . . . . . . . . . . . . . . . . . . . . . . . . . . . . . . . . . . . . . . . . . . . . . .342
Running the Spotfire Server upgrade tool interactively . . . . . . . . . . . . . . . . . . . . . . . . . . . . . . . . . . . . . . . . . . . . . . . . . . . . . . .342
14
TIBCO Spotfire® Server and Environment Installation and Administration
Running the Spotfire Server upgrade tool silently . . . . . . . . . . . . . . . . . . . . . . . . . . . . . . . . . . . . . . . . . . . . . . . . . . . . . . . . . . . .344
Start Spotfire Server . . . . . . . . . . . . . . . . . . . . . . . . . . . . . . . . . . . . . . . . . . . . . . . . . . . . . . . . . . . . . . . . . . . . . . . . . . . . . . . . . . . . . . . . . . . . 344
Upgrading nodes . . . . . . . . . . . . . . . . . . . . . . . . . . . . . . . . . . . . . . . . . . . . . . . . . . . . . . . . . . . . . . . . . . . . . . . . . . . . . . . . . . . . . . . . . . . . . . . 345
Install node manager . . . . . . . . . . . . . . . . . . . . . . . . . . . . . . . . . . . . . . . . . . . . . . . . . . . . . . . . . . . . . . . . . . . . . . . . . . . . . . . . . . . . . . . 345
Installing a node manager interactively during upgrade . . . . . . . . . . . . . . . . . . . . . . . . . . . . . . . . . . . . . . . . . . . . . . . . . 345
Run the node manager upgrade tool . . . . . . . . . . . . . . . . . . . . . . . . . . . . . . . . . . . . . . . . . . . . . . . . . . . . . . . . . . . . . . . . . . . . . . . .346
Running the node manager upgrade tool interactively . . . . . . . . . . . . . . . . . . . . . . . . . . . . . . . . . . . . . . . . . . . . . . . . . . .346
Running the node manager upgrade tool silently . . . . . . . . . . . . . . . . . . . . . . . . . . . . . . . . . . . . . . . . . . . . . . . . . . . . . . . .346
Optional upgrades . . . . . . . . . . . . . . . . . . . . . . . . . . . . . . . . . . . . . . . . . . . . . . . . . . . . . . . . . . . . . . . . . . . . . . . . . . . . . . . . . . . . . . . . . . . . . . 347
Upgrading service configurations . . . . . . . . . . . . . . . . . . . . . . . . . . . . . . . . . . . . . . . . . . . . . . . . . . . . . . . . . . . . . . . . . . . . . . . . . . . 347
Upgrading custom-modified log4j.properties files . . . . . . . . . . . . . . . . . . . . . . . . . . . . . . . . . . . . . . . . . . . . . . . . . . . . . . . . . . . .348
Applying hotfixes to the Spotfire environment . . . . . . . . . . . . . . . . . . . . . . . . . . . . . . . . . . . . . . . . . . . . . . . . . . . . . .349
Applying hotfixes for services . . . . . . . . . . . . . . . . . . . . . . . . . . . . . . . . . . . . . . . . . . . . . . . . . . . . . . . . . . . . . . . . . . . . . . . . . . . . . . . . . . . . . . . .349
Backup and restore . . . . . . . . . . . . . . . . . . . . . . . . . . . . . . . . . . . . . . . . . . . . . . . . . . . . . . . . . . . . . . . . . . . . . . . . . . . . . . 350
Backup of Spotfire database . . . . . . . . . . . . . . . . . . . . . . . . . . . . . . . . . . . . . . . . . . . . . . . . . . . . . . . . . . . . . . . . . . . . . . . . . . . . . . . . . . . . . . . . .350
Backup of Spotfire Server . . . . . . . . . . . . . . . . . . . . . . . . . . . . . . . . . . . . . . . . . . . . . . . . . . . . . . . . . . . . . . . . . . . . . . . . . . . . . . . . . . . . . . . . . . . 350
Backup of services . . . . . . . . . . . . . . . . . . . . . . . . . . . . . . . . . . . . . . . . . . . . . . . . . . . . . . . . . . . . . . . . . . . . . . . . . . . . . . . . . . . . . . . . . . . . . . . . . . 351
Uninstallation . . . . . . . . . . . . . . . . . . . . . . . . . . . . . . . . . . . . . . . . . . . . . . . . . . . . . . . . . . . . . . . . . . . . . . . . . . . . . . . . . . . .352
Deleting services . . . . . . . . . . . . . . . . . . . . . . . . . . . . . . . . . . . . . . . . . . . . . . . . . . . . . . . . . . . . . . . . . . . . . . . . . . . . . . . . . . . . . . . . . . . . . . . . . . . .352
Revoking trust of nodes . . . . . . . . . . . . . . . . . . . . . . . . . . . . . . . . . . . . . . . . . . . . . . . . . . . . . . . . . . . . . . . . . . . . . . . . . . . . . . . . . . . . . . . . . . . . . 352
Uninstalling node manager . . . . . . . . . . . . . . . . . . . . . . . . . . . . . . . . . . . . . . . . . . . . . . . . . . . . . . . . . . . . . . . . . . . . . . . . . . . . . . . . . . . . . . . . . . 352
Uninstalling Spotfire Server . . . . . . . . . . . . . . . . . . . . . . . . . . . . . . . . . . . . . . . . . . . . . . . . . . . . . . . . . . . . . . . . . . . . . . . . . . . . . . . . . . . . . . . . . .352
Advanced procedures . . . . . . . . . . . . . . . . . . . . . . . . . . . . . . . . . . . . . . . . . . . . . . . . . . . . . . . . . . . . . . . . . . . . . . . . . . . . 354
Custom configurations for managing space needs . . . . . . . . . . . . . . . . . . . . . . . . . . . . . . . . . . . . . . . . . . . . . . . . . . . . . . . . . . . . . . . . . . . 354
Changing the default location of the Web Player temporary files . . . . . . . . . . . . . . . . . . . . . . . . . . . . . . . . . . . . . . . . . . . . . . . . . .354
Temporary tablespace . . . . . . . . . . . . . . . . . . . . . . . . . . . . . . . . . . . . . . . . . . . . . . . . . . . . . . . . . . . . . . . . . . . . . . . . . . . . . . . . . . . . . . . . . . . . . . .355
Virtual memory modification . . . . . . . . . . . . . . . . . . . . . . . . . . . . . . . . . . . . . . . . . . . . . . . . . . . . . . . . . . . . . . . . . . . . . . . . . . . . . . . . . . . . . . . . . 355
Modifying the virtual memory (server not running as Windows service) . . . . . . . . . . . . . . . . . . . . . . . . . . . . . . . . . . . . . . . . . . .356
Modifying the virtual memory (server running as Windows service) . . . . . . . . . . . . . . . . . . . . . . . . . . . . . . . . . . . . . . . . . . . . . . 356
Data source templates . . . . . . . . . . . . . . . . . . . . . . . . . . . . . . . . . . . . . . . . . . . . . . . . . . . . . . . . . . . . . . . . . . . . . . . . . . . . . . . . . . . . . . . . . . . . . . 356
Setting up MySQL5 vendor driver . . . . . . . . . . . . . . . . . . . . . . . . . . . . . . . . . . . . . . . . . . . . . . . . . . . . . . . . . . . . . . . . . . . . . . . . . . . . . . . 357
Data source template commands . . . . . . . . . . . . . . . . . . . . . . . . . . . . . . . . . . . . . . . . . . . . . . . . . . . . . . . . . . . . . . . . . . . . . . . . . . . . . . . 358
XML settings for data source templates . . . . . . . . . . . . . . . . . . . . . . . . . . . . . . . . . . . . . . . . . . . . . . . . . . . . . . . . . . . . . . . . . . . . . . . . . 358
JDBC connection properties . . . . . . . . . . . . . . . . . . . . . . . . . . . . . . . . . . . . . . . . . . . . . . . . . . . . . . . . . . . . . . . . . . . . . . . . . . . . . . . .364
Advanced connection pool configuration . . . . . . . . . . . . . . . . . . . . . . . . . . . . . . . . . . . . . . . . . . . . . . . . . . . . . . . . . . . . . . . . . . . . 365
Kerberos authentication for JDBC data sources . . . . . . . . . . . . . . . . . . . . . . . . . . . . . . . . . . . . . . . . . . . . . . . . . . . . . . . . . . . . . 366
Creating an Information Services data source template using Kerberos login . . . . . . . . . . . . . . . . . . . . . . . . . . . . . . . . 366
Verifying a data source template . . . . . . . . . . . . . . . . . . . . . . . . . . . . . . . . . . . . . . . . . . . . . . . . . . . . . . . . . . . . . . . . . . . . . . . 367
Information Services settings . . . . . . . . . . . . . . . . . . . . . . . . . . . . . . . . . . . . . . . . . . . . . . . . . . . . . . . . . . . . . . . . . . . . . . . . . . . . . . . . . . . . . . . . 367
15
TIBCO Spotfire® Server and Environment Installation and Administration
Default join database . . . . . . . . . . . . . . . . . . . . . . . . . . . . . . . . . . . . . . . . . . . . . . . . . . . . . . . . . . . . . . . . . . . . . . . . . . . . . . . . . . . . . . . . . . . . . . . .369
Spotfire Server public Web Services API's . . . . . . . . . . . . . . . . . . . . . . . . . . . . . . . . . . . . . . . . . . . . . . . . . . . . . . . . . . . . . . . . . . . . . . . . . . . 369
Enabling the Web Services API . . . . . . . . . . . . . . . . . . . . . . . . . . . . . . . . . . . . . . . . . . . . . . . . . . . . . . . . . . . . . . . . . . . . . . . . . . . . . . . . . 369
Generating client proxies . . . . . . . . . . . . . . . . . . . . . . . . . . . . . . . . . . . . . . . . . . . . . . . . . . . . . . . . . . . . . . . . . . . . . . . . . . . . . . . . . . . . . . . .370
Optional security HTTP headers . . . . . . . . . . . . . . . . . . . . . . . . . . . . . . . . . . . . . . . . . . . . . . . . . . . . . . . . . . . . . . . . . . . . . . . . . . . . . . . . . . . . . 370
X-Frame-Options . . . . . . . . . . . . . . . . . . . . . . . . . . . . . . . . . . . . . . . . . . . . . . . . . . . . . . . . . . . . . . . . . . . . . . . . . . . . . . . . . . . . . . . . . . . . . . . 371
X-XSS-Protection . . . . . . . . . . . . . . . . . . . . . . . . . . . . . . . . . . . . . . . . . . . . . . . . . . . . . . . . . . . . . . . . . . . . . . . . . . . . . . . . . . . . . . . . . . . . . . .371
HTTP Strict-Transport-Security (HSTS) . . . . . . . . . . . . . . . . . . . . . . . . . . . . . . . . . . . . . . . . . . . . . . . . . . . . . . . . . . . . . . . . . . . . . . . . . .372
Cache-Control . . . . . . . . . . . . . . . . . . . . . . . . . . . . . . . . . . . . . . . . . . . . . . . . . . . . . . . . . . . . . . . . . . . . . . . . . . . . . . . . . . . . . . . . . . . . . . . . . . 372
X-Content-Type-Options . . . . . . . . . . . . . . . . . . . . . . . . . . . . . . . . . . . . . . . . . . . . . . . . . . . . . . . . . . . . . . . . . . . . . . . . . . . . . . . . . . . . . . . . 373
Changing how long the server waits before assuming that a node manager is offline . . . . . . . . . . . . . . . . . . . . . . . . . . . . . . . . . . 373
Setting the maximum execution time for an Automation Services job . . . . . . . . . . . . . . . . . . . . . . . . . . . . . . . . . . . . . . . . . . . . . . . . . .374
Setting the maximum inactivity time for an Automation Services job . . . . . . . . . . . . . . . . . . . . . . . . . . . . . . . . . . . . . . . . . . . . . . . . . . 374
Absolute session timeout and idle session timeout . . . . . . . . . . . . . . . . . . . . . . . . . . . . . . . . . . . . . . . . . . . . . . . . . . . . . . . . . . . . . . . . . . . 374
Setting idle session timeout and absolute session timeout by using the configuration tool . . . . . . . . . . . . . . . . . . . . . . . . .375
Setting idle session timeout by using the command line . . . . . . . . . . . . . . . . . . . . . . . . . . . . . . . . . . . . . . . . . . . . . . . . . . . . . . . . . .376
Setting absolute session timeout by using the command line . . . . . . . . . . . . . . . . . . . . . . . . . . . . . . . . . . . . . . . . . . . . . . . . . . . . .376
Changing whether scheduled updates are sent to exhausted service instances . . . . . . . . . . . . . . . . . . . . . . . . . . . . . . . . . . . . . . . 376
Preventing users from opening scheduled update files outside of their schedule window . . . . . . . . . . . . . . . . . . . . . . . . . . . . . . 377
Changing whether recovered rules are automatically enabled . . . . . . . . . . . . . . . . . . . . . . . . . . . . . . . . . . . . . . . . . . . . . . . . . . . . . . . . 377
Restarting a node manager to terminate its running jobs . . . . . . . . . . . . . . . . . . . . . . . . . . . . . . . . . . . . . . . . . . . . . . . . . . . . . . . . . . . . . 378
Increase the number of available sockets on Linux . . . . . . . . . . . . . . . . . . . . . . . . . . . . . . . . . . . . . . . . . . . . . . . . . . . . . . . . . . . . . . . . . . . 378
Switching from online to offline administration help . . . . . . . . . . . . . . . . . . . . . . . . . . . . . . . . . . . . . . . . . . . . . . . . . . . . . . . . . . . . . . . . . . . 378
Displaying or hiding the Spotfire Server version . . . . . . . . . . . . . . . . . . . . . . . . . . . . . . . . . . . . . . . . . . . . . . . . . . . . . . . . . . . . . . . . . . . . . . 379
Contacting support . . . . . . . . . . . . . . . . . . . . . . . . . . . . . . . . . . . . . . . . . . . . . . . . . . . . . . . . . . . . . . . . . . . . . . . . . . . . . . 380
Reference . . . . . . . . . . . . . . . . . . . . . . . . . . . . . . . . . . . . . . . . . . . . . . . . . . . . . . . . . . . . . . . . . . . . . . . . . . . . . . . . . . . . . . . 381
Spotfire Server files . . . . . . . . . . . . . . . . . . . . . . . . . . . . . . . . . . . . . . . . . . . . . . . . . . . . . . . . . . . . . . . . . . . . . . . . . . . . . . . . . . . . . . . . . . . . . . . . . 381
Bootstrap.xml file . . . . . . . . . . . . . . . . . . . . . . . . . . . . . . . . . . . . . . . . . . . . . . . . . . . . . . . . . . . . . . . . . . . . . . . . . . . . . . . . . . . . . . . . . . . . . . . 381
Server.xml file . . . . . . . . . . . . . . . . . . . . . . . . . . . . . . . . . . . . . . . . . . . . . . . . . . . . . . . . . . . . . . . . . . . . . . . . . . . . . . . . . . . . . . . . . . . . . . . . . . 382
Krb5.conf file . . . . . . . . . . . . . . . . . . . . . . . . . . . . . . . . . . . . . . . . . . . . . . . . . . . . . . . . . . . . . . . . . . . . . . . . . . . . . . . . . . . . . . . . . . . . . . . . . . . 382
Server bootstrapping and database connection pool configuration . . . . . . . . . . . . . . . . . . . . . . . . . . . . . . . . . . . . . . . . . . . . . . . . . . . . 383
Database connectivity . . . . . . . . . . . . . . . . . . . . . . . . . . . . . . . . . . . . . . . . . . . . . . . . . . . . . . . . . . . . . . . . . . . . . . . . . . . . . . . . . . . . . . . . . . 383
Database drivers and database connection URLs . . . . . . . . . . . . . . . . . . . . . . . . . . . . . . . . . . . . . . . . . . . . . . . . . . . . . . . . . . . . . . . . . . . . 384
Command-line reference . . . . . . . . . . . . . . . . . . . . . . . . . . . . . . . . . . . . . . . . . . . . . . . . . . . . . . . . . . . . . . . . . . . . . . . . . . . . . . . . . . . . . . . . . . . . 388
add-ds-template . . . . . . . . . . . . . . . . . . . . . . . . . . . . . . . . . . . . . . . . . . . . . . . . . . . . . . . . . . . . . . . . . . . . . . . . . . . . . . . . . . . . . . . . . . . . . . . . 388
add-member . . . . . . . . . . . . . . . . . . . . . . . . . . . . . . . . . . . . . . . . . . . . . . . . . . . . . . . . . . . . . . . . . . . . . . . . . . . . . . . . . . . . . . . . . . . . . . . . . . . .389
bootstrap . . . . . . . . . . . . . . . . . . . . . . . . . . . . . . . . . . . . . . . . . . . . . . . . . . . . . . . . . . . . . . . . . . . . . . . . . . . . . . . . . . . . . . . . . . . . . . . . . . . . . . . 390
check-external-library . . . . . . . . . . . . . . . . . . . . . . . . . . . . . . . . . . . . . . . . . . . . . . . . . . . . . . . . . . . . . . . . . . . . . . . . . . . . . . . . . . . . . . . . . . . 394
clear-join-db . . . . . . . . . . . . . . . . . . . . . . . . . . . . . . . . . . . . . . . . . . . . . . . . . . . . . . . . . . . . . . . . . . . . . . . . . . . . . . . . . . . . . . . . . . . . . . . . . . . . 394
16
TIBCO Spotfire® Server and Environment Installation and Administration
config-action-log-database-logger . . . . . . . . . . . . . . . . . . . . . . . . . . . . . . . . . . . . . . . . . . . . . . . . . . . . . . . . . . . . . . . . . . . . . . . . . . . . . . . 395
config-action-logger . . . . . . . . . . . . . . . . . . . . . . . . . . . . . . . . . . . . . . . . . . . . . . . . . . . . . . . . . . . . . . . . . . . . . . . . . . . . . . . . . . . . . . . . . . . . .397
config-action-log-web-service . . . . . . . . . . . . . . . . . . . . . . . . . . . . . . . . . . . . . . . . . . . . . . . . . . . . . . . . . . . . . . . . . . . . . . . . . . . . . . . . . . . 398
config-anonymous-auth . . . . . . . . . . . . . . . . . . . . . . . . . . . . . . . . . . . . . . . . . . . . . . . . . . . . . . . . . . . . . . . . . . . . . . . . . . . . . . . . . . . . . . . . . 399
config-attachment-manager . . . . . . . . . . . . . . . . . . . . . . . . . . . . . . . . . . . . . . . . . . . . . . . . . . . . . . . . . . . . . . . . . . . . . . . . . . . . . . . . . . . . . 399
config-auth . . . . . . . . . . . . . . . . . . . . . . . . . . . . . . . . . . . . . . . . . . . . . . . . . . . . . . . . . . . . . . . . . . . . . . . . . . . . . . . . . . . . . . . . . . . . . . . . . . . . . 400
config-auth-filter . . . . . . . . . . . . . . . . . . . . . . . . . . . . . . . . . . . . . . . . . . . . . . . . . . . . . . . . . . . . . . . . . . . . . . . . . . . . . . . . . . . . . . . . . . . . . . . . 402
config-basic-database-auth . . . . . . . . . . . . . . . . . . . . . . . . . . . . . . . . . . . . . . . . . . . . . . . . . . . . . . . . . . . . . . . . . . . . . . . . . . . . . . . . . . . . . 403
config-basic-ldap-auth . . . . . . . . . . . . . . . . . . . . . . . . . . . . . . . . . . . . . . . . . . . . . . . . . . . . . . . . . . . . . . . . . . . . . . . . . . . . . . . . . . . . . . . . . . 404
config-basic-windows-auth . . . . . . . . . . . . . . . . . . . . . . . . . . . . . . . . . . . . . . . . . . . . . . . . . . . . . . . . . . . . . . . . . . . . . . . . . . . . . . . . . . . . . . 404
config-client-cert-auth . . . . . . . . . . . . . . . . . . . . . . . . . . . . . . . . . . . . . . . . . . . . . . . . . . . . . . . . . . . . . . . . . . . . . . . . . . . . . . . . . . . . . . . . . . .405
config-cluster . . . . . . . . . . . . . . . . . . . . . . . . . . . . . . . . . . . . . . . . . . . . . . . . . . . . . . . . . . . . . . . . . . . . . . . . . . . . . . . . . . . . . . . . . . . . . . . . . . . 406
config-csrf-protection . . . . . . . . . . . . . . . . . . . . . . . . . . . . . . . . . . . . . . . . . . . . . . . . . . . . . . . . . . . . . . . . . . . . . . . . . . . . . . . . . . . . . . . . . . .407
config-custom-web-auth . . . . . . . . . . . . . . . . . . . . . . . . . . . . . . . . . . . . . . . . . . . . . . . . . . . . . . . . . . . . . . . . . . . . . . . . . . . . . . . . . . . . . . . . 408
config-encryption . . . . . . . . . . . . . . . . . . . . . . . . . . . . . . . . . . . . . . . . . . . . . . . . . . . . . . . . . . . . . . . . . . . . . . . . . . . . . . . . . . . . . . . . . . . . . . . 409
config-external-auth . . . . . . . . . . . . . . . . . . . . . . . . . . . . . . . . . . . . . . . . . . . . . . . . . . . . . . . . . . . . . . . . . . . . . . . . . . . . . . . . . . . . . . . . . . . . .410
config-external-scheduled-updates . . . . . . . . . . . . . . . . . . . . . . . . . . . . . . . . . . . . . . . . . . . . . . . . . . . . . . . . . . . . . . . . . . . . . . . . . . . . . . 415
config-import-export-directory . . . . . . . . . . . . . . . . . . . . . . . . . . . . . . . . . . . . . . . . . . . . . . . . . . . . . . . . . . . . . . . . . . . . . . . . . . . . . . . . . . .417
config-jmx . . . . . . . . . . . . . . . . . . . . . . . . . . . . . . . . . . . . . . . . . . . . . . . . . . . . . . . . . . . . . . . . . . . . . . . . . . . . . . . . . . . . . . . . . . . . . . . . . . . . . . 417
config-kerberos-auth . . . . . . . . . . . . . . . . . . . . . . . . . . . . . . . . . . . . . . . . . . . . . . . . . . . . . . . . . . . . . . . . . . . . . . . . . . . . . . . . . . . . . . . . . . . .419
config-ldap-group-sync . . . . . . . . . . . . . . . . . . . . . . . . . . . . . . . . . . . . . . . . . . . . . . . . . . . . . . . . . . . . . . . . . . . . . . . . . . . . . . . . . . . . . . . . . .420
config-ldap-userdir . . . . . . . . . . . . . . . . . . . . . . . . . . . . . . . . . . . . . . . . . . . . . . . . . . . . . . . . . . . . . . . . . . . . . . . . . . . . . . . . . . . . . . . . . . . . . .425
config-library-external-data-storage . . . . . . . . . . . . . . . . . . . . . . . . . . . . . . . . . . . . . . . . . . . . . . . . . . . . . . . . . . . . . . . . . . . . . . . . . . . . . 426
config-library-external-file-storage . . . . . . . . . . . . . . . . . . . . . . . . . . . . . . . . . . . . . . . . . . . . . . . . . . . . . . . . . . . . . . . . . . . . . . . . . . . . . . . 427
config-library-external-s3-storage . . . . . . . . . . . . . . . . . . . . . . . . . . . . . . . . . . . . . . . . . . . . . . . . . . . . . . . . . . . . . . . . . . . . . . . . . . . . . . . 428
config-login-dialog . . . . . . . . . . . . . . . . . . . . . . . . . . . . . . . . . . . . . . . . . . . . . . . . . . . . . . . . . . . . . . . . . . . . . . . . . . . . . . . . . . . . . . . . . . . . . . 429
config-ntlm-auth . . . . . . . . . . . . . . . . . . . . . . . . . . . . . . . . . . . . . . . . . . . . . . . . . . . . . . . . . . . . . . . . . . . . . . . . . . . . . . . . . . . . . . . . . . . . . . . . 431
config-oidc . . . . . . . . . . . . . . . . . . . . . . . . . . . . . . . . . . . . . . . . . . . . . . . . . . . . . . . . . . . . . . . . . . . . . . . . . . . . . . . . . . . . . . . . . . . . . . . . . . . . . 435
config-persistent-sessions . . . . . . . . . . . . . . . . . . . . . . . . . . . . . . . . . . . . . . . . . . . . . . . . . . . . . . . . . . . . . . . . . . . . . . . . . . . . . . . . . . . . . . 439
config-post-auth-filter . . . . . . . . . . . . . . . . . . . . . . . . . . . . . . . . . . . . . . . . . . . . . . . . . . . . . . . . . . . . . . . . . . . . . . . . . . . . . . . . . . . . . . . . . . . 440
config-public-address . . . . . . . . . . . . . . . . . . . . . . . . . . . . . . . . . . . . . . . . . . . . . . . . . . . . . . . . . . . . . . . . . . . . . . . . . . . . . . . . . . . . . . . . . . . 441
config-scheduled-updates-retries . . . . . . . . . . . . . . . . . . . . . . . . . . . . . . . . . . . . . . . . . . . . . . . . . . . . . . . . . . . . . . . . . . . . . . . . . . . . . . . .441
config-two-factor-auth . . . . . . . . . . . . . . . . . . . . . . . . . . . . . . . . . . . . . . . . . . . . . . . . . . . . . . . . . . . . . . . . . . . . . . . . . . . . . . . . . . . . . . . . . . .442
config-userdir . . . . . . . . . . . . . . . . . . . . . . . . . . . . . . . . . . . . . . . . . . . . . . . . . . . . . . . . . . . . . . . . . . . . . . . . . . . . . . . . . . . . . . . . . . . . . . . . . . .443
config-web-service-api . . . . . . . . . . . . . . . . . . . . . . . . . . . . . . . . . . . . . . . . . . . . . . . . . . . . . . . . . . . . . . . . . . . . . . . . . . . . . . . . . . . . . . . . . . 445
config-windows-userdir . . . . . . . . . . . . . . . . . . . . . . . . . . . . . . . . . . . . . . . . . . . . . . . . . . . . . . . . . . . . . . . . . . . . . . . . . . . . . . . . . . . . . . . . . 445
copy-group-membership . . . . . . . . . . . . . . . . . . . . . . . . . . . . . . . . . . . . . . . . . . . . . . . . . . . . . . . . . . . . . . . . . . . . . . . . . . . . . . . . . . . . . . . . 447
copy-library-permissions . . . . . . . . . . . . . . . . . . . . . . . . . . . . . . . . . . . . . . . . . . . . . . . . . . . . . . . . . . . . . . . . . . . . . . . . . . . . . . . . . . . . . . . . 449
copy-rules-to-site . . . . . . . . . . . . . . . . . . . . . . . . . . . . . . . . . . . . . . . . . . . . . . . . . . . . . . . . . . . . . . . . . . . . . . . . . . . . . . . . . . . . . . . . . . . . . . . 450
17
TIBCO Spotfire® Server and Environment Installation and Administration
create-default-config . . . . . . . . . . . . . . . . . . . . . . . . . . . . . . . . . . . . . . . . . . . . . . . . . . . . . . . . . . . . . . . . . . . . . . . . . . . . . . . . . . . . . . . . . . . . 452
create-jmx-user . . . . . . . . . . . . . . . . . . . . . . . . . . . . . . . . . . . . . . . . . . . . . . . . . . . . . . . . . . . . . . . . . . . . . . . . . . . . . . . . . . . . . . . . . . . . . . . . .452
create-join-db . . . . . . . . . . . . . . . . . . . . . . . . . . . . . . . . . . . . . . . . . . . . . . . . . . . . . . . . . . . . . . . . . . . . . . . . . . . . . . . . . . . . . . . . . . . . . . . . . . .453
create-ldap-config . . . . . . . . . . . . . . . . . . . . . . . . . . . . . . . . . . . . . . . . . . . . . . . . . . . . . . . . . . . . . . . . . . . . . . . . . . . . . . . . . . . . . . . . . . . . . . 454
create-site . . . . . . . . . . . . . . . . . . . . . . . . . . . . . . . . . . . . . . . . . . . . . . . . . . . . . . . . . . . . . . . . . . . . . . . . . . . . . . . . . . . . . . . . . . . . . . . . . . . . . . 471
create-user . . . . . . . . . . . . . . . . . . . . . . . . . . . . . . . . . . . . . . . . . . . . . . . . . . . . . . . . . . . . . . . . . . . . . . . . . . . . . . . . . . . . . . . . . . . . . . . . . . . . . 472
delete-disabled-users . . . . . . . . . . . . . . . . . . . . . . . . . . . . . . . . . . . . . . . . . . . . . . . . . . . . . . . . . . . . . . . . . . . . . . . . . . . . . . . . . . . . . . . . . . . 473
delete-disconnected-groups . . . . . . . . . . . . . . . . . . . . . . . . . . . . . . . . . . . . . . . . . . . . . . . . . . . . . . . . . . . . . . . . . . . . . . . . . . . . . . . . . . . . .474
delete-jmx-user . . . . . . . . . . . . . . . . . . . . . . . . . . . . . . . . . . . . . . . . . . . . . . . . . . . . . . . . . . . . . . . . . . . . . . . . . . . . . . . . . . . . . . . . . . . . . . . . . 474
delete-library-content . . . . . . . . . . . . . . . . . . . . . . . . . . . . . . . . . . . . . . . . . . . . . . . . . . . . . . . . . . . . . . . . . . . . . . . . . . . . . . . . . . . . . . . . . . . 475
delete-node . . . . . . . . . . . . . . . . . . . . . . . . . . . . . . . . . . . . . . . . . . . . . . . . . . . . . . . . . . . . . . . . . . . . . . . . . . . . . . . . . . . . . . . . . . . . . . . . . . . . 476
delete-oauth2-client . . . . . . . . . . . . . . . . . . . . . . . . . . . . . . . . . . . . . . . . . . . . . . . . . . . . . . . . . . . . . . . . . . . . . . . . . . . . . . . . . . . . . . . . . . . . .477
delete-service-config . . . . . . . . . . . . . . . . . . . . . . . . . . . . . . . . . . . . . . . . . . . . . . . . . . . . . . . . . . . . . . . . . . . . . . . . . . . . . . . . . . . . . . . . . . . 477
delete-site . . . . . . . . . . . . . . . . . . . . . . . . . . . . . . . . . . . . . . . . . . . . . . . . . . . . . . . . . . . . . . . . . . . . . . . . . . . . . . . . . . . . . . . . . . . . . . . . . . . . . . 478
delete-user . . . . . . . . . . . . . . . . . . . . . . . . . . . . . . . . . . . . . . . . . . . . . . . . . . . . . . . . . . . . . . . . . . . . . . . . . . . . . . . . . . . . . . . . . . . . . . . . . . . . . 479
demote-admin . . . . . . . . . . . . . . . . . . . . . . . . . . . . . . . . . . . . . . . . . . . . . . . . . . . . . . . . . . . . . . . . . . . . . . . . . . . . . . . . . . . . . . . . . . . . . . . . . . 480
enable-user . . . . . . . . . . . . . . . . . . . . . . . . . . . . . . . . . . . . . . . . . . . . . . . . . . . . . . . . . . . . . . . . . . . . . . . . . . . . . . . . . . . . . . . . . . . . . . . . . . . . .481
export-config . . . . . . . . . . . . . . . . . . . . . . . . . . . . . . . . . . . . . . . . . . . . . . . . . . . . . . . . . . . . . . . . . . . . . . . . . . . . . . . . . . . . . . . . . . . . . . . . . . . 481
export-ds-template . . . . . . . . . . . . . . . . . . . . . . . . . . . . . . . . . . . . . . . . . . . . . . . . . . . . . . . . . . . . . . . . . . . . . . . . . . . . . . . . . . . . . . . . . . . . . .482
export-groups . . . . . . . . . . . . . . . . . . . . . . . . . . . . . . . . . . . . . . . . . . . . . . . . . . . . . . . . . . . . . . . . . . . . . . . . . . . . . . . . . . . . . . . . . . . . . . . . . . 483
export-library-content . . . . . . . . . . . . . . . . . . . . . . . . . . . . . . . . . . . . . . . . . . . . . . . . . . . . . . . . . . . . . . . . . . . . . . . . . . . . . . . . . . . . . . . . . . . 484
export-rules . . . . . . . . . . . . . . . . . . . . . . . . . . . . . . . . . . . . . . . . . . . . . . . . . . . . . . . . . . . . . . . . . . . . . . . . . . . . . . . . . . . . . . . . . . . . . . . . . . . . 486
export-service-config . . . . . . . . . . . . . . . . . . . . . . . . . . . . . . . . . . . . . . . . . . . . . . . . . . . . . . . . . . . . . . . . . . . . . . . . . . . . . . . . . . . . . . . . . . . 487
export-users . . . . . . . . . . . . . . . . . . . . . . . . . . . . . . . . . . . . . . . . . . . . . . . . . . . . . . . . . . . . . . . . . . . . . . . . . . . . . . . . . . . . . . . . . . . . . . . . . . . . 488
help . . . . . . . . . . . . . . . . . . . . . . . . . . . . . . . . . . . . . . . . . . . . . . . . . . . . . . . . . . . . . . . . . . . . . . . . . . . . . . . . . . . . . . . . . . . . . . . . . . . . . . . . . . . . 490
import-config . . . . . . . . . . . . . . . . . . . . . . . . . . . . . . . . . . . . . . . . . . . . . . . . . . . . . . . . . . . . . . . . . . . . . . . . . . . . . . . . . . . . . . . . . . . . . . . . . . . 490
import-groups . . . . . . . . . . . . . . . . . . . . . . . . . . . . . . . . . . . . . . . . . . . . . . . . . . . . . . . . . . . . . . . . . . . . . . . . . . . . . . . . . . . . . . . . . . . . . . . . . . 491
import-jaas-config . . . . . . . . . . . . . . . . . . . . . . . . . . . . . . . . . . . . . . . . . . . . . . . . . . . . . . . . . . . . . . . . . . . . . . . . . . . . . . . . . . . . . . . . . . . . . . 492
import-library-content . . . . . . . . . . . . . . . . . . . . . . . . . . . . . . . . . . . . . . . . . . . . . . . . . . . . . . . . . . . . . . . . . . . . . . . . . . . . . . . . . . . . . . . . . . . 493
import-rules . . . . . . . . . . . . . . . . . . . . . . . . . . . . . . . . . . . . . . . . . . . . . . . . . . . . . . . . . . . . . . . . . . . . . . . . . . . . . . . . . . . . . . . . . . . . . . . . . . . . 495
import-scheduled-updates . . . . . . . . . . . . . . . . . . . . . . . . . . . . . . . . . . . . . . . . . . . . . . . . . . . . . . . . . . . . . . . . . . . . . . . . . . . . . . . . . . . . . . 497
import-service-config . . . . . . . . . . . . . . . . . . . . . . . . . . . . . . . . . . . . . . . . . . . . . . . . . . . . . . . . . . . . . . . . . . . . . . . . . . . . . . . . . . . . . . . . . . . 499
import-users . . . . . . . . . . . . . . . . . . . . . . . . . . . . . . . . . . . . . . . . . . . . . . . . . . . . . . . . . . . . . . . . . . . . . . . . . . . . . . . . . . . . . . . . . . . . . . . . . . . .500
invalidate-persistent-sessions . . . . . . . . . . . . . . . . . . . . . . . . . . . . . . . . . . . . . . . . . . . . . . . . . . . . . . . . . . . . . . . . . . . . . . . . . . . . . . . . . . . 501
list-active-service-configs . . . . . . . . . . . . . . . . . . . . . . . . . . . . . . . . . . . . . . . . . . . . . . . . . . . . . . . . . . . . . . . . . . . . . . . . . . . . . . . . . . . . . . . 502
list-addresses . . . . . . . . . . . . . . . . . . . . . . . . . . . . . . . . . . . . . . . . . . . . . . . . . . . . . . . . . . . . . . . . . . . . . . . . . . . . . . . . . . . . . . . . . . . . . . . . . . 503
list-admins . . . . . . . . . . . . . . . . . . . . . . . . . . . . . . . . . . . . . . . . . . . . . . . . . . . . . . . . . . . . . . . . . . . . . . . . . . . . . . . . . . . . . . . . . . . . . . . . . . . . . .503
list-auth-config . . . . . . . . . . . . . . . . . . . . . . . . . . . . . . . . . . . . . . . . . . . . . . . . . . . . . . . . . . . . . . . . . . . . . . . . . . . . . . . . . . . . . . . . . . . . . . . . . .504
list-certificates . . . . . . . . . . . . . . . . . . . . . . . . . . . . . . . . . . . . . . . . . . . . . . . . . . . . . . . . . . . . . . . . . . . . . . . . . . . . . . . . . . . . . . . . . . . . . . . . . 504
18
TIBCO Spotfire® Server and Environment Installation and Administration
list-configs . . . . . . . . . . . . . . . . . . . . . . . . . . . . . . . . . . . . . . . . . . . . . . . . . . . . . . . . . . . . . . . . . . . . . . . . . . . . . . . . . . . . . . . . . . . . . . . . . . . . . .505
list-deployment-areas . . . . . . . . . . . . . . . . . . . . . . . . . . . . . . . . . . . . . . . . . . . . . . . . . . . . . . . . . . . . . . . . . . . . . . . . . . . . . . . . . . . . . . . . . . . 506
list-ds-template . . . . . . . . . . . . . . . . . . . . . . . . . . . . . . . . . . . . . . . . . . . . . . . . . . . . . . . . . . . . . . . . . . . . . . . . . . . . . . . . . . . . . . . . . . . . . . . . . 507
list-groups . . . . . . . . . . . . . . . . . . . . . . . . . . . . . . . . . . . . . . . . . . . . . . . . . . . . . . . . . . . . . . . . . . . . . . . . . . . . . . . . . . . . . . . . . . . . . . . . . . . . . . 507
list-jaas-config . . . . . . . . . . . . . . . . . . . . . . . . . . . . . . . . . . . . . . . . . . . . . . . . . . . . . . . . . . . . . . . . . . . . . . . . . . . . . . . . . . . . . . . . . . . . . . . . . . 508
list-jmx-users . . . . . . . . . . . . . . . . . . . . . . . . . . . . . . . . . . . . . . . . . . . . . . . . . . . . . . . . . . . . . . . . . . . . . . . . . . . . . . . . . . . . . . . . . . . . . . . . . . . 509
list-ldap-config . . . . . . . . . . . . . . . . . . . . . . . . . . . . . . . . . . . . . . . . . . . . . . . . . . . . . . . . . . . . . . . . . . . . . . . . . . . . . . . . . . . . . . . . . . . . . . . . . . 509
list-ldap-userdir-config . . . . . . . . . . . . . . . . . . . . . . . . . . . . . . . . . . . . . . . . . . . . . . . . . . . . . . . . . . . . . . . . . . . . . . . . . . . . . . . . . . . . . . . . . . 510
list-licenses . . . . . . . . . . . . . . . . . . . . . . . . . . . . . . . . . . . . . . . . . . . . . . . . . . . . . . . . . . . . . . . . . . . . . . . . . . . . . . . . . . . . . . . . . . . . . . . . . . . . 510
list-logging . . . . . . . . . . . . . . . . . . . . . . . . . . . . . . . . . . . . . . . . . . . . . . . . . . . . . . . . . . . . . . . . . . . . . . . . . . . . . . . . . . . . . . . . . . . . . . . . . . . . . .511
list-nodes . . . . . . . . . . . . . . . . . . . . . . . . . . . . . . . . . . . . . . . . . . . . . . . . . . . . . . . . . . . . . . . . . . . . . . . . . . . . . . . . . . . . . . . . . . . . . . . . . . . . . . .512
list-ntlm-auth . . . . . . . . . . . . . . . . . . . . . . . . . . . . . . . . . . . . . . . . . . . . . . . . . . . . . . . . . . . . . . . . . . . . . . . . . . . . . . . . . . . . . . . . . . . . . . . . . . . 512
list-oauth2-clients . . . . . . . . . . . . . . . . . . . . . . . . . . . . . . . . . . . . . . . . . . . . . . . . . . . . . . . . . . . . . . . . . . . . . . . . . . . . . . . . . . . . . . . . . . . . . . . 513
list-online-servers . . . . . . . . . . . . . . . . . . . . . . . . . . . . . . . . . . . . . . . . . . . . . . . . . . . . . . . . . . . . . . . . . . . . . . . . . . . . . . . . . . . . . . . . . . . . . . .514
list-post-auth-filter . . . . . . . . . . . . . . . . . . . . . . . . . . . . . . . . . . . . . . . . . . . . . . . . . . . . . . . . . . . . . . . . . . . . . . . . . . . . . . . . . . . . . . . . . . . . . . 514
list-service-configs . . . . . . . . . . . . . . . . . . . . . . . . . . . . . . . . . . . . . . . . . . . . . . . . . . . . . . . . . . . . . . . . . . . . . . . . . . . . . . . . . . . . . . . . . . . . . .515
list-service-instances . . . . . . . . . . . . . . . . . . . . . . . . . . . . . . . . . . . . . . . . . . . . . . . . . . . . . . . . . . . . . . . . . . . . . . . . . . . . . . . . . . . . . . . . . . . 516
list-services . . . . . . . . . . . . . . . . . . . . . . . . . . . . . . . . . . . . . . . . . . . . . . . . . . . . . . . . . . . . . . . . . . . . . . . . . . . . . . . . . . . . . . . . . . . . . . . . . . . . .516
list-sites . . . . . . . . . . . . . . . . . . . . . . . . . . . . . . . . . . . . . . . . . . . . . . . . . . . . . . . . . . . . . . . . . . . . . . . . . . . . . . . . . . . . . . . . . . . . . . . . . . . . . . . . 517
list-userdir-config . . . . . . . . . . . . . . . . . . . . . . . . . . . . . . . . . . . . . . . . . . . . . . . . . . . . . . . . . . . . . . . . . . . . . . . . . . . . . . . . . . . . . . . . . . . . . . . 517
list-users . . . . . . . . . . . . . . . . . . . . . . . . . . . . . . . . . . . . . . . . . . . . . . . . . . . . . . . . . . . . . . . . . . . . . . . . . . . . . . . . . . . . . . . . . . . . . . . . . . . . . . . 518
list-windows-userdir-config . . . . . . . . . . . . . . . . . . . . . . . . . . . . . . . . . . . . . . . . . . . . . . . . . . . . . . . . . . . . . . . . . . . . . . . . . . . . . . . . . . . . . . 519
manage-deployment-areas . . . . . . . . . . . . . . . . . . . . . . . . . . . . . . . . . . . . . . . . . . . . . . . . . . . . . . . . . . . . . . . . . . . . . . . . . . . . . . . . . . . . . .520
modify-db-config . . . . . . . . . . . . . . . . . . . . . . . . . . . . . . . . . . . . . . . . . . . . . . . . . . . . . . . . . . . . . . . . . . . . . . . . . . . . . . . . . . . . . . . . . . . . . . . .521
modify-ds-template . . . . . . . . . . . . . . . . . . . . . . . . . . . . . . . . . . . . . . . . . . . . . . . . . . . . . . . . . . . . . . . . . . . . . . . . . . . . . . . . . . . . . . . . . . . . . 523
promote-admin . . . . . . . . . . . . . . . . . . . . . . . . . . . . . . . . . . . . . . . . . . . . . . . . . . . . . . . . . . . . . . . . . . . . . . . . . . . . . . . . . . . . . . . . . . . . . . . . . 524
register-job-sender-client . . . . . . . . . . . . . . . . . . . . . . . . . . . . . . . . . . . . . . . . . . . . . . . . . . . . . . . . . . . . . . . . . . . . . . . . . . . . . . . . . . . . . . . 524
remove-ds-template . . . . . . . . . . . . . . . . . . . . . . . . . . . . . . . . . . . . . . . . . . . . . . . . . . . . . . . . . . . . . . . . . . . . . . . . . . . . . . . . . . . . . . . . . . . . 525
remove-jaas-config . . . . . . . . . . . . . . . . . . . . . . . . . . . . . . . . . . . . . . . . . . . . . . . . . . . . . . . . . . . . . . . . . . . . . . . . . . . . . . . . . . . . . . . . . . . . . 526
remove-ldap-config . . . . . . . . . . . . . . . . . . . . . . . . . . . . . . . . . . . . . . . . . . . . . . . . . . . . . . . . . . . . . . . . . . . . . . . . . . . . . . . . . . . . . . . . . . . . . 526
remove-license . . . . . . . . . . . . . . . . . . . . . . . . . . . . . . . . . . . . . . . . . . . . . . . . . . . . . . . . . . . . . . . . . . . . . . . . . . . . . . . . . . . . . . . . . . . . . . . . . 527
reset-trust . . . . . . . . . . . . . . . . . . . . . . . . . . . . . . . . . . . . . . . . . . . . . . . . . . . . . . . . . . . . . . . . . . . . . . . . . . . . . . . . . . . . . . . . . . . . . . . . . . . . . .528
run . . . . . . . . . . . . . . . . . . . . . . . . . . . . . . . . . . . . . . . . . . . . . . . . . . . . . . . . . . . . . . . . . . . . . . . . . . . . . . . . . . . . . . . . . . . . . . . . . . . . . . . . . . . . . 528
s3-download . . . . . . . . . . . . . . . . . . . . . . . . . . . . . . . . . . . . . . . . . . . . . . . . . . . . . . . . . . . . . . . . . . . . . . . . . . . . . . . . . . . . . . . . . . . . . . . . . . . .529
set-addresses . . . . . . . . . . . . . . . . . . . . . . . . . . . . . . . . . . . . . . . . . . . . . . . . . . . . . . . . . . . . . . . . . . . . . . . . . . . . . . . . . . . . . . . . . . . . . . . . . . 530
set-config . . . . . . . . . . . . . . . . . . . . . . . . . . . . . . . . . . . . . . . . . . . . . . . . . . . . . . . . . . . . . . . . . . . . . . . . . . . . . . . . . . . . . . . . . . . . . . . . . . . . . . .531
set-config-prop . . . . . . . . . . . . . . . . . . . . . . . . . . . . . . . . . . . . . . . . . . . . . . . . . . . . . . . . . . . . . . . . . . . . . . . . . . . . . . . . . . . . . . . . . . . . . . . . . 531
set-db-config . . . . . . . . . . . . . . . . . . . . . . . . . . . . . . . . . . . . . . . . . . . . . . . . . . . . . . . . . . . . . . . . . . . . . . . . . . . . . . . . . . . . . . . . . . . . . . . . . . . 532
set-license . . . . . . . . . . . . . . . . . . . . . . . . . . . . . . . . . . . . . . . . . . . . . . . . . . . . . . . . . . . . . . . . . . . . . . . . . . . . . . . . . . . . . . . . . . . . . . . . . . . . . .534
19
TIBCO Spotfire® Server and Environment Installation and Administration
set-logging . . . . . . . . . . . . . . . . . . . . . . . . . . . . . . . . . . . . . . . . . . . . . . . . . . . . . . . . . . . . . . . . . . . . . . . . . . . . . . . . . . . . . . . . . . . . . . . . . . . . . 534
set-public-address . . . . . . . . . . . . . . . . . . . . . . . . . . . . . . . . . . . . . . . . . . . . . . . . . . . . . . . . . . . . . . . . . . . . . . . . . . . . . . . . . . . . . . . . . . . . . . 535
set-server-service-config . . . . . . . . . . . . . . . . . . . . . . . . . . . . . . . . . . . . . . . . . . . . . . . . . . . . . . . . . . . . . . . . . . . . . . . . . . . . . . . . . . . . . . . .536
set-service-config . . . . . . . . . . . . . . . . . . . . . . . . . . . . . . . . . . . . . . . . . . . . . . . . . . . . . . . . . . . . . . . . . . . . . . . . . . . . . . . . . . . . . . . . . . . . . . 538
set-site . . . . . . . . . . . . . . . . . . . . . . . . . . . . . . . . . . . . . . . . . . . . . . . . . . . . . . . . . . . . . . . . . . . . . . . . . . . . . . . . . . . . . . . . . . . . . . . . . . . . . . . . . 539
set-user-password . . . . . . . . . . . . . . . . . . . . . . . . . . . . . . . . . . . . . . . . . . . . . . . . . . . . . . . . . . . . . . . . . . . . . . . . . . . . . . . . . . . . . . . . . . . . . 539
show-basic-ldap-auth . . . . . . . . . . . . . . . . . . . . . . . . . . . . . . . . . . . . . . . . . . . . . . . . . . . . . . . . . . . . . . . . . . . . . . . . . . . . . . . . . . . . . . . . . . . 540
show-config-history . . . . . . . . . . . . . . . . . . . . . . . . . . . . . . . . . . . . . . . . . . . . . . . . . . . . . . . . . . . . . . . . . . . . . . . . . . . . . . . . . . . . . . . . . . . . . 540
show-deployment . . . . . . . . . . . . . . . . . . . . . . . . . . . . . . . . . . . . . . . . . . . . . . . . . . . . . . . . . . . . . . . . . . . . . . . . . . . . . . . . . . . . . . . . . . . . . . . 541
show-import-export-directory . . . . . . . . . . . . . . . . . . . . . . . . . . . . . . . . . . . . . . . . . . . . . . . . . . . . . . . . . . . . . . . . . . . . . . . . . . . . . . . . . . . .542
show-join-database . . . . . . . . . . . . . . . . . . . . . . . . . . . . . . . . . . . . . . . . . . . . . . . . . . . . . . . . . . . . . . . . . . . . . . . . . . . . . . . . . . . . . . . . . . . . . 542
show-library-permissions . . . . . . . . . . . . . . . . . . . . . . . . . . . . . . . . . . . . . . . . . . . . . . . . . . . . . . . . . . . . . . . . . . . . . . . . . . . . . . . . . . . . . . . 543
show-licenses . . . . . . . . . . . . . . . . . . . . . . . . . . . . . . . . . . . . . . . . . . . . . . . . . . . . . . . . . . . . . . . . . . . . . . . . . . . . . . . . . . . . . . . . . . . . . . . . . . 544
show-oauth2-client . . . . . . . . . . . . . . . . . . . . . . . . . . . . . . . . . . . . . . . . . . . . . . . . . . . . . . . . . . . . . . . . . . . . . . . . . . . . . . . . . . . . . . . . . . . . . .545
switch-domain-name-style . . . . . . . . . . . . . . . . . . . . . . . . . . . . . . . . . . . . . . . . . . . . . . . . . . . . . . . . . . . . . . . . . . . . . . . . . . . . . . . . . . . . . . 546
test-jaas-config . . . . . . . . . . . . . . . . . . . . . . . . . . . . . . . . . . . . . . . . . . . . . . . . . . . . . . . . . . . . . . . . . . . . . . . . . . . . . . . . . . . . . . . . . . . . . . . . . 547
trust-node . . . . . . . . . . . . . . . . . . . . . . . . . . . . . . . . . . . . . . . . . . . . . . . . . . . . . . . . . . . . . . . . . . . . . . . . . . . . . . . . . . . . . . . . . . . . . . . . . . . . . . 548
untrust-node . . . . . . . . . . . . . . . . . . . . . . . . . . . . . . . . . . . . . . . . . . . . . . . . . . . . . . . . . . . . . . . . . . . . . . . . . . . . . . . . . . . . . . . . . . . . . . . . . . . 549
update-bootstrap . . . . . . . . . . . . . . . . . . . . . . . . . . . . . . . . . . . . . . . . . . . . . . . . . . . . . . . . . . . . . . . . . . . . . . . . . . . . . . . . . . . . . . . . . . . . . . . 550
update-deployment . . . . . . . . . . . . . . . . . . . . . . . . . . . . . . . . . . . . . . . . . . . . . . . . . . . . . . . . . . . . . . . . . . . . . . . . . . . . . . . . . . . . . . . . . . . . . 553
update-ldap-config . . . . . . . . . . . . . . . . . . . . . . . . . . . . . . . . . . . . . . . . . . . . . . . . . . . . . . . . . . . . . . . . . . . . . . . . . . . . . . . . . . . . . . . . . . . . . .554
version . . . . . . . . . . . . . . . . . . . . . . . . . . . . . . . . . . . . . . . . . . . . . . . . . . . . . . . . . . . . . . . . . . . . . . . . . . . . . . . . . . . . . . . . . . . . . . . . . . . . . . . . . 568
Glossary . . . . . . . . . . . . . . . . . . . . . . . . . . . . . . . . . . . . . . . . . . . . . . . . . . . . . . . . . . . . . . . . . . . . . . . . . . . . . . . . . . . . . . . . 569
20
TIBCO Spotfire® Server and Environment Installation and Administration
TIBCO Spotfire Server Documentation and SupportServices
How to Access TIBCO Documentation
Documentation for TIBCO products is available on the TIBCO Product Documentation website, mainlyin HTML and PDF formats.
The TIBCO Product Documentation website is updated frequently and is more current than any otherdocumentation included with the product. To access the latest documentation, visit https://docs.tibco.com.
TIBCO Spotfire Server Documentation
The following documents for this product can be found on the TIBCO Documentation site:
● TIBCO Spotfire® Server and Environment - Installation and Administration
● TIBCO Spotfire® Server and Environment - Basic Installation Guide
● TIBCO Spotfire® Cobranding
● TIBCO Spotfire® Server Release Notes
● TIBCO Spotfire® Server Web Services API Reference
● TIBCO Spotfire® Server Server Platform API Reference
● TIBCO Spotfire® Server Information Services API Reference
● TIBCO Spotfire® Server License Agreement
Release Version Support
Some release versions of TIBCO Spotfire products are designated as long-term support (LTS) versions.LTS versions are typically supported for up to 36 months from release. Defect corrections will typicallybe delivered in a new release version and as hotfixes or service packs to one or more LTS versions. Seealso https://docs.tibco.com/pub/spotfire/general/LTS/spotfire_LTS_releases.htm.
How to Contact TIBCO Support
You can contact TIBCO Support in the following ways:
● For an overview of TIBCO Support, visit http://www.tibco.com/services/support.
● For accessing the Support Knowledge Base and getting personalized content about products you areinterested in, visit the TIBCO Support portal at https://support.tibco.com.
● For creating a Support case, you must have a valid maintenance or support contract with TIBCO.You also need a user name and password to log in to https://support.tibco.com. If you do not have auser name, you can request one by clicking Register on the website.
System Requirements for Spotfire Products
For information about the system requirements for Spotfire products, visit http://spotfi.re/sr.
How to Join TIBCO Community
TIBCO Community is the official channel for TIBCO customers, partners, and employee subject matterexperts to share and access their collective experience. TIBCO Community offers access to Q&A forums,product wikis, and best practices. It also offers access to extensions, adapters, solution accelerators, andtools that extend and enable customers to gain full value from TIBCO products. In addition, users can
21
TIBCO Spotfire® Server and Environment Installation and Administration
submit and vote on feature requests from within the TIBCO Ideas Portal. For a free registration, go to https://community.tibco.com.
For quick access to TIBCO Spotfire content, see https://community.tibco.com/products/spotfire.
22
TIBCO Spotfire® Server and Environment Installation and Administration
Getting started
New TIBCO Spotfire® administrators can begin by learning how a Spotfire® implementation is puttogether and how it works, or go directly to the basic installation. For experienced Spotfireadministrators, the Release Notes describe new features and other changes.
Any updates to this documentation will be available on https://docs.tibco.com. To get the latest versionof this documentation, click the help button on the TIBCO Spotfire® Server start page (if yourimplementation allows access to the internet), or go to https://docs.tibco.com/products/tibco-spotfire-server.
Experienced Spotfire administrators:
● If you are updating from Spotfire version 7.0 or earlier, you may want to begin with Introduction tothe Spotfire environment.
● To get started, see Upgrading Spotfire.
New Spotfire administrators:
● For general information on Spotfire® Server, see Spotfire Server introduction.
● For a description of the Spotfire environment, see Introduction to the Spotfire environment.
● The basic installation takes you through the required steps for a simple configuration of SpotfireServer: the server on one computer, the TIBCO Spotfire® Analyst client on another, the nodemanager installed, and the TIBCO Spotfire® Web Player and TIBCO Spotfire® Automation Services(if purchased) available on all network computers, user authentication through the Spotfiredatabase.
You can also use the basic installation process to complete the initial installation for a morecomplex implementation. In most cases it is recommended that you have a working basicinstallation before you add additional servers, load balancers, authentication methods, andso on.
To begin installation, see Basic installation process for Spotfire.
23
TIBCO Spotfire® Server and Environment Installation and Administration
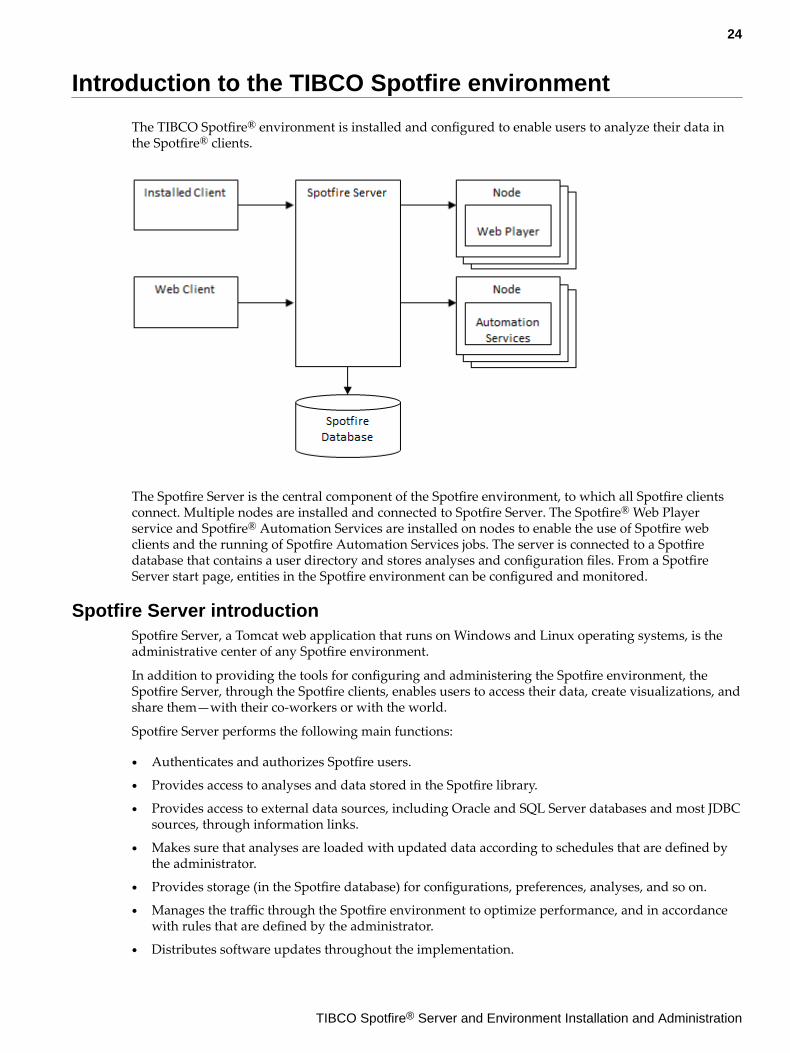
Introduction to the TIBCO Spotfire environment
The TIBCO Spotfire® environment is installed and configured to enable users to analyze their data inthe Spotfire® clients.
The Spotfire Server is the central component of the Spotfire environment, to which all Spotfire clientsconnect. Multiple nodes are installed and connected to Spotfire Server. The Spotfire® Web Playerservice and Spotfire® Automation Services are installed on nodes to enable the use of Spotfire webclients and the running of Spotfire Automation Services jobs. The server is connected to a Spotfiredatabase that contains a user directory and stores analyses and configuration files. From a SpotfireServer start page, entities in the Spotfire environment can be configured and monitored.
Spotfire Server introductionSpotfire Server, a Tomcat web application that runs on Windows and Linux operating systems, is theadministrative center of any Spotfire environment.
In addition to providing the tools for configuring and administering the Spotfire environment, theSpotfire Server, through the Spotfire clients, enables users to access their data, create visualizations, andshare them—with their co-workers or with the world.
Spotfire Server performs the following main functions:
● Authenticates and authorizes Spotfire users.
● Provides access to analyses and data stored in the Spotfire library.
● Provides access to external data sources, including Oracle and SQL Server databases and most JDBCsources, through information links.
● Makes sure that analyses are loaded with updated data according to schedules that are defined bythe administrator.
● Provides storage (in the Spotfire database) for configurations, preferences, analyses, and so on.
● Manages the traffic through the Spotfire environment to optimize performance, and in accordancewith rules that are defined by the administrator.
● Distributes software updates throughout the implementation.
24
TIBCO Spotfire® Server and Environment Installation and Administration
● Monitors the health and activities of the Spotfire environment and provides diagnostic informationboth in the server interface and through downloadable logs.
Spotfire database introductionSpotfire Server requires access to a Spotfire database.
The Spotfire database stores the information that Spotfire Server needs to control the Spotfireenvironment, including users, groups, licenses, preferences, shared analyses, and system configurationdata.
You must have a database server up and running, preferably on a dedicated computer, before installingSpotfire Server. The Spotfire database can be installed on an Oracle Database server or a Microsoft SQLServer.
Nodes and services introductionInstall nodes in the environment to enable the use of Spotfire web clients and Spotfire AutomationServices.
With Spotfire Server installed, the installed Spotfire client, called Spotfire Analyst, can be used. Toenable the use of Spotfire web clients and Spotfire Automation Services, one or more nodes must alsobe configured, preferably on dedicated computers.
For each node, the administrator installs and enables services with a specified capability. Each node canhave services with the Spotfire Web Player capability, the Spotfire Automation Services capability, orboth. The Web Player service allows users to perform analyses in a web browser. Automation Servicescan be used to automate creation of analysis files, for example, with new data. The capabilities of theenabled services determine the functionality that the node provides to Spotfire end users, through theSpotfire Server. For failover and performance purposes, multiple service instances can be added oneach node.
You can scale your Spotfire environment by adding or removing nodes and service instances.
Spotfire clients introductionSpotfire end users connect to Spotfire Server using either an installed client or a web client.
Spotfire Analyst, a fully-featured client for working with data sources and creating complex analyses, isinstalled on a user's local computer.
To facilitate interactive analysis in a web browser, a Web Player service generates visualizations that aredisplayed in the web browser. Depending on which of two licenses a user has, the web client will havedifferent capabilities. With the Consumer license users can view interactive analyses. With the BusinessAuthor license users can also create and edit simple analyses.
Environment communication introductionAll back-end communication in a Spotfire environment is secured by HTTPS/TLS, complying withcurrent security standards and industry best practices.
Spotfire Servers listen to incoming traffic from installed clients and web clients on one HTTP or HTTPSport, the front-end communication port.
Spotfire Servers listen to traffic from services on the nodes on another HTTPS port, the back-endcommunication port.
25
TIBCO Spotfire® Server and Environment Installation and Administration
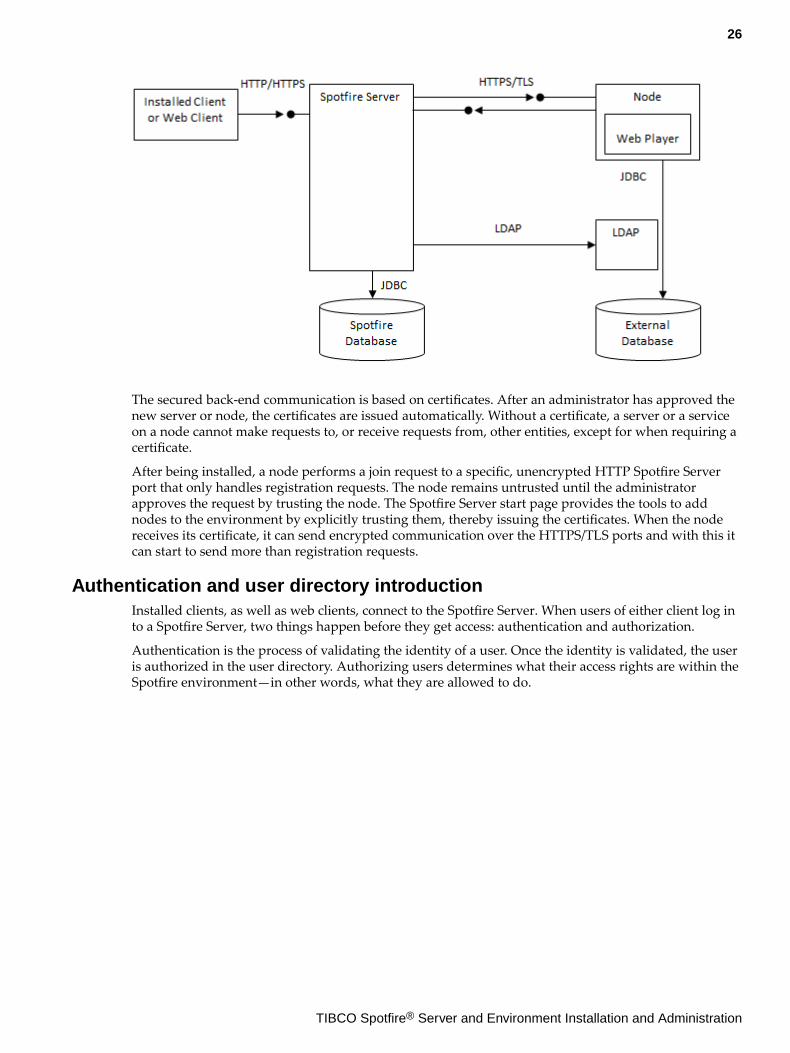
The secured back-end communication is based on certificates. After an administrator has approved thenew server or node, the certificates are issued automatically. Without a certificate, a server or a serviceon a node cannot make requests to, or receive requests from, other entities, except for when requiring acertificate.
After being installed, a node performs a join request to a specific, unencrypted HTTP Spotfire Serverport that only handles registration requests. The node remains untrusted until the administratorapproves the request by trusting the node. The Spotfire Server start page provides the tools to addnodes to the environment by explicitly trusting them, thereby issuing the certificates. When the nodereceives its certificate, it can send encrypted communication over the HTTPS/TLS ports and with this itcan start to send more than registration requests.
Authentication and user directory introductionInstalled clients, as well as web clients, connect to the Spotfire Server. When users of either client log into a Spotfire Server, two things happen before they get access: authentication and authorization.
Authentication is the process of validating the identity of a user. Once the identity is validated, the useris authorized in the user directory. Authorizing users determines what their access rights are within theSpotfire environment—in other words, what they are allowed to do.
26
TIBCO Spotfire® Server and Environment Installation and Administration
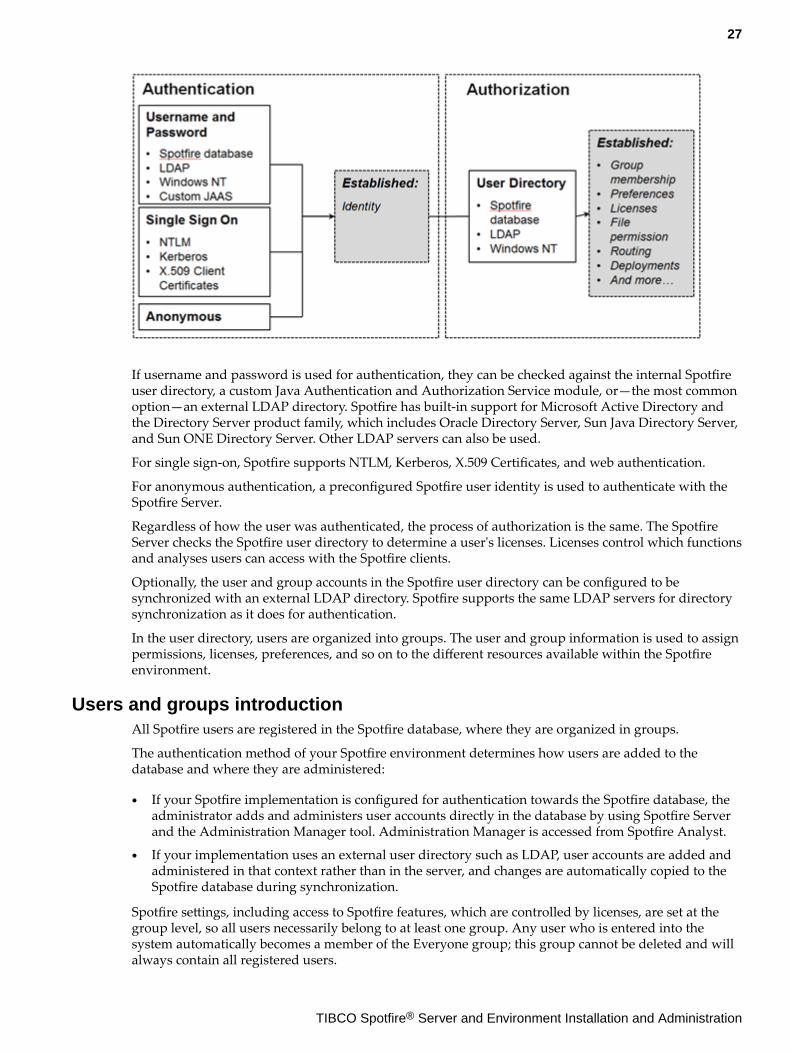
If username and password is used for authentication, they can be checked against the internal Spotfireuser directory, a custom Java Authentication and Authorization Service module, or—the most commonoption—an external LDAP directory. Spotfire has built-in support for Microsoft Active Directory andthe Directory Server product family, which includes Oracle Directory Server, Sun Java Directory Server,and Sun ONE Directory Server. Other LDAP servers can also be used.
For single sign-on, Spotfire supports NTLM, Kerberos, X.509 Certificates, and web authentication.
For anonymous authentication, a preconfigured Spotfire user identity is used to authenticate with theSpotfire Server.
Regardless of how the user was authenticated, the process of authorization is the same. The SpotfireServer checks the Spotfire user directory to determine a user's licenses. Licenses control which functionsand analyses users can access with the Spotfire clients.
Optionally, the user and group accounts in the Spotfire user directory can be configured to besynchronized with an external LDAP directory. Spotfire supports the same LDAP servers for directorysynchronization as it does for authentication.
In the user directory, users are organized into groups. The user and group information is used to assignpermissions, licenses, preferences, and so on to the different resources available within the Spotfireenvironment.
Users and groups introductionAll Spotfire users are registered in the Spotfire database, where they are organized in groups.
The authentication method of your Spotfire environment determines how users are added to thedatabase and where they are administered:
● If your Spotfire implementation is configured for authentication towards the Spotfire database, theadministrator adds and administers user accounts directly in the database by using Spotfire Serverand the Administration Manager tool. Administration Manager is accessed from Spotfire Analyst.
● If your implementation uses an external user directory such as LDAP, user accounts are added andadministered in that context rather than in the server, and changes are automatically copied to theSpotfire database during synchronization.
Spotfire settings, including access to Spotfire features, which are controlled by licenses, are set at thegroup level, so all users necessarily belong to at least one group. Any user who is entered into thesystem automatically becomes a member of the Everyone group; this group cannot be deleted and willalways contain all registered users.
27
TIBCO Spotfire® Server and Environment Installation and Administration
In addition to the Everyone group, a user can belong to any number of groups, and has access to all ofthe features that are enabled for those groups. Groups can be created and managed locally in theSpotfire database, or synchronized from an external source such as an LDAP directory.
Licenses and preferences introductionLicenses determine which features a group of users should have access to, and preferences set thedefault behavior of the Spotfire clients.
Licenses determine which features and functionality are available to Spotfire users. License data isstored in the Spotfire database. When a user logs in to Spotfire, the user can only access the featuresthat are enabled for the groups to which the user belongs.
Spotfire administrators can set a wide variety of preferences for the members of a group, such as adefault color scheme for analyses or data optimization options.
Licenses and preferences are set in the Administration Manager in Spotfire Analyst. See theAdministration Manager documentation for details on license and preference administration.
Deployment introductionTo deploy Spotfire software, the administrator places software packages in a deployment area onSpotfire Server, and assigns the deployment area to particular groups.
If a new deployment is available when a user logs in to a Spotfire client, the software packages aredownloaded from the Spotfire Server to the client.
Deployments are used:
● To set up a new Spotfire environment.
● To install a product upgrade, extension, or hotfix provided by Spotfire.
● To install a custom tool or extension.
Administrators can create multiple deployment areas, such as "Production" and "Staging". This allowsadministrators to test new deployments before rolling them out to the entire client base, or to maintaindifferent deployments for different groups of users.
Spotfire library introductionThe Spotfire database contains the Spotfire library. The library is accessible to Spotfire Analyst, and webclients through the Spotfire Server, allowing users to easily share and reuse their work.
The library stores Spotfire analyses, Spotfire data files, custom Spotfire data functions, informationlinks, shared connections created with Spotfire connectors, and visualization color schemes.
The library is organized into hierarchical folders, which are also used to control access to folder content.The administrator creates the folder structure, and assigns groups with the appropriate read and writepermissions to the folders.
Routing introductionSpotfire provides routing capabilities within the environment.
A cluster of Spotfire Servers in an environment can be fronted by a load balancer to distribute the trafficto the servers. No load balancer is required between Spotfire Server and the nodes because the routingcapability of Spotfire Server features built-in load balancing, enabling non-opened analyses to beloaded by the least utilized Web Player service instance.
28
TIBCO Spotfire® Server and Environment Installation and Administration
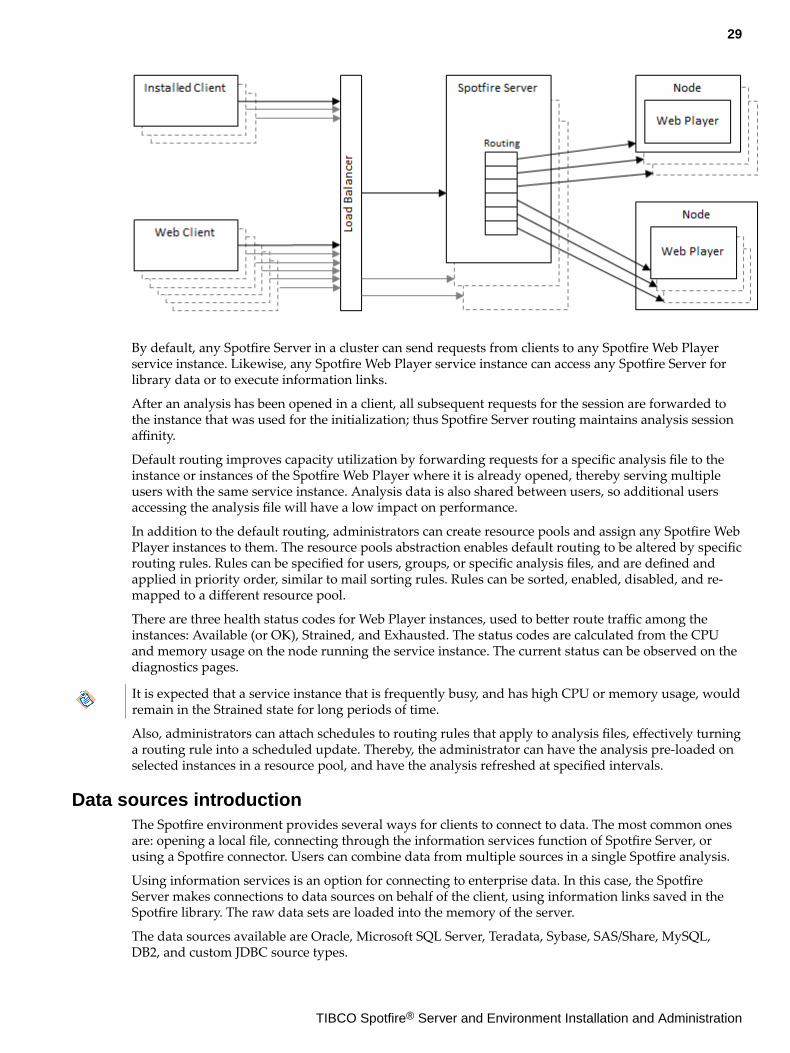
By default, any Spotfire Server in a cluster can send requests from clients to any Spotfire Web Playerservice instance. Likewise, any Spotfire Web Player service instance can access any Spotfire Server forlibrary data or to execute information links.
After an analysis has been opened in a client, all subsequent requests for the session are forwarded tothe instance that was used for the initialization; thus Spotfire Server routing maintains analysis sessionaffinity.
Default routing improves capacity utilization by forwarding requests for a specific analysis file to theinstance or instances of the Spotfire Web Player where it is already opened, thereby serving multipleusers with the same service instance. Analysis data is also shared between users, so additional usersaccessing the analysis file will have a low impact on performance.
In addition to the default routing, administrators can create resource pools and assign any Spotfire WebPlayer instances to them. The resource pools abstraction enables default routing to be altered by specificrouting rules. Rules can be specified for users, groups, or specific analysis files, and are defined andapplied in priority order, similar to mail sorting rules. Rules can be sorted, enabled, disabled, and re-mapped to a different resource pool.
There are three health status codes for Web Player instances, used to better route traffic among theinstances: Available (or OK), Strained, and Exhausted. The status codes are calculated from the CPUand memory usage on the node running the service instance. The current status can be observed on thediagnostics pages.
It is expected that a service instance that is frequently busy, and has high CPU or memory usage, wouldremain in the Strained state for long periods of time.
Also, administrators can attach schedules to routing rules that apply to analysis files, effectively turninga routing rule into a scheduled update. Thereby, the administrator can have the analysis pre-loaded onselected instances in a resource pool, and have the analysis refreshed at specified intervals.
Data sources introductionThe Spotfire environment provides several ways for clients to connect to data. The most common onesare: opening a local file, connecting through the information services function of Spotfire Server, orusing a Spotfire connector. Users can combine data from multiple sources in a single Spotfire analysis.
Using information services is an option for connecting to enterprise data. In this case, the SpotfireServer makes connections to data sources on behalf of the client, using information links saved in theSpotfire library. The raw data sets are loaded into the memory of the server.
The data sources available are Oracle, Microsoft SQL Server, Teradata, Sybase, SAS/Share, MySQL,DB2, and custom JDBC source types.
29
TIBCO Spotfire® Server and Environment Installation and Administration
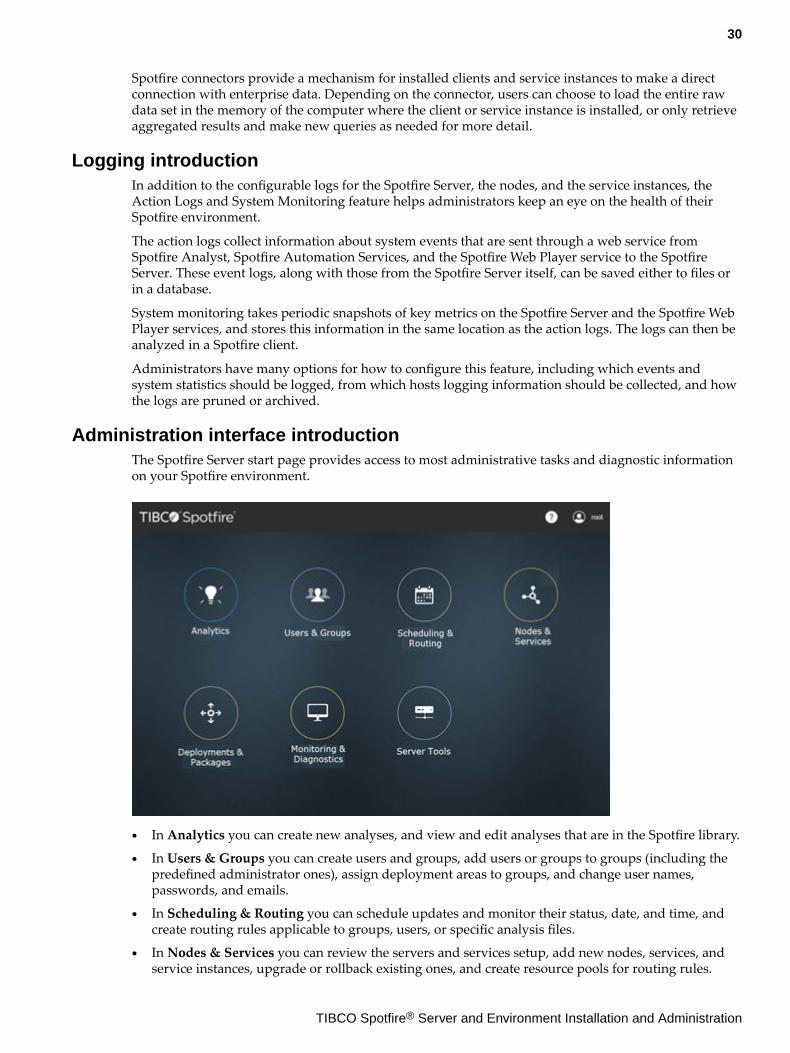
Spotfire connectors provide a mechanism for installed clients and service instances to make a directconnection with enterprise data. Depending on the connector, users can choose to load the entire rawdata set in the memory of the computer where the client or service instance is installed, or only retrieveaggregated results and make new queries as needed for more detail.
Logging introductionIn addition to the configurable logs for the Spotfire Server, the nodes, and the service instances, theAction Logs and System Monitoring feature helps administrators keep an eye on the health of theirSpotfire environment.
The action logs collect information about system events that are sent through a web service fromSpotfire Analyst, Spotfire Automation Services, and the Spotfire Web Player service to the SpotfireServer. These event logs, along with those from the Spotfire Server itself, can be saved either to files orin a database.
System monitoring takes periodic snapshots of key metrics on the Spotfire Server and the Spotfire WebPlayer services, and stores this information in the same location as the action logs. The logs can then beanalyzed in a Spotfire client.
Administrators have many options for how to configure this feature, including which events andsystem statistics should be logged, from which hosts logging information should be collected, and howthe logs are pruned or archived.
Administration interface introductionThe Spotfire Server start page provides access to most administrative tasks and diagnostic informationon your Spotfire environment.
● In Analytics you can create new analyses, and view and edit analyses that are in the Spotfire library.
● In Users & Groups you can create users and groups, add users or groups to groups (including thepredefined administrator ones), assign deployment areas to groups, and change user names,passwords, and emails.
● In Scheduling & Routing you can schedule updates and monitor their status, date, and time, andcreate routing rules applicable to groups, users, or specific analysis files.
● In Nodes & Services you can review the servers and services setup, add new nodes, services, andservice instances, upgrade or rollback existing ones, and create resource pools for routing rules.
30
TIBCO Spotfire® Server and Environment Installation and Administration

● In Deployments & Packages you can manage products, upgrades, extensions, and hotfixes bycreating or altering deployment areas, adding distributions and packages, and so forth.
● In Monitoring & Diagnostics you can monitor the system status, set logging levels, review logs,troubleshoot and download troubleshooting bundle, create memory dumps, and more.
● In Server Tools you can download the configuration tool for Spotfire Server.
Library administration, licenses, and preferences are configured in the Administration Manager in theinstalled Spotfire Analyst client.
Example scenarioThis is an example scenario of what happens in the Spotfire environment when a user opens an analysisin a web client.
1. The Spotfire web client user receives an email with a link to an analysis that contains interestinginformation.
2. When the link is opened, an ordinary http (or https) connection is set up from the browser toSpotfire Server. Because the environment is configured for username and password authentication,a login dialog appears.
3. If the username and password are correct, the user also needs to be listed in the user directory.Spotfire Server compares the credentials towards the Spotfire database for verification.
4. A check is made to see that the user has the license privileges to see the analysis, which is stored inthe library.
5. The analysis is not already loaded on any Web Player service instance, so the routing logic ofSpotfire Server selects the least utilized instance to load the analysis. The request is forwarded tothis instance.
6. The Web Player service instance loads the analysis from the library.
7. Data in an analysis can be linked or embedded. This analysis contains linked data, loaded throughinformation services. A request for the data goes back from the Web Player service instance to aSpotfire Server.
8. After the analysis and its data are loaded, Spotfire Server acts as a proxy between the web browserand the Web Player service instance.
9. The user finds the analysis interesting and wants to add an extra visualization. Because the user hasthe Business Author license, the menu options to do so are visible.
10. After the user has updated and saved the analysis, the user can send a link to interested parties.
31
TIBCO Spotfire® Server and Environment Installation and Administration
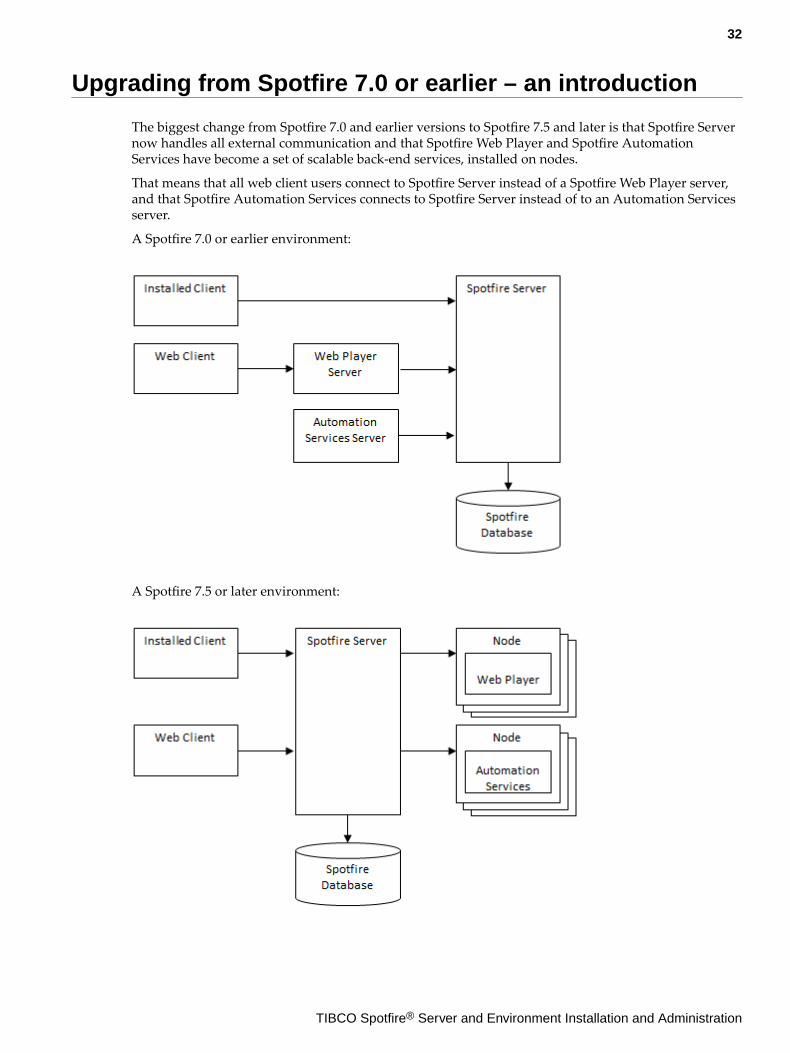
Upgrading from Spotfire 7.0 or earlier – an introduction
The biggest change from Spotfire 7.0 and earlier versions to Spotfire 7.5 and later is that Spotfire Servernow handles all external communication and that Spotfire Web Player and Spotfire AutomationServices have become a set of scalable back-end services, installed on nodes.
That means that all web client users connect to Spotfire Server instead of a Spotfire Web Player server,and that Spotfire Automation Services connects to Spotfire Server instead of to an Automation Servicesserver.
A Spotfire 7.0 or earlier environment:
A Spotfire 7.5 or later environment:
32
TIBCO Spotfire® Server and Environment Installation and Administration
When upgrading from Spotfire 7.0 or 6.5, this change mostly affects two things: Spotfire Server nowhandles all user authentication, regardless of which Spotfire client they use, and no load balancing isrequired in front of any Spotfire Web Player servers.
Upgrading Spotfire Server is done the same way as in previous versions. You install the new SpotfireServer and use the Spotfire Server Upgrade tool to upgrade the database and, if selected, copy certainfiles from the old installation of Spotfire Server to the new installation directory.
To be able to upgrade to the new environment, you must have Spotfire Server 6.5.3 HF-008 (or later) orSpotfire Server 7.0.0 HF-002 (or later) installed. If you have an earlier version of Spotfire Serverinstalled, you must first upgrade that server to one of these versions.
To upgrade to the new Spotfire Web Player and Spotfire Automation Services, you apply yourapplicable existing configurations, install the services on a node, and deploy any extensions.
It is recommended that you set up a staging environment for testing before upgrading.
Some specific things to take into consideration when upgrading are:
● CPU and memory: Because Spotfire Server performs more work than in previous versions, itconsumes more resources, I/O as well as CPU. All non-client computers in your environment (thecomputers that host Spotfire Server, and the nodes) require at least 16 GB of memory.
● Centralized configuration: All configuration files are now stored in the Spotfire database. Thismeans that a Spotfire Web Player service or Spotfire Automation Services configuration can becentrally applied to all services in your environment. However, this also means that names andcontent of configuration files have been changed and that old configurations must be copiedmanually.
● Authentication: In Spotfire 7.0 and 6.5, you configure authentication on the Spotfire Server forSpotfire Analyst users and on the Spotfire Web Player server for Spotfire web client users. In thenew environmentd you set up the authentication for all users on Spotfire Server. This means that thesame authentication method is used for Spotfire Analyst users as for Spotfire web client users.Therefore, it is no longer supported to use different authentication methods for Spotfire Analystusers and Spotfire web client users. However, anonymous authentication can be combined withanother authentication method on the same Spotfire Server. If a custom authentication method wasused, this is configured as an external authentication on Spotfire Server.
As of Spotfire version 7.9, you can use sites to configure multiple authentication methodswithin a single Spotfire environment.
● Load Balancing: If your Spotfire 7.0 or 6.5 environment had multiple Spotfire Web Player serversand a load balancer, the load balancer in front of the Web Players is no longer needed. In the newenvironment, each Web Player service on each node can have multiple instances running. The loadbalancer in front of the Spotfire Web Players is replaced by the routing capabilities of SpotfireServer. A load balancer can still be used in front of multiple Spotfire Servers.
● Web Links: If you have old web links to analyses, these must be updated. Because all users nowconnect to Spotfire Server, the DNS entry to the former Web Player server must now point to theSpotfire Server.
● Automation Services: Existing scheduled Spotfire Automation Services jobs, using the Client JobSender, must be updated because the configurations have changed and the Client Job Sender nowconnects to Spotfire Server instead of an Automation Services Server.
● Extensions and customizations: API Extensions or customizations, such as custom visualizations orco-branding, must be updated when upgrading to the new environment.
For more information on changes needed, and instructions on how to upgrade your environment, see Upgrading from 7.0 or earlier.
33
TIBCO Spotfire® Server and Environment Installation and Administration
Basic installation process for Spotfire
To get Spotfire up and running in a simple configuration, follow these steps. The resulting simpleinstallation includes the following: the server on one computer, a few Spotfire Web Player instancesavailable for other computers, the Spotfire Analyst client on another computer, and the user directoryin the Spotfire database.
Prerequisite
A database server must be up and running, preferably on a dedicated computer. Spotfire supportsOracle Database server and Microsoft SQL Server.
To view the complete system requirements, go to http://support.spotfire.com/sr.asp.
If you are running an earlier version of Spotfire Server, see Upgrading from Spotfire 7.0 or earlier.
1. Download the required software.
2. Collect the required information.
3. Set up the Spotfire database:
● On Oracle
● On SQL
4. Run the Spotfire Server installer.
5. Apply hotfix.
6. Create the bootstrap.xml file.
7. Create and save a basic Spotfire Server configuration.
8. Create an administrator user.
9. Start Spotfire Server.
10. Deploy client software packages to Spotfire Server.
11. Install a node manager.
12. Trust the node.
13. Install Spotfire Web Player instances.
14. Install Spotfire Automation Services instances.
Alternatively, you can use the command line after step 5 above (see Manually creating a simpleconfiguration) or run a script that invokes multiple commands (see Scripting a configuration).
34
TIBCO Spotfire® Server and Environment Installation and Administration

Installation and configuration
Spotfire Server requires that the preparation, installation, database configuration, and serverconfiguration happen in a specific order. Make sure that you follow the steps as described.
See Basic installation process for Spotfire for the required sequence.
PreparationPrepare to install Spotfire Server by downloading the required software from the TIBCO eDelivery andSupport websites, recording the required system properties, and setting up the Spotfire database onyour database server.
Make sure that your system fulfills the requirements listed on the TIBCO Spotfire Server SystemRequirements page, http://support.spotfire.com/sr_spotfireserver.asp.
If you are upgrading, first read Upgrading Spotfire.
Downloading required softwareThe first step in installing Spotfire Server is to download the required software to the computer thatwill run the server.
Prerequisites
You must have access to the required software on the TIBCO eDelivery website and the TIBCO Supportwebsite. If you do not have access, contact your sales representative.
As of Spotfire Server version 7.11.4, server hotfixes can be applied only on the specific service packversion that they were created for. Example: If you currently have Spotfire version 7.11.3, you can onlyapply server hotfixes for the 7.11.3 version, such as 7.11.3 HF-001, 7.11.3 HF-002, and so on. If you wanta hotfix of a different service pack level, such as 7.11.5 HF-001, you must first make sure to upgrade tothat service pack (7.11.5) before applying the hotfix. (Client hotfixes have not changed.)
Procedure
1. On the TIBCO eDelivery website, go to the TIBCO Spotfire Server page.2. At the bottom of the page, click Download, and then sign in to the site if required.3. On the server download page, select the latest version and your platform, and select the license
agreement check box.4. Under Installation Method, do one of the following:
● To download the entire product, including language packs and developer software, select FullProduct with Download Manager, click Download, and then follow the instructions.
● To download fewer files, do the following:
1. Select Individual file download.2. Under SELECT AN INDIVIDUAL COMPONENT, expand TIBCO Spotfire Server
Software.3. Under TIBCO Spotfire Server Software, select either
tib_sfire_server_version_win.zip (Windows) or tib_sfire_server_version.tar(Linux). The software is downloaded to your computer.
The following example shows the approximate location of the required softwarecomponents for Windows. The Linux options are similar.
35
TIBCO Spotfire® Server and Environment Installation and Administration
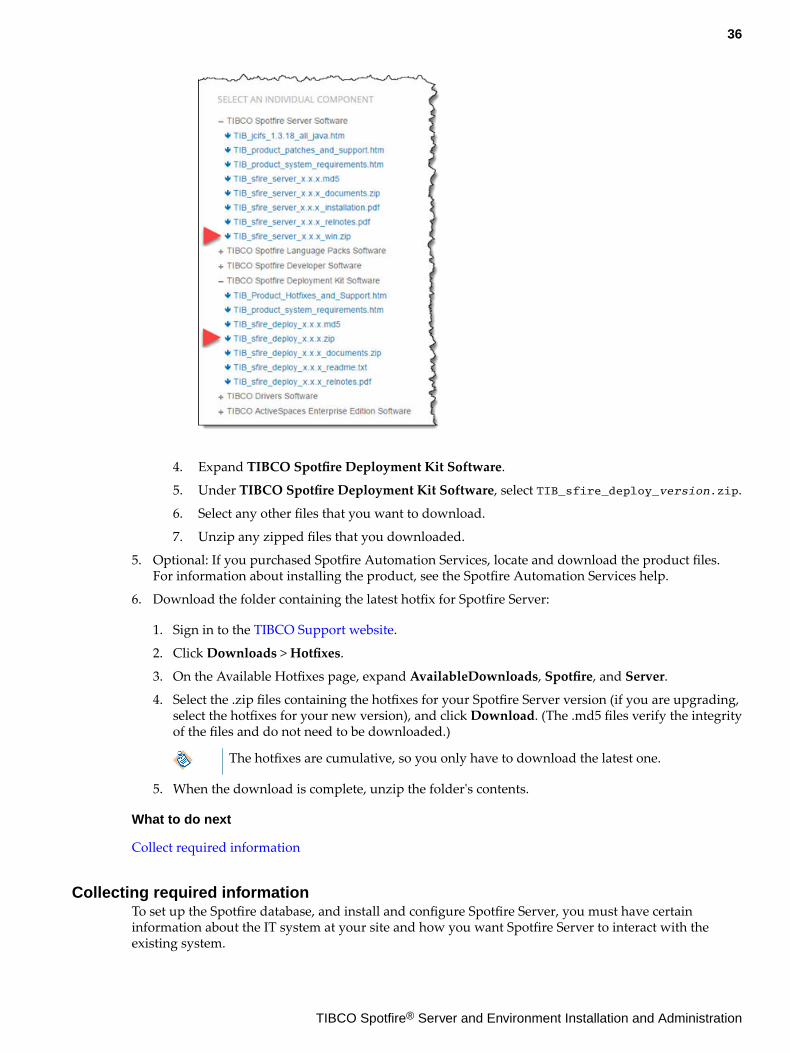
4. Expand TIBCO Spotfire Deployment Kit Software.
5. Under TIBCO Spotfire Deployment Kit Software, select TIB_sfire_deploy_version.zip.
6. Select any other files that you want to download.
7. Unzip any zipped files that you downloaded.
5. Optional: If you purchased Spotfire Automation Services, locate and download the product files.For information about installing the product, see the Spotfire Automation Services help.
6. Download the folder containing the latest hotfix for Spotfire Server:
1. Sign in to the TIBCO Support website.
2. Click Downloads > Hotfixes.
3. On the Available Hotfixes page, expand AvailableDownloads, Spotfire, and Server.
4. Select the .zip files containing the hotfixes for your Spotfire Server version (if you are upgrading,select the hotfixes for your new version), and click Download. (The .md5 files verify the integrityof the files and do not need to be downloaded.)
The hotfixes are cumulative, so you only have to download the latest one.
5. When the download is complete, unzip the folder's contents.
What to do next
Collect required information
Collecting required informationTo set up the Spotfire database, and install and configure Spotfire Server, you must have certaininformation about the IT system at your site and how you want Spotfire Server to interact with theexisting system.
36
TIBCO Spotfire® Server and Environment Installation and Administration
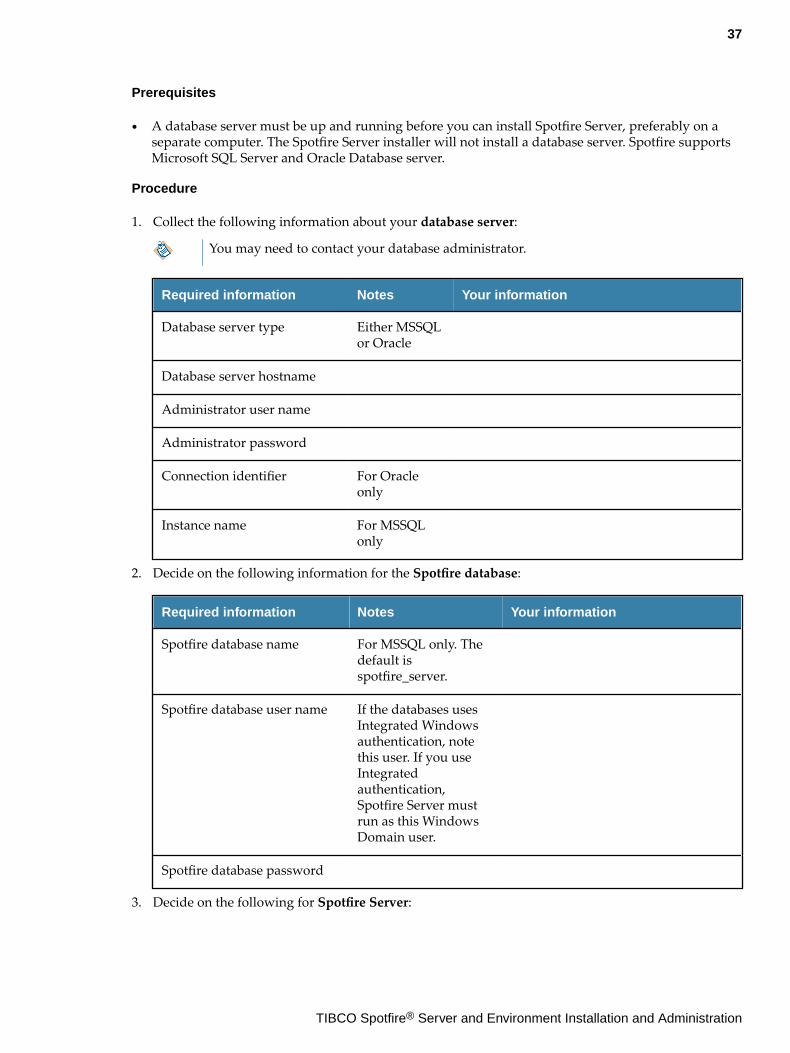
Prerequisites
● A database server must be up and running before you can install Spotfire Server, preferably on aseparate computer. The Spotfire Server installer will not install a database server. Spotfire supportsMicrosoft SQL Server and Oracle Database server.
Procedure
1. Collect the following information about your database server:
You may need to contact your database administrator.
Required information Notes Your information
Database server type Either MSSQLor Oracle
Database server hostname
Administrator user name
Administrator password
Connection identifier For Oracleonly
Instance name For MSSQLonly
2. Decide on the following information for the Spotfire database:
Required information Notes Your information
Spotfire database name For MSSQL only. Thedefault isspotfire_server.
Spotfire database user name If the databases usesIntegrated Windowsauthentication, notethis user. If you useIntegratedauthentication,Spotfire Server mustrun as this WindowsDomain user.
Spotfire database password
3. Decide on the following for Spotfire Server:
37
TIBCO Spotfire® Server and Environment Installation and Administration
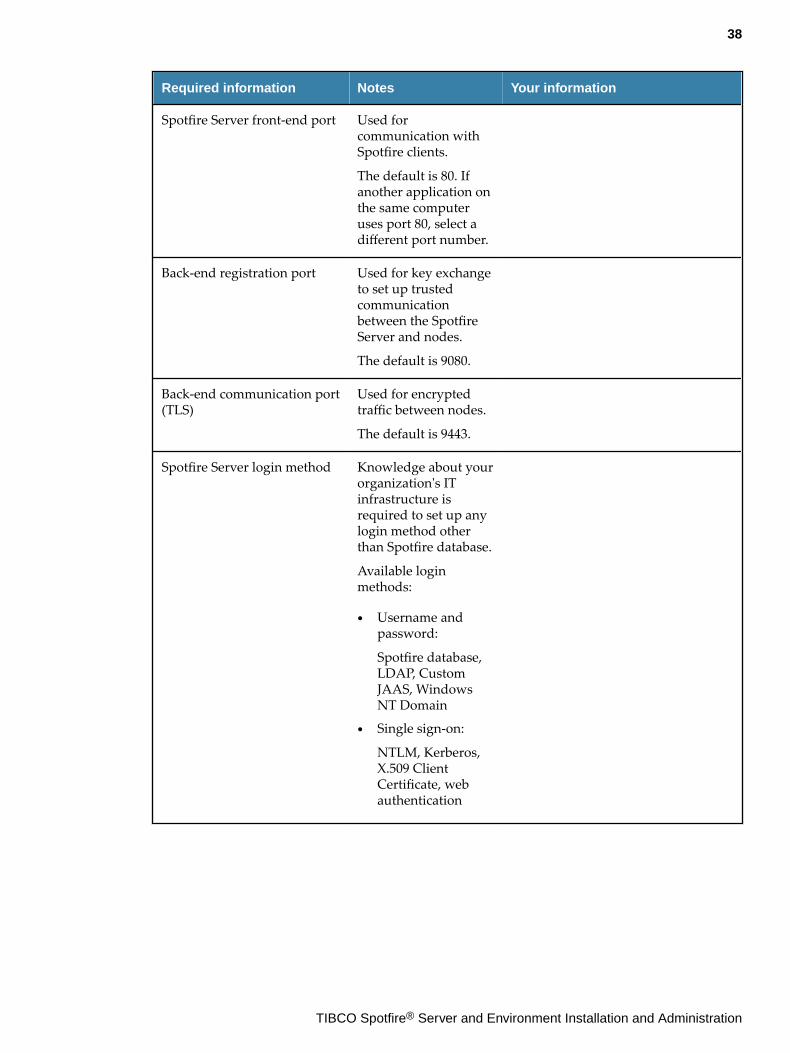
Required information Notes Your information
Spotfire Server front-end port Used forcommunication withSpotfire clients.
The default is 80. Ifanother application onthe same computeruses port 80, select adifferent port number.
Back-end registration port Used for key exchangeto set up trustedcommunicationbetween the SpotfireServer and nodes.
The default is 9080.
Back-end communication port(TLS)
Used for encryptedtraffic between nodes.
The default is 9443.
Spotfire Server login method Knowledge about yourorganization's ITinfrastructure isrequired to set up anylogin method otherthan Spotfire database.
Available loginmethods:
● Username andpassword:
Spotfire database,LDAP, CustomJAAS, WindowsNT Domain
● Single sign-on:
NTLM, Kerberos,X.509 ClientCertificate, webauthentication
38
TIBCO Spotfire® Server and Environment Installation and Administration
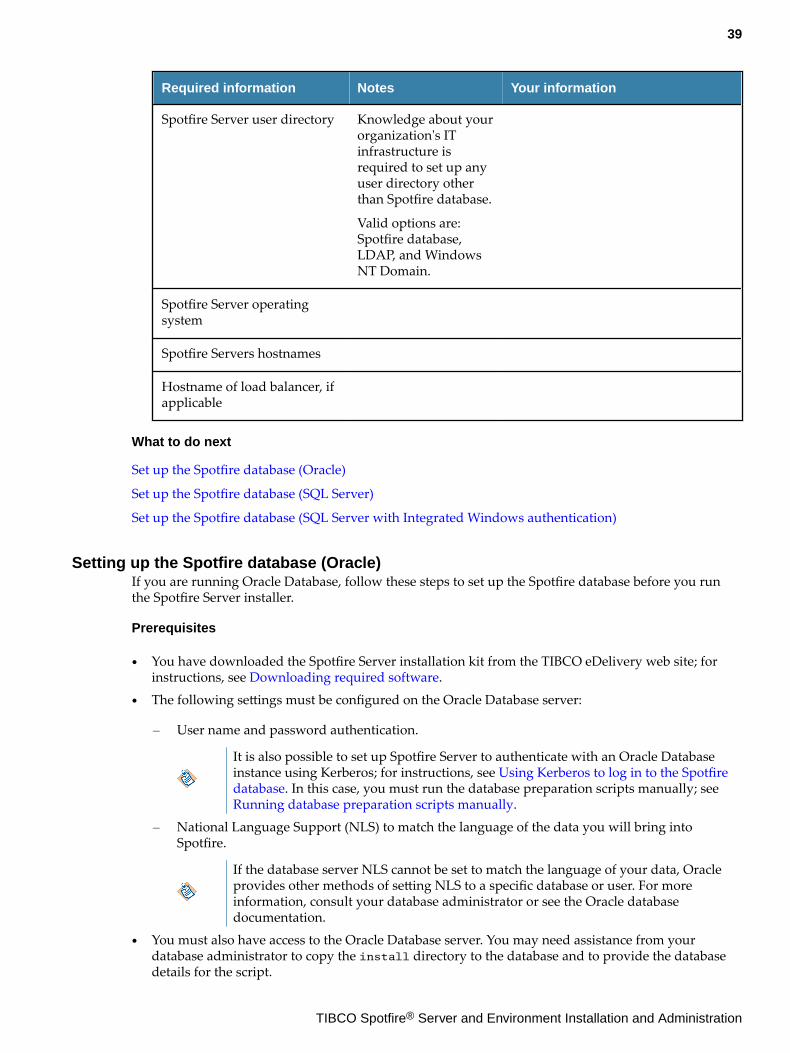
Required information Notes Your information
Spotfire Server user directory Knowledge about yourorganization's ITinfrastructure isrequired to set up anyuser directory otherthan Spotfire database.
Valid options are:Spotfire database,LDAP, and WindowsNT Domain.
Spotfire Server operatingsystem
Spotfire Servers hostnames
Hostname of load balancer, ifapplicable
What to do next
Set up the Spotfire database (Oracle)
Set up the Spotfire database (SQL Server)
Set up the Spotfire database (SQL Server with Integrated Windows authentication)
Setting up the Spotfire database (Oracle)If you are running Oracle Database, follow these steps to set up the Spotfire database before you runthe Spotfire Server installer.
Prerequisites
● You have downloaded the Spotfire Server installation kit from the TIBCO eDelivery web site; forinstructions, see Downloading required software.
● The following settings must be configured on the Oracle Database server:
— User name and password authentication.
It is also possible to set up Spotfire Server to authenticate with an Oracle Databaseinstance using Kerberos; for instructions, see Using Kerberos to log in to the Spotfiredatabase. In this case, you must run the database preparation scripts manually; see Running database preparation scripts manually.
— National Language Support (NLS) to match the language of the data you will bring intoSpotfire.
If the database server NLS cannot be set to match the language of your data, Oracleprovides other methods of setting NLS to a specific database or user. For moreinformation, consult your database administrator or see the Oracle databasedocumentation.
● You must also have access to the Oracle Database server. You may need assistance from yourdatabase administrator to copy the install directory to the database and to provide the databasedetails for the script.
39
TIBCO Spotfire® Server and Environment Installation and Administration
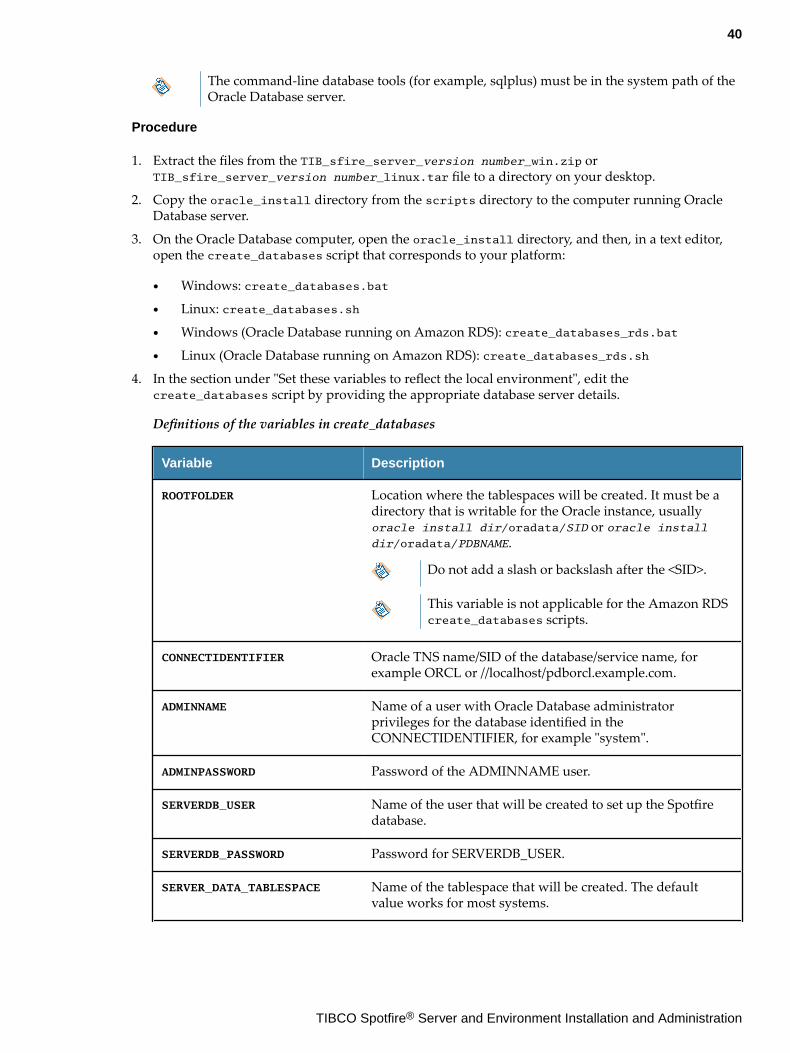
The command-line database tools (for example, sqlplus) must be in the system path of theOracle Database server.
Procedure
1. Extract the files from the TIB_sfire_server_version number_win.zip orTIB_sfire_server_version number_linux.tar file to a directory on your desktop.
2. Copy the oracle_install directory from the scripts directory to the computer running OracleDatabase server.
3. On the Oracle Database computer, open the oracle_install directory, and then, in a text editor,open the create_databases script that corresponds to your platform:
● Windows: create_databases.bat
● Linux: create_databases.sh
● Windows (Oracle Database running on Amazon RDS): create_databases_rds.bat
● Linux (Oracle Database running on Amazon RDS): create_databases_rds.sh
4. In the section under "Set these variables to reflect the local environment", edit thecreate_databases script by providing the appropriate database server details.
Definitions of the variables in create_databases
Variable Description
ROOTFOLDER Location where the tablespaces will be created. It must be adirectory that is writable for the Oracle instance, usuallyoracle install dir/oradata/SID or oracle installdir/oradata/PDBNAME.
Do not add a slash or backslash after the <SID>.
This variable is not applicable for the Amazon RDScreate_databases scripts.
CONNECTIDENTIFIER Oracle TNS name/SID of the database/service name, forexample ORCL or //localhost/pdborcl.example.com.
ADMINNAME Name of a user with Oracle Database administratorprivileges for the database identified in theCONNECTIDENTIFIER, for example "system".
ADMINPASSWORD Password of the ADMINNAME user.
SERVERDB_USER Name of the user that will be created to set up the Spotfiredatabase.
SERVERDB_PASSWORD Password for SERVERDB_USER.
SERVER_DATA_TABLESPACE Name of the tablespace that will be created. The defaultvalue works for most systems.
40
TIBCO Spotfire® Server and Environment Installation and Administration
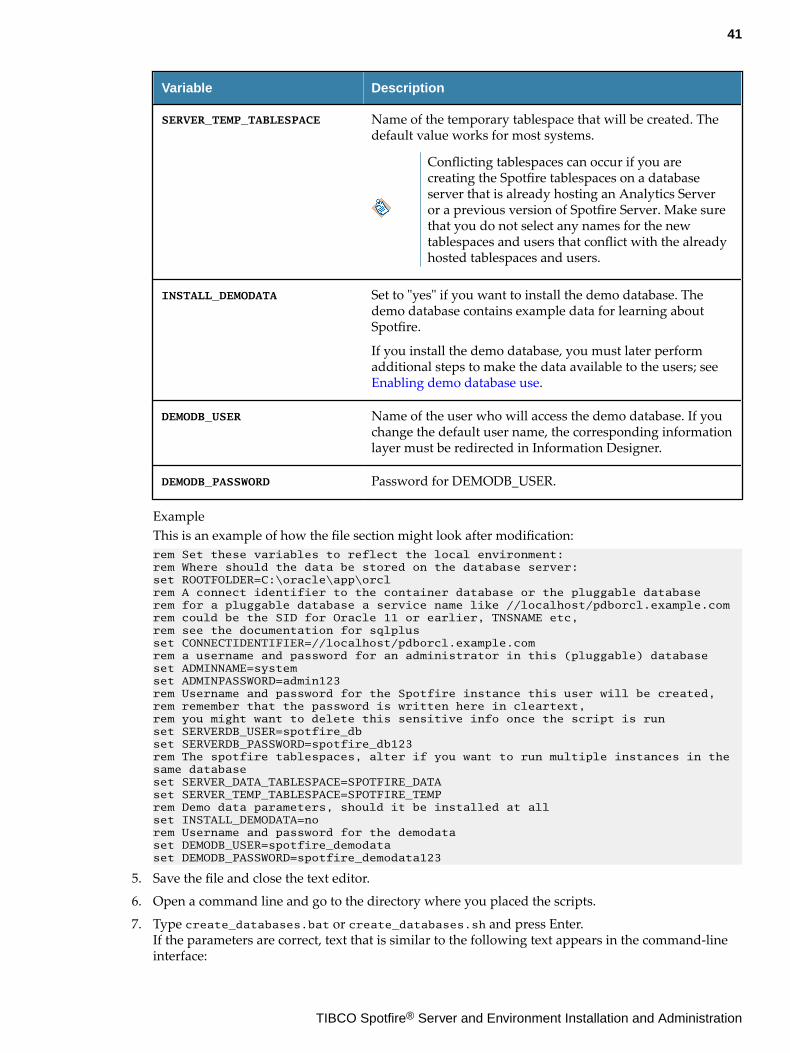
Variable Description
SERVER_TEMP_TABLESPACE Name of the temporary tablespace that will be created. Thedefault value works for most systems.
Conflicting tablespaces can occur if you arecreating the Spotfire tablespaces on a databaseserver that is already hosting an Analytics Serveror a previous version of Spotfire Server. Make surethat you do not select any names for the newtablespaces and users that conflict with the alreadyhosted tablespaces and users.
INSTALL_DEMODATA Set to "yes" if you want to install the demo database. Thedemo database contains example data for learning aboutSpotfire.
If you install the demo database, you must later performadditional steps to make the data available to the users; see Enabling demo database use.
DEMODB_USER Name of the user who will access the demo database. If youchange the default user name, the corresponding informationlayer must be redirected in Information Designer.
DEMODB_PASSWORD Password for DEMODB_USER.
ExampleThis is an example of how the file section might look after modification:rem Set these variables to reflect the local environment:rem Where should the data be stored on the database server:set ROOTFOLDER=C:\oracle\app\orclrem A connect identifier to the container database or the pluggable databaserem for a pluggable database a service name like //localhost/pdborcl.example.comrem could be the SID for Oracle 11 or earlier, TNSNAME etc,rem see the documentation for sqlplusset CONNECTIDENTIFIER=//localhost/pdborcl.example.comrem a username and password for an administrator in this (pluggable) databaseset ADMINNAME=systemset ADMINPASSWORD=admin123rem Username and password for the Spotfire instance this user will be created,rem remember that the password is written here in cleartext,rem you might want to delete this sensitive info once the script is runset SERVERDB_USER=spotfire_dbset SERVERDB_PASSWORD=spotfire_db123rem The spotfire tablespaces, alter if you want to run multiple instances in the same databaseset SERVER_DATA_TABLESPACE=SPOTFIRE_DATAset SERVER_TEMP_TABLESPACE=SPOTFIRE_TEMPrem Demo data parameters, should it be installed at allset INSTALL_DEMODATA=norem Username and password for the demodataset DEMODB_USER=spotfire_demodataset DEMODB_PASSWORD=spotfire_demodata123
5. Save the file and close the text editor.
6. Open a command line and go to the directory where you placed the scripts.
7. Type create_databases.bat or create_databases.sh and press Enter.If the parameters are correct, text that is similar to the following text appears in the command-lineinterface:
41
TIBCO Spotfire® Server and Environment Installation and Administration
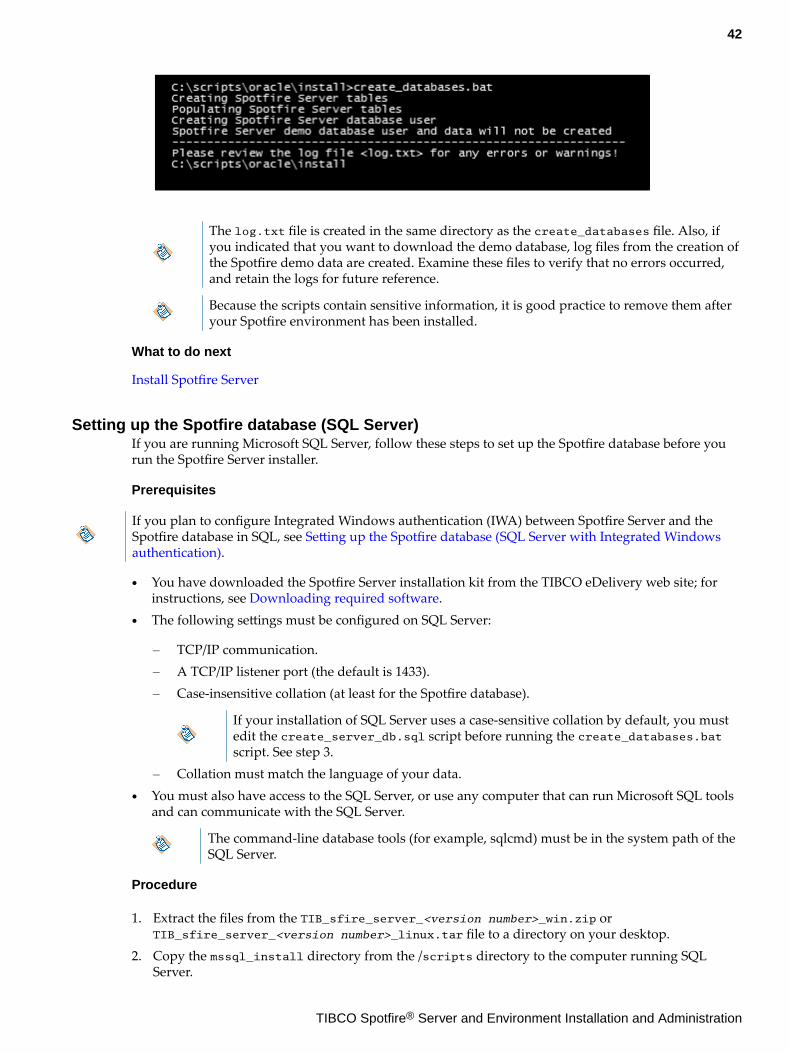
The log.txt file is created in the same directory as the create_databases file. Also, ifyou indicated that you want to download the demo database, log files from the creation ofthe Spotfire demo data are created. Examine these files to verify that no errors occurred,and retain the logs for future reference.
Because the scripts contain sensitive information, it is good practice to remove them afteryour Spotfire environment has been installed.
What to do next
Install Spotfire Server
Setting up the Spotfire database (SQL Server)If you are running Microsoft SQL Server, follow these steps to set up the Spotfire database before yourun the Spotfire Server installer.
Prerequisites
If you plan to configure Integrated Windows authentication (IWA) between Spotfire Server and theSpotfire database in SQL, see Setting up the Spotfire database (SQL Server with Integrated Windowsauthentication).
● You have downloaded the Spotfire Server installation kit from the TIBCO eDelivery web site; forinstructions, see Downloading required software.
● The following settings must be configured on SQL Server:
— TCP/IP communication.— A TCP/IP listener port (the default is 1433).— Case-insensitive collation (at least for the Spotfire database).
If your installation of SQL Server uses a case-sensitive collation by default, you mustedit the create_server_db.sql script before running the create_databases.batscript. See step 3.
— Collation must match the language of your data.● You must also have access to the SQL Server, or use any computer that can run Microsoft SQL tools
and can communicate with the SQL Server.
The command-line database tools (for example, sqlcmd) must be in the system path of theSQL Server.
Procedure
1. Extract the files from the TIB_sfire_server_<version number>_win.zip orTIB_sfire_server_<version number>_linux.tar file to a directory on your desktop.
2. Copy the mssql_install directory from the /scripts directory to the computer running SQLServer.
42
TIBCO Spotfire® Server and Environment Installation and Administration
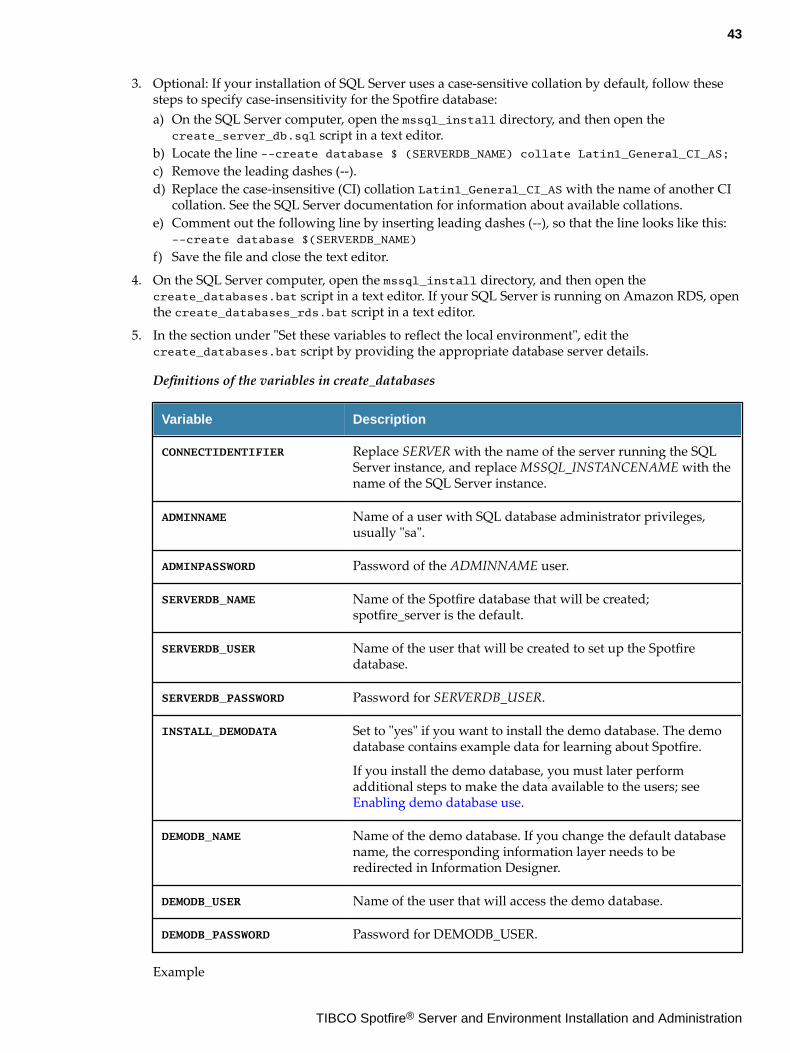
3. Optional: If your installation of SQL Server uses a case-sensitive collation by default, follow thesesteps to specify case-insensitivity for the Spotfire database:a) On the SQL Server computer, open the mssql_install directory, and then open the
create_server_db.sql script in a text editor.b) Locate the line --create database $ (SERVERDB_NAME) collate Latin1_General_CI_AS;c) Remove the leading dashes (--).d) Replace the case-insensitive (CI) collation Latin1_General_CI_AS with the name of another CI
collation. See the SQL Server documentation for information about available collations.e) Comment out the following line by inserting leading dashes (--), so that the line looks like this:
--create database $(SERVERDB_NAME)
f) Save the file and close the text editor.
4. On the SQL Server computer, open the mssql_install directory, and then open thecreate_databases.bat script in a text editor. If your SQL Server is running on Amazon RDS, openthe create_databases_rds.bat script in a text editor.
5. In the section under "Set these variables to reflect the local environment", edit thecreate_databases.bat script by providing the appropriate database server details.
Definitions of the variables in create_databases
Variable Description
CONNECTIDENTIFIER Replace SERVER with the name of the server running the SQLServer instance, and replace MSSQL_INSTANCENAME with thename of the SQL Server instance.
ADMINNAME Name of a user with SQL database administrator privileges,usually "sa".
ADMINPASSWORD Password of the ADMINNAME user.
SERVERDB_NAME Name of the Spotfire database that will be created;spotfire_server is the default.
SERVERDB_USER Name of the user that will be created to set up the Spotfiredatabase.
SERVERDB_PASSWORD Password for SERVERDB_USER.
INSTALL_DEMODATA Set to "yes" if you want to install the demo database. The demodatabase contains example data for learning about Spotfire.
If you install the demo database, you must later performadditional steps to make the data available to the users; see Enabling demo database use.
DEMODB_NAME Name of the demo database. If you change the default databasename, the corresponding information layer needs to beredirected in Information Designer.
DEMODB_USER Name of the user that will access the demo database.
DEMODB_PASSWORD Password for DEMODB_USER.
Example
43
TIBCO Spotfire® Server and Environment Installation and Administration
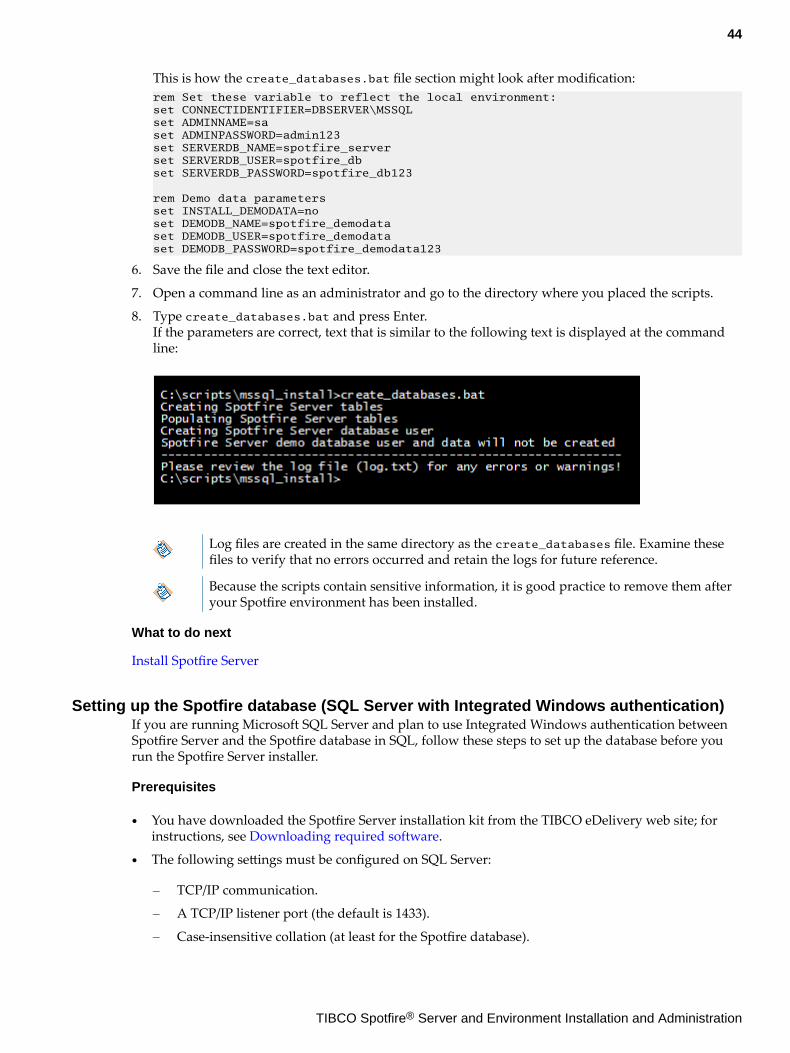
This is how the create_databases.bat file section might look after modification:rem Set these variable to reflect the local environment:set CONNECTIDENTIFIER=DBSERVER\MSSQL set ADMINNAME=saset ADMINPASSWORD=admin123set SERVERDB_NAME=spotfire_serverset SERVERDB_USER=spotfire_dbset SERVERDB_PASSWORD=spotfire_db123
rem Demo data parametersset INSTALL_DEMODATA=noset DEMODB_NAME=spotfire_demodataset DEMODB_USER=spotfire_demodataset DEMODB_PASSWORD=spotfire_demodata123
6. Save the file and close the text editor.
7. Open a command line as an administrator and go to the directory where you placed the scripts.
8. Type create_databases.bat and press Enter.If the parameters are correct, text that is similar to the following text is displayed at the commandline:
Log files are created in the same directory as the create_databases file. Examine thesefiles to verify that no errors occurred and retain the logs for future reference.
Because the scripts contain sensitive information, it is good practice to remove them afteryour Spotfire environment has been installed.
What to do next
Install Spotfire Server
Setting up the Spotfire database (SQL Server with Integrated Windows authentication)If you are running Microsoft SQL Server and plan to use Integrated Windows authentication betweenSpotfire Server and the Spotfire database in SQL, follow these steps to set up the database before yourun the Spotfire Server installer.
Prerequisites
● You have downloaded the Spotfire Server installation kit from the TIBCO eDelivery web site; forinstructions, see Downloading required software.
● The following settings must be configured on SQL Server:
— TCP/IP communication.
— A TCP/IP listener port (the default is 1433).
— Case-insensitive collation (at least for the Spotfire database).
44
TIBCO Spotfire® Server and Environment Installation and Administration
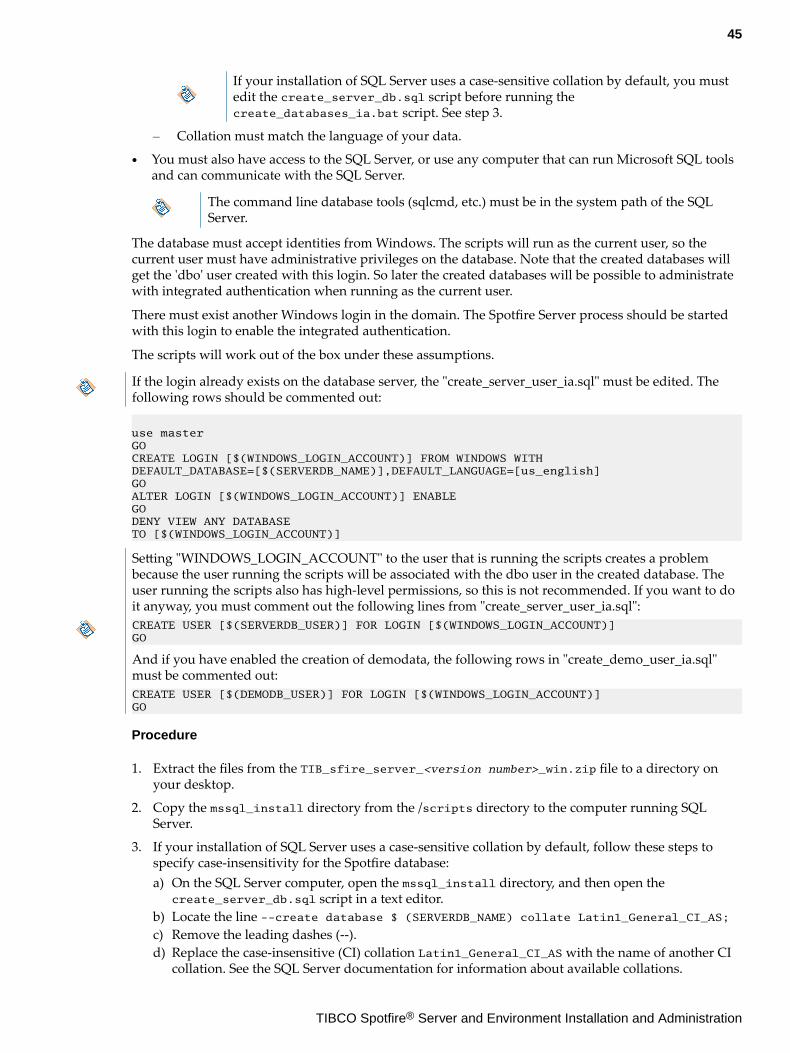
If your installation of SQL Server uses a case-sensitive collation by default, you mustedit the create_server_db.sql script before running thecreate_databases_ia.bat script. See step 3.
— Collation must match the language of your data.
● You must also have access to the SQL Server, or use any computer that can run Microsoft SQL toolsand can communicate with the SQL Server.
The command line database tools (sqlcmd, etc.) must be in the system path of the SQLServer.
The database must accept identities from Windows. The scripts will run as the current user, so thecurrent user must have administrative privileges on the database. Note that the created databases willget the 'dbo' user created with this login. So later the created databases will be possible to administratewith integrated authentication when running as the current user.
There must exist another Windows login in the domain. The Spotfire Server process should be startedwith this login to enable the integrated authentication.
The scripts will work out of the box under these assumptions.
If the login already exists on the database server, the "create_server_user_ia.sql" must be edited. Thefollowing rows should be commented out:
use master GO CREATE LOGIN [$(WINDOWS_LOGIN_ACCOUNT)] FROM WINDOWS WITH DEFAULT_DATABASE=[$(SERVERDB_NAME)],DEFAULT_LANGUAGE=[us_english] GO ALTER LOGIN [$(WINDOWS_LOGIN_ACCOUNT)] ENABLE GO DENY VIEW ANY DATABASE TO [$(WINDOWS_LOGIN_ACCOUNT)]
Setting "WINDOWS_LOGIN_ACCOUNT" to the user that is running the scripts creates a problembecause the user running the scripts will be associated with the dbo user in the created database. Theuser running the scripts also has high-level permissions, so this is not recommended. If you want to doit anyway, you must comment out the following lines from "create_server_user_ia.sql":CREATE USER [$(SERVERDB_USER)] FOR LOGIN [$(WINDOWS_LOGIN_ACCOUNT)]GO
And if you have enabled the creation of demodata, the following rows in "create_demo_user_ia.sql"must be commented out:CREATE USER [$(DEMODB_USER)] FOR LOGIN [$(WINDOWS_LOGIN_ACCOUNT)]GO
Procedure
1. Extract the files from the TIB_sfire_server_<version number>_win.zip file to a directory onyour desktop.
2. Copy the mssql_install directory from the /scripts directory to the computer running SQLServer.
3. If your installation of SQL Server uses a case-sensitive collation by default, follow these steps tospecify case-insensitivity for the Spotfire database:a) On the SQL Server computer, open the mssql_install directory, and then open the
create_server_db.sql script in a text editor.b) Locate the line --create database $ (SERVERDB_NAME) collate Latin1_General_CI_AS;c) Remove the leading dashes (--).d) Replace the case-insensitive (CI) collation Latin1_General_CI_AS with the name of another CI
collation. See the SQL Server documentation for information about available collations.
45
TIBCO Spotfire® Server and Environment Installation and Administration
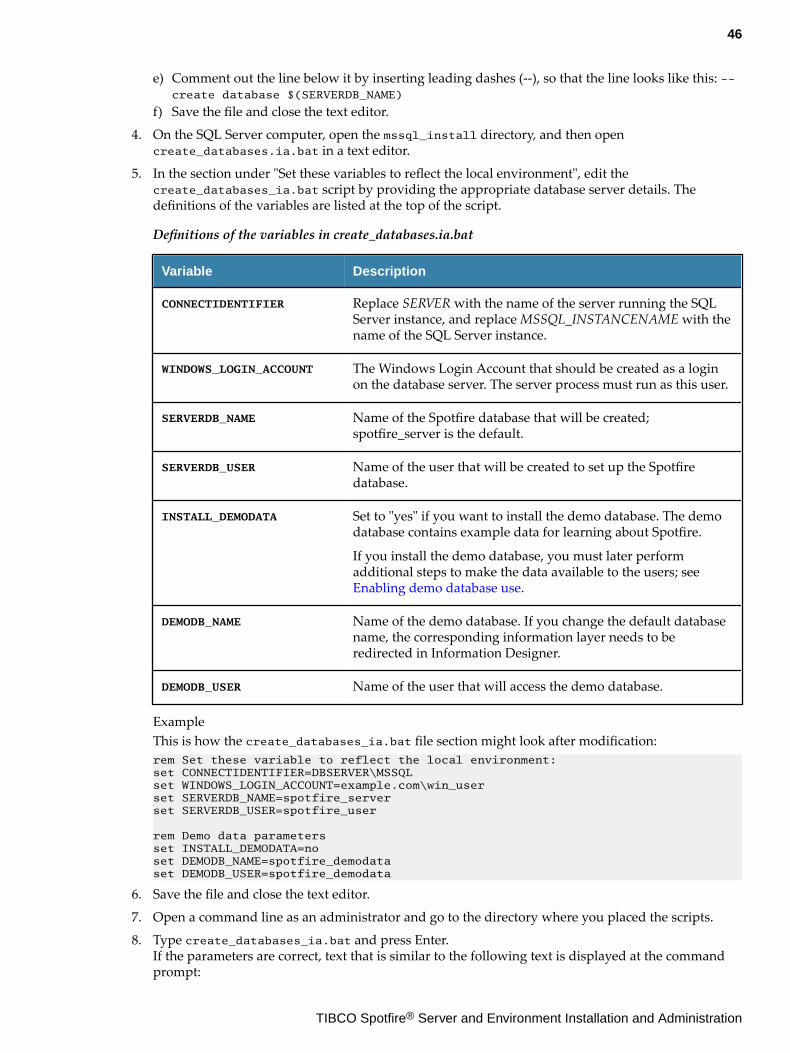
e) Comment out the line below it by inserting leading dashes (--), so that the line looks like this: --create database $(SERVERDB_NAME)
f) Save the file and close the text editor.
4. On the SQL Server computer, open the mssql_install directory, and then opencreate_databases.ia.bat in a text editor.
5. In the section under "Set these variables to reflect the local environment", edit thecreate_databases_ia.bat script by providing the appropriate database server details. Thedefinitions of the variables are listed at the top of the script.
Definitions of the variables in create_databases.ia.bat
Variable Description
CONNECTIDENTIFIER Replace SERVER with the name of the server running the SQLServer instance, and replace MSSQL_INSTANCENAME with thename of the SQL Server instance.
WINDOWS_LOGIN_ACCOUNT The Windows Login Account that should be created as a loginon the database server. The server process must run as this user.
SERVERDB_NAME Name of the Spotfire database that will be created;spotfire_server is the default.
SERVERDB_USER Name of the user that will be created to set up the Spotfiredatabase.
INSTALL_DEMODATA Set to "yes" if you want to install the demo database. The demodatabase contains example data for learning about Spotfire.
If you install the demo database, you must later performadditional steps to make the data available to the users; see Enabling demo database use.
DEMODB_NAME Name of the demo database. If you change the default databasename, the corresponding information layer needs to beredirected in Information Designer.
DEMODB_USER Name of the user that will access the demo database.
ExampleThis is how the create_databases_ia.bat file section might look after modification:rem Set these variable to reflect the local environment:set CONNECTIDENTIFIER=DBSERVER\MSSQLset WINDOWS_LOGIN_ACCOUNT=example.com\win_userset SERVERDB_NAME=spotfire_serverset SERVERDB_USER=spotfire_user
rem Demo data parametersset INSTALL_DEMODATA=noset DEMODB_NAME=spotfire_demodataset DEMODB_USER=spotfire_demodata
6. Save the file and close the text editor.
7. Open a command line as an administrator and go to the directory where you placed the scripts.
8. Type create_databases_ia.bat and press Enter.If the parameters are correct, text that is similar to the following text is displayed at the commandprompt:
46
TIBCO Spotfire® Server and Environment Installation and Administration
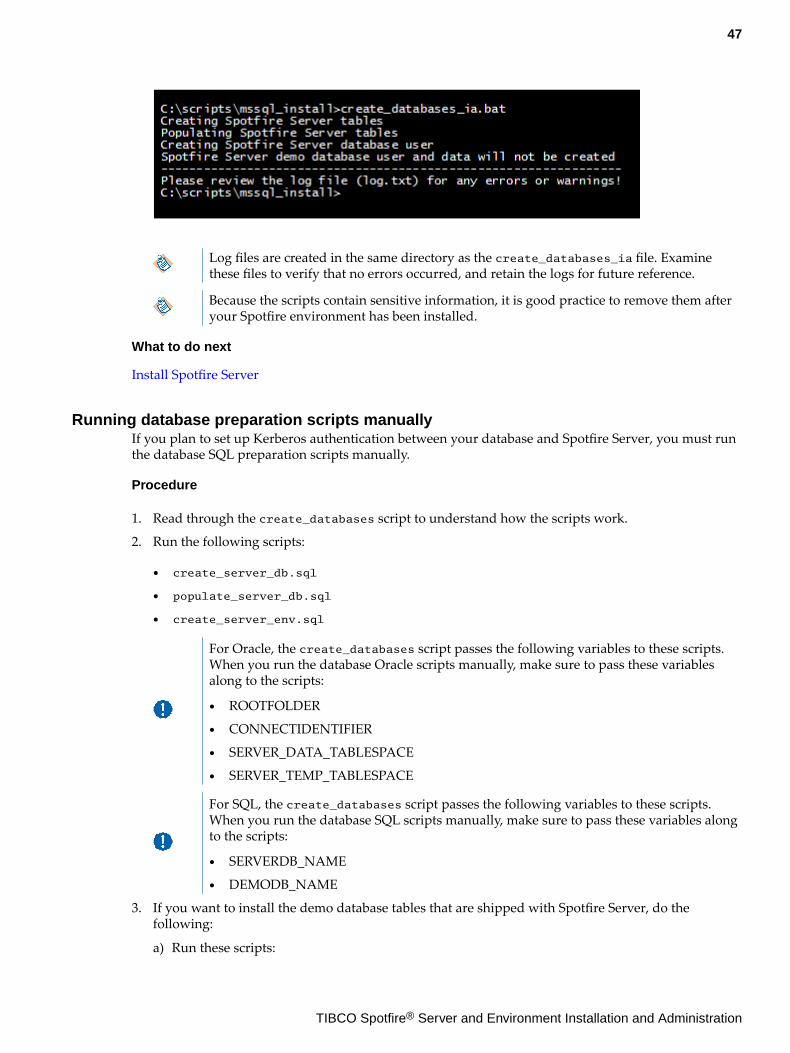
Log files are created in the same directory as the create_databases_ia file. Examinethese files to verify that no errors occurred, and retain the logs for future reference.
Because the scripts contain sensitive information, it is good practice to remove them afteryour Spotfire environment has been installed.
What to do next
Install Spotfire Server
Running database preparation scripts manuallyIf you plan to set up Kerberos authentication between your database and Spotfire Server, you must runthe database SQL preparation scripts manually.
Procedure
1. Read through the create_databases script to understand how the scripts work.
2. Run the following scripts:
● create_server_db.sql
● populate_server_db.sql
● create_server_env.sql
For Oracle, the create_databases script passes the following variables to these scripts.When you run the database Oracle scripts manually, make sure to pass these variablesalong to the scripts:
● ROOTFOLDER
● CONNECTIDENTIFIER
● SERVER_DATA_TABLESPACE
● SERVER_TEMP_TABLESPACE
For SQL, the create_databases script passes the following variables to these scripts.When you run the database SQL scripts manually, make sure to pass these variables alongto the scripts:
● SERVERDB_NAME
● DEMODB_NAME
3. If you want to install the demo database tables that are shipped with Spotfire Server, do thefollowing:
a) Run these scripts:
47
TIBCO Spotfire® Server and Environment Installation and Administration
● create_demotables.sql
● create_demodata_env.sql
b) Using the appropriate load command for your database, load all of the SQL loader files that arein the demodata folder.
InstallationThe Spotfire Server installer adds three major components to your system: A Java environment (JDK), aTomcat application server, and a Spotfire Server web application.
The Spotfire Server should run in an English (United States) language setting, as stated on the TIBCOSpotfire Server System Requirements page, http://support.spotfire.com/sr_spotfireserver.asp.
If you are upgrading, first read Upgrading Spotfire.
The JAVA_HOME of the Apache Tomcat is set to the path of the installed JDK.
For increased security, you may want to install the Java Cryptography Extension (JCE) unlimitedstrength jurisdiction policy files. It is the user's responsibility to verify that these files are allowed underlocal regulations.
Select the appropriate installation procedure for your system and level of experience.
Installing the Spotfire Server files (interactively on Windows)Running the Spotfire Server installer is the second step in the Spotfire Server installation process, aftersetting up the database.
Prerequisites
The Spotfire database has been set up on your Oracle or SQL Server database; for instructions, see Setting up the Spotfire database on Oracle or on SQL Server.
For security and product performance reasons, it is recommended that you install Spotfire Server on adifferent computer than the database.
This procedure is for an interactive installation, using the installation wizard. Alternatively, you can runa silent installation from the command line; for details, see Installing the Spotfire Server files (silentlyon Windows).
Procedure
1. In the server installation kit that you downloaded from the TIBCO eDelivery site, double-clicksetup-win64.exe.
If you use Microsoft SQL Server with Windows Integrated Authentication, install SpotfireServer as the Domain User that you set up with the script create_databases_ia.bat.Also make sure that Spotfire Server always runs as this Domain User. Confirm with thelogs that Spotfire Server starts.
2. In the installation wizard Welcome dialog, click Next.
3. In the License dialog, read the agreement, select the appropriate radio button, and then click Next.
4. In the Third Party Components dialog, if you plan to configure the system for NTLM and youcurrently have access to the internet, select Download and install and then click Next.
If you do not currently have access to the internet, you can install the third-partycomponents later; for instructions, see Downloading third-party components (JCIFS) forNTLM authentication.
48
TIBCO Spotfire® Server and Environment Installation and Administration
5. In the Destination Folder dialog you can change the location if you want to, and then click Next.
6. In the Windows Service dialog, select the option you want and then click Next.
7. In the Spotfire Server Port dialog you can specify the front-end port, and then click Next.
To check whether a port is in use, open a command prompt, type netstat -na, and pressEnter.
The ports selected during installation for front-end, back-end communication, and back-end registration ports must be open in the firewall. (The defaults are 80, 9443, and 9080.)
8. In the Backend Communication Ports dialog you can specify the back-end ports, and then clickNext.
9. In the Node Manager Hosts dialog, select the computer names that can be used by back-end trust.In general you can leave all the listed names as they are.
10. In the Ready to Install dialog, click Install.The Installing dialog tracks the progress of the installation.
11. When the installation is completed, select Launch the configuration tool to open the configurationtool, or Launch the upgrade tool if you are upgrading.
What to do next
Apply any available hotfixes for Spotfire Server: Applying hotfixes
Installing the Spotfire Server files (silently on Windows)Instead of running the installation wizard, you can install the Spotfire Server files silently by runningthe installer from the command prompt.
Prerequisites
The Spotfire database has been set up within your Oracle or SQL Server database; for instructions, see Setting up the Spotfire database on Oracle or on SQL Server.
For security and product performance reasons, it is recommended that you install Spotfire Server on adifferent computer than the database.
To use the interactive installation wizard instead of the command prompt installation, see Installing theSpotfire Server files (interactively on Windows).
Procedure
1. Open a command prompt as an administrator.
2. If necessary, edit the default parameters. Make sure that none of the ports that you select are alreadyin use. setup-win64.exe /s /v"/qn /l*vx TSS_install.log DOWNLOAD_THIRD_PARTY=Yes INSTALLDIR=C:\tibco\tss\<version> SPOTFIRE_WINDOWS_SERVICE=Create SERVER_FRONTEND_PORT=80 SERVER_BACKEND_REGISTRATION_PORT=9080 SERVER_BACKEND_COMMUNICATION_PORT=9443
49
TIBCO Spotfire® Server and Environment Installation and Administration
Silent installation parameters
Parameter Description
DOWNLOAD_THIRD_PARTY
This parameter is casesensitive.
The available options are Yes and No. Thesecomponents are only needed to configure the systemfor NTLM.
INSTALLDIR The installation directory.
SPOTFIRE_WINDOWS_SERVICE The available options are Create and DoNotCreate.
SERVER_FRONTEND_PORT Used for communication with Spotfire clients. Thedefault is 80.
SERVER_BACKEND_REGISTRATION_PORT Used for key exchange to set up trustedcommunication between the Spotfire Server andnodes. The default is 9080.
SERVER_BACKEND_COMMUNICATION_PORT Used for encrypted traffic between nodes. Thedefault is 9443.
3. Specify /qn for quiet installation with no user interface, or /qb for quiet installation with basic userinterface.
4. Run the installation script.
What to do next
Apply any available hotfixes for Spotfire Server: Applying hotfixes
Installing the Spotfire Server files (RPM Linux)If you have root access to the Linux computer on which you want to install Spotfire Server, you can usethe RPM-based installer. If you do not have root access, use the Tarball installer instead.
Prerequisites
The Spotfire database has been set up within your Oracle or SQL Server database; for instructions, see Setting up the Spotfire database on Oracle or on SQL Server.
For security and product performance reasons, it is recommended that you install Spotfire Server on adifferent computer than the database.
Procedure
1. Open a command line and run the following script: rpm -ivh tss-<versionnumber>.x86_64.rpm
As the script runs it prompts you for any missing arguments.
2. On the command line, run the post-installation script: /usr/local/bin/tibco/tss/<versionnumber>/configure [-d] [-s ] [-r ] [-b ] where:
● -d disables the download of third-party components.
● -s specifies the server front-end port.
● -r specifies the back-end registration port.
50
TIBCO Spotfire® Server and Environment Installation and Administration
● -b specifies the back-end communication port.
What to do next
Apply any available hotfixes for Spotfire Server: Applying hotfixes
Installing the Spotfire Server files (Tarball Linux)If you do not have root access to the Linux computer on which you want to install Spotfire Server, usethe Tarball installer rather than the RPM installer. Both the installation script and a post-installationscript are run from the command line.
Prerequisites
The Spotfire database has been set up within your Oracle or SQL Server database; for instructions, see Setting up the Spotfire database on Oracle or on SQL Server.
For security and product performance reasons, it is recommended that you install Spotfire Server on adifferent computer than the database.
Procedure
1. Open a command-line interface, go to the directory where you want to install Spotfire Server, andunpack and run the tar file by running the following command: tar xzf tss-<versionnumber>.x86_64.tar.gz
The directory must contain the string "tss" in order for start and stop scripts to work.
As the script runs it prompts you for any missing arguments.
2. In the command-line interface, run the post-installation script in the directory where the tar file wasunpacked: ./configure [-d] [-s ] [-r ] [-b ], where:
● -d disables the download of third-party components.
● -s specifies the server front-end port.
● -r specifies the back-end registration port.
● -b specifies the back-end communication port.
3. Optional: If you have root access to the computer, configure the server to start when the computerstarts by running this command: ./configure-boot
What to do next
Apply any available hotfixes for Spotfire Server: Applying hotfixes
Database driversDataDirect database drivers work well for test environments, but for production environments, driversfrom Oracle or Microsoft SQL are strongly recommended.
Spotfire Server ships with the following database drivers:
● DataDirect drivers for Oracle and Microsoft SQL
● Microsoft SQL Server driver
Spotfire supports the Oracle driver as well, available from the Oracle web site.
51
TIBCO Spotfire® Server and Environment Installation and Administration
Installing the Oracle database driverIf your implementation uses Oracle Database server, it is recommended that you install an Oracledriver (JDBC) for your production environments.
Procedure
1. Download the database driver from the Oracle website.
2. Place the driver in the following directory: <installation dir>/tomcat/lib.
Installing database drivers for Information DesignerThe Information Designer tool, available in Spotfire Analyst, allows users to create analyses based ondata retrieved from external JDBC sources. These external data sources are accessed using databasedrivers.
To connect to an external data source, you must also enable a data source template that matches thedatabase and the specific database driver.
The database connection URL, used by the server to connect to the database, may differ for differentdatabase drivers; see Database drivers and database connection URLs.
Procedure
1. Download the database driver.
2. Place the driver in the following directory: <installation dir>/tomcat/lib.
3. Restart Spotfire Server.
4. Enable a data source template that matches the database and the specific database driver that youare using. To enable the template, you can use either the configuration tool or the command add-ds-template.
Applying hotfixes to the serverBefore you begin configuring Spotfire Server, you must install any available hotfix for this version ofthe server.
Prerequisites
● You have installed Spotfire Server.
● You have downloaded the latest hotfix for your version of Spotfire Server; for instructions, see Downloading required software, step 6.
Procedure
● Follow the instructions in the Installation_Instructions.htm file that was included in the hotfixpackage that you downloaded.For more information, see Overview of hotfixes for TIBCO Spotfire in the TIBCO Community.
What to do next
Configure Spotfire Server; see Initial configuration.
52
TIBCO Spotfire® Server and Environment Installation and Administration
Initial configurationIt is recommended that Spotfire administrators configure a successful basic installation of SpotfireServer before configuring more advanced implementations.
Multiple configurations can be stored in the Spotfire database, but only one can be active
Configuration using the configuration toolThe Spotfire Server configuration tool provides a clear path to a basic installation, and offers the mostfrequently used configuration options.
The configuration tool must be run by a Spotfire administrator. If the Spotfire administrator does nothave access to the computer running Spotfire Server, or if the server cannot display graphics, theconfiguration tool can be run from a local computer.
Opening the configuration tool
You can use the Spotfire Server configuration tool for the initial configuration of your Spotfireimplementation, or for updating your configuration later on.
Procedure
● There are three ways to open the configuration tool:
● Select the Launch the Configuration Tool check box on the last screen of the Spotfire Serverinstallation wizard.
● On the computer running Spotfire Server, click Start, go to the Spotfire Server folder, and clickConfigure TIBCO Spotfire Server.
● Run the uiconfig.bat file (uiconfig.sh on Linux). These files are located in the<installation dir>\tomcat\bin directory.
If you cannot run the configuration tool on the Spotfire Server computer, see Running theconfiguration tool on a local computer.
Running the configuration tool on a local computer
If running the configuration tool on the Spotfire Server computer is impossible or inconvenient, you canrun the tool on a local computer.
Prerequisites
Java 8 runtime must be installed on the local computer.
Procedure
1. From the computer where Spotfire Server is installed, copy the <installation dir>/tomcat/webapps/spotfire/tools/spotfireconfigtool.jar file to the local computer.
If Spotfire Server is up and running, you can also access the spotfireconfigtool.jar fileon the Server Tools page.
2. On the local computer, unpack the .jar file by doing one of the following:
● Double-click the spotfireconfigtool.jar file.
● If your system does not recognize the file type, follow these steps:
53
TIBCO Spotfire® Server and Environment Installation and Administration
1. On the local computer, open a command line and go to the directory that contains thespotfireconfigtool.jar file.
2. On the command line, enter the following command:java -jar spotfireconfigtool.jar
A spotfireconfigtool directory is created in the same directory as the .jar file.
3. In the newly-created directory, double-click uiconfig.bat (Windows) or uiconfig.sh (Linux) toopen the configuration tool.
Creating the bootstrap.xml file
The bootstrap.xml file configures the database connection.
Prerequisites
Spotfire Server is installed.
For Integrated Windows authentication (IWA) between Spotfire Server and the Spotfire database, see Setting up the Spotfire Server bootstrap file for Integrated Windows authentication.
Procedure
1. If the configuration tool is not open, open it; for instructions see Opening the configuration tool.The configuration tool opens to the System Status page, which lists the necessary configurationsteps.
2. Click Create new bootstrap file.The Bootstrap page is displayed.
3. Enter the following information in the fields:
Path You may leave the default path as is.
Driver template Select a template that is compatible with your database server. Hostname The Spotfire database host name (the address of the computer on which the
SQL or Oracle database is installed).
Port The Spotfire database port.
Identifier (SID/database/service)
The Server ID (for Oracle) or the database name (for MS SQL) of the Spotfiredatabase that was created; spotfire_server is the default.
Username The name of the database account used by Spotfire Server to connect to theSpotfire database. In the create_databases.bat file, this is the value forADMINNAME.
Password The password of the database account. Enter correct database login details, asspecified earlier. In the create_databases.bat file, this is the value forADMINPASSWORD
URL The JDBC connection URL. This field is pre-populated from selections madebut can be edited.
Driver class This field is pre-populated from selections made, and cannot be edited. To beable to select Oracle, you must also download the JDBC driver.
For details, see Database drivers and database connection URLs
54
TIBCO Spotfire® Server and Environment Installation and Administration
Configurationtool password
Enter a configuration tool password of your choice. This will be used toprotect the server configuration from unauthorized access.
The configuration tool password will be required when running theconfiguration tool.
Server alias Enter any unique name for the Spotfire Server.
Encryptionpassword(optional)
Enter an encryption password of your own choice. This will be used forencrypting other passwords stored in the Spotfire database. The passwordsare encrypted with a static key if no encryption password is specified here.
Addresses These values should match actual hostnames, fully qualified domain names( FQDN ), and IP addresses (IPv4 or IPv6) at which the Spotfire Server can bereached by other Spotfire Servers and nodes.
If any of these values do not describe the server, or are on a network that willnot be used for back-end communication, you should remove them.
If you changed the hostname, domain, or IP address, add the new values.
Valid hostnames may only contain alphabetic characters, numericcharacters, hyphen and period.
If you want to change these addresses after setting up yourenvironment, use the set-addresses command.
Site If you plan to use sites in your implementation you should assign the serverto a site now. If you have not yet created the sites, see Creating sites. Aftercreating the sites, click Lookup to select a site for this server. For moreinformation, see Sites.
4. Click Save Bootstrap.The configuration tool checks that database drivers are installed and that the database is running. Italso checks that the database accepts the given credentials. A message indicates whether thebootstrap file was successfully created. After it is created, the Configuration page of theconfiguration tool is displayed.
Setting up the Spotfire Server bootstrap file for Integrated Windows authentication
To configure Integrated Windows authentication (IWA) between Spotfire Server and the Spotfiredatabase in SQL, follow these steps.
Prerequisites
You've followed the steps in Setting up the Spotfire database (SQL Server with Integrated Windowsauthentication).
Procedure
1. Check that the sqljdbc4.jar file with Microsoft's vendor JDBC drivers is in the following SpotfireServer folder: <installation dir>\tomcat\lib.
2. Copy the sqljdbc_auth.dll file from the <installation dir>\tomcat\bin folder to thec:\windows\SysWOW64 folder.
3. Change the login for the service to use the Windows account that has login rights to the Spotfiredatabase.
55
TIBCO Spotfire® Server and Environment Installation and Administration
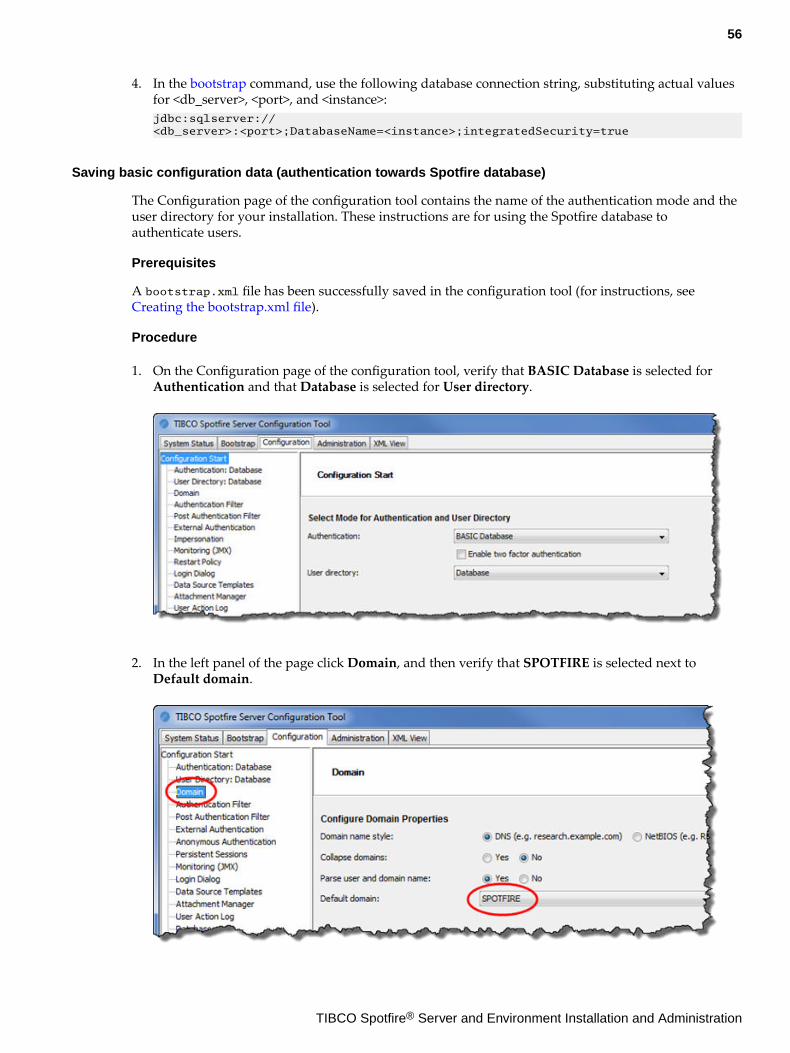
4. In the bootstrap command, use the following database connection string, substituting actual valuesfor <db_server>, <port>, and <instance>:jdbc:sqlserver://<db_server>:<port>;DatabaseName=<instance>;integratedSecurity=true
Saving basic configuration data (authentication towards Spotfire database)
The Configuration page of the configuration tool contains the name of the authentication mode and theuser directory for your installation. These instructions are for using the Spotfire database toauthenticate users.
Prerequisites
A bootstrap.xml file has been successfully saved in the configuration tool (for instructions, see Creating the bootstrap.xml file).
Procedure
1. On the Configuration page of the configuration tool, verify that BASIC Database is selected forAuthentication and that Database is selected for User directory.
2. In the left panel of the page click Domain, and then verify that SPOTFIRE is selected next toDefault domain.
56
TIBCO Spotfire® Server and Environment Installation and Administration
3. At the bottom of the page, click Save configuration.The Save Configuration wizard is displayed. Database is pre-selected as the destination for Spotfirefiles in the system.
4. Click Next.You are prompted to enter a comment.
5. Enter a comment, and then click Finish.
Creating an administrator user
To continue the installation process, the administrator must create an administrator user who has accessto all the functionality in the Spotfire implementation.
Prerequisites
Basic configuration data—the authentication mode and user directory for the system—have been savedon the Configuration tab of the configuration tool.
Procedure
1. On the Administration page of the configuration tool, under Create new user, enter a username andpassword, and click Create.The new user is displayed in the Users column.
2. Select the new user name and then click Promote to add that user to the Administrators group.
What to do next
Start Spotfire Server
Configuration using the command lineExecuting commands on the command line provides greater flexibility and access to options that arenot available in the configuration tool. Most administrators use the configuration tool.
The command line can be used in two ways: either by executing commands one-by-one, or by using ascript containing several commands that are executed one after the other.
Executing commands on the command line
The command line offers more experienced administrators quick access to a wider variety of optionsthan the configuration tool.
Prerequisites
You must have administrative credentials for Spotfire Server.
Procedure
1. On the computer running Spotfire Server, open a command line as an administrator and change thedirectory to the location of the config.bat file (config.sh on Linux). The default location is<server installation dir>/tomcat/bin.This is where you execute commands.
You can also execute commands on a local computer rather than the server computer; fordetails, see Executing commands on a local computer.
2. Export the active server configuration (the configuration.xml file) by using the export-configcommand.
57
TIBCO Spotfire® Server and Environment Installation and Administration
Example:config export-config --tool-password=mypassword
3. On the command line, enter config (config.sh on Linux) followed by the command and anyrequired parameters.
4. After you have finished running commands, upload the modified configuration back to the Spotfiredatabase by using the import-config command. The configuration that you import becomes theactive configuration for that server or cluster.Example:config import-config --tool-password=mypassword --comment=what was changed
5. Restart Spotfire Server; for instructions, see Start or stop Spotfire Server.
Because the configuration.xml file contains confidential information, you may want torestrict access to it.
Executing commands on a local computer
If it is more convenient, you can execute commands on a local computer rather than on the servercomputer.
Prerequisites
Follow the steps in Running the configuration tool on a local computer.
Procedure
1. On the local computer, on the System Status page of the configuration tool, create a new bootstrapfile.
2. Each time that you run a command on the local computer, specify the location of the bootstrap fileby using the [-b value | --bootstrap-config=value] option.
Example
To run the command export-config on a local computer where the bootstrap.xml file wasplaced on the desktop:config export-config -b=C:\bootstrap.xml
Viewing help on configuration commands
You can view information about commands and their parameters from the command line.
Procedure
1. Open a command line and go to the folder that contains the config.bat file.
The default location is <server installation dir>/tomcat/bin.
2. Type config help <command name> and press Enter.
Configuration and administration commands by function
These frequently-used commands are grouped by functional area for easy reviewing.
Command details are available in the Command-line reference. You can also view command details byrunning the help command on the command line (see Viewing help on configuration commands). Thecommand parameters to use depend on your system setup and environment.
For instructions on using the commands, see Executing commands on the command line.
58
TIBCO Spotfire® Server and Environment Installation and Administration

In general, commands work either towards the server configuration.xml file, or work directly on thedatabase. For information about the server configuration files, see Bootstrap.xml file and Configuration.xml file.
Action log configuration commands
To configure user action logging on the Spotfire Server, use the related command.
All commands in this group work on the configuration.xml file, which must be imported using the import-config command for any changes to take effect.
For instructions on using the commands, see Executing commands on the command line.
Task Command
Configure the user action database logger. config-action-log-database-logger
Configure the action log web service. config-action-log-web-service
Configure the user action logger. config-action-logger
Administration commands
To perform one of these basic administration tasks, use the related command.
All administration commands connect directly to the Spotfire database and require that the server hasbeen bootstrapped and that an initial configuration has been imported (by using the import-configcommand).
For instructions on using the commands, see Executing commands on the command line.
Task Command
Add a user or group as a member of a specified group. add-member
Copy group membership from one principal to another. copy-group-membership
Copy routing rules and schedules from one site toanother.
copy-rules-to-site
Create a new user account. create-user
Delete disabled users. delete-disabled-users
Delete disconnected groups. delete-disconnected-groups
Delete a specified OAuth2 client. delete-oauth2-client
Delete a user account. delete-user
Revoke full administrator privileges from a user. demote-admin
Enable or disables a user in the Spotfire database. enable-user
Export groups from the user directory. export-groups
59
TIBCO Spotfire® Server and Environment Installation and Administration
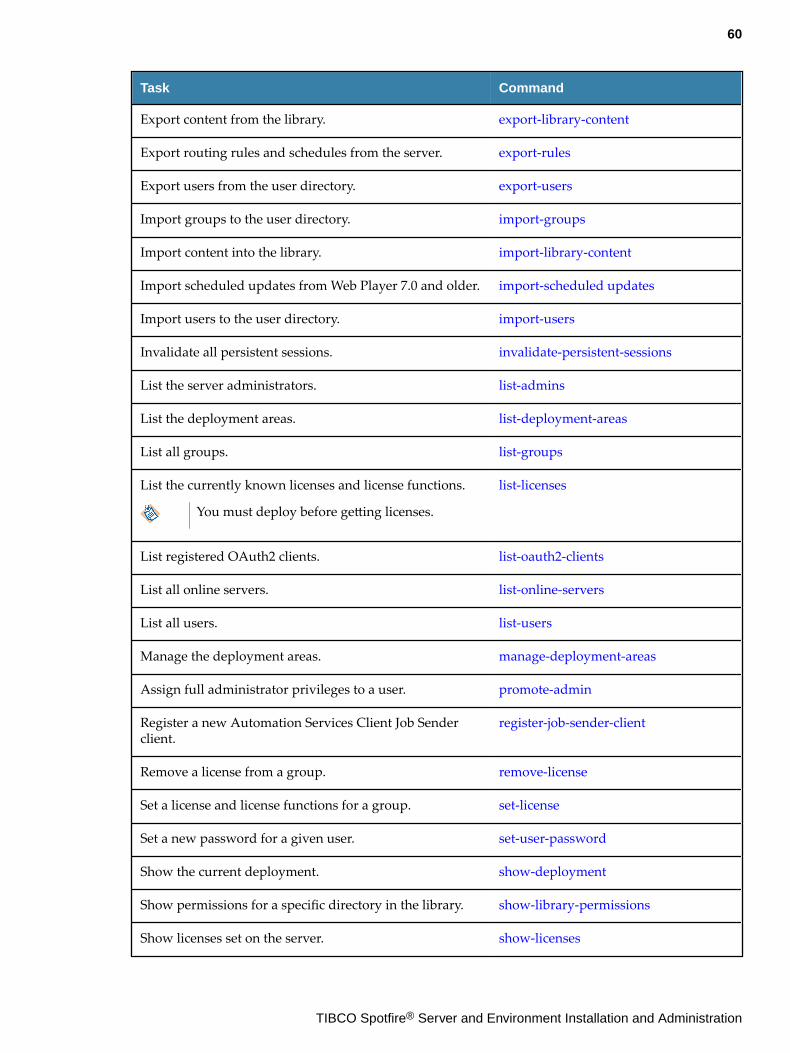
Task Command
Export content from the library. export-library-content
Export routing rules and schedules from the server. export-rules
Export users from the user directory. export-users
Import groups to the user directory. import-groups
Import content into the library. import-library-content
Import scheduled updates from Web Player 7.0 and older. import-scheduled updates
Import users to the user directory. import-users
Invalidate all persistent sessions. invalidate-persistent-sessions
List the server administrators. list-admins
List the deployment areas. list-deployment-areas
List all groups. list-groups
List the currently known licenses and license functions.
You must deploy before getting licenses.
list-licenses
List registered OAuth2 clients. list-oauth2-clients
List all online servers. list-online-servers
List all users. list-users
Manage the deployment areas. manage-deployment-areas
Assign full administrator privileges to a user. promote-admin
Register a new Automation Services Client Job Senderclient.
register-job-sender-client
Remove a license from a group. remove-license
Set a license and license functions for a group. set-license
Set a new password for a given user. set-user-password
Show the current deployment. show-deployment
Show permissions for a specific directory in the library. show-library-permissions
Show licenses set on the server. show-licenses
60
TIBCO Spotfire® Server and Environment Installation and Administration
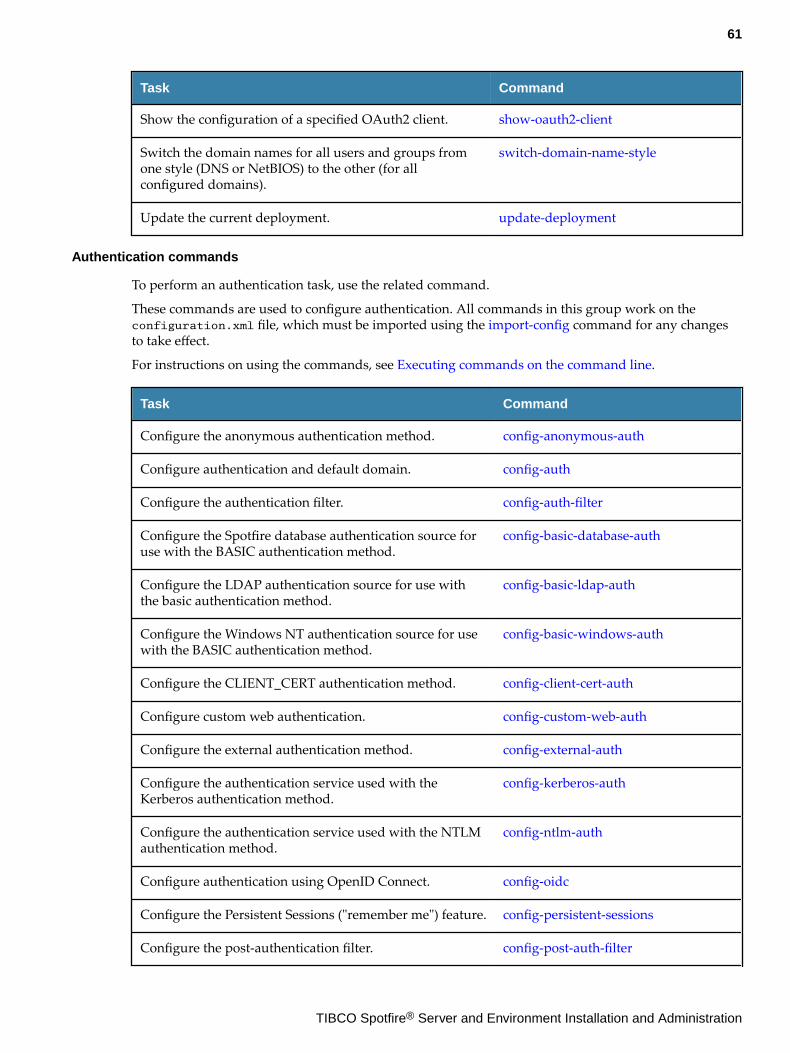
Task Command
Show the configuration of a specified OAuth2 client. show-oauth2-client
Switch the domain names for all users and groups fromone style (DNS or NetBIOS) to the other (for allconfigured domains).
switch-domain-name-style
Update the current deployment. update-deployment
Authentication commands
To perform an authentication task, use the related command.
These commands are used to configure authentication. All commands in this group work on theconfiguration.xml file, which must be imported using the import-config command for any changesto take effect.
For instructions on using the commands, see Executing commands on the command line.
Task Command
Configure the anonymous authentication method. config-anonymous-auth
Configure authentication and default domain. config-auth
Configure the authentication filter. config-auth-filter
Configure the Spotfire database authentication source foruse with the BASIC authentication method.
config-basic-database-auth
Configure the LDAP authentication source for use withthe basic authentication method.
config-basic-ldap-auth
Configure the Windows NT authentication source for usewith the BASIC authentication method.
config-basic-windows-auth
Configure the CLIENT_CERT authentication method. config-client-cert-auth
Configure custom web authentication. config-custom-web-auth
Configure the external authentication method. config-external-auth
Configure the authentication service used with theKerberos authentication method.
config-kerberos-auth
Configure the authentication service used with the NTLMauthentication method.
config-ntlm-auth
Configure authentication using OpenID Connect. config-oidc
Configure the Persistent Sessions ("remember me") feature. config-persistent-sessions
Configure the post-authentication filter. config-post-auth-filter
61
TIBCO Spotfire® Server and Environment Installation and Administration
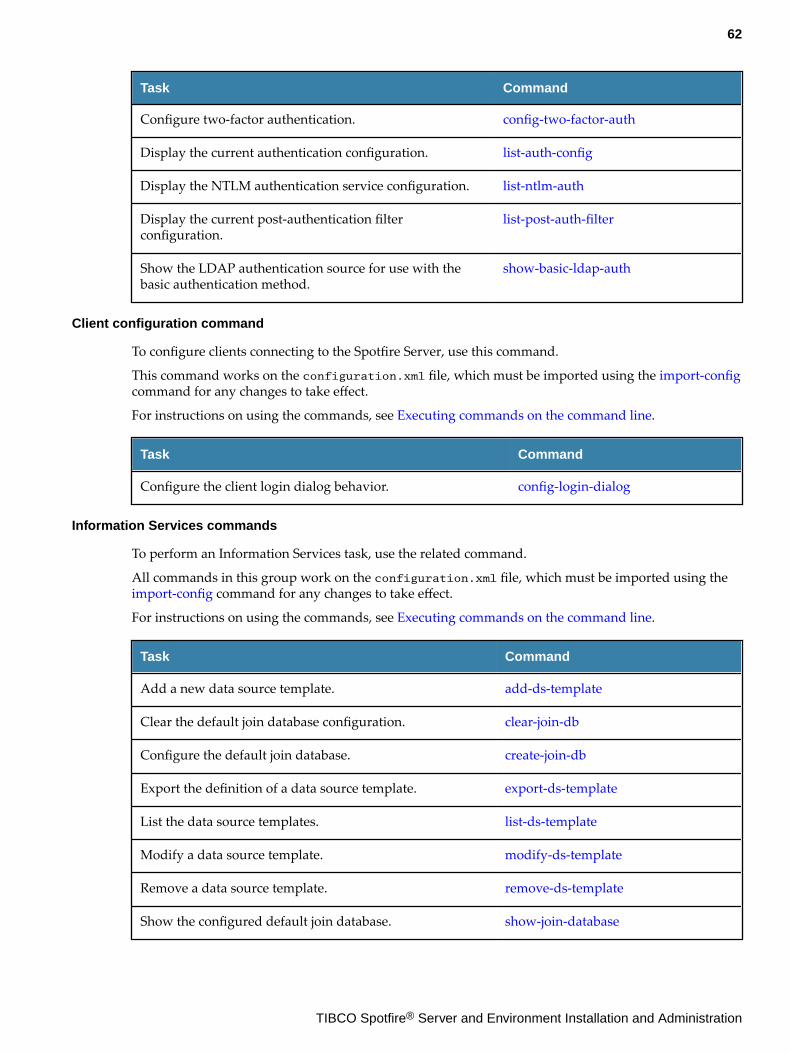
Task Command
Configure two-factor authentication. config-two-factor-auth
Display the current authentication configuration. list-auth-config
Display the NTLM authentication service configuration. list-ntlm-auth
Display the current post-authentication filterconfiguration.
list-post-auth-filter
Show the LDAP authentication source for use with thebasic authentication method.
show-basic-ldap-auth
Client configuration command
To configure clients connecting to the Spotfire Server, use this command.
This command works on the configuration.xml file, which must be imported using the import-configcommand for any changes to take effect.
For instructions on using the commands, see Executing commands on the command line.
Task Command
Configure the client login dialog behavior. config-login-dialog
Information Services commands
To perform an Information Services task, use the related command.
All commands in this group work on the configuration.xml file, which must be imported using the import-config command for any changes to take effect.
For instructions on using the commands, see Executing commands on the command line.
Task Command
Add a new data source template. add-ds-template
Clear the default join database configuration. clear-join-db
Configure the default join database. create-join-db
Export the definition of a data source template. export-ds-template
List the data source templates. list-ds-template
Modify a data source template. modify-ds-template
Remove a data source template. remove-ds-template
Show the configured default join database. show-join-database
62
TIBCO Spotfire® Server and Environment Installation and Administration
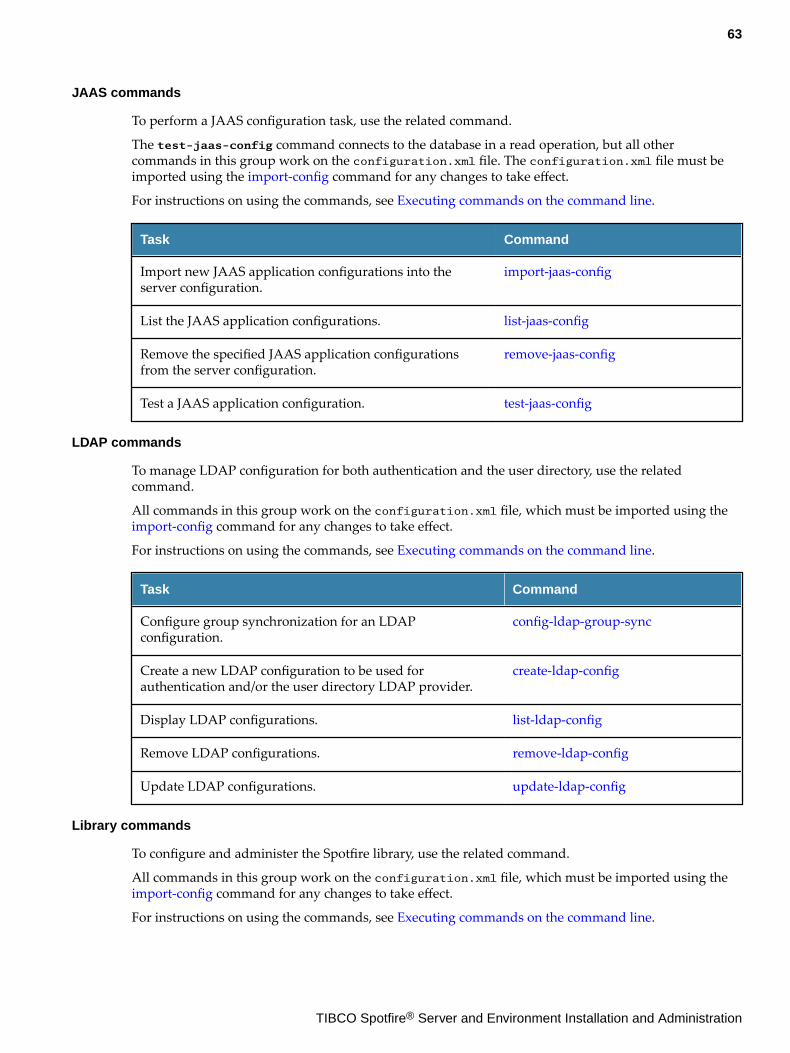
JAAS commands
To perform a JAAS configuration task, use the related command.
The test-jaas-config command connects to the database in a read operation, but all othercommands in this group work on the configuration.xml file. The configuration.xml file must beimported using the import-config command for any changes to take effect.
For instructions on using the commands, see Executing commands on the command line.
Task Command
Import new JAAS application configurations into theserver configuration.
import-jaas-config
List the JAAS application configurations. list-jaas-config
Remove the specified JAAS application configurationsfrom the server configuration.
remove-jaas-config
Test a JAAS application configuration. test-jaas-config
LDAP commands
To manage LDAP configuration for both authentication and the user directory, use the relatedcommand.
All commands in this group work on the configuration.xml file, which must be imported using the import-config command for any changes to take effect.
For instructions on using the commands, see Executing commands on the command line.
Task Command
Configure group synchronization for an LDAPconfiguration.
config-ldap-group-sync
Create a new LDAP configuration to be used forauthentication and/or the user directory LDAP provider.
create-ldap-config
Display LDAP configurations. list-ldap-config
Remove LDAP configurations. remove-ldap-config
Update LDAP configurations. update-ldap-config
Library commands
To configure and administer the Spotfire library, use the related command.
All commands in this group work on the configuration.xml file, which must be imported using the import-config command for any changes to take effect.
For instructions on using the commands, see Executing commands on the command line.
63
TIBCO Spotfire® Server and Environment Installation and Administration
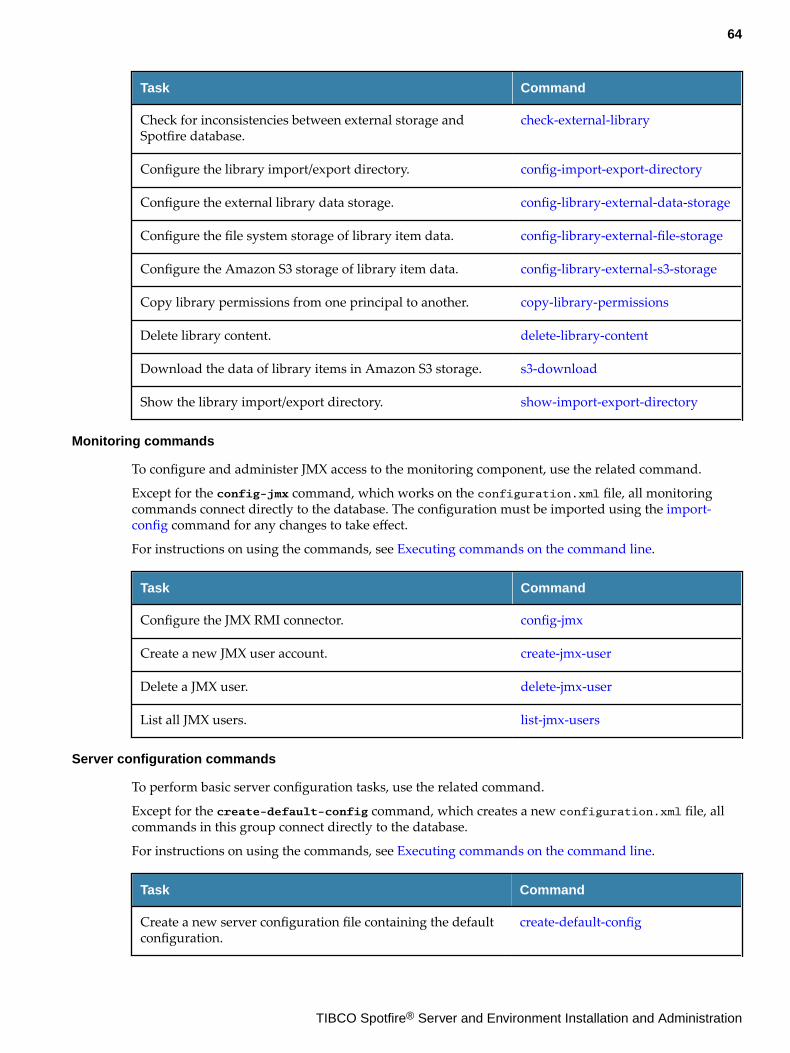
Task Command
Check for inconsistencies between external storage andSpotfire database.
check-external-library
Configure the library import/export directory. config-import-export-directory
Configure the external library data storage. config-library-external-data-storage
Configure the file system storage of library item data. config-library-external-file-storage
Configure the Amazon S3 storage of library item data. config-library-external-s3-storage
Copy library permissions from one principal to another. copy-library-permissions
Delete library content. delete-library-content
Download the data of library items in Amazon S3 storage. s3-download
Show the library import/export directory. show-import-export-directory
Monitoring commands
To configure and administer JMX access to the monitoring component, use the related command.
Except for the config-jmx command, which works on the configuration.xml file, all monitoringcommands connect directly to the database. The configuration must be imported using the import-config command for any changes to take effect.
For instructions on using the commands, see Executing commands on the command line.
Task Command
Configure the JMX RMI connector. config-jmx
Create a new JMX user account. create-jmx-user
Delete a JMX user. delete-jmx-user
List all JMX users. list-jmx-users
Server configuration commands
To perform basic server configuration tasks, use the related command.
Except for the create-default-config command, which creates a new configuration.xml file, allcommands in this group connect directly to the database.
For instructions on using the commands, see Executing commands on the command line.
Task Command
Create a new server configuration file containing the defaultconfiguration.
create-default-config
64
TIBCO Spotfire® Server and Environment Installation and Administration
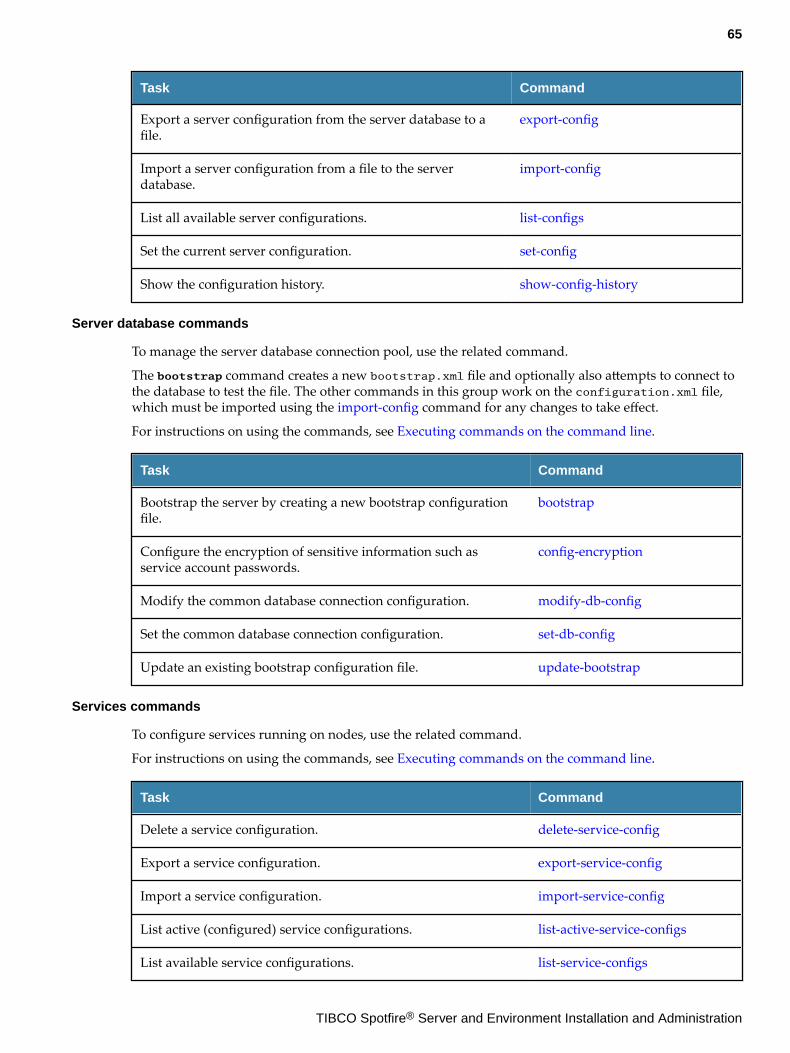
Task Command
Export a server configuration from the server database to afile.
export-config
Import a server configuration from a file to the serverdatabase.
import-config
List all available server configurations. list-configs
Set the current server configuration. set-config
Show the configuration history. show-config-history
Server database commands
To manage the server database connection pool, use the related command.
The bootstrap command creates a new bootstrap.xml file and optionally also attempts to connect tothe database to test the file. The other commands in this group work on the configuration.xml file,which must be imported using the import-config command for any changes to take effect.
For instructions on using the commands, see Executing commands on the command line.
Task Command
Bootstrap the server by creating a new bootstrap configurationfile.
bootstrap
Configure the encryption of sensitive information such asservice account passwords.
config-encryption
Modify the common database connection configuration. modify-db-config
Set the common database connection configuration. set-db-config
Update an existing bootstrap configuration file. update-bootstrap
Services commands
To configure services running on nodes, use the related command.
For instructions on using the commands, see Executing commands on the command line.
Task Command
Delete a service configuration. delete-service-config
Export a service configuration. export-service-config
Import a service configuration. import-service-config
List active (configured) service configurations. list-active-service-configs
List available service configurations. list-service-configs
65
TIBCO Spotfire® Server and Environment Installation and Administration
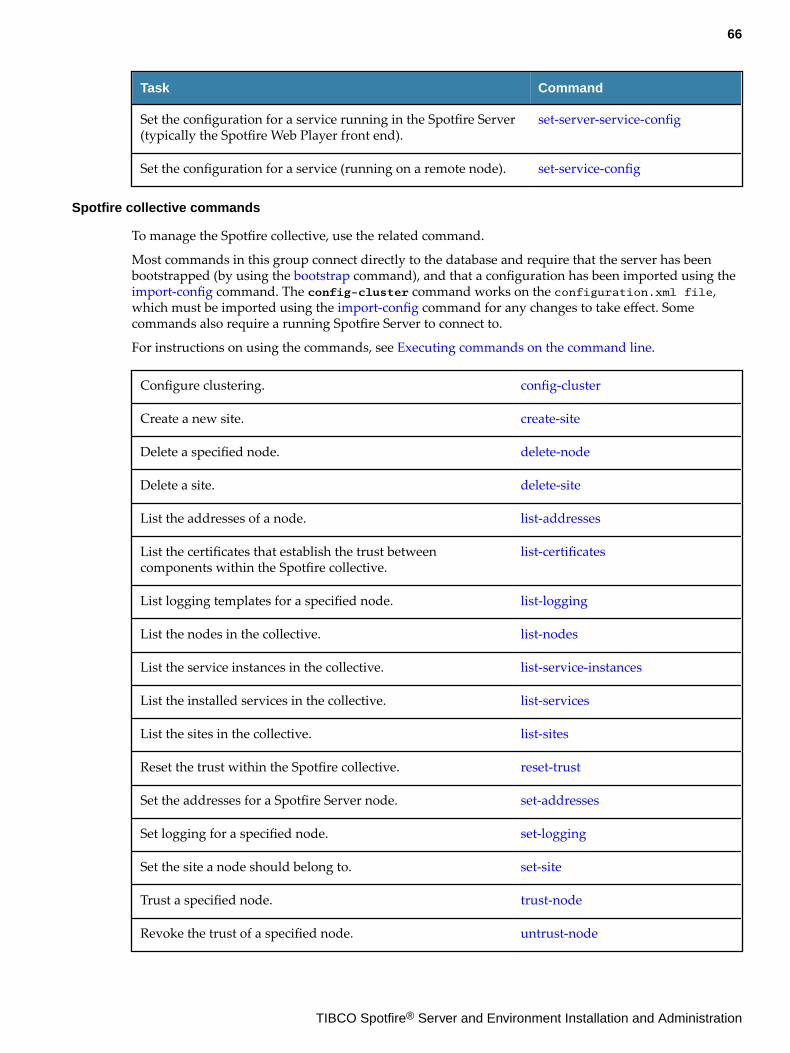
Task Command
Set the configuration for a service running in the Spotfire Server(typically the Spotfire Web Player front end).
set-server-service-config
Set the configuration for a service (running on a remote node). set-service-config
Spotfire collective commands
To manage the Spotfire collective, use the related command.
Most commands in this group connect directly to the database and require that the server has beenbootstrapped (by using the bootstrap command), and that a configuration has been imported using the import-config command. The config-cluster command works on the configuration.xml file,which must be imported using the import-config command for any changes to take effect. Somecommands also require a running Spotfire Server to connect to.
For instructions on using the commands, see Executing commands on the command line.
Configure clustering. config-cluster
Create a new site. create-site
Delete a specified node. delete-node
Delete a site. delete-site
List the addresses of a node. list-addresses
List the certificates that establish the trust betweencomponents within the Spotfire collective.
list-certificates
List logging templates for a specified node. list-logging
List the nodes in the collective. list-nodes
List the service instances in the collective. list-service-instances
List the installed services in the collective. list-services
List the sites in the collective. list-sites
Reset the trust within the Spotfire collective. reset-trust
Set the addresses for a Spotfire Server node. set-addresses
Set logging for a specified node. set-logging
Set the site a node should belong to. set-site
Trust a specified node. trust-node
Revoke the trust of a specified node. untrust-node
66
TIBCO Spotfire® Server and Environment Installation and Administration
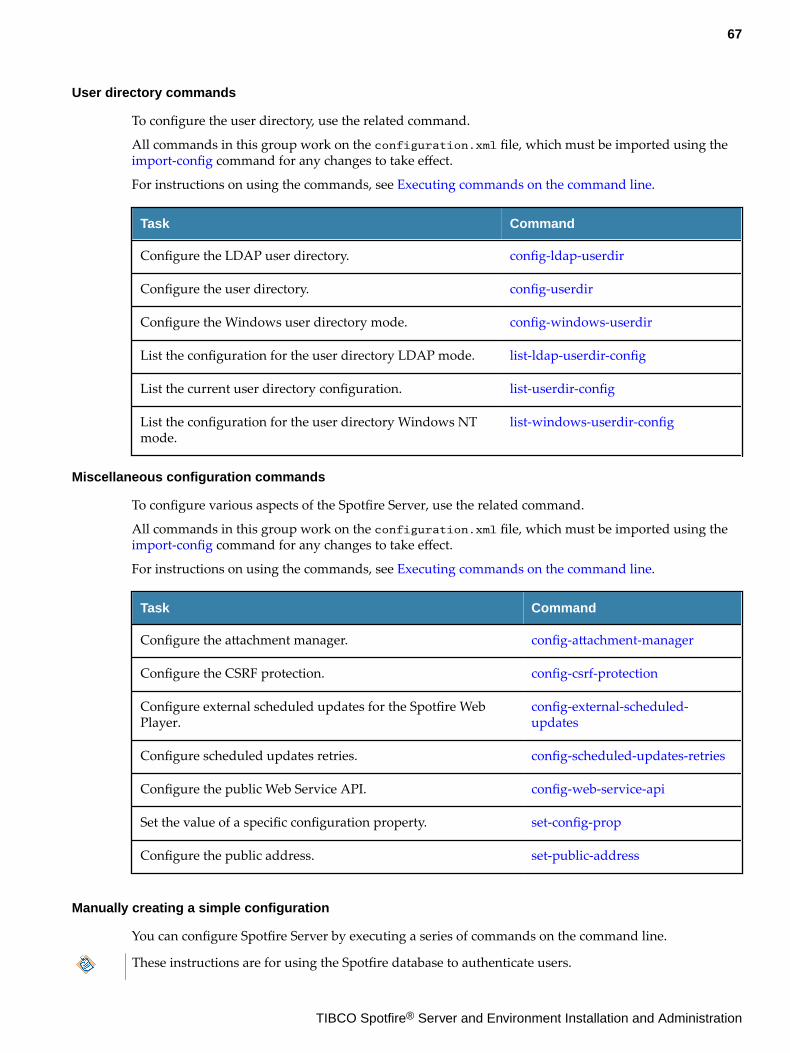
User directory commands
To configure the user directory, use the related command.
All commands in this group work on the configuration.xml file, which must be imported using the import-config command for any changes to take effect.
For instructions on using the commands, see Executing commands on the command line.
Task Command
Configure the LDAP user directory. config-ldap-userdir
Configure the user directory. config-userdir
Configure the Windows user directory mode. config-windows-userdir
List the configuration for the user directory LDAP mode. list-ldap-userdir-config
List the current user directory configuration. list-userdir-config
List the configuration for the user directory Windows NTmode.
list-windows-userdir-config
Miscellaneous configuration commands
To configure various aspects of the Spotfire Server, use the related command.
All commands in this group work on the configuration.xml file, which must be imported using the import-config command for any changes to take effect.
For instructions on using the commands, see Executing commands on the command line.
Task Command
Configure the attachment manager. config-attachment-manager
Configure the CSRF protection. config-csrf-protection
Configure external scheduled updates for the Spotfire WebPlayer.
config-external-scheduled-updates
Configure scheduled updates retries. config-scheduled-updates-retries
Configure the public Web Service API. config-web-service-api
Set the value of a specific configuration property. set-config-prop
Configure the public address. set-public-address
Manually creating a simple configuration
You can configure Spotfire Server by executing a series of commands on the command line.
These instructions are for using the Spotfire database to authenticate users.
67
TIBCO Spotfire® Server and Environment Installation and Administration
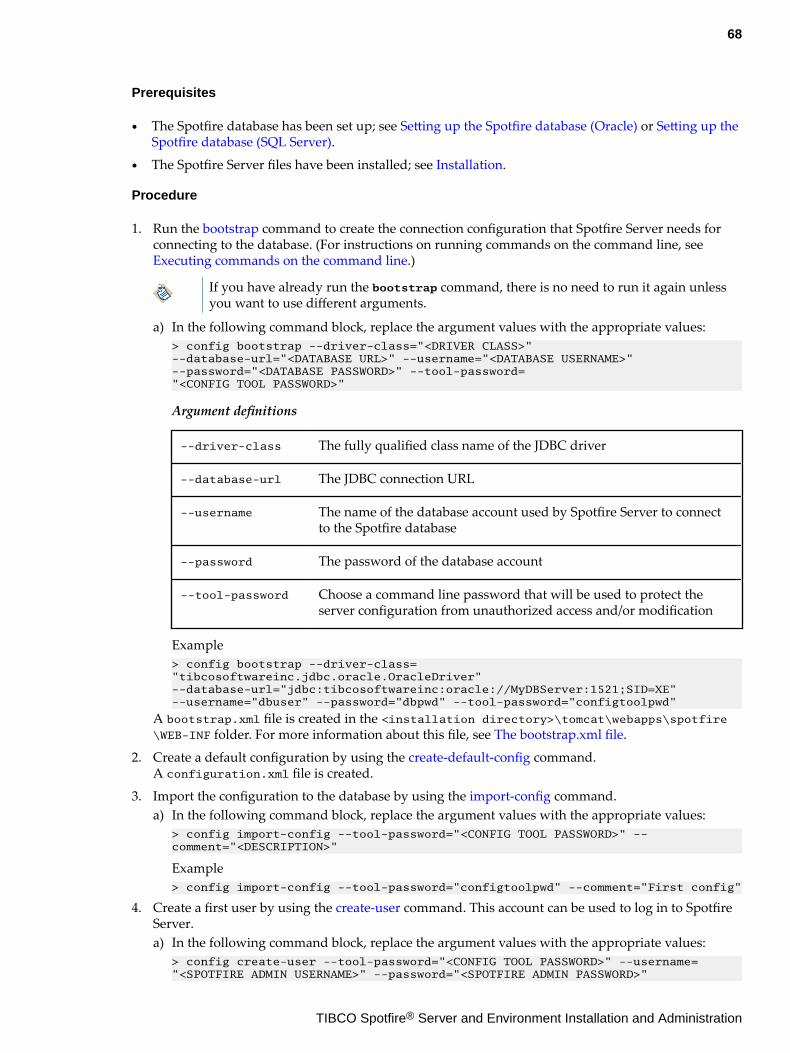
Prerequisites
● The Spotfire database has been set up; see Setting up the Spotfire database (Oracle) or Setting up theSpotfire database (SQL Server).
● The Spotfire Server files have been installed; see Installation.
Procedure
1. Run the bootstrap command to create the connection configuration that Spotfire Server needs forconnecting to the database. (For instructions on running commands on the command line, seeExecuting commands on the command line.)
If you have already run the bootstrap command, there is no need to run it again unlessyou want to use different arguments.
a) In the following command block, replace the argument values with the appropriate values:> config bootstrap --driver-class="<DRIVER CLASS>" --database-url="<DATABASE URL>" --username="<DATABASE USERNAME>" --password="<DATABASE PASSWORD>" --tool-password="<CONFIG TOOL PASSWORD>"
Argument definitions
--driver-class The fully qualified class name of the JDBC driver
--database-url The JDBC connection URL
--username The name of the database account used by Spotfire Server to connectto the Spotfire database
--password The password of the database account
--tool-password Choose a command line password that will be used to protect theserver configuration from unauthorized access and/or modification
Example> config bootstrap --driver-class="tibcosoftwareinc.jdbc.oracle.OracleDriver" --database-url="jdbc:tibcosoftwareinc:oracle://MyDBServer:1521;SID=XE" --username="dbuser" --password="dbpwd" --tool-password="configtoolpwd"
A bootstrap.xml file is created in the <installation directory>\tomcat\webapps\spotfire\WEB-INF folder. For more information about this file, see The bootstrap.xml file.
2. Create a default configuration by using the create-default-config command.A configuration.xml file is created.
3. Import the configuration to the database by using the import-config command.a) In the following command block, replace the argument values with the appropriate values:
> config import-config --tool-password="<CONFIG TOOL PASSWORD>" --comment="<DESCRIPTION>"
Example> config import-config --tool-password="configtoolpwd" --comment="First config"
4. Create a first user by using the create-user command. This account can be used to log in to SpotfireServer.a) In the following command block, replace the argument values with the appropriate values:
> config create-user --tool-password="<CONFIG TOOL PASSWORD>" --username="<SPOTFIRE ADMIN USERNAME>" --password="<SPOTFIRE ADMIN PASSWORD>"
68
TIBCO Spotfire® Server and Environment Installation and Administration
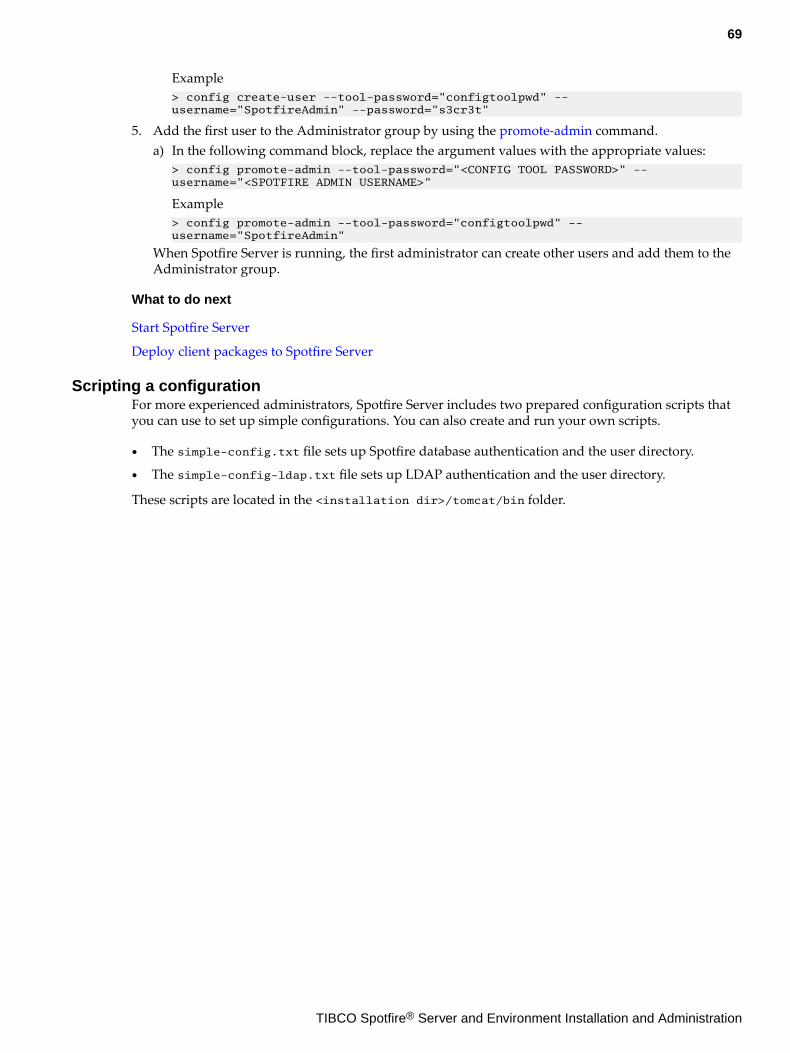
Example> config create-user --tool-password="configtoolpwd" --username="SpotfireAdmin" --password="s3cr3t"
5. Add the first user to the Administrator group by using the promote-admin command.a) In the following command block, replace the argument values with the appropriate values:
> config promote-admin --tool-password="<CONFIG TOOL PASSWORD>" --username="<SPOTFIRE ADMIN USERNAME>"
Example> config promote-admin --tool-password="configtoolpwd" --username="SpotfireAdmin"
When Spotfire Server is running, the first administrator can create other users and add them to theAdministrator group.
What to do next
Start Spotfire Server
Deploy client packages to Spotfire Server
Scripting a configurationFor more experienced administrators, Spotfire Server includes two prepared configuration scripts thatyou can use to set up simple configurations. You can also create and run your own scripts.
● The simple-config.txt file sets up Spotfire database authentication and the user directory.
● The simple-config-ldap.txt file sets up LDAP authentication and the user directory.
These scripts are located in the <installation dir>/tomcat/bin folder.
69
TIBCO Spotfire® Server and Environment Installation and Administration
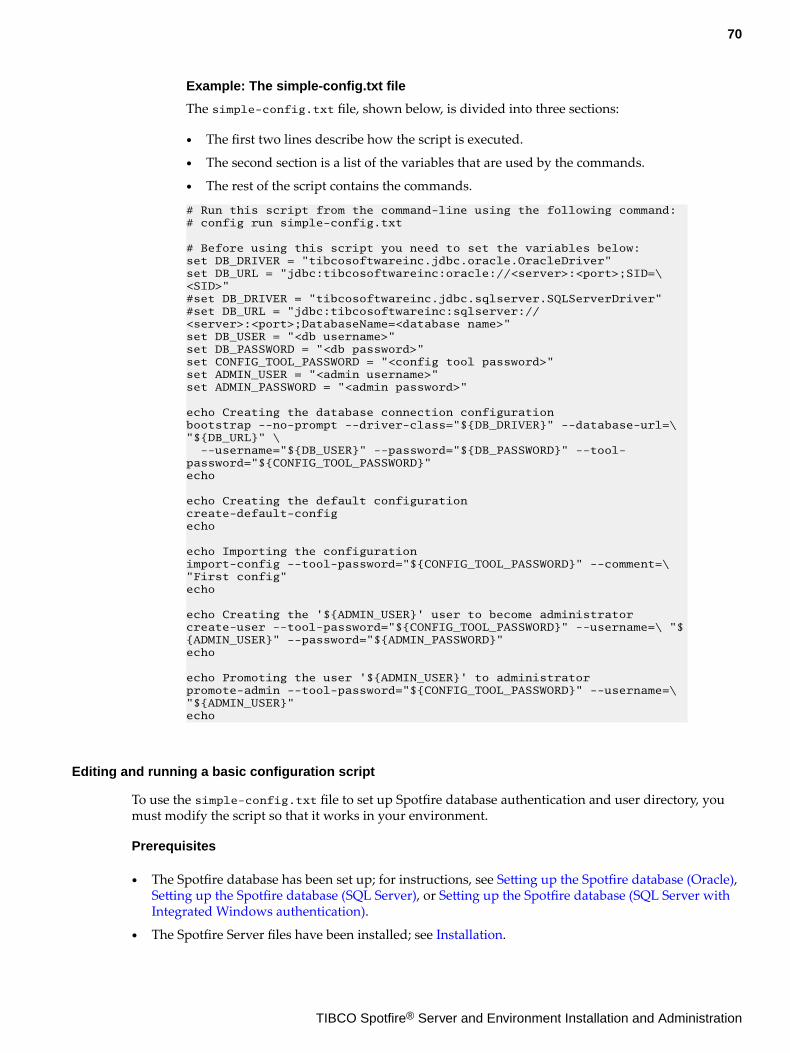
Example: The simple-config.txt file
The simple-config.txt file, shown below, is divided into three sections:
● The first two lines describe how the script is executed.
● The second section is a list of the variables that are used by the commands.
● The rest of the script contains the commands.
# Run this script from the command-line using the following command:# config run simple-config.txt
# Before using this script you need to set the variables below:set DB_DRIVER = "tibcosoftwareinc.jdbc.oracle.OracleDriver"set DB_URL = "jdbc:tibcosoftwareinc:oracle://<server>:<port>;SID=\ <SID>"#set DB_DRIVER = "tibcosoftwareinc.jdbc.sqlserver.SQLServerDriver"#set DB_URL = "jdbc:tibcosoftwareinc:sqlserver://<server>:<port>;DatabaseName=<database name>"set DB_USER = "<db username>"set DB_PASSWORD = "<db password>"set CONFIG_TOOL_PASSWORD = "<config tool password>"set ADMIN_USER = "<admin username>"set ADMIN_PASSWORD = "<admin password>"
echo Creating the database connection configurationbootstrap --no-prompt --driver-class="${DB_DRIVER}" --database-url=\ "${DB_URL}" \ --username="${DB_USER}" --password="${DB_PASSWORD}" --tool-password="${CONFIG_TOOL_PASSWORD}"echo
echo Creating the default configurationcreate-default-configecho
echo Importing the configurationimport-config --tool-password="${CONFIG_TOOL_PASSWORD}" --comment=\ "First config"echo
echo Creating the '${ADMIN_USER}' user to become administratorcreate-user --tool-password="${CONFIG_TOOL_PASSWORD}" --username=\ "${ADMIN_USER}" --password="${ADMIN_PASSWORD}"echo
echo Promoting the user '${ADMIN_USER}' to administratorpromote-admin --tool-password="${CONFIG_TOOL_PASSWORD}" --username=\ "${ADMIN_USER}"echo
Editing and running a basic configuration script
To use the simple-config.txt file to set up Spotfire database authentication and user directory, youmust modify the script so that it works in your environment.
Prerequisites
● The Spotfire database has been set up; for instructions, see Setting up the Spotfire database (Oracle), Setting up the Spotfire database (SQL Server), or Setting up the Spotfire database (SQL Server withIntegrated Windows authentication).
● The Spotfire Server files have been installed; see Installation.
70
TIBCO Spotfire® Server and Environment Installation and Administration
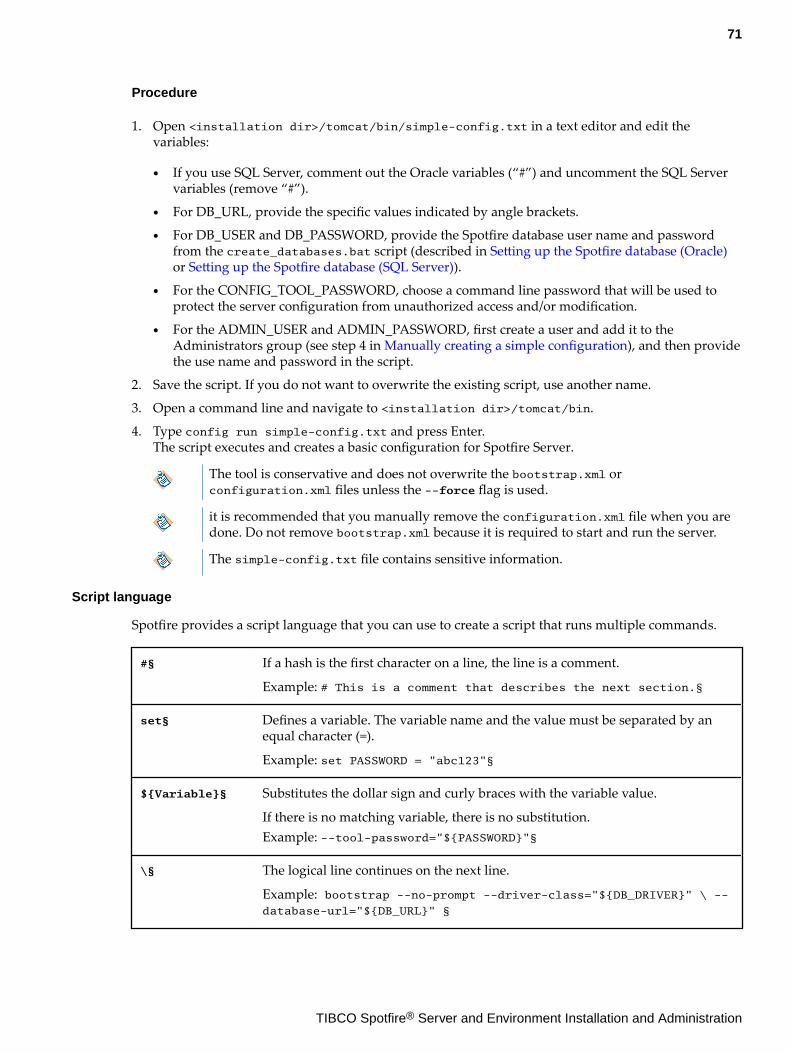
Procedure
1. Open <installation dir>/tomcat/bin/simple-config.txt in a text editor and edit thevariables:
● If you use SQL Server, comment out the Oracle variables (“#”) and uncomment the SQL Servervariables (remove “#”).
● For DB_URL, provide the specific values indicated by angle brackets.
● For DB_USER and DB_PASSWORD, provide the Spotfire database user name and passwordfrom the create_databases.bat script (described in Setting up the Spotfire database (Oracle)or Setting up the Spotfire database (SQL Server)).
● For the CONFIG_TOOL_PASSWORD, choose a command line password that will be used toprotect the server configuration from unauthorized access and/or modification.
● For the ADMIN_USER and ADMIN_PASSWORD, first create a user and add it to theAdministrators group (see step 4 in Manually creating a simple configuration), and then providethe use name and password in the script.
2. Save the script. If you do not want to overwrite the existing script, use another name.
3. Open a command line and navigate to <installation dir>/tomcat/bin.
4. Type config run simple-config.txt and press Enter.The script executes and creates a basic configuration for Spotfire Server.
The tool is conservative and does not overwrite the bootstrap.xml orconfiguration.xml files unless the --force flag is used.
it is recommended that you manually remove the configuration.xml file when you aredone. Do not remove bootstrap.xml because it is required to start and run the server.
The simple-config.txt file contains sensitive information.
Script language
Spotfire provides a script language that you can use to create a script that runs multiple commands.
#§ If a hash is the first character on a line, the line is a comment.
Example: # This is a comment that describes the next section.§
set§ Defines a variable. The variable name and the value must be separated by anequal character (=).
Example: set PASSWORD = "abc123"§
${Variable}§ Substitutes the dollar sign and curly braces with the variable value.
If there is no matching variable, there is no substitution.Example: --tool-password="${PASSWORD}"§
\§ The logical line continues on the next line.
Example: bootstrap --no-prompt --driver-class="${DB_DRIVER}" \ --database-url="${DB_URL}" §
71
TIBCO Spotfire® Server and Environment Installation and Administration
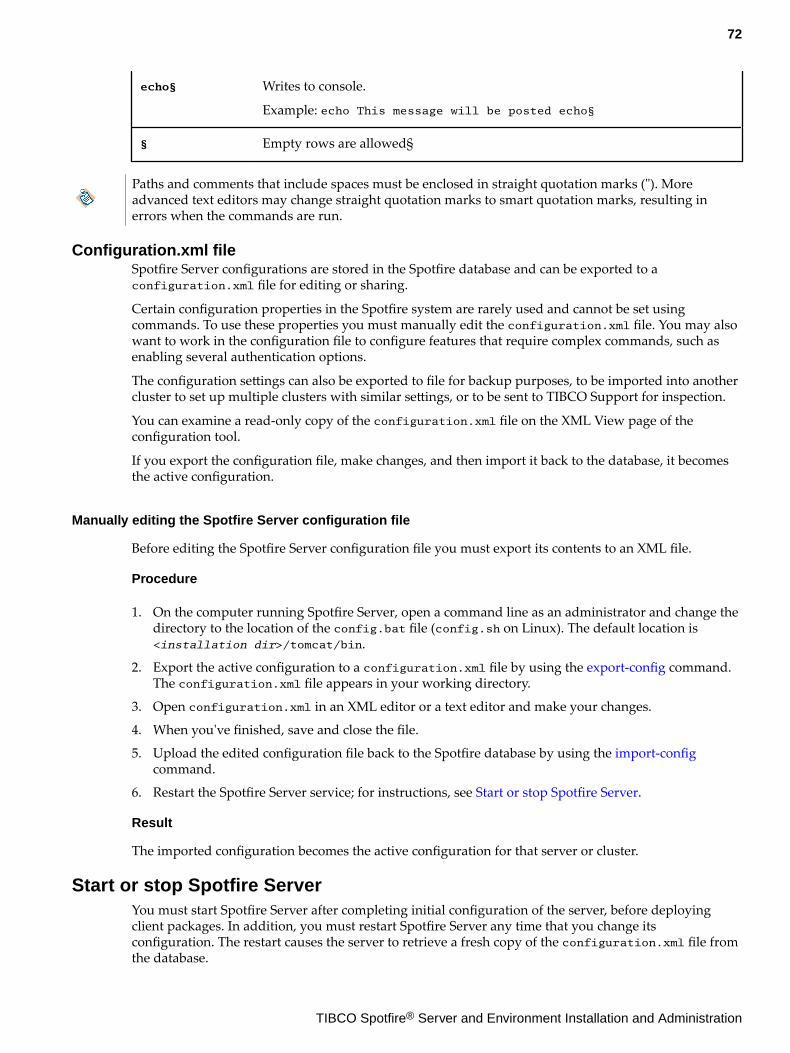
echo§ Writes to console.
Example: echo This message will be posted echo§
§ Empty rows are allowed§
Paths and comments that include spaces must be enclosed in straight quotation marks ("). Moreadvanced text editors may change straight quotation marks to smart quotation marks, resulting inerrors when the commands are run.
Configuration.xml fileSpotfire Server configurations are stored in the Spotfire database and can be exported to aconfiguration.xml file for editing or sharing.
Certain configuration properties in the Spotfire system are rarely used and cannot be set usingcommands. To use these properties you must manually edit the configuration.xml file. You may alsowant to work in the configuration file to configure features that require complex commands, such asenabling several authentication options.
The configuration settings can also be exported to file for backup purposes, to be imported into anothercluster to set up multiple clusters with similar settings, or to be sent to TIBCO Support for inspection.
You can examine a read-only copy of the configuration.xml file on the XML View page of theconfiguration tool.
If you export the configuration file, make changes, and then import it back to the database, it becomesthe active configuration.
Manually editing the Spotfire Server configuration file
Before editing the Spotfire Server configuration file you must export its contents to an XML file.
Procedure
1. On the computer running Spotfire Server, open a command line as an administrator and change thedirectory to the location of the config.bat file (config.sh on Linux). The default location is<installation dir>/tomcat/bin.
2. Export the active configuration to a configuration.xml file by using the export-config command.The configuration.xml file appears in your working directory.
3. Open configuration.xml in an XML editor or a text editor and make your changes.
4. When you've finished, save and close the file.
5. Upload the edited configuration file back to the Spotfire database by using the import-configcommand.
6. Restart the Spotfire Server service; for instructions, see Start or stop Spotfire Server.
Result
The imported configuration becomes the active configuration for that server or cluster.
Start or stop Spotfire ServerYou must start Spotfire Server after completing initial configuration of the server, before deployingclient packages. In addition, you must restart Spotfire Server any time that you change itsconfiguration. The restart causes the server to retrieve a fresh copy of the configuration.xml file fromthe database.
72
TIBCO Spotfire® Server and Environment Installation and Administration
Starting or stopping Spotfire Server (as a Windows service)After configuring Spotfire Server, you must start it.
Prerequisites
You have successfully completed the initial configuration steps so that the System Status page of theconfiguration tool shows check marks before the following steps:
● Connect to Database
● Specify Configuration
● Configure Spotfire Server Settings
● Specify Server Administrator
Procedure
1. Log in to the Spotfire Server computer as an administrator.
2. Go to Control Panel > Administrative Tools > Services and then, in the Services dialog, locate andselect the service called TIBCO Spotfire Server.
3. To the left of the services list, click Start in the phrase "Start the service".
To stop the service, click Stop to the left of the services list.
Result
"Started" appears in the Status column.
What to do next
● Deploy the latest client package to Spotfire Server; for instructions, see Deploying client packages toSpotfire Server.
Starting or stopping Spotfire Server (Windows, no service)If you did not install a Windows service you must start Spotfire Server manually.
Prerequisites
You have successfully completed the initial configuration steps so that the System Status page of theconfiguration tool contains four green check marks.
Procedure
1. Log in to the Spotfire Server computer as an administrator.
2. Open a command prompt and go to the following folder: <installation dir>/tomcat/bin.
3. Run the startup.bat file.
Result
Spotfire Server starts.
The server will stop running if you close the command prompt or log off from the computer.
73
TIBCO Spotfire® Server and Environment Installation and Administration
Starting or stopping Spotfire Server (Windows, service exists, Integrated Authenticationfor SQL Server)
If your database server uses Integrated Windows Authentication (IWA) for SQL Server, your SpotfireServer must run as a Windows Domain user that has permission to use the Spotfire database.
Prerequisites
You have successfully completed the initial configuration steps so that the System Status page of theconfiguration tool contains four green check marks.
Procedure
1. Click Start > Control Panel > Administrative Tools > Services.2. Double-click the service called TIBCO Spotfire Server.
The Properties dialog opens.3. In the Properties dialog, click the Log On tab.4. Select the This account radio button and enter the user credentials of the Domain User that was set
up with the database preparation script create_databases_ia.bat.5. Click OK.6. Start or stop the service.
Starting or stopping Spotfire Server (Windows, no service, Integrated Authentication forSQL Server)
If your database server uses Integrated Windows Authentication (IWA) for SQL Server, your SpotfireServer must run as a Windows Domain user that has permission to use the Spotfire database.
Prerequisites
You have successfully completed the initial configuration steps so that the System Status page of theconfiguration tool contains four green check marks.
Procedure
1. Log in to the Spotfire Server computer as the Domain User that was set up with the databasepreparation script create_databases_ia.bat.
2. Open a command prompt and go to the following folder: <installation dir>/tomcat/bin.3. Run the startup.bat file.
Result
Spotfire Server starts.
The server will stop running if you close the command prompt or log off from the computer.
Starting or stopping Spotfire Server (Linux)On Red Hat and SUSE systems, the Spotfire Server service starts on system startup. Only a user withroot user privileges can start and stop the server.
Prerequisites
You have successfully completed the initial configuration steps so that the System Status page of theconfiguration tool contains four green check marks.
74
TIBCO Spotfire® Server and Environment Installation and Administration
Procedure
1. Log in as root or run with sudo -s.
2. Enter the command /etc/init.d/tss-<version number> start.
To stop the server, enter the command /etc/init.d/tss-<version number> stop.
Clustered server deploymentsLarge companies often opt for clustered server deployments, where several Spotfire Servers share adatabase and work together to carry out the server tasks.
Clustered servers provide the following benefits:
● Failover protection if a server goes down.
● Scalability for the growing organization.
● Better performance in a system that handles a high volume of work.
Clustering is not enabled by default in Spotfire Server.
Usually a load balancer is added to the deployment to help distribute the workload, but this is notrequired. A cluster may also contain multiple Spotfire Servers that can be accessed individuallythrough their URLs, but share the same set of node managers. Companies must supply their own loadbalancer.
There are many configuration options for clustered server deployments; a typical installation features asingle load balancer between the Spotfire Servers and the users (on Spotfire Analyst or web client) tooptimize the distribution of requests from the clients to the servers.
You can implement clustering using one of the following data grid products:
● Hazelcast (the default) is easy to set up but uses non-secure connections.
● ActiveSpaces requires more configuration but provides secure connections.
● Apache Ignite is easy to set up and provides secure connections.
Apache Ignite is currently only recommended for testing purposes, not for a productionenvironment.
It is generally recommended that you have a working basic installation of a single Spotfire Serverbefore setting up the rest of the cluster; to begin installation, see Basic installation process for Spotfire.
Setting up a cluster of Spotfire ServersSome deployments that include clustered Spotfire Servers are very complex, and their installation andconfiguration are best left to a Spotfire consultant. However, if you plan to do it yourself, follow theseguidelines.
Prerequisites
● The Spotfire database has been set up on your Oracle or SQL Server database; for instructions, see Preparation.
For general information about Spotfire Server clusters, see Clustered server deployments.
Procedure
1. Install Spotfire Server on each computer; for instructions, see Installation.
75
TIBCO Spotfire® Server and Environment Installation and Administration
For reasons of security and performance, do not install a Spotfire Server on the samecomputer as the database. (This is true for non-clustered systems as well.)
a) Ensure that all the clustered Spotfire Servers have the same:
● Version number
● Database
● Database drivers
● Encryption password. This is an optional setting on the Bootstrap page of the configurationtool.
If you plan to use ActiveSpaces to secure the clustered environment, you must performthe following step on each server computer. If ActiveSpaces is already installed on theserver computers, you may want to do it now.
● Copy the file ActiveSpaces installation dir/lib/as-common.jar to thefollowing directory: Spotfire Server installation dir/tomcat/webapps/spotfire/WEB-INF/lib
2. Apply any available hotfix to each server. For instructions, see Applying hotfixes to the server.
3. Set clustering configuration options in the Spotfire Server configuration. The following steps modifythe shared Spotfire Server configuration, so they are only done once.
Make sure that none of the servers are running before you change the clusteringconfiguration.
These instructions are for using the configuration tool. Alternatively you can use the config-cluster command on the command line. For more information, see Executingcommands on the command line.
1. If the configuration tool is not open, open it; for instructions see Opening the configuration tool.
2. On the Configuration page, at the bottom of the left pane, click Clustering.
76
TIBCO Spotfire® Server and Environment Installation and Administration
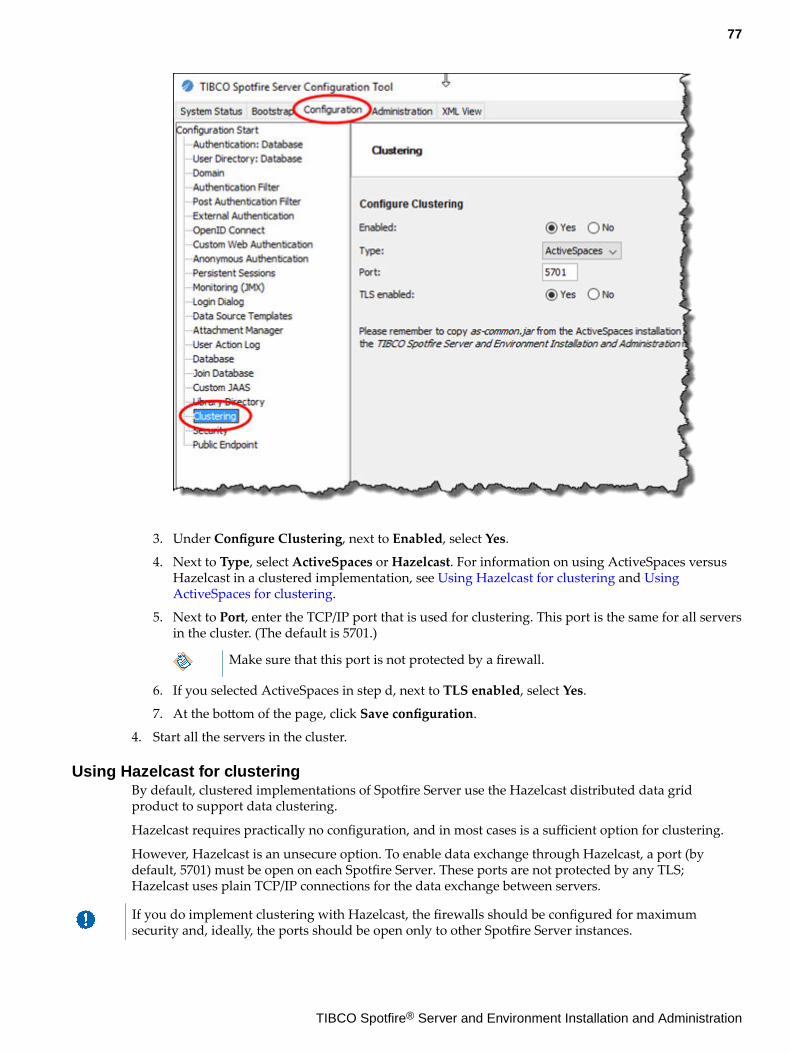
3. Under Configure Clustering, next to Enabled, select Yes.
4. Next to Type, select ActiveSpaces or Hazelcast. For information on using ActiveSpaces versusHazelcast in a clustered implementation, see Using Hazelcast for clustering and UsingActiveSpaces for clustering.
5. Next to Port, enter the TCP/IP port that is used for clustering. This port is the same for all serversin the cluster. (The default is 5701.)
Make sure that this port is not protected by a firewall.
6. If you selected ActiveSpaces in step d, next to TLS enabled, select Yes.
7. At the bottom of the page, click Save configuration.
4. Start all the servers in the cluster.
Using Hazelcast for clusteringBy default, clustered implementations of Spotfire Server use the Hazelcast distributed data gridproduct to support data clustering.
Hazelcast requires practically no configuration, and in most cases is a sufficient option for clustering.
However, Hazelcast is an unsecure option. To enable data exchange through Hazelcast, a port (bydefault, 5701) must be open on each Spotfire Server. These ports are not protected by any TLS;Hazelcast uses plain TCP/IP connections for the data exchange between servers.
If you do implement clustering with Hazelcast, the firewalls should be configured for maximumsecurity and, ideally, the ports should be open only to other Spotfire Server instances.
77
TIBCO Spotfire® Server and Environment Installation and Administration
If you have multiple network interfaces on your Spotfire Servers, you may need to configure Hazelcastto Bind to Any Network Interface. To do this, open a command line and export the active serverconfiguration by using the export-config command. Then run the following command:config set-config-prop --name=clustering.hazelcast.bind-on-any-interface --value=true
Then import the configuration back to the Spotfire database by using the import-config command, andrestart the Spotfire Servers sequentially. For additional information on executing commands, see Executing commands on the command line.
If your implementation requires secure connections between the servers in a cluster, you can installTIBCO ActiveSpaces® and configure Spotfire Server to use it for secure TCP/TLS transport. For details,see Using ActiveSpaces for clustering.
For general information about Spotfire Server clusters, see Clustered server deployments.
Using ActiveSpaces for clusteringTo enable secure TCP/TLS transport for the exchange of data between clustered Spotfire Servers, installActiveSpaces and configure the servers to use it as the underlying data grid.
ActiveSpaces is a separate product that must be deployed and configured separately. It is available free-of-charge to purchasers of Spotfire Server.
These instructions are for the baseline scenario of securing TCP/IP transport using TLS certificates/keys,without additional encryption of transmitted data. ActiveSpaces provides various means for securingthe cluster; for information on additional options, see the ActiveSpaces documentation.
For general information about Spotfire Server clusters, see Clustered server deployments.
Installing ActiveSpaces
To use ActiveSpaces to secure the connections between clustered servers, ActiveSpaces 2.2.1 must beinstalled and configured on each Spotfire Server in the cluster. (ActiveSpaces is a separate product thatis available free-of-charge to purchasers of Spotfire Server.) After installation, you reconfigure theservers to use ActiveSpaces as the underlying data grid.
For general information about Spotfire Server clusters, see Clustered server deployments.
Procedure
1. On the TIBCO eDelivery web site, go to the TIBCO Spotfire Server page.
2. At the bottom of the page, click Download and then sign in to the site, if required.
3. On the server download page, select the latest version and your platform, and select the licenseagreement check box.
4. Under Installation Method in the center of the page, click Individual file download.
5. Under SELECT AN INDIVIDUAL COMPONENT, expand TIBCO ActiveSpaces EnterpriseEdition Software and then click either TIB_activespaces_2.2.1_win_x86_64.zip (for Windows)or TIB_activespaces_2.2.1.md5 (for Linux).
The following steps pertain to a Windows installation.
6. After the zipped folder is downloaded, extract the files.
7. Double-click the ActiveSpaces installer to install the product.
8. Copy the file <ActiveSpaces installation dir>\lib\as-common.jar to the followingdirectory: <server installation dir>\tomcat\webapps\spotfire\WEB-INF\lib.
9. Restart the computer.
78
TIBCO Spotfire® Server and Environment Installation and Administration
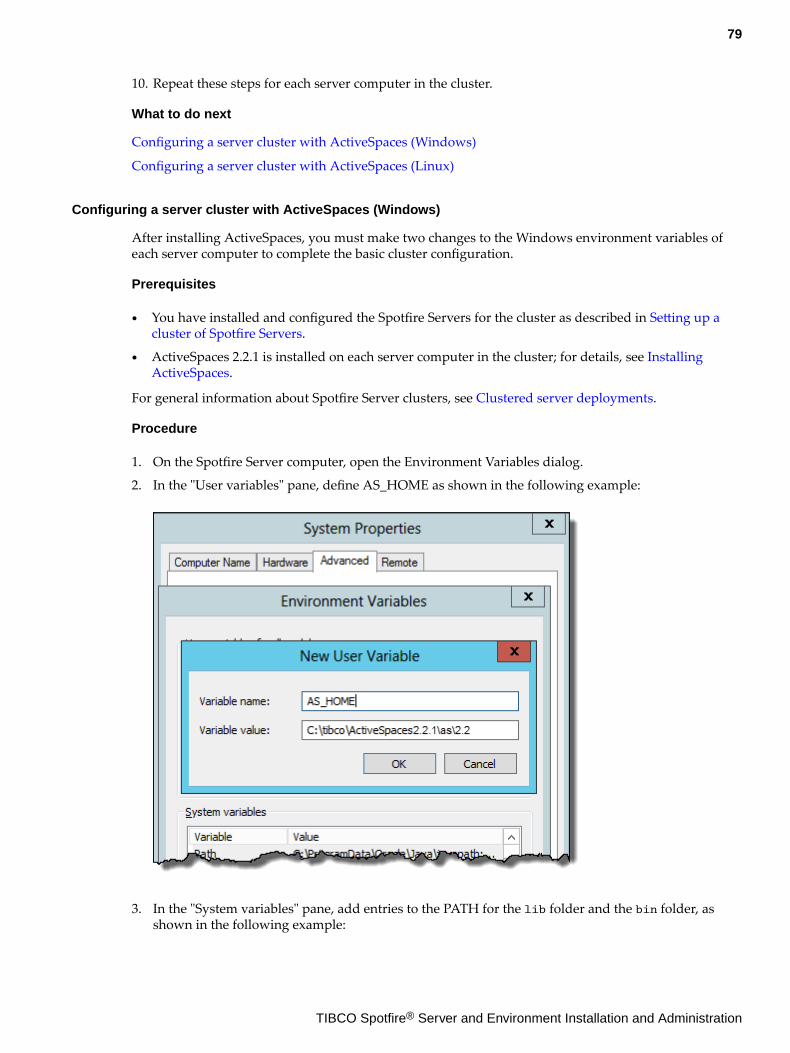
10. Repeat these steps for each server computer in the cluster.
What to do next
Configuring a server cluster with ActiveSpaces (Windows)
Configuring a server cluster with ActiveSpaces (Linux)
Configuring a server cluster with ActiveSpaces (Windows)
After installing ActiveSpaces, you must make two changes to the Windows environment variables ofeach server computer to complete the basic cluster configuration.
Prerequisites
● You have installed and configured the Spotfire Servers for the cluster as described in Setting up acluster of Spotfire Servers.
● ActiveSpaces 2.2.1 is installed on each server computer in the cluster; for details, see InstallingActiveSpaces.
For general information about Spotfire Server clusters, see Clustered server deployments.
Procedure
1. On the Spotfire Server computer, open the Environment Variables dialog.
2. In the "User variables" pane, define AS_HOME as shown in the following example:
3. In the "System variables" pane, add entries to the PATH for the lib folder and the bin folder, asshown in the following example:
79
TIBCO Spotfire® Server and Environment Installation and Administration

4. If you have not done this yet, copy the file <ActiveSpaces installation dir>\lib\as-common.jar to the following directory: <Spotfire Server installation dir>\tomcat\webapps\spotfire\WEB-INF\lib.
5. Restart the computer.
6. Repeat steps 1-5 for each server computer in the cluster.
What to do next
Enable secure transport for ActiveSpaces
Configuring a server cluster with ActiveSpaces (Linux)
After setting up the cluster and installing ActiveSpaces, you must do additional configuration if youhave a Linux installation. Then ActiveSpaces must be validated on each server computer in the cluster.
Prerequisites
● You have installed and configured the Spotfire Servers for the cluster as described in Setting up acluster of Spotfire Servers.
● ActiveSpaces 2.2.1 is installed on each server computer in the cluster; for details, see InstallingActiveSpaces.
Procedure
1. On one of the server computers, set the LD_LIBRARY_PATH variable to use the ActiveSpaces libraryby doing one of the following:
● (Recommended) To permanently set the variable for this computer, follow these steps:
1. Navigate to the etc directory.
80
TIBCO Spotfire® Server and Environment Installation and Administration
2. Open the profile file by entering the following command: vi profile3. Append the following lines to the end of the profile file:
export LD_LIBRARY_PATH=$LD_LIBRARY_PATH:/usr/local/bin/tibco/as/2.2/libexport AS_HOME=/usr/local/bin/tibco/as/2.2 export PATH=${PATH}:${AS_HOME}/bin:${AS_HOME}/lib
where .../tibco/as/2.2/lib specifies the path to ActiveSpaces.4. Save the file and restart the session.
● To set the variable for only the current session, enter the following command:export LD_LIBRARY_PATH=$LD_LIBRARY_PATH:/usr/local/bin/tibco/as/2.2/lib
where .../tibco/as/2.2/lib specifies the ActiveSpaces installation directory.
In this case the variable must be reset each time that someone logs in to Spotfire Serveron any computer in the cluster, including the current computer.
2. If you have not done this yet, copy the file <ActiveSpaces install dir>\lib\as-common.jar tothe following directory: <Spotfire Server install dir>\tomcat\webapps\spotfire\WEB-INF\lib.
3. Start the Spotfire Server.4. Repeat steps 1-3 on each server computer.5. Create the default cluster in ActiveSpaces by using the ActiveSpaces command-line interface (CLI).
The ActiveSpaces CLI should be launched only after all the Spotfire Servers in the clusterare initialized.
1. Open a command window and then open the ActiveSpaces CLI by entering the followingcommands:cd <ActiveSpaces install dir>\as\2.2\bin
as-admin
2. In the ActiveSpaces CLI, create the default cluster in ActiveSpaces as shown in the followingexample.
The discovery parameter should point to one of the Spotfire Servers in the cluster.Make sure that the clustering port matches the port that you defined in the clusteringconfiguration.as-admin> connect name "spotfire" discovery "tcp://10.90.48.16:5701"[2015-07-10T15:47:15.428][11524][10356][INFO][transport] ip_address=10.98.48.27 port=50000[2015-07-10T15:47:25.455][11524][10356][INFO][spotfire.metaspace] Connected metaspace name=[spotfire], listen=[tcp://10.90.48.16:50000], discovery=[tcp://10.98.48.27:5701], member name=[a62301b-c350] version=2.1.4.011[2015-07-10T15:47:25.455][11524][8508][INFO][spotfConnected to metaspace spotfireias-admin> re.$members] member joined: member.mydomain.com (a62301b-1645-559fbd18-31d, 10.98.48.16:5701)[2015-07-10T15:47:25.455][11524][8508][INFO][spotfire.$members] member joined: a62301b-c350 (a62301b-c350-559fbed3-1ad, 10.90.48.16:50000)
The default (immutable) ActiveSpaces metaspace name is"spotfire".
For information on the connect command, see the ActiveSpaces documentation.
3. Repeat these steps for each server in the cluster.6. For verification, list all members of the cluster, as shown in the following example:
as-admin> show membersShow Members for Metaspace 'spotfire' :
81
TIBCO Spotfire® Server and Environment Installation and Administration
_______________________________________________________________________________________________________________________Cluster Members:Member Name | IP:Port | Member Role | Member ID |-----------------------------------------------------------------------------------------------------------------member.mydomain.com | 10.90.48.16:5701 | manager | a62301b-1645-559fbd18-31d |a62301b-c350 | 10.90.48.16:50000 | member | a62301b-c350-559fbed3-1ad |Total Cluster Members: 2
The total number of cluster members should equal the number of running Spotfire Serversplus one (the administration console also joins the cluster as a member).
What to do next
Enable secure transport for ActiveSpaces
Enabling secure transport for ActiveSpaces
After configuring the Spotfire Servers in the cluster, you must enable ActiveSpaces to use securetransport for communication between the servers.
Prerequisites
You have configured each Spotfire Server in the cluster to use ActiveSpaces; see Configuring a servercluster with ActiveSpaces (Windows) or Configuring a server cluster with ActiveSpaces (Linux).
For additional information on this procedure, see the ActiveSpaces documentation.
For general information about Spotfire Server clusters, see Clustered server deployments.
Steps 1 - 3 are performed on only one server in the cluster.
Procedure
1. On one of the servers in the cluster, open a command window and then open the ActiveSpacescommand-line interface (CLI) by entering the following commands:cd ActiveSpaces installation dir/as/2.2/bin
as-admin
2. In the ActiveSpaces CLI, enter the following command:as-admin> create security_policy policy_name "as-policy" policy_file "as-policy.txt" encrypt false
Do not change the policy name or the policy file name because they are referenced in theSpotfire Server configuration and are immutable.
3. Edit the policy file that you created in the previous step:a) Under the "discovery" attribute of the metaspace_access policy key, list all the members of the
cluster.b) Change the metaspace name.
The edited section of the policy file will look similar to this:metaspace_access=metaspace=spotfire;discovery=tcp://10.97.184.60:5701;10.97.184.65:5701
c) To use traditional, TLS-like transport protection, specify transport_security=integrity. Forinformation on additional options, see the ActiveSpaces documentation.
4. Copy this generated as-policy.txt file to each of the clustered Spotfire Servers, to the folderwhere the keystore file is located. Typically, the keystore file is located here: <serverinstallation dir>/nm/trust.
5. Start all of the servers.
82
TIBCO Spotfire® Server and Environment Installation and Administration
6. To validate ActiveSpaces, execute the following commands in the ActiveSpaces CLI.
1. Create a security token by entering the following command:as-admin> create security_token domain_name "AS-DOMAIN" policy_file "C:/tibco/tss/version/nm/trust/as-policy.txt" token_file "C:/tibco/tss/version/nm/trust/mytoken.txt"
2. Connect to the metaspace with the security token by entering the following command, wherethe discovery parameter points to one of the Spotfire Servers in the cluster:as-admin> connect security_token "C:/tibco/tss/version/nm/trust/mytoken.txt" name "spotfire" discovery "tcp://10.97.120.65:5701"
7. To list the members of the cluster, enter the following command:as-admin> show members
Using Apache Ignite for clusteringApache Ignite clustering requires no manual configuration.
Apache Ignite is currently only recommended for testing purposes, not for a production environment.
Ignite provides TLS version 1.2 for communication, which makes it as secure as ActiveSpaces, and it isfaster than the other clustering solutions. In addition, it looks for specific nodes by using their IPaddress, rather than discovering any node that communicates using multicasting.
By default, Ignite uses these two ports:
● 5701 (this base value is configurable)
● 5702 (base value + 1)
You can change the default clustering ports when you configure the cluster, either in the configurationtool or by using the config-cluster command. For details, see Setting up a cluster of Spotfire Serversor config-cluster.
Configuring NTLM for a cluster of Spotfire ServersTo configure NTLM for clustered servers, first set the options common to all the servers and then set theserver-specific options.
For general information about Spotfire Server clusters, see Clustered server deployments.
Procedure
1. Configure the options common to all servers in the cluster. This is performed according to theinstructions in Configuring NTLM authentication for a single server, with the followingmodifications:
● Specify the DNS domain name (recommended) or a domain controller (not recommended),and possibly also an AD site name.
Do not specify the server, account name, or password options at this point.
2. Run the config-ntlm-auth command to add the account information for each Spotfire Server in thecluster:
● Run the command once for each server in the cluster.
● Enter the server, account name, and password options. The server option must reflect theserver name as defined in the server's bootstrap.xml file.
83
TIBCO Spotfire® Server and Environment Installation and Administration
Enabling health check URL for load balanced serversWhen using a load balancer in front of a cluster of Spotfire Servers, a health check URL can be set up toshow the status of the servers.
For general information about Spotfire Server clusters, see Clustered server deployments.
Procedure
1. Open a command-line interface and export the active configuration by using the export-configcommand. (For details on using the Spotfire command line, see Executing commands on thecommand line.)
2. On the command line, enter the following command:config set-config-prop --name=status-controller.enabled --value=true
For information about the command options, see set-config-prop.
3. Import the configuration file back to the Spotfire database by using the import-config command.
4. Restart the Spotfire Servers in the cluster.
Result
You can now use the URL /spotfire/rest/status/getStatus to check the status of the servers inyour cluster.
● If the health check URL hasn't been enabled, the HTTP code 404 is returned.● If the server is up and running, the HTTP code 200 is returned along with the text RUNNING.● If the server is currently starting or stopping, the HTTP code 503 is returned along with the text
STARTING or STOPPING.
Kerberos authentication for clustered servers with load balancerIn a clustered environment where Kerberos authentication is used to authenticate users, the loadbalancer forwards all Kerberos authentication information to the Spotfire Servers. No configuration onthe load balancer is needed, but there are certain considerations to take into account when Kerberosauthentication is set up.
These are the special considerations:
● Two Service Principal Names must be created for each Spotfire Server as well as for the loadbalancer.
● One keytab file must be created. This must use the fully qualified Service Principal Name of the loadbalancer.
● This keytab file must be copied to each Spotfire Server.● When Kerberos authentication is set up, the fully qualified Service Principal Name of the load
balancer must be provided.
For general information about Spotfire Server clusters, see Clustered server deployments.
X.509 client certificates for clustered servers with load balancerWhen using X.509 client certificate authentication in a clustered environment, the clients see the loadbalancer as the server. The load balancer must therefore be provided and configured with a servercertificate and its private key.
The load balancer also needs to be provided and configured with the CA certificate that was used toissue the server certificate.
For general information about Spotfire Server clusters, see Clustered server deployments.
84
TIBCO Spotfire® Server and Environment Installation and Administration
Configuring shared import and export folders for clustered deploymentsFrom the Library Administration tool in Spotfire Analyst, you can import and export library content.The import and export files are stored in a folder specified in the Spotfire Server configuration. In aclustered environment, where the client could be communicating with any of the servers, steps must betaken to ensure that the import and export files are always stored in the same folder.
For general information about Spotfire Server clusters, see Clustered server deployments.
Procedure
● Using Windows shared folder technology, set the location of the import and export folder to a folderthat is shared with all the Spotfire Servers in the cluster.
Deploying client packages to Spotfire ServerTo install and use the Spotfire Analyst client and Spotfire web client, you must first deploy thefollowing distribution file (.sdn file) to Spotfire Server: Spotfire.Dxp.sdn.
For more information about deployments, see Deployments and deployment areas.
Prerequisites
● A Spotfire Server administrator has been created. For instructions, see Creating an administratoruser.
● You downloaded the Spotfire.Dxp.sdn file from the TIBCO eDelivery site. For details, see Downloading required software.
Procedure
1. Log in to Spotfire Server by going to http://servername:port/spotfire, where port is the server front-end port (specified in step 7 of Installing the Spotfire Server files (interactively on Windows)).
2. Click Deployments & Packages.3. On the Deployments & Packages page, under Deployment areas, select the area you are currently
using.4. In the "Software packages" pane, click Add packages.5. In the "Add packages" dialog, click Choose File.6. Browse to and then double-click the Spotfire.Dxp.sdn file.7. In the "Add packages" dialog, click Upload.
After the packages are uploaded to the server (this may take a while), the new software packagesare displayed in the "Software packages" pane.
8. At the top of the "Software packages" pane, click Validate to check the deployment, and then clickSave.
9. In the "Save deployment" dialog that opens, verify or edit the details and then click Save.
What to do next
Node manager installation
User authenticationSpotfire supports a variety of user authentication protocols for verifying the identities of users loggingin to the program.
To configure authentication, you select both an authentication method and a user directory.
85
TIBCO Spotfire® Server and Environment Installation and Administration
Spotfire supports the two main types of authentication—user name and password, and single sign-on—as well as two-factor and external methods.
User name and password authentication methodsWhen users start a Spotfire Analyst client, they select which Spotfire Server to connect to. If that serveris configured for a user name and password based authentication method, the users are also promptedfor their user name and password.
The user name and password are then sent to Spotfire Server.
The login experience for the Spotfire Analyst client can be customized in several ways, includingwhether users have the option to save their login information, and whether the dialog contains an RSSfeed. For details, see Login behavior configuration.
The credentials that users enter are not encrypted when they are transferred to Spotfire Server unlessthe server uses TLS. To help counter the risks associated with unencrypted data, enable TLS whenconfiguring a user name and password authentication method.
For all the user name and password methods, an entry for each user is created in the Spotfire database.
● If you configure authentication towards an external user directory such as an LDAP directory, theuser list or group hierarchies from the external directory are automatically copied to the Spotfiredatabase.
● If you configure authentication towards the Spotfire database, the user and group information mustbe manually entered.
● It is possible to combine authentication towards an external user directory with users addedmanually to the Spotfire database.
Authentication towards the Spotfire database
This authentication method requires that the Spotfire user directory be configured for Spotfire database.
When the user directory is set to Database, the administrator usually enters the user names andpasswords into the Spotfire database manually. The names and passwords can also be imported from aCSV file, or automatically created as new users log in to the server. The option to automatically createusers is available through the post-authentication filter.
Authentication towards the Spotfire database is the default configuration for Spotfire Server, so nospecial configuration is required. It is easy and fast to set up and it is recommended for smallimplementations.
Authentication towards LDAP
This authentication method integrates with an existing LDAP directory and delegates the actualauthentication responsibility to its configured LDAP servers.
The result is that only users with valid accounts in the LDAP directory can log in to Spotfire Server.This setup is recommended for larger implementations.
Spotfire Server supports the following LDAP servers:
● Microsoft Active Directory
● The Directory Server product family (Oracle Directory Server, Sun Java System Directory Server,Sun ONE Directory Server, iPlanet Directory Server, Netscape Directory Server)
Other types of LDAP servers may also work with Spotfire Server, but require more advancedconfiguration.
86
TIBCO Spotfire® Server and Environment Installation and Administration
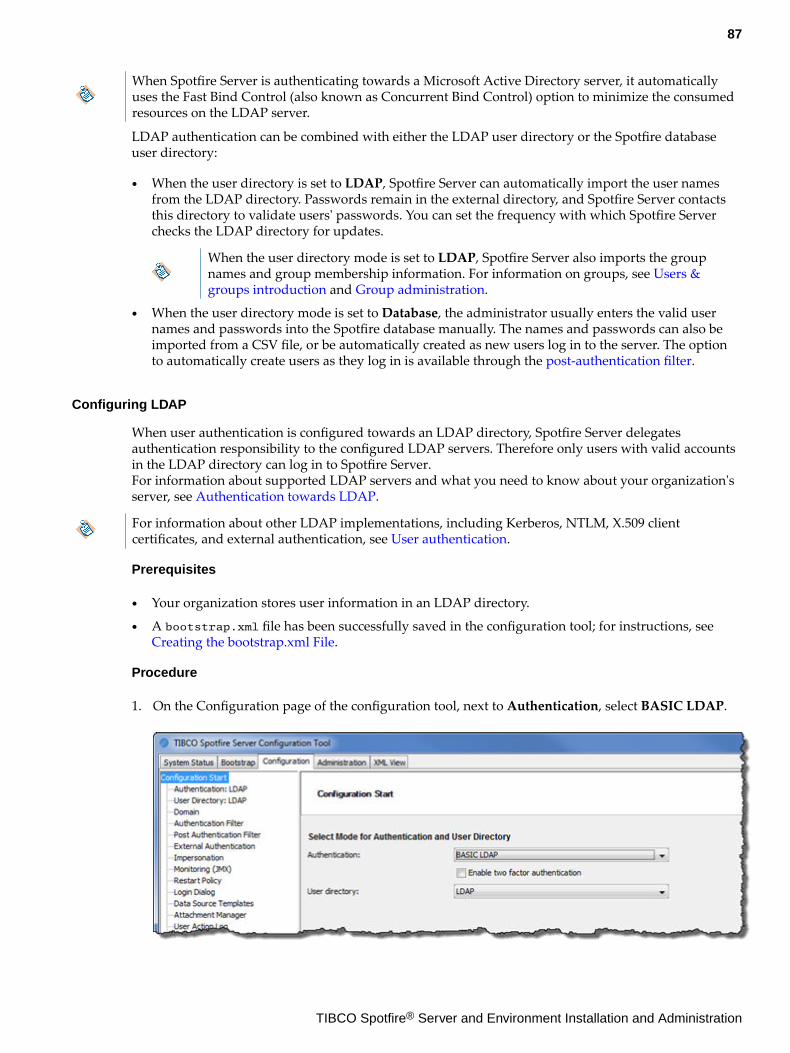
When Spotfire Server is authenticating towards a Microsoft Active Directory server, it automaticallyuses the Fast Bind Control (also known as Concurrent Bind Control) option to minimize the consumedresources on the LDAP server.
LDAP authentication can be combined with either the LDAP user directory or the Spotfire databaseuser directory:
● When the user directory is set to LDAP, Spotfire Server can automatically import the user namesfrom the LDAP directory. Passwords remain in the external directory, and Spotfire Server contactsthis directory to validate users' passwords. You can set the frequency with which Spotfire Serverchecks the LDAP directory for updates.
When the user directory mode is set to LDAP, Spotfire Server also imports the groupnames and group membership information. For information on groups, see Users &groups introduction and Group administration.
● When the user directory mode is set to Database, the administrator usually enters the valid usernames and passwords into the Spotfire database manually. The names and passwords can also beimported from a CSV file, or be automatically created as new users log in to the server. The optionto automatically create users as they log in is available through the post-authentication filter.
Configuring LDAP
When user authentication is configured towards an LDAP directory, Spotfire Server delegatesauthentication responsibility to the configured LDAP servers. Therefore only users with valid accountsin the LDAP directory can log in to Spotfire Server.For information about supported LDAP servers and what you need to know about your organization'sserver, see Authentication towards LDAP.
For information about other LDAP implementations, including Kerberos, NTLM, X.509 clientcertificates, and external authentication, see User authentication.
Prerequisites
● Your organization stores user information in an LDAP directory.
● A bootstrap.xml file has been successfully saved in the configuration tool; for instructions, see Creating the bootstrap.xml File.
Procedure
1. On the Configuration page of the configuration tool, next to Authentication, select BASIC LDAP.
87
TIBCO Spotfire® Server and Environment Installation and Administration
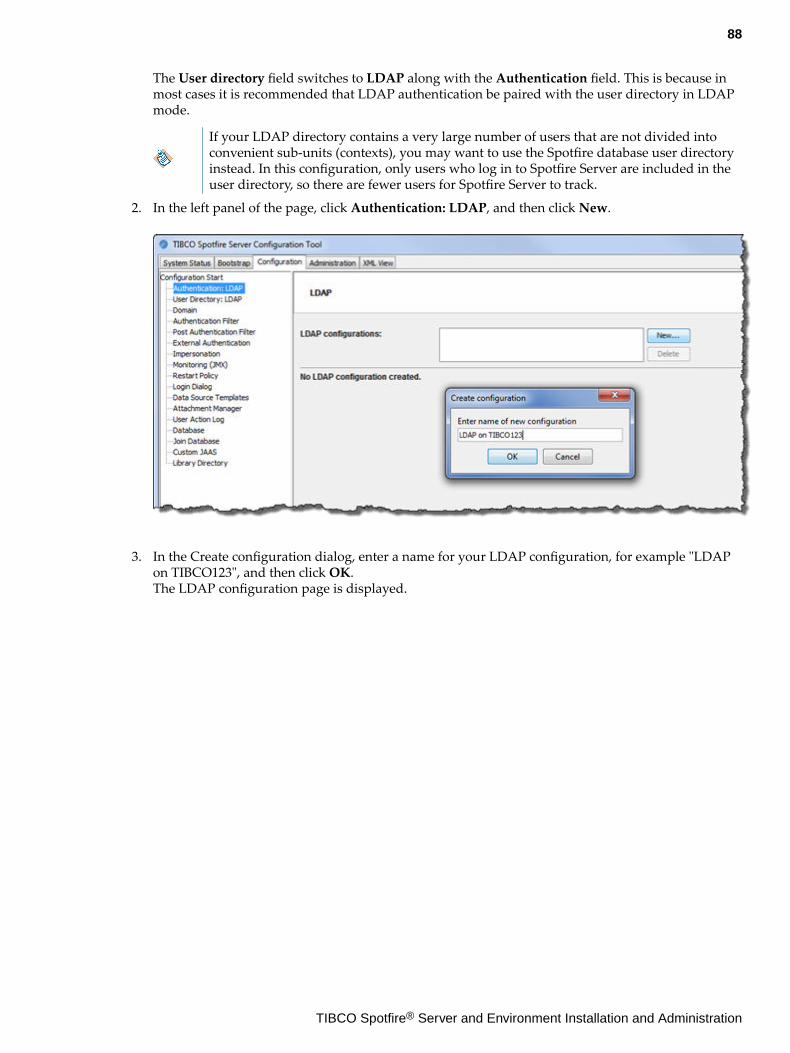
The User directory field switches to LDAP along with the Authentication field. This is because inmost cases it is recommended that LDAP authentication be paired with the user directory in LDAPmode.
If your LDAP directory contains a very large number of users that are not divided intoconvenient sub-units (contexts), you may want to use the Spotfire database user directoryinstead. In this configuration, only users who log in to Spotfire Server are included in theuser directory, so there are fewer users for Spotfire Server to track.
2. In the left panel of the page, click Authentication: LDAP, and then click New.
3. In the Create configuration dialog, enter a name for your LDAP configuration, for example "LDAPon TIBCO123", and then click OK.The LDAP configuration page is displayed.
88
TIBCO Spotfire® Server and Environment Installation and Administration
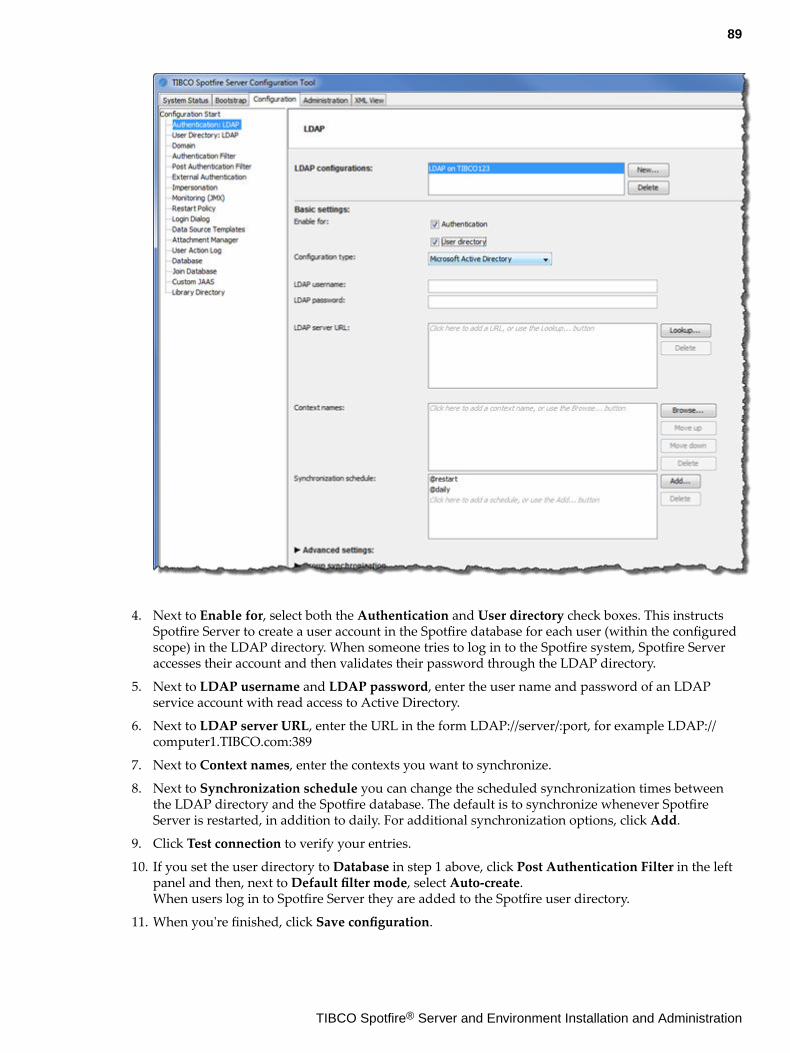
4. Next to Enable for, select both the Authentication and User directory check boxes. This instructsSpotfire Server to create a user account in the Spotfire database for each user (within the configuredscope) in the LDAP directory. When someone tries to log in to the Spotfire system, Spotfire Serveraccesses their account and then validates their password through the LDAP directory.
5. Next to LDAP username and LDAP password, enter the user name and password of an LDAPservice account with read access to Active Directory.
6. Next to LDAP server URL, enter the URL in the form LDAP://server/:port, for example LDAP://computer1.TIBCO.com:389
7. Next to Context names, enter the contexts you want to synchronize.
8. Next to Synchronization schedule you can change the scheduled synchronization times betweenthe LDAP directory and the Spotfire database. The default is to synchronize whenever SpotfireServer is restarted, in addition to daily. For additional synchronization options, click Add.
9. Click Test connection to verify your entries.
10. If you set the user directory to Database in step 1 above, click Post Authentication Filter in the leftpanel and then, next to Default filter mode, select Auto-create.When users log in to Spotfire Server they are added to the Spotfire user directory.
11. When you're finished, click Save configuration.
89
TIBCO Spotfire® Server and Environment Installation and Administration

Configuring LDAPS
In an LDAP environment, where the Spotfire system communicates with an LDAP directory server,administrators often secure the LDAP protocol using TLS, if the LDAP directory supports this.
Prerequisites
● The LDAP directory server has been set up to communicate using TLS.
Procedure
1. If you are using a self-signed certificate, set Spotfire Server to trust this certificate:a) Export the certificate to file and copy it to Spotfire Server.b) Open a command-line interface, navigate to the <installation dir>/jdk/jre/lib/security
directory, and run the following keytool command: ../../bin/keytool -import -fileldapserver.crt -keystore cacerts -alias spotfire_ldaps. Replace ldapserver.crtwith the name of the exported certificate.
c) When prompted, enter the password to the cacerts keystore. The default password is "changeit"(without quotation marks).
d) Verify that the certificate has been successfully added by using the followingcommand: ../../bin/keytool -list -keystore cacerts -alias spotfire_ldaps.
e) When prompted, enter the password to the cacerts keystore.
2. To activate LDAPS, use the create-ldap-config or the update-ldap-config command.
SASL authentication for LDAP
Spotfire Server supports two SASL (Simple Authentication Socket Layer) mechanisms forauthentication towards LDAP: DIGEST-MD5 and GSSAPI.
These mechanisms can provide secure authentication of Spotfire Server when it is connecting to LDAPservers by preventing clear text passwords from being transmitted over the network.
GSSAPI can provide secure authentication even over un-secure networks because it uses the Kerberosprotocol for authentication.
These instructions apply for Active Directory LDAP configurations. Spotfire Server does not supportGSSAPI for other LDAP configurations.
Configuring Spotfire Server for DIGEST-MD5 authentication of LDAP
These instructions apply for Active Directory LDAP configurations. Spotfire Server does not supportGSSAPI for other LDAP configurations.
Procedure
● When configuring SASL authentication with DIGEST-MD5, follow these guidelines:
● The distinguished name (DN) does not work for authentication; the userPrincipalName attributemust be used instead.
● Set the authentication attribute option to userPrincipalName.
● Set the username attribute option to sAMAccountName.
● All accounts must use reversible encryption for their passwords. This is typically not the defaultsetting for Active Directory.
90
TIBCO Spotfire® Server and Environment Installation and Administration
Configuring Spotfire Server for GSSAPI authentication of LDAP
These instructions apply for Active Directory LDAP configurations. Spotfire Server does not supportGSSAPI for other LDAP configurations.
Prerequisites
● Make sure that you have a fully working Active Directory LDAP configuration using clear-textpassword authentication (also known as simple authentication mechanism).
● Save this fully working Active Directory LDAP configuration to file.● Make a note of the LDAP configuration's ID.● Make sure that you have a fully working krb5.conf file. The content of the krb5.conf file must be the
same as when setting up Spotfire Server for Kerberos authentication. See Configuring Kerberos forJava.
Make sure to stop the entire service/Java process before installing the file. If the krb5.conffile is modified after Spotfire Server has been started, you must restart the Spotfire Serverprocess for the modifications to take effect.
Procedure
1. Stop Spotfire Server (see Start or stop Spotfire Server).
2. Copy the fully working krb5.conf file to the <install dir>/jdk/jre/lib/security directory oneach Spotfire Server in the cluster.
3. Open the configuration tool and go to the LDAP Configuration panel.
4. Update the LDAP user name so that it is a proper Kerberos principal name. Usually it is sufficient toadd the name of the account's Windows domain in upper-case letters. Sometimes it is also necessaryto include the Windows domain name. Using a name based on a distinguished name (DN) orincluding a NetBIOS domain name does not work when using GSSAPI.Examples of correct names:
● ldapsvc@ RESEARCH.EXAMPLE.COM● [email protected]@ RESEARCH.EXAMPLE.COM
5. Select the specific LDAP configuration to be enabled for GSSAPI and then expand the Advancedsettings.
6. In the Advanced dialog, make the following changes:a) Set the security-authentication configuration property to GSSAPI.b) Set the authentication-attribute to sAMAccountName or userPrincipalName (whichever works
best for your configuration). The default value is empty.
If the krb5.conf file contains more than one Kerberos realm, the authentication-attribute must be set to userPrincipalName.
c) Add a custom property with the key kerberos.login.context.name and the valueSpotfireGSSAPI.
7. Click Save configuration.
8. Restart Spotfire Server.
What to do next
Procedure steps related to LDAP configurations must be performed for each LDAP catalogue that youwant to enable for GSSAPI. For multiple LDAP configurations, repeat these steps for eachconfiguration.
91
TIBCO Spotfire® Server and Environment Installation and Administration
Authentication towards Windows NT Domain (legacy)
With this authentication method, user authentication is delegated to Windows NT domain controllers.
Spotfire Server must be installed on a computer running Windows and there must be a workingWindows NT 4 Server domain controller or a Windows Server 2000 or later domain controller runningin mixed mode. This is a legacy solution that should only be used if LDAP cannot be used.
The Windows NT Domain authentication method can be combined with a user directory in eitherWindows NT Domain mode or in Spotfire database mode.
When combining this authentication method with a Spotfire database user directory mode, the post-authentication filter must be configured for auto-creating mode, so that the users will be automaticallyadded to the user directory. When combining it with a Windows NT Domain User Directory, thedefault blocking post-authentication filter is already correctly configured.
Combination of LDAP and Spotfire database authentication
If you configure authentication towards an external user directory such as an LDAP directory, or aWindows NT Domain, you can combine this with adding users manually to the Spotfire database.
This feature allow users to access Spotfire eventhough they are not part of the external user directory.The reason for adding such users could for example be if they are temporary users, that you do notwant to add to the LDAP directory, or to make sure that administrators can access Spotfire even if theconnection to the LDAP directory is lost. These users will be added to the same domain as the groupscreated in Spotfire.
This feature is enabled by default. For information on how to disable this feature, see Disabling addingdatabase users when using LDAP on page 92.
If you switch from Spotfire database authentication to LDAP authentication, all users remaining in theSpotfire database will still have access to Spotfire.
Disabling adding database users when using LDAP
You can disable the possibility to add users to the Spotfire database when authenticating towards anexternal directory.
Procedure
1. Open a command line and export the active server configuration (the configuration.xml file) byusing the export-config command; for additional information, see Executing commands on thecommand line.
2. On the command line, enter the following command:config set-config-prop --name=user-directory.allow-database-user-creation --value=false
To enable the feature again, run the same command but set the value to true.
3. Import the configuration file back to the Spotfire database by using the import-config command.
4. Restart the Spotfire Server service.
Authentication towards a custom JAAS module
All the user name and password authentication methods that are supported by Spotfire Server areimplemented as Java Authentication and Authorization Service (JAAS) modules. Spotfire also supportsthird-party JAAS modules.
You may therefore use a custom JAAS module, provided that it does the following:
92
TIBCO Spotfire® Server and Environment Installation and Administration
● Validates user name and password authentication.
● Uses JAAS' NameCallback and PasswordCallback objects for collecting the user names andpasswords.
When using a custom JAAS module, you must place the jar file in the <installation dir>/tomcat/webapps/spotfire/WEB-INF/lib directory on all Spotfire Servers.
For more information about JAAS, consult the JAAS Reference Guide.
Single sign-on authentication methodsSpotfire Server can be integrated with certain single sign-on systems that are used in enterpriseenvironments.
Spotfire Server can use the NTLM or Kerberos single sign-on authentication methods, where theidentity information stored within the user's current Windows session is reused to authenticate the useron the server. Thus, when using these authentication methods, users are never prompted for user nameor password when they log in to Spotfire Server. The Kerberos and NTLM authentication methods arecommonly referred to as Integrated Windows Authentication.
Spotfire Server can also authenticate users based on X.509 certificates. This requires the server to beconfigured for mutual TLS, meaning HTTPS with X.509 client certificates.
NTLM authentication
The NTLM authentication method reuses the identity information associated with the user's currentWindows session. This identity information is gathered when the user initially logs in to Windows.
When both the client computer and the server computer belong to the same Windows domain or twoseparate Windows domains with established trust between them, this can provide a single sign-onexperience.
If the client computer belongs to a separate Windows domain (without trust established to the servercomputer's domain), the current Windows session is not valid in the Windows domain of the servercomputer and the user will be prompted for user name and password. The user must then enter theuser name and password of a valid account that belongs to the Windows domain of the servercomputer.
It is not possible to delegate NTLM authentication; Spotfire Server can not reuse the authenticationcredentials presented by the client, for example when authenticating against an Information Servicesdata source that also uses NTLM. If you need such functionality, use Kerberos instead.
The NTLM authentication method can be combined with a user directory of either type:
● LDAP (recommended)
● Spotfire database, provided that the default post-authentication filter is configured in auto-creatingmode
The following instructions assume that either combination of authentication and user directory isalready fully working.
Setting up NTLM authentication involves two steps:
Creating a computer service account in your Windows domain
Configuring NTLM authentication
93
TIBCO Spotfire® Server and Environment Installation and Administration
Downloading third-party components (JCIFS) for NTLM authentication
If you plan to use NTLM authentication and did not download the required JCIFS components duringserver installation, you can manually download them later.
Prerequisites
You have completed a basic installation of Spotfire Server.
Procedure
1. Go to http://public.tibco.com/pub/tibco_oss/jcifs/.
2. Download and extract jcifs_1.3.19.zip to the following directory: <installation directory>\tomcat\webapps\spotfire\WEB-INF\lib.The required jcifs.jar file appears in the ...\WEB-INF\lib directory.
Creating a computer service account in your Windows domain
To set up NTLM authentication, you first create a computer service account by running a Visual Basicscript that is distributed with Spotfire Server.
Prerequisites
● The script must be run on a Windows computer, but does not have to be run on the same computerthat the server is installed on.
● You must be logged in to your Windows domain as a member of the group Account Operators orAdministrators to run the SetupWizard.vbs script.
● If Spotfire Server is installed on a Linux computer, copy the SetupWizard.vbs script to a Windowscomputer first.
Alternatively, you can create the computer account manually; see Creating a computer service accountmanually.
Procedure
1. Double-click the following file: <installation dir>/tomcat/bin/setupwizard.vbs
2. In the Domain Controller Hostname panel, enter the hostname of one of your domain controllers.Click OK.
3. In the Account Name panel, enter the short name of the computer account to be created. The shortname must not exceed 15 characters. Click OK.
4. In the Distinguished Name panel, enter a distinguished name for the account to be created. Wesuggest that you use a distinguished name that is based on the short name entered in the previouspanel. You should edit this to match your Windows domain, with regards to parameters such as inwhich Organizational Units (OU) the account should be placed. Click OK.
5. In the Account Password panel, enter a password for the account to be created. Click OK.A dialog opens with text indicating if the tool was successful. Click OK.
If the tool was unsuccessful, make sure that the logged in user has the requiredpermissions to create accounts in the Windows Domain, and that the Domain Controllercan be reached.
6. The file SetupWizard.txt, created by the tool in the folder where the tool is located, opens. If itdoes not, open it manually. The information in the file is required to run the NTLM authenticationconfiguration commands.
94
TIBCO Spotfire® Server and Environment Installation and Administration
Example of a SetupWizard.txt file
# Generated by the Jespa Setup Wizard from IOPLEX Software on 2011-04-07
jespa.bindstr = dc.example.research.comjespa.dns.servers = 192.168.0.1 jespa.dns.site = Default-First-Site-Name jespa.service.acctname = [email protected] jespa.service.password = Pa33w0rd
What to do next
Configure NTLM authentication using configuration commands
Creating a computer service account manually
If you are setting up NTLM authentication and you are unable to run the SetupWizard.vbs script, oryou prefer to create the account manually, follow these steps.
Prerequisites
If Spotfire Server is installed on a Linux computer, copy the SetComputerPassword.vbs script to aWindows computer first.
Procedure
1. Create the computer account by using the Microsoft Management Console snap-in Domain Usersand Computers. Refer to Microsoft documentation for details on how to use this tool.
Make sure to create a new computer account. A user account will not work. Reusing anexisting computer account will not work.
2. To set a password for this account, open a command line and run this script with the account nameand password as arguments to the command: <installation dir>/tomcat/bin/SetComputerPassword.vbs.SetComputerPassword.vbs jespa‐[email protected] Pa33w0rd
What to do next
Configure NTLM authentication using configuration commands
Configuring NTLM authentication for a single server
These instructions are for configuring NTLM authentication by using the command line.
Prerequisites
You have created a computer service account; see Creating a computer service account in yourWindows domain.
Procedure
1. Configure NTLM authentication by using the following commands: config-ntlm-auth and list-ntlm-auth.This is the information you must have to run the commands:
95
TIBCO Spotfire® Server and Environment Installation and Administration
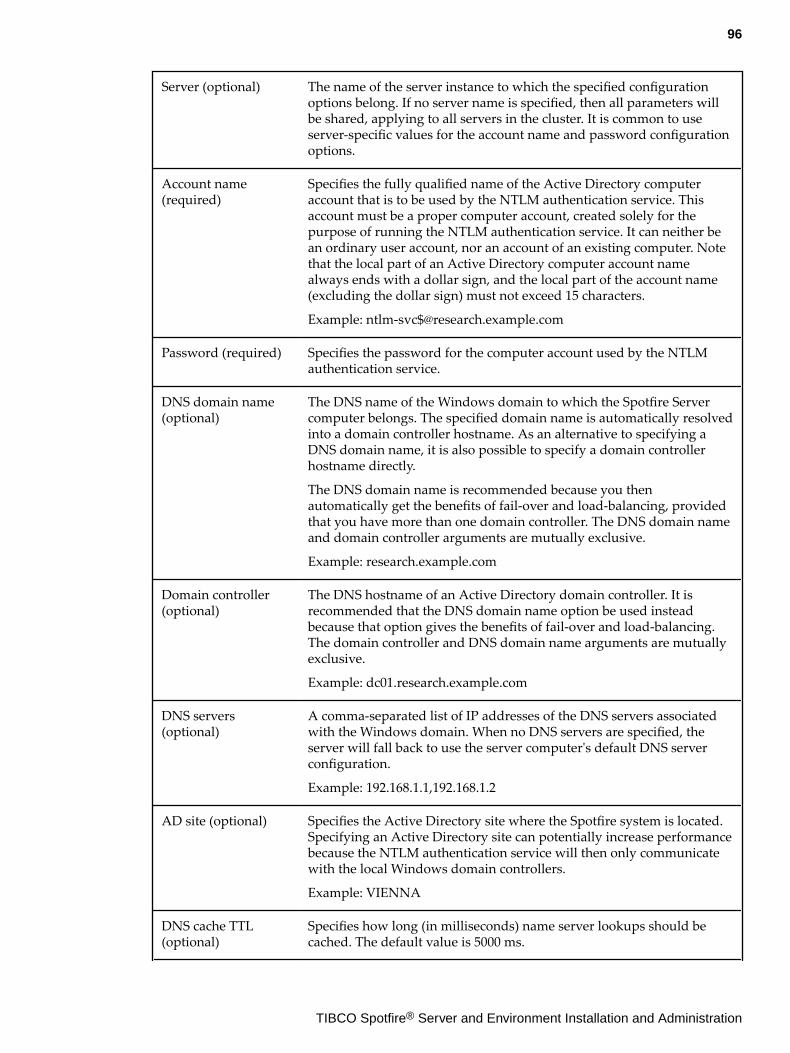
Server (optional) The name of the server instance to which the specified configurationoptions belong. If no server name is specified, then all parameters willbe shared, applying to all servers in the cluster. It is common to useserver-specific values for the account name and password configurationoptions.
Account name(required)
Specifies the fully qualified name of the Active Directory computeraccount that is to be used by the NTLM authentication service. Thisaccount must be a proper computer account, created solely for thepurpose of running the NTLM authentication service. It can neither bean ordinary user account, nor an account of an existing computer. Notethat the local part of an Active Directory computer account namealways ends with a dollar sign, and the local part of the account name(excluding the dollar sign) must not exceed 15 characters.
Example: [email protected]
Password (required) Specifies the password for the computer account used by the NTLMauthentication service.
DNS domain name(optional)
The DNS name of the Windows domain to which the Spotfire Servercomputer belongs. The specified domain name is automatically resolvedinto a domain controller hostname. As an alternative to specifying aDNS domain name, it is also possible to specify a domain controllerhostname directly.
The DNS domain name is recommended because you thenautomatically get the benefits of fail-over and load-balancing, providedthat you have more than one domain controller. The DNS domain nameand domain controller arguments are mutually exclusive.
Example: research.example.com
Domain controller(optional)
The DNS hostname of an Active Directory domain controller. It isrecommended that the DNS domain name option be used insteadbecause that option gives the benefits of fail-over and load-balancing.The domain controller and DNS domain name arguments are mutuallyexclusive.
Example: dc01.research.example.com
DNS servers(optional)
A comma-separated list of IP addresses of the DNS servers associatedwith the Windows domain. When no DNS servers are specified, theserver will fall back to use the server computer's default DNS serverconfiguration.
Example: 192.168.1.1,192.168.1.2
AD site (optional) Specifies the Active Directory site where the Spotfire system is located.Specifying an Active Directory site can potentially increase performancebecause the NTLM authentication service will then only communicatewith the local Windows domain controllers.
Example: VIENNA
DNS cache TTL(optional)
Specifies how long (in milliseconds) name server lookups should becached. The default value is 5000 ms.
96
TIBCO Spotfire® Server and Environment Installation and Administration
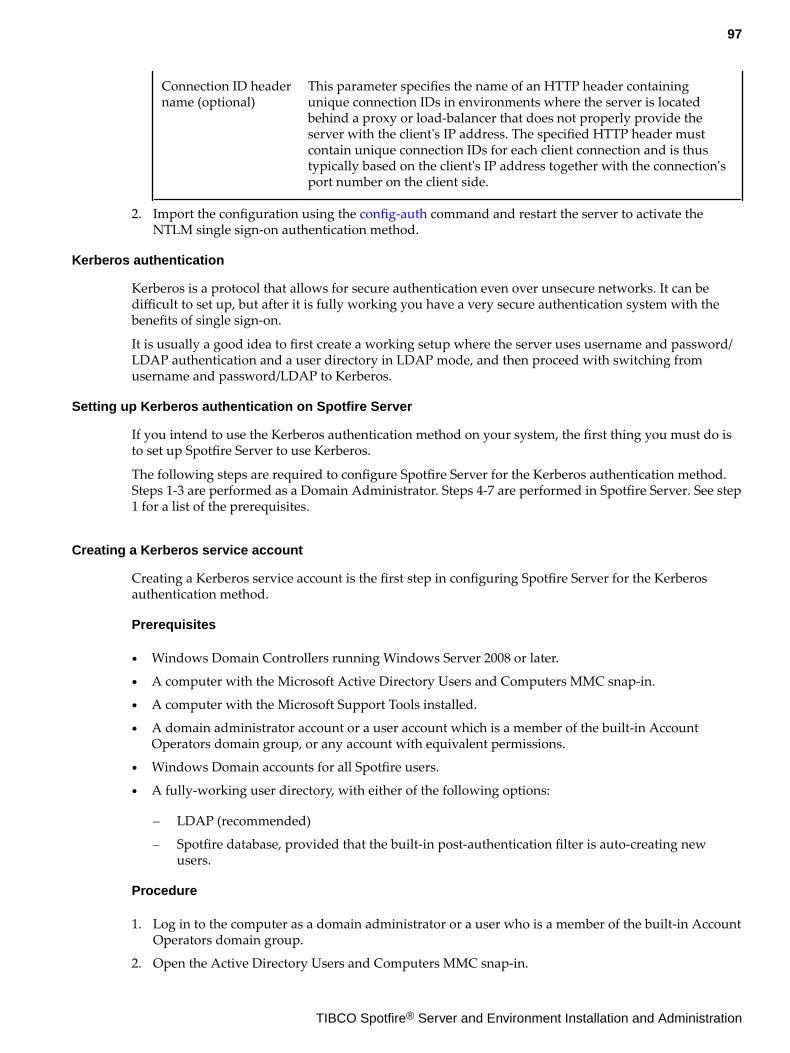
Connection ID headername (optional)
This parameter specifies the name of an HTTP header containingunique connection IDs in environments where the server is locatedbehind a proxy or load-balancer that does not properly provide theserver with the client's IP address. The specified HTTP header mustcontain unique connection IDs for each client connection and is thustypically based on the client's IP address together with the connection'sport number on the client side.
2. Import the configuration using the config-auth command and restart the server to activate theNTLM single sign-on authentication method.
Kerberos authentication
Kerberos is a protocol that allows for secure authentication even over unsecure networks. It can bedifficult to set up, but after it is fully working you have a very secure authentication system with thebenefits of single sign-on.
It is usually a good idea to first create a working setup where the server uses username and password/LDAP authentication and a user directory in LDAP mode, and then proceed with switching fromusername and password/LDAP to Kerberos.
Setting up Kerberos authentication on Spotfire Server
If you intend to use the Kerberos authentication method on your system, the first thing you must do isto set up Spotfire Server to use Kerberos.
The following steps are required to configure Spotfire Server for the Kerberos authentication method.Steps 1-3 are performed as a Domain Administrator. Steps 4-7 are performed in Spotfire Server. See step1 for a list of the prerequisites.
Creating a Kerberos service account
Creating a Kerberos service account is the first step in configuring Spotfire Server for the Kerberosauthentication method.
Prerequisites
● Windows Domain Controllers running Windows Server 2008 or later.
● A computer with the Microsoft Active Directory Users and Computers MMC snap-in.
● A computer with the Microsoft Support Tools installed.
● A domain administrator account or a user account which is a member of the built-in AccountOperators domain group, or any account with equivalent permissions.
● Windows Domain accounts for all Spotfire users.
● A fully-working user directory, with either of the following options:
— LDAP (recommended)
— Spotfire database, provided that the built-in post-authentication filter is auto-creating newusers.
Procedure
1. Log in to the computer as a domain administrator or a user who is a member of the built-in AccountOperators domain group.
2. Open the Active Directory Users and Computers MMC snap-in.
97
TIBCO Spotfire® Server and Environment Installation and Administration
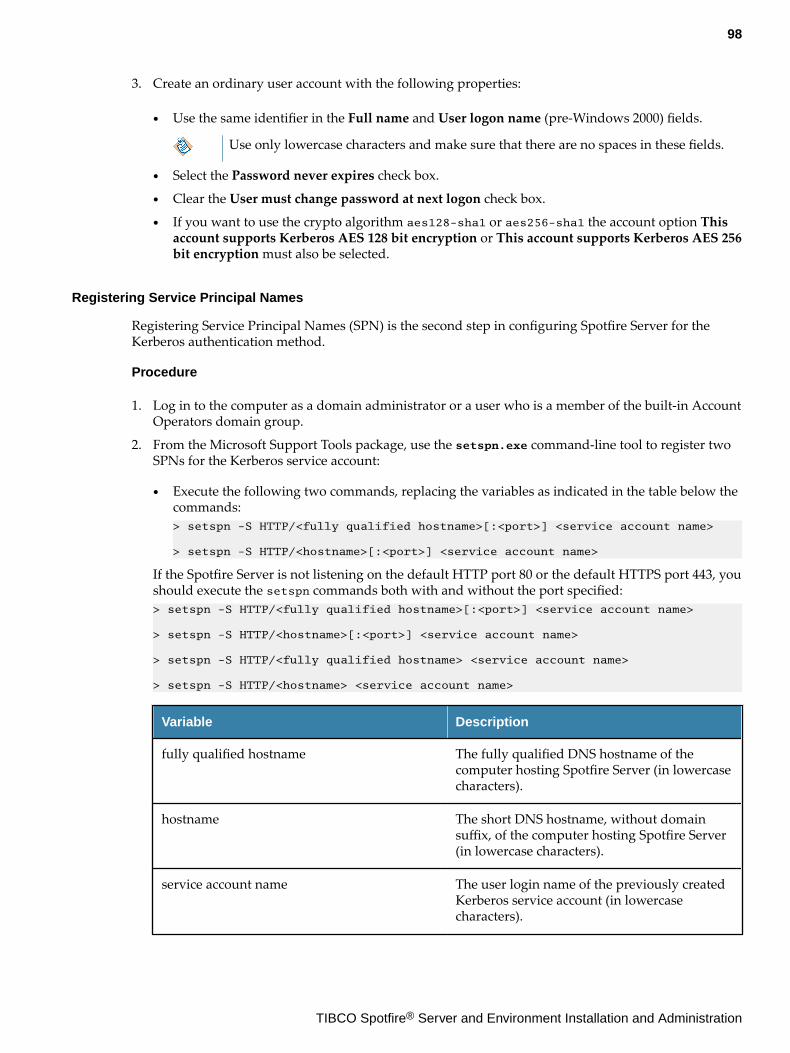
3. Create an ordinary user account with the following properties:
● Use the same identifier in the Full name and User logon name (pre-Windows 2000) fields.
Use only lowercase characters and make sure that there are no spaces in these fields.
● Select the Password never expires check box.
● Clear the User must change password at next logon check box.
● If you want to use the crypto algorithm aes128-sha1 or aes256-sha1 the account option Thisaccount supports Kerberos AES 128 bit encryption or This account supports Kerberos AES 256bit encryption must also be selected.
Registering Service Principal Names
Registering Service Principal Names (SPN) is the second step in configuring Spotfire Server for theKerberos authentication method.
Procedure
1. Log in to the computer as a domain administrator or a user who is a member of the built-in AccountOperators domain group.
2. From the Microsoft Support Tools package, use the setspn.exe command-line tool to register twoSPNs for the Kerberos service account:
● Execute the following two commands, replacing the variables as indicated in the table below thecommands:> setspn -S HTTP/<fully qualified hostname>[:<port>] <service account name>
> setspn -S HTTP/<hostname>[:<port>] <service account name>
If the Spotfire Server is not listening on the default HTTP port 80 or the default HTTPS port 443, youshould execute the setspn commands both with and without the port specified:> setspn -S HTTP/<fully qualified hostname>[:<port>] <service account name>
> setspn -S HTTP/<hostname>[:<port>] <service account name>
> setspn -S HTTP/<fully qualified hostname> <service account name>
> setspn -S HTTP/<hostname> <service account name>
Variable Description
fully qualified hostname The fully qualified DNS hostname of thecomputer hosting Spotfire Server (in lowercasecharacters).
hostname The short DNS hostname, without domainsuffix, of the computer hosting Spotfire Server(in lowercase characters).
service account name The user login name of the previously createdKerberos service account (in lowercasecharacters).
98
TIBCO Spotfire® Server and Environment Installation and Administration

Variable Description
port The TCP port number on which Spotfire Serveris listening. This is not required if using thedefault HTTP port 80 or the default HTTPSport 443.
You must use the name of a DNS A record for Spotfire Server. A CNAME record will notwork.
Avoid explicitly specifying the port number if Spotfire Server is using the default HTTPport 80.
It is recommended that you not have multiple Kerberos-enabled HTTP services on onecomputer.
Registering Service Principal Names for the "spotsvc" Kerberos service account to be used by aSpotfire Server installed on the "spotfireserver.research.example.com" computer and listening on thedefault HTTP port 80 or the default HTTPS port 443:> setspn -S HTTP/spotfireserver.research.example.com spotsvc
> setspn -S HTTP/spotfireserver spotsvc
This creates the following two SPNs for the "spotsvc" service account:
● HTTP/spotfireserver.research.example.com
● HTTP/spotfireserver
To list the resulting Service Principal Names for a Kerberos service account, execute the followingcommand:> setspn -L <service account name>
For example, for the "spotsvc" Kerberos service account, the previous command looks like this:> setspn -L spotsvc
Creating a keytab file for the Kerberos service account
Creating the keytab file is the third step in configuring Spotfire Server for the Kerberos authenticationmethod.
Procedure
1. Log in to the computer as a domain administrator or a user who is a member of the built-in AccountOperators domain group.
2. Execute the following command, replacing the variables with the appropriate values:> ktpass /princ HTTP/<fully qualified hostname>[:<port>]@<realm> /ptype krb5_nt_principal /crypto <crypto algorithm> /mapuser <service account name> /out spotfire.keytab -kvno 0 /pass <service account password>
Make sure that the executed command does not have any newlines.
All values are case sensitive.
Older versions of the ktpass.exe tool will fail to create the keytab file when the tool is notrun on an actual domain controller.
99
TIBCO Spotfire® Server and Environment Installation and Administration
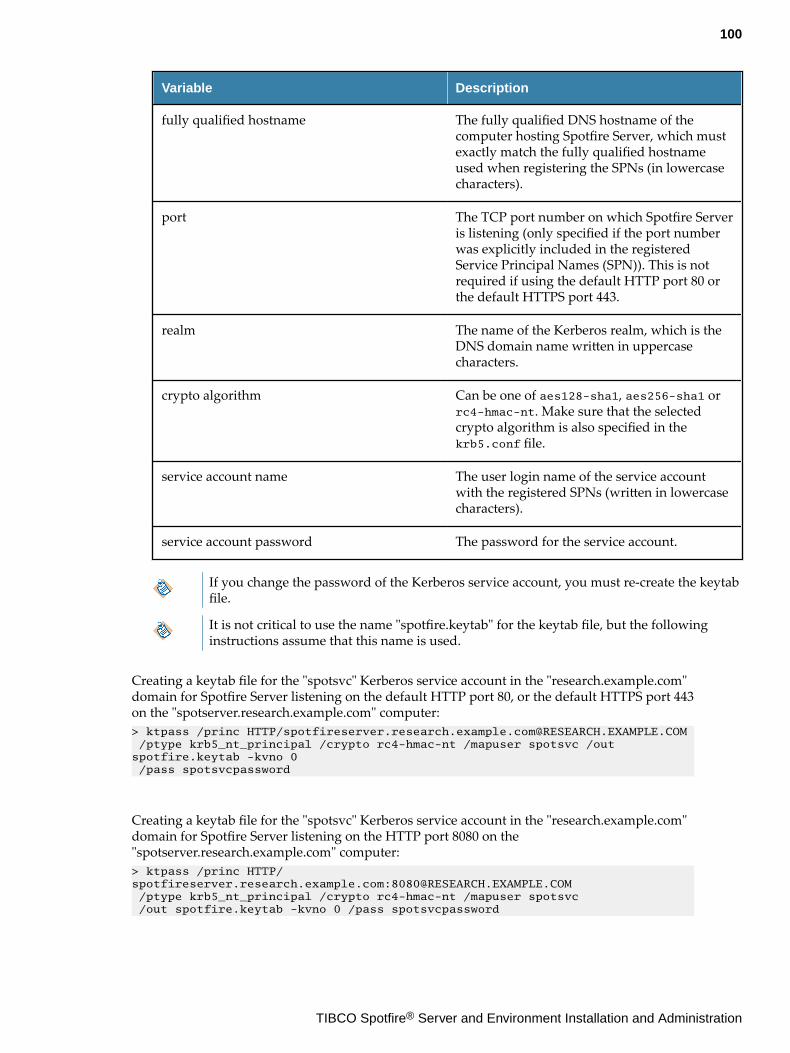
Variable Description
fully qualified hostname The fully qualified DNS hostname of thecomputer hosting Spotfire Server, which mustexactly match the fully qualified hostnameused when registering the SPNs (in lowercasecharacters).
port The TCP port number on which Spotfire Serveris listening (only specified if the port numberwas explicitly included in the registeredService Principal Names (SPN)). This is notrequired if using the default HTTP port 80 orthe default HTTPS port 443.
realm The name of the Kerberos realm, which is theDNS domain name written in uppercasecharacters.
crypto algorithm Can be one of aes128-sha1, aes256-sha1 orrc4-hmac-nt. Make sure that the selectedcrypto algorithm is also specified in thekrb5.conf file.
service account name The user login name of the service accountwith the registered SPNs (written in lowercasecharacters).
service account password The password for the service account.
If you change the password of the Kerberos service account, you must re-create the keytabfile.
It is not critical to use the name "spotfire.keytab" for the keytab file, but the followinginstructions assume that this name is used.
Creating a keytab file for the "spotsvc" Kerberos service account in the "research.example.com"domain for Spotfire Server listening on the default HTTP port 80, or the default HTTPS port 443on the "spotserver.research.example.com" computer:> ktpass /princ HTTP/[email protected] /ptype krb5_nt_principal /crypto rc4-hmac-nt /mapuser spotsvc /out spotfire.keytab -kvno 0 /pass spotsvcpassword
Creating a keytab file for the "spotsvc" Kerberos service account in the "research.example.com"domain for Spotfire Server listening on the HTTP port 8080 on the"spotserver.research.example.com" computer:> ktpass /princ HTTP/spotfireserver.research.example.com:[email protected] /ptype krb5_nt_principal /crypto rc4-hmac-nt /mapuser spotsvc /out spotfire.keytab -kvno 0 /pass spotsvcpassword
100
TIBCO Spotfire® Server and Environment Installation and Administration
Configuring Kerberos for Java
Configuring Kerberos for Java by editing the krb5.conf file is the fourth step in configuring SpotfireServer for the Kerberos authentication method.
Procedure
1. Open the file krb5.conf located in the directory <installation dir>\jdk\jre\lib\security(Windows) or <installation dir>/jdk/jre/lib/security (Unix) and edit the following valuesto reflect your environment.
The arguments are case sensitive.
For more information, see The krb5.conf file.
● MYDOMAIN: The name of the Kerberos realm, usually the same as the name of the WindowsDomain, written in uppercase characters.
● mydomain: The name of the Windows Domain, written in lowercase characters.
● mydc: The name of the domain controller, written in lowercase characters.
Configuring Kerberos for Java in the "research.example.com" domain, with the two domaincontrollers "dc01.research.example.com" and "dc02.research.example.com":[libdefaults] default_realm = RESEARCH.EXAMPLE.COM default_keytab_name = spotfire.keytab default_tkt_enctypes = aes128-cts rc4-hmac default_tgs_enctypes = aes128-cts rc4-hmac forwardable = true
[realms] RESEARCH.EXAMPLE.COM = { kdc = dc01.research.example.com kdc = dc02.research.example.com admin_server = dc01.research.example.com default_domain = research.example.com }
[domain_realm] .research.example.com = RESEARCH.EXAMPLE.COM research.example.com = RESEARCH.EXAMPLE.COM
[appdefaults] autologin = true forward = true forwardable = true encrypt = true
2. (Optional) If you want to use the crypto algorithm aes256-sha1, you must perform the followingtasks:a) Add aes256-cts as the first option in default_tkt_enctypes and default_tgs_enctypes.b) Install the Java Cryptography Extension (JCE) unlimited strength jurisdiction policy files on theSpotfire Server .
It is the user's responsibility to verify that these files are allowed under localregulations.
101
TIBCO Spotfire® Server and Environment Installation and Administration
Copying the Kerberos service account’s keytab file to Spotfire Server
Copying the keytab file to Spotfire Server is the fifth step in configuring Spotfire Server for the Kerberosauthentication method.
Procedure
1. Copy the spotfire.keytab file to the directory <installation dir>\jdk\jre\lib\security(Windows) or <installation dir>/jdk/jre/lib/security (Unix) in Spotfire Server.
Because this file contains sensitive information, it must be handled with care. The file mustnot under any circumstances be readable by unauthorized users.
To list the contents of the keytab file, use the klist command-line tool. It lists the principal name,crypto algorithm, and security credentials. The tool is included in the bundled JDK and is onlyavailable when installed on Windows:> <installation dir>\jdk\jre\bin\klist.exe -k -t -e -K <keytab file>
To test the keytab file, use the kinit command-line tool which is also included in the bundled JDKon Windows platforms:> <installation dir>\jdk\jre\bin\kinit.exe -k -t <keytab file> HTTP/<fully qualified hostname>[:<port>]@<realm>
If the keytab file is correctly set up, a ticket cache file is created in the logged-in user's homedirectory. It can typically be found in the path C:\Users\<user>\krb5cc_<user>.
2. As soon as you have verified that the ticket cache was created, you must delete the ticket cache fileto prevent future problems.
Using Kerberos authentication with delegated credentials
Users can authenticate to different data sources using single sign-on login information. The server candelegate the user authentication to the data source, either through Information Services, or through aconnector. This is possible only if you use the Kerberos single sign-on method.
If you are using a JDBC driver that supports passing the delegated user's Generic Security Standard(GSS) credentials through a connection property, then you can use constrained delegation withInformation Services.
To enable constrained delegation for these drivers, add the following connection property to thecorresponding Data Source Template. <connection-property> <key>spotfire.kerberos.gsscredential.property</key> <value>connectionPropertyName</value> </connection-property>
Where connectionPropertyName is driver-specific. (Refer to your driver's documentation for moreinformation.)
Prerequisites
For delegation to work, no client user account in the domain can have the setting Account is sensitiveand cannot be delegated. By default, this setting is not enabled.
Procedure
1. Set up Kerberos authentication as described in Kerberos authentication. Make sure that users canlog in with this method.
2. Grant the right to delegate client credentials to the Spotfire Server service account that is used forclient authentication.
102
TIBCO Spotfire® Server and Environment Installation and Administration
Only the specified accounts can be delegated by the service account.
● If possible, grant constrained delegation rights to the service account; see Enabling constraineddelegation.
● If you cannot use constrained delegation, grant unconstrained delegation rights. See thefollowing topics for more information.
— Enabling unconstrained delegation for an account on a domain controller in Windows 2000mixed or native mode.
— Enabling unconstrained delegation on a domain controller in Windows Server 2003 mode.
As of Spotfire version 7.7, the default delegation policy is "REQUIRE". This means that ifSpotfire Server cannot delegate end user credentials, end users will not be able to openanalyses in the web client. Prior to this, the default delegation policy was "TRY", whichwould open analyses using impersonation if delegation failed.
Enabling constrained delegationThis is the second step in the process of setting up Kerberos authentication with delegated credentialsfor your Spotfire implementation. It allows the Spotfire Server to delegate user credentials to nodes.
Procedure
1. On the domain controller, go to Administrative Tools.
2. Select Active Directory Users and Computers.
3. Locate the Spotfire Server service account.
4. To open the account properties, right-click the account name and then click Properties.
5. On the Delegation tab, select Trust this user for delegation to specified services only.
The Delegation tab is visible only for accounts to which SPNs are mapped.
6. Select Use any authentication protocol, and then click Add.
7. Click Users or Computers and select each user account or machine account that runs the nodemanager service on your nodes.
If the node manager services are run by user accounts, you must first register SPNs forthese. See Setting up Kerberos authentication on nodes.
8. Select the http service for each account, and then click OK.
9. Click Apply.
What to do next
Enabling constrained delegation on nodes
Enabling unconstrained delegation on a domain controller in Windows Server 2003 modeThis is the second step in the process of setting up Kerberos authentication with delegated credentialsfor your Spotfire implementation.
Procedure
1. On the domain controller, select Start > Programs > Administrative Tools.
2. Select Active Directory Users and Computers.
103
TIBCO Spotfire® Server and Environment Installation and Administration
3. Locate the Spotfire Server service account.
4. To open the account properties, right-click the account name and then click Properties.
5. On the Delegation tab, select Trust this user for delegation to any service (Kerberos only).
The Delegation tab is visible only for accounts to which SPNs are mapped.
6. Click Apply.
What to do next
Creating an Information Services data source template using Kerberos login
Enabling unconstrained delegation for an account on a domain controller in Windows 2000 mixed or native modeThis is the second step in the process of setting up Kerberos authentication with delegated credentialsfor your Spotfire implementation.
Procedure
1. On the domain controller, select Start > Programs > Administrative Tools.
2. Select Active Directory Users and Computers.
3. Locate the Spotfire Server service account.
4. To open the account properties, right-click the account name and then click Properties.
5. On the Account tab, in the Account Options list, select Account is trusted for delegation.
6. Click Apply.
What to do next
Creating an Information Services data source template using Kerberos login
Selecting Kerberos as the Spotfire login method
Selecting Kerberos as the Spotfire login method is the sixth step in configuring Spotfire Server for theKerberos authentication method. You can use the configuration tool, or use the command line asdetailed in this procedure.
Procedure
1. Execute the config-kerberos-auth command. The command takes the following two parameters:
● Keytab file: The fully qualified path to the spotfire.keytab file. If the keytab file is named"spotfire.keytab" and has been copied to the recommended directory, the default path ${java.home}/lib/security/spotfire.keytab is already correct. The shorthand ${java.home} refers to the directory <installation dir>\jdk\jre (Windows) or<installation dir>/jdk/jre (Unix).
● Service Principal Name: Specify the same Service Principal Name that was used when creatingthe keytab file. Example: HTTP/spotfireserver.research.example.com
2. Use the config-auth command to activate the Kerberos SSO authentication method.
3. Import the configuration and restart the server for the changes to take effect.
104
TIBCO Spotfire® Server and Environment Installation and Administration
Disabling the username and password fields in the Spotfire Analyst login dialog
Because the Kerberos authentication method provides single sign-on capabilities, there is no need toprompt the end user for user name and password in the Spotfire Analyst login dialog.
This step is optional.
Procedure
1. Open a command line and export the active configuration (the configuration.xml file) by usingthe export-config command; for additional information, see Executing commands on the commandline.
2. Execute the config-login-dialog command:> config config-login-dialog --allow-user-provided-credentials=false
3. Import the configuration file back to the Spotfire database by using the import-config command.
4. Restart the Spotfire Server service.
If you are using the configuration tool, select the Never display login dialog check box forthe Login dialog option.
Kerberos authentication for clustered servers with load balancer
In a clustered environment where Kerberos authentication is used to authenticate users, the loadbalancer forwards all Kerberos authentication information to the Spotfire Servers. No configuration onthe load balancer is needed, but there are certain considerations to take into account when Kerberosauthentication is set up.
These are the special considerations:
● Two Service Principal Names must be created for each Spotfire Server as well as for the loadbalancer.
● One keytab file must be created. This must use the fully qualified Service Principal Name of the loadbalancer.
● This keytab file must be copied to each Spotfire Server.
● When Kerberos authentication is set up, the fully qualified Service Principal Name of the loadbalancer must be provided.
For general information about Spotfire Server clusters, see Clustered server deployments.
Setting up Kerberos authentication on nodes
After setting up Kerberos authentication on Spotfire Server, you must set it up for the nodes in yourenvironment.
If you use Kerberos delegation, your Spotfire Server and Node Managers must be installed on differentcomputers.
The account used to run the node manager service must be trusted for delegation, and you might needto register Service Principal Names (SPN) for that account. Also, all web client users must be givenpermission to modify the node manager services folder.
● If the node manager service is run using the local machine account, open the Active Directory Usersand Computers MMC snap-in, select the machine account, and then select Trust this computer fordelegation to any service.
105
TIBCO Spotfire® Server and Environment Installation and Administration
● If the node manager service is run using a specified user account, open the Active Directory Usersand Computers MMC snap-in, select the user account, and then select Trust this user for delegationto any service.
If the node manager service is run using a specified user account, you must also register ServicePrincipal Names (SPN) for that account.> setspn -S HTTP/<fully qualified node hostname>[:<port>] <node service account name>
> setspn -S HTTP/<node hostname>[:<port>] <node service account name>
For information on how to register SPNs, see Registering Service Principal Names.
All web client user accounts must be given permission to modify the folder nm\services. Thispermission allows the delegated users to read, write, and delete temp files.
If Spotfire Connectors are used for the Web Player service, all delegated web client users must also haveaccess to the applicable connector drivers.
Enabling constrained delegation on nodes
You must enable constrained delegation for your nodes. It allows the service on the node to delegateuser credentials to the Spotfire Server and access external resources.
Prerequisites
You have enabled constrained delegation on Spotfire Server. See Enabling constrained delegation.
Procedure
1. On the domain controller, go to Administrative Tools.
2. Select Active Directory Users and Computers.
3. Locate the machine accounts or user accounts that runs the node manager services.
Steps 4 through 11 must be performed for each account that runs a node manager service.
4. To open the account properties, right-click the account name and then click Properties.
5. On the Delegation tab, select Trust this user for delegation to specified services only.
The Delegation tab is visible only for accounts to which SPNs are mapped. If the nodemanager services are run by user accounts, you must first register SPNs for these. See Setting up Kerberos authentication on nodes.
6. Select Use any authentication protocol, and then click Add.
7. Click Users or Computers and select any Spotfire Server service account.
8. Select the http service for each Spotfire Server service account, and then click OK.
9. Click Users or Computers and select any machine account or service account for a computerrunning the external resource you want to delegate to.
10. Select the applicable services for each account, and then click OK.For example the MSSQLSvc service for delegation to a Microsoft SQL Server or the CIFS service fordelegation to a file share.
11. Click Apply.
Enable Kerberos authentication for end-users
If you use Kerberos authentication, it must be enabled in the browsers of all end-user computers.
This is applicable for all users accessing Spotfire Server, either from a browser, or Spotfire Analyst.
106
TIBCO Spotfire® Server and Environment Installation and Administration
Enabling Kerberos for Internet Explorer and Spotfire Analyst
Follow these steps on every computer using Internet Explorer or Spotfire Analyst.
Procedure
1. Go to Tools > Internet Options > Advanced and select Enable Integrated Windows Authentication(Requires Restart).
2. The Spotfire Server you are connecting to must be located in the Intranet security zone.
If the website is located in the Internet security zone, Internet Explorer will not evenattempt Kerberos authentication. This is because in most Internet scenarios a connectionwith a domain controller can not be established. The simple rule is that any URL thatcontains periods, such as an IP address or Fully Qualified Domain Name (FQDN), is in theInternet zone. If you are connecting to an IP address or FQDN, you can use the settings inInternet Explorer or Group Policy to add this site to the Intranet security zone. For moreinformation on how Internet Explorer evaluates the zone of a resource, see the MicrosoftKnowledge Base article KB 258063.
If a client accesses a server belonging to another trusted domain, that server must beadded to the Local Intranet zone, found under Internet Options > Security > LocalIntranet. Without this setting, Internet Explorer, or Spotfire Analyst will not be able toauthenticate using Kerberos.
For example, if the client client.emea.example.com accesses the server server.na.example.com,then server.na.example.com must be added to the Local Intranet zone.
Enabling delegated Kerberos for Google Chrome
Follow these instructions on every computer using Google Chrome.
You must create and set a registry key for Google Chrome.
1. The Spotfire Server you are connecting to must be located in the Intranet security zone.
2. In the Registry Editor, go to [HKEY_LOCAL_MACHINE\SOFTWARE\Policies\Google\Chrome].
3. Add the String Value AuthNegotiateDelegateWhitelist.
4. Modify AuthNegotiateDelegateWhitelist and add the URL to the Spotfire Server.
For more information, see the Chromium Projects developer page at http://dev.chromium.org/administrators/policy-list-3#AuthNegotiateDelegateWhitelist
Enabling Kerberos for Mozilla Firefox
Follow these steps on every computer using Mozilla Firefox.
Procedure
1. In the Firefox browser address box, type about:config.
2. For the following parameters, set the values to the Spotfire Server URL for which you want toactivate Negotiate.
● network.negotiate-auth.delegation-uris
● network.negotiate-auth.trusted-uris
107
TIBCO Spotfire® Server and Environment Installation and Administration
Using Kerberos to log in to the Spotfire database
To increase security in your Spotfire implementation, you may want to set up Spotfire Server toauthenticate with the Spotfire database using the Kerberos protocol.
This only affects how the database connections are authenticated and is not required for SpotfireAnalyst clients or web clients to connect to Spotfire Server using the Kerberos authentication method.
Prerequisites
● Windows Domain Controllers running Windows Server 2008 or later.
● A computer with the Microsoft Active Directory Users and Computers MMC snap-in.
● A computer with the Microsoft Support Tools installed.
● A domain administrator account or a user account which is a member of the built-in AccountOperators domain group, or any account with equivalent permissions.
● The database server must already be installed and configured for both Kerberos authentication anduser name/password authentication.
● Microsoft Active Directory is used as Kerberos environment.
● If the database is an Oracle database, then download Oracle's latest JDBC driver (ojdbc7.jar) fromOracle's web page.
● If the database is a Microsoft SQL Server database, use the bundled Microsoft JDBC driver(sqljdbc4.jar). Version 4.0 of the sqljdc4.jar driver introduced the newauthenticationScheme=JavaKerberos directive, which is required.
Procedure
1. Create a Windows domain account for the Spotfire database.
2. Create the Spotfire database.
● If you are using SQL Server database: Edit and run the create_databases_ia.bat script. Thiscreates a SQL Server database account and connects it to the previously created Windowsdomain account. For instructions, see Setting up the Spotfire database (SQL Server withIntegrated Windows authentication).
● If you are using Oracle database: Edit and run the create_databases.bat script. This willcreate a normal Oracle database account that authenticates with user name and password; forinstructions on creating the database account, see Setting up the Spotfire database (Oracle).
3. Oracle database only: Configure the Spotfire database account to the Windows domain account.
4. Install Spotfire Server.
5. Install a vendor database driver; see Database drivers.
6. Configure Kerberos for Java.
7. Optional: Create a keytab file for the Kerberos service account.
8. Create a JAAS application configuration for the Spotfire database connection pool.
9. Register the JAAS application configuration file with Java.
10. Connect to the Spotfire database by running the bootstrap command or by using the configurationtool; see Configuring the database connection for Spotfire Server using Kerberos (Oracle) or Configuring the database connection for Spotfire Server using Kerberos (SQL Server).
108
TIBCO Spotfire® Server and Environment Installation and Administration
Creating a Windows domain account for the Spotfire database
Creating a Windows domain account for the database is the first step in setting up Kerberosauthentication for database connections.
Prerequisites
See Using Kerberos to log in to the Spotfire database for the list of prerequisites.
Procedure
1. Log in to Windows with one of the following accounts:
● A domain administrator
● A user who is a member of the built-in Account Operators domain group
● A user with equivalent privileges
2. Launch the Active Directory Users and Computers MMC snap-in and create a normal user accountwith the following properties:
● Use the same identifier in the Full name, User logon name, and User logon name (pre-Windows 2000) fields.
Make sure to use only lowercase characters, and leave no spaces in these fields.
● Select the Password never expires check box.
● Clear the User must change password at next logon check box.
● Recommended: Select the Account is sensitive and cannot be delegated check box.
What to do next
● SQL Server database: Edit and run the create_databases_ia.bat script. This creates a SQL Serverdatabase account and connects it to the previously created Windows domain account. Forinstructions, see Setting up the Spotfire database (SQL Server with Integrated Windowsauthentication).
● If you are using Oracle database: Edit and run the create_databases.bat script. This will create anormal Oracle database account that authenticates with user name and password; for instructionson creating the database account, see Setting up the Spotfire database (Oracle).
Configuring the Spotfire database account to the Windows domain account
If you are using an Oracle database, this is the third step in setting up Kerberos to log in to the Spotfiredatabase.
Procedure
1. Log in to the Oracle database instance with SYSDBA privileges to manage accounts.Connecting to a database with connection identifier ORCL as sysdbasqlplus sys@ORCL as sysdba
2. Alter the Spotfire database account so that it is identified externally by running the followingcommand:SQL> alter user <SERVERDB_USER> identified externally as '<SERVERDB_USER>@REALM>';
109
TIBCO Spotfire® Server and Environment Installation and Administration
Replace <SERVERDB_USER> and <REALM> with the Spotfire database account name and theKerberos realm. Make sure to use uppercase letters when specifying the Kerberos realm.SQL> alter user spotuser identified externally as'[email protected]';
3. Test the Kerberos-enabled Spotfire database account by opening a command prompt running as thecreated Windows domain account. It should now be possible to connect to the database using thefollowing command, assuming the connection identifier is ORCL: > sqlplus /@ORCL
It is assumed that Kerberos authentication is already set up for the Oracle client.
Keytab file for the Kerberos service account
There are several methods for creating the keytab file for the Kerberos service account.
Creating a keytab file for the Kerberos service account (using the ktpass.exe command from Microsoft SupportTools)
This method of creating a keytab file uses the ktpass.exe command that is included with MicrosoftSupport Tools.
Procedure
1. On a computer with the Microsoft Support Tools installed (it is not necessary to be logged in as aprivileged user), execute the following command, replacing the <database account name>,<REALM>, <crypto algorithm> and <database account password> with the appropriate values.<crypto algorithm> can be one of , aes128-sha1, aes256-sha1 or rc4-hmac-nt. Make sure thatthe selected crypto algorithm is also specified in the krb5.conf file.
All values are case sensitive.
> ktpass /princ <database account name>@<REALM> /ptype krb5_nt_principal /crypto <crypto algorithm> /out spotfire-database.keytab -kvno 0 /pass <database account password>
It is not critical to use the name "spotfire-database.keytab" for the keytab file, but thefollowing instructions assume that this name is used.
Example of creating a keytab file for the Spotfire database account named "spotuser" in theresearch.example.com domain:> ktpass /princ [email protected] /ptype krb5_nt_principal / cryptorc4-hmac-nt /out spotfire-database.keytab -kvno 0 /pass spotuserpassword
2. Copy the spotfire-database.keytab file to the directory <installation dir>\jdk\jre\lib\security (Windows) or <installation dir>/jdk/jre/lib/security (Unix) in Spotfire Server.
Because this file contains sensitive information, it must be handled with care. The file mustnot under any circumstances be readable by unauthorized users.
If you change the password of the Kerberos service account, you must re-create the keytabfile.
Creating a keytab file for the Kerberos service account (using the ktpass.exe command from the bundled JDK)
110
TIBCO Spotfire® Server and Environment Installation and Administration
This method of creating a keytab file uses the ktpass.exe command that is included with the bundledJDK.
Procedure
1. On the computer where Spotfire Server is installed, execute the following command: > ktab -kspotfire-database.keytab -a <database account name>, replacing the <database accountname> with the user login name of the Spotfire database account, written in lowercase letters.
All values are case sensitive.
It is not critical to use the name "spotfire-database.keytab" for the keytab file, but thefollowing instructions assume that this name is used.
The tool prompts you for the password of the service account.
2. Enter the password that you used when creating the Spotfire database account.
3. Verify the created keytab by running the klist and kinit utilities:> klist -k spotfire-database.keytab
> kinit -k -t spotfire-database.keytab <database account name>@<realm>
If you change the password of the Kerberos service account, you must re-create the keytabfile.
Creating and verifying a keytab file for the "serverdb_user" Spotfire database account in theresearch.example.com domain:> ktab -k spotfire-database.keytab -a serverdb_user
> klist -k spotfire-database.keytab
> kinit -k -t spotfire-database.keytab [email protected]
4. Copy the spotfire-database.keytab file to the Spotfire Server directory <installation dir>\jdk\jre\lib\security (Windows) or <installation dir>/jdk/jre/lib/security (Unix).
Because this file contains sensitive information, it must be handled with care. The file mustnot under any circumstances be readable by unauthorized users.
If you change the password of the Kerberos service account, you must re-create the keytabfile.
Creating a keytab file for the Kerberos service account (using the ktutil command on Linux)This method of creating a keytab file on Linux uses the ktutil command.
Prerequisites
● Kerberos is installed on the Linux host where Spotfire Server is installed.● The tools ktutil, klist, and kinit are available on the Linux host.
Procedure
1. Start the ktutil tool by invoking it from the command line without any arguments. Execute thecommands below, replacing <database account name> with the user login name of the Spotfiredatabase account, written in lowercase letters:> ktutil
ktutil: add_entry -password -p <database account name> -k 0 -e aes128-sha1
Password for <database account name>:
111
TIBCO Spotfire® Server and Environment Installation and Administration
ktutil: write_kt spotfire-database.keytab
ktutil: quit
All values are case sensitive.
It is not critical to use the name "spotfire-database.keytab" for the keytab file, but thefollowing instructions assume that this name is used.
The tool prompts you for the password of the service account.
2. Enter the password that you used when creating the Spotfire database account.
3. Verify the created keytab by running the klist and kinit utilities:> klist -k spotfire-database.keytab
> kinit -k -t spotfire-database.keytab <database account name>@<realm>
If you change the password of the Kerberos service account, you must re-create the keytabfile.
Creating and verifying a keytab file for the "serverdb_user" Spotfire database account in theresearch.example.com domain:> ktutil
ktutil: add_entry -password -p serverdb_user -k 0 -e rc4-hmac-nt
Password for serverdb_user:
ktutil: write_kt spotfire-database.keytab
ktutil: quit
> klist -k spotfire-database.keytab
> kinit -k -t spotfire-database.keytab [email protected]
4. Copy the spotfire-database.keytab file to the following Spotfire Server directory:<installation dir>/jdk/jre/lib/security.
Because this file contains sensitive information, it must be handled with care. The file mustnot under any circumstances be readable by unauthorized users.
If you change the password of the Kerberos service account, you must re-create the keytabfile.
Creating a JAAS application configuration for the Spotfire database connection pool
Follow these instructions to create a JAAS application configuration for the Spotfire databaseconnection pool.
Procedure
1. Acquire a Kerberos ticket in one of the following ways, and name the file "spotfire-database.login":
● By using a keytab file; see Acquiring a Kerberos ticket using a keytab file.
● By using a username and password; see Acquiring a Kerberos ticket using a username andpassword.
● By using the identity of the account running the Spotfire Server process; see
2. In Spotfire Server, create the file <install directory>\jdk\jre\lib\security\spotfire-database.login (Windows) or <install directory>/jdk/jre/lib/security/spotfire-database.login (Unix) and populate it with the spotfire-database.login file.
112
TIBCO Spotfire® Server and Environment Installation and Administration

Acquiring a Kerberos ticket by using a keytab fileThis method of acquiring a Kerberos ticket uses a keytab file.
Procedure
● In the following code, replace <service account name> and <realm> with the name of theSpotfire database account and the Kerberos realm. Make sure to
Use lowercase letters for the account name and uppercase letters for the realm name.
DatabaseKerberos{ com.sun.security.auth.module.Krb5LoginModule required debug=true storeKey=true useKeyTab=true keyTab="${java.home}/lib/security/spotfire-database.keytab" principal="<SERVERDB_USER>@<REALM>";};
Acquiring a Kerberos ticket by using a username and passwordThis method of acquiring a Kerberos ticket uses a username and password.
Procedure
● In the following code, replace <service account name> and <password> with the name and thepassword of the Spotfire database account:DatabaseKerberos{ com.sun.security.auth.module.Krb5LoginModule required debug=true storeKey=true useKeyTab=false doNotPrompt=false;};
Acquiring a Kerberos ticket by using the identity of the account running the Spotfire Server processTo make it possible to log in to the Spotfire database as the user currently running the server, theconnection pool must be able to acquire the initial Ticket-Granting-Ticket (TGT) from the native TicketCache of the Spotfire Server host.
Procedure
● Modify the following registry key so that the TGT session can be exported:[HKEY_LOCAL_MACHINE\SYSTEM\CurrentControlSet\Control\Lsa\Kerberos\Parameters]"allowtgtsessionkey"=dword:00000001
DatabaseKerberos{ com.sun.security.auth.module.Krb5LoginModule required debug=true storeKey=true useTicketCache=true doNotPrompt=false;};
113
TIBCO Spotfire® Server and Environment Installation and Administration
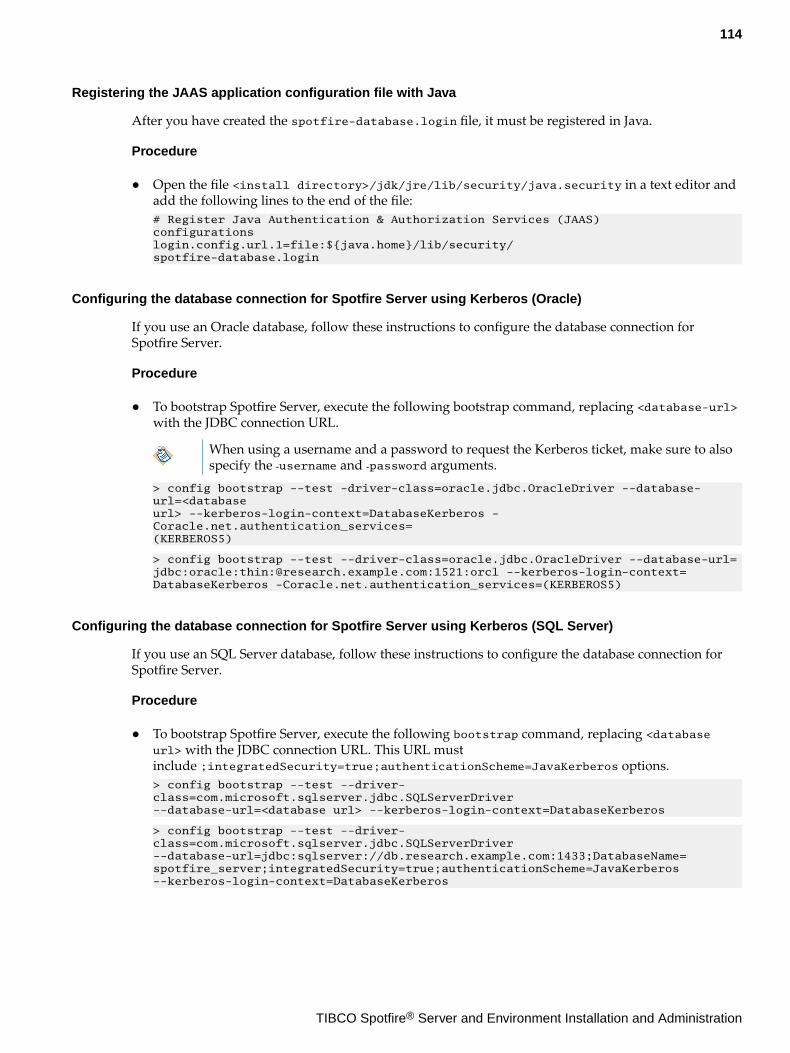
Registering the JAAS application configuration file with Java
After you have created the spotfire-database.login file, it must be registered in Java.
Procedure
● Open the file <install directory>/jdk/jre/lib/security/java.security in a text editor andadd the following lines to the end of the file:# Register Java Authentication & Authorization Services (JAAS)configurationslogin.config.url.1=file:${java.home}/lib/security/spotfire-database.login
Configuring the database connection for Spotfire Server using Kerberos (Oracle)
If you use an Oracle database, follow these instructions to configure the database connection forSpotfire Server.
Procedure
● To bootstrap Spotfire Server, execute the following bootstrap command, replacing <database-url>with the JDBC connection URL.
When using a username and a password to request the Kerberos ticket, make sure to alsospecify the ‐username and ‐password arguments.
> config bootstrap --test -driver-class=oracle.jdbc.OracleDriver --database-url=<databaseurl> --kerberos-login-context=DatabaseKerberos -Coracle.net.authentication_services=(KERBEROS5)
> config bootstrap --test --driver-class=oracle.jdbc.OracleDriver --database-url=jdbc:oracle:thin:@research.example.com:1521:orcl --kerberos-login-context=DatabaseKerberos -Coracle.net.authentication_services=(KERBEROS5)
Configuring the database connection for Spotfire Server using Kerberos (SQL Server)
If you use an SQL Server database, follow these instructions to configure the database connection forSpotfire Server.
Procedure
● To bootstrap Spotfire Server, execute the following bootstrap command, replacing <databaseurl> with the JDBC connection URL. This URL mustinclude ;integratedSecurity=true;authenticationScheme=JavaKerberos options.> config bootstrap --test --driver-class=com.microsoft.sqlserver.jdbc.SQLServerDriver--database-url=<database url> --kerberos-login-context=DatabaseKerberos
> config bootstrap --test --driver-class=com.microsoft.sqlserver.jdbc.SQLServerDriver--database-url=jdbc:sqlserver://db.research.example.com:1433;DatabaseName=spotfire_server;integratedSecurity=true;authenticationScheme=JavaKerberos--kerberos-login-context=DatabaseKerberos
114
TIBCO Spotfire® Server and Environment Installation and Administration
Authentication using X.509 client certificates
When Spotfire Server is set up with HTTPS and is configured to require client certificates, theinformation from the certificates can also be used for login purposes.
This method authenticates users by using an X.509 client certificate from the Spotfire client to SpotfireServer.
These are the general steps to configure Spotfire to use X.509 client certificates for authentication:
1. Configure Spotfire Server for HTTPS; see Configuring HTTPS.
2. Install client certificates on each client. For details, see the documentation provided by youroperating system vendor.
3. If you have not already done so, import the Certification Authority (CA) certificate(s) to thekeystore; see Installing CA certificates.
4. Configure Spotfire Server to require client certificates for HTTPS; see Configuring Spotfire Server torequire client certificates for HTTPS.
5. Configure Spotfire Server to use X.509 client certificates to authenticate users; see ConfiguringSpotfire Server to use X.509 client certificates to authenticate users.
Installing CA certificates
To use X.509 client certificates for authentication, a keystore with CA certificate(s) must be placed in theinstallation directory.
Procedure
1. If you do not yet have a keystore, follow these steps:a) Create a keystore and import the CA certificate(s) by executing the following command:.
><installation dir>/jdk/bin/keytool -importcert -alias cacert -keystore <installation dir>/tomcat/certs/<keystore filename> -file <certificate filename>
CA certificates can be in either PEM format or DER format.Example for Windows:
> C:\tibco\tss\<version>\jdk\bin\keytool -importcert -alias cacert -keystore C:\tibco\tss\<version>\tomcat\certs\example.jks -file cacert.cer
where "example" in example.jks is the server hostname.b) Repeat the previous step for each additional CA certificate.
2. When you have a keystore containing the CA certificate(s), copy the keystore file to the<installation dir>/tomcat/certs directory.
The keystore containing the CA certificate(s) can be in either PKCS #12 or JKSformat.
Configuring Spotfire Server to require client certificates for HTTPS
This procedure configures the server to require a valid user certificate for all connections.
This is done by editing the server.xml file.
Prerequisites
You have performed the first three steps in the topic Authentication using X.509 client certificates.
115
TIBCO Spotfire® Server and Environment Installation and Administration
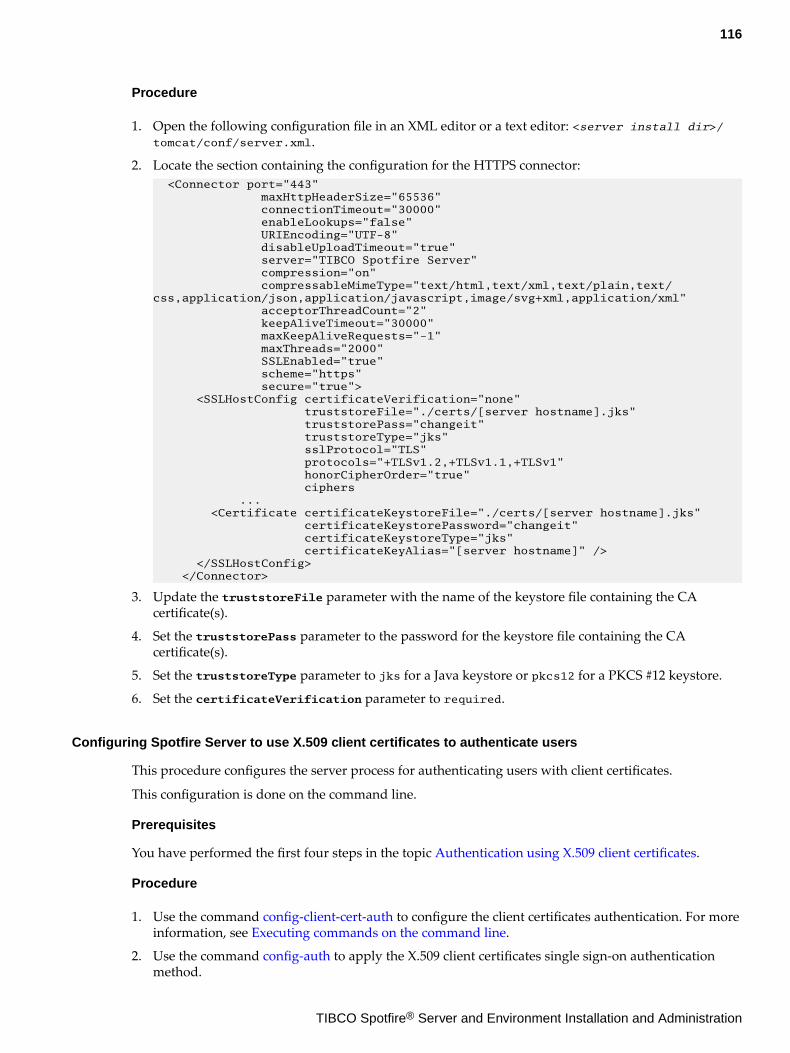
Procedure
1. Open the following configuration file in an XML editor or a text editor: <server install dir>/tomcat/conf/server.xml.
2. Locate the section containing the configuration for the HTTPS connector: <Connector port="443" maxHttpHeaderSize="65536" connectionTimeout="30000" enableLookups="false" URIEncoding="UTF-8" disableUploadTimeout="true" server="TIBCO Spotfire Server" compression="on" compressableMimeType="text/html,text/xml,text/plain,text/css,application/json,application/javascript,image/svg+xml,application/xml" acceptorThreadCount="2" keepAliveTimeout="30000" maxKeepAliveRequests="-1" maxThreads="2000" SSLEnabled="true" scheme="https" secure="true"> <SSLHostConfig certificateVerification="none" truststoreFile="./certs/[server hostname].jks" truststorePass="changeit" truststoreType="jks" sslProtocol="TLS" protocols="+TLSv1.2,+TLSv1.1,+TLSv1" honorCipherOrder="true" ciphers ... <Certificate certificateKeystoreFile="./certs/[server hostname].jks" certificateKeystorePassword="changeit" certificateKeystoreType="jks" certificateKeyAlias="[server hostname]" /> </SSLHostConfig> </Connector>
3. Update the truststoreFile parameter with the name of the keystore file containing the CAcertificate(s).
4. Set the truststorePass parameter to the password for the keystore file containing the CAcertificate(s).
5. Set the truststoreType parameter to jks for a Java keystore or pkcs12 for a PKCS #12 keystore.
6. Set the certificateVerification parameter to required.
Configuring Spotfire Server to use X.509 client certificates to authenticate users
This procedure configures the server process for authenticating users with client certificates.
This configuration is done on the command line.
Prerequisites
You have performed the first four steps in the topic Authentication using X.509 client certificates.
Procedure
1. Use the command config-client-cert-auth to configure the client certificates authentication. For moreinformation, see Executing commands on the command line.
2. Use the command config-auth to apply the X.509 client certificates single sign-on authenticationmethod.
116
TIBCO Spotfire® Server and Environment Installation and Administration
If you intend to use an LDAP user directory, an attribute in the certificate's DistinguishedName (DN) must match an LDAP account name. By default, the server will use theCommon Name (CN) attribute as account name. Use the configuration tool or the config-client-cert-auth command to configure the server to use another attribute as account name.
Examples
● Using the entire DN as account name:config config-client-cert-auth --name-attribute="DN"
This will use the entire DN as account name.
● Using the Subject Alternative Name of type rfc822Name as account name:config config-client-cert-auth --name-attribute="subjectAltName:rfc822Name"
This will use a Subject Alternative Name as account name.
Configuring anonymous authentication
Anonymous authentication allows anyone to access public information that is available for viewing onthe Spotfire web client without prompting them for a user name or password.
Procedure
1. Export the Spotfire Server basic configuration from the Spotfire database to an XML file, and thenopen the file in a text editor; for instructions on exporting the file, see Manually editing the SpotfireServer configuration file.
2. Set the security.anonymous-auth.enabled configuration property to "true".
3. Save and close the file.
4. Import the file back into Spotfire Server; for instructions, see Manually editing the Spotfire Serverconfiguration file.
5. Enable the guest account by using the enable-user command in the following form: configenable-user --username=ANONYMOUS\guest
Web authentication
When using web authentication, a web browser will be displayed for all users, allowing them to log into Spotfire using an external authentication provider, such as Google.
By default, the web authentication method supports authentication providers with OpenID Connectsupport, such as Google. The supported authentication providers can be expanded using the CustomWeb Authenticator API. If you configure and enable several authentication providers, users will beallowed to select any of these providers. Users can select to remember the chosen provider, therebyenabling single sign-on, as long as they are logged in on that account.
Web authentication can be combined with username and password authentication.
Configuring OpenID Connect
These instructions are for configuring a default OpenID Connect web authentication provider using theconfiguration tool.
Prerequisites
● You have configured a public address URL. To do this, go to the Public Address page in the SpotfireServer configuration tool and enable the public address URL http[s]://<spotfireserver>[:<port>]/.
117
TIBCO Spotfire® Server and Environment Installation and Administration
● You have registered a client at the provider with a return endpoint URL, and received a client IDand a client secret from the provider.
— The registered client must support the Authorization Code Grant.
— The registered client must have permission to request the scopes that the server is configured torequest. By default, these scopes are "openid", "profile", and "email", but the latter two can beremoved and other scopes can be added.
For the default OpenID Connect web authentication providers, use the URL (starting with theconfigured public address URL):http[s]://<spotfire server>[:<port>]/spotfire/auth/oidc/authenticate
When using web authentication, it is recommended to use HTTPS.
It is recommended to use the Auto-create option for the post-authentication filter.
Procedure
1. Open the Spotfire Server configuration tool. For information on launching the configuration tool,see Opening the configuration tool.
2. In the configuration tool, select the Configuration tab.
3. On the Configuration Start page, select the authentication method Web authentication.
If, for example for backward compatibility with older Spotfire clients, you want tocombine web authentication with username and password authentication, you shouldselect the BASIC authentication method. This way, the launched web browser will haveboth a username and password alternative, and the alternative to use an external webauthentication provider.
4. On the OpenID Connect page, select Yes to enable OpenID Connect authentication.
5. To add and configure a new provider, click Add new provider.
6. For each added provider, select Yes to enable the provider, and specify the Provider name (that willbe displayed for users when selecting a provider).
7. For each provider, specify the Discovery document URL, the Client ID and the Client secret, asreceived when registering a client at the provider.
8. Save the configuration and restart the Spotfire Server.
Advanced OpenID Connect settings
More advanced settings can be configured for OpenID Connect, specifying what is displayed for end-users and what is communicated on the end-users between the provider and Spotfire Server.
For more information on these settings, refer to the documentation of the provider and to OpenIDConnect, http://openid.net/specs/openid-connect-core-1_0.html.
Option Description
Domain name By default, the value of the issuer claim is used. A static namecan be specified instead.
Username claim By default, the value of the sub claim is used. Another claimcan be specified.
118
TIBCO Spotfire® Server and Environment Installation and Administration
Option Description
Scopes Add scopes to specify what access privileges are beingrequested. The requested scopes should preferably give accessto the name and email claims.
Auth request prompt value The value to give the prompt request parameter when makingthe authentication request. Controls how the provider promptsthe end-user. May be one of none, login, consent andselect_account. This is optional. By default the parameter willbe omitted from the request.
Background color You can specify a background color, as a hexadecimal value, forthe added provider on the login page.
Configuring custom web authentication
These instructions are for configuring custom web authentication using the configuration tool.
Prerequisites
● You have implemented the CustomWebAuthenticator API.
● If applicable, you have registered a client at the provider, using a return endpoint URL, and havereceived a client ID and a client secret from the provider. Use the URL:http[s]://<spotfire server>[:<port>]/spotfire/auth/custom/authenticate
When using web authentication, it is recommended to use HTTPS.
It is recommended to use the Auto-create option for the post-authentication filter.
Procedure
1. Open the Spotfire Server configuration tool. For information on how to launch the configurationtool, see Configuration using the configuration tool.
2. In the configuration tool, select the Configuration tab.
3. On the Configuration Start page, select the authentication method Web authentication.
If, for example for backward compatibility with older Spotfire clients, you want tocombine web authentication with username and password authentication, select theBASIC authentication method. This way, the launched web browser will have both ausername and password alternative, and the alternative to use an external webauthentication provider.
4. On the Custom Web Authentication page, select Yes to enable custom web authentication.
5. Specify the Authenticator class - the class implementing the CustomWebAuthenticator APIinterface.
6. Add any Initialization parameters relevant to your custom web authentication implementation.
7. Save the configuration and restart the Spotfire Server.
119
TIBCO Spotfire® Server and Environment Installation and Administration
Two-factor authenticationSpotfire Server supports one form of two-factor authentication. It is possible to combine the chosenprimary authentication method with X.509 client certificates.
Typically, the primary authentication method in the two-factor authentication is Basic, but it is alsopossible to use the other authentication methods.
When two-factor authentication is enabled, the server requires the name of the authenticated user tomatch the user name in the provided X.509 certificate. For instructions, see Configuring two-factorauthentication.
Configuring two-factor authentication
You can configure authentication through X.509 client certificates in addition to your primaryauthentication method.
Procedure
1. Configure the server to use the chosen primary authentication method.
2. In the configuration tool, on the Configuration page, in the Configuration Start panel, select Enabletwo-factor authentication.A second Authentication panel is added.
3. In the second Authentication panel, configure the server to use client certificates.
Configuring two-factor authentication using the command line
You can set up two-factor authentication by using the command line or the configuration tool.
Procedure
1. Use the command line to set up the primary authentication method and the client certificates.
2. On the command line, enter the following command:config config-two-factor-auth --enabled=true
External authenticationSpotfire clients may access Spotfire Server through an external authentication mechanism, usually aproxy or a load balancer.
When using an external authentication mechanism, Spotfire Server gets the external user name from anHTTP header or a cookie. Getting the external user name from an HTTP header or a cookie couldpotentially be a security risk and it is strongly recommended that you restrict the permissions to usethis feature. It is also recommended to use the external authentication method only when using a loadbalancer or proxy.
When configuring external authentication, you can add several constraints:
● You can configure Spotfire Server to allow external authentication only when using a secure (TLS)connection.
● You can specify allowed hostnames and/or IP addresses of the client computers that are permitted tolog in using external authentication. You can list allowed IP addresses and/or write regularexpressions; if you specify both, Spotfire Server first checks in the list and then the regularexpression.
In some cases, the proxy or load balancer has already forced the client to authenticate itself. Someproxies and load balancers are capable of forwarding the name of the authenticated user to Spotfire
120
TIBCO Spotfire® Server and Environment Installation and Administration
Server. By enabling external authentication on Spotfire Server, the server can extract the identity of theclient so that the client does not have to authenticate twice. Any proxy or load balancer that canpropagate the user name so that it is available in the HTTP request to the server as a request attribute, iscompatible
Typical scenarios are:
● When both the Spotfire Server cluster and its load balancer are configured for NTLM authentication.
● When the load balancer is configured for X.509 client certificate authentication and propagates theuser names extracted from the certificates.
● When the load balancer requires the user to authenticate with username and password in a webform (for example SiteMinder). In this case, you must configure the load balancer to intercept andauthenticate requests to, and only to, the path /spotfire/sf_security_check_external_auth.
External authentication may be used as a supplementary authentication method that can be usedtogether with the main authentication method, but it can also be used as the main and onlyauthentication method.
● If clients are to always go through a load balancer to reach Spotfire Server, configure external as themain authentication method in the Authentication panel. In this case it is not possible to access aSpotfire Server directly. You must also specify a declared authentication method in the ExternalAuthentication panel.
● Even if a load balancer is used in front of a set of Spotfire Servers, accessing the server directly maybe desired. If this is the case, configure another authentication mechanism (any mechanism isallowed) as the main authentication method, and configure external as a supplementaryauthentication method.
Configuring external authentication
You can configure external authentication by using the configuration tool or the command line.
Procedure
● Use the configuration tool or the config-external-auth command to set up and enable the externalauthentication method.Use the following information to set options:
Enable External Authentication (required) Specifies whether the external authenticationmethod should be enabled.
Declared authentication method Select the authentication method used by theload balancer.
121
TIBCO Spotfire® Server and Environment Installation and Administration
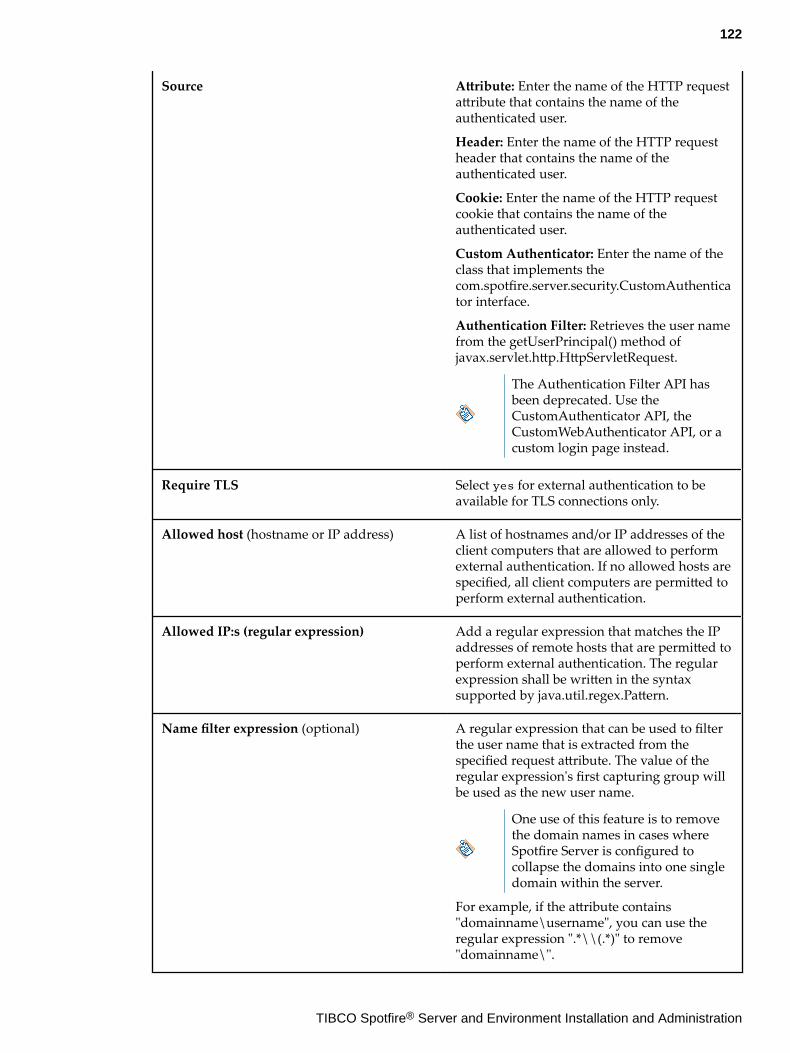
Source Attribute: Enter the name of the HTTP requestattribute that contains the name of theauthenticated user.
Header: Enter the name of the HTTP requestheader that contains the name of theauthenticated user.
Cookie: Enter the name of the HTTP requestcookie that contains the name of theauthenticated user.
Custom Authenticator: Enter the name of theclass that implements thecom.spotfire.server.security.CustomAuthenticator interface.
Authentication Filter: Retrieves the user namefrom the getUserPrincipal() method ofjavax.servlet.http.HttpServletRequest.
The Authentication Filter API hasbeen deprecated. Use theCustomAuthenticator API, theCustomWebAuthenticator API, or acustom login page instead.
Require TLS Select yes for external authentication to beavailable for TLS connections only.
Allowed host (hostname or IP address) A list of hostnames and/or IP addresses of theclient computers that are allowed to performexternal authentication. If no allowed hosts arespecified, all client computers are permitted toperform external authentication.
Allowed IP:s (regular expression) Add a regular expression that matches the IPaddresses of remote hosts that are permitted toperform external authentication. The regularexpression shall be written in the syntaxsupported by java.util.regex.Pattern.
Name filter expression (optional) A regular expression that can be used to filterthe user name that is extracted from thespecified request attribute. The value of theregular expression's first capturing group willbe used as the new user name.
One use of this feature is to removethe domain names in cases whereSpotfire Server is configured tocollapse the domains into one singledomain within the server.
For example, if the attribute contains"domainname\username", you can use theregular expression ".*\\(.*)" to remove"domainname\".
122
TIBCO Spotfire® Server and Environment Installation and Administration
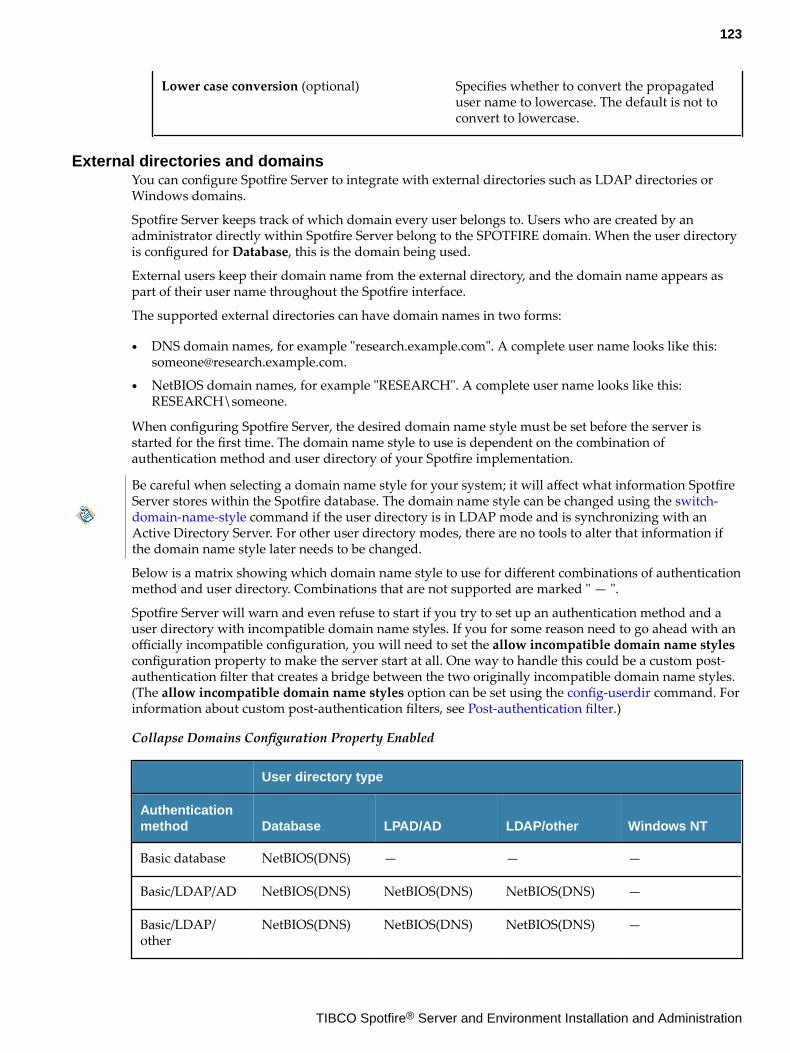
Lower case conversion (optional) Specifies whether to convert the propagateduser name to lowercase. The default is not toconvert to lowercase.
External directories and domainsYou can configure Spotfire Server to integrate with external directories such as LDAP directories orWindows domains.
Spotfire Server keeps track of which domain every user belongs to. Users who are created by anadministrator directly within Spotfire Server belong to the SPOTFIRE domain. When the user directoryis configured for Database, this is the domain being used.
External users keep their domain name from the external directory, and the domain name appears aspart of their user name throughout the Spotfire interface.
The supported external directories can have domain names in two forms:
● DNS domain names, for example "research.example.com". A complete user name looks like this:[email protected].
● NetBIOS domain names, for example "RESEARCH". A complete user name looks like this:RESEARCH\someone.
When configuring Spotfire Server, the desired domain name style must be set before the server isstarted for the first time. The domain name style to use is dependent on the combination ofauthentication method and user directory of your Spotfire implementation.
Be careful when selecting a domain name style for your system; it will affect what information SpotfireServer stores within the Spotfire database. The domain name style can be changed using the switch-domain-name-style command if the user directory is in LDAP mode and is synchronizing with anActive Directory Server. For other user directory modes, there are no tools to alter that information ifthe domain name style later needs to be changed.
Below is a matrix showing which domain name style to use for different combinations of authenticationmethod and user directory. Combinations that are not supported are marked " — ".
Spotfire Server will warn and even refuse to start if you try to set up an authentication method and auser directory with incompatible domain name styles. If you for some reason need to go ahead with anofficially incompatible configuration, you will need to set the allow incompatible domain name stylesconfiguration property to make the server start at all. One way to handle this could be a custom post-authentication filter that creates a bridge between the two originally incompatible domain name styles.(The allow incompatible domain name styles option can be set using the config-userdir command. Forinformation about custom post-authentication filters, see Post-authentication filter.)
Collapse Domains Configuration Property Enabled
User directory type
Authenticationmethod Database LPAD/AD LDAP/other Windows NT
Basic database NetBIOS(DNS) — — —
Basic/LDAP/AD NetBIOS(DNS) NetBIOS(DNS) NetBIOS(DNS) —
Basic/LDAP/other
NetBIOS(DNS) NetBIOS(DNS) NetBIOS(DNS) —
123
TIBCO Spotfire® Server and Environment Installation and Administration
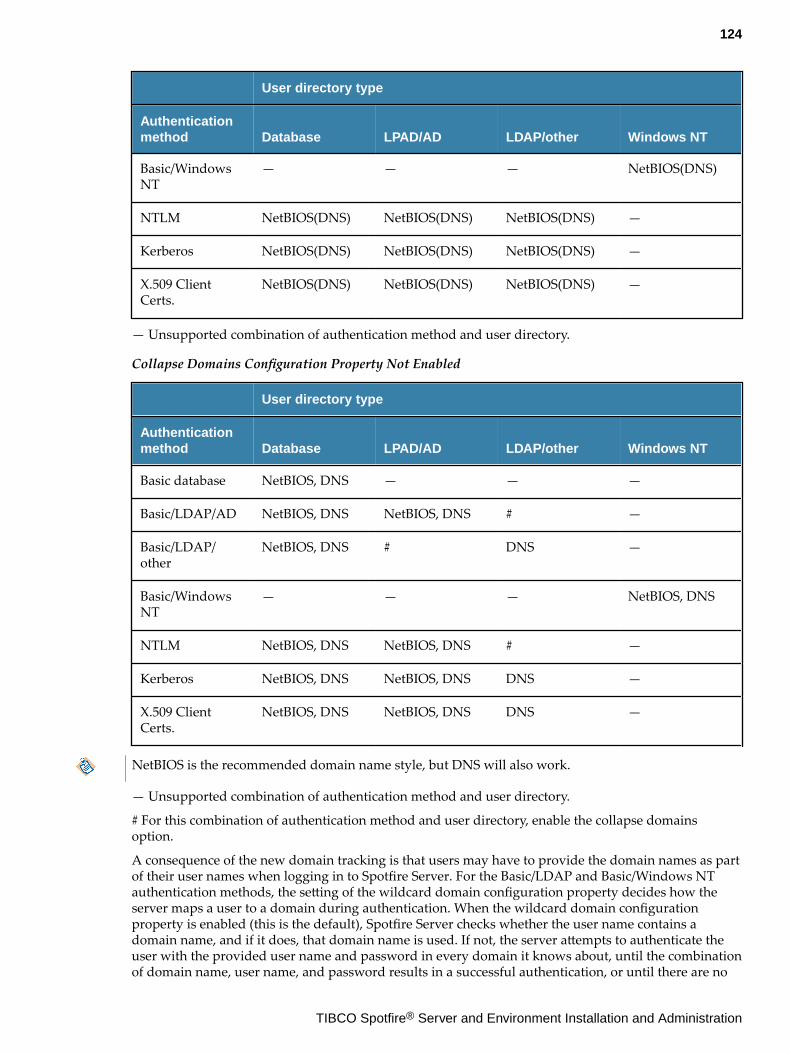
User directory type
Authenticationmethod Database LPAD/AD LDAP/other Windows NT
Basic/WindowsNT
— — — NetBIOS(DNS)
NTLM NetBIOS(DNS) NetBIOS(DNS) NetBIOS(DNS) —
Kerberos NetBIOS(DNS) NetBIOS(DNS) NetBIOS(DNS) —
X.509 ClientCerts.
NetBIOS(DNS) NetBIOS(DNS) NetBIOS(DNS) —
— Unsupported combination of authentication method and user directory.
Collapse Domains Configuration Property Not Enabled
User directory type
Authenticationmethod Database LPAD/AD LDAP/other Windows NT
Basic database NetBIOS, DNS — — —
Basic/LDAP/AD NetBIOS, DNS NetBIOS, DNS # —
Basic/LDAP/other
NetBIOS, DNS # DNS —
Basic/WindowsNT
— — — NetBIOS, DNS
NTLM NetBIOS, DNS NetBIOS, DNS # —
Kerberos NetBIOS, DNS NetBIOS, DNS DNS —
X.509 ClientCerts.
NetBIOS, DNS NetBIOS, DNS DNS —
NetBIOS is the recommended domain name style, but DNS will also work.
— Unsupported combination of authentication method and user directory.
# For this combination of authentication method and user directory, enable the collapse domainsoption.
A consequence of the new domain tracking is that users may have to provide the domain names as partof their user names when logging in to Spotfire Server. For the Basic/LDAP and Basic/Windows NTauthentication methods, the setting of the wildcard domain configuration property decides how theserver maps a user to a domain during authentication. When the wildcard domain configurationproperty is enabled (this is the default), Spotfire Server checks whether the user name contains adomain name, and if it does, that domain name is used. If not, the server attempts to authenticate theuser with the provided user name and password in every domain it knows about, until the combinationof domain name, user name, and password results in a successful authentication, or until there are no
124
TIBCO Spotfire® Server and Environment Installation and Administration
more domain names to try. If the wildcard domain configuration property is turned off, the domainname must be specified by the user unless it belongs to the configured default domain. This can beconfigured in the configuration tool.
If the wildcard domain configuration property is enabled and two identically named users in differentdomains have the same password, there is a risk that the wrong account will be selected when one ofthese users logs in. Thus, if security has a higher priority than user convenience, make sure to turn offthe wildcard domain configuration property. There is also the risk that multiple authentication attemptswill lock out the "correct" user.
Spotfire Server provides a configuration property that reverts to the behavior from previous releases.The configuration property is called collapse-domains and enabling this means that the externaldomain of a user is essentially ignored, and that different users with the same user name, but indifferent domains, will share an account on Spotfire Server. When the collapse domains configurationproperty is enabled, all external users and groups will be associated with the SPOTFIRE domain,regardless of which domain they belong to in the external directory.
If you want to keep running Spotfire Server without ever caring about domain names, enable both thecollapse-domains and wildcard-domain configuration properties. Doing so will ensure that all usersbelong to the internal SPOTFIRE domain, and no users will have to enter a domain name when loggingin. (The collapse-domains configuration property can be set in the configuration tool or by using the config-userdir command).
All users will belong to one domain when the collapse-domains configuration property is enabled. Ifthere are multiple users with the same account name in different external domains, they will noweffectively share the same account within Spotfire Server. If security has a higher priority than userconvenience, make sure not to enable the collapse domain configuration property.
It is not recommended to change the collapse-domains configuration property after once havingsynchronized Spotfire Server with an external directory. This creates double accounts with differentdomain names for every synchronized user and group in the user directory. The new accounts do notinherit the permissions of the old accounts.
LDAP synchronizationsYou can schedule when Spotfire Server synchronizes its user directory with LDAP directories. Bothusers and groups are synchronized in the background, and user and group look-ups query the Spotfiredatabase rather than the LDAP directory.
There are two algorithms that can be used when configuring the recurrence of synchronization tasks:one is based on cron schedules and the other on sleep time between synchronizations.
Sleep time is only used when no cron schedule exists for the LDAP configuration. The sleeping periodis configurable and by default it is set to 60 minutes.
New configurations have two default cron schedules: "restart" and "daily". "Restart" runssynchronization at each restart of Spotfire Server; "daily" runs synchronization once a day (at midnightserver time). Upgraded configurations may not have these default cron schedules.
Each LDAP configuration has its own schedules. It is possible to use cron schedules for one LDAPconfiguration and sleep time for another.
User synchronization
By default, the user directory only synchronizes users (not groups) from the LDAP directories.
After an LDAP user has been synchronized and imported to the user directory, the user accountbecomes a permanent part of the user directory. If the LDAP user is later removed from the LDAPdirectory, the corresponding user account in the user directory is disabled. Disabled accounts remainvisible in the Spotfire system but the user cannot log in.
To prevent user accounts from being disabled by failed synchronization attempts, for example causedby network errors, the safe-synchronization option can be enabled. When this option is enabled, no
125
TIBCO Spotfire® Server and Environment Installation and Administration
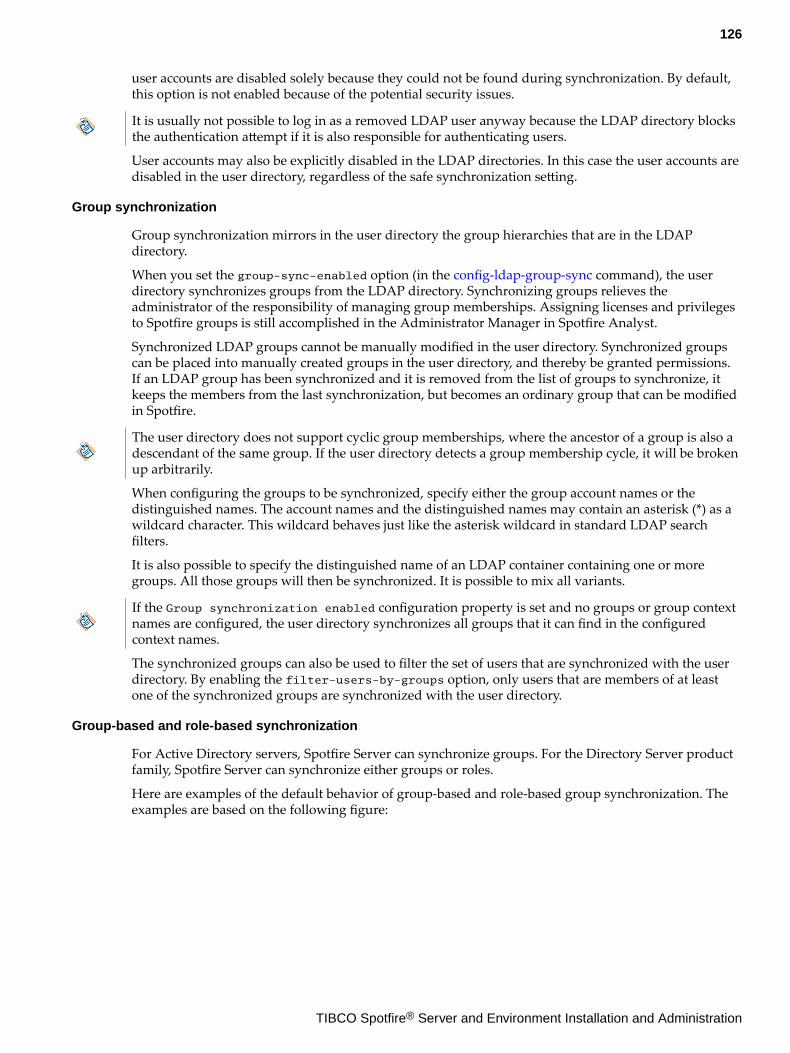
user accounts are disabled solely because they could not be found during synchronization. By default,this option is not enabled because of the potential security issues.
It is usually not possible to log in as a removed LDAP user anyway because the LDAP directory blocksthe authentication attempt if it is also responsible for authenticating users.
User accounts may also be explicitly disabled in the LDAP directories. In this case the user accounts aredisabled in the user directory, regardless of the safe synchronization setting.
Group synchronization
Group synchronization mirrors in the user directory the group hierarchies that are in the LDAPdirectory.
When you set the group-sync-enabled option (in the config-ldap-group-sync command), the userdirectory synchronizes groups from the LDAP directory. Synchronizing groups relieves theadministrator of the responsibility of managing group memberships. Assigning licenses and privilegesto Spotfire groups is still accomplished in the Administrator Manager in Spotfire Analyst.
Synchronized LDAP groups cannot be manually modified in the user directory. Synchronized groupscan be placed into manually created groups in the user directory, and thereby be granted permissions.If an LDAP group has been synchronized and it is removed from the list of groups to synchronize, itkeeps the members from the last synchronization, but becomes an ordinary group that can be modifiedin Spotfire.
The user directory does not support cyclic group memberships, where the ancestor of a group is also adescendant of the same group. If the user directory detects a group membership cycle, it will be brokenup arbitrarily.
When configuring the groups to be synchronized, specify either the group account names or thedistinguished names. The account names and the distinguished names may contain an asterisk (*) as awildcard character. This wildcard behaves just like the asterisk wildcard in standard LDAP searchfilters.
It is also possible to specify the distinguished name of an LDAP container containing one or moregroups. All those groups will then be synchronized. It is possible to mix all variants.
If the Group synchronization enabled configuration property is set and no groups or group contextnames are configured, the user directory synchronizes all groups that it can find in the configuredcontext names.
The synchronized groups can also be used to filter the set of users that are synchronized with the userdirectory. By enabling the filter-users-by-groups option, only users that are members of at leastone of the synchronized groups are synchronized with the user directory.
Group-based and role-based synchronization
For Active Directory servers, Spotfire Server can synchronize groups. For the Directory Server productfamily, Spotfire Server can synchronize either groups or roles.
Here are examples of the default behavior of group-based and role-based group synchronization. Theexamples are based on the following figure:
126
TIBCO Spotfire® Server and Environment Installation and Administration
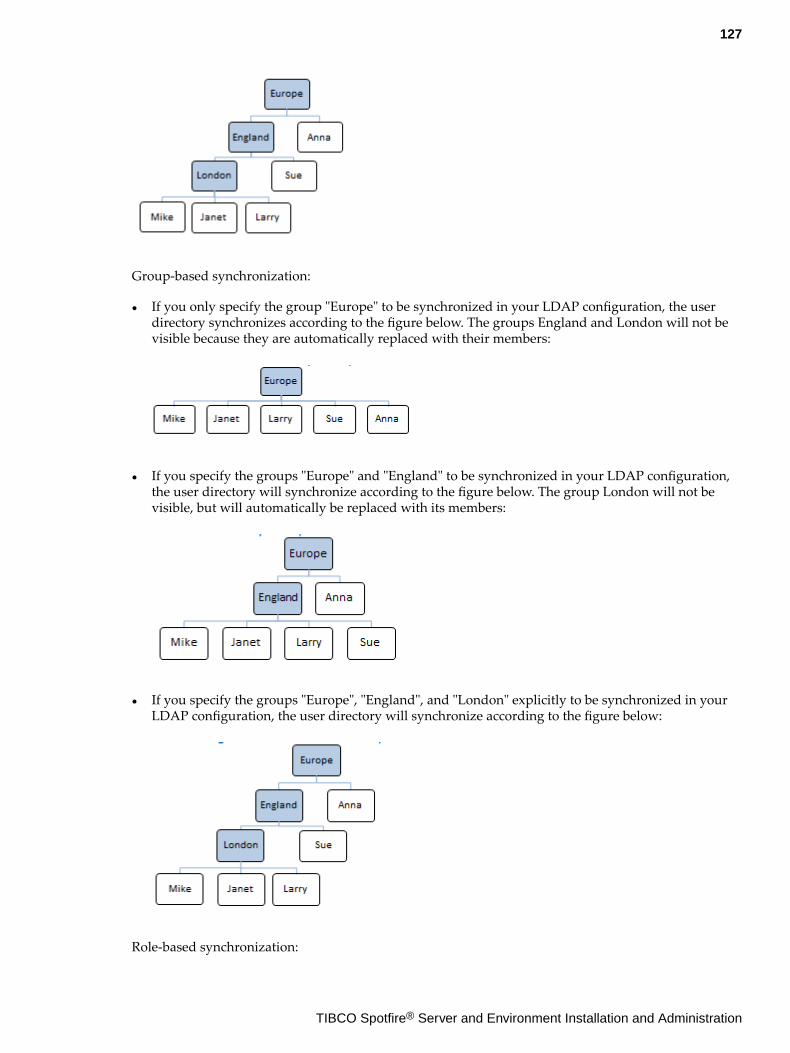
Group-based synchronization:
● If you only specify the group "Europe" to be synchronized in your LDAP configuration, the userdirectory synchronizes according to the figure below. The groups England and London will not bevisible because they are automatically replaced with their members:
● If you specify the groups "Europe" and "England" to be synchronized in your LDAP configuration,the user directory will synchronize according to the figure below. The group London will not bevisible, but will automatically be replaced with its members:
● If you specify the groups "Europe", "England", and "London" explicitly to be synchronized in yourLDAP configuration, the user directory will synchronize according to the figure below:
Role-based synchronization:
127
TIBCO Spotfire® Server and Environment Installation and Administration
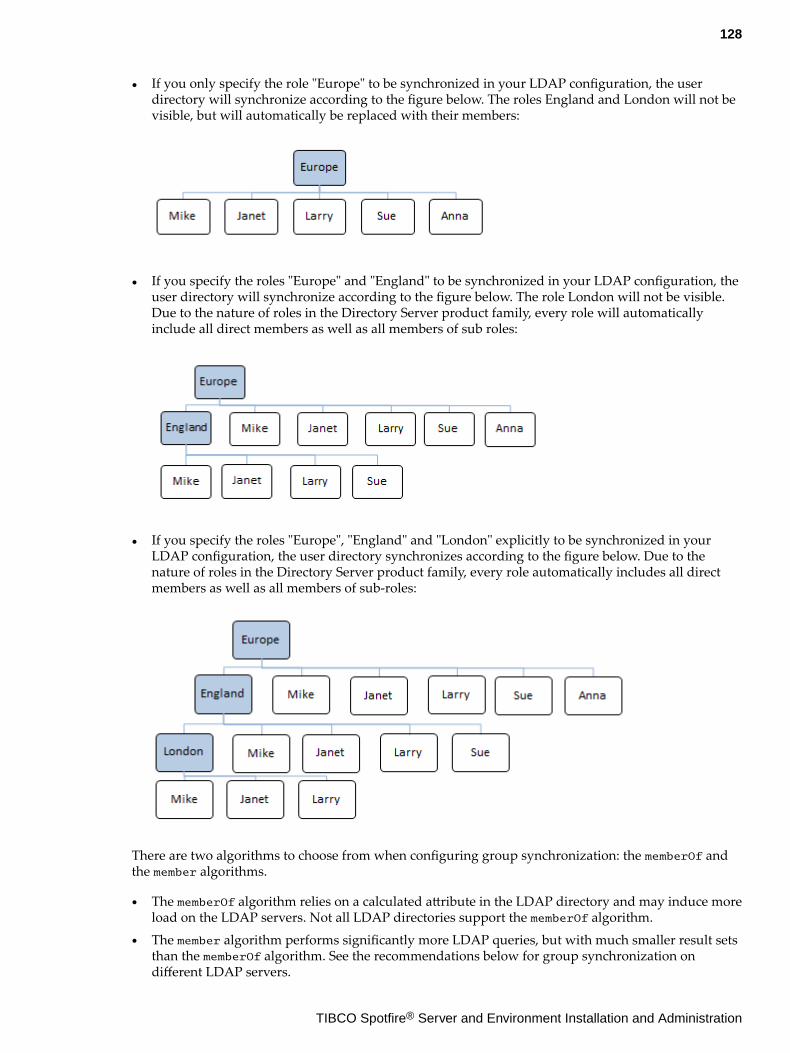
● If you only specify the role "Europe" to be synchronized in your LDAP configuration, the userdirectory will synchronize according to the figure below. The roles England and London will not bevisible, but will automatically be replaced with their members:
● If you specify the roles "Europe" and "England" to be synchronized in your LDAP configuration, theuser directory will synchronize according to the figure below. The role London will not be visible.Due to the nature of roles in the Directory Server product family, every role will automaticallyinclude all direct members as well as all members of sub roles:
● If you specify the roles "Europe", "England" and "London" explicitly to be synchronized in yourLDAP configuration, the user directory synchronizes according to the figure below. Due to thenature of roles in the Directory Server product family, every role automatically includes all directmembers as well as all members of sub-roles:
There are two algorithms to choose from when configuring group synchronization: the memberOf andthe member algorithms.
● The memberOf algorithm relies on a calculated attribute in the LDAP directory and may induce moreload on the LDAP servers. Not all LDAP directories support the memberOf algorithm.
● The member algorithm performs significantly more LDAP queries, but with much smaller result setsthan the memberOf algorithm. See the recommendations below for group synchronization ondifferent LDAP servers.
128
TIBCO Spotfire® Server and Environment Installation and Administration
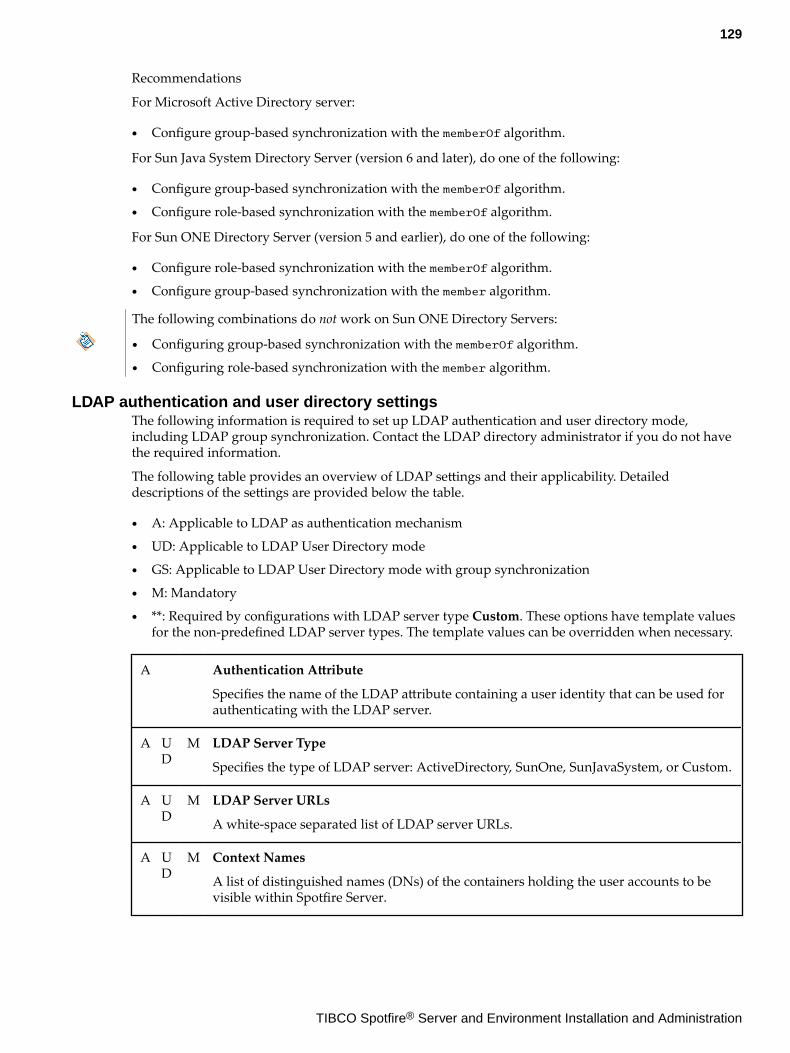
Recommendations
For Microsoft Active Directory server:
● Configure group-based synchronization with the memberOf algorithm.
For Sun Java System Directory Server (version 6 and later), do one of the following:
● Configure group-based synchronization with the memberOf algorithm.
● Configure role-based synchronization with the memberOf algorithm.
For Sun ONE Directory Server (version 5 and earlier), do one of the following:
● Configure role-based synchronization with the memberOf algorithm.
● Configure group-based synchronization with the member algorithm.
The following combinations do not work on Sun ONE Directory Servers:
● Configuring group-based synchronization with the memberOf algorithm.
● Configuring role-based synchronization with the member algorithm.
LDAP authentication and user directory settingsThe following information is required to set up LDAP authentication and user directory mode,including LDAP group synchronization. Contact the LDAP directory administrator if you do not havethe required information.
The following table provides an overview of LDAP settings and their applicability. Detaileddescriptions of the settings are provided below the table.
● A: Applicable to LDAP as authentication mechanism
● UD: Applicable to LDAP User Directory mode
● GS: Applicable to LDAP User Directory mode with group synchronization
● M: Mandatory
● **: Required by configurations with LDAP server type Custom. These options have template valuesfor the non-predefined LDAP server types. The template values can be overridden when necessary.
A Authentication Attribute
Specifies the name of the LDAP attribute containing a user identity that can be used forauthenticating with the LDAP server.
A UD
M LDAP Server Type
Specifies the type of LDAP server: ActiveDirectory, SunOne, SunJavaSystem, or Custom.
A UD
M LDAP Server URLs
A white-space separated list of LDAP server URLs.
A UD
M Context Names
A list of distinguished names (DNs) of the containers holding the user accounts to bevisible within Spotfire Server.
129
TIBCO Spotfire® Server and Environment Installation and Administration
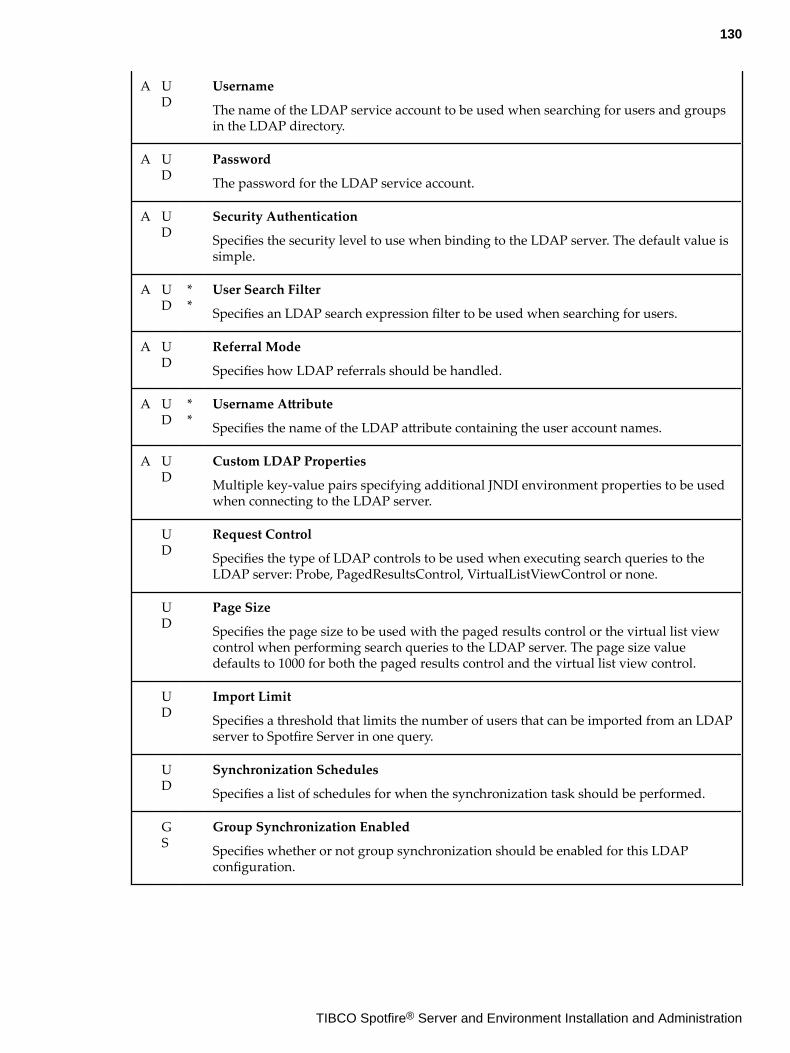
A UD
Username
The name of the LDAP service account to be used when searching for users and groupsin the LDAP directory.
A UD
Password
The password for the LDAP service account.
A UD
Security Authentication
Specifies the security level to use when binding to the LDAP server. The default value issimple.
A UD
**
User Search Filter
Specifies an LDAP search expression filter to be used when searching for users.
A UD
Referral Mode
Specifies how LDAP referrals should be handled.
A UD
**
Username Attribute
Specifies the name of the LDAP attribute containing the user account names.
A UD
Custom LDAP Properties
Multiple key-value pairs specifying additional JNDI environment properties to be usedwhen connecting to the LDAP server.
UD
Request Control
Specifies the type of LDAP controls to be used when executing search queries to theLDAP server: Probe, PagedResultsControl, VirtualListViewControl or none.
UD
Page Size
Specifies the page size to be used with the paged results control or the virtual list viewcontrol when performing search queries to the LDAP server. The page size valuedefaults to 1000 for both the paged results control and the virtual list view control.
UD
Import Limit
Specifies a threshold that limits the number of users that can be imported from an LDAPserver to Spotfire Server in one query.
UD
Synchronization Schedules
Specifies a list of schedules for when the synchronization task should be performed.
GS
Group Synchronization Enabled
Specifies whether or not group synchronization should be enabled for this LDAPconfiguration.
130
TIBCO Spotfire® Server and Environment Installation and Administration
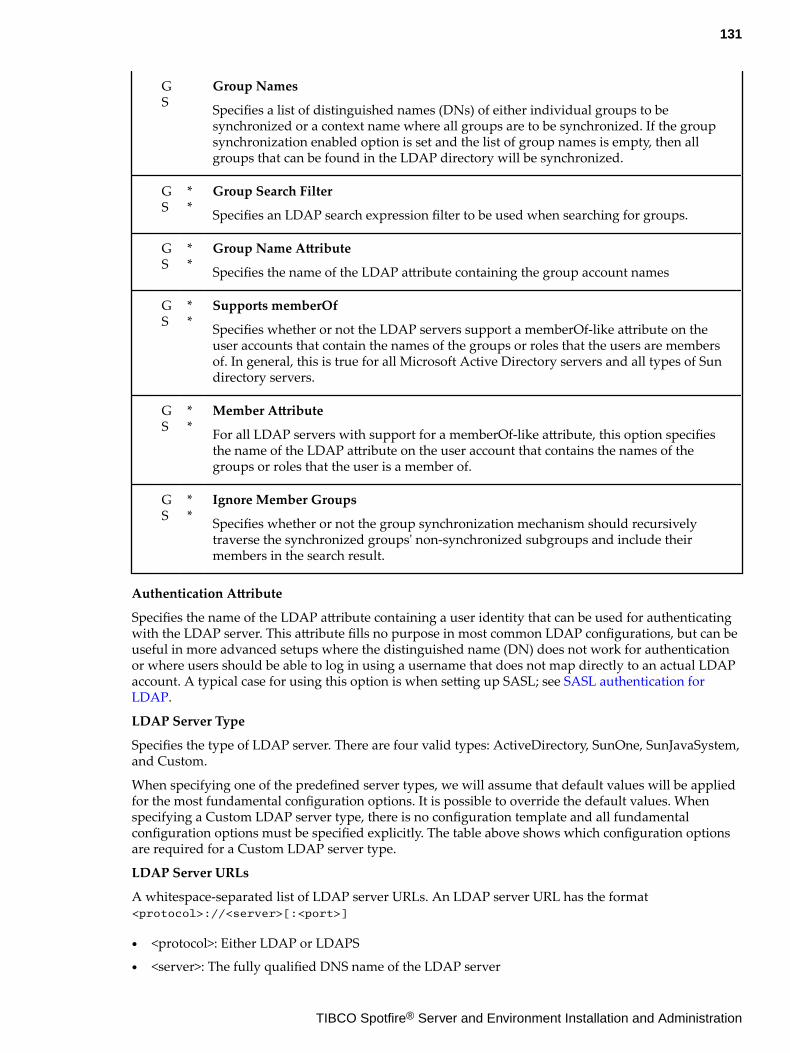
GS
Group Names
Specifies a list of distinguished names (DNs) of either individual groups to besynchronized or a context name where all groups are to be synchronized. If the groupsynchronization enabled option is set and the list of group names is empty, then allgroups that can be found in the LDAP directory will be synchronized.
GS
**
Group Search Filter
Specifies an LDAP search expression filter to be used when searching for groups.
GS
**
Group Name Attribute
Specifies the name of the LDAP attribute containing the group account names
GS
**
Supports memberOf
Specifies whether or not the LDAP servers support a memberOf-like attribute on theuser accounts that contain the names of the groups or roles that the users are membersof. In general, this is true for all Microsoft Active Directory servers and all types of Sundirectory servers.
GS
**
Member Attribute
For all LDAP servers with support for a memberOf-like attribute, this option specifiesthe name of the LDAP attribute on the user account that contains the names of thegroups or roles that the user is a member of.
GS
**
Ignore Member Groups
Specifies whether or not the group synchronization mechanism should recursivelytraverse the synchronized groups' non-synchronized subgroups and include theirmembers in the search result.
Authentication Attribute
Specifies the name of the LDAP attribute containing a user identity that can be used for authenticatingwith the LDAP server. This attribute fills no purpose in most common LDAP configurations, but can beuseful in more advanced setups where the distinguished name (DN) does not work for authenticationor where users should be able to log in using a username that does not map directly to an actual LDAPaccount. A typical case for using this option is when setting up SASL; see SASL authentication forLDAP.
LDAP Server Type
Specifies the type of LDAP server. There are four valid types: ActiveDirectory, SunOne, SunJavaSystem,and Custom.
When specifying one of the predefined server types, we will assume that default values will be appliedfor the most fundamental configuration options. It is possible to override the default values. Whenspecifying a Custom LDAP server type, there is no configuration template and all fundamentalconfiguration options must be specified explicitly. The table above shows which configuration optionsare required for a Custom LDAP server type.
LDAP Server URLs
A whitespace-separated list of LDAP server URLs. An LDAP server URL has the format<protocol>://<server>[:<port>]
● <protocol>: Either LDAP or LDAPS
● <server>: The fully qualified DNS name of the LDAP server
131
TIBCO Spotfire® Server and Environment Installation and Administration
● <port>: An optional number indicating the TCP port the LDAP service is listening on. When usingthe LDAP protocol, the port number defaults to 389. When using the LDAPS protocol, the portnumber defaults to 636. Active Directory LDAP servers also provide a Global Catalog containingforest-wide information, instead of domain-wide information only. The Global Catalog LDAPservice by default listens on port number 3268 (LDAP) or 3269 (LDAPS).
Spotfire Server does not expect any search base, scope, filter, or other additional parameters after theport number in the LDAP server URLs. Such properties are specified using other configuration optionsfor this command.
Examples of LDAP server URLs:
LDAP://myserver.example.com
LDAPS://myserver.example.com
LDAP://myserver.example.com:389
LDAPS://myserver.example.com:636
LDAP://myserver.example.com:3268
LDAPS://myserver.example.com:3269
Context Names
A list of distinguished names (DNs) of the containers holding the LDAP accounts to be visible withinSpotfire Server. When specifying more than one DN, the DNs must be separated by pipe characters (|).If the specified containers contain a large number of users, but only a few should be visible in SpotfireServer, a custom user search filter can be specified to include only the filtered users; see "User SearchFilter", below.
Username
The name of the LDAP service account to be used when searching for users and groups in the LDAPdirectory. This service account does not need to have any write permissions, but it needs to have readpermissions for all configured context names (LDAP containers). For most LDAP servers, the accountname is the account's distinguished name (DN). For Active Directory, the account name can also bespecified in the forms ntdomain\name or name@dnsdomain.
Examples:
CN=spotsvc,OU=services,DC=research,DC=example,dc=COM
RESEARCH\spotsvc (Active Directory only)
[email protected] (Active Directory only)
Password
The password for the LDAP service account.
Security Authentication
Specifies the security level to use when binding to the LDAP server. The default value is simple. Onlyuse this parameter in special cases, and use it with care in production environments.
● To enable anonymous binding, it should be set to none.● To enable plain user name/password authentication, it should be set to simple.● To enable SASL authentication, it should be set to the name of the SASL mechanism to be used.Spotfire Server supports the two SASL mechanisms DIGEST-MD5 and GSSAPI. You can set multiple-C flags to set the additional JNDI environment properties that the SASL authentication mechanismtypically requires
A typical case for using this option is when setting up SASL; see SASL authentication for LDAP.
User Search Filter
132
TIBCO Spotfire® Server and Environment Installation and Administration
This parameter specifies an LDAP search expression filter to be used when searching for users.
If only a subset of all the users in the specified LDAP containers should be allowed access to SpotfireServer, a restrictive user search filter can be specified. For instance, the search expression can beconfigured so that it puts restrictions on which groups the users belong to, or which roles they have.
● For Active Directory servers, the parameter value defaults to objectClass=user● For Active Directory servers, access can be restricted to only those users belonging to a certain
group by using a search expression with the pattern &(objectClass=user)(memberOf=<groupDN>)where <groupDN> is to be replaced by the real DN of the group to which the users must belong. Ifthe users are divided among multiple groups, use the pattern &(objectClass=user)(|(memberOf=<firstDN> )(memberOf=<secondDN>)). Add extra (memberOf=<groupDN>) sub-expressions as needed.
Example: &(objectClass=person)(isMemberOf=cn=project-x,dc=example,dc=com)● For any version of the Sun Directory Servers, it defaults to objectClass=person.● For a Sun Java System Directory Server version 6 and later, the same effect can be achieved by using
a search expression with the pattern &(objectClass= person)(isMemberOf=<groupDN>). If the usersare divided among multiple groups, use the pattern &(objectClass=person)(|(isMemberOf=<firstDN> )(isMemberOf=<secondDN>)). Add extra (isMemberOf=<groupDN>) sub-expressions as needed.
Example: &(objectClass=person)(isMemberOf=cn=project-x,dc=example,dc=com)● For the Directory Server product family, access can be restricted to only those users having certainspecific roles. The search expression for role filtering must match the pattern &(objectClass=person)(nsRole=<roleDN>). If multiple roles are of interest, use the pattern &(objectClass=person)(|(nsRole=<firstDN>))(nsRole=<secondDN>) ). Add extra (nsRole=<roleDN>)) sub-expressions asneeded.
Example: &(objectClass=person)(isMemberOf=cn=project-x,dc=example,dc=com)The syntax of LDAP search expression filters is specified by RFC 4515. Consult this specification forinformation about more advanced filters.
Referral Mode
This argument specifies how LDAP referrals should be handled. Valid arguments are follow(automatically follow any referrals), ignore (ignore referrals) and throw (fail with an error). The defaultand recommended value is follow.
Username Attribute
Specifies the name of the LDAP attribute containing the user account names. For Active Directoryservers the value defaults to sAMAccountName. For the Directory Server product family with a defaultconfiguration, it defaults to uid.
Custom LDAP Properties
Multiple key-value pairs specifying additional JNDI environment properties to be used whenconnecting to the LDAP server. For instance, specifying the key java.naming.security.authentication andthe value simple have the same result as setting the Security Authentication option to "simple".
Request Control
This option determines the type of LDAP controls to be used when executing search queries to theLDAP server. Valid controls are Probe, PagedResultsControl, VirtualListViewControl, and none.
The default behavior is to probe the LDAP server for the best supported request control. The pagedresults control is always preferred, since it provides the most efficient way of retrieving the result of thequery. The virtual list view control can also be used to retrieve a large number of users, if the pagedresults control is not supported. The virtual list view control will automatically be used together with asort control. Both the paged results control and the virtual list view control support a configurable pagesize, as specified by the page size option.
133
TIBCO Spotfire® Server and Environment Installation and Administration
Page Size
This argument specifies the page size to be used with the paged results control or the virtual list viewcontrol when performing search queries to the LDAP server. The page size value defaults to 1000 forboth the paged results control and the virtual list view control.
Import Limit
This argument specifies a threshold that limits the number of users that can be imported from an LDAPserver to Spotfire Server in one query. This can be used to prevent accidental flooding of SpotfireServer's User Directory when integrating with an LDAP server with tens or even hundreds ofthousands of users. By setting an import limit, the administrator can be sure that an unexpected highnumber of users won't affect the server's performance. By default, there is no import limit. To explicitlyrequest unlimited import, set the parameter value to -1. All positive numbers are treated as an importlimit. Leave this parameter untouched. in most cases.
Group Synchronization Enabled
Specifies whether or not group synchronization should be enabled for this LDAP configuration.
Group Names
Specifies the groups to be synchronized. Groups can be specified with either their account names ortheir distinguished names (DNs). The account names and the distinguished names may contain anasterisk (*) as a wildcard character. This wildcard behaves just like the asterisk wildcard in standardLDAP search filters. Wildcards work for both account names and distinguished names.
It is also possible to specify the distinguished name of an LDAP container containing multiple groupsand thereby synchronizing all those groups. Wildcards can also be used for specifying groupcontainers.
It is possible to mix all variants above. Consider the following when specifying a group to besynchronized:
● Specify either the group's account name or its distinguished name (DN). The account name mustmatch the value of the configured group name attribute.
● It is possible to use an asterisk (*) as a wildcard character s in the account names when specifyinggroup names. If a configured group name contains wildcard characters and matches multiplegroups in the directory, all those groups will be synchronized.
● It is also possible to specify the distinguished name of an LDAP container containing one or moregroups. All those groups will then be synchronized.
● It is possible to mix all variants.
If the enable group synchronization configuration property is set and the list of group names is empty,then all groups that can be found in the configured context names in the LDAP directory will besynchronized.
Synchronization Schedules
Specifies a list of schedules for when the group synchronization task should be performed. Theschedules are specified in the cron format, where each schedule consists of either five fields or oneshorthand label.
The five fields are, from left to right, with their valid ranges:
● minute (0-59)
● hour (0-23)
● day of month (1-31)
● month (1-12)
● day of week (0-7, where both 0 and 7 indicate Sunday)
134
TIBCO Spotfire® Server and Environment Installation and Administration
A field may also be configured with the wildcard character (*), indicating that any moment in timematches this field. A group synchronization is triggered when all fields match the current time. If bothday of month and day of week have non-wildcard values, then only one of them has to match.
There are also the following shorthand labels that can be used instead of the full cron expressions:
@yearly or @annually: run once a year (equivalent to 0 0 1 1 *)
@monthly: run once a month (equivalent to 0 0 1 * *)
@weekly: run once a week (equivalent to 0 0 * * 0)
@daily or @midnight: run once a day (equivalent to 0 0 * * *)
@hourly: run once an hour (equivalent to 0 * * * *)
@minutely: run once a minute (equivalent to * * * * *)
@reboot or @restart: run every time Spotfire Server is started
Refer to the Wikipedia overview article on the cron scheduler.
Group Search Filter
This parameter specifies an LDAP search expression filter to be used when searching for groups.
● For Active Directory servers, the parameter value defaults to objectClass=group
● For Oracle Directory Servers and Sun Java System Directory Servers, it defaults toobjectClass=groupOfUniqueNames
● For Sun ONE Directory Servers, it defaults to &(|(objectclass= nsManagedRoleDefinition)(objectClass=nsNestedRoleDefinition))(objectclass= ldapSubEntry)
Group Name Attribute
Specifies the name of the LDAP attribute containing the group account names:
● For Active Directory servers the value defaults to sAMAccountName
● For any version of the Sun directory servers with a default configuration, it defaults to cn
Supports memberOf
Specifies whether or not the LDAP servers support a memberOf-like attribute on the user accounts thatcontain the names of the groups or roles that the users are members of. In general, this is true for allMicrosoft Active Directory servers and the Directory Server product family.
For some LDAP servers with configurations of type Custom, there is no memberOf-like attribute. Thisis declared by setting the supports memberOf configuration property to "false".
Member Attribute
This parameter value can be set to: memberOf, nsRole, or isMemberOf.
For LDAP configurations with the supports memberOf option set to false, the member attribute optionspecifies the name of the LDAP attribute on the group accounts that contains the distinguished names(DNs) of its members. In general, this includes LDAP servers with configurations of type Custom andany Sun ONE Directory Servers (version 5 and earlier) when used with group-based synchronization.
For LDAP configurations with the supports memberOf option set to "true", the member attribute optionspecifies the name of the LDAP attribute on the user accounts that contain the names of the groups orroles that the users are members of. In general, this includes all Microsoft Active Directory servers andall types of Sun Directory Servers version 6 and later. For Sun ONE Directory Servers (version 5 andolder), this also applies for roles.
● For Microsoft Active Directory servers, the member attribute value defaults to memberOf.
● For Sun ONE Directory Servers, the member attribute option defaults to nsRole.
135
TIBCO Spotfire® Server and Environment Installation and Administration
● For Sun Java System Directory Server version 6.0 or later, the member attribute option defaults toisMemberOf. To use the roles with the Sun Java System Directory Server or later, it is recommendedto use the SunONE configuration template instead.
All configurations with the memberOf option set to "false" will use a far less efficient groupsynchronization algorithm that will generate more traffic to the LDAP servers, because Spotfire Serverwill first have to search for the distinguished names (DNs) of the group members within the groups,and then perform repeated lookups to translate the member DN to the correct account name.
Ignore Member Groups
This argument determines whether or not the group synchronization mechanism should recursivelytraverse the synchronized groups' non-synchronized subgroups and include their members in thesearch result.
For Microsoft Active Directory servers, the parameter value defaults to "false" so that all inheritedgroup memberships are correctly reflected. For any version of the Sun Directory Servers, it defaults to"true" because the role and groups mechanisms in those servers automatically include those members.
Post-authentication filterAfter a user's identity is validated, Spotfire Server performs an additional check using the post-authentication filter.
This filter has two built-in modes:
● Block. When the post-authentication filter is set to Block, it blocks all users who are not alreadypresent in the Spotfire Server user directory. This is the default mode, and the appropriate mode touse with an LDAP user directory.
● Auto-create. When the post-authentication filter is set to Auto-create, it automatically creates newaccounts for any user who logs in to the server for the first time. This mode is valid only when theuser directory mode is set to Database.
The blocking mode is the default mode. When it is used with a user directory in LDAP/Active Directorymode, it automatically transforms to the domain name of the authenticated user to match theconfigured domain name style.
The auto-creating mode is typically applied when using an LDAP directory or X.509 certificates forauthentication together with the User Directory set up in database mode. The Post-authentication filterwill create users with their external domain names, even though the user directory is in database mode,unless the collapse domains configuration property is enabled. This makes it possible to later switch toLDAP or Windows NT mode. If the collapse domains configuration property is enabled, the users willbe created within the internal SPOTFIRE domain and it will not be possible to later switch to LDAP orWindows NT mode.
It is also possible to use the Spotfire Server API to create a custom post-authentication filter to performadditional validation. This filter must be installed in the /tomcat/webapps/spotfire/WEB-INF/libdirectory on all servers. It is enabled using the config-post-auth-filter command. If a custom filter isused, it will be combined with the built-in filter, meaning that the filters will work together.
HTTPSBy default, Spotfire uses the HTTP protocol for communication between clients and Spotfire Server. Toachieve a higher level of security, use the HTTPS protocol instead, ensuring encryption between clientsand server.
HTTPS also includes a mechanism for clients to authenticate the server. To have the server authenticatethe clients as well, you can enable X.509 client certificate authentication.
To enable encrypted communication using HTTPS, see Configuring HTTPS.
To enable X.509 client certificate authentication, start with Configuring HTTP and then proceed to Authentication using X.509 client certificates.
136
TIBCO Spotfire® Server and Environment Installation and Administration
Configuring HTTPSHTTPS ensures that the communication between clients and Spotfire Servers is encrypted.
Prerequisites
Obtain a server certificate and private key, stored in a Java keystore (JKS) or PKCS #12 keystore (P12/PFX).
Procedure
1. Stop Spotfire Server.2. Copy the keystore file to the <server installation dir>/tomcat/certs directory. We suggest
using the server's hostname as keystore filename.3. Open the configuration file <server installation dir>/tomcat/conf/server.xml in an XML
editor or a text editor and locate the section containing the configuration template for an HTTPSconnector:<!-- <Connector port="443" maxHttpHeaderSize="65536" connectionTimeout="30000" enableLookups="false" URIEncoding="UTF-8" disableUploadTimeout="true" server="TIBCO Spotfire Server" compression="on" compressableMimeType="text/html,text/xml,text/plain,text/css,application/json,application/javascript,image/svg+xml,application/xml" acceptorThreadCount="2" keepAliveTimeout="30000" maxKeepAliveRequests="-1" maxThreads="2000" SSLEnabled="true" scheme="https" secure="true"> <SSLHostConfig certificateVerification="none" truststoreFile="./certs/[server hostname].jks" truststorePass="changeit" truststoreType="jks" sslProtocol="TLS" protocols="+TLSv1.2,+TLSv1.1,+TLSv1" honorCipherOrder="true" ciphers ... <Certificate certificateKeystoreFile="./certs/[server hostname].jks" certificateKeystorePassword="changeit" certificateKeystoreType="jks" certificateKeyAlias="[server hostname]" /> </SSLHostConfig> </Connector>-->
(In your installation, [server hostname] is replaced with the actual hostname of your server.)4. Remove the lines with the comment markers <!-- and --> .5. Update the certificateKeystoreFile parameter with the name of the keystore file containing the
server certificate and private key.6. Set the certificateKeystorePass parameter to the password for the keystore file containing the
server certificate and private key.7. Set the certificateKeystoreType parameter to jks for a Java keystore or pkcs12 for a PKCS #12
keystore.8. If the keystore contains more certificates than the server certificate, the certificateKeyAlias
parameter must be set to the alias for the server certificate and private key.
137
TIBCO Spotfire® Server and Environment Installation and Administration
9. Unless you will enable X.509 client certificate authentication, remove the truststoreFile,truststorePass, and truststoreType parameters.
10. To disable unencrypted HTTP traffic, follow these steps:
1. Locate the section containing the default HTTP connector:<Connector port="[HTTP port]"maxHttpHeaderSize="16384"connectionTimeout="30000"enableLookups="false"URIEncoding="UTF-8"disableUploadTimeout="true"server="TIBCO Spotfire Server" />
(In your installation, [HTTP port] is replaced with the HTTP port of your server.)
2. Add comment markers <!-- and --> around the HTTP connector configuration:<!--<Connector port="[HTTP port]"maxHttpHeaderSize="16384"connectionTimeout="30000"enableLookups="false"URIEncoding="UTF-8"disableUploadTimeout="true"server="TIBCO Spotfire Server" />-->
11. Start Spotfire Server.
Node manager installationTo be able to run services, you must first install and trust one or several node managers, depending onthe expected workload. Node managers should not be installed on computers that are running SpotfireServer.
Currently the node manager is capable of running services with two different capabilities: Spotfire WebPlayer and Spotfire Automation Services.
The installation of the node manager creates a Windows service that runs as the LocalSystem account.
If you change the node manager service account, make sure that the account is a local administratorand that it has read and write access to the node manager installation directory and subdirectories.
There are two principal ways to install and trust a node manager:
● In an interactive installation, you run the nm-setup.exe file and then use the administrative tools inSpotfire Server to trust the node and install services and service instances. This is the most commonmethod. For details, see Installing a node manager interactively.
● In a silent installation, you run the installer from the command line. For details, see Installing a nodemanager silently.
For administrators of large implementations who want to be able to quickly scale their Spotfire systemas necessary, an automated method of installing and configuring services and service instances isavailable. For details, see Automatically installing services and instances.
For more information, see Nodes and services introduction.
138
TIBCO Spotfire® Server and Environment Installation and Administration
Installing a node manager interactivelyTo make Spotfire Web Player and Spotfire Automation Services available to end users, you first mustinstall a node manager. A Spotfire implementation can contain several nodes, but each one must beinstalled on a different computer.
Prerequisites
● Spotfire Server is installed and running.
● In the firewall of the computer on which you are installing the node manager, open the ports thatwill be used for the node manager and the services. (See step 5 below for information on how theseports are used.)
This procedure is for an interactive installation, using the installation wizard. Alternatively, you can runa silent installation from the command line; for details, see Installing a node manager silently.
Procedure
1. Double-click nm-setup.exe.
You may be prompted to install Microsoft .NET Framework at this point.
2. On the installation wizard Welcome page, click Next.
3. On the License page, read the agreement, select I accept, and then click Next.
4. On the Destination Folder page you can change the location if you want to, and then click Next.
The directory path must not contain spaces.
The Node Manager Ports page opens.
5. On the Node Manager Ports page, enter numbers (or leave the defaults) for the following ports:
● Node Manager registration port–The port that is used to set up secure internal communicationchannels.
If you are installing the node manager on the same computer as Spotfire Server, thisport must be different than the Spotfire Server back-end registration port. The defaultfor the Spotfire Server port is 9080.
● Node Manager communication port (TLS)–The port that is used for secure (TLS)communication within the implementation.
If you are installing the node manager on the same computer as Spotfire Server, thisport must be different than the Spotfire Server back-end communication port. Thedefault for the Spotfire Server port is 9443.
The selected ports must be available and not blocked by a firewall.
To check whether a port is in use, on a command line enter netstat -na.
6. Click Next.The Spotfire Server page opens.
7. On the Spotfire Server page, enter the following information, and then click Next.
These values must match the values you used when installing the Spotfire Server files.
● Server name–The hostname of Spotfire Server.
139
TIBCO Spotfire® Server and Environment Installation and Administration
Valid hostnames may contain only alphabetic characters, numeric characters, hyphens,and periods.
● Server backend registration port–The registration port that you specified during Spotfire Serverinstallation.
● Server backend communication port (TLS)–The back-end communication port that youspecified during Spotfire Server installation.
8. On the Network Names page, select the computer names that can be used by back-end trust. Ingeneral you can leave all the listed names as they are.
9. On the Ready to Install page, click Install.
What to do next
After the installation wizard finishes running, you must start the new node manager manually; see Starting or stopping a node manager (as a Windows service).
Installing a node manager silentlyTo make Spotfire Web Player and Spotfire Automation Services available to end users, you first mustinstall a node manager. A Spotfire implementation can contain several nodes, but each one must beinstalled on a different computer.
Prerequisites
● Spotfire Server is installed and running.
● In the firewall of the computer on which you are installing the node manager, open the ports thatwill be used for the node manager and the service instances.
To use the interactive installation wizard instead of the command-line installation, see Installing a nodemanager interactively.
Procedure
1. Open a command line as an administrator.
2. Replace the parameters in the following code:${Installer_Name} /s /v"/qn /l*vx TSS_NM_install.log INSTALLDIR=\"${INSTALLDIR}\"NODEMANAGER_REGISTRATION_PORT=${NODEMANAGER_REGISTRATION_PORT} NODEMANAGER_COMMUNICATION_PORT=${NODEMANAGER_COMMUNICATION_PORT} SERVER_NAME=${SERVER_NAME} SERVER_BACKEND_REGISTRATION_PORT=${SERVER_BACKEND_REGISTRATION_PORT} SERVER_BACKEND_COMMUNICATION_PORT=${SERVER_BACKEND_COMMUNICATION_PORT}NODEMANAGER_HOST_NAMES=${HOSTNAME}"
Examplenm-setup.exe /s /v"/qn /l*vx TSS_NM_install.log INSTALLDIR=\"C:\tibco\tsnm\" NODEMANAGER_REGISTRATION_PORT=83NODEMANAGER_COMMUNICATION_PORT=84 SERVER_NAME=<SpotfireServerName> SERVER_BACKEND_REGISTRATION_PORT=81SERVER_BACKEND_COMMUNICATION_PORT=82 NODEMANAGER_HOST_NAMES=<NodeManagerHostNames>"
140
TIBCO Spotfire® Server and Environment Installation and Administration

Silent installation parameters
Parameter Description
INSTALLDIR The installation directory.
The directory path must not contain spaces.
NODEMANAGER_REGISTRATION_PORT Node manager registration port (Default: 9080)
nodemanager.properties: nodemanager.cleartext.port
● Port used for initial setup of internal securecommunication channels.
● Needs only be accessible from Spotfire Server(s).
If you are installing the node manager on thesame computer as Spotfire Server, this portmust be different than the Spotfire Serverback-end registration port.
NODEMANAGER_COMMUNICATION_PORT Node manager communication port (TLS) (Default:9443)
nodemanager.properties: nodemanager.port
● Port used for secure (TLS) internal communicationwithin the environment.
● Needs only be accessible from Spotfire Server(s).
If you are installing the node manager on thesame computer as Spotfire Server, this portmust be different than the Spotfire Serverback-end communication port.
SERVER_NAME nodemanager.properties: nodemanager.supervisor
● Must match the host name of the Spotfire Server.
Valid hostnames may only containalphabetic characters, numeric characters,hyphens, and periods.
SERVER_BACKEND_REGISTRATION_PO
RT
Server backend registration port (Default: 9080)
nodemanager.properties:nodemanager.supervisor.cleartext.port
● Must match the registration port specified in theSpotfire Server installation.
141
TIBCO Spotfire® Server and Environment Installation and Administration
Parameter Description
SERVER_BACKEND_COMMUNICATION_P
ORT
Server backend communication port (TLS): (Default:9443)
nodemanager.properties: nodemanager.supervisor.port
● Must match the back-end communication portspecified in the Spotfire Server installation.
NODEMANAGER_HOST_NAMES A comma-separated list of IP addresses, hostnames, andFQDN names that can be used by back-end trust. Theseshould be for the interface(s) on the computer where thenode manager is installed.
Valid hostnames may only contain alphabeticcharacters, numeric characters, hyphens andperiods.
If you do not enter any values, the installerautomatically provides values. Afterinstallation, confirm that these are correct inthe [node manager installation dir]\nm\config\nodemanager.properties file.
3. Run the installation script.
What to do next
After installation, you must start the new node manager manually; see Starting or stopping a nodemanager (as a Windows service).
Starting or stopping a node manager (as a Windows service)Start or stop the node manager Windows service from the Control Panel on the node managercomputer.
Procedure
1. Log in as an administrator to the computer on which the node manager is installed.
2. Go to Control Panel > Administrative Tools > Services and then, in the Services dialog, locate andselect the service called TIBCO Spotfire Node Manager.
3. To the left of the services list, click Start in the phrase "Start the service" to start the node managerWindows service.
To stop the service, click Stop to the left of the services list.
Result
"Started" appears in the Status column.
What to do next
After starting a node manager you must indicate to the server that you "trust" it; see Trusting a node.
142
TIBCO Spotfire® Server and Environment Installation and Administration
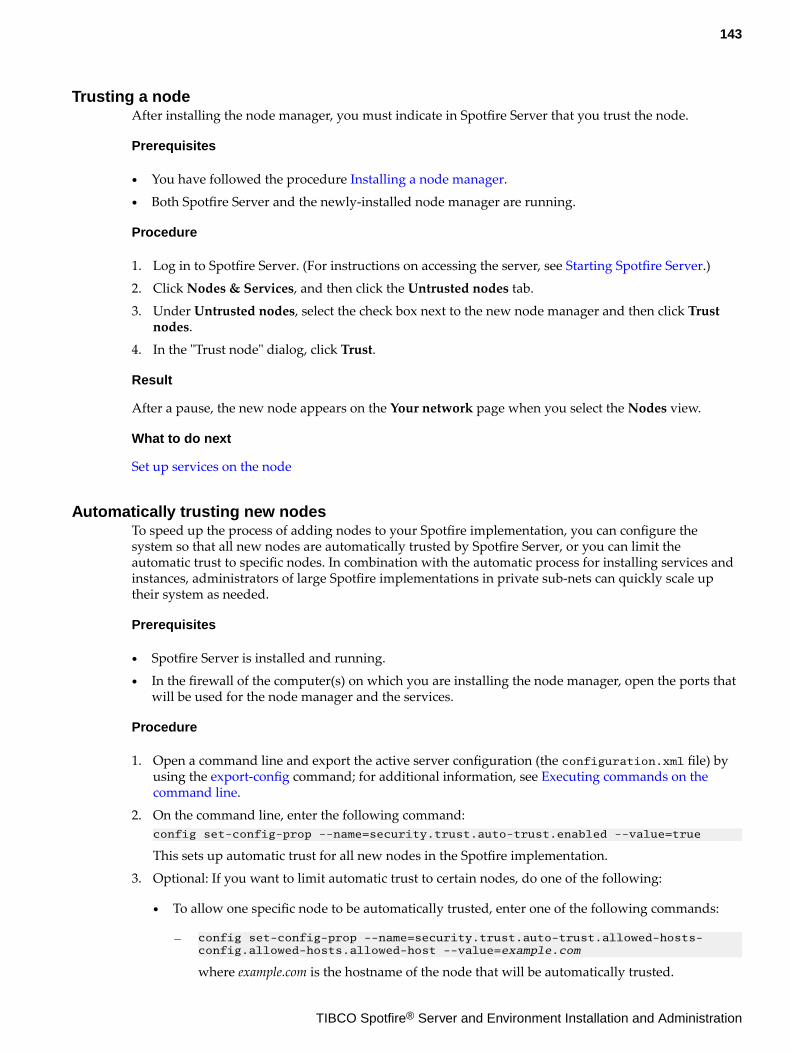
Trusting a nodeAfter installing the node manager, you must indicate in Spotfire Server that you trust the node.
Prerequisites
● You have followed the procedure Installing a node manager.● Both Spotfire Server and the newly-installed node manager are running.
Procedure
1. Log in to Spotfire Server. (For instructions on accessing the server, see Starting Spotfire Server.)
2. Click Nodes & Services, and then click the Untrusted nodes tab.
3. Under Untrusted nodes, select the check box next to the new node manager and then click Trustnodes.
4. In the "Trust node" dialog, click Trust.
Result
After a pause, the new node appears on the Your network page when you select the Nodes view.
What to do next
Set up services on the node
Automatically trusting new nodesTo speed up the process of adding nodes to your Spotfire implementation, you can configure thesystem so that all new nodes are automatically trusted by Spotfire Server, or you can limit theautomatic trust to specific nodes. In combination with the automatic process for installing services andinstances, administrators of large Spotfire implementations in private sub-nets can quickly scale uptheir system as needed.
Prerequisites
● Spotfire Server is installed and running.● In the firewall of the computer(s) on which you are installing the node manager, open the ports that
will be used for the node manager and the services.
Procedure
1. Open a command line and export the active server configuration (the configuration.xml file) byusing the export-config command; for additional information, see Executing commands on thecommand line.
2. On the command line, enter the following command:config set-config-prop --name=security.trust.auto-trust.enabled --value=true
This sets up automatic trust for all new nodes in the Spotfire implementation.
3. Optional: If you want to limit automatic trust to certain nodes, do one of the following:
● To allow one specific node to be automatically trusted, enter one of the following commands:
— config set-config-prop --name=security.trust.auto-trust.allowed-hosts-config.allowed-hosts.allowed-host --value=example.com
where example.com is the hostname of the node that will be automatically trusted.
143
TIBCO Spotfire® Server and Environment Installation and Administration
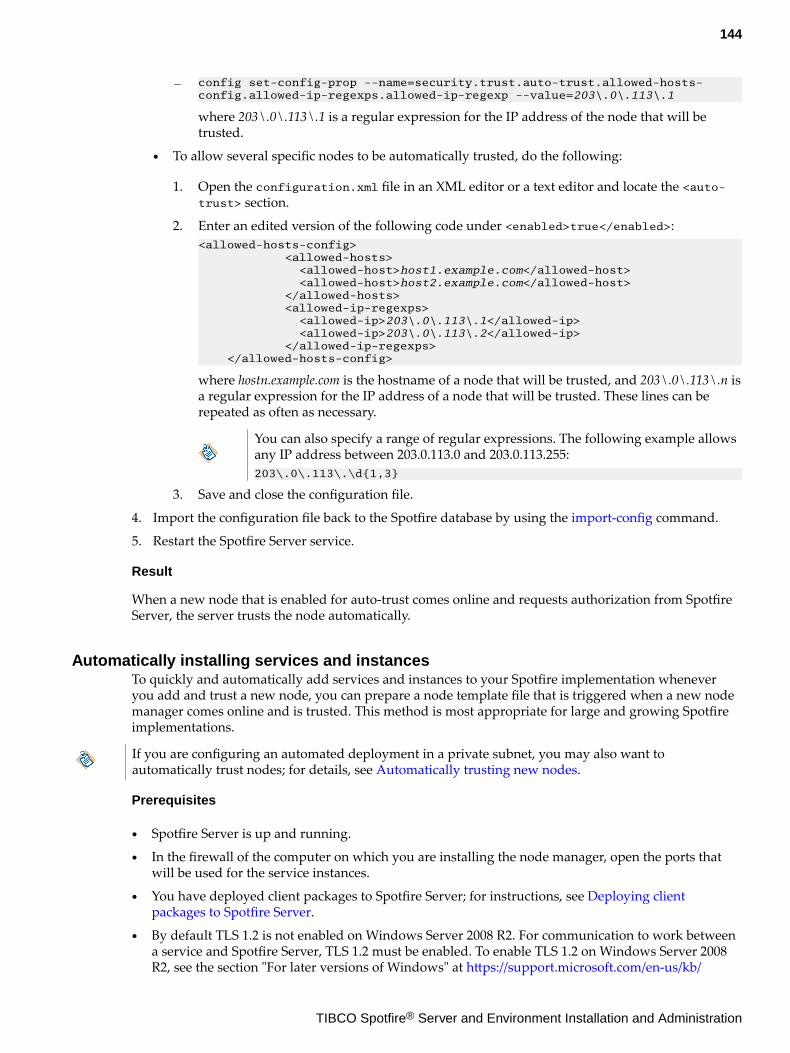
— config set-config-prop --name=security.trust.auto-trust.allowed-hosts-config.allowed-ip-regexps.allowed-ip-regexp --value=203\.0\.113\.1
where 203\.0\.113\.1 is a regular expression for the IP address of the node that will betrusted.
● To allow several specific nodes to be automatically trusted, do the following:
1. Open the configuration.xml file in an XML editor or a text editor and locate the <auto-trust> section.
2. Enter an edited version of the following code under <enabled>true</enabled>:<allowed-hosts-config> <allowed-hosts> <allowed-host>host1.example.com</allowed-host> <allowed-host>host2.example.com</allowed-host> </allowed-hosts> <allowed-ip-regexps> <allowed-ip>203\.0\.113\.1</allowed-ip> <allowed-ip>203\.0\.113\.2</allowed-ip> </allowed-ip-regexps> </allowed-hosts-config>
where hostn.example.com is the hostname of a node that will be trusted, and 203\.0\.113\.n isa regular expression for the IP address of a node that will be trusted. These lines can berepeated as often as necessary.
You can also specify a range of regular expressions. The following example allowsany IP address between 203.0.113.0 and 203.0.113.255:203\.0\.113\.\d{1,3}
3. Save and close the configuration file.
4. Import the configuration file back to the Spotfire database by using the import-config command.
5. Restart the Spotfire Server service.
Result
When a new node that is enabled for auto-trust comes online and requests authorization from SpotfireServer, the server trusts the node automatically.
Automatically installing services and instancesTo quickly and automatically add services and instances to your Spotfire implementation wheneveryou add and trust a new node, you can prepare a node template file that is triggered when a new nodemanager comes online and is trusted. This method is most appropriate for large and growing Spotfireimplementations.
If you are configuring an automated deployment in a private subnet, you may also want toautomatically trust nodes; for details, see Automatically trusting new nodes.
Prerequisites
● Spotfire Server is up and running.
● In the firewall of the computer on which you are installing the node manager, open the ports thatwill be used for the service instances.
● You have deployed client packages to Spotfire Server; for instructions, see Deploying clientpackages to Spotfire Server.
● By default TLS 1.2 is not enabled on Windows Server 2008 R2. For communication to work betweena service and Spotfire Server, TLS 1.2 must be enabled. To enable TLS 1.2 on Windows Server 2008R2, see the section "For later versions of Windows" at https://support.microsoft.com/en-us/kb/
144
TIBCO Spotfire® Server and Environment Installation and Administration
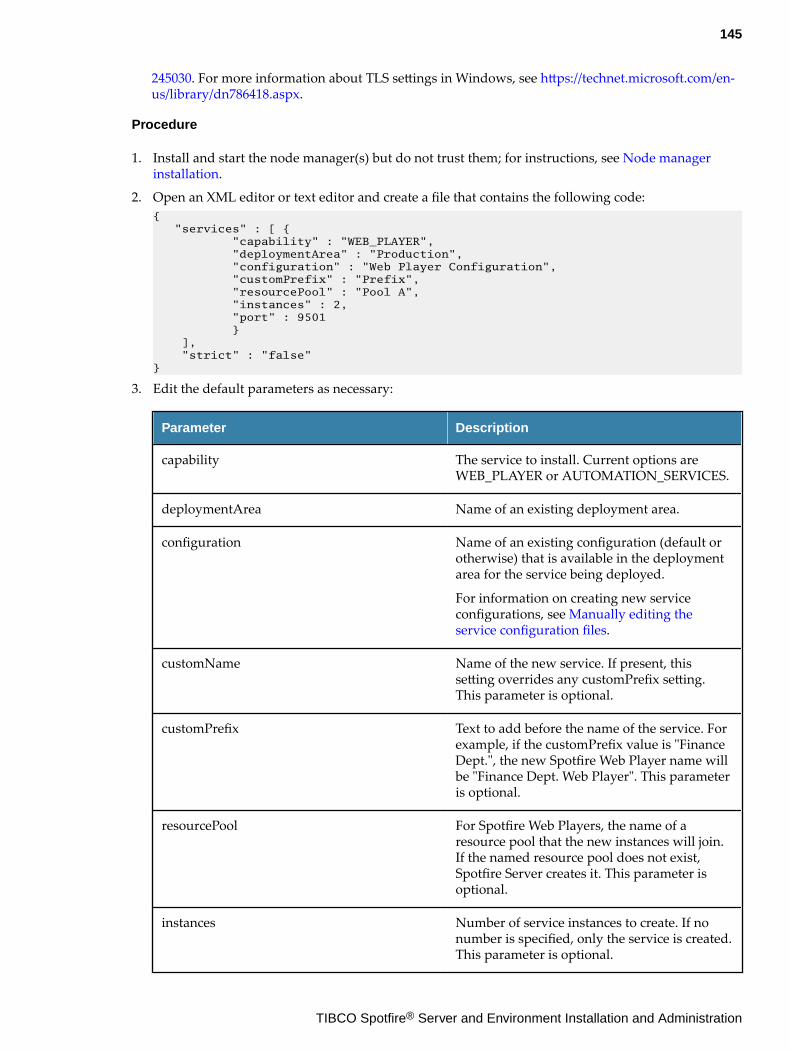
245030. For more information about TLS settings in Windows, see https://technet.microsoft.com/en-us/library/dn786418.aspx.
Procedure
1. Install and start the node manager(s) but do not trust them; for instructions, see Node managerinstallation.
2. Open an XML editor or text editor and create a file that contains the following code:{ "services" : [ { "capability" : "WEB_PLAYER", "deploymentArea" : "Production", "configuration" : "Web Player Configuration", "customPrefix" : "Prefix", "resourcePool" : "Pool A", "instances" : 2, "port" : 9501 } ], "strict" : "false"}
3. Edit the default parameters as necessary:
Parameter Description
capability The service to install. Current options areWEB_PLAYER or AUTOMATION_SERVICES.
deploymentArea Name of an existing deployment area.
configuration Name of an existing configuration (default orotherwise) that is available in the deploymentarea for the service being deployed.
For information on creating new serviceconfigurations, see Manually editing theservice configuration files.
customName Name of the new service. If present, thissetting overrides any customPrefix setting.This parameter is optional.
customPrefix Text to add before the name of the service. Forexample, if the customPrefix value is "FinanceDept.", the new Spotfire Web Player name willbe "Finance Dept. Web Player". This parameteris optional.
resourcePool For Spotfire Web Players, the name of aresource pool that the new instances will join.If the named resource pool does not exist,Spotfire Server creates it. This parameter isoptional.
instances Number of service instances to create. If nonumber is specified, only the service is created.This parameter is optional.
145
TIBCO Spotfire® Server and Environment Installation and Administration
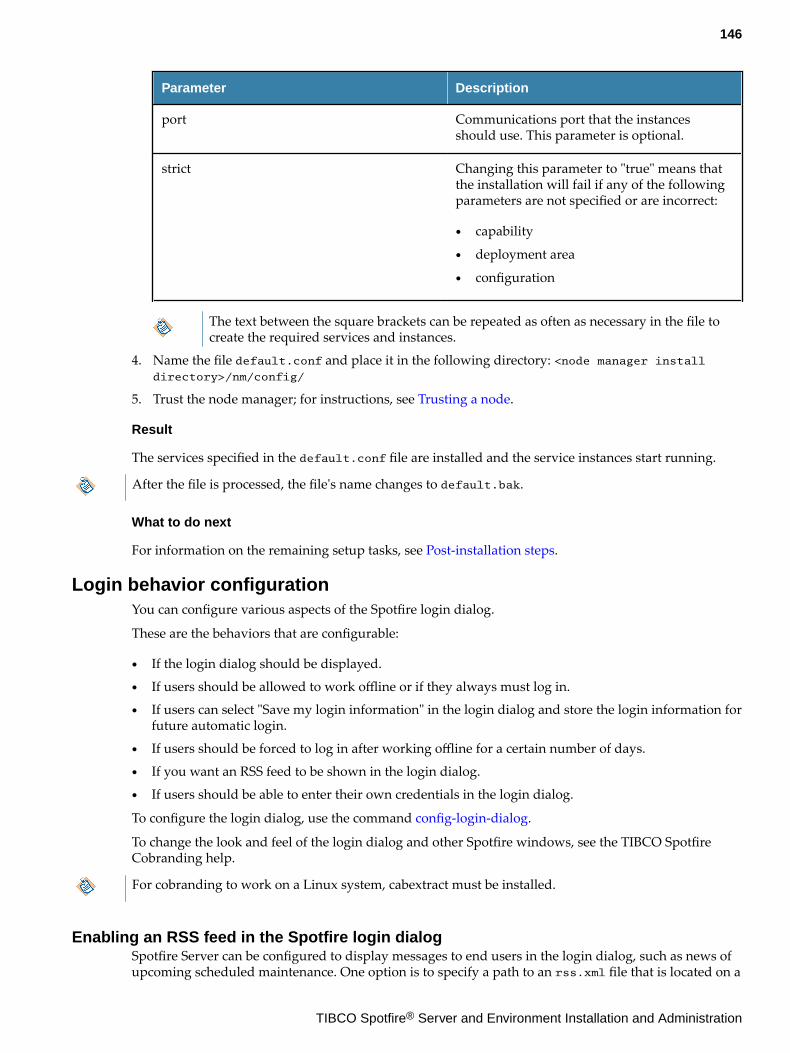
Parameter Description
port Communications port that the instancesshould use. This parameter is optional.
strict Changing this parameter to "true" means thatthe installation will fail if any of the followingparameters are not specified or are incorrect:
● capability
● deployment area
● configuration
The text between the square brackets can be repeated as often as necessary in the file tocreate the required services and instances.
4. Name the file default.conf and place it in the following directory: <node manager installdirectory>/nm/config/
5. Trust the node manager; for instructions, see Trusting a node.
Result
The services specified in the default.conf file are installed and the service instances start running.
After the file is processed, the file's name changes to default.bak.
What to do next
For information on the remaining setup tasks, see Post-installation steps.
Login behavior configurationYou can configure various aspects of the Spotfire login dialog.
These are the behaviors that are configurable:
● If the login dialog should be displayed.● If users should be allowed to work offline or if they always must log in.● If users can select "Save my login information" in the login dialog and store the login information for
future automatic login.● If users should be forced to log in after working offline for a certain number of days.● If you want an RSS feed to be shown in the login dialog.● If users should be able to enter their own credentials in the login dialog.
To configure the login dialog, use the command config-login-dialog.
To change the look and feel of the login dialog and other Spotfire windows, see the TIBCO SpotfireCobranding help.
For cobranding to work on a Linux system, cabextract must be installed.
Enabling an RSS feed in the Spotfire login dialogSpotfire Server can be configured to display messages to end users in the login dialog, such as news ofupcoming scheduled maintenance. One option is to specify a path to an rss.xml file that is located on a
146
TIBCO Spotfire® Server and Environment Installation and Administration
Spotfire Server; in this case the XML file is updated manually. The other option is to specify the URL toan external RSS feed.
Procedure
1. If you are using an rss.xml file that you will update manually, copy the file to the followingdirectory: <server install dir.>\tomcat\webapps\spotfire.
2. Open a command-line interface and export the active configuration (the configuration.xml file)by using the export-config command. (For details on using the Spotfire command line, see Executing commands on the command line.)
3. On the command line, use the config-login-dialog command to set up the feed.
Make sure that the specified RSS feed complies with the standard RSS 2.0 specification,and that the source is available to the end users' clients.
To enable all users see the news in the login dialog, set the display behavior setting (-svalue) to "always". The login dialog will be shown to all users, even if they opt to savetheir login credentials for automatic login.
Example using a relative URL on the Spotfire Server:config config-login-dialog -c C:\tibco\tss\tomcat\bin\configuration.xml -s always -R "/spotfire/rss.xml"
4. Import the configuration file back to the Spotfire database by using the import-config command.
5. Restart the Spotfire Server service.
Service installation on a nodeAfter installing and trusting a node manager, you configure and install services and service instanceson the node.
For each service you install on the node, you select a capability, and the number of instances for thatservice, Spotfire Web Player or Spotfire Automation Services. For information on how to install aSpotfire Web Player service, see Installing Spotfire Web Player instances. For information on how toinstall a Spotfire Automation Services service, see Installing Spotfire Automation Services instances.
The services are automatically set up with a default configuration. You can edit the defaultconfiguration files manually to create your own service configurations. For more information on how tomanually configure the services, see Manually editing the service configuration files.
Preconfiguring Spotfire Web Player services (optional)You can prepare one or several Spotfire Web Player configurations to apply to new services as youcreate them. This gives you access to an extended set of Spotfire Web Player options, and simplifies thetask of setting up a group of services with identical properties.
Prerequisites
The Spotfire client distribution file (.sdn file) has been deployed to the server; for instructions see Deploying client packages to Spotfire Server.
Procedure
● Follow the steps in Manually editing the service configuration files.
Result
When you install a new Spotfire Web Player, you can select the customized configuration.
147
TIBCO Spotfire® Server and Environment Installation and Administration
Installing Spotfire Web Player instancesAfter installing and authorizing a node manager, you install the Spotfire Web Player service andindicate the number of Spotfire Web Player instances that you want to make available. The Spotfire WebPlayer instances can then be accessed on any computer in the network.
Prerequisites
● You have installed and authorized a node manager; for instructions, see Installing a node managerinteractively and Trusting a node.
● Spotfire Server and the node manager are up and running.
● You have deployed client packages to Spotfire Server; for instructions, see Deploying clientpackages to Spotfire Server.
● By default TLS 1.2 is not enabled on Windows Server 2008 R2. For communication to work betweena service and Spotfire Server, TLS 1.2 must be enabled. To enable TLS 1.2 on Windows Server 2008R2, see the section "For later versions of Windows" at https://support.microsoft.com/en-us/kb/245030. For more information about TLS settings in Windows, see https://technet.microsoft.com/en-us/library/dn786418.aspx.
Procedure
1. Log in to Spotfire Server and click Nodes & Services.
2. Under Select a view, select Nodes, and then select the node to which you want to add the SpotfireWeb Player service. There should be a green circle with a check mark next to the selected node.
3. In the lower-right pane, click Install new service.
4. Make your selections in the "Install new service" dialog:a) Under Deployment area, select the area you are using.
Administrators generally create a Test deployment area to use as a staging server.
b) Under Capability, select Web Player.c) Under Configuration, select the service configuration that you want to apply to the service.
Spotfire Server contains a default service configuration that you can replace later. If youwant to prepare a configuration file ahead of time, see Preconfiguring Spotfire WebPlayer services.
d) Under Number of instances, enter the number of instances of the service that you want to makeavailable. For more information, see Multiple service instances on one node.
e) Under Port, you can change the default of 9501 if you want to.f) Enter a name for this service.
5. Click Install and start.To view the progress of the installation, click the Activity tab.
What to do next
● If applicable, install Spotfire Automation Services; for instructions, see Installing SpotfireAutomation Services instances.
● For information on the remaining setup tasks, see Post-installation steps.
148
TIBCO Spotfire® Server and Environment Installation and Administration
Multiple service instances on one nodeAdding more than one Spotfire Web Player instance could be beneficial, particularly on largecomputers with NUMA architecture.
For failover reasons, it is recommended to have more than one instance in your environment. However,for failover reasons the instances do not have to be on the same node.
There are two main reasons for adding more service instances on the same node:
● If there are unstable analyses that are suspected to result in issues for the process, these analyses canbe routed to one dedicated service instance using file routing rules. This isolates the analyses fromother instances.
● A very large .NET heap may lead to long duration blocking garbage collections. By distributinganalyses that lead to a large .NET memory footprint over more than one service instance, the .NETheap becomes smaller, which leads to quicker garbage collections.
There are two reasons to avoid using too many service instances:
● Each service instance requires some overhead, mostly in terms of memory usage but also some CPUusage.
● There is no data or document sharing between service instances.
You may want to experiment with fewer or more service instances, especially on large computers.
Preconfiguring Spotfire Automation Services (optional)You can prepare one or several Spotfire Automation Services configurations to apply to new services asyou create them. This gives you access to an extended set of Spotfire Automation Services options, andsimplifies the task of setting up a group of services with identical properties.
Prerequisites
The Spotfire client distribution file (.sdn file) has been deployed to the server; for instructions see Deploying client packages to Spotfire Server.
Procedure
● Follow the steps in Manually editing the service configuration files.
Result
When you install a new Spotfire Automation Services, you can select the customized configuration.
Installing Spotfire Automation Services instancesAfter installing and authorizing a node manager, you can install Spotfire Automation Services andindicate the number of instances of this service that you want to make available. Spotfire AutomationServices can then be accessed on any computer in the network.
All users that execute Automation Services jobs on the server, using the Job Builder or the Client JobSender, must be members of the group Automation Services Users.
Prerequisites
● You have installed and authorized a node manager; for instructions, see Installing a node managerand Trusting a node.
● Spotfire Server and the node manager are up and running.
149
TIBCO Spotfire® Server and Environment Installation and Administration
● You have deployed client packages to Spotfire Server; for instructions, see Deploying clientpackages to Spotfire Server.
● In Administration Manager in Spotfire Analyst you have assigned licenses required by theAutomation Services jobs to the automationservices@SPOTFIRESYSTEM user, which is the accountused to execute the jobs on the service instance.
For a description of the licenses, see the Administration Manager help.
● By default TLS 1.2 is not enabled on Windows Server 2008 R2. For communication to work betweena service and Spotfire Server this must be enabled. To enable TLS 1.2 on Windows Server 2008 R2see section "For later versions of Windows" on https://support.microsoft.com/en-us/kb/245030. Formore information about TLS settings in windows see https://technet.microsoft.com/en-us/library/dn786418.aspx.
Procedure
1. Log in to Spotfire Server and click Nodes & Services.
2. In the Nodes view, select the node to which you want to add the Spotfire Automation Servicesservice. There should be a green circle with a check mark next to the selected node manager.The words Installed services followed by the name of the node manager are displayed in the lower-right pane of the window.
3. Click Install new service.
4. Make your selections in the "Install new service" dialog:a) Under Deployment area, select the area you are using.
Administrators generally create a Test deployment area to use as a staging server.
b) Under Capability select Automation Services.c) Under Configuration, select the service configuration that you want to apply to the service.
Spotfire Server contains a default service configuration that you can replace later. If youwant to prepare a configuration file ahead of time, see Preconfiguring SpotfireAutomation Services.
d) Under Number of instances, enter the number of instances of the service that you want to makeavailable.
e) Under Port, you can change the default of 9501 if you want to.f) Enter a name for this service.
5. Click Install and start.To view the progress of the installation, click the Activity tab.
What to do next
For information on the remaining setup tasks, see Post-installation steps.
Automation Services Job Builder and Client Job SenderSpotfire Automation Services includes the Job Builder tool for creating multi-step jobs, and the ClientJob Sender tool for automating jobs that are created in the Job Builder.
The Job Builder requires no installation. It is accessed from Spotfire Analyst.
The Client Job Sender must be installed and then configured to communicate with the Spotfire Server.The job execution schedule is set by using Windows Task Scheduler.
For more information, see the Spotfire Automation Services User's Guide.
150
TIBCO Spotfire® Server and Environment Installation and Administration
SitesYou can create multiple Spotfire environments that share the same Spotfire database, including thelibrary and user directory. These environments, which are called sites, can be configured to reducelatency for multi-geographic deployments. Sites also enable the use of a variety of authenticationmethods, along with different user directories, within the same deployment.
Each site includes one or more Spotfire Servers along with their connected nodes and services. A site'sservers, nodes, and services can only communicate within the site, but because the Spotfire database isshared among the sites, all of the sites have access to the users, groups, and library in your Spotfireimplementation.
If the site will contain more than one server, clustering must be enabled for that site; for moreinformation, see Clustered server deployments.
All the sites in an implementation must use the same clustering method.
You assign a Spotfire Server to a site when bootstrapping the server. You can change the assignmentafterwards by following the instructions in Moving a server and its nodes to a different site. When youassign a Spotfire Server to a site, any nodes that are connected to the server are automatically includedin the site.
As of Spotfire version 7.9, all upgraded servers and nodes belong to the Default site. To assign theupgraded components to a site that you created, use the procedure Moving a server and its nodes to adifferent site.
The potential reduced latency occurs between the servers and the service instances within a site,resulting in quicker manipulation of data that is already present in the site. To optimize the end-userexperience, a best practice when configuring sites is to create scheduled updates so that data andanalyses are downloaded from the database before users request them. For more information, see Scheduled updates to analyses.
These are typical uses of Spotfire sites:
● To route user requests from a particular office to the servers and nodes that are physically closest tothat office. This reduces the impact of network latency between servers that are located in differentgeographic regions.
● To enable different authentication methods for different sets of users who share a Spotfireimplementation. For example, internal users may use Kerberos authentication while external userssuch as customers and partners may use username and password authentication.
Administrators who oversee several sites can switch sites from the landing page of the administrationinterface.
In a deployment that contains sites, the following items are site specific and not shared with any othersites:
● Nodes
● Resource pools
● Schedules
● Scheduled updates and routing rules
● Authentication can be configured to be site specific; see Setting different authentication methodsand user directories for sites.
● Public address; set a site's public address when creating the site, or later by using the set-public-address command.
The following items are "global", so shared among all the sites in a deployment:
151
TIBCO Spotfire® Server and Environment Installation and Administration
● Library
● User directory
● Groups
● Deployments
● Server configuration file
● Service configuration files
● LDAP synchronization
● Signing certificates
● Login page RSS feed
Creating sitesSites are created on the command line, and then you assign a server to a particular site when youbootstrap the server. In the case of a server that has previously been installed and configured, use theset-site command to assign it to a site.
For general information about sites, see Sites.
Procedure
1. Open a command line as an administrator and go to the <server installation directory>\tomcat\bin directory.
2. Run the create-site command.
It is recommended to specify the public address (the -a parameter) when creating a site. Ifyou do not specify the public address now, you can do it later by using the set-public-address command.
Example
config create-site -s MySite -a https://server.example.com/
where:
MySite is the name of the site you create.
https://server.example.com/ is the public address of the site (optional).
When using the default port (80 for HTTP, 443 for HTTPS), do not specify the port inthe public address.
Setting different authentication methods and user directories for sitesYou can configure the sites in your implementation to use different authentication methods and, ifnecessary, different user directories.
Prerequisites
You have created the sites; for instructions, see Creating sites.
For general information about sites, see Sites.
152
TIBCO Spotfire® Server and Environment Installation and Administration
Procedure
1. On any server computer in the implementation, open a command line as an administrator andexport the active configuration by using the export-config command. For additional information onusing the command line, see Executing commands on the command line.
2. To set different authentication methods, do the following:
1. To set the global authentication method, run the config-auth command without specifying a site.
2. To set a different authentication method for a site, run the config-auth command, specifying thesite.
Example
In this example, all of the sites will use LDAP authentication except for the "Tokyo" site, which willuse Kerberos.config config-auth -a BASIC -l
config config-auth -a KERBEROS -s Tokyo
3. If all the sites will not use the same user directory, run the config-userdir command in a similarmanner.
4. Import the configuration file by using the import-config command.
5. Restart the servers.
Moving a server and its nodes to a different siteWhen moving a server and its nodes from one site to another site, you must edit thenodemanager.properties file for each node. This procedure should also be used to move upgradedservers and nodes from the Default site to a site that you created.
Prerequisites
You have created the site to which you want to assign the server; for instructions, see Creating sites.
For general information about sites, see Sites.
Procedure
1. Stop the server and its nodes. For instructions, see Start or stop Spotfire Server and Starting orstopping a node manager.
2. Assign the server to the new site by using the set-site command:
1. On the computer that is running the server, open a command line as an administrator and go tothe <server installation directory>\tomcat\bin directory.
2. Run the set-site command.
Exampleconfig set-site -n 1234abcd-ab1-1a23-1234-ab1234c5678 -s Tokyo
where:
-n value is the ID of the server.
-s value is the name of the site to which you want to assign the server.
If you do not know the ID of the server, use the list-nodes command to find the IDs of allthe servers and nodes in the environment.
3. Start the server. (Do not start the node managers.)
153
TIBCO Spotfire® Server and Environment Installation and Administration
4. Do the following for each node that is connected to the server:
1. Open the following file in a text editor or XML editor: <node manager installationdirectory>\nm\config\nodemanager.properties.
Example of the nodemanager.properties file:#Supervisor changed#Wed Feb 16 22:27:19 CET 2017nodemanager.host.names=Comp_A,10.101.10.10nodemanager.communication.port=9443server.backend.registration.port=9080nodemanager.registration.port=9080nodemanager.host=server.name=Comp_12nodemanager.supervisor.known=Comp_C:9443-9080,Comp_D:9443-9080,Comp_12:9443-9080nodemanager.bundle.version=42.0.6127.7990server.backend.communication.port=9443
The nodemanager.supervisor.known property lists the servers in the current site.
2. Delete the line that begins with nodemanager.supervisor.known.
3. Edit the server.backend.registration.port, server.name, andserver.backend.communication.port to point to a Spotfire Server in the site to which you aremoving.
Example of the edited nodemanager.properties file:#Supervisor changed#Wed Feb 16 22:27:19 CET 2017nodemanager.host.names=Comp_A,10.101.10.10nodemanager.communication.port=9443server.backend.registration.port=9080nodemanager.registration.port=9080nodemanager.host=server.name=Comp_5nodemanager.bundle.version=42.0.6127.7990server.backend.communication.port=9443
4. Save and close the file.
5. Start the node manager.
The nodemanager.supervisor.known property is added back into the nodemanager.propertiesfile. It should contain the names of the servers in the new site.
5. In the administrative interface, verify that the node manager comes online in the correct site.
When you move a node, its service instances are removed from any resource pools theymay have previously been assigned to.
Sites administrationSites are administered in the same way as an ordinary Spotfire environment, with the difference thatsome features are global and some are site specific.
Because the Spotfire database is shared among all the sites, changes made in Users & Groups will beglobal, and affect all sites.
Communication between the Spotfire Server and the nodes only occurs within each site. For this reason,nodes, services, and routing are site specific and administered individually for each site. You can selectwhich site to administer at the top of the Spotfire Server home page.
For general information about sites, see Sites.
154
TIBCO Spotfire® Server and Environment Installation and Administration
Deleting sitesSites are deleted on the command line. If the site contains servers and nodes, you must specify a site tomove them to.
Procedure
1. Stop the servers and node managers in the site that you want to delete. For instructions, see Start orstop Spotfire Server and Starting or stopping a node manager.
2. Open a command line as an administrator and go to the <server installation directory>\tomcat\bin directory.
3. Run the delete-site command.
4. Restart any servers and node managers that were in the site.
Exampleconfig delete-site -s "East Coast" -i "Default"
where:
East Coast is the name of the site to delete.
Default is the name of the site to which you want to move the deleted site's servers and nodes.
ConnectorsWith the connectors that are available in Spotfire, users can connect to, and analyze data from, a varietyof data sources. This section describes how to configure the connectors for use in Spotfire Analyst,TIBCO Spotfire® Business Author, TIBCO Spotfire Consumer, and TIBCO Spotfire® AutomationServices.
The following connectors are currently available:
● Amazon Redshift
● Apache Spark SQL
● Cisco Information Server
● Cloudera Hive
● Cloudera Impala
● Google Analytics
● Hortonworks
● HP Vertica
● IBM DB2
● IBM Netezza
● Microsoft SQL Server
● Microsoft SQL Server Analysis Services
● OData
● Oracle
● Oracle Essbase
● Oracle MySQL
● Pivotal Greenplum
155
TIBCO Spotfire® Server and Environment Installation and Administration
● Pivotal HAWQ
● PostgreSQL
● Salesforce.com
● SAP BW
● SAP HANA
● Teradata
● Teradata Aster
Setting up connectorsBefore you can use a data source connector on a Spotfire client, the connector must be installed on theserver and the data source driver must be installed on the client computer.
Prerequisites
Client packages have been deployed to Spotfire Server. The connectors are included in the distributionfile named Spotfire.Dxp.sdn. For information on package deployment, see Deploying client packagesto Spotfire Server.
After deployment, make sure to update the clients with the deployed packages. This is done byrestarting any open Spotfire clients, logging in as usual, and then clicking Update now.
These are the additional required steps for setting up data source connectors.
Procedure
1. On the following computers, install the data source drivers that correspond to the connectors thatwill be used in your implementation:
● All computers running Spotfire Analyst.
● All computers running a node with Spotfire Web Players or Spotfire Automation Services forwhich connectors should be available.
For information about the required drivers and where to find them, see the system requirements at http://support.spotfire.com/sr_spotfire_dataconnectors.asp.
If you have installed a 32-bit version of the Spotfire Analyst, then you must use the 32-bitversion of the data source driver. For Spotfire Web Player services, always use the 64-bitdriver.
2. If the connectors should be available for users of Spotfire Web Players or in Spotfire AutomationServices, additional configuration on the server is necessary; see Configuring connectors for usewith web clients and Spotfire Automation Services.
3. Set the access rights for the users; for details, see Access to the connectors.
4. Some connectors require additional configuration; see, for example, Configuring the GoogleAnalytics connector and Installing Oracle Essbase Client on client computers.
Configuring connectors for use with web clients and Spotfire Automation ServicesIf connectors should be available for users of Spotfire web clients, or in Spotfire Automation Services,some configuration on the Spotfire Server is necessary.This is a suggested workflow; detailed descriptions for each step are available in separate topics.
156
TIBCO Spotfire® Server and Environment Installation and Administration
Procedure
1. Optional: Create a configuration that the service will use, and assign it to the deployment area thatthe web clients or Automation Services use. For instructions, see Preconfiguring Spotfire Web Playerservices (optional) on page 147 or Preconfiguring Spotfire Automation Services (optional) on page149, depending on the type of service that you are configuring.
If you have to configure the authentication mode for any of the deployed connectors, thisstep is required. See Authentication modes on page 157 for more information.
2. Install a service and make sure to select the same deployment area as in Step 1. For detailedinstructions on installation of services, see Installing Spotfire Web Player instances on page 148 or Installing Spotfire Automation Services instances on page 149, depending on the type of service youare configuring.
If you created a configuration in Step 1, select that configuration when you install theservice.
3. After the service has been installed successfully, test that it is now possible to work with data fromthe connectors.Note that some connectors require additional configuration. See for example Configuring theGoogle Analytics connector on page 163 and Installing Oracle Essbase Client on client computers onpage 162.Create an analysis in Spotfire Analyst, and configure connections with the connectors that should beavailable in the web clients. Then save the analysis to the library. Verify that you can successfullyopen the analysis in a web client.Create a Spotfire Automation Services job with tasks that use the connectors that should beavailable for Spotfire Automation Services. Verify that you can run the job successfully.
Authentication modes
You may have to change the authentication mode for some connectors so that they are available for usewith Spotfire web clients. This is done in the Spotfire.Dxp.Worker.Host.exe.config file.
To change the authentication mode for a connector on a Spotfire Web Player service, you must modifyan existing configuration or create a new configuration and assign it to the deployment area on whichthe Spotfire.Dxp.sdn distribution file has been deployed. Instructions are available in PreconfiguringSpotfire Web Player services (optional) on page 147, but details specific to the connectors are listed here.
● The authentication mode settings are located in the section<Spotfire.Dxp.Data.Access.Adapters.Settings>. To edit the configuration file, you must firstexport it from Spotfire Server using the export-service-config command. For instructions, see Preconfiguring Spotfire Web Player services (optional) on page 147.
● These are the available authentication modes:
— Prompt
— ServiceAccount
— Kerberos
— WebConfig
By default, all the connectors use the Prompt mode. To read more about the settings, see Configuration file examples.
● If you are unsure of what a certain connector is called in the configuration file, see Connector namesin configuration file.
157
TIBCO Spotfire® Server and Environment Installation and Administration
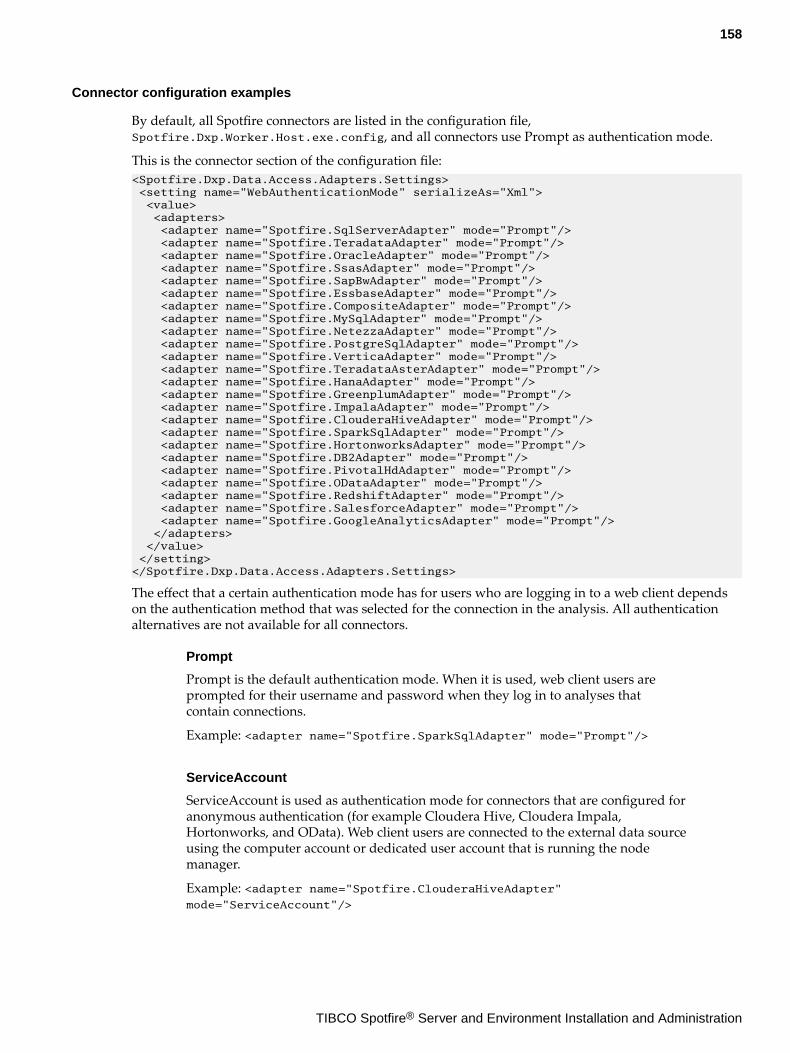
Connector configuration examples
By default, all Spotfire connectors are listed in the configuration file,Spotfire.Dxp.Worker.Host.exe.config, and all connectors use Prompt as authentication mode.
This is the connector section of the configuration file:<Spotfire.Dxp.Data.Access.Adapters.Settings> <setting name="WebAuthenticationMode" serializeAs="Xml"> <value> <adapters> <adapter name="Spotfire.SqlServerAdapter" mode="Prompt"/> <adapter name="Spotfire.TeradataAdapter" mode="Prompt"/> <adapter name="Spotfire.OracleAdapter" mode="Prompt"/> <adapter name="Spotfire.SsasAdapter" mode="Prompt"/> <adapter name="Spotfire.SapBwAdapter" mode="Prompt"/> <adapter name="Spotfire.EssbaseAdapter" mode="Prompt"/> <adapter name="Spotfire.CompositeAdapter" mode="Prompt"/> <adapter name="Spotfire.MySqlAdapter" mode="Prompt"/> <adapter name="Spotfire.NetezzaAdapter" mode="Prompt"/> <adapter name="Spotfire.PostgreSqlAdapter" mode="Prompt"/> <adapter name="Spotfire.VerticaAdapter" mode="Prompt"/> <adapter name="Spotfire.TeradataAsterAdapter" mode="Prompt"/> <adapter name="Spotfire.HanaAdapter" mode="Prompt"/> <adapter name="Spotfire.GreenplumAdapter" mode="Prompt"/> <adapter name="Spotfire.ImpalaAdapter" mode="Prompt"/> <adapter name="Spotfire.ClouderaHiveAdapter" mode="Prompt"/> <adapter name="Spotfire.SparkSqlAdapter" mode="Prompt"/> <adapter name="Spotfire.HortonworksAdapter" mode="Prompt"/> <adapter name="Spotfire.DB2Adapter" mode="Prompt"/> <adapter name="Spotfire.PivotalHdAdapter" mode="Prompt"/> <adapter name="Spotfire.ODataAdapter" mode="Prompt"/> <adapter name="Spotfire.RedshiftAdapter" mode="Prompt"/> <adapter name="Spotfire.SalesforceAdapter" mode="Prompt"/> <adapter name="Spotfire.GoogleAnalyticsAdapter" mode="Prompt"/> </adapters> </value> </setting></Spotfire.Dxp.Data.Access.Adapters.Settings>
The effect that a certain authentication mode has for users who are logging in to a web client dependson the authentication method that was selected for the connection in the analysis. All authenticationalternatives are not available for all connectors.
Prompt
Prompt is the default authentication mode. When it is used, web client users areprompted for their username and password when they log in to analyses thatcontain connections.
Example: <adapter name="Spotfire.SparkSqlAdapter" mode="Prompt"/>
ServiceAccount
ServiceAccount is used as authentication mode for connectors that are configured foranonymous authentication (for example Cloudera Hive, Cloudera Impala,Hortonworks, and OData). Web client users are connected to the external data sourceusing the computer account or dedicated user account that is running the nodemanager.
Example: <adapter name="Spotfire.ClouderaHiveAdapter"mode="ServiceAccount"/>
158
TIBCO Spotfire® Server and Environment Installation and Administration
Kerberos
To use Kerberos as authentication method, the following must be true:
● Spotfire Server is configured to use delegated Kerberos.
● In the analysis' connection login dialog, Kerberos is selected as authenticationmethod.
For more information about Kerberos configuration, see Kerberos authentication onpage 97.
Example: <adapter name="Spotfire.SqlServerAdapter" mode="Kerberos"/>
WebConfig
When WebConfig is used as authentication method, all web client users log in usingcredentials profiles.
Example: <adapter name="Spotfire.SparkSqlAdapter" mode="WebConfig"/>
If this option is selected, you must also specify the credentials profile to use whenlogging in. This is done in the DataAdapterCredentials settings section in theconfiguration file. See the next section, which is about DataAdapterCredentials.
159
TIBCO Spotfire® Server and Environment Installation and Administration
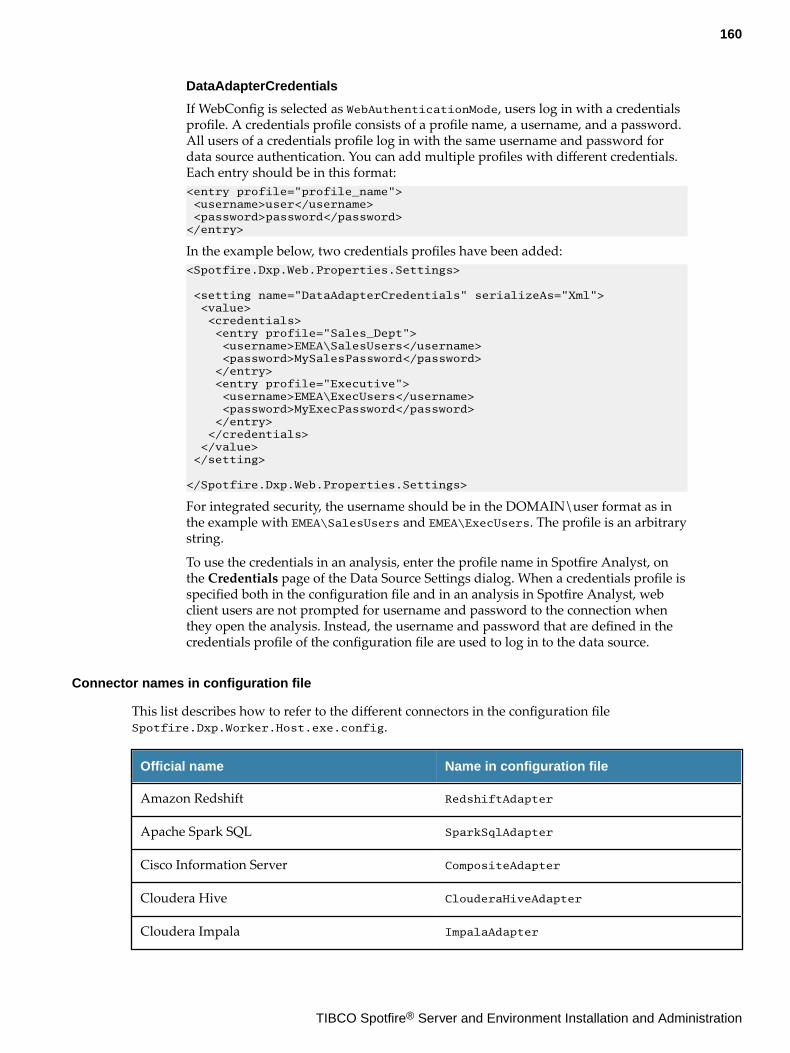
DataAdapterCredentials
If WebConfig is selected as WebAuthenticationMode, users log in with a credentialsprofile. A credentials profile consists of a profile name, a username, and a password.All users of a credentials profile log in with the same username and password fordata source authentication. You can add multiple profiles with different credentials.Each entry should be in this format:<entry profile="profile_name"> <username>user</username> <password>password</password></entry>
In the example below, two credentials profiles have been added:<Spotfire.Dxp.Web.Properties.Settings>
<setting name="DataAdapterCredentials" serializeAs="Xml"> <value> <credentials> <entry profile="Sales_Dept"> <username>EMEA\SalesUsers</username> <password>MySalesPassword</password> </entry> <entry profile="Executive"> <username>EMEA\ExecUsers</username> <password>MyExecPassword</password> </entry> </credentials> </value> </setting>
</Spotfire.Dxp.Web.Properties.Settings>
For integrated security, the username should be in the DOMAIN\user format as inthe example with EMEA\SalesUsers and EMEA\ExecUsers. The profile is an arbitrarystring.
To use the credentials in an analysis, enter the profile name in Spotfire Analyst, onthe Credentials page of the Data Source Settings dialog. When a credentials profile isspecified both in the configuration file and in an analysis in Spotfire Analyst, webclient users are not prompted for username and password to the connection whenthey open the analysis. Instead, the username and password that are defined in thecredentials profile of the configuration file are used to log in to the data source.
Connector names in configuration file
This list describes how to refer to the different connectors in the configuration fileSpotfire.Dxp.Worker.Host.exe.config.
Official name Name in configuration file
Amazon Redshift RedshiftAdapter
Apache Spark SQL SparkSqlAdapter
Cisco Information Server CompositeAdapter
Cloudera Hive ClouderaHiveAdapter
Cloudera Impala ImpalaAdapter
160
TIBCO Spotfire® Server and Environment Installation and Administration
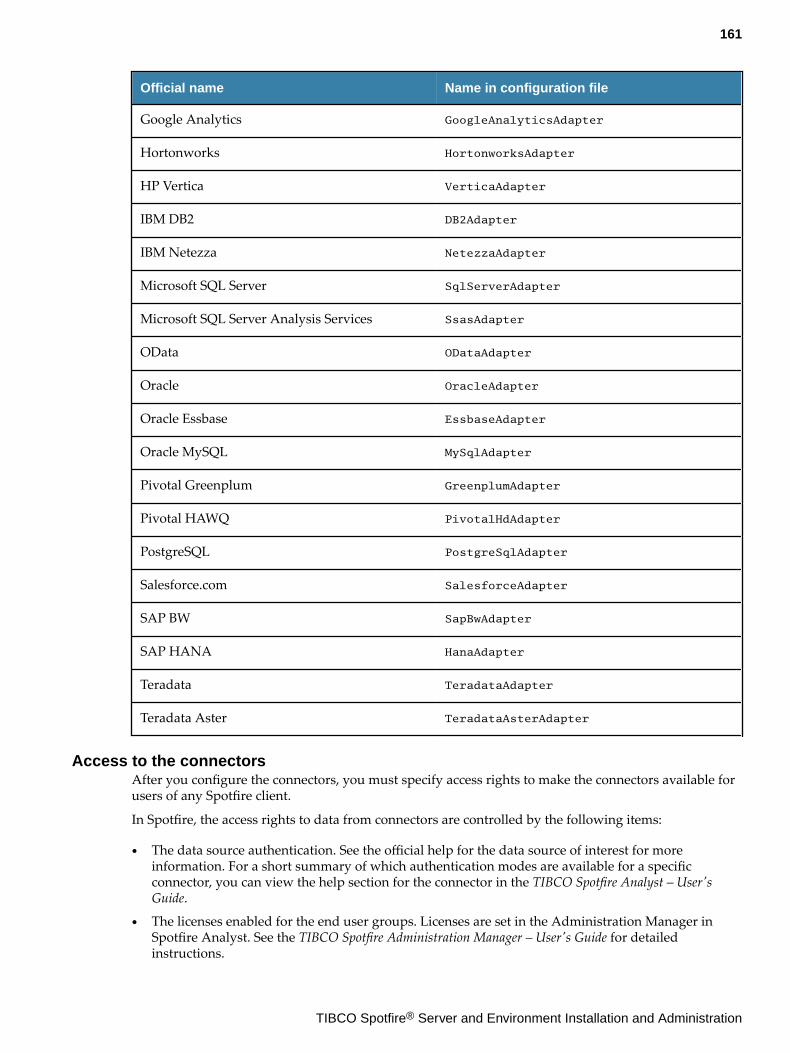
Official name Name in configuration file
Google Analytics GoogleAnalyticsAdapter
Hortonworks HortonworksAdapter
HP Vertica VerticaAdapter
IBM DB2 DB2Adapter
IBM Netezza NetezzaAdapter
Microsoft SQL Server SqlServerAdapter
Microsoft SQL Server Analysis Services SsasAdapter
OData ODataAdapter
Oracle OracleAdapter
Oracle Essbase EssbaseAdapter
Oracle MySQL MySqlAdapter
Pivotal Greenplum GreenplumAdapter
Pivotal HAWQ PivotalHdAdapter
PostgreSQL PostgreSqlAdapter
Salesforce.com SalesforceAdapter
SAP BW SapBwAdapter
SAP HANA HanaAdapter
Teradata TeradataAdapter
Teradata Aster TeradataAsterAdapter
Access to the connectorsAfter you configure the connectors, you must specify access rights to make the connectors available forusers of any Spotfire client.
In Spotfire, the access rights to data from connectors are controlled by the following items:
● The data source authentication. See the official help for the data source of interest for moreinformation. For a short summary of which authentication modes are available for a specificconnector, you can view the help section for the connector in the TIBCO Spotfire Analyst – User'sGuide.
● The licenses enabled for the end user groups. Licenses are set in the Administration Manager inSpotfire Analyst. See the TIBCO Spotfire Administration Manager – User's Guide for detailedinstructions.
161
TIBCO Spotfire® Server and Environment Installation and Administration
If the steps in Configuring connectors for use with web clients and Automation Services are performedon the Spotfire Web Player service, and an analysis using that connection is created, then users ofSpotfire web clients can connect to the data source directly.
Installing Oracle Essbase Client on client computersTo use the Oracle Essbase connector, you must also install Oracle Essbase Client on each computer thatwill run the connector.
Prerequisites
Ensure that you have access to the appropriate Oracle Essbase Client installer and unzip any zippedfiles on your computer (for example, ClientInstallers-11122.zip).
For more information about the supported Oracle Essbase versions, see http://support.spotfire.com/sr_spotfire_dataconnectors.asp.
Procedure
1. In the extracted archive, locate the EssbaseClient directory containing the installation programEssbaseClient.exe.
2. Double-click EssbaseClient.exe.
3. Select the appropriate language and continue.
4. In the installer pane, click Next.
5. Make a note of the destination directory; you need it for creating the appropriate environmentvariables. Click Next.
6. In the Custom Setup pane, ensure that both Essbase Client and Essbase Client C API are selectedto be installed before you click Next.
The Essbase Client C API is not selected by default. You must select it manually.
7. Click Install, and then click Finish when the installation is completed.
In the Installed Programs list of the Control Panel, you can find a listing for Oracle®
Hyperion Essbase Client. Use this entry if you must uninstall Oracle Essbase. Also,remember to remove the created environment variables that are listed in Creatingenvironment variables.
Creating environment variables
You must create the required environment variables to access the Essbase Client C API.
The environment variables must be exactly as specified, and they must point to the correct paths. Makesure that no additional blank spaces are added.
Procedure
1. Open the System Properties of your computer. (On Windows 7 this is reached from Control Panel >All Control Panel Items > System > Advanced system settings.)
2. On the Advanced tab, click Environment Variables.
3. On client computers, under System variables, click New, and then create the variable EPMHOME andset its value to the home path for the Oracle Enterprise Management System (for example,C:\oracle\Middleware\EPMSystem11R1).
This home path contains the directories bin, bin-32, common, and products.
162
TIBCO Spotfire® Server and Environment Installation and Administration
It is recommended to always use System variables, if possible. For computers runningSpotfire Web Player services or Spotfire Automation Services services, the environmentvariables must be defined as System variables.
4. Create the variable ARBORPATH and set it to the destination folder chosen in the installer (forexample, C:\oracle\Middleware\EPMSystem11R1\products\Essbase\EssbaseClient (or%EPMHOME%\products\Essbase\EssbaseClient)).
5. Create the variable ESSBASEPATH and set it to %ARBORPATH%.
6. Add the following to the PATH variable (or create the PATH variable): %ARBORPATH%\bin;%EPMHOME%\bin;
Configuring the Google Analytics connectorTo enable the Google Analytics connector for use in web clients, you must create a new project in yourGoogle Analytics instance to obtain the required ClientID and ClientSecret.
Procedure
1. Log in to https://console.developers.google.com.
2. Create a new project.
3. Enable the Analytics API.
4. Create credentials.This will provide you with a client ID and a client secret.
5. Add the following hosts:
● http://localhost:55931/authorize/code
● http://localhost:55932/authorize/code
● http://<spotfire_server>/spotfire/wp/oauth2/code
To learn more about how to work with these settings, refer to the online help in the developer'sconsole .
6. Log in to Spotfire Analyst as a user with administrator rights.
7. Click Tools > Administration Manager.
8. On the Preferences page, click a group for which you want to enable Google Analytics connectivity.
9. On the Preferences tab, expand Connectors and click GoogleAnalytics.
10. Click Edit.
11. In the ClientID field, add the client ID obtained in Step 4.
12. In the ClientSecret field, add the client secret obtained in Step 4.
13. In the LocalRedirectPorts field, enter 55931, 55932.
14. In the Edit Preferences dialog, click OK.
15. In the Administration Manager, click Close.
16. For the settings to take effect, users must log out of Spotfire and then log in again.
Additional configurationYou can add to or change your Spotfire configuration by using the configuration tool or the commandline, or by working directly in the configuration file.
163
TIBCO Spotfire® Server and Environment Installation and Administration
Updating a server configuration in the configuration toolYou can change a Spotfire Server configuration by using the configuration tool.
If you cannot run the configuration tool on the Spotfire Server computer, see Running the configurationtool on a local computer.
Procedure
1. Open the configuration tool and sign in.
2. On the Configuration tab, make your changes.
3. Click Save.
4. Restart Spotfire Server.
Updating a server configuration on the command lineYou can change a Spotfire Server configuration by running a series of commands on the command line.
Procedure
1. Open a command line.
2. Run the export-config command to export the configuration from the Spotfire database to aconfiguration file; for additional information, see Executing commands on the command line.> config export-config configuration.xml
where "configuration.xml" is optional and the -f (--force) option is not applied.
3. Update the configuration in the configuration file using selected commands. Example:> config config-auth --configuration=configuration.xml --auth-method=BASIC --jaas-database
where "--configuration=configuration.xml" is optional.
4. Run the import-config command to import the updated configuration file into the Spotfire database.Example:> config import-config --comment="Switched to BASIC authentication using the Spotfire Database authentication source" configuration.xml
where "configuration.xml" is optional.
5. Restart the server(s).
6. Remove the configuration.xml file or restrict access to it.
Do not remove the bootstrap.xml file.
Manually editing the Spotfire Server configuration fileBefore editing the Spotfire Server configuration file you must export its contents to an XML file.
Procedure
1. On the computer running Spotfire Server, open a command line as an administrator and change thedirectory to the location of the config.bat file (config.sh on Linux). The default location is<installation dir>/tomcat/bin.
2. Export the active configuration to a configuration.xml file by using the export-config command.The configuration.xml file appears in your working directory.
3. Open configuration.xml in an XML editor or a text editor and make your changes.
164
TIBCO Spotfire® Server and Environment Installation and Administration
4. When you've finished, save and close the file.
5. Upload the edited configuration file back to the Spotfire database by using the import-configcommand.
6. Restart the Spotfire Server service; for instructions, see Start or stop Spotfire Server.
Result
The imported configuration becomes the active configuration for that server or cluster.
Manually editing the service configuration filesThe service configuration files give you access to options that are not available in the Spotfire Serveradministrative interface. You can use the default configuration files as a template to create and importas many customized service configurations as your Spotfire implementation requires. You can thenapply the customized configurations to new or existing Spotfire Automation Services or Spotfire WebPlayer services.
Procedure
1. On the computer running Spotfire Server, open a command line as an administrator and change thedirectory to the location of the config.bat file (config.sh on Linux). The default location is<server installation dir>/tomcat/bin.
2. On the command line, export the service configuration that you want to modify from SpotfireServer by using the export-service-config command. Specify the service's capability and thedeployment area, and optionally the configuration name.
By default, all new services receive a "Default" configuration. The properties of the defaultconfiguration cannot be changed, but you can edit the configuration files and import theresulting customized configuration with a specified name.
If you are editing a service configuration that has been applied to an existing service, youmust verify the name of the active service configuration before you export it. If the nameof the active configuration is not "Default", you must specify the name in the exportcommand.
Example for exporting the "Default" Spotfire Automation Services configuration that is in theProduction deployment area:config export-service-config --capability=AUTOMATION_SERVICES --deployment-area=Production
Example for exporting a customized configuration:config export-service-config --config-name=AutomationServicesConfiguration
The following configuration files are exported. By default, these files are saved to the <serverinstallation dir>\tomcat\bin\config\root directory.
● Spotfire.Dxp.Worker.Automation.config (for Automation Services only)
● Spotfire.Dxp.Worker.Core.config
● Spotfire.Dxp.Worker.Host.exe.config
● Spotfire.Dxp.Worker.Web.config
● log4net.config
3. Edit the exported configuration files in a text editor or XML editor. For details about these files, seeService configuration files.
4. On the command line, import the customized configuration file back into Spotfire Server and namethe configuration by using the import-service-config command.
165
TIBCO Spotfire® Server and Environment Installation and Administration
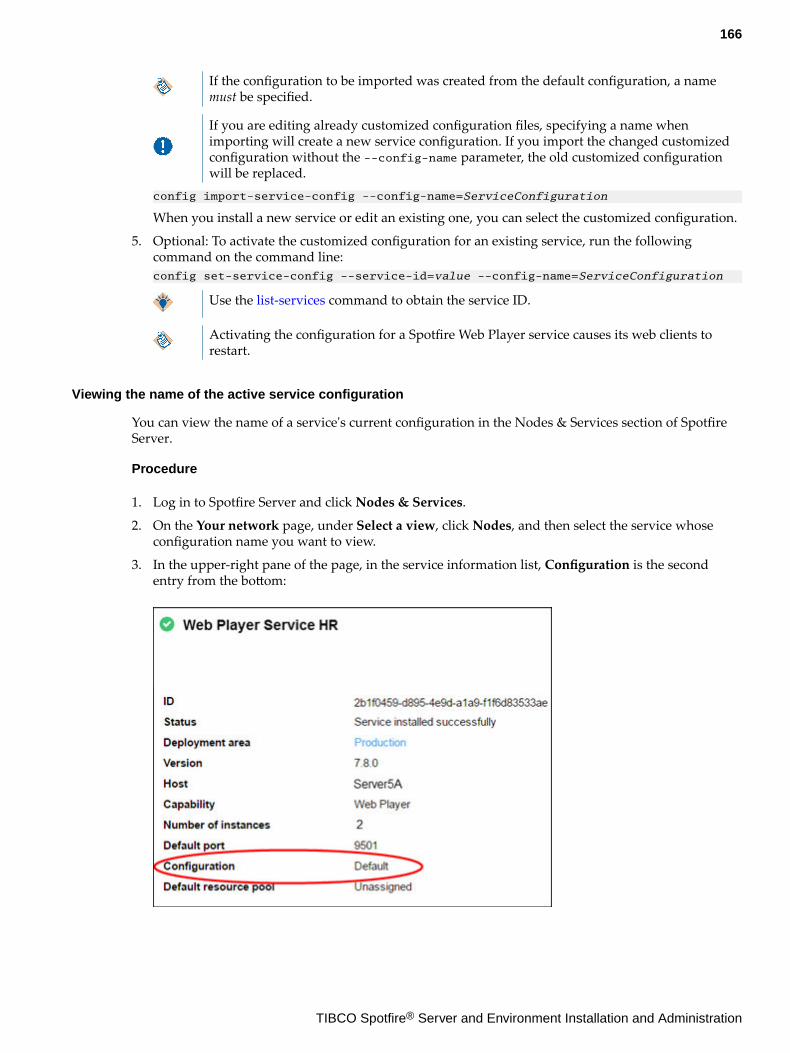
If the configuration to be imported was created from the default configuration, a namemust be specified.
If you are editing already customized configuration files, specifying a name whenimporting will create a new service configuration. If you import the changed customizedconfiguration without the --config-name parameter, the old customized configurationwill be replaced.
config import-service-config --config-name=ServiceConfiguration
When you install a new service or edit an existing one, you can select the customized configuration.
5. Optional: To activate the customized configuration for an existing service, run the followingcommand on the command line:config set-service-config --service-id=value --config-name=ServiceConfiguration
Use the list-services command to obtain the service ID.
Activating the configuration for a Spotfire Web Player service causes its web clients torestart.
Viewing the name of the active service configuration
You can view the name of a service's current configuration in the Nodes & Services section of SpotfireServer.
Procedure
1. Log in to Spotfire Server and click Nodes & Services.
2. On the Your network page, under Select a view, click Nodes, and then select the service whoseconfiguration name you want to view.
3. In the upper-right pane of the page, in the service information list, Configuration is the secondentry from the bottom:
166
TIBCO Spotfire® Server and Environment Installation and Administration
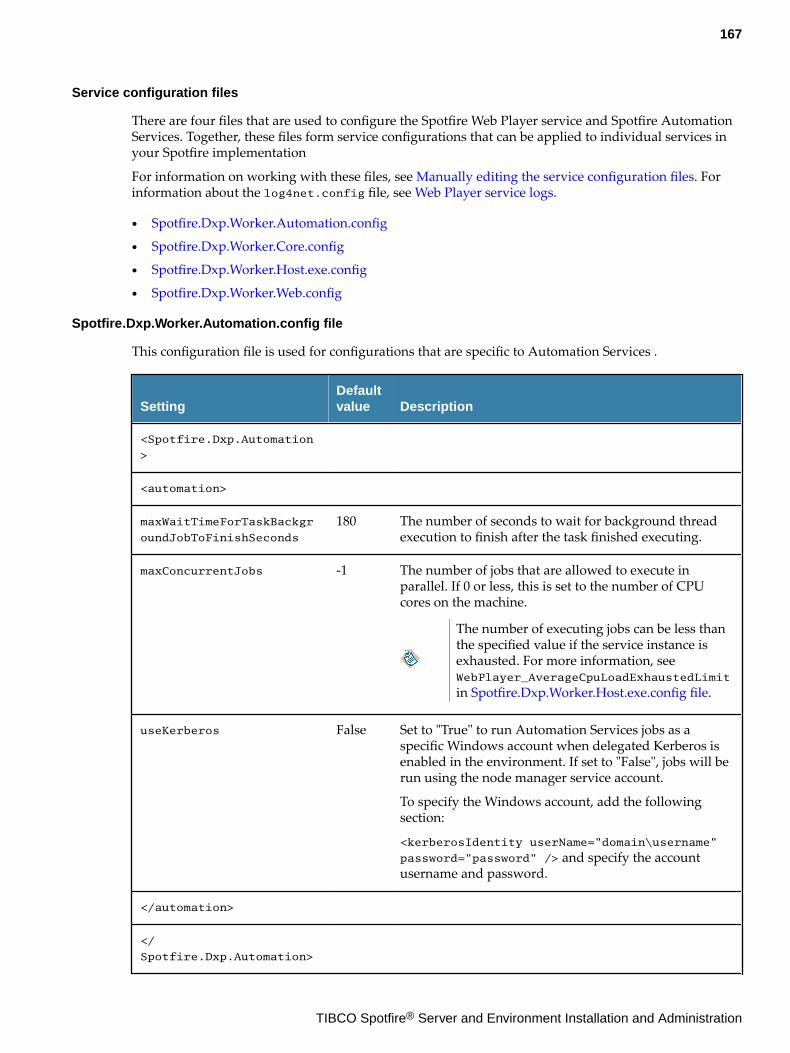
Service configuration files
There are four files that are used to configure the Spotfire Web Player service and Spotfire AutomationServices. Together, these files form service configurations that can be applied to individual services inyour Spotfire implementation
For information on working with these files, see Manually editing the service configuration files. Forinformation about the log4net.config file, see Web Player service logs.
● Spotfire.Dxp.Worker.Automation.config
● Spotfire.Dxp.Worker.Core.config
● Spotfire.Dxp.Worker.Host.exe.config
● Spotfire.Dxp.Worker.Web.config
Spotfire.Dxp.Worker.Automation.config file
This configuration file is used for configurations that are specific to Automation Services .
SettingDefaultvalue Description
<Spotfire.Dxp.Automation
>
<automation>
maxWaitTimeForTaskBackgr
oundJobToFinishSeconds
180 The number of seconds to wait for background threadexecution to finish after the task finished executing.
maxConcurrentJobs -1 The number of jobs that are allowed to execute inparallel. If 0 or less, this is set to the number of CPUcores on the machine.
The number of executing jobs can be less thanthe specified value if the service instance isexhausted. For more information, seeWebPlayer_AverageCpuLoadExhaustedLimit
in Spotfire.Dxp.Worker.Host.exe.config file.
useKerberos False Set to "True" to run Automation Services jobs as aspecific Windows account when delegated Kerberos isenabled in the environment. If set to "False", jobs will berun using the node manager service account.
To specify the Windows account, add the followingsection:
<kerberosIdentity userName="domain\username"
password="password" /> and specify the accountusername and password.
</automation>
</
Spotfire.Dxp.Automation>
167
TIBCO Spotfire® Server and Environment Installation and Administration
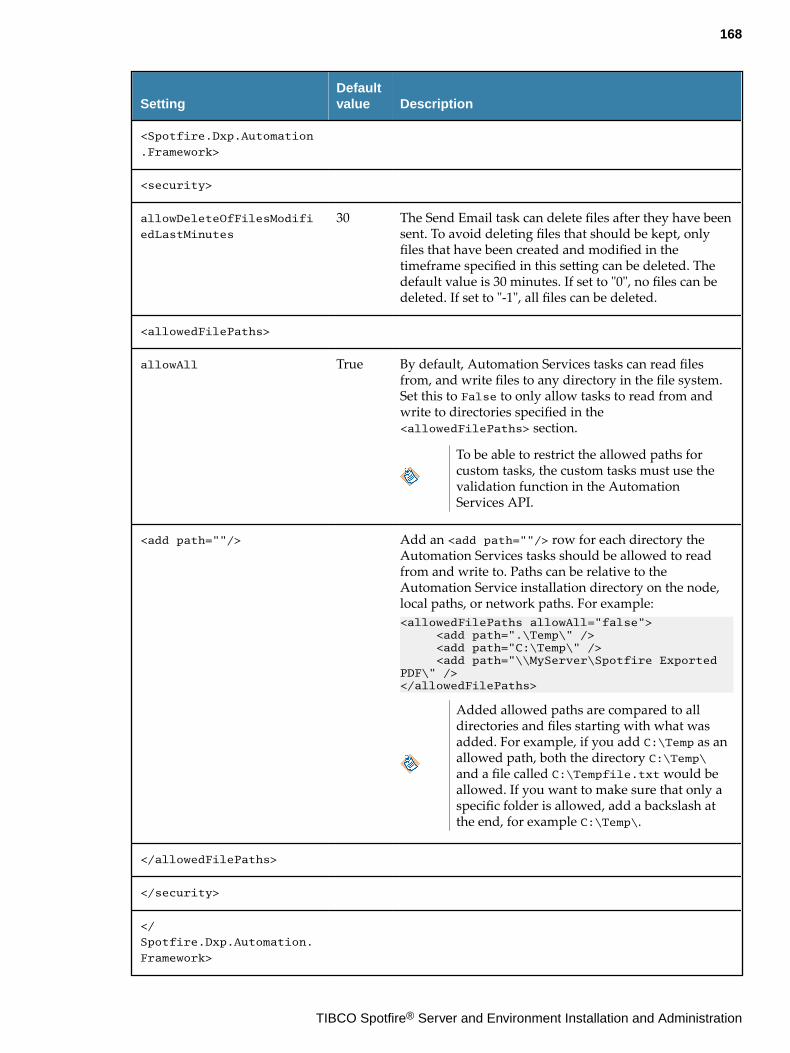
SettingDefaultvalue Description
<Spotfire.Dxp.Automation
.Framework>
<security>
allowDeleteOfFilesModifi
edLastMinutes
30 The Send Email task can delete files after they have beensent. To avoid deleting files that should be kept, onlyfiles that have been created and modified in thetimeframe specified in this setting can be deleted. Thedefault value is 30 minutes. If set to "0", no files can bedeleted. If set to "-1", all files can be deleted.
<allowedFilePaths>
allowAll True By default, Automation Services tasks can read filesfrom, and write files to any directory in the file system.Set this to False to only allow tasks to read from andwrite to directories specified in the<allowedFilePaths> section.
To be able to restrict the allowed paths forcustom tasks, the custom tasks must use thevalidation function in the AutomationServices API.
<add path=""/> Add an <add path=""/> row for each directory theAutomation Services tasks should be allowed to readfrom and write to. Paths can be relative to theAutomation Service installation directory on the node,local paths, or network paths. For example:<allowedFilePaths allowAll="false"> <add path=".\Temp\" /> <add path="C:\Temp\" /> <add path="\\MyServer\Spotfire Exported PDF\" /></allowedFilePaths>
Added allowed paths are compared to alldirectories and files starting with what wasadded. For example, if you add C:\Temp as anallowed path, both the directory C:\Temp\and a file called C:\Tempfile.txt would beallowed. If you want to make sure that only aspecific folder is allowed, add a backslash atthe end, for example C:\Temp\.
</allowedFilePaths>
</security>
</
Spotfire.Dxp.Automation.
Framework>
168
TIBCO Spotfire® Server and Environment Installation and Administration
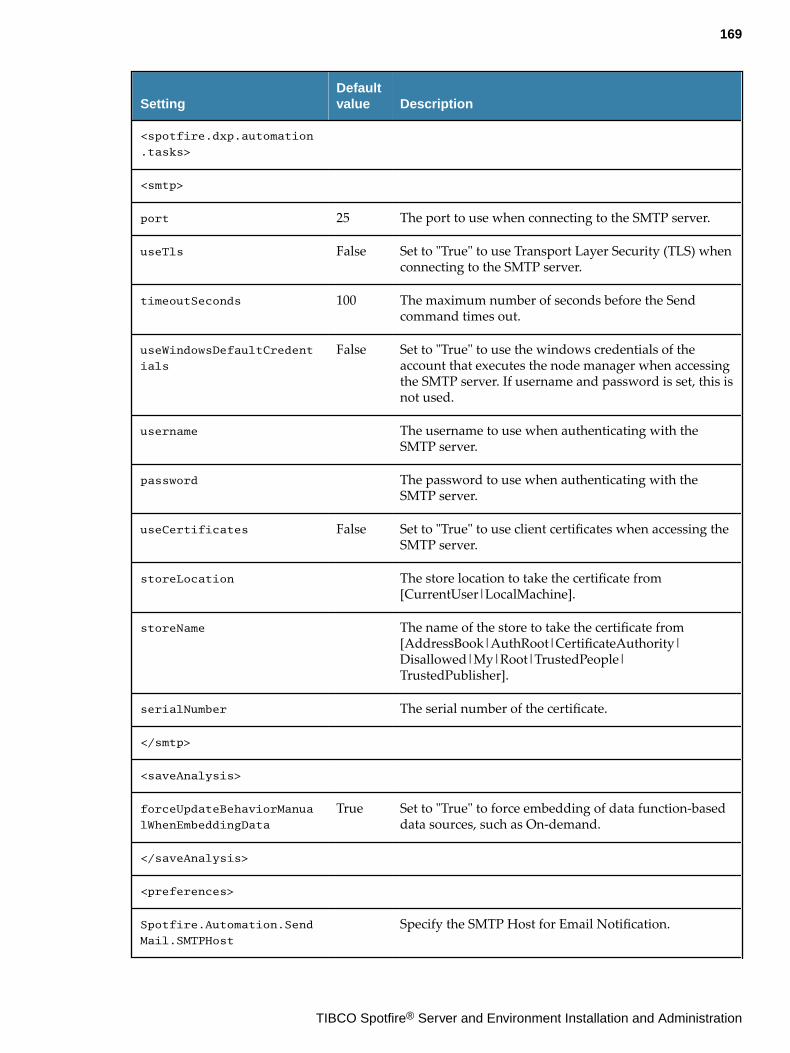
SettingDefaultvalue Description
<spotfire.dxp.automation
.tasks>
<smtp>
port 25 The port to use when connecting to the SMTP server.
useTls False Set to "True" to use Transport Layer Security (TLS) whenconnecting to the SMTP server.
timeoutSeconds 100 The maximum number of seconds before the Sendcommand times out.
useWindowsDefaultCredent
ials
False Set to "True" to use the windows credentials of theaccount that executes the node manager when accessingthe SMTP server. If username and password is set, this isnot used.
username The username to use when authenticating with theSMTP server.
password The password to use when authenticating with theSMTP server.
useCertificates False Set to "True" to use client certificates when accessing theSMTP server.
storeLocation The store location to take the certificate from[CurrentUser|LocalMachine].
storeName The name of the store to take the certificate from[AddressBook|AuthRoot|CertificateAuthority|Disallowed|My|Root|TrustedPeople|TrustedPublisher].
serialNumber The serial number of the certificate.
</smtp>
<saveAnalysis>
forceUpdateBehaviorManua
lWhenEmbeddingData
True Set to "True" to force embedding of data function-baseddata sources, such as On-demand.
</saveAnalysis>
<preferences>
Spotfire.Automation.Send
Mail.SMTPHost
Specify the SMTP Host for Email Notification.
169
TIBCO Spotfire® Server and Environment Installation and Administration
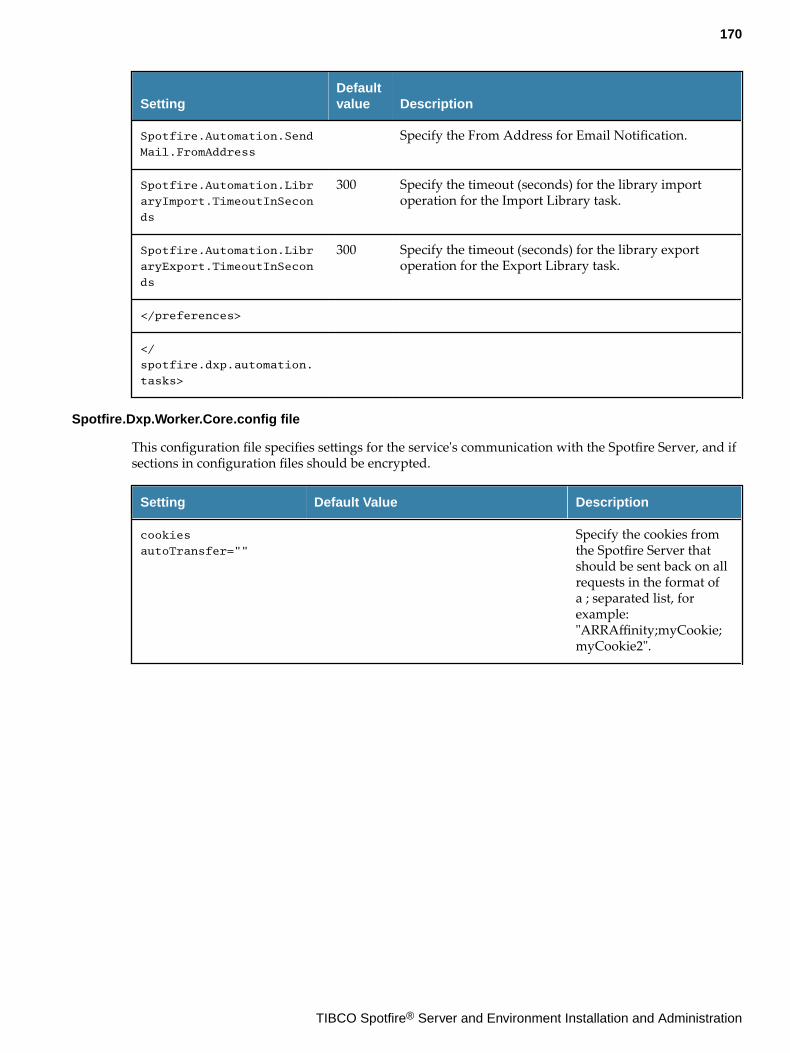
SettingDefaultvalue Description
Spotfire.Automation.Send
Mail.FromAddress
Specify the From Address for Email Notification.
Spotfire.Automation.Libr
aryImport.TimeoutInSecon
ds
300 Specify the timeout (seconds) for the library importoperation for the Import Library task.
Spotfire.Automation.Libr
aryExport.TimeoutInSecon
ds
300 Specify the timeout (seconds) for the library exportoperation for the Export Library task.
</preferences>
</
spotfire.dxp.automation.
tasks>
Spotfire.Dxp.Worker.Core.config file
This configuration file specifies settings for the service's communication with the Spotfire Server, and ifsections in configuration files should be encrypted.
Setting Default Value Description
cookies
autoTransfer=""
Specify the cookies fromthe Spotfire Server thatshould be sent back on allrequests in the format ofa ; separated list, forexample:"ARRAffinity;myCookie;myCookie2".
170
TIBCO Spotfire® Server and Environment Installation and Administration
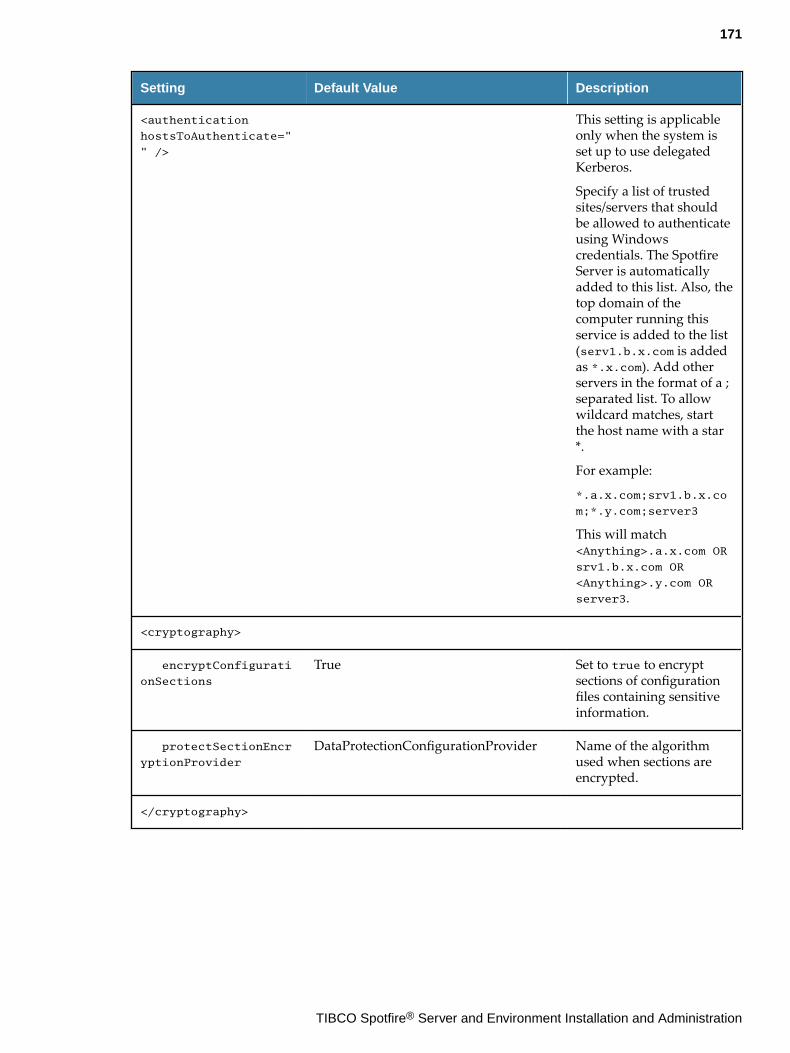
Setting Default Value Description
<authentication
hostsToAuthenticate="
" />
This setting is applicableonly when the system isset up to use delegatedKerberos.
Specify a list of trustedsites/servers that shouldbe allowed to authenticateusing Windowscredentials. The SpotfireServer is automaticallyadded to this list. Also, thetop domain of thecomputer running thisservice is added to the list(serv1.b.x.com is addedas *.x.com). Add otherservers in the format of a ;separated list. To allowwildcard matches, startthe host name with a star*.
For example:
*.a.x.com;srv1.b.x.co
m;*.y.com;server3
This will match<Anything>.a.x.com OR
srv1.b.x.com OR
<Anything>.y.com OR
server3.
<cryptography>
encryptConfigurati
onSections
True Set to true to encryptsections of configurationfiles containing sensitiveinformation.
protectSectionEncr
yptionProvider
DataProtectionConfigurationProvider Name of the algorithmused when sections areencrypted.
</cryptography>
171
TIBCO Spotfire® Server and Environment Installation and Administration
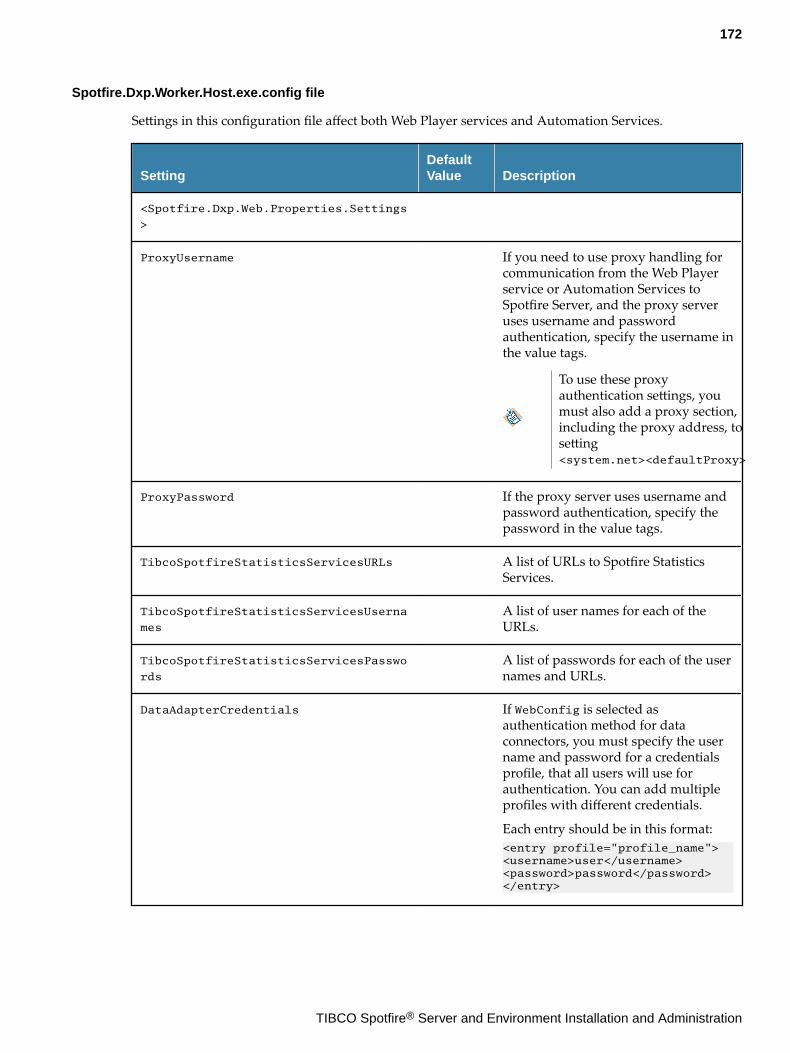
Spotfire.Dxp.Worker.Host.exe.config file
Settings in this configuration file affect both Web Player services and Automation Services.
SettingDefaultValue Description
<Spotfire.Dxp.Web.Properties.Settings
>
ProxyUsername If you need to use proxy handling forcommunication from the Web Playerservice or Automation Services toSpotfire Server, and the proxy serveruses username and passwordauthentication, specify the username inthe value tags.
To use these proxyauthentication settings, youmust also add a proxy section,including the proxy address, tosetting<system.net><defaultProxy>
ProxyPassword If the proxy server uses username andpassword authentication, specify thepassword in the value tags.
TibcoSpotfireStatisticsServicesURLs A list of URLs to Spotfire StatisticsServices.
TibcoSpotfireStatisticsServicesUserna
mes
A list of user names for each of theURLs.
TibcoSpotfireStatisticsServicesPasswo
rds
A list of passwords for each of the usernames and URLs.
DataAdapterCredentials If WebConfig is selected asauthentication method for dataconnectors, you must specify the username and password for a credentialsprofile, that all users will use forauthentication. You can add multipleprofiles with different credentials.
Each entry should be in this format:<entry profile="profile_name"><username>user</username><password>password</password></entry>
172
TIBCO Spotfire® Server and Environment Installation and Administration
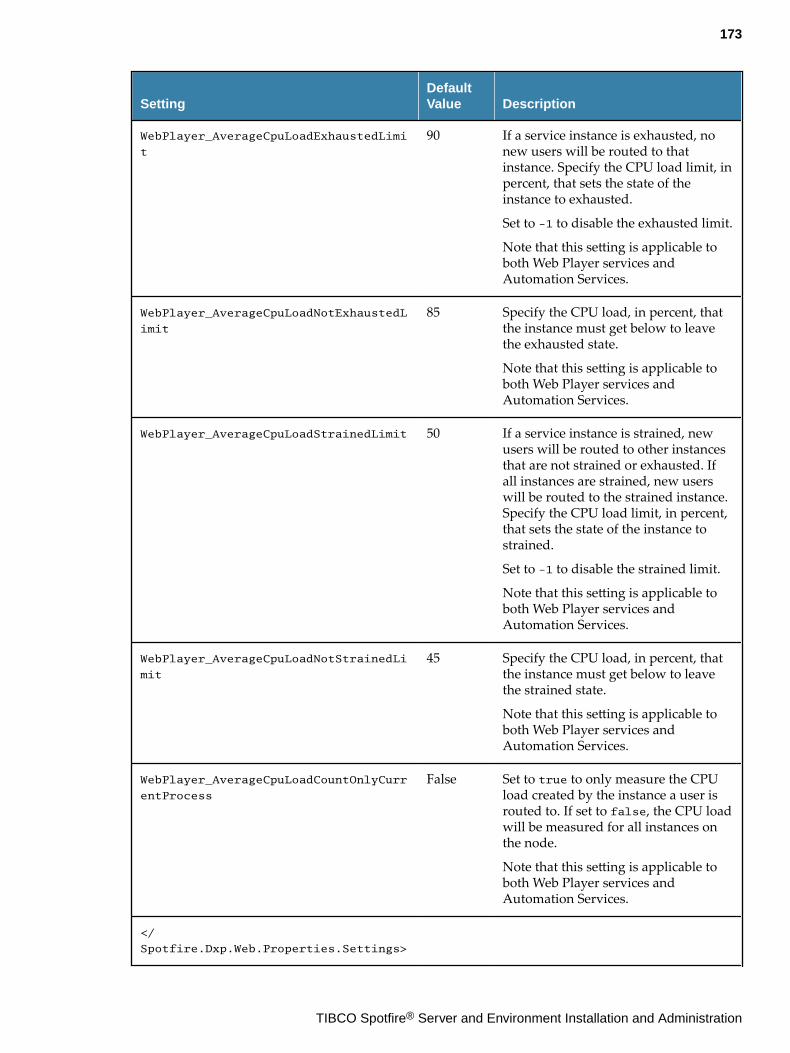
SettingDefaultValue Description
WebPlayer_AverageCpuLoadExhaustedLimi
t
90 If a service instance is exhausted, nonew users will be routed to thatinstance. Specify the CPU load limit, inpercent, that sets the state of theinstance to exhausted.
Set to -1 to disable the exhausted limit.
Note that this setting is applicable toboth Web Player services andAutomation Services.
WebPlayer_AverageCpuLoadNotExhaustedL
imit
85 Specify the CPU load, in percent, thatthe instance must get below to leavethe exhausted state.
Note that this setting is applicable toboth Web Player services andAutomation Services.
WebPlayer_AverageCpuLoadStrainedLimit 50 If a service instance is strained, newusers will be routed to other instancesthat are not strained or exhausted. Ifall instances are strained, new userswill be routed to the strained instance.Specify the CPU load limit, in percent,that sets the state of the instance tostrained.
Set to -1 to disable the strained limit.
Note that this setting is applicable toboth Web Player services andAutomation Services.
WebPlayer_AverageCpuLoadNotStrainedLi
mit
45 Specify the CPU load, in percent, thatthe instance must get below to leavethe strained state.
Note that this setting is applicable toboth Web Player services andAutomation Services.
WebPlayer_AverageCpuLoadCountOnlyCurr
entProcess
False Set to true to only measure the CPUload created by the instance a user isrouted to. If set to false, the CPU loadwill be measured for all instances onthe node.
Note that this setting is applicable toboth Web Player services andAutomation Services.
</
Spotfire.Dxp.Web.Properties.Settings>
173
TIBCO Spotfire® Server and Environment Installation and Administration
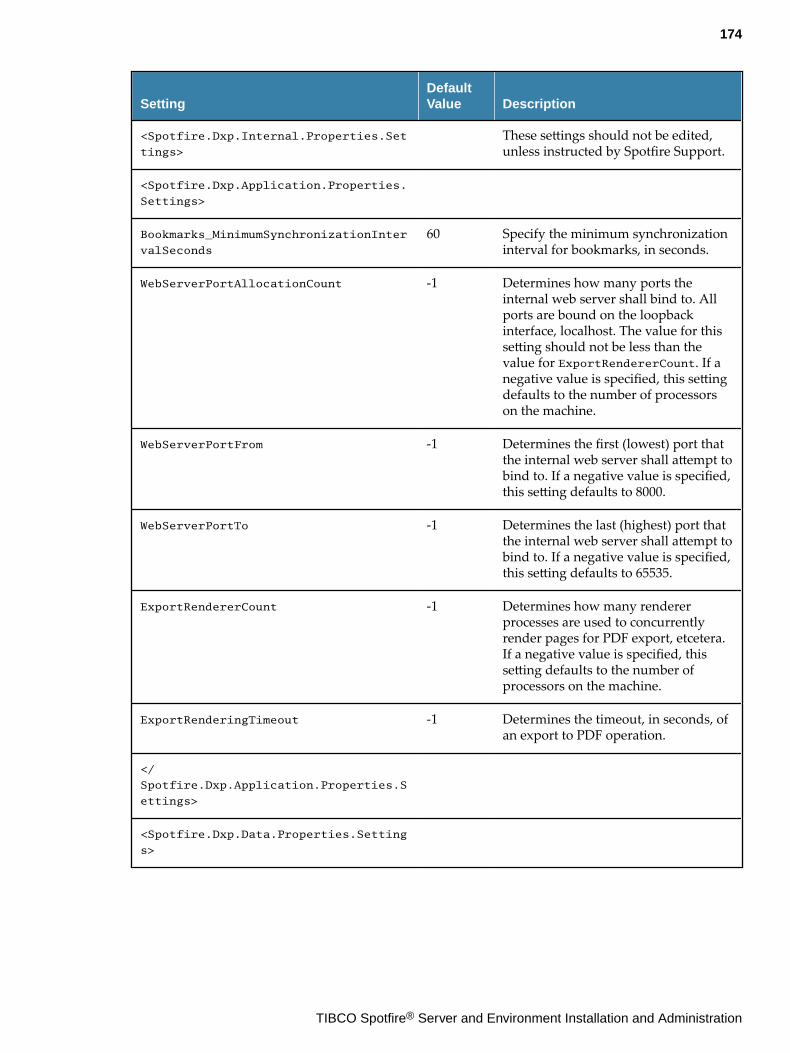
SettingDefaultValue Description
<Spotfire.Dxp.Internal.Properties.Set
tings>
These settings should not be edited,unless instructed by Spotfire Support.
<Spotfire.Dxp.Application.Properties.
Settings>
Bookmarks_MinimumSynchronizationInter
valSeconds
60 Specify the minimum synchronizationinterval for bookmarks, in seconds.
WebServerPortAllocationCount -1 Determines how many ports theinternal web server shall bind to. Allports are bound on the loopbackinterface, localhost. The value for thissetting should not be less than thevalue for ExportRendererCount. If anegative value is specified, this settingdefaults to the number of processorson the machine.
WebServerPortFrom -1 Determines the first (lowest) port thatthe internal web server shall attempt tobind to. If a negative value is specified,this setting defaults to 8000.
WebServerPortTo -1 Determines the last (highest) port thatthe internal web server shall attempt tobind to. If a negative value is specified,this setting defaults to 65535.
ExportRendererCount -1 Determines how many rendererprocesses are used to concurrentlyrender pages for PDF export, etcetera.If a negative value is specified, thissetting defaults to the number ofprocessors on the machine.
ExportRenderingTimeout -1 Determines the timeout, in seconds, ofan export to PDF operation.
</
Spotfire.Dxp.Application.Properties.S
ettings>
<Spotfire.Dxp.Data.Properties.Setting
s>
174
TIBCO Spotfire® Server and Environment Installation and Administration

SettingDefaultValue Description
DataBlockStorage_MemoryLoadExhaustedL
imit
98 If a service instance is exhausted, nonew users will be routed to thatinstance. Specify the memory loadlimit, in percent, that sets the state ofthe instance to exhausted.
Set to -1 to disable the exhausted limit.
DataBlockStorage_
MemoryLoadNotExhaustedLimit
93 Specify the memory load, in percent,that the instance must get below toleave the exhausted state.
DataBlockStorage_MemoryLoadStrainedLi
mit
75 If a service instance is strained, newusers will be routed to other instancesthat are not strained or exhausted. Ifall instances are strained, new userswill be routed to the strained instance.Specify the memory load limit, inpercent, that sets the state of theinstance to strained.
Set to -1 to disable the strained limit.
DataBlockStorage_MemoryLoadNotStraine
dLimit
70 Specify the memory load, in percent,that the instance must get below toleave the strained state.
DataBlockStorageStorageIOSizeKB 64 This setting should not be edited,unless instructed by Spotfire Support.
DataOnDemand_MaxCacheTime 01:00:00 Specify the length of time, in theformat HH:MM:SS, for data ondemand to be cached. This setting isonly used if you configured data ondemand to be cached on the webclients.
AllowedFilePaths Provide the full path to directories orfiles on a local disk that you want toaccess in the web clients.
Specify each file or directory in aseparate <string> tag.
</
Spotfire.Dxp.Data.Properties.Settings
>
<Spotfire.Dxp.Data.Access.Properties.
Settings>
AllowCustomQueries True Enables custom queries for users onthis service.
175
TIBCO Spotfire® Server and Environment Installation and Administration
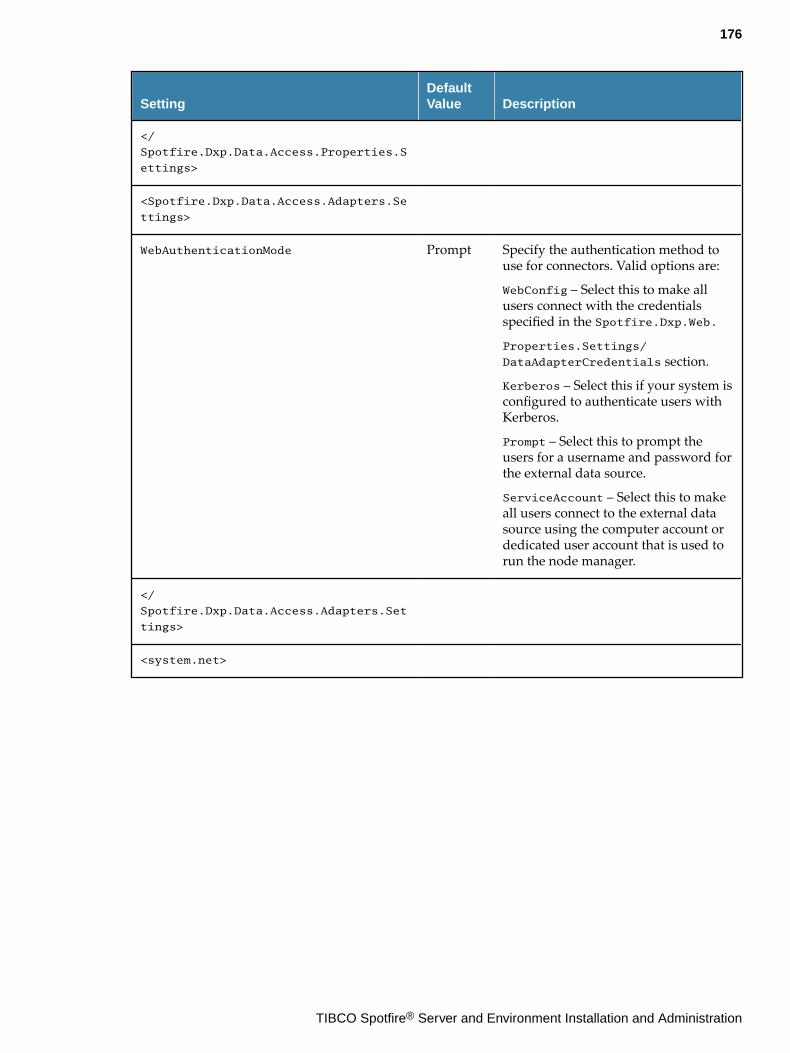
SettingDefaultValue Description
</
Spotfire.Dxp.Data.Access.Properties.S
ettings>
<Spotfire.Dxp.Data.Access.Adapters.Se
ttings>
WebAuthenticationMode Prompt Specify the authentication method touse for connectors. Valid options are:
WebConfig – Select this to make allusers connect with the credentialsspecified in the Spotfire.Dxp.Web.
Properties.Settings/
DataAdapterCredentials section.
Kerberos – Select this if your system isconfigured to authenticate users withKerberos.
Prompt – Select this to prompt theusers for a username and password forthe external data source.
ServiceAccount – Select this to makeall users connect to the external datasource using the computer account ordedicated user account that is used torun the node manager.
</
Spotfire.Dxp.Data.Access.Adapters.Set
tings>
<system.net>
176
TIBCO Spotfire® Server and Environment Installation and Administration

SettingDefaultValue Description
<defaultProxy> If you need to use proxy handling forcommunication from the Web Playerservice or Automation Services toSpotfire Server, you must add thefollowing proxy setting inside thedefaultProxy tag:<proxyproxyaddress="http://MyProxyServer:3128"scriptLocation="MyScriptLocation"/>
The proxy setting is a part of thestandard .NET Framework. You canfind more information about thisconfiguration at the MicrosoftDeveloper Network (MSDN).
If the proxy server uses username andpassword authentication, you must alsospecify the username and password for theproxy server in the<Spotfire.Dxp.Web.Properties.Settings>
setting.
</system.net>
<runtime> These settings should not be editedunless instructed by Spotfire Support.
<startup> These settings should not be editedunless instructed by Spotfire Support.
<system.web> These settings should not be editedunless instructed by Spotfire Support.
<system.serviceModel> These settings should not be editedunless instructed by Spotfire Support.
Spotfire.Dxp.Worker.Web.config file
This configuration file specifies Web Player service configurations, some Automation Servicesconfigurations, and user interface elements applicable to both the web clients and the library browseron Spotfire Server.
The settings in the sections <application>, <userInterface><pages>,<userInterface><closedAnalysis>, and <userInterface><errorPage>, and the settingmaxReceivedMessageSizeMb, which sets the maximum size for file upload, are applicable both to theweb client and the library browser on Spotfire Server. If these settings are changed, you must run the set-service-config command to apply the settings in the web client, and the set-server-service-configcommand to apply the settings in the library browser on Spotfire Server.
177
TIBCO Spotfire® Server and Environment Installation and Administration
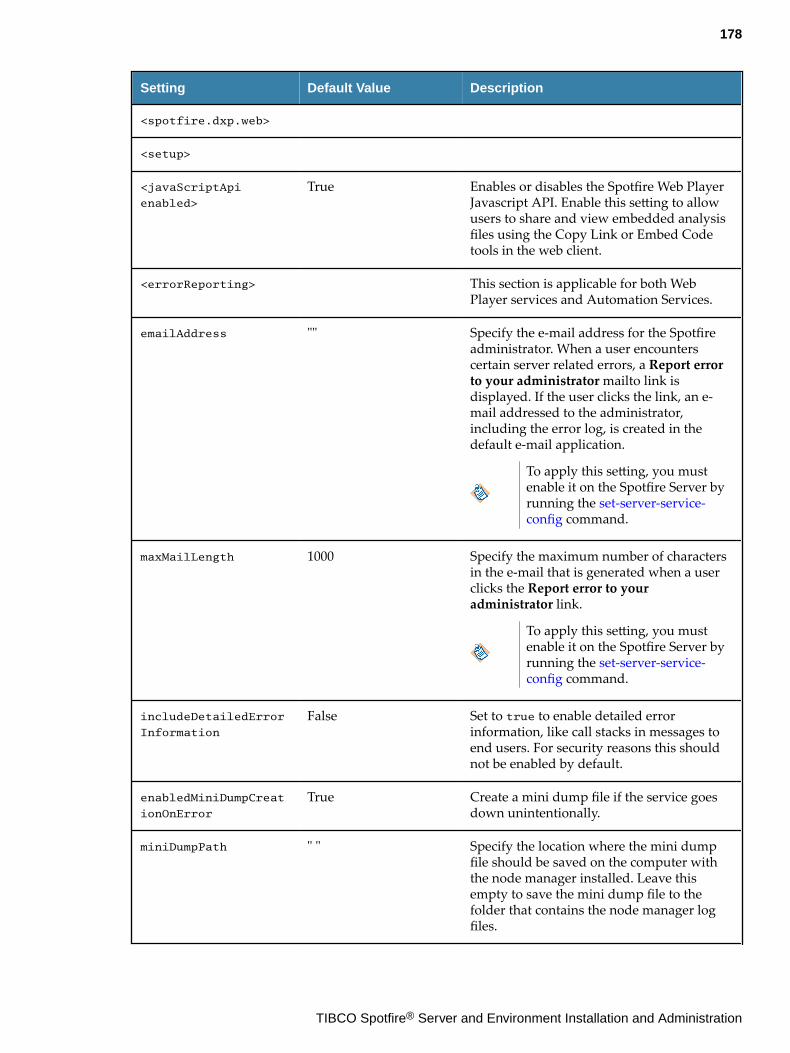
Setting Default Value Description
<spotfire.dxp.web>
<setup>
<javaScriptApi
enabled>
True Enables or disables the Spotfire Web PlayerJavascript API. Enable this setting to allowusers to share and view embedded analysisfiles using the Copy Link or Embed Codetools in the web client.
<errorReporting> This section is applicable for both WebPlayer services and Automation Services.
emailAddress "" Specify the e-mail address for the Spotfireadministrator. When a user encounterscertain server related errors, a Report errorto your administrator mailto link isdisplayed. If the user clicks the link, an e-mail addressed to the administrator,including the error log, is created in thedefault e-mail application.
To apply this setting, you mustenable it on the Spotfire Server byrunning the set-server-service-config command.
maxMailLength 1000 Specify the maximum number of charactersin the e-mail that is generated when a userclicks the Report error to youradministrator link.
To apply this setting, you mustenable it on the Spotfire Server byrunning the set-server-service-config command.
includeDetailedError
Information
False Set to true to enable detailed errorinformation, like call stacks in messages toend users. For security reasons this shouldnot be enabled by default.
enabledMiniDumpCreat
ionOnError
True Create a mini dump file if the service goesdown unintentionally.
miniDumpPath " " Specify the location where the mini dumpfile should be saved on the computer withthe node manager installed. Leave thisempty to save the mini dump file to thefolder that contains the node manager logfiles.
178
TIBCO Spotfire® Server and Environment Installation and Administration
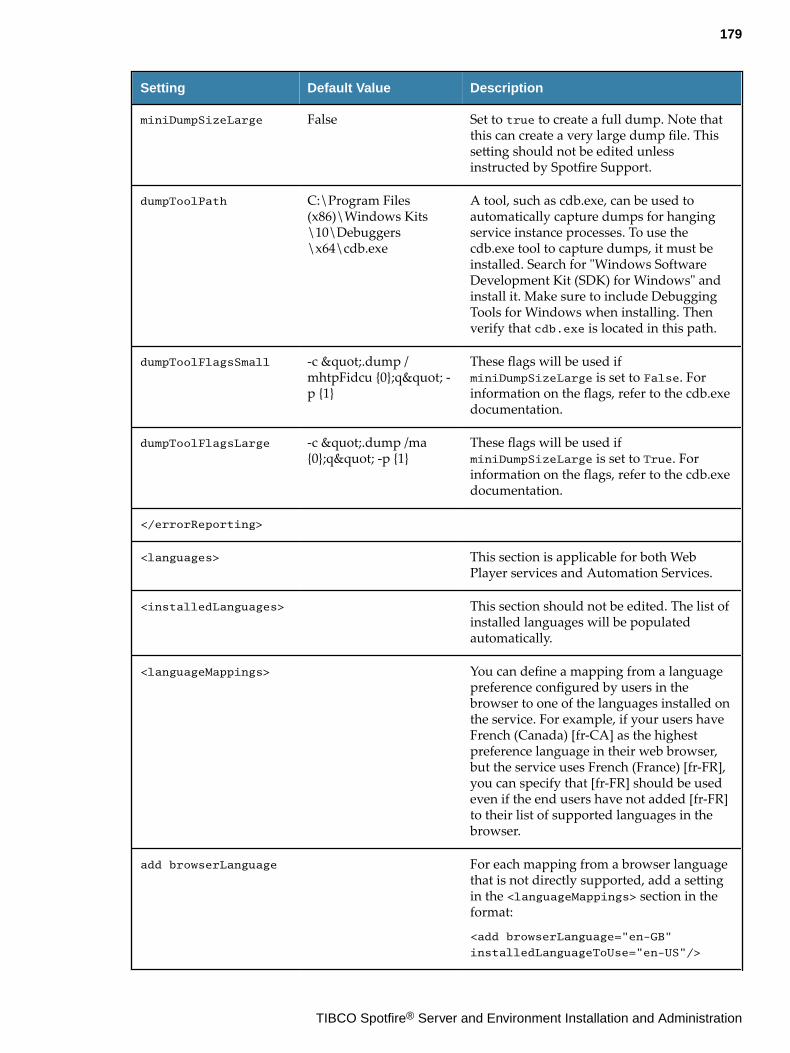
Setting Default Value Description
miniDumpSizeLarge False Set to true to create a full dump. Note thatthis can create a very large dump file. Thissetting should not be edited unlessinstructed by Spotfire Support.
dumpToolPath C:\Program Files(x86)\Windows Kits\10\Debuggers\x64\cdb.exe
A tool, such as cdb.exe, can be used toautomatically capture dumps for hangingservice instance processes. To use thecdb.exe tool to capture dumps, it must beinstalled. Search for "Windows SoftwareDevelopment Kit (SDK) for Windows" andinstall it. Make sure to include DebuggingTools for Windows when installing. Thenverify that cdb.exe is located in this path.
dumpToolFlagsSmall -c ".dump /mhtpFidcu {0};q" -p {1}
These flags will be used ifminiDumpSizeLarge is set to False. Forinformation on the flags, refer to the cdb.exedocumentation.
dumpToolFlagsLarge -c ".dump /ma{0};q" -p {1}
These flags will be used ifminiDumpSizeLarge is set to True. Forinformation on the flags, refer to the cdb.exedocumentation.
</errorReporting>
<languages> This section is applicable for both WebPlayer services and Automation Services.
<installedLanguages> This section should not be edited. The list ofinstalled languages will be populatedautomatically.
<languageMappings> You can define a mapping from a languagepreference configured by users in thebrowser to one of the languages installed onthe service. For example, if your users haveFrench (Canada) [fr-CA] as the highestpreference language in their web browser,but the service uses French (France) [fr-FR],you can specify that [fr-FR] should be usedeven if the end users have not added [fr-FR]to their list of supported languages in thebrowser.
add browserLanguage For each mapping from a browser languagethat is not directly supported, add a settingin the <languageMappings> section in theformat:
<add browserLanguage="en-GB"
installedLanguageToUse="en-US"/>
179
TIBCO Spotfire® Server and Environment Installation and Administration
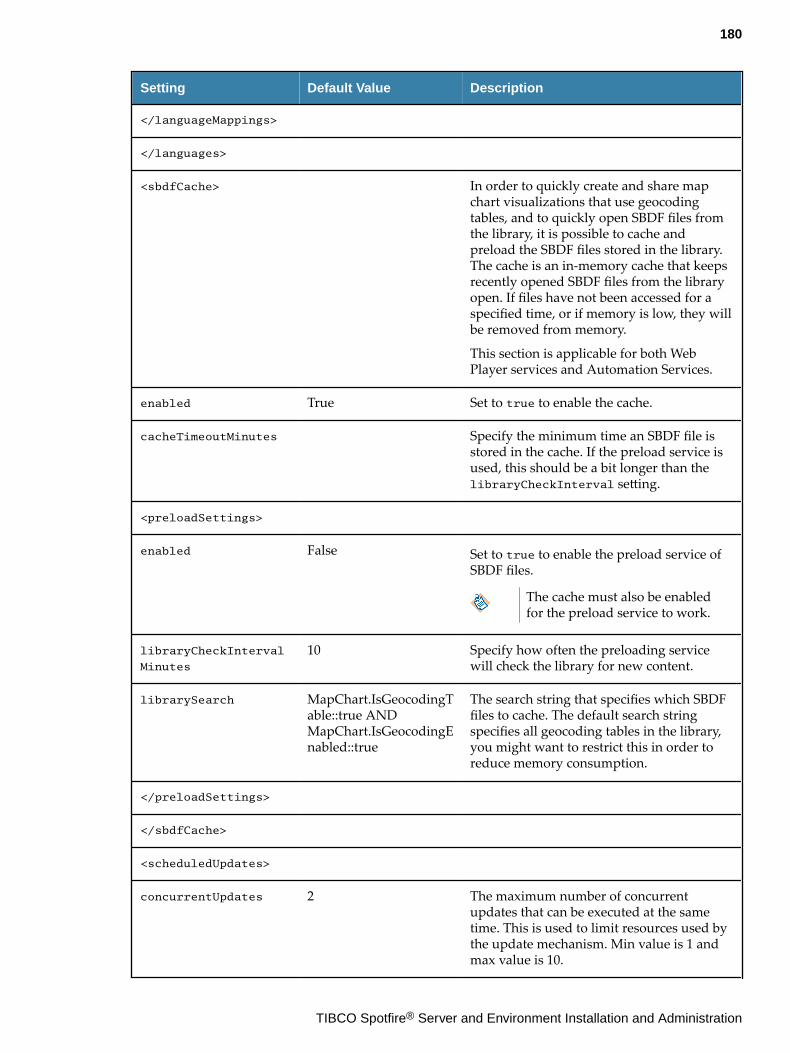
Setting Default Value Description
</languageMappings>
</languages>
<sbdfCache> In order to quickly create and share mapchart visualizations that use geocodingtables, and to quickly open SBDF files fromthe library, it is possible to cache andpreload the SBDF files stored in the library.The cache is an in-memory cache that keepsrecently opened SBDF files from the libraryopen. If files have not been accessed for aspecified time, or if memory is low, they willbe removed from memory.
This section is applicable for both WebPlayer services and Automation Services.
enabled True Set to true to enable the cache.
cacheTimeoutMinutes Specify the minimum time an SBDF file isstored in the cache. If the preload service isused, this should be a bit longer than thelibraryCheckInterval setting.
<preloadSettings>
enabled False Set to true to enable the preload service ofSBDF files.
The cache must also be enabledfor the preload service to work.
libraryCheckInterval
Minutes
10 Specify how often the preloading servicewill check the library for new content.
librarySearch MapChart.IsGeocodingTable::true ANDMapChart.IsGeocodingEnabled::true
The search string that specifies which SBDFfiles to cache. The default search stringspecifies all geocoding tables in the library,you might want to restrict this in order toreduce memory consumption.
</preloadSettings>
</sbdfCache>
<scheduledUpdates>
concurrentUpdates 2 The maximum number of concurrentupdates that can be executed at the sametime. This is used to limit resources used bythe update mechanism. Min value is 1 andmax value is 10.
180
TIBCO Spotfire® Server and Environment Installation and Administration
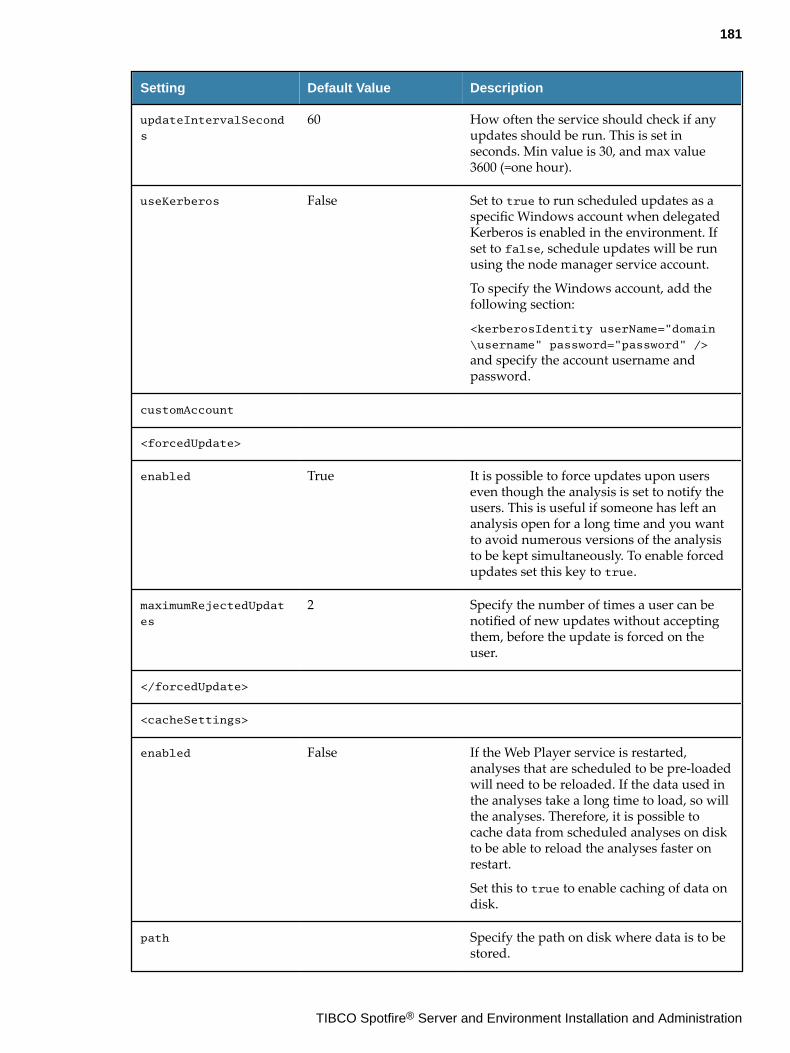
Setting Default Value Description
updateIntervalSecond
s
60 How often the service should check if anyupdates should be run. This is set inseconds. Min value is 30, and max value3600 (=one hour).
useKerberos False Set to true to run scheduled updates as aspecific Windows account when delegatedKerberos is enabled in the environment. Ifset to false, schedule updates will be runusing the node manager service account.
To specify the Windows account, add thefollowing section:
<kerberosIdentity userName="domain
\username" password="password" />
and specify the account username andpassword.
customAccount
<forcedUpdate>
enabled True It is possible to force updates upon userseven though the analysis is set to notify theusers. This is useful if someone has left ananalysis open for a long time and you wantto avoid numerous versions of the analysisto be kept simultaneously. To enable forcedupdates set this key to true.
maximumRejectedUpdat
es
2 Specify the number of times a user can benotified of new updates without acceptingthem, before the update is forced on theuser.
</forcedUpdate>
<cacheSettings>
enabled False If the Web Player service is restarted,analyses that are scheduled to be pre-loadedwill need to be reloaded. If the data used inthe analyses take a long time to load, so willthe analyses. Therefore, it is possible tocache data from scheduled analyses on diskto be able to reload the analyses faster onrestart.
Set this to true to enable caching of data ondisk.
path Specify the path on disk where data is to bestored.
181
TIBCO Spotfire® Server and Environment Installation and Administration
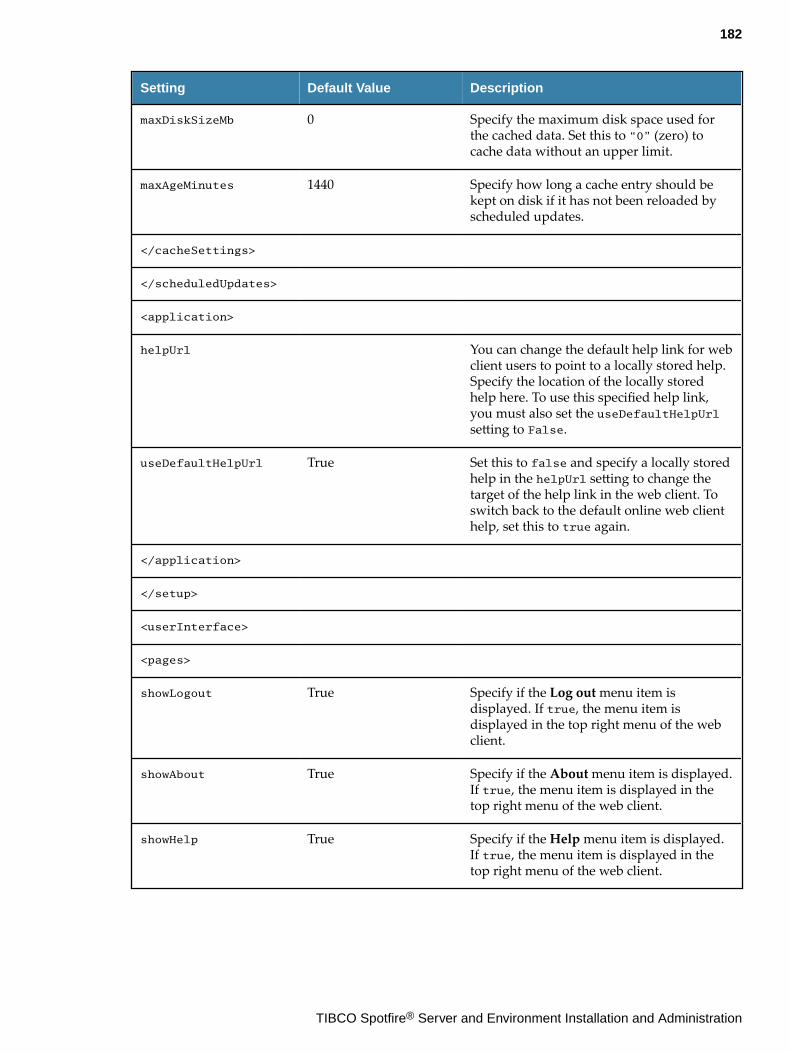
Setting Default Value Description
maxDiskSizeMb 0 Specify the maximum disk space used forthe cached data. Set this to “0” (zero) tocache data without an upper limit.
maxAgeMinutes 1440 Specify how long a cache entry should bekept on disk if it has not been reloaded byscheduled updates.
</cacheSettings>
</scheduledUpdates>
<application>
helpUrl You can change the default help link for webclient users to point to a locally stored help.Specify the location of the locally storedhelp here. To use this specified help link,you must also set the useDefaultHelpUrlsetting to False.
useDefaultHelpUrl True Set this to false and specify a locally storedhelp in the helpUrl setting to change thetarget of the help link in the web client. Toswitch back to the default online web clienthelp, set this to true again.
</application>
</setup>
<userInterface>
<pages>
showLogout True Specify if the Log out menu item isdisplayed. If true, the menu item isdisplayed in the top right menu of the webclient.
showAbout True Specify if the About menu item is displayed.If true, the menu item is displayed in thetop right menu of the web client.
showHelp True Specify if the Help menu item is displayed.If true, the menu item is displayed in thetop right menu of the web client.
182
TIBCO Spotfire® Server and Environment Installation and Administration
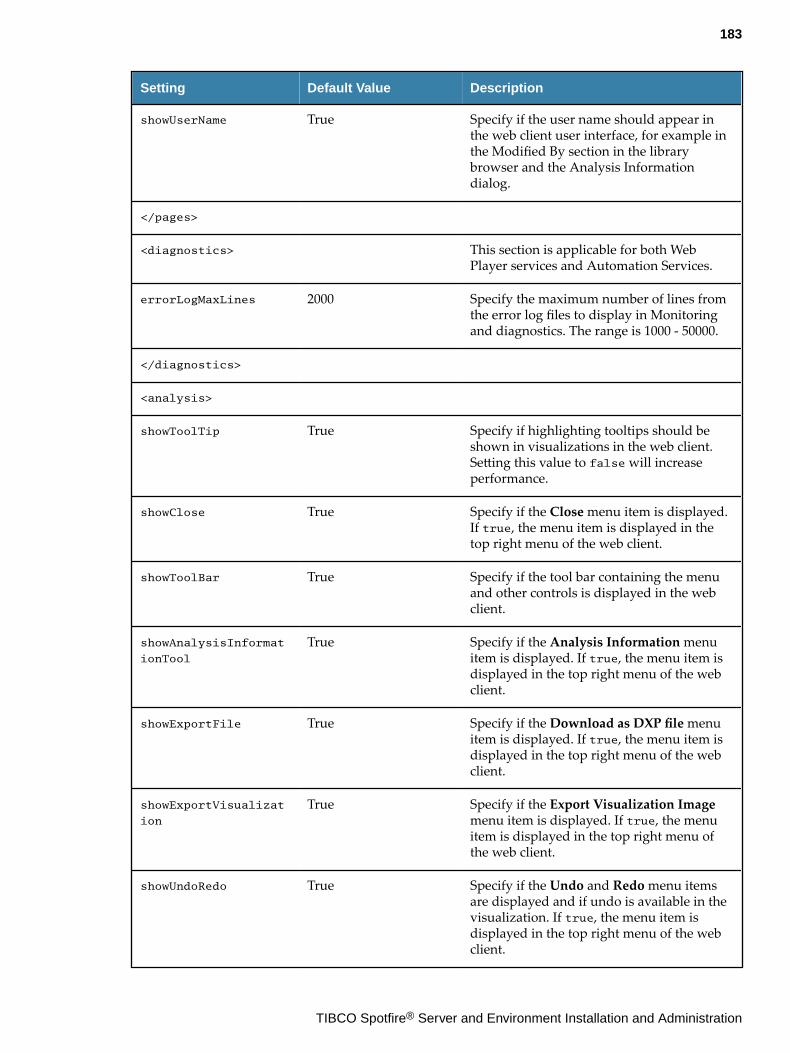
Setting Default Value Description
showUserName True Specify if the user name should appear inthe web client user interface, for example inthe Modified By section in the librarybrowser and the Analysis Informationdialog.
</pages>
<diagnostics> This section is applicable for both WebPlayer services and Automation Services.
errorLogMaxLines 2000 Specify the maximum number of lines fromthe error log files to display in Monitoringand diagnostics. The range is 1000 - 50000.
</diagnostics>
<analysis>
showToolTip True Specify if highlighting tooltips should beshown in visualizations in the web client.Setting this value to false will increaseperformance.
showClose True Specify if the Close menu item is displayed.If true, the menu item is displayed in thetop right menu of the web client.
showToolBar True Specify if the tool bar containing the menuand other controls is displayed in the webclient.
showAnalysisInformat
ionTool
True Specify if the Analysis Information menuitem is displayed. If true, the menu item isdisplayed in the top right menu of the webclient.
showExportFile True Specify if the Download as DXP file menuitem is displayed. If true, the menu item isdisplayed in the top right menu of the webclient.
showExportVisualizat
ion
True Specify if the Export Visualization Imagemenu item is displayed. If true, the menuitem is displayed in the top right menu ofthe web client.
showUndoRedo True Specify if the Undo and Redo menu itemsare displayed and if undo is available in thevisualization. If true, the menu item isdisplayed in the top right menu of the webclient.
183
TIBCO Spotfire® Server and Environment Installation and Administration
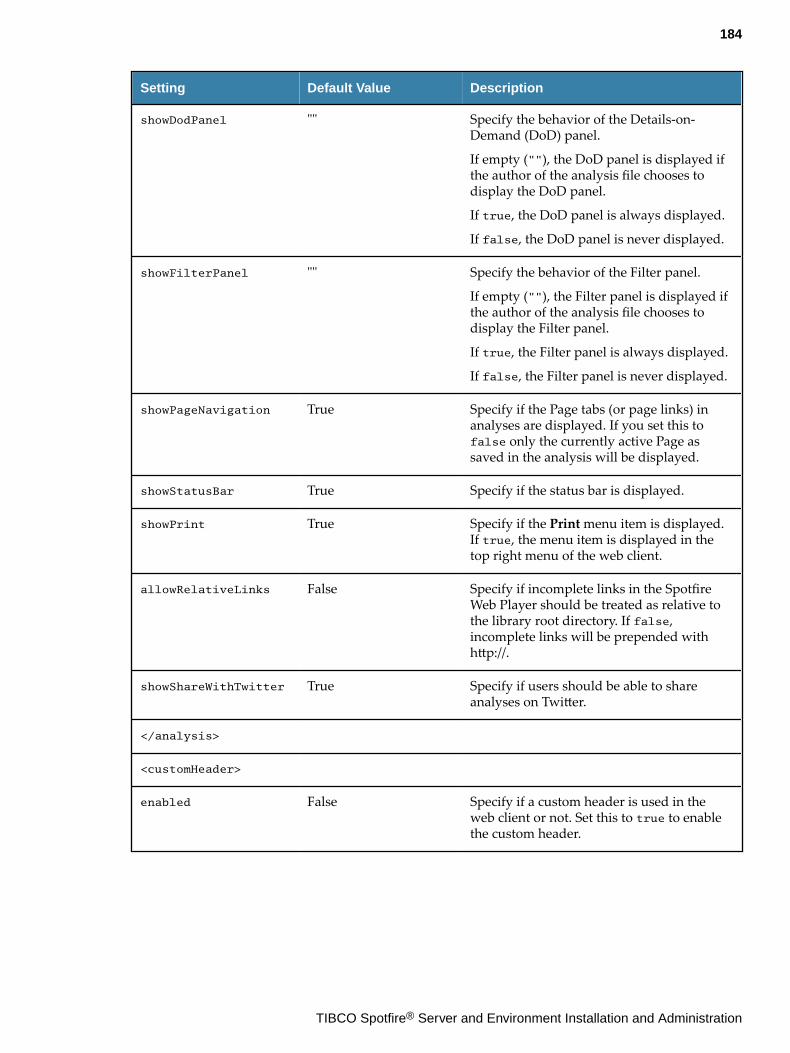
Setting Default Value Description
showDodPanel "" Specify the behavior of the Details-on-Demand (DoD) panel.
If empty (""), the DoD panel is displayed ifthe author of the analysis file chooses todisplay the DoD panel.
If true, the DoD panel is always displayed.
If false, the DoD panel is never displayed.
showFilterPanel "" Specify the behavior of the Filter panel.
If empty (""), the Filter panel is displayed ifthe author of the analysis file chooses todisplay the Filter panel.
If true, the Filter panel is always displayed.
If false, the Filter panel is never displayed.
showPageNavigation True Specify if the Page tabs (or page links) inanalyses are displayed. If you set this tofalse only the currently active Page assaved in the analysis will be displayed.
showStatusBar True Specify if the status bar is displayed.
showPrint True Specify if the Print menu item is displayed.If true, the menu item is displayed in thetop right menu of the web client.
allowRelativeLinks False Specify if incomplete links in the SpotfireWeb Player should be treated as relative tothe library root directory. If false,incomplete links will be prepended withhttp://.
showShareWithTwitter True Specify if users should be able to shareanalyses on Twitter.
</analysis>
<customHeader>
enabled False Specify if a custom header is used in theweb client or not. Set this to true to enablethe custom header.
184
TIBCO Spotfire® Server and Environment Installation and Administration
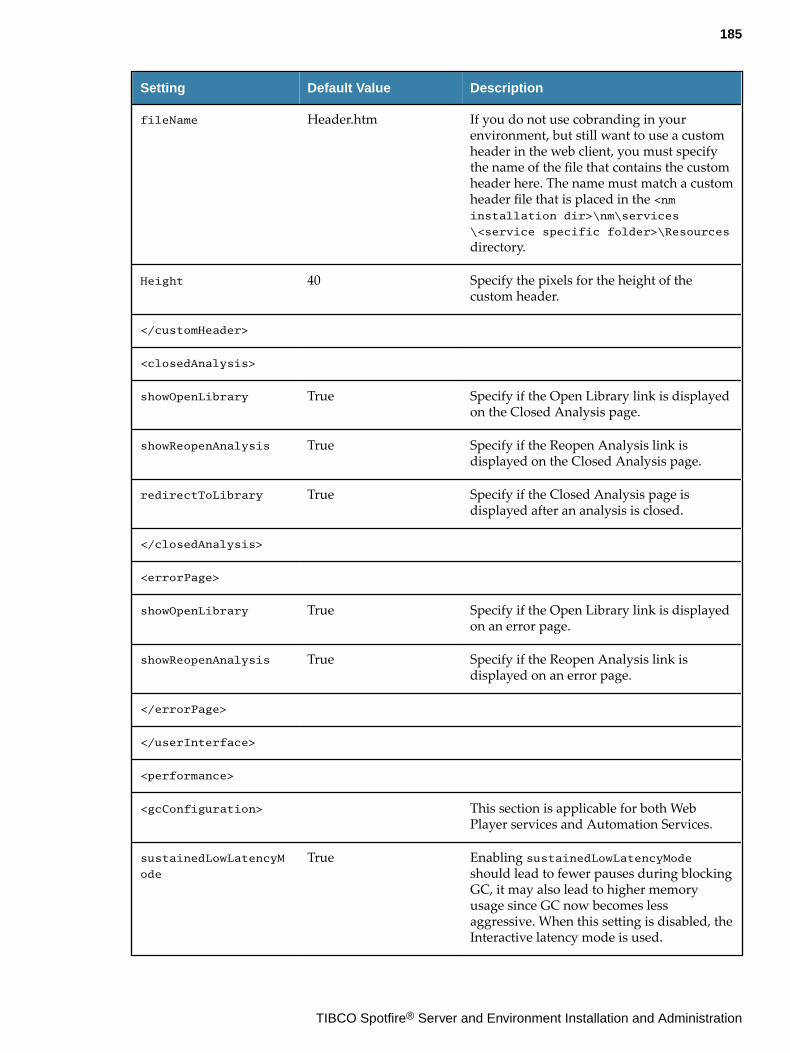
Setting Default Value Description
fileName Header.htm If you do not use cobranding in yourenvironment, but still want to use a customheader in the web client, you must specifythe name of the file that contains the customheader here. The name must match a customheader file that is placed in the <nminstallation dir>\nm\services
\<service specific folder>\Resources
directory.
Height 40 Specify the pixels for the height of thecustom header.
</customHeader>
<closedAnalysis>
showOpenLibrary True Specify if the Open Library link is displayedon the Closed Analysis page.
showReopenAnalysis True Specify if the Reopen Analysis link isdisplayed on the Closed Analysis page.
redirectToLibrary True Specify if the Closed Analysis page isdisplayed after an analysis is closed.
</closedAnalysis>
<errorPage>
showOpenLibrary True Specify if the Open Library link is displayedon an error page.
showReopenAnalysis True Specify if the Reopen Analysis link isdisplayed on an error page.
</errorPage>
</userInterface>
<performance>
<gcConfiguration> This section is applicable for both WebPlayer services and Automation Services.
sustainedLowLatencyM
ode
True Enabling sustainedLowLatencyModeshould lead to fewer pauses during blockingGC, it may also lead to higher memoryusage since GC now becomes lessaggressive. When this setting is disabled, theInteractive latency mode is used.
185
TIBCO Spotfire® Server and Environment Installation and Administration

Setting Default Value Description
</gcConfiguration>
<recoverMemory> This section is applicable for both WebPlayer services and Automation Services.
enabled True Enabling recoverMemory will help thesystem in the case where memory isexhausted and the last user session isremoved. This state may occur if GC wasnot triggered by the system when freeing uplarge resources.
The action can be specified with an integerdepending on the service's memory status:
0. Do nothing.
1. Run garbage collection GC2.
2. Recycle the process.
actionWhenOk 0 Specify action when memory is OK.
actionWhenStrained 1 Specify action when memory is strained.
actionWhenExhausted 2 Specify action when memory is exhausted.
recycleIfScheduledAn
dCacheEnabled
False Set to True to allow actions (garbagecollection or process recycling) to betriggered even if analyses are cached byscheduled updates, but only if scheduledupdates caching is enabled.
recycleEvenIfSchedul
edAnalyses
False Set to True to allow actions (garbagecollection or process recycling) to betriggered even if analyses are cached byscheduled updates, even if scheduledupdates caching is not enabled.
triggerEvenIfUsersLo
ggedIn
True Actions (garbage collection or processrecycling) may be triggered even if users arelogged in.
allowGcEvenIfAnalyse
sLoaded
False Set to True to allow GC even if anaylses areopen.
minMinutesBetweenGc 60 Specify the minimum number of minutesbetween garbage collections.
minMinutesBeforeRecy
cle
300 Specify the minimum number of minutesbefore the process is recycled.
</recoverMemory>
186
TIBCO Spotfire® Server and Environment Installation and Administration
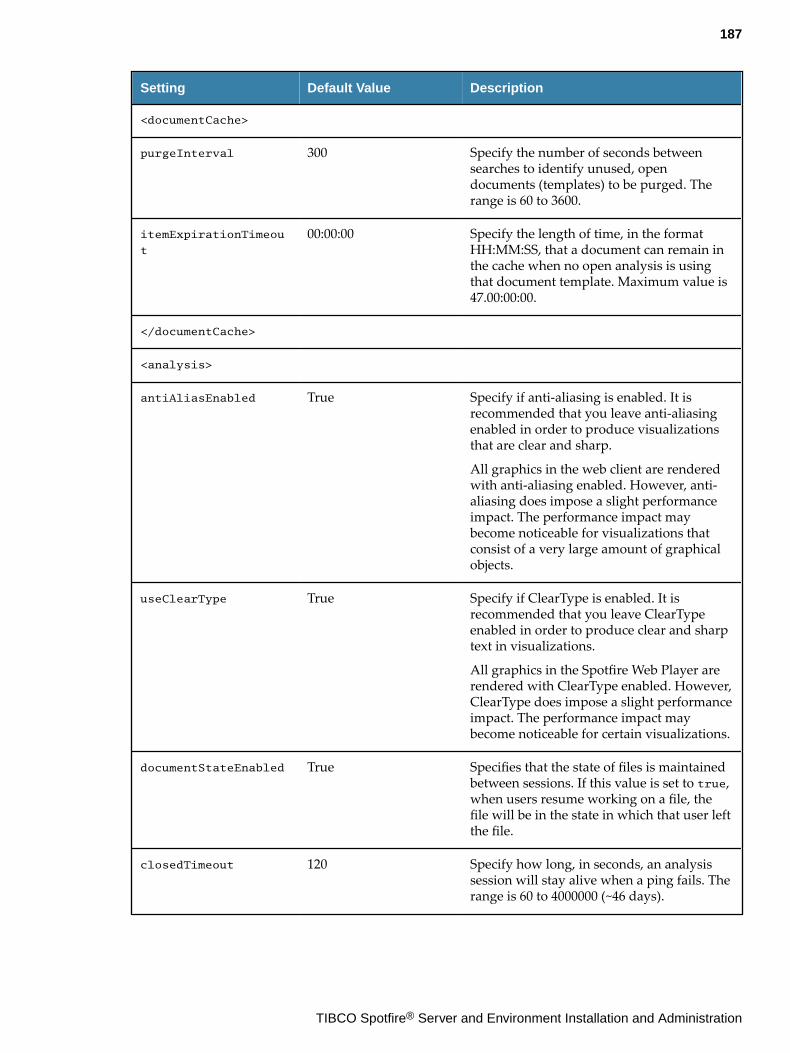
Setting Default Value Description
<documentCache>
purgeInterval 300 Specify the number of seconds betweensearches to identify unused, opendocuments (templates) to be purged. Therange is 60 to 3600.
itemExpirationTimeou
t
00:00:00 Specify the length of time, in the formatHH:MM:SS, that a document can remain inthe cache when no open analysis is usingthat document template. Maximum value is47.00:00:00.
</documentCache>
<analysis>
antiAliasEnabled True Specify if anti-aliasing is enabled. It isrecommended that you leave anti-aliasingenabled in order to produce visualizationsthat are clear and sharp.
All graphics in the web client are renderedwith anti-aliasing enabled. However, anti-aliasing does impose a slight performanceimpact. The performance impact maybecome noticeable for visualizations thatconsist of a very large amount of graphicalobjects.
useClearType True Specify if ClearType is enabled. It isrecommended that you leave ClearTypeenabled in order to produce clear and sharptext in visualizations.
All graphics in the Spotfire Web Player arerendered with ClearType enabled. However,ClearType does impose a slight performanceimpact. The performance impact maybecome noticeable for certain visualizations.
documentStateEnabled True Specifies that the state of files is maintainedbetween sessions. If this value is set to true,when users resume working on a file, thefile will be in the state in which that user leftthe file.
closedTimeout 120 Specify how long, in seconds, an analysissession will stay alive when a ping fails. Therange is 60 to 4000000 (~46 days).
187
TIBCO Spotfire® Server and Environment Installation and Administration

Setting Default Value Description
checkClosedInterval 60 Specify how often, in seconds, a checkshould be made if an analysis has beenclosed in the web client. The range is 60 to300.
inactivityTimeout 02:00:00 Specify the length of time, in the formatHH:MM:SS, that an analysis session can bealive when no user activity has beendetected, excluding pings. The range is00:01:00 to Infinite.
checkInactivityInter
val
300 Specify how often, in seconds, a checkshould be made if an analysis session hashad no user activity, excluding pings. Therange is 60 to 12*3600.
regularPollChangesIn
terval
500 Specify the base interval, in microseconds,from when a change is made on the webclient to when the client polls for a statusupdate. The range is 200 to 1000.
maxPollChangesInterv
al
3000 Specify the maximum value, inmicroseconds, by which the poll interval inregularPollChangesInterval is increasedfor each try until this value is reached. Therange is 1000 to 10000.
pollLoadInterval 1000 Specify the interval, in microseconds,between polls when an analysis file isloading. The range is 1000 to 10000.
needsRefreshInterval 15 Specify the frequency, in seconds, withwhich the web client should ping or poll tokeep the analysis alive. The range is 10 to 60.
privateThreadPoolEna
bled
True This setting should not be edited unlessinstructed by TIBCO Spotfire Support.
privateThreadPoolWor
kerCount
1 This setting should not be edited unlessinstructed by TIBCO Spotfire Support.
toolTipDelay 1000 Specify the length of time, in microseconds,that the client must wait before requesting avisualization highlighting tooltip from theserver. The range is 200 to 3000.
undoRedoEnabled True Specify if the Undo and Redo functionalityis enabled.
188
TIBCO Spotfire® Server and Environment Installation and Administration
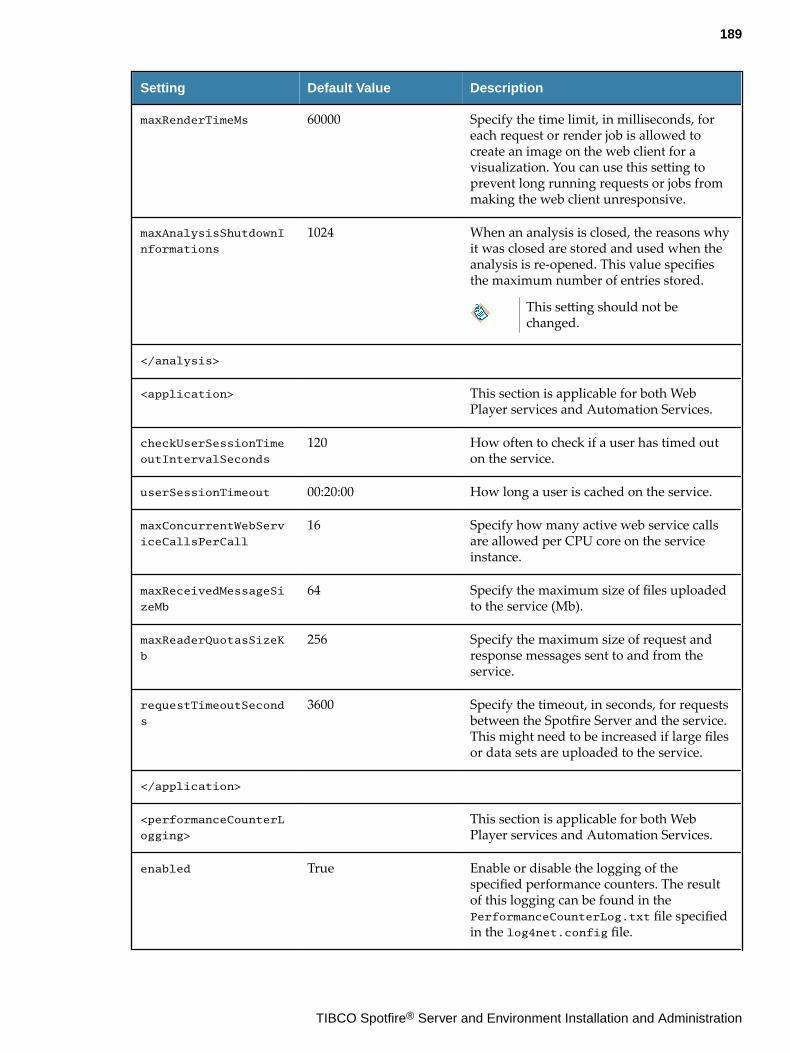
Setting Default Value Description
maxRenderTimeMs 60000 Specify the time limit, in milliseconds, foreach request or render job is allowed tocreate an image on the web client for avisualization. You can use this setting toprevent long running requests or jobs frommaking the web client unresponsive.
maxAnalysisShutdownI
nformations
1024 When an analysis is closed, the reasons whyit was closed are stored and used when theanalysis is re-opened. This value specifiesthe maximum number of entries stored.
This setting should not bechanged.
</analysis>
<application> This section is applicable for both WebPlayer services and Automation Services.
checkUserSessionTime
outIntervalSeconds
120 How often to check if a user has timed outon the service.
userSessionTimeout 00:20:00 How long a user is cached on the service.
maxConcurrentWebServ
iceCallsPerCall
16 Specify how many active web service callsare allowed per CPU core on the serviceinstance.
maxReceivedMessageSi
zeMb
64 Specify the maximum size of files uploadedto the service (Mb).
maxReaderQuotasSizeK
b
256 Specify the maximum size of request andresponse messages sent to and from theservice.
requestTimeoutSecond
s
3600 Specify the timeout, in seconds, for requestsbetween the Spotfire Server and the service.This might need to be increased if large filesor data sets are uploaded to the service.
</application>
<performanceCounterL
ogging>
This section is applicable for both WebPlayer services and Automation Services.
enabled True Enable or disable the logging of thespecified performance counters. The resultof this logging can be found in thePerformanceCounterLog.txt file specifiedin the log4net.config file.
189
TIBCO Spotfire® Server and Environment Installation and Administration
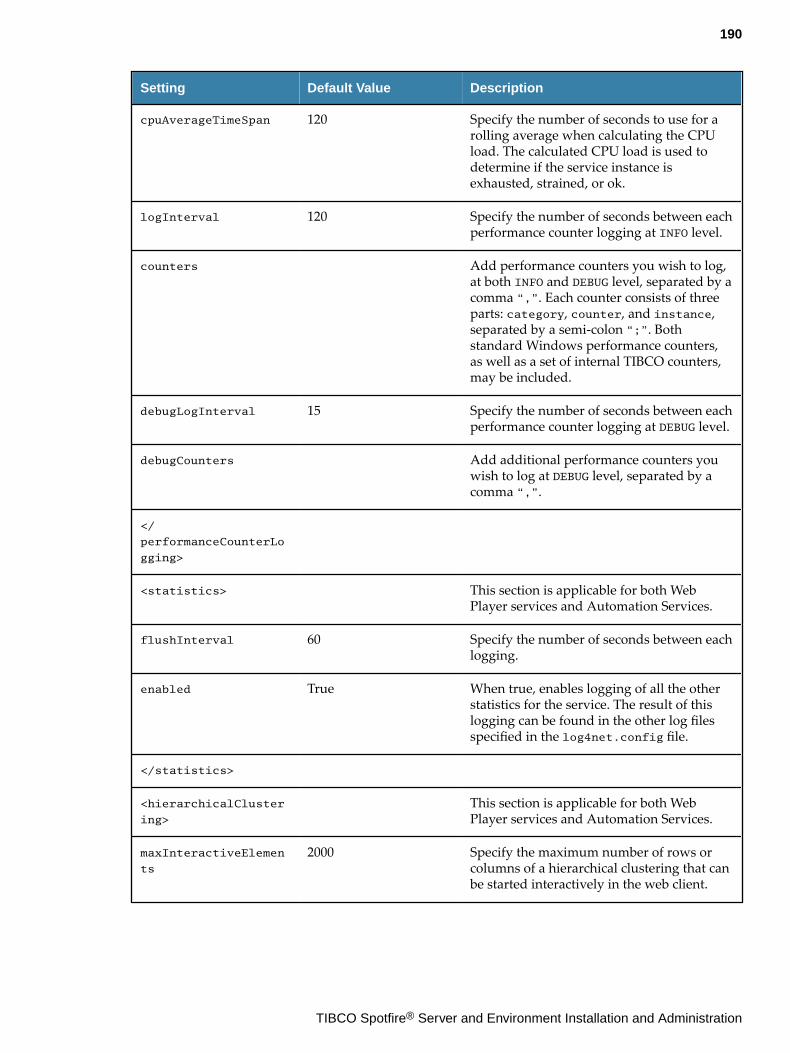
Setting Default Value Description
cpuAverageTimeSpan 120 Specify the number of seconds to use for arolling average when calculating the CPUload. The calculated CPU load is used todetermine if the service instance isexhausted, strained, or ok.
logInterval 120 Specify the number of seconds between eachperformance counter logging at INFO level.
counters Add performance counters you wish to log,at both INFO and DEBUG level, separated by acomma “,”. Each counter consists of threeparts: category, counter, and instance,separated by a semi-colon “;”. Bothstandard Windows performance counters,as well as a set of internal TIBCO counters,may be included.
debugLogInterval 15 Specify the number of seconds between eachperformance counter logging at DEBUG level.
debugCounters Add additional performance counters youwish to log at DEBUG level, separated by acomma “,”.
</
performanceCounterLo
gging>
<statistics> This section is applicable for both WebPlayer services and Automation Services.
flushInterval 60 Specify the number of seconds between eachlogging.
enabled True When true, enables logging of all the otherstatistics for the service. The result of thislogging can be found in the other log filesspecified in the log4net.config file.
</statistics>
<hierarchicalCluster
ing>
This section is applicable for both WebPlayer services and Automation Services.
maxInteractiveElemen
ts
2000 Specify the maximum number of rows orcolumns of a hierarchical clustering that canbe started interactively in the web client.
190
TIBCO Spotfire® Server and Environment Installation and Administration
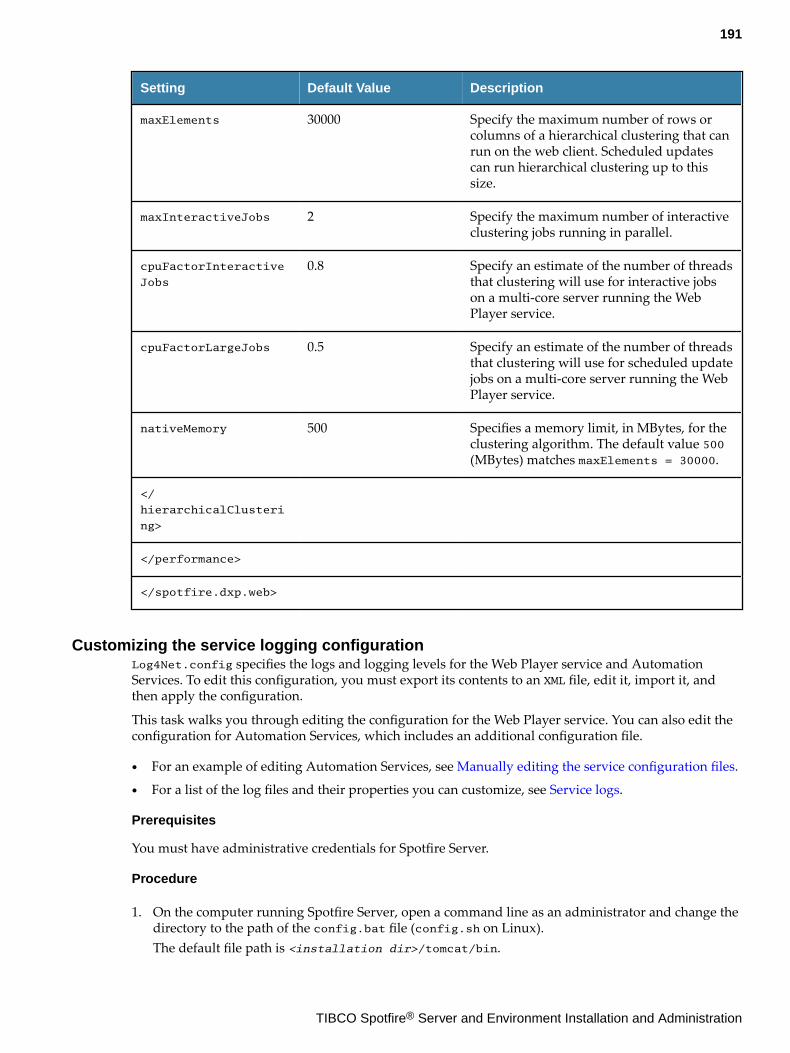
Setting Default Value Description
maxElements 30000 Specify the maximum number of rows orcolumns of a hierarchical clustering that canrun on the web client. Scheduled updatescan run hierarchical clustering up to thissize.
maxInteractiveJobs 2 Specify the maximum number of interactiveclustering jobs running in parallel.
cpuFactorInteractive
Jobs
0.8 Specify an estimate of the number of threadsthat clustering will use for interactive jobson a multi-core server running the WebPlayer service.
cpuFactorLargeJobs 0.5 Specify an estimate of the number of threadsthat clustering will use for scheduled updatejobs on a multi-core server running the WebPlayer service.
nativeMemory 500 Specifies a memory limit, in MBytes, for theclustering algorithm. The default value 500(MBytes) matches maxElements = 30000.
</
hierarchicalClusteri
ng>
</performance>
</spotfire.dxp.web>
Customizing the service logging configurationLog4Net.config specifies the logs and logging levels for the Web Player service and AutomationServices. To edit this configuration, you must export its contents to an XML file, edit it, import it, andthen apply the configuration.
This task walks you through editing the configuration for the Web Player service. You can also edit theconfiguration for Automation Services, which includes an additional configuration file.
● For an example of editing Automation Services, see Manually editing the service configuration files.
● For a list of the log files and their properties you can customize, see Service logs.
Prerequisites
You must have administrative credentials for Spotfire Server.
Procedure
1. On the computer running Spotfire Server, open a command line as an administrator and change thedirectory to the path of the config.bat file (config.sh on Linux).The default file path is <installation dir>/tomcat/bin.
191
TIBCO Spotfire® Server and Environment Installation and Administration
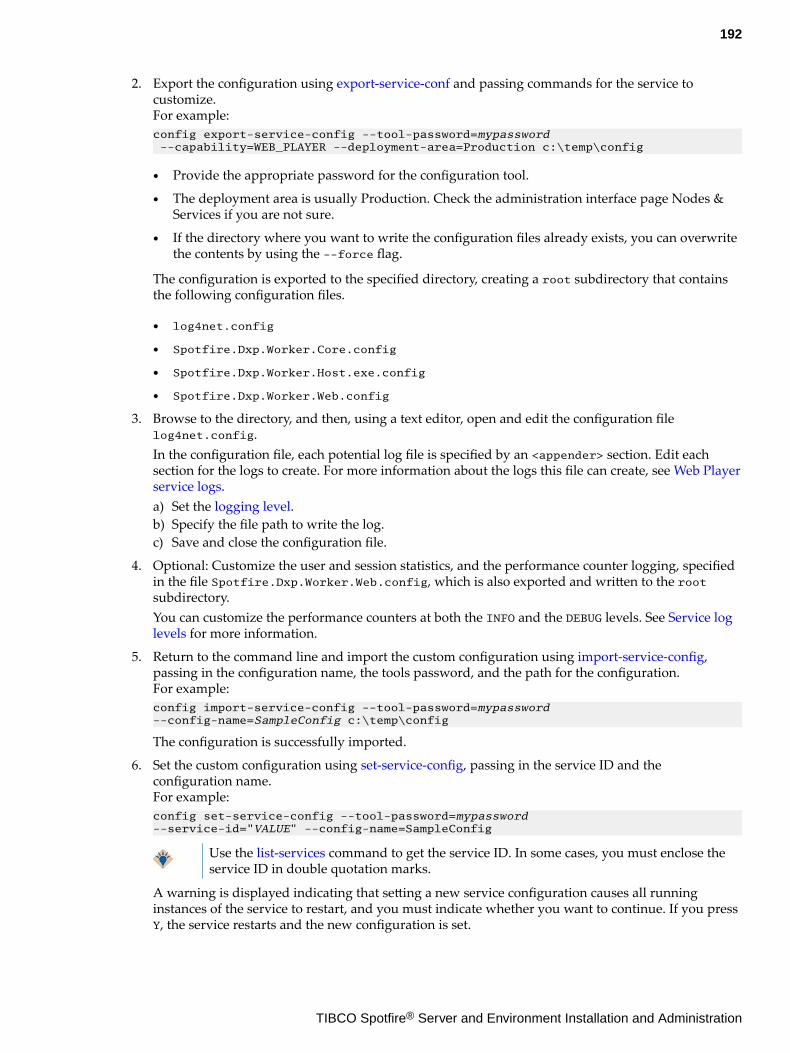
2. Export the configuration using export-service-conf and passing commands for the service tocustomize.For example:config export-service-config --tool-password=mypassword --capability=WEB_PLAYER --deployment-area=Production c:\temp\config
● Provide the appropriate password for the configuration tool.
● The deployment area is usually Production. Check the administration interface page Nodes &Services if you are not sure.
● If the directory where you want to write the configuration files already exists, you can overwritethe contents by using the --force flag.
The configuration is exported to the specified directory, creating a root subdirectory that containsthe following configuration files.
● log4net.config
● Spotfire.Dxp.Worker.Core.config
● Spotfire.Dxp.Worker.Host.exe.config
● Spotfire.Dxp.Worker.Web.config
3. Browse to the directory, and then, using a text editor, open and edit the configuration filelog4net.config.In the configuration file, each potential log file is specified by an <appender> section. Edit eachsection for the logs to create. For more information about the logs this file can create, see Web Playerservice logs.a) Set the logging level.b) Specify the file path to write the log.c) Save and close the configuration file.
4. Optional: Customize the user and session statistics, and the performance counter logging, specifiedin the file Spotfire.Dxp.Worker.Web.config, which is also exported and written to the rootsubdirectory.You can customize the performance counters at both the INFO and the DEBUG levels. See Service loglevels for more information.
5. Return to the command line and import the custom configuration using import-service-config,passing in the configuration name, the tools password, and the path for the configuration.For example:config import-service-config --tool-password=mypassword --config-name=SampleConfig c:\temp\config
The configuration is successfully imported.
6. Set the custom configuration using set-service-config, passing in the service ID and theconfiguration name.For example:config set-service-config --tool-password=mypassword --service-id="VALUE" --config-name=SampleConfig
Use the list-services command to get the service ID. In some cases, you must enclose theservice ID in double quotation marks.
A warning is displayed indicating that setting a new service configuration causes all runninginstances of the service to restart, and you must indicate whether you want to continue. If you pressY, the service restarts and the new configuration is set.
192
TIBCO Spotfire® Server and Environment Installation and Administration
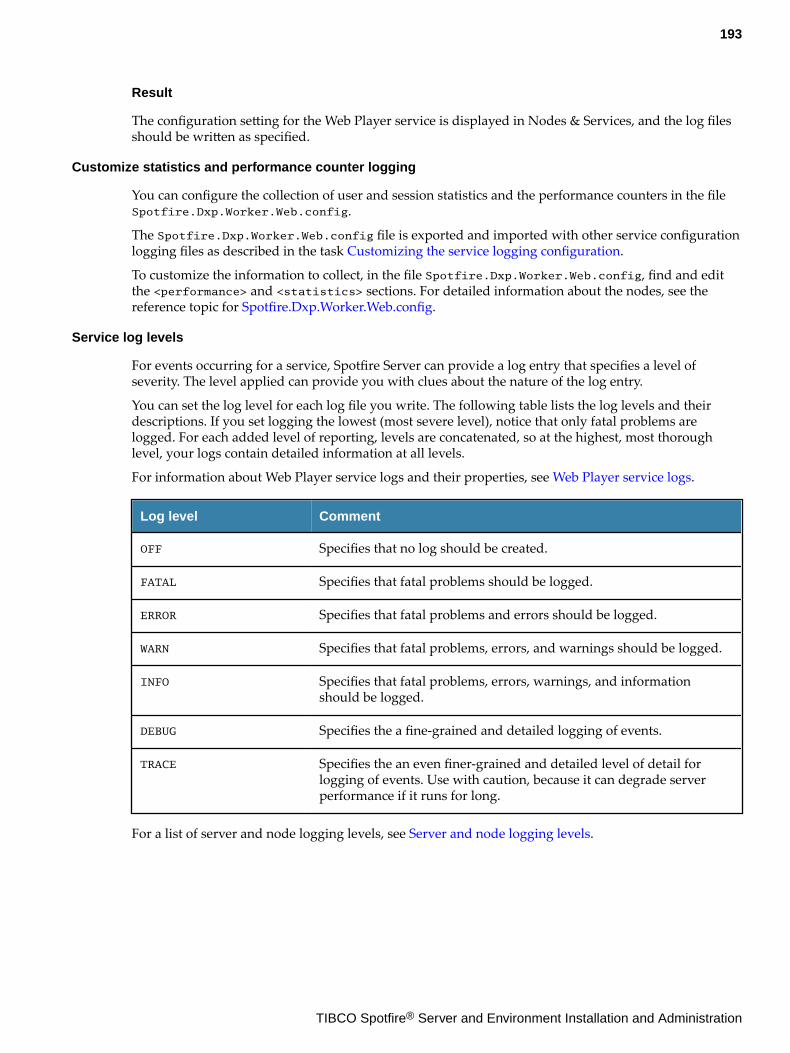
Result
The configuration setting for the Web Player service is displayed in Nodes & Services, and the log filesshould be written as specified.
Customize statistics and performance counter logging
You can configure the collection of user and session statistics and the performance counters in the fileSpotfire.Dxp.Worker.Web.config.
The Spotfire.Dxp.Worker.Web.config file is exported and imported with other service configurationlogging files as described in the task Customizing the service logging configuration.
To customize the information to collect, in the file Spotfire.Dxp.Worker.Web.config, find and editthe <performance> and <statistics> sections. For detailed information about the nodes, see thereference topic for Spotfire.Dxp.Worker.Web.config.
Service log levels
For events occurring for a service, Spotfire Server can provide a log entry that specifies a level ofseverity. The level applied can provide you with clues about the nature of the log entry.
You can set the log level for each log file you write. The following table lists the log levels and theirdescriptions. If you set logging the lowest (most severe level), notice that only fatal problems arelogged. For each added level of reporting, levels are concatenated, so at the highest, most thoroughlevel, your logs contain detailed information at all levels.
For information about Web Player service logs and their properties, see Web Player service logs.
Log level Comment
OFF Specifies that no log should be created.
FATAL Specifies that fatal problems should be logged.
ERROR Specifies that fatal problems and errors should be logged.
WARN Specifies that fatal problems, errors, and warnings should be logged.
INFO Specifies that fatal problems, errors, warnings, and informationshould be logged.
DEBUG Specifies the a fine-grained and detailed logging of events.
TRACE Specifies the an even finer-grained and detailed level of detail forlogging of events. Use with caution, because it can degrade serverperformance if it runs for long.
For a list of server and node logging levels, see Server and node logging levels.
193
TIBCO Spotfire® Server and Environment Installation and Administration
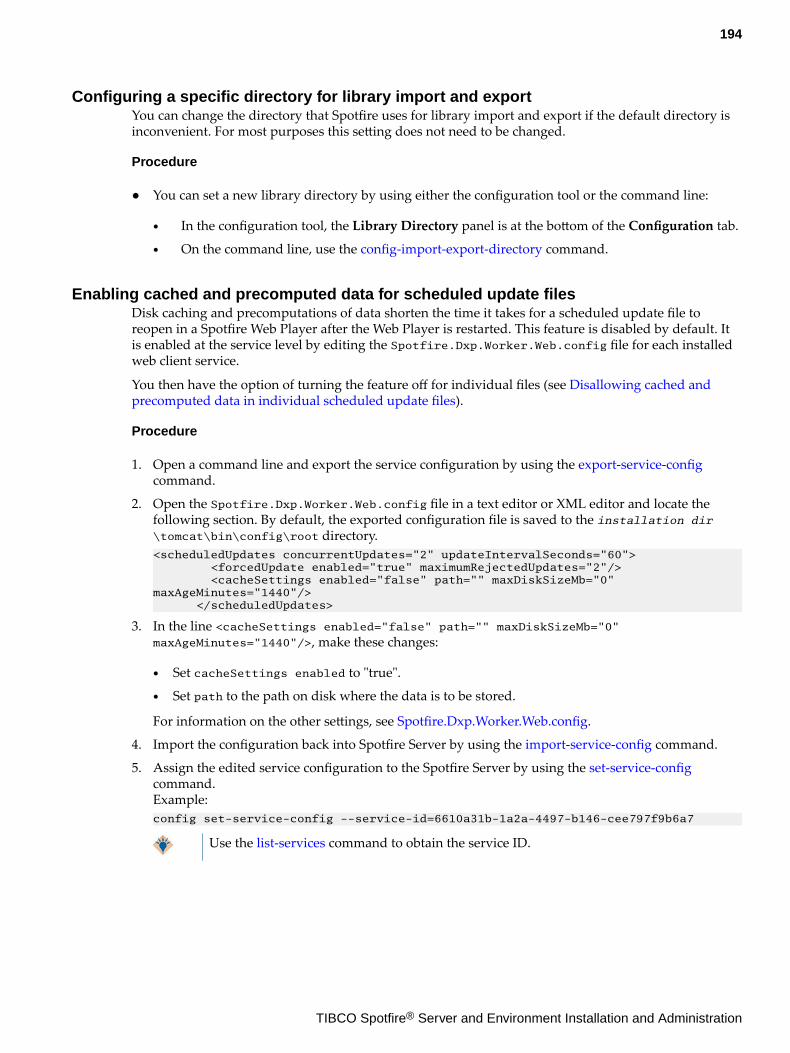
Configuring a specific directory for library import and exportYou can change the directory that Spotfire uses for library import and export if the default directory isinconvenient. For most purposes this setting does not need to be changed.
Procedure
● You can set a new library directory by using either the configuration tool or the command line:
● In the configuration tool, the Library Directory panel is at the bottom of the Configuration tab.
● On the command line, use the config-import-export-directory command.
Enabling cached and precomputed data for scheduled update filesDisk caching and precomputations of data shorten the time it takes for a scheduled update file toreopen in a Spotfire Web Player after the Web Player is restarted. This feature is disabled by default. Itis enabled at the service level by editing the Spotfire.Dxp.Worker.Web.config file for each installedweb client service.
You then have the option of turning the feature off for individual files (see Disallowing cached andprecomputed data in individual scheduled update files).
Procedure
1. Open a command line and export the service configuration by using the export-service-configcommand.
2. Open the Spotfire.Dxp.Worker.Web.config file in a text editor or XML editor and locate thefollowing section. By default, the exported configuration file is saved to the installation dir\tomcat\bin\config\root directory.<scheduledUpdates concurrentUpdates="2" updateIntervalSeconds="60"> <forcedUpdate enabled="true" maximumRejectedUpdates="2"/> <cacheSettings enabled="false" path="" maxDiskSizeMb="0" maxAgeMinutes="1440"/> </scheduledUpdates>
3. In the line <cacheSettings enabled="false" path="" maxDiskSizeMb="0"maxAgeMinutes="1440"/>, make these changes:
● Set cacheSettings enabled to "true".
● Set path to the path on disk where the data is to be stored.
For information on the other settings, see Spotfire.Dxp.Worker.Web.config.
4. Import the configuration back into Spotfire Server by using the import-service-config command.
5. Assign the edited service configuration to the Spotfire Server by using the set-service-configcommand.Example:config set-service-config --service-id=6610a31b-1a2a-4497-b146-cee797f9b6a7
Use the list-services command to obtain the service ID.
194
TIBCO Spotfire® Server and Environment Installation and Administration
Disabling the attachment manager cacheBy default the Spotfire attachment manager caches library content and the results of information linkexecutions when downloading or saving large amounts of data. You can disable the attachmentmanager cache by editing the configuration.xml file
Procedure
1. Export and open the Spotfire Server configuration file; for general instructions, see Manually editingthe Spotfire Server configuration file.
2. In the configuration.xml file, locate the following section and set <content-caching-enabled>to "false":<library> <import-export-path>default</import-export-path> <content-caching-enabled>true</content-caching-enabled> <max-number-concurrent-imports-and-exports>3</max-number-concurrent-imports-and-exports> </library>
3. Then locate the <information services> section and set <result-caching-enabled> to "false".
4. Import the server configuration file and restart the server(s); for instructions, see Manually editingthe Spotfire Server configuration file.
195
TIBCO Spotfire® Server and Environment Installation and Administration
Post-installation steps
After Spotfire Server is installed and configured, the Spotfire administrator must complete these setuptasks before end users can access and work in Spotfire.
1. Install Spotfire Analyst on a computer for the administrator to use.
Steps 3-6 in this list require SpotfireAnalyst.
2. Set up users and groups; see User administration and Group administration for details.3. Assign licenses and preferences to groups; use the Administration Manager in Spotfire Analyst to
accomplish these tasks.
For a description of the licenses and preferences, see the Administration Manager help.
4. Set up the Spotfire library by using Spotfire Analyst.5. Optional: Import demo database files into the library files so that users can experiment with the
demo database ; see Enabling demo database use.6. Optional: Import geocoding tables into the library so that data can be displayed on maps; see
Enabling geocoding tables for map charts.
Enabling demo database useTo make the demo database available to end users for practice with Spotfire, you must also import itsrelated ZIP file to the Spotfire library. This ZIP file contains analysis files and an information model thatlinks to the demo data.
Prerequisites
● While setting up the Spotfire database, the administrator chose to install the demo database.● Spotfire Analyst is installed.
Procedure
1. Copy the file <Spotfire Server installation kit>/demodata/<mssql or oracle>/demo.part0.zip to the library folder that is used for importing and exporting files. (By default, thisis <server installation directory>/tomcat/application-data/library.)
2. Log in to Spotfire Analyst as a Spotfire Administrator or Library Administrator.3. Click Tools > Library Administration.4. Click Import and then browse to and select the file demo.part0.zip.5. Click OK twice, and then in the Select Destination Folder dialog, either select an existing folder or
create a new one (for example, you can create a "Demo" folder).6. Click OK, wait for the dialog to display the words "Import done", and then click Close.
Enabling geocoding tables for map chartsTo display data on a Spotfire map, the data must be "geocoded". This involves matching the data tolocation identifiers in a set of data tables that are known as a geocoding hierarchy. These geocodingtables must be imported into the library before they can be used.
Prerequisites
Spotfire Analyst is installed.
196
TIBCO Spotfire® Server and Environment Installation and Administration
Procedure
1. Copy the file <Spotfire Server installation kit>/geoanalytics/geoanalytics.part0.zipto the library folder that is used for importing and exporting files. (By default, this is <serverinstallation directory>/tomcat/application-data/library.)
2. Log in to Spotfire Analyst as a Spotfire Administrator or Library Administrator.
3. Click Tools > Library Administration.
4. Click Import and then browse to and select the file geoanalytics.part0.zip.
5. Click OK twice, and then in the Select Destination Folder dialog, either select an existing folder orcreate a new one (for example, you can create a "GeoAnalytics" folder).
6. Click OK, wait for the dialog to display the words "Import done", and then click Close.
197
TIBCO Spotfire® Server and Environment Installation and Administration
Administration
Administrators can perform most management tasks in Spotfire Server, including creating users andgroups, deploying software updates, and managing and monitoring software configurations.
To set licenses and preferences, however, and to manage the library, use Spotfire Analyst.
Spotfire Analyst currently offers the same administrative functionality as its previous version, but as ofthe 7.5 version, Spotfire Server offers a new, streamlined interface and easy access to both new andexisting features.
Opening Spotfire ServerYou can access Spotfire Server through a browser on any computer in the domain.
There are two ways to open Spotfire Server:
● On the computer running Spotfire Server, click Start, go to the Spotfire Server folder, and clickTIBCO Spotfire Server.
● On any computer in the domain, go to http://servername:port/spotfire.
If you work in a clustered environment, it does not matter which server in the cluster you use. Changesmade to one server are stored in the Spotfire database and are available to all servers. If your clustereddeployment includes a load balancer, use the load balancer hostname in place of servername in thesecond method.
Nodes, services, and resource poolsIn Spotfire Server you can enlarge or scale down your implementation as needed, as well as create andmanage resource pools. Resource pools are used in routing rules to direct Spotfire traffic to specific serviceinstances.
For more information, see Nodes and services introduction, Node manager installation, and Routingrules.
Creating resource poolsIf you want a certain analysis, or all analyses requested by certain users, to open on specific instances ofthe Spotfire Web Player, create a resource pool that contains the selected instances and use it in arouting rule.
Procedure
1. Log in to Spotfire Server and click Nodes & Services.
2. On the "Resource pools" page, click Create resource pool.
3. In the "Create new resource pool" dialog, enter a name for the pool, and select the check box of eachSpotfire Web Player instance that you want to add to the pool.
Each Spotfire Web Player instance can belong to only one resource pool.
4. Click Create.The new pool appears in the Resource pools list.
198
TIBCO Spotfire® Server and Environment Installation and Administration
Adding resources to resource poolsTo respond to changing needs in your organization, you can adjust the contents of resource pools at anytime.
Procedure
1. Log in to Spotfire Server and click Nodes & Services.
2. Click the Resource pools tab.
3. In the "Resource pools" table, locate the pool that you want to change and then click the plus sign onthe right side of its row.
4. In the "Add instances to resource pool" dialog, select the check box for each instance that you wantto add.
5. Click Add.
Removing resources from resource poolsTo respond to changing needs in your organization, you can adjust the contents of resource pools at anytime.
Procedure
1. Log in to Spotfire Server and click Nodes & Services.
2. Click the Resource pools tab.
3. In the "Resource pools" table, locate the pool that you want to change and then click the downarrow in its "AVAILABLE" box.This displays a list of the instances that the resource pool currently contains.
4. Above the list of instances, on the right, click the pencil icon.Check boxes are displayed to the left of each instance.
5. Select the check boxes of the instances that you want to remove from the pool, and then clickRemove.The removed instance(s) are added to the "Unassigned instances" section.
Changing the name of a resource poolYou can rename a resource pool directly in the "Resource pools" list.
Procedure
1. Log in to Spotfire Server and click Nodes & Services.
2. Click the Resource pools tab and then, in the list of resource pools, click the name you want tochange.
3. Make your changes, and then click the check mark.
Deleting resource poolsYou can delete any resource pool that is no longer being used in a routing rule.
Prerequisites
Make sure that the resource pool is not in use by reviewing the "Resource pool" column of the Rules listin Scheduling & Routing.
199
TIBCO Spotfire® Server and Environment Installation and Administration
Procedure
1. Log in to Spotfire Server and click Nodes & Services.
2. Click the Resource pools tab.
3. In the "Resource pools" table, locate the pool that you want to delete and then click the trash icon onthe right side of its row.
Updating node managersWhen you add a node manager software update (hotfix) to the appropriate deployment area, anUpdate button is displayed in the information pane for each affected node.
Prerequisites
The software update is in the node manager's deployment area; for instructions, see Adding softwarepackages to a deployment area.
Procedure
1. Log in to Spotfire Server and click Nodes & Services.
2. On the "Your network" page, under Select a view, click Nodes, and then select the node that youwant to update.In the upper-right pane there is an Update button.
3. Click Update, and then in the confirmation dialog click Update again.A message indicates that the update has started, and then the Status line indicates that the node isoffline.
Result
When the Roll back button appears in the upper-right pane, the update is complete.
If you want to cancel the update and return to the previous node manager version, see Rolling back anode manager update.
Rolling back a node manager updateAfter updating a node manager, you have the option of undoing the update and returning to theprevious version of the node manager.
Procedure
1. Log in to Spotfire Server and click Nodes & Services.
2. On the "Your network" page, under Select a view, click Nodes, and then select the node managerthat was updated.In the upper-right pane there is a Roll back button.
3. Click Roll back, and then in the confirmation dialog click Roll back again.A message indicates that the rollback has started, and then the Status line indicates that the node isoffline.
Result
When the Update button reappears, the rollback is complete.
200
TIBCO Spotfire® Server and Environment Installation and Administration
Updating servicesWhen you add an update for a service to the appropriate deployment area (or make any other changeto a deployment, such as deleting a package or changing the deployment area of a service), an Updateservice button becomes available in the information pane for each affected service.
Procedure
1. Log in to Spotfire Server and click Nodes & Services.
2. On the "Your network" page, under Select a view, click Nodes, and then select the service that youwant to update.In the upper-right pane there is an Update service button. You can scan the Packages pane for theorange notes that indicate exactly what has changed from the current deployment.
3. Click Update service, and then in the confirmation dialog click Update.In the upper-right pane, the Status line indicates that the update has started. The Activity pageshows the progress of the update.
Result
When the update is complete, the Status line indicates "Service installed successfully". The new serviceduplicates the settings of the old service, including its name, resource pool, and port. No furtherrequests will be routed to the old service.
If you want to cancel the update and return to the previous service version, see Rolling back a serviceupdate.
If you delete the old service you will not be able to roll back the service.
When the update is successful and you are sure that you want to keep the new version, you shoulddelete the old service version. Because Spotfire Server stores a maximum of two versions of a service, ifyou perform another update on the same service, the first version will be deleted automatically if it isstill being stored.
Rolling back a service updateAfter updating a service, you have the option of undoing the update and returning to the previousversion of the service.
Procedure
1. Log in to Spotfire Server and click Nodes & Services.
2. On the "Your network" page, under Select a view, click Nodes, and then select the service that wasupdated.The Show old service link is visible in the upper-right corner of the page.
3. Click Show old service.In the upper-right pane, information about the old service appears (in a paler font) to the right ofinformation about the new service. A Roll back button becomes available in the upper-right cornerof the page.
4. Click Roll back, and then in the confirmation dialog click Roll back again.The Status line indicates "Instances are being modified".
5. When the Status line indicates "Service is available but the functionality is limited until rollback isconfirmed", click Confirm rollback in the upper-right corner of the page. In the confirmation dialog,click Roll back.
201
TIBCO Spotfire® Server and Environment Installation and Administration
Result
The Status line indicates "Service installed successfully".
Shutting down a service instanceIf you want to shut down a service instance because it is not needed, for example, or because you wantto run it on a different node, you can shut the service down without disturbing the work of end users.You can also shut it down immediately.
Procedure
1. Log in to Spotfire Server and click Nodes & Services.
2. On the "Your network" page, under Select a view, select Nodes.
3. In the left pane, expand the entries under the node and select the service instance that you want toshut down.
4. In the right pane, click Shut down and then do one of the following:
● If you want the instance to continue running for a while, click Schedule and then enter thenumber of hours and minutes you want Spotfire Server to wait before shutting it down.
Before the shutdown, any users on that service instance are notified that the instancewill be shutting down; this gives them time to save their work. The instance is thenshut down when the user or users close the analysis, or at the scheduled time,whichever is earlier. If no one is using the instance, the instance is shut downimmediately.
● If you want the instance to shut down immediately, whether or not it is being used, clickImmediately.
End users who are on this service instance will lose any unsaved work.
Revoking trust of a nodeYou may want to remove the authorization of a node because you are upgrading your hardware, forexample, or down-scaling your network, or if you see an unusual error and want to reset the computer.This immediately shuts down any services that are running on the node, and disables all managementoptions for the node except re-trusting it.
Procedure
1. Log in to Spotfire Server and click Nodes & Services.
2. On the "Your network" page, under Select a view, select Nodes.
3. In the left pane, select the node whose trust you want to revoke, and in the upper-right pane clickRevoke trust.
Result
The node moves from the "Your network" page to the "Untrusted nodes" page.
202
TIBCO Spotfire® Server and Environment Installation and Administration

User administrationIf the user accounts for your Spotfire implementation are manually added to the database (rather thansynchronized with an external directory such as LDAP), user administration takes place in SpotfireServer.
User accounts that are automatically created by Spotfire Server, such asautomationservices@SPOTFIRESYSTEM, cannot be deleted and their names cannot be changed.
For more information about users, see Users & groups introduction.
Creating new Spotfire usersIf your Spotfire implementation is configured for Spotfire database authentication, you can add newusers in Spotfire Server. (To import and export users, use the Administrator Manager in SpotfireAnalyst.)
Externally synchronized users are managed in that context and not within the Spotfire system..
Procedure
1. Log in to Spotfire Server. (For instructions on accessing the server, see Opening Spotfire Server.)
2. Click Users & Groups.
3. Under Select a category, select Users.
4. At the top of the pane, click Create new user.
5. In the New user dialog, enter the user name and password.
6. Re-type the password, enter an email address (optional), and click Save.
Result
The new user is displayed in the Users list, and the Groups list in the lower right pane indicates thatthe user belongs to the Everyone group.
Adding a user to one or more groupsA user can belong to one or many groups. A user who is an explicit member of a group is also, byinheritance, a member of that group's parent groups.
Procedure
1. Log in to Spotfire Server and click Users & Groups.
2. Under Select a category, select Users.
3. Highlight the name of the user that you want to add to groups.
4. In the Groups pane on the right, click Add.
5. In the Select groups for user to join dialog, select the check box next to the groups to which youwant to add the user.
6. Click Save.
Result
The selected groups are displayed in the user's Groups list.
203
TIBCO Spotfire® Server and Environment Installation and Administration
Removing a user from one or more groupsYou can remove a user from a group to remove the user's access to the licenses that are enabled for thatgroup.
Procedure
1. Log in to Spotfire Server and click Users & Groups.
2. Under Select a category, select Users.
3. In the left pane of the Users page, highlight the user who you want to remove from a group.
4. In the lower right pane, under Groups, select the check box of the groups from which you want toremove the user.
5. Click Remove.
Result
The selected groups no longer appear in the user's Groups list.
Changing a user's name, password, or emailYou can change user properties in Spotfire Server.
Externally synchronized users are managed in that context and not within the Spotfire system.
Procedure
1. Log in to Spotfire Server and click Users & Groups.
2. Under Select a category, select Users.
3. Highlight the name of the user whose properties you want to change.
4. In the upper-right corner of the page, click Edit.
5. In the Edit user dialog, make your changes. (Select the Change password check box to create a newpassword.)
6. When you've finished, click Save.
Disabling a user accountDisabling a user account makes it impossible for the user to log in to Spotfire, but keeps their record inthe system for reference or for enabling them again in the future.
Externally synchronized users are managed in that context and not within the Spotfire system..
Procedure
● On the command line, use the enable-user command.For more information about the command line, see Configuration using the command line.
204
TIBCO Spotfire® Server and Environment Installation and Administration

Deleting users from the systemTo permanently remove users from your Spotfire implementation, delete them. However, if you want todeny them access to Spotfire but keep their records in the system, you can disable their accountsinstead.
Externally synchronized users are managed in that context and not within the Spotfire system..
Procedure
1. Log in to Spotfire Server and click Users & Groups.
2. Under Select a category, select Users.
3. Select the check box next to the user or users that you want to delete.
4. Click the Delete checked users button.
Group administrationMost group administration takes place in Spotfire Server. Managing licenses and preferences, however,takes place in the Administration Manager in Spotfire Analyst.
For groups that are synchronized from an external source such as an LDAP directory, certain tasksincluding adding and removing members of the synchronized group, take place in the externalenvironment and not within the Spotfire system.
For more information about groups, see Users & groups introduction.
Roles and special groupsSpotfire includes a number of special groups that are present at installation and cannot be removed.They define standard roles for administering and using Spotfire.
Each special group enables a set of licenses that correspond to an administrative or user role. To assigna role to a user, simply add the user to one of the special groups. Note that some roles require not onlymembership in the special group, but also that a specific license be enabled for the group. Licenses areset in the Administration Manager in Spotfire Analyst.
Role Description
Administrator All users who need administrator privileges on Spotfire Server, includingthe ability to manage users and groups, must belong to this group.Membership in this group grants all permissions described below inaddition to administration of preferences, licenses, and the user directory.
This group must also have the Spotfire Administrator licenseenabled to fully administer the Spotfire system (to access theAdministration Manager tool in Spotfire Analyst as well as allareas of Spotfire Server).
205
TIBCO Spotfire® Server and Environment Installation and Administration
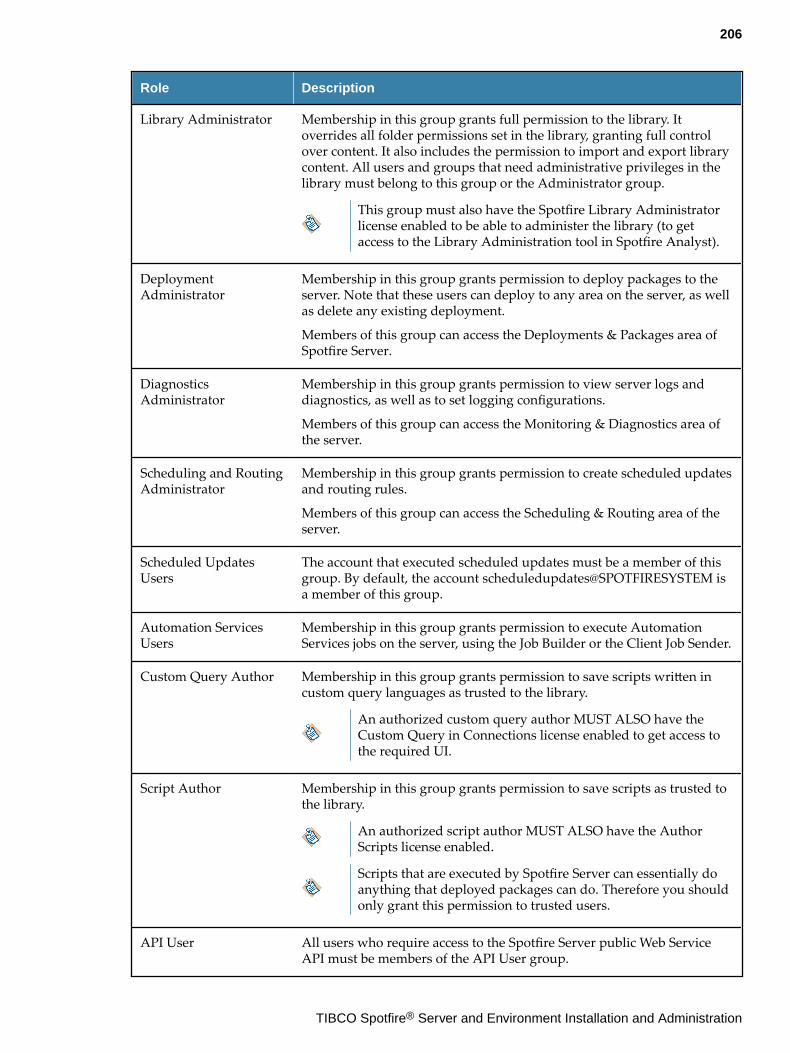
Role Description
Library Administrator Membership in this group grants full permission to the library. Itoverrides all folder permissions set in the library, granting full controlover content. It also includes the permission to import and export librarycontent. All users and groups that need administrative privileges in thelibrary must belong to this group or the Administrator group.
This group must also have the Spotfire Library Administratorlicense enabled to be able to administer the library (to getaccess to the Library Administration tool in Spotfire Analyst).
DeploymentAdministrator
Membership in this group grants permission to deploy packages to theserver. Note that these users can deploy to any area on the server, as wellas delete any existing deployment.
Members of this group can access the Deployments & Packages area ofSpotfire Server.
DiagnosticsAdministrator
Membership in this group grants permission to view server logs anddiagnostics, as well as to set logging configurations.
Members of this group can access the Monitoring & Diagnostics area ofthe server.
Scheduling and RoutingAdministrator
Membership in this group grants permission to create scheduled updatesand routing rules.
Members of this group can access the Scheduling & Routing area of theserver.
Scheduled UpdatesUsers
The account that executed scheduled updates must be a member of thisgroup. By default, the account scheduledupdates@SPOTFIRESYSTEM isa member of this group.
Automation ServicesUsers
Membership in this group grants permission to execute AutomationServices jobs on the server, using the Job Builder or the Client Job Sender.
Custom Query Author Membership in this group grants permission to save scripts written incustom query languages as trusted to the library.
An authorized custom query author MUST ALSO have theCustom Query in Connections license enabled to get access tothe required UI.
Script Author Membership in this group grants permission to save scripts as trusted tothe library.
An authorized script author MUST ALSO have the AuthorScripts license enabled.
Scripts that are executed by Spotfire Server can essentially doanything that deployed packages can do. Therefore you shouldonly grant this permission to trusted users.
API User All users who require access to the Spotfire Server public Web ServiceAPI must be members of the API User group.
206
TIBCO Spotfire® Server and Environment Installation and Administration
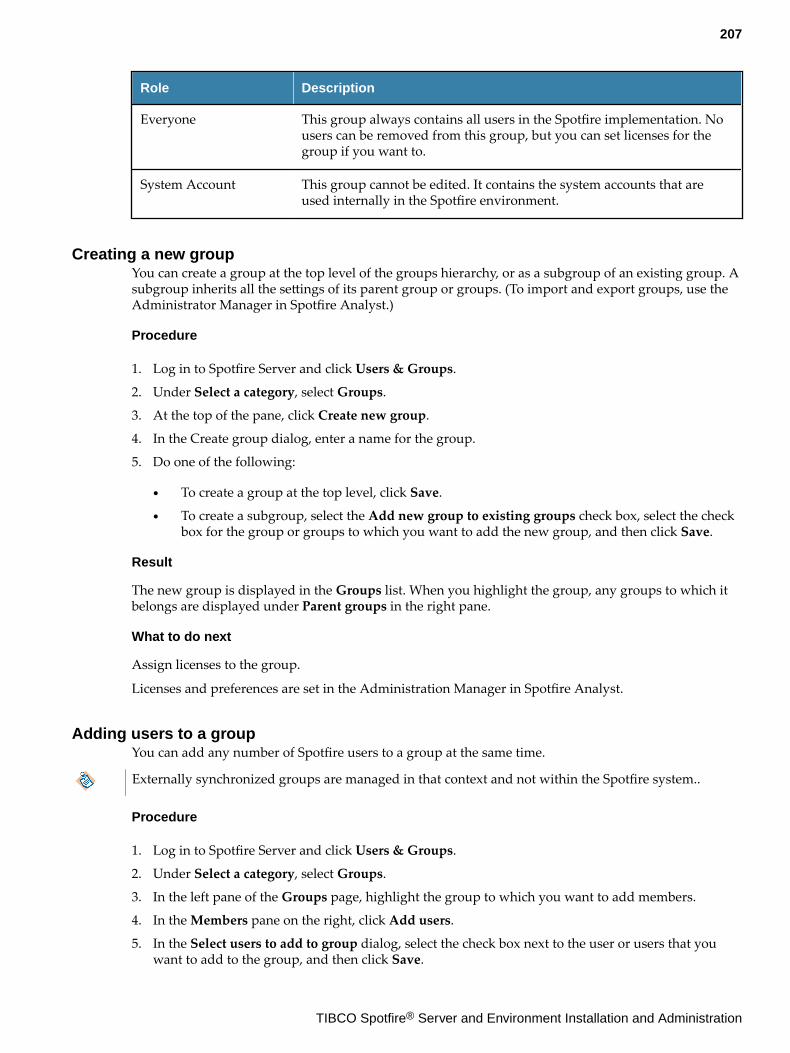
Role Description
Everyone This group always contains all users in the Spotfire implementation. Nousers can be removed from this group, but you can set licenses for thegroup if you want to.
System Account This group cannot be edited. It contains the system accounts that areused internally in the Spotfire environment.
Creating a new groupYou can create a group at the top level of the groups hierarchy, or as a subgroup of an existing group. Asubgroup inherits all the settings of its parent group or groups. (To import and export groups, use theAdministrator Manager in Spotfire Analyst.)
Procedure
1. Log in to Spotfire Server and click Users & Groups.
2. Under Select a category, select Groups.
3. At the top of the pane, click Create new group.
4. In the Create group dialog, enter a name for the group.
5. Do one of the following:
● To create a group at the top level, click Save.
● To create a subgroup, select the Add new group to existing groups check box, select the checkbox for the group or groups to which you want to add the new group, and then click Save.
Result
The new group is displayed in the Groups list. When you highlight the group, any groups to which itbelongs are displayed under Parent groups in the right pane.
What to do next
Assign licenses to the group.
Licenses and preferences are set in the Administration Manager in Spotfire Analyst.
Adding users to a groupYou can add any number of Spotfire users to a group at the same time.
Externally synchronized groups are managed in that context and not within the Spotfire system..
Procedure
1. Log in to Spotfire Server and click Users & Groups.
2. Under Select a category, select Groups.
3. In the left pane of the Groups page, highlight the group to which you want to add members.
4. In the Members pane on the right, click Add users.
5. In the Select users to add to group dialog, select the check box next to the user or users that youwant to add to the group, and then click Save.
207
TIBCO Spotfire® Server and Environment Installation and Administration
Result
The added users are displayed in the Members list.
Adding groups to a groupAdding one group to another group creates a hierarchy of groups where a user who is an explicitmember of the child group is also, by inheritance, a member of the parent group.
Externally synchronized groups are managed in that context and not within the Spotfire system.
Procedure
1. Log in to Spotfire Server and click Users & Groups.
2. Under Select a category, select Groups.
3. In the left pane of the Groups page, highlight the group to which you want to add other groups.
4. In the Members pane on the right, click Add groups.
5. In the Select groups to add to group dialog, select the check box next to the group or groups thatyou want to add to the group, and then click Save.
Result
The added groups are displayed in the Members list.
Assigning a primary group to a subgroupWhen a group has several parent groups, different values may be set for the same license or preferenceitem in two or more parent groups. To ensure that the child group inherits the default settings of aparticular parent group, set that group as the primary group.
Procedure
1. Log in to Spotfire Server and click Users & Groups.
2. Under Select a category, select Groups.
3. Highlight the name of the group to which you want to assign a primary group.
4. In the upper-right pane, click Edit.
5. In the Edit group dialog, under Assign primary group, select the primary group for the highlightedsubgroup.
6. Click Save.
Result
In the upper-right pane, the selected group is listed as the primary group.
Assigning a deployment area to a groupFor users to have access to a deployment, you must assign the deployment area that contains thedeployment to the appropriate groups. If no deployment area is set for a group, the group members areassigned the default deployment area.
For general information, see Deployments and deployment areas.
208
TIBCO Spotfire® Server and Environment Installation and Administration
Procedure
1. Log in to Spotfire Server and click Users & Groups.
2. Under Select a category, select Groups.
3. Highlight the name of the group to which you want to assign a deployment area.
4. In the upper-right pane, click Edit.
5. In the Edit group dialog, under Assign deployment area, select the deployment area for the group.
6. Click Save.
Result
The selected deployment area is displayed under Deployment area in the upper-right pane.
Renaming a groupYou can rename only those groups that were added to Spotfire Server after installation. The groups thatSpotfire creates automatically, such as Administrator and Script Author, cannot be renamed. Also,externally synchronized groups cannot be renamed in the server.
Procedure
1. Log in to Spotfire Server and click Users & Groups.
2. Under Select a category, select Groups.
3. Highlight the name of the group that you want to rename.
4. In the upper-right pane, click Edit.
5. In the Edit group dialog, under Name, enter the new name.
6. Click Save.
Removing members from a groupMembers of a Spotfire group can be either users or other groups.
Externally synchronized groups are managed in that context and not within the Spotfire system.
Procedure
1. Log in to Spotfire Server and click Users & Groups.
2. Under Select a category, select Groups.
3. In the left pane of the Groups page, highlight the group from which you want to remove members.
4. In the right pane, under Members, select the check box of the users or groups that you want toremove.
5. Click Remove.
Result
The members you removed no longer appear in the Members list.
209
TIBCO Spotfire® Server and Environment Installation and Administration
Deleting groups from the systemDeleting a group does not delete any of its members from Spotfire; only the group itself is deleted. Allusers and groups that are members of the deleted group remain in the system. Subgroups that losetheir parent group are automatically placed at the top level of the group hierarchy.
There is no recursive delete function that deletes an entire branch of the hierarchy.
You cannot delete any of the roles and special groups that Spotfire creates automatically at installation.
Externally synchronized groups are managed in that context and not within the Spotfire system.
Procedure
1. Log in to Spotfire Server and click Users & Groups.
2. Under Select a category, select Groups.
3. In the left pane of the Groups page, select the check box next to the group or groups that you wantto delete.
4. At the top of the left pane, click Delete checked groups.
Result
The deleted groups no longer appear in the Groups list.
Deployments and deployment areasTo deploy Spotfire software, the administrator places software packages in a deployment area and assignsthe deployment area to particular groups.
If a new deployment is available when a user logs in to a Spotfire client, the software packages aredownloaded from the server to the client.
Deployments are used:
● To set up a new a new Spotfire system.
● To install a product upgrade, extension, or hotfix provided by Spotfire.
● To install a custom tool or extension.
A group of software packages (.spk files) can be bundled together into a distribution (.sdn file). Adistribution can be copied to create a new deployment area, or downloaded for deployment to anotherSpotfire Server.
Every user is associated with at least one deployment area; by default, this is the Production area that iscreated when you install Spotfire Server, but you can designate any area as the default.
Some users have access to more than one deployment area because they belong to several groups thatare associated with different deployment areas. In this case, users are prompted to choose adeployment area when they log in to the Spotfire client.
Whether a user has access to a particular feature contained in a distribution depends on the licensesthat are assigned to that user's groups. For more information, see Licenses and preferencesintroduction.
Administrators usually create a Test deployment area to use as a staging server; when the new softwarehas been thoroughly tested in their Spotfire environment, the distribution is copied to a productionarea.
210
TIBCO Spotfire® Server and Environment Installation and Administration
Creating a new deployment areaDeployment areas contain software packages that you make available to certain groups. You can createa new deployment area for a Spotfire update or extension, for custom tools created in yourorganization, and so on.
For general information, see Deployments and deployment areas.
Procedure
1. Log in to Spotfire Server. (For instructions on accessing the server, see Opening Spotfire Server.)
2. Click Deployments & Packages.
3. In the Deployment areas pane, click Add.
4. In the Add area dialog, enter a name for the new area.
Deployment area names are case insensitive and have a maximum length of 25 characters.These are the valid characters:
● a - z
● 0 - 9
● The underline character _
● The dash character -
5. Click Add area.
Result
The new deployment area is displayed in the Deployment areas list.
Adding software packages to a deployment areaWhen Spotfire releases updates, or if your company creates custom tools or other software elements,the administrator adds these to a deployment area so that they can be uploaded to Spotfire Server. Thenthe server distributes the new software to the appropriate groups, as selected by the administrator.
For general information, see Deployments and deployment areas.
Procedure
1. Log in to Spotfire Server and click Deployments & Packages.
2. In the left pane, under Deployment areas, select a deployment area.
It is recommended that you first test the software on a deployment area that is not inproduction.
3. Optional: If the deployment area contains any software packages that are not currently needed,delete them. (For instructions, see Removing packages from a deployment area.)
4. In the "Software packages" pane, click Add packages.
5. In the "Add packages" dialog, click Choose File, locate and select the file you want to add, and clickOpen.
6. In the "Add packages" dialog, click Upload.The added packages are displayed in the Software packages pane.
If you want to start over again, you can return to the last saved version of the deploymentarea by clicking Revert all.
211
TIBCO Spotfire® Server and Environment Installation and Administration
7. To confirm that the packages are error-free, in the "Software packages" pane click Validate.
8. To save the new packages, click Save.
9. In the "Save deployment" dialog, if you want the Spotfire clients to automatically accept the updatewhen they are opened (rather than having the user decide when to accept the update), select theForce client update check box.
10. Click Save.
Copying a distribution to another deployment areaYou can copy a distribution from one deployment area to another when you are ready to move it from atest area to a production area, or if you want to create a new deployment based on an existing one.
Procedure
1. Log in to Spotfire Server and click Deployments & Packages.
2. Under Deployment areas, select the deployment area that contains the distribution you want tocopy.
3. In the Information pane to the right, click Copy distribution.
4. In the "Copy distribution" dialog, do one of the following:
● Select the existing deployment area to which you want to add the distribution, and then clickCopy.
● Create a new deployment area to hold the distribution by clicking the To new area tab, enteringa name for the area, and clicking Copy.
Result
When you select the deployment area in the "Deployment areas" pane, the copied software packagesare displayed under Software packages.
Exporting a distributionYou can download a local copy of a distribution (.sdn file) for deployment to another Spotfire Server.
Procedure
1. Log in to Spotfire Server and click Deployments & Packages.
2. Under Deployment areas, select the area that contains the distribution that you want to export.
3. In the Information pane to the right, click Export distribution.
Changing the default deployment areaThe default deployment area is available to all groups for which no deployment area has been set.During installation, Spotfire Server adds a "Production" deployment area and sets it as the default, butyou can change the default area to give users access to new software packages.
For general information, see Deployments and deployment areas.
Procedure
1. Log in to Spotfire Server and click Deployments & Packages.
2. In the "Deployment areas" pane, select the deployment area you want to set as the default.
212
TIBCO Spotfire® Server and Environment Installation and Administration
3. In the upper-right pane, click Make default.
Renaming a deployment areaYou can rename any deployment area in your system.
Procedure
1. Log in to Spotfire Server and click Deployments & Packages.
2. In the "Deployment areas" pane, select the deployment area you want to rename.
3. In the Information pane to the right, click Rename.
4. In the "Rename deployment area" dialog, enter a new name.
Deployment area names are case insensitive and have a maximum length of 25 characters.These are the valid characters:
● a-z
● 0-9
● The underline character _
● The dash character -
5. Click Rename.
Removing packages from a deployment areaYou can edit the contents of any of your deployment areas.
Procedure
1. Log in to Spotfire Server and click Deployments & Packages.
2. In the "Deployment areas" pane, select the deployment area from which you want to removepackages.
3. In the "Software packages" pane, select the check boxes for the packages you want to remove, andthen click Remove packages.
Clearing a deployment areaIf you want to create a new deployment in an existing deployment area, you can clear the area of itscontents.
Procedure
1. Log in to Spotfire Server and click Deployments & Packages.
2. In the "Deployment areas" pane, select the deployment area that you want to clear.
3. In the "Software packages" pane, click Clear area.
213
TIBCO Spotfire® Server and Environment Installation and Administration
Deleting a deployment areaYou can delete a deployment area that is no longer needed. The software packages in that area will beremoved as well.
Procedure
1. Log in to Spotfire Server and click Deployments & Packages.
2. In the "Deployment areas " pane, select the check box in front of the deployment area you want todelete.
It is not possible to delete the area that is set as the default deployment area.
3. In the "Deployment areas " pane, click Delete.
Scheduled updates to analysesFor analyses that contain links to large amounts of data, downloading fresh data can take a significantamount of time. Scheduled updates save time by downloading the latest data before users need it.
Based on settings in Spotfire Server, or on messages that the server receives from an external source,selected analyses can be preloaded with fresh data, stored on specific Spotfire Web Player instances,and then made available to users as needed.
For example, in the case of sales data that is tallied at the end of the day, you could schedule the updateto occur overnight so that users can quickly access the analysis first thing in the morning, when they login. Or, in the case of a large analysis that users tend to refer to several times during the day, you couldschedule an update every 20 minutes.
You can trigger updates in two ways:
● In Spotfire Server you can create rules that specify the analysis to preload, when to do it, whetherthe new data is automatically displayed to the end user, and so on.
● Using TIBCO Enterprise Message Service™ (EMS) or a web service, you can create "event-drivenupdates" that are triggered by an external process. For more information about event-drivenupdates, see Creating a scheduled update by using TIBCO EMS or Creating a scheduled update byusing a web service.
When scheduling an update in Spotfire Server, you can configure the following options:
● The days of the week that the update runs.
● The times of day between which the updated analysis is available to end users.
● How often the server checks for new data.
● The resource pool on which to preload the analysis, and the number of Spotfire Web Player instancesthat should be available for users opening the analysis.
● Whether the updated data is automatically displayed in the user's copy of the analysis, or the userdecides when to refresh the information.
● Whether to allow cached and pre-computed data when the analysis is reopened.
On the Overview page, the "Scheduled updates" pane gives you the basic status of your scheduledupdates.
In the Rules list you can identify scheduled updates (as opposed to routing rules) by their Type (File)and the fact that a schedule is displayed under Schedule in the list.
You can also view the Activity and Notifications pages in Scheduling & Routing to monitor job status.
214
TIBCO Spotfire® Server and Environment Installation and Administration
Creating a scheduled update by using Spotfire ServerIn Spotfire Server, you can configure and run automated data updates to existing analysis files. Thissaves time for end users because they do not have to wait for the new data to download when theyopen the analysis.
Prerequisites
● The analysis file to be updated must be in the Spotfire library.
● The scheduled updates user service account (scheduledupdates@SPOTFIRESYSTEM) must have thefollowing library permissions:
— Browse & Access permissions to the analysis.
— Permissions to access the folder(s) that hold the information link object.
— Permission to access the data source object.
To set library permissions, use the tools in Spotfire Analyst.
Alternatively, you can use the copy-library-permissions command to copy librarypermissions from another user or group.
The following tasks are optional, but you may want to complete them before creating the scheduledupdate:
● If you want this update to run according to a schedule (or several schedules) that you plan to reuse,create the schedules first; for instructions, see Creating a reusable schedule.
● If you want the updated file to open on specific instances of the Spotfire Web Player, create a resourcepool containing those instances; for instructions, see Creating a resource pool.
If you are creating a scheduled update for an analysis that is based on data from a prompted orpersonalized information link, see Scheduled updates with prompted or personalized informationlinks.
For general information, see Scheduled updates to analyses.
Procedure
1. Log in to Spotfire Server and click Scheduling & Routing.
2. In the Rules pane, click Create rule.
3. Under Type, select File, and then click Next.
4. Enter a name for the rule and select the file that you want to update.
5. Under Select resource pool, do one of the following:
● If you do not want to set a specific resource pool on which to open the analysis, leave the SystemDefault routing selected.
● If you want the analysis to open on a specific resource pool, select it.
If a scheduled update rule indicates that a file should open on a specific resource pool,this rule overrides any routing rules (for a group or an individual user) that specify adifferent resource pool for the user who opens the updated file.
6. Optional: Set a priority. This setting comes into effect if two or more scheduled updates arescheduled to occur at the same time. 0 is the highest priority.
7. To set a schedule, do one of the following:
215
TIBCO Spotfire® Server and Environment Installation and Administration

● To update the analysis based on a schedule that has already been created or several schedules,select Use saved schedule and then, in the "Select schedule" dialog, select the schedule orschedules that you want to use.
● To create a "unique schedule" for this rule (a schedule that will not be available for reuse), selectUse custom schedule. For instructions on setting up the schedule, see Creating a reusableschedule.
Analyses are always updated and loaded at the beginning of each scheduled start time, inaddition to the reloads that are set in the Check for updates every field. If a scheduledupdate is scheduled for 24 hours a day/7 days a week, with Check for updates every set to0, the analysis is loaded only once, when the rule is initially executed.
8. If you want the rule to be disabled initially, select the Disable rule check box in the bottom right ofthe dialog. You can enable the rule later, on the Scheduling & Routing page.
9. Optional: If you want to do one of the following, click Additional properties:
● Set the number of Spotfire Web Player instances for this rule.
● Switch the client update method from automatic to manual.
● Disallow cached and pre-computed data.
For details, see Additional settings for scheduled updates.
10. In the "Create rule" dialog, click Save.
If you are unable to save the information you entered, and your library files are storedexternally on Amazon Web Services S3 (AWS), see Forcing Java to use IPv4.
Result
The rule is displayed in the Rules list.
Additional settings for scheduled updates
In addition to basic information about the analysis that you want to update and when you want theupdate to occur, several additional property settings are available in Spotfire Server.
Setting the number of Spotfire Web Player instances to make available for a scheduled update
By default Spotfire Server uses one of the available Spotfire Web Player instances when users open ascheduled update file. To load balance or to change the resource load of a particular analysis, theadministrator can set the number of instances on which the updated analysis can open.
Procedure
1. Log in to Spotfire Server and click Scheduling & Routing.
2. Do one of the following:
● If you want to change this property for an existing scheduled update, under Rules select theupdate and click Edit.
● If you are creating a new scheduled update, at the bottom of the second Create rule dialog, clickAdditional properties.
3. In the Additional properties dialog, under Number of instances select a number.
4. Click Update and then Save.
216
TIBCO Spotfire® Server and Environment Installation and Administration
Switching the scheduled update method from automatic to manual
When the scheduled update method is set to manual, users decide when to incorporate new data in theanalysis.
Procedure
1. Log in to Spotfire Server and click Scheduling & Routing.
2. Do one of the following:
● If you want to set this property for an existing scheduled update, under Rules select the checkbox next to the update rule and click Edit.
● If you are creating a new scheduled update, at the bottom of the second Create rule dialog, clickAdditional properties.
3. In the Additional properties dialog, under Update method, indicate how users should receive theupdated data:
● Automatic—The new data is automatically displayed in the analysis when a user opens it.
● Manual—A Refresh icon on the title bar of the analysis indicates that an updated version isavailable. When the user clicks the icon, the analysis is updated.
4. Click Update and then Save.
Disallowing cached and precomputed data in individual scheduled update files
If your Spotfire environment is set up to use disk caching and precomputations of data to shorten thetime it takes for an updated analysis to reopen in a Spotfire Web Player after the analysis closes, thissetting may prevent the latest data from appearing in the reopened analysis. You can turn this settingoff for individual scheduled update files.
By default, cached and precomputed data is not enabled. To enable this feature, see Enabling cachedand precomputed data for scheduled update files.
Procedure
1. Log in to Spotfire Server and click Scheduling & Routing.
2. Do one of the following:
● If you want to change these properties for an existing scheduled update, under Rules select theupdate, click Edit, and then click Additional Properties.
● If you are creating a new scheduled update, at the bottom of the second Create rule dialog, clickAdditional Properties.
3. In the Additional properties dialog, under Caching, clear the check boxes of the settings you wantto turn off.
4. Click Update and then Save.
Result
The analysis will always reflect the latest data but it may reopen more slowly.
217
TIBCO Spotfire® Server and Environment Installation and Administration

Scheduled updates with prompted or personalized information links
Scheduled updates are intended mainly for use with analyses that were set up using ordinaryinformation links to load data. If you set up scheduled updates for an analysis that is based on datafrom a prompted or personalized information link, there are special issues to consider.
When a user opens an analysis that is based on a prompted information link, the user selects a certainview of the data to be loaded. In the same way, when a user opens an analysis that is based on apersonalized information link, the data loaded is determined by the permissions of the user who logsin.
However, when a scheduled update of this file occurs, the update causes the analysis to reload based onthe prompted values that were specified when the file was originally saved, and the permissions of theuser that the administrator set up to programmatically run the scheduled update. This means that userswith an analysis already open will see a different selection of data the next time that they update theanalysis because the scheduled update has in fact updated the underlying data on the server.
You should be especially careful when setting up scheduled updates for analyses with personalizedinformation links. If the user you specify for the scheduled updates has access to more data than theintended end users of the analyses, these end users may see more data than they have access to; theywill see all the data that is available to the user specified for scheduled updates.
Editing a scheduled update
You can edit most properties of a scheduled update at any time. To change the analysis file or theresource pool in a scheduled update, however, you must first disable the rule.
Procedure
1. Log in to Spotfire Server and click Scheduling & Routing.
2. In the Rules pane, select the scheduled update that you want to edit.
3. Optional: If you want to change the rule's analysis file or resource pool, click Disable.
4. In the Rules pane, click Edit and make your changes.
5. Click Save.
6. Optional: If you disabled the rule in step 3, click Enable to make it active again.
Creating a reusable schedule
You can create and save schedules that you plan to reuse in scheduled updates to analyses. If aschedule will only be used once, you can set it when you create the update rule.
Procedure
1. Log in to Spotfire Server and click Scheduling & Routing.
2. In the "Saved schedules" pane, click Create schedule.
3. In the "Create schedule" dialog, enter a name for the schedule.
4. Under Repeat, indicate the days on which you want the update to run by selecting the appropriatecheck boxes.
5. Under Start and End, enter the times between which the updated analysis should be available toend users (on the days that you indicated in the previous step).
6. Under Time zone, select the time zone for the times that you entered in the previous step.
218
TIBCO Spotfire® Server and Environment Installation and Administration
7. Under Check for updates every, select how often you want Spotfire Server to check whether theanalysis file or its underlying data has changed. If the analysis or data has changed, the serverupdates the pre-loaded file.
Analyses are always updated and loaded at the beginning of each scheduled start time, inaddition to the reloads that are set in the Check for updates every field. If a scheduledupdate is scheduled for 24 hours a day/7 days a week, with Check for updates every set to0, the analysis is loaded only once, when the rule is initially executed.
8. Click Save.
Result
The new schedule is displayed in the Saved schedules list.
Manually updating a file outside of its update schedule
If you do not want to wait for a file to be updated according to its schedule, you can trigger an updatemanually.
Prerequisites
There is a scheduled update for the file that you want to manually update.
Procedure
1. Log in to Spotfire Server and click Scheduling & Routing.
2. On the Overview page, under Rules, select the file.
3. Click Reload.
Copying routing rules and schedules from one site to another
You can copy all the routing rules and saved schedules from one site in your Spotfire environment toanother site in the same environment by using the copy-rules-to-site command. This is helpfulwhen setting up local access points for users who are located in different regions.
This procedure copies rules that were created in the Spotfire Server administration interface. Scheduledupdates that are triggered externally, for example by TIBCO Enterprise Message Service (EMS), are notcopied.
Procedure
1. Open a command line as an administrator and go to the server installation dir/tomcat/bindirectory.
2. On the command line, enter the copy-rules-to-site command, specifying the options needed.Example:config copy-rules-to-site --bootstrap="C:\Work\server\bootstrap.xml" --keystore-file="C:\Work\nm\trust\keystore.p12" --source-site-name=NewYork --target-site-name=SanFran --tool-password=Spotfire rule-conflict-resolution=replace --use-default-resource-pool=true --disabled=false --test-run=false
For information on the command options, see copy-rules-to-site.
Result
In this example, the rules and saved schedules from the NewYork site are reproduced in the SanFransite. On the computer where you ran the command, the impex.rules.log file, which provides
219
TIBCO Spotfire® Server and Environment Installation and Administration
information about the copy process, is available in the following directory: <installation dir>/tomcat/logs.
Exporting routing rules and schedules for import in a different Spotfire environment
You can export the routing rules and saved schedules from a Spotfire Server to a JSON file. Then, toprepare for a rolling update or to test and validate a new version of Spotfire, you can import the JSONfile on a different Spotfire environment.
This procedure exports rules that were created in the Spotfire Server administration interface.Scheduled updates that are triggered externally, for example by TIBCO Enterprise Message Service(EMS), are not exported.
Procedure
1. Open a command line as an administrator and go to the server installation dir/tomcat/bindirectory.
2. On the command line, enter the export-rules command, specifying the options needed to exportthe data to a JSON file.Example:config export-rules --bootstrap-config="C:\Work\Spotfire\bootstrap.xml" --tool-password=Spotfire --keystore-file "C:\Work\nm\trust\keystore.p12" --force
For information on the command options, see export-rules.
Result
In this example, the rules.json file containing your scheduled updates and routing rules is availablein the server installation dir/tomcat/bin directory.
Importing routing rules and schedules from a different Spotfire environment
After you have exported the routing rules and saved schedules from a Spotfire Server to a JSON file,you can import the JSON file in a different Spotfire environment to prepare for a rolling update, forexample, or to test and validate a new version of Spotfire.
Prerequisites
● You have exported the rules and schedules from the original server to a JSON file; for instructions,see Exporting routing rules and schedules.
● At least one server in the target environment is running.
● The analysis files referred to in the rules have been added to the target environment.
● The users and groups referred to in the rules have been created in the target environment.
● If you want the target environment to use resource pools that are named the same as the resourcepools in the original environment, and you want the import to use the same resource poolassignments as the original environment, create the resource pools before importing the file.
Your other options are to assign the imported rules to the default resource pool, or toanother resource pool; for details, see the -r option and the -u option in import-rules.
Procedure
1. Open a command line as an administrator and go to the <server installation dir>/tomcat/bin directory.
220
TIBCO Spotfire® Server and Environment Installation and Administration
2. On the command line, enter the import-rules command, specifying the options needed.Example:config import-rules --bootstrap-config="C:\Work\Spotfire\bootstrap.xml" --keystore-file="C:\Work\nm\trust\keystore.p12" --rule-conflict-resolution=replace --schedule-conflict-resolution=rename --use-default-resource-pool=true --test-run=false
For information on the command options, see import-rules.
If you want the chance to address import errors up front, you can enable the --test-runoption. This option provides a preview of any import errors before the actual import takesplace.
Result
In the previous example, the rules and saved schedules are imported and assigned to the defaultresource pool. On the server where you ran the command, the impex.rules.log file, which providesinformation about your import, is available in the following directory: installation dir/tomcat/logs.
Disabling or deleting scheduled updates and routing rules
Disabling a scheduled update or other rule makes the rule inactive until you activate it again. Deletinga rule removes it from the database.
Procedure
1. Log in to Spotfire Server and click Scheduling & Routing.
2. Select the check box next to the rule or rules that you want to disable or delete.
3. Click Disable or Delete.If you disabled a rule, it appears grayed out in the list.
Deleting schedules
Deleting a schedule removes it from the database and cancels any scheduled updates that use theschedule.
Procedure
1. Log in to Spotfire Server and click Scheduling & Routing.
2. Select the check box next to the schedule or schedules that you want to delete.
3. Click Delete.
If deleting the schedule will cancel any scheduled updates, Spotfire Server lists theaffected rules.
Creating a scheduled update by using TIBCO EMSYou can create scheduled updates that are triggered by messages from TIBCO Enterprise MessageService (EMS). In Spotfire Server, the external updates configuration takes place in the server, and the
221
TIBCO Spotfire® Server and Environment Installation and Administration
updates are sent to the server. Spotfire Server then sends the updates to the appropriate web playerservice(s).
Prerequisites
● EMS is installed on a computer.
● The following files, which are located in your TIBCO EMS installation in the lib folder, must becopied to the Spotfire Server classpath on the server computer. If your implementation is clustered,the files must be copied to each computer in the cluster. If your implementation includes sites, thefiles must be copied to each server in the sites that will receive scheduled updates via EMS.
— jms.jar or jms-2.0.jar (depending on the version)
— tlbjms.jar
— tibcrypt.jar
Procedure
1. On the Spotfire Server command line, use the config-external-scheduled-updates command toconfigure the server to accept the EMS messages. (For details on using the Spotfire command line,see Executing commands on the command line.) Include the following parameters:
● Set the ems-enabled value to "true".
● Set the server and port to the computer and port on which EMS is currently running. Use thisconfiguration:<server-url>tcp://localhost:7222,tcp://localhost:7222</server-url>
This enables the reconnect parameters. For more information about this value, see "FaultTolerance" in the TIBCO EMS documentation.
● Set the client-id value to indicate which server or site will handle the scheduled updates:
— If your Spotfire implementation includes a clustered server deployment (but not sites), setthe client-id to a unique value in the cluster. In this case, the first server to connect to EMSwill handle all the scheduled updates received via EMS.
— If your Spotfire implementation includes sites, each site that will receive scheduled updatesvia EMS must have its own client-id.
Command exampleconfig config-external-scheduled-updates -e true -s tcp://localhost:7222 -i clientId1 -t scheduled_updates -S "first site"
Example of the resulting section in the server configuration file (configuration.xml):</external-updates> <external-updates site="first site" operation="override"> <ems-enabled>true</ems-enabled> <server-url>tcp://localhost:7222</server-url> <client-id>clientId1</client-id> <topic>scheduled_updates</topic> <reconnect-attempt-count>10</reconnect-attempt-count> <reconnect-attempt-delay-milliseconds>1000</reconnect-attempt-delay-milliseconds> <reconnect-attempt-timeout-milliseconds>1000</reconnect-attempt-timeout-milliseconds> <keep-alive-minutes>10</keep-alive-minutes> </external-updates>
2. In EMS, create the message. Include the following parameters:
● Path (required)
222
TIBCO Spotfire® Server and Environment Installation and Administration
● ClientUpdate
● KeepAliveMinutes
● ResourcePoolName
If the following statements are true, the resource pool value in the existing rule takesprecedence:
● There is an existing rule for the same file.
● The existing rule was created in Spotfire Server.
● The existing rule specifies a resource pool.
● The existing rule is enabled.
For the ClientUpdate parameter, the value (manual or automatic) that is defined in theexternal rule takes precedence. If the external update does not specify a value, or if thespecified value is invalid, the value from an enabled rule is used, if available.
3. Send the EMS request. For details, see the TIBCO EMS documentation.
Creating a scheduled update by using a SOAP web serviceYou can create scheduled updates that are triggered by messages from a SOAP web service. In SpotfireServer, the external updates configuration takes place in the server, and the updates are sent to theserver. Spotfire Server then sends the updates to the appropriate web player service(s).
Prerequisites
The user calling the web service must have the following:
● Administrator privileges.
● One of the following:
— Membership in the API User group.
— The "External updates of analysis in Spotfire web clients" (under "TIBCO Spotfire Consumer")license enabled.
Procedure
1. Edit the Spotfire Server configuration file to enable public web service API access:<public-api> <web-services> <enabled>true</enabled> </web-services> </public-api>
2. Configure the SOAP request using these parameters:
● Web service address: http://<servername_and_port>/spotfire/ws/pub/UpdateAnalysisService
● WSDL located at: http://<servername_and_port>/spotfire/ws/pub/UpdateAnalysisService?wsdl
223
TIBCO Spotfire® Server and Environment Installation and Administration

You now have the option of setting the resource pool (a set of specific Spotfire Web Playerinstances on which to preload the updated analysis file). However, if the followingstatements are true, the resource pool value in the existing rule takes precedence:
● There is an existing rule for the same file.
● The existing rule was created in Spotfire Server.
● The existing rule specifies a resource pool.
● The existing rule is enabled.
For the ClientUpdate parameter, the value (manual or automatic) that is defined in theexternal rule takes precedence. If the external update does not specify a value, or if thespecified value is invalid, the value from an enabled rule is used, if available.
Sample request<soapenv:Envelope xmlns:soapenv="http://schemas.xmlsoap.org/soap/envelope/" xmlns:ext="http://spotfire.tibco.com/ws/2015/08/externalScheduledUpdate.xsd"> <soapenv:Header/> <soapenv:Body> <ext:loadAnalysis> <!--Optional:--> <updateAnalysis> <!--Optional:--> <path>/A121-02 BostonMatrix</path> <!--Optional:--> <clientUpdate>manual</clientUpdate> <keepAliveMinutes>5</keepAliveMinutes> <!--Optional:--> <!--resourcePool>Main</resourcePool--> </updateAnalysis> </ext:loadAnalysis> </soapenv:Body></soapenv:Envelope>
3. Send the request with the user that was configured for this purpose.
Scheduled updates monitoringThe Scheduling & Routing area of Spotfire Server provides several ways of monitoring the success ofyour scheduled updates.
The "Scheduled updates" pane at the top of the Overview page summarizes the current state of yourscheduled updates:
224
TIBCO Spotfire® Server and Environment Installation and Administration
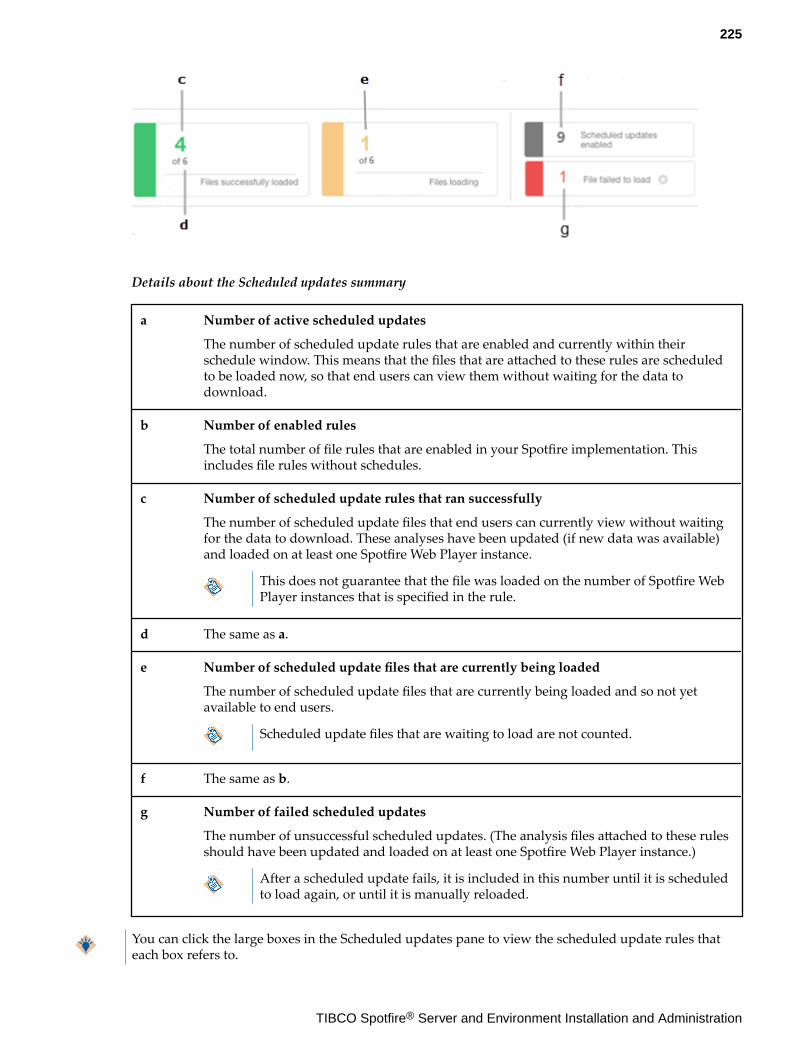
Details about the Scheduled updates summary
a Number of active scheduled updates
The number of scheduled update rules that are enabled and currently within theirschedule window. This means that the files that are attached to these rules are scheduledto be loaded now, so that end users can view them without waiting for the data todownload.
b Number of enabled rules
The total number of file rules that are enabled in your Spotfire implementation. Thisincludes file rules without schedules.
c Number of scheduled update rules that ran successfully
The number of scheduled update files that end users can currently view without waitingfor the data to download. These analyses have been updated (if new data was available)and loaded on at least one Spotfire Web Player instance.
This does not guarantee that the file was loaded on the number of Spotfire WebPlayer instances that is specified in the rule.
d The same as a.
e Number of scheduled update files that are currently being loaded
The number of scheduled update files that are currently being loaded and so not yetavailable to end users.
Scheduled update files that are waiting to load are not counted.
f The same as b.
g Number of failed scheduled updates
The number of unsuccessful scheduled updates. (The analysis files attached to these rulesshould have been updated and loaded on at least one Spotfire Web Player instance.)
After a scheduled update fails, it is included in this number until it is scheduledto load again, or until it is manually reloaded.
You can click the large boxes in the Scheduled updates pane to view the scheduled update rules thateach box refers to.
225
TIBCO Spotfire® Server and Environment Installation and Administration
On the Activity page, you can view the status, date, and time of each file update attempt. Click thearrow to the left of the line to view additional details, any messages that were generated, and a link torelevant logs.
Important messages are listed on the Notifications page. An information symbol on the Notificationstab, and on the Scheduling & Routing image on the main server page, indicates that there is a newnotification.
Changing the priority of a ruleSpotfire Server uses rule priorities if two or more rules are executed at the same time.
Procedure
1. Log in to Spotfire Server and click Scheduling & Routing.On the Overview page, under Rules, the scheduled updates and routing rules are listed in priorityorder.
2. Select the rule whose priority you want to change and then do one of the following:
● Drag the rule to a new position in the list.
● On the right end of the row, click the More menu (...) and then select Move to top or Move tobottom.
● Click Edit and then, in the " Edit rule" dialog, enter a new priority number under Set a priority.
Changing the number of retries for failed scheduled updatesBy default, Spotfire Server retries a failed scheduled update ten times. Using the command-lineinterface, you can set a different limit for the number of times that a scheduled update is retried if itinitially fails.
This property was previously set by using the stopUpdatesAfterRepeatedFail setting in theSpotfire.Dxp.Worker.Web.config file.
Procedure
1. Open a command-line interface and export the active configuration (the configuration.xml file)by using the export-config command. (For details on using the Spotfire command line, see Executing commands on the command line.)
2. Use the config-scheduled-updates-retries command to set the retry limit.Example:config config-scheduled-updates-retries --stop-updates-after-repeated-fail-enabled=true --fails-before-stop=X
where X is the number of times to retry the update.
3. Import the configuration file back to the Spotfire database by using the import-config command.
4. Restart the Spotfire Server service.
226
TIBCO Spotfire® Server and Environment Installation and Administration
Changing how often the scheduled update history is clearedIf your organization runs many scheduled updates, history records can quickly pile up in the database.Spotfire Server automatically purges the history once a week, but you can change how often this occursby editing the configuration.xml file.
Procedure
1. Export and open the Spotfire Server configuration file; for general instructions, see Manually editingthe Spotfire Server configuration file.
2. Do one of the following:
● If you are editing a Spotfire Server 7.5 or later configuration file, change the number "7" (whichindicates 7 days) in the following section:<scheduled-updates> <!-- All scheduled updates details older than the specified number of days will be automatically deleted. Default: one week, value must be strictly positive.--> <purge-history-older-than>7</purge-history-older-than> </scheduled-updates>
● If you are updating an existing configuration file from a previous version of Spotfire Server, addthe entire <scheduled-updates> section to the file and then change the number of daysbetween history purges.
3. Save the configuration file and import it back to the server; for instructions, see Manually editingthe Spotfire Server configuration file.
Common analysis loading errorsThe following are the most common error codes and messages that are displayed when an analysis filedoes not load successfully.
● SPOT-10001 FileCorruptMissingRequiredEntry
Server was unable to read the uploaded file because it is not a valid DXP file.
● SPOT-10002 IncompatibleVersion
Unsupported file version.
● SPOT-10003 FileCorrupt
Server was unable to read this file because it is not a valid DXP file.
● SPOT-10004 IncompatibleDevelopmentVersion
Server was unable to read the file. The file was saved with a development version of Spotfire andcontains features that are not supported by this version.
● SPOT-20000 LoadFileUnknownError
Server was unable to read the file.
● SPOT-20001 IOException
An I/O error occurred when the server attempted to open the file.
● SPOT-30001 LoadFileNoPermissions
Server was denied access to the file.
● SPOT-40001 LoadFileOutOfMemory
Server was unable to load the file due to insufficient memory.
● SPOT-50001 LibraryFailedLoad
227
TIBCO Spotfire® Server and Environment Installation and Administration
Server could not load the analysis.● SPOT-70001 FailedToExecuteDataSource
Server was unable to execute the data query.● SPOT-70002 CouldNotCreateDatabaseConnection
Server was unable to access one or more data sources.● SPOT-70003 FailedToOpenInformationLink
Server was unable to load the information link.● SPOT-100000 UnknownError
Server was unable to read the file.
Routing rulesA routing rule specifies the resource pool on which an analysis opens. You can create routing rules to seta resource pool on which to open analyses that are requested by members of a specific group, or by aspecific user. You can also set a resource pool for a specific analysis, regardless of who requests it.
You can use routing rules to fine-tune resource management, but their use is optional.
Specific reasons for creating routing rules include the following:
● Define an exclusive resource pool for a critical analysis so that it can be updated and viewedwithout interference from other analyses and user requests.
● Define a resource pool for management so that they can view and work with analyses withoutwaiting.
● Define a resource pool for users who are trying out a new version of Spotfire.● Load an analysis on several Spotfire Web Player instances to handle a large number of users.
The default routing ruleThe default routing rule indicates the resource pools on which all analyses are opened, unless theanalysis itself, or the user who is requesting it, is subject to another routing rule. By default, the defaultrouting rule includes all the services and instances that are available in your Spotfire implementation.
You can edit default routing to include only certain services and instances, but the rule cannot bedeleted.
The default routing rule is always displayed at the bottom of the Rules list on the Scheduling &Routing page.
Creating a routing ruleYou can create routing rules that apply to user groups, individual users, or specific analysis files.
Prerequisites
● Create the resource pool that you want to specify for the rule; see Creating a resource pool.● If you are creating a rule for an analysis file, the file must be in the Spotfire library.For general information, see Routing rules.
Procedure
1. Log in to Spotfire Server and click Scheduling & Routing.
2. In the Rules pane, click Create rule.The Create rule dialog opens.
228
TIBCO Spotfire® Server and Environment Installation and Administration
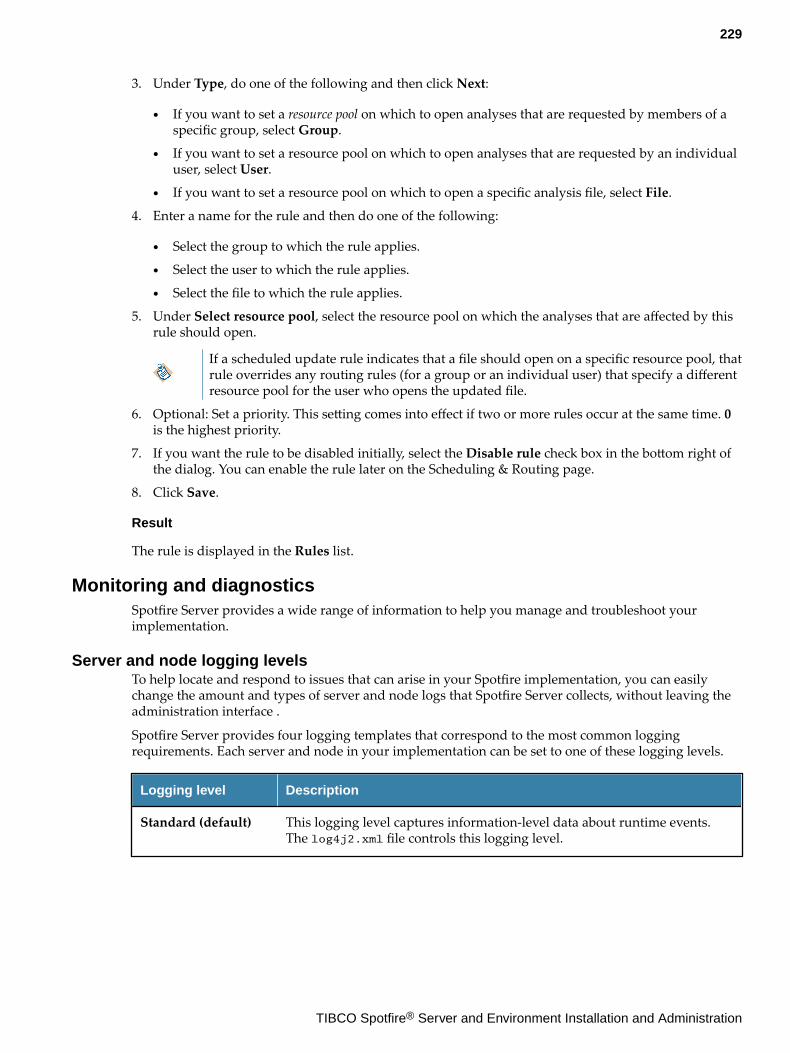
3. Under Type, do one of the following and then click Next:
● If you want to set a resource pool on which to open analyses that are requested by members of aspecific group, select Group.
● If you want to set a resource pool on which to open analyses that are requested by an individualuser, select User.
● If you want to set a resource pool on which to open a specific analysis file, select File.
4. Enter a name for the rule and then do one of the following:
● Select the group to which the rule applies.
● Select the user to which the rule applies.
● Select the file to which the rule applies.
5. Under Select resource pool, select the resource pool on which the analyses that are affected by thisrule should open.
If a scheduled update rule indicates that a file should open on a specific resource pool, thatrule overrides any routing rules (for a group or an individual user) that specify a differentresource pool for the user who opens the updated file.
6. Optional: Set a priority. This setting comes into effect if two or more rules occur at the same time. 0is the highest priority.
7. If you want the rule to be disabled initially, select the Disable rule check box in the bottom right ofthe dialog. You can enable the rule later on the Scheduling & Routing page.
8. Click Save.
Result
The rule is displayed in the Rules list.
Monitoring and diagnosticsSpotfire Server provides a wide range of information to help you manage and troubleshoot yourimplementation.
Server and node logging levelsTo help locate and respond to issues that can arise in your Spotfire implementation, you can easilychange the amount and types of server and node logs that Spotfire Server collects, without leaving theadministration interface .
Spotfire Server provides four logging templates that correspond to the most common loggingrequirements. Each server and node in your implementation can be set to one of these logging levels.
Logging level Description
Standard (default) This logging level captures information-level data about runtime events.The log4j2.xml file controls this logging level.
229
TIBCO Spotfire® Server and Environment Installation and Administration
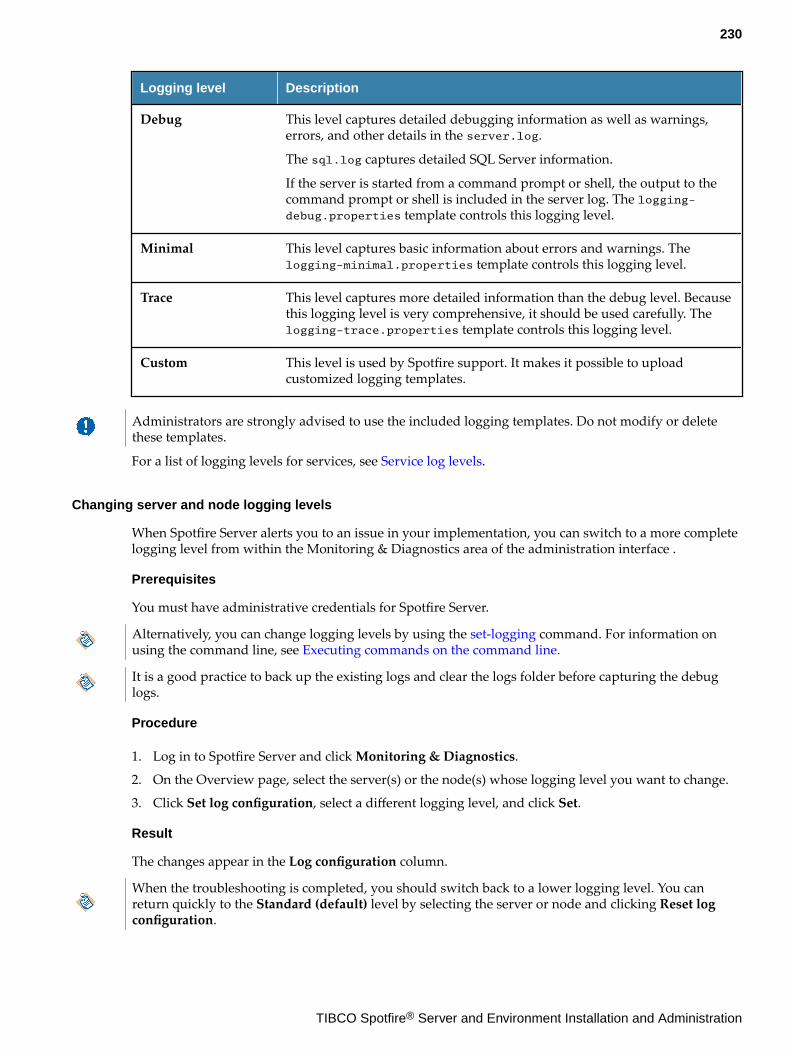
Logging level Description
Debug This level captures detailed debugging information as well as warnings,errors, and other details in the server.log.
The sql.log captures detailed SQL Server information.
If the server is started from a command prompt or shell, the output to thecommand prompt or shell is included in the server log. The logging-debug.properties template controls this logging level.
Minimal This level captures basic information about errors and warnings. Thelogging-minimal.properties template controls this logging level.
Trace This level captures more detailed information than the debug level. Becausethis logging level is very comprehensive, it should be used carefully. Thelogging-trace.properties template controls this logging level.
Custom This level is used by Spotfire support. It makes it possible to uploadcustomized logging templates.
Administrators are strongly advised to use the included logging templates. Do not modify or deletethese templates.
For a list of logging levels for services, see Service log levels.
Changing server and node logging levels
When Spotfire Server alerts you to an issue in your implementation, you can switch to a more completelogging level from within the Monitoring & Diagnostics area of the administration interface .
Prerequisites
You must have administrative credentials for Spotfire Server.
Alternatively, you can change logging levels by using the set-logging command. For information onusing the command line, see Executing commands on the command line.
It is a good practice to back up the existing logs and clear the logs folder before capturing the debuglogs.
Procedure
1. Log in to Spotfire Server and click Monitoring & Diagnostics.
2. On the Overview page, select the server(s) or the node(s) whose logging level you want to change.
3. Click Set log configuration, select a different logging level, and click Set.
Result
The changes appear in the Log configuration column.
When the troubleshooting is completed, you should switch back to a lower logging level. You canreturn quickly to the Standard (default) level by selecting the server or node and clicking Reset logconfiguration.
230
TIBCO Spotfire® Server and Environment Installation and Administration
Changing the logging level for a server or node that is not running
When a server or node is not running, you can increase its logging level to capture moretroubleshooting data.
Best practice is to back up the existing logs and clear the logs folder before capturing the debug logs.
Procedure
1. On the computer that is hosting the server or node whose logging level you want to change,navigate to the directory that contains the logging templates.
● For a Spotfire Server, the default location is server installation dir\tomcat\spotfire-config.
● For a node manager, the default location is node manager installation dir\nm\config\log-config.
2. If the directory already contains a logging-levels.properties file, delete it.
3. Make a copy of the logging template that you want to apply to the server or node, and name thecopy "logging-levels.properties". The available templates are logging-debug.properties,logging-minimal.properties, and logging-trace.properties.
4. Open the logging-levels.properties file in a text editor or an XML editor.
5. In the logging-levels.properties file, add the following line of code to the top of the file,replacing template name with the name of the template file that you copied:ActiveConfig=template name
ExampleActiveConfig=logging-debug.properties
6. Save and close the logging-levels.properties file.
7. Restart the Spotfire Server service or the Spotfire Node Manager service for the changes to takeeffect.
Result
The server or node captures the logging information that is indicated in the logging-levels.properties file.
When the troubleshooting is completed, switch back to a lower logging level.
Switching back to the Standard (default) logging level
After troubleshooting an issue, you can quickly return to the Standard (default) logging level.
Procedure
1. Log in to Spotfire Server and click Monitoring & Diagnostics.
2. On the Overview page, select the server(s) or the node(s) whose logging level you want to return tothe default.
3. Click Reset log configuration.
Result
The changes appear in the Log configuration column.
231
TIBCO Spotfire® Server and Environment Installation and Administration
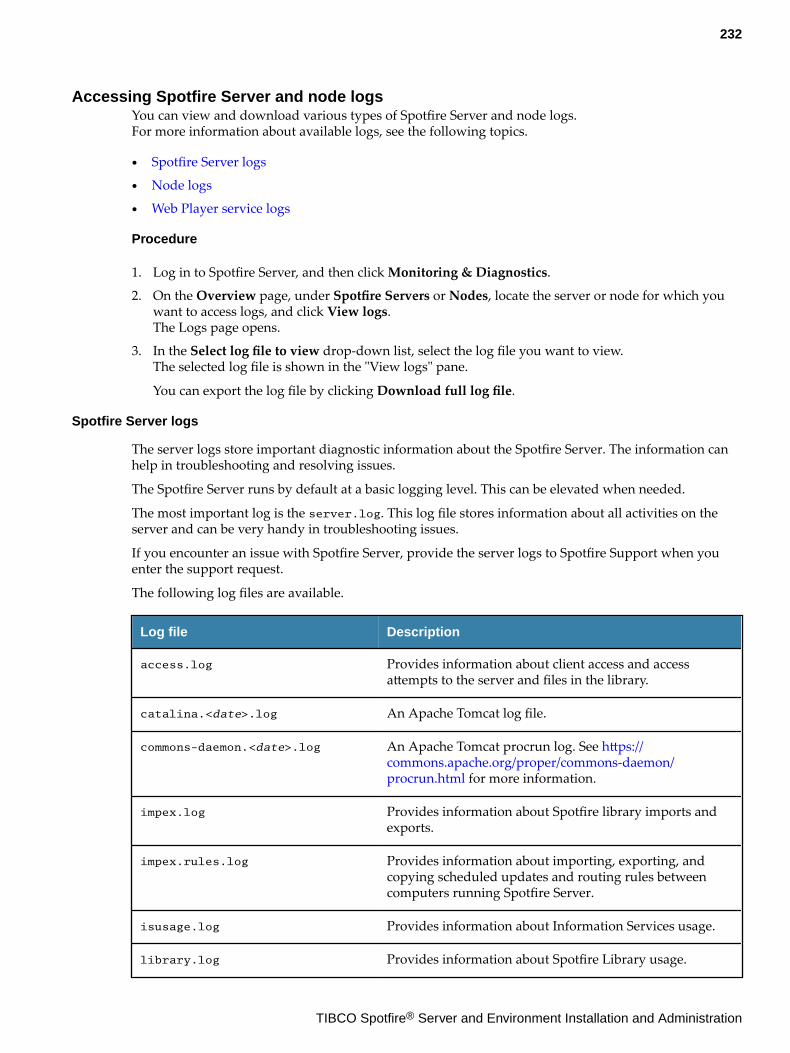
Accessing Spotfire Server and node logsYou can view and download various types of Spotfire Server and node logs.For more information about available logs, see the following topics.
● Spotfire Server logs
● Node logs
● Web Player service logs
Procedure
1. Log in to Spotfire Server, and then click Monitoring & Diagnostics.
2. On the Overview page, under Spotfire Servers or Nodes, locate the server or node for which youwant to access logs, and click View logs.The Logs page opens.
3. In the Select log file to view drop-down list, select the log file you want to view.The selected log file is shown in the "View logs" pane.
You can export the log file by clicking Download full log file.
Spotfire Server logs
The server logs store important diagnostic information about the Spotfire Server. The information canhelp in troubleshooting and resolving issues.
The Spotfire Server runs by default at a basic logging level. This can be elevated when needed.
The most important log is the server.log. This log file stores information about all activities on theserver and can be very handy in troubleshooting issues.
If you encounter an issue with Spotfire Server, provide the server logs to Spotfire Support when youenter the support request.
The following log files are available.
Log file Description
access.log Provides information about client access and accessattempts to the server and files in the library.
catalina.<date>.log An Apache Tomcat log file.
commons-daemon.<date>.log An Apache Tomcat procrun log. See https://commons.apache.org/proper/commons-daemon/procrun.html for more information.
impex.log Provides information about Spotfire library imports andexports.
impex.rules.log Provides information about importing, exporting, andcopying scheduled updates and routing rules betweencomputers running Spotfire Server.
isusage.log Provides information about Information Services usage.
library.log Provides information about Spotfire Library usage.
232
TIBCO Spotfire® Server and Environment Installation and Administration
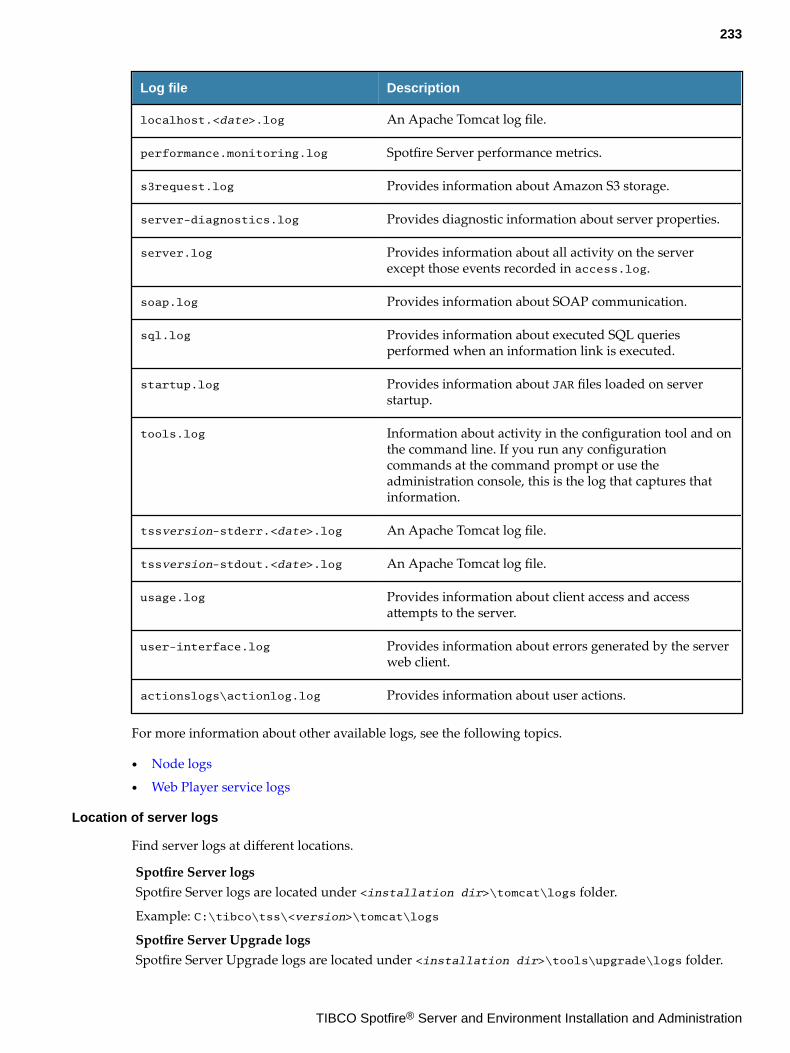
Log file Description
localhost.<date>.log An Apache Tomcat log file.
performance.monitoring.log Spotfire Server performance metrics.
s3request.log Provides information about Amazon S3 storage.
server-diagnostics.log Provides diagnostic information about server properties.
server.log Provides information about all activity on the serverexcept those events recorded in access.log.
soap.log Provides information about SOAP communication.
sql.log Provides information about executed SQL queriesperformed when an information link is executed.
startup.log Provides information about JAR files loaded on serverstartup.
tools.log Information about activity in the configuration tool and onthe command line. If you run any configurationcommands at the command prompt or use theadministration console, this is the log that captures thatinformation.
tssversion-stderr.<date>.log An Apache Tomcat log file.
tssversion-stdout.<date>.log An Apache Tomcat log file.
usage.log Provides information about client access and accessattempts to the server.
user-interface.log Provides information about errors generated by the serverweb client.
actionslogs\actionlog.log Provides information about user actions.
For more information about other available logs, see the following topics.
● Node logs
● Web Player service logs
Location of server logs
Find server logs at different locations.
Spotfire Server logsSpotfire Server logs are located under <installation dir>\tomcat\logs folder.
Example: C:\tibco\tss\<version>\tomcat\logs
Spotfire Server Upgrade logsSpotfire Server Upgrade logs are located under <installation dir>\tools\upgrade\logs folder.
233
TIBCO Spotfire® Server and Environment Installation and Administration

Example: C:\tibco\tss\<version>\tools\upgrade\logs
To change these default locations, see Changing the default location of server logs.
Changing the default location of server logs
You can change the default directory location for logs by providing a configuration setting in theTomcat webapp.Perform this task on the server where Spotfire Server is installed.
Prerequisites
You must have administrative privileges on the Spotfire Server.
Procedure
1. On the server where Spotfire Server is installed, locate the file <installation dir>\tomcat\webapps\spotfire\WEB-INF\web.xml.
2. Locate and modify the following parameter.<context-param> <param-name>log.dir</param-name> <param-value>/../../logs</param-value></context-param>
Node logs
The node logs store important diagnostic information. The information can help in troubleshooting andresolving issues.
To view node manager logs, see Accessing Spotfire Server and node logs.
The following table is a partial list available from the Select log file to view drop-down list found in thenode Log files page. These are the most important node manager log files. You can find information forother logs on this list in the following topics:
● Spotfire Server logs
● Service logs
Log file Description
jetty.log The output from the jetty container that the nodemanager runs within (similar to catalina.log).
nm.log, nm.log.n (n is a number between 1 andthe maximum number of logs that is configuredto roll through.)
Information about all activity on the node.
nodemanager.txt Generated only when you create atroubleshooting bundle. If you downloadanother troubleshooting bundle at a later time,this log file is overwritten with newer data.
service-<guid>.log STDOUT from the service with the specific guid.This is a service instance log, and not aninstallation log.
234
TIBCO Spotfire® Server and Environment Installation and Administration
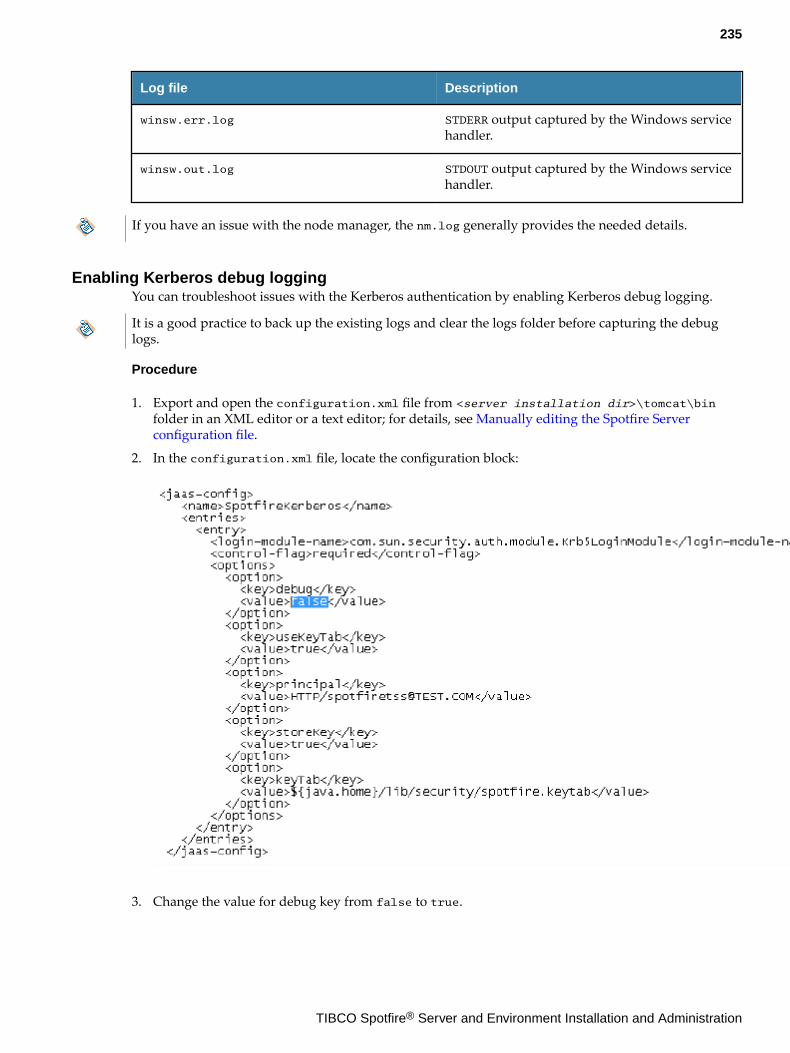
Log file Description
winsw.err.log STDERR output captured by the Windows servicehandler.
winsw.out.log STDOUT output captured by the Windows servicehandler.
If you have an issue with the node manager, the nm.log generally provides the needed details.
Enabling Kerberos debug loggingYou can troubleshoot issues with the Kerberos authentication by enabling Kerberos debug logging.
It is a good practice to back up the existing logs and clear the logs folder before capturing the debuglogs.
Procedure
1. Export and open the configuration.xml file from <server installation dir>\tomcat\binfolder in an XML editor or a text editor; for details, see Manually editing the Spotfire Serverconfiguration file.
2. In the configuration.xml file, locate the configuration block:
3. Change the value for debug key from false to true.
235
TIBCO Spotfire® Server and Environment Installation and Administration
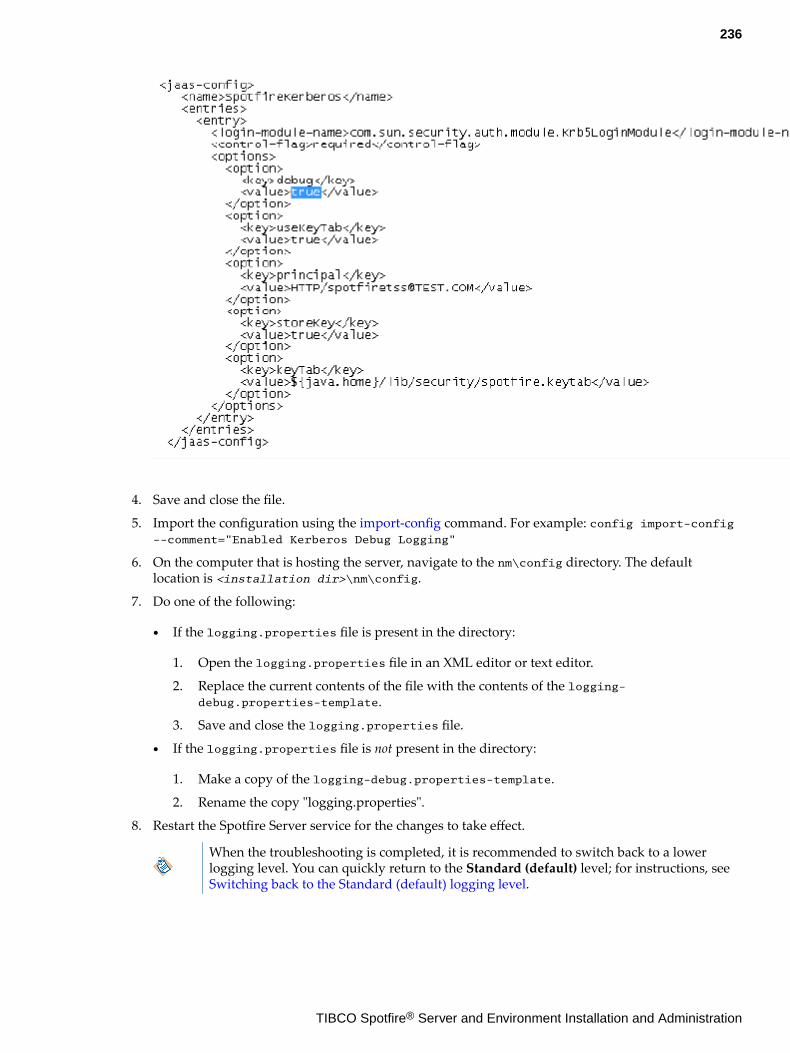
4. Save and close the file.
5. Import the configuration using the import-config command. For example: config import-config--comment="Enabled Kerberos Debug Logging"
6. On the computer that is hosting the server, navigate to the nm\config directory. The defaultlocation is <installation dir>\nm\config.
7. Do one of the following:
● If the logging.properties file is present in the directory:
1. Open the logging.properties file in an XML editor or text editor.
2. Replace the current contents of the file with the contents of the logging-debug.properties-template.
3. Save and close the logging.properties file.
● If the logging.properties file is not present in the directory:
1. Make a copy of the logging-debug.properties-template.
2. Rename the copy "logging.properties".
8. Restart the Spotfire Server service for the changes to take effect.
When the troubleshooting is completed, it is recommended to switch back to a lowerlogging level. You can quickly return to the Standard (default) level; for instructions, see Switching back to the Standard (default) logging level.
236
TIBCO Spotfire® Server and Environment Installation and Administration
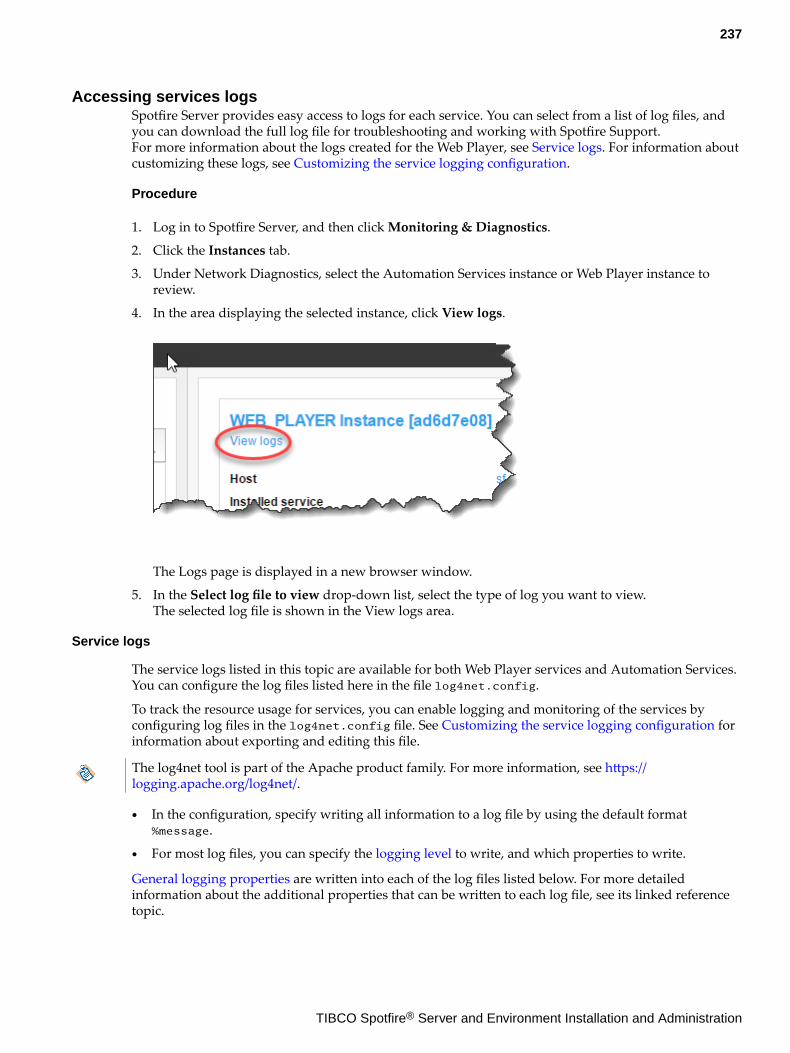
Accessing services logsSpotfire Server provides easy access to logs for each service. You can select from a list of log files, andyou can download the full log file for troubleshooting and working with Spotfire Support.For more information about the logs created for the Web Player, see Service logs. For information aboutcustomizing these logs, see Customizing the service logging configuration.
Procedure
1. Log in to Spotfire Server, and then click Monitoring & Diagnostics.
2. Click the Instances tab.
3. Under Network Diagnostics, select the Automation Services instance or Web Player instance toreview.
4. In the area displaying the selected instance, click View logs.
The Logs page is displayed in a new browser window.
5. In the Select log file to view drop-down list, select the type of log you want to view.The selected log file is shown in the View logs area.
Service logs
The service logs listed in this topic are available for both Web Player services and Automation Services.You can configure the log files listed here in the file log4net.config.
To track the resource usage for services, you can enable logging and monitoring of the services byconfiguring log files in the log4net.config file. See Customizing the service logging configuration forinformation about exporting and editing this file.
The log4net tool is part of the Apache product family. For more information, see https://logging.apache.org/log4net/.
● In the configuration, specify writing all information to a log file by using the default format%message.
● For most log files, you can specify the logging level to write, and which properties to write.
General logging properties are written into each of the log files listed below. For more detailedinformation about the additional properties that can be written to each log file, see its linked referencetopic.
237
TIBCO Spotfire® Server and Environment Installation and Administration
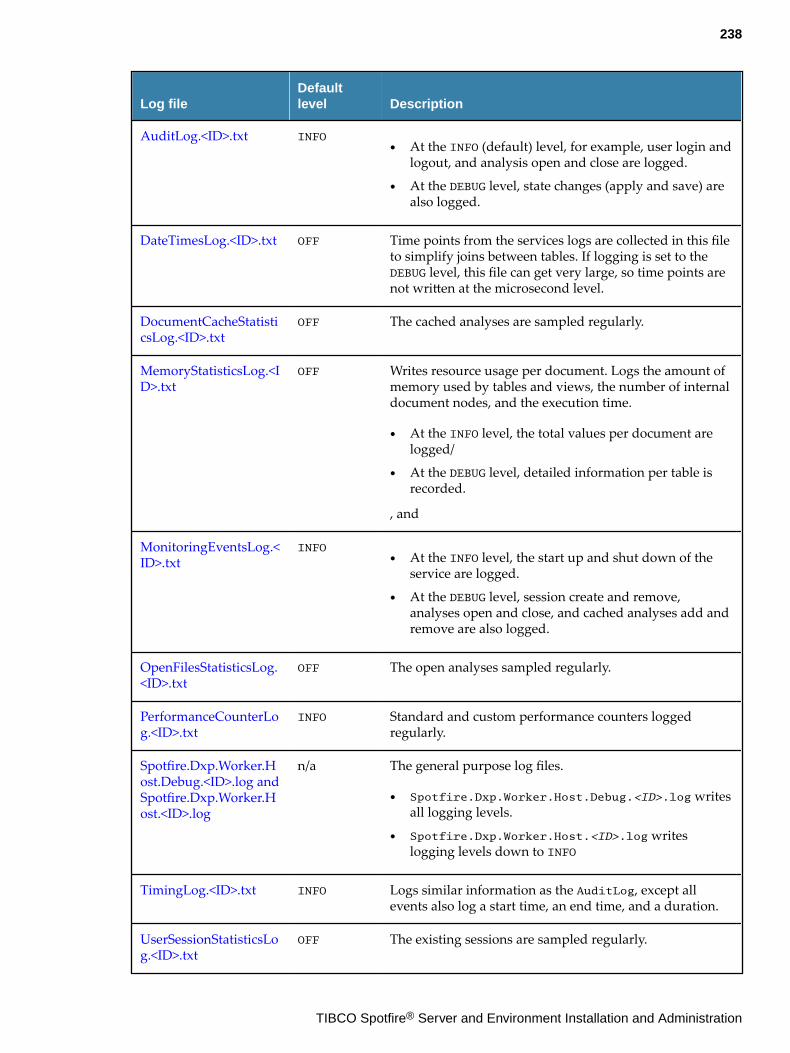
Log fileDefaultlevel Description
AuditLog.<ID>.txt INFO● At the INFO (default) level, for example, user login and
logout, and analysis open and close are logged.
● At the DEBUG level, state changes (apply and save) arealso logged.
DateTimesLog.<ID>.txt OFF Time points from the services logs are collected in this fileto simplify joins between tables. If logging is set to theDEBUG level, this file can get very large, so time points arenot written at the microsecond level.
DocumentCacheStatisticsLog.<ID>.txt
OFF The cached analyses are sampled regularly.
MemoryStatisticsLog.<ID>.txt
OFF Writes resource usage per document. Logs the amount ofmemory used by tables and views, the number of internaldocument nodes, and the execution time.
● At the INFO level, the total values per document arelogged/
● At the DEBUG level, detailed information per table isrecorded.
, and
MonitoringEventsLog.<ID>.txt
INFO● At the INFO level, the start up and shut down of the
service are logged.
● At the DEBUG level, session create and remove,analyses open and close, and cached analyses add andremove are also logged.
OpenFilesStatisticsLog.<ID>.txt
OFF The open analyses sampled regularly.
PerformanceCounterLog.<ID>.txt
INFO Standard and custom performance counters loggedregularly.
Spotfire.Dxp.Worker.Host.Debug.<ID>.log andSpotfire.Dxp.Worker.Host.<ID>.log
n/a The general purpose log files.
● Spotfire.Dxp.Worker.Host.Debug.<ID>.log writesall logging levels.
● Spotfire.Dxp.Worker.Host.<ID>.log writeslogging levels down to INFO
TimingLog.<ID>.txt INFO Logs similar information as the AuditLog, except allevents also log a start time, an end time, and a duration.
UserSessionStatisticsLog.<ID>.txt
OFF The existing sessions are sampled regularly.
238
TIBCO Spotfire® Server and Environment Installation and Administration
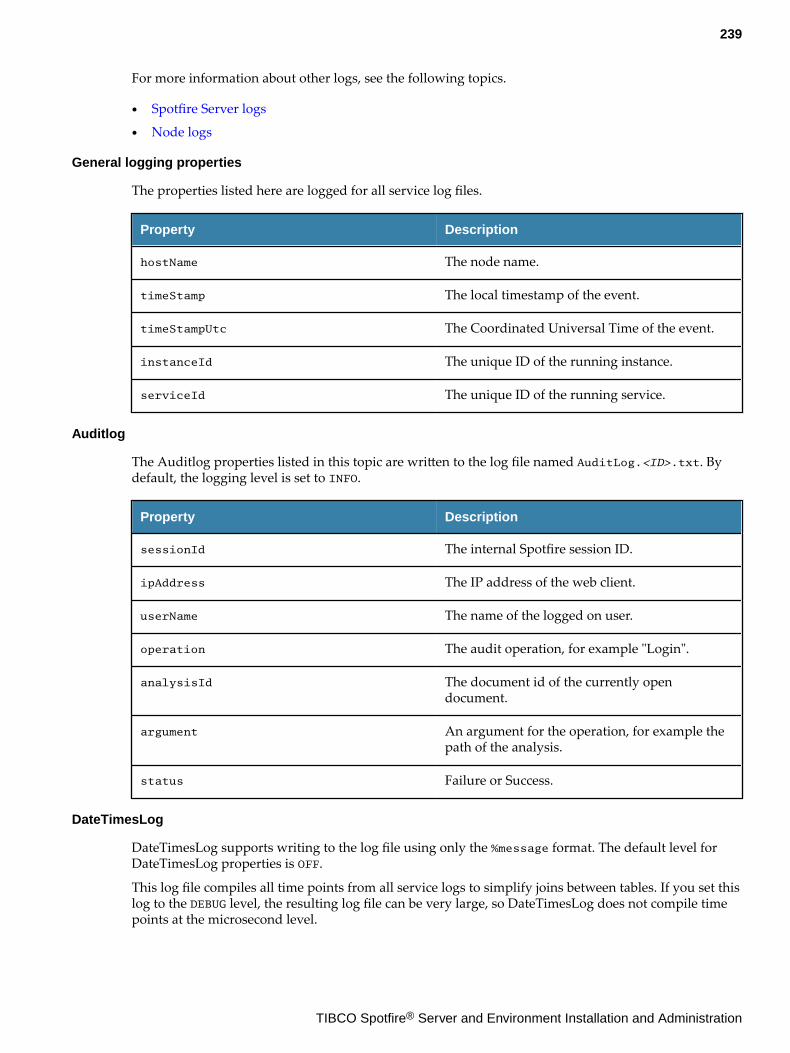
For more information about other logs, see the following topics.
● Spotfire Server logs
● Node logs
General logging properties
The properties listed here are logged for all service log files.
Property Description
hostName The node name.
timeStamp The local timestamp of the event.
timeStampUtc The Coordinated Universal Time of the event.
instanceId The unique ID of the running instance.
serviceId The unique ID of the running service.
Auditlog
The Auditlog properties listed in this topic are written to the log file named AuditLog.<ID>.txt. Bydefault, the logging level is set to INFO.
Property Description
sessionId The internal Spotfire session ID.
ipAddress The IP address of the web client.
userName The name of the logged on user.
operation The audit operation, for example "Login".
analysisId The document id of the currently opendocument.
argument An argument for the operation, for example thepath of the analysis.
status Failure or Success.
DateTimesLog
DateTimesLog supports writing to the log file using only the %message format. The default level forDateTimesLog properties is OFF.
This log file compiles all time points from all service logs to simplify joins between tables. If you set thislog to the DEBUG level, the resulting log file can be very large, so DateTimesLog does not compile timepoints at the microsecond level.
239
TIBCO Spotfire® Server and Environment Installation and Administration

DocumentCacheStatisticsLog
The DocumentCacheStatisticsLog properties listed in this topic are written to the log file namedDocumentCacheStatisticsLog.<ID>.txt. By default, the logging level is set to OFF.
Property Description
path The path of the currently open document.
modifiedOn The date the document was modified.
referenceCount The count of concurrent open references to thecurrent document.
MemoryStatisticsLog
The MemoryStatisticsLog properties listed in this topic are written to the log file namedMemoryStatisticsLog.<ID>.txt. By default, the logging level is set to OFF.
Property Description
sessionId The internal Spotfire session ID.
userName The name of the logged on user.
analysisId The unique ID for the analysis.
tableId The unique ID for the table. This is empty if the value is a total.
analysisPath The library path for the analysis.
title The title of the analysis.
type The type of information. Can be one of the following.
● SharedApproximateTotalTableSize
● SharedApproximateTotalViewSize
● DocumentNodeCount
● SharedDocumentNodeCount
● ApproximateExecutionTime
value The number of bytes, nodes, or milliseconds depending on type.
MonitoringEventsLog
The MonitoringEventsLog properties listed in this topic are written to the log file namedMonitoringEventsLog.<ID>.txt. By default, the logging level is set to INFO.
Property Description
eventType The type of event.
240
TIBCO Spotfire® Server and Environment Installation and Administration

Property Description
argument Arguments related to the event.
information Information related to the event.
OpenFilesStatisticsLog
The OpenFilesStatisticsLog properties listed in this topic are written to the log file namedAuditLOpenFilesStatisticsLogog.<ID>.txt. By default, the logging level is set to OFF.
Property Description
sessionId The internal Spotfire session ID.
filePath The path of the currently open document.
modifiedOn The date the document was modified.
fileId The file ID.
elapsedTime The time since opened.
inactiveTime The inactivity time.
PerformanceCounterLog
The PerformanceCounterLog properties listed in this topic are written to the log file namedPerformanceCounterLog.<ID>.txt. By default, the logging level is set to INFO.
Property Description
counterCategory The category of the performance counter.
counterName The name of the performance counter.
counterInstance The instance of the performance counter.
counterValue The value the performance counter returns.
Spotfire.Dxp.Worker.Host and Spotfire.Dxp.Worker.Host.Debug
The properties for Spotfire.Dxp.Worker.Host and Spotfire.Dxp.Worker.Host.Debug are written to thelog files Spotfire.Dxp.Worker.Host.ID.log and Spotfire.Dxp.Worker.Host.Debug.ID.log. Theseare general purpose log files for all logging levels, and for logging levels down to INFO, respectively.For the properties listed in this topic, you cannot use the standard Apache log4net pattern strings.
Property Description
pid The Process ID.
user The name of the logged on user.
241
TIBCO Spotfire® Server and Environment Installation and Administration

Property Description
windowsUser The Windows user.
sessionId The internal Spotfire session ID.
TimingLog
The TimingLog properties listed in this topic are written to the log file named TimingLog.<ID>.txt. Bydefault, the logging level is set to INFO.
Property Description
endTime The time the event ends.
duration The duration of the event.
sessionId The internal Spotfire session ID.
ipAddress The IP address of the web client.
userName The name of the logged on user.
operation The audit operation, for example "Login".
analysisId The document id of the currently opendocument.
argument An argument for the operation, for example, thepath of the analysis.
status Failure or Success.
UserSessionStatisticsLog
The UserSessionStatisticsLog properties listed in this topic are written to the log file namedUserSessionStatisticsLog.<ID>.txt. By default, the logging level is set to OFF.
Property Description
sessionID The internal Spotfire session ID.
ipAddress The IP address of the web client.
userName The name of the logged on user.
browserType The name and (major) version number of thebrowser.
cookies Returns true if cookies are enabled.
loggedInDuration The duration of time the user has been logged in.
242
TIBCO Spotfire® Server and Environment Installation and Administration
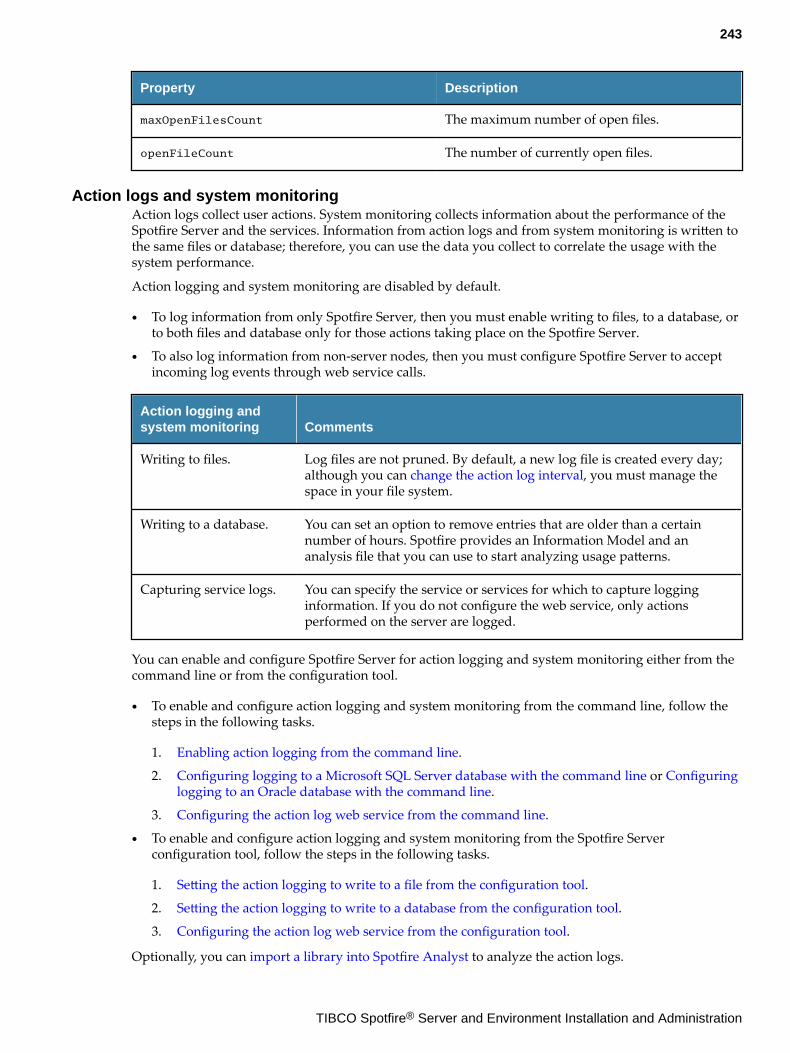
Property Description
maxOpenFilesCount The maximum number of open files.
openFileCount The number of currently open files.
Action logs and system monitoringAction logs collect user actions. System monitoring collects information about the performance of theSpotfire Server and the services. Information from action logs and from system monitoring is written tothe same files or database; therefore, you can use the data you collect to correlate the usage with thesystem performance.
Action logging and system monitoring are disabled by default.
● To log information from only Spotfire Server, then you must enable writing to files, to a database, orto both files and database only for those actions taking place on the Spotfire Server.
● To also log information from non-server nodes, then you must configure Spotfire Server to acceptincoming log events through web service calls.
Action logging andsystem monitoring Comments
Writing to files. Log files are not pruned. By default, a new log file is created every day;although you can change the action log interval, you must manage thespace in your file system.
Writing to a database. You can set an option to remove entries that are older than a certainnumber of hours. Spotfire provides an Information Model and ananalysis file that you can use to start analyzing usage patterns.
Capturing service logs. You can specify the service or services for which to capture logginginformation. If you do not configure the web service, only actionsperformed on the server are logged.
You can enable and configure Spotfire Server for action logging and system monitoring either from thecommand line or from the configuration tool.
● To enable and configure action logging and system monitoring from the command line, follow thesteps in the following tasks.
1. Enabling action logging from the command line.
2. Configuring logging to a Microsoft SQL Server database with the command line or Configuringlogging to an Oracle database with the command line.
3. Configuring the action log web service from the command line.
● To enable and configure action logging and system monitoring from the Spotfire Serverconfiguration tool, follow the steps in the following tasks.
1. Setting the action logging to write to a file from the configuration tool.
2. Setting the action logging to write to a database from the configuration tool.
3. Configuring the action log web service from the configuration tool.
Optionally, you can import a library into Spotfire Analyst to analyze the action logs.
243
TIBCO Spotfire® Server and Environment Installation and Administration
Configure action logging from the command line
By default, user action logging and system monitoring is not enabled or configured. You can enable andconfigure it from the server command line.
● You can configure user action logging for actions occuring on Spotfire Server, and for actionsoccurring on services (Spotfire Analyst, Automation Services, and Spotfire Business Author).
● You can configure the user action and system monitoring logs to write to a file, to a database, or toboth.
● Additionally, if you write the logs to a database, you can install a Spotfire Analyst library, whichcontains Information Links for all available logging categories, and configure it to read the logs fromthe database to create a Spotfire visualization for analyzing the logs.
Follow the guidance in this section to enable action logging from the command line.
Enabling action logging and system monitoring from the command line
By default, action logging and system monitoring is not enabled. You can enable it from the servercommand line.From the command line, running the enable-action-logging command is the first step.
Prerequisites
You must have administrative credentials for Spotfire Server.
Procedure
1. Log in to the Spotfire Server, and from the Start menu, open a command-line window asadministrator.
2. Browse to <installation dir>\tomcat\bin.
3. At the command prompt, type the command config config-action-logger, passing in thearguments specifying where to record the logs.
● To write the action logs to a file, type the following.config config-action-logger --file-logging-enabled=true --database-logging-enabled=false
Log files are not removed automatically. If you enable action logging to write to a file,remember to manage space needs for the resulting log files. By default, log files arewritten on a daily basis, but the configuration can be changed. See Setting the actionlog interval for more information.
● To write the action logs to a database, type the following.config config-action-logger --file-logging-enabled=false --database-logging-enabled=true
● To write the action logs to both a file and a database, type the following.config config-action-logger --file-logging-enabled=true --database-logging-enabled=true
In these examples, other command-line defaults are accepted. For example, the defaultconfiguration enables all categories for logging ( categories="all"). To limit the enabledcategories, provide a comma-separated list. See Action log categories for a complete list.For information about all available options for this command, see config-action-logger.
244
TIBCO Spotfire® Server and Environment Installation and Administration
What to do next
● If you specify the database option, configure the action log to write to the database you use.
— Configure action logging to a Microsoft SQL Server database.
— Configure action logging to an Oracle database.
● To specify which services are allowed for logging on the server, see configure the action log webservice.
Configuring logging to a Microsoft SQL Server database with the command line
You can configure action logging to write to a Microsoft SQL Server database, and then run therequired additional scripts need for logging to a database. Sample scripts are included in theinstallation kit for Spotfire Server.
This topic describes the steps required to configure the database for action logging, and to run theconfiguration scripts from the command line. Alternatively, you can enable and configure the actionlogging and system monitoring from the Configuration Tool. For more information, see the followingtopics.
● Setting the action logging to write to a file from the configuration tool.
● Setting the action logging to write to a database from the configuration tool.
● Configuring the action log web service from the configuration tool.
Prerequisites
● You must have administrative credentials for Spotfire Server.
● You must have enabled logging to a database.
Procedure
1. Log in to Spotfire Server, and in the file system, browse to the directory containing the installationkit files.
2. In the installation kit that you downloaded from the TIBCO eDelivery site, browse to the directorycontaining the scripts to create a new database and schema.For Oracle, this directory is /scripts/mssql_install/actionlog.
3. Using a text editor, open the script file.The script file to edit is named create_actionlog_db.bat (or, for Linux,create_actionlog_db.sh) .
4. In the script file, edit the section containing the database name spotfire_actionlog, setting thevariables to reflect your database environment.
You must provide the database password in this script. If you do not have the password, consultyour DBA for assistance.
If you want to use the information layer, do not change the user and name, unless you usethe Redirect dependent elements functionality in Spotfire Analyst Information Designer.See the Spotfire Analyst help topic "Redirecting the Information Model" for moreinformation on this functionality.
5. Optional: If your database is running on Amazon RDS, also edit the script filecreate_actionlog_db_rds.bat (or, for Linux, create_actionlog_db_rds.sh), specifying thesame information.
245
TIBCO Spotfire® Server and Environment Installation and Administration
6. Run the script to create the database.Information and error logs are written to a file named actionlogs.txt in the directory from whereyou run the script. If the script takes a very long time, or if it fails, check this text file for moreinformation.The database is created on the server.
7. Log in to the Spotfire Server, and from the Start menu, open a command-line window asadministrator.
8. Browse to <installation dir>\tomcat\bin.
9. Export the configuration: At the command prompt, type the command config export-config.config export-config --force
When prompted, supply the tools password. See export-config for more information.
10. Log in to the Spotfire Server, and from the Start menu, open a command-line window asadministrator.
11. Browse to <installation dir>\tomcat\bin.
12. At the command prompt, type the command config config-action-log-database-logger,passing in the arguments specifying the details of the database.For example, to specify the Microsoft SQL Server database URL, driver class, user name, andpassword, provide the following.config config-action-log-database-logger --database-url="jdbc:sqlserver://[mycompany]:1433;DatabaseName=[Mydatabase]" --driver-class="com.microsoft.sqlserver.jdbc.SQLServerDriver" --username="spotfire_actionlog"
When prompted, supply the tools password. See config-action-log-database-logger for moreinformation.
13. At the command prompt, type the command config import-config.config import-config --comment="adding database configuration for action logging."
When prompted, supply the tools password. See import-config for more information.
14. Restart Spotfire Server.
Result
The database is configured.
What to do next
Use the Information Links and sample analysis file from the installation kit to create a visualizationfrom the action logs.
Configuring logging to an Oracle database with the command line
You can configure action logging to write to an Oracle database, and then run the required additionalscripts need for logging to a database. Sample scripts are included in the installation kit for SpotfireServer.
This topic describes the steps required to configure the database and run the configuration scripts fromthe command line. Alternatively, you can enable and configure the action logging and systemmonitoring from the configuration tool. For more information, see the following topics.
● Setting the action logging to write to a file.
● Setting the action logging to write to a database.
246
TIBCO Spotfire® Server and Environment Installation and Administration
● Configuring the action log web service from the configuration tool.
Prerequisites
● You must have administrative credentials for Spotfire Server.
● You must have enabled logging to a database.
Procedure
1. Log in to Spotfire Server, and in the file system, browse to the directory containing the installationkit files.
2. In the installation kit that you downloaded from the TIBCO eDelivery site, browse to the directorycontaining the scripts to create a new database and schema.For Oracle, this directory is /scripts/oracle_install/actionlog.
3. Using a text editor, open the script file.The script file to edit is named create_actionlog_db.bat (or, for Linux,create_actionlog_db.sh) .
4. In the script file, edit the section containing the database name spotfire_actionlog, setting thevariables to reflect your database environment.
You must provide the database password in this script. If you do not have the password, consultyour DBA for assistance.
If you want to use the information layer, do not change the user and name, unless you usethe Redirect dependent elements functionality in Spotfire Analyst Information Designer.See the Spotfire Analyst help topic "Redirecting the Information Model" for moreinformation on this functionality.
5. Optional: If your database is running on Amazon RDS, also edit the script filecreate_actionlog_db_rds.bat (or, for Linux, create_actionlog_db_rds.sh), specifying thesame information.
6. Run the script to create the database.Information and error logs are written to a file named actionlogs.txt in the directory from whereyou run the script. If the script takes a very long time, or if it fails, check this text file for moreinformation.The database is created on the server.
7. On Spotfire Server, from the Start menu, open a command-line window as administrator.
8. Browse to <installation dir>\tomcat\bin.
9. Export the configuration: At the command prompt, type the command config export-config.config export-config --force
When prompted, supply the tools password. See export-config for more information.
10. At the command prompt, type the command config config-action-log-database-logger,passing in the arguments specifying the details of the database.For example, to specify the Oracle database URL, driver class, user name, and password. Thefollowing example demonstrates the information you must provide.config config-action-log-database-logger --database-url="jdbc:tibcosoftwareinc:oracle://some.oraserver.com:1521;ServiceName=pdborcl.example.com" --driver-class="tibcosoftwareinc.jdbc.oracle.OracleDriver" --username="spotfire_actionlog"
When prompted, supply the tools password. See config-action-log-database-logger for moreinformation.
247
TIBCO Spotfire® Server and Environment Installation and Administration
11. At the command prompt, type the command config import-config.config import-config --comment="adding database configuration for action logging."
When prompted, supply the tools password. See import-config for more information.
12. Restart Spotfire Server.
Result
The database is configured for use.
What to do next
Use the Information Links and sample analysis file from the installation kit to create a visualizationfrom the action logs.
Configuring the action log web service from the command line
To collect logging from the Spotfire Server and specified services (Spotfire Analyst, Web Player andAutomation Services), first enable and configure writing to files or a database, and then enable andconfigure the action log web service. This task describes configuring the action log web service from thecommand line.
If you do not configure the action log web service, then only actions performed on Spotfire Server arelogged.
Alternatively, you can enable and configure the action log web service from the configuration tool. Formore information, see Configuring the action log web service from the configuration tool.
Prerequisites
You must have administrative credentials for Spotfire Server.
You must have completed the following tasks.
● Enable action logging from the command line.
● Configure action logging to write to either a file or to a database (Microsoft SQL Server or Oracle).
Procedure
1. Log in to the Spotfire Server, and from the Start menu, open a command-line window asadministrator.
2. Browse to <installation dir>\tomcat\bin.
3. At the command prompt, type the command config config-action-log-web-service, passingin the arguments specifying the services for which to collect logs.For example, to enable all categories from all hosts, type the following command.config config-action-log-web-service --allowedHosts=".*" --categories="all"
By default, all hosts are allowed and all categories are logged. If you want to reduce the trafficpassing between services and the server, replace the default argument values.
● Specify from which host the server should accept logging requests.
● Specify which individual services are allowed for logging. Provide a comma-separated list.
At startup, all configured services check the server for allowed categories. See Action logcategories for a complete list.
248
TIBCO Spotfire® Server and Environment Installation and Administration

Configure action logging using the configuration tool
By default, user action logging and system monitoring is not enabled or configured. You can enable andconfigure it from the Spotfire Server configuration tool.
● You can configure user action logging for actions occuring on Spotfire Server, and for actionsoccurring on services (Spotfire Analyst, Automation Services, and Spotfire Business Author).
● You can configure the user action and system monitoring logs to write to a file, to a database, or toboth.
● Additionally, if you write the logs to a database, you can install a Spotfire Analyst library, whichcontains Information Links for all available logging categories, and configure it to read the logs fromthe database to create a Spotfire visualization for analyzing the logs.
Follow the guidance in this section to enable action logging from the configuration tool.
Setting action logging to write to a file from the configuration tool
If you need to capture action logs, you can set the Spotfire Server configuration file to write the actionlogs to a file, a database, or both. This topic discusses writing an action log to a file.
Log files are not removed automatically. If you enable action logging to write to a file, remember tomanage space needs for the resulting log files. By default, log files are written on a daily basis, but theconfiguration can be changed. See Setting the action log interval for more information.
Prerequisites
You must have administrative credentials for Spotfire Server.
Procedure
1. On the computer running Spotfire Server, click Start, go to the Spotfire Server folder, and clickConfigure TIBCO Spotfire Server.
2. In the Configuration Start panel, click User Action log.User Action Log configuration options are displayed.
3. For Enable file logger, select Yes, and then save the configuration.The Save configuration dialog is displayed, prompting you to write to a database (therecommended default), or to a file.
4. Select File, and then click Next.A Save dialog is displayed, prompting you to specify the directory to store the XML configurationfiles.
5. Browse to a directory to store the files, provide a file name, and then click Save to save theconfiguration.The action logs are written to the specified file path at the interval specified in the log4j2configuration file.
6. Optional: Set the action logs to write to a database from the configuration tool.
What to do next
Configure the web service to log actions from the configuration tool. If you do not configure the webservice, only actions that occur on the Spotfire Server are logged.
Save the configuration and restart all services and Spotfire Server for your changes to take effect.
249
TIBCO Spotfire® Server and Environment Installation and Administration
Setting action logging to write to a database from the configuration tool
If you need to capture action logs, you can set the Spotfire Server configuration file to write the actionlogs to a file, a database, or both. This topic discusses writing an action log to a database.You can configure the action logs by using command-line commands. For more information, see Enabling action logging and system monitoring from the command line.
Prerequisites
● You must have administrative credentials for Spotfire Server.
● You must have a database established to collect the logs.
Procedure
1. On the computer running Spotfire Server, click Start, go to the Spotfire Server folder, and clickConfigure TIBCO Spotfire Server.
2. In the Configuration Start panel, click User Action log.User Action Log configuration options are displayed.
3. For Enable database logger, click Yes.
4. To set specific categories to log, for Enable categories, click Some Categories, and from the list,select the catetgories to log.Only those categories you select are added to the database logger queue. By default all categoriesare logged.
5. To ensure certain categories are added to the database logger queue, select the Prioritized checkbox.See Database logging for more information.
6. Complete the Database logger configuration section, specifying the required database connectioninformation.Optionally, change the default configuration settings.
7. Click Test connection to make sure the configuration works.
8. Optional: Set the action logs to write to a file from the configuration tool.
What to do next
Configure the web service to log actions from the configuration tool. If you do not configure the webservice, only actions that occur on the Spotfire Server are logged.
Save the configuration and restart all services and Spotfire Server for your changes to take effect.
Configuring the action log web service from the configuration tool
To collect logging from the Spotfire Server and specified services (Spotfire Analyst, Web Player andAutomation Services), first enable and configure writing to files or a database, and then enable andconfigure the action log web service. This task describes configuring the action log web service from theconfiguration tool.
Prerequisites
● You must have administrative credentials for Spotfire Server.
● You must have either configured the tool to write to a file or to a database to collect the logs.
250
TIBCO Spotfire® Server and Environment Installation and Administration
Procedure
1. On the computer running Spotfire Server, click Start, go to the Spotfire Server folder, and clickConfigure TIBCO Spotfire Server.
2. In the Configuration Start panel, click User Action log.User Action Log configuration options are displayed.
3. Set Enable web service to Yes.For this option to be enabled, you must have completed the prerequisite to write to a file ordatabase to collect logs.The Web service configuration section is available.
4. Specify the settings for the web service configuration.
● Specify the allowed host as a regular expression, if different from the default .*. For example,192\.168\.[0-9]{1,3}\.[0-9]{ 1,3}$
● Specify which categories to allow to communicate with the server. The default is All. If you setthis option to Some Categories, then you can select from the resulting list box the servicecategories to allow. See Action log categories for a complete list.
At startup, a service reads the list and sends to the Spotfire Server user action logger only the useraction information for those services that are allowed. If a service is not allowed, then at startup, ithas no communication with the Spotfire Server action logger. This setting is useful if you want toremove high-volume services from filling the log files.
If you set the property to enable a service, but you do not set the property to allow it, remember thatno communication is sent from the service to the logger.
5. Save the configuration, specifying the configuration destination, and restart all servers and services.
Importing a library to Spotfire Analyst for analyzing action logs
The installation kit includes a downloadable .zip file containing Information Links and a sampleanalysis file so that you can create a visualization to analyze your user action logs.
Prerequisites
● You must have administrative credentials for Spotfire Server.
● You must have enabled action logging, configured action logging for either an Oracle database or a Microsoft SQL Server database, and configured the web service to specify which services to log.
Procedure
1. In the installation kit that you downloaded from the TIBCO eDelivery site, browse to the directorycontaining the scripts to create a new database and schema.
● For Oracle, this directory is /scripts/oracle_install/actionlog.
● For SQL Server, this directory is /scripts/mssql_install/actionlog.
2. In the installation kit directory, find the .zip file.
● For Oracle, this file is logged_user_actions_ora.part0.zip.
● For SQL Server, this file is logged_user_actions_mssql.part0.zip.
3. On Spotfire Server, open a command line as administrator and go to the <server installationdir>/tomcat/bin directory.
251
TIBCO Spotfire® Server and Environment Installation and Administration
4. On the command line, type the command config import-library-content, specifying theoptions needed to import the .zip file.Exampleconfig import-library-content --tool-password=<password> --file-path=/scripts/oracle_install/actionlog/logged_user_actions_ora.part0.zip --conflict-resolution-mode=KEEP_BOTH --user=jdoe
See import-library-content for more information.
5. Open Spotfire Analyst.
6. From the menu, click Tools > Information Designer, and then open the Data Source tab.
7. Provide information to connect to the data source, and then save the changes.You must provide the Type, the Connection URL, the Username, and the Password.
Result
The analysis is ready to start reading logging from the database, and the Spotfire Analyst should reflectdata read from the system monitoring and the user action logs.
Setting the action log interval
If you set the Spotfire Server configuration to write an action log to a database or a file, then the log isupdated on a daily basis, by default. You can change the interval from daily by editing the log4j2configuration file.
Log files are not removed automatically, and changing the interval can affect the amount of spacerequired by the files or in the database. Be prepared to manage the space requirements.
Prerequisites
You must have administrative credentials for Spotfire Server.
Before editing the log4j2 configuration file, make a backup copy.
Procedure
1. On the computer running Spotfire Server, open the following file in a text editor or an XML editor:<installation dir>/tomcat/spotfire-config/log4j2.xml.
2. Find the appender section specifying <RollingFile name="actionlog"...>
3. Edit the filePattern entry to specify a different interval.For detailed information about filePattern, see https://logging.apache.org/log4j/2.x/manual/appenders.html#RollingFileAppender.
4. Save and close the file.
5. Restart the server service.
Result
Any action logs are written at the new interval.
Database logging
When you configure Spotfire Server to log user actions to a database, you create a dependent andintegrated system that you can tune to your logging needs, and you can monitor its health with a JMX-compatible application, such as JConsole.
If you enable database logging, then the server depends on being able to connect successfully to thedatabase. During startup, the database logger attempts to connect to the database. If the database
252
TIBCO Spotfire® Server and Environment Installation and Administration
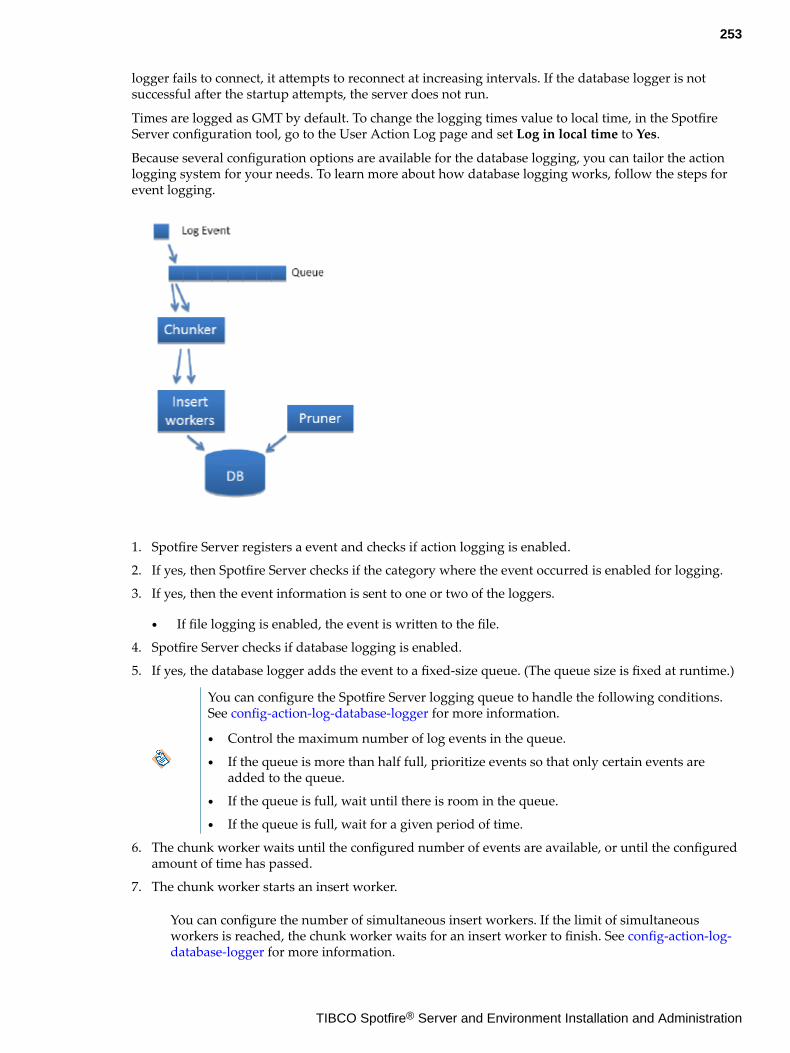
logger fails to connect, it attempts to reconnect at increasing intervals. If the database logger is notsuccessful after the startup attempts, the server does not run.
Times are logged as GMT by default. To change the logging times value to local time, in the SpotfireServer configuration tool, go to the User Action Log page and set Log in local time to Yes.
Because several configuration options are available for the database logging, you can tailor the actionlogging system for your needs. To learn more about how database logging works, follow the steps forevent logging.
1. Spotfire Server registers a event and checks if action logging is enabled.
2. If yes, then Spotfire Server checks if the category where the event occurred is enabled for logging.
3. If yes, then the event information is sent to one or two of the loggers.
● If file logging is enabled, the event is written to the file.
4. Spotfire Server checks if database logging is enabled.
5. If yes, the database logger adds the event to a fixed-size queue. (The queue size is fixed at runtime.)
You can configure the Spotfire Server logging queue to handle the following conditions.See config-action-log-database-logger for more information.
● Control the maximum number of log events in the queue.
● If the queue is more than half full, prioritize events so that only certain events areadded to the queue.
● If the queue is full, wait until there is room in the queue.
● If the queue is full, wait for a given period of time.
6. The chunk worker waits until the configured number of events are available, or until the configuredamount of time has passed.
7. The chunk worker starts an insert worker.
You can configure the number of simultaneous insert workers. If the limit of simultaneousworkers is reached, the chunk worker waits for an insert worker to finish. See config-action-log-database-logger for more information.
253
TIBCO Spotfire® Server and Environment Installation and Administration
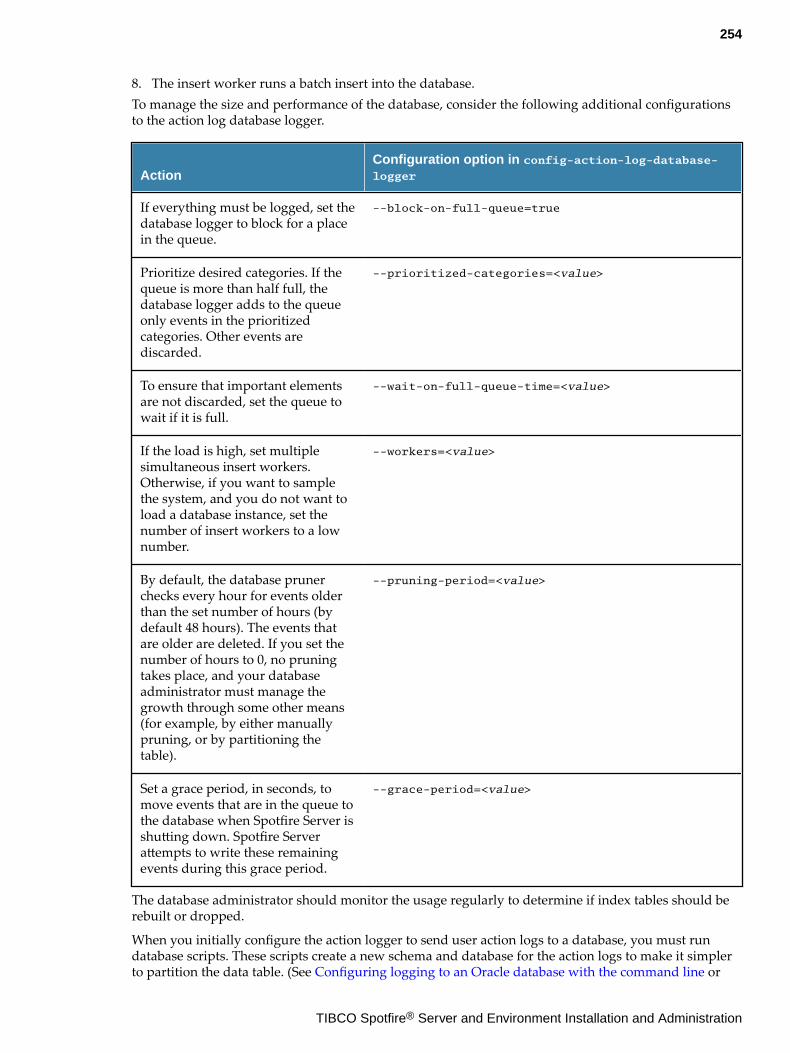
8. The insert worker runs a batch insert into the database.To manage the size and performance of the database, consider the following additional configurationsto the action log database logger.
ActionConfiguration option in config-action-log-database-logger
If everything must be logged, set thedatabase logger to block for a placein the queue.
--block-on-full-queue=true
Prioritize desired categories. If thequeue is more than half full, thedatabase logger adds to the queueonly events in the prioritizedcategories. Other events arediscarded.
--prioritized-categories=<value>
To ensure that important elementsare not discarded, set the queue towait if it is full.
--wait-on-full-queue-time=<value>
If the load is high, set multiplesimultaneous insert workers.Otherwise, if you want to samplethe system, and you do not want toload a database instance, set thenumber of insert workers to a lownumber.
--workers=<value>
By default, the database prunerchecks every hour for events olderthan the set number of hours (bydefault 48 hours). The events thatare older are deleted. If you set thenumber of hours to 0, no pruningtakes place, and your databaseadministrator must manage thegrowth through some other means(for example, by either manuallypruning, or by partitioning thetable).
--pruning-period=<value>
Set a grace period, in seconds, tomove events that are in the queue tothe database when Spotfire Server isshutting down. Spotfire Serverattempts to write these remainingevents during this grace period.
--grace-period=<value>
The database administrator should monitor the usage regularly to determine if index tables should berebuilt or dropped.
When you initially configure the action logger to send user action logs to a database, you must rundatabase scripts. These scripts create a new schema and database for the action logs to make it simplerto partition the data table. (See Configuring logging to an Oracle database with the command line or
254
TIBCO Spotfire® Server and Environment Installation and Administration
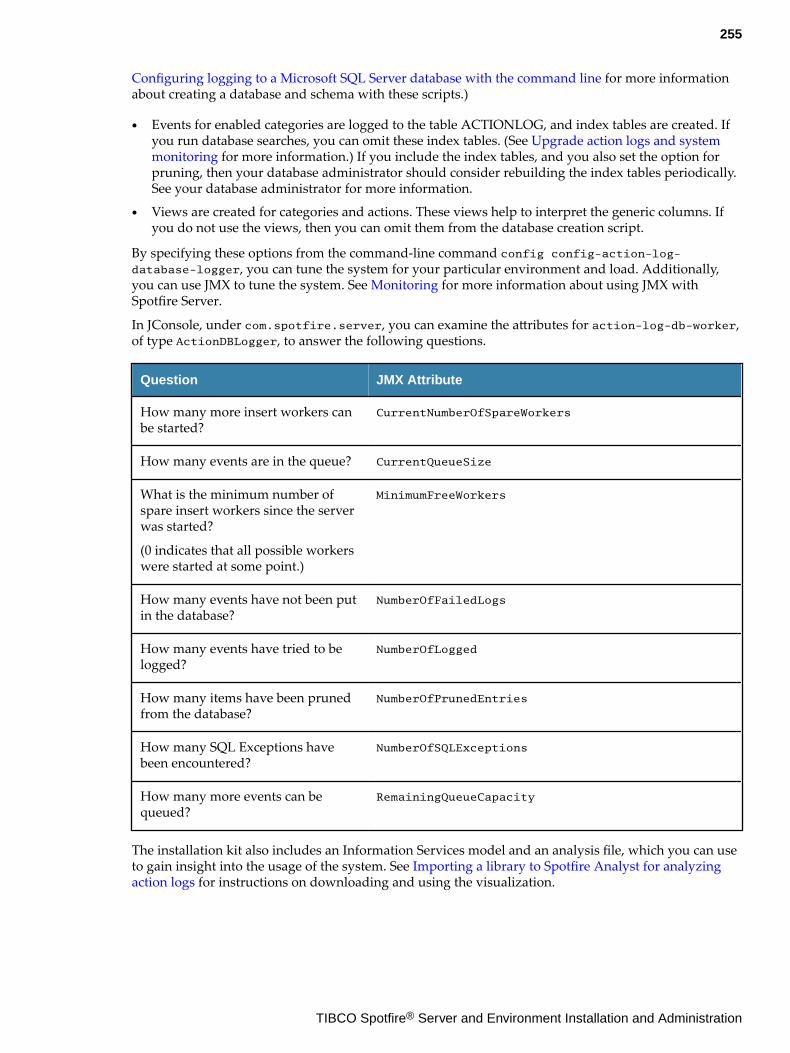
Configuring logging to a Microsoft SQL Server database with the command line for more informationabout creating a database and schema with these scripts.)
● Events for enabled categories are logged to the table ACTIONLOG, and index tables are created. Ifyou run database searches, you can omit these index tables. (See Upgrade action logs and systemmonitoring for more information.) If you include the index tables, and you also set the option forpruning, then your database administrator should consider rebuilding the index tables periodically.See your database administrator for more information.
● Views are created for categories and actions. These views help to interpret the generic columns. Ifyou do not use the views, then you can omit them from the database creation script.
By specifying these options from the command-line command config config-action-log-database-logger, you can tune the system for your particular environment and load. Additionally,you can use JMX to tune the system. See Monitoring for more information about using JMX withSpotfire Server.
In JConsole, under com.spotfire.server, you can examine the attributes for action-log-db-worker,of type ActionDBLogger, to answer the following questions.
Question JMX Attribute
How many more insert workers canbe started?
CurrentNumberOfSpareWorkers
How many events are in the queue? CurrentQueueSize
What is the minimum number ofspare insert workers since the serverwas started?
(0 indicates that all possible workerswere started at some point.)
MinimumFreeWorkers
How many events have not been putin the database?
NumberOfFailedLogs
How many events have tried to belogged?
NumberOfLogged
How many items have been prunedfrom the database?
NumberOfPrunedEntries
How many SQL Exceptions havebeen encountered?
NumberOfSQLExceptions
How many more events can bequeued?
RemainingQueueCapacity
The installation kit also includes an Information Services model and an analysis file, which you can useto gain insight into the usage of the system. See Importing a library to Spotfire Analyst for analyzingaction logs for instructions on downloading and using the visualization.
255
TIBCO Spotfire® Server and Environment Installation and Administration
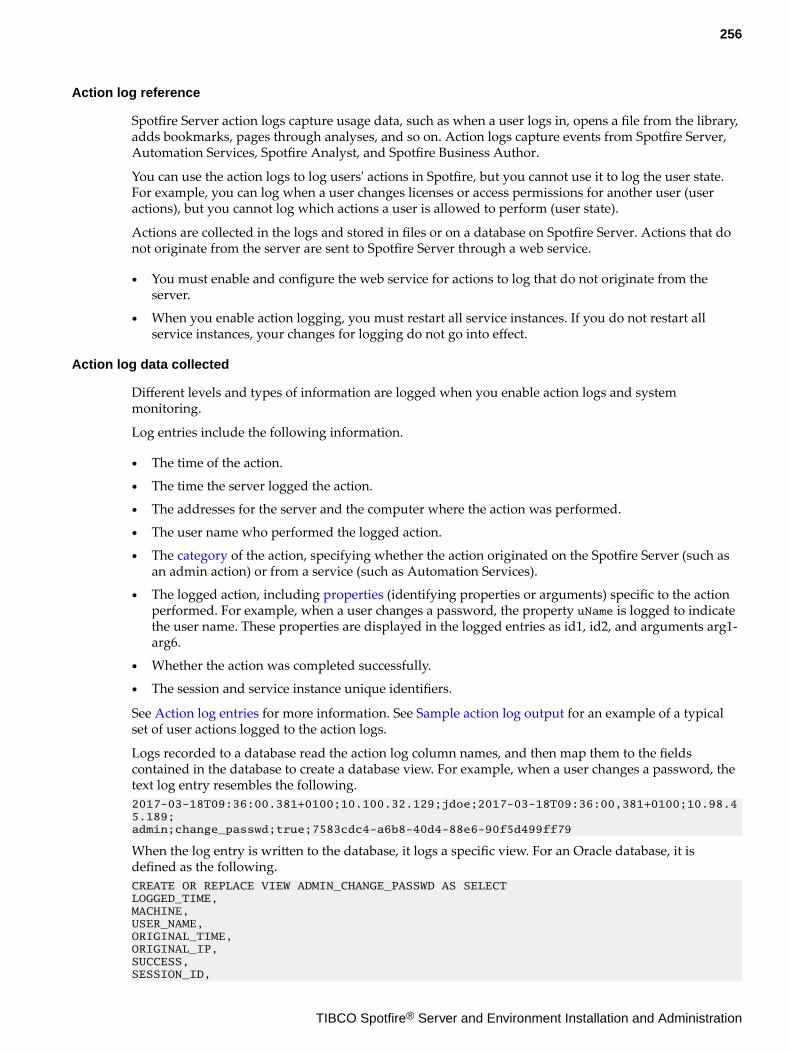
Action log reference
Spotfire Server action logs capture usage data, such as when a user logs in, opens a file from the library,adds bookmarks, pages through analyses, and so on. Action logs capture events from Spotfire Server,Automation Services, Spotfire Analyst, and Spotfire Business Author.
You can use the action logs to log users' actions in Spotfire, but you cannot use it to log the user state.For example, you can log when a user changes licenses or access permissions for another user (useractions), but you cannot log which actions a user is allowed to perform (user state).
Actions are collected in the logs and stored in files or on a database on Spotfire Server. Actions that donot originate from the server are sent to Spotfire Server through a web service.
● You must enable and configure the web service for actions to log that do not originate from theserver.
● When you enable action logging, you must restart all service instances. If you do not restart allservice instances, your changes for logging do not go into effect.
Action log data collected
Different levels and types of information are logged when you enable action logs and systemmonitoring.
Log entries include the following information.
● The time of the action.● The time the server logged the action.● The addresses for the server and the computer where the action was performed.● The user name who performed the logged action.● The category of the action, specifying whether the action originated on the Spotfire Server (such as
an admin action) or from a service (such as Automation Services).● The logged action, including properties (identifying properties or arguments) specific to the action
performed. For example, when a user changes a password, the property uName is logged to indicatethe user name. These properties are displayed in the logged entries as id1, id2, and arguments arg1-arg6.
● Whether the action was completed successfully.● The session and service instance unique identifiers.
See Action log entries for more information. See Sample action log output for an example of a typicalset of user actions logged to the action logs.
Logs recorded to a database read the action log column names, and then map them to the fieldscontained in the database to create a database view. For example, when a user changes a password, thetext log entry resembles the following.2017-03-18T09:36:00.381+0100;10.100.32.129;jdoe;2017-03-18T09:36:00,381+0100;10.98.45.189;admin;change_passwd;true;7583cdc4-a6b8-40d4-88e6-90f5d499ff79
When the log entry is written to the database, it logs a specific view. For an Oracle database, it isdefined as the following.CREATE OR REPLACE VIEW ADMIN_CHANGE_PASSWD AS SELECT LOGGED_TIME, MACHINE, USER_NAME, ORIGINAL_TIME, ORIGINAL_IP, SUCCESS, SESSION_ID,
256
TIBCO Spotfire® Server and Environment Installation and Administration
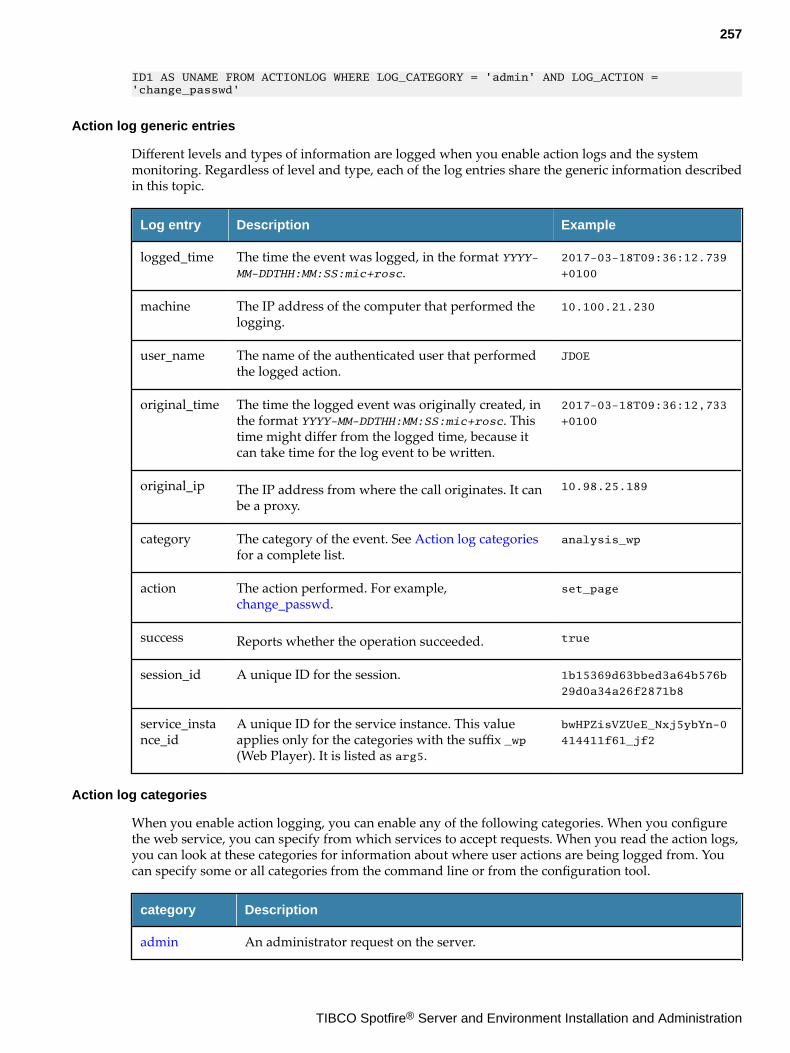
ID1 AS UNAME FROM ACTIONLOG WHERE LOG_CATEGORY = 'admin' AND LOG_ACTION = 'change_passwd'
Action log generic entries
Different levels and types of information are logged when you enable action logs and the systemmonitoring. Regardless of level and type, each of the log entries share the generic information describedin this topic.
Log entry Description Example
logged_time The time the event was logged, in the format YYYY-MM-DDTHH:MM:SS:mic+rosc.
2017-03-18T09:36:12.739
+0100
machine The IP address of the computer that performed thelogging.
10.100.21.230
user_name The name of the authenticated user that performedthe logged action.
JDOE
original_time The time the logged event was originally created, inthe format YYYY-MM-DDTHH:MM:SS:mic+rosc. Thistime might differ from the logged time, because itcan take time for the log event to be written.
2017-03-18T09:36:12,733
+0100
original_ip The IP address from where the call originates. It canbe a proxy.
10.98.25.189
category The category of the event. See Action log categoriesfor a complete list.
analysis_wp
action The action performed. For example, change_passwd.
set_page
success Reports whether the operation succeeded. true
session_id A unique ID for the session. 1b15369d63bbed3a64b576b
29d0a34a26f2871b8
service_instance_id
A unique ID for the service instance. This valueapplies only for the categories with the suffix _wp(Web Player). It is listed as arg5.
bwHPZisVZUeE_Nxj5ybYn-0
414411f61_jf2
Action log categories
When you enable action logging, you can enable any of the following categories. When you configurethe web service, you can specify from which services to accept requests. When you read the action logs,you can look at these categories for information about where user actions are being logged from. Youcan specify some or all categories from the command line or from the configuration tool.
category Description
admin An administrator request on the server.
257
TIBCO Spotfire® Server and Environment Installation and Administration

category Description
analysis_as A Spotfire analysis sent to the server by Automation Services.
analysis_pro A Spotfire analysis sent to the server by Spotfire Analyst.
analysis_wp A Spotfire analysis sent to the server by the Web Player (Spotfire Business Authoror Spotfire Cloud.)
auth_as An authorization request sent from Automation Services.
auth_pro An authorization request sent from the Spotfire Analyst.
auth_wp An authorization request sent from the Web Player.
automation_job_as
An automation job sent from Automation Services.
automation_task_as
An automation task sent from Automation Services.
data_con_pro A data connection request sent from Spotfire Analyst.
data_con_wp A data connection request sent from Web Player.
datafunction_pro
A data function sent from Spotfire Analyst.
datafunction_wp
A data function sent from Web Player.
datasource_pro
A data source request sent from Spotfire Analyst.
datasource_wp
A data source request sent from Web Player.
dblogging Action logs written only if you log to a database.
ems A server request for establishing a TIBCO Enterprise Message Service ( EMS )connection.
file_pro A file sent from Spotfire Analyst.
info_link An information link request on the server.
library A library request on the server.
library_as A library request sent from Automation Services.
library_pro A library request sent from Spotfire Analyst.
library_wp A library request sent from Web Player.
258
TIBCO Spotfire® Server and Environment Installation and Administration
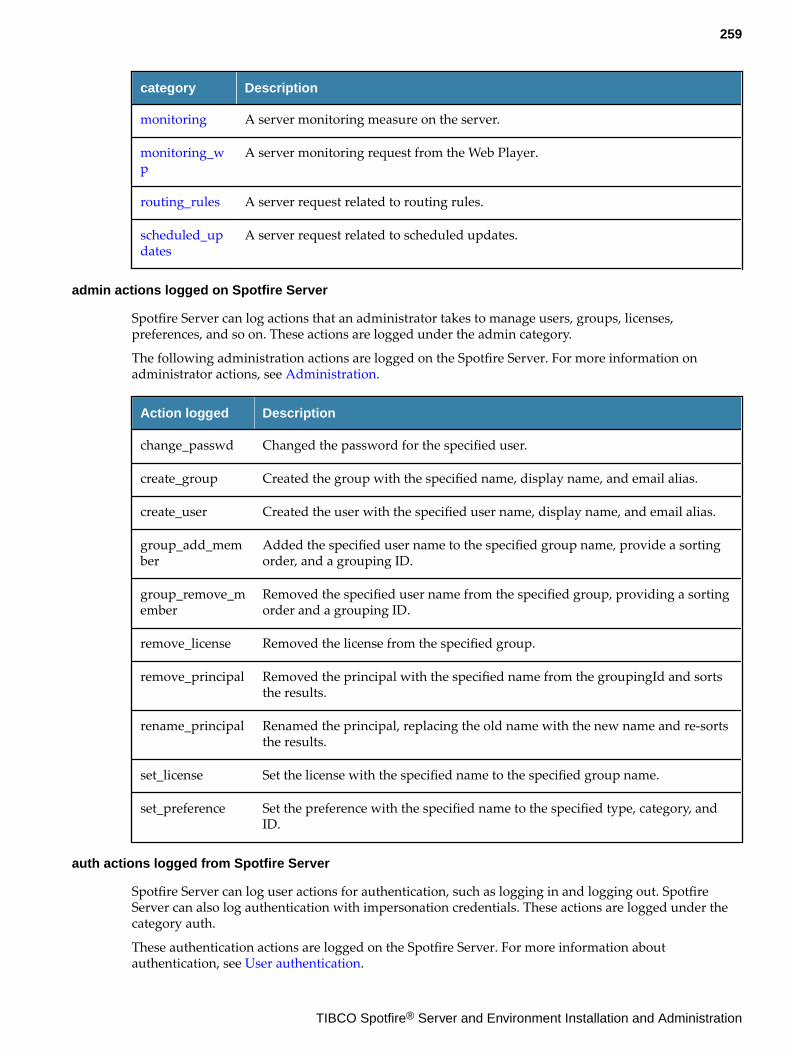
category Description
monitoring A server monitoring measure on the server.
monitoring_wp
A server monitoring request from the Web Player.
routing_rules A server request related to routing rules.
scheduled_updates
A server request related to scheduled updates.
admin actions logged on Spotfire Server
Spotfire Server can log actions that an administrator takes to manage users, groups, licenses,preferences, and so on. These actions are logged under the admin category.
The following administration actions are logged on the Spotfire Server. For more information onadministrator actions, see Administration.
Action logged Description
change_passwd Changed the password for the specified user.
create_group Created the group with the specified name, display name, and email alias.
create_user Created the user with the specified user name, display name, and email alias.
group_add_member
Added the specified user name to the specified group name, provide a sortingorder, and a grouping ID.
group_remove_member
Removed the specified user name from the specified group, providing a sortingorder and a grouping ID.
remove_license Removed the license from the specified group.
remove_principal Removed the principal with the specified name from the groupingId and sortsthe results.
rename_principal Renamed the principal, replacing the old name with the new name and re-sortsthe results.
set_license Set the license with the specified name to the specified group name.
set_preference Set the preference with the specified name to the specified type, category, andID.
auth actions logged from Spotfire Server
Spotfire Server can log user actions for authentication, such as logging in and logging out. SpotfireServer can also log authentication with impersonation credentials. These actions are logged under thecategory auth.
These authentication actions are logged on the Spotfire Server. For more information aboutauthentication, see User authentication.
259
TIBCO Spotfire® Server and Environment Installation and Administration
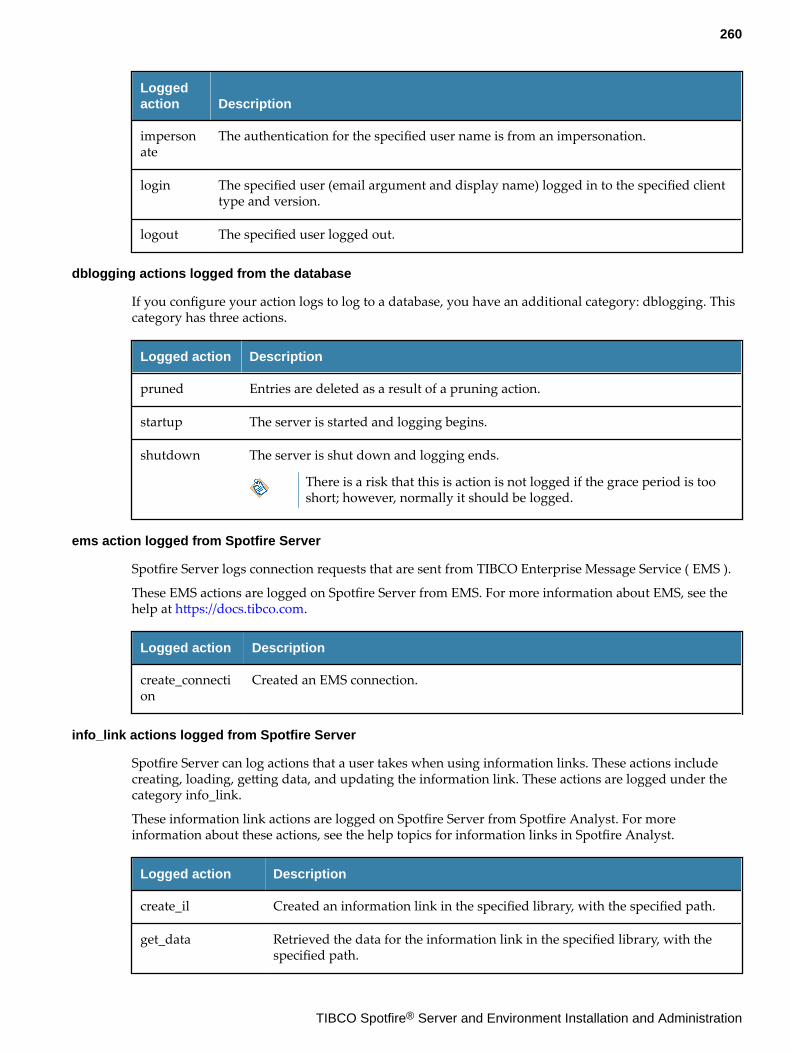
Loggedaction Description
impersonate
The authentication for the specified user name is from an impersonation.
login The specified user (email argument and display name) logged in to the specified clienttype and version.
logout The specified user logged out.
dblogging actions logged from the database
If you configure your action logs to log to a database, you have an additional category: dblogging. Thiscategory has three actions.
Logged action Description
pruned Entries are deleted as a result of a pruning action.
startup The server is started and logging begins.
shutdown The server is shut down and logging ends.
There is a risk that this is action is not logged if the grace period is tooshort; however, normally it should be logged.
ems action logged from Spotfire Server
Spotfire Server logs connection requests that are sent from TIBCO Enterprise Message Service ( EMS ).
These EMS actions are logged on Spotfire Server from EMS. For more information about EMS, see thehelp at https://docs.tibco.com.
Logged action Description
create_connection
Created an EMS connection.
info_link actions logged from Spotfire Server
Spotfire Server can log actions that a user takes when using information links. These actions includecreating, loading, getting data, and updating the information link. These actions are logged under thecategory info_link.
These information link actions are logged on Spotfire Server from Spotfire Analyst. For moreinformation about these actions, see the help topics for information links in Spotfire Analyst.
Logged action Description
create_il Created an information link in the specified library, with the specified path.
get_data Retrieved the data for the information link in the specified library, with thespecified path.
260
TIBCO Spotfire® Server and Environment Installation and Administration
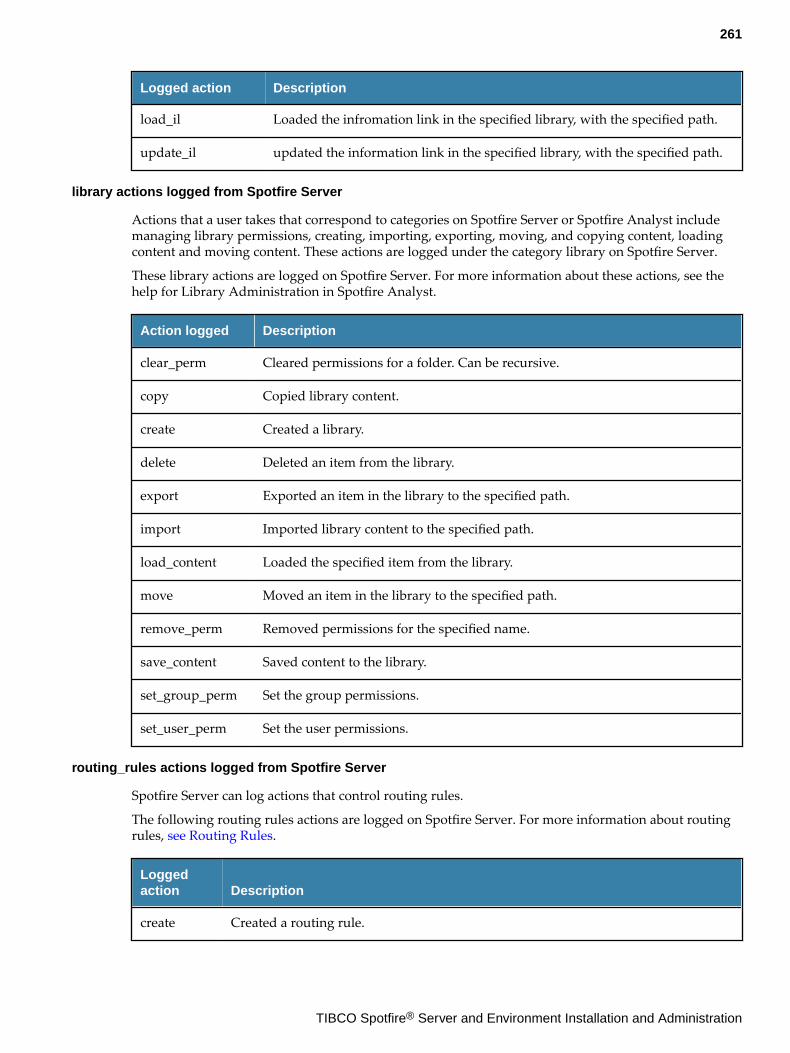
Logged action Description
load_il Loaded the infromation link in the specified library, with the specified path.
update_il updated the information link in the specified library, with the specified path.
library actions logged from Spotfire Server
Actions that a user takes that correspond to categories on Spotfire Server or Spotfire Analyst includemanaging library permissions, creating, importing, exporting, moving, and copying content, loadingcontent and moving content. These actions are logged under the category library on Spotfire Server.
These library actions are logged on Spotfire Server. For more information about these actions, see thehelp for Library Administration in Spotfire Analyst.
Action logged Description
clear_perm Cleared permissions for a folder. Can be recursive.
copy Copied library content.
create Created a library.
delete Deleted an item from the library.
export Exported an item in the library to the specified path.
import Imported library content to the specified path.
load_content Loaded the specified item from the library.
move Moved an item in the library to the specified path.
remove_perm Removed permissions for the specified name.
save_content Saved content to the library.
set_group_perm Set the group permissions.
set_user_perm Set the user permissions.
routing_rules actions logged from Spotfire Server
Spotfire Server can log actions that control routing rules.
The following routing rules actions are logged on Spotfire Server. For more information about routingrules, see Routing Rules.
Loggedaction Description
create Created a routing rule.
261
TIBCO Spotfire® Server and Environment Installation and Administration
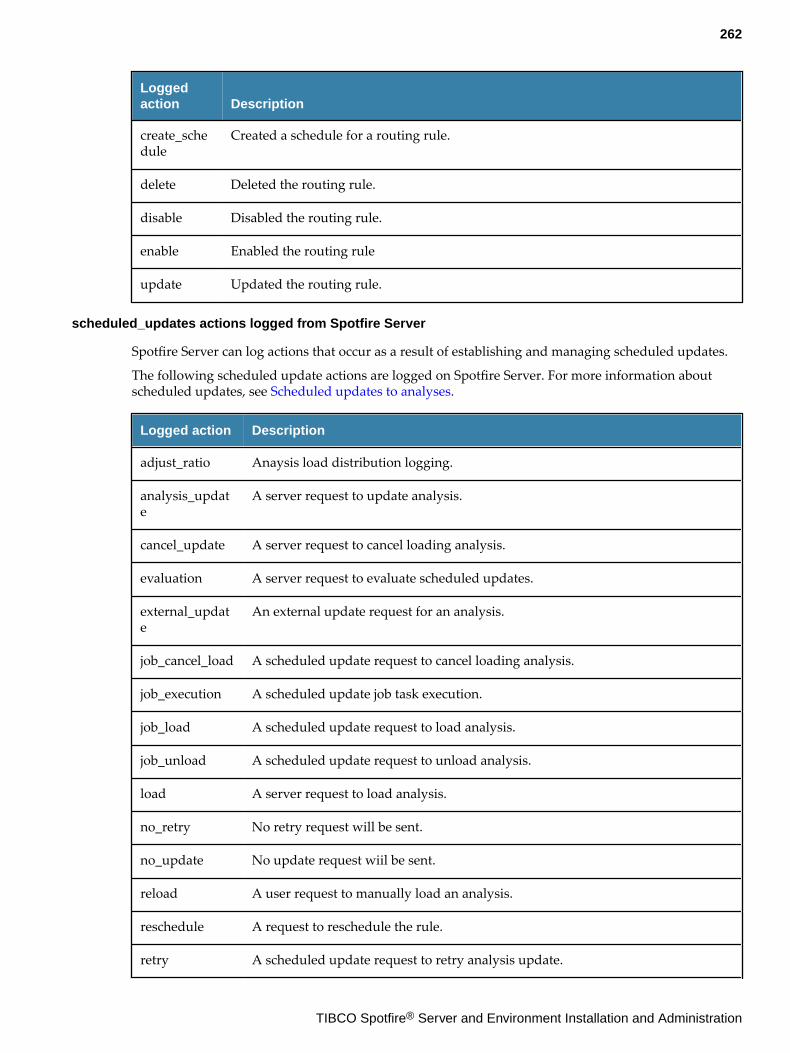
Loggedaction Description
create_schedule
Created a schedule for a routing rule.
delete Deleted the routing rule.
disable Disabled the routing rule.
enable Enabled the routing rule
update Updated the routing rule.
scheduled_updates actions logged from Spotfire Server
Spotfire Server can log actions that occur as a result of establishing and managing scheduled updates.
The following scheduled update actions are logged on Spotfire Server. For more information aboutscheduled updates, see Scheduled updates to analyses.
Logged action Description
adjust_ratio Anaysis load distribution logging.
analysis_update
A server request to update analysis.
cancel_update A server request to cancel loading analysis.
evaluation A server request to evaluate scheduled updates.
external_update
An external update request for an analysis.
job_cancel_load A scheduled update request to cancel loading analysis.
job_execution A scheduled update job task execution.
job_load A scheduled update request to load analysis.
job_unload A scheduled update request to unload analysis.
load A server request to load analysis.
no_retry No retry request will be sent.
no_update No update request wiil be sent.
reload A user request to manually load an analysis.
reschedule A request to reschedule the rule.
retry A scheduled update request to retry analysis update.
262
TIBCO Spotfire® Server and Environment Installation and Administration
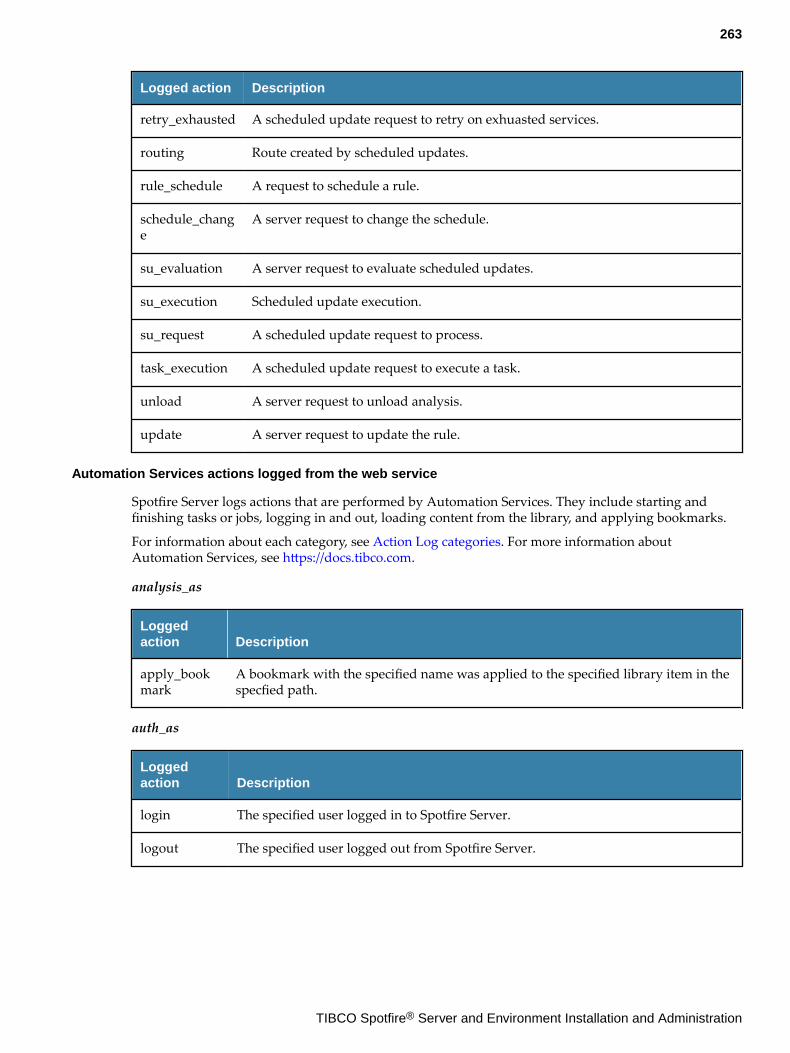
Logged action Description
retry_exhausted A scheduled update request to retry on exhuasted services.
routing Route created by scheduled updates.
rule_schedule A request to schedule a rule.
schedule_change
A server request to change the schedule.
su_evaluation A server request to evaluate scheduled updates.
su_execution Scheduled update execution.
su_request A scheduled update request to process.
task_execution A scheduled update request to execute a task.
unload A server request to unload analysis.
update A server request to update the rule.
Automation Services actions logged from the web service
Spotfire Server logs actions that are performed by Automation Services. They include starting andfinishing tasks or jobs, logging in and out, loading content from the library, and applying bookmarks.
For information about each category, see Action Log categories. For more information aboutAutomation Services, see https://docs.tibco.com.
analysis_as
Loggedaction Description
apply_bookmark
A bookmark with the specified name was applied to the specified library item in thespecfied path.
auth_as
Loggedaction Description
login The specified user logged in to Spotfire Server.
logout The specified user logged out from Spotfire Server.
263
TIBCO Spotfire® Server and Environment Installation and Administration
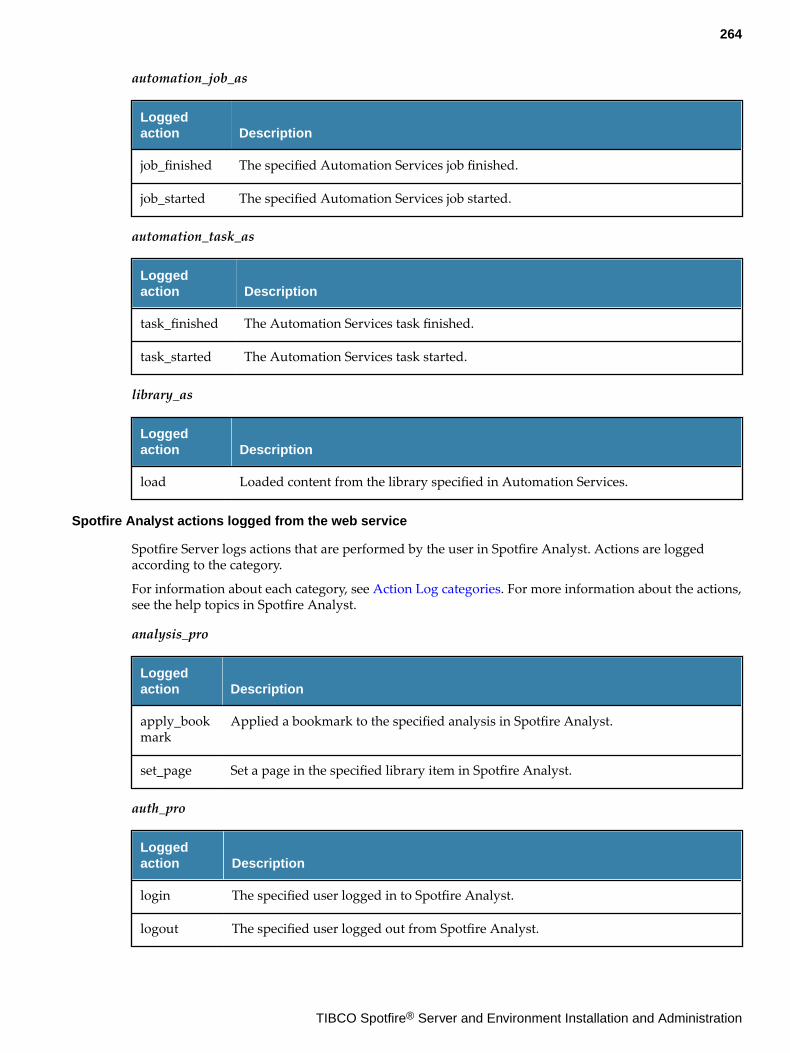
automation_job_as
Loggedaction Description
job_finished The specified Automation Services job finished.
job_started The specified Automation Services job started.
automation_task_as
Loggedaction Description
task_finished The Automation Services task finished.
task_started The Automation Services task started.
library_as
Loggedaction Description
load Loaded content from the library specified in Automation Services.
Spotfire Analyst actions logged from the web service
Spotfire Server logs actions that are performed by the user in Spotfire Analyst. Actions are loggedaccording to the category.
For information about each category, see Action Log categories. For more information about the actions,see the help topics in Spotfire Analyst.
analysis_pro
Loggedaction Description
apply_bookmark
Applied a bookmark to the specified analysis in Spotfire Analyst.
set_page Set a page in the specified library item in Spotfire Analyst.
auth_pro
Loggedaction Description
login The specified user logged in to Spotfire Analyst.
logout The specified user logged out from Spotfire Analyst.
264
TIBCO Spotfire® Server and Environment Installation and Administration
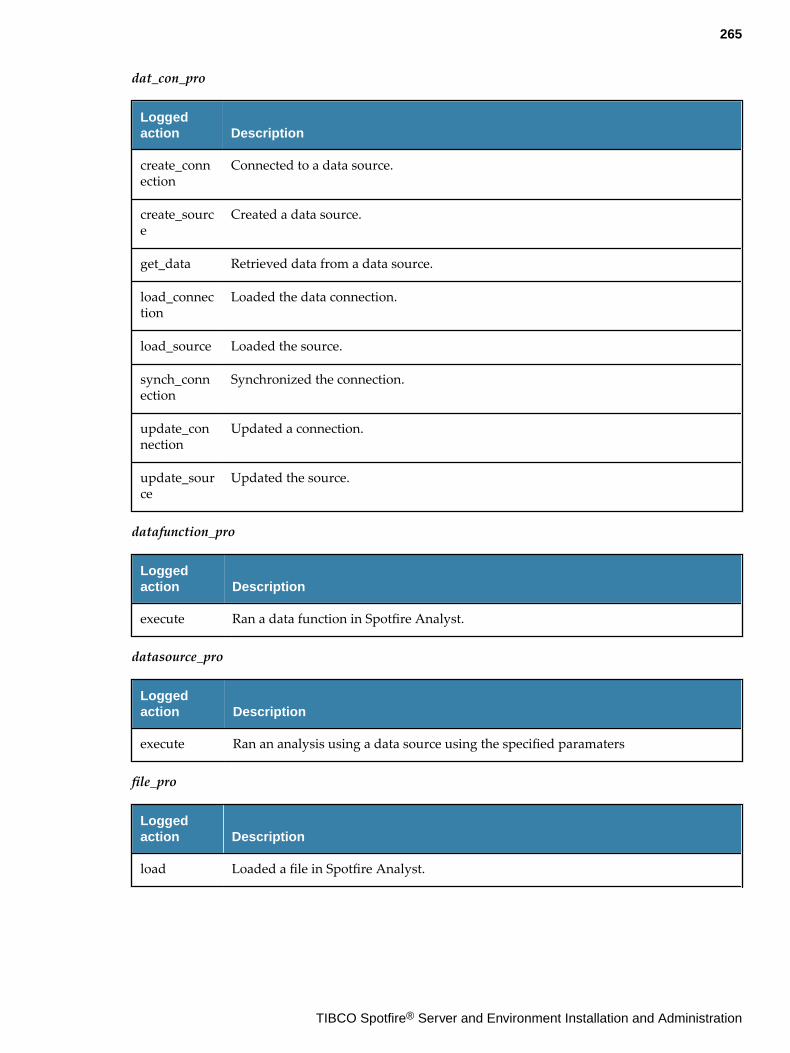
dat_con_pro
Loggedaction Description
create_connection
Connected to a data source.
create_source
Created a data source.
get_data Retrieved data from a data source.
load_connection
Loaded the data connection.
load_source Loaded the source.
synch_connection
Synchronized the connection.
update_connection
Updated a connection.
update_source
Updated the source.
datafunction_pro
Loggedaction Description
execute Ran a data function in Spotfire Analyst.
datasource_pro
Loggedaction Description
execute Ran an analysis using a data source using the specified paramaters
file_pro
Loggedaction Description
load Loaded a file in Spotfire Analyst.
265
TIBCO Spotfire® Server and Environment Installation and Administration
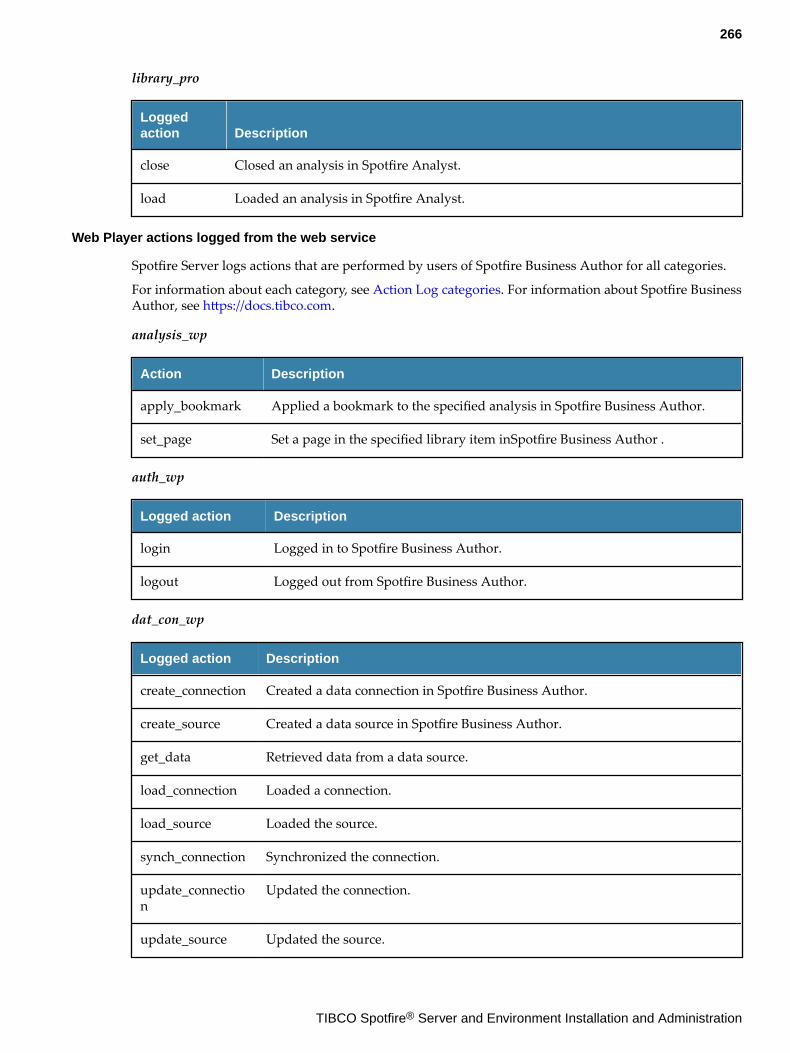
library_pro
Loggedaction Description
close Closed an analysis in Spotfire Analyst.
load Loaded an analysis in Spotfire Analyst.
Web Player actions logged from the web service
Spotfire Server logs actions that are performed by users of Spotfire Business Author for all categories.
For information about each category, see Action Log categories. For information about Spotfire BusinessAuthor, see https://docs.tibco.com.
analysis_wp
Action Description
apply_bookmark Applied a bookmark to the specified analysis in Spotfire Business Author.
set_page Set a page in the specified library item inSpotfire Business Author .
auth_wp
Logged action Description
login Logged in to Spotfire Business Author.
logout Logged out from Spotfire Business Author.
dat_con_wp
Logged action Description
create_connection Created a data connection in Spotfire Business Author.
create_source Created a data source in Spotfire Business Author.
get_data Retrieved data from a data source.
load_connection Loaded a connection.
load_source Loaded the source.
synch_connection Synchronized the connection.
update_connection
Updated the connection.
update_source Updated the source.
266
TIBCO Spotfire® Server and Environment Installation and Administration
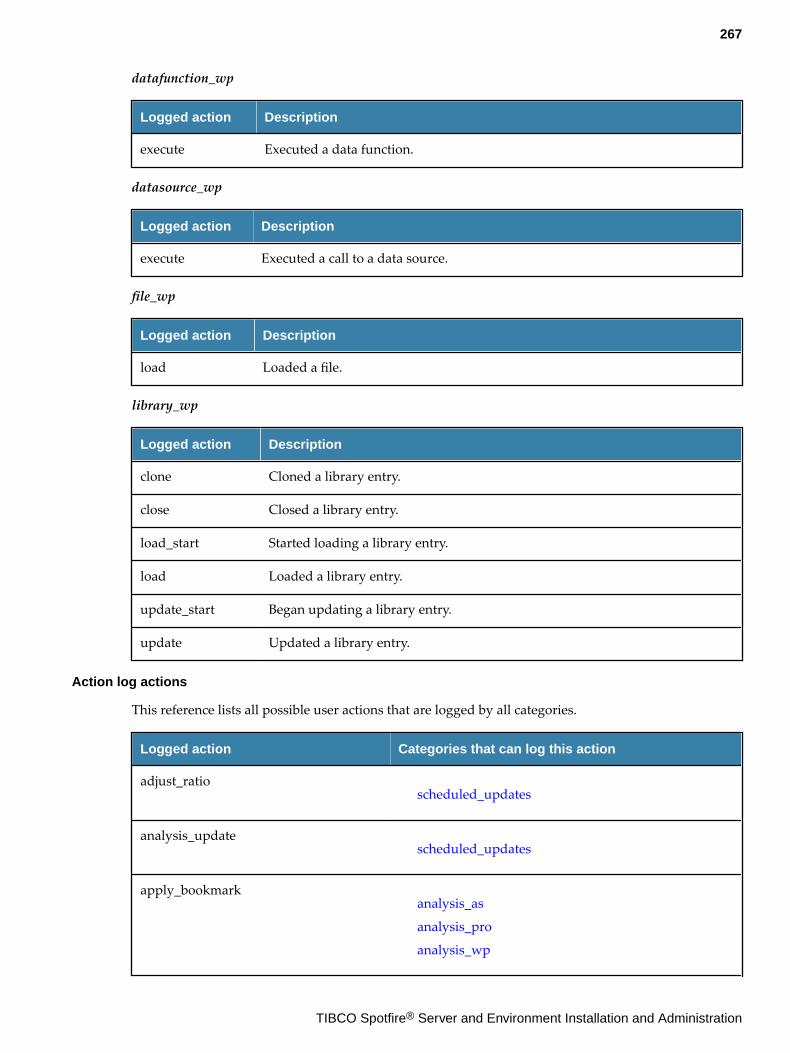
datafunction_wp
Logged action Description
execute Executed a data function.
datasource_wp
Logged action Description
execute Executed a call to a data source.
file_wp
Logged action Description
load Loaded a file.
library_wp
Logged action Description
clone Cloned a library entry.
close Closed a library entry.
load_start Started loading a library entry.
load Loaded a library entry.
update_start Began updating a library entry.
update Updated a library entry.
Action log actions
This reference lists all possible user actions that are logged by all categories.
Logged action Categories that can log this action
adjust_ratioscheduled_updates
analysis_updatescheduled_updates
apply_bookmarkanalysis_as
analysis_pro
analysis_wp
267
TIBCO Spotfire® Server and Environment Installation and Administration
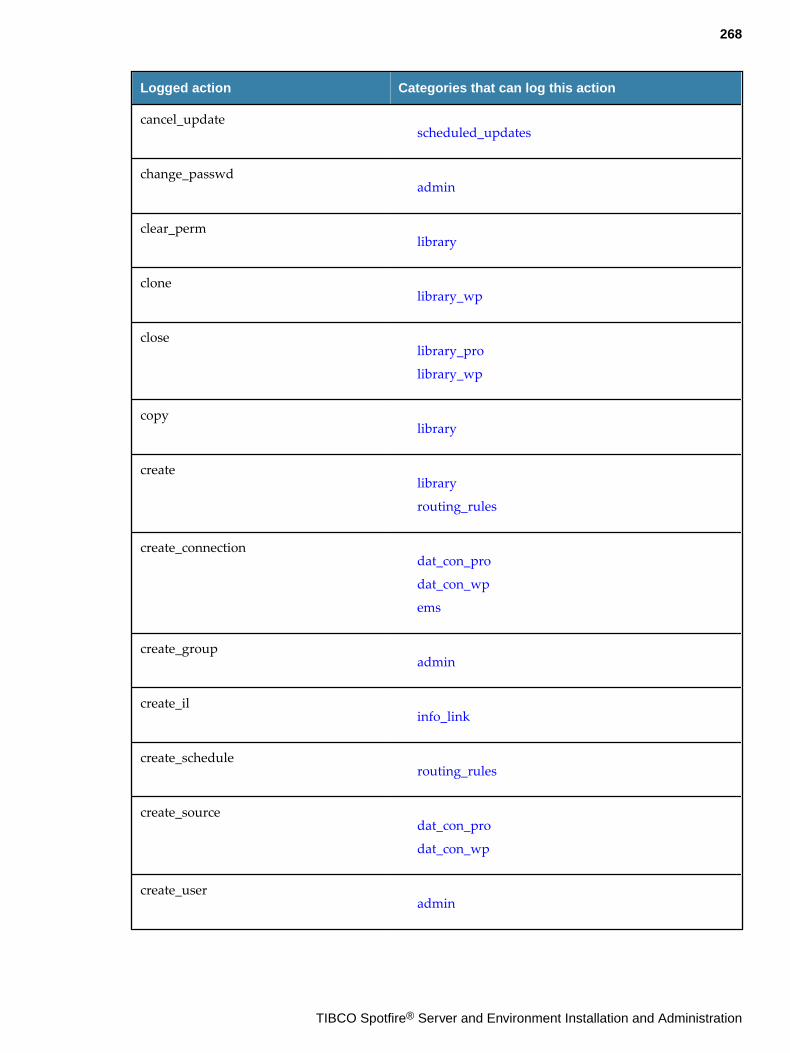
Logged action Categories that can log this action
cancel_updatescheduled_updates
change_passwdadmin
clear_permlibrary
clonelibrary_wp
closelibrary_pro
library_wp
copylibrary
createlibrary
routing_rules
create_connectiondat_con_pro
dat_con_wp
ems
create_groupadmin
create_ilinfo_link
create_schedulerouting_rules
create_sourcedat_con_pro
dat_con_wp
create_useradmin
268
TIBCO Spotfire® Server and Environment Installation and Administration
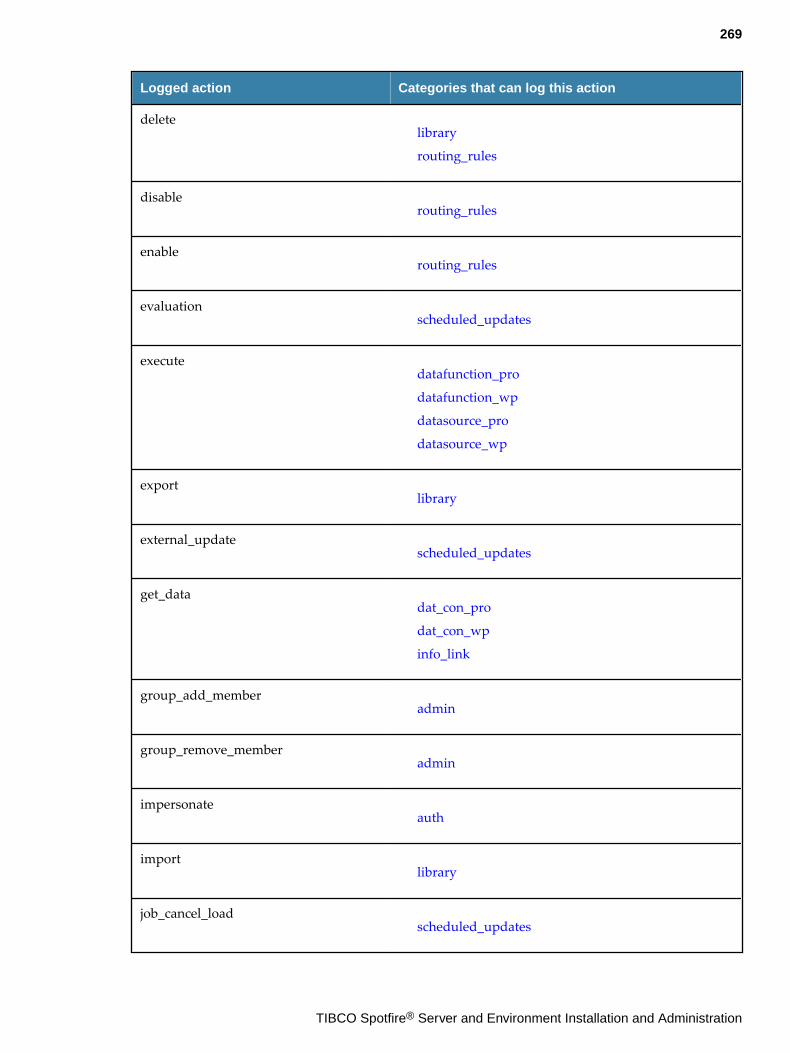
Logged action Categories that can log this action
deletelibrary
routing_rules
disablerouting_rules
enablerouting_rules
evaluationscheduled_updates
executedatafunction_pro
datafunction_wp
datasource_pro
datasource_wp
exportlibrary
external_updatescheduled_updates
get_datadat_con_pro
dat_con_wp
info_link
group_add_memberadmin
group_remove_memberadmin
impersonateauth
importlibrary
job_cancel_loadscheduled_updates
269
TIBCO Spotfire® Server and Environment Installation and Administration
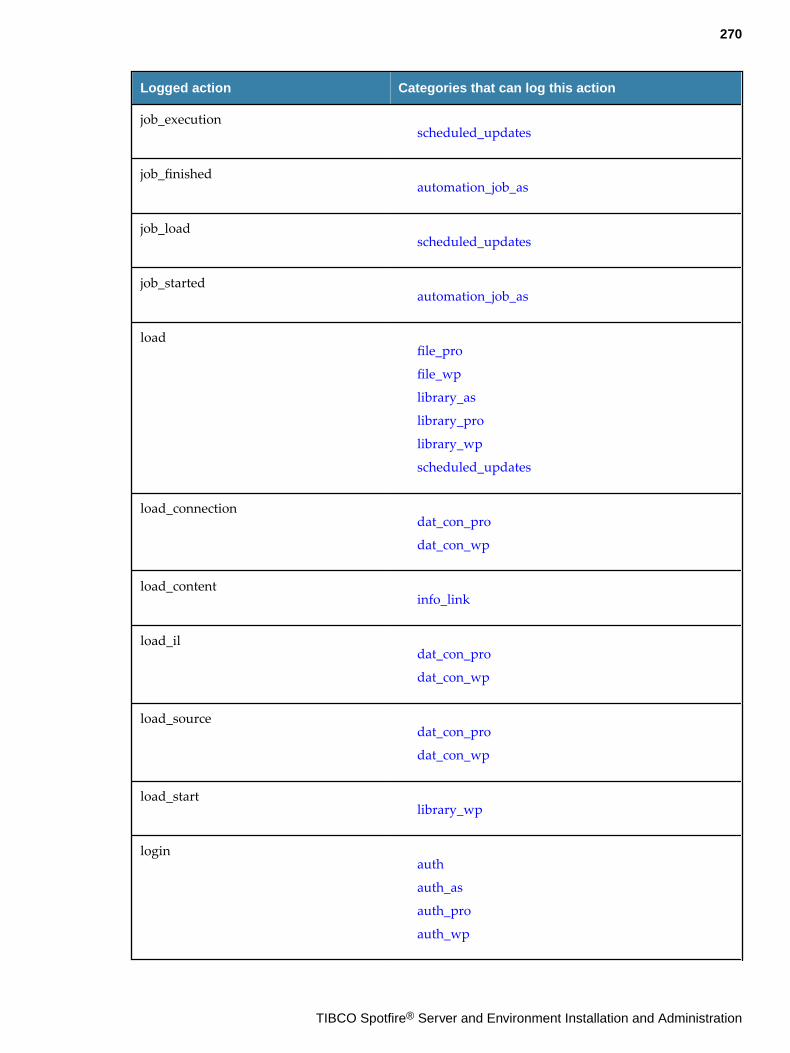
Logged action Categories that can log this action
job_executionscheduled_updates
job_finishedautomation_job_as
job_loadscheduled_updates
job_startedautomation_job_as
loadfile_pro
file_wp
library_as
library_pro
library_wp
scheduled_updates
load_connectiondat_con_pro
dat_con_wp
load_contentinfo_link
load_ildat_con_pro
dat_con_wp
load_sourcedat_con_pro
dat_con_wp
load_startlibrary_wp
loginauth
auth_as
auth_pro
auth_wp
270
TIBCO Spotfire® Server and Environment Installation and Administration
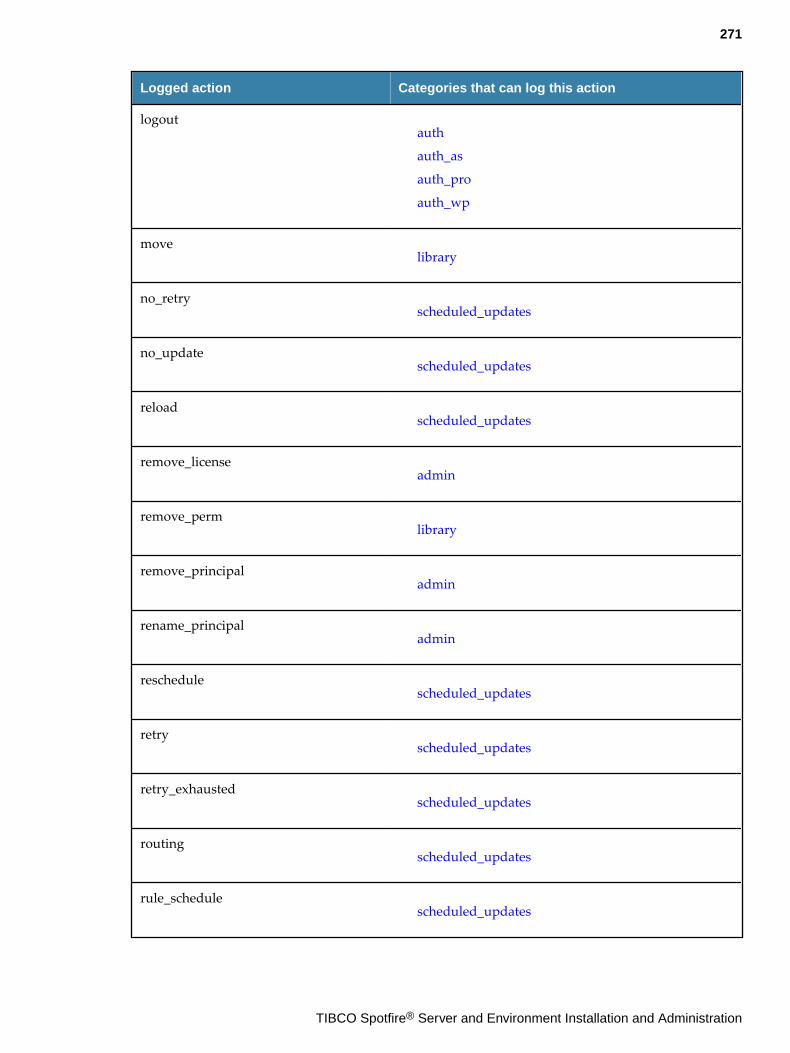
Logged action Categories that can log this action
logoutauth
auth_as
auth_pro
auth_wp
movelibrary
no_retryscheduled_updates
no_updatescheduled_updates
reloadscheduled_updates
remove_licenseadmin
remove_permlibrary
remove_principaladmin
rename_principaladmin
reschedulescheduled_updates
retryscheduled_updates
retry_exhaustedscheduled_updates
routingscheduled_updates
rule_schedulescheduled_updates
271
TIBCO Spotfire® Server and Environment Installation and Administration
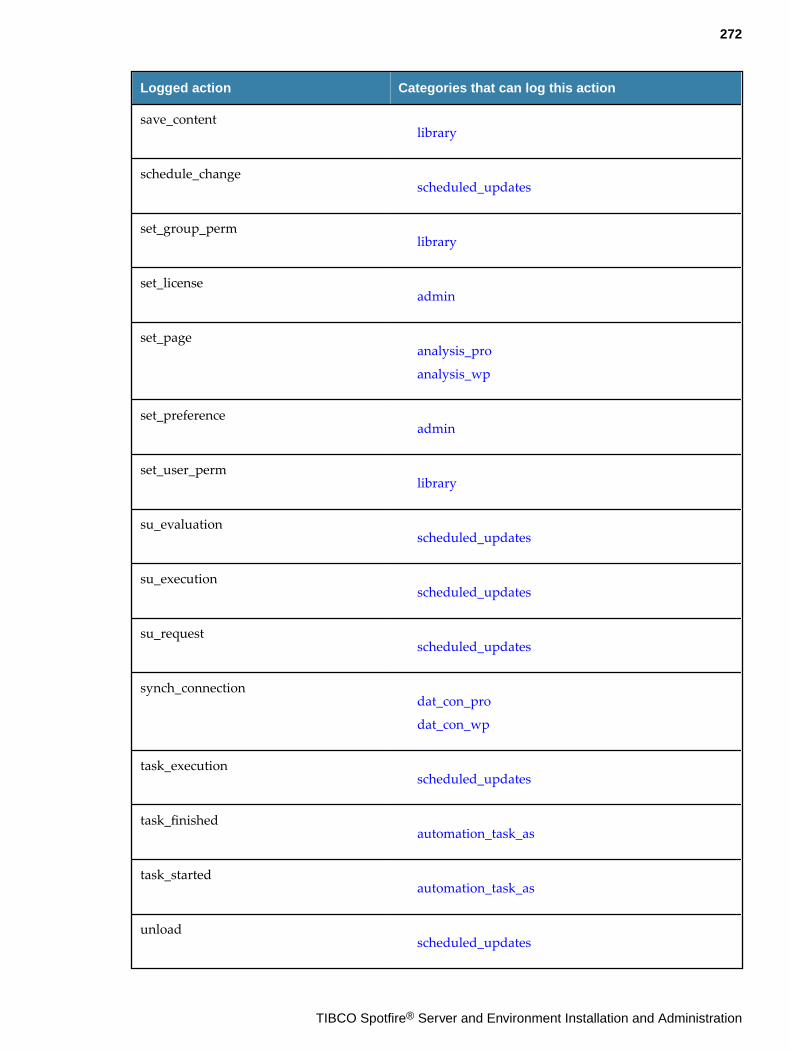
Logged action Categories that can log this action
save_contentlibrary
schedule_changescheduled_updates
set_group_permlibrary
set_licenseadmin
set_pageanalysis_pro
analysis_wp
set_preferenceadmin
set_user_permlibrary
su_evaluationscheduled_updates
su_executionscheduled_updates
su_requestscheduled_updates
synch_connectiondat_con_pro
dat_con_wp
task_executionscheduled_updates
task_finishedautomation_task_as
task_startedautomation_task_as
unloadscheduled_updates
272
TIBCO Spotfire® Server and Environment Installation and Administration
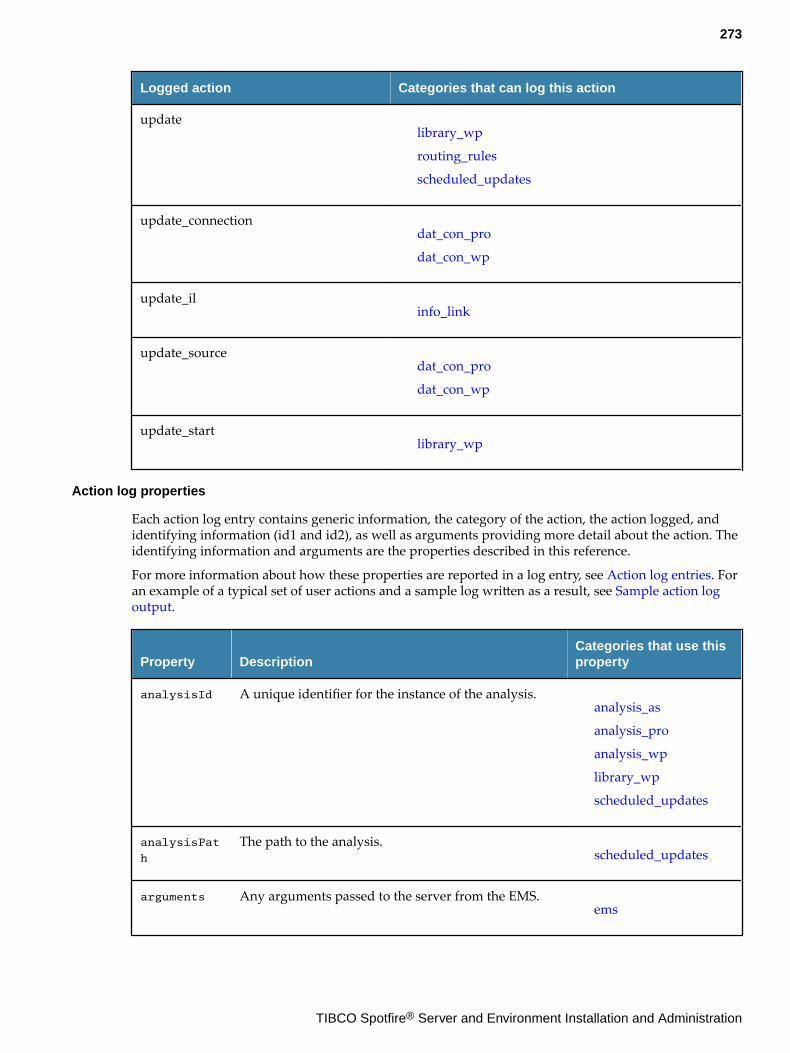
Logged action Categories that can log this action
updatelibrary_wp
routing_rules
scheduled_updates
update_connectiondat_con_pro
dat_con_wp
update_ilinfo_link
update_sourcedat_con_pro
dat_con_wp
update_startlibrary_wp
Action log properties
Each action log entry contains generic information, the category of the action, the action logged, andidentifying information (id1 and id2), as well as arguments providing more detail about the action. Theidentifying information and arguments are the properties described in this reference.
For more information about how these properties are reported in a log entry, see Action log entries. Foran example of a typical set of user actions and a sample log written as a result, see Sample action logoutput.
Property DescriptionCategories that use thisproperty
analysisId A unique identifier for the instance of the analysis.analysis_as
analysis_pro
analysis_wp
library_wp
scheduled_updates
analysisPat
h
The path to the analysis.scheduled_updates
arguments Any arguments passed to the server from the EMS.ems
273
TIBCO Spotfire® Server and Environment Installation and Administration
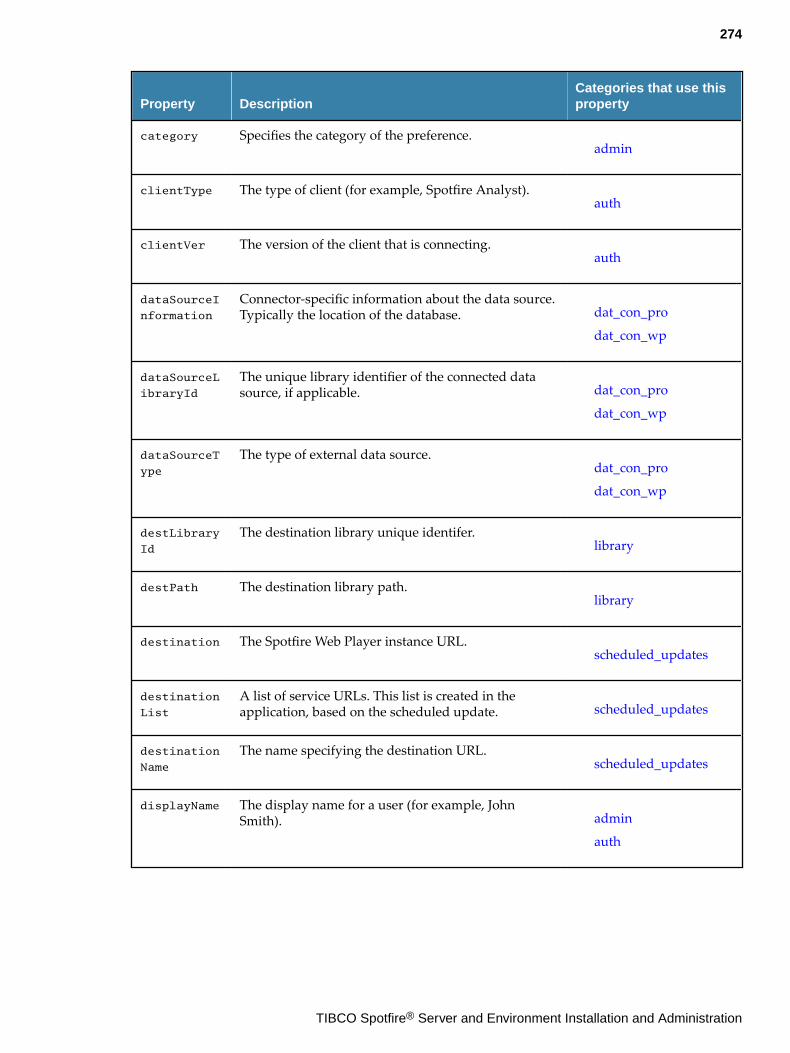
Property DescriptionCategories that use thisproperty
category Specifies the category of the preference.admin
clientType The type of client (for example, Spotfire Analyst).auth
clientVer The version of the client that is connecting.auth
dataSourceI
nformation
Connector-specific information about the data source.Typically the location of the database. dat_con_pro
dat_con_wp
dataSourceL
ibraryId
The unique library identifier of the connected datasource, if applicable. dat_con_pro
dat_con_wp
dataSourceT
ype
The type of external data source.dat_con_pro
dat_con_wp
destLibrary
Id
The destination library unique identifer.library
destPath The destination library path.library
destination The Spotfire Web Player instance URL.scheduled_updates
destination
List
A list of service URLs. This list is created in theapplication, based on the scheduled update. scheduled_updates
destination
Name
The name specifying the destination URL.scheduled_updates
displayName The display name for a user (for example, JohnSmith). admin
auth
274
TIBCO Spotfire® Server and Environment Installation and Administration
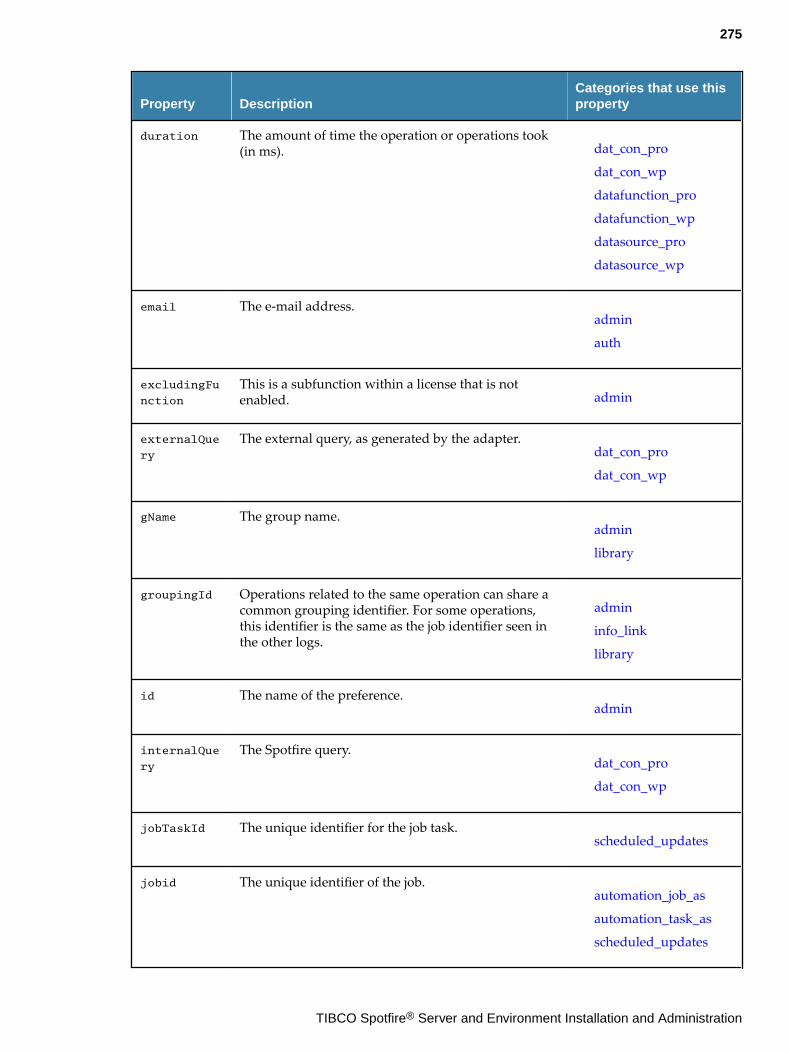
Property DescriptionCategories that use thisproperty
duration The amount of time the operation or operations took(in ms). dat_con_pro
dat_con_wp
datafunction_pro
datafunction_wp
datasource_pro
datasource_wp
email The e-mail address.admin
auth
excludingFu
nction
This is a subfunction within a license that is notenabled. admin
externalQue
ry
The external query, as generated by the adapter.dat_con_pro
dat_con_wp
gName The group name.admin
library
groupingId Operations related to the same operation can share acommon grouping identifier. For some operations,this identifier is the same as the job identifier seen inthe other logs.
admin
info_link
library
id The name of the preference.admin
internalQue
ry
The Spotfire query.dat_con_pro
dat_con_wp
jobTaskId The unique identifier for the job task.scheduled_updates
jobid The unique identifier of the job.automation_job_as
automation_task_as
scheduled_updates
275
TIBCO Spotfire® Server and Environment Installation and Administration
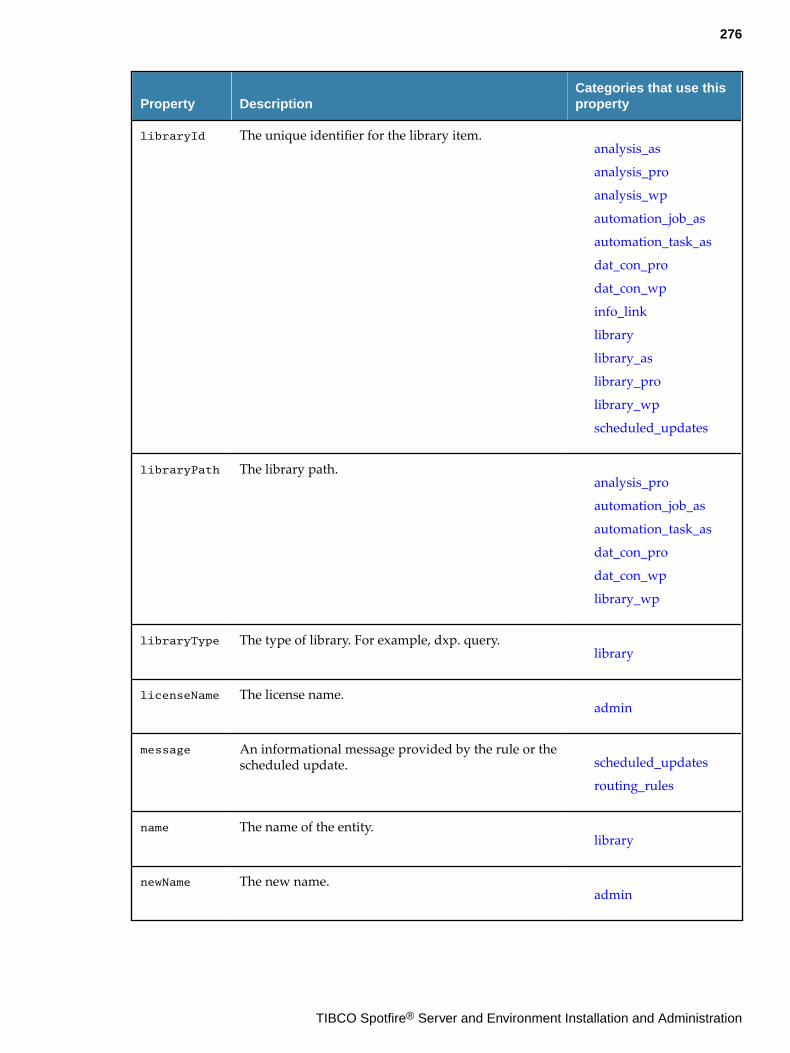
Property DescriptionCategories that use thisproperty
libraryId The unique identifier for the library item.analysis_as
analysis_pro
analysis_wp
automation_job_as
automation_task_as
dat_con_pro
dat_con_wp
info_link
library
library_as
library_pro
library_wp
scheduled_updates
libraryPath The library path.analysis_pro
automation_job_as
automation_task_as
dat_con_pro
dat_con_wp
library_wp
libraryType The type of library. For example, dxp. query.library
licenseName The license name.admin
message An informational message provided by the rule or thescheduled update. scheduled_updates
routing_rules
name The name of the entity.library
newName The new name.admin
276
TIBCO Spotfire® Server and Environment Installation and Administration
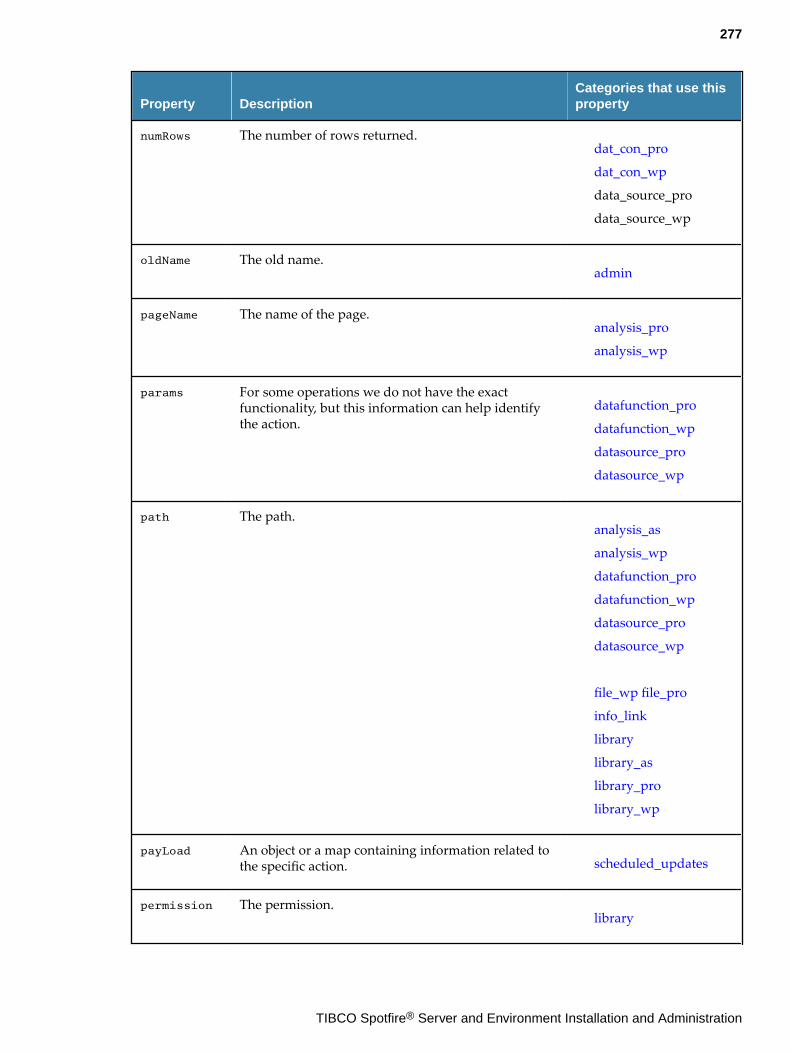
Property DescriptionCategories that use thisproperty
numRows The number of rows returned.dat_con_pro
dat_con_wp
data_source_pro
data_source_wp
oldName The old name.admin
pageName The name of the page.analysis_pro
analysis_wp
params For some operations we do not have the exactfunctionality, but this information can help identifythe action.
datafunction_pro
datafunction_wp
datasource_pro
datasource_wp
path The path.analysis_as
analysis_wp
datafunction_pro
datafunction_wp
datasource_pro
datasource_wp
file_wp file_pro
info_link
library
library_as
library_pro
library_wp
payLoad An object or a map containing information related tothe specific action. scheduled_updates
permission The permission.library
277
TIBCO Spotfire® Server and Environment Installation and Administration
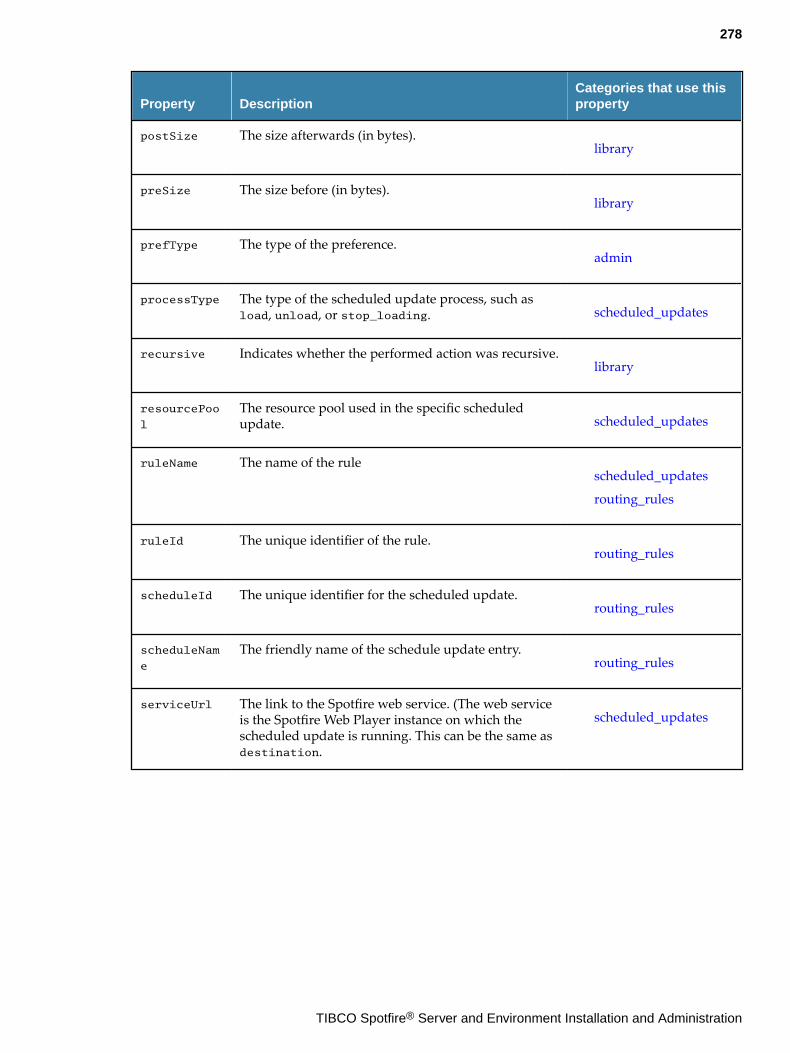
Property DescriptionCategories that use thisproperty
postSize The size afterwards (in bytes).library
preSize The size before (in bytes).library
prefType The type of the preference.admin
processType The type of the scheduled update process, such asload, unload, or stop_loading. scheduled_updates
recursive Indicates whether the performed action was recursive.library
resourcePoo
l
The resource pool used in the specific scheduledupdate. scheduled_updates
ruleName The name of the rulescheduled_updates
routing_rules
ruleId The unique identifier of the rule.routing_rules
scheduleId The unique identifier for the scheduled update.routing_rules
scheduleNam
e
The friendly name of the schedule update entry.routing_rules
serviceUrl The link to the Spotfire web service. (The web serviceis the Spotfire Web Player instance on which thescheduled update is running. This can be the same asdestination.
scheduled_updates
278
TIBCO Spotfire® Server and Environment Installation and Administration
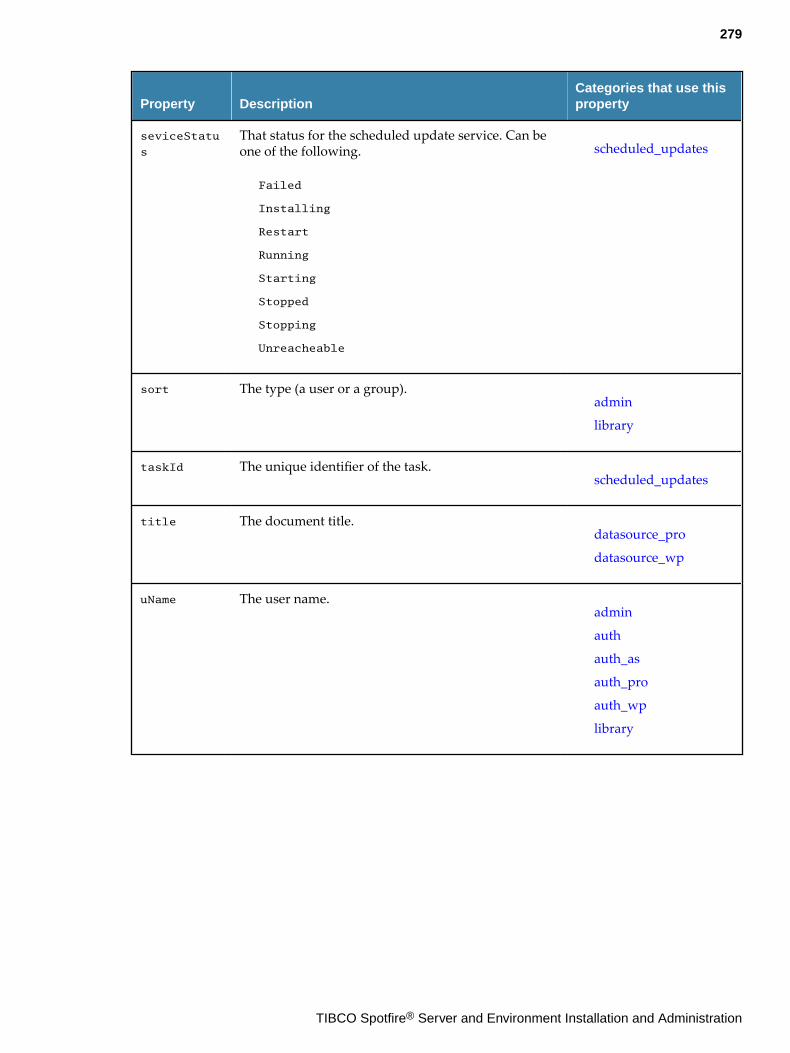
Property DescriptionCategories that use thisproperty
seviceStatu
s
That status for the scheduled update service. Can beone of the following.
Failed
Installing
Restart
Running
Starting
Stopped
Stopping
Unreacheable
scheduled_updates
sort The type (a user or a group).admin
library
taskId The unique identifier of the task.scheduled_updates
title The document title.datasource_pro
datasource_wp
uName The user name.admin
auth
auth_as
auth_pro
auth_wp
library
279
TIBCO Spotfire® Server and Environment Installation and Administration
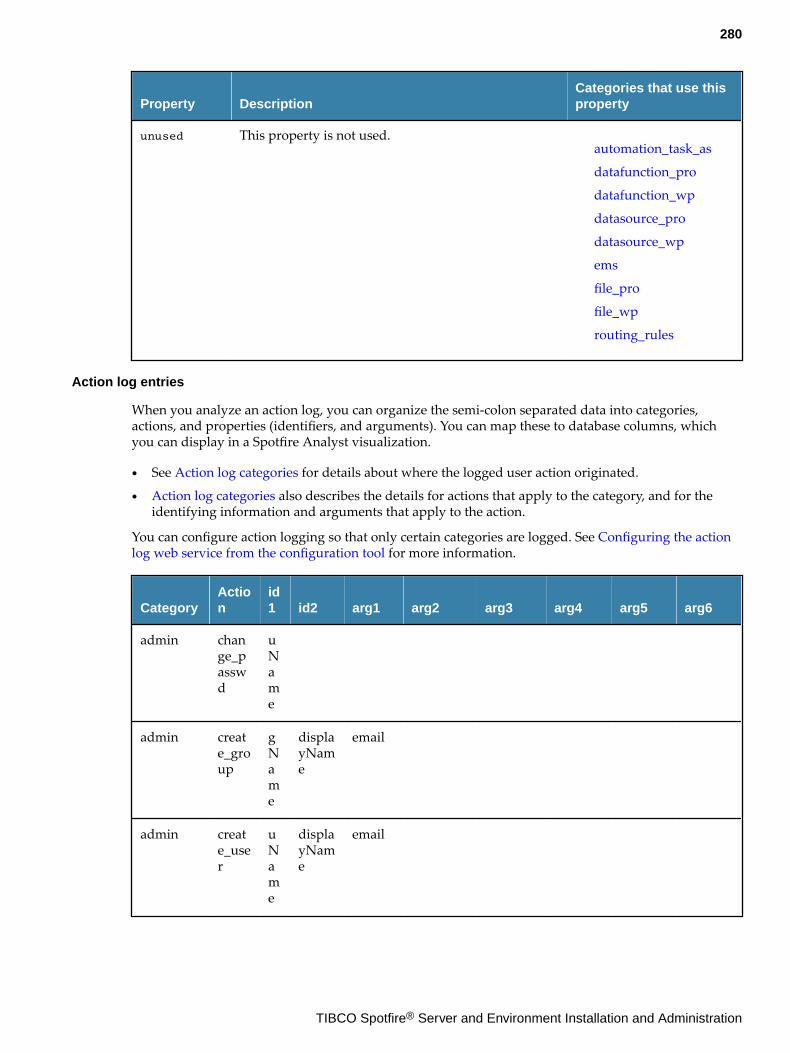
Property DescriptionCategories that use thisproperty
unused This property is not used.automation_task_as
datafunction_pro
datafunction_wp
datasource_pro
datasource_wp
ems
file_pro
file_wp
routing_rules
Action log entries
When you analyze an action log, you can organize the semi-colon separated data into categories,actions, and properties (identifiers, and arguments). You can map these to database columns, whichyou can display in a Spotfire Analyst visualization.
● See Action log categories for details about where the logged user action originated.
● Action log categories also describes the details for actions that apply to the category, and for theidentifying information and arguments that apply to the action.
You can configure action logging so that only certain categories are logged. See Configuring the actionlog web service from the configuration tool for more information.
CategoryAction
id1 id2 arg1 arg2 arg3 arg4 arg5 arg6
admin change_passwd
uName
admin create_group
gName
displayName
admin create_user
uName
displayName
280
TIBCO Spotfire® Server and Environment Installation and Administration

CategoryAction
id1 id2 arg1 arg2 arg3 arg4 arg5 arg6
admin group_add_member
name
gName
sort groupingId
admin group_remove_member
name
gName
sort groupingId
admin remove_license
gName
licenseName
admin remove_principal
name
sort groupingId
admin rename_principal
oldName
newName
sort
admin set_license
gName
licenseName
excludingFunction
admin set_preference
name
prefType
category
id
analysis_as
apply_bookmark
libraryId
path bookmarkName
analysis_pro
apply_bookmark
libraryId
libraryPath
bookmarkName
analysisId
281
TIBCO Spotfire® Server and Environment Installation and Administration
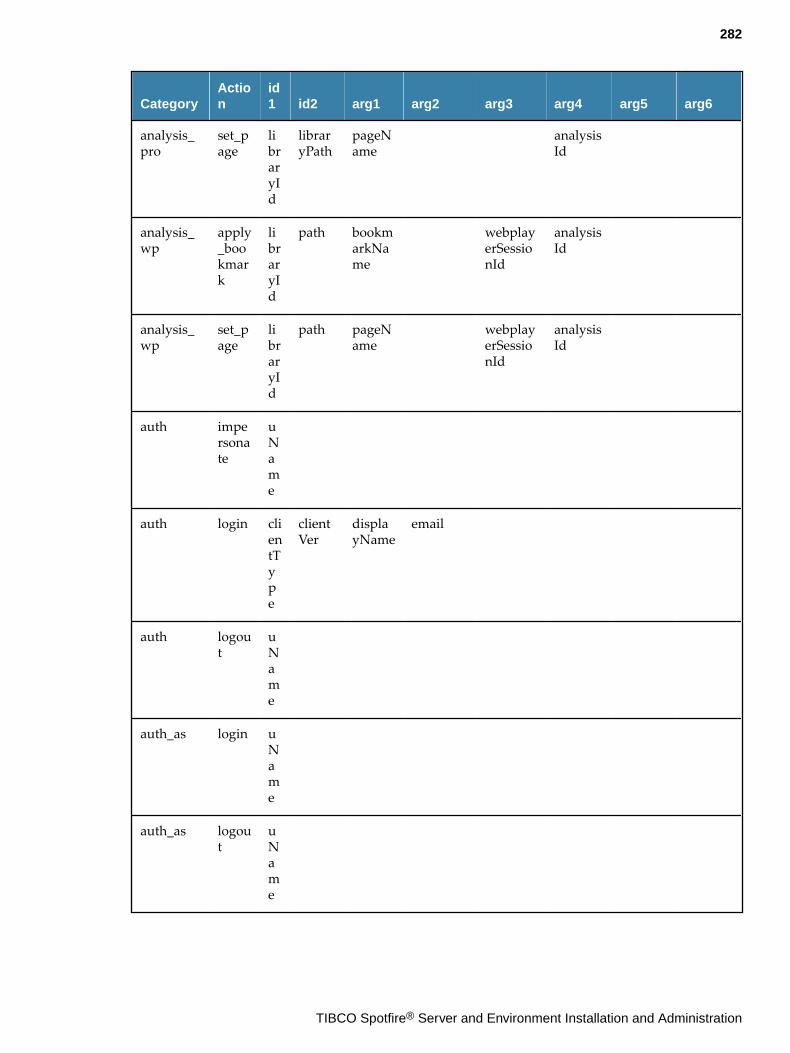
CategoryAction
id1 id2 arg1 arg2 arg3 arg4 arg5 arg6
analysis_pro
set_page
libraryId
libraryPath
pageName
analysisId
analysis_wp
apply_bookmark
libraryId
path bookmarkName
webplayerSessionId
analysisId
analysis_wp
set_page
libraryId
path pageName
webplayerSessionId
analysisId
auth impersonate
uName
auth login clientType
clientVer
displayName
auth logout
uName
auth_as login uName
auth_as logout
uName
282
TIBCO Spotfire® Server and Environment Installation and Administration
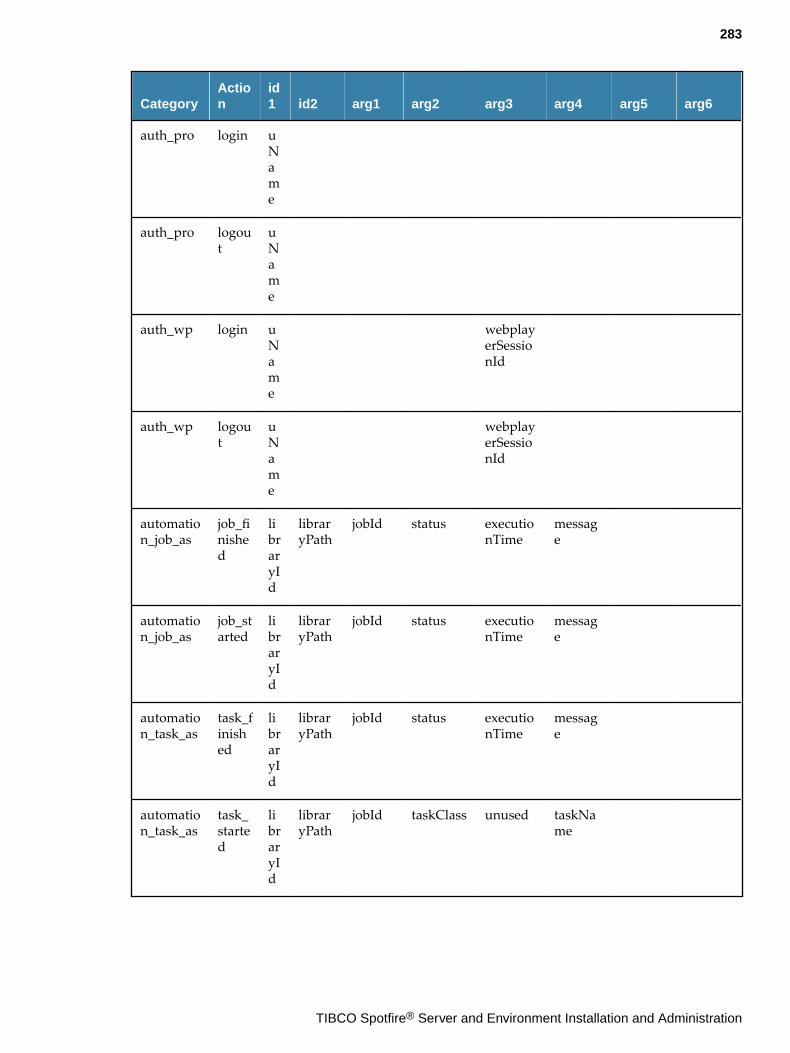
CategoryAction
id1 id2 arg1 arg2 arg3 arg4 arg5 arg6
auth_pro login uName
auth_pro logout
uName
auth_wp login uName
webplayerSessionId
auth_wp logout
uName
webplayerSessionId
automation_job_as
job_finished
libraryId
libraryPath
jobId status executionTime
message
automation_job_as
job_started
libraryId
libraryPath
jobId status executionTime
message
automation_task_as
task_finished
libraryId
libraryPath
jobId status executionTime
message
automation_task_as
task_started
libraryId
libraryPath
jobId taskClass unused taskName
283
TIBCO Spotfire® Server and Environment Installation and Administration

CategoryAction
id1 id2 arg1 arg2 arg3 arg4 arg5 arg6
dat_con_pro
create_connection
libraryId
libraryPath
dataSourceType
dataSourceInformation
dataSourceLibraryId
dat_con_pro
create_source
libraryId
libraryPath
dataSourceType
dataSourceInformation
dat_con_pro
get_data
libraryId
libraryPath
dataSourceType
dataSourceInformation
internalQuery
NumRows
duration
externalQuery
dat_con_pro
load_connection
libraryId
libraryPath
dataSourceType
dataSourceInformation
dataSourceLibraryId
dat_con_pro
load_source
libraryId
libraryPath
dataSourceType
dataSourceInformation
dat_con_pro
synch_connection
libraryId
libraryPath
dataSourceType
dataSourceInformation
dataSourceLibraryId
dat_con_pro
update_connection
libraryId
libraryPath
dataSourceType
dataSourceInformation
dataSourceLibraryId
dat_con_pro
update_source
libraryId
libraryPath
dataSourceType
dataSourceInformation
284
TIBCO Spotfire® Server and Environment Installation and Administration
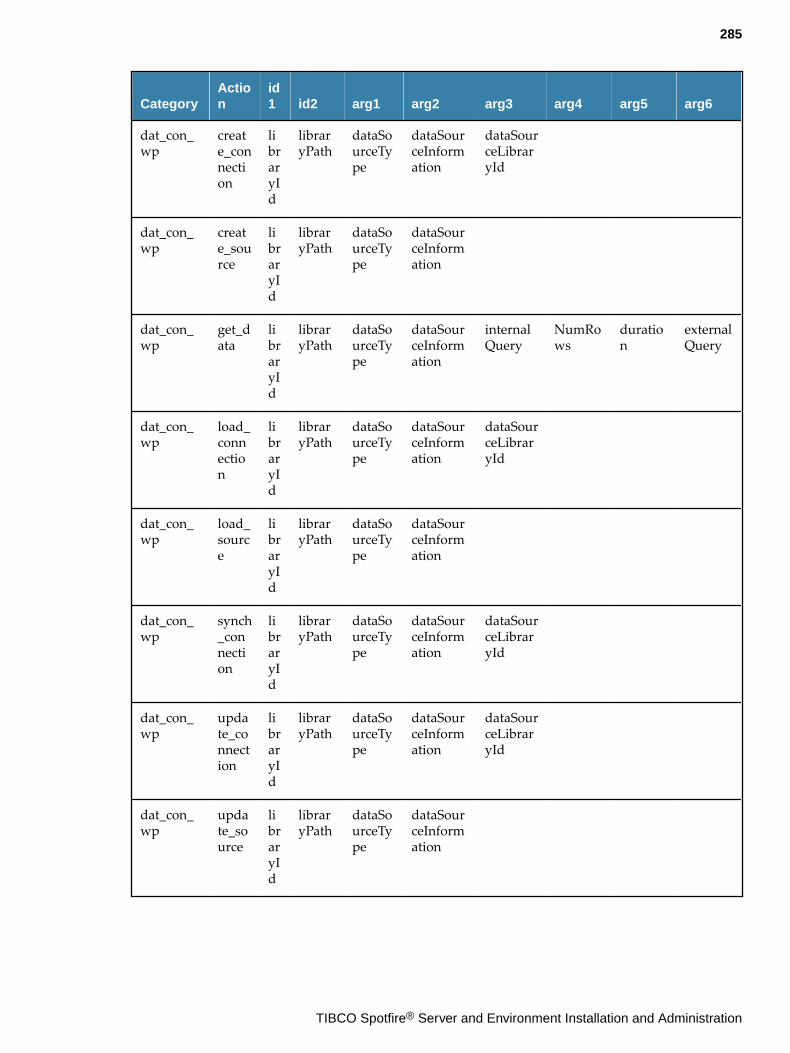
CategoryAction
id1 id2 arg1 arg2 arg3 arg4 arg5 arg6
dat_con_wp
create_connection
libraryId
libraryPath
dataSourceType
dataSourceInformation
dataSourceLibraryId
dat_con_wp
create_source
libraryId
libraryPath
dataSourceType
dataSourceInformation
dat_con_wp
get_data
libraryId
libraryPath
dataSourceType
dataSourceInformation
internalQuery
NumRows
duration
externalQuery
dat_con_wp
load_connection
libraryId
libraryPath
dataSourceType
dataSourceInformation
dataSourceLibraryId
dat_con_wp
load_source
libraryId
libraryPath
dataSourceType
dataSourceInformation
dat_con_wp
synch_connection
libraryId
libraryPath
dataSourceType
dataSourceInformation
dataSourceLibraryId
dat_con_wp
update_connection
libraryId
libraryPath
dataSourceType
dataSourceInformation
dataSourceLibraryId
dat_con_wp
update_source
libraryId
libraryPath
dataSourceType
dataSourceInformation
285
TIBCO Spotfire® Server and Environment Installation and Administration
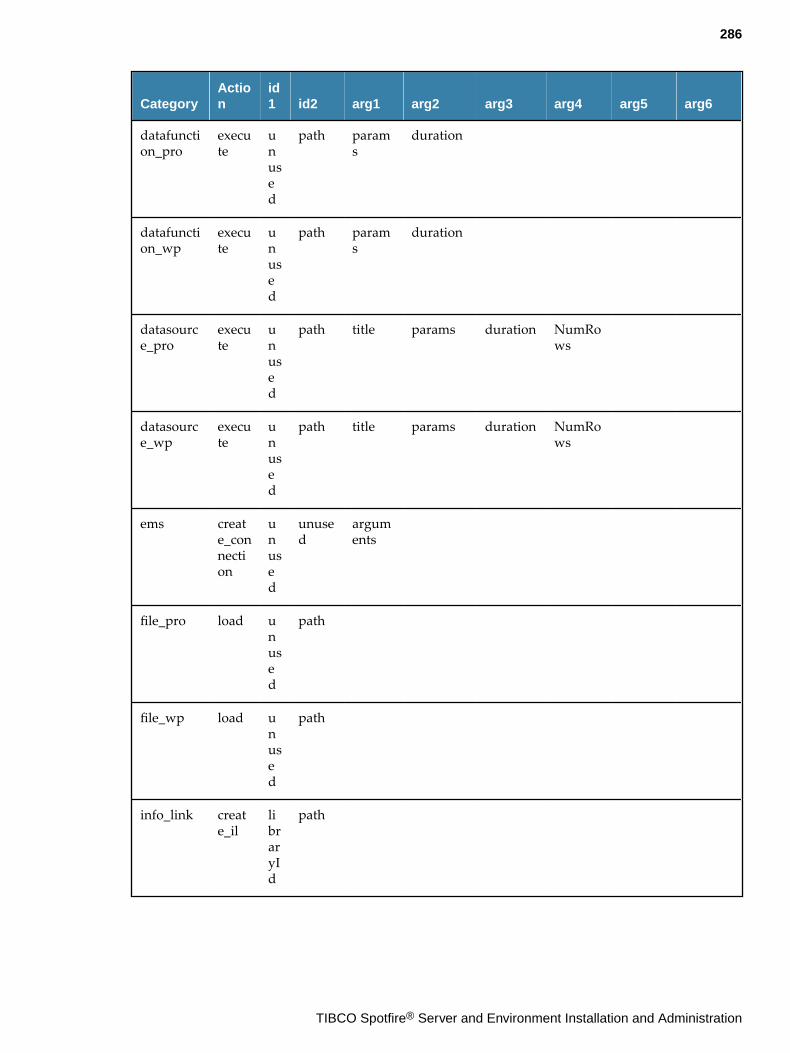
CategoryAction
id1 id2 arg1 arg2 arg3 arg4 arg5 arg6
datafunction_pro
execute
unused
path params
duration
datafunction_wp
execute
unused
path params
duration
datasource_pro
execute
unused
path title params duration NumRows
datasource_wp
execute
unused
path title params duration NumRows
ems create_connection
unused
unused
arguments
file_pro load unused
path
file_wp load unused
path
info_link create_il
libraryId
path
286
TIBCO Spotfire® Server and Environment Installation and Administration
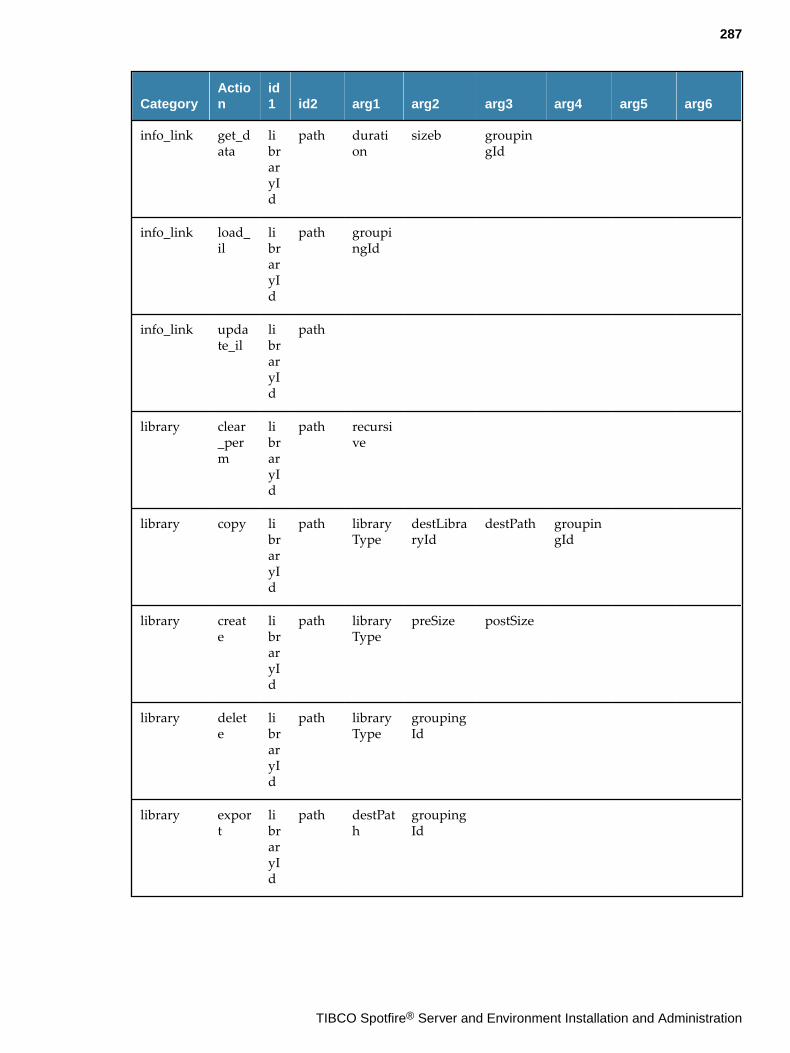
CategoryAction
id1 id2 arg1 arg2 arg3 arg4 arg5 arg6
info_link get_data
libraryId
path duration
sizeb groupingId
info_link load_il
libraryId
path groupingId
info_link update_il
libraryId
path
library clear_perm
libraryId
path recursive
library copy libraryId
path libraryType
destLibraryId
destPath groupingId
library create
libraryId
path libraryType
preSize postSize
library delete
libraryId
path libraryType
groupingId
library export
libraryId
path destPath
groupingId
287
TIBCO Spotfire® Server and Environment Installation and Administration
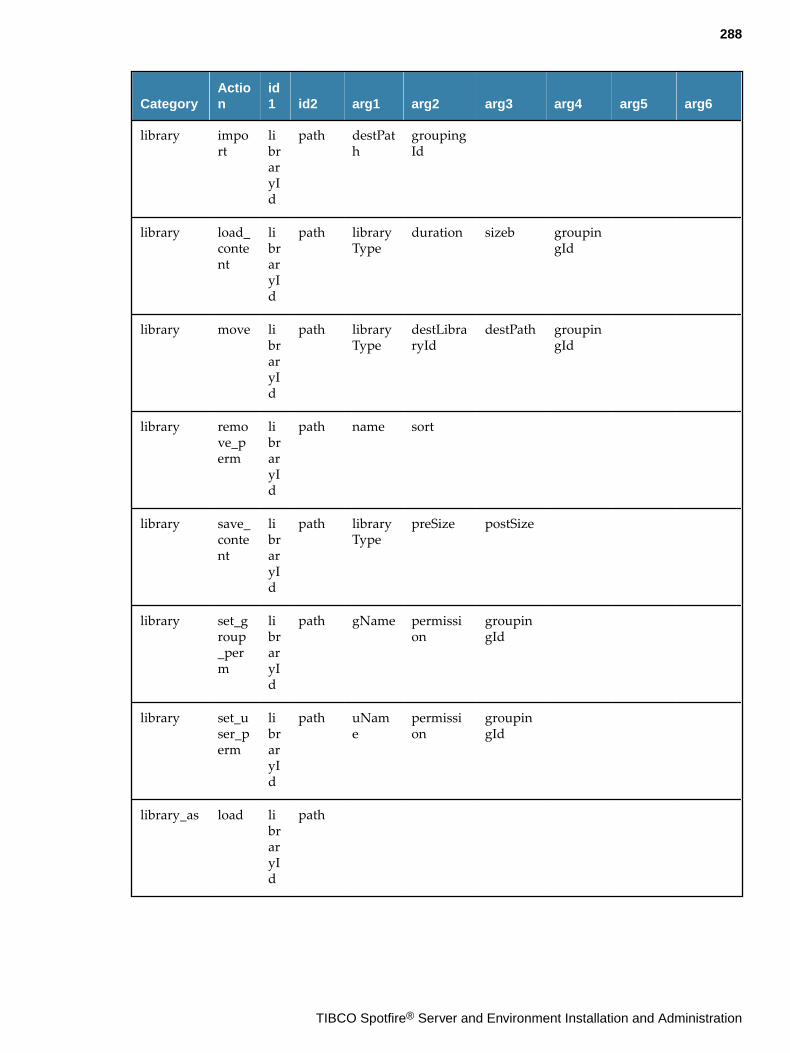
CategoryAction
id1 id2 arg1 arg2 arg3 arg4 arg5 arg6
library import
libraryId
path destPath
groupingId
library load_content
libraryId
path libraryType
duration sizeb groupingId
library move libraryId
path libraryType
destLibraryId
destPath groupingId
library remove_perm
libraryId
path name sort
library save_content
libraryId
path libraryType
preSize postSize
library set_group_perm
libraryId
path gName permission
groupingId
library set_user_perm
libraryId
path uName
permission
groupingId
library_as load libraryId
path
288
TIBCO Spotfire® Server and Environment Installation and Administration
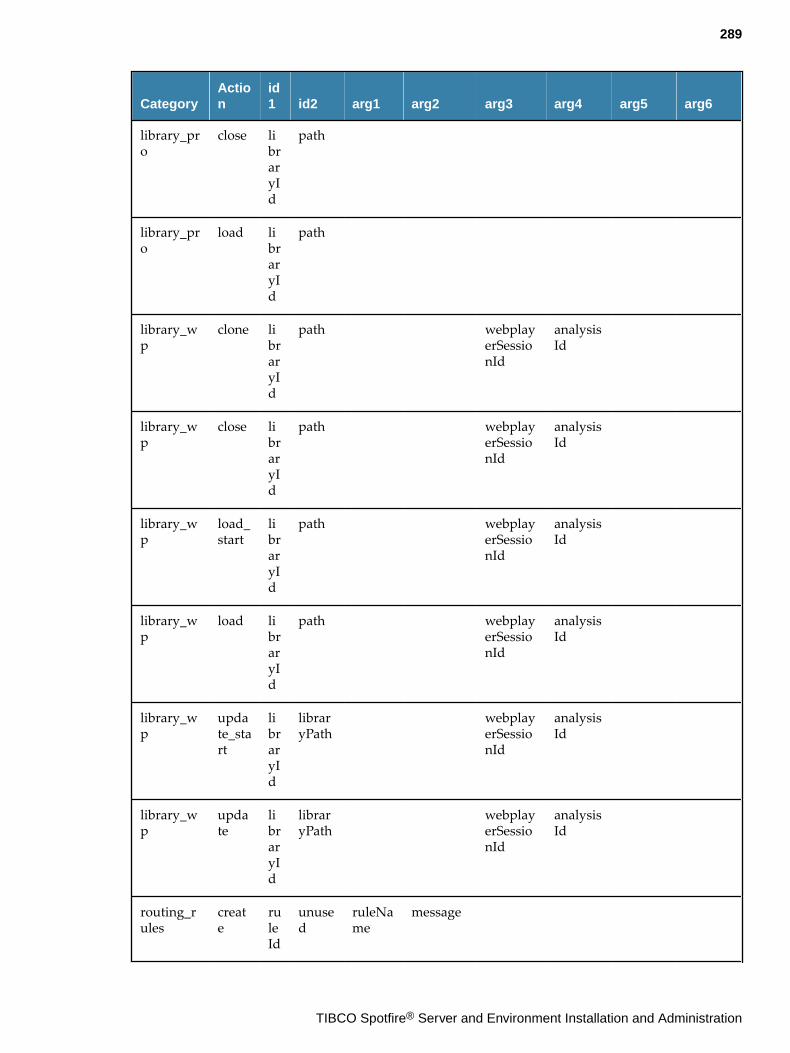
CategoryAction
id1 id2 arg1 arg2 arg3 arg4 arg5 arg6
library_pro
close libraryId
path
library_pro
load libraryId
path
library_wp
clone libraryId
path webplayerSessionId
analysisId
library_wp
close libraryId
path webplayerSessionId
analysisId
library_wp
load_start
libraryId
path webplayerSessionId
analysisId
library_wp
load libraryId
path webplayerSessionId
analysisId
library_wp
update_start
libraryId
libraryPath
webplayerSessionId
analysisId
library_wp
update
libraryId
libraryPath
webplayerSessionId
analysisId
routing_rules
create
ruleId
unused
ruleName
message
289
TIBCO Spotfire® Server and Environment Installation and Administration
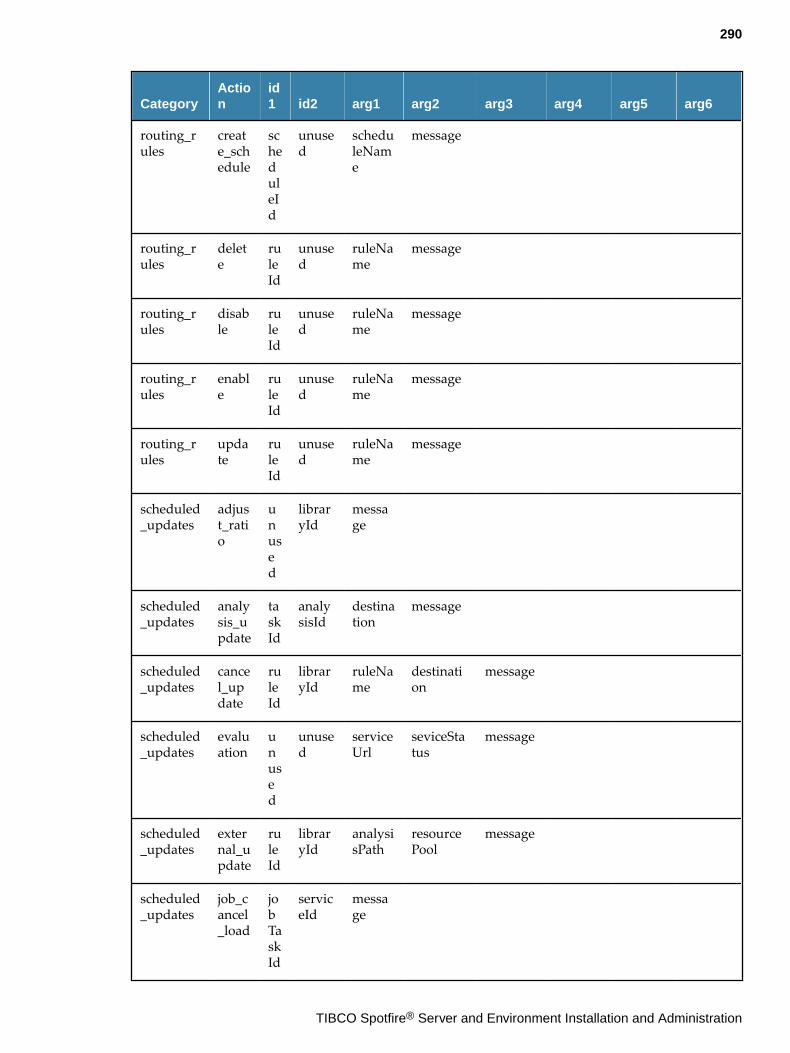
CategoryAction
id1 id2 arg1 arg2 arg3 arg4 arg5 arg6
routing_rules
create_schedule
scheduleId
unused
scheduleName
message
routing_rules
delete
ruleId
unused
ruleName
message
routing_rules
disable
ruleId
unused
ruleName
message
routing_rules
enable
ruleId
unused
ruleName
message
routing_rules
update
ruleId
unused
ruleName
message
scheduled_updates
adjust_ratio
unused
libraryId
message
scheduled_updates
analysis_update
taskId
analysisId
destination
message
scheduled_updates
cancel_update
ruleId
libraryId
ruleName
destination
message
scheduled_updates
evaluation
unused
unused
serviceUrl
seviceStatus
message
scheduled_updates
external_update
ruleId
libraryId
analysisPath
resourcePool
message
scheduled_updates
job_cancel_load
jobTaskId
serviceId
message
290
TIBCO Spotfire® Server and Environment Installation and Administration
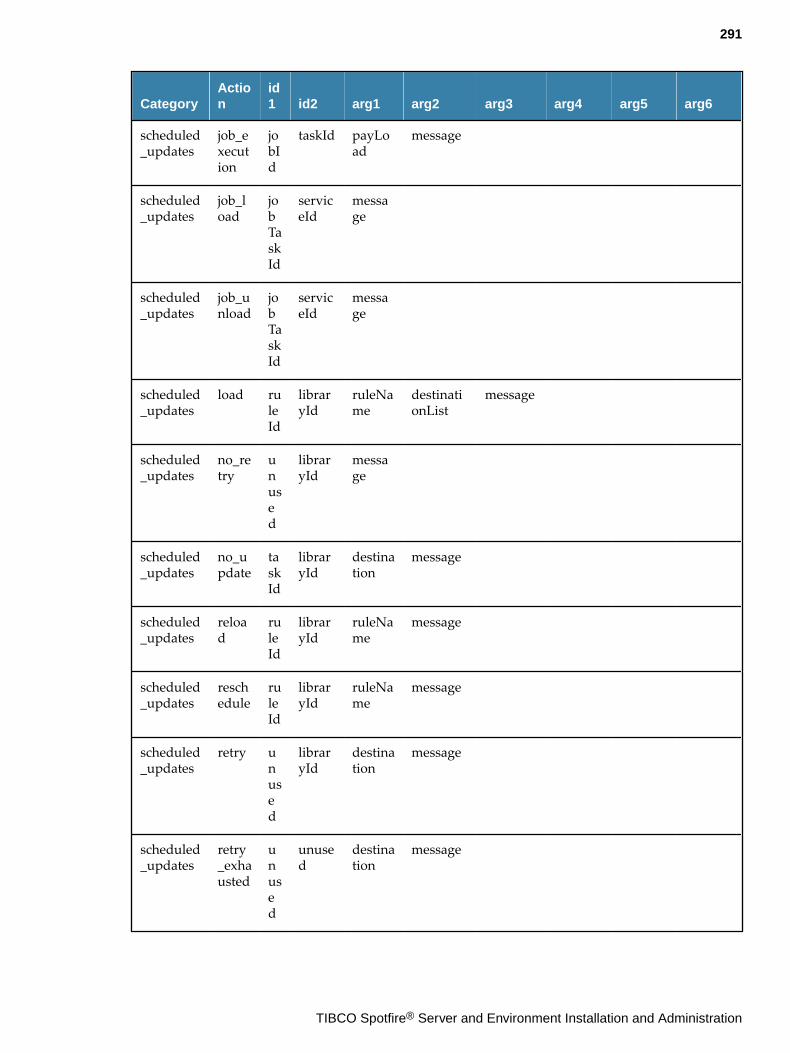
CategoryAction
id1 id2 arg1 arg2 arg3 arg4 arg5 arg6
scheduled_updates
job_execution
jobId
taskId payLoad
message
scheduled_updates
job_load
jobTaskId
serviceId
message
scheduled_updates
job_unload
jobTaskId
serviceId
message
scheduled_updates
load ruleId
libraryId
ruleName
destinationList
message
scheduled_updates
no_retry
unused
libraryId
message
scheduled_updates
no_update
taskId
libraryId
destination
message
scheduled_updates
reload
ruleId
libraryId
ruleName
message
scheduled_updates
reschedule
ruleId
libraryId
ruleName
message
scheduled_updates
retry unused
libraryId
destination
message
scheduled_updates
retry_exhausted
unused
unused
destination
message
291
TIBCO Spotfire® Server and Environment Installation and Administration
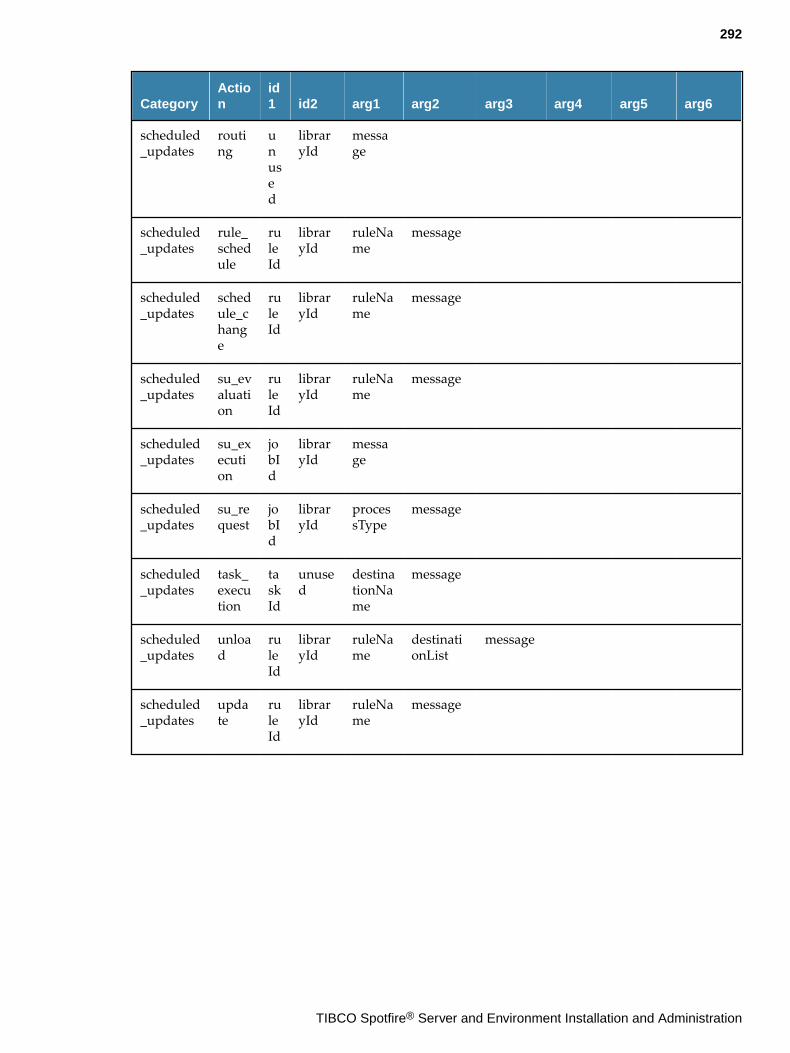
CategoryAction
id1 id2 arg1 arg2 arg3 arg4 arg5 arg6
scheduled_updates
routing
unused
libraryId
message
scheduled_updates
rule_schedule
ruleId
libraryId
ruleName
message
scheduled_updates
schedule_change
ruleId
libraryId
ruleName
message
scheduled_updates
su_evaluation
ruleId
libraryId
ruleName
message
scheduled_updates
su_execution
jobId
libraryId
message
scheduled_updates
su_request
jobId
libraryId
processType
message
scheduled_updates
task_execution
taskId
unused
destinationName
message
scheduled_updates
unload
ruleId
libraryId
ruleName
destinationList
message
scheduled_updates
update
ruleId
libraryId
ruleName
message
292
TIBCO Spotfire® Server and Environment Installation and Administration
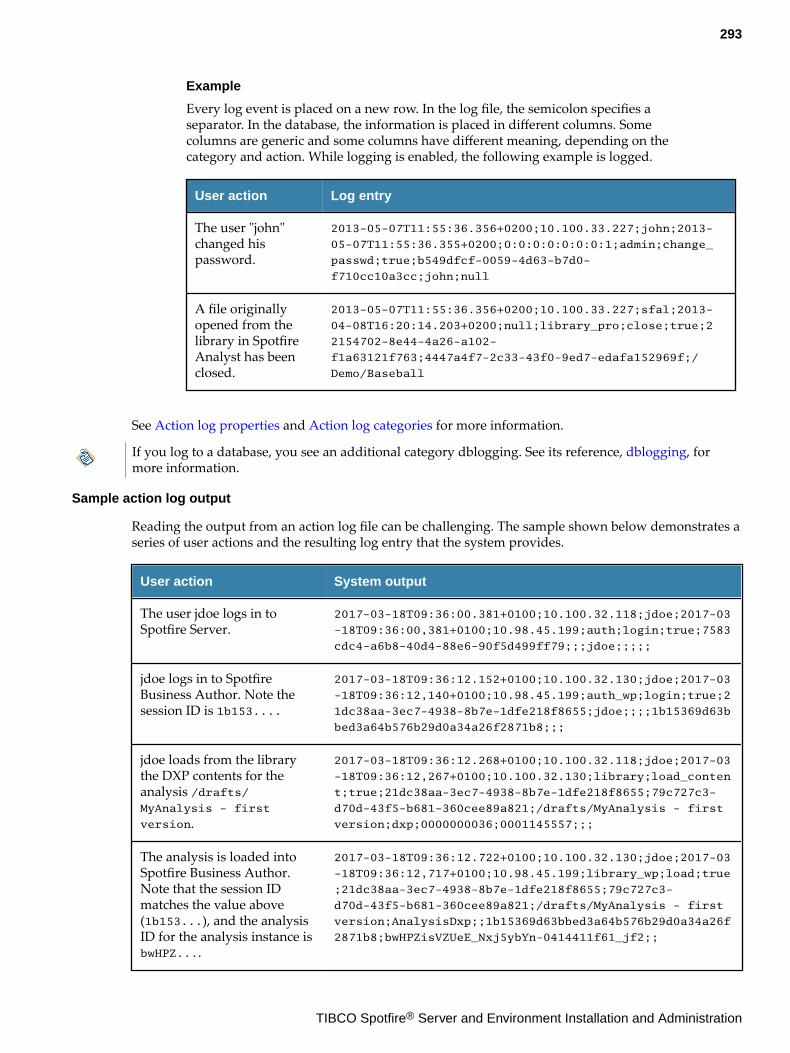
Example
Every log event is placed on a new row. In the log file, the semicolon specifies aseparator. In the database, the information is placed in different columns. Somecolumns are generic and some columns have different meaning, depending on thecategory and action. While logging is enabled, the following example is logged.
User action Log entry
The user "john"changed hispassword.
2013-05-07T11:55:36.356+0200;10.100.33.227;john;2013-
05-07T11:55:36.355+0200;0:0:0:0:0:0:0:1;admin;change_
passwd;true;b549dfcf-0059-4d63-b7d0-
f710cc10a3cc;john;null
A file originallyopened from thelibrary in SpotfireAnalyst has beenclosed.
2013-05-07T11:55:36.356+0200;10.100.33.227;sfal;2013-
04-08T16:20:14.203+0200;null;library_pro;close;true;2
2154702-8e44-4a26-a102-
f1a63121f763;4447a4f7-2c33-43f0-9ed7-edafa152969f;/
Demo/Baseball
See Action log properties and Action log categories for more information.
If you log to a database, you see an additional category dblogging. See its reference, dblogging, formore information.
Sample action log output
Reading the output from an action log file can be challenging. The sample shown below demonstrates aseries of user actions and the resulting log entry that the system provides.
User action System output
The user jdoe logs in toSpotfire Server.
2017-03-18T09:36:00.381+0100;10.100.32.118;jdoe;2017-03
-18T09:36:00,381+0100;10.98.45.199;auth;login;true;7583
cdc4-a6b8-40d4-88e6-90f5d499ff79;;;jdoe;;;;;
jdoe logs in to SpotfireBusiness Author. Note thesession ID is 1b153....
2017-03-18T09:36:12.152+0100;10.100.32.130;jdoe;2017-03
-18T09:36:12,140+0100;10.98.45.199;auth_wp;login;true;2
1dc38aa-3ec7-4938-8b7e-1dfe218f8655;jdoe;;;;1b15369d63b
bed3a64b576b29d0a34a26f2871b8;;;
jdoe loads from the librarythe DXP contents for theanalysis /drafts/MyAnalysis - first
version.
2017-03-18T09:36:12.268+0100;10.100.32.118;jdoe;2017-03
-18T09:36:12,267+0100;10.100.32.130;library;load_conten
t;true;21dc38aa-3ec7-4938-8b7e-1dfe218f8655;79c727c3-
d70d-43f5-b681-360cee89a821;/drafts/MyAnalysis - first
version;dxp;0000000036;0001145557;;;
The analysis is loaded intoSpotfire Business Author.Note that the session IDmatches the value above(1b153...), and the analysisID for the analysis instance isbwHPZ....
2017-03-18T09:36:12.722+0100;10.100.32.130;jdoe;2017-03
-18T09:36:12,717+0100;10.98.45.199;library_wp;load;true
;21dc38aa-3ec7-4938-8b7e-1dfe218f8655;79c727c3-
d70d-43f5-b681-360cee89a821;/drafts/MyAnalysis - first
version;AnalysisDxp;;1b15369d63bbed3a64b576b29d0a34a26f
2871b8;bwHPZisVZUeE_Nxj5ybYn-0414411f61_jf2;;
293
TIBCO Spotfire® Server and Environment Installation and Administration
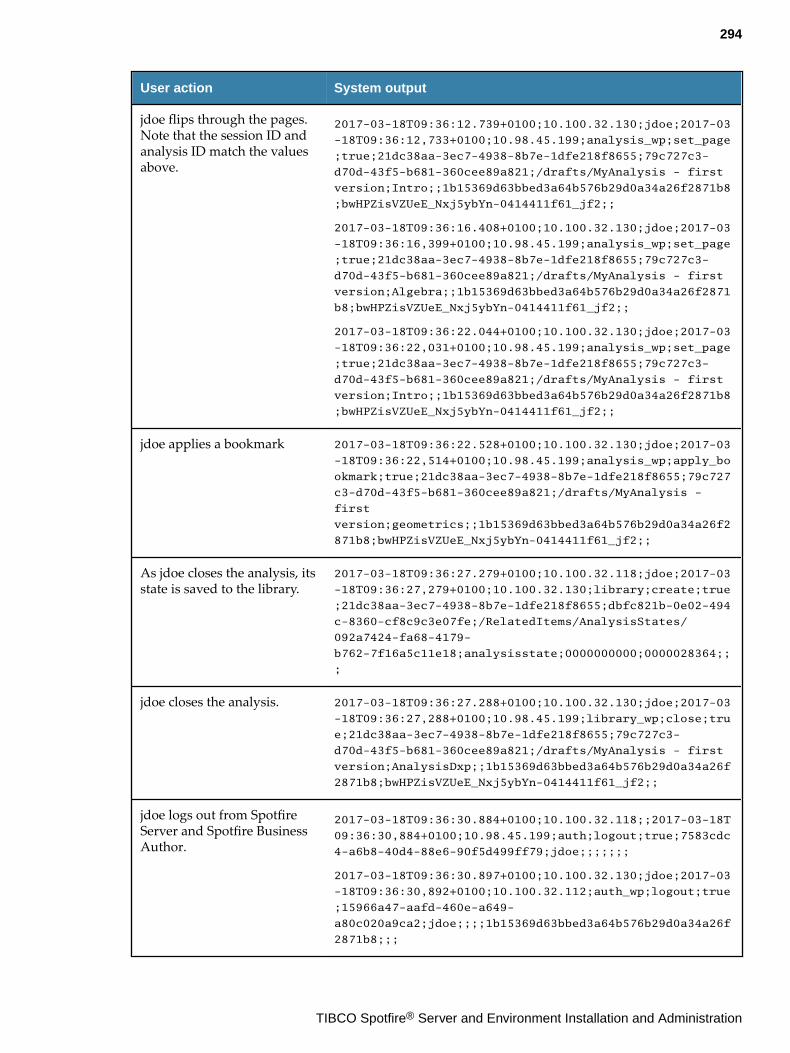
User action System output
jdoe flips through the pages.Note that the session ID andanalysis ID match the valuesabove.
2017-03-18T09:36:12.739+0100;10.100.32.130;jdoe;2017-03
-18T09:36:12,733+0100;10.98.45.199;analysis_wp;set_page
;true;21dc38aa-3ec7-4938-8b7e-1dfe218f8655;79c727c3-
d70d-43f5-b681-360cee89a821;/drafts/MyAnalysis - first
version;Intro;;1b15369d63bbed3a64b576b29d0a34a26f2871b8
;bwHPZisVZUeE_Nxj5ybYn-0414411f61_jf2;;
2017-03-18T09:36:16.408+0100;10.100.32.130;jdoe;2017-03
-18T09:36:16,399+0100;10.98.45.199;analysis_wp;set_page
;true;21dc38aa-3ec7-4938-8b7e-1dfe218f8655;79c727c3-
d70d-43f5-b681-360cee89a821;/drafts/MyAnalysis - first
version;Algebra;;1b15369d63bbed3a64b576b29d0a34a26f2871
b8;bwHPZisVZUeE_Nxj5ybYn-0414411f61_jf2;;
2017-03-18T09:36:22.044+0100;10.100.32.130;jdoe;2017-03
-18T09:36:22,031+0100;10.98.45.199;analysis_wp;set_page
;true;21dc38aa-3ec7-4938-8b7e-1dfe218f8655;79c727c3-
d70d-43f5-b681-360cee89a821;/drafts/MyAnalysis - first
version;Intro;;1b15369d63bbed3a64b576b29d0a34a26f2871b8
;bwHPZisVZUeE_Nxj5ybYn-0414411f61_jf2;;
jdoe applies a bookmark 2017-03-18T09:36:22.528+0100;10.100.32.130;jdoe;2017-03
-18T09:36:22,514+0100;10.98.45.199;analysis_wp;apply_bo
okmark;true;21dc38aa-3ec7-4938-8b7e-1dfe218f8655;79c727
c3-d70d-43f5-b681-360cee89a821;/drafts/MyAnalysis -
first
version;geometrics;;1b15369d63bbed3a64b576b29d0a34a26f2
871b8;bwHPZisVZUeE_Nxj5ybYn-0414411f61_jf2;;
As jdoe closes the analysis, itsstate is saved to the library.
2017-03-18T09:36:27.279+0100;10.100.32.118;jdoe;2017-03
-18T09:36:27,279+0100;10.100.32.130;library;create;true
;21dc38aa-3ec7-4938-8b7e-1dfe218f8655;dbfc821b-0e02-494
c-8360-cf8c9c3e07fe;/RelatedItems/AnalysisStates/
092a7424-fa68-4179-
b762-7f16a5c11e18;analysisstate;0000000000;0000028364;;
;
jdoe closes the analysis. 2017-03-18T09:36:27.288+0100;10.100.32.130;jdoe;2017-03
-18T09:36:27,288+0100;10.98.45.199;library_wp;close;tru
e;21dc38aa-3ec7-4938-8b7e-1dfe218f8655;79c727c3-
d70d-43f5-b681-360cee89a821;/drafts/MyAnalysis - first
version;AnalysisDxp;;1b15369d63bbed3a64b576b29d0a34a26f
2871b8;bwHPZisVZUeE_Nxj5ybYn-0414411f61_jf2;;
jdoe logs out from SpotfireServer and Spotfire BusinessAuthor.
2017-03-18T09:36:30.884+0100;10.100.32.118;;2017-03-18T
09:36:30,884+0100;10.98.45.199;auth;logout;true;7583cdc
4-a6b8-40d4-88e6-90f5d499ff79;jdoe;;;;;;;
2017-03-18T09:36:30.897+0100;10.100.32.130;jdoe;2017-03
-18T09:36:30,892+0100;10.100.32.112;auth_wp;logout;true
;15966a47-aafd-460e-a649-
a80c020a9ca2;jdoe;;;;1b15369d63bbed3a64b576b29d0a34a26f
2871b8;;;
294
TIBCO Spotfire® Server and Environment Installation and Administration
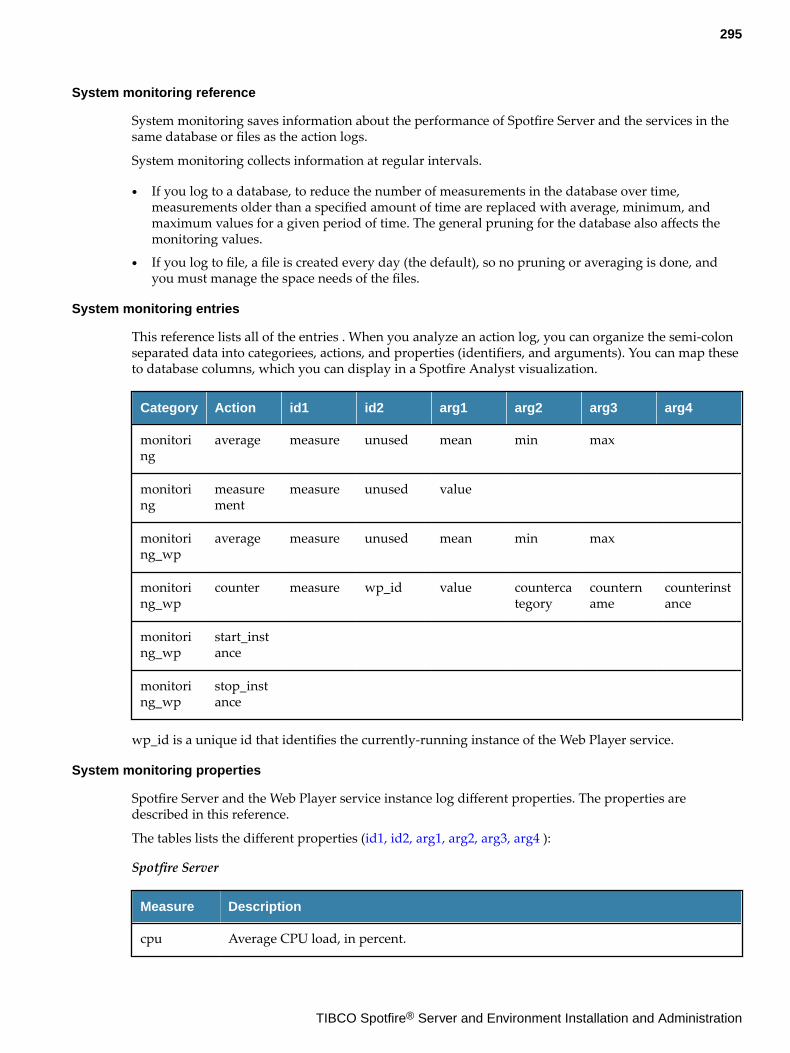
System monitoring reference
System monitoring saves information about the performance of Spotfire Server and the services in thesame database or files as the action logs.
System monitoring collects information at regular intervals.
● If you log to a database, to reduce the number of measurements in the database over time,measurements older than a specified amount of time are replaced with average, minimum, andmaximum values for a given period of time. The general pruning for the database also affects themonitoring values.
● If you log to file, a file is created every day (the default), so no pruning or averaging is done, andyou must manage the space needs of the files.
System monitoring entries
This reference lists all of the entries . When you analyze an action log, you can organize the semi-colonseparated data into categoriees, actions, and properties (identifiers, and arguments). You can map theseto database columns, which you can display in a Spotfire Analyst visualization.
Category Action id1 id2 arg1 arg2 arg3 arg4
monitoring
average measure unused mean min max
monitoring
measurement
measure unused value
monitoring_wp
average measure unused mean min max
monitoring_wp
counter measure wp_id value countercategory
countername
counterinstance
monitoring_wp
start_instance
monitoring_wp
stop_instance
wp_id is a unique id that identifies the currently-running instance of the Web Player service.
System monitoring properties
Spotfire Server and the Web Player service instance log different properties. The properties aredescribed in this reference.
The tables lists the different properties (id1, id2, arg1, arg2, arg3, arg4 ):
Spotfire Server
Measure Description
cpu Average CPU load, in percent.
295
TIBCO Spotfire® Server and Environment Installation and Administration
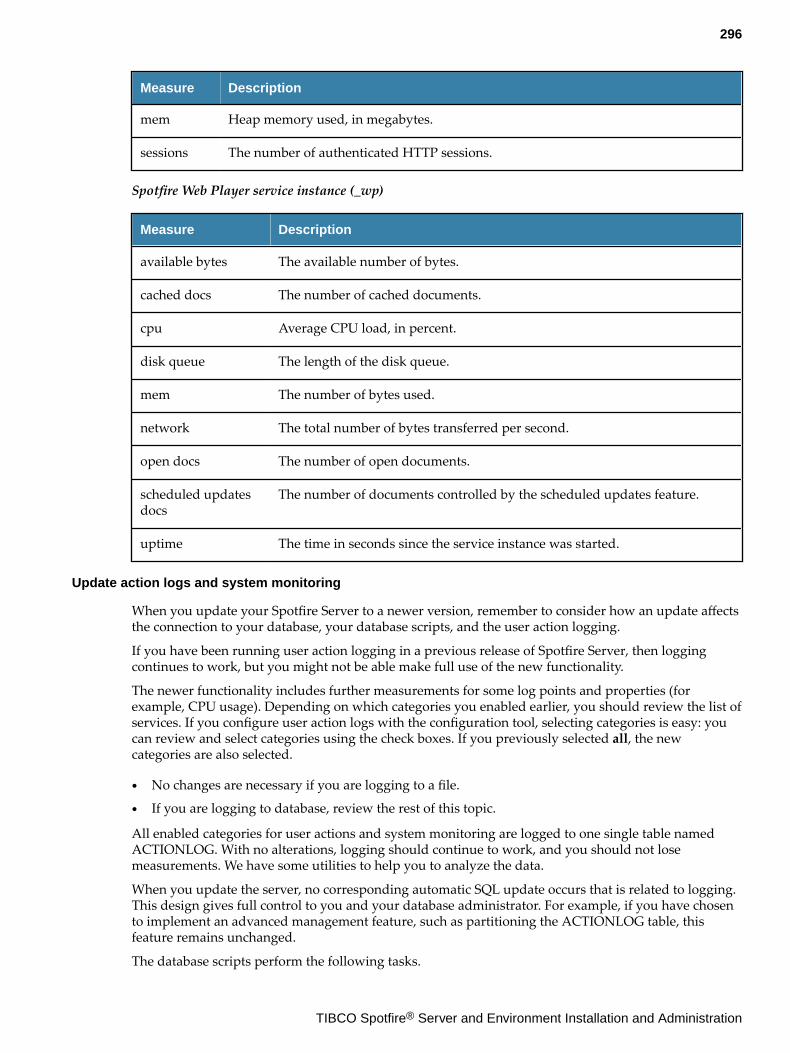
Measure Description
mem Heap memory used, in megabytes.
sessions The number of authenticated HTTP sessions.
Spotfire Web Player service instance (_wp)
Measure Description
available bytes The available number of bytes.
cached docs The number of cached documents.
cpu Average CPU load, in percent.
disk queue The length of the disk queue.
mem The number of bytes used.
network The total number of bytes transferred per second.
open docs The number of open documents.
scheduled updatesdocs
The number of documents controlled by the scheduled updates feature.
uptime The time in seconds since the service instance was started.
Update action logs and system monitoring
When you update your Spotfire Server to a newer version, remember to consider how an update affectsthe connection to your database, your database scripts, and the user action logging.
If you have been running user action logging in a previous release of Spotfire Server, then loggingcontinues to work, but you might not be able make full use of the new functionality.
The newer functionality includes further measurements for some log points and properties (forexample, CPU usage). Depending on which categories you enabled earlier, you should review the list ofservices. If you configure user action logs with the configuration tool, selecting categories is easy: youcan review and select categories using the check boxes. If you previously selected all, the newcategories are also selected.
● No changes are necessary if you are logging to a file.
● If you are logging to database, review the rest of this topic.
All enabled categories for user actions and system monitoring are logged to one single table namedACTIONLOG. With no alterations, logging should continue to work, and you should not losemeasurements. We have some utilities to help you to analyze the data.
When you update the server, no corresponding automatic SQL update occurs that is related to logging.This design gives full control to you and your database administrator. For example, if you have chosento implement an advanced management feature, such as partitioning the ACTIONLOG table, thisfeature remains unchanged.
The database scripts perform the following tasks.
296
TIBCO Spotfire® Server and Environment Installation and Administration
● Create user, schema and database. After an update, you can continue to log to the same target, so donot need to recreate these.
● Create the ACTIONLOG table. This table is still used, and the structure is not altered.
● Create index tables to help searches performed on the ACTIONLOG table. If you configured yourearlier installation to omit index tables, then you do not need to change this configuration. Withpruning enabled, the ACTIONLOG table has rows both added and deleted, so index tables benefitfrom being rebuilt regularly. Discuss this task schedule with your database administrator.
● Create views for categories and actions with informative column names, and with the sameinformation as that described in Action log data collected. The views are needed only if you usethem for analysis. During an update, these are the only names that must be updated in the database.You can find the information for creating the views in the database installation scripts. These scriptsare in the installation kit as follows.
./scripts/oracle_install/actionlog
./scripts/mssql_install/actionlog
See the following topics for updating the databases.
● Updating the Oracle database.
● Updating the Microsoft SQL Server database.
Updating the Oracle database
When you update your Spotfire Server to a newer version, remember to consider how an update affectsthe connection to your Oracle database, your database scripts, and the user action logging.After you have updated your Spotfire Server, make sure your scripts are correct. See Upgrade actionlogs and system monitoring for details.
Prerequisites
You must have administrative credentials for Spotfire Server.
Procedure
1. Log in to the schema spotfire_actionlog.
2. Run the SQL command found in create_actionlog_db.sql.SQL checks for the table, and then creates only the views.
3. Open the .bat or .sh file for editing.
4. In this file, remove the section that creates the tablespace and user.
5. Enter the information for CONNECTIDENTIFIER, ACTIONDB_USER, and ACTIONDB_PASSWORD.
6. Run the edited script.
What to do next
The installation kit also includes an Information Services model and an analysis file, which you can useto gain insight into the usage of the system. See Importing a library to Spotfire Analyst for analyzingaction logs for instructions on downloading and using the visualization.
297
TIBCO Spotfire® Server and Environment Installation and Administration
Updating the Microsoft SQL Server database
When you update your Spotfire Server to a newer version, remember to consider how an update affectsthe connection to your Microsoft SQL Server database, your database scripts, and the user actionlogging.After you have updated your Spotfire Server, make sure your scripts are correct. See Upgrade actionlogs and system monitoring for details.
Prerequisites
You must have administrative credentials for Spotfire Server.
Procedure
1. Open the file create_actionlog_db.sql for editing.
2. Remove the lines above use $(ACTIONDB_NAME), and change this line to usespotfire_actionlog.The script creates the views only if the table exists.
3. Log in to the database spotfire_actionlog and run the SQL command in your editedcreate_actionlog_db.sql.
4. Open the .bat file for editing.
5. Remove the section "Create the Spotfire Action log database user."
6. Enter the information where the placeholders are (for example the CONNECTIDENTIFIER).
7. Run the edited script.
What to do next
The installation kit also includes an Information Services model and an analysis file, which you can useto gain insight into the usage of the system. See Importing a library to Spotfire Analyst for analyzingaction logs for instructions on downloading and using the visualization.
Server monitoring using JMXYou can monitor the Spotfire Server to detect problems with the server itself, with external systems, orwith the network. You can also detect misconfigured clients or (in some cases) malicious behavior.
Spotfire Server runs within the Tomcat application server. Tomcat provides the basic functionalityneeded, the server (Agent level), and a Java Remote Method Invocation (Java RMI) connector (RemoteManagement level).
Tomcat provides a rich instrumentation set for monitoring and managing the application server. Forexample, it monitors Tomcat configuration parameters and basic usage statistics. The Java runtimeenvironment that ships with Spotfire Server is also heavily instrumented using JMX. This toolsetprovides information about CPU and memory usage, garbage collection, and thread pools.
● To monitor the server itself, view and manage logs, and troubleshoot the server, log in to theSpotfire Server administration interface and see the Overview page of Monitoring and Diagnostics.
● To monitor user actions and system events, such as those from Spotfire, Spotfire Web Player, andSpotfire Automation Services, see Action logs and system monitoring.
● To monitor other aspects of the server, use available tools such as TIBCO Hawk®, JConsole (which isincluded in the Java JDK), or any other Java Management Extensions (JMX)-compliant monitoringtool.
This section provides information on the architecture of the JMX system, types of information capturedby JMX, and how to configure and work with JMX-compliant tools to monitor Spotfire Server.
298
TIBCO Spotfire® Server and Environment Installation and Administration
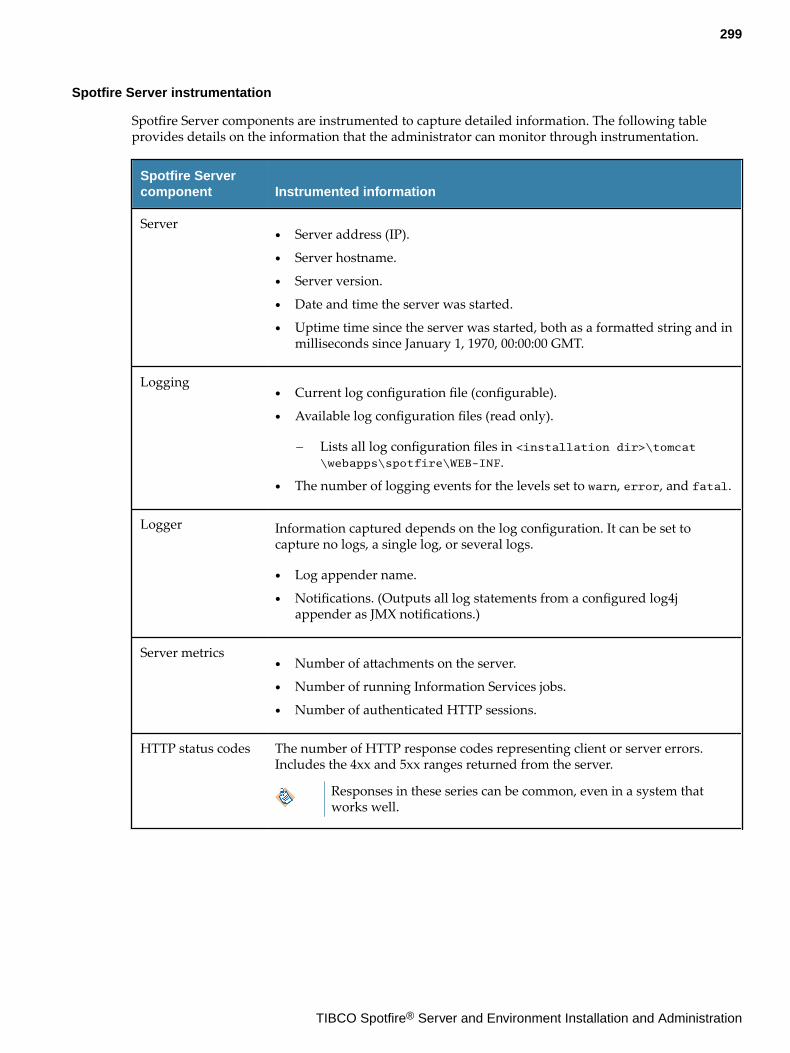
Spotfire Server instrumentation
Spotfire Server components are instrumented to capture detailed information. The following tableprovides details on the information that the administrator can monitor through instrumentation.
Spotfire Servercomponent Instrumented information
Server● Server address (IP).
● Server hostname.
● Server version.
● Date and time the server was started.
● Uptime time since the server was started, both as a formatted string and inmilliseconds since January 1, 1970, 00:00:00 GMT.
Logging● Current log configuration file (configurable).
● Available log configuration files (read only).
— Lists all log configuration files in <installation dir>\tomcat\webapps\spotfire\WEB-INF.
● The number of logging events for the levels set to warn, error, and fatal.
Logger Information captured depends on the log configuration. It can be set tocapture no logs, a single log, or several logs.
● Log appender name.
● Notifications. (Outputs all log statements from a configured log4jappender as JMX notifications.)
Server metrics● Number of attachments on the server.
● Number of running Information Services jobs.
● Number of authenticated HTTP sessions.
HTTP status codes The number of HTTP response codes representing client or server errors.Includes the 4xx and 5xx ranges returned from the server.
Responses in these series can be common, even in a system thatworks well.
299
TIBCO Spotfire® Server and Environment Installation and Administration
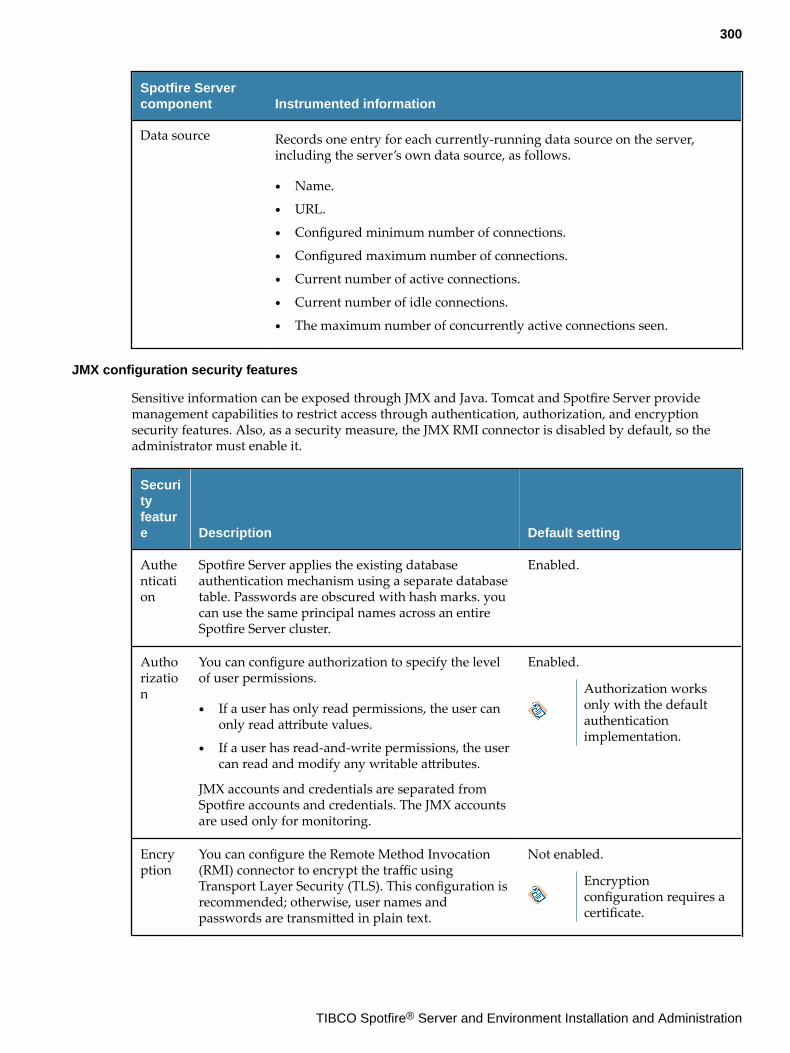
Spotfire Servercomponent Instrumented information
Data source Records one entry for each currently-running data source on the server,including the server’s own data source, as follows.
● Name.
● URL.
● Configured minimum number of connections.
● Configured maximum number of connections.
● Current number of active connections.
● Current number of idle connections.
● The maximum number of concurrently active connections seen.
JMX configuration security features
Sensitive information can be exposed through JMX and Java. Tomcat and Spotfire Server providemanagement capabilities to restrict access through authentication, authorization, and encryptionsecurity features. Also, as a security measure, the JMX RMI connector is disabled by default, so theadministrator must enable it.
Securityfeature Description Default setting
Authentication
Spotfire Server applies the existing databaseauthentication mechanism using a separate databasetable. Passwords are obscured with hash marks. youcan use the same principal names across an entireSpotfire Server cluster.
Enabled.
Authorization
You can configure authorization to specify the levelof user permissions.
● If a user has only read permissions, the user canonly read attribute values.
● If a user has read-and-write permissions, the usercan read and modify any writable attributes.
JMX accounts and credentials are separated fromSpotfire accounts and credentials. The JMX accountsare used only for monitoring.
Enabled.
Authorization worksonly with the defaultauthenticationimplementation.
Encryption
You can configure the Remote Method Invocation(RMI) connector to encrypt the traffic usingTransport Layer Security (TLS). This configuration isrecommended; otherwise, user names andpasswords are transmitted in plain text.
Not enabled.
Encryptionconfiguration requires acertificate.
300
TIBCO Spotfire® Server and Environment Installation and Administration
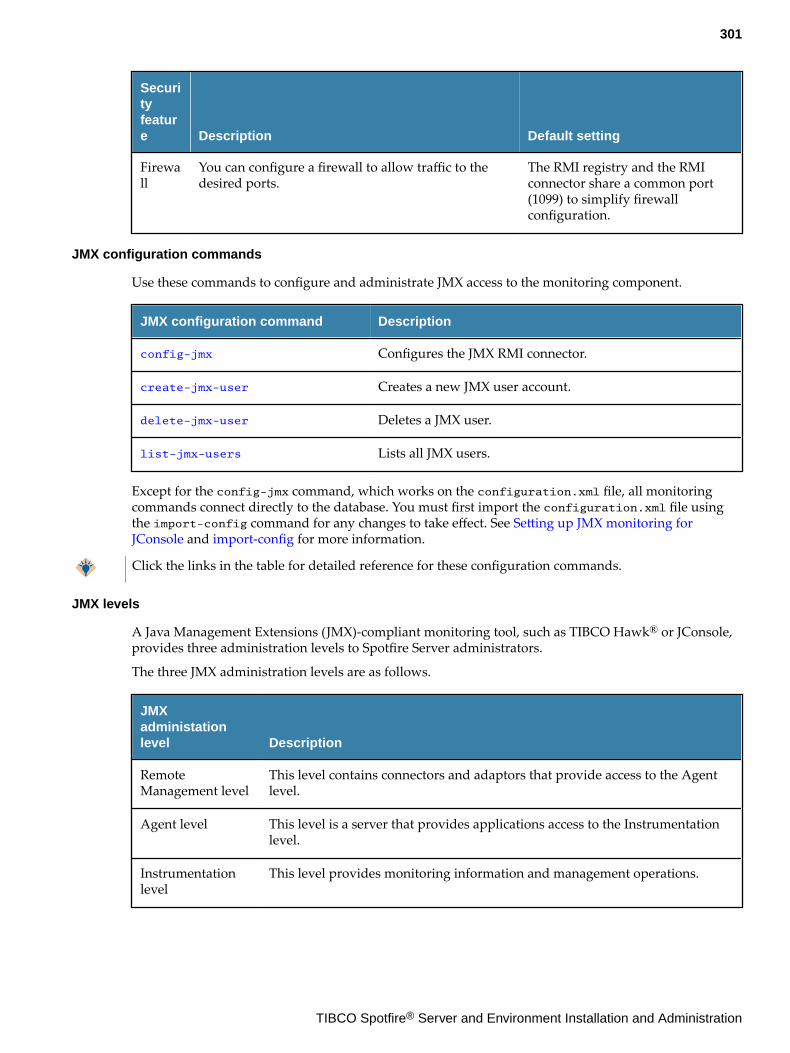
Securityfeature Description Default setting
Firewall
You can configure a firewall to allow traffic to thedesired ports.
The RMI registry and the RMIconnector share a common port(1099) to simplify firewallconfiguration.
JMX configuration commands
Use these commands to configure and administrate JMX access to the monitoring component.
JMX configuration command Description
config-jmx Configures the JMX RMI connector.
create-jmx-user Creates a new JMX user account.
delete-jmx-user Deletes a JMX user.
list-jmx-users Lists all JMX users.
Except for the config-jmx command, which works on the configuration.xml file, all monitoringcommands connect directly to the database. You must first import the configuration.xml file usingthe import-config command for any changes to take effect. See Setting up JMX monitoring forJConsole and import-config for more information.
Click the links in the table for detailed reference for these configuration commands.
JMX levels
A Java Management Extensions (JMX)-compliant monitoring tool, such as TIBCO Hawk® or JConsole,provides three administration levels to Spotfire Server administrators.
The three JMX administration levels are as follows.
JMXadministationlevel Description
RemoteManagement level
This level contains connectors and adaptors that provide access to the Agentlevel.
Agent level This level is a server that provides applications access to the Instrumentationlevel.
Instrumentationlevel
This level provides monitoring information and management operations.
301
TIBCO Spotfire® Server and Environment Installation and Administration
Enabling the JMX logging appender
To monitor the server by using TIBCO Hawk or another Java Management Extensions (JMX)-compliantmonitoring tool, you can enable an extra log appender so that the server outputs log events as JMXnotifications.
Prerequisites
You must have write access to the server where Spotfire Server is installed.
Perform this task on the computer where Spotfire Server is installed.
Procedure
1. Open the following file in a text editor or an XML editor: <server installation dir>/tomcat/spotfire-config/log4j2.xml.
2. Add a new appender definition to the <Appenders> section of the log4j2.xml file.For example:<Jmx name="Jmx" description="description of the log"> <PatternLayout pattern="[%X{thread.info}] %c{3}: %m%n" /> </Jmx>
where the values of the name, description, and pattern attributes can be changed, and thedescription attribute is optional.
3. In the <Loggers> section of the file, locate the loggers for which you want to enable JMXfunctionality and then add a reference to the JMX appender. See the fourth line of the followingexample code.For example: <Logger name="com.spotfire" level="DEBUG" additivity="false"> <AppenderRef ref="serverlog"/> <AppenderRef ref="Console"/> <AppenderRef ref="Jmx"/> </Logger>
You can configure multiple JMX appenders, but each one must have a different value forthe name attribute.
4. Save and close the file.
5. Restart the server service.
Setting up JMX monitoring for JConsole
This task walks you through setting up JMX monitoring for using JConsole. It does not use TransportLayer Security (TLS).
Prerequisites
● You must have administrative credentials for Spotfire Server. If you are running these commands inWindows, run the command-line interface as administrator.
● You must have access to JConsole.
Perform this task at a command-line prompt on the server, from the directory where the fileconfig.bat (on Windows) or config.sh (on Linux) is installed. By default, this location is <serverinstallation dir>/tomcat/bin.
302
TIBCO Spotfire® Server and Environment Installation and Administration
Procedure
1. Log in to the Spotfire Server, and from the Start menu, open a command-line window asadministrator.
2. At the command line, run the command config export-config.Provide the tools password when prompted.The configuration is successfully exported and is ready to change.
3. At the command line, run the command config config-jmx --enabled=true.Provide the tools password when prompted.
4. Import the configuration by running the command config import-config --comment=”Enabling JMX” configuration.xml.Provide the tools password when prompted.
5. Create a JMX user by running the command config create-jmx-user --username=MyJMXUser.
6. Provide a password for the user MyJMXUser.Provide the tools password when prompted.
7. Restart Spotfire Server.
8. Browse to the JDK directory containing the JConsole executable.the JConsole executable is in the bin directory of the JDK installation, such as <Java installationdir>/jdk#.#.#_###/bin, where #.#.#_### represents the version number, such as 1.8.0_121.
9. Launch the JConsole application.
10. In the JConsole New Connection dialog, select Remote Process, enter the <hostname>:1099, andthen provide the JMX user name and password.
To view the Spotfire information, click the MBeans tab, and then select thecom.spotfire.server domain.
Services monitoringYou can collect and review information on the services running under Spotfire Server using a variety oftools and resources that are provided with your Spotfire Server installation.
Accessing performance data
If your users report to you that the system is slower than they expect, you can begin investigating theproblems by examining the performance tracking tools found in Monitoring & Diagnostics.
Prerequisites
You must have administrative privileges on the Spotfire Server.
You can find the performance data for either Automation Services instances or Web Player instances.
Procedure
1. Log in to Spotfire Server, and then click Monitoring & Diagnostics.
2. Click the Instances tab.
3. Under Network Diagnostics, select the Automation Services instance or Web Player instance toreview.
303
TIBCO Spotfire® Server and Environment Installation and Administration
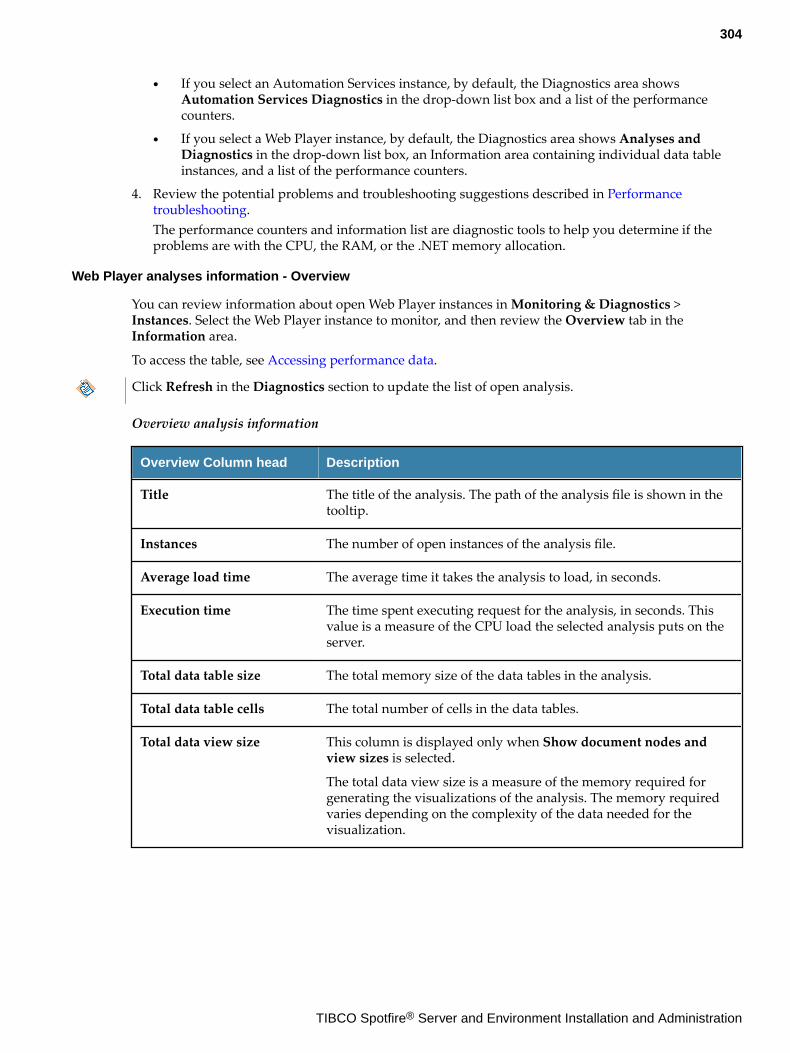
● If you select an Automation Services instance, by default, the Diagnostics area showsAutomation Services Diagnostics in the drop-down list box and a list of the performancecounters.
● If you select a Web Player instance, by default, the Diagnostics area shows Analyses andDiagnostics in the drop-down list box, an Information area containing individual data tableinstances, and a list of the performance counters.
4. Review the potential problems and troubleshooting suggestions described in Performancetroubleshooting.The performance counters and information list are diagnostic tools to help you determine if theproblems are with the CPU, the RAM, or the .NET memory allocation.
Web Player analyses information - Overview
You can review information about open Web Player instances in Monitoring & Diagnostics >Instances. Select the Web Player instance to monitor, and then review the Overview tab in theInformation area.
To access the table, see Accessing performance data.
Click Refresh in the Diagnostics section to update the list of open analysis.
Overview analysis information
Overview Column head Description
Title The title of the analysis. The path of the analysis file is shown in thetooltip.
Instances The number of open instances of the analysis file.
Average load time The average time it takes the analysis to load, in seconds.
Execution time The time spent executing request for the analysis, in seconds. Thisvalue is a measure of the CPU load the selected analysis puts on theserver.
Total data table size The total memory size of the data tables in the analysis.
Total data table cells The total number of cells in the data tables.
Total data view size This column is displayed only when Show document nodes andview sizes is selected.
The total data view size is a measure of the memory required forgenerating the visualizations of the analysis. The memory requiredvaries depending on the complexity of the data needed for thevisualization.
304
TIBCO Spotfire® Server and Environment Installation and Administration
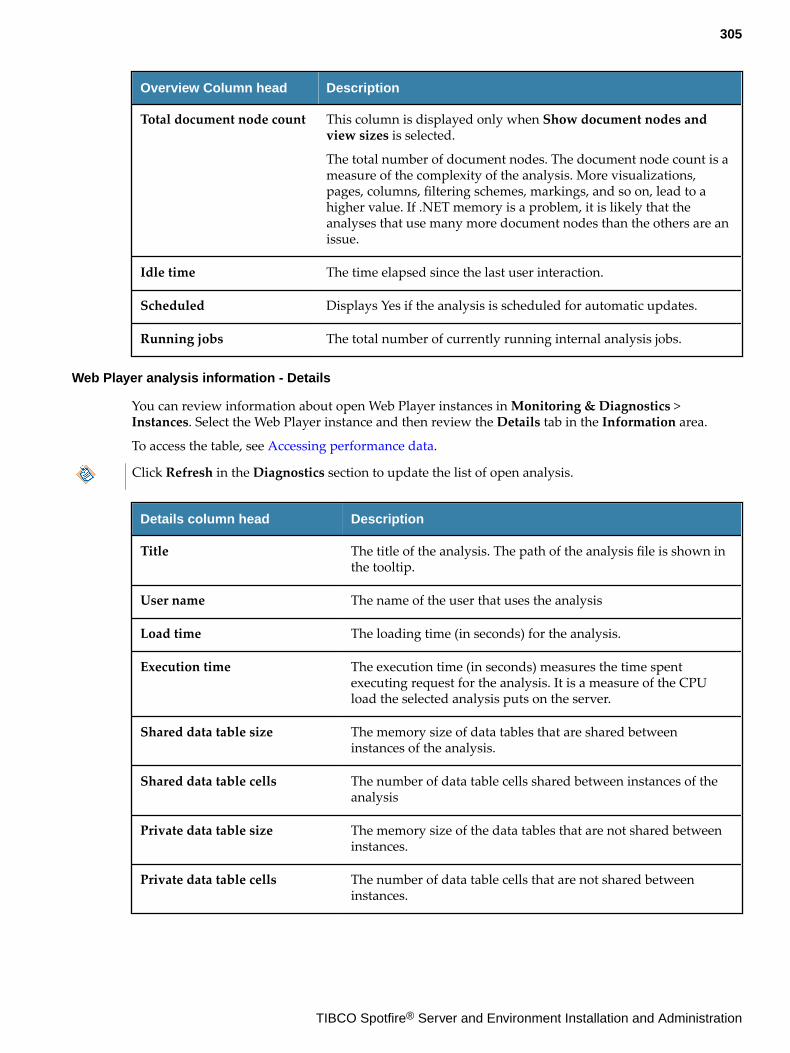
Overview Column head Description
Total document node count This column is displayed only when Show document nodes andview sizes is selected.
The total number of document nodes. The document node count is ameasure of the complexity of the analysis. More visualizations,pages, columns, filtering schemes, markings, and so on, lead to ahigher value. If .NET memory is a problem, it is likely that theanalyses that use many more document nodes than the others are anissue.
Idle time The time elapsed since the last user interaction.
Scheduled Displays Yes if the analysis is scheduled for automatic updates.
Running jobs The total number of currently running internal analysis jobs.
Web Player analysis information - Details
You can review information about open Web Player instances in Monitoring & Diagnostics >Instances. Select the Web Player instance and then review the Details tab in the Information area.
To access the table, see Accessing performance data.
Click Refresh in the Diagnostics section to update the list of open analysis.
Details column head Description
Title The title of the analysis. The path of the analysis file is shown inthe tooltip.
User name The name of the user that uses the analysis
Load time The loading time (in seconds) for the analysis.
Execution time The execution time (in seconds) measures the time spentexecuting request for the analysis. It is a measure of the CPUload the selected analysis puts on the server.
Shared data table size The memory size of data tables that are shared betweeninstances of the analysis.
Shared data table cells The number of data table cells shared between instances of theanalysis
Private data table size The memory size of the data tables that are not shared betweeninstances.
Private data table cells The number of data table cells that are not shared betweeninstances.
305
TIBCO Spotfire® Server and Environment Installation and Administration
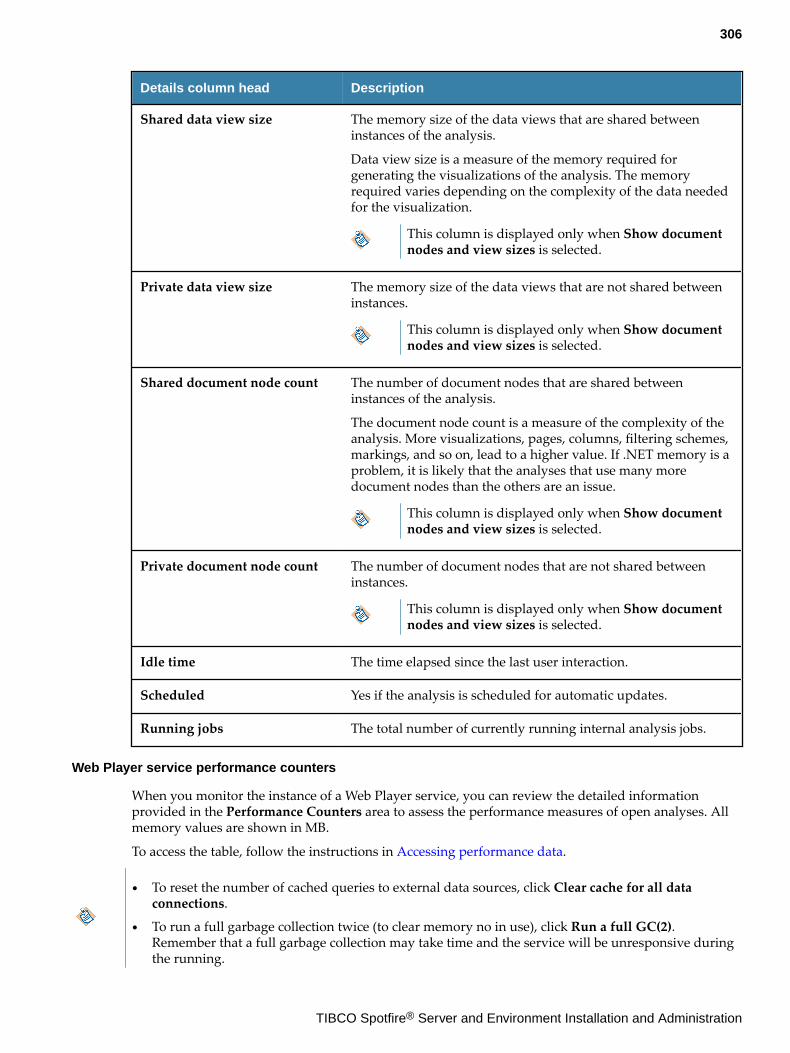
Details column head Description
Shared data view size The memory size of the data views that are shared betweeninstances of the analysis.
Data view size is a measure of the memory required forgenerating the visualizations of the analysis. The memoryrequired varies depending on the complexity of the data neededfor the visualization.
This column is displayed only when Show documentnodes and view sizes is selected.
Private data view size The memory size of the data views that are not shared betweeninstances.
This column is displayed only when Show documentnodes and view sizes is selected.
Shared document node count The number of document nodes that are shared betweeninstances of the analysis.
The document node count is a measure of the complexity of theanalysis. More visualizations, pages, columns, filtering schemes,markings, and so on, lead to a higher value. If .NET memory is aproblem, it is likely that the analyses that use many moredocument nodes than the others are an issue.
This column is displayed only when Show documentnodes and view sizes is selected.
Private document node count The number of document nodes that are not shared betweeninstances.
This column is displayed only when Show documentnodes and view sizes is selected.
Idle time The time elapsed since the last user interaction.
Scheduled Yes if the analysis is scheduled for automatic updates.
Running jobs The total number of currently running internal analysis jobs.
Web Player service performance counters
When you monitor the instance of a Web Player service, you can review the detailed informationprovided in the Performance Counters area to assess the performance measures of open analyses. Allmemory values are shown in MB.
To access the table, follow the instructions in Accessing performance data.
● To reset the number of cached queries to external data sources, click Clear cache for all dataconnections.
● To run a full garbage collection twice (to clear memory no in use), click Run a full GC(2).Remember that a full garbage collection may take time and the service will be unresponsive duringthe running.
306
TIBCO Spotfire® Server and Environment Installation and Administration
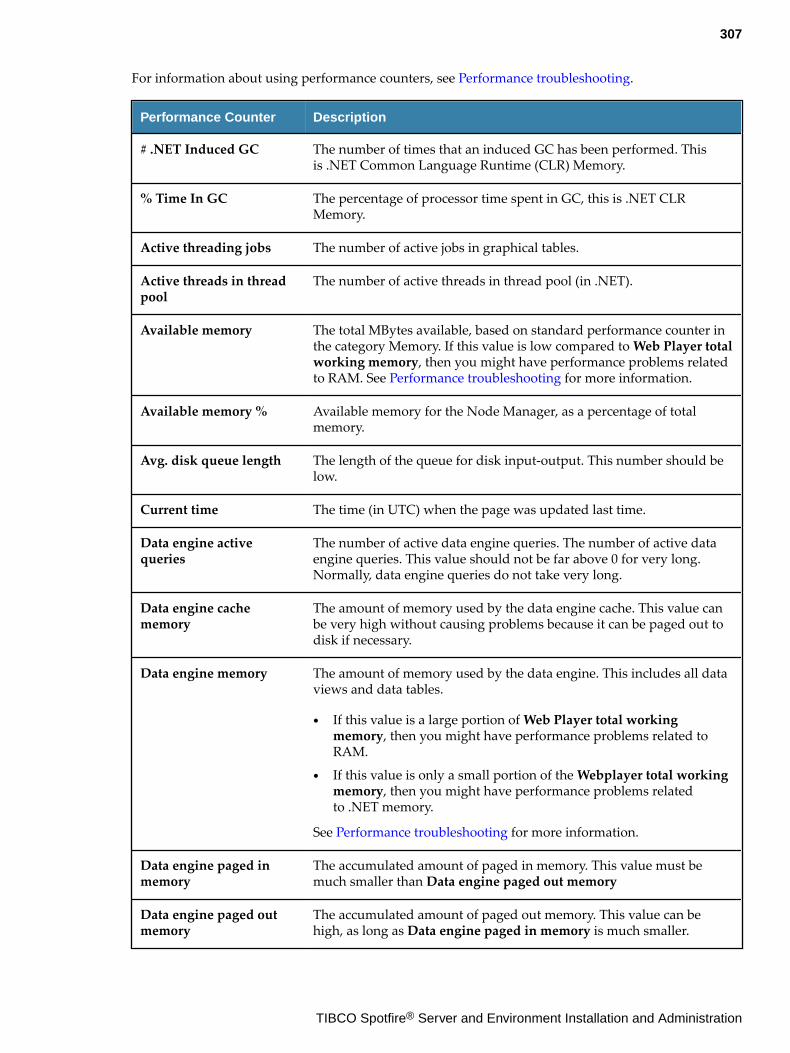
For information about using performance counters, see Performance troubleshooting.
Performance Counter Description
# .NET Induced GC The number of times that an induced GC has been performed. Thisis .NET Common Language Runtime (CLR) Memory.
% Time In GC The percentage of processor time spent in GC, this is .NET CLRMemory.
Active threading jobs The number of active jobs in graphical tables.
Active threads in threadpool
The number of active threads in thread pool (in .NET).
Available memory The total MBytes available, based on standard performance counter inthe category Memory. If this value is low compared to Web Player totalworking memory, then you might have performance problems relatedto RAM. See Performance troubleshooting for more information.
Available memory % Available memory for the Node Manager, as a percentage of totalmemory.
Avg. disk queue length The length of the queue for disk input-output. This number should below.
Current time The time (in UTC) when the page was updated last time.
Data engine activequeries
The number of active data engine queries. The number of active dataengine queries. This value should not be far above 0 for very long.Normally, data engine queries do not take very long.
Data engine cachememory
The amount of memory used by the data engine cache. This value canbe very high without causing problems because it can be paged out todisk if necessary.
Data engine memory The amount of memory used by the data engine. This includes all dataviews and data tables.
● If this value is a large portion of Web Player total workingmemory, then you might have performance problems related toRAM.
● If this value is only a small portion of the Webplayer total workingmemory, then you might have performance problems relatedto .NET memory.
See Performance troubleshooting for more information.
Data engine paged inmemory
The accumulated amount of paged in memory. This value must bemuch smaller than Data engine paged out memory
Data engine paged outmemory
The accumulated amount of paged out memory. This value can behigh, as long as Data engine paged in memory is much smaller.
307
TIBCO Spotfire® Server and Environment Installation and Administration
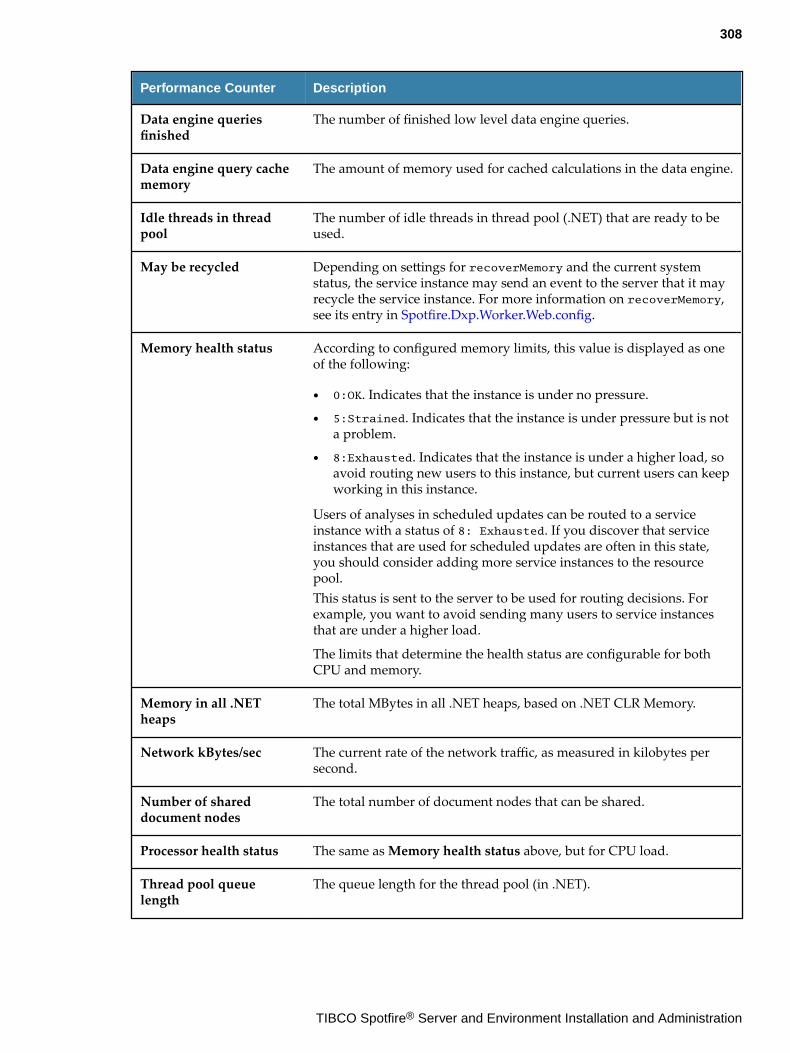
Performance Counter Description
Data engine queriesfinished
The number of finished low level data engine queries.
Data engine query cachememory
The amount of memory used for cached calculations in the data engine.
Idle threads in threadpool
The number of idle threads in thread pool (.NET) that are ready to beused.
May be recycled Depending on settings for recoverMemory and the current systemstatus, the service instance may send an event to the server that it mayrecycle the service instance. For more information on recoverMemory,see its entry in Spotfire.Dxp.Worker.Web.config.
Memory health status According to configured memory limits, this value is displayed as oneof the following:
● 0:OK. Indicates that the instance is under no pressure.
● 5:Strained. Indicates that the instance is under pressure but is nota problem.
● 8:Exhausted. Indicates that the instance is under a higher load, soavoid routing new users to this instance, but current users can keepworking in this instance.
Users of analyses in scheduled updates can be routed to a serviceinstance with a status of 8: Exhausted. If you discover that serviceinstances that are used for scheduled updates are often in this state,you should consider adding more service instances to the resourcepool.This status is sent to the server to be used for routing decisions. Forexample, you want to avoid sending many users to service instancesthat are under a higher load.
The limits that determine the health status are configurable for bothCPU and memory.
Memory in all .NETheaps
The total MBytes in all .NET heaps, based on .NET CLR Memory.
Network kBytes/sec The current rate of the network traffic, as measured in kilobytes persecond.
Number of shareddocument nodes
The total number of document nodes that can be shared.
Processor health status The same as Memory health status above, but for CPU load.
Thread pool queuelength
The queue length for the thread pool (in .NET).
308
TIBCO Spotfire® Server and Environment Installation and Administration
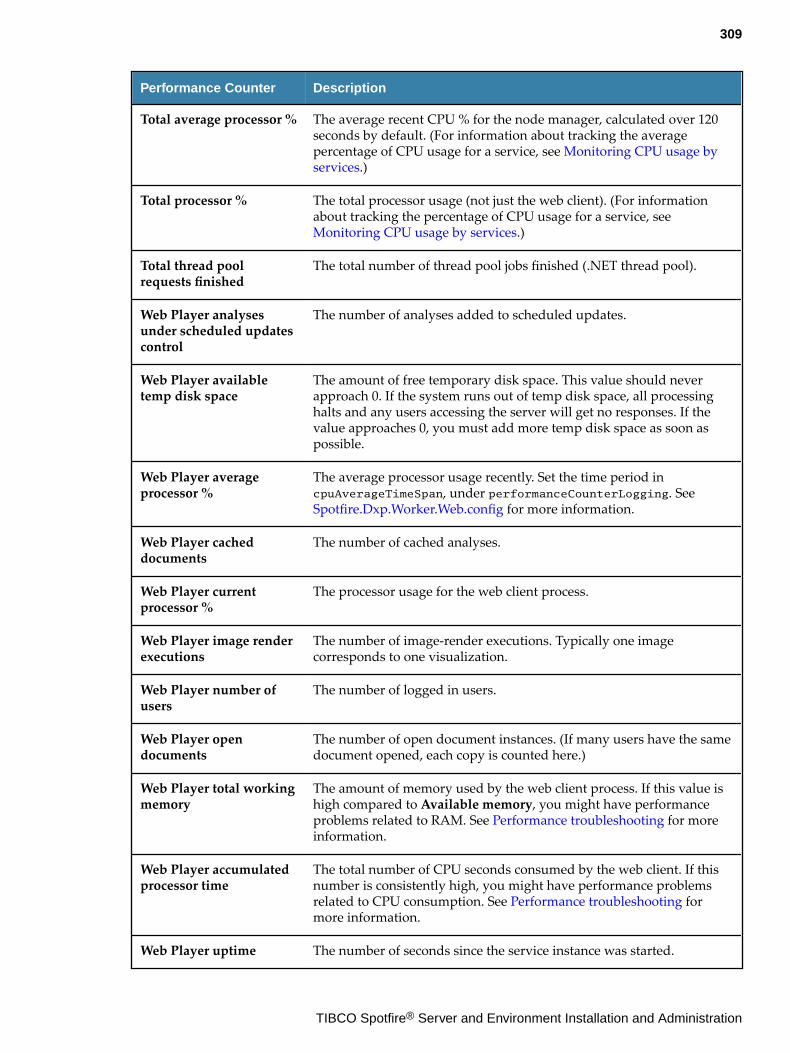
Performance Counter Description
Total average processor % The average recent CPU % for the node manager, calculated over 120seconds by default. (For information about tracking the averagepercentage of CPU usage for a service, see Monitoring CPU usage byservices.)
Total processor % The total processor usage (not just the web client). (For informationabout tracking the percentage of CPU usage for a service, see Monitoring CPU usage by services.)
Total thread poolrequests finished
The total number of thread pool jobs finished (.NET thread pool).
Web Player analysesunder scheduled updatescontrol
The number of analyses added to scheduled updates.
Web Player availabletemp disk space
The amount of free temporary disk space. This value should neverapproach 0. If the system runs out of temp disk space, all processinghalts and any users accessing the server will get no responses. If thevalue approaches 0, you must add more temp disk space as soon aspossible.
Web Player averageprocessor %
The average processor usage recently. Set the time period incpuAverageTimeSpan, under performanceCounterLogging. See Spotfire.Dxp.Worker.Web.config for more information.
Web Player cacheddocuments
The number of cached analyses.
Web Player currentprocessor %
The processor usage for the web client process.
Web Player image renderexecutions
The number of image-render executions. Typically one imagecorresponds to one visualization.
Web Player number ofusers
The number of logged in users.
Web Player opendocuments
The number of open document instances. (If many users have the samedocument opened, each copy is counted here.)
Web Player total workingmemory
The amount of memory used by the web client process. If this value ishigh compared to Available memory, you might have performanceproblems related to RAM. See Performance troubleshooting for moreinformation.
Web Player accumulatedprocessor time
The total number of CPU seconds consumed by the web client. If thisnumber is consistently high, you might have performance problemsrelated to CPU consumption. See Performance troubleshooting formore information.
Web Player uptime The number of seconds since the service instance was started.
309
TIBCO Spotfire® Server and Environment Installation and Administration
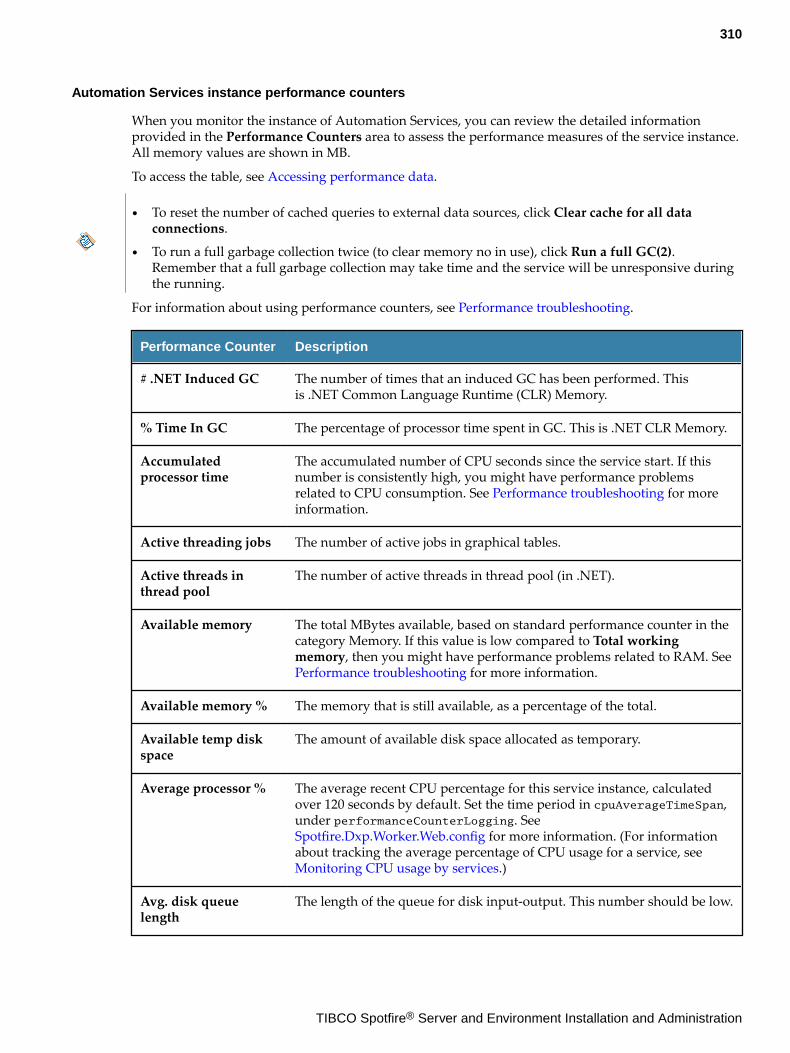
Automation Services instance performance counters
When you monitor the instance of Automation Services, you can review the detailed informationprovided in the Performance Counters area to assess the performance measures of the service instance.All memory values are shown in MB.
To access the table, see Accessing performance data.
● To reset the number of cached queries to external data sources, click Clear cache for all dataconnections.
● To run a full garbage collection twice (to clear memory no in use), click Run a full GC(2).Remember that a full garbage collection may take time and the service will be unresponsive duringthe running.
For information about using performance counters, see Performance troubleshooting.
Performance Counter Description
# .NET Induced GC The number of times that an induced GC has been performed. Thisis .NET Common Language Runtime (CLR) Memory.
% Time In GC The percentage of processor time spent in GC. This is .NET CLR Memory.
Accumulatedprocessor time
The accumulated number of CPU seconds since the service start. If thisnumber is consistently high, you might have performance problemsrelated to CPU consumption. See Performance troubleshooting for moreinformation.
Active threading jobs The number of active jobs in graphical tables.
Active threads inthread pool
The number of active threads in thread pool (in .NET).
Available memory The total MBytes available, based on standard performance counter in thecategory Memory. If this value is low compared to Total workingmemory, then you might have performance problems related to RAM. See Performance troubleshooting for more information.
Available memory % The memory that is still available, as a percentage of the total.
Available temp diskspace
The amount of available disk space allocated as temporary.
Average processor % The average recent CPU percentage for this service instance, calculatedover 120 seconds by default. Set the time period in cpuAverageTimeSpan,under performanceCounterLogging. See Spotfire.Dxp.Worker.Web.config for more information. (For informationabout tracking the average percentage of CPU usage for a service, see Monitoring CPU usage by services.)
Avg. disk queuelength
The length of the queue for disk input-output. This number should be low.
310
TIBCO Spotfire® Server and Environment Installation and Administration
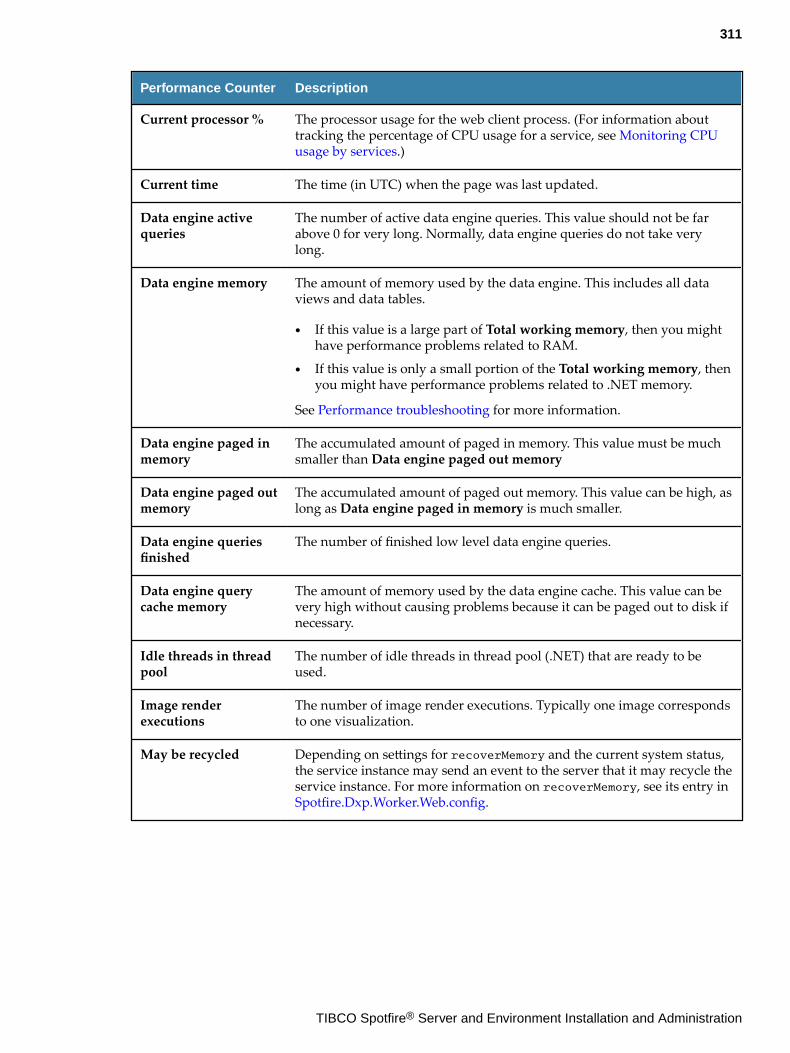
Performance Counter Description
Current processor % The processor usage for the web client process. (For information abouttracking the percentage of CPU usage for a service, see Monitoring CPUusage by services.)
Current time The time (in UTC) when the page was last updated.
Data engine activequeries
The number of active data engine queries. This value should not be farabove 0 for very long. Normally, data engine queries do not take verylong.
Data engine memory The amount of memory used by the data engine. This includes all dataviews and data tables.
● If this value is a large part of Total working memory, then you mighthave performance problems related to RAM.
● If this value is only a small portion of the Total working memory, thenyou might have performance problems related to .NET memory.
See Performance troubleshooting for more information.
Data engine paged inmemory
The accumulated amount of paged in memory. This value must be muchsmaller than Data engine paged out memory
Data engine paged outmemory
The accumulated amount of paged out memory. This value can be high, aslong as Data engine paged in memory is much smaller.
Data engine queriesfinished
The number of finished low level data engine queries.
Data engine querycache memory
The amount of memory used by the data engine cache. This value can bevery high without causing problems because it can be paged out to disk ifnecessary.
Idle threads in threadpool
The number of idle threads in thread pool (.NET) that are ready to beused.
Image renderexecutions
The number of image render executions. Typically one image correspondsto one visualization.
May be recycled Depending on settings for recoverMemory and the current system status,the service instance may send an event to the server that it may recycle theservice instance. For more information on recoverMemory, see its entry in Spotfire.Dxp.Worker.Web.config.
311
TIBCO Spotfire® Server and Environment Installation and Administration
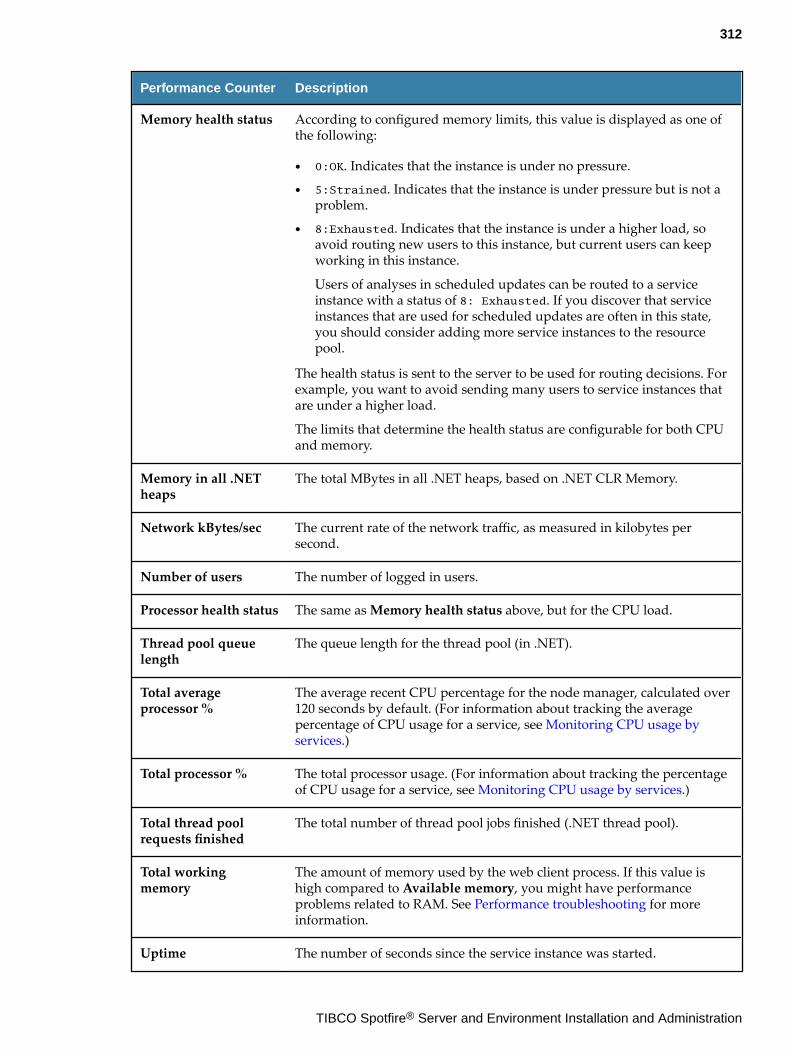
Performance Counter Description
Memory health status According to configured memory limits, this value is displayed as one ofthe following:
● 0:OK. Indicates that the instance is under no pressure.
● 5:Strained. Indicates that the instance is under pressure but is not aproblem.
● 8:Exhausted. Indicates that the instance is under a higher load, soavoid routing new users to this instance, but current users can keepworking in this instance.
Users of analyses in scheduled updates can be routed to a serviceinstance with a status of 8: Exhausted. If you discover that serviceinstances that are used for scheduled updates are often in this state,you should consider adding more service instances to the resourcepool.
The health status is sent to the server to be used for routing decisions. Forexample, you want to avoid sending many users to service instances thatare under a higher load.
The limits that determine the health status are configurable for both CPUand memory.
Memory in all .NETheaps
The total MBytes in all .NET heaps, based on .NET CLR Memory.
Network kBytes/sec The current rate of the network traffic, as measured in kilobytes persecond.
Number of users The number of logged in users.
Processor health status The same as Memory health status above, but for the CPU load.
Thread pool queuelength
The queue length for the thread pool (in .NET).
Total averageprocessor %
The average recent CPU percentage for the node manager, calculated over120 seconds by default. (For information about tracking the averagepercentage of CPU usage for a service, see Monitoring CPU usage byservices.)
Total processor % The total processor usage. (For information about tracking the percentageof CPU usage for a service, see Monitoring CPU usage by services.)
Total thread poolrequests finished
The total number of thread pool jobs finished (.NET thread pool).
Total workingmemory
The amount of memory used by the web client process. If this value ishigh compared to Available memory, you might have performanceproblems related to RAM. See Performance troubleshooting for moreinformation.
Uptime The number of seconds since the service instance was started.
312
TIBCO Spotfire® Server and Environment Installation and Administration
Performance troubleshooting
Your users might report that the system is much slower than they expect. System slowdowns can resultfrom one or multiple problems, including system resources and memory. The tools found inMonitoring & Diagnostics can help you track down these types of problems.
By analyzing the problems described in this topic, you can collect information about which analyses areconsuming system resources and memory.
Not all performance problems can be traced to the performance issues reported in Monitoring &Diagnostics. If you do not discover the source of the performance problem through the performancecounters, you might need to investigate problems with connectivity, network speed, or other externalproblems.
To find the performance counters and analysis statistical information, follow the instructions in Accessing performance data.
● If a Web Player instance indicates high consumption of resources, you can review the Analysisinformation to determine if you have problem analyses causing these issues.
● If an Automation Services instance indicates a high consumption of resources, then review therunning analysis for usage information.
You can get additional statistics for a single analysis in the desktop client. You can discover which of itspages or visualizations use most of the resources. See Examining the statistics of an individual analysisfor more information.
1. In the list of Performance counters, find the entry for Accumulated processor % (or Web Playeraverage processor % for a Web Player instance). Monitor it for a few minutes.
● If the entry for Accumulated processor % (or Web Player accumulated processor %) isconsistently high, then you have problems with CPU consumption. For a Web Player instance,in the Information area, click the Overview tab and review the Average load time andExecution Time columns. The analyses with the highest values are consuming the most CPU.
● If the entry for Web Player accumulated processor is not consistently high and varies, and yourperformance problems continue, then check for problems with RAM and .NET memory.
2. To check for problems with RAM or .NET memory, in the list of performance counters, review thefollowing values for the following conditions.
● The value for Total working memory (or Web Player total working memory for a Web Playerinstance) is high, and the value for Available memory is low.
● The value for Data Engine memory is a large portion of the value for Total working memory(or Webplayer total working memory).
If these conditions exist, then memory consumption is the issue. For a Web Player instance, in theInformation area, click the Overview tab and examine the list of data table instances. The valueslisted for the columns Total data table size and Total data view size indicate which analyses areholding the most data table and view memory.
● If an analysis has a large value for Total data table size, then the amount of raw data can causeproblems. Check the analysis to see if it includes any tables or columns that are not used. If alltables and columns are used, then you need to install more RAM in the Spotfire Server computer.
● If an analysis has a high value for Total data view size, or if it appears that the number ofdocument nodes is high, the analysis might be too complicated.
313
TIBCO Spotfire® Server and Environment Installation and Administration
Unused tables, columns, pages, and visualizations generate more document nodes anduse data engine memory. However, unused data engine memory can be paged out todisk when available memory becomes low.
3. To check for additional problems with .NET memory, in the list of performance counters, review theentry for Memory in all .NET heaps. Click Run a full GC(2) twice. This action gives the system achance to reclaim memory that is released.
For a Web Player instance, in the Information area, click the Overview tab and review theDocument Node Count column. Document nodes are more complicated because they can bedifferent sizes. Analyses that use many more document nodes than the others can cause problemswith .NET memory.
Try to perform this action when the server is not very busy, because the system can beunresponsive while running the GC action.
Examining the statistics of an individual analysis
If you have problems with performance of a server, and you suspect one or more analyses of causingthe problems on the server, you can examine the suspicious analyses individually using SpotfireAnalyst.
See Performance troubleshooting for advice for identifying any analyses run from the Web Player orthrough Automation Services that might be causing problems with resource consumption.
Prerequisites
You must have log in credentials for the Spotfire Server for which you want to load the analysis andexamine its performance data.
Procedure
1. Log in to Spotfire Analyst and load the analysis to examine.
2. On the menu, click Help > Support Diagnostics and Logging.
3. Click the Diagnostics Information tab.Detailed usage information for the analysis is displayed on this tab.
What to do next
Temporarily removing pages, plots, or tables, and then re-examining the resource usage data canprovide more insight for troubleshooting, including whether to increase system resources orrecommend changes to the analysis.
Logging and exporting monitoring diagnostics
Monitoring diagnostics can be logged, and the logged results can be exported as a Spotfire analysis filethat displays the information in the log files.
Procedure
1. Log in to Spotfire Server, and then click Monitoring & Diagnostics.
2. On the Instances page, under Network diagnostics, click the instance for which you want to logand export monitoring diagnostics.
3. Under Diagnostics, in the left drop-down list, select the default diagnostics option.
● For Web Player instances, this option is Analyses and Diagnostics.
314
TIBCO Spotfire® Server and Environment Installation and Administration
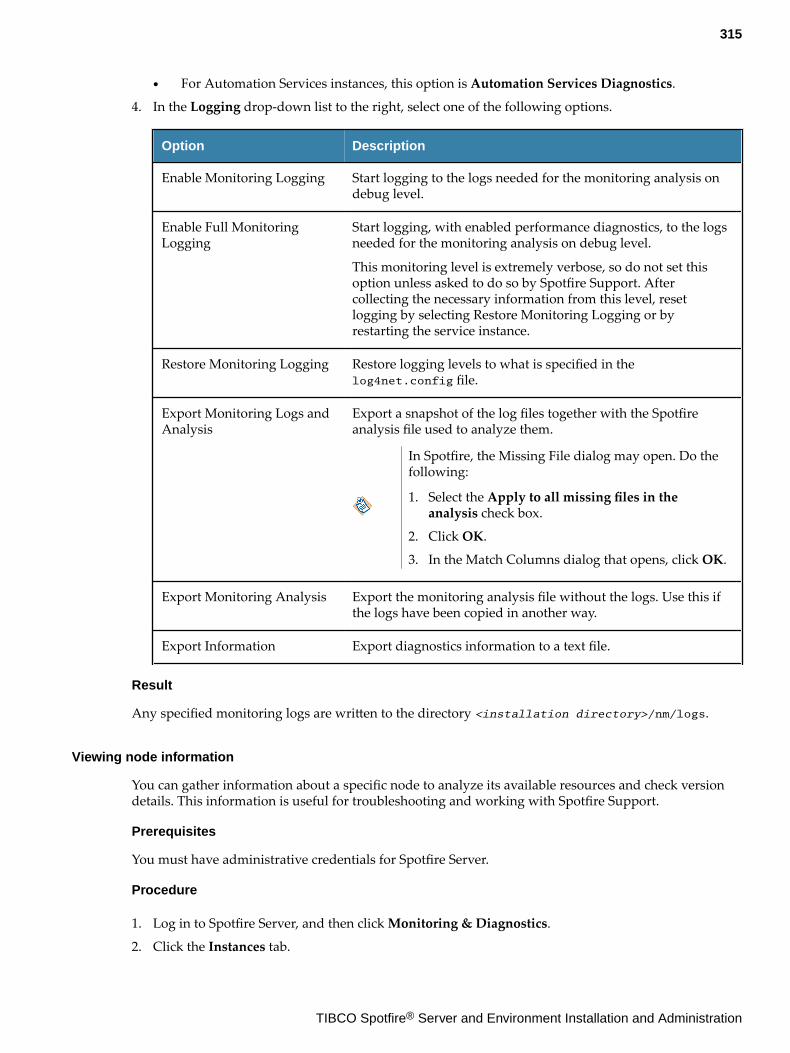
● For Automation Services instances, this option is Automation Services Diagnostics.
4. In the Logging drop-down list to the right, select one of the following options.
Option Description
Enable Monitoring Logging Start logging to the logs needed for the monitoring analysis ondebug level.
Enable Full MonitoringLogging
Start logging, with enabled performance diagnostics, to the logsneeded for the monitoring analysis on debug level.
This monitoring level is extremely verbose, so do not set thisoption unless asked to do so by Spotfire Support. Aftercollecting the necessary information from this level, resetlogging by selecting Restore Monitoring Logging or byrestarting the service instance.
Restore Monitoring Logging Restore logging levels to what is specified in thelog4net.config file.
Export Monitoring Logs andAnalysis
Export a snapshot of the log files together with the Spotfireanalysis file used to analyze them.
In Spotfire, the Missing File dialog may open. Do thefollowing:
1. Select the Apply to all missing files in theanalysis check box.
2. Click OK.
3. In the Match Columns dialog that opens, click OK.
Export Monitoring Analysis Export the monitoring analysis file without the logs. Use this ifthe logs have been copied in another way.
Export Information Export diagnostics information to a text file.
Result
Any specified monitoring logs are written to the directory <installation directory>/nm/logs.
Viewing node information
You can gather information about a specific node to analyze its available resources and check versiondetails. This information is useful for troubleshooting and working with Spotfire Support.
Prerequisites
You must have administrative credentials for Spotfire Server.
Procedure
1. Log in to Spotfire Server, and then click Monitoring & Diagnostics.
2. Click the Instances tab.
315
TIBCO Spotfire® Server and Environment Installation and Administration
3. Under Network Diagnostics, select the Automation Services instance or Web Player instance toreview.
4. Under Diagnostics, in the left drop-down list box, select Node.
Result
The information about the selected node is displayed.
Viewing service configuration information
You can gather information about the service configuration for a node. This information is useful fortroubleshooting configuration problems.
Prerequisites
You must have administrative credentials for Spotfire Server.
Procedure
1. Log in to Spotfire Server, and then click Monitoring & Diagnostics.
2. Click the Instances tab.
3. Under Network Diagnostics, select the Automation Services instance or Web Player instance toreview.
4. Under Diagnostics, in the left drop-down list box, select Service Configuration.
Result
The configurations and settings that are specified in the Spotfire.Dxp.Worker.Web.config file of theservice are listed.
Monitoring CPU usage by instances
If you have performance problems, and you expect the CPU usage is an issue, you can monitor theusage for instances. The Spotfire Server Monitoring & Diagnostics tools provide this information.
Prerequisites
You must have administrative credentials for Spotfire Server.
Procedure
1. Log in to Spotfire Server, and then click Monitoring & Diagnostics.
2. From Monitoring & Diagnostics, click the Overview tab.The information page for Spotfire Server, Nodes, and service instances is displayed.
3. In the service instances area, look for the column CPU usage (Avg).The value outside of the parenthesis indicates the percentage of the CPU that the service instanceidentified in that row is using. The value inside the parenthesis specifies the average CPU usage forthat service instance.
What to do next
For general diagnostic information about an instance's node, see Accessing performance data and Viewing service configuration information.
316
TIBCO Spotfire® Server and Environment Installation and Administration
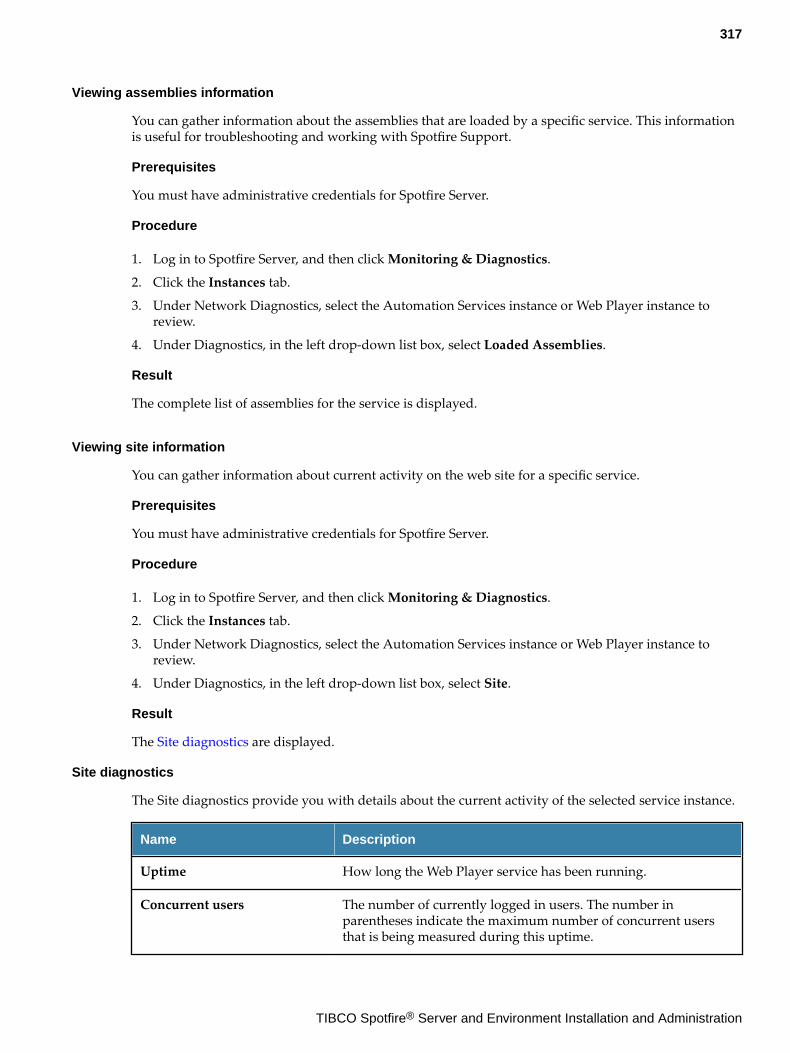
Viewing assemblies information
You can gather information about the assemblies that are loaded by a specific service. This informationis useful for troubleshooting and working with Spotfire Support.
Prerequisites
You must have administrative credentials for Spotfire Server.
Procedure
1. Log in to Spotfire Server, and then click Monitoring & Diagnostics.
2. Click the Instances tab.
3. Under Network Diagnostics, select the Automation Services instance or Web Player instance toreview.
4. Under Diagnostics, in the left drop-down list box, select Loaded Assemblies.
Result
The complete list of assemblies for the service is displayed.
Viewing site information
You can gather information about current activity on the web site for a specific service.
Prerequisites
You must have administrative credentials for Spotfire Server.
Procedure
1. Log in to Spotfire Server, and then click Monitoring & Diagnostics.
2. Click the Instances tab.
3. Under Network Diagnostics, select the Automation Services instance or Web Player instance toreview.
4. Under Diagnostics, in the left drop-down list box, select Site.
Result
The Site diagnostics are displayed.
Site diagnostics
The Site diagnostics provide you with details about the current activity of the selected service instance.
Name Description
Uptime How long the Web Player service has been running.
Concurrent users The number of currently logged in users. The number inparentheses indicate the maximum number of concurrent usersthat is being measured during this uptime.
317
TIBCO Spotfire® Server and Environment Installation and Administration
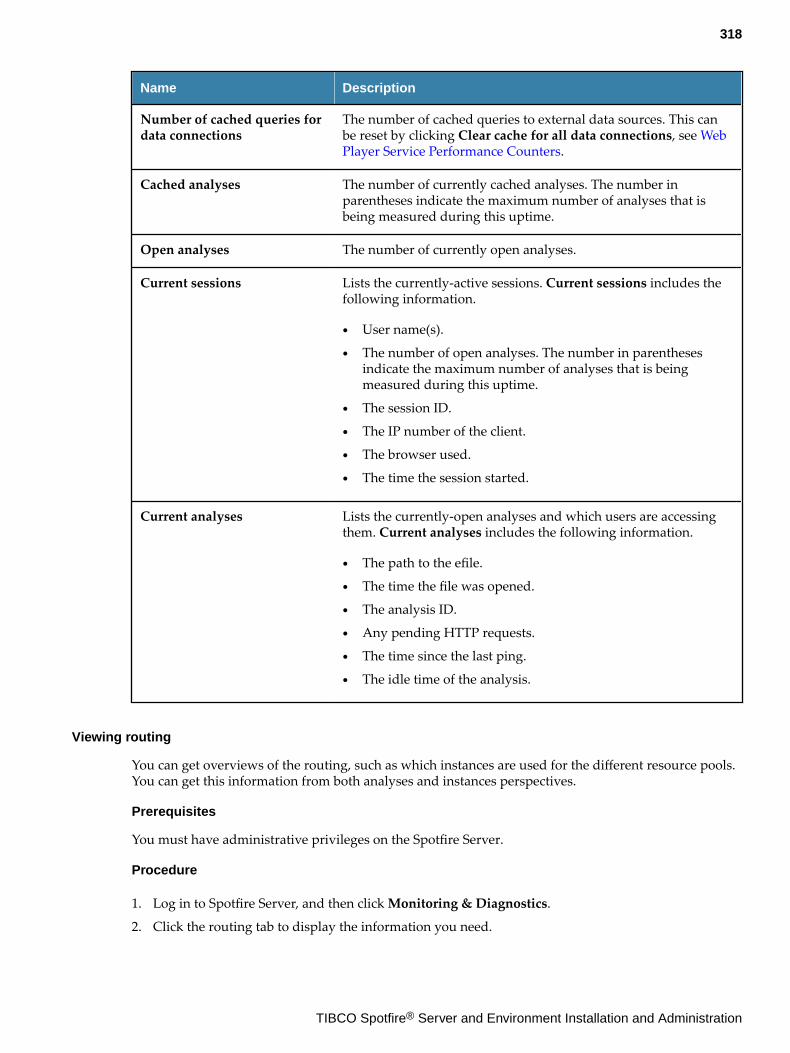
Name Description
Number of cached queries fordata connections
The number of cached queries to external data sources. This canbe reset by clicking Clear cache for all data connections, see WebPlayer Service Performance Counters.
Cached analyses The number of currently cached analyses. The number inparentheses indicate the maximum number of analyses that isbeing measured during this uptime.
Open analyses The number of currently open analyses.
Current sessions Lists the currently-active sessions. Current sessions includes thefollowing information.
● User name(s).
● The number of open analyses. The number in parenthesesindicate the maximum number of analyses that is beingmeasured during this uptime.
● The session ID.
● The IP number of the client.
● The browser used.
● The time the session started.
Current analyses Lists the currently-open analyses and which users are accessingthem. Current analyses includes the following information.
● The path to the efile.
● The time the file was opened.
● The analysis ID.
● Any pending HTTP requests.
● The time since the last ping.
● The idle time of the analysis.
Viewing routing
You can get overviews of the routing, such as which instances are used for the different resource pools.You can get this information from both analyses and instances perspectives.
Prerequisites
You must have administrative privileges on the Spotfire Server.
Procedure
1. Log in to Spotfire Server, and then click Monitoring & Diagnostics.
2. Click the routing tab to display the information you need.
318
TIBCO Spotfire® Server and Environment Installation and Administration
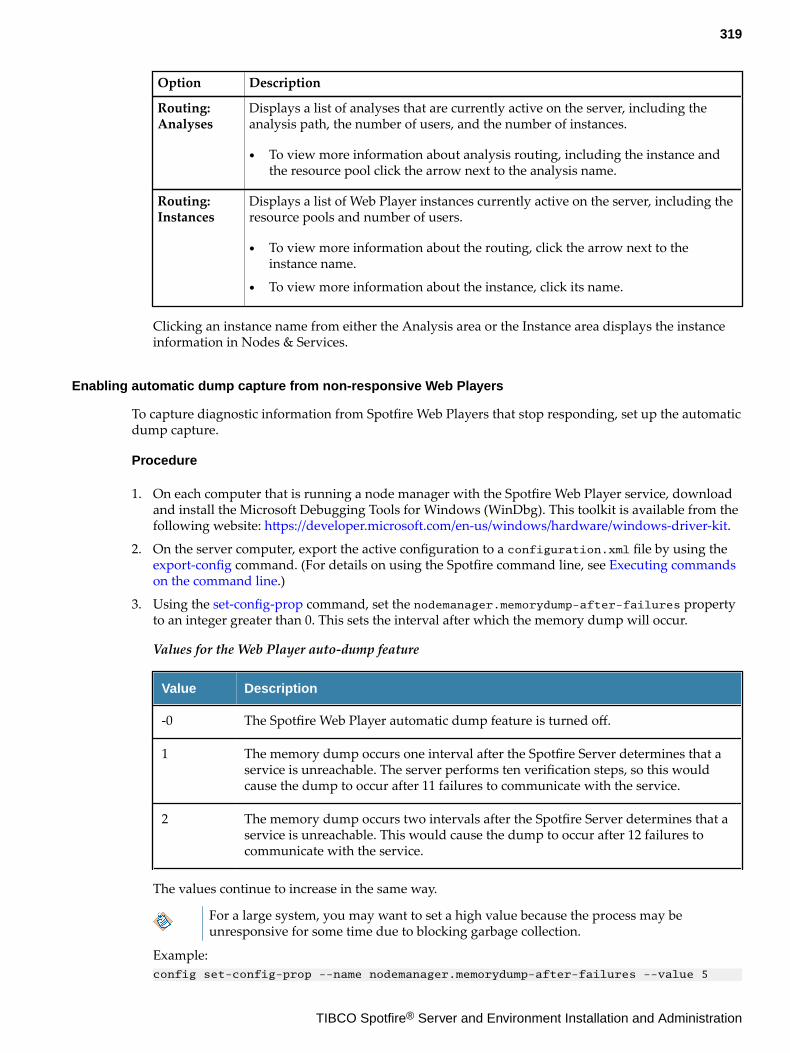
Option Description
Routing:Analyses
Displays a list of analyses that are currently active on the server, including theanalysis path, the number of users, and the number of instances.
● To view more information about analysis routing, including the instance andthe resource pool click the arrow next to the analysis name.
Routing:Instances
Displays a list of Web Player instances currently active on the server, including theresource pools and number of users.
● To view more information about the routing, click the arrow next to theinstance name.
● To view more information about the instance, click its name.
Clicking an instance name from either the Analysis area or the Instance area displays the instanceinformation in Nodes & Services.
Enabling automatic dump capture from non-responsive Web Players
To capture diagnostic information from Spotfire Web Players that stop responding, set up the automaticdump capture.
Procedure
1. On each computer that is running a node manager with the Spotfire Web Player service, downloadand install the Microsoft Debugging Tools for Windows (WinDbg). This toolkit is available from thefollowing website: https://developer.microsoft.com/en-us/windows/hardware/windows-driver-kit.
2. On the server computer, export the active configuration to a configuration.xml file by using the export-config command. (For details on using the Spotfire command line, see Executing commandson the command line.)
3. Using the set-config-prop command, set the nodemanager.memorydump-after-failures propertyto an integer greater than 0. This sets the interval after which the memory dump will occur.
Values for the Web Player auto-dump feature
Value Description
-0 The Spotfire Web Player automatic dump feature is turned off.
1 The memory dump occurs one interval after the Spotfire Server determines that aservice is unreachable. The server performs ten verification steps, so this wouldcause the dump to occur after 11 failures to communicate with the service.
2 The memory dump occurs two intervals after the Spotfire Server determines that aservice is unreachable. This would cause the dump to occur after 12 failures tocommunicate with the service.
The values continue to increase in the same way.
For a large system, you may want to set a high value because the process may beunresponsive for some time due to blocking garbage collection.
Example:config set-config-prop --name nodemanager.memorydump-after-failures --value 5
319
TIBCO Spotfire® Server and Environment Installation and Administration
4. Import the configuration back into the database by using the import-config command.
5. Do the following on the server computer that you accessed in step 2 above:
1. Export and open the Spotfire.Dxp.Worker.Web.config file for editing; for instructions, see Manually editing the service configuration files.
2. In Spotfire.Dxp.Worker.Web.config, locate the following section:<errorReporting emailAddress="" maxMailLength="1000" includeDetailedErrorInformation="false" enabledMiniDumpCreationOnError="true" miniDumpPath="" miniDumpSizeLarge="false" dumpToolPath ="C:\Program Files (x86)\Windows Kits\10\Debuggers\x64\cdb.exe" dumpToolFlagsSmall="-c ".dump /mhtpFidcu {0};q" -p {1}" dumpToolFlagsLarge="-c ".dump /ma {0};q" -p {1}"/>
3. Set the dumpToolPath to match the location of the cdb.exe file that you installed in step 1.
4. (Optional) To configure flags, see the descriptions of the following settings in Spotfire.Dxp.Worker.Web.config: dumpToolFlagsSmall, dumpToolFlagsLarge, andminiDumpSizeLarge.
5. Save the file and then import it back to the server by using the import-service-config command.
6. Assign the updated configuration to the services by using the set-service-config command.
6. Restart the server.
Result
If a Spotfire Web Player becomes non-responsive, a dump file with the namehanging_process_dump_ServiceInstanceID_pidXX.dmp will be created in the C:\tibco\tsnm\versionnumber\nm\logs directory of the node manager computer.
Basic troubleshootingSpotfire Server provides tools to troubleshoot if you encounter problems in your installation andconfiguration.
Troubleshooting Spotfire Server
Before diving deeply into logs or contacting suppport, you can perform some basic steps to checkwhere problems might exist.From the server where Spotfire Server is installed, perform these basic steps.
Prerequisites
You must have administrative access to Spotfire Server.
Procedure
1. Make sure that Spotfire Server has network connectivity.
2. Make sure that the Spotfire Server service is up and running.If a custom user account is used to run the Spotfire Server service, ensure that the accountcredentials are valid and not locked.
3. Verify that no port conflicts with the Spotfire Server ports.
4. Verify that the Spotfire Server administration interface can be accessed outside of the Spotfire Servercomputer.
320
TIBCO Spotfire® Server and Environment Installation and Administration
If it works correctly on the server machine but is not accessible outside the server, make sure thatthere is no firewall or proxy blocking server access.
What to do next
If none of these steps solve the problem with Spotfire Server, review all of the logs and consider creating a troubleshooting bundle for Spotfire Support to analyze.
Spotfire Server fails to start
If the Spotfire Server fails to start, check the log for the error described in this topic.
Error initializing the Spotfire web application. Please contact the
server administrator.
The following errors are captured in the server logs.SEVERE: Catalina.startLifecycleException: service.getName(): "Spotfire"; Protocol handler start failed: java.net.BindException: Address already in use: JVM_Bind <null>:
Cause
This is an indication of a port conflict.
Resolution
You can check if any of the Spotfire Server ports are blocked by other processes on the Spotfire Servermachine. Either stop those services so that Spotfire Server can grab these ports or assign a different portby modifying the server.xml file located under \tomcat\conf folder.
Spotfire Server runs out of JVM memory
If the Spotfire Server runs out of JVM memory, Spotfire Server can fail or hang. This failure can makenew connections impossible, and opening any files can fail.
The following errors are captured in the server logs.Caused by: java.lang.OutOfMemoryError: GC overhead limit exceeded...... SEVERE: Exception invoking periodic operation:java.lang.OutOfMemoryError: Java heap space
Cause
This exception indicates that you are out of memory. It is thrown by the garbage collector in theunderlying Java and is not specific to Spotfire.
Resolution
You must add more memory. See Virtual memory modification for more information.
321
TIBCO Spotfire® Server and Environment Installation and Administration
Users cannot log in
Two conditions can cause users to not be able to log into Spotfire Server. The causes and resolutions forthese problems are described in this topic.
In both conditions, users are not able to log in to Spotfire Analyst or SpotfireBusiness Author. Administrators can fail to log into the Spotfire Serveradministration interface. Both of these conditions result in LDAP errors beinggenerated. You can find the error codes in the server logs.
LDAP error codes Cause Resolutions
javax.naming.AuthenticationEx
ception: [LDAP: error code 49
- 80090308: LdapErr:
DSID-0C090334, comment:
AcceptSecurityContext error,
data 52e, vece ]
This LDAP error code indicatesthat the log in credentials used forLDAP binding are invalid. Thiscan happen if the password of theLDAP Service Account is expired.
Modify the LDAPconfiguration with theupdated credentials.
javax.naming.AuthenticationEx
ception: [LDAP: error code 49
- 80090308: LdapErr:
DSID-0C0903A9, comment:
AcceptSecurityContext error,
data 533, v1db1 ]
This LDAP error code indicatesthat the Service Account that isused for LDAP binding can belocked out or disabled.
Enable the ServiceAccount and then tryagain.
Troubleshooting the Spotfire database
Before diving deeply into logs or contacting suppport, you can perform some basic steps to checkwhere problems might exist.From the server where Spotfire Server is installed, perform these basic steps.
Prerequisites
You must have administrative access to Spotfire Server and the Spotfire database.
Procedure
1. Make sure that the Spotfire database is up and running.
2. Validate the database credentials specified in the bootstrap.xml file.
3. Ensure that the database user has access to all the required Spotfire database tables and procedures.That is, if the user logs in to the Spotfire Server database with those credentials, the user should beable to browse and access all the contents of the Spotfire database.
4. Make sure there is communication between the Spotfire Server computer and the Spotfire databaseserver.For example, ping the database server from Spotfire Server.
What to do next
If none of these steps solve the problem with the Spotfire database server, see Contacting support.
322
TIBCO Spotfire® Server and Environment Installation and Administration
Creating a thread dump
Creating thread dumps can be useful. For example, you can use a thread dump to examine problemswith servers that appear to be unresponsive, or to investigate why the server is taking an unusualamount of time to respond.To help troubleshoot such cases, Spotfire Support can examine a dump of thread activity to helpdetermine what is happening. When the Spotfire Server is running as a Windows service, it can becomplicated to create this thread dump. This topic describes a simple way to create a thread dump.
Prerequisites
You must have administrative credentials for Spotfire Server.
Procedure
1. Log in to Spotfire Server, and then click Monitoring & Diagnostics.
2. Select the Spotfire Server for which you want to download the dump.
3. Click the More button (...), and from the resulting drop-down list, click Download thread dump.The thread dump is written to a text file and downloaded to the computer.
4. In the server file system where the Spotfire Server is installed, browse to the directory where the textfile was written.The text file name follows the convention threadDump-<guid>.txt.
Result
You can open the text file and review the results, and you can share the thread dump with SpotfireSupport.
Memory exhaustion
An exhausted memory usually shows an out-of-memory exception in the log. If you are using McirosoftSQL Server, it can manifest itself as a deadlock.
First, try to increase the amount of memory available to the server. For more information, see Virtualmemory modification.
If increasing the memory for the server does not solve the problem, you can contact Spotfire Support.Spotfire Support might want to get a dump of the memory to investigate memory leaks. See Creating amemory dump for instructions.
If your organization handles sensitive information that should not be exposed in a memory dump, youmight need to disable this feature. For more information, see Disabling the memory dump feature.
Creating a memory dump
You can create a memory dump to examine problems with exhausted memory.
Perform this task from the Administration interface, and from the file system of the server whereSpotfire Server is installed.
When a memory dump is created, the Java Virtual Machine halts for a short period.
Prerequisites
● You must be a member of the Administrator group. It is not sufficient to be only a member of theDiagnostics Administrator group.
323
TIBCO Spotfire® Server and Environment Installation and Administration
● You must have write access to the server's file system where Spotfire Server is installed.
Procedure
1. Log in to Spotfire Server, and then click Monitoring & Diagnostics.
2. Select the server for which to create the memory dump.
3. On the right end of the row, click the More button (...), and then select Create memory dump.
Because memory dumps contain the entire state of the running server, they can contain sensitiveinformation. Therefore, you must prove that you have access to the server.
You are prompted to create a "proof file" in a specific location and with a specific name, and then toreturn to the Administration interface to resubmit your request.
4. In the server file system where the Spotfire Server is installed, create the specified proof file.The file does not need to contain content; it merely demonstrates that you are an Administratorwith write access to the file system on the server. The memory dump cannot proceed until the fileexists.
A new name is generated every time the server is restarted or when a memory dump ismade.
5. After you create the proof file as instructed, return to the Administration interface.The name of the proof file should appear on the page.
6. Click Refresh, and then repeat Step 3.
● A memory dump file is created. This process can take some time.● Any previous dump file is overwritten.● When it is completed, the path to the file in the server's file system is displayed.
7. Return to the server file system to retrieve the file.There is no download functionality on the page.
8. After you have analyzed and solved the memory problem, delete the dump file.The dump file can contain sensitive information.
On normal termination of the server, the generated heap dump file is deletedautomatically.
Disabling the memory dump feature
Because a memory dump can contain sensitive information, you might need to configure the SpotfireServer to never create this artifact.Perform this task in the file configuration.xml, exported from the Spotfire Server.
Prerequisites
● You must have credentials to export, edit, and import the configuration file for Spotfire Server.● You must export the file configuration.xml for editing. See Manually editing the Spotfire Serverconfiguration file for more information.
Procedure
1. In the file configuration.xml, create a new node as follows.<tools> <enable-memory-dump> <enabled>false</enabled>
324
TIBCO Spotfire® Server and Environment Installation and Administration
</enable-memory-dump> </tools>
2. Save and close the file.
3. Follow the steps for importing the file to the server and then restarting the service.See Manually editing the Spotfire Server configuration file.
Result
The new imported configuration becomes the active configuration for that server or cluster.
Creating a troubleshooting bundle
You can create a zip archive of different types of logging information. This information can helpSpotfire Support assist you with troubleshooting Spotfire Server.
Prerequisites
You must have administrative credentials for Spotfire Server.
Procedure
1. Log in to Spotfire Server, and then click Monitoring & Diagnostics.
2. Select the Spotfire Server for which you want to create the troubleshooting bundle.
3. Click Download troubleshooting bundle.A warning dialog is shown advising you that this process can take several minutes.
4. In the Download server troubleshooting bundle dialog, click OK to continue.The troubleshooting bundle is written to a zip archive and downloaded to the server file system.
5. In the server file system where the Spotfire Server is installed, browse to the directory where the ziparchive was written.The zip archive can contain some or all of the following information.
● The entire logs directory.
● A thread dump.
● The results of diagnostics.
● The full configuration history (but not the actual configurations).
● A list of all server startup and shutdown events.
● A list of all nodes in the collective.
● A list of all certificates issued by the internal CA.
What to do next
Contact Spotfire Support for instructions on sharing the troubleshooting bundle.
Command-based library administration tasksMost library administration tasks are performed in Spotfire Analyst. These include structuring thelibrary and its contents, and setting permissions for library folders. The tasks listed here either can beperformed only in Spotfire Server, or can be performed in the server (as well as in Spotfire Analyst) foradministrators who prefer using the command line.
For information about library administration in Spotfire Analyst, download the Spotfire User's Guide.
325
TIBCO Spotfire® Server and Environment Installation and Administration
Importing library content by using the command lineInstead of using the Library Administration tool in Spotfire Analyst, you can import content to thelibrary by using the command line.
Prerequisites
You must have administrative credentials for Spotfire Server.
For general information about library administration, download the Spotfire User's Guide
Procedure
1. Open a command line as an administrator and go to the server installation dir/tomcat/bindirectory.
2. On the command line, enter the import-library-content command, specifying the optionsneeded to import the .zip file.
Example:config import-library-content --tool-password=password --file-path=/TIB_sfire_server_version_win/demodata/mssql/demo.part0.zip --conflict-resolution-mode=KEEP_BOTH --user=jdoe --library-path=/
For more information, see import-library-content.
Result
The progress of the import is displayed on the command line.
Exporting library content by using the command lineInstead of using the Library Administration tool in Spotfire Analyst, you can export content from thelibrary by using the command line.
Prerequisites
You must have administrative credentials for Spotfire Server.
For general information about library administration, download the Spotfire User's Guide
Procedure
1. Open a command line as an administrator and go to the server installation dir/tomcat/bindirectory.
2. On the command line, enter the import-library-content command, specifying the optionsneeded to import the ZIP file.
Example:config export-library-content --tool-password=password --file-path=C:/YearEndAnalyses --user=jdoe --item-type=analysis_files --library-path=/Finals/Europe
For more information, see export-library-content.
Result
The progress of the export is displayed on the command line.
The exported folder and its contents are saved as a ZIP file. The exported items are not removed fromthe library.
326
TIBCO Spotfire® Server and Environment Installation and Administration
Library content storage outside of the Spotfire databaseTo minimize the size of your Spotfire database, you can store your organization's Spotfire librarycontent (analyses and analysis data) in the cloud using Amazon Web Services S3 (AWS), or in a filesystem elsewhere.
In a typical Spotfire installation, the largest part of database storage consists of the library content.When you move the library content to external storage, only the metadata about the library filesremains in the database. The other items in database storage (system configuration data, permissions,licenses, and so on) remain where they are.
In this scenario, all library content is stored externally; it isn't possible to split storage between theserver database and the external site.
Currently there are three main drawbacks to this option:
● Referential integrity is not guaranteed; there is the possibility that content referenced in the Spotfiredatabase will not exist in external storage, and vice versa.
● Your system may run more slowly, such as when loading files.
● A database backup will not back up the library content.
Configuring external library storage in AWS
You can configure external library storage in the cloud using Amazon Web Services S3 (AWS).
Prerequisites
● You must have administrative credentials for Spotfire Server.
● You must have an Amazon S3 account.
● You must have a bucket name. Every server database (or database cluster) should have its ownbucket. (Items stored in S3 are identified by their GUIDs. If different servers use the same bucket,importing files to Cluster B—when the files already exist in Cluster A—will overwrite the files inCluster A.)
Procedure
1. Back up the database.
2. On the command line, export the library using the export-library-content command. (For details onusing the Spotfire command line, see Executing commands on the command line.)
3. Remove the content from the library.
Do not use the truncate command in the database because there are hidden folders thatshould not be removed.
4. To enable external storage and select the type of external storage, use the command config-library-external-data-storage.
5. To configure AWS storage, use the command config-library-external-s3-storage.
You can set the following options when using this command:
● Which AWS regional datacenter the server should connect to.
● Whether large files should be uploaded in chunks, and the details of this behavior.
6. Import the library using the import-library-content command.
327
TIBCO Spotfire® Server and Environment Installation and Administration
The external library storage system uses the Spotfire library globally unique identifiers(GUIDs) to identify files.
For information on monitoring the external system, see Monitoring external library storage andfixing inconsistencies.
Configuring external library storage in a file system
You can configure external library storage in a file system by using the command line.
Prerequisites
You must have administrative credentials for Spotfire Server.
Procedure
1. Back up the database.
2. On the command line, export the library using the export-library-content command. (For details onusing the Spotfire command line, see Executing commands on the command line.)
3. Remove the content from the library.
Do not use the truncate command in the database because there are hidden folders thatshould not be removed.
4. To enable external storage and to select the type of external storage, use the command config-library-external-data-storage.
5. To specify the path to the storage root, use the command config-library-external-file-storage.Subdirectories for the content files are created under this root.
6. Import the library.
The external library storage system uses the Spotfire library globally unique identifiers(GUIDs) to identify files.
For information on monitoring the external system, see Monitoring external library storage andfixing inconsistencies.
Monitoring external library storage and fixing inconsistencies
Because there is no guarantee of referential integrity when using external library storage, theadministrator should regularly check for inconsistencies between the metadata in the Spotfire databaseand the files in external storage.
Procedure
1. On the command line, enter the command check-external-library to check for discrepancies. (Fordetails on using the Spotfire command line, see Executing commands on the command line.)A discrepancy report is generated, including where discrepancies occur and any availableinformation to help identify the "orphan" files. This is an excerpt from a report:
2. If a file is found in external storage that is not referenced in the Spotfire database, you can downloadthe file. If it is an analysis file, you can then manually save it to the Spotfire library. If metadata isfound for a file that does not exist, you can delete the metadata.
328
TIBCO Spotfire® Server and Environment Installation and Administration
If you want to Do this
Retrieve an orphan file from Amazon WebServices S3 (AWS)
Download it using the command s3-download.
Retrieve an orphan file from an external filesystem
Manually copy it from the file system.
Delete files from AWS Use the command delete-library-content.
Delete files from an external file system Manually delete the files.
Delete metadata from Spotfire Server Use the command delete-library-content.
Forcing Java to use Internet Protocol version 4
If your library files are stored on Amazon Web Services S3 (AWS) and you discover instances of thefollowing event in the server logs, you should force Java to use Internet Protocol version 4 (IPv4):java.net.UnknownHostException: <your bucket name>.s3.amazonaws.com at
java.net.Inet6AddressImpl.lookupAllHostAddr(Native Method)
This parameter is set manually in a Spotfire Server configuration file.
Procedure
1. Open the appropriate file in a text editor:
● If you are running Spotfire Server as a Windows service, open the <installation dir>/tomcat/bin/service.bat file.
● If you are not running Spotfire Server as a Windows service, open the <installation dir>/tomcat/bin/setenv.bat file.
2. Locate the variable named JAVA_OPTS.
3. Enter the following parameter in the JAVA_OPTS section: -Djava.net.preferIPv4Stack=trueThe file will look similar to this (the new parameter is highlighted in yellow):
4. Save and close the file.
5. Restart Spotfire Server.
329
TIBCO Spotfire® Server and Environment Installation and Administration
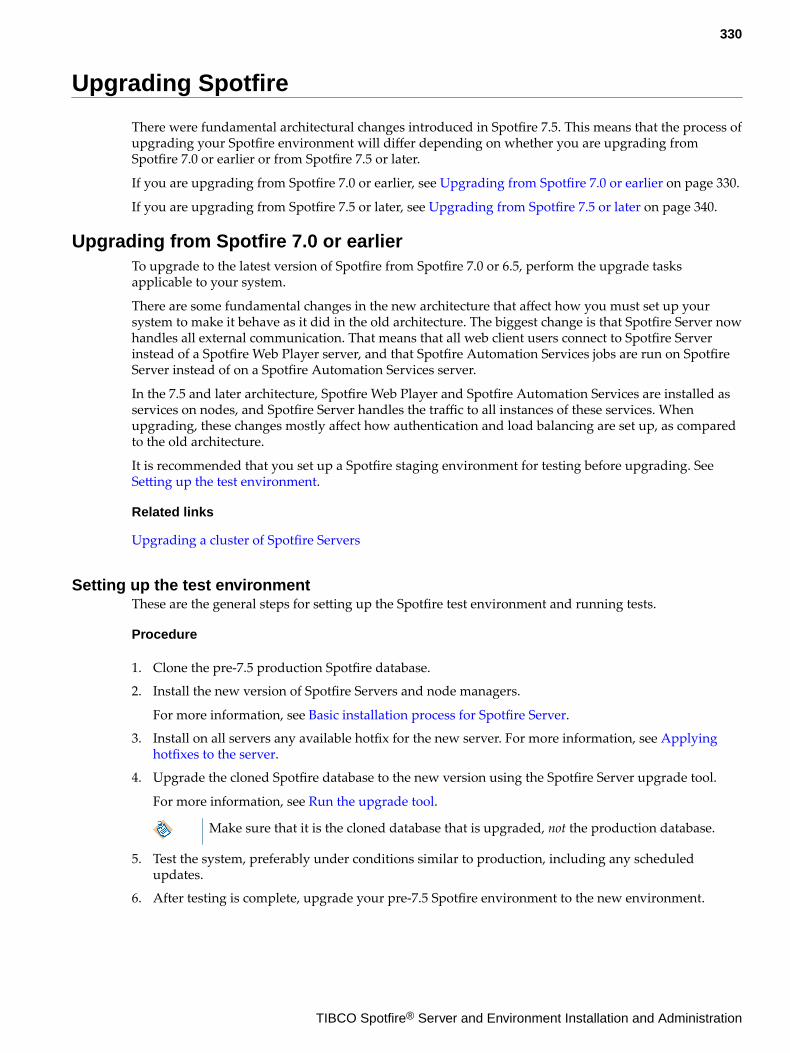
Upgrading Spotfire
There were fundamental architectural changes introduced in Spotfire 7.5. This means that the process ofupgrading your Spotfire environment will differ depending on whether you are upgrading fromSpotfire 7.0 or earlier or from Spotfire 7.5 or later.
If you are upgrading from Spotfire 7.0 or earlier, see Upgrading from Spotfire 7.0 or earlier on page 330.
If you are upgrading from Spotfire 7.5 or later, see Upgrading from Spotfire 7.5 or later on page 340.
Upgrading from Spotfire 7.0 or earlierTo upgrade to the latest version of Spotfire from Spotfire 7.0 or 6.5, perform the upgrade tasksapplicable to your system.
There are some fundamental changes in the new architecture that affect how you must set up yoursystem to make it behave as it did in the old architecture. The biggest change is that Spotfire Server nowhandles all external communication. That means that all web client users connect to Spotfire Serverinstead of a Spotfire Web Player server, and that Spotfire Automation Services jobs are run on SpotfireServer instead of on a Spotfire Automation Services server.
In the 7.5 and later architecture, Spotfire Web Player and Spotfire Automation Services are installed asservices on nodes, and Spotfire Server handles the traffic to all instances of these services. Whenupgrading, these changes mostly affect how authentication and load balancing are set up, as comparedto the old architecture.
It is recommended that you set up a Spotfire staging environment for testing before upgrading. See Setting up the test environment.
Related links
Upgrading a cluster of Spotfire Servers
Setting up the test environmentThese are the general steps for setting up the Spotfire test environment and running tests.
Procedure
1. Clone the pre-7.5 production Spotfire database.
2. Install the new version of Spotfire Servers and node managers.
For more information, see Basic installation process for Spotfire Server.
3. Install on all servers any available hotfix for the new server. For more information, see Applyinghotfixes to the server.
4. Upgrade the cloned Spotfire database to the new version using the Spotfire Server upgrade tool.
For more information, see Run the upgrade tool.
Make sure that it is the cloned database that is upgraded, not the production database.
5. Test the system, preferably under conditions similar to production, including any scheduledupdates.
6. After testing is complete, upgrade your pre-7.5 Spotfire environment to the new environment.
330
TIBCO Spotfire® Server and Environment Installation and Administration
Upgrading Spotfire ServerTo upgrade Spotfire Server, you install the new version of Spotfire Server and any available hotfixes,and then use the Spotfire Server upgrade tool to upgrade relevant settings, including configurationsand node manager trust.
The upgrade tool upgrades the Spotfire database to the current version and, if selected, copies certainfiles from an old installation of Spotfire Server to the new Spotfire Server installation directory.
If you are upgrading from a pre-7.5 Spotfire Server, you must have Spotfire Server 6.5.3 HF-008 (orlater) or Spotfire Server 7.0.0 HF-002 (or later) installed. If you have an earlier version of Spotfire Serverinstalled, you must first upgrade that server to one of these versions.
After the Spotfire database is upgraded, older versions of Spotfire Server will not be able to connect toit. Therefore, stop any older Spotfire Servers connected to the Spotfire database before beginning anupgrade. If you intend to copy information from the old version, do not uninstall it until the newSpotfire Server is in place.
In addition to stopping the older versions of the server, you should prevent the older servers fromstarting automatically when Windows starts. For instructions for servers running as Windows services,see Preventing Spotfire Servers and node managers from starting automatically.
The upgrade will perform a validation of LDAP configurations. If an invalid LDAP configuration isfound, the upgrade will fail. If so, go back to your previous installation, correct the error, and performthe upgrade again.
After the upgrade, make sure that the Administrator group has all licenses, including new ones,assigned to it. Use the Administration Manager in Spotfire Analyst to assign licenses. For a descriptionof the licenses, see the Administration Manager help.
Installation of Spotfire Server during upgrade
When you install Spotfire Server, the upgrade tool is installed as well.
Before installing the new version of Spotfire Server, note the following:
● Configure the new server to use the same ports as the previous installation. This will not cause aport conflict if you have followed steps 1 and 2 in Upgrading from Spotfire 7.5 or later.
● Make sure to install the latest hotfix on all servers before running the upgrade tool.
● Do not start or configure the newly installed server before running the upgrade tool.
● If you intend to copy information from the old version, do not uninstall it until the new version ofSpotfire Server is in place.
For general instructions on how to install Spotfire Server, see Installation.
Applying hotfixes to the server
Before you run the upgrade tool, you must install on all servers any available hotfix for the new versionof the server.
Prerequisites
● You have installed Spotfire Server.
● You have downloaded the latest hotfix for your new version of Spotfire Server; for instructions, see Downloading required software.
331
TIBCO Spotfire® Server and Environment Installation and Administration
Procedure
● Follow the instructions in the Installation_Instructions.htm file that was included in the hotfixpackage that you downloaded.For more information, see Overview of hotfixes for TIBCO Spotfire in the TIBCO Community.
Run the Spotfire Server upgrade tool
The server upgrade tool updates the database. You can run the upgrade tool interactively, or silently byusing the command-line interface.
If you have not already done so, make a working backup of your Spotfire database.
For information on how to run the upgrade tool, see Running the upgrade tool interactively or Runningthe upgrade tool silently.
Running the Spotfire Server upgrade tool interactively
When you run the Spotfire Server upgrade tool interactively, you are prompted for information aboutboth your older installation and your new installation.
If you are upgrading a cluster of Spotfire Servers, run the upgrade tool on only one server. The Spotfiredatabase will be updated when you run the upgrade tool.
If Spotfire Server is set up to authenticate with the Spotfire database using Windows IntegratedAuthentication, it is important that you run the upgrade tool as the same user that Spotfire Serverauthenticates as. Otherwise, the upgrade tool will not be able to authenticate with the database.
The upgrade will perform a validation of LDAP configurations. If an invalid LDAP configuration isfound, the upgrade will fail. If so, go back to your previous installation, correct the error, and performthe upgrade again.
Prerequisites
● You have installed the new version of Spotfire Server and any available hotfixes.
● You have a working backup of your Spotfire database.
● If you are using LDAPS, and if the CA certificate is not included in the cacert file by default, youmust import the CA certificate used to issue the LDAP server's certificate before running the upgradetool. See Configuring LDAP.
Procedure
1. If the server upgrade tool is not already open, go to the following directory and double-clickupgradetool.bat (Windows) or upgradetool.sh (Unix): new version Spotfire Serverinstall dir/tools/upgrade
By default, the server installation directory is located here: C:/tibco/tss/version number.
2. The Spotfire Server Upgrade panel is displayed. It provides a reminder to back up or clone theSpotfire database. Click Next.The File Locations panel is displayed. It provides new information and the choice to copy, or not tocopy, an existing configuration.
3. If you have file access to an old installation, you can select Previous server installation and enterthe path to its installation directory, for example: C:/tibco/tss/version number or /opt/tss/version number. Click Next.
332
TIBCO Spotfire® Server and Environment Installation and Administration
If there are changes needed after the upgrade, for example, port configuration or the location of TLScertificate, manually edit the server.xml file, located in the Spotfire Server install dir/tomcat/conf directory.
4. If you did not copy an existing configuration, the Database Type and Driver panel is displayed.Here, specify the database and database driver you are using, and click Next.If you select a database driver type that is not installed in the old installation directory, the message“The selected driver must be installed manually” is displayed. Install the driver manually byplacing it in the new version Spotfire Server install dir/tomcat/lib directory and restartthe upgrade tool.If you select a database driver type that is not installed and click Next, the Database Drivers NotInstalled panel is displayed. If this occurs, click Done to exit the upgrade tool, then install thedatabase driver and start the upgrade tool again.The Database Connection Information panel is displayed.
5. Here, provide the Spotfire database Connection string, Username and Password. If your databaseserver uses integrated login, like Windows authentication, select the Integrated login check box, todisable the Username and Password fields. Click Next.
6. If you did not copy an existing configuration, the Additional Information panel is displayed. Here,specify the configuration tool password, the encryption password, and the server name to use whenconfiguring the Spotfire Server, and click Next.
7. If LDAP User Directory mode or Windows NT User Directory mode is used, the User DirectoryConfiguration panel is displayed. Here, select a domain name style (DNS or NetBIOS) and adefault domain.
Make sure to select an accurate domain name style for your system. For more information,see External directories and domains.
The Summary panel is displayed.
8. Click Upgrade.The Upgrade panel is displayed. Here you can see if the upgrade was successful. If there wereproblems with the upgrade, click Next to get information on where the issues have been logged.
9. When the upgrade has been successfully completed (the text "Upgrade done" appears in the panel),click Finish.
Running the Spotfire Server upgrade tool silently
As an alternative to running the upgrade tool interactively, you can run it silently using the commandline.
If you are upgrading a cluster of Spotfire Servers, run the upgrade tool on only one server. The Spotfiredatabase will be updated when you run the upgrade tool.
If Spotfire Server is set up to authenticate with the Spotfire database using Windows IntegratedAuthentication, it is important that you run the upgrade tool as the same user that Spotfire Serverauthenticates as. Otherwise, the upgrade tool will not be able to authenticate with the database.
The upgrade will perform a validation of LDAP configurations. If an invalid LDAP configuration isfound, the upgrade will fail. If so, go back to your previous installation, correct the error, and performthe upgrade again.
Prerequisites
● You have installed the new version of Spotfire Server and any available hotfixes.
● You have a working backup of your Spotfire database.
333
TIBCO Spotfire® Server and Environment Installation and Administration
● If you are using LDAPS, and if the CA certificate is not included in the cacert file by default, youmust import the CA certificate used to issue the LDAP server's certificate before running the upgradetool. See Configuring LDAP.
Procedure
1. Go to the following directory: new version Spotfire Server install dir/tools/upgrade.
2. Open the file silent.properties in a text editor or XML editor.
3. Follow the instructions in the file and specify the values of the parameters.The from parameter is the only parameter that you are required to specify.
4. Save the silent.properties file.
5. Open a command line.
6. To see the parameters that the upgrade tool will use, do one of the following:
● On Windows, type upgradetool.bat -h.
● On Linux, type upgradetool.sh -h.
The parameters are listed on the command line. Review the list of parameters and specify any thatare applicable for your server.
7. To run the upgrade tool silently, do one of the following:
● On Windows, type upgradetool.bat -silent silent.properties.
● On Linux, type upgradetool.sh -silent silent.properties.
8. Press Enter.The upgrade tool runs silently.
Start Spotfire Server
When the upgrade tool has completed without issues, you should start the Spotfire Server.
For information on how to start the Spotfire Server, see Starting Spotfire Server.
To verify that Spotfire Server has been installed and started, launch a browser and go to the SpotfireServer start page: http://<hostname>:<port>/spotfire.
Upgrading a cluster of Spotfire ServersClustering is disabled by default. Therefore, during the update process, you must enable clustering andreconfigure your cluster-related options.
For general information on upgrading, see Upgrading. For general information on clustering, see Clustered server deployments.
If you have a load balancer that routes based on the jvmRoute part of the session id, note that thedefault value has changed from uppercase to lowercase. If needed, update the load balancerconfiguration accordingly.
These are the basic steps for upgrading a clustered implementation of Spotfire:
1. Download the required software; see Downloading required software.
2. Install the Spotfire Servers in your cluster; see Install Spotfire Server.
3. Apply the latest hotfix for your version of Spotfire Server (if one is available) to all of the servers; see Applying hotfixes to the server.
4. On only one of the servers, run the upgrade tool; see Run the upgrade tool.
334
TIBCO Spotfire® Server and Environment Installation and Administration
5. On the same server, set your clustering parameters; see Setting up a cluster of Spotfire Servers.
6. Start the same server; see Start or stop Spotfire Server.
7. Start the other servers in the cluster.
8. If you are using ActiveSpaces to secure the connections between clustered servers, you must installand configure ActiveSpaces on every server in the cluster; for details, see Using ActiveSpaces forclustering.
Upgrading Spotfire Analyst clientsSpotfire Analyst clients are upgraded when users connect to a new Spotfire Server on which the newclient packages were deployed.
If you use any custom visualizations, these extensions must be modified before you deploy them toSpotfire Server. For more information, see Upgrading custom visualizations.
Deploy client packages
Deploy the new Spotfire client packages to the server.
For information on how to deploy the client packages, see Deploying client packages to Spotfire Server.
After deploying the packages, start a Spotfire client and log in to Spotfire Server. Make sure that theclient is upgraded with the new deployment. Verify that the Spotfire library and information model areaccessible and work as they did before the upgrade.
Upgrading Spotfire Web PlayerUpgrade Spotfire Web Player by installing the Web Player service on a node and applying yourconfigurations.In the current Spotfire architecture, you no longer install a Spotfire Web Player server that web clientusers connect to. Now all web client users connect to a Spotfire Server that has a Web Player serviceinstalled on a node. You install the Web Player service on a node, apply your Web Playerconfigurations, and deploy any extensions.
Because all web client users connect to the Spotfire Server, authentication is now set up on the SpotfireServer. For more information, see Upgrading authentication method.
Prerequisites
You have a new Spotfire Server up and running.
Procedure
1. Make a copy of your old Web Player server installation directory. This is likely located in a defaultdirectory, such as C:\Program Files\Tibco\Spotfire Web Player\7.0\. This will contain yourweb.config file, which contains the configuration of your old Web Player server.
If you are using scheduled updates, make sure that you also have a copy of theScheduledUpdates.xml file. For more information, see Upgrading scheduled updates.
2. Deploy the Spotfire distribution to Spotfire Server. For more information, see Deploying clientpackages to Spotfire Server.
3. Open a command line and export the service configuration files from Spotfire Server by using the export-service-config command. Specify the Web Player capability and the deployment area:config export-service-config --capability=WEB_PLAYER --deployment-area=Production
The configuration files Spotfire.Dxp.Worker.Automation.config,Spotfire.Dxp.Worker.Core.config, Spotfire.Dxp.Worker.Host.exe.config, and
335
TIBCO Spotfire® Server and Environment Installation and Administration
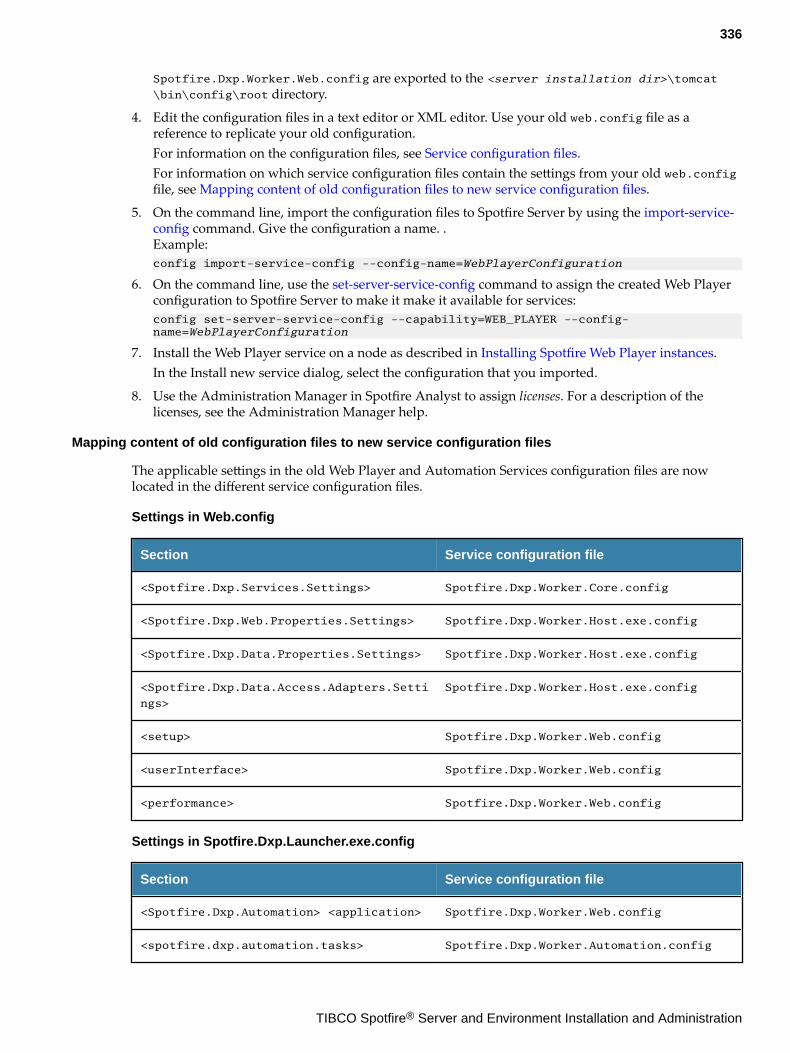
Spotfire.Dxp.Worker.Web.config are exported to the <server installation dir>\tomcat\bin\config\root directory.
4. Edit the configuration files in a text editor or XML editor. Use your old web.config file as areference to replicate your old configuration.For information on the configuration files, see Service configuration files.For information on which service configuration files contain the settings from your old web.configfile, see Mapping content of old configuration files to new service configuration files.
5. On the command line, import the configuration files to Spotfire Server by using the import-service-config command. Give the configuration a name. .Example:config import-service-config --config-name=WebPlayerConfiguration
6. On the command line, use the set-server-service-config command to assign the created Web Playerconfiguration to Spotfire Server to make it make it available for services:config set-server-service-config --capability=WEB_PLAYER --config-name=WebPlayerConfiguration
7. Install the Web Player service on a node as described in Installing Spotfire Web Player instances.In the Install new service dialog, select the configuration that you imported.
8. Use the Administration Manager in Spotfire Analyst to assign licenses. For a description of thelicenses, see the Administration Manager help.
Mapping content of old configuration files to new service configuration files
The applicable settings in the old Web Player and Automation Services configuration files are nowlocated in the different service configuration files.
Settings in Web.config
Section Service configuration file
<Spotfire.Dxp.Services.Settings> Spotfire.Dxp.Worker.Core.config
<Spotfire.Dxp.Web.Properties.Settings> Spotfire.Dxp.Worker.Host.exe.config
<Spotfire.Dxp.Data.Properties.Settings> Spotfire.Dxp.Worker.Host.exe.config
<Spotfire.Dxp.Data.Access.Adapters.Setti
ngs>
Spotfire.Dxp.Worker.Host.exe.config
<setup> Spotfire.Dxp.Worker.Web.config
<userInterface> Spotfire.Dxp.Worker.Web.config
<performance> Spotfire.Dxp.Worker.Web.config
Settings in Spotfire.Dxp.Launcher.exe.config
Section Service configuration file
<Spotfire.Dxp.Automation> <application> Spotfire.Dxp.Worker.Web.config
<spotfire.dxp.automation.tasks> Spotfire.Dxp.Worker.Automation.config
336
TIBCO Spotfire® Server and Environment Installation and Administration
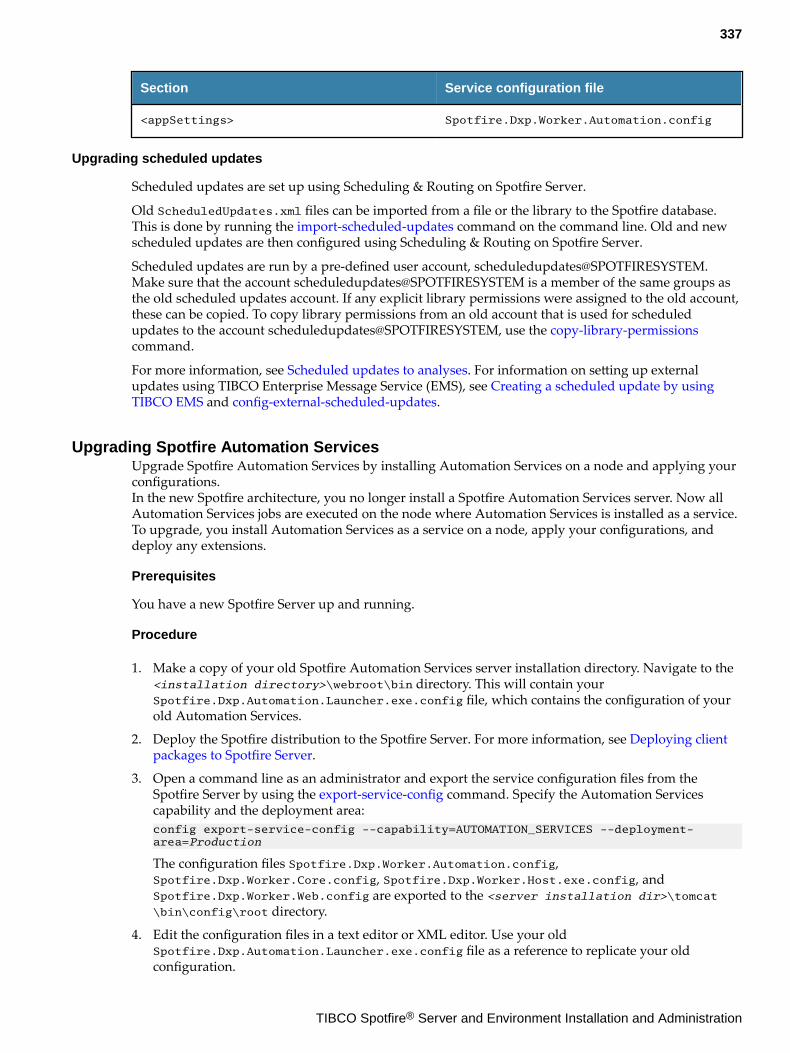
Section Service configuration file
<appSettings> Spotfire.Dxp.Worker.Automation.config
Upgrading scheduled updates
Scheduled updates are set up using Scheduling & Routing on Spotfire Server.
Old ScheduledUpdates.xml files can be imported from a file or the library to the Spotfire database.This is done by running the import-scheduled-updates command on the command line. Old and newscheduled updates are then configured using Scheduling & Routing on Spotfire Server.
Scheduled updates are run by a pre-defined user account, [email protected] sure that the account scheduledupdates@SPOTFIRESYSTEM is a member of the same groups asthe old scheduled updates account. If any explicit library permissions were assigned to the old account,these can be copied. To copy library permissions from an old account that is used for scheduledupdates to the account scheduledupdates@SPOTFIRESYSTEM, use the copy-library-permissionscommand.
For more information, see Scheduled updates to analyses. For information on setting up externalupdates using TIBCO Enterprise Message Service (EMS), see Creating a scheduled update by usingTIBCO EMS and config-external-scheduled-updates.
Upgrading Spotfire Automation ServicesUpgrade Spotfire Automation Services by installing Automation Services on a node and applying yourconfigurations.In the new Spotfire architecture, you no longer install a Spotfire Automation Services server. Now allAutomation Services jobs are executed on the node where Automation Services is installed as a service.To upgrade, you install Automation Services as a service on a node, apply your configurations, anddeploy any extensions.
Prerequisites
You have a new Spotfire Server up and running.
Procedure
1. Make a copy of your old Spotfire Automation Services server installation directory. Navigate to the<installation directory>\webroot\bin directory. This will contain yourSpotfire.Dxp.Automation.Launcher.exe.config file, which contains the configuration of yourold Automation Services.
2. Deploy the Spotfire distribution to the Spotfire Server. For more information, see Deploying clientpackages to Spotfire Server.
3. Open a command line as an administrator and export the service configuration files from theSpotfire Server by using the export-service-config command. Specify the Automation Servicescapability and the deployment area:config export-service-config --capability=AUTOMATION_SERVICES --deployment-area=Production
The configuration files Spotfire.Dxp.Worker.Automation.config,Spotfire.Dxp.Worker.Core.config, Spotfire.Dxp.Worker.Host.exe.config, andSpotfire.Dxp.Worker.Web.config are exported to the <server installation dir>\tomcat\bin\config\root directory.
4. Edit the configuration files in a text editor or XML editor. Use your oldSpotfire.Dxp.Automation.Launcher.exe.config file as a reference to replicate your oldconfiguration.
337
TIBCO Spotfire® Server and Environment Installation and Administration
For more information on the configuration files, see Service configuration files.For information on which service configuration files contain the settings from your oldSpotfire.Dxp.Automation.Launcher.exe.config file, see Mapping content of old configurationfiles to new service configuration files.
5. On the command line, import the configuration files to the Spotfire Server by using the import-service-config command. Give the configuration a name.Example:config import-service-config --config-name=AutomationServicesConfiguration
6. On the command line, use the set-server-service-config command to assign the created AutomationServices configuration to the Spotfire Server to make it available for services:config set-server-service-config --capability=AUTOMATION_SERVICES --config-name=AutomationServicesConfiguration
7. Install Automation Services as a service on a node as described in Installing Spotfire AutomationServices instances.In the Install new service dialog, select the configuration that you imported.
8. Use the Administration Manager in Spotfire Analyst to assign licenses required by the AutomationServices jobs to the automationservices@SPOTFIRESYSTEM user, which is the account used toexecute the jobs on the service instance. For a description of the licenses, see the AdministrationManager help.
9. Make sure that all users who should execute automation services jobs are members of the groupAutomation Services Users.
10. Existing scheduled jobs using the Client Job Sender must be updated because the configurationshave changed and the Client Job Sender now connects to the Spotfire Server instead of anAutomation Services server. For more information, see the Automation Services help.
Upgrading authentication methodSpotfire Server is now used for all authentication.
In the old architecture, you set up authentication on the Spotfire Server for Spotfire Analyst users andon the Spotfire Web Player server for Spotfire web client users. In the new architecture you set up theauthentication for all users on the Spotfire Server.
This means that the same authentication method is used for Spotfire Analyst users and Spotfire webclient users.
For information on how to set up the authentication method on Spotfire Server, see User authentication.
Impersonation is no longer applicable for single sign-on authentication methods because users nowauthenticate towards Spotfire Server directly.
If you used custom authentication on the Spotfire Web Player server, see External authentication.
There are, however, some special cases where different authentication methods have been used. See Anonymous combined with other authentication method and Different authentication methods forSpotfire Server and Web Player.
Anonymous combined with other authentication method
Anonymous authentication can be combined with another authentication method on the same SpotfireServer.
If you previously had a system with multiple Spotfire Web Player servers, where some usedAnonymous authentication and some used another authentication method, this is now done on thesame Spotfire Server.
To do this, first set up the authentication method you want to use. For more information, see Userauthentication.
338
TIBCO Spotfire® Server and Environment Installation and Administration
Then also enable Anonymous authentication on the Spotfire Server. For more information, see Configuring anonymous authentication.
Different authentication methods for Spotfire Server and Web Player
It is no longer supported to use different authentication methods for the Spotfire Server and the SpotfireWeb Player.
Because all users connect to the Spotfire Server, it is not possible to use different authenticationmethods for Spotfire Analyst users and Spotfire web client users. If you previously used differentauthentication methods, you must now decide on one authentication method for all users.
As of Spotfire version 7.9, you can use sites to configure multiple authentication methods within asingle Spotfire environment.
Upgrading load balancingIn the new architecture, you no longer need a load balancer between the Spotfire Server and SpotfireWeb Players.
If you have a system with multiple Spotfire Web Player servers and a load balancer, the load balancer isno longer needed. In the new architecture each Web Player service on each node can have multipleinstances running. The load balancer is replaced by the routing capabilities in the new architecture. Forinformation on how to set up routing of users, see Creating resource pools and Routing rules.
If you have a cluster of Spotfire Servers, you can still use a load balancer in front of them. For moreinformation, see Clustered server deployments.
Upgrading analysis linksIf you have web links to analyses, these must be updated to work in in the new architecture.
You no longer install a Spotfire Web Player server that web client users connect to. Now all web clientusers connect to a Spotfire Server that has a Spotfire Web Player service installed on a node. Therefore,to make old links to web player analysis files continue to work as previously, the DNS entry to theformer Web Player server must now point to the Spotfire Server.
If a custom virtual directory (other than the default SpotfireWeb) was previously used an additionalmapping must be added to the file
server installation dir/tomcat/webapps/ROOT/WEB‐INF/web.xml.
Locate the following section and add all custom directory remappings as a semicolon-separated string.
The target part of the mappings should always be "spotfire/wp".
<filter> <filter-name>RedirectFilter</filter-name> <filter-class>com.spotfire.server.security.RedirectFilter</filter-class> <init-param> <param-name>rules</param-name> <param-value>SpotfireWeb=spotfire/wp;MyCustomVirtualDirectory=spotfire/wp</param-value> </init-param> </filter>
Upgrading Web Services API clientsIf you have created clients to the Spotfire Server Web Services API and you plan to activate the CSRFprotection that is now available, the clients must be modified to work properly in the new architecture.
If you do not plan to activate the CSRF protection for the public Web Service API, nothing needs to bedone.
For more information about the CSRF protection and how the clients should be updated, see the WebServices API documentation on https://docs.tibco.com/products/tibco-spotfire-server.
339
TIBCO Spotfire® Server and Environment Installation and Administration
Upgrading customizationsIf you have any custom extensions, they must be deployed to the Spotfire Server. Some of them must beedited before deployment to work in in the new architecture.
Upgrading custom visualizations
If you are using the custom visualization extension in the Spotfire web client, the extension must bemodified to work properly in the new architecture.
Both the C# code and the JavaScript code require changes. For instructions on how to update the code,see the article Create a Custom Visualization in TIBCO Spotfire on the TIBCO Community site.
After the changes have been made, you must rebuild the custom visualization extension package anddeploy it to the Spotfire Server. For more information, see Adding software packages to a deploymentarea.
Upgrading cobranding
If you have cobranded an earlier version of Spotfire, the cobranding must be updated and thendeployed to the server.
For information on the changes and how to cobrand Spotfire, see the TIBCO Spotfire Cobranding help.
Upgrading from Spotfire 7.5 or laterAs of Spotfire Server version 7.11.4, server hotfixes can be applied only on the specific service packversion that they were created for. Example: If you currently have Spotfire version 7.11.3, you can onlyapply server hotfixes for the 7.11.3 version, such as 7.11.3 HF-001, 7.11.3 HF-002, and so on. If you wanta hotfix of a different service pack level, such as 7.11.5 HF-001, you must first make sure to upgrade tothat service pack (7.11.5) before applying the hotfix.Client hotfixes have not changed.
The Spotfire Server and node manager upgrade tools copy all relevant settings, includingconfigurations and node manager trust, to your new Spotfire environment.
Prerequisites
● Before upgrading, create a working backup of your Spotfire database.
● Download the required software from the TIBCO eDelivery web site and the TIBCO Supportwebsite; for details, see Downloading required software.
Procedure
1. Stop your Spotfire Servers and node managers. For information on how to stop them, see Start orstop Spotfire Server and Starting or stopping node manager.
2. Set the Startup type to Manual for your existing Spotfire Servers and node managers to prevent theold installation from starting automatically and causing a port conflict with the new installation. Forinstructions, see Preventing Spotfire Servers and node managers from starting automatically.
3. Install the new version of Spotfire Server. For instructions and details related to the upgrade, see Installation of Spotfire Server during upgrade.
4. Upgrade the Spotfire Servers by running the Spotfire Server upgrade tool on each server. For moreinformation, see Run the Spotfire Server upgrade tool.
If your servers are clustered, run the upgrade tool on only one of the servers in the cluster.
340
TIBCO Spotfire® Server and Environment Installation and Administration
5. Apply to all the Spotfire Servers any available server hotfix that has the same version number as thenew server. For more information, see Applying hotfixes to the server.
Do not apply any hotfixes whose three-digit version number is different from the newserver's three-digit version number. Apply only the latest hotfix for the version number.
6. Start the new Spotfire Servers. For information on how to start the Spotfire Server, see Start SpotfireServer.
7. Deploy the Spotfire client packages (Spotfire.Dxp.sdn) and node manager packages(Spotfire.Dxp.NodeManagerWindows.sdn) to the new Spotfire Server. For more information onhow to deploy packages to Spotfire Server, see Deploying client packages to Spotfire Server.
8. Upgrade the nodes by installing the new node manager and running the node manager upgradetool on each node. For more information, see Upgrading nodes.
When installing the new node managers, specify the same ports that were used by the oldnode managers.
9. After the upgrade, make sure that the Administrator group has all licenses, including new ones,assigned to it. Use the Administration Manager in Spotfire Analyst to assign licenses. For adescription of the licenses, see the Administration Manager help.
10. Start the node managers. For information on how to start the node managers, see Starting orstopping a node manager (as a Windows service).
11. Update all services on all nodes in your environment. For information on how to update theservices, see Upgrading services.
12. Optional: Verify or edit changes to service configuration files. Your existing configurations willwork in the new version of Spotfire, but some settings have been added or changed and must beupdated manually if you do not want to use the default values. For more information, see Upgrading service configurations.
Installation of Spotfire Server during upgradeWhen you install Spotfire Server, the upgrade tool is installed as well.
Before installing the new version of Spotfire Server, note the following:
● Configure the new server to use the same ports as the previous installation. This will not cause aport conflict if you have followed steps 1 and 2 in Upgrading from Spotfire 7.5 or later.
● Make sure to install the latest hotfix on all servers before running the upgrade tool.
● Do not start or configure the newly installed server before running the upgrade tool.
● If you intend to copy information from the old version, do not uninstall it until the new version ofSpotfire Server is in place.
For general instructions on how to install Spotfire Server, see Installation.
Preventing Spotfire Servers and node managers from starting automatically
When upgrading Spotfire Servers and node managers to the next version, you must prevent the oldversion of these components from starting automatically when Windows starts. Because the old andnew versions use the same communication ports, starting both versions results in a port conflict.
These instructions apply to servers that are running as a Windows service.
Procedure
1. Log in to the Spotfire Server or node manager computer as an administrator.
341
TIBCO Spotfire® Server and Environment Installation and Administration
2. Go to Control Panel > Administrative Tools > Services and then, in the Services dialog, locate andselect the previous version of the service called TIBCO Spotfire Server or TIBCO Spotfire NodeManager.
3. Right-click the service and then click Properties.
4. In the center of the Properties dialog, next to Startup type, select Manual and then click OK.
Result
When you restart Windows, the server or node manager will not start automatically.
Applying hotfixes to the serverBefore you run the upgrade tool, you must install on all servers any available hotfix for the new versionof the server.
Prerequisites
● You have installed Spotfire Server.
● You have downloaded the latest hotfix for your new version of Spotfire Server; for instructions, see Downloading required software.
Procedure
● Follow the instructions in the Installation_Instructions.htm file that was included in the hotfixpackage that you downloaded.For more information, see Overview of hotfixes for TIBCO Spotfire in the TIBCO Community.
Run the Spotfire Server upgrade toolThe server upgrade tool updates the database. You can run the upgrade tool interactively, or silently byusing the command-line interface.
If you have not already done so, make a working backup of your Spotfire database.
For information on how to run the upgrade tool, see Running the upgrade tool interactively or Runningthe upgrade tool silently.
Running the Spotfire Server upgrade tool interactively
When you run the Spotfire Server upgrade tool interactively, you are prompted for information aboutboth your older installation and your new installation.
If you are upgrading a cluster of Spotfire Servers, run the upgrade tool on only one server. The Spotfiredatabase will be updated when you run the upgrade tool.
If Spotfire Server is set up to authenticate with the Spotfire database using Windows IntegratedAuthentication, it is important that you run the upgrade tool as the same user that Spotfire Serverauthenticates as. Otherwise, the upgrade tool will not be able to authenticate with the database.
The upgrade will perform a validation of LDAP configurations. If an invalid LDAP configuration isfound, the upgrade will fail. If so, go back to your previous installation, correct the error, and performthe upgrade again.
Prerequisites
● You have installed the new version of Spotfire Server and any available hotfixes.
342
TIBCO Spotfire® Server and Environment Installation and Administration
● You have a working backup of your Spotfire database.
● If you are using LDAPS, and if the CA certificate is not included in the cacert file by default, youmust import the CA certificate used to issue the LDAP server's certificate before running the upgradetool. See Configuring LDAP.
Procedure
1. If the server upgrade tool is not already open, go to the following directory and double-clickupgradetool.bat (Windows) or upgradetool.sh (Unix): new version Spotfire Serverinstall dir/tools/upgrade
By default, the server installation directory is located here: C:/tibco/tss/version number.
2. The Spotfire Server Upgrade panel is displayed. It provides a reminder to back up or clone theSpotfire database. Click Next.The File Locations panel is displayed. It provides new information and the choice to copy, or not tocopy, an existing configuration.
3. If you have file access to an old installation, you can select Previous server installation and enterthe path to its installation directory, for example: C:/tibco/tss/version number or /opt/tss/version number. Click Next.If there are changes needed after the upgrade, for example, port configuration or the location of TLScertificate, manually edit the server.xml file, located in the Spotfire Server install dir/tomcat/conf directory.
4. If you did not copy an existing configuration, the Database Type and Driver panel is displayed.Here, specify the database and database driver you are using, and click Next.If you select a database driver type that is not installed in the old installation directory, the message“The selected driver must be installed manually” is displayed. Install the driver manually byplacing it in the new version Spotfire Server install dir/tomcat/lib directory and restartthe upgrade tool.If you select a database driver type that is not installed and click Next, the Database Drivers NotInstalled panel is displayed. If this occurs, click Done to exit the upgrade tool, then install thedatabase driver and start the upgrade tool again.The Database Connection Information panel is displayed.
5. Here, provide the Spotfire database Connection string, Username and Password. If your databaseserver uses integrated login, like Windows authentication, select the Integrated login check box, todisable the Username and Password fields. Click Next.
6. If you did not copy an existing configuration, the Additional Information panel is displayed. Here,specify the configuration tool password, the encryption password, and the server name to use whenconfiguring the Spotfire Server, and click Next.
7. If LDAP User Directory mode or Windows NT User Directory mode is used, the User DirectoryConfiguration panel is displayed. Here, select a domain name style (DNS or NetBIOS) and adefault domain.
Make sure to select an accurate domain name style for your system. For more information,see External directories and domains.
The Summary panel is displayed.
8. Click Upgrade.The Upgrade panel is displayed. Here you can see if the upgrade was successful. If there wereproblems with the upgrade, click Next to get information on where the issues have been logged.
9. When the upgrade has been successfully completed (the text "Upgrade done" appears in the panel),click Finish.
343
TIBCO Spotfire® Server and Environment Installation and Administration
Running the Spotfire Server upgrade tool silently
As an alternative to running the upgrade tool interactively, you can run it silently using the commandline.
If you are upgrading a cluster of Spotfire Servers, run the upgrade tool on only one server. The Spotfiredatabase will be updated when you run the upgrade tool.
If Spotfire Server is set up to authenticate with the Spotfire database using Windows IntegratedAuthentication, it is important that you run the upgrade tool as the same user that Spotfire Serverauthenticates as. Otherwise, the upgrade tool will not be able to authenticate with the database.
The upgrade will perform a validation of LDAP configurations. If an invalid LDAP configuration isfound, the upgrade will fail. If so, go back to your previous installation, correct the error, and performthe upgrade again.
Prerequisites
● You have installed the new version of Spotfire Server and any available hotfixes.
● You have a working backup of your Spotfire database.
● If you are using LDAPS, and if the CA certificate is not included in the cacert file by default, youmust import the CA certificate used to issue the LDAP server's certificate before running the upgradetool. See Configuring LDAP.
Procedure
1. Go to the following directory: new version Spotfire Server install dir/tools/upgrade.
2. Open the file silent.properties in a text editor or XML editor.
3. Follow the instructions in the file and specify the values of the parameters.The from parameter is the only parameter that you are required to specify.
4. Save the silent.properties file.
5. Open a command line.
6. To see the parameters that the upgrade tool will use, do one of the following:
● On Windows, type upgradetool.bat -h.
● On Linux, type upgradetool.sh -h.
The parameters are listed on the command line. Review the list of parameters and specify any thatare applicable for your server.
7. To run the upgrade tool silently, do one of the following:
● On Windows, type upgradetool.bat -silent silent.properties.
● On Linux, type upgradetool.sh -silent silent.properties.
8. Press Enter.The upgrade tool runs silently.
Start Spotfire ServerWhen the upgrade tool has completed without issues, you should start the Spotfire Server.
For information on how to start the Spotfire Server, see Starting Spotfire Server.
To verify that Spotfire Server has been installed and started, launch a browser and go to the SpotfireServer start page: http://<hostname>:<port>/spotfire.
344
TIBCO Spotfire® Server and Environment Installation and Administration
Upgrading nodesTo upgrade the nodes, install the new node managers on the same computers as the old nodemanagers. Then run the node manager upgrade tool on each new node manager.
Set the Startup type to Manual for your existing node managers to prevent the old installation fromstarting automatically and causing a port conflict with the new installation. For instructions, see Preventing Spotfire Servers and node managers from starting automatically.
Install node manager
The node manager upgrade tool is installed along with the new node manager.
You can install a node manager either interactively with a graphical interface or silently by using thecommand line.
● For the interactive installation, see Installing a node manager interactively during upgrade.
● For the silent installation, see Installing a node manager silently. Then see Running the nodemanager upgrade tool silently
Configure the node managers to use the same ports as the previous installation. This will not cause aport conflict if you have followed steps 1 and 2 in Upgrading from Spotfire 7.5 or later.
Do not start the newly installed node manager before running the upgrade tool.
Installing a node manager interactively during upgrade
Install the new node manager on the same computer as the old node manager. You must run the nodemanager installer with administrative permissions.
Prerequisites
● Spotfire Server is installed and running.
Procedure
1. In the installation kit, right-click nm-setup.exe and then click Run as administrator.
2. On the installation wizard Welcome page, click Next.
3. On the License page, read the agreement, select I accept, and then click Next.
4. On the Destination Folder page you can change the location if you want to, and then click Next.The Node Manager Ports page opens.
5. On the Node Manager Ports page, specify the same ports that were used by the old node manager.
6. Click Next.The Spotfire Server page opens.
7. On the Spotfire Server page, enter the following information, and then click Next.
These values must match the values you used when installing the Spotfire Server files.
● Server name–The hostname of Spotfire Server.
Valid hostnames may contain only alphabetic characters, numeric characters, hyphens,and periods.
● Server backend registration port–The registration port that you specified during Spotfire Serverinstallation.
345
TIBCO Spotfire® Server and Environment Installation and Administration
● Server backend communication port (TLS)–The back-end communication port that youspecified during Spotfire Server installation.
8. On the Network Names page, select the computer names that can be used by back-end trust. Ingeneral you can leave all the listed names as they are.
9. On the Ready to Install page, click Install.
Do not start the newly installed node manager before running the upgrade tool.
10. On the Install Wizard Completed page, select Launch the upgrade tool and click Finish.
What to do next
Running the node manager upgrade tool interactively
Run the node manager upgrade tool
You can run the node manager upgrade tool interactively, or silently by using the command-lineinterface.
For information on how to run the node manager upgrade tool, see Running the node managerupgrade tool interactively or Running the node manager upgrade tool silently.
Running the node manager upgrade tool interactively
When you run the node manager upgrade tool interactively, you are prompted for the installationdirectory of both your old node manager installation and your new installation.
Prerequisites
You have installed the new node manager.
Procedure
1. If the node manager upgrade tool is not already open, go to the following directory and double-click upgradetool.bat: new node manager installation dir/nm/upgrade. By default, the nodemanager installation directory is located here: C:/tibco/tsnm/version number.The node manager upgrade tool opens.
2. In the Upgrade to path field, specify the location of your new node manager installation directory.
3. In the Upgrade from field, specify the location of your old node manager installation directory.
4. Indicate whether you want the upgrade tool to start the node manager Windows service afterupgrade.
5. Click Run Upgrade.The result of the node manager upgrade is shown in the text field below the controls.
6. When the node manager is successfully upgraded, close the node manager upgrade tool window.
Running the node manager upgrade tool silently
As an alternative to running the node manager upgrade tool interactively, you can run it silently fromthe command line.
Prerequisites
You have installed the new node manager.
346
TIBCO Spotfire® Server and Environment Installation and Administration
Procedure
1. On the command line, go to the directory new node manager installation dir/nm/upgrade.
2. Run the following command .upgradetool.bat --cmd --from old node manager installation dir --to new node manager installation dir
The node manager upgrade tool runs silently.
Optional upgradesThe following upgrades may or may not apply to your Spotfire implementation.
Upgrading service configurations
Service configuration changes require manual updates if you do not want to use their default values.
To get the correct configuration files, it is recommended that you export both the default new serviceconfiguration and your old service configuration from Spotfire Server by using the export-service-config command. Then apply all changes made in the old configuration files to the new configurationfiles. Then import the new configuration back into Spotfire Server by using the import-service-configcommand, and use this configuration for your new services.
For more information on how to edit the configuration files, see Manually editing the serviceconfiguration files.
For information on the added or changed settings, see the topics for the appropriate configuration files.
Changes introduced in Spotfire 7.6
Spotfire.Dxp.Worker.Web.config
Additional service configuration settings were added for the mini-dump creation if a service goes downunintentionally.
In the <errorReporting> section, the following settings were added: miniDumpSizeLarge="false"and miniDumpPath="".
The miniDumpSizeLarge setting can create a very large dump file that should not be edited unlessinstructed by Spotfire Support.
Changes introduced in Spotfire 7.9
Spotfire.Dxp.Worker.Host.exe.config
The following proxy handling settings were added, if you need to use proxy handling forcommunication from the Web Player service or Automation Services to Spotfire Server:ProxyUsername, ProxyPassword and <defaultProxy>.
Spotfire.Dxp.Worker.Automation.config
The section <Spotfire.Dxp.Automation.Framework> has been added, where you can specify whichdirectories Automation Services tasks can read from, write to, and delete from.
The settings useKerberos and kerberosIdentity have been added to be able to run AutomationServices jobs as a specified Windows account when delegeted Kerberos is used in the environment.
Spotfire.Dxp.Worker.Web.config
The following settings have been added to configure the use of a tool, such as cdb.exe, to automaticallycapture dumps for hanging service instance processes: dumpToolPath, dumpToolFlagsSmall,dumpToolFlagsLarge.
347
TIBCO Spotfire® Server and Environment Installation and Administration
The settings useKerberos and kerberosIdentity have been added to be able to run scheduledupdates as a specified Windows account when delegeted Kerberos is used in the environment.
The setting allowGcEvenIfAnalysesLoaded has been added. It allows you to run garbage collectioneven if analyses are open.
The default value of the setting requestTimeoutSeconds has been changed from 300 seconds to 3600seconds.
Upgrading custom-modified log4j.properties files
For Spotfire Server 7.9, the logging framework was upgraded from Log4j to Log4j2. If you used acustom-modified log4j.properties file in any Spotfire Server version between 7.5 and 7.8, you mustmanually add these modifications to the new log4j2.xml file to continue using the same loggingproperties.
Note that custom edits to the log4j2.xml file are intended for settings that are not available in theadministrative interface, such as adding log appenders or changing the log size or rotation.
Procedure
1. Open the log4j.properties file from your previous Spotfire Server installation.
2. Open the new version of the following Spotfire Server file in an XML editor or a text editor: <newSpotfire Server installation dir>/tomcat/spotfire-config/log4j2.xml.
3. Add the modifications from the old file to the new file, using the new, XML-based format. For fulldocumentation of the new format, see https://logging.apache.org/log4j/2.x/manual/configuration.html.
4. Save and close the file.
5. Restart the server.
348
TIBCO Spotfire® Server and Environment Installation and Administration
Applying hotfixes to the Spotfire environment
Any available hotfixes for components of your Spotfire environment should be downloaded andinstalled.
As of Spotfire Server version 7.11.4, server hotfixes can be applied only on the specific service packversion that they were created for. Example: If you currently have Spotfire version 7.11.3, you can onlyapply server hotfixes for the 7.11.3 version, such as 7.11.3 HF-001, 7.11.3 HF-002, and so on. If you wanta hotfix of a different service pack level, such as 7.11.5 HF-001, you must first make sure to upgrade tothat service pack (7.11.5) before applying the hotfix.
Client hotfixes have not changed.
For general hotfix information and links to specific information about each hotfix, see Overview ofhotfixes for TIBCO Spotfire in the TIBCO Community.
Procedure
1. Sign in to the TIBCO Support website.
2. Click Downloads > Hotfixes.
3. On the Available Hotfixes page, expand AvailableDownloads and Spotfire.
4. For each product component in your implementation, locate and select the folder containing thelatest hotfix for your product version and click Download.
Service hotfixes are in the Clients (Analyst_WebPlayer_AutomationServices) folder.
5. When the download is complete, unzip the folder's contents and follow the instructions in theInstallation_Instructions.htm file.
Applying hotfixes for servicesAny available hotfixes for your Automation Services or Web Player services should be downloaded andinstalled.
Procedure
1. Go to https://support.tibco.com to download the latest hotfix for your services. For instructions, see Applying hotfixes to the Spotfire environment.
2. Deploy the downloaded Spotfire distribution to the Spotfire Server. For instructions, see Deployingclient packages to Spotfire Server.
3. Update the services. For instructions, see Updating services.
349
TIBCO Spotfire® Server and Environment Installation and Administration
Backup and restore
To enable recovery after a crash or disaster in your Spotfire environment, it is important thatinformation stored in the system is backed up. Most of this information is stored in the Spotfiredatabase, but some of it is stored on the Spotfire Server.
This manual will not describe how to perform backups, only what to back up. It is assumed that youhave some sort of backup software for files and computers, and that you use the backup tools providedwith the database. Refer to the database documentation for instructions on how to perform backups.
One can only restore to a machine running the same operating system as the backed up system, sincethere is a bundled Java runtime with binaries for a specific architecture.
Back up each server in the cluster.
The following sections describe what needs to be backed up.
Backup of Spotfire databaseThe most important part of the Spotfire environment to back up is the Spotfire database.
It contains tables which store the state of the server, for example the library, preferences, anddeployments. Most of the server and service configuration files are also stored in the database. Even ifonly the database has been backed up, it is still possible to restore most of the functionality after acrash. It is therefore vital that you have a valid and current backup of the Spotfire database.
Verify your backups.
Backup of Spotfire ServerA small set of configuration is unique for each Spotfire Server and is stored on the actual Spotfire Serverrather than in the database.
This includes information about how Spotfire Server connects to the Spotfire database, which ports theserver should listen to, authentication methods such as Kerberos etc.
During installation the server files are essentially all placed in the installation directory. It should besufficient to back up this directory, of course it is possible to back up the entire file system.
Once a server has been configured or hotfixed there are no further persistent changes. Log files andother temporary files will change, but a restored backup will have the same functionality.
The configuration which is not in the database includes:
● Listening ports configuration. See The server.xml file for more information.
● Database connection and database drivers. See Database drivers and database connection URLs formore information.
● Logging configuration. See Monitoring and diagnostics for more information.
● Memory configuration. See Virtual memory modification for more information.
● HTTPS. See HTTPS for more information.
● Authentication such as Kerberos or Client Certificates.
● Any other advanced configuration performed in Advanced procedures. When performing advancedconfiguration, you should always take backup into consideration.
The bootstrap.xml file is not stored in the database either. However, since the bootstrap.xml filecontains a unique server ID, it can not be re-used if a server is restored on another computer. Therefore,in the event of a server crash where the server is restored on another machine, it is recommended tobootstrap the server again.
350
TIBCO Spotfire® Server and Environment Installation and Administration
Whenever you make any configuration changes or have applied a server hotfix, you should alsoperform a backup of the Spotfire Server installation directory.
Windows Installations
On Windows installations, there is functionality which will not be restored by only recovering theSpotfire Server installation directory:
● Windows Service
● Uninstall functionality
● Start Menu shortcuts
The Windows Service can be (re-)installed using the bat file service.bat located in the<installation dir>\tomcat\bin directory. Run it on the command line with the followingarguments: C:\tibco\tss\<version>\tomcat\bin>service.bat install.
Uninstallation can be done by removing the service and simply remove the installation directory.
The Start Menu shortcuts can be backed up by copying them to the server installation directory, backthat up, and when restoring, copying these files to the start menu directory.
Unix and Linux Installations
On Unix and Linux installations, no essential data is placed outside the installation directory bySpotfire Server. If you have a startup script for the server, it will need to be recreated.
Network Considerations
If you are using Kerberos you should note that configuration needed for this to work is tied to a specificmachine and cannot be copied easily to a new one.
You should also consider any other conditions in your environment and their implications, such as IPaddresses and firewall rules, LDAP restrictions, and anything else that might affect getting a systemback up and running.
Backup of servicesThe service configuration files are stored in the Spotfire database, so there is no need to make additionalbackups for the services.
If a node or service must be restored, install it again and select the configuration used for the oldservice.
Information on which resource pools the service instances should be used for is not stored in thedatabase. The new service instances must be assigned to the old resource pools manually.
351
TIBCO Spotfire® Server and Environment Installation and Administration
Uninstallation
To perform a complete uninstallation of your Spotfire environment, the following steps must becompleted, in order.
Deleting servicesThe first step of uninstalling the Spotfire environment is to delete the installed services.
Procedure
1. Go to the Spotfire Server start page and log in as an administrator.
2. Click Nodes & Services.
3. On the Your network page, under Select a view, select Nodes.
4. In the left pane, expand the entries under the node and select the service.
5. In the right pane, click Delete for each installed service.
Revoking trust of nodesThe second step of uninstalling the Spotfire environment is to revoke the trust for all installed nodes.For instructions on how to revoke the trust of a node, see Revoking trust of a node.
This must be done for each node in your Spotfire environment.
Uninstalling node managerThe third step of uninstalling the Spotfire environment is to uninstall all node managers.
Uninstallation of the node manager is performed through the regular Windows procedure. On eachmachine with a node manager installed, click Start > Control Panel > Programs and Features >Uninstall or change a program. Then right-click TIBCO Spotfire Node Manager and select Uninstall.
Uninstalling Spotfire ServerThe fourth step of uninstalling the Spotfire environment is to uninstall the Spotfire Server(s).
If you have placed any additional files in the installation directory or any of its subdirectories, such asSpotfire Library export files, you should move these files to a secure location before uninstalling. Theinstaller will remove the installation directory and all its subdirectories.
Windows
Uninstallation of Spotfire Server is performed through the regular Windows procedure. On eachcomputer with a Spotfire Server installed, click Start > Control Panel > Programs and Features >Uninstall or change a program. Then right-click TIBCO Spotfire Server and select Uninstall.
After successful uninstallation, only use-modified files (such as custom JDBC drivers) remain on thecomputer.
RPM Linux
On each computer with a Spotfire Server installed, uninstall the server by running the command:
rpm -e tss-<version number>
After a successful uninstallation, only modified files in tomcat/conf remain.
352
TIBCO Spotfire® Server and Environment Installation and Administration
Tarball Linux
On each computer with a Spotfire Server installed, uninstall the server by running the followingcommands:
If the Spotfire Server was configured to start on boot, it must be stopped and removed.
To stop the server, run the command:
service tss-<version number> stop
To remove the server, run the command:
chkconfig --del tss-<version number>
Delete added scripts by running the following commands:
rm /etc/init.d/tss-<version number>
rm /etc/sysconfig/tss-<version number>
To be able to do this, you must have root access.
The final step is to remove the folder with Spotfire Server files. Do this by running the followingcommand:
rm -rf <folder where the tarball was installed>
353
TIBCO Spotfire® Server and Environment Installation and Administration
Advanced procedures
These manual procedures are for setting up various features that are supported by Spotfire. Many ofthe procedures assume prior knowledge of technologies such as LDAP, Kerberos, Apache httpd, and soon.
Custom configurations for managing space needsIf you need more space for library content, log files, information links, or the files that the Web Playerservice writes to the hard disk, you can change the default settings to store these items in differentdirectories.
For information about the system requirements for Spotfire Server, see http://support.spotfire.com/sr.asp.
Links to information for changing settings
Configuration need For more information
Change the directory where Spotfire Server logfiles are written.
Follow the instructions in Changing the defaultlocation of server logs.
Configure the directory for library imports andexports.
Use the configuration command config-import-export-directory.
Change the maximum size of the cache for theWeb Player service Information Links andlibrary content.
If Spotfire Server is configured tocache Information Links and librarycontent, this uses additional diskspace. By default, caching is enabledand the max cache size set to 10 GB.
Set the --max-cache-size option for theconfiguration command config-attachment-manager.
Change the amount of disk space available forall of the log files generated by the Web Playerservice.
Follow the instructions in Customizing the servicelogging configuration.
Change the location of the temporary directorythat the Web Player service uses for temporaryfiles, paging, and caching data (scheduledupdates caching and SBDF caching).
Follow the instruction in Changing the defaultlocation of the Web Player temporary files.
Changing the default location of the Web Player temporary filesBy default the Web Player service stores temporary files, paging, and caching data (scheduled updatescaching and Spotfire Binary Data File (SBDF) caching) in the Temp directory inside the serviceinstallation directory. If you need to change the location, or if Spotfire Support suggests that you changeit, follow this procedure.
Procedure
1. On the computer running Spotfire Server, open a command line as an administrator and change thedirectory to the path of the config.bat file (config.sh on Linux).
354
TIBCO Spotfire® Server and Environment Installation and Administration
The default file path is <server installation dir>/tomcat/bin.
2. Export the service configuration by using the export-service-config command.Example:config export-service-config --tool-password=mypassword --capability=WEB_PLAYER --deployment-area=Production
3. Open the Spotfire.Dxp.Worker.Host.exe.config file in a text editor or XML editor and locatethe following section. By default, the exported configuration files are saved to the <serverinstallation dir>/tomcat/bin/config/root directory.<Spotfire.Dxp.Internal.Properties.Settings> <setting name="TempFolder" serializeAs="String"> <value>Temp</value> </setting>
4. Replace the value Temp with the path to the new Temp directory.
The Temp directory should be located on a local disk.
Example:<Spotfire.Dxp.Internal.Properties.Settings> <setting name="TempFolder" serializeAs="String"> <value>C:\NewTemp</value> </setting>
5. Save and close the configuration file.
6. Return to the command line and import the custom configuration using the import-service-configcommand.Example:config import-service-config --tool-password=mypassword --config-name=SampleConfig
7. Apply the custom configuration to specific services by using the set-service-config command.Example:config set-service-config --tool-password=mypassword --service-id="VALUE" --config-name=SampleConfig
Use the list-services command to get the service ID.
Result
The configuration setting for the indicated Web Player service is displayed in Nodes & Services, and theWeb Player temporary files should be written as specified.
Temporary tablespaceBy default, the tablespaces/database files for Spotfire Server with either an Oracle or SQL database usesautoextend/autogrowth. If this does not meet your needs, alter the settings.
You may want to alter the amount that the files are extended with each increment.
For Oracle, review the maxsize for each table space. For SQL, review the unlimited growth property.
Virtual memory modificationIf many simultaneous users intend to perform heavy data pivoting via Information Services or in otherways stress the server, you may need to modify the amount of memory available to the virtualcomputer.
355
TIBCO Spotfire® Server and Environment Installation and Administration
Modifying the virtual memory (server not running as Windows service)If Spotfire Server is not running as a Windows service, you can modify the virtual memory byfollowing these steps to set up the start script.
Procedure
1. Open the file <installation dir>/tomcat/bin/setenv.bat or <installation dir>/tomcat/bin/setenv.sh in a text editor.
2. Locate the line that sets the variable CATALINA_OPTS.
3. Set the following values to the amount of memory you want to allocate:
● -Xms512M
● -Xmx4096M
4. Restart the server.
Modifying the virtual memory (server running as Windows service)If Spotfire Server is running as a Windows service, you can modify the virtual memory by followingthese steps to set up the start script.
Procedure
1. Stop the Spotfire Server service.
2. On the command line, go to the <installation dir>/tomcat/bin directory.
3. Enter the following command: service.bat remove
4. Open the <installation dir>/tomcat/bin/service.bat file in a text editor.
5. Locate the following entries and change the numbers to suitable memory values (in MB):
● --JvmMs 512
● --JvmMx 4096
6. Save and close the file.
7. Enter the following command: service.bat install
8. Start the Spotfire Server service.
Data source templatesData source templates are used when creating information links. Using the Information Designer toolfound in Spotfire Analyst, a database administrator can create custom data source templates to definethe data sources that are available to users when they create information links.
For more information about the Information Designer, see the Spotfire Analyst help.
Spotfire Analyst includes two data source templates:
● Oracle (DataDirect driver)
● Microsoft SQL Server (DataDirect driver)
Custom data source templates can be based on the following data sources:
● Teradata
● Sybase (JTDS)
356
TIBCO Spotfire® Server and Environment Installation and Administration
● Sybase (DataDirect)
● Sybase
● SQL Server 2005
● SQL Server (JTDS)
● SQL Server (DataDirect)
● SQL Server
● SAS/SHARE
● Composite
● Oracle (delegated Kerberos)
● Oracle (DataDirect)
● Oracle
● MySQL5
● MySQL (DataDirect)
● MySQL
● DB2 (DataDirect)
● DB2
If you add a data source template that does not use the pre-installed DataDirect driver, you mustmanually install this driver on each Spotfire Server in the cluster before you restart the cluster.Download the appropriate driver JAR file and place it in the /tomcat/lib folder of each server.
Setting up MySQL5 vendor driverFor the MySQL5 vendor driver to work with MySQL data sources that include TIMESTAMPS that canpotentially be null, you must edit the template.
Procedure
1. In the MySQL5 data source template, locate the following section:<connection-properties> <connection-property> <key>useDynamicCharsetInfo</key> <value>false</value> </connection-property></connection-properties>
2. Within the connection-properties tag, add the following code:<connection-property> <key>noDatetimeStringSync</key> <value>true</value></connection-property><connection-property> <key>zeroDateTimeBehavior</key <value>convertToNull</value></connection-property>
357
TIBCO Spotfire® Server and Environment Installation and Administration
Data source template commandsYou can use these command-line commands to handle data source templates.
If you want to Use this command Notes
Add a new data sourcetemplate
add-ds-template
Enable, modify, or disable adata source template
modify-ds-template For a data source template tobecome available in theInformation Designer, it mustbe enabled.
Remove a data source template remove-ds-template Verify that no data sources usethe data source template beforeyou remove it. If a data sourcetemplate is removed, all datasources using that templatestop working.
XML settings for data source templatesThe following table defines all the available XML settings for data source templates; only the first threeare required. All other settings use their default values if not specified.
Setting Description Default value
type-name A unique name for theconfiguration.
driver The JDBC driver Java classused for creatingconnections.
connection-url-pattern A pattern for theconnection URL. The URLsyntax is driver specific.
ping-command A dummy command totest connections.
SELECT 1
connection-properties JDBC connectionproperties.
metadata-provider Java class that providesdatabase metadata.
BasicJDBCMetadataProvider
sql-filter Java class that generatesSQL.
BasicSQLFilter
sql-runtime Java class that handlesSQL execution.
BasicSQLRuntime
358
TIBCO Spotfire® Server and Environment Installation and Administration
Setting Description Default value
fetch-size A fetch size specifies theamount of data fetchedwith each database roundtrip for a query. Thespecified value is shownas the default value inInformation Designer.May be changed atinstance level.
10000
batch-size A batch size specifies theamount of data in eachbatch update. Thespecified value is shownas the default value inInformation Designer.May be changed atinstance level.
100
max-column-name-length The maximum length of adatabase column name.This limit is used whencreating temporary tables.
30
table-types Specify which table typesto retrieve.
TABLE, VIEW
supports-catalogs Tells if the driver supportscatalogs.
true
supports-schemas Tells if the driver supportsschemas.
true
supports-procedures Tells if the driver supportsstored procedures.
false
supports-distinct Tells if the driver supportsdistinct option in SQLqueries.
true
supports-order-by Tells if the driver supportsorder-by option in SQLqueries.
true
column-name-pattern Determines how a columnname is written in the SQLquery.
"$$name$$"
table-name-pattern Determines how a tablename is written in the SQLquery.
"$$name$$"
359
TIBCO Spotfire® Server and Environment Installation and Administration
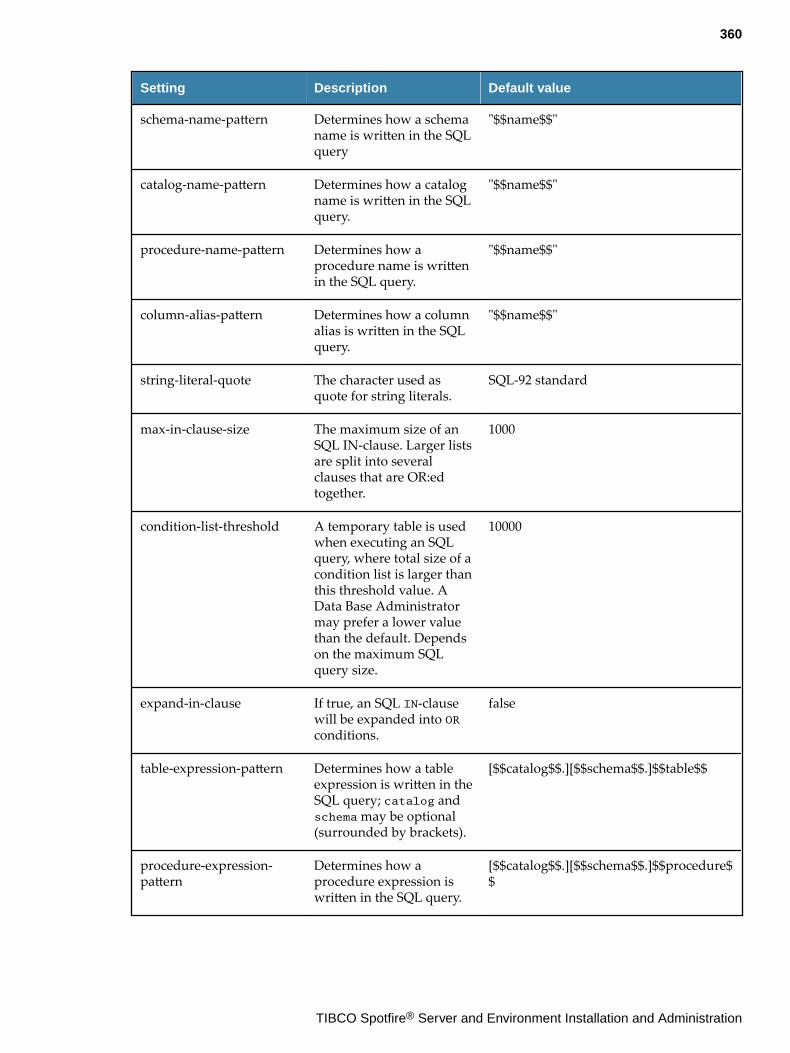
Setting Description Default value
schema-name-pattern Determines how a schemaname is written in the SQLquery
"$$name$$"
catalog-name-pattern Determines how a catalogname is written in the SQLquery.
"$$name$$"
procedure-name-pattern Determines how aprocedure name is writtenin the SQL query.
"$$name$$"
column-alias-pattern Determines how a columnalias is written in the SQLquery.
"$$name$$"
string-literal-quote The character used asquote for string literals.
SQL-92 standard
max-in-clause-size The maximum size of anSQL IN-clause. Larger listsare split into severalclauses that are OR:edtogether.
1000
condition-list-threshold A temporary table is usedwhen executing an SQLquery, where total size of acondition list is larger thanthis threshold value. AData Base Administratormay prefer a lower valuethan the default. Dependson the maximum SQLquery size.
10000
expand-in-clause If true, an SQL IN-clausewill be expanded into ORconditions.
false
table-expression-pattern Determines how a tableexpression is written in theSQL query; catalog andschema may be optional(surrounded by brackets).
[$$catalog$$.][$$schema$$.]$$table$$
procedure-expression-pattern
Determines how aprocedure expression iswritten in the SQL query.
[$$catalog$$.][$$schema$$.]$$procedure$$
360
TIBCO Spotfire® Server and Environment Installation and Administration
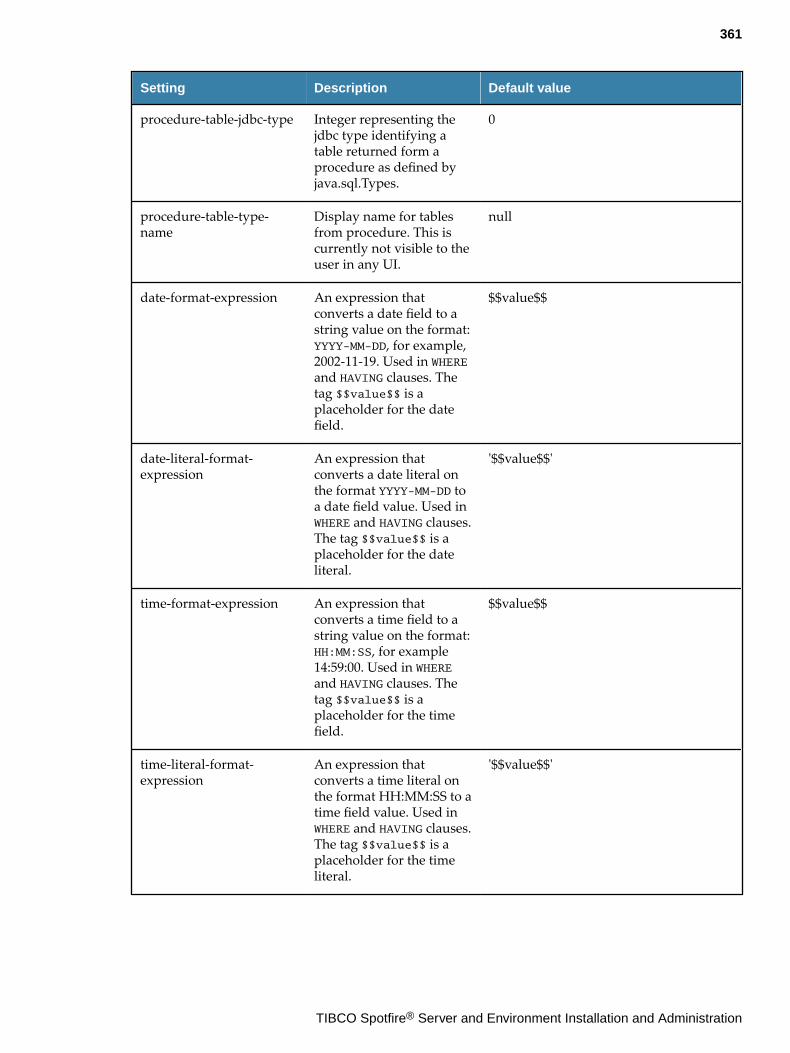
Setting Description Default value
procedure-table-jdbc-type Integer representing thejdbc type identifying atable returned form aprocedure as defined byjava.sql.Types.
0
procedure-table-type-name
Display name for tablesfrom procedure. This iscurrently not visible to theuser in any UI.
null
date-format-expression An expression thatconverts a date field to astring value on the format:YYYY-MM-DD, for example,2002-11-19. Used in WHEREand HAVING clauses. Thetag $$value$$ is aplaceholder for the datefield.
$$value$$
date-literal-format-expression
An expression thatconverts a date literal onthe format YYYY-MM-DD toa date field value. Used inWHERE and HAVING clauses.The tag $$value$$ is aplaceholder for the dateliteral.
'$$value$$'
time-format-expression An expression thatconverts a time field to astring value on the format:HH:MM:SS, for example14:59:00. Used in WHEREand HAVING clauses. Thetag $$value$$ is aplaceholder for the timefield.
$$value$$
time-literal-format-expression
An expression thatconverts a time literal onthe format HH:MM:SS to atime field value. Used inWHERE and HAVING clauses.The tag $$value$$ is aplaceholder for the timeliteral.
'$$value$$'
361
TIBCO Spotfire® Server and Environment Installation and Administration
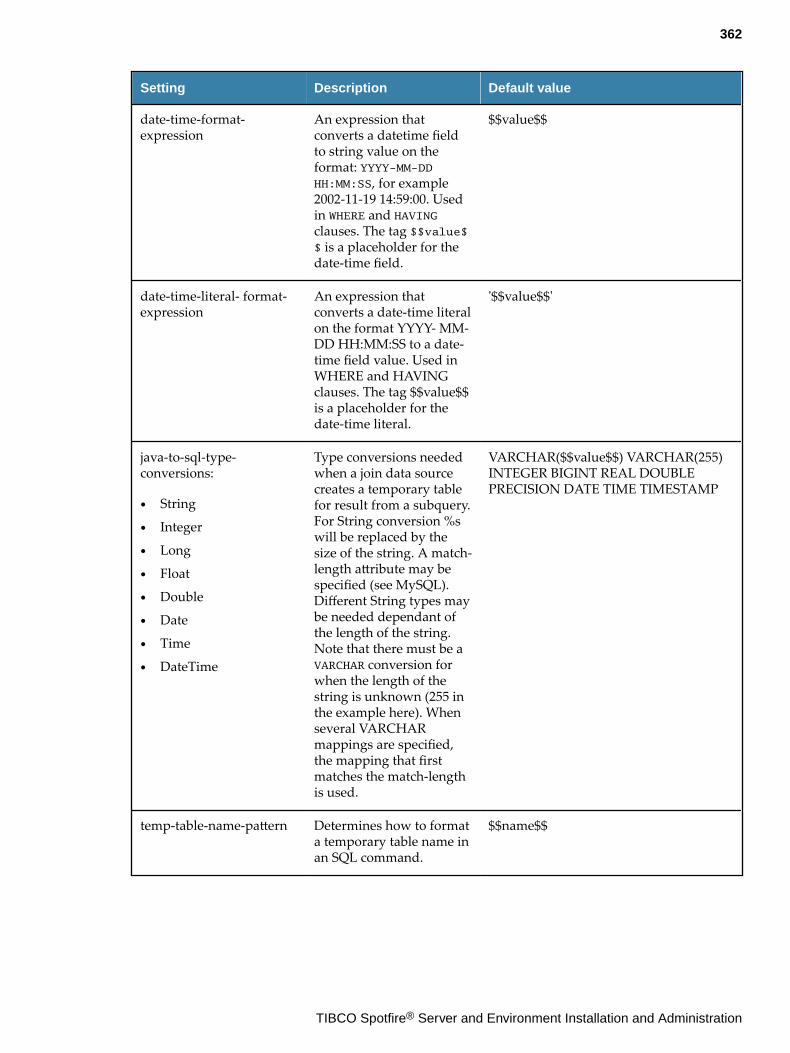
Setting Description Default value
date-time-format-expression
An expression thatconverts a datetime fieldto string value on theformat: YYYY-MM-DDHH:MM:SS, for example2002-11-19 14:59:00. Usedin WHERE and HAVINGclauses. The tag $$value$$ is a placeholder for thedate-time field.
$$value$$
date-time-literal- format-expression
An expression thatconverts a date-time literalon the format YYYY- MM-DD HH:MM:SS to a date-time field value. Used inWHERE and HAVINGclauses. The tag $$value$$is a placeholder for thedate-time literal.
'$$value$$'
java-to-sql-type-conversions:
● String
● Integer
● Long
● Float
● Double
● Date
● Time
● DateTime
Type conversions neededwhen a join data sourcecreates a temporary tablefor result from a subquery.For String conversion %swill be replaced by thesize of the string. A match-length attribute may bespecified (see MySQL).Different String types maybe needed dependant ofthe length of the string.Note that there must be aVARCHAR conversion forwhen the length of thestring is unknown (255 inthe example here). Whenseveral VARCHARmappings are specified,the mapping that firstmatches the match-lengthis used.
VARCHAR($$value$$) VARCHAR(255)INTEGER BIGINT REAL DOUBLEPRECISION DATE TIME TIMESTAMP
temp-table-name-pattern Determines how to formata temporary table name inan SQL command.
$$name$$
362
TIBCO Spotfire® Server and Environment Installation and Administration
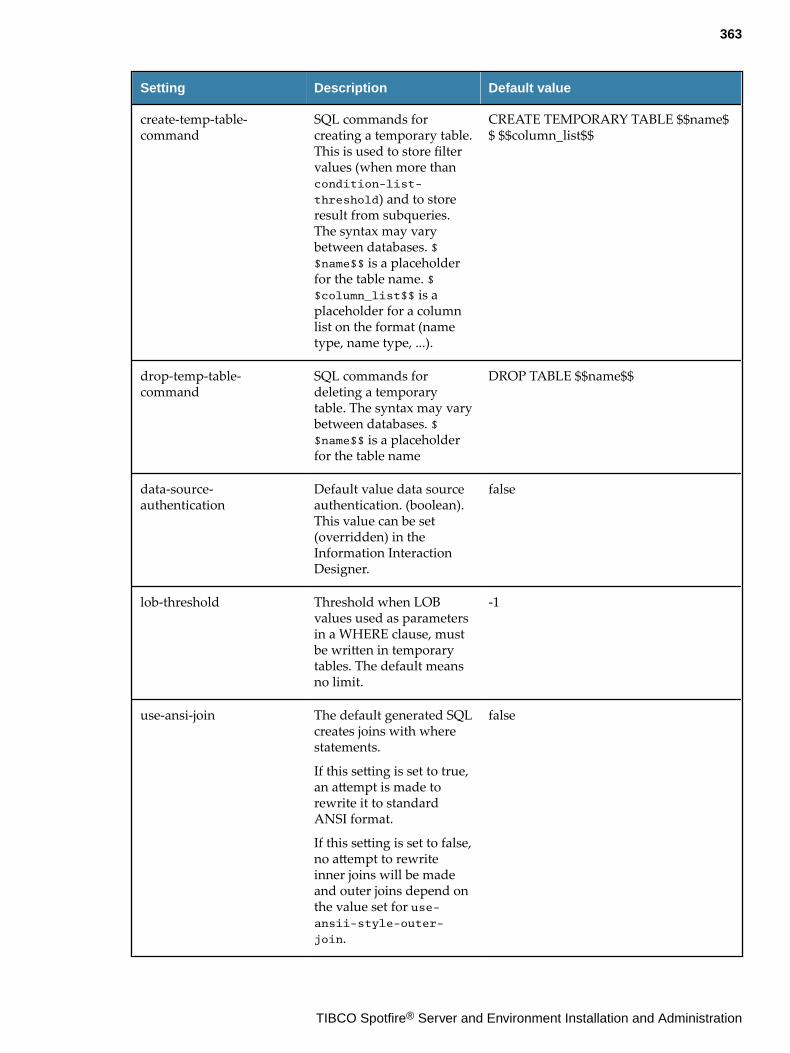
Setting Description Default value
create-temp-table-command
SQL commands forcreating a temporary table.This is used to store filtervalues (when more thancondition-list-
threshold) and to storeresult from subqueries.The syntax may varybetween databases. $$name$$ is a placeholderfor the table name. $$column_list$$ is aplaceholder for a columnlist on the format (nametype, name type, ...).
CREATE TEMPORARY TABLE $$name$$ $$column_list$$
drop-temp-table-command
SQL commands fordeleting a temporarytable. The syntax may varybetween databases. $$name$$ is a placeholderfor the table name
DROP TABLE $$name$$
data-source-authentication
Default value data sourceauthentication. (boolean).This value can be set(overridden) in theInformation InteractionDesigner.
false
lob-threshold Threshold when LOBvalues used as parametersin a WHERE clause, mustbe written in temporarytables. The default meansno limit.
-1
use-ansi-join The default generated SQLcreates joins with wherestatements.
If this setting is set to true,an attempt is made torewrite it to standardANSI format.
If this setting is set to false,no attempt to rewriteinner joins will be madeand outer joins depend onthe value set for use-ansii-style-outer-
join.
false
363
TIBCO Spotfire® Server and Environment Installation and Administration
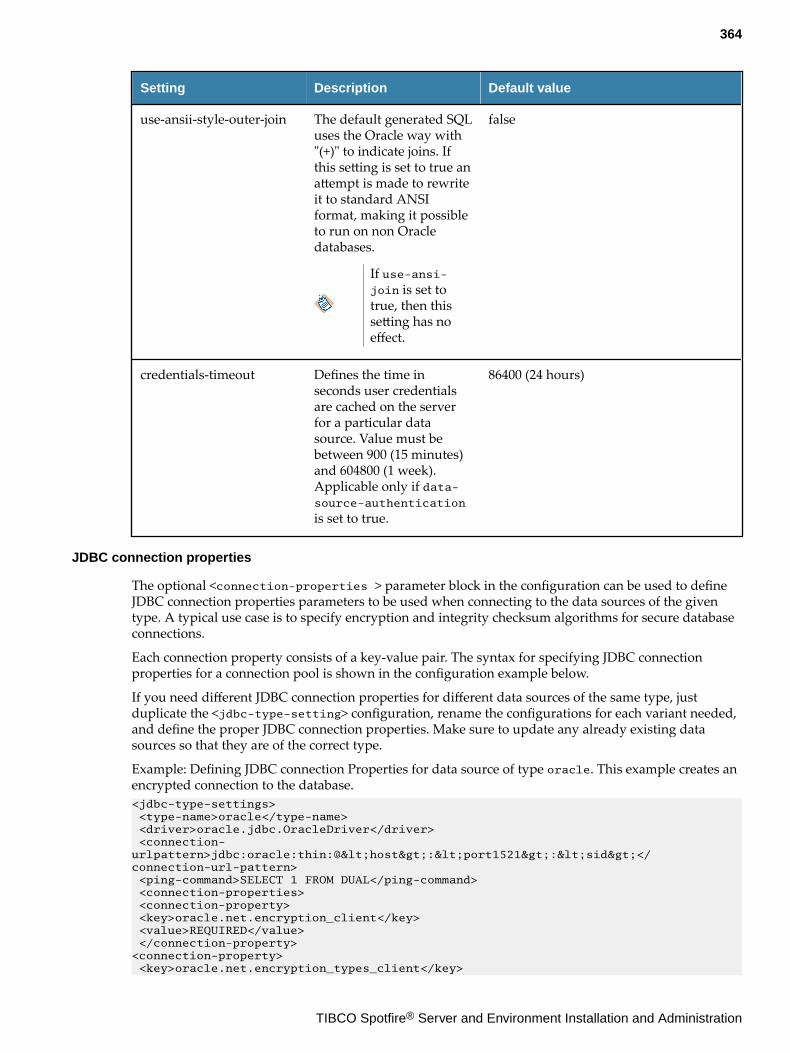
Setting Description Default value
use-ansii-style-outer-join The default generated SQLuses the Oracle way with"(+)" to indicate joins. Ifthis setting is set to true anattempt is made to rewriteit to standard ANSIformat, making it possibleto run on non Oracledatabases.
If use-ansi-join is set totrue, then thissetting has noeffect.
false
credentials-timeout Defines the time inseconds user credentialsare cached on the serverfor a particular datasource. Value must bebetween 900 (15 minutes)and 604800 (1 week).Applicable only if data-source-authentication
is set to true.
86400 (24 hours)
JDBC connection properties
The optional <connection-properties > parameter block in the configuration can be used to defineJDBC connection properties parameters to be used when connecting to the data sources of the giventype. A typical use case is to specify encryption and integrity checksum algorithms for secure databaseconnections.
Each connection property consists of a key-value pair. The syntax for specifying JDBC connectionproperties for a connection pool is shown in the configuration example below.
If you need different JDBC connection properties for different data sources of the same type, justduplicate the <jdbc-type-setting> configuration, rename the configurations for each variant needed,and define the proper JDBC connection properties. Make sure to update any already existing datasources so that they are of the correct type.
Example: Defining JDBC connection Properties for data source of type oracle. This example creates anencrypted connection to the database.<jdbc-type-settings> <type-name>oracle</type-name> <driver>oracle.jdbc.OracleDriver</driver> <connection-urlpattern>jdbc:oracle:thin:@<host>:<port1521>:<sid></connection-url-pattern> <ping-command>SELECT 1 FROM DUAL</ping-command> <connection-properties> <connection-property> <key>oracle.net.encryption_client</key> <value>REQUIRED</value> </connection-property><connection-property> <key>oracle.net.encryption_types_client</key>
364
TIBCO Spotfire® Server and Environment Installation and Administration
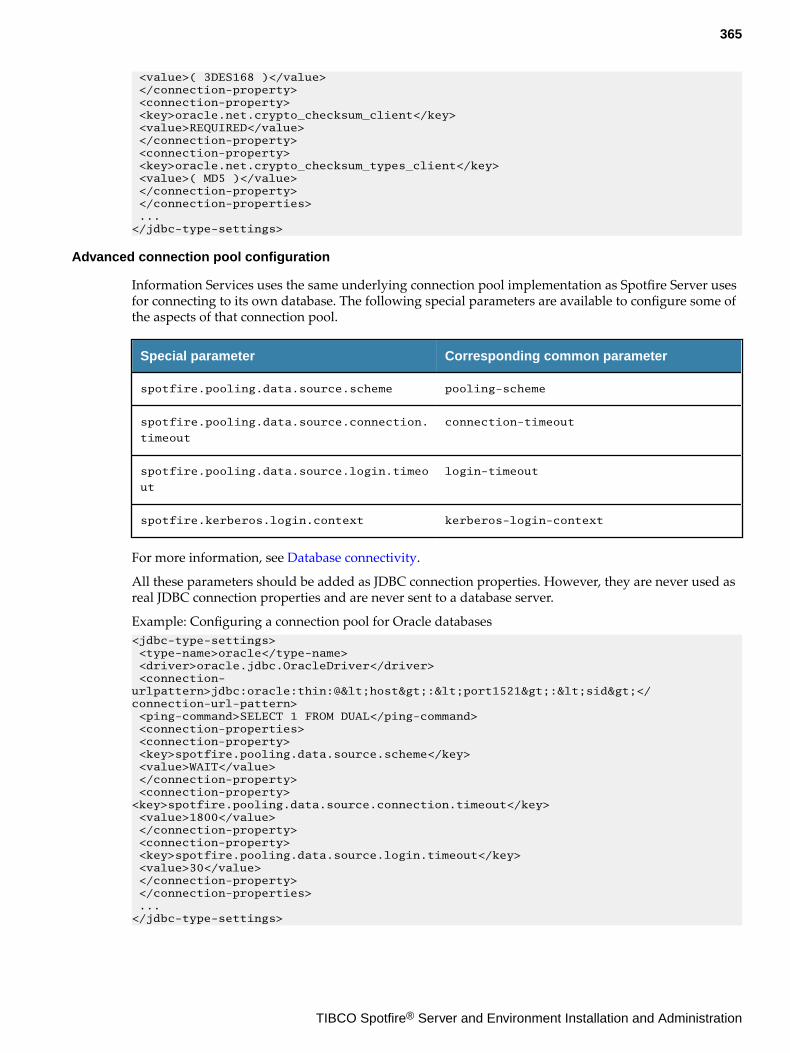
<value>( 3DES168 )</value> </connection-property> <connection-property> <key>oracle.net.crypto_checksum_client</key> <value>REQUIRED</value> </connection-property> <connection-property> <key>oracle.net.crypto_checksum_types_client</key> <value>( MD5 )</value> </connection-property> </connection-properties> ...</jdbc-type-settings>
Advanced connection pool configuration
Information Services uses the same underlying connection pool implementation as Spotfire Server usesfor connecting to its own database. The following special parameters are available to configure some ofthe aspects of that connection pool.
Special parameter Corresponding common parameter
spotfire.pooling.data.source.scheme pooling-scheme
spotfire.pooling.data.source.connection.
timeout
connection-timeout
spotfire.pooling.data.source.login.timeo
ut
login-timeout
spotfire.kerberos.login.context kerberos-login-context
For more information, see Database connectivity.
All these parameters should be added as JDBC connection properties. However, they are never used asreal JDBC connection properties and are never sent to a database server.
Example: Configuring a connection pool for Oracle databases<jdbc-type-settings> <type-name>oracle</type-name> <driver>oracle.jdbc.OracleDriver</driver> <connection-urlpattern>jdbc:oracle:thin:@<host>:<port1521>:<sid></connection-url-pattern> <ping-command>SELECT 1 FROM DUAL</ping-command> <connection-properties> <connection-property> <key>spotfire.pooling.data.source.scheme</key> <value>WAIT</value> </connection-property> <connection-property><key>spotfire.pooling.data.source.connection.timeout</key> <value>1800</value> </connection-property> <connection-property> <key>spotfire.pooling.data.source.login.timeout</key> <value>30</value> </connection-property> </connection-properties> ...</jdbc-type-settings>
365
TIBCO Spotfire® Server and Environment Installation and Administration
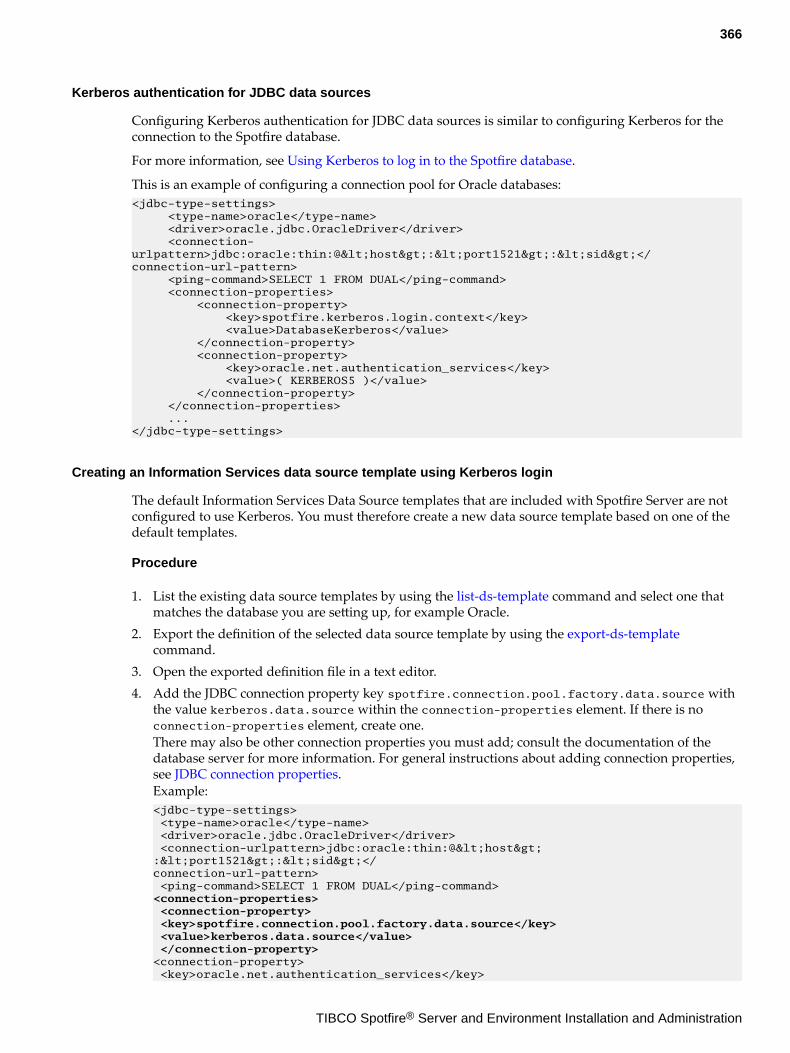
Kerberos authentication for JDBC data sources
Configuring Kerberos authentication for JDBC data sources is similar to configuring Kerberos for theconnection to the Spotfire database.
For more information, see Using Kerberos to log in to the Spotfire database.
This is an example of configuring a connection pool for Oracle databases:<jdbc-type-settings> <type-name>oracle</type-name> <driver>oracle.jdbc.OracleDriver</driver> <connection-urlpattern>jdbc:oracle:thin:@<host>:<port1521>:<sid></connection-url-pattern> <ping-command>SELECT 1 FROM DUAL</ping-command> <connection-properties> <connection-property> <key>spotfire.kerberos.login.context</key> <value>DatabaseKerberos</value> </connection-property> <connection-property> <key>oracle.net.authentication_services</key> <value>( KERBEROS5 )</value> </connection-property> </connection-properties> ...</jdbc-type-settings>
Creating an Information Services data source template using Kerberos login
The default Information Services Data Source templates that are included with Spotfire Server are notconfigured to use Kerberos. You must therefore create a new data source template based on one of thedefault templates.
Procedure
1. List the existing data source templates by using the list-ds-template command and select one thatmatches the database you are setting up, for example Oracle.
2. Export the definition of the selected data source template by using the export-ds-templatecommand.
3. Open the exported definition file in a text editor.4. Add the JDBC connection property key spotfire.connection.pool.factory.data.source with
the value kerberos.data.source within the connection-properties element. If there is noconnection-properties element, create one.There may also be other connection properties you must add; consult the documentation of thedatabase server for more information. For general instructions about adding connection properties,see JDBC connection properties.Example:<jdbc-type-settings> <type-name>oracle</type-name> <driver>oracle.jdbc.OracleDriver</driver> <connection-urlpattern>jdbc:oracle:thin:@<host>:<port1521>:<sid></connection-url-pattern> <ping-command>SELECT 1 FROM DUAL</ping-command><connection-properties> <connection-property> <key>spotfire.connection.pool.factory.data.source</key> <value>kerberos.data.source</value> </connection-property><connection-property> <key>oracle.net.authentication_services</key>
366
TIBCO Spotfire® Server and Environment Installation and Administration
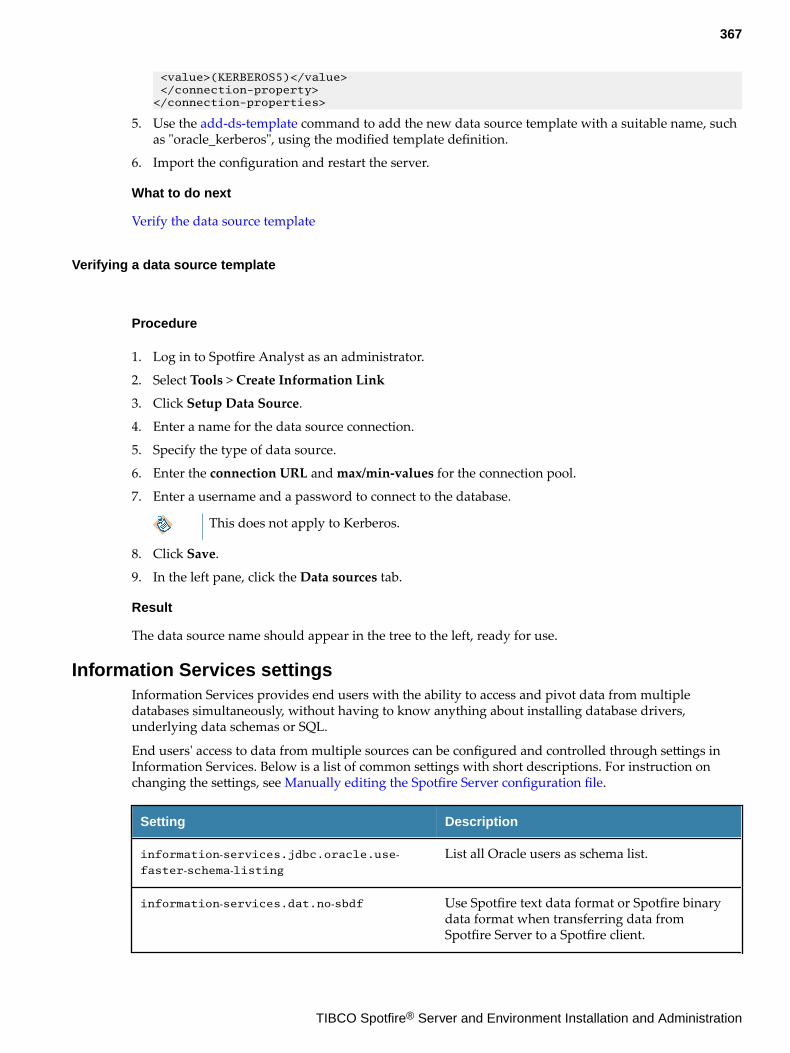
<value>(KERBEROS5)</value> </connection-property></connection-properties>
5. Use the add-ds-template command to add the new data source template with a suitable name, suchas "oracle_kerberos", using the modified template definition.
6. Import the configuration and restart the server.
What to do next
Verify the data source template
Verifying a data source template
Procedure
1. Log in to Spotfire Analyst as an administrator.
2. Select Tools > Create Information Link
3. Click Setup Data Source.
4. Enter a name for the data source connection.
5. Specify the type of data source.
6. Enter the connection URL and max/min-values for the connection pool.
7. Enter a username and a password to connect to the database.
This does not apply to Kerberos.
8. Click Save.
9. In the left pane, click the Data sources tab.
Result
The data source name should appear in the tree to the left, ready for use.
Information Services settingsInformation Services provides end users with the ability to access and pivot data from multipledatabases simultaneously, without having to know anything about installing database drivers,underlying data schemas or SQL.
End users' access to data from multiple sources can be configured and controlled through settings inInformation Services. Below is a list of common settings with short descriptions. For instruction onchanging the settings, see Manually editing the Spotfire Server configuration file.
Setting Description
information‐services.jdbc.oracle.use‐faster‐schema‐listing
List all Oracle users as schema list.
information‐services.dat.no‐sbdf Use Spotfire text data format or Spotfire binarydata format when transferring data fromSpotfire Server to a Spotfire client.
367
TIBCO Spotfire® Server and Environment Installation and Administration

Setting Description
information‐services.runtime‐query‐validation
Validate information link prior to execution.
information‐services.dat.data‐block‐queue‐size
Maximum number of queued (not yet consumedby client) data blocks per job.
information‐services.dat.idle‐limit Maximum idle time in seconds before a job isgarbage collected.
information‐services.dat.max‐field‐size Maximum size (in Megabytes) for a data cell.
information‐services.dat.max‐jobs Maximum number of concurrent jobs.
information‐services.dat.max‐timeout Maximum value of timeout parameters; must beat least 60 seconds less than the idle limit.
information‐services.dat.pivot.thread‐pool‐size
Maximum number of pivot worker threads.
information‐services.dat.reshape.max‐memory‐usage
Maximum memory available to a reshapeoperation.
information‐services.dat.retrieve‐timeout Maximum time allowed for retrieve requests, inseconds.
information‐services.dat.thread‐pool‐size Maximum number of job worker threads.
information‐services.ds.credentials‐cache‐timeout
The default expiration time in seconds forcached data source authentication credentials.
information‐services.ds.credentials‐provider
The class used to provide credentials for datasources that require authentication.
information‐services.jdbc.connection‐login‐timeout
Login timeout for JDBC database connections.
information‐services.jdbc.oracle.temp‐table‐grantee
Selecting privileges on temporary tables usedduring query execution will be granted to thisuser or role. The temporary tables are only validduring the query transaction.
information‐services.jdbc.use‐inner‐select‐in‐clause
This setting affects the behavior when thenumber of filter values sent to a jdbc data sourceexceeds the condition-list-threshold.
If set to false (default): all data rows matchingany duplicate filter values will be duplicated,
If set to true: data rows matching any duplicateswill not be duplicated (the same behavior aswhen the number of filter values is below thecondition-list-threshold limit), but there is alarge performance penalty.
368
TIBCO Spotfire® Server and Environment Installation and Administration
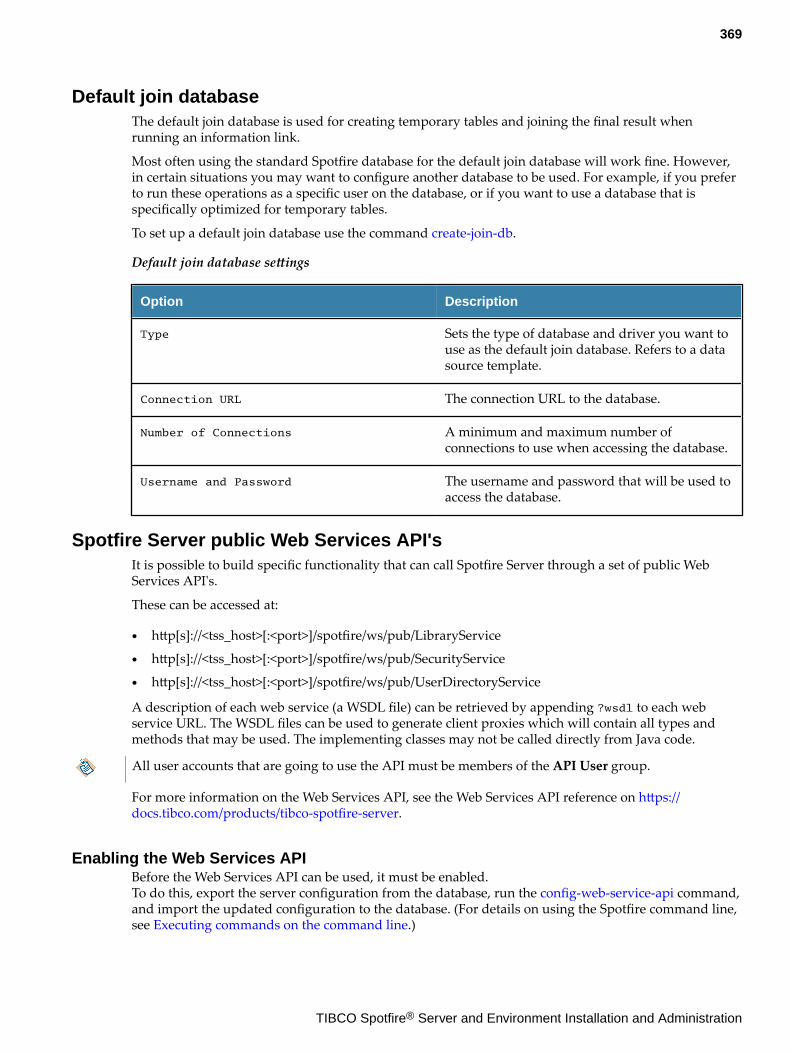
Default join databaseThe default join database is used for creating temporary tables and joining the final result whenrunning an information link.
Most often using the standard Spotfire database for the default join database will work fine. However,in certain situations you may want to configure another database to be used. For example, if you preferto run these operations as a specific user on the database, or if you want to use a database that isspecifically optimized for temporary tables.
To set up a default join database use the command create-join-db.
Default join database settings
Option Description
Type Sets the type of database and driver you want touse as the default join database. Refers to a datasource template.
Connection URL The connection URL to the database.
Number of Connections A minimum and maximum number ofconnections to use when accessing the database.
Username and Password The username and password that will be used toaccess the database.
Spotfire Server public Web Services API'sIt is possible to build specific functionality that can call Spotfire Server through a set of public WebServices API's.
These can be accessed at:
● http[s]://<tss_host>[:<port>]/spotfire/ws/pub/LibraryService
● http[s]://<tss_host>[:<port>]/spotfire/ws/pub/SecurityService
● http[s]://<tss_host>[:<port>]/spotfire/ws/pub/UserDirectoryService
A description of each web service (a WSDL file) can be retrieved by appending ?wsdl to each webservice URL. The WSDL files can be used to generate client proxies which will contain all types andmethods that may be used. The implementing classes may not be called directly from Java code.
All user accounts that are going to use the API must be members of the API User group.
For more information on the Web Services API, see the Web Services API reference on https://docs.tibco.com/products/tibco-spotfire-server.
Enabling the Web Services APIBefore the Web Services API can be used, it must be enabled.To do this, export the server configuration from the database, run the config-web-service-api command,and import the updated configuration to the database. (For details on using the Spotfire command line,see Executing commands on the command line.)
369
TIBCO Spotfire® Server and Environment Installation and Administration
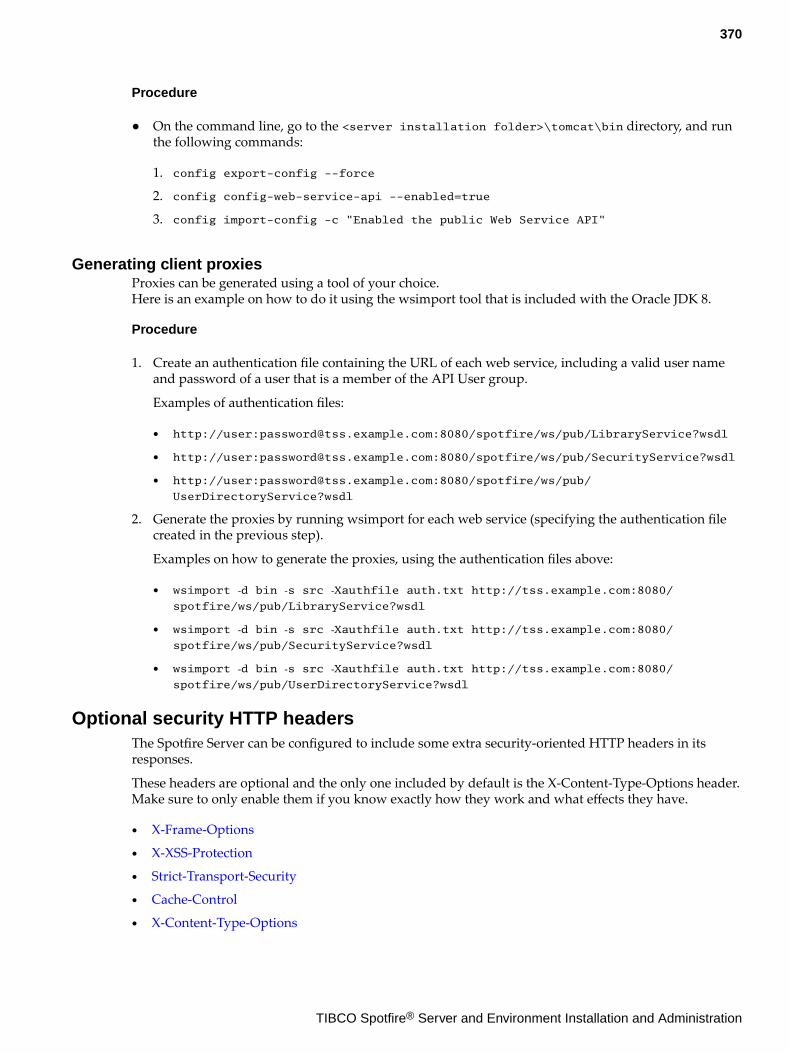
Procedure
● On the command line, go to the <server installation folder>\tomcat\bin directory, and runthe following commands:
1. config export-config --force
2. config config-web-service-api --enabled=true
3. config import-config -c "Enabled the public Web Service API"
Generating client proxiesProxies can be generated using a tool of your choice.Here is an example on how to do it using the wsimport tool that is included with the Oracle JDK 8.
Procedure
1. Create an authentication file containing the URL of each web service, including a valid user nameand password of a user that is a member of the API User group.
Examples of authentication files:
● http://user:[email protected]:8080/spotfire/ws/pub/LibraryService?wsdl
● http://user:[email protected]:8080/spotfire/ws/pub/SecurityService?wsdl
● http://user:[email protected]:8080/spotfire/ws/pub/
UserDirectoryService?wsdl
2. Generate the proxies by running wsimport for each web service (specifying the authentication filecreated in the previous step).
Examples on how to generate the proxies, using the authentication files above:
● wsimport ‐d bin ‐s src ‐Xauthfile auth.txt http://tss.example.com:8080/spotfire/ws/pub/LibraryService?wsdl
● wsimport ‐d bin ‐s src ‐Xauthfile auth.txt http://tss.example.com:8080/spotfire/ws/pub/SecurityService?wsdl
● wsimport ‐d bin ‐s src ‐Xauthfile auth.txt http://tss.example.com:8080/spotfire/ws/pub/UserDirectoryService?wsdl
Optional security HTTP headersThe Spotfire Server can be configured to include some extra security-oriented HTTP headers in itsresponses.
These headers are optional and the only one included by default is the X-Content-Type-Options header.Make sure to only enable them if you know exactly how they work and what effects they have.
● X-Frame-Options
● X-XSS-Protection
● Strict-Transport-Security
● Cache-Control
● X-Content-Type-Options
370
TIBCO Spotfire® Server and Environment Installation and Administration
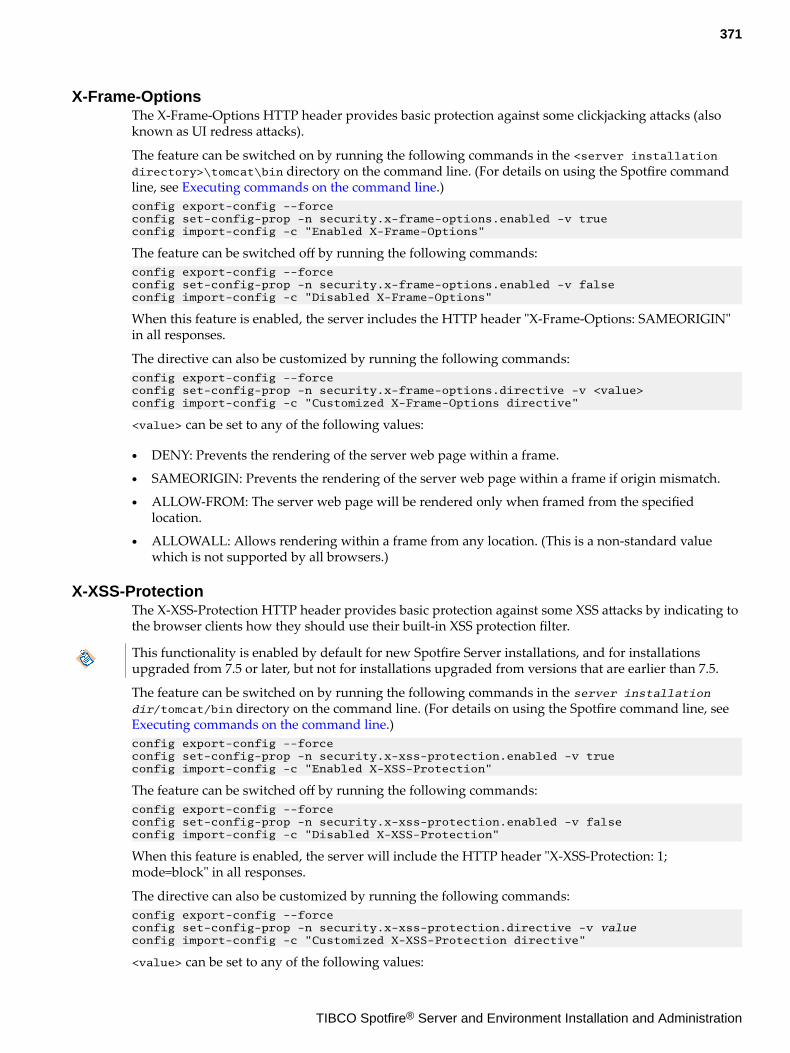
X-Frame-OptionsThe X-Frame-Options HTTP header provides basic protection against some clickjacking attacks (alsoknown as UI redress attacks).
The feature can be switched on by running the following commands in the <server installationdirectory>\tomcat\bin directory on the command line. (For details on using the Spotfire commandline, see Executing commands on the command line.)config export-config --forceconfig set-config-prop -n security.x-frame-options.enabled -v trueconfig import-config -c "Enabled X-Frame-Options"
The feature can be switched off by running the following commands:config export-config --forceconfig set-config-prop -n security.x-frame-options.enabled -v falseconfig import-config -c "Disabled X-Frame-Options"
When this feature is enabled, the server includes the HTTP header "X-Frame-Options: SAMEORIGIN"in all responses.
The directive can also be customized by running the following commands:config export-config --forceconfig set-config-prop -n security.x-frame-options.directive -v <value>config import-config -c "Customized X-Frame-Options directive"
<value> can be set to any of the following values:
● DENY: Prevents the rendering of the server web page within a frame.
● SAMEORIGIN: Prevents the rendering of the server web page within a frame if origin mismatch.
● ALLOW-FROM: The server web page will be rendered only when framed from the specifiedlocation.
● ALLOWALL: Allows rendering within a frame from any location. (This is a non-standard valuewhich is not supported by all browsers.)
X-XSS-ProtectionThe X-XSS-Protection HTTP header provides basic protection against some XSS attacks by indicating tothe browser clients how they should use their built-in XSS protection filter.
This functionality is enabled by default for new Spotfire Server installations, and for installationsupgraded from 7.5 or later, but not for installations upgraded from versions that are earlier than 7.5.
The feature can be switched on by running the following commands in the server installationdir/tomcat/bin directory on the command line. (For details on using the Spotfire command line, see Executing commands on the command line.)config export-config --forceconfig set-config-prop -n security.x-xss-protection.enabled -v trueconfig import-config -c "Enabled X-XSS-Protection"
The feature can be switched off by running the following commands:config export-config --forceconfig set-config-prop -n security.x-xss-protection.enabled -v falseconfig import-config -c "Disabled X-XSS-Protection"
When this feature is enabled, the server will include the HTTP header "X-XSS-Protection: 1;mode=block" in all responses.
The directive can also be customized by running the following commands:config export-config --forceconfig set-config-prop -n security.x-xss-protection.directive -v valueconfig import-config -c "Customized X-XSS-Protection directive"
<value> can be set to any of the following values:
371
TIBCO Spotfire® Server and Environment Installation and Administration
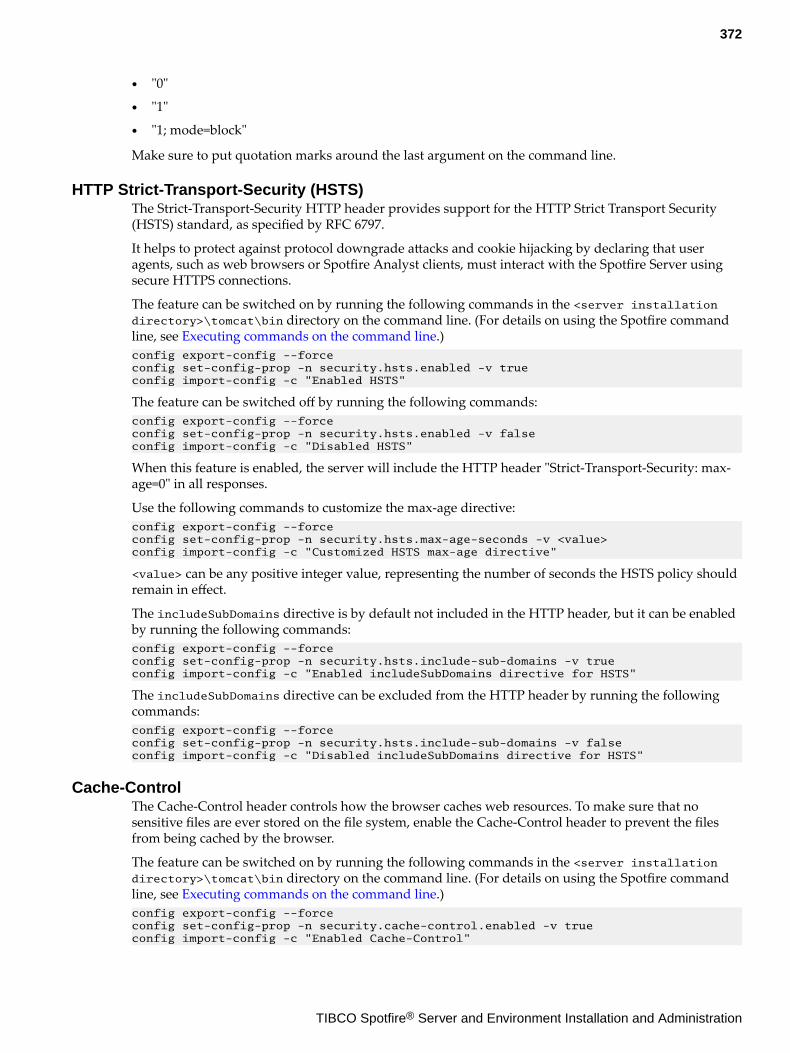
● "0"
● "1"
● "1; mode=block"
Make sure to put quotation marks around the last argument on the command line.
HTTP Strict-Transport-Security (HSTS)The Strict-Transport-Security HTTP header provides support for the HTTP Strict Transport Security(HSTS) standard, as specified by RFC 6797.
It helps to protect against protocol downgrade attacks and cookie hijacking by declaring that useragents, such as web browsers or Spotfire Analyst clients, must interact with the Spotfire Server usingsecure HTTPS connections.
The feature can be switched on by running the following commands in the <server installationdirectory>\tomcat\bin directory on the command line. (For details on using the Spotfire commandline, see Executing commands on the command line.)config export-config --forceconfig set-config-prop -n security.hsts.enabled -v trueconfig import-config -c "Enabled HSTS"
The feature can be switched off by running the following commands:config export-config --forceconfig set-config-prop -n security.hsts.enabled -v falseconfig import-config -c "Disabled HSTS"
When this feature is enabled, the server will include the HTTP header "Strict-Transport-Security: max-age=0" in all responses.
Use the following commands to customize the max-age directive:config export-config --forceconfig set-config-prop -n security.hsts.max-age-seconds -v <value>config import-config -c "Customized HSTS max-age directive"
<value> can be any positive integer value, representing the number of seconds the HSTS policy shouldremain in effect.
The includeSubDomains directive is by default not included in the HTTP header, but it can be enabledby running the following commands:config export-config --forceconfig set-config-prop -n security.hsts.include-sub-domains -v trueconfig import-config -c "Enabled includeSubDomains directive for HSTS"
The includeSubDomains directive can be excluded from the HTTP header by running the followingcommands:config export-config --forceconfig set-config-prop -n security.hsts.include-sub-domains -v falseconfig import-config -c "Disabled includeSubDomains directive for HSTS"
Cache-ControlThe Cache-Control header controls how the browser caches web resources. To make sure that nosensitive files are ever stored on the file system, enable the Cache-Control header to prevent the filesfrom being cached by the browser.
The feature can be switched on by running the following commands in the <server installationdirectory>\tomcat\bin directory on the command line. (For details on using the Spotfire commandline, see Executing commands on the command line.)config export-config --forceconfig set-config-prop -n security.cache-control.enabled -v trueconfig import-config -c "Enabled Cache-Control"
372
TIBCO Spotfire® Server and Environment Installation and Administration
The feature can be switched off by running the following commands:config export-config --forceconfig set-config-prop -n security.cache-control.enabled -v falseconfig import-config -c "Disabled Cache-Control"
When this feature is enabled, the server will include the HTTP header "Cache-Control: no-cache, no-store, must-revalidate" in all responses.
Use the following commands to customize the header directive:config export-config --forceconfig set-config-prop -n security.cache-control.directive -v <value>config import-config -c "Customized Cache-Control directive"
Replace <value> with any valid cache-control header directive.
You cannot customize the Cache-Control header for files ending with ".html" or attachments withcontent type "text/html" or "text/plain". These files will always have the value "no-cache, no-store, must-revalidate". They will also get the "Pragma" header set to "no-cache" and the "Expires" header set to "0".The Pragma headers are legacy HTTP 1.0 headers and serve the same purpose as the "Cache-Control"header in HTTP 1.1.
X-Content-Type-OptionsThe X-Content-Type-Options HTTP header can be used to prevent user agents, such as web browsers orSpotfire Analyst clients, from guessing the MIME content type. Instead, they will always use thedeclared content type.
The X-Content-Type-Options header is enabled by default.
The feature can be switched off by running the following commands in the <server installationdirectory>\tomcat\bin directory on the command line:config export-config --forceconfig set-config-prop -n security.x-content-type-options.enabled -v falseconfig import-config -c "Disabled X-Content-Type-Options"
If switched off, the feature can be switched on again by running the following commands:config export-config --forceconfig set-config-prop -n security.x-content-type-options.enabled -v trueconfig import-config -c "Enabled X-Content-Type-Options"
For details on using the Spotfire command line, See Executing commands on the command line.
Changing how long the server waits before assuming that a node manageris offline
You can configure the amount of time that Spotfire Server waits for a node manager to signal itspresence. If the node manager does not send a signal within the configured time period, the serverassumes that the node is offline. For setups that are experiencing a heavy load, you can raise this valueto avoid unnecessarily restarting a node manager.The default value for this property is 12,000 milliseconds (12 seconds).
Procedure
1. Open a command line and export the active server configuration by using the export-configcommand; for additional information, see Executing commands on the command line.
2. On the command line, enter the following command:config set-config-prop --name=nodemanager.heartbeat.threshold --value=X
where X is the length of time, in milliseconds, that the server will wait for the node manager signal.
3. Import the configuration back to the Spotfire database by using the import-config command.
4. Restart the Spotfire Server service.
373
TIBCO Spotfire® Server and Environment Installation and Administration
Setting the maximum execution time for an Automation Services jobThis Spotfire Server property indicates how long an Automation Services job can run before the servercancels the job. The default setting for this property is 259,200 seconds (72 hours).
Procedure
1. Open a command-line interface and export the active configuration (the configuration.xml file)by using the export-config command.
2. Enter the following command:config set-config-prop --name="automation-services.max-job-execution-time" --value="X"
where "X" is the length of time, in seconds, that an Automation Services job is permitted to run.
3. Import the configuration file back to the Spotfire database by using the import-config command.
4. Restart Spotfire Server.
Setting the maximum inactivity time for an Automation Services jobThis Spotfire Server property indicates how long an Automation Services job can remain inactive beforethe server cancels the job. The default setting for this property is 259,200 seconds (72 hours).
Procedure
1. Open a command-line interface and export the active configuration (the configuration.xml file)by using the export-config command.
2. Enter the following command:config set-config-prop --name="automation-services.job-inactivity-timeout" --value="X"
where "X" is the time period, in seconds, after which the server will cancel an inactive AutomationServices job.
3. Import the configuration file back to the Spotfire database by using the import-config command.
4. Restart Spotfire Server.
Absolute session timeout and idle session timeoutAbsolute session timeout is a recommended security feature, while idle session timeout is mainly aresource management feature.
Absolute session timeout requires all Spotfire users to log in to the program again after the configuredamount of time. This is true whether a user has been working in Spotfire the entire time, has left thecomputer unattended, or has shut the computer down. The data associated with the session remainsavailable to the user so that they can log back in (on the same computer or a different computer) andcontinue working. The absolute session timeout default is 1,440 minutes (24 hours).
However, because open user sessions tie up system resources that could be used elsewhere, the idlesession timeout begins its countdown when a user shuts down their computer or the computer is nolonger connected to the Spotfire network. If the user does not reactivate their session before the idlesession timeout has been reached, the data associated with the session is destroyed and the session'sresources become available for other sessions. The idle session timeout default is 30 minutes.
The session is not considered "idle" until the computer shuts down or disconnects from the networkbecause Spotfire Web Player, like many other applications, makes periodic background requests to theserver.
374
TIBCO Spotfire® Server and Environment Installation and Administration
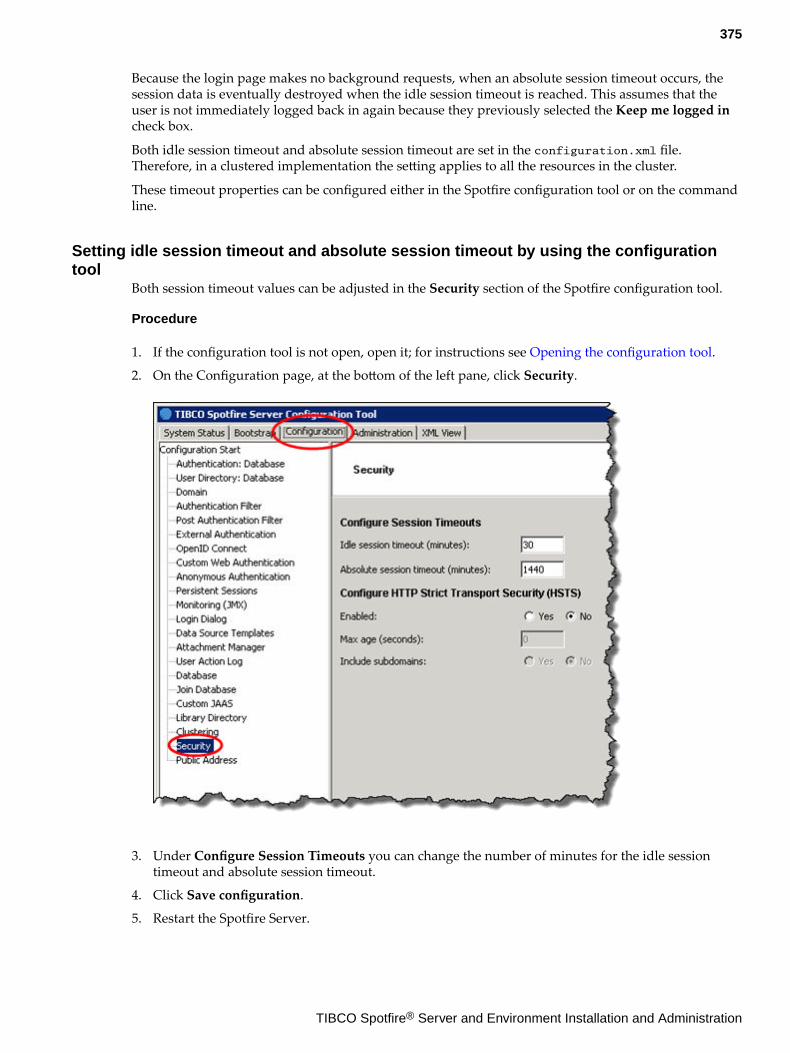
Because the login page makes no background requests, when an absolute session timeout occurs, thesession data is eventually destroyed when the idle session timeout is reached. This assumes that theuser is not immediately logged back in again because they previously selected the Keep me logged incheck box.
Both idle session timeout and absolute session timeout are set in the configuration.xml file.Therefore, in a clustered implementation the setting applies to all the resources in the cluster.
These timeout properties can be configured either in the Spotfire configuration tool or on the commandline.
Setting idle session timeout and absolute session timeout by using the configurationtool
Both session timeout values can be adjusted in the Security section of the Spotfire configuration tool.
Procedure
1. If the configuration tool is not open, open it; for instructions see Opening the configuration tool.
2. On the Configuration page, at the bottom of the left pane, click Security.
3. Under Configure Session Timeouts you can change the number of minutes for the idle sessiontimeout and absolute session timeout.
4. Click Save configuration.
5. Restart the Spotfire Server.
375
TIBCO Spotfire® Server and Environment Installation and Administration
Setting idle session timeout by using the command lineThe primary function of the idle session timeout is to release the resources that are associated with auser session when the computer is inactive for the configured amount of time. The default is 30minutes.
Procedure
1. Open a command-line interface and export the active configuration (the configuration.xml file)by using the export-config command. (For details on using the Spotfire command line, see Executing commands on the command line.)
2. On the command line, enter the following command:config set-config-prop -n security.idle-session-timeout -v XX
where XX is the number of minutes after which an idle user session will be closed.
A negative value for XX indicates that the idle session timeout value that is configured forthe container (in the web.xml file) will be used. A value of 0 indicates that a user sessionwill never be closed based solely on its inactivity.
3. Import the configuration file back to the Spotfire database by using the import-config command.4. Restart the Spotfire Server.
Setting absolute session timeout by using the command lineThe absolute session timeout indicates the number of minutes after which a user must log in to Spotfireagain. The default is 1,440 minutes (24 hours).
Procedure
1. Open a command-line interface and export the active configuration (the configuration.xml file)by using the export-config command. (For details on using the Spotfire command line, see Executing commands on the command line.)
2. On the command line, enter the following command:config set-config-prop -n security.absolute-session-timeout -v XX
where XX is the number of minutes after which a user must log in again.3. Import the configuration file back to the Spotfire database by using the import-config command.4. Restart the Spotfire Server.
Changing whether scheduled updates are sent to exhausted serviceinstances
By default, if all the Web Player instances in an implementation or a site are listed as "exhausted",scheduled update requests for analyses that are not cached will not be sent to a Web Player instanceuntil one becomes available (no longer exhausted). In the same situation, a scheduled update requestfor an analysis that is already cached will be sent to exhausted instances. You can change these defaultsby editing the Spotfire Server configuration file.
Procedure
1. On the server computer, export and open the configuration.xml file. For detailed instructions onworking with this file, see Manually editing the Spotfire Server configuration file.
2. In the configuration.xml file, locate the following section:<scheduled-updates> ...
376
TIBCO Spotfire® Server and Environment Installation and Administration
<performance> <load-on-exhausted-instances>false</load-on-exhausted-instances> <update-exhausted-instances>true</update-exhausted-instances> </performance> ...</scheduled-updates>
3. To allow scheduled update analyses that are not cached to use exhausted Web Player instances,change the load-on-exhausted-instances value to "true".
4. To prevent scheduled update analyses that are cached from using exhausted Web Player instances,change the update-exhausted-instances value to "false".
When a Web Player instance becomes available, the scheduled update is applied only ifthe rule is still scheduled at that time.
5. Save and close the file.
6. Import the file back to the Spotfire database.
7. Restart the server.
Preventing users from opening scheduled update files outside of theirschedule window
Large analysis files are often managed by scheduled updates so that end users can view these fileswithout waiting for them to download. If an end user tries to open one of these scheduled update filesoutside of its schedule window, however, the file can take a long time to open and may significantly tieup system resources. You can configure the server to block end-user access to these files when the filesare not scheduled.
This configuration applies to all scheduled update files. It has no effect on files that are not managed byscheduled updates.
Procedure
1. Open a command-line interface and export the active configuration by using the export-configcommand. (For details on using the Spotfire command line, see Executing commands on thecommand line.)
2. On the command line, enter the following command:config set-config-prop --name=scheduled-updates.performance.deny-open-when-not-scheduled --value=true
For information about the command options, see set-config-prop.
3. Import the configuration file back to the Spotfire database by using the import-config command.
4. Restart the Spotfire Server.
Changing whether recovered rules are automatically enabledWhen an analysis file is deleted from the library, any scheduled update or routing rule for that file fails.If the analysis file is then imported back to its previous location, the rule is recovered but it does notrun because the rule is, by default, in the "disabled" state. You can switch the default for these recoveredrules to "enabled".
Procedure
1. Open a command-line interface and export the active configuration by using the export-configcommand. (For details on using the Spotfire command line, see Executing commands on thecommand line.)
377
TIBCO Spotfire® Server and Environment Installation and Administration
2. On the command line, enter the following command:config set-config-prop --name=scheduled-updates.enable-recovered-rules-automatically --value=true
For information about the command options, see set-config-prop.3. Import the configuration file back to the Spotfire database by using the import-config command.4. Restart the Spotfire Server.
Restarting a node manager to terminate its running jobsUse this procedure to "refresh" a node when its service instances appear to be running jobs that shouldhave terminated.
Procedure
1. Log on with administrator credentials to the computer on which the node manager was installed.2. Open the Windows Services list and stop the "TIBCO Spotfire Node Manager" service.3. Open Windows Task Manager and end all the "Spotfire.Dxp.Worker.Host.exe" processes.4. Restart the "TIBCO Spotfire Node Manager" service.
Increase the number of available sockets on LinuxThe Spotfire Server will open many connections, and each will require a file descriptor. Forperformance and security reasons Linux has a cap on how many connections that can be opened by aprocess per default. This limit might need to be increased.
To change this limit, edit the /etc/security/limits.conf file as root and make the following changesor add the following lines, respectively:spotuser soft nofile 8192spotuser hard nofile 65000
Where spotuser is the account that is running the Spotfire Server.
In this example, 8192 files (which includes sockets) can be opened. The setting should be high enoughfor the system, but not too high. To test the limit without editing the file one can run, for exampleulimit -n 32000
With a value up to to the hard limit to see what the suitable limit is.
The hard limit might be increased if needed but not to more than is given by /proc/sys/fs/file-max.
Switching from online to offline administration helpBy default, the help button on the administration pages of Spotfire Server opens the online version ofthis documentation. If you are unable to use the online version, you can switch to the offline version.
Any updates to this documentation will be available at https://docs.tibco.com/products/tibco-spotfire-server.
Procedure
1. On the computer running Spotfire Server, open a command-line interface and go to the followingdirectory: <server installation dir>/tomcat/bin.
2. On the command line, enter the following commands:config export-config --force
config set-config-prop -n general.applications.admin.use-online-help -v false
config import-config -c "Switching to offline administration help"
378
TIBCO Spotfire® Server and Environment Installation and Administration
3. Restart the Spotfire Server.
Displaying or hiding the Spotfire Server versionYou can configure which users should be able to see information on the Spotfire Server version.
Default mode
By default, information about the Spotfire Server version is present in the About view and in the URLof the online help resources. This information is available to all logged in users. If anonymousauthentication is enabled, the information is also available to anonymous users. Users who have notlogged in cannot access the version information.
To activate the default mode, run the following commands in the <server installation directory>\tomcat\bin directory on the command line:config export-config --forceconfig set-config-prop -n security.version-settings-mode -v defaultconfig import-config -c "Setting the version settings mode to default"
Safe mode
To hide this version information from anonymous users, so that the version information is onlyavailable to logged in users, it is possible to activate a safe mode.
To active the safe mode, run the following commands in the <server installation directory>\tomcat\bin directory on the command line:config export-config --forceconfig set-config-prop -n security.version-settings-mode -v safeconfig import-config -c "Setting the version settings mode to safe"
Unsafe mode
To make the version information available to everyone, including anonymous users as well as userswho have not logged in, it is possible to active an unsafe mode.
To active the unsafe mode, run the following commands in the <server installation directory>\tomcat\bin directory on the command line:config export-config --forceconfig set-config-prop -n security.version-settings-mode -v unsafeconfig import-config -c "Setting the version settings mode to unsafe"
This configuration setting does not affect the web client. See the showAbout and showHelp settings inthe Spotfire.Dxp.Worker.Web.config configuration file for information on how to disable these featuresin the web client.
379
TIBCO Spotfire® Server and Environment Installation and Administration
Contacting support
If you encounter an issue that requires assistance from TIBCO Support, consider including thefollowing information (where applicable to your specific issue) when reporting the issue, to help ensurea quick resolution.
● Describe the issue in detail, including any error messages.
● List all products/components and exact versions involved in the issue.
● When was the issue first observed? Has it ever worked in the past? How often does it occur?
● Were any changes made in the environment (on the Spotfire side or externally, such as changes tothe operating system/web browser/database/anti-virus software, and so on) around the time that theissue started?
● Are the steps needed to reproduce/trigger the issue known? If so, describe them and, if possible,provide any objects (such as analysis files) that are needed to reproduce it.
● Is the extent of the issue known? For example, does it only affect one/some objects (such as specificservers/analysis files/users), while others work? If so, list any objects that are affected, and also stateif there are any known differences between those that work and those that do not.
● Provide logs from the time of the issue. (It is always strongly recommended to submit all availablelogs). A convenient way to gather the server-side logs is by generating a troubleshooting bundle. Formore information, see Troubleshooting bundle.
If you have a way to reproduce the issue, it is recommended to set the logging level toDEBUG (for more information, see Changing server and node logging levels), reproducethe issue, and then provide the captured logs. Remember to reset the logging level afteryou are done.
After you have gathered the information, submit your issue to TIBCO Support using the TIBCOCustomer Support Portal at https://support.tibco.com.
380
TIBCO Spotfire® Server and Environment Installation and Administration
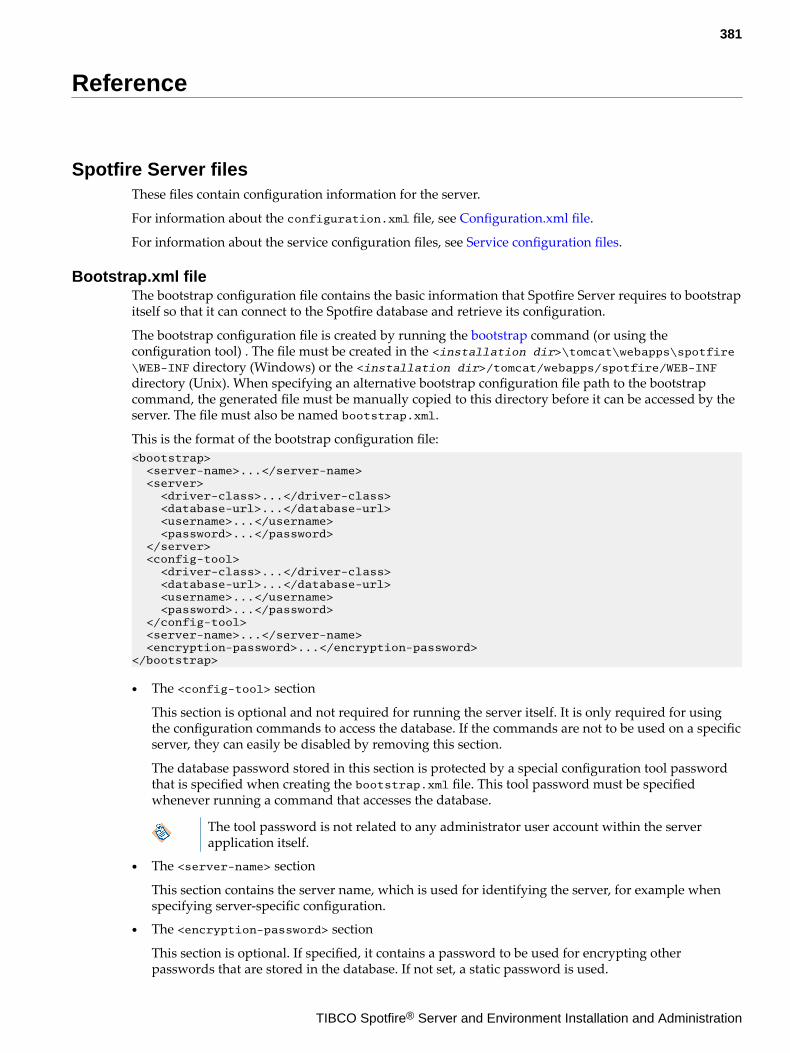
Reference
Spotfire Server filesThese files contain configuration information for the server.
For information about the configuration.xml file, see Configuration.xml file.
For information about the service configuration files, see Service configuration files.
Bootstrap.xml fileThe bootstrap configuration file contains the basic information that Spotfire Server requires to bootstrapitself so that it can connect to the Spotfire database and retrieve its configuration.
The bootstrap configuration file is created by running the bootstrap command (or using theconfiguration tool) . The file must be created in the <installation dir>\tomcat\webapps\spotfire\WEB-INF directory (Windows) or the <installation dir>/tomcat/webapps/spotfire/WEB-INFdirectory (Unix). When specifying an alternative bootstrap configuration file path to the bootstrapcommand, the generated file must be manually copied to this directory before it can be accessed by theserver. The file must also be named bootstrap.xml.
This is the format of the bootstrap configuration file:<bootstrap> <server-name>...</server-name> <server> <driver-class>...</driver-class> <database-url>...</database-url> <username>...</username> <password>...</password> </server> <config-tool> <driver-class>...</driver-class> <database-url>...</database-url> <username>...</username> <password>...</password> </config-tool> <server-name>...</server-name> <encryption-password>...</encryption-password></bootstrap>
● The <config-tool> section
This section is optional and not required for running the server itself. It is only required for usingthe configuration commands to access the database. If the commands are not to be used on a specificserver, they can easily be disabled by removing this section.
The database password stored in this section is protected by a special configuration tool passwordthat is specified when creating the bootstrap.xml file. This tool password must be specifiedwhenever running a command that accesses the database.
The tool password is not related to any administrator user account within the serverapplication itself.
● The <server-name> section
This section contains the server name, which is used for identifying the server, for example whenspecifying server-specific configuration.
● The <encryption-password> section
This section is optional. If specified, it contains a password to be used for encrypting otherpasswords that are stored in the database. If not set, a static password is used.
381
TIBCO Spotfire® Server and Environment Installation and Administration
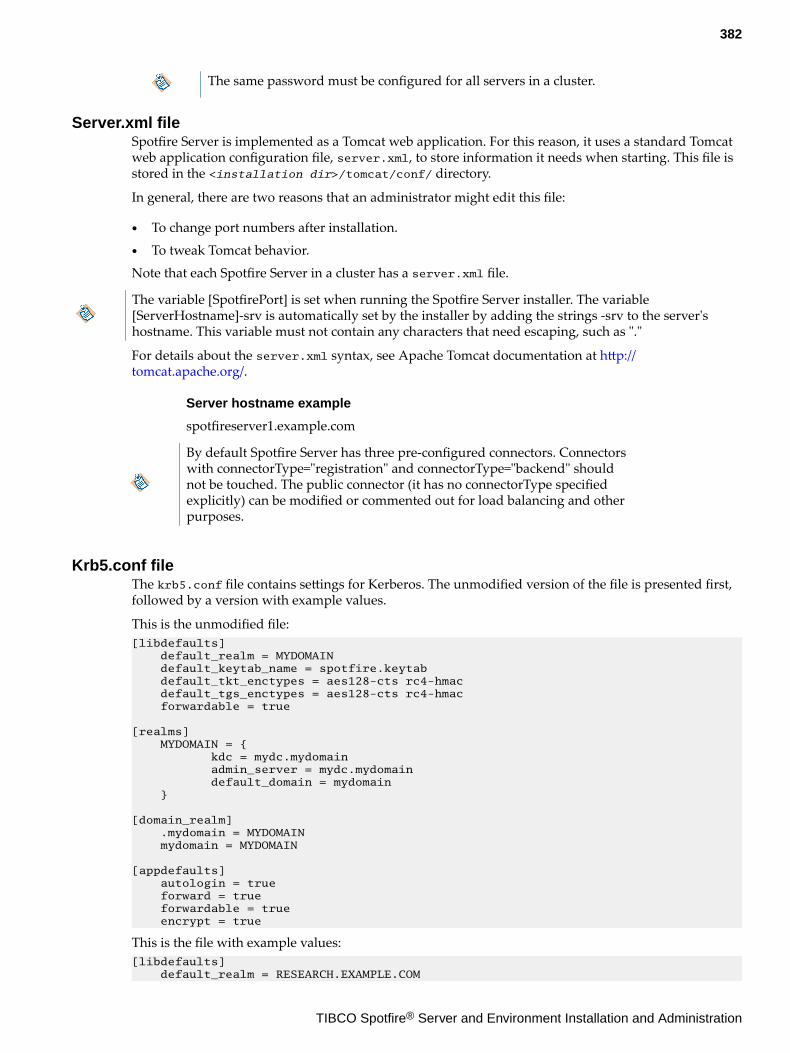
The same password must be configured for all servers in a cluster.
Server.xml fileSpotfire Server is implemented as a Tomcat web application. For this reason, it uses a standard Tomcatweb application configuration file, server.xml, to store information it needs when starting. This file isstored in the <installation dir>/tomcat/conf/ directory.
In general, there are two reasons that an administrator might edit this file:
● To change port numbers after installation.● To tweak Tomcat behavior.
Note that each Spotfire Server in a cluster has a server.xml file.
The variable [SpotfirePort] is set when running the Spotfire Server installer. The variable[ServerHostname]-srv is automatically set by the installer by adding the strings -srv to the server'shostname. This variable must not contain any characters that need escaping, such as "."
For details about the server.xml syntax, see Apache Tomcat documentation at http://tomcat.apache.org/.
Server hostname example
spotfireserver1.example.com
By default Spotfire Server has three pre-configured connectors. Connectorswith connectorType="registration" and connectorType="backend" shouldnot be touched. The public connector (it has no connectorType specifiedexplicitly) can be modified or commented out for load balancing and otherpurposes.
Krb5.conf fileThe krb5.conf file contains settings for Kerberos. The unmodified version of the file is presented first,followed by a version with example values.
This is the unmodified file:[libdefaults] default_realm = MYDOMAIN default_keytab_name = spotfire.keytab default_tkt_enctypes = aes128-cts rc4-hmac default_tgs_enctypes = aes128-cts rc4-hmac forwardable = true
[realms] MYDOMAIN = { kdc = mydc.mydomain admin_server = mydc.mydomain default_domain = mydomain }
[domain_realm] .mydomain = MYDOMAIN mydomain = MYDOMAIN
[appdefaults] autologin = true forward = true forwardable = true encrypt = true
This is the file with example values:[libdefaults] default_realm = RESEARCH.EXAMPLE.COM
382
TIBCO Spotfire® Server and Environment Installation and Administration
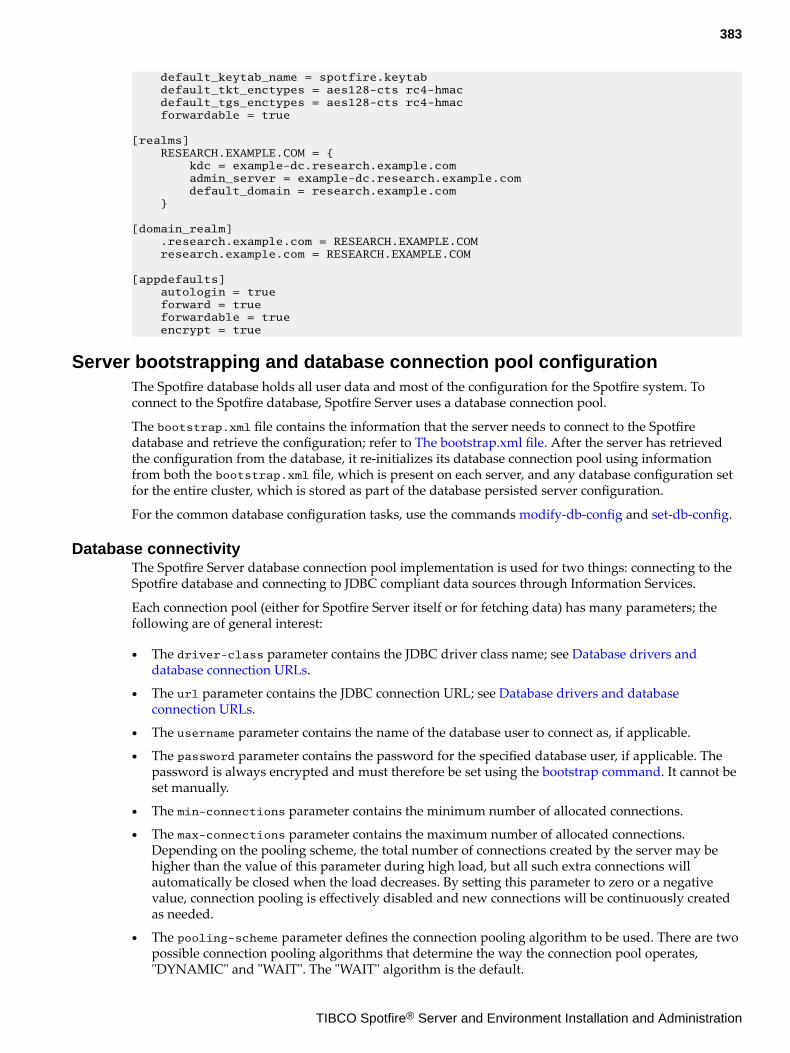
default_keytab_name = spotfire.keytab default_tkt_enctypes = aes128-cts rc4-hmac default_tgs_enctypes = aes128-cts rc4-hmac forwardable = true
[realms] RESEARCH.EXAMPLE.COM = { kdc = example-dc.research.example.com admin_server = example-dc.research.example.com default_domain = research.example.com }
[domain_realm] .research.example.com = RESEARCH.EXAMPLE.COM research.example.com = RESEARCH.EXAMPLE.COM
[appdefaults] autologin = true forward = true forwardable = true encrypt = true
Server bootstrapping and database connection pool configurationThe Spotfire database holds all user data and most of the configuration for the Spotfire system. Toconnect to the Spotfire database, Spotfire Server uses a database connection pool.
The bootstrap.xml file contains the information that the server needs to connect to the Spotfiredatabase and retrieve the configuration; refer to The bootstrap.xml file. After the server has retrievedthe configuration from the database, it re-initializes its database connection pool using informationfrom both the bootstrap.xml file, which is present on each server, and any database configuration setfor the entire cluster, which is stored as part of the database persisted server configuration.
For the common database configuration tasks, use the commands modify-db-config and set-db-config.
Database connectivityThe Spotfire Server database connection pool implementation is used for two things: connecting to theSpotfire database and connecting to JDBC compliant data sources through Information Services.
Each connection pool (either for Spotfire Server itself or for fetching data) has many parameters; thefollowing are of general interest:
● The driver-class parameter contains the JDBC driver class name; see Database drivers anddatabase connection URLs.
● The url parameter contains the JDBC connection URL; see Database drivers and databaseconnection URLs.
● The username parameter contains the name of the database user to connect as, if applicable.
● The password parameter contains the password for the specified database user, if applicable. Thepassword is always encrypted and must therefore be set using the bootstrap command. It cannot beset manually.
● The min-connections parameter contains the minimum number of allocated connections.
● The max-connections parameter contains the maximum number of allocated connections.Depending on the pooling scheme, the total number of connections created by the server may behigher than the value of this parameter during high load, but all such extra connections willautomatically be closed when the load decreases. By setting this parameter to zero or a negativevalue, connection pooling is effectively disabled and new connections will be continuously createdas needed.
● The pooling-scheme parameter defines the connection pooling algorithm to be used. There are twopossible connection pooling algorithms that determine the way the connection pool operates,"DYNAMIC" and "WAIT". The "WAIT" algorithm is the default.
383
TIBCO Spotfire® Server and Environment Installation and Administration
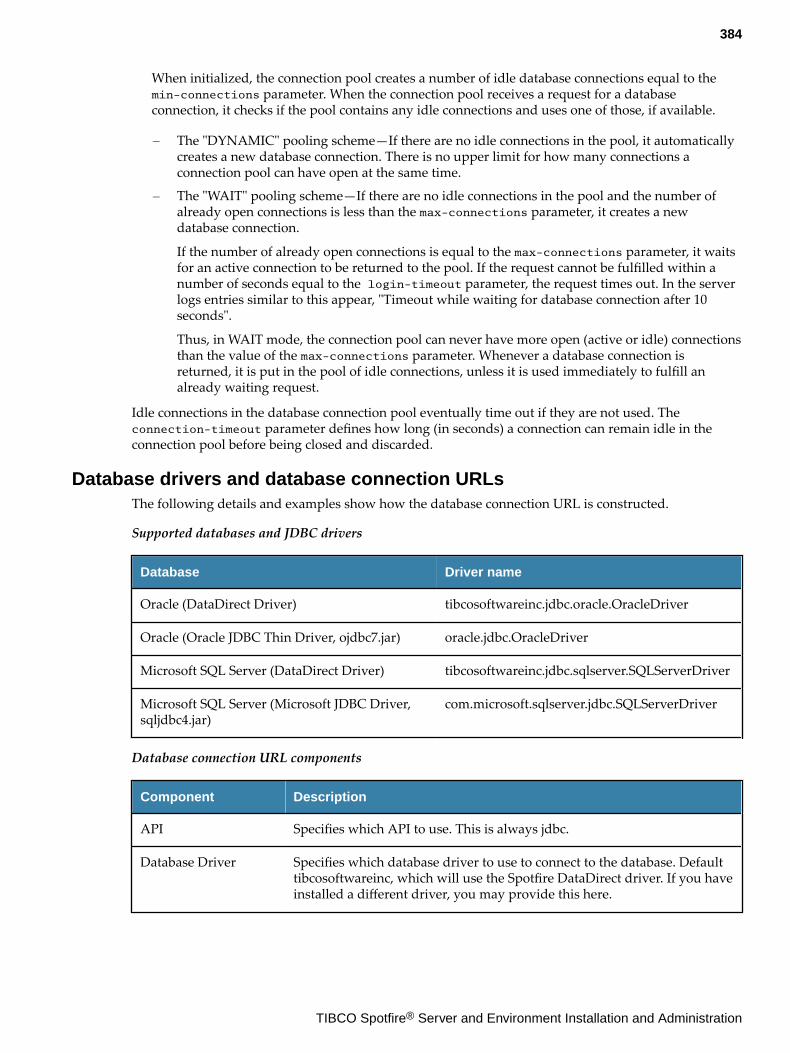
When initialized, the connection pool creates a number of idle database connections equal to themin-connections parameter. When the connection pool receives a request for a databaseconnection, it checks if the pool contains any idle connections and uses one of those, if available.
— The "DYNAMIC" pooling scheme—If there are no idle connections in the pool, it automaticallycreates a new database connection. There is no upper limit for how many connections aconnection pool can have open at the same time.
— The "WAIT" pooling scheme—If there are no idle connections in the pool and the number ofalready open connections is less than the max-connections parameter, it creates a newdatabase connection.
If the number of already open connections is equal to the max-connections parameter, it waitsfor an active connection to be returned to the pool. If the request cannot be fulfilled within anumber of seconds equal to the login-timeout parameter, the request times out. In the serverlogs entries similar to this appear, "Timeout while waiting for database connection after 10seconds".
Thus, in WAIT mode, the connection pool can never have more open (active or idle) connectionsthan the value of the max-connections parameter. Whenever a database connection isreturned, it is put in the pool of idle connections, unless it is used immediately to fulfill analready waiting request.
Idle connections in the database connection pool eventually time out if they are not used. Theconnection-timeout parameter defines how long (in seconds) a connection can remain idle in theconnection pool before being closed and discarded.
Database drivers and database connection URLsThe following details and examples show how the database connection URL is constructed.
Supported databases and JDBC drivers
Database Driver name
Oracle (DataDirect Driver) tibcosoftwareinc.jdbc.oracle.OracleDriver
Oracle (Oracle JDBC Thin Driver, ojdbc7.jar) oracle.jdbc.OracleDriver
Microsoft SQL Server (DataDirect Driver) tibcosoftwareinc.jdbc.sqlserver.SQLServerDriver
Microsoft SQL Server (Microsoft JDBC Driver,sqljdbc4.jar)
com.microsoft.sqlserver.jdbc.SQLServerDriver
Database connection URL components
Component Description
API Specifies which API to use. This is always jdbc.
Database Driver Specifies which database driver to use to connect to the database. Defaulttibcosoftwareinc, which will use the Spotfire DataDirect driver. If you haveinstalled a different driver, you may provide this here.
384
TIBCO Spotfire® Server and Environment Installation and Administration

Component Description
Server Type Specifies the type of database server. Either sqlserver or oracle.
Server Type is only applicable when using the DataDirect driver.
Hostname Specifies the hostname of the database server.
Port Specifies the port which the database server listens to; for example 1433.
Database name, SID,or service name
Specifies the name (MSSQL), SID (Oracle) or Service Name (Oracle) thatdefines your Spotfire database.
Options Specifies further options, separated with semicolons. Only necessary ifyou want to set something specific for your database server, such as anamed Instance in an MSSQL server. See the following examples.
Database connection URL examples
Database driver URL structure Examples
Oracle (DataDirect Driver) [API]:[DBDriver]:[ServerType]://[Hostname]:[Port];SID=[SID]
jdbc:tibcosoftwareinc:oracle://dbsrv.example.com:1521;SID=spotfire_server
Oracle (DataDirect Driver) [API]:[DBDriver]:[ServerType]://[Hostname]:[Port];ServiceName=[ServiceName]
jdbc:tibcosoftwareinc:oracle://dbsrv.example.com:1521;ServiceName= pdborcl.example.com
Oracle (Vendor Driver,ojdbc7.jar)
[API]:[DBDriver]:[DriverType]://[Hostname]:[Port]:SID
jdbc:oracle:thin:@dbsrv.example.com:1521:orcl
Oracle (Vendor Driver,ojdbc7.jar)
[API]:[DBDriver]:[DriverType]://[Hostname]:[Port]/[ServiceName]
jdbc:oracle:thin:@//dbsrv.example.com:1521/pdborcl.example.com
385
TIBCO Spotfire® Server and Environment Installation and Administration
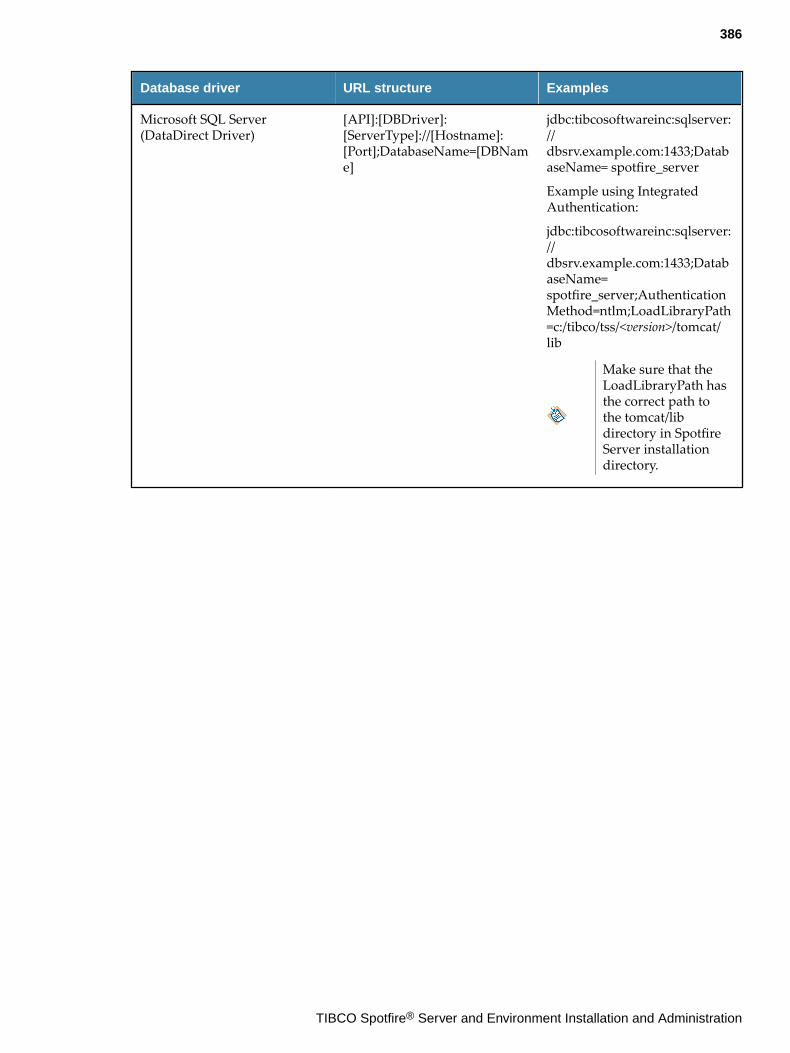
Database driver URL structure Examples
Microsoft SQL Server(DataDirect Driver)
[API]:[DBDriver]:[ServerType]://[Hostname]:[Port];DatabaseName=[DBName]
jdbc:tibcosoftwareinc:sqlserver://dbsrv.example.com:1433;DatabaseName= spotfire_server
Example using IntegratedAuthentication:
jdbc:tibcosoftwareinc:sqlserver://dbsrv.example.com:1433;DatabaseName=spotfire_server;AuthenticationMethod=ntlm;LoadLibraryPath=c:/tibco/tss/<version>/tomcat/lib
Make sure that theLoadLibraryPath hasthe correct path tothe tomcat/libdirectory in SpotfireServer installationdirectory.
386
TIBCO Spotfire® Server and Environment Installation and Administration
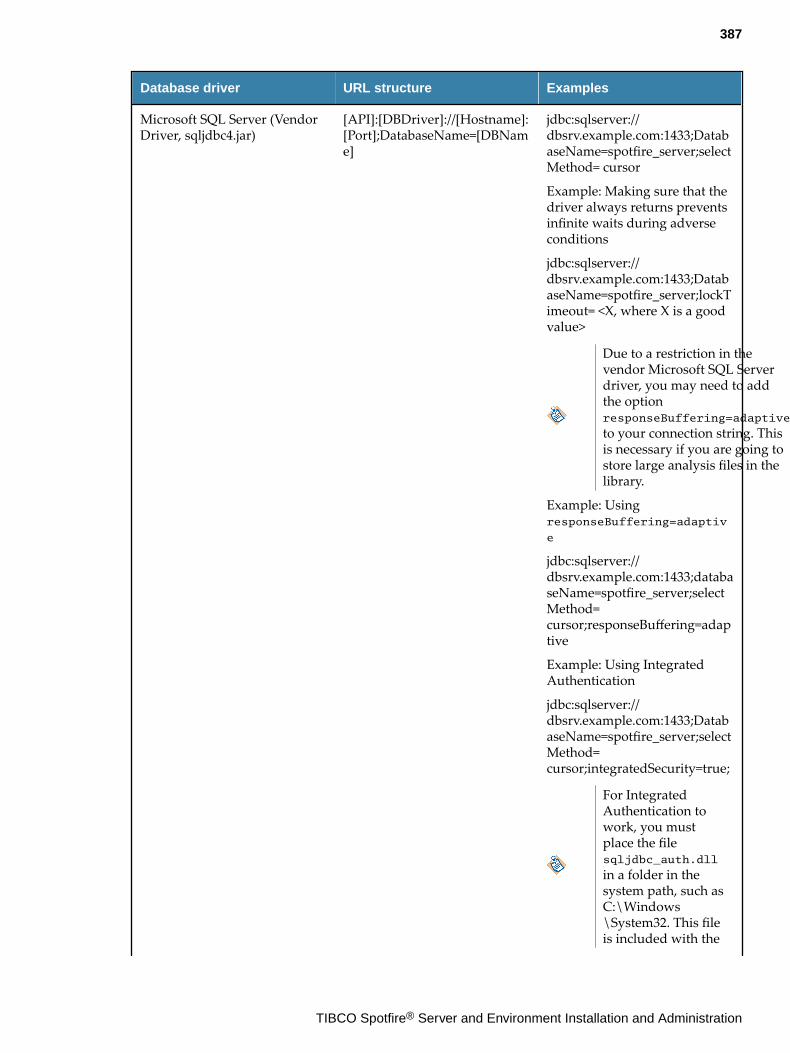
Database driver URL structure Examples
Microsoft SQL Server (VendorDriver, sqljdbc4.jar)
[API]:[DBDriver]://[Hostname]:[Port];DatabaseName=[DBName]
jdbc:sqlserver://dbsrv.example.com:1433;DatabaseName=spotfire_server;selectMethod= cursor
Example: Making sure that thedriver always returns preventsinfinite waits during adverseconditions
jdbc:sqlserver://dbsrv.example.com:1433;DatabaseName=spotfire_server;lockTimeout= <X, where X is a goodvalue>
Due to a restriction in thevendor Microsoft SQL Serverdriver, you may need to addthe optionresponseBuffering=adaptive
to your connection string. Thisis necessary if you are going tostore large analysis files in thelibrary.
Example: UsingresponseBuffering=adaptiv
e
jdbc:sqlserver://dbsrv.example.com:1433;databaseName=spotfire_server;selectMethod=cursor;responseBuffering=adaptive
Example: Using IntegratedAuthentication
jdbc:sqlserver://dbsrv.example.com:1433;DatabaseName=spotfire_server;selectMethod=cursor;integratedSecurity=true;
For IntegratedAuthentication towork, you mustplace the filesqljdbc_auth.dll
in a folder in thesystem path, such asC:\Windows\System32. This fileis included with the
387
TIBCO Spotfire® Server and Environment Installation and Administration
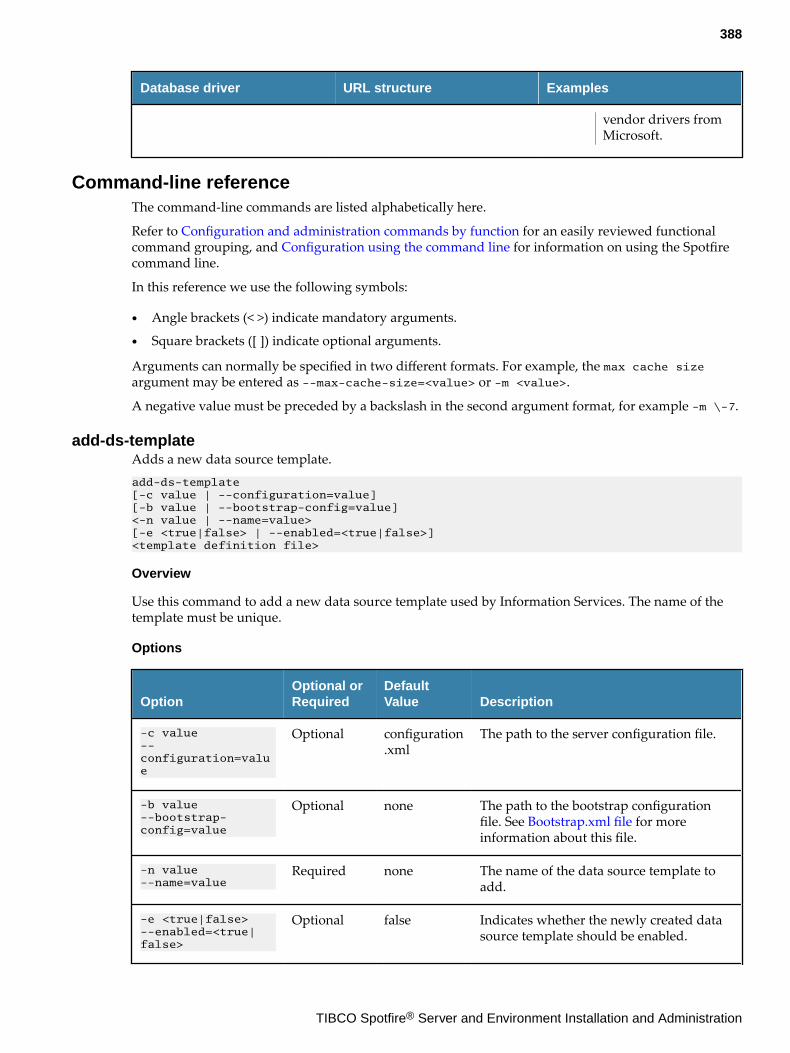
Database driver URL structure Examples
vendor drivers fromMicrosoft.
Command-line referenceThe command-line commands are listed alphabetically here.
Refer to Configuration and administration commands by function for an easily reviewed functionalcommand grouping, and Configuration using the command line for information on using the Spotfirecommand line.
In this reference we use the following symbols:
● Angle brackets (< >) indicate mandatory arguments.
● Square brackets ([ ]) indicate optional arguments.
Arguments can normally be specified in two different formats. For example, the max cache sizeargument may be entered as --max-cache-size=<value> or -m <value>.
A negative value must be preceded by a backslash in the second argument format, for example -m \-7.
add-ds-templateAdds a new data source template.add-ds-template [-c value | --configuration=value] [-b value | --bootstrap-config=value] <-n value | --name=value> [-e <true|false> | --enabled=<true|false>] <template definition file>
Overview
Use this command to add a new data source template used by Information Services. The name of thetemplate must be unique.
Options
OptionOptional orRequired
DefaultValue Description
-c value--configuration=value
Optional configuration.xml
The path to the server configuration file.
-b value--bootstrap-config=value
Optional none The path to the bootstrap configurationfile. See Bootstrap.xml file for moreinformation about this file.
-n value--name=value
Required none The name of the data source template toadd.
-e <true|false>--enabled=<true|false>
Optional false Indicates whether the newly created datasource template should be enabled.
388
TIBCO Spotfire® Server and Environment Installation and Administration
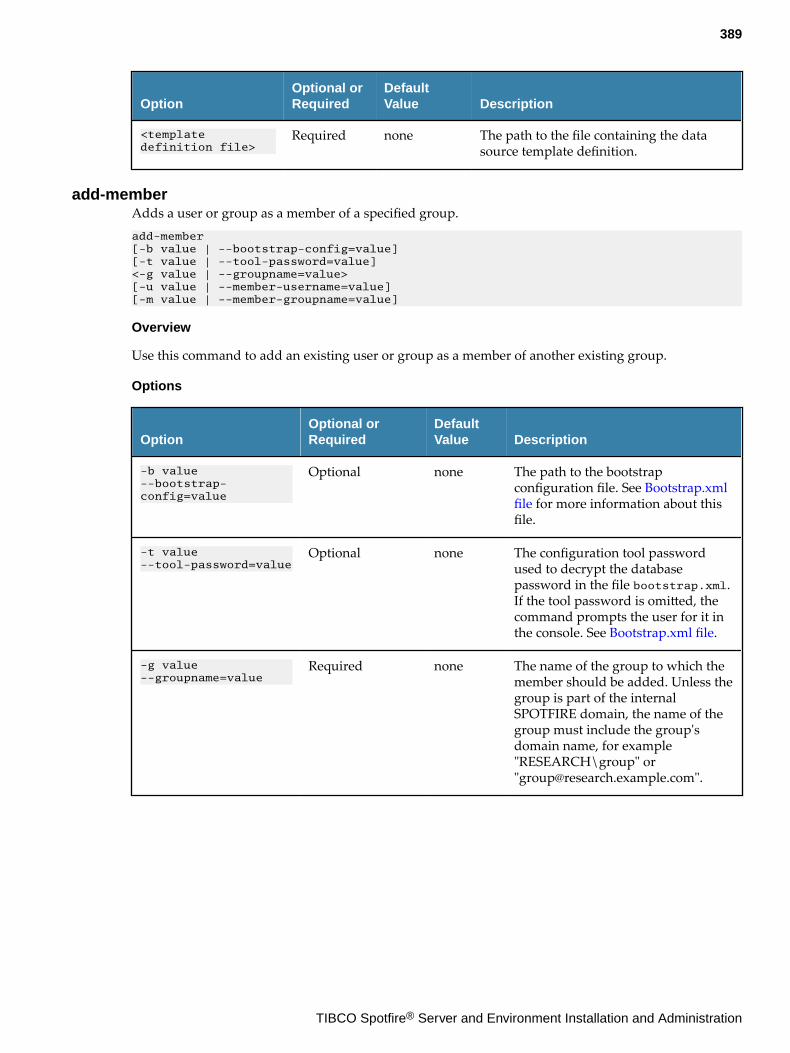
OptionOptional orRequired
DefaultValue Description
<template definition file>
Required none The path to the file containing the datasource template definition.
add-memberAdds a user or group as a member of a specified group.add-member [-b value | --bootstrap-config=value] [-t value | --tool-password=value] <-g value | --groupname=value> [-u value | --member-username=value] [-m value | --member-groupname=value]
Overview
Use this command to add an existing user or group as a member of another existing group.
Options
OptionOptional orRequired
DefaultValue Description
-b value--bootstrap-config=value
Optional none The path to the bootstrapconfiguration file. See Bootstrap.xmlfile for more information about thisfile.
-t value--tool-password=value
Optional none The configuration tool passwordused to decrypt the databasepassword in the file bootstrap.xml.If the tool password is omitted, thecommand prompts the user for it inthe console. See Bootstrap.xml file.
-g value--groupname=value
Required none The name of the group to which themember should be added. Unless thegroup is part of the internalSPOTFIRE domain, the name of thegroup must include the group'sdomain name, for example"RESEARCH\group" or"[email protected]".
389
TIBCO Spotfire® Server and Environment Installation and Administration
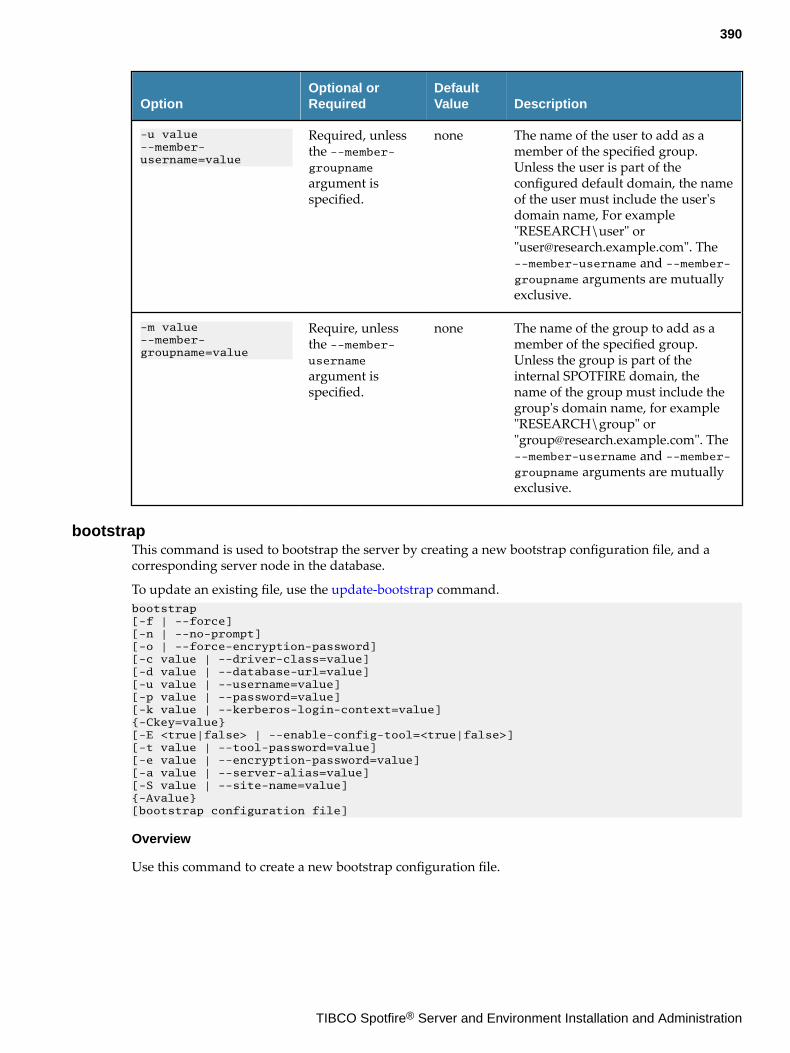
OptionOptional orRequired
DefaultValue Description
-u value--member-username=value
Required, unlessthe --member-groupname
argument isspecified.
none The name of the user to add as amember of the specified group.Unless the user is part of theconfigured default domain, the nameof the user must include the user'sdomain name, For example"RESEARCH\user" or"[email protected]". The--member-username and --member-groupname arguments are mutuallyexclusive.
-m value--member-groupname=value
Require, unlessthe --member-username
argument isspecified.
none The name of the group to add as amember of the specified group.Unless the group is part of theinternal SPOTFIRE domain, thename of the group must include thegroup's domain name, for example"RESEARCH\group" or"[email protected]". The--member-username and --member-groupname arguments are mutuallyexclusive.
bootstrapThis command is used to bootstrap the server by creating a new bootstrap configuration file, and acorresponding server node in the database.
To update an existing file, use the update-bootstrap command.bootstrap [-f | --force] [-n | --no-prompt] [-o | --force-encryption-password] [-c value | --driver-class=value] [-d value | --database-url=value] [-u value | --username=value] [-p value | --password=value] [-k value | --kerberos-login-context=value] {-Ckey=value} [-E <true|false> | --enable-config-tool=<true|false>] [-t value | --tool-password=value] [-e value | --encryption-password=value] [-a value | --server-alias=value][-S value | --site-name=value] {-Avalue} [bootstrap configuration file]
Overview
Use this command to create a new bootstrap configuration file.
390
TIBCO Spotfire® Server and Environment Installation and Administration
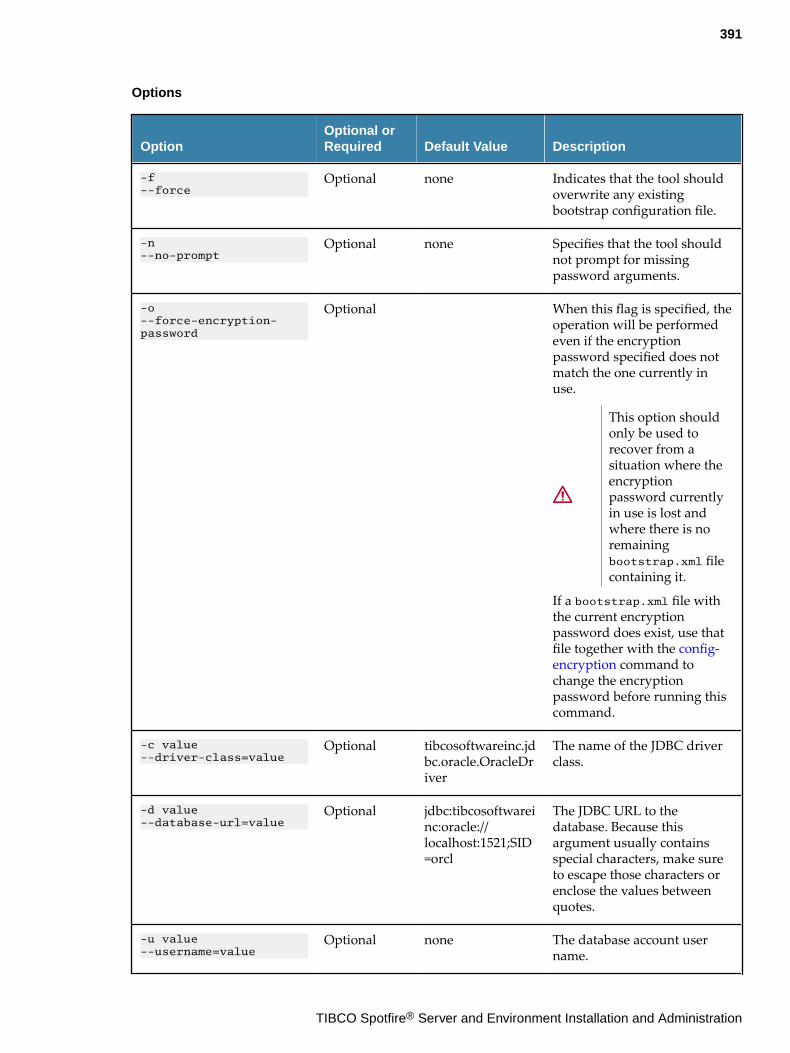
Options
OptionOptional orRequired Default Value Description
-f--force
Optional none Indicates that the tool shouldoverwrite any existingbootstrap configuration file.
-n--no-prompt
Optional none Specifies that the tool shouldnot prompt for missingpassword arguments.
-o--force-encryption-password
Optional When this flag is specified, theoperation will be performedeven if the encryptionpassword specified does notmatch the one currently inuse.
This option shouldonly be used torecover from asituation where theencryptionpassword currentlyin use is lost andwhere there is noremainingbootstrap.xml filecontaining it.
If a bootstrap.xml file withthe current encryptionpassword does exist, use thatfile together with the config-encryption command tochange the encryptionpassword before running thiscommand.
-c value--driver-class=value
Optional tibcosoftwareinc.jdbc.oracle.OracleDriver
The name of the JDBC driverclass.
-d value--database-url=value
Optional jdbc:tibcosoftwareinc:oracle://localhost:1521;SID=orcl
The JDBC URL to thedatabase. Because thisargument usually containsspecial characters, make sureto escape those characters orenclose the values betweenquotes.
-u value--username=value
Optional none The database account username.
391
TIBCO Spotfire® Server and Environment Installation and Administration
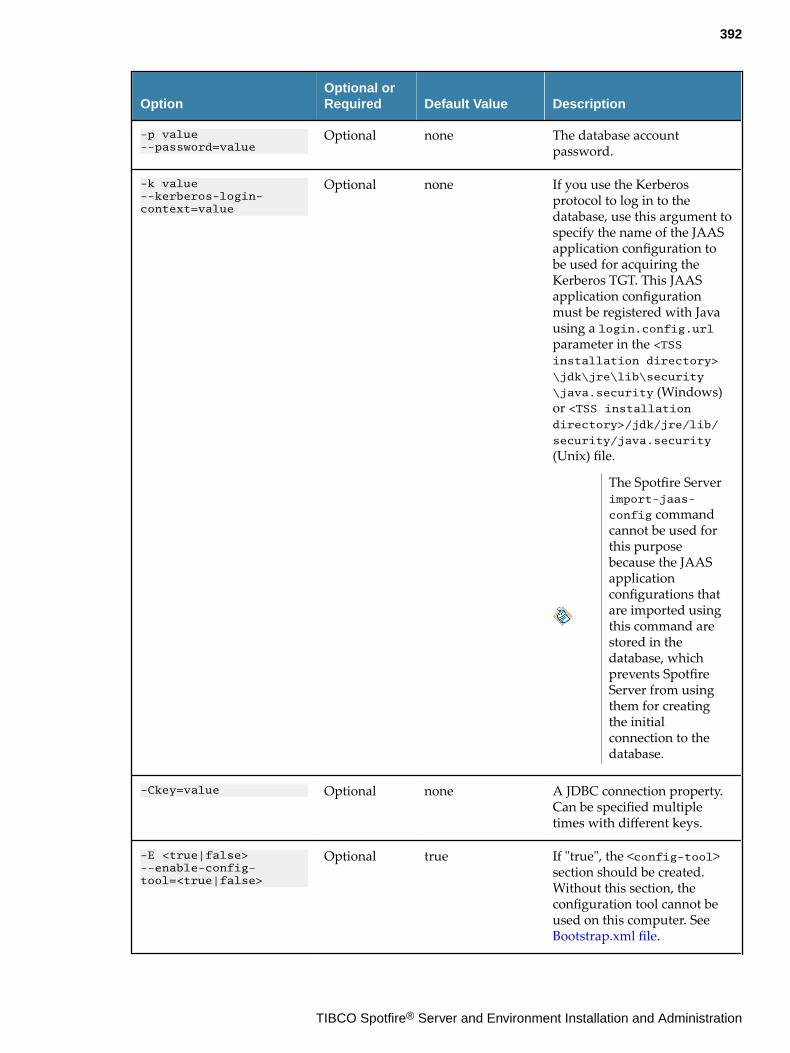
OptionOptional orRequired Default Value Description
-p value--password=value
Optional none The database accountpassword.
-k value--kerberos-login-context=value
Optional none If you use the Kerberosprotocol to log in to thedatabase, use this argument tospecify the name of the JAASapplication configuration tobe used for acquiring theKerberos TGT. This JAASapplication configurationmust be registered with Javausing a login.config.urlparameter in the <TSSinstallation directory>
\jdk\jre\lib\security
\java.security (Windows)or <TSS installationdirectory>/jdk/jre/lib/
security/java.security
(Unix) file.
The Spotfire Serverimport-jaas-
config commandcannot be used forthis purposebecause the JAASapplicationconfigurations thatare imported usingthis command arestored in thedatabase, whichprevents SpotfireServer from usingthem for creatingthe initialconnection to thedatabase.
-Ckey=value Optional none A JDBC connection property.Can be specified multipletimes with different keys.
-E <true|false>--enable-config-tool=<true|false>
Optional true If "true", the <config-tool>section should be created.Without this section, theconfiguration tool cannot beused on this computer. See Bootstrap.xml file.
392
TIBCO Spotfire® Server and Environment Installation and Administration
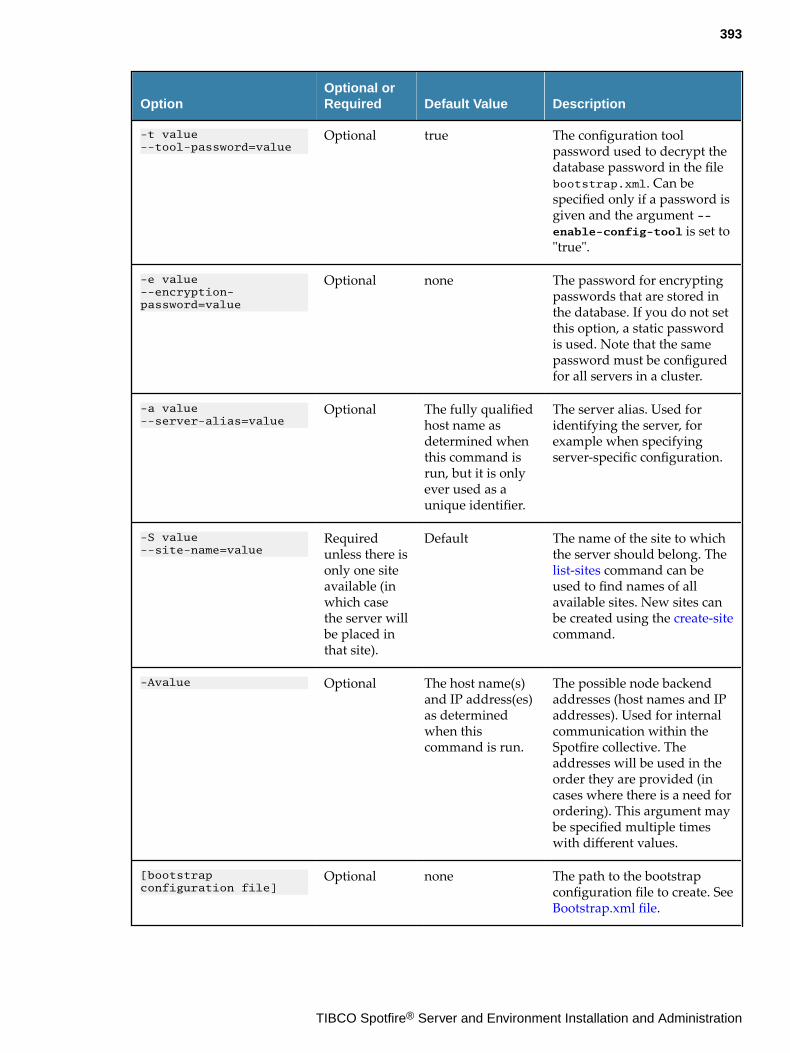
OptionOptional orRequired Default Value Description
-t value--tool-password=value
Optional true The configuration toolpassword used to decrypt thedatabase password in the filebootstrap.xml. Can bespecified only if a password isgiven and the argument --enable-config-tool is set to"true".
-e value--encryption-password=value
Optional none The password for encryptingpasswords that are stored inthe database. If you do not setthis option, a static passwordis used. Note that the samepassword must be configuredfor all servers in a cluster.
-a value--server-alias=value
Optional The fully qualifiedhost name asdetermined whenthis command isrun, but it is onlyever used as aunique identifier.
The server alias. Used foridentifying the server, forexample when specifyingserver-specific configuration.
-S value--site-name=value
Requiredunless there isonly one siteavailable (inwhich casethe server willbe placed inthat site).
Default The name of the site to whichthe server should belong. The list-sites command can beused to find names of allavailable sites. New sites canbe created using the create-sitecommand.
-Avalue Optional The host name(s)and IP address(es)as determinedwhen thiscommand is run.
The possible node backendaddresses (host names and IPaddresses). Used for internalcommunication within theSpotfire collective. Theaddresses will be used in theorder they are provided (incases where there is a need forordering). This argument maybe specified multiple timeswith different values.
[bootstrap configuration file]
Optional none The path to the bootstrapconfiguration file to create. See Bootstrap.xml file.
393
TIBCO Spotfire® Server and Environment Installation and Administration
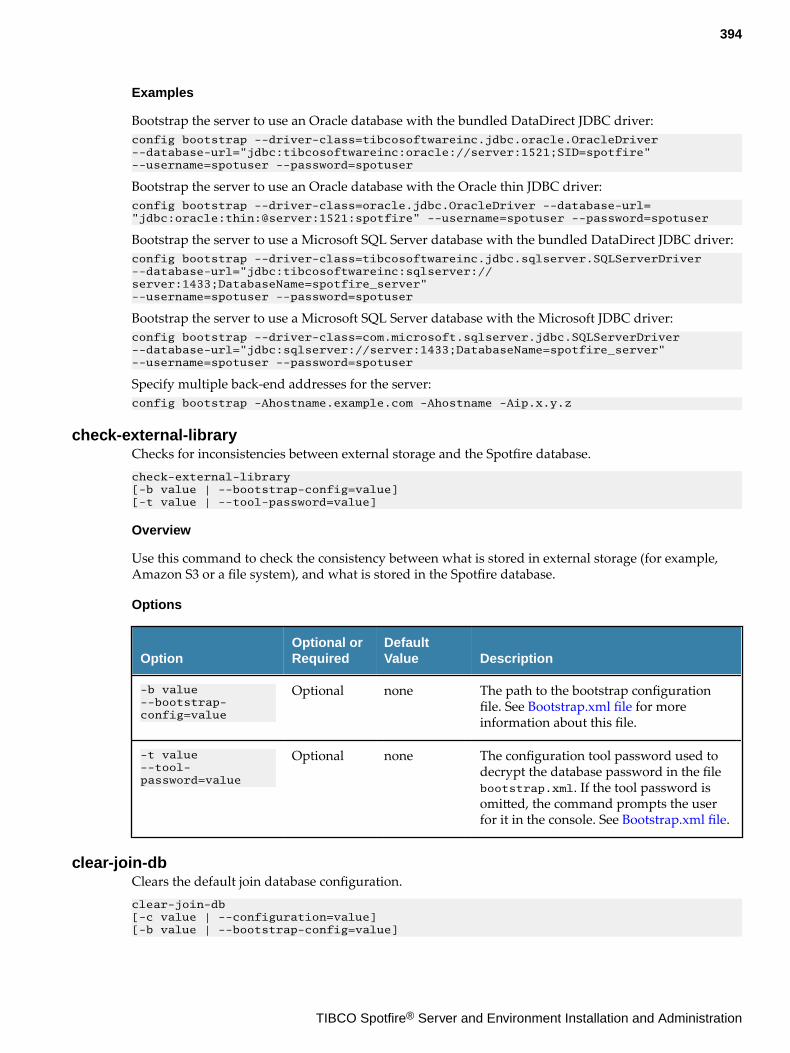
Examples
Bootstrap the server to use an Oracle database with the bundled DataDirect JDBC driver:config bootstrap --driver-class=tibcosoftwareinc.jdbc.oracle.OracleDriver --database-url="jdbc:tibcosoftwareinc:oracle://server:1521;SID=spotfire" --username=spotuser --password=spotuser
Bootstrap the server to use an Oracle database with the Oracle thin JDBC driver:config bootstrap --driver-class=oracle.jdbc.OracleDriver --database-url="jdbc:oracle:thin:@server:1521:spotfire" --username=spotuser --password=spotuser
Bootstrap the server to use a Microsoft SQL Server database with the bundled DataDirect JDBC driver:config bootstrap --driver-class=tibcosoftwareinc.jdbc.sqlserver.SQLServerDriver --database-url="jdbc:tibcosoftwareinc:sqlserver://server:1433;DatabaseName=spotfire_server" --username=spotuser --password=spotuser
Bootstrap the server to use a Microsoft SQL Server database with the Microsoft JDBC driver:config bootstrap --driver-class=com.microsoft.sqlserver.jdbc.SQLServerDriver --database-url="jdbc:sqlserver://server:1433;DatabaseName=spotfire_server" --username=spotuser --password=spotuser
Specify multiple back-end addresses for the server:config bootstrap -Ahostname.example.com -Ahostname -Aip.x.y.z
check-external-libraryChecks for inconsistencies between external storage and the Spotfire database.check-external-library[-b value | --bootstrap-config=value] [-t value | --tool-password=value]
Overview
Use this command to check the consistency between what is stored in external storage (for example,Amazon S3 or a file system), and what is stored in the Spotfire database.
Options
OptionOptional orRequired
DefaultValue Description
-b value--bootstrap-config=value
Optional none The path to the bootstrap configurationfile. See Bootstrap.xml file for moreinformation about this file.
-t value--tool-password=value
Optional none The configuration tool password used todecrypt the database password in the filebootstrap.xml. If the tool password isomitted, the command prompts the userfor it in the console. See Bootstrap.xml file.
clear-join-dbClears the default join database configuration.clear-join-db [-c value | --configuration=value] [-b value | --bootstrap-config=value]
394
TIBCO Spotfire® Server and Environment Installation and Administration
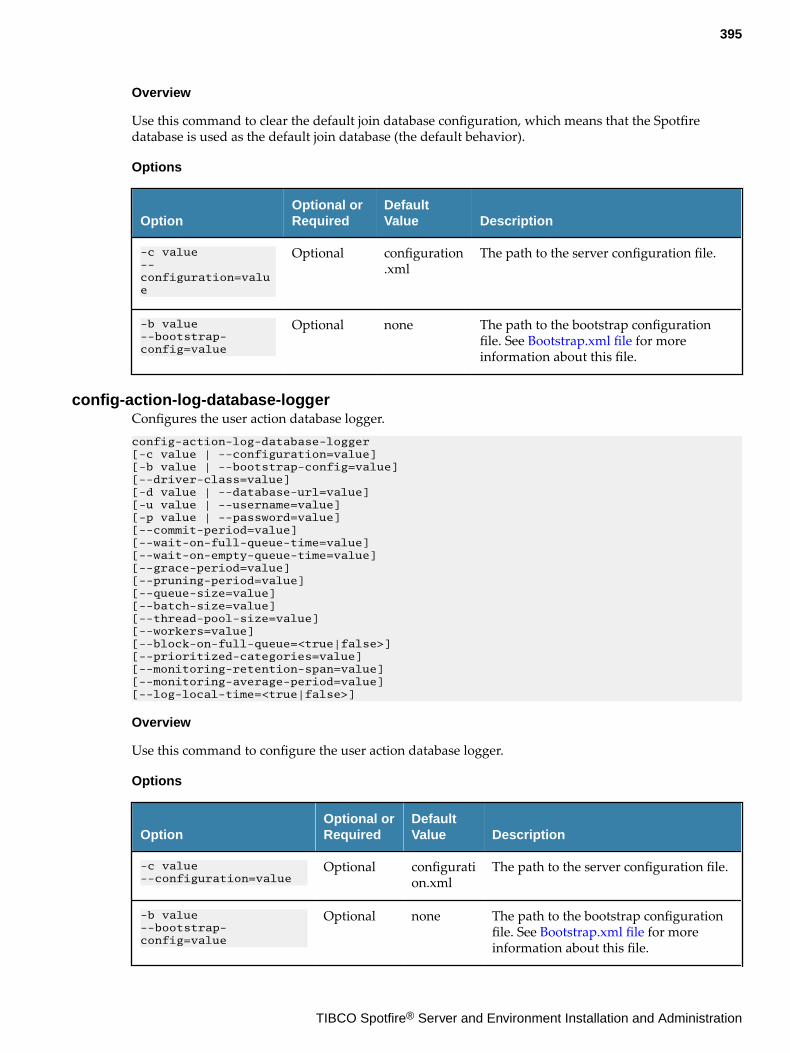
Overview
Use this command to clear the default join database configuration, which means that the Spotfiredatabase is used as the default join database (the default behavior).
Options
OptionOptional orRequired
DefaultValue Description
-c value--configuration=value
Optional configuration.xml
The path to the server configuration file.
-b value--bootstrap-config=value
Optional none The path to the bootstrap configurationfile. See Bootstrap.xml file for moreinformation about this file.
config-action-log-database-loggerConfigures the user action database logger.config-action-log-database-logger [-c value | --configuration=value] [-b value | --bootstrap-config=value] [--driver-class=value] [-d value | --database-url=value] [-u value | --username=value] [-p value | --password=value] [--commit-period=value] [--wait-on-full-queue-time=value][--wait-on-empty-queue-time=value] [--grace-period=value] [--pruning-period=value] [--queue-size=value] [--batch-size=value] [--thread-pool-size=value] [--workers=value] [--block-on-full-queue=<true|false>][--prioritized-categories=value] [--monitoring-retention-span=value] [--monitoring-average-period=value] [--log-local-time=<true|false>]
Overview
Use this command to configure the user action database logger.
Options
OptionOptional orRequired
DefaultValue Description
-c value--configuration=value
Optional configuration.xml
The path to the server configuration file.
-b value--bootstrap-config=value
Optional none The path to the bootstrap configurationfile. See Bootstrap.xml file for moreinformation about this file.
395
TIBCO Spotfire® Server and Environment Installation and Administration
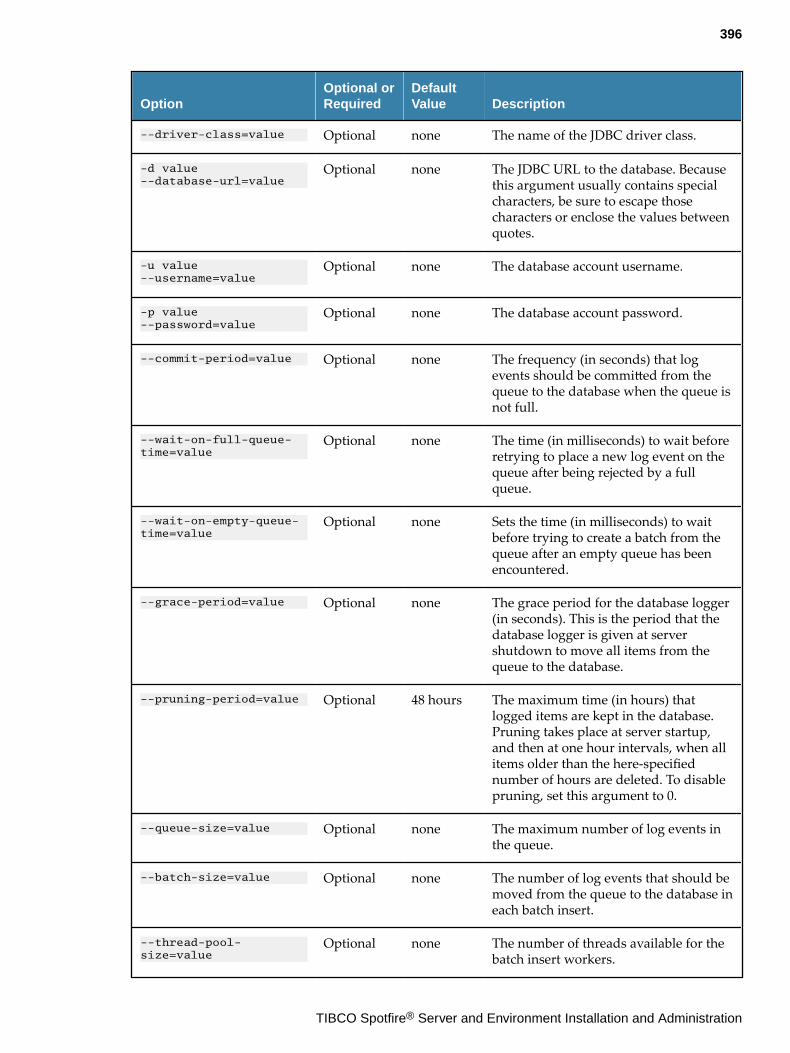
OptionOptional orRequired
DefaultValue Description
--driver-class=value Optional none The name of the JDBC driver class.
-d value--database-url=value
Optional none The JDBC URL to the database. Becausethis argument usually contains specialcharacters, be sure to escape thosecharacters or enclose the values betweenquotes.
-u value--username=value
Optional none The database account username.
-p value--password=value
Optional none The database account password.
--commit-period=value Optional none The frequency (in seconds) that logevents should be committed from thequeue to the database when the queue isnot full.
--wait-on-full-queue-time=value
Optional none The time (in milliseconds) to wait beforeretrying to place a new log event on thequeue after being rejected by a fullqueue.
--wait-on-empty-queue-time=value
Optional none Sets the time (in milliseconds) to waitbefore trying to create a batch from thequeue after an empty queue has beenencountered.
--grace-period=value Optional none The grace period for the database logger(in seconds). This is the period that thedatabase logger is given at servershutdown to move all items from thequeue to the database.
--pruning-period=value Optional 48 hours The maximum time (in hours) thatlogged items are kept in the database.Pruning takes place at server startup,and then at one hour intervals, when allitems older than the here-specifiednumber of hours are deleted. To disablepruning, set this argument to 0.
--queue-size=value Optional none The maximum number of log events inthe queue.
--batch-size=value Optional none The number of log events that should bemoved from the queue to the database ineach batch insert.
--thread-pool-size=value
Optional none The number of threads available for thebatch insert workers.
396
TIBCO Spotfire® Server and Environment Installation and Administration
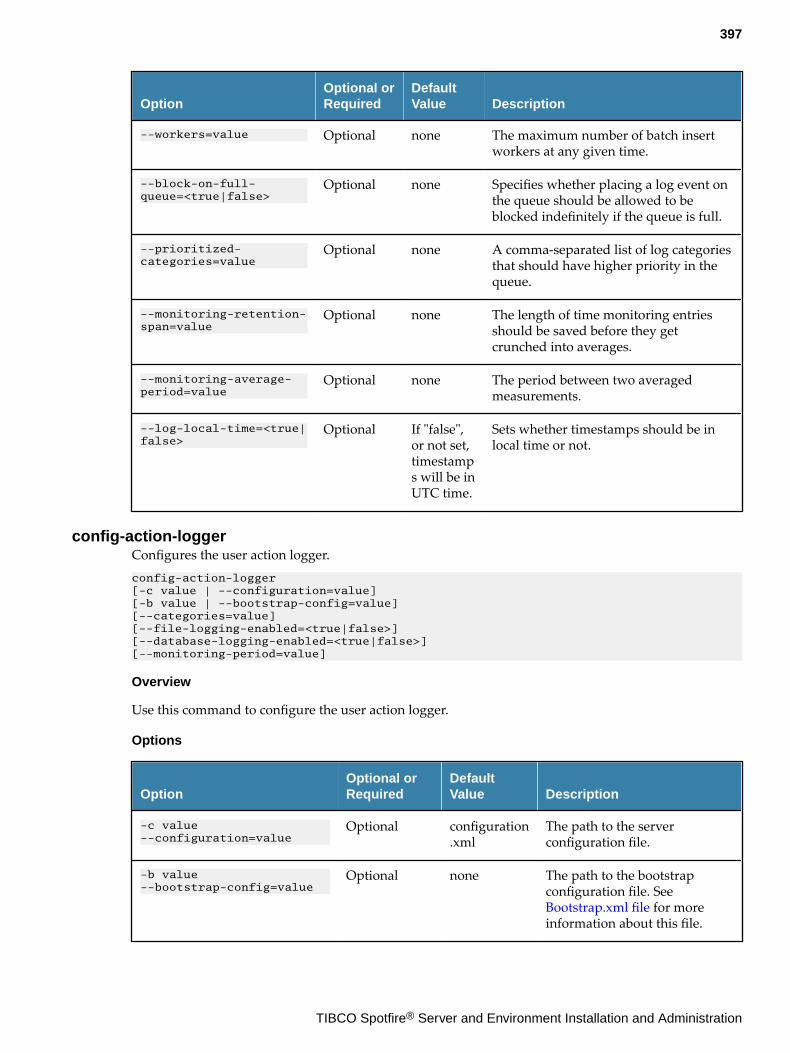
OptionOptional orRequired
DefaultValue Description
--workers=value Optional none The maximum number of batch insertworkers at any given time.
--block-on-full-queue=<true|false>
Optional none Specifies whether placing a log event onthe queue should be allowed to beblocked indefinitely if the queue is full.
--prioritized-categories=value
Optional none A comma-separated list of log categoriesthat should have higher priority in thequeue.
--monitoring-retention-span=value
Optional none The length of time monitoring entriesshould be saved before they getcrunched into averages.
--monitoring-average-period=value
Optional none The period between two averagedmeasurements.
--log-local-time=<true|false>
Optional If "false",or not set,timestamps will be inUTC time.
Sets whether timestamps should be inlocal time or not.
config-action-loggerConfigures the user action logger.config-action-logger [-c value | --configuration=value] [-b value | --bootstrap-config=value] [--categories=value] [--file-logging-enabled=<true|false>] [--database-logging-enabled=<true|false>][--monitoring-period=value]
Overview
Use this command to configure the user action logger.
Options
OptionOptional orRequired
DefaultValue Description
-c value--configuration=value
Optional configuration.xml
The path to the serverconfiguration file.
-b value--bootstrap-config=value
Optional none The path to the bootstrapconfiguration file. See Bootstrap.xml file for moreinformation about this file.
397
TIBCO Spotfire® Server and Environment Installation and Administration
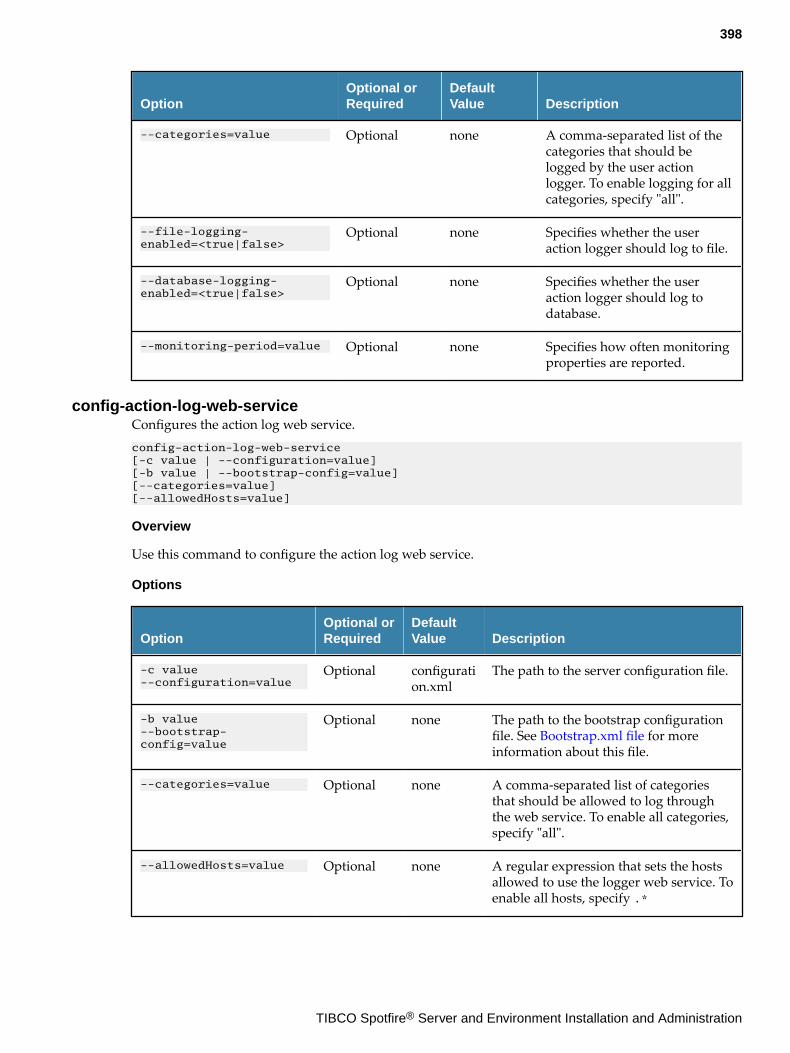
OptionOptional orRequired
DefaultValue Description
--categories=value Optional none A comma-separated list of thecategories that should belogged by the user actionlogger. To enable logging for allcategories, specify "all".
--file-logging-enabled=<true|false>
Optional none Specifies whether the useraction logger should log to file.
--database-logging-enabled=<true|false>
Optional none Specifies whether the useraction logger should log todatabase.
--monitoring-period=value Optional none Specifies how often monitoringproperties are reported.
config-action-log-web-serviceConfigures the action log web service.config-action-log-web-service [-c value | --configuration=value] [-b value | --bootstrap-config=value][--categories=value] [--allowedHosts=value]
Overview
Use this command to configure the action log web service.
Options
OptionOptional orRequired
DefaultValue Description
-c value--configuration=value
Optional configuration.xml
The path to the server configuration file.
-b value--bootstrap-config=value
Optional none The path to the bootstrap configurationfile. See Bootstrap.xml file for moreinformation about this file.
--categories=value Optional none A comma-separated list of categoriesthat should be allowed to log throughthe web service. To enable all categories,specify "all".
--allowedHosts=value Optional none A regular expression that sets the hostsallowed to use the logger web service. Toenable all hosts, specify .*
398
TIBCO Spotfire® Server and Environment Installation and Administration
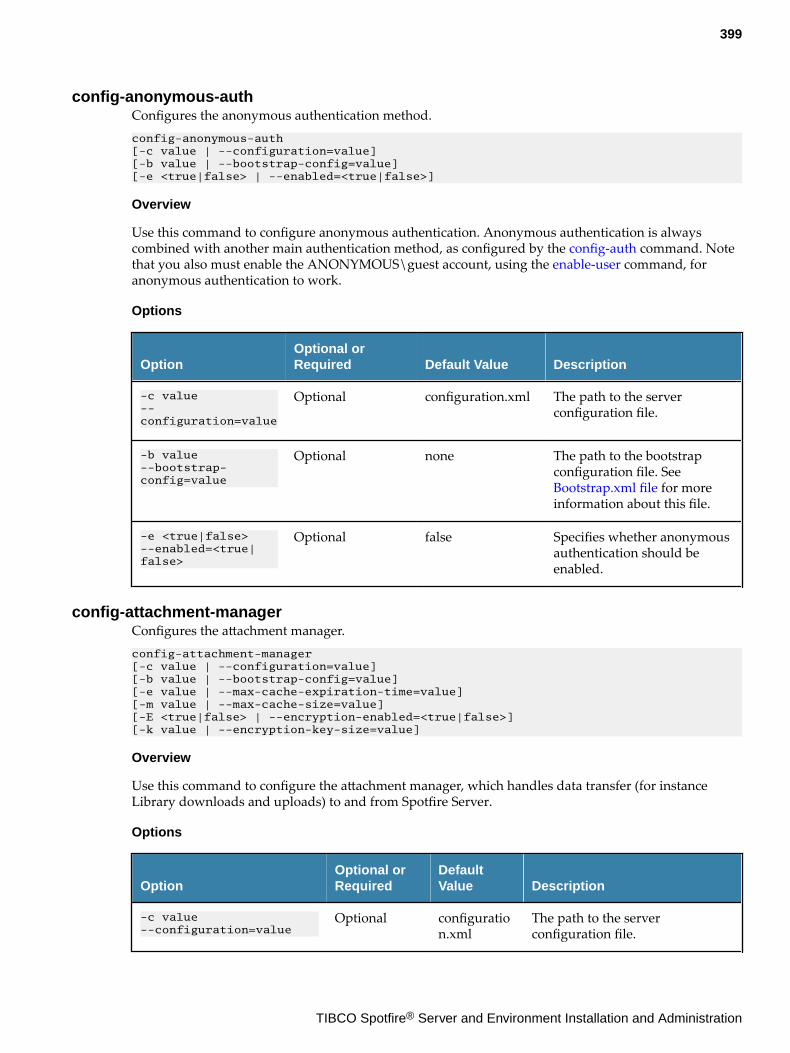
config-anonymous-authConfigures the anonymous authentication method.config-anonymous-auth [-c value | --configuration=value] [-b value | --bootstrap-config=value] [-e <true|false> | --enabled=<true|false>]
Overview
Use this command to configure anonymous authentication. Anonymous authentication is alwayscombined with another main authentication method, as configured by the config-auth command. Notethat you also must enable the ANONYMOUS\guest account, using the enable-user command, foranonymous authentication to work.
Options
OptionOptional orRequired Default Value Description
-c value--configuration=value
Optional configuration.xml The path to the serverconfiguration file.
-b value--bootstrap-config=value
Optional none The path to the bootstrapconfiguration file. See Bootstrap.xml file for moreinformation about this file.
-e <true|false>--enabled=<true|false>
Optional false Specifies whether anonymousauthentication should beenabled.
config-attachment-managerConfigures the attachment manager.config-attachment-manager [-c value | --configuration=value] [-b value | --bootstrap-config=value][-e value | --max-cache-expiration-time=value] [-m value | --max-cache-size=value] [-E <true|false> | --encryption-enabled=<true|false>] [-k value | --encryption-key-size=value]
Overview
Use this command to configure the attachment manager, which handles data transfer (for instanceLibrary downloads and uploads) to and from Spotfire Server.
Options
OptionOptional orRequired
DefaultValue Description
-c value--configuration=value
Optional configuration.xml
The path to the serverconfiguration file.
399
TIBCO Spotfire® Server and Environment Installation and Administration
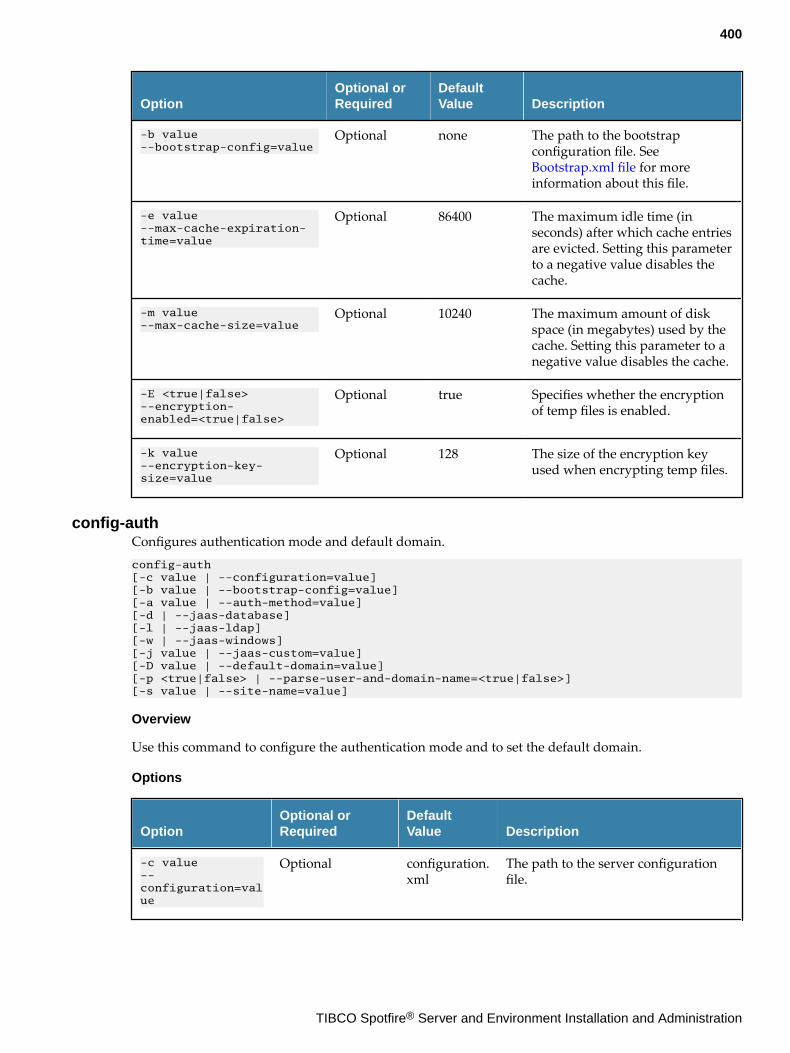
OptionOptional orRequired
DefaultValue Description
-b value--bootstrap-config=value
Optional none The path to the bootstrapconfiguration file. See Bootstrap.xml file for moreinformation about this file.
-e value--max-cache-expiration-time=value
Optional 86400 The maximum idle time (inseconds) after which cache entriesare evicted. Setting this parameterto a negative value disables thecache.
-m value--max-cache-size=value
Optional 10240 The maximum amount of diskspace (in megabytes) used by thecache. Setting this parameter to anegative value disables the cache.
-E <true|false>--encryption-enabled=<true|false>
Optional true Specifies whether the encryptionof temp files is enabled.
-k value--encryption-key-size=value
Optional 128 The size of the encryption keyused when encrypting temp files.
config-authConfigures authentication mode and default domain.config-auth [-c value | --configuration=value] [-b value | --bootstrap-config=value] [-a value | --auth-method=value] [-d | --jaas-database] [-l | --jaas-ldap] [-w | --jaas-windows] [-j value | --jaas-custom=value] [-D value | --default-domain=value] [-p <true|false> | --parse-user-and-domain-name=<true|false>][-s value | --site-name=value]
Overview
Use this command to configure the authentication mode and to set the default domain.
Options
OptionOptional orRequired
DefaultValue Description
-c value--configuration=value
Optional configuration.xml
The path to the server configurationfile.
400
TIBCO Spotfire® Server and Environment Installation and Administration
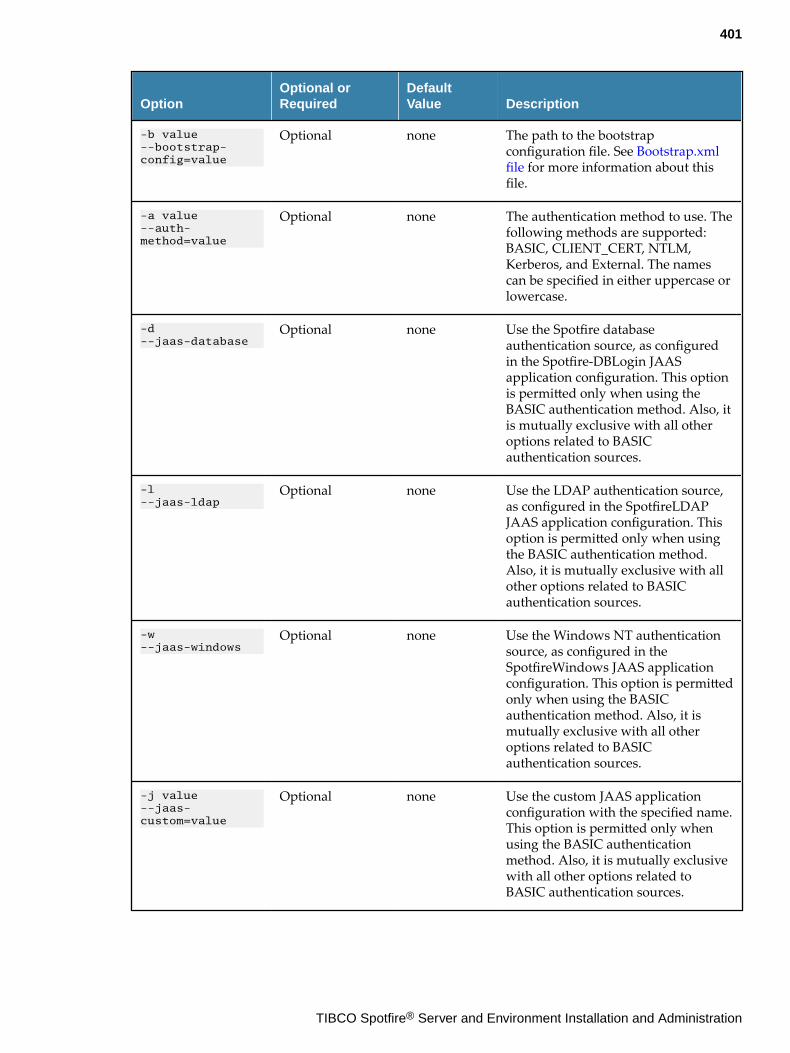
OptionOptional orRequired
DefaultValue Description
-b value--bootstrap-config=value
Optional none The path to the bootstrapconfiguration file. See Bootstrap.xmlfile for more information about thisfile.
-a value--auth-method=value
Optional none The authentication method to use. Thefollowing methods are supported:BASIC, CLIENT_CERT, NTLM,Kerberos, and External. The namescan be specified in either uppercase orlowercase.
-d--jaas-database
Optional none Use the Spotfire databaseauthentication source, as configuredin the Spotfire-DBLogin JAASapplication configuration. This optionis permitted only when using theBASIC authentication method. Also, itis mutually exclusive with all otheroptions related to BASICauthentication sources.
-l--jaas-ldap
Optional none Use the LDAP authentication source,as configured in the SpotfireLDAPJAAS application configuration. Thisoption is permitted only when usingthe BASIC authentication method.Also, it is mutually exclusive with allother options related to BASICauthentication sources.
-w--jaas-windows
Optional none Use the Windows NT authenticationsource, as configured in theSpotfireWindows JAAS applicationconfiguration. This option is permittedonly when using the BASICauthentication method. Also, it ismutually exclusive with all otheroptions related to BASICauthentication sources.
-j value--jaas-custom=value
Optional none Use the custom JAAS applicationconfiguration with the specified name.This option is permitted only whenusing the BASIC authenticationmethod. Also, it is mutually exclusivewith all other options related toBASIC authentication sources.
401
TIBCO Spotfire® Server and Environment Installation and Administration
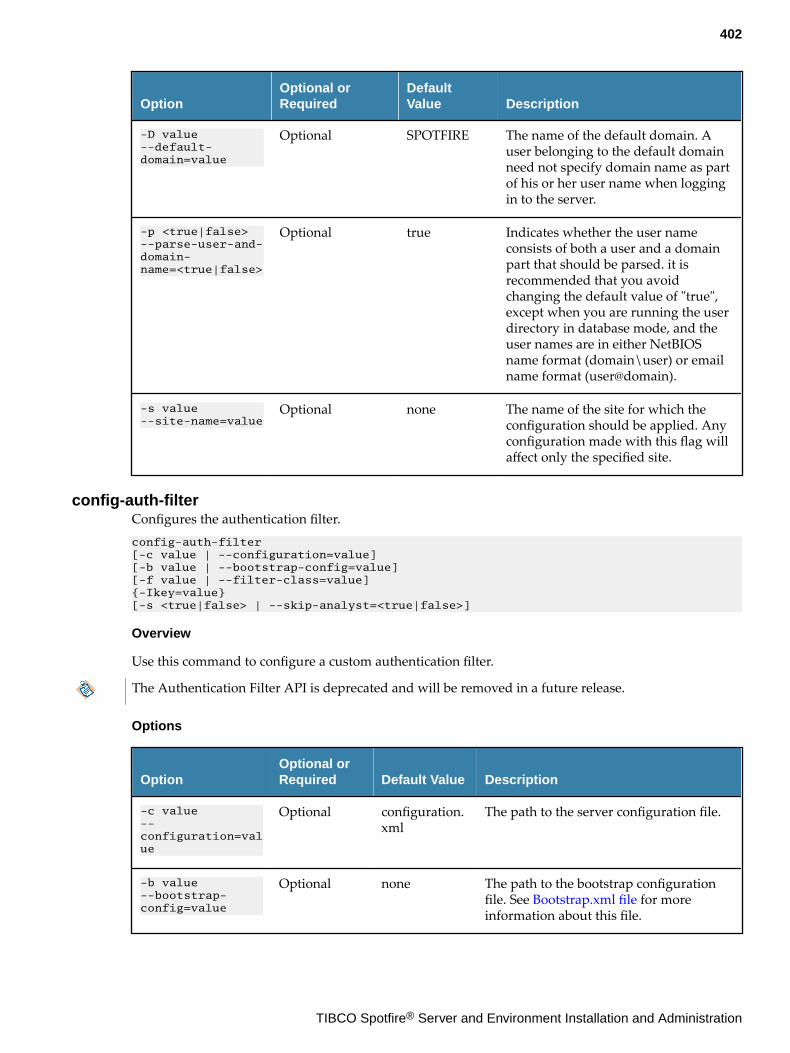
OptionOptional orRequired
DefaultValue Description
-D value--default-domain=value
Optional SPOTFIRE The name of the default domain. Auser belonging to the default domainneed not specify domain name as partof his or her user name when loggingin to the server.
-p <true|false>--parse-user-and-domain-name=<true|false>
Optional true Indicates whether the user nameconsists of both a user and a domainpart that should be parsed. it isrecommended that you avoidchanging the default value of "true",except when you are running the userdirectory in database mode, and theuser names are in either NetBIOSname format (domain\user) or emailname format (user@domain).
-s value--site-name=value
Optional none The name of the site for which theconfiguration should be applied. Anyconfiguration made with this flag willaffect only the specified site.
config-auth-filterConfigures the authentication filter.config-auth-filter [-c value | --configuration=value] [-b value | --bootstrap-config=value] [-f value | --filter-class=value] {-Ikey=value} [-s <true|false> | --skip-analyst=<true|false>]
Overview
Use this command to configure a custom authentication filter.
The Authentication Filter API is deprecated and will be removed in a future release.
Options
OptionOptional orRequired Default Value Description
-c value--configuration=value
Optional configuration.xml
The path to the server configuration file.
-b value--bootstrap-config=value
Optional none The path to the bootstrap configurationfile. See Bootstrap.xml file for moreinformation about this file.
402
TIBCO Spotfire® Server and Environment Installation and Administration
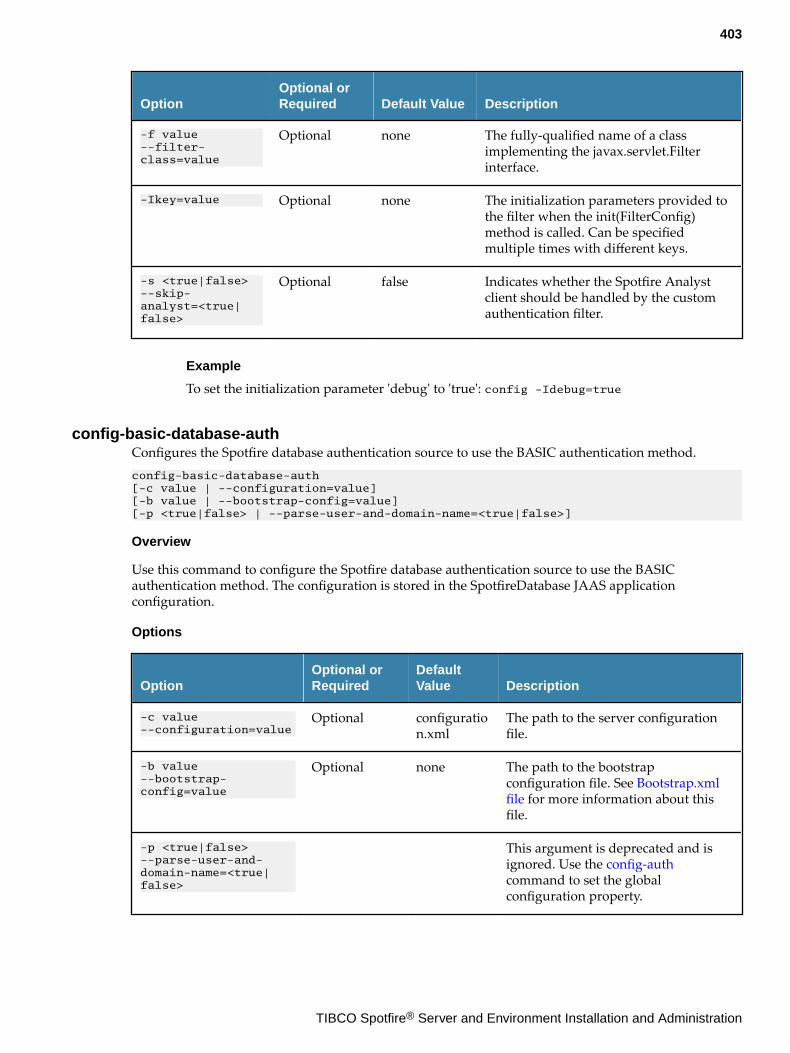
OptionOptional orRequired Default Value Description
-f value--filter-class=value
Optional none The fully-qualified name of a classimplementing the javax.servlet.Filterinterface.
-Ikey=value Optional none The initialization parameters provided tothe filter when the init(FilterConfig)method is called. Can be specifiedmultiple times with different keys.
-s <true|false>--skip-analyst=<true|false>
Optional false Indicates whether the Spotfire Analystclient should be handled by the customauthentication filter.
Example
To set the initialization parameter 'debug' to 'true': config -Idebug=true
config-basic-database-authConfigures the Spotfire database authentication source to use the BASIC authentication method.config-basic-database-auth [-c value | --configuration=value] [-b value | --bootstrap-config=value] [-p <true|false> | --parse-user-and-domain-name=<true|false>]
Overview
Use this command to configure the Spotfire database authentication source to use the BASICauthentication method. The configuration is stored in the SpotfireDatabase JAAS applicationconfiguration.
Options
OptionOptional orRequired
DefaultValue Description
-c value--configuration=value
Optional configuration.xml
The path to the server configurationfile.
-b value--bootstrap-config=value
Optional none The path to the bootstrapconfiguration file. See Bootstrap.xmlfile for more information about thisfile.
-p <true|false>--parse-user-and-domain-name=<true|false>
This argument is deprecated and isignored. Use the config-authcommand to set the globalconfiguration property.
403
TIBCO Spotfire® Server and Environment Installation and Administration
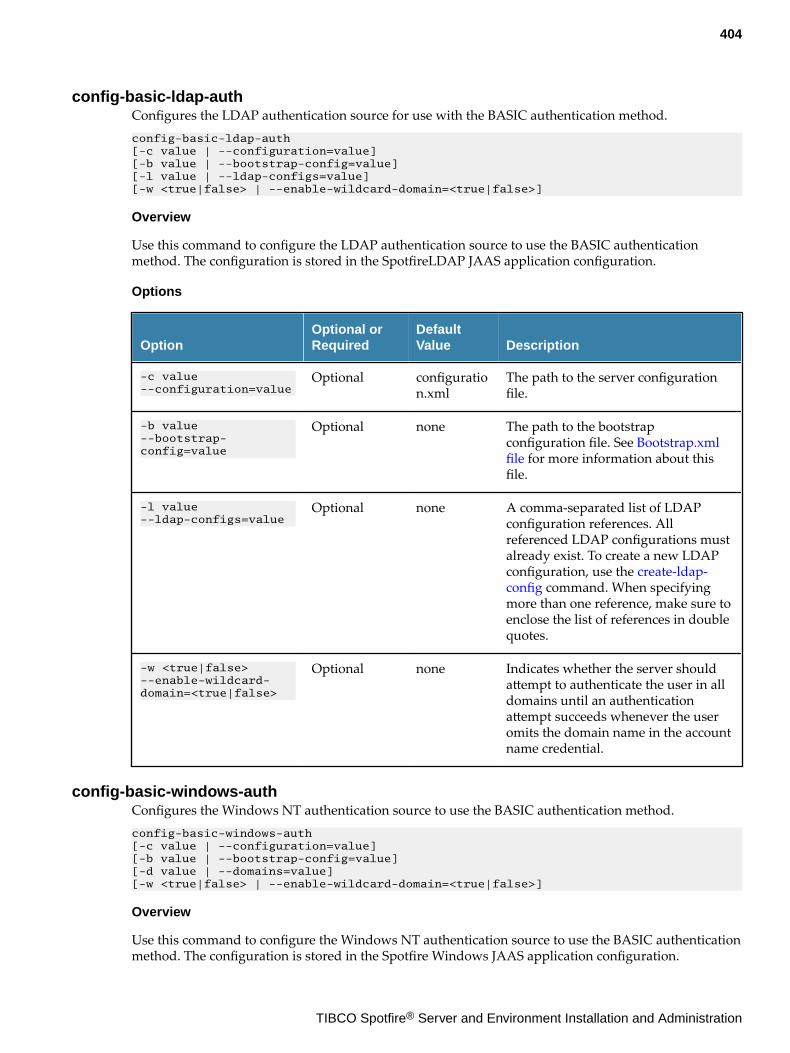
config-basic-ldap-authConfigures the LDAP authentication source for use with the BASIC authentication method.config-basic-ldap-auth [-c value | --configuration=value] [-b value | --bootstrap-config=value] [-l value | --ldap-configs=value] [-w <true|false> | --enable-wildcard-domain=<true|false>]
Overview
Use this command to configure the LDAP authentication source to use the BASIC authenticationmethod. The configuration is stored in the SpotfireLDAP JAAS application configuration.
Options
OptionOptional orRequired
DefaultValue Description
-c value--configuration=value
Optional configuration.xml
The path to the server configurationfile.
-b value--bootstrap-config=value
Optional none The path to the bootstrapconfiguration file. See Bootstrap.xmlfile for more information about thisfile.
-l value--ldap-configs=value
Optional none A comma-separated list of LDAPconfiguration references. Allreferenced LDAP configurations mustalready exist. To create a new LDAPconfiguration, use the create-ldap-config command. When specifyingmore than one reference, make sure toenclose the list of references in doublequotes.
-w <true|false>--enable-wildcard-domain=<true|false>
Optional none Indicates whether the server shouldattempt to authenticate the user in alldomains until an authenticationattempt succeeds whenever the useromits the domain name in the accountname credential.
config-basic-windows-authConfigures the Windows NT authentication source to use the BASIC authentication method.config-basic-windows-auth [-c value | --configuration=value] [-b value | --bootstrap-config=value] [-d value | --domains=value] [-w <true|false> | --enable-wildcard-domain=<true|false>]
Overview
Use this command to configure the Windows NT authentication source to use the BASIC authenticationmethod. The configuration is stored in the Spotfire Windows JAAS application configuration.
404
TIBCO Spotfire® Server and Environment Installation and Administration
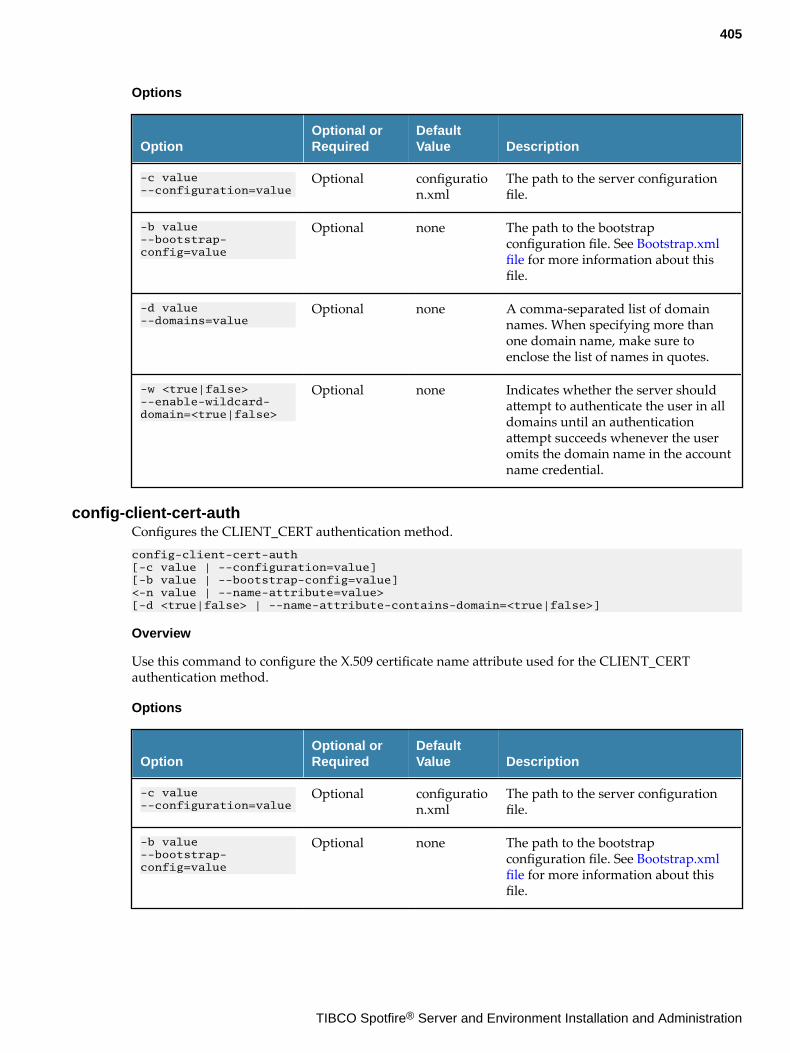
Options
OptionOptional orRequired
DefaultValue Description
-c value--configuration=value
Optional configuration.xml
The path to the server configurationfile.
-b value--bootstrap-config=value
Optional none The path to the bootstrapconfiguration file. See Bootstrap.xmlfile for more information about thisfile.
-d value--domains=value
Optional none A comma-separated list of domainnames. When specifying more thanone domain name, make sure toenclose the list of names in quotes.
-w <true|false>--enable-wildcard-domain=<true|false>
Optional none Indicates whether the server shouldattempt to authenticate the user in alldomains until an authenticationattempt succeeds whenever the useromits the domain name in the accountname credential.
config-client-cert-authConfigures the CLIENT_CERT authentication method.config-client-cert-auth [-c value | --configuration=value] [-b value | --bootstrap-config=value] <-n value | --name-attribute=value> [-d <true|false> | --name-attribute-contains-domain=<true|false>]
Overview
Use this command to configure the X.509 certificate name attribute used for the CLIENT_CERTauthentication method.
Options
OptionOptional orRequired
DefaultValue Description
-c value--configuration=value
Optional configuration.xml
The path to the server configurationfile.
-b value--bootstrap-config=value
Optional none The path to the bootstrapconfiguration file. See Bootstrap.xmlfile for more information about thisfile.
405
TIBCO Spotfire® Server and Environment Installation and Administration
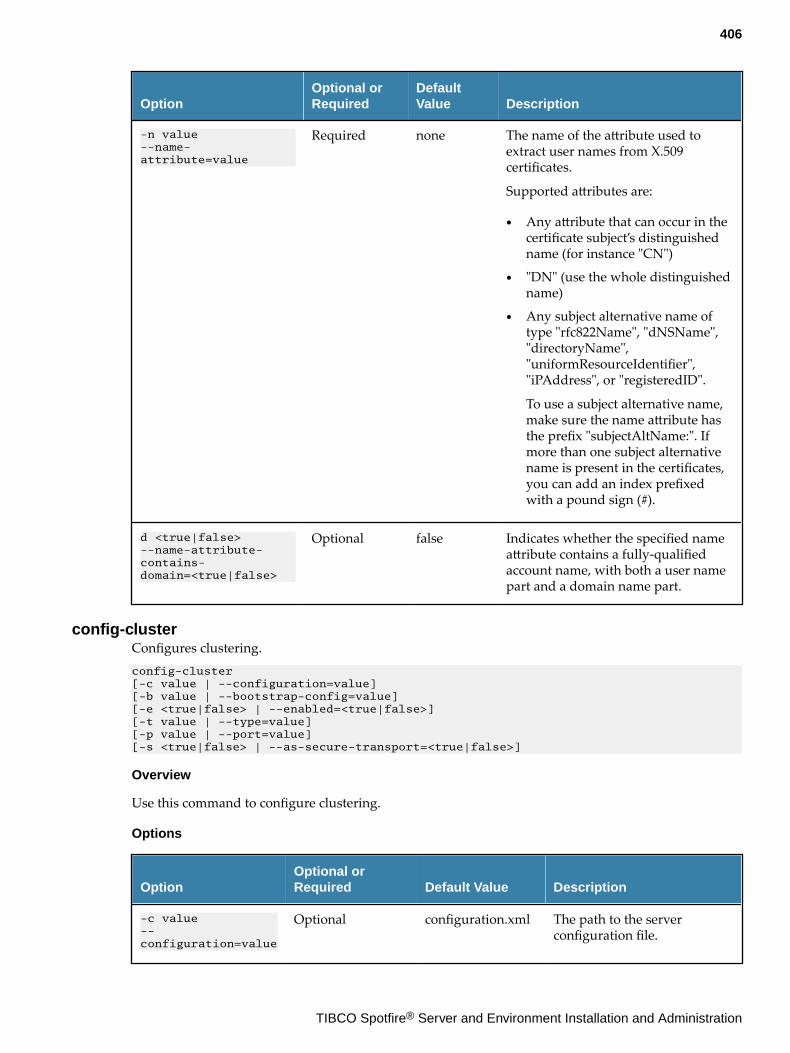
OptionOptional orRequired
DefaultValue Description
-n value--name-attribute=value
Required none The name of the attribute used toextract user names from X.509certificates.
Supported attributes are:
● Any attribute that can occur in thecertificate subject’s distinguishedname (for instance "CN")
● "DN" (use the whole distinguishedname)
● Any subject alternative name oftype "rfc822Name", "dNSName","directoryName","uniformResourceIdentifier","iPAddress", or "registeredID".
To use a subject alternative name,make sure the name attribute hasthe prefix "subjectAltName:". Ifmore than one subject alternativename is present in the certificates,you can add an index prefixedwith a pound sign (#).
d <true|false>--name-attribute-contains-domain=<true|false>
Optional false Indicates whether the specified nameattribute contains a fully-qualifiedaccount name, with both a user namepart and a domain name part.
config-clusterConfigures clustering.config-cluster[-c value | --configuration=value] [-b value | --bootstrap-config=value] [-e <true|false> | --enabled=<true|false>] [-t value | --type=value] [-p value | --port=value] [-s <true|false> | --as-secure-transport=<true|false>]
Overview
Use this command to configure clustering.
Options
OptionOptional orRequired Default Value Description
-c value--configuration=value
Optional configuration.xml The path to the serverconfiguration file.
406
TIBCO Spotfire® Server and Environment Installation and Administration
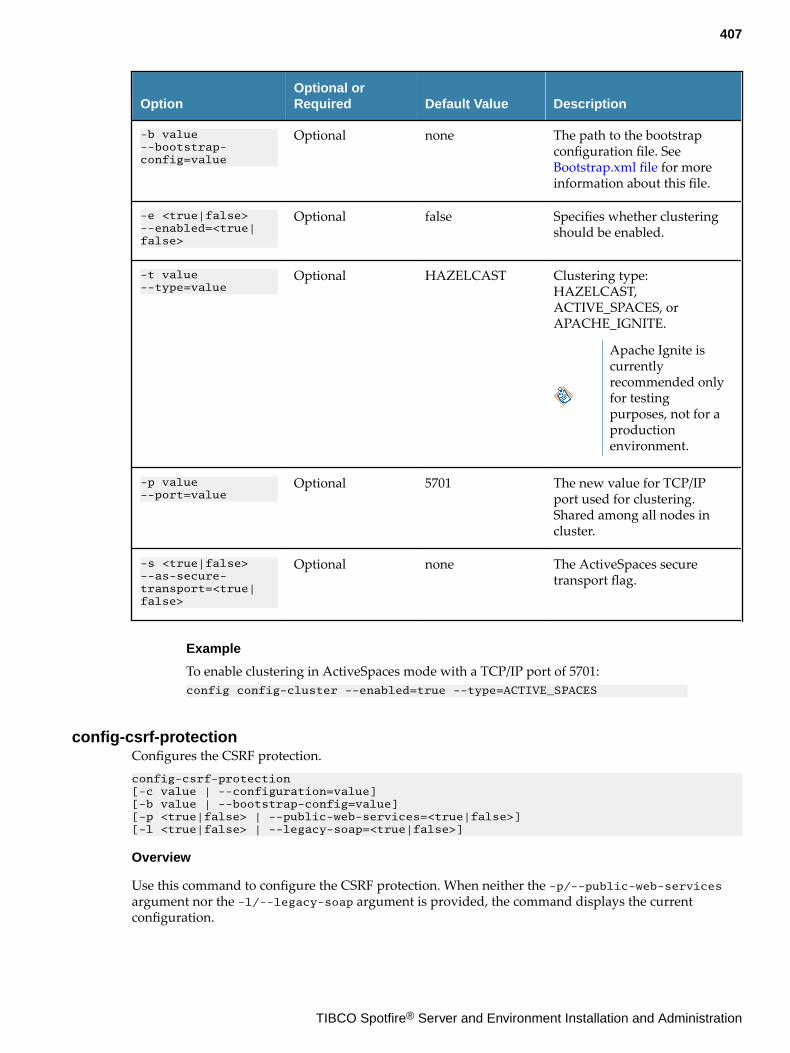
OptionOptional orRequired Default Value Description
-b value--bootstrap-config=value
Optional none The path to the bootstrapconfiguration file. See Bootstrap.xml file for moreinformation about this file.
-e <true|false>--enabled=<true|false>
Optional false Specifies whether clusteringshould be enabled.
-t value--type=value
Optional HAZELCAST Clustering type:HAZELCAST,ACTIVE_SPACES, orAPACHE_IGNITE.
Apache Ignite iscurrentlyrecommended onlyfor testingpurposes, not for aproductionenvironment.
-p value--port=value
Optional 5701 The new value for TCP/IPport used for clustering.Shared among all nodes incluster.
-s <true|false>--as-secure-transport=<true|false>
Optional none The ActiveSpaces securetransport flag.
Example
To enable clustering in ActiveSpaces mode with a TCP/IP port of 5701:config config-cluster --enabled=true --type=ACTIVE_SPACES
config-csrf-protectionConfigures the CSRF protection.config-csrf-protection [-c value | --configuration=value] [-b value | --bootstrap-config=value] [-p <true|false> | --public-web-services=<true|false>] [-l <true|false> | --legacy-soap=<true|false>]
Overview
Use this command to configure the CSRF protection. When neither the -p/--public-web-servicesargument nor the -l/--legacy-soap argument is provided, the command displays the currentconfiguration.
407
TIBCO Spotfire® Server and Environment Installation and Administration
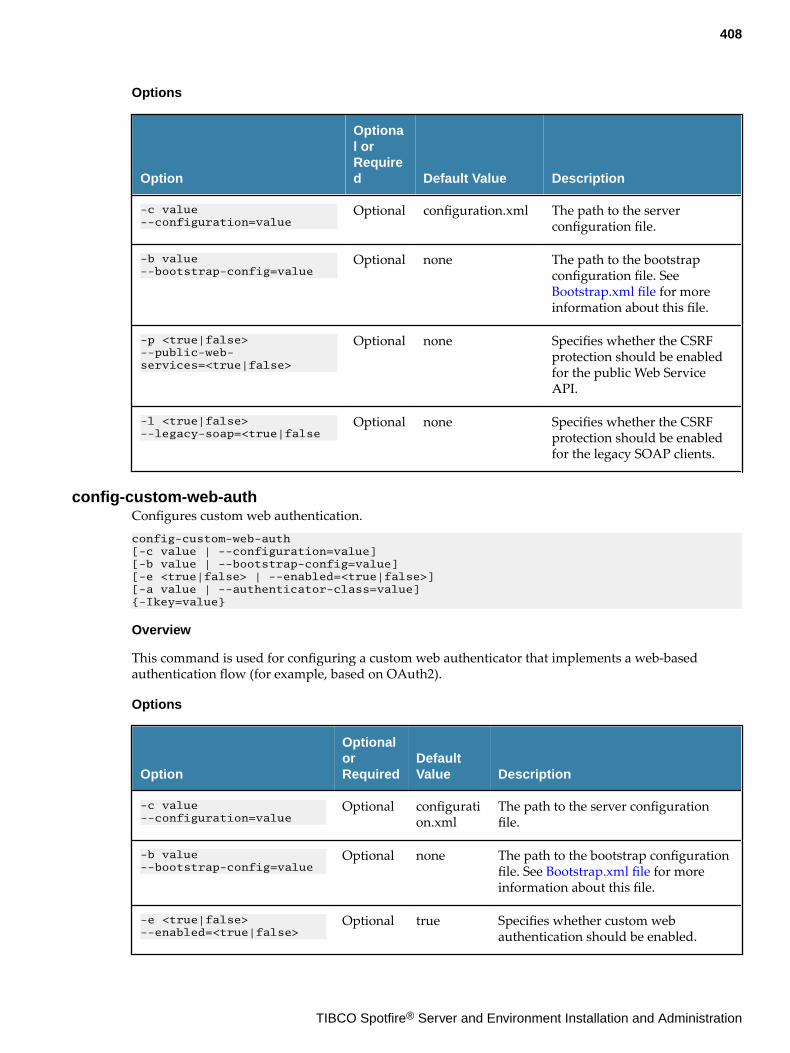
Options
Option
Optional orRequired Default Value Description
-c value--configuration=value
Optional configuration.xml The path to the serverconfiguration file.
-b value--bootstrap-config=value
Optional none The path to the bootstrapconfiguration file. See Bootstrap.xml file for moreinformation about this file.
-p <true|false>--public-web-services=<true|false>
Optional none Specifies whether the CSRFprotection should be enabledfor the public Web ServiceAPI.
-l <true|false>--legacy-soap=<true|false
Optional none Specifies whether the CSRFprotection should be enabledfor the legacy SOAP clients.
config-custom-web-authConfigures custom web authentication.config-custom-web-auth [-c value | --configuration=value] [-b value | --bootstrap-config=value] [-e <true|false> | --enabled=<true|false>] [-a value | --authenticator-class=value] {-Ikey=value}
Overview
This command is used for configuring a custom web authenticator that implements a web-basedauthentication flow (for example, based on OAuth2).
Options
Option
OptionalorRequired
DefaultValue Description
-c value--configuration=value
Optional configuration.xml
The path to the server configurationfile.
-b value--bootstrap-config=value
Optional none The path to the bootstrap configurationfile. See Bootstrap.xml file for moreinformation about this file.
-e <true|false>--enabled=<true|false>
Optional true Specifies whether custom webauthentication should be enabled.
408
TIBCO Spotfire® Server and Environment Installation and Administration
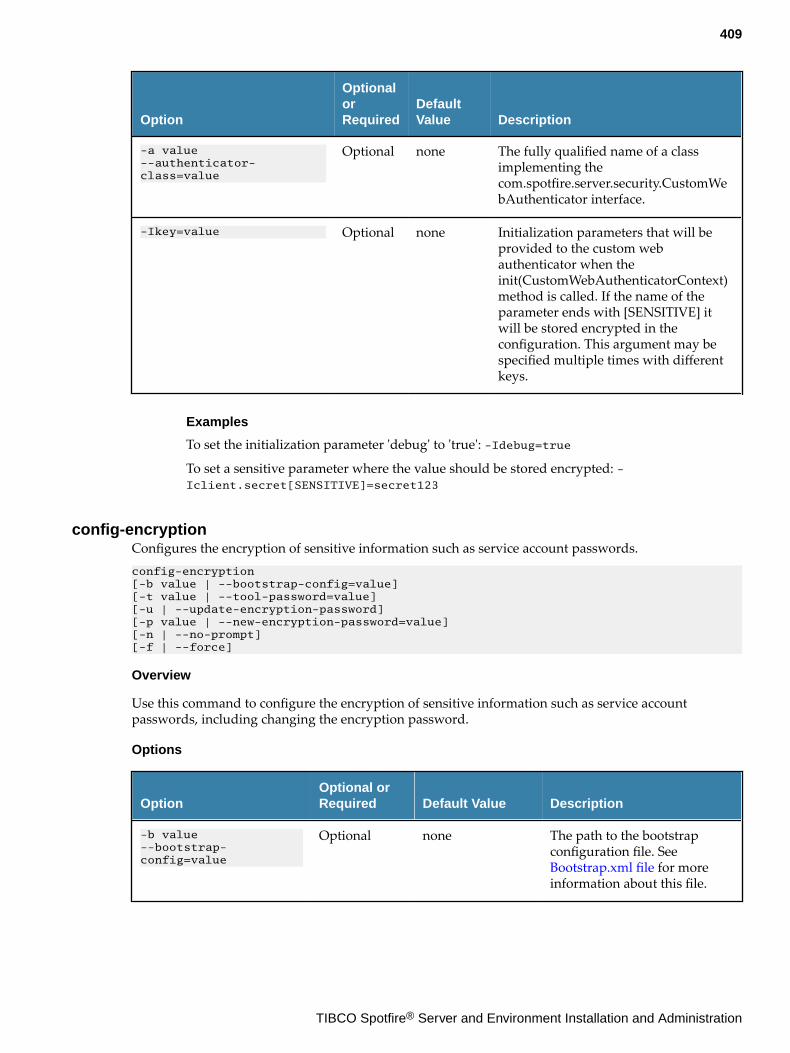
Option
OptionalorRequired
DefaultValue Description
-a value--authenticator-class=value
Optional none The fully qualified name of a classimplementing thecom.spotfire.server.security.CustomWebAuthenticator interface.
-Ikey=value Optional none Initialization parameters that will beprovided to the custom webauthenticator when theinit(CustomWebAuthenticatorContext)method is called. If the name of theparameter ends with [SENSITIVE] itwill be stored encrypted in theconfiguration. This argument may bespecified multiple times with differentkeys.
Examples
To set the initialization parameter 'debug' to 'true': -Idebug=true
To set a sensitive parameter where the value should be stored encrypted: -Iclient.secret[SENSITIVE]=secret123
config-encryptionConfigures the encryption of sensitive information such as service account passwords.config-encryption [-b value | --bootstrap-config=value] [-t value | --tool-password=value] [-u | --update-encryption-password] [-p value | --new-encryption-password=value] [-n | --no-prompt] [-f | --force]
Overview
Use this command to configure the encryption of sensitive information such as service accountpasswords, including changing the encryption password.
Options
OptionOptional orRequired Default Value Description
-b value--bootstrap-config=value
Optional none The path to the bootstrapconfiguration file. See Bootstrap.xml file for moreinformation about this file.
409
TIBCO Spotfire® Server and Environment Installation and Administration
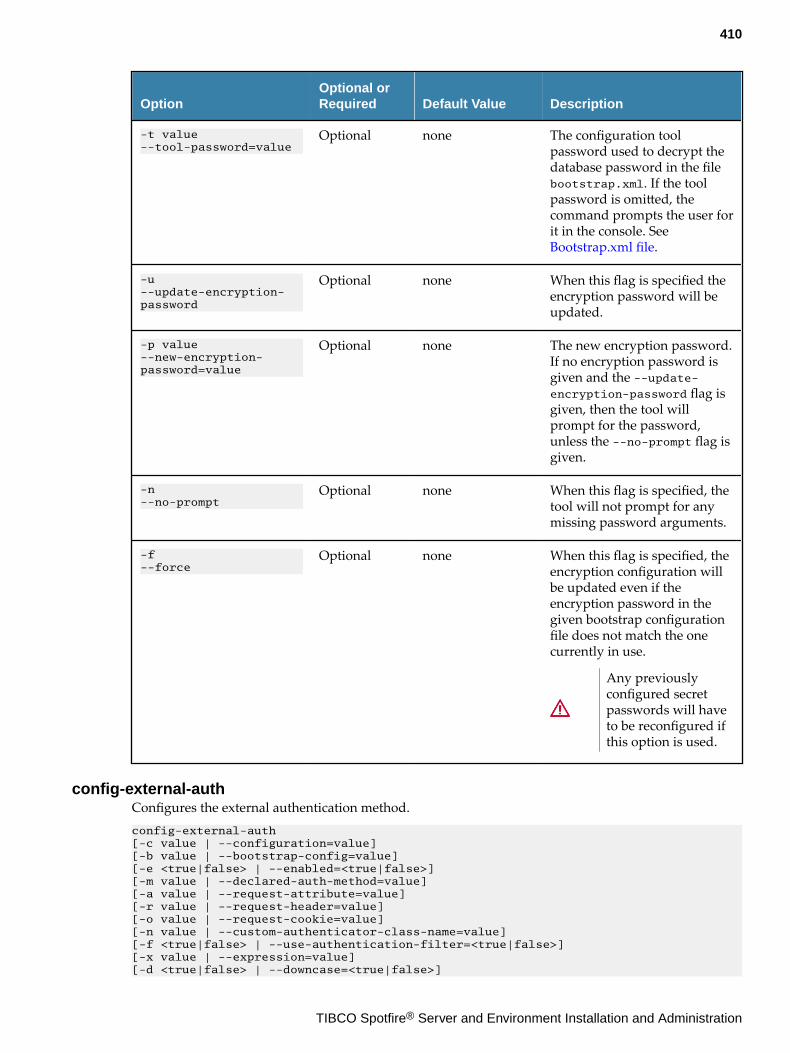
OptionOptional orRequired Default Value Description
-t value--tool-password=value
Optional none The configuration toolpassword used to decrypt thedatabase password in the filebootstrap.xml. If the toolpassword is omitted, thecommand prompts the user forit in the console. See Bootstrap.xml file.
-u--update-encryption-password
Optional none When this flag is specified theencryption password will beupdated.
-p value--new-encryption-password=value
Optional none The new encryption password.If no encryption password isgiven and the --update-encryption-password flag isgiven, then the tool willprompt for the password,unless the --no-prompt flag isgiven.
-n--no-prompt
Optional none When this flag is specified, thetool will not prompt for anymissing password arguments.
-f--force
Optional none When this flag is specified, theencryption configuration willbe updated even if theencryption password in thegiven bootstrap configurationfile does not match the onecurrently in use.
Any previouslyconfigured secretpasswords will haveto be reconfigured ifthis option is used.
config-external-authConfigures the external authentication method.config-external-auth [-c value | --configuration=value] [-b value | --bootstrap-config=value] [-e <true|false> | --enabled=<true|false>][-m value | --declared-auth-method=value][-a value | --request-attribute=value] [-r value | --request-header=value] [-o value | --request-cookie=value][-n value | --custom-authenticator-class-name=value] [-f <true|false> | --use-authentication-filter=<true|false>] [-x value | --expression=value] [-d <true|false> | --downcase=<true|false>]
410
TIBCO Spotfire® Server and Environment Installation and Administration
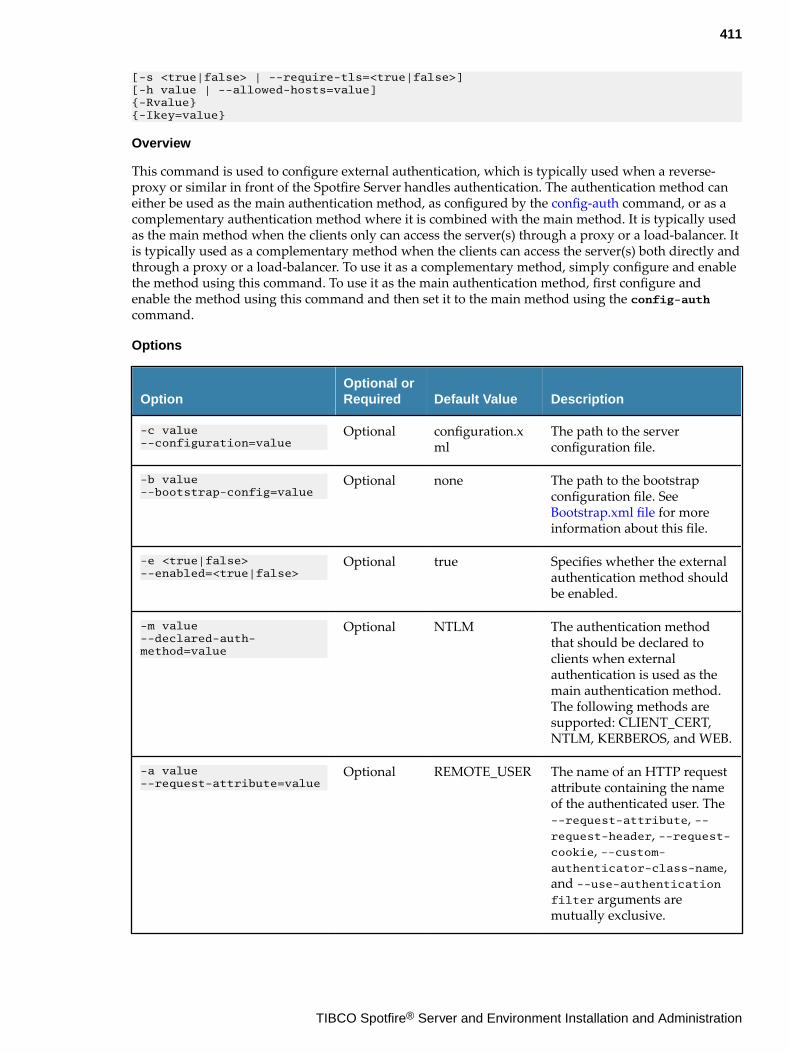
[-s <true|false> | --require-tls=<true|false>] [-h value | --allowed-hosts=value] {-Rvalue}{-Ikey=value}
Overview
This command is used to configure external authentication, which is typically used when a reverse-proxy or similar in front of the Spotfire Server handles authentication. The authentication method caneither be used as the main authentication method, as configured by the config-auth command, or as acomplementary authentication method where it is combined with the main method. It is typically usedas the main method when the clients only can access the server(s) through a proxy or a load-balancer. Itis typically used as a complementary method when the clients can access the server(s) both directly andthrough a proxy or a load-balancer. To use it as a complementary method, simply configure and enablethe method using this command. To use it as the main authentication method, first configure andenable the method using this command and then set it to the main method using the config-authcommand.
Options
OptionOptional orRequired Default Value Description
-c value--configuration=value
Optional configuration.xml
The path to the serverconfiguration file.
-b value--bootstrap-config=value
Optional none The path to the bootstrapconfiguration file. See Bootstrap.xml file for moreinformation about this file.
-e <true|false>--enabled=<true|false>
Optional true Specifies whether the externalauthentication method shouldbe enabled.
-m value--declared-auth-method=value
Optional NTLM The authentication methodthat should be declared toclients when externalauthentication is used as themain authentication method.The following methods aresupported: CLIENT_CERT,NTLM, KERBEROS, and WEB.
-a value--request-attribute=value
Optional REMOTE_USER The name of an HTTP requestattribute containing the nameof the authenticated user. The--request-attribute, --request-header, --request-cookie, --custom-authenticator-class-name,and --use-authenticationfilter arguments aremutually exclusive.
411
TIBCO Spotfire® Server and Environment Installation and Administration
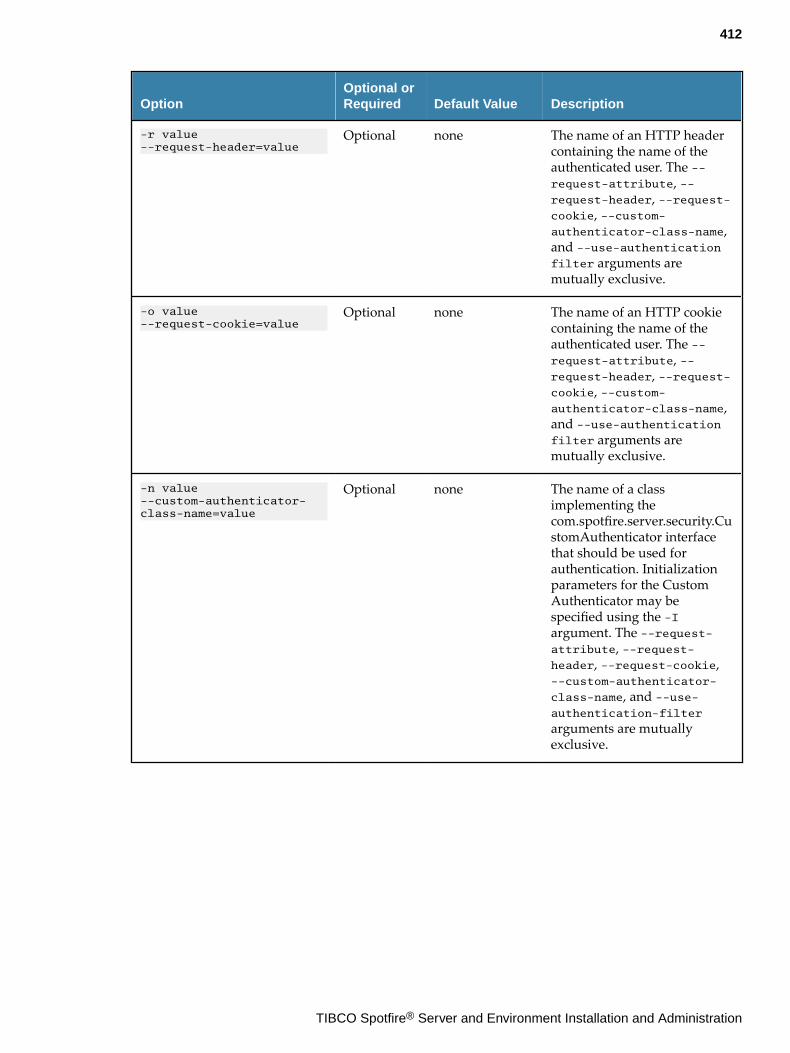
OptionOptional orRequired Default Value Description
-r value--request-header=value
Optional none The name of an HTTP headercontaining the name of theauthenticated user. The --request-attribute, --request-header, --request-cookie, --custom-authenticator-class-name,and --use-authenticationfilter arguments aremutually exclusive.
-o value--request-cookie=value
Optional none The name of an HTTP cookiecontaining the name of theauthenticated user. The --request-attribute, --request-header, --request-cookie, --custom-authenticator-class-name,and --use-authenticationfilter arguments aremutually exclusive.
-n value --custom-authenticator-class-name=value
Optional none The name of a classimplementing thecom.spotfire.server.security.CustomAuthenticator interfacethat should be used forauthentication. Initializationparameters for the CustomAuthenticator may bespecified using the -Iargument. The --request-attribute, --request-header, --request-cookie,--custom-authenticator-
class-name, and --use-authentication-filter
arguments are mutuallyexclusive.
412
TIBCO Spotfire® Server and Environment Installation and Administration
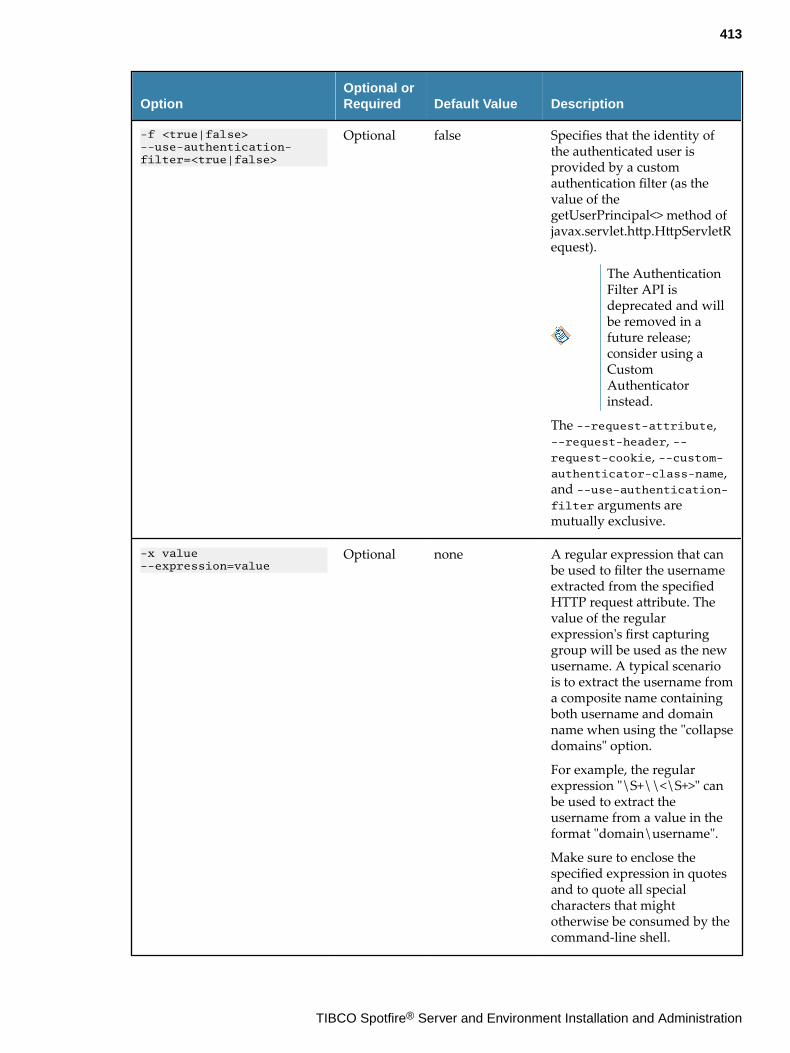
OptionOptional orRequired Default Value Description
-f <true|false>--use-authentication-filter=<true|false>
Optional false Specifies that the identity ofthe authenticated user isprovided by a customauthentication filter (as thevalue of thegetUserPrincipal<> method ofjavax.servlet.http.HttpServletRequest).
The AuthenticationFilter API isdeprecated and willbe removed in afuture release;consider using aCustomAuthenticatorinstead.
The --request-attribute,--request-header, --request-cookie, --custom-authenticator-class-name,and --use-authentication-filter arguments aremutually exclusive.
-x value--expression=value
Optional none A regular expression that canbe used to filter the usernameextracted from the specifiedHTTP request attribute. Thevalue of the regularexpression's first capturinggroup will be used as the newusername. A typical scenariois to extract the username froma composite name containingboth username and domainname when using the "collapsedomains" option.
For example, the regularexpression "\S+\\<\S+>" canbe used to extract theusername from a value in theformat "domain\username".
Make sure to enclose thespecified expression in quotesand to quote all specialcharacters that mightotherwise be consumed by thecommand-line shell.
413
TIBCO Spotfire® Server and Environment Installation and Administration
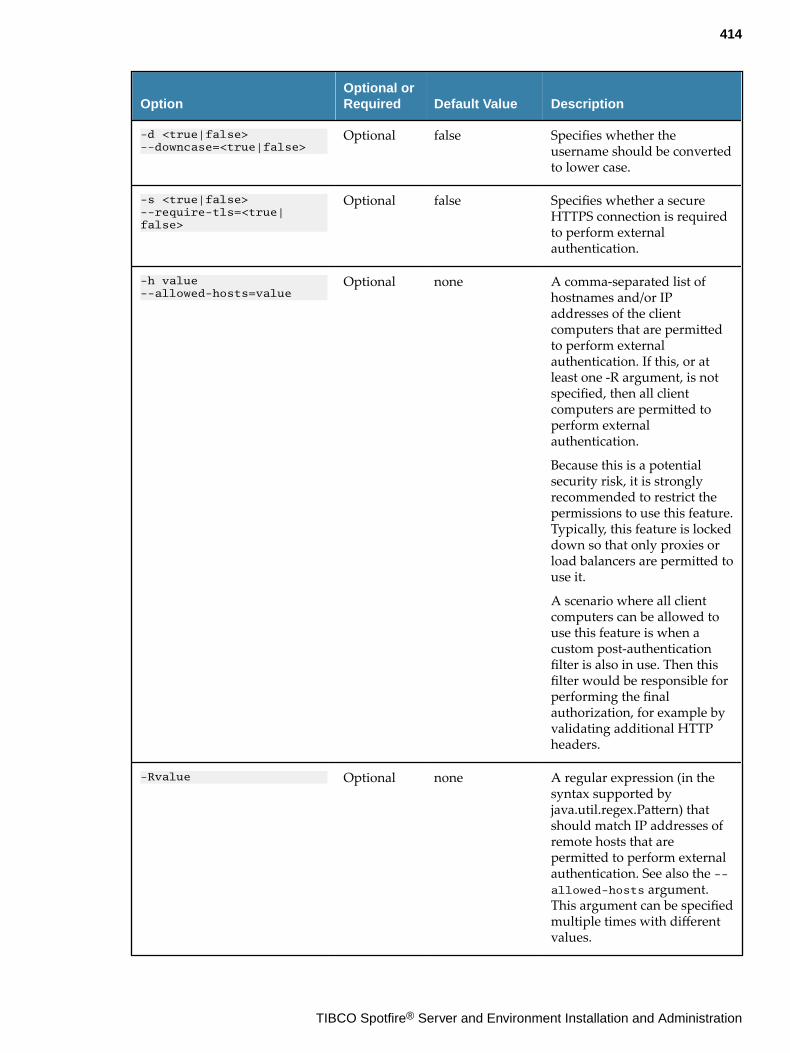
OptionOptional orRequired Default Value Description
-d <true|false>--downcase=<true|false>
Optional false Specifies whether theusername should be convertedto lower case.
-s <true|false>--require-tls=<true|false>
Optional false Specifies whether a secureHTTPS connection is requiredto perform externalauthentication.
-h value--allowed-hosts=value
Optional none A comma-separated list ofhostnames and/or IPaddresses of the clientcomputers that are permittedto perform externalauthentication. If this, or atleast one -R argument, is notspecified, then all clientcomputers are permitted toperform externalauthentication.
Because this is a potentialsecurity risk, it is stronglyrecommended to restrict thepermissions to use this feature.Typically, this feature is lockeddown so that only proxies orload balancers are permitted touse it.
A scenario where all clientcomputers can be allowed touse this feature is when acustom post-authenticationfilter is also in use. Then thisfilter would be responsible forperforming the finalauthorization, for example byvalidating additional HTTPheaders.
-Rvalue Optional none A regular expression (in thesyntax supported byjava.util.regex.Pattern) thatshould match IP addresses ofremote hosts that arepermitted to perform externalauthentication. See also the --allowed-hosts argument.This argument can be specifiedmultiple times with differentvalues.
414
TIBCO Spotfire® Server and Environment Installation and Administration
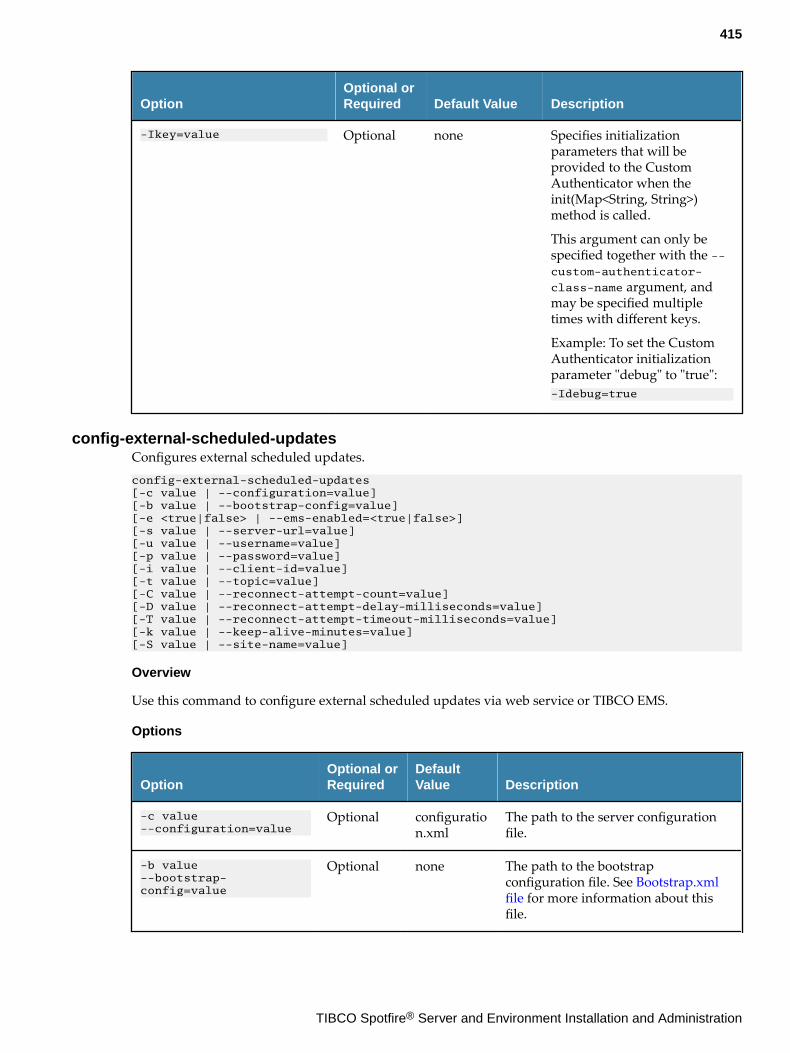
OptionOptional orRequired Default Value Description
-Ikey=value Optional none Specifies initializationparameters that will beprovided to the CustomAuthenticator when theinit(Map<String, String>)method is called.
This argument can only bespecified together with the --custom-authenticator-
class-name argument, andmay be specified multipletimes with different keys.
Example: To set the CustomAuthenticator initializationparameter "debug" to "true":-Idebug=true
config-external-scheduled-updatesConfigures external scheduled updates.config-external-scheduled-updates [-c value | --configuration=value] [-b value | --bootstrap-config=value] [-e <true|false> | --ems-enabled=<true|false>] [-s value | --server-url=value] [-u value | --username=value] [-p value | --password=value] [-i value | --client-id=value] [-t value | --topic=value] [-C value | --reconnect-attempt-count=value] [-D value | --reconnect-attempt-delay-milliseconds=value] [-T value | --reconnect-attempt-timeout-milliseconds=value] [-k value | --keep-alive-minutes=value][-S value | --site-name=value]
Overview
Use this command to configure external scheduled updates via web service or TIBCO EMS.
Options
OptionOptional orRequired
DefaultValue Description
-c value--configuration=value
Optional configuration.xml
The path to the server configurationfile.
-b value--bootstrap-config=value
Optional none The path to the bootstrapconfiguration file. See Bootstrap.xmlfile for more information about thisfile.
415
TIBCO Spotfire® Server and Environment Installation and Administration
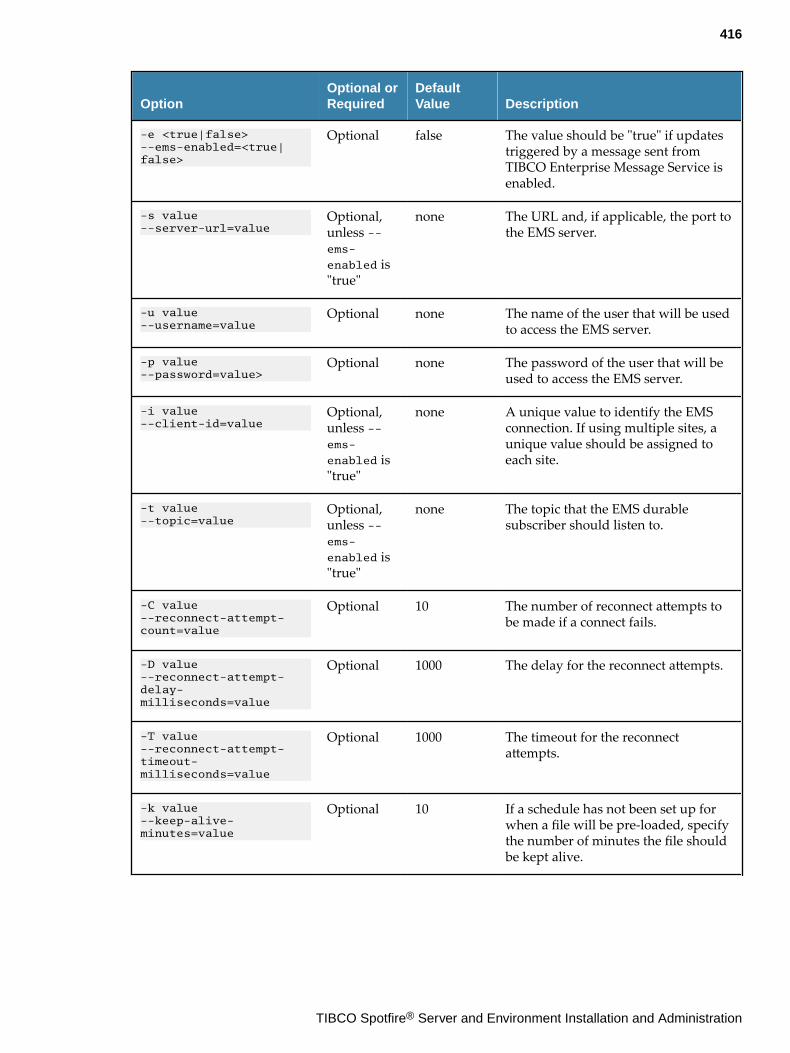
OptionOptional orRequired
DefaultValue Description
-e <true|false>--ems-enabled=<true|false>
Optional false The value should be "true" if updatestriggered by a message sent fromTIBCO Enterprise Message Service isenabled.
-s value--server-url=value
Optional,unless --ems-
enabled is"true"
none The URL and, if applicable, the port tothe EMS server.
-u value--username=value
Optional none The name of the user that will be usedto access the EMS server.
-p value--password=value>
Optional none The password of the user that will beused to access the EMS server.
-i value--client-id=value
Optional,unless --ems-
enabled is"true"
none A unique value to identify the EMSconnection. If using multiple sites, aunique value should be assigned toeach site.
-t value--topic=value
Optional,unless --ems-
enabled is"true"
none The topic that the EMS durablesubscriber should listen to.
-C value--reconnect-attempt-count=value
Optional 10 The number of reconnect attempts tobe made if a connect fails.
-D value--reconnect-attempt-delay-milliseconds=value
Optional 1000 The delay for the reconnect attempts.
-T value--reconnect-attempt-timeout-milliseconds=value
Optional 1000 The timeout for the reconnectattempts.
-k value--keep-alive-minutes=value
Optional 10 If a schedule has not been set up forwhen a file will be pre-loaded, specifythe number of minutes the file shouldbe kept alive.
416
TIBCO Spotfire® Server and Environment Installation and Administration
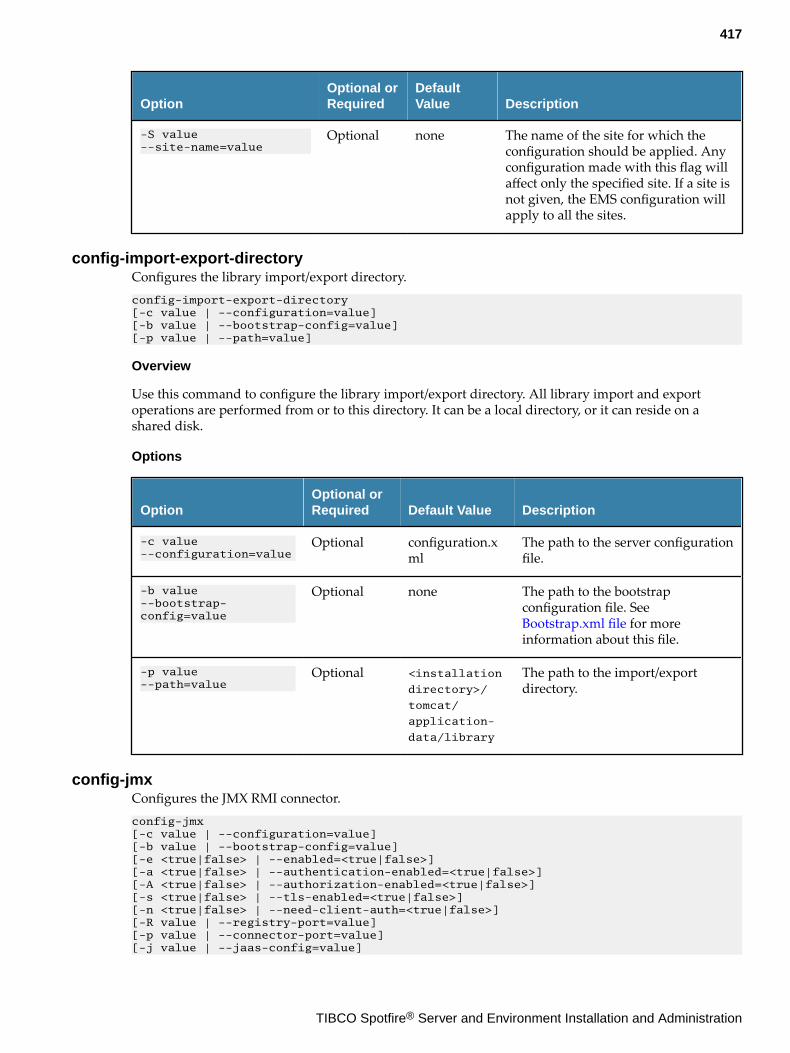
OptionOptional orRequired
DefaultValue Description
-S value --site-name=value
Optional none The name of the site for which theconfiguration should be applied. Anyconfiguration made with this flag willaffect only the specified site. If a site isnot given, the EMS configuration willapply to all the sites.
config-import-export-directoryConfigures the library import/export directory.config-import-export-directory [-c value | --configuration=value] [-b value | --bootstrap-config=value] [-p value | --path=value]
Overview
Use this command to configure the library import/export directory. All library import and exportoperations are performed from or to this directory. It can be a local directory, or it can reside on ashared disk.
Options
OptionOptional orRequired Default Value Description
-c value--configuration=value
Optional configuration.xml
The path to the server configurationfile.
-b value--bootstrap-config=value
Optional none The path to the bootstrapconfiguration file. See Bootstrap.xml file for moreinformation about this file.
-p value--path=value
Optional <installation
directory>/
tomcat/
application-
data/library
The path to the import/exportdirectory.
config-jmxConfigures the JMX RMI connector.config-jmx [-c value | --configuration=value] [-b value | --bootstrap-config=value] [-e <true|false> | --enabled=<true|false>] [-a <true|false> | --authentication-enabled=<true|false>] [-A <true|false> | --authorization-enabled=<true|false>] [-s <true|false> | --tls-enabled=<true|false>][-n <true|false> | --need-client-auth=<true|false>] [-R value | --registry-port=value] [-p value | --connector-port=value] [-j value | --jaas-config=value]
417
TIBCO Spotfire® Server and Environment Installation and Administration
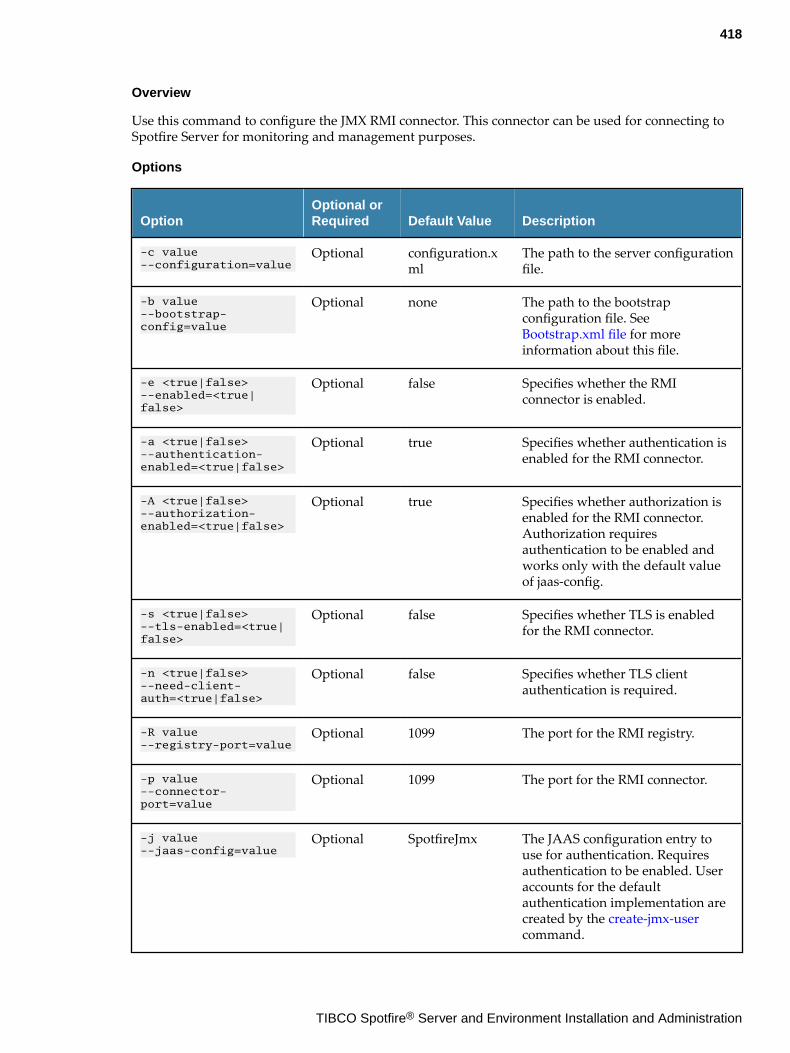
Overview
Use this command to configure the JMX RMI connector. This connector can be used for connecting toSpotfire Server for monitoring and management purposes.
Options
OptionOptional orRequired Default Value Description
-c value--configuration=value
Optional configuration.xml
The path to the server configurationfile.
-b value--bootstrap-config=value
Optional none The path to the bootstrapconfiguration file. See Bootstrap.xml file for moreinformation about this file.
-e <true|false>--enabled=<true|false>
Optional false Specifies whether the RMIconnector is enabled.
-a <true|false>--authentication-enabled=<true|false>
Optional true Specifies whether authentication isenabled for the RMI connector.
-A <true|false>--authorization-enabled=<true|false>
Optional true Specifies whether authorization isenabled for the RMI connector.Authorization requiresauthentication to be enabled andworks only with the default valueof jaas-config.
-s <true|false>--tls-enabled=<true|false>
Optional false Specifies whether TLS is enabledfor the RMI connector.
-n <true|false>--need-client-auth=<true|false>
Optional false Specifies whether TLS clientauthentication is required.
-R value--registry-port=value
Optional 1099 The port for the RMI registry.
-p value--connector-port=value
Optional 1099 The port for the RMI connector.
-j value--jaas-config=value
Optional SpotfireJmx The JAAS configuration entry touse for authentication. Requiresauthentication to be enabled. Useraccounts for the defaultauthentication implementation arecreated by the create-jmx-usercommand.
418
TIBCO Spotfire® Server and Environment Installation and Administration
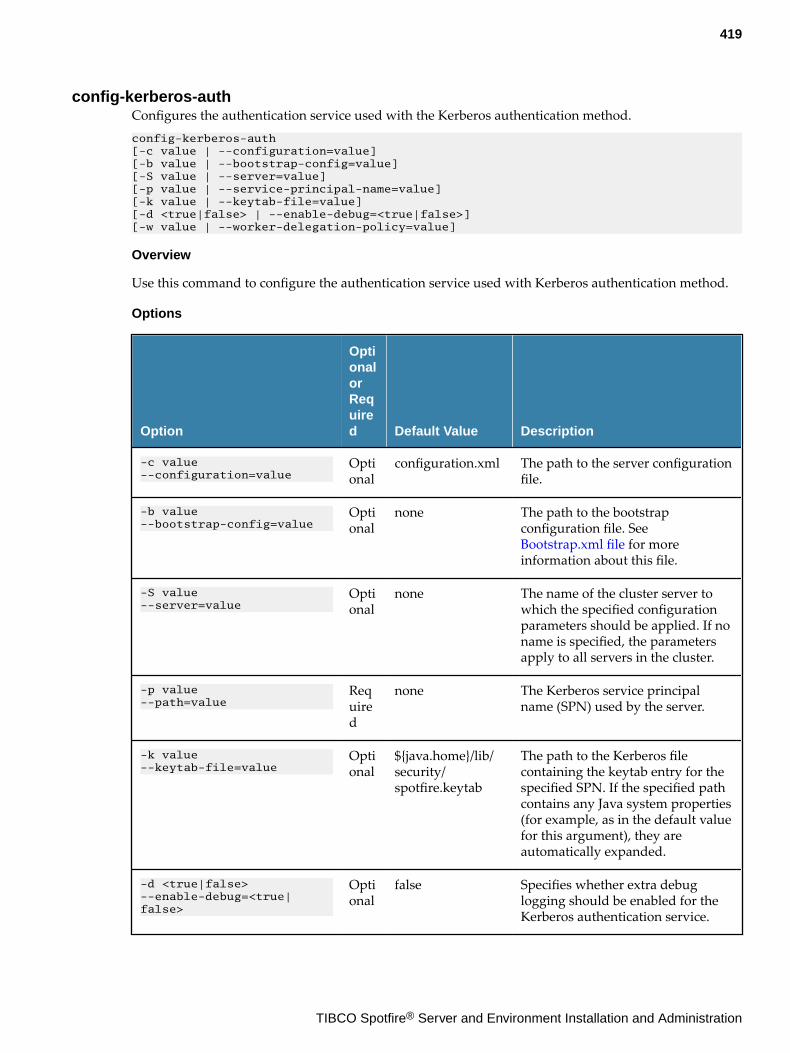
config-kerberos-authConfigures the authentication service used with the Kerberos authentication method.config-kerberos-auth [-c value | --configuration=value] [-b value | --bootstrap-config=value] [-S value | --server=value] [-p value | --service-principal-name=value] [-k value | --keytab-file=value] [-d <true|false> | --enable-debug=<true|false>] [-w value | --worker-delegation-policy=value]
Overview
Use this command to configure the authentication service used with Kerberos authentication method.
Options
Option
OptionalorRequired Default Value Description
-c value--configuration=value
Optional
configuration.xml The path to the server configurationfile.
-b value--bootstrap-config=value
Optional
none The path to the bootstrapconfiguration file. See Bootstrap.xml file for moreinformation about this file.
-S value--server=value
Optional
none The name of the cluster server towhich the specified configurationparameters should be applied. If noname is specified, the parametersapply to all servers in the cluster.
-p value--path=value
Required
none The Kerberos service principalname (SPN) used by the server.
-k value--keytab-file=value
Optional
${java.home}/lib/security/spotfire.keytab
The path to the Kerberos filecontaining the keytab entry for thespecified SPN. If the specified pathcontains any Java system properties(for example, as in the default valuefor this argument), they areautomatically expanded.
-d <true|false>--enable-debug=<true|false>
Optional
false Specifies whether extra debuglogging should be enabled for theKerberos authentication service.
419
TIBCO Spotfire® Server and Environment Installation and Administration
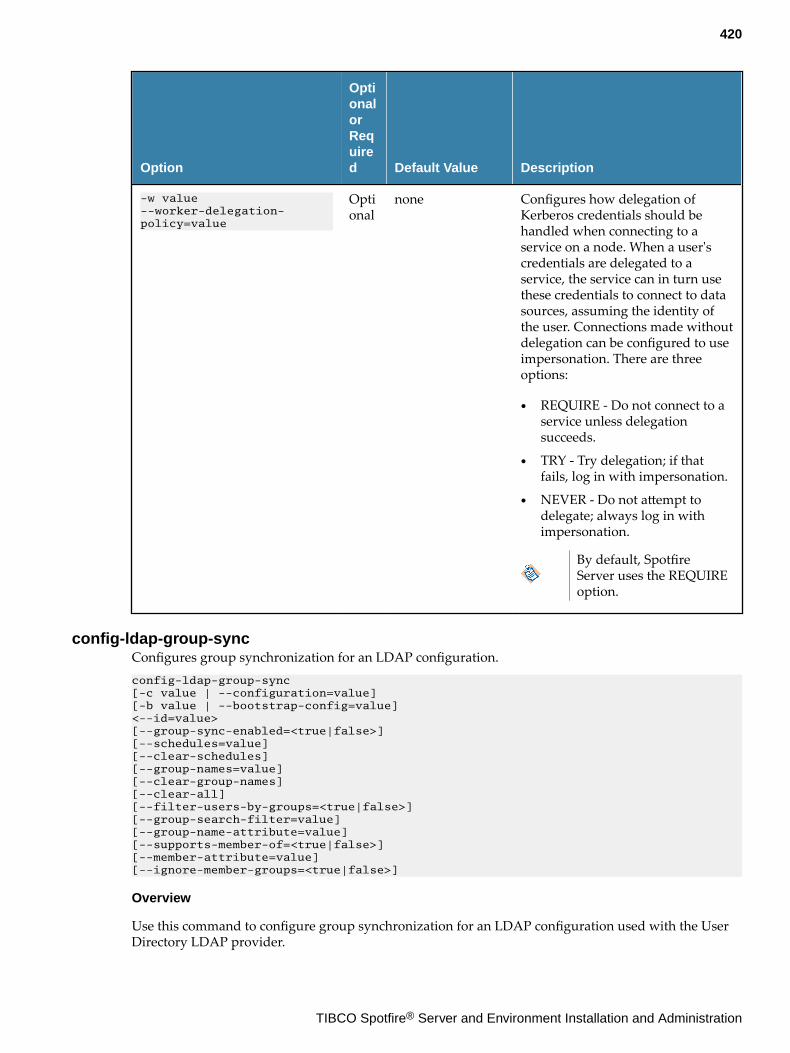
Option
OptionalorRequired Default Value Description
-w value--worker-delegation-policy=value
Optional
none Configures how delegation ofKerberos credentials should behandled when connecting to aservice on a node. When a user'scredentials are delegated to aservice, the service can in turn usethese credentials to connect to datasources, assuming the identity ofthe user. Connections made withoutdelegation can be configured to useimpersonation. There are threeoptions:
● REQUIRE - Do not connect to aservice unless delegationsucceeds.
● TRY - Try delegation; if thatfails, log in with impersonation.
● NEVER - Do not attempt todelegate; always log in withimpersonation.
By default, SpotfireServer uses the REQUIREoption.
config-ldap-group-syncConfigures group synchronization for an LDAP configuration.config-ldap-group-sync [-c value | --configuration=value] [-b value | --bootstrap-config=value] <--id=value> [--group-sync-enabled=<true|false>] [--schedules=value] [--clear-schedules] [--group-names=value] [--clear-group-names] [--clear-all] [--filter-users-by-groups=<true|false>] [--group-search-filter=value] [--group-name-attribute=value] [--supports-member-of=<true|false>] [--member-attribute=value] [--ignore-member-groups=<true|false>]
Overview
Use this command to configure group synchronization for an LDAP configuration used with the UserDirectory LDAP provider.
420
TIBCO Spotfire® Server and Environment Installation and Administration
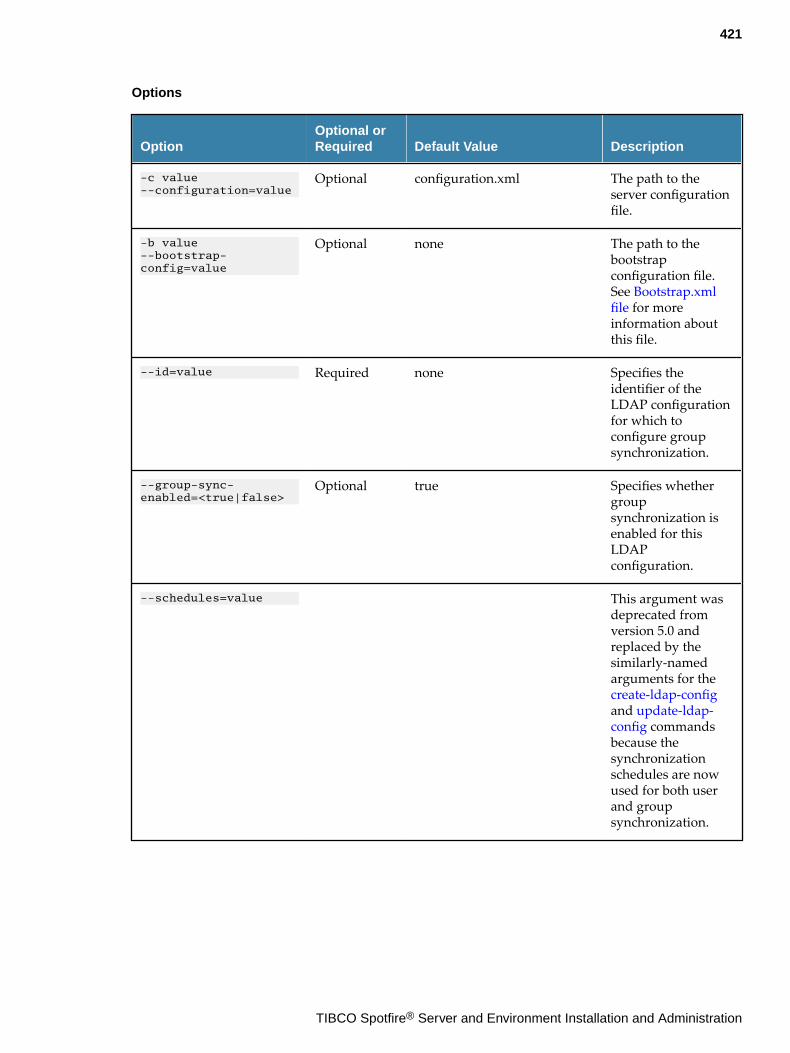
Options
OptionOptional orRequired Default Value Description
-c value--configuration=value
Optional configuration.xml The path to theserver configurationfile.
-b value--bootstrap-config=value
Optional none The path to thebootstrapconfiguration file.See Bootstrap.xmlfile for moreinformation aboutthis file.
--id=value Required none Specifies theidentifier of theLDAP configurationfor which toconfigure groupsynchronization.
--group-sync-enabled=<true|false>
Optional true Specifies whethergroupsynchronization isenabled for thisLDAPconfiguration.
--schedules=value This argument wasdeprecated fromversion 5.0 andreplaced by thesimilarly-namedarguments for the create-ldap-configand update-ldap-config commandsbecause thesynchronizationschedules are nowused for both userand groupsynchronization.
421
TIBCO Spotfire® Server and Environment Installation and Administration
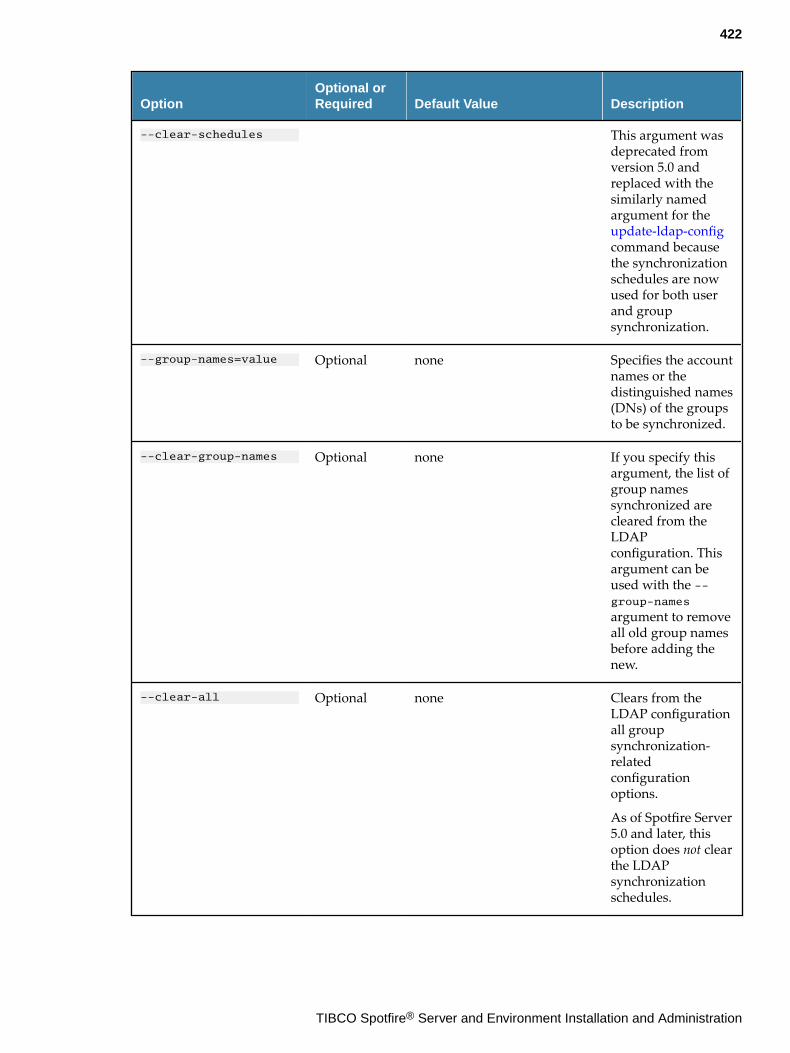
OptionOptional orRequired Default Value Description
--clear-schedules This argument wasdeprecated fromversion 5.0 andreplaced with thesimilarly namedargument for the update-ldap-configcommand becausethe synchronizationschedules are nowused for both userand groupsynchronization.
--group-names=value Optional none Specifies the accountnames or thedistinguished names(DNs) of the groupsto be synchronized.
--clear-group-names Optional none If you specify thisargument, the list ofgroup namessynchronized arecleared from theLDAPconfiguration. Thisargument can beused with the --group-names
argument to removeall old group namesbefore adding thenew.
--clear-all Optional none Clears from theLDAP configurationall groupsynchronization-relatedconfigurationoptions.
As of Spotfire Server5.0 and later, thisoption does not clearthe LDAPsynchronizationschedules.
422
TIBCO Spotfire® Server and Environment Installation and Administration
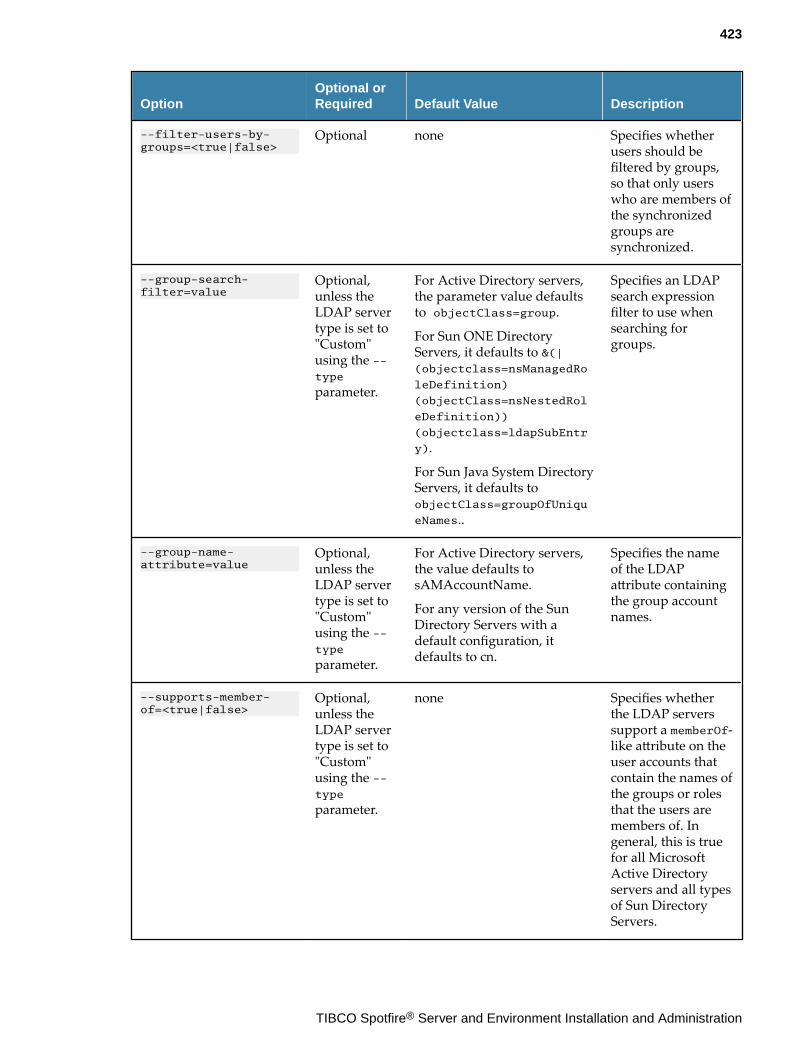
OptionOptional orRequired Default Value Description
--filter-users-by-groups=<true|false>
Optional none Specifies whetherusers should befiltered by groups,so that only userswho are members ofthe synchronizedgroups aresynchronized.
--group-search-filter=value
Optional,unless theLDAP servertype is set to"Custom"using the --type
parameter.
For Active Directory servers,the parameter value defaultsto objectClass=group.
For Sun ONE DirectoryServers, it defaults to &(|(objectclass=nsManagedRo
leDefinition)
(objectClass=nsNestedRol
eDefinition))
(objectclass=ldapSubEntr
y).
For Sun Java System DirectoryServers, it defaults toobjectClass=groupOfUniqu
eNames..
Specifies an LDAPsearch expressionfilter to use whensearching forgroups.
--group-name-attribute=value
Optional,unless theLDAP servertype is set to"Custom"using the --type
parameter.
For Active Directory servers,the value defaults tosAMAccountName.
For any version of the SunDirectory Servers with adefault configuration, itdefaults to cn.
Specifies the nameof the LDAPattribute containingthe group accountnames.
--supports-member-of=<true|false>
Optional,unless theLDAP servertype is set to"Custom"using the --type
parameter.
none Specifies whetherthe LDAP serverssupport a memberOf-like attribute on theuser accounts thatcontain the names ofthe groups or rolesthat the users aremembers of. Ingeneral, this is truefor all MicrosoftActive Directoryservers and all typesof Sun DirectoryServers.
423
TIBCO Spotfire® Server and Environment Installation and Administration
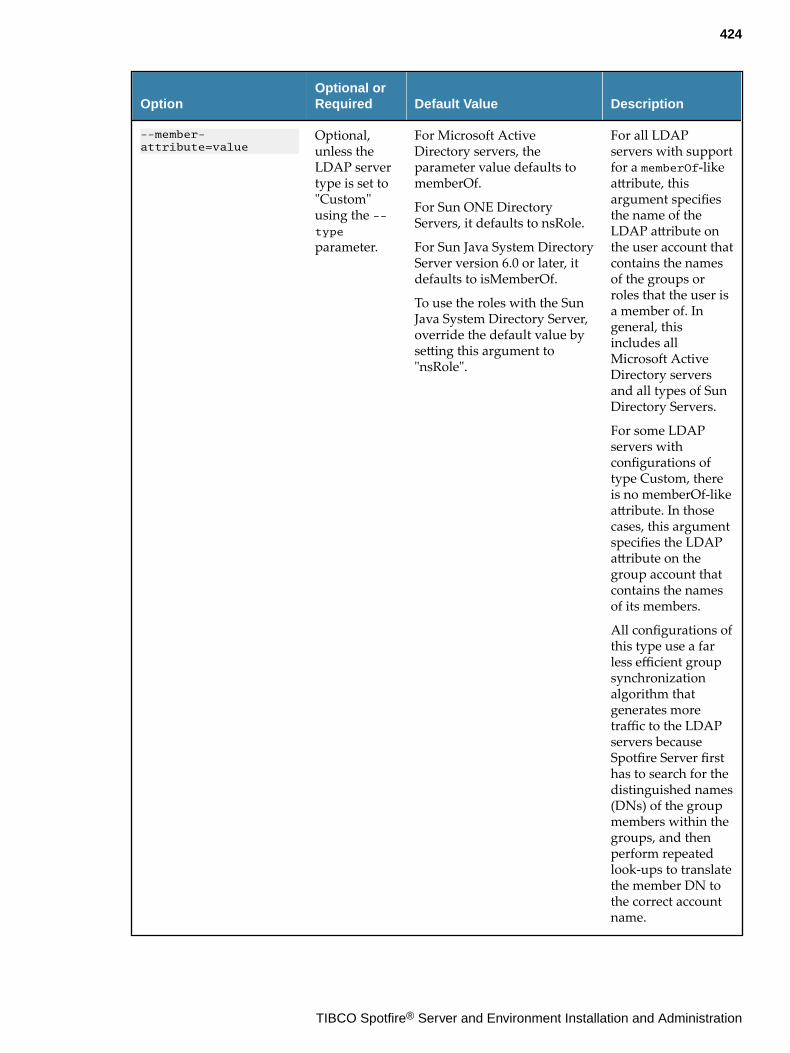
OptionOptional orRequired Default Value Description
--member-attribute=value
Optional,unless theLDAP servertype is set to"Custom"using the --type
parameter.
For Microsoft ActiveDirectory servers, theparameter value defaults tomemberOf.
For Sun ONE DirectoryServers, it defaults to nsRole.
For Sun Java System DirectoryServer version 6.0 or later, itdefaults to isMemberOf.
To use the roles with the SunJava System Directory Server,override the default value bysetting this argument to"nsRole".
For all LDAPservers with supportfor a memberOf-likeattribute, thisargument specifiesthe name of theLDAP attribute onthe user account thatcontains the namesof the groups orroles that the user isa member of. Ingeneral, thisincludes allMicrosoft ActiveDirectory serversand all types of SunDirectory Servers.
For some LDAPservers withconfigurations oftype Custom, thereis no memberOf-likeattribute. In thosecases, this argumentspecifies the LDAPattribute on thegroup account thatcontains the namesof its members.
All configurations ofthis type use a farless efficient groupsynchronizationalgorithm thatgenerates moretraffic to the LDAPservers becauseSpotfire Server firsthas to search for thedistinguished names(DNs) of the groupmembers within thegroups, and thenperform repeatedlook-ups to translatethe member DN tothe correct accountname.
424
TIBCO Spotfire® Server and Environment Installation and Administration
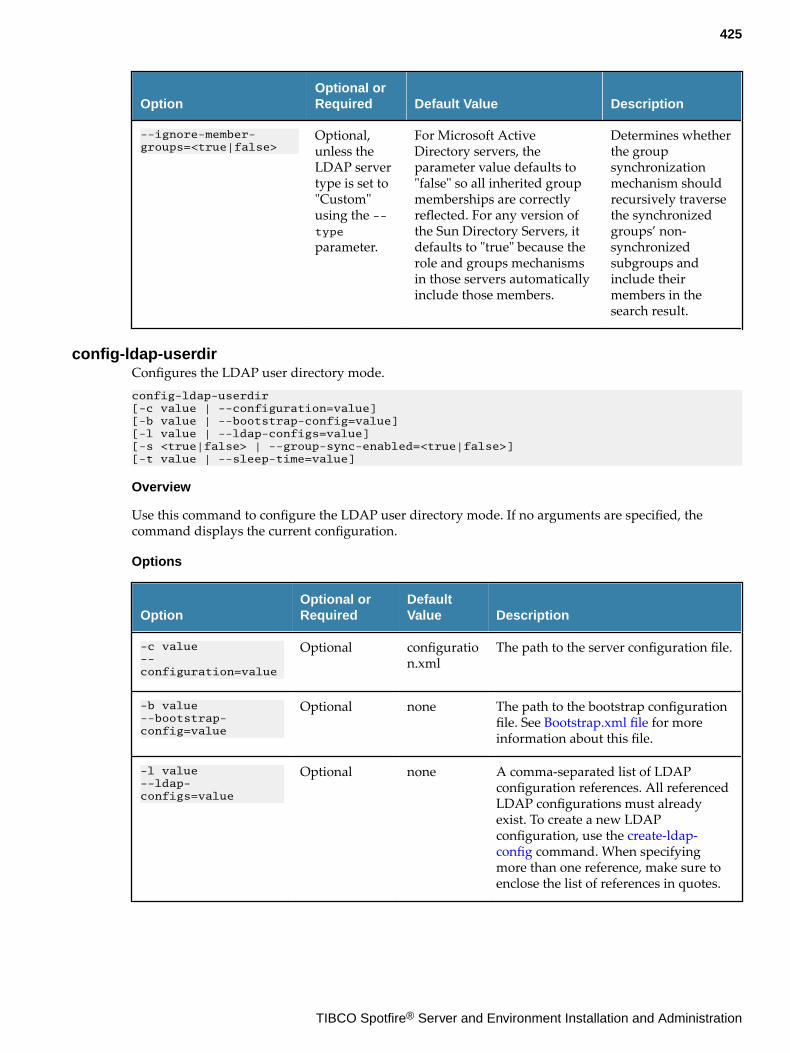
OptionOptional orRequired Default Value Description
--ignore-member-groups=<true|false>
Optional,unless theLDAP servertype is set to"Custom"using the --type
parameter.
For Microsoft ActiveDirectory servers, theparameter value defaults to"false" so all inherited groupmemberships are correctlyreflected. For any version ofthe Sun Directory Servers, itdefaults to "true" because therole and groups mechanismsin those servers automaticallyinclude those members.
Determines whetherthe groupsynchronizationmechanism shouldrecursively traversethe synchronizedgroups’ non-synchronizedsubgroups andinclude theirmembers in thesearch result.
config-ldap-userdirConfigures the LDAP user directory mode.config-ldap-userdir [-c value | --configuration=value] [-b value | --bootstrap-config=value] [-l value | --ldap-configs=value] [-s <true|false> | --group-sync-enabled=<true|false>] [-t value | --sleep-time=value]
Overview
Use this command to configure the LDAP user directory mode. If no arguments are specified, thecommand displays the current configuration.
Options
OptionOptional orRequired
DefaultValue Description
-c value--configuration=value
Optional configuration.xml
The path to the server configuration file.
-b value--bootstrap-config=value
Optional none The path to the bootstrap configurationfile. See Bootstrap.xml file for moreinformation about this file.
-l value--ldap-configs=value
Optional none A comma-separated list of LDAPconfiguration references. All referencedLDAP configurations must alreadyexist. To create a new LDAPconfiguration, use the create-ldap-config command. When specifyingmore than one reference, make sure toenclose the list of references in quotes.
425
TIBCO Spotfire® Server and Environment Installation and Administration

OptionOptional orRequired
DefaultValue Description
-s <true|false>--group-sync-enabled=<true|false>
Optional none This argument is deprecated and isignored. Use the config-ldap-group-sync command to enable or disablegroup synchronization for each LDAPconfiguration instead.
-t value--sleep-time=value
Optional 60 The number of minutes between eachsynchronization. The sleep time settingis used only for LDAP configurationentries without group synchronizationschedules. If an LDAP configurationentry has a synchronization scheduledefined, then this value is ignored.
config-library-external-data-storageConfigures the external library data storage.config-library-external-data-storage [-c value | --configuration=value] [-b value | --bootstrap-config=value] [-t value | --tool-password=value] <-e <true|false> | --enabled=<true|false>> [-s value | --external-storage=value] [-f | --force]
Overview
Use this command for general configuration of the external library data storage.
When this feature is enabled, the structure of the library is stored in the Spotfire database, while theactual data of library items is stored elsewhere.
The library must be empty when you switch to or from an external data storage. The prescribedprocedure for switching is to export the entire library, empty the library, change the configuration, andthen import the library. Switching storage modes with items in the library causes data to be lost.
When you change the external library data storage configuration with this command, a query is madeto the Spotfire database to make sure that the library is empty. This check can be overridden by usingthe --force argument.
Currently, Spotfire supports two options for external data storage: storing on the server's file system, orstoring on Amazon S3. After enabling this feature, you must configure the storage using the config-library-external-file-storage command or config-library-external-s3-storage command.
Options
OptionOptional orRequired Default Value Description
-c value--configuration=value
Optional configuration.xml The path to the serverconfiguration file.
426
TIBCO Spotfire® Server and Environment Installation and Administration
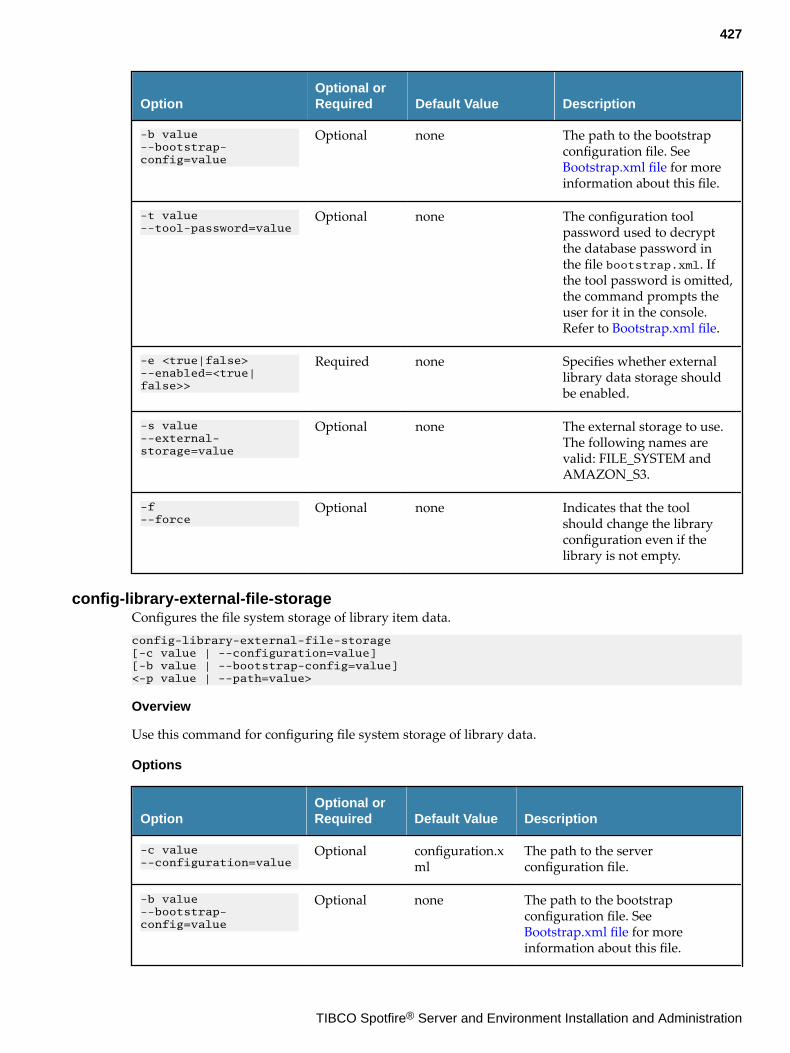
OptionOptional orRequired Default Value Description
-b value--bootstrap-config=value
Optional none The path to the bootstrapconfiguration file. See Bootstrap.xml file for moreinformation about this file.
-t value--tool-password=value
Optional none The configuration toolpassword used to decryptthe database password inthe file bootstrap.xml. Ifthe tool password is omitted,the command prompts theuser for it in the console.Refer to Bootstrap.xml file.
-e <true|false>--enabled=<true|false>>
Required none Specifies whether externallibrary data storage shouldbe enabled.
-s value--external-storage=value
Optional none The external storage to use.The following names arevalid: FILE_SYSTEM andAMAZON_S3.
-f--force
Optional none Indicates that the toolshould change the libraryconfiguration even if thelibrary is not empty.
config-library-external-file-storageConfigures the file system storage of library item data.config-library-external-file-storage [-c value | --configuration=value] [-b value | --bootstrap-config=value] <-p value | --path=value>
Overview
Use this command for configuring file system storage of library data.
Options
OptionOptional orRequired Default Value Description
-c value--configuration=value
Optional configuration.xml
The path to the serverconfiguration file.
-b value--bootstrap-config=value
Optional none The path to the bootstrapconfiguration file. See Bootstrap.xml file for moreinformation about this file.
427
TIBCO Spotfire® Server and Environment Installation and Administration
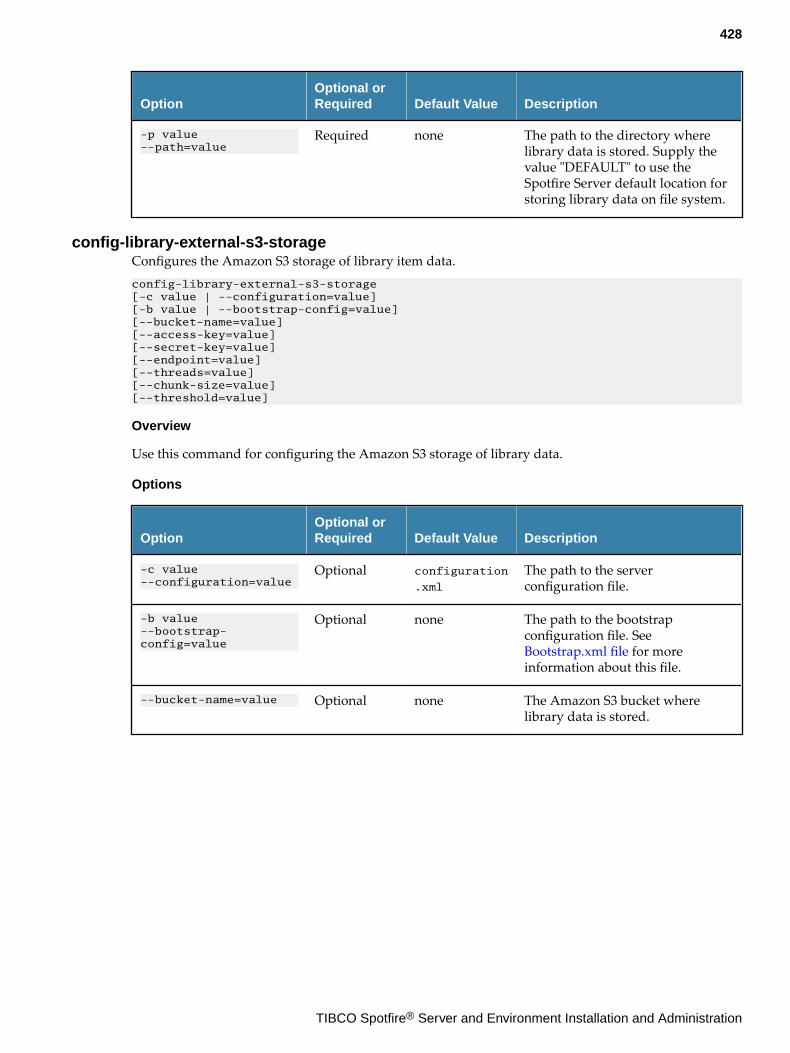
OptionOptional orRequired Default Value Description
-p value--path=value
Required none The path to the directory wherelibrary data is stored. Supply thevalue "DEFAULT" to use theSpotfire Server default location forstoring library data on file system.
config-library-external-s3-storageConfigures the Amazon S3 storage of library item data.config-library-external-s3-storage [-c value | --configuration=value] [-b value | --bootstrap-config=value] [--bucket-name=value] [--access-key=value] [--secret-key=value] [--endpoint=value] [--threads=value] [--chunk-size=value] [--threshold=value]
Overview
Use this command for configuring the Amazon S3 storage of library data.
Options
OptionOptional orRequired Default Value Description
-c value--configuration=value
Optional configuration
.xml
The path to the serverconfiguration file.
-b value--bootstrap-config=value
Optional none The path to the bootstrapconfiguration file. See Bootstrap.xml file for moreinformation about this file.
--bucket-name=value Optional none The Amazon S3 bucket wherelibrary data is stored.
428
TIBCO Spotfire® Server and Environment Installation and Administration

OptionOptional orRequired Default Value Description
--access-key=value Optional none The access key for connecting toAmazon S3. If set to default, aninstance ofDefaultAWSCredentialsProvider
Chain is created.DefaultAWSCredentialsProvider
Chain can take authenticationtokens from environmentvariables, Java system properties,by way of a config file, throughthe Amazon EC2 container, orthrough instance profile credentialsdelivered through the AmazonEC2 metadata service. For moreinformation see the documentationforDefaultAWSCredentialsProvider
Chain.
--secret-key=value Optional none The secret key for connecting toAmazon S3.
--endpoint=value Optional If not explicitlyconfigured, thedefault regionis used.
The Amazon S3 endpoint toconnect to. For example, s3.eu-central-1.amazonaws.com.
--threads=value Optional none The maximum number of threadsused for uploading to Amazon S3.
--chunk-size=value Optional none The maximum number of bytes ina chunk when the data is chunkedbefore transfer to Amazon S3.
--threshold=value Optional none Above this value, the number ofbytes for the transferred data issplit into chunks of a configurablesize that are then transferredseparately to Amazon S3.
config-login-dialogConfigures the client login dialog behavior.config-login-dialog [-c value | --configuration=value] [-b value | --bootstrap-config=value] [-s value | --show-login-dialog=value] [-o <true|false> | --allow-work-offline=<true|false>] [-d value | --offline-days-permitted=value] [-r <true|false> | --allow-remember-me=<true|false>] [-u <true|false> | --allow-user-provided-credentials=<true|false>] [-R value | --rss=value]
429
TIBCO Spotfire® Server and Environment Installation and Administration
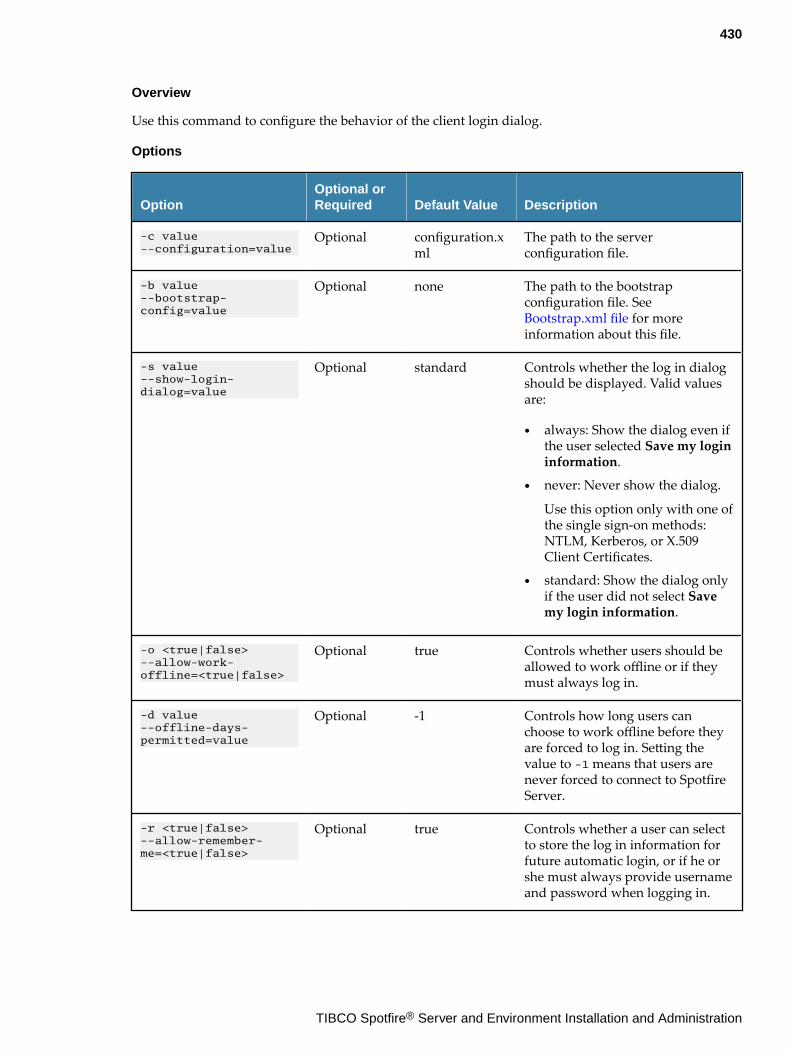
Overview
Use this command to configure the behavior of the client login dialog.
Options
OptionOptional orRequired Default Value Description
-c value--configuration=value
Optional configuration.xml
The path to the serverconfiguration file.
-b value--bootstrap-config=value
Optional none The path to the bootstrapconfiguration file. See Bootstrap.xml file for moreinformation about this file.
-s value--show-login-dialog=value
Optional standard Controls whether the log in dialogshould be displayed. Valid valuesare:
● always: Show the dialog even ifthe user selected Save my logininformation.
● never: Never show the dialog.
Use this option only with one ofthe single sign-on methods:NTLM, Kerberos, or X.509Client Certificates.
● standard: Show the dialog onlyif the user did not select Savemy login information.
-o <true|false>--allow-work-offline=<true|false>
Optional true Controls whether users should beallowed to work offline or if theymust always log in.
-d value--offline-days-permitted=value
Optional -1 Controls how long users canchoose to work offline before theyare forced to log in. Setting thevalue to -1 means that users arenever forced to connect to SpotfireServer.
-r <true|false>--allow-remember-me=<true|false>
Optional true Controls whether a user can selectto store the log in information forfuture automatic login, or if he orshe must always provide usernameand password when logging in.
430
TIBCO Spotfire® Server and Environment Installation and Administration
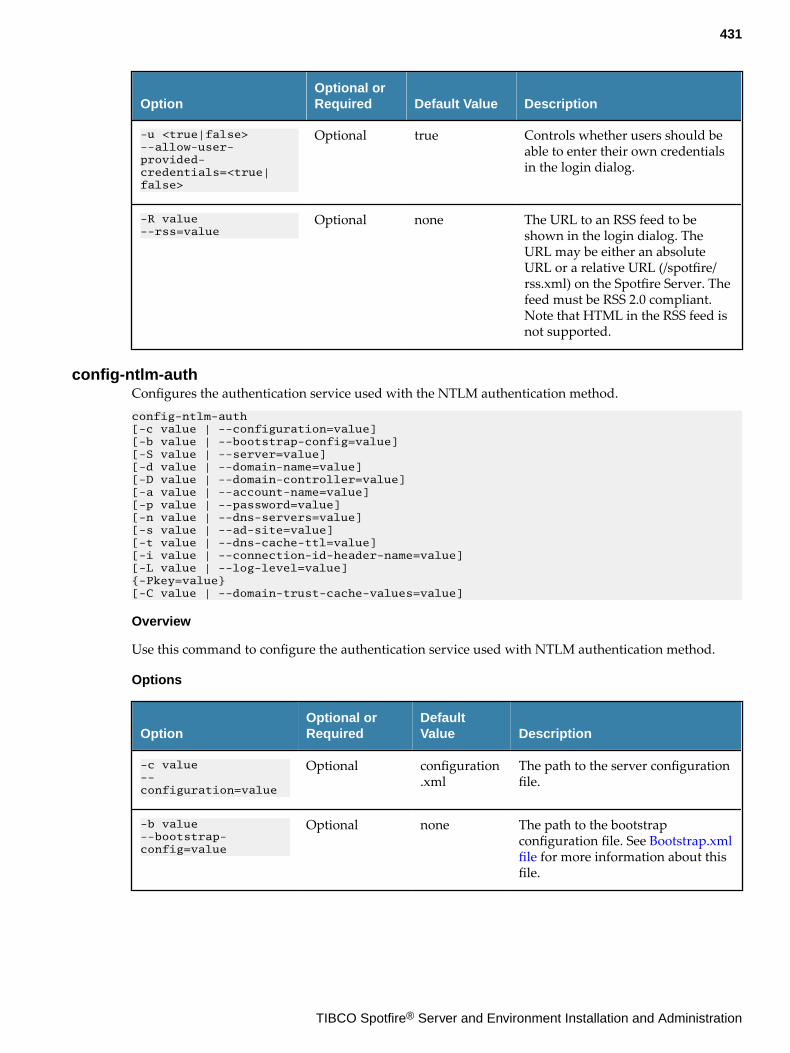
OptionOptional orRequired Default Value Description
-u <true|false>--allow-user-provided-credentials=<true|false>
Optional true Controls whether users should beable to enter their own credentialsin the login dialog.
-R value--rss=value
Optional none The URL to an RSS feed to beshown in the login dialog. TheURL may be either an absoluteURL or a relative URL (/spotfire/rss.xml) on the Spotfire Server. Thefeed must be RSS 2.0 compliant.Note that HTML in the RSS feed isnot supported.
config-ntlm-authConfigures the authentication service used with the NTLM authentication method.config-ntlm-auth [-c value | --configuration=value] [-b value | --bootstrap-config=value] [-S value | --server=value] [-d value | --domain-name=value] [-D value | --domain-controller=value] [-a value | --account-name=value] [-p value | --password=value] [-n value | --dns-servers=value] [-s value | --ad-site=value] [-t value | --dns-cache-ttl=value] [-i value | --connection-id-header-name=value] [-L value | --log-level=value] {-Pkey=value} [-C value | --domain-trust-cache-values=value]
Overview
Use this command to configure the authentication service used with NTLM authentication method.
Options
OptionOptional orRequired
DefaultValue Description
-c value--configuration=value
Optional configuration.xml
The path to the server configurationfile.
-b value--bootstrap-config=value
Optional none The path to the bootstrapconfiguration file. See Bootstrap.xmlfile for more information about thisfile.
431
TIBCO Spotfire® Server and Environment Installation and Administration
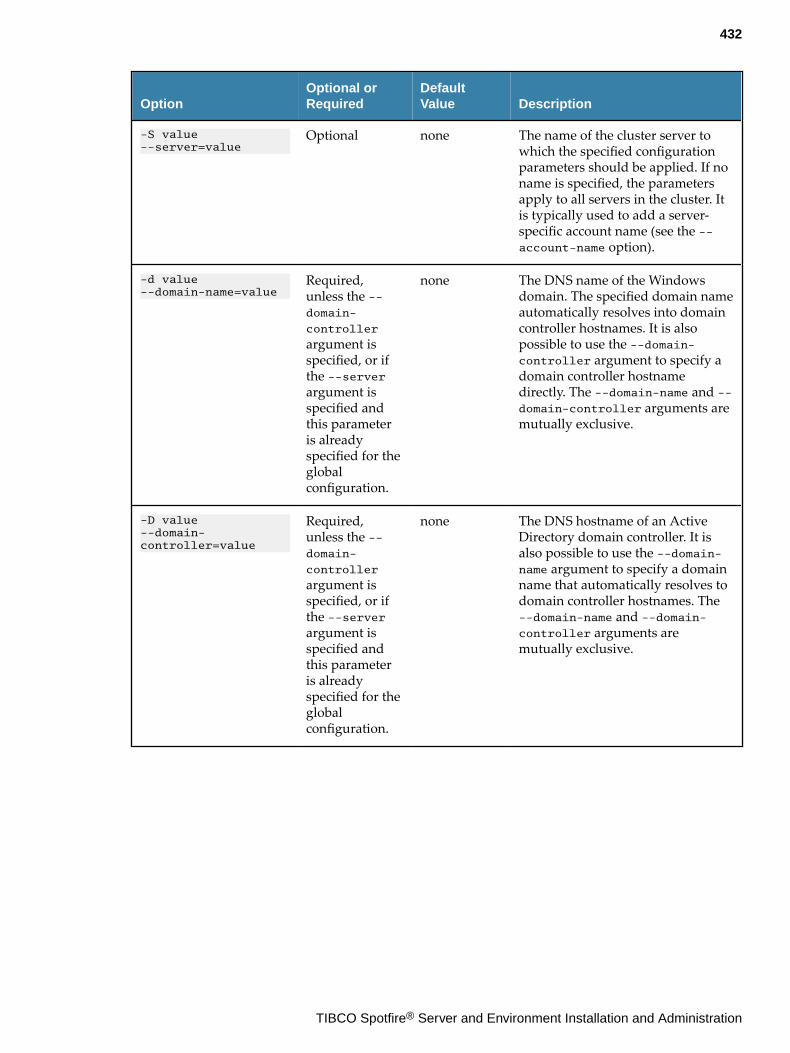
OptionOptional orRequired
DefaultValue Description
-S value--server=value
Optional none The name of the cluster server towhich the specified configurationparameters should be applied. If noname is specified, the parametersapply to all servers in the cluster. Itis typically used to add a server-specific account name (see the --account-name option).
-d value--domain-name=value
Required,unless the --domain-
controller
argument isspecified, or ifthe --serverargument isspecified andthis parameteris alreadyspecified for theglobalconfiguration.
none The DNS name of the Windowsdomain. The specified domain nameautomatically resolves into domaincontroller hostnames. It is alsopossible to use the --domain-controller argument to specify adomain controller hostnamedirectly. The --domain-name and --domain-controller arguments aremutually exclusive.
-D value--domain-controller=value
Required,unless the --domain-
controller
argument isspecified, or ifthe --serverargument isspecified andthis parameteris alreadyspecified for theglobalconfiguration.
none The DNS hostname of an ActiveDirectory domain controller. It isalso possible to use the --domain-name argument to specify a domainname that automatically resolves todomain controller hostnames. The--domain-name and --domain-controller arguments aremutually exclusive.
432
TIBCO Spotfire® Server and Environment Installation and Administration
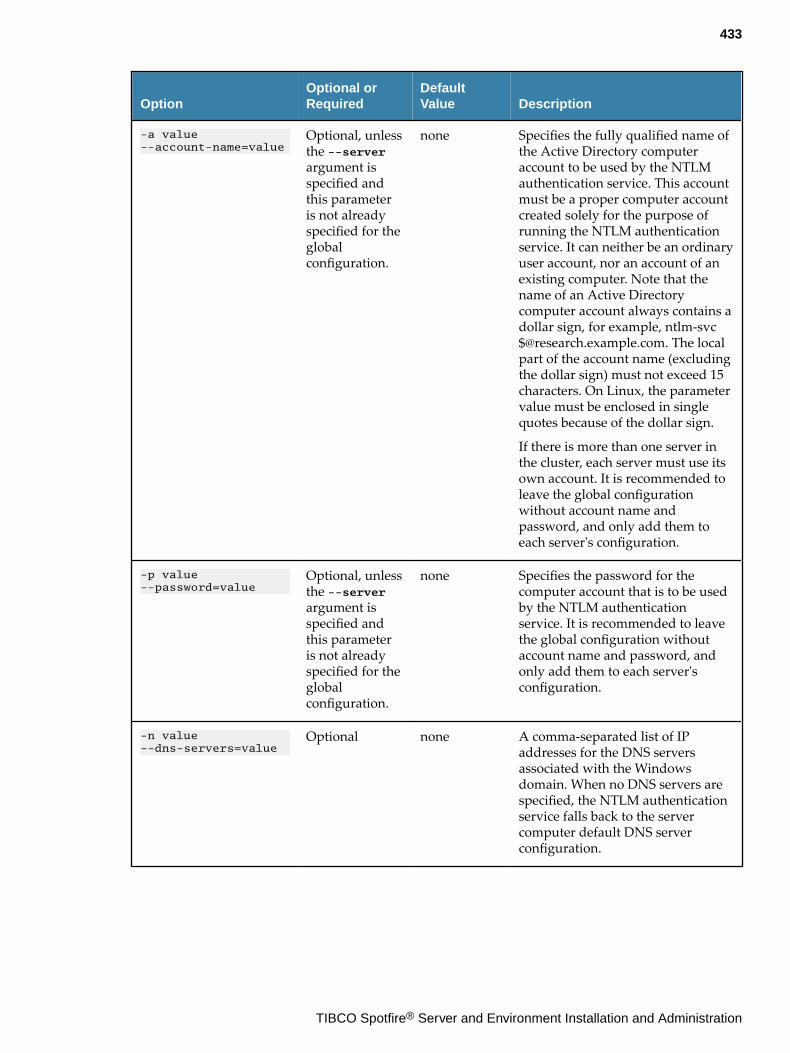
OptionOptional orRequired
DefaultValue Description
-a value--account-name=value
Optional, unlessthe --serverargument isspecified andthis parameteris not alreadyspecified for theglobalconfiguration.
none Specifies the fully qualified name ofthe Active Directory computeraccount to be used by the NTLMauthentication service. This accountmust be a proper computer accountcreated solely for the purpose ofrunning the NTLM authenticationservice. It can neither be an ordinaryuser account, nor an account of anexisting computer. Note that thename of an Active Directorycomputer account always contains adollar sign, for example, [email protected]. The localpart of the account name (excludingthe dollar sign) must not exceed 15characters. On Linux, the parametervalue must be enclosed in singlequotes because of the dollar sign.
If there is more than one server inthe cluster, each server must use itsown account. It is recommended toleave the global configurationwithout account name andpassword, and only add them toeach server's configuration.
-p value--password=value
Optional, unlessthe --serverargument isspecified andthis parameteris not alreadyspecified for theglobalconfiguration.
none Specifies the password for thecomputer account that is to be usedby the NTLM authenticationservice. It is recommended to leavethe global configuration withoutaccount name and password, andonly add them to each server'sconfiguration.
-n value--dns-servers=value
Optional none A comma-separated list of IPaddresses for the DNS serversassociated with the Windowsdomain. When no DNS servers arespecified, the NTLM authenticationservice falls back to the servercomputer default DNS serverconfiguration.
433
TIBCO Spotfire® Server and Environment Installation and Administration
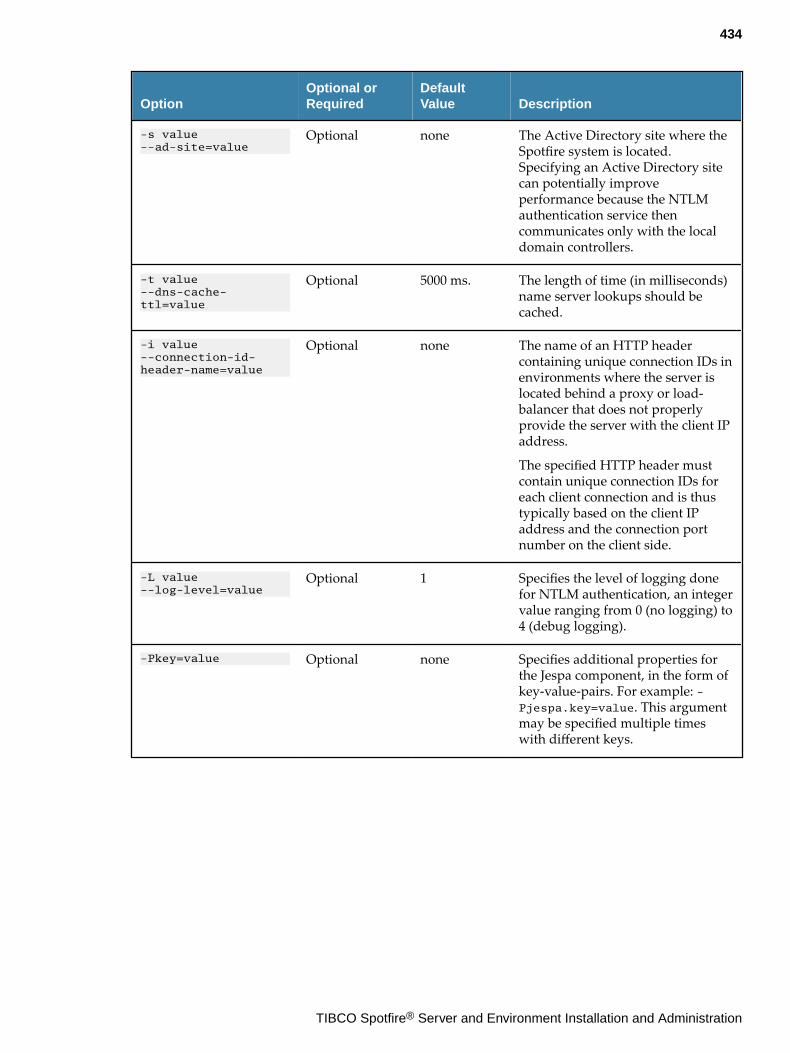
OptionOptional orRequired
DefaultValue Description
-s value--ad-site=value
Optional none The Active Directory site where theSpotfire system is located.Specifying an Active Directory sitecan potentially improveperformance because the NTLMauthentication service thencommunicates only with the localdomain controllers.
-t value--dns-cache-ttl=value
Optional 5000 ms. The length of time (in milliseconds)name server lookups should becached.
-i value--connection-id-header-name=value
Optional none The name of an HTTP headercontaining unique connection IDs inenvironments where the server islocated behind a proxy or load-balancer that does not properlyprovide the server with the client IPaddress.
The specified HTTP header mustcontain unique connection IDs foreach client connection and is thustypically based on the client IPaddress and the connection portnumber on the client side.
-L value--log-level=value
Optional 1 Specifies the level of logging donefor NTLM authentication, an integervalue ranging from 0 (no logging) to4 (debug logging).
-Pkey=value Optional none Specifies additional properties forthe Jespa component, in the form ofkey-value-pairs. For example: -Pjespa.key=value. This argumentmay be specified multiple timeswith different keys.
434
TIBCO Spotfire® Server and Environment Installation and Administration
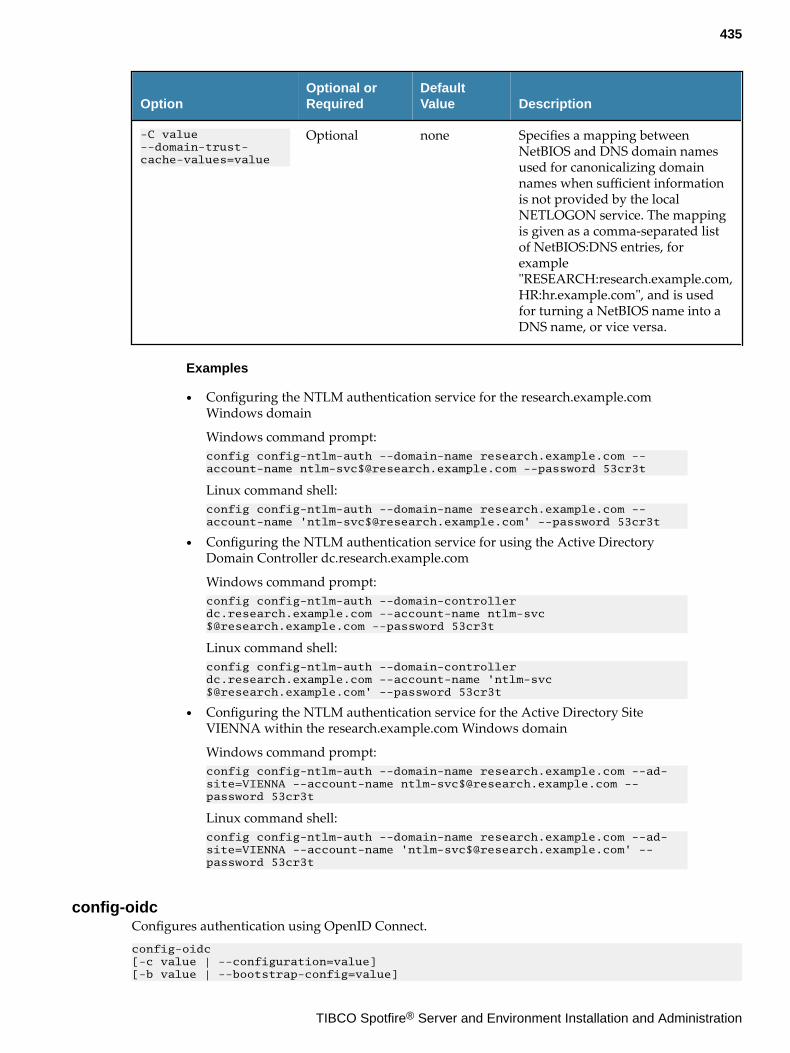
OptionOptional orRequired
DefaultValue Description
-C value--domain-trust-cache-values=value
Optional none Specifies a mapping betweenNetBIOS and DNS domain namesused for canonicalizing domainnames when sufficient informationis not provided by the localNETLOGON service. The mappingis given as a comma-separated listof NetBIOS:DNS entries, forexample"RESEARCH:research.example.com,HR:hr.example.com", and is usedfor turning a NetBIOS name into aDNS name, or vice versa.
Examples
● Configuring the NTLM authentication service for the research.example.comWindows domain
Windows command prompt:config config-ntlm-auth --domain-name research.example.com --account-name [email protected] --password 53cr3t
Linux command shell:config config-ntlm-auth --domain-name research.example.com --account-name '[email protected]' --password 53cr3t
● Configuring the NTLM authentication service for using the Active DirectoryDomain Controller dc.research.example.com
Windows command prompt:config config-ntlm-auth --domain-controller dc.research.example.com --account-name [email protected] --password 53cr3t
Linux command shell:config config-ntlm-auth --domain-controller dc.research.example.com --account-name '[email protected]' --password 53cr3t
● Configuring the NTLM authentication service for the Active Directory SiteVIENNA within the research.example.com Windows domain
Windows command prompt:config config-ntlm-auth --domain-name research.example.com --ad-site=VIENNA --account-name [email protected] --password 53cr3t
Linux command shell:config config-ntlm-auth --domain-name research.example.com --ad-site=VIENNA --account-name '[email protected]' --password 53cr3t
config-oidcConfigures authentication using OpenID Connect.config-oidc [-c value | --configuration=value] [-b value | --bootstrap-config=value]
435
TIBCO Spotfire® Server and Environment Installation and Administration
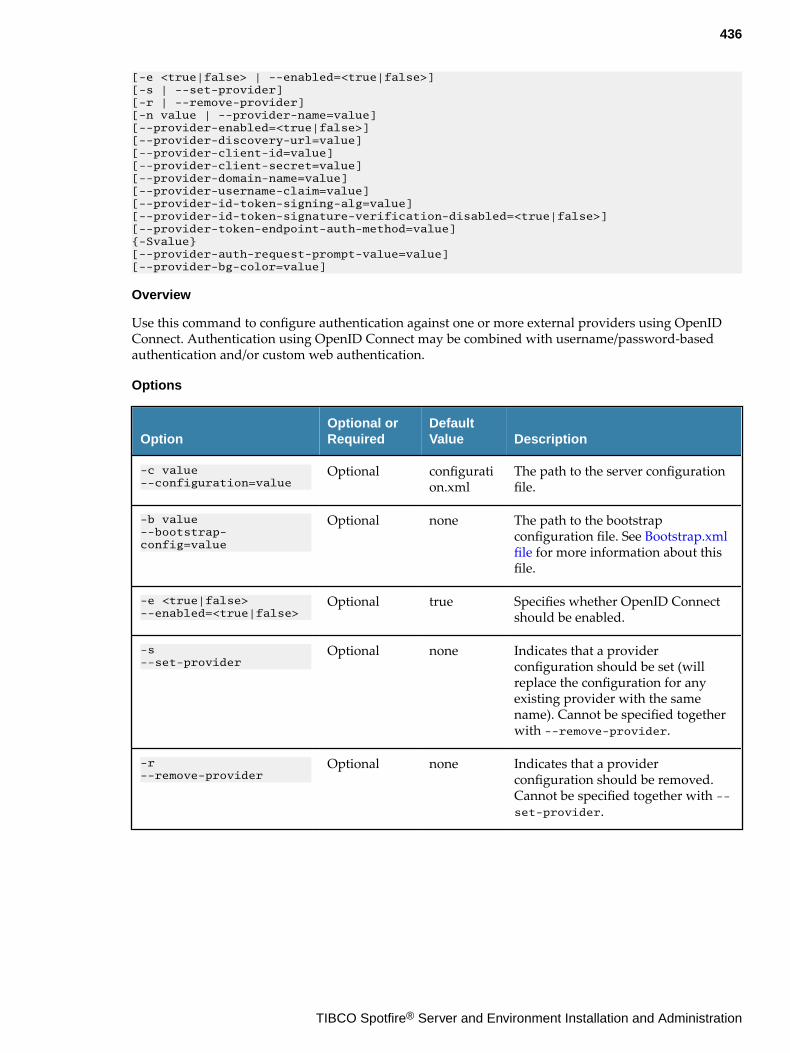
[-e <true|false> | --enabled=<true|false>] [-s | --set-provider] [-r | --remove-provider] [-n value | --provider-name=value] [--provider-enabled=<true|false>] [--provider-discovery-url=value] [--provider-client-id=value] [--provider-client-secret=value] [--provider-domain-name=value] [--provider-username-claim=value] [--provider-id-token-signing-alg=value] [--provider-id-token-signature-verification-disabled=<true|false>] [--provider-token-endpoint-auth-method=value] {-Svalue} [--provider-auth-request-prompt-value=value] [--provider-bg-color=value]
Overview
Use this command to configure authentication against one or more external providers using OpenIDConnect. Authentication using OpenID Connect may be combined with username/password-basedauthentication and/or custom web authentication.
Options
OptionOptional orRequired
DefaultValue Description
-c value--configuration=value
Optional configuration.xml
The path to the server configurationfile.
-b value--bootstrap-config=value
Optional none The path to the bootstrapconfiguration file. See Bootstrap.xmlfile for more information about thisfile.
-e <true|false>--enabled=<true|false>
Optional true Specifies whether OpenID Connectshould be enabled.
-s --set-provider
Optional none Indicates that a providerconfiguration should be set (willreplace the configuration for anyexisting provider with the samename). Cannot be specified togetherwith --remove-provider.
-r--remove-provider
Optional none Indicates that a providerconfiguration should be removed.Cannot be specified together with --set-provider.
436
TIBCO Spotfire® Server and Environment Installation and Administration
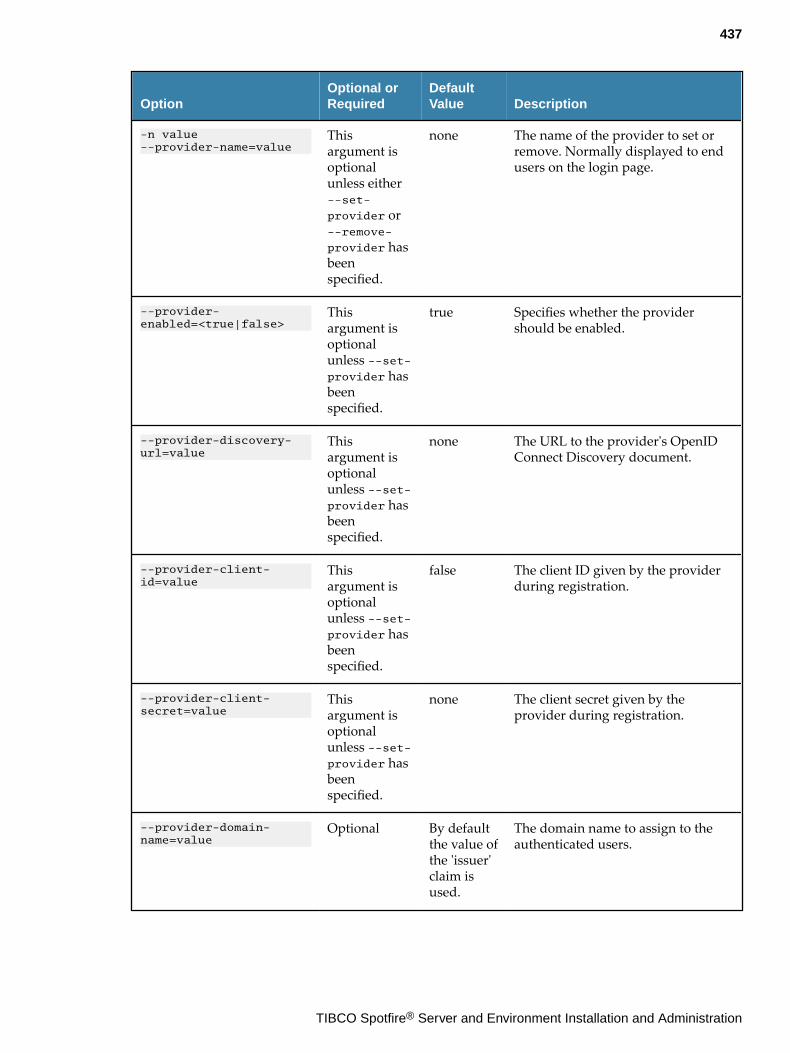
OptionOptional orRequired
DefaultValue Description
-n value--provider-name=value
Thisargument isoptionalunless either--set-
provider or--remove-
provider hasbeenspecified.
none The name of the provider to set orremove. Normally displayed to endusers on the login page.
--provider-enabled=<true|false>
Thisargument isoptionalunless --set-provider hasbeenspecified.
true Specifies whether the providershould be enabled.
--provider-discovery-url=value
Thisargument isoptionalunless --set-provider hasbeenspecified.
none The URL to the provider's OpenIDConnect Discovery document.
--provider-client-id=value
Thisargument isoptionalunless --set-provider hasbeenspecified.
false The client ID given by the providerduring registration.
--provider-client-secret=value
Thisargument isoptionalunless --set-provider hasbeenspecified.
none The client secret given by theprovider during registration.
--provider-domain-name=value
Optional By defaultthe value ofthe 'issuer'claim isused.
The domain name to assign to theauthenticated users.
437
TIBCO Spotfire® Server and Environment Installation and Administration
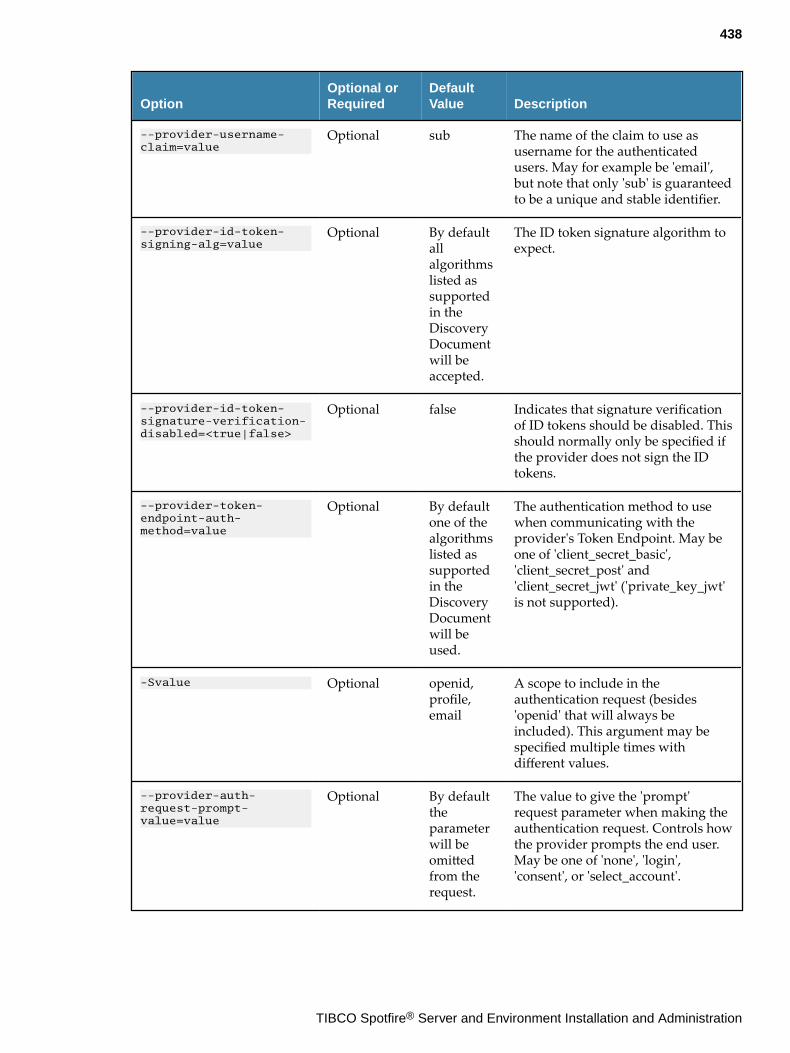
OptionOptional orRequired
DefaultValue Description
--provider-username-claim=value
Optional sub The name of the claim to use asusername for the authenticatedusers. May for example be 'email',but note that only 'sub' is guaranteedto be a unique and stable identifier.
--provider-id-token-signing-alg=value
Optional By defaultallalgorithmslisted assupportedin theDiscoveryDocumentwill beaccepted.
The ID token signature algorithm toexpect.
--provider-id-token-signature-verification-disabled=<true|false>
Optional false Indicates that signature verificationof ID tokens should be disabled. Thisshould normally only be specified ifthe provider does not sign the IDtokens.
--provider-token-endpoint-auth-method=value
Optional By defaultone of thealgorithmslisted assupportedin theDiscoveryDocumentwill beused.
The authentication method to usewhen communicating with theprovider's Token Endpoint. May beone of 'client_secret_basic','client_secret_post' and'client_secret_jwt' ('private_key_jwt'is not supported).
-Svalue Optional openid,profile,email
A scope to include in theauthentication request (besides'openid' that will always beincluded). This argument may bespecified multiple times withdifferent values.
--provider-auth-request-prompt-value=value
Optional By defaulttheparameterwill beomittedfrom therequest.
The value to give the 'prompt'request parameter when making theauthentication request. Controls howthe provider prompts the end user.May be one of 'none', 'login','consent', or 'select_account'.
438
TIBCO Spotfire® Server and Environment Installation and Administration
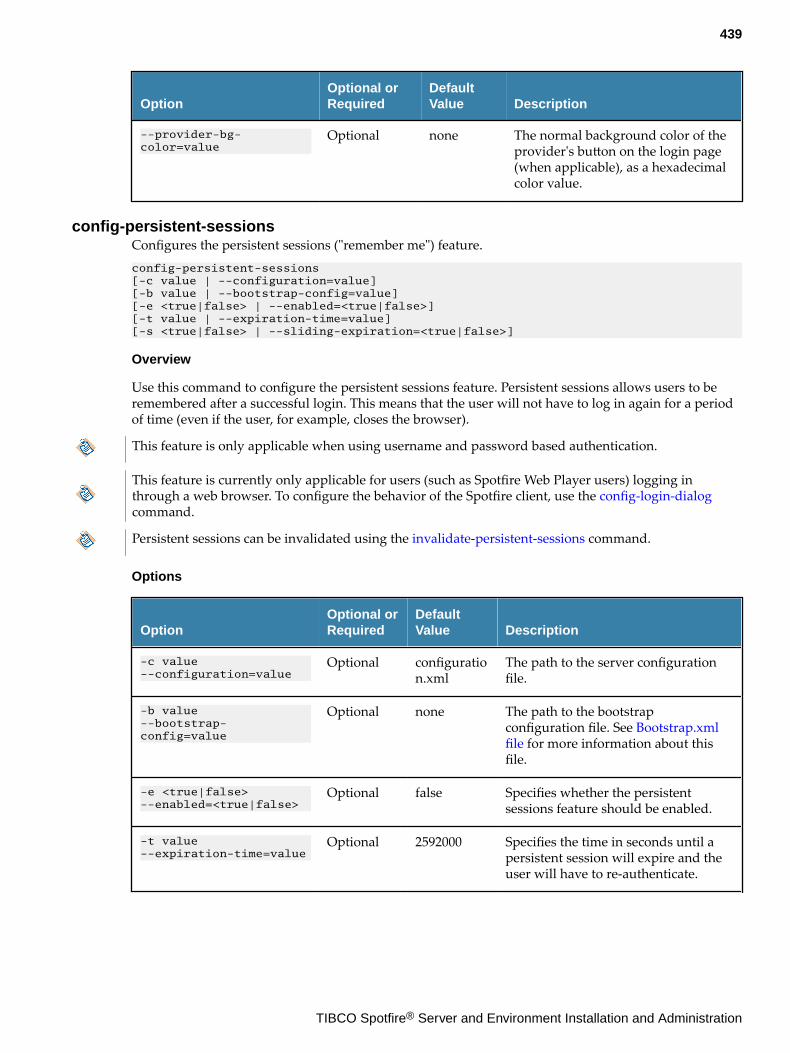
OptionOptional orRequired
DefaultValue Description
--provider-bg-color=value
Optional none The normal background color of theprovider's button on the login page(when applicable), as a hexadecimalcolor value.
config-persistent-sessionsConfigures the persistent sessions ("remember me") feature.config-persistent-sessions [-c value | --configuration=value] [-b value | --bootstrap-config=value] [-e <true|false> | --enabled=<true|false>] [-t value | --expiration-time=value] [-s <true|false> | --sliding-expiration=<true|false>]
Overview
Use this command to configure the persistent sessions feature. Persistent sessions allows users to beremembered after a successful login. This means that the user will not have to log in again for a periodof time (even if the user, for example, closes the browser).
This feature is only applicable when using username and password based authentication.
This feature is currently only applicable for users (such as Spotfire Web Player users) logging inthrough a web browser. To configure the behavior of the Spotfire client, use the config-login-dialogcommand.
Persistent sessions can be invalidated using the invalidate-persistent-sessions command.
Options
OptionOptional orRequired
DefaultValue Description
-c value--configuration=value
Optional configuration.xml
The path to the server configurationfile.
-b value--bootstrap-config=value
Optional none The path to the bootstrapconfiguration file. See Bootstrap.xmlfile for more information about thisfile.
-e <true|false>--enabled=<true|false>
Optional false Specifies whether the persistentsessions feature should be enabled.
-t value--expiration-time=value
Optional 2592000 Specifies the time in seconds until apersistent session will expire and theuser will have to re-authenticate.
439
TIBCO Spotfire® Server and Environment Installation and Administration
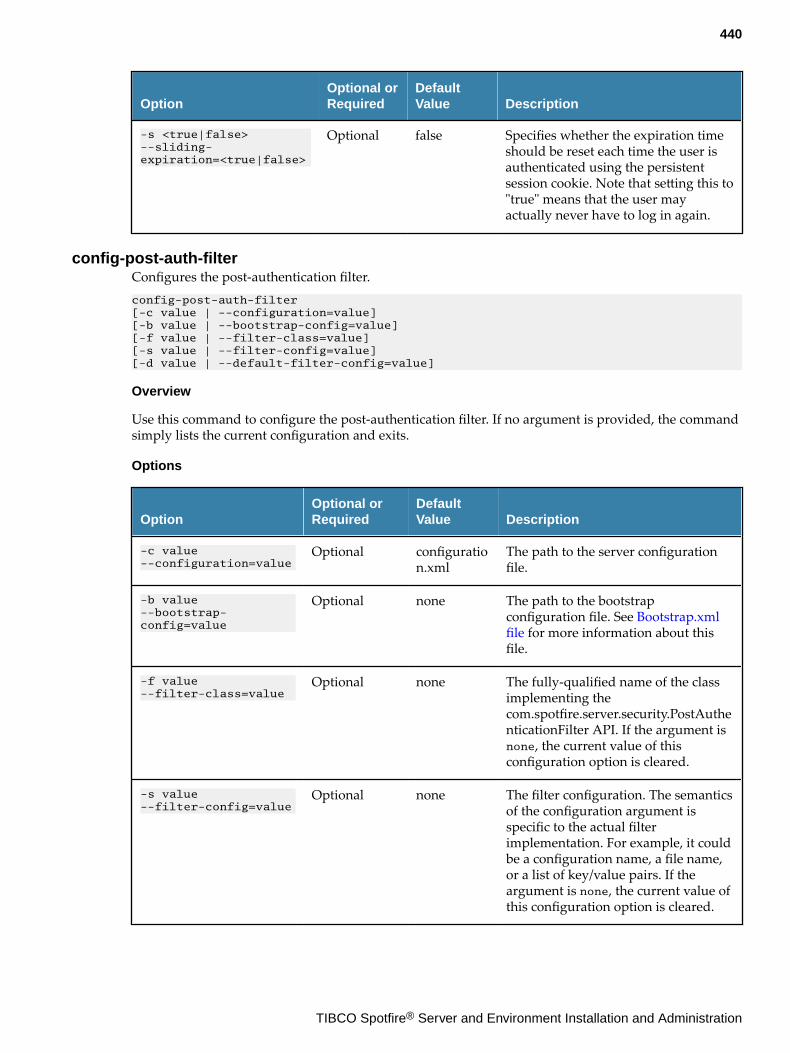
OptionOptional orRequired
DefaultValue Description
-s <true|false>--sliding-expiration=<true|false>
Optional false Specifies whether the expiration timeshould be reset each time the user isauthenticated using the persistentsession cookie. Note that setting this to"true" means that the user mayactually never have to log in again.
config-post-auth-filterConfigures the post-authentication filter.config-post-auth-filter [-c value | --configuration=value] [-b value | --bootstrap-config=value] [-f value | --filter-class=value] [-s value | --filter-config=value] [-d value | --default-filter-config=value]
Overview
Use this command to configure the post-authentication filter. If no argument is provided, the commandsimply lists the current configuration and exits.
Options
OptionOptional orRequired
DefaultValue Description
-c value--configuration=value
Optional configuration.xml
The path to the server configurationfile.
-b value--bootstrap-config=value
Optional none The path to the bootstrapconfiguration file. See Bootstrap.xmlfile for more information about thisfile.
-f value--filter-class=value
Optional none The fully-qualified name of the classimplementing thecom.spotfire.server.security.PostAuthenticationFilter API. If the argument isnone, the current value of thisconfiguration option is cleared.
-s value--filter-config=value
Optional none The filter configuration. The semanticsof the configuration argument isspecific to the actual filterimplementation. For example, it couldbe a configuration name, a file name,or a list of key/value pairs. If theargument is none, the current value ofthis configuration option is cleared.
440
TIBCO Spotfire® Server and Environment Installation and Administration
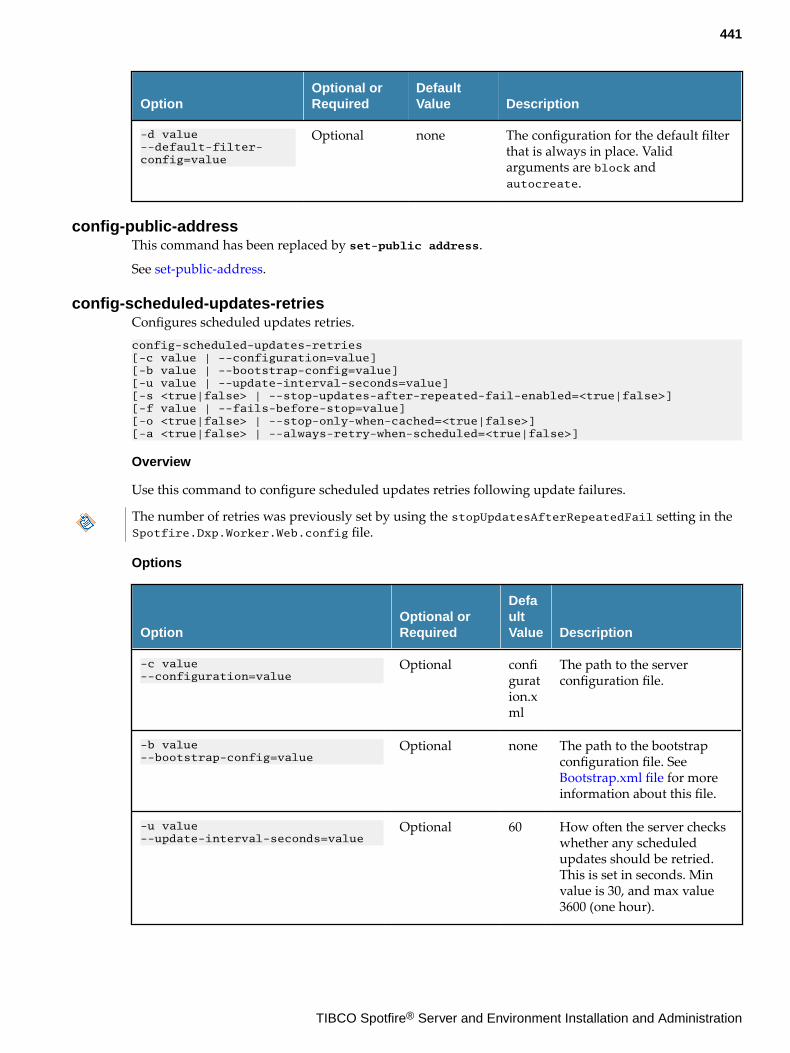
OptionOptional orRequired
DefaultValue Description
-d value--default-filter-config=value
Optional none The configuration for the default filterthat is always in place. Validarguments are block andautocreate.
config-public-addressThis command has been replaced by set-public address.
See set-public-address.
config-scheduled-updates-retriesConfigures scheduled updates retries.config-scheduled-updates-retries [-c value | --configuration=value] [-b value | --bootstrap-config=value] [-u value | --update-interval-seconds=value] [-s <true|false> | --stop-updates-after-repeated-fail-enabled=<true|false>] [-f value | --fails-before-stop=value] [-o <true|false> | --stop-only-when-cached=<true|false>] [-a <true|false> | --always-retry-when-scheduled=<true|false>]
Overview
Use this command to configure scheduled updates retries following update failures.
The number of retries was previously set by using the stopUpdatesAfterRepeatedFail setting in theSpotfire.Dxp.Worker.Web.config file.
Options
OptionOptional orRequired
DefaultValue Description
-c value--configuration=value
Optional configuration.xml
The path to the serverconfiguration file.
-b value--bootstrap-config=value
Optional none The path to the bootstrapconfiguration file. See Bootstrap.xml file for moreinformation about this file.
-u value--update-interval-seconds=value
Optional 60 How often the server checkswhether any scheduledupdates should be retried.This is set in seconds. Minvalue is 30, and max value3600 (one hour).
441
TIBCO Spotfire® Server and Environment Installation and Administration
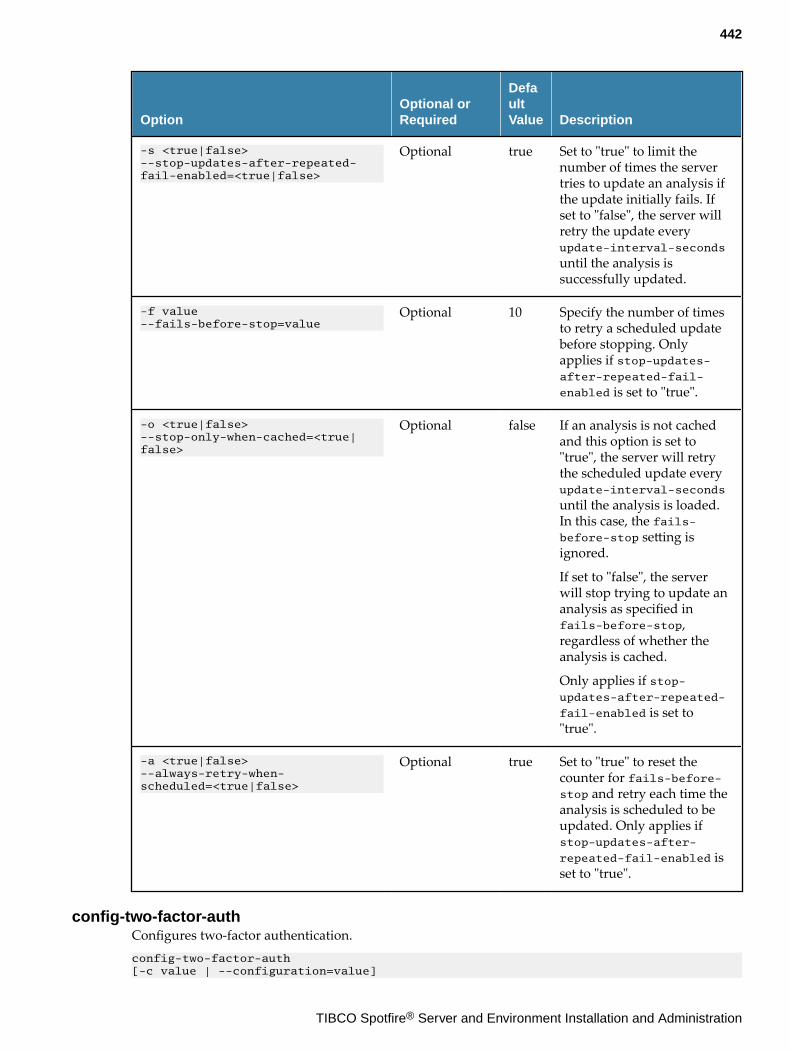
OptionOptional orRequired
DefaultValue Description
-s <true|false>--stop-updates-after-repeated-fail-enabled=<true|false>
Optional true Set to "true" to limit thenumber of times the servertries to update an analysis ifthe update initially fails. Ifset to "false", the server willretry the update everyupdate-interval-seconds
until the analysis issuccessfully updated.
-f value--fails-before-stop=value
Optional 10 Specify the number of timesto retry a scheduled updatebefore stopping. Onlyapplies if stop-updates-after-repeated-fail-
enabled is set to "true".
-o <true|false>--stop-only-when-cached=<true|false>
Optional false If an analysis is not cachedand this option is set to"true", the server will retrythe scheduled update everyupdate-interval-seconds
until the analysis is loaded.In this case, the fails-before-stop setting isignored.
If set to "false", the serverwill stop trying to update ananalysis as specified infails-before-stop,regardless of whether theanalysis is cached.
Only applies if stop-updates-after-repeated-
fail-enabled is set to"true".
-a <true|false>--always-retry-when-scheduled=<true|false>
Optional true Set to "true" to reset thecounter for fails-before-stop and retry each time theanalysis is scheduled to beupdated. Only applies ifstop-updates-after-
repeated-fail-enabled isset to "true".
config-two-factor-authConfigures two-factor authentication.config-two-factor-auth [-c value | --configuration=value]
442
TIBCO Spotfire® Server and Environment Installation and Administration
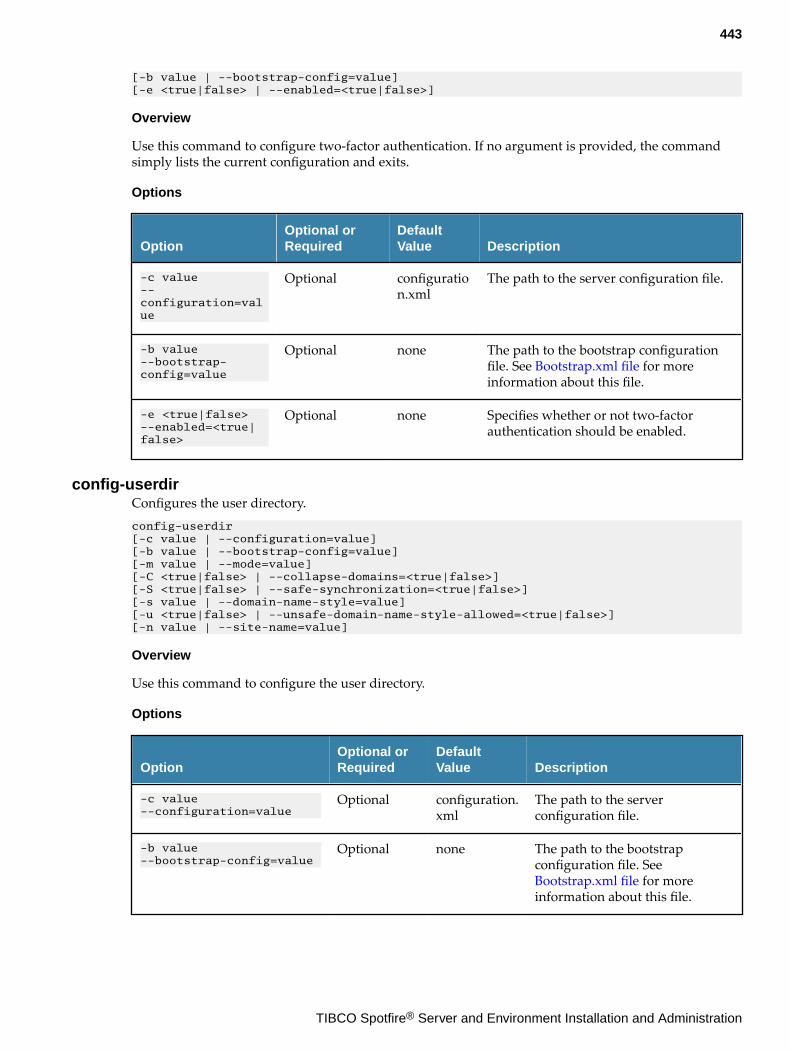
[-b value | --bootstrap-config=value] [-e <true|false> | --enabled=<true|false>]
Overview
Use this command to configure two-factor authentication. If no argument is provided, the commandsimply lists the current configuration and exits.
Options
OptionOptional orRequired
DefaultValue Description
-c value--configuration=value
Optional configuration.xml
The path to the server configuration file.
-b value--bootstrap-config=value
Optional none The path to the bootstrap configurationfile. See Bootstrap.xml file for moreinformation about this file.
-e <true|false>--enabled=<true|false>
Optional none Specifies whether or not two-factorauthentication should be enabled.
config-userdirConfigures the user directory.config-userdir [-c value | --configuration=value] [-b value | --bootstrap-config=value] [-m value | --mode=value] [-C <true|false> | --collapse-domains=<true|false>] [-S <true|false> | --safe-synchronization=<true|false>] [-s value | --domain-name-style=value] [-u <true|false> | --unsafe-domain-name-style-allowed=<true|false>][-n value | --site-name=value]
Overview
Use this command to configure the user directory.
Options
OptionOptional orRequired
DefaultValue Description
-c value--configuration=value
Optional configuration.xml
The path to the serverconfiguration file.
-b value--bootstrap-config=value
Optional none The path to the bootstrapconfiguration file. See Bootstrap.xml file for moreinformation about this file.
443
TIBCO Spotfire® Server and Environment Installation and Administration
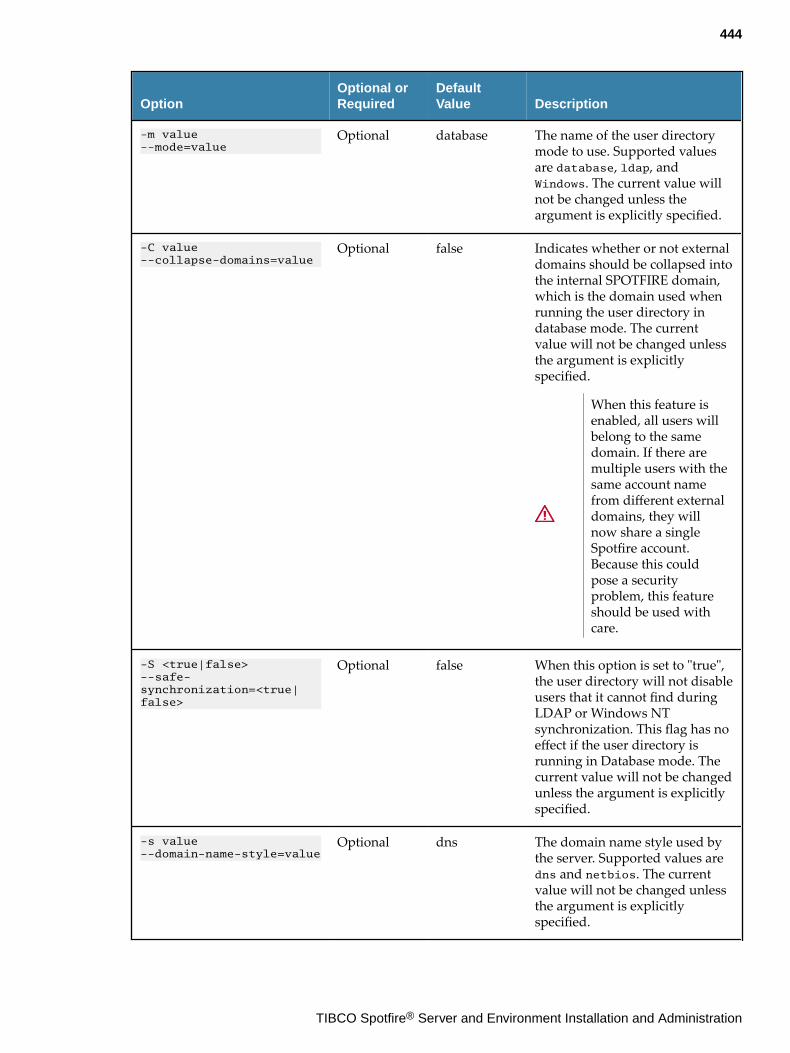
OptionOptional orRequired
DefaultValue Description
-m value--mode=value
Optional database The name of the user directorymode to use. Supported valuesare database, ldap, andWindows. The current value willnot be changed unless theargument is explicitly specified.
-C value--collapse-domains=value
Optional false Indicates whether or not externaldomains should be collapsed intothe internal SPOTFIRE domain,which is the domain used whenrunning the user directory indatabase mode. The currentvalue will not be changed unlessthe argument is explicitlyspecified.
When this feature isenabled, all users willbelong to the samedomain. If there aremultiple users with thesame account namefrom different externaldomains, they willnow share a singleSpotfire account.Because this couldpose a securityproblem, this featureshould be used withcare.
-S <true|false>--safe-synchronization=<true|false>
Optional false When this option is set to "true",the user directory will not disableusers that it cannot find duringLDAP or Windows NTsynchronization. This flag has noeffect if the user directory isrunning in Database mode. Thecurrent value will not be changedunless the argument is explicitlyspecified.
-s value--domain-name-style=value
Optional dns The domain name style used bythe server. Supported values aredns and netbios. The currentvalue will not be changed unlessthe argument is explicitlyspecified.
444
TIBCO Spotfire® Server and Environment Installation and Administration
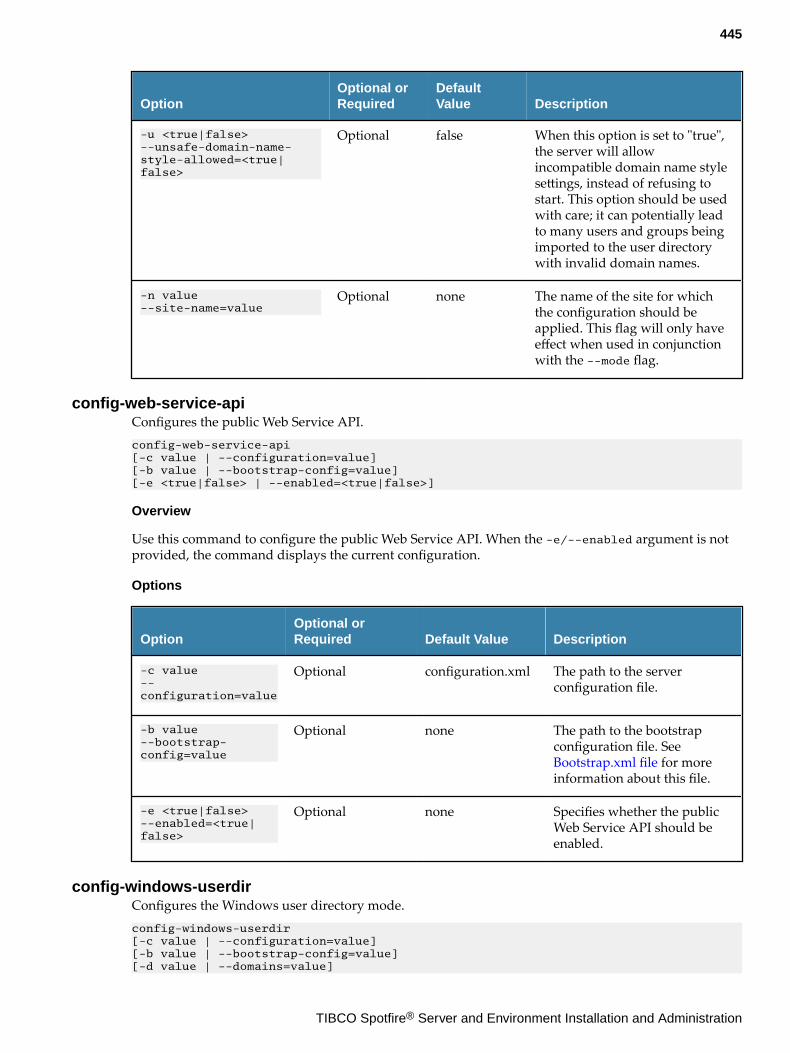
OptionOptional orRequired
DefaultValue Description
-u <true|false>--unsafe-domain-name-style-allowed=<true|false>
Optional false When this option is set to "true",the server will allowincompatible domain name stylesettings, instead of refusing tostart. This option should be usedwith care; it can potentially leadto many users and groups beingimported to the user directorywith invalid domain names.
-n value--site-name=value
Optional none The name of the site for whichthe configuration should beapplied. This flag will only haveeffect when used in conjunctionwith the --mode flag.
config-web-service-apiConfigures the public Web Service API.config-web-service-api [-c value | --configuration=value] [-b value | --bootstrap-config=value] [-e <true|false> | --enabled=<true|false>]
Overview
Use this command to configure the public Web Service API. When the -e/--enabled argument is notprovided, the command displays the current configuration.
Options
OptionOptional orRequired Default Value Description
-c value--configuration=value
Optional configuration.xml The path to the serverconfiguration file.
-b value--bootstrap-config=value
Optional none The path to the bootstrapconfiguration file. See Bootstrap.xml file for moreinformation about this file.
-e <true|false>--enabled=<true|false>
Optional none Specifies whether the publicWeb Service API should beenabled.
config-windows-userdirConfigures the Windows user directory mode.config-windows-userdir [-c value | --configuration=value] [-b value | --bootstrap-config=value] [-d value | --domains=value]
445
TIBCO Spotfire® Server and Environment Installation and Administration
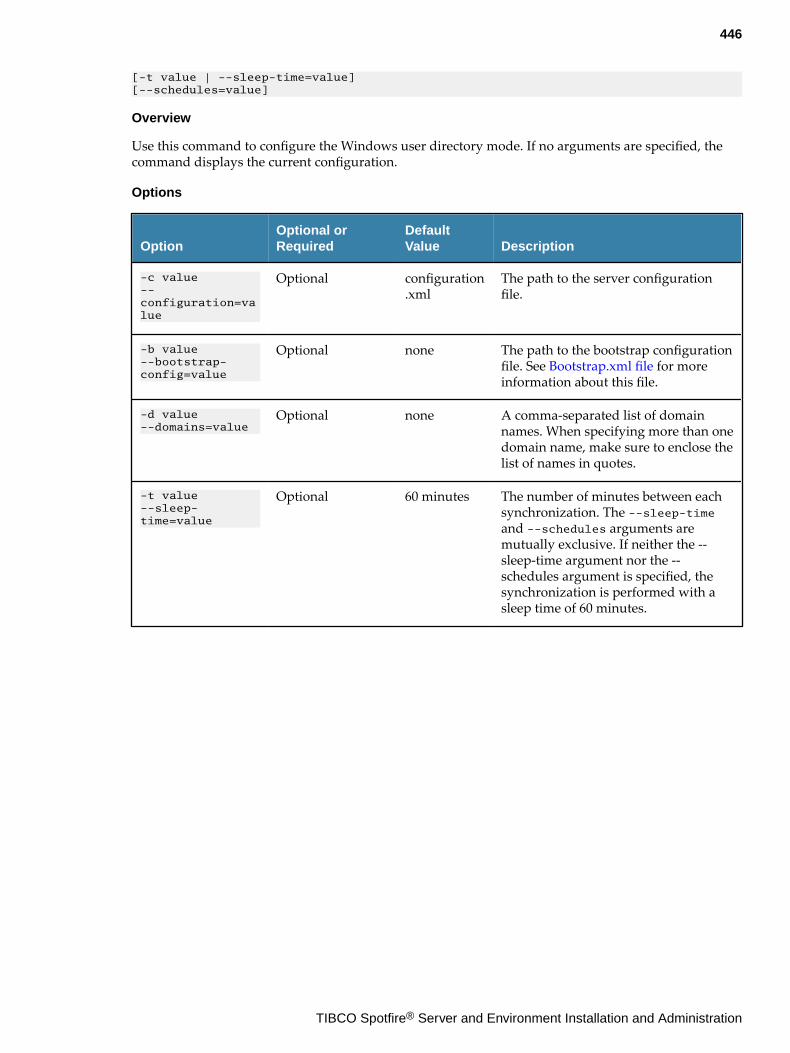
[-t value | --sleep-time=value] [--schedules=value]
Overview
Use this command to configure the Windows user directory mode. If no arguments are specified, thecommand displays the current configuration.
Options
OptionOptional orRequired
DefaultValue Description
-c value--configuration=value
Optional configuration.xml
The path to the server configurationfile.
-b value--bootstrap-config=value
Optional none The path to the bootstrap configurationfile. See Bootstrap.xml file for moreinformation about this file.
-d value--domains=value
Optional none A comma-separated list of domainnames. When specifying more than onedomain name, make sure to enclose thelist of names in quotes.
-t value--sleep-time=value
Optional 60 minutes The number of minutes between eachsynchronization. The --sleep-timeand --schedules arguments aremutually exclusive. If neither the --sleep-time argument nor the --schedules argument is specified, thesynchronization is performed with asleep time of 60 minutes.
446
TIBCO Spotfire® Server and Environment Installation and Administration
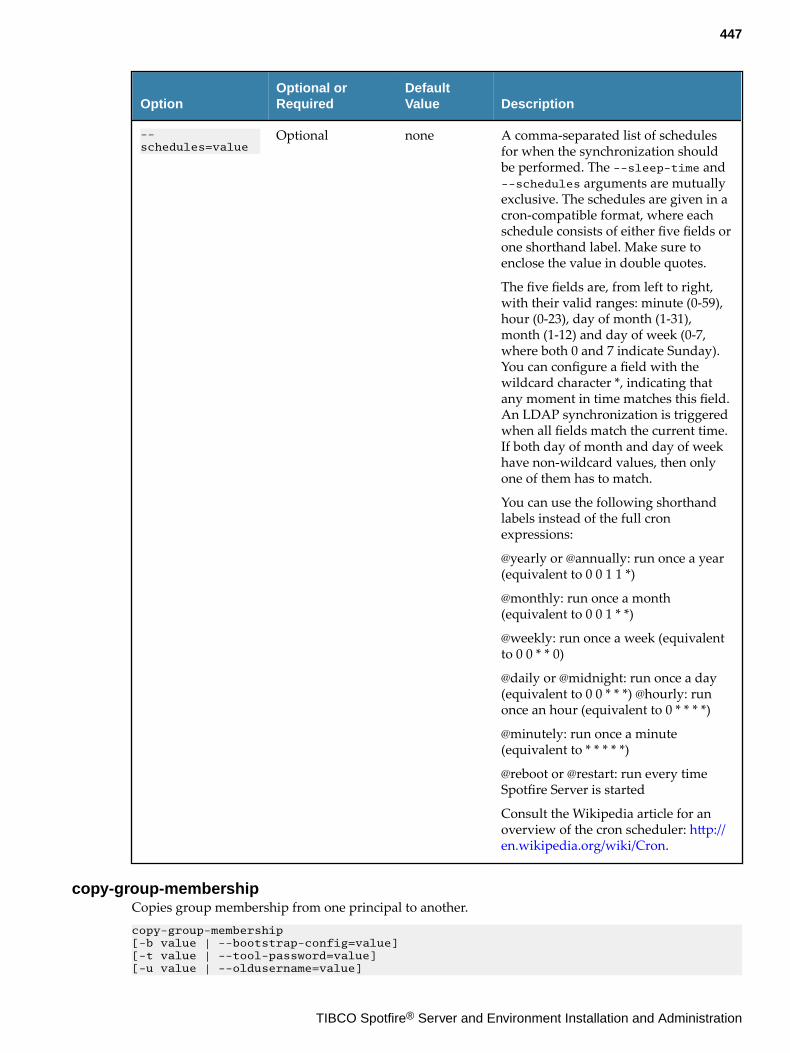
OptionOptional orRequired
DefaultValue Description
--schedules=value
Optional none A comma-separated list of schedulesfor when the synchronization shouldbe performed. The --sleep-time and--schedules arguments are mutuallyexclusive. The schedules are given in acron-compatible format, where eachschedule consists of either five fields orone shorthand label. Make sure toenclose the value in double quotes.
The five fields are, from left to right,with their valid ranges: minute (0-59),hour (0-23), day of month (1-31),month (1-12) and day of week (0-7,where both 0 and 7 indicate Sunday).You can configure a field with thewildcard character *, indicating thatany moment in time matches this field.An LDAP synchronization is triggeredwhen all fields match the current time.If both day of month and day of weekhave non-wildcard values, then onlyone of them has to match.
You can use the following shorthandlabels instead of the full cronexpressions:
@yearly or @annually: run once a year(equivalent to 0 0 1 1 *)
@monthly: run once a month(equivalent to 0 0 1 * *)
@weekly: run once a week (equivalentto 0 0 * * 0)
@daily or @midnight: run once a day(equivalent to 0 0 * * *) @hourly: runonce an hour (equivalent to 0 * * * *)
@minutely: run once a minute(equivalent to * * * * *)
@reboot or @restart: run every timeSpotfire Server is started
Consult the Wikipedia article for anoverview of the cron scheduler: http://en.wikipedia.org/wiki/Cron.
copy-group-membershipCopies group membership from one principal to another.copy-group-membership [-b value | --bootstrap-config=value] [-t value | --tool-password=value] [-u value | --oldusername=value]
447
TIBCO Spotfire® Server and Environment Installation and Administration
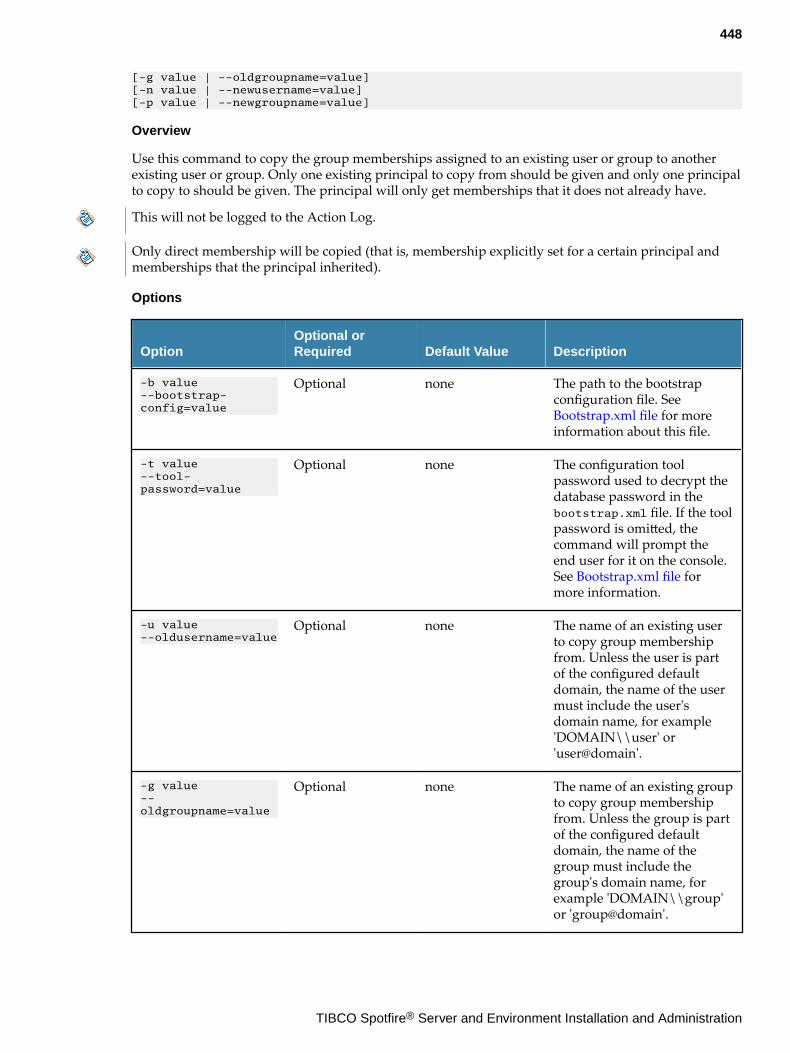
[-g value | --oldgroupname=value] [-n value | --newusername=value] [-p value | --newgroupname=value]
Overview
Use this command to copy the group memberships assigned to an existing user or group to anotherexisting user or group. Only one existing principal to copy from should be given and only one principalto copy to should be given. The principal will only get memberships that it does not already have.
This will not be logged to the Action Log.
Only direct membership will be copied (that is, membership explicitly set for a certain principal andmemberships that the principal inherited).
Options
OptionOptional orRequired Default Value Description
-b value--bootstrap-config=value
Optional none The path to the bootstrapconfiguration file. See Bootstrap.xml file for moreinformation about this file.
-t value--tool-password=value
Optional none The configuration toolpassword used to decrypt thedatabase password in thebootstrap.xml file. If the toolpassword is omitted, thecommand will prompt theend user for it on the console.See Bootstrap.xml file formore information.
-u value--oldusername=value
Optional none The name of an existing userto copy group membershipfrom. Unless the user is partof the configured defaultdomain, the name of the usermust include the user'sdomain name, for example'DOMAIN\\user' or'user@domain'.
-g value--oldgroupname=value
Optional none The name of an existing groupto copy group membershipfrom. Unless the group is partof the configured defaultdomain, the name of thegroup must include thegroup's domain name, forexample 'DOMAIN\\group'or 'group@domain'.
448
TIBCO Spotfire® Server and Environment Installation and Administration
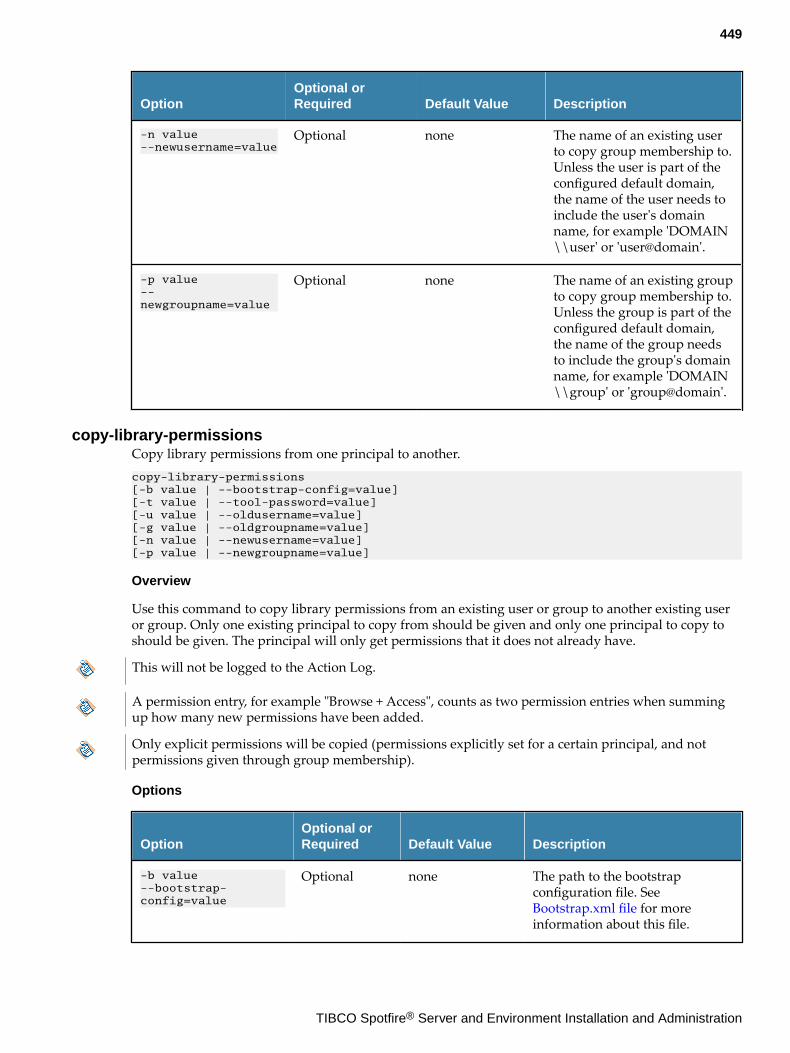
OptionOptional orRequired Default Value Description
-n value--newusername=value
Optional none The name of an existing userto copy group membership to.Unless the user is part of theconfigured default domain,the name of the user needs toinclude the user's domainname, for example 'DOMAIN\\user' or 'user@domain'.
-p value--newgroupname=value
Optional none The name of an existing groupto copy group membership to.Unless the group is part of theconfigured default domain,the name of the group needsto include the group's domainname, for example 'DOMAIN\\group' or 'group@domain'.
copy-library-permissionsCopy library permissions from one principal to another.copy-library-permissions [-b value | --bootstrap-config=value] [-t value | --tool-password=value] [-u value | --oldusername=value] [-g value | --oldgroupname=value] [-n value | --newusername=value] [-p value | --newgroupname=value]
Overview
Use this command to copy library permissions from an existing user or group to another existing useror group. Only one existing principal to copy from should be given and only one principal to copy toshould be given. The principal will only get permissions that it does not already have.
This will not be logged to the Action Log.
A permission entry, for example "Browse + Access", counts as two permission entries when summingup how many new permissions have been added.
Only explicit permissions will be copied (permissions explicitly set for a certain principal, and notpermissions given through group membership).
Options
OptionOptional orRequired Default Value Description
-b value--bootstrap-config=value
Optional none The path to the bootstrapconfiguration file. See Bootstrap.xml file for moreinformation about this file.
449
TIBCO Spotfire® Server and Environment Installation and Administration
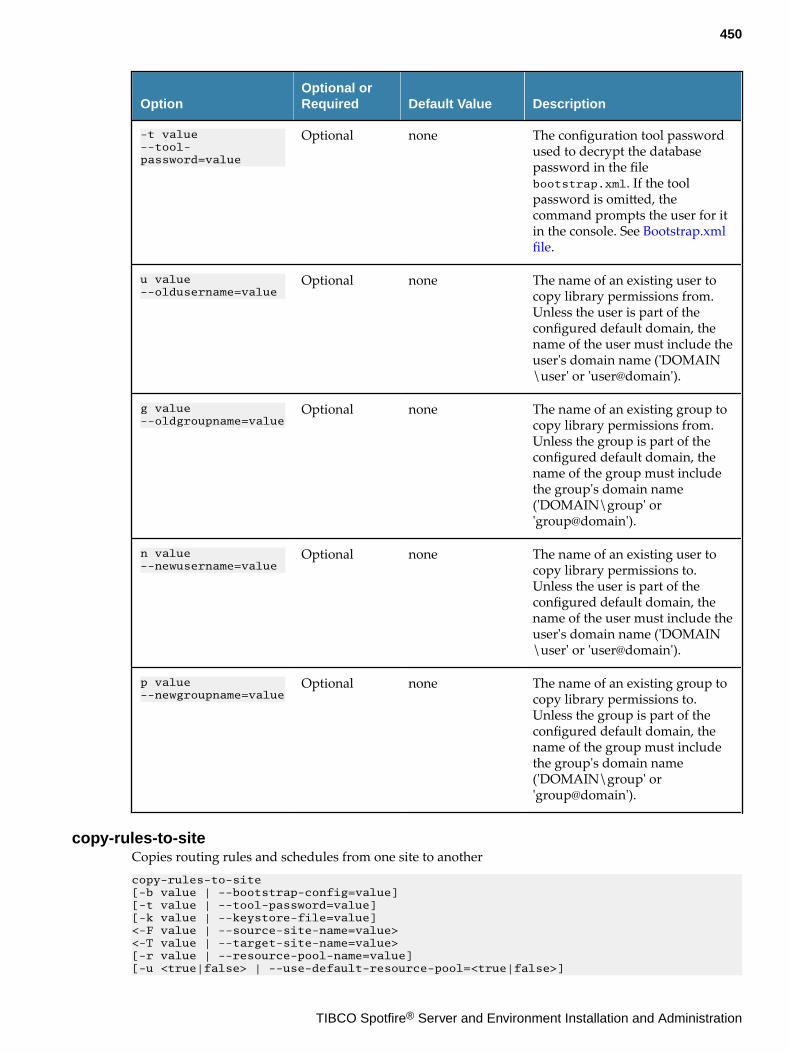
OptionOptional orRequired Default Value Description
-t value--tool-password=value
Optional none The configuration tool passwordused to decrypt the databasepassword in the filebootstrap.xml. If the toolpassword is omitted, thecommand prompts the user for itin the console. See Bootstrap.xmlfile.
u value--oldusername=value
Optional none The name of an existing user tocopy library permissions from.Unless the user is part of theconfigured default domain, thename of the user must include theuser's domain name ('DOMAIN\user' or 'user@domain').
g value--oldgroupname=value
Optional none The name of an existing group tocopy library permissions from.Unless the group is part of theconfigured default domain, thename of the group must includethe group's domain name('DOMAIN\group' or'group@domain').
n value--newusername=value
Optional none The name of an existing user tocopy library permissions to.Unless the user is part of theconfigured default domain, thename of the user must include theuser's domain name ('DOMAIN\user' or 'user@domain').
p value--newgroupname=value
Optional none The name of an existing group tocopy library permissions to.Unless the group is part of theconfigured default domain, thename of the group must includethe group's domain name('DOMAIN\group' or'group@domain').
copy-rules-to-siteCopies routing rules and schedules from one site to anothercopy-rules-to-site[-b value | --bootstrap-config=value] [-t value | --tool-password=value] [-k value | --keystore-file=value] <-F value | --source-site-name=value> <-T value | --target-site-name=value> [-r value | --resource-pool-name=value] [-u <true|false> | --use-default-resource-pool=<true|false>]
450
TIBCO Spotfire® Server and Environment Installation and Administration
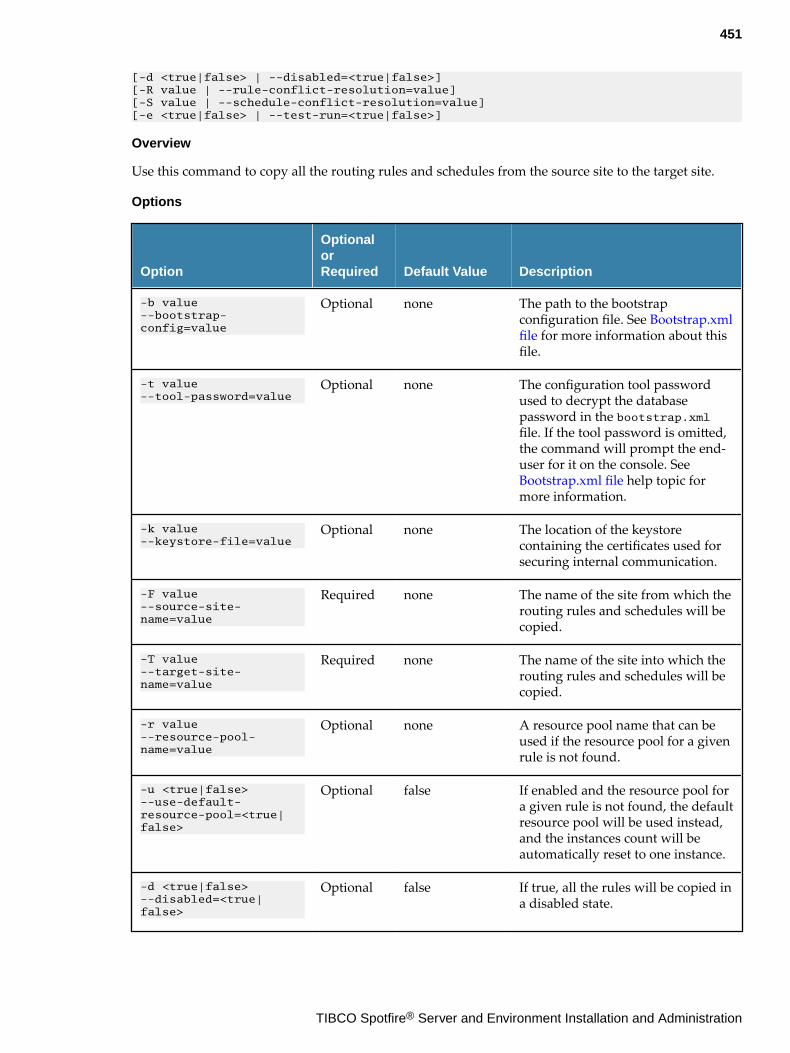
[-d <true|false> | --disabled=<true|false>] [-R value | --rule-conflict-resolution=value] [-S value | --schedule-conflict-resolution=value] [-e <true|false> | --test-run=<true|false>]
Overview
Use this command to copy all the routing rules and schedules from the source site to the target site.
Options
Option
OptionalorRequired Default Value Description
-b value--bootstrap-config=value
Optional none The path to the bootstrapconfiguration file. See Bootstrap.xmlfile for more information about thisfile.
-t value--tool-password=value
Optional none The configuration tool passwordused to decrypt the databasepassword in the bootstrap.xmlfile. If the tool password is omitted,the command will prompt the end-user for it on the console. See Bootstrap.xml file help topic formore information.
-k value--keystore-file=value
Optional none The location of the keystorecontaining the certificates used forsecuring internal communication.
-F value--source-site-name=value
Required none The name of the site from which therouting rules and schedules will becopied.
-T value--target-site-name=value
Required none The name of the site into which therouting rules and schedules will becopied.
-r value--resource-pool-name=value
Optional none A resource pool name that can beused if the resource pool for a givenrule is not found.
-u <true|false>--use-default-resource-pool=<true|false>
Optional false If enabled and the resource pool fora given rule is not found, the defaultresource pool will be used instead,and the instances count will beautomatically reset to one instance.
-d <true|false>--disabled=<true|false>
Optional false If true, all the rules will be copied ina disabled state.
451
TIBCO Spotfire® Server and Environment Installation and Administration

Option
OptionalorRequired Default Value Description
-R valuerule-conflict-resolution=value
Optional fail Defines how to handle copying arule if there already exists a rulewith the same name and the samefile/user/group in the target site.The argument can be one of: fail(default), replace, or skip.
-S value--schedule-conflict-resolution=value
Optional rename Defines how to handle copying ashared schedule if there alreadyexists a shared schedule with thesame name in the target site. Theargument can be one of: rename(default), or replace. If the schedulesare identical, the schedule in thetarget site will remain as it was.
-e <true|false>--test-run=<true|false>
Optional false If true, the copy will not actuallytake place, but the command willproduce a preview of the importstatus of each rule/schedule.
create-default-configCreates a new server configuration file containing the default configuration.create-default-config [-f | --force] [export file]
Overview
Use this command to export a default server configuration to a file. The configuration in the file can beedited and then imported into the server database using the import-config command.
Options
OptionOptional orRequired Default Value Description
-f--force
Optional none Indicates that the tool shouldoverwrite an existing destinationfile.
[export file] Optional configuration.xml
The path to the configuration filethat will be created.
create-jmx-userCreates a new JMX user account.create-jmx-user [-b value | --bootstrap-config=value] [-t value | --tool-password=value] <-u value | --username=value>
452
TIBCO Spotfire® Server and Environment Installation and Administration
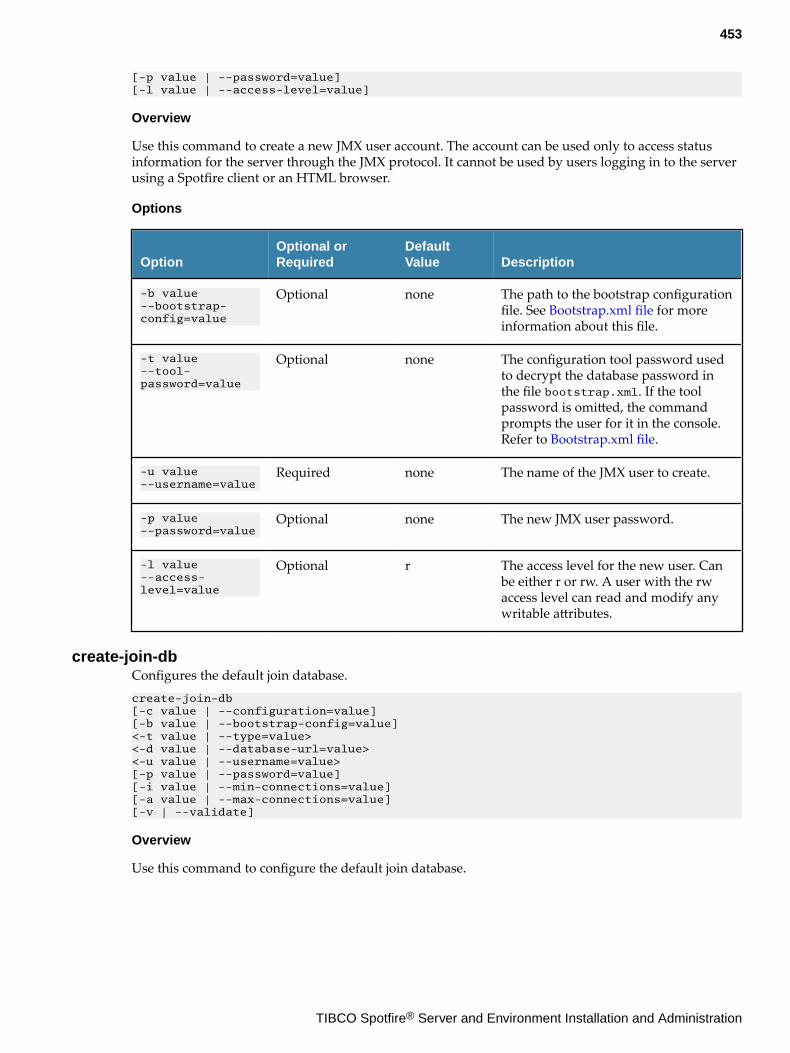
[-p value | --password=value] [-l value | --access-level=value]
Overview
Use this command to create a new JMX user account. The account can be used only to access statusinformation for the server through the JMX protocol. It cannot be used by users logging in to the serverusing a Spotfire client or an HTML browser.
Options
OptionOptional orRequired
DefaultValue Description
-b value--bootstrap-config=value
Optional none The path to the bootstrap configurationfile. See Bootstrap.xml file for moreinformation about this file.
-t value--tool-password=value
Optional none The configuration tool password usedto decrypt the database password inthe file bootstrap.xml. If the toolpassword is omitted, the commandprompts the user for it in the console.Refer to Bootstrap.xml file.
-u value--username=value
Required none The name of the JMX user to create.
-p value--password=value
Optional none The new JMX user password.
-l value--access-level=value
Optional r The access level for the new user. Canbe either r or rw. A user with the rwaccess level can read and modify anywritable attributes.
create-join-dbConfigures the default join database.create-join-db [-c value | --configuration=value] [-b value | --bootstrap-config=value] <-t value | --type=value> <-d value | --database-url=value> <-u value | --username=value> [-p value | --password=value] [-i value | --min-connections=value] [-a value | --max-connections=value] [-v | --validate]
Overview
Use this command to configure the default join database.
453
TIBCO Spotfire® Server and Environment Installation and Administration

Options
OptionOptional orRequired
DefaultValue Description
-c value--configuration=value
Optional configuration.xml
The path to the server configurationfile.
-b value--bootstrap-config=value
Optional none The path to the bootstrap configurationfile. See Bootstrap.xml file for moreinformation about this file.
-t value--type=value
Required none The database type and the driver touse. Must match the type name of oneof the enabled data source templates.
-d value--database-url=value
Required none The JDBC URL to the database.Because this argument usually containsspecial characters, be sure to escapethose characters or enclose the valuesin quotes.
-u value--username=value
Required none The database account username.
-p value--password=value
Optional none The database account password.
-i value--min-connections=value
Optional 0 The minimum number of connectionsto keep in the connection pool.
-a value--max-connections=value
Optional 0 The maximum number of connectionsto keep in the connection pool.
-v--validate
Optional none Indicates whether the createdconfiguration should be validated byattempting to connect to the databaseusing the specified connectioninformation.
create-ldap-configCreates a new LDAP configuration for authentication and/or the user directory LDAP provider.create-ldap-config [-c value | --configuration=value] [-b value |--bootstrap-config=value] <--id=value> [--discover] [-t value |--type=value] [-s value | --servers=value] [-n value |--context-names=value] [-u value | --username=value]
454
TIBCO Spotfire® Server and Environment Installation and Administration
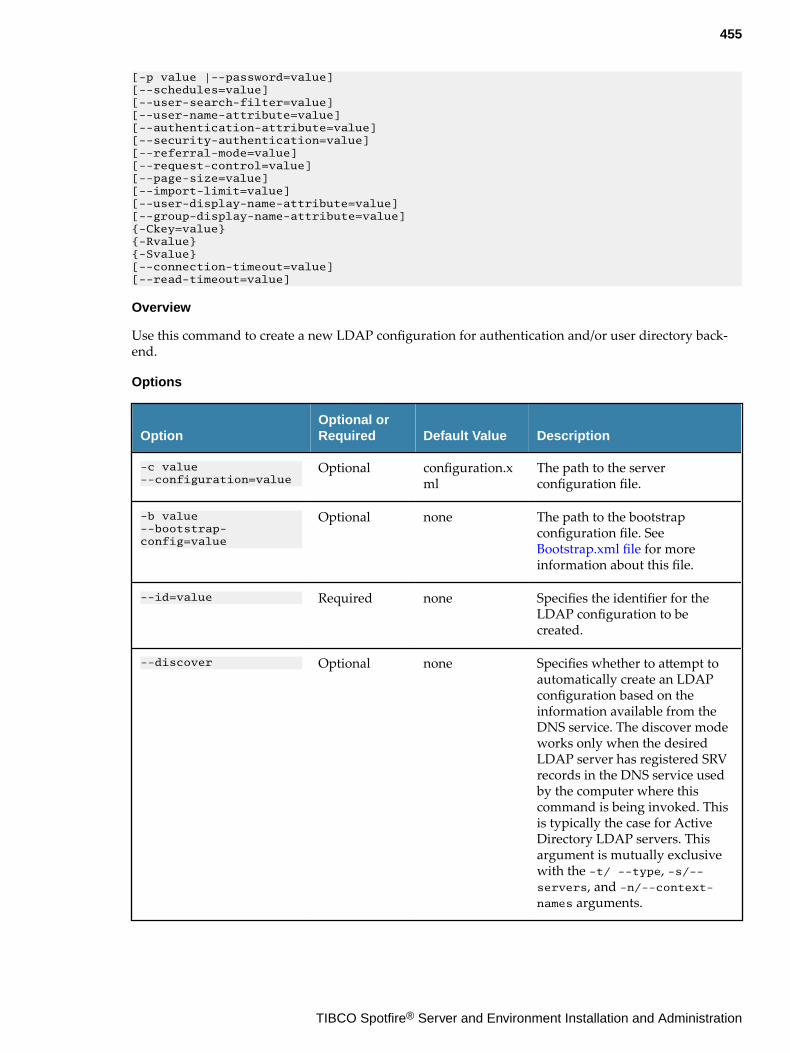
[-p value |--password=value] [--schedules=value] [--user-search-filter=value][--user-name-attribute=value] [--authentication-attribute=value][--security-authentication=value] [--referral-mode=value][--request-control=value] [--page-size=value] [--import-limit=value][--user-display-name-attribute=value][--group-display-name-attribute=value] {-Ckey=value}{-Rvalue}{-Svalue}[--connection-timeout=value] [--read-timeout=value]
Overview
Use this command to create a new LDAP configuration for authentication and/or user directory back-end.
Options
OptionOptional orRequired Default Value Description
-c value--configuration=value
Optional configuration.xml
The path to the serverconfiguration file.
-b value--bootstrap-config=value
Optional none The path to the bootstrapconfiguration file. See Bootstrap.xml file for moreinformation about this file.
--id=value Required none Specifies the identifier for theLDAP configuration to becreated.
--discover Optional none Specifies whether to attempt toautomatically create an LDAPconfiguration based on theinformation available from theDNS service. The discover modeworks only when the desiredLDAP server has registered SRVrecords in the DNS service usedby the computer where thiscommand is being invoked. Thisis typically the case for ActiveDirectory LDAP servers. Thisargument is mutually exclusivewith the -t/ --type, -s/--servers, and -n/--context-names arguments.
455
TIBCO Spotfire® Server and Environment Installation and Administration
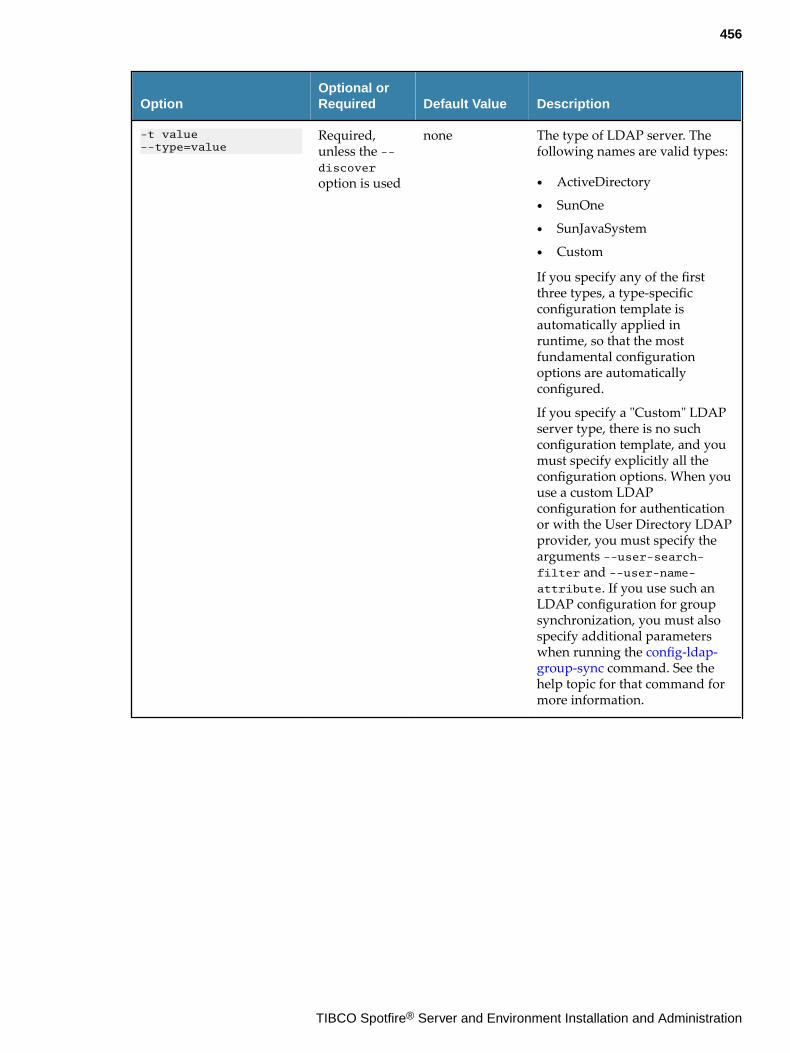
OptionOptional orRequired Default Value Description
-t value--type=value
Required,unless the --discover
option is used
none The type of LDAP server. Thefollowing names are valid types:
● ActiveDirectory
● SunOne
● SunJavaSystem
● Custom
If you specify any of the firstthree types, a type-specificconfiguration template isautomatically applied inruntime, so that the mostfundamental configurationoptions are automaticallyconfigured.
If you specify a "Custom" LDAPserver type, there is no suchconfiguration template, and youmust specify explicitly all theconfiguration options. When youuse a custom LDAPconfiguration for authenticationor with the User Directory LDAPprovider, you must specify thearguments --user-search-filter and --user-name-attribute. If you use such anLDAP configuration for groupsynchronization, you must alsospecify additional parameterswhen running the config-ldap-group-sync command. See thehelp topic for that command formore information.
456
TIBCO Spotfire® Server and Environment Installation and Administration
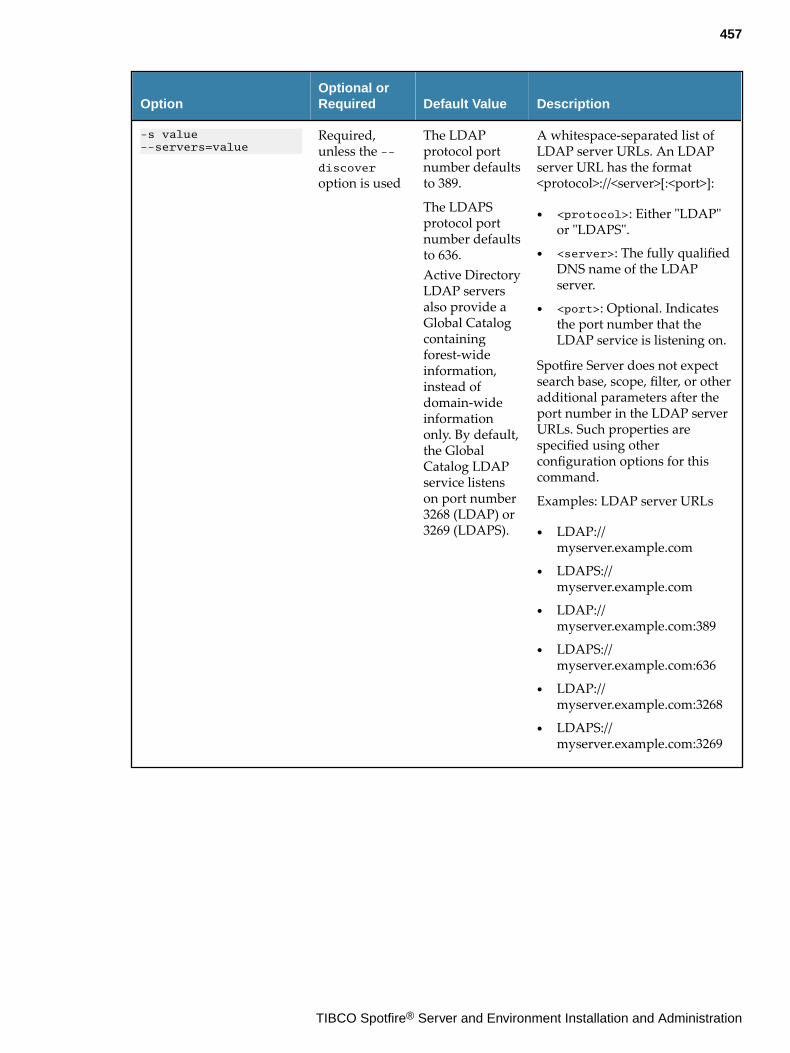
OptionOptional orRequired Default Value Description
-s value--servers=value
Required,unless the --discover
option is used
The LDAPprotocol portnumber defaultsto 389.
The LDAPSprotocol portnumber defaultsto 636.Active DirectoryLDAP serversalso provide aGlobal Catalogcontainingforest-wideinformation,instead ofdomain-wideinformationonly. By default,the GlobalCatalog LDAPservice listenson port number3268 (LDAP) or3269 (LDAPS).
A whitespace-separated list ofLDAP server URLs. An LDAPserver URL has the format<protocol>://<server>[:<port>]:
● <protocol>: Either "LDAP"or "LDAPS".
● <server>: The fully qualifiedDNS name of the LDAPserver.
● <port>: Optional. Indicatesthe port number that theLDAP service is listening on.
Spotfire Server does not expectsearch base, scope, filter, or otheradditional parameters after theport number in the LDAP serverURLs. Such properties arespecified using otherconfiguration options for thiscommand.
Examples: LDAP server URLs
● LDAP://myserver.example.com
● LDAPS://myserver.example.com
● LDAP://myserver.example.com:389
● LDAPS://myserver.example.com:636
● LDAP://myserver.example.com:3268
● LDAPS://myserver.example.com:3269
457
TIBCO Spotfire® Server and Environment Installation and Administration
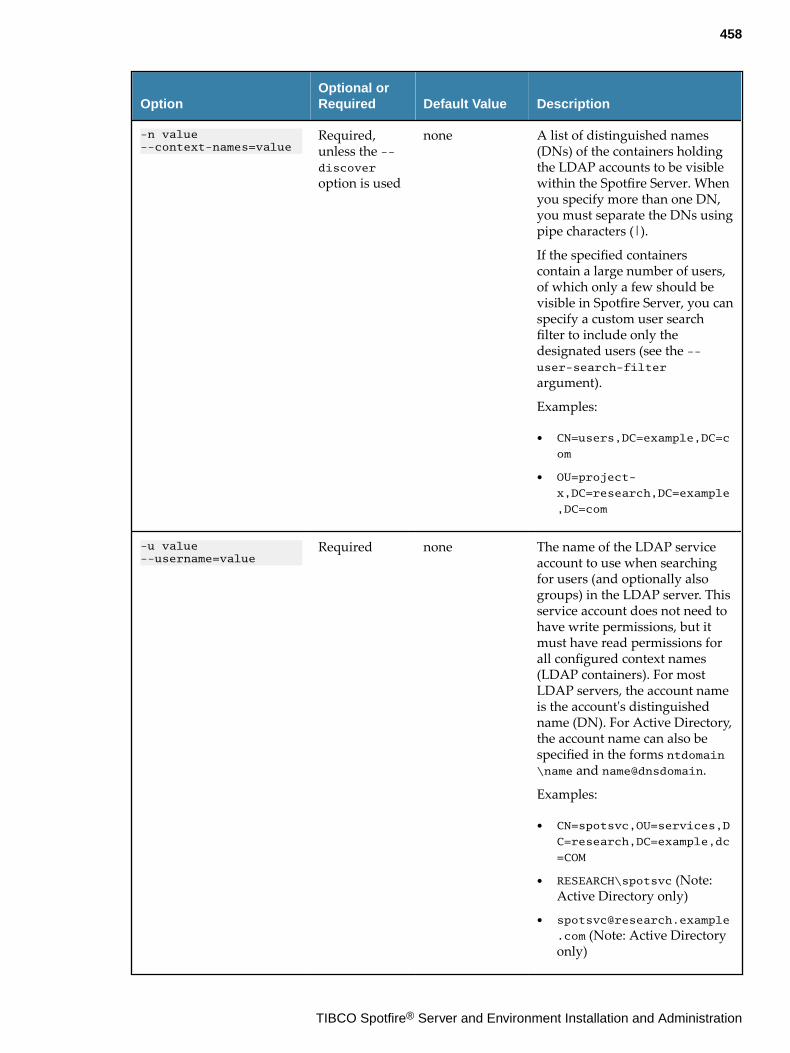
OptionOptional orRequired Default Value Description
-n value--context-names=value
Required,unless the --discover
option is used
none A list of distinguished names(DNs) of the containers holdingthe LDAP accounts to be visiblewithin the Spotfire Server. Whenyou specify more than one DN,you must separate the DNs usingpipe characters (|).
If the specified containerscontain a large number of users,of which only a few should bevisible in Spotfire Server, you canspecify a custom user searchfilter to include only thedesignated users (see the --user-search-filter
argument).
Examples:
● CN=users,DC=example,DC=c
om
● OU=project-
x,DC=research,DC=example
,DC=com
-u value--username=value
Required none The name of the LDAP serviceaccount to use when searchingfor users (and optionally alsogroups) in the LDAP server. Thisservice account does not need tohave write permissions, but itmust have read permissions forall configured context names(LDAP containers). For mostLDAP servers, the account nameis the account's distinguishedname (DN). For Active Directory,the account name can also bespecified in the forms ntdomain\name and name@dnsdomain.
Examples:
● CN=spotsvc,OU=services,D
C=research,DC=example,dc
=COM
● RESEARCH\spotsvc (Note:Active Directory only)
.com (Note: Active Directoryonly)
458
TIBCO Spotfire® Server and Environment Installation and Administration
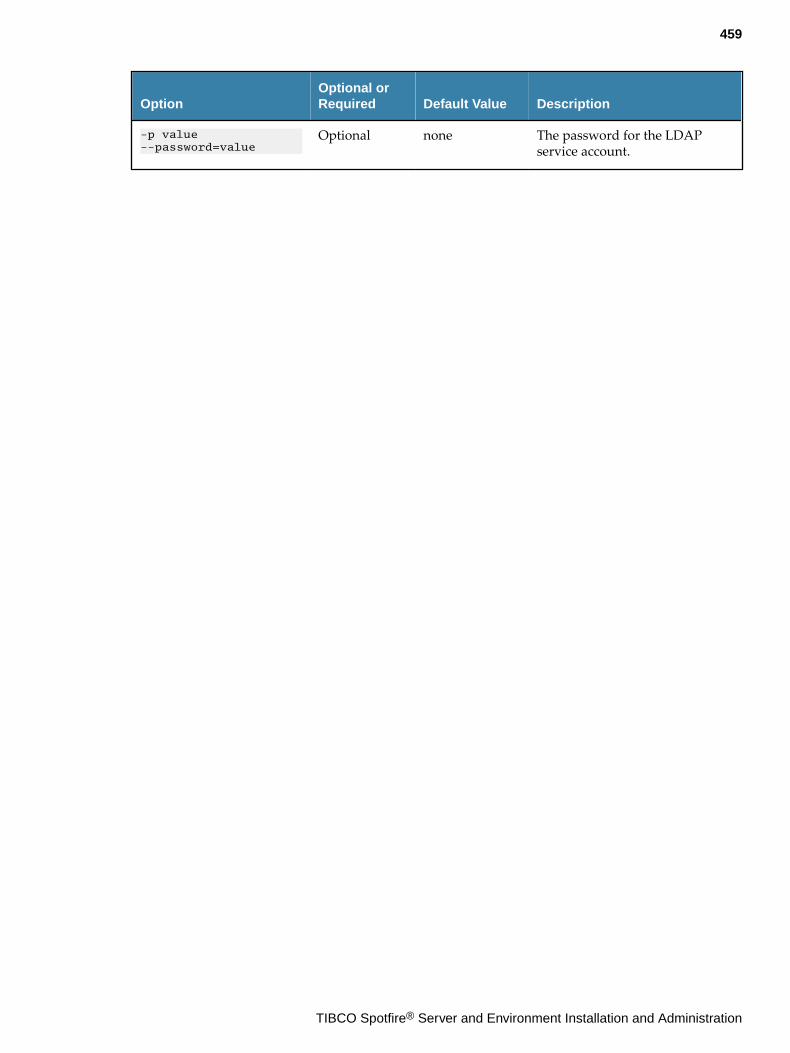
OptionOptional orRequired Default Value Description
-p value--password=value
Optional none The password for the LDAPservice account.
459
TIBCO Spotfire® Server and Environment Installation and Administration
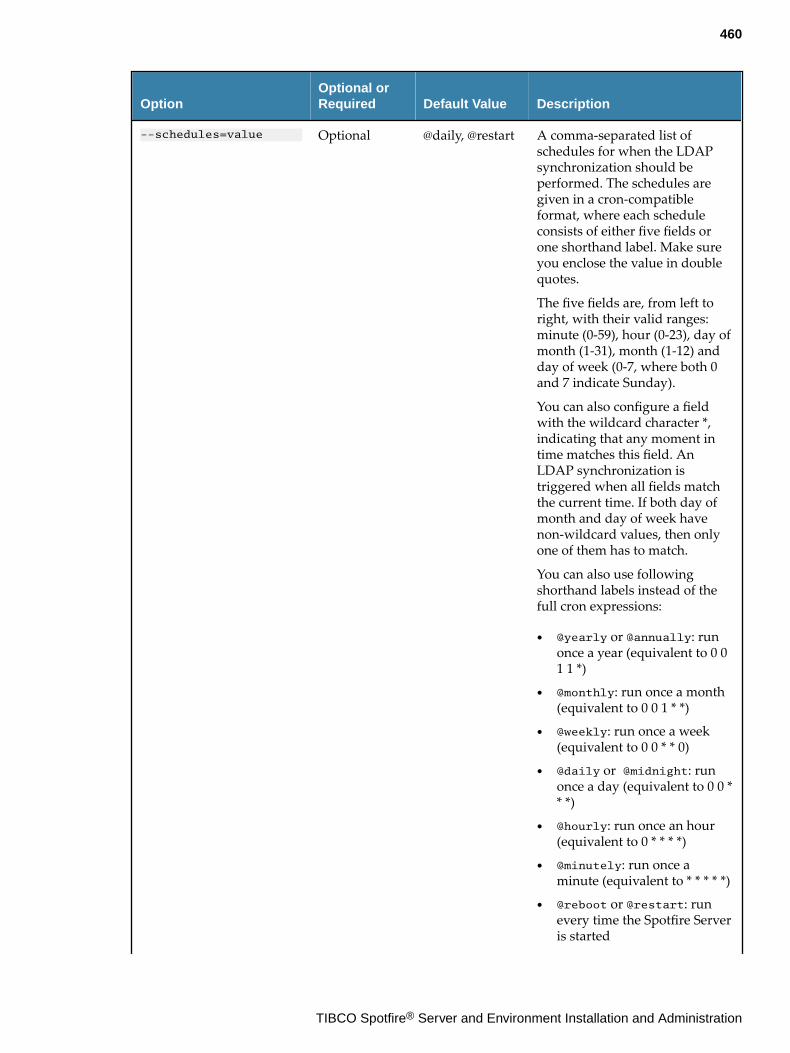
OptionOptional orRequired Default Value Description
--schedules=value Optional @daily, @restart A comma-separated list ofschedules for when the LDAPsynchronization should beperformed. The schedules aregiven in a cron-compatibleformat, where each scheduleconsists of either five fields orone shorthand label. Make sureyou enclose the value in doublequotes.
The five fields are, from left toright, with their valid ranges:minute (0-59), hour (0-23), day ofmonth (1-31), month (1-12) andday of week (0-7, where both 0and 7 indicate Sunday).
You can also configure a fieldwith the wildcard character *,indicating that any moment intime matches this field. AnLDAP synchronization istriggered when all fields matchthe current time. If both day ofmonth and day of week havenon-wildcard values, then onlyone of them has to match.
You can also use followingshorthand labels instead of thefull cron expressions:
● @yearly or @annually: runonce a year (equivalent to 0 01 1 *)
● @monthly: run once a month(equivalent to 0 0 1 * *)
● @weekly: run once a week(equivalent to 0 0 * * 0)
● @daily or @midnight: runonce a day (equivalent to 0 0 ** *)
● @hourly: run once an hour(equivalent to 0 * * * *)
● @minutely: run once aminute (equivalent to * * * * *)
● @reboot or @restart: runevery time the Spotfire Serveris started
460
TIBCO Spotfire® Server and Environment Installation and Administration
OptionOptional orRequired Default Value Description
Refer to the Wikipedia overviewarticle on the cron scheduler.
461
TIBCO Spotfire® Server and Environment Installation and Administration
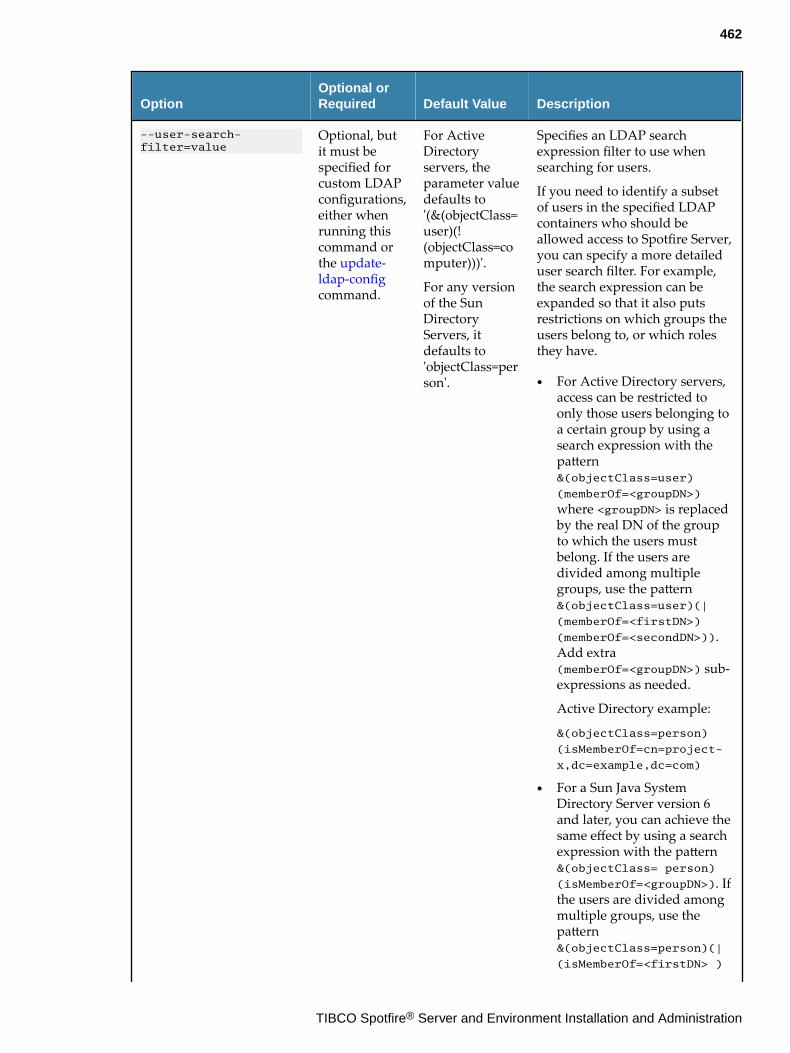
OptionOptional orRequired Default Value Description
--user-search-filter=value
Optional, butit must bespecified forcustom LDAPconfigurations,either whenrunning thiscommand orthe update-ldap-configcommand.
For ActiveDirectoryservers, theparameter valuedefaults to'(&(objectClass=user)(!(objectClass=computer)))'.
For any versionof the SunDirectoryServers, itdefaults to'objectClass=person'.
Specifies an LDAP searchexpression filter to use whensearching for users.
If you need to identify a subsetof users in the specified LDAPcontainers who should beallowed access to Spotfire Server,you can specify a more detaileduser search filter. For example,the search expression can beexpanded so that it also putsrestrictions on which groups theusers belong to, or which rolesthey have.
● For Active Directory servers,access can be restricted toonly those users belonging toa certain group by using asearch expression with thepattern&(objectClass=user)
(memberOf=<groupDN>)
where <groupDN> is replacedby the real DN of the groupto which the users mustbelong. If the users aredivided among multiplegroups, use the pattern&(objectClass=user)(|
(memberOf=<firstDN>)
(memberOf=<secondDN>)).Add extra(memberOf=<groupDN>) sub-expressions as needed.
Active Directory example:
&(objectClass=person)
(isMemberOf=cn=project-
x,dc=example,dc=com)
● For a Sun Java SystemDirectory Server version 6and later, you can achieve thesame effect by using a searchexpression with the pattern&(objectClass= person)
(isMemberOf=<groupDN>). Ifthe users are divided amongmultiple groups, use thepattern&(objectClass=person)(|
(isMemberOf=<firstDN> )
462
TIBCO Spotfire® Server and Environment Installation and Administration
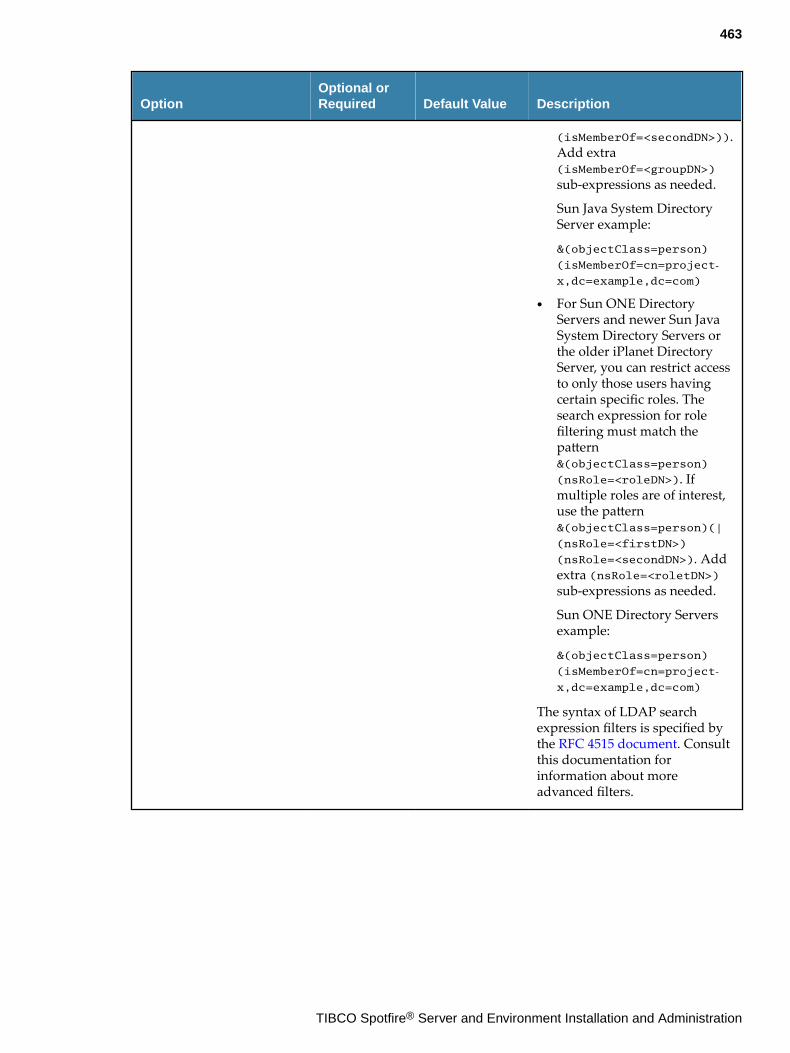
OptionOptional orRequired Default Value Description
(isMemberOf=<secondDN>)).Add extra(isMemberOf=<groupDN>)
sub-expressions as needed.
Sun Java System DirectoryServer example:
&(objectClass=person)
(isMemberOf=cn=project‐x,dc=example,dc=com)
● For Sun ONE DirectoryServers and newer Sun JavaSystem Directory Servers orthe older iPlanet DirectoryServer, you can restrict accessto only those users havingcertain specific roles. Thesearch expression for rolefiltering must match thepattern&(objectClass=person)
(nsRole=<roleDN>). Ifmultiple roles are of interest,use the pattern&(objectClass=person)(|
(nsRole=<firstDN>)
(nsRole=<secondDN>). Addextra (nsRole=<roletDN>)sub-expressions as needed.
Sun ONE Directory Serversexample:
&(objectClass=person)
(isMemberOf=cn=project‐x,dc=example,dc=com)
The syntax of LDAP searchexpression filters is specified bythe RFC 4515 document. Consultthis documentation forinformation about moreadvanced filters.
463
TIBCO Spotfire® Server and Environment Installation and Administration
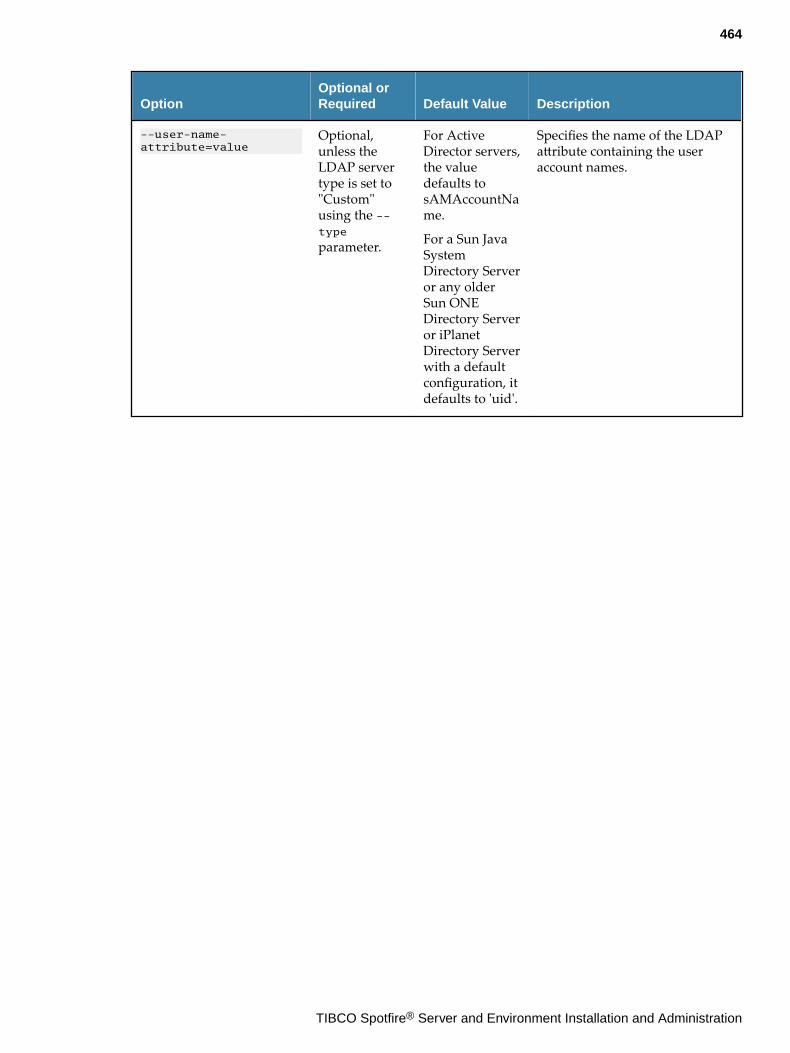
OptionOptional orRequired Default Value Description
--user-name-attribute=value
Optional,unless theLDAP servertype is set to"Custom"using the --type
parameter.
For ActiveDirector servers,the valuedefaults tosAMAccountName.
For a Sun JavaSystemDirectory Serveror any olderSun ONEDirectory Serveror iPlanetDirectory Serverwith a defaultconfiguration, itdefaults to 'uid'.
Specifies the name of the LDAPattribute containing the useraccount names.
464
TIBCO Spotfire® Server and Environment Installation and Administration
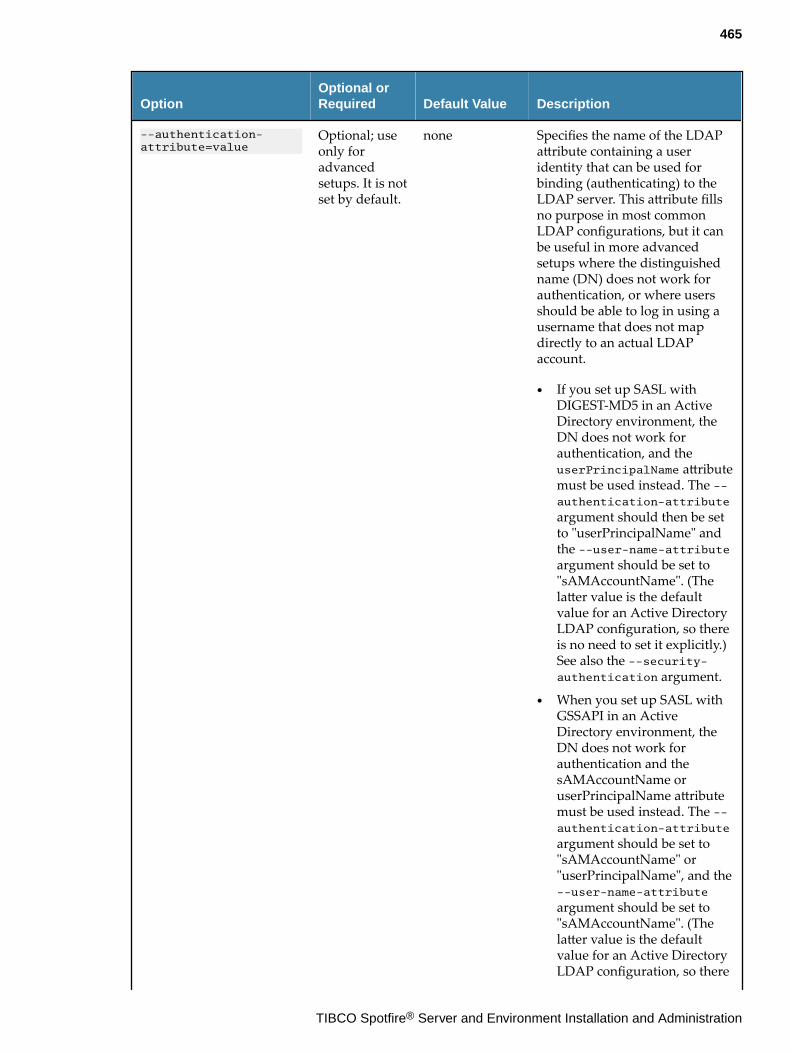
OptionOptional orRequired Default Value Description
--authentication-attribute=value
Optional; useonly foradvancedsetups. It is notset by default.
none Specifies the name of the LDAPattribute containing a useridentity that can be used forbinding (authenticating) to theLDAP server. This attribute fillsno purpose in most commonLDAP configurations, but it canbe useful in more advancedsetups where the distinguishedname (DN) does not work forauthentication, or where usersshould be able to log in using ausername that does not mapdirectly to an actual LDAPaccount.
● If you set up SASL withDIGEST-MD5 in an ActiveDirectory environment, theDN does not work forauthentication, and theuserPrincipalName attributemust be used instead. The --authentication-attribute
argument should then be setto "userPrincipalName" andthe --user-name-attributeargument should be set to"sAMAccountName". (Thelatter value is the defaultvalue for an Active DirectoryLDAP configuration, so thereis no need to set it explicitly.)See also the --security-authentication argument.
● When you set up SASL withGSSAPI in an ActiveDirectory environment, theDN does not work forauthentication and thesAMAccountName oruserPrincipalName attributemust be used instead. The --authentication-attribute
argument should be set to"sAMAccountName" or"userPrincipalName", and the--user-name-attribute
argument should be set to"sAMAccountName". (Thelatter value is the defaultvalue for an Active DirectoryLDAP configuration, so there
465
TIBCO Spotfire® Server and Environment Installation and Administration
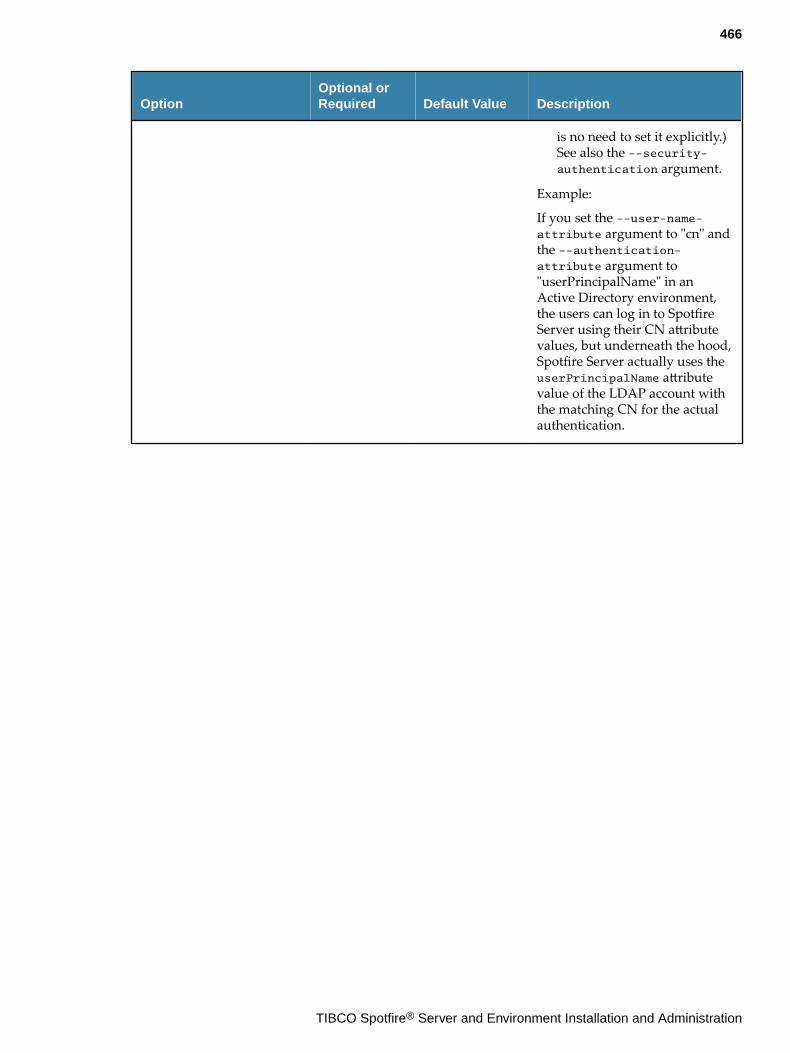
OptionOptional orRequired Default Value Description
is no need to set it explicitly.)See also the --security-authentication argument.
Example:
If you set the --user-name-attribute argument to "cn" andthe --authentication-attribute argument to"userPrincipalName" in anActive Directory environment,the users can log in to SpotfireServer using their CN attributevalues, but underneath the hood,Spotfire Server actually uses theuserPrincipalName attributevalue of the LDAP account withthe matching CN for the actualauthentication.
466
TIBCO Spotfire® Server and Environment Installation and Administration
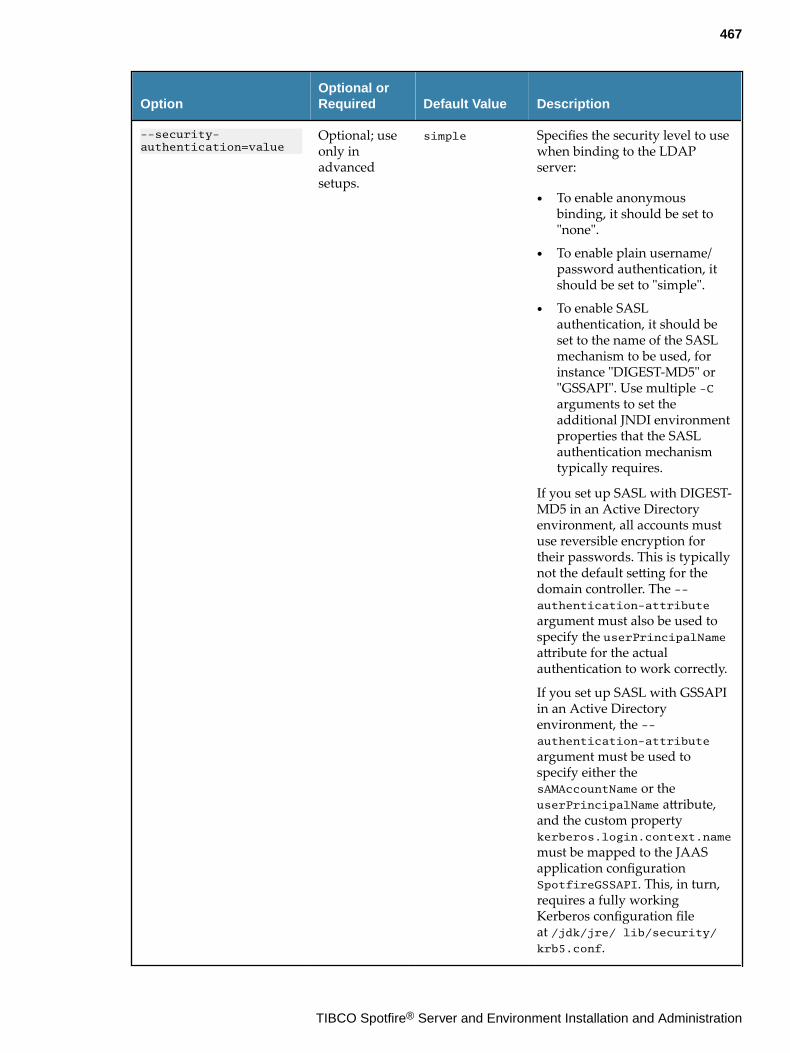
OptionOptional orRequired Default Value Description
--security-authentication=value
Optional; useonly inadvancedsetups.
simple Specifies the security level to usewhen binding to the LDAPserver:
● To enable anonymousbinding, it should be set to"none".
● To enable plain username/password authentication, itshould be set to "simple".
● To enable SASLauthentication, it should beset to the name of the SASLmechanism to be used, forinstance "DIGEST-MD5" or"GSSAPI". Use multiple -Carguments to set theadditional JNDI environmentproperties that the SASLauthentication mechanismtypically requires.
If you set up SASL with DIGEST-MD5 in an Active Directoryenvironment, all accounts mustuse reversible encryption fortheir passwords. This is typicallynot the default setting for thedomain controller. The --authentication-attribute
argument must also be used tospecify the userPrincipalNameattribute for the actualauthentication to work correctly.
If you set up SASL with GSSAPIin an Active Directoryenvironment, the --authentication-attribute
argument must be used tospecify either thesAMAccountName or theuserPrincipalName attribute,and the custom propertykerberos.login.context.name
must be mapped to the JAASapplication configurationSpotfireGSSAPI. This, in turn,requires a fully workingKerberos configuration fileat /jdk/jre/ lib/security/krb5.conf.
467
TIBCO Spotfire® Server and Environment Installation and Administration
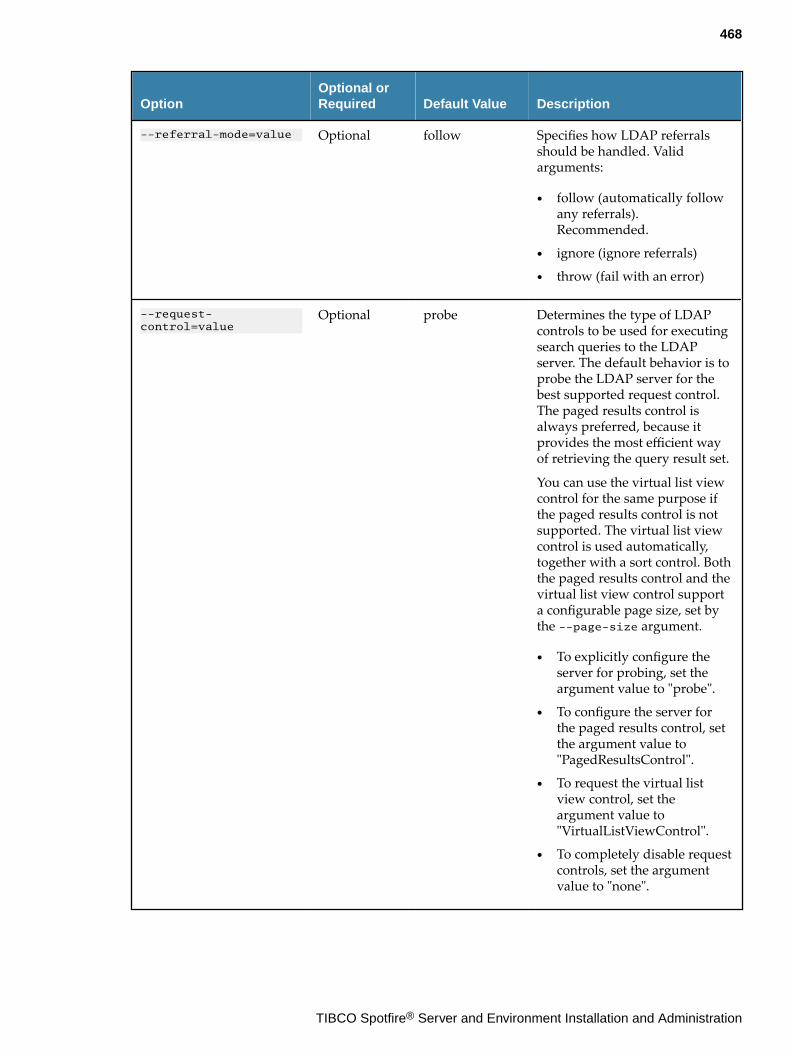
OptionOptional orRequired Default Value Description
--referral-mode=value Optional follow Specifies how LDAP referralsshould be handled. Validarguments:
● follow (automatically followany referrals).Recommended.
● ignore (ignore referrals)
● throw (fail with an error)
--request-control=value
Optional probe Determines the type of LDAPcontrols to be used for executingsearch queries to the LDAPserver. The default behavior is toprobe the LDAP server for thebest supported request control.The paged results control isalways preferred, because itprovides the most efficient wayof retrieving the query result set.
You can use the virtual list viewcontrol for the same purpose ifthe paged results control is notsupported. The virtual list viewcontrol is used automatically,together with a sort control. Boththe paged results control and thevirtual list view control supporta configurable page size, set bythe --page-size argument.
● To explicitly configure theserver for probing, set theargument value to "probe".
● To configure the server forthe paged results control, setthe argument value to"PagedResultsControl".
● To request the virtual listview control, set theargument value to"VirtualListViewControl".
● To completely disable requestcontrols, set the argumentvalue to "none".
468
TIBCO Spotfire® Server and Environment Installation and Administration
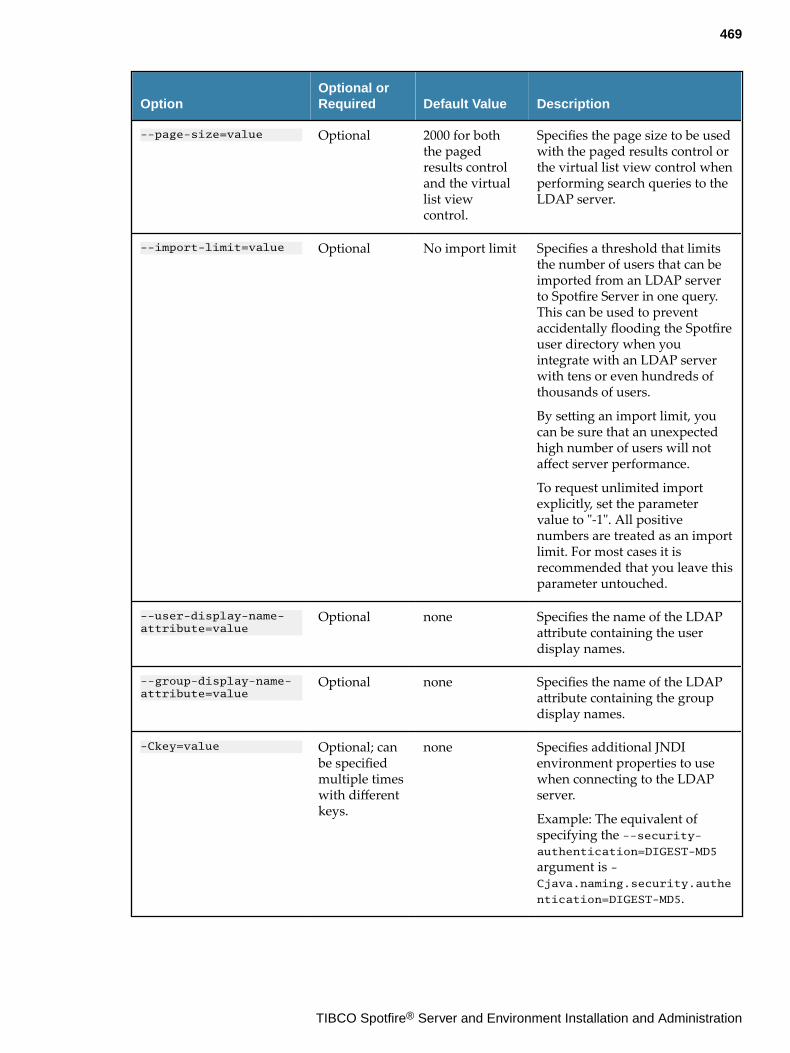
OptionOptional orRequired Default Value Description
--page-size=value Optional 2000 for boththe pagedresults controland the virtuallist viewcontrol.
Specifies the page size to be usedwith the paged results control orthe virtual list view control whenperforming search queries to theLDAP server.
--import-limit=value Optional No import limit Specifies a threshold that limitsthe number of users that can beimported from an LDAP serverto Spotfire Server in one query.This can be used to preventaccidentally flooding the Spotfireuser directory when youintegrate with an LDAP serverwith tens or even hundreds ofthousands of users.
By setting an import limit, youcan be sure that an unexpectedhigh number of users will notaffect server performance.
To request unlimited importexplicitly, set the parametervalue to "-1". All positivenumbers are treated as an importlimit. For most cases it isrecommended that you leave thisparameter untouched.
--user-display-name-attribute=value
Optional none Specifies the name of the LDAPattribute containing the userdisplay names.
--group-display-name-attribute=value
Optional none Specifies the name of the LDAPattribute containing the groupdisplay names.
-Ckey=value Optional; canbe specifiedmultiple timeswith differentkeys.
none Specifies additional JNDIenvironment properties to usewhen connecting to the LDAPserver.
Example: The equivalent ofspecifying the --security-authentication=DIGEST-MD5
argument is -Cjava.naming.security.authe
ntication=DIGEST-MD5.
469
TIBCO Spotfire® Server and Environment Installation and Administration
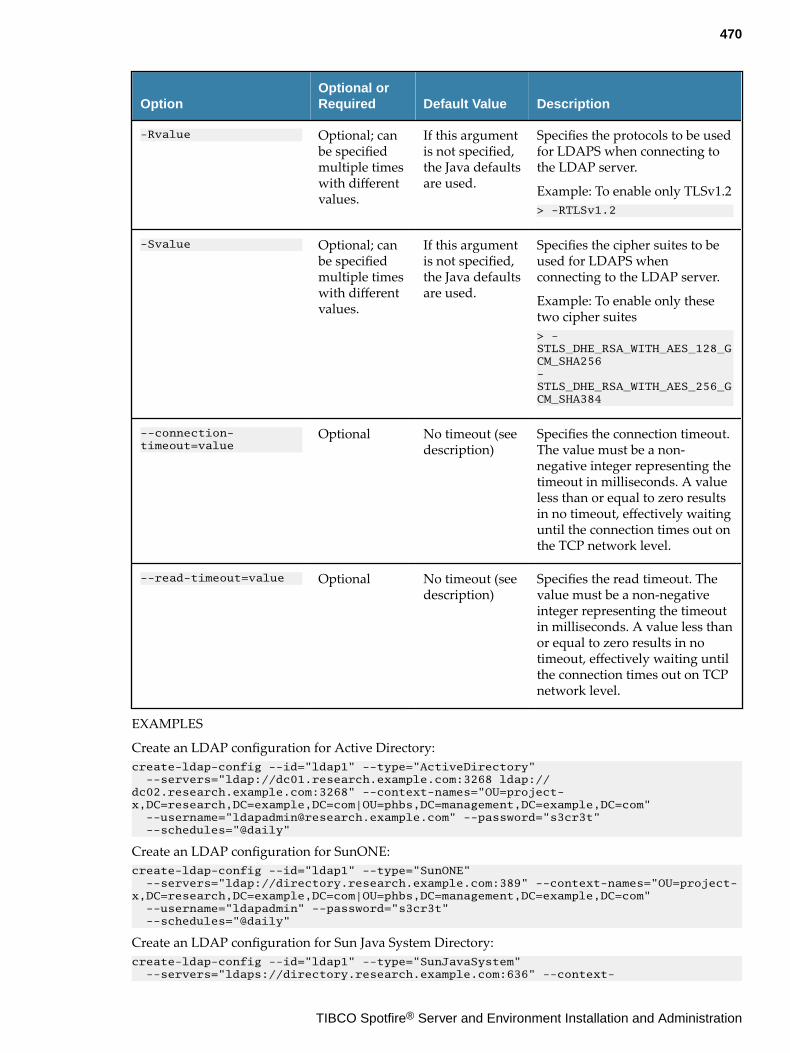
OptionOptional orRequired Default Value Description
-Rvalue Optional; canbe specifiedmultiple timeswith differentvalues.
If this argumentis not specified,the Java defaultsare used.
Specifies the protocols to be usedfor LDAPS when connecting tothe LDAP server.
Example: To enable only TLSv1.2> -RTLSv1.2
-Svalue Optional; canbe specifiedmultiple timeswith differentvalues.
If this argumentis not specified,the Java defaultsare used.
Specifies the cipher suites to beused for LDAPS whenconnecting to the LDAP server.
Example: To enable only thesetwo cipher suites> -STLS_DHE_RSA_WITH_AES_128_GCM_SHA256 -STLS_DHE_RSA_WITH_AES_256_GCM_SHA384
--connection-timeout=value
Optional No timeout (seedescription)
Specifies the connection timeout.The value must be a non-negative integer representing thetimeout in milliseconds. A valueless than or equal to zero resultsin no timeout, effectively waitinguntil the connection times out onthe TCP network level.
--read-timeout=value Optional No timeout (seedescription)
Specifies the read timeout. Thevalue must be a non-negativeinteger representing the timeoutin milliseconds. A value less thanor equal to zero results in notimeout, effectively waiting untilthe connection times out on TCPnetwork level.
EXAMPLES
Create an LDAP configuration for Active Directory:create-ldap-config --id="ldap1" --type="ActiveDirectory" --servers="ldap://dc01.research.example.com:3268 ldap://dc02.research.example.com:3268" --context-names="OU=project-x,DC=research,DC=example,DC=com|OU=phbs,DC=management,DC=example,DC=com" --username="[email protected]" --password="s3cr3t" --schedules="@daily"
Create an LDAP configuration for SunONE:create-ldap-config --id="ldap1" --type="SunONE" --servers="ldap://directory.research.example.com:389" --context-names="OU=project-x,DC=research,DC=example,DC=com|OU=phbs,DC=management,DC=example,DC=com" --username="ldapadmin" --password="s3cr3t" --schedules="@daily"
Create an LDAP configuration for Sun Java System Directory:create-ldap-config --id="ldap1" --type="SunJavaSystem" --servers="ldaps://directory.research.example.com:636" --context-
470
TIBCO Spotfire® Server and Environment Installation and Administration
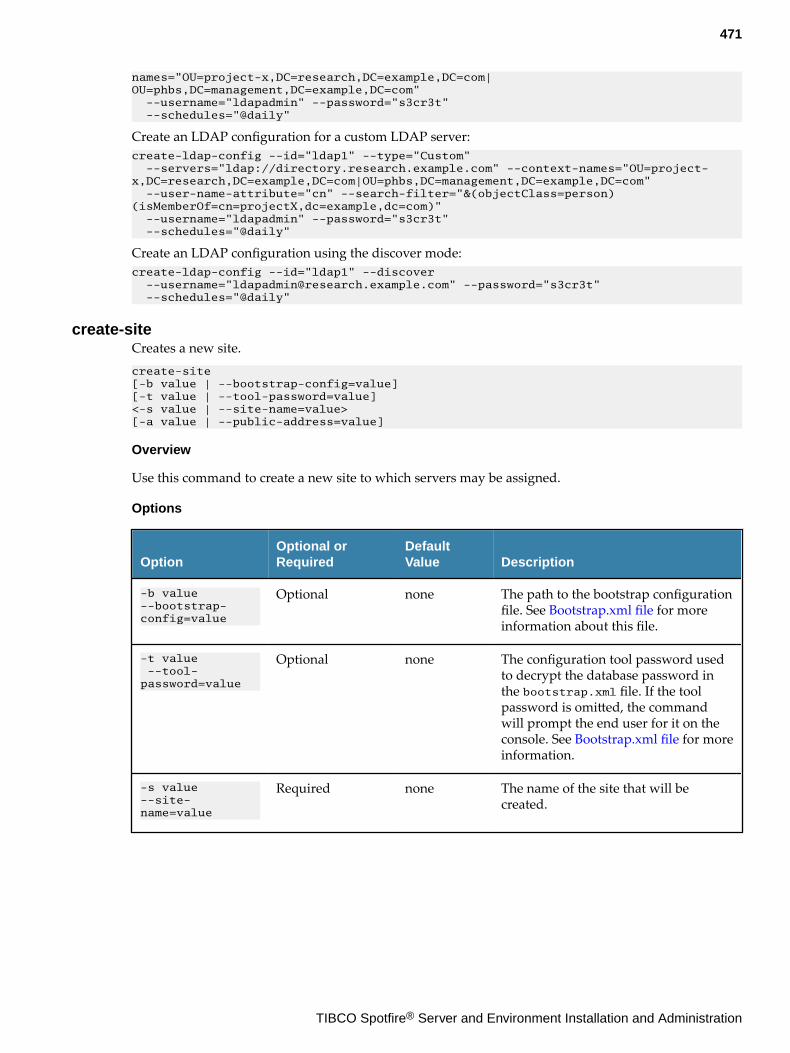
names="OU=project-x,DC=research,DC=example,DC=com|OU=phbs,DC=management,DC=example,DC=com" --username="ldapadmin" --password="s3cr3t" --schedules="@daily"
Create an LDAP configuration for a custom LDAP server:create-ldap-config --id="ldap1" --type="Custom" --servers="ldap://directory.research.example.com" --context-names="OU=project-x,DC=research,DC=example,DC=com|OU=phbs,DC=management,DC=example,DC=com" --user-name-attribute="cn" --search-filter="&(objectClass=person)(isMemberOf=cn=projectX,dc=example,dc=com)" --username="ldapadmin" --password="s3cr3t" --schedules="@daily"
Create an LDAP configuration using the discover mode:create-ldap-config --id="ldap1" --discover --username="[email protected]" --password="s3cr3t" --schedules="@daily"
create-siteCreates a new site.create-site [-b value | --bootstrap-config=value][-t value | --tool-password=value] <-s value | --site-name=value>[-a value | --public-address=value]
Overview
Use this command to create a new site to which servers may be assigned.
Options
OptionOptional orRequired
DefaultValue Description
-b value--bootstrap-config=value
Optional none The path to the bootstrap configurationfile. See Bootstrap.xml file for moreinformation about this file.
-t value --tool-password=value
Optional none The configuration tool password usedto decrypt the database password inthe bootstrap.xml file. If the toolpassword is omitted, the commandwill prompt the end user for it on theconsole. See Bootstrap.xml file for moreinformation.
-s value--site-name=value
Required none The name of the site that will becreated.
471
TIBCO Spotfire® Server and Environment Installation and Administration
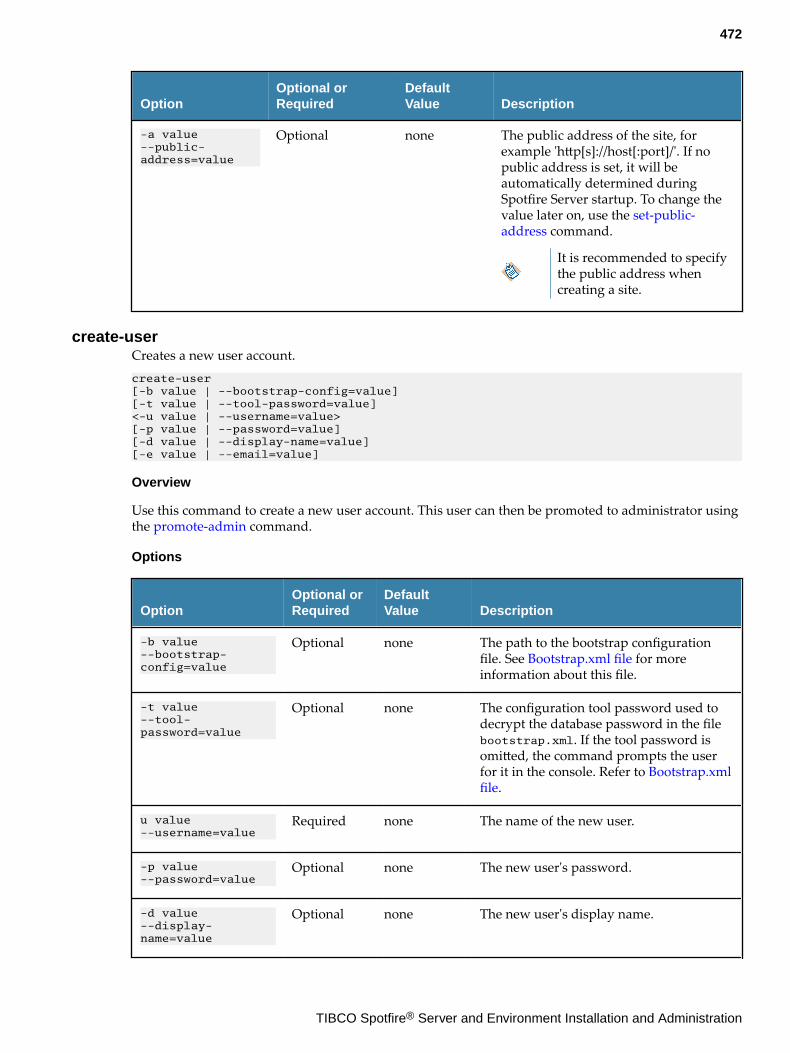
OptionOptional orRequired
DefaultValue Description
-a value--public-address=value
Optional none The public address of the site, forexample 'http[s]://host[:port]/'. If nopublic address is set, it will beautomatically determined duringSpotfire Server startup. To change thevalue later on, use the set-public-address command.
It is recommended to specifythe public address whencreating a site.
create-userCreates a new user account.create-user [-b value | --bootstrap-config=value] [-t value | --tool-password=value] <-u value | --username=value> [-p value | --password=value] [-d value | --display-name=value] [-e value | --email=value]
Overview
Use this command to create a new user account. This user can then be promoted to administrator usingthe promote-admin command.
Options
OptionOptional orRequired
DefaultValue Description
-b value--bootstrap-config=value
Optional none The path to the bootstrap configurationfile. See Bootstrap.xml file for moreinformation about this file.
-t value--tool-password=value
Optional none The configuration tool password used todecrypt the database password in the filebootstrap.xml. If the tool password isomitted, the command prompts the userfor it in the console. Refer to Bootstrap.xmlfile.
u value--username=value
Required none The name of the new user.
-p value--password=value
Optional none The new user's password.
-d value--display-name=value
Optional none The new user's display name.
472
TIBCO Spotfire® Server and Environment Installation and Administration
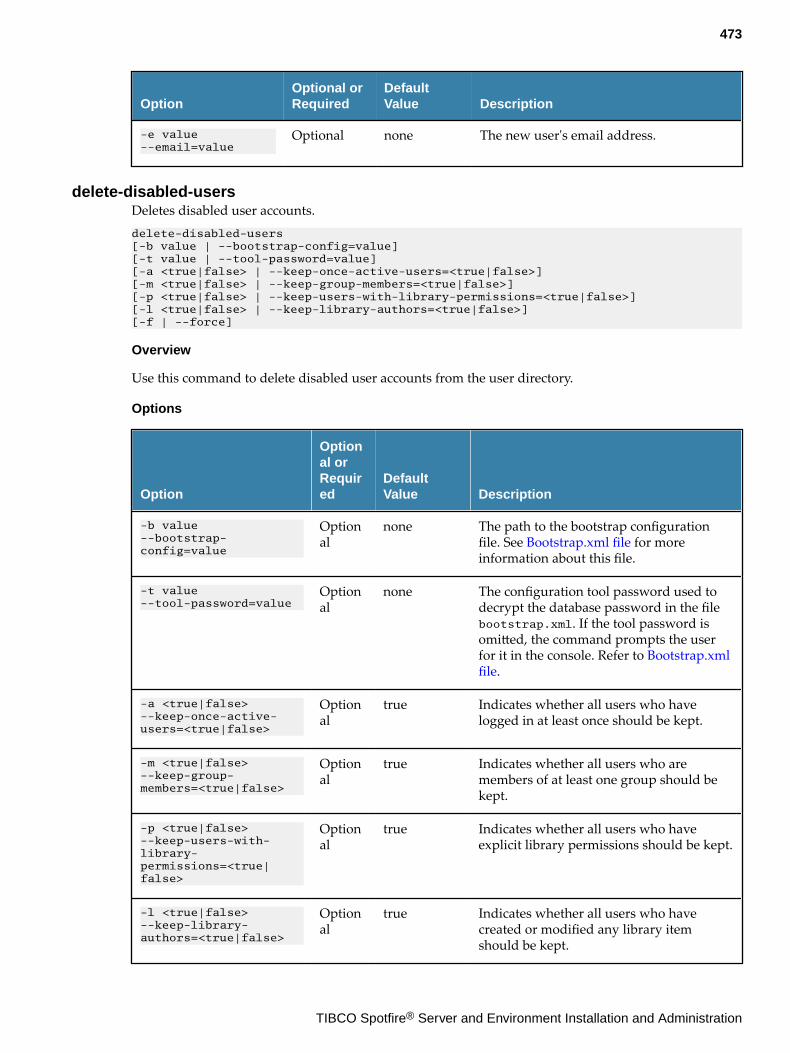
OptionOptional orRequired
DefaultValue Description
-e value--email=value
Optional none The new user's email address.
delete-disabled-usersDeletes disabled user accounts.delete-disabled-users [-b value | --bootstrap-config=value] [-t value | --tool-password=value] [-a <true|false> | --keep-once-active-users=<true|false>] [-m <true|false> | --keep-group-members=<true|false>] [-p <true|false> | --keep-users-with-library-permissions=<true|false>] [-l <true|false> | --keep-library-authors=<true|false>] [-f | --force]
Overview
Use this command to delete disabled user accounts from the user directory.
Options
Option
Optional orRequired
DefaultValue Description
-b value--bootstrap-config=value
Optional
none The path to the bootstrap configurationfile. See Bootstrap.xml file for moreinformation about this file.
-t value--tool-password=value
Optional
none The configuration tool password used todecrypt the database password in the filebootstrap.xml. If the tool password isomitted, the command prompts the userfor it in the console. Refer to Bootstrap.xmlfile.
-a <true|false>--keep-once-active-users=<true|false>
Optional
true Indicates whether all users who havelogged in at least once should be kept.
-m <true|false>--keep-group-members=<true|false>
Optional
true Indicates whether all users who aremembers of at least one group should bekept.
-p <true|false>--keep-users-with-library-permissions=<true|false>
Optional
true Indicates whether all users who haveexplicit library permissions should be kept.
-l <true|false>--keep-library-authors=<true|false>
Optional
true Indicates whether all users who havecreated or modified any library itemshould be kept.
473
TIBCO Spotfire® Server and Environment Installation and Administration

Option
Optional orRequired
DefaultValue Description
-f--force
Optional
none Indicates that users should be deletedwithout need for further confirmation.
delete-disconnected-groupsDeletes disconnected groups.delete-disconnected-groups [-b value | --bootstrap-config=value] [-t value | --tool-password=value] [-f | --force]
Overview
Use this command to delete from the user directory disconnected groups that have been previouslysynchronized from an LDAP directory.
Options
Option
Optional orRequired
DefaultValue Description
-b value--bootstrap-config=value
Optional
none The path to the bootstrap configurationfile. See Bootstrap.xml file for moreinformation about this file.
-t value--tool-password=value
Optional
none The configuration tool password used todecrypt the database password in the filebootstrap.xml. If the tool password isomitted, the command prompts the userfor it in the console. Refer to Bootstrap.xmlfile.
-f--force
Optional
none Indicates that groups should be deletedwithout need for further confirmation.
delete-jmx-userDeletes a JMX user.delete-jmx-user [-b value | --bootstrap-config=value] [-t value | --tool-password=value] <-u value | --username=value>
Overview
Use this command to delete a user who can access the server through JMX.
474
TIBCO Spotfire® Server and Environment Installation and Administration
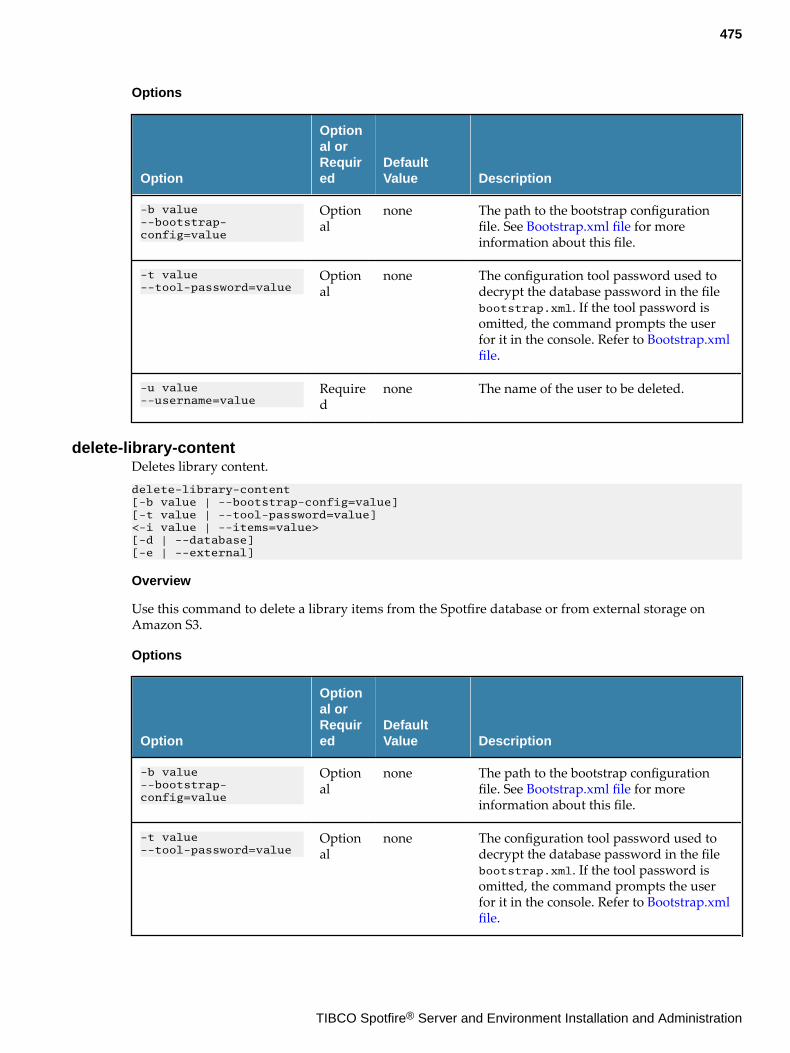
Options
Option
Optional orRequired
DefaultValue Description
-b value--bootstrap-config=value
Optional
none The path to the bootstrap configurationfile. See Bootstrap.xml file for moreinformation about this file.
-t value--tool-password=value
Optional
none The configuration tool password used todecrypt the database password in the filebootstrap.xml. If the tool password isomitted, the command prompts the userfor it in the console. Refer to Bootstrap.xmlfile.
-u value--username=value
Required
none The name of the user to be deleted.
delete-library-contentDeletes library content.delete-library-content[-b value | --bootstrap-config=value] [-t value | --tool-password=value] <-i value | --items=value> [-d | --database] [-e | --external]
Overview
Use this command to delete a library items from the Spotfire database or from external storage onAmazon S3.
Options
Option
Optional orRequired
DefaultValue Description
-b value--bootstrap-config=value
Optional
none The path to the bootstrap configurationfile. See Bootstrap.xml file for moreinformation about this file.
-t value--tool-password=value
Optional
none The configuration tool password used todecrypt the database password in the filebootstrap.xml. If the tool password isomitted, the command prompts the userfor it in the console. Refer to Bootstrap.xmlfile.
475
TIBCO Spotfire® Server and Environment Installation and Administration
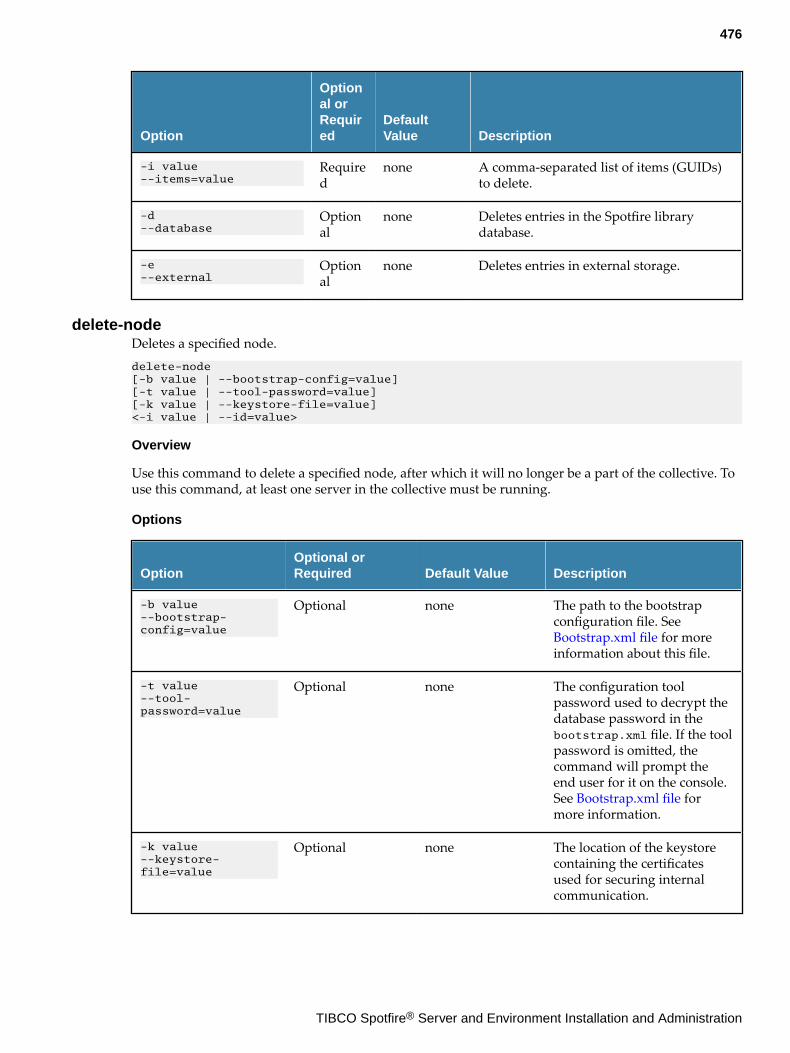
Option
Optional orRequired
DefaultValue Description
-i value--items=value
Required
none A comma-separated list of items (GUIDs)to delete.
-d--database
Optional
none Deletes entries in the Spotfire librarydatabase.
-e--external
Optional
none Deletes entries in external storage.
delete-nodeDeletes a specified node.delete-node [-b value | --bootstrap-config=value] [-t value | --tool-password=value] [-k value | --keystore-file=value] <-i value | --id=value>
Overview
Use this command to delete a specified node, after which it will no longer be a part of the collective. Touse this command, at least one server in the collective must be running.
Options
OptionOptional orRequired Default Value Description
-b value--bootstrap-config=value
Optional none The path to the bootstrapconfiguration file. See Bootstrap.xml file for moreinformation about this file.
-t value--tool-password=value
Optional none The configuration toolpassword used to decrypt thedatabase password in thebootstrap.xml file. If the toolpassword is omitted, thecommand will prompt theend user for it on the console.See Bootstrap.xml file formore information.
-k value--keystore-file=value
Optional none The location of the keystorecontaining the certificatesused for securing internalcommunication.
476
TIBCO Spotfire® Server and Environment Installation and Administration
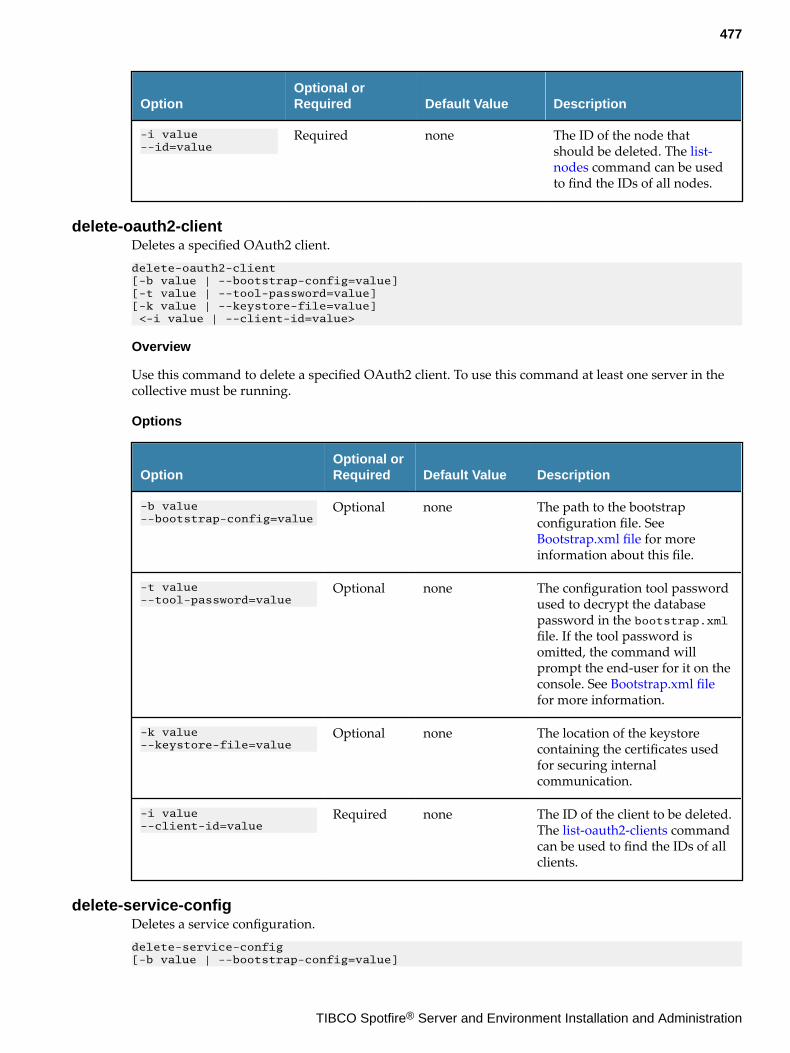
OptionOptional orRequired Default Value Description
-i value--id=value
Required none The ID of the node thatshould be deleted. The list-nodes command can be usedto find the IDs of all nodes.
delete-oauth2-clientDeletes a specified OAuth2 client.delete-oauth2-client [-b value | --bootstrap-config=value][-t value | --tool-password=value][-k value | --keystore-file=value] <-i value | --client-id=value>
Overview
Use this command to delete a specified OAuth2 client. To use this command at least one server in thecollective must be running.
Options
OptionOptional orRequired Default Value Description
-b value--bootstrap-config=value
Optional none The path to the bootstrapconfiguration file. See Bootstrap.xml file for moreinformation about this file.
-t value--tool-password=value
Optional none The configuration tool passwordused to decrypt the databasepassword in the bootstrap.xmlfile. If the tool password isomitted, the command willprompt the end-user for it on theconsole. See Bootstrap.xml filefor more information.
-k value--keystore-file=value
Optional none The location of the keystorecontaining the certificates usedfor securing internalcommunication.
-i value--client-id=value
Required none The ID of the client to be deleted.The list-oauth2-clients commandcan be used to find the IDs of allclients.
delete-service-configDeletes a service configuration.delete-service-config [-b value | --bootstrap-config=value]
477
TIBCO Spotfire® Server and Environment Installation and Administration
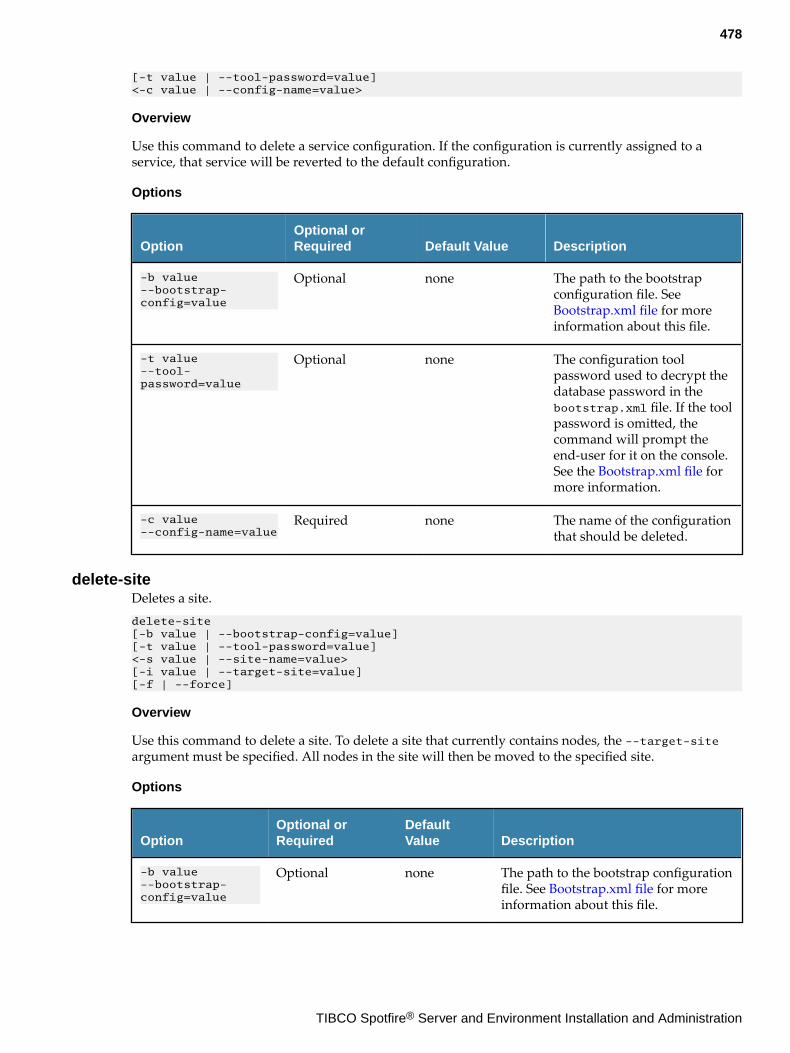
[-t value | --tool-password=value] <-c value | --config-name=value>
Overview
Use this command to delete a service configuration. If the configuration is currently assigned to aservice, that service will be reverted to the default configuration.
Options
OptionOptional orRequired Default Value Description
-b value--bootstrap-config=value
Optional none The path to the bootstrapconfiguration file. See Bootstrap.xml file for moreinformation about this file.
-t value--tool-password=value
Optional none The configuration toolpassword used to decrypt thedatabase password in thebootstrap.xml file. If the toolpassword is omitted, thecommand will prompt theend-user for it on the console.See the Bootstrap.xml file formore information.
-c value--config-name=value
Required none The name of the configurationthat should be deleted.
delete-siteDeletes a site.delete-site [-b value | --bootstrap-config=value] [-t value | --tool-password=value] <-s value | --site-name=value>[-i value | --target-site=value][-f | --force]
Overview
Use this command to delete a site. To delete a site that currently contains nodes, the --target-siteargument must be specified. All nodes in the site will then be moved to the specified site.
Options
OptionOptional orRequired
DefaultValue Description
-b value--bootstrap-config=value
Optional none The path to the bootstrap configurationfile. See Bootstrap.xml file for moreinformation about this file.
478
TIBCO Spotfire® Server and Environment Installation and Administration
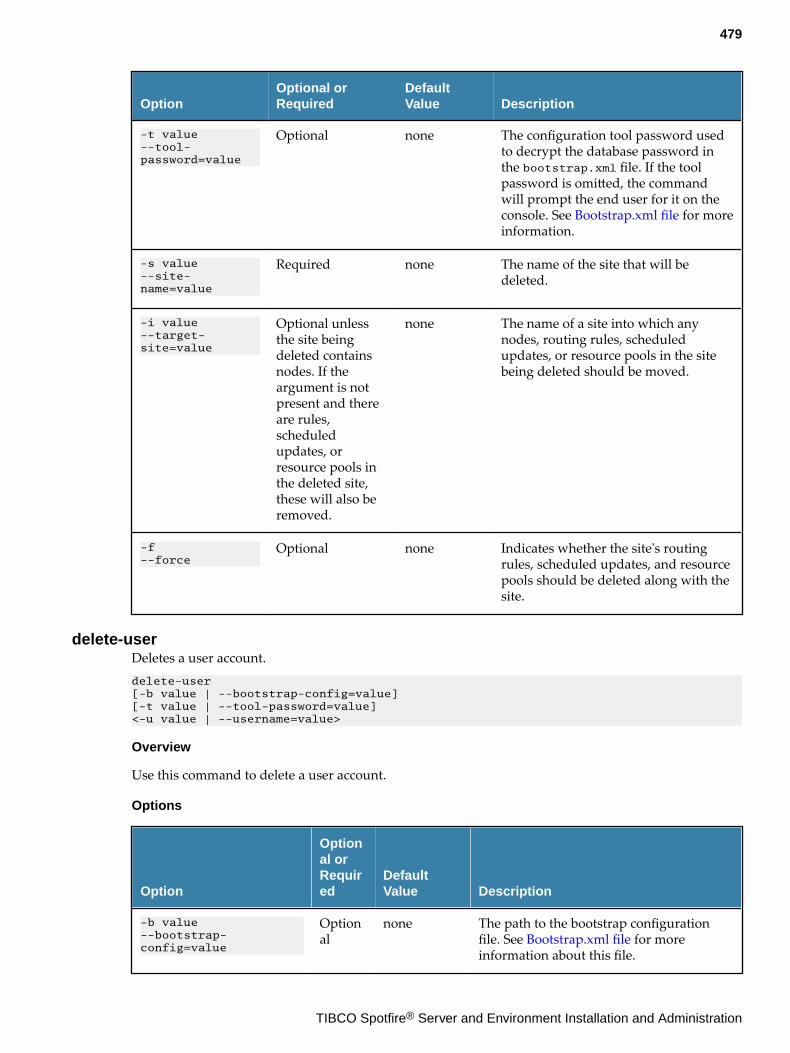
OptionOptional orRequired
DefaultValue Description
-t value--tool-password=value
Optional none The configuration tool password usedto decrypt the database password inthe bootstrap.xml file. If the toolpassword is omitted, the commandwill prompt the end user for it on theconsole. See Bootstrap.xml file for moreinformation.
-s value--site-name=value
Required none The name of the site that will bedeleted.
-i value--target-site=value
Optional unlessthe site beingdeleted containsnodes. If theargument is notpresent and thereare rules,scheduledupdates, orresource pools inthe deleted site,these will also beremoved.
none The name of a site into which anynodes, routing rules, scheduledupdates, or resource pools in the sitebeing deleted should be moved.
-f--force
Optional none Indicates whether the site's routingrules, scheduled updates, and resourcepools should be deleted along with thesite.
delete-userDeletes a user account.delete-user [-b value | --bootstrap-config=value] [-t value | --tool-password=value] <-u value | --username=value>
Overview
Use this command to delete a user account.
Options
Option
Optional orRequired
DefaultValue Description
-b value--bootstrap-config=value
Optional
none The path to the bootstrap configurationfile. See Bootstrap.xml file for moreinformation about this file.
479
TIBCO Spotfire® Server and Environment Installation and Administration
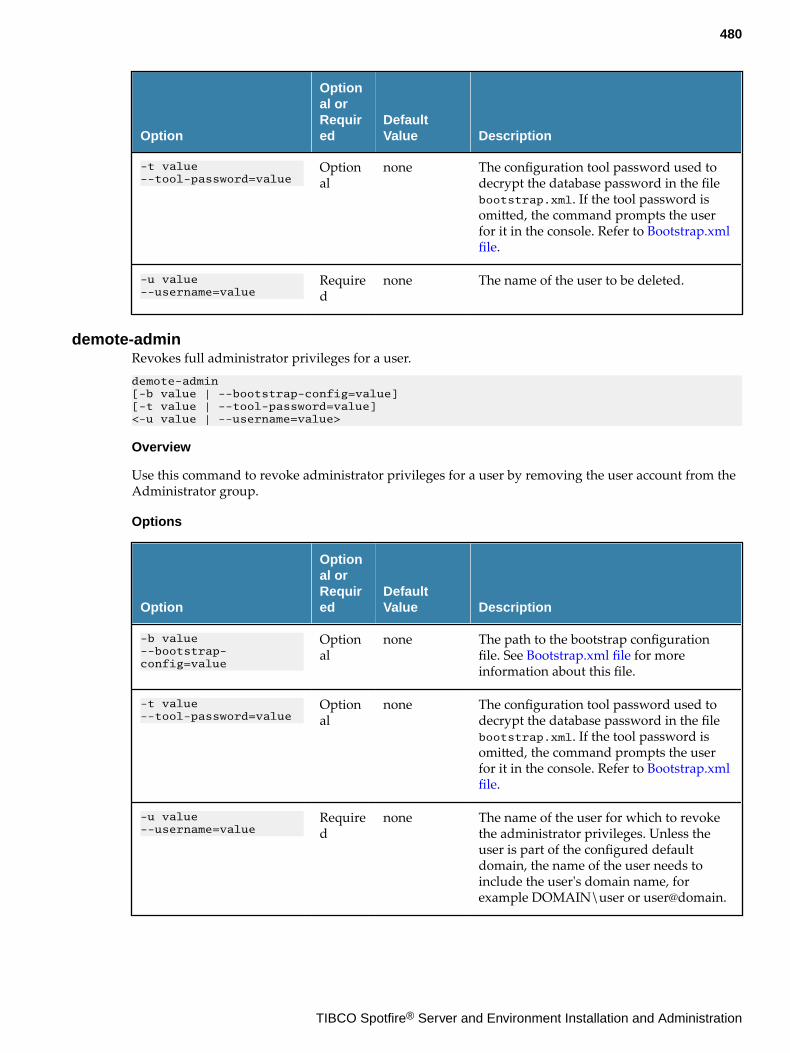
Option
Optional orRequired
DefaultValue Description
-t value--tool-password=value
Optional
none The configuration tool password used todecrypt the database password in the filebootstrap.xml. If the tool password isomitted, the command prompts the userfor it in the console. Refer to Bootstrap.xmlfile.
-u value--username=value
Required
none The name of the user to be deleted.
demote-adminRevokes full administrator privileges for a user.demote-admin [-b value | --bootstrap-config=value] [-t value | --tool-password=value] <-u value | --username=value>
Overview
Use this command to revoke administrator privileges for a user by removing the user account from theAdministrator group.
Options
Option
Optional orRequired
DefaultValue Description
-b value--bootstrap-config=value
Optional
none The path to the bootstrap configurationfile. See Bootstrap.xml file for moreinformation about this file.
-t value--tool-password=value
Optional
none The configuration tool password used todecrypt the database password in the filebootstrap.xml. If the tool password isomitted, the command prompts the userfor it in the console. Refer to Bootstrap.xmlfile.
-u value--username=value
Required
none The name of the user for which to revokethe administrator privileges. Unless theuser is part of the configured defaultdomain, the name of the user needs toinclude the user's domain name, forexample DOMAIN\user or user@domain.
480
TIBCO Spotfire® Server and Environment Installation and Administration
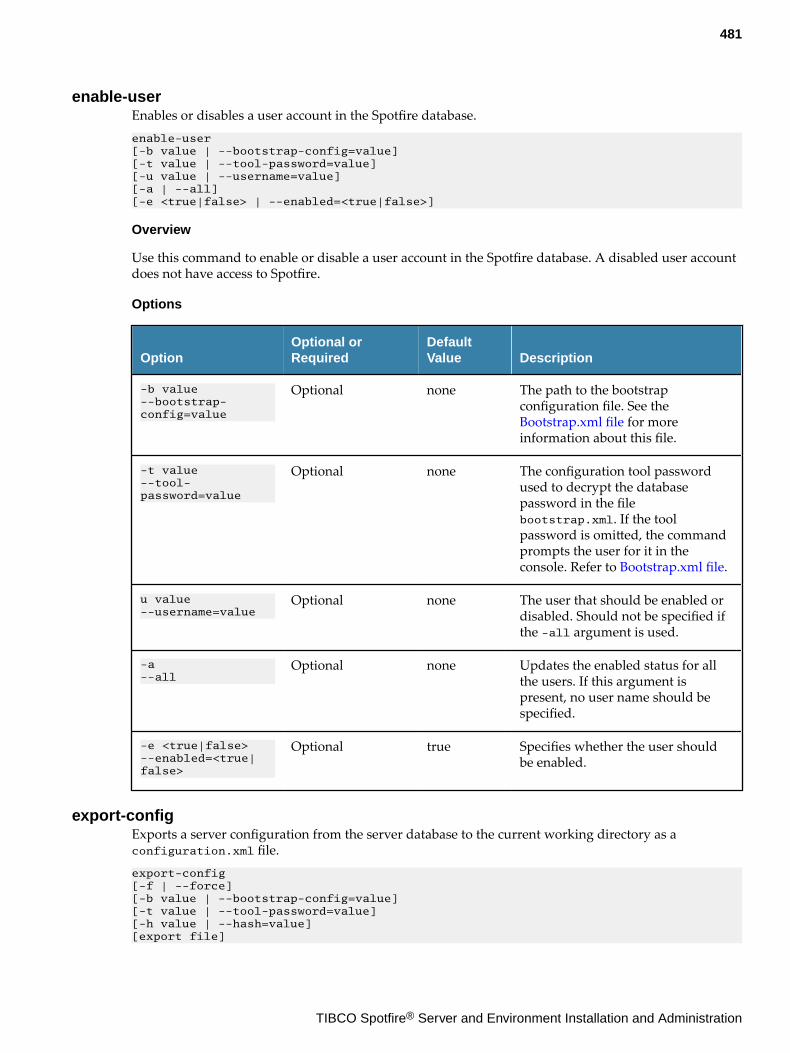
enable-userEnables or disables a user account in the Spotfire database.enable-user [-b value | --bootstrap-config=value] [-t value | --tool-password=value] [-u value | --username=value] [-a | --all] [-e <true|false> | --enabled=<true|false>]
Overview
Use this command to enable or disable a user account in the Spotfire database. A disabled user accountdoes not have access to Spotfire.
Options
OptionOptional orRequired
DefaultValue Description
-b value--bootstrap-config=value
Optional none The path to the bootstrapconfiguration file. See the Bootstrap.xml file for moreinformation about this file.
-t value--tool-password=value
Optional none The configuration tool passwordused to decrypt the databasepassword in the filebootstrap.xml. If the toolpassword is omitted, the commandprompts the user for it in theconsole. Refer to Bootstrap.xml file.
u value--username=value
Optional none The user that should be enabled ordisabled. Should not be specified ifthe -all argument is used.
-a--all
Optional none Updates the enabled status for allthe users. If this argument ispresent, no user name should bespecified.
-e <true|false>--enabled=<true|false>
Optional true Specifies whether the user shouldbe enabled.
export-configExports a server configuration from the server database to the current working directory as aconfiguration.xml file.export-config [-f | --force] [-b value | --bootstrap-config=value] [-t value | --tool-password=value] [-h value | --hash=value] [export file]
481
TIBCO Spotfire® Server and Environment Installation and Administration
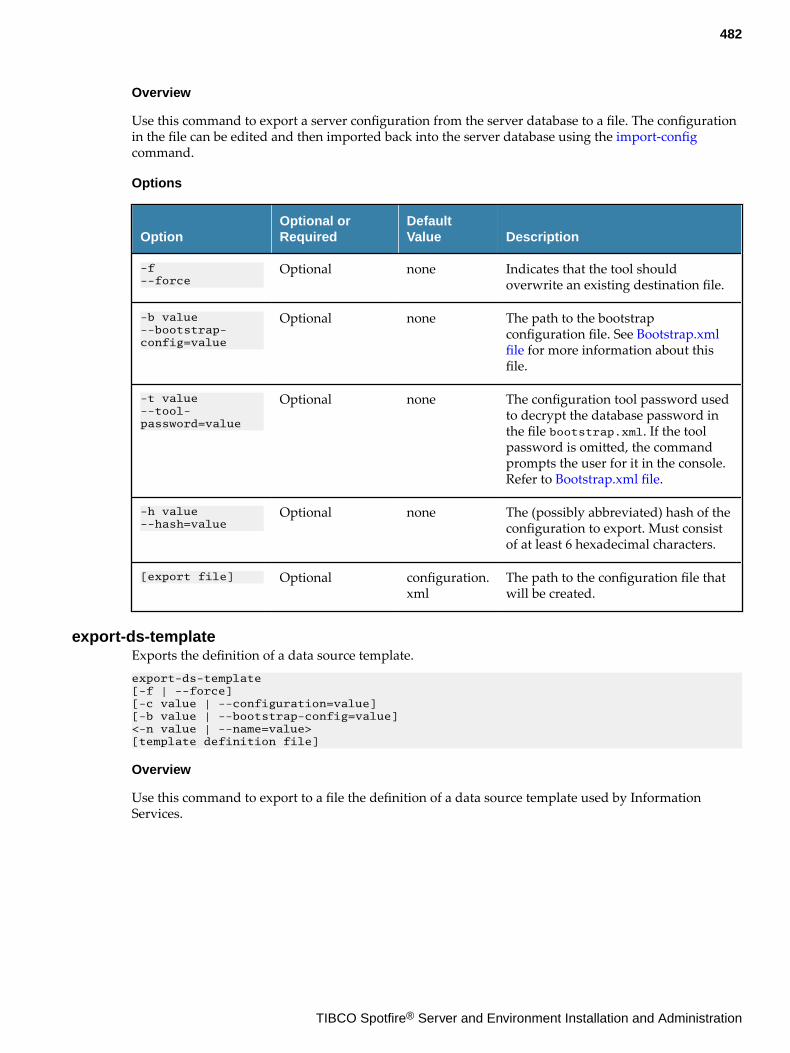
Overview
Use this command to export a server configuration from the server database to a file. The configurationin the file can be edited and then imported back into the server database using the import-configcommand.
Options
OptionOptional orRequired
DefaultValue Description
-f--force
Optional none Indicates that the tool shouldoverwrite an existing destination file.
-b value--bootstrap-config=value
Optional none The path to the bootstrapconfiguration file. See Bootstrap.xmlfile for more information about thisfile.
-t value--tool-password=value
Optional none The configuration tool password usedto decrypt the database password inthe file bootstrap.xml. If the toolpassword is omitted, the commandprompts the user for it in the console.Refer to Bootstrap.xml file.
-h value--hash=value
Optional none The (possibly abbreviated) hash of theconfiguration to export. Must consistof at least 6 hexadecimal characters.
[export file] Optional configuration.xml
The path to the configuration file thatwill be created.
export-ds-templateExports the definition of a data source template.export-ds-template [-f | --force] [-c value | --configuration=value] [-b value | --bootstrap-config=value] <-n value | --name=value> [template definition file]
Overview
Use this command to export to a file the definition of a data source template used by InformationServices.
482
TIBCO Spotfire® Server and Environment Installation and Administration
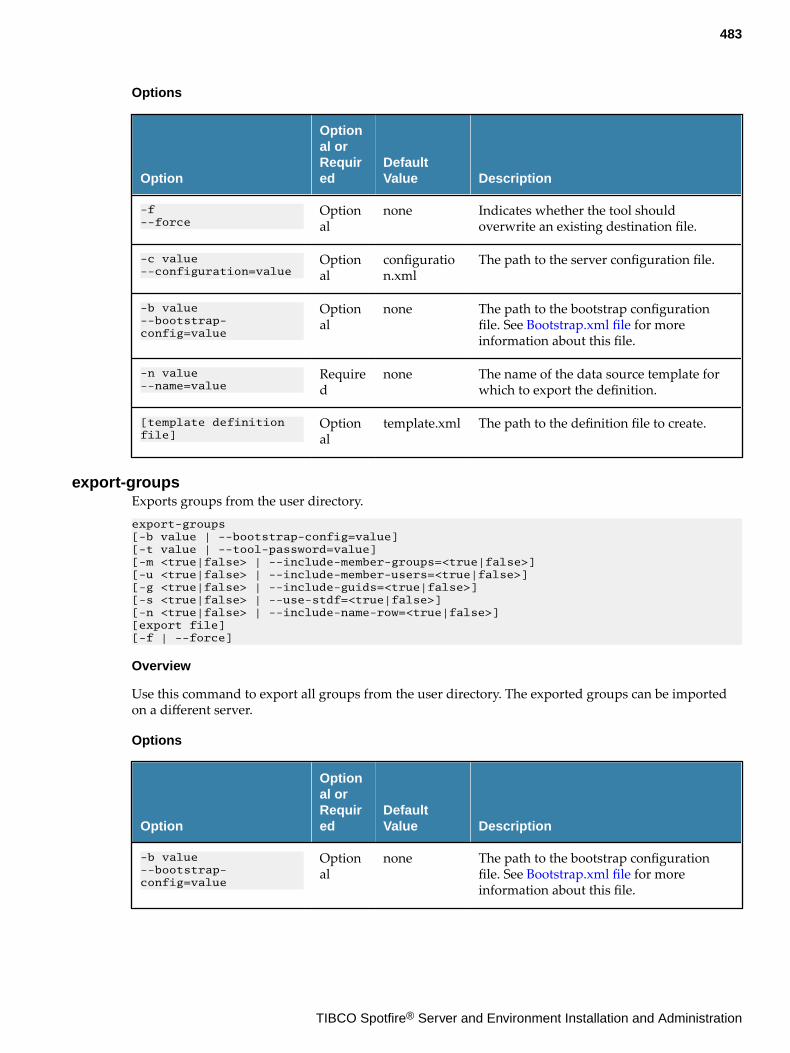
Options
Option
Optional orRequired
DefaultValue Description
-f--force
Optional
none Indicates whether the tool shouldoverwrite an existing destination file.
-c value--configuration=value
Optional
configuration.xml
The path to the server configuration file.
-b value--bootstrap-config=value
Optional
none The path to the bootstrap configurationfile. See Bootstrap.xml file for moreinformation about this file.
-n value--name=value
Required
none The name of the data source template forwhich to export the definition.
[template definition file]
Optional
template.xml The path to the definition file to create.
export-groupsExports groups from the user directory.export-groups [-b value | --bootstrap-config=value] [-t value | --tool-password=value] [-m <true|false> | --include-member-groups=<true|false>] [-u <true|false> | --include-member-users=<true|false>] [-g <true|false> | --include-guids=<true|false>] [-s <true|false> | --use-stdf=<true|false>] [-n <true|false> | --include-name-row=<true|false>] [export file] [-f | --force]
Overview
Use this command to export all groups from the user directory. The exported groups can be importedon a different server.
Options
Option
Optional orRequired
DefaultValue Description
-b value--bootstrap-config=value
Optional
none The path to the bootstrap configurationfile. See Bootstrap.xml file for moreinformation about this file.
483
TIBCO Spotfire® Server and Environment Installation and Administration
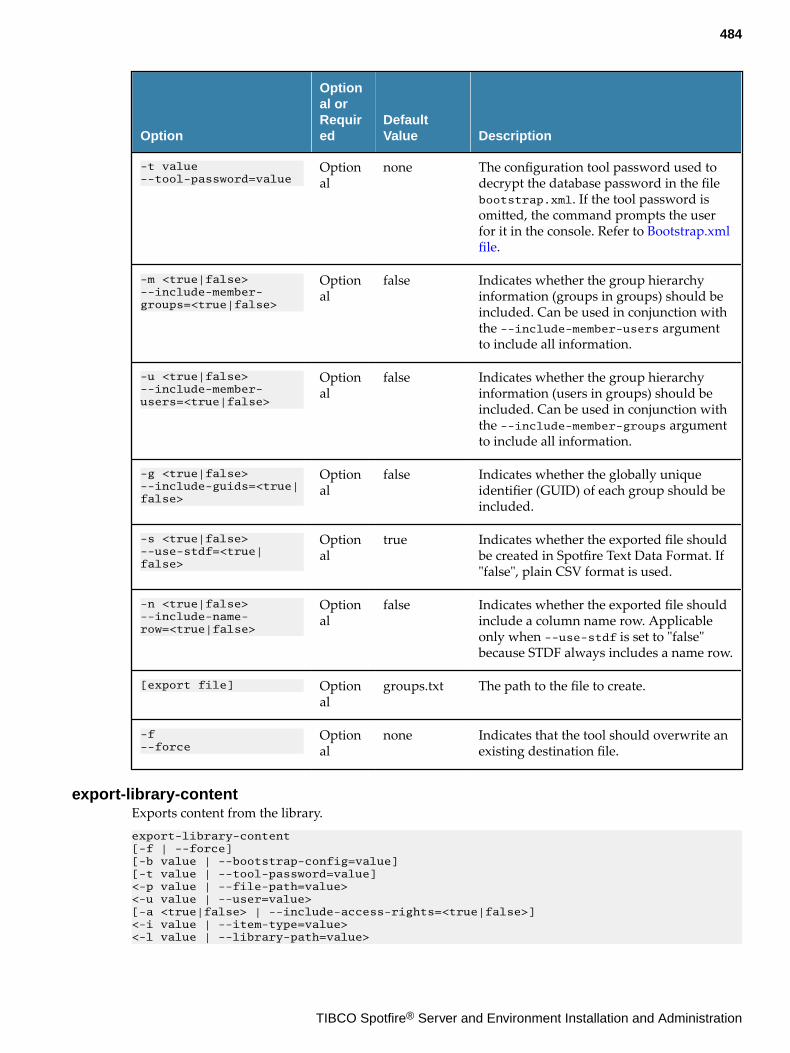
Option
Optional orRequired
DefaultValue Description
-t value--tool-password=value
Optional
none The configuration tool password used todecrypt the database password in the filebootstrap.xml. If the tool password isomitted, the command prompts the userfor it in the console. Refer to Bootstrap.xmlfile.
-m <true|false>--include-member-groups=<true|false>
Optional
false Indicates whether the group hierarchyinformation (groups in groups) should beincluded. Can be used in conjunction withthe --include-member-users argumentto include all information.
-u <true|false>--include-member-users=<true|false>
Optional
false Indicates whether the group hierarchyinformation (users in groups) should beincluded. Can be used in conjunction withthe --include-member-groups argumentto include all information.
-g <true|false>--include-guids=<true|false>
Optional
false Indicates whether the globally uniqueidentifier (GUID) of each group should beincluded.
-s <true|false>--use-stdf=<true|false>
Optional
true Indicates whether the exported file shouldbe created in Spotfire Text Data Format. If"false", plain CSV format is used.
-n <true|false>--include-name-row=<true|false>
Optional
false Indicates whether the exported file shouldinclude a column name row. Applicableonly when --use-stdf is set to "false"because STDF always includes a name row.
[export file] Optional
groups.txt The path to the file to create.
-f--force
Optional
none Indicates that the tool should overwrite anexisting destination file.
export-library-contentExports content from the library.export-library-content [-f | --force] [-b value | --bootstrap-config=value] [-t value | --tool-password=value] <-p value | --file-path=value><-u value | --user=value> [-a <true|false> | --include-access-rights=<true|false>] <-i value | --item-type=value> <-l value | --library-path=value>
484
TIBCO Spotfire® Server and Environment Installation and Administration
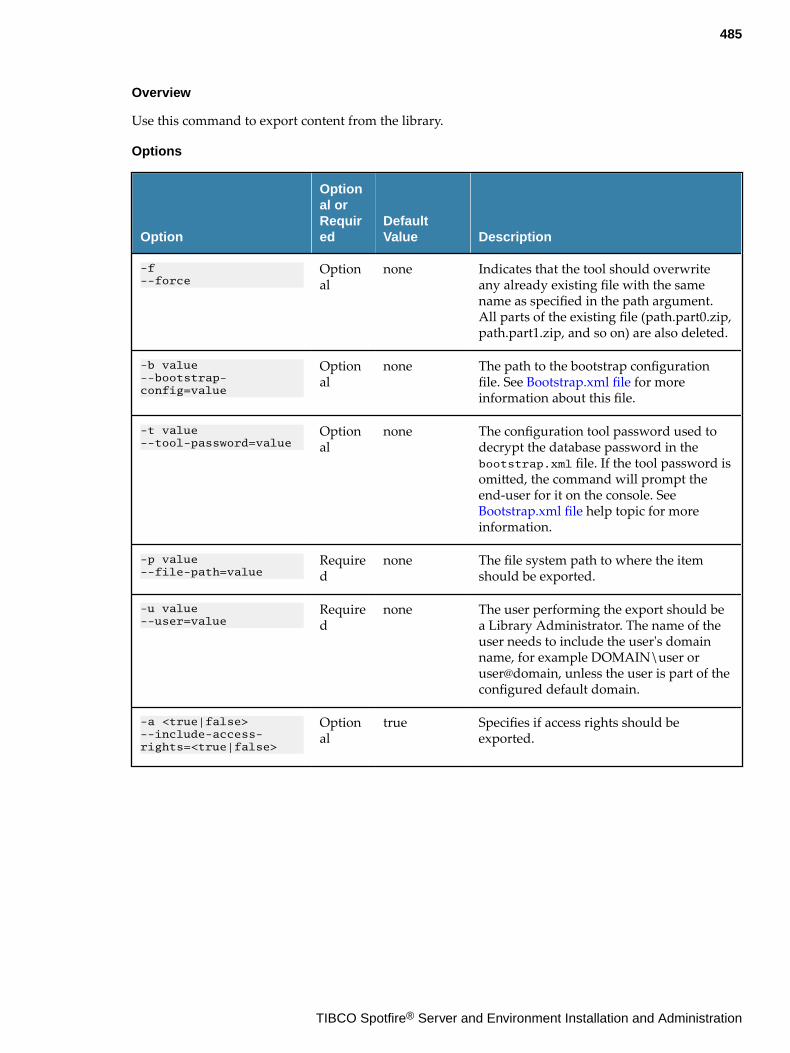
Overview
Use this command to export content from the library.
Options
Option
Optional orRequired
DefaultValue Description
-f--force
Optional
none Indicates that the tool should overwriteany already existing file with the samename as specified in the path argument.All parts of the existing file (path.part0.zip,path.part1.zip, and so on) are also deleted.
-b value--bootstrap-config=value
Optional
none The path to the bootstrap configurationfile. See Bootstrap.xml file for moreinformation about this file.
-t value--tool-password=value
Optional
none The configuration tool password used todecrypt the database password in thebootstrap.xml file. If the tool password isomitted, the command will prompt theend-user for it on the console. See Bootstrap.xml file help topic for moreinformation.
-p value--file-path=value
Required
none The file system path to where the itemshould be exported.
-u value--user=value
Required
none The user performing the export should bea Library Administrator. The name of theuser needs to include the user's domainname, for example DOMAIN\user oruser@domain, unless the user is part of theconfigured default domain.
-a <true|false>--include-access-rights=<true|false>
Optional
true Specifies if access rights should beexported.
485
TIBCO Spotfire® Server and Environment Installation and Administration
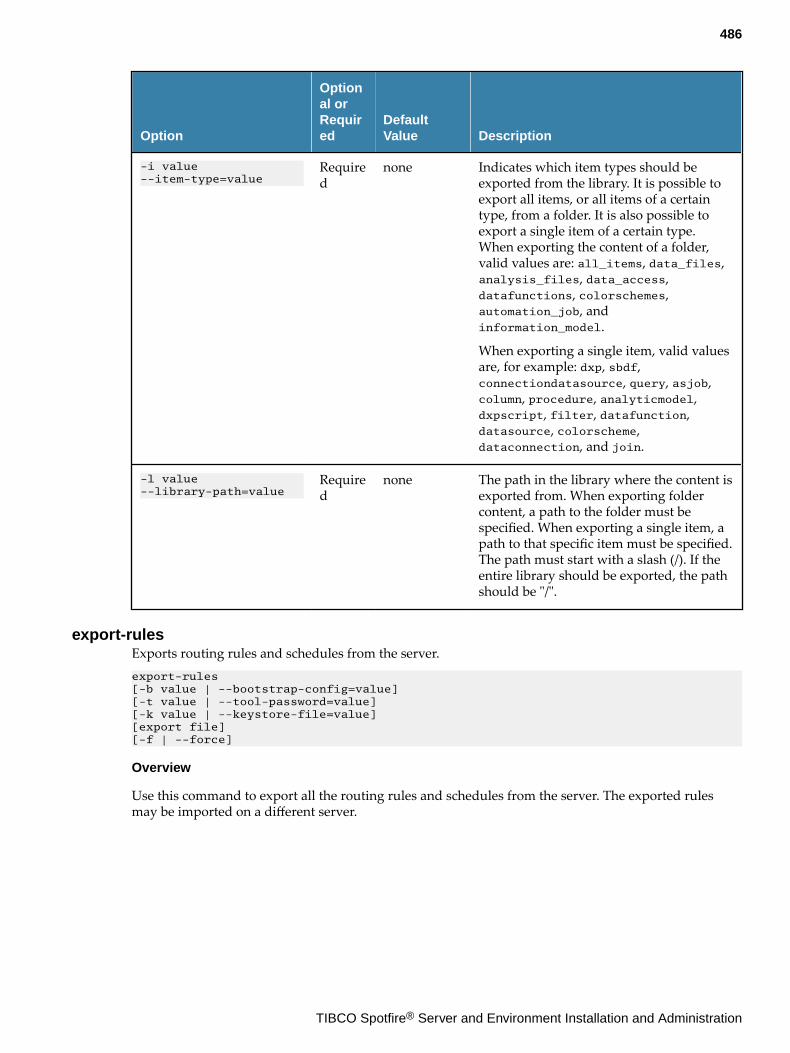
Option
Optional orRequired
DefaultValue Description
-i value--item-type=value
Required
none Indicates which item types should beexported from the library. It is possible toexport all items, or all items of a certaintype, from a folder. It is also possible toexport a single item of a certain type.When exporting the content of a folder,valid values are: all_items, data_files,analysis_files, data_access,datafunctions, colorschemes,automation_job, andinformation_model.
When exporting a single item, valid valuesare, for example: dxp, sbdf,connectiondatasource, query, asjob,column, procedure, analyticmodel,dxpscript, filter, datafunction,datasource, colorscheme,dataconnection, and join.
-l value--library-path=value
Required
none The path in the library where the content isexported from. When exporting foldercontent, a path to the folder must bespecified. When exporting a single item, apath to that specific item must be specified.The path must start with a slash (/). If theentire library should be exported, the pathshould be "/".
export-rulesExports routing rules and schedules from the server.export-rules [-b value | --bootstrap-config=value] [-t value | --tool-password=value] [-k value | --keystore-file=value] [export file] [-f | --force]
Overview
Use this command to export all the routing rules and schedules from the server. The exported rulesmay be imported on a different server.
486
TIBCO Spotfire® Server and Environment Installation and Administration

Options
Option
Optional orRequired
DefaultValue Description
-b value--bootstrap-config=value
Optional
none The path to the bootstrap configurationfile. See Bootstrap.xml file for moreinformation about this file.
-t value--tool-password=value
Optional
none The configuration tool password used todecrypt the database password in thebootstrap.xml file. If the tool password isomitted, the command will prompt theend-user for it on the console. See Bootstrap.xml file help topic for moreinformation.
-k value--keystore-file=value
Optional
none The location of the keystore containing thecertificates used for securing internalcommunication.
[export-file] Optional
rules.json The path to the file to create.
-f--force
Optional
none The force flag indicates whether the tooloverwrites an existing destination file.
export-service-configExports a service configuration.export-service-config [-b value | --bootstrap-config=value] [-t value | --tool-password=value] [-c value | --config-name=value] [-a value | --capability=value] [-d value | --deployment-area=value] [-f | --force] [destination directory]
Overview
Use this command to export a service configuration for editing. The edited configuration can beimported using the import-service-config command. Either specify a configuration name or, to export adefault configuration, a capability, and a deployment area.
Options
OptionOptional orRequired Default Value Description
-b value--bootstrap-config=value
Optional none The path to the bootstrapconfiguration file. See Bootstrap.xml file for moreinformation about this file.
487
TIBCO Spotfire® Server and Environment Installation and Administration
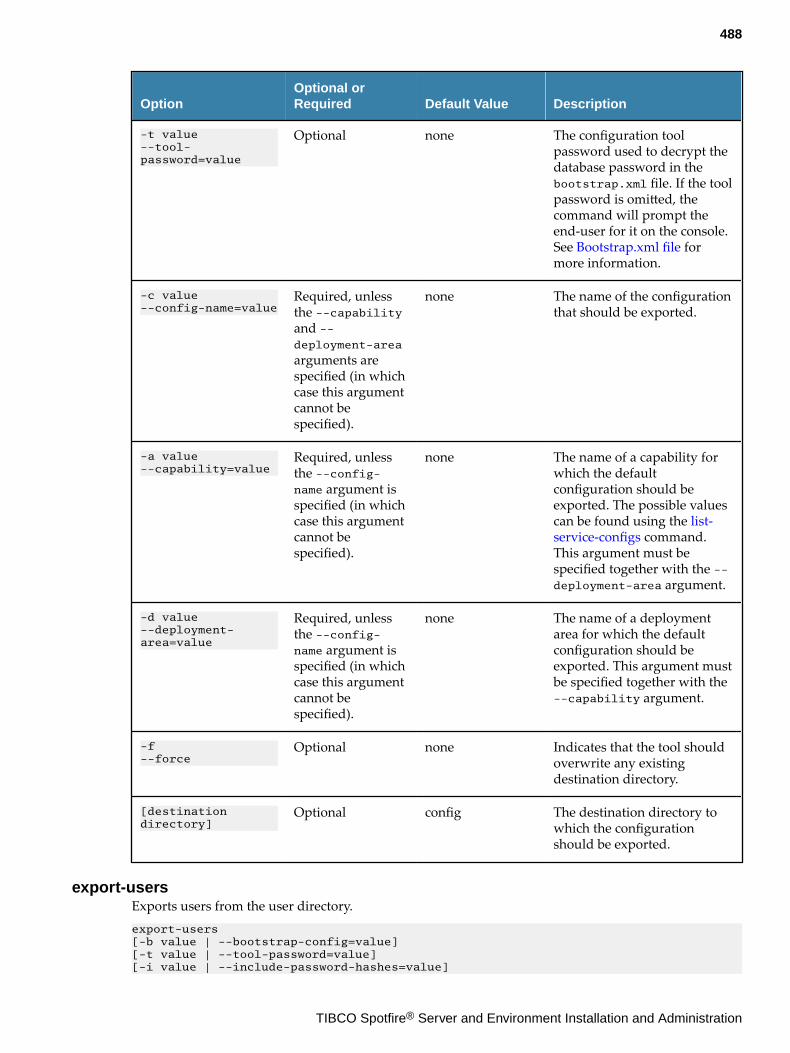
OptionOptional orRequired Default Value Description
-t value--tool-password=value
Optional none The configuration toolpassword used to decrypt thedatabase password in thebootstrap.xml file. If the toolpassword is omitted, thecommand will prompt theend-user for it on the console.See Bootstrap.xml file formore information.
-c value--config-name=value
Required, unlessthe --capabilityand --deployment-area
arguments arespecified (in whichcase this argumentcannot bespecified).
none The name of the configurationthat should be exported.
-a value--capability=value
Required, unlessthe --config-name argument isspecified (in whichcase this argumentcannot bespecified).
none The name of a capability forwhich the defaultconfiguration should beexported. The possible valuescan be found using the list-service-configs command.This argument must bespecified together with the --deployment-area argument.
-d value--deployment-area=value
Required, unlessthe --config-name argument isspecified (in whichcase this argumentcannot bespecified).
none The name of a deploymentarea for which the defaultconfiguration should beexported. This argument mustbe specified together with the--capability argument.
-f--force
Optional none Indicates that the tool shouldoverwrite any existingdestination directory.
[destination directory]
Optional config The destination directory towhich the configurationshould be exported.
export-usersExports users from the user directory.export-users [-b value | --bootstrap-config=value] [-t value | --tool-password=value] [-i value | --include-password-hashes=value]
488
TIBCO Spotfire® Server and Environment Installation and Administration
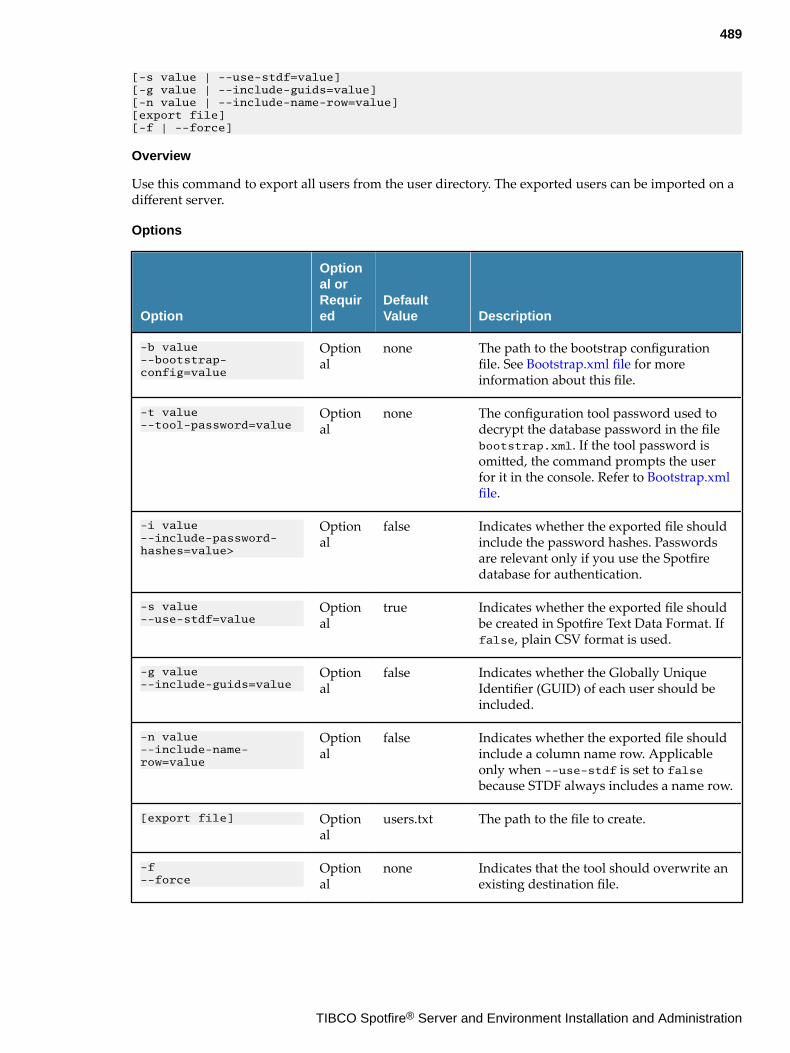
[-s value | --use-stdf=value] [-g value | --include-guids=value] [-n value | --include-name-row=value] [export file] [-f | --force]
Overview
Use this command to export all users from the user directory. The exported users can be imported on adifferent server.
Options
Option
Optional orRequired
DefaultValue Description
-b value--bootstrap-config=value
Optional
none The path to the bootstrap configurationfile. See Bootstrap.xml file for moreinformation about this file.
-t value--tool-password=value
Optional
none The configuration tool password used todecrypt the database password in the filebootstrap.xml. If the tool password isomitted, the command prompts the userfor it in the console. Refer to Bootstrap.xmlfile.
-i value--include-password-hashes=value>
Optional
false Indicates whether the exported file shouldinclude the password hashes. Passwordsare relevant only if you use the Spotfiredatabase for authentication.
-s value--use-stdf=value
Optional
true Indicates whether the exported file shouldbe created in Spotfire Text Data Format. Iffalse, plain CSV format is used.
-g value--include-guids=value
Optional
false Indicates whether the Globally UniqueIdentifier (GUID) of each user should beincluded.
-n value--include-name-row=value
Optional
false Indicates whether the exported file shouldinclude a column name row. Applicableonly when --use-stdf is set to falsebecause STDF always includes a name row.
[export file] Optional
users.txt The path to the file to create.
-f--force
Optional
none Indicates that the tool should overwrite anexisting destination file.
489
TIBCO Spotfire® Server and Environment Installation and Administration
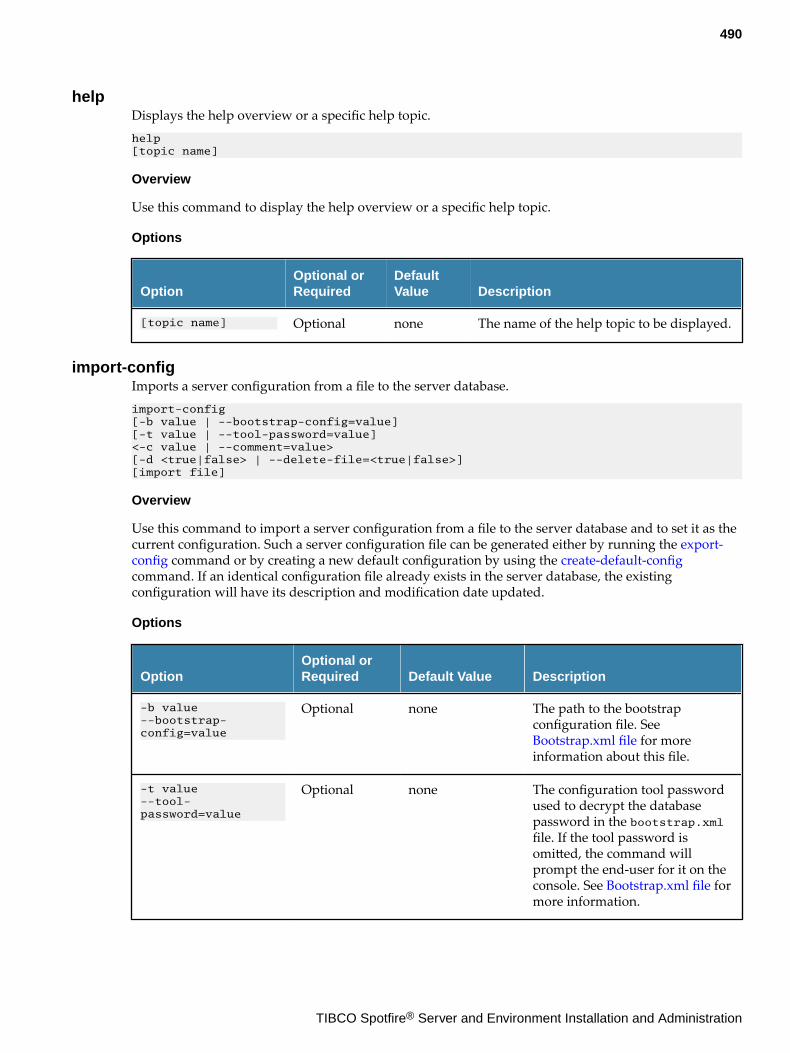
helpDisplays the help overview or a specific help topic.help [topic name]
Overview
Use this command to display the help overview or a specific help topic.
Options
OptionOptional orRequired
DefaultValue Description
[topic name] Optional none The name of the help topic to be displayed.
import-configImports a server configuration from a file to the server database.import-config [-b value | --bootstrap-config=value] [-t value | --tool-password=value] <-c value | --comment=value> [-d <true|false> | --delete-file=<true|false>] [import file]
Overview
Use this command to import a server configuration from a file to the server database and to set it as thecurrent configuration. Such a server configuration file can be generated either by running the export-config command or by creating a new default configuration by using the create-default-configcommand. If an identical configuration file already exists in the server database, the existingconfiguration will have its description and modification date updated.
Options
OptionOptional orRequired Default Value Description
-b value--bootstrap-config=value
Optional none The path to the bootstrapconfiguration file. See Bootstrap.xml file for moreinformation about this file.
-t value--tool-password=value
Optional none The configuration tool passwordused to decrypt the databasepassword in the bootstrap.xmlfile. If the tool password isomitted, the command willprompt the end-user for it on theconsole. See Bootstrap.xml file formore information.
490
TIBCO Spotfire® Server and Environment Installation and Administration
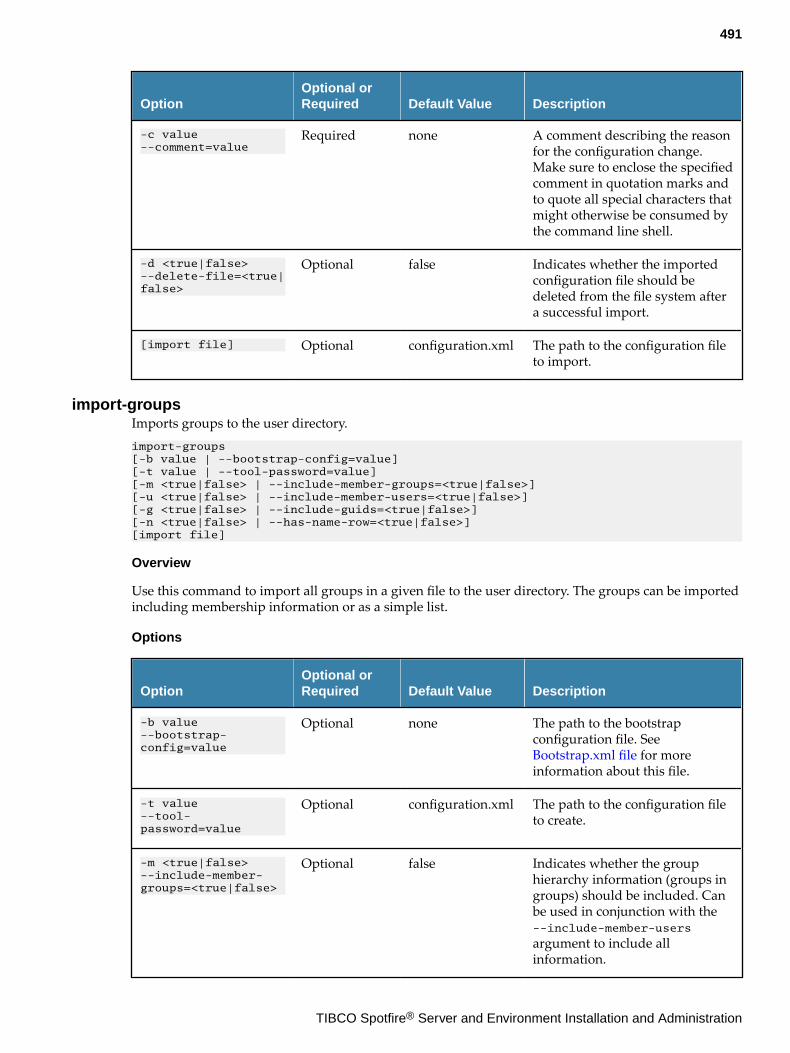
OptionOptional orRequired Default Value Description
-c value--comment=value
Required none A comment describing the reasonfor the configuration change.Make sure to enclose the specifiedcomment in quotation marks andto quote all special characters thatmight otherwise be consumed bythe command line shell.
-d <true|false>--delete-file=<true|false>
Optional false Indicates whether the importedconfiguration file should bedeleted from the file system aftera successful import.
[import file] Optional configuration.xml The path to the configuration fileto import.
import-groupsImports groups to the user directory.import-groups [-b value | --bootstrap-config=value] [-t value | --tool-password=value] [-m <true|false> | --include-member-groups=<true|false>] [-u <true|false> | --include-member-users=<true|false>] [-g <true|false> | --include-guids=<true|false>] [-n <true|false> | --has-name-row=<true|false>] [import file]
Overview
Use this command to import all groups in a given file to the user directory. The groups can be importedincluding membership information or as a simple list.
Options
OptionOptional orRequired Default Value Description
-b value--bootstrap-config=value
Optional none The path to the bootstrapconfiguration file. See Bootstrap.xml file for moreinformation about this file.
-t value--tool-password=value
Optional configuration.xml The path to the configuration fileto create.
-m <true|false>--include-member-groups=<true|false>
Optional false Indicates whether the grouphierarchy information (groups ingroups) should be included. Canbe used in conjunction with the--include-member-users
argument to include allinformation.
491
TIBCO Spotfire® Server and Environment Installation and Administration
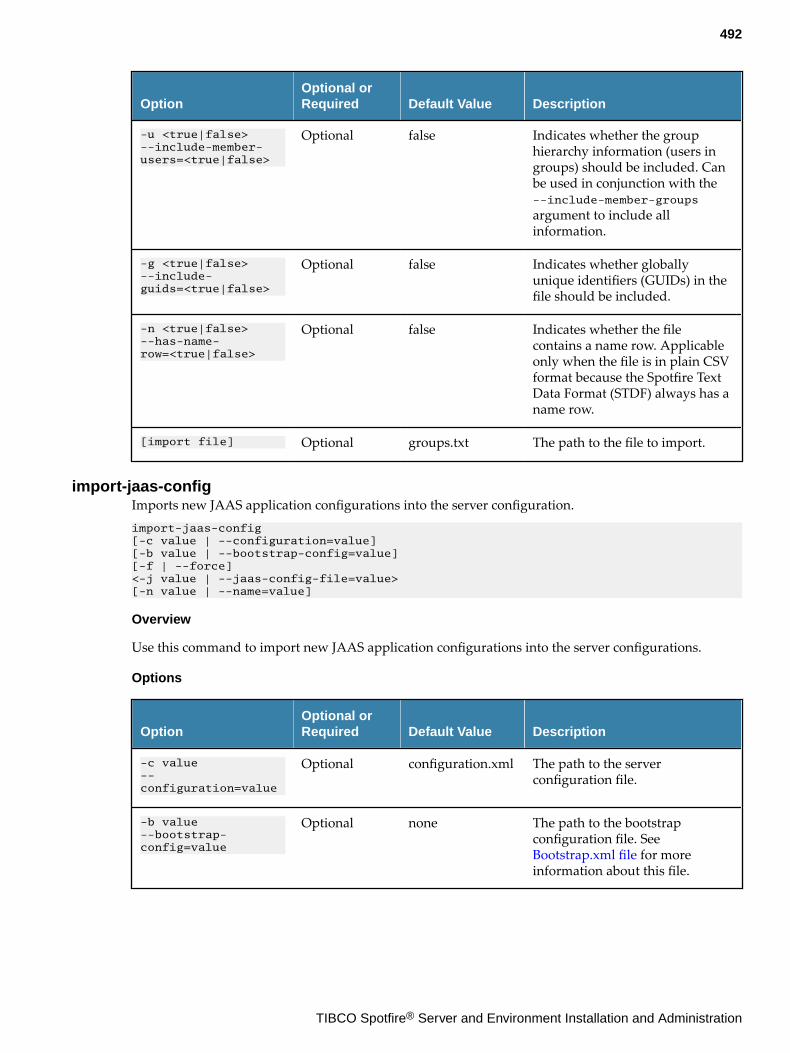
OptionOptional orRequired Default Value Description
-u <true|false>--include-member-users=<true|false>
Optional false Indicates whether the grouphierarchy information (users ingroups) should be included. Canbe used in conjunction with the--include-member-groups
argument to include allinformation.
-g <true|false>--include-guids=<true|false>
Optional false Indicates whether globallyunique identifiers (GUIDs) in thefile should be included.
-n <true|false>--has-name-row=<true|false>
Optional false Indicates whether the filecontains a name row. Applicableonly when the file is in plain CSVformat because the Spotfire TextData Format (STDF) always has aname row.
[import file] Optional groups.txt The path to the file to import.
import-jaas-configImports new JAAS application configurations into the server configuration.import-jaas-config [-c value | --configuration=value] [-b value | --bootstrap-config=value] [-f | --force]<-j value | --jaas-config-file=value> [-n value | --name=value]
Overview
Use this command to import new JAAS application configurations into the server configurations.
Options
OptionOptional orRequired Default Value Description
-c value--configuration=value
Optional configuration.xml The path to the serverconfiguration file.
-b value--bootstrap-config=value
Optional none The path to the bootstrapconfiguration file. See Bootstrap.xml file for moreinformation about this file.
492
TIBCO Spotfire® Server and Environment Installation and Administration
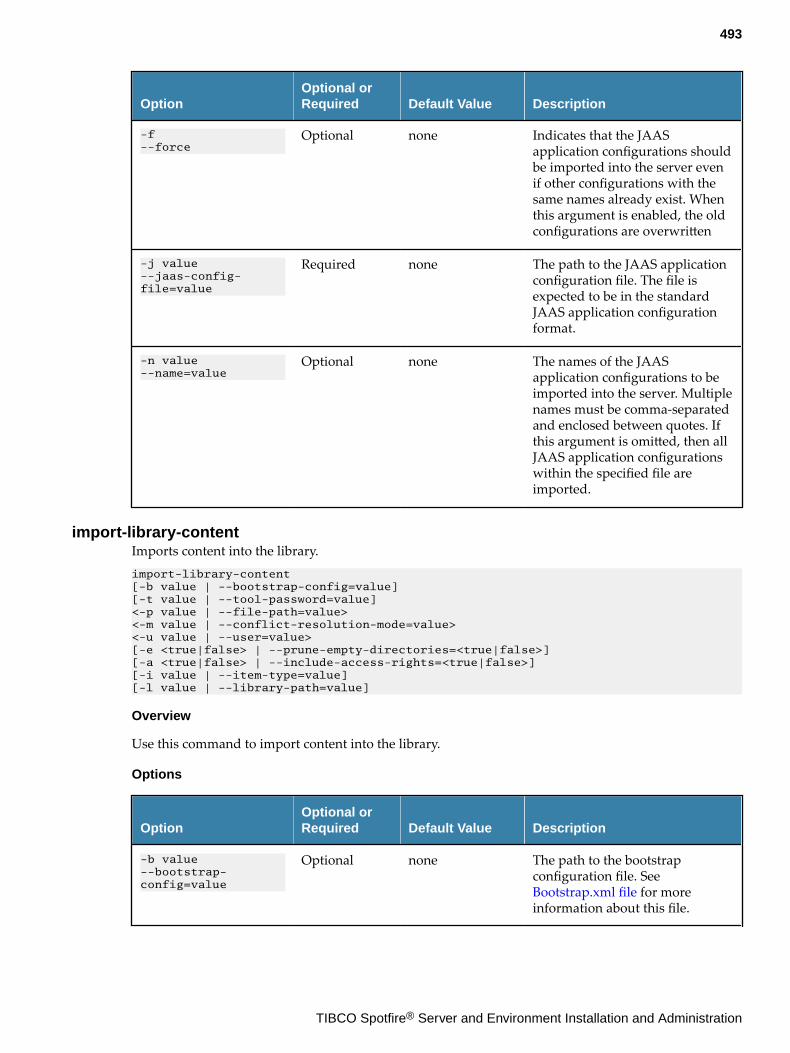
OptionOptional orRequired Default Value Description
-f--force
Optional none Indicates that the JAASapplication configurations shouldbe imported into the server evenif other configurations with thesame names already exist. Whenthis argument is enabled, the oldconfigurations are overwritten
-j value--jaas-config-file=value
Required none The path to the JAAS applicationconfiguration file. The file isexpected to be in the standardJAAS application configurationformat.
-n value--name=value
Optional none The names of the JAASapplication configurations to beimported into the server. Multiplenames must be comma-separatedand enclosed between quotes. Ifthis argument is omitted, then allJAAS application configurationswithin the specified file areimported.
import-library-contentImports content into the library.import-library-content [-b value | --bootstrap-config=value] [-t value | --tool-password=value] <-p value | --file-path=value> <-m value | --conflict-resolution-mode=value> <-u value | --user=value> [-e <true|false> | --prune-empty-directories=<true|false>] [-a <true|false> | --include-access-rights=<true|false>] [-i value | --item-type=value] [-l value | --library-path=value]
Overview
Use this command to import content into the library.
Options
OptionOptional orRequired Default Value Description
-b value--bootstrap-config=value
Optional none The path to the bootstrapconfiguration file. See Bootstrap.xml file for moreinformation about this file.
493
TIBCO Spotfire® Server and Environment Installation and Administration
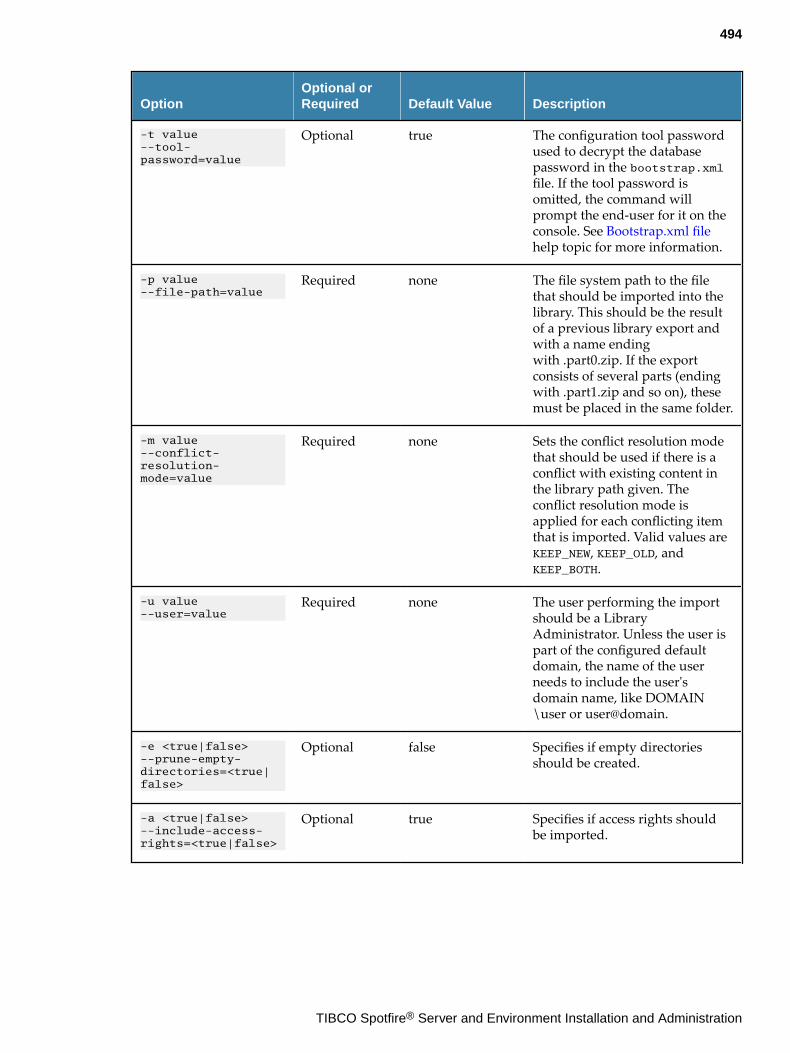
OptionOptional orRequired Default Value Description
-t value--tool-password=value
Optional true The configuration tool passwordused to decrypt the databasepassword in the bootstrap.xmlfile. If the tool password isomitted, the command willprompt the end-user for it on theconsole. See Bootstrap.xml filehelp topic for more information.
-p value--file-path=value
Required none The file system path to the filethat should be imported into thelibrary. This should be the resultof a previous library export andwith a name endingwith .part0.zip. If the exportconsists of several parts (endingwith .part1.zip and so on), thesemust be placed in the same folder.
-m value--conflict-resolution-mode=value
Required none Sets the conflict resolution modethat should be used if there is aconflict with existing content inthe library path given. Theconflict resolution mode isapplied for each conflicting itemthat is imported. Valid values areKEEP_NEW, KEEP_OLD, andKEEP_BOTH.
-u value--user=value
Required none The user performing the importshould be a LibraryAdministrator. Unless the user ispart of the configured defaultdomain, the name of the userneeds to include the user'sdomain name, like DOMAIN\user or user@domain.
-e <true|false>--prune-empty-directories=<true|false>
Optional false Specifies if empty directoriesshould be created.
-a <true|false>--include-access-rights=<true|false>
Optional true Specifies if access rights shouldbe imported.
494
TIBCO Spotfire® Server and Environment Installation and Administration
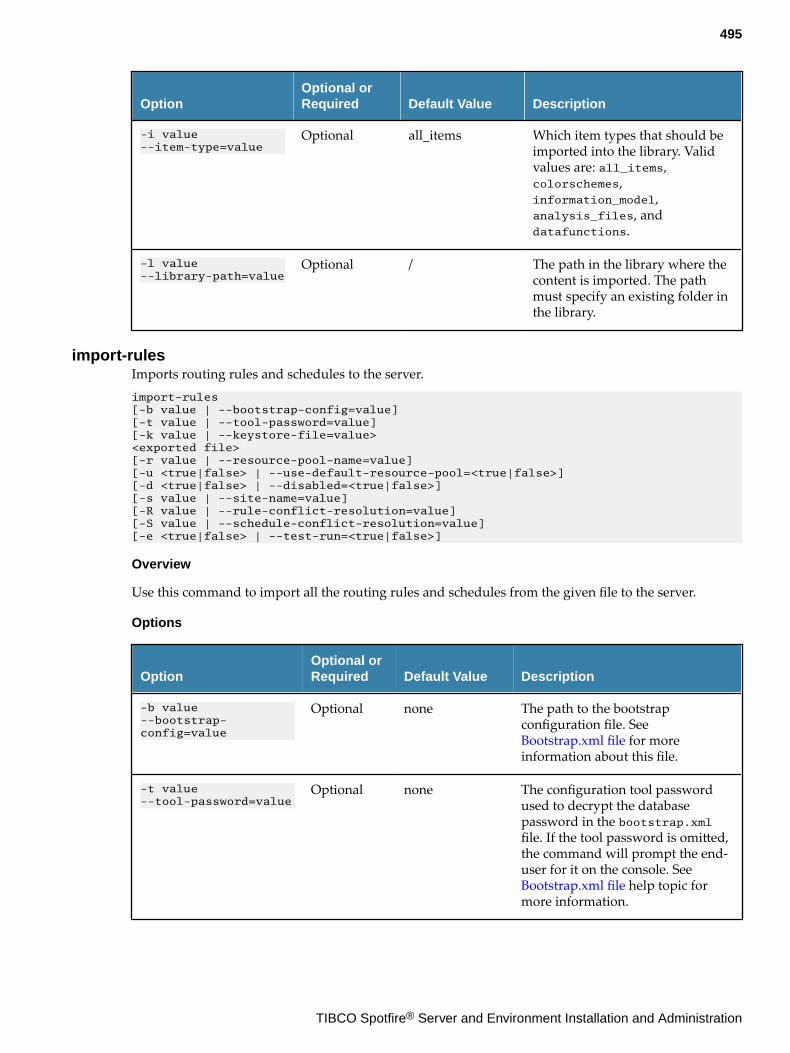
OptionOptional orRequired Default Value Description
-i value--item-type=value
Optional all_items Which item types that should beimported into the library. Validvalues are: all_items,colorschemes,information_model,analysis_files, anddatafunctions.
-l value--library-path=value
Optional / The path in the library where thecontent is imported. The pathmust specify an existing folder inthe library.
import-rulesImports routing rules and schedules to the server.import-rules [-b value | --bootstrap-config=value] [-t value | --tool-password=value] [-k value | --keystore-file=value><exported file> [-r value | --resource-pool-name=value][-u <true|false> | --use-default-resource-pool=<true|false>][-d <true|false> | --disabled=<true|false>][-s value | --site-name=value][-R value | --rule-conflict-resolution=value][-S value | --schedule-conflict-resolution=value][-e <true|false> | --test-run=<true|false>]
Overview
Use this command to import all the routing rules and schedules from the given file to the server.
Options
OptionOptional orRequired Default Value Description
-b value--bootstrap-config=value
Optional none The path to the bootstrapconfiguration file. See Bootstrap.xml file for moreinformation about this file.
-t value--tool-password=value
Optional none The configuration tool passwordused to decrypt the databasepassword in the bootstrap.xmlfile. If the tool password is omitted,the command will prompt the end-user for it on the console. See Bootstrap.xml file help topic formore information.
495
TIBCO Spotfire® Server and Environment Installation and Administration
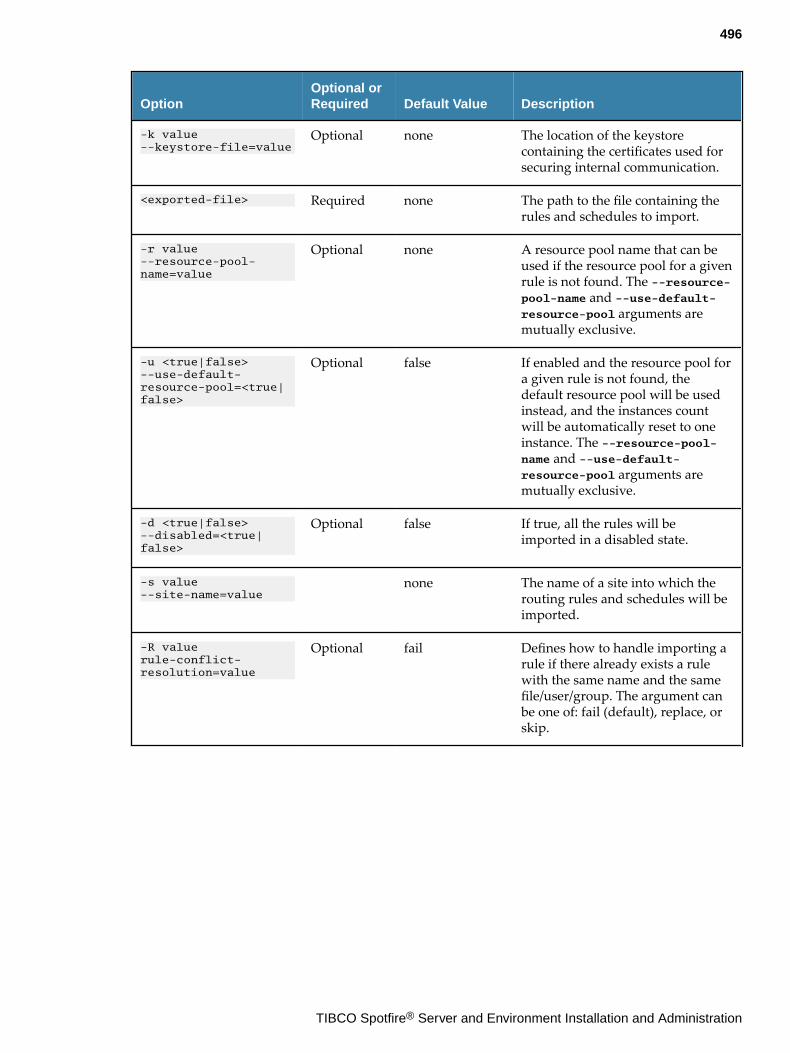
OptionOptional orRequired Default Value Description
-k value--keystore-file=value
Optional none The location of the keystorecontaining the certificates used forsecuring internal communication.
<exported-file> Required none The path to the file containing therules and schedules to import.
-r value--resource-pool-name=value
Optional none A resource pool name that can beused if the resource pool for a givenrule is not found. The --resource-pool-name and --use-default-resource-pool arguments aremutually exclusive.
-u <true|false>--use-default-resource-pool=<true|false>
Optional false If enabled and the resource pool fora given rule is not found, thedefault resource pool will be usedinstead, and the instances countwill be automatically reset to oneinstance. The --resource-pool-name and --use-default-resource-pool arguments aremutually exclusive.
-d <true|false>--disabled=<true|false>
Optional false If true, all the rules will beimported in a disabled state.
-s value--site-name=value
none The name of a site into which therouting rules and schedules will beimported.
-R valuerule-conflict-resolution=value
Optional fail Defines how to handle importing arule if there already exists a rulewith the same name and the samefile/user/group. The argument canbe one of: fail (default), replace, orskip.
496
TIBCO Spotfire® Server and Environment Installation and Administration
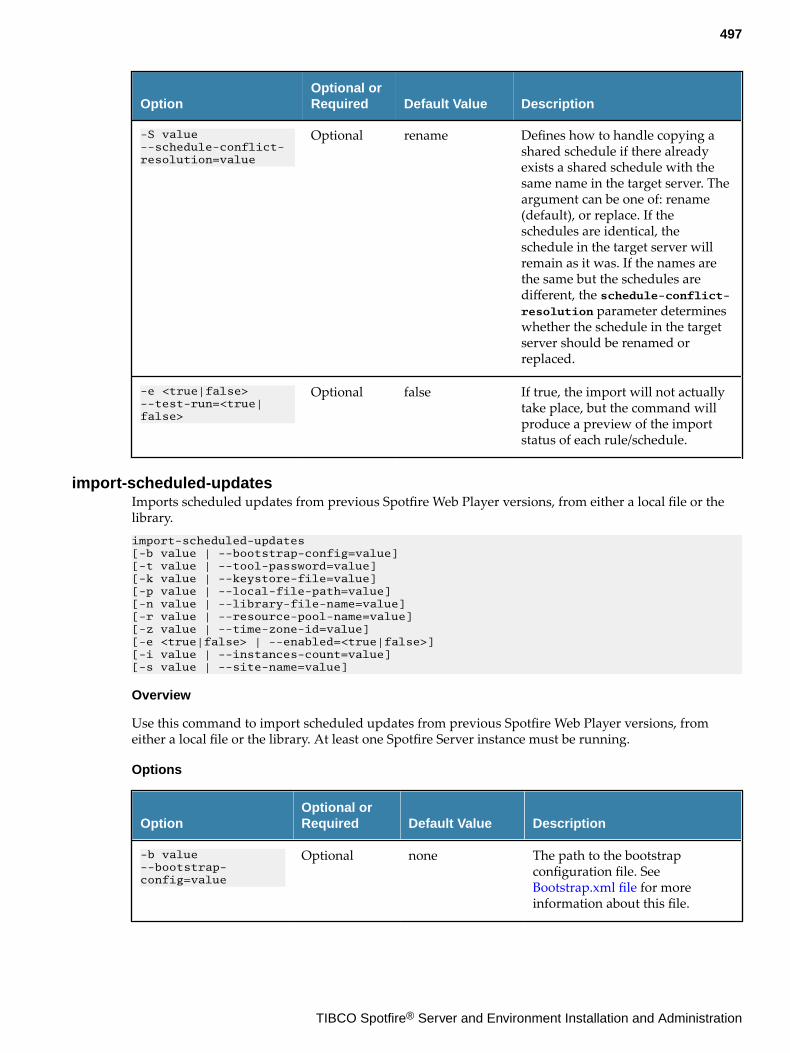
OptionOptional orRequired Default Value Description
-S value--schedule-conflict-resolution=value
Optional rename Defines how to handle copying ashared schedule if there alreadyexists a shared schedule with thesame name in the target server. Theargument can be one of: rename(default), or replace. If theschedules are identical, theschedule in the target server willremain as it was. If the names arethe same but the schedules aredifferent, the schedule-conflict-resolution parameter determineswhether the schedule in the targetserver should be renamed orreplaced.
-e <true|false>--test-run=<true|false>
Optional false If true, the import will not actuallytake place, but the command willproduce a preview of the importstatus of each rule/schedule.
import-scheduled-updatesImports scheduled updates from previous Spotfire Web Player versions, from either a local file or thelibrary.import-scheduled-updates [-b value | --bootstrap-config=value] [-t value | --tool-password=value] [-k value | --keystore-file=value] [-p value | --local-file-path=value] [-n value | --library-file-name=value] [-r value | --resource-pool-name=value] [-z value | --time-zone-id=value] [-e <true|false> | --enabled=<true|false>] [-i value | --instances-count=value][-s value | --site-name=value]
Overview
Use this command to import scheduled updates from previous Spotfire Web Player versions, fromeither a local file or the library. At least one Spotfire Server instance must be running.
Options
OptionOptional orRequired Default Value Description
-b value--bootstrap-config=value
Optional none The path to the bootstrapconfiguration file. See Bootstrap.xml file for moreinformation about this file.
497
TIBCO Spotfire® Server and Environment Installation and Administration
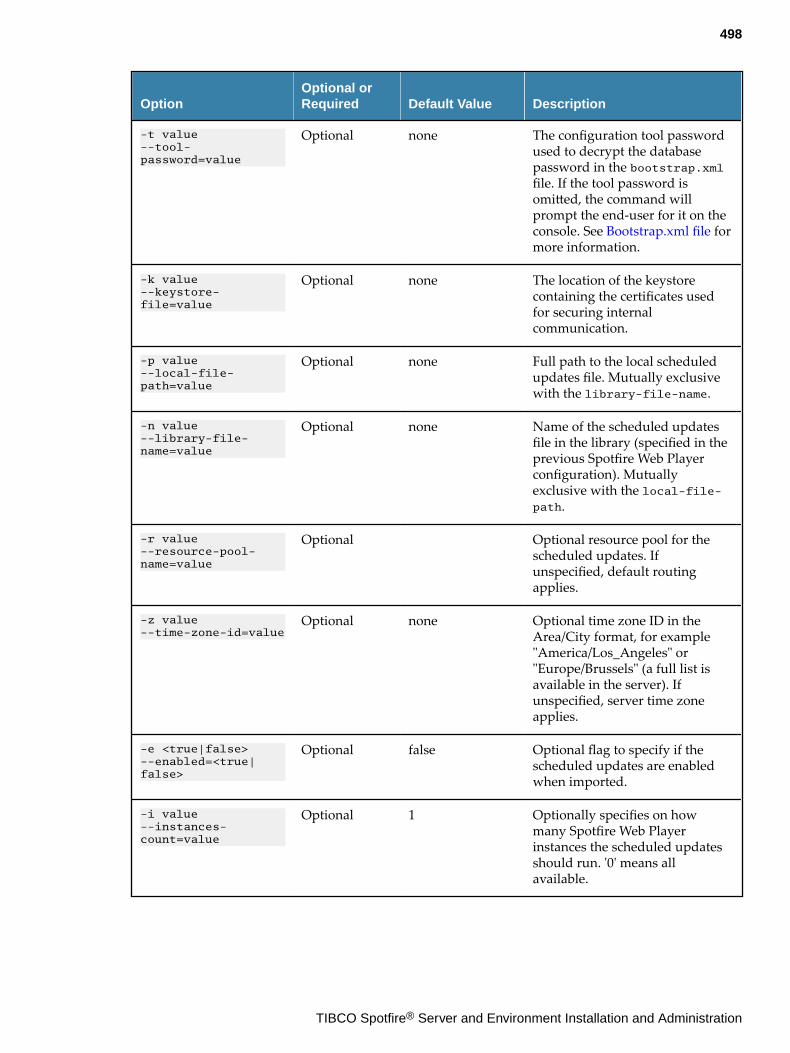
OptionOptional orRequired Default Value Description
-t value--tool-password=value
Optional none The configuration tool passwordused to decrypt the databasepassword in the bootstrap.xmlfile. If the tool password isomitted, the command willprompt the end-user for it on theconsole. See Bootstrap.xml file formore information.
-k value--keystore-file=value
Optional none The location of the keystorecontaining the certificates usedfor securing internalcommunication.
-p value--local-file-path=value
Optional none Full path to the local scheduledupdates file. Mutually exclusivewith the library-file-name.
-n value--library-file-name=value
Optional none Name of the scheduled updatesfile in the library (specified in theprevious Spotfire Web Playerconfiguration). Mutuallyexclusive with the local-file-path.
-r value--resource-pool-name=value
Optional Optional resource pool for thescheduled updates. Ifunspecified, default routingapplies.
-z value--time-zone-id=value
Optional none Optional time zone ID in theArea/City format, for example"America/Los_Angeles" or"Europe/Brussels" (a full list isavailable in the server). Ifunspecified, server time zoneapplies.
-e <true|false>--enabled=<true|false>
Optional false Optional flag to specify if thescheduled updates are enabledwhen imported.
-i value--instances-count=value
Optional 1 Optionally specifies on howmany Spotfire Web Playerinstances the scheduled updatesshould run. '0' means allavailable.
498
TIBCO Spotfire® Server and Environment Installation and Administration
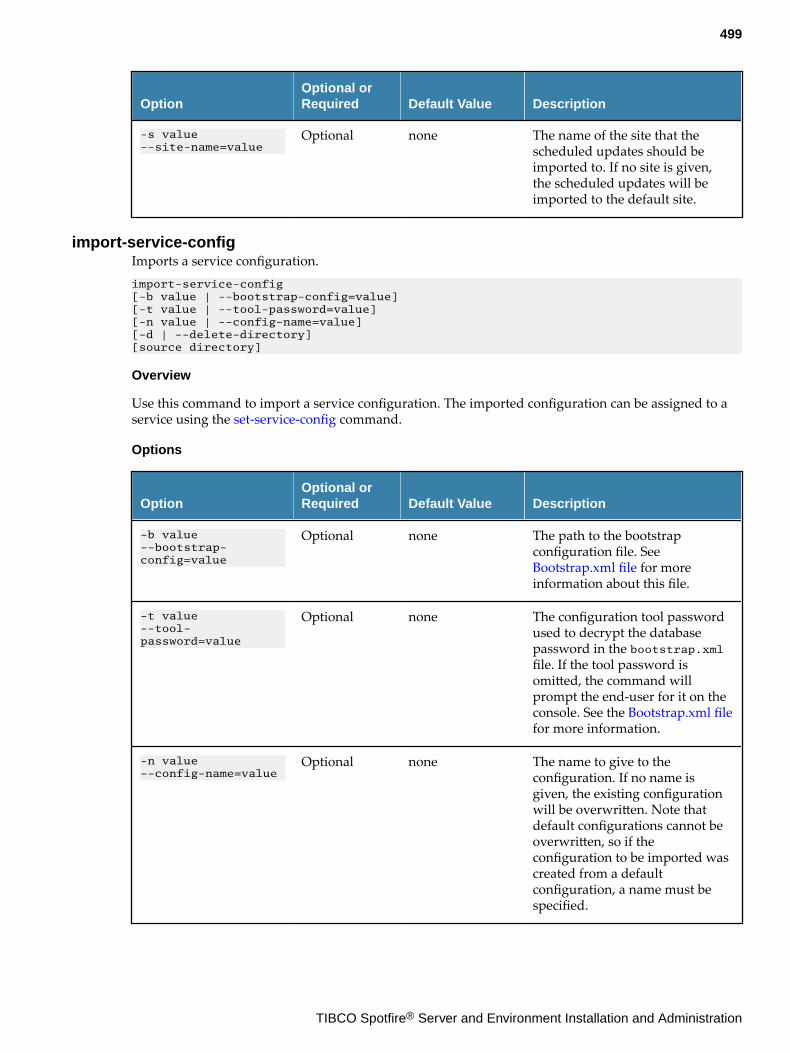
OptionOptional orRequired Default Value Description
-s value--site-name=value
Optional none The name of the site that thescheduled updates should beimported to. If no site is given,the scheduled updates will beimported to the default site.
import-service-configImports a service configuration.import-service-config [-b value | --bootstrap-config=value] [-t value | --tool-password=value] [-n value | --config-name=value] [-d | --delete-directory] [source directory]
Overview
Use this command to import a service configuration. The imported configuration can be assigned to aservice using the set-service-config command.
Options
OptionOptional orRequired Default Value Description
-b value--bootstrap-config=value
Optional none The path to the bootstrapconfiguration file. See Bootstrap.xml file for moreinformation about this file.
-t value--tool-password=value
Optional none The configuration tool passwordused to decrypt the databasepassword in the bootstrap.xmlfile. If the tool password isomitted, the command willprompt the end-user for it on theconsole. See the Bootstrap.xml filefor more information.
-n value--config-name=value
Optional none The name to give to theconfiguration. If no name isgiven, the existing configurationwill be overwritten. Note thatdefault configurations cannot beoverwritten, so if theconfiguration to be imported wascreated from a defaultconfiguration, a name must bespecified.
499
TIBCO Spotfire® Server and Environment Installation and Administration
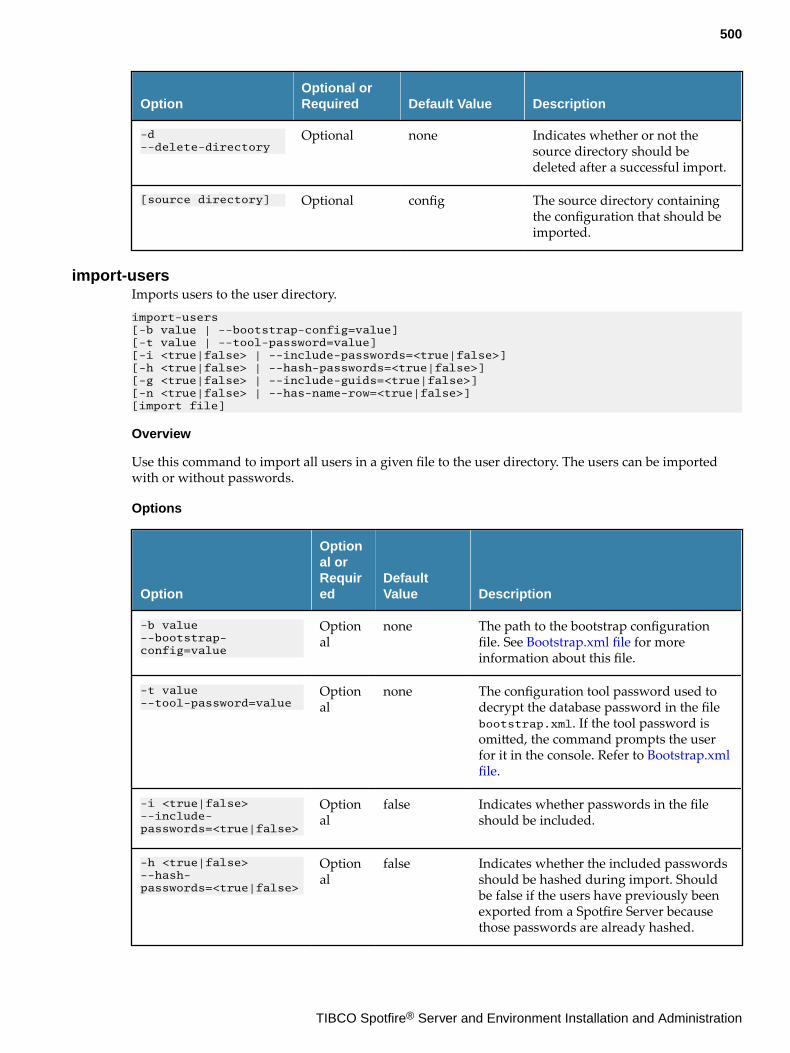
OptionOptional orRequired Default Value Description
-d--delete-directory
Optional none Indicates whether or not thesource directory should bedeleted after a successful import.
[source directory] Optional config The source directory containingthe configuration that should beimported.
import-usersImports users to the user directory.import-users [-b value | --bootstrap-config=value] [-t value | --tool-password=value] [-i <true|false> | --include-passwords=<true|false>] [-h <true|false> | --hash-passwords=<true|false>] [-g <true|false> | --include-guids=<true|false>] [-n <true|false> | --has-name-row=<true|false>] [import file]
Overview
Use this command to import all users in a given file to the user directory. The users can be importedwith or without passwords.
Options
Option
Optional orRequired
DefaultValue Description
-b value--bootstrap-config=value
Optional
none The path to the bootstrap configurationfile. See Bootstrap.xml file for moreinformation about this file.
-t value--tool-password=value
Optional
none The configuration tool password used todecrypt the database password in the filebootstrap.xml. If the tool password isomitted, the command prompts the userfor it in the console. Refer to Bootstrap.xmlfile.
-i <true|false>--include-passwords=<true|false>
Optional
false Indicates whether passwords in the fileshould be included.
-h <true|false>--hash-passwords=<true|false>
Optional
false Indicates whether the included passwordsshould be hashed during import. Shouldbe false if the users have previously beenexported from a Spotfire Server becausethose passwords are already hashed.
500
TIBCO Spotfire® Server and Environment Installation and Administration

Option
Optional orRequired
DefaultValue Description
-g <true|false>--include-guids=<true|false>
Optional
false Indicates whether the globally uniqueidentifiers (GUIDs) in the file should beincluded.
-n <true|false>--has-name-row=<true|false>
Optional
false Indicates whether the file contains a namerow. Applicable only when the file is inplain CSV format because the Spotfire TextData Format (STDF) always has a namerow.
[import file] Optional
users.txt The path to the file to import.
invalidate-persistent-sessionsInvalidates all persistent sessions.invalidate-persistent-sessions [-b value | --bootstrap-config=value] [-t value | --tool-password=value] [-u value | --username=value] [-a | --all]
Overview
Use this command to invalidate persistent sessions for a specified user or for all users.
After the persistent sessions have been invalidated, the user(s) must re-authenticate when they next login. Currently active sessions will remain active until the next idle timeout or absolute timeout(whichever happens first), after which the user will have to re-authenticate.
Options
OptionOptional orRequired Default Value Description
-b value--bootstrap-config=value
Optional none The path to the bootstrapconfiguration file. See Thebootstrap.xml file for moreinformation about this file.
-t value--tool-password=value
Optional none The configuration tool passwordused to decrypt the databasepassword in the bootstrap.xmlfile. If the tool password isomitted, the command willprompt the end-user for it on theconsole. See The bootstrap.xmlfile for more information.
501
TIBCO Spotfire® Server and Environment Installation and Administration
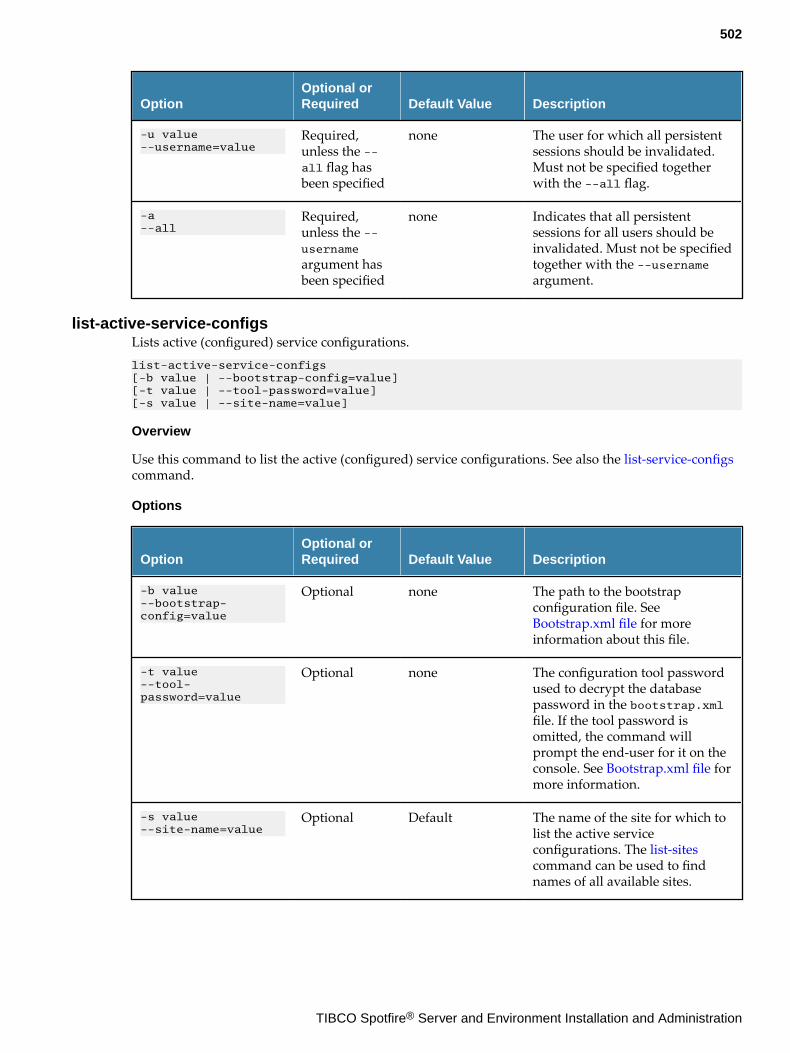
OptionOptional orRequired Default Value Description
-u value--username=value
Required,unless the --all flag hasbeen specified
none The user for which all persistentsessions should be invalidated.Must not be specified togetherwith the --all flag.
-a--all
Required,unless the --username
argument hasbeen specified
none Indicates that all persistentsessions for all users should beinvalidated. Must not be specifiedtogether with the --usernameargument.
list-active-service-configsLists active (configured) service configurations.list-active-service-configs [-b value | --bootstrap-config=value] [-t value | --tool-password=value][-s value | --site-name=value]
Overview
Use this command to list the active (configured) service configurations. See also the list-service-configscommand.
Options
OptionOptional orRequired Default Value Description
-b value--bootstrap-config=value
Optional none The path to the bootstrapconfiguration file. See Bootstrap.xml file for moreinformation about this file.
-t value--tool-password=value
Optional none The configuration tool passwordused to decrypt the databasepassword in the bootstrap.xmlfile. If the tool password isomitted, the command willprompt the end-user for it on theconsole. See Bootstrap.xml file formore information.
-s value--site-name=value
Optional Default The name of the site for which tolist the active serviceconfigurations. The list-sitescommand can be used to findnames of all available sites.
502
TIBCO Spotfire® Server and Environment Installation and Administration
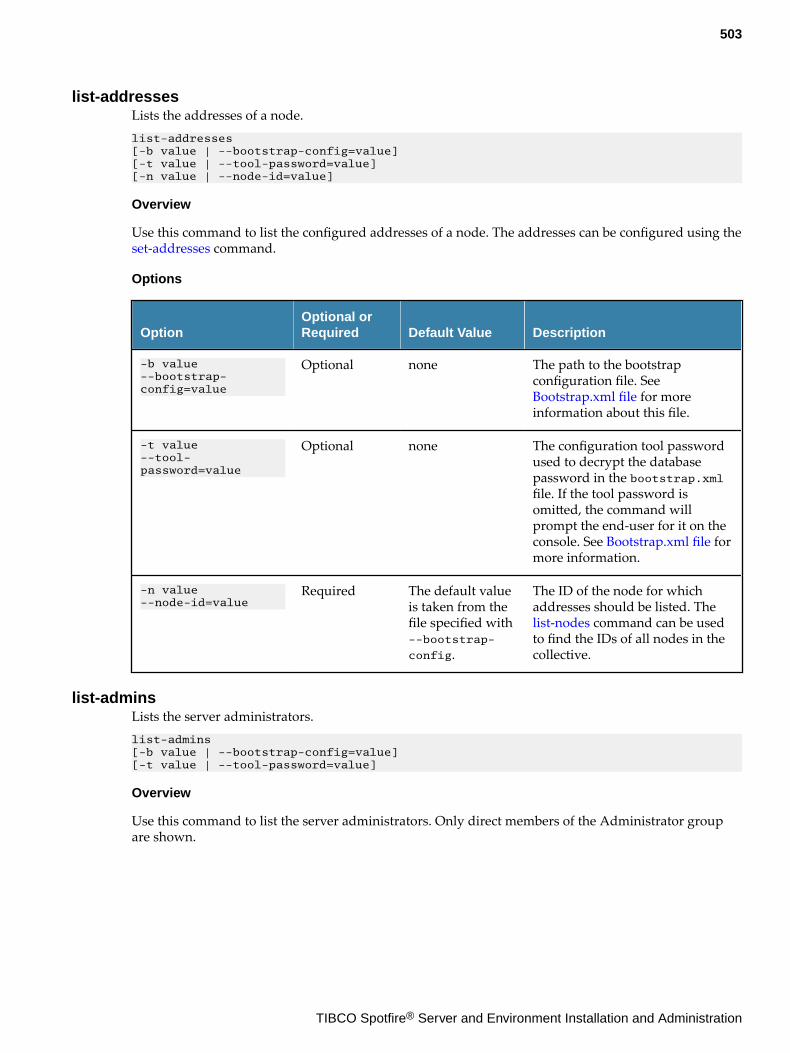
list-addressesLists the addresses of a node.list-addresses [-b value | --bootstrap-config=value] [-t value | --tool-password=value] [-n value | --node-id=value]
Overview
Use this command to list the configured addresses of a node. The addresses can be configured using the set-addresses command.
Options
OptionOptional orRequired Default Value Description
-b value--bootstrap-config=value
Optional none The path to the bootstrapconfiguration file. See Bootstrap.xml file for moreinformation about this file.
-t value--tool-password=value
Optional none The configuration tool passwordused to decrypt the databasepassword in the bootstrap.xmlfile. If the tool password isomitted, the command willprompt the end-user for it on theconsole. See Bootstrap.xml file formore information.
-n value--node-id=value
Required The default valueis taken from thefile specified with--bootstrap-
config.
The ID of the node for whichaddresses should be listed. The list-nodes command can be usedto find the IDs of all nodes in thecollective.
list-adminsLists the server administrators.list-admins [-b value | --bootstrap-config=value] [-t value | --tool-password=value]
Overview
Use this command to list the server administrators. Only direct members of the Administrator groupare shown.
503
TIBCO Spotfire® Server and Environment Installation and Administration
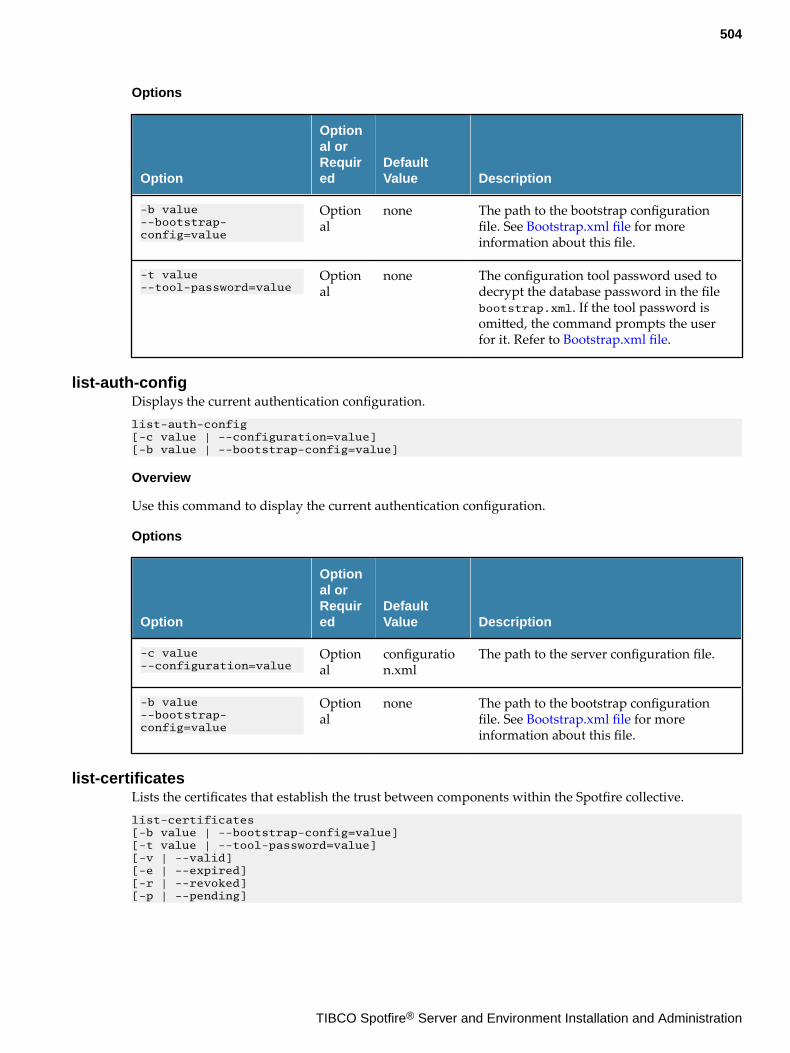
Options
Option
Optional orRequired
DefaultValue Description
-b value--bootstrap-config=value
Optional
none The path to the bootstrap configurationfile. See Bootstrap.xml file for moreinformation about this file.
-t value--tool-password=value
Optional
none The configuration tool password used todecrypt the database password in the filebootstrap.xml. If the tool password isomitted, the command prompts the userfor it. Refer to Bootstrap.xml file.
list-auth-configDisplays the current authentication configuration.list-auth-config [-c value | --configuration=value] [-b value | --bootstrap-config=value]
Overview
Use this command to display the current authentication configuration.
Options
Option
Optional orRequired
DefaultValue Description
-c value--configuration=value
Optional
configuration.xml
The path to the server configuration file.
-b value--bootstrap-config=value
Optional
none The path to the bootstrap configurationfile. See Bootstrap.xml file for moreinformation about this file.
list-certificatesLists the certificates that establish the trust between components within the Spotfire collective.list-certificates [-b value | --bootstrap-config=value] [-t value | --tool-password=value] [-v | --valid] [-e | --expired] [-r | --revoked] [-p | --pending]
504
TIBCO Spotfire® Server and Environment Installation and Administration
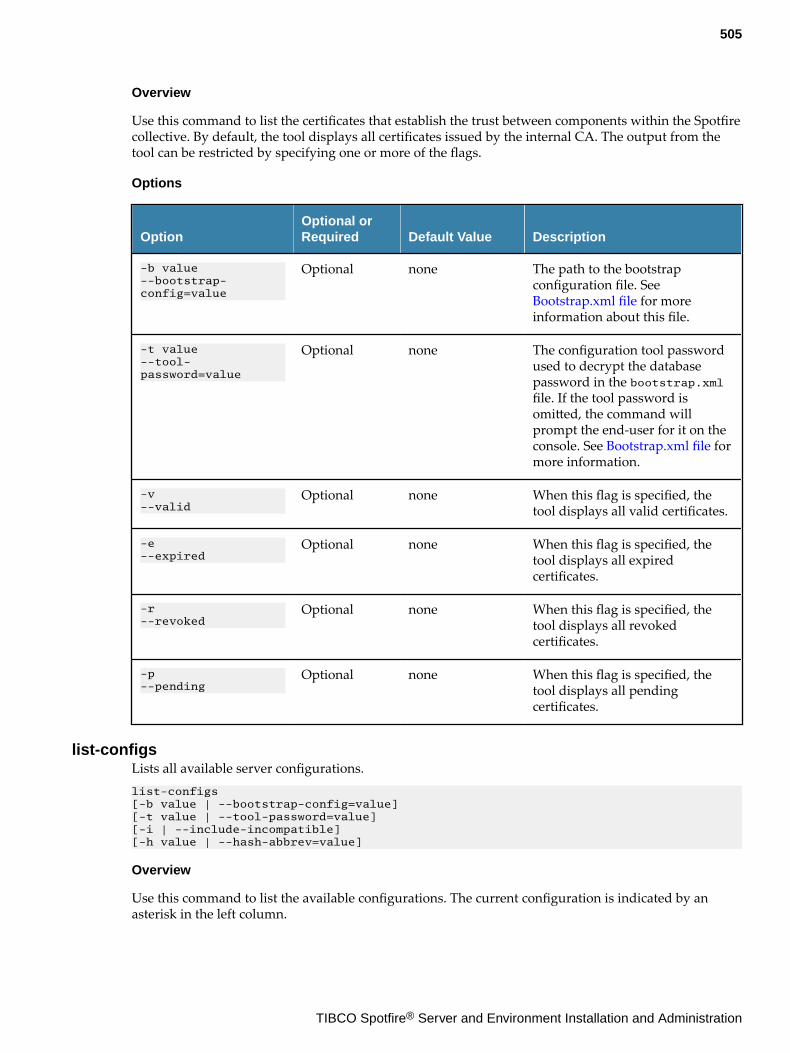
Overview
Use this command to list the certificates that establish the trust between components within the Spotfirecollective. By default, the tool displays all certificates issued by the internal CA. The output from thetool can be restricted by specifying one or more of the flags.
Options
OptionOptional orRequired Default Value Description
-b value--bootstrap-config=value
Optional none The path to the bootstrapconfiguration file. See Bootstrap.xml file for moreinformation about this file.
-t value--tool-password=value
Optional none The configuration tool passwordused to decrypt the databasepassword in the bootstrap.xmlfile. If the tool password isomitted, the command willprompt the end-user for it on theconsole. See Bootstrap.xml file formore information.
-v--valid
Optional none When this flag is specified, thetool displays all valid certificates.
-e--expired
Optional none When this flag is specified, thetool displays all expiredcertificates.
-r--revoked
Optional none When this flag is specified, thetool displays all revokedcertificates.
-p--pending
Optional none When this flag is specified, thetool displays all pendingcertificates.
list-configsLists all available server configurations.list-configs [-b value | --bootstrap-config=value] [-t value | --tool-password=value] [-i | --include-incompatible] [-h value | --hash-abbrev=value]
Overview
Use this command to list the available configurations. The current configuration is indicated by anasterisk in the left column.
505
TIBCO Spotfire® Server and Environment Installation and Administration
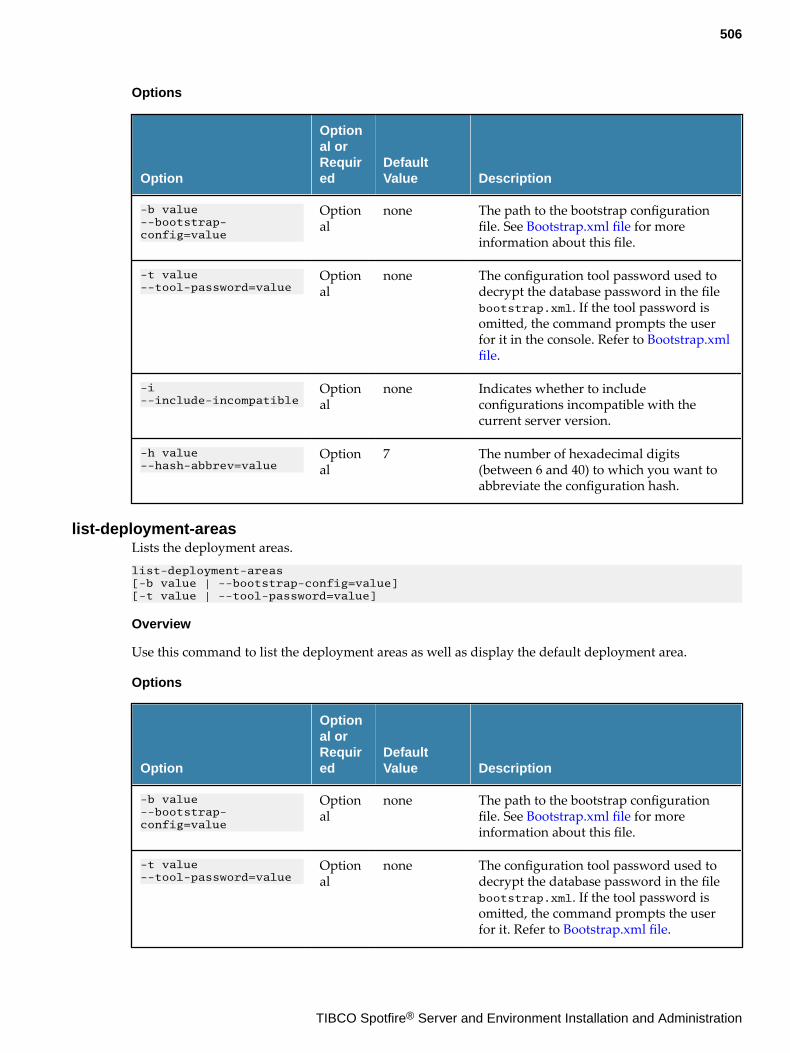
Options
Option
Optional orRequired
DefaultValue Description
-b value--bootstrap-config=value
Optional
none The path to the bootstrap configurationfile. See Bootstrap.xml file for moreinformation about this file.
-t value--tool-password=value
Optional
none The configuration tool password used todecrypt the database password in the filebootstrap.xml. If the tool password isomitted, the command prompts the userfor it in the console. Refer to Bootstrap.xmlfile.
-i--include-incompatible
Optional
none Indicates whether to includeconfigurations incompatible with thecurrent server version.
-h value--hash-abbrev=value
Optional
7 The number of hexadecimal digits(between 6 and 40) to which you want toabbreviate the configuration hash.
list-deployment-areasLists the deployment areas.list-deployment-areas [-b value | --bootstrap-config=value] [-t value | --tool-password=value]
Overview
Use this command to list the deployment areas as well as display the default deployment area.
Options
Option
Optional orRequired
DefaultValue Description
-b value--bootstrap-config=value
Optional
none The path to the bootstrap configurationfile. See Bootstrap.xml file for moreinformation about this file.
-t value--tool-password=value
Optional
none The configuration tool password used todecrypt the database password in the filebootstrap.xml. If the tool password isomitted, the command prompts the userfor it. Refer to Bootstrap.xml file.
506
TIBCO Spotfire® Server and Environment Installation and Administration
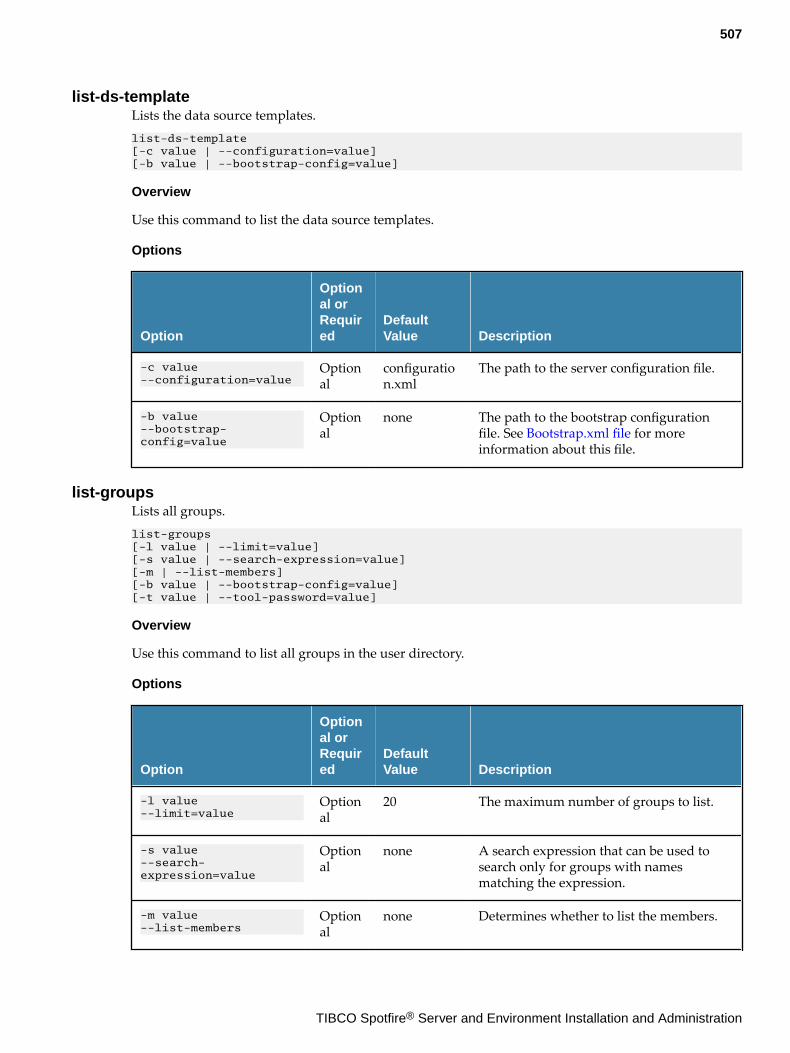
list-ds-templateLists the data source templates.list-ds-template [-c value | --configuration=value] [-b value | --bootstrap-config=value]
Overview
Use this command to list the data source templates.
Options
Option
Optional orRequired
DefaultValue Description
-c value--configuration=value
Optional
configuration.xml
The path to the server configuration file.
-b value--bootstrap-config=value
Optional
none The path to the bootstrap configurationfile. See Bootstrap.xml file for moreinformation about this file.
list-groupsLists all groups.list-groups [-l value | --limit=value] [-s value | --search-expression=value] [-m | --list-members] [-b value | --bootstrap-config=value] [-t value | --tool-password=value]
Overview
Use this command to list all groups in the user directory.
Options
Option
Optional orRequired
DefaultValue Description
-l value--limit=value
Optional
20 The maximum number of groups to list.
-s value--search-expression=value
Optional
none A search expression that can be used tosearch only for groups with namesmatching the expression.
-m value--list-members
Optional
none Determines whether to list the members.
507
TIBCO Spotfire® Server and Environment Installation and Administration
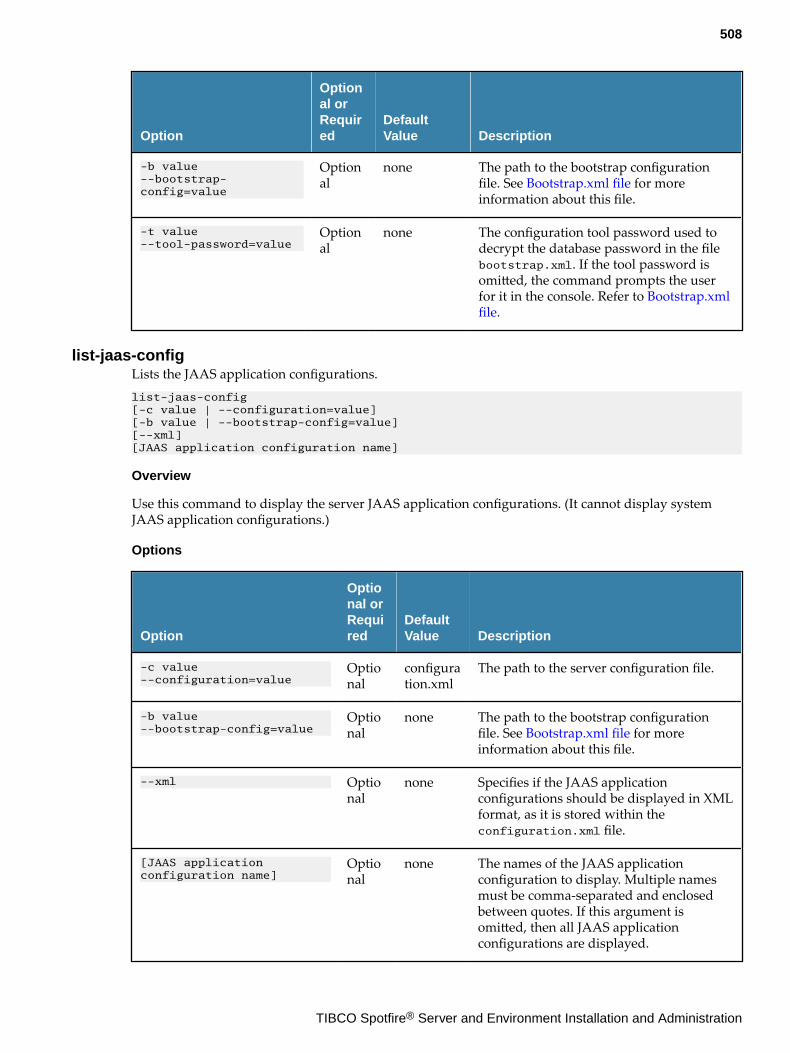
Option
Optional orRequired
DefaultValue Description
-b value--bootstrap-config=value
Optional
none The path to the bootstrap configurationfile. See Bootstrap.xml file for moreinformation about this file.
-t value--tool-password=value
Optional
none The configuration tool password used todecrypt the database password in the filebootstrap.xml. If the tool password isomitted, the command prompts the userfor it in the console. Refer to Bootstrap.xmlfile.
list-jaas-configLists the JAAS application configurations.list-jaas-config [-c value | --configuration=value] [-b value | --bootstrap-config=value] [--xml] [JAAS application configuration name]
Overview
Use this command to display the server JAAS application configurations. (It cannot display systemJAAS application configurations.)
Options
Option
Optional orRequired
DefaultValue Description
-c value--configuration=value
Optional
configuration.xml
The path to the server configuration file.
-b value--bootstrap-config=value
Optional
none The path to the bootstrap configurationfile. See Bootstrap.xml file for moreinformation about this file.
--xml Optional
none Specifies if the JAAS applicationconfigurations should be displayed in XMLformat, as it is stored within theconfiguration.xml file.
[JAAS application configuration name]
Optional
none The names of the JAAS applicationconfiguration to display. Multiple namesmust be comma-separated and enclosedbetween quotes. If this argument isomitted, then all JAAS applicationconfigurations are displayed.
508
TIBCO Spotfire® Server and Environment Installation and Administration
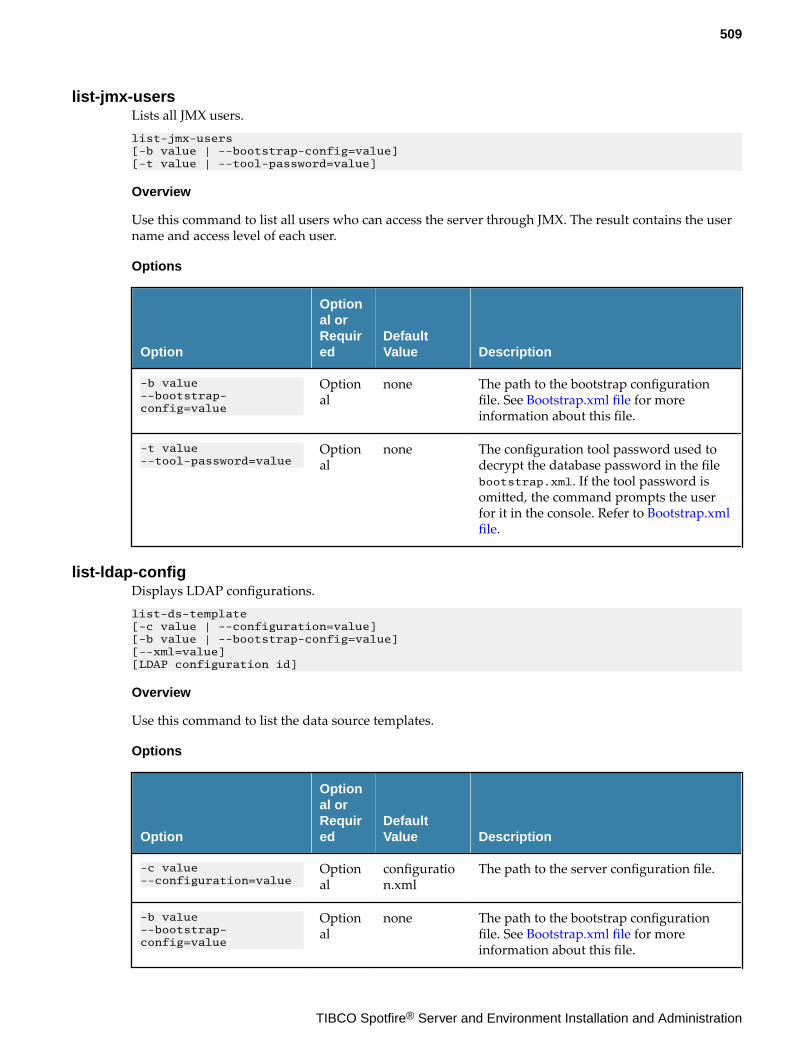
list-jmx-usersLists all JMX users.list-jmx-users [-b value | --bootstrap-config=value] [-t value | --tool-password=value]
Overview
Use this command to list all users who can access the server through JMX. The result contains the username and access level of each user.
Options
Option
Optional orRequired
DefaultValue Description
-b value--bootstrap-config=value
Optional
none The path to the bootstrap configurationfile. See Bootstrap.xml file for moreinformation about this file.
-t value--tool-password=value
Optional
none The configuration tool password used todecrypt the database password in the filebootstrap.xml. If the tool password isomitted, the command prompts the userfor it in the console. Refer to Bootstrap.xmlfile.
list-ldap-configDisplays LDAP configurations.list-ds-template [-c value | --configuration=value] [-b value | --bootstrap-config=value][--xml=value][LDAP configuration id]
Overview
Use this command to list the data source templates.
Options
Option
Optional orRequired
DefaultValue Description
-c value--configuration=value
Optional
configuration.xml
The path to the server configuration file.
-b value--bootstrap-config=value
Optional
none The path to the bootstrap configurationfile. See Bootstrap.xml file for moreinformation about this file.
509
TIBCO Spotfire® Server and Environment Installation and Administration
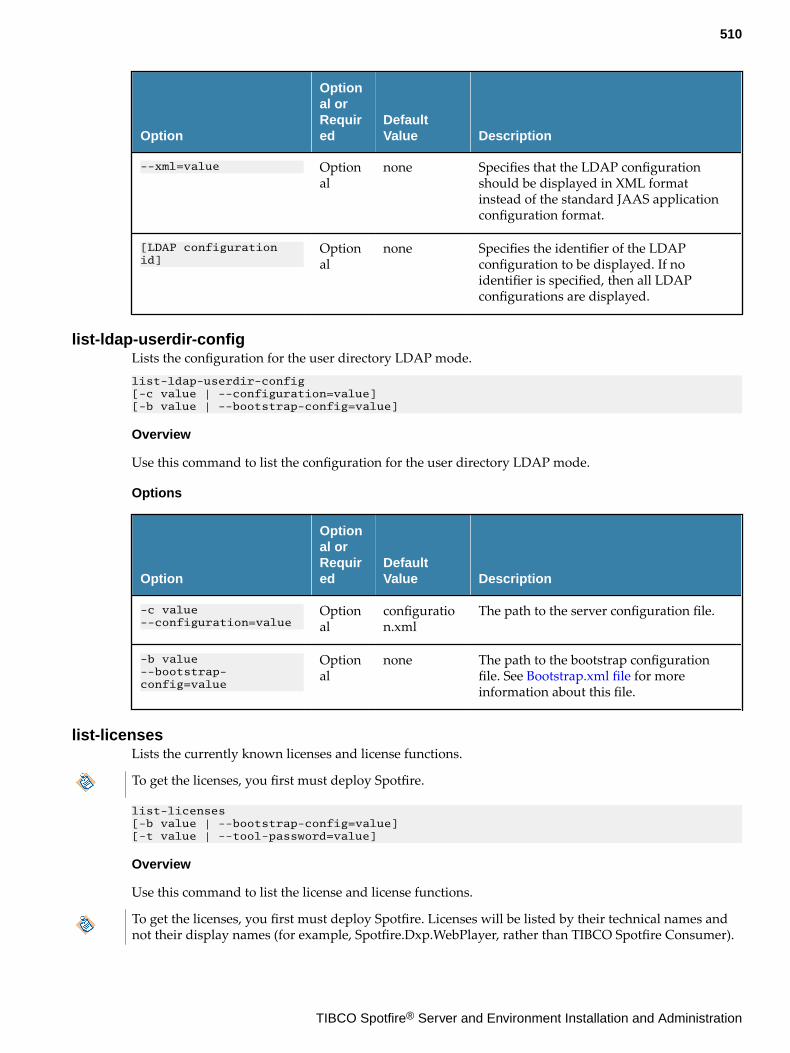
Option
Optional orRequired
DefaultValue Description
--xml=value Optional
none Specifies that the LDAP configurationshould be displayed in XML formatinstead of the standard JAAS applicationconfiguration format.
[LDAP configuration id]
Optional
none Specifies the identifier of the LDAPconfiguration to be displayed. If noidentifier is specified, then all LDAPconfigurations are displayed.
list-ldap-userdir-configLists the configuration for the user directory LDAP mode.list-ldap-userdir-config [-c value | --configuration=value] [-b value | --bootstrap-config=value]
Overview
Use this command to list the configuration for the user directory LDAP mode.
Options
Option
Optional orRequired
DefaultValue Description
-c value--configuration=value
Optional
configuration.xml
The path to the server configuration file.
-b value--bootstrap-config=value
Optional
none The path to the bootstrap configurationfile. See Bootstrap.xml file for moreinformation about this file.
list-licensesLists the currently known licenses and license functions.
To get the licenses, you first must deploy Spotfire.
list-licenses [-b value | --bootstrap-config=value] [-t value | --tool-password=value]
Overview
Use this command to list the license and license functions.
To get the licenses, you first must deploy Spotfire. Licenses will be listed by their technical names andnot their display names (for example, Spotfire.Dxp.WebPlayer, rather than TIBCO Spotfire Consumer).
510
TIBCO Spotfire® Server and Environment Installation and Administration
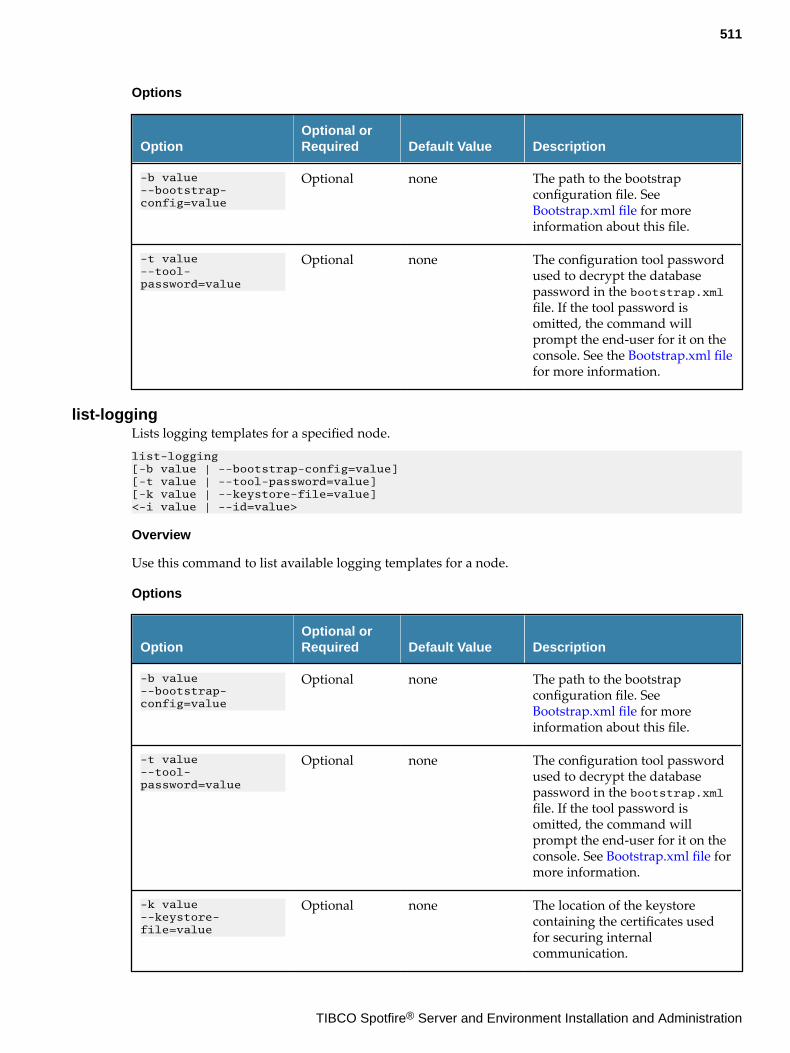
Options
OptionOptional orRequired Default Value Description
-b value--bootstrap-config=value
Optional none The path to the bootstrapconfiguration file. See Bootstrap.xml file for moreinformation about this file.
-t value--tool-password=value
Optional none The configuration tool passwordused to decrypt the databasepassword in the bootstrap.xmlfile. If the tool password isomitted, the command willprompt the end-user for it on theconsole. See the Bootstrap.xml filefor more information.
list-loggingLists logging templates for a specified node.list-logging [-b value | --bootstrap-config=value] [-t value | --tool-password=value] [-k value | --keystore-file=value] <-i value | --id=value>
Overview
Use this command to list available logging templates for a node.
Options
OptionOptional orRequired Default Value Description
-b value--bootstrap-config=value
Optional none The path to the bootstrapconfiguration file. See Bootstrap.xml file for moreinformation about this file.
-t value--tool-password=value
Optional none The configuration tool passwordused to decrypt the databasepassword in the bootstrap.xmlfile. If the tool password isomitted, the command willprompt the end-user for it on theconsole. See Bootstrap.xml file formore information.
-k value--keystore-file=value
Optional none The location of the keystorecontaining the certificates usedfor securing internalcommunication.
511
TIBCO Spotfire® Server and Environment Installation and Administration
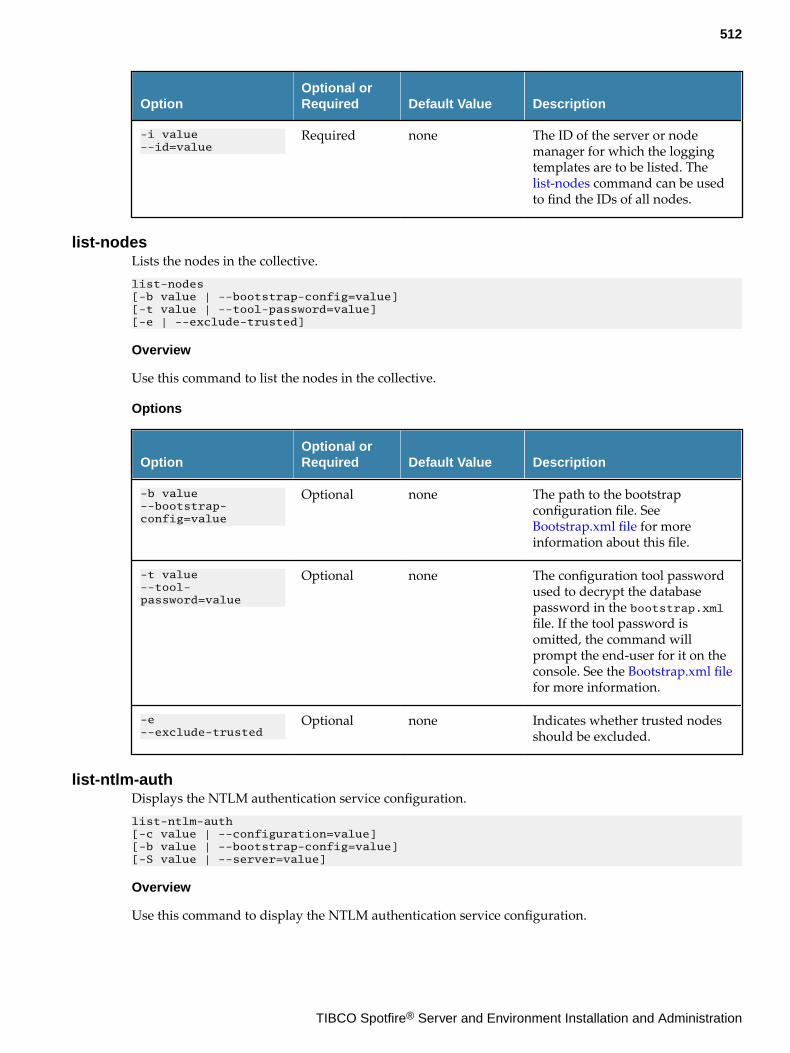
OptionOptional orRequired Default Value Description
-i value--id=value
Required none The ID of the server or nodemanager for which the loggingtemplates are to be listed. The list-nodes command can be usedto find the IDs of all nodes.
list-nodesLists the nodes in the collective.list-nodes [-b value | --bootstrap-config=value] [-t value | --tool-password=value] [-e | --exclude-trusted]
Overview
Use this command to list the nodes in the collective.
Options
OptionOptional orRequired Default Value Description
-b value--bootstrap-config=value
Optional none The path to the bootstrapconfiguration file. See Bootstrap.xml file for moreinformation about this file.
-t value--tool-password=value
Optional none The configuration tool passwordused to decrypt the databasepassword in the bootstrap.xmlfile. If the tool password isomitted, the command willprompt the end-user for it on theconsole. See the Bootstrap.xml filefor more information.
-e--exclude-trusted
Optional none Indicates whether trusted nodesshould be excluded.
list-ntlm-authDisplays the NTLM authentication service configuration.list-ntlm-auth [-c value | --configuration=value] [-b value | --bootstrap-config=value] [-S value | --server=value]
Overview
Use this command to display the NTLM authentication service configuration.
512
TIBCO Spotfire® Server and Environment Installation and Administration
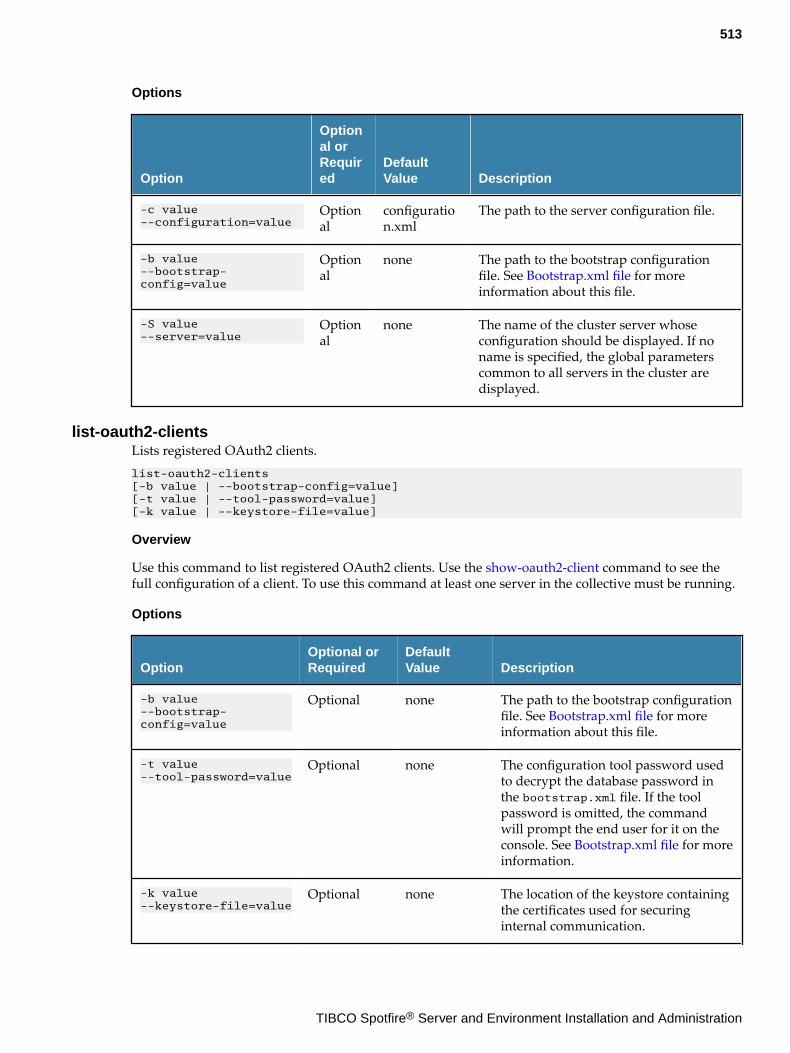
Options
Option
Optional orRequired
DefaultValue Description
-c value--configuration=value
Optional
configuration.xml
The path to the server configuration file.
-b value--bootstrap-config=value
Optional
none The path to the bootstrap configurationfile. See Bootstrap.xml file for moreinformation about this file.
-S value--server=value
Optional
none The name of the cluster server whoseconfiguration should be displayed. If noname is specified, the global parameterscommon to all servers in the cluster aredisplayed.
list-oauth2-clientsLists registered OAuth2 clients.list-oauth2-clients [-b value | --bootstrap-config=value] [-t value | --tool-password=value][-k value | --keystore-file=value]
Overview
Use this command to list registered OAuth2 clients. Use the show-oauth2-client command to see thefull configuration of a client. To use this command at least one server in the collective must be running.
Options
OptionOptional orRequired
DefaultValue Description
-b value--bootstrap-config=value
Optional none The path to the bootstrap configurationfile. See Bootstrap.xml file for moreinformation about this file.
-t value--tool-password=value
Optional none The configuration tool password usedto decrypt the database password inthe bootstrap.xml file. If the toolpassword is omitted, the commandwill prompt the end user for it on theconsole. See Bootstrap.xml file for moreinformation.
-k value--keystore-file=value
Optional none The location of the keystore containingthe certificates used for securinginternal communication.
513
TIBCO Spotfire® Server and Environment Installation and Administration
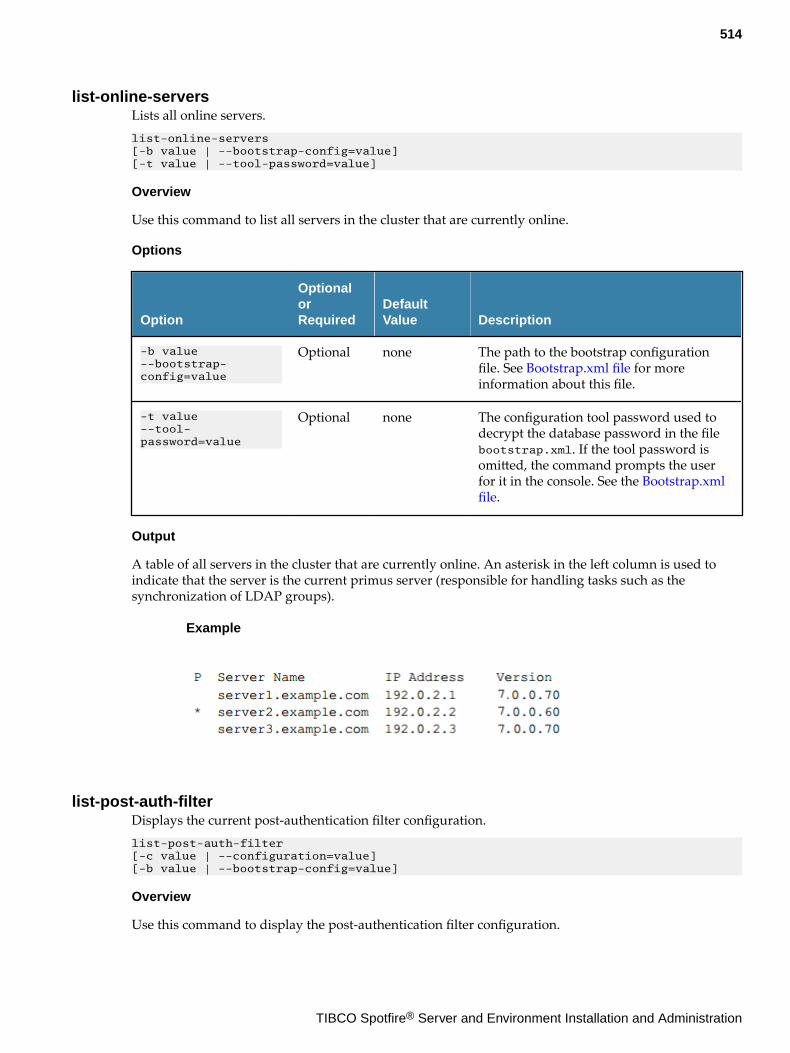
list-online-serversLists all online servers.list-online-servers [-b value | --bootstrap-config=value] [-t value | --tool-password=value]
Overview
Use this command to list all servers in the cluster that are currently online.
Options
Option
OptionalorRequired
DefaultValue Description
-b value--bootstrap-config=value
Optional none The path to the bootstrap configurationfile. See Bootstrap.xml file for moreinformation about this file.
-t value--tool-password=value
Optional none The configuration tool password used todecrypt the database password in the filebootstrap.xml. If the tool password isomitted, the command prompts the userfor it in the console. See the Bootstrap.xmlfile.
Output
A table of all servers in the cluster that are currently online. An asterisk in the left column is used toindicate that the server is the current primus server (responsible for handling tasks such as thesynchronization of LDAP groups).
Example
list-post-auth-filterDisplays the current post-authentication filter configuration.list-post-auth-filter [-c value | --configuration=value] [-b value | --bootstrap-config=value]
Overview
Use this command to display the post-authentication filter configuration.
514
TIBCO Spotfire® Server and Environment Installation and Administration

Options
Option
Optional orRequired
DefaultValue Description
-c value--configuration=value
Optional
configuration.xml
The path to the server configuration file.
-b value--bootstrap-config=value
Optional
none The path to the bootstrap configurationfile. See Bootstrap.xml file for moreinformation about this file.
list-service-configsLists available service configurations.list-service-configs [-b value | --bootstrap-config=value] [-t value | --tool-password=value] [-c value | --capability=value] [-a value | --deployment-area=value] [-e | --exclude-default-configs]
Overview
Use this command to list the available service configurations. The configurations can be exported usingthe export-service-config command.
Options
OptionOptional orRequired Default Value Description
-b value--bootstrap-config=value
Optional none The path to the bootstrapconfiguration file. See Bootstrap.xml file for moreinformation about this file.
-t value--tool-password=value
Optional none The configuration tool passwordused to decrypt the databasepassword in the bootstrap.xmlfile. If the tool password isomitted, the command willprompt the end-user for it on theconsole. See Bootstrap.xml file formore information.
-c value--capability=value
Optional none The name of the capability forwhich to list configurations.
-a value--deployment-area=value
Optional none The name of the deployment areafor which to list configurations.
515
TIBCO Spotfire® Server and Environment Installation and Administration
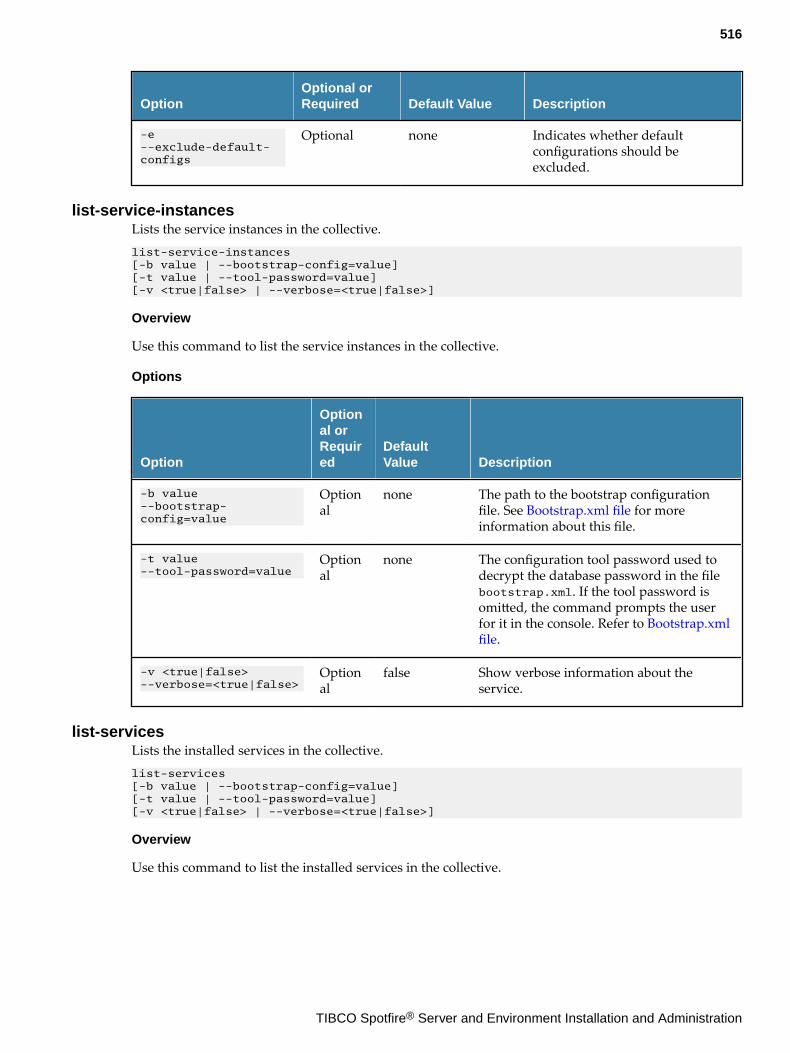
OptionOptional orRequired Default Value Description
-e--exclude-default-configs
Optional none Indicates whether defaultconfigurations should beexcluded.
list-service-instancesLists the service instances in the collective.list-service-instances [-b value | --bootstrap-config=value] [-t value | --tool-password=value] [-v <true|false> | --verbose=<true|false>]
Overview
Use this command to list the service instances in the collective.
Options
Option
Optional orRequired
DefaultValue Description
-b value--bootstrap-config=value
Optional
none The path to the bootstrap configurationfile. See Bootstrap.xml file for moreinformation about this file.
-t value--tool-password=value
Optional
none The configuration tool password used todecrypt the database password in the filebootstrap.xml. If the tool password isomitted, the command prompts the userfor it in the console. Refer to Bootstrap.xmlfile.
-v <true|false>--verbose=<true|false>
Optional
false Show verbose information about theservice.
list-servicesLists the installed services in the collective.list-services[-b value | --bootstrap-config=value] [-t value | --tool-password=value] [-v <true|false> | --verbose=<true|false>]
Overview
Use this command to list the installed services in the collective.
516
TIBCO Spotfire® Server and Environment Installation and Administration
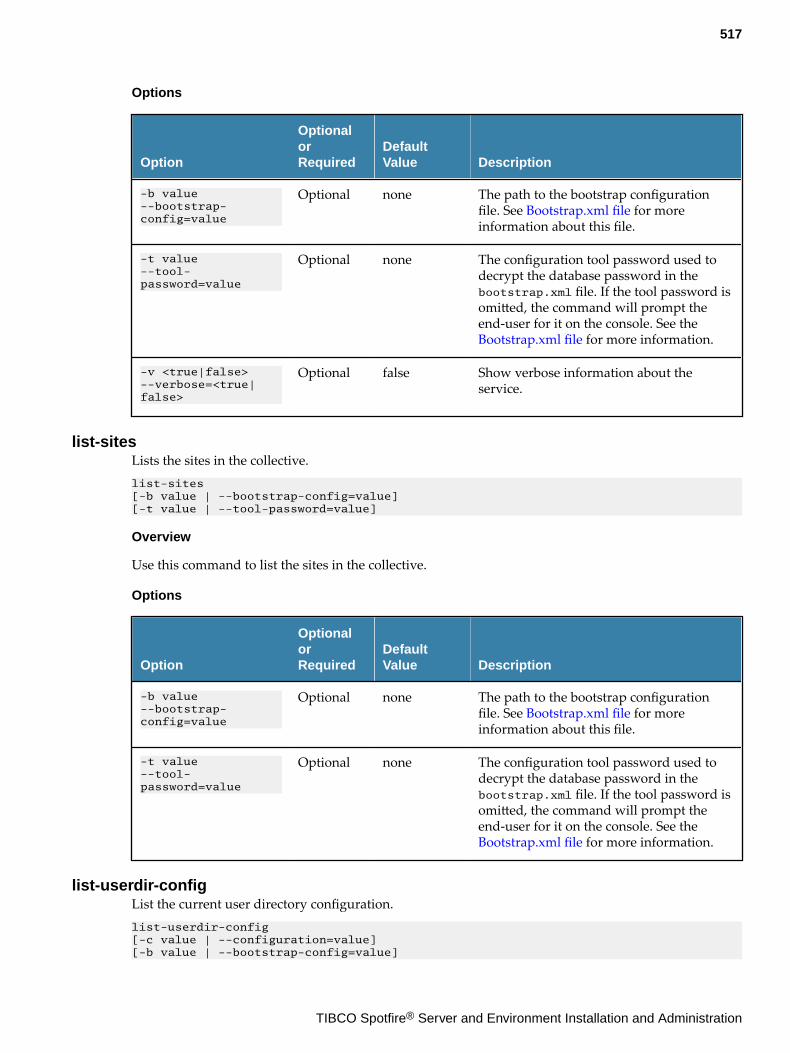
Options
Option
OptionalorRequired
DefaultValue Description
-b value--bootstrap-config=value
Optional none The path to the bootstrap configurationfile. See Bootstrap.xml file for moreinformation about this file.
-t value--tool-password=value
Optional none The configuration tool password used todecrypt the database password in thebootstrap.xml file. If the tool password isomitted, the command will prompt theend-user for it on the console. See the Bootstrap.xml file for more information.
-v <true|false>--verbose=<true|false>
Optional false Show verbose information about theservice.
list-sitesLists the sites in the collective.list-sites [-b value | --bootstrap-config=value] [-t value | --tool-password=value]
Overview
Use this command to list the sites in the collective.
Options
Option
OptionalorRequired
DefaultValue Description
-b value--bootstrap-config=value
Optional none The path to the bootstrap configurationfile. See Bootstrap.xml file for moreinformation about this file.
-t value--tool-password=value
Optional none The configuration tool password used todecrypt the database password in thebootstrap.xml file. If the tool password isomitted, the command will prompt theend-user for it on the console. See the Bootstrap.xml file for more information.
list-userdir-configList the current user directory configuration.list-userdir-config [-c value | --configuration=value] [-b value | --bootstrap-config=value]
517
TIBCO Spotfire® Server and Environment Installation and Administration
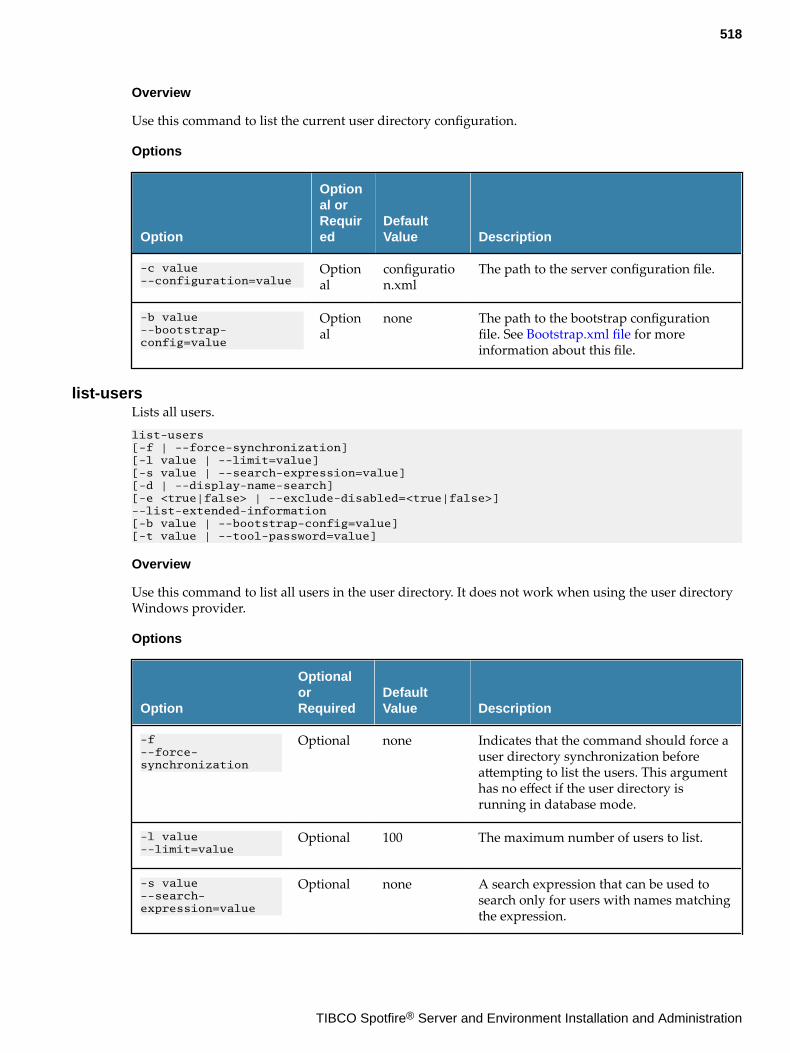
Overview
Use this command to list the current user directory configuration.
Options
Option
Optional orRequired
DefaultValue Description
-c value--configuration=value
Optional
configuration.xml
The path to the server configuration file.
-b value--bootstrap-config=value
Optional
none The path to the bootstrap configurationfile. See Bootstrap.xml file for moreinformation about this file.
list-usersLists all users.list-users [-f | --force-synchronization] [-l value | --limit=value] [-s value | --search-expression=value][-d | --display-name-search] [-e <true|false> | --exclude-disabled=<true|false>]--list-extended-information [-b value | --bootstrap-config=value] [-t value | --tool-password=value]
Overview
Use this command to list all users in the user directory. It does not work when using the user directoryWindows provider.
Options
Option
OptionalorRequired
DefaultValue Description
-f--force-synchronization
Optional none Indicates that the command should force auser directory synchronization beforeattempting to list the users. This argumenthas no effect if the user directory isrunning in database mode.
-l value--limit=value
Optional 100 The maximum number of users to list.
-s value--search-expression=value
Optional none A search expression that can be used tosearch only for users with names matchingthe expression.
518
TIBCO Spotfire® Server and Environment Installation and Administration
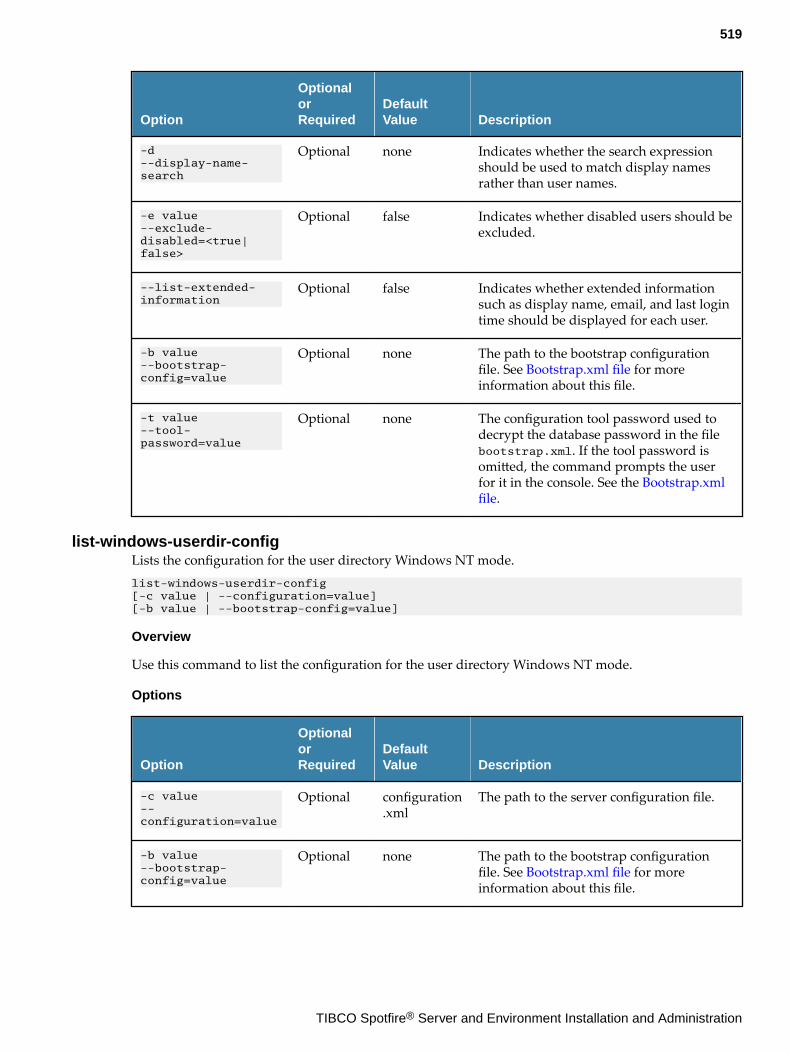
Option
OptionalorRequired
DefaultValue Description
-d--display-name-search
Optional none Indicates whether the search expressionshould be used to match display namesrather than user names.
-e value--exclude-disabled=<true|false>
Optional false Indicates whether disabled users should beexcluded.
--list-extended-information
Optional false Indicates whether extended informationsuch as display name, email, and last logintime should be displayed for each user.
-b value--bootstrap-config=value
Optional none The path to the bootstrap configurationfile. See Bootstrap.xml file for moreinformation about this file.
-t value--tool-password=value
Optional none The configuration tool password used todecrypt the database password in the filebootstrap.xml. If the tool password isomitted, the command prompts the userfor it in the console. See the Bootstrap.xmlfile.
list-windows-userdir-configLists the configuration for the user directory Windows NT mode.list-windows-userdir-config [-c value | --configuration=value] [-b value | --bootstrap-config=value]
Overview
Use this command to list the configuration for the user directory Windows NT mode.
Options
Option
OptionalorRequired
DefaultValue Description
-c value--configuration=value
Optional configuration.xml
The path to the server configuration file.
-b value--bootstrap-config=value
Optional none The path to the bootstrap configurationfile. See Bootstrap.xml file for moreinformation about this file.
519
TIBCO Spotfire® Server and Environment Installation and Administration
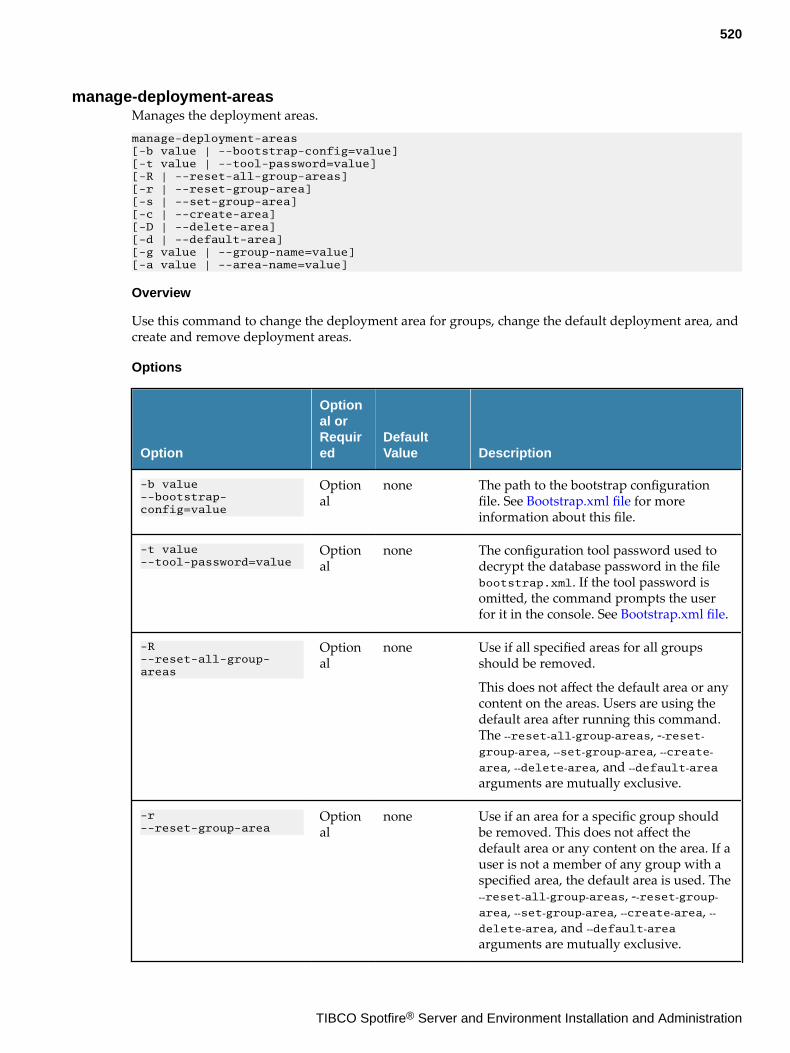
manage-deployment-areasManages the deployment areas.manage-deployment-areas [-b value | --bootstrap-config=value] [-t value | --tool-password=value] [-R | --reset-all-group-areas] [-r | --reset-group-area] [-s | --set-group-area] [-c | --create-area] [-D | --delete-area] [-d | --default-area] [-g value | --group-name=value] [-a value | --area-name=value]
Overview
Use this command to change the deployment area for groups, change the default deployment area, andcreate and remove deployment areas.
Options
Option
Optional orRequired
DefaultValue Description
-b value--bootstrap-config=value
Optional
none The path to the bootstrap configurationfile. See Bootstrap.xml file for moreinformation about this file.
-t value--tool-password=value
Optional
none The configuration tool password used todecrypt the database password in the filebootstrap.xml. If the tool password isomitted, the command prompts the userfor it in the console. See Bootstrap.xml file.
-R--reset-all-group-areas
Optional
none Use if all specified areas for all groupsshould be removed.
This does not affect the default area or anycontent on the areas. Users are using thedefault area after running this command.The ‐‐reset‐all‐group‐areas, -‐reset‐group‐area, ‐‐set‐group‐area, ‐‐create‐area, ‐‐delete‐area, and ‐‐default‐areaarguments are mutually exclusive.
-r--reset-group-area
Optional
none Use if an area for a specific group shouldbe removed. This does not affect thedefault area or any content on the area. If auser is not a member of any group with aspecified area, the default area is used. The‐‐reset‐all‐group‐areas, -‐reset‐group‐area, ‐‐set‐group‐area, ‐‐create‐area, ‐‐delete‐area, and ‐‐default‐areaarguments are mutually exclusive.
520
TIBCO Spotfire® Server and Environment Installation and Administration
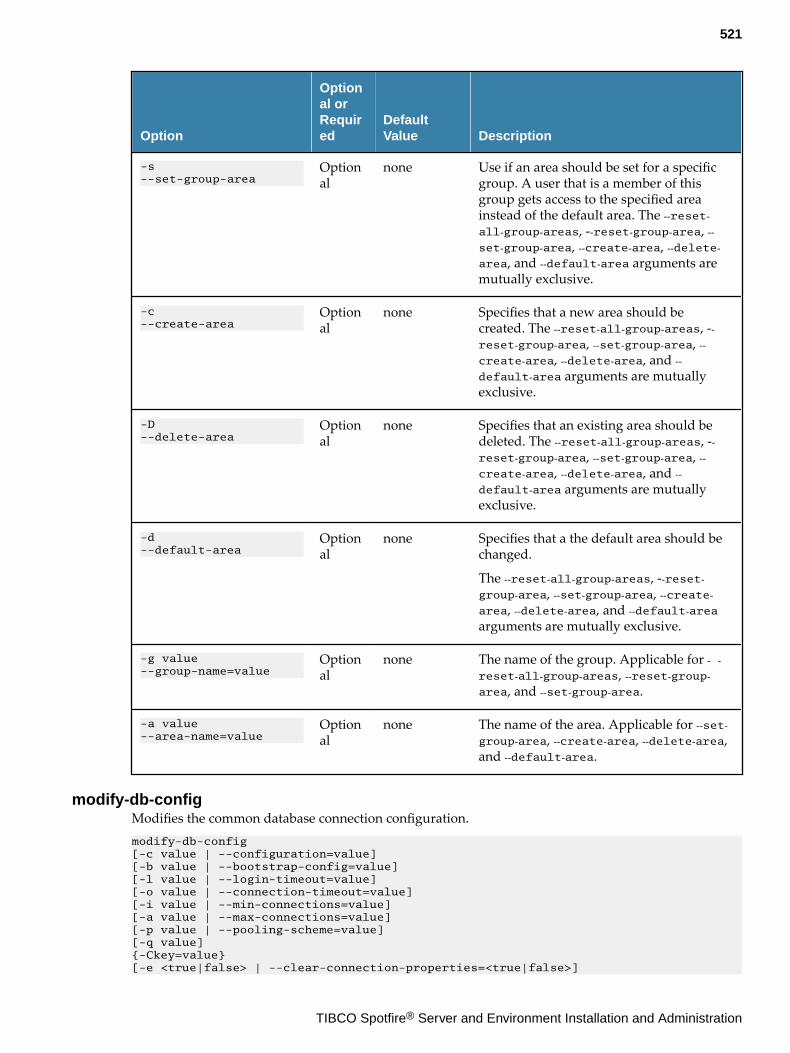
Option
Optional orRequired
DefaultValue Description
-s--set-group-area
Optional
none Use if an area should be set for a specificgroup. A user that is a member of thisgroup gets access to the specified areainstead of the default area. The ‐‐reset‐all‐group‐areas, -‐reset‐group‐area, ‐‐set‐group‐area, ‐‐create‐area, ‐‐delete‐area, and ‐‐default‐area arguments aremutually exclusive.
-c--create-area
Optional
none Specifies that a new area should becreated. The ‐‐reset‐all‐group‐areas, -‐reset‐group‐area, ‐‐set‐group‐area, ‐‐create‐area, ‐‐delete‐area, and ‐‐default‐area arguments are mutuallyexclusive.
-D--delete-area
Optional
none Specifies that an existing area should bedeleted. The ‐‐reset‐all‐group‐areas, -‐reset‐group‐area, ‐‐set‐group‐area, ‐‐create‐area, ‐‐delete‐area, and ‐‐default‐area arguments are mutuallyexclusive.
-d--default-area
Optional
none Specifies that a the default area should bechanged.
The ‐‐reset‐all‐group‐areas, -‐reset‐group‐area, ‐‐set‐group‐area, ‐‐create‐area, ‐‐delete‐area, and ‐‐default‐areaarguments are mutually exclusive.
-g value--group-name=value
Optional
none The name of the group. Applicable for ‐ ‐reset‐all‐group‐areas, ‐‐reset‐group‐area, and ‐‐set‐group‐area.
-a value--area-name=value
Optional
none The name of the area. Applicable for ‐‐set‐group‐area, ‐‐create‐area, ‐‐delete‐area,and ‐‐default‐area.
modify-db-configModifies the common database connection configuration.modify-db-config [-c value | --configuration=value] [-b value | --bootstrap-config=value] [-l value | --login-timeout=value] [-o value | --connection-timeout=value][-i value | --min-connections=value] [-a value | --max-connections=value] [-p value | --pooling-scheme=value][-q value] {-Ckey=value} [-e <true|false> | --clear-connection-properties=<true|false>]
521
TIBCO Spotfire® Server and Environment Installation and Administration
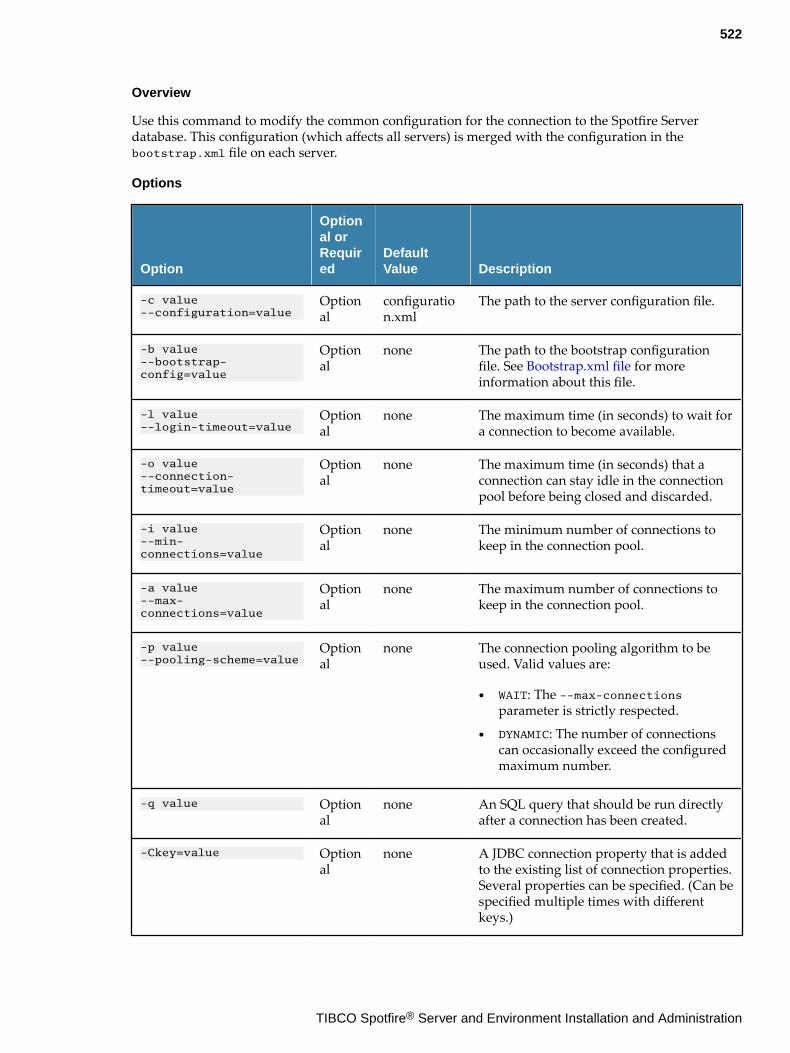
Overview
Use this command to modify the common configuration for the connection to the Spotfire Serverdatabase. This configuration (which affects all servers) is merged with the configuration in thebootstrap.xml file on each server.
Options
Option
Optional orRequired
DefaultValue Description
-c value--configuration=value
Optional
configuration.xml
The path to the server configuration file.
-b value--bootstrap-config=value
Optional
none The path to the bootstrap configurationfile. See Bootstrap.xml file for moreinformation about this file.
-l value--login-timeout=value
Optional
none The maximum time (in seconds) to wait fora connection to become available.
-o value--connection-timeout=value
Optional
none The maximum time (in seconds) that aconnection can stay idle in the connectionpool before being closed and discarded.
-i value--min-connections=value
Optional
none The minimum number of connections tokeep in the connection pool.
-a value--max-connections=value
Optional
none The maximum number of connections tokeep in the connection pool.
-p value--pooling-scheme=value
Optional
none The connection pooling algorithm to beused. Valid values are:
● WAIT: The --max-connectionsparameter is strictly respected.
● DYNAMIC: The number of connectionscan occasionally exceed the configuredmaximum number.
-q value Optional
none An SQL query that should be run directlyafter a connection has been created.
-Ckey=value Optional
none A JDBC connection property that is addedto the existing list of connection properties.Several properties can be specified. (Can bespecified multiple times with differentkeys.)
522
TIBCO Spotfire® Server and Environment Installation and Administration
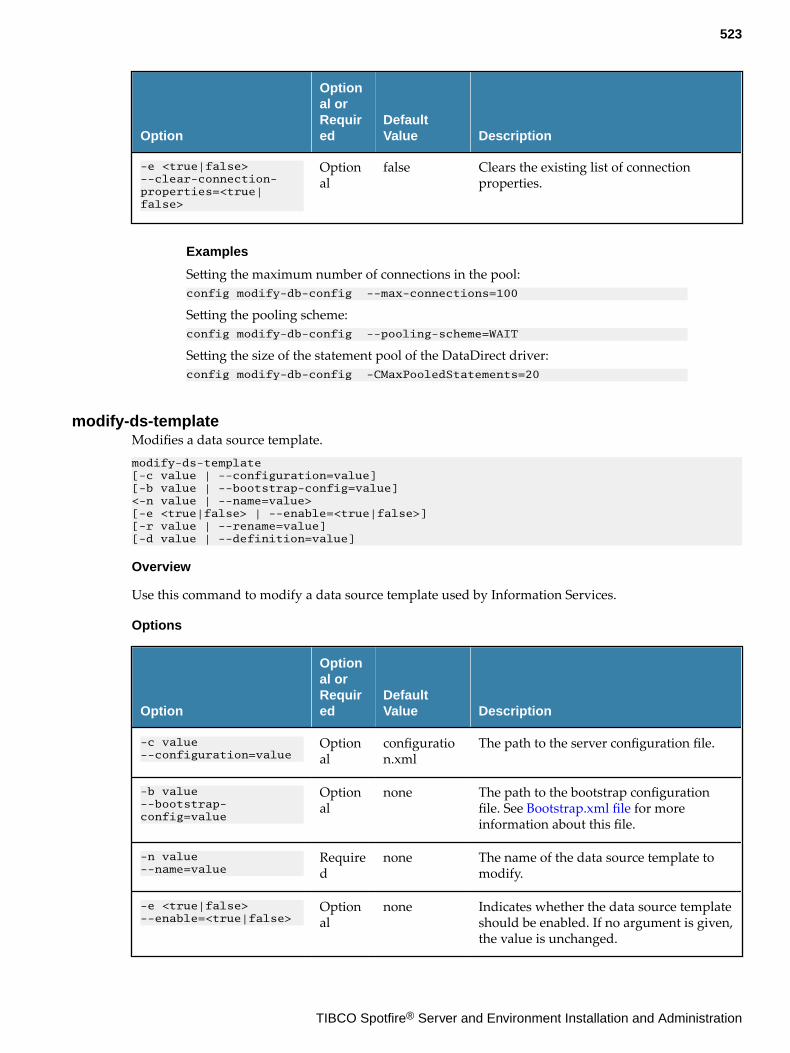
Option
Optional orRequired
DefaultValue Description
-e <true|false>--clear-connection-properties=<true|false>
Optional
false Clears the existing list of connectionproperties.
Examples
Setting the maximum number of connections in the pool:config modify-db-config --max-connections=100
Setting the pooling scheme:config modify-db-config --pooling-scheme=WAIT
Setting the size of the statement pool of the DataDirect driver:config modify-db-config -CMaxPooledStatements=20
modify-ds-templateModifies a data source template.modify-ds-template [-c value | --configuration=value] [-b value | --bootstrap-config=value] <-n value | --name=value> [-e <true|false> | --enable=<true|false>] [-r value | --rename=value] [-d value | --definition=value]
Overview
Use this command to modify a data source template used by Information Services.
Options
Option
Optional orRequired
DefaultValue Description
-c value--configuration=value
Optional
configuration.xml
The path to the server configuration file.
-b value--bootstrap-config=value
Optional
none The path to the bootstrap configurationfile. See Bootstrap.xml file for moreinformation about this file.
-n value--name=value
Required
none The name of the data source template tomodify.
-e <true|false>--enable=<true|false>
Optional
none Indicates whether the data source templateshould be enabled. If no argument is given,the value is unchanged.
523
TIBCO Spotfire® Server and Environment Installation and Administration
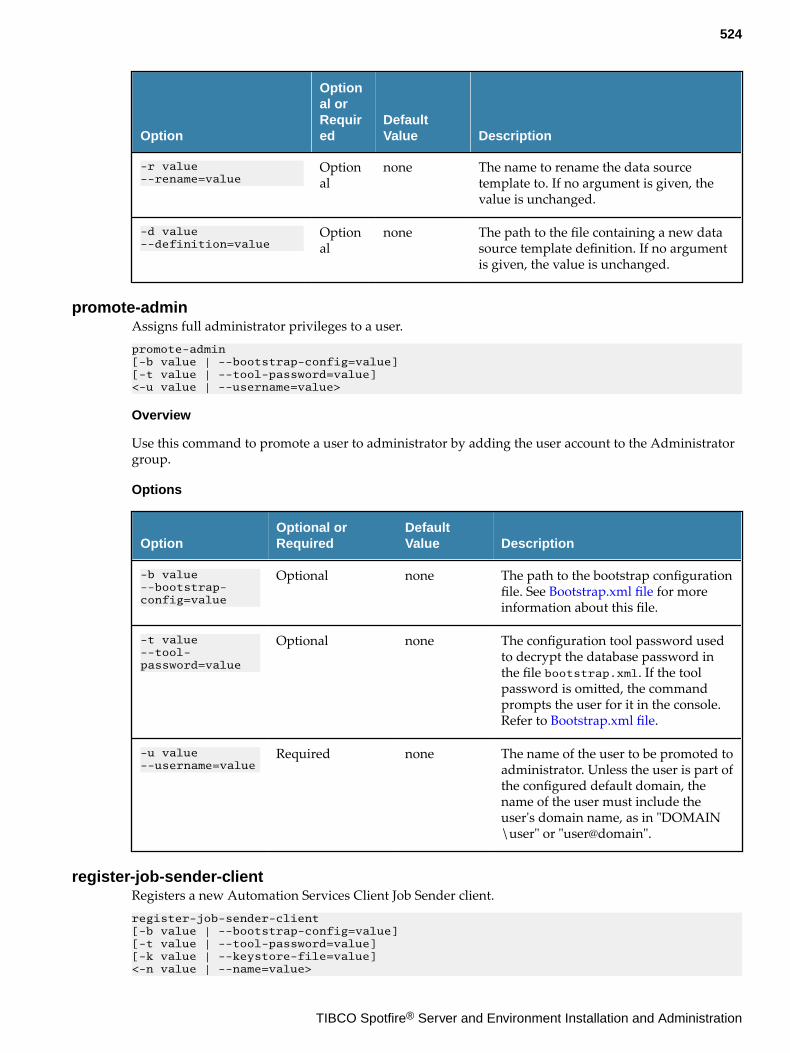
Option
Optional orRequired
DefaultValue Description
-r value--rename=value
Optional
none The name to rename the data sourcetemplate to. If no argument is given, thevalue is unchanged.
-d value--definition=value
Optional
none The path to the file containing a new datasource template definition. If no argumentis given, the value is unchanged.
promote-adminAssigns full administrator privileges to a user.promote-admin [-b value | --bootstrap-config=value] [-t value | --tool-password=value] <-u value | --username=value>
Overview
Use this command to promote a user to administrator by adding the user account to the Administratorgroup.
Options
OptionOptional orRequired
DefaultValue Description
-b value--bootstrap-config=value
Optional none The path to the bootstrap configurationfile. See Bootstrap.xml file for moreinformation about this file.
-t value--tool-password=value
Optional none The configuration tool password usedto decrypt the database password inthe file bootstrap.xml. If the toolpassword is omitted, the commandprompts the user for it in the console.Refer to Bootstrap.xml file.
-u value--username=value
Required none The name of the user to be promoted toadministrator. Unless the user is part ofthe configured default domain, thename of the user must include theuser's domain name, as in "DOMAIN\user" or "user@domain".
register-job-sender-clientRegisters a new Automation Services Client Job Sender client.register-job-sender-client [-b value | --bootstrap-config=value] [-t value | --tool-password=value] [-k value | --keystore-file=value] <-n value | --name=value>
524
TIBCO Spotfire® Server and Environment Installation and Administration
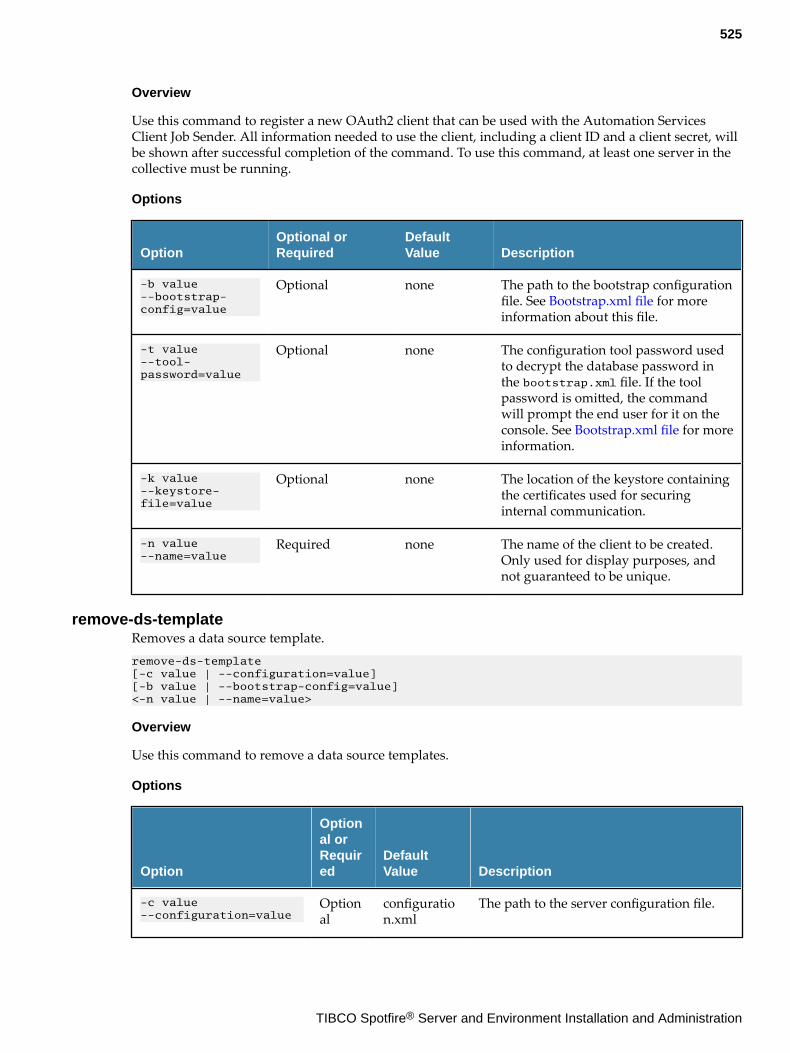
Overview
Use this command to register a new OAuth2 client that can be used with the Automation ServicesClient Job Sender. All information needed to use the client, including a client ID and a client secret, willbe shown after successful completion of the command. To use this command, at least one server in thecollective must be running.
Options
OptionOptional orRequired
DefaultValue Description
-b value--bootstrap-config=value
Optional none The path to the bootstrap configurationfile. See Bootstrap.xml file for moreinformation about this file.
-t value--tool-password=value
Optional none The configuration tool password usedto decrypt the database password inthe bootstrap.xml file. If the toolpassword is omitted, the commandwill prompt the end user for it on theconsole. See Bootstrap.xml file for moreinformation.
-k value--keystore-file=value
Optional none The location of the keystore containingthe certificates used for securinginternal communication.
-n value--name=value
Required none The name of the client to be created.Only used for display purposes, andnot guaranteed to be unique.
remove-ds-templateRemoves a data source template.remove-ds-template [-c value | --configuration=value] [-b value | --bootstrap-config=value] <-n value | --name=value>
Overview
Use this command to remove a data source templates.
Options
Option
Optional orRequired
DefaultValue Description
-c value--configuration=value
Optional
configuration.xml
The path to the server configuration file.
525
TIBCO Spotfire® Server and Environment Installation and Administration
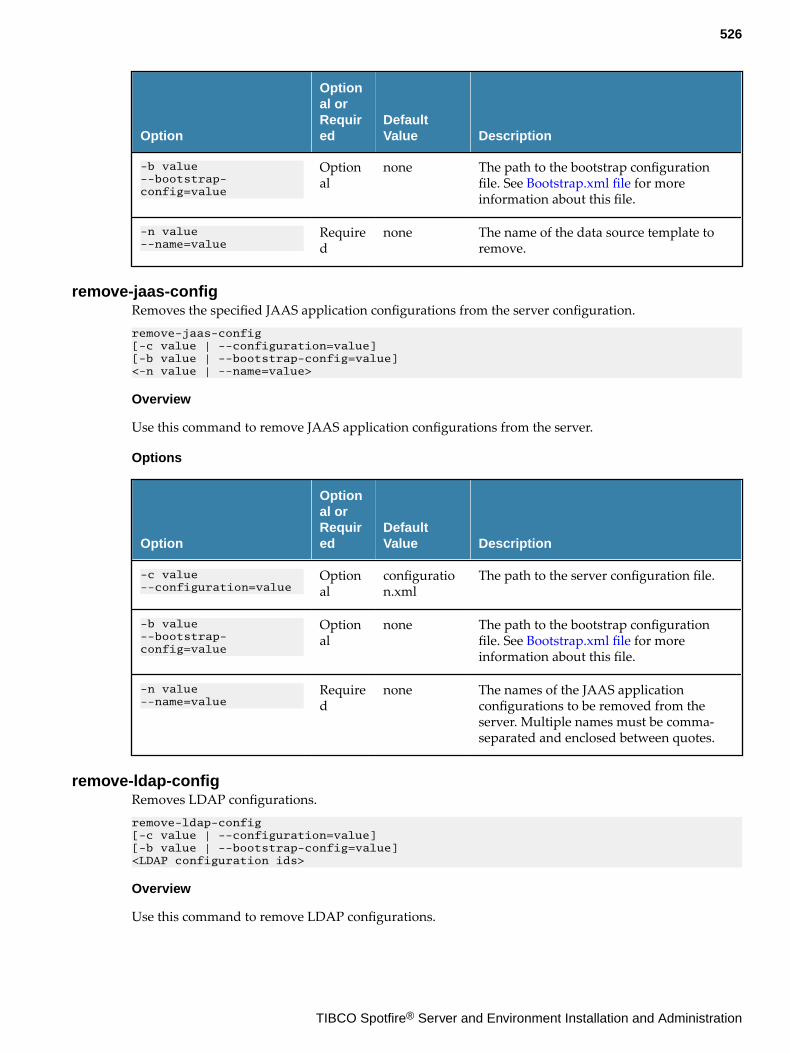
Option
Optional orRequired
DefaultValue Description
-b value--bootstrap-config=value
Optional
none The path to the bootstrap configurationfile. See Bootstrap.xml file for moreinformation about this file.
-n value--name=value
Required
none The name of the data source template toremove.
remove-jaas-configRemoves the specified JAAS application configurations from the server configuration.remove-jaas-config [-c value | --configuration=value] [-b value | --bootstrap-config=value] <-n value | --name=value>
Overview
Use this command to remove JAAS application configurations from the server.
Options
Option
Optional orRequired
DefaultValue Description
-c value--configuration=value
Optional
configuration.xml
The path to the server configuration file.
-b value--bootstrap-config=value
Optional
none The path to the bootstrap configurationfile. See Bootstrap.xml file for moreinformation about this file.
-n value--name=value
Required
none The names of the JAAS applicationconfigurations to be removed from theserver. Multiple names must be comma-separated and enclosed between quotes.
remove-ldap-configRemoves LDAP configurations.remove-ldap-config [-c value | --configuration=value] [-b value | --bootstrap-config=value] <LDAP configuration ids>
Overview
Use this command to remove LDAP configurations.
526
TIBCO Spotfire® Server and Environment Installation and Administration
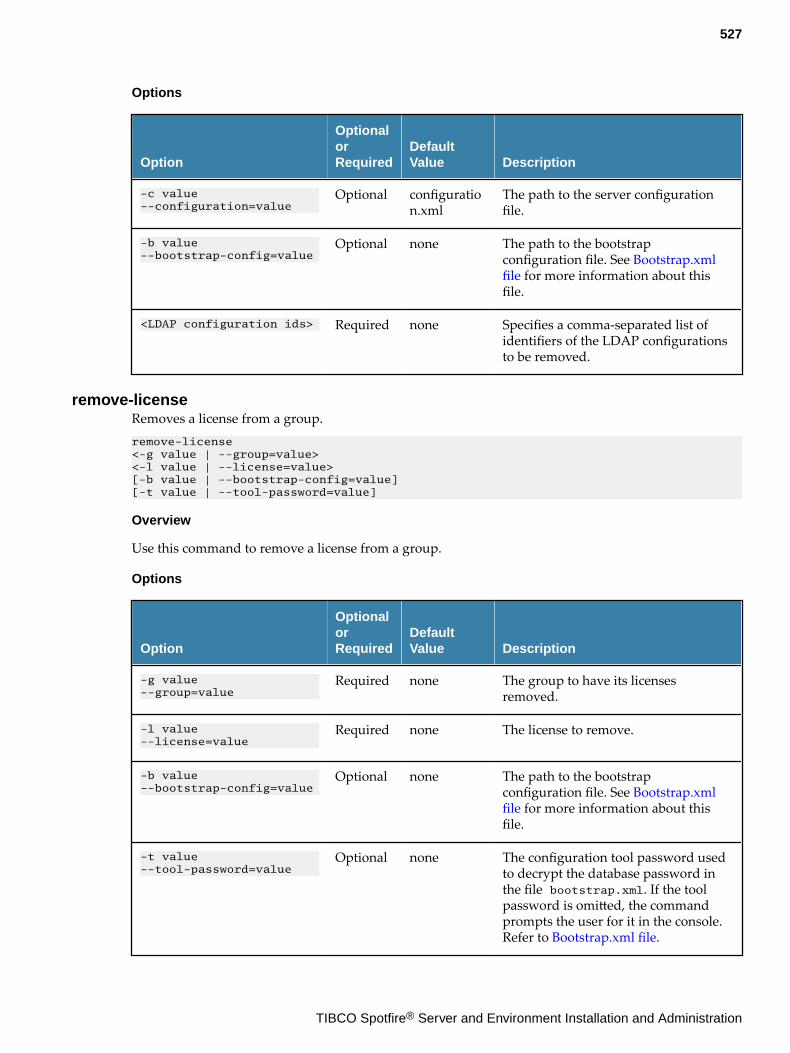
Options
Option
OptionalorRequired
DefaultValue Description
-c value--configuration=value
Optional configuration.xml
The path to the server configurationfile.
-b value--bootstrap-config=value
Optional none The path to the bootstrapconfiguration file. See Bootstrap.xmlfile for more information about thisfile.
<LDAP configuration ids> Required none Specifies a comma-separated list ofidentifiers of the LDAP configurationsto be removed.
remove-licenseRemoves a license from a group.remove-license <-g value | --group=value> <-l value | --license=value> [-b value | --bootstrap-config=value] [-t value | --tool-password=value]
Overview
Use this command to remove a license from a group.
Options
Option
OptionalorRequired
DefaultValue Description
-g value--group=value
Required none The group to have its licensesremoved.
-l value--license=value
Required none The license to remove.
-b value--bootstrap-config=value
Optional none The path to the bootstrapconfiguration file. See Bootstrap.xmlfile for more information about thisfile.
-t value--tool-password=value
Optional none The configuration tool password usedto decrypt the database password inthe file bootstrap.xml. If the toolpassword is omitted, the commandprompts the user for it in the console.Refer to Bootstrap.xml file.
527
TIBCO Spotfire® Server and Environment Installation and Administration
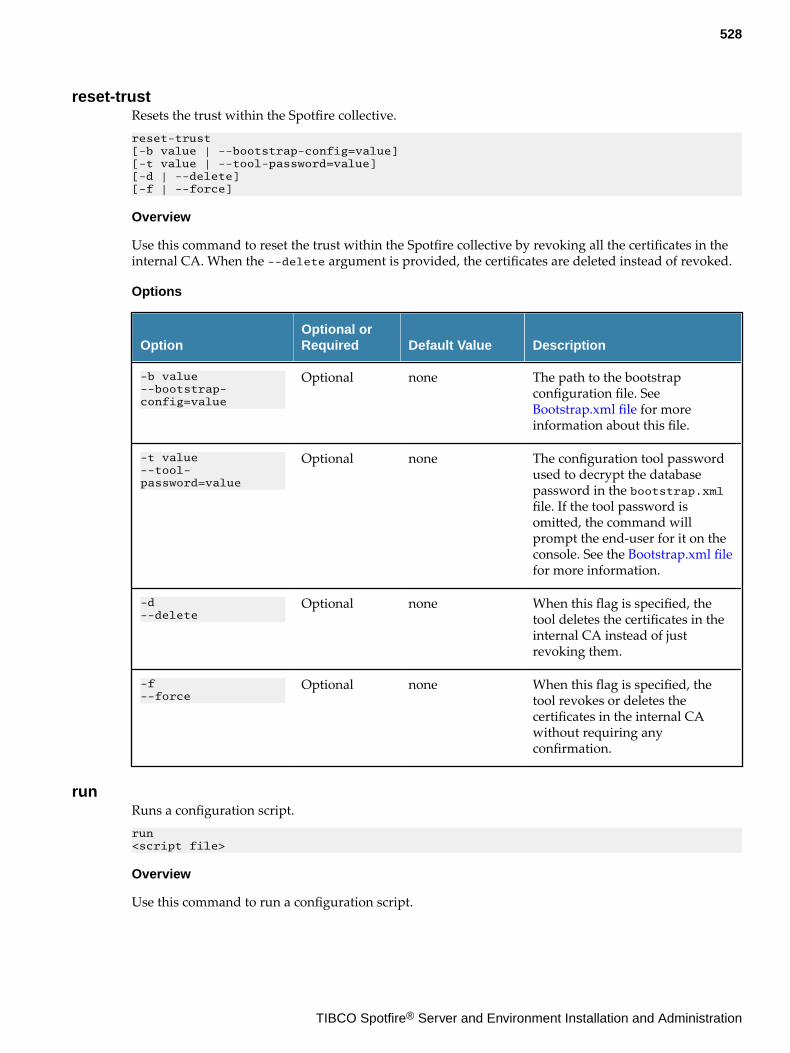
reset-trustResets the trust within the Spotfire collective.reset-trust [-b value | --bootstrap-config=value] [-t value | --tool-password=value] [-d | --delete] [-f | --force]
Overview
Use this command to reset the trust within the Spotfire collective by revoking all the certificates in theinternal CA. When the --delete argument is provided, the certificates are deleted instead of revoked.
Options
OptionOptional orRequired Default Value Description
-b value--bootstrap-config=value
Optional none The path to the bootstrapconfiguration file. See Bootstrap.xml file for moreinformation about this file.
-t value--tool-password=value
Optional none The configuration tool passwordused to decrypt the databasepassword in the bootstrap.xmlfile. If the tool password isomitted, the command willprompt the end-user for it on theconsole. See the Bootstrap.xml filefor more information.
-d--delete
Optional none When this flag is specified, thetool deletes the certificates in theinternal CA instead of justrevoking them.
-f--force
Optional none When this flag is specified, thetool revokes or deletes thecertificates in the internal CAwithout requiring anyconfirmation.
runRuns a configuration script.run <script file>
Overview
Use this command to run a configuration script.
528
TIBCO Spotfire® Server and Environment Installation and Administration
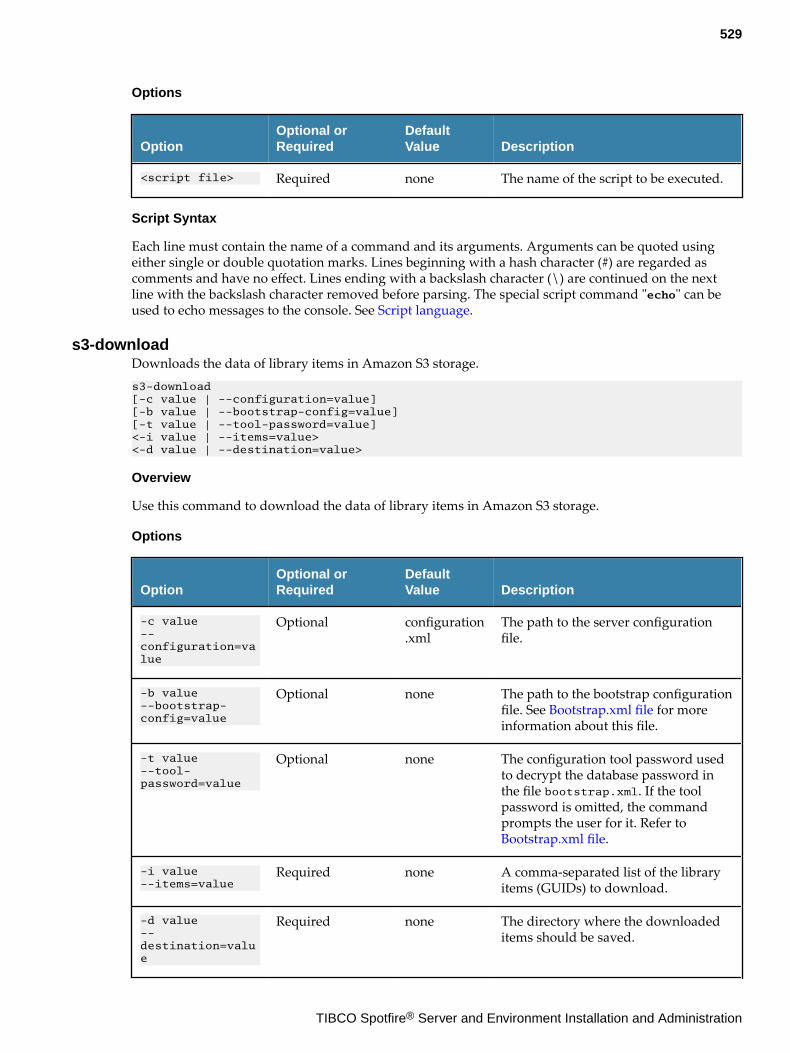
Options
OptionOptional orRequired
DefaultValue Description
<script file> Required none The name of the script to be executed.
Script Syntax
Each line must contain the name of a command and its arguments. Arguments can be quoted usingeither single or double quotation marks. Lines beginning with a hash character (#) are regarded ascomments and have no effect. Lines ending with a backslash character (\) are continued on the nextline with the backslash character removed before parsing. The special script command "echo" can beused to echo messages to the console. See Script language.
s3-downloadDownloads the data of library items in Amazon S3 storage.s3-download [-c value | --configuration=value] [-b value | --bootstrap-config=value] [-t value | --tool-password=value] <-i value | --items=value> <-d value | --destination=value>
Overview
Use this command to download the data of library items in Amazon S3 storage.
Options
OptionOptional orRequired
DefaultValue Description
-c value--configuration=value
Optional configuration.xml
The path to the server configurationfile.
-b value--bootstrap-config=value
Optional none The path to the bootstrap configurationfile. See Bootstrap.xml file for moreinformation about this file.
-t value--tool-password=value
Optional none The configuration tool password usedto decrypt the database password inthe file bootstrap.xml. If the toolpassword is omitted, the commandprompts the user for it. Refer to Bootstrap.xml file.
-i value--items=value
Required none A comma-separated list of the libraryitems (GUIDs) to download.
-d value--destination=value
Required none The directory where the downloadeditems should be saved.
529
TIBCO Spotfire® Server and Environment Installation and Administration
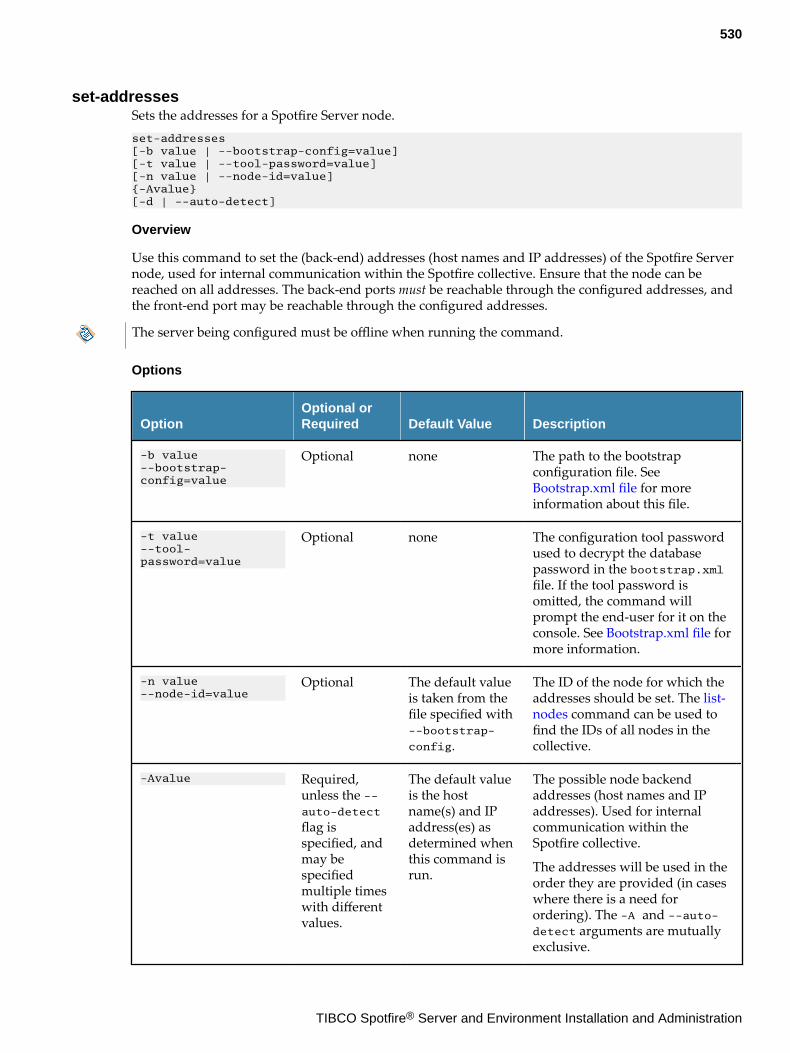
set-addressesSets the addresses for a Spotfire Server node.set-addresses [-b value | --bootstrap-config=value] [-t value | --tool-password=value] [-n value | --node-id=value] {-Avalue} [-d | --auto-detect]
Overview
Use this command to set the (back-end) addresses (host names and IP addresses) of the Spotfire Servernode, used for internal communication within the Spotfire collective. Ensure that the node can bereached on all addresses. The back-end ports must be reachable through the configured addresses, andthe front-end port may be reachable through the configured addresses.
The server being configured must be offline when running the command.
Options
OptionOptional orRequired Default Value Description
-b value--bootstrap-config=value
Optional none The path to the bootstrapconfiguration file. See Bootstrap.xml file for moreinformation about this file.
-t value--tool-password=value
Optional none The configuration tool passwordused to decrypt the databasepassword in the bootstrap.xmlfile. If the tool password isomitted, the command willprompt the end-user for it on theconsole. See Bootstrap.xml file formore information.
-n value--node-id=value
Optional The default valueis taken from thefile specified with--bootstrap-
config.
The ID of the node for which theaddresses should be set. The list-nodes command can be used tofind the IDs of all nodes in thecollective.
-Avalue Required,unless the --auto-detect
flag isspecified, andmay bespecifiedmultiple timeswith differentvalues.
The default valueis the hostname(s) and IPaddress(es) asdetermined whenthis command isrun.
The possible node backendaddresses (host names and IPaddresses). Used for internalcommunication within theSpotfire collective.
The addresses will be used in theorder they are provided (in caseswhere there is a need forordering). The -A and --auto-detect arguments are mutuallyexclusive.
530
TIBCO Spotfire® Server and Environment Installation and Administration
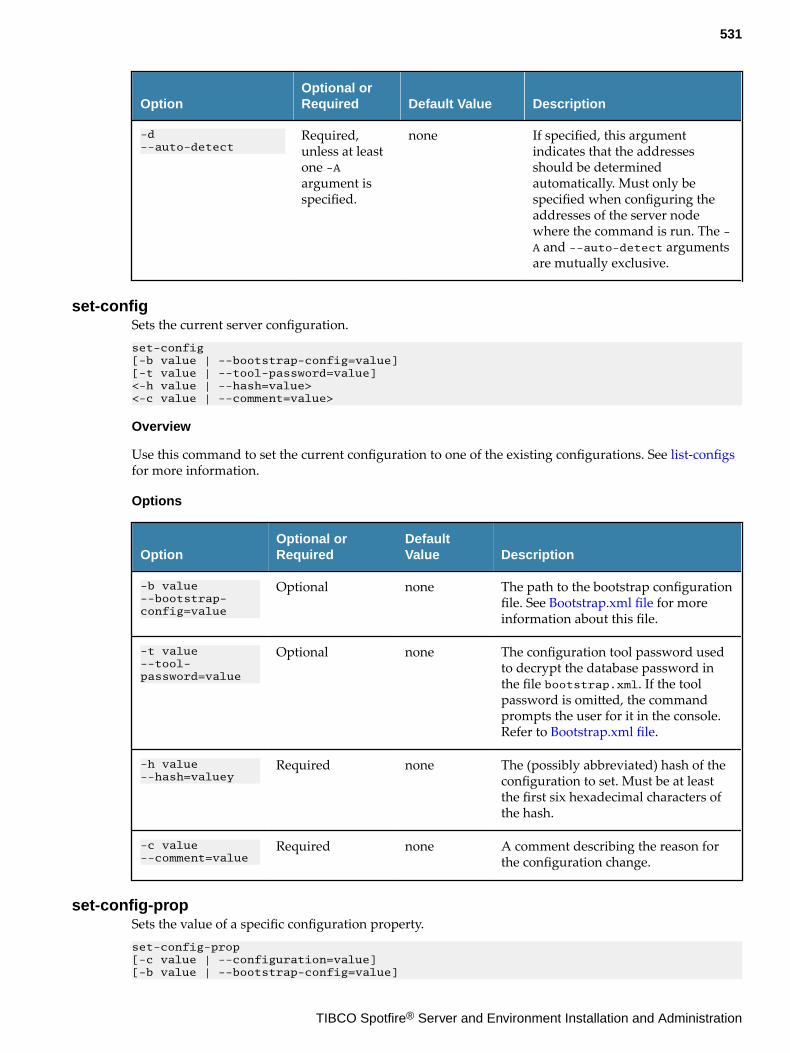
OptionOptional orRequired Default Value Description
-d--auto-detect
Required,unless at leastone -Aargument isspecified.
none If specified, this argumentindicates that the addressesshould be determinedautomatically. Must only bespecified when configuring theaddresses of the server nodewhere the command is run. The -A and --auto-detect argumentsare mutually exclusive.
set-configSets the current server configuration.set-config [-b value | --bootstrap-config=value] [-t value | --tool-password=value] <-h value | --hash=value> <-c value | --comment=value>
Overview
Use this command to set the current configuration to one of the existing configurations. See list-configsfor more information.
Options
OptionOptional orRequired
DefaultValue Description
-b value--bootstrap-config=value
Optional none The path to the bootstrap configurationfile. See Bootstrap.xml file for moreinformation about this file.
-t value--tool-password=value
Optional none The configuration tool password usedto decrypt the database password inthe file bootstrap.xml. If the toolpassword is omitted, the commandprompts the user for it in the console.Refer to Bootstrap.xml file.
-h value--hash=valuey
Required none The (possibly abbreviated) hash of theconfiguration to set. Must be at leastthe first six hexadecimal characters ofthe hash.
-c value--comment=value
Required none A comment describing the reason forthe configuration change.
set-config-propSets the value of a specific configuration property.set-config-prop [-c value | --configuration=value][-b value | --bootstrap-config=value]
531
TIBCO Spotfire® Server and Environment Installation and Administration

<-n value | --name=value> <-v value | --value=value>[-e <true|false> | --encrypt=<true|false>]
Overview
Use this command to set the value of a specific configuration property. There must be at most one suchproperty and the value of the property must be representable as a string.
Options
Option
OptionalorRequired
DefaultValue Description
-c value--configuration=value
Optional
configuration.xml
The path to the server configurationfile.
-b value--bootstrap-config=value
Optional
none The path to the bootstrap configurationfile. See Bootstrap.xml file for moreinformation about this file.
-n value--name=value
Required
none The name of the configurationproperty.
-v value--value=value
Required
none The new value of the configurationproperty. This will replace any existingvalue.
-e <true|false>--encrypt=<true|false>
Optional
false Indicates whether the value should bestored encrypted.
Example
To set the absolute session timeout to one hour:config set-config-prop --name="security.absolute-session-timeout" --value="60"
set-db-configSets the common database connection configuration.set-db-config [-c value | --configuration=value] [-b value | --bootstrap-config=value] [-l value | --login-timeout=value] [-o value | --connection-timeout=value][-i value | --min-connections=value] [-a value | --max-connections=value] [-p value | --pooling-scheme=value] [-q value] {-Ckey=value}
Overview
Use this command to set the common configuration for the connection to the Spotfire Server database.This configuration (which affects all servers) is merged with the configuration in the bootstrap.xmlfile on each server.
532
TIBCO Spotfire® Server and Environment Installation and Administration
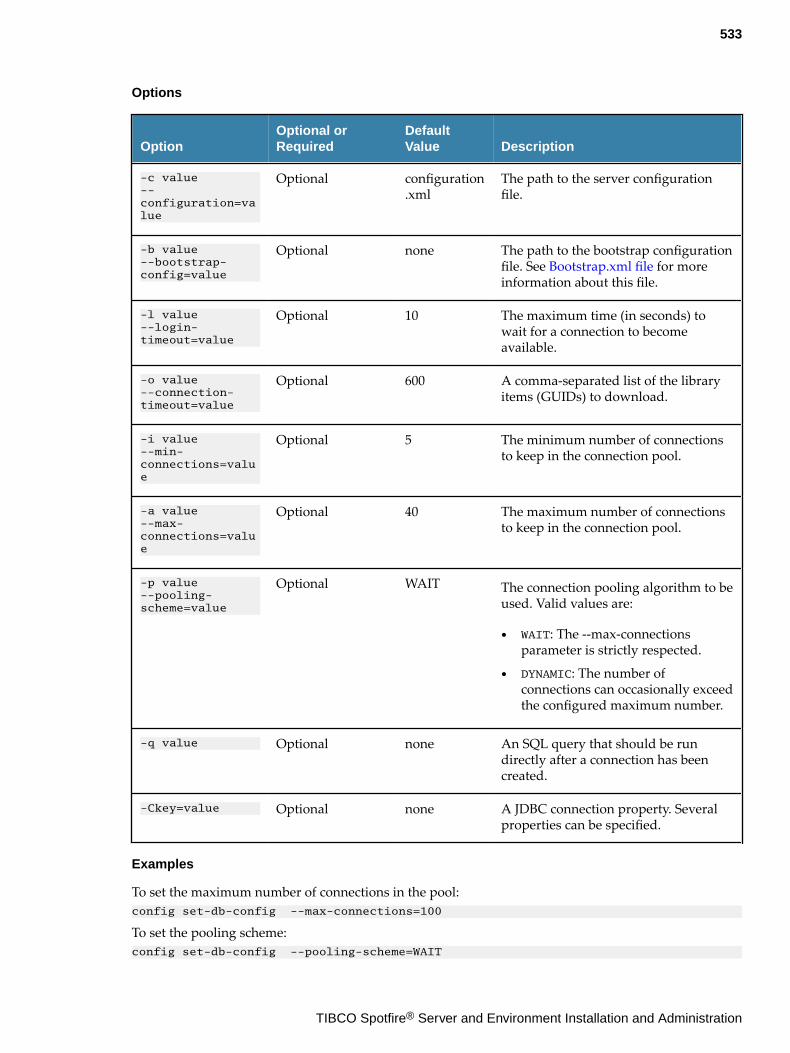
Options
OptionOptional orRequired
DefaultValue Description
-c value--configuration=value
Optional configuration.xml
The path to the server configurationfile.
-b value--bootstrap-config=value
Optional none The path to the bootstrap configurationfile. See Bootstrap.xml file for moreinformation about this file.
-l value--login-timeout=value
Optional 10 The maximum time (in seconds) towait for a connection to becomeavailable.
-o value--connection-timeout=value
Optional 600 A comma-separated list of the libraryitems (GUIDs) to download.
-i value--min-connections=value
Optional 5 The minimum number of connectionsto keep in the connection pool.
-a value--max-connections=value
Optional 40 The maximum number of connectionsto keep in the connection pool.
-p value--pooling-scheme=value
Optional WAIT The connection pooling algorithm to beused. Valid values are:
● WAIT: The --max-connectionsparameter is strictly respected.
● DYNAMIC: The number ofconnections can occasionally exceedthe configured maximum number.
-q value Optional none An SQL query that should be rundirectly after a connection has beencreated.
-Ckey=value Optional none A JDBC connection property. Severalproperties can be specified.
Examples
To set the maximum number of connections in the pool:config set-db-config --max-connections=100
To set the pooling scheme:config set-db-config --pooling-scheme=WAIT
533
TIBCO Spotfire® Server and Environment Installation and Administration
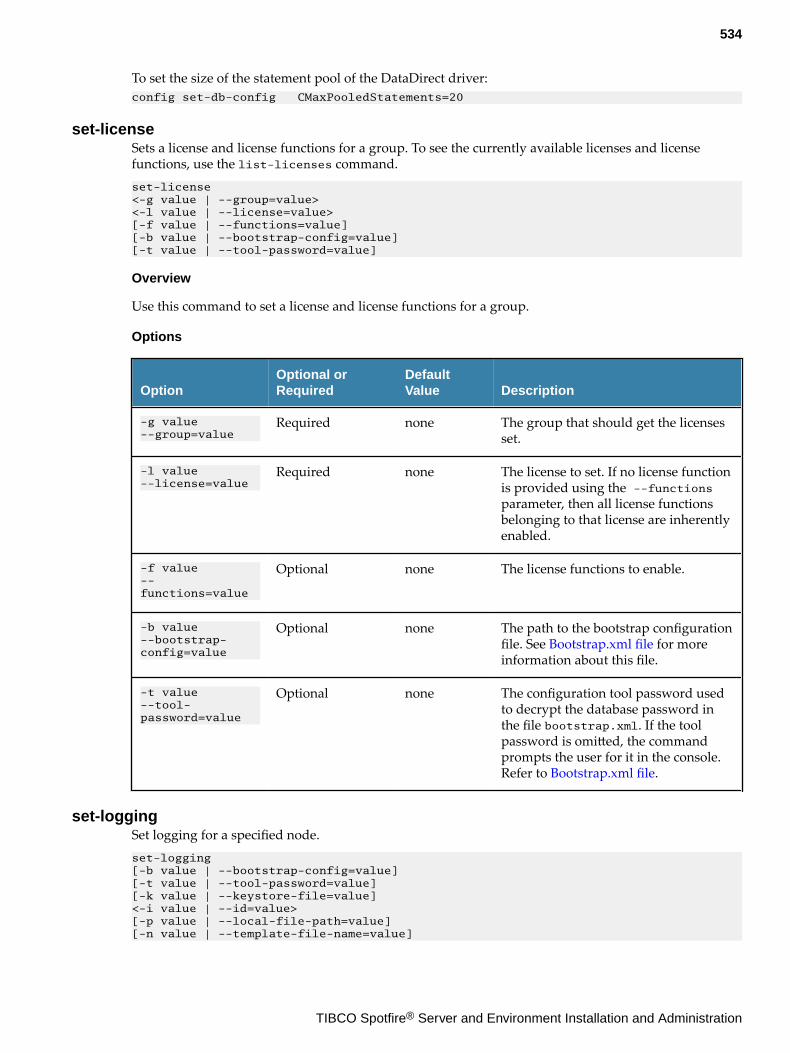
To set the size of the statement pool of the DataDirect driver:config set-db-config CMaxPooledStatements=20
set-licenseSets a license and license functions for a group. To see the currently available licenses and licensefunctions, use the list-licenses command.set-license <-g value | --group=value> <-l value | --license=value> [-f value | --functions=value] [-b value | --bootstrap-config=value] [-t value | --tool-password=value]
Overview
Use this command to set a license and license functions for a group.
Options
OptionOptional orRequired
DefaultValue Description
-g value--group=value
Required none The group that should get the licensesset.
-l value--license=value
Required none The license to set. If no license functionis provided using the --functionsparameter, then all license functionsbelonging to that license are inherentlyenabled.
-f value--functions=value
Optional none The license functions to enable.
-b value--bootstrap-config=value
Optional none The path to the bootstrap configurationfile. See Bootstrap.xml file for moreinformation about this file.
-t value--tool-password=value
Optional none The configuration tool password usedto decrypt the database password inthe file bootstrap.xml. If the toolpassword is omitted, the commandprompts the user for it in the console.Refer to Bootstrap.xml file.
set-loggingSet logging for a specified node.set-logging [-b value | --bootstrap-config=value] [-t value | --tool-password=value] [-k value | --keystore-file=value] <-i value | --id=value> [-p value | --local-file-path=value] [-n value | --template-file-name=value]
534
TIBCO Spotfire® Server and Environment Installation and Administration
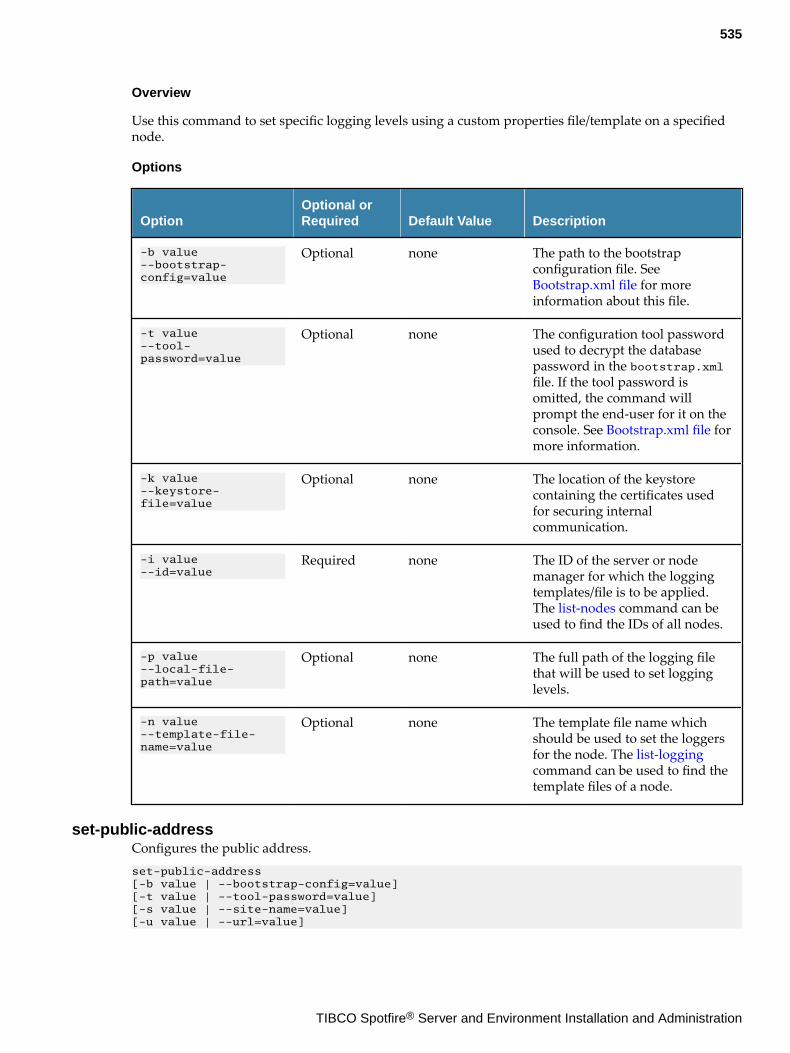
Overview
Use this command to set specific logging levels using a custom properties file/template on a specifiednode.
Options
OptionOptional orRequired Default Value Description
-b value--bootstrap-config=value
Optional none The path to the bootstrapconfiguration file. See Bootstrap.xml file for moreinformation about this file.
-t value--tool-password=value
Optional none The configuration tool passwordused to decrypt the databasepassword in the bootstrap.xmlfile. If the tool password isomitted, the command willprompt the end-user for it on theconsole. See Bootstrap.xml file formore information.
-k value--keystore-file=value
Optional none The location of the keystorecontaining the certificates usedfor securing internalcommunication.
-i value--id=value
Required none The ID of the server or nodemanager for which the loggingtemplates/file is to be applied.The list-nodes command can beused to find the IDs of all nodes.
-p value--local-file-path=value
Optional none The full path of the logging filethat will be used to set logginglevels.
-n value--template-file-name=value
Optional none The template file name whichshould be used to set the loggersfor the node. The list-loggingcommand can be used to find thetemplate files of a node.
set-public-addressConfigures the public address.set-public-address [-b value | --bootstrap-config=value] [-t value | --tool-password=value] [-s value | --site-name=value] [-u value | --url=value]
535
TIBCO Spotfire® Server and Environment Installation and Administration
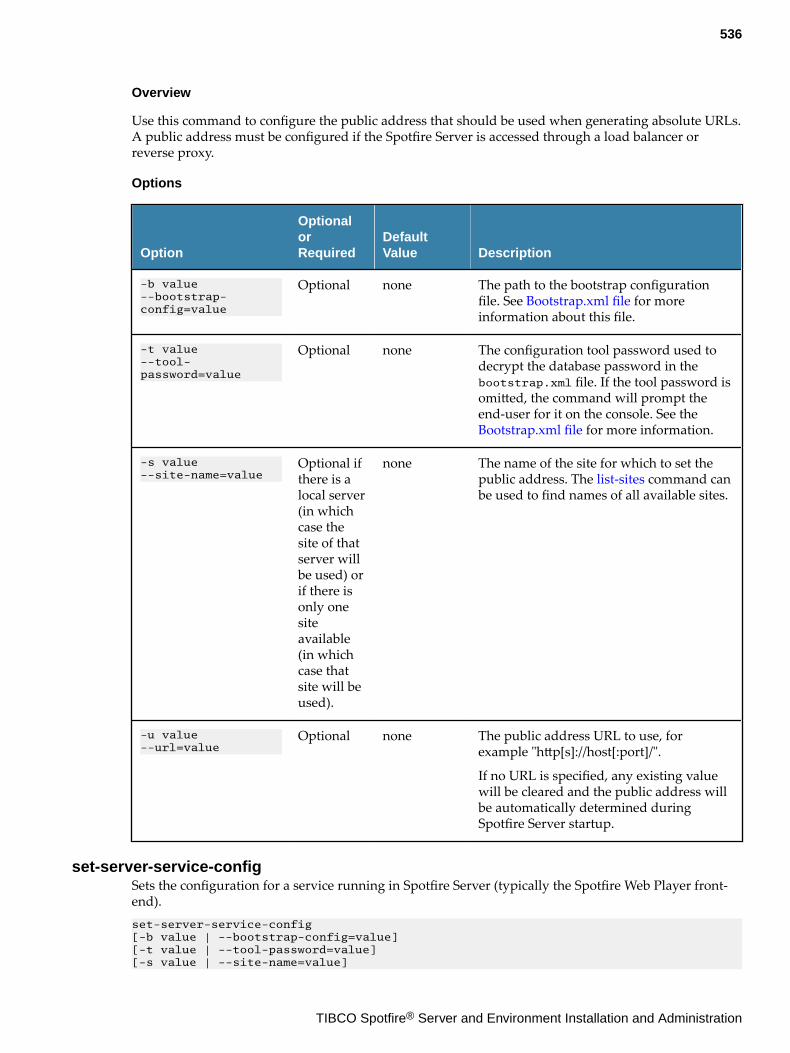
Overview
Use this command to configure the public address that should be used when generating absolute URLs.A public address must be configured if the Spotfire Server is accessed through a load balancer orreverse proxy.
Options
Option
OptionalorRequired
DefaultValue Description
-b value--bootstrap-config=value
Optional none The path to the bootstrap configurationfile. See Bootstrap.xml file for moreinformation about this file.
-t value--tool-password=value
Optional none The configuration tool password used todecrypt the database password in thebootstrap.xml file. If the tool password isomitted, the command will prompt theend-user for it on the console. See the Bootstrap.xml file for more information.
-s value--site-name=value
Optional ifthere is alocal server(in whichcase thesite of thatserver willbe used) orif there isonly onesiteavailable(in whichcase thatsite will beused).
none The name of the site for which to set thepublic address. The list-sites command canbe used to find names of all available sites.
-u value--url=value
Optional none The public address URL to use, forexample "http[s]://host[:port]/".
If no URL is specified, any existing valuewill be cleared and the public address willbe automatically determined duringSpotfire Server startup.
set-server-service-configSets the configuration for a service running in Spotfire Server (typically the Spotfire Web Player front-end).set-server-service-config [-b value | --bootstrap-config=value] [-t value | --tool-password=value][-s value | --site-name=value]
536
TIBCO Spotfire® Server and Environment Installation and Administration
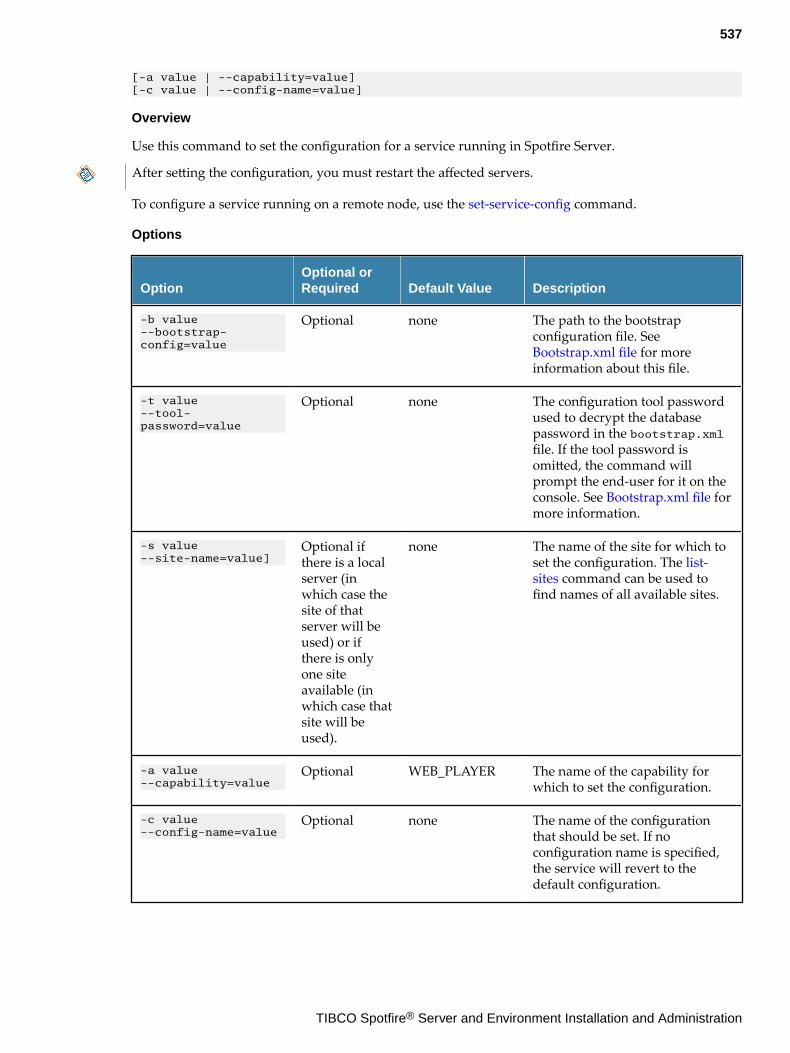
[-a value | --capability=value] [-c value | --config-name=value]
Overview
Use this command to set the configuration for a service running in Spotfire Server.
After setting the configuration, you must restart the affected servers.
To configure a service running on a remote node, use the set-service-config command.
Options
OptionOptional orRequired Default Value Description
-b value--bootstrap-config=value
Optional none The path to the bootstrapconfiguration file. See Bootstrap.xml file for moreinformation about this file.
-t value--tool-password=value
Optional none The configuration tool passwordused to decrypt the databasepassword in the bootstrap.xmlfile. If the tool password isomitted, the command willprompt the end-user for it on theconsole. See Bootstrap.xml file formore information.
-s value--site-name=value]
Optional ifthere is a localserver (inwhich case thesite of thatserver will beused) or ifthere is onlyone siteavailable (inwhich case thatsite will beused).
none The name of the site for which toset the configuration. The list-sites command can be used tofind names of all available sites.
-a value--capability=value
Optional WEB_PLAYER The name of the capability forwhich to set the configuration.
-c value--config-name=value
Optional none The name of the configurationthat should be set. If noconfiguration name is specified,the service will revert to thedefault configuration.
537
TIBCO Spotfire® Server and Environment Installation and Administration
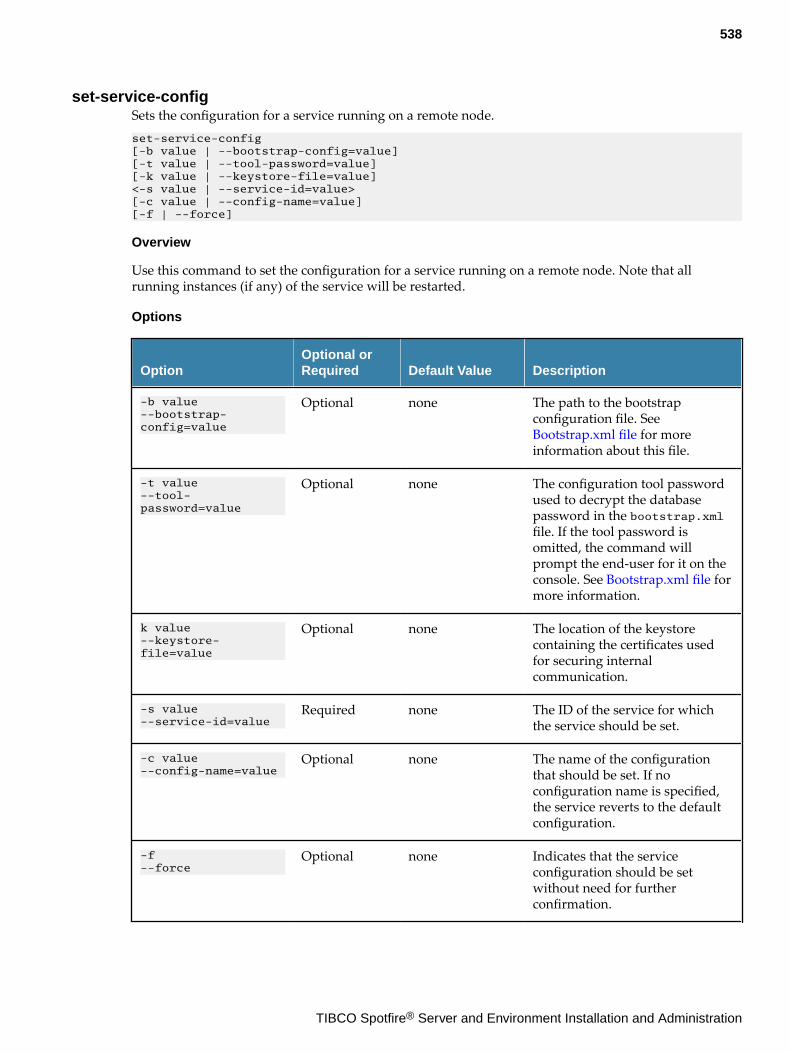
set-service-configSets the configuration for a service running on a remote node.set-service-config [-b value | --bootstrap-config=value] [-t value | --tool-password=value] [-k value | --keystore-file=value] <-s value | --service-id=value> [-c value | --config-name=value] [-f | --force]
Overview
Use this command to set the configuration for a service running on a remote node. Note that allrunning instances (if any) of the service will be restarted.
Options
OptionOptional orRequired Default Value Description
-b value--bootstrap-config=value
Optional none The path to the bootstrapconfiguration file. See Bootstrap.xml file for moreinformation about this file.
-t value--tool-password=value
Optional none The configuration tool passwordused to decrypt the databasepassword in the bootstrap.xmlfile. If the tool password isomitted, the command willprompt the end-user for it on theconsole. See Bootstrap.xml file formore information.
k value--keystore-file=value
Optional none The location of the keystorecontaining the certificates usedfor securing internalcommunication.
-s value--service-id=value
Required none The ID of the service for whichthe service should be set.
-c value--config-name=value
Optional none The name of the configurationthat should be set. If noconfiguration name is specified,the service reverts to the defaultconfiguration.
-f--force
Optional none Indicates that the serviceconfiguration should be setwithout need for furtherconfirmation.
538
TIBCO Spotfire® Server and Environment Installation and Administration
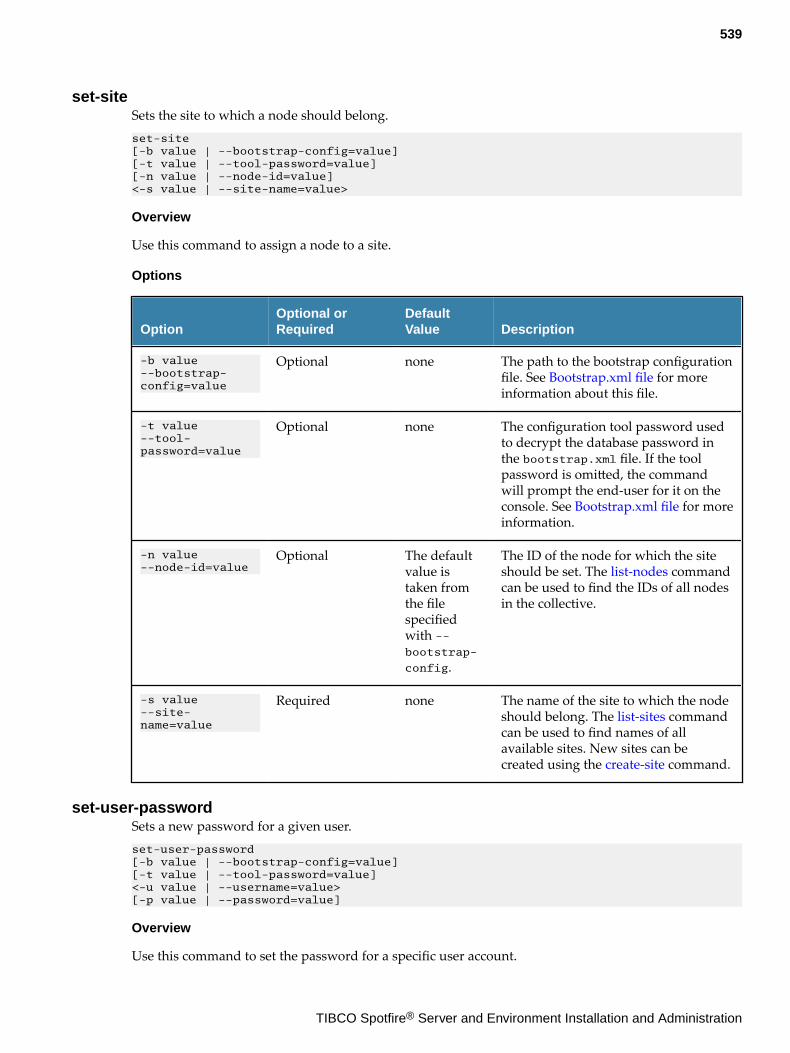
set-siteSets the site to which a node should belong.set-site [-b value | --bootstrap-config=value] [-t value | --tool-password=value] [-n value | --node-id=value] <-s value | --site-name=value>
Overview
Use this command to assign a node to a site.
Options
OptionOptional orRequired
DefaultValue Description
-b value--bootstrap-config=value
Optional none The path to the bootstrap configurationfile. See Bootstrap.xml file for moreinformation about this file.
-t value--tool-password=value
Optional none The configuration tool password usedto decrypt the database password inthe bootstrap.xml file. If the toolpassword is omitted, the commandwill prompt the end-user for it on theconsole. See Bootstrap.xml file for moreinformation.
-n value--node-id=value
Optional The defaultvalue istaken fromthe filespecifiedwith --bootstrap-
config.
The ID of the node for which the siteshould be set. The list-nodes commandcan be used to find the IDs of all nodesin the collective.
-s value--site-name=value
Required none The name of the site to which the nodeshould belong. The list-sites commandcan be used to find names of allavailable sites. New sites can becreated using the create-site command.
set-user-passwordSets a new password for a given user.set-user-password [-b value | --bootstrap-config=value] [-t value | --tool-password=value] <-u value | --username=value> [-p value | --password=value]
Overview
Use this command to set the password for a specific user account.
539
TIBCO Spotfire® Server and Environment Installation and Administration
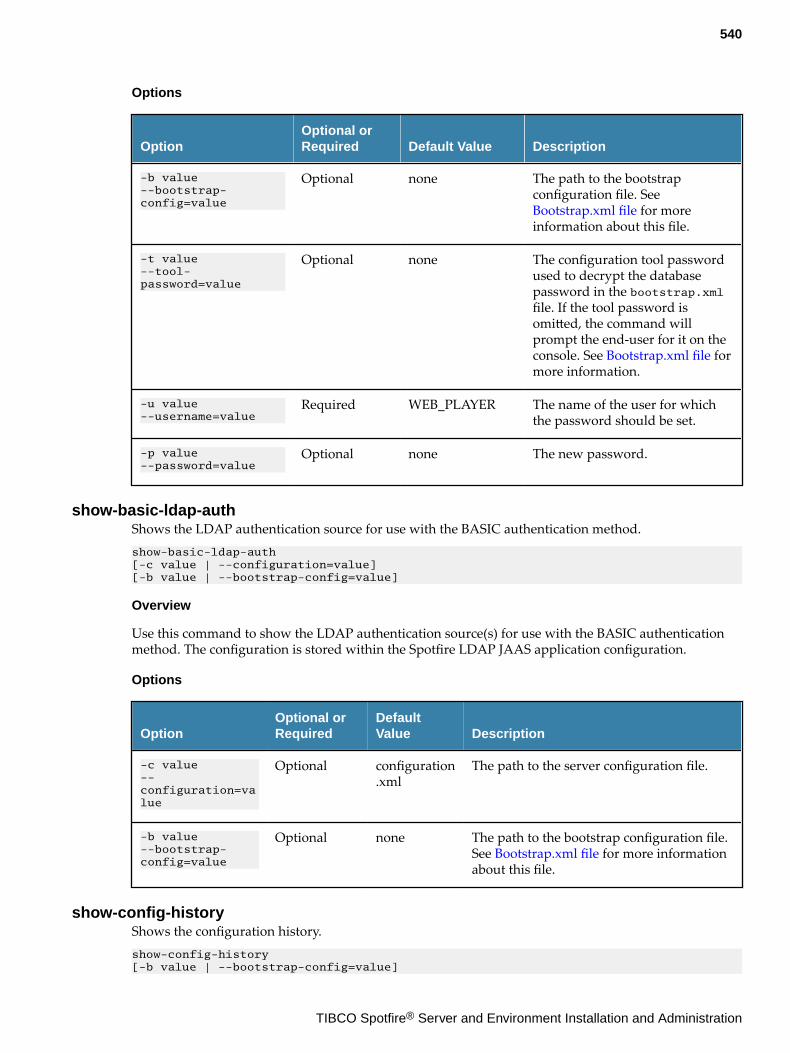
Options
OptionOptional orRequired Default Value Description
-b value--bootstrap-config=value
Optional none The path to the bootstrapconfiguration file. See Bootstrap.xml file for moreinformation about this file.
-t value--tool-password=value
Optional none The configuration tool passwordused to decrypt the databasepassword in the bootstrap.xmlfile. If the tool password isomitted, the command willprompt the end-user for it on theconsole. See Bootstrap.xml file formore information.
-u value--username=value
Required WEB_PLAYER The name of the user for whichthe password should be set.
-p value--password=value
Optional none The new password.
show-basic-ldap-authShows the LDAP authentication source for use with the BASIC authentication method.show-basic-ldap-auth [-c value | --configuration=value] [-b value | --bootstrap-config=value]
Overview
Use this command to show the LDAP authentication source(s) for use with the BASIC authenticationmethod. The configuration is stored within the Spotfire LDAP JAAS application configuration.
Options
OptionOptional orRequired
DefaultValue Description
-c value--configuration=value
Optional configuration.xml
The path to the server configuration file.
-b value--bootstrap-config=value
Optional none The path to the bootstrap configuration file.See Bootstrap.xml file for more informationabout this file.
show-config-historyShows the configuration history.show-config-history [-b value | --bootstrap-config=value]
540
TIBCO Spotfire® Server and Environment Installation and Administration
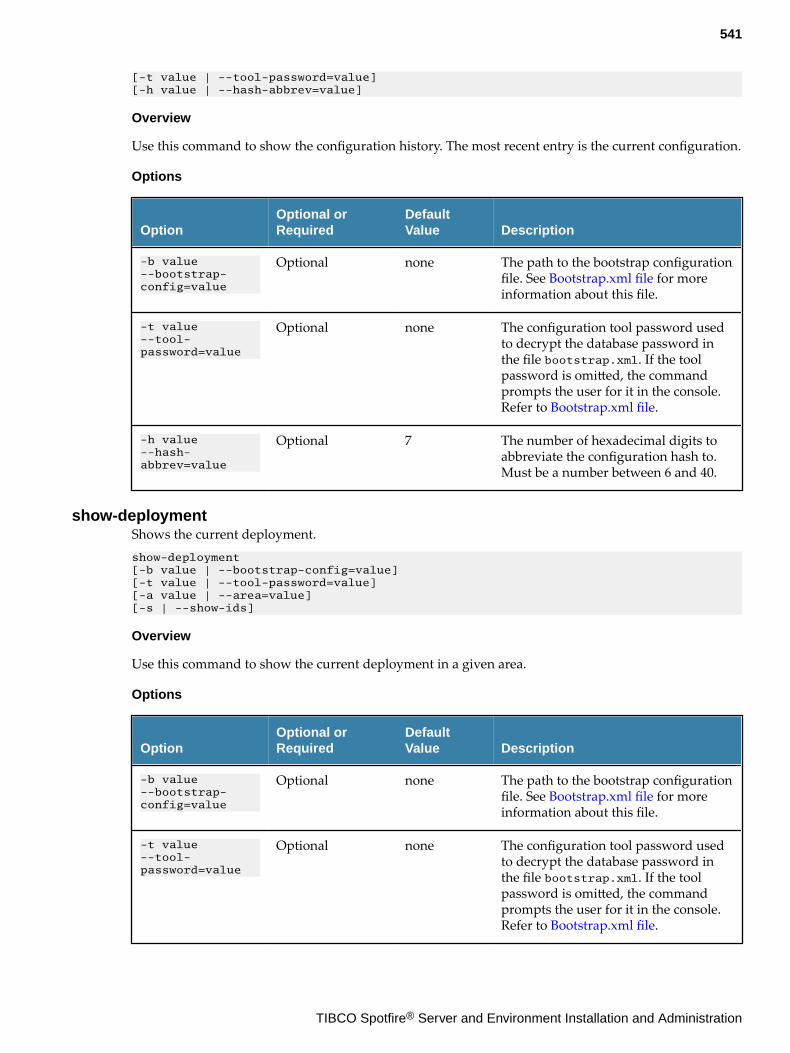
[-t value | --tool-password=value] [-h value | --hash-abbrev=value]
Overview
Use this command to show the configuration history. The most recent entry is the current configuration.
Options
OptionOptional orRequired
DefaultValue Description
-b value--bootstrap-config=value
Optional none The path to the bootstrap configurationfile. See Bootstrap.xml file for moreinformation about this file.
-t value--tool-password=value
Optional none The configuration tool password usedto decrypt the database password inthe file bootstrap.xml. If the toolpassword is omitted, the commandprompts the user for it in the console.Refer to Bootstrap.xml file.
-h value--hash-abbrev=value
Optional 7 The number of hexadecimal digits toabbreviate the configuration hash to.Must be a number between 6 and 40.
show-deploymentShows the current deployment.show-deployment [-b value | --bootstrap-config=value] [-t value | --tool-password=value] [-a value | --area=value] [-s | --show-ids]
Overview
Use this command to show the current deployment in a given area.
Options
OptionOptional orRequired
DefaultValue Description
-b value--bootstrap-config=value
Optional none The path to the bootstrap configurationfile. See Bootstrap.xml file for moreinformation about this file.
-t value--tool-password=value
Optional none The configuration tool password usedto decrypt the database password inthe file bootstrap.xml. If the toolpassword is omitted, the commandprompts the user for it in the console.Refer to Bootstrap.xml file.
541
TIBCO Spotfire® Server and Environment Installation and Administration
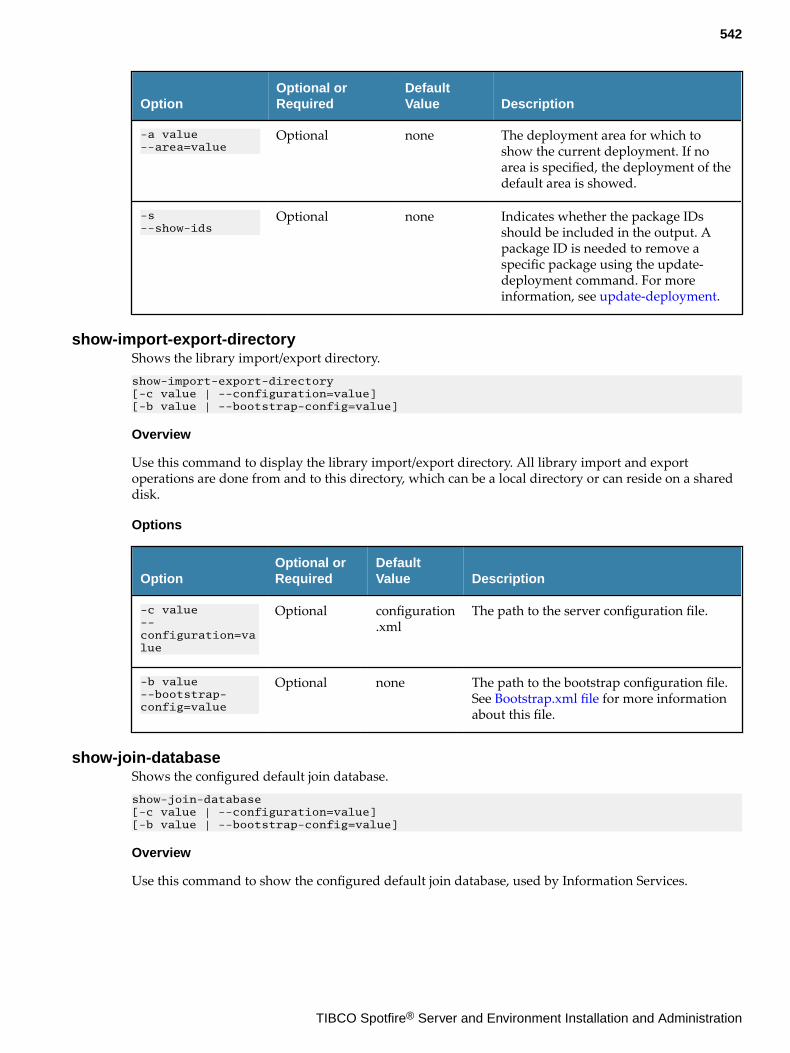
OptionOptional orRequired
DefaultValue Description
-a value--area=value
Optional none The deployment area for which toshow the current deployment. If noarea is specified, the deployment of thedefault area is showed.
-s--show-ids
Optional none Indicates whether the package IDsshould be included in the output. Apackage ID is needed to remove aspecific package using the update-deployment command. For moreinformation, see update-deployment.
show-import-export-directoryShows the library import/export directory.show-import-export-directory [-c value | --configuration=value] [-b value | --bootstrap-config=value]
Overview
Use this command to display the library import/export directory. All library import and exportoperations are done from and to this directory, which can be a local directory or can reside on a shareddisk.
Options
OptionOptional orRequired
DefaultValue Description
-c value--configuration=value
Optional configuration.xml
The path to the server configuration file.
-b value--bootstrap-config=value
Optional none The path to the bootstrap configuration file.See Bootstrap.xml file for more informationabout this file.
show-join-databaseShows the configured default join database.show-join-database [-c value | --configuration=value] [-b value | --bootstrap-config=value]
Overview
Use this command to show the configured default join database, used by Information Services.
542
TIBCO Spotfire® Server and Environment Installation and Administration
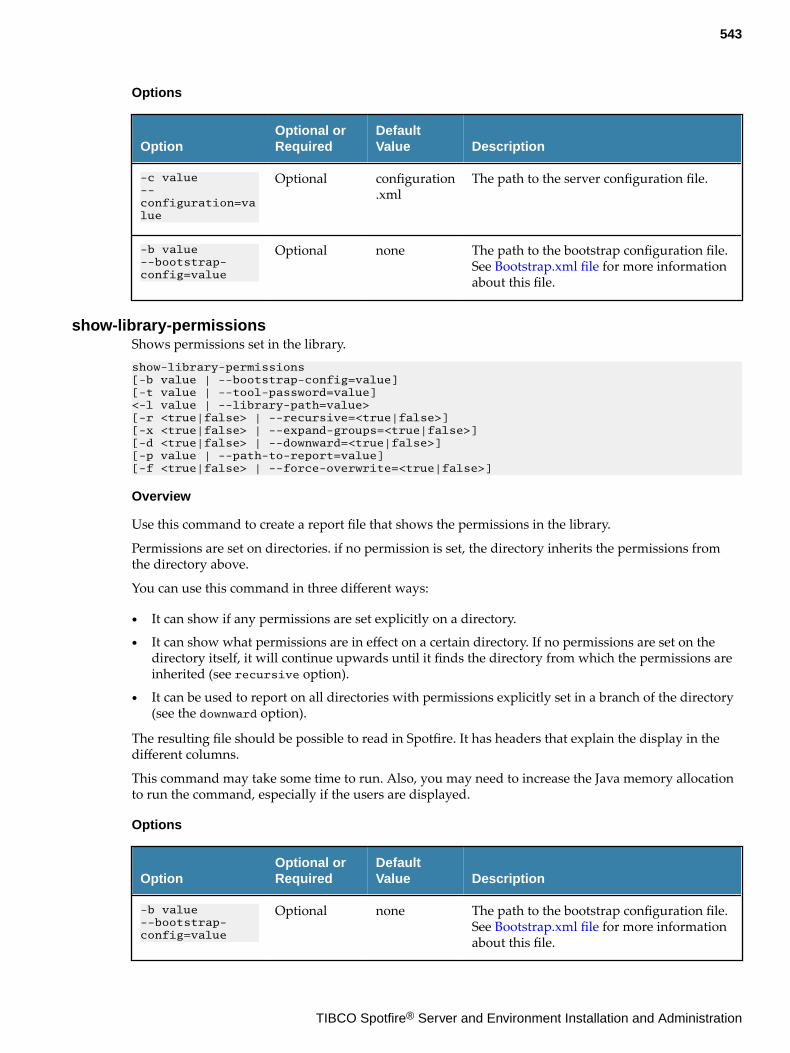
Options
OptionOptional orRequired
DefaultValue Description
-c value--configuration=value
Optional configuration.xml
The path to the server configuration file.
-b value--bootstrap-config=value
Optional none The path to the bootstrap configuration file.See Bootstrap.xml file for more informationabout this file.
show-library-permissionsShows permissions set in the library.show-library-permissions [-b value | --bootstrap-config=value] [-t value | --tool-password=value] <-l value | --library-path=value> [-r <true|false> | --recursive=<true|false>] [-x <true|false> | --expand-groups=<true|false>][-d <true|false> | --downward=<true|false>] [-p value | --path-to-report=value] [-f <true|false> | --force-overwrite=<true|false>]
Overview
Use this command to create a report file that shows the permissions in the library.
Permissions are set on directories. if no permission is set, the directory inherits the permissions fromthe directory above.
You can use this command in three different ways:
● It can show if any permissions are set explicitly on a directory.
● It can show what permissions are in effect on a certain directory. If no permissions are set on thedirectory itself, it will continue upwards until it finds the directory from which the permissions areinherited (see recursive option).
● It can be used to report on all directories with permissions explicitly set in a branch of the directory(see the downward option).
The resulting file should be possible to read in Spotfire. It has headers that explain the display in thedifferent columns.
This command may take some time to run. Also, you may need to increase the Java memory allocationto run the command, especially if the users are displayed.
Options
OptionOptional orRequired
DefaultValue Description
-b value--bootstrap-config=value
Optional none The path to the bootstrap configuration file.See Bootstrap.xml file for more informationabout this file.
543
TIBCO Spotfire® Server and Environment Installation and Administration
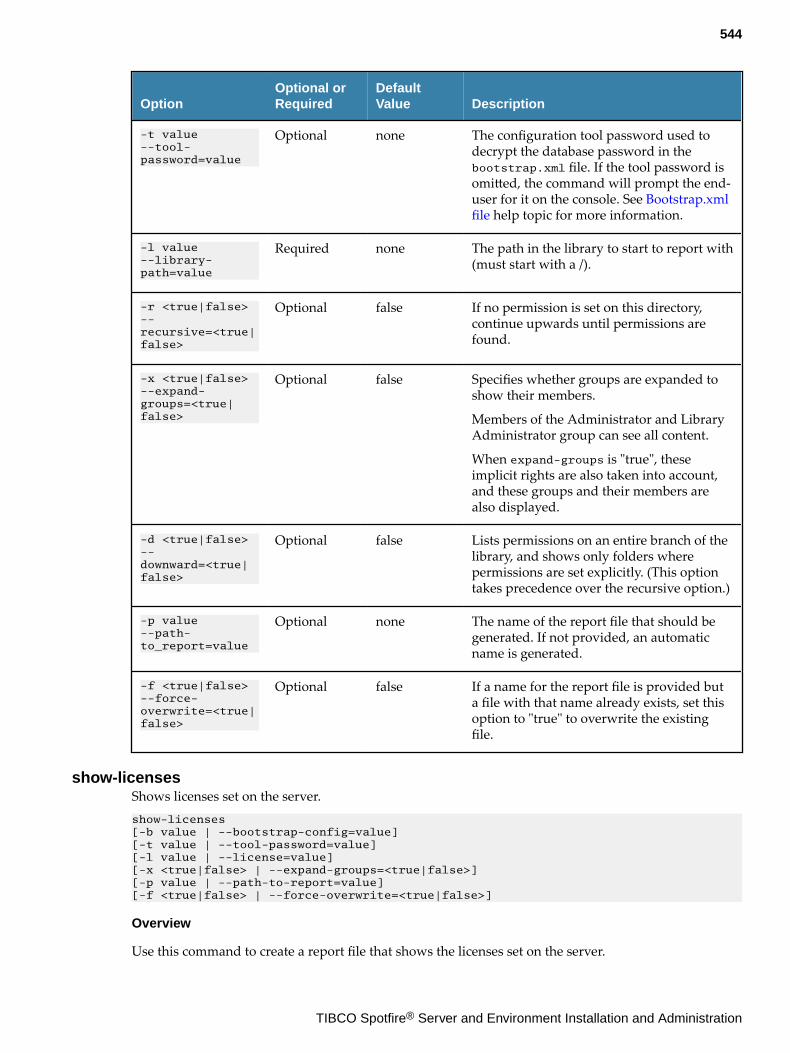
OptionOptional orRequired
DefaultValue Description
-t value--tool-password=value
Optional none The configuration tool password used todecrypt the database password in thebootstrap.xml file. If the tool password isomitted, the command will prompt the end-user for it on the console. See Bootstrap.xmlfile help topic for more information.
-l value--library-path=value
Required none The path in the library to start to report with(must start with a /).
-r <true|false>--recursive=<true|false>
Optional false If no permission is set on this directory,continue upwards until permissions arefound.
-x <true|false>--expand-groups=<true|false>
Optional false Specifies whether groups are expanded toshow their members.
Members of the Administrator and LibraryAdministrator group can see all content.
When expand-groups is "true", theseimplicit rights are also taken into account,and these groups and their members arealso displayed.
-d <true|false>--downward=<true|false>
Optional false Lists permissions on an entire branch of thelibrary, and shows only folders wherepermissions are set explicitly. (This optiontakes precedence over the recursive option.)
-p value--path-to_report=value
Optional none The name of the report file that should begenerated. If not provided, an automaticname is generated.
-f <true|false>--force-overwrite=<true|false>
Optional false If a name for the report file is provided buta file with that name already exists, set thisoption to "true" to overwrite the existingfile.
show-licensesShows licenses set on the server.show-licenses [-b value | --bootstrap-config=value] [-t value | --tool-password=value] [-l value | --license=value] [-x <true|false> | --expand-groups=<true|false>][-p value | --path-to-report=value][-f <true|false> | --force-overwrite=<true|false>]
Overview
Use this command to create a report file that shows the licenses set on the server.
544
TIBCO Spotfire® Server and Environment Installation and Administration
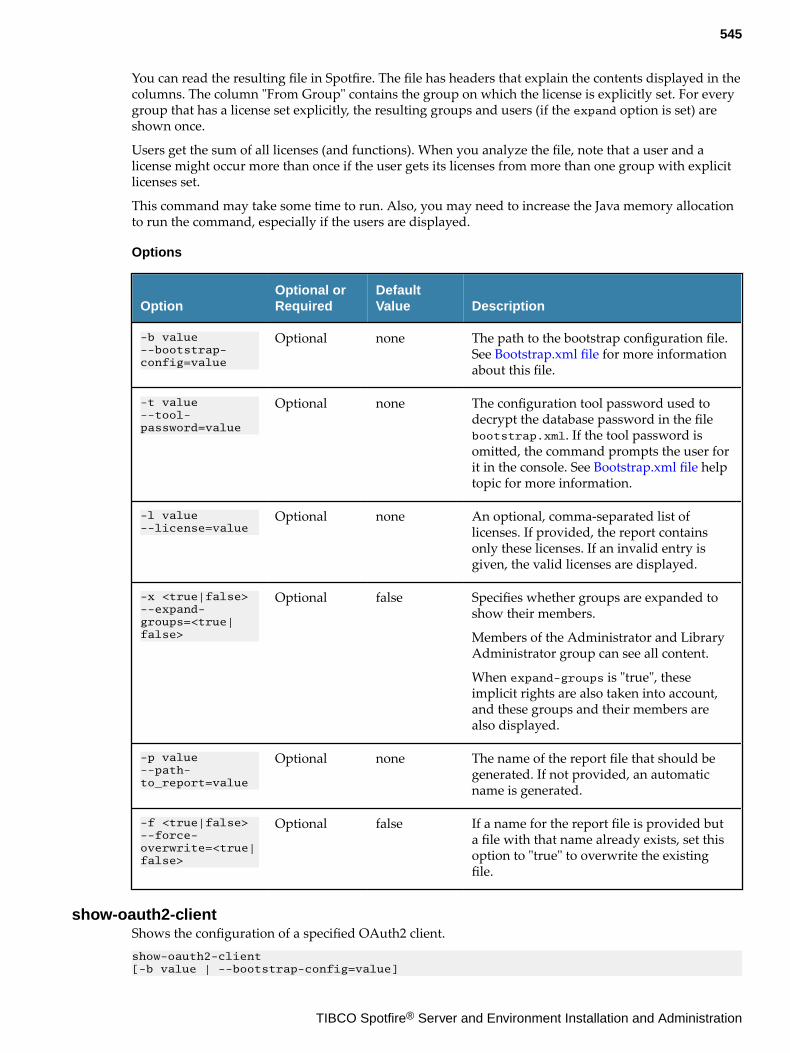
You can read the resulting file in Spotfire. The file has headers that explain the contents displayed in thecolumns. The column "From Group" contains the group on which the license is explicitly set. For everygroup that has a license set explicitly, the resulting groups and users (if the expand option is set) areshown once.
Users get the sum of all licenses (and functions). When you analyze the file, note that a user and alicense might occur more than once if the user gets its licenses from more than one group with explicitlicenses set.
This command may take some time to run. Also, you may need to increase the Java memory allocationto run the command, especially if the users are displayed.
Options
OptionOptional orRequired
DefaultValue Description
-b value--bootstrap-config=value
Optional none The path to the bootstrap configuration file.See Bootstrap.xml file for more informationabout this file.
-t value--tool-password=value
Optional none The configuration tool password used todecrypt the database password in the filebootstrap.xml. If the tool password isomitted, the command prompts the user forit in the console. See Bootstrap.xml file helptopic for more information.
-l value--license=value
Optional none An optional, comma-separated list oflicenses. If provided, the report containsonly these licenses. If an invalid entry isgiven, the valid licenses are displayed.
-x <true|false>--expand-groups=<true|false>
Optional false Specifies whether groups are expanded toshow their members.
Members of the Administrator and LibraryAdministrator group can see all content.
When expand-groups is "true", theseimplicit rights are also taken into account,and these groups and their members arealso displayed.
-p value--path-to_report=value
Optional none The name of the report file that should begenerated. If not provided, an automaticname is generated.
-f <true|false>--force-overwrite=<true|false>
Optional false If a name for the report file is provided buta file with that name already exists, set thisoption to "true" to overwrite the existingfile.
show-oauth2-clientShows the configuration of a specified OAuth2 client.show-oauth2-client [-b value | --bootstrap-config=value]
545
TIBCO Spotfire® Server and Environment Installation and Administration
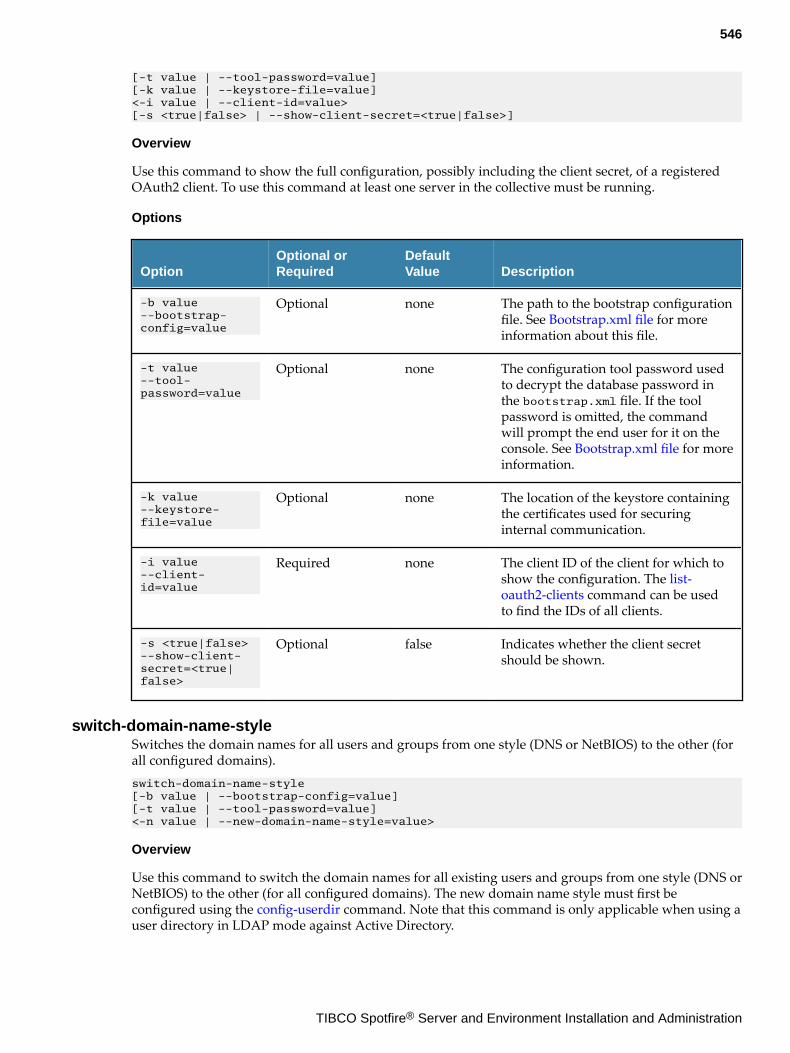
[-t value | --tool-password=value] [-k value | --keystore-file=value]<-i value | --client-id=value> [-s <true|false> | --show-client-secret=<true|false>]
Overview
Use this command to show the full configuration, possibly including the client secret, of a registeredOAuth2 client. To use this command at least one server in the collective must be running.
Options
OptionOptional orRequired
DefaultValue Description
-b value--bootstrap-config=value
Optional none The path to the bootstrap configurationfile. See Bootstrap.xml file for moreinformation about this file.
-t value--tool-password=value
Optional none The configuration tool password usedto decrypt the database password inthe bootstrap.xml file. If the toolpassword is omitted, the commandwill prompt the end user for it on theconsole. See Bootstrap.xml file for moreinformation.
-k value--keystore-file=value
Optional none The location of the keystore containingthe certificates used for securinginternal communication.
-i value--client-id=value
Required none The client ID of the client for which toshow the configuration. The list-oauth2-clients command can be usedto find the IDs of all clients.
-s <true|false>--show-client-secret=<true|false>
Optional false Indicates whether the client secretshould be shown.
switch-domain-name-styleSwitches the domain names for all users and groups from one style (DNS or NetBIOS) to the other (forall configured domains).switch-domain-name-style [-b value | --bootstrap-config=value] [-t value | --tool-password=value] <-n value | --new-domain-name-style=value>
Overview
Use this command to switch the domain names for all existing users and groups from one style (DNS orNetBIOS) to the other (for all configured domains). The new domain name style must first beconfigured using the config-userdir command. Note that this command is only applicable when using auser directory in LDAP mode against Active Directory.
546
TIBCO Spotfire® Server and Environment Installation and Administration
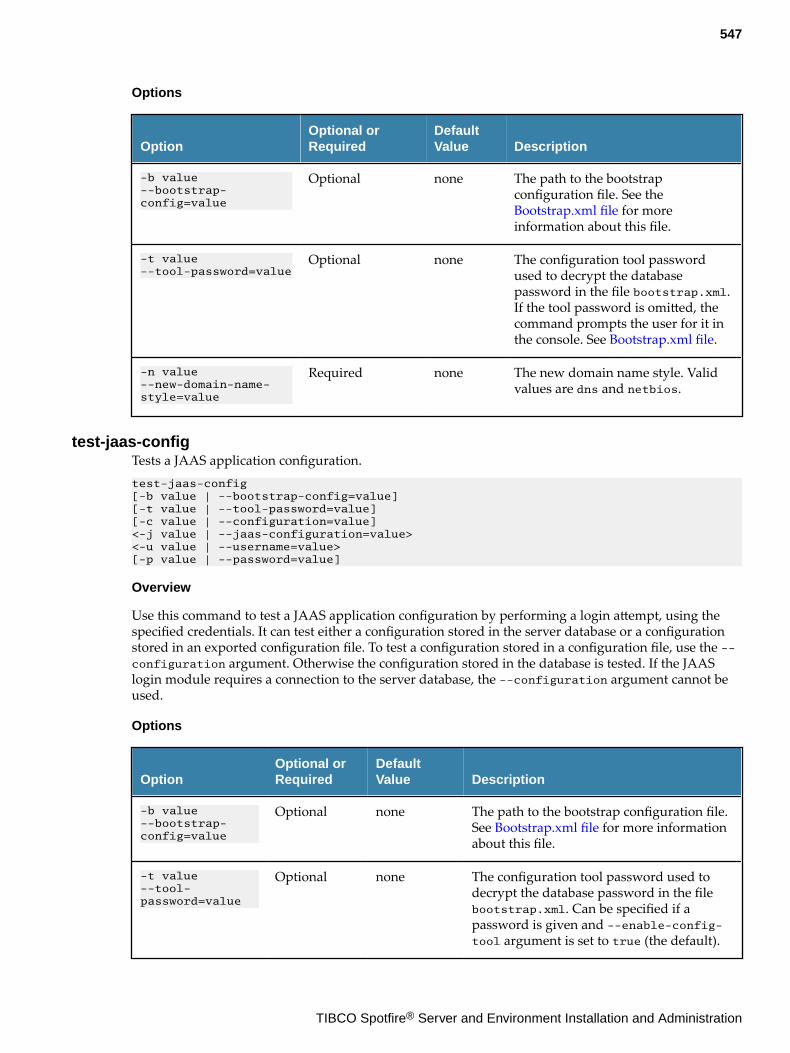
Options
OptionOptional orRequired
DefaultValue Description
-b value--bootstrap-config=value
Optional none The path to the bootstrapconfiguration file. See the Bootstrap.xml file for moreinformation about this file.
-t value--tool-password=value
Optional none The configuration tool passwordused to decrypt the databasepassword in the file bootstrap.xml.If the tool password is omitted, thecommand prompts the user for it inthe console. See Bootstrap.xml file.
-n value--new-domain-name-style=value
Required none The new domain name style. Validvalues are dns and netbios.
test-jaas-configTests a JAAS application configuration.test-jaas-config [-b value | --bootstrap-config=value] [-t value | --tool-password=value] [-c value | --configuration=value] <-j value | --jaas-configuration=value> <-u value | --username=value> [-p value | --password=value]
Overview
Use this command to test a JAAS application configuration by performing a login attempt, using thespecified credentials. It can test either a configuration stored in the server database or a configurationstored in an exported configuration file. To test a configuration stored in a configuration file, use the --configuration argument. Otherwise the configuration stored in the database is tested. If the JAASlogin module requires a connection to the server database, the --configuration argument cannot beused.
Options
OptionOptional orRequired
DefaultValue Description
-b value--bootstrap-config=value
Optional none The path to the bootstrap configuration file.See Bootstrap.xml file for more informationabout this file.
-t value--tool-password=value
Optional none The configuration tool password used todecrypt the database password in the filebootstrap.xml. Can be specified if apassword is given and --enable-config-tool argument is set to true (the default).
547
TIBCO Spotfire® Server and Environment Installation and Administration
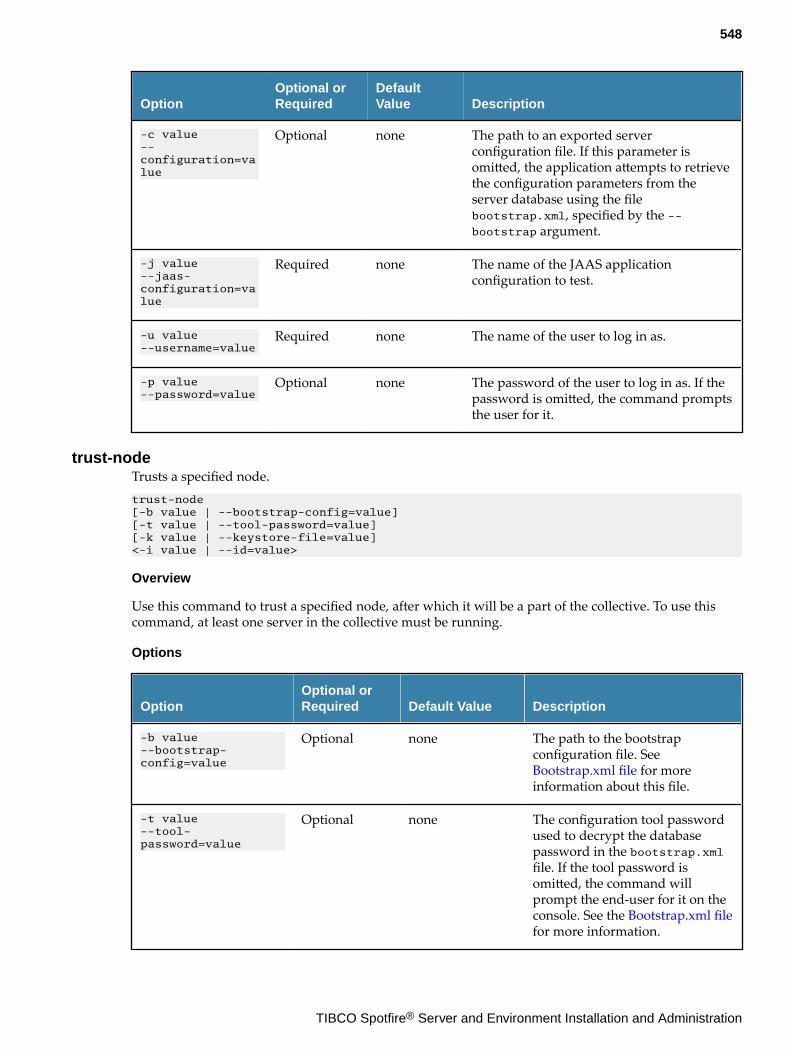
OptionOptional orRequired
DefaultValue Description
-c value--configuration=value
Optional none The path to an exported serverconfiguration file. If this parameter isomitted, the application attempts to retrievethe configuration parameters from theserver database using the filebootstrap.xml, specified by the --bootstrap argument.
-j value--jaas-configuration=value
Required none The name of the JAAS applicationconfiguration to test.
-u value--username=value
Required none The name of the user to log in as.
-p value--password=value
Optional none The password of the user to log in as. If thepassword is omitted, the command promptsthe user for it.
trust-nodeTrusts a specified node.trust-node [-b value | --bootstrap-config=value] [-t value | --tool-password=value] [-k value | --keystore-file=value] <-i value | --id=value>
Overview
Use this command to trust a specified node, after which it will be a part of the collective. To use thiscommand, at least one server in the collective must be running.
Options
OptionOptional orRequired Default Value Description
-b value--bootstrap-config=value
Optional none The path to the bootstrapconfiguration file. See Bootstrap.xml file for moreinformation about this file.
-t value--tool-password=value
Optional none The configuration tool passwordused to decrypt the databasepassword in the bootstrap.xmlfile. If the tool password isomitted, the command willprompt the end-user for it on theconsole. See the Bootstrap.xml filefor more information.
548
TIBCO Spotfire® Server and Environment Installation and Administration
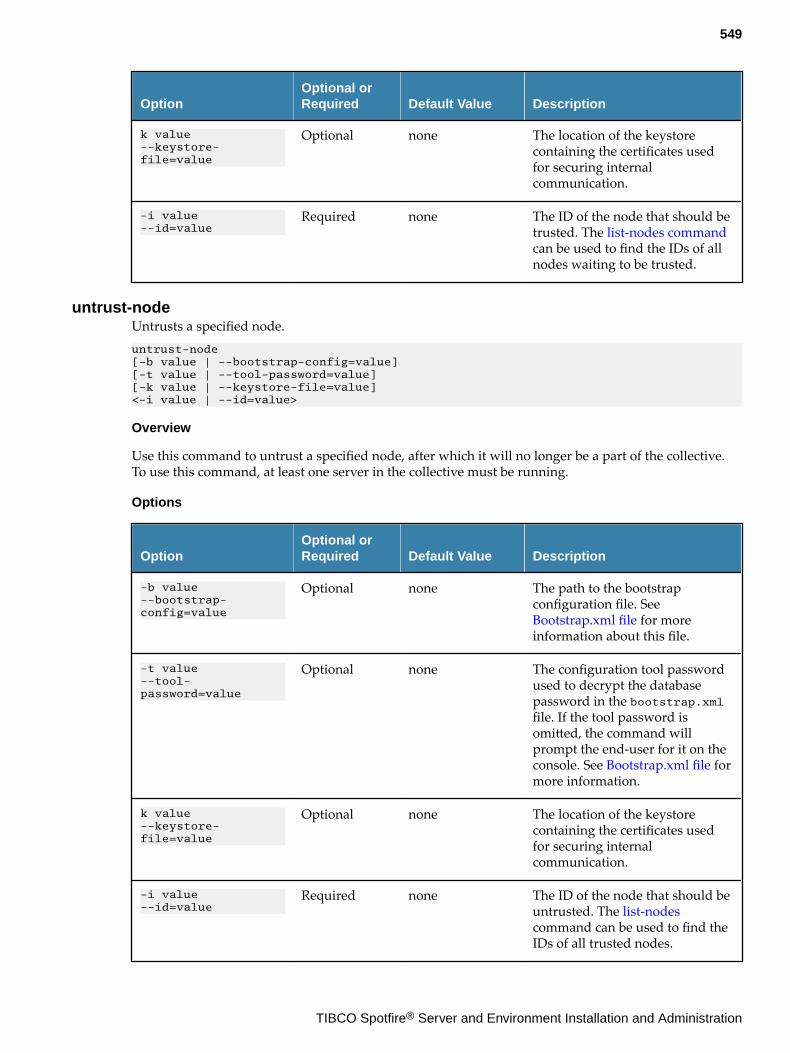
OptionOptional orRequired Default Value Description
k value--keystore-file=value
Optional none The location of the keystorecontaining the certificates usedfor securing internalcommunication.
-i value--id=value
Required none The ID of the node that should betrusted. The list-nodes commandcan be used to find the IDs of allnodes waiting to be trusted.
untrust-nodeUntrusts a specified node.untrust-node [-b value | --bootstrap-config=value] [-t value | --tool-password=value] [-k value | --keystore-file=value] <-i value | --id=value>
Overview
Use this command to untrust a specified node, after which it will no longer be a part of the collective.To use this command, at least one server in the collective must be running.
Options
OptionOptional orRequired Default Value Description
-b value--bootstrap-config=value
Optional none The path to the bootstrapconfiguration file. See Bootstrap.xml file for moreinformation about this file.
-t value--tool-password=value
Optional none The configuration tool passwordused to decrypt the databasepassword in the bootstrap.xmlfile. If the tool password isomitted, the command willprompt the end-user for it on theconsole. See Bootstrap.xml file formore information.
k value--keystore-file=value
Optional none The location of the keystorecontaining the certificates usedfor securing internalcommunication.
-i value--id=value
Required none The ID of the node that should beuntrusted. The list-nodescommand can be used to find theIDs of all trusted nodes.
549
TIBCO Spotfire® Server and Environment Installation and Administration
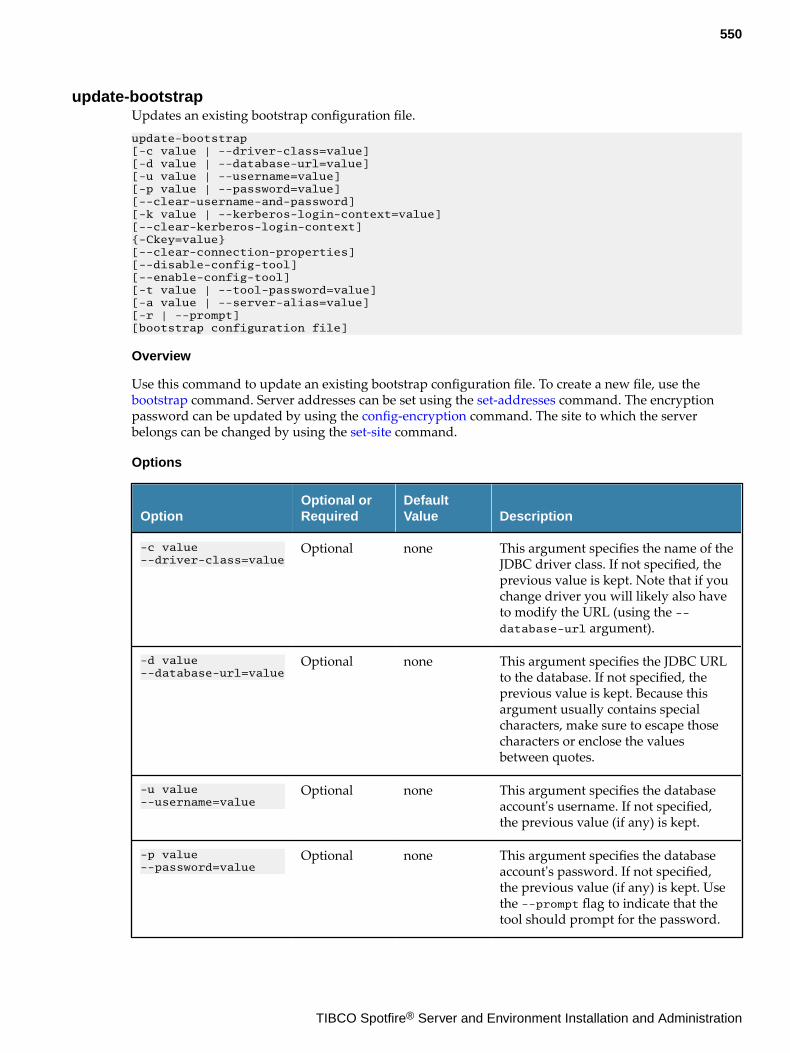
update-bootstrapUpdates an existing bootstrap configuration file.update-bootstrap [-c value | --driver-class=value] [-d value | --database-url=value] [-u value | --username=value] [-p value | --password=value] [--clear-username-and-password] [-k value | --kerberos-login-context=value] [--clear-kerberos-login-context] {-Ckey=value} [--clear-connection-properties] [--disable-config-tool] [--enable-config-tool] [-t value | --tool-password=value] [-a value | --server-alias=value] [-r | --prompt] [bootstrap configuration file]
Overview
Use this command to update an existing bootstrap configuration file. To create a new file, use the bootstrap command. Server addresses can be set using the set-addresses command. The encryptionpassword can be updated by using the config-encryption command. The site to which the serverbelongs can be changed by using the set-site command.
Options
OptionOptional orRequired
DefaultValue Description
-c value--driver-class=value
Optional none This argument specifies the name of theJDBC driver class. If not specified, theprevious value is kept. Note that if youchange driver you will likely also haveto modify the URL (using the --database-url argument).
-d value--database-url=value
Optional none This argument specifies the JDBC URLto the database. If not specified, theprevious value is kept. Because thisargument usually contains specialcharacters, make sure to escape thosecharacters or enclose the valuesbetween quotes.
-u value --username=value
Optional none This argument specifies the databaseaccount's username. If not specified,the previous value (if any) is kept.
-p value--password=value
Optional none This argument specifies the databaseaccount's password. If not specified,the previous value (if any) is kept. Usethe --prompt flag to indicate that thetool should prompt for the password.
550
TIBCO Spotfire® Server and Environment Installation and Administration
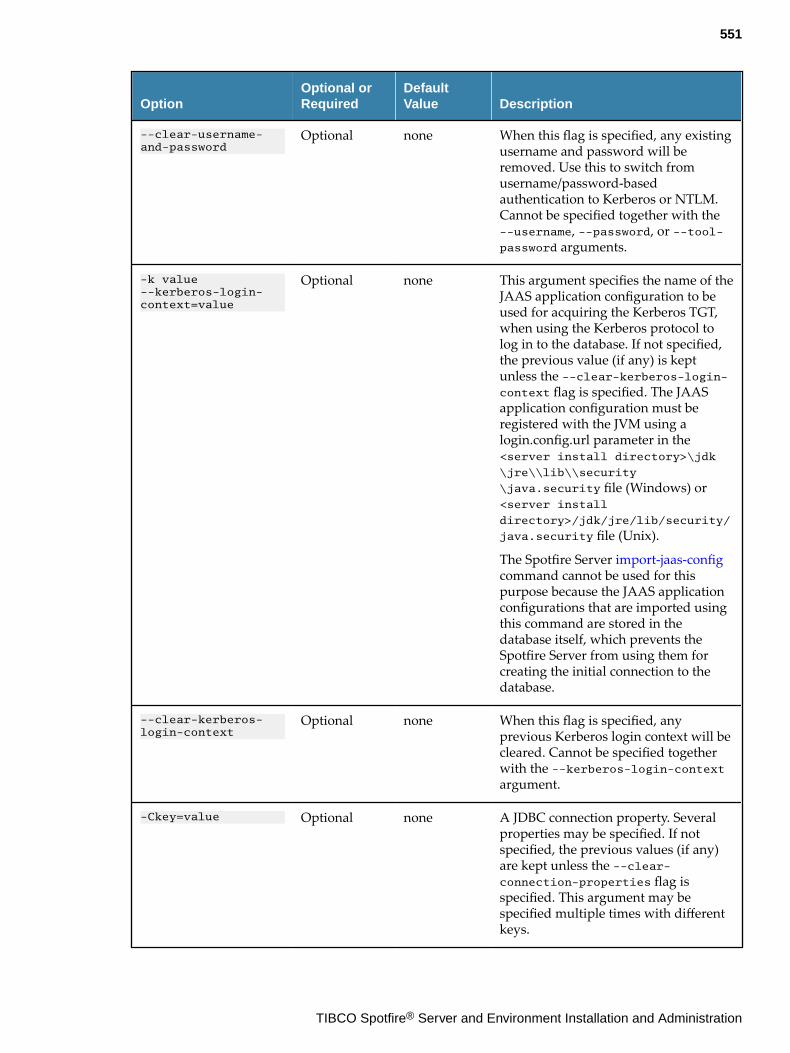
OptionOptional orRequired
DefaultValue Description
--clear-username-and-password
Optional none When this flag is specified, any existingusername and password will beremoved. Use this to switch fromusername/password-basedauthentication to Kerberos or NTLM.Cannot be specified together with the--username, --password, or --tool-password arguments.
-k value--kerberos-login-context=value
Optional none This argument specifies the name of theJAAS application configuration to beused for acquiring the Kerberos TGT,when using the Kerberos protocol tolog in to the database. If not specified,the previous value (if any) is keptunless the --clear-kerberos-login-context flag is specified. The JAASapplication configuration must beregistered with the JVM using alogin.config.url parameter in the<server install directory>\jdk
\jre\\lib\\security
\java.security file (Windows) or<server install
directory>/jdk/jre/lib/security/
java.security file (Unix).
The Spotfire Server import-jaas-configcommand cannot be used for thispurpose because the JAAS applicationconfigurations that are imported usingthis command are stored in thedatabase itself, which prevents theSpotfire Server from using them forcreating the initial connection to thedatabase.
--clear-kerberos-login-context
Optional none When this flag is specified, anyprevious Kerberos login context will becleared. Cannot be specified togetherwith the --kerberos-login-contextargument.
-Ckey=value Optional none A JDBC connection property. Severalproperties may be specified. If notspecified, the previous values (if any)are kept unless the --clear-connection-properties flag isspecified. This argument may bespecified multiple times with differentkeys.
551
TIBCO Spotfire® Server and Environment Installation and Administration
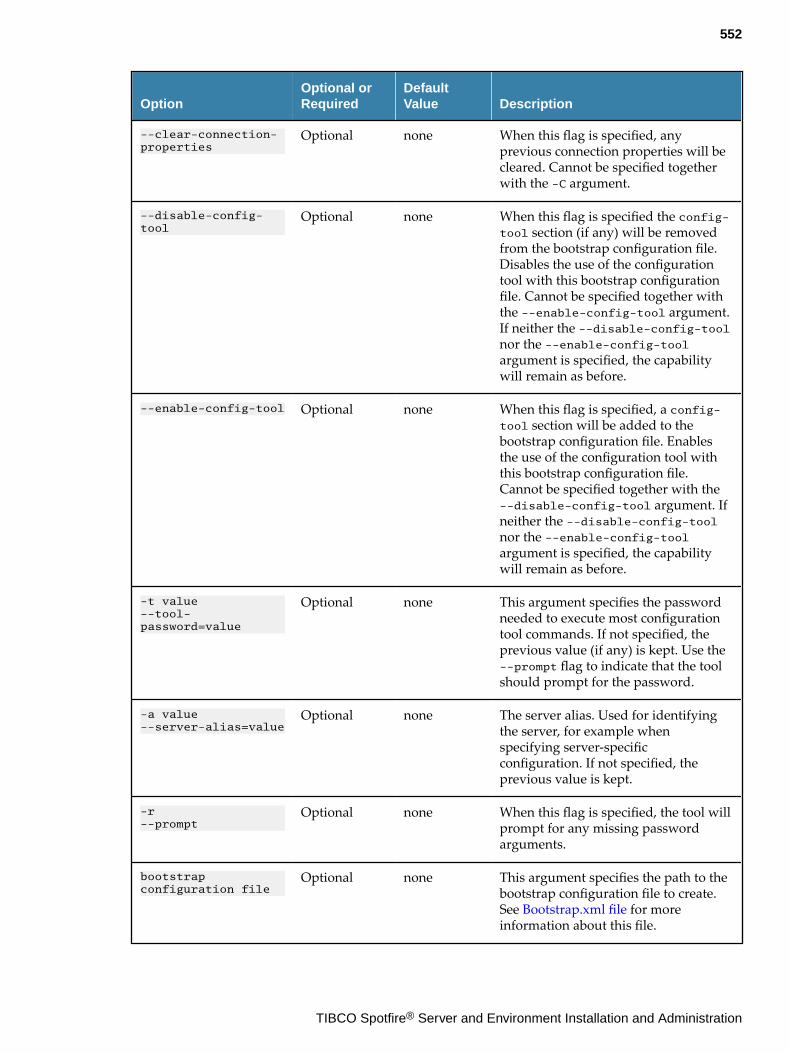
OptionOptional orRequired
DefaultValue Description
--clear-connection-properties
Optional none When this flag is specified, anyprevious connection properties will becleared. Cannot be specified togetherwith the -C argument.
--disable-config-tool
Optional none When this flag is specified the config-tool section (if any) will be removedfrom the bootstrap configuration file.Disables the use of the configurationtool with this bootstrap configurationfile. Cannot be specified together withthe --enable-config-tool argument.If neither the --disable-config-toolnor the --enable-config-toolargument is specified, the capabilitywill remain as before.
--enable-config-tool Optional none When this flag is specified, a config-tool section will be added to thebootstrap configuration file. Enablesthe use of the configuration tool withthis bootstrap configuration file.Cannot be specified together with the--disable-config-tool argument. Ifneither the --disable-config-toolnor the --enable-config-toolargument is specified, the capabilitywill remain as before.
-t value--tool-password=value
Optional none This argument specifies the passwordneeded to execute most configurationtool commands. If not specified, theprevious value (if any) is kept. Use the--prompt flag to indicate that the toolshould prompt for the password.
-a value--server-alias=value
Optional none The server alias. Used for identifyingthe server, for example whenspecifying server-specificconfiguration. If not specified, theprevious value is kept.
-r--prompt
Optional none When this flag is specified, the tool willprompt for any missing passwordarguments.
bootstrap configuration file
Optional none This argument specifies the path to thebootstrap configuration file to create.See Bootstrap.xml file for moreinformation about this file.
552
TIBCO Spotfire® Server and Environment Installation and Administration

update-deploymentUpdates the current deployment.update-deployment [-b value | --bootstrap-config=value] [-t value | --tool-password=value] <-a value | --area=value> [-c | --clear] [-r value | --remove-packages=value] [-v value | --version=value] [-d value | --description=value] [-f | --force-update] [deployment files]
Overview
Use this command to add a new deployment or to update the current deployment in a given area.
Options
OptionOptional orRequired
DefaultValue Description
-b value--bootstrap-config=value
Optional none The path to the bootstrap configurationfile. See Bootstrap.xml file for moreinformation about this file.
-t value--tool-password=value
Optional none The configuration tool password usedto decrypt the database password in thefile bootstrap.xml. If the toolpassword is omitted, the commandprompts the user for it in the console.Refer to Bootstrap.xml file.
-a value--area=value
Required none The deployment area that should beupdated.
-c--clear
Optional none Indicates that all existing packagesshould be removed before any new filesare added. If no files are provided toadd to the deployment, the deploymentarea is empty.
-r value--remove-packages=value
Optional none A comma-separated list of IDs ofpackages that should be removed fromthe deployment. The IDs can bedetermined using the show-deployment command. Should not bespecified together with the --clearargument
-v value--version=value
Optional none The version of the new deployment. Ifno value is given, it is taken from thecurrent deployment, or from the lastadded distribution if one is added.
553
TIBCO Spotfire® Server and Environment Installation and Administration
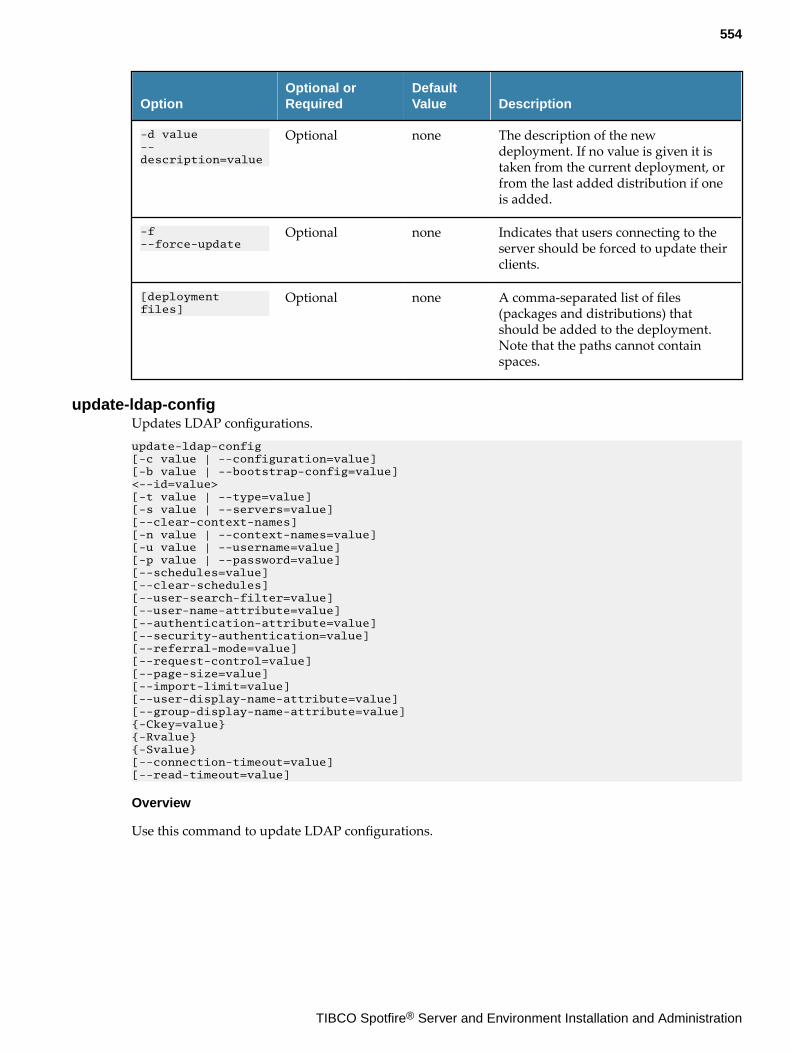
OptionOptional orRequired
DefaultValue Description
-d value--description=value
Optional none The description of the newdeployment. If no value is given it istaken from the current deployment, orfrom the last added distribution if oneis added.
-f--force-update
Optional none Indicates that users connecting to theserver should be forced to update theirclients.
[deployment files]
Optional none A comma-separated list of files(packages and distributions) thatshould be added to the deployment.Note that the paths cannot containspaces.
update-ldap-configUpdates LDAP configurations.update-ldap-config [-c value | --configuration=value] [-b value | --bootstrap-config=value] <--id=value> [-t value | --type=value] [-s value | --servers=value] [--clear-context-names] [-n value | --context-names=value] [-u value | --username=value] [-p value | --password=value] [--schedules=value] [--clear-schedules] [--user-search-filter=value] [--user-name-attribute=value] [--authentication-attribute=value] [--security-authentication=value] [--referral-mode=value] [--request-control=value] [--page-size=value] [--import-limit=value] [--user-display-name-attribute=value] [--group-display-name-attribute=value] {-Ckey=value}{-Rvalue} {-Svalue}[--connection-timeout=value] [--read-timeout=value]
Overview
Use this command to update LDAP configurations.
554
TIBCO Spotfire® Server and Environment Installation and Administration
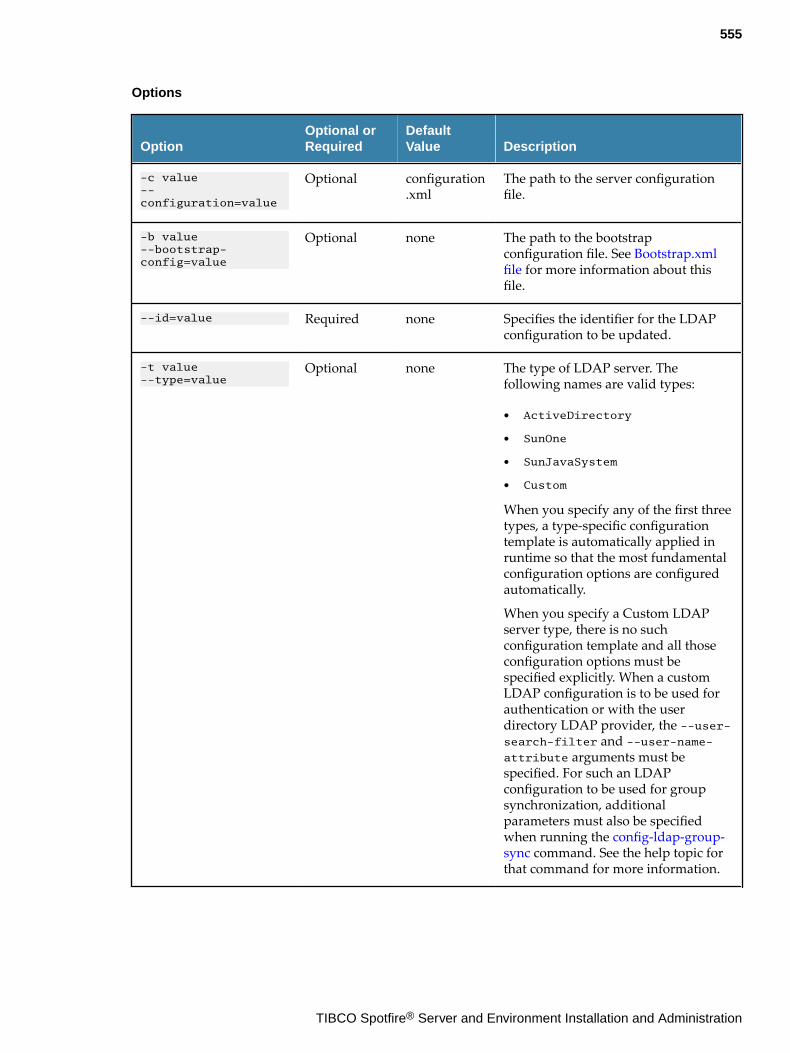
Options
OptionOptional orRequired
DefaultValue Description
-c value--configuration=value
Optional configuration.xml
The path to the server configurationfile.
-b value--bootstrap-config=value
Optional none The path to the bootstrapconfiguration file. See Bootstrap.xmlfile for more information about thisfile.
--id=value Required none Specifies the identifier for the LDAPconfiguration to be updated.
-t value--type=value
Optional none The type of LDAP server. Thefollowing names are valid types:
● ActiveDirectory
● SunOne
● SunJavaSystem
● Custom
When you specify any of the first threetypes, a type-specific configurationtemplate is automatically applied inruntime so that the most fundamentalconfiguration options are configuredautomatically.
When you specify a Custom LDAPserver type, there is no suchconfiguration template and all thoseconfiguration options must bespecified explicitly. When a customLDAP configuration is to be used forauthentication or with the userdirectory LDAP provider, the --user-search-filter and --user-name-attribute arguments must bespecified. For such an LDAPconfiguration to be used for groupsynchronization, additionalparameters must also be specifiedwhen running the config-ldap-group-sync command. See the help topic forthat command for more information.
555
TIBCO Spotfire® Server and Environment Installation and Administration
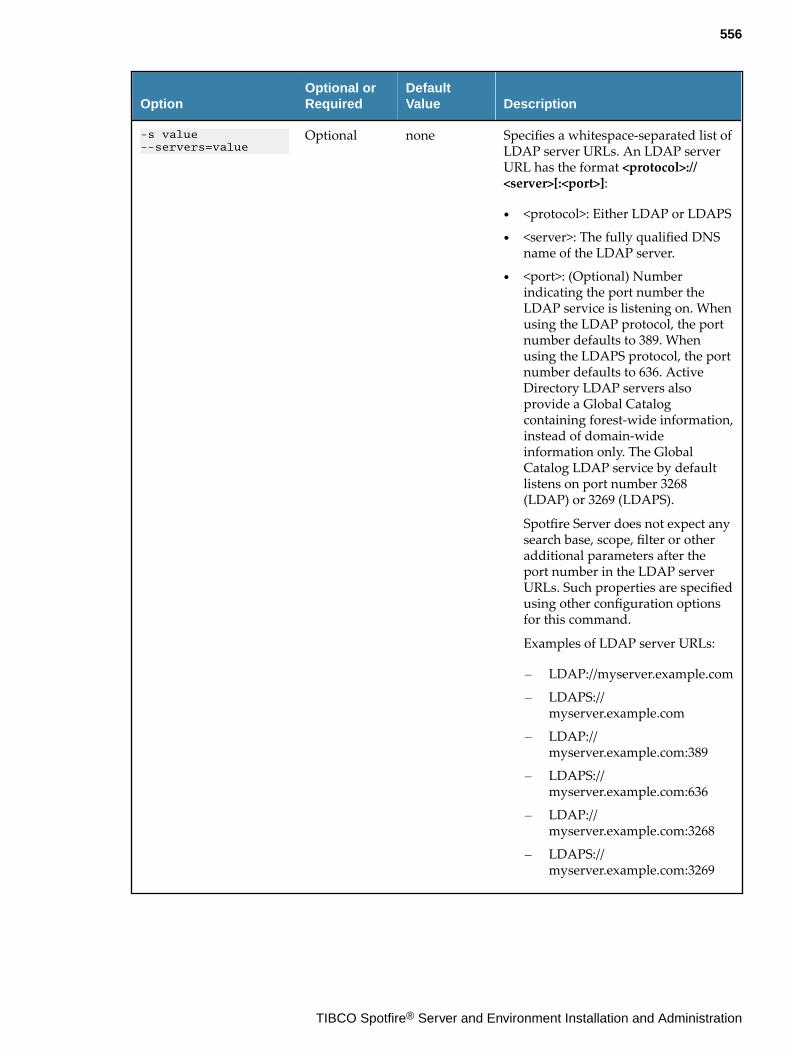
OptionOptional orRequired
DefaultValue Description
-s value--servers=value
Optional none Specifies a whitespace-separated list ofLDAP server URLs. An LDAP serverURL has the format <protocol>://<server>[:<port>]:
● <protocol>: Either LDAP or LDAPS
● <server>: The fully qualified DNSname of the LDAP server.
● <port>: (Optional) Numberindicating the port number theLDAP service is listening on. Whenusing the LDAP protocol, the portnumber defaults to 389. Whenusing the LDAPS protocol, the portnumber defaults to 636. ActiveDirectory LDAP servers alsoprovide a Global Catalogcontaining forest-wide information,instead of domain-wideinformation only. The GlobalCatalog LDAP service by defaultlistens on port number 3268(LDAP) or 3269 (LDAPS).
Spotfire Server does not expect anysearch base, scope, filter or otheradditional parameters after theport number in the LDAP serverURLs. Such properties are specifiedusing other configuration optionsfor this command.
Examples of LDAP server URLs:
— LDAP://myserver.example.com
— LDAPS://myserver.example.com
— LDAP://myserver.example.com:389
— LDAPS://myserver.example.com:636
— LDAP://myserver.example.com:3268
— LDAPS://myserver.example.com:3269
556
TIBCO Spotfire® Server and Environment Installation and Administration
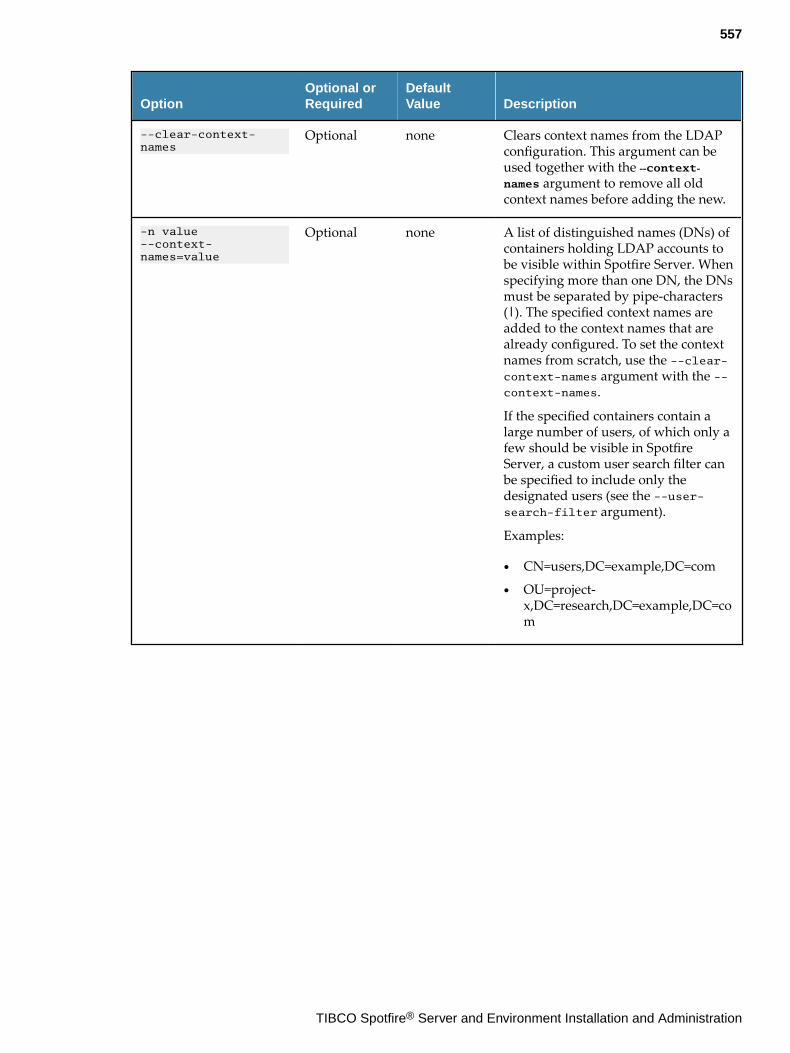
OptionOptional orRequired
DefaultValue Description
--clear-context-names
Optional none Clears context names from the LDAPconfiguration. This argument can beused together with the ‐‐context‐names argument to remove all oldcontext names before adding the new.
-n value--context-names=value
Optional none A list of distinguished names (DNs) ofcontainers holding LDAP accounts tobe visible within Spotfire Server. Whenspecifying more than one DN, the DNsmust be separated by pipe-characters(|). The specified context names areadded to the context names that arealready configured. To set the contextnames from scratch, use the --clear-context-names argument with the --context-names.
If the specified containers contain alarge number of users, of which only afew should be visible in SpotfireServer, a custom user search filter canbe specified to include only thedesignated users (see the --user-search-filter argument).
Examples:
● CN=users,DC=example,DC=com
● OU=project-x,DC=research,DC=example,DC=com
557
TIBCO Spotfire® Server and Environment Installation and Administration
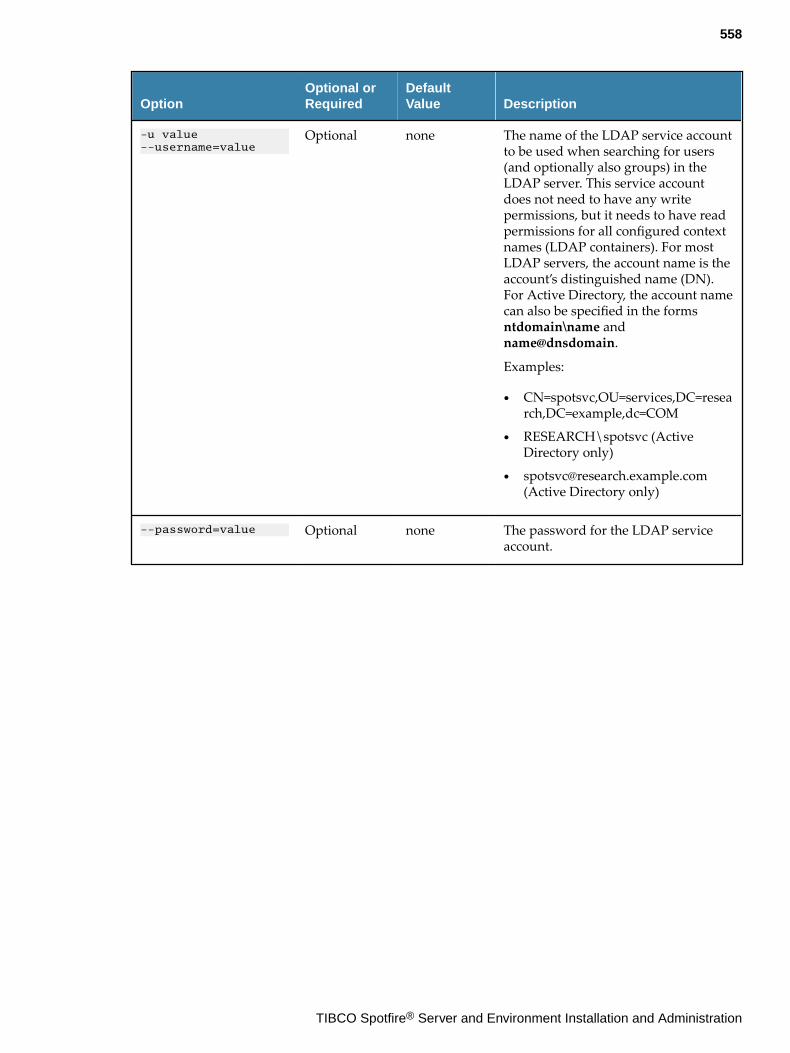
OptionOptional orRequired
DefaultValue Description
-u value--username=value
Optional none The name of the LDAP service accountto be used when searching for users(and optionally also groups) in theLDAP server. This service accountdoes not need to have any writepermissions, but it needs to have readpermissions for all configured contextnames (LDAP containers). For mostLDAP servers, the account name is theaccount’s distinguished name (DN).For Active Directory, the account namecan also be specified in the formsntdomain\name andname@dnsdomain.
Examples:
● CN=spotsvc,OU=services,DC=research,DC=example,dc=COM
● RESEARCH\spotsvc (ActiveDirectory only)
● [email protected](Active Directory only)
--password=value Optional none The password for the LDAP serviceaccount.
558
TIBCO Spotfire® Server and Environment Installation and Administration
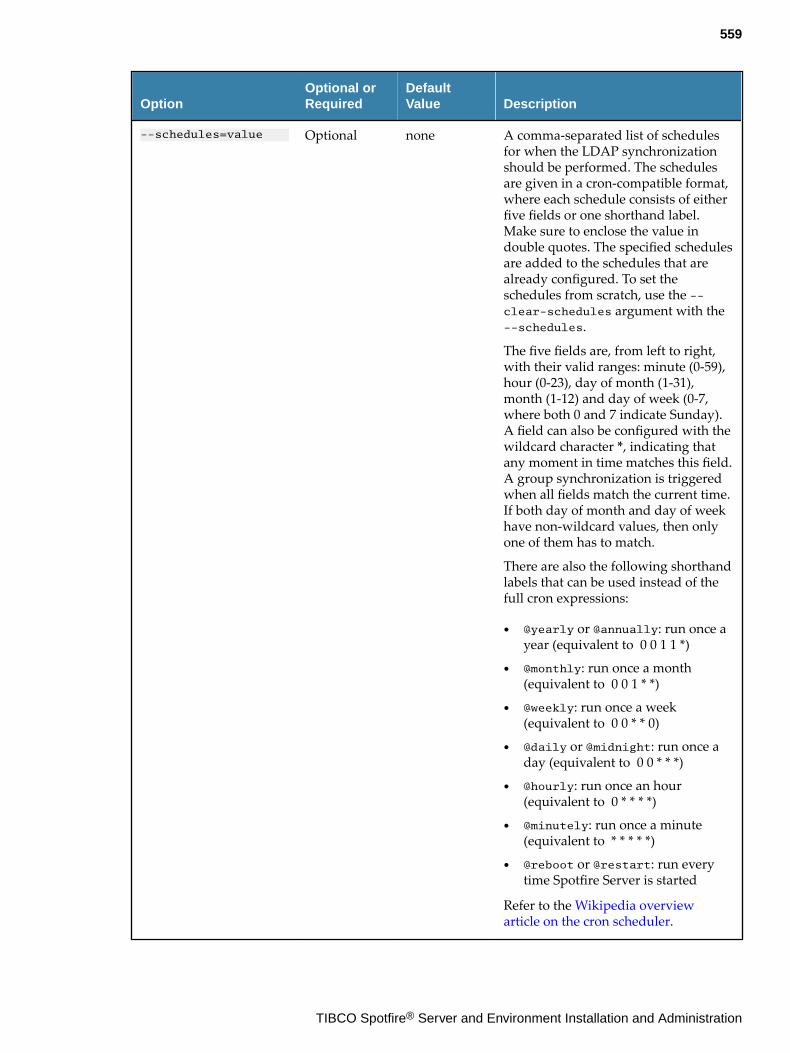
OptionOptional orRequired
DefaultValue Description
--schedules=value Optional none A comma-separated list of schedulesfor when the LDAP synchronizationshould be performed. The schedulesare given in a cron-compatible format,where each schedule consists of eitherfive fields or one shorthand label.Make sure to enclose the value indouble quotes. The specified schedulesare added to the schedules that arealready configured. To set theschedules from scratch, use the --clear-schedules argument with the--schedules.
The five fields are, from left to right,with their valid ranges: minute (0-59),hour (0-23), day of month (1-31),month (1-12) and day of week (0-7,where both 0 and 7 indicate Sunday).A field can also be configured with thewildcard character *, indicating thatany moment in time matches this field.A group synchronization is triggeredwhen all fields match the current time.If both day of month and day of weekhave non-wildcard values, then onlyone of them has to match.
There are also the following shorthandlabels that can be used instead of thefull cron expressions:
● @yearly or @annually: run once ayear (equivalent to 0 0 1 1 *)
● @monthly: run once a month(equivalent to 0 0 1 * *)
● @weekly: run once a week(equivalent to 0 0 * * 0)
● @daily or @midnight: run once aday (equivalent to 0 0 * * *)
● @hourly: run once an hour(equivalent to 0 * * * *)
● @minutely: run once a minute(equivalent to * * * * *)
● @reboot or @restart: run everytime Spotfire Server is started
Refer to the Wikipedia overviewarticle on the cron scheduler.
559
TIBCO Spotfire® Server and Environment Installation and Administration
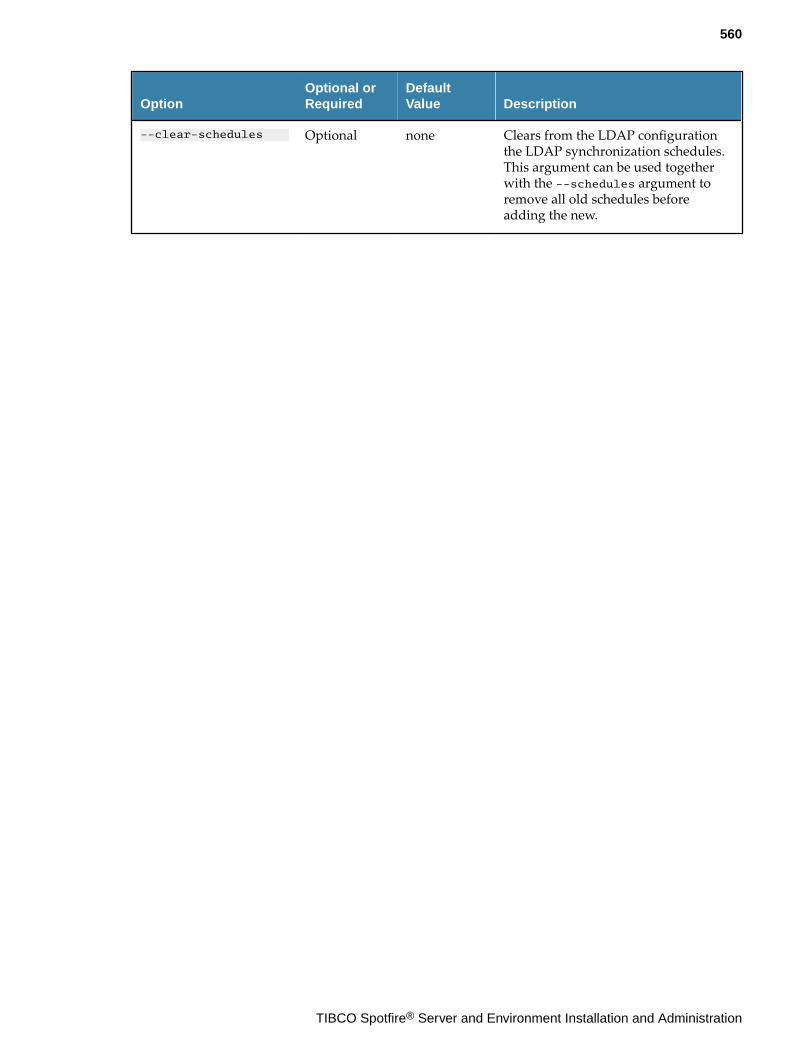
OptionOptional orRequired
DefaultValue Description
--clear-schedules Optional none Clears from the LDAP configurationthe LDAP synchronization schedules.This argument can be used togetherwith the --schedules argument toremove all old schedules beforeadding the new.
560
TIBCO Spotfire® Server and Environment Installation and Administration
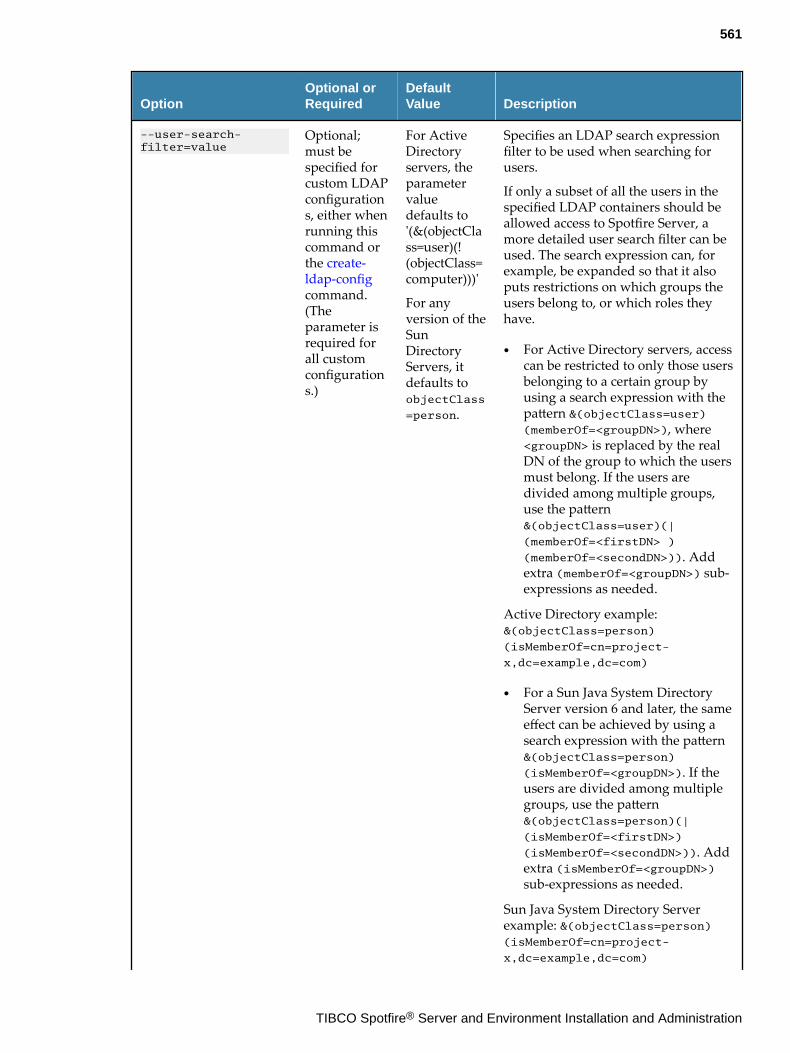
OptionOptional orRequired
DefaultValue Description
--user-search-filter=value
Optional;must bespecified forcustom LDAPconfigurations, either whenrunning thiscommand orthe create-ldap-configcommand.(Theparameter isrequired forall customconfigurations.)
For ActiveDirectoryservers, theparametervaluedefaults to'(&(objectClass=user)(!(objectClass=computer)))'
For anyversion of theSunDirectoryServers, itdefaults toobjectClass
=person.
Specifies an LDAP search expressionfilter to be used when searching forusers.
If only a subset of all the users in thespecified LDAP containers should beallowed access to Spotfire Server, amore detailed user search filter can beused. The search expression can, forexample, be expanded so that it alsoputs restrictions on which groups theusers belong to, or which roles theyhave.
● For Active Directory servers, accesscan be restricted to only those usersbelonging to a certain group byusing a search expression with thepattern &(objectClass=user)(memberOf=<groupDN>), where<groupDN> is replaced by the realDN of the group to which the usersmust belong. If the users aredivided among multiple groups,use the pattern&(objectClass=user)(|
(memberOf=<firstDN> )
(memberOf=<secondDN>)). Addextra (memberOf=<groupDN>) sub-expressions as needed.
Active Directory example:&(objectClass=person)
(isMemberOf=cn=project-
x,dc=example,dc=com)
● For a Sun Java System DirectoryServer version 6 and later, the sameeffect can be achieved by using asearch expression with the pattern&(objectClass=person)
(isMemberOf=<groupDN>). If theusers are divided among multiplegroups, use the pattern&(objectClass=person)(|
(isMemberOf=<firstDN>)
(isMemberOf=<secondDN>)). Addextra (isMemberOf=<groupDN>)sub-expressions as needed.
Sun Java System Directory Serverexample: &(objectClass=person)(isMemberOf=cn=project-
x,dc=example,dc=com)
561
TIBCO Spotfire® Server and Environment Installation and Administration
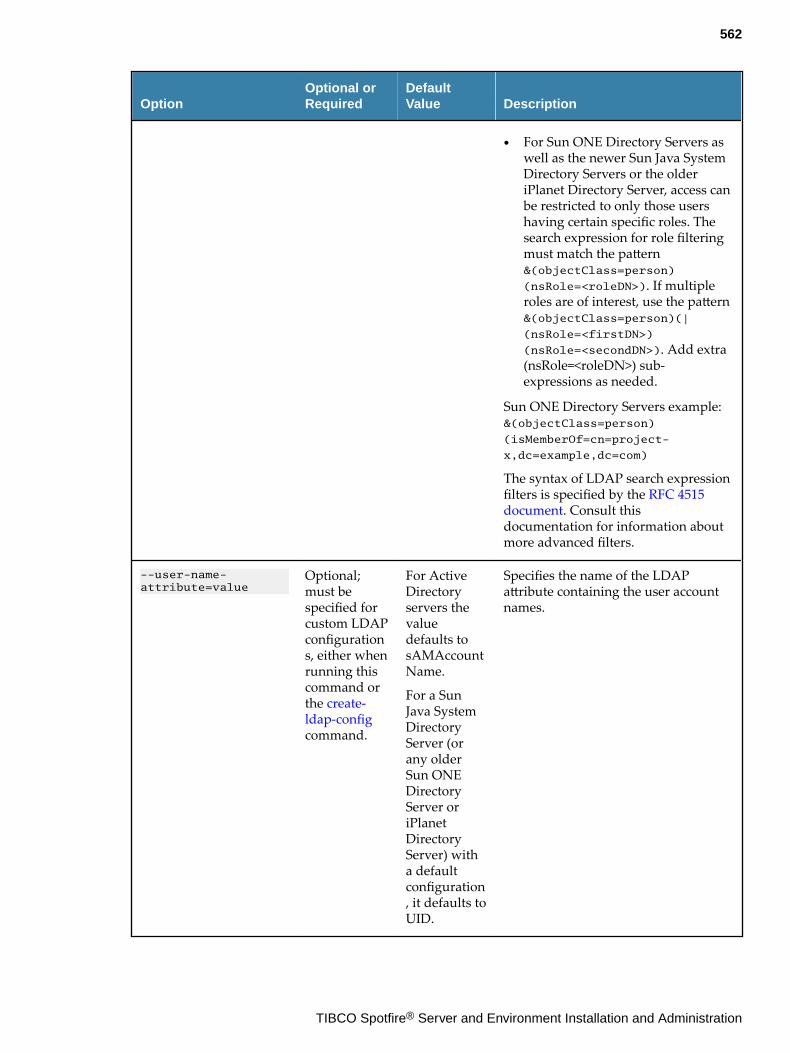
OptionOptional orRequired
DefaultValue Description
● For Sun ONE Directory Servers aswell as the newer Sun Java SystemDirectory Servers or the olderiPlanet Directory Server, access canbe restricted to only those usershaving certain specific roles. Thesearch expression for role filteringmust match the pattern&(objectClass=person)
(nsRole=<roleDN>). If multipleroles are of interest, use the pattern&(objectClass=person)(|
(nsRole=<firstDN>)
(nsRole=<secondDN>). Add extra(nsRole=<roleDN>) sub-expressions as needed.
Sun ONE Directory Servers example:&(objectClass=person)
(isMemberOf=cn=project-
x,dc=example,dc=com)
The syntax of LDAP search expressionfilters is specified by the RFC 4515document. Consult thisdocumentation for information aboutmore advanced filters.
--user-name-attribute=value
Optional;must bespecified forcustom LDAPconfigurations, either whenrunning thiscommand orthe create-ldap-configcommand.
For ActiveDirectoryservers thevaluedefaults tosAMAccountName.
For a SunJava SystemDirectoryServer (orany olderSun ONEDirectoryServer oriPlanetDirectoryServer) witha defaultconfiguration, it defaults toUID.
Specifies the name of the LDAPattribute containing the user accountnames.
562
TIBCO Spotfire® Server and Environment Installation and Administration

OptionOptional orRequired
DefaultValue Description
--authentication-attribute=value
Optional;should beused only foradvancedsetups. It isnot set bydefault.
none Specifies the name of the LDAPattribute containing a user identitythat can be used for binding(authenticating) to the LDAP server.This attribute fills no purpose in mostcommon LDAP configurations, butcan be useful in more advancedsetups, where the distinguished name(DN) does not work for authentication,or where users should be able to log inusing a username that does not mapdirectly to an actual LDAP account.
When setting up SASL with DIGEST-MD5 in an Active Directoryenvironment, the DN does not workfor authentication and theuserPrincipalName attribute must beused instead. The --authentication-attribute argument should then beset to userPrincipalName and the --user-name-attribute argumentshould be set to sAMAccountName (thelatter value also happens to be thedefault value for an Active DirectoryLDAP configuration, so there's noneed to set it explicitly). See also the --security-authentication
argument.
When setting up SASL with GSSAPI inan Active Directory environment, theDN does not work for authenticationand the sAMAccountName oruserPrincipalName attribute must beused instead. The --authentication-attribute argument should then beset to sAMAccountName oruserPrincipalName and the --user-name-attribute argument should beset to sAMAccountName (the lattervalue also happens to be the defaultvalue for an Active Directory LDAPconfiguration, so there is no need toset it explicitly). See also the --security-authentication
argument.
Example: By setting the --user-name-attribute argument to cn and the --authentication-attribute
argument to userPrincipalName inan Active Directory environment, theusers can log in to Spotfire Server
563
TIBCO Spotfire® Server and Environment Installation and Administration
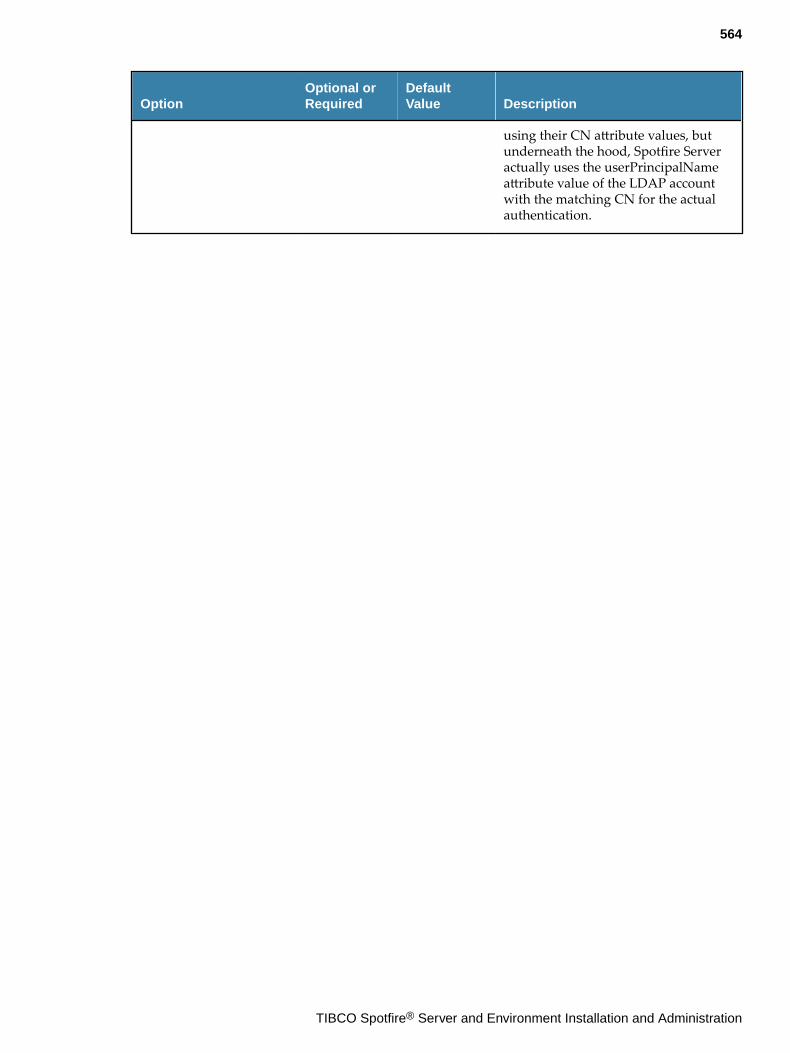
OptionOptional orRequired
DefaultValue Description
using their CN attribute values, butunderneath the hood, Spotfire Serveractually uses the userPrincipalNameattribute value of the LDAP accountwith the matching CN for the actualauthentication.
564
TIBCO Spotfire® Server and Environment Installation and Administration
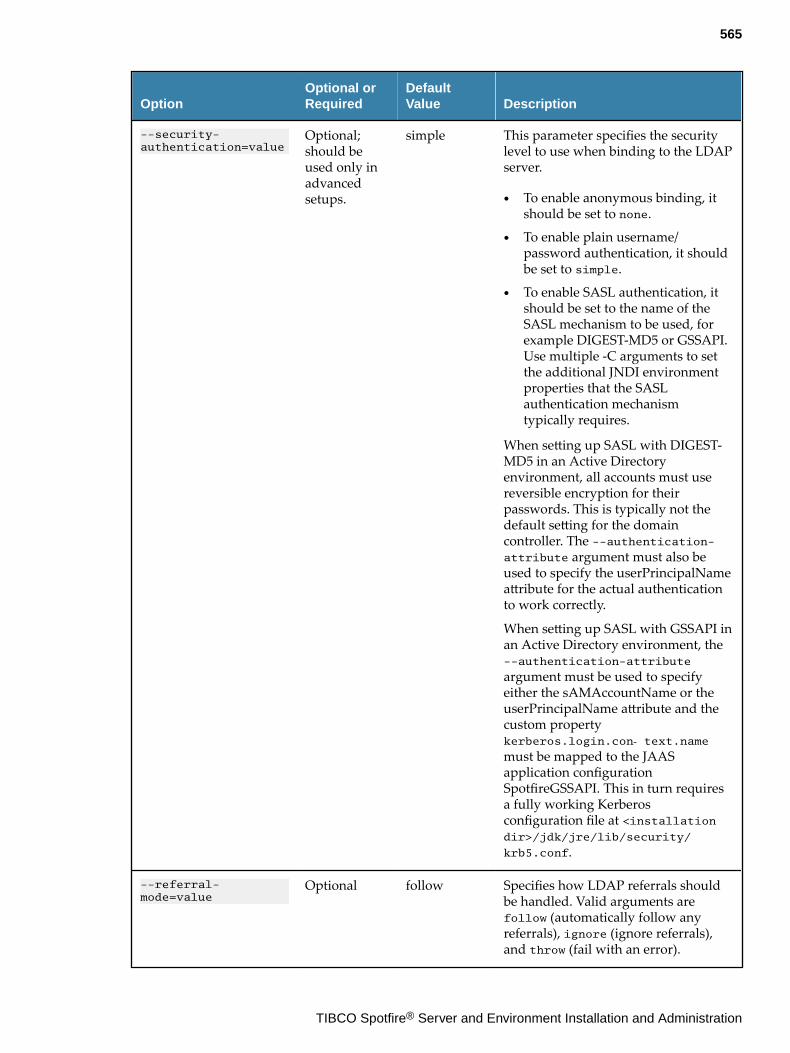
OptionOptional orRequired
DefaultValue Description
--security-authentication=value
Optional;should beused only inadvancedsetups.
simple This parameter specifies the securitylevel to use when binding to the LDAPserver.
● To enable anonymous binding, itshould be set to none.
● To enable plain username/password authentication, it shouldbe set to simple.
● To enable SASL authentication, itshould be set to the name of theSASL mechanism to be used, forexample DIGEST-MD5 or GSSAPI.Use multiple -C arguments to setthe additional JNDI environmentproperties that the SASLauthentication mechanismtypically requires.
When setting up SASL with DIGEST-MD5 in an Active Directoryenvironment, all accounts must usereversible encryption for theirpasswords. This is typically not thedefault setting for the domaincontroller. The --authentication-attribute argument must also beused to specify the userPrincipalNameattribute for the actual authenticationto work correctly.
When setting up SASL with GSSAPI inan Active Directory environment, the--authentication-attribute
argument must be used to specifyeither the sAMAccountName or theuserPrincipalName attribute and thecustom propertykerberos.login.con‐ text.namemust be mapped to the JAASapplication configurationSpotfireGSSAPI. This in turn requiresa fully working Kerberosconfiguration file at <installationdir>/jdk/jre/lib/security/
krb5.conf.
--referral-mode=value
Optional follow Specifies how LDAP referrals shouldbe handled. Valid arguments arefollow (automatically follow anyreferrals), ignore (ignore referrals),and throw (fail with an error).
565
TIBCO Spotfire® Server and Environment Installation and Administration
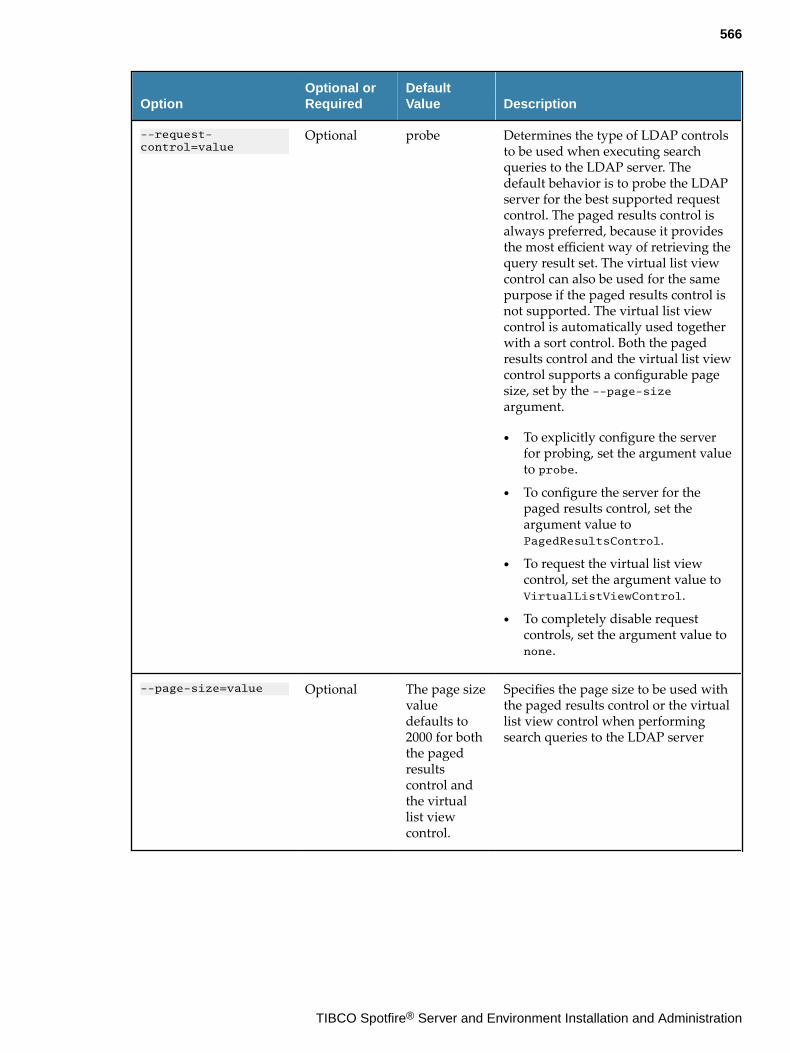
OptionOptional orRequired
DefaultValue Description
--request-control=value
Optional probe Determines the type of LDAP controlsto be used when executing searchqueries to the LDAP server. Thedefault behavior is to probe the LDAPserver for the best supported requestcontrol. The paged results control isalways preferred, because it providesthe most efficient way of retrieving thequery result set. The virtual list viewcontrol can also be used for the samepurpose if the paged results control isnot supported. The virtual list viewcontrol is automatically used togetherwith a sort control. Both the pagedresults control and the virtual list viewcontrol supports a configurable pagesize, set by the --page-sizeargument.
● To explicitly configure the serverfor probing, set the argument valueto probe.
● To configure the server for thepaged results control, set theargument value toPagedResultsControl.
● To request the virtual list viewcontrol, set the argument value toVirtualListViewControl.
● To completely disable requestcontrols, set the argument value tonone.
--page-size=value Optional The page sizevaluedefaults to2000 for boththe pagedresultscontrol andthe virtuallist viewcontrol.
Specifies the page size to be used withthe paged results control or the virtuallist view control when performingsearch queries to the LDAP server
566
TIBCO Spotfire® Server and Environment Installation and Administration
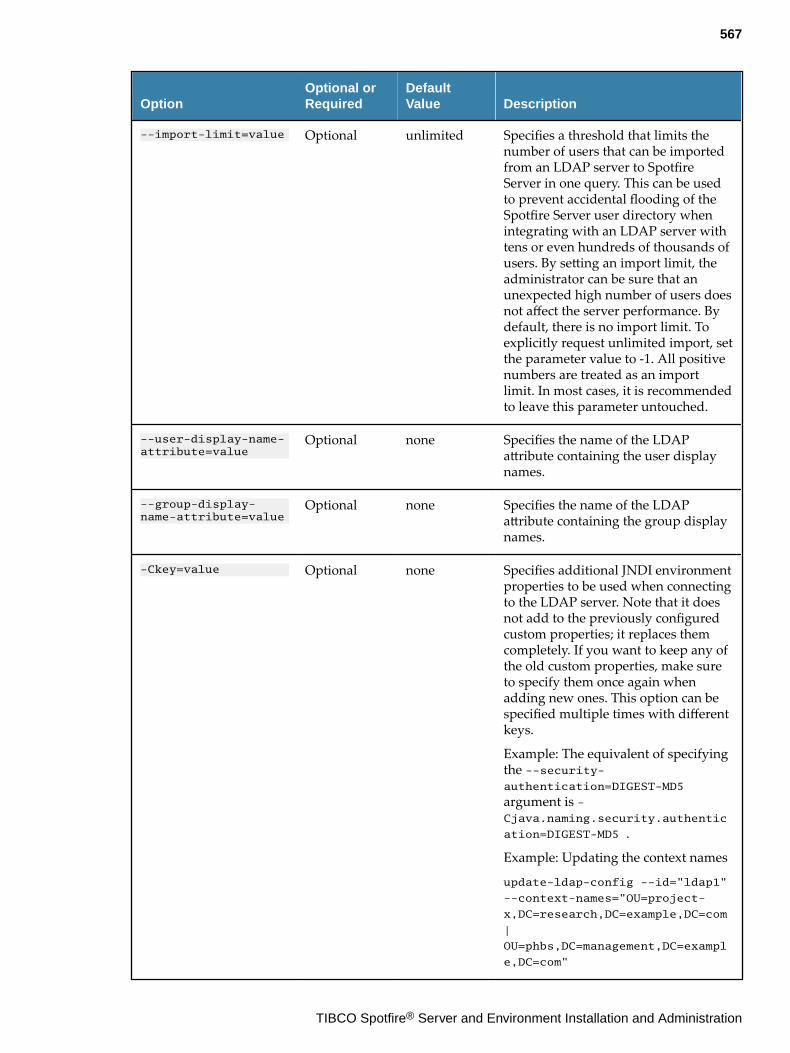
OptionOptional orRequired
DefaultValue Description
--import-limit=value Optional unlimited Specifies a threshold that limits thenumber of users that can be importedfrom an LDAP server to SpotfireServer in one query. This can be usedto prevent accidental flooding of theSpotfire Server user directory whenintegrating with an LDAP server withtens or even hundreds of thousands ofusers. By setting an import limit, theadministrator can be sure that anunexpected high number of users doesnot affect the server performance. Bydefault, there is no import limit. Toexplicitly request unlimited import, setthe parameter value to -1. All positivenumbers are treated as an importlimit. In most cases, it is recommendedto leave this parameter untouched.
--user-display-name-attribute=value
Optional none Specifies the name of the LDAPattribute containing the user displaynames.
--group-display-name-attribute=value
Optional none Specifies the name of the LDAPattribute containing the group displaynames.
-Ckey=value Optional none Specifies additional JNDI environmentproperties to be used when connectingto the LDAP server. Note that it doesnot add to the previously configuredcustom properties; it replaces themcompletely. If you want to keep any ofthe old custom properties, make sureto specify them once again whenadding new ones. This option can bespecified multiple times with differentkeys.
Example: The equivalent of specifyingthe --security-authentication=DIGEST-MD5
argument is -Cjava.naming.security.authentic
ation=DIGEST-MD5 .
Example: Updating the context names
update-ldap-config --id="ldap1"
--context-names="OU=project-
x,DC=research,DC=example,DC=com
|
OU=phbs,DC=management,DC=exampl
e,DC=com"
567
TIBCO Spotfire® Server and Environment Installation and Administration
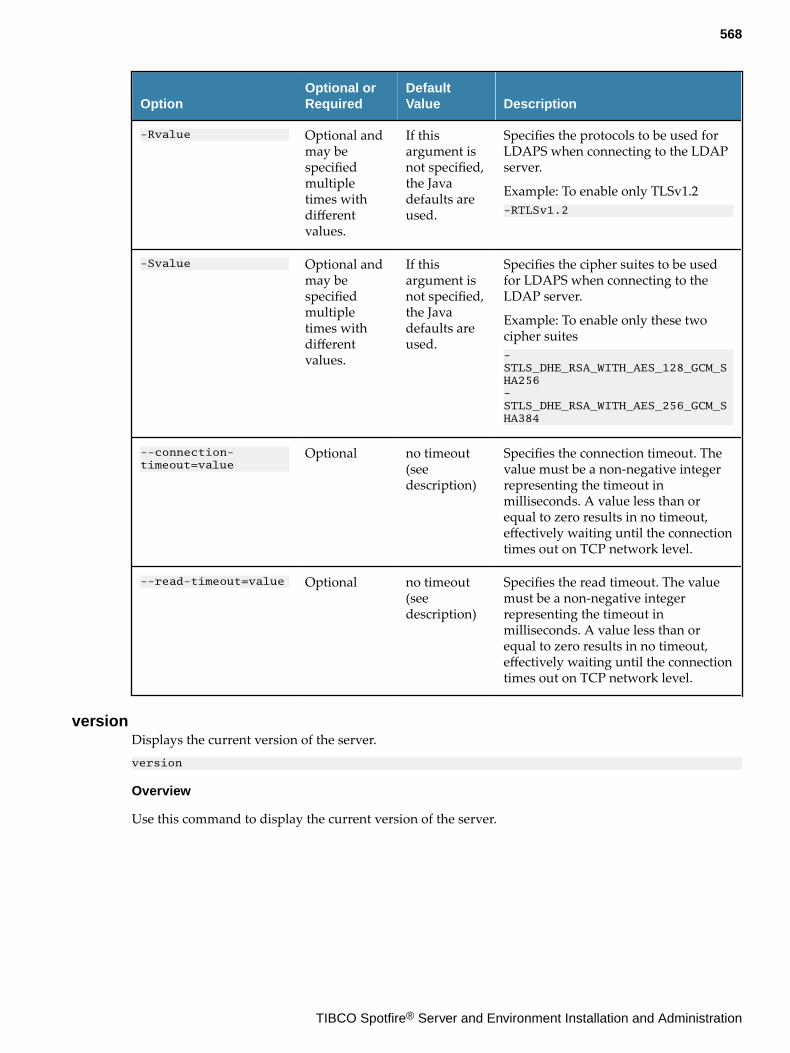
OptionOptional orRequired
DefaultValue Description
-Rvalue Optional andmay bespecifiedmultipletimes withdifferentvalues.
If thisargument isnot specified,the Javadefaults areused.
Specifies the protocols to be used forLDAPS when connecting to the LDAPserver.
Example: To enable only TLSv1.2-RTLSv1.2
-Svalue Optional andmay bespecifiedmultipletimes withdifferentvalues.
If thisargument isnot specified,the Javadefaults areused.
Specifies the cipher suites to be usedfor LDAPS when connecting to theLDAP server.
Example: To enable only these twocipher suites-STLS_DHE_RSA_WITH_AES_128_GCM_SHA256 -STLS_DHE_RSA_WITH_AES_256_GCM_SHA384
--connection-timeout=value
Optional no timeout(seedescription)
Specifies the connection timeout. Thevalue must be a non-negative integerrepresenting the timeout inmilliseconds. A value less than orequal to zero results in no timeout,effectively waiting until the connectiontimes out on TCP network level.
--read-timeout=value Optional no timeout(seedescription)
Specifies the read timeout. The valuemust be a non-negative integerrepresenting the timeout inmilliseconds. A value less than orequal to zero results in no timeout,effectively waiting until the connectiontimes out on TCP network level.
versionDisplays the current version of the server.version
Overview
Use this command to display the current version of the server.
568
TIBCO Spotfire® Server and Environment Installation and Administration
Glossary
Deployments & Packages
deployment areaDeployment areas, which are set up by the Spotfire administrator, make it possible to give differentusers access to different versions of the Spotfire client, while still using a single Spotfire Server.
distributionA collection of one or more software packages. The contents of a distribution are distributed to eachend user’s desktop using the deployment mechanism. A distribution is deployed to a deploymentarea.
Nodes & Services
node managerThe node manager is the networked software agent that is responsible for managing a set of serviceson a specific physical or virtual host. This software makes it possible to execute remote commandsfrom the Spotfire Server.
nodeAll the services and instances that are run by a particular node manager.
serviceAn application that runs on a node manager and provides a particular capability; in the currentversion of Spotfire Server, Spotfire Web Player and Spotfire Automation Services are the availableservices. A service is not available to end users until a service instance is running.
service instanceA specific realization of a service that is available to Spotfire end users. For example, when a useropens an analysis in the Spotfire Web Player, the user is accessing a particular instance of the WebPlayer service. (This distinction is invisible to the user.)
resource poolA set of specific Spotfire Web Player service instances (or a single instance) that can be used in a routingrule to define where a given file, or a file requested by a specific user, should preferably open. Forexample, a rule can specify that company VIPs always view analyses in a particular resource pool.
Scheduling & Routing
rulesThere are three types of rules: File, Group, and User.
The Spotfire administrator creates rules to do one of the following:
● Schedule updates to analyses (type of rule = File).
● Specify resource pools on which to open analyses that are requested by specific users or membersof specific groups (type of rule = User or Group).
● Specify resource pools on which to open specific analyses (type of rule = File).
scheduled update
569
TIBCO Spotfire® Server and Environment Installation and Administration
A rule that sets a schedule for automatically adding fresh data to an existing analysis. The rule alsoindicates the resource pool on which the analysis should open (Type of rule=File).
routing ruleA rule that specifies the resource pool on which an analysis should preferably open.
Users & Groups
primary groupThe primary group is the group that determines which licenses and settings apply for a user whobelongs to two or more groups.
Miscellaneous
information linkAn information link is a structured request for data. Users can create information links to connect toexternal JDBC databases and thereby access and load data into Spotfire analysis files. Informationlinks and the elements they are created from are stored in the Spotfire database.
licenseLicenses determine which features and functionality a user has access to when working in Spotfire.Administrators set licenses at the group level, using the Administration Manager in Spotfire Analyst.
post-authentication filterThe Spotfire Server filter that can either block all users who try to log in but are not already present inthe user directory, or automatically create a new account in the user directory for any user who logs into the server for the first time. It is also possible to use the Spotfire Server api to create a custom post-authentication filter.
preferencesPreferences are default settings for the way that people work, and the analyses they create.Preferences include a wide range of properties, from which toolbars are visible when the user startsSpotfire to the look of tables in visualizations. Administrators set preferences at the group level, usingthe Administration Manager in Spotfire Analyst.
570
TIBCO Spotfire® Server and Environment Installation and Administration


