20
1 Last Revised - February 18, 2015 February 18, 2015 Timekeeper’s Manual For Using the Time and Attendance System (TAS)

1 Last Revised - February 18, 2015
February 18, 2015
Timekeeper’s Manual For Using the
Time and Attendance System
(TAS)
2 Last Revised - February 18, 2015
Table of Contents
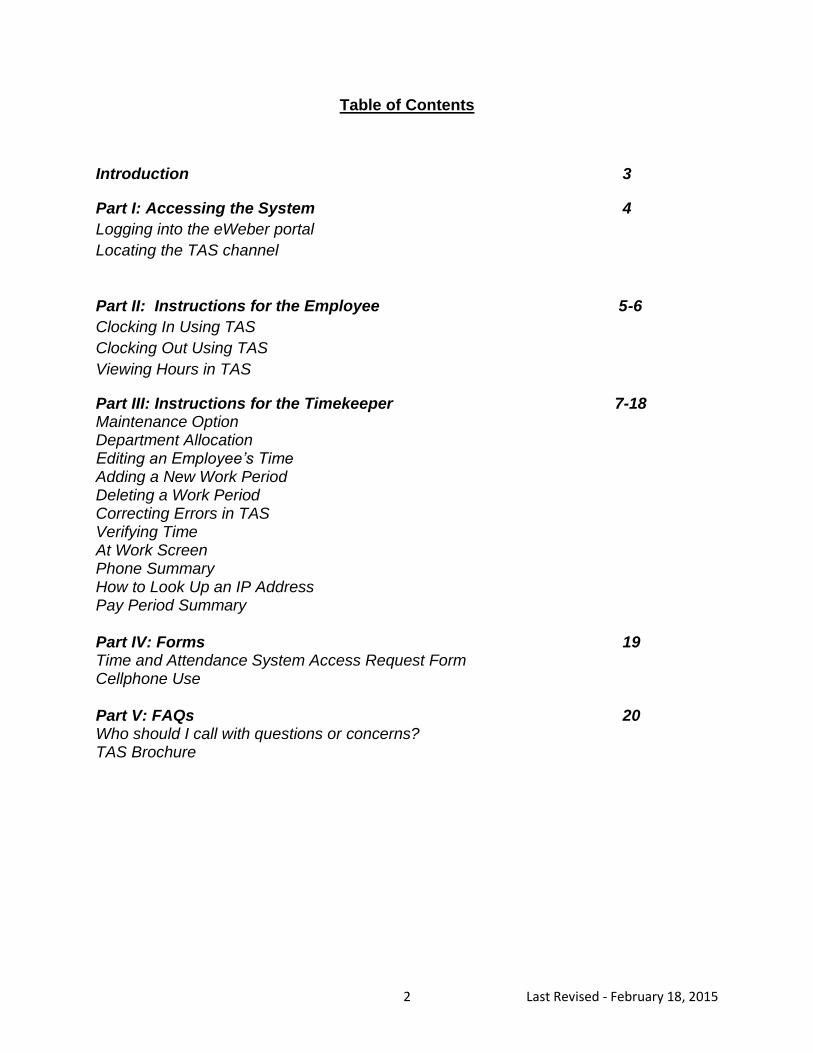
Introduction 3
Part I: Accessing the System 4
Logging into the eWeber portal
Locating the TAS channel
Part II: Instructions for the Employee 5-6
Clocking In Using TAS
Clocking Out Using TAS
Viewing Hours in TAS
Part III: Instructions for the Timekeeper 7-18 Maintenance Option Department Allocation Editing an Employee’s Time Adding a New Work Period Deleting a Work Period Correcting Errors in TAS Verifying Time At Work Screen Phone Summary How to Look Up an IP Address Pay Period Summary Part IV: Forms 19 Time and Attendance System Access Request Form Cellphone Use Part V: FAQs 20 Who should I call with questions or concerns? TAS Brochure

3 Last Revised - February 18, 2015
Introduction
Welcome to the UPDATED Time and Attendance System at Weber State University. This manual explains how to use the updated Time and Attendance System (TAS). It is an update from the system originally created in 2006. This manual is intended for timekeepers and back-up timekeepers. Separate materials are available to assist employees with keeping track of their time in TAS. However, some information is given here so that you can assist your employees. Access to this system is password protected for limited availability to privileged information. Timekeepers must request permission to use the system through the Payroll Office by completing the “Time and Attendance System Access Request Form” found at http://www.weber.edu/financialservices/Forms.html#Payroll Forms At the back of this manual is a list of individuals and their contact information. If after reading and following this manual you still have questions or need assistance please refer to this contact list.

4 Last Revised - February 18, 2015
Part I: Accessing the System
Logging into the eWeber portal
To login to the Time and Attendance System (TAS) you will need to login to the eWeber portal at https://www.weber.edu/ by entering your Wildcat Username and Password in the appropriate fields as shown below.
Locating the TAS channel
After logging in to the eWeber portal, select Payroll under ‘Categories’.
Next, click on TAS Time Clock.

5 Last Revised - February 18, 2015
Clocking in Using TAS (On the Web):
After clicking on the TAS Time Clock, you will be able to clock in and out.
The following is an example of the employee’s clock in screen and descriptions of each
area (in this case the employee works for two departments).
If the employee works for multiple departments, the employee will choose the department they are clocking in for by selecting it from the department drop down list and clicking on the “Clock In” button.
Current Pay Period
Most recent activity
Complete record of time
punches worked in the pay
period
Total hours worked in the pay period
listed by department.

6 Last Revised - February 18, 2015
The “Your Hours:” section is then updated to show that the clock in process has been completed and lists the date and time without a clock out entry.
Clocking Out Using TAS (On the Web):
Employees follow a similar process at the end of their work shift. To clock out online using TAS, the employee will again login to the student portal at https://www.weber.edu/, and select Payroll under ‘Categories’. Next, click TAS Time Clock and Clock out.
Clocking in/out Using TAS (On a desk phone):
Dial 8880 from an office phone in your department or area. Press 1 to access the TAS
menu. Then press 9 (for “W”) followed by your 8 digit W#. TAS will say your name
and ask: “Is that correct?” Press 1 (yes) or 2 (no). Enter the last four digits of your
social security number. After you have been identified you can clock in by pressing
1. Use these same instructions to clock out. When you are finished, hang up to exit
TAS. You will also clock out using the same instructions.
Clocking in/out Using TAS (On a cellphone):
Personal cellphone is accepted ONLY if you have a signed agreement on file prior to using your cell phone.
7 Last Revised - February 18, 2015
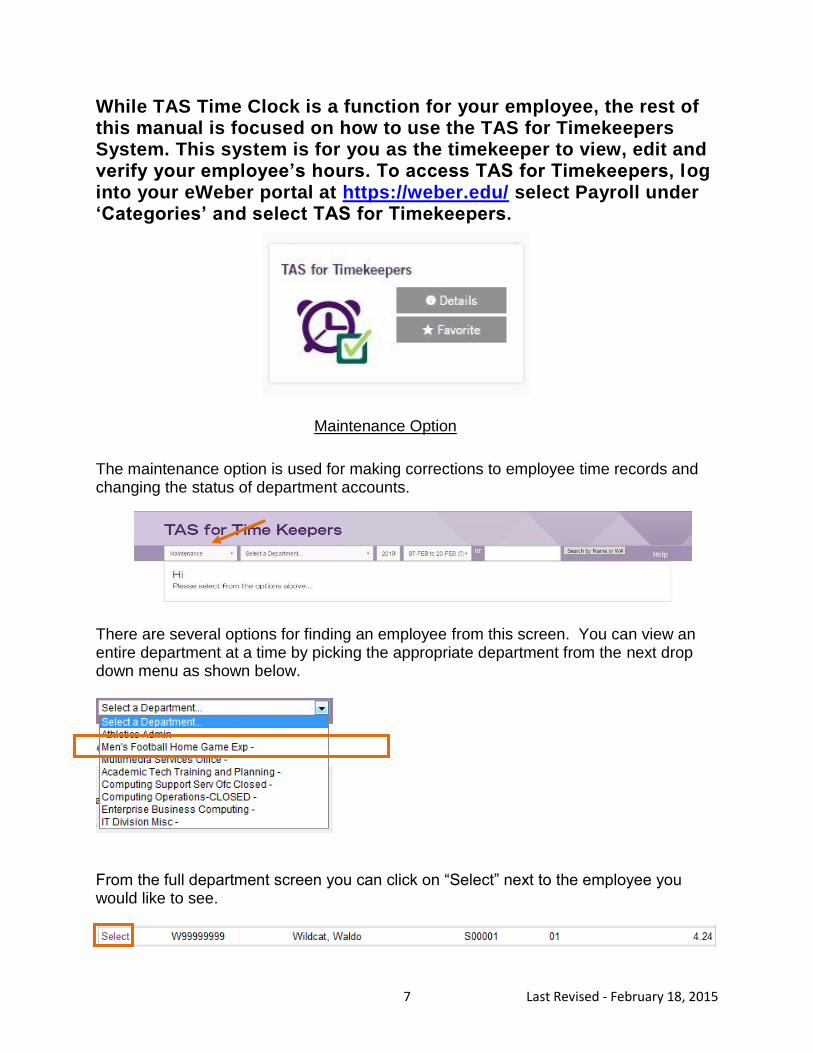
While TAS Time Clock is a function for your employee, the rest of this manual is focused on how to use the TAS for Timekeepers System. This system is for you as the timekeeper to view, edit and verify your employee’s hours. To access TAS for Timekeepers, log into your eWeber portal at https://weber.edu/ select Payroll under ‘Categories’ and select TAS for Timekeepers.
Maintenance Option
The maintenance option is used for making corrections to employee time records and changing the status of department accounts.
There are several options for finding an employee from this screen. You can view an entire department at a time by picking the appropriate department from the next drop down menu as shown below.
From the full department screen you can click on “Select” next to the employee you would like to see.

8 Last Revised - February 18, 2015
The second way to find an employee from the “Maintenance” screen is by an employee’s last name or W number. After doing a search for the employee, either by selecting from the department list, name search, or W number, the maintenance screen for that employee appears. The following is an example of an employee’s maintenance screen and descriptions of each area.
Department Allocation
To change the status of accounts (different pay rates or indexes) within the same department for an employee, click on the “Edit” link next to an index as shown below.
This shows
the total
hours an
employee
has worked
in each
department.
This box
shows the
status, index
number, hourly
rate, and total
hours worked
at each rate in
this
department.
This shows the employee’s clock in/out times in the pay
period for the department specified.

9 Last Revised - February 18, 2015
A box will appear on the screen to the right like the one below.
Choose the correct status for the index from the drop down menu. “Home” means the employee will be clocked in to this account automatically when choosing this department. “Terminate” means the employee will not be able to clock in to this account again (can be adjusted within the same pay period). “Nothing” means the index is active but not the account you want the employee to automatically clock in to. Example: use “Nothing” when the employee has a different rate for working weekends so the timekeeper can make those manual adjustments. When the appropriate status is selected click the “Change Status” button. To return without saving changes, click the “Cancel” button. Only a status of “Home” or “Nothing” are active indexes. If “Terminate” or “Frozen” status shows on an account, the employee cannot clock in for that Department. The “Frozen” status resets every pay period. If an error is made on the status of an index, it can be reversed until the Payroll Office uploads the hours into Banner.
Editing an Employee’s Time
To edit an employee’s punch, click “Select” on the left side of the screen next to the time punch you wish to edit as shown below.
The following box will appear with the information from the time punch you selected.

10 Last Revised - February 18, 2015
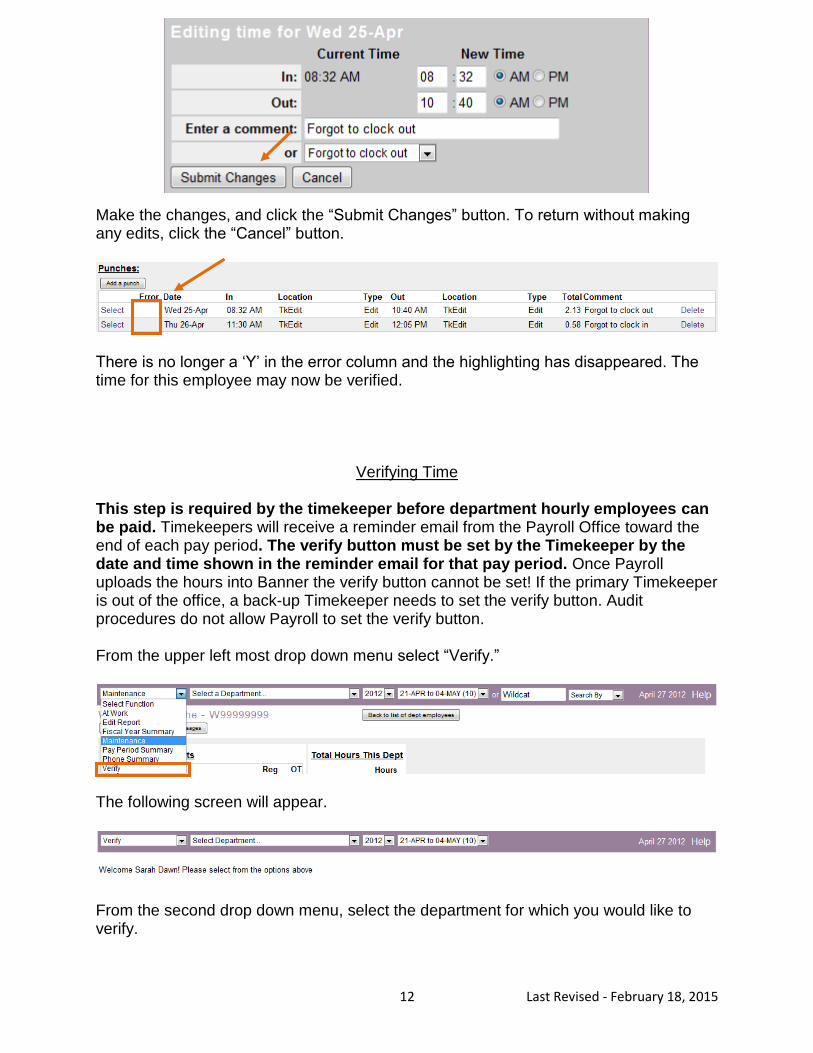
Enter the corrected times in the “New Time” section. A comment is required by either typing in a custom comment (which will appear in the drop down menu from then on) or select from the current drop down menu. Click the “Submit Changes” button. The selected time punch will now be updated with your edits. To return without making any edits, click the “Cancel” button.
Adding a New Work Period To add a new time punch to the employee’s time, click the “Add a Punch” button located to the left and above the list of all punches for this department.
The below box will appear.
11 Last Revised - February 18, 2015
Type in the correct information, including a comment (or select from the drop down menu) and click the “Submit Changes” button. A new time punch will now be added. To return without adding a new punch, click the “Cancel” button.
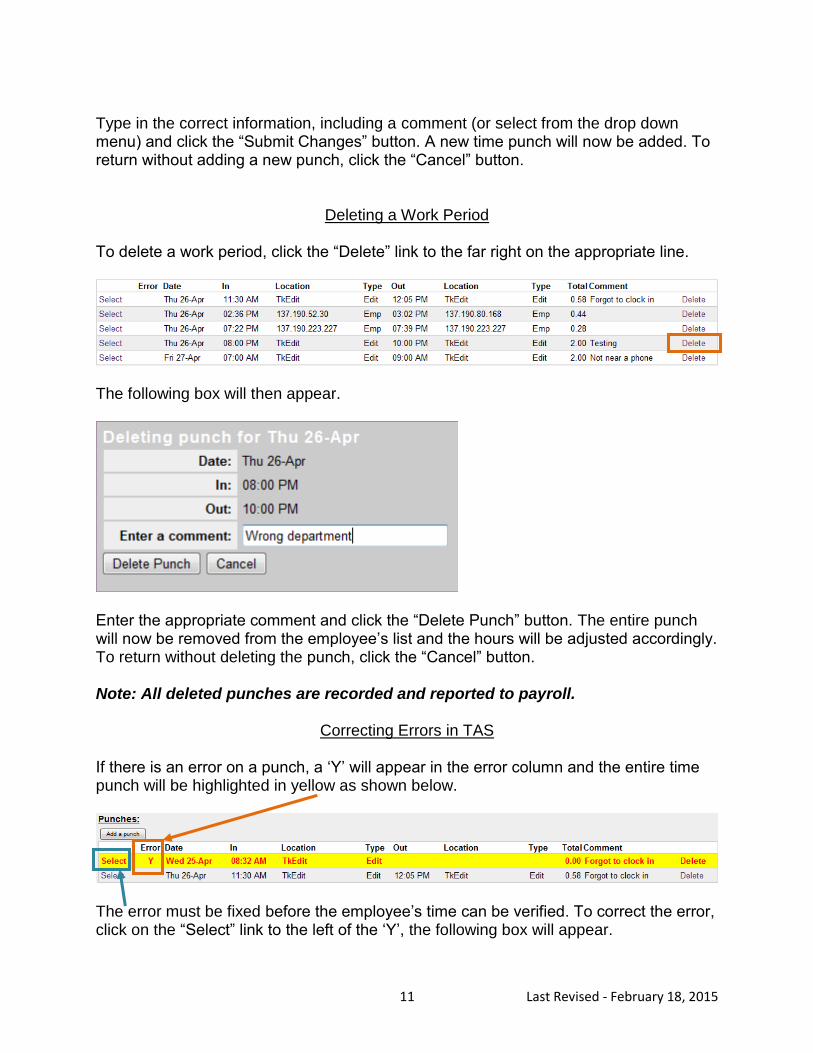
Deleting a Work Period To delete a work period, click the “Delete” link to the far right on the appropriate line.
The following box will then appear.
Enter the appropriate comment and click the “Delete Punch” button. The entire punch will now be removed from the employee’s list and the hours will be adjusted accordingly. To return without deleting the punch, click the “Cancel” button. Note: All deleted punches are recorded and reported to payroll.
Correcting Errors in TAS If there is an error on a punch, a ‘Y’ will appear in the error column and the entire time punch will be highlighted in yellow as shown below.
The error must be fixed before the employee’s time can be verified. To correct the error, click on the “Select” link to the left of the ‘Y’, the following box will appear.
12 Last Revised - February 18, 2015
Make the changes, and click the “Submit Changes” button. To return without making any edits, click the “Cancel” button. There is no longer a ‘Y’ in the error column and the highlighting has disappeared. The time for this employee may now be verified.
Verifying Time This step is required by the timekeeper before department hourly employees can be paid. Timekeepers will receive a reminder email from the Payroll Office toward the end of each pay period. The verify button must be set by the Timekeeper by the date and time shown in the reminder email for that pay period. Once Payroll uploads the hours into Banner the verify button cannot be set! If the primary Timekeeper is out of the office, a back-up Timekeeper needs to set the verify button. Audit procedures do not allow Payroll to set the verify button. From the upper left most drop down menu select “Verify.”
The following screen will appear.
From the second drop down menu, select the department for which you would like to verify.

13 Last Revised - February 18, 2015
Confirm that you have the correct calendar year (NOT fiscal year) in the next drop down menu.
In the final drop down menu, select the pay period for which you are currently verifying.
The screen below will now show all of the employees who have clocked in for the selected pay period (if an employee has multiple accounts/suffixes they will be listed multiple times). For each employee, check the hours and look for errors. When everything is correct, click the “Verify” button on the left side of the screen.

14 Last Revised - February 18, 2015
If there is an error, the screen will look like the following.
To correct an error, click on the “Select” link to the left of the employee’s name. This will route you back to the maintenance screen (see “Correcting Errors in TAS”). Errors must be corrected before time can be verified.
At Work Screen To determine if an employee is currently at work, select “At Work” from the left most drop down menu.
Select the department you would like to view from the next drop down menu. Followed by confirming the correct calendar year and selecting the pay period you would like to view (choosing the current pay period will allow you to see if they are clocked in at this moment).
The following screen will appear with a list of all the selected department’s employees and their last activity in this pay period.

15 Last Revised - February 18, 2015
Because our Waldo Wildcat example has no clock out time listed, he is presently at work
Phone Summary For monitoring the phone and/or computer location used to clock in/out, select “Phone Summary” from the upper left drop down menu.
Select the department you would like to view from the next drop down menu. Followed by confirming the correct calendar year and selecting the pay period you would like to view.
This following screen shows the locations used by the employees to clock in/out.

16 Last Revised - February 18, 2015
The five options that could appear in the “Location” column are: A campus extension,
an off campus telephone number (shows all ten digits of the number),
the IP address of the computer used to clock in,
the mobility service (this will capture the location of the clock in/out as long as the employee is connected to WSU Secure) or a ‘TkEdit’ because a clock in/out time was entered by the Timekeeper.
*The department supervisor may, if needed, designate which computer and/or telephone number hourly employees may use for clocking in/out.

17 Last Revised - February 18, 2015
How to Look Up an IP Address
It is recommended that you designate computer(s) from which to clock in/out. To determining which computer was used to clock in/out you can look-up an IP address on the internet. You must be using the computer for which you want the IP address. Make sure your internet browser is open. Once online you may type in one of the following URLs: http://www.whatismyipaddress.com/ The IP address for the computer you are using then appears. Here are examples from each of the link above.

18 Last Revised - February 18, 2015
Pay Period Summary
For verifying that employee hours will be paid from the desired index, select “Pay Period Summary” from the upper left drop down menu.
Select the department you would like to view from the next drop down menu. Followed by confirming the correct calendar year and selecting the pay period you would like to view.
This screen displays each employee that has clocked in to an index within this department and pay period. It shows total hours for each index and for the entire Organization.

19 Last Revised - February 18, 2015
Forms
TAS Access Request Form
http://weber.edu/wsuimages/financialservices/Forms/Payroll/Forms/TAS%20Access%2
0Form.pdf
Cellphone Agreement
http://www.weber.edu/wsuimages/financialservices/Forms/Payroll/TAS%20Cell%20Pho
ne%20Use%20Agreement.pdf

20 Last Revised - February 18, 2015
FAQ’s
Who should I call with questions or concerns?
Lisa Allen Director 801-626-6602 [email protected]
Lorinda DeBoer Salaried Payroll 801-626-6736 [email protected]
Jolene Frazier Hourly Payroll 801-626-6038 [email protected]
Nancy Loewen Front Desk 801-626-6031 [email protected]
Ashley Hendrickson Hourly Payroll 801-626-6601 [email protected]
Kallie Bennett Support Staff 801-626-8878 [email protected]
Lili Smith Support Staff 801-626-6607 [email protected]
Connor Larsen Support Staff 801-626-8676 [email protected]
Where can I access the TAS employee guide/brochure online?
http://weber.edu/wsuimages/financialservices/Forms/Payroll/System/TAS%20-
%20Employee%20Guide%20Brochure.pdf


