Page 1
Employee Handbook
Page 1 of 13 [email protected]
Clocking in/out
Employees can clock in or clock out using either the computer/portal or the badge reader.
Instructions on how to clock in or out using the computer/portal follow. Please refer to the trifold
handout located on the TimeNet page for instructions on how to use the badge reader.
Type in the username and password at the login screen. It will look like the one below. Your
username and password are the same as your Outlook email username and password.
By checking the box beside the option located under the button and
then clicking , a punch is recorded and the transaction is finished. You should have a pop up
similar to the one below confirming the punch.
Page 2
Page 2 of 13 [email protected]
By not checking the “Quick Badge Only” box, the main menu will appear. This brings you to the
home screen menu. Notice the yellow halo around the Home icon of the screen below:
Quick Badge Screen ‐
If an employee chooses to log into the system, he or she can clock in/out by using the Quick Badge
icon located on the menu bar. The following screen will be displayed:
1. Select Save if you are working in your home labor distribution, department, etc.
Take note of the date and time when selecting save, this will be your clocking time.
2. If you need to enter a special code, select one of the special codes from the right side of the
screen such as Lunch Out or Orientation and select Save.
3. Once the clocking information is entered, an informational message will appear stating the
clocking was submitted.
Page 3
Page 3 of 13 [email protected]
The clocking entered will be displayed on the Time Card Screen.
List of Special Codes
CB: Called back must be used to indicate an employee who is on call was called back to work during
the on call period. When badging in/out for call back make sure you use the special code CB for
the in and out punches to capture the complete time spent working.
CL: Class must be used to indicate when an employee attends a class or training and should be paid
for this time. When badging in/out for class time make sure you use the special code CL for the
in and out punches to capture the complete time spent in class.
EXS: Extended Shift must be used to indicate the time between the previous punch and the current
punch is greater than 16 hours.
LO: Lunch out must be used to indicate when an employee is clocking out for lunch. All employees
are now required to badge out for lunch and then back in from lunch. Note: You only have the
use the special code LO on the lunch out punch.
MT: Meeting must be used to indicate when an employee attends a meeting and should be paid for
this time. When badging in/out for meeting make sure you use the special code MT for the in
and out punches to capture the complete time spent in the meeting.
NL: No lunch is used on the final punch of the day to indicate that the employee was unable to take
a lunch during that shift
Code Description Clocking Category
CB Called Back Both
CL Class Both
EXS Extended Shift Out Only
LO Lunch Out Out Only
MT Meeting Both
NL No Lunch Out Only
OR Orientation Both
VTR Voting Time Requested Either
Page 4
Page 4 of 13 [email protected]
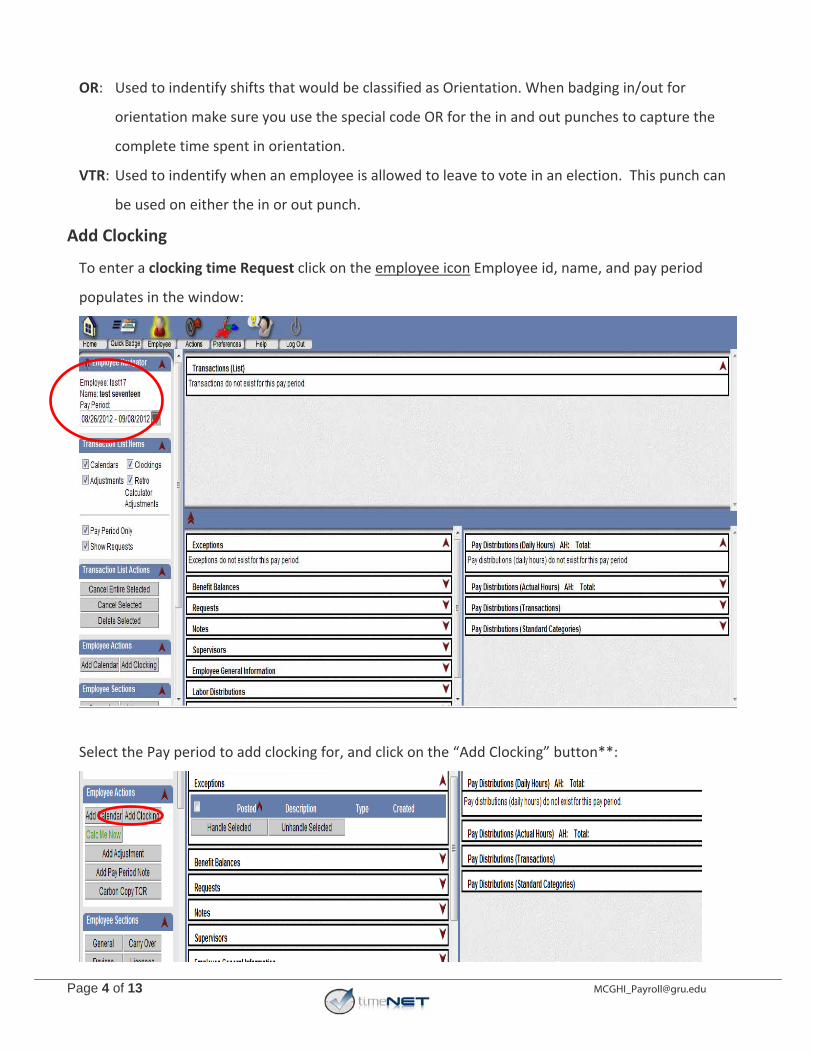
OR: Used to indentify shifts that would be classified as Orientation. When badging in/out for
orientation make sure you use the special code OR for the in and out punches to capture the
complete time spent in orientation.
VTR: Used to indentify when an employee is allowed to leave to vote in an election. This punch can
be used on either the in or out punch.
Add Clocking
To enter a clocking time Request click on the employee icon Employee id, name, and pay period
populates in the window:
Select the Pay period to add clocking for, and click on the “Add Clocking” button**:
Page 5
Page 5 of 13 [email protected]
By clicking “Add Clocking” the system displays the screen that allows you to manually add clocking:
All fields that have an “*“next to it are required.
Date (The format is mm/dd/yyyy)
Entering a value of “T” in the date pre‐populates the field with today’s date,
OR Click on the calendar on the right side of the screen to select a date,
OR Manually key the date.
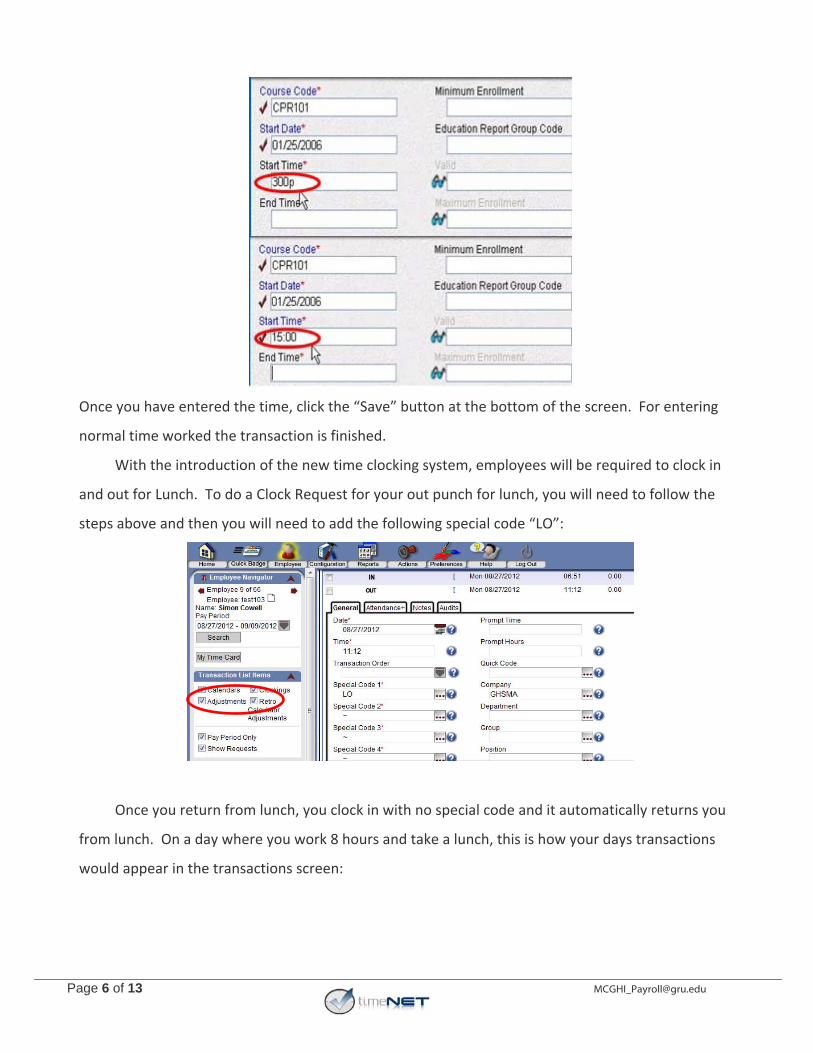
Time
The time must be entered in a 24hour format. If entered in a non 24 hour format, the system
reformats the time into a 24 hour format if you add PM after the time. Example: 3:00pm will
change to 15:00 automatically.
Page 6
Page 6 of 13 [email protected]
Once you have entered the time, click the “Save” button at the bottom of the screen. For entering
normal time worked the transaction is finished.
With the introduction of the new time clocking system, employees will be required to clock in
and out for Lunch. To do a Clock Request for your out punch for lunch, you will need to follow the
steps above and then you will need to add the following special code “LO”:
Once you return from lunch, you clock in with no special code and it automatically returns you
from lunch. On a day where you work 8 hours and take a lunch, this is how your days transactions
would appear in the transactions screen:
Page 7
Page 7 of 13 [email protected]
To Add Calendar Requests for PTO, EMLB, Called Off, Jury Duty, Etc:
Click on the Employee Icon, this action brings you to the transaction screen, notice the TCS (Time Card
Screen) button is dark gray, this indicates that you are viewing the transaction screen:
To enter non productive time for multiple days, click on the “Monthly View” button.
Page 8
Page 8 of 13 [email protected]
This screen displays the current month and highlights the current day. For my example, I am going to
enter annual leave on November 2, 2012 – November 4, 2012.
Step 1: Click on forward arrow to navigate to November.
Step 2: Click on November 2 dark bar
Step 3: Hold the Ctrl key and click on the dark bar for November 3 and November 4th
Once you have selected the days they will appear as highlighted, Click on the “Add Calendar” button:
Click on the dark
bar for the 16th.
Hold the Ctrl key down while clicking on the dark bar for the
3rd and 4th
Page 9
Page 9 of 13 [email protected]
The “Add Calendar” button displays the general employee info screen, verify you have selected the
correct date range, and then enter the appropriate pay code:
Enter the start of the transaction time:
Click in the Pay Code field. Click on the
appropriate Pay Code for the
calendar request from the Field Look
Up Values pane.
Page 10
Page 10 of 13 [email protected]
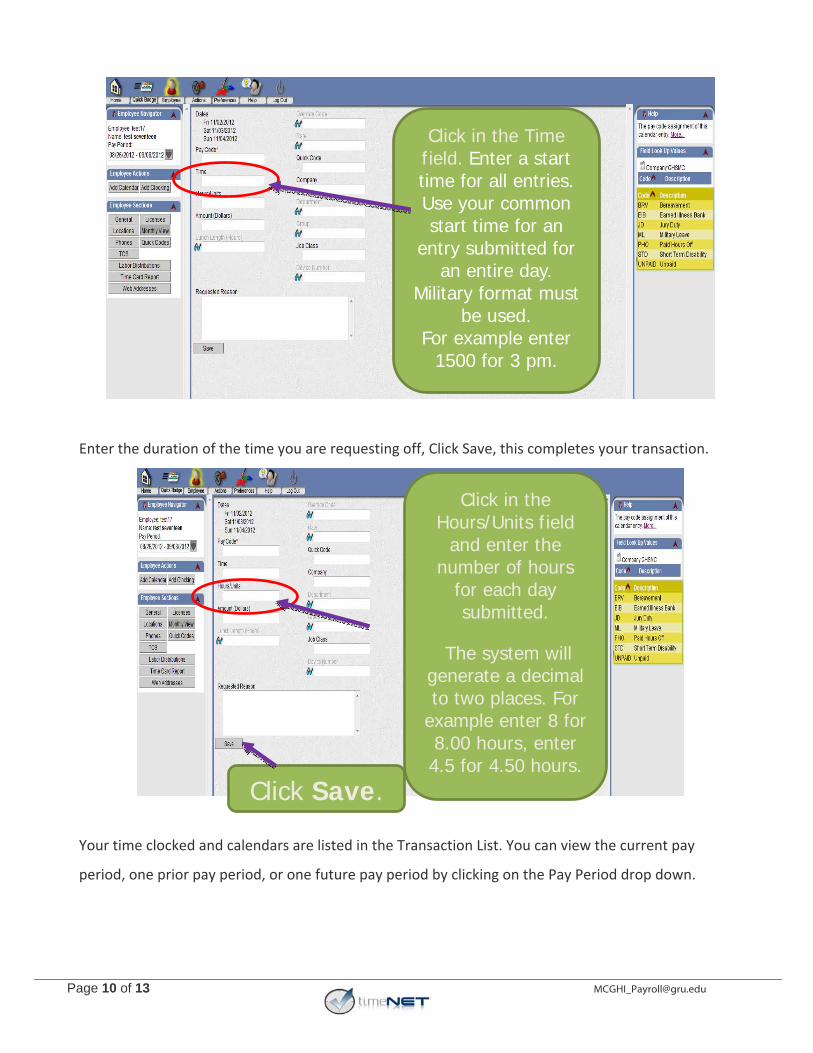
Enter the duration of the time you are requesting off, Click Save, this completes your transaction.
Your time clocked and calendars are listed in the Transaction List. You can view the current pay
period, one prior pay period, or one future pay period by clicking on the Pay Period drop down.
Click in the Time field. Enter a start time for all entries. Use your common start time for an
entry submitted for an entire day.
Military format must be used.
For example enter 1500 for 3 pm.
Click in the Hours/Units field
and enter the number of hours
for each day submitted.
The system will generate a decimal to two places. For
example enter 8 for 8.00 hours, enter 4.5 for 4.50 hours.
Click Save.
Page 11
Page 11 of 13 [email protected]
Benefit Balances
To view Benefit Balances click on the red card arrow to expand:
To view your Pay Distribution for the selected pay period click on the red card arrow to expand:
Page 12
Page 12 of 13 [email protected]
Signing Off On Time At the End of the Pay Period
Employees are expected to sign off on their time at the end of the pay period. To sign off on your
time:
1. Click on the icon at the top of the screen. This will access your time card screen with
the detail of your clockings for the pay period.
2. Make sure there are no exceptions messages by clicking the exceptions card in the middle of your
screen underneath the transactions list showing your punch detail.
3. Check that all of your daily hours totals are correct by reviewing the Pay Distributions (Daily
Hours) on the bottom right side of your screen. Each week is totaled separately and you can
review each week by clicking on either the Week 1 tab or the Week 2 tab.
4. If your hours are correct and there are no exceptions to clear, then you should click on the
button located on the left side of your screen located under the
section.
Page 13
Page 13 of 13 [email protected]
Rounding Chart:
In/Out Punch Low Value In/Out Punch High Value Rounded Value
:58 :03 :00
:04 :09 :06
:10 :15 :12
:16 :21 :18
:22 :27 :24
:28 :33 :30
:34 :39 :36
:40 :45 :42
:46 :51 :48
:52 :57 :54
Middle In‐Punches, Middle Out‐Punches and Non‐productive hours and times are not rounded. This includes
Lunch punches.