21
TIPS AND TRICKS USER GUIDE

TIPS AND TRICKS
USER GUIDE

1
Table of Contents
Filtering .......................................................................................................................................................... 2 Import/Export ............................................................................................................................................... 5
Pivot Query .................................................................................................................................................... 9
Printing ........................................................................................................................................................ 12 Sorting .......................................................................................................................................................... 13
View Archive ............................................................................................................................................... 14
Wrap Data ................................................................................................................................................... 16 Pop-up Blocker Access ............................................................................................................................... 18

2
Filtering There are two ways to filter lists: drop-down menus and filter icon 1. Access the table you would like to filter
For this example, we will be using the Vehicles table (Located on the left toolbar)
2. Your filtering options are located at the top of the vehicle list.
3. Using the drop-down menu to filter, we will filter all Makes that equal Dodge.
4. Click on the search icon

3
5. FleetWave displays only vehicles with the Makes that equal Dodge.
6. Using the filter icon , we will filter all Makes that equal Dodge. 7. Click on the filter icon beside Make. A filter pop-up screen will be displayed.
8. Under the Basic Filter, select Dodge. Users can also use the Custom Filter to produce same results.
4
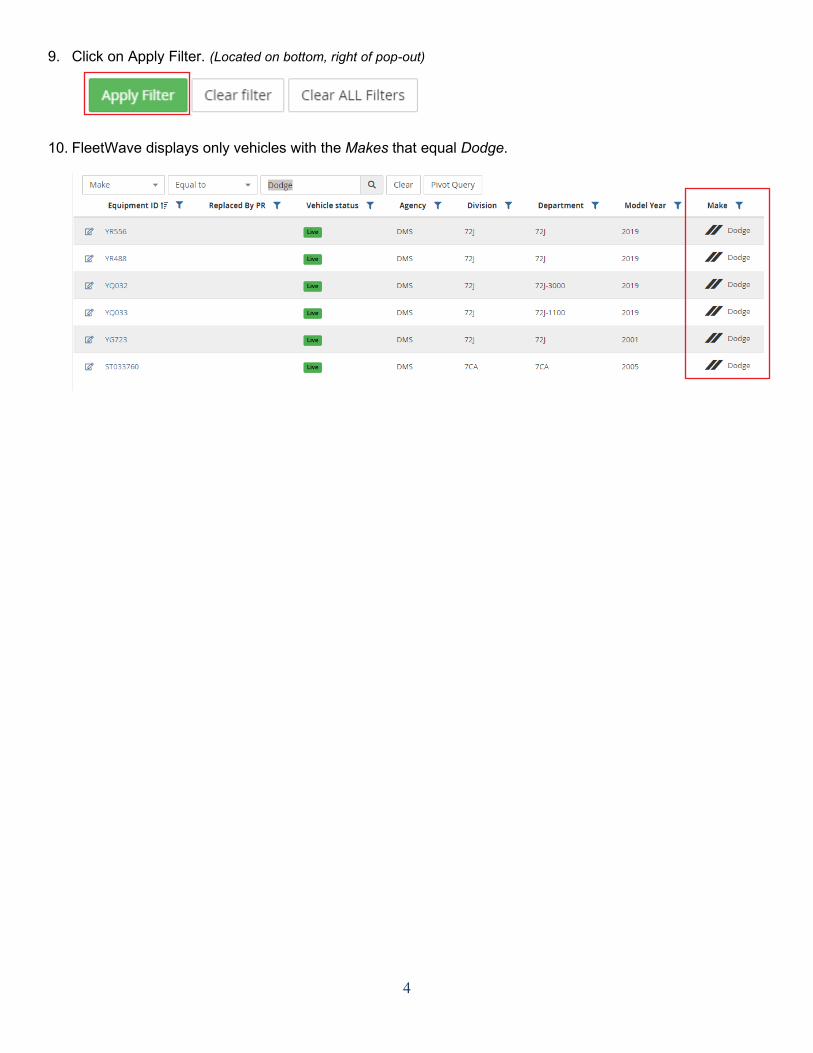
9. Click on Apply Filter. (Located on bottom, right of pop-out)
10. FleetWave displays only vehicles with the Makes that equal Dodge.

5
Import/Export Import/Export allows you to print the screen you are on or export data to a CSV, Word, PDF or Excel format. 1. Access the table you would like to Import/Export.
For this example, we will be using the Vehicles table (Located on the left toolbar)
2. Click on the ellipses⋮(Located on the top, right) An Actions menu will display.

6
3. Click on Import/Export.
4. An Import/Export pop-up screen will be displayed.
5. On the Print tab, click on Print to print your table of equipment.

7
6. A print screen pop-out will be displayed.
a. Displays print preview b. Print: Displays number of pages c. Destination: Display the printer option d. Pages: Choose how many pages you want to print e. Copies: Choose how many copies you want to print f. Layout: Choose portrait or landscape g. Color: Choose your print color option h. More Settings: Allows user to choose more printer settings
7. Click print to send print display to the destination of your choice.
a. b.
c.
d.
e.
f.
g.
h.

8
8. To Export, repeat steps one (1) through four (4). 9. On the Export tab, click on the format you would like to export the table of equipment in.
For this example, we will be using Excel format.
10. Once you click on your format of choice, your export will display on the bottom of the screen.
11. Click on the file, and your data will be displayed in the format selected.
9
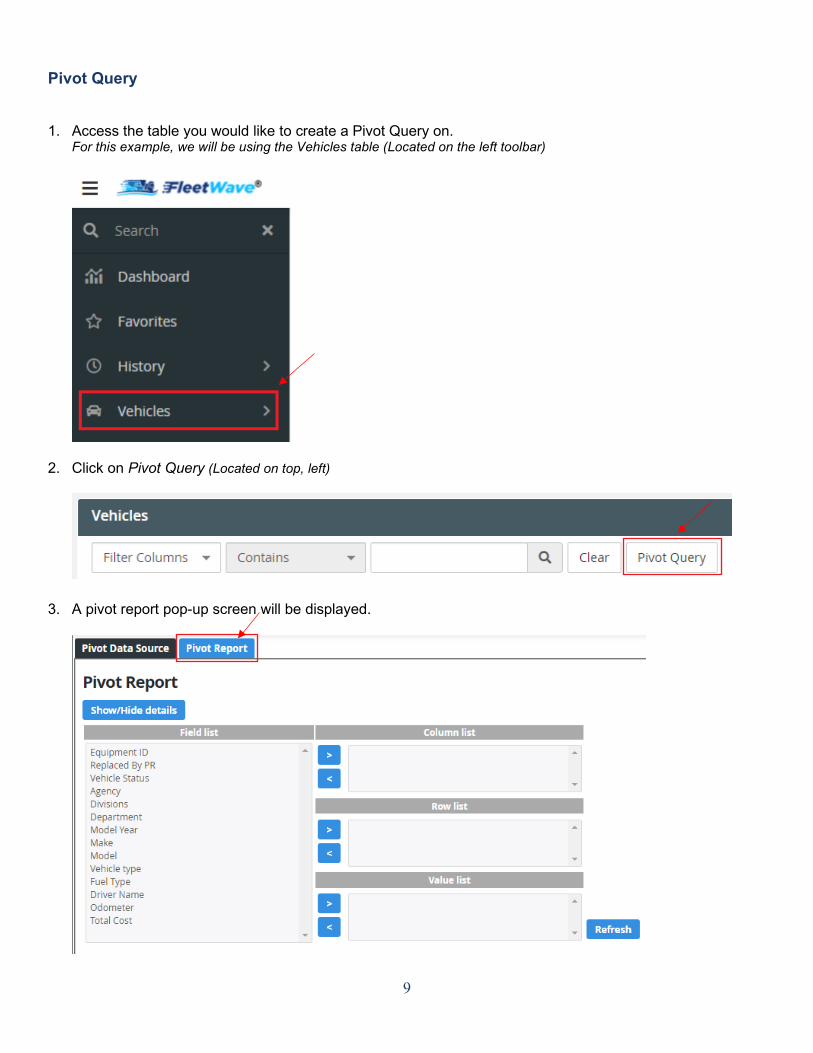
Pivot Query 1. Access the table you would like to create a Pivot Query on.
For this example, we will be using the Vehicles table (Located on the left toolbar)
2. Click on Pivot Query (Located on top, left)
3. A pivot report pop-up screen will be displayed.
10
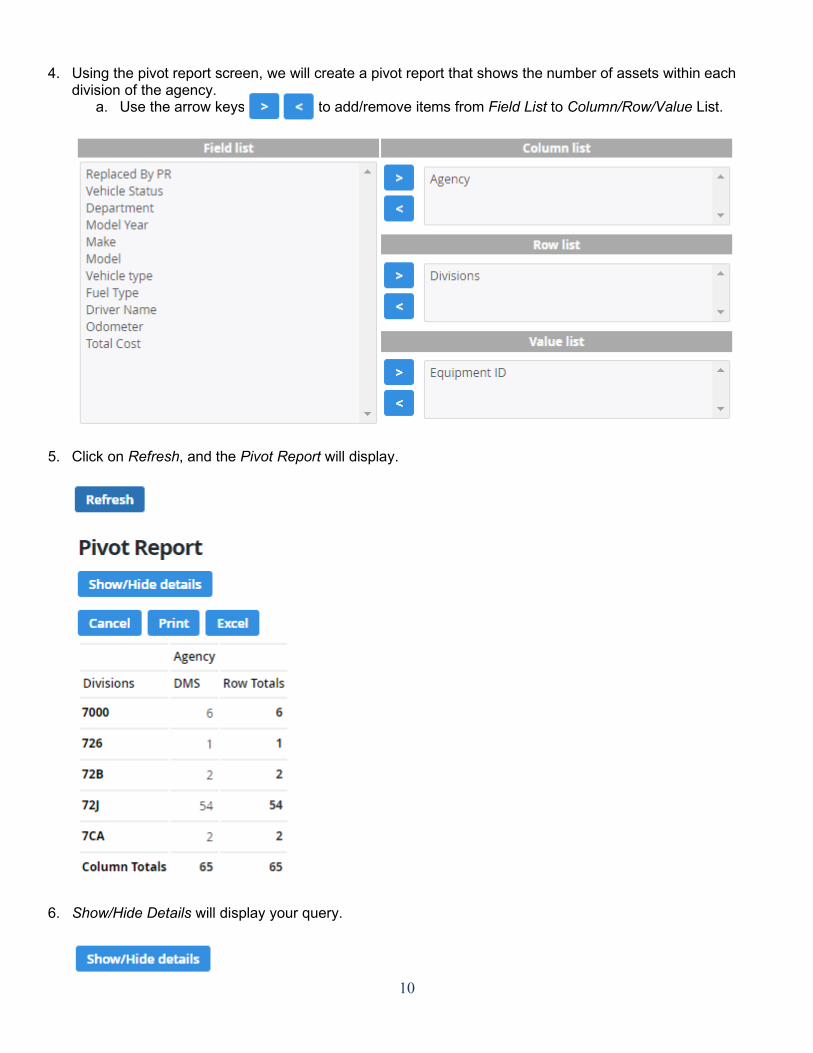
4. Using the pivot report screen, we will create a pivot report that shows the number of assets within each
division of the agency. a. Use the arrow keys to add/remove items from Field List to Column/Row/Value List.
5. Click on Refresh, and the Pivot Report will display.
6. Show/Hide Details will display your query.
11
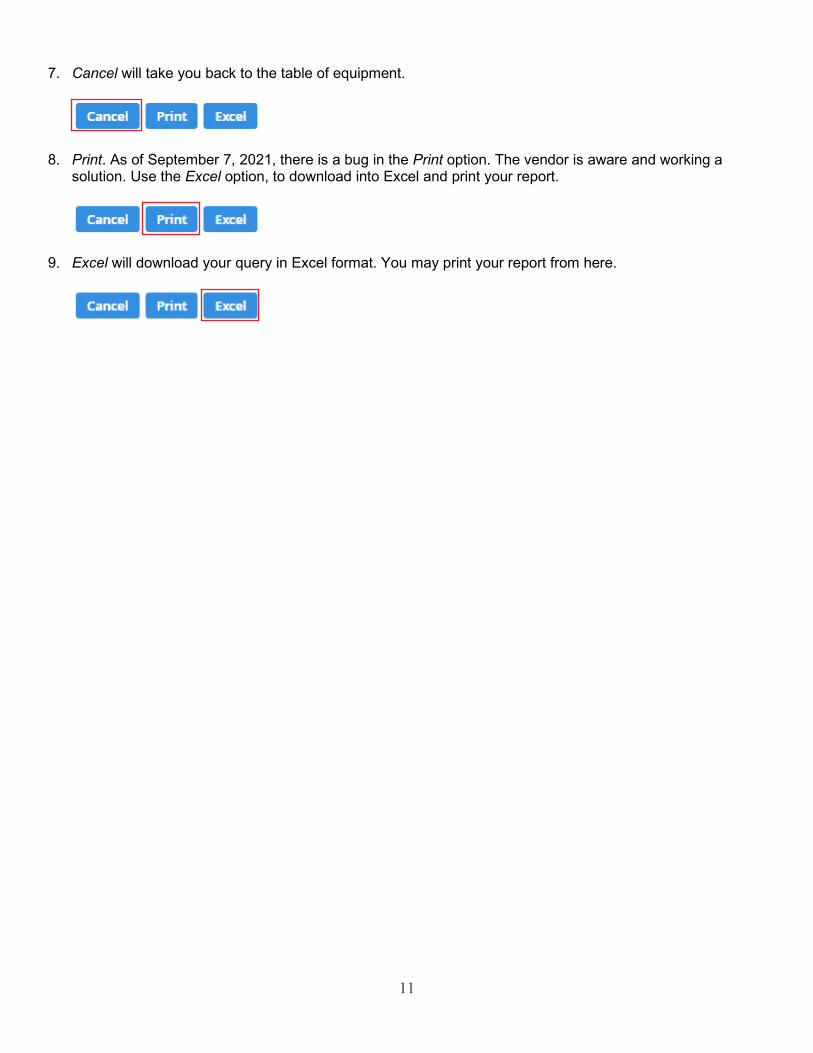
7. Cancel will take you back to the table of equipment.
8. Print. As of September 7, 2021, there is a bug in the Print option. The vendor is aware and working a
solution. Use the Excel option, to download into Excel and print your report.
9. Excel will download your query in Excel format. You may print your report from here.

12
Printing There are multiple ways to print information in the system. 1. See Import/Export steps one (1) through seven (7). 2. Access the table you would like to Print.
For this example, we will be using the Vehicles table (Located on the left toolbar)
3. Locate the piece of equipment you would like to print information on using the filter option. 4. Once you find the equipment, click on the edit icon. (You can also click directly on the Equipment ID)
5. Locate and click on the print icon. (located near tabs on top screen)
6. Screen print preview will be displayed. Click on Print (located on top, right)
7. Print screen pop-out will then be displayed. Follow Import/Export steps six (6) and seven (7).

13
Sorting
You can sort items on your screen in ascending or descending order if the sort icon is displayed.
1. Access the table you would like to Print. For this example, we will be using the Vehicles table (Located on the left toolbar)
2. Locate the sort icon 3. The up arrow on the sort icon will sort your information in descending order.
4. The down arrow on the sort icon will sort your information in ascending order.
14
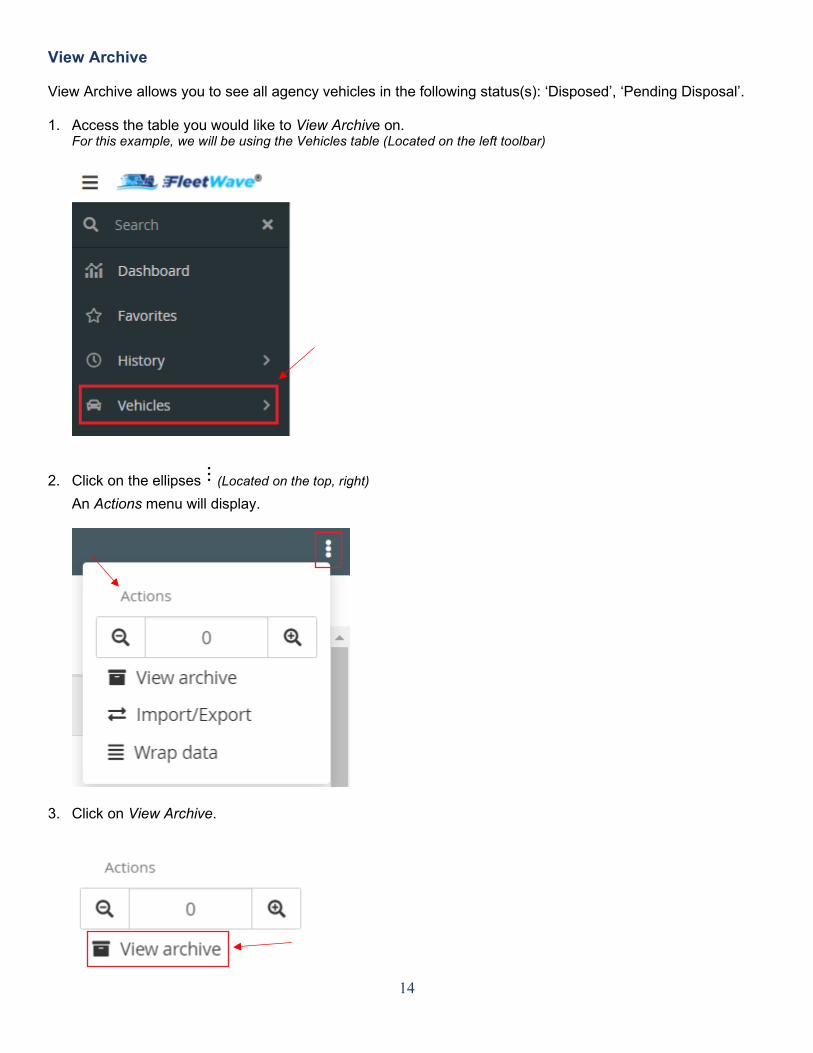
View Archive View Archive allows you to see all agency vehicles in the following status(s): ‘Disposed’, ‘Pending Disposal’. 1. Access the table you would like to View Archive on.
For this example, we will be using the Vehicles table (Located on the left toolbar)
2. Click on the ellipses⋮(Located on the top, right) An Actions menu will display.
3. Click on View Archive.

15
4. The vehicle table will display all archived equipment.
5. To exit the archive view, click on the ellipses⋮(Located on the top, right) An Actions menu will display.
6. Click on Hide Archive.
7. FleetWave will display the active table of equipment.

16
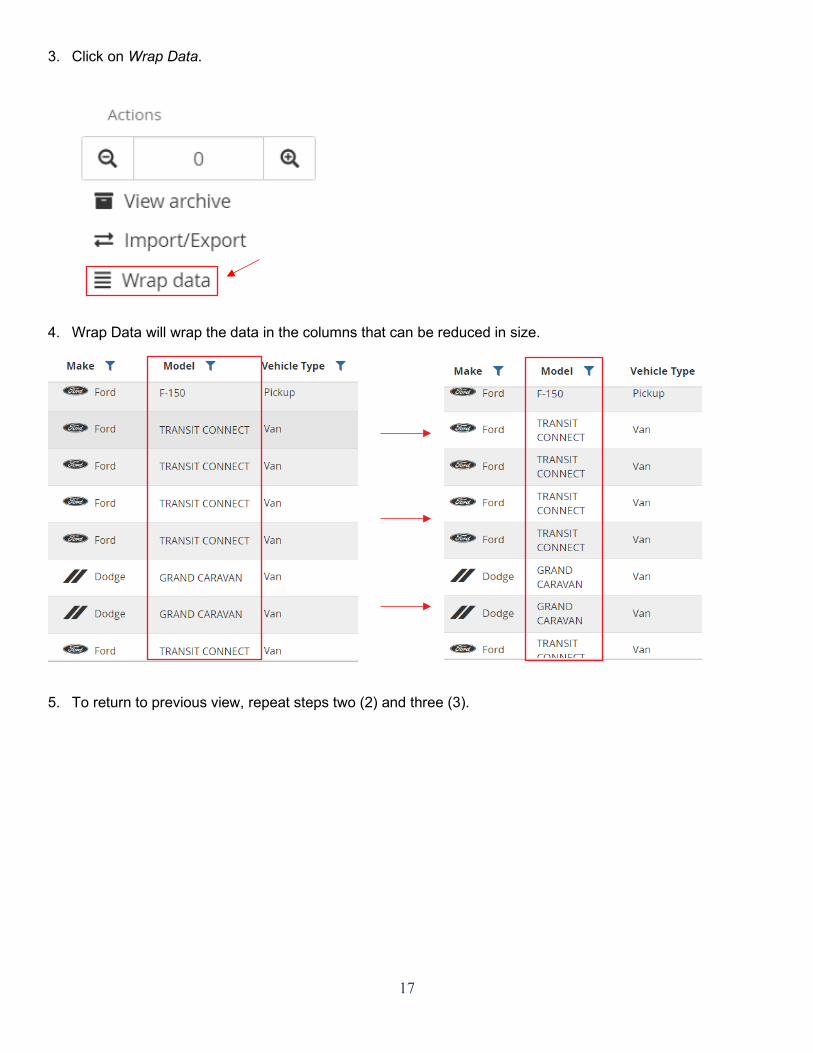
Wrap Data
Wrap Data will only take effect when there are sufficient columns on the screen to require you to horizontally scroll. FleetWave will look for columns that can be reduced in size and wrap the data in them (like the wrap data function in Excel). 1. Access the table you would like to Wrap Data on.
For this example, we will be using the Vehicles table (Located on the left toolbar)
2. Click on the ellipses⋮(Located on the top, right) An Actions menu will display.
17
3. Click on Wrap Data.
4. Wrap Data will wrap the data in the columns that can be reduced in size.
5. To return to previous view, repeat steps two (2) and three (3).
18
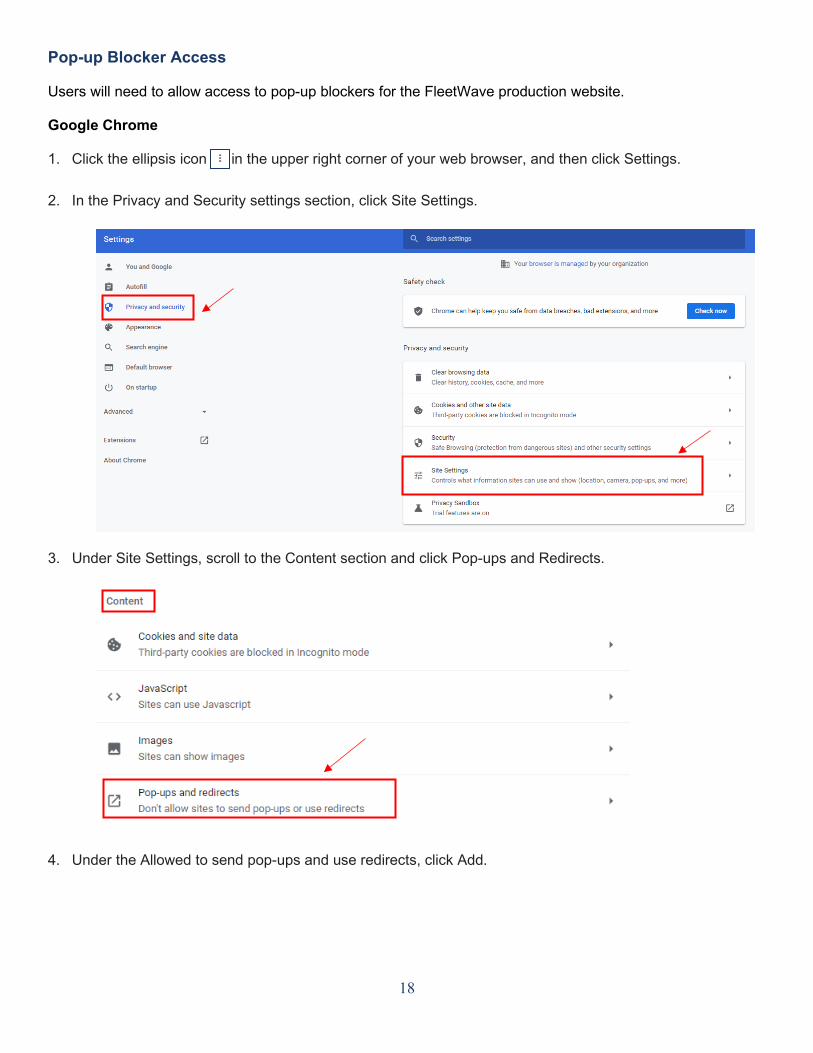
Pop-up Blocker Access Users will need to allow access to pop-up blockers for the FleetWave production website. Google Chrome 1. Click the ellipsis icon in the upper right corner of your web browser, and then click Settings. 2. In the Privacy and Security settings section, click Site Settings.
3. Under Site Settings, scroll to the Content section and click Pop-ups and Redirects.
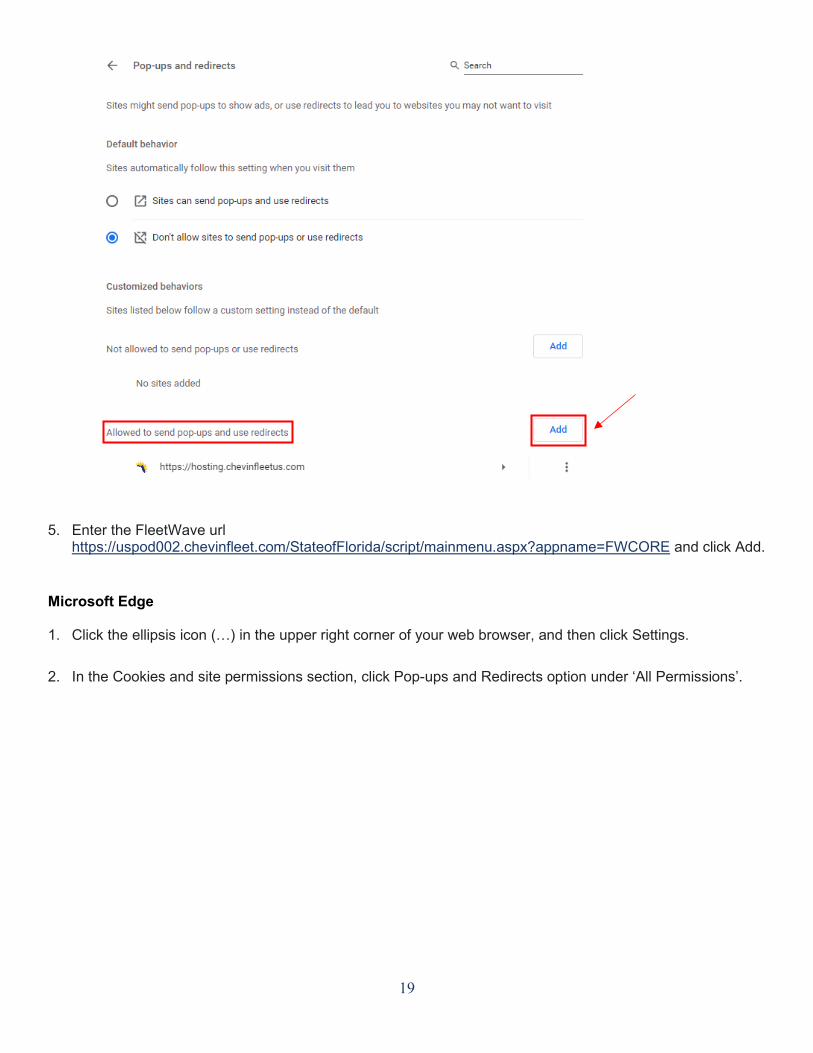
4. Under the Allowed to send pop-ups and use redirects, click Add.
19
5. Enter the FleetWave url
https://uspod002.chevinfleet.com/StateofFlorida/script/mainmenu.aspx?appname=FWCORE and click Add. Microsoft Edge 1. Click the ellipsis icon (…) in the upper right corner of your web browser, and then click Settings. 2. In the Cookies and site permissions section, click Pop-ups and Redirects option under ‘All Permissions’.

20
3. Under the Allow, click Add.
4. Enter the FleetWave url https://uspod002.chevinfleet.com/StateofFlorida/script/mainmenu.aspx?appname=FWCORE
5. Click Add.


