+ All Categories
Home > Documents > TK-Prog v1.03 Smart key solution

TK-Prog v1.03 Smart key solution

Date post: 27-Feb-2022
Category:
Upload: others
View: 16 times
Download: 0 times
Share this document with a friend
2
TK-Prog v1.03 Smart key solution Quick start guide TKProg v1.03 is an engineering USBattached device for smart key registration and ECU repairing within Toyota/Lexus/Subaru keyless Smart Access System. Supported model range (MY20062016): Lexus LX, GX, RX, LS, GS, IS; Toyota LC200, LC Prado, Camry, RAV4, Venza, Corolla, Highlander; Subaru Impreza, Forester, Legacy, Outback,Tribeca. Connection and overview Plug TKProg into USB socket and install standard USBtoCOM drivers. Launch the TKP software. First of all you have to select COMport number (can be checked in Windows device manager) and press “Connect” button. If everything is correct main menu entries become active. EEPROM tool is general purpose programming tool for 93C46, 93C56, 93C66, 93C76, 93C86 microchips. It is usually used for backup and restore of EEPROM chip in Certification unit, but you could use it for any incircuit EEPROM programming task. Red wire on clipconnector must be linked up with first pin on EEPROM chip. All functions are standard: read, write, erase and verify. Also you can see EEPROM content in HEX mode (no editing available here). Dump tool is used for Smart ECU and ID Code Box memory editing for the purpose Master key registration and ECU reset. Master key allows to launch the engine, but remote door blocking function does not work. Car start is possible only if the smartkey is no farther than one centimeter from the start button. Remote doors blocking can be activated by OBD programming tool as well as permanent smartkey registration. Dump Tool also allows to reset Smart ECU and ID Code Box: all key information will be erased and ECUs will behave likenew. To perform this procedure, select ECU type in Dump tool main window. Load EEPROM dump from file or directly from ECU (red wire on clipconnector must be linked up with first pin on EEPROM chip). If the dump is OK, you should see message “Data ~ correct…” Press “Reset Smart ECU” or “Reset ID Code ECU” (depends on initial ECU selection). Now you can save modified dump file and write it down to ECU (“Save” and “Write” buttons respectively). Master key registering procedure Open Dump Tool submenu and select ECU type from the list. Load Smart ECU dump from file (if you have read it before) or directly from ECU EEPROM (you have to use clipconnector). “Load” button for first case and “Read” for second. If the dump is correct, you should see message like on the picture below. Now you should load Master key data from file (by pressing “Open” button) or from Smartkey itself (“Read” button). Place the key on TKProg top surface and press “Read Key Data” in next window. As Smartkey is read properly you will see its Type and ID. Press “Apply Key Data” and “Add Master Key” button in Dump Tool window becomes active. Press it and key information will be added into Smart ECU dump. Now you can save modified dump file and write it down to Smart ECU (“Save” and “Write” buttons respectively).
Transcript

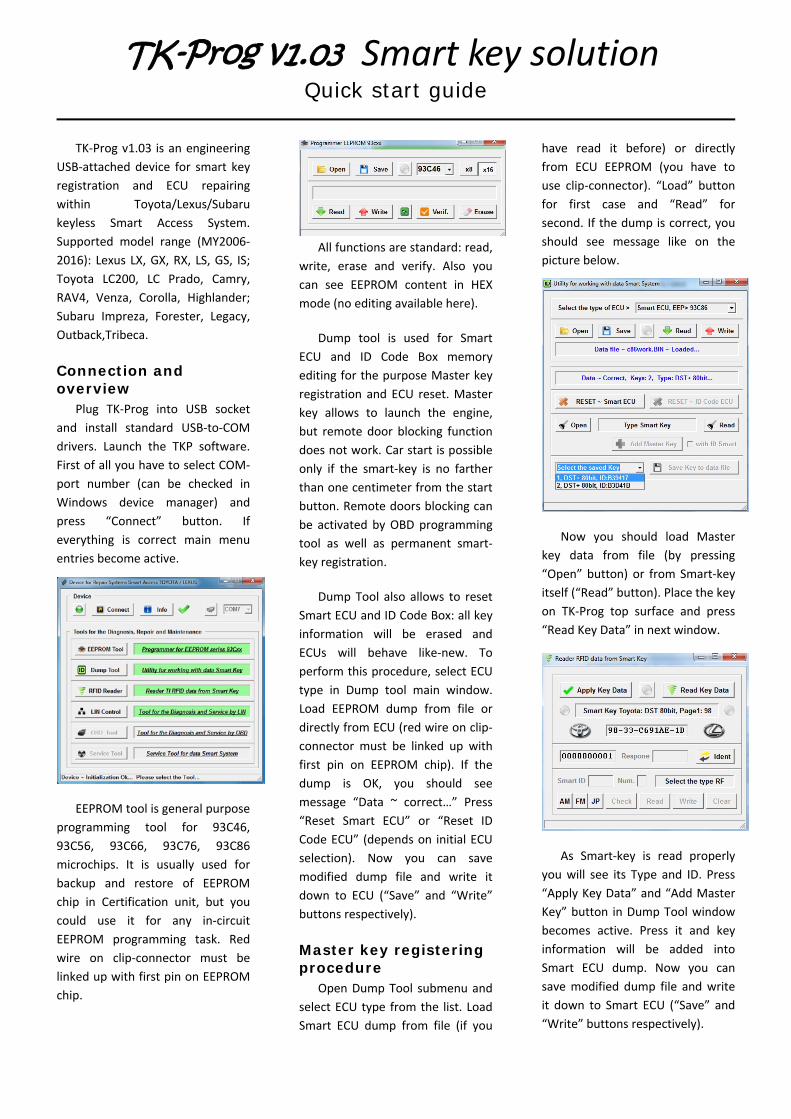
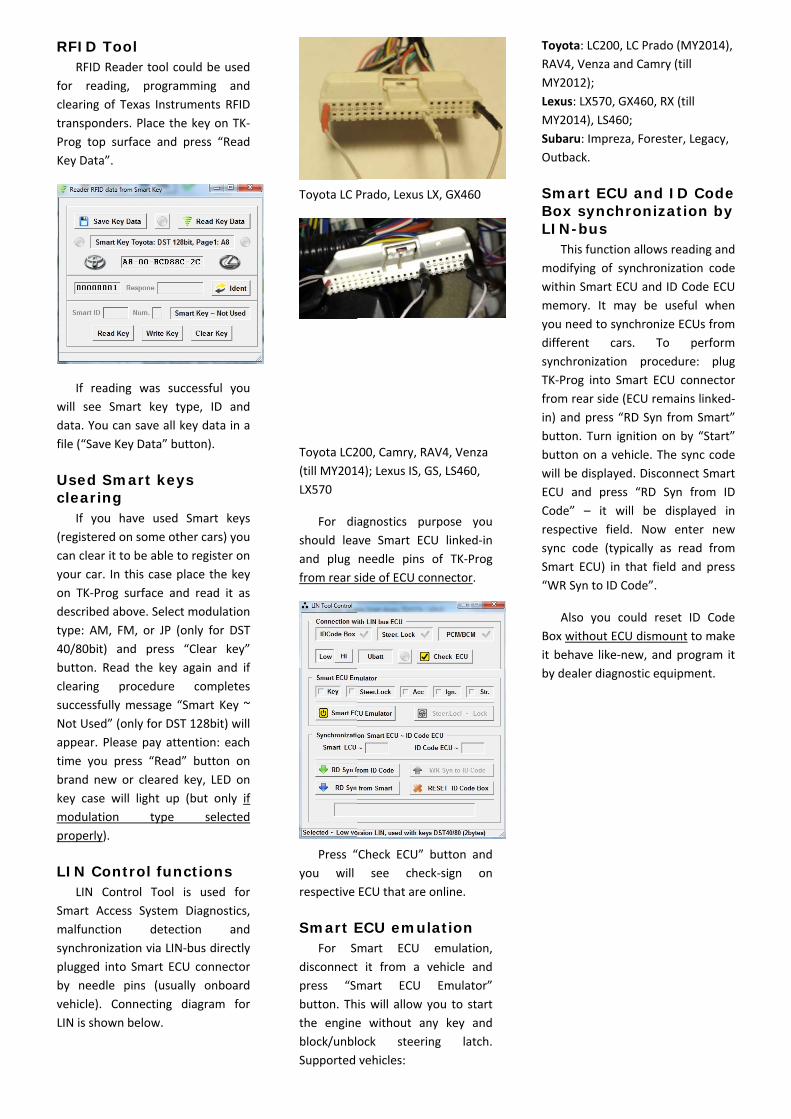
TK-Prog v1.03 Smart key solution Quick start guide


TK‐Prog v1.03  is an engineering USB‐attached device  for  smart key registration  and  ECU  repairing within  Toyota/Lexus/Subaru keyless  Smart  Access  System. Supported  model  range  (MY2006‐2016): Lexus LX, GX, RX, LS, GS,  IS; Toyota  LC200,  LC  Prado,  Camry, RAV4,  Venza,  Corolla,  Highlander; Subaru  Impreza,  Forester,  Legacy, Outback,Tribeca. 

Connection and overview

Plug  TK‐Prog  into  USB  socket and  install  standard  USB‐to‐COM drivers.  Launch  the  TKP  software. First of all you have to select COM‐port  number  (can  be  checked  in Windows  device  manager)  and press  “Connect”  button.  If everything  is  correct  main  menu entries become active. 

EEPROM tool is general purpose programming  tool  for  93C46, 93C56,  93C66,  93C76,  93C86 microchips.  It  is  usually  used  for backup  and  restore  of  EEPROM chip  in  Certification  unit,  but  you could  use  it  for  any  in‐circuit EEPROM  programming  task.  Red wire  on  clip‐connector  must  be linked up with first pin on EEPROM chip. 

All functions are standard: read, 

write,  erase  and  verify.  Also  you can  see  EEPROM  content  in  HEX mode (no editing available here). 

Dump  tool  is  used  for  Smart ECU  and  ID  Code  Box  memory editing for the purpose Master key registration and ECU  reset. Master key  allows  to  launch  the  engine, but  remote door blocking  function does not work. Car start is possible only  if  the  smart‐key  is  no  farther than one centimeter from the start button. Remote doors blocking can be activated by OBD programming tool  as  well  as  permanent  smart‐key registration. 

Dump Tool also allows  to  reset Smart ECU and ID Code Box: all key information  will  be  erased  and ECUs  will  behave  like‐new.  To perform this procedure, select ECU type  in  Dump  tool  main  window. Load  EEPROM  dump  from  file  or directly from ECU (red wire on clip‐connector must  be  linked  up with first  pin  on  EEPROM  chip).  If  the dump  is  OK,  you  should  see message  “Data  ~  correct…”  Press “Reset  Smart  ECU”  or  “Reset  ID Code ECU”  (depends on  initial ECU selection).  Now  you  can  save modified  dump  file  and  write  it down  to  ECU  (“Save”  and  “Write” buttons respectively). 

Master key registering procedure

Open Dump Tool submenu and select ECU  type  from  the  list. Load Smart  ECU  dump  from  file  (if  you 

have  read  it  before)  or  directly from  ECU  EEPROM  (you  have  to use  clip‐connector).  “Load” button for  first  case  and  “Read”  for second.  If the dump  is correct, you should  see  message  like  on  the picture below. 

Now  you  should  load  Master key  data  from  file  (by  pressing “Open” button) or  from Smart‐key itself (“Read” button). Place the key on  TK‐Prog  top  surface  and  press “Read Key Data” in next window. 

As  Smart‐key  is  read  properly you will  see  its Type and  ID. Press “Apply Key Data” and “Add Master Key” button  in Dump Tool window becomes  active.  Press  it  and  key information  will  be  added  into Smart  ECU  dump.  Now  you  can save modified dump  file and write it down  to  Smart ECU  (“Save” and “Write” buttons respectively). 

RF

forcletraProKey

wildatfile

Uscle

(recanyouon destyp40/butclesucNoapptimbrakeymopro

LI

Smmasynpluby vehLIN

FID Tool RFID Reader

r  reading, aring of Texansponders. Pog  top  surfacy Data”. 

If  reading  wl  see  Smart ta. You can sae (“Save Key D

sed Smarearing If  you  havegistered on son clear it to beur car.  In thisTK‐Prog  surfscribed abovepe: AM,  FM, /80bit)  and tton.  Read  tharing  procccessfully mesot Used” (onlypear. Please pme  you  press and new or  cy  case  will  ligodulation operly). 

IN ControLIN  Control 

mart  Access  Salfunction nchronization ugged  into Smneedle  pins

hicle).  ConneN is shown bel

 tool could beprogrammingas  Instrumentlace the key ce  and  press 

was  successfukey  type,  I

ave all key daData” button).

rt keys

e  used  Smartome other care able to regiss case place tface  and  reade. Select moduor  JP  (only  fopress  “Clearhe  key  again edure  comssage  “Smart y for DST 128bpay attention“Read”  butt

cleared  key,  Lght  up  (but type  se

ol functioTool  is  use

System  Diagndetection via LIN‐bus d

mart ECU  cons  (usually  onecting  diagraow. 

e used g  and ts RFID on TK‐“Read 


ul  you D  and ta in a  

t  keys rs) you ster on he key d  it  as ulation or DST r  key” and  if 

mpletes Key ~ 

bit) will n: each ton  on LED on only  if elected 

ns ed  for nostics, 

and directly nector nboard m  for 

Toyota LC P

Toyota LC2(till MY201LX570 

For  diashould  leaand  plug from rear s

Press  “you  will respective 

Smart EFor  S

disconnectpress  “Smbutton. Ththe  engineblock/unblSupported 

Prado, Lexus L

200, Camry, RA4); Lexus IS, G

agnostics  puve  Smart  ECneedle  pins side of ECU co

“Check  ECU” see  chec

ECU that are 

ECU emulmart  ECU   it  from  a  vmart  ECU is will allow ye  without  anock  steerinvehicles: 

LX, GX460 

AV4, Venza GS, LS460, 

urpose  you CU  linked‐in of  TK‐Prog 

onnector. 

button  and ck‐sign  on online. 

lation emulation, 

vehicle  and Emulator” 

you  to start ny  key  and ng  latch. 

ToyotRAV4,MY20LexusMY20SubarOutba

SmaBoxLIN

Thmodifwithinmemoyou ndifferesynchTK‐Profrom in) anbuttobuttowill beECU  aCode”respesync Smart“WR S

AlsBox wit behby dea

ta: LC200, LC P, Venza and C012); s: LX570, GX46014), LS460; ru: Impreza, Fack. 

art ECU ax synchro-bus his function alfying  of  synchn Smart ECU aory.  It  may eed to synchrent  cars. ronization  pog  into  Smarrear side (ECUnd press “RD n. Turn  ignitin on a vehiclee displayed. Dand  press  “R”  –  it  will ctive  field.  Ncode  (typicalt  ECU)  in  thatSyn to ID Code

so  you  couldwithout ECU dhave  like‐newaler diagnosti

Prado (MY201amry (till 

60, RX (till 

orester, Legac

nd ID Conization b

lows reading hronization  cand ID Code Ebe  useful  wronize ECUs fr

To  perfoprocedure:  pt  ECU  connecU remains linkSyn  from Smaon on by “Stae. The sync cDisconnect SmRD  Syn  frombe  displayedNow  enter  nly  as  read  frt  field  and pre”. 

d  reset  ID  Cismount to m

w, and programic equipment.

14), 

cy, 

de by

and ode ECU hen rom orm plug ctor ked‐art” art” ode mart m  ID d  in new rom ress 

ode make m  it  


Recommended