42


ww
w.te
chno
mat
e.co
m
1
INTRODUCTION 2
EASY INSTALLATION GUIDE 4
7SAFETY INFORMATION
CHECK POINTS BEFORE USE
OverviewMain Features
AccessoriesSatellite Dish
CONTROLS/FUNCTIONS
Front PanelRear PanelRemote controlFront Display
EQUIPMENT CONNECTIONConnection With Antenna/ TV Set/ A/V System
HOW TO DOWNLOAD SOFTWARE FROM PC
TROUBLE SHOOTING
SPECIFICATIONS
BRIEF USER’S GUIDE IN FRANCH
OPERATION
9
10
15
17
51
53
55
57
Getting StartedSystem SettingsEdit ChannelsEPG (Electronic Program Guide)GamesUSB Menu (How to download SW from USB)System InformationCommon InterfaceConditional Access SystemDVRPIP
TM-7102HD-T2 Super

ww
w.te
chno
mat
e.co
m
2 3
Your
Dig
ital P
artn
er fo
r Life
OVERVIEWThis satellite receiver is designed for using both free-to-air and encrypted channelreception. Enjoy the rich choice of more than 10,000 different channels, broadcasting alarge range of culture, sports, cinema, news, events, etc. This receiver is a technicalmasterpiece, assembled with the highest qualified electronic parts.
Parental, Installation & Receiver Lock
Zoom function on Pause & Live channel
Multipicture display
Support for multiple language broadcasts
SCPC & MCPC receivable from C/Ku band satellites LNBs supported : Universal, Single,
Single S & C band wideband LNBs
AC 100~250V 50/60Hz
LNB Short Circuit protection onboard
2 Scarts, (CVBS, RGB / Loop-through RGB) & S-Video
Supports up to 1TB S-ATA 3.5” & 2.5” Hard Disk Drives (HDD)
2x USB 2.0 Ports: PVR function using external HDD, playback MP3, JPEG Photos &
Software transfer
Record: 1. Channel from each tuner and playback a recording at the same time
2. Channels using the two satellite tuners (2 Channels have to be on the
same Transponder TP)
3. Channels and playback a recording or watch another live channel at the
same time
Lan 10/100Mbps Ethernet
Blind Search
Manufactured under license from Dolby Laboratories.
“Dolby” and the double-D Symbol are trademarks of Dloby Laboratories.
DiSEqC is a trademark of EUTELSAT
The digital receiver can supply a current 400 milliampere at maximum for antenna
devices including LNB, DiSEqc switch and antenna rotor through each antenna input
connection separately but not simultaneously.If there are too many antenna devices
to be supplied with power through antenna input connections simultaneously for a
long time, your LNBs may lack power to operate. So it is recommended to link the
LOOP OUT 1 connector to the LNB INPUT 2 connector with a loop cable even though
the digital receiver is designed to operate over two antennas alternatively.
MAIN FEATURESHigh-Definition Personal Video Recorder (HD PVR)
2x DVB-S/DVB-S2 Satellite Tuners (MPEG-2, MPEG-4 & H.264)
1x DVB-T / DVB-T2 Terrestrial Tuner
RF modulator (CH 21 - CH 69 PAL G, I, K, M)
Output resolution : 576p & 576i, 720p, 1080p & 1080i
2 Smart Card Reader & 2 Common Interfaces (2CI)
HDMI & Component Output (YPbPr) with Upscaler to Improve Picture Quality
10,000 TV & Radio Channels
MP3 player and JPEG viewer via internal HDD or USB flash Drive (memory stick)
Software & Channel List download via USB 2.0
Fully Featured VFD text Front Panel Display
Sensitive Tuner
Support 4:2:0
Less than 1 second channel change
Dolby Digital Optical S / PDIF
DiSEqC 1.0, 1.1, 1.2 & 1.3 (USALS) compatible
Auto Navigation system select as many satellites as you want to search
On-screen display with true full colour resolution
Enhanced 16 Favourite channel groups
Channel control by : Favourites, Lock, Skip, Move & Delete
Channel sort by : All, Alphavet, Transponder & CAS
Multilingual OSD Menu : English, Spanish, Portuguese, French, Dutch, German, Italian,
Turkish, Arabic, Russian, Persian, Greek, Czech, Romanian
Extended EPG and program reservation on EPG
Teletext & Subtitle by OSD and VBI
Last channel memory function
Factory default channel list
Various games
Software & channel list upgrade via RS-232C : PC to STB, STB to PC, STB-STB and USB

ww
w.te
chno
mat
e.co
m
54
Your
Dig
ital P
artn
er fo
r Life
This receiver is preinstalled with 25 Satellite and 1500 default Channels and is fully configured.No settings need to be changed.
After turning ON the receiver, select a language and Country. You will be taken to theViewing mode. Press the SAT button on the Remote and select a satellite. To bring up theChannel List, press the OK button on the remote.
To delete unwanted Satellites-press the MENU button on the remote and go to Installation.Press OK and OK on Satellite Setup. Press OK again and a Satellite List will appear. To delete aSatellite, press the BLUE( ) button on the remote.
This receiver is preinstalled with 25 Satellite and 1500 default Channels, and is fullyconfigured.No settings need to be changed.
Press the MENU button on the remote.Press OK on Installation. Go to Motorised Setting andpress OK. Go to the Third line (DiSEqC Motor) and use the Left/Right arrow buttons on theremote to select USALS. Then go to Position Setting and press OK. Then go to Longitude andLatitude and enter the coordinates of where you live (London’s Longitude is 000. 1 West;South of UK’s Latitude is 51.5 North).Press the EXIT button on the remote. Go to GOTO andpress OK. Wait until the Signal Quality is more than 40% in the progress bar. When a Satellite isfound, then all the selected 25 Satellites are fully configured for a Motorised system.
If the Signal Quality is below 40%, then the settings are incorrect and the Longitude needs tobe adjusted, for example: 000.2, 000.3, 000.4,5/6/7/8/9 West or East. The Latitude may alsoneed to be adjusted. If you still have not got a signal, then the external installation (dish, etc)needs to be adjusted.
Press the MENU button on the remote and go to Installation and press OK. Go to MotorisedSetting and press OK. Press OK again to open the satellite list. Select a satellite from the listand press OK. Go to the Third line (DiSEqC Motor) and use the Left/Right buttons on theremote to select DiSEqC 1.2. Go to Move and press and hold the Left/Right buttons on theremote until you get a Signal Quality of more than 40%. Go to Save and press OK. Press theRED( )button on the remote to Scan. To scan extra satellites, repeat the above.
How to Motorise 25 Satellite & 1500 Channels with USALS in 60secsHow to Motorise 25 Satellite & 1500 Channels with USALS in 60secs
How to Setup a DiSEqC 1.2 Motorised SystemHow to Setup a DiSEqC 1.2 Motorised System
If you want to start the receiver without the preinstalled Satellites and Channels, press theMENU button on the remote and go to System Settings and press the OK button. Go toFactory Reset, press OK and enter 0000. Then select Factory Reset. Press OK and select Yes.
How to do a Factory Reset to Delete the Preinstalled Satellites and ChannelsHow to do a Factory Reset to Delete the Preinstalled Satellites and Channels
Press the MENU button on the remote and press the OK button on Installation. Press OK onSatellite Setup and OK again to display a Satellite List. To add a Satellite, press the YELLOW( )button on the remote. Press the EXIT button on the remote to exit the list.
When the Quality Bar is at its highest level, press the RED( ) button on the remote to Scanthe Satellite. To view a channel, press the OK button inthe Viewing Mode (clear screen) and select any channel. To view $ (Scrambled) channels, aCAM (Decoder) and a viewing card are required.
Press the MENU button on the remote and press the OK button on Installation. Press OK onSatellite Setup and OK again to display a Satellite List. Select a Satellite (e.g. Hotbird 13E andAstra 19.2E) and press the YELLOW button on the remote for each Satellite to Save. Press theEXIT button on the remote to exit the list.
Go to DiSEqC Switching and select a Satellite (e.g. Hotbird 13E as Number 1 and Astra 19.2E asNumber 2). When the Quality Bar is at its highest level for each Satellite, press the RED ( )button on the remote to Scan. To view a channel, press the OK button in the ViewingMode (clear screen) and select any channel. To view $ (Scrambled) channels, a CAM(Decoder) and a viewing card are required.
If the above installation was not successful, change the DiSEqC Switching number, e.g. Hotbird13E as Number 2 and Astra 19E as Number 1.
How to Install a New Satellite (Fixed Non-Motorised System)How to Install a New Satellite (Fixed Non-Motorised System)
How to Setup a Monoblock or DiSEqC Switch (up to 4 LNBs / Dishes)How to Setup a Monoblock or DiSEqC Switch (up to 4 LNBs / Dishes)
Press the MENU button on the remote and press the OK button on Installation. Press OK onSatellite Setup and OK again to display a Satellite List. Select a Satellite (e.g. Hotbird 13E andAstra 19.2E) and press the YELLOW button on the remote for each Satellite to Save.Press the EXIT button on the remote to exit the list.
Press the EXIT button again. Press OK on Motorised Setting. Press OK again to display a SatelliteList. Select a Satellite and press OK. Go to the Third line (DiSEqC Motor) and use the Left/Rightbuttons on the remote to select DiSEqC 1.2. Go to Move and press and hold the Left/Rightbuttons on the remote until you get a Signal Quality of more than 40%. Go to Save and pressOK. Press the RED button on the remote to Scan. Repeat the above for more satellites.
How to Setup DiSEqC 1.2 Motorised SystemHow to Setup DiSEqC 1.2 Motorised System
Press the MENU button on the remote and press the OK button on Installation. Press OK onSatellite Setup and OK again to display a Satellite List. Select a Satellite (e.g. Hotbird 13E andAstra 19.2E) and press the YELLOW ( ) button on the remote for each Satellite to Save.
Press the EXIT button on the remote to exit the list.Press the EXIT button again. Go to Motorised Setting and press OK. Go to the Third line (DiSEqCMotor) and use the Left/Right arrow buttons on the remote to select USALS. Then go to PositionSetting and press OK. Then go to Longitude and Latitude and enter the coordinates of whereyou live (London’s Longitude is 000.1 West; South of UK’s Latitude is 51.5 North). Press the EXITbutton on the remote. Go to GOTO and press OK. Wait until the Signal Quality is more than 40%in the progress bar. Press the RED ( ) button on the remote to Scan.
How to Setup a USALS Motorised SystemHow to Setup a USALS Motorised System

ww
w.te
chno
mat
e.co
m
6 7
Your
Dig
ital P
artn
er fo
r Life
How to restore default channelsHow to restore default channels
If the Signal Quality is below 40%, then the settings are incorrect and the Longitude needs tobe adjusted, for example : 000.2, 000.3, 000.4,5/6/7/8/9 West or East.The Latitude may also need to be adjusted. If you still have not got a signal, then the externalinstallation (dish, etc) needs to be adjusted.
Press MENU button on the remote. Go to Factory Reset, Then go to Restore default channels.Press OK button on the remote, and input password and wait.It will retrieve default channels.
For Technomate Motorized Systems
Be sure to read the user’s manual beforestarting the operation of the unit.
Do not touch the power cord with wethands as it may cause electric shock.
Never open the cover. It is very dangerous totouch the inside of the unit due to thepossibility of an electric shock.
Place the unit in a well ventilated and no-heat environment.
A professional installation is required. Ifreception is interrupted, contact your localservice centre.
When you do not use this unit for a long time,make sure that the power cord is pulled outfrom the outlet. Also do not use a damagedpower cord as it may cause fire or electric shock.

ww
w.te
chno
mat
e.co
m
8 9
Your
Dig
ital P
artn
er fo
r Life
Place the unit horizontally. An unevenplacement may cause the unit to bedamaged.
Do not put heavy items such as a TV onthe unit. This may damage the unit.
Do not put water containing items suchas vase on the unit.Do not leave the unit near water.
The disconnect device shall remainreadily operable.
The mains plug is used as the disconnectdevice.
Do not install the unit :Where it is subject to vibrations.Where it is exposed to direct sunlight.Where there is humidity.Where the temperature is too high or too low.Where there is no ventilation.
Moving the unit to a hot area from a coldone will cause condensation. Do not operatethe unit for one or two hours or until it hasdried completely.
ACCESSORIES
SATELLITE DISH
User’s manual : 1
Batteries (AAA type) : 2
HDMI cable : 1
TM-71
02 H
D-T2
Remote control : 1
Power cord : 1
Warranty card : 1
or
If any accessories listed aboveare missing, contact the salesrepresentative where youpurchased this unit.
Your dish should be properly installed and azimuth and elevation must be precisely set up.This unit is working with DiSEqC 1.2 on a compatible antenna positioner.Ask your dealer for more information.

ww
w.te
chno
mat
e.co
m
10 11
Your
Dig
ital P
artn
er fo
r Life
FRONT PANEL
1. Power :To switch the receiver between “Standby” and “Power ON” modes.
2. Standby/Power Indicators :Red in Standby mode and no light in Power-On mode.
3. Menu :To enter or exit the Main Menu.
4. Select :To open the Channel List in non-menu mode and to select/confirm an item inmenu mode.
5-6. VOL( / ) :To change the volume level in non-menu mode and to modify a setting in menu mode.
7-8. CH( / ) :To change channels or to move Up/Down in the menus/application.
9. 2.5” & 3.5” S-ATA HDD(Max. 1TB)
REAR PANEL
No. Name Connector Function1 RF OUT UHF 21-69 IEC 169-2 MALE Output to TV2 TV ANT IN IEC 169-2 FEMALE Input from analog terrestrial antenna3 USB USB A-type USB 2.04 RS-232C DB-9 Low speed serial port5 S/PDIF Fiber Optic Digital audio output (Optical)6 HDMI HDMI Digital Video/Audio Output7 LAN RJ-45 10/100Mbps Ethernet8 VCR/AUX SCART SCART CVBS Video Output
CVBS, RGB Video InputAudio Output
9 TV SCART SCART CVBS, RGB Video Output, Audio Output10 VIDEO RCA cinch Composite video output11 AUDIO L RCA cinch Left audio output12 AUDIO R RCA cinch Right audio output13 Y RCA cinch Component video output(Y)14 Pb RCA cinch Component video output(Pb)15 Pr RCA cinch Component video output(Pr)16 LNB INPUT2 IEC 169-24 FEMALE IF input from LNB to digital tuner217 LNB INPUT1 IEC 169-24 FEMALE IF input from LNB to digital tuner118 LNB OUTPUT2 IEC 169-24 FEMALE IF loop-through output from digital tuner219 LNB OUTPUT1 IEC 169-24 FEMALE IF loop-through output from digital tuner120 DVB-T IN IEC 169-2 FEMALE Cable signal input to digital tuner.21 LOOP OUT IEC 169-2 MALE Loop-through output from digital tuner.22 VIDEO(option) RCA cinch Composite video input23 AUDIO(option) RCA cinch Left audio input24 AUDIO(option) RCA cinch Right audio input25 Y(option) RCA cinch Component video input (Y)26 Cb(option) RCA cinch Component video input (Cb)27 Cr(option) RCA cinch Component video input (Cr)

ww
w.te
chno
mat
e.co
m
12 13
Your
Dig
ital P
artn
er fo
r Life
REMOTE CONTROL REMOTE CONTROL
TM-7102 HD-T2
1. POWER : To turn the receiver On/Off.
2. TV/RADIO : To switch between TV and Radiomodes.
3. MUTE : To turn the sound On/Off.
4. TV/SAT : To switch the TV output sourcebetween the satellite input and the UHF/VHFantenna input.
5. MEDIA : To access media file playback menu.
6. SLEEP : To adjust the Sleep Timer.
7. PIP SWAP : To swap the PIP picture and themain picture.
8. PIP : To activate the Picture in Picturefunction.
9. PIP LIST : To display the PIP list.
10. EPG : To show the TV/Radio program guide.
11. SUBTITLE : To show the subtitle contents ifsubtitle is transmitted.
12. FAV : To show favorite list in the favoritegroup or to move to the next page.
13. A-Z : To sort channel list.
14. USB : To show the usb menu.
15. TEXT : To show the teletext contents if teletextis transmitted. Used for special functions inmenu mode.
16. AUDIO : To show Multi-language audio track,the stereo-mono mode and subtitleinformation. Used for special functions inmenu mode.
17. INFO : To show information about the currentprogram. Press twice to show detailedinformation.
18. MENU : To enter or exit the main menu.
19. EXIT : To exit from the present menu and togo to the previous menu.
20-21. VOL UP & DOWN : To change the volumele vel in non-menu mode.
TM-7102 HD-T2
22-23. UP & DOWN : To change channels in nonmenu mode and move the cursor up/down inmenu mode.
24-25. LEFT & RIGHT : To change the volume levelin non-menu mode.
26. OK : To show the Channel List in non-menumode and select an item or confirm in menumode.
27. SAT : To show Satellite list.
28. RECALL : To go to the previous channel menu.Used for special functions in menu mode.
29. FILELIST : To display the filelist.
30. PLAY : Play Content.
31. STOP : Stop Playback.
32. RWD : Rewind a file / Arrow UP : To move tothe previous page when many pages areavailable.(It is worked when in Menu List)
33. PAUSE : Pause playback.
34. FWD : Forward a file / Arrow Down : To moveto the next page when many pages areavailable (It is worked when in Menu List).
35. ADVANCE : Go to live channel.
36. REC : Start recording.
37. SLOW : Playback in slow mode.
38. BOOKMARK : Set the bookmark position.
39. Color : To control brightness, contrast color ofa picture (when in CVBS mode).
40. POS : To show the DiSEqC motor view control.
41. Color Key : To use special functions in themenu.
42. Numeric Keys (0 - 9) : To enter numericalsettings(such as channel numbers) directly.
43. V.FORMAT : To change video output’sresolution.
44. Wide : To select a TV aspect ratio with PanScan or Letter-Box(4:3) (Full screen or Pillarbox(16:9).
4141
4242

ww
w.te
chno
mat
e.co
m
14 15
Your
Dig
ital P
artn
er fo
r Life
FRONT DISPLAY
1 2 3 4 5 6 7 8 9 10 11 12 13 14 15
22 2116 17 19 18 20
1
2
3
4
5
6
7
8
9
10
11
12
13
14
15
16
17
18
19
20
21
22
Power On/Off mode.
It is displayed when a Satellite signal is present.
It is displayed when a channel is recording.
It is displayed when Time-Shift mode is enabled.
It is displayed when Time-Shift mode is enabled.
It is displayed when a Timer is set (in Standby mode).
It is displayed when the channel is HD.
It is displayed when a USB device is connected.
It is displayed when a channel is locked.
It is displayed when a channel is broadcasted in Dolby Digital Audio.
It is displayed when the audio is muted.
Feature not supported.
Feature not supported.
It is displayed when the MP3 player is enabled.
It is displayed when Loop mode is selected in the MP3 player.
It is displayed when you are in Radio mode.
It is displayed when you are in TV mode.
It is displayed when a Terrestrial signal is present.
It is displayed when in Playback mode in File List.
It is displayed when during Playback.
Displays the video output’s resolution.
It is displayed if the resolution Progressive or Interlaced.
CONNECTION WITH ANTENNA / TV SET / A/V SYSTEM
1. Connect the TV antenna to TV ANT IN.
2. Connect the Video and Audio of TV to the Video and Audio.Connect Red and White connector to Audio R and Audio L, and Yellow into Video port respectively.
3. Connect the Component Video of your TV to Component Video of best quality.Connect the Y, Pb and Pr of your TV to Y, Pb and Pr respectively.
4. Connect your satellite dish.
* Note : In some receivers TV scart is at the top or bottom of the rear of the receiver
please follow the Writing of the TV then connect your scart cable for viewing.
RFIN

ww
w.te
chno
mat
e.co
m
16 17
Your
Dig
ital P
artn
er fo
r Life
3.5”, 2.5” SATA HDD ASSEMBLY INSTRUCTION
1. Turn off AC power.2. Open the HDD SLOT cover.
3. Remove HDD Bracket .Push no.1 and pull no 2.
4. Screw & assemble HDD and HDDBracket.
5. Assemble HDD Bracket at the HDDSLOT.
* Note : For PVR Mode, Please go to Page 45
2.5inch HDD& SCREW
3.5inch HDD& SCREW
GETTING STARTED
Turn yyour rreceiver ppower oon aand pproceed wwith ssystem ssetup aas ffollows ::
1. Turn on your TV and receiver.
2. The language selection menu will be
displayed, select a language and press the
OK button on.
Menu Language Setting
1. Select a country and press the OK button on.
Country

ww
w.te
chno
mat
e.co
m
1918
Your
Dig
ital P
artn
er fo
r Life
1. Press the MENU button on the remote to
display the main menu and go to Installation
2. Select Tuner Connection, the TunerConnection menu will appear.
3. Select your Dish setup:
Twin (using 2 satellite dishes or a Twin LNB or
Single or Loopthrough)
Tuner Setup
1. Press the MENU button on the remote to
display the main menu.
2. Use / and / button on the remote to
move in the menu.
3. Select Satellite Setup, the Satellite Setupmenu will appear.
4. Select each menu you want to edit/change.
- Satellite : Select any satellite by pressing /
buttons on the remote.
- Tuner : Select Tuner1 / Tuner2 / Both(Tuner1) / Both(Tuner2).
- Transponder : Select the Transponder.
- LNB Power : Select LNB Power ON/OFF / 13V / 18V.
- LNB Type : Select your LNB Type Single / Universal / OCS.
- LNB Freq : Select LNB oscillator frequency.
Satellite Setup
- 22KHz : Select ON/OFF of 0/22 KHz.
- DiSEqC 1.0 : Select DiSEqC 1.0 Port.
- DiSEqC 1.1 : Select DiSEqC 1.1 Port.
5. Scan : Press Red ( ) button on the remote
to begin satellite search.
6. Rename : Press Green ( ) button on the
remote to rename the selected
satellite.
7. Auto Navigation : Press Green ( ) button on the remote to begin auto
navigation.
8. Save : Press Yellow ( ) button on the remote to save the selected satellite.
9. Delete : Press Blue ( ) button on the remote to de select the selected satellite.
1. Press the MENU button on the remote to
display the main menu.
2. Use the / and / buttons on the remote
to move in the menu.
3. Select Motorized Setting, the Motorized Settingmenu will appear.
4. Select each menu you want to edit / change.
- Satellite : Select any satellite by pressing /
buttons on the remote.
- Tuner : Select Both(Tuner1) / Both(Tuner2).
- Transponder : Displays the current TP value of the selected satellite.
- DiSEqC Motor : Select DiSEqC Motor type OFF/1.2/USALS.
- Save : Press OK button on the remote to save.
5. Scan : Press Red ( ) button on the remote to begin satellite search.
6. Auto Navigation : Press Green ( ) button on the remote to begin auto
navigation.
Motorized Setting

1. Select USALS on DiSEqC Motor, the USALSmenu will appear.
- Satellite : Select any satellite by pressing /
buttons.
- Tuner : Select Both(Tuner1) / Both(Tuner2).
- Transponder : Display the current TP value of the
selected satellite.
- DiSEqC Motor : Select DiSEqC Motor USALS.
- Move : Move the dish position to West/East by
pressing / buttons.
- Motor Control : Control Motor by press OK button
on the remote.
Goto Reference : Goto reference by pressing OK
button.
Delete Limit : Delete limit by pressing OK button.
Enable Limit : Enable the saved east and west limit.
Set East Limit : Edit & Save east limit by pressing /
or OK buttons.
Set West Limit : Edit & Save west limit by pressing / or OK buttons.
- Sat Degree : Displays the current degree of the selected satellite.
Edit degree by pressing / buttons and numeric buttons.
Goto Reference : Move the dish to the 0 position.
Antenna Longitude : Edit antenna longitude by pressing / buttons and numeric buttons.
Antenna Latitude : Edit antenna latitude by pressing / buttons and numeric buttons.
- Go To : Save the current setting of USALS System.
2. Scan : Press Red ( ) button on the remote to begin satellite search.
3. Auto Navigation : Press Green ( ) button the remote to begin auto navigation.* Note : When you change each parameter, you need to know exact parameter of the LNB to modify L.O(local oscillator)
frequency.
1. Select DiSEqC 1.2 on DiSEqC Motor, the
DiSEqC 1.2 menu will appear.
- Satellite : Select any satellite by pressing /
buttons.
- Tuner : Select Both(Tuner1) / Both(Tuner2).
- Transponder : Displays the current TP value of the
selected satellite.
- DiSEqC Motor : Selected DiSEqC 1.2
- Move : Move the dish position to west/east by
pressing / buttons.
- Move Fine : Move the dish position 1 step at a time
to west/east by pressing / buttons.
- Motor Control : Control motor by press OK button
on the remote.
Recalculate : Recalculate the position of all other
saved satellites relative to the known
position.
Reset System : Reset the position of all saved
satellites.
Goto Reference : Move the dish to the 0 position.
Delete Limit : Delete east and west limit.
Enable Limit : Enable the saved east and west limit.
Set East Limit : Edit & Save east limit by pressing / or OK buttons.
Set West Limit : Edit & Save west limit by pressing / or OK buttons.
- Go To : Go to the position of the saved satellite.
- Save : Save the current setting of DiSEqC 1.2 system.
2. Scan : Press Red ( ) button on the remote to begin satellite search.
3. Auto Navigation : Press Green ( ) button on the remote to begin auto
navigation.
ww
w.te
chno
mat
e.co
m
20 21
Your
Dig
ital P
artn
er fo
r Life
DiSEqC 1.2 Setup USALS System Setup

All the available channels/satellites can be
searched in this menu. Select the satellite and
save before Auto Search.
1. Press the MENU button on the remote to
display the main menu.
2. Use the / and / buttons to move in
the menu.
3. Select Auto Navigation, Auto Navigationmenu will appear.
4. Select the satellites you want to search by
pressing the OK button on the remote.
You can select more satellites by pressing the
/ buttons and OK button on the remote.
- Search Type : Select the type of channel search
you want by pressing / buttons
on the remote.
All : To search all the Free To Air and scrambled
channels, TV & Radio channels.
Free : To search Free To Air channels only.
TV : To search TV channels only.
- Network Search : Select Network Search ON/OFF to find more transponders through NIT
Search.
ww
w.te
chno
mat
e.co
m
22 23
Your
Dig
ital P
artn
er fo
r Life
- Scan : Begin channel search of the selected satellite.
5. Auto Navigation : Press Red ( ) button on the remote.
6. Auto Navigation Blind Search : Press Green( ) button on the remote and then
begin Blind Search of the selected satellite.* Note : Make sure that the signal level of the selected satellites is high by the signal quality bar. If the signal quality is lower
than 50%, go gack to satellite Setup and check LNB DiSEqC Switching, ect.
1. Select DiSEqC 1.2 or USALS in the MotorizedSetting menu.
2. In the viewing mode, Press POS button on the
remote to display DiSEqC Motor View Control.
3. Press / buttons on the remote to move
DiSEqC Motor to get the best singal.
DiSEqC Motor View Control
Auto Navigation
1. Select the satellites you want to search by
pressing the button on the remote.
2. For Polarization, choose from ALL, V or H. For
Scan Mode choose either Fast or Detail.
3. Press the OK button to start scanning.
4. Auto Navigation Blind Search : Press Red
( )button on the remote and then begin
Blind Search of all ‘selected’ satellite.
Blind Search
Te edit and search channels on newly launched
satellites or not preprogrammed satellites in the
list.
1. Press the MENU button to display the main
memu.
2. Use / and / buttons to move in the
menu.
3. Select Advence Search, the Advence Searchmenu will appear.
4. Select each menu you want to edit/ change.
- Satellite : Select a satellite by pressing / buttons on the remote.
- Transponder : Displays the current Transponder list of the selected satellite.
- Symbol Rate : Displays the current symbol rate list of the selected transponder.
- Polarization : Select Horizontal/ Vertical.
- Search Type : Select All Channel/ FTA Only/ TV Only.
- Network Search : Select Network Search ON/OFF.
Advance Search

Through this function, the receiver searches for
all the available channels and saves them in
memory.
- Auto Scan
1. When the Quality is at its highest level, press
the YELLOW( ) button on the remote
control to start scanning for channels.
- Manual Scan
1. Select the channel number or frequency that
you want to search by using the UP/DOWNbuttons on the remote control, manually
enter a frequency.
2. For Bandwidth, choose either 7 MHz or 8MHz
For Search Type, choose from : All Channel,FTA Only or TV Only.
3. For Network Search, select ON to find the
most channels available. The Strength and
Quality of the signal from the selected
channel is shown by the Level and Qualityindicators at the bottom of the screen.
4. Antenna Supply 5V : Select antenna booster
power ON / OFF.
5. Press the OK button to start scanning.
ww
w.te
chno
mat
e.co
m
24 25
Your
Dig
ital P
artn
er fo
r Life
5. Scan : Press Red ( ) button on the remote to begin satellite search.
6. Add TP : Press Green ( ) button on the remote to add new transponders by
using numeric buttons 0~9 and / buttons on the remote.
7. Delete TP : Press Yellow ( ) button on the remote to delete transponders.
Terrestrial Scan
Edit the information of the current transponder
PID/Audio PID/PCR PID and search the satellite.
1. Press the MENU button on the remote to
display the main menu.
2. Use / and / buttons on the remote to
move in the menu.
3. Select PID Search, then the PID Search menu
will be displayed.
- Satellite : Select a transponder which you want to
search.
- Transponder : Displays the Transponders of the selected satellite.
- Symbol Rate : Displays the current symbol rate list of the selected transponder.
- Polarization : Select Vertical/ Horizontal.
- Video PID / Audio PID / PCR PID : Select and edit by using numeric buttons 0~9 and /
buttons on the remote.
4. Scan : Press Red ( ) button on the remote to begin PID Search.
5. Add TP : Press Green ( ) button on the remote to edit transponder by using
numeric buttons 0~9 and / buttons on the remote.
6. Delete TP : Press Yellow ( ) button on the remote to delete the selected
transponder.* Note : Setup is now completed. If you cannot see programme after finishing these procedures, please contact your local
dealer.
PID Search
1. For Provider choose either Canal Digitaal or
TV Vlaanderen.
2. For CHs Renumber select ON/OFF
3. Press the Red( ) button.
Fast Scan

ww
w.te
chno
mat
e.co
m
26 27
Your
Dig
ital P
artn
er fo
r Life
TV/ RADIO switchingYou can press this key to change from a TV channel to a Radio channel or vice
versa.
RECALLPress to return to the previous channel.
AudioPress to adjust the subtitle and / or audio status of the current channel :
- Audio Mode : Select between, Stereo -> Mono-Left -> Mono-Right
- Audio Track : Select between tracks available in this program
- Audio Level : Select between, High -> Medium -> Low* Note : These subtitle and audio paramenters are workable only when the desired channel supports these functions.
TEXTThe Teletext service is a text data service sometimes available from the Service
Provider.
SATPress the SAT button on the remote and select a satellite in the Satellite List.
FAVPress FAV button on the remote to display a favorite channel list int the favorite
group.
FREEZEYou can press this key to freeze the video. Press it again to resume the video.
GROUPWhen watching TV or listening to Radio, you can press this button to view the list of
satellite and / or favorite channel groups. Only
registered satellites and favorite groups are
displayed.
Multi Picture DisplayPress the MOSAIC button on the remote to
display multi-picture mode.
You can select the numbers of multi-pictures.
eg. 1x2, 2x2, 2x3, 3x3
If you know the channel number, enter the
channel number by using numeric buttons on
the remote and wait 2 seconds until the
channel changes.
If you know the channel name, press OKbutton on the remote, then the channel list
will be displayed. Select the channel you
want to watch by using / , OK buttons on
the remote.
1. In the right side of screen, detailed information of the selected channel is
displayed. (Satellite Name, TP and Channel Name)
2. You can navigate between channels with these buttons.
- / : Moves up/ down
- / or / / : Moves page up / page down.
- RED ( ) : Displays all channels in current satellite.
- GREEN ( ) : Displays channels sorted by alphabetical order.
- YELLOW ( ) : Displays channels sorted by transponder.
- BLUE ( ) : Displays channels sorted by FTA/ FTA + Scrambled / CAS.
3. When the selection bar is positioned on the channel you want to see, press OK on
the remote.
Channel Selection
Volume Control1. While you are watching a program me, press / buttons on the remote to
control volume.
2. Press the MUTE button to turn off the sound of the program me.
Press MUTE button again to turn the sound On.
Channel InformationDisplays the information of a program me by pressing INFO button on the remote.
Other Functions of the Remote Control

ww
w.te
chno
mat
e.co
m
28 29
Your
Dig
ital P
artn
er fo
r Life
ZOOMYou can press to zoom in the video.
1. Press the PAUSE button and press ZOOM button You can zoom in sections of
Freezed Video.
2. While watching a program, press. You can zoom in sections of playing video.
3. To cancel the freeze status, please release the zoom status.
SUBTITLEYou can press select the subtitle language of current channel.
SLEEPYou can set the receiver to turn off after a few minutes. Press the SLEEP button to
set a Sleep timer.
- To cancel a Sleep Timer, press the SLEEP button until you set the time as “0 min”.
(Disable, 10, 20, 30, 60, 100, 120 Minutes)
V.FORMATPress the V.FORMAT button to change the video resolution : 1080p > 1080i > 720p >
576p > 576i
WIDEPress the WIDE button to change the TV’s Aspect Ratio :
- 4:3 : Pan-Scan or Letter-Box
- 16:9 : Full-Screen or Pillar-Box
COLOR AdjustmentPress the COLOR button on the remote to
select Color Adjustment menu.
By using the / buttons on the remote, you
can adjust the brightness, contrast and the
color of picture.
ww
w.te
chno
mat
e.co
m
3130
Your
Dig
ital P
artn
er fo
r Life
- Display Format : Select the TV aspect ratio (Letter Box/Pan Scan, Full Screen/Pillar Box)
- RF Type : Select among supported PAL standards.(PAL B/G, PAL I, PAL D/K).
- RF Channel : Set the RF channel to which to display the audio and video signals on your TV set
(21 to 69); if you select 40, they will be displayed at channel 40 on your TV set.
- Video Format : Select the Scanning type (Interaced, Progressive)
- Digital Audio : Select the Audio output type (Dolby SPDIF / PCM / DOLBY HDMI)
- Radio Backpicture : Set the radio backpicture to On/Off
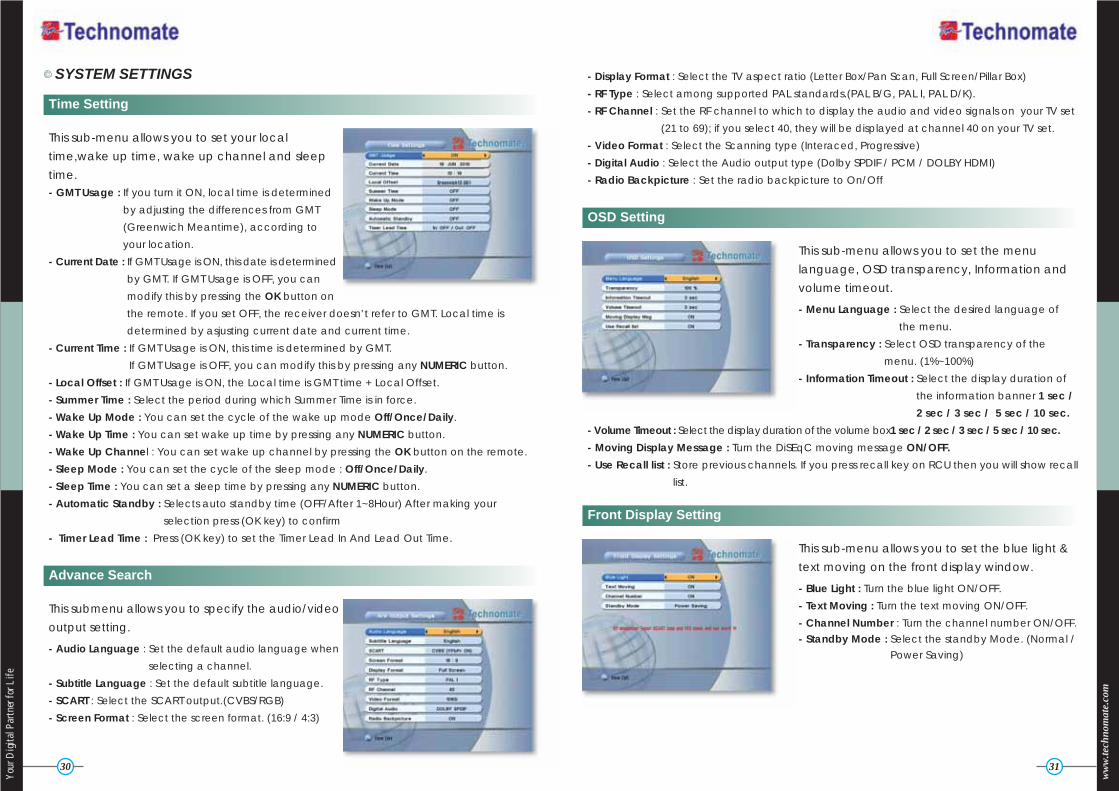
SYSTEM SETTINGS
This sub-menu allows you to set your local
time,wake up time, wake up channel and sleep
time.- GMT Usage : If you turn it ON, local time is determined
by adjusting the differences from GMT
(Greenwich Meantime), according to
your location.
- Current Date : If GMT Usage is ON, this date is determined
by GMT. If GMT Usage is OFF, you can
modify this by pressing the OK button on
the remote. If you set OFF, the receiver doesn’t refer to GMT. Local time is
determined by asjusting current date and current time.
- Current Time : If GMT Usage is ON, this time is determined by GMT.
If GMT Usage is OFF, you can modify this by pressing any NUMERIC button.
- Local Offset : If GMT Usage is ON, the Local time is GMT time + Local Offset.
- Summer Time : Select the period during which Summer Time is in force.
- Wake Up Mode : You can set the cycle of the wake up mode Off/Once/Daily.
- Wake Up Time : You can set wake up time by pressing any NUMERIC button.
- Wake Up Channel : You can set wake up channel by pressing the OK button on the remote.
- Sleep Mode : You can set the cycle of the sleep mode : Off/Once/Daily.
- Sleep Time : You can set a sleep time by pressing any NUMERIC button.
- Automatic Standby : Selects auto standby time (OFF/After 1~8Hour) After making your
selection press (OK key) to confirm
- Timer Lead Time : Press (OK key) to set the Timer Lead In And Lead Out Time.
Time Setting
This submenu allows you to specify the audio/video
output setting.
- Audio Language : Set the default audio language when
selecting a channel.
- Subtitle Language : Set the default subtitle language.
- SCART : Select the SCART output.(CVBS/RGB)
- Screen Format : Select the screen format. (16:9 / 4:3)
Advance Search
This sub-menu allows you to set the menu
language, OSD transparency, Information and
volume timeout.
- Menu Language : Select the desired language of
the menu.
- Transparency : Select OSD transparency of the
menu. (1%~100%)
- Information Timeout : Select the display duration of
the information banner 1 sec /
2 sec / 3 sec / 5 sec / 10 sec.
- Volume Timeout : Select the display duration of the volume box1 sec / 2 sec / 3 sec / 5 sec / 10 sec.
- Moving Display Message : Turn the DiSEqC moving message ON/OFF.
- Use Recall list : Store previous channels. If you press recall key on RCU then you will show recall
list.
OSD Setting
This sub-menu allows you to set the blue light &
text moving on the front display window.
- Blue Light : Turn the blue light ON/OFF.
- Text Moving : Turn the text moving ON/OFF.
- Channel Number : Turn the channel number ON/OFF.- Standby Mode : Select the standby Mode. (Normal /
Power Saving)
Front Display Setting

If the Network supports DHCP, IP settings can be
allocated automatically. If the Network does
not support DHCP, the Addresses must enter
manually (Static IP).
- DHCP Usage : On/Off to receive IP settings
automatically
- IP Address : Here enter the IP address
- Subnet Mask : Here enter Subnet Mask Number from
your Network
- Gateway : Here enter IP address of Gateway (e.g.
router)
- DNS : Here Enter IP address of main DNS Server
- Mac Address : Mac Address display
- Firmware update : Support download from a LAN.
1) BLUE button, appear input target IP address.
2) button to connect after input a target IP.
3) Choose a update software and (OK)button for
downloading.
* Note : Have to run PC tool before connect PC.
ww
w.te
chno
mat
e.co
m
3332
Your
Dig
ital P
artn
er fo
r Life
This sub-menu allows you to change the
password option to access or lock menu entry
and to change password.
- Receiver Lock : If you turn it ON, you will be asked to
enter PIN code when power on.
- Remote / Ch / Install Lock :
If you turn it ON, you will be asked to enter PIN code
when you go to Installation/Edit Channels and When
you use Function keys on the remote.
- Lock Channel Confirm :
If you turn it ON, you wil be asked to enter PIN code
when you switch to a locked channel.
- Age Limit : Prevents children or unauthorized people
from watching the specific prgrams.
(Free / 8 above / 12 above / 15 above /
18 above)
- Current Password : Enter current password to
change password.
- New Password : Enter the new password you want to
change.
- Verify Password : Enter new password to confirm.
* Note : The default password is 0000.
Password Setting
This sub-menu allows you to restore the factory
setting if the users encounters a problem after
changing any settings.
- Delete Radio Channels : Erase all radio channels.
- Delete Scramble Channels : Erase all scramble
channels.
- Delete All Channels : Erase all channels and restore
default setting.
- Factory Reset : Erase all channels and restore factory
default setting.
Factory Reset
- Save As Default Channel : Change the factory
channels.
- Restore Default Channels : Restores 25 satellites and
approx 1,500 channels
pre-tuned.
IP Setting

This sub-menu allows you to rename the
channels and input user PID.
You can switch between TV or Radio channels
by pressing the TV/RADIO button on the remote.
1. Select Rename CH / Edit Pids, the Rename CH/ Edit PIDs menu will appear.
2. Press the OK button on the channel that you
want to edit.
3. Press the OK button on Edit Name to rename
a channel. A virtual keyboard will appear.
Rename a channel by using the / , /
and OK buttons on the remote. Press the EXITbutton on the remote to exit.
4. You can edit a PID by using NUMERIC buttons
on the remote.* Note : The VIDEO PID, AUDIO PID and PCR PID are very important
for optimal satellite signal reception.
This sub-menu allows you to set up favorite name
and favorite lists.
You can choose TV or Radio channels by pressing
the TV/RADIO button. Supports is for 16 favorite
groups.
1. Press the MENU button on the remote to display
the main menu.
2. Use / and / button on the remote to
move in the menu.
3. Select Set Favorites, Select Favorite Group will
appear.
4. Select a favorite group by pressing the /
and OK buttons on the remote. The TV/Radio
channel list will appear.
If you want to edit the favorite group name,
press the RED ( ) button on the remote. A
virtual keyboard will appear.
5. Set favorite channels by pressing the /
and OK buttons on the remote. The selected
channels will have a heart symbol on the
right.
Press the OK button on the remote again to
remove the channel from a favorite group.
6. Press the EXIT button on the remote to return
to the previous menu.
This sub-menu allows you to transfer the software of a receiver to another receiver.
- Firmware : Transfer the firmware of a receiver to another receiver.
- Games : Transfer the game data of a receiver to another receiver.
- All : Transfer all data (Firmware + Channel Data + Games) to another receiver.
ww
w.te
chno
mat
e.co
m
3534
Your
Dig
ital P
artn
er fo
r Life
Data Transfer
EDIT CHANNELS
Set Favorites
Rename CH / Edit PIDs

ww
w.te
chno
mat
e.co
m
3736
Your
Dig
ital P
artn
er fo
r Life
This sub-menu allows you to move a channel in
the list.
You can switch between TV or Radio channels
by pressing the TV/RADIO button.
1. Press the OK button on Move Channels, the
Move Channels menu will appear.
2. Press the OK button to select the channel that
you want to move, then arrow buttons will
appear.
3. Use any NUMERIC buttons on the remote to move the selected channel or press
/ , OK buttons to move a channel.
4. Press the EXIT button on the remote to return to the previous menu.
Move Channels
This sub-menu allows you to lock channels.
Once the channel is locked, every time you
want to watch the channel, you will have to
enter the password.* Note : If you set Lock Channel Confirm OFF, you will not be asked to
enter a password even if a channel is locked.
1. Press the OK button on Lock Channels, theLock Channels menu will appear.
2. Press the OK button to select the channel that
you want to lock. A lock symbol will appear
next to the channel’s name.
3. Press the OK button again to unlock a channel. The lock symbol will disappear.
4. Press the EXIT button on the remote to return to the previous menu.
Lock Channels
This sub-menu allows you to skip channels.
Once a channel is skipped, every time you try to
change the channel using / in the viewing
mode, this channel will be skipped.* Note : If you try to change the channel using NUMERIC button in
viewing mode, you can watch this channel.
1. Press the OK button on Skip Channels, the Skip
Channels menu will appear.
2. Press the OK button on the remote to select the
channel that you want to skip. A skip symbol will appear.
3. Press the OK button on the remote again to cancel skip. The skip symbol will disappear.
4. Press the EXIT button on the remote to return to the previous menu.
Skip Channels
This sub-menu allows you to delete channels.* Note : If you delete a channel, you cannot watch this channel until you do a channel search again.
1. Press the OK button on Delete Channels, the
Delete Channels menu will appear.
2. Press the OK button to select the channel that
you want to delete. A symbol will appear.
3. Press the OK button again to cancel delete.
The delete symbol will disappear.
4. Press the INFO button to delete all channels in
the current list. You will be asked to enter a
password.
5. Press the EXIT button to return to the previous menu.
Delete Channels

ww
w.te
chno
mat
e.co
m
3938
Your
Dig
ital P
artn
er fo
r Life
1. Select the satellite and save in the Satellite
setup before Add Channels.
- Satellite : Select a transponder which you want to
search.
- Transponder : Display the Transponders of the
selected satellite.
- Channel Name : Press OK button on the Channel
Name that you want to edit.
- Channel Type : Select TV/Radio.
- Video PID/Audio PID/PCR PID : Select and edit by using numeric buttons 0~9 and /
buttons on the remote.
- Video Type : Select video type MPEG1/2 / H.264.
- Audio Type : Select audio type MPEG1/2 / HE-AAC / AC3 / MPEG4 / AAC / DD+.
2. Press Yellow ( )buttons on the remote to add channel.
Add Channels
This function allows you to view externel device
output.
- AV Input : On/Off to add or delete a AV IN Channel.
If you selecto ON then you will see AV IN
Channel in channel list.
- Input Select : Select the video input type. (CVBS or
YPbPr)
AV In
EPG (ELECTRONIC PROGRAMME GUIDE)
This sub-menu allows you to view the electronic
programme guide (if available).
1. Press the EPG button on the remote, the EPGmenu will appear.
2. Press the / to go to the previous/next EPG.
3. Press the / or / buttons to change the
channel.
4. Press the OK button on right side of screen
(Program List) and the selected program will be
reserved (Record OFF) in the Timer menu. Repeat for more programs.
5. Press the REC button on right side of screen(Program List) and the selected program
will be reserved(Record ON) in the Timer menu. Repeat for more programs.
6. Press the TV/Radio button on the remote to view TV/RADIO channel list.
7. Press the SAT/FAV button on the remote to view the SAT/FAV list.
8. Press the RED ( ) button on the remote, the Timer menu will appear.
9. Press the INFO ( ) button on the remote to EPG mode switching.
EPG (Electronic Prograamme Guide)
This sub-menu allows you to set the on/off time of
your receiver.
1. Press the RED ( ) button in the EPG menu, the
Timer menu will appear.
2. Press the / buttons to move to other menus.
3. Press the / buttons to change the selection.
- Timer No. 1-8 : Select the timer that you want to modify.
- State : Select the timer : Off/Once/Daily/Weekly.
- Date : Press the OK button to select the date. A virtual
calendar will appear.
- Start Time : Enter the time by using the NUMERIC buttons on the remote for your receiver to turn On.
- End Time : Enter the time by using the NUMERIC buttons on the remote for your receiver to turn OFF.
Timer

1. Press the OK button on Snake, the game will
load.
2. You can select a skill using the / buttons
on the remote.
3. Press the OK button to start a game or press
the EXIT button the remote to return to the
previous menu.
4. Press the / or / buttons to move.
5. If the snake takes BLUE blocks on the screen,
the length will increase.
6. If the snake takes RED blocks on the screen,
the length will decrease.
7. If the snake takes BLACK blocks, the game will
end.
8. Press the EXIT button to quit a game.
3. Press the OK button to start a game or press
the EXIT button to return to the previous
menu.
4. Press the / or / buttons to move.
5. Press the RED ( ) button to undo previous
move.You can only undo a step once at a
time.
6. Press the GREEN ( ) button to restart the
game.
7. Press the YELLOW ( ) / BLUE ( ) buttons
to jump to the previous / next level. You can
jump between completed levels.
8. Press the EXIT button to quit a game.
1. Press the OK button on Tetris, the game will
load.
2. Select a skill by using the / buttons on the
remote.
3. Press the OK button to start a game or press
the EXIT button to return to the previous
menu.
4. Press the OK button to rotate the block.
5. Press the / buttons to move the block.
6. Press the button to drop the block.
7. In the top right window, you can see the next
block.
8. Press the EXIT button to quit a game.
ww
w.te
chno
mat
e.co
m
4140
Your
Dig
ital P
artn
er fo
r Life
- Channel : To view the channel list, press OK button on the remote.
- If you want to record a program in the right side of the screen, you can select a program by using
OK button. The selected program will be reserved.
- Record : Select the record ON / OFF.
- You can also see change the timer menu.
GAMES
Tetris
To play Sokoban, you have to push the balls into their correct positions. The balls can
only be pushed, not pulled. You have to be careful not to push them into a corner
where you cannot get them out again. You can only push one ball at a time.
1. Press the OK button on Sokoban, the Game will load.
2. Select a skill by using the / buttons on the remote.
Sokoban
Snake

1. Select the MP3 file that you want to listen to by
using the / , OK buttons in the file list. Press
the OK button select a file.
2. Press the EXIT button to hide the file list.
You can then select an option using / , OKbuttons.
3. Use the VOL+/VOL- buttons to adjust the
volume.
4. Press the OK button on . The MP3 file list will
be displayed.
5. Press the OK button on .
The MP3 file information will be displayed.
- FILELIST : Open/Close the MP3 file list.
- INFO : Displays MP3 file information.
- YELLOW ( ) : Choose:Hard Disk or USB device.
ww
w.te
chno
mat
e.co
m
4342
Your
Dig
ital P
artn
er fo
r Life
This submenu allows you to use a calculator on
the screen.
- You can switch between Hex (Hexadecimal) and
Dec (Decimal) basis for arithmetic with the RED
( ) button of the remote control unit.
- Use the Numerical and the / and / buttons
on the remote control unit.
Calculator
USB Menu
This sub-menu allows you to playback MP3(music) and JPEG(picture) files and to
download software and channel list by connecting your USB memory stick(USB
flash drive) to the USB port in the receiver.
MP3 Menu
1. Use the / buttons to select a picture.
2. Press the OK button to dispay the picture.
- RED ( ) : Set the time interval between slides
(slideshow)
- GREEN ( ) : Slideshow
- YELLOW ( ) : Choose:Hard Disk or USB device
- FILELIST : Open/Close the JPEG file list
- BLUE ( ) : Rotate the picture.
JPEG Menu
1. Select the software or channel list you want
to download by using the / buttons in the
list.
2. Press OK button to start the software
download.
- YELLOW ( ) : Choose:Hard Disk or USB device
- RED : Upload the current CNDF(compressed dish
and channel data file).
* Warning : Do not turn off your receiver whilst downloading.
Data Transfer Menu (How to download Software from USB)
- Default Disk : Set the DVR disk.
- Disk Information : Choose:Hard Disk or USB device. You can view the information of
the USB device (used size, total size, free size).
- Check Disk : Choose:Hard Disk or USB device. You can check the USB device.
- Format Disk : Formats the USB device or HDD.
Management

ww
w.te
chno
mat
e.co
m
4544
Your
Dig
ital P
artn
er fo
r Life
- Testing USB Speed : USB speed test.
- Timeshift Rec Time : You can change default
timeshift recording time.
- Auto Timeshift : Set automatic timeshift On/Off.
- HDD Sleep Time : HDD is change sleep mode
after selected time.
SYSTEM INFORMATION
You can check the current information about
your receiver, such as the receiver model name,
software version, hardware version,
manufacturing date, etc.* Note : This information is necessary when you want to download a new
software or you need to repair the receiver.
COMMON INTERFACE
To watch scrambled channels, you will need a
Conditional Access Module (CAM) and Smart
card which is specific to that CAM from the
service provider (broadcaster).* Note : Without a CAM and a smart card, you can watch only Free-
toAir programmes.
1. Insert a CAM into a CAM slot in the receiver
and a Smart card the CAM.
2. The message : CAM Initializing will appear.
CAM Initializing
1. Go to Common Interface. Press OK on the CAM to see further information of theCAM.
2. Proceed with further instructions displayed on the screen, then you can checkfurther details depending on the CAM in use.
* Note : Further detailed information is not mentioned in this manual since the information depends on the type of CAM.
Status of the CAM
To Enjoy CONAX CAS7 scrambled channels, you
will need a Smart Card from the service provider
(program distributor). If you are subscribing to
services from more than one service provider,
you will need a Smart Card from each one.
Since a Smart Card is connected to a single
service provider, a limited range of channels will
be available via it.* Note : Without the Smart Card, you can watch only Free-To-Air
programs.
1. Insert the Smart Card into the receiver’s slot designed for it.
2. The message ‘Smart Card Initializing’ will appear on the screen.
3. After the message ‘Smart Card Initializing’ has disappeared, you will be able to
watch the channels offered by the service provider.
Card Initializing
CONDITIONAL ACCESS SYSTEM

File Playback1. Press the FILELIST button to open the file list.
Select the file you want to playback byusing UP/DOWN & OK buttons.
2. Press the OK button. On the left side ofscreen, detailed information about theselected file will be displayed.(Recorded Date/Time, Used size, Total Size)
- For Full Screen, press the OK button oncemore and then following time-bar willappear.
ww
w.te
chno
mat
e.co
m
4746
Your
Dig
ital P
artn
er fo
r Life
1. You can access detailed information about
the Smart Card using the / keys in the Main
Menu to select ‘CA’ and pressing / .
2. Proceed with further instructions displayed on
the screen to check more detailed
information depending on the Smart Card in
use.* Note : Futher detailed information is not mentioned in this manual
since the information depends on the Smart Card in use.
The Status of the Smart Card
PVR Mode via Internal HDD or USB
File List
Edit Menu
Enter the password. Press the YELLOW button. A
popup menu will appear.
Select the file that you want to edit, and set its
parameters as desired.
1. Normal Mode : Press the OK button on file
that you want to see a preview.
2. Lock Mode : Press the OK button on the file
that you want to lock/unlock.
3. Delete Mode : Press the OK button on the file
that you want to delete.
4. Rename Mode : Press the OK button on the file that you want to rename.
- RED : Choose from : File Mode <-> Dir Mode
- GREEN : Displays all sorted files. Choose from : Sort by name <-> Sort by time* If you set ‘Channel Lock’ to OFF (refer to <Figure 6.2.4> security setting), you will not be asked to enter a password, even if
the channel is locked.
You can operate the Trick Mode while you are
playing the files. This function is available in
Playback mode and Time-Shift mode.
PLAYBACKThis button will display a time-banner.
If you want to open the playlist while playing
the file, press the PLAY button on the remote.
In This Mode, press the INFO button to show
the trick-operation.
PAUSEThis button will pause the file until you playback again (press the PLAY button or
PAUSE button to resume watching).
ADVANCEIf Time-Shift mode is enabled, press the ADVANCE button to go to the real time live
broadcast.
Trick Mode

ww
w.te
chno
mat
e.co
m
4948
Your
Dig
ital P
artn
er fo
r Life
FF (Fast Forward)When playing the file, press the FF button to forward the program (adjust the
playing speed).
- Choose from : x2, x4 and x8, x8 and x32
RWD (Rewind)When playing the file, press the RWD button to rewind the program (adjust the
playing speed).
- Choose from : x2, x4 and x8, x8 and x32
Slow (1/2x, 1/4x)When playing the file, press the SLOW button to slow the speed of the playback
(adjust the playing speed)
Jump- Go to a desired position of the file by using the LEFT/RIGHT buttons.
- If you press this key continuously, you can go to the desired position faster.
BookmarkTo create a bookmard/chapter at a specific
time/place of the file.
- RED : Press the RED button and a red triangle
will appear at that position.
If you want to delete the bookmarked position,
press the RED button once more and the red
triangle will disappear.
- GREEN : Press the GREEN button to go/jump to
the previous bookmark position. Playback will
start from this point.
- YELLOW : Press the YELLOW button to return to the next bookmark position.
Playback will start from this point.* Note : The maximum number of bookmarks is 20 for each file.
File Edit- BLUE : Press this button and edit(copy, cut) the file.
Press (OK key) button to select edit start position and one more (OK key)
button to selectedit end position. Select cut or copy.

ww
w.te
chno
mat
e.co
m
5150
Your
Dig
ital P
artn
er fo
r Life
- Channel : Displays the current channel- Name : Displays the current recording name- Duration : You can change the duration of a recording’s time by using the LEFT /
RIGHT button. Current recorded time will appear.* Note1 : DO NOT REMOVE the USB device while recording a program.
* Note2 : You can’t change to another channel while recording a program.
1. You can record the current channel you are watching instantly by using RECbutton.
If you then press the PLAY button, a time-banner will be displayed.
2. Press the REC button once more. The following picture shows that you can select
an item when you record the current channel.
Instant Recording
1. Press the STOP button on the remote to stop
the recording then Record Stop will be
displayed.
2. Select the recording file by OK / STOP button.
3. Press EXIT button then selected recording is
stopped.
Record Stop
This function is available when a USB device is connected. You can choose a
channel to record from the EPG Guide by using the REC button.
(Refer to 6.4 EPG, 2) Timer)
Timer Recording
Press (f1 key) button to display divx file list.
Press (OK key) button to play the selected file.
Divx Play
1. To pause and resume live TV channel, press the PASUSE button. The default time
for Time-Shift is 30 minutes.
2. To resume live TV channel, press the PLAY button.
3. The trick-mode operations are available. To return to the live broadcast, press the
ADVANCE button.
Time Shift

ww
w.te
chno
mat
e.co
m
5352
Your
Dig
ital P
artn
er fo
r Life
1. Connect the null model cable to the RS-232Cconnection on the back of the receiver and to your PC.
2. Download the latest version of the TM Loader from theTechnomate web site (www.technomate.com).
3. Download the latest software (.STB) of your receiverEnsure that the model number of the software is thesame as the receiver you have.
4. Click on Browse in the TM Loader.
5. Select the file from where you saved it when youdownloaded it from the Technomate website.
6. Turn ON the satellite receiver.
7. Click on Connect on TM Loader and then click Startto begin the software download.
8. The downloading status is displayed.
9. Once it displays 100% Finished (wait until it hascompleted erasing), the software download hasfinished.
10. When it completes the writing of the new software,disconnect the cable between the receiver and the PC.A Factory Reset is rezuired.
11. Go to System Information on the main menu andmake sure that you have correct software version.
PIP
Press (pip key) on the remote to start PIP and “Sub Channel List” will displayed.
Select the channel using (OK key)
Press Exit to hide Sub Channel List.
Press (pip key) on the remote to change small PIP screen size.
Press (pip key) on the remote to stop PIP.
Start, Stop, Change PIP screen size
Press (pip channel list key) on the remote to display Sub Channel List.
Press (exit key) on the remote to hide Sub Channel List.
Sub channel list
Press (swap key) on the remote to swap main
with sub channel.
Swap to Channel

ww
w.te
chno
mat
e.co
m
5554
Your
Dig
ital P
artn
er fo
r Life
There may be various reasons for the abnormal operation of a set-top box. If itdoes not work properly, check if according to the procedures shown in the tablebelow.
Note. How to download / upload Channels
If you want to download / upload Channels, Click on Channels in the TM loader,
then select Download / Upload.
* Downloading Channels PC to TM-7100HD Series.
1. Click on Download, and then Click on Browse in the TM Loader.
2. Select the file from where you saved it.
3. Turn on the satellite receiver.
4. Click on Connect in the TM Loader and then click on Start to begin downloading
Channels PC to TM-7100HD Series.
5. Once it displays 100% fifnished, the Channel downloading has finished.
* Downloading Channels TM-7100HD Series to PC.
1. Click on Upload, and then Click on Browse in the TM Loader.
2. Select the file and folder where you want to save in your PC.
3. Turn on the satellite receiver.
4. Click on Connect in the TM Loader and then click on Start to begin uploading
Channels TM-7100HD to PC.
5. Once it displays 100% finished, the Channel uploading has finished...
* You can upload / download default channels maximu 1,500 TV & Radio channels.
If you want to add more than 1,500 channels, you will have to do a channel search/scan.

ww
w.te
chno
mat
e.co
m
5756
Your
Dig
ital P
artn
er fo
r Life
1) Check if the scart is connected,2) Check the A/V settings on your television is correct,3) Scart cable could be faulty there fore replace of in doubt.
The receiver is on but I cannot get any Menu on the screen?
1) Check if the LNB cable is inserted into the IF INPUT,2) Check if the LNB setup menu is correctly set.3) Your satellite Dish may be out of alignment or your LNB may be is faulty.4) Go to Easy installatin guide and start fresh,5) Contact your dealer / installer.
I get the message ‘no signal’ displayed?
You need to check the following :1) Check if you a correct transponder.
Go to advance search, Turn on the Network Search, press redbutton to tune.
2) Make sure you have correct PID numbers.b) if above dose not help go to
www.lyngsat.comwww.kingofsat.net/en/prefs.phpPlease contact your Supplier for further assistance.
I cannot access a particular channel I require?
Press Menu on the remote, Go to system information press ok, Fullinformation is displayed.
How can I find out what software version I have?
For security reason, please contact your dealer.
I have lost my personal Lock Code setting, what do I do?
IEC 169-24, female950MHz ~ 2150MHz-65dBm ~ -25dBmDC 13/18V, max 400mA22KHzVer 1.0/1.1/1.2/USALS CompatibleDVB-S/S2 QPSK, 8PSKDVB-S : 2~45Msps DVB-S2 : 10~30Msps(QPSK) 10~30Msps(8PSK)
Auto conversionIEC 169-2, FemaleIEC 169-2, Male149 ~ 426 MHz, 434 ~ 858 MHz75 Ohms Nominal7,8MHz(-78dBm~-25dBm) switchable by software7,8MHzOFDM(DVB-T, DVB-T2)DVB-T : 2k, 8k / DVB-T2 : 1k, 2k, 4k, 8k, 16k, 32kDVB-T : 1/2, 2/3, 3/4, 5/6, 7/8DVB-T2 : 1/2, 3/5, 2/3, 3/4, 4/5, 5/6DVB-T : 1/4, 1/8, 1/16, 1/32DVB-T2 : 1/4, 5/32, 1/8, 5/64, 1/16, 1/32, 1/64, 1/12832bit processor (450MHz)128Mbyte X 28Mbyte256KbitMPEG-2, MPEG-4, H.264up to 15M bits/s1920 X 1080p/i, 1280 X 720p, 720 X 576p/iPAL4:3,16:9
Mono, Stereo, Joint Stereo32, 44.1 and 48 KHz9pin D-sub male, Max 115K bps
Fully DVB compliantConnectorFrequency rangeSignal levelLNB supplyLNB switch controlDiSEqCFront endSymbol rate
SCPC and MCPC CapableSpectral inversionInput connectorLoop-through outFrequency rangeInput impedanceSignal levelIF BandwidthWaveformCarrier ModeCode Rate
Guard Interval
ProcessorDDR SDRAMFLASHEEPROMMPEG 2Data RateResolutionVideo formatAspec RatioDVB compliantMPEG 1 layer 1 &2TypeSampling ratesConnector
System capabilitiessatelliteLNB/Tuner input
Demodulator
TERRESTRIALSystem capabilitiesTuner& Channel Decoder
System resource
Video decoder
TeletextMPEG Audio
Serial data interface

58
Your
Dig
ital P
artn
er fo
r Life
390 X 73 X 283(mm)
3.5Kg
Size (W X H X D)
Weight (Net)PhysicalSpecification
Disposal of Old Electrical & Electronic Equipment(Applicable in the European Unionand other European Countries with separate collection systems)This symbol on the product or on its packaging indicates that this product shall not be treated ashousehold waste. Instead it shall be handed over to the applicable collection point for therecycling of electrical and electronic equipnent. By ensuring this product is disposed of correctly,you will help prevent potential negative consequences for the environment and human health,which could otherwise be caused by inappropirate waste handling of this product. The recyclingof materials will help to conserve natural resources.For more detailed information about recycling of this product, please contact your local cityoffice, your household waste disposal service or the shop where you purchased the product.
NEC-IRup to 7 MeterDC 5V Max 500mAmax 60WAC 100V ~ 250V50Hz ~ 60HzCVBS, RGB Video output, Loop-through RGB outputAudio OutVideo Output(CVBS)Video Input(CVBS, RGB)Audio Out(L, R)1 X RCA cinch2 X RCA cinch3 X RCA cinch9pin D-subIEC 169 - 24IEC 169 - 24IEC 169 - 2IEC 169 - 2IEC 169 - 2IEC 169 - 2Fiber Optic1 X HDMIUSB A-typeRJ-451 X RCA cinch 2 X RCA cinch3 X RCA cinch
CodeOperating conditionUSB Supply(Front/Rear)Power consumptionSupply voltageSupply frequencyTV SCART
VCR SCART
Video Audio L/RComponent(Y/Pb/Pr)Serial dataDigital tuner input X 2Loop-through Digital tuner X 2Terrestrial ant inputTerrestrial ant outputRF modulator inputRF modulator outputS/PDIFHDMIUSBLANVideo input Audio L/R input Component input(Y/Pb/Pr)
Remote control
USBPower supply
Rear Panel connectors
Option

ww
w.te
chno
mat
e.co
m
6160
Your
Dig
ital P
artn
er fo
r Life
Nous vous remercions de nous avoir fait confiance pour l’acquisition de votreTerminal Numérique. Nous espérons qu’il vous donnera entière satisfactiondurant de nombreuses années.Ce produit étant un appareil de haute technologie, il est nécessaire d’enprendre soin et de respecter les consignes élémentaires de sécurité que nousvous communiquons ci-dessous.
Avant de commencer toute opération, bien lire le manuel.
Ne pas toucher le câble d’alimentation avec les mains humides, il pourraitcauser un choc électrique.
Ne jamais ouvrir le récepteur. Ne pas toucher l’intérieur du récepteur, ceci peut causer un choc électrique.
Laisser libres tous les orifices de ventilation du récepteur.
Ne surchargez pas une prise murale, un cordon prolongateur ou un adaptateur car cela pourrait entraîner un incendie ou un choc électrique.
L’installation par un personnel qualifié est recommandée. Si la réception estinterrompue, contactez votre centre de service local.
Installez le récepteur horizontalement. Une installation non conforme peut endommager le système.
Ne pas déposer un objet lourd comme une télévision sur le récepteur.Cela peut endommager le récepteur.
Le récepteur ne doit pas être exposé à des gouttes ou à des éclaboussures.
Aucun abjet contenant du liquide, comme une vase, ne doit être placé sur l’appareil.
INTRODUCTION
59
59
CONSIGNES ELEMENTAIRES DE SECURITE
POINTS DE CONTRÔLE AVANT L’EMPLOI
CONTRÔLES/FUNCTIONS
EQUIPMENT CONNEXION
EN CAS DE PROBLEME
61
62
66
66
77
OPERATION

ww
w.te
chno
mat
e.co
m
6362
Your
Dig
ital P
artn
er fo
r Life
Accessoires
Manuel d’utilisationTélécommandePiles (type AAA)HDMI câble
Si certains accessoires énumérés ci-dessus sont perdus, entrez en contactavec votre représentant afin d’en obtenir de nouveaux.
Antenne paraboliqueVotre antenne devrait être installée et orientée correctement et l’élévationdoit être ajustée avec précision.Ce récepteur est conçu pour être compatible avec DiSEqC 1.2.Demandez à votre revendeur pour plus d’informations.
Ne pas installez le récepteur :A un endroit sujet à des vibrations.A la lumière du soleil directe.A l’humidité.A une température trop haute ou trop basse.ou il n y a aucune ventilation.
Déplacer le récepteur d’un endroit chaud à un endroit froid provoquerq de la condensation. N’allumez pas le récepteur durant une ou deux heures,jusqu’à qu’il soit complètement sec.

ww
w.te
chno
mat
e.co
m
6564
Your
Dig
ital P
artn
er fo
r Life
Panneau Arrière
Panneau Frontal
1. Power :To switch the receiver between “Standby” and “Power ON” modes.
2. Standby/Power Indicators :Red in Standby mode and no light in Power-On mode.
3. Menu :To enter or exit the Main Menu.
4. Select :To open the Channel List in non-menu mode and to select/confirm an item inmenu mode.
5-6. VOL( / ) :To change the volume level in non-menu mode and to modify a setting in menu mode.
7-8. CH( / ) :To change channels or to move Up/Down in the menus/application.
9. 2.5” & 3.5” S-ATA HDD(Max. 1TB)
No. Name Connector Function1 RF OUT UHF 21-69 IEC 169-2 MALE Output to TV2 TV ANT IN IEC 169-2 FEMALE Input from analog terrestrial antenna3 USB USB A-type USB 2.04 RS-232C DB-9 Low speed serial port5 S/PDIF Fiber Optic Digital audio output (Optical)6 HDMI HDMI Digital Video/Audio Output7 LAN RJ-45 10/100Mbps Ethernet8 VCR/AUX SCART SCART CVBS Video Output
CVBS, RGB Video InputAudio Output
9 TV SCART SCART CVBS, RGB Video Output, Audio Output10 VIDEO RCA cinch Composite video output11 AUDIO L RCA cinch Left audio output12 AUDIO R RCA cinch Right audio output13 Y RCA cinch Component video output(Y)14 Pb RCA cinch Component video output(Pb)15 Pr RCA cinch Component video output(Pr)16 LNB INPUT2 IEC 169-24 FEMALE IF input from LNB to digital tuner217 LNB INPUT1 IEC 169-24 FEMALE IF input from LNB to digital tuner118 LNB OUTPUT2 IEC 169-24 FEMALE IF loop-through output from digital tuner219 LNB OUTPUT1 IEC 169-24 FEMALE IF loop-through output from digital tuner120 DVB-T IN IEC 169-2 FEMALE Cable signal input to digital tuner.21 LOOP OUT IEC 169-2 MALE Loop-through output from digital tuner.22 VIDEO(option) RCA cinch Composite video input23 AUDIO(option) RCA cinch Left audio input24 AUDIO(option) RCA cinch Right audio input25 Y(option) RCA cinch Component video input (Y)26 Cb(option) RCA cinch Component video input (Cb)27 Cr(option) RCA cinch Component video input (Cr)

ww
w.te
chno
mat
e.co
m
6766
Your
Dig
ital P
artn
er fo
r Life
TélécommandeTélécommande
TM-7102 HD-T2
1. POWER : To turn the receiver On/Off.
2. TV/RADIO : To switch between TV and Radiomodes.
3. MUTE : To turn the sound On/Off.
4. TV/SAT : To switch the TV output sourcebetween the satellite input and the UHF/VHFantenna input.
5. MEDIA : To access media file playback menu.
6. SLEEP : To adjust the Sleep Timer.
7. PIP SWAP : To swap the PIP picture and themain picture.
8. PIP : To activate the Picture in Picturefunction.
9. PIP LIST : To display the PIP list.
10. EPG : To show the TV/Radio program guide.
11. SUBTITLE : To show the subtitle contents ifsubtitle is transmitted.
12. FAV : To show favorite list in the favoritegroup or to move to the next page.
13. A-Z : To sort channel list.
14. USB : To show the usb menu.
15. TEXT : To show the teletext contents if teletextis transmitted. Used for special functions inmenu mode.
16. AUDIO : To show Multi-language audio track,the stereo-mono mode and subtitleinformation. Used for special functions inmenu mode.
17. INFO : To show information about the currentprogram. Press twice to show detailedinformation.
18. MENU : To enter or exit the main menu.
19. EXIT : To exit from the present menu and togo to the previous menu.
20-21. VOL UP & DOWN : To change the volumele vel in non-menu mode.
TM-7102 HD-T2
22-23. UP & DOWN : To change channels in nonmenu mode and move the cursor up/down inmenu mode.
24-25. LEFT & RIGHT : To change the volume levelin non-menu mode.
26. OK : To show the Channel List in non-menumode and select an item or confirm in menumode.
27. SAT : To show Satellite list.
28. RECALL : To go to the previous channel menu.Used for special functions in menu mode.
29. FILELIST : To display the filelist.
30. PLAY : Play Content.
31. STOP : Stop Playback.
32. RWD : Rewind a file / Arrow UP : To move tothe previous page when many pages areavailable.(It is worked when in Menu List)
33. PAUSE : Pause playback.
34. FWD : Forward a file / Arrow Down : To moveto the next page when many pages areavailable (It is worked when in Menu List).
35. ADVANCE : Go to live channel.
36. REC : Start recording.
37. SLOW : Playback in slow mode.
38. BOOKMARK : Set the bookmark position.
39. Color : To control brightness, contrast color ofa picture (when in CVBS mode).
40. POS : To show the DiSEqC motor view control.
41. Color Key : To use special functions in themenu.
42. Numeric Keys (0 - 9) : To enter numericalsettings(such as channel numbers) directly.
43. V.FORMAT : To change video output’sresolution.
44. Wide : To select a TV aspect ratio with PanScan or Letter-Box(4:3) (Full screen or Pillarbox(16:9).
4141
4242

ww
w.te
chno
mat
e.co
m
6968
Your
Dig
ital P
artn
er fo
r Life
Installation Satellite
4. Sélectionnez chaque menu que vous voulez éditer / changer.
Satellite : Sélectionnez le satellite souhaité à l’aide des touches / de latélécommande.
Tuner :Transpondeur : LNB Power : A l’aide des touches sélectionnez sur ON/OFF / 13V/18V.LNB Type : Sélectionnez votre type de LNB sur soit Single/Universal/OCS.22KHz : Sélectionnez sur ON/OFF ou 0/22 KHz.DiSEqC 1.0 :DiSEqC 1.1 :
5. Scan : Appuyez sur la touche rouge de la télécommande pour commencer lesrecherches satellite.
6. Rename=renommer : Appuyez sur la touche verte de la télécommande pourrenommer le satellite sélectionné.
7. Save=sauvegarder : Appuyez sur la touche jaune de la télécommande poursauvegarder.
8. Delete=supprimer : Appuyez sur la touche bleue de la télécommande poursupprimer le satellite sélectionné.
Installation motorisée
Appuyez sur la touche MENU de la télécommande pour afficher le menu principal.
1. Appuyez sur la touche MENU de la télécommande pour afficher le menu principal.
2. Utilisez les touches / et / de la télécommande pour déplacer dans le menu.
3. Sélectionnez installation motorisée, la fenêtre suivante apparaîtra.
4. Sélectionnez chaque menu que vous voulez éditer ou changer.Tuner :Satellite : Sélectionnez le satellite souhaité à l’aide des touches / de la
télécommande.Transpondeur : Montre la valeur courante de transpondeur du satellite choisi.DiSEqC Motor : A l’’aide des touches, sélectionnez OFF 1.2 USALS.Save=sauvegarder : Appuyez sur la touche OK de la télécommande pour
sauvegarder.
5. Appuyez sur la touche rouge de le télécommande pour commencer les recherches.
6. Appuyez sur la touche verte de la télécommande pour renommer les satellites.
Raccordement avec le système A/V / antenne / TV set
1. Raccordez TV ant IN de l’appareil à l’antenne TV.
2. Raccordez vidéo et Audio de l’appareil au TV et Vidéo de la TV.Raccordez le connecteur rouge et blanc à audio R et audio L, et le jaunedans le port vidéo respectivement.
3. Raccordez votre antenne satellite.
Démarrage
Démarrez le récepteur en appuyant sur Power et procédez à l’installation dusystème comme suit :
Installation du menu langue
1. Allumez votre récepteur et TV.
2. Le menu langage apparaître.Sélectionnez la langue et appuyez sur la touche OK de la télécommande pourprocéder.
Installation Satellite
1. Appuyez sur la touche menu de la télécommande pour faire apparaître le menu.
2. Utilisez les touches / et / de la télécommande pour se déplacer dans lemenu.
3. Sélectionnez Satellite Setup = installation satellite, alors le menu installation satellites’affichera à l’écran.

ww
w.te
chno
mat
e.co
m
7170
Your
Dig
ital P
artn
er fo
r Life
Recherche PID
1. Appuyez sur la touche MENU de la télécommande pour afficher le menu principal.
2. Utilisez lez touches de la télécommandepour déplacer dans le menu.
3. Sélectionnez PID recherche, ensuite lafenêtre suivante apparaîtra.
Satellite : sélectionnez un transpondeur dans lequel vous souhaitez faire desrecherches.
Transpoondeur : il montre le transpondeur d’un satellite sélectionné.
Symbol Rate : il montre la liste courante de symbole rate du satellite choisi.
Polarisation : Sélectionnez Vertical ou Horizontal.
Video PID / Audio PID / PCR PID : sélectionnez et éditez à l’aide des touchesnumériques 0-9 de la télécommande.
Add TP : appuyez sur la touche verte de la télécommande pour éditer letranspondeur à l’aide des touches numériques 0-9 et des touches /de la télécommande.
Delete TP : appuyez sur la touche jaune de la télécommande pour supprimer letranspondeur sélectionné.
Recherche avancée
1. Appuyez sur la touche menu pour faireapparaître le menu principal.
2. Utilisez les touches / et / poursélectionnez dans le menu.
3.Sélectionnez recherche avancée, ensuitela fenêtre suivante apparaîtra.
4. Sélectionnez chaque menu que vousvoulez éditer ou changer.
Satellite : A l’aide des touches / de la télécommande sélectionnez lesatellite souhaité.
Transpondeur : Montre la liste courante de transpondeur du satellite choisi.Symbole rate : Montre la liste courante de symbole rate du satellite choisi.Polarisation : Sélectionnez Horizontal ou Verticale.Type de recherche : Sélectionnez toutes les chaînes ou seulement FTA ou
seulement TV.Recherche Network : Sélectionnez Network recherche sur ON ou OFF.
5. Scan : Appuyez sur la touche rouge de la télécommande pour commencer lesrecherches satellite.
6. Add TP : Appuyez sur la touche «verte» de la télécommande pour ajouter uanouveau transpondeur à l’aide des touches numériques 0-9 et les touches /de la télécommande.
7. Delete TP : Appuyez sur la touche jaune de la télécommande pour supprimer letranspondeur.

ww
w.te
chno
mat
e.co
m
7372
Your
Dig
ital P
artn
er fo
r Life
Autre Fonction de ra télécommande
Contrôle du volume
1. Lorsque vous regardez un programme, à l’aide des touches / vous pouvezcontrôler le volume.
2. Lorsque c’est nécessaire, appuyez sur la touche Mute pour couper le son.Appuyez à nouveau sur la touche mute pour remettre le son.
Information
L’information à propos d’un programme apparaîtra en utilisant la touche INFO dela télécommande.
Sélection de programme
Vous pouvez changer le programme courant par un autre programme.
Dans le cas où vous voulez sélectionnezune chaîne au hasard sans savoir le nomde celle-ci, vous pouvez naviguer entre leschaînes jusqu’à ce que vous trouviez ceque vous souhaitez.
Si vous connaissez le numéro de chaînesouhaitée, entrez le numéro et attendez 2secondes jusqu’à ce que la chaînechange.
Si vous connaissez le nom de la chaînesouhaitée, appuyez sur OK et la liste de chaîne apparaîtra.
1. Dans l’écran droit, l’information détaillée de la chaîne sélectionnée apparaîtra.
2. Vous pouvez naviguer entre les chaînes avec ces touches:
/ : Déplacer vers le haut et vers le bas
/ : Déplacer de page en page
Rouge : Affichera toutes les chaînes
Vert : Affichera toutes les sortes de chaînes par ordre alphabétique
Jaune : Affichera toutes les chaînes par transpondeur
Bleu : Affichera
3. Lorsque la chaîne souhaitée est sur surbrillance, appuyez sur OK pour confirmer.

ww
w.te
chno
mat
e.co
m
7574
Your
Dig
ital P
artn
er fo
r Life
Renommer ch / edit pids
Se sous-memu vous permet de renommer les chaînes et entrer l’utilisateur PID.En utilisant la toche TV/Radio, vous pouvez alterner entre les modes TV/Radil.Vous pouvez changer la liste de chaîne en utilisant les touches SAT/FAV de latélécommande.
1. Appuyez sur la touche OK pour renommerCh/Edit Peds, le menu suivant apparaîtra.
2. Appuyez sur la touche OK pour la chaîneque vous voulez éditer.
3. Appuyez sur la touche OK pour renommerune chaîne, le tableau suivant s’affichera.Renommer une chaîne en utilisant lestouches / et / , OK de latélécommande. Appuyez sur la toucheExit de la télécommande pour quitter.
4. Vous pouvez éditer en utilisant les touches numériques de télécommande.
Déplacer les chaînes
Vous pouvez changer la liste de chaînes en utilisant lf touche GROUP.
1. Appuyez sur OK pour déplacer les chaînes.Le menu suivant apparaîtra.
2. Appuyez sur OK pour sélectionnez lachaîne que vous voulez changer.
3. Appuyez sur les touches numériques pourdéplacer la chaîne sélectionnée ouappuyez sur les touches / , OK pourdéplacer une chaîne.
4. Appuyez sur la touche Exit de la télécommende pour retourner au menuprécédent.
EDIT CHANNELS
Installation des chaînes favorites
Ce sous-menu vous permet d’installer le nom préféré et les listes préférées commevous le souhaitez.En utilisant la touche TV/Radio, vous pouvez alterner entre les modes TV et Radio.ll soutient 8 groupes favoris.
1. Appuyez sur la touche OK de pourinstallation favorite, ensuite « selectFavorite Group » = « sélection de groupefavoris » apparaîtra.
2. Sélectionnez un groupe favoris en utilisantles touches / et OK de latélécommande, la liste de chaînes TVRadio apparaîtra. Si vous voluez changerle nom du groupe favoris, appuyez sur latouche Rouge et le tableau s’affichera.
3. Réglez les chaînes préférées en utilisant les touches / et OK de latélécommande Appuyez à nouveau sur la touche OK de la télécommande pourenlever le groupes favoris.
4. Appuyez sur la touche Exit de la télécommande pour retourner au menu principal.

ww
w.te
chno
mat
e.co
m
7776
Your
Dig
ital P
artn
er fo
r Life
Suppression de chaînes
Ce sous-menu vous permet de supprimer les chaînes. En utilisant les touchesTV/Radio, vous pouvez alterner entre les TV/Radio.Vous pouvez changer le groupe de liste de chaîne à I’aide de la touche GROUP.
* Note : Attention! Si vous supprimer une chaîne, vous ne pourrez la regarder que si vous la recherchez à nouveau.
1. Appuyez sur OK pour «Suppression de chaîne». Le menu suivant s’affichera.
2. Appuyez sur la touche OK pour sélectionner la chaîne que vous
souhaitezsupprimer. L’icône «suppression»
s’affichera.
3. Appuyez à nouveau sur la touche OKpour confirmer.L’icône «suppression» disparaîtra.
4. Appuyez sur la touche INFO pour supprimer toutes les chaînes de la liste courante.Vous serez invité à entrer le mot de passe.
5. Appuyez sur la touche Exit = Quitter pour revenir au menu précédent.
Chaîne verrouilée
Ce sous-menu vous permet de verrouiller les chaînes. Une fois que la chaîne estverrouillée, lorsque vous essayez de la regarder ; vous devez entrer le mot de passe.En utilisant les touches TV/Radil vous pouvez alterner entre les modes TV ou Radio.En utilisant les touches SAT/FAV vous pouvez changer la liste de chaîne.
* Note : si vous placez sur OFF la chaîne qui est verrouillée, alors vous ne devez plus entrer le mot de pass même si une chaîne
est verrouillée.
1. Appuyez sur la touche OK pour la chaîneverrouillée. Le menu suivant apparaîtra.
2. Appuyez sur la touche OK poursélectionner la chaîne que vous voulezverrouiller.L’icône «verrouillé» s’affichera.
3. Appuyez à nouveau sur la touche OK pourdéverrouiller une chaîne. L’icône«verrouillé» disparaîtra.
4. Appuyez sur la touche Exit = quitter de la télécommande pour revenir au menuprécédent.

ww
w.te
chno
mat
e.co
m
7978
Your
Dig
ital P
artn
er fo
r Life
Interface commune
CAM (modules d’accès conditionnel)
Pour regarder les chaînes cryptées, vous avez besoin de modules d’accèsconditionnel (CAM) et/ou une carte à puce d’abonnement.
* Note : sans le module d’accès conditionnel et/ou la carte à puce, vous ne pouvez regarder que les services libre d’accès.
1. Insérez le module d’accès conditionnel dans l’une de fente du récepteur et unecarte Smart dans le module.
2. Le message de « CAM Initializing » s’affichera à l’écran.
3. Après ce message, vous pouvez sélectionner la chaîne souhaitée.
EPG (Electronic Program Guide)
EPG (le guide électronique des programmes)
Ce sous-menu vous permet de visualiser le guide électronique des programmes si ilest disponible.
1. Appuyez sur la touche EPG de latélémmande, le menu Guide Eléctroniquedes programmes s’affichera.
2. Appuyez sur / pour voir le guideélectronique des programmes précédentou suivant.
3. Appuyez sur les touches / ou /pour vous faire passer verticalement d’unechaîne à l’autre.
4. Appuyez sur la touche OK sur côté droit de l’écran (liste de programme) et leprogramme sélectionné sera réservé dans le menu Timer. Vous pouvezsélectionner autant de programmes que vous souhaitez.
5. Sélectionnez Programme TV/Radio à l’aide des touches TV/Radio de latélécommaned.
6. Sélectionnez SAT, liste Favori à l’aide des touches SAT, FAV de la télécommande.
7. Appuyez sur la touche Rouge de la télécommande, le menu Timer s’affichera.
Menu Minuterie
Ce sous-menu vous permet de programmer la mise en veille de votre récepteur.
1. Appuyez sur la touche rouge dans le menu guide, le menu Timer s’affichera.
2. Appuyez sur les touches / pour déplacer à d’autre menu.
3. Appuyez sur les touches / pour changer la sélection.

80
Your
Dig
ital P
artn
er fo
r Life
TM-6902HD-T2 Super
TM-7102HD-T2 Super


