11
TM-ILLUSION 9™ TECHNICAL MANUAL FOR OPERATION AND MAINTENANCE OF SILENCER MODEL ILLUSION 9 1816 Remington Circle SW Huntsville, AL 35824 ISSUED: January 1, 2016

TM-ILLUSION 9™TECHNICAL MANUAL FOR
OPERATION AND MAINTENANCE
OF SILENCER MODEL
ILLUSION 9
1816 Remington Circle SWHuntsville, AL 35824ISSUED: January 1, 2016

SILENCER LIFETIME LIMITED WARRANTY
AAC will repair or replace free of charge any silencer manufactured by AAC for the dura-tion of this lifetime warranty. This warranty is of unlimited duration, and covers, at Ad-vanced Armament Corp., LLC and its affiliates’ discretion, service, repair, and/orreplacement of damaged products caused by normal use.
LIMITATIONS This warranty does not cover damage to the silencer and/or host firearmresulting in whole or in part from criminal, abusive or negligent use, improper or carelesshandling, unauthorized modifications, defective, improper handloaded or reloaded am-munition, or neglect. Any repairs to the unit made necessary by these factors will be in-voiced to the owner. Further, baffle strikes which are not due to a defect in workmanshipare not covered by this warranty.
DEFINED Negligent or abusive use is defined as utilizing the silencer in a way that islikely to result in premature wear or damage to either the silencer or the host firearm. Fur-ther, the warranty does not cover prohibited usage as described in our various owners’manuals. This expressed limited lifetime warranty is the only warranty on this product.This product is sold “as is” and has no implied warranties or merchantability or fitness fora particular purpose. There are not warranties which exceed beyond the description putforth hereto. If your silencer is not covered under this warranty, you may have the silencerreplaced for half the most current retail price-subject to any and all transfer fees requiredby the BATFE.
REPAIR POLICY
Should the silencer require repair or modification, the owner should contact AAC Cus-tomer Service to secure a Return Merchandise Authorization (RMA). Once the customerhas the RMA, they may then ship the silencer insured to AAC for evaluation and repair,along with a xerox of the approved form proving ownership and a brief letter detailing thecustomer’s concerns and contact information.
MANUFACTURERS DISCLAIMER
ADVANCED ARMAMENT CORP., LLC shall not be responsible in any manner whatso-ever for physical injury or property damage stemming from criminal or negligent misuse,improper or careless handling, unauthorized modifications, defective, improper hand-loaded or reloaded ammunition, neglect, or other influences beyond our direct and im-mediate control. If you do not understand the instructions and recommendations in thismanual, contact ADVANCED ARMAMENT CORP., LLC at 770-925-9988 for clarification.
Nothing contained in this manual should be construed as granting, by implication or other-wise, any license to trademarks displayed herein.
THIS MANUAL
FIRST EDITION January 2016
COPYRIGHT NOTICE:
2016 ADVANCED ARMAMENT CORP., LLCAll rights reserved. The contents of this publication may not be reproduced in any form or byany means in whole or in part without the prior written permission of the copyright owner.
OPERATIONAL MANUAL FOR SILENCER MODEL ILLUSION 9
Distributed by
ADVANCED ARMAMENT CORP., LLCPhone: (770) 925-9988
www.advanced-armament.com
CONTENTS:
The Ten Commandments of Firearms Safety................................ P.1General description........................................................................ P.2Installing your ILLUSION 9 on a host firearm................................. P.3Aligning your ILLUSION 9 on a host firearm.................................. P.4Verifying secure installation of your ILLUSION 9........................... P.5Removing your ILLUSION 9 from a host firearm........................... P.6Disassembling your ILLUSION 9 A.S.A.P™. System.................... P.6Cleaning and maintaining the A.S.A.P. System............................. P.7Baffle stack removal and maintenance.......................................... P.9Cleaning your baffle stack.............................................................. P.11Reassembling your ILLUSION 9.................................................... P.12Reassembling the A.S.A.P. System.............................................. P.14Fixed barrel spacer installation...................................................... P.15Using your ILLUSION 9 with an artificial environment................... P.16O-ring guide................................................................................... P.17
This manual contains operating, care, and maintenance instructions. To assuresafe operation, any user of this silencer must use and understand this manualbefore using the silencer. Failure to follow the instructions and heed the warn-ings in this manual can cause property damage, personal injury, and/or death.This manual should always accompany this silencer, and be transferred with itupon change of ownership.WARNING Keep this silencer out of the reach of children, unauthorized and/orprohibited individuals, and others unfamiliar with the safe handling of firearmsand silencers.
Alert Symbols and Definitions:Indicates a hazardous situation which, if not avoided, willresult in property damage, personal injury, or death.Indicates a hazardous situation which, if not avoided, willresult in minor to moderate personal injury.
Addresses practices not relating to personal injury.
WARNING!
CAUTION!
NOTE:
© 2016 ADVANCED ARMAMENT CORP., LLC

THE TEN COMMANDMENTS OF FIREARMS SAFETY
1. Always keep the muzzle pointed in a safe direction.2. Firearms should be unloaded when not in use.3. Do not rely on your firearm's safety.4. Be sure of your target and what is beyond it. 5. Only use ammunition that exactly matches the markings on yourfirearm.
6. If your firearm fails to fire when the trigger is pulled, handle withcare.
7. Always wear eye and ear protection when shooting.8. Be sure the barrel is clear of obstructions before shooting.9. Do not alter or modify your firearm and have it serviced regularly.10.Learn the mechanics and handling characteristics of your firearm.Read your firearm's instruction manual.
WARNING! Failure to follow the instructions and recommendationsset forth in this manual can create a potentially dangerous situationfor the user and surrounding personnel, and possibly leading to prop-erty damage, personal injury and/or death.
WARNING! Never install or remove a silencer on or from a hostfirearm that you have not verified to be completely empty and ren-dered safe. Installing or removing a silencer on or from a loadedfirearm may lead to property damage, personal injury and/or death.
WARNING! Always wear eye protection when discharging a firearmequipped with a silencer. Discharging a firearm without wearing eyeprotection may lead to property damage, personal injury and/ordeath.
WARNING! The ILLUSION 9 is designed for use on modern semi-au-tomatic pistols and semi-automatic carbines in serviceable condition.It is the user's responsibility to insure the intended host firearm is inserviceable condition. Using an ILLUSION 9 on firearms that are notin serviceable condition can lead to property damage, personal injuryand/or death.
WARNING! The barrel threads must be properly machined to allowproper attachment of an ILLUSION 9 The use of an improperlythreaded barrel with a silencer may lead to property damage, per-sonal injury and/or death. Barrel threading guides are available on
the AAC website at www.advanced-armament.com. For further clari-fication on muzzle threads, contact ADVANCED ARMAMENT CORP.,LLC at 770-925-9988.
WARNING! The bore through your ILLUSION 9 must align concentri-cally with the bore of the barrel to which it is mounted. A mismatchof the silencer and barrel bore may lead to property damage, personalinjury and/or death.
WARNING! Only fire standard pressure (Not +P) ammunition throughan ILLUSION 9. The use of ammunition other than standard pressureammunition may lead to property damage, personal injury and/ordeath.
CAUTION! Silencers can become extremely hot while the host firearmis being discharged. After shooting, allow the silencer to reach ambi-ent temperature before attempting to remove the silencer from thefirearm. If removal is necessary prior to the silencer cooling to ambi-ent and/or the tightness of the silencer on the host firearm barrelmust be verified, the use of heat-resistant gloves is mandatory. Han-dling a hot silencer without heat resistant gloves may lead to skinburns and/or personal injury.
WARNING! Discharging silenced firearms can make airborne and/ordeposit lead and other substances around, on and in the silencer.Using, handling and/or cleaning a silencer may result in exposure tolead and other substances known to cause birth defects, reproductiveharm, cancer and other serious physical injury. Have adequate ven-tilation at all times and wash hands thoroughly after exposure.
NOTE: Only use ammunition that features a projectile with a total metaljacket or total metal plating. This will significantly minimize the buildup oflead in the silencer. Projectiles with any exposed lead will deposit lead in-side the silencer, necessitating more frequent and comprehensive clean-ing.
GENERAL DESCRIPTION
Congratulations! You are now the proud owner of the only high-perfor-mance, dry technology 9mm silencer available in the marketplace todaythat offers users an unobstructed sight picture. That’s right, the anodizedaluminum and stainless steel body of the ILLUSION 9 can be quickly and
SILENCER MODEL ILLUSION 9 P.1 SILENCER MODEL ILLUSION 9 P.2
easily aligned so that the user has a sight picture that is unobstructed bythe silencer. The ILLUSION 9 is designed for use on modern centerfirehost firearms chambered in 9mm Luger and 22 LR. Why include 22 LR?Given that the ILLUSION 9 can be completely disassembled for cleaning(a very important consideration for any 22 LR silencer), that it has a lowerbore-axis to top-radius ratio than many dedicated 22LR silencers (so youstill have use of your sights), and because it sounds as good as a dedicated22 LR silencer. That’s why. Please take a few minutes to read through this technical manual and fa-miliarize yourself with the details on the proper use and maintenance ofyour ILLUSION 9. The ILLUSION 9 enables reliable semi-automatic oper-ation on most contemporary locked-breech host pistols through the use ofan innovative new version of AAC's A.S.A.P. System. A variety of A.S.A.P.accessory piston adapters are available to accommodate the majority ofmuzzle threads found in today's marketplace. Additionally, a fixed barrelspacer is available for adapting the ILLUSION 9 for use on fixed (non-mov-ing) barreled, semi-automatic carbines.
INSTALLING YOUR ILLUSION 9 ON A HOST FIREARM
1. Always keep the firearm pointed in a safe direction.
2. Render the firearm safe by removing the magazine, completely unload-ing the firearm and engaging the safety to the "SAFE" position. See thefirearm's owner's manual for detailed instructions.
3. Remove the thread protector from the muzzle.
4. Inspect the muzzle threads to verify they are clean and undamaged
5. Inspect the threads in the rear of the A.S.A.P.™ piston to verify they areclean and undamaged.
6. Look through the silencer from the rear to insure the bullet path throughthe silencer is unobstructed.
7. Examine the silencer for any signs of damage.
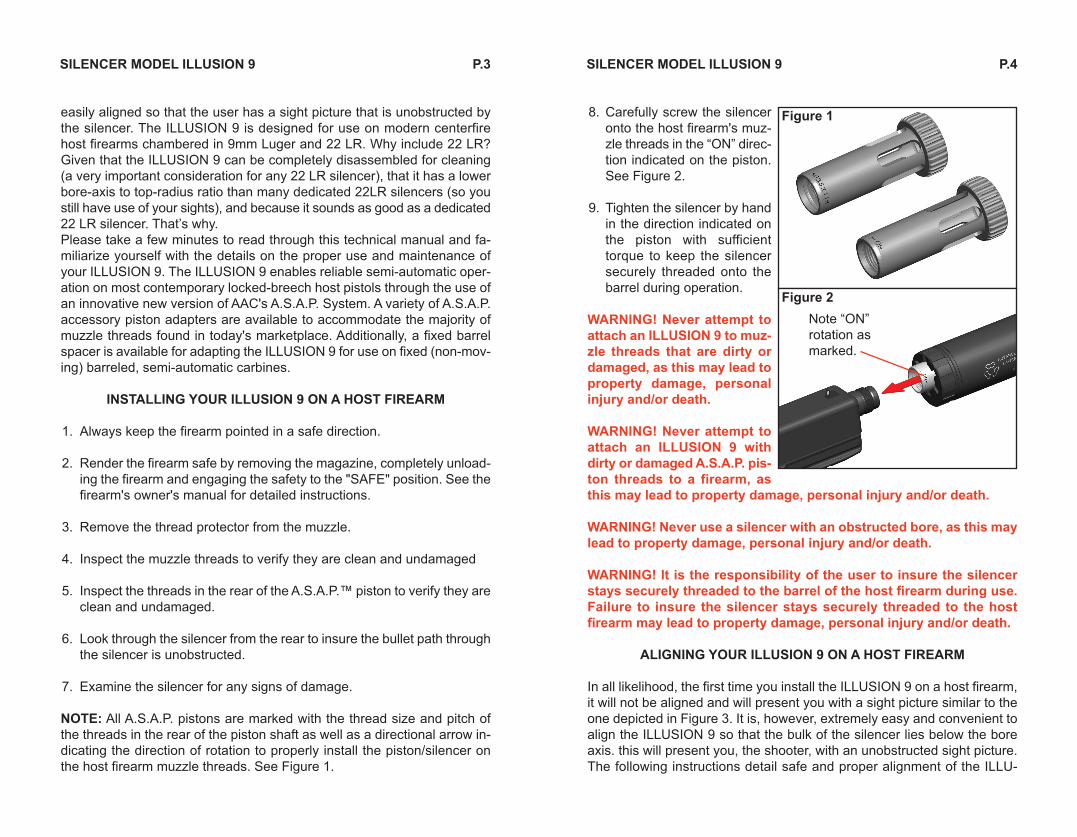
NOTE: All A.S.A.P. pistons are marked with the thread size and pitch ofthe threads in the rear of the piston shaft as well as a directional arrow in-dicating the direction of rotation to properly install the piston/silencer onthe host firearm muzzle threads. See Figure 1.
8. Carefully screw the silenceronto the host firearm's muz-zle threads in the “ON” direc-tion indicated on the piston.See Figure 2.
9. Tighten the silencer by handin the direction indicated onthe piston with sufficienttorque to keep the silencersecurely threaded onto thebarrel during operation.
WARNING! Never attempt toattach an ILLUSION 9 to muz-zle threads that are dirty ordamaged, as this may lead toproperty damage, personalinjury and/or death.
WARNING! Never attempt toattach an ILLUSION 9 withdirty or damaged A.S.A.P. pis-ton threads to a firearm, asthis may lead to property damage, personal injury and/or death.
WARNING! Never use a silencer with an obstructed bore, as this maylead to property damage, personal injury and/or death.
WARNING! It is the responsibility of the user to insure the silencerstays securely threaded to the barrel of the host firearm during use.Failure to insure the silencer stays securely threaded to the hostfirearm may lead to property damage, personal injury and/or death.
ALIGNING YOUR ILLUSION 9 ON A HOST FIREARM
In all likelihood, the first time you install the ILLUSION 9 on a host firearm,it will not be aligned and will present you with a sight picture similar to theone depicted in Figure 3. It is, however, extremely easy and convenient toalign the ILLUSION 9 so that the bulk of the silencer lies below the boreaxis. this will present you, the shooter, with an unobstructed sight picture.The following instructions detail safe and proper alignment of the ILLU-
SILENCER MODEL ILLUSION 9 P.3 SILENCER MODEL ILLUSION 9 P.4
Figure 1
Figure 2Note “ON”rotation asmarked.

SION 9.
1. Always keep the firearm pointed in a safedirection.
2. Render the firearm safe by removing themagazine, completely unloading the firearmand engaging the safety to the "SAFE" po-sition. See the firearm's owner's manual fordetailed instructions.
3. With the unloaded host firearm held firmly in one hand, grasp the si-lencer with the other hand. Pull forward on the silencer, against tensionfrom the A.S.A.P. System driving spring. This will disengage the splineson the piston head from the locking recesses in the piston housing, en-abling the silencer to rotate about the piston axis. Rotate the silencer inthe direction of installation, until the engraving on the silencer is in the3 o-clock position (as seen from the rear). When the engraving is soaligned, the bulk of the silencer is now below the bore axis, providingan unobstructed sight picture. See Figures 4 and 5.
4. Release forward tension on the silencer, which will reset under springtension and allow the splines on the piston head to re-engage the lock-ing recesses in the piston housing. It may be necessary to rotate the si-lencer slightly to allow the splines to engage and allow the A.S.A.P.system to fully seat.
VERIFYING SECURE INSTALLATION OF YOUR ILLUSION 9
1. Always keep the firearm pointed in a safe direction.
2. Render the firearm safe by removing the magazine, completely unload-ing the firearm and engaging the safety to the "SAFE" position. See thefirearm's owner's manual for detailed instructions.
CAUTION! Silencers can become extremely hot while the host firearmis being shot. Heat-resistant gloves must be worn when verifying thesecurity of the installation of an ILLUSION 9 on the host firearm. Han-dling a hot silencer without heat-resistant gloves may lead to skinburns and/or personal injury.
3. Carefully tighten the silencer onto the host firearm's muzzle threads inthe “ON” direction indicated on the piston. See Figure 2.
REMOVING YOUR ILLUSION 9 FROM A HOST FIREARM
1. Always keep the host firearm pointed in a safe direction.
2. Render the firearm safe by removing the magazine, completely unload-ing the firearm and engaging the safety to the "SAFE" position. See thefirearm's owner's manual for detailed instructions.
3. Verify the silencer is at ambient temperature. If the silencer is hot, allowit to cool.
CAUTION! Never handle a hotsilencer without heat-resis-tant gloves, as this may leadto skin burns and/or personalinjury.
4. Carefully unscrew the si-lencer from the host firearm'smuzzle threads in the oppo-site of the “ON” direction in-dicated on the piston. SeeFigure 6.
DISASSEMBLING YOUR ILLUSION 9 A.S.A.P. SYSTEM
The A.S.A.P. System can be quickly and easily disassembled for cleaning,maintenance, or to simply swap one A.S.A.P. System piston for one with adifferent barrel interface thread. It is recommended that users disassemble
SILENCER MODEL ILLUSION 9 P.5 SILENCER MODEL ILLUSION 9 P.6
Figure 6Unscrew in oppositedirection of “ON”rotation arrow.
Figure 3
Figure 4Direction is asindicated as “ON”on the piston.
Figure 5

and clean the A.S.A.P. System after every 500 rounds or after every rangevisit to remove accumulated fouling.
WARNING! Only perform disassembly, cleaning, and maintenanceprocedures on silencers that are not mounted to a firearm. Attemptingto clean or perform maintenance on a mounted silencer could leadto property damage, personal in-jury and/or death.
1. Always keep the firearm pointedin a safe direction.
2. Render the firearm safe by re-moving the magazine, com-pletely unloading the firearm andengaging the safety to the"SAFE" position. See thefirearm's owner's manual for de-tailed instructions.
3. Remove the silencer from thehost firearm. See "Removingyour ILLUSION 9 from a hostfirearm" in this manual.
4. Using the supplied spanner tool,unscrew and remove the rearcap from the piston housing. SeeFigure 7.
5. Extract the piston and drivingspring. See Figure 8.
6. Remove the driving spring fromthe piston shaft. See Figure 9.
MAINTAINING YOUR A.S.A.P. SYSTEM
WARNING! Only perform disassembly, cleaning, and maintenanceprocedures on silencers that are not mounted to a firearm. Attemptingto clean or perform maintenance on a mounted silencer could lead
to property damage, personal injuryand/or death.
1. Using a plastic bristle brush and sol-vent, clean the exterior of theA.S.A.P. piston of any accumulatedcarbon. See Figure 10.
2. Using a plastic bristle brush and sol-vent, clean the bore and threads ofthe A.S.A.P. piston adapter of any ac-cumulated carbon. Some pistonshave O-rings located in grooves in-side the threaded socket. These O-rings grip sections of the host firearmbarrel and minimize the potential forthe silencer to unscrew while in use.An O-ring is shown colored red inFigure 11. If the visible surface of theO-ring appears worn or frayed, replace it. See the Viton O-ring fitmentguide at the end of this instruction manual for O-ring size and procure-ment information.
WARNING! Do not use sandpaper or emery cloth to clean any part ofan ILLUSION 9. Abrasives more aggressive than ScotchBrite maydamage the precision contact surfaces of the piston, piston housing,and rear cap, resulting in friction that can lead to malfunctions of theILLUSION 9 and host firearm. A malfunctioning silencer and/or hostfirearm is a dangerous situation that can lead to property damage,personal injury and/or death.
WARNING! Only use solvents in a well-ventilated area away fromopen flames. Unsafe use of solvents may lead to property damage,personal injury and/or death.
WARNING! All traces of solvent must be allowed to evaporate priorto reassembling the A.S.A.P. System. Failure to remove all traces ofsolvent from the A.S.A.P. System prior to use may lead to propertydamage, personal injury and/or death.
3. Using a plastic bristle brush and solvent, clean the driving spring of anyloose material or carbon buildup. See Figure 12.
SILENCER MODEL ILLUSION 9 P.7 SILENCER MODEL ILLUSION 9 P.8
Figure 7
Figure 8
Figure 10
Figure 11
Figure 9

4. Using a plastic bristle brush and sol-vent, scrub the piston housing bore inthe rear of the silencer. See Figure13. Insure the piston index notchesand piston stop-surfaces located onthe inside of the piston housing arefree of carbon buildup. The pistonstop-surface and index notches canbe seen colored red in Figure 14.
5. Inspect the O-ring located in the boreof the rear cap. The O-ring is showncolored red in Figure 15. If it is wornor frayed, replace it with the appropri-ate Viton O-ring. See the Viton O-ringfitment guide at the end of this man-ual.
6. Apply a small amount of white lithiumgrease to the threads, bore, and O-ring of the rear cap.
BAFFLE STACK REMOVAL ANDMAINTENANCE
It is recommended users remove andclean the baffles in an ILLUSION 9 afterevery 1,000 rounds of dry use or afterevery 500 rounds if the silencer is usedwith an artificial environment. See the"Using your ILLUSION 9 with an ArtificialEnvironment" section for more informa-tion on artificial environments.
WARNING! Only perform disassem-bly, cleaning, and maintenance pro-cedures on silencers that are notmounted to a firearm. Attempting toclean or perform maintenance on amounted silencer could lead to property damage, personal injuryand/or death.
1. Always keep the firearm pointed in a safe direction.
2. Render the firearm safe by removing the magazine, completely unload-ing the firearm and engaging the safety to the "SAFE" position. See thefirearm's owner's manual for detailed instructions.
3. Remove the silencer from the host firearm. See "Removing your ILLU-SION 9" in these instructions.
4. Disassemble the A.S.A.P. System. See "Disassembling your Illusion 9A.S.A.P. System" in these instructions.
WARNING! When cleaning the baffles in an ILLUSION 9, only use asolvent that is not harmful to anodized aluminum, such as acetone,paint thinner, or lacquer thinner. Exposing the anodized aluminumcomponents of an ILLUSION 9 to a solvent that is not aluminumfriendly can weaken the aluminum components. Using an ILLUSION9 with weakened components may lead to property damage, personalinjury and/or death.
WARNING! Only use solvents in a well-ventilated area away fromopen flames. Unsafe use of solvents may lead to property damage,personal injury and/or death.
WARNING! Always wear protective gear, such as eye protection andrubber gloves when working with any solvent. Unprotected exposureto solvents may lead to property damage, personal injury and/ordeath.
WARNING! Do not clean any part of an ILLUSION 9 using an ultra-sonic cleaner. Ultrasonic cleaners can damage aluminum compo-nents. Using an ILLUSION 9 with weakened components may lead toproperty damage, personal injury and/or death.
5. Unscrew, remove, and set asidethe front nut. See Figure 16.
6. Remove and set aside the frontchamber. See Figure 17.
7. Insert a 5/8" wooden dowel fromthe rear of the silencer, through
SILENCER MODEL ILLUSION 9 P.9 SILENCER MODEL ILLUSION 9 P.10
Figure 12
Figure 13
Figure 14
Figure 15
Figure 16

the piston housing, and upagainst the rear face of theblast baffle.
8. While holding the silencertightly in one hand and thedowel in the other hand,apply force to the dowel topush the baffle stack out thefront of the tube. See Figure18. If the baffles will not pushout with hand pressure,lightly tap the end of thedowel with a hammer.
9. Separate the baffles fromone another prior to clean-ing. The baffle stack, asshown in Figure 19, is com-prised of (L-R), a caged blastbaffle, six standard baffles,and a short front baffle.
CLEANING YOUR BAFFLESTACK
WARNING! Only use solventsin a well ventilated area awayfrom open flames. Unsafeuse of solvents may lead toproperty damage, personalinjury and/or death.
1. Clean accumulated foulingfrom the baffles using a plas-tic bristle brush and solvent.See Figure 20.
2. Clean accumulated foulingfrom the inside of the frontchamber using a plastic bris-tle brush and solvent. See
Figure 21.
3. Inspect the Viton O-ring onthe outside of the front cham-ber (shown as red in Figure21). Replace the O-ring if itappears worn or frayed. Re-placements can be pur-chased from McMaster-Carr.The part number is 9464K74.
4. Use a cotton swab, plasticbrush, and solvent to cleanaccumulated fouling from thecaged blast baffle. See Fig-ure 22.
WARNING! All traces of sol-vent must be allowed toevaporate prior to reassem-bly. Failure to remove all sol-vent from the silencer prior touse may lead to propertydamage, personal injuryand/or death.
REASSEMBLING YOURILLUSION 9
1. Insert the caged blast baffleinto the tube. See Figure 23. NOTE: Do not be concerned with bafflealignment at this point. Alignment of the baffles will occur in step 3.
2. Insert six standard baffles into the tube. See Figure 24. NOTE: As youcan see in Figure 25, the stack of six standard baffles and the cagedblast baffle will not be tabbed together and not be aligned. Do not beconcerned with baffle alignment at this point. Alignment of the baffleswill occur in step 3. NOTE: The outer tube is depicted as transparent inthe following steps to clearly show the method of aligning the bafflestack.
3. Hold the silencer upright and place the front chamber on the front-most
SILENCER MODEL ILLUSION 9 P.11 SILENCER MODEL ILLUSION 9 P.12
Figure 17
Figure 18
Figure 22
Figure 23
Figure 24
Figure 19
Figure 20
Figure 21

standard baffle so that the notchin the front chamber engages thetab on the front of the front-mostbaffle. See Figure 26.
4. Turn the engaged frontchamber/first baffle until the com-bination rotationally tabs to andlocks into the second standardbaffle. See Figure 27.
5. Repeat this process until the frontchamber and all five standard baf-fles tab onto the caged blast baf-fle, which will engage the front ofthe piston housing. See Figure 28.
Once the aligned stack en-gages the front of the pistonhousing, the stack will nolonger turn.
6. Remove the front chamberand insert the short, frontbaffle into the tube. Use thefront chamber to engage thenotch on the front baffle withthe tab on the aligned stackof adjacent standard baffles.See Figure 29.
7. Install the front nut. See Fig-ure 30.
8. Hold the silencer up to thelight and look through theprojectile passage. The pas-sage should be circular (SeeFigure 31). If the passage isnot circular, or appearsblocked, remove the bafflestack and repeat steps 1-8.
WARNING! - Do not installand use an ILLUSION 9 withan improperly assembled baf-fle core. Using an ILLUSION 9with an improperly assem-bled baffle core may lead toproperty damage, personalinjury and/or death.
REASSEMBLING YOUR A.S.A.P. SYSTEM
1. Place the driving spring around the piston shaft. See Figure 32.
2. Insert the piston and driving spring into the piston housing assembly.See Figure 33.
SILENCER MODEL ILLUSION 9 P.13 SILENCER MODEL ILLUSION 9 P.14
Figure 25 Figure 29
Figure 26
Figure 27
Figure 28
Figure 30
Figure 31

3. Using the supplied spannertool, fully thread the rear capinto the piston housing. SeeFigure 34.
FIXED BARREL SPACER IN-STALLATION
The driving spring of theA.S.A.P. System may be re-placed with the separately avail-able AAC Fixed Barrel Spacerwhen using an ILLUSION 9 ona host firearm with a fixed (non-moving) barrel.
WARNING! When using an IL-LUSION 9 on a host firearmwith a fixed (non-moving) bar-rel, the driving spring of theA.S.A.P. System must be re-placed with the AAC FixedBarrel Spacer. Failure to in-stall and use the AAC FixedBarrel Spacer in an ILLUSION9 when using it on a hostfirearm with a non-movingbarrel can result in acceler-ated wear to the silencer andfixed-barrel host firearm. Ac-celerated wear to the silencerand host firearm can result in a dangerous situation that can lead toproperty damage, personal injury and/or death.
1. Remove the silencer from the host firearm. See “Removing your ILLU-SION 9 from a host firearm”.
2. Using the supplied end cap spanner tool, remove the rear end cap. SeeFigure 5.
3. Tip the silencer upright and allow the driving spring to fall from the rearof the piston housing. See Figure 35.
4. Install the fixed barrel spaceraround the piston shaft inplace of the driving spring.See Figure 36.
5. Using the supplied spannertool, fully thread the rear capinto the piston housing. SeeFigure 34.
USING YOUR ILLUSION 9WITH AN ARTIFICIALENVIRONMENT
In situations where it is advan-tageous to eliminate the major-ity of muzzle and ejection portflash and/or sound, the ILLU-SION 9 can be used with an in-ternal artificial environment in place. The term, "artificial environment"refers to the environment inside the silencer being composed of anythingother than dry air. The recommended artificial environment media for theILLUSION 9 is water. An artificial environment made of 5cc's of water willinfluence sound performance for approximately 50 shots and will remainin the silencer if unfired for up to 3 days depending on environmental con-ditions. Although water is the preferred artificial environment media, oilssuch as Break-Free CLP or grease with a high flash point, and/or wire-pulling gel can be used to diminish the sound signature of an ILLUSION 9equipped firearm. The following procedure details introducing water to theinterior of an ILLUSION 9 for the purposes of firing with an artificial envi-ronment in place.
WARNING! Only use non-flammable liquids, gels, and oils to createan artificial environment in an ILLUSION 9. The use of other liquidsand/or gels can result in a dangerous situation that can lead to prop-erty damage, personal injury and/or death.
WARNING! Using an artificial environment in an ILLUSION 9 will ac-celerate the buildup of fouling within the A.S.A.P. System, necessi-tating more frequent and thorough disassembly and cleaning. Failureto adequately clean the A.S.A.P. System after using an ILLUSION 9with an artificial environment in place can result in a dangerous situ-
SILENCER MODEL ILLUSION 9 P.15 SILENCER MODEL ILLUSION 9 P.16
Figure 32
Figure 33
Figure 35
Figure 34
Figure 36

ation that can lead to property damage, personal injury and/or death.
1. Always keep the firearm pointed in a safe direction.
2. Render the firearm safe by removing the magazine, completely unload-ing the firearm and engaging the safety to the "SAFE" position. See thefirearm's owner's manual for detailed instructions.
3. Remove the silencer from the host firearm. See "Removing an ILLU-SION 9" in these instructions.
4. Pour 5cc's of water into the rear ofthe silencer through the threadedsocket in the A.S.A.P.™ System pis-ton. NOTE: The plastic cap that isstandard on most commercial bottlesof bottled water holds approximately5cc's. See Figure 37.
WARNING! Do not overfill an ILLU-SION 9 with more than 5cc's of waterwhen creating an artificial environ-ment. Over-filling an ILLUSION 9 canresult in a dangerous over-pressuresituation that can lead to propertydamage, personal injury and/ordeath.
5. Rotate the silencer around its longaxis to distribute the water within thebaffle stack. See Figure 38.
6. The silencer can be reinstalled on thehost firearm. See "Installing your IL-LUSION 9" in this manual.
O-ring GUIDE
There are a number of high temperature Viton O-rings used in the ILLU-SION 9. Inspect these O-rings for signs of wear whenever the silencerand/or A.S.A.P. System are disassembled for cleaning and maintenance.Replacement O-rings are available from McMaster-Carr Supply.
SILENCER MODEL ILLUSION 9 P.17 SILENCER MODEL ILLUSION 9 P.18
Figure 37
LOCATION O-ring SIZE McMASTER PNREAR CAP 3/4” O.D. X 1/16” 1201T27
M13.5 X 1 PISTON 12mm I.D. X 1.0mm 9263K287
FRONT CHAMBER 1.0” O.D. X 1/16” 9464K74
Figure 38


![Manufactured by G&G ARMAMENT 100% Made in Taiwan · 2012. 7. 9. · Manufactured by G&G ARMAMENT 100% Made in Taiwan [ Address ] Changhua Headquarters / No. 999, Zhonghua Rd., Shengang](https://static.documents.pub/doc/80x56/61096f2990ccec48174e3bd6/manufactured-by-gg-armament-100-made-in-taiwan-2012-7-9-manufactured.jpg)
