16
A Step-By-Step Guide to Measuring Replacement Toilet Partitions Form No. TPMG-297 Revised 7/07 © 2007 Bobrick Washroom Equipment, Inc. Printed in U.S.A. Toilet Partition Measurement Guide
A Step-By-Step Guide to MeasuringReplacement Toilet Partitions
Form No. TPMG-297 Revised 7/07 © 2007 Bobrick Washroom Equipment, Inc. Printed in U.S.A.
Toilet PartitionMeasurement Guide

Page 2
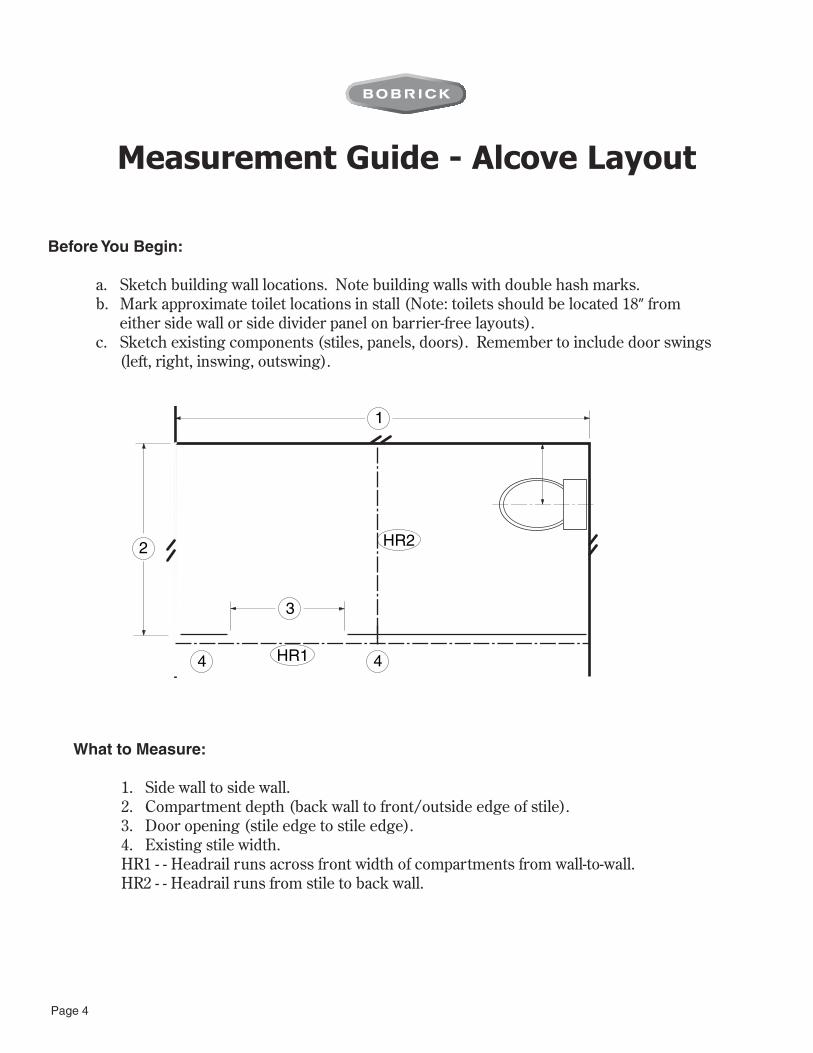
Before You Begin:
a. Sketch building wall locations. Note building walls with double hash marks.b. Mark approximate toilet locations in stall (Note: toilets should be located 18” from
either side wall or side divider panel on barrier-free layouts).c. Sketch existing components (stiles, panels, doors). Remember to include door
swings (left, right, inswing, outswing).
Measurement Guide - Recessed Layout
3 3
5 5HR1 5
2 2
1
4
What to Measure:
1. Side wall to side wall.2. Side wall to centerline of divider panel.3. Door opening (stile edge to stile edge).4. Compartment depth (back wall to front/outside edge of stile).5. Existing stile width.HR1 - - Headrail runs across front width of compartments from wall to wall.

Page 3
Before You Begin:
a. Sketch building wall locations. Note building walls with double hash marks.b. Mark approximate toilet locations in stall (Note: toilets should be located 18” from
either side wall or side divider panel on barrier-free layouts).c. Sketch existing components (stiles, panels, doors). Remember to include door
swings (left, right, inswing, outswing).
Measurement Guide - Corner Layout
6 6HR1 6
2 3
1
5
4 4
HR2
What to Measure:
1. Side wall to outside edge of stile.2. Side wall to centerline of divider panel.3. Centerline of panel to outside of panel.4. Door opening (stile edge to stile edge).5. Compartment depth (back wall to front/outside edge of stile).6. Existing stile width.HR1 - - Headrail runs across front width of compartment to outside edge of corner stile.HR2 - - Headrail runs from back side of corner stile to back wall (over top of end panel).
Page 4
Before You Begin:
a. Sketch building wall locations. Note building walls with double hash marks.b. Mark approximate toilet locations in stall (Note: toilets should be located 18” from
either side wall or side divider panel on barrier-free layouts).c. Sketch existing components (stiles, panels, doors). Remember to include door swings
(left, right, inswing, outswing).
Measurement Guide - Alcove Layout
What to Measure:
1. Side wall to side wall.2. Compartment depth (back wall to front/outside edge of stile).3. Door opening (stile edge to stile edge).4. Existing stile width.HR1 - - Headrail runs across front width of compartments from wall-to-wall.HR2 - - Headrail runs from stile to back wall.
3
4 4
HR2
1
2
HR1

Page 5
2'' 2''
Pan
el
Pan
el
Stile Stile
Stile
Pan
el
Bobrick Design Notes:
1. 3”, 4” or 5” stile may only be used at wall or attached perpendicular to a side panel.
Stile Stile
Pan
el
2. Average standard compartment is 30-36” wide, 54-60” deep.3. Inswing doors average 23-26”.4. Wall-hung screens are 42” high, maximum 24” deep.5. Door hardware requires 2” mounting offset on stile.
6. Overhead braced or floor-to-ceiling anchored can have flush stile/panel corner.
7. Floor anchored and ceiling hung need minimum 1” stile-to-panel corner offset.
8. Overhead braced or floor-to-ceiling anchored have in-line stile-to-panel connection foralcove. *Stile must be 8”. In-line stiles are not recommended for 1080 and 1090 series.On these series a perpendicular stile is recommended. Stile may be as small as 3”.
1''Stile
Pan
el
Stile StilePanelDoor
Stile
Stil
e
PanelDoor
9. Floor anchored and ceiling hung have perpendicular stile-to-panel connection foralcove. *Stile must be 6”. For overhead braced stile may be as small as 3”.
*
*
Toilet Partition Measurement
Page 6
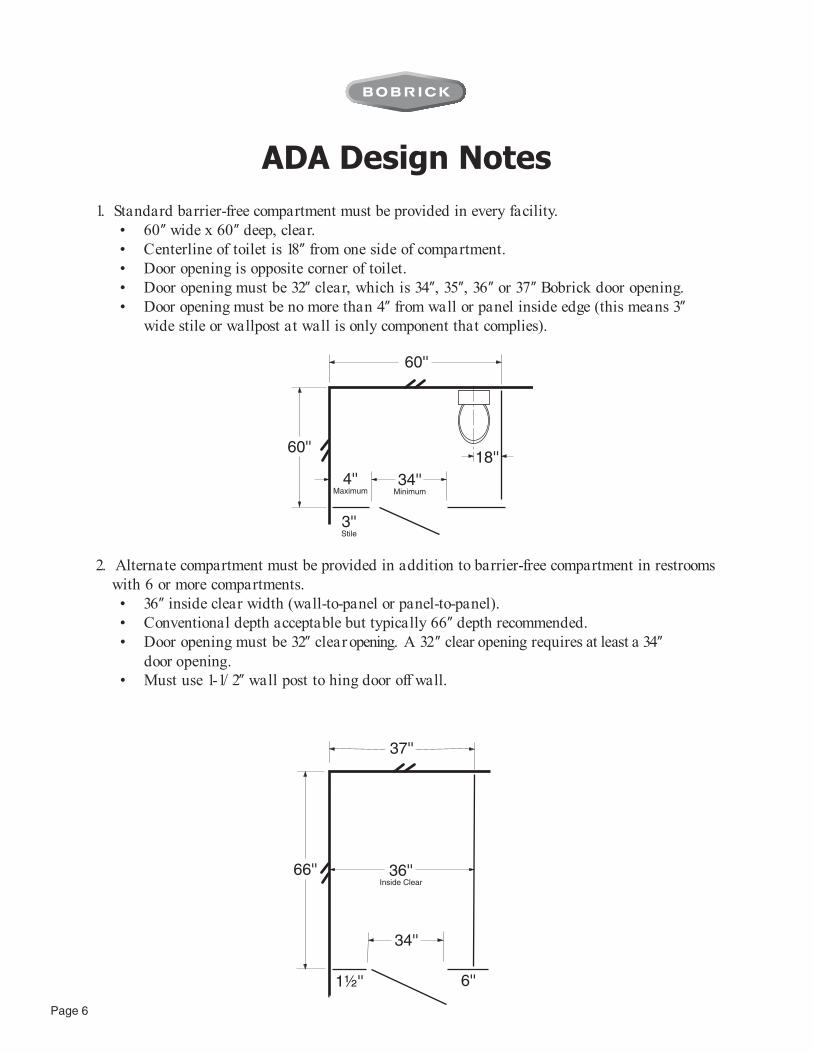
1. Standard barrier-free compartment must be provided in every facility.• 60” wide x 60” deep, clear.• Centerline of toilet is 18” from one side of compartment.• Door opening is opposite corner of toilet.• Door opening must be 32” clear, which is 34”, 35”, 36” or 37” Bobrick door opening.• Door opening must be no more than 4” from wall or panel inside edge (this means 3”
wide stile or wallpost at wall is only component that complies).
2. Alternate compartment must be provided in addition to barrier-free compartment in restrooms with 6 or more compartments.
• 36” inside clear width (wall-to-panel or panel-to-panel).• Conventional depth acceptable but typically 66” depth recommended.• Door opening must be 32” clear opening. A 32” clear opening requires at least a 34”
• Must use 1-1/ 2” wall post to hing door off wall.
34''Minimum
60''
4''Maximum
3''Stile
60''
18''
66''
37''
34''
1½'' 6''
36''Inside Clear
door opening.
ADA Design Notes
Page 7
Site Conditions:The following site conditions should be checked and noted on your drawing, if applicable.
Minimum Compartment Depth - Inswing Doors• Standard rule for inswing doors is add 30” (distance from back wall to front of toilet) plus door opening size (stile
edge to stile edge). This is the minimum toilet compartment depth required for the door to swing into compartment.
• If compartment is too shallow, need to increase compartment depth or change to outswing door.
Measurement Conventions• Compartment widths are wall to wall; wall to centerline of panel; centerline of panel to centerline of panel.• Compartment depths are back wall to outside (front edge) of stile.• Door is opening size - stile edge to stile edge.
Ceiling Height• Elevation for overhead-braced toilet compartments is 85” from finished floor to top of headrail - need to ensure
ceiling height at least 88” or higher.• For ceiling-hung or floor-to-ceiling anchored stiles, need to measure ceiling height from finished floor to finished
ceiling.• If floor slopes more than 1” across front of compartments, provide finished floor-to-ceiling measurements at each
stile location in layout.
Wall-to-Wall Measurements• When toilet partitions are recessed between two building walls, the critical measurement is the smallest space
between walls.• Measure wall-to-wall dimensions along the line of the stiles and doors in the toilet compartment (the front).• Room treatments that will affect measurement will be:
– Tile base cove molding – Wood or other thick baseboard applications– Wainscotting or decorative trim – Half-wall tile
• If there are existing wall treatments, measure smallest distance (i.e. baseboard to baseboard), note on drawings,and request gaps between stile and wall be kept to a minimum (1/2” is minimum gap, 1” is maximum).
Existing Partition Configuration and Materials• Note existing material, color and condition of partitions.• Look for Bobrick product which best meets needs of building.• Try to match existing components and locations where possible - this reduces the amount of “patch and match”
required to fill wall bracket and floor anchor holes.
Add-On Sales• Look for washroom accessory opportunities and other fill-in products.• Suggest ADA alternatives and ways to become compliant, if possible.
Other Building Conditions that Cause Problems• Baseboard heaters • Windows
smaeb troppuS•sniarD•• Plumbing/pipe runs • Dropped ceilings
Cutouts• Cutouts may be made in any panel for Bobrick partition-mounted accessories if requested when placing the order.
Each panel location should be marked with specific washroom accessory model number.
Toilet Partition - Tips, Tricks, and Traps
Page 8
S S
SS S
S S S S
S S S S S
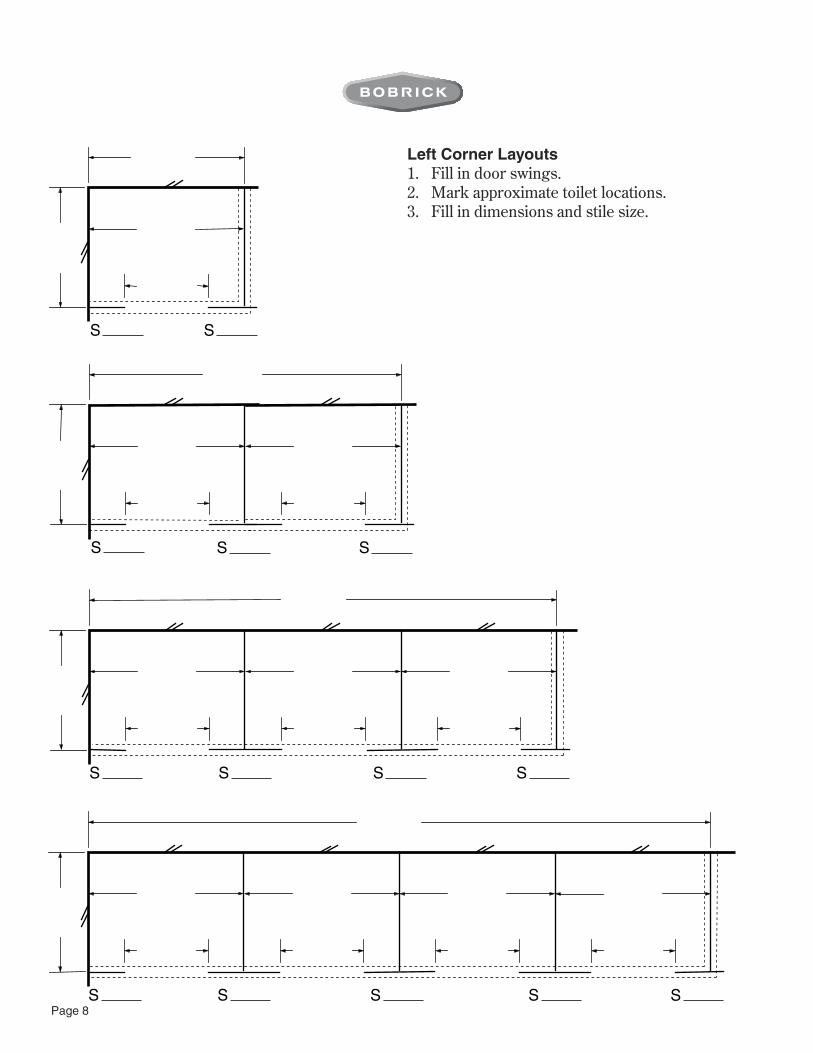
Left Corner Layouts1. Fill in door swings.2. Mark approximate toilet locations.3. Fill in dimensions and stile size.

Page 9
S S
SS S
S S S S
S S S S S
Right Corner Layouts1. Fill in door swings.2. Mark approximate toilet locations.3. Fill in dimensions and stile size.
Page 10
S S
SS S
S S S S
S S S S S
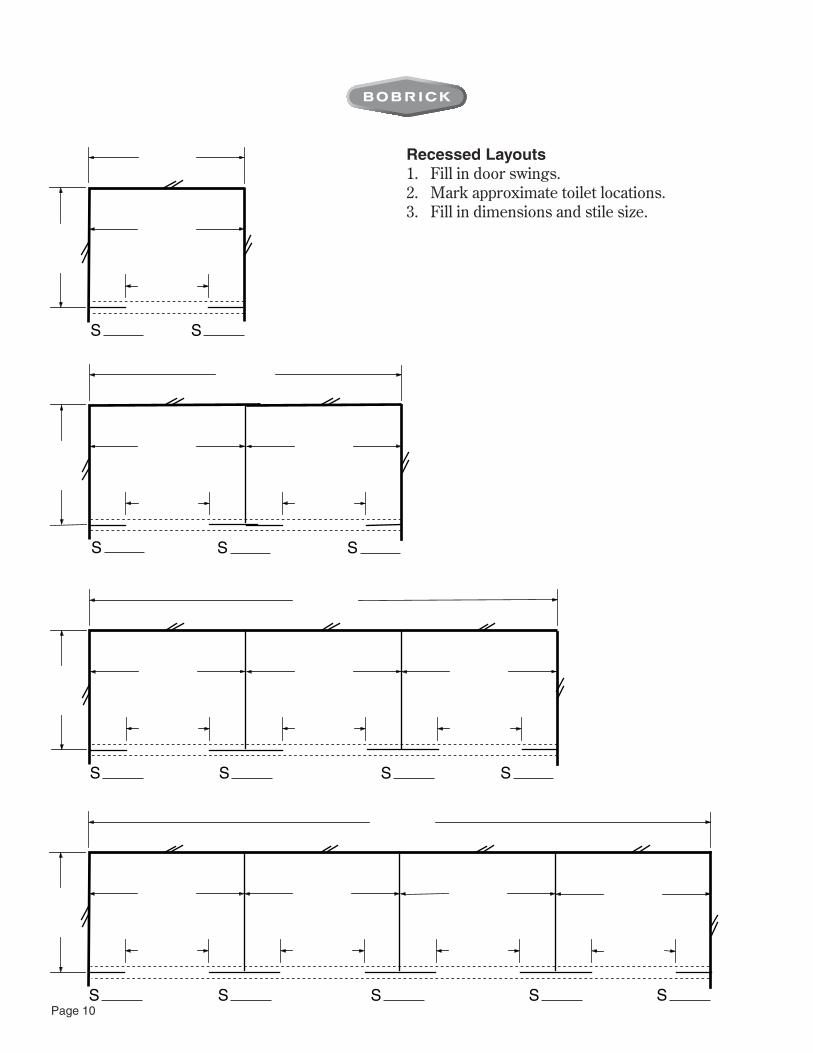
Recessed Layouts1. Fill in door swings.2. Mark approximate toilet locations.3. Fill in dimensions and stile size.

Page 11
Alcove Layouts1. Fill in door swings.2. Mark approximate toilet locations.3. Fill in dimensions and stile size.
S S
S
S
S S
S
S
Page 12
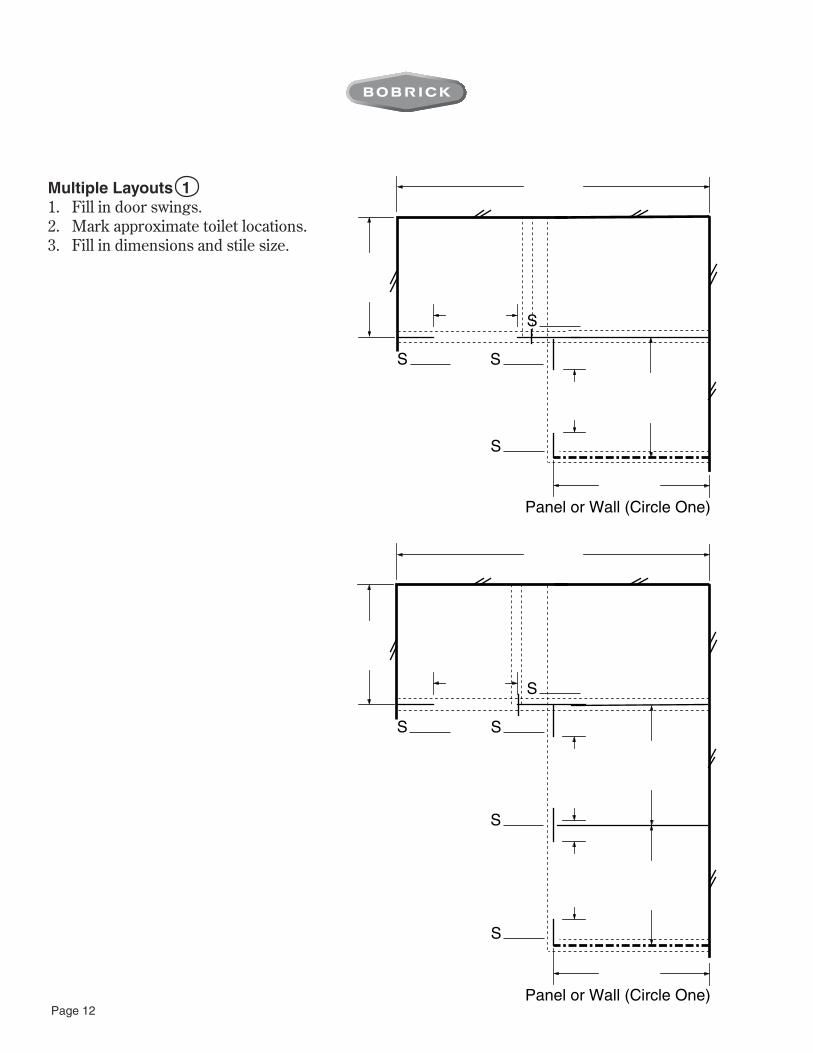
Multiple Layouts 11. Fill in door swings.2. Mark approximate toilet locations.3. Fill in dimensions and stile size.
S S
S
S
Panel or Wall (Circle One)
S S
S
S
S
Panel or Wall (Circle One)

Page 13
S
S
S
S
S
S
S
S
S
Panel or Wall (Circle One)
Panel or Wall (Circle One)
Multiple Layout 21. Fill in door swings.2. Mark approximate toilet locations.3. Fill in dimensions and stile size.
Page 14
S
Panel or Wall(Circle One)
S
Panel or Wall(Circle One)
Panel or Wall(Circle One)
S S
S S
S S S
S S
S S S S
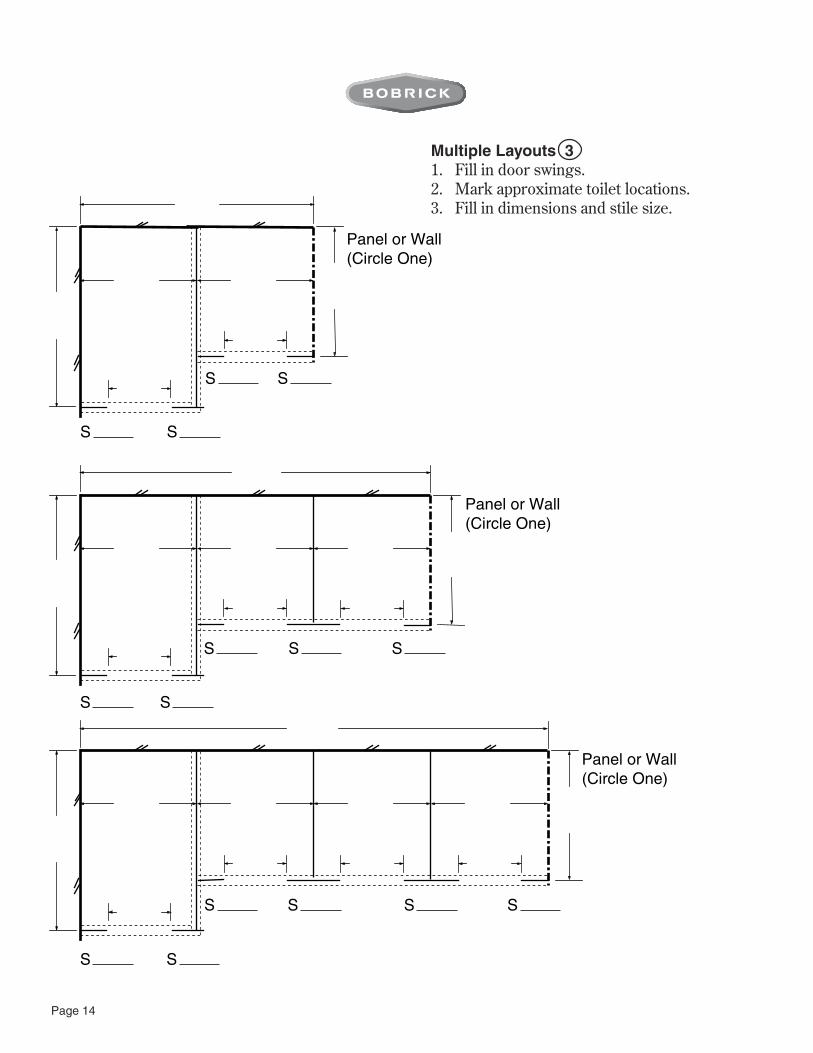
Multiple Layouts 31. Fill in door swings.2. Mark approximate toilet locations.3. Fill in dimensions and stile size.
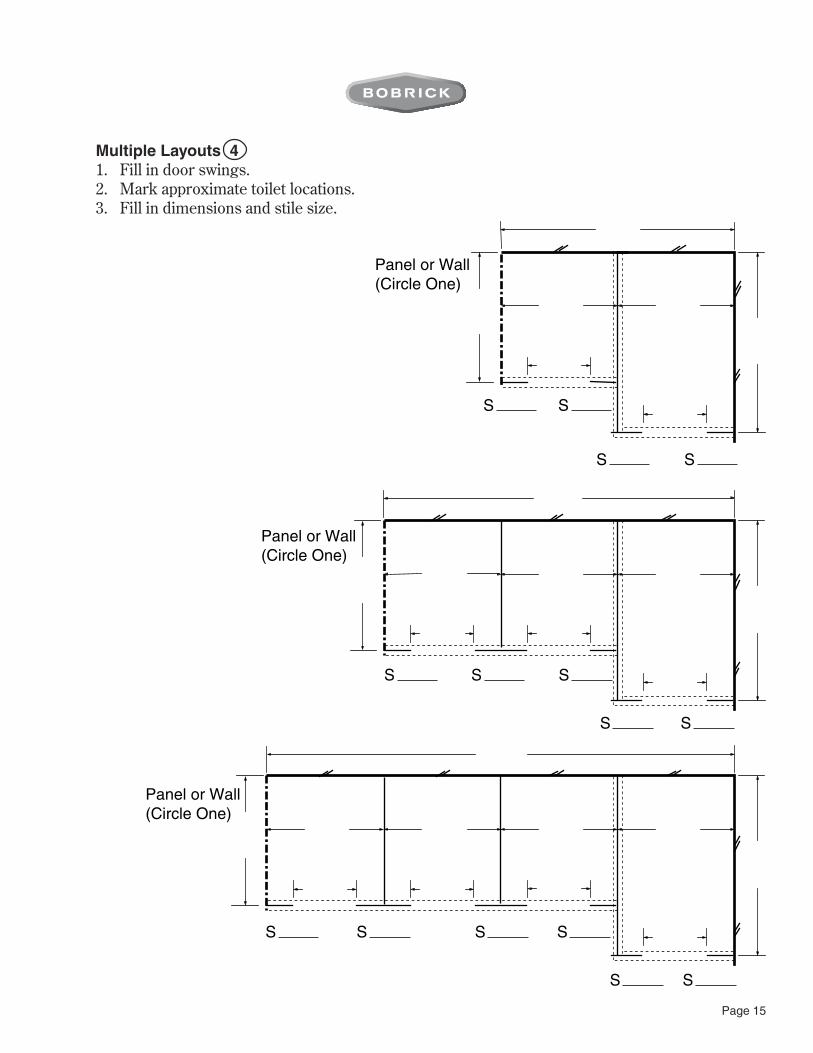
Page 15
Multiple Layouts 41. Fill in door swings.2. Mark approximate toilet locations.3. Fill in dimensions and stile size.
S
Panel or Wall(Circle One)
S
Panel or Wall(Circle One)
Panel or Wall(Circle One)
S S
S S
S S S
S S
S S S S

Air Delights, Inc.
11170 SW 5th Street, Beaverton, OR. 97005Telephone: 800-440-5556, Fax: 503-643-8224
or email [email protected]
www.AirDelights.com
Form No. TPMG-297 Revised 7/07 © 2007 Bobrick Washroom Equipment, Inc. Printed in U.S.A.


![[XLS] · Web viewFLS FLS Instructions Access Access Instructions OLE_LINK1 Reconfigure existing toilet partitions and partition door to create a semi-ambulant toilet compartment Remove](https://static.documents.pub/doc/80x56/5addf0bf7f8b9a1a088df7c3/xls-viewfls-fls-instructions-access-access-instructions-olelink1-reconfigure.jpg)


