41
TomTom Golfer Reference Guide 1.0.8

TomTom Golfer
Reference Guide
1.0.8
2
Contents
Welcome 4
New features 5
New in this release ................................................................................................ 5
Getting started 6
Your watch 8
About your watch .................................................................................................. 8 Cleaning your watch ............................................................................................... 8 Using the desk dock ............................................................................................... 9 Watch status ........................................................................................................ 9 Performing a reset ............................................................................................... 10
Playing a round of golf 12
Quick Start: Playing your first hole ........................................................................... 12 Quick Start: Button checklist .................................................................................. 12 Choosing a course ................................................................................................ 14 Updating golf course information ............................................................................. 14 Pausing, stopping and continuing a round ................................................................... 15
Doglegs 16
About doglegs .................................................................................................... 16 Understanding doglegs on your watch ....................................................................... 16
Laying up 18
About laying up .................................................................................................. 18 Laying up using your watch .................................................................................... 18 Layup and green views .......................................................................................... 19
Approaching the green 20
About greens ...................................................................................................... 20 Approaching the green using your watch .................................................................... 20 Layup and green views .......................................................................................... 21
Hazards 23
About hazards .................................................................................................... 23 Understanding hazards on your watch ....................................................................... 23
Scoring 26
About scoring ..................................................................................................... 26 Scoring using your watch ....................................................................................... 26 Viewing previous scores ........................................................................................ 27

3
Settings 29
About settings .................................................................................................... 29 Clock ............................................................................................................... 29 Phone .............................................................................................................. 29 Airplane mode .................................................................................................... 31 Options ............................................................................................................ 31 Profile .............................................................................................................. 32
TomTom MySports account 33
TomTom MySports Connect 34
TomTom MySports mobile app 35
Glossary of Terms 36
Addendum 38
Copyright notices 41

4
This Reference Guide explains everything you need to know about your new TomTom Golfer watch.
If you want a quick read of the essentials, we recommend that you read Getting started. This covers downloading TomTom MySports Connect and using the desk dock.
After that, if you have a smartphone, you will probably want to download the TomTom MySports app for free from your usual app store or by going to tomtom.com/app.
Important: Before using the MySports app on your smartphone, you need to link your watch to your
MySports account using a computer. This needs to be done only once.
For information about what you see on the watch and how to use it, here are some good starting points:
New features
About your watch
Quick Start: Playing your first hole
Settings
Tip: There are also frequently asked questions (FAQs) at tomtom.com/support. Select your
product model from the list or enter a search term.
We hope you enjoy reading about and, most importantly, playing golf with your new TomTom Golfer!
Welcome

5
New in this release
Note: To get the most out of your watch we recommend that you reinstall all courses globally. Reinstalling all courses can take up to two hours.
Simplified hazards view
The hazards view has been simplified to provide at-a-glance distances.
To learn more, go to Understanding hazards on your watch.
Doglegs and corner distances
Doglegs are now included on the range screen. Dogleg direction and corner distance are now included in the hazards view.
To learn more, go to Quick Start: Playing your first hole and Understanding doglegs on your watch.
Distance to dogleg
Distance to dogleg in the hazards view is now measured along the course centre line.
To learn more, go to Understanding doglegs on your watch.
Advance to next hole
Your watch now advances to the next hole more accurately.
To learn more, go to Options.
Language support has been added for Traditional and Simplified Chinese.
Minor bug fixes and performance improvements have been made.
New features

6
Before you start playing golf, it's a good idea to charge your watch, download any software updates and download QuickGPSfix.
Note: QuickGPSfix helps your watch get a GPS fix and find your location quickly.
1. Download TomTom MySports Connect from tomtom.com/getstarted/sports and install it on your computer. TomTom MySports Connect is available for free.
2. Place your watch in the desk dock and connect the dock to your computer.
Follow the instructions that TomTom MySports Connect gives you.
After your watch is charged, you can play your first hole.
Tip: Your watch is fully charged when the battery animation stops moving and shows a full battery.
You should connect your watch to your computer regularly to charge it, update golf course information, download software updates and download QuickGPSfix information.
Important: You can also use any USB wall charger to charge your TomTom Golfer. Place your watch
in the desk dock and then connect the USB connector from the desk dock to your USB wall charger.
Battery life
When the battery is fully charged, your watch can be used for up to 10 hours of playing golf. The battery is used more quickly if you use the backlight on your watch frequently.
Tip: Your watch shows a low battery symbol if there is not enough charge for a complete round of golf (4 hours). A low battery symbol with a line through it means that you need to charge your
watch immediately.
TomTom MySports app
Important: Before using the MySports app on your smartphone, you need to link your watch to your
MySports account using a computer. This needs to be done only once.
You can download the TomTom MySports app for free from your usual app store or by going to tomtom.com/app.
To learn more, go to TomTom MySports mobile app in this guide.
Getting started

7
Pairing your watch with your phone
To learn more, go to Phone in this guide.

8
About your watch
When you use your watch, you start from the clock screen. This screen shows the time and date. The hour number is shown slightly dimmed and the minutes are shown brighter so you can see the precise time more clearly.
Use the button to move Up, Down, Left or Right to other screens on your watch.
1. Left - opens the Status screen.
2. Down - opens the Settings menu.
3. Right - opens the Golf course menu.
4. Up - opens the Scorecard history screen.
5. GPS receiver. While wearing the watch, the GPS receiver should face upwards.
6. Touch this area of the screen to turn on the back light.
The clock screen shows the time and date. You can choose to show the time in 12 hour or 24 hour format by moving down to open the Settings menu, then selecting Clock.
Using your watch
Move Up or Down to select items in a menu.
Move Right to select an item and open the menu for that item.
Move Left to exit a menu.
To select an option in a menu, make sure it is highlighted when you leave the menu. Your watch remembers the option you highlighted.
If an option in a menu switches on and off, move Right to change the setting.
Cleaning your watch
It is recommended that you clean your watch once a week if you use it frequently.
Wipe the watch with a damp cloth as needed. Use mild soap to remove oil or dirt.
Do not expose your watch to strong chemicals such as gasoline, cleaning solvents, acetone, alcohol, or insect repellents. Chemicals can damage the watch’s seal, case, and finish.
Your watch

9
Using the desk dock
You can use the desk dock when your watch is in the wrist strap or you can remove your watch from the wrist strap first.
To remove the watch from the wrist strap, hold the watch in one hand and lift the strap upwards away from the watch. The wrist strap pops off the front of the watch.
To place your watch in the desk dock, slide the watch into the dock, following the curve of the back of the watch.
To remove your watch from the desk dock, push underneath the screen of the watch. The watch will slide out, following the curve of the back of the watch. Do not lift the watch from the top as this can damage the desk dock.
Important: You can also use any USB wall charger to charge your TomTom Golfer. Place your watch in the desk dock and then connect the USB connector from the desk dock to your USB wall charger.
Watch status
From the clock screen, move Left to open the status screen.
The status screen shows the following information:
Battery - the battery power remaining on your watch.
To charge the battery, place the watch in the desk dock and connect the dock to your computer.
QuickGPS - the status of the QuickGPSfix information on your watch.
QuickGPSfix helps your watch find your precise location quickly so that you can start your round of golf. To update the QuickGPSfix information on your watch, connect your watch to your computer. TomTom MySports Connect automatically updates QuickGPSfix on your watch. QuickGPSfix information is valid for three days after you download it.
These symbols are used to show the status of QuickGPSfix:
QuickGPSfix on your watch is up-to-date.
or
QuickGPSfix on your watch is out-of-date. If the QuickGPSfix information on your watch is out-of-date, your watch still works as usual. It may, however, take longer to get a GPS fix when you want to play a round of golf.
If you see this icon, you are using a very old version of the software and should update your watch as soon as possible.
Version - the software version number and serial number of your watch. You may need this information if you contact Customer Support. Every time you connect your watch to your computer, TomTom MySports Connect checks if a software update is available for your watch.

10
Performing a reset
Soft reset
A soft reset is performed each time you disconnect your watch from a wall charger or computer.
To perform a soft reset on your watch, follow these steps:
1. Connect your watch to a wall charger or computer.
Wait until your watch shows a battery symbol.
If you are using a computer, wait until MySports Connect finishes updating your watch.
2. Disconnect your watch from the wall charger or computer.
The software on your watch restarts. This performs a soft reset on your watch.
Recovery mode
Before you perform a factory reset on your watch you should try updating the watch software using the recovery mode. The recovery mode allows you to reinstall the software on your watch without deleting any personal data and settings.
To perform a reset on your watch using the recovery mode, follow these steps:
1. Connect your watch to your computer and wait until MySports Connect finishes updating your watch.
2. On your watch, move Down but keep the button pressed.*
3. Disconnect the USB cable from your computer.*
4. Keep pressing the button until your watch shows a watch connected with a computer and tomtom.com/reset.
5. Release the button and connect the USB cable to your computer.
6. Click Update in MySports Connect.
* If the USB port on your computer is not easily accessible, connect the dock to the computer without the watch. Then move down from the clock screen while you slide the watch into the dock.
Factory reset
Important: A factory reset removes all golf courses and settings from your watch and then reinstalls the software. To reinstall golf courses after a reset, connect your watch to your computer and follow the instructions to open a MySports account. If you don't want to do a factory reset now,
select Cancel and then select Update instead.
You should only use a factory reset as a last resort to restore your watch or if you really want to remove all your golf courses and settings.
A factory reset reinstalls the software on your watch and this removes the following:
Your golf courses.
Your scorecard history.
Your settings on the watch.
Important: When you perform a factory reset, do not disconnect your watch before MySports Connect has finished restoring your watch. Installing the software on your watch takes several minutes. You then need to setup your watch in MySports Connect before you can install the golf courses again. Check any messages shown in MySports Connect and on your watch before you disconnect your watch.
To perform a factory reset on your watch, follow these steps:
1. Connect your watch to your computer and wait until MySports Connect finishes updating your watch.

11
2. Expand SETTINGS in MySports Connect.
3. Click FACTORY RESET at the bottom of MySports Connect.
MySports Connect downloads the latest version of the software for your watch.
4. Keep your watch connected when the window for MySports Connect closes.
MySports Connect installs the software on your watch.
5. Keep your watch connected when the window for MySports Connect opens again.
6. Follow the instructions in MySports Connect to setup your watch.

12
Quick Start: Playing your first hole
To play your first hole, do the following:
1. From the clock screen, move Right.
Your watch shows Please wait. When a GPS fix is found, you see a list of nearby golf courses.
2. Move Up or Down to select a course, then move Right to start a round.
3. The first hole is shown and you see the following information on the range screen on your watch:
Dogleg, if present, and dogleg direction.
Hole number (next to the flag symbol).
Par for the hole.
Distance from your position to the back, centre and front of the green.
Note: Distance to the pin is not shown because pin placement may vary from day to day.
Tip: Move Right to see more information about the hole.
4. Take any practice strokes that you need. Play your first stroke and then walk to the location of your golf ball.
The remaining distance to the hole is shown.
5. Play the remainder of the strokes for this hole until you hole out.
6. Move Right twice to enter the score for your first hole.
7. Walk to the second hole. Your watch automatically advances or you can move Up or Down from the range screen to manually move to the second hole.
Quick Start: Button checklist
To help you get started, here is a list of what the button moves do in each screen:
Playing a round of golf

13
Name of screen
Button Action
Clock screen
Move Left Go to the Watch Status screen.
Move Up Go to Scorecard history screen.
Move Down Go to the Settings screen.
Move Right Please wait while a GPS fix is obtained. When a fix is obtained, go to Golf Course menu.
Move Right after stopping a round
Go to Resume scorecard screen.
Please wait screen
Move Left Back to the Clock screen.
Move Down Go to the Recent Courses screen.
Move Right Nothing happens.
Move Up Nothing happens.
Golf course menu
Move Up Browse up through the list of courses.
Move Down Browse down through the list of courses.
Move Right Start your round on your selected course.
Range screen
Move Up Go to the next hole.
Move Down Go to the previous hole.
Move Right Go to the Hazards, Layup or Green view screen, depending on which are applicable for the current hole. Green view is always present
Move Right again to go to the Scorecard screen.
Move Left Pauses your round.
Pause screen
Move Left Stops your round and goes back to the Clock screen.
Move Right Continue your round after a pause.
Layup screen
Move Up Keep moving Up to cycle through the Hazards, Layup or Green view screen, depending on which are applicable for the current hole. Green view is always present.
Move Down Keep moving Down to cycle through the Hazards, Layup or Green view screen, depending on which are applicable for the current hole. Green view is always present.
Move Left Go back to the Range screen.
Move Right Go to the Scorecard screen.
Scorecard screen
Move Left Go to the Hazards, Layup or Green view screen, depending on which are applicable for the current

14
hole. Green view is always present.
Move Right Nothing happens.
Move Up Add strokes to your score for that hole.
Move Down Remove strokes from your score for that hole.
Choosing a course
Tip: When your watch shows Please wait while waiting for a QuickGPSFix, you can move Down to
browse recent courses. The watch vibrates when a fix is found.
Move Up or Down to in the golf course menu to choose a golf course.
Move Right when you are ready to start playing.
Move Left to go back to the clock screen.
Note: To find out if your golf course is available on the watch, go to tomtom.com/course-coverage. The page is available in English.
Updating golf course information
One-off update to start receiving incremental course updates
To allow your watch to receive incremental updates, we recommend that you reinstall all courses globally.
Note: Reinstalling all courses can take up to two hours.
To update your Golfer, follow these steps:
1. Connect your watch to your computer.
2. MySports Connect downloads and installs the latest changes to your recently played golf courses.
3. In MySports Connect, click Update.
4. MySports Connect downloads and installs the latest software version.

15
Note: Only software version 1.0.5. or higher support incremental course updates.
5. Select the GOLF COURSES tab in MySports Connect and click REINSTALL COURSES.
6. MySports Connect downloads and installs all courses globally.
Updating course information thereafter
You can update the golf courses on your TomTom Golfer in two ways:
1. TomTom MySports mobile app
If you have a compatible phone, you can use the TomTom MySports mobile app to update all recent golf courses and those within a range of 3 kilometres (1.8 miles).
2. TomTom MySports Connect
Each time you connect your watch to your computer, MySports Connect downloads and installs the latest changes to your recently played golf courses.
If you need to update all golf courses globally, for example when you plan to travel, expand SETTINGS in MySports Connect. Select the GOLF COURSES tab and click GLOBAL UPDATE.
Note that a global update will take about an hour to complete.
Pausing, stopping and continuing a round
Pausing and restarting a round of golf
During a round of golf, move Left to stop the clock and pause your round.
To resume your round again, move Right.
Stopping a round of golf
To stop the round, move Left to pause and then move Left again to return to the Clock screen.
Continuing a round of golf
To continue a round of golf, do the following:
1. From the Clock screen, move Right and choose the course you were playing previously.
2. Move Right to go to the Range screen.
You are asked if you wish to resume your scorecard.
3. Move Right to choose 'yes' or move Left to select 'no'.
Note: You can resume a scorecard for up to 24 hours after pausing a round and returning to the
Clock screen. The scorecard is still saved in your Score history if you select 'no'.

16
About doglegs
Some holes are deliberately designed with no direct line-of-sight from the tee to the green.
A hole may bend either to the left or to the right and this bend is called a "dogleg", in reference to the similarity to a dog's ankle.
There are three types of dogleg:
A "dogleg left" - the hole bends to the left as you look towards the green from the tee.
A "dogleg right" - the hole bends to the right as you look towards the green from the tee.
A "double dogleg" - there are two bends, for example in an "S" shape, as you look towards the green from the tee.
See also: Understanding doglegs on your watch
Understanding doglegs on your watch
Your TomTom Golfer can show whether any doglegs are present on a hole.
On your watch, doglegs are shown as an arrow icon on the range screen. The direction the arrow points shows you whether the dogleg bends to left or to the right.
You may choose to hit over a dogleg or to lay up instead.
See: About doglegs
Position of doglegs on the fairway
Your TomTom Golfer shows the position of doglegs relative to their position on the actual course.
Doglegs

17
For example, the watch below is showing a dogleg right at 230 yards/metres from your current position.
The distance to the start of the dogleg is measured along the course centre line.

18
About laying up
A layup shot is made from the fairway after the drive, but due to the presence of a hazard, you have to deliberately make the shot shorter than usual or more accurate. This called laying up.
Most often, you lay up to avoid hitting the ball into a hazard on the fairway, or to put the ball in a more favourable position on the fairway for the next shot.
See also: Laying up using your watch
Laying up using your watch
The layup screen during play (see below) shows the layup markers on the left-hand side of the watch screen and your current distance from that marker on the right-hand side of the watch screen.
So as you look towards the pin, you can see how far away you currently are from the 200, 150 and 100 yard/metre markers.
For example, in the image below, the golfer is 236 yards/metres from the 200 yard/metre layup marker.
As you walk the hole towards the pin, your current distance from the first L200 marker on the right-hand side of the watch screen reduces.
Laying up

19
When you reach a layup marker, the layup marker disappears from the screen.
The default distances for the layup markers are 100, 150, 200.
Note: Keep moving Up to cycle through the Hazards, Layup or Green view screen, depending on which are applicable for the current hole. Green view is always present.
Tip: If a poor or loss of signal occurs, the range values grey and display the last values that were
deemed to be good or accurate.
See also: Layup and green views
Layup and green views
As you approach the green, move Up or Down to swap between the layup screen and the green view as shown below.
Once you have passed the last layup marker, the watch automatically shows only the view of the green.
See also: Approaching the green using your watch

20
About greens
A green, or putting green, is an area of closely trimmed grass surrounding the hole or pin. Holing out or getting the ball into the hole with the minimum number of strokes possible is the main aim of playing golf.
The green allows players to putt or make precision strokes using a putter. A putter has very low loft or angle on the face of the club so that the ball rolls smoothly along the ground, and hopefully into the hole.
Usually the green is flatter than other areas of the course, though gentle slopes and undulations can be found on courses. Sand or water hazards are often placed adjacent to the green, which makes the approach to the pin more challenging and can require the golfer to lay up.
The location of the hole changes from day to day to promote even wear of the turf on the green.
The grass of the green is cut very short so that a ball can roll for a long distance. The green is typically surrounded by slightly higher grass known as the fringe, and then by the fairway and/or rough. The fringe slows the ball and stops it rolling along the green from an approach shot or putt, preventing the ball from leaving the green.
Though it is possible to putt on the fringe, the longer grass interferes with the path of the ball. Hence players often choose to use a lofted club such as an iron to make a chip shot, where the ball carries in the air for a few yards and then rolls along the green like a normal putt.
See also: Approaching the green using your watch
Approaching the green using your watch
As seen from the example below, the shape of the green on your watch mirrors the shape of the actual green that you approaching.
Any surrounding hazards are shown as patterns. Water is shown using a wave pattern and bunkers as a dotted pattern. If a water and sand hazard are in the same area surrounding the green, water takes priority and that pattern is shown over the sand pattern. For more information on hazards, see About hazards.
Approaching the green

21
The pin location is shown and reflects the middle value on the range screen.
See also: Layup and green views
Layup and green views
As you approach the green, move Up or Down to swap between the layup screen and the green view as shown below.

22
Once you have passed the last layup marker, the watch automatically shows only the view of the green.
See also: Approaching the green using your watch

23
About hazards
A hazard is an area of a golf course which provides a difficult obstacle for the golfer to negotiate. A course may include water hazards such as lakes and rivers, man-made hazards such as bunkers, and natural hazards such as trees or thick vegetation.
Many recreational golfers use the term "hazard" to mean anything on a golf course that is hazardous to one's score such as thick rough or a tall tree in the middle of a fairway.
A ball is considered to be in a hazard when any part of the ball touches that hazard. Special rules apply to playing balls that have landed in a hazard. For example, a player may not touch the ground with his club before playing a ball, not even for a practice swing. A ball in any hazard may be played as it lies without penalty. If it cannot be played from the hazard, the ball may be hit from another location, generally with a penalty of one stroke.
Bunkers
A bunker is a steep-sided hole or shallow pit near the green or fairway that is usually filled with sand. It can be more difficult to play a ball from sand than from grass and bunkers sometimes have a raised lip which makes it difficult to hit the ball out of the bunker.
To hit the ball out of a bunker, you usually need to use a very lofted club called a "sand wedge". Specific rules of golf govern play from a bunker. Also, after playing out of a bunker, the player or their caddy must rake smooth the area of the sand disturbed during play.
There are three types of bunkers used when designing a course and all are designed to impede the golfer's progress toward the green. Bunkers in the middle or sides of the fairway can catch inaccurate tee shots on par 4 and par 5 holes. Bunkers near and around the green can collect inaccurate approach shots on long holes and tee shots on par 3 holes. On links or coastal courses, very large natural sandy areas are not considered to be hazards according to the rules of golf, and the rules are different for these areas from other bunkers.
Water hazards
Water hazards are usually natural obstacles that add difficulty to a golf course, though on brand new courses they can of course be man-made. A water hazard may typically be a stream or pond, positioned next to the fairway or across a fairway, forcing the player to hit the ball over the water hazard.
Tip: Water hazards don't have to actually have water in them to count as hazards.
See also: Understanding hazards on your watch
Understanding hazards on your watch
Your TomTom Golfer can show you nearby water hazards or bunkers that are within 300 metres (328 yards).
Hazards
24
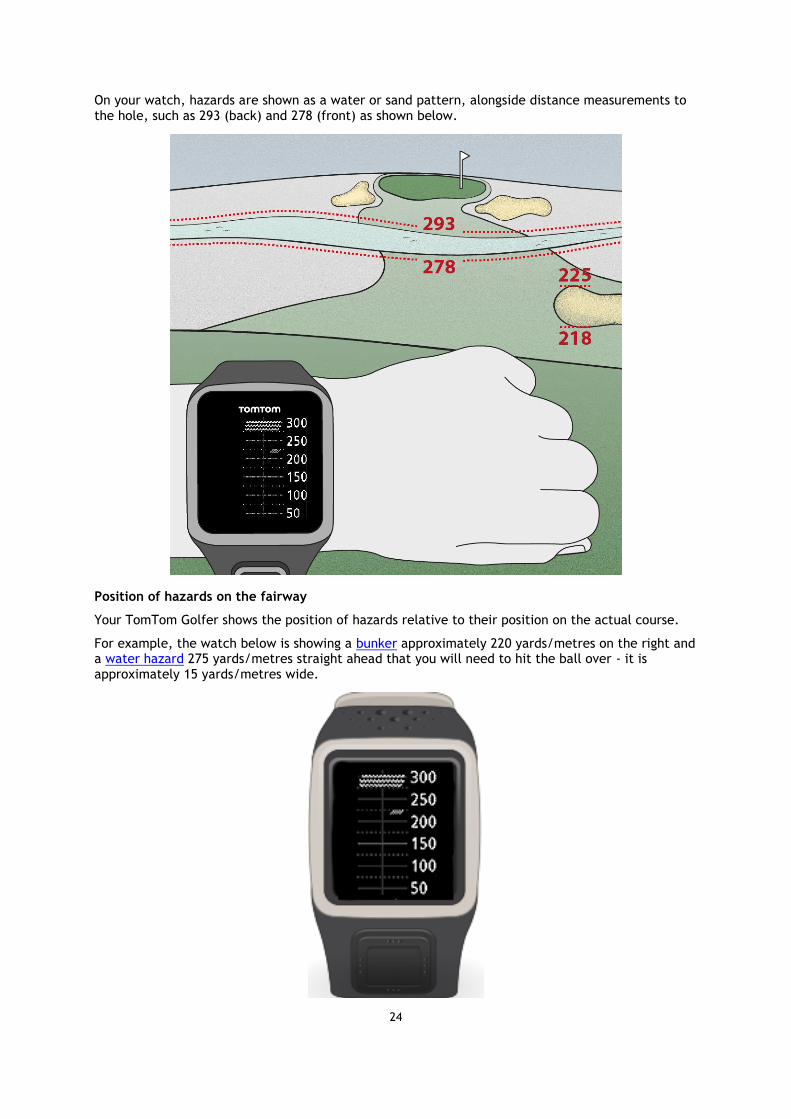
On your watch, hazards are shown as a water or sand pattern, alongside distance measurements to the hole, such as 293 (back) and 278 (front) as shown below.
Position of hazards on the fairway
Your TomTom Golfer shows the position of hazards relative to their position on the actual course.
For example, the watch below is showing a bunker approximately 220 yards/metres on the right and a water hazard 275 yards/metres straight ahead that you will need to hit the ball over - it is approximately 15 yards/metres wide.

25
If there are no hazards on a hole or you have passed them already, you see a tick in the middle of the Hazards screen.
Note: When there is no information available about hazards on a hole, you see a message saying
No info.

26
About scoring
Your TomTom Golfer can be used for normal stroke play, also known as medal play. This involves counting the total number of strokes taken on each hole during a round, or series of rounds. The winner is the player who has taken the fewest number of strokes over the course of the round, or rounds.
The par value for a golf course is the pre-determined number of strokes that a scratch or zero handicap golfer needs to play a hole, a round (the sum of the pars of the played holes), or a tournament (the sum of the pars of each round).
A golfer's score is compared with the par score. If a course has a par of 72 and a golfer takes 76 strokes to complete the course, the reported score is +4, or four over par, taking four shots more than par to complete the course. If a golfer takes 69 strokes, their reported score is –3, or three under par.
Tip: It is mainly the length of the hole from the tee position to the pin that sets the par value for a hole. Other things that affect the par chosen for each hole include the terrain and obstacles, such as trees, hazards, hills, or buildings, any of which may mean that the golfer takes more or fewer shots. Most eighteen hole courses that were not designed for championships have a par
close to seventy two.
See also: Scoring using your watch
Scoring using your watch
After playing a hole, move Right until you see the scorecard screen. The scorecard is used for recording your score for each hole, and it also shows you your total score so far for the round.
1. Your score relative to par for the round.
"E" means even par for the hole. A plus sign (+) means over par, and a minus sign (-) below par.
2. The identifying number of the hole, for example, here the golfer is on the first hole.
3. The par for the hole. For example, the first hole shown above is a par 5.
Scoring

27
4. The total number of strokes taken so far for a round. In this example, the golfer has played one hole and taken 5 strokes so the total for the round so far is also 5 strokes.
5. The number of strokes for the hole just played.
Enter the score for a hole by moving Up and Down until the number of strokes that you played for that hole are shown.
Note: If you hit a ball out of bounds or onto an adjoining hole by mistake, just record the extra strokes on your watch as part of the total for that hole after you finished playing it.
See also: Viewing previous scores
Viewing previous scores
1. Move Up from the clock screen to see scores from your previous rounds.
You see the dates of your recent rounds along with the overall score for the round, for example as shown above, 3 under, 2 under or even par.
2. Move Up and Down to choose a previous round to look at in more detail, then move Right.
You see the name of the course you played.

28
3. Move Right to see the par and total score for the round, split into the front 9 holes and back 9 holes, as shown below.
4. Move Right to see the score for each hole of that previous round.
5. Move Left to go back to the name of the course.

29
About settings
From the clock screen, move down to open the Settings menu. These settings determine the overall behaviour of your watch.
The following settings are available for your watch:
Clock
Phone
Airplane mode
Options
Profile
Clock
From the clock screen, move down to open the Settings menu, then select Clock and move Right to open the Clock menu.
Alarm
Select Alarm to turn the alarm on and off and to set the alarm time.
When the alarm goes off, move Left to stop it or move Right to snooze. If you snooze the alarm, it goes off again in 9 minutes.
Time
Select Time to set the time on your watch. The time is either set using the 12 or 24 hour clock, depending on the setting for 24HR.
Date
Select Date to set the date on your watch.
24HR
Select 24HR to switch between using the 12 hour clock and the 24 hour clock to display and set the time. Move Right to switch between ON and OFF for this setting.
Phone
For information as to why you should want to pair your watch with your phone or mobile device, see TomTom MySports app.
To pair your watch with a phone or mobile device, do the following:
1. Make sure that your phone or mobile device is close by.
2. On your phone, make sure that Bluetooth is enabled.
3. From the clock screen on your watch, move down to open the Settings screen, then select Phone and move right.
4. Move right to start pairing.
Settings

30
5. On your phone, start the MySports Connect app and tap to connect.
6. When the name of your watch appears, tap on it.
7. On your phone, enter the pin number shown on the watch, then tap Pair.
Your watch is now paired with your phone or mobile device.
When pairing has been completed, you see a "Connected" message on your watch.
As long as you have the mobile app active or running in the background on your phone or mobile device, the watch automatically tries to connect when it has a new activity to upload or when the QuickGPSfix data is out-of-date.
If you open the MySports app on your phone and it is trying to connect to your watch, you may need to wake up your watch by moving away from the clock screen. Move down, left or right from the clock screen.
Synchronising course information
You can automatically synchronise golf course information with your TomTom MySports account by using this setting.

31
From the clock screen on your watch, move down to open the Settings screen, then select Phone and move right.
Select Sync. If automatic uploading is currently switched OFF, move up or down to switch automatic uploading on.
Airplane mode
From the clock screen on your watch, move Down to open the Settings screen, select Airplane mode and then move Right.
Move Up or Down to switch on airplane or flight mode.
When airplane mode or flight mode is switched on, an airplane icon is shown on the clock screen and all Bluetooth low energy (also known as BLE or Bluetooth® Smart) connectivity is disabled.
To switch airplane mode off, move Up or Down again.
Options
From the clock screen, move Down to open the Settings menu, then select Options and move Right to open the Options menu.
Units
Select Units to set the distance and weight units used on your watch. You can select any combination of yards or metres, and pounds or kilogrammes.
Click
Select Click to set what your watch does as you move through menus. Your watch can do the following:
Make a clicking sound.
Vibrate/buzz for short time.
You can turn both on or off, or turn only one on.

32
Profile
From the clock screen on your watch, move down to open the Settings menu, then select Profile and move right to open the Profile menu.
Select the following options to set your details in each case:
Language
Weight
Height
Age
Gender
Gender is used by the TomTom Golfer when playing a hole that may have different par values for men and women. For example, a hole could be a par 5 for women and a par 4 for men.
Language
Select Language to set the language used for menus and messages on your watch.

33
Your TomTom MySports account is a central storage location for all your sports information.
To create an account, click the button in TomTom MySports Connect, or go directly to the website: mysports.tomtom.com
As you can see from the diagram below, you can manage to your MySports account using either TomTom MySports Connect or the TomTom MySports app.
Important: Before using the MySports app on your smartphone, you need to link your watch to your MySports account using a computer. This needs to be done only once.
TomTom MySports account

34
TomTom MySports Connect does the following:
Helps you set up your watch.
Updates the software on your watch when new versions become available.
Updates golf course information on your watch.
Transfers any settings you make on TomTom MySports to your watch.
Updates the QuickGPSfix information on your watch.
Installing TomTom MySports Connect
You can download TomTom MySports Connect for free from here: tomtom.com/getstarted/sports
Once installed, connect your watch to your computer using the desk dock.
TomTom MySports Connect

35
The TomTom MySports mobile app does the following:
Updates golf course information.
Updates the QuickGPSfix information on your watch.
Provides an alternative to TomTom MySports Connect for updating QuickGPSfix.
Supported phones and mobile devices
iOS
The TomTom MySports app is compatible with iOS 6 and higher on the following Bluetooth Smart enabled devices:
iPhone 4S or later.
iPod touch 5th generation.
iPad3 or later.
All iPad mini.
Android
The TomTom MySports app requires Bluetooth Smart (or Bluetooth LE) and Android 4.3 or higher to communicate with your watch. A range of Bluetooth Smart enabled Android devices have been tested to confirm their compatibility with the MySports app. Check your phone's compatibility with the MySports app by visiting the Google Play Store.
Before using the TomTom MySports app
Important: Before using the MySports app on your smartphone, you need to link your watch to your MySports account using a computer. This needs to be done only once.
You can download the TomTom MySports app for free from your usual app store or by going to tomtom.com/app.
TomTom MySports mobile app

36
B Bunker
A bunker is a steep-sided hole or shallow pit near the green or fairway that is usually filled with sand. It can be more difficult to play a ball from sand than from grass and bunkers sometimes have a raised lip which makes it difficult to hit the ball out of the bunker.
D Dogleg
Some holes are deliberately designed with no direct line-of-sight from the tee to the green. A hole may bend either to the left or to the right and this bend is called a "dogleg", in reference to the similarity to a dog's ankle.
G Green
A green, or putting green, is an area of closely trimmed grass surrounding the hole or pin. Holing out or getting the ball into the hole with the minimum number of strokes possible is the main aim of playing golf.
H Hazard
A hazard is an area of a golf course which provides a difficult obstacle for the golfer to negotiate. A course may include water hazards such as lakes and rivers, man-made hazards such as bunkers, and natural hazards such as trees or thick vegetation.
Many recreational golfers use the term "hazard" to mean anything on a golf course that is hazardous to one's score such as thick rough or a tall tree in the middle of a fairway.
L Laying up
A layup shot is made from the fairway after the drive, but due to the presence of a hazard, you have to deliberately make the shot shorter than usual or more accurate. This called laying up.
Most often, you lay up to avoid hitting the ball into a hazard on the fairway, or to put the ball in a more favourable position on the fairway for the next shot.
Layup marker
A layup marker shows you how far away you currently are from the hole. For example, if you see L100, 223, it means that you are 223 yards/metres away from the 100 yard/metre marker.
The L100 marker is 100 yards/metres from the pin.
When you reach a layup marker, the layup marker disappears from the screen.
Glossary of Terms

37
M Medal play
Your TomTom Golfer can be used for normal stroke play, also known as medal play. This involves counting the total number of strokes taken on each hole during a round, or series of rounds. The winner is the player who has taken the fewest number of strokes over the course of the round, or rounds.
O Out of bounds
"Out of bounds" means that all of your ball is laying beyond the boundaries of the golf course or any part of the course. The boundary of the golf course is marked by the committee in charge of the competition or the golf course.
Usually, if your ball is out of bounds, you must play the ball, under penalty of one stroke, as nearly as possible at the spot from which the original ball was last played. However you should refer to the rules for your particular course.
P Par
The par value for a golf course is the pre-determined number of strokes that a scratch or zero handicap golfer needs to play a hole, a round (the sum of the pars of the played holes), or a tournament (the sum of the pars of each round).
A golfer's score is compared with the par score. If a course has a par of 72 and a golfer takes 76 strokes to complete the course, the reported score is +4, or four over par, taking four shots more than par to complete the course. If a golfer takes 69 strokes, their reported score is –3, or three under par.
S Stroke play
Your TomTom Golfer can be used for normal stroke play, also known as medal play. This involves counting the total number of strokes taken on each hole during a round, or series of rounds. The winner is the player who has taken the fewest number of strokes over the course of the round, or rounds.
W Water hazard
Water hazards are usually natural obstacles that add difficulty to a golf course, though on brand new courses they can of course be man-made. A water hazard may typically be a stream or pond, positioned next to the fairway or across a fairway, forcing the player to hit the ball over the water hazard.

38
How TomTom uses your information
Information regarding the use of personal information can be found at tomtom.com/privacy.
Battery and Environmental information
This product uses a lithium polymer battery that is not user accessible or user replaceable. Do not open the case or (attempt to) remove the battery. Substances in the product and/or battery may be harmful to the environment or your health if disposed of improperly. The battery contained in the product must be recycled or disposed of properly according to the local laws and regulations and always kept separate from household waste.
WEEE directive
The wheelie bin symbol on the product or its packaging indicates that this product shall not be treated as household waste. In line with EU Directive 2012/19/EU for waste electrical and electronic equipment (WEEE), this electrical product must not be disposed of as unsorted municipal waste. Please dispose of this product by returning it to the point of sale or to your local municipal collection point for recycling. By doing this you will help conserve the environment.
Battery operating temperatures
Operating temperatures: -20°C (-4°F) to 60°C (140°F). Do not expose to temperatures beyond this.
R&TTE directive
Hereby, TomTom declares that TomTom products and accessories are in compliance with the essential requirements and other relevant provisions of the EU Directive 1999/5/EC. The declaration of conformity can be found here: tomtom.com/legal.
FCC information for the user
Addendum

39
THE DEVICE COMPLIES WITH PART 15 OF THE FCC RULES
Federal Communications Commission (FCC) Statement
This equipment radiates radio frequency energy and if not used properly - that is, in strict accordance with the instructions in this manual - may cause interference to radio communications and television reception.
Operation is subject to the following two conditions: (1) this device may not cause harmful interference and (2) this device must accept any interference, including interference that may cause undesired operation of the device.
This device has been tested and found to comply with the limits for a Class B digital device, pursuant to part 15 of the FCC rules. These limits are designed to provide reasonable protection against harmful interference in a residential installation. This equipment generates, uses and can radiate radio frequency energy and, if not installed and used in accordance with the instructions, may cause harmful interference to radio communications. However, there is no guarantee that interference will not occur in a particular installation. If this equipment does cause harmful interference to radio or television reception, which can be determined by turning the equipment off and on, the user is encouraged to try to correct the interference by one or more of the following measures:
Reorient or relocate the receiving antenna.
Increase the separation between the equipment and receiver.
Connect the equipment into an outlet on a circuit different from that to which the receiver is connected.
Consult the dealer or an experienced radio/TV technician for help.
Changes or modifications not expressly approved by the party responsible for compliance could void the user's authority to operate the equipment.
FCC ID: S4L-8RG0
IC ID: 5767A-8RG0
FCC RF Radiation Exposure Statement
The transmitters within this device must not be co-located or operating in conjunction with any other antenna or transmitter.
Responsible party in North America
TomTom, Inc., 24 New England Executive Park, Suite 410, Burlington, MA 01803
Tel: 866 486-6866 option 1 (1-866-4-TomTom)
Emissions information for Canada
Operation is subject to the following two conditions:
This device may not cause interference.
This device must accept any interference, including interference that may cause undesired operation of the device.
Operation is subject to the condition that this device does not cause harmful interference.
This Class B digital apparatus complies with Canadian ICES-003.
The Country Code Selection feature is disabled for products marketed in the US or Canada.
Equipment is certified to the requirements of RSS-210 for 2.4-GHz.
IMPORTANT NOTE
IC Radiation Exposure Statement:

40
This equipment complies with IC RSS-102 radiation exposure limits set forth for an uncon-trolled environment.
This device and its antenna(s) must not be co-located or operating in conjunction with any other antenna or transmitter.
This equipment complies with IC radiation exposure limits set forth for an uncontrolled environ-ment. End users must follow the specific operating instructions for satisfying RF exposure compliance. To maintain with IC RF exposure compliance requirements please follow operation instruction as documented in this manual.
Regulatory Compliance Mark
This product displays the Regulatory Compliance Mark (RCM) to show that it complies with relevant Australian regulations.
Notice for New Zealand
This product displays R-NZ to show it complies with relevant New Zealand regulations.
Customer support contact
Australia: 1300 135 604
New Zealand: 0800 450 973
Model names
8RG0

41
© 2015 TomTom. All rights reserved. TomTom and the "two hands" logo are registered trademarks of TomTom N.V. or one of its subsidiaries. Please see tomtom.com/legal for limited warranty and end user licence agreements applying to this product.
Linotype, Frutiger and Univers are trademarks of Linotype GmbH registered in the U.S. Patent and Trademark Office and may be registered in certain other jurisdictions. MHei is a trademark of The Monotype Corporation and may be registered in certain jurisdictions.
AES code
The software included in this product contains AES code under Copyright (c) 1998-2008, Brian Gladman, Worcester, UK. All rights reserved.
Licence terms:
The redistribution and use of this software (with or without changes) is allowed without the payment of fees or royalties provided that the following conditions are adhered to:
Source code distributions include the above copyright notice, this list of conditions and the following disclaimer.
Binary distributions include the above copyright notice, this list of conditions and the following disclaimer in their documentation.
The name of the copyright holder is not used to endorse products built using this software without specific written permission.
Copyright notices


