12
Trabecular Metal ™ Primary Patella NexGen ® Complete Knee Solution Surgical Technique
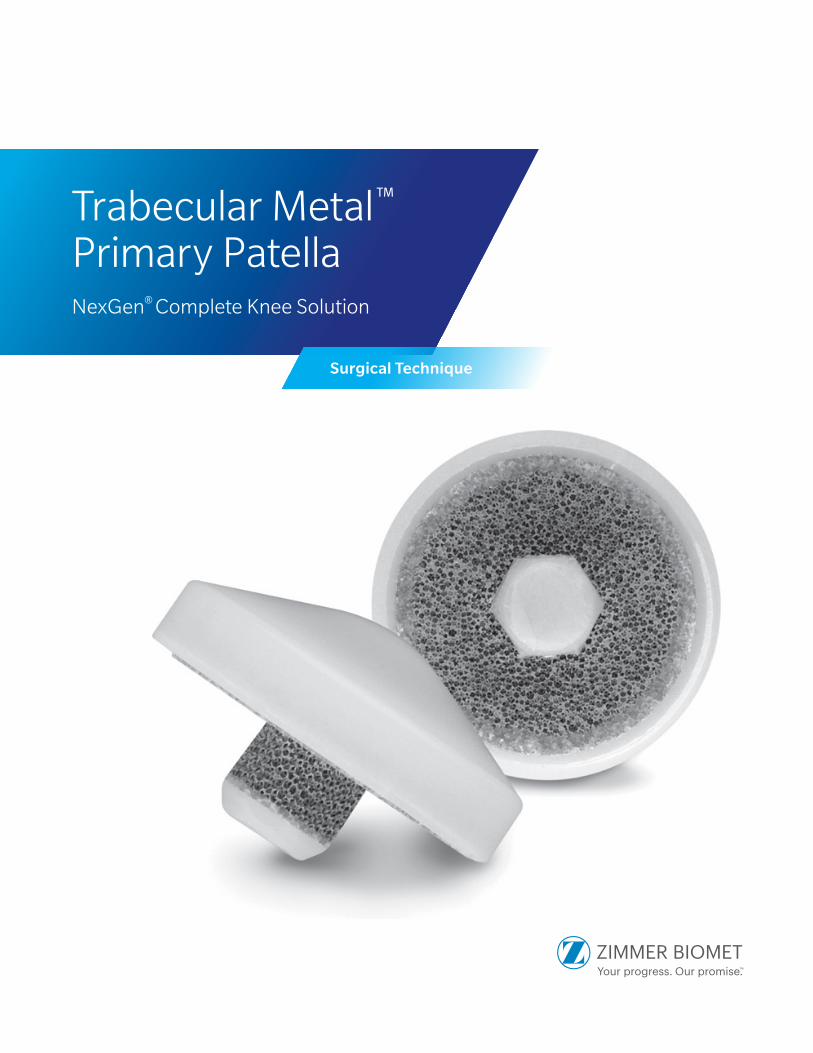
Trabecular Metal™ Primary PatellaNexGen® Complete Knee Solution
Surgical Technique


Table of Contents
Introduction .............................................................................................................. 2
Prepare the Patella ................................................................................................... 2 Patella Reamer Technique .................................................................................... 3 Insetting Technique ............................................................................................ 5 Universal Saw Guide Technique .......................................................................... 6
Preparation for Trabecular Metal Peg ..................................................................... 7
Trial Reduction ......................................................................................................... 7
Insertion ................................................................................................................... 8
Implant Removal ...................................................................................................... 9
Ordering Information ............................................................................................. 10
2 | Trabecular Metal Primary Patella Surgical Technique
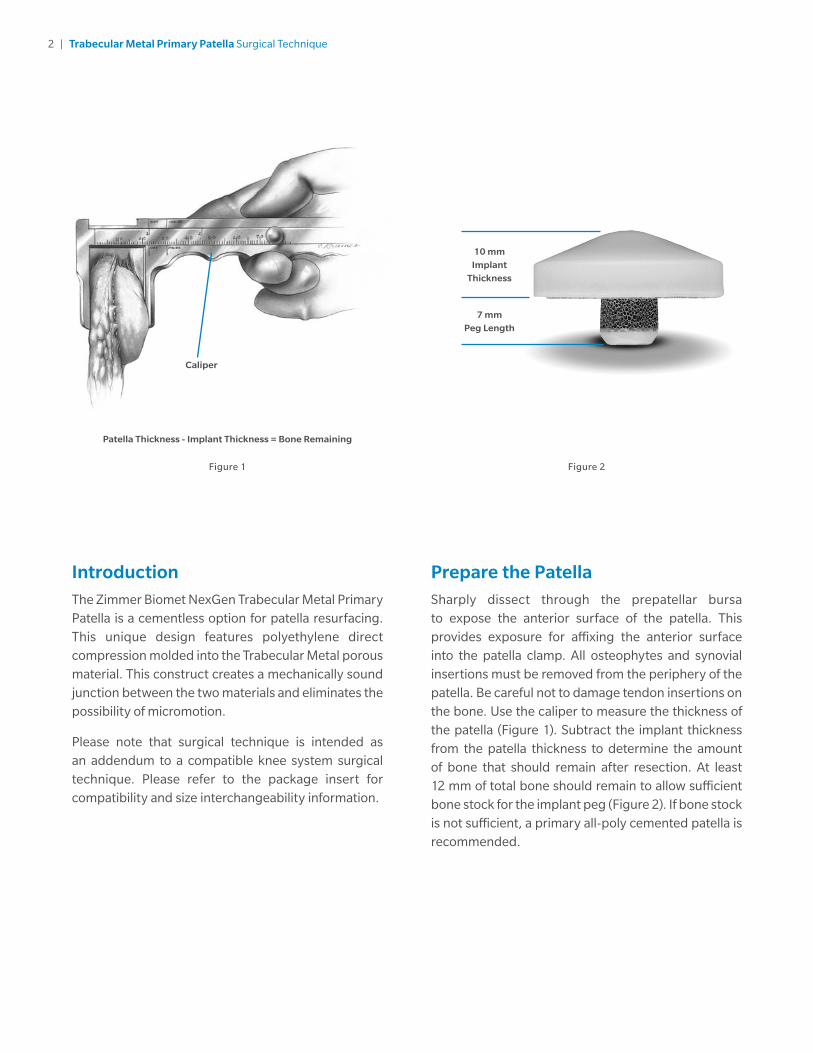
Caliper
10 mm Implant
Thickness
7 mm Peg Length
Prepare the PatellaSharply dissect through the prepatellar bursa to expose the anterior surface of the patella. This provides exposure for affixing the anterior surface into the patella clamp. All osteophytes and synovial insertions must be removed from the periphery of the patella. Be careful not to damage tendon insertions on the bone. Use the caliper to measure the thickness of the patella (Figure 1). Subtract the implant thickness from the patella thickness to determine the amount of bone that should remain after resection. At least 12 mm of total bone should remain to allow sufficient bone stock for the implant peg (Figure 2). If bone stock is not sufficient, a primary all-poly cemented patella is recommended.
Patella Thickness - Implant Thickness = Bone Remaining
IntroductionThe Zimmer Biomet NexGen Trabecular Metal Primary Patella is a cementless option for patella resurfacing. This unique design features polyethylene direct compression molded into the Trabecular Metal porous material. This construct creates a mechanically sound junction between the two materials and eliminates the possibility of micromotion.
Please note that surgical technique is intended as an addendum to a compatible knee system surgical technique. Please refer to the package insert for compatibility and size interchangeability information.
Figure 1 Figure 2

3 | NexGen Trabecular Metal Primary Patella Surgical Technique
Patella Reamer Surfacing Guide
Clamp Wing
Patella Reamer Surfacing Guide
Locking Screw
Fixation Plate and Pins
Prepare the Patella (cont.)There are three techniques for preparing the patella:
1 Reamer Technique
2 Insetting Technique
3 Universal Saw Guide Technique
1 Patella Reamer Technique: Total Resurfacing Procedure
Use the patella reamer surfacing guides as templates to determine the appropriate size guide and reamer. Choose the guide which fits snugly around the patella, using the smallest guide possible (Figure 3). If the patella is only slightly larger than the total surfacing guide in the mediolateral dimension, use a rongeur to remove the medial or lateral edge until the bone fits the guide.
Insert the appropriate size patella reamer surfacing guide into the patella reamer clamp (Figure 4). Turn the locking screw until tight.
Figure 3 Figure 4

4 | Trabecular Metal Primary Patella Surgical Technique
Prepare the Patella (cont.)1 Patella Reamer Technique:
Total Resurfacing Procedure (cont.)
Apply the patella reamer clamp at a 90 degree angle to the longitudinal axis, with the patella reamer surfacing guide encompassing the articulating surface of the patella. Squeeze the clamp until the anterior surface of the patella is fully seated against the fixation plate (Figure 5). Turn the locking screw to hold the instrument in place. The anterior surface must fully seat upon the pins and contact the fixation plate.
Turn and set the clamp wing to the amount of bone that is to remain after reaming (Figure 6).
Figure 5
Patella Reamer Shaft
Patella Reamer Blade
Attach the appropriate size patella reamer blade to the appropriate size patella reamer shaft (Figure 7). Use only moderate hand pressure to tighten the blade. Do not over tighten the blade. Insert the patella reamer shaft into a drill/reamer. Insert the reamer assembly into the patella reamer surfacing guide. Raise the reamer slightly off the bone, bring it to full speed, and advance it slowly until the prominent high points are reamed off the bone. Continue reaming with moderate pressure until the step on the reamer shaft bottoms out on the clamp wing. Remove the reamer clamp assembly. (Proceed to Preparation for Trabecular Metal Peg, page 7.)
Figure 6 Figure 7

5 | NexGen Trabecular Metal Primary Patella Surgical Technique
Prepare the Patella (cont.)2 Insetting Technique
Use the patella reamer insetting guides as templates to determine the appropriate size guide and reamer. Choose the guide which will allow approximately 2 mm between the superior edge of the patella and the outer diameter of the guide (Figure 8).
Insert the appropriate size patella reamer insetting guide into the patella reamer clamp. Turn the locking screw until tight.
Apply the patella reamer clamp at a 90 degree angle to the longitudinal axis with the patella reamer insetting guide on the articulating surface. Squeeze the clamp until the anterior surface of the patella is fully seated against the fixation plate. Turn the locking screw to hold the instrument in place. The anterior surface must fully seat upon the pins and contact the fixation plate.
Turn the clamp wing to the “inset” position (Figure 9).
Attach the appropriate size patella reamer blade to the appropriate size patella reamer shaft (Figure 10). Use only
Patella Reamer Depth Stop
Figure 8
Figure 9
Figure 10
moderate hand pressure to tighten the blade. Do not overtighten the blade.
Use the patella reamer depth stop to control the amount of bone to be removed, based on the constant thickness (10 mm) of the implants. The depth gauge wing can be used instead of the stops to control the amount of bone remaining, rather than the amount of bone removed. The procedure is then the same as that described under Total Resurfacing (Pages 3 and 4). Insert the reamer assembly into the patella reamer insetting guide. Raise the reamer slightly off the bone, bring it to full speed, and advance it slowly until the prominent high points are reamed off the bone. Continue reaming with moderate pressure. Remove the reamer clamp assembly.
Note: See your local Zimmer Biomet representative for a detailed surgical technique on the Zimmer Biomet Patella Reamer System.
(Proceed to Preparation for Trabecular Metal Peg, page 7)

6 | Trabecular Metal Primary Patella Surgical Technique
Universal Patellar Saw Guide
Prepare the Patella (cont.)3 Universal Saw Guide Technique
Apply the universal patellar saw guide in line with the patellar tendon. Push the patella up between the jaws of the saw guide. Level the patella within the saw guide jaws and use the thumbscrew to tighten the guide.
The amount of bone to be resected across the top of the saw guide jaws should be approximately the same on all sides. Check to be sure that the 10 mm gauge does not rotate beneath the anterior surface of the patella. If the gauge hits the anterior surface of the patella as it is rotated, this indicates that at least 10 mm of bone stock will remain after the cut (Figure 11). It is recommended that a minimum of 12 mm of bone remain to allow sufficient bone stock for the implant peg.
10 mm
2 mm
Figure 11
Figure 12
Cut the patella flat so that a smooth surface remains (Figure 12).

7 | NexGen Trabecular Metal Primary Patella Surgical Technique
Preparation for Trabecular Metal PegInspect the surface of the resected patella to ensure that a flat cut has been made and that no burrs or irregularities exist that could prevent the patellar drill guide from seating flush to the surface.
Center the appropriate patellar drill guide over the resected patella surface with the handle on the medial side of the patella and perpendicular to the tendon (Figure 13). Press the drill guide firmly in place so that the teeth fully engage and the drill guide uniformly contacts the bone surface (Figure 14). The Trabecular Metal Primary Patella Clamp may be used to fully seat the drill guide on hard sclerotic bone surfaces. Drill the peg hole making sure the drill stop collar contacts the top of the drill guide (Figure 14, inset).
Caution: Failure to fully seat the drill will result in a shallow peg preparation which could prevent the implant from achieving surface to surface contact with the bone.
Drill Stop Collar
Patellar Drill Guide
Figure 13 Figure 14
Trial ReductionUsing the appropriate provisional patella (trial), ensure that the peg is fully seated and that the base of the provisional is uniformly contacting the resected/reamed patella. Perform a trial reduction prior to insertion of the Trabecular Metal Primary Patella.
8 | Trabecular Metal Primary Patella Surgical Technique
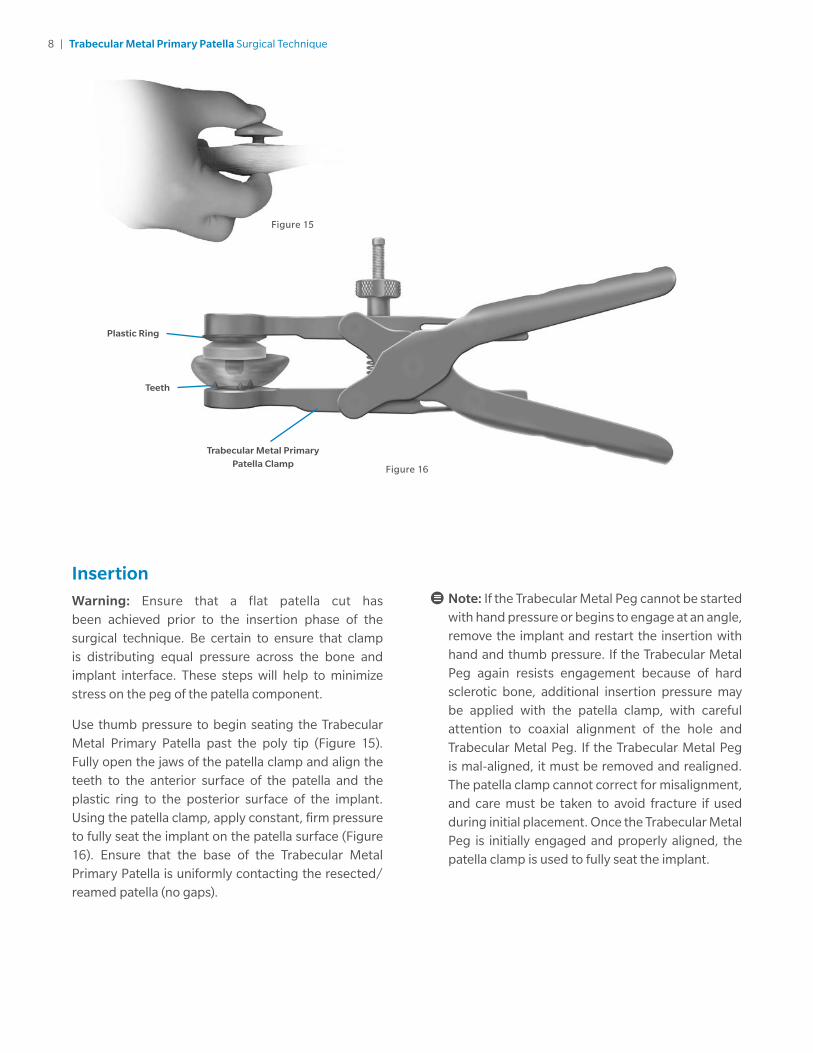
Trabecular Metal Primary Patella Clamp
Plastic Ring
Teeth
InsertionWarning: Ensure that a flat patella cut has been achieved prior to the insertion phase of the surgical technique. Be certain to ensure that clamp is distributing equal pressure across the bone and implant interface. These steps will help to minimize stress on the peg of the patella component.
Use thumb pressure to begin seating the Trabecular Metal Primary Patella past the poly tip (Figure 15). Fully open the jaws of the patella clamp and align the teeth to the anterior surface of the patella and the plastic ring to the posterior surface of the implant. Using the patella clamp, apply constant, firm pressure to fully seat the implant on the patella surface (Figure 16). Ensure that the base of the Trabecular Metal Primary Patella is uniformly contacting the resected/reamed patella (no gaps).
Note: If the Trabecular Metal Peg cannot be started with hand pressure or begins to engage at an angle, remove the implant and restart the insertion with hand and thumb pressure. If the Trabecular Metal Peg again resists engagement because of hard sclerotic bone, additional insertion pressure may be applied with the patella clamp, with careful attention to coaxial alignment of the hole and Trabecular Metal Peg. If the Trabecular Metal Peg is mal-aligned, it must be removed and realigned. The patella clamp cannot correct for misalignment, and care must be taken to avoid fracture if used during initial placement. Once the Trabecular Metal Peg is initially engaged and properly aligned, the patella clamp is used to fully seat the implant.
Figure 15
Figure 16
9 | NexGen Trabecular Metal Primary Patella Surgical Technique
Implant RemovalShould the implant need to be removed, use a saw to break the interface between the bone and Trabecular Metal surface of the patella in all directions around the central peg. The central peg can then be cut by either:
1. Using the saw to cut all the way through the peg on the same plane as the bone interface surface. It is recommended to irrigate the area to reduce heat while cutting.
2. Positioning a small osteotome against the peg and using a mallet to force the osteotome through the peg on the same plane as the bone interface.
A small section of the patella peg may remain in the patella. If so desired, use a small trephine to remove this section. The peg features a polyethylene tip to facilitate the removal of this section of the implant.
Insertion (cont.)
If bone cement is used, apply cement to the Trabecular Metal base while the cement is in a doughy consistency. Then, follow the instructions above for insertion of the implant. Do a visual check to ensure that the implant is fully seated and flush with the resected/reamed patella.
If cement is used, remove all excess bone cement and ensure that there is no bone cement on any of the articulating surfaces.
This documentation is intended exclusively for physicians and is not intended for laypersons. Information on the products and procedures contained in this document is of a general nature and does not represent and does not constitute medical advice or recommendations. Because this information does not purport to constitute any diagnostic or therapeutic statement with regard to any individual medical case, each patient must be examined and advised individually, and this document does not replace the need for such examination and/or advise in whole or in part.
Please refer to the package inserts for important product information, including, but not limited to, indications, contraindications, warnings, precautions, and adverse effects.
©2016 Zimmer Biomet
97-7255-112-00 REV3-0516
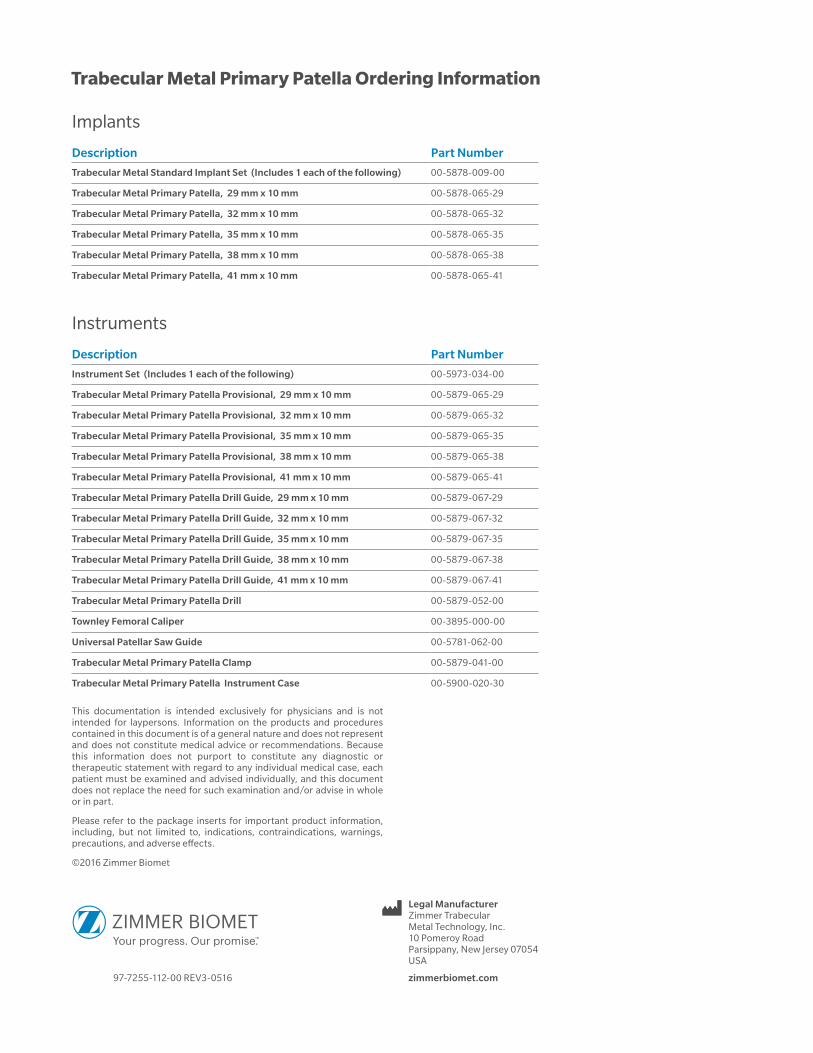
Implants
Description Part Number
Trabecular Metal Standard Implant Set (Includes 1 each of the following) 00-5878-009-00
Trabecular Metal Primary Patella, 29 mm x 10 mm 00-5878-065-29
Trabecular Metal Primary Patella, 32 mm x 10 mm 00-5878-065-32
Trabecular Metal Primary Patella, 35 mm x 10 mm 00-5878-065-35
Trabecular Metal Primary Patella, 38 mm x 10 mm 00-5878-065-38
Trabecular Metal Primary Patella, 41 mm x 10 mm 00-5878-065-41
Instruments
Description Part Number
Instrument Set (Includes 1 each of the following) 00-5973-034-00
Trabecular Metal Primary Patella Provisional, 29 mm x 10 mm 00-5879-065-29
Trabecular Metal Primary Patella Provisional, 32 mm x 10 mm 00-5879-065-32
Trabecular Metal Primary Patella Provisional, 35 mm x 10 mm 00-5879-065-35
Trabecular Metal Primary Patella Provisional, 38 mm x 10 mm 00-5879-065-38
Trabecular Metal Primary Patella Provisional, 41 mm x 10 mm 00-5879-065-41
Trabecular Metal Primary Patella Drill Guide, 29 mm x 10 mm 00-5879-067-29
Trabecular Metal Primary Patella Drill Guide, 32 mm x 10 mm 00-5879-067-32
Trabecular Metal Primary Patella Drill Guide, 35 mm x 10 mm 00-5879-067-35
Trabecular Metal Primary Patella Drill Guide, 38 mm x 10 mm 00-5879-067-38
Trabecular Metal Primary Patella Drill Guide, 41 mm x 10 mm 00-5879-067-41
Trabecular Metal Primary Patella Drill 00-5879-052-00
Townley Femoral Caliper 00-3895-000-00
Universal Patellar Saw Guide 00-5781-062-00
Trabecular Metal Primary Patella Clamp 00-5879-041-00
Trabecular Metal Primary Patella Instrument Case 00-5900-020-30
Trabecular Metal Primary Patella Ordering Information
Legal ManufacturerZimmer TrabecularMetal Technology, Inc.10 Pomeroy RoadParsippany, New Jersey 07054USA
zimmerbiomet.com


