62
Genium INET TM TradeGuard User's Guide NASDAQ Nordic Version: 5.0.0201

Genium INETTM
TradeGuard User's GuideNASDAQ Nordic
Version: 5.0.0201

Document Version: 21
Publication Date: Friday, 25th Aug, 2017
Confidentiality: Non-confidential
Genium, INET, ITCH, CONDICO, EXIGO, and TradeGuard are registered trademarks of Nasdaq, Inc.X-stream Trading, OUCH, ICS-II, SWIFT Gateway, Genium Market Info (GMI), Appmind, PRM,PTRM, MiQ, SMARTS, X-stream CSD, Genium Risk Manager (GRM), TIP, CLICK, CLICK XT, andSECUR are trademarks of Nasdaq, Inc.
Whilst all reasonable care has been taken to ensure that the details are true and not misleading at thetime of publication, no liability whatsoever is assumed by Nasdaq, Inc., or any subsidiary of Nasdaq,Inc., with respect to the accuracy or any use of the information provided herein. Any license, deliveryand support of software systems etc. require entering into separate agreements with Nasdaq, Inc. Thisdocument contains confidential information and may not be modified or reproduced, in whole or inpart, or transmitted in any form to any third party, without the written approval from Nasdaq, Inc.
Copyright © 2017 Nasdaq, Inc. All rights reserved.
All rights reserved.

© 2017 Nasdaq, Inc.
Table of Contents
Introduction.................................................................................................. 5Purpose................................................................................................................................................5Audience.............................................................................................................................................. 5References...........................................................................................................................................5
Overview....................................................................................................... 6
Getting Started.............................................................................................7System Requirements......................................................................................................................... 7Launching the Application the First Time........................................................................................... 7Window Layout.................................................................................................................................... 8Expanding and Collapsing Panels.................................................................................................... 10Starting and Stopping Updates......................................................................................................... 10
Understanding Group Types in TradeGuard.......................................... 11Pre-Trade Limit Groups.....................................................................................................................11Account Limit Nodes......................................................................................................................... 12
Understanding Intraday vs Next Day Changes...................................... 13Intraday Changes.............................................................................................................................. 13Next Day Changes............................................................................................................................ 13
Understanding Breaches versus Blocks.................................................15Breaches............................................................................................................................................15Types of Blocks.................................................................................................................................15
Trader Panel............................................................................................... 16Searching for Groups and Accounts.................................................................................................16Notice, Warn, and Breach Notices in the Trader Panel....................................................................17Restricting Instruments for a Pre-Trade Limit Group........................................................................17Setting Warn and Notice Percentages..............................................................................................18Setting the Order Rate Limit............................................................................................................. 19
Working With Pre-Trade Limit Groups....................................................21Adding a Pre-Trade Limit Group.......................................................................................................21Deleting a Pre-Trade Limit Group.....................................................................................................22Mass Canceling Orders on a Pre-Trade Limit Group....................................................................... 23Blocking a Pre-Trade Limit Group.................................................................................................... 24Unblocking a Pre-Trade Limit Group................................................................................................ 25Unblocking an Order Rate Breach....................................................................................................26Unbreaching a Tradeable Limit.........................................................................................................26Mass Canceling Orders by User IDs................................................................................................ 27

© 2017 Nasdaq, Inc.
Unblocking a User ID........................................................................................................................28Mass Canceling Orders by Trader IDs............................................................................................. 29Unblocking a Trader ID.....................................................................................................................30
Working With Account Limit Nodes........................................................ 32Adding an Account Limit Node......................................................................................................... 32Deleting an Account Limit Node....................................................................................................... 33Block an Account Limit Node............................................................................................................35Unblock an Account Limit Node....................................................................................................... 35
Current Consumption Tab........................................................................ 37Starting and Stopping Updates......................................................................................................... 37
Editing Limits Overview............................................................................39Adding a Trade Limit.........................................................................................................................40Editing Trade Limits.......................................................................................................................... 42Deleting an Existing Trade Limit.......................................................................................................43
Managing Users Overview........................................................................45Viewing Users....................................................................................................................................45Adding a User to a Pre-Trade Limit Group...................................................................................... 45Removing a User From a Pre-Trade Limit Group............................................................................ 47Changing or Removing a Monitored User........................................................................................ 48Default Group.................................................................................................................................... 51
Managing Email Alerts Overview.............................................................52Setting Email Alerts...........................................................................................................................52Adding New Email Alert Recipients.................................................................................................. 53Editing Email Alert Recipients...........................................................................................................54Removing Email Alert Recipients......................................................................................................55
Margin Limits Tab......................................................................................58Changing Margin Limits.....................................................................................................................58Breaches to Margin Limits................................................................................................................ 59Enabling Popup Warnings for Margin Breaches...............................................................................59
Appendix.....................................................................................................61Glossary.............................................................................................................................................61
At-Trade.................................................................................................................................. 61Monitored User....................................................................................................................... 61Pre-Trade................................................................................................................................ 61Pre-Trade Limits Group..........................................................................................................61Price Quotation Factor............................................................................................................61Sponsored Client.................................................................................................................... 61Sponsoring Participant............................................................................................................61Trade Report...........................................................................................................................61Tradeable................................................................................................................................ 61
Change Log....................................................................................................................................... 62

TradeGuard User's Guide
© 2017 Nasdaq, Inc. 5
Introduction
PurposeThis guide explains how to use the Genium INET TradeGuard application to set limits on the risk exposureof order activity at an exchange.
AudienceThis document is intended for Genium INET TradeGuard application users that need to configure andmonitor risk exposure by participants at the exchange.
ReferencesPlease use the member extranet for additional information on the TradeGuard service includingconnectivity, contact information, service description, and so on.
The member extranet can be found at http://nordic.nasdaqomxtrader.com/memberextranet/genium_inet/

TradeGuard User's Guide
© 2017 Nasdaq, Inc. 6
Overview
The Genium INET TradeGuard system provides Sponsoring and Sponsored Participants the ability tocontrol risk by:
• Control the risk exposure by setting exposure limits on groups of users belonging to a Participant (withinthe same firm or for another firm).
• Monitor the real-time risk exposure of each Pre-Trade Limit Group.• Set limits on order rate.• Set limits on max order size.• Set limits on group exposure per Tradeable.• Restrict individual groups to only trade in instruments with established limits.• Generate email alerts when a Tradeable’s exposure crosses a notification threshold, or breaches set
limits.• Block the members of a group from trading past established limits.• Manually block and unblock a Pre-Trade Limit Group so its users cannot enter new orders.• Mass cancel all open orders for users connected to a Pre-Trade Limit Group.

TradeGuard User's Guide
© 2017 Nasdaq, Inc. 7
Getting Started
System RequirementsTo run the Genium INET TradeGuard application, you must have Java® 7 or higher installed on yourcomputer. You will also need connectivity to NASDAQ OMX extranet, and a Web browser.
Launching the Application the First TimeFrom the TradeGuard landing page, you can install Java Web Start technology (if needed), and then log into the system.
To download and run the application, complete the following steps:
1) Open web browser and go to the launch page.2) Optional: If you do not have Java installed, click the Java icon, and download it.3) Click the Genium INET TradeGuard link.
Genium INET TradeGuard Launch Page
The application will download, and when ready present a login window.4) Enter your user name and password.5) Click the Login button.

TradeGuard User's Guide
© 2017 Nasdaq, Inc. 8
Login Window
Launching the Application after Installation
When you install the application, a shortcut is placed on the desktop.
TradeGuard Desktop Shortcut
Window LayoutThe Genium INET TradeGuard interface shows each Sponsoring Participant, Sponsored Participant, andPre-Trade Limit Group in real-time as well as allowing users to view or edit risk limit parameters.
Genium INET TradeGuard Window
The Genium INET TradeGuard window is composed of the following parts:

TradeGuard User's Guide
© 2017 Nasdaq, Inc. 9
1 Trader Panel: This panel displays a hierarchy of Sponsoring Participants, their SponsoredClients, and groups and nodes assigned to each Sponsored Client.
2 Current Consumption Tab: The Current Consumption tab shows the usage of all limits seton a Pre-Trade Limit Group.
3 Edit Limits Tab: The Edit Limits tab lets you add and edit limits on a Pre-Trade Limit Group.
4 Users Tab: The Users tab lets you add, remove, and view which exchange users areassigned to a Pre-Trade Limit Group.
5 Email Alerts Tab: The Email Alerts tab shows the alert notification list for the Pre-Trade LimitGroup, and lets you set which kinds of alerts will be sent to that group.
6 Users IDs Tab:
7 Trader IDs Tab:
8 Margin Limits Tab: Margin limits for individual accounts, and the current exposure of thoseaccounts can be reviewed on this tab.
9 Intraday Changes: The Intraday Changes pane shows changes that when saved in theinterface, are applied immediately.
10 Next Day Changes: The Next Day Changes pane shows changes that when saved in theinterface, are sent to the exchange database, and become effective when the system isstarted the next day.
Window Buttons
From left to right:
Minimize: Minimizes the application to your taskbar.
Maximize: Maximizes the application to fill your entire screen.
Close: Closes the application.
Revert: Undoes any unsaved changes.
Save: Saves your current changes.
Stop: Stops updates to the user interface.
Start: Resumes updates to the user interface.
Add: Adds a limit, user, or email recipient.

TradeGuard User's Guide
© 2017 Nasdaq, Inc. 10
Remove: Removes a limit, user, or email recipient.
Window Icons
In the Trader, the Same Day Changes, and the Next Day Changes panel, there are several icons thatindicate the status of that item.
Removed: Indicates that this item has been saved and is marked for removal in a nextday change.
Added: Indicates that this item has been saved and is marked to be added in a next daychange.
Unsaved: Indicated that this item has not yet been saved. You must press the savebutton if you want this item to be saved.
Expanding and Collapsing PanelsIf you do not want to view a particular panel in the Genium INET TradeGuard application, you can hide itusing collapse buttons. Alternatively, you can display it using the expand buttons.
Clicking these buttons will hide and display panels in the application.
Starting and Stopping UpdatesClick the Stop Updates button to stop data updates and review details displayed in the application.Stopping data updates does not affect server processing, only updates to the application will be paused.The server will continue monitoring and risk checking orders for all Pre-Trade Limit Groups. To resumeupdates, click the Start Updates button.
• To pause updates, click the Stop Updates button in the top right corner of a panel.• To resume updates to the user interface with the latest server data, click the Start
Updates button in the top right corner of a panel.
Start and Stop Updates Buttons

TradeGuard User's Guide
© 2017 Nasdaq, Inc. 11
Understanding Group Types in TradeGuard
Pre-Trade Limit GroupsA Pre-Trade Limit Group is the central conceptual unit where risk is monitored in the Genium INETTradeGuard application.
A Pre-Trade Limit Group is composed of the following parts:
• A Sponsoring Participant.• A Sponsored Client.• A group of users associated with the Sponsored Client to be controlled by the limits of the group.• Position limits for Tradeables.• An order rate limit for the group.• A list of email addresses which will receive alerts concerning the groups' exposure.• A restricted instrument flag. If set, the group will be limited to trading only instruments that have defined
risk limits.• A default user flag. If set, transactions from the sponsoring participant's default user will be added to the
group.
Components of a Pre-Trade Limit Group
Pre-Trade Limit Groups are shown with a briefcase icon in the TradeGuard interface.
User-based Pre-Trade Limit Groups
The following tabs are enabled for a Pre-Trade Limit Group:

TradeGuard User's Guide
© 2017 Nasdaq, Inc. 12
• Current Consumption Tab: Current exposure to Tradeable limits only applies to Pre-Trade LimitGroups.
• Edit Limits Tab: Tradeable limits only apply to Pre-Trade Limit Groups.• Users Tab: Pre-Trade Limit Groups monitor risk limits on a set of users.• Email Alerts Tab: All aspects of email alerting is the same for Pre-Trade Limit Groups and Account
Limit Nodes.
Account Limit NodesTradeGuard can also monitor the risk of individual accounts that belong to market participants. This iscalled an Account Limit Node.
Components of an Account Limit Node
Account Limit Nodes are shown with an 'A' icon in the TradeGuard interface.
Account Limit Node
The following tabs are enabled for an Account Limit Node:
• Margin Limit Tab: Only Account Limit Nodes can track margin limits.• Email Alerts Tab: All aspects of email alerting is the same for Pre-Trade Limit Groups and Account
Limit Nodes.

TradeGuard User's Guide
© 2017 Nasdaq, Inc. 13
Understanding Intraday vs Next Day Changes
Intraday ChangesThe following changes can be made, and are effective, at any time in the Genium INET TradeGuardapplication interface:
• Updating Limit Values• Setting Warn and Notice Percentages• Setting the Order Rate Limit• Setting Email Alerts• Adding New Email Alert Recipients• Blocking a Pre-Trade Limit Group• Unblocking a Pre-Trade Limit Group• Mass Canceling Orders on a Pre-Trade Limit Group• Unblocking an Order Rate Breach• Restricting Instruments for a Pre-Trade Limit Group• Mass Canceling Orders by User IDs on page 27• Unblocking a User ID on page 28• Mass Canceling Orders by Trader IDs on page 29• Unblocking a Trader ID on page 30• Add Account Limit Node• Remove Account Limit Node• Blocking an Account Limit Node• Unblocking an Account Limit Node
Unsaved intraday changes are displayed in the Intraday changes panel.
Intraday Changes Pane
Next Day ChangesThe following changes are 'next day'. When saved in the interface, these changes will be sent to theexchange database, and become effective when the system is started the next day:

TradeGuard User's Guide
© 2017 Nasdaq, Inc. 14
• Adding a New Trade Limit• Deleting an Existing Trade Limit• Changing Which Thresholds Trigger Email Alerts• Removing Email Alert Recipients• Adding a User to a Pre-Trade Limit Group• Adding a Pre-Trade Limit Group• Deleting a Pre-Trade Limit Group• Removing a User from a Pre-Trade Limit Group• Changing a Monitored User• Setting the Default User to Contribute to a Group• Setting the Overnight Positions Account for a Group• Changing the Margin Limit for an Account Limit Node
Next day changes display in a different panel to illustrate that they are pending changes to the system andwill not be applied during the current trading day.
Next Day Changes Pane
Note:
• If you add a next day change, and you need to modify that next day change before the next day,you must delete the pending change and then add a new one.
• Intraday and next day changes cannot be saved for a group at the same time. In this case theintraday changes must be made first, and saved to the group configuration. Then, next daychanges can be prepared for the group and saved.

TradeGuard User's Guide
© 2017 Nasdaq, Inc. 15
Understanding Breaches versus Blocks
BreachesA breach can occur on a tradeable level or a group level.
Tradeable Level
Breaches at the tradeable level are caused when orders on a tradeable surpass one of the position checksfor a user-based Pre-Trade Limit Group. When a breach occurs at the tradeable level, no orders in thistradeable are allowed. New orders are rejected for a breached tradeable. See Unbreaching a TradeableLimit for more information.
Group Level
Secondly, breaches are checked at the group level. At this time the only group level check is the OrderRate check. When a breach occurs at the group level, no orders are allowed for the user who caused thebreach.
Margin Breach
Account Limit Nodes can create margin limits breaches. This breach can optionally cause pop-up alerts forusers, but other wise do not cause any automatic reactions in the TradeGuard application. It is up to theoperator to decide on the appropriate action to take for a margin breach.
Types of Blocks
Manual PTLG Block
A manual block can be placed at the group level. No orders will be allowed for the group when thisis in effect. See Blocking a Pre-Trade Limit Group and Unblocking a Pre-Trade Limit Group for moreinformation.
Monitored User Disconnect Block
Another typed of “block” is a monitored user disconnect block. This “block” is automatic. If the monitoredclearing member disconnects, traders in the Pre-Trade Limit Group will be automatically blocked fromentering transactions. See Changing or Removing a Monitored User for more information.
Account Block
Account Limit Nodes can be blocked, but only manually. See Blocking an Account Limit Node, andUnblocking an Account Limit Node.

TradeGuard User's Guide
© 2017 Nasdaq, Inc. 16
Trader Panel
The trader panel shows all Sponsoring Participants, Sponsored Clients, Pre-Trade Limit Groups, andAccount Limit Nodes in a hierarchical tree.
The hierarchy contains the following levels:
• Top level—Sponsoring Participant: A trading participant who sponsors one or more participant’sdirect connection to the market.
• 2nd level—Sponsored Client: A Participant who is controlled by a Sponsoring Participant. ASponsored Client is only associated to one Sponsoring Participant.
• 3rd level
• Pre-Trade Limit Groups: A logical grouping of traders connected to one Sponsored Participant. Themembers of a group are defined by the trading IDs shown on the Users panel.
• Account Limit Nodes : Limits on individual accounts are also shown at this level.
Risk checks are enforced on all groups and limits nodes in real time as execution messages are read fromthe trading engine.
Columns Displayed
The following columns display on the Trader Panel:
• Restricted Instruments: This checkbox shows if the group is restricted to trading only instruments forwhich they have defined trading limits. If unchecked, the group can trade in any instruments, and onlythose that have defined limits will be checked for risk breaches.
• Breaches: Displays the number of risk check breaches by the participant, or group.• Warnings: Displays the number of risk check warnings made by the participant or group.• Notices: Displays the number of notices generated by the participant or group.• Warn %: When the trader or group reaches this limit percentage, warning email alerts will be
generated.• Notice %: When the trader or group reaches this limit percentage, warning email alerts will be
generated.• Order Rate: Shows the current rate of orders submitted by the limit group.• Order Rate Limit: Displays the limit set by the Participant for a user-based group. Order rate does not
apply to account groups. Exceeding the Order Rate limit will only generate Breach emails. Exceedingthe Order Rate limit will not generate Warnings or Notices.
Searching for Groups and AccountsYou can filter the groups and account limit nodes shown in the trader panel by searching for an account oruser.
To search for a particular account or group, complete the following steps:
1. From the trader panel, click the search bar.
Trader Panel Search Bar

TradeGuard User's Guide
© 2017 Nasdaq, Inc. 17
2. Select whether to search for user names or account names.3. Type a search string. An asterisk (*) can be used as a wildcard character in the search string.
For example, searching for ACCT* will display all groups containing any account that starts with thecharacters ACCT, followed by any other characters.
4. Click Search.
The Trader Panel is filtered, and only displays groups that have users or accounts that match thesearch string.
Filtered Trader Panel5. To show the entire hierarchy again, click the Clear button.
Notice, Warn, and Breach Notices in the Trader PanelGroups in the trader panel will display in different colors. The color corresponds to the any notice, warn,and breach events that have occurred for that group.
• Green: The exposure of the group is currently below the notice threshold.• Yellow: The group has passed the notice level on a limit.• Orange: The group has passed the warning level on a limit.• Red: The group has breached a limit.
Display of Breaches
While the group is breached:
• Members of the group cannot submit any orders for the instruments of the breached limit.• Members of the group can still cancel open orders.
To unbreach a group, see Unbreaching a Tradeable Limit.
Restricting Instruments for a Pre-Trade Limit GroupThe trader panel displays a column for Restricted instruments. This setting controls whether the groupcan only trade for Tradeables that have defined risk limits. When unchecked, the group can trade in allTradeables and only the limits set will be monitored and create breaches.

TradeGuard User's Guide
© 2017 Nasdaq, Inc. 18
To restrict a group to only trade instruments that have defined risk limits, complete the following steps:
1) On the Trader Panel, select a group.2) Check the box for Restricted Instruments.
Selecting Restricted Instruments3) Click Save.
Confirmation Window
A confirmation window displays.4) Click OK.
Note: This is an intraday change. This change takes effect immediately. See intraday changes formore information about intraday changes.
Setting Warn and Notice PercentagesYou can configure warn and notice percentages to monitor a Pre-Trade Limit Group's thresholds.
The values associated with breaches are further defined by level and are color coded to provide a visualindicator.
• Notice is the lowest level of alert.• Warning is next highest level of alert.
To set warn and notice percentages on a group:
1) Double click a Warn % or Notice % column in the row of a group.2) Enter a new value for the Warn % or Notice %.

TradeGuard User's Guide
© 2017 Nasdaq, Inc. 19
Setting Warn and Notice Percentages3) Click the Save button in the trader panel to save your changes.
Save Button
The Save Successful dialogue box appears confirming your changes for the group or groups you havechanged.
Save Successful Dialogue Box4) Click the OK button to confirm your change.
Note: This is an intraday change. This change takes effect immediately. See intraday changes formore information about intraday changes.
Setting the Order Rate LimitThe order rate limit is set on user-based Pre-Trade Limit Groups from the trader limit panel. This limitmeasures orders sent to the trading engine from all members in the group.
The Order Rate Limit check is based on new orders inserted into the book. If an order is traded at entry itwill also count towards the Order Rate Limit.
The following order types are ignored by the Order Rate Limit check:
• Order Cancel Requests• Rejected orders• Order modifications• Order types that do not stay in the book, such as IOC or FOK.

TradeGuard User's Guide
© 2017 Nasdaq, Inc. 20
Note:
• These orders will be counted if they trade.• During auction times these types do stay in the order book.
The order rate limit is checked every 1/10th of a second. This limit will be breach if the order rate is higherthan one tenth of the set limit within one tenth of a second. See Unblocking an Order Rate Breach for howto lift this breach condition.
To set an order rate limit on a Pre-Trade Limit Group:
1) Double click the order rate column in the row of a Pre-Trade Limit Group.2) Enter a new value for the order rate.
Setting the Order Rate Limit3) Click the Save button in the trader panel to save your changes.
Save Button
The Save Successful dialogue box appears confirming your changes for the group or groups you havechanged.
Save Successful Dialogue Box4) Click the OK button.
Note: This is an intraday change. This change takes effect immediately. See intraday changes formore information about intraday changes.

TradeGuard User's Guide
© 2017 Nasdaq, Inc. 21
Working With Pre-Trade Limit Groups
Adding a Pre-Trade Limit GroupTo add a user-based Pre-Trade Limit Group, complete the following steps:
1) From the Genium INET TradeGuard window, in the Trader Panel, select a market participant.2) Right-click, and then select Add Pre Trade Limits Group from the right-click menu.
Right Click Menu for Market Participant
The Input window appears.3) Enter the name of the new group.
Note: A Pre-Trade Limit Group must be given a unique identifier. The identifier should use thefollowing naming convention:
[sponsoring participant ID]_[Sponsored Client ID]_[Group Name]4) Click the OK button. (Alternatively, you can click the Cancel button to cancel the action.)
Create a New Pre-Trade Limit Group5) Assign a single tradeable or multiple tradeables to your new group by clicking the Add new Tradeable
button.
See Adding a New Trade Limit if you need help doing this.6) Click the Save button of the trader panel to save your changes.

TradeGuard User's Guide
© 2017 Nasdaq, Inc. 22
Save Button on Trader Panel
The Save Successful dialogue box appears confirming your changes for the group or groups you havechanged.
Save Successful Dialogue Box7) Click the OK button to confirm your change.
After you add the group and click the Save button, the group will appear in the Next Day Changes paneand become active the next trading day.
Note:
This is a next day change. Saving the change sends it to the exchange database and becomeseffective when the system is started the next day. See next day change for more information aboutnext day changes.
Deleting a Pre-Trade Limit GroupTo delete a Pre-Trade Limit Group, complete the following steps:
1) From the Genium INET TradeGuard window, in the Trader Panel, select a Pre Trade Limits Group.2) Right-click, and then select Delete Pre Trade Limits Group from the right-click menu.
Pre-Trade Limit Group Right Click Menu

TradeGuard User's Guide
© 2017 Nasdaq, Inc. 23
3) Click the Save button.
Save Button on Trader Panel
A confirmation window appears.4) Click the OK button to delete the group. (Alternatively, you can click the Cancel button to cancel the
action.)
Deleting a Pre-Trade Limit Group
After you delete the group and click the Save button, the group will appear in the Next Day Changes paneand be deleted the next trading day.
Note:
This is a next day change. Saving the change sends it to the exchange database and becomeseffective when the system is started the next day. See next day change for more information aboutnext day changes.
Mass Canceling Orders on a Pre-Trade Limit GroupMass canceling will cancel all open orders for all users in a Pre-Trade Limit Group. Mass canceling willautomatically block the group. The group needs to be manually unblocked to allow the group's users tosend new orders.
To mass cancel orders for a group, complete the following steps:
1) From the Genium INET TradeGuard window, in the Trader Panel, select a Pre-Trade Limit Group.2) Right-click, and then select Mass Cancel Pre Trade Limits Group from the right-click menu.

TradeGuard User's Guide
© 2017 Nasdaq, Inc. 24
Right Click Menu for Pre-Trade Limit Groups
All open orders for the group are canceled, and the group is blocked.
Note: This is an intraday change. This change takes effect immediately. See intraday changes formore information about intraday changes.
Blocking a Pre-Trade Limit GroupA Pre-Trade Limit Group can be blocked manually by the Participant or by exchange personnel. A blockedgroup's users cannot enter new orders, nor can they alter existing orders.
Blocked users of a Pre-Trade Limit Group are:
• Able to delete existing orders and quotes,• Allowed to login, and• Allowed to receive broadcasts, send queries, thus being able to view the market.
The Participant and the exchange personnel can still act on behalf of a blocked group (in the same way asbefore the group was blocked).
Pre-Trade Limit Groups are never unblocked automatically intraday. A blocked group can be unblockedintra-day by the Participant or by the exchange.
If the blocked group is not unblocked manually during that trading day, the blocked group will be unblockedautomatically at the beginning of the next trading day.
To block a Pre-Trade Limit Group, complete the following steps:
1) From the Genium INET TradeGuard window, in the Trader Panel, select a Pre-Trade Limit Group.2) Right-click, and then select Block Pre Trade Limits Group from the right-click menu.

TradeGuard User's Guide
© 2017 Nasdaq, Inc. 25
Pre-Trade Limit Group Right Click Menu
• Block Pre Trade Limits Group: Select this option and users for the group are allowed neither toenter new orders nor alter existing orders.
The group will be blocked. The icon for the group changes to indicate this condition.
A Blocked Pre-Trade Limit Group
Note: This is an intraday change. This change takes effect immediately. See intraday changes formore information about intraday changes.
Unblocking a Pre-Trade Limit GroupTo unblock a Pre-Trade Limit Group, complete the following steps:
1) From the Genium INET TradeGuard window, in the Trader Panel, select a group.2) Right-click, and then select Unblock Pre Trade Limits Group from the right-click menu.
Pre-Trade Limit Group Right Click Menu
The group will be unblocked. The icon for the group changes to indicate this condition.

TradeGuard User's Guide
© 2017 Nasdaq, Inc. 26
After you unblock the group, they are allowed to trade normally.
Note: This is an intraday change. This change takes effect immediately. See intraday changes formore information about intraday changes.
Unblocking an Order Rate BreachIf a Pre-Trade Limit Group breaches their order rate limit, they will not be able to submit any orders. Amanual unblock is required to lift the breach restriction.
To unblock an order rate breach, complete the following steps:
1) From the Genium INET TradeGuard window, in the Trader Panel, select a breached group.
Breached Group2) Right-click, and then select Unblock order rate from the right-click menu.
Unblocking an Order Rate Right Click Menu
The breach is lifted. The group will be able to trade normally.
Note: This is an intraday change. This change takes effect immediately. See intraday changes formore information about intraday changes.
Unbreaching a Tradeable Limit
Consequences of Breaching
When a Pre-Trade Limit Group is in breach of a Tradeable limit:
• Users in that group can:
• Cancel open orders.• Trade normally in Tradeables that are not breached.

TradeGuard User's Guide
© 2017 Nasdaq, Inc. 27
• Users in that group cannot:
• Place new orders on the breached Tradeable.• Modify an order for the breached Tradeable.
If a trader cancels and amends down until their limit is no longer in breach, the breach restriction is liftedand they can trade normally.
Acting on a Breached Group
The sponsoring partner, or exchange personnel can take several courses of action on a breached group:
1) Leave the group breached—messages will be rejected.2) Raise the associated limit on the group.
Mass Canceling Orders by User IDsThe User IDs for all users associated with the Sponsoring Participant or Sponsored Client will display inthe User IDs tab. You can mass cancel all open orders by User ID in this tab. Mass canceling by User IDblocks the trader user from entering orders until the block is manually cleared.
User IDs Tab
Note: By default, the Show trader users only check box will be selected.
To see all users in addition to trader users, clear the check box.
Mass Canceling by User ID
To mass cancel orders by User ID, complete the following steps:
1. From the Genium INET TradeGuard window, in the Trader Panel, select a Sponsoring Participant orSponsored Client. The User IDs for that participant displays in the Users IDs tab.
2. Click the User ID(s).

TradeGuard User's Guide
© 2017 Nasdaq, Inc. 28
3. Right-click, and then select Mass Cancel User(s) from the right-click menu.
or
If multiple users are selected, press CTRL and then right-click, and select Mass Cancel User(s) fromthe right-click menu.
Mass Cancel User(s)
A confirmation window appears.
Mass Cancel User(s) Confirmation Window4. Click Yes to cancel all open orders for the User ID. User IDs that have been mass canceled appear in
red.
Note: This is an intraday change. This change takes effect immediately. See intraday changes formore information about intraday changes.
Unblocking a User IDTo unblock a User ID, complete the following steps:
1) From the Genium INET TradeGuard window, in the Trader Panel, select a Sponsoring Participant orSponsored Client. The User IDs for that participant displays in the User IDs tab.
Users IDs Tab2) Right-click, and then select Unblock User(s) from the right-click menu.

TradeGuard User's Guide
© 2017 Nasdaq, Inc. 29
A confirmation window appears.
Unblock User(s) Confirmation Window
Unblock User(s)3) Click Yes to unblock the user.
The user(s) will be unblocked. The User ID row will no longer be red. When you unblock the user, they areallowed to trade normally.
Note: This is an intraday change. This change takes effect immediately. See intraday changes formore information about intraday changes.
Mass Canceling Orders by Trader IDsThe Trader IDs for all traders associated with the Sponsoring Participant or Sponsored Client will displayin the Trader IDs tab. You can mass cancel all open orders by Trader ID in this tab. Mass canceling byTrader ID blocks the participant from entering orders until the block is manually cleared.
Trader IDs Tab
Mass Canceling by Trader ID
To mass cancel orders by Trader ID, complete the following steps:
1. From the Genium INET TradeGuard window, in the Trader Panel, select a Sponsoring Participant orSponsored Client. The Trader IDs for that participant displays in the Trader IDs tab.
2. Click the Trader ID(s).3. Right-click, and then select Mass Cancel Trader(s) from the right-click menu.
or
If multiple Trader IDs are selected, press CTRL and then right-click, and select Mass Cancel Trader(s)from the right-click menu.

TradeGuard User's Guide
© 2017 Nasdaq, Inc. 30
Mass Cancel Trader(s)
A confirmation window appears.
Mass Cancel Trader(s) Confirmation Window4. Click Yes to cancel all open orders entered with that Trader ID under the selected participant. Trader
IDs that have been blocked appear in red.
Note: This is an intraday change. This change takes effect immediately. See intraday changes formore information about intraday changes.
Unblocking a Trader IDTo unblock a Trader ID, complete the following steps:
1) From the Genium INET TradeGuard window, in the Trader Panel, select a Sponsoring Participant orSponsored Client. The Trader IDs for that participant displays in the Trader IDs tab.
Traders IDs Tab2) Right-click, and then select Unblock Trader(s) from the right-click menu.
A confirmation window appears.

TradeGuard User's Guide
© 2017 Nasdaq, Inc. 31
Unblock Trader(s) Confirmation Window
Unblock Trader(s)3) Click Yes to unblock the Trader ID.
The trader ID will be unblocked. The Trader ID row will no longer be red. When you unblock the trader ID,they are allowed to be used normally to send orders.
Note: This is an intraday change. This change takes effect immediately. See intraday changes formore information about intraday changes.

TradeGuard User's Guide
© 2017 Nasdaq, Inc. 32
Working With Account Limit Nodes
In addition to Pre-Trade Limit Groups, a market participant can also set limits on individual accountsvia Account Limit Nodes. See Understanding Group Types in TradeGuard for more information on thedifferences between Pre-Trade Limit Groups and Account Limit Nodes.
Adding an Account Limit NodeTo add an Account Limit Node to a market participant, complete the following steps:
1. From the Trader Panel, right click a market participant node.2. Click Add Position Account Limits from the context menu.
Right Click Menu for Market Participant
A window will display showing accounts belonging to the market participant.
Account Picker Window3. Click an account from the listed accounts, then click Select.
The new account limit node will appear in the hierarchy.

TradeGuard User's Guide
© 2017 Nasdaq, Inc. 33
Newly Added Account Node4. Save the changes to the hierarchy. Click the Save button.
Save Button on Trader Panel
A confirmation dialogue will appear.
Save Successful Dialogue Box5. Click OK.
Note: This is an intraday change. This change takes effect immediately. See intraday changes formore information about intraday changes.
Deleting an Account Limit NodeTo delete an Account Limit Node, complete the following steps:
1. From the Trader Panel, right click an Account Limit Node.
The context menu will appear.

TradeGuard User's Guide
© 2017 Nasdaq, Inc. 34
Account Limit Node Right-click Menu2. Click Delete Position Account Limits.
The Account Limit Node will appear with staged changes in the trader panel.
Staged Deletion of a Node3. Save the changes to the hierarchy. Click the Save button.
Save Button on Trader Panel
A confirmation dialogue will appear.
Save Successful Dialogue Box4. Click OK.
Note: This is an intraday change. This change takes effect immediately. See intraday changes formore information about intraday changes.

TradeGuard User's Guide
© 2017 Nasdaq, Inc. 35
Block an Account Limit NodeAn Account Limit Node does not automatically block. It can only be manually blocked via a command fromthe TradeGuard interface.
To block and account based group, complete the following steps:
1. From the Trader Panel, right click an Account Limit Node.
2. Click Block Account from the group context menu.
The icon of the group changes to reflect its condition.
Blocked Account Limit Node
Note: This is an intraday change. This change takes effect immediately. See intraday changes formore information about intraday changes.
Unblock an Account Limit NodeTo unblock an Account Limit Node, complete the following steps:
1. From the Trader Panel, right click a blocked Account Limit Node.2. Click Unblock Account from the group context menu.

TradeGuard User's Guide
© 2017 Nasdaq, Inc. 36
Right-click Menu for Account Limit Node
The block on the account will be immediately lifted.
Note: This is an intraday change. This change takes effect immediately. See intraday changes formore information about intraday changes.

TradeGuard User's Guide
© 2017 Nasdaq, Inc. 37
Current Consumption Tab
The Current Consumption tab displays defined limits for the selected user-based group and the currentusage of those limits by trading activity.
Current Consumption Tab
The following columns display on the Current Consumption tab:
• Name: The name of the Tradeable instrument.• Calculation: The calculation method for the limits.• Open Buy: The current value of open buy orders for the Tradeable.• Open Sell: The current value of open sell orders for the Tradeable.• Traded Bought: The current value of executed buy orders for the Tradeable.• Traded Sold: The current value of executed sell orders for the Tradeable.• Traded Net: The absolute value of traded bought minus traded sold for the Tradeable.• Tot Buy: The current value of open and executed buy orders for the Tradeable.• Tot Sell: The current value of open and executed sell orders for the Tradeable.• Tot Net Buy: Traded Bought – Traded Sold + Open Buy for the Tradeable.• Tot Net Sell: Traded Sold – Traded Bought + Open Sell for the Tradeable.• FX-Net Open Position: Net open position is the net sum of positions for each currency in foreign
exchange currency pairs. This limit only applies to foreign exchange instruments. Overnight positions,open positions, and traded positions contribute to the total exposure.
• FX-Gross Limit: The gross limit is the sum of the absolute position in each foreign exchange currency.This limit only applies to foreign exchange instruments. Overnight positions, open positions, and tradedpositions contribute to the total exposure.
Note:
• Pre-trade limits are not shown on the Current Consumption tab because there is no traderexposure that changes over time for these limits.
• The set of risk checks used by the exchange is configurable. Some risk checks might not bedisplayed in your client application.
Starting and Stopping UpdatesClick the Stop Updates button to stop data updates and review details on the Current consumption tab.Stopping data updates does not affect server processing—only updates to the Current consumption tab willbe paused. The server will continue monitoring trades and risk checks.
To pause updates to the Current consumption tab, click the Stop Updates button in the top right corner.
Stop Updates Button

TradeGuard User's Guide
© 2017 Nasdaq, Inc. 38
Click the Start Updates button to restart data updates to the Genium INET TradeGuard user interface withthe latest server data.
To resume updates to the Current consumption tab, click the Start Updates button in the top right corner.
Start Updates Button

TradeGuard User's Guide
© 2017 Nasdaq, Inc. 39
Editing Limits Overview
The risk exposure of all instruments held by users of a Pre-Trade Limit Group is calculated together. Thiscombined exposure can be limited according to several calculations.
In the Genium INET TradeGuard application, a limit is defined with the following parameters:
1) An instrument class or instrument type (regular or combination).2) A calculation type for the exposure value. This can be one of the following:
• Quantity: The exposure is calculated by summing the share quantity for each order submitted by amember of the group.
• Volume: The exposure is calculated by summing the volume (shares * price quotation factor) of allorders submitted by members of the group.
Note: The selection of calculation method does not affect FX limits, Max Order limits, orPrice Collar. These limits use static calculation methods.
3) Each tradeable or tradeable group can have multiple 'risk counter' limits in effect:
• Open Buy: The current value of open buy orders for the Tradeable.• Open Sell: The current value of open sell orders for the Tradeable.• Traded Bought: The current value of executed buy orders for the Tradeable.• Traded Sold: The current value of executed sell orders for the Tradeable.• Traded Net: The absolute value of traded bought minus traded sold for the Tradeable.• Tot Buy: The current value of open and executed buy orders for the Tradeable.• Tot Sell: The current value of open and executed sell orders for the Tradeable.• Tot Net Buy: Traded Bought – Traded Sold + Open Buy for the Tradeable.• Tot Net Sell: Traded Sold – Traded Bought + Open Sell for the Tradeable.• FX-Net Open Position: Net open position is the net sum of positions for each currency in foreign
exchange currency pairs. This limit only applies to foreign exchange instruments. Overnightpositions, open positions, and traded positions contribute to the total exposure.
• FX-Gross Limit: The gross limit is the sum of the absolute position in each foreign exchangecurrency. This limit only applies to foreign exchange instruments. Overnight positions, openpositions, and traded positions contribute to the total exposure.
• Max Trade Report Size: A pre-trade limit on the total computed exposure of trade reporttransactions. Any trade report exceeding the limit is rejected before being accepted by theexchange.
• Max Order Quantity: A pre-trade limit on the total computed exposure of a regular order, using theQuantity calculation method. If an order exceeds the limit it is rejected before being accepted by theexchange.
• Max Order Volume: A pre-trade limit on the total computed exposure of a regular order, using theVolume calculation method. If an order exceeds the limit it is rejected before being accepted by theexchange.
• Max Order Value: A pre-trade limit on the total computed exposure of a regular order, using theValue calculation method, which is Volume * Order Price. If an order exceeds the limit it is rejectedbefore being accepted by the exchange.
• Price Collar: A pre-trade limit on the number of price ticks by which an order price can differ fromthe reference price for that instrument. If an order exceeds the limit it is rejected before beingaccepted by the exchange.
Note:

TradeGuard User's Guide
© 2017 Nasdaq, Inc. 40
• When setting limits for foreign exchange instruments, the recommendation is to set a limit onthe group containing all foreign exchange instruments. Limits on individual foreign exchangeinstruments are possible, but they are not good controls for overall risk.
• The set of risk checks used by the exchange is configurable. Some risk checks might not bedisplayed in your client application.
• The following risk checks are not applicable to Combination classes or types: Max OrderVolume, Max Order Value, Price Collar.
Maximum Limit Values
The maximum value allowed as the calculated exposure for a Pre-Trade Limit Group or as the limit on thegroup is 922,337,203,685,477. The maximum value allowed for the Price Collar limit is 2,147,483,647.
Breached Limits
If any of the risk limits are exceeded, the system rejects new orders submitted in any of the instrumentsconnected to the affected Tradeable from any of the User IDs that are part of the group. However, a usercan still cancel open orders for the affected instrument when the limit is breached.
Adding a Trade LimitTo add a new trade limit to a Pre-Trade Limit Group, complete the following steps:
1) Click the Pre-Trade Limit Group for which you want to edit limits, and then click the Edit Limits tab.2)
Click the Add New Tradeable button.
The Add new Tradeable window displays.
Adding a Limit
Note: The instruments listed will only show regular and combination instrument classes andtypes specified in the Legal Instrument Type for the user logged in.
3) Select an instrument:
• Market: Select the market where the tradeable is offered. Leaving the field blank will showtradeables in all markets.
• Name: The name of the tradeable to monitor.4) Select the calculation method for the limit:
• Quantity: The exposure is calculated based on the share quantity of all orders.• Volume: The exposure is calculated based on the volume (shares * price quotation factor) of all
orders.
Note: The selection of calculation method does not affect FX limits. These limits use a singlestatic calculation.
5) Click the Use this tradeable button.

TradeGuard User's Guide
© 2017 Nasdaq, Inc. 41
Use This Tradeable Button
A row with the new tradeable instrument will appear in the Edit Limits panel.6) Set any limits to be enforced on the selected tradeable.
Note: Remember, an FX instrument can have all available limits applied to it, but a non-FXinstrument cannot set FX limits.
7) Click the Save button.
Save Button
The Next Day Changes Available confirmation window appears.
Next Day Changes Save Button8) Click the Save button.
Note: A limit value of zero means no limit, and no breach is possible for that risk counter.
The Save Successful dialogue box appears confirming your changes for the group or groups you havechanged.

TradeGuard User's Guide
© 2017 Nasdaq, Inc. 42
Save Successful Dialogue Box9) Click the OK button to confirm your change.
The new limit appears in the Next Day changes panel and will change the next trading day.
Note:
This is a next day change. Saving the change sends it to the exchange database and becomeseffective when the system is started the next day. See next day change for more information aboutnext day changes.
Editing Trade LimitsTo edit a limit on a Pre-Trade Limit Group, complete the following steps:
1) From the Genium INET TradeGuard window, click the group for which you want to edit limits, and thenclick the Edit Limits tab.
Limits for a Pre-Trade Limit Group2) In the Same Day Changes panel, review or change the fields as necessary. See the Editing Limits
Overview for definitions of any of the fields.
Note: Remember, an FX instrument can have all available limits applied to it, but a non-FXinstrument cannot set FX limits.
Limits for a Pre-Trade Limit Group3) Click the Save button.

TradeGuard User's Guide
© 2017 Nasdaq, Inc. 43
Save Button
The Save Successful dialogue box appears confirming your changes for the group or groups you havechanged.
Save Successful Dialogue Box4) Click the OK button to confirm your change.
Note:
Changing a trade limit can be either an intraday day or a next day change.
• If the change only affects risk counter limits, it will be an intraday change.• If the change affects the limit calculation, the limit will appear in the Next Day changes panel and
be applied the next day.
Note:
• Setting a limit to zero disables the limit check.• Changing a limit from zero to a non-zero value intra-day may cause unpredictable results.
TradeGuard ignores credit consumption while the limit is zero.
Deleting an Existing Trade LimitTo delete an existing trade limit to on a Pre-Trade Limit Group, complete the following steps:
1) Click the group for which you want to edit limits, and then click the Edit Limits tab.2) In either the Same Day Changes or the Next Day Changes panel, select the limit to delete.3)
In the appropriate panel, click the Remove Tradeable button.4) Click the Save button.
Saving Changes to the Group

TradeGuard User's Guide
© 2017 Nasdaq, Inc. 44
The Next Day Changes Available confirmation window appears.5) Click the Save button.
Next Day Changes Save Button
The Save Successful dialogue box appears confirming your changes for the group or groups you havechanged.
Save Successful Dialogue Box6) Click the OK button to confirm your change.
After you delete the trade limit click the Save button, the limit will appear in the Next Day Changespanel and be removed the next trading. The limit will appear in the Next Day Changes panel and beremoved the next trading.
Note:
This is a next day change. Saving the change sends it to the exchange database and becomeseffective when the system is started the next day. See next day change for more information aboutnext day changes.

TradeGuard User's Guide
© 2017 Nasdaq, Inc. 45
Managing Users Overview
The Users tab shows which Genium INET user accounts are assigned to a given Pre-Trade Limit Group.
Viewing UsersTo view users that are assigned to a Pre-Trade Limit Group, complete the following steps:
1) From the main window, click the group for which you want to view users, and then click the Users tab.
Users Tab2) Review the users assigned to the group.
• Name: Displays the signature of the user.• Participant: Shows the Participant the user belongs to.
Note:
• In order to see a user that was added intra-day by another user, you need to log out and logback into the application.
• Properties of users cannot be edited from the TradeGuard application.
Adding a User to a Pre-Trade Limit GroupGenium INET users need to be assigned to a Pre-Trade Limit Group. A user can belong to only one groupin the Genium INET TradeGuard application.
To add a user to a group, complete the following steps:
1) From the Genium INET TradeGuard window, click the group for which you want to add a new user.2) Then click the Users tab.
Users Tab

TradeGuard User's Guide
© 2017 Nasdaq, Inc. 46
3)
Click the Add New User button.
The Select Users window displays.
Select Users Window4) The table shows users who are unassigned to Pre-Trade Limit Groups. Review the following fields to
determine which user you want to add:
• Name: Displays the signature of the user.• Participant: Shows the Participant ID the user belongs to.
5) Select a user from the table.6) Click the Select user button.
Select User Button
The new user is added to the Users tab.7) Click the Save button.
Save Button on Trader Panel
The Next Day Changes Available confirmation window appears.8) Click the Save button.

TradeGuard User's Guide
© 2017 Nasdaq, Inc. 47
Next Day Changes Save Button
The Save Successful dialogue box appears confirming your changes for the group or groups you havechanged.
Save Successful Dialogue Box9) Click the OK button to confirm your change.
Note:
This is a next day change. Saving the change sends it to the exchange database and becomeseffective when the system is started the next day. See next day change for more information aboutnext day changes.
Removing a User From a Pre-Trade Limit GroupTo remove a user from a group, complete the following steps:
1) Click the Pre-Trade Limit Group you want to modify, and then click the Users tab.
Users Tab2) Select the user to remove.3)
Click the Remove User button.4) Click the Save button.

TradeGuard User's Guide
© 2017 Nasdaq, Inc. 48
Save Button on Trader Panel
The Next Day Changes Available confirmation window appears.5) Click the Save button.
Next Day Changes Save Button
The Save Successful dialogue box appears confirming your changes for the group or groups you havechanged.
Save Successful Dialogue Box6) Click the OK button to confirm your change.
Note:
This is a next day change. Saving the change sends it to the exchange database and becomeseffective when the system is started the next day. See next day change for more information aboutnext day changes.
Changing or Removing a Monitored UserA Pre-Trade Limit Group can be configured to monitor the connection status of a Sponsoring Participant’sreal-time feed session (FIX and/or OMnet). For example, this can be used to monitor the drop-copy feedconnection status of a specific clearing member user. If the clearing member disconnects, traders in thegroup will be automatically blocked from entering transactions.

TradeGuard User's Guide
© 2017 Nasdaq, Inc. 49
If the Monitored User disconnects from the exchange, any Pre-Trade Limit Groups that monitor that userswill:
• Be blocked (unable to submit orders and quotes).
Setting a Monitored User is optional. The monitored user must belong to the Pre-Trade Limit Group'sSponsoring Participant.
Note: The monitored user id should NEVER be used to log into the Genium INET TradeGuardclient application. Doing so will trigger monitoring groups to block.
To change a Monitored User, complete the following steps:
1) From the Genium INET TradeGuard window, click the Pre-Trade Limit Group for which you want tochange a Monitored User, and then click the Users tab.
Users Tab2) Click the Change button. Alternatively, click the Remove button to remove the selected user.
Change Button
The user selection window appears.
Picking a Monitored User3) Click the user to be monitored, and then click the Select User button.

TradeGuard User's Guide
© 2017 Nasdaq, Inc. 50
Select User Button4) Click the Save button in the trader panel to save your changes.
Save Button on Trader Panel5) The Next Day Changes Available confirmation window appears.6) Click the Save button.
Next Day Changes Save Button
The Save Successful dialogue box appears confirming your changes for the group or groups you havechanged.
Save Successful Dialogue Box7) Click the OK button to confirm your change.
Note:

TradeGuard User's Guide
© 2017 Nasdaq, Inc. 51
This is a next day change. Saving the change sends it to the exchange database and becomeseffective when the system is started the next day. See next day change for more information aboutnext day changes.
Default GroupDesignating a group as the default group associates transactions from the default user into the group.Transactions by the default user are those where the user field does not contain a valid user ID. This canoccur when a two-party trade is entered, or when the exchange enters or modifies an order on behalf of amember. Unless a group is designated as the default group, these transactions will not be represented inthe exposure calculated by TradeGuard.
To assign the default user to a Pre-Trade Limit Group, complete the following steps:
1) Select a Pre-Trade Limit Group where you will add the default user risk.2) Click the Users tab.
Default Group Checkbox3) Click the Default Group check box in the next day changes panel.4) Click the Save button.
A save confirmation appears.
Confirmation Window
Note:
This is a next day change. Saving the change sends it to the exchange database and becomeseffective when the system is started the next day. See next day change for more information aboutnext day changes.

TradeGuard User's Guide
© 2017 Nasdaq, Inc. 52
Managing Email Alerts Overview
The Genium INET TradeGuard server monitors the activity of all groups, and account limit nodes at alltimes. If the calculated current risk of a group or a node exceeds any of its established notification levels,emails are sent to all members of the notification list for that group. The notification levels are set as apercentage of the limit and can be set individually for each Pre-Trade Limit Group and account node.
The Genium INET TradeGuard application can be configured to send three types of email alerts:
1) Notices: Lowest level of alert.2) Warnings: Highest level of alert.3) Breaches: Risk limit values have been exceeded.
The values associated with breaches are defined by level and are color coded to provide a visual indicatorof risk.
• Notice (yellow) is the lowest level of alert.• Warning (orange) is next highest level of alert.• Breach (red) indicates that the set values have been exceeded.
Each limit defined for a Pre-Trade Limit Group will only send one notice, warn, and breach email alert pertrading day.
If a limit is altered during the trading day, this limitation will be reset, and the limit will again generate oneemail alert for each notification level regardless of any that were sent previously.
Note: The Order Rate limit only generates breach emails. It does not create notice or warningemail alerts. Each time the Order Rate limit breaches it will send an email alert.
Setting Email AlertsTo set email alerts, complete the following steps:
1) From the Genium INET TradeGuard window, in the Trader Panel, select the Pre-Trade Limit Group forwhich you want to define new email alerts, and then click the Email Alerts tab.
Email Alerts Tab2) Select or deselect the following check boxes to turn them on or off.

TradeGuard User's Guide
© 2017 Nasdaq, Inc. 53
• Breach: Send emails when the group breaches a set limit.• Warning: Send emails when the group reaches the warning level of a limit.• Notice: Send emails when the group reaches the notice level of a limit.
Selecting Alerts3) Click the Save button in the trader panel to save your changes.
Save Button
After you set and save email alerts, all members of the email alert group receive notifications when theselected events occur.
Note:
This is a next day change. Saving the change sends it to the exchange database and becomeseffective when the system is started the next day. See next day change for more information aboutnext day changes.
Adding New Email Alert RecipientsYou can add new email addresses to be alerted when a Pre-Trade Limit Group generates notice, warn,and breach events.
To add new email alerts, complete the following steps:
1) From the Genium INET TradeGuard window, in the Trader Panel, select the Pre-Trade Limit Group forwhich you want to define new email alerts, and then click the Email Alerts tab.
Email Alerts Tab

TradeGuard User's Guide
© 2017 Nasdaq, Inc. 54
2)
Click the Add New Email button.
The Add notification email window displays.
Add Notification Email Window3) Enter the new email address.4) Click the OK button.5) Click the Save button in the trader panel to save your changes.
Save Button
The Save Successful dialogue box appears confirming your changes for the group or groups you havechanged.
Save Successful Dialogue Box6) Click the OK button to confirm your change.
After you add the new email alert recipient and click the Save button, the email address is immediatelyadded to the notification list for the group or node.
Note: This is an intraday change. This change takes effect immediately. See intraday changes formore information about intraday changes.
Editing Email Alert RecipientsYou can edit the email address of any notification recipient at any time. After you edit the email alertrecipients and click the Save button, they begin to receive email alerts immediately.
To edit email alerts, complete the following steps:

TradeGuard User's Guide
© 2017 Nasdaq, Inc. 55
1) From the Genium INET TradeGuard window, in the Trader Panel, select the Pre-Trade Limit Group forwhich you want to define new email alerts, and then click the Email Alerts tab.
The Email Alerts panel displays.
Genium Email Alerts Tab2) Edit the following fields and options as necessary:
• Email: Double click the name field to edit the email recipient.• Generate Email on: Select or deselect the following check boxes to turn notifications on or off.• Breach: Notify recipients when the group breaches a limit.• Warning: Notify recipients when the group passes the warning threshold and is close to a breach.• Notice: Notify recipients when the group passes the notice threshold.
3) Click the Save button.
Save Button
Note: This is an intraday change. This change takes effect immediately. See intraday changes formore information about intraday changes.
Removing Email Alert RecipientsTo remove an email address from the alert list, complete the following steps:
1) From the Genium INET TradeGuard window, in the Trader Panel, select a Pre-Trade Limit Group.2) Next, click the Email Alerts tab.

TradeGuard User's Guide
© 2017 Nasdaq, Inc. 56
Email Alerts Tab3) Click the desired email recipient.4)
Click the Remove Email button.
A confirmation dialogue appears.
Removing Email Alert Recipients5) Click the Yes button.6) Click the Save button.
Save Button
The Next Day Changes Available confirmation window appears.7) Click the Save button.
Next Day Changes Save Button

TradeGuard User's Guide
© 2017 Nasdaq, Inc. 57
The Save Successful dialogue box appears confirming your changes for the group or groups you havechanged.
Save Successful Dialogue Box8) Click the OK button to confirm your change.
Note:
This is a next day change. Saving the change sends it to the exchange database and becomeseffective when the system is started the next day. See next day change for more information aboutnext day changes.
TradeGuard User's Guide
© 2017 Nasdaq, Inc. 58
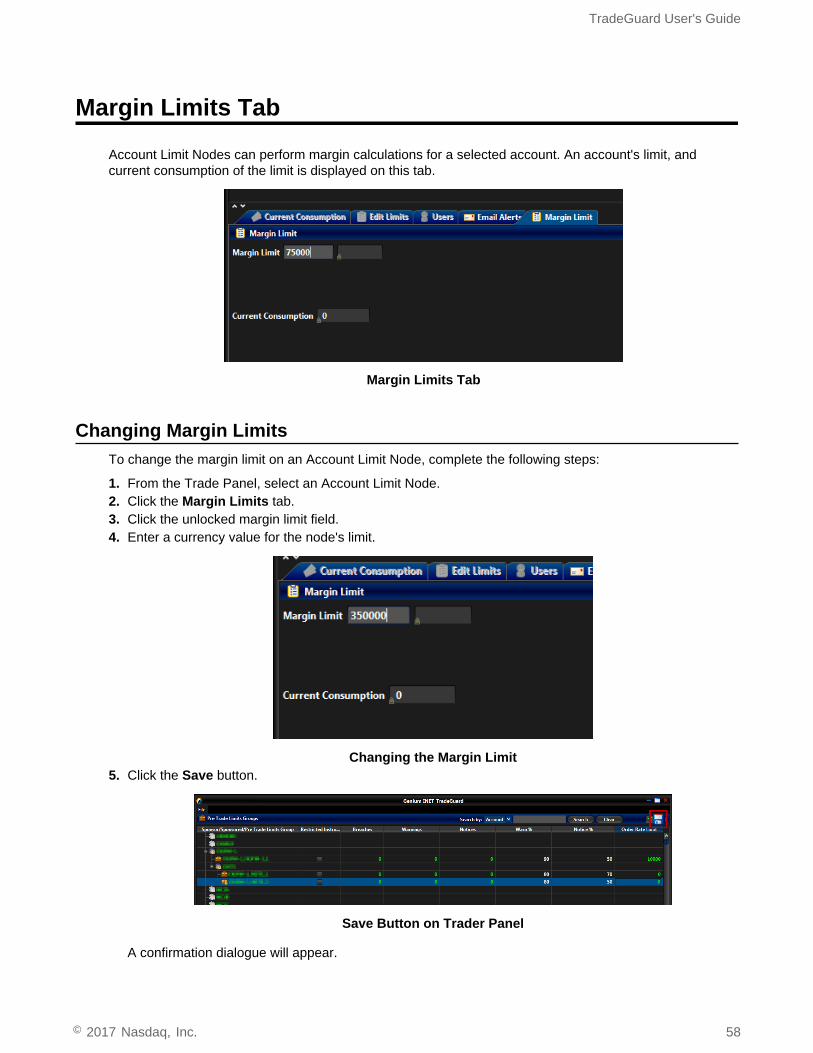
Margin Limits Tab
Account Limit Nodes can perform margin calculations for a selected account. An account's limit, andcurrent consumption of the limit is displayed on this tab.
Margin Limits Tab
Changing Margin LimitsTo change the margin limit on an Account Limit Node, complete the following steps:
1. From the Trade Panel, select an Account Limit Node.2. Click the Margin Limits tab.3. Click the unlocked margin limit field.4. Enter a currency value for the node's limit.
Changing the Margin Limit5. Click the Save button.
Save Button on Trader Panel
A confirmation dialogue will appear.

TradeGuard User's Guide
© 2017 Nasdaq, Inc. 59
Save Successful Dialogue Box6. Click OK.
Note: This is an intraday change. This change takes effect immediately. See intraday changes formore information about intraday changes.
Breaches to Margin LimitsIf an Account Limit Node breaches a margin limit:
• the breach count for the node is incremented.• Email alerts are sent to the notification list for the node.• If popup alerts are enabled for any users of the TradeGuard with permission to view the node, then a
pop-up will occur for those client applications.
Example of Pop-up Breach Alert
Note: Margin breaches do not automatically trigger a block on the node. It is up to the operator todecide how to respond to a margin limit breach.
Enabling Popup Warnings for Margin BreachesTo enable pop-up warnings on margin breaches, complete the following steps:
1. Click the File menu of the TradeGuard application.
The File menu will appear.
File Menu2. Click Show popup on margin limit breach. Alternately, de-select the check-box again to disable pop-
up alerts for margin breaches.

TradeGuard User's Guide
© 2017 Nasdaq, Inc. 60
Once selected, any margin breaches on Account Limit Nodes visible to your user login will cause popupalerts to appear.

TradeGuard User's Guide
© 2017 Nasdaq, Inc. 61
Appendix
Glossary
At-Trade
This term pertains to limits that are checked by the TradeGuard server after it receives a copy of the orderdetail or match detail message. If an at-trade limit is exceeded, then the TradeGuard server sends a'breach' message to the matching engine to block further order flow until the breach condition is resolved.
Monitored User
A user belonging to a Sponsoring Participant, who is used to monitor the trading activities of Pre-TradeLimit Groups.
Pre-Trade
The impact of an order against is checked against the limits in place, and an order is possibly rejected,before the order is allowed to enter the order-book of the exchange matching engine.
Pre-Trade Limits Group
A group of users from the same market participant. Pre-Trade Limit Groups are set up by a SponsoringParticipant to control the risk of a group of users within a Sponsored Client. Sometimes abbreviated asPTLG.
Price Quotation Factor
A number which describes the volume of underlying units represented by a derivative instrument. Forinstance, if a single futures contract represents the right to buy or sell 100 units of the contract’s underlyinginstrument, the price quotation factor for the futures contract would be 100. Also known as contractmultiple.
Sponsored Client
A market participant who is granted direct trading access on the basis of a Sponsoring Participantaccepting responsibility for all entered transactions.
Sponsoring Participant
Sponsoring Participant means a market participant who sponsors one or more clients so that they canhave a direct connection to an exchange.
Trade Report
A trade report is a trade arranged without submitting orders to the exchange to be matched. Even thoughthis order was matched off the exchange, a record of the transaction is still sent to the exchange with aspecialized message type.
Tradeable
A set of instruments traded in Genium INET, which typically has some common characteristics. This groupof instruments may either be an “instrument type” or “instrument class”. The exposure of each Pre-TradeLimit Group to a tradeable is monitored and limited by the TradeGuard application.

TradeGuard User's Guide
© 2017 Nasdaq, Inc. 62
Change Log
Revision Date Description
1 2013-04-17 Add topics for Restricted Instrument functionality.
Add topics for Default Group functionality.
Release for 2.0.0230.
2 2013-06-12 Update intraday and next day changes in topic 'Understanding Intraday vs. NextDay Changes'.
Update actions allowed when a tradeable is breached in 'Unbreaching a PRMTradeable Limit'.
Change 'Default User' topic name to 'Default Group'. Expand information ontransactions that use the default user.
Updated description when email alerts are sent in ‘Managing Email Alerts’ topic.
3 2013-12-05 Update screen shots of the tradeable picker.
4 2014-11-05 Updates for FX limits net open position, and gross position.
5 2014-12-03 Addition of Accounts, and Messages tabs.
6 2015-02-11 Column names for FX limits are prefixed with 'FX-'. Update screen shots. Minortext changes.
7 2015-03-23 Updates for addition of Max Trade Report Size limit. General editing.
8 2015-04-08 Minor corrections.
9 2015-04-20 Minor edits.
10 2015-05-05 The names of the Account tab and Messages tabs changed to Account (FX)and Messages (FX). Update screen shots. Minor edits.
11 2015-05-06 Minor edits.
12 2015-10-21 Re-issue for 4.0.0260 release. Minor stylesheet changes.
13 2016-01-06 Change product name to TradeGuard. Update screenshots.
14 2016-01-12 Updates related to Margin Limits tab and Account Limit Nodes. Updates toWindow Layout, Working With Account Limit Nodes, and Margin Limits tabtopics.
Remove the Account (FX) tab, and the Messages (FX) tab.
Update screenshots throughout manual. General editing.
15 2017-08-25 Updated with new Mass Cancel functionality.


