110
TrafficShield ® Installation and Configuration Manual version 3.2 MAN-0141-00
TrafficShield ® Installation andConfiguration Manual
version 3.2
MAN-0141-00


Service and Support Information
Service and Support Information
Product VersionThis manual applies to product version 3.2 of the TrafficShield® Application Firewall.
Legal Notices
CopyrightCopyright 2002 - 2005, F5 Networks, Inc. All rights reserved.
F5 Networks, Inc. (F5) believes the information it furnishes to be accurate and reliable. However, F5 assumes no responsibility for the use of this information, nor any infringement of patents or other rights of third parties which may result from its use. No license is granted by implication or otherwise under any patent, copyright, or other intellectual property right of F5 except as specifically described by applicable Control user licenses. F5 reserves the right to change specifications at any time without notice.
TrademarksF5, F5 Networks, the F5 logo, BIG-IP, 3-DNS, iControl, GLOBAL-SITE, SEE-IT, EDGE-FX, FireGuard, Internet Control Architecture, IP Application Switch, iRules, OneConnect, Packet Velocity, SYN Check, Control Your World, ZoneRunner, uRoam, FirePass, and TrafficShield are registered trademarks or trademarks of F5 Networks, Inc. in the U.S. and certain other countries. All other trademarks mentioned in this document are the property of their respective owners. F5 Networks' trademarks may not be used in connection with any product or service except as permitted in writing by F5.
Export Regulation NoticeThis product may include cryptographic software. Under the Export Administration Act, the United States government may consider it a criminal offense to export this product from the United States.
Export WarningThis is a Class A product. In a domestic environment this product may cause radio interference in which case the user may be required to take adequate measures.
FCC ComplianceThis equipment generates, uses, and may emit radio frequency energy. The equipment has been type tested and found to comply with the limits for a Class A digital device pursuant to Part 15 of FCC rules, which are designed to provide reasonable protection against such radio frequency interference.
Operation of this equipment in a residential area may cause interference, in which case the user at his own expense will be required to take whatever measures may be required to correct the interference.
Any modifications to this device, unless expressly approved by the manufacturer, can void the user's authority to operate this equipment under part 15 of the FCC rules.
Canadian Regulatory ComplianceThis class A digital apparatus complies with Canadian I CES-003.
Standards ComplianceThe product conforms to ANSI/UL 60950-1-2002 1st edition and Certified to CAN/CSA C22.2 No. 60950-1-3 first edition.
TrafficShield® Installation and Configuration Manual Version 3.2 i

ii

Table of Contents


Table of Contents
1Introduction
Product overview ............................................................................................................................1-1Document objectives .....................................................................................................................1-1How this manual is organized ......................................................................................................1-1Audience and assumed knowledge .............................................................................................1-2Related documentation ..................................................................................................................1-2
2Installing TrafficShield Units
Network terminology ....................................................................................................................2-1TrafficShield private network ..............................................................................................2-1Private IP ..................................................................................................................................2-1Service IP .................................................................................................................................2-1IP to Web server ...................................................................................................................2-2Server IP ...................................................................................................................................2-2Trusted IP ................................................................................................................................2-2Permanent IP ...........................................................................................................................2-2Static Route .............................................................................................................................2-2Gateway ...................................................................................................................................2-2Alias IP ......................................................................................................................................2-3
Installation and configuration workflow ....................................................................................2-4Installation workflow for a single unit topology .............................................................2-4Installation workflow for a Primary with Standby unit topology ................................2-4Installation workflow for a TrafficShield Load Balancer topology ..............................2-5
Installing TrafficShield in Active and Standby topology ..........................................................2-6Running tsconfig.pl for the Primary (Active) unit ...........................................................2-7Running tsconfig.pl for the Standby unit ........................................................................ 2-10
3Configuration
Configuring the TrafficShield units ..............................................................................................3-1Accessing TSMS ......................................................................................................................3-1Configuration wizards ...........................................................................................................3-2Configuring units later ..........................................................................................................3-5
Configuring units manually ............................................................................................................3-7Units ..........................................................................................................................................3-7Route Table .............................................................................................................................3-7IP Aliases ..................................................................................................................................3-8
Licensing ......................................................................................................................................... 3-10Activating the license ......................................................................................................... 3-10Viewing the license information ...................................................................................... 3-14
4Web Applications
Defining a new Web Application ................................................................................................4-1Web Application Wizard .....................................................................................................4-2
Editing an existing Web Application ........................................................................................ 4-12Service Properties ............................................................................................................... 4-12
TrafficShield® Installation and Configuration Manual version 3.2 v

Table of Contents
5Monitoring
Monitoring tools ..............................................................................................................................5-1System monitoring area .................................................................................................................5-2
Displaying the system status ................................................................................................5-2Security ..............................................................................................................................................5-7
Status ........................................................................................................................................5-7Displaying the events ............................................................................................................5-9
Reports on illegal requests ........................................................................................................ 5-10Attacks report ..................................................................................................................... 5-10Executive report ................................................................................................................. 5-13
Activity ............................................................................................................................................ 5-14Users ...................................................................................................................................... 5-14
6Administration
Users ..................................................................................................................................................6-1Adding users ...........................................................................................................................6-1
Alerts .................................................................................................................................................6-4System ................................................................................................................................................6-6
Restart ......................................................................................................................................6-7Reboot ......................................................................................................................................6-7Shutdown .................................................................................................................................6-7
Upgrades ...........................................................................................................................................6-8Adding a Software Package ..................................................................................................6-8Install Package Wizard ..........................................................................................................6-9Rollback ................................................................................................................................. 6-11
Backing up TrafficShield security application ......................................................................... 6-12Defining Backup Schedules ............................................................................................... 6-12Testing the Destinations ................................................................................................... 6-15
Permanent IP Addresses ............................................................................................................ 6-16Downloads ..................................................................................................................................... 6-18
Policy Browser .................................................................................................................... 6-18Support tools ................................................................................................................................ 6-19
Export configuration data and logs ................................................................................. 6-19Record Traffic ...................................................................................................................... 6-20F5 Support Website ........................................................................................................... 6-21
Glossary
vi

1
Introduction
• Product overview
• Document objectives
• How this manual is organized
• Audience and assumed knowledge
• Related documentation


Introduction
Product overview Web applications are the single greatest point of contact most people have with corporations today. However, these applications let users through the traditional security perimeter around the company's IT infrastructure, allowing access to sensitive internal data. Today the Web application is the security perimeter. That is, enterprises are relying on the security of each application to keep users from accessing restricted data or systems. Browser-based applications are inherently difficult to secure and full of vulnerabilities.
F5® Networks TrafficShield® security application, is a dedicated appliance built to protect applications by preventing hackers from stealing customer and corporate data. It can map each application to determine every legal user action, and then blocks actions not known to be legal according to this map.
This manual describes the single-unit deployment and the optional Standby unit deployment.
Document objectivesThis user guide describes how to configure and manage the TrafficShield security applications. Configuration Administration operations are using the TrafficShield Management Station (TSMS), a Web-based tool built into the TrafficShield security application units.
How this manual is organizedThe user interface organization is based on an everyday user's perspective: the user has configured the TrafficShield security application and has now switched to an ongoing maintenance focused mode.
The manual's focus is on the first-time user performing the initial steps to install the TrafficShield security application:
• Pre-configure the Unit outside TSMS
• Launch TSMS and complete the unit configuration.
• Register the production license.
• Define all relevant Web Applications.
Only then will the user be able to create policies and be able to utilize all the other Configuration and Policy management features of this product.
This manual consists of the following chapters:
TrafficShield® Installation and Configuration Manual Version 3.2 1 - 1

Chapter 1
Chapter 1- Introduction: This chapter provides an overview of the TrafficShield security application, traces the document objectives, how the manual is organized, the targeted audience and their assumed knowledge, and a note about related documents
Chapter 2 - Installing TrafficShield Units: This chapter explains how to perform an initial installation of the TrafficShield security application and its Standby unit.
Chapter 3 - Configuration: The installation process is followed by a network configuration stage. In this stage, you can define a Standby unit, if not defined during installation, set static routes, and assign aliases to the network cards. This chapter focuses on these topics, as well as on additional configuration parameters and Licensing.
Chapter 4 - Web Applications: This chapter explains how to create a Web application definition in TSMS, and how to continue to maintain it.
Chapter 5 - Monitoring: This chapter describes the tools that can be used by the network and policy administrators to monitor request traffic. It also explains how to use the TrafficShield security application monitoring tools to follow up potential attacks and workload.
Chapter 6 - Administration: This chapter describes administrative operations such as defining additional users, backups, downloading helpful utilities, etc.
Glossary: Provides a glossary of terms and abbreviations used throughout the document.
Audience and assumed knowledgeThis document is intended for network operators and security administrators. Additional information and technical support is available on request.
Related documentationThe TrafficShield® Security and Policy Manual Version 3.2 explains how to set up a TrafficShield security policy and how to apply it to a Web
application. The manual presents the TrafficShield® security application concepts and shows how the concepts are implemented in the security policy context.
1 - 2

2
Installing TrafficShield Units
• Network terminology
• Installing TrafficShield in Active and Standby topology
• IP to Web server


Installing TrafficShield Units
Network terminologyBefore you install and configure the TrafficShield security application unit, you need to determine several IP addresses. This section describes the function of each address.
TrafficShield private networkThis is the network which all TrafficShield security application units use to communicate between each other for management purposes.
Private IPAn IP address uniquely assigned to a TrafficShield security application unit. Each unit may have only one private IP address. The Private IP address will be assigned as an alias of the Eth0 network card. If the intended topology of the TrafficShield security application consists of more than one unit, then the internal communication between the units will be based on Private IP addresses.
Service IPThe IP address at which the TrafficShield security application unit receives requests directed to the Web application. In a network not protected by the TrafficShield security application, this would be the IP address of the Web server. After installing the TrafficShield security application, you can assign the Web server's current IP address to the TrafficShield security application unit as a service IP (the Web server will get a different address).
Note
In some cases this is the IP address which is mapped to the DNS A record of the web server. Usually this is an external IP.
Each TrafficShield security application unit may have as many Service IP addresses as the number of Web applications it protects (up to 255 web applications, which limits the number of service IP addresses to 255 as well). This address is disabled when the unit is in standby mode.Service IP addresses maybe assigned to either the Eth0 or Eth1 card, according to the Unit Installation and System Configuration.
TrafficShield® Installation and Configuration Manual Version 3.2 2 - 1

Chapter 2
IP to Web serverThis is the IP address allocated on the TrafficShield security application unit for communicating with the Web server. This IP address is used by all Web applications. This IP address is usually an internal address. This address is disabled when the unit is in standby mode.
You can set both the IP to Web Server and the Service IP to the same address, if the Service IP addresses are attached to Eth0.
Server IPThis is the IP address of the real Web server to which the TrafficShield security application forwards the requests.
Trusted IPAn IP address authorized to send to the Web server extended HTTP methods such as PUT, DELETE, etc.
Permanent IPAn IP address allocated to the TrafficShield security application unit that allows an Administrator to access the unit even when it is in standby mode.
One TrafficShield security application unit may have multiple Permanent IP addresses.
Permanent IP addresses may be assigned either to Eth0 or to Eth1 cards, depending on whether the Administrator intends to install and administer the unit internally or externally.
Static Route Add static routes, as required.
GatewayThis is the default gateway for the TrafficShield security application unit.
2 - 2

Installing TrafficShield Units
Alias IPThis optional IP address can be used for management purposes. This address is published only on the active unit. If the active unit fails, this address will be transferred to the Standby unit once it becomes active.
Note
The permanent IP and the Alias IP can be configured for the internal interface as well.Alias IP addresses may be assigned either to Eth0 or to Eth1 interfaces.
TrafficShield® Installation and Configuration Manual Version 3.2 2 - 3

Chapter 2
Installation and configuration workflowTrafficShield security application may be installed in three topologies:
• Single (Active) unit
• Primary (Active) unit with one Standby unit
• Load Balancer topology including one Active unit, one Standby unit, and at least one Shield unit
In all three topologies, you start the configuration by running the tsconfig.pl script on the tsconfig UNIX prompt of the Active unit.
The following sections describe the installation and configuration workflow for each of these topologies, and provide step-by-step instructions to configure a Primary unit and its Standby unit.
Note
The step-by-step instructions for configuring the TrafficShield units in Load Balancer topology are provided in a separate manual (see TrafficShield Load Balancer Topology Configuration Manual version 3.2).
Installation workflow for a single unit topologyThe following workflow describes the process required to install and configure the TrafficShield units in a Single unit topology.
You must follow these procedures in the order given:
1. Run tsconfig.pl for the Primary unit (see Running tsconfig.pl for the Primary (Active) unit, on page 2-7).
2. Access TrafficShield Management System (TSMS) and follow the instructions of the Configuration Wizard (see Accessing TSMS, on page 3-1).
3. Install the license using the Configuration Wizard (see Activating the license, on page 3-10).
4. Configure the web application (see Web Application Wizard, on page 4-2).
Installation workflow for a Primary with Standby unit topologyIn the Primary and Standby units configuration, you install the TrafficShield security application on the two units. Both units are identical. The Standby unit is automatically activated when the active unit fails.
The following workflow describes the process required to install and configure the TrafficShield units, including the different step-by-step procedures.
2 - 4

Installing TrafficShield Units
You must follow these procedures in the order given:
1. Run the tsconfig.pl script for the Primary unit (see Running tsconfig.pl for the Primary (Active) unit, on page 2-7).
2. Access TrafficShield Management System (TSMS) on the Primary unit (see Accessing TSMS, on page 3-1).
3. In the Primary (Active) unit TrafficShield Configuration Wizard, define the Standby unit (see TrafficShield Configuration wizard, on page 3-2).
4. Run the tsconfig.pl script on the Standby unit (see Running tsconfig.pl for the Standby unit, on page 2-10).
5. Install the license (see Activating the license, on page 3-10).
6. Configure the web application (see Web Application Wizard, on page 4-2).
Installation workflow for a TrafficShield Load Balancer topologyThe TrafficShield security application software can also be installed in a Load Balancer configuration, in which the Database and TSMS application will be installed on two units (Active and Standby units) and the Shield application will be installed on all other units.
Note
Configuring a web application without installing the license prevents TrafficShield security application from performing any kind of traffic blocking
Note
The TrafficShield security application should always be installed behind a network firewall before deployment on a network.
TrafficShield® Installation and Configuration Manual Version 3.2 2 - 5

Chapter 2
Installing TrafficShield in Active and Standby topologyThis section explains how to configure a single unit and/or its standby unit after they have been physically connected to the network.
At this stage you will be asked to run a script that defines the minimal
parameters needed by the TrafficShield Management Station (TSMS) to continue the installation via the user interface.
To install and configure a unit in a single-unit topology
1. Connect a power cable to the TrafficShield security application unit.
2. Connect the TrafficShield security application unit to the network.
The TrafficShield security application supports two types of network configuration:
• (Eth0 only) - A single network cable, plugged into the Eth0 card (port 1.1), connects the TrafficShield security application unit, Web server's internal network and service network. This option may be selected when there is no security need to physically separate the client-to-unit traffic from the unit-to-web server traffic. Accordingly, the service IPs should be attached to Eth0 at the System Configuration step in the graphical user interface. See Chapter 3, Configuring the TrafficShield units.
• (Eth0 and Eth1) - Two network cables, plugged into the Eth0 card (port 1.1) and Eth1 card (port 1.2) respectively. The Eth0 card connects the TrafficShield unit to the Web server's internal network and to additional TrafficShield Application units. This option ensures a total separation between external and internal traffic. Accordingly, the service IPs should be attached to Eth1 at the System Configuration step in the user interface. See Configuring the TrafficShield units, on page 3-1.
3. Prepare a serial console terminal. This can be any PC with any serial console software installed on it.
For example: Microsoft® Hyper terminal.
2 - 6

Installing TrafficShield Units
4. Attach a serial cable from the serial console terminal to the RS232 serial console port on the TrafficShield security application unit's front panel. Please see photograph below.
5. Launch your serial console software per the software manufacturer's instructions.
6. Configure your serial console software as follows:- baud rate (speed) of: 19200 bit per sec- Parity: Odd- Data: 8- stop Bit: 1
7. Log on to the TrafficShield security application unit using the following username and password: - User: root- Password: default
Running tsconfig.pl for the Primary (Active) unitThe /ts/install/tsconfig.pl script prompts you to enter the following parameters.
Note
All IPs and values displayed below are examples only. Some IP addresses entered during the installation process may have multiple instances. In such cases, the installation program allows you to enter one address. You can later add other instances, using TSMS.
Tip
It is important to prepare all the required information before beginning the configuration.
TrafficShield® Installation and Configuration Manual Version 3.2 2 - 7

Chapter 2
Enter current system password
In the previous task, you logged in by entering the system password of the unit. This password has been delivered to you by the TrafficShield security application supplier. You can change this password now, in order to ensure maximum security.
Enter new password:
Enter a new password for the unit. This replaces the root password with your own private and secure password.
Re-enter new password:
Re-enter the new password
TrafficShield system topology
The system prompts you to choose a topology.
Type 1 for single unit topology, or 2 for External Load Balancer Topology (option 2 not supported in current version).
Which type of unit would you like to configure?
(1) Single Unit system
(2) External Load Balancer topology >1
Enter 1 to access the single unit configuration tool.
Which type of unit would you like to configure?
(1) Single Unit system
(2) Standby for Single Unit >1
Enter 1 to access the single unit configuration tool.
The current system time is (12:37:52 06/01/2004). Do you want to change the system time? (y/n) [n]: y
Enter Y if the date and time shown are not correct.
Please enter the current date (mm/dd/yyyy):10/15/2003
This and the next question appear if you entered Y in the previous question. Enter the current date in the format shown in the question.
Please enter the current time (hh:mm:ss):13:38:50
Enter the current time.
The new system time will be (13:38:50 10/15/2003). Is this correct? (y/n) [y]:
Confirm the new date and time by typing y.
Or type N to restart the date-time entry cycle.
2 - 8

Installing TrafficShield Units
Please enter the TrafficShield private network [192.168.223.0]:
Specify the unit's private network address (first 3 octets of the unit's IP address, followed by zero).
Please complete TrafficShield private IP [192.168.223.X].
Complete the unit's private IP address by entering the last octet.
Would you like to set Permanent IP? (y/n) [n]: y
Enter y if you want to define a permanent IP address for the unit.
Enter Permanent IP: 192.168.1.237
Enter the permanent IP address.
Enter permanent IP Mask [255.255.255.0]:
Enter the network IP mask for the permanent IP.
Enter network interface (eth) [0, 1]
Specify the network interface card through which the TrafficShield security application user will access the TrafficShield security application unit. Enter 0 for interface 1.1 (eth0) or 1 for interface 1.2 (eth1).
Tip
If you are only using one network connection, it must be connected to the 1.1 network port and you must type 0 here.
Would you like to set a static route for the permanent IP? (y/n) [y]:
Enter y if you want to define a static route.
Enter Destination Network:
If you answered y to the previous question, specify the network address of the internal network from where the permanent IP can be accessed.
Enter Netmask [255.255.255.0]:
Enter the network mask of the internal network's address.
Enter Gateway:
Enter the gateway address.
Please enter the TrafficShield web administrator's access IP/Network (remote manager host):
You activate the TrafficShield Management Station user interface through a Web browser from any PC on the network to which the unit is connected. Specify the IP address of the PC from which you will access TSMS in order to define policies. You can define the network as well.
Please enter the Access IP/Network netmask [255.255.255.0]:
Specify the network address and network mask for the Web administrator's access IP address.
TrafficShield® Installation and Configuration Manual Version 3.2 2 - 9

Chapter 2
Please enter the initial TrafficShield Web administrator's username:
Enter the user name to specify when accessing the TrafficShield Management Station using its Web interface.
Please enter the initial TrafficShield Web administrator's password:
Enter the password to specify when accessing the TrafficShield Management Station using its Web interface.
Please confirm password:
Re-enter the password.
Please confirm the following settings:
Examine the settings displayed. Enter y to confirm them or N to restart the configuration cycle.
Would you like to apply these settings (y/n) [y]
Enter y to apply the settings to the single unit.
To complete the single unit installation, please launch TSMS. See Chapter 3, Accessing TSMS.
To install a Stanby unit, use the following procedure.
If no Stanby unit must be installed, go to Configuring the TrafficShield units, on page 3-1.
Running tsconfig.pl for the Standby unitThe Standby unit MUST be configured in the TSMS application before running the tsconfig.pl script.
After configuring the Standby unit in TSMS, you must restart the single unit machine (the Active machine).
Run the /ts/install/tsconfig.pl script on the standby unit.
Note
The Primary (Active) unit must be configured before you configure the Standby unit.
When you are asked to select the unit type from a list, select (2) Standby for single unit.
The procedure involves a shorter series of questions, as follows:
Please enter the TrafficShield private network [192.168.223.0]:
Specify the standby unit's private network address (first 3 octets of the unit's IP address, followed by zero).
2 - 10

Installing TrafficShield Units
Note
This Private Network must be the same as the Active unit Private network. These IP addresses should not be used by other non-TrafficShield machines.
Please complete TrafficShield private IP [192.168.223.X]:1
Complete the Standby unit's private IP address by entering the last octet of the unit's IP address in the private network.
Would you like to set permanent IP? (y/n) [n]: y
If you want to set a permanent IP address for the standby unit as well, enter y.
Enter permanent IP: 192.168.1.237
Enter the permanent IP address of the standby unit.
Enter permanent IP mask
Enter the network mask for the permanent IP of the standby unit.
Enter network interface (eth)
Specify the network interface card through which the TrafficShield security application user will access the TrafficShield security application unit. Enter 0 or 1 for 1.1 (eth0) or 1.2 (eth1), respectively.
Tip
If you are only using one network connection it must be connected to the 1.1 network port and you must type 0 here.
Would you like to set a static route for the permanent IP? (y/n) [y]:
Enter y if you want to define a static route.
Enter destination network:
If you answered y to the previous question, specify the network address of the internal network from where the permanent IP can be accessed.
Enter netmask:
Enter the network mask of the internal network's address.
Enter gateway:
Enter the gateway address.
Please confirm the following settings:
Examine the settings displayed. Enter y to confirm them or n to restart the Standby unit configuration cycle.
Would you like to apply these settings (y/n) [y]
Enter y to apply the settings to the standby unit.
The next task consists of configuring the TrafficShield security application unit and creating and configuring the Web applications.
TrafficShield® Installation and Configuration Manual Version 3.2 2 - 11

Chapter 2
2 - 12

3
Configuration
• Configuring the TrafficShield units
• Configuring units manually
• Licensing


Configuration
Configuring the TrafficShield unitsThis chapter explains how to access the TrafficShield security application and configure it using the configuration wizards.
Accessing TSMSYou access the TrafficShield security application through the TrafficShield Management Station (TSMS).
To access TSMS
1. On a PC from which the TrafficShield security application unit can be reached, use your Web browser to connect to the TrafficShield management portal. Point the browser to the TrafficShield security application Private or Permanent IP specified during the initial configuration script. Use custom SSL port 1043:https://ip.add.re.ss:1043 A security alert message may appear.
2. Click Yes to continue. The logon page opens.
TrafficShield® Installation and Configuration Manual Version 3.2 3 - 1

Chapter 3
3. Enter the TrafficShield Web Administrator's user name and password that you defined earlier, and click the Login button.
Configuration wizardsTrafficShield security application offers you two wizards:
• TrafficShield Configuration wizard. See below.
• Web Application Wizard. See Web Application Wizard, on page 4-2
TrafficShield Configuration wizard
The next task consists of configuring the F5 Networks TrafficShield security application and creating and configuring the Web applications.TrafficShield Management Station (TSMS) offers a wizard that you can use to configure the unit according to the required network configuration.
First-time access:
When you access TSMS for the first time or after re-installing the unit software, the Configuration wizard starts automatically and asks you whether you want to configure the TrafficShield security application unit now (if this is not your first access, see Configuring the TrafficShield units, on page 3-1).
Note
Using this wizard is mandatory for the initial TrafficShield security application installation.
To configure TrafficShield system using the Configuration wizard
1. Click Yes to start the wizard. The TrafficShield Configuration wizard Step 2 page appears.
3 - 2

Configuration
2. Click Next. The TrafficShield Configuration Wizard step 3 page appears. If a router is located between TrafficShield security application and the web-server, you can use this page to configure a static route for the web server machine.
TrafficShield® Installation and Configuration Manual Version 3.2 3 - 3

Chapter 3
3. Click Next to move to the next step. The TrafficShield Configuration Wizard step 4 window appears.
4. If you wish to install a Standby machine, select the Configure standby machine now option and click Next. See Running tsconfig.pl for the Standby unit, on page 2-10.-Or-If you wish to install the Primary unit first, select the Configure standby machine later option and Next. The TrafficShield Configuration Wizard step 5 - Summary page appears.
3 - 4

Configuration
5. Click Finish to confirm the Primary unit configuration settings.The TrafficShield Configuration Wizard last screen appears, offering you either returning to TSMS or configuring a new web application.
Configuring units later If you wish to reconfigure TrafficShield system settings at a later stage, use the following procedure.
To configure TrafficShield system later
1. Select Administration, and then System under Configuration. The following page appears.
TrafficShield® Installation and Configuration Manual Version 3.2 3 - 5

Chapter 3
2. If you want to channel the service traffic to the second network (eth1) card as well, select the Attach service IPs to ETH1 option.
3. Enter the information described in the subsequent sections of this chapter. See Configuring units later, on page 3-5 and TrafficShield Configuration wizard, on page 3-2.
4. After entering the information, click Update TrafficShield to save the information into the TrafficShield system tables. You may be required to restart the TrafficShield unit.
3 - 6

Configuration
Configuring units manuallyTo manually reconfigure the TrafficShield system using the Installation wizard, select Administration > Configuration > System and click the icon.
UnitsIn the Units section you can:
• Add the IP to Web Server address, the network mask, and the gateway for the TrafficShield security application unit, if you didn't define it via the TrafficShield security application unit Configuration Wizard.
• Add the MAC Address and the Private IP for the Standby unit.
To manually add the Standby unit
1. In the Units section, click Add.The Add Unit dialog box opens.
2. Enter the unit's ID (MAC address) and its private IP address.Both the main (active) and Standby units use the same IP address.
3. Click OK.
Route TableIf a gateway different from the default gateway exists in your network, use the Static Route feature to specify the gateway details. TrafficShield security application looks first for the static route and uses the default gateway if it does not find one.
The procedure described below allows you to add more routes.
TrafficShield® Installation and Configuration Manual Version 3.2 3 - 7

Chapter 3
To enter or modify static routes
1. In the Route Table section, click the Add button or select the unit by checking the check box located to the left of the relevant unit and click the Edit button.The Add or Edit Static Route dialog box opens.
2. Select the Default Gateway or Static Route.
3. You can handle incoming requests either via the default gateway or via a static route of your choice.
a) If you chose to accept requests via the default gateway, in the Gateway field, enter its IP address.
b) If you chose to accept requests via another route, enter the following information:Destination Network: Specify the destination network address which the gateway is used for.Gateway: Specify the gateway's IP address.Mask: Specify the network mask.
4. Click OK.The static route definition appears on the main page.
5. Repeat the above procedure for all the static routes you intend to use.
6. When you are done, click the Update TrafficShield button.
IP AliasesThe IP aliases section is designed to assign additional IP addresses to one or both of the network cards, for management purposes. For example: a user desiring to access the TSMS user interface using an alias or directly by SSH.
This alias is replicated to the Standby unit in case the Active unit fails.
3 - 8

Configuration
To assign IP addresses to the network card
1. In the IP Aliases section, click the Add button. The Add IP Alias dialog box opens.
2. Enter the following information:IP Alias: Specify the IP address.Mask: Specify the network mask.Interface: Select the network card to which you want to assign this address.
3. Click OK.The IP alias definition appears on the main page.
4. Repeat the above procedure for all the aliases you intend to use.
5. When you are done, click the Update TrafficShield button.Upon completion, a message appears informing you about the successful update.
TrafficShield® Installation and Configuration Manual Version 3.2 3 - 9

Chapter 3
LicensingThe TrafficShield security application comes with a registration key which is used to generate a dossier, which is used to retrieve a license from the F5 License server. The license is then installed to the product. The license must be activated before users are allowed to administer core functions of the product. External users can visit and browse through the Web application only after the license has been activated.
You need to activate the license also after changing the TrafficShield security application, for example, after upgrading it.
When you acquire a TrafficShield security application for the first time, the TrafficShield security application units are delivered to you with a registration key recorded in them, and you do not need to obtain one. In any other case where the license should be updated, you need to obtain the registration key before you perform the procedure explained below.
Note
In case the license expires, the user is alerted by a system event and TrafficShield system avoids blocking of any kind. However, the user is able to view the Monitoring Events page and access the Licensing page in order to renew the license.
Activating the license
To activate the license
1. Select the Administration button at the top of the TSMS window.
2. In the Maintenance menu, select Licensing.A list of the installed TrafficShield security application units appears. You need to license each unit separately.
3 - 10
Configuration
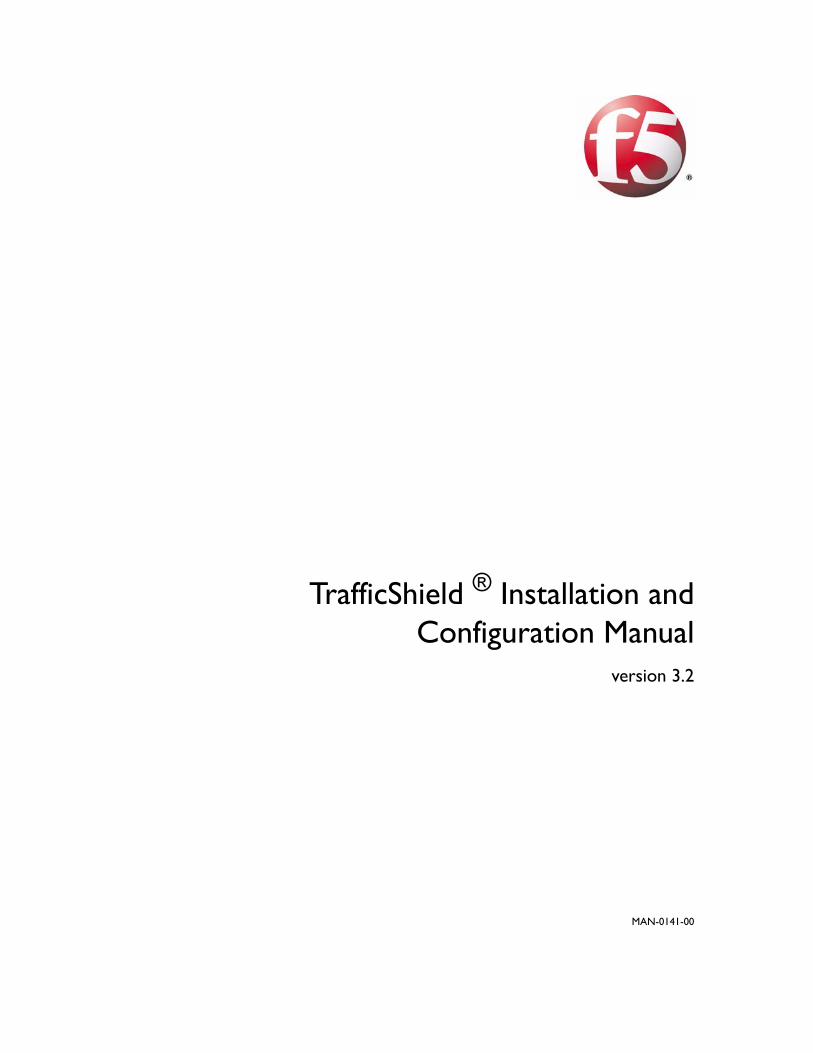
3. Click the Activate License button of the unit you want. This starts the licensing wizard and opens the Enter Registration Key window.
The Registration Key field displays the key currently stored in the selected TrafficShield security application unit. You have two options: Automatic or Manual.
4. To download the license automatically from the F5 server, select Automatic and then click Next. You will be asked to supply your registration key.
5. If you select Manual, do one of the following:
• If this is your first licensing, click the Next button.
• If you are performing the licensing operation as a result of system changes that require a new registration key, enter the key in this field, and click Next.The Install License for Unit window appears.
TrafficShield® Installation and Configuration Manual Version 3.2 3 - 11

Chapter 3
This window displays a dossier that you need to save on your computer. You will use it in subsequent steps.
Note: The dossier is an encryption of a string containing a set of physical hardware elements of the machine.
6. Choose either option:
To save the dossier information in a file for loading the F5 License Activation Screen:
a) Click the download it here link.A Save as box opens.
b) Select a folder and enter a filename indicating the destination location for the dossier. This returns you to the Install License for Unit window.
-Or-To copy the dossier information directly to the F5 license activation screen:
a) Copy the dossier information.
7. Click the Click here to access F5 Licensing Server link. A new browser window opens and connects you to the F5 licensing server.
8. Save your information in the way consistent with your previous choice:
• If you created a file, use the browser button to load the file.
• If you copied it, then paste the dossier information in the dossier window.
3 - 12

Configuration
9. Choose Next to continue.The dossier information is processed and the following F5 Networks licensing screen is displayed.
10. Copy the full form to the clipboard, or click the download button to download a copy of the license file.
11. Return to the TrafficShield security application's Activate unit license window.
12. You must now enter the license information received from F5.
• If you saved the information in a file, select the Upload license from file option, click the Browse button and select the license file created by the F5 licensing server.
• If you copied the file to the Clipboard, select the Paste license here option and paste the contents of the license file.
TrafficShield® Installation and Configuration Manual Version 3.2 3 - 13

Chapter 3
13. Click the Install License button.The Activate License for Unit window appears.
14. Click Back to return to previous step.
15. Click Finish to close the window.
Viewing the license informationYou can view the details of a specific license by clicking on the Active link in the Units list.
To view License Information
1. Click Administration and then Maintenance.
2. In the Maintenance section, click Licenses.
3. Click the Active link to display the full license details.
3 - 14

4
Web Applications
• Defining a new Web Application
• Editing an existing Web Application


Web Applications
Defining a new Web Application This section explains how to create and define a new Web application in the
F5® Networks TrafficShield® Management Station (TSMS) using the Web Application Wizard that guides you step-by-step through the required procedures.
To configure or maintain an existing web application, or remove any of its definitions, see Editing an existing Web Application, on page 4-12.
TrafficShield security application only allows traffic that is routed through it to known Web applications. In other words, each Web application sitting behind the TrafficShield security application in the network must be defined individually.
To define a new Web application
1. At the top of the TSMS page, select Administration > Configuration > Web Applications.Web Applications is selected by default.
If this is not the first time you are defining a Web application, a list of existing Web application definitions will be displayed.
2. Click the Add button to open the Web Application WizardThe Web Application Wizard Step 1 page appears. See below. The Wizard will ask you at the end of the process if you would like to run the Crawler Wizard or return to the TSMS.
Note
Manually creating a web application creates a default policy for the web application.
TrafficShield® Installation and Configuration Manual Version 3.2 4 - 1
Chapter 4
Web Application Wizard All the information you see entered into the Wizard's fields of the various sample screens is for demonstration purposes only.
Web Application Wizard will guide you through the entire process of defining a new web application.
Step 1: Web Application Name
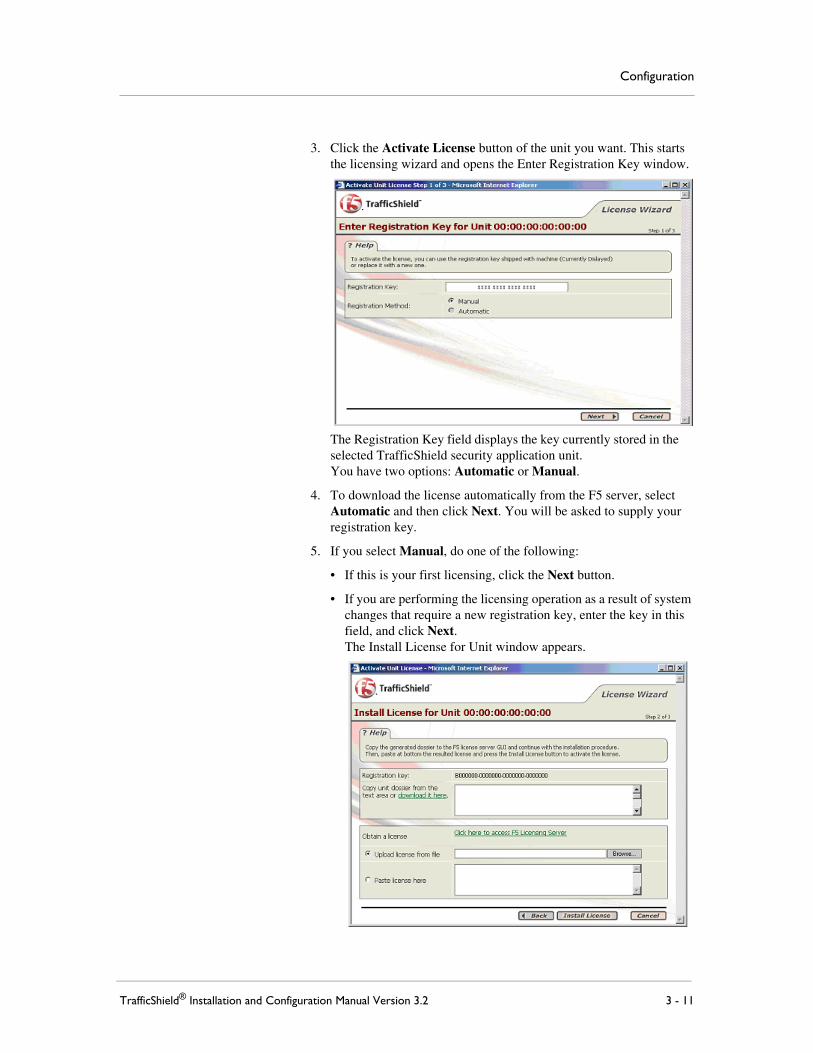
In the Web Application Wizard Step 1 page, you define the name of the web application, its Fully Qualified Domain Name (FQDN), its language/ encoding, whether it will log all requests, and whether to treat the Referrer header as HTTP.
To define the Fully Qualified Domain Name (FQDN)
• Enter the fully qualified domain name (FQDN) of the Web application as defined in your organization (e.g., www.siterequest.com).
To choose a language/encoding
1. From the Language box, select the Web application Primary language.
2. Select the Log All Requests option if required. For more information, see Service Properties, on page 4-12.
3. Check the Treat Referrer header as HTTP check box if required.
4. Click Next to continue.
4 - 2

Web Applications
The TrafficShield system may forward HTTP traffic even though the web application uses SSL (for example, if a Load Balancer applies an SSL termination), in which case the policy contains only HTTP objects. The Learning module considers the referrer header which may include an SSL object. In cases like this, be sure to select the Treat Referrer option as HTTP option, in order to prevent problems in the Learning process.
Step 2: Service IP
In the Web Application Wizard Step 2 page, you define the Web Application IP address and the corresponding network mask.
Service IP, Service IP Netmask
1. Specify the Web Application IP address and the corresponding network mask.
2. Click Back to go back to the previous step.-Or- Click Next to continue.
TrafficShield® Installation and Configuration Manual Version 3.2 4 - 3

Chapter 4
Step 3: HTTP Settings
In the Web Application Wizard Step 2 page, you define the Web Application HTTP settings
To define the Web Application HTTP Settings
Fill in the appropriate details in the following fields.
Use HTTP
To allow HTTP access to the Web application, select the Use HTTP option and enter the appropriate information.
Configure at least one protocol: HTTP or HTTPS (next step).
Web Server IP
Specify the Web server's IP address. The address is used for communications with the TrafficShield unit.
Web Server Port
Specify the Web server's port.
Specify the maximum number of simultaneous sessions TrafficShield security application can open in its interactions with the Web server.
Max. Sessions
The number of sessions that can be opened, and therefore the number of visitors that can be served simultaneously, depends on the capacity of the Web server.
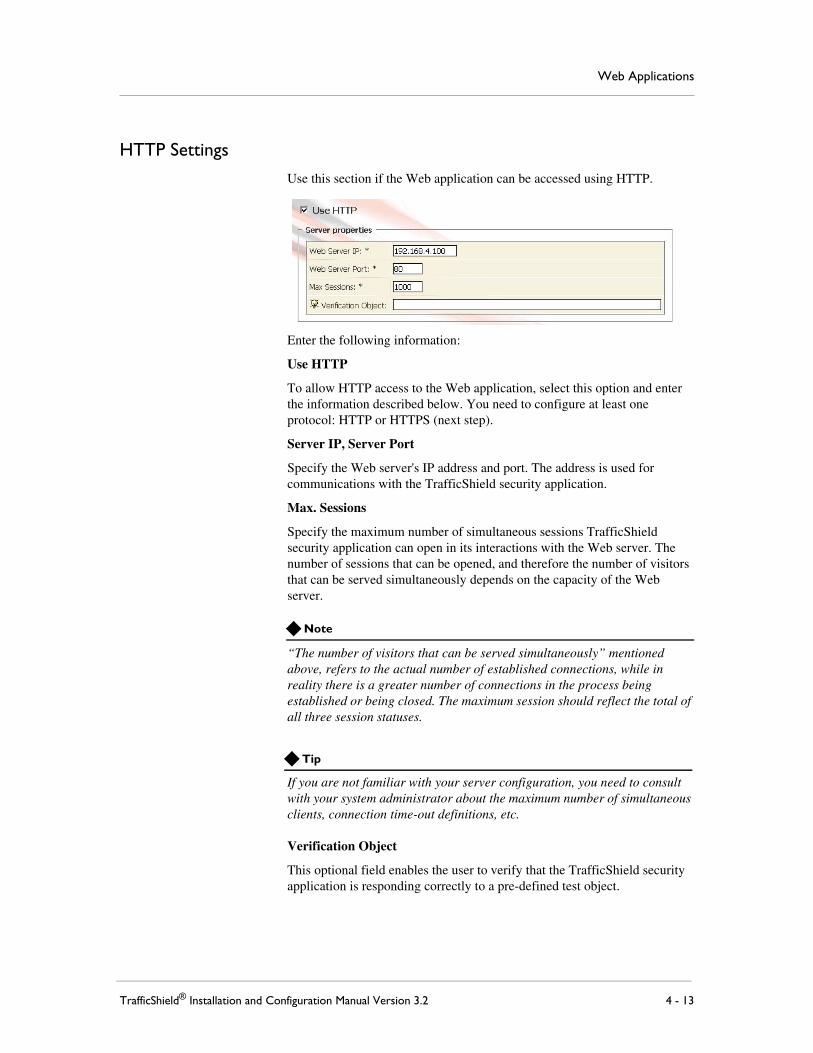
4 - 4

Web Applications
Number of Visitors
The number of visitors that can be served simultaneously refers to the actual number of established connections, while in reality there is a greater number of connections in the process being established or closed. The maximum session should reflect the total of all three session statuses.
Tip
If you are not familiar with your server configuration, please consult your system administrator about the maximum number of simultaneous clients, connection time-out definitions, etc.
Verification Object
This is an optional field that enables the user to verify that the TrafficShield security application is responding correctly to a pre-defined test object. Selecting this option initializes the TrafficShield Hang detection mechanism.
This operation requires that you restart TrafficShield security application.
Click Back, to go back to the previous step. -Or- Click Next to continue.
TrafficShield® Installation and Configuration Manual Version 3.2 4 - 5

Chapter 4
Step 4: HTTPS Settings
In the Web Application Wizard Step 4 page, you set the HTTPS settings for the web application.
Use HTTPS
To allow HTTPS access to the Web application, select this box.All the fields in the section become enabled.
Note
You need to configure at least one protocol: HTTP (see previous step) or HTTPS.
Server IP, Server Port
Specify the Web server's internal IP address and port. The address is used for internal communications with TrafficShield security application.
Max. Sessions
Specify the maximum number of simultaneous sessions TrafficShield security application can open in its interactions with the Web server. The number of sessions that can be opened, and therefore the number of visitors that can be served simultaneously, depends on the capacity of the Web server.
4 - 6

Web Applications
Note
“The number of visitors that can be served simultaneously” refers to the actual number of established connections, while in reality there is a greater number of connections in the process being established or being closed. The maximum session should reflect the total of all three session statuses.
Tip
If you are not familiar with your server configuration, please consult your system administrator about the maximum number of simultaneous clients, connection time-out definitions, etc.
Keep SSL connection to web-server
Selecting this box will cause TrafficShield security application to maintain the SSL connections to the Web server. If you choose not to enable this option, TrafficShield security application will decrypt the SSL traffic and will use HTTP to send the requests to the Web server.
Note
Requests will flow to the server quicker without encryption.
Verification Object
This optional field enables the user to verify that the TrafficShield security application is responding correctly to a pre-defined test object.
Key and Certificate Files
Click the Browse button and select the files that hold the SSL key and certificate. Then, click the Upload button. The files should be in PEM format.
Use SSL Password checkbox
If the SSL key file is password-protected, select the Use SSL Password option.
Password
Specify the password for key file.
Confirm Password
Type the password again for confirmation.
Click Back, to go back to the previous step. -Or- Click Next to continue.
TrafficShield® Installation and Configuration Manual Version 3.2 4 - 7

Chapter 4
Step 5: Aliases
In the Web Application Wizard Step 5 page, you define the aliases if the Web application uses several Web application names.
Note
You must add the Service IP Address if you want to access the site via the IP address instead of the host name.
Enter a new alias if the Web application uses several Web application names (or several DNS CNAME records), all of them pointing to the Web application you are defining now (as specified in the Fully Qualified Domain Name earlier).
4 - 8

Web Applications
You need to define in advance all of the aliases that might appear in requests addressed to this Web application. TrafficShield security application will block requests containing undefined destinations.
Tip
If you wish to allow access to the Web application by specifying its actual IP address, define the IP address as an alias by entering it in the Domain Name box.
Click Back, to back go to the previous step, or Next to continue.
Step 6: Create Policy
In the Web Application Wizard Step 6 page, you establish a preliminary policy by letting the wizard create a Default Policy or by importing a previously exported policy.
A web application must have a policy as soon as you exit this wizard. In this page you will establish a preliminary policy by letting the wizard create a Default Policy or by importing a previously exported policy.
Click Back, to go to the previous step, or Next to continue.
TrafficShield® Installation and Configuration Manual Version 3.2 4 - 9
Chapter 4
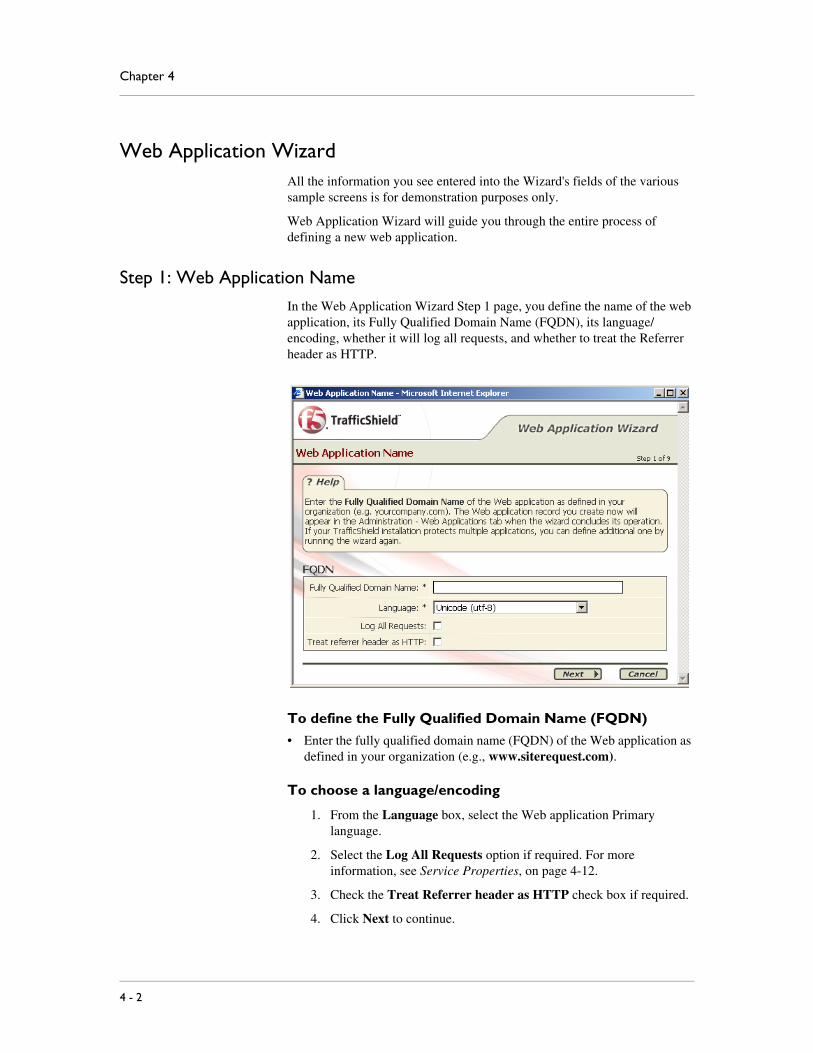
Step 7: Web Application configuration summary
Upon completion of the wizard configuration, the Web Application configuration summary window is displayed.
Review this information and proceed in one of these ways:
• Click Back to go back to the previous step.
• Click Cancel to exit without saving.
• Click Finish button to save and exit the Wizard.
If you clicked Finish, the following window appears.
4 - 10

Web Applications
This screen offers two options:
• Return to TSMS - Returns to the TSMS window.
• Configure Crawler - Automatically opens the Crawler configuration Wizard.
Or you can click Cancel to exit the wizard.
Tip
Once you have completed this step and returned to TSMS, activate your default policy by clicking the Set active Policy button located in the Administration > Configuration > Web Application Window.
TrafficShield® Installation and Configuration Manual Version 3.2 4 - 11
Chapter 4
Editing an existing Web ApplicationYou can edit an existing web application by pressing the Edit button in the Web Application Configuration Wizard.
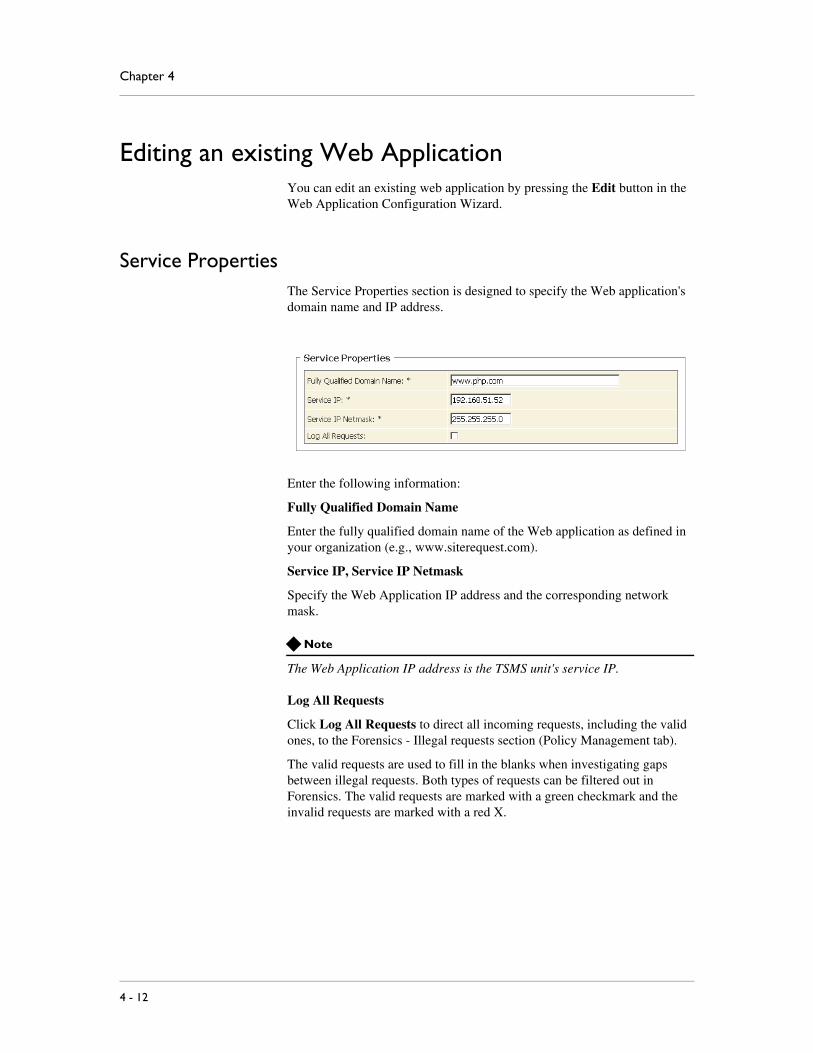
Service PropertiesThe Service Properties section is designed to specify the Web application's domain name and IP address.
Enter the following information:
Fully Qualified Domain Name
Enter the fully qualified domain name of the Web application as defined in your organization (e.g., www.siterequest.com).
Service IP, Service IP Netmask
Specify the Web Application IP address and the corresponding network mask.
Note
The Web Application IP address is the TSMS unit's service IP.
Log All Requests
Click Log All Requests to direct all incoming requests, including the valid ones, to the Forensics - Illegal requests section (Policy Management tab).
The valid requests are used to fill in the blanks when investigating gaps between illegal requests. Both types of requests can be filtered out in Forensics. The valid requests are marked with a green checkmark and the invalid requests are marked with a red X.
4 - 12
Web Applications
HTTP Settings
Use this section if the Web application can be accessed using HTTP.
Enter the following information:
Use HTTP
To allow HTTP access to the Web application, select this option and enter the information described below. You need to configure at least one protocol: HTTP or HTTPS (next step).
Server IP, Server Port
Specify the Web server's IP address and port. The address is used for communications with the TrafficShield security application.
Max. Sessions
Specify the maximum number of simultaneous sessions TrafficShield security application can open in its interactions with the Web server. The number of sessions that can be opened, and therefore the number of visitors that can be served simultaneously depends on the capacity of the Web server.
Note
“The number of visitors that can be served simultaneously” mentioned above, refers to the actual number of established connections, while in reality there is a greater number of connections in the process being established or being closed. The maximum session should reflect the total of all three session statuses.
Tip
If you are not familiar with your server configuration, you need to consult with your system administrator about the maximum number of simultaneous clients, connection time-out definitions, etc.
Verification Object
This optional field enables the user to verify that the TrafficShield security application is responding correctly to a pre-defined test object.
TrafficShield® Installation and Configuration Manual Version 3.2 4 - 13
Chapter 4
HTTPS Settings
Use this section if the Web application can be accessed using HTTPS.
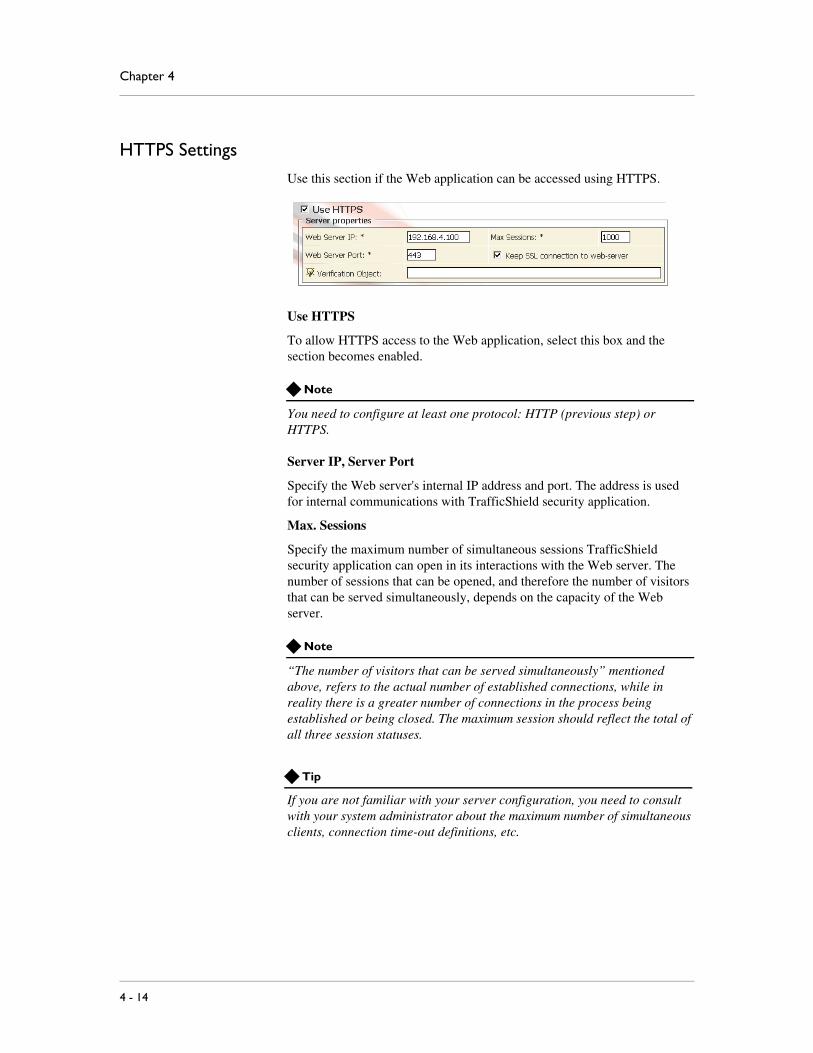
Use HTTPS
To allow HTTPS access to the Web application, select this box and the section becomes enabled.
Note
You need to configure at least one protocol: HTTP (previous step) or HTTPS.
Server IP, Server Port
Specify the Web server's internal IP address and port. The address is used for internal communications with TrafficShield security application.
Max. Sessions
Specify the maximum number of simultaneous sessions TrafficShield security application can open in its interactions with the Web server. The number of sessions that can be opened, and therefore the number of visitors that can be served simultaneously, depends on the capacity of the Web server.
Note
“The number of visitors that can be served simultaneously” mentioned above, refers to the actual number of established connections, while in reality there is a greater number of connections in the process being established or being closed. The maximum session should reflect the total of all three session statuses.
Tip
If you are not familiar with your server configuration, you need to consult with your system administrator about the maximum number of simultaneous clients, connection time-out definitions, etc.
4 - 14

Web Applications
Keep SSL connection to web-server
Checking this box causes TrafficShield security application to maintain SSL connections to the Web server. If you choose not to enable this option, TrafficShield security application will decrypt the SSL traffic and will use HTTP requests to access the Web server.
Note
Requests will flow to the server more quickly without encryption.
Server Certificate
Enter the following information:
Key and Certificate Files
Click the Browse button and select the files that hold the SSL key and certificate. Then, click the Upload button. The files should be in XSO9 format.
Use SSL Password checkbox
If the SSL key file is password-protected, check the Use SSL Password check box.
Password
Specify the password for key file.
Confirm Password
Type password again for confirmation.
Client CertificateIf application end-users are required to present a certificate when accessing the Web application, you will need to complete this information in the Client Certificate Window.
TrafficShield® Installation and Configuration Manual Version 3.2 4 - 15

Chapter 4
Enter the following information:
Verify Client Certificate
Select the Verify Client Certificate check box to instruct TrafficShield security application to request Client certificate information.
CA Certificate File
Browse to select the CA (Certificate Authority) certificate to verify client certificates and then click the Upload button.
Revocation File
Browse to select the appropriate client's certificate revocation file, if applicable, and then click the Upload button. You can remove the revocation file by clicking the Remove button.
Chain Verification Depth
The chain verification depth is used to define the level of CA verification required to verify the authenticity of the CA File.
Verify Fail if no Peer Certificate
Check this check box to terminate the SSL handshake if no client certificate was provided.
Verify Only Once
Check this check box to verify the client certificate only during the initial handshake. If this box is not checked, client certificate verification is performed for each request.
Note
We highly recommended that you check the “Verify Fail if no Peer Certificate” check box to ensure SSL handshake termination if no client certificate was provided; the client may use SSLv2 or SSLv3 versions.
4 - 16
Web Applications
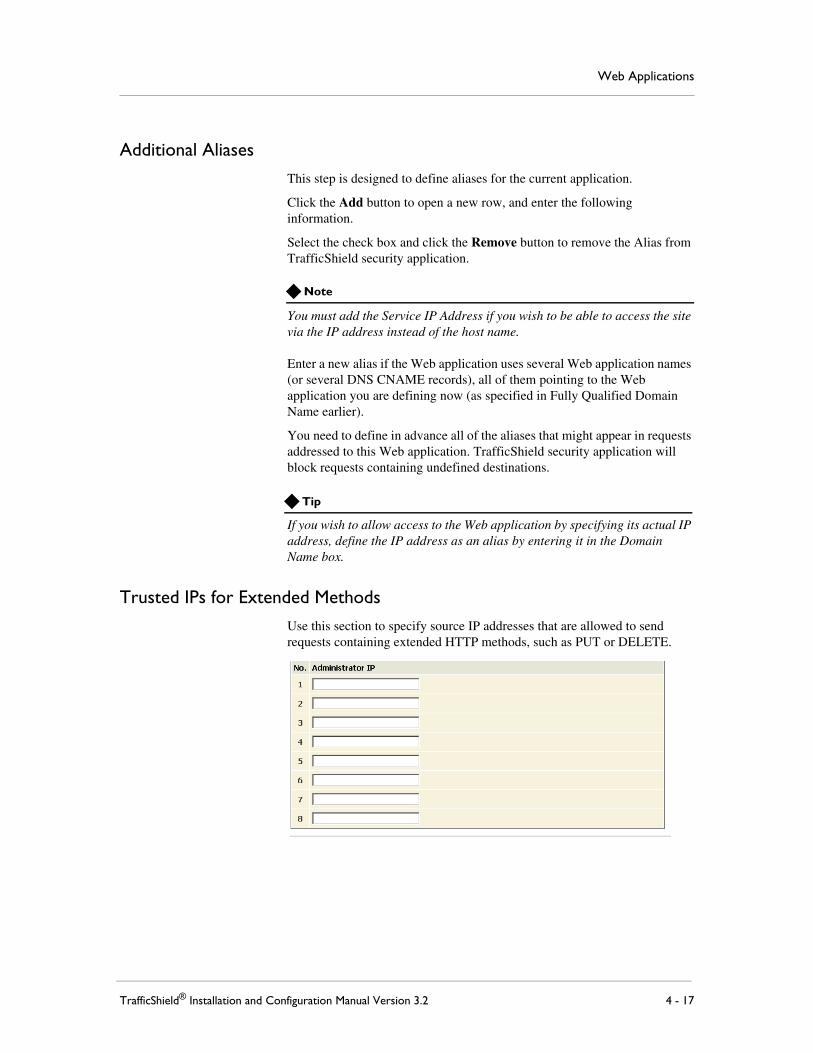
Additional Aliases
This step is designed to define aliases for the current application.
Click the Add button to open a new row, and enter the following information.
Select the check box and click the Remove button to remove the Alias from TrafficShield security application.
Note
You must add the Service IP Address if you wish to be able to access the site via the IP address instead of the host name.
Enter a new alias if the Web application uses several Web application names (or several DNS CNAME records), all of them pointing to the Web application you are defining now (as specified in Fully Qualified Domain Name earlier).
You need to define in advance all of the aliases that might appear in requests addressed to this Web application. TrafficShield security application will block requests containing undefined destinations.
Tip
If you wish to allow access to the Web application by specifying its actual IP address, define the IP address as an alias by entering it in the Domain Name box.
Trusted IPs for Extended Methods
Use this section to specify source IP addresses that are allowed to send requests containing extended HTTP methods, such as PUT or DELETE.
TrafficShield® Installation and Configuration Manual Version 3.2 4 - 17

Chapter 4
4 - 18

5
Monitoring
• Monitoring tools
• System monitoring area
• Security
• Reports on illegal requests
• Activity


Monitoring
Monitoring toolsMonitoring tools allow the network and policy administrators to monitor
request traffic. This chapter explains how to use the TrafficShield® security application monitoring tools to follow up on potential attacks and workload.
The monitoring tools described in this chapter are designed to help network and policy administrators examine both legitimate and potentially malicious traffic. The data collected by the Monitoring tool helps to identify overloaded units and make the necessary decisions on needed deployment changes.
All of the events tracked in Monitoring can also be exported as SNMP traps as well as Syslog messages. In addition, the reports generated can be exported as HTML or PDF files.
To access the monitoring functions
• Click the Monitoring tab at the top of the TrafficShield security application.
This tool is divided into four areas, which this chapter explains in detail:
• System Monitoring area monitors the TrafficShield security application units and their system status; for example, whether the unit is active or in standby mode. System logs can also be monitored from here.
• Security Monitoring area monitors the security events generated by the TrafficShield security application units.
• Reports area generates reports and graphs on the ongoing attacks that have occurred on the TrafficShield security application units.
• User Monitoring area monitors the authorized users' activities on the TrafficShield security application units.
The filtering tools allow you to retrieve and focus on a set of events of particular interest to you. For example, you can focus on events that took place in the last hour, or events that involve requests that contained a specific text string.
TrafficShield® Installation and Configuration Manual Version 3.2 5 - 1

Chapter 5
System monitoring areaThis page displays information about the current status of the TrafficShield units and web applications.
Displaying the system statusChoose Monitoring > System > Status to open the Units and Web Application Status window.
Displaying the TrafficShield units status in case of no error
When no error was detected, the following window is displayed.
This window displays the current status of all the TrafficShield Units.
Unit Id
This is the MAC address of the relevant unit.
Role and Status
There are three possible roles:
Shield - This tool is responsible for blocking requests that violated the security definitions and alerting the user.
TSMS (TrafficShield Management Station) - This tool is responsible for monitoring, configuring and managing the TrafficShield security application components and graphical user interface.
TSMS Backup - indicates whether the Hot Backup unit is active.
Private IP
The unique IP address assigned to the TrafficShield security application unit.
CPU Usage
The current level of CPU Usage.
5 - 2

Monitoring
Memory Usage
The current level of memory usage.
Disk Usage
The current level of disk usage.
Displaying the TrafficShield unit status in case of error
When TrafficShield security application detects a critical error on one of the units, the yellow notification bar is displayed on all user graphical interface pages.
Click the notification bar to display the Current Units Errors window.
This window displays all the critical errors that were detected.
Click Details to open a window that displays a full description of the error with troubleshooting instructions.
Displaying the web applications statusDomain NameThe name of the domain in which the monitored web application is operating.
ProtocolsThe protocols used by the web application
Service IPThe service IP address of the unit on which the web application is running.
Active PolicyThe currently active policy that protects the web application.
Security LevelThe security level defined by the user.
TrafficShield® Installation and Configuration Manual Version 3.2 5 - 3

Chapter 5
Blocking ModeDefines whether the web application runs in Transparent mode or in Blocking mode.
Click the Hand icon to open a window listing the violations that will be blocked if the Blocking option is active.
Events
This screen displays the system events that have occurred and been recorded in the TrafficShield system. Use this screen with its advanced filter to concentrate on events pertinent to your needs.
1. Open the filtering tool by clicking the down-arrow icon displayed on the Filter row (you can close it by clicking the button again).
2. Select one or more filtering options.The filtering options are those that have a radio button next to them. For example, click the Severity radio button and then select a severity level to list only events of the selected severity.
You can select multiple filtering options to further limit the scope of the retrieval. For example, setting a period in the From/To area and selecting a severity, lists the events of the selected severity level that took place within the specified period.
Note
To cancel the filter in a certain category, deselect its corresponding All radio button.
5 - 4

Monitoring
Criteria Description
Filter A predefined set of filtering parameters.
Type: Event Of Filters the events that took place in the units, and events that have been posted to the operating system's log (system Log). Check the box that corresponds to the events you want to retrieve. You can select more than one option.
Name: Event If you want to focus on a specific event, select the Event radio button and then select the event you want in the drop-down list.
Time Period: From/To To retrieve events that took place in a certain period,
select the From radio button. Then, use the icon in the From/To fields to select the start date/time and end date/time of the period. Note that you can select the time by clicking the time fields at the bottom of the calendar box.
Unit: Units If you want to focus on events that took place in a certain unit, select the Units radio button and then select the unit's ID.
Severity: Severity To retrieve only events of a certain severity level, select the Severity radio button and then select a level from the drop-down list.
Containing String: Search
Use this option to pinpoint events whose message contains a certain text. Select the Search radio button and type the text.
TrafficShield® Installation and Configuration Manual Version 3.2 5 - 5

Chapter 5
Unit events
If you want to focus on events that took place in a certain unit, select the Units radio button and then select the unit's ID.
To display more information about the event
1. Click the Event link. This displays a description of the event.
2. When you have read the event summary, click the Close button.
3. On the Events screen, click the Go button to activate the filter.
4. Click the Save button, after selecting the retrieval criteria, so you can re-use it whenever you want. This opens the following window.
5. Type a name for the selected criteria and click OK.
6. You can delete a criteria definition by selecting it in the Filter list and clicking the Remove button.
5 - 6

Monitoring
SecurityThis page displays information about security violation types under the Status page, and about security violations time of occurrence under the Events page.
StatusThe Status tab in the Security menu shows a list of security violations that have occurred. There are two report types available.
In Report Type, select:
• Violation Report, to display a list of violations.
• IP Report, to display the IP addresses that committed the violations.
Both reports display the number of requests and the percentage of those requests that occurred from the total requests.
To define the filter criteria
1. Open the filtering tool by clicking the down-arrow icon displayed on the Filter row (you can close it by clicking the button again).
2. Click the Go button to update the violation display using the latest filter criteria.
3. Click the Save button to save the changes made to the filter criteria, thus creating a customized filter.
4. Use the Remove button to remove customized filters.
Note: It is not possible to delete the built in filters.
TrafficShield® Installation and Configuration Manual Version 3.2 5 - 7

Chapter 5
5. The filter criteria are displayed in the top part of the window while the filtered violation list is displayed in the bottom part of the window.
Criteria Description
Filter A predefined set of filtering parameters
Web Application To focus on events relating to one of the protected Web applications, select the Web Application radio button and then select the Web application from the drop-down list.
Time Period
From/To
To retrieve events that took place in a certain period, select the From radio button. Then, use the icon in the From/To fields to select the start date/time and end date/time of the period. Note that you can select the time by clicking the time fields at the bottom of the calendar box.
IP To retrieve events originating from an IP address, select the IP radio button and then enter the address in the adjacent box.
Violations To list the events that were registered as a result of a specific attack type, select the Violation radio button and then select the standard attack name from the drop-down list.
Containing String: Search
Use this option to pinpoint events whose message contains a certain text. Select the Search radio button and type the text.
Show Violations To display all of the violations or only those with occurrences.
5 - 8

Monitoring
Displaying the eventsThe Security-Events tab lists the events relating to requests that do not comply with the applied security policies. For example, you can see a list of events relating to requests that committed a length violation or a cookie violation.
Events that have been blocked are marked with the (stop) icon.To display more information about the event, click the Severity link.
TrafficShield® Installation and Configuration Manual Version 3.2 5 - 9

Chapter 5
Reports on illegal requests TrafficShield security application generates reports on illegal requests that were detected.
• Attacks report
• Executive report
Attacks reportThis report provides a more global view on a number of illegal requests of a given type.
When sent at a high frequency, these illegal requests are considered as a clear intention to cause a specific damage. For example, the TrafficShield security application detects such attack types as “buffer overflow,” “parameter value tempering,” “forceful browsing,” and more. The Reports-Attacks tab displays such sets of illegal requests.
To display illegal requests of a given type
1. Open the filtering tool by clicking the down-arrow icon displayed on the Filter row (you can close it by clicking the button again).
5 - 10

Monitoring
2. Use the Go button to update the attack display using the latest filter criteria.
3. Use the Save button to save the changes made to the filter criteria, thus creating a customized filter.
4. Use the Remove button to remove customized filters.
The columns displayed are:
• Request NumberThe Request Number column indicates the number of requests of the specific attack type. Click a number to display the requests.
• Attack ProbabilityThe TrafficShield security application calculates and suggests a probability that the certain set of requests already launched an attack. The numbers that appear in this field represent the percentage of attack probability. While 100 is the highest probability and 1 is the lowest, 0 means no probability at all.
• Start TimeThis is the first time this attack was noted.
• Last TimeThis is the last time this attack was noted.
The options in the Report Type section are as follows:
Criteria Description
IPs Report The reports are organized by the IP of the computers from which the attacks came.
Attack Types Report The reports are organized by type of attack.
TrafficShield® Installation and Configuration Manual Version 3.2 5 - 11

Chapter 5
The options in the Filter section are as follows:
Criteria Description
Filter A predefined set of filtering parameters. Options are:
Not FIltered
Last Hour
Last Day
Last Week
Last Month
Custom
Web application To focus on events relating to one of the protected Web applications, click the Web Application button, and then select the Web application from the list.
Time PeriodFrom/To
To retrieve events that took place in a certain period, select the From radio button. Then, use the icon in the From/To fields to select the start date/time and end date/time of the period. Note that you can select the time by clicking the time fields at the bottom of the calendar box.
IP To retrieve events originating from an IP address, select the IP radio button and then enter the address in the adjacent box.
Attack Type Select an attack type. This applies, especially, to the Attacks Report that groups together requests that have the characteristics of a standard attack type. You can use it in conjunction with “Minimal number of requests”.
Minimal number of requests
Use this parameter to list attacks that included at least a specified number of requests that characterize standard attack types.
Minimal attack probability
This is a sorting option that displays the attacks from the lowest probability.
Containing String Use this option to pinpoint events whose message contains a certain text. Select the Search radio button and type the text.
5 - 12

Monitoring
Executive reportThe report is displayed by selecting the Reports and then Executive. It graphically displays the attack statistics.
This report contains the same type of information as in the Attacks report, only it retrieves the five most frequent attacks or attackers (IP). The Details button functions like the links in the Attacks report, listing attacks or IP addresses.
The Attacks Distribution section displays the attack types over time. The Details button displays the same information in textual format.
TrafficShield® Installation and Configuration Manual Version 3.2 5 - 13

Chapter 5
ActivityUser activity consists of operations such as logging on to TSMS or adding a new policy, removing a policy, adding a web application, modifying the Server SSL files, changing the blocking policy, changing the system configuration, change the character set, restarting the unit, adding a user, adding a Rexpool, and so on.
UsersYou can use the monitoring tool to examine the user activities that took place in the system.
To monitor user activities
1. On the top menu, click the Monitoring button.
2. In the Activity section of the navigation pane, select the Users tab.
3. In Filter By: select the type of events to display. In with value: select the value to be filtered. For example, in Filter By, select Policy, and in with value, select the name of a policy, and click the Go button to list user activities that took place in relation with the indicated policy.
4. To delete all of the listed events, click the Remove button.
5. To list the events that meet the criteria, click the Go button.
5 - 14

6
Administration
• Users
• Alerts
• System
• Upgrades
• Backing up TrafficShield security application
• Permanent IP Addresses
• Downloads
• Support tools


Administration
Users This chapter describes administrative operations such as defining additional users, backups, downloading helpful utilities, upgrade of the software version, etc. All of the subjects discussed here can be found under the Administration Tab.
During the installation stage you were asked to define the TSMS Administrator as the initial super user. It is possible to add additional users
who are authorized to access the TrafficShield® security application and back up TrafficShield security application data.
Adding usersWhen you add users, you can restrict user access to TSMS management portal based on either source IP address or Network address.
In both cases you define the user’s details in the relevant fields.
In the Access IP/ Access Network section, select the relevant radio button
To add users
1. Select the Administration button.
2. In the Configuration menu, select the Users tab.The Users screen appears.
TrafficShield® Installation and Configuration Manual Version 3.2 6 - 1

Chapter 6
3. Click the Add button.The Add User screen opens.
4. In the Username field, enter the name that the user should specify when accessing TSMS.
5. In the Password field, enter the password that the user should specify when accessing TSMS.
6. In the Confirm Password field, enter the password again.
7. In the Group field, select the group to which this user belongs. The group determines the operations that this user will be allowed to perform in the TrafficShield security application.
The following table describes the attributes of each group.
User Type Authorization
Administrator The Administrator has access to all Web applications defined in TSMS and can perform all operations in TSMS.
Web Application AdministratorAccess only to the Web Application. This user can only create additional users for his allowed Web Application. The assignment is made in the Web Application field.
Policy Editor Access to the Policy Management tool only within the context of the assigned application. Currently this user can access any policy of any web application. The user cannot view the Administration and Monitoring tabs.
Monitoring Access to the Monitoring tool only. Users in this group can only view data.
6 - 2

Administration
8. In the Web Application field, select the Web application that this user will be authorized to access.Each user may access one application. To allow a user to access more than one Web application, define a separate user record for each.This field is not accessible if the user group is Administrator, as administrators have access to all applications.
9. In the Access IP field, specify the IP addresses of the computers from which this user is entitled to access TSMS. You can specify a single IP address or a network address.
a) To add a user and allow him access from individual IP addresses, select the Access IP radio button.
b) To allow access from any IP address in a network, select the Access Network radio button.
10. Enter the IP address or the network address.
11. Click the Add button.The address moves to the box on the left.
Note: You can remove an address by selecting it in the left box and clicking the Remove button.
12. Clear the Active User box to withdraw this user's access permissions without deleting the user record. Select the check box again to re-enable the user.
13. In the Full Name, E-mail and Phone fields, enter the full name, e-mail address and the telephone number of this user.
14. To complete the process of adding a user, click the Add button.This closes the Add User page. The user record appears in the main page.
15. Click Update TrafficShield button.
16. Repeat the procedure for all relevant addresses.
TrafficShield® Installation and Configuration Manual Version 3.2 6 - 3

Chapter 6
AlertsThe alerts feature allows you to collect events and to send them to the SNMP Server. The TrafficShield security application Alerts mechanism can collect events of different types.
To configure alerts
1. Select the Administration button.
2. In the Configuration menu, select Alerts.The Alerts page opens.
3. Examine the sections to see the types of alerts that your version of the TrafficShield security application sends out. The procedure is identical in all cases; only the destination server parameters are different.
4. Click the Activate Alerts check box to enable the desired alerts.
5. Click the Add button in a section.The Add SNMP dialog box opens.
6 - 4

Administration
6. Select the types of events to capture by checking one or more of the options described below.
7. Enter the server IP address relating to the server that will receive the events.
8. If necessary, repeat the operation to create alert collection records that combine different types of alerts and/or send alerts to different servers.
9. Click the Update TrafficShield button.
Option Collects
Security Events identified as attacks.
User Operations performed by TSMS users. For example, logging in to TSMS is a user event.
TrafficShield System Events related to operations at system level. For example, rebooting units is a system event.
TrafficShield Syslog Events registered at the OS system log.
TrafficShield® Installation and Configuration Manual Version 3.2 6 - 5

Chapter 6
SystemYou can shut down or reboot a TrafficShield unit, or restart the TSMS from within the TSMS user interface. Major modifications in the configuration require you to restart the units. For example, when you modify the system configuration (system page), a verification object in a Web application page, or the system time in one of the units.
To set the system time
1. Click Administration > Maintenance > System. In the screen that appears, click the Set System Clock tab and set the system time.
2. Set the Time zone, Time and date, and when finished, click the Set Time button. The unit restarts and you will be sent to the Login page.
To restart, reboot, or shut down TrafficShield system
1. In the Administration tool, select the System tab under Maintenance.The existing TrafficShield security application unit records are listed.
2. Select the unit by checking its checkbox in the leftmost column.
3. Click the appropriate button > Restart, Reboot, or Shutdown.
6 - 6

Administration
RestartRestart affects only the TrafficShield Management Station [TSMS].
Note
Restart affects only the TrafficShield security application components and not the Operating System.
The following actions require Restart:
• Changing verification object in HTTP/HTTPS
• Changing any parameter in client certificate
• Changing any internal parameter
• Changing any parameter in system page
RebootReboot halts the system and resets the hardware. You must wait several minutes before connecting to your unit.
Note
If you have a Standby unit installed, it will become the Active unit and the other re-booted unit will become the Standby unit.
ShutdownShutdown powers the unit down.
To turn the power back on, you will need to manually turn on the power button.
TrafficShield® Installation and Configuration Manual Version 3.2 6 - 7

Chapter 6
UpgradesThis section describes the upgrade package wizard workflow.
By following this wizard, you can install a new package.
At the end of the installation, dependant on the package contents, you may be required to restart or reboot the TrafficShield unit.
Adding a Software Package
To add a Software Package
1. Select the Administration tab at the top of the TSMS window.
2. In the Maintenance menu, select Upgrades. A list of the installed TrafficShield security application units appears. If you have one Active unit and a Standby unit, you must upgrade each unit separately.
3. Choose the relevant unit to upgrade and click the Show Packages button. The Currently Installed packages window will be displayed. If this is the first upgrade you perform on the system, no row will be displayed.
4. Click Install Package to open the Install Package Wizard.
6 - 8

Administration
Install Package Wizard
Step 1: Upload the package file
1. Use the browser to locate the package file you wish to upgrade.
2. Click the Next button.
Step 2: Package Information uploaded and displayed
Fill in the fields as indicated:
Package Name
Logical name of the package is not necessarily identical to the file name.
TrafficShield® Installation and Configuration Manual Version 3.2 6 - 9

Chapter 6
Target Platforms
This is the TrafficShield security application minimum version number required to install this package.
Warning
Sometimes the user needs to be aware of a certain risk or problem that the installation of this package may cause under specific circumstances (for example: the user must reboot the unit, reactivate the policy etc.).
We highly recommended that you read the notes and explanations provided in the README file that can be accessed by clicking the View README file link.
Rollback Available
This field indicates whether it would be possible to roll back to previous status after installation, should problems occur.
Required Downtime
Sometimes the new package may take effect only after the TrafficShield unit has been reactivated. The user needs to know that the TrafficShield security application will not be protecting the user's application during the installation time.
• Click the Back button, to go to the previous step or choose Install Package to continue.
Step 3: Package successfully installed
• This screen indicates the successful completion of the package installation to TrafficShield security application. In the example above, the specific package requires the user to restart the unit. Should this not be required, the Restart TrafficShield button will not be displayed.
• Click the Finish button, to close the Wizard without restarting the unit.
6 - 10

Administration
Rebooting
In this case, it is the user responsibility to reboot the unit later, in order to activate the changes created by the package installation.
RollbackAfter installing a new software package, problems may occur due to unforeseen circumstances. In some cases it is possible to roll back to a previous software version after installing a new software package. If you have already installed five sequential packages and you roll back the fifth package, you will roll back to the fourth package.
To roll back from an installation
1. Select the Administration tab at the top of the TSMS window.
2. In the Maintenance menu, select Upgrades. A list of the installed TrafficShield units appears. If you have an Active unit and a Standby unit, you will need to roll back each unit separately.
3. Choose the relevant Unit to roll back and click the Show Packages button. The Currently Installed packages window will be displayed.
4. Click the Rollback button next to the relevant package to roll back. A message will be displayed only if the rollback was unsuccessful.
A unit reboot may be required in order to activate the rollback changes.
Note
Please note that if you have installed several packages, and you wish to roll back to a specific package, please roll back in an orderly sequence without skipping any of them (5, 4, 3, etc.).
TrafficShield® Installation and Configuration Manual Version 3.2 6 - 11

Chapter 6
Backing up TrafficShield security applicationYou can set a schedule for automatically backing up the TrafficShield security application configuration parameters and the security policies. The configuration parameters and the security policies can be backed up separately or in a single operation. You can also define different backup schedules for the same material and thus create backup “generations” and even create different schedules that direct the data to different backup computers.
The backup procedure utilizes the SSH protocol. The TrafficShield security application initiates an SCP procedure to the backup server, using the backup user name and password that must reside on the backup machine.
The backup file is compressed using the tar.gz compression software.
The backup file size is dependent on the TrafficShield system configuration, however, it can reach up to around 100MB.
A built in test backup feature enables you to check the accuracy of your settings. See below for details.
Defining Backup SchedulesTo secure yourself against hardware failures or unintended modifications to the system, in which case you might want to rollback to the system previous stage, we recommend that you regularly schedule backups.
To schedule backups
1. Click the Administration button.
2. In the Maintenance menu, select the Backup tab.The Backup page opens.
3. Click the Add button.The Add Backup Target page opens.
6 - 12

Administration
4. Enter the information described below.
ActiveIf you want this schedule to work, make sure that this box is checked.
At first, you may want to create schedules with this box cleared in order to prevent the system from running backups before you are ready to do so. You can activate a schedule at any time by checking this box.
Target IPSpecify the IP address of the computer where the backed up data will be stored.
Note that the backup procedure uses Secure Shell (SSH). The target computer should be configured to use this protocol.
PathSpecify the path to the folder where you want to store the data on the backup computer's disk.
Username, PasswordSpecify the user name and the password that are needed to access the backup computer.
Confirm PasswordType the password again.
Schedule RuleSpecify the schedule using the UNIX cron syntax.
Note: The Format is in this order: minute hour day month weekday. The command is: Minute: Minutes after the hour (0-59), Hour: 24 hour format (0-23), Day: Day of the month (1-31), Month: Month of the year (1-12), Weekday: Day of the week (0-6; the 0 refers to Sunday). For more information, please refer to relevant web sites.
TrafficShield® Installation and Configuration Manual Version 3.2 6 - 13

Chapter 6
Backup TypeSelect what to back up.If you select the Backup Only radio button, TrafficShield security application allows you to mark the type of information to back up via this definition.
5. Click the Add button.The backup definition appears on the main page.
6. Repeat the above procedure for all the backup schedules you want to define.Defining different schedules for the same material creates “generations.” A “generation” helps you restore data as it was at the time the generation was created.
7. Click the Update TrafficShield button.
6 - 14

Administration
Testing the DestinationsThis procedure is designed to check that the data supplied in the backup definition is correct. The test checks the correctness of the destination IP address, the user name and password, and the path, as entered in the backup definition.
To test a destination
1. In the Backup Targets page, select the backup entry to test.
2. To select an entry, mark its check box on the leftmost column. You can test one backup entry at a time.
3. Click the Test Backup button.If all data is correct, a confirmation message appears.
TrafficShield® Installation and Configuration Manual Version 3.2 6 - 15

Chapter 6
Permanent IP AddressesEach TrafficShield security application unit may have one or more permanent IP addresses that remain usable even when TrafficShield system processes are down. This is not mandatory. If you need permanent addresses, define them as explained below. You can either add/edit a Permanent IP, or add/edit a Permanent Static Route.
To set a permanent IP address
1. Click the Administration button at the top of the TSMS window.
2. In the Maintenance menu, select Permanent IPs.
3. Click the Add button above the Permanent IPs window to add a new Permanent IP.
4. Enter the following information:
Unit IDSelect the unit to which you want to assign a permanent IP address.
IP, MaskEnter the unit's permanent IP address and its network mask.
InterfaceEach unit has two network cards. Select the card to which you want to assign a permanent IP address.
5. Click OK.The permanent IP address definition appears on the main page.
6. Repeat the above procedure for all the permanent IP addresses you need to define.
7. Click the Update TrafficShield button to update the unit.
6 - 16

Administration
To set a permanent Static Route
1. Click the Administration button at the top of the TSMS window.
2. In the Maintenance menu, select Permanent IPs.
3. Click the Add button above the Permanent Static Route window to add a new Permanent Static Route.
The following window opens.
4. If the PC resides in an external network, enter the following:
Unit IDSelect the unit to which you want to assign a permanent IPaddress.
Default GatewayThe IP address of the default gateway
Static Route NetworkItem Description
Static Route MaskThe netmask of the destination network address.
Static Route GatewayThe IP address of the gateway
5. Click OK.The permanent Static Route definition appears on the main page.
6. Repeat the above procedure for all the permanent Static Route addresses you need to define.
7. Click the Update TrafficShield button to update the unit.
TrafficShield® Installation and Configuration Manual Version 3.2 6 - 17

Chapter 6
DownloadsTrafficShield security application supports four types of Policy Browser
downloads. Two for the Windows® platform, and two for the Linux platform.
Select the appropriate Policy Browser that corresponds to your system configuration.
Policy BrowserThe Policy Browser is an add-on tool that enables you to record your navigation activities on your Website into an output file.
This output file will be loaded later on onto the policy and can be used to build up the policy,
To download the Policy Browser software
1. In the Administration tool, select the Downloads tab under Maintenance.
2. Select the relevant Policy Browser Installation Kit from the Downloads list.
3. Click the Download Action button and download to a selected folder.
4. Run the downloaded executable file to install the Policy Browser on your machine.
5. At the end of the installation, run the policy browser.
Note
The recorded scan is saved in mybrowser.csv. Load this file from browser recordings.
6 - 18

Administration
Support toolsThe TrafficShield security application offers you the following support tools:
• Export Configuration
• Record Traffic
• F5 Support Website
Export configuration data and logsUsing the Export Configuration tool, you can export TrafficShield security application log activity and configuration data. The export tool performance is influenced by the unit performance at the time the export process is run.
To export your configuration to a disk
1. In the Administration tool, select Maintenance and click the Export Configuration tab under the Support Tools.The Export Configuration tab appears
2. Choose the required logs you wish to export.
TrafficShield® Installation and Configuration Manual Version 3.2 6 - 19

Chapter 6
3. Click the Export button. The file Download screen opens.
4. Click Save to open the browser, and select the export target folder.The file is saved to the disk and the Download complete window appears.
5. Click Close to return to the TrafficShield security application.The file is saved with a default name: ts_config_mm-dd-yy_hh-mm.tsc You can modify that name before saving it.
Record TrafficThis tool is used to record the traffic between the clients and the TrafficShield security application, as received on the IP to Web interface, through either http (80) or https (443) ports. This output is used for internal support purposes only, and is exported as part of the system configuration or copied directly. The name of the file is: /ts/log/temp/rec_traffic.new.
To record the Traffic
1. In the Administration tool, select Maintenance under Support Tools.
2. Click the Record Traffic tab, and then click Start. You are required to confirm the action, and upon confirmation, the recording operation starts.
3. To end the recording, click Stop.
6 - 20

Administration
To view the recording files
1. Stop the recording process.
2. Export the configuration.
3. Open the export file using tar (UNIX/Linux) or WinZip (windows) and extract the recording file named traffic_log.tar.gz.
4. Open this archive again using an archiving software, and extract the recording files from it.
5. Open the tcpdump files with a network analyzer software (such as Ethereal).
Note
We recommend that you not leave the tool running for long periods of time while TrafficShield system is under stress, otherwise the output file may reach its maximum size limit and the oldest part of the recording might be lost.
F5 Support WebsiteThis tool provides information about the F5 Support site, and a link to the Ask F5 Technical Support Center, where you can find additional information, solutions, and documentation for the product.
To access the F5 Support Website
1. In the Administration tool, select Maintenance under the Support Tools.
2. Click the F5 Support Website tab to display the relevant web site details.
3. Click the http://askf5.com link.The F5 support web site displays, where you can check on solutions, and locate additional product documentation.
TrafficShield® Installation and Configuration Manual Version 3.2 6 - 21

Chapter 6
6 - 22

Glossary

Glossary
ARP
Address Request Protocol: (a networking protocol). A method for finding a host's IP address from its Ethernet address. The sender broadcasts an ARP packet containing the IP address of another host and waits for it (or some other host) to send back its Ethernet address. Each host maintains a cache of address translations to reduce delay and loading. ARP allows the IP address to be independent of the Ethernet address, but it only works if all hosts support it.
ARP is defined in RFC 826.
The alternative for hosts that do not do ARP is constant mapping.
Check Object
Indicates whether TrafficShield security application should check the Object requested in the HTTP/HTTPS request against the list of its known objects before it forwards the request to the server. In case it doesn't find the requested object in the list, it generates a violation that, based on the blocking policy, can cause the request to be blocked
Cookie
A packet of information sent by an HTTP server to a World-Wide Web browser and then sent back by the browser each time it accesses that server. Cookies can contain any arbitrary information the server chooses and are used to maintain state between otherwise stateless HTTP transactions. Typically this is used to authenticate or identify a registered user of a Web application without requiring them to sign in again every time they access that Web application. Other uses are maintaining a "shopping basket" of goods you have selected to purchase during a session at a Web application, Web application personalization (presenting different pages to different users), and tracking a particular user's access to a Web application.
DELETE
An HTTP request type that requests to delete a resource on the web server.
Domain Name
A series of alphanumeric strings separated by periods, such as www.siterequest.com, that is an address of a computer network connection, and that identifies the owner of the address.
Dynamic Parameter
A dynamic parameter is a parameter in a request where the set of legal values this parameter can have is changing dynamically, and usually depends of the user session. For example, in a banking application the account number is a dynamic parameter, since each user has its own set of legal account numbers that this parameter can have. This set of legal account numbers is dynamically generated by the server and embedded in the web page sent to user. TrafficShield security application extracts this list of legal values from the web page that is sent to the user, and uses them to verify that the value sent in the request for the dynamic parameter is legal.
TrafficShield® Installation and Configuration Manual Version 3.2 Glossary - 1

Glossary
Dynamic Value
See dynamic parameter
Entry Point
A web page that could be the first requested page in the Web application: an end-user could get to the Entry Point by typing a URL in the browser window, opening a favorites menu, be linked from a different Web application or e-mail client. The end user could also get to the Entry Point by clicking a back button of the browser.
Flow
The defined access path for a browser to get from one object to another specific object.
GET
A type of HTTP request that does not have a content body.
Learning
A process of making a policy more accurate by verifying how the policy complies with the traffic requests, and if there are discrepancies between the policy and the traffic requests, then translating these discrepancies into a suggestion for modifying the policy. The learning phase also enables the system administrator to verify that the policy is not generating any false positives before turning on the blocking feature. The learning process can be used to fine-tune any policy component such as requests length, parameters, and values. In case new objects are added in the Web application, TrafficShield security application can learn those objects and their flows using the learning engine.
Length-Cookie
The length of the cookie.
Length-Post Data
The length of the Data that comes with a POST request.
Length-Query String
The length of the Query string.
Length-Request
See Request Length.
Length-URI
The length of the URI in characters.
Glossary - 2
Glossary
Meta character
A character or a sequence of characters that has a special meaning (<SCRIPT >, \ , SELECT, INSERT, ; ,`, <).
Method
The HTTP/HTTPS request method, for example, GET, POST, HEAD, PUT, and DELETE.
Non Existent Object
The flow did not match the defined flows.
Object
A file or a script that generates web pages on the web server that can be requested by a user.
Object is Allowed to modify domain Cookie
In case an Object (i.e., a web page) includes a JavaScript/java applet/flash as part of the client-side and can change a domain cookie value, the object should by defined as "Object is allowed to modify Cookie."
Path Traversal
An HTTP Attack that uses patterns like ../../ to get access to files not intended to viewed above the WWW root, or in order to cross directories on the server.
Policy
A set of rules that enables TrafficShield security application to understand if a request is valid.
POST
A type of HTTP request, in which a query is put into a content body and possibly compressed or encoded.
PUT
An HTTP request type that requests a content change on the web server.
Query String
Part of an HTTP request that specifies a list of parameters and values into a CGI script. For instance:
http://www.siterequest.com/index.cgi?param1=value1¶m2=value2
Anything that comes after the question mark in the example above is a query string.
TrafficShield® Installation and Configuration Manual Version 3.2 Glossary - 3

Glossary
Referrer
A web page that requests other objects. An HTML page could request picture files and other HTML objects to be downloaded, but pictures cannot cause other objects to be downloaded. For example, HTML, ASP, or PHP pages are usually Referrers, while GIF and JPEG images are not.
Regular Expression
Used by UNIX utilities such as grep, sed and awk, and by editors such as vi and Emacs. A regular expression (regexp) is a sequence of characters which provides the user with a powerful, flexible and efficient test processing tool.
For more details on how to write regular expressions please refer to the many books written on this subject; for example: Mastering Regular Expressions, by Jeffrey E.F. Frieldl, published by O'Reilly & Associates, Inc.
Request Length
The total Length of the HTTP request (in characters) which includes the request line, all headers, cookies, and post data.
Server IP
The IP address of the Web Server that TrafficShield security application is protecting (usually this is an internal IP address).
Service IP
The external IP address on which TrafficShield security application is listening for http requests. (Usually this is the IP address that the DNS A record of the Web Server is mapped to.)
Shield Unit
The on-line enforcing mechanism responsible for TCP session termination, requests parsing, and analyzing.
Static Parameter
A parameter in the request where its values are chosen from a known set of values: Name of a Country, Yes/No, etc.
Static Value
See static parameter.
Target Frame
The frame to which the object is loaded.
Undefined Flow
The flow did not match the defined flows.
Glossary - 4

Glossary
Undefined Object
The object did not match any objects on the list of allowed objects.
URI
Part of the URL that specifies the name of the object requested: in http://www.siterequest.com/index.html, index.html is the URI.
TrafficShield® Installation and Configuration Manual Version 3.2 Glossary - 5


