23
g n i n i a r T l a u n a M s n o i t c n u F c i s a B d n a n o i t a l l a t s n I 6 1 0 2 r e n n a l P o r P t i r e b e G

Geberit ProPlanner 2016Installation and Basic Functions Training Manual
gniniarT launaM
snoitcnuF cisaB dna noitallatsnI
6102 rennalPorP tirebeG

Legal Notice
Geberit ProPlanner 2016
These instructions and the software described in it form part of the license agreement and may be used or copied only in accordance with the license terms. The content of these instructions is intended exclusively for information purposes, may be changed without notification and does not entail an obligation on the part of Geberit Verwaltungs AG. Geberit Verwaltungs AG provides no warranty nor guarantee with regard to the correctness and accuracy of the data in these instructions.
Any mention of company names in sample templates is exclusively for demonstration purposes and reference to any actual organisation is unintentional, with the exception of the following. The following companies and brands are mentioned in these instructions:
• Geberit and the Geberit logo are trademarks of the Geberit Group in Switzerland and in other countries
• Microsoft, Windows 10, Windows 8.1, Windows 8 and Windows 7 are brands of the Microsoft Corporation in the USA and other countries
• Autodesk® RealDWG is a brand of Autodesk in the USA and other countries • YouTube• Adobe Acrobat Reader• Gebr. Kemper GmbH + Co. KG · Metallwerke with headquarters in Olpe, Germany
© Copyright 2016, Geberit Verwaltungs AG. All rights reserved.
Geberit Verwaltungs AG is legally represented by Roland Iff and Rudolf Eberhard.
Geberit Verwaltungs AG
Schachenstrasse 77
CH-8645 Jona, Switzerland
Phone number: +41 55 221 6111
Fax: +41 55 221 6242
E-mail: [email protected]
Commercial register entry: Company registration number CH-320.3.010.425-2 (Company Register of the Canton of St. Gallen)
Value Added Tax no: CHE-116.306.913
Find the sales company in your country at www.geberit.com or via the Internet link on the software's start page.

1Installation and Basic Functions Training ManualGeberit ProPlanner 2016
Table of Contents
Table of Contents
1 About this Document 2
2 Installation and Licensing 32.1 Technical Prerequisites 32.2 Installation 42.3 Starting the Program for the First Time 52.4 Registration 62.5 Licensing 92.6 Start Page 10
3 Projects 113.1 Creating a New Project 113.2 Creating Subprojects 14
4 User Interface 154.1 Selecting the Window Arrangement 154.2 Arranging Windows 154.3 Saving the Window Arrangement 16
5 Data Export 175.1 Graphic Export for Installation Systems 175.2 Graphic Export for All Other Modules 185.3 Export for Industry Software 195.4 Excel Export 20

2
About this Document
Installation and Basic Functions Training ManualGeberit ProPlanner 2016
1 About this Document
Use this Training Manual during training but also to repeat what you have already learned.
Use the Training Manual to familiarise yourself with the installation and basic functions of Geberit ProPlanner.
The topics at a glance:
• Installation and licensing• Projects and subprojects• Data export
Characters and symbols
The following characters and symbols are used in this training manual:
Symbol Designation Meaning
Info Reference to additional information on the subject under Help
Hint Hint for a simpler or better method of operation
Note Basic information on a specific procedure
Important note Information to be urgently noted. Failure to adhere to this can result in loss of data or extensive planning problems
Action Instruction for action consisting of only one step
1.2.
Instruction for action consisting of several steps
Result Result of an action
Info
You can find additional information under Help, which you can call up using the Help menu or by pressing F1.
3Installation and Basic Functions Training ManualGeberit ProPlanner 2016
Installation and Licensing
Technical Prerequisites
2 Installation and Licensing
Install and register the software before starting up Geberit ProPlanner. You can then use certain modules free of charge but will need to purchase a license for others.
Please note the technical prerequisites necessary for installation and operation of the software.
2.1 Technical Prerequisites
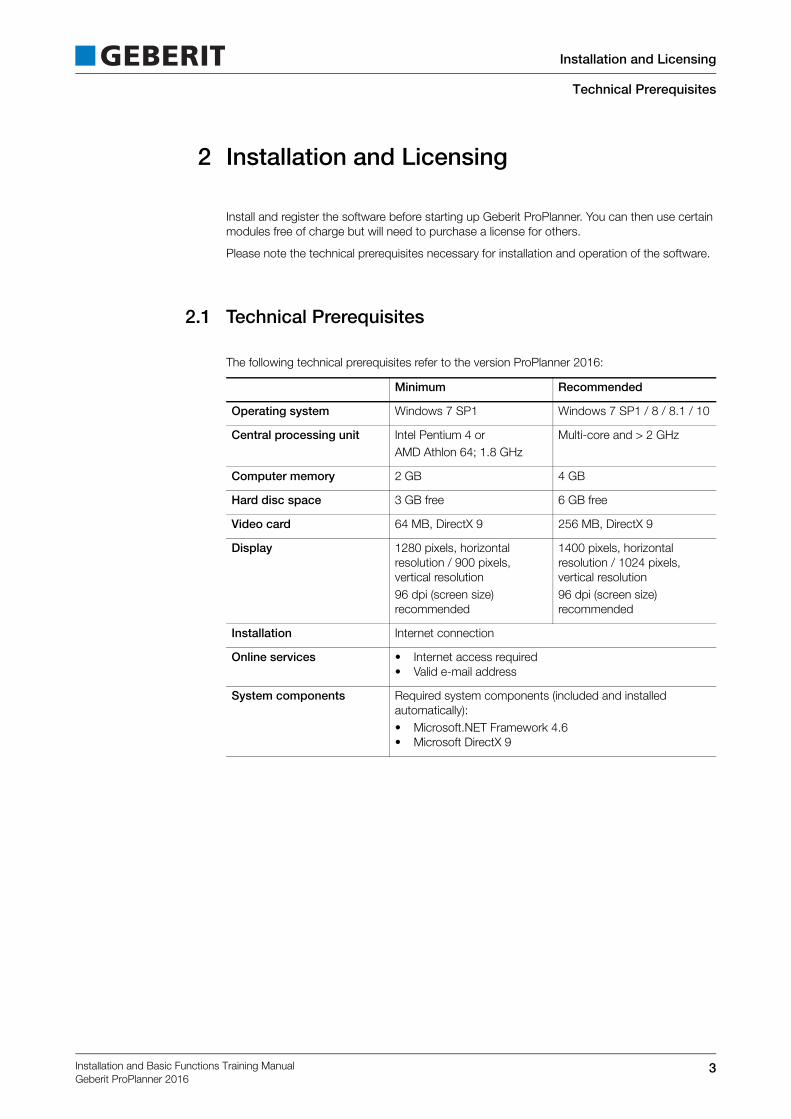
The following technical prerequisites refer to the version ProPlanner 2016:
Minimum Recommended
Operating system Windows 7 SP1 Windows 7 SP1 / 8 / 8.1 / 10
Central processing unit Intel Pentium 4 orAMD Athlon 64; 1.8 GHz
Multi-core and > 2 GHz
Computer memory 2 GB 4 GB
Hard disc space 3 GB free 6 GB free
Video card 64 MB, DirectX 9 256 MB, DirectX 9
Display 1280 pixels, horizontal resolution / 900 pixels, vertical resolution96 dpi (screen size) recommended
1400 pixels, horizontal resolution / 1024 pixels, vertical resolution96 dpi (screen size) recommended
Installation Internet connection
Online services • Internet access required• Valid e-mail address
System components Required system components (included and installed automatically):• Microsoft.NET Framework 4.6• Microsoft DirectX 9

4
Installation and Licensing
Installation
Installation and Basic Functions Training ManualGeberit ProPlanner 2016
2.2 Installation
1. Call up the following Geberit download page: http://gpp-update.geberit.com/Download/ProPlanner_2016. Download the ProPlanner_2016.exe file and double-click on the file.
2. Follow the on-display commands.3. Accept the license agreement and click on Next.
4. Click on Finish to complete the installation.
Note
You may need to install additional updates depending on the update status of your Windows operating system.

5Installation and Basic Functions Training ManualGeberit ProPlanner 2016
Installation and Licensing
Starting the Program for the First Time
2.3 Starting the Program for the First Time
The choice of country affects the available modules. The examples shown in the Training Manual cannot be performed in every country selected.
1. Start Geberit ProPlanner by double-clicking on the relevant symbol on your desktop. The following window will appear after a short time.
2. Select your country. As soon as you have selected a country, you will be assigned to a sales company and a
market. The user interface language will also be set accordingly.
3. Confirm with OK. The Geberit ProPlanner registration window appears.
If you need to adapt the settings for language and market, this can be done via the File > Program settings menu. This change does not affect existing saved projects.
Note
The assignment to a sales company and the associated fundamental module selection cannot be subsequently changed.
Info
You can find additional information on the language and market settings in the Help, which you can access via Basics > General program settings.

6
Installation and Licensing
Registration
Installation and Basic Functions Training ManualGeberit ProPlanner 2016
2.4 Registration
You must register after starting the program for the first time. Registration is free of charge and every corporate customer receives a so-called corporate key and a license file. The name of the individual is entered with private customers in place of the name of the company.
Registering as a new user of Geberit ProPlanner
Proceed as follows if your company has not yet used Geberit ProPlanner:
1. Select the first registration option.
2. Click on Next.
3. Enter your contact details.
Your contact details will be automatically transferred.
4. Once you have received the corporate key by e-mail, enter it and confirm with Finish.
Note
Continue reading under "Registration with Corporate Key or License File"(see page 7) if you have already received a corporate key.
Important note
Make sure that you enter your contact details correctly as they cannot subsequently be changed.

7Installation and Basic Functions Training ManualGeberit ProPlanner 2016
Installation and Licensing
Registration
Registering with a corporate key or license file
Proceed as follows if your company has already used Geberit ProPlanner:
1. Select the second registration option.
2. Click on Next.
3. Import your company's license data (PLD file) or enter the registration details and corporate key.
4. Confirm with Finish.
Offline registration
You can register offline if you do not have internet access and your company has not yet registered.
1. Start up Geberit ProPlanner and register as a new user.2. Call your sales company to obtain a corporate key and additional information.
8
Installation and Licensing
Registration
Installation and Basic Functions Training ManualGeberit ProPlanner 2016
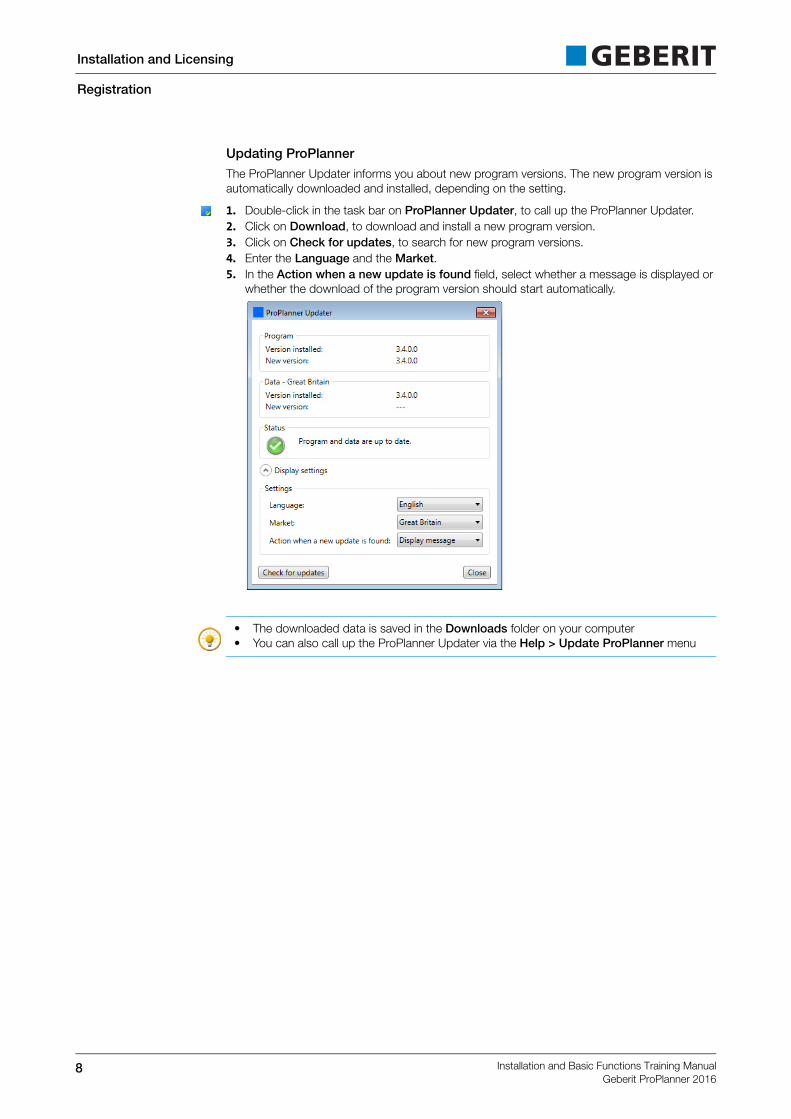
Updating ProPlanner
The ProPlanner Updater informs you about new program versions. The new program version is automatically downloaded and installed, depending on the setting.
1. Double-click in the task bar on ProPlanner Updater, to call up the ProPlanner Updater.2. Click on Download, to download and install a new program version.3. Click on Check for updates, to search for new program versions.4. Enter the Language and the Market.5. In the Action when a new update is found field, select whether a message is displayed or
whether the download of the program version should start automatically.
Tip
• The downloaded data is saved in the Downloads folder on your computer• You can also call up the ProPlanner Updater via the Help > Update ProPlanner menu
9Installation and Basic Functions Training ManualGeberit ProPlanner 2016
Installation and Licensing
Licensing
2.5 Licensing
After registering, you can use some modules free of charge but will have to purchase licenses for additional modules. The licenses are issued for a limited period of time but can be used on many computers as required.
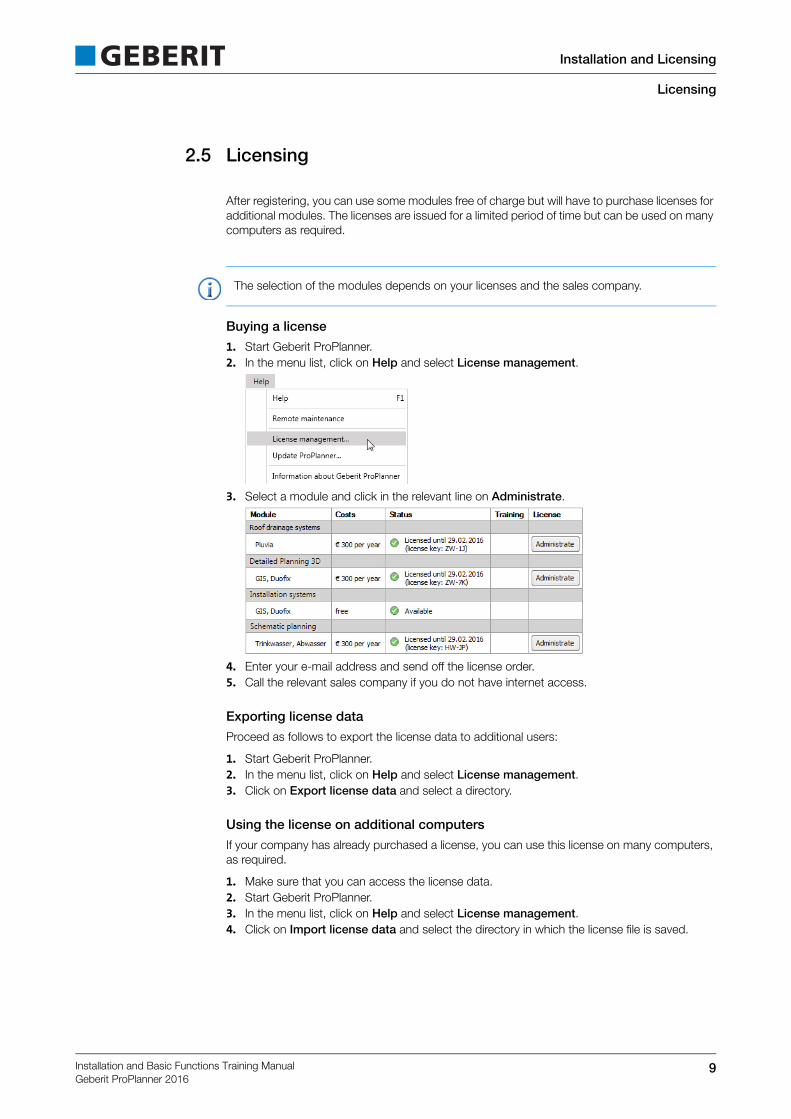
Buying a license
1. Start Geberit ProPlanner.2. In the menu list, click on Help and select License management.
3. Select a module and click in the relevant line on Administrate.
4. Enter your e-mail address and send off the license order.5. Call the relevant sales company if you do not have internet access.
Exporting license data
Proceed as follows to export the license data to additional users:
1. Start Geberit ProPlanner.2. In the menu list, click on Help and select License management.3. Click on Export license data and select a directory.
Using the license on additional computers
If your company has already purchased a license, you can use this license on many computers, as required.
1. Make sure that you can access the license data.2. Start Geberit ProPlanner.3. In the menu list, click on Help and select License management.4. Click on Import license data and select the directory in which the license file is saved.
Note
The selection of the modules depends on your licenses and the sales company.

10
Installation and Licensing
Start Page
Installation and Basic Functions Training ManualGeberit ProPlanner 2016
2.6 Start Page
The following window appears as soon as you start up Geberit ProPlanner:
Fig. 2-1 Start page user interface(1) Menu toolbar(2) General toolbar(3) Open project(4) First steps(5) Program information(6) Create a new project
Open project
You can open available projects. Projects are displayed as soon as the projects are saved in the current version of Geberit ProPlanner.
First steps
You will find Help and information on innovations in the current version of Geberit ProPlanner here. There is also a link via which you can call up further documents and videos.
Program information
You can find the following information here:
• Information on the program version• Information on the selected market• Information on the data version• Date of the price lists used• Link to Geberit on the Internet
Create a new project
You can select a module in the Create a new project area.
12
3
4
5
6
11Installation and Basic Functions Training ManualGeberit ProPlanner 2016
Projects
Creating a New Project
3 Projects
In Geberit ProPlanner you always work within a project. This project can consist of several subprojects from the following modules:
• Installation Systems• Schematic Planning• Detailed Planning 3D• Roof Drainage System
When you create a new project, a subproject of the module you have selected is automatically added.
3.1 Creating a New Project
As soon as you create a new project in ProPlanner, you can choose whether you wish to enter project data and building properties using wizards at the start of a project or whether you wish to enter the program directly and enter the project data and building properties at a later stage.
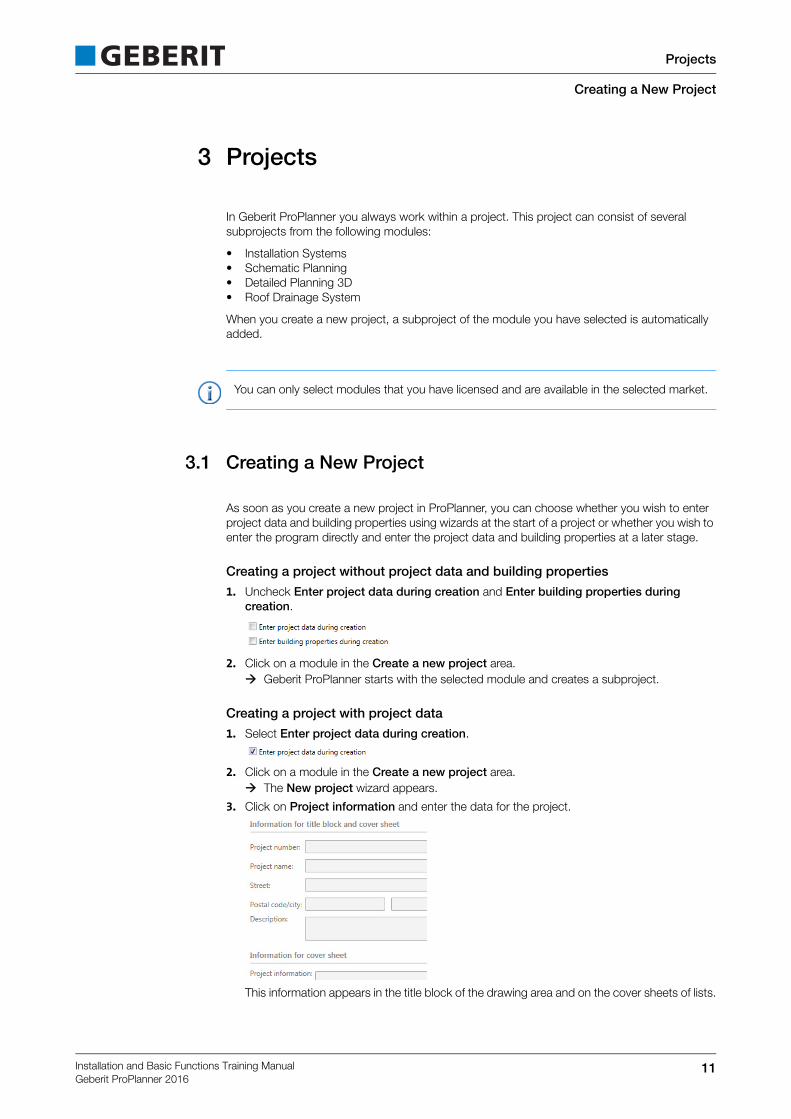
Creating a project without project data and building properties
1. Uncheck Enter project data during creation and Enter building properties during creation.
2. Click on a module in the Create a new project area. Geberit ProPlanner starts with the selected module and creates a subproject.
Creating a project with project data
1. Select Enter project data during creation.
2. Click on a module in the Create a new project area. The New project wizard appears.
3. Click on Project information and enter the data for the project.
This information appears in the title block of the drawing area and on the cover sheets of lists.
Note
You can only select modules that you have licensed and are available in the selected market.

12
Projects
Creating a New Project
Installation and Basic Functions Training ManualGeberit ProPlanner 2016
4. Click on Plumber/sanitary engineer to change the company logo and enter the address of the person responsible for the project.
The logo and plumber/sanitary engineer's details appear in the drawing title block and on the cover sheets of lists.
5. Click on Change company logo and select an image file.
6. Click on Open to carry over the image file into the New project wizard. The logo is now saved for all new projects and subprojects.
7. Click on Next and document the Change history of the project.
The Change history appears on the cover sheets of lists.

13Installation and Basic Functions Training ManualGeberit ProPlanner 2016
Projects
Creating a New Project
8. Click on Next to define the Hourly rate and the Value Added Tax for Offers.
9. Click on Default settings and select Save as user default to carry over the settings as the default for additional projects. The data will be saved on your computer.
10. Click on Finish to exit the wizard. A new project with a subproject from the selected module appears.
Creating a project with building properties
1. Check Enter building properties during creation.
2. Click on Detailed Planning 3D or Schematic Planning in the Create a new project area. A new project is created and the Building and calculation settings window appears.
3. Accept the building properties and click on Close.
Save project
1. Click in the toolbar on Save.2. Enter a File name in the Save project as window.3. Click on Save.
Note
Building properties can only be entered for Detailed Planning 3D and Schematic Planning modules.
Note
You will learn how to adapt the building properties in the respective Detailed Planning 3D and Schematic Planning Training Manuals.
Tip
Remember to save your projects regularly.
Note
As soon as a project is saved, it will appear in the Open project window on the Start page and a link will be automatically created.

14
Projects
Creating Subprojects
Installation and Basic Functions Training ManualGeberit ProPlanner 2016
3.2 Creating Subprojects
You can create and edit several subprojects within a project. There are various functions available to you to manage your subprojects so that you retain an overview of them.
Creating subprojects
1. Click on Add subproject in the toolbar.2. Select a module. The subproject appears in the Project window.
Renaming subprojects
ProPlanner automatically names subprojects according to the respective module. If you wish to create several subprojects of the same module, you can rename the subprojects to differentiate more easily between them.
1. Right-click on a subproject in the Project window and select Rename in the pop-up menu.
2. Enter a designation and confirm with Enter.
Copying subprojects
If you wish to plan an installation multiple times, you can copy this installation as follows:
1. In the Project window, double-click on a subproject in the Number field.
2. Enter the required number per subproject and confirm with Enter. The number previously entered appears after the subproject. The numbers will be
adjusted in the material list to match this figure.
Info
Additional information is available in the Help under Projects and subprojects > Subprojects.

15Installation and Basic Functions Training ManualGeberit ProPlanner 2016
User Interface
Selecting the Window Arrangement
4 User Interface
You can change the Geberit ProPlanner user interface by moving the single windows or changing the window arrangement.
4.1 Selecting the Window Arrangement
The following window arrangements are available in each module in Geberit ProPlanner:
• Default window arrangement 1 with a large number of open setting windows• Default window arrangement 2 with maximum possible drawing area• User-defined window arrangement with your saved window arrangement (see page 16)
Proceed as follows to select one of the window arrangements:
1. In the menu list, click on View and select Window arrangement.
2. Select Default window arrangement 1, Default window arrangement 2 or User-defined window arrangement.
4.2 Arranging Windows
The user interface windows can be moved and arranged as required for every module in Geberit ProPlanner.
Showing and hiding windows
1. Click on the pin in the title bar of a window.
The window is hidden but remains visible at the edge as a tab.
Note
The User-defined window arrangement is available as soon as you have saved a proprietary window arrangement for the respective module (see page 16).
16
User Interface
Saving the Window Arrangement
Installation and Basic Functions Training ManualGeberit ProPlanner 2016
2. Click on the tab if you wish to briefly show the window.3. If you wish to show the window permanently, click on the pin in the title bar of the window.
Re-docking windows
You can move a window so that is it then docked at a new position. To do so, first cancel the fixed arrangement.
1. Click on Window arrangement in the View menu and deselect Lock window arrangement.
2. Move the windows by clicking in the title bar and, holding down the left mouse key, slide them using one of the blue arrows. A total of 8 blue arrows are visible. The new position of the window appears as a blue rectangle.
Your window will be docked in its new position when you release the mouse key.
3. If you wish to protect the new arrangement from unintentional changes, click on Window arrangement in the View menu and select Lock window arrangement.
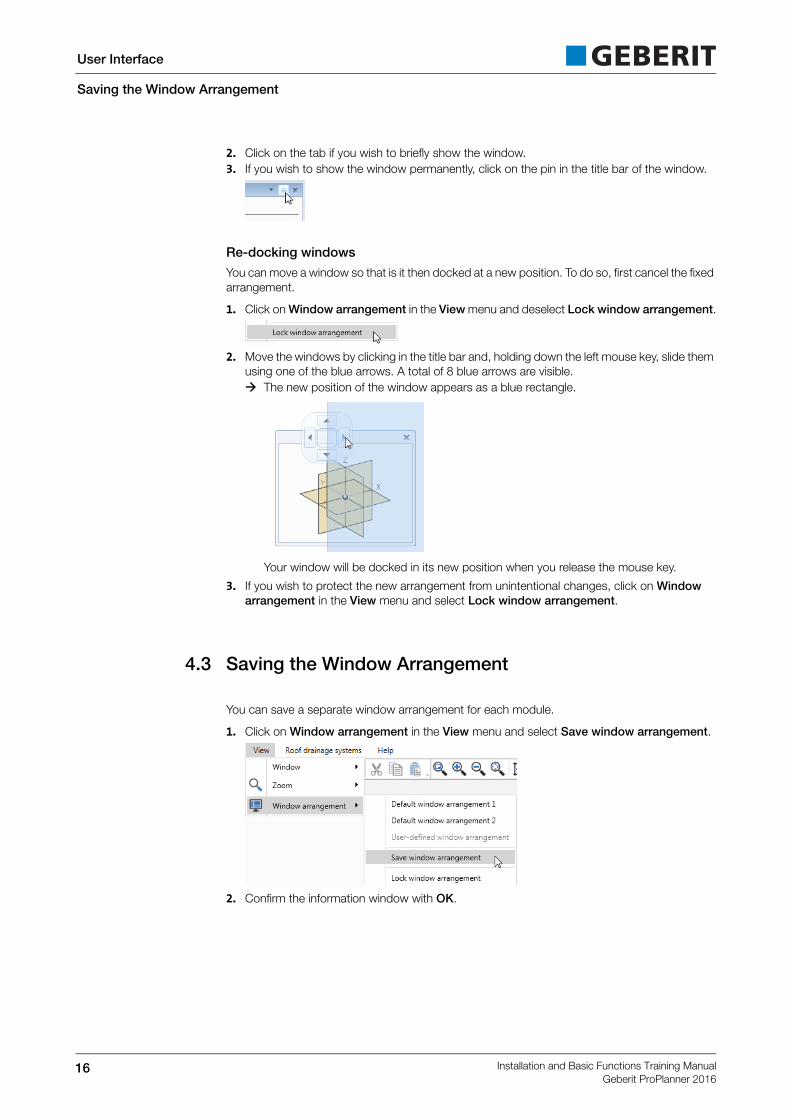
4.3 Saving the Window Arrangement
You can save a separate window arrangement for each module.
1. Click on Window arrangement in the View menu and select Save window arrangement.
2. Confirm the information window with OK.

17Installation and Basic Functions Training ManualGeberit ProPlanner 2016
Data Export
Graphic Export for Installation Systems
5 Data Export
You have the following export options:
• Graphic export (DXF, DWG, JPEG, BMP etc.)• Export for industry software (GAEB, UGL, IGH451, CalWin)• Excel export (XLS, CSV)
5.1 Graphic Export for Installation Systems
Proceed as follows in the Installation Systems module:
1. Double-click on an installation wall.
The Installation wall window appears.
2. Select a view in the preview (Side view, Front view or Floor plan).3. Click on Print / Export.
The Print/export window appears.
4. Select CAD file or Image file in the Output area.5. If you have selected Image file, adjust the number of pixels per image file.6. Click on Export. The Save as window appears.
7. Enter a File name.8. Select an image format or the file format for your CAD program as the File type.
Fig. 5-1 Selection for general image formats

18
Data Export
Graphic Export for All Other Modules
Installation and Basic Functions Training ManualGeberit ProPlanner 2016
Fig. 5-2 Selection for CAD formats9. Click on Save.
5.2 Graphic Export for All Other Modules
Proceed as follows in the Detailed Planning 3D, Schematic Planning and Roof Drainage System modules:
1. If you export from the Detailed Planning 3D module, highlight the installation unit to be exported in the Buildings window.
2. Click on Print / Export in the toolbar.3. Click on Graphics.
4. Select CAD file or Image file in the Output area.5. If you have selected Image file specify the number of pixels.6. Click on Export. The Save as window appears.
7. Enter a File name.

19Installation and Basic Functions Training ManualGeberit ProPlanner 2016
Data Export
Export for Industry Software
8. Select an image format or the file format for your CAD program as the File type.
Fig. 5-3 Selection for general image formats
Fig. 5-4 Selection for CAD formats9. Click on Save.
5.3 Export for Industry Software
ProPlanner provides various export formats to facilitate a uniform standard for the replacement of data for specifications or requests for tenders:
• GAEB• UGL• IGH451• CalWin
1. Click on Data exchange in the File menu and then on an export format.2. Select the subprojects you wish to export.3. Select a file format and additional settings for the GAEB export.
Note
The export formats offered depend on the market set in the program settings.

20
Data Export
Excel Export
Installation and Basic Functions Training ManualGeberit ProPlanner 2016
4. Enter a customer number, a supplier number and one of the following kinds of enquiries for the UGL export:• TB: Call-off order by contractor to wholesaler• AN: Inquiry from contractor to wholesaler• BE: Order by contractor to wholesaler• A0: Call-off by contractor to wholesaler for delivery from a call-off order• A1: Call-off by contractor to wholesaler for delivery from a quotation• A2: Creation of a call-off order from a quotation• PA: Price quotation by wholesaler to contractor• AB: Order confirmation by wholesaler to contractor
5. Enter Export type, Customer address and Supplier address for IGH451 export.
6. Click on Export.7. Select a Storage location and a File name.
5.4 Excel Export
You can save lists as Excel files or as CSV files via the Print dialog.
Proceed as follows:
1. Click on Print / Export in the toolbar.2. Click on Lists.
3. Select Excel export or CSV export in the Output area.4. Select the subprojects which you wish to export in the Source data area.
Note
The Microsoft Office® version you have installed determines which format can be exported.

21Installation and Basic Functions Training ManualGeberit ProPlanner 2016
Data Export
Excel Export
5. Click on Export. The Save as window appears.
6. Select a File name and a storage location.7. Click on Save.
Info
Additional information on the setting options in the Print dialog is available under Help in Print and Export.


