125
1 Training Manual

1
Training Manual

2
Table of Contents
System Requirements ................................................................................................................................................. 3
Getting Started ............................................................................................................................................................. 4
Activating Your Account ............................................................................................................................................. 5
Home Page..................... ........................................................................................................................................... 6
Case Initiation Section ................................................................................................................................................. 7
Quick Plaintiff List..................... ................................................................................................................................. 8
Private Attorney/Non-Attorney Section ...................................................................................................................... 9
Initiate New Claim--Small Claims..................... ...................................................................................................... 10
Initiate New Claim--Landlord-Tenant...................................................................................................................... 21
Initiate New Petition.................................................................................................................................................. 31
Initiate New Writ......... ............................................................................................................................................... 38
Writ of Execution..................... ....................................................................................................................... 39
Writ of Possession..................... .................................................................................................................... 44
Praecipe of Notice of Intent to Attach Wages................................................................................................. 50
Praecipe to Enter Judgment Against a Garnishee..................... .................................................................... 55
Writ of Revival..................... ........................................................................................................................... 59
Initiate New Claim Relistment..................... ............................................................................................................. 63
Relistment at New Address..................... ....................................................................................................... 64
Relistment at Same Address..................... ..................................................................................................... 69
Initiate New Additional Claim..................... .............................................................................................................. 75
Initiate Continuance Request..................... .............................................................................................................. 92
Amend A Complaint and/or Docket Entry................................................................................................................. 99
Private Attorney Entry of Appearance..................... ............................................................................................... 103
Review Queues..................... ................................................................................................................................. 104
Schedule Private Attorney and Non Attorney Filer Hearings ............................................................................... 107
Schedule Private Attorney and Non Attorney Filer Hearings.................................................................................. 108
Service Packs ........................................................................................................................................................... 109
Attorney Service Packs Pending Printing/Attorney Service Pack Printed Report................................................... 110
Reports ..................................................................................................................................................................... 111
Billing Report..................... ..................................................................................................................................... 112
Hearings .................................................................................................................................................................... 113
Read Only Hearing List..................... ..................................................................................................................... 114
CMS (Case Management System) ......................................................................................................................... 116
Search..................... ................................................................................................................................................ 117
Miscellaneous........................................................................................................................................................... 118

3
Windows XP, Windows Vista, Windows 7, MAC OS X
Internet Explorer 7 +, Mozilla Firefox, Google Chrome, Safari—Browser must have JavaScript enabled
Adobe Acrobat v9 or later
Recommended screen resolution 1024 x 768 or higher
Any standard printer supported by browser
Scanner—must produce PDF files
4
Getting Started
To set up an account, email a request to [email protected] or
[email protected]. The request should include:
1. Your name
2. Your PA bar number (Attorneys Only)
3. Your organization name, address and telephone number
4. The email address(es) to be associated with the account
After receiving a username and a temporary password, log onto our website to
activate your account and change the temporary password. The web address for
CLAIMS is http://fjdclaims.phila.gov.

5
Once the account password has been updated, the CLAIMS Home page will open.
Enter the username and
temporary password to log into
CLAIMS.
Change the password using the
guidelines provided.
6
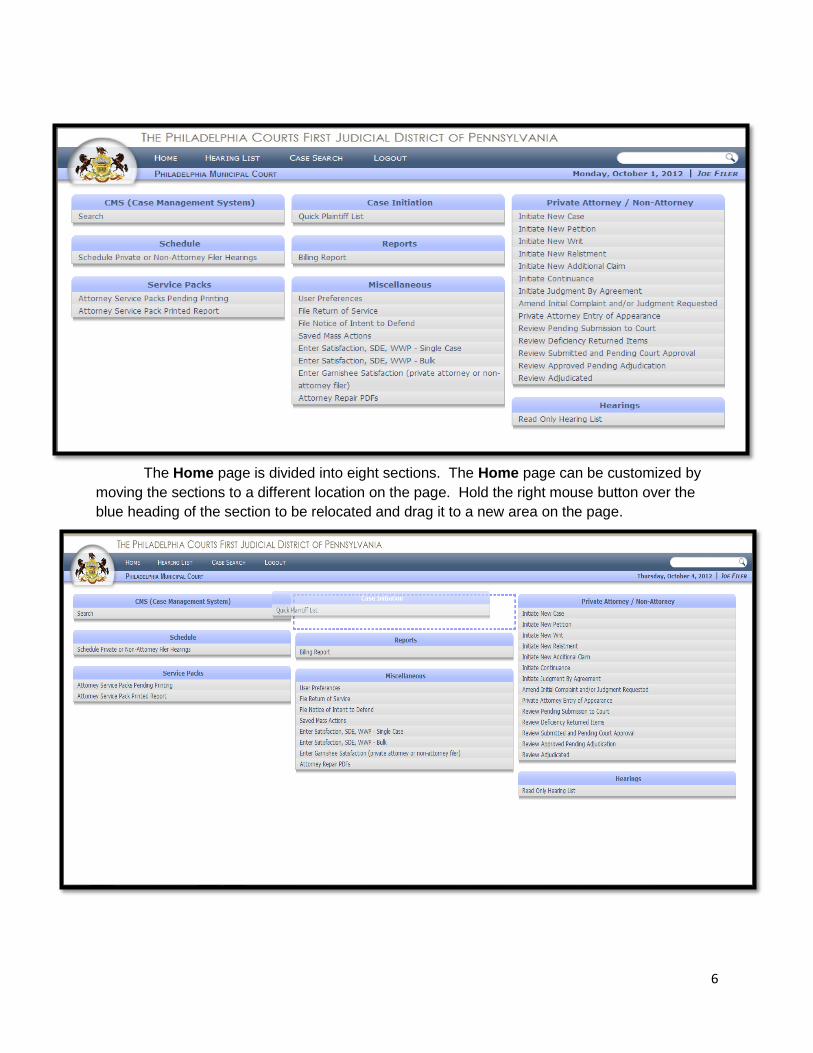
The Home page is divided into eight sections. The Home page can be customized by
moving the sections to a different location on the page. Hold the right mouse button over the
blue heading of the section to be relocated and drag it to a new area on the page.

7
Quick Plaintiff List

8
The Quick Plaintiff List allows the User to enter the information for plaintiff(s) and save
it to the Quick Plaintiff List screen. The information will remain stored on this screen and can
be added to new claims with a few mouse clicks. It is a convenient way to store information that
is used often.
To begin, go to the Case Initiation section of the Home page and click on the Quick
Plaintiff List.
Enter the information and click Save. All Quick Plaintiffs appear on the screen in
alphabetical order.
Click on Add New Plaintiff to Quick List
Only the text fields with bold lettering are
required for Pro-se filers. However, an
attorney is required to enter his or her
PA Bar number to become attorney of
record for the plaintiff. If you are a Pro
Se filer, make sure to add your email
address in the box provided.
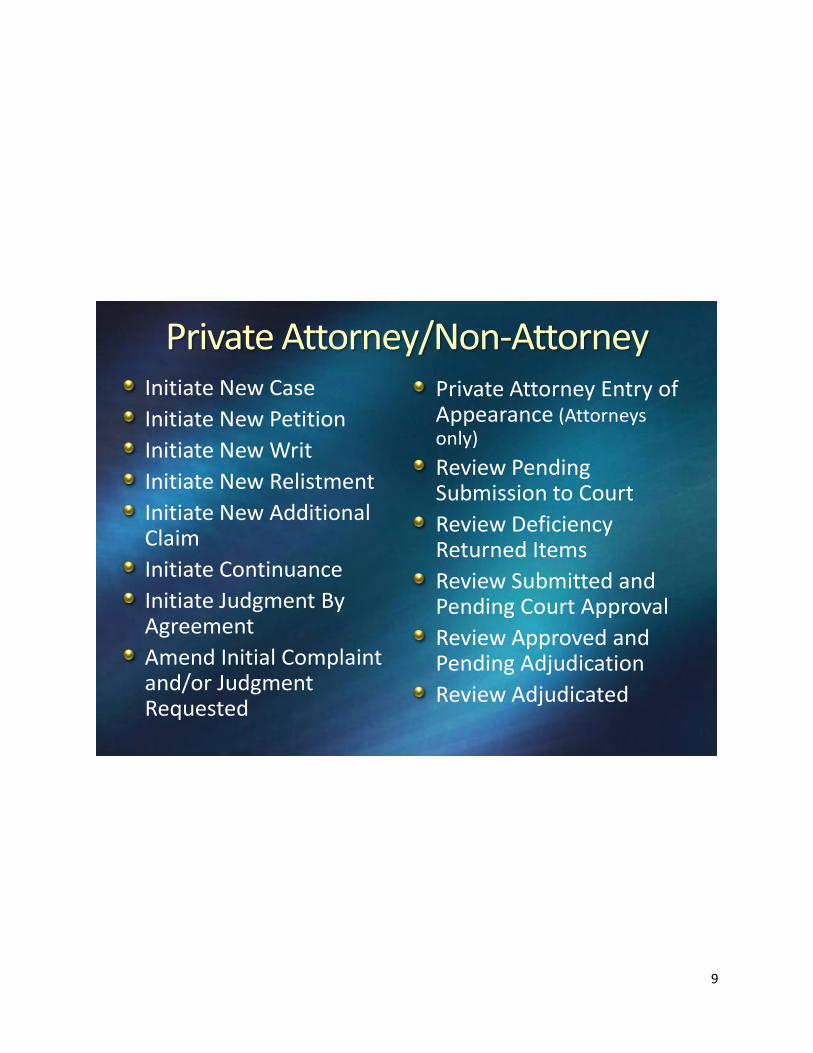
9
Initiate New Case
Initiate New Petition
Initiate New Writ
Initiate New Relistment
Initiate New Additional Claim
Initiate Continuance
Initiate Judgment By Agreement
Amend Initial Complaint and/or Judgment Requested
Private Attorney Entry of Appearance (Attorneys only)
Review Pending Submission to Court
Review Deficiency Returned Items
Review Submitted and Pending Court Approval
Review Approved and Pending Adjudication
Review Adjudicated

10
Initiate New Case-SMALL CLAIMS
The first step to file a Small Claims case is to click on the Initiate New Case link on the
Home page. The Select Case Type screen will open. There are four different types of Small
Claims case types (each with a separate description). Click the radio button for the appropriate
case type and click the Next button.
The next screen is the Case Initiation screen. At the top of the screen in the Case
Details there is Case ID number. Each case receives its own ID number. It will stay with the
case even after a claim number has been assigned and can always be used for search
purposes. Also in Case Details, is the case type, docket type and the status; which at this
point is pending.

11
The first step when filing a claim is to add the plaintiff(s) and defendant(s). Several
parties can be added to each case. There are a few options from which to chose including
adding a quick plaintiff.
The first option is to add an individual plaintiff. To do this, choose the Individual link
under the Plaintiff(s) section and insert text into the text boxes.
Once the plaintiff has been added, click the Save button. More plaintiffs can be added
at either the same address or a different address.
Only the text fields with bold lettering are
required for Pro-se filers. However, an
attorney is required to enter his or her
PA Bar number to become attorney of
record for the plaintiff. Add your email
address in the text box provided.
Once the first plaintiff has
been added, additional links
will appear to add more
plaintiffs.

12
If the plaintiff is an organization, click the Organization link in the Plaintiff(s) section.
To add an individual defendant, click on the Add Individual link.
A Pro-Se filer cannot file on behalf of an organization
such as a corporation, LLC, limited partnership,
general partnership, or unincorporated association
unless documentation such as Articles of
Incorporation, Certificate of Membership, Minutes or
IRS return can be provided showing the filer as a
principal in the organization and must indicate his title
in the caption. If a Pro-Se filer cannot provide such
documentation, an Appointment of Authorized
Representative form may be used. Refer to page ##
for further information.
Only the text fields with bold lettering are
required. Do not add an Attorney ID number
for the defendant.
Add the defendant's address and choose
the service type for this case. Service
options are determined by the defendant's
location. Refer to the Rules, Procedures
and Forms folder on your flash drive for
more information.
If the claim is against a married couple, add
the spouse in this area. Once the
information is complete, click the Save
button.
If the defendant is in the military service,
click Yes.

13
To add an organization as a defendant, choose the Organization link.
/pr
Once the information is saved, it appears in the Parties section of the Case Initiation
page. The plaintiff and/or defendant can be edited at any time prior to the submission of the
claim, by clicking on the hyperlinks for the names and addresses.
A defendant can also be docketed under more than one address and served at more
than one address.
n
A defendant can be docketed under one
address and served at another. To do
that, click the Alternative Service
Address link.
When adding another address for an
existing defendant, use the Linked to
defendant drop down menu to link the
defendant to both addresses.
Only the text fields with bold lettering are
required. Do not add an Attorney ID
number for the defendant.
14
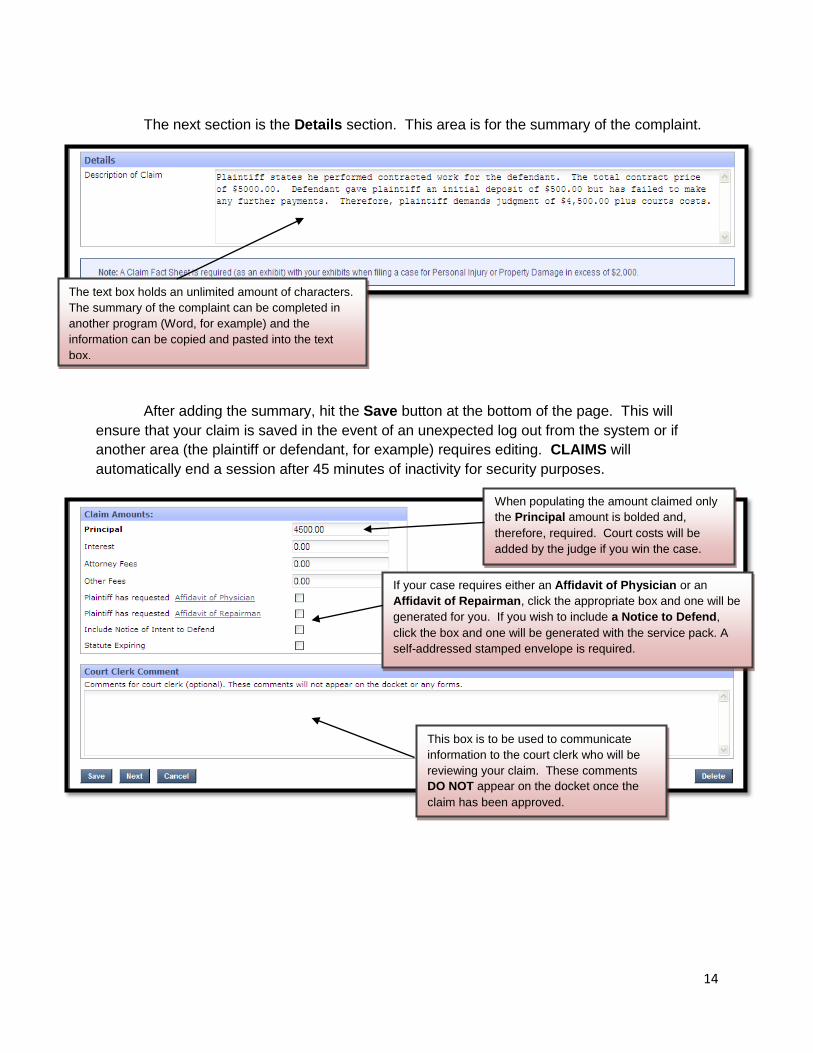
The next section is the Details section. This area is for the summary of the complaint.
After adding the summary, hit the Save button at the bottom of the page. This will
ensure that your claim is saved in the event of an unexpected log out from the system or if
another area (the plaintiff or defendant, for example) requires editing. CLAIMS will
automatically end a session after 45 minutes of inactivity for security purposes.
The text box holds an unlimited amount of characters.
The summary of the complaint can be completed in
another program (Word, for example) and the
information can be copied and pasted into the text
box.
When populating the amount claimed only
the Principal amount is bolded and,
therefore, required. Court costs will be
added by the judge if you win the case.
If your case requires either an Affidavit of Physician or an
Affidavit of Repairman, click the appropriate box and one will be
generated for you. If you wish to include a Notice to Defend,
click the box and one will be generated with the service pack. A
self-addressed stamped envelope is required.
This box is to be used to communicate
information to the court clerk who will be
reviewing your claim. These comments
DO NOT appear on the docket once the
claim has been approved.

15
Once you have completed the Case Initiation page. It will look like this:
If the complaint is satisfactory, click the Next button;
which will both save the information and navigate to the
next step in the process. To save the information and
complete the filing process at a later time, click the
Save button. The claim will be in the Review Pending
Submission to Court queue.
If the statute is expiring, check the box
indicating that. Clerks will only review
claims between the hours of 9:00 am to
5:00 pm Monday through Friday. If your
statute is expiring the day you submit your
case, contact the First Filing Unit at
215.686.2901 upon submission.

16
To continue on with the claim, click the Next button which will open the Verification
page.
After that verification has been completed, click the Next button to navigate to the next
screen.
A pro-se filer filing on behalf of himself
should populate the first radio button.
Attorneys and non- attorney filers filing
as an authorized representative, should
populate the second radio button. Type
the name of the authorized
representative in the Other Persons
text box.
17
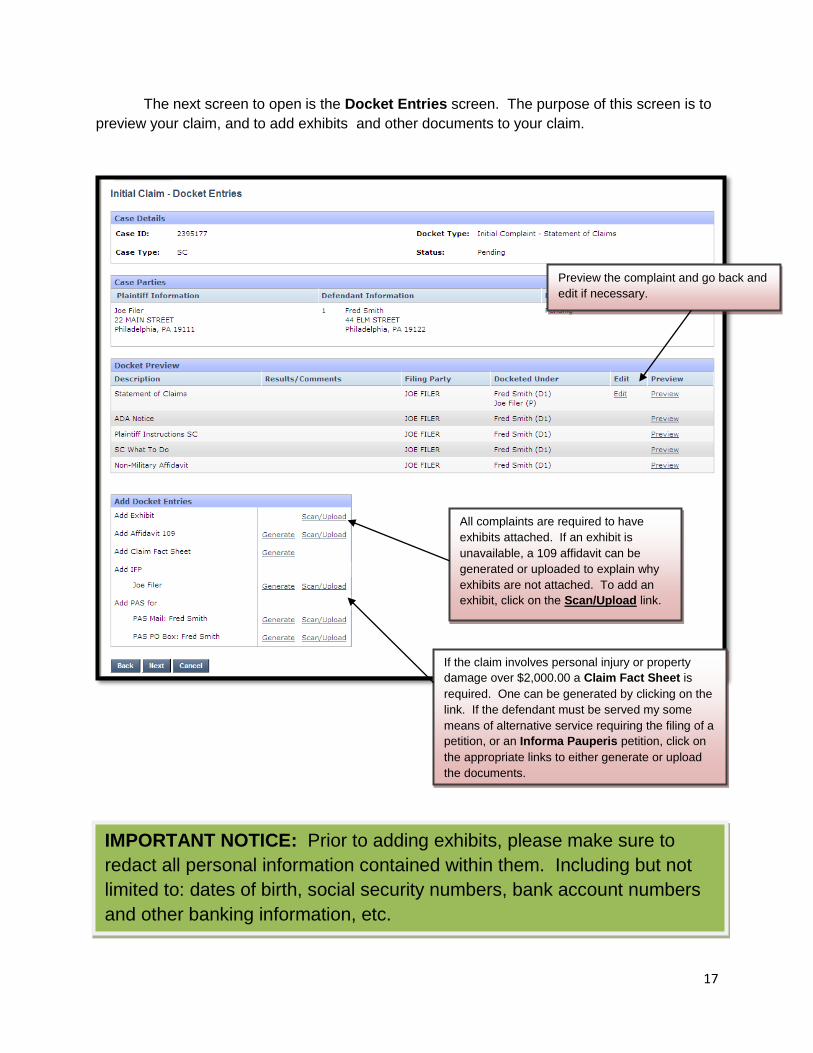
The next screen to open is the Docket Entries screen. The purpose of this screen is to
preview your claim, and to add exhibits and other documents to your claim.
To add an exhibit, click on the Scan/Upload link:
Preview the complaint and go back and
edit if necessary.
All complaints are required to have
exhibits attached. If an exhibit is
unavailable, a 109 affidavit can be
generated or uploaded to explain why
exhibits are not attached. To add an
exhibit, click on the Scan/Upload link.
If the claim involves personal injury or property
damage over $2,000.00 a Claim Fact Sheet is
required. One can be generated by clicking on the
link. If the defendant must be served my some
means of alternative service requiring the filing of a
petition, or an Informa Pauperis petition, click on
the appropriate links to either generate or upload
the documents.
IMPORTANT NOTICE: Prior to adding exhibits, please make sure to
redact all personal information contained within them. Including but not
limited to: dates of birth, social security numbers, bank account numbers
and other banking information, etc.
18
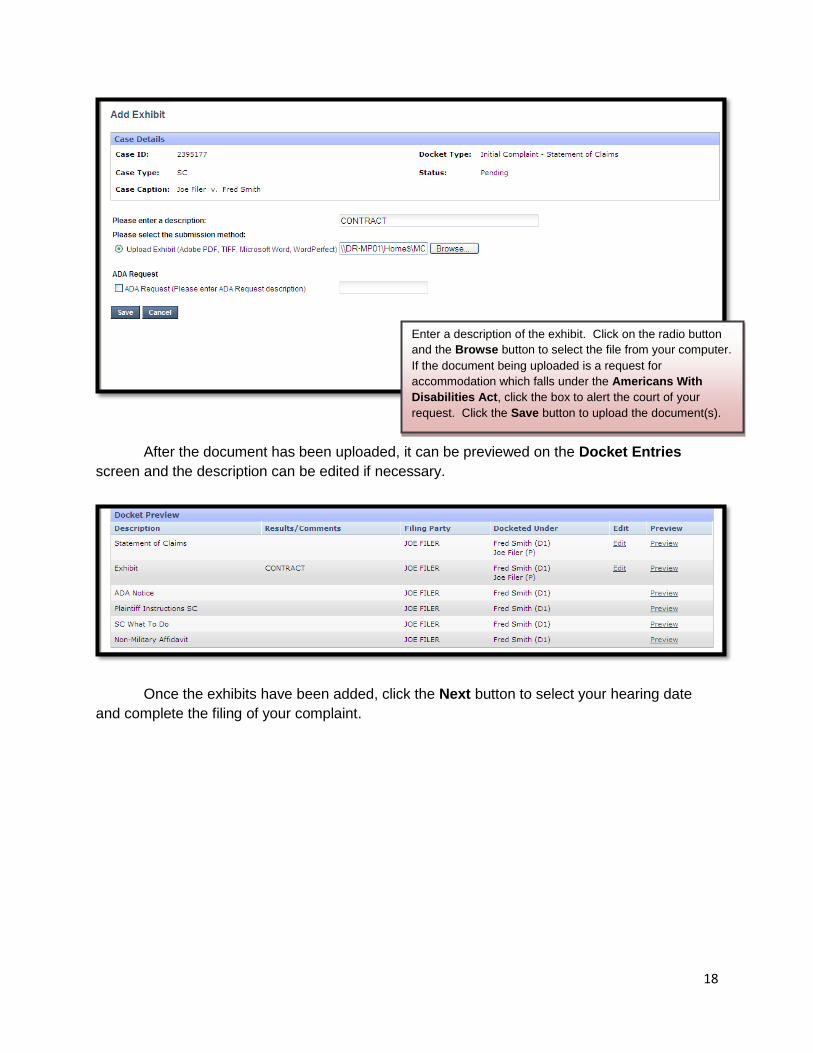
After the document has been uploaded, it can be previewed on the Docket Entries
screen and the description can be edited if necessary.
Once the exhibits have been added, click the Next button to select your hearing date
and complete the filing of your complaint.
Enter a description of the exhibit. Click on the radio button
and the Browse button to select the file from your computer.
If the document being uploaded is a request for
accommodation which falls under the Americans With
Disabilities Act, click the box to alert the court of your
request. Click the Save button to upload the document(s).

19
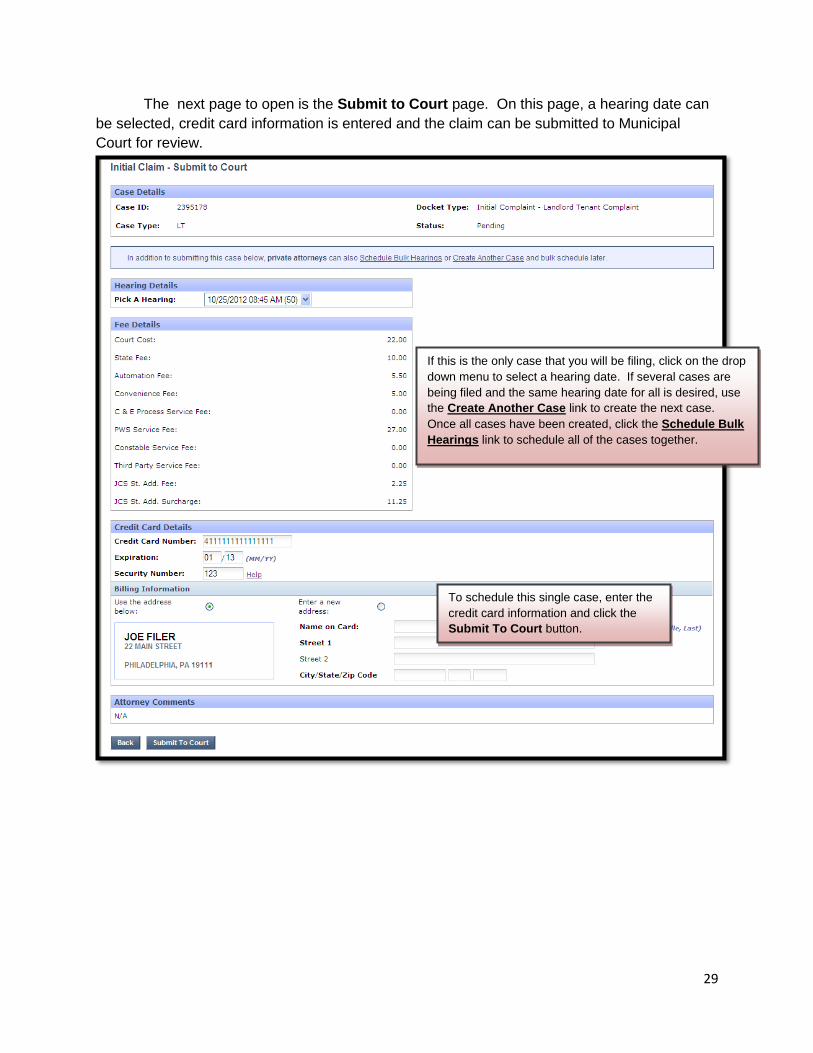
The next page to open is the Submit to Court page. On this page, a hearing date can
be selected, credit card information is entered and the claim can be submitted to Municipal
Court for review.
If this is the only case that you will be filing, click on the drop
down menu to select a hearing date. If several cases are
being filed and the same hearing date for all is desired, use
the Create Another Case link to create the next case.
Once all cases have been created, click the Schedule Bulk
Hearings link to schedule all of the cases together. This is
the ONLY way to ensure that all of your cases will have the
same hearing date, time and COURTROOM.
To schedule this single case, enter the
credit card information and click the
Submit To Court button.

20
Once the claim has been submitted for review, an invoice can be viewed and printed.
The court will review the claim normally within 24 to 48 hours. Your credit card will not
be charged until your claim is approved. If the claim has an expiring statute, please contact the
First Filing Unit at 215-686-2901/7988 immediately after submission. Email notification from
[email protected] will be sent once the case has been reviewed. Make sure to add
this email address to your address book.
21
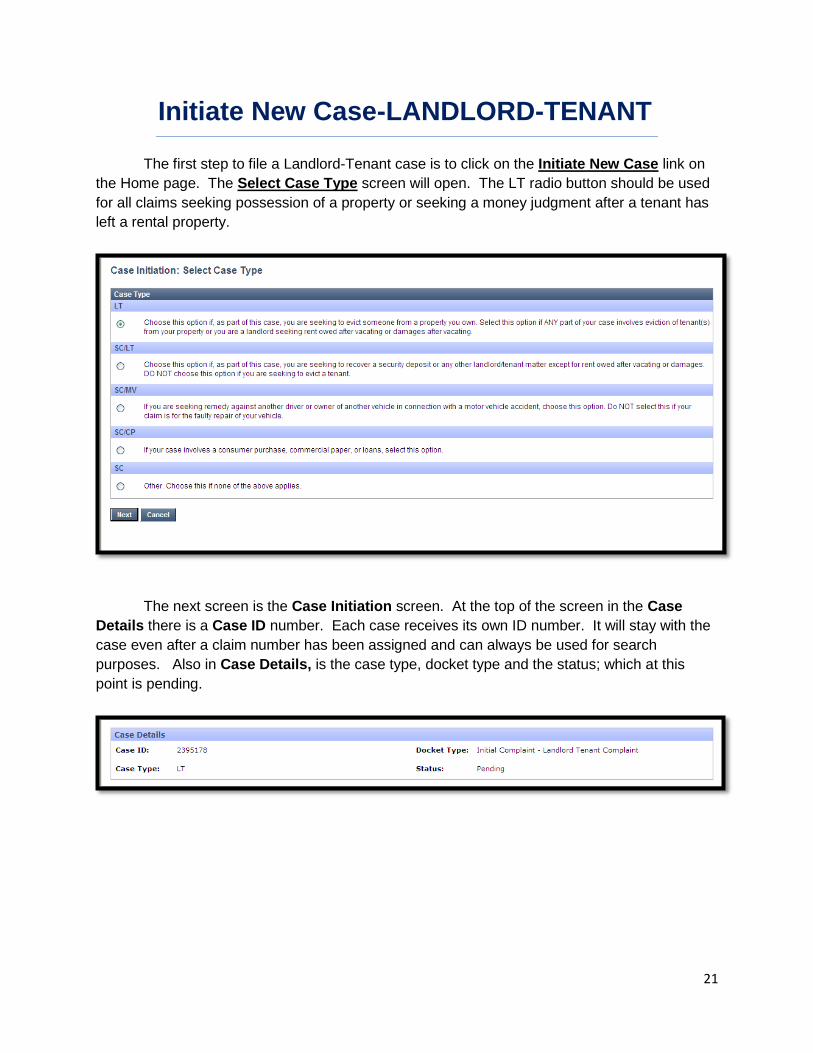
Initiate New Case-LANDLORD-TENANT
The first step to file a Landlord-Tenant case is to click on the Initiate New Case link on
the Home page. The Select Case Type screen will open. The LT radio button should be used
for all claims seeking possession of a property or seeking a money judgment after a tenant has
left a rental property.
The next screen is the Case Initiation screen. At the top of the screen in the Case
Details there is a Case ID number. Each case receives its own ID number. It will stay with the
case even after a claim number has been assigned and can always be used for search
purposes. Also in Case Details, is the case type, docket type and the status; which at this
point is pending.

22
The first step when filing a claim is to add the plaintiff(s) and defendant(s). Several
parties can be added to each case. There are a few options from which to chose including
adding a quick plaintiff. The plaintiff in a Landlord-Tenant complaint should be the owner
of the property.
The first option is to add an individual plaintiff. To do this, choose the Individual link
under the Plaintiff(s) section and insert text into the text boxes.
Once the plaintiff has been added, click the Save button. More plaintiffs can be added
at either the same address or a different address.
Only the text fields with bold lettering are
required for Pro-se filers. However, an
attorney is required to enter his or her
PA Bar number to become attorney of
record for the plaintiff. Add your email
address in the text box provided.
Once the first plaintiff has
been added, additional links
will appear to add more
plaintiffs.

23
If the plaintiff is an organization, click the Organization link in the Plaintiff(s) section.
To add an individual defendant, click on the Add Individual link.
A Pro-Se filer cannot file on behalf of an organization
such as a corporation, LLC, limited partnership,
general partnership, or unincorporated association
unless documentation such as Articles of
Incorporation, Certificate of Membership, Minutes or
IRS return can be provided showing the filer as a
principal in the organization and must indicate his title
in the caption. If a Pro-Se filer cannot provide such
documentation, an Appointment of Authorized
Representative form may be used. Refer to page ##
for further information.
Only the text fields with bold lettering are
required. Do not add an Attorney ID number
for the defendant.
If the defendant is in the military service,
click Yes. If the defendant is a minor, click
Yes. If the defendant is over 60, click Yes.
Add the defendant's address and choose
the service type for this case. Service
options are determined by the defendant's
location. Refer to the Rules, Procedures
and Forms folder on your flash drive for
more information.
If the claim is against a married couple, add
the spouse in this area. Once the
information is complete, click the Save
button.

24
To add an organization as a defendant, click the add Organization link.
Once the information is saved, it appears in the Parties section of the Case Initiation
page. The plaintiff and/or defendant can be edited at any time prior to the submission of the
claim, by clicking on the hyperlinks for the names and addresses.
A defendant can also be docketed under more than one address and served at more
than one address.
A defendant can also be docketed under more than one address and served at more
than one address. However, only the rental property can be posted.
Only the text fields with bold lettering are
required. Do not add an Attorney ID number
for the defendant.
A defendant can be docketed under one
address and served at another. To do
that, click the Alternative Service
Address link.
When adding another address for an
existing defendant, use the Linked to
defendant drop down menu to link the
defendant to both addresses.

25
The next section is the Details section. This area is for the summary of the complaint.
If possession is being sought for
breach, a description of the breach will
be required. If damages are being
sought, a description of the damages
will be required.
If the complaint is satisfactory, click the Next button;
which will both save the information and navigate to the
next step in the process. To save the information and
complete the filing process at a later time, click the
Save button. The claim will be in the Review Pending
Submission to Court queue.
If the defendant has vacated the
property, indicate the date possession
was surrendered.
Always enter the rental
property address.

26
To continue on with the claim, click the Next button which will open the Verification
page.
A pro-se filer filing on behalf of himself
should populate the first radio button.
Attorneys and non- attorney filers filing as an
authorized representative, should populate the
second radio button. Type the name of the
authorized representative in the Other Persons
text box.

27
The next screen to open is the Docket Entries screen. The purpose of this screen is to
preview your claim, and to add exhibits and other documents to your claim.
Preview the complaint and go back and
edit if necessary.
All Landlord-Tenant claims for residential properties
are required to have a Housing Inspection license
attached. If the lease or notice to vacate or other
documentation is unavailable, a 109 affidavit can be
generated or uploaded to explain why those
documents are not attached. To add an exhibit, click
on the Scan/Upload link.
If the defendant must be served my some means
of alternative service requiring the filing of a
petition, or an Informa Pauperis petition must be
filed, click on the appropriate links to either
generate or upload the documents.
IMPORTANT NOTICE: Prior to adding exhibits, please make sure to
redact all personal information contained within them. Including but not
limited to: dates of birth, social security numbers, bank account numbers
and other banking information, etc.
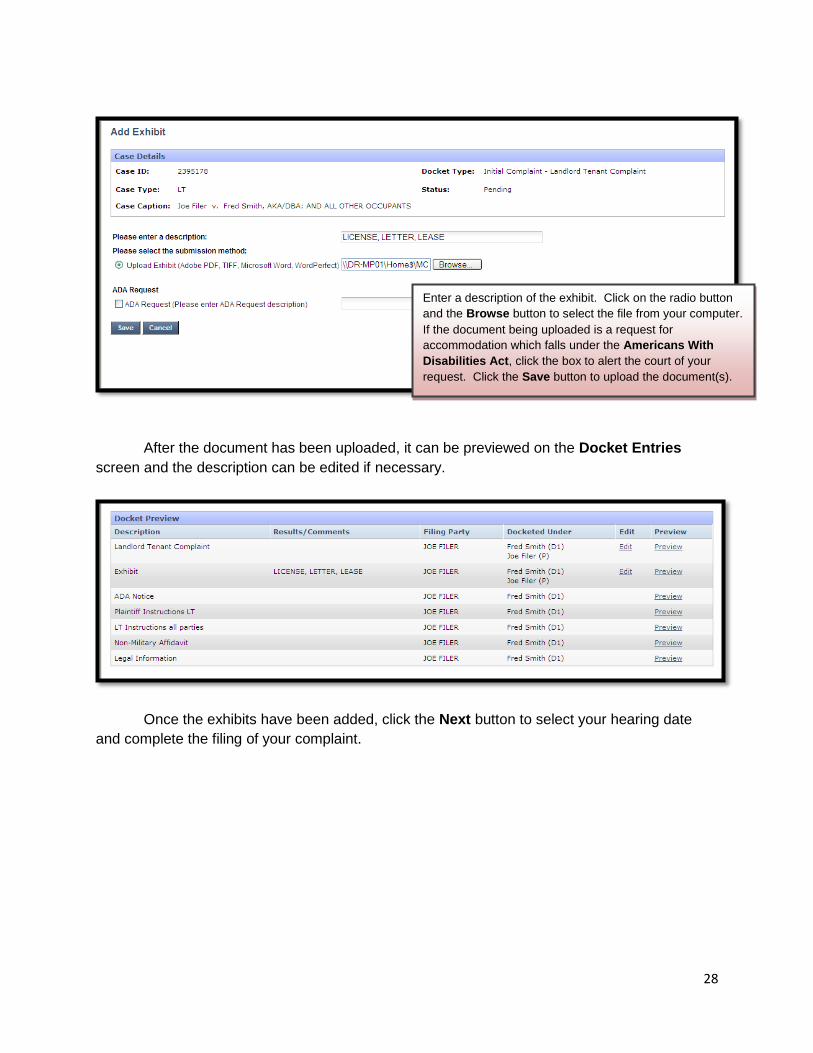
28
After the document has been uploaded, it can be previewed on the Docket Entries
screen and the description can be edited if necessary.
Once the exhibits have been added, click the Next button to select your hearing date
and complete the filing of your complaint.
Enter a description of the exhibit. Click on the radio button
and the Browse button to select the file from your computer.
If the document being uploaded is a request for
accommodation which falls under the Americans With
Disabilities Act, click the box to alert the court of your
request. Click the Save button to upload the document(s).
29
The next page to open is the Submit to Court page. On this page, a hearing date can
be selected, credit card information is entered and the claim can be submitted to Municipal
Court for review.
If this is the only case that you will be filing, click on the drop
down menu to select a hearing date. If several cases are
being filed and the same hearing date for all is desired, use
the Create Another Case link to create the next case.
Once all cases have been created, click the Schedule Bulk
Hearings link to schedule all of the cases together.
To schedule this single case, enter the
credit card information and click the
Submit To Court button.

30
Once the claim has been submitted for review, an invoice can be viewed and printed.
The court will review the claim normally within 24 to 48 hours. Your credit card will not be
charged until your claim is approved. Email notification from [email protected] will be
sent once the claim has been reviewed. Make sure to add this email address to your address
book.
31
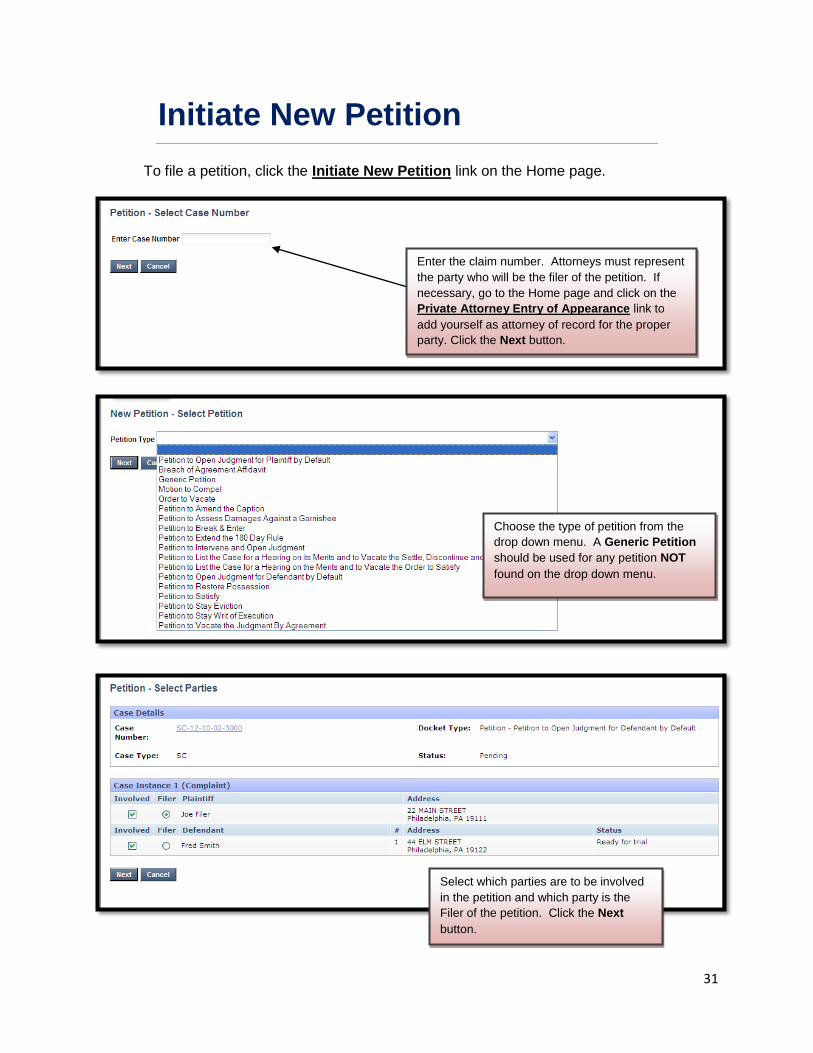
Initiate New Petition
To file a petition, click the Initiate New Petition link on the Home page.
Choose the type of petition from the
drop down menu. A Generic Petition
should be used for any petition NOT
found on the drop down menu.
Enter the claim number. Attorneys must represent
the party who will be the filer of the petition. If
necessary, go to the Home page and click on the
Private Attorney Entry of Appearance link to
add yourself as attorney of record for the proper
party. Click the Next button.
Select which parties are to be involved
in the petition and which party is the
Filer of the petition. Click the Next
button.

32
Most petitions require service of
process. Click on the drop down menu
to choose the service type.
A pro-se filer filing on behalf of himself
should populate the first radio button.
Attorneys and non- attorney filers filing as an
authorized representative, should populate the
second radio button. Type the name of the
authorized representative in the Other Persons text
box. AN AUTHORIZED REPRESENTATIVE CAN
ONLY FILE A PETITION TO OPEN JUDGMENT.

33
Here is an example of a Petition To Open Judgment for Defendant by Default. Each
petition will have text boxes specific to that petition. It is not necessary to create a petition as a
separate document.
Enter in the date of the hearing and the date of the
judgment. There is a link to the docket at the top of
the page which will provide that information if
unknown.
In the first text box, explain the reason for missing
the hearing. In the second text box, explain the
reason to proceed. The third text box is for
comments to the court clerk and will not be seen by
the judge reviewing the petition.
If the petition is an emergency, check the box to indicate that. A
petition should only be marked as an emergency if there is a true
emergency such as a frozen bank account, a lockout has been
scheduled or a lockout has already happened in Landlord-Tenant
situations. Click the Next button to continue with the filing.

34
If there are exhibits that should be reviewed by the judge
reviewing the merits of the petition, upload them on the Docket
Entries screen. Click on the Add Exhibit Scan/Upload link.
The petition can be previewed and edited if
necessary.
IMPORTANT NOTICE: Prior to adding exhibits, please make sure to
redact all personal information contained within them. Including but not
limited to: dates of birth, social security numbers, bank account numbers
and other banking information, etc.

35
Enter a description of the exhibit. Click on the radio button and
the Browse button to select the file from your computer. If the
document being uploaded is a request for accommodation
which falls under the Americans With Disabilities Act, click
the box to alert the court of your request. Click the Save button
to upload the document(s).
Once the exhibit has been uploaded, it will appear on the
Docket Entries screen. It can be previewed and edited if
necessary. Click the Next button to continue.
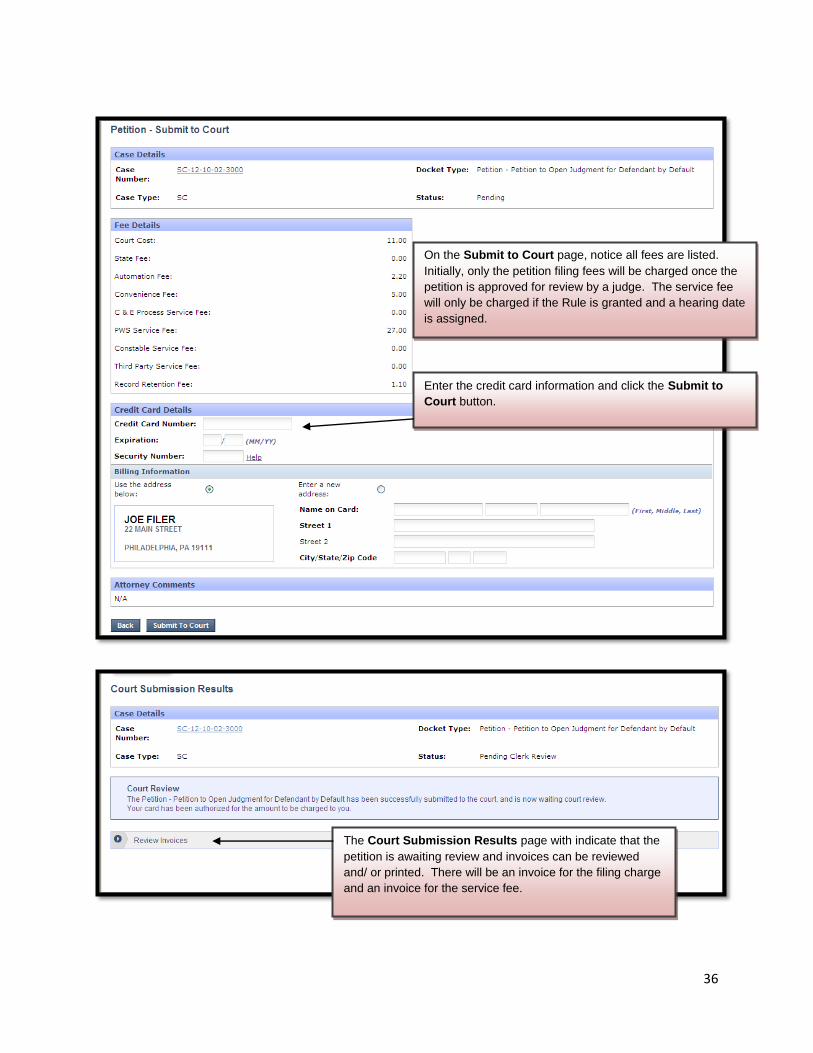
36
On the Submit to Court page, notice all fees are listed.
Initially, only the petition filing fees will be charged once the
petition is approved for review by a judge. The service fee
will only be charged if the Rule is granted and a hearing date
is assigned.
Enter the credit card information and click the Submit to
Court button.
The Court Submission Results page with indicate that the
petition is awaiting review and invoices can be reviewed
and/ or printed. There will be an invoice for the filing charge
and an invoice for the service fee.
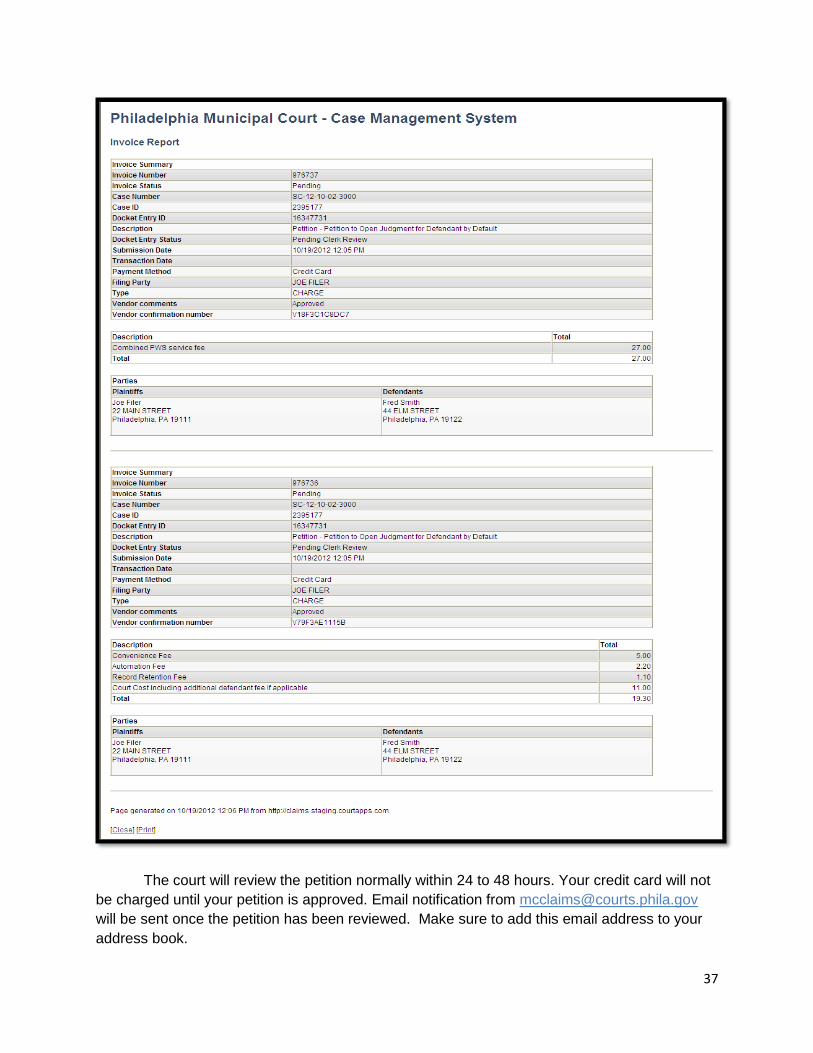
37
The court will review the petition normally within 24 to 48 hours. Your credit card will not
be charged until your petition is approved. Email notification from [email protected]
will be sent once the petition has been reviewed. Make sure to add this email address to your
address book.

38
Initiate New Writ
To begin filing a writ, click on the Initiate New Writ link on the Home Page and enter the
claim number.
Choose the type of writ from the drop down menu. A Writ of
Possession, Alias Writ of Possession and Praecipe of
Notice of Intent to Attach Wages are to be used for
Landlord-Tenant complaints. A Writ of Revival should be
used to revive a judgment that is at least five years old.
Enter the claim number. Attorneys must represent the party
who will be the filer of the writ. If necessary, go to the Home
page and click on the Private Attorney Entry of Appearance
link to add yourself as attorney of record for the proper party.

39
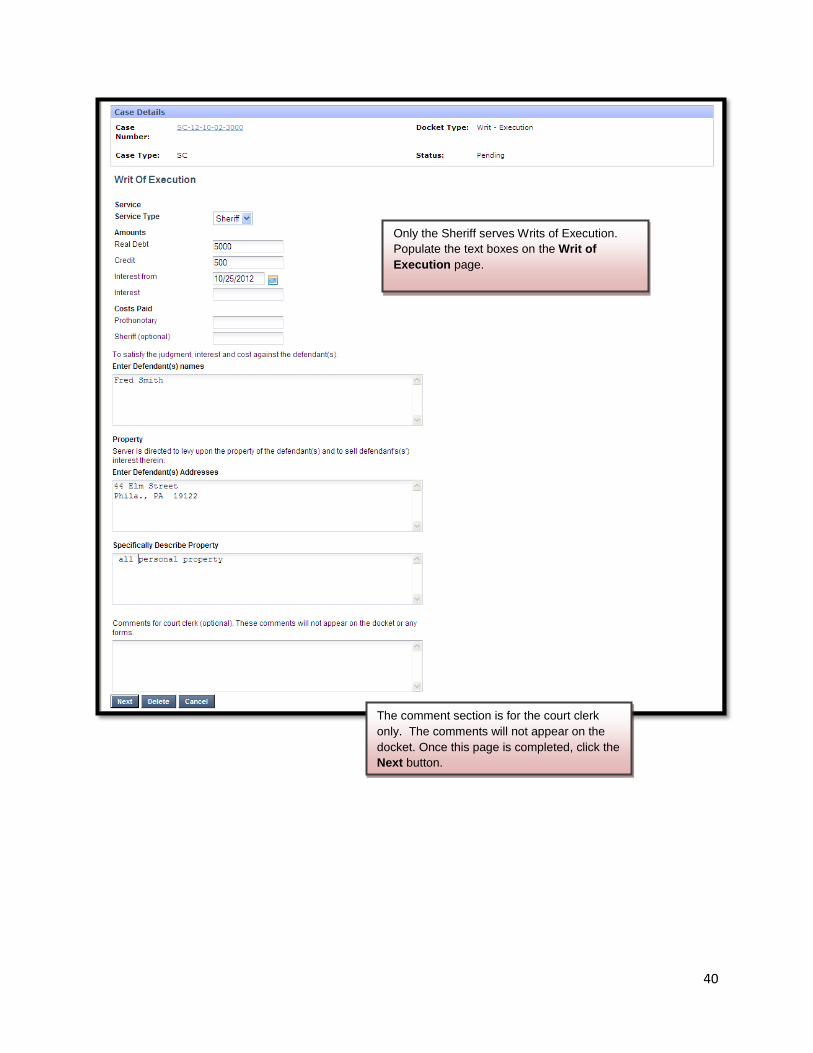
Writ of Execution
Select which parties are to be involved in the writ and which
party is the Filer of the writ. Click the Next button.
If a Garnishee is to be added, click the Add
Individual/Organizational Garnishee link.
Choose whether the Garnishee is an
individual or an Organization and select the
related party. Provide the address of the
garnishee and click Submit.
40
Only the Sheriff serves Writs of Execution.
Populate the text boxes on the Writ of
Execution page.
The comment section is for the court clerk
only. The comments will not appear on the
docket. Once this page is completed, click the
Next button.

41
Click the Next button to proceed to the Docket Entries screen.
A pro-se filer should populate the first
radio button.
Attorneys should populate the second radio button.
AN AUTHORIZED REPRESENTATIVE CANNOT
FILE A WRIT OF ANY KIND.

42
The writ can be previewed and edited if
necessary.
If a Garnishee has been added, Interrogatories will be
generated. It also possible to add additional exhibits by
clicking on the Add Exhibit Scan/Upload link.
Enter a description of the exhibit. Click on the radio button and
the Browse button to select the file from your computer. Click
the Save button to upload the document(s).
IMPORTANT NOTICE: Prior to adding exhibits, please make sure to
redact all personal information contained within them. Including but not
limited to: dates of birth, social security numbers, bank account numbers
and other banking information, etc.

43
The court will review the writ normally within 24 to 48 hours. Email notification from
[email protected] will be sent once the writ has been reviewed. Make sure to add
this email address to your address book.
Once the exhibit has been uploaded, it will appear on the
Docket Entries screen. It can be previewed and edited if
necessary. Click the Next button to continue.
The Court does not charge a fee for the filing of the Writ of
Execution. Click the Submit To Court button to send it to
the Court for review.
44
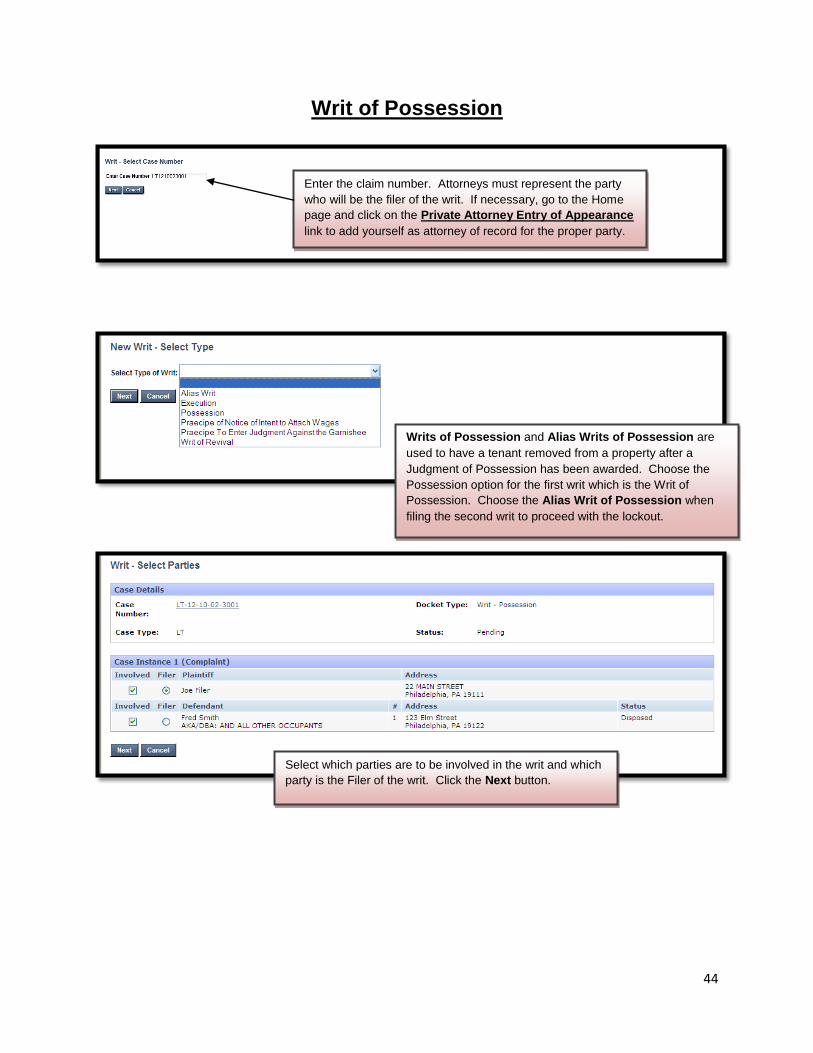
Writ of Possession
Enter the claim number. Attorneys must represent the party
who will be the filer of the writ. If necessary, go to the Home
page and click on the Private Attorney Entry of Appearance
link to add yourself as attorney of record for the proper party.
Writs of Possession and Alias Writs of Possession are
used to have a tenant removed from a property after a
Judgment of Possession has been awarded. Choose the
Possession option for the first writ which is the Writ of
Possession. Choose the Alias Writ of Possession when
filing the second writ to proceed with the lockout.
Select which parties are to be involved in the writ and which
party is the Filer of the writ. Click the Next button.
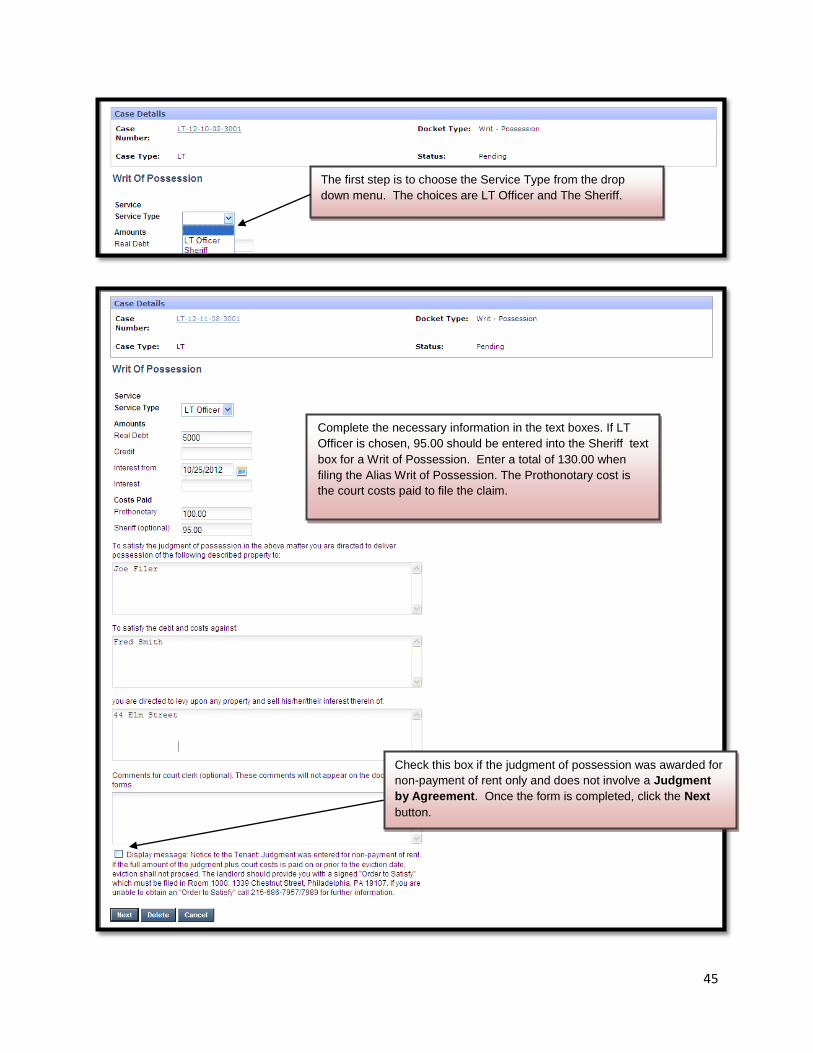
45
The first step is to choose the Service Type from the drop
down menu. The choices are LT Officer and The Sheriff.
Complete the necessary information in the text boxes. If LT
Officer is chosen, 95.00 should be entered into the Sheriff text
box for a Writ of Possession. Enter a total of 130.00 when
filing the Alias Writ of Possession. The Prothonotary cost is
the court costs paid to file the claim.
Check this box if the judgment of possession was awarded for
non-payment of rent only and does not involve a Judgment
by Agreement. Once the form is completed, click the Next
button.
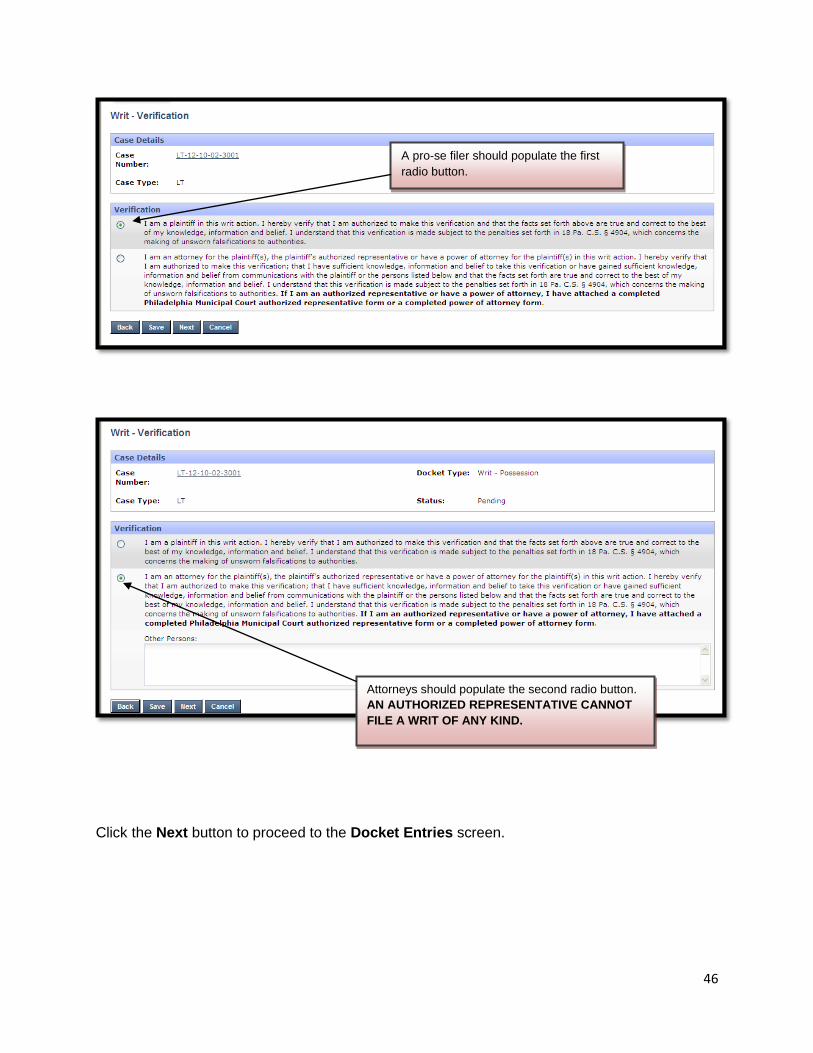
46
Click the Next button to proceed to the Docket Entries screen.
A pro-se filer should populate the first
radio button.
Attorneys should populate the second radio button.
AN AUTHORIZED REPRESENTATIVE CANNOT
FILE A WRIT OF ANY KIND.

47
The writ can be previewed and edited if
necessary.
Add additional exhibits by clicking on the Add Exhibit
Scan/Upload link.
Enter a description of the exhibit. Click on the radio button and
the Browse button to select the file from your computer Click
the Save button to upload the document(s).
IMPORTANT NOTICE: Prior to adding exhibits, please make sure to
redact all personal information contained within them. Including but not
limited to: dates of birth, social security numbers, bank account numbers
and other banking information, etc.
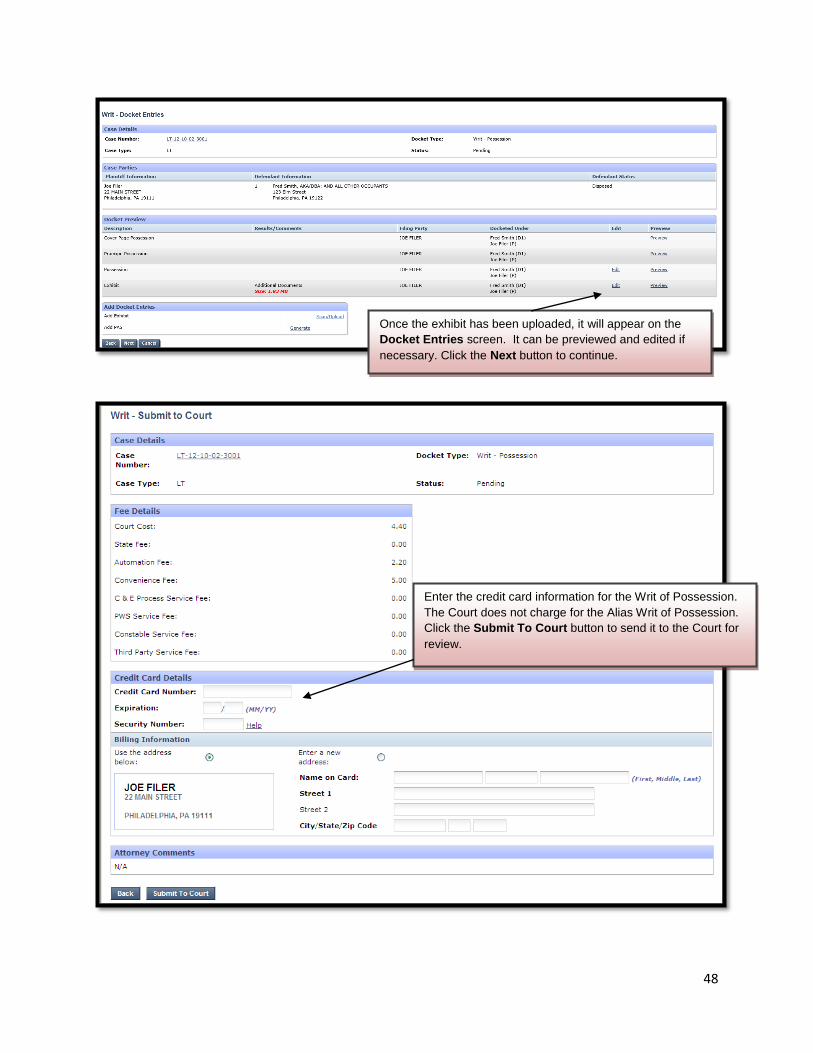
48
Once the exhibit has been uploaded, it will appear on the
Docket Entries screen. It can be previewed and edited if
necessary. Click the Next button to continue.
Enter the credit card information for the Writ of Possession.
The Court does not charge for the Alias Writ of Possession.
Click the Submit To Court button to send it to the Court for
review.

49
The court will review the complaint normally within 24 to 48 hours. Your credit card will
not be charged until your writ is approved. Email notification from [email protected]
will be sent once the Writ of Possession has been reviewed. Make sure to add this email
address to your address book.
The Court Submission Results page will indicate
that the Notice is now awaiting Court review. An
invoice is available by clicking Review Invoices.

50
Praecipe of Notice of Intent to Attach Wages
Enter the claim number. Attorneys must represent the party
who will be the filer of the writ. If necessary, go to the Home
page and click on the Private Attorney Entry of Appearance
link to add yourself as attorney of record for the proper party.
Choose the Praecipe from the drop down menu.
To add the Garnishee, click the Add
Individual/Organizational Garnishee link.
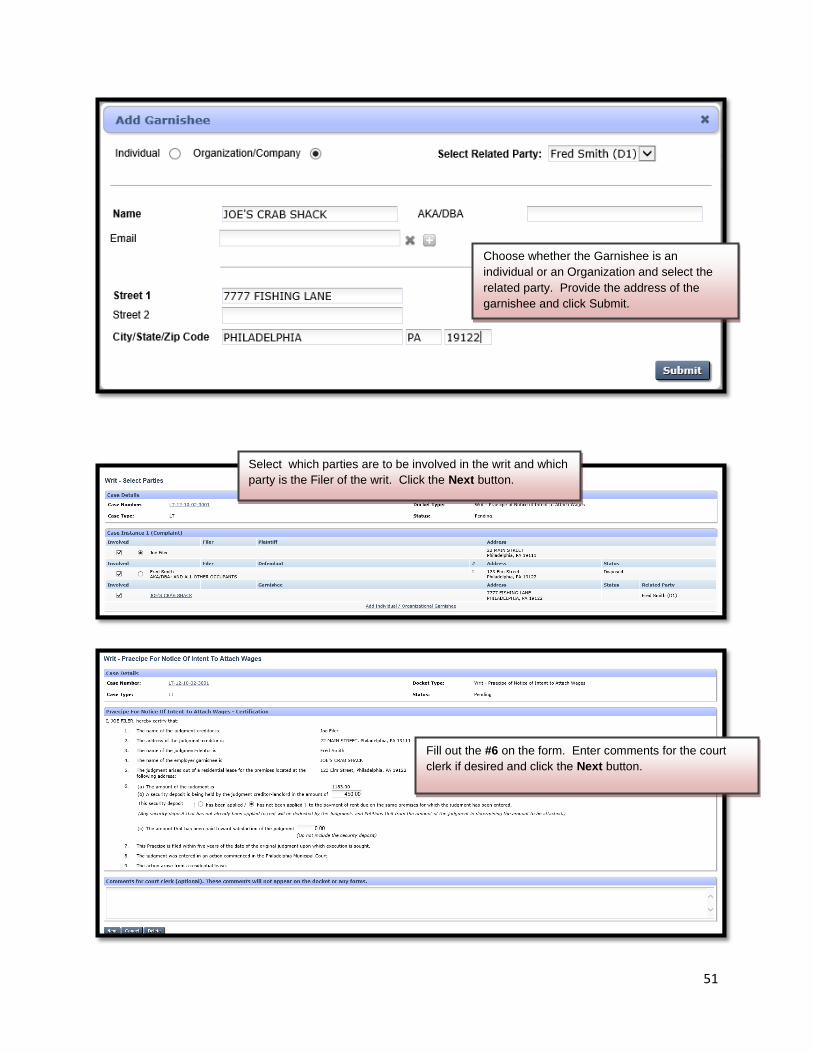
51
Choose whether the Garnishee is an
individual or an Organization and select the
related party. Provide the address of the
garnishee and click Submit.
Select which parties are to be involved in the writ and which
party is the Filer of the writ. Click the Next button.
Fill out the #6 on the form. Enter comments for the court
clerk if desired and click the Next button.

52
Choose the service type for service on the
defendant and click the Next button.
A pro-se filer should populate the first
radio button.
Attorneys should populate the second radio button.
AN AUTHORIZED REPRESENTATIVE CANNOT
FILE A NOTICE OF INTENT TO ATTACH WAGES.

53
The Notice of Intent can be previewed and
edited if necessary. Click the Next button.
Enter the credit card information for the Notice of
Intent to Attach Wages. Click the Submit To Court
button to send it to the Court for review.
54
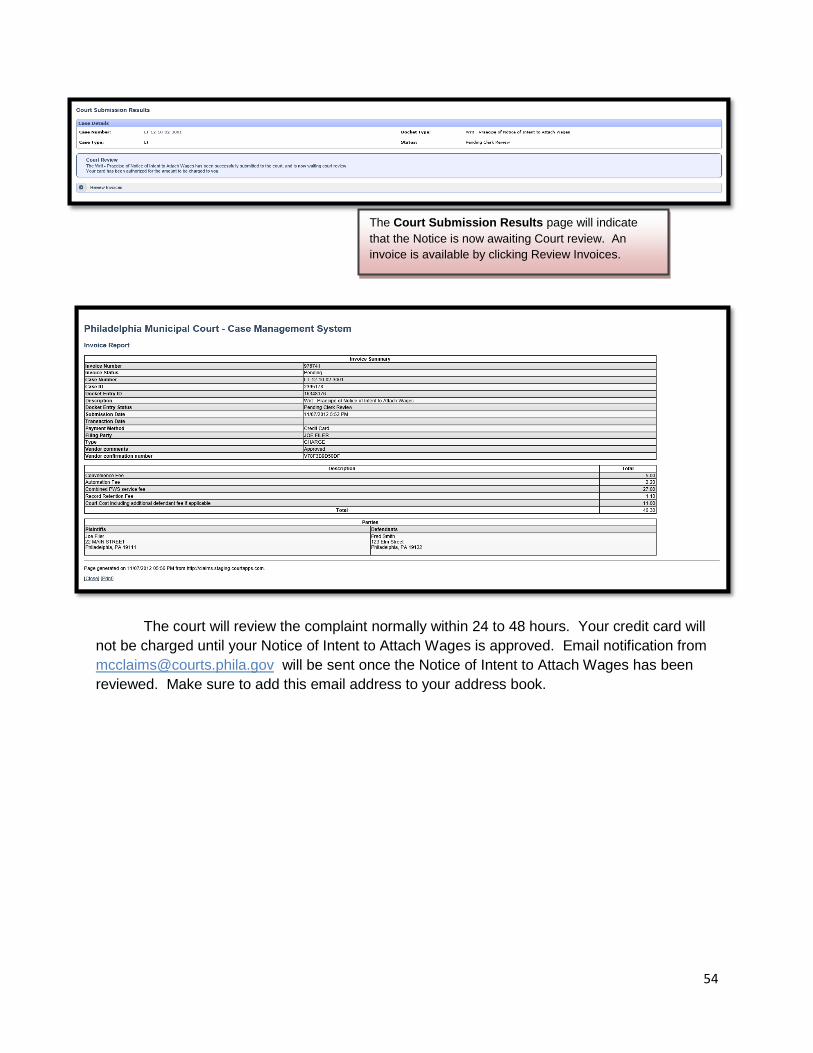
The court will review the complaint normally within 24 to 48 hours. Your credit card will
not be charged until your Notice of Intent to Attach Wages is approved. Email notification from
[email protected] will be sent once the Notice of Intent to Attach Wages has been
reviewed. Make sure to add this email address to your address book.
The Court Submission Results page will indicate
that the Notice is now awaiting Court review. An
invoice is available by clicking Review Invoices.
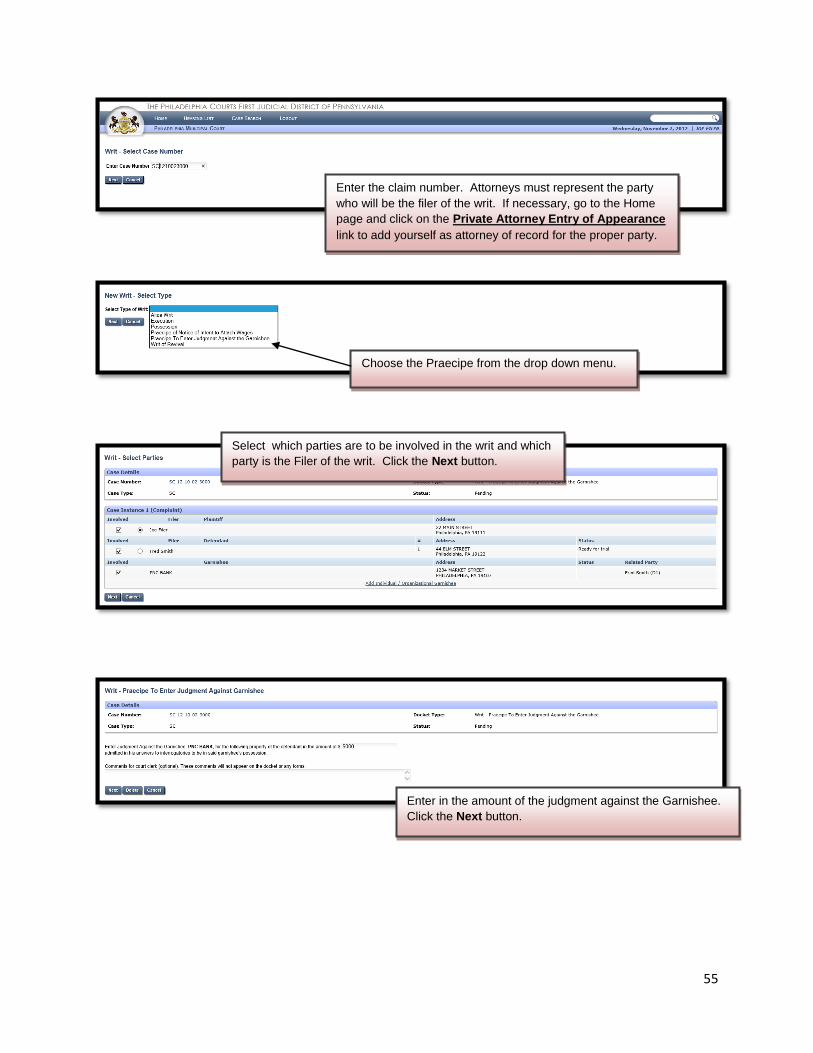
55
Enter the claim number. Attorneys must represent the party
who will be the filer of the writ. If necessary, go to the Home
page and click on the Private Attorney Entry of Appearance
link to add yourself as attorney of record for the proper party.
Choose the Praecipe from the drop down menu.
Select which parties are to be involved in the writ and which
party is the Filer of the writ. Click the Next button.
Enter in the amount of the judgment against the Garnishee.
Click the Next button.

56
Click the Next button.
A pro-se filer should populate the first
radio button.
Attorneys should populate the second radio button.
AN AUTHORIZED REPRESENTATIVE CANNOT
FILE A PRAECIPE TO ENTER JUDGMENT
AGAINST THE GARNISHEE.
The Praecipe can be previewed and edited if
necessary. Click the Next button.
Upload the Answers to Interrogatory if they
have not been previously uploaded by
clicking on the Scan/Upload link.
IMPORTANT NOTICE: Prior to adding exhibits, please make sure to
redact all personal information contained within them. Including but not
limited to: dates of birth, social security numbers, bank account numbers
and other banking information, etc.

57
There is no charge for the Praecipe To Enter
Judgment Against The Garnishee at this
time. Click the Submit to Court button.
Click on the radio button and the Browse button to select the
file from your computer. Click the Save button to upload the
document(s).
Once the Answer has been uploaded, it will appear on the
Docket Entries screen. It can be previewed and edited if
necessary. Click the Next button to continue.

58
The court will review the writ normally within 24 to 48 hours. Email notification from
[email protected] will be sent once the writ has been reviewed. Make sure to add
this email address to your address book.
59
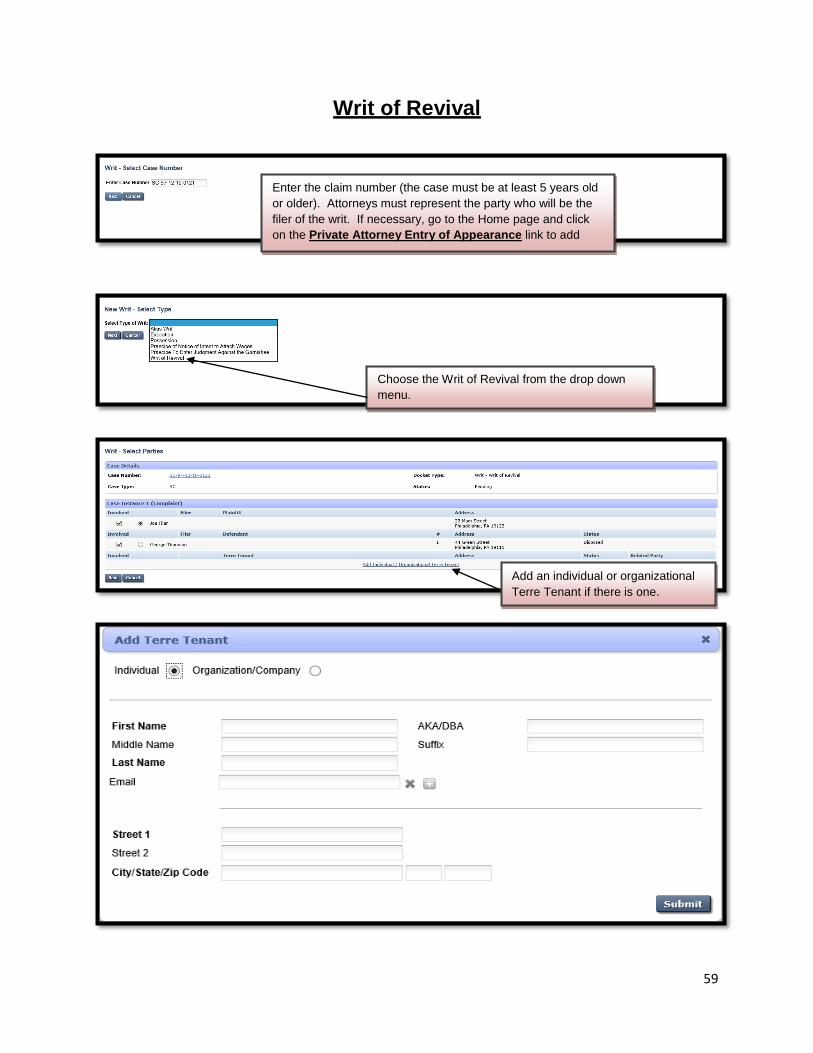
Writ of Revival
Enter the claim number (the case must be at least 5 years old
or older). Attorneys must represent the party who will be the
filer of the writ. If necessary, go to the Home page and click
on the Private Attorney Entry of Appearance link to add
yourself as attorney of record for the proper party.
Choose the Writ of Revival from the drop down
menu.
Add an individual or organizational
Terre Tenant if there is one.

60
Select the parties involved in the
Writ of Revival and the filer.
Enter the interest date.
Service of Process is required.
Choose a service type.
A pro-se filer should populate the first
radio button.
Attorneys should populate the second radio button.
AN AUTHORIZED REPRESENTATIVE CANNOT
FILE A PRAECIPE TO ENTER JUDGMENT
AGAINST THE GARNISHEE.

61
The Praecipe can be previewed and edited if
necessary. Click the Next button.
Additional exhibits can be uploaded by
clicking the Scan/Upload link.
IMPORTANT NOTICE: Prior to adding exhibits, please make sure to
redact all personal information contained within them. Including but not
limited to: dates of birth, social security numbers, bank account numbers
and other banking information, etc.
Click on the radio button and the Browse button to select the
file from your computer. Click the Save button to upload the
document(s).
Once the exhibit has been uploaded, it can be previewed and
edited if necessary.
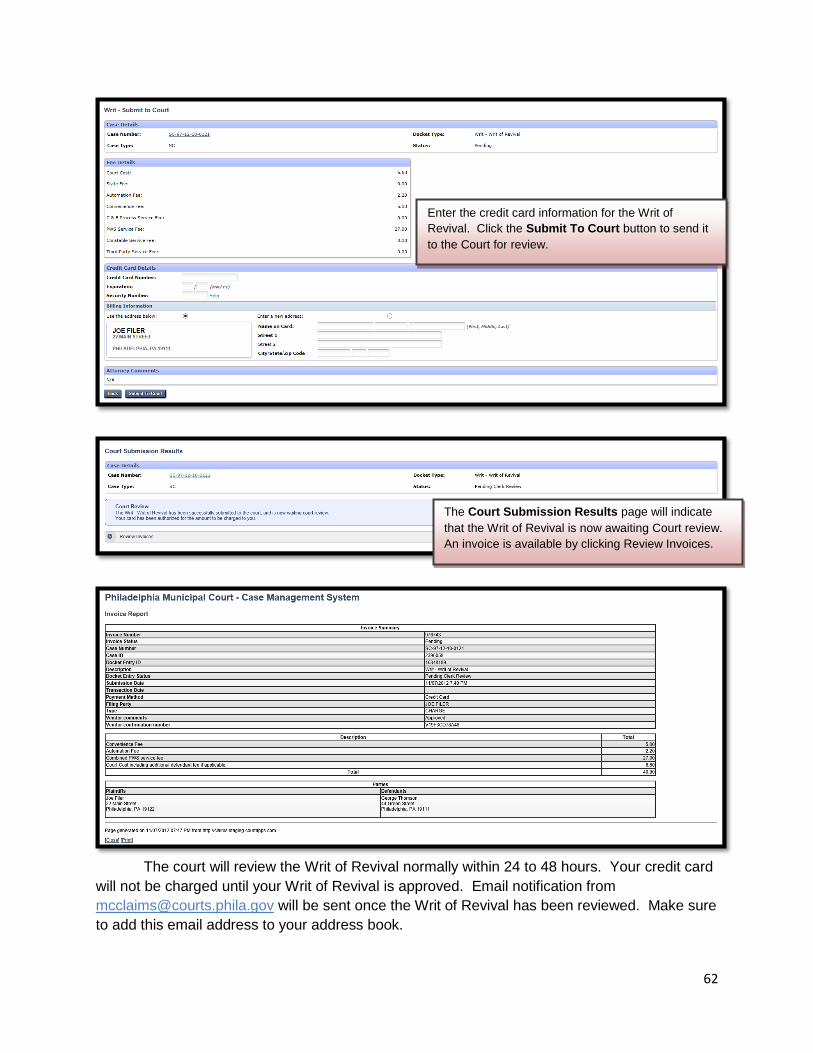
62
The court will review the Writ of Revival normally within 24 to 48 hours. Your credit card
will not be charged until your Writ of Revival is approved. Email notification from
[email protected] will be sent once the Writ of Revival has been reviewed. Make sure
to add this email address to your address book.
Enter the credit card information for the Writ of
Revival. Click the Submit To Court button to send it
to the Court for review.
The Court Submission Results page will indicate
that the Writ of Revival is now awaiting Court review.
An invoice is available by clicking Review Invoices.

63
Initiate New Relistment
Enter the claim number for the case to be relisted.
Cases are typically relisted when service of process
was not previously effective or if the case has been
withdrawn without prejudice.
First choose the case that instance that should be
relisted. It is possible to see more than just the original
filing on this screen. Then choose whether the
relistment is to be done at the original address or a
new address.

64
Relistment at a New Address
Choose the parties to be involved in the relistment
and the filer. Attorneys must represent the party who
is the filer. Go to the Home page and choose the
Private Attorney Entry of Appearance link to add an
attorney of record.
Enter the new address and choose service of process

65
The relistment can be edited before continuing the
filing process. Click the Next button to move to the
next page
A pro-se filer should choose this radio
button.
Attorneys should populate the second radio button.
AN AUTHORIZED REPRESENTATIVE CAN FILE
A RELISTMENT ONLY IF A JUDGMENT HAS
NOT BE ENTERED.

66
The relistment can be previewed or edited.
Exhibits or a Petition for Alternative Service can be
added (if the new service address requires it) or an
Informa Pauperis petition. To add an exhibit,
choose the Add Exhibit Scan/Upload link.
Enter a description for the exhibit and click the
Browse button to select the exhibit from your
computer. Click the Save button to upload.
IMPORTANT NOTICE: Prior to adding exhibits, please make sure to
redact all personal information contained within them. Including but not
limited to: dates of birth, social security numbers, bank account numbers
and other banking information, etc.

67
Once the exhibit has been uploaded, it can be
previewed or edited. Click the Next button to
continue.
If several relistments are being filed and the same hearing
date for all is desired, use the Create Another Relistment
link to create the next one. Once all cases have been
created, click the Schedule Bulk Relistments link to
request that all relistments be schedule together. This is the
ONLY way to ensure that all of your relistments will have the
same hearing date, time and COURTROOM.
If this is the only relistment being filed, use the
optional text box to request a hearing day, or time,
enter your credit card information and click the
Submit To Court button.

68
The court will review the Relistment normally within 24 to 48 hours. Your credit card will
not be charged until your Relistment is approved. Email notification from
[email protected] will be sent once the Relistment has been reviewed. Make sure to
add this email address to your address book.
The Court Submission Results page will indicate
that the relistment is now awaiting review by the
Court. A Review Invoices link is available to print a
copy of the invoice if desired.

69
Relistment at Same Address
Choose the parties to be involved in the relistment
and the filer. Attorneys must represent the party
who is the filer. Go to the Home page and choose
the Private Attorney Entry of Appearance link to
add an attorney of record.

70
Click the link to relist the case at the same
address.
Choose the radio button based on whether service was good
on the original filing or not. If service was good, the relistment
can be served via regular mail. If service was not good,
verification from the United States Postal Service is required to
perform service via certified and regular mail. If the
verification cannot be obtained, personal service will be
required for all Philadelphia addresses.
Click the Save button to
continue.

71
The relistment can be edited by clicking on the Edit
relistment at same address link before continuing with
the fling. Click the Next button to move forward.
A pro-se filer should choose this radio
button.
Attorneys should populate the second radio button.
AN AUTHORIZED REPRESENTATIVE CAN FILE
A RELISTMENT ONLY IF A JUDGMENT HAS
NOT BEEN ENTERED.

72
The relisment can be previewed and edited, if
necessary.
Exhibits (such as the verification from the United
States Postal Service) or a Petition for Alternative
Service can be added (if the new service address
requires it) or an Informa Pauperis petition. To add
an exhibit, choose the Add Exhibit Scan/Upload
link.
Enter a description for the exhibit and click the
Browse button to select the exhibit from your
computer. Click the Save button to upload.
IMPORTANT NOTICE: Prior to adding exhibits, please make sure to
redact all personal information contained within them. Including but not
limited to: dates of birth, social security numbers, bank account numbers
and other banking information, etc.

73
Once the exhibit has been uploaded, it can be
previewed or edited. Click the Next button to
continue.
If several relistments are being filed and the same hearing
date for all is desired, use the Create Another Relistment
link to create the next one. Once all cases have been
created, click the Schedule Bulk Relistments link to
request that all relistments be schedule together. This is the
ONLY way to ensure that all of your relistments will have the
same hearing date, time and COURTROOM.
If this is the only relistment being filed, use the
optional text box to request a hearing day, or time,
enter your credit card information and click the
Submit To Court button.

74
The court will review the Relistment normally within 24 to 48 hours. Your credit card will
not be charged until your Relistment is approved. Email notification from
[email protected] will be sent once the Relistment has been reviewed. Make sure to
add this email address to your address book.
The Court Submission Results page will indicate
that the relistment is now awaiting review by the
Court. A Review Invoices link is available to print a
copy of the invoice if desired.
75
Initiate New Additional Claim
Additional Claims are Counter-Claims, Co-Defendants,
Additional Defendants, and Cross-Claims. The only additional
claims that are able to add a NEW party to a case are Co-
Defendants and Additional Defendants.
A Co-Defendant is filed when the PLAINTIFF wishes to add
another defendant to a pre-existing case. New exhibits can be
added but are not required for this filing.
An Additional Defendant is filed when the DEFENDANT
wishes to add another defendant to a pre-existing case. New
exhibits can be added but are not required for this filing.
A Counter-Claim is filed when the DEFENDANT is seeking
a money judgment from the plaintiff named in a pre-existing case.
A new party may not be added with this filing. Exhibits or a Rule
109 Affidavit are required for this filing. In addition, a Landlord-
Tenant filing seeking possession of a property cannot be filed as
a Counter-Claim. It should be a new filing.
A Cross-Claim is filed when an already named
DEFENDANT is files against another already named defendant. A
new party may not be added with this filing.
All additional claims MUST be filed at least ten (10) days
prior to the hearing date.
76
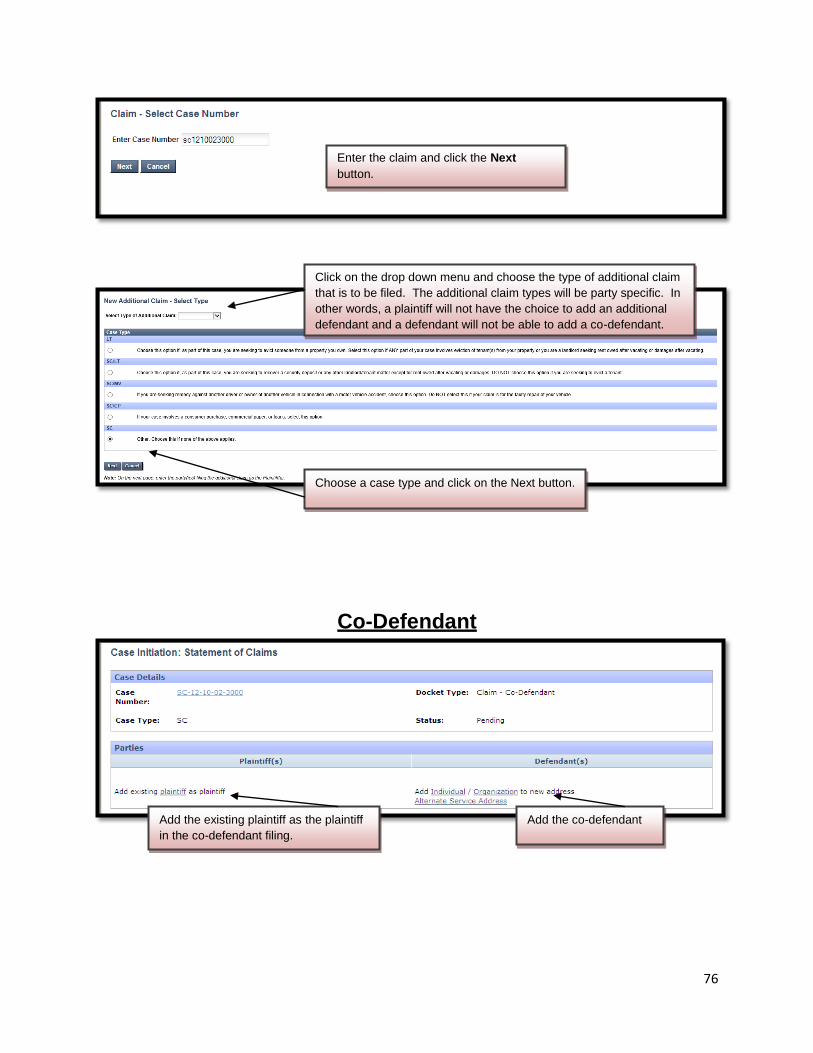
Co-Defendant
Enter the claim and click the Next
button.
Click on the drop down menu and choose the type of additional claim
that is to be filed. The additional claim types will be party specific. In
other words, a plaintiff will not have the choice to add an additional
defendant and a defendant will not be able to add a co-defendant.
Choose a case type and click on the Next button.
Add the existing plaintiff as the plaintiff
in the co-defendant filing.
Add the co-defendant
77
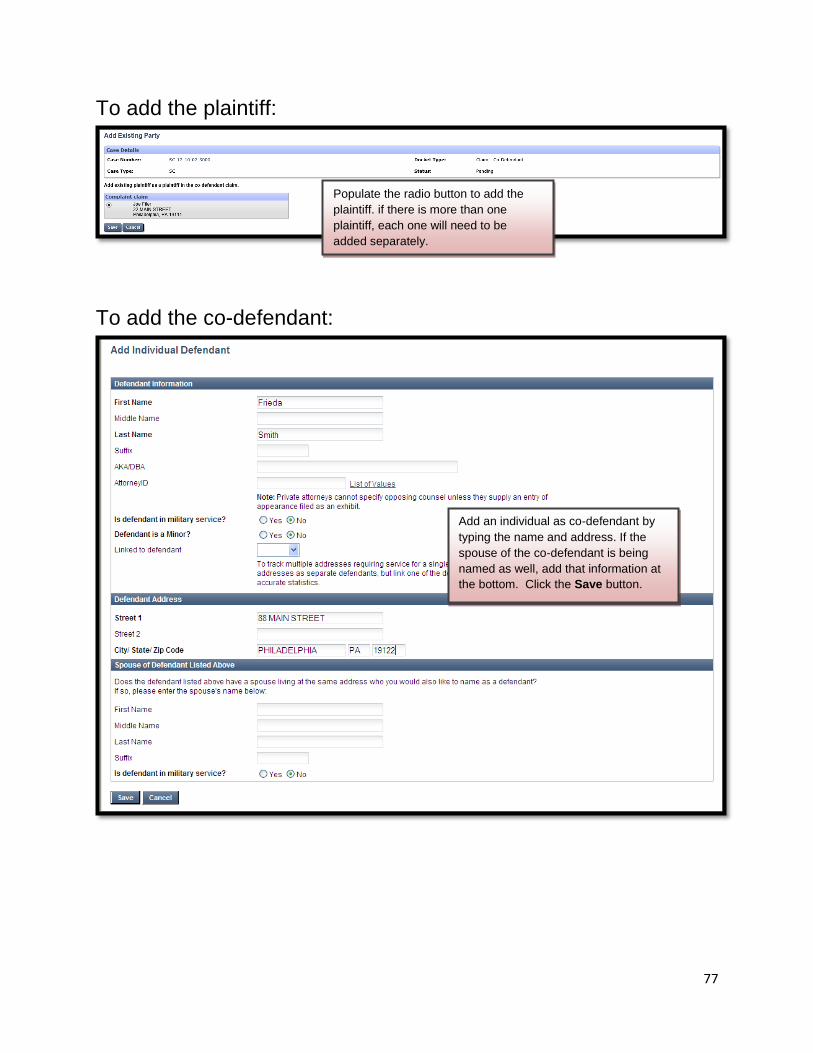
To add the plaintiff:
To add the co-defendant:
Populate the radio button to add the
plaintiff. if there is more than one
plaintiff, each one will need to be
added separately.
Add an individual as co-defendant by
typing the name and address. If the
spouse of the co-defendant is being
named as well, add that information at
the bottom. Click the Save button.

78
Click the Next button to move to the next screen.
Enter a summary to explain why the
co-defendant is being added.
Only the Principal amount is required
and should be the same amount as the
original judgment requested. If a
higher judgment is requested,
additional exhibits may have to be
added. Click the Next button.
79
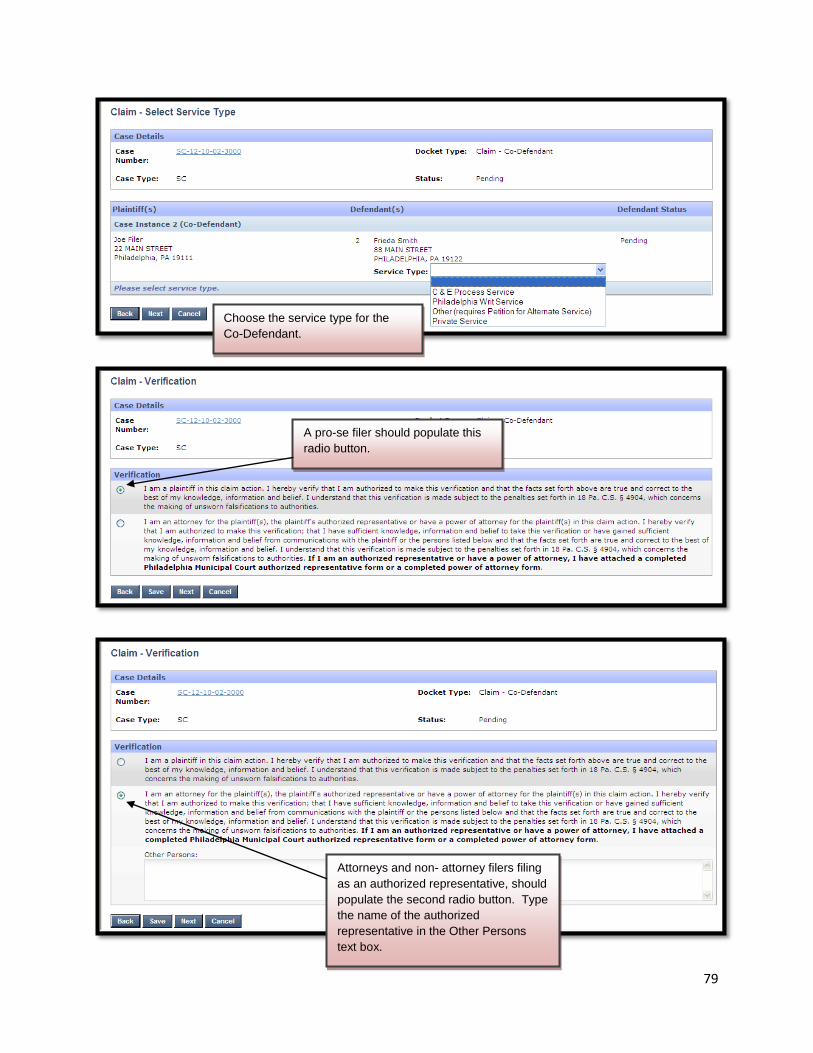
Choose the service type for the
Co-Defendant.
A pro-se filer should populate this
radio button.
Attorneys and non- attorney filers filing
as an authorized representative, should
populate the second radio button. Type
the name of the authorized
representative in the Other Persons
text box.

80
The Co-Defendant can be
previewed or edited if necessary.
New exhibits can be added by clicking on the
Add Exhibits Scan/Upload link. It is not
necessary to add any exhibits previously
uploaded. The Co-Defendant will
automatically receive the original complaint
and any original exhibits.
IMPORTANT NOTICE: Prior to adding exhibits, please make sure to
redact all personal information contained within them. Including but not
limited to: dates of birth, social security numbers, bank account numbers
and other banking information, etc.
81
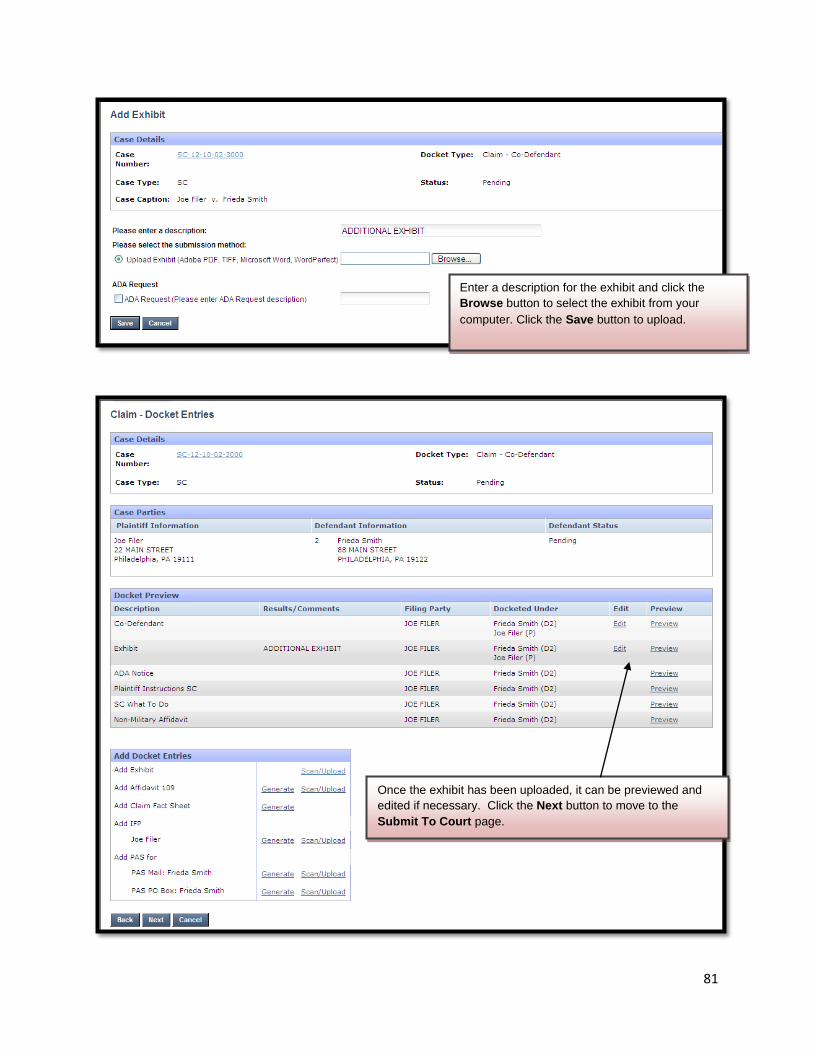
Enter a description for the exhibit and click the
Browse button to select the exhibit from your
computer. Click the Save button to upload.
Once the exhibit has been uploaded, it can be previewed and
edited if necessary. Click the Next button to move to the
Submit To Court page.
82
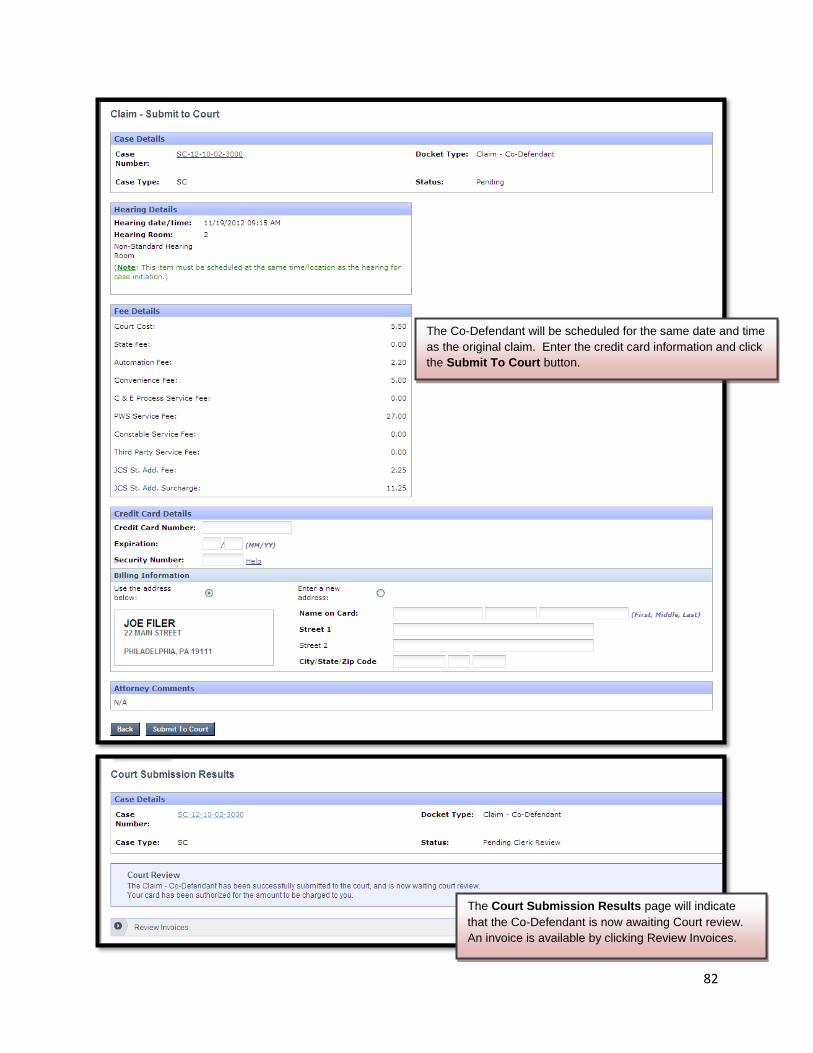
The Co-Defendant will be scheduled for the same date and time
as the original claim. Enter the credit card information and click
the Submit To Court button.
The Court Submission Results page will indicate
that the Co-Defendant is now awaiting Court review.
An invoice is available by clicking Review Invoices.

83
The court will review the Co-Defendant immediately to make sure that is timely filed.
Your credit card will not be charged until your submission is approved. Email notification from
[email protected] will be sent once the Co-Defendant has been reviewed. Make sure
to add this email address to your address book.
84
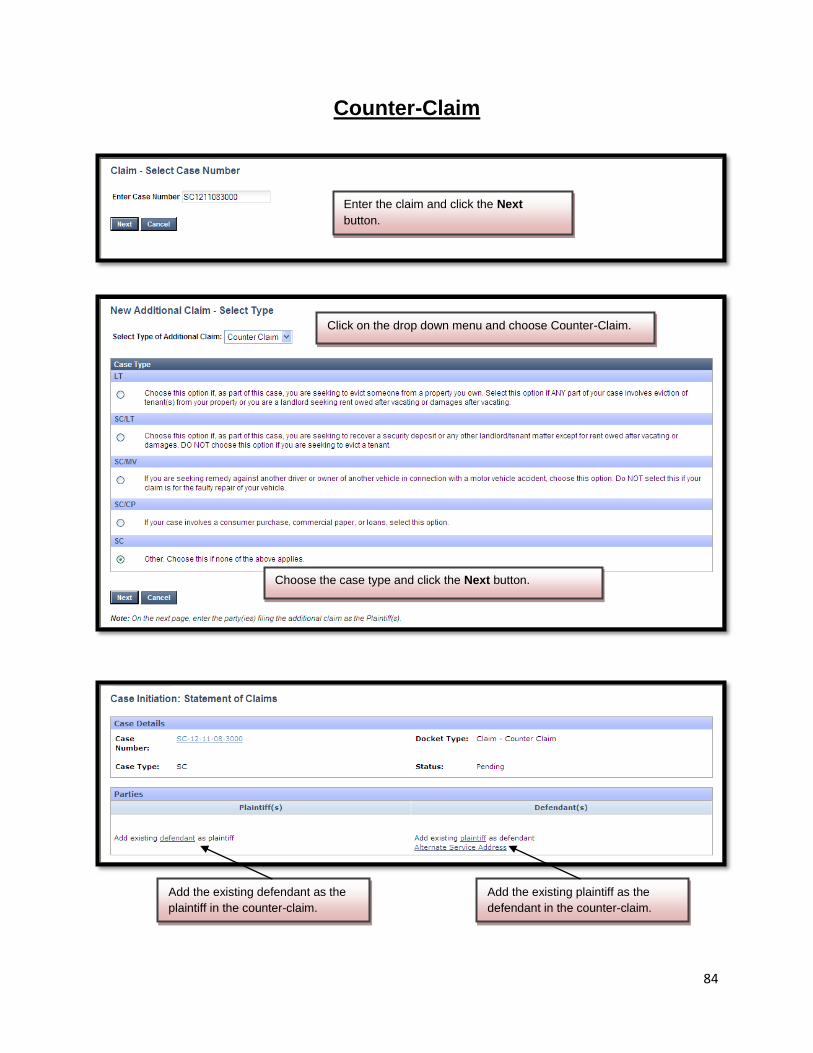
Counter-Claim
Enter the claim and click the Next
button.
Click on the drop down menu and choose Counter-Claim.
Choose the case type and click the Next button.
Add the existing defendant as the
plaintiff in the counter-claim.
Add the existing plaintiff as the
defendant in the counter-claim.

85
To add the existing defendant as the plaintiff:
Once all the parties are added, the caption will look like this.
Populate the radio button to add the
defendant as the plaintiff. If there is more
than one defendant involved, each one will
need to be added separately.
Populate the radio button to add the
plaintiff as the defendant. If there is more
than one plaintiff involved, each one will
need to be added separately. Click the
Save button.
86
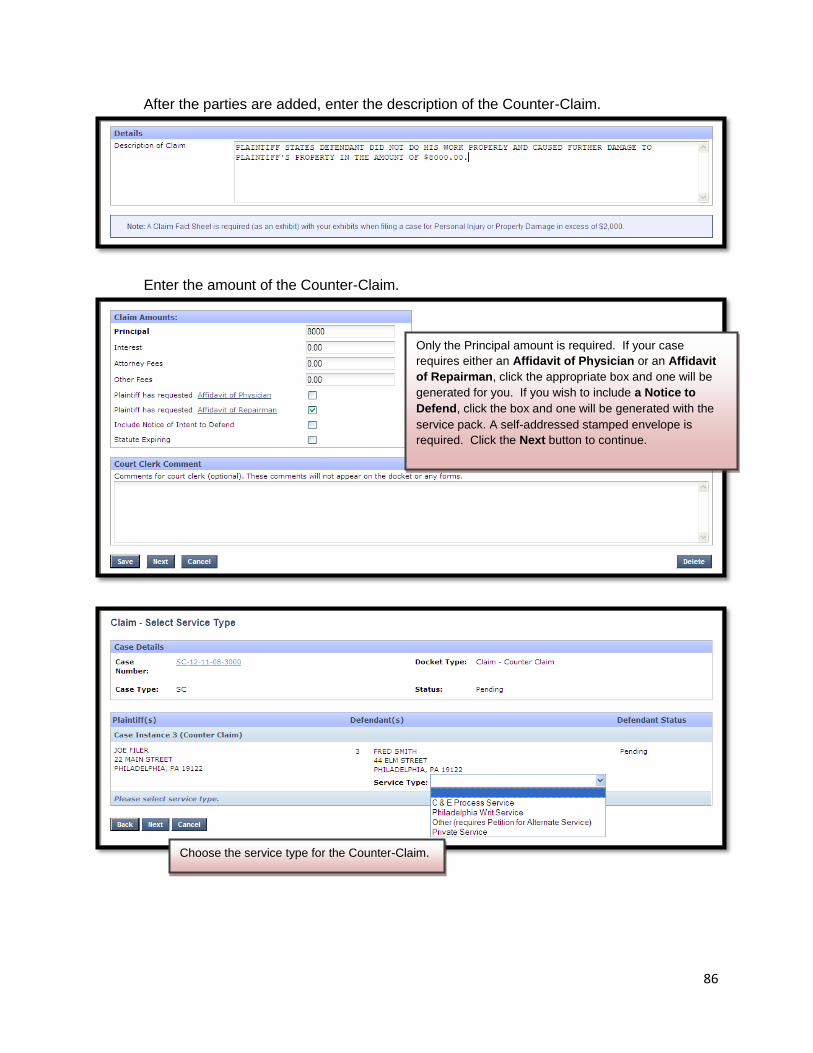
After the parties are added, enter the description of the Counter-Claim.
Enter the amount of the Counter-Claim.
Only the Principal amount is required. If your case
requires either an Affidavit of Physician or an Affidavit
of Repairman, click the appropriate box and one will be
generated for you. If you wish to include a Notice to
Defend, click the box and one will be generated with the
service pack. A self-addressed stamped envelope is
required. Click the Next button to continue.
Choose the service type for the Counter-Claim.

87
Click the Next button.
A pro-se filer should populate this
radio button.
Attorneys and non- attorney filers filing
as an authorized representative, should
populate the second radio button. Type
the name of the authorized
representative in the Other Persons
text box.

88
The Counter-Claim can be previewed and
edited, if necessary.
If the Counter-Claim involves personal injury or
property damage over $2,000.00 a Claim Fact
Sheet is required. One can be generated by
clicking on the link. If the defendant must be
served my some means of alternative service
requiring the filing of a petition, or an Informa
Pauperis petition, click on the appropriate links to
either generate or upload the documents.
All complaints are required to have
exhibits attached. If an exhibit is
unavailable, a 109 affidavit can be
generated or uploaded to explain why
exhibits are not attached. To add an
exhibit, click on the Scan/Upload link.
IMPORTANT NOTICE: Prior to adding exhibits, please make sure to
redact all personal information contained within them. Including but not
limited to: dates of birth, social security numbers, bank account numbers
and other banking information, etc.

89
Click on the radio button and the Browse button to select the
file from your computer. Click the Save button to upload the
document(s).
Once the exhibit has been uploaded, it will appear on the
Docket Entries screen. It can be previewed and edited if
necessary. Click the Next button to continue.

90
The Counter-Claim will be scheduled for the same date and
time as the original claim. Enter the credit card information and
click the Submit To Court button.
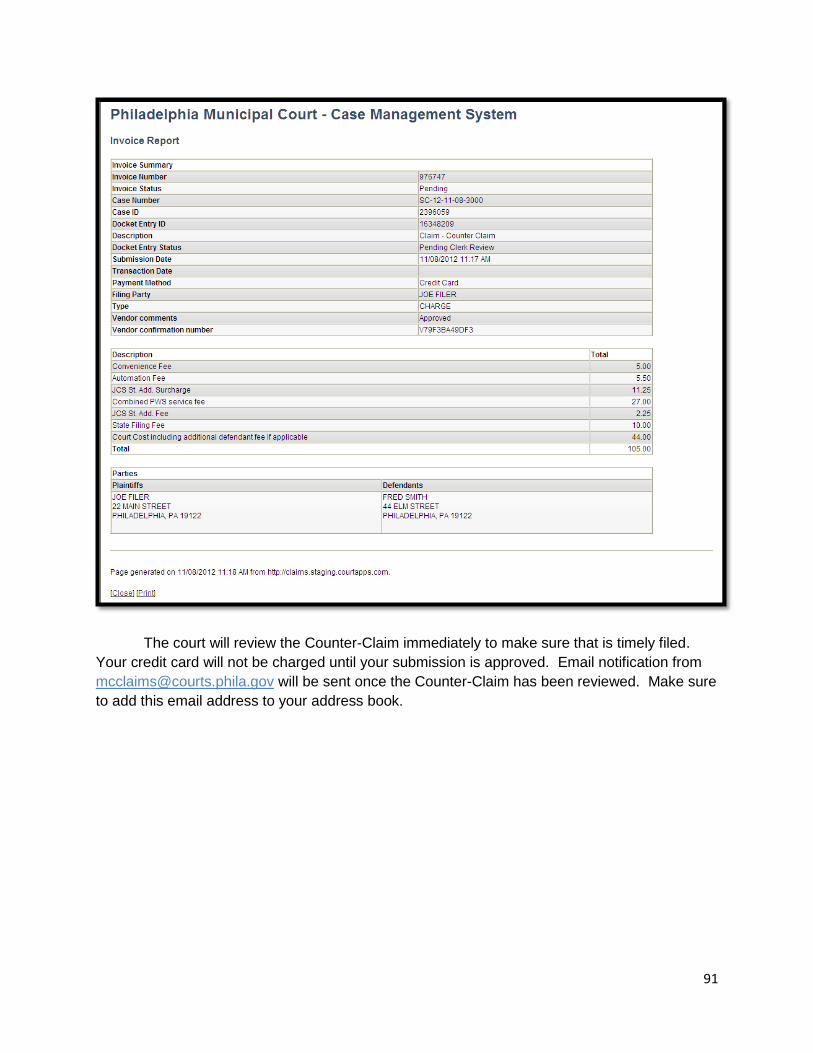
The Court Submission Results page will indicate
that the Counter-Claim is now awaiting Court review.
An invoice is available by clicking Review Invoices.
91
The court will review the Counter-Claim immediately to make sure that is timely filed.
Your credit card will not be charged until your submission is approved. Email notification from
[email protected] will be sent once the Counter-Claim has been reviewed. Make sure
to add this email address to your address book.

92
Initiate Continuance Request
A continuance can be granted administratively up until ten (10) days prior to the hearing. Any
continuance request filed within less than ten (10) days will be marked for Judicial Review unless the
request is by agreement of all parties.
Enter the claim number and click the Next button.
Select the hearing date and click the
Next button.
Select which parties are to be involved in the continuance
request and which party is the Filer of the writ. ALL
PARTIES WHO ARE MARKED READY FOR TRIAL
SHOULD BE INCLUDED IN THE REQUEST. Click the Next
button.
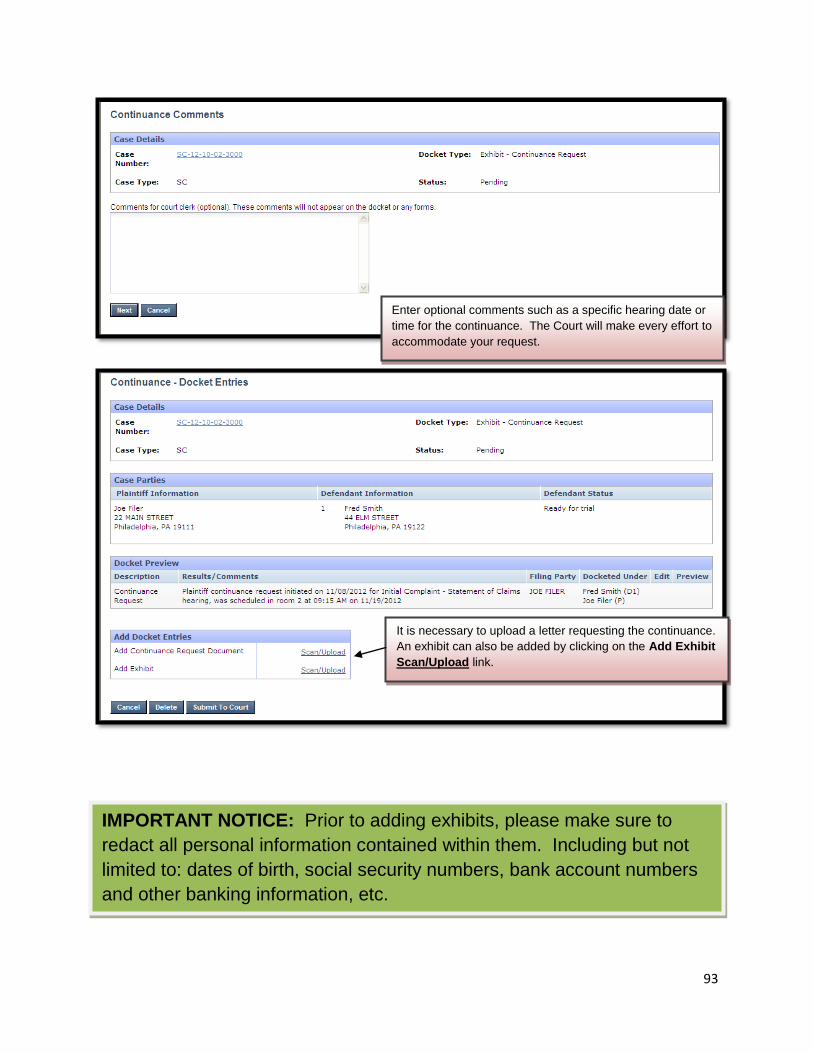
93
Enter optional comments such as a specific hearing date or
time for the continuance. The Court will make every effort to
accommodate your request.
It is necessary to upload a letter requesting the continuance.
An exhibit can also be added by clicking on the Add Exhibit
Scan/Upload link.
IMPORTANT NOTICE: Prior to adding exhibits, please make sure to
redact all personal information contained within them. Including but not
limited to: dates of birth, social security numbers, bank account numbers
and other banking information, etc.
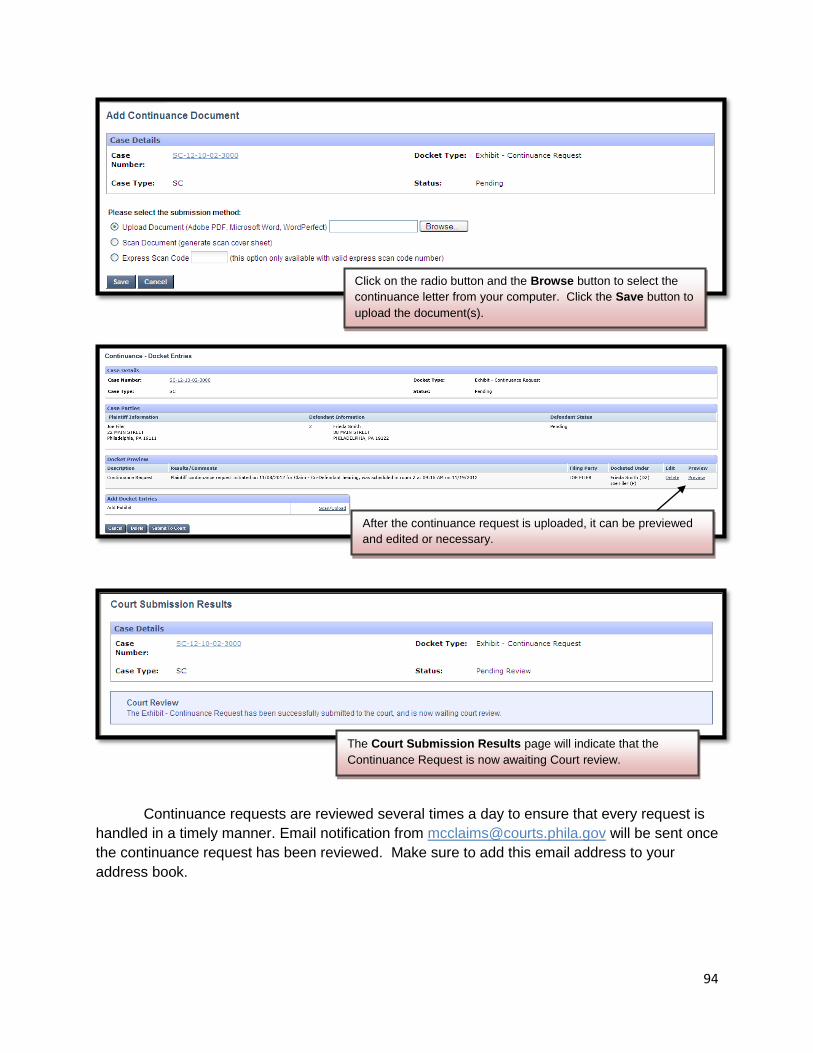
94
Continuance requests are reviewed several times a day to ensure that every request is
handled in a timely manner. Email notification from [email protected] will be sent once
the continuance request has been reviewed. Make sure to add this email address to your
address book.
Click on the radio button and the Browse button to select the
continuance letter from your computer. Click the Save button to
upload the document(s).
After the continuance request is uploaded, it can be previewed
and edited or necessary.
The Court Submission Results page will indicate that the
Continuance Request is now awaiting Court review.

95
Initiate Judgment By Agreement
Landlord-Tenant Judgments By Agreement can only be done on the day of the hearing. Small
Claims Judgments By Agreement can be added can uploaded and approved prior to the hearing date.
SMALL CLAIMS JUDGMENT BY AGREEMENT
Enter the claim number and click the Next button.
Choose the type of agreement to be filed and
indicate if the agreement will be scanned prior
to the hearing or the terms will be entered on
the day of the hearing.
Choose the parties involved in the agreement.
A scanned agreement must be uploaded for
review.

96
Small Claims Judgments By Agreement submitted before the hearing are reviewed
several times a day to ensure that every agreement is handled in a timely manner. Email
notification from [email protected] will be sent once the agreement has been
reviewed. Make sure to add this email address to your address book.
If the agreement is broken, a Breach of Agreement Affidavit should be filed. The
Breach of Agreement Affidavit can be filed by clicking on the Initiate New Petition link.
Click on the Browse button to upload the
agreement from your computer. Click the
Save button.
After the agreement is uploaded, it can be previewed and edited
or necessary. Click the Submit to Court button.
The Court Submission Results page will indicate that the
Judgment by Agreement is now awaiting Court review.
97
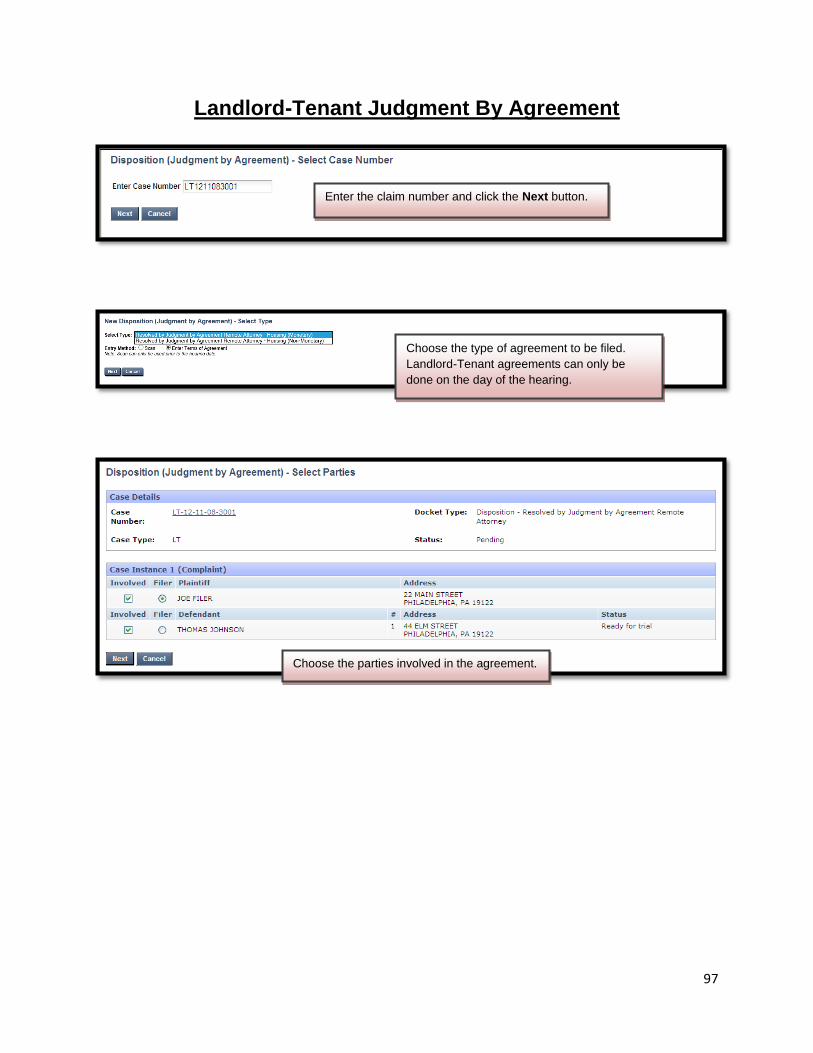
Landlord-Tenant Judgment By Agreement
Enter the claim number and click the Next button.
Choose the type of agreement to be filed.
Landlord-Tenant agreements can only be
done on the day of the hearing.
Choose the parties involved in the agreement.
98
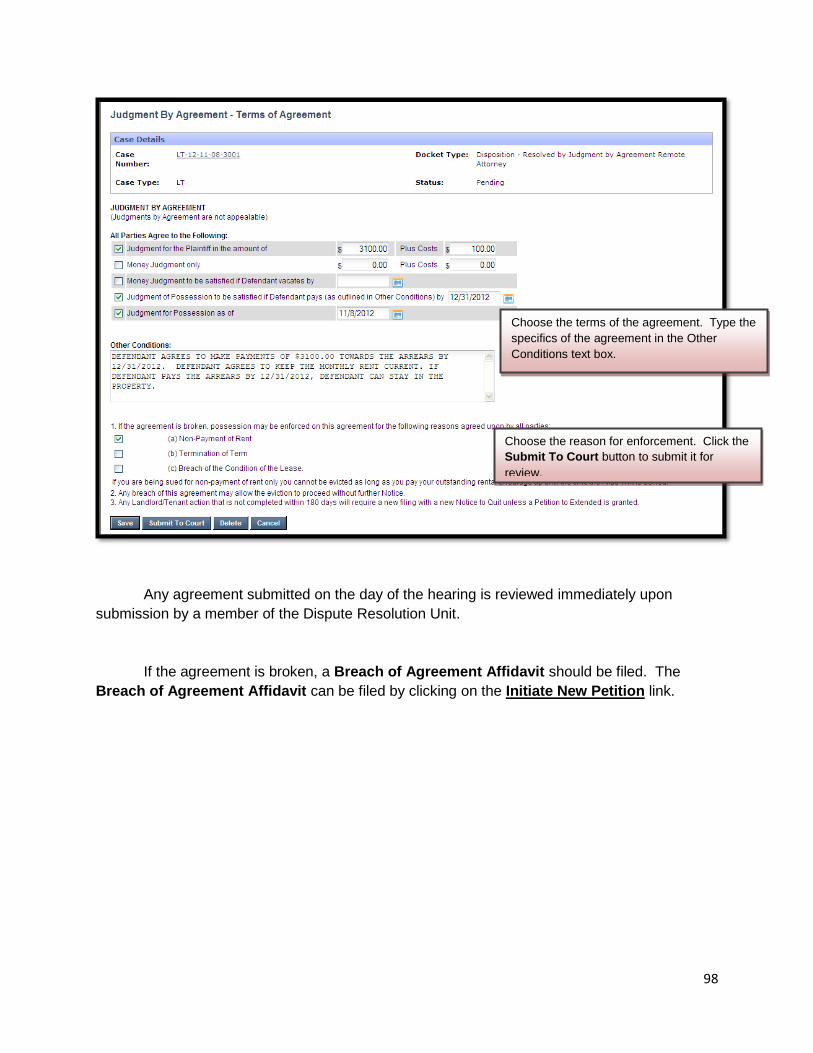
Any agreement submitted on the day of the hearing is reviewed immediately upon
submission by a member of the Dispute Resolution Unit.
If the agreement is broken, a Breach of Agreement Affidavit should be filed. The
Breach of Agreement Affidavit can be filed by clicking on the Initiate New Petition link.
Choose the terms of the agreement. Type the
specifics of the agreement in the Other
Conditions text box.
Choose the reason for enforcement. Click the
Submit To Court button to submit it for
review.
99
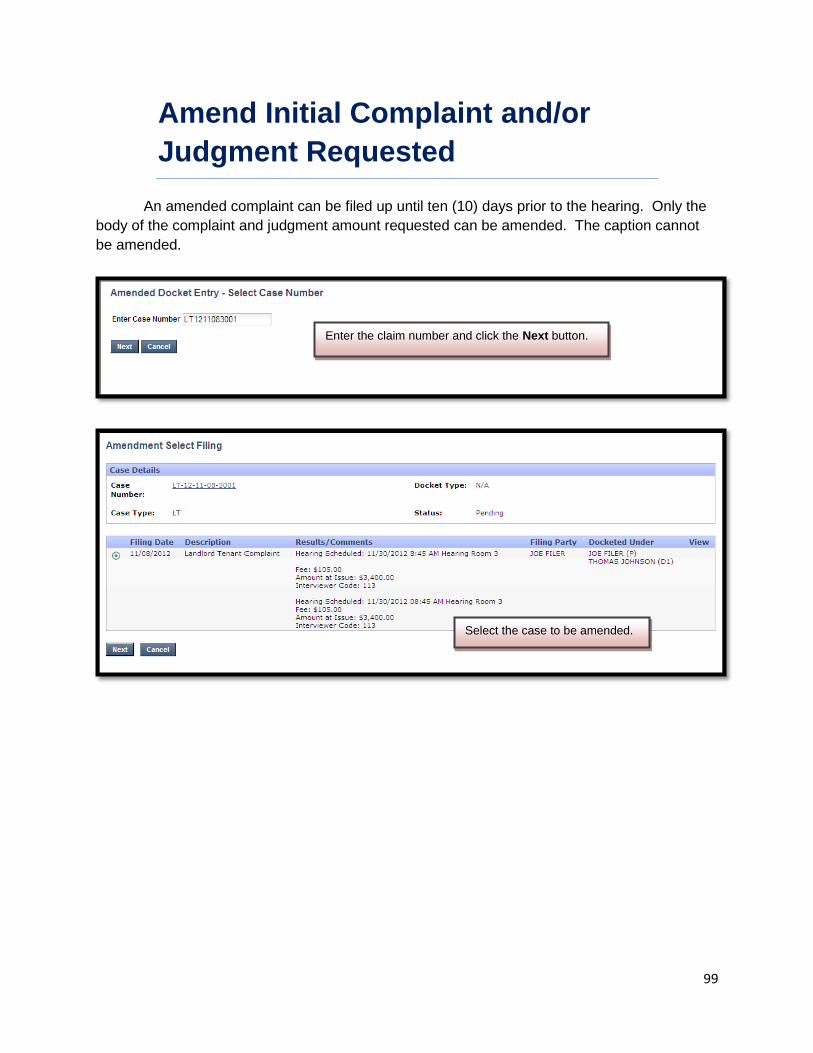
Amend Initial Complaint and/or
Judgment Requested
An amended complaint can be filed up until ten (10) days prior to the hearing. Only the
body of the complaint and judgment amount requested can be amended. The caption cannot
be amended.
Enter the claim number and click the Next button.
Select the case to be amended.

100
Add the amendment to the original case.
Click the Next button.

101
Once the amendment is saved, it can be
previewed and edited by using the Back
button.
If the claim is amended after the service
copy is printed and sent for service, a new
charge for service will be added to the fees.
Enter the credit card information and click
the Submit To Court button.

102
The court will review the Amended Complaint immediately to make sure that is timely
filed. Your credit card will not be charged until your Amended Complaint is approved. Email
notification from [email protected] will be sent once the Amended Complaint has
been reviewed. Make sure to add this email address to your address book.
The Court Submission Results page will indicate that the
Amendment is now awaiting Court review. . A Review Invoices
link is available to print a copy of the invoice if desired.

103
Private Attorney Entry of
Appearance
An attorney must enter an appearance before filing anything on behalf of a party.
Enter the claim number and click the Next button.
Click the Map to this party box underneath the
party the attorney represents. Click the Save
button.
The name of the attorney will appear underneath
the represented party.

104
Review Queues
Review Pending Submission To Court
Review Deficiency Returned Items
This queue stores all cases that have been created
but not submitted to the Court for review.
This queue stores all cases that have been
submitted to the Court but rejected for correction.
105
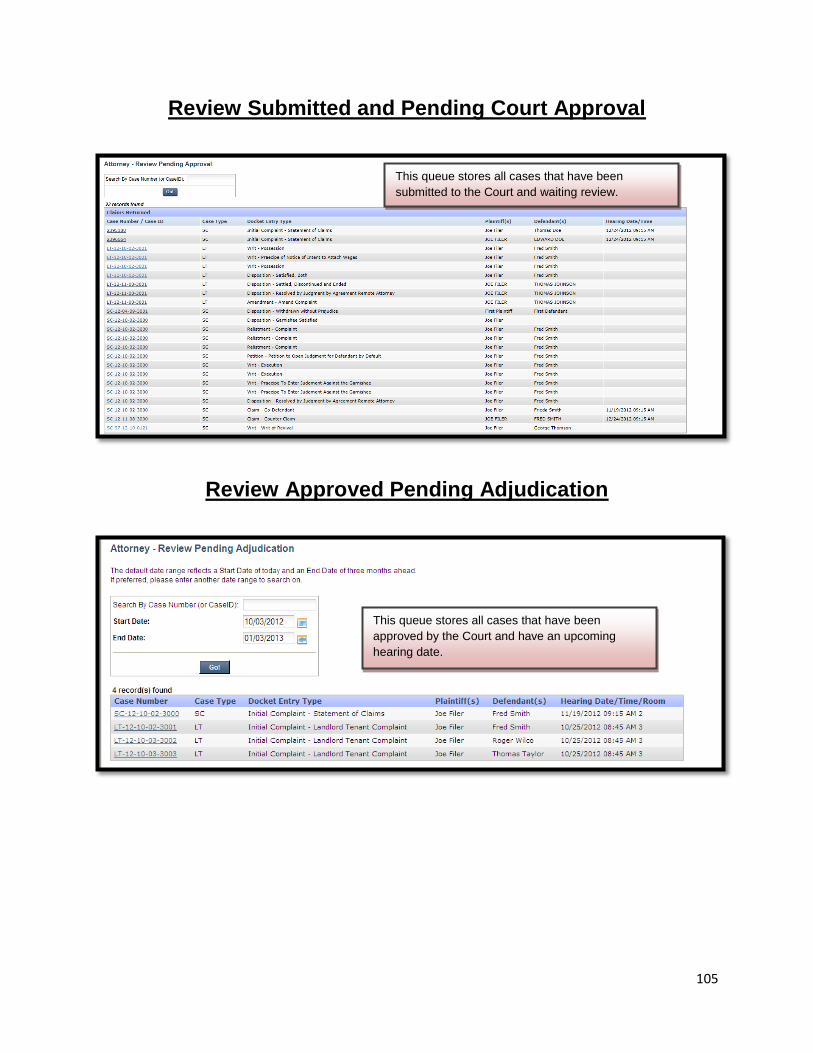
Review Submitted and Pending Court Approval
Review Approved Pending Adjudication
This queue stores all cases that have been
submitted to the Court and waiting review.
This queue stores all cases that have been
approved by the Court and have an upcoming
hearing date.

106
Review Adjudicated
This queue stores all cases that have been to a
hearing and have been disposed.

107
Schedule Private Attorney or Non Attorney Filer Hearings
108
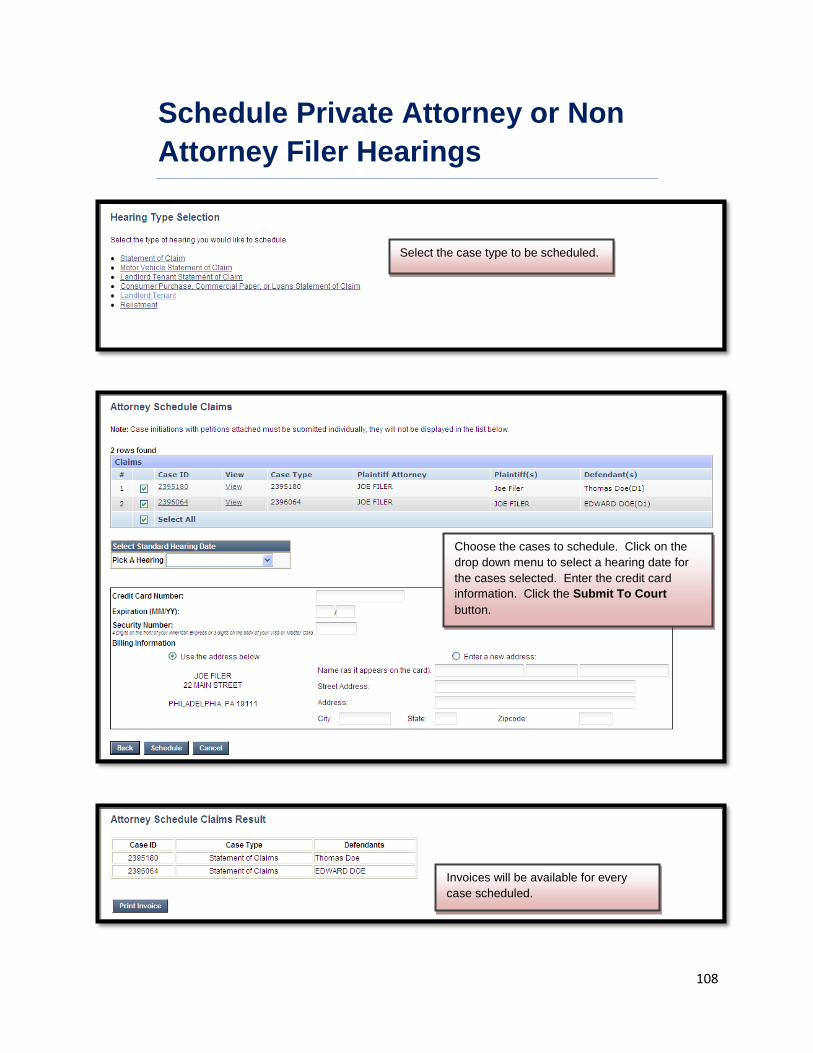
Schedule Private Attorney or Non
Attorney Filer Hearings
Select the case type to be scheduled.
Choose the cases to schedule. Click on the
drop down menu to select a hearing date for
the cases selected. Enter the credit card
information. Click the Submit To Court
button.
Invoices will be available for every
case scheduled.

109
Attorney Service Packs Pending Printing
Attorney Service Packs Printed Report
110
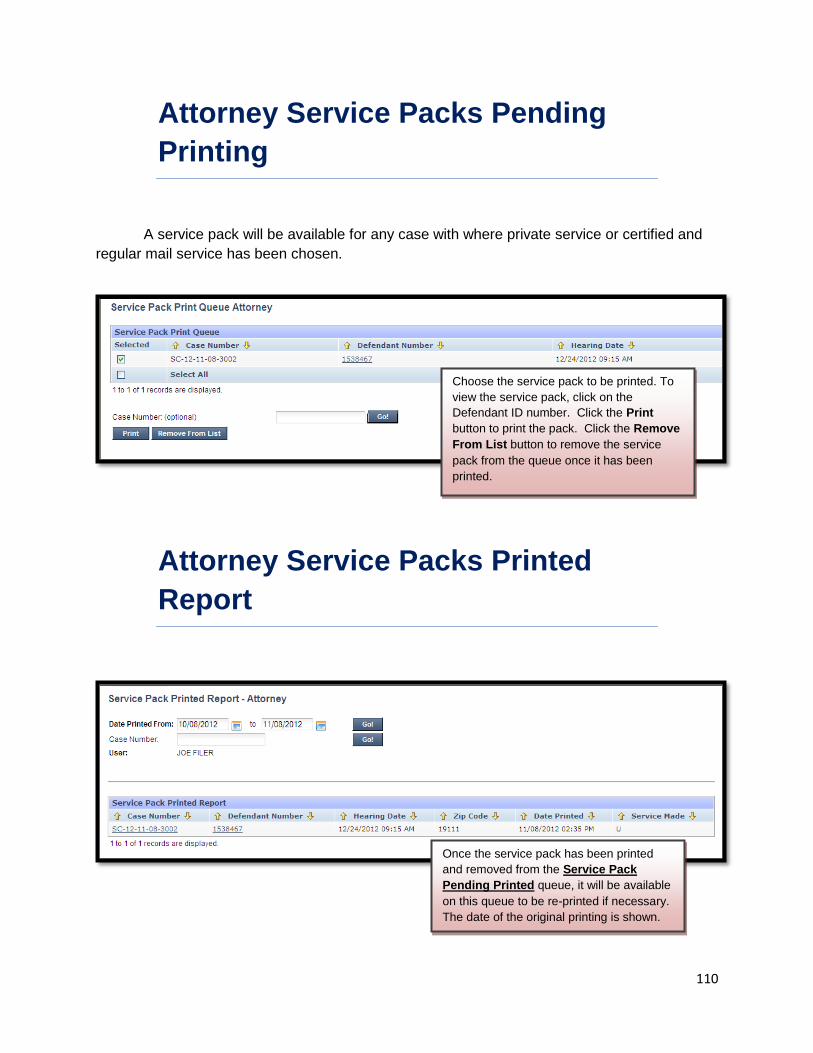
Attorney Service Packs Pending
Printing
A service pack will be available for any case with where private service or certified and
regular mail service has been chosen.
Attorney Service Packs Printed
Report
Choose the service pack to be printed. To
view the service pack, click on the
Defendant ID number. Click the Print
button to print the pack. Click the Remove
From List button to remove the service
pack from the queue once it has been
printed.
Once the service pack has been printed
and removed from the Service Pack
Pending Printed queue, it will be available
on this queue to be re-printed if necessary.
The date of the original printing is shown.

111
Billing Report
112
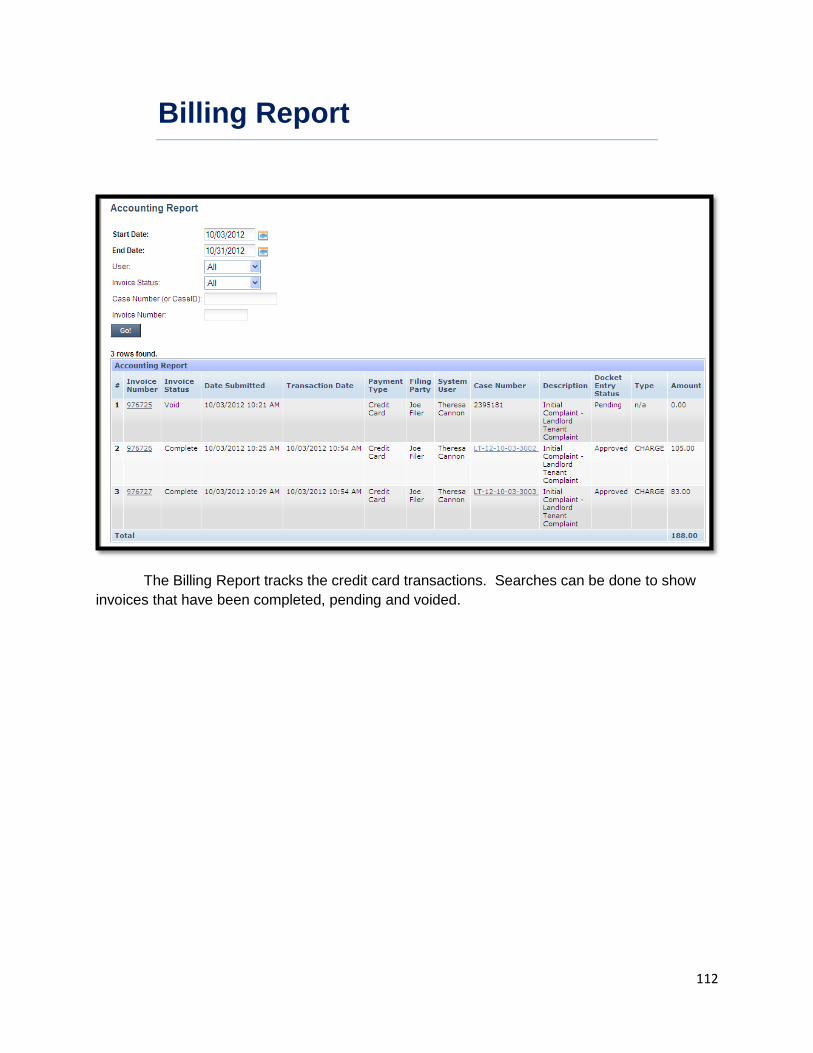
Billing Report
The Billing Report tracks the credit card transactions. Searches can be done to show
invoices that have been completed, pending and voided.

113
Read Only Hearing List

114
Read Only Hearing List
Select the courtroom to view. Select the
month and the year. Click the Jump To
button. Click the hearing list to be viewed.
The hearing list shows all the cases to be
heard for a specific courtroom, date and
time. It can be sorted by case number or
attorney.
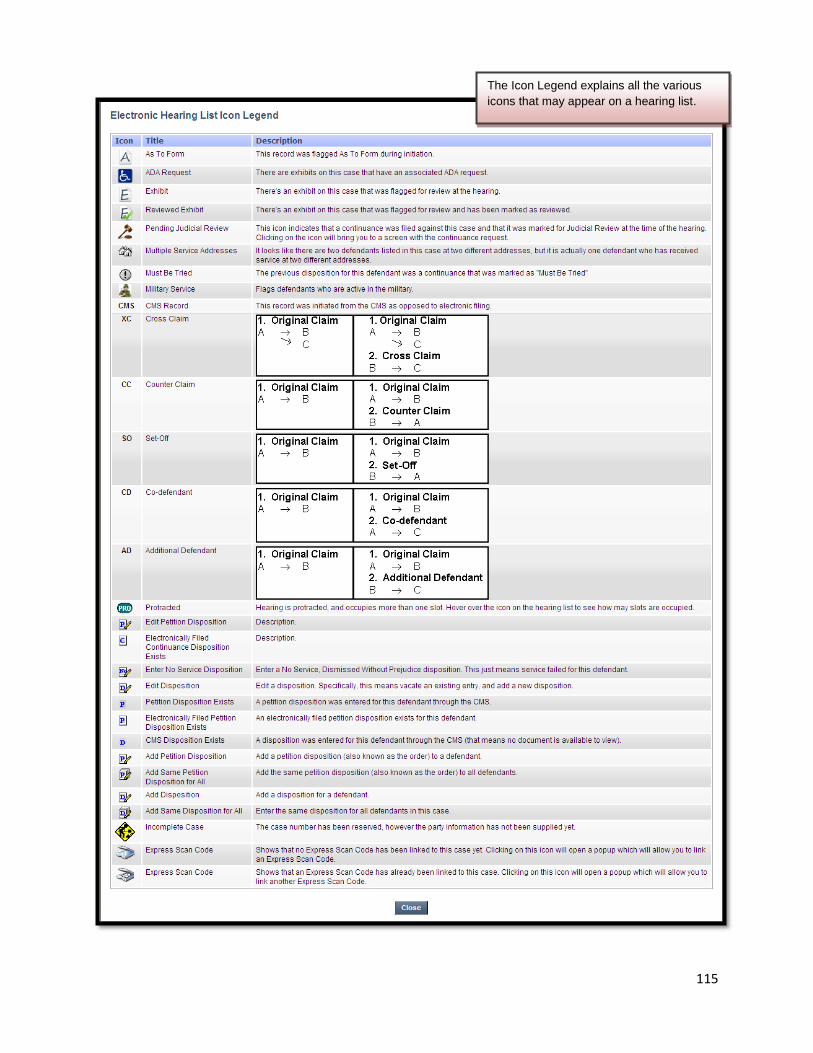
115
The Icon Legend explains all the various
icons that may appear on a hearing list.

116
Search

117
Search
A search can be done by using a claim number, case ID number, plaintiff name or
defendant name.
Click on the claim number to open the docket

118
User Preferences
File Return of Service
File Notice of Intent to Defend
Saved Mass Actions
Enter Satisfaction, SDE, WWP-Single Case
Enter Satisfaction, SDE, WWP-Bulk
Enter Garnishee Satisfaction (private attorney)

119
User Preferences
User Preferences is used to change or add
email addresses for an account or change
a password.

120
File Return of Service
The File Return of Service queue is used to upload Affidavits of Service for private
service and certified mail service. The affidavit MUST be the affidavit that is provided on the
Attorney Service Packs Pending Printing queue. Scan the affidavit into the computer and
save it as a PDF file. Browse the computer and upload the affidavit. The Defendant ID number
is found next to the defendant's name on the affidavit.
File Notice of Intent To Defend
If a Notice To Defend is included with a Small Claims case and it is returned by the
defendant. It is responsibility of the attorney or pro-se plaintiff to upload it onto the docket.
Scan the Notice To Defend into the computer and save it as a PDF file. Browse the computer
and upload it. The Defendant ID number is found next to the defendant's name on the Notice to
Defend.

121
Enter Satisfaction, SDE, WWP-
Single Case
Enter the claim and click the Next
button.
Choose the parties involved and the filer.
Enter the type of disposition. A Satisfaction disposition can
be done after a money judgment is entered. Settled
Discontinued and Ended and Withdrawn Without Prejudice
dispositions can be done before a money judgment has
been entered.
Click on the Submit To Court button. The disposition
will appear on the docket after it is approved by a court
clerk.

122
Enter Garnishee Satisfaction
(private attorney or non-attorney)
Enter the claim and click the Next
button.
Choose to either satisfy or dissolve the
attachment.
Choose the parties involved and a filer.
Click on the Submit To Court button. The disposition
will appear on the docket after it is approved by a court
clerk.

123
File Bulk Return of Service
The bar coded returns of service provided by the court can be uploaded in bulk if
scanned as a TIFF file. The affidavits must be separated by good service and no service before
being scanned and uploaded as one file for good service and one file for no service.
Browse and attach the file. Use the drop down menu
to indicate whether service was made or not. Click the
upload the button.

124
Enter Satisfaction, SDE, WWP-Bulk
This queue is for attorney use only. It allows an attorney to satisfy, settle or withdraw
several cases at one time.
Choose the type of mass action to be performed and
click the Next button.
Provide a description of the mass action and select the
criteria. The options are by hearing date, case
number, file date, by attorney or by party name. A
docket comment is optional. Please Note: Unlike
previous attorney comments, this comment section
does appear on the docket once the mass action is
approved by the Court. Click the Next button to save
the action.

125
Once the cases have been compiled, the mass action
can be viewed and edited.
To submit the mass action, click the Edit link and
select the cases to be satisfied. Click the Save button
to submit the mass action to the Court for approval.
Email notification will be generated once the Court has
completed review.


![AFFIDAVIT AND PRAECIPE FOR SUMMONS IN GARNISHMENT … · Nebraska State Court Form AFFIDAVIT AND PRAECIPE FOR SUMMONS IN GARNISHMENT [IN AID OF EXECUTION] Case No. Plaintiff. vs.](https://static.documents.pub/doc/80x56/5b82f4ad7f8b9a23668c170a/affidavit-and-praecipe-for-summons-in-garnishment-nebraska-state-court-form.jpg)


![[J-94-94] OFFICE OF DISCIPLINARY COUNSEL, 977 … · court judge with respect to respondent's dealings with Abraham Brown, ... praecipe for writ of execution against PSFS, to garnish](https://static.documents.pub/doc/80x56/5ac2543a7f8b9a433f8dee5c/j-94-94-office-of-disciplinary-counsel-977-judge-with-respect-to-respondents.jpg)


