27
37187A SYNCONpanel Transportable Remote Synchronizing Panel Brief Manual Version 1.1xx Manual 37187A
| Date post: | 03-Nov-2018 |
| Category: |
Documents |
| Upload: | duongquynh |
| View: | 214 times |
| Download: | 0 times |

37187A
SYNCONpanel Transportable Remote Synchronizing Panel
Brief Manual Version 1.1xx
Manual 37187A

Manual 37187A SYNCONpanel - Transportable Remote Synchronizing Panel
WARNING Read this entire manual and all other publications pertaining to the work to be performed before install-ing, operating, or servicing this equipment. Practice all plant and safety instructions and precautions. Failure to follow instructions can cause personal injury and/or property damage. The engine, turbine, or other type of prime mover should be equipped with an overspeed (overtempera-ture, or overpressure, where applicable) shutdown device(s), that operates totally independently of the prime mover control device(s) to protect against runaway or damage to the engine, turbine, or other type of prime mover with possible personal injury or loss of life should the mechanical-hydraulic gov-ernor(s) or electric control(s), the actuator(s), fuel control(s), the driving mechanism(s), the linkage(s), or the controlled device(s) fail.
CAUTION To prevent damage to a control system that uses an alternator or battery-charging device, make sure the charging device is turned off before disconnecting the battery from the system. Electronic controls contain static-sensitive parts. Observe the following precautions to prevent dam-age to these parts. • Discharge body static before handling the control (with power to the control turned off, contact a
grounded surface and maintain contact while handling the control). • Avoid all plastic, vinyl, and Styrofoam (except antistatic versions) around printed circuit boards. • Do not touch the components or conductors on a printed circuit board with your hands or with
conductive devices.
OUT-OF-DATE PUBLICATION This publication may have been revised or updated since this copy was produced. To verify that you have the latest revision, be sure to check the Woodward website: http://www.woodward.com/pubs/current.pdfThe revision level is shown at the bottom of the front cover after the publication number. The latest version of most publications is available at: http://www.woodward.com/publicationsIf your publication is not there, please contact your customer service representative to get the latest copy.
Important definitions
WARNING Indicates a potentially hazardous situation that, if not avoided, could result in death or serious injury.
CAUTION indicates a potentially hazardous situation that, if not avoided, could result in damage to equipment.
NOTE Provides other helpful information that does not fall under the warning or caution categories.
Woodward Governor Company reserves the right to update any portion of this publication at any time. Information provided by Wood-ward Governor Company is believed to be correct and reliable. However, Woodward Governor Company assumes no responsibility unless otherwise expressly undertaken.
© Woodward Governor Company
All Rights Reserved.
Page 2/27 © Woodward
Manual 37187A SYNCONpanel - Transportable Remote Synchronizing Panel
Revision History
Rev. Date Editor Changes NEW 05-10-04 TP Release A 06-04-06 TP Note for current measuring added
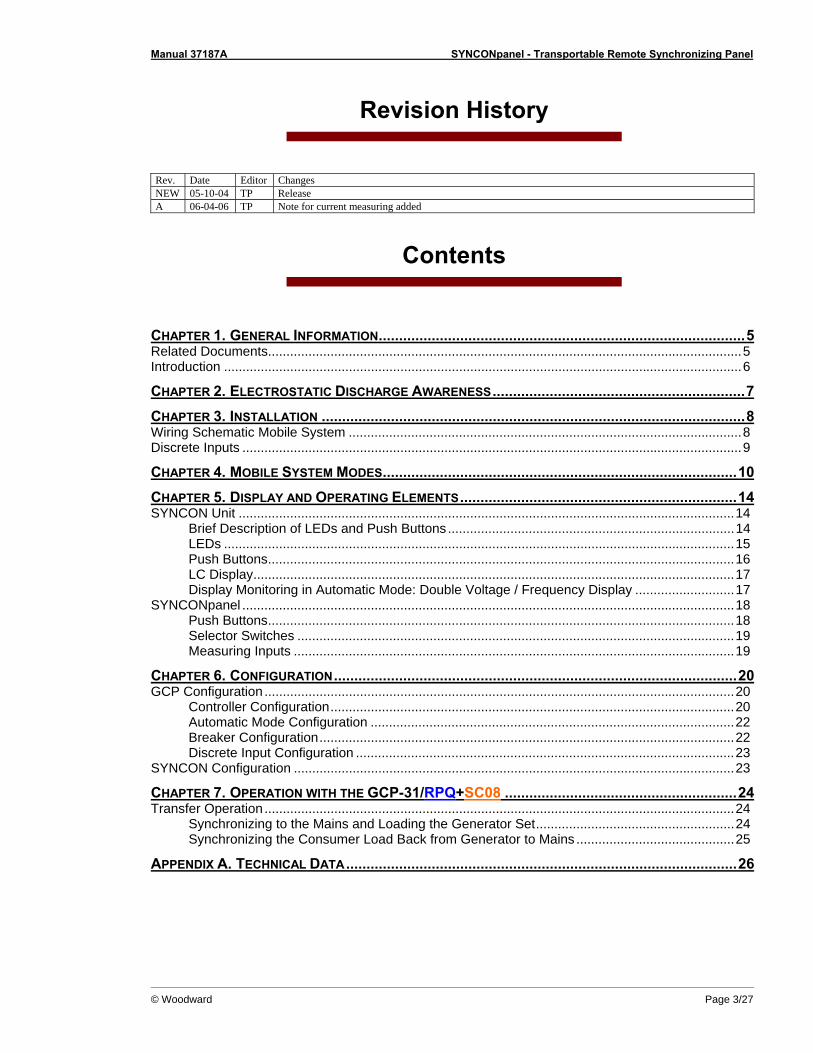
Contents
CHAPTER 1. GENERAL INFORMATION..........................................................................................5Related Documents.................................................................................................................................5 Introduction .............................................................................................................................................6 CHAPTER 2. ELECTROSTATIC DISCHARGE AWARENESS..............................................................7CHAPTER 3. INSTALLATION ........................................................................................................8Wiring Schematic Mobile System ...........................................................................................................8 Discrete Inputs ........................................................................................................................................9 CHAPTER 4. MOBILE SYSTEM MODES.......................................................................................10CHAPTER 5. DISPLAY AND OPERATING ELEMENTS....................................................................14SYNCON Unit .......................................................................................................................................14
Brief Description of LEDs and Push Buttons..............................................................................14 LEDs ...........................................................................................................................................15 Push Buttons...............................................................................................................................16 LC Display...................................................................................................................................17 Display Monitoring in Automatic Mode: Double Voltage / Frequency Display ...........................17
SYNCONpanel ......................................................................................................................................18 Push Buttons...............................................................................................................................18 Selector Switches .......................................................................................................................19 Measuring Inputs ........................................................................................................................19
CHAPTER 6. CONFIGURATION...................................................................................................20GCP Configuration ................................................................................................................................20
Controller Configuration..............................................................................................................20 Automatic Mode Configuration ...................................................................................................22 Breaker Configuration.................................................................................................................22 Discrete Input Configuration .......................................................................................................23
SYNCON Configuration ........................................................................................................................23 CHAPTER 7. OPERATION WITH THE GCP-31/RPQ+SC08 .........................................................24Transfer Operation................................................................................................................................24
Synchronizing to the Mains and Loading the Generator Set......................................................24 Synchronizing the Consumer Load Back from Generator to Mains ...........................................25
APPENDIX A. TECHNICAL DATA................................................................................................26
© Woodward Page 3/27

Manual 37187A SYNCONpanel - Transportable Remote Synchronizing Panel
Illustrations and Tables
Illustrations Figure 1-2: Typical application of a mobile system................................................................................................................... 6 Figure 3-1: Wiring schematic mobile system ............................................................................................................................ 8 Figure 5-1: SYNCON unit front panel..................................................................................................................................... 14 Figure 5-2: SYNCONpanel front ............................................................................................................................................. 18 Figure 6-1: Frequency controller droop characteristic............................................................................................................. 20 Figure 6-2: Voltage controller droop characteristic ................................................................................................................. 21
Tables Table 1-1: Manual - Overview................................................................................................................................................... 5 Table 3-1: Terminal assignment - discrete inputs ...................................................................................................................... 9 Table 3-2: Terminal assignment - discrete inputs ...................................................................................................................... 9
Page 4/27 © Woodward
Manual 37187A SYNCONpanel - Transportable Remote Synchronizing Panel
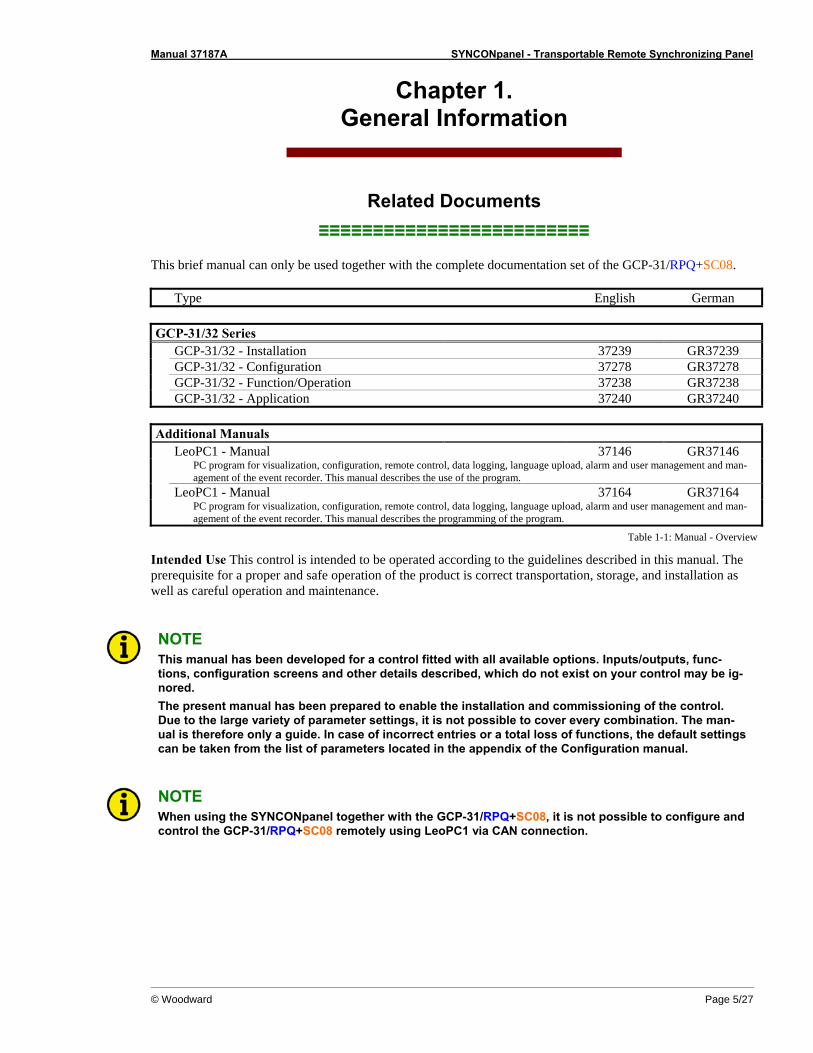
Chapter 1. General Information
Related Documents ≡≡≡≡≡≡≡≡≡≡≡≡≡≡≡≡≡≡≡≡≡≡≡≡≡
This brief manual can only be used together with the complete documentation set of the GCP-31/RPQ+SC08. Type English German GCP-31/32 Series GCP-31/32 - Installation 37239 GR37239 GCP-31/32 - Configuration 37278 GR37278 GCP-31/32 - Function/Operation 37238 GR37238 GCP-31/32 - Application 37240 GR37240 Additional Manuals LeoPC1 - Manual 37146 GR37146 PC program for visualization, configuration, remote control, data logging, language upload, alarm and user management and man-
agement of the event recorder. This manual describes the use of the program. LeoPC1 - Manual 37164 GR37164 PC program for visualization, configuration, remote control, data logging, language upload, alarm and user management and man-
agement of the event recorder. This manual describes the programming of the program.
Table 1-1: Manual - Overview
Intended Use This control is intended to be operated according to the guidelines described in this manual. The prerequisite for a proper and safe operation of the product is correct transportation, storage, and installation as well as careful operation and maintenance.
NOTE This manual has been developed for a control fitted with all available options. Inputs/outputs, func-tions, configuration screens and other details described, which do not exist on your control may be ig-nored. The present manual has been prepared to enable the installation and commissioning of the control. Due to the large variety of parameter settings, it is not possible to cover every combination. The man-ual is therefore only a guide. In case of incorrect entries or a total loss of functions, the default settings can be taken from the list of parameters located in the appendix of the Configuration manual.
NOTE When using the SYNCONpanel together with the GCP-31/RPQ+SC08, it is not possible to configure and control the GCP-31/RPQ+SC08 remotely using LeoPC1 via CAN connection.
© Woodward Page 5/27

Manual 37187A SYNCONpanel - Transportable Remote Synchronizing Panel
Introduction ≡≡≡≡≡≡≡≡≡≡≡≡≡≡≡≡≡≡≡≡≡≡≡≡≡
ConnectorConnector
Remoteoperation
Closemanually
CAN Bus
I
V
V
GCP-31 RPQ-SC08
V / kV A (L1) A (L2) A (L3)
Operating and Alarm Messages
AUTO MAN TEST STOP
RESET
Setpoint
ON Mains Parallel
Automatic Manual Protection Alarm
V1
V2
V3
Stop
Genset Control Package GCP-30
ON
OFF STOP
Figure 1-2: Typical application of a mobile system
Mobile systems are defined as a generator set with a generator circuit breaker (GCB), which can easily be in-stalled near a feeder or transformer, and operate as follows:
• In parallel with mains operation to support the utility [peak load operation] • In automatic mains failure mode to operate in case of a mains failure [emergency operation] • Independent operation from the utility [isolated operation] • With a behavior which allows to open and close the interchange point to the utility [transfer operation]
The GCP-31/RPQ+SC08 supports these modes, which are required for a mobile system. For maintenance on a interchange point to mains (high voltage transformer or wiring replacement), the GCP-31/RPQ+SC08 requires the connection to the SYNCON Panel which helps the operator to overtake load from mains to the mobile system and back. Therefore one or several mobile container(s) can be used. The GCP-31/RPQ+SC08 offers a special discrete input for the transfer operation and emergency operation. Ad-ditionally, it offers a special discrete input for connecting an phase rotation relay, which is required for the bus-bar connection. The other modes are realized through special handling of the given control inputs.
Page 6/27 © Woodward

Manual 37187A SYNCONpanel - Transportable Remote Synchronizing Panel
Chapter 2. Electrostatic Discharge Awareness
All electronic equipment is static-sensitive, some components more than others. To protect these components from static damage, you must take special precautions to minimize or eliminate electrostatic discharges. Follow these precautions when working with or near the control. 1. Before doing maintenance on the electronic control, discharge the static electricity on your body to
ground by touching and holding a grounded metal object (pipes, cabinets, equipment, etc.). 2. Avoid the build-up of static electricity on your body by not wearing clothing made of synthetic materials.
Wear cotton or cotton-blend materials as much as possible because these do not store static electric char-ges as easily as synthetics.
3. Keep plastic, vinyl, and Styrofoam materials (such as plastic or Styrofoam cups, cigarette packages, cello-
phane wrappers, vinyl books or folders, plastic bottles, etc.) away from the control, modules, and work area as much as possible.
4. Opening the control cover may void the unit warranty.
Do not remove the printed circuit board (PCB) from the control cabinet unless absolutely necessary. If you must remove the PCB from the control cabinet, follow these precautions:
• Ensure that the device is completely voltage-free (all connectors have to be disconnected).
• Do not touch any part of the PCB except the edges.
• Do not touch the electrical conductors, connectors, or components with conductive devices or with
bare hands.
• When replacing a PCB, keep the new PCB in the plastic antistatic protective bag it comes in until you are ready to install it. Immediately after removing the old PCB from the control cabinet, place it in the antistatic protective bag.
CAUTION To prevent damage to electronic components caused by improper handling, read and observe the pre-cautions in Woodward manual 82715, Guide for Handling and Protection of Electronic Controls, Printed Circuit Boards, and Modules.
© Woodward Page 7/27

Manual 37187A SYNCONpanel - Transportable Remote Synchronizing Panel
Chapter 3. Installation
Wiring Schematic Mobile System ≡≡≡≡≡≡≡≡≡≡≡≡≡≡≡≡≡≡≡≡≡≡≡≡≡
1Busbar Sensing
VoltageNeutral
N
Busbar
L1
Mains
L1
Current
Control
Mains
FrequencyReal Power
0
ControlVoltageRe-active Power
0 RemoteLocalUnloadMains
StartSynch
UnloadGenerator
EMERGENCYSTOP
SYN
CO
Npa
nel
Unloading Mains Synch Started
Ready
GCB on
UnloadingGenerator
SYNCON
N
L1L2L3
MCB GCB
GMobile Container
X5X4X3
GCP-31TransformerStation
Front Back
Load
SYNCONpanel
Page 8/27 © Woodward
at position "Local" only
PE
Cable
CAN shielding
EMERGENCYSTOP
SYNCONpanel Schematic 2006-04-05.SKF
a b
The emergency disconnector of the SYNCON Panel (make-contact) may be connected using the lines a and b (terminals 6 and 7).
2 3 4 5
109876
short-circuit if noclamp-on transducer
is used
Figure 3-1: Wiring schematic mobile system

Manual 37187A SYNCONpanel - Transportable Remote Synchronizing Panel
Discrete Inputs ≡≡≡≡≡≡≡≡≡≡≡≡≡≡≡≡≡≡≡≡≡≡≡≡≡
To use the GCP-31/RPQ+SC08 for a mobile system like described, discrete inputs are required.
CAUTION Please note that the maximum voltages, which may be applied at the discrete inputs are defined as fol-lows. Voltages higher than those specified destroy the hardware! Maximum input range: +/-4 to 40 Vdc.
Terminal Associatedcommon
Description (according to DIN 40 719 Part 3, 5.8.3)
Amax
3 Automatic 1 2.5 mm² 5 Automatic 2 2.5 mm²
53 7
Enable MCB (mains circuit breaker) 2.5 mm² 4 Reply: GCB is open 2.5 mm²
54 7 Reply: Mains power circuit breaker is open or mains parallel status (in
items with 1 CB) 2.5 mm²
Table 3-1: Terminal assignment - discrete inputs
To monitor a phase rotation relay, the alarm input [D03] must be used. If it is required to block an automatic mains failure start, the discrete input [D11] must be programmed to "Inhibit emergency run".
Terminal Associatedcommon
Description (according to DIN 40 719 Part 3, 5.8.3)
Amax
36 33
Discrete input [D03] "Phase rotation check O.K.": This control input is evaluated if the busbar is energized. In case of a failure, the message "Phase sequence" is displayed and closing the cir-cuit breakers is blocked. If the busbar phase rotation shall not be monitored, this input must be energized permanently.
2.5 mm²
68 60 Discrete input [D11] - Alarm input or - Inhibit emergency run
2.5 mm²
Table 3-2: Terminal assignment - discrete inputs
© Woodward Page 9/27

Manual 37187A SYNCONpanel - Transportable Remote Synchronizing Panel
Chapter 4. Mobile System Modes
The operating modes of the Rental Package GCP-31/RPQ+SC08 are usually selected via an external selector switch and the digital inputs. A typical connection of the selector switch and a description of the operating modes belonging to it may be found in the following.
OFF
Isolatedoperation
Transferoperation Peak load operation
internal
Peak load operationexternal
Emergency oper.Start
For this, the signals are to be connected as follows:
Signals to be con-nected Operating mode
Terminal 54 Reply MCB OFF
Terminal 126 Mobile Sys-tems
Terminal 53 Enable MCB
Terminal 68 Inhibit emer-gency run **
Terminal 3 Automatic 1
Terminal 5 Automatic 2
OFF (de-energized) irrelevant irrelevant irrelevant irrelevant irrelevant irrelevant Isolated operation 1 0 0 1 remote control 0 Transfer operation 1 1 0 (Syncon Pa-
nel) remote control *
1 remote control irrelevant
Peak load operation internal
0 0 1 1 remote control 0
Peak load operation external
0 0 1 1 0 remote con-trol
Emergency opera-tion Start
reply must be connected
0 1 0 0 0
*) If a synchronization between mains and generator busbar voltage is to be performed without SYNCON Panel, this DI must initiate the synchronization.
**) If no emergency power operation is required, the parameter "Emergency run" may be disabled. This allows to use termi-nal 68 as free alarm input.
Page 10/27 © Woodward

Manual 37187A SYNCONpanel - Transportable Remote Synchronizing Panel
© Woodward Page 11/27
Switch Position OFF
The GCP will be de-energized in this operating mode. No actions are initiated by the unit anymore. If you switch to position OFF while the genset is running, the GCB opens and the genset stops immediately (it is assumed that this is provided by the customer).
Switch Position Isolated Operation
The GCP operating modes are enabled: STOP: Genset stops with cool down or remains stopped. If necessary, the load will be taken off of the
genset and the GCB will be opened. MANUAL: Genset may be started and stopped manually. The generator breaker may be closed and opened
using the manual keys. Frequency and voltage are controlled isochronous. AUTOMATIC: The genset will be started and the GCB will be closed if remote control has been activated. TEST: The genset will be started. The GCB may be closed and opened using the MANUAL keys. The set points for frequency and voltage may either be modified using the arrow keys at the unit or via the digital inputs.
Switch Position Transfer Operation
(Function enable station and return to the mains) The GCP operating modes may be freely available or fixed to MANUAL operating mode. The parameter "Inter-change mode in Manual", which is responsible for this, is in the parameter group Automatic (refer to Configura-tion Manual 37278). The following is valid in general: Only the GCB will be synchronized. It is not possible to connect to a de-energized generator busbar. If the GCB is closed, the generator monitoring is loaded with the trigger times mains monitoring, the phase shift monitoring is not active. The automatic mains connection detection*) will be activated. If no mains connection is detected, a frequency and voltage control with droop will be performed. If a mains connection is detected, real and reactive power control will be performed. A phase relation zero control with the mains may be restarted via the DI at terminal 53 (Enable MCB) or the SYNCON Panel. This will be disabled automatically if a mains connection is detected. It is principally possible to open the GCB with the Operation mode STOP key for security reasons. *) Automatic mains connection detection: The GCP detects automatically via phase L1 whether the generator is in parallel with the mains. If the phase relation between mains and generator busbar is recognized as "fixed", the message "Mains con-nected" will be displayed. This is the case if the angle of L1 between mains and busbar remains below a certain angle limit for a certain time. Angle and time may be configured with the parameter "Detection mains coupling" under phase controller within the parameter group breaker (refer to Configuration Manual 37278). This automatic detection is used to decide whether real and reactive power or frequency and voltage control is to be performed.

Manual 37187A SYNCONpanel - Transportable Remote Synchronizing Panel
Page 12/27 © Woodward
The following is valid for free operating mode selection at the GCP: STOP: Genset stops with cool down or remains stopped. If necessary, the load will be taken off of the
genset and the GCB will be opened. MANUAL: Genset may be started and stopped manually. The generator breaker may be closed and opened
using the manual keys. AUTOMATIC: The genset will be started and the GCB will be closed if remote control has been activated. TEST: Not possible; if transfer operation is selected during TEST operation, an automatic change to
MANUAL operating mode will be performed. The set points for frequency and voltage or real power and power factor may either be modified using the arrow keys at the unit, via the digital inputs, or using the SYNCON Panel. Only the set points, the control of which is currently active, may be modified via the Dis.
Switch Position Peak Load Operation "Internal"
The GCP operating modes are enabled: STOP: Genset stops with cool down or remains stopped. If necessary, the load will be taken off of the
genset and the GCB will be opened. MANUAL: Genset may be started and stopped manually.
The generator breaker may be closed and opened using the manual keys. After closing the GCB, real and reactive power are controlled.
AUTOMATIC: The genset will be started and the GCB will be synchronized if remote control has been acti-vated. After closing the GCB, real and reactive power are controlled. The set real power 1 and the power factor are stored "internally".
TEST: The genset will be started. The generator breaker may be closed and opened using the manual keys.
The set points for real power and power factor may either be modified using the arrow keys at the unit or via the digital inputs.
Switch Position Peak Load Operation "External"
The functions correspond with the switch position peak load operation "internal" except the difference that the real power set point is controlled by a 0/4 to 20mA signal or transmitted via an interface.

Manual 37187A SYNCONpanel - Transportable Remote Synchronizing Panel
Switch Position Emergency Power Start
The GCP operating modes are enabled: STOP: Genset stops with cool down or remains stopped. If necessary, the load will be taken off of the
genset and the GCB will be opened. MANUAL: Genset may be started and stopped manually.
The generator breaker may be closed and opened using the manual keys. No automatic change-over to emergency power is activated.
AUTOMATIC: If mains fail (measurement via terminals 50, 51, 52) the genset will be started, the MCB will be opened and the GCB will be closed. If mains return, the MCB will be synchronized back after the mains settling time has expired. Then the load will be taken off of the genset and the genset will be stopped.
TEST: The genset will be started. The generator breaker may be closed and opened using the manual keys. An automatic change-over to emergency power will be performed if necessary.
The set points for frequency and voltage may either be modified using the arrow keys at the unit or via the digital inputs.
NOTE It is required for the emergency power start function that the MCB reply is connected. The start and stop commands from the GCP must also be wired to the MCB to enable an automatic change-over.
© Woodward Page 13/27

Manual 37187A SYNCONpanel - Transportable Remote Synchronizing Panel
Chapter 5. Display and Operating Elements
SYNCON Unit ≡≡≡≡≡≡≡≡≡≡≡≡≡≡≡≡≡≡≡≡≡≡≡≡≡
The pressure-sensitive membrane of the front panel consists of a plastic coating. All keys have been designed as touch-sensitive membrane switch elements. The display is a LC-display, consisting of 2 rows of 16 characters each, with indirect green lighting. The contrast of the display can be infinitely adjusted via a rotary potentiometer positioned on the right side of the control.
5
1
23
4Unloading Mains Synch Started
Ready
GCB on
UnloadingGenerator
SYNCON
6 7 8 9
10
Figure 5-1: SYNCON unit front panel
Brief Description of LEDs and Push Buttons
LEDs
No Description Function 1 Ready Ready for operation 2 GCB on Reply: GCB is closed 3 Unloading Generator Generator is being unloaded 4 Synchroscope Display of phase position 5 Unloading Mains Mains are being unloaded 6 Synch Started Synchronization has been started
Buttons
No Description Function 7 Display↓ Scroll display 7 Select Confirm selection 8 Digit↑ Increase digit 9 Clear No function 9 Cursor→ Shift input position one digit to the right
Others
No Description Function 10 LC-Display LC-Display
Page 14/27 © Woodward

Manual 37187A SYNCONpanel - Transportable Remote Synchronizing Panel
© Woodward Page 15/27
LEDs
1 Ready Color: green
Ready for operation
This LED indicates that the unit is ready for operation if the follow-ing conditions are fulfilled: • Terminal 126 of the GCP must be energized • GCB must be closed (reply "GCB is open" must be de-energized) • CAN bus connection between SYNCONpanel and GCP must be
active • The "Phase control" parameter of the GCP must be configured
ON
2 GCB on Color: green
Power circuit breaker open/closed
The "Gen CB - ON" LED indicates if the response of the power cir-cuit breaker is open or closed. The "Gen CB - ON" LED illuminates if the discrete input "Reply: CB is open" of the GCP is not energized and will turn off as soon as the discrete input is energized.
3 Unloading Generator
Color: green Unloading generator
This LED indicates that the generator unloading function is active. The LED extinguishes if the GCB is open.
4 LED-row: too fast→
Color: red/yellow/green Phase position / Synchroscope
The row of LEDs indicates the current phase relationship between the two voltages indicated in the display. The green LED in the cen-ter of the 15 LEDs indicates that the measured phase angle between the voltage systems is +/- 12 ° electrical. The synchroscope LEDs can move in two directions: left → right . If the LEDs illuminate from left to right, the generator
(variable system) frequency is higher than the mains or reference voltage system (i.e. the generator or the vari-able system has a frequency of 60.5hz and the mains is 60hz).
right → left . If the LEDs illuminate from right to left, the generator (variable system) frequency is lower than the mains or reference voltage system (i.e. the generator respec-tively the variable system has a frequency of 59.5hz and the mains is 60hz).
5 Unloading Mains
Color: green Unloading mains
This LED indicates that the mains unloading function is active. The LED extinguishes if the MCB is open (mains disconnected).
6 Synch Started
Color: green Synchronization started
This LED indicates that the synchronization of the MCB with phase matching is active.

Manual 37187A SYNCONpanel - Transportable Remote Synchronizing Panel
Page 16/27 © Woodward
Push Buttons Configuration may be performed by manually inputting the desired set points utilizing the pushbuttons and the LC display. In order to facilitate configuring the parameters, the push buttons have been enabled with an AUTOROLL function. This permits the user to advance to the next setting, configuration screen, digit, and/or cursor position more rapidly by pressing and holding the corresponding pushbutton.
7 Display / Select
Display / Select
Automatic mode: Display - By pressing this button, the user may navigate through the displayed measured parameters and alarm messages.
Configuration: Select - Advances the LC display to the next con-figuration screen. If any values in a configuration screen have been modified with the "Digit↑" or "Cur-sor→", then the "Select" button must be pressed to save the new setting. By pressing this push-button again, the user causes the system to display the next configuration screen.
8 Digit↑
Digit ↑
Automatic mode: no function Configuration: Digit↑ - Numerical values over the cursor are in-
creased by one digit. The increase is restricted by the admissible limits (refer to the list of parameters in-cluded in the appendix). If the maximum admissible number is reached, the number automatically returns to the lowest admissible number.
9 Clear / Cursor →
Clear / Cursor→
Automatic mode: Clear - no function Configuration: Cursor→ - This button moves the cursor one posi-
tion from left to right. When the cursor is under the last digit that may be changed, it may be moved to the first number of the value by pressing the "Cursor→" button again.

Manual 37187A SYNCONpanel - Transportable Remote Synchronizing Panel
© Woodward Page 17/27
LC Display
10 LC-Display LC-Display
The two-line LC display outputs corresponding text messages and values depending on the mode that the SYNCON is operating. In the configuration mode, the monitoring parameters may be changed. When the SYNCON is in the automatic mode, the measured values are displayed.
Display Monitoring in Automatic Mode: Double Voltage / Frequency Display MN: 000 V 00.0Hz GN: 000 V 00.0Hz
Double voltage and double frequency displays, mains and generator values
The mains/generator voltage and frequency are displayed in this screen. The phase angle between the mains and generator voltage is displayed by the synchroscope (LED strip). MN ....Mains voltage and frequency GN.....Generator voltage and frequency
-.-- 000kvar 000 A 000kW
Mains measuring value displays
The following mains measuring values are displayed: • Power factor • Reactive power • Current • Active power Note: The measuring values are only displayed if the clamp-on transducer
is connected.

Manual 37187A SYNCONpanel - Transportable Remote Synchronizing Panel
SYNCONpanel ≡≡≡≡≡≡≡≡≡≡≡≡≡≡≡≡≡≡≡≡≡≡≡≡≡
The SYNCONpanel consists of the SYNCON unit described under SYNCON Unit on page 14 and various con-trol switches and buttons as well as measuring inputs.
11
12
13
14
15 16 17
18 19
Figure 5-2: SYNCONpanel front
Push Buttons The following push buttons are utilized to remote control the synchronization process on the SYNCONpanel.
11 EMERGENCY STOP
Emergency Stop
The emergency stop button generates an alarm in the GCP that opens the GCB and stops the engine immediately. Note: For safety reasons, it is absolutely necessary that the connec-
tion with the GCP and the configuration of the GCP's discrete input are correct.
12 Start Synch
Start synchronization
This push button starts the synchronization sequence with phase matching. If the two systems are synchronous, the lamp in the push button illuminates.
13 Unload mains
Unload mains
This push button initiates the mains unloading sequence. The load will be ramped from the mains to the generator. Note: The unload mains push button can only be used if the SYN-
CONpanel is measuring the current.
14 Unload generator
Unload generator
This button initiates the generator unloading sequence. The generator performs the unloading function and opens the GCB.
Page 18/27 © Woodward

Manual 37187A SYNCONpanel - Transportable Remote Synchronizing Panel
Selector Switches
15 Frequency / Real Power Control
Frequency / Real Power Control
↓ (lower) ....Decreases the frequency / real power control set point ↑ (raise) .....Increases the frequency / real power control set point
16 Voltage / Reactive
Power Control
Voltage / Reactive Power Control
↓ (lower) ....Decreases the voltage / reactive power control set point ↑ (raise) .....Increases the voltage / reactive power control set point
17 Busbar Sensing
Busbar sensing selection
Local ..........The busbar voltage is measured via the voltage measur-ing inputs on the front of the SYNCONpanel.
Remote ......The busbar voltage is measured via the industrial plug-in connector. The measuring inputs on the front of the SYNCONpanel (Busbar L1 and Neutral N) are discon-nected.
CAUTION Observe the safety instructions in the SYNCONpanel cover!
Measuring Inputs
18 Current
Current measuring input
The clamp-on transducer must be connected here.
NOTE If no clamp-on transducer is used, the current measuring input must be closed with a short-circuiting termination to ensure a proper operation of the unit without a clamp-on transducer.
19 Voltage
Voltage measuring input
The voltage measuring lines must be connected here.
© Woodward Page 19/27

Manual 37187A SYNCONpanel - Transportable Remote Synchronizing Panel
Chapter 6. Configuration
NOTE When using the SYNCONpanel together with the GCP-31/RPQ+SC08, it is not possible to configure and control the GCP-31/RPQ+SC08 remotely using LeoPC1 via CAN connection. It is required to configure the unit via LeoPC1 and a DPC connection.
CAUTION Please note that configuration only should be done in a standstill of the system.
GCP Configuration ≡≡≡≡≡≡≡≡≡≡≡≡≡≡≡≡≡≡≡≡≡≡≡≡≡
Controller Configuration
Frequency Controller
In case of transfer operation mode, the unit controls frequency and voltage with droop behavior. For the transfer operation mode, a droop characteristic for the frequency controller is required, otherwise the gen-erator set would not be able to maintain a stable active power being in parallel with the mains. Freq.controller droop 02.0%
Frequency controller droop 0 to 20 %
The internally set value for frequency will be reduced by the configured value, when the nominal power of the generator is reached.
Setpoint Frequency-Control
Droop (static curve)
80
84
88
92
96
100
104
0 10 20 30 40 50 60 70 80 90 100 110
Pactive in %
f Nom
inal in
%
isochronisotroop
2 %
Figure 6-1: Frequency controller droop characteristic
Page 20/27 © Woodward

Manual 37187A SYNCONpanel - Transportable Remote Synchronizing Panel
Voltage Controller
In case of transfer operation mode, the unit controls frequency and voltage with droop behavior. For the transfer operation mode, a droop characteristic for the voltage controller is required, otherwise the gen-erator set would not be able to maintain a stable reactive power being in parallel with the mains. Volt.controller droop 02.0%
Frequency controller droop 0 to 20 %
The internally set value for voltage will be reduced by the configured value, when the maximum reactive power of the generator is reached. Example: In case of a 200 kW engine power, the reactive power will be 200 kvar as base value.
Setpoint Voltage-Control
Droop (static curve)
80
84
88
92
96
100
104
0 10 20 30 40 50 60 70 80 90 100 110
Preactive in %
V Nom
inal in
%
isochronisotroop
2 %
Figure 6-2: Voltage controller droop characteristic
Power Factor Controller
In case of transfer and mains parallel operation mode, the power factor controller is required. Pow.fact.contr. ON
Power factor controller ON / OFF
ON................ In a mains parallel operation automatic control of the power factor is carried out. If there are excessively low currents (secondary current less than 5 % Irated) the power factor cannot be accurately measured. In order to prevent power swings, the controller automatically locks the power factor at a set value. The subsequent screens of this func-tion are displayed.
OFF.............. Power factor control is not performed, and the subsequent screens of this function are not displayed.
© Woodward Page 21/27

Manual 37187A SYNCONpanel - Transportable Remote Synchronizing Panel
Automatic Mode Configuration Power On Mode: STOP
Start in mode: STOP, MANUAL, AUTOMATIC, as before
STOP............The unit is in STOP operating mode after applying battery voltage. MANUAL ....The unit is in MANUAL operating mode after applying battery volt-
age. AUTOMATIC The unit is in AUTOMATIC operating mode after applying bat-
tery voltage. as before.......The unit is in the same operating mode after applying battery voltage
as it was before disconnecting the battery voltage. Note: The operating mode may be changed with the terminals 126, 127, and 128.
Interchange Mode in Manual ON
Interchange mode in manual ON/OFF
OFF ..............Interchange mode (enabled by the DI at terminal 126) may also be performed in AUTOMATIC operating mode.
ON ................Interchange mode (enabled by the DI at terminal 126) may only be performed in AUTOMATIC operating mode.
Breaker Configuration Breaker logic: --------PARALLEL
Breaker logic see below
The control automatically controls the two breakers (MCB and GCB). Up to five (5) breaker logic modes may be selected. These are: EXTERNAL, PARALLEL, OPEN TRANSIT, CLOSED TRANSIT and INTERCHANGE. For mobile systems the parallel logic is required.
NOTE In case of transfer and mains parallel operation mode, phase matching is required. The SYNCON Panel will not operate, if this parameter is disabled.
Phase matching ON
Phase matching ON/OFF
ON ................Synchronization will be performed with phase matching. OFF ..............Synchronization will be performed with slightly positive slip.
Phase matching gain 00
Phase matching gain 1 to 36
The phase matching effect on the frequency control may be affected with this gain factor.
Phase matching df start 00,0Hz
Phase matching df start 0,02 to 0,25 Hz
Phase matching will only be enabled if the frequency difference of the voltages to be synchronized is below the value configured here.
Detection Mains connected < 00°
Mains connection detection (angle) 1 to 15°
If the phase angle between busbar and mains is below the angle configured here for at least the time configured in the next parameter, the unit detects the connection be-tween busbar and mains and indicates this with the message "Mains connected".
Page 22/27 © Woodward

Manual 37187A SYNCONpanel - Transportable Remote Synchronizing Panel
© Woodward Page 23/27
Detection Mains conn. after 000s
Mains connection detection (time) 0 to 999 s
If the phase angle between busbar and mains is below the angle configured above for at least the time configured here, the unit detects the connection between busbar and mains and indicates this with the message "Mains connected".
Discrete Input Configuration For mobile systems with AMF mode, the following function is required. Emergency OFF by Ter.68 OFF
Prevent an emergency power operation via terminal 68 ON/OFF
OFF.............. This terminal is used as an alarm input. ON................ This terminal is used as control input.
• High signal If this terminal utilizes a HIGH signal (energized), an emergency power operation is prevented or termi-nated. The unit operates as if "Emergency power" is disabled.
• Low signal If this terminal utilizes a LOW signal (de-energized), the setting of "Emergency power" is taken over.
SYNCON Configuration ≡≡≡≡≡≡≡≡≡≡≡≡≡≡≡≡≡≡≡≡≡≡≡≡≡
The following parameters are available in the SYNCON unit. Current probe 1mV/A
Current probe output voltage 1mV/A / 10mV/A
The output voltage of the current probe is configured here. The output voltage sig-nal must be an AC signal. Refer to Technical Data on page 26 for specifications.
Export power limitation =00kW
Export power limitation 0 to 99 kW
This parameter is utilized to detect a miswired current probe. Mains import power must be indicated negative. If the mains power is indicated positive and the value is higher than the value configured here, the message "reverse power" is displayed.
Synchron. Gen. df max = 0.00Hz
Maximum permissible differential frequency (positive slip) 0.02 to 0.49 Hz
If the positive slip is higher than the value configured here, the lamp and buzzer for the synchronization are not active.
Synchron. Gen. df min = -0.00Hz
Minimum permissible differential frequency (negative slip) -0.00 to 0.49 Hz
If the negative slip is higher than the value configured here, the lamp and buzzer for the synchronization are not active.
Synchronization dV max = 00V
Maximum permissible differential voltage 1 to 60 V
If the voltage difference between the two systems is higher than the value config-ured here, the lamp and buzzer for the synchronization are not active.
Synchron. Gen. phimax < 00°
Maximum permissible differential angle 0 to 15 °
If the phase angle between the two systems is below the value configured here for at least 1 second, the lamp and buzzer for the synchronization will indicate this.

Manual 37187A SYNCONpanel - Transportable Remote Synchronizing Panel
Chapter 7. Operation with the GCP-31/RPQ+SC08
Transfer Operation ≡≡≡≡≡≡≡≡≡≡≡≡≡≡≡≡≡≡≡≡≡≡≡≡≡
This mode is selected using the switch on the main control panel. The operating mode on the GCP-31/RPQ+SC08 may be freely selected or fixed to MANUAL operating mode (depends on the setting of the parameter "Interchange Mode in Manual", refer to Automatic Mode Configuration on page 22).
Synchronizing to the Mains and Loading the Generator Set Taking over a consumer load to the mobile system, which previously has been supplied by the mains. 1. Set up the mobile system near the place of power supply/network feeder. 2. Connect the mobile system to the consumer busbar. 3. Ensure that the phases L1, L2, and L3 are connected correctly and the phase rotation is correct. 4. Connect the SYNCONpanel to the container (mobile system) 5. Connect the voltage measuring cables and the clamp-on transducer. Check, whether the polarity of the
clamp-on transducer is correct (import power must be indicated negative). When using the clamp-on trans-ducer in the wrong way, a "reverse power" is indicated on the SYNCONpanel display.
6. Select the "Transfer operation" mode using the switch on the control panel of the container (mobile system).
The GCP is automatically switching to MANUAL mode (depends on the setting of the parameter "Inter-change Mode in Manual", refer to Automatic Mode Configuration on page 22). The MCB LED starts to flash.
7. Start the generator set by pressing the START button on the GCP. 8. After starting the engine successfully, the generator can be synchronized with the busbar by pressing the
"GCB ON" button on the GCP. With the feedback of a closed GCB, the "Ready" LED at the SYNCONpanel should light up, otherwise the SYNCONpanel is not in operation.
9. While the mobile system is operating in parallel with the mains, the load can be ramped from the mains to
the generator in several ways: - The set point buttons on the GCP - The discrete inputs at terminal 65 and 66 on the GCP - The frequency and voltage control switches of the SYNCONpanel - Automatically using the "Unload Mains" push button of the SYNCONpanel
NOTE The "Unload Mains" push button can only be used if the SYNCONpanel is measuring the current.
Measurements of Amps, kW, power factor, volts and frequency are indicated on the SYNCONpanel display.
Page 24/27 © Woodward

Manual 37187A SYNCONpanel - Transportable Remote Synchronizing Panel
10. When the load has been transferred from mains to the generator set, the connection to mains can be opened
manually at the interchange point. If the single phases have to be disconnected individually, the following sequence must be kept: L3 – L2 – L1.
11. Now the generator is running with load in an isolated operation, but with droop characteristic. To avoid this,
the "Isolated operation" mode can be select on the control panel of the container (mobile system). The GCP continues the isolated operation in "isochronous mode", so the frequency and the voltage is stable independ-ently from the load. The "MCB" LED extinguishes.
Now the mobile system is feeding the load independently.
Synchronizing the Consumer Load Back from Generator to Mains 1. If not already done, connect the SYNCONpanel with the container and use the flat bar clamps for voltage
measuring. The clamp-on transducer is not required, but if the connection with the mains is expected to take longer, it is recommended to use a clamp-on transducer here as well (the correct polarity must be observed).
2. Bus sensing should be performed locally. Only if there is no other possibility, the bus sensing may be per-
formed remotely. But this requires the correct connection of the Container at the busbar, phase rotation and phase angle must checked before.
NOTE If remote bus sensing is being used, the voltage across the fuse or breaker must be checked to ensure it is synchronous with the indication of the SYNCONpanel.
3. The operating mode of the mobile system must be set to "Transfer operation" at the container switch gear
board. 4. Start of the back synchronisation by pressing the "Start Synch" push button. The zero phase angle between
the two voltage systems, which adjust themself automatically, will be additional indicated by an acoustical (buzzer) and optical signal (lamp in push button). The phase angle between busbar and mains can be moni-tored generally by the LED band (synchronoscope). The range for being "in phase" is to be configured in the SYNCON unit.
5. The operator observes the remote panel and restores the connection to the mains if the phases are synchro-
nous. If the single phases have to be connected individually, the following sequence must be kept: L1 – L2 – L3. If a mains connection is detected by the GCP and the clamp-on transducer is connected to the mains for power measurement, it will be switched to mains unloading from the first connection with the mains. The "Synch Started" LED extinguishes and the "Unloading Mains" LED illuminates. Now, the other connections may be made while limiting the power flow between mains and busbar. If a mains connection is detected by the GCP and no clamp-on transducer is connected to the mains for power measurement, it will be switched to constant real power and reactive power measurement from the first connection with the mains. Now, the other connections may be made while limiting the power flow be-tween mains and busbar. Zero-phase control with clamp-on transducer is preferred for power measurement if the connection with the mains is expected to take longer.
6. After re-establishing the connection with the mains, the GCB may be opened via the remote panel. There-
fore, the generator active power will be unloaded before. The GCB will open as soon as the load on the gen-erator has dropped below a set value.
7. The Generator set can then be stopped by pressing the STOP push button on the GCP.
The set can now be disconnected
© Woodward Page 25/27

Manual 37187A SYNCONpanel - Transportable Remote Synchronizing Panel
Appendix A. Technical Data
Measuring values, voltages ---------------------------------------------------------------------------------- Busbar measuring input: front / back switchable Mains measuring input: front Front measuring inputs with internal fuse 5x20 mm 5 A slow-to-blow
Rated measuring voltage (Vrated) ................................................................................230 Vac Accuracy ......................................................................................................................Class 1 Linear measuring range ..........................................................................................1.3 × VratedMaximum power consumption per path .................................................................. < 0.15 W Input resistance ..............................................................................................approx. 0.7 MΩ
Measuring values, current -------------- via clamp-on transducer (1mV/1A ac or 10mV/1A ac) Voltage signal measuring input for current measurement: front
Rated measuring voltage (VmeasI) ...................................................................................1 Vac Accuracy ......................................................................................................................Class 1 Linear measuring range ..............................................................................................1.6 Vac Input resistance ............................................................................................approx. 0.21 MΩ
Measuring values, frequency -------------------------------------------------------------------------------- Rated measuring frequency (fN)................................................... 50/60 Hz (40.0 to 70.0 Hz)
Ambient variables --------------------------------------------------------------------------------------------- Power supply (Vaux) ............................................................................ 24 Vdc (18 to 32 Vdc) Intrinsic consumption ............................................................................................max. 12 W Ambient temperature ...........................................................................................-20 to 70 °C Ambient humidity .................................................................................95 %, not condensing
Emergency Stop output----------------------------------------------------------------------potential free Contact type ........................................................................................... N.O. (make-contact) Switching voltage ........................................................................................ max. 250 Vac/dc
Interface -----------------------------------------------------------------------------------------------isolated Insulation voltage....................................................................................................3,000 Vdc Version..........................................................................................................CAN bus (CAL)
Housing ----------------------------------------------------------------------- portable with hinged cover Type .....................................................................................................Peli 1300 Case Plastic Dimensions (W × H × D)............................................approx. 270 mm x 174 mm x 246 mm Front connector ................................................................ safety connectors 4 mm² (isolated) Back connector ........................................................................ Industrial connector, A series (Harting HAN-A, Type 0920 010 2612) Weight.............................................................................................................. approx. 3.3 kg
Protection ------------------------------------------------------------------------------------------------------- Protection system............................................................................................................IP 65
with closed cover and proper installation Protection system............................................................................................................IP 40
with open cover and proper installation EMV test (CE) ................................................. tested according to applicable EN guidelines
Page 26/27 © Woodward

We appreciate your comments about the content of our publications. Please send comments to: [email protected]
Please include the manual number from the front cover of this publication.
Woodward Governor Company Leonhard-Reglerbau GmbH
Handwerkstrasse 29 - 70565 Stuttgart - Germany Phone +49 (711) 789 54-0 • Fax +49 (711) 789 54-100
Homepage
http://www.woodward.com/power
Woodward has company-owned plants, subsidiaries, and branches, as well as authorized distributors and other authorized service and sales facilities throughout the world.
Complete address/phone/fax/e-mail information
for all locations is available on our website (www.woodward.com).
06/4/S


