HISTOLOGIC, Vol. XLIII, No. 1 1 Vol. XLIII, No. 1 June 2010 Managing Editor, Nancy Klemme Scientific Editor, Vinnie Della Speranza, MS, HTL(ASCP)HT, MT IN THIS ISSUE Treasures in Archived Histopathology Collections: Preserving the Past for Future Understanding 1 Forty Years Through a Microscope 8 Frozen Tissue Microarray for Morphological Evaluation of the Quality of Processed Luncheon Meat 14 A Source for the Heat Effect in GI Biopsies 18 Saffron — A Natural Dye of Uncommon Significance 22 Headband Binocular Magnifier for Embedding and Grossing 24 Mark Your Calendar 27 (NOAA) National Marine Fisheries Service, and other agencies and academic institutions. The RTLA is a specimen depository and information clearinghouse of cases submitted by researchers from around the world, providing slides of neoplasms 1,2 and related diseases among reptiles, amphibians, fish, sharks, mollusks, arthropods, echinoderms, and coral. These archived collections are valuable resources for scientists seeking to understand health and disease in diverse species (Fig. 1), for training new aquatic pathologists, predicting risks from biotic and abiotic stressors (eg, toxicant impacts on organisms in multiple locations), determining disease status through DNA extraction and analysis, supplying data for historical reconstructions (eg, when a virus first affected a host species), Fig. 1. Disseminated neoplasia of bivalves. (A) Soft-shell clam, Mya arenaria: abnormal cells completely replacing hemocytes, H&E, 250X; (B) Blue mussel, Mytilus edulis: replacement of hemocytes by abnormal cells, Giemsa, 250X; (C) Macoma baltica: abnormal cells in gill hemolymphs, H&E, 400X; (D) European flat oyster, Ostrea edulis: abnormal cells filling hemolymph sinuses, H&E, 250X. Abstract Extensive collections of histopathology materials from studies of marine and freshwater fish, mollusks, crustaceans, echinoderms, and other organisms are archived at the Registry of Tumors in Lower Animals (RTLA), the US Environmental Protection Agency (EPA), the National Oceanic and Atmospheric Administration Treasures in Archived Histopathology Collections: Preserving the Past for Future Understanding Doranne Borsay Horowitz, BS, HT(ASCP) 1 ; Esther C. Peters, PhD 2 ; Inke Sunila, PhD 3 ; Jeffrey C. Wolf, DVM 4 [email protected]1 US Environmental Protection Agency, Office of Research & Development, National Health & Environmental Effects Research Laboratory, Atlantic Ecology Division, Narragansett, RI 2 Department of Environmental Science and Policy, George Mason University, Fairfax, VA 3 State of Connecticut, Department of Agriculture, Bureau of Aquaculture, Milford, CT 4 Experimental Pathology Laboratories, Sterling, VA A C B D
Transcript
HISTOLOGIC, Vol. XLIII, No. 1 1
Vol. XLIII, No. 1 June 2010
Managing Editor, Nancy KlemmeScientific Editor, Vinnie Della Speranza,
MS, HTL(ASCP)HT, MT
IN THIS ISSUETreasures in Archived Histopathology
Collections: Preserving the Past for Future Understanding . . . . . . . . . . . . . . 1
Forty Years Through a Microscope . . . . . . . . . . . . . . . . . . . . . . 8
Frozen Tissue Microarray for Morphological Evaluation of the Quality of Processed Luncheon Meat . . . . . . . . . . . . . . . . . . . 14
A Source for the Heat Effect in GI Biopsies . . . . . . . . . . . . . . . . . . . . . 18
Saffron — A Natural Dye of Uncommon Significance . . . . . . . 22
Headband Binocular Magnifier for Embedding and Grossing . . . . 24
Mark Your Calendar . . . . . . . . . . . . . . . . 27
(NOAA) National Marine Fisheries Service, and other agencies and academic institutions. The RTLA is a specimen depository and information clearinghouse of cases submitted by researchers from around the world, providing slides of neoplasms1,2 and related diseases among reptiles, amphibians, fish, sharks, mollusks, arthropods, echinoderms, and coral. These archived collections are valuable resources for scientists seeking to understand health and disease in diverse species (Fig. 1), for training new aquatic pathologists, predicting risks from biotic and abiotic stressors (eg, toxicant impacts on organisms in multiple locations), determining disease status through DNA extraction and analysis, supplying data for historical reconstructions (eg, when a virus first affected a host species),
Fig. 1. Disseminated neoplasia of bivalves. (A) Soft-shell clam, Mya arenaria: abnormal cells completely replacing hemocytes, H&E, 250X; (B) Blue mussel, Mytilus edulis: replacement of hemocytes by abnormal cells, Giemsa, 250X; (C) Macoma baltica: abnormal cells in gill hemolymphs, H&E, 400X; (D) European flat oyster, Ostrea edulis: abnormal cells filling hemolymph sinuses, H&E, 250X.
Abstract
Extensive collections of histopathology materials from studies of marine and freshwater fish, mollusks, crustaceans, echinoderms, and other organisms are archived at the Registry of Tumors in Lower Animals (RTLA), the US Environmental Protection Agency (EPA), the National Oceanic and Atmospheric Administration
Treasures in Archived Histopathology Collections: Preserving the Past for Future Understanding Doranne Borsay Horowitz, BS, HT(ASCP)1; Esther C. Peters, PhD2; Inke Sunila, PhD3; Jeffrey C. Wolf, DVM4
1US Environmental Protection Agency, Office of Research & Development, National Health & Environmental Effects Research Laboratory, Atlantic Ecology Division, Narragansett, RI2Department of Environmental Science and Policy, George Mason University, Fairfax, VA3State of Connecticut, Department of Agriculture, Bureau of Aquaculture, Milford, CT4Experimental Pathology Laboratories, Sterling, VA
examining trends in parasite distribution and prevalence, and improving interpretation of host and parasite population fluctuations for modeling ecosystems. Applying new histological technologies to these archived materials opens a world of possibilities to be able to understand and predict the future health of these organisms.
Introduction
Recent advances in histology have enabled scientists and researchers to apply techniques developed for mammalian tissues to the wide variety of aquatic organisms. The preservation of these tissues has safeguarded important materials from archived collections housed across the world for future analysis. Due to budget cuts and funding issues, these collections are in danger of being lost. There must be support to maintain current collections and to allow for the processing of additional case materials. To ensure future availability of these irreplaceable resources, online databases with cross-linking records of materials for search and retrieval—as is being developed for the US EPA Atlantic Ecology Division collections—can provide access, but these collections need cross-agency support to improve their database capabilities, maintain slide collections, and provide hands-on examination and study. By applying new and developing scientific histotechniques, cutting-edge information can be obtained from material that is decades old. The uses for these archived collections are far reaching. We provide a few examples in this article: education and training, stressor identification training, improving toxicological evaluations, and research applications.
Education and Training
Environmental scientists often play the role of crime scene investigators, attempting to tease out the causes of ecosystem degradation (the criminals) by examining changes occurring in the diversity and health of the organisms living in a particular ecosystem (the victims). One of the most useful tools in this investigation is the study of cells, tissues, organs, and organ systems. Not just an indicator of diseases, microscopic anatomy provides a visual record and bridge between changes
occurring in cells and organisms as a result of exposure to physical, chemical, and biological stressors, and the impact those stressors have on populations, communities, and ecosystems.3 Pathologists learn in medical school to apply histotechniques to help solve human health issues, but scientists are not often trained in this field tohelp solve animal health and ecosystem condition issues.
Training scientists in the use of archived materials is available in a course developed by Dr. Esther Peters and offered by George Mason University, Department of Environmental Science and Policy. This advanced laboratory course introduces students to the basics of histology and how investigations of organism structure and function using light microscopy can help solve environmental problems. Graduate students learn how to interpret pathologies using case studies and slide sets loaned from various archived collections. These studies address current issues in environmental science– community diversity, population dynamics, toxicology, and global change, and provide students with beneficial training in animal health and applications to ongoing real-world issues.
Stressor Identification Training
Collections such as the RTLA also include detailed case histories and extensive reprint collections, which can facilitate research. Cases of adenocarcinoma in situ were detected in the 1980s during controlled laboratory exposures of eastern oysters, Crassostrea virginica, to diverse chemical contaminants from dredged materials collected during the Field Verification Program conducted jointly by the EPA and the US Army Corps of Engineers in Black Rock Harbor, Connecticut (Fig. 5A).4 Similar lesions, based on comparisons with archived tissue samples, were found in field-collected oysters from another site in Connecticut 10 to 20 years later, indicating suspect chemical contamination at the site (Fig. 5B). Because analytical chemistry protocols for some contaminants can be cumbersome and expensive, require extensive development and validation, or may be improved in resolution as equipment and protocols evolve in the future, frozen tissue banking (as practiced for marine mammals) along with the initial diagnostic analyses may lead to additional important discoveries in the future.
Found in pharmaceutical products and present in released effluents after waste treatment, endocrine disrupting chemicals (EDCs), such as the estrogens estradiol (E2) and ethinylestradiol (EE2), have been reported to affect fish reproduction. Two species of male fish, summer flounder (Paralichthys dentatus) and cunner
(Tautogolabrus adspersus), were exposed to EDCs in the laboratories of the EPA Atlantic Ecology Division and sampled for histopathology to evaluate the effects microscopically. Although spawning and producing motile sperm appeared normal, both species of treated fish revealed an accumulation of excessive hyaline material in liver, kidney, and testes, resulting in hepatocyte hypertrophy, disruption of spermatogenesis, and destruction of renal glomeruli (Fig. 6A, 6B). Modern immunochemical staining conducted on archived tissues for presence of vitellogenin (VtG), an egg yolk precursor protein expressed in female fish, was positive for VtG in the hyaline material and negative in control groups, confirming that the EDCs were inducing the male fish to produce excessive levels of VtG (Fig. 6C).5-7 These modern techniques make it possible to analyze archived fish tissues collected at impacted environmental sites and link abnormal findings to the effect of effluent waste.
A
B
C
Fig. 5. Adenocarcinoma in situ. (A) Eastern oyster, Crassostrea virginica, from 1985 EPA archive collection, H&E, 200X; (B) Eastern oyster, Crassostrea virginica, from 1997 State of Connecticut collection, H&E, 200X.
Fig. 6. Endocrine disrupting chemicals (EDCs) in the environment. (A) Male kidney cells stained with PAS-H from flounder exposed to estradiol (E2), 400X; (B) male kidney cells stained with H&E from cunner exposed to ethinyl estradiol (EE2), 200X; (C) male kidney cells stained with IHC VtG from flounder exposed to estradiol (E2), 400X. All slides from EPA collection.
Fig. 2. Microtome used in tissue preparation. Fig. 4. Specimen slides archived in a slide file cabinet.
Fig. 3. Hands-on training for students learning to use archived materials.
Fig. 9. Soft-shell clam, Mya arenaria, demonstrating branchial hyperplasia of the gills. (A) and (B) were collected recently in Connecticut; (C) and (D) were collected in 1976 from Searsport, Maine. All images: H&E, 100X.
Improving Toxicological Evaluations
Terrestrial and aquatic field and laboratory toxicity tests that identify potentially hazardous or carcinogenic chemical contaminants or biotoxins have traditionally used macroscopic measurable endpoints (eg, percent mortality over time, change in weight or scope for growth, and altered reproductive cycle or success) in conjunction with analytical chemistry to examine tissue uptake and detoxification. For those studies that have incorporated histopathological endpoints, microscopic changes in tissues often provide earlier evidence of subcellular and cellular toxicity. They can also improve understanding of molecular, proteomics, metabolomics, and immunological data in the search for biomarkers of exposure and effects. Archived collections of materials from histopathology studies can contribute to linking these data with the impact observed at the population, community, and ecosystem levels and tracking trends in contaminant dispersal or habitat recovery. Acceptance of toxicity test results is highly dependent on a high rate of survival or low level of observed effects in the control organisms. As part of a health condition screening or certification of test organisms, histopathological examinations ensure the quality of the test results and identify any confounding factors that might otherwise be missed. These tests can be quite cost-effective, considering the costs of generating toxicity test data and how subclinical diseases and parasitic infections might alter results.
Examples of the gross examination of healthy-looking test animals with hidden disease are illustrated in submissions to the RTLA in research zebrafish and polychaetes. Control zebrafish, Danio rerio, from research colonies and pet shop sources that were processed for routine histopathological screening yielded multiple lesions internally (Fig. 7), although these animals had a normal and healthy outward appearance.8
Polychaete worms, Neanthes arenaceodentata, are cultured for sediment toxicity tests, using young healthy-looking worms in the toxicity tests. Histopathology revealed a putative virus infecting the intestinal tract of both apparently healthy younger and abnormally appearing older diseased worms. The underlying virus, which is only evident in much older worms, leads to epithelial necrosis and sloughing, starvation, and bacterial infections of the coelom and cuticle.
Samples of younger healthy-looking (Fig. 8A) and older obviously diseased polychaete worms (Fig. 8B) were contributed by Dr. Donald Reish, Professor Emeritus, California State University, Long Beach, California. The abnormal melanization was the result of bacterial infections of the cuticle and internal melanized granuloma formation; the appearance of a tumor was actually protruding connective tissue from ulceration of the cuticle (Fig. 8C). Both groups of polychaetes had putative intranuclear viral inclusion bodies in intestinal epithelial cells with necrosis (Fig. 8D). This virus is not apparent in younger polychaetes without microscopic screening. Young normal-looking polychaetes were tested and discarded following 28-day exposure protocols, never reaching older ages where the outward signs of disease are more noticeable. Had this virus gone undetected in the younger animals and the diseased worms used in the sediment toxicity tests, the disease state of these test animals might have altered the results.
These cases are examples of the problems that could occur in toxicity studies where protocols are not in place for the retention of the test animals following exposures. The numbers generated from the toxicity test would not provide the answers to troubleshoot incorrect findings caused by the disease state of the original test animals.
Research Applications
We present two examples of how archived histopathologysamples can be used in research applications.
Are branchial lesions in archived soft-shell clams caused by the same virus? DNA could be the key to unlock this puzzle.
There are 47 cases of soft-shell clam, Mya arenaria, with branchial hyperplasia (Fig. 9) in the RTLA from the last 40 years submitted from Maine, Rhode Island, Maryland, and California. When compared to healthy clam gills (Fig. 10), the hyperplastic gills showed abnormal structure in the columnar epithelial layer and basophilic areas along the brush borders of the cells. Analysis under transmission electron microscopy (TEM) of lesions seen in clams collected from Connecticut revealed a herpesvirus (Fig. 11). By extracting and sequencing the viral DNA from paraffin blocks with modern scientific technology, researchers can use archived materials from the past to compare with lesions seen in present day to determine etiologies and trends.Fig. 7. Zebrafish, Danio rerio: multiple lesions identified in controls.
effects, to following the waves of disease for predicting future epidemics, the benefits are limitless. These resources can be invaluable for studying changes in the ecology, morphology, physiology, biochemistry, systematics, genetics, parasites, and diseases of species over long time periods. Identification of these irreplaceable resources and development of online databases with cross-linking records of materials for search and retrieval will be critical to future scientists.9 Dedicated efforts will keep them accessible for further examination using new and innovative technologies by inquiring minds.
References
1. Peters EC. Recent investigations on the disseminated sarcomas of marine bivalve mollusks. Am Fish Soc Spec Publ. 1988;18:74-92.
2. Galimany E, Sunila I. Several cases of disseminated neoplasia in mussels Mytilus edulis (L.) in western Long Island Sound. J Shellfish Res. 2008;27(5):1201-1207.
3. Yevich PP, Yevich CA. Use of histopathology in biomonitoring marine invertebrates. In: Kramer KJM, ed. Biomonitoring of Coastal Waters and Estuaries. Boca Raton, FL: CRC Press; 1994:179-204.
4. Gardner GR, Yevich PP, Harshbarger JC, Malcolm AR. Carcinogenicity of Black Rock Harbor sediment to the eastern oyster and trophic transfer of Black Rock Harbor carcinogens from the blue mussel to the winter flounder. Environ Health Perspect. 1991;90:53-66.
5. Folmar LC, Gardner GR, Schreibman MP, et al. Vitellogenin-induced pathology in male summer flounder (Paralichthys dentatus). Aquat Toxicol. 2001;51(4):431-441.
6. Mills LJ, Gutjahr-Gobell RE, Horowitz DB, Denslow ND, Chow MC, Zaroogian GE. Relationship between reproductive success and male plasma vitellogenin concentrations in cunner, Tautogolabrus adsperus. Environ Health Perspect. 2003;111(1):93-100.
7. Mills LJ, Chichester C. Review of evidence: are endocrine-disrupting chemicals in the aquatic environment impacting fish populations? Sci Total Environ. 2005;343(1-3):1-34.
8. Kent ML, Bishop-Stewart JK, Matthews JL, Spitsbergen JM. Diseases in zebrafish (Danio rerio) from research facilities: histological lesions. In: Proceedings of the 4th International Symposium on Aquatic Animal Health; September 2-6, 2002; New Orleans, LA.
9. Spitsbergen JM, Blazer VS, Bowser PR, et al. Finfish and aquatic invertebrate pathology resources for now and the future [published online ahead of print October 9, 2008]. Comp Biochem Physiol C Toxicol Pharmacol. 2009;149(2):249-257. doi:10.1016/j.cbpc.2008.10.002.
Bibliography
Fournie JW, Hawkins WE, Krol RM, Wolfe MJ. Preparation of whole small fish for histological evaluation. In: Ostrander GE, ed. Techniques in Aquatic Toxicology. Vol 1. Boca Raton, FL: CRC Press, Inc; 1996:577-587.
Horowitz DB, Peters EC, Price KL. Synopsis of histotechniques for aquatic animals. In: Callis G, Sterchi D, eds. Animal Processing Techniques Manual. Bowie, MD: National Society for Histotechnology: Veterinary, Industry, and Research Committee; 2002.
Fig. 12. Pacific white shrimp with tumor mass. From the RTLA collection (#7622).
Sometimes once is not enough.
That’s why Sakura features the HistoLogic® Archives on its web site at www.sakuraus.com. Whether you want to review recent advances or decades-old innovations in histology, you can find ample material in our archives.
The HistoLogic® Archives enables users to access articles from past HistoLogic® issues dating back to 1971. Just type in a keyword in our archive search engine or look up an article by subject category. It’s that simple.
The HistoLogic® Archives. Another resource that demonstrates Sakura dedication to histology.
Access HistoLogic® Archives
Could the diagnosis of epidermal papilloma in cultured shrimp using today’s technologies answer early unsolved mysteries?
Dr. Ken Hasson, Texas Veterinary Diagnostic Laboratory, received this unusual specimen that was found in a culture pond and ultimately contributed to the RTLA in June 2005. The bisected Pacific white shrimp, Litopenaeus vannamei, had a hemispherical firm white mass attached by a narrow stalk to the dorsal surface between the fourth and fifth abdominal segments (Fig. 12). The mass had multiple cysts on the cut surface. The H&E-stained tissue section showed abnormal epidermis and cuticle development (Fig. 13), abundant mitotic figures in some areas, and extensive hemolymph-filled stroma in the interior of the mass. This contribution proved valuable in confirming the neoplastic status of two Farfantepenaeus spsubmissions to the RTLA in the 1970s. All of these shrimp lesions were diagnosed as epidermal papillomas. Archived cases such as these are invaluable in providing the materials needed to diagnose tumors and other disease states.
Summary
Tissues have been preserved and processed into stained sections for histopathological examination for more than 150 years. Archived collections of tissues from diverse organisms exist around the world. These collections are not only in natural history museums and tissue registries developed for specific study purposes, but also in universities, state agencies, public and private research laboratories, and even in individual researchers’ basements. With shrinking research monies and the increased need to make every dollar count, the potential benefit of using new and unique technologies on archived tissues is enormous. From gleaning more scientific information on test organisms and understanding sublethal
Fig. 10. Gills from healthy soft-shell clam, H&E, 100X.
Fig. 11. Herpesvirus detected in soft-shell clam gills using transmission electron microscopy (TEM).
Fig. 13. Epidermal papilloma from pacific white shrimp shown in Fig. 11. H&E, 25X.
Where We’ve Been, Where We Are, and Where We’re GoingJames H. Nicholson Research Image Core FacilityDepartment of Pathology and Laboratory MedicineMedical University of South CarolinaCharleston, SC
“Human beings, who are almost unique in having the ability to learn from the experience of others, are also remarkable for their apparent disinclination to do so.” — Douglas Adams
It is a truism that the most difficult part of writing anything, be it an article, book, play, or poem, is deciding exactly where to start. I decided to trust the excellent advice of the King to the White Rabbit in Lewis Carroll’s Adventures in Wonderland: “Begin at the beginning and go on till you come to the end: then stop.”
For me, the beginning of my adventures in the wonderland of microscopy was in 1968. Historically, it was a year of some violent and unhappy memories, but it was also the year when man first saw the Earth as a planet during the flight of Apollo 8. I was out of college and fair game for the draft board, so I was looking for a job just to tide me over until the letter came. I found an opening in the Department of Pathology photo lab at Duke University, taking pictures through a gigantic Zeiss Ultraphot II. It was a microscope so large, it came with a built-in desk, and had both 35mm and 4" x 5" film cameras. If you’re too young to remember film, just look up ‘‘photographic film” on Wikipedia—you’ll be amazed.
At the time, I gave choosing a job no more thought than buying underwear, assuming I would be drafted into the Army in a month or so. As it happened, the draft board, perhaps wisely, decided they could settle things in Vietnam without my help, so I have been in the microscopy business ever since. This is called career planning.
The Ultraphot II was state of the art in 1968, so I Googled for images to illustrate this fine instrument. Remarkably, the first picture I found was not just that type of microscope; it was the very microscope I had used (Fig. 1). It was donated to the Duke University Library Museum in 2008. That’s a geriatric slap in the face for you.
Except for a gradual shift to 35mm from larger formats, not much changed until about 1994. It’s hard to pick a date for the birth of the digital age, but 1994 was the year we bought our first digital camera. It was a Kodak DCS420, and for a mere $10,000, you got a whole 1.5 megapixel image. Your cell phone camera is almost certainly better; if not, take it back. The DCS420 turned out to be almost useless for microscopy, but it was a beginning. Summing up—for 26 of my 40 years, nothing really happened. Then all hell broke loose.
The Digital Age BeginsHaving never particularly cared for darkrooms and stinky chemicals, I jumped ship at the earliest opportunity. I did look forward to the upcoming image wars with digital disciples shooting it out with film fanatics in all the photo journals. It never really happened. Digital just really wasn’t a serious contender for professional imaging. Then, in 1999, Nikon released the D1, and the war was over. Digital was suddenly good enough for pros, and it was getting better fast. Film had not made any big advances since the introduction of Kodachrome slide film in 1935. Game, set, and match. Digital was here to stay, after only 31 of my 40 years. I almost missedthe whole thing, but I’m glad I didn’t.
Microscopy TodayNow digital microscope cameras of excellent quality and variety are available from all major microscope manufacturers and some excellent independent camera makers. Unlike objectives, cameras are almost always interchangeable with the proper adapter. There are fewer different kinds of sensors made than there are cameras. Many cameras are almost identical except for the housing and the name. Software, however, varies widely. Be sure to check out new software thoroughly on your computer. Microscope camera manufacturers are notoriously slow at writing new drivers, so if you’re the type who always has the latest operating system, or you use a minority system such as Linux, expect frustration. That said, Windows 7 drivers are coming out unusually fast, as quite a few companies skipped Vista and have gone directly from XP to 7.
What should we expect in a good clinical microscope camera today?
1. It should have between 2 and 4 megapixels, because the inherent resolution of the microscope will be the limiting factor, not the camera. Only someone doing a lot of very low power work, such as a dermatopathologist, will gain any benefit from higher resolution cameras.
2. The camera should use a standard USB 2.0 or FireWire interface (Fig. 3). FireWire is more often used on the higher performance cameras. USB 2.0 offers similar capability, and is standard on all computers. Thank goodness, the age of special proprietary cards is over.
3. The camera should offer real-time or near real-time frame rates.
4. The software, at a minimum, should offer simple and rapid methods to both correct and store images; it should also address color balancing and background subtraction to remove uneven illumination. Focus assistance is helpful, especially for low power.
5. After extensive experience in a multiuser environment, I have found it very useful to have software that operates at two levels. One version is highly automated and simple to operate even for the casual or one-time user. The other version offers full control for those who need or prefer it.
Digital microscope cameras are loaded with capabilities that far exceed what film cameras could only hope to deliver, but they are not inexpensive. A good bright field camera will cost between $1,700 and $6,000 depending on the features selected. Therefore, we should ask ourselves if we are getting our money’s worth.
Fig. 1. The author’s first microscope, a Zeiss Ultraphot II (1968-1974). Now in a museum. (Property of Duke University Medical Center Library, History of Medicine Collections.)
Fig. 2. The Zeiss Axiomat was arguably the greatest film photomicrography system ever made. On the left is the author, with beard, and his entire staff in 1973 when the instrument was acquired. It was one of only 10 in the US. On the right is the author, with beard, and his entire digital age staff in 2003, when the Axiomat was finally retired after 30 years of service. (Photo courtesy of the author.)
Fig. 3. The SPOT Insight 1820, a popular workhorse 2MP FireWire camera (Diagnostic Imaging).
Based on many conversations and an informal survey, I asked some questions of both sellers and consumers of digital microscope cameras.
Do you believe you take full advantage of the camera’s capabilities, including flat field correction and white balancing?
Of microscopists who were asked, 65% felt that they did make full use of the camera’s technology. Of vendors asked the same question about their customers, there was a wide range of responses, from a high of 75% to a low of 1%, with an average of about 40%. Several vendors commented that they attempted to offer training, but found little interest on the part of their customers.
I decided to look at the evidence presented as published images in peer-reviewed journals. I chose the Archives of Dermatology (American Medical Association) because it uses a variety of clinical and microscopic images. I am frequently sent articles to review for pictorial quality, and I use my own system of scoring image quality: good; marginal (accept if the rest of the article is ready to publish and the images aren’t critical); and unacceptable (inexcusably poor quality, or images that may be misleading).
I reviewed 6 recent issues of the Archives of Dermatology and rated all of the images.
I found it surprising that the clinical images actually scored a bit higher (Table 1), despite the fact that they are often taken under less than ideal conditions, or are old images that cannot be reshot. Photomicrographs are usually taken specifically for the publication and, with a few exceptions, can be retaken if necessary.
I decided to compare today’s sophisticated digital product to yesteryear’s film-based pictures. Using the same scoring system, I reviewed images from 2 issues of the same journal 20 years apart (Table 2).
The capabilities of modern cameras don’t seem to have produced improved images overall. What kinds of defects most often relegated an image to be scored as marginal or unacceptable? For the most part, the same kinds of things as 20 years ago. It’s just harder to excuse them now.
The image in Figure 4A illustrates the high-quality photomicrograph your equipment should be able to produce—and almost certainly can. A high-dry image of a nicely
contrasting Masson trichrome stain is the photomicrography equivalent of a 2-inch putt.
Figure 4B illustrates the off-color backgrounds that are still appearing in publication and being presented at conferences. In the past, when using film, color shifts were often due to variations in the chemicals used at the photo processing lab. All you could do was reshoot the image and find a more reliable processing lab.
Today, all camera software allows for perfect color correction, and all photo processing programs can correct it. How hard can it be? A white reference is all that’s required to balance color. HINT: the clear area between cells is blank glass—it should be white. Click there and the color will be properly adjusted. Leave the lamp voltage alone and it will stay perfect. There is no excuse for publishing or presenting photos with a blue or yellow background (Fig. 4B).
Figure 4C illustrates a problem that is often mistaken for pixelization and incorrectly blamed on the camera. The dense, refractile appearance is the result of improper microscope technique. It can be caused by several different misadjustments, but the underlying cause is the failure to use proper Koehler illumination. Unfortunately, training in this simple yet essential technique seems to be on the decline. Perhaps it is time to consider other options, one of which will be discussed later.
One image problem is both indirectly caused by and easily corrected by digital camera software. With film, if a specimen was thin or weakly stained, there was no real remedy, at least for color pictures. At one time, I would routinely request thicker tissue sections for low power microscopy. Now, with programs like Photoshop, contrast is easily increased to any degree desired. Unfortunately, increasing specimen contrast also makes any unevenness in illumination more objectionable.
The solution is provided by a feature in the camera software called flat field or background correction. A blank field, with the specimen removed, is captured and stored. It is an exact record of the illumination including any flaws. When the image is captured, the background is digitally subtracted, resulting in completely even light. Then contrast can be raised without creating artifact (Fig. 5).
While it is apparent that sophisticated digital cameras and software do not guarantee great results, there are occasions when the equipment and software stretch the technology to its limits and create images of scientific value and extraordinary beauty. I strongly recommend that you visit Olympus Bioscapes at www.olympusbioscapes.com/gallery/2009/ and Nikon Small World at www.nikonsmallworld.com/gallery. There you will see what imaging technology is capable of in the hands of those who have mastered it.
Fig. 4. Common image problems seen in published articles. (A) An ideal photomicrograph, with good image detail and a clear background, Masson trichrome stain, 400X; (B) unacceptable images due to the off-color backgrounds that can be easily corrected with color correction software; (C) unacceptable image with refractile appearance due to improper microscope adjustments.
Fig. 5. Pancreas tissue stained with H&E, 40X. (A) Image without background correction; (B) with contrast enhanced; (C) same field with background correction; (D) after contrast enhancement. Notice the absence of dark areas in the background.
Do you think that more automated microscopes requiring less training are going to become prominent in the clinical area? This was the only survey question that got unanimous support.
So, are “black box” microscopes the wave of the future? Perhaps. Users seem to anticipate that they are, but they have been available for several years and the market penetration so far is slight. For the near term, they will be most useful for highly standardized protocols rather than for general use (Figs. 7, 8).
The ultimate answer may be a hybrid microscope that combines the automated features for image capture and processing but retains some optical capability.
Virtual MicroscopyThe black box microscope is the virtual microscope that will eventually replace the glass slide as the means of distributing material for review to the diagnostic staff. Laboratory managers tend to love this concept since it sometimes seems that the ultimate fate of a glass slide is to get lost in a clinician’s office so that recuts are required.
A few hospitals have already made the transition but others are waiting for faster scanning, greater slide capacity, and more clinical trials. For a midsized teaching hospital doing 600 to 1000 slides per day, current equipment would require multiple manual reloads or a large number of very expensive machines.
Most people think that this is a technology that will eventually change the way clinical diagnostic microscopy is done. Once again, the question is when. Obviously at a small minority of institutions, the answer is today. Everyone, both supplier and user, who responded to the question of when virtual slides would replace glass slides chose “10 years,” with a single exception who chose “never.”
The Integrated Imaging SuiteAlmost all institutions are using some type of centralized patient information system. The goal is to get all images, test results, physician’s notes, and all other relevant material into
a standardized form so that it is rapidly stored and accessible to everyone involved with the patient’s care. In pathology alone, that may involve several different types of images starting from when the specimen is first received at the grossing station. Depending on the nature of the case, this would theoretically include gross specimen images, stereoscopic images, and microscopic images. Having camera systems that are integrated by design to work together in a standardized interface can eliminate many potential problems. Companies such as Diagnostic Instruments (Sterling Heights, MI) have invested in developing comprehensive suites of instruments (Fig. 9).
Remaining true to Lewis Carroll’s words, this seems to be the end, at least for now, so I will stop. I would like to point out that opinions expressed are mine alone. Equipment shown in this article are examples only. They are not intended to imply any endorsement of a particular brand or model of instrument.
The Future of MicroscopyIn light of how fast things have changed in the world of photography, especially in more recent years, it would be challenging to try to predict where technology will take us next. In the area of research microscopy I wouldn’t even dare to try.
A Word About Research MicroscopyThe first papers on epifluorescence and confocal microscopy were published around the time I first entered the field. It was some time before most of us noticed, but a revolution had started that brought light microscopy out of mundane senescence and back to the leading edge of scientific investigation. Digital imaging and powerful computers were like pouring gasoline on the fire. A few years ago I attended a workshop that included 5-dimensional fluorescence microscopy. I suddenly had an epiphany that the journey that brought me to 5-D microscopy had started at a time when people were still impressed with being able to take a color photograph of a slide on a microscope, and 3-D applied mainly to viewing comic books with special red and green glasses. Needless to say, research imaging is well beyond the scope of this article, if only because I refuse to predict the future of things when I’m not entirely certain that I understand how they work now.
In the somewhat less esoteric world of clinical microscopy, I feel slightly more confident in looking down the road a bit. Here are some things I think are coming, even if it’s hard to know exactly when they will arrive in your lab.
LED Bright Field IlluminationTraining for optimal use of traditional microscope lighting seems to be hit or miss at best and probably getting worse. Perhaps the most promising alternative in the short term is light-emitting diodes (LEDs). They are cool, long lived, and highly energy efficient, and can even be designed to focus light without the need for external lenses. One outstanding feature is the constant color.
This future is already here. All of the major manufacturers have begun to offer this as an option on selected microscopes. They also have the technology under active development. The question now is how quickly and widely the LED light sources will be adopted. Given the apparent unwillingness of many users to deal with manually focusing traditional microscope illumination, I would bet heavily on the future of this technology.
Interchangeable LED Cubes for Fluorescence MicroscopyThe current generation of metal halide discharge lamps are an improvement over the older mercury vapor bulbs by offering longer bulb life and adjustable brightness. They are expensive and bulky and, like their predecessor, they emit potentially hazardous amounts of UV radiation whether or not they are in use.
LEDs are now available in a variety of wavelengths and offer a less expensive, more compact illumination source (Fig. 6). In a busy lab, LEDs also have an advantage because they don’t require any warm-up time or waiting period before the light can be turned back on. Most major manufacturers are developing or introducing LEDs for entry-level fluorescence systems. An independent manufacturer with worldwide distribution,
ThorLabs (Newton, NJ), has a four-channel LED system available in a variety of wavelengths and with adapters for all major microscopes.
A German company, Partec, has developed an innovative new fluorescence microscope. Because it is specifically designed to equip developing-world medical teams in the field, it is low cost, highly portable, and can even be battery powered. It has a USB camera system and LED bright field illumination. It features interchangeable LED cubes, which are custom tailored to specific diagnostic stains. This microscope, light source and all, weighs less than 8 pounds, compared to about 44 pounds for a typical laboratory microscope and metal halide lamp. Some of its features, including a “robust transportation box,” may not be required in the average clinical lab but I like the simplicity of design and fluorescence cubes, which are clearly identified. I think this scope may be pointing the way to a lower- cost, smaller-footprint fluorescence microscope for routine laboratory use, especially in smaller satellite labs.
I Object to No ObjectivesAstronomers stopped looking through telescope eyepieces decades ago. Many research microscopists use the eyepieces only for finding a field; instruments such as confocal microscopes display images that are actually created by a computer.
The question is when, or if, diagnostic users such as pathologists and cytologists will be comfortable making their diagnosis from a high-resolution monitor instead of through the oculars of a microscope. An informal survey among pathologists at my institution indicated that they anticipate making that transition, although some don’t feel the technology is quite there yet.
Fig. 7. Nikon Coolscope II.
Fig. 8. Olympus FSX100.
Fig. 9. Integrated Pathology Suite by Diagnostic Instruments.
Fig. 6. Lightweight, low-cost portable field fluorescent microscope with interchangeable LED cubes.
Frozen Tissue Microarray for Morphological Evaluation of the Quality of Processed Luncheon MeatSalah Deeb, PhD; Khalid El-Nesr, PhD; Emad Mahdi, PhD Department of Pathology Faculty of Veterinary Medicine University of Beni-Suef, Egypt
Frozen tissue microarrays were prepared from fresh unfixed samples of processed luncheon meat according to the technique described by Deeb et al.1 Stained cryostat sections were studied morphologically. Microscopic examination of these samples could easily and rapidly differentiate between meat and other ingredients, which helped facilitate in grading its nutritional composition.
Introduction
There is a growing concern among consumers regarding the safety and quality of food products. The nutritional importance of meat is derived from its content of muscle. Muscle is a very highly organized biological tissue with an intricate, complex structure, a unique composition, and very active biochemical capability. All of these characteristics carry over to the meat when further processed, which imparts specific and sometimes variable properties to the meat. The composition, anatomy, and histological properties are important in developing an understanding of the use of this tissue in processed meat products.
Meat is composed of bundles of muscular tissue surrounded by a thin sheath of connective tissue (perimysium). The muscles are usually attached to bones, cartilage, ligaments, or fascia; in all cases, that attachment is connective tissue. Skeletal muscles, as viewed microscopically, are composed of long cylindrical fibers, measuring, on average, 50 microns in diameter and an inch in length in mammals.
Knowing the composition of the meat itself is important in determining the composition of the final product after processing. Lean meat, by itself, is relatively constant in composition but whole meat cuts (including external fat, etc.) are highly variable. While the protein content of lean meat is approximately 20%, it can vary in processed meat products from 9% to 34%. Structurally, properties will vary considerably between different muscles on a particular carcass and will vary even within a particular muscle. Furthermore, variations due to an animal’s age, sex, and species are also observed.
Protein in muscles is categorized in three groups: myofibrillar, sarcoplasmic, and connective tissue protein. These protein groups have unique basic properties that affect processed meats differently. The myofibrillar proteins, also called contractile proteins, form the largest structure and bulk of muscle. Sarcoplasmic proteins are found inside the muscle cell. They are part of the fluid mass that bathes the myofibrillar proteins. Functionally, connective tissue proteins transmit the movement generated by contraction of the myofibrillar proteins to the skeleton of the body. Collagen is the major connective tissue protein in meat and is similar to the collagen found in skin, ligaments, and tendons. Collagen content varies between different muscles and can vary even within the same muscle. This protein group is an important component in processed meat products because cheaper lean meat sources tend to contain large amounts of connective tissue.
The fat component in muscle is also highly variable. As a result, the fat content in processed meats is the most variable component. Biochemical analysis of the fat and protein content in processed meat gives no proper criteria for the quality of meat with regard to the kind of tissue incorporated in its processing.
The tissue microarray procedure allows for analysis of a large number of samples at the same time. An array of cylindrical cores of fresh frozen or paraffin-embedded tissues are removed from previously prepared “donor” tissue specimens (blocks) and inserted into an array in a recipient block containing tissue cores from other specimens. By using this technique, multiple specimens can be inserted in one block, cut into thin sections, and mounted on glass slides that are then examined microscopically after staining with either routine hematoxylin and eosin (H&E) stain or specific stains. Once tissue microarrays are constructed, they can be used for a range of techniques including histochemical staining as well as immunohistochemical and immunofluorescent staining. In this study, microscopic examination of tissue microarrays allowed for a detailed assessment of the structure and composition of processed meat specimens.
Materials and Methods
Tissue microarrays from fresh processed meat were done according to our previously published method1 with slight modification. The technique was based on the use of coagulated egg albumin as a mold for the recipient block; cylinders of tissue cores from fresh processed meats were inserted in an array into the recipient block mold. A punching needle 2 mm in diameter produced suitable cylinders of tissue cores. Sections were affixed to the slides without any adhesive, according to the method described below.
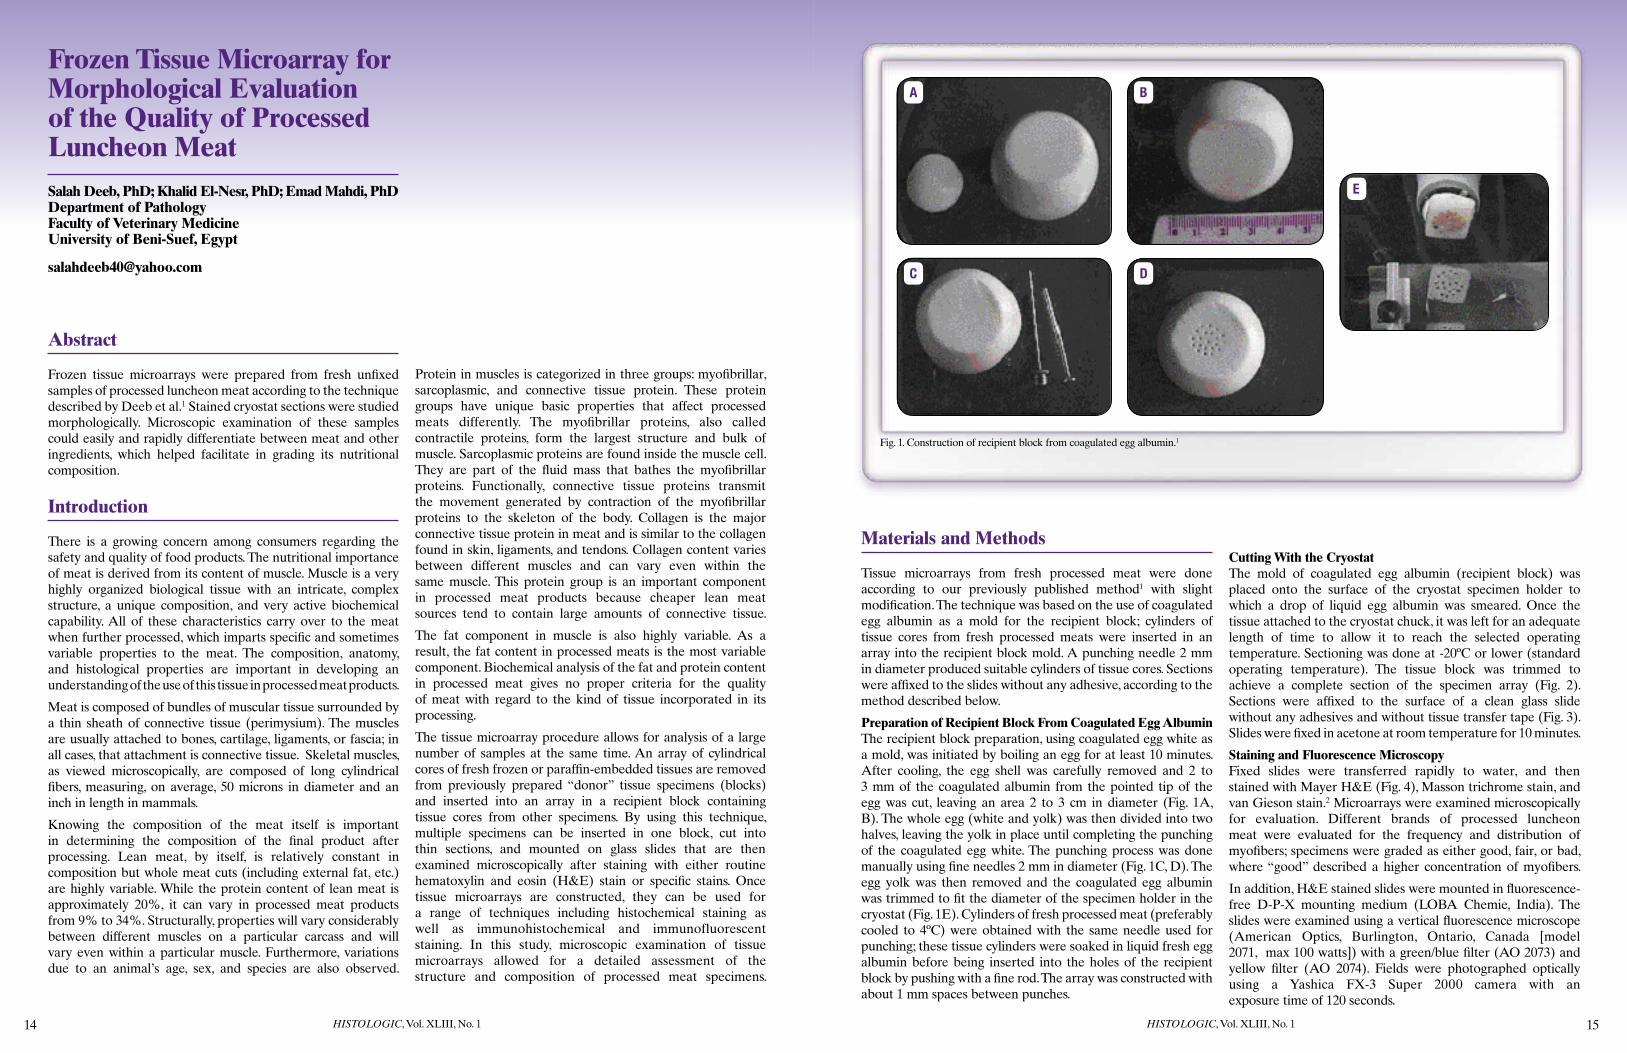
Preparation of Recipient Block From Coagulated Egg AlbuminThe recipient block preparation, using coagulated egg white as a mold, was initiated by boiling an egg for at least 10 minutes. After cooling, the egg shell was carefully removed and 2 to 3 mm of the coagulated albumin from the pointed tip of the egg was cut, leaving an area 2 to 3 cm in diameter (Fig. 1A, B). The whole egg (white and yolk) was then divided into two halves, leaving the yolk in place until completing the punching of the coagulated egg white. The punching process was done manually using fine needles 2 mm in diameter (Fig. 1C, D). The egg yolk was then removed and the coagulated egg albumin was trimmed to fit the diameter of the specimen holder in the cryostat (Fig. 1E). Cylinders of fresh processed meat (preferably cooled to 4ºC) were obtained with the same needle used for punching; these tissue cylinders were soaked in liquid fresh egg albumin before being inserted into the holes of the recipient block by pushing with a fine rod. The array was constructed with about 1 mm spaces between punches.
Cutting With the CryostatThe mold of coagulated egg albumin (recipient block) was placed onto the surface of the cryostat specimen holder to which a drop of liquid egg albumin was smeared. Once the tissue attached to the cryostat chuck, it was left for an adequate length of time to allow it to reach the selected operating temperature. Sectioning was done at -20ºC or lower (standard operating temperature). The tissue block was trimmed to achieve a complete section of the specimen array (Fig. 2). Sections were affixed to the surface of a clean glass slide without any adhesives and without tissue transfer tape (Fig. 3). Slides were fixed in acetone at room temperature for 10 minutes.
Staining and Fluorescence MicroscopyFixed slides were transferred rapidly to water, and then stained with Mayer H&E (Fig. 4), Masson trichrome stain, and van Gieson stain.2 Microarrays were examined microscopically for evaluation. Different brands of processed luncheon meat were evaluated for the frequency and distribution of myofibers; specimens were graded as either good, fair, or bad, where “good” described a higher concentration of myofibers.
In addition, H&E stained slides were mounted in fluorescence-free D-P-X mounting medium (LOBA Chemie, India). The slides were examined using a vertical fluorescence microscope (American Optics, Burlington, Ontario, Canada [model 2071, max 100 watts]) with a green/blue filter (AO 2073) and yellow filter (AO 2074). Fields were photographed optically using a Yashica FX-3 Super 2000 camera with an exposure time of 120 seconds.
Fig. 1. Construction of recipient block from coagulated egg albumin.1
StorageCut frozen sections were kept in slide boxes wrapped in airtight parafilm at -20ºC for long-term storage and at 4ºC for short-term storage (overnight). Original tissue blocks were stored at -20ºC after being removed from the specimen holder.
Results
Microscopic examination of processed luncheon meat revealed shreds of tissue having the structure of myofibers distributed among a lattice of eosinophilic connective tissue fibers (Figs. 5, 6). Individual myofibers were coagulated and homogeneously eosinophilic. Pyknotic basophilic staining characterized the nuclei. The ground substance consisted of PAS-positive granules, probably carbohydrate-like in nature. Staining with van Gieson stain and trichrome stain was unsuitable for this processed meat. Identification of collagen fibers could be confirmed through examination under UV light with the fluorescence microscope; collagen fibers impart a brilliant yellowish fluorescence (Fig. 7). This study confirmed that microscopic examination of processed luncheon meat can easily and rapidly differentiate between meat and other ingredients, which can be used to facilitate nutritional evaluation and grading.
Discussion
Several changes occur in animal muscle immediately following slaughter.3 Muscle remains functional for some time, but because there is no longer a circulating blood supply, oxygen is not conveyed to the muscle and metabolic end products are not removed. As a result, the muscle utilizes glycogen as an energy source for ATP and in the process generates and accumulates lactic acid. Ordinarily, with oxygen present, the energy sources are more completely broken down and excess lactic acid is removed via the blood. Without blood circulation, oxygen is unavailable for energy production and lactic acid is not removed from the muscle. The accumulation of lactic acid causes an increase in muscle acidity, from a near neutral pH of 6.8 to 7.2 to an acidic pH of approximately 5.6.3
Meat curing is used as a means of preserving processed meat. Today, cured meat products are generally mild-cured, which means they must be stored under refrigeration. A variety of compounds are used in curing meat, including starch and nonmeat protein (as soya protein). The term “soy protein” covers a range of products derived from the soybean. These products are classified as soy flours, soy protein concentrates, and isolated soy proteins. The protein content of soya protein varies from 50% in soya flour to 90% in isolated soya protein.
Evaluation of the quality of processed meat can be done using biochemical analysis of protein4-9; however, the specific source of this protein cannot be determined by these methods. Moreover, connective tissue of skin, fascia, tendons, or ligaments can be incorporated into processed meats. Prayson et al10 applied morphologic techniques (paraffin sections stained with H&E, oil red O, and electron microscopy) in the evaluation of hot dogs.
In the present work, we applied histologic techniques to evaluate fresh frozen specimens of processed luncheon meat by using tissue microarray preparations. These morphologic techniques, based on microscopic examination of processed meat, have the advantage of being able to determine the grade of meat depending on how much meat is incorporated during meat processing. Tissue microarray preparations of frozen specimens provide an inexpensive method by which results can be delivered within a short time frame and large numbers of samples can be tested.
References
1. Deeb S, El-Nesr K, El-Begawey M, Badii M. A simple manual method for preparing microarrays from fresh frozen tissue. Egypt J Comp Pathol Clin Pathol. 2004;17:262-266.
2. Bancroft JD, Stevens A. Theory and Practice of Histological Technique. New York, NY: Churchill-Livingstone; 1996.
3. Ingredients in Processed Meat Products: Basic Chemistry of Meat. Presented at the Montana Meat Processors Convention; April 27-29, 2001; Bozeman, MT.
4. Briskey EJ. Etiological status and associated studies of pale, soft, exudative porcine musculature. Adv Food Res. 1964;13:89-178.
6. Hamm R. Biochemistry of meat hydration. Adv Food Res. 1960;10:355-463.
7. Jay JJ. Modern Food Microbiology. 4th ed. New York, NY: Van Nostrand Reinhold/AVI Books; 1986.
8. Kierant BH, Johnson JA, Siedler AJ. A Summary of Nutrient Content of Meat. Washington, DC: American Meat Institute Foundation; 1964. Bulletin No. 47.
9. Newbold RP. Changes associated with rigor mortis. In: Briskey EJ, Cassens RG, Trautman JC, eds. The Physiology and Biochemistry of Muscle as Food. Madison, WI: University of Wisconsin Press; 1966:213-224.
10. Prayson B, McMahon JT, Prayson RA. Fast food hamburgers: what are we really eating? Ann Diagn Pathol. 2008;12(6):406-409.
Readers are invited to access http://www.sakura-americas.com/products/tisstek-quickray.html for online information about Tissue-Tek® Quick-RayTM, a microarray system that features a preformed paraffin recipient block.
Fig. 7. Fluorescence microscopy of a core of processed luncheon meat stained with H&E showing yellow autofluorescent collagen fibers, 200X.
Fig. 2. Macrophoto of a recipient block containing 9 cores of processed meat.
Fig. 3. Macrophoto of an H&E stained array mounted to a glass slide.
Fig. 4. Macrophoto of an H&E stained core of processed luncheon meat in cross-section.
Fig. 5. Microscopic appearance of a core of processed luncheon meat in cross-section stained with H&E; the area is filled mainly with fragmented collagen fibers, 100X.
Fig. 6. Microscopic appearance of a shred of myofiber (muscle fiber) stained with H&E, 400X.
Table 1: Sample guidelines for methods used in polyp removal
Polyp Size Suggested Surgical Device
1-3 mm Cold biopsy forceps
4-6 mm Either cold or RF method
7-9 mm Monopolar snares with RF energy
Table 2: Electrosurgical settings used for polyp removal during biopsy
Image Generator Power Mode Power Setting
Figure 4B None None None
Figure 5 ERBE Endocut™ 150 Watts
Figure 6 ForceTriad™ Fulgurate 30 Watts
Figure 7 ForceTriad Fulgurate 30 Watts
Figure 8 ForceTriad Fulgurate 30 Watts
Figure 9 ForceTriad Valleylab™ 30 Watts
Electrosurgical generators are designed to produce a variety of electrical waveforms. Tissue effect will correspond to whichever waveform or modality is chosen. Using a constant or cut waveform, the surgeon is able to vaporize or cut tissue by producing heat very rapidly. When using an intermittent or coag waveform, where the duty cycle (on time) is reduced, less heat is produced, resulting in a coagulum and, ultimately, hemostasis. The generator can also be set to blend (not mix), in which the duty cycle is modified to both cut tissue with a very rapid heat and then transition to less heat, resulting in hemostasis.
Monopolar electrosurgery is the most commonly used type of electrosurgery due to its versatility and clinical effectiveness. In monopolar surgery, the active electrode is secured within the instrument at the surgical site, which cuts or coagulates the tissue. In the present study, a monopolar snare functioned as the active electrode, which removed the desired tissue while also coagulating surrounding tissue to prevent bleeding. An electrical return pad was placed on the patient’s body, completing the circuit from the active electrode to the patient return electrode. Both of these items need to be in place before the system will work. Tissue desiccation occurs when the active electrode comes in contact with the desired tissue when current is applied.
Methods
Sessile polyps were artificially created by injecting 0.5 mL of saline between the mucosa and submucosa layers of the colon. GI biopsy tissue from excised canine bowel was removed using a Cook AcuSnare® (Cook Medical, Bloomington, IN), which was employed either with RF energy or without energy. RF energy was delivered from either the ForceTriad™ Generator (Covidien Energy-based Devices, Boulder, CO) or the ERBE ICC 200® Generator (ERBE, Atlanta, GA)(Table 2). The section surrounding the biopsy site was removed from the canine bowel, fixed in 10% neutral buffered formalin (NBF) for at least 24 hours, trimmed, processed using Pro-Soft Dehydrant and Pro-Par Clearant (Anatech Ltd., Battle Creek, MI), embedded in paraffin, sectioned at 4 μm, and stained with picro-sirius red (PSR).
The PSR staining method is based on the one that Kiernan describes in Histological and Histochemical Methods: Theory and Practice, with one exception6—2% acetic acid was used following PSR staining. In our experience, the addition of a stronger acetic acid prevents dye from being removed in the dehydrating solutions. Olympus microscope, camera, and MicroSuite™ software were used to photograph the pictures used in this study.7
A Source for the Heat Effect in GI BiopsiesJanet Maass, ME, HTL, CT, HT(ASCP); Jennifer Harper, MS; John Carlton, PhD; Jason Hampton, BS, HT(ASCP); Bruce Dunne, PhD Covidien, Energy-based Devices Boulder, CO
When heat effect is seen on a microscopic slide of gastrointestinal (GI) biopsy tissue, one needs to look beyond the tissue processor as being the cause of such an artifact. As professionals in histology, we rarely see firsthand how GI biopsies are collected. The method used for collection may affect how the biopsies look after processing and staining. Biopsy specimens can be collected using biopsy forceps or snares, either without energy (cold) or with radiofrequency (RF) energy that uses multiple modes of power from a generator. There are also different types of generators from many manufacturers, which may add additional variables. Regardless of the manufacturer, RF energy can be responsible for the heat effect result in biopsy tissue. This article demonstrates canine bowel tissue and how it looks after GI biopsy with and without RF energy.
Introduction
When physicians observe an abnormal region or a polyp during a colonoscopy, they can remove a sample or the entire tissue (GI biopsy) for microscopic examination in order to make a diagnosis. Some GI biopsy specimens may be difficult to section, appear desiccated under the microscope, or react unexpectedly to immunohistochemical stains. Often, the first reaction is that something went wrong during tissue processing, but the biopsy collection method might also need to be carefully considered as a possible source of artifacts. Innovative technology that may be beneficial to both the patient and the procedure can challenge the skills of laboratory personnel and pathologists. The use of RF energy in such procedures has become common practice. RF energy used during electrosurgery should not be confused with current microwave technologies that apply microwave energy to control the heat generated during tissue sample processing.1 Nor should electrosurgery that uses alternating current be confused with electrocautery that employs direct current (electrons flowing in one direction).2
Canine bowel is the preferred animal model for studying the human intestine.3,4 In this study, GI tissue was removed from excised canine bowel using either forceps or a snare (loop) (Fig. 1). This allowed for clearer views of the surrounding bowel tissue to better visualize and differentiate the underlying tissues from the biopsy site. Table 1 provides general guidelines for choosing which devices to use based on the size of the polyp to be excised.5
Radiofrequency Energy
In the surgical and endoscopy suites, electrosurgical generators are employed that utilize the same standard alternating electrical current found in our homes (Fig. 2). That current has a frequency of 60 cycles per second (Hz), which is converted by the generators into more than 100 kHz; this is within the wavelength range of radiofrequencies. Electrosurgical generators operate at frequencies greater than 200,000 Hz (200 kHz), as it is known that nerve and muscle stimulation ceases at 100,000 Hz (100 kHz). By operating at frequencies over 100 kHz, RF energy is safe for the patient as the energy will pass through the body with minimal neuromuscular stimulation as well as with no risk of electrocution.2
Fig. 2. Electrosurgery current relative to current generated from other sources.
1. Maass J, Coulson R. The effect of radiofrequency energy in tissue. HistoLogic. 2005;38(2):21-24.
2. Principles of electrosurgery: frequency spectrum. Covidien Web site. http://www.valleylab.com/education/poes/poes_04.html. Accessed April 13, 2010.
3. Tucker RD, Platz CE, Sievert CE, Vennes JA, Silvis SE. In vivo evaluation of monopolar versus bipolar electrosurgical polypectomy snares. Am J Gastroenterol. 1990;85(10):1386-1390.
4. Sievert CE Jr, Silvis SE. A canine model of gastric and colonic polyps. Gastrointest Endosc. 1981;27(1):12-16.
5. Singh N, Harrison M, Rex DK. A survey of colonoscopic polypectomy practices among clinical gastroenterologists. Gastrointest Endosc. 2004;60(3):414-418.
6. Kiernan JA. Histological and Histochemical Methods: Theory and Practice. Woburn, MA: Butterworth Heinemann; 1999:150.
7. MicroSuite Five Biological Edition Software With Olympus DP71 Digital Micro-imaging Camera [computer program]. Lakewood, CO: Olympus Soft Imaging Solutions; 2009.
Results
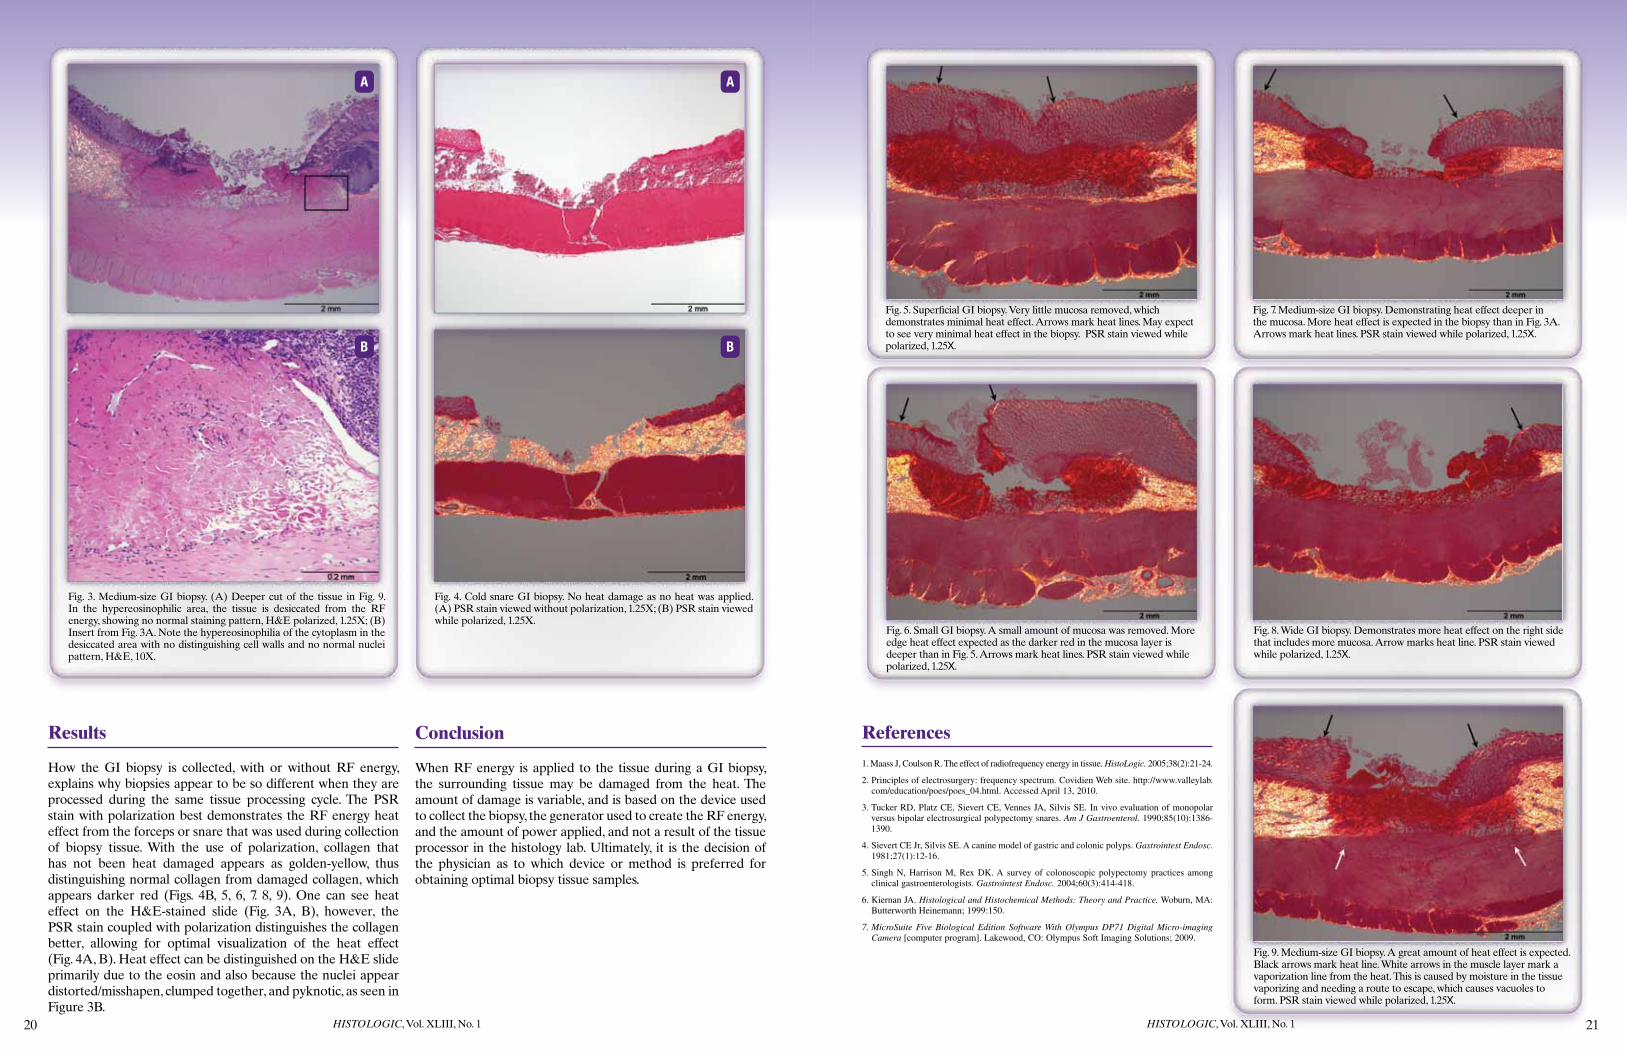
How the GI biopsy is collected, with or without RF energy, explains why biopsies appear to be so different when they are processed during the same tissue processing cycle. The PSR stain with polarization best demonstrates the RF energy heat effect from the forceps or snare that was used during collection of biopsy tissue. With the use of polarization, collagen that has not been heat damaged appears as golden-yellow, thus distinguishing normal collagen from damaged collagen, which appears darker red (Figs. 4B, 5, 6, 7. 8, 9). One can see heat effect on the H&E-stained slide (Fig. 3A, B), however, the PSR stain coupled with polarization distinguishes the collagen better, allowing for optimal visualization of the heat effect (Fig. 4A, B). Heat effect can be distinguished on the H&E slide primarily due to the eosin and also because the nuclei appear distorted/misshapen, clumped together, and pyknotic, as seen in Figure 3B.
Conclusion
When RF energy is applied to the tissue during a GI biopsy, the surrounding tissue may be damaged from the heat. The amount of damage is variable, and is based on the device used to collect the biopsy, the generator used to create the RF energy, and the amount of power applied, and not a result of the tissue processor in the histology lab. Ultimately, it is the decision of the physician as to which device or method is preferred for obtaining optimal biopsy tissue samples.
Fig. 3. Medium-size GI biopsy. (A) Deeper cut of the tissue in Fig. 9. In the hypereosinophilic area, the tissue is desiccated from the RF energy, showing no normal staining pattern, H&E polarized, 1.25X; (B) Insert from Fig. 3A. Note the hypereosinophilia of the cytoplasm in the desiccated area with no distinguishing cell walls and no normal nuclei pattern, H&E, 10X.
Fig. 4. Cold snare GI biopsy. No heat damage as no heat was applied. (A) PSR stain viewed without polarization, 1.25X; (B) PSR stain viewed while polarized, 1.25X.
Fig. 5. Superficial GI biopsy. Very little mucosa removed, which demonstrates minimal heat effect. Arrows mark heat lines. May expect to see very minimal heat effect in the biopsy. PSR stain viewed while polarized, 1.25X.
Fig. 7. Medium-size GI biopsy. Demonstrating heat effect deeper in the mucosa. More heat effect is expected in the biopsy than in Fig. 3A. Arrows mark heat lines. PSR stain viewed while polarized, 1.25X.
Fig. 6. Small GI biopsy. A small amount of mucosa was removed. More edge heat effect expected as the darker red in the mucosa layer is deeper than in Fig. 5. Arrows mark heat lines. PSR stain viewed while polarized, 1.25X.
Fig. 8. Wide GI biopsy. Demonstrates more heat effect on the right side that includes more mucosa. Arrow marks heat line. PSR stain viewed while polarized, 1.25X.
Fig. 9. Medium-size GI biopsy. A great amount of heat effect is expected. Black arrows mark heat line. White arrows in the muscle layer mark a vaporization line from the heat. This is caused by moisture in the tissue vaporizing and needing a route to escape, which causes vacuoles to form. PSR stain viewed while polarized, 1.25X.
Perhaps best known as a spice enjoyed by millions of people worldwide, saffron forms part of the culinary culture in different regions around the world. Saffron is used in such well-known dishes as saffron rice and paella from Spain and risotto from northern Italy. Indian saffron is an indispensable ingredient in many recipes of rice, sweets, and ice cream, while an authentic Arabic coffee in Saudi Arabia must have saffron and cardamom.1
In histology, our interest in saffron is due to its properties as a dye. The earliest dyes were of natural origin, obtained by extraction from plants. Saffron is a natural dye that comes from the saffron flower, Crocus sativus, specifically from the flower’s golden-colored, pungent stigmas.2 The color of saffron dye is a beautiful orange yellow, which is attributed to the main chromophore, crocin 60.3 Today, saffron is primarily grown in Spain and Iran, but is also grown in other countries around the world.2
The earliest recorded use of saffron is credited to the ancient Egyptian and Roman civilizations, where it was used as a textile dye.3 It was also used in perfumes and served medicinal as well as culinary purposes.2 There are reports that saffron-dyed fabrics were found in the tomb of Tutankhamun. Saffron is still used in textile dyeing today. There have been several studies to investigate its dyeing properties. In a study comparing the staining properties of two yellow dyes, one being saffron, it was determined that pretreatment of the fabrics with enzyme results in improvement in pigment adsorption of crocin, the main chromophore of saffron, on cotton and wool.4 In another study comparing the staining quality of saffron on cotton and wool, enzymatic pretreatment of the wool samples not only improved dyeing quality, but also prevented shrinkage of the fabric.5
Saffron has not only been beneficial in the textile industry, but has also made significant contributions to medicine. Saffron, commonly used in many folk remedies, was considered a treatment for scarlet fever, smallpox, colds, asthma, eye and heart diseases, and cancer.2 Today, the advantages of saffron in medicine are still of interest. In one study, saffron extracts were found to reduce the blood pressure of anesthetized rats.2 In traditional Iranian medicine, saffron was used as an anticonvulsant remedy, and more recently has been further evaluated for use with absence and tonic-clonic seizures. Studies have shown that saffron also acts as an antioxidant and an anti-inflammatory agent.2 Legend has it that Alexander the Great used saffron in bath water, believing in its healing properties so much that he made it available to his men.
Some modern studies have focused on the anticancer properties of saffron. One investigation demonstrated that topical administration of saffron extracts on mice with skin tumors delayed the onset of papilloma formation and reduced the overall number of papillomas per mouse.2 Taken orally, saffron extracts restricted tumor incidence in mice with soft tissue sarcomas. Overall, extracts from saffron stigmas prolonged the life span of mice with cancer and prevented a decrease in body weight, leukocyte count, and hemoglobin levels.2 Recently, an animal model used frog embryos to show that crocetin, isolated from saffron, was effective in treating certain types of cancers treatable with all-trans retinoic acids (ATRA). From this study, crocetin was suggested to be a safer option for women of childbearing age with ATRA-sensitive cancers.2
In histotechnique, saffron is used as a stain for connective tissue. It is most often used in the hematoxylin-phloxine-saffron (HPS) staining technique. Hematoxylin stains acidic structures, such as DNA, purple; phloxine stains most proteins pink; saffron stains collagen yellow.6 Eosin can substitute for
phloxine in the hematoxylin-eosin-saffron (HES) stain, which will highlight the nuclei, cytoplasm, and collagen, respectively. The HES stain is routinely used in dermatopathology.7
The HPS stain was part of Masson’s trichrome staining techniques that he presented in Chicago, Illinois, at the International Association of Medical Museums meeting in 1929. Trichrome staining procedures, such as HPS, were first introduced in French publications and were practically unknown in America before 1929. American scientists feared that trichrome staining would be more complicated to perform than traditional dichrome methods. While trichrome staining requires more attention, the time and effort put into the staining is worthwhile because the results obtained are far superior to those obtained from dichrome staining. Masson determined that the addition of saffron in the H&E technique required a modification in the dehydration step after staining. Weaker concentrations of alcohol will extract saffron, so absolute alcohol must be used in HES and HPS staining. Rapid dehydration is also required for good saffron staining; if the specimen is exposed to water after the addition of saffron, the results will be undesirable.8
In a study published by Cribier and Grosshans in 1995, an HES stain incorporating a fourth dye, astra blue, was performed on 56,000 cutaneous samples. With this method, mucin stained a bright blue with the astra blue, while nuclei stained navy blue from the hematoxylin, cytoplasm stained pink from the eosin, and collagen stained yellow from the saffron. The addition of astra blue also enhanced the contrast of the different dyes and did not modify the other colors. 7
Saffron is sometimes used in the Movat pentachrome stain, where it also stains for connective tissue; elastin stains black and collagen stains yellow. However, saffron is an expensive dye and is sometimes substituted by other yellow dyes, such as Martius yellow and Victoria yellow, to offset the costs and to gain a similar staining effect.9 Once claimed to be “worth its weight in gold,” the cultivation and harvesting of the crocus flower must be done by hand. One kilogram of crocus stigmas requires the harvesting of 85,000 flower blooms. After processing, this will yield about 200 grams of saffron dye.1
Saffron’s fluorescence properties are generally not well known but have been thoroughly researched. In one study, the reaction between saffron and eosinophil leukocyte granules was investigated. Peripheral air-dried smears of horse blood were fixed with methanol and stained with the supernatant of a saturated solution of saffron in borate buffer pH 10. Under violet-blue excitation light, the blood smears revealed bright yellow-green fluorescence of eosinophils in horses and of heterophils in chickens. The chemical structure of saffron shows that fluorescence is not an unexpected result. Saffron, a neutral ester, should be unable to experience ionic binding; however, saffron is hydrolyzed when the borate buffer pH 10 is added. Crocetin, the hydrolyzed derivative of saffron, functions as an anionic dye, which can stain eosinophil granules that are acidophilic proteins.10
Saffron has enjoyed a rich history yet is best known today for its culinary applications. Historically, it has had numerous applications in medicine as well as in the laboratory. However, it is unfortunate that its cost may have discouraged a generation of histologists from working with what is a most interesting dye, leaving many of its unique properties still unknown.
References
1. The saffron. http://www.saffron-spain.com/ingles/azafran.html. Accessed April 27, 2010.
2. Abdullaev FI, Espinosa-Aguirre JJ. Biomedical properties of saffron and its potential use in cancer therapy and chemoprevention trials. Cancer Detect Prev. 2004:28(6):426-432.
3. Ferreira ESB, Hulme AN, McNab H, Quye A. The natural constituents of historical textile dyes. Chem Soc Rev. 2004;33(6):329-336.
4. Tsatsaroni E, Liakopoulou-Kyriakides M, Eleftheriadis I. Comparative study of dyeing properties of two yellow natural pigments: effects of enzymes and proteins. Dyes Pigments. 1998;37(4):307-315.
5. Liakopoulou-Kyriakides M, Tsatsaroni E, Laderos P, Georgiadou K. Dyeing of cotton and wool fibres with pigments from Crocus sativus: effect of enzymatic treatment. Dyes Pigments. 1998;36(3):215-221.
6. Saffron. Polysciences, Inc. Web site. http://www.polysciences.com/Catalog/ Department/Product/98/Search_Saffron/productld_2836/categoryld_200/. Accessed April 27, 2010.
7. Cribier B, Grosshans E. Quadri-chromic staining in routine cutaneous histopathology (hematoxylin, eosin, saffron and astra blue) [in French]. Ann Dermatol Venereol. 1995;122(11-12):758-763.
8. Foot NC. The Masson trichrome staining methods in routine laboratory use. Biotech Histochem. 1933;8(3):101-110.
9. Parascandola J. Dinitrophenol and bioenergetics: a historical perspective. Mol Cell Biochem. 1974;5(1-2):69-77.
10. Trigoso CI, Stockert JC. Fluorescence of the natural dye saffron: selective reaction with eosinophil leucocyte granules. Histochem Cell Biol. 1995;104(1):75-77.
Fig. 1. Saffron crocus flowers, Crocus sativus.
Fig. 2. Dermis of human skin. The structure in the center of the image is an arteriole that nicely demonstrates smooth muscle (pink) and collagen (yellow) staining, HPS, 100X.
Fig. 3. Saffron threads (red-colored stigmas) mixed with styles (yellow) from Iran.
Binocular magnifiers are not adequate for identifying glomeruli in renal biopsy specimens, nor for examining small intestine biopsy specimens from patients being evaluated for celiac disease. One really needs a stereo microscope (dissecting microscope) for that but, at $1,000 or more, such microscopes are beyond the reach of most small pathology services.
Dr. Richmond has no commercial affiliation with any of the businesses mentioned in this article.
Photos used with permission of Donegan Optical Company Inc.
Headband Binocular Magnifier for Embedding and GrossingRobert Richmond, MD Locum Tenens Pathologist
Two inescapable facts about gross pathology have become apparent: specimens are getting smaller, and my eyes are getting older. Embedding and gross examination of small tissue specimens become more visually difficult tasks as our eyes get older (I’m 71) and lose accommodation (the ability to focus the eye at near and far distance is pretty well lost by the age of 45).
For several years now I’ve used a headband binocular magnifier when I gross surgical specimens. Two positive sphere lenses are mounted in a binocular arrangement and hinged on a rigid plastic headband (Fig. 1). The lenses can be pivoted into place when needed (Fig. 2), and raised out of the way when not needed (Fig. 3).
I use what is probably the best known of these magnifiers, the OptiVISOR®, made by Donegan Optical Company (Lenexa, KS). Competing products I’m aware of include the Bausch & Lomb Magna Visor (San Dimas, CA) and the ElectroOptix Visor Binocular Headband Magnifier (Pompano Beach, FL), neither of which I’ve seen or used. Donegan doesn’t retail, but numerous vendors sell these products, including Amazon.com. The OptiVISOR is probably best known to hobbyists—I got mine at a gem and mineral show. The manufacturer does not promote the OptiVISOR as a medical device; however, it is used by healthcare professionals in various settings.
The OptiVISOR costs about $40, including the lenses. Additional lenses can be purchased separately. The lenses are made of high-quality Crown glass (apparently there are cheap plastic lens imitations, which should be avoided). A wide range of lens strengths is available. The 3 and 4 diopter lenses are probably optimal for use in pathology. I have both of them. Although the device is quite rugged, one will want to take care to avoid scratching the lenses. According to a Donegan representative, the OptiVISOR is the only brand offering ground glass lenses, which can be worn for extended periods of time without eyestrain or headache. Donegan also offers the OptiVISOR LX with acrylic (plastic) lenses, which is different from the model discussed above.
The OptiVISOR can be worn over ordinary eyeglasses, an important consideration for me since I’m quite nearsighted. It can also be worn over some safety glasses. A useful accessory is a clamp-on xenon light with a battery pack that clips onto the headband. Two AA batteries provide about 5 hours of light.
I find the binocular magnifier extremely useful for reading scrawled container labels, and for identifying, counting, and cassetting small biopsy specimens. It greatly facilitates searching for lymph nodes, particularly the small lymph nodes found by using disclosing fixatives. It’s helpful for accurately orienting and describing small skin lesion excision specimens. Orienting, inking, and cutting frozen sections of skin cancer excision specimens are much easier when you can see what you’re doing. The skin surgeon, who is likely to be using a powerful (and expensive) OR microscope, is often surprised to learn that pathologists usually work without magnification.
I’ve met only one histology embedder, a woman of about 60, who uses binocular magnification. Any pathologist knows that loss of small biopsy specimens in the embedding process is extremely frequent, and I would certainly want to require binocular magnification (and the use of a work sheet) when embedding small biopsy specimens. Trusted InnovationTM
Quick-Start.Quick-Punch.Quick-Ray.TM
Generate superior quality TMAs in a fraction of the time than with traditional methods.• Preformed ready-to-use paraffin recipient blocks• Multiple samples on one slide
For more information, please visit our website at www.sakuraus.com.
Automation that enhances patients’ lives and yours
Tissue-Tek® Prisma®/ Film® Automated Slide Stainer and Coverslipper
Faster results leave lasting impressionsDelivering quality results in record time means patients get answers sooner and physicians can expedite the initiation of their treatment and recovery.
Faster results also benefit your lab. You can streamline the workload and enjoy more personal time outside the lab.
It’s more of what patients desire and what you’ve come to expect from Tissue-Tek®, the most trusted name in histology automation.
✔ Mark Your Calendar!Educational Opportunities in 2010
4-6 Region VII Meeting Site: Phoenix, AZ Contact: Andrea Grantham Email: [email protected] 10-12 Region II Meeting Site: Atlantic City, NJ Contact: Carole Barone Email: [email protected] 18 University of Texas Health Sciences Ctr/San Antonio Teleconference 12:00 pm Central Time (800) 982-8868 Title: Competency and Process Improvement in Paraffin Embedding Speaker: Joelle Weaver, BA, HTL(ASCP) Columbus State Community College Columbus, OH 23 NSH Teleconference 1:00 pm Eastern Time Title: Basics of FISH/CISH for the Histotech Speaker: Traci DeGeer, HTL(ASCP)HT, QIHC Ventana Medical Systems Tucson, AZ Phone: (443) 535-4060 Email: [email protected]
16 University of Texas Health Sciences Ctr/San Antonio Teleconference 12:00 pm Central Time (800) 982-8868 Title: Hematoxylin and Eosin: The Most Common Special Stain Speaker: Elizabeth Sheppard, MBA, HT(ASCP) Ventana Medical Systems, Inc. Tucson, AZ 28 NSH Teleconference 1:00 pm Eastern Time Title: Job Assessment Including Best Practices for the Histology Laboratory Speaker: Jason D. Burrill, HT(ASCP)SLS Charles River Laboratories Wilmington, MA Phone: (443) 535-4060 Email: [email protected]
20 University of Texas Health Sciences Ctr/San Antonio Teleconference 12:00 pm Central Time (800) 982-8868 Title: Innovations in Histology Speaker: Azorides R. Morales, MD Department of Pathology University of Miami Miller School of Medicine Miami, FL 25 NSH Teleconference 1:00 pm Eastern Time Title: The Association of Cancer and Infectious Agents Speakers: Sheron C. Lear, HTL(ASCP)HT, QIHC and Alvin W. Martin, MD CPA Laboratory Louisville, KY Phone: (443) 535-4060 Email: [email protected]
JUNE
JULY
AUGUST
15 University of Texas Health Sciences Ctr/San Antonio Teleconference 12:00 pm Central Time (800) 982-8868 Title: Carbohydrate Histochemistry Speaker: John A. Kiernan, MB, ChB, PhD, DSc Department of Anatomy and Cell Biology The University of Western Ontario London, Ontario, Canada 27 NSH Teleconference 1:00 pm Eastern Time Title: Connective Tissue Special Stains Speaker: Kimberly Feaster, HTL(ASCP), QIHC West Virginia University Morgantown, WV Phone: (443) 535-4060 Email: [email protected]
15 NSH Teleconference 1:00 pm Eastern Time Title: TB or not TB: That Is the AFB Question Speaker: Joshua Fink, HTL(ASCP) Beaumont Hospital Royal Oak, MI Phone: (443) 535-4060 Email: [email protected]
17 University of Texas Health Sciences Ctr/San Antonio Teleconference 12:00 pm Central Time (800) 982-8868 Title: The Paradox of Change in Histotechnology Speaker: Herbert Skip Brown IV, MD, HT(ASCP) Clinical Applications Manager Leica BioSystems LLC St. Louis, MO 18 Nebraska Society for Histotechnology Autumn Symposium Contact: Janice Mahoney Email: [email protected] 22 NSH Teleconference 1:00 pm Eastern Time Title: Upper G.I. Biopsies: Tissue Identification, Diseases and Stains Speaker: Mitual Amin, MD Beaumont Hospital Royal Oak, MI Phone: (443) 535-4060 Email: [email protected] 24-29 National Society for Histotechnology Symposium/Convention Site: Seattle, Washington Contact: Aubrey Wanner, NSH Office Phone: (443) 535-4060 Fax: (443) 535-4055 Email: [email protected]
OCTOBER
NOVEMBER
DECEMBER
SEPTEMBER
17 NSH Teleconference 1:00 pm Eastern Time Title: From LEAN to Green: A Partnership for Making an Environmentally Friendly Histology Laboratory Speaker: Carole Barone, HT(ASCP) Nemours-A.I. Dupont Hospital for Children Wilmington, DE Phone: (443) 535-4060 Email: [email protected]
19 University of Texas Health Sciences Ctr/San Antonio Teleconference 12:00 pm Central Time (800) 982-8868 Title: Understanding Fixation Speaker: Ada Feldman, MS, HTL(ASCP), HT Anatech Ltd Battle Creek, MI
SAKURA WEBINAR SERIESThrough November, Sakura is providing a monthly 1-hour webinar series. One contact hour certificate provided for ASCP Certification Maintenance. Contact your Sakura Area Sales Manager.
All begin at 1:00 pm ET/10:00 am PT.October 21 November 18
August 19 September 16
June 17 July 22
Presorted StandardUS Postage
PaidSakura Finetek U.S.A., Inc. 1750 West 214th Street Torrance, CA 90501
No varnish in this area.
To receive your own copy of HistoLogic® or to have someone added to the mailing list, submit home address to: Sakura Finetek U.S.A., Inc., 1750 West 214th Street, Torrance, CA 90501.
The editor wishes to solicit information, questions, and articles relating to histotechnology. Submit these to: Vinnie Della Speranza, HistoLogic® Editor, 165 Ashley Avenue, Suite 309, Charleston, SC 29425. Articles, photographs, etc, will not be returned unless requested in writing when they are submitted.
Uniform Results With Accu-Edge® Grossing Tools• Grossing board has two adjustable wells for varying size and thickness• Grossing forks feature two sets of sharp tines, separated by a space
of 1.5, 2.0, or 2.5 mm for precise grossing
• Tissue tampers hold specimens firmly in the wells for easier trimming• Scalpel and trimming blades provide unsurpassed sharpness
for maximum cutting efficiency
Designed for Specimen Standardization
The foundation for uniform grossing and optimal results.