Trend Micro™ Antivirus for Mac® 2016 – Product Guide v1.0
2
Trend Micro Incorporated reserves the right to make changes to this document and to the service described herein without notice. Before implementing the service, please review the readme file and the latest version of the applicable user documentation.
Trend Micro, the Trend Micro t-ball logo, and Antivirus for Mac are trademarks or registered trademarks of Trend Micro, Incorporated. All other product or company names may be trademarks or registered trademarks of their owners.
Trend Micro™ Antivirus for Mac 2016® Product Guide provides help for analysts, reviewers, potential customers, and users who are evaluating, reviewing, or using Trend Micro Antivirus (Internet Security) for the Mac.
Trend Micro™ Antivirus for Mac® 2016 - Product Guide v1.0
3
Table of Contents
Chapter 1: Introducing Trend Micro™ Antivirus for Mac ............................................................ 4
Product Overview................................................................................................................... 4 Key Features........................................................................................................................... 5 System Requirements ............................................................................................................ 7 Incompatible Software ........................................................................................................... 7 Internet Connection ............................................................................................................... 7 Global Availability .................................................................................................................. 7 Contacting Trend Micro .......................................................................................................... 8 Consumer Support Line .......................................................................................................... 8 Free phone, email and chat support ....................................................................................... 8 Premium Services ................................................................................................................... 8
Chapter 2: Getting Started With Trend Micro™ Antivirus for Mac® ............................................ 9 Installing Trend Micro Internet Security ................................................................................. 9
Chapter 3: Using Trend Micro™ Internet Security for Mac........................................................ 19 The Console Overview .......................................................................................................... 19 Scan Now ............................................................................................................................. 21 Web: Privacy Scanner for Social Networks ........................................................................... 22 Web: Web Threat Protection ................................................................................................ 34 Web: Website Filter | Managing Your Children’s Online Activity ......................................... 36 Scans: Scan Options | Smart, Custom, and Full Scans ........................................................... 37 Scans: Scan Preferences | Change Settings | Schedule Scans ............................................... 39 Logs ...................................................................................................................................... 42 Help...................................................................................................................................... 43
About Trend Micro .......................................................................................................... 44
Trend Micro™ Antivirus for Mac® 2016 – Product Guide v1.0
4
Chapter 1: Introducing Trend Micro™ Antivirus for Mac
This chapter introduces you to Trend Micro™ Antivirus for Mac®. The topics discussed in this chapter include:
Product Overview
Key Features
System Requirements
Incompatible Software
Internet Connection
Product Overview Platform-Independent Threats
Motivated by the lure of profits from the sale of stolen confidential information, cyber criminals of today have shifted to the Web and to social networking sites as their chosen attack vectors, which provide ideal environments for cybercrime. Mac users expose more information than they should on social networks—and don’t understand how they can set their privacy settings to protect against identity theft; while Web Threats, which include “phishing” scams, take advantage of human weakness more than just operating system vulnerabilities, making these attacks truly “platform-independent.” Web Threats, particularly within social networks, are the fastest growing type of attack, and Mac users are just as susceptible as PC users.
Trend Micro Antivirus for Mac
As Macs are no longer immune to viruses and other Internet threats, Mac users need privacy protection when shopping, banking, and socializing online. Trend Micro Antivirus for Mac safeguards your digital life and protects it against online threats, dangerous websites, and identity thieves. Its unique security is designed to safeguard your privacy on social networks like Facebook, Google+, Twitter, and LinkedIn. With Trend Micro, you can relax and enjoy your digital life safely.
Antivirus for Mac is designed to meet the security needs of Mac users. Rather than just porting a Windows-based product to the Mac, Trend Micro built Antivirus for Mac from the ground up. Taking this approach has allowed Trend Micro to focus on easy-to-use features that Mac users have come to expect, and to make the software work smoothly and seamlessly within the Mac operating system.
Antivirus for Mac is powered by Trend Micro’s innovative cloud-based web reputation technologies, the Trend Micro Smart Protection Network. Antivirus for Mac also guards against infection by malicious software (viruses and spyware), with automatic, real-time scanning and automatic pattern file updates. The security technology behind these features results from Trend Micro’s 25+ years of security industry expertise.
Trend Micro™ Antivirus for Mac® 2016 - Product Guide v1.0
5
Trend Micro delivers:
The fastest protection against new web threats1
Top rated protection at blocking sites trying to trick you into downloading malware1
Protection against more than 250 million threats per day2
Provides Safe Surfing
Prevents you from visiting dangerous websites so you can browse without having to worry about online threats.
1 NSS Labs
2 Using Trend Micro™ Smart Protection Network™
Key Features Trend Micro™ Antivirus for Mac provides full-featured security in an easy-to-use program that won’t get in your way during your daily activities.
Essential Protection. Protects you from a wide range of malware, including viruses, spyware, image spam, and rootkits.
Privacy Scanner. Includes a Privacy Scanner for Facebook, Google+, Twitter, and LinkedIn. The Privacy Scanner within Trend Micro Toolbar identifies privacy settings in Facebook, Google+, Twitter and LinkedIn that may leave your personal information publically available and vulnerable to identity theft.
Detect Web Threats. Automatically configured to protect against viruses and spyware by identifying and blocking dangerous links in websites, social networks, emails and instant messaging. It guards against identity theft by detecting spam emails containing phishing scams that can trick you into revealing confidential information. And it prevents websites from installing dangerous software on your Mac.
Blocks Dangerous Websites. Protects against viruses and spyware by identifying and blocking dangers links in websites, social networks, emails, and instant messaging.
Trend Micro Toolbar. Enabled for Safari, Google Chrome, or Mozilla Firefox, the Trend Micro Toolbar proactively warns you about any security risks associated with links on websites you visit, including popular social media sites. A page rating icon appears next to links on social networking sites, web mail, and search results. You can also mouse over a URL to obtain details about its trustworthiness.
Real-Time Scanning. Scans your Mac’s memory in real time, so that you’re always protected from any malicious files downloaded onto your computer.
Automatic Updates. Preconfigured to automatically receive updates to signatures and program files whenever they’re available.
Protect Kids Online. Restrict or filter website access when your kids go online. Allows you to filter your family’s access to the web by age groups and content categories. You can make
Trend Micro™ Antivirus for Mac® 2016 – Product Guide v1.0
6
exceptions to these general rules by adding URLs to Approved or Blocked Website lists. Ensure your family only views the content you approve.
Custom and Scheduled Scanning. Scan options allow “smart scans” to target typical areas on your system where malware lurks, as well as full scans and targeted scans—to pinpoint where the scan should occur. You can also designate the actions taken. And you can schedule scans to fit your own schedule.
Logs. Produces logs of its activity, so you always have a history of every action it takes and the results. This greatly assists malware troubleshooting.
Trend Micro™ Antivirus for Mac® 2016 - Product Guide v1.0
7
System Requirements Before you attempt to install Trend Micro Antivirus for Mac, make sure that your Mac meets all of the minimum system requirements.
Table 1. Trend Micro Antivirus for Mac (6.0) 2016
Operating System CPU Memory Disk Space
Mac OS® X version 10.10 "Yosemite”
Apple Macintosh computer with an Intel® Core™ Processor
2GB 1.5GB
Mac OS® X version 10.9 "Mavericks”
Other Requirements
Web Browser Apple® Safari® 7.0 or higher
Mozilla® Firefox® - The newest version and the most recent previous version
Google Chrome™ - The newest version and the most recent previous version
Incompatible Software To ensure successful installation of Trend Micro Antivirus for Mac you should uninstall other antivirus software first.
Internet Connection Antivirus for Mac needs an Internet connection for activating online, checking the expiration date, downloading updates, sending Trend Micro URL/web queries and logs to the portal, and browsing knowledge base pages on the Trend Micro Web site.
If you have a dial-up or other connection to the Internet that charges fees per connection, by the amount of time connected or for the amount of data downloaded, make sure your router or connection software does not automatically start a connection to support the features listed above to avoid extra connection fees. Follow your router's instructions to edit your router settings as required.
Global Availability July 29, 2015
Trend Micro™ Antivirus for Mac® 2016 – Product Guide v1.0
8
Contacting Trend Micro Trend Micro Incorporated 225 E. John Carpenter Freeway, Suite 1500 Irving, Texas 75062 U.S.A. Phone: +1 (817) 569-8900 Toll-free: (888) 762-8763 www.trendmicro.com
Consumer Support Line (800) 864-6027 Monday - Friday, 5:00AM - 8:00PM Pacific
Free phone, email and chat support A current subscription of Trend Micro Antivirus for Mac includes free phone, email, and chat support. For more information, contact eSupport at: www.trendmicro.com/support/home.
Premium Services Trend Micro offers Premium Services for a wide variety of technical issues including installation, virus and spyware removal, PC Tune-ups, and more. For more information, visit www.trendmicro.com/support/home.
Trend Micro™ Antivirus for Mac® 2016 - Product Guide v1.0
9
Chapter 2: Getting Started With Trend Micro™ Antivirus for Mac®
This chapter shows you how to install Trend Micro™ Antivirus for Mac®—hereafter referred to as Internet Security (the name displayed in the user interface).
Installing Trend Micro Internet Security To install Trend Micro Internet Security:
1. Download the application at http://www.trendmicro.com/us/home/products/software/antivirus-for-mac/index.html or insert the CD.
2. When Trend Micro Internet Security.dmg appears on your Mac desktop, double-click the icon. The installer appears.
Figure 1. Trend Micro Internet Security Installer
3. In the installer window, double-click Install Trend Micro Internet Security. A popup appears, indicating the installer will run a program to determine if Internet Security can be installed.
Figure 2. Pre-install Check
4. Click Continue. The Trend Micro Internet Security Installer Welcome screen appears.
Trend Micro™ Antivirus for Mac® 2016 – Product Guide v1.0
10
Figure 3. Welcome Screen
5. Click Continue. The Software License Agreement appears.
Figure 4. Software License Agreement
6. Scroll down the window to read the Trend Micro End User License Agreement. If you agree to the terms, click Continue. A popup appears for you to agree or disagree to the agreement.
Figure 5. Accept Agreement
7. Click Agree. A screen appears for you to Enter a Serial Number or Start a Free Trial.
Trend Micro™ Antivirus for Mac® 2016 - Product Guide v1.0
11
Figure 6. Enter Serial Number
Figure 7. Start a Free Trial
8. Choose the type of installation you prefer. For a Paid version, enter the Serial Number into the field provided. For a Free Trial, simply click the button for it.
9. Click Continue. A window appears, indicating that a Standard Install will begin on your computer, calculating the amount of space it will take.
Figure 8. Standard install
10. Click Install. A popup appears for you to enter your administrator credentials to allow the install.
Trend Micro™ Antivirus for Mac® 2016 – Product Guide v1.0
12
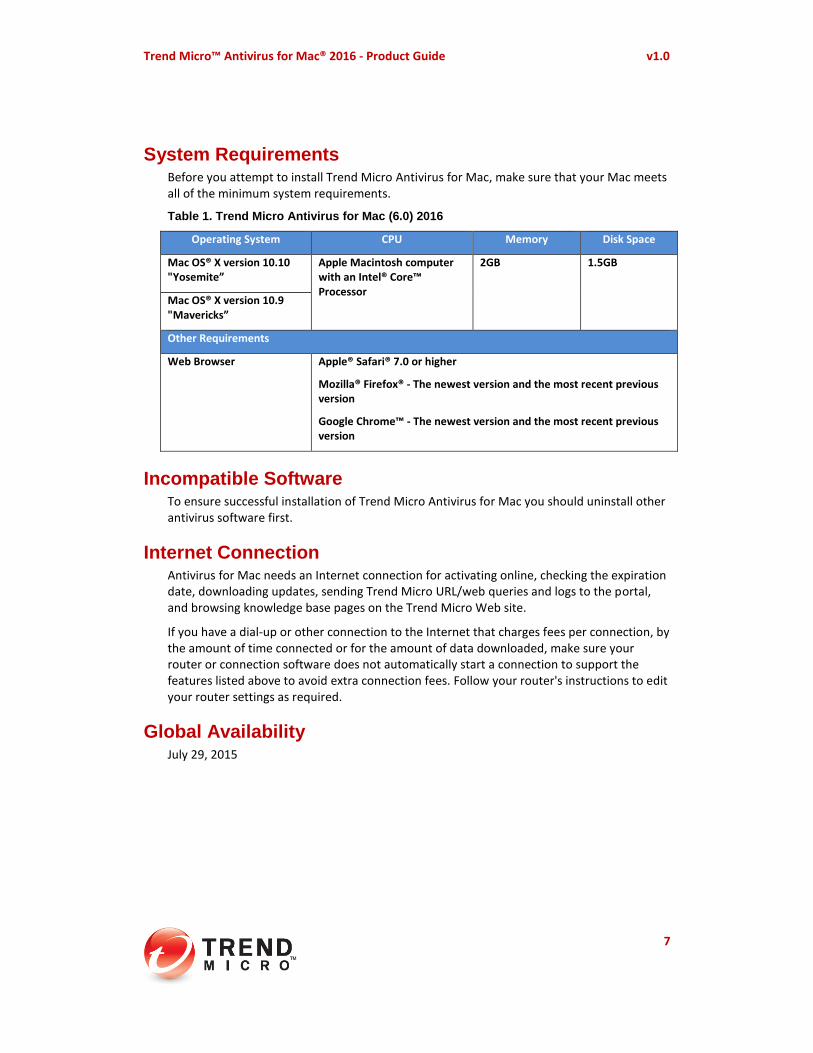
Figure 9. Admin Credentials
11. Enter the admin account Name and Password for your Mac and click Install Software. The installation proceeds, writing files to your hard disk.
Figure 10. Installing Trend Micro Internet Security
12. If you installed the Free Trial, a window then appears, recommending you provide your email address to receive the latest news and offers from Trend Micro.
Figure 11. Provide Your Email Address
13. Enter your preferred email address if you wish, or simply click Continue. A window appears, saying Installation Successful.
Trend Micro™ Antivirus for Mac® 2016 - Product Guide v1.0
13
Figure 12. Installation Successful
14. If you installed a Paid version, a screen appears, asking you to enter your email address to Activate Your Protection.
Figure 13. Activate Your Protection
15. You now have two options:
Use an existing Trend Micro Account. Provide the email address for this account.
Create a new Trend Micro Account. Provide a preferred email address.
Trend Micro™ Antivirus for Mac® 2016 – Product Guide v1.0
14
Using a previously created Trend Micro Account:
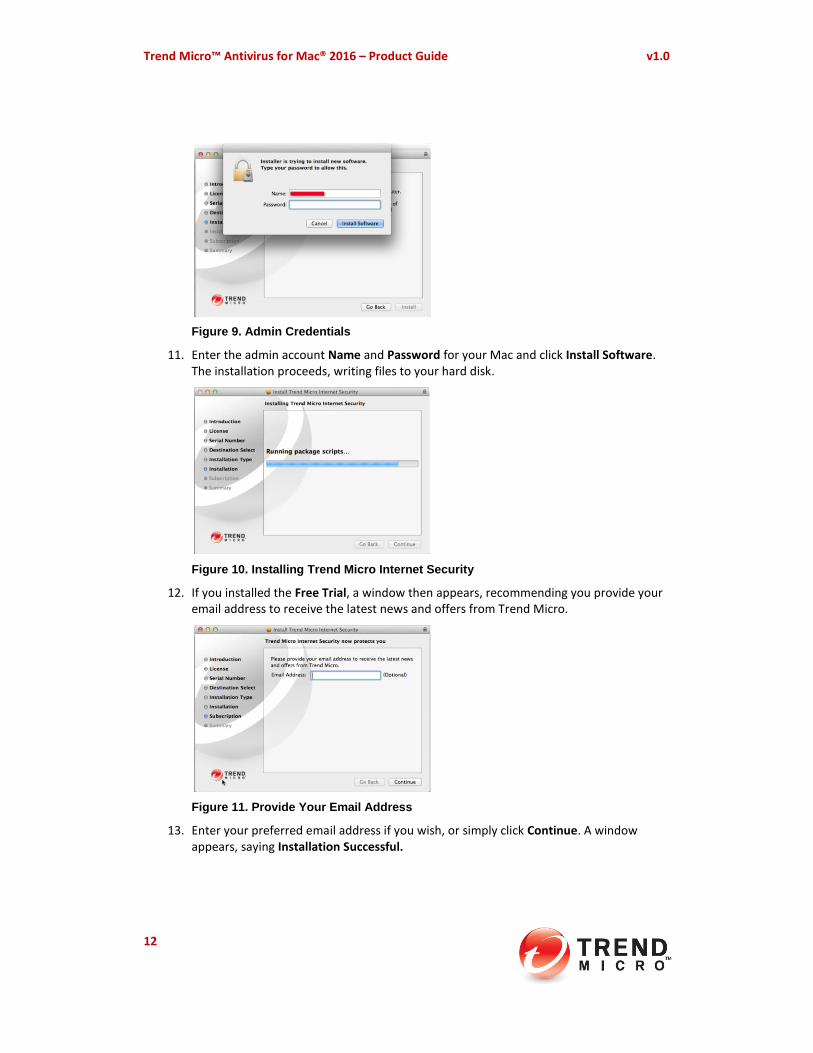
1. If you have activated Trend Micro software before, simply enter the email address you used to create the account and click Next. A screen appears for you to Sign In to your account.
Figure 14. Sign In
2. Enter the Password for your Trend Micro account and click Next. A screen appears for you to name the computer.
Figure 15. Computer Name
3. Enter a computer name to help identify it in your Trend Micro Account and click Next. A screen appears, saying Protection Activated.
Figure 16. Protection Activated
4. Your protection is activated and the installation is complete. Click the Close box to close the Installer.
Trend Micro™ Antivirus for Mac® 2016 - Product Guide v1.0
15
Creating a new Trend Micro Account:
1. If you have not activated Trend Micro Software before, enter your preferred email address in the Activate Your Protection screen and click Next. A screen appears, asking you to Enter Account Information.
Figure 17. Enter Account Information
2. Enter your account information, then read the Trend Micro Privacy Statement. If you agree to the terms, check “I have read and agree to the Trend Micro Privacy Statement.”
3. Keep or remove the check from the box to “Receive the latest news and offers from Trend Micro,” and click Next. A screen appears to Check What You Entered.
Figure 18. Check What You Entered
4. Make sure your entries are correct and click Next. A screen appears saying Protection Activated.
Trend Micro™ Antivirus for Mac® 2016 – Product Guide v1.0
16
Figure 19. Protection Activated
5. Click Finish to close the activation screen. The Trend Micro Internet Security Console appears, with a message Not Yet Updated.
Figure 20. Console – Not Yet Updated
6. Trend Micro Internet Security will automatically update in 10 minutes—and moving forward, will automatically update itself whenever necessary.
7. If you wish to begin the update now, click Update Now. A popup appears, indicating that Trend Micro Internet Security is downloading an update.
Figure 21. Downloading an Update
8. When the update is complete, a popup appears, saying Update Completed.
Trend Micro™ Antivirus for Mac® 2016 - Product Guide v1.0
17
Figure 22. Update Completed
9. Click Close to close the popup. You now have access to the latest protection.
Figure 23. Console after Update
10. Click the Close box in the upper left-hand corner to close the Console.
Figure 24. Installer
11. Click the Close box in the upper left-hand corner to close the Installer.
Trend Micro™ Antivirus for Mac® 2016 – Product Guide v1.0
18
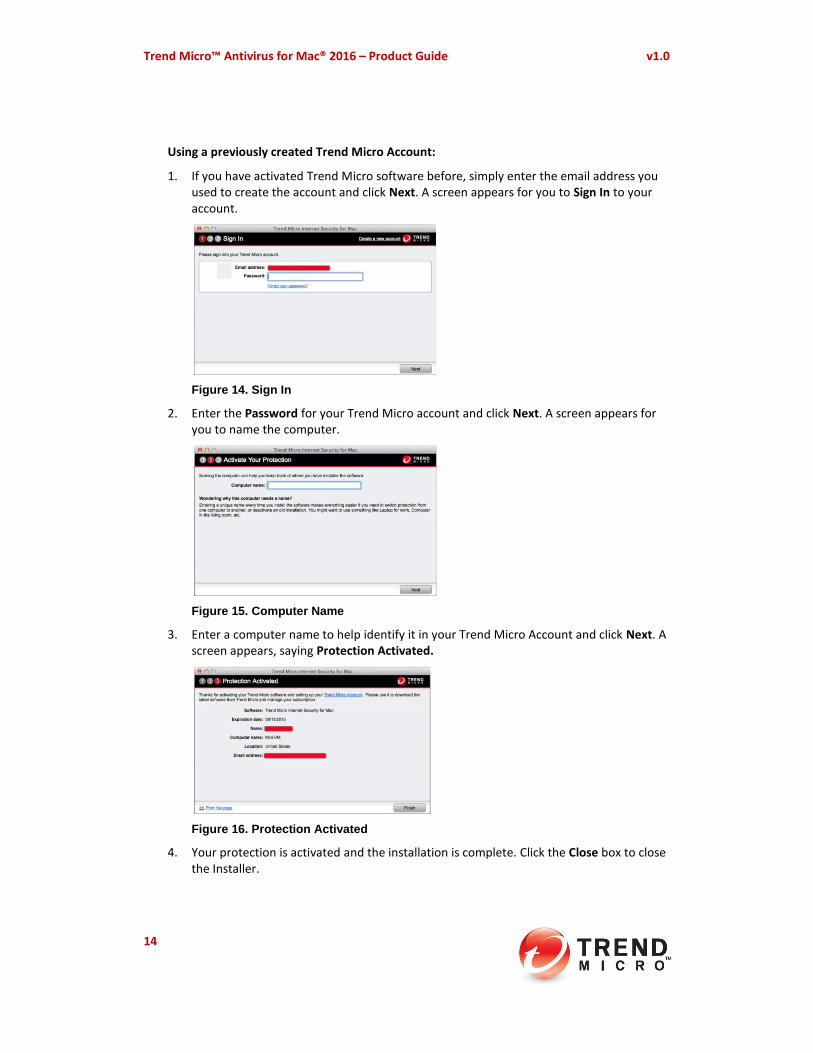
Figure 25. Eject "TRENDMICRO"
12. Right-click (Cmd-click) the mounted installer disk icon and choose Eject “TRENDMICRO” to eject the mounted installer. The icon is removed from your desktop.
13. If your browser was open during the install, a popup will appear during the install process, asking you to close your browser(s) to enable the Trend Micro Toolbar.
Figure 26. Quit Your Browsers
14. Click Quit Browser to close your open browser(s).
15. Congratulations! This completes your installation of Trend Micro Internet Security for Mac.
16. To keep your Mac safe, read the following chapter to learn how to use the program.
Trend Micro™ Antivirus for Mac® 2016 - Product Guide v1.0
19
Chapter 3: Using Trend Micro™ Internet Security for Mac
This chapter provides an overview of Trend Micro™ Internet Security for Mac. Topics discussed in this chapter include:
The Console Overview
Scan Now
Privacy Scanner for Social Networks
Web Threat Protection
Website Filter: Managing Your Children’s Online Activity
Scan Options
Scan Preferences
Logs
Help
The Console Overview To open the Console:
Figure 27. The Internet Security Finder Menu
Note: You can perform a number of options directly from the Internet Security Finder Menu. These include: Scan Now, Update Now, disable the detection of Web Threats, Open the Trend Micro Internet Security Console, Open Preferences, Open Help, and Shut Down Trend Micro Internet Security.
1. In the Internet Security Menu in the Finder’s Menu Bar, select Open Trend Micro Internet Security. The Internet Security Console appears.
Trend Micro™ Antivirus for Mac® 2016 – Product Guide v1.0
20
Figure 28. The Internet Security Console
2. The default settings are set to On. These include:
Detect Web Threats. Internet Security is automatically configured to protect you from Web threats.
It blocks Instant Messaging and email links that lead to dangerous websites.
It protects against phishing scams that can trick you into revealing confidential information.
It prevents websites from installing dangerous software on your Mac.
Real-Time Scanning. Internet Security scans your Mac’s memory in real time, so that you’re always protected from any files downloaded onto your computer. Unwanted files are blocked before they touch your hard drive.
3. Click Update Now to manually begin an update process. You might wish to do a manual update before you execute a manual scan.
4. Click Scan Now to execute a Smart Scan on your computer. Smart Scan scans those parts of your computer where malware typically lurks.
5. Click the lock to make changes. A popup appears, asking permission to allow the changes.
Figure 29. Password Permission
6. The Mac OS should automatically load your Mac’s admin account name into the Name field. If not, enter it.
7. Enter your admin Password and click OK. The Lock opens and you can now make changes to the settings in Internet Security.
Trend Micro™ Antivirus for Mac® 2016 - Product Guide v1.0
21
Scan Now Once you’ve installed Internet Security, it’s a good practice to execute a quick Smart Scan to search for possible malware already lurking on your computer.
To Scan Now for viruses:
1. Perform one of two options:
Figure 30. Internet Security Menu > Scan Now...
a) Select Scan Now in the Internet Security Menu.
Figure 31. Open Trend Micro Internet Security
b) Select Open Trend Micro Internet Security in the Internet Security Menu, and when the Internet Security Console appears, click Scan Now.
Figure 32. Internet Security Console > Scan Now
2. A progress dialog appears, as Internet Security conducts a quick Smart Scan. You can click Continue in the Background to hide the dialog.
Figure 33. Smart Scan (Scan Now)
3. When the scan is complete, Internet Security returns a dialog saying Scan Completed.
Trend Micro™ Antivirus for Mac® 2016 – Product Guide v1.0
22
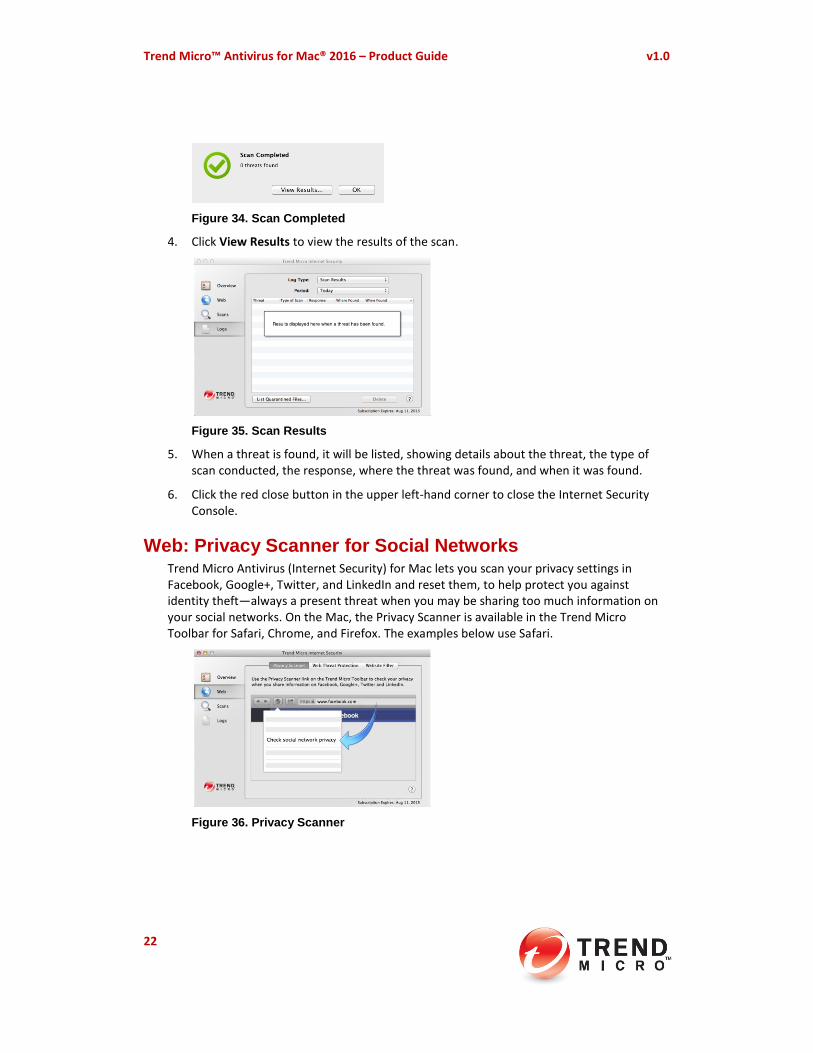
Figure 34. Scan Completed
4. Click View Results to view the results of the scan.
Figure 35. Scan Results
5. When a threat is found, it will be listed, showing details about the threat, the type of scan conducted, the response, where the threat was found, and when it was found.
6. Click the red close button in the upper left-hand corner to close the Internet Security Console.
Web: Privacy Scanner for Social Networks Trend Micro Antivirus (Internet Security) for Mac lets you scan your privacy settings in Facebook, Google+, Twitter, and LinkedIn and reset them, to help protect you against identity theft—always a present threat when you may be sharing too much information on your social networks. On the Mac, the Privacy Scanner is available in the Trend Micro Toolbar for Safari, Chrome, and Firefox. The examples below use Safari.
Figure 36. Privacy Scanner
Trend Micro™ Antivirus for Mac® 2016 - Product Guide v1.0
23
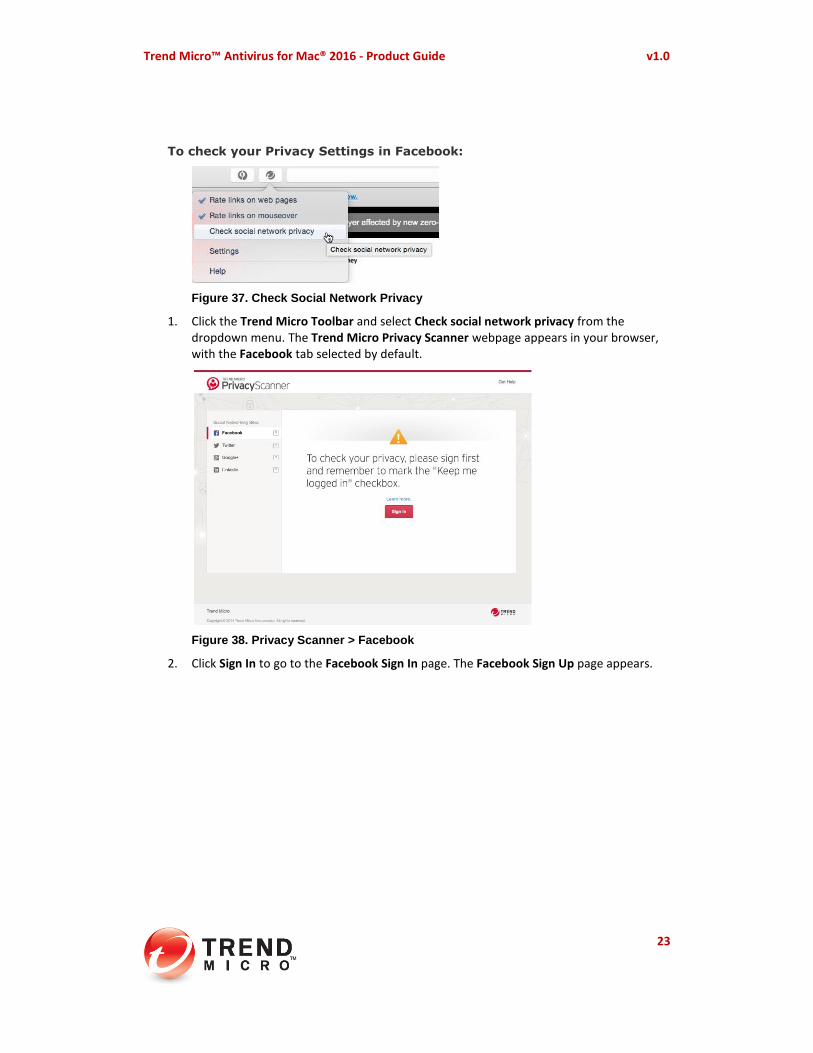
To check your Privacy Settings in Facebook:
Figure 37. Check Social Network Privacy
1. Click the Trend Micro Toolbar and select Check social network privacy from the dropdown menu. The Trend Micro Privacy Scanner webpage appears in your browser, with the Facebook tab selected by default.
Figure 38. Privacy Scanner > Facebook
2. Click Sign In to go to the Facebook Sign In page. The Facebook Sign Up page appears.
Trend Micro™ Antivirus for Mac® 2016 – Product Guide v1.0
24
Figure 39. Facebook Log In
3. Check the checkbox “Keep me logged in,” then type in your Facebook login credentials and click Log In. The Facebook home page appears, with the Trend Micro Privacy Scanner showing at the top.
Figure 40. See Scan Results
4. Click the See Scan Results button. Internet Security returns the results, indicating when you have privacy concerns.
Trend Micro™ Antivirus for Mac® 2016 - Product Guide v1.0
25
Figure 41. Privacy Concern(s)
5. If you have concerns, click Fix All to fix all the concerns at once using the Internet Security recommended privacy settings, or select the drop-down settings menu to fix them manually. In this example, we’ll choose Fix All. The Fix All popup appears.
Figure 42. Fix All | Editor
6. Click Fix for the settings with Privacy Concerns. Internet Security changes your settings and returns the result. In this case, since you accepted the default recommendations, it returned “Nice work! You don’t have any privacy concerns, but your friends might need some help…” Use the links to recommend Privacy Scanner on the supported social networks.
Figure 43. Facebook: Nice Work!
Trend Micro™ Antivirus for Mac® 2016 – Product Guide v1.0
26
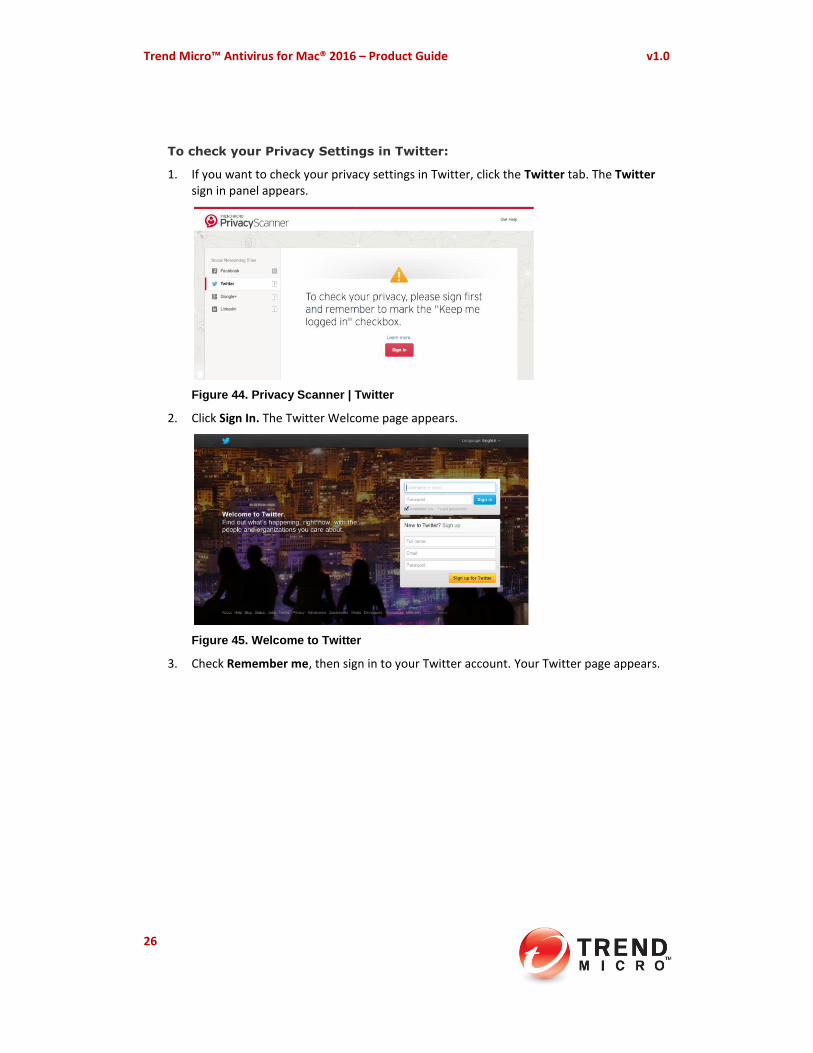
To check your Privacy Settings in Twitter:
1. If you want to check your privacy settings in Twitter, click the Twitter tab. The Twitter sign in panel appears.
Figure 44. Privacy Scanner | Twitter
2. Click Sign In. The Twitter Welcome page appears.
Figure 45. Welcome to Twitter
3. Check Remember me, then sign in to your Twitter account. Your Twitter page appears.
Trend Micro™ Antivirus for Mac® 2016 - Product Guide v1.0
27
Figure 46. See Scan Results
4. Click See Scan Results. The Privacy Scanner returns the result.
Figure 47. Twitter Privacy Concerns
5. As you did for Facebook, click Fix All or use the editor to edit specific settings. The editor appears.
Trend Micro™ Antivirus for Mac® 2016 – Product Guide v1.0
28
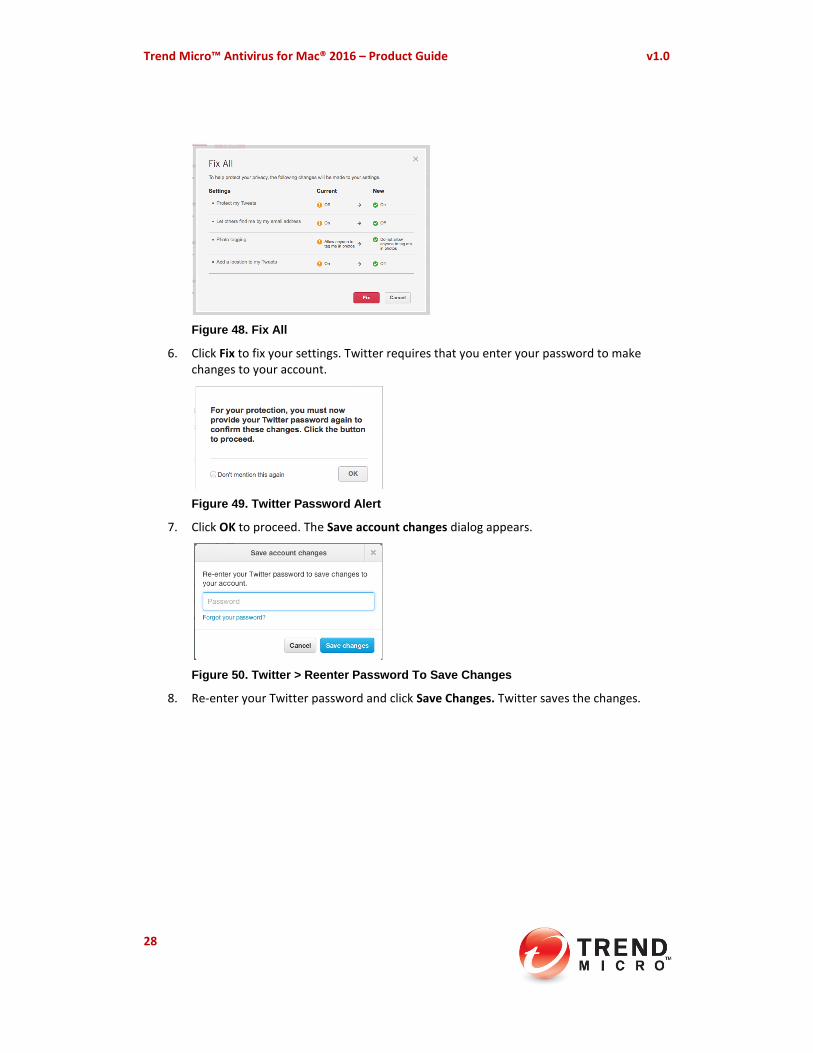
Figure 48. Fix All
6. Click Fix to fix your settings. Twitter requires that you enter your password to make changes to your account.
Figure 49. Twitter Password Alert
7. Click OK to proceed. The Save account changes dialog appears.
Figure 50. Twitter > Reenter Password To Save Changes
8. Re-enter your Twitter password and click Save Changes. Twitter saves the changes.
Trend Micro™ Antivirus for Mac® 2016 - Product Guide v1.0
29
Figure 51. Twitter Changes Saved
9. Return to the Privacy Scanner page, where a dialog appears, saying “Now that you have confirmed your password, click the button to see the results.”
Figure 52. See Results
10. Click OK. Privacy Scanner returns the result, with the Nice Work! message.
Figure 53. Twitter: Nice Work!
Trend Micro™ Antivirus for Mac® 2016 – Product Guide v1.0
30
To check your Privacy Settings in Google+:
1. Select the Google+ tab if you have a Google+ account. The Google+ sign in panel appears.
Figure 54. Privacy Scanner > Google+
2. Click Sign in. The Google Sign In page appears.
Figure 55. Google+ SIgn In
3. Sign in to your Google account. Privacy Scanner will scan your settings and return the results. To see them, click back to the Privacy Scanner portal page in your browser.
Trend Micro™ Antivirus for Mac® 2016 - Product Guide v1.0
31
Figure 56. Check My Privacy
4. Click Fix All. The Fix All popup appears.
Figure 57. Fix All
5. Click Fix to fix the privacy concerns. Privacy Scanner fixes your privacy concerns and returns the results, with the Nice Work! message.
Figure 58. Google+ Nice Work!
Trend Micro™ Antivirus for Mac® 2016 – Product Guide v1.0
32
To check your Privacy Settings in LinkedIn:
1. Select the LinkedIn tab if you have a LinkedIn account. The LinkedIn sign in panel appears.
Figure 59. Privacy Scanner > LinkedIn
2. Click Sign In to sign into your LinkedIn account. The LinkedIn Sign In page appears.
Figure 60. LinkedIn Sign In
3. Enter your email address and password and click Sign In. Your LinkedIn page appears.
Trend Micro™ Antivirus for Mac® 2016 - Product Guide v1.0
33
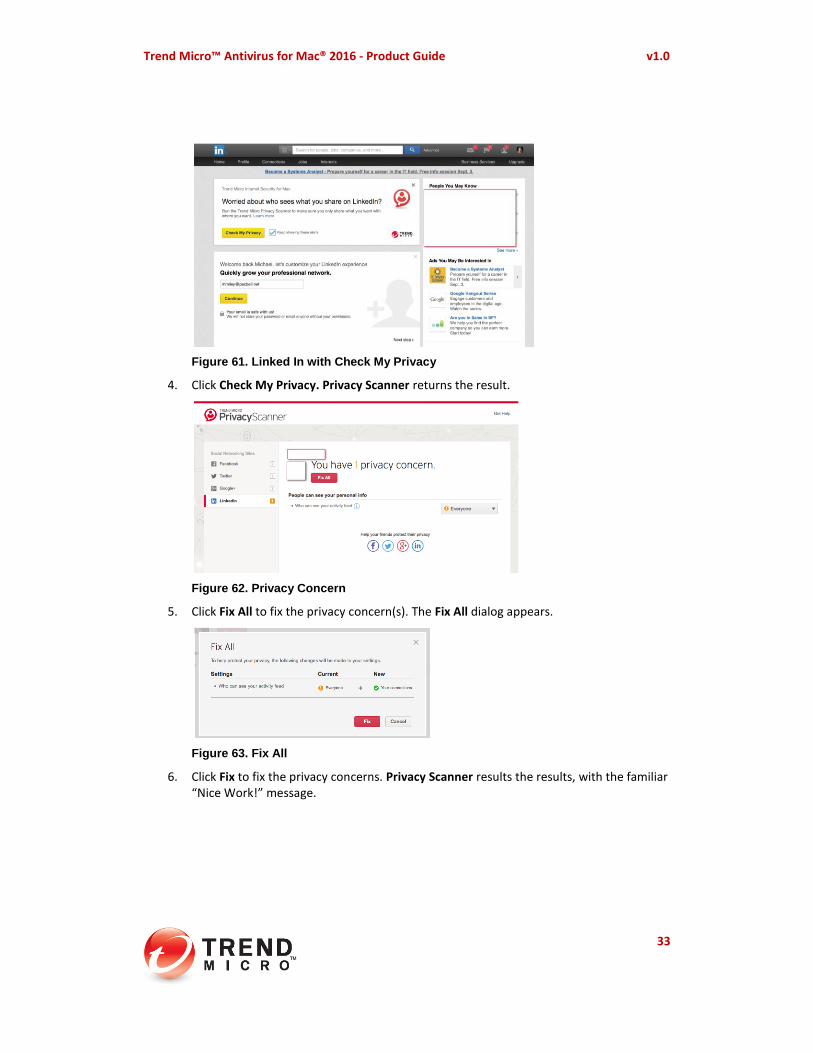
Figure 61. Linked In with Check My Privacy
4. Click Check My Privacy. Privacy Scanner returns the result.
Figure 62. Privacy Concern
5. Click Fix All to fix the privacy concern(s). The Fix All dialog appears.
Figure 63. Fix All
6. Click Fix to fix the privacy concerns. Privacy Scanner results the results, with the familiar “Nice Work!” message.
Trend Micro™ Antivirus for Mac® 2016 – Product Guide v1.0
34
Figure 64. Nice Work!
7. Internet Security provides ongoing protection for Facebook, Twitter, Google+, and LinkedIn. At any time, particularly when the social networking site changes any privacy policies, you can run another Privacy Scan on your social networking pages to check your privacy settings.
Web: Web Threat Protection To set Web Threat Protection:
Figure 65. Web Threat Protection
1. Select Web from the Command Menu. The Privacy Scanner tab appears by default.
2. Click Web Threat Protection. The Web Threats Protection panel appears, with Detect Web Threats pre-checked by default. Uncheck it to disable Web Threat Protection (not recommended). (Requires clicking the lock and entering your password to enable changes.)
3. Adjust the level of Web Threat Protection by moving the slider:
Low. This setting only blocks websites definitely confirmed as fraudulent or capable of transmitting malicious software. Select this setting only if you do not need much help with avoiding suspicious websites.
Trend Micro™ Antivirus for Mac® 2016 - Product Guide v1.0
35
Normal. Trend Micro recommends this setting for regular daily use. It provides protection against malicious software, online fraud, and other threats without aggressively blocking minor security risks.
High. This setting will prevent you from opening any websites that show any signs of transmitting malicious software. To be on the safe side, even suspicious sites that might not actually cause problems are blocked. You might want to choose this level of protection when children use the web.
4. Enable Toolbar on Web Browser is pre-checked by default. Click Advanced Settings to edit the settings. The Toolbar Advanced Settings dialog appears.
Figure 66. Toolbar Advanced Settings
5. Three options are available:
Rate Links on web pages. Automatically warn about any security risks associated with links on websites you visit. A page rating icon appears next to links on social networking sites, web mail, and search results. This feature is checked by default; uncheck to disable.
Rate links on mouseover. Display the page rating icon for links on other websites by pausing your mouse cursor over the link. This feature is unchecked by default; check to enable.
Restore Default. Click this button to restore the default Advanced Toolbar Settings. Click the close button to close the dialog.
6. Click Trusted Websites to edit the list of approved websites. The editor appears.
Figure 67. Trusted Websites
7. To add a trusted website, click the Plus sign (+). A URL field appears for you to add the website.
Trend Micro™ Antivirus for Mac® 2016 – Product Guide v1.0
36
Figure 68. Add a Trusted Website
8. Type in the name of the website. Use asterisks as shown to expand the coverage of the URL.
9. To delete a trusted website, select the website in the list and click the Minus sign (-). The website is deleted.
10. To edit a trusted website, select the website in the list and click Edit. The URL field becomes active, so you can edit the website.
11. Click Done to save your changes.
12. Click Blocked Websites to edit the list of blocked websites.
13. Follow the same procedures to add, delete, or edit a blocked website as you used above, then click Done to save your changes.
14. Click the lock closed to prevent further changes.
Web: Website Filter | Managing Your Children’s Online Activity
To edit the Website Filter settings:
1. Click the Website Filter tab to open the settings for the website filter. The Website Filter screen appears, with the settings disabled by default.
Figure 69. Website Filter
2. Check Filter websites based on your selections below to enable the Website Filter.
Trend Micro™ Antivirus for Mac® 2016 - Product Guide v1.0
37
Figure 70. Medium (Teenager)
3. Choose the preset you prefer from the popup menu: High (Child), Medium (Teenager), Low (Mature Teenager), Minimal (Adult), or pick Custom to customize the settings.
4. Check/uncheck a category in the list to enable/disable protection for that category.
5. Scroll down the list using the scrollbar to see more categories.
6. Select a category name to see a description of that category.
7. Click Trusted/Blocked Websites as you did in the previous section to edit your list of approved or blocked websites for this Website Filter.
8. Click the lock closed to prevent further changes.
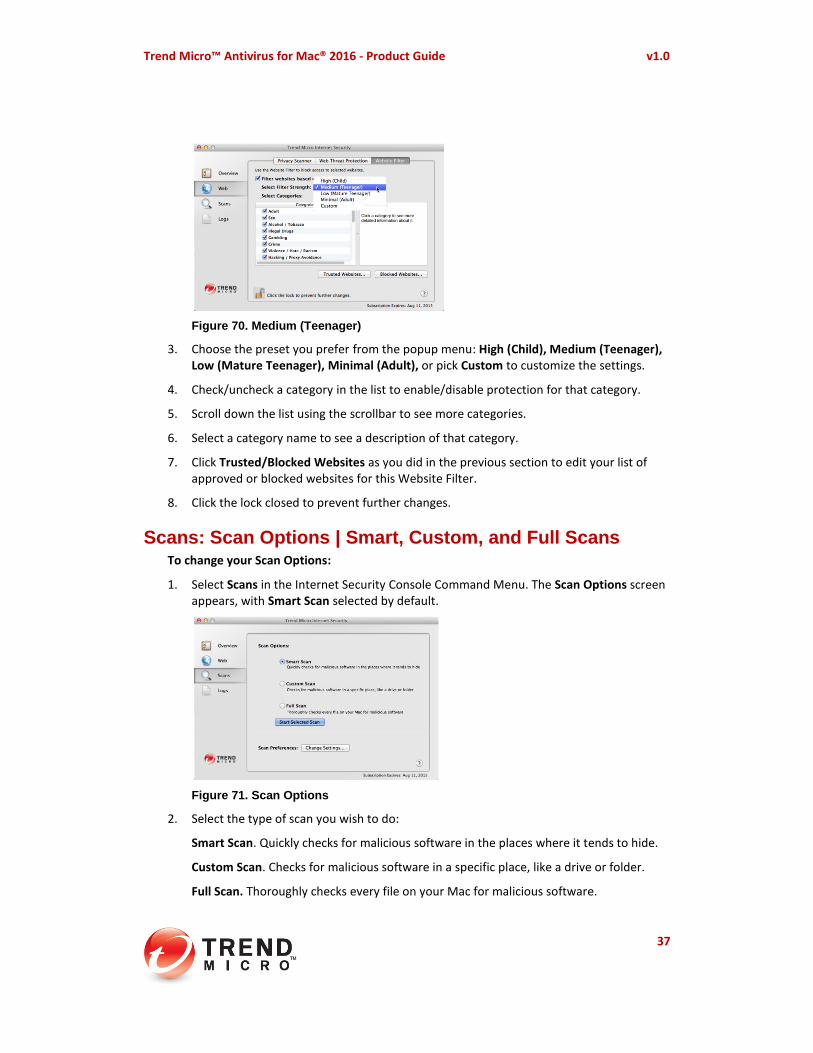
Scans: Scan Options | Smart, Custom, and Full Scans To change your Scan Options:
1. Select Scans in the Internet Security Console Command Menu. The Scan Options screen appears, with Smart Scan selected by default.
Figure 71. Scan Options
2. Select the type of scan you wish to do:
Smart Scan. Quickly checks for malicious software in the places where it tends to hide.
Custom Scan. Checks for malicious software in a specific place, like a drive or folder.
Full Scan. Thoroughly checks every file on your Mac for malicious software.
Trend Micro™ Antivirus for Mac® 2016 – Product Guide v1.0
38
3. For the Custom Scan, click Choose Files or Folders to pick the areas you wish to scan. A selection dialog appears.
Figure 72. Select File or Folder
4. Navigate to the file or folder you wish to scan and click Choose.
5. Click Start Selected Scan. Internet Security scans your target file or folder, shows a progress dialog, then tells you when the scan has completed, presenting the results.
Figure 73. Scan Completed
6. Click OK to close the Scan Completed dialog.
Trend Micro™ Antivirus for Mac® 2016 - Product Guide v1.0
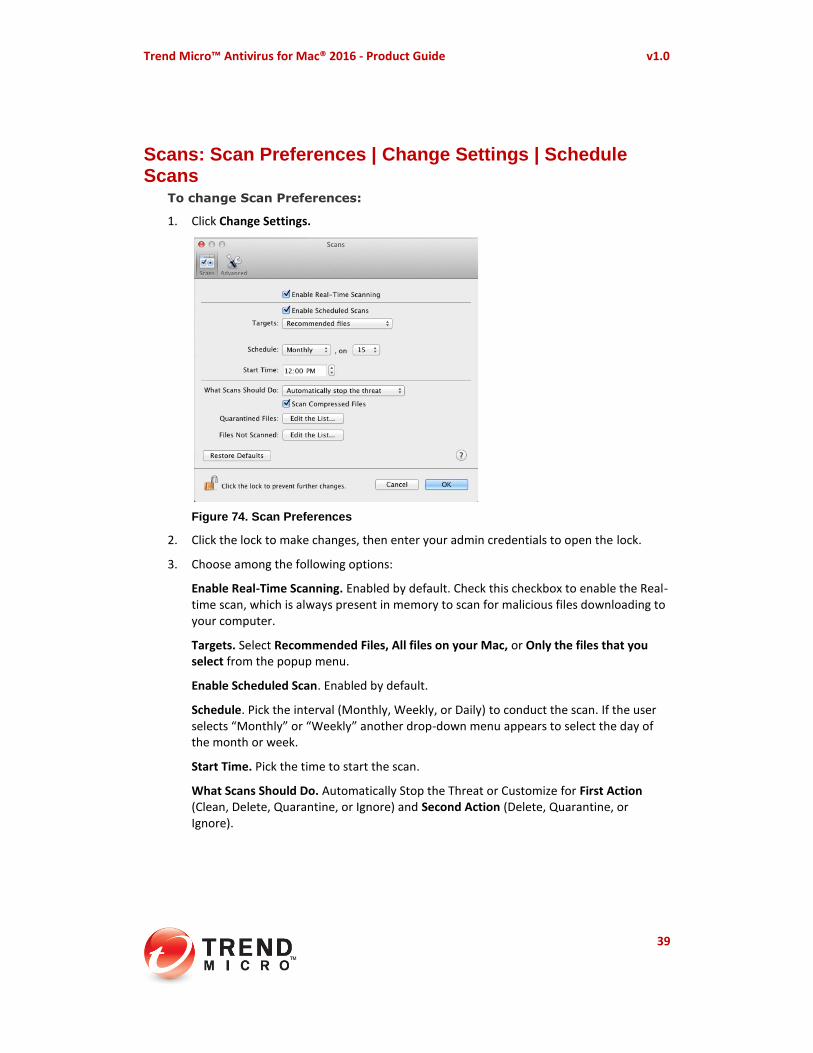
2. Click the lock to make changes, then enter your admin credentials to open the lock.
3. Choose among the following options:
Enable Real-Time Scanning. Enabled by default. Check this checkbox to enable the Real-time scan, which is always present in memory to scan for malicious files downloading to your computer.
Targets. Select Recommended Files, All files on your Mac, or Only the files that you select from the popup menu.
Enable Scheduled Scan. Enabled by default.
Schedule. Pick the interval (Monthly, Weekly, or Daily) to conduct the scan. If the user selects “Monthly” or “Weekly” another drop-down menu appears to select the day of the month or week.
Start Time. Pick the time to start the scan.
What Scans Should Do. Automatically Stop the Threat or Customize for First Action (Clean, Delete, Quarantine, or Ignore) and Second Action (Delete, Quarantine, or Ignore).
Trend Micro™ Antivirus for Mac® 2016 – Product Guide v1.0
40
Figure 75. Customize What Scans Should Do
Scan Compressed Files. Check this checkbox to scan compressed files.
Quarantined Files. Edit the list after the scan by clicking Restore, Delete, or Clean.
Figure 76. Quarantine List
Files Not Scanned. Click the Files, Folders, or File Types tab to choose the list. Edit the list before the scan by clicking the Plus sign (+) to add files or file types to the list(s), the Minus sign (-) to remove them, Edit to edit the list(s), then Done to save the list.
Figure 77. Files | Folders Not Scanned List
Trend Micro™ Antivirus for Mac® 2016 - Product Guide v1.0
41
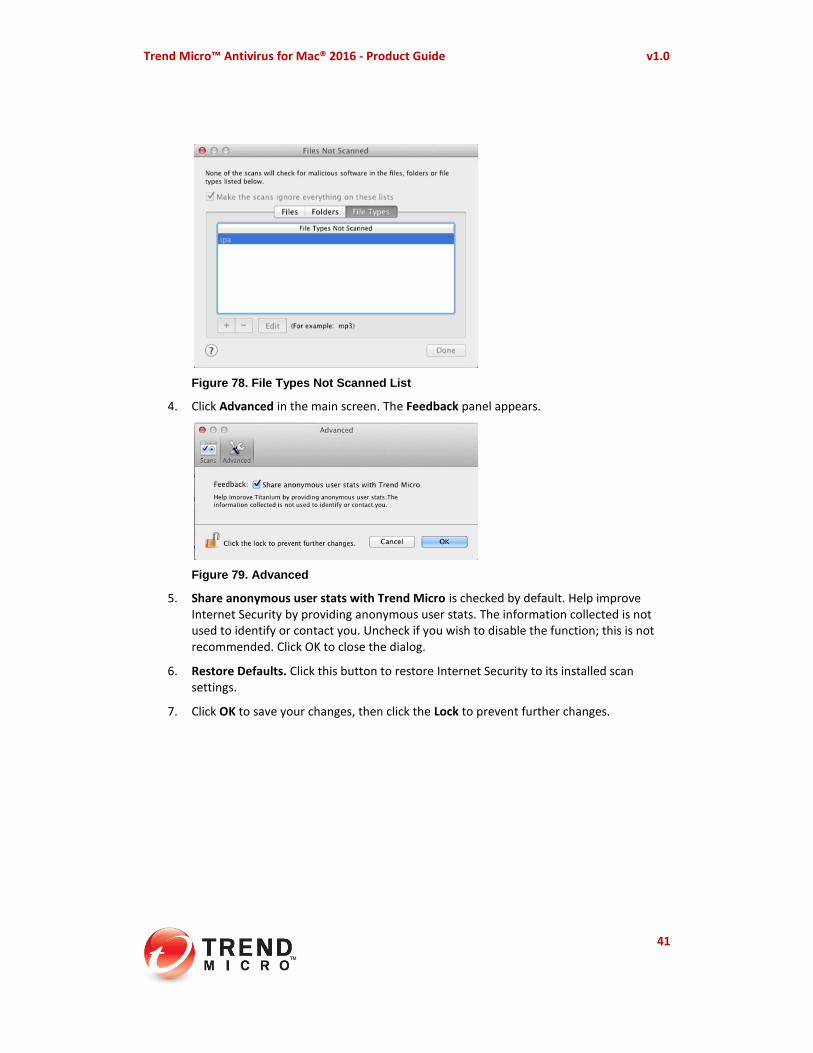
Figure 78. File Types Not Scanned List
4. Click Advanced in the main screen. The Feedback panel appears.
Figure 79. Advanced
5. Share anonymous user stats with Trend Micro is checked by default. Help improve Internet Security by providing anonymous user stats. The information collected is not used to identify or contact you. Uncheck if you wish to disable the function; this is not recommended. Click OK to close the dialog.
6. Restore Defaults. Click this button to restore Internet Security to its installed scan settings.
7. Click OK to save your changes, then click the Lock to prevent further changes.
Trend Micro™ Antivirus for Mac® 2016 – Product Guide v1.0
42
Logs To view Logs:
1. Select Logs from the Internet Security Console Command Menu. The Logs screen appears.
Period: Today, Last 24 hours, Last 7 days, Last 30 days, Customize.
Figure 81. Customize the Log Period
3. To delete a log, select the log in the list and click Delete.
Trend Micro™ Antivirus for Mac® 2016 - Product Guide v1.0
43
Help To get Help:
Figure 82. Help Icon
1. Click the Question Mark (?) in the Internet Security Console. The Help Center appears.
Figure 83. Help Center
2. Scroll down to review the main topics, click the topic headers to review them, or enter keywords in the Search Help field.
Trend Micro™ Antivirus for Mac® 2016 – Product Guide v1.0
44
About Trend Micro Trend Micro, a global leader in security software and solutions, strives to make the world safe for exchanging digital information. For the past 25+ years, its employees have been inspired to protect individuals, families, businesses and governments as they look to harness the potential of emerging technologies and new ways of sharing information.
In today’s organizations, information has become the most strategic asset; embodying competitive advantage and powering operational excellence. With the explosion of mobile, social and cloud technologies, protecting this information has become more challenging than ever. Organizations need smart protection of information, with technology that is simple to deploy and manage, and security that fits an evolving ecosystem. Trend Micro solutions enable a smart protection strategy for organizations. Smart. Simple. Security that fits.
Trend Micro provides layered content security for mobile devices, endpoints, gateways, servers and the cloud. Leveraging these solutions, organizations can protect their end users, their evolving data center and cloud resources, and their information threatened by sophisticated targeted attacks.
All of our solutions are powered by cloud-based global threat intelligence, the Trend Micro™ Smart Protection Network™, and are supported by over 1,200 threat experts around the globe. For additional information, visit www.trendmicro.com.