14
Leister Technologies AG Galileo-Strasse 10 CH-6056 Kaegiswil/Switzerland Tel. +41 41 662 74 74 Fax +41 41 662 74 16 www.leister.com [email protected] TRIAC AT English

Leister Technologies AGGalileo-Strasse 10CH-6056 Kaegiswil/SwitzerlandTel. +41 41 662 74 74 Fax +41 41 662 74 16 [email protected]
TRIAC AT
EnglishEnglish

2
ContentsContents
1. Application 31.1 Power supply 31.2 Protective clothing 31.3 Intended use 31.4 Unintended use 31.5 Safety Instructions 3
2. Functions 4
3. Technical data 4
4. Your TRIAC AT 54.1 Overview of device parts 54.2 Control knob (e-Drive) 54.3 Display 6
5. Commissioning 65.1 Connect the device to the power supply (standby) 65.2 Turning the device on (operation) 6
5.2.1 Setting the temperature 75.2.2 Setting the air volume 75.2.3 Checking the supply voltage 75.2.4 Locking / unlocking the controls (e-Drive) 7
6. Decommissioning 86.1 Turning the device off using the cool down function 8
6.1.1 Cancel turn down (revert to operation) 86.1.2 Enforced power down (continue to standby) 8
6.2 Turning the device off without the cool down function (directly into standby mode) 86.3 Disconnecting the device from the power supply 8
7. Configuration menu 97.1 Accessing the menu 97.2 Menu navigation 9
7.2.1 Defining the unit of temperature 97.2.2 Defining the working range 97.2.3 Defining eco mode 9
7.3 Exiting the menu 107.4 Display of a changed basic configuration 107.5 Resetting to the basic configuration (Reset) 10
8. Warnings 11
9. Errors and error codes 11
10. Maintenance and repair 1210.1 Cleaning the air filter 1210.2 Changing the heating element and mica tube 12
11. Disposal 12
12. Other applicable documents 12
13. Declaration of Conformity 13

3
TRIAC ATHot-air blower
Congratulations on your TRIAC AT purchase.You have chosen a first-class hot-air blower.The TRIAC AT was developed and produced in accordance with the latest state-of-the-art technology in the plastics-processing industry.
You can find more information about the TRIAC AT online at www.leister.com
This hot-air blower is suitable for welding, shrinking and shaping thermoplastics, as well as for heating up and drying thermoplastics.
We recommend that persons should wear suitable protective clothing (gloves, apron or similar) when using the device.
Any extension cables must be approved for usage site and be marked accordingly. Comply with the necessary minimum conductor cross-sec-tion for extension cables, as required.
When using on-site generators as a power supply, please ensure that the generators are equipped with residual-current circuit breakers. For the nominal output of the generators, the formula “2 × nominal output of the hot-air blower” applies.
Any other use of the TRIAC AT or any use beyond the type of use described is deemed improper use.
We recommend that you always keep the instruction manual with the device.
1. Application
The safety instructions for device can be found in the “Safety Instructions – Hand Tools” section in the document provided. You can also find this document in the operating instructions on our web-site.
1.1 Power supply
1.2 Protective clothing
1.3 Intended use
1.4 Unintended use
1.5 Safety Instructions
230V~ up to 10m 2 x 1.5 mm2
120V~ up to 10m 2 x 16AWG
4
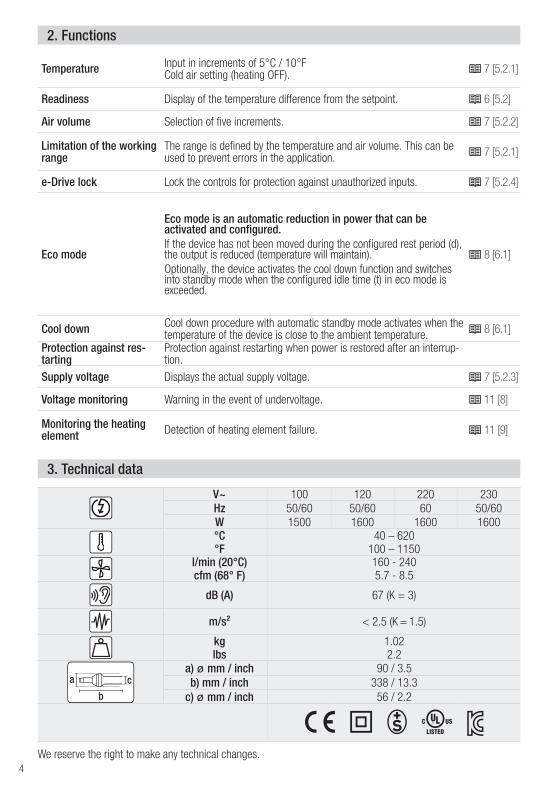
V~ 100 120 220 230Hz 50/60 50/60 60 50/60W 1500 1600 1600 1600°C°F
40 – 620100 – 1150
l/min (20°C)cfm (68° F)
160 - 2405.7 - 8.5
dB (A) 67 (K = 3)
m/s² < 2.5 (K = 1.5)
kglbs
1.022.2
a c
b
a) ø mm / inch 90 / 3.5b) mm / inch 338 / 13.3
c) ø mm / inch 56 / 2.2
We reserve the right to make any technical changes.
Temperature Input in increments of 5°C / 10°FCold air setting (heating OFF). 7 [5.2.1]
Readiness Display of the temperature difference from the setpoint. 6 [5.2]
Air volume Selection of five increments. 7 [5.2.2]
Limitation of the working range
The range is defined by the temperature and air volume. This can be used to prevent errors in the application. 7 [5.2.1]
e-Drive lock Lock the controls for protection against unauthorized inputs. 7 [5.2.4]
Eco mode
Eco mode is an automatic reduction in power that can be activated and configured.If the device has not been moved during the configured rest period (d), the output is reduced (temperature will maintain).Optionally, the device activates the cool down function and switches into standby mode when the configured idle time (t) in eco mode is exceeded.
8 [6.1]
Cool down Cool down procedure with automatic standby mode activates when the temperature of the device is close to the ambient temperature. 8 [6.1]
Protection against res-tarting
Protection against restarting when power is restored after an interrup-tion.
Supply voltage Displays the actual supply voltage. 7 [5.2.3]
Voltage monitoring Warning in the event of undervoltage. 11 [8]
Monitoring the heating element Detection of heating element failure. 11 [9]
2. Functions
3. Technical data

5
2
1
2
3
7
6
54
1 3
1
2
3
7
6
54
1. Heating element tube2. Protective tube3. Soft coating for non-slip placement4. Display
5. Control knob (e-Drive)6. Power supply cord7. Air filter
4. Your TRIAC AT
4.1 Overview of device parts
4.2 Control knob (e-Drive)
1
2
3
7
6
54
short press (<1s)long press (>1s) turn

6
1
1 2 3
2 3 43
Defective heating element 11 [9]
Heating – cooling 7 [5.2.1]
Blower 7 [5.2.2]
e-Drive lock 7 [5.2.4]Limit reached 9 [7.2.2]
Air volume display 7 [5.2.2]
Motor 11 [8] Overheating 11 [8]
Temperature display 7 [5.2.1]
Voltage 7 [5.2.3]
Undervoltage 11 [8]
Cooling down 8 [6] Maintenance 12 [10]
Software version
ready to use
A long press on the e-Drive will turn the device on. The device heats up until it reaches the setpoint from the last time it was used. Once there is no longer a difference in temperature (flashing arrow), the device is ready to use.
1 s
4.3 Display
5. Commissioning
5.1 Connect the device to the power supply (standby)
5.2 Turning the device on (operation)
The nominal voltage specified on the device must match the local supply voltage.
Fire hazard and burn hazardDo not touch the heating element tube and/or nozzle when they are hot, since they pose potential threat of injuries. Do not point the hot air flow at people or animals.
Hazardous voltage: Risk of injury or death if the cable or power plug is damaged. Prior to commis-sioning, check the power supply cord and the power plug together with the extension cable for electrical and mechanical damage.
7
1 2 3 4
1
1x
2 31
1
2 3
90° 90°
90° 90°2 3 4
1 2 3
2
4 s ready to use
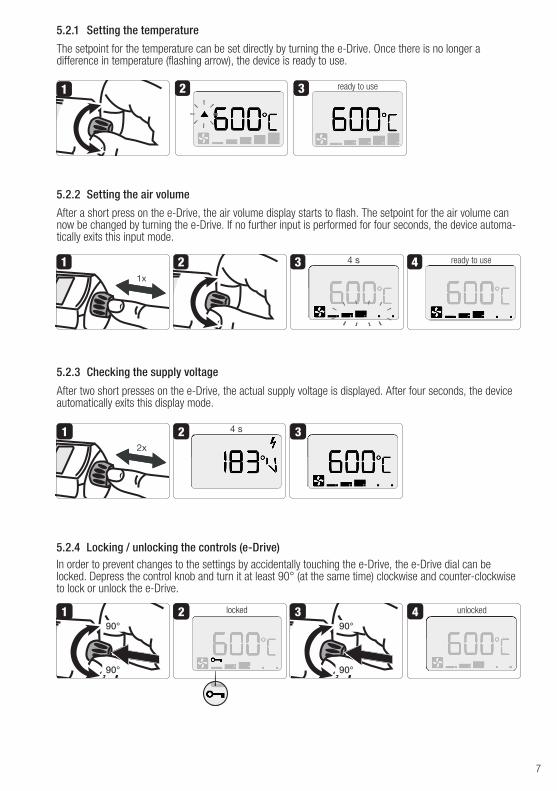
The setpoint for the temperature can be set directly by turning the e-Drive. Once there is no longer a difference in temperature (flashing arrow), the device is ready to use.
After two short presses on the e-Drive, the actual supply voltage is displayed. After four seconds, the device automatically exits this display mode.
ready to use
2x
4 s
After a short press on the e-Drive, the air volume display starts to flash. The setpoint for the air volume can now be changed by turning the e-Drive. If no further input is performed for four seconds, the device automa- tically exits this input mode.
5.2.1 Setting the temperature
5.2.2 Setting the air volume
5.2.3 Checking the supply voltage
In order to prevent changes to the settings by accidentally touching the e-Drive, the e-Drive dial can be locked. Depress the control knob and turn it at least 90° (at the same time) clockwise and counter-clockwise to lock or unlock the e-Drive.
locked unlocked
5.2.4 Locking / unlocking the controls (e-Drive)

8
2 3
2
1
3s
3s
1x
2 31
1s
1 2 3
1
1
A long press on the e-Drive, while the device is in operation, will start the cool down function.The device turns itself off automatically when the temperature of the device is close to the ambient temperature.
After a short press on the e-Drive while the device is cooling down, the device reverts to operation.
After a very long press on the e-Drive, while the device is cooling down, the device switches into standby mode (cancels the cool down function). Caution, the device may still be very hot.
ready to use
After a very long press on the e-Drive whilst the device is in operation, the device switches into standby mode (after one second it starts the cool down function and performs it for two seconds). Caution, the device may still be very hot.
Fire hazard and burn hazardDo not touch the heating element tube and nozzle when they are hot, since they pose potential threat of injuries. After use, allow the device to cool down.
Fire hazard and burn hazardDo not touch the heating element tube and nozzle when they are hot, since they pose potential threat of injuries. After use, allow the device to cool down.
6. Decommissioning
6.1 Turning the device off using the cool down function
6.1.1 Cancel turn down (revert to operation)
6.1.2 Enforced power down (continue to standby)
6.2 Turning the device off without the cool down function (directly into standby mode)
6.3 Disconnecting the device from the power supply
9
21 3
1x
1 34x
2
Eco 0
Eco 1
21x
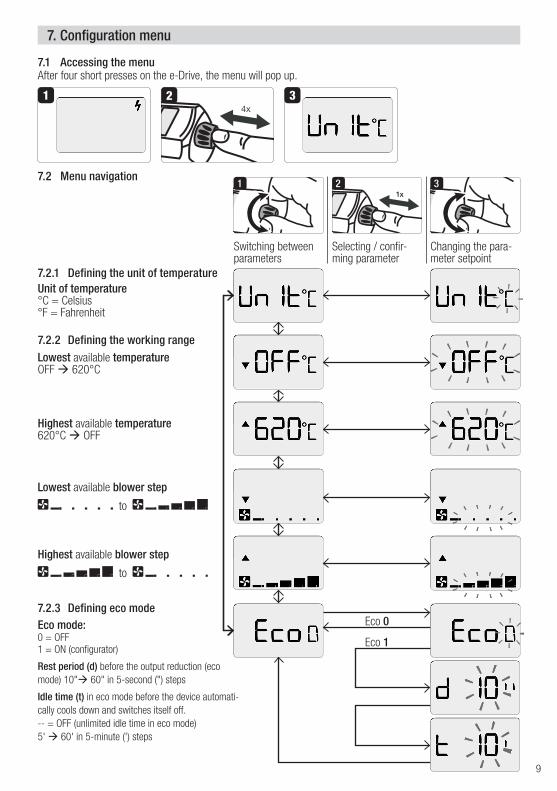
Unit of temperature°C = Celsius°F = Fahrenheit
Switching between parameters
Selecting / confir-ming parameter
Changing the para-meter setpoint
Lowest available temperatureOFF 620°C
Highest available temperature620°C OFF
Lowest available blower step
to
Highest available blower step
to
7. Configuration menu
After four short presses on the e-Drive, the menu will pop up.
Eco mode:0 = OFF1 = ON (configurator)
Rest period (d) before the output reduction (eco mode) 10" 60" in 5-second (") steps
Idle time (t) in eco mode before the device automati-cally cools down and switches itself off.-- = OFF (unlimited idle time in eco mode)5' 60' in 5-minute (') steps
7.1 Accessing the menu
7.2 Menu navigation
7.2.1 Defining the unit of temperature
7.2.2 Defining the working range
7.2.3 Defining eco mode

10
1 2 3 4
5 6
1s1s
Device with a changed basic configuration
Device with a basic configuration
7.3 Exiting the menu
7.4 Display of a changed basic configuration
7.5 Resetting to the basic configuration (Reset)
After a long press on the e-Drive, the menu will close.
Keep the e-Drive depressed, connect the device to the rate voltage and wait until RESET appears. The reset will be performed once the e-Drive is released.

11
Undervoltage check the supply voltage 7 [5.2.3]
About to reach the max. operating hours for the carbon brushes Maintenance recommended. Contact your Leister service center.
Device overheated (automatic cool down check the air flow, e.g. clean the air filter 12 [10.2]), check the nozzle etc.
8. Warnings
Defective heating element Replace 12 [10.1]
Withdraw the power plug start the device again. If the error recurs, contact your Leister service center.
9. Errors and error codes

12
1 4
7
2
5 8
3
6
1 2 3
With the exception of the following instructions, repairs may be performed exclusively by Leister-service centers.
Electrical equipment, accessories, and packaging should be recycled in an environmentally friendly way. When you are disposing our products, please observe the national and local regulations. For EU count- ries: Do not dispose electrical equipment with household refuse.
Hazardous voltage: risk of injury or death when opening the device due to exposed live components and terminals. Withdraw the mains plug from the socket before opening the device.
• Safety Instructions – Hand Tools (item number: 129.099)
10. Maintenance and repair
10.1 Cleaning the air filter
10.2 Changing the heating element and mica tube
11. Disposal
12. Other applicable documents

13
1/1
Leister Technologies AG | Galileo-Strasse 10 | 6056 Kägiswil | Switzerland phone: +41 41 662 74 74 | [email protected] | www.leister.com | www.weldy.com
PLASTIC WELDING PRODUCTS | INDUSTRIAL HEATING & LASER SYSTEMS
Company Titel First Last Name Address City, St. Zip
Your Ref. Our Ref. First Last Name Phone direct +41 (41) 662 Fax direct +41 (41) E-mail @leister.com Date
Subject Best regards Leister Technologies First Last Name Title
Leister Technologies AG | Galileo-Strasse 10 | 6056 Kägiswil | Switzerland phone: +41 41 662 74 74 | [email protected] | www.leister.com | www.weldy.com
PLASTIC WELDING PRODUCTS | INDUSTRIAL HEATING & LASER SYSTEMS
EC declaration of conformity (in terms of the EC machinery directive 2006/42; Appendix II A) Leister Technologies AG Galileo-Strasse 10, CH-6056 Kaegiswil/Switzerland hereby declares the machine described below, released by us, fulfills the provisions of the following EU directives: Designation Hot Air Tool Type TRIAC AT EU directives 2006/42/EC (Machinery Directive) 2014/30/EU (EMC Directive) 2011/65/EU (RoHS Directive) Harmonised standards EN ISO 12100:2010 EN 55014-1:2006 + A1:2009 + A2:2011 EN 55014-2:2015 EN 61000-6-2:2005 EN 61000-3-2:2014 EN 61000-3-3:2013 EN 62233:2008 EN 60335-1:2012 + A11:2014 + A13:2017 EN 60335-2-45:2002 + A1:2008 + A2:2012 EN 50581:2012 Authorised documentation representative: Thomas Schäfer, Manager Product Conformity Kaegiswil, 09.01.2020 ………………………………… ………………………………… Bruno von Wyl Christoph Baumgartner (Chief Technical Officer) (General Manager)
13. Declaration of Conformity

14
© Copyright by Leister
TRIA
C A
TA
rt. 1
41.3
15 /
01.
2020
Leister Technologies AGGalileo-Strasse 10CH-6056 Kaegiswil/SwitzerlandTel. +41 41 662 74 74Fax +41 41 662 74 [email protected]
Sales and service center
Warranty
• The guarantee or warranty rights granted for this device by the direct distribution partner/salesperson apply from the date of purchase. In the event of a guarantee or warranty claim (verification by invoice or delivery note), manufacturing or processing errors will be rectified by the sales partner through replacement delivery or repair. Heating elements are excluded from warranty obligations or guarantees.
• Other guarantee or warranty claims are excluded within the framework of mandatory law.• Damage resulting from natural wear, overload, or improper handling is excluded from the warranty.• No guarantee or warranty claims exist for devices that have been converted or modified by the purchaser.


