1638 Kebet Way, Port Coquitlam BC V3C 5W9 Tel: 604-942-1001 Fax: 604-942-1010 email: [email protected]www.tonebone.com Radial Engineering is a division of C•TEC (JP CableTek Electronics Ltd.) CLASSIC TRIMODE ™ Owners Manual ™ ®
Transcript
1638 Kebet Way, Port Coquitlam BC V3C 5W9 Tel: 604-942-1001 Fax: 604-942-1010 email: [email protected]
ww
.tone
bone
.com
Radial Engineering is a division of C•TEC (JP CableTek Electronics Ltd.)
CLASSIC TRIMODE
™
Owners Manual
™
®
Radial is a division of JP Cabletek Electronics Ltd. Specifications and appearances subject to change without notice.Radial Tonebone™ owners manual V1.0 - Part #: R870 1110 00
Congratulations on your purchase of the Radial Tonebone Trimode distortion pedal. Based on the original Tonebone Classic tube distortion, the Trimode gives guitar players instant access to the three most essential tones at once: clean, rhythm and lead. These three tones form a solid foundation from which to explore new sonic landscapes and spur on creativity.
This manual shows how to operate and maintain your Tonebone. To take advantage of all of the wonderful features that have been incorporated into the Trimode, please read through this manual before using it. This will give you a broader sense of the Trimode’s capabilities and answer most questions about its op-eration. Once done, please take time to experiment. You will find that the Trimode is so well designed it is practically impossible to make it sound bad!
If you have questions that are not covered in this manual, please visit the FAQ section on our website. This is where we post an-swers from questions that come from users. If you cannot find the answer to your question please feel free to send us an email at [email protected] and we will do our very best to respond as quickly as possible.
With three tones from one pedal, you're ready to TRI-umph!
1 Classic Trimode
True to the Music
Radial Engineering
INTRODUCTIONThe Trimode’s tone and distortion philosophy follows the Ameri-can tradition set by Leo Fender some 50 years ago, the very root of all the finest tube amplifiers made today.
Like the award-winning Tonebone Classic, the Trimode is a 12AX7 tube-equipped hybrid distortion pedal that combines the warmth and natural harmonic generation of a tube with the dynamics and control of our unique overdrive circuit. Activate the Trimode and toggle between clean "true bypass", crunchy rhythm and searing lead tones with days-of-sustain for the ulti-mate live performance pedal. The Trimode has three operational modes. The first mode is true-bypass. In true-bypass mode, the clean sound of your amp comes through without alteration. The second and third modes are distortion channels 1 and 2. For the purposes of this manual we will refer to channel-1 as rhythm and channel-2 as lead, as this is how most players will use the Trimode.
The two distortion channels in the Trimode feature slightly differ-ent tonal structures that have been voiced for rhythm and lead use. The difference between the channel voicing is subtle, yet very musical. The Trimode’s rhythm channel is slightly tighter to ensure the distinctiveness of each string is retained even when the tone is highly saturated. For added control, rhythm channel-1 is equipped with an intermediate drive gain for fine-tuning the amount of distortion.
The lead channel's voicing offers slightly more mid-range to cut through and extra sustain. Furthermore, each Trimode channel has slightly different MID BOOST settings that let you fine-tune the critical mid-range frequencies. To add even greater control over your lead sound, channel-2 features a built-in effects loop. The effects loop allows an echo, chorus or delay to be inserted into the lead channel and be instantly activated when the lead channel is engaged. One foot stomp gets you distortion with ef-fects for solos that stand out from the mix. This is way cool!
The Trimode's EQ is a powerful tool that allows you to make a subtle change in your tone or carve up the frequency response for extremes. Both Trimode channels share the HIGH, LOW, FILTER controls and the TOP END switch for controlling the overall tone.
Using the Trimode will become second nature as you become accustomed to what each control does. The best way to get there is to understand each function, experiment, and above all, have fun!
True to the Music
2Radial Engineering Classic Trimode
FEATURES AND FUNCTIONS OVERVIEW
1. Guitar input jack 1/4" jack connection for guitar input.
2. Intermediate drive gain control (on side) Used to fine tune the distortion of rhythm channel-1. Works in conjunction with DRIVE GAIN switch, DRIVE-1 and LEVEL-1 controls.
3. Drive-1 control Used to adjust the amount of input gain & distortion for the rhythm channel-1.
4. Drive gain switch Used to set the overall amount of distortion. LOW = 0dB, MED = +9dB, HIGH = +20dB.
5. Drive-2 control Used to adjust the amount of input gain & distortion for the lead channel-2.
6. Mid boost 1 and 2 switches Separate switches for rhythm channel-1 and lead channel-2. Used to fatten up the sound for more cut and sustain. Channel 1 High: Boosts +8dB @ 390Hz Medium: Boosts +4dB @ 390Hz Out: Flat, no boost
7. Filter control Anti-presence gently reduces high frequencies to compensate for overly bright amplifiers.
8. Low frequency control Active ‘post-distortion’ tone control. Boost or cut ±14.5dB at 100Hz. 12 o’clock position equals zero boost/cut.
9. Top end switch Shapes the Trimode's overall high frequency response. BRIGHT: +6dB @ 10kHz, adds sparkle and character. FLAT: switched out of circuit, no boost or cut. DARK: -6dB @ 1.8kHz, compensates for bright-sounding amps.
10. High frequency control Active ‘post-distortion’ tone control. Boost or cut ±10dB at 4.3kHz. 12 o’clock position equals zero boost/cut.
11. 12AX7 vacuum tube The Trimode combines solid-state circuity with a tube (valve) to create a wide range of distortion from slight over-drive to bone crunching saturation.
12. Level-1 control This is used to adjust the overall output level of rhythm channel-1.
13. Level-2 control This is used to adjust the overall output level of lead channel-2.
14. External power supply connection 15VDC (400mA) PSU connection.
15. Effects loop insert jack 1/4" TRS insert jack allows effect pedals to be placed in the lead channel-2 signal path. (Tip=Send / Ring=Return)
16. Guitar output jack 1/4" jack connects to amplifier's input.
17. True-bypass footswitch with LED indicator When the Trimode is bypassed, the guitar signal passes straight through without any effect. The full size LED illuminates when in true-bypass mode.
18. Channel toggle footswitch with LED indicators Toggles between rhythm channel-1 and lead channel-2. Full size LEDs indicate the active channel.
4
True to the Music
Radial Engineering Classic Trimode
MAKING CONNECTIONSAs with any pedal, make sure your amp is off and the volume turned down before making connections. Connect your guitar to the input of the Trimode and the output of the Trimode to your amplifier. There is no power switch on the Trimode. Connecting the 15VDC power supply automatically activates the Trimode. The Trimode is designed to stay on for long periods and leav-ing it on will exert very little wear and tear on the tube. Like a tube amplifier, the Classic Trimode should be allowed to warm up for a few minutes so the tube can reach a stable operating temperature.
USING THE TRIMODEThe Trimode is now ready for operation. Turn on your amp and bring up the volume slowly to ensure proper connections have been made. To start, set your amp to a clean sound so you can hear how each of the Trimode functions work.
FootswitchesThe Trimode features two footswitches. The first footswitch is labeled TRUE-BYPASS and selects the clean sound of your amp. When in true-bypass mode, the bypass LED will illuminate, signaling the Trimode is switched 'OUT' of your signal chain. The second footswitch, labeled TOGGLE, selects between the two Trimode distortion channels. Each channel has its own LED to indicate the Trimode’s channel status. The cool thing about true-bypass mode is you can still toggle between the rhythm and lead channels to prepare for the next sound. Try it! Activate the true-bypass footswitch. Now switch between the Trimode channels by stepping on the channel TOGGLE footswitch. The channel LEDs will alternately light up but the Trimode will remain in by-pass mode until the true-bypass footswitch is depressed again. Control PanelThe Trimode is extremely versatile and easy to use. To get started, we recommend setting the Trimode up as follows:
Note the tone controls (HIGH, LOW and FILTER) are set at 12 o’clock in what is commonly known as ‘flat’. Begin by set-ting the DRIVE GAIN switch to the MEDIUM position and set the DRIVE-1 control to 9 o’clock and the DRIVE-2 control to 3 o’clock. Now, adjust the output LEVEL controls for each channel to your desired listening level. With these settings, the rhythm and solo channels will sound quite different. You are now ready to start experimenting.
i
TRIMODE DRIVE AND LEVEL CONTROLSThink of the Trimode as a two channel amplifier. There are two input drive controls and two output levels that work very much like the preamp and power-amp stages of a guitar amp. On the Trimode, this is supplemented with a 3 position overall drive range control that allows you to set the input level from the guitar from slight overdrive, to moderate or full on distortion.
The LOW position is great for replicating the sound of older amps that do not have a master volume for those ‘clean’ but slightly crackling tones from the early days of rock & roll. The MED (medium position) lets you get into the crunchy rhythm tones and bluesy lead tones and truly shines when used in conjunction with the volume control on your guitar for added dynamics. The HIGH position gives you maximum saturation for metal and power.
Start by setting the Trimode to the MED position as this will give you the most range. With channel-1 drive at 9 o’clock and the channel-2 drive at 3 o’clock, you will immediately get a sense of how these can be set to work together. Then set your rhythm and lead channel output levels to suit.
For added control, we have introduced an intermediate drive on the rhythm channel that is factory set at 12 o’clock. This control lets you fine-tune the amount of distortion produced by the rhythm channel-1. It is accessed through a small hole on the side of the Trimode. Use a small “tweaker” screwdriver to adjust the intermediate drive gain of channel-1. This control is factory set at 50%. Turn the control counter-clockwise for a “cleaner” rhythm channel-1. Turn the control clockwise for more distortion.
Note: If you find you are consistently placing the DRIVE-1 control at the 1 o’clock position or higher, consider increasing the channel-1 INTERMEDIATE DRIVE by turning it clockwise. This will increase the range of DRIVE-1 control by allowing you to set it at a lower position. If you find that rhythm channel-1 is not quite clean enough even with the DRIVE-1 control set low, consider decreasing the channel-1 INTERMEDIATE DRIVE control by turning it counter-clockwise.
5
True to the Music
Radial Engineering Classic Trimode
i
6
True to the Music
Radial Engineering Classic Trimode
Mid Boost SwitchesThe Trimode’s rhythm and lead channels have been voiced slightly differently to maximize their effectiveness. This is supple-mented with a different 3-position MID BOOST switch for each channel. In the OUT position, the switch has no effect. On chan-nel-1, you can boost the signal +4dB and +8dB @ 390Hz re-spectively, while on channel-2, the mid boost can be set at +9dB or +20dB. The mid boost is one of the most beneficial functions built-in the Trimode. Adding mid boost to your distorted tone will make it sustain longer and help you cut through the mix.
TRIMODE TONE CONTROLS
Top End SwitchThe TOP END switch controls the Trimode's overall high frequency response. It has three settings; DARK, FLAT and BRIGHT. Start with the FLAT setting and experiment with the Trimode’s powerful HIGH and LOW EQ. If you have an overly bright amp, you may end up with the DARK setting. On the other hand, if you are looking for that big ‘scooped’ chunky tone, you might increase the LOW EQ control to 5 o’clock and set the TOP END switch to BRIGHT. Use your ears and have fun!
Filter ControlThe FILTER control is like an "anti-presence" and is used to tame bright-sounding amps. It also reduces the high end that can be brittle when recording direct. Turning the FILTER control counter-clockwise rolls off high frequencies. The full clockwise setting removes it from the signal path.
Treble and Bass ControlsThe HIGH and LOW controls are active EQ controls that come after the distortion circuit. The 12 o’clock position is neutral or “flat”. The HIGH control is capable of boosting or cutting the signals by 10dB at 4.3kHz. The LOW control boosts or cuts the signal by 14.5dB at 100Hz. These are very powerful EQ controls and small adjustments will make a big impact.
Note: While you are working with the Trimode, keep in mind that all the controls interact together. This means that when you add bass or treble, the perceived loudness will be affected. The Trimode is designed to allow you to create your own distinct tone by working all of the controls together to find your personal sweet spot. Because of the Trimode’s amazing interactive EQ, it is almost impossible to find a bad or unusable tone. Take your time, listen and test the extremes. This can lead to all kinds of fun settings. So that you may recreate these tones again, record them on the tone charts provided in the back of this manual. There are so many possibilities that it is worth taking the time to experiment
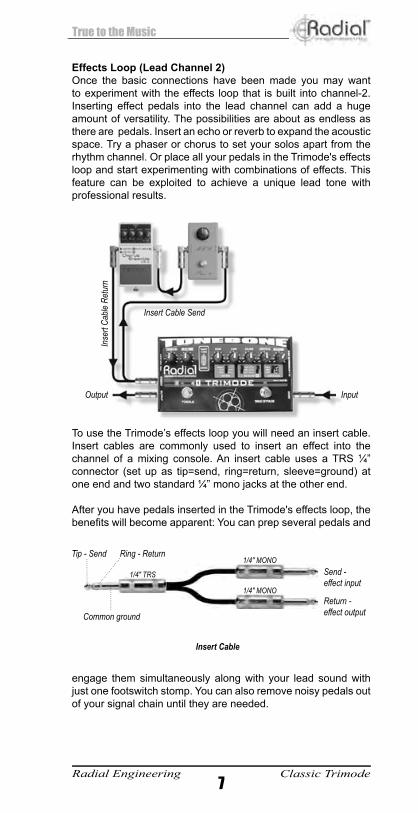
Effects Loop (Lead Channel 2)Once the basic connections have been made you may want to experiment with the effects loop that is built into channel-2. Inserting effect pedals into the lead channel can add a huge amount of versatility. The possibilities are about as endless as there are pedals. Insert an echo or reverb to expand the acoustic space. Try a phaser or chorus to set your solos apart from the rhythm channel. Or place all your pedals in the Trimode's effects loop and start experimenting with combinations of effects. This feature can be exploited to achieve a unique lead tone with professional results.
To use the Trimode’s effects loop you will need an insert cable. Insert cables are commonly used to insert an effect into the channel of a mixing console. An insert cable uses a TRS ¼” connector (set up as tip=send, ring=return, sleeve=ground) at one end and two standard ¼” mono jacks at the other end.
After you have pedals inserted in the Trimode's effects loop, the benefi ts will become apparent: You can prep several pedals and
engage them simultaneously along with your lead sound with just one footswitch stomp. You can also remove noisy pedals out of your signal chain until they are needed.
True to the Music
7Radial Engineering Classic Trimode
Insert Cable
Send - effect input
Return - effect output
Tip - Send Ring - Return
Common ground
1/4" TRS
1/4" MONO
1/4" MONO
Output Input
Inse
rt Ca
ble R
etur
n
Insert Cable Send
CHANGING THE TUBEYour Tonebone has been designed to provide years of perfor-mance before ever needing the tube changed. In fact, it is unlikely that a tube change will be necessary for two to three years or more, depending on use. Change the tube only when a degradation of sound is noticeable.
Disassembly
1. Remove the rubber knobs by pulling them straight up. These pressure-fitted knobs should be removed with care to avoid damage.
2. Remove the nuts and washers securing the potentiometer, footswitch, and input/output jacks using an open-ended wrench or socket. Please use caution so as not to mar the finish.
3. Remove the 4 bottom screws that hold the top and bottom chassis halves together. Carefully separate them. Note that the chassis top and bottom fit snugly, so a little careful force may be needed to clear the two side-mounted ¼” input and output connectors. Watch you don’t lose the nylon washer between the footswitch and the chassis top!
4. Remove and replace the tube. To do this, gently loosen the 12AX7 tube in the socket by wiggling it back and forth.
Reassembly
1. Install the PC board to the chassis top. Carefully align the potentiometers, LEDs and footswitches with the holes in the chassis and assemble through the top. Don’t forget the nylon footswitch washer!
2. Attach the pot, footswitch washers and nuts (just finger-tight for now), to allow alignment of the jacks when the bottom is attached.
3. Carefully push the chassis bottom on, spreading the sides slightly so as not to stress the side mounted ¼” input and output jacks.
4. Attach the side ¼” jack washers and nuts. Do not over-tighten the plastic isolation jacks as they can strip. Attach the 4 chas-sis screws (don’t over-tighten). Now you can tighten up the potentiometer shaft nuts.
5. Re-install the knobs... first rotate the potentiometer shafts fully counter-clockwise. Place the knobs over the shafts so they point to 7 o’clock and push straight down.
6. Test the pedal to make sure it works… plug in the power. The
LEDs should light when you depress the footswitches and you can see the tube filament light up through the side vents.
8Radial Engineering Classic Trimode
True to the Music
Ready to wiggle tube out of the socket. 12AX7 tube replacement.
9Radial Engineering Classic Trimode
Ready to change the tube? Ok, lets start here.
Knobs off, nuts & washers off, side jack nuts & washers off, now remove screws.
True to the Music
Spread chassis sides to clear input & output jacks.
Press on knobs with shafts counter-clockwise and pointers at 7 o’clock.
TROUBLE SHOOTINGI am not getting any sound at all… Start by connecting your guitar directly to your amplifier & check each cable to make sure they work. Make sure that these are plugged in correctly.
I am getting sound but no distortion… Make sure pedal is not connected backwards by reversing the input and output. If ok, check tube. If the problem persists, see your Tonebone dealer.
The LEDs do not light up… Check the power adaptor to make sure it is plugged in. If the LEDs do not light up, check the outlet with another device to make sure power is present. If they still do not light up, check the power supply with a voltmeter.
The sound has changed, it sounds thin… The tube may need changing. Bring it to your dealer to have him test to make sure.
I am getting radio signals though my amplifier… Cables and bad grounding are usually the cause. Check amplifier is properly grounded with a 3-prong A/C cord and wall receptacle is wired correctly. Use high quality guitar cables with proper shielding.
PHOTOS OF TONEBONE CLASSIC
10Radial Engineering Classic Trimode
True to the Music
FAQ
Q: Why do you call it a Trimode when it only has two distor-tion settings?A: We felt that getting the ‘clean, rhythm, lead’ point across was so important that we had to come up with a name to relate the function. Trimode says it all.
Q: Is the Trimode like having a Classic and a Hot British in a single pedal?A: Yes and no. The Trimode’s two channels have been voiced slightly differently to capture the very best rhythm and solo tones in a single unit. This allows the Trimode to get close to some of the fat tones that can be created with the Hot British. However, the Classic employs two internal gain stages while the Hot Brit-ish employs three and a different circuit topology.
Q: What is a hybrid design? The Tonebone Classic Trimode combines tube and solid-state circuitry to create the tone. The tube provides harmonics and warmth while the solid-state gain stages provide the saturation. We found that this winning combination provides great tone, lots of dynamics and low noise.
Q: What kind of tube is inside the Trimode?The Trimode employs a standard 12AX7. Because we are ‘starv-ing the tube’ with low voltage, the tube will last a long time and will never get very hot. The ‘air vents’ on the side panel provide sufficient ventilation to keep the Trimode running cool.
Q: I thought tubes required high voltage to work?This is true. To make tubes sound good and clean, they need lots of voltage. But we are not trying to get the tubes to sound clean. We are trying to get the tubes to distort, so we starve them of voltage to suit our purpose. It’s an old trick, but it works!
Q: Why does the Trimode require 15VDC to work?Even though we are starving the tubes, we still need sufficient voltage to get the heater coils to "light up". The typical 9V sup-plies just do not have sufficient voltage to do the job.
Q: Can I use a multi-pedal power supply with the Trimode? Please check with the manufacturer and your dealer on this mat-ter to be sure. Some pedalboard power supplies are equipped with 16VDC outputs and the Tonebones may be run with these so long as the polarity is correct and the supply can output 400mA of current. Q: What is the benefit of having an effects loop? There are several advantages in using the Trimode's effects loop. The primary advantage is you can augment the tone of the lead channel-2 by inserting effects or combinations of effect pedals. Another advantage is the ability to prep several pedals "off-line" and then engage with your lead sound simultaneously.
11Radial Engineering Classic Trimode
True to the Music
The effects loops also allows you to take pedals out of the sig-nal chain when they are not in use. This reduces noise and will provide you with a better tone. Most pedals are not ‘true-bypass’ and therefore introduce a load on the signal which will affect the clean tone.
Q: Can I not simply connect all my pedals in series?As for using all of your pedals in series, you can of course do this. You would, however, be losing the benefits of the Trimode's effects loop that allows you to engage effect pedals along with your lead sound. The Trimode's effects loop also lets you keep the pedals connected to it out of the main circuit. This will trans-late into better dynamics and less noise, especially when in rhythm and clean modes.
Q: Can I get ‘Marshall’ style tones with the Trimode? Tone is subjective. If you read the user comments on Har-mony Central, (http://www.harmony-central.com/Effects/Data/Tonebone/) you will find that some users find the Classic’s tone to be very much like a ‘Marshall’ while others insist the Hot Brit-ish is the best ‘Marshall in a pedal’ made. I think it is safe to say that if you combine the Classic with a good amp, a good guitar and a good pair of hands, you can get some very good sounds and be able to perform most musical styles.
Q: Can I use the Trimode for two different lead tones? Yes of course. We only refer to channel-1 as the rhythm channel for reference sake. The Trimode’s rhythm channel is voiced very much like the original Classic while the solo channel has been voiced for a bit more bite. Both will yield exceptional lead tones. If you are using channel-1 for lead work try increasing the chan-nel-1 INTERMEDIATE DRIVE control for more distortion.
Q: How can I get more sustain with my tone? Generally, there are two types of sustain: a heavily distorted tone will provide plenty of sustain at low levels; a clean sustain is generally played louder and is created by controlled feedback with added mid-range. The Trimode is able to do both.
Q: Can I record 'direct' using the Trimode?Yes. Many musicians use Tonebone pedals to record direct. When you do, keep in mind that these pedals have been de-signed to work best when connected to a guitar amplifier. Most professional guitar amps use 12" speakers which tend to have lots of mid-range. This means that you wil have to adjust your EQ to suit. A good place to start is reducing the high end with the Trimode's FILTER control. Most players find the high-end often needs to be attenuated when recording direct.
12Radial Engineering Classic Trimode
True to the Music
EXAMPLE SETTING
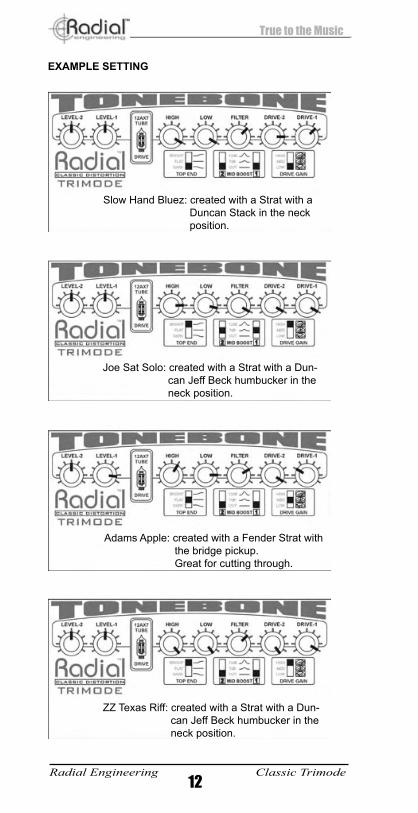
Slow Hand Bluez: created with a Strat with a Duncan Stack in the neck position.
Joe Sat Solo: created with a Strat with a Dun-can Jeff Beck humbucker in the neck position.
Adams Apple: created with a Fender Strat with the bridge pickup. Great for cutting through.
ZZ Texas Riff: created with a Strat with a Dun-can Jeff Beck humbucker in the neck position.
13Radial Engineering Classic Trimode
True to the Music
Chunky Rhythm: created with a Strat with middle pickup.
Water Smoke: created with a Strat with middle pickup.
Deep Lazy: created using a stock Strat with a Twin using the middle pickup. Move to the bridge pickup for more cut.
Dire Violin Singing Strat: created using a Les Paul in the neck position. Used with volume control for effect.
14Radial Engineering Classic Trimode
True to the Music
Metallic Shrine: created using a Strat in the bridge position. Big sound with small pickup!
Johnny B. Goodness: created using a Strat in the bridge position. Great for all kinds of rhythms when you want extra edge.
Clean Voodoo Child: Created using a Strat in the neck position. Change the volume on the guitar to get maximum effect
Stone Age Sugar: Created using a Strat and a Fender Twin Reverb amp. Great dynam-ics for rhythm.
USER SETTINGS
15Radial Engineering Classic Trimode
True to the Music
16Radial Engineering Classic Trimode
True to the Music
USER SETTINGS
17Radial Engineering Classic Trimode
True to the Music
USER SETTINGS
True to the Music
1638 Kebet Way, Port Coquitlam BC V3C 5W9 tel: 604-942-1001 fax: 604-942-1010 email: [email protected]
Radial Engineering - a division of JP Cabletek Electronics Ltd. warrants this product to be free from defects in material and workmanship to the original owner and will remedy any such defects free of charge according to the terms of this warranty. Radial Engineering will repair or replace at its option any defective component(s) of this product, excluding the finish, the tube, the footswitch (tube and footswitch are warranted for 90 days) and wear and tear from normal use, for a period of three (3) years from the original date of purchase. In the event that a particular product is no longer available, Radial Engineering reserves the right to replace the product with a similar product of equal or greater value. To make a request or claim under this limited warranty, the product must be returned prepaid in the original shipping container (or equivalent) to Radial Engineering or to an authorized repair centre and you must assume the risk of loss or damage. A copy of the original invoice showing date of purchase and the dealer name must accompany any request for work to be performed under this limited war-ranty. This limited warranty shall not apply if the product has been damaged due to abuse, misuse, misapplication, accident or as a result of service or modification by any other than an authorized repair centre.
THERE ARE NO EXPRESSED WARRANTIES OTHER THAN THOSE ON THE FACE HEREOF AND DESCRIBED ABOVE. NO WARRANTIES WHETHER EXPRESSED OR IMPLIED, INCLUDING BUT NOT LIMITED TO, ANY IMPLIED WARRANTIES OF MERCHANTABILITY OR FITNESS FOR A PARTICULAR PURPOSE SHALL EXTEND BEYOND THE RESPEC-TIVE WARRANTY PERIOD DESCRIBED ABOVE OF ONE YEAR.
RADIAL ENGINEERING SHALL NOT BE RESPONSIBLE OR LIABLE FOR ANY SPECIAL, INCIDENTAL OR CONSEQUENTIAL DAMAGES OR LOSS ARISING FROM THE USE OF THIS PRODUCT. THIS WAR-RANTY GIVES YOU SPECIFIC LEGAL RIGHTS, AND YOU MAY ALSO HAVE OTHER RIGHTS, WHICH MAY VARY FROM STATE/PROVINCE TO STATE/PROVINCE.