EZClaim Premier ANSI 837P 5010 TriZetto Clearinghouse Manual EZClaim Medical Billing Software November 2016 TriZetto Site ID#_________________ TriZetto SFTP Password_________________ Trizetto Website login Password ________________
Transcript
EZClaim Premier ANSI 837P 5010
TriZetto Clearinghouse Manual
EZClaim Medical Billing Software November 2016
TriZetto Site ID#_________________
TriZetto SFTP Password_________________
Trizetto Website login Password ________________
2
Enrollment Process for EDI Services
Note: For questions regarding TriZetto Enrollment, Payer agreements, testing, or other Clearinghouse questions please contact TriZetto Enrollment Dept. at 1.800.969.3666 or Trizetto Customer Service at 1.800.556.2231.
Client signs a contract with TriZetto. Within 24 hours a Trizetto Provider Enrollment representative will call the client for their initial “Kick off
Call”. Any outstanding client questions can be answered at this time.
After the call, client receives a TriZetto Welcome Email containing a link to TriZetto’s website along with the username and temporary password to login to client website and start enrollment process.
Once logged into the TriZetto website the client will enter the practice, provider, and payer information
including addresses, NPIs, and payer specific provider numbers. Client will also select the transactions they wish to be enrolled for by payer (such as claims and/or remittance).
Client will have the Digital Signature Option which gives them the option to not have to sign enrollment
paperwork. The Digital Signature Option is suggested for a timely enrollment.
Once the client submits the information through the online Enrollment Manager, their dedicated Provider Enrollment Rep. will review data for completeness and accuracy and generate the enrollment forms.
The practice can access their Enrollment Status at any time on their online TriZetto account. This
access also includes payer turn-around times for EDI approval dates.
A dedicated representative from the TriZetto Implementation Team will reach out to schedule an appointment for the claim test file. Trizetto will notify EZClaim of the installation day and time.
EZClaim will contact the client prior to submitting a test file to assist with EZClaim program set up. Plan
20-30 minutes for this call.
TriZetto will contact the client on the phone on the specified day and time to assist with the upload of the first claim file.
The client file is tested by TriZetto to ensure that all payer IDs, NPI numbers, and all other claims data
is accurate. Once testing is complete the site is moved into Production. Any questions can be directed to TriZetto Customer Service Department at 1-800-556-2231.
Once the client is in production and sending claims, they will be contacted by TriZetto to schedule
TriZetto website training.
Clients can register for additional Client Training webinars on the TriZetto website. Webinars are recommended for new clients and they’re FREE!
If you have questions at any time, please contact TriZetto Customer Service at 800-556-2231
3
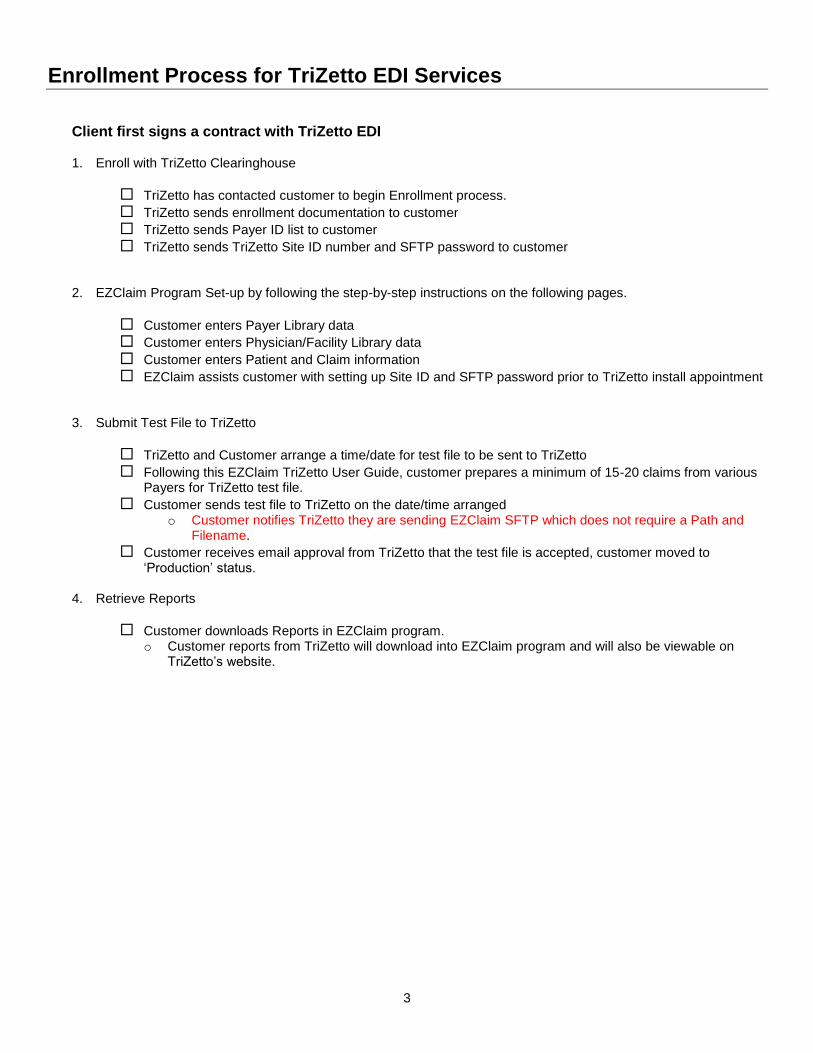
Enrollment Process for TriZetto EDI Services
Client first signs a contract with TriZetto EDI
1. Enroll with TriZetto Clearinghouse
TriZetto has contacted customer to begin Enrollment process.
TriZetto sends enrollment documentation to customer
TriZetto sends Payer ID list to customer
TriZetto sends TriZetto Site ID number and SFTP password to customer
2. EZClaim Program Set-up by following the step-by-step instructions on the following pages.
Customer enters Payer Library data
Customer enters Physician/Facility Library data
Customer enters Patient and Claim information
EZClaim assists customer with setting up Site ID and SFTP password prior to TriZetto install appointment
3. Submit Test File to TriZetto
TriZetto and Customer arrange a time/date for test file to be sent to TriZetto
Following this EZClaim TriZetto User Guide, customer prepares a minimum of 15-20 claims from various Payers for TriZetto test file.
Customer sends test file to TriZetto on the date/time arranged o Customer notifies TriZetto they are sending EZClaim SFTP which does not require a Path and
Filename.
Customer receives email approval from TriZetto that the test file is accepted, customer moved to ‘Production’ status.
4. Retrieve Reports
Customer downloads Reports in EZClaim program. o Customer reports from TriZetto will download into EZClaim program and will also be viewable on
TriZetto’s website.
4
Payer ID# Lists Click on the link below to access the TriZetto Payer Lists. http://payers.TriZettoedi.com/ Click on ‘Professional (HCFA)’
Open ‘Advanced Search’ or search by clicking on a letter.
The following errors will cause your claims to reject at TriZetto!!
Zip Code - The Facility and Billing zip codes must be nine digits without punctuation.
Assignment of Benefits -. Confirm selection is correct. See ‘Patient Information’ tab. If unchecked, payment from the insurance will go directly to the patient.
Tax ID – Do not use a hyphen or any spaces in the Tax ID. See ‘Physician, Facility Library’.
Payer ID # - Trizetto payer IDs must be entered in the ‘Payer Library’. http://payers.gatewayedi.com/default.aspx
DX Codes - All DX codes must be valid codes.
PO Box Number - You cannot use a PO Box for the Billing or Facility locations. (Box 32 & 33 of the claim form (Facility and Billing information.) See Step 2- ‘Physician, Facility Library’ for setting up a PO Box Number.
Hospital Admission Date -Include an Admitted Date on all inpatient hospital medical visits. Go to Claims screen>Claim Information grid>Date Information
Taxonomy Codes - Taxonomy Codes must be 10 digits http://www.wpc-edi.com/reference/ See ‘Physician, Facility Library’ > Taxonomy Codes
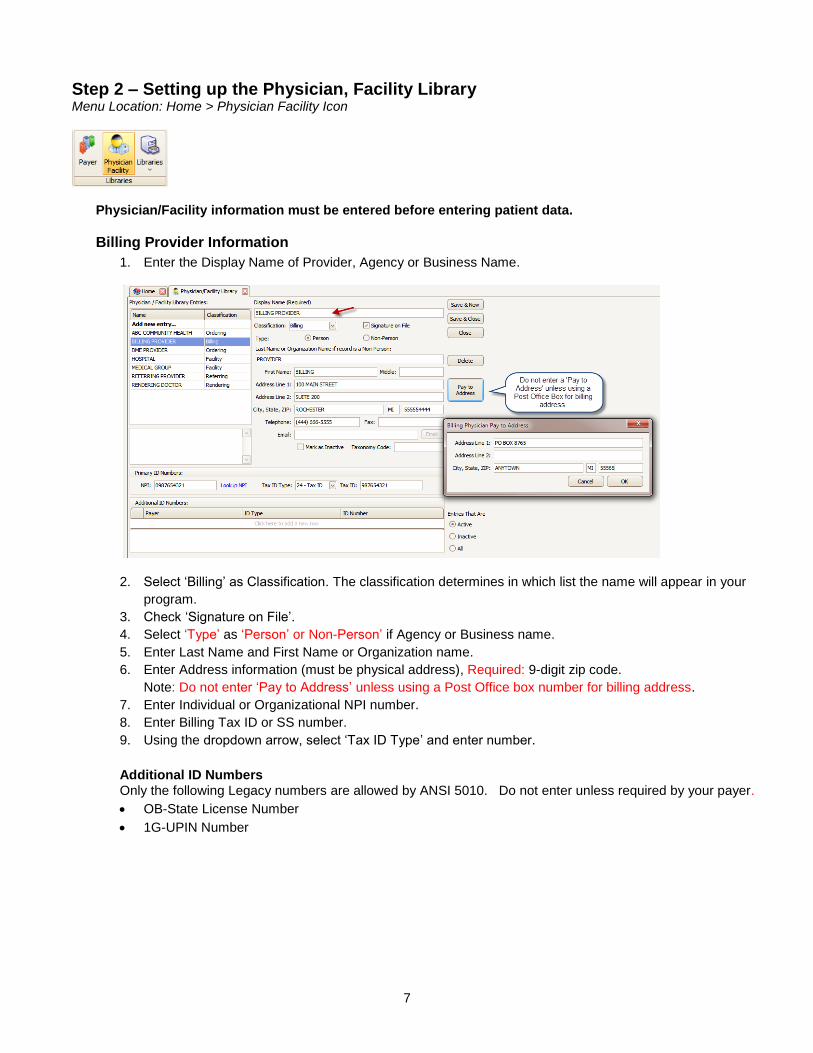
Step 2 – Setting up the Physician, Facility Library Menu Location: Home > Physician Facility Icon
Physician/Facility information must be entered before entering patient data.
Billing Provider Information
1. Enter the Display Name of Provider, Agency or Business Name.
2. Select ‘Billing’ as Classification. The classification determines in which list the name will appear in your
program.
3. Check ‘Signature on File’.
4. Select ‘Type’ as ‘Person’ or Non-Person’ if Agency or Business name.
5. Enter Last Name and First Name or Organization name.
6. Enter Address information (must be physical address), Required: 9-digit zip code.
Note: Do not enter ‘Pay to Address’ unless using a Post Office box number for billing address.
7. Enter Individual or Organizational NPI number.
8. Enter Billing Tax ID or SS number.
9. Using the dropdown arrow, select ‘Tax ID Type’ and enter number.
Additional ID Numbers
Only the following Legacy numbers are allowed by ANSI 5010. Do not enter unless required by your payer.
OB-State License Number
1G-UPIN Number
8
Rendering Provider Information
1. Enter Display Name.
2. Select ‘Rendering’ as Classification. 3. Select ‘Type’ as ‘Person or Non-Person’. 4. Enter Last and First name or Organization Name. 5. Enter NPI number.
Facility Information
If place of service is 11, do not enter Facility information unless different from Billing information. For other POS codes, contact your insurance company for guidelines
1. Enter Facility Name.
2. Select ‘Facility’ Classification
3. Select ‘Type’ as ‘Non-Person’.
4. Enter Name and Address information. Required: 9-digit Zip Code
5. Optional: Enter NPI number.
6. Click on ‘Save’.
Referring Provider Information
1. Enter Name.
2. Select ‘Referring’ as Classification.
3. Select ‘Type’ as ‘Person’.
4. Enter Last and First name.
5. Enter NPI number.
6. Click on ‘Save’.
9
Ordering Provider Information
1. Enter Name.
2. Select ‘Ordering’ as Classification.
3. Select ‘Type’ as ‘Person’.
4. Enter Last and First name.
5. Required: Enter address
6. Enter NPI number.
7. Click on ‘Save’.
Step 3 – Entering Patient, Provider and Insurance Info Menu Location: Create Patient
Open Patient information screen by clicking on the Patient icon on the menu bar or Create Patient icon on Home screen.
Do not use initials or credentials. MR., MS., DR., MD, INC. etc.
Do not use words such as ‘SAME’ or ‘NONE’ or ‘N/A’.
1. Enter Patient Information.
2. Enter Diagnosis codes on this screen only if codes remain the same for all dates of service. For electronic
claims, up to twelve Diagnosis codes may be entered. Claim specific codes can be entered on the
Charges screen.
3. Enter Billing Provider (Use dropdown arrow or Click to open library).
4. Enter Rendering Provider information only if different than Billing provider (Use dropdown arrow or Click
to open library) if needed.
5. Enter Service Facility information only if different than Billing provider (Use dropdown arrow or Click to
open library) if needed
10
Additional Claim Information
Note: Click on dropdown arrow to open Additional Claim Information grids.
1. Check ‘Print Current Date’ or enter a date.
2. Signature Source, usually blank or option ‘P ’.
3. Enter ‘Situational’ information only if required by your insurance company.
Step 4 – Entering Payer Information
Note: Click on ‘Add Ins’ to add insurance. Click on ‘Copy Information from the patient’ or ‘Lookup’ button to enter Insured’s information.
Primary payer
1. If the patient is the same as the insured you can use the ‘Copy Information from the Patient’ button or
enter new information.
2. Using the dropdown arrow select the Payer.
3. Enter the Insured’s ID.
4. Enter’ Patient Rel to Insured’.
5. Enter ‘Accept Assignment’.
6. Enter ‘Claim Filing Indicator’.
Situational All other fields are ‘Situational’. Enter only as needed.
11
Additional Payers
1. Click on ’Add Ins’ to add additional Payers. 2. Follow guideline above.
Note: To delete a Payer, click on the ‘Delete’ button.
Step 5 – Entering Claim Information Location: Create Claim
1. Select claim by clicking on the Patient you want to add a claim for
2. Optional: Select ‘Previous Claim’ or ‘Previous Service’ or template previously created.
3. Enter Diagnosis codes if they had not been previously entered on the Patient Info screen
4. Expand Claim Information Grids by clicking on dropdown arrow to confirm additional information. Ex: Claim
Information, Physician Libraries, etc.
NOTE: DME Companies do not use Rendering Providers. Leave the rendering provider fields blank.
Also DME suppliers will need to select an ‘Ordering Provider’.
5. ICD Indicator, using the dropdown box select 0 for ICD-10 codes. 6. Enter service line dates by clicking on a date on the calendar or typing in the information.
7. Continue filling in all required data in Service Line.
Situational – Enter EMG only if requested by your insurance company. Required - Enter the diagnosis POINTER on the service line in the Diag # field. Do not use the actual diagnosis code in this box, only pointers. Enter up to four pointers if necessary. Ex: ABCD
12
Uploading Claims to the Clearinghouse
Step 6 – EDI Connection set-up Menu Location: Electronic Billing > EDI Connection Library Icon
1. Enter ‘TriZetto’ as the name of your EDI Connection. 2. Using the dropdown list choose ‘TriZetto Secure File Transfer’ as the connection ‘Type’. 3. Enter User Login (Trizetto Site ID) and User Password (SFTP password). 4. Click on ‘Test Connection’ to verify connection was set up successfully.
Step 7 – Submitter / Receiver Library Menu Location: Home > Libraries Icon > Submitter / Receiver
Submitter ID = Trizetto assigned site number, 4 digits.
Receiver ID (NM109) and Receiver Code (GS03)= 431420764
Receiver ID (ISA07 and ISA 08) = 431420764000000
13
Step 8 - Submitting Claims Location: Send Claims
1. Using the dropdown select TriZetto Connection library entry.
2. Using the dropdown select TriZetto Submitter/Receiver entry.
3. Select claims to be exported.
4. Click on the ‘Check for Errors’ button.
5. If the analyzed report states there are errors, return to the claim and correct errors. Once errors have been
corrected, return to ‘Electronic Claims’ and continue.
6. If the report states there are no errors, click OK.
7. Click on the ‘Create and Send Batch’ button.
14
Step 9 – Reports Location: View EDI Reports
1. Click on ‘Get Reports’.
2. Double click on a Report file name to open
3. View Reports. If your report states that your claims have errors, make necessary changes to claims and
Resubmit.
4. Click on column headings to sort reports.
Note: See Working Rejected Claims on Page 18.
Search/Filter Options
Use the EDI Reports search feature to quickly find reports. Enter a keyword such as a Provider or Patient Name or other report data and click on ‘Search for Keyword’. If you use the Archive feature check the box to Show Archived to search all reports.
2. Highlight and then double click on the previous batch of claims to view.
3. Select by highlighting all claims or individual claims to re-export.
4. Click on the ‘Create and Send Batch’ button.
5. Confirm ‘Claim File Upload Successful’.
16
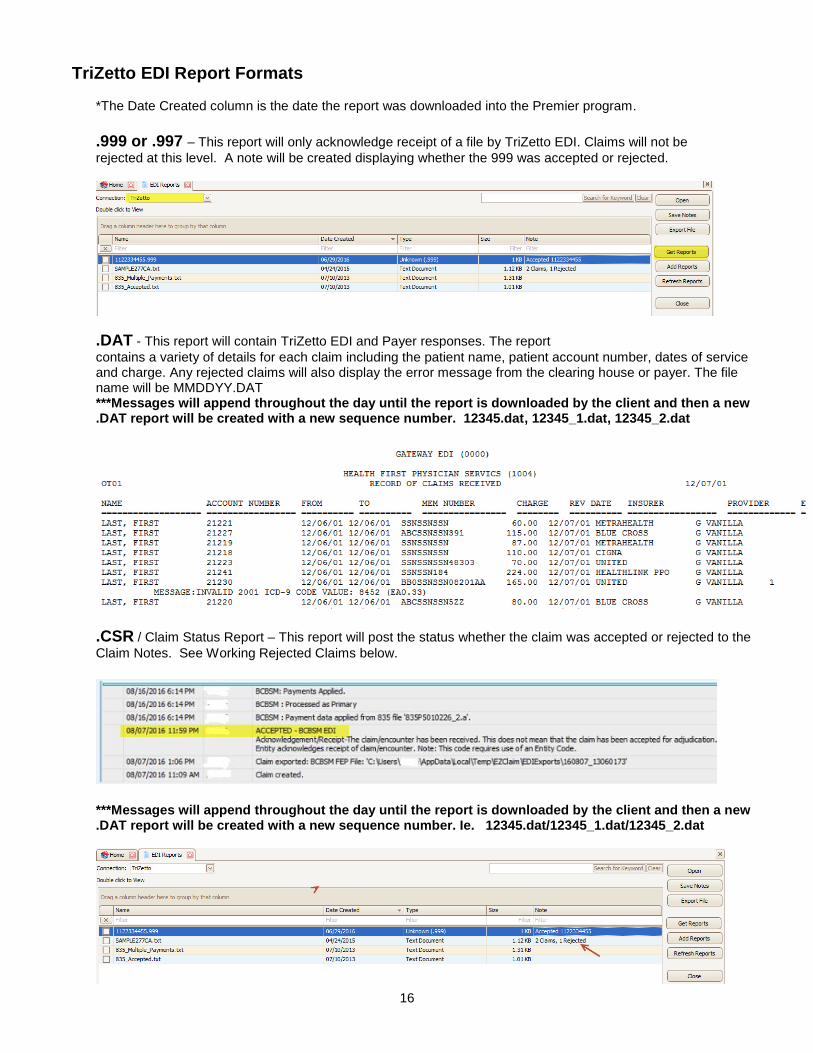
TriZetto EDI Report Formats *The Date Created column is the date the report was downloaded into the Premier program. .999 or .997 – This report will only acknowledge receipt of a file by TriZetto EDI. Claims will not be
rejected at this level. A note will be created displaying whether the 999 was accepted or rejected.
.DAT - This report will contain TriZetto EDI and Payer responses. The report
contains a variety of details for each claim including the patient name, patient account number, dates of service and charge. Any rejected claims will also display the error message from the clearing house or payer. The file name will be MMDDYY.DAT ***Messages will append throughout the day until the report is downloaded by the client and then a new .DAT report will be created with a new sequence number. 12345.dat, 12345_1.dat, 12345_2.dat
.CSR / Claim Status Report – This report will post the status whether the claim was accepted or rejected to the
Claim Notes. See Working Rejected Claims below.
***Messages will append throughout the day until the report is downloaded by the client and then a new .DAT report will be created with a new sequence number. Ie. 12345.dat/12345_1.dat/12345_2.dat
17
Working Rejected Claims Working rejected claims is the most important part of revenue cycle management. EZClaim Premier provides multiple tools to help you manage and work rejected claims. There are two types of rejected claims:
Front End Rejections (rejection information found on clearinghouse or payer status reports) o Clearinghouse rejections due to missing or invalid data. o Payer rejections due to patient not found or some other issue that caused the claim to be rejected at
the ‘front door’
Payer Rejections (rejection information found on the EOB or 835) o Claim was processed by the payer but not paid due to reasons provided by reason codes and/or
remark codes. o EZClaim Premier handles both types of rejections and provides tools to create tasks or work lists to
manage follow up and make sure these claims are taken care of. More Information on Working Rejected Claims:
Front End Rejections Payer Rejections
.RMT – This report is an 835 Remittance Report
When an ANSI 835 report is added to the grid, the program will automatically read the contents and add the payment information to the note area (if the note is already blank)
Note: Payer and trading partner responses are received in various formats but standardized by TriZetto EDI.
Managing Reports Keep only reports that you are currently working on in the View EDI Reports screen. As you process or view reports you can then choose one of the options for saving the reports.
o We do not recommend deleting reports. o To display previously archived reports simply check the Show Archived box and they will