1 TROPICAL GREENHOUSE GROWERS MANUAL FOR THE CARIBBEAN Written by Anthony DeGannes, Kamau Ra Heru, Aziz Mohammed, Compton Paul, Jervis Rowe, Lennox Sealy and Govind Seepersad CARDI January 2014
Transcript
1
TROPICAL GREENHOUSE GROWERS MANUAL FOR THE
CARIBBEAN
Written by
Anthony DeGannes, Kamau Ra Heru, Aziz Mohammed, Compton Paul, Jervis Rowe, Lennox Sealy and Govind Seepersad
TROPICAL GREENHOUSE GROWERS MANUAL FOR THE CARIBBEAN
Written by Anthony DeGannes, Kamau Ra Heru, Aziz Mohammed, Compton Paul, Jervis Rowe, Lennox Sealy and Govind Seepersad
CONTENTS
Page
Preface 3
CHAPTER 1 – INTRODUCTION 5
CHAPTER 2 - GREENHOUSE STRUCTURES and EQUIPMENT 6 CHAPTER 3 – TROPICAL GREENHOUSE PRODUCTION SYSTEMS and PLANT TROUBLES 27 Part I – Production systems 27 Part II – Plant troubles and Solutions 52 CHAPTER 4 – GENERAL PESTS, DISEASES and PHYSIOLOGICAL DISORDERS of TROPICAL GREENHOUSE VEGETABLES and their MANAGEMENT 55 Part I – Pests attacking greenhouse crops 61 Part II – Diseases of greenhouse crops 76 Part III – Physiological disorders 88 CHAPTER 5 – CROP CULTURE OF TOMATO, SWEET PEPPER, CUCUMBER AND LETTUCE 95 CHAPTER 6 – MARKETING CONSIDERATIONS 129 CHAPTER 7 – ECONOMIC CONSIDERATIONS 140 LITERATURE CONSULTED 149
Citation: CARDI. 2014. Tropical Greenhouse Manual for the Caribbean. Published under the CFC/EU-funded project on: “Increased Production of Vegetables and Herbs through the use of Protected Agriculture in the Caribbean”. The Caribbean Agricultural Research and Development Institute, UWI Campus, St. Augustine, Trinidad and Tobago.
3
PREFACE
Protected Agriculture (PA) can be defined as ‘the modification of the natural environment to achieve optimum plant growth’ and can take a variety of forms, such as, greenhouses, tunnels and shadehouses. This document deals only with greenhouses. Greenhouse production of vegetables has enabled many countries to increase agricultural production. Greenhouse production, which is more intensive than in open-field agriculture (OFA), is particularly important for Caribbean smallholders, many of whom have restricted access to land. A greenhouse can provide an optimum growing environment, crops can be grown out of season, and under controlled conditions; there is potentially a faster crop growth rate with higher yields and better quality, insects and diseases can be eliminated or reduced and, crop growth can be manipulated. Also, the use of agrochemicals (fertilisers and pesticides) can be more easily monitored and controlled and, problems, such as, “run-off” can be reduced. Therefore, greenhouse production systems could present attractive returns on investment opportunities, possibilities for environmental conservation and marginal land utilisation. The technology is much more sophisticated than existing OFA cropping, thus requiring drastically more diligence and precision and attracting higher startup and operational costs. The technical skills needed for greenhouse operations differ greatly from those of OFA, with the operations requiring greater regularity, timing and level of attention to detail. Additional activities, such as, intensive pruning, trellising, pollination, measurement of environmental variables such as soil pH, relative humidity and electrical conductivity, and care in using double-doors, are involved. For optimal efficiency, literacy and numeracy are critical. Hence, the need for increased and continuous training of producers to improve their knowledge and skills in the use of greenhouse production systems. Moreover, experience, to date, suggests that females are generally more suited for most operations owing to their diligence and greater attention to detail. Commercially viable and sustainable vegetable production using greenhouses is a priority for several Caribbean countries for the improvement of livelihood systems, food and nutrition security and, regional food production and trade. The dramatic increase in food prices in the past five years, and the impact on living standards, has greatly increased the interest and desire of farmers, processors and government agencies to invest in and establish greenhouse production systems as a means of increasing food production and incomes. The idea for a “Tropical Greenhouse Growers Manual for the Caribbean”, was conceived under the project: “Increased production of vegetables and herbs through the use of Protected Agriculture in the Caribbean”, financed by the Common Fund for Commodities (CFC) and the European Union (EU) and executed by the Caribbean Agricultural Research and Development Institute (CARDI) during the period, 2010–2013. Credit for guiding the development of the manual is due to Dr. Compton Paul, Agricultural Consultant to CARDI and Regional Coordinator, for the above-mentioned project. Most of the material for the various chapters was provided by the co-authors Jervis Rowe, Greenhouse Technology Consultant, Anthony
4
DeGannes, Greenhouse Technical Consultant, Dr. Lennox Sealy, Marketing Consultant, Aziz Mohammed, Marketing Consultant, Dr. Govind Seepersad, Consultant in Agricultural Economics and Kamau Ra Heru, Technical Director of the Jamaica Greenhouse Growers Association (JGGA). The goals of the project were: (a) to strengthen the competitiveness of vegetable farmers in the Caribbean engaged in the production and marketing of fresh vegetables and herbs through the use of greenhouses; and, (b) to develop improved production and marketing tools, including more integrated greenhouse production and marketing information systems and databases, accessible to all stakeholders. Given the greater skill and level of technology required for economically viable greenhouse operations and the lack of relevant information for producers in the Caribbean, CARDI decided to publish this manual. This was also in part fulfillment of the outputs required under the project’s Component that had the objective: “To coordinate the collection and dissemination of information on PA systems in the selected target countries and the Caribbean Region so as to improve information access and dissemination for stakeholders in the PA value chain”. On behalf of CARDI and on my own behalf I wish to particularly express appreciation to the following Institutions: the Jamaica Greenhouse Growers Association (JGGA), the Trinidad & Tobago Tropical Greenhouse Operators Association (TTTGOA), the Mayaro Greenhouse Growers Association (MGGA), the Common Fund for Commodities (CFC) and the European Union (EU) that have contributed to make this manual possible. Also, thanks are due to several individuals at CARDI who conceptualized and contributed to the implementation of the PA project, the Authors, all of the collaborating stakeholders who assisted with practical information and allowed photographing of their operations and crops and, to Bruce Lauckner who performed the editorial review of the final manuscript. CARDI is also grateful to those publishers and authors who allowed us to cite their material.
H. Arlington D. Chesney Executive Director Caribbean Agricultural Research and Development Institute (CARDI)
5
CHAPTER 1
INTRODUCTION by Compton Paul Greenhouses are used in many tropical regions of the world for the production of vegetable crops. The greenhouse offers the ability to manage the growing environment in order to increase control over quality and productivity. It is possible to build, with relatively simple means, greenhouses in tropical areas, in which plants are protected and can grow in temperatures and other environmental conditions that produce higher yields and healthier crops. The primary reasons for protected cultivation in the tropics are for pest exclusion, protection from extreme solar radiation, and heavy rains and wind. In the tropics, plants in open-field cultivation are often completely destroyed by severe storms and suffer from many pests and diseases. Under these circumstances, plants can be highly productive, their fruits are generally not of the highest quality or, they may contain too many residues of plant protection chemicals. This is unfortunate, given that tropical areas have more than enough available sunlight and, very often also, more than enough water. The main challenges to greenhouse production in tropical areas include:
o High relative humidity and ambient temperatures reaching more than 40°C. o Reduced light especially below minimum threshold levels in cloudy or rainy days. o Impedance of flower fertilisation and fruit set and development. o Low level of maintenance of exterior parts of the greenhouse structure. o Lack of adequate maintenance of undesirable vegetation, drainage and other
environmental elements surrounding the structure. o Lack of guttering causing algal growth on the outer surface of the cover material. o Bad orientation and site selection of the structure leading to incorrect direction of flow
of prevailing winds. The present manual consists of seven chapters dealing with Greenhouse Structures and Equipment; Tropical Greenhouse Production Systems and Plant Troubles; General Pests, Diseases and Physiological Disorders of Tropical Greenhouse Vegetables and their Management; Crop Culture of Tomato, Sweet pepper, Cucumber and Lettuce; Marketing Considerations; and, Economic Considerations. Various scientific publications (noted under “Literature consulted” at the end of the manual) were consulted in the development of the subject matter by the authors. A large number of tables, diagrams and photographs is placed in the text to illustrate the information presented. The authors have attempted to present the material in such a way as to assist potential producers in deciding whether to begin a greenhouse vegetable production business and, at the same time, provide existing producers with relevant information on the technologies required to manage a profitable greenhouse vegetable enterprise.
6
CHAPTER 2
GREENHOUSE STRUCTURES AND EQUIPMENT By Anthony DeGannes and Compton Paul INTRODUCTION This Chapter deals with greenhouse structures in the hot humid tropics as this environment presents the greatest challenges to greenhouse production of vegetables in the Caribbean.
Because in tropical greenhouses the requirement is to lower temperatures inside the structure rather than to increase it as is the case in temperate climates, their design, construction and management in the tropics are somewhat different. An effective design uses insect netting for side walls and a passively-ventilated polyethylene or polycarbonate panel roof. The following should be considered in determining design, suitability and features of greenhouse structures in the tropics.
I. LOCATION and ORIENTATION of the STRUCTURE
For the purposes of greenhouse design, the need for adequate light and ventilation, protection from rain and, insect exclusion are primary concerns. An effective design uses insect-proof netting for side walls and a passively-ventilated polyethylene or polycarbonate panel roof. In many developing countries, a need exists for a low-cost greenhouse, using locally available materials where possible (Hickman, 2010). Greenhouses in tropical climates should follow the orientation of east–west (single span) and north-south (multispan with gutter connected) for maximum interception of light levels throughout the year. In selecting the site for the structure much attention should be given to orienting it for maximum light intake; however, in the tropics, there is an abundance of light all year round so ensuring that there are no large trees, buildings, etc, casting a shadow onto the structure, becomes a priority. The following factors should be considered in the site selection:
• environmental conditions i.e. ambient temperature, rainfall, humidity, wind, etc. • physical features (slope of the land and exposure to the sun). • access to utilities (adequate amounts of good quality water and electricity). • access to a main transportation corridor and supporting infrastructure .e.g.
roads, drainage, etc. • access to labour. • proximity to markets.
7
• space for future expansion. • zoning requirements or limitations/local building codes/permits. • potential environmental hazards such as industrial pollution and contaminated
water.
II. MATERIALS for GREENHOUSE STRUCTURES Materials for greenhouse structures can be classified as wood, metal, plastic or, concrete.
a. Wood. Wood is used mainly to build and frame greenhouse structures and can be classified into two categories, hardwoods and softwoods. Hardwoods such as Teak and Greenheart are very durable and weather-resistant but are expensive. Softwoods are not as durable but are less expensive. Wood is more commonly used to make gable roof structures and are common in the larger islands in the Caribbean. Painting wooden frames white will improve lighting conditions within the greenhouse. Wood should be pressure-treated with preservatives to resist decay. Creosote and Penta give off fumes toxic to plants and should not be used. Water preservatives such as chromated copper arsenate (CCA) or ammonium copper arsenate (ACA) are the best for greenhouses. b. Metal Metals are good conductors of heat and the heat loss or gain through an aluminum or steel frame can be significant. The high strength of steel makes it possible to use small structural elements, minimising shading caused by the frame. Metal is used extensively in structural members and components requiring combined strength and longevity. It is used in three forms: ferrous, galvanised and non-ferrous. i. Ferrous metals, also known as mild steel, have the advantage that they can be
fabricated easily, found in different shapes and forms and, are relatively the most inexpensive type of all metals. However, they are prone to rust especially when in contact with moisture so they should be coated with rust-inhibiting paint (primer and top coat).
ii. Galvanised metals are basically ferrous metals which have been coated with a layer of zinc to prevent corrosion. Most manufactured structures are made with galvanised metal. It’s main advantage is that it is extremely durable and can last over 15 years. However, rust can occur as in ferrous metals especially in areas such as exposed holes, welded parts, cut ends and ends buried in the ground or exposed to moist soil. Galvanised steel frames offer high strength and long life at less expense than aluminum frames, although maintenance costs of steel frames may be higher.
8
iii. Non-ferrous metals are stainless steel and aluminium. These are found in different shapes and forms and can be used in certain members or for specific applications such as brackets, bolts, nuts, fasteners and locking mouldings or “wire lock” to fasten meshes and cover structures. They are extremely durable but expensive. Aluminum frames are long-lasting, corrosion resistant, lightweight, and can be prefabricated. They can be permanently glazed and have low maintenance requirements. Aluminum frames have a high initial cost and require the services of experienced personnel during construction.
c. Plastics Three of the most important uses of plastics in greenhouses are for roof covering, shade cloth and insect mesh.
i. Roof coverings are made of the following types of plastic:
• Acrylic • Polycarbonate • Fiberglass • Polyethylene film • Polyvinyl chloride film
Their characteristics, advantages and disadvantages are summarised in Table 1. Table 1: Characteristics, advantages and disadvantages of plastics used in greenhouses.
Easily scratched. Reduced light transmission with age. Expand/contract.
Good (approx. 5 years)
Fair to good 80 – 90%
FIBERGLASS
Impact-resistant. Moderately-priced. Easily cut.
Reduced light transmission with age.
Very good > 5 years
Fair 80%
POLYETHYL -ENE FILM
Inexpensive. Wide and of variable sizes.
Requires maintenance. Can puncture/tear.
< 5 Years Very good if kept clean. > 90%
POLYVINYL CHLORIDE FILM
Allows UV through. Heat retention properties.
Requires maintenance. Can puncture/tear.
< 5 years Good if kept clean 85 – 90%
9
ii. Shade cloth is made in a variety of colours and shade densities. There are two types, namely, plastic and aluminet, and are manufactured by knitting or weaving. They are supplied in variable lengths and widths with some companies offering custom sizes and fabrication. The density is expressed as the percentage of light excluded. For example, 30% shade cloth has 30% light exclusion and allows 70% light to pass through. Shade cloth is commonly used in greenhouses utilised for hardening tissue culture planting material or for hardening of budded and grafted plants. In certain situations, it is used as an alternative to insect mesh or as thermal screens.
iii. Meshes are of different sizes and are based on the type of exclusion needed (e.g. birds or insects such as Aphids, Whiteflies, Leaf Minors and Thrips; a mesh that excludes Thrips excludes all of these other insects). The size of mesh is determined by three variables, namely, the number of threads per inch, the size of threads used and the pore space between threads.
Generally, the greater the thread count of the mesh, the lower the pore space, the lower the light transmission and the greater the impedance of air movement through the mesh. Great care and consideration should be taken to select the appropriate mesh to match the environment required within the greenhouse. A general assessment should be undertaken by scouting for pests and obtaining information from agricultural extension officers or farmers as to pest problems in the area so as to guide the selection of a suitable mesh. It is important to note that meshes do not exclude mites. In an effort to reduce the presence of certain insects, insect screening is often used on greenhouse vents and entrance areas. For this to be effective, the openings in the screen must be smaller than the size of the insect. For example, for Whitefly, a very common pest, the pore size should be a maximum of 0.29 mm which corresponds to a 58 mesh screen. This size screen would also exclude Aphids and Leaf Miners and is sometimes called “anti-virus” screen. If using screens over vents, a negative effect is a reduction in ventilation. This causes an increase in both internal temperatures and humidity levels. For instance, with the 58 mesh screen, the ventilation is reduced by approximately 30%, so it is important to choose an appropriate mesh size when designing a greenhouse structure (Hickman, 2010).
d. Concrete Concrete is mainly used to provide weight and strength in foundations especially when securing posts to the ground. In some instances, as in some specialised installations, it has been used in walkways in and around structures as well as for internal flooring. It has also been used for constructing benches but its cost can be quite high.
10
III. GREENHOUSE STRUCTURAL DESIGNS Structural designs should increase production if water and nutrients, air, light and pests and diseases are adequately managed.
Although there are many greenhouse structural designs to select from, choice of design is dependent on the environment where the greenhouse is to be situated. In the Caribbean, two distinct zones can be defined: 1) Sea level/low elevation hot humid environments below 500m above sea level with
average yearly daytime temperatures above 28°C e.g. Lesser Antilles. 2) Cool high elevations above 500m above sea level with average daytime
temperatures for most of the year less than 28°C e.g. high areas of Jamaica, Haiti and the Dominican Republic. It should be noted that during the cold winter months in the northern hemisphere, cold fronts move southward and cause lower temperatures (as low as 12°C) in these islands.
The height of mechanically-ventilated greenhouses should be as low as is feasible for worker comfort and to reduce the overall volume that is cooled. Naturally-ventilated greenhouses require the use of a ridge vent on a gable roof or a sawtooth roof. This type of roof must be sloped between 3:12 to 6:12 for proper natural ventilation. This will normally result in a higher roof than is required for mechanical ventilation. The greenhouse structure must also be designed to withstand the loads that will be imposed on it during normal use. These include environmental loads such as wind, rain, and loads imposed by hanging baskets or by equipment mounted on the structure. For vegetable production, most greenhouse frames are not strong enough to perform double duty as a trellis support for vegetables. Therefore, it is best to erect a separate trellis system for supporting vegetable plants within the confines of the greenhouse.
Many designs have been tried in the Caribbean but four designs have prevailed. These are (Figure 1): 1. Tunnel (arch), 2. Single arch (raised). 3. Gable and Split-gable 4. Split-arch.
Tunnel designs are usually no more than 18m long and have open sides and ends because of the high temperatures that occur within them especially with closed or fine mesh covers. The Split-gable and Split-arch designs characterised by a vent on the top, are constructed in longer lengths. Small stand-alone houses typically utilise the Gable design that offers the advantages of low overall initial investment and flexibility of operation; however, this design is generally more expensive to construct on a square foot basis than larger houses (Bucklin, 2011).
11
Figure 1. Tropical Greenhouse designs. (Sources: CARDI, 2012; University of Missouri Extension, 2013a)
IV. GREENHOUSE DESIGN FEATURES/CHARACTERISTICS 1. ROOF The angle (pitch) of the roof to the horizontal or radius of curvature of roof members is important for two reasons. Firstly, overall steep angles allow for fast runoff of rain and so allows for faster removal of debris and dust. Secondly, the design of split ventilated roofs:angles <15⁰ has no advantage to create the hot air extraction ventilation effect at the top of the roof. It should be noted that gable roof designs tend to shorten the life span of the UV polyethylene plastic film cover by allowing flapping and abrasion to occur during windy and sunny periods when the plastic expands. In such environments, fastening of plastic tightly may be required on every truss or it may be better to use arch designs to avoid this problem. The use of ridged (clear) materials such as fiberglass-reinforced plastics, acrylic or polycarbonate sheets would alleviate this problem. Height of roof sides determines the height of the lowest part of the structure above the crop. This is important especially in hot humid conditions with average day temperatures >28°C. A temperature air buffer zone should be a minimum of 1.6m of height for open side structures and at least 3m for fully-protected structures. In situations where tall trellising crops, such as vining tomato, are grown, little or no buffer zone can be established, especially when the crop has reached maturity. This is even more problematic in indeterminate varieties of vining crops.
12
The height of the centre of the greenhouse structure also determines the angle of slope of the roof as well as the efficiency of ventilation of split-roof designs. Tall structures in excess of 3m on the sides and 4m at the centre require a longer period of time to reach high temperatures in excess of 40°C and with generally a relatively small reduction in peak temperature. Increased height requires larger posts and more bracing, thereby increasing the cost of the structure.
2. GUTTERING Guttering is strongly recommended for use in greenhouse structures for the following reasons:
1. It prevents runoff from falling on the sides of the insect screen thereby reducing the build-up of algae and/or moss which can severely restrict ventilation.
2. It can serve as a water-harnessing mechanism for the collection of rainwater for irrigation.
3. It allows better drainage control of runoff from the roof to the drains thereby preventing water-logged conditions within and along the perimeter of the structure.
Generally, the minimum guttering size recommended is 15cm wide with a 10cm downpipe every 80cm². However, this can vary depending on the slope of the roof and the slope of the guttering along the structure (greater the slope the faster the runoff).
3. GROUND COVER For soil-grown production of vegetables (greenhouse floor used as growth medium), the greenhouse design should utilise a minimum of vertical support posts so as not to hinder operations. Concrete or gravel walkways between rows in the greenhouse and between buildings not only facilitate the movement of materials but can improve sanitation by minimising the tracking of contaminated soil or plant material into the greenhouse. However, this type of material absorbs excessive amount of heat and negatively impacts on the greenhouse environment. For non-soil grown production (growth media in pots or bags) floors should provide a firm dry surface to support greenhouse activities and pedestrian movement throughout the greenhouse and surrounding outside perimeter. The floor should also facilitate a clean, weed-free environment. Floor design starts with a porous sub-base material such as unscreened gravel or crushed rock, the thickness depending on the drainage required and parent subsurface soil conditions (usually 10 to 15cm thickness will work in most cases). Muddy conditions, or conditions where the site has a high water table or parent soil material that has a high clay content require more extensive excavation, filling or raising, to have a firm dry surface. The sub-base should be graded, rolled and/or compacted with a double cambered slope from along the centre length of the structure to the sides with a grade of 1 in 180 to 1 in 200. The sub-base should be prepared before erection of the structure and it is recommended that it be then covered with a layer of sand not exceeding a thickness of 5cm. This can then be covered with ground cover fabric or weed resistant
13
material that is porous to water. It is not advisable to completely cast the floor in concrete as this material traps and retains heat within the greenhouse.
4. DOORS
Sealing the greenhouse should be done with an "airlock" double-door entrance design. This entrance porch prevents direct ingress of wind, insects, soil, and spores into the greenhouse and has the additional advantage of preventing short-circuit air flow patterns when ventilation fans are in operation. Double door entrances are recommended for pest exclusion. Doors can be of two types, namely, slide or swing, and are usually constructed of the same materials as those of the main structure. Sliding designs have a smaller opening area profile than swing doors and do not force movement of air, thereby reducing the chances of pests entering the greenhouse.
Doors should have a minimum width of about 82cm and a minimum height of about 2m so as to allow the free movement of personnel, equipment and materials required for all activities associated with crop production. The enclosed area between the two doors should be large enough to allow at least one person with a wheelbarrow to traverse between the two doors, with one door closed at all times. It is recommended that the floor between the double doors contain a foot bath of disinfectant such as Green-Shield®, Physan 20® or KleenGrow™ to prevent dirty shoes from introducing pests or disease vectors.
5. VENTILATION The main challenge to greenhouse structures especially in the hot humid tropics at sea level or low altitudes <500m is high temperatures. It is not uncommon to find internal temperatures reaching greater than 40°C by mid-morning. The solution to this problem is to find a cost-effective reliable design or intervention that facilitates the movement of hot air out of the structure and cooler air in. The exchange of air within the internal environment with air from the external environment is defined as ventilation. One underlying factor that is important in any design for a greenhouse in tropical regions is the amount of vent area. For passive or naturally ventilated greenhouses, the roof vent area should be 20% of the floor area and located on the leeward side of the greenhouse (Hickman, 2010). Most completely-enclosed designs rely on passive ventilation for cooling and should have the following to maximise this:
• Split roof designs to force a pressure differential to extract the hot air at the top of the structure.
• High side walls in excess of 3m. • Orientation of the structure so as to harness the maximum cooling benefit of
the prevailing wind. • Use of an appropriate mesh size that aids air flow through it while screening out
harmful insects.
14
It is recommended that passive ventilated structures be oriented to harness the maximum cooling benefit of the prevailing winds. Also, a 100% air exchange per minute is needed for the internal temperature to be equal to that of the outside temperature. In some areas in the Caribbean at sea level, the wind flow is not consistent or strong enough for adequate ventilation and optimal conditions cannot be achieved using passive ventilation despite use of the best designs and features. It may be, therefore, practical to use larger meshes or remove mesh sections in certain parts (e.g. the roof vent mesh in split roof structures) or even have open sides at high temperatures. The adoption of the latter measures would be at the expense of increased pest and disease pressure. Good management practices to optimise passive ventilation efficiency include:
o Yearly cleaning of insect mesh. o Installation of adequate guttering. o Good routine maintenance of surrounding vegetation. o Adequate inter-house spacing for multi-structure systems. o Provision of adequate ventilation surface area by the installation of large roof
vent/windows. o Using an adequate height of the roof. o Using an appropriate mesh size.
It should now be evident that reducing temperature in passively ventilated structures is heavily dependent on location, orientation and design.
6. FORCED VENTILATION
An alternative to passive ventilation, especially in large structures wider than 10m and longer than 22m, is the use of forced ventilation by the incorporation of extractor fans but this requires a source of reliable electricity which is generally costly in most areas of the Caribbean Region. Alternative sources of energy are solar, wind and hydro, but these technologies are initially very expensive to set up and are out of the reach of most producers. Since several greenhouses in the Region are located in areas away from the electric grid system, forced or artificial cooling is impossible. Ultimately, cost and sustainability become the major considerations. Heat movement into and out of the greenhouse is shown in Figure 2. Extractor fan placement and structural orientation are dependent on design and dynamics of air movement in and out of the structure. It should be noted that louvered extractor fans move air from inside the structure to outside across the covering mesh. The size of the fan required depends on the size of the greenhouse and the rate of extraction needed while consideration needs to be given to additional structural support and bracing. Circulation fans move air from one part to another within the structure.
15
Figure 2. Heat movement into, inside and out of a greenhouse. Placement of extractor fans is indicated. (Source: Kumar et al, 2010).
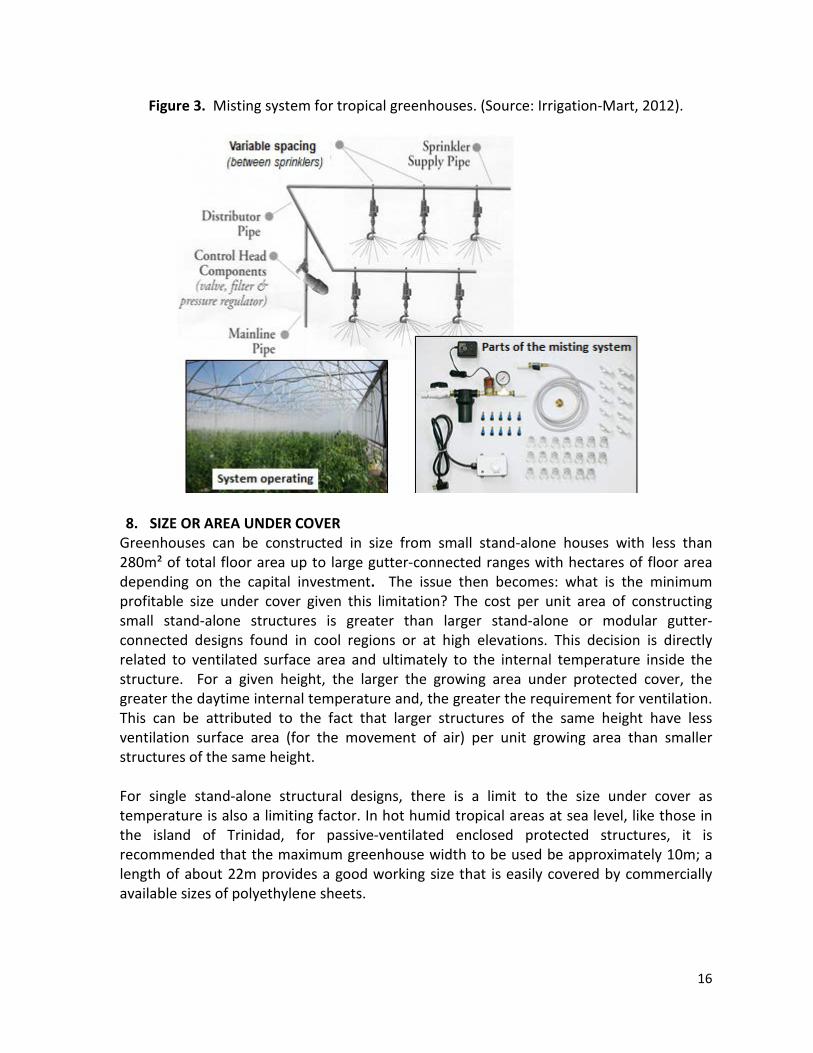
7. COOLING WITH MIST SPRAYS Most tropical greenhouse growers face a continual battle with low humidity and high temperatures. Greenhouse plants can be seriously affected if the humidity drops below 30% so it is important to maintain an adequate humidity level of 50% to 70% in a greenhouse while higher humidity levels help to reduce the watering frequency of plants. The use of misting systems is most beneficial and efficient in the dry periods of the year where the relative humidity is below 50% but the use of these systems depends on climatic conditions of the area and the access to affordable utilities. When the greenhouse is vented, essential moisture is lost, and plants are more likely to dry out and wilt. Misting systems (Figure 3) with fine nozzles are very effective at providing additional humidity because they pressurise water into aerosol particles of micron size and disperse them evenly into the greenhouse environment causing them to evaporate quickly and produce cooling. The downside to misting is that not all of the mist will evaporate, and water will collect on plants thereby providing an environment for diseases (ACF Greenhouses, 2013). The cost/benefit ratio should be carefully considered and it is important for growers to determine what they want to accomplish with a misting system before purchasing one.
16
Figure 3. Misting system for tropical greenhouses. (Source: Irrigation-Mart, 2012).
8. SIZE OR AREA UNDER COVER Greenhouses can be constructed in size from small stand-alone houses with less than 280m² of total floor area up to large gutter-connected ranges with hectares of floor area depending on the capital investment. The issue then becomes: what is the minimum profitable size under cover given this limitation? The cost per unit area of constructing small stand-alone structures is greater than larger stand-alone or modular gutter-connected designs found in cool regions or at high elevations. This decision is directly related to ventilated surface area and ultimately to the internal temperature inside the structure. For a given height, the larger the growing area under protected cover, the greater the daytime internal temperature and, the greater the requirement for ventilation. This can be attributed to the fact that larger structures of the same height have less ventilation surface area (for the movement of air) per unit growing area than smaller structures of the same height. For single stand-alone structural designs, there is a limit to the size under cover as temperature is also a limiting factor. In hot humid tropical areas at sea level, like those in the island of Trinidad, for passive-ventilated enclosed protected structures, it is recommended that the maximum greenhouse width to be used be approximately 10m; a length of about 22m provides a good working size that is easily covered by commercially available sizes of polyethylene sheets.
17
For farmers having large areas under production, several stand-alone structures or modular gutter-connected structures can be constructed. The size of a greenhouse range is limited only by the initial investment and the type of management scheme used in the operation. If greenhouse ranges are to be mechanically-ventilated, then they should be laid out so that air does not have to travel much more than 36m from inlet to outlet so that temperature gradients within the greenhouse are kept to a minimum. Inside layout should provide enough space for at least five to six double-rows of plants. Many vegetable crops require trellising to maximise utilisation of space and to facilitate crop management. Heavy galvanised steel pipes or "I" beams are used at the ends of the trellis to anchor the wire. Secondary supports or props will be needed down the row to prevent sagging of the wire under heavy fruit load. Adjacent facilities for properly storing and handling growing media should be provided. Even though tomato, for instance, may be the intended first crop, factors may change that will force one to either grow another crop or more than one crop. Row spacing requirements, trellis design and irrigation design should be researched before the final layout is chosen. Growers should try to incorporate as much flexibility as possible into the layout design so that changes can be quickly made if necessary.
9. LIGHT
Light levels can fluctuate from being high on bright sunny days to being rather low under overcast conditions, particularly during the rainy season. Growers should be interested primarily in that light which is received by the plant surface and is responsible for photosynthesis. The portion of the light band most responsible for photosynthesis measures 400-700 nanometers (nm) and is termed the Photosynthetically Active Radiation (PAR). Within this range, intensity is the most critical factor along with duration of the light period. Within the PAR region, light is measured as the Photosynthetic Photon Flux (PPF) and is expressed in micromoles per square meter per second (µmol/m2/s) (Univ. Arizona, 2012). The most common light meters are calibrated in foot-candles (1ft-c = 10.76lux). [Note: Multiply the PPF by the conversion factor to get foot-candles; for example, full sunlight has a PPF of 2000µmol/m2/s or 10,020ft-c (that is, 2000 x 5.01 or 107,815.20lux]. Tropical areas close to the equator also experience a consistently short daylength and this, combined with continually overcast conditions, can reduce light levels available for crop growth to below optimal levels. Preference should be given to selection of durable and strong coverings for both roof and sidings with adequate light transmission over their protective life. Maintaining clean coverings is of paramount importance to ensure good transmission of light through the roof and sides. The requirement for light is also crop dependent and the minimum requirements should be maintained throughout the cropping cycle. Situating structures in areas that permit the reception of the most amount of light in a given day should be one of the main considerations. However, an important point to note is that even though there is reduced light under overcast and short-day conditions, the resulting lower ambient temperatures can lead to significantly greater crop production.
18
It is recommended that greenhouse operators be familiar with light requirements for specific crops chosen to be grown in greenhouses. Measurement of light can be done using light meters which may have units in lux or foot candles. This measurement can be converted to PAR units. Alternatively, modern compact data loggers and or miniature weather stations can also provide this information continuously, but at significantly increased cost, and can be integrated in automated systems.
10. WATER SUPPLY
Factors such as the type of crops being produced, area to be watered, light intensity, growing media and time of year, all influence the water requirements of a greenhouse operation. A typical greenhouse operation requires 800m³ of water per 100m² of growing space per year. The irrigation system and pump need to be designed to deliver adequate water to individual plants during peak consumptive periods. The main sources of water are: 1. Public utility water. 2. Surface, pond, spring (well) and river water. 3. Rain water.
Water from the water authority can be from three sources, namely, treated well water, river or pond (reservoir) water. The main treatment method by the water authority is chlorination but this is bad for most plants since chlorine damages the roots, hinders nutrient uptake by the plant and, usually complexes with nutrient constituents in fertilisers thereby making them non-absorptive. Therefore, chlorinated water should be left standing for 24 hours before being used for watering so as to allow the chlorine as a dissolved gas to be expelled. Additionally, the presence of dissolved salts can be seen as a white film deposit on green leaves and pots (Figure 4). Dissolved salts usually originate from two sources. The first, is dissolved minerals found in well water from the soil and ground rock and, the second, is from flocculating agents used in the filtration process by the water authority. This accumulation of deposits has a detrimental effect on plant health. Managing this problem most often requires a regular watering programme to keep the soil moist or, a complete flushing of the plant media once a month depending on the plant or crop or, complete washing of media prior to replanting and reuse of the media. Treatment will depend on the crop and the cropping system. Another important water quality parameter is the concentration of micro-organisms common in many of the waterways and ponds. The high microbial water from these sources can predispose plants to various bacterial diseases when used directly for irrigation. Water from surface sources should also be tested for use and should be managed to meet optimum crop requirements. Necessary equipment and installation systems for filtration and disinfection are required to maintain water quality and efficient delivery to plants.
19
Figure 4. Salt accumulation from water and fertiliser (manifested as white, granular deposits especially in container-grown conditions).
(Source: Smart! Fertilizer Management, 2012)
11. WATER STORAGE The water storage capacity required is determined by the daily requirement and the recharge interval. Water is usually stored in tanks or ponds (Figure 5). Tanks can be made of many materials e.g. concrete, plastic, steel etc. Those located below ground are called cisterns. Cisterns are the most expensive type of water storage system as they require additional reinforcement to prevent cave-in from the surrounding ground; however, they offer a distinct advantage by keeping water cool. Enclosed tanks are costly but are the recommended choice as they limit the exposure of water to the sun thereby reducing algal or moss build up. Ponds provide a cheap large scale method of storage but they leave water exposed to the environment and accumulate unwanted flora and fauna; they are also subject to high water loss from evaporation and seepage.
Figure 5. Some types of water storage structures for greenhouses.
(Photographs by C. Paul)
20
12. FERTIGATION SYSTEM Fertigation is by far the most popular method used to supply fertiliser feed to greenhouse plants. It involves applying fertiliser dissolved in the irrigation water directly to the root zone of each plant. Automation of the fertiliser delivery system will save time and money. Many growers add fertiliser stock to the mixing tank by hand but this can be made automatic through the use of timers, injectors, electronic valves and, electric pumps to supply the required operating pressure. There are several automatic fertigation systems available on the market and the grower must check their specifications carefully before making a selection. The basic parts of a drip fertigation system are shown in Figure 6. The diagram at left depicts the equipment external to the greenhouse while that at right shows the nutrient flow system within the greenhouse.
Figure 6. Basic parts of a drip fertigation system.
(Sources: Magen, 1999; Seedbuzz, 2013; Photograph and diagram by C. Paul)
Plants growing directly in soils or in the various forms of artificial growing media may be fed using this method. Fertigation is an accurate and efficient method of applying nutrients and certain pesticides to the plant. The system must be maintained regularly to eliminate waste and reduce runoff. It is best to always use high grade material which will give the least residue, reduce waste, reduce blockage to lines, filters, drippers and other parts of the irrigation system.
13. PLANT SUPPORT SYSTEMS The most common internal structures are plant support systems in greenhouse crop production. The plant support systems are of two types, namely, stand-alone systems which are independent of the main greenhouse structure and, the integrated structures which are part of the main greenhouse structure.
21
The selection of a particular system is dependent on structural design and structural strength of the materials with which the greenhouse is constructed. Plant support systems consist of three levels of support, namely: 1) Primary level: This consists of those structural members on which the main cumulative loads of the system rest and include stanchions, posts and large cross braces. 2) Secondary level: The load distribution system where loads are borne in sections between primary level members. These include pulling wire (8 -10 guage galvanised wire), light cables (1cm diameter or less) and/or light small diameter (2.5cm or less) support bars. 3) Tertiary level: This consists of hooks, lines, nylon strings, clips, reels, clamps and/or other individual plant supporting mechanisms (Figure 7) often suspended from the secondary support system and attached to the plant especially vining crops.
Figure 7. Tertiary level plant support accessories and tools required for
In addition to these, other specialised structures can be found in greenhouse crop production. These include independent low benches and plant supports that are used to support plant pots or grow bags and stems to facilitate air movement and to prevent contact of vining crop stems with the ground thereby stopping the establishment of secondary roots. These structures are common in indeterminate tomato production systems.
14. DRAINAGE Drainage functions to prevent damp wet areas from occurring within the greenhouse structure. Without drainage, these damp areas can harbour micro-organisms which can
22
be detrimental to plant health and eventually impact negatively on production. There are two types of drainage systems, namely, internal drainage and external drainage. The function of internal drainage is to remove surplus runoff so as to maintain a clean dry environment. Drainage within the greenhouse is achieved with materials constructed and arranged so as to remove any excess runoff from irrigation/fertigation of plants in pot or bags. They are usually made of plastic and can be in the form of pipes and/or troughs which eventually exit the structure, although other materials such as galvanised steel can be made as troughs from roofing material. Internal drainage is assisted by the slope of the floor so as to facilitate the direction of runoff. The eventual exit of the system to the outside may end in a small pond or open field areas used to grow other crops. In some countries, there is strict regulation of the amount of runoff permitted so as to prevent contamination of groundwater; in a few situations, this runoff can be recycled. The function of external drainage (most often by earthen drains) is to remove any surface runoff from rainfall away from the greenhouse structure thereby preventing wet areas occurring around and within the greenhouse structure. These drains end in a pond, ravine or river and their maintenance once each year should be carried out each year.
15. MONITORING EQUIPMENT Monitoring growing parameters in greenhouse production in the past required a range of individual instruments. These instruments can be grouped into two types, namely, those that measure environmental conditions including light, carbon dioxide (CO₂), temperature and relative humidity (RH) and, those that measure soil pH, soil moisture and fertilizer parameters of soil pH and electrical conductivity (EC). Technological advancement has led to one or a few instruments capable of measuring several parameters. For example, there are now dataloggers that function as a single instrument used to measure all the environmental parameters. These can be programmed as to the automatic timing of measurements and the information stored over a period of time. Digital soil moisture meters can be left in media for continuous monitoring. There are now irrigation/fertigation controllers and extractor fans that can be fully integrated with these units for continuous and complete environmental monitoring and control. The main instruments used in the greenhouse are shown in Figure 8. Relative Humidity meter (Hygrometer) • Growers should use this meter to adjust for the desired level of RH which should be between 50 and 70% since a high RH in the greenhouse can predispose plants to fungal disease. • These meters can be digital or analog and are often paired with thermometers.
23
pH meter • Growers should invest in buying a good quality pH meter and regularly check the
pH of the nutrient solution as well as the pH of the growing medium. • Some pH meters are integrated with an EC meter. • The degree of acidity in the growth medium and the nutrient feed solution is
indicated by the pH which is measured on a scale of 0 to 14 (7 is neutral; less than 7 is acidic; and, more than 7 is alkaline).
Figure 8. Measuring instruments for temperature, relative humidity, light, pH and EC. (Sources: International Greenhouse Co., 2013; ABPT Trading Ltd., 2013; HM Digital Inc., 2012).
Electrical Conductivity (EC) meter • An EC meter is used to estimate soluble salts in water which are measured by their electrical conductivity expressed as millimhos per centimeter (mmho/cm) or milliSiemens per centimeter (mS/cm). [Note: 1mmho/cm = 1000µmmos/cm = 1dS/m = 1mS/cm]. The total dissolved salts in the root zone affect nutrient absorption by plant roots. • Measurement should be made of the nutrient feed solution and the root medium. • The EC measurement alone does not indicate the types of fertilizer in the nutrient solution, but this measurement can provide a good indication of the total amount of fertilizer being applied. A root-zone EC of above 1.5mmhos/cm should alert growers to salt build-up and whether the growing medium should be flushed.
24
Light meter • Inexpensive light meters are available for measuring the light intensity. The most
common light meters are calibrated in foot candles (1ft cd =10.76lux). Foot candles should be measured at the growing level of the plants (Envirocept, 2013).
• The grower should research his/her particular type of plant to find out what the optimum foot candles are for growth or propagation. Then the light level should be adjusted accordingly (by structural and design factors discussed previously in this chapter) so that the foot candles are correct at the growing level when measured with the light meter.
V. STRUCTURAL MANAGEMENT AND MAINTENANCE PRACTICES
It is important that cleaning practices be carried out routinely to ensure maximum transmission of light through the roof and sides and maximum ventilation through the mesh sides. Besides choosing an appropriate structure, good surrounding environmental maintenance practices are also required. These include removal of trees, shrubs, vines, bushes and grass on and in close proximity to the greenhouse structure and continued maintenance of this environment to ensure the best ventilation conditions for the structure. This also aids in integrated pest management practices. Maintenance must also be carried out on the structure itself. This includes corrosion management and replacement of parts, bolts and or cables/wires so as to maintain the structural integrity and maximise the lifespan of the structure. It is also worthy to note that consideration should be given to scheduled cleaning, sanitation and maintenance activities to coincide with most difficult climatic conditions especially with respect to the occurrence of high temperatures. A critical decision will have to be made by the grower as to the timing of sanitation and maintenance operations so that the crop harvest can be scheduled to take advantage of favourable market prices. Proper greenhouse sanitation is a key component in reducing costs of managing pests and pathogens. Investing time and money in greenhouse sanitation is much less expensive than paying for repeated pesticide applications and crop losses associated with unsanitary conditions. Greenhouse sanitation aims to prevent disease and insect outbreaks since insects and pathogens easily enter greenhouses. It is critical to properly train anyone using the greenhouse to recognise pest and pathogen problems, and to understand what can be done to reduce their presence in the greenhouse. It also pays to recognise the major sources of greenhouse pests, including floors and benches, weeds, tools, containers, equipment, trash, clothing and, new plants that have been introduced into the greenhouse. The greenhouse floor is a major source of pests and pathogens many of which can survive in soil and residues for extended periods. In the greenhouse, many pathogens can spread to container-grown plants through splashed water, nozzles in contact with plant roots and growth media or, nozzles placed on the floor (Kleczewski and Egel, 2013).
Proper sanitation starts with maintaining a clean workspace with chemically sterilised benches. Establishing an area away from the benches for storing dirty containers and
25
tools helps ensure that items get cleaned again before using. Keeping plants on benches rather than on the floor helps keep the plants from becoming contaminated (Wagner, 2013).
All equipment, including potting containers and tools require steaming, washing or chemical sterilisation before use. The greenhouse's irrigation system requires periodic cleaning so as to make sure that fresh, clean solution comes into contact with the plants. Use of chlorine dioxide applied over the course of two nights offers a solution for both irrigation systems and all surfaces in the greenhouse. Copper ionisation offers another method of controlling algae and pathogens in the irrigation system.
VI. HURRICANE PREPARATION GUIDELINES Since high winds from tropical typhoons or hurricanes can be a major risk in the Caribbean, greenhouses are designed so that the wide insect mesh side covers can come away from the building before causing any damage to the framework. Six months pre-hurricane: 1. Construct buildings according to codes and regulations for hurricane wind loads. 2. Schedule maintenance for equipment used during hurricanes, such as adding stabilisers to fuel generators. 3. Develop a written plan of pre- and post- hurricane responsibilities and job descriptions for personnel. Two to six months pre-hurricane: 1. Clean ditches and grade areas for drainage. 2. Prune permanent trees to reduce wind resistance. 3. Provide for portable water storage. 4. Tie down portable buildings. One to two days pre-hurricane: 1. Irrigate plants and remove water from reservoirs. 2. Remove plants from benches. 3. Fill fuel tanks and fill sprayers with water. 4. Print out payroll, plant inventory, fertiliser and pesticide inventory. Within one day pre-hurricane: 1. Secure items such as small portable trailers and substrate mixing equipment; position portable generators. 2. Dismantle irrigation risers; remove greenhouse plastic and shade cloth. 3. Turn off natural and propane gas, water and electricity.
VII. COSTS Nearly all greenhouse systems can be automated. Generally, the more a structure is automated, the greater the cost of the structure. One needs to consider carefully the
26
cost/benefit of automation against labour/management and the overall cost of the PA structure as well as the profitability of the crop. Ultimately, all decisions depend on economics. Success in greenhouse operation depends on choosing the best structures and features thereby providing the optimum growing conditions with the foresight in striking a balance between costs of infrastructure, cost of management and the knowledge of growing a valuable crop. The maintenance of the structure and its systems must be conducted under the backdrop of obtaining a significant return on investment from the greatest yield with the best quality of the harvest produced over the life of the structure.
27
CHAPTER 3
TROPICAL GREENHOUSE PRODUCTION SYSTEMS and PLANT TROUBLES By Jervis Rowe and Compton Paul
PART I - PRODUCTION SYSTEMS INTRODUCTION If farmers are to realise the best yields of high quality produce, the growing environment must be adjusted to give plants a greater advantage. The use of greenhouses coupled with other agricultural best practices is an attempt to facilitate plants with such an environment. All factors such as light, carbon dioxide, temperature, relative humidity, nutrition and water impact on the plant environment. Plant growth and development are regulated by these factors and, if any of these factors are less than ideal, they will become limiting to the overall level of growth and development of the affected plant. Controlling a crop's environment to target optimum plant growth accounts for approximately 90% of the yield. Growers need to manage the key environmental factors in a timely and economic manner to achieve maximum yields and reduce plant stress. Many greenhouse operators rely on controlling these factors with the aid of a computer. LIGHT Important aspects of light relative to plant growth are its intensity, duration and quality. Intensity is brightness, duration is how long it lasts (photoperiod) and, quality is the wavelength of the light (photosynthesis uses light of wavelength 400-700nm). The amount of light (photosynthetically active radiation, PAR) required and the use of the light by the plant for photosynthesis depend on the type of crop grown, the crop stage of growth and other environmental and plant factors. Generally, increasing energy in the PAR range increases the plant photosynthesis up to a point. The cumulative amount of PAR received by the plant over a day period is known as the Daily Light Integral (DLI) and is a function of both PAR amount and time. Plants generally utilise morning light more effectively, as their metabolism is most active during the mornings. Although it is assumed not to be a problem in the tropics, low light intensity within greenhouses has contributed significantly to loss of production. Adequate light might be available outside of the greenhouse but is often insufficient inside the structure because of the following:
28
o Dirty roof cover. o Use of incorrect plastic film covering. o Use of incorrect shade netting. o Overcrowded beds (plant density too high). o Objects casting shadows on the greenhouse.
Light quality may be improved in the greenhouse through the use of reflective material such as white side netting, white grow bags and white ground cover. When supplemental light is used, it must be of the right intensity (brightness). Contrary to popular belief, red and blue light have the greatest effect on plants. Green light has the least effect on plants and as such is reflected; it is this reflected light that gives plants their green colour. Periods of uninterrupted darkness promote flower production (process known as photo-periodism) in many plants. Hence it is important that farmers understand that plants also need uninterrupted periods of darkness. Plants may be placed into three groups, depending on their flowering response to the duration of darkness, namely, short-day plants, long-day plants and, day-neutral plants. Some species of plants such as strawberry can show all three responses depending upon variety. TEMPERATURE High ambient temperatures present the greatest problem to tropical greenhouse vegetable production. Temperature affects the productivity and growth of a plant, the extent of the effects being dependent on whether the plant is adapted to warm or cool season. If temperatures are high and days long, cool season crops such as broccoli and cauliflower will bolt. Both day and night temperatures influence plant vigour, leaf size, leaf expansion rate, and time to fruit development. Under low night temperatures, the rate of leaf growth is slower, and leaf size is reduced in young plants. Day and night temperatures should be carefully monitored. A general rule of thumb for most horticultural crops is for night temperatures to be approximately 7°C lower than day temperatures.
High temperatures in excess of 30°C to 35°C will cause many different types of damage to plants, such as inhibition of growth and even death. The physiological nature of heat damage is thought to involve a denaturation of some protein component of plant cells. Fruit abortion may occur at these temperatures as well. Temperatures lower than optimum will alter the plant metabolic systems, slow growth and, hinder fruit set.
In warm season crops such as tomato and sweet pepper, if temperatures are too high or too low, fruit set is hampered as pollen grains lose their viability. During the warmer dry months when plants are stressed, plants may drop fruits, or if fruit embryos are not properly formed, the plants will develop mal-formed fruit. Bitterness in lettuce can be caused by high temperatures.
29
Plants produce their maximum yield when exposed to day temperatures 5.5-8oC higher than night temperatures. Photosynthesis must exceed respiration for growth of the plant to take place because when respiration exceeds photosynthesis, the plant is using food faster than the rate at which food is being manufactured. The temperature of the air, the type of growing medium and, irrigation water directly affect the temperature of the plant. Efforts to reduce heat in tropical greenhouses often also result in a reduction of light intensity within the structure. Indeed, it is very difficult to separate light from heat since heat is the infra-red component of light. In order to reduce the temperature within a greenhouse, a mist or fog system could be employed. This system is based on spraying water as small droplets (droplet diameter of 2–60mm) with high pressure nozzles. Cooling is achieved by evaporation of droplets. Fogging can also be used to increase the relative humidity as well as cooling the greenhouse. A combination of forced ventilation and fogging system can be used for cooling greenhouses.
High pressure nozzles of uniformity distribution coupled with fans placed at both ends can achieve the required cooling demand. Air temperature and relative humidity of 28⁰C and 80%, respectively, can be maintained with the combination of forced ventilation and fogging (Kumar et al, 2009). WATER There are two main parameters which determine the quality of water, namely, pH and electrical conductivity (EC). Generally, the optimum pH range is 5.2 to 6.8 for most plants (Robbins, 2010). EC is a measure of the total dissolved salts in the irrigation water. Water used for irrigation should have an EC of less than 1.5mmhos/cm (mS/cm). The EC varies with age and type of plant and should be ≤0.6mmhos/cm for germinating seeds or rooting cuttings and ≤1.2mmhos/cm for general plant growth (Robbins, 2010; Whipker, 1999). Water helps to maintain turgidity within the individual cells, and also to keep the plant erect; lack of water in this manner causes flaccidity within the cells, ultimately resulting in wilting of the plant and over an extended period, the eventual death of the plant. Water acts as a solvent for minerals moving in the plant and for manufacturing carbohydrates that are translocated to the storage organs. Greenhouse crops require a very good source of high quality water. Water with high levels of soluble salts is not suitable for greenhouse vegetable production. For instance, high pH, calcium and bicarbonate levels in water limit growth, clog nozzles and, cause spots on leaves.
30
All water selected for use within the greenhouse environment must be tested for the presence of nutrients, soluble salts and some organic toxins. Water with an EC of 0.8mmhos/cm or less is considered of good quality. If the EC is higher than 0.8mmhos/cm, special management practices are required. The alkalinity or the measure of the dissolved carbonate, bicarbonates and hydroxides in the irrigation water, must be taken into account as this feature of the water will help to determine the availability of fertilisers as well as the efficacy of several pesticides, growth stimulants, etc., used with the crop. ALKALINITY IN WATER Alkalinity (Robbins, 2010) is the ability of the water to change the pH of the growing media and is a measure of the total carbonates (COᴣ²¯), bicarbonates (HCOᴣ¯) and hydroxyl ions (OH¯). To correct for high alkalinity in irrigation water, the following actions are necessary:
• For CaCOᴣ content greater than 480ppm, use reverse osmosis. • For CaCOᴣ content of 180-480ppm, use acidification. • For CaCOᴣ content of 120-180ppm, use acidic fertilisers. • For CaCOᴣ content of 40-120ppm, use neutral fertilisers. • For CaCOᴣ content less than 40ppm, add alkalinity and use basic fertilisers.
[Note: 1meq/L alkalinity = 50ppm CaCOᴣ or 61ppm HCOᴣ¯].
Water within the air surrounding the plant canopy must also be taken into account due to the effect that it has on the plant. The Relative Humidity (RH) is expressed as a percentage (%) and is calculated by dividing the amount of water in the air by the amount of water the air could hold at constant temperature and pressure. Warm air can hold more water vapour than cold air; if the amount of water in the air is constant and the temperature increases, the RH will decrease. Water will move from an area of high RH to an area of low RH and, the greater the difference in RH between the two areas, the faster the movement. The optimum RH range for greenhouse crops is generally 50-70%. RH is measured using a hygrometer (Figure 8); the moisture content of the growing media is measured with a tensiometer; and, levels of evapo-transpiration from the crop is measured with a lysimeter (Figure 9). GROWING MEDIA The growing medium is a very important part of the production system. The growing media within the Caribbean Region’s greenhouses range from soil, organic matter mixes, non-soil media, combination of several non-soil mixes and, water as used in NFT hydroponics. Some growers are now growing in non-soil media due to problems with soil such as nematodes, soil pathogens, poor drainage and pH-related issues. The transition to soilless media is relatively slow due to the high cost, limited availability of most non-soil media and, the unforgiving nature of these media when compared with soil. Some advantages of using soilless media are as follows:
31
o Lower incidence of root diseases. o Greater control of the root zone. o Ease of disinfection. o Ability to grow on marginal lands. o Higher quality produce.
Figure 9. Suction Lysimeter
(Source: Irrometer Company Inc., 2013)
Irrespective of the kind of medium selected, it should have the following characteristics:
o Good aeration and drainage. o Free from material having sharp edges. o Free from pathogens. o Free from harmful chemicals. o Have a low EC. o Have a near neutral pH. o Have a good Cation Exchange Capacity (CEC). This refers to the media’s ability to
hold nutrients having a positive charge, such as NH₄, Ca, Mg and K. The term “buffering capacity” is often used interchangeably with CEC. It refers to the ability of the media, as a result of its CEC, to resist changes in pH and nutrient levels (Will and Faust, 2013).
Commonly available growing media materials include: coir, perlite, sand, peat, rockwool, sawdust, several combinations of the above and water (hydroponics).
32
Coir (Figure 10) Coir is made from coconut fibre and is the most popular growing medium being used by farmers within the Caribbean Region. Large volumes of the product are imported from countries such as Indonesia, India and Sri Lanka. The physical properties of coir include:
o High water holding capacity of 70-80%. o High lignin, making it suitable for microbial decomposition. o Good re-wetting capacity. o High CEC. o High EC. o High carbon/nitrogen ratio (C/N) of 80:1. o pH of 4.5-5.8.
Figure 10. Common types of growth media.
(Sources: Super Sources Industrial Co., 2011; SANS Exim, 2010)
Coir may have high initial levels of sodium and chlorine which require leaching (flushing) before use. Coir will absorb large amounts of nitrogen from the fertilizer feed during the early phase of its decomposition and the grower must compensate for this loss by using more nitrogen in the fertiliser feed or by supplemental foliar applications of nitrogen.
pH and EC meters are used to assist in the preparation of coir as a growth medium. Coir may be purchased loose or in a dried compressed form. The loose form is very bulky and presents a challenge for the transportation of large volumes; the compressed form is transported more easily but requires a considerable amount of work and water to hydrate the bags.
33
Since coir holds up to 80% water it is imperative that drainage holes are cut in the bags. Coir lay-flat bags should have slits in the sides approximately 2.5 to 4cm from the base, the slits corresponding with the plants established in the bag, that is, one hole per root zone area. If additional drainage is required, drainage holes may be carefully punched directly in the bottom of the bags. All grow bags, pots, continuous troughs, etc., must be isolated from the underlying floor using an appropriate ground covering material. Isolation is most important when dealing with contaminated or infested soils and hot surfaces such as concrete.
Applying nutrients to the uncovered surface of coir will cause the growth of algae which appears as an impermeable thick crust on top of the medium. This reduces percolation of water and nutrients to the roots of the plant. Growers using sprayer stakes in containers are at a higher risk of causing this condition. To reduce this algae growth, nutrients should be applied at least 1.3cm below the surface of the growing medium; drip pegs, drip stakes and subsurface irrigation can be used to accomplish this exercise. Perlite (Figure 10) Several plants are well-adapted to growing in perlite contained in bags, troughs and pots. Perlite is made from volcanic rocks heated to very high temperatures of about 982oC until they expand to form white light fluffy “popcorn-looking” particles made up of closed air-filled cells. Perlite possesses large pore, good aeration, is light-weight and, holds water loosely to its outer surface. It is chemically inert, has a negligible CEC and a near neutral pH of 7.5. Particles of perlite can range from small (1mm) to large (8mm). The grower must select the perlite of the required size based on the anticipated use. As perlite ages, it disintegrates into progressively smaller particles. Perlite should be washed with bleach or hydrogen peroxide as a sterilisation agent. After a crop cycle, perlite accumulates debris from crop residues that must be removed from the system. Providing there is no contamination of the perlite, it can be re-used for several years. Sterilisation and solar treatment to kill pathogens in perlite helps to increase the active life of the product. Algae growth and build up can also be present within the perlite medium, the level of growth and build up being directly related to the amount of nutrient that is exposed to sunlight. If the perlite is applied too thinly, less than 10cm deep, then sunlight will penetrate it and get to the nutrient film on the surface of the channel resulting in the growth of algae. Trials using a mixture of coir and perlite at various ratios can give favourable results. Perlite and coir mixes provide large pore spaces that allow quicker penetration of nutrient solution throughout the substrate. This facilitates lateral movement of the solution into the pores of coir, resulting in a more uniform wetting.
34
The dust inhaled from dry perlite, especially when new, is bad for health and a respirator or dust mask should be used when handling the product. Periodical wetting of the material with a fine spray of water will help to reduce the dust.
Sand Sand has long been used as a propagation medium for cuttings of several horticultural plants and to germinate several kinds of seeds. Using sand as a hydroponic growing medium in the Caribbean Region has been long in the making but has not yet gained prominence. Major disadvantages to using sand are its weight and the great possibility of being infested with nematodes. Sand is a good additive to both soil and non-soil medium as it helps to improve aeration and drainage. Trials currently being conducted using a mixture of coarse washed river sand and coir in a ratio of 1:1 are giving very good results for the growing of romaine lettuce and tomatoes in 7.5L capacity plastic bags. Sand culture presently is a worthwhile alternative to expensive manufactured growing media. Peat Peat is partially decomposed vegetation, where the decay has been slowed by wet and cold conditions. Peat is only found in very small pockets on a few islands within the tropics as the high temperatures are not conducive for its formation. In cold areas such as North America and Canada, peat can be found in large quantities where it is used to amend soils and to manufacture potting mixtures. It has the characteristics of a good growing medium, but it is very expensive for Caribbean producers to purchase in large volumes. Rockwool (Figure 10) Rockwool is an inert porous, sterile product made from rocks heated to high temperatures and formed into fibres. The fibers are then made into slabs. Rockwool is slightly alkaline, has a very low CEC and, holds water relatively well. Rockwool slabs are usually 7.6cm x 15.2cm x 92cm appearing as lay-flat grow bags. The bags are re-usable up to three crop cycles providing they were not contaminated by root pathogens. Extended use (up to six years) may be gained by steam treatment and re-wrapping. Rockwool is very expensive and even its disposal incurs further cost.
Comparison of container-grown plants with soil-grown plants Non-soil media are placed into containers in an effort to use less material due to their high cost and oftentimes their unavailability. A comparison of container-grown and soil-grown plants is given in Figure 2.
35
Table 2. Container-grown vs soil-grown.
Container-grown Soil-grown • More delicate plant system • Quick response to changes • Smaller root zone • Less pathogens in root zone • Lower nutrient-holding capacity • Low buffer capacity and, therefore,
conditions change rapidly
• Less delicate plant system • Soil buffer higher and,
therefore, less responsive • Larger root zone and root
length
Common mistakes encountered with the use of container-grown plants include:
• Direct radiation from the sun causes overheating of the container. • Salt accumulation when root zone not sufficiently leached. • Root death due to oxygen deficiency under over-watering especially under hot
conditions.
Layout of bags of growing media (Figure 11) Leachate from lay-flat bags is allowed to drain into the walkways (furrows) or directed to the centre of the bed where it is drained to the exterior exterior; the latter being the better option. The drained solution should not be allowed to run to waste, as it still contains fertiliser nutrients which can either be re-circulated to the greenhouse crop or collected and re-distributed to open field cultivation.
Figure 11. Growbag layout (Source: USAID, 2010a; Photograph and lower diagram by C. Paul)
36
Management of bags of growing media (i) Salt accumulation Manifested in high EC values in the lowest zone of slabs i.e. corners. Occurs between two plants and emitters. Ions accumulating in the dead corners include Cl¯¯, SO₄²¯, Ca²⁺, Mg²⁺. Caused by poor drainage. During sunny periods expect nutrient accumulation; signs include:
- Wilting of plants during sunny periods of day even though root substrate is moist.
- Overall growth slows down. - Roots die from the tips back (particularly in drier parts of the
rootzone). - Leaves become necrotic along margins.
(ii) Leaching
- Flushing of rootzone to reduce salt accumulation. - Leachate should be of 5-10% concentration when plants are young. - Increase to 20-30% concentration when older and during high temperatures. - Prevents “pooling” of feed solution in the bottom of the growbag.
(iii) Conditioning of pot before transplanting (24 hours before).
- Collect drainage solution. - Measure EC. - Depending on the EC, flush with water again. - Inject nutrient solution into growth media.
PRACTICES OF PLANT PROPAGATION The greenhouse vegetables producer should try to acquire at least a basic knowledge of plant production. In this pursuit, emphasis must be placed on crop and variety selection, methods of propagation and plant care. Varietal selection The grower must constantly evaluate the market, to make sure that the variety supplied is filling the needs of the consumers. If this is not so, the grower must seek to get varieties that satisfy demand. In general, he should grow varieties that are:
1. Appealing to the market. 2. Compatible with the production system. 3. Newly-developed and satisfies specific needs.
The introduction of hybrids has given growers more flexibility. They have the advantages of
37
producing more stable uniform yields, more uniform fruit size and greater resistance to diseases. However, they are more expensive and saved seeds will not produce true-to-type offsprings of the parent plant. Growers who plant the progeny seeds of hybrids are very unlikely to get plants yielding fruits of the same characteristics as those of the original parent plant. Open field varieties are not bred for greenhouse production, though they may be grown under these structures and benefit equally from the environmental conditions created therein.
Purchasing and storage of seeds Growers should always aim to select high quality seeds and be determined to verify the authenticity of seeds purchased. They should always consult the various seed catalogues or seek advice from experienced personnel who can provide them with accurate information on the seeds or planting material. They should:
1. Select high quality seeds from a reputable seed company. 2. Note that open-field varieties are not bred for greenhouses. 3. Always check packaging for information related to:
o the numbers of seed. o the test date for the batch of seeds. o the percentage germination. o the presence of pesticide which might be harmful to the handler.
4. Make sure seeds were stored under cool conditions at the point of purchase. 5. After opening packages containing seeds and there is need to store remaining
seeds, make sure the seeds are dry and the container has as little air as possible. 6. Store seeds in a tightly-sealed container within the vegetable compartment of the
refrigerator. 7. When handling seeds coated with a pesticide, make sure to wear gloves, face
goggles and a respirator. 8. If the seed handler has sweaty hands, take care not to get perspiration onto the
seeds or into the container holding the seeds. Important points to note for the propagation from seeds
1. Calculate the number of seeds required per row or per area. 2. Sow 3-10% more seeds than counted, 3% more when using hybrids and 10% more
when using non-hybrids. 3. Sanitise all trays, tools and equipment, using a 100ppm chlorine solution. 4. Starter solution may be mixed into the growing medium, but care must be taken to
ensure that the solution is mixed to the correct strength so that there is no damage to the emerging seedling.
5. Fill seedlings trays loosely; do not compact the medium. 6. Place seeds in the centre of the cells and cover them lightly. 7. The depth of cover depends on the seed; in general, cover seed 2.5 times its
length.
38
8. The first wetting of the trays should be gentle and enough so that water droplets start falling through the openings found in the bottom of each cell.
9. Place seeds in the germination chamber which must be housed in a cool place. 10. Check seeds regularly to avoid etiolation.
Germination of seeds Germination time depends on seed viability, the type of crop, the variety and, environmental conditions. For instance, sweet pepper generally germinates in 6 to 8 days and tomato in about 3 days. Seed propagation media should provide the following: a. Good levels of moisture. b. Good levels of aeration. c. Be chemically inert. d. Be free from disease pathogens.
There are commercial germination mixes such as Lambert and Pro-mix, which may be purchased at a farm store. The size and number of cells within the seedling trays to be used is determined by the crop. Popular tray sizes in use are: 50, 72, 128 and 200 cells. The smaller the cell, the shorter the period of time the seedling can remain in it. Seedlings left to grow for too long in a restricted root media space will become root-bound. The resulting plant will have a very weak root system which is also out of proportion with the growth of the stem. The use of Styrofoam seedling trays should be avoided, as very fine root hairs often get trapped into the walls of these trays making cleaning and disinfecting of them very difficult when compared to plastic trays. Plastic trays, too, must be used with caution and are not to be left with seedlings in intense direct sunlight, as they heat up easily and can change the media temperature. Methods of plant propagation Propagation can be from seeds, in which case, it is referred to as “sexual “propagation, or it can be from any vegetative part of the plant, and referred to as “asexual” or “vegetative” propagation. Propagation from seeds is most common for vegetable farmers within the Region. Asexual techniques such as grafting, budding, layering, air-layering and micro-propagation (tissue culture) are practised by a few growers on a small scale. The need to practise more of these techniques is very relevant to the improvement and increase of local germplasm. Growers of tomatoes often use “auxiliary buds”, “suckers”, or “gormandisers”, to grow a new plant. In the process, healthy suckers are selected from a relatively young plant and treated so that they produce roots. Roots are encouraged to grow by placing the sucker in
39
a medium such as sand, coir, potting mixture or, even moist soil. The practice can save the grower money and while it can give yields similar to the original parent plant, there is always the risk of multiplying the growth of diseased plant material. Disease control during germination and early seedling stages Damping-off (Figure 12) is the most important disease affecting small seedlings at all stages of their life cycle. It is caused by certain fungi primarily Pythium ultimum and Rhizoctonia solani. There are also other fungi, bacteria and viruses that are present within the seed or irrigation water. Common water-related fungi are Botryis cineraria and Phytopthora species. The development of damping-off is promoted by the following conditions:
• Diseased soil medium. • Over watering. • Poor drainage. • Poor light. • Poor ventilation. • Too much nitrogen.
Control of damping-off is by: o The use of sterile seedling trays. o The use of sterile growing medium. o Avoiding over-watering; applying heavier watering in the morning. o Watering from bottom up. o Using less ammonia-based fertilisers. o Inoculating seedlings with biological control agents such as Trichoderma. o Using broad spectrum fungicides as a last resort.
Figure 12. Damping-off of seedling due to the fungus Pythium ultimum
(Source: Clark, 2013)
40
Acclimatisation (hardening-off) process This usually starts a week in advance of placing the seedlings into the production area. The process starts by gradually reducing water and nutrient, along with slow exposure to environmental conditions similar to those in the production area. During this time, the grower must use the opportunity to cull weak plants and constantly check for pests and diseases. Adjusting the Shoot:Root ratio Symptoms of too high a Shoot:Root ratio are: - Stretched seedlings. - Large, soft leaves. - Poor root growth. - Small and light-coloured leaves. - Small top with very short internodes. - Profuse root growth.
Corrective measures for root toning: - Reduce moisture levels. - Change fertiliser to one with more nitrates, ammonium, phosphorus and calcium. - Alternate wet/dry moisture cycles (increase moisture stress). - Reduce light levels.
General transplanting guidelines Seedlings should be transplanted when they have four to six true leaves. On the morning of transplant, they should be watered thoroughly so that they return to full vigour. The desired length and width of the seedling block are shown in Figure 13. Seedlings should be placed in the hole with the tip of the root ball 1.5cm below the surface of the growing medium (Figure 14). Recent work with sweet peppers is, however, supporting the placement of seedlings in the medium to a depth where the cotyledon node is totally covered. The practice is said to reduce a disease condition of sweet peppers called “Elephant’s Foot”. When establishing the seedling, the medium should fill the hole and be firm around the root of the seedlings. Fertigation must be carried out immediately after transplanting.
41
Figure 13. Length and width of seedling block (Photographs provided by J. Rowe) Length of seedling block should be 6cm. Width of seedling block should be 2.5cm.
Figure 14. Planting procedure (Photographs provided by J. Rowe)
Using two fingers, open an 8 cm deep hole
Hold the seedlinggently
The Drip Line and the Wetted Area
The wetted area Drippers
Dry area
seedlings
Transplanting (non-soil production) Growers must make sure that the environmental conditions including those of the growing medium are conducive for the introduction of the seedlings. They should:
a. Conduct water and media tests prior to planting. b. Check the EC and pH of the solution from flushed medium. c. Introduce nutritive solution into the growing medium 1-2 days prior to
transplanting. d. Make sure the entire fertigation system is functioning properly. e. Saturate the growing medium with the feed solution and check to make
sure the EC and pH are 0.8-1.2mmho/cm and 5.2-6.8, respectively (Figure 15).
6 cm
2.5 cm
42
Figure 15. Monitoring EC levels and rootzone temperature (Photographs provided by J. Rowe)
EC levels Rootzone temperature CROP NUTRIENT MANAGEMENT
Crop nutrition may be described as the process of determination, formulation, application and monitoring of the correct balance of the mixture of the essential mineral nutrient elements and the plant root environment to get optimum plant growth and fruit production. Plants get most of their mineral nutrients from the soil or from water solutions with the nutrients dissolved in them. Carbon, hydrogen and oxygen are obtained from water and carbon dioxide. Growers should know the nutritional requirements of the crop(s) and be prepared to monitor them on a regular basis. Fertiliser management is a critical element in greenhouse vegetable production. The stage of crop growth, fertiliser formulation and concentration, climate control and disease control practices must be taken into account when developing a fertiliser programme. The fertiliser is generally delivered through the irrigation system. Growers should ensure that they have appropriate storage tanks to hold and deliver the nutrient solutions. Essential elements may be divided into three groups, namely:
1. Mega-nutrients (used in extremely large quantities): carbon, hydrogen and oxygen. 2. Macro-nutrients (used in relatively large quantities): nitrogen, phosphorus,
potassium, calcium, magnesium and sulphur. 3. Micro-nutrients (used in small quantities): iron, copper, zinc, manganese,
molybdenum, boron. Essential element criteria An element or nutrient is considered essential if: 1. The plant cannot satisfactorily complete growth and production in the absence of the element. 2. The action of the element must be specific and no other element can completely substitute for it.
43
3. The nutrient must be directly involved in plant nutrition processes. 4. Deficiency symptoms are seen in the absence of the element. Nutrient deficiency A nutrient deficiency occurs when one or more elements are absent or are not available to the plant in sufficient quantities to meet the needs of the plant for growth, development and production. In growing systems where fertilizer recipes are developed and applied to fit the specific needs of the crop plant, nutrient deficiencies are greatly reduced; however, they are not totally eliminated as there are several factors which can render nutrient unavailable to the plant, though present in the growing environment. Plants will show deficiency symptoms in many ways, namely:
1. Chlorosis: yellowing of the plant tissues due to lack of chlorophyll production. 2. Necrosis: death of plant tissues. 3. Accumulation of pigments, e.g. red or purple colour. 4. Growth cessation: lack of new growth. 5. Stunting: new growth that is reduced when compared to normal growth.
Induced deficiency This occurs when mineral nutrients are supplied in correct quantities but the plant shows deficiency symptoms, because there are other factors within the plant growing environment which limit the plant’s ability to access nutrients. Considerations under induced deficiency
1. Uptake of iron is reduced in the presence of excess Cu, Zn, Cr and Ni. 2. Excess magnesium reduces the uptake of potassium and calcium. 3. Macro-nutrient cations are leached at low pH. 4. Boron uptake is reduced between pH 7.5–8.5. 5. High media pH affects the uptake of phosphorous. 6. High levels of calcium can reduce the uptake of nitrogen and can lead to lime-
induced chlorosis. 7. Excess sodium affects the uptake of calcium and magnesium and can lead to tip
burn and Blossom End Rot (BER). 8. Excess phosphorous in the root zone reduces the uptake of zinc, iron and copper
resulting in poor plant growth. Plant nutrient toxicity The lack or oversupply of a nutrient can both have detrimental effects on the plant. Minerals may be toxic to plants if:
a. They are present in quantities which interfere with plant metabolism. b. They are present in concentrations, that if combined with other factors in the
solution, causes them to interfere with the plant water relations.
44
c. Elements such as Na, Cl, Br, Se and heavy metals such as Co, Ni, Cr and Al can also cause toxicity.
d. All plants grow poorly in very acidic media (pH≤3.5). Growers using soil as a medium have to pay keen attention to the information given above, making soil and water tests a compulsory part of their operations. Growers using artificial growing media need to also test the growing media for excessive salts, but more importantly, they need to conduct tests for heavy metals within the irrigation water. Mobility of plant nutrients All nutrients move around within the plant transportation system by way of the xylem vessels which are located through the entire structure of the plant. Some nutrients, however, move more readily in the plant than others. Based on this specific characteristic of nutrients, they are divided into two groups, namely mobile and immobile nutrients. Those that move around easily are referred to as being mobile while the others that find movement more difficult are describe as being immobile. Deficiency signs within a plant are sometimes more easily diagnosed based on where the symptoms are observed on the plant. As a general rule, mobile nutrients show their deficiency symptoms in the lower leaves while immobile nutrient do the opposite and signs are seen in the younger leaves located towards the tip of the plant (Table 3).
Factors affecting nutrient availability Frequently, all the required nutrients are present within the nutrient solution, but not available to the crop plant. Below are some factors that cause unavailability of nutrients in solution.
1. Cation Exchange Capacity (CEC) of the medium is a measure of how well the medium can hold positively charged nutrient ions and how easily it will release these ions when required by the plant.
2. Media buffering capacity relates to how well the medium can resist changes in pH. Media with high buffering capacity will also have high CEC and require large volumes of material to amend them. It is not an issue if the media has the correct pH but, if the pH has to be adjusted, this can be difficult to fix.
3. If the pH is not in the correct range, certain individual nutrients will not be taken up, while on the other hand, some nutrients may be taken up too rapidly resulting
45
in toxicity to the plant. Most nutrient elements are best absorbed between pH 5.5 to 6.5.
The following information, related to nutrient uptake, may be used as a general guide: At very high pH 1. Occurrence of micro-nutrient deficiencies e.g. boron, molybdenum. 2. Toxicity of phosphorous, potassium and sulphur. At very low pH 1. Occurence of macro-nutrient deficiencies e.g. phosphorus, potassium and sulphur. 2. Occurrence of micro-nutrient toxicity, e.g. iron. The ideal alkalinity range for most crops is 50-120ppm of calcium carbonate equivalent; within this range the media pH is stable. Unstable media pH will affect the uptake of mineral nutrients. Growers can reduce the “liming effect” caused by high alkalinity by adding a strong mineral acid such as nitric, sulphuric, or phosphoric to the irrigation water. Fertilisers high in the ammonium form of nitrogen produce an acidic reaction, which can neutralise the liming effect of water alkalinity. Ideally, in the process of lowering pH, high alkalinity within the irrigation water is also reduced. If the irrigation water has a high pH and an alkalinity below 50ppm the grower must lower the pH then add alkalinity or buffer; potassium bi-carbonate is often used to add alkalinity. In general, the higher the pH or alkalinity of the water, the lower the solubility of the fertilisers and the efficacy of insecticides, fungicides, growth regulators, etc. Approximate acid requirements to reduce alkalinity to an endpoint pH of 5.8 are presented in Table 4.
Table 4. Approximate acid requirements to reduce alkalinity to an endpoint pH of 5.8.
Acid type
Volume (cm3) of acid to be added to 1,000L water for each meq /liter* alkalinity to be neutralized.
Nutrients added by 100cm3
of acid in 3,800L water.
Nitric - 67% 52 5.4ppm N Phosphoric -75% 64 9.8ppm P Sulphuric - 35% 86 3.7ppm S *One meq/liter CaCO
3= 50ppm CaCO
3
Other methods to neutralise water alkalinity include reverse osmosis, de-ionisation, distillation and electro-dialysis; these are, however, very expensive procedures to conduct and in most cases would not be practical for growers. Solubility limits of fertilizers
46
This is a measure of the maximum amount of fertiliser that can be dissolved in a given volume of water at ambient temperature. Several of the factors already discussed such as pH, alkalinity and, temperature and purity of the solvent, also affect the solubility limit (Table 5). Table 5. Solubility limits of some fertilisers (mass of fertiliser per unit volume of ambient water)
The grower must remember that the ability of the solvent to dissolve more fertiliser is gradually reduced with each quantity of fertiliser that is dissolved in it. When mixing several fertiliser quantities it is best to dissolve each in a container with the solvent and then add to a stock tank. Solubility of several fertilisers, particularly those containing the mico-nutrients is greatly improved by mixing in warm water. Dissolving potassium sulphate can be challenging. Dissolving potassium sulphate The caking of various types of fertilisers interferes with the handling of fertilisers in bulk form at the factory and by the end user. Several methods have been used to decrease fertiliser caking which involve the use of additives to the fertiliser composition. Typical additives include the use of finely-divided powders which must cover the fertiliser substantially and uniformly; e.g. talc, kaolin and diatomaceous clay. These anti-caking agents, besides lowering solubility of fertilisers, form sediments when the fertilisers are dissolved. Growers may follow the procedure below:
a) Place an amount of potassium sulphate at a rate of 0.50kg/L water in a suitable container. b) Mix for 10 minutes with a sump pump (minimum 4500L/hour). c) Adjust pH of solution to 2.6 by adding a mineral acid. d) Continue to mix for another 10 minutes.
47
e) Allow the solution to stand for 2 hours (anti-caking agents will flocculate and fall out of solution). f) Filter solution through cheese cloth or pump off the clear supernate having an EC of approximately 10-11mmho/cm.
Heating will not significantly increase the solubility of potassium sulphate. Fertilisers for greenhouses Greenhouse crops are considered to be heavy feeders requiring large quantities of fertiliser which must be fed at the right ratio and from a reputable source. Materials used to supply nutrients for greenhouse vegetable production are chosen based on several factors including cost per unit of nutrient, solubility in water, ability to supply multiple nutrients, freedom from contaminants and ease of handling. The commonly used fertiliser materials for greenhouse are listed in Table 6. Chemical fertilisers Of all the fertilisers supplied to the plant by the grower nitrogen, phosphorous, potassium are used in the largest quantities and are referred to as primary macro-nutrients or macro-elements. Most common greenhouse fertilisers will contain one, two or three of these elements in various ratios based on formulation. Calcium, magnesium and sulphur are usually supplied in lesser quantities and are referred to as secondary macro–nutrients. The micro-nutrients boron, chlorine, copper, iron, manganese, molybdenum, and cobalt are used by the plant in very small quantities and are also called trace elements. Table 6. Sources of nutrients to formulate various nutrient solutions for greenhouse vegetables.
Fertiliser application techniques Fertilisers may be supplied to the plants using several techniques or methods and absorption is via the roots or the leaves. All plant foods are absorbed in solution form. Foliar feeding Small pore-like openings in the leaves called “stomata” facilitates the absorption of water, mineral salts and the exchange of gases between the plant and the environment. The absorption of dilute forms of fertilisers can take place through these openings. Foliar application of fertiliser is not recommended as the normal method to supply the plant with food, but is usually done when the grower wants to quickly correct a nutrient deficiency. Plants readily absorb nutrients through their leaves and care must be taken, not to over feed them. Foliar applications of fertiliser must be dilute and applications done when the growing environment is cool (early morning). The pH of the solution has to be within the prescribed range to enhance rapid absorption via the leaves. Pre-plant fertilisers In this method, fertiliser is mixed into the growing media prior to the establishment of the crop plant. Pre-plant fertilisers will start decomposition as soon as they come in contact with water. This method is not popular among greenhouse growers as they use the fertigation system to accurately supply fertiliser whenever needed. Irrigation systems
49
Water delivered to the crop may be done using various types of irrigation systems. The grower must meet crop watering needs by selecting an economical and efficient irrigation method that is safe to the user, the public and the environment. Top-down irrigation This refers to irrigating from above the foliage using sprayer or applying water to the top of the growing media by hand or drip lines. The downward movement of solution causes leaching of excess salts out of the root zone. It is recommended that in top-down irrigation systems, 10% of the solution applied be allowed to drain from the bottom of the container. Spraying with nutrient solution Sprayers can supply sufficient solution to provide plants with fertiliser, but they over-wet leaves and are, therefore, not the best option for fertiliser application within tropical greenhouses. Trickle tubes or micro–tubes or spaghetti tubes These tubes extend from main lines to the surface of the substrate of the individual plant in the container or to the root zone of plants grown in beds. Ideally, the leaves of the plants are not wet during irrigation. Drip pegs or stakes are recommended for use in this application to deliver the solution below the surface of the growing medium. Nutritive solutions applied to the surface of the growing medium, such as with spray stakes, encourages the growth of algae on top of the media. Sub-irrigation In this method, plants are irrigated from below, through capillary uptake or flooding. Dry or partially dry substrate will draw water upwards when the lower portion of the substrate is in contact with the water. This is referred to as capillary uptake, the success of the capillary uptake depending on the number of capillary spaces within the media. Growing media with very large air spaces do not facilitate capillary action and require amendment to reduce the spaces between particles. Methods of hydroponics, such as the ebb and flow systems and others which rely on the upward movement of nutrients from the surface of the growing channel to the roots in the growing media, depend heavily on the media ability to facilitate capillary movement . Capillary mats used in seedling nurseries provide the seedlings with irrigation from below as their roots grow down towards water or nutrients. The system is helpful as it encourages the early downward growth of roots and no water touches the foliage of the seedlings. Fertiliser mixing Fertiliser mixing, proportioning and delivery can be manual or largely automatic. The selection of the method is dependent on factors such as affordability, access to electricity, access to the correct inputs and, the level of skill. Common to both systems is the
50
preparation of concentrated fertiliser feed firstly in two “Stock” tanks (“A” and “B”) and then mixed together in a mixing tank called the “Bulk” tank or “Mother Solution” tank. The two Stock tanks and the Bulk tank are the “heart-beat” of a fertigation feeding programme. Not all that is put into the tanks is taken up by the plants and, if the chemical properties of the solutions are not correct, the plants will not feed….. check final solutions for pH and EC regularly! Bulk tank system The Bulk tank system requires the following items:
1. A final Bulk tank from which the plants are fed directly. 2. Two Stock tanks, “A” and “B” which must be of plastic or stainless steel. 3. A water treatment tank for treating approximately 380L water for the
stock tanks. 4. Submersible water pump with a capacity of approximately 4500L/hour. 5. Weighing scale. 6. pH (with thermometer) and EC meters. 7. Alkalinity tester (consumer models not very reliable and water analysis
might be better option). Mixing stock solutions in Stock tanks “A” and “B” As discussed earlier, there are several factors which impact the solubility of fertilisers; in addition, some fertilisers are incompatible with each other when mixed at high concentrations within a stock tank. For instance, fertilisers containing phosphates, and sulphates are not mixed with calcium nitrate. When incompatible fertilisers are mixed, precipitation, re -crystallisation or displacement in some chelates will occur. When writing fertiliser recipes, the technician may reduce or eliminate these problems by doing the following:
1. Carefully select the quality and type of fertilisers. 2. Group compatible fertilisers in the same stock tank. 3. Manage the quality and pH of the mixing water.
Following the procedure above should result in a solution that is clear with no suspension (cloudy or milky), no precipitates (sediments) and no sludge. The presence of any of these is an indication that you are wasting fertiliser and, by extension, money. Also, the nutrients precipitated will be unavailable for uptake and can eventually lead to nutrient deficiencies. The quantities of the different fertilisers are to be accurately weighed and mixed in their separate Stock tanks using pH-corrected water. The pH in these Stock tanks needs to be kept below 5.5. The EC in Stock tanks is usually very high and may cause irreversible damage to some EC meters. In which case, diluted percentages of the solutions are used to calculate the approximate strengths of the solutions within the Stock tanks.
51
Basic Stock tank solution chemistry o Phosphates will precipitate calcium, magnesium and iron. o Sulphates will precipitate calcium. o Calcium, zinc, copper and manganese will displace iron from some chelates at
high pH levels. o pH will impact all fertiliser reactions.
Managing iron in the Stock tank solution Use only the chelated forms of iron. If phosphates and sulphates of zinc, copper and manganese are present in Stock tank ”B”, place iron in Stock tank “A”. If all micro-nutrients except boron and molybdenum are chelated, then iron can be placed in either of tanks “A” or “B”. It is, however, best to add the chelated micronutrients to the “B” tank containing the phosphates. Irrespective of where the micro-nutrients are placed, tank “A” or tank “B”, the pH within the tanks must be maintained below 5.5. Proportioning within stock tanks “A” and “B” A typical stock solution may contain some or none of the following at various quantities based on the recommendations:
Stock tank “A” Stock tank “B” Calcium nitrate Potassium sulphate Potassium nitrate Mono potassium phosphate Iron Micro-nutrients
There is a very wide range of fertilisers recommended for use within greenhouses and the decision on which is selected is guided by the evidence of information on water, media and the kind of crop, given to the recipe writer. After Stock tanks “A” and “B” are mixed to specification, the recommended proportion of their respective contents is to be added to a third tank (the Bulk tank). The Bulk tank should be half-full with pH-corrected water, the recommended quantity of stock in tank “A” measured and placed into it, making sure to mix continually using the submersible pump. After the full quantity of stock in tank “A” is added, continue to fill the Bulk tank up to the three-quarters full point, using more pH-corrected water and making sure the mixing continues via the submersible pump. With all of the stock in tank “A” fully mixed in the three-quarters full Bulk tank, its concentration is now low enough for the contents of Stock tank “B” to be added without any problems. The calculated portion of stock from tank “B” is added and mixing continued. After a very thorough mix, the pH and EC of the contents within the Bulk tank are checked and corrected based on the recommended recipe for the final solution which is then fed within the fertigation system to the particular crop plants.
52
Proportioning by injectors Injectors are used to measure the amount of fertiliser that is mixed into the incoming irrigation water. Each displacement of the injector produces a fixed volume of fertiliser that is pumped into the irrigation water as it passes through the unit. If fixed ratio injectors are used, the fertiliser feed has to be formulated to give the correct EC, taking into account the fixed delivery ratio of the injector in use. Variable injectors operate on the same principle as fixed injectors, with the exception that the quantity of fertiliser to be injected into the water stream can be adjusted. This creates an advantage in that the nutrient solution may remain the same and the EC being delivered can be altered, eliminating the need to mix different solutions to acquire a different EC ratio. Greenhouse irrigation water Greenhouse operations require a very good source of high quality water. Water used for greenhouses in the tropics is mainly sourced from rivers, gullies, wells, streams, ponds with harvested surface water, ponds or tanks with harvested rain water and from the domestic water supply systems. Water with high salt content is not recommended for use within greenhouses and especially within hydroponics systems. Water with high salt may be made good by reverse osmosis; this is, however, a very expensive venture which might not be cost-effective for most growers, in which case, relocation and the harvesting of rain water become more viable alternatives.
PART II - PLANT TROUBLES and SOLUTIONS
A clean greenhouse, providing a conducive environment for plant growth, will produce strong and healthy plants, which, in turn, will increase profits for growers (Nair and Ngouaijio, 2010). At the end of each production cycle all structures, irrigation infrastructure, clips, and truss support systems should be cleaned with a 10% bleach solution (USAID, 2010e). Floors should be swept to remove all plant debris and accumulated soils. Make sure to clean the trench drains. Pull weeds out of cracks and trenches. Disinfecting the floor is an effective method to prevent disease-causing organisms like Pythium and Rhizoctonia. Chlorine dioxide or similar chemicals can be used to sterilise greenhouse benches. It is preferable to use new containers for each crop; however, for economic and other reasons, some growers re-use their pots, containers, and flats multiple times. Whenever old containers are used, it is critical to make sure that they are free of disease pathogens. If the previous crop had a disease problem, it is likely the disease can spread to new transplants or other greenhouse vegetables through leftover soil particles. Organisms like Pythium and Rhizoctonia can survive in soil particles and infect plants. All containers
53
should be thoroughly washed to remove plant debris and soil particles after which they should be treated with a greenhouse disinfectant.
A 10% solution of household chlorine bleach could be used, but its activity period is short compared to other disinfectants. To obtain better results, soak containers for a minimum of 30 minutes and finally rinse with water. Rinsing helps to avoid phytotoxicity to plants.
Spraying and fumigating (also, post-fumigation practices) It is important to fumigate a greenhouse between crops to clear out any pests that have flourished during the previous crop. Fumigating with a sulphur candle has been the traditional way of clearing pests, but now those nasty sulphur candles can be replaced by chemical-free Biofume Garlic Candle. It is important to kill any pests which have thrived during the cropping season i.e. red spider mite, whitefly and aphids, before beginning a new crop. The following steps are used for fumigation:
1. Ensure that all doors, windows, etc., of the greenhouse are firmly closed. 2. Place the Biofume Garlic Candle on a brick or in a metal container in the middle of
the greenhouse and light the paper wick. 3. Close the door and leave overnight. 4. After at least 12 hours, open the greenhouse and ventilate well.
General cultural disorders Apart from keeping the warm and moist greenhouse environment clean and well ventilated, appropriate cultural practices are necessary to prevent several plant disorders. Some of the disorders which may occur are listed below with their causes in brackets: - Upper leaves firm and yellow (lime in water or soil – use lime-free compost). - Leaves dull and lifeless (too much direct sunlight or spider mite infestation). - Plants not growing (overwatering or too little light). - Small leaves, spindly growth (underfeeding or too little light). - Spots and patches on leaves (under- or overwatering; too much direct sun; pests;
diseases). - Brown tips or edges on leaves (overfeeding; incorrect watering; too much direct
sunlight causing heat). - Leaves curl and fall (overwatering). - Leaves droop (overwatering; drought). - Lower leaves dry up and fall (too little light; heat; overwatering). - Leaf fall on established plants (sudden temperature rise; drought). - Leaf fall on new plants (transplant shock). - Leaves turn yellow and fall (overwatering). - Leaves wilting (overwatering; drought; heat; diseases; pests). - Flower buds fall (drought; too little light; pests; diseases). - Flowers quickly fade (drought; too little light; heat). - Holes and tears in leaves (insect damage; people brushing against leaves). - No flowers (too little light; heat; inappropriate daylength).
54
- Etiolated stems with long internodes (too high plant density; too little light). - Leaves and stems rot (fungus; bacteria; overwatering). - Green slime on clay pot (overwatering; impeded drainage). - White crust on clay pot (overfertilisation; lime in water or soil).
Some watering and heating troubles are depicted in diagrams in Figures 16 and 17, respectively.
Figure 16. Some watering troubles. (Source: Hessayon, 2009).
CHAPTER 4 GENERAL PESTS, DISEASES and PHYSIOLOGICAL DISORDERS of TROPICAL GREENHOUSE VEGETABLES and their MANAGEMENT By Jervis Rowe and Compton Paul General IPM Considerations Integrated pest management (IPM) is the use of a number of compatible practices, such as Biological, Cultural, Mechanical, Genetic and Chemical, to minimise pest damage and prevent economic losses. Management of pests must be done at all stages of the crop starting at the nursery through land preparation, plot establishment, plant growth and harvesting. Under IPM growers should aim to achieve the following:
o Grow a healthy crop. o Understand and conserve natural enemies. o Observe the greenhouse regularly by scouting. o Seek to increase knowledge in crop management.
Growers must remember that disease-causing organisms (pathogens) are always in the environment; however, if conditions do not favour their growth, development or survival, they cannot affect the crop. A cycle showing the pre-requisites for a disease is shown in Figure 18. Figure 18. A cycle showing the pre-requisites for a disease. (Source: Rossel, 2008).
Growers must remember that they cannot eliminate all pests as most measures can only result in the reduction of their population. The objective then is to keep the number of pests at a level where they do not cause unacceptable economic losses. IPM measures should promote the reduction of negative impacts on the environment and human health. These measures can only work if there is great co-operation among the stakeholders.
IPM Strategies The Greenhouse IPM The good conditions created for the plant within the greenhouse will also benefit several pests once they get into the structure. Greenhouses provide ideal conditions for the spread of some diseases and insects making disease and pest control an essential part of any production system. Mechanical control (screens, barriers, hand-picking pests) Mechanical control measures under IPM rely heavily on the principle of exclusion, as physical barriers are placed in the path of the organism wanting to cause disease. The construction of greenhouses is one such measure as the coverings installed unto the structure serves to keep out whatever is not wanted in the greenhouse. Ultra violet blocking plastic films can be used to manage the rays from the sun, so they have an effect on the flight orientation of some insects thus reducing flight activities within the greenhouse. Blocking certain aspects of the sun’s rays can also inhibit the germination of certain fungal spores e.g. Botrytis Grey Mould. In an attempt to exclude diseases from the greenhouse the grower needs to practise the following:
o At least one greenhouse door must always be closed. o Use foot-bath with bleach, iodine, disinfectant, etc. o No spaces allowed under the greenhouse sides. o Repair all holes in mesh. o Any material entering greenhouse has to be pest & disease-free (visual
inspections, cleaning, sanitising). o Quality of the water must be disease-free. o Specific boots and overalls to be worn only in the greenhouse. o Equipment and tools to be used only in the greenhouse.
Cultural control (site selection, use of non-soil media, sanitation, spacing, solarisation, cultivar selection, water management). Cultural control plays a critical part in any IPM program. It can be one of the least costly methods of disease control if procedures are carried out in a sequential order making sure to start with clean planting material introduced into a clean healthy space. Avoid having weeds or planting certain crops immediately outside the walls of the greenhouse. Crops
57
planted in these areas cannot be from the same family as the crop in the greenhouse and must not be tall enough to block the flow of air and light going into the greenhouse through the side netting. Critical to cultural control, is an environment which is not conducive to the growth and development of the pathogen. Improvement in the relative humidity (RH) and the lowering of temperature within the greenhouse, is sometimes achieved through leaf pruning as this practice improves the air flow within the structure. Removal of lower, often diseased and non-functional leaves can reduce the need for chemical applications as the affected leaves are physically removed from the plant and the greenhouse. When all the cultural practices are followed it creates a bright, fresh, neat and clean space, an environment where plants are positively affected and where the greenhouse technician can work comfortably. The grower needs to consider the following under cultural control as a part of IPM practices:
o Pests are generally brought into the greenhouse on new planting material. o Many pests are able to survive short periods of time between harvest and the
planting of the next crop. o Inspect new plants thoroughly to prevent the accidental introduction of pests
into the greenhouse. o Keep doors, screens and ventilators in good repair. o Use clean or sterile growing media. o Clean or sterilise tools, flats and other equipment. o Maintain a clean, closely mowed or covered (ground cover) area around the
greenhouse to reduce invasion by pests that develop in the weeds . o Eliminate pools of standing water on the greenhouse floor. o Dispose of trash and old plant debris in the area; plant material removed
through activities such as pruning must not be left in the greenhouse overnight. o Avoid over watering and promote good ventilation to minimise wet areas
conducive to the breeding of flies and fungus. o Avoid wearing yellow and blue clothing, as they attract many insect pests. o Maintain a weed-free greenhouse at all times. o Eliminate infestations by removing heavily-infested plants.
Biological control (natural enemies, pheromones, beneficial fungi) Biological control (Figure 19) involves the use of living organisms to control other organisms. These may include beneficial microorganisms e.g. Trichoderma spp., or natural enemies of the pest. Natural enemies of the insect pest, also called biological control agents, include predators, parasitoids and pathogens. Natural predators such as birds, lady beetle and, lace wings, will consume a large number of pests during their life time. Predators such as birds may enter the greenhouse via the window at the extreme top of the structure which is sometimes left open to improve ventilation. This window can also serve as a point of entry for butterflies and moths, so proper management is required.
58
Spiders also use their web to trap flying insects and, for this reason, can be allowed to remain in the structure. Biological control is more management-intensive than using conventional pesticides and requires a greater knowledge of the pest biology and pest numbers. Figure 19. Biological control in motion (Mode of action - natural enemies).
(Sources: Foerster and Corrêa, 2009; Spofford, 2012).
Wasp predator on armyworm Tomato hornworm parasitised by braconid wasp (pupal cases shown)
There are many factors which will help to determine the success or failure of biological control methods; these include:
1. Release rates. 2. Time of release. 3. Placement. 4. Temperature and humidity. 5. Previous use of chemicals. 6. Quality of the biological control agent.
High pest populations will be difficult to control using biological agents. The life span of the predator or parasite will determine how often it has to be reintroduced. Parasitoid wasps will live longer if they are given a nectar source of food. If all the pests are eliminated, then the beneficial insects will also get eliminated. When beneficial insects are used to work within the greenhouse sticky cards should be temporarily removed. . Parasitoids are species with their immature period developing on or within a single insect host, weakening or eventually killing the host. Many species of wasps and some flies are parasitoids. Fungi, bacteria and viruses are pathogens which will debilitate or kill their host. Trichoderma is a beneficial fungus; its spores germinate and live in the soil near the roots of the plant, feeding on the nutrients that exude from the plant roots. It grows at an alarming rate and is able to out-grow and displace many plant pathogens. The fungus
grows over the roots and acts like a protective glove making it very difficult for pathogens to reach the plant. Trichoderma is presently being used in the Caribbean Region by farmers for the reduction of some pests and diseases. For instance, nematode infestation in tomato has been dramatically reduced through the use of Trichoderma. The spores of the fungus must be stored under the prescribed conditions as outlined by the manufacturers. Naturally-occurring biological controls are oftentimes just as susceptible to pesticides used to control pathogens of the crop plant and care must be taken not to eliminate the friends along with the enemies. Chemical control (last resort; only when necessary; use of soaps, oils, botanical and biorationals) Chemical control is often practised as the first line of defence in the fight against greenhouse and open field pests. This is unfortunate, as chemical control should only be used when all other methods have failed. Farmers have gotten accustomed to the often fast action of chemical pesticides and have either lost patience or trust in other methods of control as they anticipate a quick-fix to the problems. All chemicals are harmful and absolute care must be taken when using chemical pesticides, starting with the selection of the correct chemical and all the safety equipment required when using the chemical. If and when chemicals are used, the farmer should practise the following:
• Use only as a last resort. • Rotate chemicals; rotations must include pesticides belonging to different chemical
classes that use different modes of action to control the pests. • Limit treatments to pest “hot spots” to avoid treating the entire house. • Use a selective, short residual pesticide where possible.
Bio-rational pesticides such as insecticidal soaps, oils, neem products and Bacillus thuringiensis (BT) can be much less harmful to beneficial insects although active against certain pest species. Systemic insecticides and insect growth regulators for mating disruption can also be used. Some products are harmful to some stages of some beneficial insects and not others. For instance, oils are toxic to lacewing eggs and adult parasitoid wasps, but have very little effect on adult lady beetles and lacewings. Soaps are toxic to young lady beetles larvae while neem and BT are relatively safe. Conventional insecticides still have a place in IPM as sometimes it is not feasible to use bio-rational and biological control agents to get the desired control. When using chemicals, following the steps below can be beneficial to the grower:
1. Choose the right insecticide. Making the proper identification of the pest and understanding its biology and life cycle allows the grower to make wiser decisions in choosing the best insecticide.
60
2. Use the correct amount of insecticide. Read the label to determine the correct amount to be used. The decision will vary based on the size or stage of the pest and the size of the population.
Genetic control This approach to IPM deals with the breeding and use of cultivars which are resistant to the pest. Information about these cultivars can be found in the seed catalogues available from the seed companies. Growers must keep checking on new developments in order to remain current and to benefit from the advancement of technology as it relates to their area. Crop scouting and monitoring When scouting and monitoring are practised correctly, they result in the early detection and diagnosis of pest infestations. Many of the general IPM practices and tactics that are applied to the control of plant diseases relate to the management of insects and mites. All the plants within the greenhouse must be inspected at least once a week. As a guideline, plants should be randomly inspected in a zigzag pattern with the scout stopping in at least 1 spot for every 10m² of production area (Schnell and Rebek, 2008). Special attention must be given to plants near ventilators, doors, windows and fans. Examine the leaves, flowers, fruits and roots for pests and diseases (the scout must be aware of the habits of pests e.g. Tomato Fruitworm is found on the leaf below the highest open flower because this is the preferred site for egg deposition). Inspection of the plants should take place from the ground up to the growing tip, as some insects will feed on roots, stems, leaves, flower blossoms and fruits. Inspect both leaf surfaces upper and lower. Most insects as well as a number of diseases will start their attack on the plant from the lower surface of the leaf. Many insects and mites feed from the lower surface of the leaf, they will only move to the upper surface and other parts of the plant if overcrowding forces them to move. Some insects, particularly Thrips, will be found within the blossoms. They are very small insects requiring the use of a hand lens for proper identification. They hide so carefully within the blossoms, that it is often necessary to blow warm air from the mouth onto the blossom to cause them discomfort and force them to move. The area under the calyx or stem end of tomatoes and cucumbers is also a popular hiding place for insects. In general, insects will stay in secluded parts of plants. If there are weeds, examine them for pests, after which they must be removed from the greenhouse or the areas near the greenhouse. In this case, they can be used as indicator plants to give advance warning. Aphids, caterpillars and, leaf miners, can easily be identified while scouting. Yellow and blue sticky cards are also helpful in detecting insects flying in and around the greenhouse. Growers should observe the entire plant looking for any abnormalities including:
All comparisons should be made against a normal healthy plant. Legal control This is enforcing or introducing laws which govern the movement of agricultural goods at the various ports of entry. All efforts should be made to protect agricultural life by ensuring that only healthy materials can enter or leave the country.
PART I – PESTS ATTACKING GREENHOUSE CROPS Types of greenhouse pests The pests which affect crops in greenhouses are similar to those that attack plants in open-field. In the greenhouse, they enjoy all the comforts of the protected space including easy access to food and shelter from the harsh environmental conditions; as such, their rate of multiplication and the severity of their attack on the crop can be more devastating. Specific greenhouse pests Several insects and mites seem to be a habitual problem to greenhouse farmers. Although the pests are similar the control is often times different, one large difference being, all the pesticides used in open field are not automatically recommended for use within greenhouses, making finding a suitable pesticide difficult at times. The most important pests attacking tomato, sweet pepper, cucumber and lettuce in the Caribbean are:
SPIDER MITES (Figure 20) These are minute sap-sucking pests that infest the underside of leaves when conditions are hot and dry. The upper surface of the leaves become mottled. Spider mites are very
62
common in tropical greenhouses. The most common Spider mite in the greenhouse is the Two-spotted Spider mite. Size: 0.5mm (adult). Colour: pale green to light green with a large dark spot on each side of the body. Females will lay eggs on the underside of the leaf. The small whitish larvae have three pairs of legs. The larvae stage is short and is followed by the nymphal stage. In the nymphal stage the mites have eight legs and soon develop into the eight-legged adult Spider mite. Except for the egg stage all other stages during the life cycle feed on the plant. Spider mites will experience a shorter life cycle under higher temperatures. Usually, Spider mites go from eggs to adult in 5-7 days. At higher temperatures the period can be drastically reduced. New adults will start laying eggs within 36 hours and will lay 5-7 eggs per day. Spider mites will live and feed on the underside of leaves moving to the surface if there is over population. The mites pierce the plants with their style-like mouth parts and suck juices from the cells within the leaves. Each feeding site is relatively small; however, when they are in a cluster close to each other it gives the leaves a yellow, silver dusty appearance. The damage interferes with photosynthesis, the leaf dries up and, the plant eventually dies. The grower will know mites are present because of the damage done to the plants. Mites are very small and require the use of a hand lens or microscope for proper identification. The eggs and feeding marks are even smaller and can be observed only under magnification. When the mite population increases significantly, they move to the upper surface of the leaves and start a route towards the apical tip of the plant where they will produce silken webs. Webs are then lowered downwards so that other mites may use this rope to climb to the tip of the plant or act as bridge to move from one plant to the other. Spider mite control Prevention and sanitation is critical to any control program. Many mite infestations start through the introduction of infested planting material, mites are also very small and can enter the greenhouse through most conventional nets. They are easily blown by the wind and are carried over long distances to their next host plant. Rainfall and sprinkler irrigation are detrimental to mites as they aid in control and delaying build-up of the population. Mites like dry hot conditions. When miticides are used they need to be applied three times at five day intervals, due to the very short life cycle of the mites. Within the five days an attempt is made to kill all the adults and the immature stages. Make sure to direct sprays to the underside of the leaves where the mites live in an attempt to get the spray directly in contact with the body of the
63
mites. Note that once mites become established in the greenhouse it may be impossible to regain full control for the entire season.
Figure 20. Spider mites (Tetranychidae and Tarsonemidae spp.).
APHIDS (GREENFLIES, WHITEFLIES, BLACKFLIES) – Aphidoidea family (Figure 21) Aphids, also called plant lice, are pear-shaped, soft-bodied insects. Size: about 2.5mm or less in length. Colour: green, grey, brown, black, yellow, orange, or pink. Aphids have a pair of tubes which protrude from the rear of the upper abdominal surface. These tubes, called cornicles, can be seen easily with a hand lens or microscope. Winged aphids appear when the plant is heavily infested; a winged aphid on a sticky trap during any stage of production is a clear indication for the farmer to take action. Aphids feed on the lower surface of young tender leaves found at the growing tips. Aphids have needle like piercing- sucking mouth parts which they use to puncture the plant tissue and suck out plant juices. Aphid damage may appear as follows:
1. Stunting due to loss of nutritional fluids. 2. Distorted plant growth, such as twisted and abnormally thick leaves with edges
cupping downwards. 3. Collection of honeydew on leaves and fruits (honeydew: excreta from aphid
containing excess sugars). 4. Stunted or dead plants as a result of diseases (viruses) carried to the crop by
aphids.
64
Aphids reproduce very rapidly and most of the population is female thereby increasing the potential to multiply rapidly. They give birth to nymphs rather than laying eggs. Three to ten young aphids are born per female per day and they start feeding immediately after birth. Young aphids usually reach maturity in 5-7 days, and at this time, begin giving birth. The insects can live for 30 to 45 days, continuing to give birth daily and can have 30 or more generations per year especially under tropical conditions. Aphid control Biological control can be applied using techniques outlined on pages 57-59. Aphids are particularly difficult to control with insecticides since they must be contacted directly by the spray. Since they primarily feed under the leaf they are protected unless special effort is made to direct the spray to these areas. To gain control, ever effort must be made to achieve complete spray coverage of the plant. Systemic insecticides with good action against aphids are very limited.
WHITEFLIES (Figure 22) Greenish larvae suck sap from the underside of leaves and deposit sticky honeydew. The Whitefly is a very active flyer with four wings and a body looking like it was dusted with very fine white powder. Size: 0.8mm. Colour: whitish/yellowish. Generally, the Whitefly likes the leaves in the upper part of the plant. If the plant is shaken or tapped the flies will leave the plant and fly vigorously around the greenhouse.
The two popular species of Whitefly in the greenhouse are:
1. The Greenhouse Whitefly. The nymphal stage lasts 28-30 days and adults live 30-40 days under greenhouse conditions.
2. The Silverleaf Whitefly. It can lay an average of 100 or more eggs at a rate of 6-12 eggs per day. The eggs measure 0.20mm, are usually yellow and are attached to the underside of the leaf by a short stalk. Eggs may be arranged randomly or arranged in circular patterns. Eggs hatch in 3-7 days giving rise to tiny pale green first nymphal instars (crawlers) which will move a small distance from where they were hatched, find a suitable spot and start to feed. There are four instars, after which there is a non-feeding pupal stage.
Whiteflies have piercing and sucking mouth parts used to extract nutrients from the plant. Chlorotic (yellow) spots appear on the upper leaf surfaces and heavily infested plants appear stunted and sticky due to the presence of honeydew. Honeydew will later grow fungus resulting in sooty mold. Whiteflies are also vectors for several viruses such as the Geminvirus, Tomato Yellow Leafcurl Virus (TYLCV) and Tomato Mottle Geminivirus, to name a few. Some whiteflies can cause irregular ripening in tomatoes, where the tomato looks completely red on the outside with tough white areas internally. Whiteflies can be detected by observation, shaking on the plants or through the use of sticky traps. They are attracted to bright yellow, and so, yellow sticky traps can be used to reduce the numbers of adults.
66
Whitefly control Whiteflies are very difficult to control because:
1. In bushy plants spray penetration is difficult and because all stages of the developing whitefly reside underneath the leaf, making spray contract with the insect very difficult.
2. Whiteflies are covered with a waxy material which reduces the ability of sprays to stick to their bodies.
3. Since whiteflies suck juices from plants and do not chew on plant tissues, only systemic insecticides are consumed by whiteflies.
4. Only adults and crawlers move and come into contact with spray residues. 5. Immature whiteflies must be hit directly with contact insecticides in order to kill
them. 6. Whiteflies tend to be very resistant to several of the commonly used insecticides.
The following are practices that can be used in the control of whiteflies:
1. Never plant a new crop in or near a house with current whitefly problem. 2. Control requires co-operation from neighboring farmers. 3. Nursery operators must take extra precaution to avoid whitefly related problems. 4. Workers should avoid wearing yellow clothing. 5. Keep the greenhouse free of weeds at all times. 6. Inspect all seedlings for whiteflies before transplanting. 7. Destroy infested plants and plant parts immediately after the end of the crop.
For chemical control to be effective, the grower must concentrate on the adult, crawler, nymphal and pupal stages. A good management programme includes a spray against each stage. The spray programme must be started as soon as the adults appear and continued on a 4 day cycle until the flies are controlled, the programme will fail if spray intervals are too long. The spray programme must be started at the first sign on the insect. Parasitic wasps have been used successfully to control greenhouse whiteflies; however, control of the silverleaf whitefly is much more difficult. THRIPS (Figure 23) Thrips are tiny insects that fly or jump from leaf to leaf and damage flowers and foliage. Size : Range from 1mm to less than 2.5mm in length. Colour: Yellowish, brown, black. Thrips infest most cultivated crops as well as many wild host plants. They were considered to be only a nuisance rather than causing harm to the plant. However, in the last several years, their activities have caused great concern to growers of both greenhouse and open field crops, to include tomatoes. The Western Flower Thrip has caused concern because it vectors the Tomato Flower Spotted Wilt Viral disease (TFSWV). Since Thrips are very small, they are often times overlooked.
Adult Thrips have two pairs of wings with fringes on the margins and can fly readily but also move around by running and hopping. They make incisions in the leaves and lay about 25-75 extremely small, bean-shaped delicate eggs in the leaf tissue. Eggs are layed one at a time over 2-7 days. Larval stages are generally cream-coloured when first hatched and turn yellow as they develop. The larval and adult stages feed by rasping the tissue surface, rupturing the epidermal cells to extract plant fluids. Some Thrips primarily feed on leaves but some feed almost exclusively on flowers, buds and fruits. Thrips hide well and are found in the shady places. They are found feeding most frequently on the lower leaf surfaces on the inner plant leaves. As a general rule, Thrips show up on the foliage of the middle to upper parts of the plant. Affected leaves are discoloured and distorted, tending to cup or curl. The leaves become flecked and bleached with white spots. As damage increases leaves appear silvery and paper-like, they then dry out appears burned and die. Fruit damage is characterised by well-defined irregular depressed areas. Damaged fruits appear scaly with rough silvery patches or russeting (scars) that resemble wind burn. Western Flower Thrips transmit tomato spotted wilt virus. They cause cucumbers to be curved and hooked, reducing yields by up to 50 %. As Thrips feed they deposit reddish dropping which turns black, this is usually found on the underside of the leaves. Leaves are distorted and twisted, which if opened will reveal the colonies. Thrips can be made more visible by striking blossoms or leaves on a piece of stiff, blue or green piece of cardboard, cartridge or construction paper. Green or blue paper provides a good background on which to see the yellow and dark coloured Thrips.
68
Thrips are attracted to yellow and blue and are frequently captured on sticky traps of these colours. Thrips sometimes bite workers operating in close proximity to their infestation and in doing so they make growers aware of their presence. The damages caused by Thrips can be mistaken for damage caused by mites; the grower needs to be very observant in order to make the correct diagnosis and treatment. Cucumbers and tomatoes are favourite plants for Thrips. They can enter the greenhouse on boxes, tools and equipment which come from infected areas as well as the wing adult flying into the greenhouse. Thrips control Secure the entire greenhouse so the Thrips cannot enter. Check and sanitise all tools, equipment, clothing, etc., which are to enter the greenhouse. There is a shortage of registered pesticides for Thrips as they have become resistant to many available pesticides. Sprays have to be directed towards the underside of leaves, flower, buds, young fruits and leaf axils. Predator mites and some pirate bugs are very effective Thrips predators. BEETLES (Figure 24) They feed on foliage and new shoots leaving small holes in the foliage. The larvae feed on the underground parts of the plants, normally discolouring the calyx and causing fruit to drop. They can be controlled by running a sweep net across the tops of plants to collect foraging adults and by the use of Pheromone traps.
Figure 24. Beetles. (Sources: Day and Spring, 2011; Choate et al, 2013).
69
CATERPILLARS Earworm and Budworm are shown in Figure 25; Pickleworm in Figure 26; Pinworm in Figure 27; Armyworm in Figure 28; and, Cornborer in Figure 29. Caterpillars, the larval/immature stage of moths and butterflies, eat young leaves and sometimes spin webs that distort leaves. They may eat the entire leaf or parts of it, leaving the mid-vein. The adults (moths) enter greenhouses through doors, vents and sidewalls (which are usually open) and lay eggs that hatch into caterpillars. These caterpillars have chewing mouthparts and will feed on a variety of plants. If left unchecked, caterpillars can severely damage a crop. Pest control materials are directed primarily at the caterpillar stage. Control is by spraying contact insecticide or, hand-picked if the infestation is not severe. An alternative management strategy available to growers experiencing problems with caterpillars on a regular basis is to purchase natural enemies for release into the greenhouse. Parasitic wasps in the genus Trichogramma attack the egg stage of various caterpillar species.
Figure 25. Caterpillars – Earworm and Budworm. (Sources: Davidson et al, 1992; Van Dyk, 2001; Univ. Missouri Ext., 2003; Capinera, 2007; Missouri Botanical Garden, 2013b; Sorensen and Baker, 2013; Vargo, 2013; VPISU, 2013).
LEAFMINERS (Figure 30) The vast majority of leafminers are moths belonging to the Lepidoptera family. A leafminer is the larval stage of an insect that lives in and feeds within the tissues of the leaves themselves. The precise pattern formed by the feeding tunnel is very often diagnostic for which kind of insect is responsible. Control is by insecticide sprays applied to leaves and timed to coincide with periods when egg-laying occurs - usually shortly after leaves have expanded. Persisting contact insecticides can be used for this purpose, such as the various pyrethroids that currently predominate for control of insects that chew on leaves (e.g. permethrin - common names: Lyclear, Nix; bifenthrin - common names: Talstar, Capture; lambda-cyhalothrin - common names: Kung-fu, Matador; cyfluthrin - common names: Baythroid, Laser; and, deltamethrin - common names: Decis®, Proteus®).
BROWN STINK BUG (Halyomorpha halys) (Figure 31) Adults are approximately 17mm long and are shades of brown on both the upper and lower body surfaces. They are the typical “shield” shape of other stink bugs, almost as wide as they are long. To distinguish them from other stink bugs, look for lighter bands on the antennae and darker bands on the membranous, overlapping part at the rear of the front pair of wings. They have patches of coppery or bluish-metallic colored puntures (small rounded depressions) on the head and pronotum. The name “stink bug” refers to the scent glands located on the dorsal surface of the abdomen and the underside of the thorax. Feeding on fruits results in a characteristic distortion referred to as “cat facing,” that renders the fruit unmarketable as a fresh product. Typically, stink bugs will emerge from
cracks under or behind baseboards, around windows and door trims, and around exhaust fans or lights in ceilings. Control is by sealing these openings with caulk or other suitable materials to prevent the insects from crawling out. Spraying insecticides, directed into cracks and crevices, will not prevent the bugs from eventually emerging and is not a viable or recommended treatment.
Figure 31. Brown Stink Bug. (Sources: Organic Gardening Information Blog, 2013; Macgardens, 2013; Missouri Botanical Garden, 2013d; Sparks and Riley, 2008).
SNAILS AND SLUGS (Figure 32) Both snails and slugs are members of the mollusk phylum and are similar in structure and biology, except slugs lack the snail’s external, spiral shell. These mollusks move by gliding along on a muscular “foot” that constantly secretes mucus, which facilitates their movement and later dries to form the silvery “slime trail” that signals the presence of either pest. They are most active at night and on sunny days they seek hiding places out of the heat and bright light. They chew irregular holes with smooth edges in leaves and flowers and can clip succulent plant parts including fruit and young plant bark. Control by handpicking can be very effective if done thoroughly on a regular basis. Copper barriers, such as copper foil, are effective because the copper reacts with the slime that snails and slugs secrete, causing a disruption in their nervous system. Slug baits available from garden stores include metaldehyde powder.
MEALYBUGS (Figure 33) Mealybugs are insects in the family Pseudococcidae, unarmored scale insects. Mealybug females feed on plant sap, normally on leaves, roots or other crevices, resulting in a distorting, stunting, and yellowing of the foliage. They attach themselves to the plant and secrete a powdery wax layer used for protection while they suck the plant juices; the secretion (honeydew) promotes sooty mold and ants. The males are short-lived as they do not feed at all as adults and only live to fertilise the females. Mealy bugs also act as a vector for several plant diseases. Mealybugs are difficult to control because of their ability to reproduce rapidly and the protection afforded by their white waxy coat. Cultural control includes dislodging of mealybugs with water and soap sprays, practising good sanitation by checking new plants carefully and disposing of infested plants. Biological control includes the use of lady beetle, green lacewings (predators) and a wasp parasite, Leptomastix dactvlopii. Insecticidal sprays may be applied if mealybug populations are heavy.
NEMATODES (Figure 34) Plant parasitic nematodes (Meloidogyne spp), are small microscopic roundworms that live in the soil and attack the roots of plants. Crop production problems induced by nematodes, therefore, generally occur as a result of root dysfunction, reducing rooting volume and foraging and utilisation efficiency of water and nutrients. In addition to the direct crop damage caused by nematodes, many of these species have also been shown to predispose plants to infection by fungal or bacterial pathogens or to transmit virus diseases, which contribute to additional yield reductions (Noling, 2013). Nematodes management In most cases, greenhouse problems with soil borne nematodes arise from planting of infected seed or planting stocks. At present, no chemical or nonchemical management tactics are available that can resolve nematode problems within the greenhouse once introduced into the crop. As a result, nematode-free transplants should be used to exclude nematodes and to expedite plant establishment and crop production. Other cultural measures that reduce nematode problems in the greenhouses include rapid destruction of infested crop root systems following harvest. Discarding infected potted plants will help prevent spread of nematode damage. Entry points for greenhouse structures should also contain sanitizing stations for hands, shoes, boots, tools, and other equipment (Noling and Rich, 2013).
76
Figure 34. Nematode damage on tomato. Damaged plants are shown on the right of the photograph. Inset is a view of damaged roots with lesions or “rootknots” clearly evident. (Sources: North Carolina State University, 2006; Conrad, 2012).
PART II - DISEASES OF GREENHOUSE CROPS
Good disease management is crucial in the production of greenhouse vegetables. Growers must remember that under plant disease control “prevention is easier and cheaper than to control”. Most of the pathogenic diseases that affect plants in greenhouses are caused by fungus. Fungicides labelled specifically for use within greenhouse are very limited for the following reasons:
1. Greenhouse vegetable acreages are small when compared to open field so manufacturers of fungicides do not target greenhouse acreages due to the smaller size of the market.
2. Fungicides cleared for use in greenhouses have resulted in much more worker exposure, resulting in more legal actions against responsible parties.
3. Phyotoxicity caused by pesticide formulations are more frequent in greenhouses, when compared to open field.
4. Pesticide residues are higher in greenhouses due to the absence of environmental forces such as rain, wind and UV light which help to erode the chemicals.
Because of the conditions listed above it is imperative that growers focus more on the prevention of the diseases, using methods of control which do not involve the use of chemicals. Disease control is achieved through crop monitoring, cultural, chemical, physical and biological control strategies. Growers need to utilise all of these methods to ensure a productive operation. The main diseases affecting tropical greenhouse crops are:
SEPTORIA LEAF SPOT (Figure 35) Septoria Leaf Spot, caused by the fungus Septoria lycopersici, is a common foliar disease of tomatoes. It first appears as small, water-soaked spots that soon become circular spots about 3mm in diameter. The lesions gradually develop greyish white centres with dark edges. The light-colored centres of these spots are the most distinctive symptom of Septoria Leaf Spot. When conditions are favourable, fungal fruiting bodies appear as tiny black specks in the centres of the spots. Spores are spread to new leaves by splashing. Heavily infected leaves turn yellow, wither, and eventually fall off. Lower leaves are infected first, and the disease progresses upward if wet conditions persist. Defoliation can be severe after periods of prolonged warm, wet weather.
Figure 35. Septoria Leaf Spot symptoms (the light colored centers
distinguish them from leaf spots caused by Bacterial Spot). (Sources: ISU, 2010; Ontario Crop IPM, 2009d).
78
Infection can occur at any stage of plant development but appears most frequently after plants have begun to set fruit. To control Septoria Leaf Spot, a combination of cultural practices is often needed. These practices, which also will help to reduce the risk of many other diseases, include the following:
o Plant disease-free transplants far enough apart that the plants will not be crowded after they are full grown, in order to help the foliage dry rapidly
o Water at the base of the plants, and in the morning rather than the evening, to minimise the amount of time that the leaves are wet.
o Remove as much plant debris as possible, which must not be left in the greenhouse overnight.
o To avoid spreading disease, do not work with plants when foliage is wet. EARLY BLIGHT (Figure 36) Early Blight, caused by the fungus Alternaria solani, is also known as Alternaria Leaf Spot or Target Spot. Like Septoria Leaf Spot, Early Blight is a common disease of tomatoes, and the two diseases may attack the same plants at the same time. Premature loss of lower leaves is the most obvious symptom of the disease. Brown to black spots, 6 to 12mm in diameter with dark edges, appear on lower leaves. Spots frequently merge, forming irregular blotches. Dark, concentric rings often appear in leaf spots, resulting in the “target” appearance suggested by the common name. Leaves turn yellow and dry up when only a few spots are present.
Figure 36. Defoliation caused by Early Blight. (Sources: HGIC, 2013; Kemmitt, 2002; Infonet-biovision, 2013; Missouri Botanical Garden, 2013c).
79
The fungus occasionally attacks fruit at the stem end, causing large, sunken areas with concentric rings and a black, velvety appearance. Warm, wet weather favours rapid spread of early blight. Like Septoria Leaf Spot, Early Blight can infect plants at any stage during the growing season but usually progresses most rapidly after plants have set fruit. For control, decaying vines and fruits should be removed. Controlling weeds which serve as alternative hosts for the disease, prior to planting the new crop, will help to reduce the risk of transmission of the disease. Ensuring seed or transplants are pathogen-free before planting will also help to reduce buildup of inoculum in the soil or growth medium. The use of resistant varieties and fungicides (e.g. maneb, ziram, daconil) with protectant and curative properties are also recommended. ANTHRACNOSE (Figure 37) Anthracnose, caused by the fungus Colletotrichum coccodes, is probably the most common fruit-attacking disease of tomato in the region. Symptoms first become visible on ripe or ripening fruit as small, circular, indented spots in the skin. As these spots expand, they develop dark centres or concentric rings of dark specks, which are the spore-producing bodies of the fungus. In moist weather these bodies exude large numbers of spores, giving diseased areas a cream to salmon pink colour. By this stage, decay has penetrated deeply into the tomato flesh. Spotted fruits often rot completely because of attack by secondary fungi through anthracnose spots. Anthracnose appears most commonly on over ripe fruits.
Because Anthracnose is more prevalent on poorly drained soils, tomatoes should be planted on well-drained media or soil. Three-to-four-year crop rotations, which exclude crops in the Solanaceae family, are recommended to prevent a buildup of the fungus in soil. Several fungicides are registered for use on tomatoes to control anthracnose. Fungicide applications should begin when fruits are formed on the first cluster (Dillard, 1987).
FUSARIUM WILT (Figure 38) Fusarium oxysporum f. sp. lycopersici, the fungus that causes Fusarium Wilt, attacks only certain tomato cultivars. Plants infected by this soil-dwelling fungus show leaf yellowing and wilting that progress upward from the base of the stem. Initially, only one side of a leaf midrib, one branch, or one side of a plant will be affected. The symptoms soon spread to the remainder of the plant and, affected plants die early and produce few, if any, fruit. Splitting open an infected stem reveals brownish streaks extending up and down the stem. These discolored streaks are the water-conducting tissue, which becomes plugged during attack by the fungus, leading to wilting of the leaves. Plants are susceptible at all stages of development, but symptoms are most obvious at or soon after flowering.
Figure 38. Fusarium Wilt on tomato.
(Sources: Edmunds and Porttorff, 2013; Sedbrook, 2010).
To reduce the effects of Fusarium Wilt farmers are encouraged to plant resistant varieties. The letter “F” following the variety name indicates resistance to one or more races of Fusarium fungus. VERTICILLIUM WILT (Figure 39) Verticillium albo-atrum and Verticillium dahliae, the fungi that cause Verticillium Wilt, appear first on the lower leaves and progress upward. Yellow blotches develop on lower leaves; the leaves rapidly turn completely yellow, wither, and drop off. Unlike Fusarium Wilt, symptoms of Verticillium Wilt do not progress along one side of a leaflet, branch, or plant. Infected plants may survive through the growing season, but are stunted and yield is reduced. Verticillium fungus lives in the plant's vascular system which carries water from the roots to the leaves and, like Fusarium, causes internal browning of the water-conducting tissue in stems. The discoloration is most pronounced near the soil line and seldom extends more than 25 to 30cm above this point. Control measures are similar to those for Fusarium Wilt. Names of Verticillium-resistant tomato cultivars are followed by the letter “V.”
81
Figure 39. Verticillium Wilt foliage symptoms and cut stem showing browning. (Sources: Sinclair and Lyon, 2005; McAvoy, 2012).
LATE BLIGHT (Figure 40) Late Blight, caused by the fungus Phytophthora infestans, is a major disease condition that causes much devastation for tomato growers within the tropics. The condition is triggered by periods of cool, rainy weather. Figure 40. Late Blight symptoms on leaflet and fruit. (Sources: Seaman et al, 2013; Pokorny, 2009; Schumamm and D’Arcy, 2005; Menu, 2011).
Late Blight may infect either young (upper) or old (lower) leaves. It first appears as water-soaked areas that enlarge rapidly, forming irregular, greenish black blotches. The
undersides of the leaves often show a downy white growth in moist weather. Infection of green or ripe fruit produces large, irregularly shaped brown blotches. Infected fruits rapidly deteriorate into foul-smelling masses. Late blight appears when cool night temperatures cause frequent heavy dews. P. infestans causes similar symptoms on potatoes and can spread from potatoes to tomatoes. Control measures for late blight are the same as for Septoria Leaf Spot. BACTERIAL SPOT (Figure 41) Bacterial Spot, caused by the bacterium Xanthomonas campestris pv. vesicatoria, infects both tomato and pepper. Spots that appear on leaves and stems are small (up to 3mm across), circular to irregular in shape, and have a slightly greasy feel. Unlike similar-sized spots caused by the fungus Septoria lycopersici, those caused by the Bacterial Spot pathogen do not develop greyish brown centers. As lesions enlarge, they often become surrounded by a yellow halo. If spots are numerous, they begin to grow together, and leaves wither and turn brown. Fruit symptoms are more distinctive than leaf or stem symptoms. Spots on green fruit first appear as black, raised, pimple-like dots surrounded by water-soaked areas. As the spots enlarge to 6 to 12mm, they become grey-brown and scabby with sunken, pitted centers. The bacterium spends the off-season on the surface of seeds, in infected debris, and in soil. It is commonly brought into fields on infected transplants. Warm, rainy weather favors rapid spread of Bacterial Spot.
Figure 41. Bacterial Spot on leaflet and fruit of sweet pepper and tomato. (Sources: Ontario Crop IPM, 2009a; Ritchie, 2007; Missouri Botanical Garden, 2013e).
83
Control measures are essentially the same as for Septoria Leaf Spot. However, obtaining disease-free transplants is particularly crucial for controlling this and other bacterial diseases, since the bacteria can be transmitted to seedlings from contaminated seeds. Sprays of a fixed copper product can reduce spread of the disease in the greenhouse if applications begin when first symptoms appear. BACTERIAL SPECK (Figure 42) This disease, caused by the bacterium Pseudomonas syringae pv. tomato, does not affect pepper or other solanaceous crops but may survive on non-host plants. Tiny, 1.6mm diameter, dark spots appear on leaves, surrounded by yellow halos. However, as with Bacterial Spot and Bacterial Canker, the fruit symptoms are most characteristic. The numerous specks that develop on young green fruit are slightly raised, 0.8 to 1.6mm in diameter, and have well-defined margins. The specks are considerably smaller than the spots caused by Bacterial Spot, do not penetrate the fruit deeply, and can be scraped off with a fingernail. Although bacterial speck seldom reduces yields greatly, it can harm fruit quality. Infection is favoured by very cool (less than 21⁰C), wet conditions. Control of Bacterial Speck (Zitter, 1985) (1) Use disease-free, hot water-treated seed. (2) Obtain disease-free transplants that have been produced with a good protective spray programme (e.g. mancozeb plus fixed copper, with streptomycin as a replacement bactericide for copper in later sprayings if weather conditions favour speck development). Note: Streptomycin can only be used on tomato plants before transplanting. (3) Practise crop rotation because of the carryover of inoculum in plant debris and weeds. (4) Follow good weed control and sanitation programmes before establishing the current season crop. (5) Practise a preventive spray programme using copper + mancozeb from anthesis until the first-formed fruits are one-third their final size. After that point, the greatest risk of Bacterial Speck is passed; copper can be dropped from the programme, and the full labelled rate of fungicide should be used to control foliar blights, especially Early Blight. (6) Use of Bacterial Speck resistant varieties.
84
Figure 42. Fruit spots caused by Bacterial Speck. (Sources: Univ. of Missouri. 2013b; Smith and Koike, 2012; Ontario Crop IPM, 2009b; MacNab, 2013).
BACTERIAL CANKER (Figure 43) Bacterial Canker, caused by the bacterium Clavibacter michiganensis subsp. michiganensis, has caused serious losses in some tomato crops. Young transplants may wilt suddenly and completely. On older plants, leaflets begin to turn brown at the edges, then die back progressively toward the leaf midrib . Often only one side of a leaflet or a plant develops symptoms first, but symptoms eventually spread. Rarely, cavities may develop within stems, sometimes splitting open into brown, longitudinal cankers. Spots on fruit are quite distinctive: white and slightly raised at first, then raised, dark-colored centers with white halos 1.6 to 3.2mm in diameter. These spots are sometimes termed “bird’s-eye” lesions. The white halo turns brown as the spot becomes older. Control measures for Bacterial Canker are the same as for Bacterial Speck, except that copper sprays have minimal impact on slowing the spread of the canker.
85
Figure 43. Bacterial Canker on tomato and sweet pepper. (Sources: NSW Dept. of Primary Industries, 2013a; Mr. Tomato King, 2010; Miller, 2006).
GREY MOULD (Figure 44) Grey Mould, caused by the fungus Botrytis cinerea, is a common disease of greenhouse-grown tomatoes. This disease is characterised by a light-grey fuzzy growth that appears on stems and leaves. Soft rot of the stem end of the fruit can also be seen. Botrytis infections are most severe in greenhouses with moderate temperatures, high humidity, and stagnant air. Increasing ventilation and air circulation to reduce humidity levels can be helpful, as well as timely fungicide applications. Figure 44. Grey Mould on tomato fruit. (Sources: BBC, 2013; Bayer CropScience Inc, 2011).
86
LEAF MOULD (Figure 45) Leaf Mold, caused by the fungus Fulvia fulva, can cause problems in humid greenhouses with poor air circulation. This fungal disease appears on lower leaves as yellow spots on the upper surface and fuzzy masses of buff-colored spores on the underside. These leaves drop prematurely as the disease progresses upward on the plant. Lowering greenhouse humidity, planting resistant varieties, and applying fungicide promptly can be helpful in Leaf Mold management. Figure 45. Leaf Mould on tomato leaves. (Sources: Univ. of Florida. 2008; Miller, 2011).
POWDERY MILDEW (Figure 46) Powdery Mildew, caused by the fungus Oidium neolycopersici, is also common in humid tropical greenhouses with poor air movement. Characterised in the early stages by white patches on the upper surface of leaves, this disease can cause defoliation as the spots develop into brown lesions. Increasing air circulation and spacing between plants will reduce Powdery Mildew problems. Fungicide sprays also can be effective if used when symptoms of Powdery Mildew are first noticed.
ELEPHANT’S FOOT DISEASE OF SWEET PEPPER (Figure 47) Elephant’s Foot Disease is characterised by the presence of epidermal injury on a swollen region of the stem developed at the base. Openings (longitudinal cracks/wounds) in the epidermis of the stem in this region expose the plant to fungal infections. Epidermal injuries are more likely to occur in plants where seedlings are transplanted with the cotyledonary node above the surface of the media. The condition is reduced when seedlings are transplanted to the depth of the first true leaves. The stem/root junction might be more sensitive to salts than upper regions of the stem and is injured by exposure to harsh salty conditions. High moisture in the substrate, injecting nutrition solution too close to the base of the stem, placement of emitters too close to the stem, salt accumulation on the stem and lack of aeration around the base of the stem are all contributory factors to the disease. The plant experiences sudden wilting and eventual death. No pathogen has been observed. Prevention measures include:
- Transplant placement of cotyledonary node below the surface of the growth medium (depth of first true leaves).
- Move irrigation emitters gradually from the stem base. - Ensure growing medium at the surface of pot and base of the plant stem region is
kept dry.
88
Figure 47. Elephant’s Foot Disease of sweet pepper. (Sources: Jovicich and Cantliffe,1999; Jovicich and Cantliffe, 2013).
PART III - PHYSIOLOGICAL DISORDERS
Physiological disorders of greenhouse plants are those problems resulting from the influence of cultural and environmental factors on plant development. A number of physiological disorders arise in controlled environment facilities because cultural and environmental conditions in these facilities often are significantly different from those encountered by plants growing in the natural environment. Factors implicated in the occurrence of physiological disorders include irradiance (intensity, photoperiod and spectral quality), humidity, CO² concentration, air temperature, air movement, growing medium temperature and moisture level and, mechanical effects. Effects of physiological disorders range from subtle symptoms not visibly apparent to those of severely stunted and malformed growth. In some cases, the symptoms can be severe enough as to limit the use of the greenhouses for commercial production of vegetables (Morrow and Wheeler, 1997). The following are the main physiological disorders found in vegetables grown in greenhouses in the Caribbean Region.
89
Blossom End Rot (Figure 48) Blossom End Rot (BER) is a very common problem on green and ripe tomatoes and sweet peppers. It first appears as a sunken, brownish black spot 12 to 25mm in diameter on the blossom end of the fruit. These spots may gradually increase in size. Although BER itself causes only local injury, secondary organisms frequently invade the lesion and cause complete rotting of the fruit. It often occurs in rapidly developing fruit during periods of hot, dry weather and tends to have the greatest impact on the earliest maturing fruit. BER is caused by a calcium deficiency that is related to wide fluctuations in available moisture. To prevent BER, maintain a steady rate of plant growth without stress. A consistent and ample supply of moisture can reduce the problem by helping to maintain a steady flow of calcium from the growing medium to the fruit. Mulching also will help by conserving soil moisture. BER is more serious when an excess of nitrogen fertiliser has been applied. If BER occurs, remove the affected fruit so that later-maturing fruit will develop normally.
Figure 48. Blossom End Rot. (Sources: The Garden of Eaden. 2011; NSW Dept. of Primary Industries, 2013b).
Fruit cracking, splitting, spotting and distortion (Figures 49 and 50) Two types of cracks may develop on tomato fruit. Radial growth cracks radiate from the stem and concentric cracks encircle the fruit, usually on the shoulders Similar to BER, cracking is associated with rapid fruit development and wide fluctuations in water availability to the plant. Fruit that has reached the ripening stage during dry weather may show considerable cracking if the dry period is followed by heavy rains and high temperatures. Tomato varieties differ considerably in the amount and severity of cracking under climatic conditions. As with BER, mulching and avoiding heavy applications of nitrogen fertiliser help to reduce fruit cracking.
90
Figure 49. Fruit cracking in tomato. (Sources: UMassAmherst, 2013c; Front Range Food Gardener, 2010; Missouri Botanical Garden, 2013f).
In the case of sweet pepper (Figure 50), the development of large cracks and splitting on the surfaces of the fruits are a response to high root pressure and are related to sudden changes in the growth rates of the fruits. Cracks may appear after periods of high humidity usually above 85%, changes from hot sunny weather to cool cloudy weather or vice versa. To prevent the condition, the efficient management of water is required; do not over-water, reduce watering cycles and avoid all night watering. The appearance of small white dots (Figure 50) under the surface of the sweet pepper fruits results from excessive calcium levels in the fruit. The white dots are calcium oxalate crystals. Conditions that facilitate high root pressure will favour the formation of these crystals, again the management of moisture is critical to this disease prevention. The development of distorted or misshapen sweet pepper fruits is generally associated with very poor growing conditions at the time of flowering and pollination. Growers must check flowers by tapping with the finger gently, while a dark colour paper or dark surface material is placed below the flower to catch any pollen which would have been mechanically dislodged. If pollens do not fall freely, then it is not a good time to pollinate mechanically. The tendency for pollen grains to clump together is mostly due to high relative humidity.
91
Figure 50. Physiological disorders of sweet pepper. (Sources: www.semena.org, 2013; Silber et al, 2009).
Catfaced fruit (Figure 51) Catfacing is a term used to describe misshapen fruit with irregular bulges at the blossom end and bands of leathery scar tissue. Cold weather, as encountered in the northern coast of Jamaica during the Northern winter months, at the time of blossom set, distorts and kills certain cells that should develop into fruit, resulting in the deformities. The disorder is most often observed among first-formed fruit. Catfacing is most common in the large-fruited “beefsteak” varieties of tomato.
Sunscald (Figure 52) Sunscald occurs on tomato fruit overexposed to the sun. The initial symptom is a whitish, shiny area that appears blistered. The killed, bleached tissues gradually collapse, forming a slightly sunken area that may become pale yellowish and wrinkled as the fruit ripens. The dead tissue is quickly invaded by secondary organisms and the fruit decays. Fruits most subject to sunscald are those that have been exposed suddenly to the sun because of pruning, natural spreading of the plant caused by a heavy fruit load, or loss of foliage from diseases. The extent of the injury is more serious during periods of abnormally high temperatures. To prevent sunscald on tomato and peppers, control foliar diseases and avoid heavy pruning or shoot removal. In sweet peppers, trellising must begin early to keep the plant erect so that leaves are properly positioned over fruits. Plants that grow to the side will develop leaves which rarely cover the fruits; most attempts to straighten the plant to a near vertical position oftentimes results in the breaking of the stem.
Blotchy ripening (Figure 53) This physiological disorder is highlighted by the absence of abnormal red pigment on localised areas of the fruit. These areas appear as yellow or grey-green patches on otherwise normal-coloured ripening fruit. When these fruits are sliced open, brown discoloration is often apparent.
Climatic, nutritional, and cultural problems may contribute to blotchy ripening. Low levels of potassium in plants and prolonged cloudy periods or inadequate light intensity have been associated with the disorder. Other possible contributing factors are high soil moisture, high humidity, soil compaction, and excessive fertilisation. These environmental factors can contribute to nutrient deficiencies or other imbalances that impede development of red pigment in the fruit. To minimise incidence of blotchy ripening, follow proper cultural practices to maintain nutritional balance and plant vigour. If commercial fertilizers are used, select balanced formulations and avoid over-application. Physiological Leafroll (Figure 54) Physiological Leafroll occurs when the edges of the leaves roll upward and inward . Sometimes the curling continues until the leaf margins from either side touch or overlap. Some leaves on the plant may not exhibit rolling. Leafroll is believed to result from irregular water supply, and may be intensified following pruning. The symptoms are sometimes temporary, disappearing after a few days, but can persist throughout the growing season and thereby reduce yields. Some varieties exhibit this condition much more than others. Leafroll must also not be confused with copper deficiency.
Fruit set failure High day and night temperatures will reduce flower production of fruiting plants in several ways. Daytime temperatures above 32⁰C and night temperatures above 22⁰C result in reduced flowering and fruit set (Rief et al, 2009). High temperatures for several consecutive days, coupled with drought conditions, will lead to poor pollination and cause flowers to drop from the plants. Hot drying winds may intensify the problem. Tomato plant growth, fruit ripening and yields are satisfactory when night temperatures are maintained at 17⁰C to 22⁰C and day temperatures are about 27⁰C to 29⁰C (Hochmuth and Hochmuth, 2012) but some hybrids such as Solar Set VFF Hybrid are reported to set fruit even up to a day temperature of 33⁰C (GardenWeb, 2013c). In the Caribbean Region where ambient temperatures are tropical to sub-tropical in nature, growers should seek to use varieties that perform well at the higher ends of the day and night temperature ranges noted in the foregoing, that is, day temperatures close to 29⁰C and night temperatures close to 22⁰C.
CHAPTER 5 CROP CULTURE OF TOMATO, SWEET PEPPER, CUCUMBER AND LETTUCE By Jervis Rowe and Compton Paul CHOICE OF CROP Choosing the crop to grow in a greenhouse is dependent on a number of factors which include the following: I. Optimal environmental growing requirements for the crop i.e. temperature, light,
water, nutrition: For most crops, there are upper and lower limits of temperature under which maximum production can be attained. Exposure of crops outside this range usually affects some important plant processes. These eventually lead to reduced productivity or reduced quality of produce. As much information as possible should be obtained to guide the selection of a suitable crop and type or variety that can produce well under the protected structure.
II. The growing system: this is the physical infrastructure that is required to grow the crop inside the greenhouse in an attempt at providing optimal conditions. This determines structural design parameters, crop density (spacing), media, trellis support system, irrigation/fertigation, etc. This may also be variety dependent or stage dependent or vary with the type of production system within a particular crop e.g. tomato seedling production is a different set up to that of tomato vegetable production.
III. The market: this helps to determine the profitability of the operation. It involves: a. Marketing intelligence. b. Market price research. What are the prices (average, over the year)? What are
the premium prices? c. Market dynamics (What are the causes of price variations with time of year?).
This usually indicates the problems associated with conventional production e.g. the high incidence of pest and/or disease problems with the dry or rainy season. Or, physical problems e.g. flooding in the main production areas during the rainy season.
d. Market requirements: post-harvest considerations as well as the condition, grade, colour, size, packaging and, quantum of produce.
Ultimately, at the end of the selection process, the economic feasibility of producing and marketing the crop so as to command premium prices for high quality and safe food grown under protected greenhouse structures, should be evaluated and considered.
96
In the Caribbean Region, the main vegetable crops grown in greenhouses are tomato, sweet pepper, cucumber and lettuce.
GREENHOUSE PRODUCTION OF TOMATO (Lycoperson esculentum Mill)
The tomato is a member of the Solanaceae family, which includes a number of other important food crops, such as the Irish potato, pepper, and eggplant. Tomato can be placed into three broad groups based on their growth habits. These are, indeterminate types characterised by a vine-like growth, semi-determinate types and determinate types that have a more compact growth habit (Figure 55). Indeterminate types are commonly cultivated in greenhouses where they are well-suited to trellising and training for continuous production over a long period of time. Based upon their regular growth and flowering habits, indeterminate types can yield fruit consistently for 9-12 months over a growing season. Comparatively, semi-determinate and determinate types generally build to a large initial yield that can be followed by an extended period of moderate yield. Indeterminate varieties:
o Are climbing varieties. o Are well adapted to greenhouse conditions rather than to those of open-
fields. o Require constant maintenance and physical support.
Semi-determinate and Determinate varieties: o Are bush-type varieties. o Usually do not require pruning. o May be grown without physical support. o Usually grown in open fields but are also common in greenhouses.
Common fruit types (Figure 56) of tomato include small grape, cherry, plum and beefsteak. As with many other crops, tomato cultivars may either be hybrid or non-hybrid (open-pollinated).
97
Figure 55. Diagrammatic representation of growth habits of tomato. (Source: Diagrams provided by Jervis Rowe)
Figure 56. Fruit types of tomato. (Sources: Wikipedia, 2013a; Austral Seedlings, 2013;
Friends School Plant Sale, 2013; Canned Fresh, 2013).
Many modern tomato cultivars are hybrids, being produced by the controlled crossing of two parent lines to encourage specific, positive traits. Hybrids tend to be uniform, high yielding, and typically resistant to multiple diseases, but they do not breed true-to-type. Seeds saved from
98
hybrids will produce a variable crop of mixed genotypes, segregating from the many attributes found in the parent hybrid. ENVIRONMENTAL REQUIREMENTS Site selection and Structure In the Region, the type of greenhouse structure is dependent on the area where this crop is to be grown (Table 7).
Table 7. Greenhouse structure requirements for tomato.
Note: a mesh size of 50% shade rate has perforations of 7mm x 2mm All passively ventilated structures must have a window or vent. The size of the window is the equivalent of 15 to 20% of the floor space area. In low altitude areas, plastics offering over 70% light transmission may also allow too much heat, into the greenhouse. When thermal radiation becomes too high the grower can install shade mesh on the outside over the top of the structure. The use of white reflective materials is also preferred. All the measures individually and sometimes combined are implemented to reduce heat in low cost, passively cooled tropical greenhouses. Environmental conditions within protected structures must be conducive for the growth of the plants as well as providing a comfortable working environment for the greenhouse technicians. Tomatoes can adapt to a wide range of growing environment, providing the correct varieties are selected. They do best within the range of conditions below:
Temperature For tomato, ideal day temperatures should be 21°-26°C and night temperatures around 16°-19°C, although many new varieties do best with little difference between day and night temperature (check with your seed company for recommended growing temperatures). To attain these ideal temperatures in the tropics, systems of ventilation, mist spraying and air conditioning are required. For seedlings, the temperatures should be constant at 20°-22°C, then gradually increased to the diurnal temperatures before transplanting. Humidity o Hygrometer should read 50-70% relative humidity.
99
o Good relative humidity in the greenhouse is supported by proper air movement within the structure.
Light o Tomato needs at least 8 hours of full light which is not usually a problem in the
tropics, but low light intensity within greenhouses has contributed significantly to loss of production.
Some factors prevent light from impacting plant leaves; these are:
o Use of incorrect plastic films. o Use of incorrect shade netting. o Over-crowding of plants. o Objects casting shadows on the greenhouse. o The most common cause is “dirty roof plastics”.
A light intensity of 15,000 to 20,000lux (1,395–1,860ft-c) should be maintained at the leaf surface (Badgery-Parker, 1999; Runkle, 2011). High light intensities at temperatures over 32˚C can be damaging to the crop. Low light results in: o Poor fruit set. o Pale slender plants with long internodes. o Fruits that do not ripen evenly. o Overall very weak growth and production.
Water This crop requires a very good source of high quality water. Water used for agriculture must be tested for the presence of elements such as sodium, chlorine, boron, calcium, etc. Checks should also be made for water-borne pathogens particularly those that can cause plant diseases. High pH, calcium and bicarbonate levels in water: o Limit growth. o Clog nozzles. o Cause spots on leaves.
On average, a mature tomato plant will consume 1.5-2L of water per day.
Varieties In 2005, Alboran from the seed company Rijkzwaan was the variety of choice for the Jamaican greenhouse famers who were at that time largely growing in soil medium. Alboran was very susceptible to one strain of the root knot nematode and, by 2007, was replaced by Beverly, a sister variety to Alboran, only now showing resistance to the root knot nematode. Beverly is still very popular among several greenhouse farmers.
100
Popular varieties in production under greenhouses currently include: o Beverly, Geronimo, Trust, Matrix, Big Dena, Blitz (indeterminate growth types). o Tyranus, Striker and Adonis (determinate growth types). o There are also several varieties of cocktail, cherry and grape tomatoes in production.
Planting After land preparation which includes bank construction, placing of grow bags or bags with medium at the required planting distances, checking of the irrigation system and the complete sanitation of the greenhouse it is time to plant. Growth media
(i) Soil o Tomatoes may be planted directly in the soil; however, problems due to soil
pathogens and general poor soil conditions e.g. nematodes, water-logging and incorrect soil pH will always cause concern. Soil tests will provide value information on the condition of the soil.
o When soil is used tomato plants are established on raised beds 25cm tall x 90cm wide.
o The soil should be properly soaked with water the day before and a few minutes before planting.
o All the seedlings must be treated with a systemic insecticide and fungicide 24 hours before transplanting.
o During transplanting, a starter solution such as Mono-ammonium phosphate (MAP) can be used. Mix 1.5-2.5kg of MAP in 200L of water, and then apply 200-300cm³ around each hole.
o Place the seedling in the hole within 5 minutes after application but not in direct contact with the fertiliser as root tip burning may result.
o The plants can be stressed for about 5 days by reducing the amount of water given to the plant; stressing induces better root formation. Care has to be taken to avoid wilting on very hot days.
(ii) Non-soil growth media
Coir, perlite and rockwool are also used as growth media for tomato. Farmers can also make their own media using soil plus mixtures such as: soil/rice husk, soil/filter press mud, soil/peanut trash and, soil/saw dust. Non-soil mixes such as perlite/sawdust, perlite/coir, coir/sand, sand/rice husk, etc., can also be used. A non-soil medium is normally placed in pots, black or white plastic bags in sizes ranging from 25cm x 25cm x 25cm and upwards; large bags of 15-20L can facilitate two tomato plants.
(iii) NFT (Nutrient Film Technique) hydroponics Tomato plants are grown in lined open top troughs or plastic pipes with the nutrients circulating as a shallow film on the surface of these channels, continuously or for a few
101
minutes every hour. This system is not popular for growing tomatoes within the Region possibly due to the vast infrastructure layout required, the depth of knowledge required to operate the system and the additional work to establish a reliable plant support system for the tomatoes.
Fertigation (Table 8) The grower should ensure that the quality of water to be used for fertigation is acceptable. He/she may need to have the water sampled and analysed by a reputable laboratory. Fertiliser application to the root zone is usually via drip irrigation systems (see Chapter 3 of the present manual). A typical nutrient solution for greenhouse tomato is shown in Table 8.
Table 8. A typical nutrient solution for greenhouse tomato.
Plant training (Figure 57). Indeterminate types of the tomato plant is vine-like in nature and may run for distances exceeding 12m. Figure 57. Training the tomato plant (attaching to trellis or twine and cable system – left; lowering and leaning – right). (Photographs provided by J. Rowe).
Plants are trained so they initially grow vertically, being supported by poly twines attached to a plant support cable approximately 3m tall. When the plants grow until their growing tips reach near plant support cables they have to be lowered and leaned horizontally, and
102
only raised back to a height approximately 12cm tall, making sure that no fruits or leaves are touching the ground after plants are lowered. Tomato plants will require pruning every 3-4 days. Lower leaf removal, de-suckering, de-flowering and, cluster pruning, are best done before leaning and lowering. The use of a fungicide to spray or paint unto open wounds on the stem after these activities is recommended. The grower must maintain a good fruit to leaf ratio (Figure 58) making sure there are enough leaves to manufacture sufficient food, leaves to support the transpiration process, and to provide shade for fruits. In general, there should be a minimum of 1m of foliage measuring from the growing tip to the last set of leaves on the stem. No more than four healthy leaves should be removed from the plant at one time. De-flowering (Figure 59) and cluster pruning (Figure 60) on tomato is done to promote the development of fewer, more uniform and larger fruits suited for the market. The number of fruits that are allowed to remain and develop on each cluster is determined by the variety and the general health of the mother plant. Generally, for larger fruits, three to five are allowed to develop per cluster and as the fruit size reduces, the number of fruits left increases; as such, cherry tomatoes are rarely cluster-pruned. The objective should be to thin the cluster to a group of fruits that are most uniform in size and are near the same stage of development.
Figure 58. Maintaining a good fruit/leaf ratio through de-leafing. (Source: Burrell, 2013).
103
Figure 59. De-flowering (numbers show the fruits that are allowed to develop). (Source: USAID, 2010a)
Figure 60. No cluster-pruning done (developed fruits are not uniform in size). (Photograph provided by J. Rowe).
Tomato plant training activities are made easier with the use of vine clips (Figure 61) attached to the poly twine which is attached to the plant support cables. The Poly twine with clips in place is secured to the lower portion of the plant, usually below a leaf or fruit cluster, the string is then thrown over the support cable and brought back to the plant for a second connection via another clip on another point of the stem above the previous clip. Maintain some tension but not too much to break the stem or damage the plant. Allocation must be made for excess string to service the plant as the vine grows longer.
104
Other methods of trellising using tomato reels and hooks can also be used. Figure 61. Clips, reels and hooks used to train the plants up the trellis or twine/cable System. (Sources: Benny Hill Drip Irrigation, 2013; Roscam Young Plants Pty Ltd., 2013).
Flowering It is best to have good vegetative growth before any fruit set; as such, early nutrition must be steered towards structural development. Tomatoes have hermaphrodite flowers, which may be self–pollinated. Flowering and fruit set are best when pollination (Figure 62) is assisted e.g. shaking gently by hand or the wind, tapping on the plant support cables, use of an air blower, artificial bee pollination (electric pollination) or using bumble bees will result in better fruit set and higher yield than self-pollination alone. High temperatures, poor light, poor nutrition and the use of certain pesticides can reduce flowering and lead to poor fruit-set.
105
Figure 62. Pollination of tomato flowers. (Sources: Mike’s Journal, 2008; Greenhouse photos provided by A. DeGannes).
Pests and Diseases Pests and diseases affecting tomatoes in greenhouses are similar to those affecting tomato plants in open-field. These were discussed in Chapter 4. Harvesting (Figure 63) Tomatoes will take 100-110 days from seedlings to harvest, weekly reaping can continue for up to almost one year. Beefsteak tomatoes in Jamaica, to date, have yielded over 18kg per plant over 10 months.
o Reap according to the needs of the market. o Reap in cooler part of the day, store fruits in a cool area. o Avoid physical damage to the plant and fruits while reaping and transporting
respectively. Field crates should be padded and fruits placed on top of each other should be insulated from each other using packaging paper. Do not stack fruits more than three fruits high. Crates used for harvesting and storage should be ventilated and stackable to maximise the use of space.
GREENHOUSE PRODUCTION OF SWEET PEPPER (Capsicum annuum) Sweet pepper, like tomato, is a member of the Solanaceae family. While there are a number of cultivated species of peppers, in the Region the pepper most commonly grown in protected structures is Capsicum annuum, known commonly as sweet or bell pepper.
Sweet pepper origin , Taxonomy and Characteristics
• It is native of South America (Bolivia and Peru). • It belongs to the Solanaceae family. • At the beginning of growth there is only one stem that is then divided at a given
height (the cross). Each one of these new stems is divided again in two more and then this is repeated several times.
• Pivotant root system with a lot of horizontal adventitious roots • The mean height of the plant will depend on several factors (variety, the date it was
planted, weather, soil, determinate or indeterminate characteristic, etc.) • The stems are fragile and must be trained and supported.
There is a large range of pepper types. Knowledge of and demand for speciality types are increasing in many areas as consumers become familiar with the different varieties. Greenhouses in the Caribbean Region are primarily used for the production of sweet peppers, particularly red, yellow or orange-coloured fruits that usually secure a higher price than green peppers. The demand for green peppers is, however, greatest, followed by red, yellow, then orange; the other colours such as purple, brown and white are not as popular and are not grown on a large scale.
107
Temperature requirements Sweet bell peppers grow best in the range of 18-30°C. Below 18°C and above 27°C, growth will decrease. Peppers can tolerate daytime temperatures of over 30°C if night temperatures fall to the 21-24°C range.
Phenology Seedling, transplant and young plant establishment stage (0 to 42 days):
• Focus on root development and initial aerial part. Vegetative growth (42 to 45 days):
• Fruits start to develop continuously. Flowering and fruitset:
• Fruitset starts 30 – 40 days after transplanting and continues during the rest of the growing cycle.
Fruit development: • Accumulation of dry matter in fruit.
Physiological ripeness and harvest: • On average 60 days of green stage; 80 days to ripe stage. • Harvesting continues in flushes. • Affected by environmental or economical (price of pepper).
Number of fruits set depends on: • Genetics. • Environment (light and temperature). • Physiological load: the presence of developing fruits reduces the fruitset of later
fruits. • Hormones : ethylene production favours flower abortion. • Nutrition: avoid excess of nitrogen before the first fruits set.
Water This crop requires a very good source of high quality water as explained in Chapter 3. Checks should also be made for water borne pathogens particularly those that can cause plant diseases. A mature sweet pepper plant on average will consume 1L of water per day.
High pH, calcium and bicarbonate levels in water limit growth, clog nozzles and cause spots on leaves. Growth media
(i) Soil Sweet pepper may be planted directly in the soil but problems due to soil pathogens (especially nematodes) and poor soil conditions e.g. water-logging and unfavourable pH will always cause concern. Water-logging increases the incidence of several root and stem diseases, so raised beds are preferred. Soil tests will provide valuable information on the condition of the soil’s biological and chemical properties. Practices such as sterilisation and the addition of soil amendments can be used to remedy some problems.
108
(ii) Non-soil growth media (See recommendations above for tomato).
(iii) NFT hydroponics o In hydroponics, the pepper is a plant difficult to dominate. o It is a shrub with lignified stem, this can cause problems in the lower part of the
stem, where humidity is high (Elephant’s foot or Wilt syndrome). o The pepper doesn’t have a root system strong enough to support harsh humidity
changes and if the substrate is not able to buffer these changes, many plants will die.
Varieties The grower has several options from numerous seed companies. The selection of a variety is made after careful considerations. The grower needs to remember that the product must meet the needs of the consumer on one hand and must be adaptable to the growing environment prepared for the establishment of the particular variety. Seeds harvested from hybrids are not recommended as they will not be true to type. Seeds and Seedling management
1. Always select high quality seeds from reputable seed companies. 2. Open field varieties are not bred for greenhouse conditions. 3. When buying seeds, make sure that they were stored under cool dry conditions. 4. Check the packaging for the number of seeds, test date, the percentage germination
and, the presence of any pesticides which might be harmful to the handler. 5. After opening packages which must be returned to storage, make sure that seeds are
dry and the package contains very little air. 6. Store seeds in the vegetable compartment within a refrigerator.
To prepare seedlings, a commercially-prepared seed starting mix, usually a combination of peat moss, vermiculite and perlite, is recommended. Avoid mixes that have a high fertiliser content, as this can burn the seedlings. The mix is placed in containers such as commercial seedling trays made of plastic or cardboard; small growers use styrofoam or plastic drinking cups with holes poked in the bottom. Just about anything will work as long as excess water can drain out. Before planting seeds, you must determine when your plants can be safely placed into the greenhouse (GardenWeb, 2013b).
Transplanting o Transplant seedlings when they have more than four true leaves and a
considerable amount of roots show up in the base of the block. o Discard plants damaged or not healthy. o Irrigate prior to transport. o Protect from wind and heat.
Irrigation o Before using any substrate it should be saturated with nutritive solution. o Adjust EC and pH of the nutrient solution.
109
o Drench with high liquid phosphorous fertiliser. o Only plant healthy seedlings of the same height. o If new coir grow bags are be used they must be charged using a calcium nitrate
solution (5g/L left for 48 hrs).
Planting After land preparation which includes bank construction, placing of grow bags or bags with medium at the required planting distances (Figure 64), checking of the irrigation system and the complete sanitation of the greenhouse, it is time to plant. For planting directly in soil, follow the same instruction given previously for tomatoes. Fertigation (Table 9) Follow the same instruction given previously for tomatoes. Note that if the operation cannot facilitate separate fertigation systems for tomato and sweet peppers respectively, both may be fed the same nutritive solution providing they are at a similar stage of growth.
Figure 64. High density planting - double staggered
(Source: Photographs provided by J. Rowe)
110
Table 9. Content of nutrient solution.
Seedling Young plant Fruiting Macro nutrients, ppmping
Cultural practices Cultural practices in sweet pepper improve aeration, give a more uniform plant, lessen the risk of some diseases and improve the quality of fruits. It will, however, cost the grower money to conduct the practices in a technologically-sound manner. Leaf pruning
• Removal of the old leaves. • Facilitate the ventilation. • Improves the colour of the fruits. • Accelerate the maturation when there is a high price of market. • Diseased leaves must be removed immediately from the greenhouse, in order to
prevent an infection. Thinning
• Done throughout the culture by eliminating the inner stems. • This favours the development of the stems selected. • Increases entry of solar radiation. • Improves on ventilation. • Be cautious when pruning; DO NOT over expose the fruits by removing too much
foliage.
Trellising and support systems Trellising and support systems for sweet pepper typically involve training to two stems. Studies have shown that similar yields and fruit sizes can also be obtained using the
111
“Spanish” system, where plants are not pruned, but rather held in place with a support system of poles and horizontal twines. Trellising and pruning (two stems) (Figure 65)
• Trained on two stems per plant and supported using strings attached to overhead cables.
• Remove flower buds from points of first and second stem divisions. • After the first two stems are formed, remove all side shoots after the second leaf. • Continue pruning until the plant reaches the plant support cable. • Allow six fruits per stem.
Figure 65. Pepper pruning. Note that all subsequent flowers above the fourth node are kept.
(Source: USAID, 2010b).
Horizontal training (Figure 66)
• Two parallel lines. • The plant is pruned leaving three or four stems. • If the plant is not very strong, a second pruning is needed; the stems that are less
developed in the centre can be removed. If the plant is strong, the second pruning is not done.
• System: - Lines run in a zigzag fashion. - Support training posts are placed 1m apart.
Sweet pepper flowering and fruits (Figures 67 and 68)
• Providing environmental conditions are favourable, the plant will produce flowers that later develop into fruits.
• Flowers appear one by one in the base of the leaf (in each node). • They self-pollinate, less than 10% are self-incompatible. • First flower appears normally in the tenth leaf. • The fruit is a round hollowed berry, and its color may be variable (green, red, yellow,
orange and white). It has two to four inner cells that are partially separated by incomplete walls and a lot of discoidal seeds.
• Weight and size are variable. • A young plant starts flowering 2-6 weeks after planting or when it has 7-13 leaves. • The first flower (crown flower) will abort, if not, it should be removed. • Later flowers should be treated as shown in Figure 65. • Temperature can affect both size and shape of the developing fruits. • Lower than ideal temperatures during flower development give shorter fruits. Low
temperatures at flowering can also give a reduced number of locules per fruit, giving two or three locules instead of four.
• The optimum temperature for flowering and fruit set in pepper is 16°C (Calpas, 2002), while the optimum 24-hour temperature for yield is about 21°C. This means that in tropical greenhouses, ventilation/cooling systems are necessary as indicated in Chapter 2.
113
Figure 66. Crown flower of sweet Figure 67. Shorter fruit due to lower pepper. (Source: Conlon, 2011). temperature. (Photograph provided by J. Rowe).
Flower bud abscission
More frequent in high temperatures, low light levels and/or, the presence of several rapidly-growing fruits (fruit load). The grower can reduce incidences of flower abscission by selecting improved varieties, growing in cooler areas or by installing automated cooling systems. Poor pollination (Figure 69) Green pepper plants that experience poor or incomplete pollination can appear misshapen and not produce seeds inside the fruit. High temperatures inside the greenhouse can lead to poor pollination.
Figure 69. Poorly-formed fruit due to poor pollination. (Photograph provided by J. Rowe)
Pests and diseases Pests and diseases of sweet pepper were discussed in Chapter 4.
Harvesting Sweet pepper needs 60 to 90 days (depending on variety) from seedling stage to harvest with reaping taking place weekly for 8-9 months. Reaping should be done during the cooler part of the day. Fruits should be handled carefully at all stages and placed in a cool area for storage immediately after reaping. The stage at which harvesting takes placed is determined by the market. Workers conducting harvesting should have closely-trimmed fingernails to prevent mechanical damage of the produce. Containers used for harvesting should be sturdy, re-useable, not too deep, have a smooth inner surface and be easily cleaned. No more than two layers of fruit should be packed per crate, in order to prevent damage from compression. Transportation of the fruits to the market must also be done with the greatest amount of care so there is no reduction in the quality and shelf life of the product.
GREENHOUSE PRODUCTION OF CUCUMBER (Cucumis sativus)
Cucumber is a member of the Cucurbitaceae family of which all melons and squashes are a part. It is a native of southwestern Asia. Cucumbers (Figure 70) grow on sprawling, medium length vines with rough, dark green, three pointed fuzzy leaves.
Having separate male and female flowers, cucumber is primarily a cross-pollinated crop. Traditional cultivars tend to be open-pollinated while modern types are hybrids. The normal tendency of cucumber and other cucurbits is to initially produce male flowers, followed by the production of female flowers. The female flower produces the fruit. Some cucumber genotypes are highly gynoeceous (meaning, they have a tendency to produce female flowers from the beginning of flowering). Also, many greenhouse cultivars tend to be parthenocarpic (can produce fruit without pollination). Major greenhouse cultivars are
115
gynoeceous and parthenocarpic. Female (gynoecious) varieties have been developed to give greater yields, as do self-fertile (parthenocarpic) varieties; fruits produced without pollination are seedless. There are basically two main types of cucumbers, namely, big, long, green slicing cucumbers (Figures 71 and 72) and short fat pickling cucumbers (Figure 73). Figure 71. Dutch cucumber. Figure 72. East long French cucumber. (long, exceeds 25 cm; seedless; (20-25 cm long; good for slicing). smooth skin) (Source: USAID, 2010d) (Source: USAID, 2010d)
Figure 73. Gherkin Spanish cucumber (small; 15 cm long; green; striped skin; good for pickling) (Source: USAID, 2010d)
Seeded varieties require pollination to form healthy fruit. There are both male and female flowers produced. Pollen from the male flowers must be transferred to female flowers.
116
Outdoors under good weather conditions, insects normally do the pollinating. In the greenhouse, it is the grower’s responsibility to transfer pollen. When cucumbers are not properly pollinated, the fruit will be misshapen and poorly developed, especially on the blossom end of the fruit. Cucumber is very sensitive to growing conditions, such as the fertiliser salts, light, air temperature, humidity, carbon dioxide and moisture. Great fluctuation in any of the growing conditions will result in less fruit being produced and bitter tasting cucumbers. The plants naturally produce chemicals called cucurditacins, which are very bitter and if consumed in large quantities can make a person get sick. Most times these chemicals are confined to the leaves and stem of the plant but can work their way into fruits. Bitterness not caused through genetics can be made less by reducing conditions which will place the plant under stress. Cucumber seeds germinate within 2 -3 days of planting when the temperature is at a constant 29°C. Once germinated, lower temperatures are preferred for optimal seedling growth – around 25°C. Transplants should not be allowed to become water or nutrient stressed and should be transplanted at the 3-4 leaf stage. Growth media The roots of cucumber require good aeration, this must come through the selection of the proper soil or artificial growing medium. Sandy loam soils high in organic matter are well suited for growing cucumber. Non-soil media such as coir, perlite, rockwool, vermiculite, sand, sawdust and, peat give good results. Mixes high in organic matter can also be used. Fresh organic matter uses a lot of nitrogen during decomposition; nitrogen lost must be replaced to prevent plants developing deficiency. Cucumber is well adapted to NFT hydroponic systems, where it gives excellent yields. Cucumbers may be planted in double rows in beds 1.5m apart or in single rows (Figure 74). In a double row system, the distance between plants is ideally 60cm apart with offset rows. In single row plantings, the distance between plants ideally would be 45cm. Based on the variety and the growing environment cucumber can also be established as shown in Figure 74. Cucumber requires 50-70 days from seeding to first harvest; it does best with a growing temperature of 27oC during the day and 18oC at night. Plants require 0.45m²/plant under full sunlight and 0.75m²/plant under low light intensity. Cucumber can yield 8-15kg/plant or 20-40kg/m²/year. It is possible to complete two crop cycles per year.
117
Figure 74. Double-staggered planting (Diagram by C. Paul)
Fertigation Cucumber is a heavy consumer of water; in the tropics, mature cucumber plants can use up to 3L of water per day. The frequency of irrigation will depend on the growing medium, weather and the age of the plants. In the beginning light watering once or twice per day will suffice, at flowering and fruit set water is increased significantly. The recommended nutrient mixture for cucumber is shown in Table 10. Table 10. Recommended nutrient levels in irrigation water for cucumber (actual ppm will depend on the results of analyses on growth media and water; also, on variety and growing environment).
Nutrients, ppm N P K Ca Mg Fe Mn Zn B Cu Mo 210 50 380 190 50 0.8 0.5 0.3 0.5 0.05 0.05
Cucumber nutrient solution concentration (ppm) Nutrient uptake is significantly affected by the pH of the fertiliser feed, when the pH is out of the recommended range, the plants will not take up some nutrients even if they are present at the correct levels. The pH and EC for growing cucumbers should be between 5.5 and 6.0 and between 1.5 and 2.5mmhos/cm, respectively. Plant training (Figure 75) Cucumber plants are often trained like indeterminate tomatoes to have a single main stem accompanied by a string to which the stem may be wrapped around and/or clipped. In order to encourage vegetative growth, initial fruits are typically pruned off up to the eight node. In Dutch greenhouse type cultivars, a fruit is allowed to set every other node. The leader stem may be tipped (stopped) at the top of the trellis and two laterals allowed to grow back down to the ground in a vertical cordon system. There are two suitable trellising systems for cucumber. They are shown in Figure 75 and described below.
118
Figure 75. Umbrella and tree trellising training systems for cucumber. (Source: USAID, 2010d)
For Umbrella trellising system: • Tie the plant to overhead support. • Pinch out growing tip. • Remove laterals on lower sections of the main stem. • Allow two top laterals to hang over the support and to the left and right of the main
stem. These are allowed to grow until they are two-thirds of the way down the main stem.
• After old laterals have produced, they should be removed and younger laterals allowed to carry on the production.
For Tree trellising system:
• Tie plant to horizontal wires spaced 60cm apart. Top wire 1.80m from ground. • Remove leaves and lateral from bottom 50cm of plant. • At 1.80m tie the main stem and remove growing point. • Allow laterals at leaf axils along the main stem to grow to two leaves, then terminate. • Train top shoot along the top wire. • Entire process can be repeated using a lower lateral.
Cucumbers benefit from careful sanitation, with removal of all debris from the protected structure being crucial. Screening will help keep out pollinators and will also exclude insect pests.
119
Common diseases and disorders of cucumber Cucumber fruit crooking (Figure 76) Excess curving in cucumber results in decreased yields and reduced quality of greenhouse cucumber. Crooking can begin when a leaf, clip, trellising cord or fruits resting on the ground interfere with the growth of a young fruit. If insects such as Thrips feed on one side of the young fruit crooking can be induced as one side of the fruit develops faster than the other. Adverse temperatures, excessive moisture and poor nutrition can also result in crooked fruits. Severely curved fruits should be removed from the plants as soon as possible.
Figure 76. Fruit crooking and thrips damage on cucumber fruits (Sources: The Telegraph, 2013; Kakkar et al, 2010)
Disease control (Figure 77) The most common diseases include Grey Mould, Powdery Mildew and Mosaic viruses. Grey Mould becomes a problem when ventilation is poor. Removing the lower leaves and controlling the greenhouse humidity is the best defense against this problem. To reduce damage and disease a sharp clean tool should be used to cut the fruit from the plant. Cucumbers have a thin skin causing them to lose moisture and soften in storage. Fruits should be handled carefully so as not to damage the skin. To extend storage life, fruits should be wrapped in clear plastic and stored at high humidity below 7˚C. Mildews “Downy and Powdery” are very important to cucumber growers as they cause significant economic loss of income each year. Powdery Mildew is encouraged by high humidity and excessive use of nitrogen fertilisers. Mildew spores are very resistant to most treatments that are currently being used in control programs. Cultural practices related to the treatment of these diseases must form the foundation of any control measure. Incidence of these diseases increases under warm wet conditions. It should be noted that:
• Water carries spores that cause symptoms which appear on the leaves as yellow angular-shaped spots that end up necrotic.
• White powdery spots also appear on all surfaces of the leaves, stems, petioles.
Figure 76. Several diseases of Cucumber (Sources: St. Clare Seeds, 2013; WNC, 2013; TAMU, 2013c; Nassr, 2013)
Grey Mould (Botrytis cinerea) is an important disease of cucumber plants. This fungus will attack the stem of the plant causing it to rot, this results in the collapse of the stem and the eventual death of the plant. Spores from the fungi are able to live in the dead decaying stem and the soil, with the potential to infect new plants.
Angular Leaf Spot is caused by the bacteria Pseudomonas syringae. Like other bacteria- related diseases, the organism is very dependent on water in order to survive. When moisture is high, there is exudation of droplets from the leaves and stems. These drops of bacterial suspension will dry to give rise to some scabs, whitish in areas of injury, affected areas may also be surrounded by a yellowish halo. The bacteria stay in the remains of cultivation and may persist for 2 to 3 years in dry leaves.
GREENHOUSE PRODUCTION OF LETTUCE (Lactuca sativa L) Lettuce is a member of the Asteraceae family also known as the Compositae family. Asteraceae is commonly referred to as the daisy family and includes other food crops such as artichoke and endive. Lettuce (Lactuca sativa) is a temperate annual and it is most often grown as a leaf vegetable. It is the most important salad vegetable grown worldwide today. Lettuce grows best at higher altitudes and/or cooler locations; however, it can grow at lower levels with proper care and environment.
121
Lettuce is an excellent crop for growth in protected agriculture structures because of the rapid growth cycle. The controlled environment protects the leaves from environmental hazards and insect pests, greatly increasing yield and quality. Lettuce is intensely produced due to high market demand which has increased substantially over the last few years. Modern breeding has concentrated on resistance to disease and bolting in common types, and on more fancy leaf shapes and colors, such as increasing red intensity and differences in leaf edges and frill. Lettuce may be harvested at the full head stage or may be grown for baby salad greens. The lettuce market is split into three groups.
• Whole heads for bagging • Pre-packed chopped lettuce salad packs • Pre-packed baby leaves from young plants.
Lettuce Seeds
• There are approximately 800 raw seeds per gram of most lettuce varieties. • Seeds may be purchased as raw seeds or pelleted (prill). • Pelleted seeds are raw seeds covered with a layer of inert material or clay. • Pelleted seeds are more uniform in size, shape, easier to handle. • Approximate size of most pelleted seed is 3.25-3.75 mm in width. • Under proper storage seeds will remain viable for at least 3 years; however,
germination percentage reduces with time. • Store seeds in a sealed container within the vegetable compartment of the
refrigerator. • Temperatures above 24oC are not conducive for germinating lettuce seeds. • Ideal media temperature for germinating lettuce seeds is 20oC or lower. • Seeds will germinate in conditions as cool as 3-4oC. • All lettuce seeds require light for germination and should be left uncovered, some
may even be pressed lightly into the germination medium. • Under Caribbean conditions, germination is normally within 3-4 days, but this can
range from 2 to 15 days depending on growing conditions.
Seedling Production • Select a germination medium based on water holding capacity, aeration, hygiene,
ease to handle and cost. • Seedlings are best started in trays of 72, 128 or 200 cells. • Feed seedlings a complete diluted hydroponic solution of EC 0.5-0.6mmhos/cm at
the time of full expansion of the seedling leaves. • The same formulation used to feed mature plants can be fed to seedlings in a diluted
form. • Seedlings fed at lower EC will develop faster than those fed at EC of about
2mmhos/cm; however, they are not as hardy.
122
• Do not over water seedlings in the nursery as this may cause “damping off”. • Seedlings are usually ready for transplant in 2-3 weeks or when they have two to
three true leaves.
Temperature Lettuce is adapted to cool growing conditions with the optimum temperatures for growth of 15–18oC. At 20–27oC, the plants flower and produce seed. Lettuce can tolerate a few days of temperatures from 27 to 29oC, provided that nights are cool (Sanders, 2001). Wide gaps between day and night temperatures tend to give better production.
Humidity o A relative humidity of 70-85% is suitable for lettuce production. o High humidity may cause diseases such as Grey Mould and Mildews. o Low humidity may cause drying and burning of leaf margins. o Good humidity within the growing environment should be supported by air
movement around the plants.
Light Low light results in: o Pale slender plants with long internodes (stretching). o Overall very weak growth, resulting in a loose floppy product. o Non-green leaf lettuce requires higher levels of light intensity to enhance their
colour.
Water Lettuce requires a very good source of high quality water. Water used for drinking might not be suitable for growing lettuce due to high levels of chlorine, which can cause root death and necrosis of leaves, especially in hydroponic systems.
Growth media (Figure 78)
Lettuce can be grown successfully in a wide range of media, ranging from water (hydroponics) to soil, coir, sand, peat, perlite, saw dust, vermiculite and rice husk, etc. The medium can be placed in pots, bags or continuous troughs.
NFT hydroponics
o Is a popular culture used for the growing of lettuce. o In the apparatus plants are grown in lined open top troughs or plastic pipes. o Nutrients dissolved in the irrigation water will circulate as a shallow film on the
surface of these channels continuously or for a few minutes every hour. o Critical to the success of this operation is the grower’s knowledge.
Varieties
o Select varieties that are resistant to disease and heat.
123
o Select varieties which satisfy the market in size, colour and taste. The main varieties of lettuce are grouped into three types (Table 11): o Romaine types, forming a loose upright head. o Leaf lettuce, non-head or loose leaf. o Head or cabbage lettuce e.g. Icebergs (Crisphead and Butterhead).
Figure 78. Romaine lettuce in concrete troughs lined with plastic and filled with perlite.
(Photograph provided by J. Rowe)
Table 11. Varieties of lettuce in the three major groups (Romaine, leaf, head)
Romaine Leaf lettuce Head lettuce Noga Red/Green Oak Leaf Trinity Df-7 Salad Bowl Tropical Emperor Green Towers Lollo Rossa Great Lakes Paris Island Cos Royal Oak Leaf Aviram Conquistador Black Seeded Simpson Jericho Rudy Cimmaron Red Sails
Fertigation (Table 12)
o Water samples should be collected from the source supplying the greenhouse and taken to a reputable laboratory for analysis.
o It is important that the nutrient solution be tailored to the water source, so that elements which cause toxicities, because of their presence in the water, can be left out of the nutrient mix.
124
Table 12. Suggested nutrient formulation using soft water (rain water).
Fertiliser compound Grams in 100L of stock solution
Stock A Calcium nitrate 7549 EDTA iron 260 Stock B Potassium nitrate 1703 Mono potassium phosphate
Adjustments can be made to feed more potassium when enhancing bright red colour during the hot months.
125
Pests, diseases and physiological disorders (Table 14 and Figures 79, 80, and 81) o Prevention is best. Scouting is the number one cultural practice employed by
lettuce growers. Growers should also remove greenhouse perimeter vegetation as a measure of field sanitation. The crop can be pest-free due to short time from seedlings to maturity if proper sanitation measures are put in place.
o When pest problems arise, they are difficult to control by spraying due to the close spacing of the plants. Also, the grower must control pesticide residues that can be harmful to consumers and the environment.
Table 14. Pests, Diseases and Physiological Disorders of lettuce.
o Lettuce, like other leafy vegetables, is highly perishable. o Lettuce is very prone to water loss after harvest. o Reap early morning when temperatures are relatively cool and plants still turgid. o Pack into cool crates. o Place harvested product into shade as soon as possible. o Remove field heat, by cooling as soon as possible. o Transport lettuce in closed vehicles. o If you have no cool storage facility, get the product to the market in the shortest
possible time. Storage
o Store lettuce in clean dry areas away from products such as apples, banana, pears, tomatoes, melons as these produce ethylene when ripening and this chemical reduces the quality of leafy vegetables.
o Internal combustion gas or diesel engines also produce ethylene, so keep lettuce away from exhaust fumes.
126
o Store lettuce for short term at 0-2oC with RH between 90 and 98%.
Post-harvest handling o Use plastic wrappers, bags or cellophane sleeves to protect the lettuce from
mechanical damage and from drying out. o Perforate film packages to provide ventilation and gas exchange.
Figure 80. Important bacterial diseases of lettuce. (Sources: Miller, 2013; Riley et al, 2002).
128
Figure 81. Important virus diseases of lettuce. (Sources: UMassAmherst, 2013b; Kerns et al, 1999; Koike, 2013).
129
CHAPTER 6 MARKETING CONSIDERATIONS By Lennox Sealy, Aziz Mohammed and Compton Paul Marketing considerations involve five major activities as follows:
1. Market Research and Segmentation. 1.1 Research 1.2 Segmentation
2. Quality Management. 2.1 Managing the harvest 2.2 Post-harvest handling 2.3 Preparing and sorting in the field 2.4 Grading and Packaging 2.5 Transport
3. Promotion and marketing distribution channels. 4. Market Information. 5. Price considerations.
Producers should begin to think about marketing as this will impact upon the success of the enterprise. While marketing is not the only area of emphasis for the business, it is the ultimate action that results in revenue. Simply put, attention to marketing considerations is the integrative force that will match production with customers’ needs and guarantee customer satisfaction – the key to long term success. Marketing, therefore, is not an activity to which attention should be given at the end of the production phase of operations, but rather, one that needs to be directing production in accordance with clear signals from the marketplace as to what is needed by the customers being targeted.
1. Market Research and Segmentation 1.1 Market Research
Market research is the process of gathering, analysing and interpreting information about a market, about a product or service to be offered for sale in that market, and about the past, present and potential customers for the product. Any research into customer characteristics, spending habits, location and needs of the business's target market, the industry as a whole will assist in making the right production decisions. Given that the startup costs for greenhouse operations are higher than open field production, conducting market research, is even more important, not only as a risk management strategy, but to identify those segments that will pay a premium price and also the times of the year when prices will permit the best margin to be obtained. In market research two types of data are used, namely:
130
• Primary information. This is research producers either compile themselves directly from on-going events in the marketplace or someone is hired to gather the information.
• Secondary information. This type of research is already compiled and organised. Examples of secondary information include reports and studies by government agencies or trade associations or other businesses within the PA Industry. Most of the research to be conducted will most likely be secondary.
Specific questions asked when conducting market research for greenhouse produce are:
1. What products do consumers buy? 2. Who buys the product(s)? 3. What is the market size? 4. What, when and where do the buyers buy? 5. What are the packaging requirements of each market? 6. What are the market prices? 7. How much and when do prices fluctuate over the year? 8. Is the market mature or growing? 9. Does the market have room for additional production? 10. What percentage of the market can be captured?
Market research should be conducted before any production activities are started (Chaudhary, 2011). Since there are only four major greenhouse vegetable crops (tomato, sweet pepper, cucumber and, lettuce) in the Caribbean, research should focus on the different markets for these crops and how to access them. New producers must pay particular attention to evidence of excess supply in a particular market and trends of declining consumption or prices. 1.2 Market Segmentation The breaking down or building up of potential buyers into groups to which produce for sale is offered is called market segmentation. The objective of market segmentation is to identify groups within the broader market that are sufficiently similar in characteristics and responses to warrant specific approaches in order to close a sale. The variables used to segment markets may be demographic (e.g. age, sex, geographic location, occupation, education, race), psychographic (e.g. activities, interests, opinions, personality, lifestyle) or behavioural (e.g. product usage rate, degree of brand loyalty, occasions of product usage). For PA producers, market segments are likely to be large buyers or upper middle income persons who are interested in quality produce at competitive prices. Greenhouse vegetables are perishable crops. As a result, growers must have a marketing strategy that ensures their produce has timely access to the retail markets. The majority of greenhouse vegetables are marketed to consumers through retailers. Smaller retailers and some restaurants may be willing to purchase produce from local growers on the basis that it is locally grown. However, most restaurants also buy their produce from a
131
wholesaler because of steady supply. Growers hoping to access the retail or foodservice market through wholesalers must, however, be able to prove their ability to provide a quality product on a reliable basis at a competitive price. Generally, growers have to be in the business for a few years before wholesale buyers show an interest in developing a business relationship. Producers who are seeking to market to wholesalers must be prepared to:
• Make business calls with wholesale buyers in order to develop and maintain markets for their produce. The local greenhouse growers associations can assist in this effort.
• Assess new trends in order to respond to changing consumer tastes and preferences. • Sort, grade and package the product as required by each wholesaler. 2. Quality Management
The concept of "Quality Management" includes quality assurance and is a neglected concept that should be incorporated for the successful production and marketing of greenhouse produce in today's competitive marketplace. Quality Management involves all the processes that focus on meeting the customer requirements by implementing standards for the production, harvesting, post-harvest handling and, packaging tasks carried out in the greenhouse operations. A quality management approach sets and implements standards for the following seven areas:
1. Leadership -Leading by example to ensure that employees are not afraid to make decisions that ensure the practice of the right techniques on a daily basis.
2. Record keeping and data analysis - Documentation of all technical and financial data in a formal and structured way and using that data for effective decision making about costs and husbandry practices.
3. Planning - This involves three major components: 1) developing long- and short-term production targets, 2) identifying ways to achieve those targets along with your workers and, 3) measuring the extent to which targets are being achieved so that plans can be continuously updated.
4. Training - Every worker should undergo some formal training in PA production, thereby encouraging them to use their knowledge to achieve new levels of production.
5. Process improvement - This refers to the improvement in the cleanliness and timing of all activities.
6. Customer feedback - This entails asking customers about the quality of your produce and sharing that feedback with all workers and
7. Continuous improvement - This means that there is an overall commitment by all workers that every crop should be better than the previous one in some small way.
Success can certainly be achieved by utilising the above-outlined approach. Everyone in the business must, however, be involved in the approach.
132
2.1 Managing the harvest The objective is to harvest the crop without damage and to get it to the market in the best possible condition. Although the scale of production, availability of labour and, type of produce may vary, the basic factors that must be taken into account in the planning of any harvest operation are as follows:
• Appropriate equipment must be obtained. • Labour must be trained and organised. • Maturity Indices must be known for optimal timing of harvesting, collection and
removal from the field.
The efficiency of the harvesting operation itself depends upon the use of experienced or trained staff, and the adoption of methods which will meet buyers’ requirements. 2.2 Post-harvest handling Post-harvest handling is about maintaining quality from production to consumption. Post-harvest handling includes immediate field operations, cooling, storage, primary processing, packaging and, transport. 2.3 Preparing and sorting in the field As with all aspects of post-harvest handling, the objective is to minimise stress on the produce and keep handling operations to a minimum with due care to keep the time between harvest and first destination of the produce according to some standard. It is recommended that the number of handling steps not exceed three and that the maximum time between harvest and cooling in the packinghouse be 30 minutes. Operating standards include:
• Shade and shelter - out of the sun and rain. • Storage - off the ground and no bulk-piling. • Minimum distance to assembly. • Transport of produce.
After harvest, produce must be cleaned, sorted, sized and packaged for sale to the relevant market segment. A part of the standards might state that this be in an enclosed area either in a small structure (shelter) near the greenhouse or a larger packinghouse with automated equipment shared with a cluster of producers. 2.4. Grading and Packaging
2.4.1 Grading Products can be differentiated by having them graded according to a system that accurately describes them in a uniform and meaningful manner. Grades and standards are part of a quality management approach to the marketing of produce and will contribute to operational and pricing efficiency by providing buyers with a system of communication of price and product information. This will also inform what buyers require and which grades they are willing to purchase at what prices. Prices vary among the grades depending upon the relative
133
supply of and demand for each grade. Since the value of a commodity is directly affected by its grade, disputes can also be easily settled. Figure 82 suggests grades by size that can be adopted by greenhouse producers for tomatoes.
Figure 82. Grades of tomato by size. (Photographs provided by L. Sealy).
2.4.2 Packaging The type of packaging to be used will be identified during the market research . Two common forms of packaging are:
• Plastic crates for sale to wholesalers or distributors. • Shrink wrapping or clamshell packs for sale to the final consumer.
Packing houses are an essential part of the operation where selection, grading and quality control must be disciplined. The operations which are carried out in a packinghouse include the following:
• Receipt, checking and unloading. • Washing, waxing, fungicide treatment, grading, sizing, packing. • Storage, fumigation, ripening, curing and cooling. • Loading, checking and dispatch. 2.5 Transport
Produce is usually transported by pick-up/open truck or refrigerated vehicle. The preferred mode of transport is a chilled vehicle; however, this may not be feasible depending on the size of the operation.
134
Pick-ups and open trucks are the commonest type of road transport. They are often fitted with frames to ease stacking and covering. If open vehicles (pick–ups) are used, the following standards should be adhered to:
• Ensure that the vehicle is clean. • Pack produce in a neat manner. • Do not overload the vehicle. • Avoid transport during peak heat periods. 3. Promotion and marketing distribution channels
Promotion can be seen as raising the awareness of all the actors in the channel so that they see the product as that which carries the right price available to them at the right locations. A marketing distribution channel may be defined as: “the set of firms and/or individuals that take title, and, therefore, facilitate the transference of title of goods and services as they move from the producer to the final consumer”. Types of marketing distribution channels are shown in Figure 83. The choice of channel should vary according to the type of greenhouse produce. While open field produce is normally sold through municipal markets, either formal types set up by central or local government or, informal ones where trade has spontaneously developed, these channels may not be the best for greenhouse produce. A generic classification of market channels appropriate for greenhouse produce is described below.
Figure 83. Produce flow through the major marketing channels in the Caribbean Region. (Diagram provided by L. Sealy).
135
3.1 Wholesale markets Wholesale markets are centres for the sale of fresh produce in bulk. In these centres produce is brought together by farmers, distributors, and traders, for sale to buyers from secondary wholesale markets, supermarkets, restaurants, hotels, as well as retailers at public markets. 3.2 Retail markets These markets are spread along the major thoroughfares following the traditional pattern of development of the major population centers. Produce at these markets are for direct sale to consumers. Farmers and traders can be found selling produce in these markets. 3.3 Farmers’ markets Farmers' markets consist of a number of producers selling their products directly to consumers at a common location. These markets are for farmers to sell their produce directly to the public. Generally, smaller farmers, and those with specialised produce, operate in these markets. The objective of these markets is to minimise or eliminate the impact on prices of middlemen. The farmer is thereby expected to obtain a price above wholesale and the consumer a reduced purchase price. Each grower has a separate stall or stand at the market. There are farmers' markets located throughout the Caribbean. The advantages of farmers' markets are:
• Individual growers benefit from collective advertising that attracts more customers to the market location.
• There is an opportunity for new growers to gain exposure with consumers. • They provide a means for growers to market surplus produce. • The availability of services such as parking and promotion. • Access to a wide range of consumers, depending on how many markets at which a
producer wishes to sell. The disadvantages of farmers' markets are:
• Growers must harvest, package and transport their produce to the market. • Growers must be prepared for competition with other vendors for sales . • Growers must be prepared to have unsold produce that needs to be returned to the
greenhouse facility.
Some pointers for marketing at farmers' markets are: • Keep the same stall location to establish a market presence. • Sell only high quality produce and work to establish a reputation as a grower of high
quality produce. The critical marketing activity for the manager of a greenhouse vegetable enterprise is to gain access to both the wholesale and retail consumers. Therefore, growers must be prepared to
136
research the various markets in order to determine which crop(s) to grow and which markets to target. 3.4 Supermarkets Supermarkets provide a one-stop facility for consumers to obtain all of their food items inclusive of fresh produce. Almost all supermarkets in the Caribbean sell fresh produce that is washed, graded and packaged for easy purchase by the consumer. These outlets, therefore, provide an opportunity for marketing of greenhouse produce at a premium price. What is required is consistency in supply and quantity. 3.5 Hotels, Restaurants and other Institutions Similar to supermarkets, these outlets can provide premium prices; however, supply and quality must be consistent. 3.6 Distributors The rapid expansion of both international and local fast food outlets in the Caribbean Region has created the need for bulk supplies of fresh produce. Distributors provide this service through purchases from various suppliers. They collect, store, wash, grade, package and, transport to individual outlets. These distributors are committed to long-term supply arrangements with franchise chains and they are willing to provide contracts to their suppliers. Two major items purchased by fast-food chains are tomato and sweet pepper. 3.7 Alternative marketing channels
Other marketing channels available are: i. Farmgate
On-farm or “farmgate” sales occur where wholesalers and distributors purchase produce directly from farmers at the location of their farms. They then arrange transport to processors, wholesale outlets, packhouses or, directly to supermarkets.
ii. Roadside outlets There is a proliferation of these outlets located on major routes throughout the Region. Producers have the responsibility to transport to these outlets. The quantities sold are small and prices received fluctuate.
iii. Cluster/Group marketing This arrangement presents the greatest potential for rapidly increasing the market impact of greenhouse-produced vegetables. Joint branding and bulking of produce (also grading) will allow producers to pursue multiple marketing channels and, in some cases, influence prices. Producers are encouraged to consider this type of marketing as a viable option.
iv. Internet marketing Internet marketing of fresh produce is rapidly increasing in Caribbean countries. This type of marketing can be focused on customers who require delivery of a higher quality product since they are willing to pay premium prices.
137
v. Contract marketing With contract marketing the producer sells to a buyer under a contract arrangement. Agreements may be formal (that is, via a written contract) or informal. The contract arrangement usually covers the quality requirements of the buyer as well as the price, quantity, timing, method of delivery and, packaging. This arrangement may be with:
• Distributor(s). • Supermarkets, hotels, restaurants and, other institutional buyers and retail stores. • Exporter(s).
4. Market information
Market information includes any aspect of information ranging from production to the final point of sale which improves ability to market effectively and efficiently. Some areas of information required on both domestic and export markets are:
1. Consumer demand. 2. Changes in consumer preference and taste. 3. Seasonal variations in supply and demand. 4. Historical, current and anticipated prices. 5. Selection, grading and packaging requirements. 6. Transport availability and charges. 7. Trade contacts. 8. Export/Import policies. 9. Phyto-sanitary regulations. 10. Tariff barriers. 11. Production information for competing countries.
Market information and intelligence helps producers, traders and consumers balance supply and demand in the marketing system for fresh produce and thus avoid gluts and deficits in supply and corresponding price fluctuations. Farmers need information about probable supplies and prices in order to make decisions when planning their production, harvest and sale of produce. The knowledge that a farmer can compare one price offered by a trader with another price elsewhere, also influences buyers in offering fair prices. Access to better information enables wholesalers to develop those consumer demands and producer supplies which might otherwise have been neglected. This reduces their business risks and enables them to operate profitably on lower margins. This in turn brings benefits to both producers and consumers. Consumer purchases can also be influenced by market news in that they may choose not to buy expensive produce which is in short supply in favour of more plentiful and cheaper alternatives.
5. Price considerations All of the decisions made with respect to marketing considerations culminate with price. The task of pricing must be iterative because it must consider not only costs but market behaviour.
138
A logical starting point is to clearly articulate the long term objectives for entering the greenhouse vegetables business and to intimately understand its cost structure. Locally grown tomato, sweet pepper, cucumber and lettuce have to compete with imported greenhouse vegetables and prices are influenced by the availability of these competing crops. Since greenhouse vegetables must also compete with open-field supplies, prices fluctuate greatly during the year and market prices are not always sufficient to cover the cost of production. The greenhouse vegetables industry value chain in CARICOM countries The greenhouse vegetables industry in CARICOM countries is characterised by a small number of single unit producers, inconsistent quality and supply of produce, inadequate infrastructure, limited market information and fragmented distribution channels. In addition, fragmented and disorganised farmer groups and weak consumer lobbies allow the market to be largely price driven, all of which do not facilitate industry development. The regional greenhouse vegetables sector is being influenced by the ability of traders to easily import vegetables from areas where the technological hurdles to greenhouse production systems have largely been solved and there exists a pool of well-qualified technicians that have the ability to manage their facilities at optimum levels. The key to successful strategic repositioning of the greenhouse vegetables industry in the Caribbean is recognising that success requires innovative change and requires advocacy, capacity building and marketing (CTA and FARA, 2011). In the Caribbean context, this could be achieved by the collaboration of the various stakeholders along the industry value chain to formulate and implement strategies which will result in the strengthening and repositioning of the industry within the agriculture sector. The value chain concept should be used to:
• Gain an understanding of the various steps involved in the production and marketing of greenhouse produce in the Region.
• Identify constraints and possible solutions at different levels in the chain. • Identify the various actors (stakeholders) and their impact at each link of the chain. • Understand the processes and the networks/groups/clusters involved. • Analyse interdependencies of the various actors within the greenhouse vegetables
industry. The value chain for greenhouse vegetables production and marketing in CARICOM countries of the Caribbean is shown in Figure 84.
139
Figure 84. Value chain for greenhouse vegetables production and marketing in CARICOM countries of the Caribbean. (Source: Titus and Georges, 2013).
Major constraints of the greenhouse vegetables industry in CARICOM countries of the Caribbean The major constraints facing the industry at the beginning of the century were identified (Lawrence et al, 2001) as follows:
• Inconsistent supply. • Poor record keeping especially of cost of production. • Limited knowledge of the market (demand, supply, prices). • Poor market differentiation. • Few greenhouse vegetables producer groups. • Weak linkages among stakeholders along the value chain.
These constraints are still applicable to current conditions since very little has been done by policy-makers and industry stakeholders to alleviate the problems.
140
CHAPTER 7 ECONOMIC CONSIDERATIONS
By Govind Seepersad and Compton Paul Introduction
Greenhouse vegetable producers must supply products that meet consumer needs, achieve a good market price and control production costs. Producers must be prepared to keep accurate records of their production costs to help develop pricing strategies for their products and monitor the profitability of their greenhouse enterprises. They must be prepared to research the prices, costs and operating requirements as well as estimate the costs and returns for their specific operations (Dey, 2001). Producers must be able to achieve all of the factors necessary for their enterprises to be profitable. These factors include:
• gaining access to consumers. • achieving a market price for the product that is competitive and
profitable. • undertaking the production, harvesting and marketing activities at a cost
that can be covered by revenues.
This chapter addresses approaches to ensuring computation of total cost of production and returns from greenhouse production of vegetables with data provided for tomato and sweet pepper produced in greenhouses in Jamaica and Trinidad & Tobago. These figures are provided to give producers an overview of the costs and returns of a greenhouse vegetable enterprise. The intention is to give producers a framework to identify the type of information and the kinds of analyses required to assess the viability of their operations. The production costs for individual enterprises will vary due to size, type of structure, location and crop.
Finance/record keeping The importance of monitoring production costs and market price in the case of greenhouse crops cannot be over-emphasised. Ideally, at all stages of the production process, farmers should be aware of their expenditures so that they can be aware, for example, at what price they should sell their produce to cover their costs. Given the complexity of the greenhouse vegetables production system, growers must record financial transactions and should not depend on memory recall. The price sensitivity issue Records are critical for assessment of farm performance. Without them, producers cannot get the information they require from the conventional method of checking the residual amount of cash that remains in the bank account for the greenhouse operation. Profit and loss statements will not provide enough data to allow for
141
assessment of the ongoing performance of the business, particularly when output prices are changing on a regular basis. The farm business needs to keep track of costs for each product, to decide if to sell the output, in which market it should be sold and, the minimum price that should be accepted. Without product-specific information, the producer will not be able to tell which products are covering costs and doing well and which need additional cost-cutting intervention or marketing support. In order to gather all the relevant information, the farm business will need to keep track of prevailing market prices, price trends (market signals) as well as two types of costs, namely: (i) Variable costs which include costs specific to the production and marketing of
the particular good, that is: o Labour. o Materials and supplies such as planting material, fertilisers and,
agrochemicals for pest and disease control. o Transportation. o Repairs and maintenance. o Marketing. o Miscellaneous (legal and accounting fees, office supplies,
membership fees).
(i) Fixed costs which include ongoing costs that occur whether the farm business is in full production or not, that is:
o Land value. o Depreciation. o Utilities (electricity, water, telecommunications). o Property and building taxes. o Administration costs. o Interest on investment.
Contribution analysis Ideally, the price obtained when selling a product should cover all the variable and fixed costs and yield a profit, but this does not always happen. Contribution analysis looks at how the final selling price for a product will contribute towards covering fixed costs. It is advised that if the farm has excess capacity, it would be better to continue production because it will be covering its variable costs and part of its fixed costs. If, however, the farm is operating at full capacity, selling a product which does not cover fixed costs may not be advisable. Focus should rather be placed on those products which are better able to cover costs. Determining which products to pursue becomes clearer after calculating the percentage variable contribution margin (CM) as shown in the following:
142
CM = selling price (SP) – variable costs (VC) So that, the CM% = SP – VC X 100 % SP
For example, if the price of tomato is $20/kg and the unit variable cost is $4/kg, then the CM is $20 - $4 = $16, and the CM% is $16/$20 x 100 = 80%. That is, the farmer has made an 80% margin above the cost of production which can be used to cover fixed costs and retain a profit from the investment.
Break-even analysis It is well known that prices keep changing on a regular basis in the market and farmers are concerned about what prices they should sell to cover the production costs or break even. Selling above the breakeven price allows the farmer to achieve profitability. Break-even analysis is a commonly used tool to help guide farm businesses such as greenhouse operations. Break-even price is used as a benchmark for initially setting a product’s price. This helps producers to know when they are covering all variable and fixed costs. The break-even point is where the revenue received from the sale of a particular product equals the cost of production. Selling below this price, incurs a loss while selling above this price, realizes a profit. The formula used for calculating break-even price (or unit cost of production) is: Break-even price ($/kg) = total cost of production ($)/yield required to recapture total production costs (kg) Break-even volume allows producers to know when they have sold enough at a particular price to cover their cost of production. Further, by increasing the volume of output while keeping other costs constant, can lead to a reduction of unit cost on the farm. The formula used for calculating break-even yield is:
Break-even yield (kg) = total cost ($)/market price ($/kg)
Calculating markup Benchmarking is an essential tool which allows farmers to evaluate their break-even price relative to prevailing prices in the market. Thus, markups should ideally be calculated from the retail price benchmark working back, rather than from the break-even price working up, taking into consideration the cost of transport to market as well as marketing as the product moves from the farm toward the consumer. The markup is the difference between the cost of the good and its selling price and is added to the
143
total cost of producing the good in order to make a profit. The following illustrates this point. Assuming cost of production = $5/kg and retail price = $6/kg, two methods of calculating markup are as follows:
1. Cash markup = retail price - cost of production = $6 - $5 = $1/kg
2. Percent markup from retail price or cost of production
= retail price – cost of production x 100 % cost of production = $6 - $5 x 100 % = 20% $5
Approaches to ensuring computation of total cost of production Anytime a product is being sold at a price higher than the cost of production, a profit is being made. Calculating cost of production, however, is not always simple. The process becomes even more challenging when multiple products are being produced and sold from the farm, or when output from one enterprise is an input into another. Producers must know how to calculate their product costs in order to keep an accurate track of the performance of their business. The formula used for calculating unit cost of production is:
Unit cost of production ($/kg) = total cost of production ($)/yield (kg) While the equation may appear simple, the reliability of the results depends on the accuracy of the data collected. Typically, the cost per unit should be determined for one enterprise at a time and for a single production cycle because it is quite common for costs to change after each successive crop. Given the high level of technology necessary for the operation of a greenhouse system, production costs are characterised by a higher initial investment and higher operational costs when compared to an open-field agriculture system. Fixed assets required for a greenhouse operation include: structure including metal frame and roofing material, peripheral netting/enclosure materials, pumps, fertigation system, water tanks, water cistern and monitoring devices (pH meter, electrical conductivity meter, hygrometer, thermometer and light meter). Variable costs include stocks such as planting material, grow bags, growing medium, agrochemicals, trellising materials, harvesting and packing trays, transport and labour.
144
The cost of production exercise typically identifies the major costs associated with production under a typical/modified system technology and “other minor costs” are lumped under “overheads” for ease of computation. A suggested template for recording cost of production data is shown in Table 15.
Table 15: An example of a greenhouse cost of production data template.
ITEMS IN THE COST OF PRODUCTION
MATERIALS, MACHINERY AND EQUIPMENT COST
LABOUR COST
TOTAL COST
Building/infrastructure 9m x 30m structural frame (annualised) 30m plastic (annualised) Shade cloth (annualised) Set up cost (annualised) Fertigation equipment (annualised)
Total plants and transplanting cost Pests and diseases control All chemicals before, during and after production Insecticide Fungicide
Total pests and diseases control cost Fertiliser application Fertiliser 1 Fertiliser 2
Total fertiliser application cost Weed control (in and around building) Chemical weed control Manual weed control (including ridging-up)
Total weed control cost Husbandry activities Pruning Pollination Leaf sanitation
145
Other (specify) Total husbandry cost
Harvesting and marketing Harvesting Bags Crates Post-harvest handling/Farmgate transport Marketing (arrangements) Transportation for marketing
Total harvesting and marketing cost Total operational cost
Overhead costs: Land cost (annualised) n/a n/a
Cost of working capital (%) n/a n/a Farmers’ Association fees n/a n/a
Other overheads
Total overhead cost
TOTAL COST OF PRODUCTION
RETURNS ON THE GREENHOUSE OPERATIONS
(1) Total marketable yield (kg) (2) Farmgate price or market price ($/kg) Total revenue ($) = (1) x (2) Gross margin ($) = total revenue – total cost of production Gross margin/kg ($/kg) = gross margin ($)/total marketable yield (kg) Break-even yield (kg) = total cost of production ($)/market price ($/kg) Break-even price ($/kg) = total cost of production ($)/yield required to recapture total production costs (kg)
A ‘typical’ cost of production for a greenhouse system separates various components of the greenhouse by the different life spans for calculation of depreciation. For example, the steel structure can be given a life span of 15 years while the lifespan of the plastic could range from 3 to 5 years. Demonstrating costs and returns in selected greenhouse crops - tomato, and sweet pepper using data collected in Jamaica and Trinidad & Tobago Greenhouse growers should take into consideration the intricacies of the market in terms of prices at different times of the year, the prices for competing products (e.g. open field grown tomato, imported tomato, or those differentiated by size as well as the best time to enter the
146
market. These factors can impact directly on returns to labour, investment and the overall profitability of the greenhouse enterprise. The costs of production for tomato and sweet pepper grown in greenhouses in Jamaica and Trinidad &Tobago were calculated. For tomato, the cost of production in Jamaica was US$1.47/kg while in Trinidad & Tobago, it was US$2.16/kg. In the case of sweet pepper, cost of production in Jamaica was US$3.30/kg while in Trinidad & Tobago, it ranged between US$2.42/kg and US$4.95/kg. Market price trends over the year Producers and marketers will often ask the question: When is the best time of the year to produce in order to maximise profits? An examination of the average quarterly prices for tomato in Jamaica and Trinidad & Tobago for the period 2009-2011 is presented in Figure 85. Figure 85. Average quarterly prices for tomato in Jamaica and Trinidad & Tobago.
In the case of quarterly farmgate prices for tomato in Jamaica and Trinidad & Tobago, the data show that prices have been lower in the first and second quarters (Q1/Q2) and increased in Q3 and further in Q4. This indicates that prospects for covering costs and obtaining better returns are more favourable in the latter period of the year (Q3/Q4). Similarly, in the case of sweet peppers, there was an increase in prices from Q1 to Q4 in both countries. Again, this indicates that prospects for covering costs and obtaining better returns are more favourable in the latter period of the year (Q3/Q4). Cost of production and domestic market prices – Tomato (Table 16) In addition to the historical market prices, producers and marketers will also want to know who the competitors in the market are, since low-cost producers can impact on profitability by bidding down prices. In such a case, it will be necessary to consider the average prices in each quarter of the year and also the typical cost of production of competitors in the market at each period.
147
It is well known that open-field grown tomato producers are in the market during the drier months of the year (Q1/Q2 in the Caribbean). The higher volumes from open-field tomato producers will be influencing the prices to move downwards during the first half of the year. Thus, when open-field producers are in the market at Q1/Q2, greenhouse producers may find it difficult to compete with the low farmgate price for tomato. Greenhouse producers will need to target delivery of production in the market during Q3/Q4 when prices are higher (Figure 85). This recommendation is, however, made with reservations as there is also the need to maintain production and revenues throughout the year to optimise returns to investments. Cost of production and domestic market prices - Sweet pepper (Table 16). In the case of sweet pepper, both Jamaica and Trinidad & Tobago greenhouse producers will find it difficult to compete with the low farmgate prices for sweet pepper which are influenced by open-field producers. In this regard, greenhouse producers will need to target delivery to premium end-users in the marketplace where they can command higher prices through previously negotiated contracts.
Table 16. Cost of production (US$/kg) of Tomato and Sweet pepper grown in greenhouses and under open-field conditions in Jamaica and Trinidad & Tobago during 2012 (Farmgate price listed for comparison).
Key areas of management to ensure economic viability of greenhouse vegetable crops (tomato and sweet pepper). From the data collection exercise undertaken in Jamaica and Trinidad & Tobago, it was found that three costs were often overlooked by producers:
(i) Cost of the greenhouse structure. (ii) Cost of working capital. (iii) Overhead costs.
However, these costs are critical for the computation of profitability and should thus be taken into consideration.
148
The high value of up-front costs, that is, fixed cost items such as building and equipment, impact heavily on cost/price competitiveness. Sometimes when these costs are taken into account, particularly if the entrepreneur has to raise funds from a commercial entity, it can make the production model unsustainable. In such cases, optimising output should be a key area for management’s attention. Producers should also give consideration to the following: 1. Timing the market: Greenhouse vegetable producers should schedule production to avoid delivery to the market during months of lowest prices while giving consideration to supplier requirements for year-round supply. This will serve to reduce competition from open-field production and also afford output that will cover costs during the months when prices are typically higher. In the case of tomato, given the need to increase output per unit area per unit time, and to target the market with greater precision, producers may consider cultivating determinate varieties. This can give much higher output per unit area per unit time compared to indeterminate types which produce fruit over a period of as much as 9-10 months; by so doing, producers can reduce unit costs through higher production (total cost/yield). However, the use of indeterminate types combined with determinate types might be useful to maintain a regular supply of produce for the market. 2. Replacement cost: Greenhouse structural costs should be amortised, that is, the up-front cost components (metal frame, plastic, equipment, etc.) of the greenhouse system should be accordingly spread over the life of the items and the real cost of production be used when negotiating supply contracts. All efforts should be made to reduce costs while maximising outputs. Thus, when building greenhouse structures, producers should ensure that all parts of the structure are absolutely essential for optimal production. 3. Premium prices for greenhouse vegetables: There is no doubt that locally-produced vegetables should be equal to or superior in quality to imported products. In this regard, greenhouse vegetable producers should negotiate optimal prices for their products and occupy premium shelf-space. However, they should identify and promote the desirable attributes of their products such as nutritional quality and shelf-life so that they can better satisfy consumer preferences and command higher prices.
149
Literature consulted
1. 123RF Ltd. 2013. Ripe tomatoes ready to pick in a greenhouse. [email protected] 2. ABPT Trading Ltd. 2013. Digital Hygrometer Thermometer. Lancashire, England, UK. 3. ACF Greenhouses. 2013. Greenhouse supplies guide. Website:
[email protected]. Buffalo Junction, Virginia, USA. 4. Andrews, B. 2013. Year-round production. Greenhouse Canada Magazine Issue October
2013. Simcoe, Ontario, Canada. 5. Arbico Organics. 2013. Control Mealybugs and other soft-bodied pests. Oro Valley,
Arizona, USA. www.arbico-organics.com 6. Austral Seedlings. 2013. Chery tomato seedlings. www.australseedlings.com.au 7. Badgery-Parker, J. 1999. Light in the greenhouse. Agdex 200/13. New South Wales Dept.
of Agriculture, NSW, Australia. 8. Bayer CropScience Inc. 2011. Botrytis grey mould. Bayer CropScience Canada.
www.bayercropscience.ca 9. BBC. 2013. Grey mould. Pest and disease homepage. BBC, London, UK. www.bbc.co.uk 10. Berry Hill Drip Irrigation. 2013. Tomato clips for training vines on a trellis.
www.berryhilldrip.com 11. Bessin, R., T. Jones and W. Nesmithet. 2001. Armyworms. Crop Profile for Peppers in
Kentucky. University of Kentucky, Lexington, Kentucky, USA. 12. Borlongan, J. 2012. Pickleworm information. Gardenguides.com 13. Bruntse-Nganga, A. 2013. Leafminer damage in cucumber. Regional Coordination and
Awareness. Infonet-Biovision Office at ICIPE, Nairobi, Kenya. 14. Bucklin, R.A. 2011. Physical Greenhouse Design Considerations - Florida Greenhouse
Vegetable Production Handbook, Vol 2. Inst Food and Agric. Sciences (IFAS) Extension, University of Florida. Document HS776).
15. Buglogical Control Systems Inc. 2013. Mealybug destroyer- Cryptolaemus. Tucson, Arizona, USA.
16. Burrell, C. C. 2013. Staking vegetables. How Stuff Works Inc. home.howstuffworks.com 17. Calpas, J. 2002. Production of sweet bell peppers. Alberta Agriculture and Rural
Development, Ag-Info Centre, Edmonton, Alberta, Canada. 18. Canned Fresh. 2013. Substituting canned tomatoes for fresh. Photo by S. Phillips.
www.canned-fresh.com 19. Capinera, J. L. 2005. Featured Creatures – Pickleworm. University of Florida IFAS, Florida,
USA. 20. Capinera, J. L. 2007. Featured Creatures – Tobacco Budworm. University of Florida IFAS,
Florida, USA. 21. CARDI. 2012. TTTGOA Profile. CARDI, St. Augustine, Trinidad, W.I. www.cardi.org 22. Cahri's Bugs Online. 2005. Pickleworms. www.organicgardensite.com 23. Chaudhary, G. N. 2011. The Economics of Production and Marketing of Greenhouse
Crops in Alberta. Alberta Agriculture and Rural Development Economics and Competitiveness Division. Edmonton, Alberta, Canada.
24. Choate, P.M., J. L. Capinera and E. Rodriguez. 2013. Featured creatures - Pepper Weevil. University of Florida, IFAS, Florida, USA.
25. Clark, T. 2013. Plant Propagation. National Junior Horticultural Association, Homer City, Pennsylvania, USA.
26. Clemson University. 2013. Tomato spotted wilt virus. Clemson Public Service activities. Clemson University, Clemson, USA.
27. Conlon, M. K. 2011. Our cottage garden & country living. Dory-dossersdaily.blogspot.com 28. Conrad, J. 2012. Tomato disaster. Naturalist Newsletter issued from Hacienda Chichen
Resort, Yucatan, Mexico. www.backyardnature.net/yucatan/nematode. 29. Cox, B. and T. Coolong. 2011. Management of Non-Pathogenic Fruit Disorders of Tomato
in Organic Production Systems. Cooperative Extension System. eOrganic, eExtension, www.extension.org
30. CTA and FARA. 2011. Agricultural Innovations for Sustainable Development. Contributions from the Finalists of the 2009/2010 Africa-wide Women and Young Professionals in Science Competitions. Keynote Paper: Strategic Repositioning of Agrobiodiversity in the Horticulture Sector for Sustainable Development in Africa by A.M.O. Onyango. Accra, Ghana : s.n., 2011. pp. 8-16.
31. Davey Wavey. 2013. New study: Organic tomatoes are healthier. www.daveywaveyfitness.com
32. Davidson, N. A., M. G. Kinsey, L. E. Ehler and G. W. Frankie. 1992. Tobacco budworm, pest of petunias, can be managed with Bt. California, University of California, California, USA.
33. Day, E. and A. Spring. 2011. Pepper Weevil. Virginia Tech Dept. of Entomology, Virginia Cooperative Extension, Virginia, USA.
34. Dey, D. 2001. Commercial greenhouse vegetable production. AGRI-FACTS. Agdex 250/830-2. Alberta Ag-Info Centre, Alberta, Canada.
35. Dillard, H. R. 1987. Vegetable crops – tomato anthracnose. Dept. Plant Pathology, Cornell Univ. New York State Agricultural Experiment Station, Geneva, New York, USA.
36. Edmunds, B. and L. Porttorff. 2013. Recognizing tomato problems. Colorado State University Extension, Denver, Colorado, USA.
37. Envirocept. 2013. Lights for greenhouses and temperature control. The Greenhouse Company Store. www.envirocept.com.
38. Fasulo, T. R. and Denmark, H.A. 2009. Featured creatures – Two-spotted spider mite. University of Florida, IFAS. Florida, USA.
39. Foerster, L. A. and M.F.M. Corrêa. 2009 - Laboratory of Integrated Control of Insects. UFPR, Puerto Rico.
40. Forestry Images. 2010. Downy mildew. College of Agriculture and Environmental Sciences, University of Georgia, Georgia, USA.
41. Foster, R. E. 2008 Managing insect pests of potato., Dept. of Entomology, Purdue University, Indiana, USA.
42. Friends School Plant Sale. 2013. Christmas grape variety of tomato. Photo from Burpee Seed Company. www.friendsschoolplantsale.com
43. Front Range Food Gardener. 2010. Tomato fruit cracking. frontrangefoodgardener.blogspot.com
44. Gabriel, A. 2013. Monument Farm, Farndon, Chester, CH3 6QP. 45. GardenWeb. 2013a. Infestation in my greenhouse. www.forums.gardenweb.com
46. GardenWeb. 2013b. Tomatoes flowering. forums2.gardenweb.com 47. GardenWeb. 2013c. How do I start tomatoes from seed?
www.GothicArchGreenhouses.com 48. Growstone. 2012. Physiological disorders and corrective measures for greenhouse
tomatoes. www.growstone.com 49. Hessayon, D. G. 2009. The Greenhouse Expert. 128pp. Transworld Publishers. 50. HGIC. 2013. Landscape problem solver. Early Blight. University of Maryland Extension,
University of Maryland, Maryland, USA. 51. Hickman, G. W. 2010. Tropical Greenhouses: Design, Construction and Supply Lists.
Cuesta Roble Consulting, University of California, USA. 52. HM Digital Inc. 2012. Waterproof pH meter and Waterproof EC/TDS/Temp Combo meter.
Calver City, California, USA. 53. Hochmuth, G. J. and R. C. Hochmuth. 2012. Production of Greenhouse Tomatoes –
Florida Greenhouse Vegetable Handbook, Vol 3. Publ #HS788. University of Florida IFAS Extension, Florida, USA.
54. Holowko, P. 2013. Gardening Rythms – Mealy bug. www.comcast.net 55. Infonet-biovision. 2013. General information on disease and damage – Early blight.
Infonet-biovision.org 56. International Greenhouse Co. 2013. Greenhouse light meter. Danville, Illinois, USA. 57. Irrigation-Mart. 2012. Greenhouse misting/propagation system. Robbins
Association/Irrigation-Mart, Inc., Rustin, Los Angeles, USA). 58. Irrometer Company Inc. 2013. Riverside, California, USA. 59. ISU, 2010. Septoria leaf spot. Plant and Insect Diagnostic Clinic. Iowa State University of
Science and Technology, Iowa, USA. 60. ISU. 2013. Keeping crops insect-free: Dipel. Iowa State University Science & Technology,
Iowa, USA. 61. Johnny’s Selected Seeds. 2010. Pest of the Week: Snails and Slugs. Johnny’s Research
Farm, Albion, Maine. www.growingideas.johnnyseeds.com 62. Jovicich, E. and D. J. Cantliffe. 1999. Transplant depth, irrigation, and soilless media effect
on “elephant’s foot” plant disorder in a hydroponic greenhouse sweet pepper crop. Horticultural Sciences Department, University of Florida, Gainesville, Florida, USA.
63. Jovicich, E. and D.J. Cantliffe. 2013. "Elephant's Foot," a Basal Stem Disorder in Greenhouse-Grown Bell Peppers. Univ. of Florida IFAS Extension. Publication #HS959. Florida, USA.
64. Kakkar, G., D.R. Seal and V. Kumar. 2010. Common blossom thrips. University of Florida IFAS, Florida, USA.
65. Kemmitt, G. 2002. Early blight of potato and tomato. The Plant Health Instructor. American Phytopathological Society (APSnet), St. Paul, Minnesota, USA.
66. Kerns, D. L., M. E. Matheron, J. C. Palumbo, C. A. Sanchez, D. W. Still, B. R. Tickes, K. Umeda and M. A. Wilcox. 1999. Guidelines for head lettuce production in Arizona. IPM series No. 12. University of Arizona, Tucson, Arizona.
67. Kleczewski, N.M. and D. S. Egel. 2013. Sanitation for Disease and Pest Management. Purdue Botany and Plant Pathology, Purdue University, USA.
68. Knoji Consumer Knowledge. 2013. Slug damage to tomato. Organic pest control: How to build a Slug and Snail beer trap. www.knoji.com
69. Koike, S. T. 2013. Spring alert: Tospoviruses may break out early in lettuce. Salinas Valley Agriculture. Dept. Agriculture and Natural Resourses. University of California, California, USA.
70. Kumar, K. S., K. N. Tiwari and M. K. Jha. 2009. Design and technology for greenhouse cooling in tropical and subtropical regions: A review. Indian Institute of Technology, Kharagpur 721302, India. Energy and Buildings 41- 1269–1275. Elsevier Publ.
71. Kumar, K. S., M. K. Jha, K. N. Tiwari and A. Singh. 2010. Modelling and evaluation of greenhouse for floriculture in subtropics. Agricultural and Food Engineering Department, Indian Institute of Technology, Kharagpur 721302, India. Elsevier Publ.
72. Lawrence, J., D. O. Clarke-Harris and R. Pilgrim. 2001. Protected Agriculture in the CARICOM region: The future role of CARDI. CARDI, UWI Campus, Trinidad, W.I.
74. Macgardens. 2013. www.macgardens.org 75. MacNab, A. A. 2013. Bacterial speck of tomato, a result of infection by Pseudomonas
syringe pv. tomato. Jpkc.jluhp.edu.cu 76. Magen, H. 1999. Recirculating nutrient solutions in greenhouse production. 9th IPI-ISSAS
Regional Workshop, Haikou, Hainan, PRC. 77. Menu, K. G. 2011. Blight devastates fields of tomatoes. The Sag Harbor Express. Sag
Harbor, New York, USA. 78. McAvoy, G. 2012. Pest of the month: Verticillium Wilt of Tomato. Univ. Florida/IFAS
Hendry County Extension, LaBelle, Florida, USA. 79. Mike’s Journal. 2008. Tomato flower. www.mikejournal.com 80. Miller, S. A. 2006. Bacterial canker in peppers. Ohio State University Extension Vegetable
Crops. vegnet.osu.edu 81. Miller, S.A. 2011. Managing diseases of organic tomatoes in greenhouses and high
tunnels. eOrganic. eExtension. www.extension.org 82. Miller, S. A. 2013a. Supporting healthy and safe vegetable production. Ohio State
University Extension. Vegetable Pathology Laboratory. Ohio Agricultural Research and Development Center, Ohio State University, Ohio, USA.
83. Miller, S. A. 2013b. Disease management in organic lettuce production. Ohio State University Cooperative Extension System, Ohio State University, Ohio, USA.
84. Missouri Botanical Garden. 2013a. Anthracnose. St. Louis, Missouri, USA. www.missouribotanicalgarden.org
85. Missouri Botanical Garden. 2013b. Caterpillars - Borers and miners. Missouri Botanical Garden, St. Louis, Missouri, USA. www.missouribotanicalgarden.org
86. Missouri Botanical Garden. 2013c. Early blight of tomato. Missouri Botanical Garden, St. Louis, Missouri, USA. www.missouribotanicalgarden.org
87. Missouri Botanical Garden. 2013d. Stink bugs. Missouri Botanical Garden, St. Louis, Missouri, USA. www.missouribotanicalgarden.org
88. Missouri Botanical Garden. 2013e. Bacterial spots, blights and rots. Missouri Botanical Garden, St. Louis, Missouri, USA. www.missouribotanicalgarden.org
92. Morrow, R. C. and R. M. Wheeler. 1997. Plant physiological disorders. Chapter 9 of Plant Growth Chamber Handbook. Langhans, R. W. and T. W. Tibbitts (Eds). Iowa Agricultural and Home Economics Experimental Station Special Report No. 99. Iowa State University, Iowa, USA.
93. Moul, B. 2013. Spodoptera ornithogalli. Digital Guide to moth identification. Mississippi Entomological Museum, Mississippi State University, USA.
94. Mr. Tomato King. 2010. Bacterial canker. Tomato, diseases, pests and disorders. Growing tomato plants. mr-tomato-king.blogspot.com
95. Nair, N. A. and M. Ngouaijio. 2010. Keep the greenhouse clean. Growing produce. Dept. of Horticulture, Michigan State University, USA.
96. Nassr, S. K. 2013. Gray mold on cucumber. APSnet. www.apsnet.org 97. Nelson, H. 2012. Goldie. Cold garden warm kitchen. www.coldgarden.com 98. Noling, J. W. 2013. Nematode management in tomatoes, peppers and eggplant.
University of Florida IFAS Extension. Publ. #ENY-032. University of Florida, USA. 99. Noling, J. W. and J. R. Rich. 2013. Greenhouse Nematode Management, Florida
Greenhouse Vegetable Production Handbook - Vol 3. Publication #HS1158. Horticultural Sciences Department, Florida Cooperative Extension Service, Institute of Food and Agricultural Sciences (IFAS), University of Florida (UF), Florida, USA.
100. North Carolina State University. 2006. 22nd Annual Tomato Disease Workshop, November 9-10. Mountain Horticultural Crops Research & Extension Center, NC, USA.
101. NSW Dept. of Primary Industries. 2013a. Illustration of Bacterial canker by M. Senior. NSW Gov’t, Orange, NSW, Australia.
102. NSW Dept. of Primary Industries. 2013b. Illustration of Physiological blossom end rot by M. Senior. NSW Gov’t, Orange, NSW, Australia.
103. Ontario Crop IPM. 2009a. Bacterial spot. Ontario Ministry of Agriculture, Food & Rural Affairs. Gov’t of Ontario, Ontario, Canada.
104. Ontario Crop IPM. 2009b. Bacterial speck. Ontario Ministry of Agriculture, Food & Rural Affairs. Gov’t of Ontario, Ontario, Canada.
105. Ontario Crop IPM. 2009c. Powdery mildew. Ontario Ministry of Agriculture, Food & Rural Affairs. Gov’t of Ontario, Ontario, Canada.
106. Ontario Crop IPM.2009d. Septoria leaf spot. Ministry of Agriculture, Food and Rural Affairs. Ontario, Canada.
107. Organic Gardening Information Blog. 2013. Brown stink bug. Organicgardeninfo.com 108. Palumbo, J. C. and D. L. Kerns. 1998. Melon insect pest management in Arizona.
IPM Series 1. Publ. No. AZ1028. University of Arizona, College of Agriculture and Life Sciences, Cooperative Extension, Tucson, Arizona.
109. Percy, I. 2010. Plant Pathology: Grey mould on Cicoria pan di zucchero. Florez Nursery. [email protected]
110. Pessl Instruments.2012. Lettuce Grey mould. www.metos.at 111. Pestech Exterminating Inc. 2013. Broad mites. Pestech Pest Solutions. Liberty, New York,
USA. 112. Poe, S.L. 2005. Featured Creatures – Tomato Pinworm. University of Florida IFAS,
Florida, USA. 113. Pokorny, K. 2009. Prevention the best approach to Oregon late blight. Oregon Live.
Oregon State University Extension Service, Oregon, USA. 114. Rief, D., A. McDaniel and R. D. Morse. 2009. Tomatoes. Virginia Cooperative Extension.
Virginia Tech University, USA. 115. Riley, M. B., M.R. Williamson, and O. Maloy. 2002. Plant disease diagnosis. The Plant
Health Instructor. Bacterial leaf spot on Greenleaf lettuce caused by Xanthomonas campestris pv vitians. Courtesy S. T. Koike. APSnet. St. Paul, Minnesota, USA.
116. Ritchie, D. F. 2007. Baterial spot of pepper and tomato. The Plant Health Instructor. APSnet, St. Paul, Minneapolis, Minnesota, USA.
117. Robbins, J. 2010. Irrigation water for greenhouses and nurseries. Univ. of Arkansas Division of Agriculture, Arkansas, USA.
118. Roscam Young Plants Pty Ltd. 2013. Suppliers of Horticultural Products. Melbourne, Australia. www. roscam.com.au
119. Rossel, J. 2008. Illustration of interactions that combine to allow plant diseases to form. Plant disease triangle. Wikimedia Commons.
120. Runkle, E. 2011. Lighting greenhouse vegetables. Dept. of Floriculture, Michigan State University, Michigan, USA.
121. Sanders, D. C. 2001. Lettuce production. Dept. Horticultural Science, North Carolina State University, North Carolina, USA.
122. SANS Exim. 2010. Growbags. Pollachi, India. 123. Schnelle, M. and E. Rebek. 2008. IPM – Scouting and Monitoring for Pests in Commercial
Greenhouses. Oklahoma Cooperative Extension Service. Factsheet HLA-6711. Oklahoma State University, Oklahoma, USA.
124. Silber, A., A. Bar-Tal, I. Levcovitch, M. Bruner, H. Yehezkel, D. Shmuel, S. Cohen, E. Matan, Karni, H. Aktas, E. Turhan, and B. Aloni. 2009. Manganese nutrition of pepper (Capsicum annuum L.): Growth, Mn uptake and fruit disorder incidence. Institute of Soils, Water and Environmental Sciences,Agricultural Research Organization, the Volcani Center, Israel. ELSEVIER Publ.
125. Schumann, G.L. and C. J. D’Arcy. 2005. Late blight of potato and tomato. The Plant Health Instructor. American Phytopathological Society Press, St. Paul, Minnesota, USA.
126. Seaman, A., R. Loria, W. Fry and T. Zitter. 2013. Late Blight: A Serious Disease of Potatoes and Tomatoes. Cornell Univ. New York State IPM program, Publication No. 140, New York, USA.
127. Sedbrook, J. 2010. Common tomato problems. Colorado State University Cooperative Extension, Denver, Colorado, USA.
128. Seedbuzz. 2013. Benefits of Automation in Drip Irrigation System. N Buzz Business Solution Private Limited, India.
129. Seplyarsky, V., V. Kravchenko and G. C. Muller. 2013. Spodoptera exigua. Insect gallery PPIS – Noctuidae Pests. www.ppis.moag.gov.il
132. Smith, R. and St. T. Koike.2012. Occurrence of black root rot of lettuce. Salinas Valley Agriculture. University of California, California, USA.
133. SNOMNH Recent Invertebrates. 2012. Slimy slugs and super-sized snails, all loving beer.www.snomnh-ri.blogspot.com
134. Sorensen, K. and J. R. Baker. 2013. Insect and related pests of vegetables. Center for integrated pest management. North Carolina Cooperative Extension Service. North Carolina State University, North Carolona, USA.
135. Soroka, A. 2011. The Spider Mite. OCC Biology News and Views Blog Archive. 136. Sparks, A. Jr. and D.G. Riley. 2008. Stink Bugs. University of Georgia College of
Agricultural and Environmental Sciences (UGCAES), University of Georgia, Georgia, USA. 137. Spofford, S. 2012. Parasitism. Blog Archive. WHS HP Bio 2012./Open pollinated
vegetable garden plants. www.stclareseeds.com 138. St. Clare Seeds. 2013. Powdery mildew on Heirloom 139. Super Sources Industrial Co. Ltd. 2011. Rockwool Blanket. Kowloon, Hong Kong. 140. Superior Growers Supply Inc. 2012. Hydroponic Supplies for beginners and professionals
alike. East Lansing, Michigan, USA. 141. TAMU. 2013a. Tomato Pinworm. Department of Entomology, Texas A&M AgriLife
Extension. Texas A&M University. College Station, Texas, USA. www.vegipm.tamu.edu 142. TAMU. 2013b. Leaf Miner. Department of Entomology, Texas A&M AgriLife Extension.
Texas A&M University, College Station, Texas, USA. www.vegipm.tamu.edu 143. TAMU. 2013c. Fruiting vegetables. Vegetable Resources. Department of Entomology,
Texas A&M AgriLife Extension. Texas A&M University, College Station, Texas, USA. www.vegipm.tamu.edu
144. TAMU. 2013d. Bacterial wilt. Vegetable Resources. Department of Entomology, Texas A&M AgriLife Extension. Texas A&M University, College Station, Texas, USA. www.vegipm.tamu.edu
145. The Garden of Eaden. 2011. What is Blossom End Rot in tomatoes. www.GothicArchGreenhouses.com
146. The Telegraph. 2013. Gardener discovers “Swan cucumber”. Telegraph Group Media Ltd. www.telegraph.co.uk
147. Titus, P. and B. Georges. 2013. Policies and developmental initiatives required to strengthen the Roots and Tubers (RT) and Protected Agriculture (PA) Industries in the Caribbean. An output of the CFC/EU-financed projects on Roots and Tubers and Protected Agriculture in the Caribbean being implemented by CARDI in the Caribbean Region.CARD, St. Augustine, Trinidad, W.I.
148. Treforest Glass. 2007a. Glassworld (Cardiff) Ltd, Trading as Treforest Glass Unit 9/10 Upperboat Industrial Estate, Pontypridd, South Wales, CF37 5BP.
149. Treforest Glass. 2007b. Unit 9/10 Upperboat Industrial Estate, Pontypridd, South Wales, UK, CF37 5BP. www. treforestglass.co.uk.
150. UMassAmherst. 2013a. Anthracnose. Vegetable Program. USDA. National Institute of
Food and Agriculture. UMass Extension Center for Agriculture, Amherst, Massachusetts, USA.
151. UMassAmherst. 2013b. Disease management in lettuce. www.people.umass.edu 152. UMassAmherst. 2013c. Lettuce Septoria blight. UMass Extension Center for Agriculture.
USDA. University of Massachusetts, Massachusetts, USA. 153. UMassAmherst. 2013d. Tomato fruit cracking. Univ. of Massachusetts Centre for
Agriculture, Vegetable Program. Massachusetts, USA. 154. University of Arizona. 2012. Environmental Control Systems hydroponically.
ag.arizona.edu/hydroponictomatoes/system.htm 155. University of California. 2011. Tomato Catface/Cracking. UCDavis Dept. of Plant
Sciences, California, USA. 156. University of Florida. 2008. Leaf mould. Florida tomato scouting guide. University of
Florida, Florida, USA. 157. University of Maryland. Tomato Pinworm. 2013. College of Agriculture & Natural
Resources. Maryland, USA. 158. University of Minnesota. 2007. Insect and Disease Diagnostic Key. University of
Minnesota Dept. of Horticultural Science. Minnesota, USA. 159. Univ. of Missouri Extension. 2003. Tomato fruitworm and corn earworm. IPM 1019.
University of Missouri, USA. 160. Univ. of Missouri Extension. 2013a. High tunnel melon and watermelon production.
University of Missouri, USA. 161. Univ. of Missouri Extension. 2013b. Bacterial speck of tomato. University of Missouri,
USA. 162. USAID. 2010a. Crop Bulletin #1. Growing greenhouse tomatoes. In: RADA Agriculture
Crop Bulletins. Rural Agricultural Development Authority of Jamaica, Kingston, Jamaica. 163. USAID. 2010b. Crop Bulletin #2. Growing greenhouse sweet peppers. In: RADA
Agriculture Crop Bulletins. Rural Agricultural Development Authority of Jamaica, Kingston, Jamaica.
164. USAID. 2010c. Crop Bulletin #3. Growing greenhouse lettuce. In: RADA Agriculture Crop Bulletins. Rural Agricultural Development Authority of Jamaica, Kingston, Jamaica.
165. USAID. 2010d. Crop Bulletin #4. Growing greenhouse cucumbers. In: RADA Agriculture Crop Bulletins. Rural Agricultural Development Authority of Jamaica, Kingston, Jamaica.
166. USAID. 2010e. Crop Bulletin #5. Greenhouse Pests and Diseases. In: RADA Agriculture Crop Bulletins. Rural Agricultural Development Authority of Jamaica, Kingston, Jamaica.
167. Van Dyk, J. 2001. Corn earworm. Iowa State University Entomology Dept., Iowa State University, Iowa, USA.
168. Vargo, J. 2013. Digital Guide to moth identification. Mississippi Entomological Museum, Mississippi State University, USA.
169. VPISU. 2013. Insect Management. Virginia Polytechnic Institute and State University. Virginia Agricultural Experiment Station. Virginia Tech University, USA.
170. Wagner, N. 2013. Sanitation of greenhouses. http://www.ehow.com/facts_7980086_sanitation-greenhouses.html
171. Waldman, Z. 2010. How to Get Rid of Powdery Mildew. Pacific Coast Hydroponics. Los Angeles, California, USA.
172. Weekes, J. A., A. C. Hodges and N. C. Leppla. 2012. Factsheet: Pink hibiscus mealybug. Univ. of Florida, Florida, USA.
173. Weyer, L. 2008. Leafminers. University of Georgia College of Agricultural and Environmental Sciences (UGCAES), University of Georgia, Georgia, USA.
174. Whipker, B. 1999. Irrigation Water Quality for Container-grown Plants. Iowa State University Horticulture Guide, Department of Horticulture, Univ. of Iowa, USA.
175. Wikipedia. 2013a. Tomato. en.wikipedia.org 176. Wikipedia. 2013b. Aphid. Wikimedia Foundation Inc. 177. Wilkinson, R. 2012. Battling Aphids.Hip Chick Digs. Blog powered by Wordpress. 178. Will, E. and J. E. Faust. 2013. Growing media for greenhouse production. Univ. of
Tennessee Agricultural Extension Service. PB1618. Tennessee, USA. 179. WNC. 2013. Downy mildew on cucumber. WNC Vegetable and Small Fruit news.
North Carolina State University, North Carolina, USA. wncveggies.blogspot.com 180. www.semena.org. 2013. Diseases of pepper & eggplant. 181. Zitter, T. A. 1985. Vegetable Crops – Bacterial diseases of tomato. Factsheet page
735.50. Cooperative Extension Dept., Cornell University, Ithaca, NY, USA. 182. Zitter, T. A. 2013a. Agriculture – Crop Disease – Anthracnose on tomato plant.
www.agefotostock.com 183. Zitter, T.A. 2013b. Diseases of lettuce – Fusarium wilt. Shoura Chemicals. Cairo, Egypt. 184. Zitter, T. A. 2013c. Important New York vegetable diseases. Cornell University, Ithaca,