● ● ● ● ● ● ● ● ❍ ❍ ❍ ● ● ❍ ❍ ● ● ❍ ❍ ❍ ● ❍ ❍ ❍ ● ❍ ❍ ❍ ● ❍ ❍ Troubleshooting a Cisco Business Wireless Mesh Network Objective This document will cover several areas to analyze when troubleshooting Cisco Business Wireless (CBW) mesh networks. If you have a traditional wireless network, you should check out Troubleshooting a Traditional Cisco Business Wireless Network. Applicable Devices | Firmware Version 140AC (Data Sheet) | 10.1.1.0 (Download latest) 141ACM (Data Sheet) | 10.1.1.0 (Download latest) 142ACM (Data Sheet) | 10.1.1.0 (Download latest) 143ACM (Data Sheet) | 10.1.1.0 (Download latest) 145AC (Data Sheet) | 10.1.1.0 (Download latest) 240AC (Data Sheet) | 10.1.1.0 (Download latest) Table of Contents For optimum performance and reliability, keep these in mind! When troubleshooting, why not start with the basics? Check Physical and Environmental Conditions Other Items to Consider Number of SSIDs Are you having trouble logging into the Primary AP? Do you have the latest version running on your APs? Why It’s Important Upgrade Troubleshooting Do any of these situations apply to you? Check connectivity issues Run Connectivity Tests from the Web User Interface (UI) Could DHCP Problems be the Issue? Windows Support Maybe the settings need to be adjusted RF Optimization Bridge Group Names Allow Lists Interference and spacing considerations Rogues, Interferers, and RF Channels…oh my! Recommendations for Spacing and Deployment Signal to Noise Ratio Between “Hops” Take a look behind the curtain Syslogs Support Bundle
Transcript
●
●
●
●
●
●
●
●
❍
❍
❍
●
●
❍
❍
●
●
❍
❍
❍
●
❍
❍
❍
●
❍
❍
❍
●
❍
❍
Troubleshooting a Cisco Business WirelessMesh Network Objective This document will cover several areas to analyze when troubleshooting Cisco Business Wireless(CBW) mesh networks. If you have a traditional wireless network, you should check out Troubleshooting a TraditionalCisco Business Wireless Network. Applicable Devices | Firmware Version
For optimum performance and reliability, keep these in mind!When troubleshooting, why not start with the basics?
Check Physical and Environmental ConditionsOther Items to ConsiderNumber of SSIDs
Are you having trouble logging into the Primary AP?Do you have the latest version running on your APs?
Why It’s ImportantUpgrade Troubleshooting
Do any of these situations apply to you?Check connectivity issues
Run Connectivity Tests from the Web User Interface (UI)Could DHCP Problems be the Issue?Windows Support
Maybe the settings need to be adjusted RF OptimizationBridge Group NamesAllow Lists
Interference and spacing considerations Rogues, Interferers, and RF Channels…oh my!Recommendations for Spacing and DeploymentSignal to Noise Ratio Between “Hops”
Take a look behind the curtain SyslogsSupport Bundle
Alternative Access to the Support Bundle on the Primary APAdjust one of the CBW Mobile Phone SettingsIf all else fails, reset to factory default settings
Introduction Mesh wireless networks are awesome, but let’s face it, things happen! Just like any wirelessnetwork, a number of things can cause problems. Sometimes there is a simple fix, while othersmight be more complicated. If you are unfamiliar with terms in this document, check out Cisco Business: Glossary of NewTerms. For optimum performance and reliability, keep these in mind!
Make sure the area has full coverage for the expected number of clients and theirapplications. Additional wireless access points may need to be added in order to smooth outthe performance across your total wireless infrastructure.Be aware of the types of applications they may be using (or as an administrator, the types ofapplications you may allow).Clients running video streaming applications consume more bandwidth than those that maybe streaming audio-only programs. Video applications rely on buffering to provide a decentexperience.Clients running voice-related applications require immediate service with no delays while notbeing as bandwidth-intensive. Since there is no buffering with a voice call, it is very importantthat packets are not dropped.
Ready for some troubleshooting? Let’s dig in! This toggled section highlights tips for beginners. Logging In Log into the Web User Interface (UI) of the Primary AP. To do this, open a web browser and enterhttps://ciscobusiness.cisco.com You may receive a warning before proceeding. Enter yourcredentials.You can also access the Primary AP by entering https://[ipaddress] (of the Primary AP)into a web browser. Tool Tips If you have questions about a field in the user interface, check for a tool tip that looks like the
following: Trouble locating the Expand Main Menu icon? Navigate to the menu on the left-hand side of the screen, if you don’t see the menu button, click
Cisco Business App These devices have companion apps that share some management features with the web userinterface. Not all features in the Web user interface will be available in the App.
Frequently Asked Questions If you still have unanswered questions, you can check our frequently asked questions document. FAQ When troubleshooting, why not start with the basics? Check Physical and Environmental Conditions This is the easiest way to troubleshoot but is often overlooked. Even though these may appear tobe obvious, it is good to start with the basics.
Is all the equipment turned on?Is there power to everything?Do you have a link light on consistently? Green lights are a good sign!Are the cables connected correctly?Could it be a bad cable?Is any of the equipment overheated?Could there be environmental factors such as where it is located?Are there metal or thick walls between the AP and the wireless device?If the client is completely unable to connect, could the client be out of range?
Other Items to Consider
Restart the APFor APs connecting to a switch, check the switch configuration and verify that the switch isrunning in good health. The CPU utilization, temperature, and memory utilization should bebelow the specified threshold levels.On the Web UI, under Monitoring, check the Wireless Dashboard to gather information onperformance and other issues.Enable Bonjour and Link Layer Discovery Protocol (LLDP) on the router if it is available.Enable Wireless Multicast Forwarding when available for gaming and streaming applications.Make sure all Primary Capable APs are on the same VLAN.If you’ve logged into the Primary AP via wireless, and you edit certain settings, such as theVLAN, you may be disconnected. Connecting to the Primary AP via wired allows thatconnection to remain more stable.
Number of SSIDs Every SSID requires sending a beacon frame every 100 milliseconds (ms), which can eat up a lotof channel utilization. It is best to limit the total number of SSIDs on the AP to 1-2 SSIDs per radio or per AP, eventhough the mesh network can support up to a physical limit of 16 SSIDs per radio.
Are you having trouble logging into the Primary AP? Perhaps you have tried to log into ciscobusiness.cisco, and are encountering problems. Check outthese simple suggestions:
If you just completed Day Zero configurations, close the app and then re-launch it.Make sure the correct Service Set Identifier (SSID) is selected. This is the name that youcreated for the wireless network.Log into the Primary AP with https://<IP address of the Primary AP>. The Primary AP addressis the assigned IP address you used in the initial set up procedure. If you opted out ofassigning a manual address at that time, check your router for the DHCP IP address given tothe Primary AP management page. The management address will be assigned on MACaddress 00:00:5e:00:01:01.Once you do initial setup, be sure https:// is being used whether you are logging into ciscobusiness.cisco or by entering the IP management address into your web browser.Depending on your settings, your browser may have auto-populated with http:// since that iswhat you used the very first time you logged in.The problem might be your web browser. For example, in Firefox you would click on the menuat the top right of the screen. Select Help > Troubleshooting Information and click on Refresh Firefox.Disconnect any Virtual Private Network (VPN) for either the mobile app or on a laptop. Youmight even be connected to a VPN that your mobile service provider uses that you might noteven know. For example, an Android (Pixel 3) phone with Google Fi as a service providerthere is a built-in VPN that auto-connects without notification. This would need to be disabledto find the Primary AP.If you have an Android phone, you may be using a private Domain Name Server (DNS) andmay need to disable this feature for connectivity. To check this, you can typically find thisunder Settings > Network and Internet > Advanced > Private DNS.
Do you have the latest version running on your APs? Why It’s Important Firmware, also referred to as software, comes embedded on your access point. Upgradingfirmware improves the performance and stability of your AP. Upgrades may include new featuresor fix a vulnerability that was experienced in the previous version of the software. Is it really thatimportant? Absolutely! It is so vital that all the links for upgrades were added in the FirmwareVersion section of this article. This could be a simple solution to try if you are having networkproblems. You may have issues when adding the first Mesh Extender to a network if there is afirmware version mismatch, so why not update them all right away!
You can upgrade the firmware in a number of ways, but it is recommended that you use Cisco.com for the upgrade. If you would like assistance in upgrading firmware, check out UpdateSoftware of a Cisco Business Wireless Access Point. Upgrade Troubleshooting
It is extremely important to update all Mesh Extenders before updating the Primary Capable APs.
Sometimes an upgrade doesn’t go smoothly. There are some simple things you can try:
Refresh or close the web browser.Clear the browser cache and re-log into the Primary AP. The process for this varies based onthe web browser you use.Click on an alternate page or tab in the Primary AP Web User Interface (UI) and then goback to the Software Update page and try the firmware image download again.Try a new web browser. For example, if you were using Chrome and it isn’t working, tryFirefox.On rare occasions, if the management page failed to start the firmware upgrade or isunresponsive (no status change after initiating upgrade), it may be necessary to power off/onall the access points and mesh extenders on the network and retry the firmware upgrade.
Do any of these situations apply to you?
If you are using the downstream Ethernet port on the CBW240, switch to another port.If you are using captive portal, avoid using Chrome-based browsers, including Microsoft Edge.Sometimes you may not be able to joing the network. It might be as simple as using Firefox asyour browser.If a client is using a VPN connection without split tunneling/split DNS, the CBW managementpage may be inaccessible and the mobile app may not function. Try temporarily disabling theVPN on the client to access CBW management functions.If private DNS is enabled on the client, DNS queries are encrypted and CBW cannot interceptthem. This will prevent the Cisco Business mobile app from working and will preventciscobusiness.cisco from resolving. It is recommended that you either manage CBW from aclient joined to the network without private DNS, or manage CBW using the Web UI via themanagement IP address.Make sure CBW devices are not set up in the same VLAN as a Cisco Wireless LANController.
Could it be a connectivity issue? Run Connectivity Tests from the Web User Interface (UI) The AP must be able to communicate with other devices to be effective. A simple way to checkthis is to perform a ping. Ping the AP from at least two clients that are connected (associated) to that particular accesspoint. Ping from the router to the access point IP address to see if end-to-end connectivity is available.Ping from the router to the wireless clients associated with the AP to check if they can be reachedfrom the main network. Potential DHCP Problems Even though you probably assigned a static IP address to your Primary AP, this AP still needs tohave access to a DHCP server. This DHCP server must be operational and reachable from theLAN Ethernet port of the AP. This is necessary so the Primary AP can provide IP addresses for all
APs and clients that join the network. If you see a blinking red light on the Primary after a reboot,this could be your problem. Even though a static IP address can be chosen for CBW management, it only applies to themanagemetnt IP address. Every access point, including mesh extenders need a separate IPaddress for its access point functionality. The management MAC address is 00:00:5e:00:01:01. Even if all CBW addresses are configured as static, adding a new AP or mesh extender stillrequires a DHCP server for the initial installation of the new device, even if you plan to change it toa static IP address later. It’s possible that there are more clients needing an IP address than are available in the DHCPpool. See the section How to View or Change the Pool of IP Addresses for DHCP section thearticle Best Practices for Setting Static IP Addresses on Cisco Business Hardware for moreinformation. There may be times where too many DHCP addresses are cached, which can also prevent clientsfrom getting an IP address. To learn more about this, check out Tips to Keep the ARP TableAvailable for DHCP IP Addressing. You may also reboot the router if this is more convenient. Windows Support If you use Windows, select your wireless connection from the Network Connections panel andverify that its status is Enabled. Detailed guidance can be found at the Microsoft Support Forum for troubleshooting wirelessnetwork connectivity at the clicking on the following link: Fix Wi-Fi connection issues in Windows. Maybe the CBW settings need to be adjusted There are some default settings that might cause connection issues in some older devices. Youcan try changing the following settings. RF Optimization Step 1 Make sure you are in Expert View for these settings.
Step 2 Navigate to Advanced > RF Optimization. Toggle on RF Optimization.
Step 3 Scroll down to the bottom of this screen. Within each radio Data Rates, remove support for lowercontrol rates to remove older legacy wireless mode clients, such as 802.11b clients.
Step 4 A notification will come up that older devices are not supported. The further to the right you slide,the less that can connect.
Bridge Group Names If you set up your network with all APs at factory default When you conducted the Day Zero configurations for your mesh network, a BGN wasautomatically created. It is the same as the first Service Set Identifier (SSID) you entered, up tothe first 10 characters. This BGN is used within APs to associate and make sure the APs arestaying connected properly. If you set up your Primary AP and then join subordinate APs, the BGNshould automatically match with no further configurations needed. If you reset a Primary AP or moved a configured AP to a new network If you perform a reset to factory default on the Primary AP, or move APs from one configurednetwork to another, this can cause a mismatch of BGNs. When an AP tries to join a network in a scenario where the BGN doesn’t match any networksavailable, the subordinate AP will still attempt to temporarily join the network with the strongestsignal. The AP will be able to join the network if it is Allow Listed and approved. Once the AP has joined the network, since the BGN doesn’t match, the subordinate AP willcontinue to look for a matching BGN every 10 to 15 minutes. This will cause the connection todrop and then join again if a matching BGN isn’t found. This can cause a lot of problems withconnectivity in the wireless network, especially when there might be a stronger wireless signalcoming from another wireless network. As a simple solution, for all APs to work together, you should make sure the BGN on all APsmatch exactly. To clear out the BGN on the other APs, you can do a factory reset on them, or youcan manually change each one to match.
If you want to view or change a Bridge Group Name (BGN) on an AP It is recommended that BGNs get assigned to the mesh extenders with the most hops beconfigured first, working up to the least number of hops. After that, the Primary Capable APsBGNs should be assigned. The Primary AP BGN should be configured last. You can view andchange them one at a time by performing the following steps. Step 1 Log into the AP and enter your credentials.
Step 2 Switch to Expert View by clicking on the arrow icon.
Step 3 Navigate to Wireless Settings > Access Points. Click on the edit icon of the AP you want to editor view.
Step 4
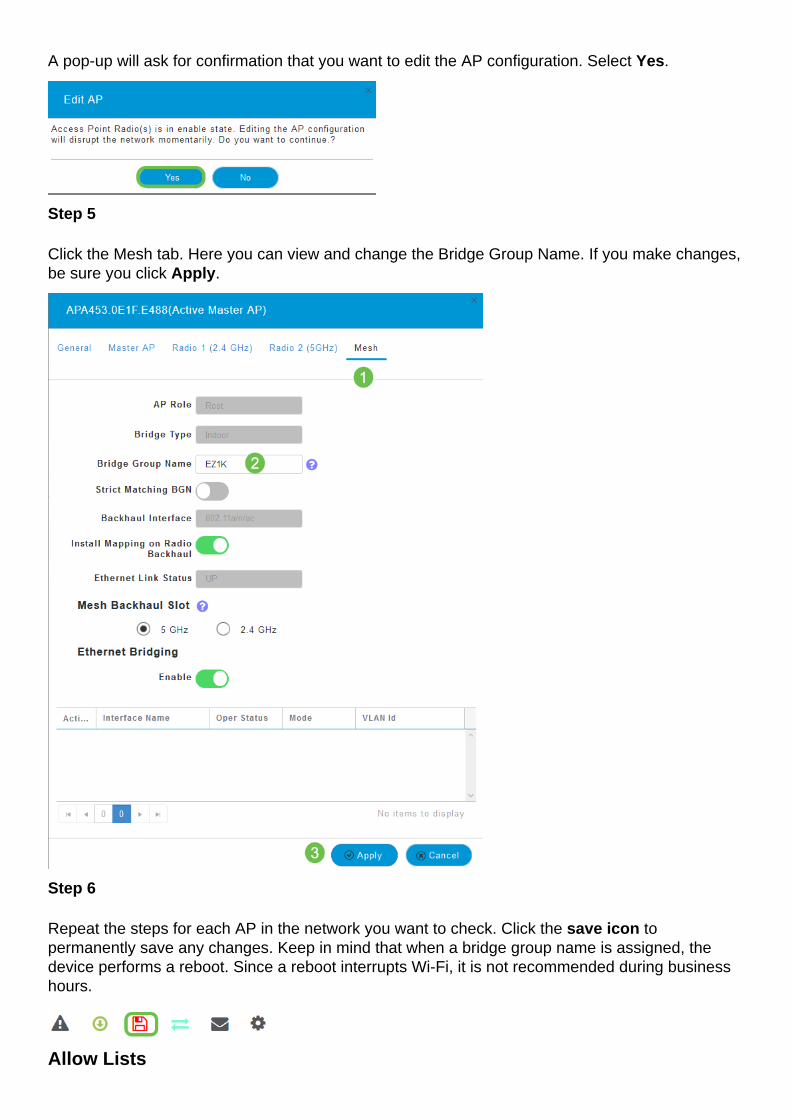
A pop-up will ask for confirmation that you want to edit the AP configuration. Select Yes.
Step 5 Click the Mesh tab. Here you can view and change the Bridge Group Name. If you make changes,be sure you click Apply.
Step 6 Repeat the steps for each AP in the network you want to check. Click the save icon topermanently save any changes. Keep in mind that when a bridge group name is assigned, thedevice performs a reboot. Since a reboot interrupts Wi-Fi, it is not recommended during businesshours.
Allow Lists
In order to connect other Primary-capable APs and mesh extenders, you need to create an AllowList on a Primary AP that includes the Media Access Control (MAC) address of all the APs. In addition, subordinate APs need to be Allow Listed so that the Primary AP can access andupgrade the other APs, which is essential to keep the network up and running. This Allow List, along with all APs having the same Bridge Group Name (BGN), helps the APsconnect efficiently and consistently. To add a Media Access Control (MAC) address and label it asAllow List, complete the following steps. Step 1 You need to know the MAC address of the AP. If you know the MAC address of your AP, you canskip to Step 4. A MAC address includes numbers and letters in pairs, separated by colons. Step 2 On most APs, the MAC address can be found on the outside of the actual AP. On the 142ACMand 143ACM you need to slide out the power apparatus to view the MAC address. To do this,apply light pressure on the AP where the arrows indicate. Slide and lift the power component out.
Step 3 On the 142ACM and 143ACM, you will see the MAC address in the locations pointed out below.
1.2.3.4.
1.2.3.4.
Step 4
Select Wireless SettingsSelect WLAN UsersSelect Local MAC AddressesSelect Add MAC Address
Step 5 Enter the following information:
MAC AddressDescription (up to 32 characters)Select the Allow List radio buttonClick Apply
Interference and spacing considerations Rogues, Interferers, and RF Channels…oh my! Interference can cause issues on wireless networks and can come from more sources than everbefore. Microwaves, security cameras, smartwatches, motion detectors, or even fluorescent bulbscan cause interference.
●
●
●
1.2.3.
4.5.
How much they affect the network can depend on many factors including the amount of poweremitted if the object is constantly on, or if it is intermittent. The stronger the signal or the morefrequently it is on the more problems that can arise. Rogue APs and rogue clients can cause problems if there are too many on the same channel aswell. Interference can be a major inhibitor to wireless performance, creating security vulnerabilities andwireless network instability. There are tools available to monitor the channel(s) you are currently utilizing. You have theability to change channels as well. Check out the following articles for more information.
Place Mesh Extenders in line-of-site of Primary-Capable APs.Downstream Mesh Extenders in line-of-site of parent Mesh Extender.Downstream Mesh Extenders require good/excellent on backhaul SSID signal strength fromupstream Primary-Capable APs.Mesh Extenders should have a minimum Signal to Noise Ratio (SNR) value of 30.Avoid placing Mesh Extenders too close to other Mesh Extenders or other Primary-CapableAPs.
The following chart lists the expected coverage areas in an open space. If you deploy yournetwork in an area that is not open, reduce these values by 20-30%.
Signal to Noise Ratio Between “Hops” In all networks, you need to work on a strong signal between clients and the APs. In a meshnetwork, you also need to make sure there is a strong signal between the various APs betweeneach other. If one of the “hops” doesn’t have a great signal, a higher signal to noise ratio, you willneed to troubleshoot that. You may need to adjust the location or check to see what is causinginterference. Step 1 Navigate to Monitoring > Network Summary > Access Points and click on any access point in
the table to check the associated client signal strength.
Step 2 Once the Access Point View opens, look over the information under Performance Summary.
Step 3 You can also gather information on all mesh extender Hop counts and Signal to Noise Ratio.Navigate to Monitoring > Network Summary > Mesh Extender.
Take a look behind the curtain
Syslogs Being aware of events can help ensure the network runs smoothly and prevent failures. Syslogsare useful for network troubleshooting, debugging packet flow, and to monitor events. These logs can be viewed on the Web User Interface (UI) of the Primary AP and if configured, onremote log servers. Events are typically erased from the system when rebooted if they are notsaved on a remote server. If you would like more information, check out Setting Up System Message Logs (Syslogs) on aCBW Network. Support Bundle A feature that is available on this CBW equipment is to download a support bundle. A supportbundle is a tool that can be helpful in troubleshooting. It provides the AP boot-up logs andspecifies the configurations applied. To get a complete picture, this might need to be done onevery AP. Before downloading the support bundle on the Primary AP, make sure you are running the mostcurrent release of firmware. To update firmware, select the correct link under Applicable Devices |Firmware Version. If you would like assistance in upgrading firmware, check out Update Softwareof a Cisco Business Wireless Access Point. Step 1 To download the support bundle, select Monitoring > Access Points. Select the AP you wouldlike to access.
Step 2 Under the Tech Support section, select Start.
Step 3 When the download is complete, you will see the Tech Support Status is Completed. Select the Download button to download the files. At this point, even if the download happens to fail, it isdeleted from the memory of the AP. This would happen if you don’t allow pop-ups.
Step 4 In the Download folder of your computer files, you will see a tech support .tgz file. The files insidethis folder need to be extracted.
Step 5 Right-click and select the unzip application that you would like to use. In this example, 7-Zip wasused. Select to extract the files to the location you select. By default, the files are sent to the Downloads folder.
(Alternative View) If you have a core crash, you might see these folders instead.
Step 6 Once the files have been extracted from the .tgz file, they will be in a .tar file. This file will need tobe extracted again.
Step 7 You will see the tech_support folder. Double-click on the folder to open the files.
Step 8 Within the support bundle, the cli_file (configuration file), msg/syslogs (event logs), and startlog provide the most relevant information. The files you see may vary. An example is shown here.
Step 9 Right-click on the file you would like to unzip. In this example, the file will be unzipped into a folderfor tech_support.
Step 10 The tech_support folder will appear. Double-click to open the folder.
Step 11 Right-click on the file and select a text file reader. In this example, we used Edit with Notepad++.
Alternative Access to the Support Bundle on the Primary AP Another way to access download the support bundle on the Primary AP is to navigate to Advanced > Primary AP Tools. Select the Troubleshooting Files tab. Select Download SupportBundle. For Transfer Mode, select HTTP or FTP. Click Apply settings. Click on the Save icon.
Adjust one of the CBW Mobile Phone Settings
Change the 802.11r settings on the CBW Network Step 1 Access the Web User Interface (UI) by entering the IP address of the Primary Access Point into aweb browser. Make sure you are not on a Virtual Private Network (VPN) or this will not work. If youencounter security warnings, select the prompts to proceed.
Step 2 In the upper right-hand of the Web UI, click on the opposing arrows to switch to expert view.
Step 3 A pop-up window will appear, asking if you want to select expert view. Click OK.
Step 4 Select WLANs and the edit icon for the WLAN you want to edit.
Step 5 A pop-up window will appear, asking if you want to continue. Click Yes.
Step 6 Click on the Advanced tab. Click on the drop-down menu for 802.11r and select Enabled.
Step 7 Click Apply.
Step 8 To permanently save these settings, click the save icon on the top right of your screen.
If all else fails, reset to factory default settings An option of last resort, that should only be done to remedy the most severe issues such as losingthe ability to gain access to the management portal, is to perform a hardware reset on the router. When you reset to factory default settings you lose all configurations. You will need to set up therouter again from scratch so make sure you have the connection details. The process on the new CBW APs is a little different than you may have experienced on otherAPs. For details on the reset, check out the article Reset a CBW AP back to Factory DefaultSettings. Conclusion It was our intention to give you several different options for troubleshooting your mesh network.Mission accomplished! You should now have connectivity and can move on with your day.