171
Trustwave ECM (MailMarshal Exchange) User Guide

Trustwave ECM
(MailMarshal Exchange)
User Guide

MailMarshal Exchange (ECM) - User Guide - Version 7.1
Legal Notice
Copyright © 2015 Trustwave Holdings, Inc.
All rights reserved. This document is protected by copyright and any distribution, reproduction, copying, or
decompilation is strictly prohibited without the prior written consent of Trustwave. No part of this document
may be reproduced in any form or by any means without the prior written authorization of Trustwave. While
every precaution has been taken in the preparation of this document, Trustwave assumes no responsibility
for errors or omissions. This publication and features described herein are subject to change without
notice.
While the authors have used their best efforts in preparing this document, they make no representation or
warranties with respect to the accuracy or completeness of the contents of this document and specifically
disclaim any implied warranties of merchantability or fitness for a particular purpose. No warranty may be
created or extended by sales representatives or written sales materials. The advice and strategies
contained herein may not be suitable for your situation. You should consult with a professional where
appropriate. Neither the author nor Trustwave shall be liable for any loss of profit or any commercial
damages, including but not limited to direct, indirect, special, incidental, consequential, or other damages.
The most current version of this document may be obtained from:
www.trustwave.com/support/
Trademarks
Trustwave and the Trustwave logo are trademarks of Trustwave. Such trademarks shall not be used,
copied, or disseminated in any manner without the prior written permission of Trustwave.
Legal NoticeCopyright © 2015 Trustwave Holdings, Inc. All rights reserved. ii

MailMarshal Exchange (ECM) - User Guide - Version 7.1
Formatting Conventions
This manual uses the following formatting conventions to denote specific information.
Format and Symbols
Meaning
Blue Underline A blue underline indicates a Web site or email address.
Bold Bold text denotes UI control and names such as commands, menu items, tab and field names, button and check box names, window and dialog box names, and areas of windows or dialog boxes.
Code Text in this format indicates computer code or information at a command line.
Italics Italics are used to denote the name of a published work, the current document, or another document; for text emphasis; or to introduce a new term. In code examples italics indicate a placeholder for values and expressions.
[Square brackets] In code examples, square brackets indicate optional sections or entries.
Note: This symbol indicates information that applies to the task at hand.
Tip: This symbol denotes a suggestion for a better or more productive way to use the product.
Caution: This symbol highlights a warning against using the product in an unintended manner.
Formatting ConventionsCopyright © 2015 Trustwave Holdings, Inc. All rights reserved. iii

MailMarshal Exchange (ECM) - User Guide - Version 7.1
Table of Contents
Legal Notice. . . . . . . . . . . . . . . . . . . . . . . . . . . . . . . . . . . . . . . . . . . . . . . . . . . . . . . . . . . . . . . . . . . . . . . . . ii
Formatting Conventions . . . . . . . . . . . . . . . . . . . . . . . . . . . . . . . . . . . . . . . . . . . . . . . . . . . . . . . . . . . . . . iii
1 Introduction 11
1.1 What Is MailMarshal Exchange (ECM)? . . . . . . . . . . . . . . . . . . . . . . . . . . . . . . . . . . . . . . . . . . . 11
1.2 What Does MailMarshal Exchange Provide? . . . . . . . . . . . . . . . . . . . . . . . . . . . . . . . . . . . . . . . 11
1.3 How MailMarshal Exchange Helps You . . . . . . . . . . . . . . . . . . . . . . . . . . . . . . . . . . . . . . . . . . . 12
1.4 How MailMarshal Exchange Works . . . . . . . . . . . . . . . . . . . . . . . . . . . . . . . . . . . . . . . . . . . . . . 12
1.4.1 Understanding What MailMarshal Exchange Does. . . . . . . . . . . . . . . . . . . . . . . . . . . . 13
1.5 Configuring MailMarshal Exchange . . . . . . . . . . . . . . . . . . . . . . . . . . . . . . . . . . . . . . . . . . . . . . 13
1.6 Monitoring and Reporting . . . . . . . . . . . . . . . . . . . . . . . . . . . . . . . . . . . . . . . . . . . . . . . . . . . . . . 13
1.7 MailMarshal Exchange and MailMarshal SEG . . . . . . . . . . . . . . . . . . . . . . . . . . . . . . . . . . . . . . 14
2 Planning Your MailMarshal Exchange Installation 15
2.1 Planning Checklist. . . . . . . . . . . . . . . . . . . . . . . . . . . . . . . . . . . . . . . . . . . . . . . . . . . . . . . . . . . . 15
2.2 Understanding MailMarshal Exchange Components . . . . . . . . . . . . . . . . . . . . . . . . . . . . . . . . . 15
2.2.1 MailMarshal Exchange Components . . . . . . . . . . . . . . . . . . . . . . . . . . . . . . . . . . . . . . 16
2.2.2 Other Software and Services . . . . . . . . . . . . . . . . . . . . . . . . . . . . . . . . . . . . . . . . . . . . 17
2.3 Understanding Installation Scenarios . . . . . . . . . . . . . . . . . . . . . . . . . . . . . . . . . . . . . . . . . . . . . 18
2.3.1 Standalone Installation . . . . . . . . . . . . . . . . . . . . . . . . . . . . . . . . . . . . . . . . . . . . . . . . . 18
2.3.2 Array Installation . . . . . . . . . . . . . . . . . . . . . . . . . . . . . . . . . . . . . . . . . . . . . . . . . . . . . . 18
2.4 Hardware and Software Requirements . . . . . . . . . . . . . . . . . . . . . . . . . . . . . . . . . . . . . . . . . . . . 19
2.4.1 Standalone Installation Requirements . . . . . . . . . . . . . . . . . . . . . . . . . . . . . . . . . . . . . 19
2.4.2 Array Installation Requirements . . . . . . . . . . . . . . . . . . . . . . . . . . . . . . . . . . . . . . . . . . 20
2.4.2.1 Server Requirements . . . . . . . . . . . . . . . . . . . . . . . . . . . . . . . . . . . . . . . . . . . . . 20
2.4.2.2 Array Manager Requirements. . . . . . . . . . . . . . . . . . . . . . . . . . . . . . . . . . . . . . . 21
2.4.3 Web Components Requirements . . . . . . . . . . . . . . . . . . . . . . . . . . . . . . . . . . . . . . . . . 22
2.4.4 Configurator or Console User Interface Requirements . . . . . . . . . . . . . . . . . . . . . . . . . 23
2.5 Database Software Considerations. . . . . . . . . . . . . . . . . . . . . . . . . . . . . . . . . . . . . . . . . . . . . . . 23
2.6 Understanding MailMarshal Exchange Folder Locations . . . . . . . . . . . . . . . . . . . . . . . . . . . . . . 25
2.7 Supported Antivirus Software . . . . . . . . . . . . . . . . . . . . . . . . . . . . . . . . . . . . . . . . . . . . . . . . . . . 26
2.8 Collecting Information for Installation . . . . . . . . . . . . . . . . . . . . . . . . . . . . . . . . . . . . . . . . . . . . . 26
3 Installing and Configuring MailMarshal Exchange 28
3.1 Installation Checklist . . . . . . . . . . . . . . . . . . . . . . . . . . . . . . . . . . . . . . . . . . . . . . . . . . . . . . . . . . 28
3.2 Installing Prerequisite Software. . . . . . . . . . . . . . . . . . . . . . . . . . . . . . . . . . . . . . . . . . . . . . . . . . 28
3.3 Installing MailMarshal Exchange on a Standalone Server . . . . . . . . . . . . . . . . . . . . . . . . . . . . . 29
3.4 Installing MailMarshal Exchange as an Array . . . . . . . . . . . . . . . . . . . . . . . . . . . . . . . . . . . . . . . 30
Copyright © 2015 Trustwave Holdings, Inc. All rights reserved. iv

MailMarshal Exchange (ECM) - User Guide - Version 7.1
3.4.1 Installing a MailMarshal Exchange Array Manager. . . . . . . . . . . . . . . . . . . . . . . . . . . . 31
3.4.2 Installing a MailMarshal Exchange Server . . . . . . . . . . . . . . . . . . . . . . . . . . . . . . . . . . 33
3.5 Running the Configuration Wizard . . . . . . . . . . . . . . . . . . . . . . . . . . . . . . . . . . . . . . . . . . . . . . . 35
3.6 Creating Directory Connectors . . . . . . . . . . . . . . . . . . . . . . . . . . . . . . . . . . . . . . . . . . . . . . . . . . 37
3.7 Configuring Antivirus Scanning . . . . . . . . . . . . . . . . . . . . . . . . . . . . . . . . . . . . . . . . . . . . . . . . . . 39
3.7.1 Excluding Working Folders From Virus Scanning. . . . . . . . . . . . . . . . . . . . . . . . . . . . . 39
3.7.2 Configuring MailMarshal Exchange to Use an Antivirus Product . . . . . . . . . . . . . . . . . 40
3.8 Installing and Customizing Web Components . . . . . . . . . . . . . . . . . . . . . . . . . . . . . . . . . . . . . . 41
3.8.1 Installing the MailMarshal Exchange Web Components. . . . . . . . . . . . . . . . . . . . . . . . 42
3.8.2 Customizing the Web Components. . . . . . . . . . . . . . . . . . . . . . . . . . . . . . . . . . . . . . . . 44
3.9 Installing Additional User Interfaces . . . . . . . . . . . . . . . . . . . . . . . . . . . . . . . . . . . . . . . . . . . . . . 45
3.10 Upgrading MailMarshal Exchange . . . . . . . . . . . . . . . . . . . . . . . . . . . . . . . . . . . . . . . . . . . . . . 45
3.10.1 Upgrading from MailMarshal Exchange (ECM) Version 7.X . . . . . . . . . . . . . . . . . . . . 45
3.10.2 Upgrading from MailMarshal Exchange Version 5.X . . . . . . . . . . . . . . . . . . . . . . . . . 48
3.11 Uninstalling MailMarshal Exchange . . . . . . . . . . . . . . . . . . . . . . . . . . . . . . . . . . . . . . . . . . . . . 48
4 Understanding MailMarshal Exchange Interfaces 50
4.1 Understanding the Configurator . . . . . . . . . . . . . . . . . . . . . . . . . . . . . . . . . . . . . . . . . . . . . . . . . 50
4.1.1 Working With the Getting Started and Common Tasks Pages . . . . . . . . . . . . . . . . . . . 51
4.1.2 Working With Menu and Detail Items . . . . . . . . . . . . . . . . . . . . . . . . . . . . . . . . . . . . . . 51
4.1.3 Working With Properties Configuration . . . . . . . . . . . . . . . . . . . . . . . . . . . . . . . . . . . . . 52
4.1.4 Committing Configuration . . . . . . . . . . . . . . . . . . . . . . . . . . . . . . . . . . . . . . . . . . . . . . . 52
4.2 Understanding the Console. . . . . . . . . . . . . . . . . . . . . . . . . . . . . . . . . . . . . . . . . . . . . . . . . . . . . 52
4.3 Understanding the Web Console . . . . . . . . . . . . . . . . . . . . . . . . . . . . . . . . . . . . . . . . . . . . . . . . 53
4.4 Understanding the Quarantine Management Website . . . . . . . . . . . . . . . . . . . . . . . . . . . . . . . . 54
4.5 Understanding Other Tools . . . . . . . . . . . . . . . . . . . . . . . . . . . . . . . . . . . . . . . . . . . . . . . . . . . . . 54
5 Implementing Your Email Content Security Policy 56
5.1 Configuring Email Content Security . . . . . . . . . . . . . . . . . . . . . . . . . . . . . . . . . . . . . . . . . . . . . . 56
5.2 Stopping Viruses . . . . . . . . . . . . . . . . . . . . . . . . . . . . . . . . . . . . . . . . . . . . . . . . . . . . . . . . . . . . . 56
5.2.1 How MailMarshal Exchange Uses Virus Scanners . . . . . . . . . . . . . . . . . . . . . . . . . . . . 57
5.2.1.1 Features . . . . . . . . . . . . . . . . . . . . . . . . . . . . . . . . . . . . . . . . . . . . . . . . . . . . . . . 57
5.2.1.2 Implementation Options . . . . . . . . . . . . . . . . . . . . . . . . . . . . . . . . . . . . . . . . . . . 57
5.2.2 Virus and Threats Policy and Rules . . . . . . . . . . . . . . . . . . . . . . . . . . . . . . . . . . . . . . . 58
5.2.3 Best Practices . . . . . . . . . . . . . . . . . . . . . . . . . . . . . . . . . . . . . . . . . . . . . . . . . . . . . . . . 58
5.2.4 Viewing Virus Scanner Properties. . . . . . . . . . . . . . . . . . . . . . . . . . . . . . . . . . . . . . . . . 59
5.3 Filtering Messages and Attachments . . . . . . . . . . . . . . . . . . . . . . . . . . . . . . . . . . . . . . . . . . . . . 59
6 Understanding Email Policy, Policy Groups, and Rules 61
6.1 Understanding Policy Types . . . . . . . . . . . . . . . . . . . . . . . . . . . . . . . . . . . . . . . . . . . . . . . . . . . . 61
6.1.1 Content Analysis Policy. . . . . . . . . . . . . . . . . . . . . . . . . . . . . . . . . . . . . . . . . . . . . . . . . 61
6.1.2 Dead Letter Policy. . . . . . . . . . . . . . . . . . . . . . . . . . . . . . . . . . . . . . . . . . . . . . . . . . . . . 61
6.2 Understanding Policy Groups . . . . . . . . . . . . . . . . . . . . . . . . . . . . . . . . . . . . . . . . . . . . . . . . . . . 61
Copyright © 2015 Trustwave Holdings, Inc. All rights reserved. v

MailMarshal Exchange (ECM) - User Guide - Version 7.1
6.3 Understanding Rules. . . . . . . . . . . . . . . . . . . . . . . . . . . . . . . . . . . . . . . . . . . . . . . . . . . . . . . . . . 62
6.3.1 Creating Rules . . . . . . . . . . . . . . . . . . . . . . . . . . . . . . . . . . . . . . . . . . . . . . . . . . . . . . . 62
6.4 Understanding User Matching. . . . . . . . . . . . . . . . . . . . . . . . . . . . . . . . . . . . . . . . . . . . . . . . . . . 64
6.5 Understanding Rule Conditions . . . . . . . . . . . . . . . . . . . . . . . . . . . . . . . . . . . . . . . . . . . . . . . . . 65
6.5.1 Rule Conditions for Content Analysis Policy Rules. . . . . . . . . . . . . . . . . . . . . . . . . . . . 66
6.5.1.1 Where the result of a virus scan is . . . . . . . . . . . . . . . . . . . . . . . . . . . . . . . . . . . 67
6.5.1.2 Where message attachment is of type . . . . . . . . . . . . . . . . . . . . . . . . . . . . . . . . 69
6.5.1.3 Where attachment fingerprint is/is not known . . . . . . . . . . . . . . . . . . . . . . . . . . . 69
6.5.1.4 Where message size is. . . . . . . . . . . . . . . . . . . . . . . . . . . . . . . . . . . . . . . . . . . . 69
6.5.1.5 Where the estimated bandwidth required to deliver this message is . . . . . . . . . 70
6.5.1.6 Where message contains attachments named. . . . . . . . . . . . . . . . . . . . . . . . . . 70
6.5.1.7 Where message triggers text censor script(s) . . . . . . . . . . . . . . . . . . . . . . . . . . 70
6.5.1.8 Where the external command is triggered . . . . . . . . . . . . . . . . . . . . . . . . . . . . . 70
6.5.1.9 Where attachment parent is of type . . . . . . . . . . . . . . . . . . . . . . . . . . . . . . . . . . 71
6.5.1.10 Where message attachment size is . . . . . . . . . . . . . . . . . . . . . . . . . . . . . . . . . 71
6.5.1.11 Where number of recipients is count . . . . . . . . . . . . . . . . . . . . . . . . . . . . . . . . 71
6.5.1.12 Where message contains one or more headers . . . . . . . . . . . . . . . . . . . . . . . . 71
6.5.1.13 Where number of attachments is count . . . . . . . . . . . . . . . . . . . . . . . . . . . . . . 72
6.5.1.14 Where message is categorized as category . . . . . . . . . . . . . . . . . . . . . . . . . . . 72
6.5.1.15 Where the attached image is/is not/may be inappropriate . . . . . . . . . . . . . . . . 73
6.5.2 Rule Conditions for Dead Letter Policy Rules . . . . . . . . . . . . . . . . . . . . . . . . . . . . . . . . 76
6.5.2.1 Where the Dead Letter reason contains . . . . . . . . . . . . . . . . . . . . . . . . . . . . . . . 76
6.6 Understanding Rule Actions . . . . . . . . . . . . . . . . . . . . . . . . . . . . . . . . . . . . . . . . . . . . . . . . . . . . 76
6.6.1 Rule Actions for Content Analysis Policy Rules . . . . . . . . . . . . . . . . . . . . . . . . . . . . . . 76
6.6.1.1 Copy the message . . . . . . . . . . . . . . . . . . . . . . . . . . . . . . . . . . . . . . . . . . . . . . . 77
6.6.1.2 BCC a copy of the message . . . . . . . . . . . . . . . . . . . . . . . . . . . . . . . . . . . . . . . . 77
6.6.1.3 Run the external command. . . . . . . . . . . . . . . . . . . . . . . . . . . . . . . . . . . . . . . . . 77
6.6.1.4 Send a notification message. . . . . . . . . . . . . . . . . . . . . . . . . . . . . . . . . . . . . . . . 77
6.6.1.5 Strip attachment . . . . . . . . . . . . . . . . . . . . . . . . . . . . . . . . . . . . . . . . . . . . . . . . . 78
6.6.1.6 Write log message(s) with classifications . . . . . . . . . . . . . . . . . . . . . . . . . . . . . . 78
6.6.1.7 Stamp message with text . . . . . . . . . . . . . . . . . . . . . . . . . . . . . . . . . . . . . . . . . . 78
6.6.1.8 Rewrite message headers . . . . . . . . . . . . . . . . . . . . . . . . . . . . . . . . . . . . . . . . . 78
6.6.1.9 Add attachments to valid fingerprints list . . . . . . . . . . . . . . . . . . . . . . . . . . . . . . 79
6.6.1.10 Add message users into group . . . . . . . . . . . . . . . . . . . . . . . . . . . . . . . . . . . . . 79
6.6.1.11 Move the message . . . . . . . . . . . . . . . . . . . . . . . . . . . . . . . . . . . . . . . . . . . . . . 80
6.6.1.12 Park the message . . . . . . . . . . . . . . . . . . . . . . . . . . . . . . . . . . . . . . . . . . . . . . . 80
6.6.1.13 Delete the message . . . . . . . . . . . . . . . . . . . . . . . . . . . . . . . . . . . . . . . . . . . . . 80
6.6.1.14 Pass the message to rule . . . . . . . . . . . . . . . . . . . . . . . . . . . . . . . . . . . . . . . . . 80
6.6.2 Rule Actions for Dead Letter Policy Rules . . . . . . . . . . . . . . . . . . . . . . . . . . . . . . . . . . 81
6.6.2.1 Pass message through to recipients. . . . . . . . . . . . . . . . . . . . . . . . . . . . . . . . . . 81
6.7 Understanding the Order of Evaluation. . . . . . . . . . . . . . . . . . . . . . . . . . . . . . . . . . . . . . . . . . . . 81
6.7.1 Adjusting the Order of Evaluation of Policy Groups . . . . . . . . . . . . . . . . . . . . . . . . . . . 81
6.7.2 Adjusting the Order of Evaluation of Rules . . . . . . . . . . . . . . . . . . . . . . . . . . . . . . . . . . 81
6.8 Viewing Email Policy . . . . . . . . . . . . . . . . . . . . . . . . . . . . . . . . . . . . . . . . . . . . . . . . . . . . . . . . . . 82
Copyright © 2015 Trustwave Holdings, Inc. All rights reserved. vi

MailMarshal Exchange (ECM) - User Guide - Version 7.1
7 Understanding Email Policy Elements 83
7.1 Configuring Connectors . . . . . . . . . . . . . . . . . . . . . . . . . . . . . . . . . . . . . . . . . . . . . . . . . . . . . . . 84
7.2 Configuring User Groups . . . . . . . . . . . . . . . . . . . . . . . . . . . . . . . . . . . . . . . . . . . . . . . . . . . . . . 85
7.2.1 Creating and Populating User Groups . . . . . . . . . . . . . . . . . . . . . . . . . . . . . . . . . . . . . 85
7.2.1.1 Populating an Active Directory or LDAP Group . . . . . . . . . . . . . . . . . . . . . . . . . 86
7.2.1.2 Adding Members to a MailMarshal Exchange Group . . . . . . . . . . . . . . . . . . . . . 86
7.2.1.3 Adding Groups to a MailMarshal Exchange Group. . . . . . . . . . . . . . . . . . . . . . . 86
7.2.1.4 Pruning a MailMarshal Exchange Group . . . . . . . . . . . . . . . . . . . . . . . . . . . . . . 87
7.2.1.5 Finding a User in Groups . . . . . . . . . . . . . . . . . . . . . . . . . . . . . . . . . . . . . . . . . . 87
7.2.2 Moving and Copying Users and Groups . . . . . . . . . . . . . . . . . . . . . . . . . . . . . . . . . . . . 88
7.3 Identifying Email Text Content Using TextCensor Scripts . . . . . . . . . . . . . . . . . . . . . . . . . . . . . 88
7.3.1 Creating Scripts. . . . . . . . . . . . . . . . . . . . . . . . . . . . . . . . . . . . . . . . . . . . . . . . . . . . . . . 89
7.3.2 Editing Scripts . . . . . . . . . . . . . . . . . . . . . . . . . . . . . . . . . . . . . . . . . . . . . . . . . . . . . . . . 91
7.3.3 Duplicating Scripts . . . . . . . . . . . . . . . . . . . . . . . . . . . . . . . . . . . . . . . . . . . . . . . . . . . . 91
7.3.4 Script and Item Weighting . . . . . . . . . . . . . . . . . . . . . . . . . . . . . . . . . . . . . . . . . . . . . . . 91
7.3.5 Item Syntax . . . . . . . . . . . . . . . . . . . . . . . . . . . . . . . . . . . . . . . . . . . . . . . . . . . . . . . . . . 92
7.3.6 Importing Scripts . . . . . . . . . . . . . . . . . . . . . . . . . . . . . . . . . . . . . . . . . . . . . . . . . . . . . . 93
7.3.7 Exporting Scripts . . . . . . . . . . . . . . . . . . . . . . . . . . . . . . . . . . . . . . . . . . . . . . . . . . . . . . 93
7.3.8 TextCensor Best Practices . . . . . . . . . . . . . . . . . . . . . . . . . . . . . . . . . . . . . . . . . . . . . . 93
7.3.8.1 Constructing TextCensor Scripts . . . . . . . . . . . . . . . . . . . . . . . . . . . . . . . . . . . . 94
7.3.8.2 Decreasing Unwanted Triggering . . . . . . . . . . . . . . . . . . . . . . . . . . . . . . . . . . . . 94
7.3.9 Testing Scripts . . . . . . . . . . . . . . . . . . . . . . . . . . . . . . . . . . . . . . . . . . . . . . . . . . . . . . . 94
7.4 Notifying Users with Message Templates and Message Stamps . . . . . . . . . . . . . . . . . . . . . . . . 95
7.4.1 Message Templates . . . . . . . . . . . . . . . . . . . . . . . . . . . . . . . . . . . . . . . . . . . . . . . . . . . 95
7.4.2 Creating a Message Template . . . . . . . . . . . . . . . . . . . . . . . . . . . . . . . . . . . . . . . . . . . 96
7.4.3 Creating Digest Templates . . . . . . . . . . . . . . . . . . . . . . . . . . . . . . . . . . . . . . . . . . . . . . 97
7.4.4 Editing Templates . . . . . . . . . . . . . . . . . . . . . . . . . . . . . . . . . . . . . . . . . . . . . . . . . . . . . 99
7.4.5 Duplicating Templates. . . . . . . . . . . . . . . . . . . . . . . . . . . . . . . . . . . . . . . . . . . . . . . . . . 99
7.4.6 Deleting Templates . . . . . . . . . . . . . . . . . . . . . . . . . . . . . . . . . . . . . . . . . . . . . . . . . . . . 99
7.4.7 Working with Message Stamps. . . . . . . . . . . . . . . . . . . . . . . . . . . . . . . . . . . . . . . . . . . 99
7.4.7.1 Duplicating Message Stamps . . . . . . . . . . . . . . . . . . . . . . . . . . . . . . . . . . . . . . 100
7.4.7.2 Editing Message Stamps . . . . . . . . . . . . . . . . . . . . . . . . . . . . . . . . . . . . . . . . . 100
7.4.7.3 Deleting Message Stamps . . . . . . . . . . . . . . . . . . . . . . . . . . . . . . . . . . . . . . . . 101
7.4.8 Using Variables . . . . . . . . . . . . . . . . . . . . . . . . . . . . . . . . . . . . . . . . . . . . . . . . . . . . . . 101
7.4.9 Date Formatting . . . . . . . . . . . . . . . . . . . . . . . . . . . . . . . . . . . . . . . . . . . . . . . . . . . . . 103
7.5 Using Virus Scanning . . . . . . . . . . . . . . . . . . . . . . . . . . . . . . . . . . . . . . . . . . . . . . . . . . . . . . . . 104
7.6 Using Email Folders and Message Classifications . . . . . . . . . . . . . . . . . . . . . . . . . . . . . . . . . . 105
7.6.1 Working with Message Classifications . . . . . . . . . . . . . . . . . . . . . . . . . . . . . . . . . . . . 105
7.6.1.1 Editing Message Classifications . . . . . . . . . . . . . . . . . . . . . . . . . . . . . . . . . . . . 105
7.6.1.2 Duplicating Message Classifications. . . . . . . . . . . . . . . . . . . . . . . . . . . . . . . . . 106
7.6.1.3 Deleting Message Classifications . . . . . . . . . . . . . . . . . . . . . . . . . . . . . . . . . . . 106
7.6.2 Working with Folders. . . . . . . . . . . . . . . . . . . . . . . . . . . . . . . . . . . . . . . . . . . . . . . . . . 106
7.6.3 Creating Folders . . . . . . . . . . . . . . . . . . . . . . . . . . . . . . . . . . . . . . . . . . . . . . . . . . . . . 107
7.6.4 Editing Folders . . . . . . . . . . . . . . . . . . . . . . . . . . . . . . . . . . . . . . . . . . . . . . . . . . . . . . 107
Copyright © 2015 Trustwave Holdings, Inc. All rights reserved. vii

MailMarshal Exchange (ECM) - User Guide - Version 7.1
7.6.4.1 Deleting Folders . . . . . . . . . . . . . . . . . . . . . . . . . . . . . . . . . . . . . . . . . . . . . . . . 108
7.7 Header Matching and Rewriting . . . . . . . . . . . . . . . . . . . . . . . . . . . . . . . . . . . . . . . . . . . . . . . . 108
7.7.1 Using Rules to Find Headers . . . . . . . . . . . . . . . . . . . . . . . . . . . . . . . . . . . . . . . . . . . 108
7.7.2 Using Rules to Change Headers. . . . . . . . . . . . . . . . . . . . . . . . . . . . . . . . . . . . . . . . . 108
7.7.3 Using the Header Rewrite Wizard. . . . . . . . . . . . . . . . . . . . . . . . . . . . . . . . . . . . . . . . 109
7.8 Extending Functionality Using External Commands . . . . . . . . . . . . . . . . . . . . . . . . . . . . . . . . . 112
8 Monitoring Email Flow 115
8.1 Using the MailMarshal Exchange Console . . . . . . . . . . . . . . . . . . . . . . . . . . . . . . . . . . . . . . . . 116
8.1.1 Connecting to MailMarshal Exchange Using the Console . . . . . . . . . . . . . . . . . . . . . 116
8.1.2 Connecting to MailMarshal Exchange Using the Web Console . . . . . . . . . . . . . . . . . 116
8.1.3 Viewing Server Statistics. . . . . . . . . . . . . . . . . . . . . . . . . . . . . . . . . . . . . . . . . . . . . . . 117
8.1.4 Viewing Folders and Folder Contents . . . . . . . . . . . . . . . . . . . . . . . . . . . . . . . . . . . . . 118
8.1.5 Working With Email Messages . . . . . . . . . . . . . . . . . . . . . . . . . . . . . . . . . . . . . . . . . . 118
8.1.5.1 Forwarding Messages. . . . . . . . . . . . . . . . . . . . . . . . . . . . . . . . . . . . . . . . . . . . 118
8.1.5.2 Deleting Messages . . . . . . . . . . . . . . . . . . . . . . . . . . . . . . . . . . . . . . . . . . . . . . 119
8.1.5.3 Restoring Messages . . . . . . . . . . . . . . . . . . . . . . . . . . . . . . . . . . . . . . . . . . . . . 119
8.1.5.4 Viewing Messages . . . . . . . . . . . . . . . . . . . . . . . . . . . . . . . . . . . . . . . . . . . . . . 119
8.1.5.5 Releasing Messages. . . . . . . . . . . . . . . . . . . . . . . . . . . . . . . . . . . . . . . . . . . . . 121
8.1.6 Viewing Email History . . . . . . . . . . . . . . . . . . . . . . . . . . . . . . . . . . . . . . . . . . . . . . . . . 122
8.1.7 Searching Folders and Email History . . . . . . . . . . . . . . . . . . . . . . . . . . . . . . . . . . . . . 123
8.1.8 Viewing Alert History . . . . . . . . . . . . . . . . . . . . . . . . . . . . . . . . . . . . . . . . . . . . . . . . . . 124
8.1.9 Setting Console Security. . . . . . . . . . . . . . . . . . . . . . . . . . . . . . . . . . . . . . . . . . . . . . . 124
8.1.9.1 Configuring Console Access. . . . . . . . . . . . . . . . . . . . . . . . . . . . . . . . . . . . . . . 124
8.1.9.2 Configuring Default Folder Access . . . . . . . . . . . . . . . . . . . . . . . . . . . . . . . . . . 125
8.1.9.3 Configuring Access for a Specific Folder . . . . . . . . . . . . . . . . . . . . . . . . . . . . . 126
8.1.10 Viewing Event History . . . . . . . . . . . . . . . . . . . . . . . . . . . . . . . . . . . . . . . . . . . . . . . . 127
8.1.11 Finding Events . . . . . . . . . . . . . . . . . . . . . . . . . . . . . . . . . . . . . . . . . . . . . . . . . . . . . 127
8.1.11.1 Event Log Filter. . . . . . . . . . . . . . . . . . . . . . . . . . . . . . . . . . . . . . . . . . . . . . . . 128
8.1.11.2 Event Log Search . . . . . . . . . . . . . . . . . . . . . . . . . . . . . . . . . . . . . . . . . . . . . . 128
8.1.12 Viewing News From Trustwave. . . . . . . . . . . . . . . . . . . . . . . . . . . . . . . . . . . . . . . . . 129
8.2 Using Windows Tools . . . . . . . . . . . . . . . . . . . . . . . . . . . . . . . . . . . . . . . . . . . . . . . . . . . . . . . . 129
8.2.1 Event Log . . . . . . . . . . . . . . . . . . . . . . . . . . . . . . . . . . . . . . . . . . . . . . . . . . . . . . . . . . 129
8.2.2 Performance Monitor. . . . . . . . . . . . . . . . . . . . . . . . . . . . . . . . . . . . . . . . . . . . . . . . . . 129
8.3 Using MailMarshal Exchange Text Logs. . . . . . . . . . . . . . . . . . . . . . . . . . . . . . . . . . . . . . . . . . 129
9 Managing MailMarshal Exchange Configuration 131
9.1 Managing Your MailMarshal Exchange Licenses . . . . . . . . . . . . . . . . . . . . . . . . . . . . . . . . . . . 131
9.1.1 Reviewing Installed Licenses . . . . . . . . . . . . . . . . . . . . . . . . . . . . . . . . . . . . . . . . . . . 131
9.1.2 Requesting a New License Key . . . . . . . . . . . . . . . . . . . . . . . . . . . . . . . . . . . . . . . . . 131
9.1.3 Entering a License Key . . . . . . . . . . . . . . . . . . . . . . . . . . . . . . . . . . . . . . . . . . . . . . . . 132
9.2 Backing Up and Restoring the Configuration . . . . . . . . . . . . . . . . . . . . . . . . . . . . . . . . . . . . . . 132
9.2.1 Backing Up the Configuration . . . . . . . . . . . . . . . . . . . . . . . . . . . . . . . . . . . . . . . . . . . 133
9.2.2 Restoring the Configuration . . . . . . . . . . . . . . . . . . . . . . . . . . . . . . . . . . . . . . . . . . . . 134
Copyright © 2015 Trustwave Holdings, Inc. All rights reserved. viii

MailMarshal Exchange (ECM) - User Guide - Version 7.1
9.3 Configuring Local Domains . . . . . . . . . . . . . . . . . . . . . . . . . . . . . . . . . . . . . . . . . . . . . . . . . . . . 135
9.3.1 Changing Local Domains Information . . . . . . . . . . . . . . . . . . . . . . . . . . . . . . . . . . . . . 135
9.4 Configuring Manager Security. . . . . . . . . . . . . . . . . . . . . . . . . . . . . . . . . . . . . . . . . . . . . . . . . . 136
9.5 Configuring Automatic Updates . . . . . . . . . . . . . . . . . . . . . . . . . . . . . . . . . . . . . . . . . . . . . . . . 136
9.5.0.1 Configuring and Checking Automatic Updates . . . . . . . . . . . . . . . . . . . . . . . . . 136
9.5.0.2 Configuring Proxy Settings for Updates . . . . . . . . . . . . . . . . . . . . . . . . . . . . . . 137
9.6 Managing Array Nodes . . . . . . . . . . . . . . . . . . . . . . . . . . . . . . . . . . . . . . . . . . . . . . . . . . . . . . . 138
9.6.1 Managing Node Services . . . . . . . . . . . . . . . . . . . . . . . . . . . . . . . . . . . . . . . . . . . . . . 138
9.6.2 Adding and Deleting Nodes . . . . . . . . . . . . . . . . . . . . . . . . . . . . . . . . . . . . . . . . . . . . 138
9.6.2.1 Adding a Node . . . . . . . . . . . . . . . . . . . . . . . . . . . . . . . . . . . . . . . . . . . . . . . . . 138
9.6.2.2 Deleting a Node . . . . . . . . . . . . . . . . . . . . . . . . . . . . . . . . . . . . . . . . . . . . . . . . 139
9.6.3 Joining a Node to an Array . . . . . . . . . . . . . . . . . . . . . . . . . . . . . . . . . . . . . . . . . . . . . 139
9.6.4 Customizing Settings for Nodes . . . . . . . . . . . . . . . . . . . . . . . . . . . . . . . . . . . . . . . . . 140
9.7 Setting Advanced Options. . . . . . . . . . . . . . . . . . . . . . . . . . . . . . . . . . . . . . . . . . . . . . . . . . . . . 140
9.7.1 Working with Array Communications . . . . . . . . . . . . . . . . . . . . . . . . . . . . . . . . . . . . . 141
9.7.1.1 Changing Array Port Settings . . . . . . . . . . . . . . . . . . . . . . . . . . . . . . . . . . . . . . 141
9.7.1.2 Changing the Database Location . . . . . . . . . . . . . . . . . . . . . . . . . . . . . . . . . . . 142
9.7.2 Changing Folder Locations . . . . . . . . . . . . . . . . . . . . . . . . . . . . . . . . . . . . . . . . . . . . . 143
9.8 Using the Group File Import Tool . . . . . . . . . . . . . . . . . . . . . . . . . . . . . . . . . . . . . . . . . . . . . . . 143
9.8.0.1 Group File Import Text File Format. . . . . . . . . . . . . . . . . . . . . . . . . . . . . . . . . . 144
9.8.0.2 Group File Import Command Format . . . . . . . . . . . . . . . . . . . . . . . . . . . . . . . . 144
9.9 Using the Configuration Export Tool . . . . . . . . . . . . . . . . . . . . . . . . . . . . . . . . . . . . . . . . . . . . . 145
9.9.0.1 Export Configuration Command Format . . . . . . . . . . . . . . . . . . . . . . . . . . . . . . 145
9.10 Using the Quarantine Synchronization Tool . . . . . . . . . . . . . . . . . . . . . . . . . . . . . . . . . . . . . . 146
10 Delegating Quarantine Management 147
10.1 Setting Up Console Access. . . . . . . . . . . . . . . . . . . . . . . . . . . . . . . . . . . . . . . . . . . . . . . . . . . 147
10.2 Setting Up Quarantine Management Features . . . . . . . . . . . . . . . . . . . . . . . . . . . . . . . . . . . . 147
10.2.1 Quarantine Management Windows. . . . . . . . . . . . . . . . . . . . . . . . . . . . . . . . . . . . . . 147
10.2.2 Setting Up Folders and Templates . . . . . . . . . . . . . . . . . . . . . . . . . . . . . . . . . . . . . . 149
10.2.3 Setting Up Message Digests. . . . . . . . . . . . . . . . . . . . . . . . . . . . . . . . . . . . . . . . . . . 149
10.2.3.1 Creating Message Digests . . . . . . . . . . . . . . . . . . . . . . . . . . . . . . . . . . . . . . . 150
10.2.3.2 Editing Message Digests . . . . . . . . . . . . . . . . . . . . . . . . . . . . . . . . . . . . . . . . 150
10.2.3.3 Deleting Message Digests . . . . . . . . . . . . . . . . . . . . . . . . . . . . . . . . . . . . . . . 151
10.2.4 Setting Up Rules . . . . . . . . . . . . . . . . . . . . . . . . . . . . . . . . . . . . . . . . . . . . . . . . . . . . 151
11 Reporting on MailMarshal Exchange Activity 152
11.1 Data Retention and Grouping . . . . . . . . . . . . . . . . . . . . . . . . . . . . . . . . . . . . . . . . . . . . . . . . . 152
11.1.1 Configuring Data Retention. . . . . . . . . . . . . . . . . . . . . . . . . . . . . . . . . . . . . . . . . . . . 152
11.1.2 Configuring Reporting Groups . . . . . . . . . . . . . . . . . . . . . . . . . . . . . . . . . . . . . . . . . 153
A Wildcards and Regular Expressions 154
A.1 Wildcard Characters . . . . . . . . . . . . . . . . . . . . . . . . . . . . . . . . . . . . . . . . . . . . . . . . . . . . . . . . . 154
Copyright © 2015 Trustwave Holdings, Inc. All rights reserved. ix

MailMarshal Exchange (ECM) - User Guide - Version 7.1
A.2 Regular Expressions. . . . . . . . . . . . . . . . . . . . . . . . . . . . . . . . . . . . . . . . . . . . . . . . . . . . . . . . . 155A.2.1 Reserved Characters . . . . . . . . . . . . . . . . . . . . . . . . . . . . . . . . . . . . . . . . . . . . . . . . . 156
A.2.1.1 Operators. . . . . . . . . . . . . . . . . . . . . . . . . . . . . . . . . . . . . . . . . . . . . . . . . . . . . 156A.2.1.2 Wildcard Character . . . . . . . . . . . . . . . . . . . . . . . . . . . . . . . . . . . . . . . . . . . . . 156A.2.1.3 Repeat Operators * + ? {} . . . . . . . . . . . . . . . . . . . . . . . . . . . . . . . . . . . . . . . . 156A.2.1.4 Parentheses ( ) . . . . . . . . . . . . . . . . . . . . . . . . . . . . . . . . . . . . . . . . . . . . . . . . 156A.2.1.5 Alternatives . . . . . . . . . . . . . . . . . . . . . . . . . . . . . . . . . . . . . . . . . . . . . . . . . . . 157
A.2.2 Examples . . . . . . . . . . . . . . . . . . . . . . . . . . . . . . . . . . . . . . . . . . . . . . . . . . . . . . . . . . 157A.2.2.1 Matching . . . . . . . . . . . . . . . . . . . . . . . . . . . . . . . . . . . . . . . . . . . . . . . . . . . . . 157A.2.2.2 Substitution . . . . . . . . . . . . . . . . . . . . . . . . . . . . . . . . . . . . . . . . . . . . . . . . . . . 157
A.2.3 Map Files . . . . . . . . . . . . . . . . . . . . . . . . . . . . . . . . . . . . . . . . . . . . . . . . . . . . . . . . . . 157A.2.3.1 Map file . . . . . . . . . . . . . . . . . . . . . . . . . . . . . . . . . . . . . . . . . . . . . . . . . . . . . . 158A.2.3.2 Search expression. . . . . . . . . . . . . . . . . . . . . . . . . . . . . . . . . . . . . . . . . . . . . . 158A.2.3.3 Lookup key . . . . . . . . . . . . . . . . . . . . . . . . . . . . . . . . . . . . . . . . . . . . . . . . . . . 158A.2.3.4 Sample results. . . . . . . . . . . . . . . . . . . . . . . . . . . . . . . . . . . . . . . . . . . . . . . . . 158
B Third Party Extensions 159
B.1 Image Analyzer. . . . . . . . . . . . . . . . . . . . . . . . . . . . . . . . . . . . . . . . . . . . . . . . . . . . . . . . . . . . . 159
B.1.1 Why Would I Use Image Analyzer? . . . . . . . . . . . . . . . . . . . . . . . . . . . . . . . . . . . . . . 159B.1.2 What Results Can I Expect From Image Analyzer? . . . . . . . . . . . . . . . . . . . . . . . . . . 159B.1.3 How Does Image Analyzer Address the Issues? . . . . . . . . . . . . . . . . . . . . . . . . . . . . 160
B.2 Virus Scanning Software . . . . . . . . . . . . . . . . . . . . . . . . . . . . . . . . . . . . . . . . . . . . . . . . . . . . . 160
Glossary . . . . . . . . . . . . . . . . . . . . . . . . . . . . . . . . . . . . . . . . . . . . . . . . . . . . . . . . . . . . . . . . . . . . . . . . . 161
Index . . . . . . . . . . . . . . . . . . . . . . . . . . . . . . . . . . . . . . . . . . . . . . . . . . . . . . . . . . . . . . . . . . . . . . . . . . . . 167
Copyright © 2015 Trustwave Holdings, Inc. All rights reserved. x

MailMarshal Exchange (ECM) - User Guide - Version 7.1
1 Introduction
Email is an essential communication tool, but it also creates serious productivity and security issues. Email
offers an entry point in your network for spam and other undesired non-business content, such as
malicious code, large file attachments that consume valuable disk space, phishing attempts, information
and identity theft attacks, and other damaging content and activity.
In addition, email can become a conduit for proprietary data and confidential information to leave the
company. Spam, email viruses, malicious code, liability issues, and declining employee productivity are all
risks associated with email.
Email viruses, Trojan horses, and other malicious files can cause millions of dollars in damage in just a
matter of hours. Reports of companies forced into legal action because of staff misuse of email are
becoming commonplace.
Email remains the lifeblood of modern business communication, but the damages email can cause
become more costly each year.
1.1 What Is MailMarshal Exchange (ECM)?MailMarshal Exchange (also known as Email Content Manager or ECM) is an email filtering solution for
Microsoft Exchange Server that helps organizations to provide a safe environment for employees, free
from harassment and objectionable material. It also improves productivity levels by managing non-
business email content and attachments.
Many organizations today have created policies and guidelines for the appropriate use of email, and
employee education programs to deal with the torrent of spam and viruses. MailMarshal Exchange
complements a gateway email filtering solution such as MailMarshal SEG, and can help your company to
apply email policy and security automatically to internal messages.
1.2 What Does MailMarshal Exchange Provide?As a content security solution for internal email, MailMarshal Exchange protects your network and your
organization. MailMarshal Exchange enforces your Acceptable Use Policy to protect against viruses and
other undesirable consequences of using email.
MailMarshal Exchange scans the content of internal, inbound and outbound email messages, including the
headers, message body, and attachments. MailMarshal can detect many conditions, such as:
• Presence of a virus (using one or more supported virus scanners)
• Presence of particular phrases in header, message, or attachment
• Size or type of attachments
The product can also respond to messages that violate your Acceptable Use Policy, by taking actions such
as:
• Quarantining a message for later review by administrators or users
IntroductionCopyright © 2015 Trustwave Holdings, Inc. All rights reserved. 11

MailMarshal Exchange (ECM) - User Guide - Version 7.1
• Deleting a message
• Redirecting a message
• Archiving a message for future reference
MailMarshal Exchange provides email administrators with granular control of policies and the ability to
delegate email monitoring and control to other personnel. MailMarshal Exchange provides the following
user interfaces to meet the needs of a variety of administrators and your email recipients:
Configurator
For email security administrators to configure the product and establish email policy.
Console
For email administrators and helpdesk personnel to monitor and control product activity. Also available
as a Web based application.
Quarantine Management Website
For email recipients to verify quarantined email for their own email addresses.
1.3 How MailMarshal Exchange Helps YouUnmonitored email presents both financial and legal dangers to a company. For example, virus infection
and malicious code can be costly in employee time, repair time, and lost data. Inappropriate and offensive
email content wastes time and is a potential liability.
Using MailMarshal Exchange, your company can earn a significant ROI as you secure your network,
protect corporate assets, reduce the potential for corporate liability, and improve workplace productivity.
1.4 How MailMarshal Exchange WorksMailMarshal Exchange is installed with the Exchange Server computer. It complements and is compatible
with traditional Internet firewalls, SMTP mail servers, antivirus scanners, and other security applications.
The MailMarshal Server software integrates with an Exchange Server Hub Transport server using the
Transport Agent architecture. Email processed by Exchange is filtered by MailMarshal.
MailMarshal Exchange includes several components including the Array Manager, one or more email
processing server installations (Transport Agent and Engine on an Exchange Server), a Microsoft SQL
Server database, and optional management websites. Small organizations can install the components on
a single computer. Large organizations can install the components across several computers. Enterprises
can manage a distributed array of email processing servers with a single Array Manager computer.
MailMarshal Exchange provides a number of user interfaces, including the Configurator, Console, Web
Console, and Quarantine Management site. The Configurator lets security policy administrators set email
policy for the entire organization from a central console. You can install additional user interfaces on other
computers throughout the network as needed.
IntroductionCopyright © 2015 Trustwave Holdings, Inc. All rights reserved. 12

MailMarshal Exchange (ECM) - User Guide - Version 7.1
1.4.1 Understanding What MailMarshal Exchange DoesThe MailMarshal Exchange installation plugs in to the Exchange Server through the Transport Agent, and
extracts email that is queued for processing.
The MailMarshal Engine unpacks each email, expanding any attached archive or compressed files. The
Engine then checks each component against the email policy (rules) you have enabled, including XML
Category scripts, TextCensor scripts, and any other rules you have enabled. You can alter the effects of
MailMarshal Exchange rules by changing the rule order and by changing specific characteristics of the
rule.
MailMarshal Exchange also scans email for viruses using antivirus scanning software.
MailMarshal Exchange supports several scanners with high-throughput interfaces.
After the MailMarshal Engine evaluates each email component against the rules, it determines whether to
accept, modify, or quarantine the email.
• Accepted email is passed to Exchange Server, which then delivers it to the appropriate recipients.
• Modified email can be delivered to recipients with attachments removed.
• Virus-laden email, or other email that violates policy restrictions, is quarantined.
MailMarshal Exchange can also notify administrators of specific actions or notify end-users of quarantined
email. You can associate the appropriate rule action when you create or modify rules.
1.5 Configuring MailMarshal ExchangeYou configure MailMarshal Exchange rules and settings using the Configurator interface, connected to the
MailMarshal Array Manager. The Array Manager coordinates the activity of all other MailMarshal Servers
in the array and connects with the user interfaces, optional Web server, and the database.
You can enforce a wide variety of Acceptable Usage Policies by customizing the way
MailMarshal Exchange processes email content and attachments.
1.6 Monitoring and Reporting MailMarshal Exchange provides additional user interfaces for monitoring and daily email administration.
The Console features the Dashboard to summarize MailMarshal Exchange activity and server health at a
glance. Using the Console, email administrators can review email processing history for a message and
view and release any quarantined message.
The administrator can grant other users access to specific Console functions or specific quarantine folders.
Using this feature, the administrator can delegate basic tasks to help desk or departmental personnel.
MailMarshal Exchange also offers a Web version of the Console to allow remote access to the Console
capabilities.
Email users can review and manage quarantined email using daily email digests and the Quarantine
Management Web-based console. This console is a Web application you can easily deploy on your
intranet Web server running Microsoft Internet Information Services (IIS).
IntroductionCopyright © 2015 Trustwave Holdings, Inc. All rights reserved. 13

MailMarshal Exchange (ECM) - User Guide - Version 7.1
Administrators and managers can generate reports on MailMarshal Exchange activity using Marshal
Reporting Console. Marshal Reporting Console uses SQL Server Reporting Services to product reports.
This is a server application with a website interface. Marshal Reporting Console can deliver reports by web
view, email, FTP, or local network files, and can schedule automatic delivery of reports.
Marshal Reporting Console is provided as a separate package from Trustwave. This application is
available to all MailMarshal Exchange customers.
1.7 MailMarshal Exchange and MailMarshal SEGMailMarshal Exchange provides email content security for email sent or received internally when you use
Microsoft Exchange as your email server. MailMarshal Exchange lets you scan internal email and apply
your internal Acceptable Use Policy.
MailMarshal SEG (formerly known as MailMarshal SMTP) is a gateway solution that applies email content
security for email inbound from or outbound to the Internet. MailMarshal SEG provides industry leading
anti-spam performance with a variety of proprietary technologies.
If you require both internal and external email content security, you can use both products.
For more information about MailMarshal SEG, see the User Guide for MailMarshal SEG.
IntroductionCopyright © 2015 Trustwave Holdings, Inc. All rights reserved. 14

MailMarshal Exchange (ECM) - User Guide - Version 7.1
2 Planning Your MailMarshal Exchange Installation
When planning to install MailMarshal Exchange, you should understand how MailMarshal Exchange
manages email and the recommended installation scenarios based on your needs. This chapter provides
information about these concepts and provides hardware requirements, software requirements, and
planning checklists to help you through the planning process.
2.1 Planning ChecklistPlan your MailMarshal Exchange installation by reading the following sections and completing the
following checklist:
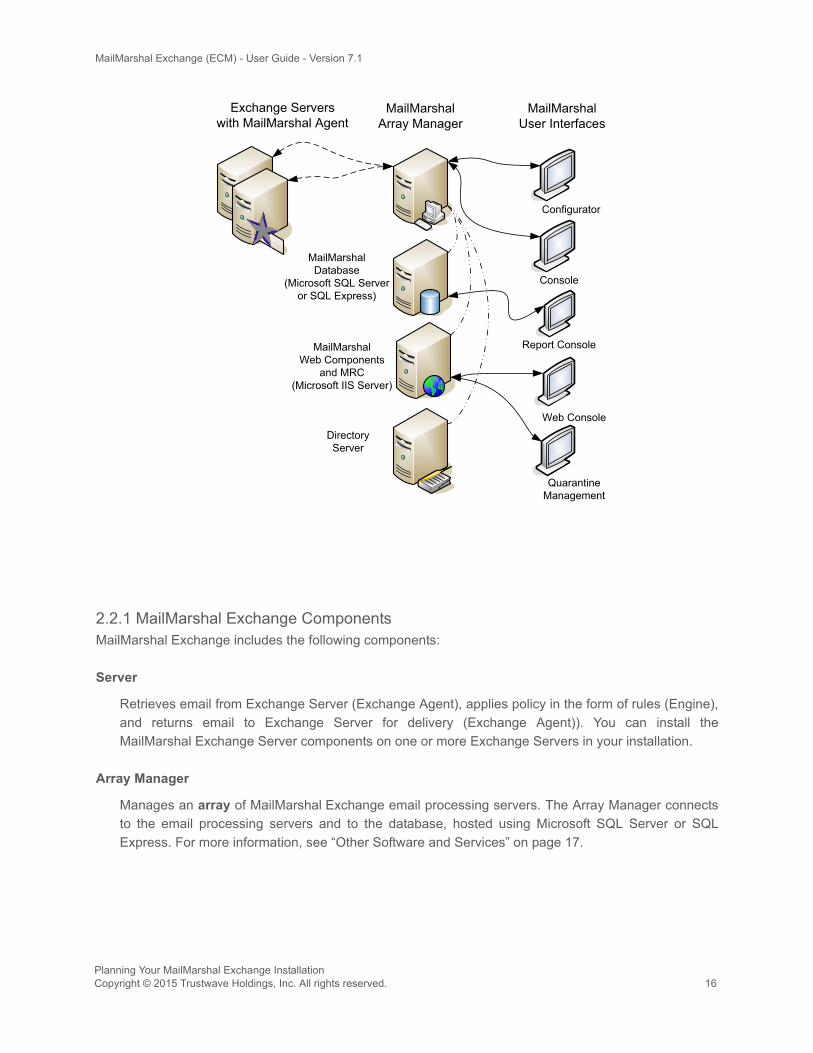
2.2 Understanding MailMarshal Exchange ComponentsMailMarshal Exchange consists of several software components, which you can install on different
computers in your network. These components can be installed in a variety of configurations to suit any
size organization from small businesses to distributed enterprises. While the components are shown on
separate computers in the following figure, in lower volume scenarios you can install all components on a
single computer.
Step See Section
1. Learn about important MailMarshal Exchange concepts.
“Understanding MailMarshal Exchange Components” on page 15.
2. Choose a standalone or array installation. “Understanding Installation Scenarios” on page 18.
3. If you selected a standalone installation, choose the appropriate configuration for your environment.
“Standalone Installation” on page 18.
4. If you selected an array installation, determine the number and location for the MailMarshal Exchange Servers and Array Manager components.
“Array Installation” on page 18.
5. Ensure the computers meet the hardware and software requirements.
“Standalone Installation Requirements” on page 19 or “Array Installation Requirements” on page 20
6. Determine whether to use Microsoft SQL Server or SQL Express.
“Database Software Considerations” on page 23.
7. Decide where to install the MailMarshal Exchange folders.
“Understanding MailMarshal Exchange Folder Locations” on page 25.
8. Choose the antivirus software to use with MailMarshal Exchange.
“Supported Antivirus Software” on page 26.
9. Collect installation information about your email environment.
“Collecting Information for Installation” on page 26.
Planning Your MailMarshal Exchange InstallationCopyright © 2015 Trustwave Holdings, Inc. All rights reserved. 15
MailMarshal Exchange (ECM) - User Guide - Version 7.1
2.2.1 MailMarshal Exchange ComponentsMailMarshal Exchange includes the following components:
Server
Retrieves email from Exchange Server (Exchange Agent), applies policy in the form of rules (Engine),
and returns email to Exchange Server for delivery (Exchange Agent)). You can install the
MailMarshal Exchange Server components on one or more Exchange Servers in your installation.
Array Manager
Manages an array of MailMarshal Exchange email processing servers. The Array Manager connects
to the email processing servers and to the database, hosted using Microsoft SQL Server or SQL
Express. For more information, see “Other Software and Services” on page 17.
MailMarshalArray Manager
MailMarshalWeb Components
and MRC(Microsoft IIS Server)
MailMarshalDatabase
(Microsoft SQL Server or SQL Express)
DirectoryServer
Configurator
Console
Report Console
Web Console
QuarantineManagement
MailMarshalUser Interfaces
Exchange Serverswith MailMarshal Agent
Planning Your MailMarshal Exchange InstallationCopyright © 2015 Trustwave Holdings, Inc. All rights reserved. 16

MailMarshal Exchange (ECM) - User Guide - Version 7.1
Configurator
User interface allowing email policy Administrators to define policy (rules) and configure
MailMarshal Exchange.
Console
User interface allowing email Administrators to manage and monitor undelivered or filtered email.
Web Console
Web based interface used by roaming email Administrators just as they would use the Console.
Quarantine Management Website
Web based interface used by email users to view and manage quarantined email.
Marshal Reporting Console
Optional Web based interface used to generate traffic and management reports based on
MailMarshal Exchange activity.
To operate properly, MailMarshal Exchange requires an Array Manager, at least one email processing
Server, a database, a Configurator, and a Console. You can optionally install Web Components and the
Marshal Reporting Console if you plan to use the additional features these components offer.
2.2.2 Other Software and ServicesIn addition, MailMarshal Exchange may require the following software and network services:
Microsoft SQL Server or SQL Express
The MailMarshal Exchange database stores configuration data and log information. If your email vol-
ume permits, you can use the free SQL Express. If your email volume is higher, use Microsoft SQL
Server. If possible, install the database software and the MailMarshal Exchange Array Manager on the
same computer. To use Marshal Reporting Console, you must install SQL Express Advanced Edition
or SQL Server Reporting Services. For more information, see “Array Installation Requirements” on
page 20 and “Database Software Considerations” on page 23.
Directory Server
If you want to import existing users and groups from your directory service for use in applying email
Acceptable Use Policy, the MailMarshal Exchange Array Manager must be able to connect with your
directory server. MailMarshal Exchange can connect with Microsoft Active Directory and most LDAP
compliant directories.
Microsoft Internet Information Services (Microsoft IIS)
If you want to offer the Web Console and end-user Quarantine Management Website, install the
MailMarshal Exchange Web Components. If you want to use Marshal Reporting Console, install this
component. All web components require a server with Microsoft IIS and ASP.NET 4.0 installed.
Planning Your MailMarshal Exchange InstallationCopyright © 2015 Trustwave Holdings, Inc. All rights reserved. 17

MailMarshal Exchange (ECM) - User Guide - Version 7.1
2.3 Understanding Installation ScenariosYou can choose between two installation scenarios, based on the number of Exchange Servers:
• Standalone, or basic installation
• Array installation
The standalone installation scenario is appropriate for small organizations with a lower volume of email.
This option allows smaller organizations to gain all the benefits of using MailMarshal Exchange with
Exchange Server or Microsoft SBS.
The array installation is appropriate for larger organizations where email volume is high. This option
provides all the security and efficiency options larger organizations require.
For more information about determining your configuration needs, contact your Technical Support or Sales
Engineering representative.
2.3.1 Standalone InstallationFor small organizations, a standalone installation provides convenience and value. In a standalone
installation, you install all the MailMarshal Exchange components on a single Exchange Server. You may
also be able to install the SQL Express database on the same single computer.
You can install the MailMarshal Exchange Configurator and Console user interfaces on one or more
computers in the local network.
To use the MailMarshal Exchange Web Console, Quarantine Management Website, or Marshal Reporting
Console, install these components on a Microsoft IIS Server.
2.3.2 Array InstallationYou can install MailMarshal Exchange as an array where your environment includes more than one
Exchange Server in the Hub Transport role.
Install the MailMarshal Exchange Array Manager, and the database if possible, on a dedicated computer.
The location of the Array Manager can affect the performance of the administration and configuration tools
used in MailMarshal Exchange but does not affect email processing performance.
For best results, install the MailMarshal Exchange Array Manager component in one of the following
locations, listed from most-preferred to least-preferred:
• On the same server as the Microsoft SQL Server hosting the database. Since the Array Manager is the
only MailMarshal Exchange component that communicates directly with the database, installing the
Array Manager on the computer that hosts Microsoft SQL Server or SQL Express results in the most
efficient operation.
• On another computer in the network close to the computer hosting the database over a high-speed
network connection.
• On an Active Directory Global Catalog or other Directory Server. The Array Manager communicates
regularly to the Global Catalog if you are running Active directory, or through LDAP to another existing
Directory Server.
Planning Your MailMarshal Exchange InstallationCopyright © 2015 Trustwave Holdings, Inc. All rights reserved. 18

MailMarshal Exchange (ECM) - User Guide - Version 7.1
You can install the MailMarshal Exchange Configurator and Console on one or more computers in the local
network.
To use the MailMarshal Exchange Web Console, Quarantine Management Website, or Marshal Reporting
Console, install these components on a Microsoft IIS server domain member inside the network.
2.4 Hardware and Software RequirementsDepending on the installation scenario you select and your estimated email volume, the specification for
computers on which you install MailMarshal Exchange components can vary. The following sections
specify the recommended hardware and software for various computers where you may be installing
MailMarshal Exchange components. Consider all the requirements before mapping your
MailMarshal Exchange installation.
The MailMarshal Exchange product installation package includes many prerequisite software updates,
including SQL Express and ASP.NET Framework. If you install MailMarshal Exchange from a Web
download, you may have to download software you need from the vendor sites. To avoid a system restart
during product installation, install any prerequisite software on your computers before you start installing
MailMarshal Exchange.
For more information about the latest requirements and supported environments, see the Trustwave
Knowledge Base.
2.4.1 Standalone Installation RequirementsThe following table lists system requirements for installing the MailMarshal Exchange Server, Array
Manager, and selected database on a single Exchange Server.
MailMarshal Exchange supports use of SQL Express or Microsoft SQL Server as host database.
If you install other applications on the same server, the minimum hardware requirements may be greater
than those shown in the table, depending on the number of users and typical email volume.
Note: SQL Server/Express 2008 and above has additional prerequisites, including .NET 3.5 SP1 and Windows Installer 4.5.
Category Requirements
Processor As recommended for Exchange Server
Disk Space Minimum: 10GB (NTFS) additional to Exchange Server requirements. Separate physical disk drive strongly recommended for MailMarshal Exchange Quarantine and Unpacking.
Memory As recommended for Exchange Server
Supported Operating System • Windows Server 2012 including R2
• Windows Server 2008 SP2 including R2 and SBS
• Windows Server Standard or Enterprise 2003 SP2
Planning Your MailMarshal Exchange InstallationCopyright © 2015 Trustwave Holdings, Inc. All rights reserved. 19

MailMarshal Exchange (ECM) - User Guide - Version 7.1
When processing large volumes of email, disk I/O can become a limitation. To provide optimal throughput
in this case, plan to include multiple drives so you can install the Exchange data store,
MailMarshal Exchange Quarantine and Unpacking folders, and database on separate physical drives. For
more information about choosing folder locations, see “Understanding MailMarshal Exchange Folder
Locations” on page 25.
To provide redundancy, plan for quad drives configured as two mirrored pairs.
2.4.2 Array Installation RequirementsIn an array installation scenario, you may plan for several MailMarshal Exchange Servers and one Array
Manager computer. The following sections provide hardware and software requirements for
MailMarshal Exchange Server and Array Manager computers.
2.4.2.1 Server Requirements
The following table lists system requirements for a MailMarshal Exchange Server computer in an array
configuration.
Network Access • TCP/IP protocol
• Domain structure
• External DNS name resolution
Software • Exchange Server 2013
• Exchange Server 2010 (SP1 or above)
• Exchange Server 2007 (SP2 or SP3)
• Exchange Hub Transport Role (Installation with the Edge Transport role is not supported)
• Database server: SQL Server/Express 2012, SQL Server/Express 2008 (SP1 or R2), SQL Server/Express 2005 (SP3). Note that SQL installation on Windows 2012 requires later SQL service packs.
• Antivirus scanning software supported by MailMarshal Exchange. For more information, see “Supported Antivirus Software” on page 26.
Port Access • Port 80 (HTTP) and Port 443 (HTTPS) - for automatic updates to Category Scripts, and Console RSS feeds (Proxy usage is supported)
• Port 1433 - for connection to SQL Server database computer
Category Requirements
Processor As recommended for Exchange Server
Disk Space Minimum: 10GB (NTFS) additional to Exchange Server requirements. Separate physical disk drive strongly recommended for MailMarshal Exchange Quarantine and Unpacking.
Memory As recommended for Exchange Server
Category Requirements
Planning Your MailMarshal Exchange InstallationCopyright © 2015 Trustwave Holdings, Inc. All rights reserved. 20

MailMarshal Exchange (ECM) - User Guide - Version 7.1
When processing large volumes of email, disk I/O can become a limitation. To provide optimal throughput
in this case, plan for multiple drives in the MailMarshal Exchange Server computer so you can separate
the Exchange data store from MailMarshal Exchange Quarantine and Unpacking folders. For more
information about choosing folder locations, see “Understanding MailMarshal Exchange Folder Locations”
on page 25.
To provide redundancy, you may want to plan for mirrored drives.
2.4.2.2 Array Manager Requirements
The following table lists system requirements for a MailMarshal Exchange Array Manager computer also
hosting the SQL Express or Microsoft SQL Server database.
Supported Operating System • Windows Server 2012 including R2
• Windows Server 2008 SP2 including R2 and SBS
• Windows Server Standard or Enterprise 2003 SP2
Network Access • TCP/IP protocol
• Domain structure
• DNS service available
Software • Exchange Server 2013
• Exchange Server 2010 (SP1 or above)
• Exchange Server 2007 (SP2 or SP3)
• Exchange Hub Transport Role (Installation with the Edge Transport role is not supported)
• Antivirus scanning software supported by MailMarshal Exchange. For more information, see “Supported Antivirus Software” on page 26.
Port Access • Port 19011 - Communication with MailMarshal Exchange Array Manager in trusted network
Category Requirements
Processor Minimum: Pentium III 1.0 GHz
Disk Space Minimum: 10GB (NTFS)
Memory Minimum: 2GB
Supported Operating System • Windows Server 2012 including R2
• Windows Server 2008 SP2 including R2 and SBS
• Windows Server Standard or Enterprise 2003 SP2
Network Access • TCP/IP protocol
• Domain structure
• DNS service available
Category Requirements
Planning Your MailMarshal Exchange InstallationCopyright © 2015 Trustwave Holdings, Inc. All rights reserved. 21

MailMarshal Exchange (ECM) - User Guide - Version 7.1
If you install the Array Manager component on a computer running Windows Server or Enterprise 2003,
connecting Console computers should reside in the same domain or in a trusted domain.
2.4.3 Web Components RequirementsTo use the MailMarshal Exchange Quarantine Management Website or Web Console, install the
MailMarshal Exchange Web Components on a computer running Microsoft Internet Information Services
(Microsoft IIS). The following table lists system requirements and recommendations for the computer
running Microsoft IIS.
Use a secure (HTTPS) website to protect user data and authentication information. The Web components
support browsing from Internet Explorer 7 or later clients.
There are additional requirements to install Web components on a computer running a Windows Domain
Controller. For more information, see the Trustwave Knowledge Base.
Software • Database server: SQL Server/Express 2012, SQL Server/Express 2008 (SP1 or R2), SQL Server/Express 2005 (SP3). For more information about database considerations, see “Database Software Considerations” on page 23. SQL Server 2008 versions have additional prerequisites, including .NET 3.5 SP1 and Windows Installer 4.5. SQL installation on Windows 2012 requires later SQL service packs.
Port Access • Port 80 (HTTP) and Port 443 (HTTPS) - for automatic updates to Category Scripts, and Console RSS feeds (Proxy usage is supported)
• Port 19011 - Communication with MailMarshal Exchange Servers in DMZ
Category Requirements
Processor Minimum: Pentium III 1.0 GHz
Recommended: Pentium III 2.0 GHz
Disk Space Minimum: 100MB
Recommended: 500MB
Memory Minimum: 1024MB
Supported Operating System • Windows Server 2012 including R2
• Windows Server 2008 SP2 including R2 and SBS
• Windows Server, Enterprise, or Web Edition 2003 SP2
Network Access • TCP/IP protocol
• Domain structure
• DNS service available
Software Microsoft Internet Information Services 6 or above
Microsoft ASP.NET Framework 4
Category Requirements
Planning Your MailMarshal Exchange InstallationCopyright © 2015 Trustwave Holdings, Inc. All rights reserved. 22

MailMarshal Exchange (ECM) - User Guide - Version 7.1
2.4.4 Configurator or Console User Interface RequirementsThe following table lists system requirements and recommendations for computers on which you want to
install the MailMarshal Exchange Configurator or Console user interfaces.
2.5 Database Software ConsiderationsMailMarshal Exchange supports use of SQL Express or Microsoft SQL Server. To estimate the size of your
MailMarshal Exchange database and determine whether to use SQL Express or Microsoft SQL Server,
review the following sample worksheet and complete My Worksheet with appropriate estimates.
Category Requirements
Processor Minimum: Pentium III 500 MHz
Recommended: Pentium III 1.0 GHz
Disk Space Minimum: 100MB
Recommended: 500MB
Memory Minimum: 1024MB
Supported Operating System • Windows Server 2012 including R2
• Windows Server 2008 SP2 including R2 and SBS
• Windows Server 2003 SP2 (all editions except Web)
• Windows 8 and 8.1
• Windows 7 RTM or SP1
• Windows Vista SP2
• Windows XP Professional SP3
Network Access • TCP/IP protocol
• Domain structure
• DNS service available
• If running Web Console, access to Microsoft IIS server
Software MMC 1.2 or later
Internet Explorer 6 or later
Port Access NetBIOS - Communication with Array Manager computer
Sample Worksheet
Number of users = 100
Average number of valid and quarantined email messages per user per day x 70
Number of days in log data retention period x 100
Safety margin x 1.25
Total database size in bytes for retention period = 875,000 bytes
Planning Your MailMarshal Exchange InstallationCopyright © 2015 Trustwave Holdings, Inc. All rights reserved. 23

MailMarshal Exchange (ECM) - User Guide - Version 7.1
The following blank worksheet lets you estimate the database size requirement based on your enterprise
use.
The following table shows calculations with example data you can use as a guideline if the assumptions for
email volume, log retention duration, and safety margin are appropriate for you.
For small installations, when the MailMarshal Exchange email processing server is on a computer other
than the Array Manager and database server, the database server will have a light load on the database.
However, using the Consoles and Reports user interfaces places additional load on the database.
If you have more than 500 email users, the Microsoft SQL Server memory footprint can become quite high.
In this case, you can add memory to the Microsoft SQL Server computer (3GB or more) so Microsoft SQL
Server can use its maximum of 2GB and still reserve memory for the Array Manager, operating system,
and other system demand. Other environment factors may also affect performance and throughput rates.
Total database size in MB for retention period (divide by 1024) = 855 MB
My Worksheet
Number of users =
Average number of valid and quarantined email messages per user per day x
Number of days in log data retention period x
Safety margin x
Total database size in bytes for retention period =
Total database size in MB for retention period (divide by 1024) =
Users Email / Day / User
Days to Keep Logs
Safety Margin
Bytes MB GB DB to Use
100 70 100 1.25 875,000 854 0.83 Express
200 70 100 1.25 1,750,000 1709 1.67 Express
225 70 100 1.25 1,968,750 1923 1.88 Express
250 70 100 1.25 2,187,500 2136 2.09 SQL
500 70 100 1.25 4,375,000 4272 4.17 SQL
1000 70 100 1.25 8,750,000 8545 8.34 SQL
2000 70 100 1.25 175,00,000 17090 16.69 SQL
5000 70 100 1.25 43,750,000 42725 41.72 SQL
Sample Worksheet
Planning Your MailMarshal Exchange InstallationCopyright © 2015 Trustwave Holdings, Inc. All rights reserved. 24

MailMarshal Exchange (ECM) - User Guide - Version 7.1
2.6 Understanding MailMarshal Exchange Folder LocationsBy default, the installation process creates several folders in the MailMarshal Exchange program
installation folder. For many cases, the default folder locations work well.
In some cases, you can enhance product performance by creating these folders on another local physical
hard drive. You can choose different locations on each email processing server. The folders are defined as
follows:
Logging
MailMarshal Exchange uses this folder to store text logs that provide details of each action taken by
each MailMarshal Exchange service. By default, MailMarshal Exchange retains logs for five days. The
files can be large when email volume is high.
Queues
MailMarshal Exchange uses this folder and subfolders to hold messages for processing or sending. In
most cases, these folders do not grow large.
Unpacking
MailMarshal Exchange uses this folder to unpack messages and extract their content, including
attachments such as archive files. The size of this folder is relatively small. Because the Server cre-
ates and deletes files repeatedly, this area of the disk can become fragmented, which can have an
adverse effect on other applications running on the server. You can improve performance by placing
this folder on a separate physical disk drive from other MailMarshal Exchange components.
Quarantine
MailMarshal Exchange uses this folder as the default location for all quarantine folders.
MailMarshal Exchange stores all quarantined messages in subfolders of this folder, including any
archived messages and messages in the Mail Recycle Bin. Ensure the disk drive where this folder
resides has enough free space to accommodate the messages. The space required varies depending
on your retention policies for quarantined messages. You can move individual folders to physically
separate places on the server. For more information, see “Working with Folders” on page 106.
Note: Compressing this folder with Windows file system compression reduces the disk space required and does not affect performance in most cases. Do not use compression for any other MailMarshal Exchange folders.
Note: MailMarshal Exchange does not accept new messages if there is less than 512MB of free disk space available for the Queues, Unpacking, Quarantine, or Logging folders. MailMarshal Exchange slows down mail acceptance if there is less than 1GB of free space available for these folders. This is a significant increase in required space from earlier versions.
For more information, see Trustwave Knowledge Base article Q11669.
Planning Your MailMarshal Exchange InstallationCopyright © 2015 Trustwave Holdings, Inc. All rights reserved. 25

MailMarshal Exchange (ECM) - User Guide - Version 7.1
2.7 Supported Antivirus SoftwareMailMarshal Exchange supports a number of third-party antivirus scanners to scan for (and in some cases
clean) virus-laden email. The scanners offering a MailMarshal Exchange specific DLL file offer much
higher throughput and enhanced features. command line scanners are suitable for basic scanning in
relatively small organizations.
Trustwave licenses the Marshal antivirus solutions separately from the MailMarshal Exchange product.
Trial versions of the Marshal antivirus solutions are available as downloads from www.trustwave.com.
MailMarshal Exchange actively supports the antivirus software brands listed in the following table. For
more information about currently supported versions, see Trustwave Knowledge Base article Q10922.
2.8 Collecting Information for InstallationBefore you install MailMarshal Exchange, you may want to collect the following information about your
environment. When you run the Configuration Wizard after you install the product, having the following
details handy can help you quickly configure MailMarshal Exchange.
Antivirus Application Features
Computer Associates AntiVirus (formerly eTrust EZAntiVirus or InoculateIT)
Command line scanner
Kaspersky for Marshal DLL, cleaning
McAfee Command Line Command line scanner
McAfee for Marshal DLL, cleaning
Marshal Norman Virus Control DLL, cleaning, Sandbox II
NOD32 Command Line Command line scanner
Sophos Anti-Virus DLL, cleaning
Sophos for Marshal DLL, cleaning
Symantec AntiVirus Scan Engine DLL, cleaning, remote installation
Information required My information
Names of computers where you plan to install MailMarshal Exchange components including: Servers, Array Manager, database, Configurator, and Console, and optionally, Web Components and Marshal Reporting Console.
Prerequisite software for each computer where you will install software and the best time to restart each system, if necessary.
Antivirus software to use with MailMarshal Exchange.
Company name for MailMarshal Exchange license.
Planning Your MailMarshal Exchange InstallationCopyright © 2015 Trustwave Holdings, Inc. All rights reserved. 26

MailMarshal Exchange (ECM) - User Guide - Version 7.1
Names of local domains for which MailMarshal Exchange will process email (for example, mycompany.com or pop.mycompany.com)
IP address and access port for your existing Microsoft SQL server computer.
IP address and logon credentials for your directory server (Active Directory or LDAP).
Email address where MailMarshal Exchange will send administrator notification emails (existing or new account).
Email address email notifications to recipients will be from (reply to address) (existing or new account).
Information required My information
Planning Your MailMarshal Exchange InstallationCopyright © 2015 Trustwave Holdings, Inc. All rights reserved. 27
MailMarshal Exchange (ECM) - User Guide - Version 7.1
30
3 Installing and Configuring MailMarshal Exchange
Before you install MailMarshal Exchange, be sure to complete the steps in the planning checklist. For more
information, see “Planning Checklist” on page 15.
When you complete the planning checklist, you should know if you are planning a standalone or array
installation, which MailMarshal Exchange components you want to install, and on which computers you
plan to install each component. Collect the information listed in “Collecting Information for Installation” on
page 26 before you run the Configuration Wizard.
If you are upgrading a MailMarshal Exchange installation from an earlier version, there are a number of
other considerations. For more information, see “Upgrading MailMarshal Exchange” on page 45.
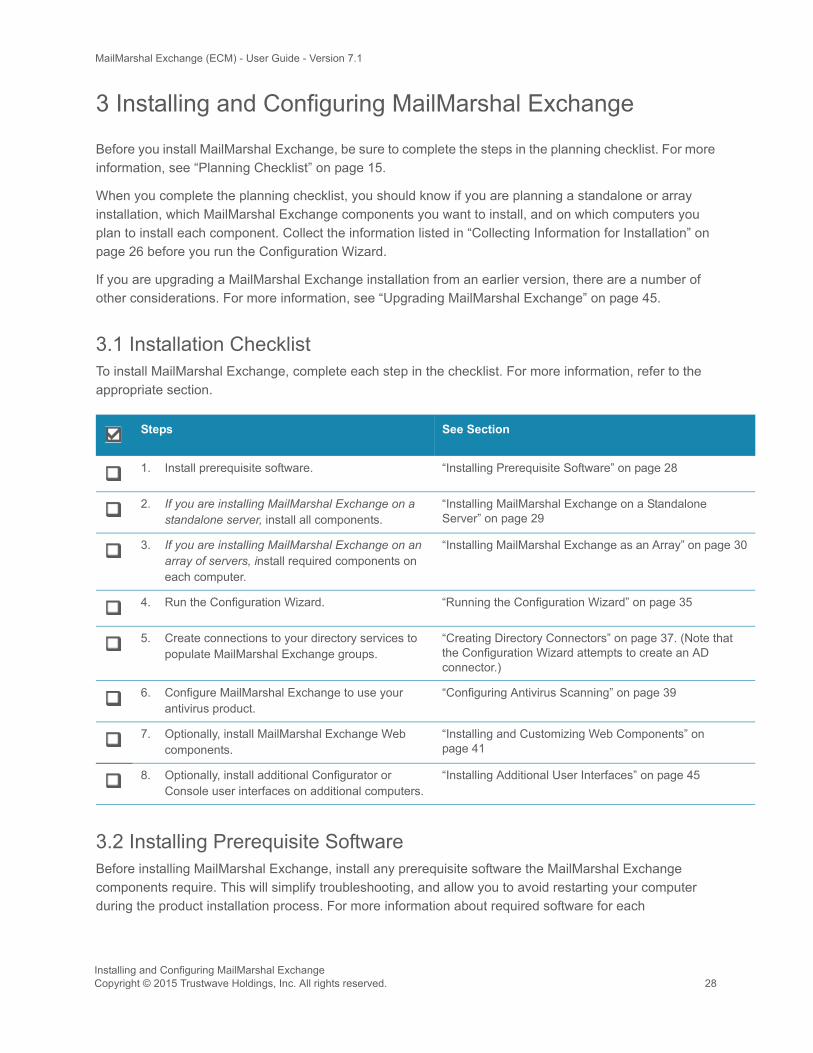
3.1 Installation ChecklistTo install MailMarshal Exchange, complete each step in the checklist. For more information, refer to the
appropriate section.
3.2 Installing Prerequisite SoftwareBefore installing MailMarshal Exchange, install any prerequisite software the MailMarshal Exchange
components require. This will simplify troubleshooting, and allow you to avoid restarting your computer
during the product installation process. For more information about required software for each
Steps See Section
1. Install prerequisite software. “Installing Prerequisite Software” on page 28
2. If you are installing MailMarshal Exchange on a standalone server, install all components.
“Installing MailMarshal Exchange on a Standalone Server” on page 29
3. If you are installing MailMarshal Exchange on an array of servers, install required components on each computer.
“Installing MailMarshal Exchange as an Array” on page
4. Run the Configuration Wizard. “Running the Configuration Wizard” on page 35
5. Create connections to your directory services to populate MailMarshal Exchange groups.
“Creating Directory Connectors” on page 37. (Note thatthe Configuration Wizard attempts to create an AD connector.)
6. Configure MailMarshal Exchange to use your antivirus product.
“Configuring Antivirus Scanning” on page 39
7. Optionally, install MailMarshal Exchange Web components.
“Installing and Customizing Web Components” on page 41
8. Optionally, install additional Configurator or Console user interfaces on additional computers.
“Installing Additional User Interfaces” on page 45
Installing and Configuring MailMarshal ExchangeCopyright © 2015 Trustwave Holdings, Inc. All rights reserved. 28

MailMarshal Exchange (ECM) - User Guide - Version 7.1
MailMarshal Exchange computer in your configuration, see “Hardware and Software Requirements” on
page 19.
The installation package includes most prerequisite software MailMarshal Exchange requires. It also
provides links that allow you to download the remaining prerequisites from Trustwave or vendor sites.
If you plan to configure MailMarshal Exchange to use an antivirus solution, install your antivirus product on
MailMarshal Exchange Server computers before installing MailMarshal Exchange. The
MailMarshal Exchange setup program Scanners tab provides links to some supported antivirus products.
For information about supported antivirus products, see “Supported Antivirus Software” on page 26, and
the Trustwave Knowledge Base. You can also configure MailMarshal Exchange to use a centrally installed
antivirus product. For more information, see “Configuring Antivirus Scanning” on page 39.
To install prerequisite software or included antivirus products:
1. Run the setup program from the MailMarshal Exchange installation.
2. On the Prerequisites or Scanners tab, click the link for the product you want to install or download.
3. For included packages, the installer will start. For other items, the link opens a web browser window
with additional information and links.
4. When installation of the items is complete, return to the setup program.
3.3 Installing MailMarshal Exchange on a Standalone ServerYou can install the MailMarshal Exchange Server, Array Manager, and database on one computer. For
more information about standalone MailMarshal Exchange installation, see “Standalone Installation” on
page 18 and “Standalone Installation Requirements” on page 19
Use the Basic Install option to install MailMarshal Exchange on a standalone computer. The basic install
option installs MailMarshal Exchange using the default installation and folder locations. If you are installing
from the “with SQL Express” version of the installation package, the Basic Install installs a local instance of
SQL Express 2008 R2 if necessary. To use a different SQL Server computer, select Custom Install. See
the instructions under “Installing a MailMarshal Exchange Array Manager” on page 31.
If you later want to specify alternate folder or database locations for MailMarshal Exchange, use the
MailMarshal Exchange Server Tool. For more information, see “Changing Folder Locations” on page 143.
To install MailMarshal Exchange on a standalone computer using the default MailMarshal Exchange folder
locations:
Note: On an Exchange Server computer most of these requirements will already have been installed.
Note: The Basic Install uses a default set of install options required to use SQL Express with MailMarshal Exchange and the Marshal Reporting Console. These include Mixed Mode authentication and TCP connections. If you want to review and alter other installation options (such as instance name and install location), Trustwave recommends you install SQL Express 2008 R2 before installing MailMarshal Exchange. See the Prerequisites tab of the MailMarshal Exchange setup program.
Installing and Configuring MailMarshal ExchangeCopyright © 2015 Trustwave Holdings, Inc. All rights reserved. 29

MailMarshal Exchange (ECM) - User Guide - Version 7.1
1. Ensure you have installed all prerequisite software specified for a standalone installation. For more
information, see “Standalone Installation Requirements” on page 19 and “Installing Prerequisite
Software” on page 28.
2. Log on to the computer as a member of the local Administrators group.
3. Close any open applications.
4. Run the setup program from the MailMarshal Exchange installation package.
5. On the Setup tab, click Install MailMarshal Exchange.
6. On the Welcome window, click Next.
7. On the License Agreement window, carefully read the license information.
8. Click I accept the terms of the license agreement, and then click Next.
9. On the Setup Type window, select Basic Install, and then click Next.
10. If you choose to install SQL Express:
a. Note that SQL Express requires .NET 3.5 SP1, and Windows Installer 4.5. The setup program
prompts you to enter a strong password for the SQL Express sa account.
b. SQL Express setup executes in silent mode. This process may take a number of minutes. Once
installation is complete, MailMarshal Exchange installation continues.
11. The Basic Install process attempts to connect to a SQL instance on the local computer using Windows
authentication, and create a database named MailMarshalExchange.
12. The Settings Summary window displays the folder locations and database details for the installation.
Review the settings, and then click Next.
13. On the Ready to Install window, click Install. The setup program displays a progress bar until the
program is installed.
14. On the Finished window, ensure Run Configuration Wizard is selected, and then click Finish.
You must run the Configuration Wizard before MailMarshal Exchange can receive email and apply rules.
For more information, see “Running the Configuration Wizard” on page 35.
3.4 Installing MailMarshal Exchange as an ArrayA MailMarshal Exchange array consists of a MailMarshal Exchange Array Manager and one or more
MailMarshal Exchange Servers (Exchange Server computers). The Array Manager hosts the user
Note: The Basic Install option enables the default set of MailMarshal Exchange rules.
Note: If the process encounters problems connecting, you can use Custom Install for more options. See the instructions under “Installing a MailMarshal Exchange Array Manager” on page 31. If the database already exists, you can choose to use or re-create it. If you are unsure, use Custom Install to create a database with a different name.
Installing and Configuring MailMarshal ExchangeCopyright © 2015 Trustwave Holdings, Inc. All rights reserved. 30

MailMarshal Exchange (ECM) - User Guide - Version 7.1
interfaces and manages the database connection. The Array Manager exports the same rules and other
configuration to all MailMarshal Exchange Servers connected to it.
First, install the Array Manager and database on a computer in the trusted network. Then, install the
MailMarshal Exchange Server software on one or more computers in the DMZ to work as an array of email
processing servers. Each MailMarshal Exchange Server receives email and processes it using your rules.
Base the number of servers you install on your email volume. You can add servers later as needed. For
more information about an array installation and requirements, see “Array Installation” on page 18 and
“Array Installation Requirements” on page 20.
3.4.1 Installing a MailMarshal Exchange Array ManagerTo install MailMarshal Exchange in an array configuration, first install the Array Manager component on the
computer you selected as the Array Manager computer.
To install the Array Manager:
1. Ensure you have installed all prerequisite software specified for an array installation. For more
information, see “Array Manager Requirements” on page 21 and “Installing Prerequisite Software” on
page 28.
2. Log on to the computer as a member of the local Administrators group.
3. Close any open applications.
4. Run the setup program from the MailMarshal Exchange installation package.
5. On the Setup tab, click Install MailMarshal Exchange.
6. On the Welcome window, click Next.
7. On the License Agreement window, carefully read the license information.
8. Click I accept the terms of the license agreement, and then click Next.
9. On the Setup Type window, select Custom Install, and then click Next.
10. On the Installation Options window, ensure Array Manager is selected. The MailMarshal Exchange
Configurator and Console user interfaces are installed by default when you install the Array Manager
component.
11. Clear Email Filtering, and then click Next.
Installing and Configuring MailMarshal ExchangeCopyright © 2015 Trustwave Holdings, Inc. All rights reserved. 31

MailMarshal Exchange (ECM) - User Guide - Version 7.1
12. On the Choose Installation Location window, optionally change the installation and folder locations.
13. On the Database window, set SQL Server options for the MailMarshal Exchange database.
a. Specify a local or remote SQL server.
b. Specify a database name (by default, MailMarshalExchange).
c. Choose an account to use for database access. This account can be a Windows or SQL Server
account. If the SQL Server is on the same computer as MailMarshal Exchange, you can use the
system service account (the Local System account used by default to run MailMarshal Exchange
services). MailMarshal Exchange can also configure an “operational user” account with limited
permissions, and use this account for most processing. For full information about available
database connection and security options, see Trustwave Knowledge Base article Q12939.
Tip: A database name must start with a letter (a..z) or an underscore (_). The name can also contain digits (0..9). Other characters including the hyphen (-) are generally NOT allowed.
Tip: You can change the account information later using the MailMarshal Exchange Server Tool.
Installing and Configuring MailMarshal ExchangeCopyright © 2015 Trustwave Holdings, Inc. All rights reserved. 32

MailMarshal Exchange (ECM) - User Guide - Version 7.1
14. Click Next. MailMarshal Exchange verifies the database information. If the database you selected
already exists, you can choose options to use it, or cancel and provide a different database name. The
available options depend on the database that is actually found.
15. Follow the instructions in the setup program until you finish installing MailMarshal Exchange.
16. On the Setup Complete window, ensure Run Configuration Wizard is selected, and then click Finish.
You must run the Configuration Wizard before MailMarshal Exchange can receive email and apply rules.
For more information, see “Running the Configuration Wizard” on page 35.
3.4.2 Installing a MailMarshal Exchange ServerTo complete a MailMarshal Exchange array installation, first install the MailMarshal Exchange Array
Manager. Then, follow the steps to install a MailMarshal Exchange Server on each Exchange Server. You
can install the software to additional Exchange Servers later as needed.
To install the MailMarshal Exchange Server components:
1. Ensure you have installed all prerequisite software specified for a MailMarshal Exchange Server
computer. For more information, see “Server Requirements” on page 20 and “Installing Prerequisite
Software” on page 28.
2. Log on to the Exchange Server computer as a member of the local administrator group.
3. Close any open applications.
4. Run the MailMarshal Exchange installation.
5. On the Setup tab, click Install MailMarshal Exchange.
6. On the Welcome window, click Next.
7. On the License Agreement window, carefully read the license information.
8. Click I accept the terms of the license agreement, and then click Next.
9. On the Setup Type window, select Custom Install, and then click Next.
10. On the Installation Options window, ensure Email Filtering is selected.
11. Clear Array Manager, and then click Next.
Installing and Configuring MailMarshal ExchangeCopyright © 2015 Trustwave Holdings, Inc. All rights reserved. 33

MailMarshal Exchange (ECM) - User Guide - Version 7.1
12. On the Choose Installation Location window, optionally change the installation and folder locations.
13. On the MailMarshal Exchange Array window, enter the name of the MailMarshal Exchange Array
Manager that you will use to manage policy for this server. The name can be the computer name, IP
address, or Fully Qualified Domain Name.
14. If you have changed the default MailMarshal Exchange port, enter the new value in the Port field.
15. If you are not logged in as a user with permission to join the MailMarshal Exchange array, select Connect
using following account and enter the correct Windows credentials. For more information about
setting this permission see “Configuring Manager Security” on page 136.
16. Click Next.
17. Continue running the setup program until you finish installing a MailMarshal Exchange Server.
18. On the Setup Complete window, click Finish to close the setup wizard. The server retrieves
configuration information from the Array Manager immediately and begins accepting email
connections.
19. If you plan to install the MailMarshal Exchange Server components on additional computers, repeat the
MailMarshal Exchange Server installation process on the other computers.
Installing and Configuring MailMarshal ExchangeCopyright © 2015 Trustwave Holdings, Inc. All rights reserved. 34

MailMarshal Exchange (ECM) - User Guide - Version 7.1
3.5 Running the Configuration WizardAfter you have completed a standalone installation or installed the Array Manager component in an array
installation, you must run the MailMarshal Exchange Configuration Wizard. This Wizard lets you configure
MailMarshal Exchange to accept email and apply rules.
When you click Finish on the final window of the MailMarshal Exchange Setup Wizard, by default
MailMarshal Exchange runs the Configuration Wizard. If you do not run this wizard after running setup,
MailMarshal Exchange runs the wizard the first time you start the MailMarshal Exchange Configurator.
To run the Configuration Wizard:
1. If the Configuration Wizard is not running, start the Wizard by running the MailMarshal Exchange
Configurator from the MailMarshal Exchange program folder.
2. On the Welcome window, click Next.
3. On the Licensing window, type your company or organization name. This information identifies your
organization when you request a license key for MailMarshal Exchange. The Licensing window also
reports details of your current license. You can enter another license key at a later time. For more
information, see “Managing Your MailMarshal Exchange Licenses” on page 131.
4. Click Next.
5. On the Local Domains window, enter one or more domain names that this Exchange Server treats as
local. This information allows MailMarshal Exchange to apply policy to inbound, outbound, and internal
messages.
a. Click New.
b. Enter a domain name and click OK.
c. Repeat the above steps for each local domain
d. To edit or delete an existing entry, select it and then click the appropriate button.
Tip: The wizard automatically enters domains that it can retrieve from Exchange Server. Enter any additional domains you want to treat as internal. If you make changes to Exchange Server settings later, you must update the Local Domains list in the MailMarshal Exchange Configurator.
Installing and Configuring MailMarshal ExchangeCopyright © 2015 Trustwave Holdings, Inc. All rights reserved. 35

MailMarshal Exchange (ECM) - User Guide - Version 7.1
6. Click Next.
7. On the Administrative Notifications window, enter email addresses used by automated functions of
MailMarshal Exchange:
a. MailMarshal Exchange sends administrative notifications (such as Dead Letter reports) to the
address you specify in the Recipient Address field. This address should be a valid and
appropriate mailbox or group alias.
b. MailMarshal Exchange sends administrative and user notifications and other automated email
from the address you specify in the From Address field. This address should be a valid address to
allow for replies to notifications.
Installing and Configuring MailMarshal ExchangeCopyright © 2015 Trustwave Holdings, Inc. All rights reserved. 36

MailMarshal Exchange (ECM) - User Guide - Version 7.1
8. On the Enable Agent window, choose whether to enable the MailMarshal Exchange Agent
immediately. The Agent is an Exchange Transport Agent that allows MailMarshal Exchange to
examine messages.
9. On the Active Directory window, if it displays, enter credentials to read user and email address
information from Active Directory.
10. Review the Completing window, and then click Finish.
When you complete the Configuration Wizard, MailMarshal Exchange starts the email processing services
and opens the Configurator. Use the Configurator to perform additional configuration tasks. You will need
to complete some tasks to implement minimum best practices for MailMarshal Exchange installation and
email filtering. For more information, see “Creating Directory Connectors” on page 37 and “Configuring
Antivirus Scanning” on page 39.
3.6 Creating Directory ConnectorsMailMarshal Exchange can apply email policies selectively based on the email address of a local or remote
user. MailMarshal Exchange can retrieve groups by connecting to a Microsoft Active Directory or an LDAP
directory server. Creating MailMarshal Exchange connectors allows you to retrieve your user and group
information periodically from these directories.
The configuration Wizard attempts to create a connector for the local Active Directory. You can create
additional connectors.
To create a directory connector:
1. If the MailMarshal Exchange Configurator is not running, start the MailMarshal Exchange Configurator
from the MailMarshal Exchange program folder.
2. In the left pane, expand MailMarshal Exchange Configurator.
3. Expand Policy Elements.
4. Click Connectors.
5. On the Action menu, click New Connector.
6. On the Connector Type window, choose the type of directory this connector will access.
MailMarshal Exchange supports connections to Microsoft Active Directory and several types of LDAP
directories.
Note: In production environments, Trustwave recommends that you customize policies and user group information as described in this Guide before enabling the Agent.
Note: This window is usually not required, because MailMarshal Exchange can usually connect to Active Directory with existing credentials.
Note: For detailed guidance on this wizard, click Help on each window.
Installing and Configuring MailMarshal ExchangeCopyright © 2015 Trustwave Holdings, Inc. All rights reserved. 37

MailMarshal Exchange (ECM) - User Guide - Version 7.1
7. If this is a Microsoft Active Directory connection, on the Microsoft Active Directory Setting page,
choose to connect as anonymous, or as a specific account. If you choose to connect using a specific
account, enter the account details, and then click Next.
8. If this is an LDAP connection, specify the following information:
a. Select a specific type of LDAP directory server from the list, and then click Next.
MailMarshal Exchange uses appropriate parameters to retrieve group and member details for the
type of server you choose.
b. On the LDAP Server and Logon page enter the server name, port, and logon information. For
more information, click Help. You can connect anonymously or specify an account with required
permissions. If you choose to connect using a specific account, specify the account details, and
then, click Next. If you do not know the required information, contact the administrator of the LDAP
server.
c. On the LDAP Search Root window identify a search root for this server, and then click Next. If you
do not know whether a search root is required, contact the administrator of the LDAP server.
d. If this is a generic LDAP connection, on the LDAP Groups and LDAP Users windows,
customize the information MailMarshal Exchange will use to query the LDAP server for group
names and group members, and then click Next. For details of the fields, see Help.
9. On the Reload Schedule window, specify how often MailMarshal Exchange will import directory
information through this connector, and then click Next.
10. On the Connector Name and Description window, enter a connector name and description, and then
click Next.
11. On the Finish window, MailMarshal Exchange displays a summary of the settings for the connector.
Review the settings, then click Finish to create the connector and close the window.
Note: The wizard populates default values depending on the server type you selected. You may need to customize the values. Consult the LDAP server documentation and the LDAP server administrator.
Installing and Configuring MailMarshal ExchangeCopyright © 2015 Trustwave Holdings, Inc. All rights reserved. 38

MailMarshal Exchange (ECM) - User Guide - Version 7.1
The properties of an LDAP connector include advanced configuration options that allow you to control
which email addresses and groups MailMarshal Exchange retrieves. For more information about editing
connectors and advanced LDAP configuration, see “Configuring Connectors” on page 84.
3.7 Configuring Antivirus ScanningTo work with MailMarshal Exchange, an antivirus product must offer a command-line interface or be
supported by a custom MailMarshal Exchange DLL. The scanner must return a documented response
indicating whether or not a virus is detected. Most commercially available virus scanners meet these
specifications. For more information about supported antivirus products, see Trustwave Knowledge Base
article Q10922.
To allow MailMarshal Exchange to use your antivirus product to scan email for viruses, first exclude
specific MailMarshal Exchange folders from virus scanning. The MailMarshal Exchange Engine service
does not run if an antivirus product scans these folders. Then, you must configure MailMarshal Exchange
to use the antivirus product you installed.
3.7.1 Excluding Working Folders From Virus ScanningMailMarshal Exchange uses a number of folders to process and quarantine email messages, possibly
including virus infected messages. MailMarshal Exchange will not operate if these folders are scanned by
an antivirus or anti-malware product.
To prevent scanning these working folders, you must configure your scanning products to exclude specific
working folders on every MailMarshal Exchange Server. You must exclude these working folders even if
you do not configure MailMarshal Exchange to scan for viruses using the antivirus product. If the virus
scanner does not have the facility to exclude the appropriate folders, you must disable on-access scanning
completely for that scanner.
Some scanners also automatically enable an Internet protection feature (for instance, the Marshal Norman
Antivirus product). In this case, disable the Internet protection option in addition to disabling the on-access
scanning option.
MailMarshal Exchange checks for resident file scanning by writing the eicar.com standard test virus file
(not a real virus) in each of the folders that must be excluded from scanning. If any copy of the test file is
removed or cleaned by a resident scanner, or if MailMarshal Exchange is denied access to the files, the
MailMarshal Exchange Engine service on the Server does not start and MailMarshal Exchange sends an
email notice to the administrator.
If the check succeeds, MailMarshal Exchange deletes copies of the eicar.com file, preserving the
original in the Unpacking\avcheck folder.
By default, the MailMarshal Exchange setup program creates working folders in the
MailMarshal Exchange installation folder. The default location of this folder is C:\Program Files (x86)\Marshal\MailMarshal Exchange
If you choose a different folder name or drive location when you install the product, you must exclude the
folders in your specified installation location.
Installing and Configuring MailMarshal ExchangeCopyright © 2015 Trustwave Holdings, Inc. All rights reserved. 39

MailMarshal Exchange (ECM) - User Guide - Version 7.1
You can verify the location of these folders by running the MailMarshal Exchange Server Tool from the
MailMarshal Exchange Tools group in the MailMarshal Exchange program group on each Server. Click the
Folders tab to see the folder locations. For more information, see “Changing Folder Locations” on
page 143.
For information about excluding folders from on-access scanning, refer to your antivirus product
documentation. For example, in Network Associates NetShield, you can specify exclusions using the
Exclusions tab in Scan Properties.
In your antivirus scanning product control panel, exclude the following subfolders of the
MailMarshal Exchange install folder from virus scanning:
\Quarantine
\Queues\Decryption
\Queues\Incoming
\Unpacking
MailMarshal Exchange uses folders in the Quarantine folder to store messages, including those
quarantined by virus scanning rule actions. The product stores email in the Queues\Decryption and
Queues\Incoming folders pending processing.
MailMarshal Exchange copies files to the Unpacking folder to scan for viruses. If an antivirus scanner
finds and cleans a file in the Unpacking folder before MailMarshal Exchange scans for viruses,
MailMarshal Exchange may determine the file is virus-free and deliver the email with the virus still present.
3.7.2 Configuring MailMarshal Exchange to Use an Antivirus ProductIf you have installed MailMarshal Exchange as an array with more than one Server, you must make the
same virus scanners available on all MailMarshal Exchange Servers. You can make a scanner available
by installing the software on the MailMarshal Exchange Server, or in some cases by installing the virus
scanner software remotely and configuring MailMarshal Exchange to access it.
If you install command line virus software on more than one MailMarshal Exchange Server, you must
install it in the same location (same drive letter and folder) on each Server.
To configure virus scanning in MailMarshal Exchange:
1. Ensure you have installed one or more supported virus scanners on each MailMarshal Exchange
Server computer, following the manufacturer's instructions. If your antivirus scanner supports remote
access, you can install the scanner in a central location to support several email processing servers.
2. Ensure the scanner does not perform on-demand scanning of the MailMarshal Exchange excluded
folders. For more information, see “Excluding Working Folders From Virus Scanning” on page 39.
3. On the MailMarshal Exchange Array Manager computer, run the MailMarshal Exchange Configurator.
4. In the left pane of the Configurator, expand MailMarshal Exchange Configurator > Policy Elements,
and select Virus Scanners.
Installing and Configuring MailMarshal ExchangeCopyright © 2015 Trustwave Holdings, Inc. All rights reserved. 40

MailMarshal Exchange (ECM) - User Guide - Version 7.1
5. On the Action menu, choose New Virus Scanner.
6. On the Welcome window, click Next.
7. On the Select a Virus Scanner window, select your antivirus scanner from the list.
8. If you are configuring a command line scanner, on the Configure Virus Scanner Path window, specify or
browse to identify the location of the antivirus scanner program, such as c:\McAfee\Scan.exe.
9. If the scanner is installed remotely, on the Configure Virus Scanner Location window enter the server
name or IP address and port where the scanner can be accessed.
10. If your scanner is not in the list, select Custom Scanner. Specify the details of your antivirus software,
and then, click Next.
11. On the Finish window of the Wizard, click Finish to add the virus scanner. MailMarshal Exchange will
test the action of the scanner on each installed MailMarshal Exchange email processing server.
12. If you plan to use more than one virus scanner, repeat Steps 5 through 11 for each scanner.
3.8 Installing and Customizing Web ComponentsMailMarshal Exchange includes the following Web-based consoles:
• A Web version of the Console application that allows administrators and others, such as help desk per-
sonnel, to view server status and manage quarantined email for all users.
• A Quarantine Management console that allows email recipients to review and manage their own quar-
antined messages.
Note: For detailed guidance on this wizard, click Help on each window.
Installing and Configuring MailMarshal ExchangeCopyright © 2015 Trustwave Holdings, Inc. All rights reserved. 41

MailMarshal Exchange (ECM) - User Guide - Version 7.1
You can install the Web Console on Microsoft IIS servers that can connect to the MailMarshal Exchange
Array Manager computer on the configuration port (19011 by default). You can also install the Quarantine
Management component on a multi-server Web farm using the state management features of ASP.NET.
The Web Components installation creates a new virtual website bound to port 82.
For more information about hardware and software requirements, see “Web Components Requirements”
on page 22.
3.8.1 Installing the MailMarshal Exchange Web ComponentsRun the Web Components setup to install the MailMarshal Exchange Web Console and Quarantine
Management Website.
To install the Web components:
1. Ensure you have installed all prerequisite software specified for a Web components computer. For
more information, see “Web Components Requirements” on page 22.
2. Log on as a local administrator to the computer on which you want to install the MailMarshal Exchange
Web components.
3. Close any open applications.
4. Run the setup program from the MailMarshal Exchange installation package.
5. On the Setup tab, click Install Web Components.
6. On the Welcome window, click Next.
7. On the License Agreement window, carefully read the license information.
8. Click I accept the terms of the license agreement, and then click Next.
9. On the Setup Type window, choose which components you want to install: Quarantine Management,
Web Console, or Both. Click Next.
10. Choose a destination location and program folder. By default the location is the C:\Program Files\Marshal folder.
11. On the Virtual Directory window, enter a directory name for each component you have chosen to
install. These names become the virtual paths of the site URLs, in the new virtual website created by
the installation.
Note: This is a change from port 81 used in earlier versions of MailMarshal Exchange. Because Exchange 2013 now creates a website on port 81, port 82 is used to allow co-existence of the sites.
If another website is already bound to port 82, the MailMarshal Exchange website will be installed but will not start. In this case, after installation, manually change the binding of one of the sites, and start the MailMarshal Exchange site. You can also change the binding if you have installed the Web components on another server where port 80 or 81 is available.
If Windows Firewall is enabled on the web server, by default remote connections to this port will be denied. To allow remote connections, change the Windows Firewall settings.
Installing and Configuring MailMarshal ExchangeCopyright © 2015 Trustwave Holdings, Inc. All rights reserved. 42

MailMarshal Exchange (ECM) - User Guide - Version 7.1
12. Click Next.
13. If you chose to install the Web Console on the same server as the Array Manager, enter the following
values on the Web Console Configuration window, and then click Next:
a. Enter the port used by the Array Manager. The default value (19011) is the default port used.
b. Choose Windows or Forms authentication.
14. On the Ready to Install the Program window, click Install.
15. On the Setup Wizard Complete window, click Finish.
16. To complete setup of the Quarantine Management website, run Internet Explorer. The default URL for
this site is http://IISServerName:82/QuarantineConsole where IISServerName is the
name of the Microsoft IIS server where you installed the Web components.
17. On the configuration page of the Quarantine management site, specify the Site URL, Array Manager
connection information, User Authentication method, and User Interface settings. For more
information, click Help.
Note: If you choose Windows authentication, authorized users will be logged in automatically (Integrated Authentication). If you choose Forms authentication, users can select a server and username each time they log in. For information about how to change authentication methods after installation, see Trustwave Knowledge Base article Q12253.
Note: You can set the authentication method for a MailMarshal Exchange installation only once. If you install the Quarantine Management Web component on more than one Microsoft IIS server, all the servers must use the same method.
Installing and Configuring MailMarshal ExchangeCopyright © 2015 Trustwave Holdings, Inc. All rights reserved. 43

MailMarshal Exchange (ECM) - User Guide - Version 7.1
18. As part of Quarantine Management site setup, the site creates an administrator login (for the specified
email address, or the Windows login used to access the configuration page). You can change many
site settings later by logging in to the site using the Administrator login.
19. The Web Console does not require any configuration. Each time you connect, you can specify the
Array Manager port and account information. The default URL for this site is
http://IISServerName:82/MEXAdminConsole where IISServerName is the name of the
Microsoft IIS server where you installed the Web components.
3.8.2 Customizing the Web ComponentsYou can configure user interface settings for the Quarantine Management website, using the Administrator
login. The configurable settings include:
• Default Theme
• Availability of email address management (add or delete an email address from the list of addresses
managed by the user)
• Availability of mail history charts, folder message counts, and the “all folders” view.
Each user can customize their default theme, language, and chart settings (if permitted by the
administrator).
Note: The charts, counts, and “all folders” view can slow site performance, especially on larger sites. If you are experiencing slow page loading, Trustwave recommends you disable these features.
Installing and Configuring MailMarshal ExchangeCopyright © 2015 Trustwave Holdings, Inc. All rights reserved. 44

MailMarshal Exchange (ECM) - User Guide - Version 7.1
The default setup includes two sample themes, and language packs for English, French, and Spanish. You
can also create new themes and add language packs. For more information about creating your own
themes and packs, see Trustwave Knowledge Base article Q11916.
3.9 Installing Additional User InterfacesYou can install the MailMarshal Exchange Configurator and Console on additional computers to distribute
access to the managing and monitoring features the users interfaces provide. The Console communicates
with the Array Manager using port 19011. The Configurator also uses NetBIOS ports.
To install the MailMarshal Exchange Configurator or Console:
1. On the computer where you want to install a user interface, log on with a user account that has
permission to access the Array Manager computer.
2. Run the setup program from the MailMarshal Exchange installation kit.
3. On the Setup tab, click Install MailMarshal Exchange.
4. On the License Agreement window, carefully read the license information.
5. Click I accept the terms of the license agreement, and then click Next.
6. On the Setup Type window, choose Custom Install then click Next.
7. On the Component Selection window, clear Array Manager and Email Filtering.
8. Select the user interfaces you want to install, and then click Next.
9. Specify or browse to a location to install the MailMarshal Exchange files, and then click Next.
10. Review your installation choices on the Ready to Install the Program window, and then click Install.
11. Ensure Run the Configuration Wizard is not selected, and then click Finish.
12. On the Connect to MailMarshal Exchange Manager window, specify the MailMarshal Exchange Array
Manager computer and connection port. By default, the Array Manager uses port 19011.
13. Click OK.
3.10 Upgrading MailMarshal ExchangeYou can upgrade or migrate MailMarshal Exchange to the latest version. Depending on which version you
have currently installed, the required procedures differ. Be sure to read the release notes for any version-
specific information.
3.10.1 Upgrading from MailMarshal Exchange (ECM) Version 7.XYou can upgrade to the latest release of MailMarshal Exchange from MailMarshal Exchange 7.0 and
above. Upgrade the Array Manager first. Then upgrade other MailMarshal Exchange components
To upgrade to the latest version of MailMarshal Exchange:
Installing and Configuring MailMarshal ExchangeCopyright © 2015 Trustwave Holdings, Inc. All rights reserved. 45
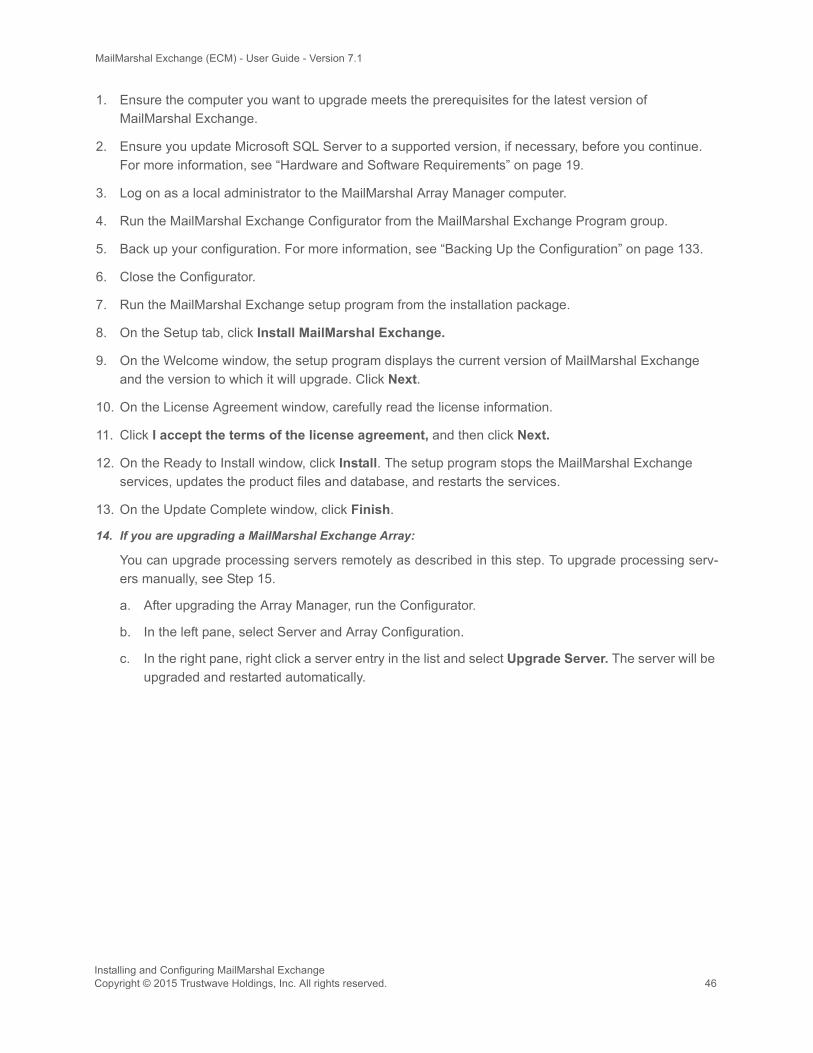
MailMarshal Exchange (ECM) - User Guide - Version 7.1
1. Ensure the computer you want to upgrade meets the prerequisites for the latest version of
MailMarshal Exchange.
2. Ensure you update Microsoft SQL Server to a supported version, if necessary, before you continue.
For more information, see “Hardware and Software Requirements” on page 19.
3. Log on as a local administrator to the MailMarshal Array Manager computer.
4. Run the MailMarshal Exchange Configurator from the MailMarshal Exchange Program group.
5. Back up your configuration. For more information, see “Backing Up the Configuration” on page 133.
6. Close the Configurator.
7. Run the MailMarshal Exchange setup program from the installation package.
8. On the Setup tab, click Install MailMarshal Exchange.
9. On the Welcome window, the setup program displays the current version of MailMarshal Exchange
and the version to which it will upgrade. Click Next.
10. On the License Agreement window, carefully read the license information.
11. Click I accept the terms of the license agreement, and then click Next.
12. On the Ready to Install window, click Install. The setup program stops the MailMarshal Exchange
services, updates the product files and database, and restarts the services.
13. On the Update Complete window, click Finish.
14. If you are upgrading a MailMarshal Exchange Array:
You can upgrade processing servers remotely as described in this step. To upgrade processing serv-
ers manually, see Step 15.
a. After upgrading the Array Manager, run the Configurator.
b. In the left pane, select Server and Array Configuration.
c. In the right pane, right click a server entry in the list and select Upgrade Server. The server will be
upgraded and restarted automatically.
Installing and Configuring MailMarshal ExchangeCopyright © 2015 Trustwave Holdings, Inc. All rights reserved. 46

MailMarshal Exchange (ECM) - User Guide - Version 7.1
d. Repeat step c for each server entry
e. Continue with Step 16.
15. To upgrade processing servers manually:
a. On a MailMarshal Exchange Server computer, run the setup program from the installation package
and complete the upgrade process.
b. When the upgrade process is complete, specify the name of the MailMarshal Exchange Array
Manager computer and port over which to connect.
c. Repeat Steps a and b on each MailMarshal Exchange Server computer.
16. On the MailMarshal Exchange Array Manager computer run the Configurator to verify that each email
Server is connected and to ensure the Receiver, Engine, and Sender services are running.
17. If you are using the MailMarshal Exchange Web components:
a. If you have customized any Web component graphics, make a backup copy of the custom files to a
backup folder. For more information, see “Customizing the Web Components” on page 44.
b. On the Web components computer, run the MailMarshal Exchange setup program from the
installation package.
c. On the Setup tab, click Install Web Components.
d. Run the Web components setup until you have completed the installation process.
e. If you backed up custom graphic files, copy your backup files to the proper locations in the new
install folders.
Note: After you upgrade the Array Manager, the servers may show as “offline” in the Configurator for a few minutes. However, email continues to flow.
The remote server upgrade process copies the required software to the target server, stops email processing on the target server, installs the new software, and restarts the target server. This process typically takes a few minutes to complete.
Installing and Configuring MailMarshal ExchangeCopyright © 2015 Trustwave Holdings, Inc. All rights reserved. 47

MailMarshal Exchange (ECM) - User Guide - Version 7.1
Refer to the Release Notes to learn more about new product features and updates. For more information
about using the new version of the product, see the User Guide.
3.10.2 Upgrading from MailMarshal Exchange Version 5.XMailMarshal Exchange 7.X implements a completely different architecture to MailMarshal Exchange
version 5.X. No upgrade path is available from version 5.X. However, you can install
MailMarshal Exchange on the same server as MailMarshal Exchange 5.3 and/or MailMarshal SEG
When upgrading from version 5.X to version 7.X, you must obtain a new product key. You can request a
key from the Configurator after installing the product.
3.11 Uninstalling MailMarshal ExchangeThe following steps provide guidelines for the types of steps you must take to stop MailMarshal Exchange
email filtering and remove the product from one or more Exchange servers.
Before you remove MailMarshal Exchange from a server, you should consider how content security will be
provided after MailMarshal Exchange is uninstalled.
When you uninstall MailMarshal Exchange, you will no longer be able to use the MailMarshal Exchange
Console to view the contents of the Quarantine folder on the server.
To uninstall MailMarshal Exchange:
1. Run the MailMarshal Exchange Configurator.
2. In the left pane, expand MailMarshal Exchange Configurator > Server and Array Configuration.
3. In the right pane, select the Server you wish to uninstall.
4. Click the Properties icon in the Configurator toolbar or Server Properties in the task pad toolbar.
5. On the Exchange Agent State window, select “Agent installed by set to bypass processing.”
6. Click OK.
7. Allow the Engine to complete processing all messages on the server.
8. If you want to preserve the data from the MailMarshal Exchange Server you are uninstalling, back up
the contents of the MailMarshal Exchange Quarantine folder and all subfolders.
9. Run Add/Remove Programs in Control Panel to remove MailMarshal Exchange. You may have to
restart your computer to remove some program files.
10. To delete the Quarantine folders, first delete the contents of the Symbolic subfolder.
11. Delete the remaining Quarantine folders and files.
Caution: The MailMarshal Exchange 7.X Agent and the MailMarshal Exchange 5.3 Agent must not be enabled at the same time. When you enable the version 7.X Agent, MailMarshal Exchange automatically uninstalls the version 5.3 Agent. You can continue to use the Configurator, Console, and Reports from version 5.3. Do not re-enable the version 5.3 Agent.
See the Release Notes for additional recommendations.
Installing and Configuring MailMarshal ExchangeCopyright © 2015 Trustwave Holdings, Inc. All rights reserved. 48

MailMarshal Exchange (ECM) - User Guide - Version 7.1
12. If you are uninstalling one email processing server but continuing to use
MailMarshal Exchange:
a. On the Array Manager computer, run the MailMarshal Exchange Configurator.
b. In the left pane, expand MailMarshal Exchange Configurator > Server and Array
Configuration.
c. In the right pane, verify that the server you uninstalled does not display in the list.
d. If the server still displays, select it and then click the Delete icon on the Configurator or task pad
toolbar.
13. If you are using a MailMarshal Exchange array and want to remove the product completely, repeat Steps
1 through 12 on each additional email processing server.
14. Use Add/Remove Programs from the Windows Control Panel to remove additional components you
may have installed on the server or other computers (such as Web Components, Console,
Configurator, or Marshal Reporting Console).
Installing and Configuring MailMarshal ExchangeCopyright © 2015 Trustwave Holdings, Inc. All rights reserved. 49
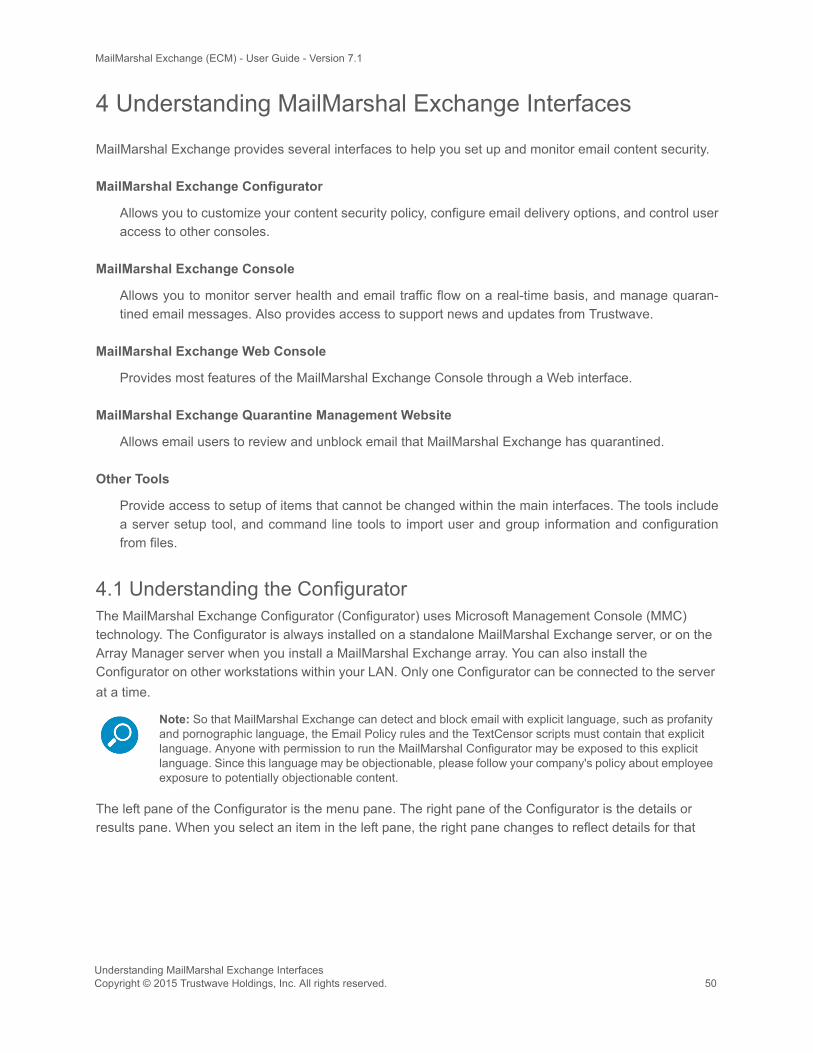
MailMarshal Exchange (ECM) - User Guide - Version 7.1
4 Understanding MailMarshal Exchange Interfaces
MailMarshal Exchange provides several interfaces to help you set up and monitor email content security.
MailMarshal Exchange Configurator
Allows you to customize your content security policy, configure email delivery options, and control user
access to other consoles.
MailMarshal Exchange Console
Allows you to monitor server health and email traffic flow on a real-time basis, and manage quaran-
tined email messages. Also provides access to support news and updates from Trustwave.
MailMarshal Exchange Web Console
Provides most features of the MailMarshal Exchange Console through a Web interface.
MailMarshal Exchange Quarantine Management Website
Allows email users to review and unblock email that MailMarshal Exchange has quarantined.
Other Tools
Provide access to setup of items that cannot be changed within the main interfaces. The tools include
a server setup tool, and command line tools to import user and group information and configuration
from files.
4.1 Understanding the ConfiguratorThe MailMarshal Exchange Configurator (Configurator) uses Microsoft Management Console (MMC)
technology. The Configurator is always installed on a standalone MailMarshal Exchange server, or on the
Array Manager server when you install a MailMarshal Exchange array. You can also install the
Configurator on other workstations within your LAN. Only one Configurator can be connected to the server
at a time.
The left pane of the Configurator is the menu pane. The right pane of the Configurator is the details or
results pane. When you select an item in the left pane, the right pane changes to reflect details for that
Note: So that MailMarshal Exchange can detect and block email with explicit language, such as profanity and pornographic language, the Email Policy rules and the TextCensor scripts must contain that explicit language. Anyone with permission to run the MailMarshal Configurator may be exposed to this explicit language. Since this language may be objectionable, please follow your company's policy about employee exposure to potentially objectionable content.
Understanding MailMarshal Exchange InterfacesCopyright © 2015 Trustwave Holdings, Inc. All rights reserved. 50
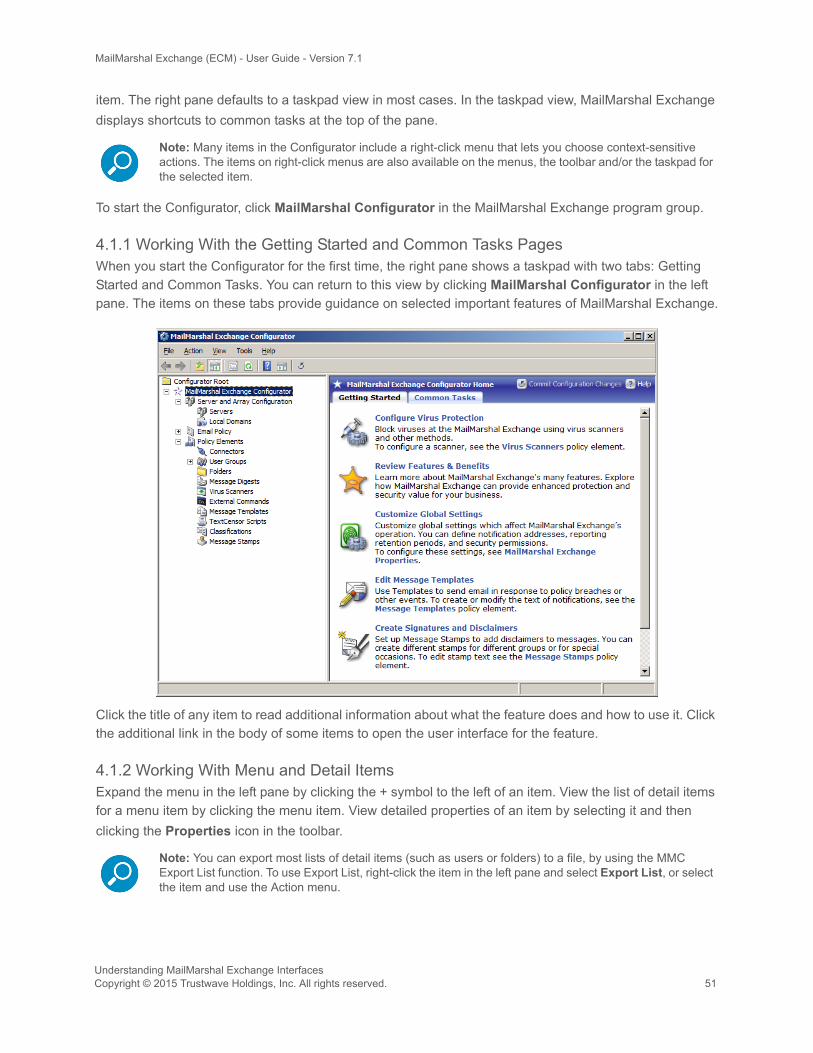
MailMarshal Exchange (ECM) - User Guide - Version 7.1
item. The right pane defaults to a taskpad view in most cases. In the taskpad view, MailMarshal Exchange
displays shortcuts to common tasks at the top of the pane.
To start the Configurator, click MailMarshal Configurator in the MailMarshal Exchange program group.
4.1.1 Working With the Getting Started and Common Tasks PagesWhen you start the Configurator for the first time, the right pane shows a taskpad with two tabs: Getting
Started and Common Tasks. You can return to this view by clicking MailMarshal Configurator in the left
pane. The items on these tabs provide guidance on selected important features of MailMarshal Exchange.
Click the title of any item to read additional information about what the feature does and how to use it. Click
the additional link in the body of some items to open the user interface for the feature.
4.1.2 Working With Menu and Detail ItemsExpand the menu in the left pane by clicking the + symbol to the left of an item. View the list of detail items
for a menu item by clicking the menu item. View detailed properties of an item by selecting it and then
clicking the Properties icon in the toolbar.
Note: Many items in the Configurator include a right-click menu that lets you choose context-sensitive actions. The items on right-click menus are also available on the menus, the toolbar and/or the taskpad for the selected item.
Note: You can export most lists of detail items (such as users or folders) to a file, by using the MMC Export List function. To use Export List, right-click the item in the left pane and select Export List, or select the item and use the Action menu.
Understanding MailMarshal Exchange InterfacesCopyright © 2015 Trustwave Holdings, Inc. All rights reserved. 51

MailMarshal Exchange (ECM) - User Guide - Version 7.1
4.1.3 Working With Properties ConfigurationYou can set many global properties of MailMarshal Exchange using two properties windows.
MailMarshal Properties
This window allows you to configure basic properties of the MailMarshal Exchange installation. You
can also back up or restore a MailMarshal Exchange configuration. To open this window, on the Tools
menu select MailMarshal Properties. To view and change specific settings, select an item from the
menu tree at the left of the Properties window.
Node Properties
Each MailMarshal Exchange installation includes one or more email processing servers, also known
as nodes. To see a list of these servers, click Server and Array Configuration in the left pane of the
Configurator. The right pane displays a list of installed servers. To configure settings for a server, click
to select that server in the right pane, then click the Server Properties icon in the toolbar. To view and
change specific settings, select an item from the menu tree at the left of the Properties window.
For more information about the properties and settings shown on these windows, see “Configuring Email
Content Security” on page 56 and “Managing Array Nodes” on page 138
4.1.4 Committing ConfigurationChanges you make to the MailMarshal Exchange configuration are not applied to email processing servers
immediately. To apply the changes, on the Tools menu choose Commit Configuration.
If configuration has not been committed, the status bar at the lower right of the MMC indicates Reload
required or Restart required, and the caption MailMarshal Configurator at the top of the left pane of the
Configurator is followed by the symbol -*- (reload required) or -!- (restart required). “Restart required”
indicates that the MailMarshal Exchange services on email processing servers will restart when the new
configuration is applied.
If you have configured “commit scheduling,” then committing configuration might not apply the
configuration to the email processing servers immediately. If the configuration has not been applied, the
status bar at the lower right of the MMC indicates Update pending. For more information about commit
scheduling, see Help for MailMarshal Properties > Commit Scheduling.
To check whether the email processing servers are up to date with the latest configuration you have
committed, in the left pane of the Configurator click Server and Array Configuration. The status of each
server shows Current if the server is up to date. To force an immediate update of the server configuration,
right-click the server name and select Deploy configuration.
4.2 Understanding the ConsoleThe MailMarshal Exchange Console (Console) uses MMC technology. The Console is always installed on
a standalone MailMarshal Exchange server, or on the Array Manager server and each email processing
node when you install a MailMarshal Exchange array. The Console can also be installed on other
workstations within the LAN.
Understanding MailMarshal Exchange InterfacesCopyright © 2015 Trustwave Holdings, Inc. All rights reserved. 52

MailMarshal Exchange (ECM) - User Guide - Version 7.1
The right pane of the Console is the details or results pane. When you select an item in the left pane, the
right pane changes to reflect details for that item. The right pane defaults to a taskpad view in most cases. You can export most lists of detail items (such as users or folders) to a file, by using the MMC Export List function. To
use Export List, right-click the item in the left pane and select Export List, or select the item and use the Action menu.
To start the Console, click MailMarshal Console in the MailMarshal Exchange program group. The
Console displays a quick overview of server health and statistics.
The Console also provides access to support news and updates from Trustwave, using RSS feeds from
the Trustwave website. You will be notified of the most important new items each time you open the
Console.
For more information about the features and functions of the Console, see “Using the
MailMarshal Exchange Console” on page 116.
4.3 Understanding the Web ConsoleThe MailMarshal Exchange Web Console (Web Console) uses Microsoft Internet Information Services
(IIS). The Web Console can be installed on any Microsoft IIS 5.0 or higher server that can connect to the
MailMarshal Exchange Array Manager or standalone MailMarshal Exchange server.
Note: Many items in the Console include a right-click menu that lets you choose context-sensitive actions. The items on right-click menus are also available on the toolbar and/or the taskpad for the selected item.
You can export most lists of detail items (such as folder contents, Mail History or history search results) to a file, by using the MMC Export List function. To use Export List, right-click the item in the left pane and select Export List, or select the item and use the Action menu.
Understanding MailMarshal Exchange InterfacesCopyright © 2015 Trustwave Holdings, Inc. All rights reserved. 53

MailMarshal Exchange (ECM) - User Guide - Version 7.1
The Web Console provides most functions of the MailMarshal Exchange Console. It supports Microsoft
Internet Explorer version 7 and higher. The browser must be configured to use JavaScript and to accept
cookies. You may also be able to use the Web Console with recent versions of other Web browsers.
For more information about the features and functions of the Web Console, see “Using the
MailMarshal Exchange Console” on page 116.
4.4 Understanding the Quarantine Management WebsiteThe MailMarshal Exchange Quarantine Management Website (QM Site) uses Microsoft IIS. The QM Site
can be installed on any Microsoft IIS 5.0 or higher server that can connect to the MailMarshal Exchange
server or Array Manager. It supports Microsoft Internet Explorer version 7.0 and higher. The browser must
be configured to use JavaScript and to accept cookies. The QM Site allows users to see a summary of
blocked mail, release messages, and manage a variety of settings.
4.5 Understanding Other ToolsThe MailMarshal Server Tool allows you to change various settings related to communication between
the MailMarshal Exchange server(s) and the MailMarshal Exchange database. These settings cannot be
changed from within other interfaces for technical reasons.
The Group File Import Tool allows you to import user and group information into MailMarshal Exchange
user groups from a text file. For more information, see “Using the Group File Import Tool” on page 143.
Understanding MailMarshal Exchange InterfacesCopyright © 2015 Trustwave Holdings, Inc. All rights reserved. 54

MailMarshal Exchange (ECM) - User Guide - Version 7.1
The Configuration Export Tool allows you to import and export MailMarshal Exchange configuration
information from a command line or batch file. For more information, see “Using the Configuration Export
Tool” on page 145.
The Quarantine Synchronization Tool allows you to rebuild the index of email messages that
MailMarshal Exchange has quarantined. This index is stored in the MailMarshal Exchange database. For
more information, see “Using the Quarantine Synchronization Tool” on page 146.
Understanding MailMarshal Exchange InterfacesCopyright © 2015 Trustwave Holdings, Inc. All rights reserved. 55
5 Implementing Your Email Content Security Policy
MailMarshal Exchange provides a powerful and flexible framework that allows you to enforce
an Email Content Security policy. Configure MailMarshal Exchange to support your
organizational Acceptable Use Policy for internal email usage.
An internal Email Content Security policy typically has several goals:
• To block virus infected email.
• To control who can send email through your server.
• To filter email messages and attachments according to local policies of the organization.
MailMarshal Exchange includes facilities to perform these tasks. MailMarshal Exchange is
configured by default with settings and rules that implement some best practices and common
filtering policies out of the box. This chapter gives an overview of typical policies and policy-
related tasks, and the MailMarshal Exchange elements available to accomplish each task.
5.1 Configuring Email Content SecurityConfigure email content security using the MailMarshal Exchange Configurator. For basic
information about the Configurator see “Understanding the Configurator” on page 50
Content Security policies are implemented using rules you configure as part of
MailMarshal Exchange Email Policy. These policies control the content of email messages.
For more information on email content policies, see “Stopping Viruses” on page 56, and
“Filtering Messages and Attachments” on page 59.
To work with the Configurator, click MailMarshal Configurator in the MailMarshal program
group.
5.2 Stopping VirusesBlocking virus infections at the email server is a primary goal of email content security for most
organizations. MailMarshal Exchange can scan email messages for virus infection using any
Trustwave, MailMarshal Exchange (ECM) User Guide 56
MailMarshal Exchange (ECM) - User Guide - Version 7.1
of a number of virus scanners, including McAfee for Marshal and Norman Antivirus. Nearly all
MailMarshal Exchange installations use virus scanning.
MailMarshal Exchange can use one or more scanners to check email for viruses. Because virus scanners
have differing architecture and update policies, some organizations choose to use multiple scanners.
For more information about configuring virus scanners, see “Configuring Antivirus Scanning” on page 39.
5.2.1 How MailMarshal Exchange Uses Virus ScannersMailMarshal Exchange invokes the virus scanner after unpacking all elements of an email message.
MailMarshal Exchange then passes the elements to the scanner software for analysis, and takes action
based on the result returned from the scanner.
5.2.1.1 Features
MailMarshal Exchange supports the following virus prevention and management features:
• Email antivirus scanning at the gateway: Adds a proactive layer of defense at a key strategic point in
the network.
• Multiple virus and malware scanners (optional): Increases the chances of detecting a virus and
reduces the vulnerabilities from delays in patch updates.
• Virus Cleaning (optional): Allows problem email to be cleared through to the recipient automatically.
• Virus notification and reporting: Provides email notifications of specific viruses, and comprehensive
reporting on virus incidents (including the virus names if provided by the scanner in use).
MailMarshal Exchange also provides additional features that can help with virus protection, including:
• Unpacking documents and archives
• Scanning text for keywords and suspect code
• Blocking dangerous file types
• Blocking encrypted files
5.2.1.2 Implementation Options
To work with MailMarshal Exchange, a virus scanner must have a command-line interface or a
MailMarshal Exchange DLL supplied by Trustwave. The scanner must return a documented response
Note: Before MailMarshal Exchange can use a virus scanner in email processing, you must configure it within MailMarshal Exchange.
Note: Cleaning is available only with DLL based scanners. For more information about scanner capabilities, see Trustwave Knowledge Base article Q10922.
• The cleaning option is not enabled in default rules. You can modify or add a rule to enable cleaning. For more information, see “To Set Up Virus Cleaning” on page 68.
Implementing Your Email Content Security PolicyCopyright © 2015 Trustwave Holdings, Inc. All rights reserved. 57

MailMarshal Exchange (ECM) - User Guide - Version 7.1
indicating whether or not a virus is detected. Most commercially available virus scanners meet these
specifications.
Install one or more chosen scanners on each MailMarshal Exchange email processing server (or remotely,
if the scanner supports remote access) following the manufacturer's instructions. For more information
about supported antivirus software, see “Supported Antivirus Software” on page 26. For more information
about installing virus scanners, see “Configuring Antivirus Scanning” on page 39.
5.2.2 Virus and Threats Policy and RulesThe default email policy provided with MailMarshal Exchange includes two policy groups titled Virus &
Threats (Inbound) and Virus & Threats (Outbound). These policy group include a number of rules to block
viruses.
To view the Virus & Threats policy groups:
1. In the left pane of the Configurator, expand the item Email Policy.
2. Expand the item Virus & Threats (Inbound) or Virus & Threats (Outbound).
3. View details of each rule, including a description of its intended use, by selecting the rule in the right
pane and choosing Properties from the toolbar of the MMC or the taskpad.
The default rules include rules to attempt to block virus infected email messages, to block known virus-
related messages by their content, and to implement Zero Day protection.
The rules that invoke virus scanners are disabled by default. You must install and configure at least one
virus scanner before you can enable these rules. Before you can configure and enable rules that use the
“cleaning” functions, you must install and configure a scanner that supports cleaning.
5.2.3 Best PracticesTrustwave recommends the following basic practices to ensure security with respect to viruses and virus
scanning:
• Block messages and attachments that MailMarshal Exchange cannot scan, such as password pro-
tected attachments and encrypted attachments (for example files of type ‘Encrypted Word Document’).
• Block encrypted messages that MailMarshal Exchange cannot decrypt, such as PGP and S/MIME
messages and encrypted ZIP files.
• Block executable and script files by type and name. This helps to ensure that unknown viruses will not
be passed through.
Note: Because DLL based scanners are always resident in memory, they are about 10 times faster than command line scanners. Trustwave recommends the use of DLL scanners for sites with high message traffic.
Tip: McAfee for Marshal requires installation of the McAfee for Marshal Console. This software is available in the MailMarshal Exchange installation package, or in a separate download from www.trustwave.com.
Implementing Your Email Content Security PolicyCopyright © 2015 Trustwave Holdings, Inc. All rights reserved. 58

MailMarshal Exchange (ECM) - User Guide - Version 7.1
• Subscribe to email notification lists for virus outbreaks. Such lists are available from many antivirus
software companies. When an outbreak occurs, block the offending messages by subject line or other
identifying features.
5.2.4 Viewing Virus Scanner PropertiesDouble click the name of any virus scanner in the right pane to review and change the
MailMarshal Exchange configuration information for that scanner. The fields shown will vary depending on
whether the scanner is a command line or DLL based scanner. For details of the fields, see the Help for
this window.
5.3 Filtering Messages and AttachmentsMailMarshal Exchange provides a framework that allows you to create an email policy in support of your
Acceptable Use Policy.
A MailMarshal Exchange email policy is divided into Content Analysis Policy and Dead Letter Policy. Each
of these sections contains one or more policy groups. Each policy group consists of one or more rules.
For more information about the options available when creating policy groups and rules, see
“Understanding Policy Groups” on page 61 and “Understanding Rules” on page 62.
The default email policy provided with MailMarshal Exchange contains several policy groups containing
example and best practice rules:
Virus & Threats (Inbound)
Contains rules that implement a recommended best practice for virus scanning of email messages
sent into your environment from the Internet.
Virus & Threats (Internal)
Contains rules that implement a recommended best practice for virus scanning of email messages
sent between users in your environment.
Virus & Threats (Outbound)
Contains rules that implement a recommended best practice for virus scanning of email messages
sent from your environment out to the Internet.
Attachment Management (Inbound)
Contains rules that implement a recommended best practice for filtering attachments sent into your
environment from the Internet.
Note: If resident or “on access” virus scanning is enabled, exclude the MailMarshal Exchange working folders from scanning. See “Excluding Working Folders From Virus Scanning” on page 39.
Implementing Your Email Content Security PolicyCopyright © 2015 Trustwave Holdings, Inc. All rights reserved. 59

MailMarshal Exchange (ECM) - User Guide - Version 7.1
Attachment Management (Internal)
Contains rules that implement a recommended best practice for filtering attachments sent between
users in your environment.
Attachment Management (Outbound)
Contains rules that implement a recommended best practice for filtering attachments sent from your
environment.
Policy Management (Inbound)
Contains rules to enforce your company policy for incoming email, for instance to control email con-
taining prohibited language, credit card details, or other content and attachments. These rules also
help you enforce SEC and SOC compliance.
Policy Management (Internal)
Contains rules to enforce your company policy for email between internal users, for instance to control
email containing prohibited language, credit card details, or other content and attachments. These
rules also help you enforce SEC and SOC compliance.
Policy Management (Outbound)
Contains rules to enforce your company policy for outgoing email, for instance to control email contain-
ing prohibited language, credit card details, or other content and attachments. These rules also help
you enforce SEC and SOC compliance.
Reporting (All Directions)
Contains rules that allow you to classify selected content for later reporting, without taking any other
action. Some of these rules check for the same conditions as rules in the other policy groups. If you
enable a reporting rule, to avoid confusion you should disable any other rule that checks for the same
conditions.
Message Archiving (All Directions)
Contains rules that specify how MailMarshal Exchange archives messages.
Implementing Your Email Content Security PolicyCopyright © 2015 Trustwave Holdings, Inc. All rights reserved. 60

MailMarshal Exchange (ECM) - User Guide - Version 7.1
6 Understanding Email Policy, Policy Groups, and Rules
The MailMarshal Exchange Email Policy defines how MailMarshal Exchange treats each email message
that it processes.
The Email Policy includes Content Analysis Policy and Dead Letter Policy. Each type of policy consists of
one or more policy groups. Each policy group contains one or more rules. Each rule has three parts: User
Matching, Conditions, and Actions.
MailMarshal Exchange applies Content Analysis Policy to each message. MailMarshal Exchange uses
Dead Letter Policy to handle messages that cannot be unpacked or processed due to errors in formatting.
When MailMarshal Exchange evaluates a message, it first checks the User Matching criteria for each
policy group. If a message meets the User Matching criteria for a group, MailMarshal Exchange evaluates
the message according to the User Matching and Conditions sections of each rule in the group. When a
message meets the criteria of a rule, MailMarshal Exchange applies the specified actions to the message.
6.1 Understanding Policy TypesMailMarshal Exchange email policy is divided into Content Analysis Policy and Dead Letter Policy. Each
Policy Group and Rule belongs to one of these types of policy.
6.1.1 Content Analysis PolicyMailMarshal Exchange applies Content Analysis Policy after a message has been fully unpacked. They
are processed by the MailMarshal Exchange Engine. Content Analysis Policy can evaluate a large number
of conditions, and can take a large number of quarantine and logging actions.
6.1.2 Dead Letter PolicyMailMarshal Exchange applies Dead Letter Policy when a message cannot be unpacked, or cannot be
processed, due to errors in message formatting. By default these messages are quarantined in special
folders. You can specify that some of these messages should be passed through to their original
destination.
6.2 Understanding Policy GroupsA policy group is a group of rules that share base User Matching conditions and a schedule of times when
they apply. When MailMarshal Exchange is processing email, the conditions defined for a policy group
must be met before any rule in that policy group is evaluated.
You can choose to use just a few policy groups, or many. For example, you could use one policy group to
contain rules that apply to all messages outbound from the organization, and another policy group to
contain rules that apply to all inbound messages. If your organization is divided into departments, you can
also use policy groups to group rules governing email to and from each department.
Some default policy groups and rules are provided with MailMarshal Exchange. You should make changes
and additions to meet your needs. Trustwave recommends a minimum of two policy groups: one for
incoming email and one for outgoing email.
Understanding Email Policy, Policy Groups, and RulesCopyright © 2015 Trustwave Holdings, Inc. All rights reserved. 61

MailMarshal Exchange (ECM) - User Guide - Version 7.1
If you have more than one policy group, you can choose the order in which MailMarshal Exchange
processes the groups.
You can set a schedule for a policy group. Any rules in the policy group will only be enabled at the
scheduled times. You can choose to apply one or more of three different scheduling options:
• A repeating weekly schedule
• An absolute starting date and time
• An absolute ending date and time
To create a policy group:
1. In the left pane of the Configurator, select Email Policy.
2. Choose New policy group from the Action menu.
3. In the top pane on the Filtering Conditions window, select the User Matching conditions for this policy
group.
4. The bottom pane of the Filtering Conditions window displays the conditions you have selected. If
MailMarshal Exchange needs more information to define a condition, the description of the condition
includes a hyperlink. Click the hyperlink to open a rule condition window that allows you to enter the
required information.
5. On the Group Completion window, enter a name and optional schedule information for this policy
group.
6.3 Understanding RulesMailMarshal Exchange applies rules after a message has been retrieved through the Transport Agent.
They are processed by the MailMarshal Exchange Engine.
6.3.1 Creating RulesYou can create as many rules as you need to implement your content security policy.
To create a rule:
1. In the left pane of the Configurator, select a policy group within Content Analysis Policy or Dead Letter
Policy.
2. Choose New Rule from the action menu.
Note: Scheduling is not available for Dead Letter Policy Groups.
Understanding Email Policy, Policy Groups, and RulesCopyright © 2015 Trustwave Holdings, Inc. All rights reserved. 62

MailMarshal Exchange (ECM) - User Guide - Version 7.1
3. In the top pane on the User Matching window, select the User Matching conditions for this rule.
4. The bottom pane on the window displays the conditions you have selected. If MailMarshal Exchange
needs more information to define a condition, the description of the condition includes a hyperlink.
Click the hyperlink to open a window that allows you to enter the required information.
5. To continue to the Rule Conditions window, click Next.
6. In the top pane on the Rule Conditions window, select the conditions for this rule.
7. In the bottom pane on the window, review the conditions you have selected and specify any additional
information required as for Step 5.
8. To continue to the Rule actions window, click Next.
9. In the top pane on the Rule Actions window, select the actions for this rule.
10. In the bottom pane on the window, review the actions you have selected and specify any additional
information required as for Step 5.
Understanding Email Policy, Policy Groups, and RulesCopyright © 2015 Trustwave Holdings, Inc. All rights reserved. 63

MailMarshal Exchange (ECM) - User Guide - Version 7.1
11. On the Rule Completion window, enter a name and optional description for this policy rule. To create
the rule and complete the wizard, click Finish.
6.4 Understanding User MatchingMailMarshal Exchange performs user matching using the SMTP email addresses associated with a
message. When you create policy groups and rules, you can include a number of User Matching
conditions. User Matching conditions can refer to individual SMTP addresses, wildcard patterns of
addresses, and user groups.
All the User Matching conditions in a policy group or rule must match (evaluate true) in order for
MailMarshal Exchange to evaluate any other rule conditions.
The available User Matching conditions include the following:
Where message is incoming
Matches if the message is addressed to a domain that is included in the MailMarshal Exchange Local
Domains list.
Where message is outgoing
Matches if the message is addressed to a domain that is not included in the MailMarshal Exchange
Local Domains list.
Where message is internal
Matches if the message is addressed to a domain that is included in the MailMarshal Exchange Local
Domains list, AND from a domain that is included in the Local Domains list.
Understanding Email Policy, Policy Groups, and RulesCopyright © 2015 Trustwave Holdings, Inc. All rights reserved. 64
MailMarshal Exchange (ECM) - User Guide - Version 7.1
Where addressed to people
Matches if a recipient of the message is found in the list of people specified.
Where addressed from people
Matches if the sender of the message is found in the list of people specified.
Where addressed either to or from people
Matches if a recipient or sender of the message is found in the list of people specified.
Where addressed both to and from people
Requires two lists of people. Matches if the sender of the message is found in the first list of people
specified, and the recipient of the message is found in the second list of people specified.
Except where addressed to people
Matches if no recipient of the message is found in the list of people specified.
Except where addressed from people
Matches if the sender of the message is not found in the list of people specified.
Except where addressed either to or from people
Matches if no recipient or sender of the message is found in the list of people specified.
Except where addressed both to and from people
Requires two lists of people. Matches if the sender of the message is not found in the first list of people
specified, and no recipient of the message is found in the second list specified. “Except” matching cri-
teria are the key to creating exception based policies. Rules that apply to all recipients with the excep-
tion of small specific groups help to ensure that security policies are uniformly applied. For instance, a
rule might apply Where the message is incoming except where addressed to Manag-ers.
6.5 Understanding Rule ConditionsMailMarshal Exchange evaluates other rule conditions after any User Matching conditions. In general
MailMarshal Exchange will only apply the rule actions to a message if all rule conditions evaluate true.
Note: Whenever a condition requires a list of “people”, the list can contain individual email addresses, wildcard patterns to match sets of addresses such as domains, and MailMarshal Exchange user groups.
• For more information about wildcard characters, see Appendix A, “Wildcards and Regular Expressions.”
• For more information about which email addresses in a message MailMarshal Exchange checks, see Trustwave Knowledge Base article Q12238.
Understanding Email Policy, Policy Groups, and RulesCopyright © 2015 Trustwave Holdings, Inc. All rights reserved. 65

MailMarshal Exchange (ECM) - User Guide - Version 7.1
You can choose one or more rule conditions when you create or edit a rule in the Configurator. If the
condition includes options, arguments, or variables, you can click a hyperlink in the rule wizard to open a
window that allows you to specify values.
6.5.1 Rule Conditions for Content Analysis Policy RulesThe following conditions are available for use in Content Analysis Policy rules. They are further explained
in the sections following:
• Where the result of a virus scan is
• Where message attachment is of type
• Where attachment fingerprint is/is not known
• Where message size is
• Where the estimated bandwidth required to deliver this message is
• Where message contains attachment(s) named (file names)
• Where message triggers text censor script(s)
• Where the external command is triggered
• Where attachment parent is of type
• Where message attachment size is
• Where number of recipients is count
• Where message contains one or more headers (header match)
• Where number of attachments is count
• Where message is categorized as category
• Where the attached image is/is not/may be inappropriate
Note: In a single rule, an AND relationship exists between multiple conditions. If a single rule includes multiple conditions, they must all evaluate true for the rule action to be taken. To match any of several conditions, place each one in its own rule. To create OR relationships between conditions, create a separate rule for each condition.
Understanding Email Policy, Policy Groups, and RulesCopyright © 2015 Trustwave Holdings, Inc. All rights reserved. 66

MailMarshal Exchange (ECM) - User Guide - Version 7.1
6.5.1.1 Where the result of a virus scan isThis condition allows you to select from the virus scanning and cleaning features available in
MailMarshal Exchange. Use the rule condition window to choose the desired virus scanning action and the
results to be checked for.
You can choose the virus scanners MailMarshal Exchange uses when processing this condition.
• All Scanners: MailMarshal Exchange uses all configured virus scanners to scan all parts of the mes-
sage and attachments. This option is the equivalent of virus scanning rules in
MailMarshal Exchange5.0 and earlier versions.
• Specific scanners: To limit the virus scan to specific installed scanners, choose this option then select
the desired scanners from the list. MailMarshal Exchange uses the scanners you select. This setting
can be useful if only some installed scanners support virus cleaning.
You can choose the scanner results that will cause this condition to trigger. To choose options, select the
appropriate boxes on the Select Virus Scanner Results window.
• Contains Virus: The condition will trigger if any part of the message contains a virus. This is the basic
condition.
• ...and is Cleaned: When you select this item, the condition will only trigger if the code returned indi-
cates that the virus was cleaned. This condition can be used in a Clean Viruses rule. You cannot
choose this option if any non-DLL scanners are selected.
For further information about setting up virus cleaning rules, see the next section.
• ...and Name Matches: When you select this item, the condition will only trigger if the name of the virus
as returned by the scanner matches the text in the field. You can use this condition to modify the
MailMarshal Exchange response based on certain virus behaviors. For instance you can choose not to
Understanding Email Policy, Policy Groups, and RulesCopyright © 2015 Trustwave Holdings, Inc. All rights reserved. 67

MailMarshal Exchange (ECM) - User Guide - Version 7.1
send notifications to the sender address for viruses known to spoof the “from” address. You can use
wildcard characters when you enter virus names. For more information, see “Wildcard Characters” on
page 154 and “Regular Expressions” on page 155.
• Password Protected: When you select this item, the condition will trigger if the scanner reports the
file as password protected.
• File is corrupt: When you select this item, the condition will trigger if the scanner reports the file as
corrupt.
• Virus scanner signatures out of date: When you select this item, the condition will trigger if the scan-
ner reports its signature files are out of date.
• Could not fully unpack or analyze file: When you select this item, the condition will trigger if the
scanner reports that it could not unpack the file.
• Unexpected scanner error: When you select this item, the condition will trigger if the scanner reports
an unknown error or the code returned is unknown.
6.5.1.1.1 To Set Up Virus Cleaning
If you want MailMarshal Exchange to attempt to “clean” viruses from email messages, you must install at
least one DLL based virus scanner and set up two rules. The default configuration for new installations of
MailMarshal Exchange includes appropriate rules.
The first rule must have these options selected:
• Contains Virus
• ...and is Cleaned
The second rule must be a standard virus blocking rule, using the option Contains Virus and invoking a
move to a quarantine folder or other blocking action.
If a virus cannot be cleaned, MailMarshal Exchange takes the following actions:
1. MailMarshal Exchange applies the rest of the email policy.
2. If no quarantine (move to folder) or other blocking rule has been triggered after all rules have been
applied, MailMarshal Exchange deadletters the affected message.
3. The message log and MailMarshal Exchange Engine log will indicate that the message still contains a
virus.
Note: The detailed failure results depend on return codes provided by the individual scanner vendors.
With the exception of Contains Virus and Unexpected scanner error, the virus scanning features listed on the rule condition window can only be used with DLL based scanners. If you attempt to select options that are not supported by the scanners you have selected, MailMarshal Exchange will not allow you to save your selections.
Use the option “Unexpected scanner error” to specify an action MailMarshal Exchange should take when the code returned by the scanner is not known to MailMarshal Exchange. If this option is not selected in a rule condition, an unexpected return code will result in the message being dead lettered. For command line scanners, configure the list of return codes in the virus scanner properties. For more information about virus scanner properties, see “Using Virus Scanning” on page 104.
Understanding Email Policy, Policy Groups, and RulesCopyright © 2015 Trustwave Holdings, Inc. All rights reserved. 68

MailMarshal Exchange (ECM) - User Guide - Version 7.1
4. If you choose to forward or process the affected message, MailMarshal Exchange displays a warning
indicating that the message contains a virus.
6.5.1.2 Where message attachment is of type
MailMarshal Exchange checks the structure of all attached files to determine their type.
MailMarshal Exchange can recognize over 175 types as of this writing.
The rule condition window provides a listing of file types organized by category. To select an entire
category, select the check box associated with the category. To select individual types within a category,
expand the category and select the check boxes associated with each type.
6.5.1.3 Where attachment fingerprint is/is not known
The “fingerprint” identifies a specific file (such as a particular image). The rule condition window allows you
to choose to base the condition on fingerprints which are known or unknown.
To add a file to the list of “known” files, use the “add to valid fingerprints” rule action, or the “add
fingerprints” option in the Console when releasing a message.
To delete a file from the list of “known” files, locate the file. It will be present on one or more of the
MailMarshal Exchange email processing servers in the ValidFingerprints subfolder of the
MailMarshal Exchange installation folder. Delete the file from this location on all servers then commit the
MailMarshal Exchange configuration.
Files can also be “made known” by placing them in the ValidFingerprints sub-folder of the Quarantine
folder on any email processing server. MailMarshal Exchange loads these fingerprints every 5 minutes,
and when configuration is committed. For further information about this process, see Trustwave
Knowledge Base article Q10543.
6.5.1.4 Where message size is
MailMarshal Exchange uses the size of the entire message, before unpacking, in this condition. The rule
condition window allows you to choose a size and matching method (greater than a given size, less than a
Note: You can enter additional custom types by entering signature information in a configuration file. For information about the required procedures and structure of the file, see Trustwave Knowledge Base article Q10199.
Tip: The attachment fingerprint ability is intended to be used for a small number of images. If you add large numbers of files, MailMarshal Exchange performance will be affected.
This option can be useful to exclude certain images, such as corporate logos or signatures, from triggering quarantine rules. It is not intended as an anti-spam option.
For example to take action only on images that are not in the list of known images, use the following conditions:
When a message arrivesWhere message attachment is of type IMAGEAnd where attachment fingerprint is not known
Understanding Email Policy, Policy Groups, and RulesCopyright © 2015 Trustwave Holdings, Inc. All rights reserved. 69

MailMarshal Exchange (ECM) - User Guide - Version 7.1
given size, between two sizes, not between two sizes, equal to or not equal to a size). If you choose to
match between two sizes the matching is inclusive.
6.5.1.5 Where the estimated bandwidth required to deliver this message is
MailMarshal Exchange calculates the bandwidth required to deliver a message by multiplying the message
size by the number of unique domains to which it is addressed. The rule condition window allows you to
choose a total bandwidth and matching method (greater than a given size, less than a given size, between
two sizes, not between two sizes, equal to or not equal to a size). If you choose to match “between” two
sizes the matching is inclusive.
One use of this criterion is to move high-bandwidth messages to a “parking” folder for delivery outside
peak hours. Another use is to reject high-bandwidth messages.
6.5.1.6 Where message contains attachments named
Use this condition to block files by extension, by specific file name, or by a wildcard pattern of the file
name.
You can enter a list of file names in the rule condition window. When you enter information, you can use the
wildcard characters asterisk (*) and question mark (?). For example, the following are valid entries:
*.SHS;*.VBS;*.DO?
You can use this condition to quickly block dangerous file types such as VBS, or known virus attachments
such as “creative.exe”. However, the condition checks only the file name and not the contents of the file.
Use the condition “Where message attachment is of type” to check files by structure.
6.5.1.7 Where message triggers text censor script(s)
This condition checks textual content in some or all parts of the message and its attachments, depending
on the settings defined in the specific script.
In the rule condition window, you can select a TextCensor script to be used in evaluating the message. You
can add a script or edit an existing script. For detailed information about Scripts, see “Identifying Email Text
Content Using TextCensor Scripts” on page 88.
6.5.1.8 Where the external command is triggered
This option allows you to select one or more external commands MailMarshal Exchange uses to test the
message. External commands can be executable programs or batch files. In the rule condition window,
specify the commands. If more than one command is specified, all commands must be triggered for this
condition to be triggered. For more information about external commands see “Extending Functionality
Using External Commands” on page 112.
Note: MailMarshal Exchange checks the size of the received message in its encoded format. This is typically 33% larger than the size reported by an email client.
Note: You can include more than one TextCensor script in this condition by selecting multiple boxes in the rule condition window. If you include more than one script, all included scripts must trigger for the rule to be triggered.
Understanding Email Policy, Policy Groups, and RulesCopyright © 2015 Trustwave Holdings, Inc. All rights reserved. 70

MailMarshal Exchange (ECM) - User Guide - Version 7.1
6.5.1.9 Where attachment parent is of typeThis condition is intended to be used with the condition “Where message attachment is of type.” When this
condition is selected, MailMarshal Exchange considers the file type of the immediate parent container as
well as that of the attachment. For instance, you can check whether an image is contained in a MS Word
document.
The rule condition window provides a listing of available parent types organized by category. To select an
entire category, select the check box associated with the category. To select individual types within a
category, expand the category and select the check boxes associated with each type. You can also choose
to apply the condition to types in or out of the selected list. For instance, you can check that an image is not
contained in a Word document.
6.5.1.10 Where message attachment size is
This condition checks the size of each attachment separately after all unpacking and decompression is
complete. The size of an attachment can be greater than the size of the original message, due to
decompression of archive files. The rule condition window allows you to choose a size and matching
method (greater than a given size, less than a given size, between two sizes, not between two sizes, equal
to or not equal to a size). If you choose to match “between” two sizes the matching is inclusive.
6.5.1.11 Where number of recipients is count
This condition checks the number of SMTP recipient addresses in a message. It is typically used to block
messages with large recipient lists as suspected spam. The rule condition window allows you to choose a
number and matching method (greater than a given number, less than a given number, between two
numbers, not between two numbers, equal to or not equal to a number). If you choose to match “between”
two numbers the matching is inclusive.
6.5.1.12 Where message contains one or more headers
This condition can be used to check for the presence, absence, or content of any message header,
including custom headers. You can use this condition to check for blank or missing headers, or to reroute
email.
Tip: You can check for well known attachments, such as signature images in documents, using the condition “Where attachment fingerprint is/is not known.”
Understanding Email Policy, Policy Groups, and RulesCopyright © 2015 Trustwave Holdings, Inc. All rights reserved. 71

MailMarshal Exchange (ECM) - User Guide - Version 7.1
Within the rule condition window, click New to create a new header match rule using the Header Matching
Wizard. For more information about this Wizard, see “Using Rules to Find Headers” on page 108.
You can check more than one header match in a single condition. If you check more than one match, all
matches must be true for the condition to be true (logical “and”). To match any of several header conditions
(logical “or”), include more than one rule with one condition per rule.
To edit any Header Match condition (or view its details), highlight it, and then click Edit to restart the
Header Matching Wizard. To delete a Header Match condition, highlight it, and then click Delete.
6.5.1.13 Where number of attachments is countThis condition is typically used to block messages with large numbers of attachments. The number of
attachments can be counted using top level attachments only, or top level attachments to email messages
including any attached messages, or all attachments at all levels.
The rule condition window allows you to choose a number and matching method (greater than a given
number, less than a given number, between two numbers, not between two numbers, equal to or not equal
to a number). If you choose to match “between” two numbers the matching is inclusive.
6.5.1.14 Where message is categorized as category
This condition allows action to be taken on messages that trigger a category script. Select one or more
categories using the rule condition window.
Note: You can only use Header Match conditions within the rule where you create them. To use the same condition in more than one rule, create it in each rule.
Note: “Top level attachments” are the files explicitly attached by name to an email message. Other files, such as the contents of a zip archive or images within a MS Word document, may be contained within the top-level attachments.
Understanding Email Policy, Policy Groups, and RulesCopyright © 2015 Trustwave Holdings, Inc. All rights reserved. 72

MailMarshal Exchange (ECM) - User Guide - Version 7.1
If a category includes multiple types (sub-categories), you can choose to include or exclude sub-types. To
make a condition based on types, select (highlight) the parent item in the category list, check the
associated box, select Filter by type, then select one or more items from the type list.
You can also choose to exclude subtypes by clicking the option Where type is ANY except.
MailMarshal Exchange can automatically download updates to category scripts.
You can create and customize your own category scripts. Some example category scripts are provided
with MailMarshal Exchange. For more information, see the Trustwave Knowledge Base.
6.5.1.15 Where the attached image is/is not/may be inappropriate
This condition allows you to take action on a message based on the result of analysis of attached images
by Image Analyzer (an optional component licensed separately).
MailMarshal passes the following types of files that it unpacks from a message to Image Analyzer for
analysis:
• Files MailMarshal recognizes as IMAGE types
• Binary files of unknown type.
Note: If Filter by type cannot be selected, no sub-categories are available for the category you have highlighted.
Note: You cannot select this rule condition if Image Analyzer is not licensed.
If the Image Analyzer license expires while this condition is selected, images will not be scanned by Image Analyzer. In this case the MailMarshal Engine log will show that Image Analyzer has not been used because it is not licensed.
Understanding Email Policy, Policy Groups, and RulesCopyright © 2015 Trustwave Holdings, Inc. All rights reserved. 73

MailMarshal Exchange (ECM) - User Guide - Version 7.1
Image Analyzer actually scans files of the following types: BMP, DIB, JPEG, JPG, JPE, J2K, JBG, JPC,
PNG, PBM, PGM, PPM, SR, RAS, TIFF, TIF, GIF, TGA, WMF, PGX, PNM, RAS. For more information see
Trustwave Knowledge Base article Q11622.
In the rule condition window, select the detailed criteria for this condition.
The attached image is inappropriate:
Specifies that the condition will trigger if Image Analyzer returned a score higher than the “inappropri-
ate above” setting.
The attached image may be inappropriate:
Specifies that the condition will trigger if Image Analyzer returned a score between the “appropriate
below” and the “inappropriate above” setting.
The attached image is not inappropriate:
Specifies that the condition will trigger if Image Analyzer returned a score below the “appropriate
below” setting.
Understanding Email Policy, Policy Groups, and RulesCopyright © 2015 Trustwave Holdings, Inc. All rights reserved. 74

MailMarshal Exchange (ECM) - User Guide - Version 7.1
Click Settings to open the Image Analysis Settings window. This window allows you to configure
advanced settings for Image Analyzer.
You can choose from the following basic detection settings:
Normal:
Specifies that the default Image Analyzer triggering levels should be used.
High:
Specifies that high sensitivity Image Analyzer triggering levels should be used. This setting detects
more objectionable content, but also produces more false positive results.
Custom:
Allows you to set the Image Analyzer triggering levels using the slider controls, and to set advanced
options using the control in the Settings section.
• Appropriate below: Specifies the maximum Image Analyzer return value that causes an image to
be classified as “appropriate” (not likely to be pornographic). The default value is 49.
• Inappropriate above: Specifies the minimum Image Analyzer return value that causes an image
to be classified as “inappropriate” (likely to be pornographic). The default value (Normal mode) is
75.
You can further tune Image Analyzer with one advanced option. The default setting has been selected after
extensive testing.
Engine sensitivity:
Allows you to tune the sensitivity of the Image Analyzer engine. Reduce this value if a low false posi-
tive rate is more important than letting some offensive images through.
Understanding Email Policy, Policy Groups, and RulesCopyright © 2015 Trustwave Holdings, Inc. All rights reserved. 75

MailMarshal Exchange (ECM) - User Guide - Version 7.1
6.5.2 Rule Conditions for Dead Letter Policy RulesThe following conditions are available for use in Dead Letter Policy rules:
• Where the dead letter reason contains
6.5.2.1 Where the Dead Letter reason contains
This condition allows you to enter text that MailMarshal Exchange will match in the Dead Letter Reason
field of a deadlettered message. You can choose to allow a deadlettered message to be passed through to
recipients. For a list of the reason codes, see Trustwave Knowledge Base article Q14226.
6.6 Understanding Rule ActionsMailMarshal Exchange rule actions are performed by rules. MailMarshal Exchange performs the actions if
the user matching criteria and the other conditions of the rule evaluate true.
You can include more than one action in a MailMarshal Exchange rule. MailMarshal Exchange can also
apply more than one set of actions to a message if more than one rule triggers. However, some actions are
terminal actions. If a terminal action is performed, MailMarshal Exchange stops processing rules for the
affected message.
6.6.1 Rule Actions for Content Analysis Policy RulesThe following actions are available for selection in Content Analysis Policy rules. Details of each action are
given in the test following.
• Copy the message to folder with release action
• BCC a copy of the message
• Run the external command
• Send a notification message
• Strip attachment
• Write log message(s) with classifications
• Stamp message with message stamp
• Rewrite message headers
• Add attachments to valid fingerprints list
• Add message users into group
• Move the message to folder with release action (terminal action)
• Park the message (terminal action)
• Delete the message (terminal action)
• Pass the message to rule
Understanding Email Policy, Policy Groups, and RulesCopyright © 2015 Trustwave Holdings, Inc. All rights reserved. 76
MailMarshal Exchange (ECM) - User Guide - Version 7.1
6.6.1.1 Copy the messageThis action copies the email message file to the specified quarantine folder. You can make the message
processing log available in the same folder by selecting the check box at the bottom of the window. The
message log showing how the message was processed will then be available in the Console.
You can specify how MailMarshal Exchange will process the message by default if it is released from this
folder. Click the Release action link to specify the action. By default when a message is released,
MailMarshal Exchange continues processing with the rule immediately after the rule that moved the
message. For more information, see Help for the Release Action window.
When you select this action you can create a new folder. To create a folder, click New Folder. For more
information see “Using Email Folders and Message Classifications” on page 105.
6.6.1.2 BCC a copy of the message
This action sends a blind copy of the message to one or more email addresses. Enter each address as a
complete SMTP address (for example [email protected]). Separate multiple entries using semi-
colons. You can also use variables in this field. The original message will not be modified in any way by this
action, so the original recipient would not know a copy had been taken..
6.6.1.3 Run the external command
This action runs an external application. The application can be a Windows executable or batch file. For
instance, an external command to release a message from quarantine is included with
MailMarshal Exchange.
Choose one or more commands to be run from the list of pre-defined external commands. For information
about defining external commands, see “Extending Functionality Using External Commands” on page 112.
To run the same application with different parameters under different conditions, use more than one
external command definition.
6.6.1.4 Send a notification messageThis action sends one or more email messages based on the templates selected in the rule action window.
To view or edit the details of a particular template, select it, and then click Edit Template. To create a new
template, click New Template. The new template will automatically be selected for use when you return to
the template selection window. For further information about templates, see “Notifying Users with Message
Templates and Message Stamps” on page 95.
Tip: You can use this action in combination with “delete the message” to effectively redirect a message to a different recipient.
Understanding Email Policy, Policy Groups, and RulesCopyright © 2015 Trustwave Holdings, Inc. All rights reserved. 77
MailMarshal Exchange (ECM) - User Guide - Version 7.1
6.6.1.5 Strip attachmentThis action removes one or more specific attachments from a message. Only the attachments that
triggered the rule conditions for this rule will be stripped. This action would typically be used to remove
attachments of specific file types or file names.
6.6.1.6 Write log message(s) with classificationsThis action writes a record classifying this message to the MailMarshal Exchange database.
Select one or more logging classifications from the list in the rule action window. Select the check box to
write a logging classification for every component of the message (for example a separate record for each
image file in a message). To view or edit the detailed information in the classification, click Edit in the
selection window. To create a new classification, click New in the selection window. For details on
classifications, see “Using Email Folders and Message Classifications” on page 105.
6.6.1.7 Stamp message with text
This action adds text to the top or bottom of the original message body.
In the rule action window, choose one or more message stamps to be used. A stamp will add text at the top
or bottom of the message as selected when it is created. To view or edit the details of a particular message
stamp, select it, and then click Edit Stamp. To create a new stamp, click New Stamp; the new message
stamp will automatically be selected when you return to the stamp selection window. For details on
message stamps, see “Notifying Users with Message Templates and Message Stamps” on page 95.
6.6.1.8 Rewrite message headers
Use this action to modify, add, or delete any message header, including custom headers. You can repair
blank or missing headers, insert a notification into the subject, or reroute email.
Note: MailMarshal Exchange does not save stripped attachments. If you use this action, normally you should copy the original message so that you can retrieve the attachment if necessary. You should stamp the message to inform the recipient that an attachment has been stripped.
You can use this action in combination with a virus detection condition to strip infected attachments and allow the message to be delivered. To ensure that the message no longer contains a virus, you must include another virus scanning rule to run after the stripping action. Otherwise MailMarshal Exchange treats the message as possibly infected and will move it to the Dead Letter\Virus folder.
Tip: If a rule moves the message to a folder, MailMarshal Exchange automatically logs a classification for the message. In this case, usually you do not need to include a classification action as well.
Understanding Email Policy, Policy Groups, and RulesCopyright © 2015 Trustwave Holdings, Inc. All rights reserved. 78

MailMarshal Exchange (ECM) - User Guide - Version 7.1
Within the rule action window, click New to create a new header rewrite rule using the Header Rewrite
Wizard. For more information about this Wizard see “Using Rules to Change Headers” on page 108.
You can include more than one Rewrite rule in the same action. If you include more than one Rewrite rule,
the order of application of the rules can be significant. The rules listed first in the Header Rewrite window
will be evaluated first. Adjust the order of evaluation by selecting a rule and using the up and down arrows
on the window.
6.6.1.9 Add attachments to valid fingerprints list
This action adds the attachments to the MailMarshal Exchange list of “valid fingerprints” (normally used for
images or other files which require special treatment, such as company logos). In the rule action window,
choose whether to add all attachments, or only images, to the list. For more information, see the rule
condition “Where attachment fingerprint is/is not known.”
6.6.1.10 Add message users into groupThis action allows you to add members to a MailMarshal Exchange user group based on any rule criteria,
such as the sender or recipients of a message. You can use this action to automate the generation of lists
of safe senders or blocked senders, based on other features of messages.
In the rule action window, select one or more groups MailMarshal Exchange should add users to. Choose
whether to add the sender or recipients.
You can create a new group by clicking New Group.
Note: Header Rewrite rules are only available within the rule where they are created. To perform the same action in more than one rule, create a Header Rewrite rule in each place.
Note: When you use this action to add members to a group, you should consider enabling automatic pruning to limit the size of the group. See “Pruning a MailMarshal Exchange Group” on page 87.
Understanding Email Policy, Policy Groups, and RulesCopyright © 2015 Trustwave Holdings, Inc. All rights reserved. 79

MailMarshal Exchange (ECM) - User Guide - Version 7.1
6.6.1.11 Move the messageThis action moves the email message file to the specified quarantine folder. To make the message
processing log available in the same folder, select the check box at the bottom of the rule action window.
The message log explaining how the message was processed will then be available in the Console. If a
new folder is required, click New Folder to start the New Folder Wizard.
You can specify how MailMarshal Exchange will process the message by default if it is released from this
folder. Click the Release action link to specify the action. By default when a message is released,
MailMarshal Exchange continues processing with the rule immediately after the rule that moved the
message. For more information, see Help for the Release action window.
This is a terminal action. MailMarshal Exchange does not process any further rules for a message if this
action is performed (unless the message is later released).
6.6.1.12 Park the message
This action moves the email message file to the specified parking folder for release according to the
schedule associated with that folder. To create a new folder with a different schedule, click New Folder to
start the New Folder Wizard.
This is a terminal action. If this action is performed, MailMarshal Exchange does not process any further
rules for a message until the message is released from the parking folder. When a message is released
from a parking folder, MailMarshal Exchange continues processing with the rule after the rule that parked
the message.
6.6.1.13 Delete the message
This action deletes the email message file. The message will not be sent to its original destination.
When you select this action, you can choose not to create an entry in the MailMarshal SQL logging
database for the deleted message. By default MailMarshal logs information about deleted messages so
that you can report on the reasons for deletions.
This is a terminal action. MailMarshal Exchange does not process any further rules for a message if this
action is performed.
6.6.1.14 Pass the message to ruleIf no “terminal” rule action has been taken, this action allows a choice of which further rules to apply.
Several choices are available in the rule action window:
• Skip the next rule (do not apply it).
• Skip to the next policy group (do not apply further rules in this policy group).
• Skip all remaining rules (pass the message through to the intended recipients).
Caution: If you choose not to create a SQL database entry, you will reduce database usage, but you will seriously affect your ability to audit MailMarshal activity. Trustwave recommends that you create SQL entries.
Understanding Email Policy, Policy Groups, and RulesCopyright © 2015 Trustwave Holdings, Inc. All rights reserved. 80

MailMarshal Exchange (ECM) - User Guide - Version 7.1
• Skip to a specific policy group or rule.
When skipping to a rule in a different policy group, remember that the parent policy group conditions can
prevent its having any effect. For instance, skipping from the MailMarshal Exchange default Content
Security (Inbound) policy group to the Content Security (Outbound) policy group is allowed, but rules in the
Outbound policy group will have no effect on inbound messages.
6.6.2 Rule Actions for Dead Letter Policy RulesThe following actions are available for use in Dead Letter Policy rules:
• Pass message through to recipients
6.6.2.1 Pass message through to recipientsThis action allows you to specify that a deadlettered message should be passed through to recipients. You
can base this action on user matching and Dead Letter Reason conditions.
6.7 Understanding the Order of EvaluationThe order in which MailMarshal Exchange evaluates policy groups and rules can affect the outcome of
processing for a message. This is usually due to “terminal” actions that stop MailMarshal Exchange
processing further rules for a given message.
For instance, by default MailMarshal Exchange evaluates virus scanning rules first. If a scanner reports a
virus MailMarshal Exchange quarantines the message immediately. In this case MailMarshal Exchange
does not perform any additional processing on the message.
MailMarshal Exchange evaluates policy groups and rules in “top down” order as it displays them in the
Configurator.
6.7.1 Adjusting the Order of Evaluation of Policy GroupsYou can change the order of evaluation by changing the order of the policy group listing in the Configurator.
To adjust the order of evaluation of policy groups:
1. Select a policy type (Content Analysis Policy or Dead Letter Policy) in the left pane.
2. Select a policy group in the right pane.
3. Move the group up or down using the arrows in the toolbar or taskpad header.
4. Commit the MailMarshal Exchange configuration to effect the change in order.
6.7.2 Adjusting the Order of Evaluation of RulesYou can change the order of evaluation by changing the order of the rule listing in the Configurator.
To adjust the order of evaluation of rules:
Note: It is only possible to skip to a rule which is evaluated after the current rule. The order of evaluation can be changed. See “Understanding the Order of Evaluation” on page 81.
Understanding Email Policy, Policy Groups, and RulesCopyright © 2015 Trustwave Holdings, Inc. All rights reserved. 81
MailMarshal Exchange (ECM) - User Guide - Version 7.1
1. Expand a policy group.
• To move a rule up or down within the policy group, use the arrows in the toolbar or taskpad header.
• To duplicate a rule, select it and then right-click and select Duplicate.
• To move or copy rules to another policy group, select one or more rules and then right-click and
select Copy To.
2. Commit the MailMarshal Exchange configuration to effect the change in order.
6.8 Viewing Email PolicyYou can list the entire email policy or a policy group in a format suitable for printing or copying to a file. For
each rule, the listing shows the rule name, a verbose description, and a detailed listing of conditions and
actions. The listing also indicates whether the rule is disabled.
To print or copy a listing of the email policy or a policy group:
1. In the left pane of the Configurator, select Email Policy or a named policy group.
2. On the Action menu, choose Print.
3. MailMarshal Exchange presents the selected items in a print preview window.
4. To print the window contents, click the Print icon on the print preview window toolbar. You can also
copy part or all of the window contents to the Clipboard using standard Windows commands.
Note: If you have configured any rules with “Pass message to rule” or “Move/Copy to folder with release action”, MailMarshal Exchange checks for possible processing loops. To prevent problems, MailMarshal Exchange will disallow moving the rules, or disable some affected rules.
• You can move or copy a referring rule (a rule that includes one of the above actions).
• If you move or copy the referring rule to a policy group below the rule that is the target of the reference, MailMarshal Exchange disables the rule and raises a warning. Edit the rule to correct the action, and then re-enable it.
• You cannot move a target rule above a rule that refers to it.
• If you copy a target rule, the original rule remains in place and any copies are not targets, unless you copy the referring rule and the target in the same operation.
You can select both a referring rule and target rule, and copy them to another policy group. MailMarshal updates the references in the copies, so that the new referring rule refers to the new target.
Understanding Email Policy, Policy Groups, and RulesCopyright © 2015 Trustwave Holdings, Inc. All rights reserved. 82

MailMarshal Exchange (ECM) - User Guide - Version 7.1
7 Understanding Email Policy Elements
Email policy elements are building blocks you can use when you create MailMarshal Exchange policy
groups and rules. These elements help you to specify complex rule conditions and rule actions.
Some examples of each type of element are provided by default when MailMarshal Exchange is installed.
These examples are used in the default email policy.
You can edit the existing elements or create new ones to support your policy requirements.
The following types of elements are available:
Connectors
Allow you to import user and group information from Active Directory or LDAP servers. For more infor-
mation, see “Configuring Connectors” on page 84.
User Groups
Allow you to apply policy based on email addresses. MailMarshal Exchange can retrieve groups from
Active Directory or LDAP servers. You can also create local groups and enter members using wildcard
characters.
MailMarshal Exchange uses two types of groups: MailMarshal Exchange groups and Imported groups.
MailMarshal Exchange groups contain users and groups that you specify directly. Imported groups
contain users and groups that you import from Microsoft Active Directory servers or LDAP servers. For
more information, see “Configuring User Groups” on page 85.
TextCensor Scripts
Allow you to apply policy based on the textual content of email messages and attachments. You can
create complex conditions using weighted combinations of Boolean and proximity searches. For more
information, see “Identifying Email Text Content Using TextCensor Scripts” on page 88.
Message Templates and Message Stamps
Allow you to notify email users and administrators about MailMarshal Exchange actions, and insert
disclaimers and confidentiality statements. You can include specific information about a message
using variables. For more information, see “Notifying Users with Message Templates and Message
Stamps” on page 95.
Virus Scanners
Allow you to check email messages for virus content. If a virus is found in a message you can attempt
to clean it. For more information, see “Using Virus Scanning” on page 104.
Understanding Email Policy ElementsCopyright © 2015 Trustwave Holdings, Inc. All rights reserved. 83

MailMarshal Exchange (ECM) - User Guide - Version 7.1
Email Folders and Message Classifications
Allow you to quarantine or copy messages, or simply to record the results of MailMarshal Exchange
evaluation. You can report on folder and classification actions using Marshal Reporting Console. For
more information, see “Using Email Folders and Message Classifications” on page 105.
Email Header Matching and Rewriting
Allow you to search for the content of email header fields using Regular Expressions. You can modify,
add, or delete headers. For more information, see “Header Matching and Rewriting” on page 108.
External Commands
Allow you to extend MailMarshal Exchange functionality with customized conditions and actions. For
more information, see “Extending Functionality Using External Commands” on page 112.
You can create or edit many policy elements on the fly while you are working with rules. For more
information, see “Understanding Policy Groups” on page 61. You can also create elements in advance.
To work with policy elements, open the MailMarshal Exchange Configurator from the MailMarshal program
folder. In the left pane of the Configurator select Policy Elements. To work with Connectors, in the left
pane of the Configurator select Connectors.
7.1 Configuring ConnectorsConnectors allow MailMarshal Exchange to import user and group information from Active Directory and
LDAP servers. Both Active Directory connectors and LDAP connectors import email addresses from user
accounts, contacts, groups, and public folders. Additionally, LDAP connectors import names from other
applications. For more information, contact Trustwave Technical Support.
For information about creating connectors, see “Creating Directory Connectors” on page 37.
To edit a connector:
1. Select a connector in the right pane of the Configurator.
2. Click Properties on the taskpad header (Taskpad view) or the tools menu (Standard view).
3. On the General tab, you can edit the name and description of the connector.
4. On the Reload Schedule tab you can edit the schedule on which MailMarshal Exchange checks for
updated information on the groups imported through this connector. You can choose to import once a
day at a specific time, or more than once a day, or manually.
5. If this is an Active Directory connector, on the Active Directory Logon tab you can choose to connect as
anonymous, or as a specific account. If you choose to connect using a specific account, enter the
account details.
6. If this is a LDAP connector, edit the information provided.
a. On the LDAP Server tab you can edit the server name, port, and logon information. You can
choose to connect as anonymous, or as a specific account. If you choose to connect using a
Understanding Email Policy ElementsCopyright © 2015 Trustwave Holdings, Inc. All rights reserved. 84
MailMarshal Exchange (ECM) - User Guide - Version 7.1
specific account, enter the account details. You can enter or browse for a search root for this
server. See the Help for full details of the fields on this tab. To change the attributes
MailMarshal Exchange uses to retrieve group and member information from the LDAP server, click
Advanced.
b. On the Group Attributes tab of the Advanced LDAP Properties window, edit the information
MailMarshal Exchange will use to retrieve groups from the LDAP server. See the Help for full
details of the fields on this tab.
c. On the User Attributes tab of the Advanced LDAP Properties window, edit the information
MailMarshal Exchange will use to retrieve user email addresses from the LDAP server. See the
Help for full details of the fields on this tab. For more information about how to retrieve all email
addresses from a server, see Trustwave Knowledge Base article Q11877.
7. When you have completed all required changes to the connector, click OK.
7.2 Configuring User Groups You can use MailMarshal Exchange user groups within policy groups and rules. User groups allow you to
apply policy to specific users. MailMarshal Exchange uses SMTP email addresses to perform user
matching. You can create and populate user groups within MailMarshal Exchange by entering email
addresses manually or copying them from other Groups. You can use wildcard characters when you define
groups. You can also import user groups from an Active Directory environment or a LDAP server through a
MailMarshal Exchange connector. MailMarshal Exchange updates the membership of imported groups
automatically on a schedule you choose within the connector.
7.2.1 Creating and Populating User GroupsBefore you can import user groups, you must create MailMarshal Exchange connectors to provide access
to the directory servers. For more information about creating connectors, see “Creating Directory
Connectors” on page 37.
To create and maintain user groups, in the left pane of the Configurator, expand User Groups.
To create a user group:
1. In the left pane of the Configurator, expand User Groups.
2. On the Action menu, choose New User Group.
3. Choose to create a MailMarshal Exchange group, or import groups through an Active Directory or
LDAP connector.
4. If you are importing a group, select the Active Directory or LDAP connector you want to use. For more
information about connectors, see “Configuring Connectors” on page 84. Click Next.
5. If you are creating a MailMarshal Exchange group, enter a name and description for the group.
Understanding Email Policy ElementsCopyright © 2015 Trustwave Holdings, Inc. All rights reserved. 85

MailMarshal Exchange (ECM) - User Guide - Version 7.1
6. If you are importing a group, enter the group name or click Browse to browse or search for available
groups. You can select more than one group to import.
7. When you have entered all the required information, click Next.
8. If you are creating a MailMarshal Exchange group, you can choose to edit the group immediately after
creating it. To edit the group, on the final window of the New User Group wizard select Edit the user
group.
9. To create or import the group, click Finish.
7.2.1.1 Populating an Active Directory or LDAP GroupInitially, an Active Directory or LDAP group will be empty of users. The group will be populated at the next
scheduled update. You can use an imported group immediately in editing MailMarshal Exchange rules.
However, you should not enable any rules that use a group until the group has been populated.
To populate an Active Directory or LDAP Directory group:
1. Select the group in the left pane of the Configurator.
2. On the Action menu, select Reload Group.
7.2.1.2 Adding Members to a MailMarshal Exchange Group
You can add addresses or wildcard patterns to a MailMarshal Exchange user group.
To add members to a MailMarshal Exchange user group:
1. Select the appropriate user group from the right pane of the Configurator.
2. On the Action menu, select Insert Users.
3. In the New User Group window, enter an individual SMTP address, a partial address using wildcard
characters, or a domain name.
4. To add the value, click Add or use the Enter key.
5. The window remains open and you can enter additional values. If you entered an individual address,
MailMarshal Exchange retains the domain name portion of the address in the field and you can simply
enter another new user name.
6. When you have completed entry of all addresses, click OK.
Note: Best practice with imported user groups is to avoid using them directly in MailMarshal Exchange rules and policy groups. Configure the rules and groups using MailMarshal Exchange groups, and include the imported groups as members of the MailMarshal Exchange groups.
Note: You can also automatically harvest addresses from email messages into a group. For more information, see “Add message users into group” on page 79.
Note: For more information about wildcard characters, see “Wildcard Characters” on page 154.
Understanding Email Policy ElementsCopyright © 2015 Trustwave Holdings, Inc. All rights reserved. 86

MailMarshal Exchange (ECM) - User Guide - Version 7.1
7. Repeat this action to add other user groups.
8. When you have added all desired groups, click OK.
7.2.1.3 Adding Groups to a MailMarshal Exchange GroupYou can add Active Directory, LDAP, and MailMarshal Exchange groups to a MailMarshal Exchange user
group.
To add other groups to a MailMarshal Exchange user group:
1. Select a MailMarshal Exchange user group from the right pane of the Configurator.
2. On the Action menu, select Insert Groups.
3. In the Insert Into User Group window, select a group from the list.
4. To add the value, click Add or use the Enter key.
5. The window remains open and you can select additional values.
6. When you have completed your selection of groups, click OK.
7.2.1.4 Pruning a MailMarshal Exchange Group
You can configure MailMarshal Exchange to remove user addresses from a MailMarshal Exchange group.
You can prune addresses that have not been seen for a time. You can also prune addresses if a group
grows too large.
To configure group pruning:
1. Right-click a MailMarshal Exchange user group in the right pane of the Configurator, and select
Properties.
2. On the Pruning tab, select one or both pruning options and set the limits.
3. Click OK.
For more information about pruning, see Help for the pruning tab, and see also Trustwave Knowledge
Base article Q12772.
7.2.1.5 Finding a User in Groups
You can search all groups for a user (email address) or a wildcard pattern that matches an email address.
To find a user:
1. Select a user group or “All Groups” from the left pane of the Configurator.
2. On the Action menu, select Find User.
3. On the Find User window, enter a user name or a domain name and then click Find.
Understanding Email Policy ElementsCopyright © 2015 Trustwave Holdings, Inc. All rights reserved. 87

MailMarshal Exchange (ECM) - User Guide - Version 7.1
4. The result shows the group or groups that contain a matching entry.
7.2.2 Moving and Copying Users and GroupsYou can use drag-and-drop to move or copy a user name or an included user group from one parent group
to another
To copy a user group, right-click it in the right pane of the Configurator. To make a copy, choose Duplicate
from the context menu.
To add a user group to another user group, in the left pane select it and drag it over the target group in the
same pane.
To move a user to another user group, in the left pane select it and drag it over the target group in the same
pane. To copy the user to the group, hold down the Ctrl key while dragging.
To copy or move users, select a user group in the left pane to view its members in the right pane. To move
group members, select one or more members in the right pane and drag them over a group in the left
pane. To copy group members, hold down the Ctrl key while dragging.
7.3 Identifying Email Text Content Using TextCensor ScriptsTextCensor scripts check for the presence of particular lexical (text) content in an email message.
MailMarshal Exchange can check one or more parts of a message, including the message headers,
message body, and any attachments that can be lexically scanned. Apply TextCensor scripts to email
messages by using rules.
Understanding Email Policy ElementsCopyright © 2015 Trustwave Holdings, Inc. All rights reserved. 88

MailMarshal Exchange (ECM) - User Guide - Version 7.1
A script can include many conditions. Each condition is based on words or phrases combined using
Boolean and proximity operators. The script matches, or triggers, if the weighted result of all conditions
reaches the target value you set.
7.3.1 Creating ScriptsTo work with TextCensor Scripts, select TextCensor Scripts in the left pane of the Configurator.
To add a TextCensor Script:
1. In the left pane of the Configurator, expand TextCensor Scripts.
2. On the Action menu, choose New TextCensor Script to open the TextCensor Script window.
3. Enter a name for the script.
4. Select which portions of an email message you want this script to scan by selecting one or more of the
check boxes Subject, Headers, Body, and Attachments.
Note: For MailMarshal to detect and block explicit language (such as profanity and pornographic language), objects such as the Email Policy rules and the TextCensor scripts need to contain that explicit language. Anyone who has permission to use the MailMarshal Configurator or other user interfaces may be exposed to this explicit language. As this language may be objectionable, please follow your company's policy with respect to exposure to content of this type.
Note: The script will check each part separately.
For instance, if you select both Headers and Message Body, the script will be evaluated once for the headers, then again for the body. Script scoring is not cumulative over the parts.
Understanding Email Policy ElementsCopyright © 2015 Trustwave Holdings, Inc. All rights reserved. 89

MailMarshal Exchange (ECM) - User Guide - Version 7.1
5. By default you can only use alphanumeric characters A-Z and 0-9 in TextCensor items. If you need to
match any non-alphanumeric characters, select the check box enable matching for special
characters, then enter any special characters to be matched in the field. For instance, to match the
HTML tag fragment <script you must enter the < in this field. To match parentheses ( ) you must
enter them in this field.
6. Add one or more TextCensor items. To begin adding items, in the TextCensor Script window click New
to open the TextCensor Item window.
7. Select a weighting level and type for the item. For more information, see “Script and Item Weighting”
on page 91.
8. Enter the item text, optionally using Boolean and proximity operators. For example you could enter
(Dog FOLLOWEDBY hous*) AND NOT cat
In this example the item weighting will be added to the script total if the scanned text contains the
words “dog house” (or “dog houses”, and so on) in order, and does not contain the word “cat”.
9. To add the value to this script, click Add or use the Enter key. The New TextCensor Item window will
remain open and you can create additional items.
10. When you have entered all items, click Close to return to the New TextCensor Script window.
11. Select a Weighting Trigger Level. If the total score of the script reaches or exceeds this level, the script
will be triggered. The total score is determined by evaluation of the individual lines of the script.
12. To set the order of evaluation, click Sort List. Sorting sets items with negative weighting levels to
evaluate first.
Note: The equal sign = is an exception. To match this character in a TextCensor item, simply enclose it within double quotes: “=”.
Note: TextCensor items are case insensitive by default. However, quoted content is case sensitive. For example “textcensor” would not trigger on the first word in the body of this note.
Note: Because evaluation of a script stops when the trigger level is first reached, setting evaluation order is important.
Understanding Email Policy ElementsCopyright © 2015 Trustwave Holdings, Inc. All rights reserved. 90

MailMarshal Exchange (ECM) - User Guide - Version 7.1
7.3.2 Editing ScriptsYou can change the content of an existing script, including the individual items and overall properties.
To edit a TextCensor Script:
1. Double-click the script to be edited in the right pane.
2. Edit an item by double-clicking it.
3. Delete an item by selecting it, and then clicking Delete.
4. Change the contents of any fields such as the script name, parts of the message tested, special
characters, and weighting trigger level.
5. Use the Sort List button to adjust the order of items.
6. Click OK to accept changes or Cancel to revert to the stored script.
7.3.3 Duplicating ScriptsDuplicate a script if you want to use it as the basis for an additional script.
To duplicate a TextCensor Script:
1. Right-click the script name in the Configurator.
2. Choose Duplicate from the context menu.
3. After duplicating the script, make changes to the copy.
7.3.4 Script and Item WeightingEach script has a trigger level expressed as a number. If the total score of the content being checked
reaches or exceeds this level, the script is triggered. The total score is determined by summing the scores
resulting from evaluation of the individual items in the script.
Each line in a script has a positive or negative weighting level and a weighting type. The type determines
how the weighting level of the line is figured into the total score of the script.
There are four weighting types:
Weighting Type Description Details
Standard Each match of the words or phrases will add the weighting value to the total.
If the weighting level of this item is 5, every match will add 5 to the total.
Decreasing Each match of the words or phrases will add a decreasing (logarithmic) weighting value to the total. Each additional match is less significant than the one before.
If the weighting level of this item is 5, the first five matches will add 5, 4, 4, 3, and 3 to the total.
Increasing Each match of the words or phrases will add an increasing (exponential) weighting value to the total. Each additional match is more significant than the one before.
If the weighting level of this item is 5, the first five matches will add 5, 5, 6, 6, and 7 to the total.
Understanding Email Policy ElementsCopyright © 2015 Trustwave Holdings, Inc. All rights reserved. 91
MailMarshal Exchange (ECM) - User Guide - Version 7.1
You can use negative weighting levels and trigger levels to allow for the number of times a word may
appear in an inoffensive message. For instance, if “breast” is given a positive weighting in an “offensive
words” script, “cancer” could be assigned a negative weighting (since the presence of this word suggests
the use of “breast” is medical/descriptive).
7.3.5 Item SyntaxA TextCensor script contains one or more items, each consisting of words or phrases and Boolean or
proximity operators.
• You can use the asterisk (*) wildcard at the end of a word only (for example “be*” matches “being” and
“behave”).
• You can use parentheses to set the order of evaluation and for grouping. You can also use parenthe-
ses to help readability in complex lines.
• You can use Boolean and proximity operators. Enter the operators in capital letters.
• When you use NEAR or FOLLOWEDBY, a word is defined as any group of one or more contiguous
alphanumeric characters, bounded at each end by non-alphanumeric characters. If any non-alphanu-
meric characters have been included as “special characters”, each single special character is also
counted as a word.
The Boolean operators TextCensor supports are shown in the following table.
Once Only Only the first match of the words or phrases will add the weighting value to the total.
If the weighting level of this item is 5, this item will contribute at most 5 to the total, no matter how many times it matches.
Note: Because MailMarshal Exchange stops evaluation of a script when it reaches the trigger level, you should make sure that items with negative weighting are set to evaluate first. Use the Sort List button to set the order of evaluation correctly.
Tip: For instance, by default S-P-A-M counts as four words. If the “-” character is entered as a “special character,” then the same text counts as 7 words.
Operator Function Example
AND Matches when all terms are present Dog AND cat
OR Matches when any term is present dog OR cat
dog OR (cat AND rat)
NOT Logical negation of terms; use after other operators; means “anything else but.”
Dog AND NOT cat
Dog FOLLOWEDBY (NOT house)
NEAR Matches when two terms are found within the specified number of words of each other. The default is 5.
Dog NEAR=2 bone
Weighting Type Description Details
Understanding Email Policy ElementsCopyright © 2015 Trustwave Holdings, Inc. All rights reserved. 92

MailMarshal Exchange (ECM) - User Guide - Version 7.1
MailMarshal Exchange allows the INSTANCES operator for compatibility with earlier TextCensor scripts,
but it is deprecated. You can use item weighting types to produce the same result with improved
performance.
7.3.6 Importing ScriptsYou can import scripts in files. Use this function to copy a script from another MailMarshal Exchange
installation, or to restore a backup
To import a TextCensor Script from a CSV or XML file:
1. On the Action menu, choose New TextCensor Script to open the TextCensor Script window.
2. Click Import.
3. Choose the file to import from, and click Open.
4. In the Edit TextCensor Script window, click OK.
7.3.7 Exporting ScriptsYou can save scripts in files. Use this function to move a script between MailMarshal Exchange
installations, or to edit a script in another application such as Microsoft Excel.
To export a TextCensor Script to a CSV or XML file:
1. Double-click the name of the script to be exported in the right pane to open the Edit TextCensor Script
window.
2. Click Export.
3. Enter the name of the file to export to, and click Save.
4. In the Edit TextCensor Script window, click OK.
7.3.8 TextCensor Best PracticesTo use TextCensor scripts effectively, you should understand how the Text Censor facility works and what it
does.
MailMarshal Exchange applies TextCensor scripts to text portions of messages. Depending on the potions
you select, a script can apply to headers, message bodies, and attachment content.
FOLLOWEDBY Matches when one term follows another within the specified number of words. The default is 5.
Dog FOLLOWEDBY=2 house
INSTANCES Matches when a term is found the specified number of times. You must specify a value.
Dog INSTANCES=3
Note: TextCensor Scripts exported from MailMarshal Exchange 4.2.5 and earlier versions do not include the Weighting Trigger Level, Special Characters, and Apply to following parts settings. If you are importing such a script, you must add this information by editing the script after you import it.
Operator Function Example
Understanding Email Policy ElementsCopyright © 2015 Trustwave Holdings, Inc. All rights reserved. 93

MailMarshal Exchange (ECM) - User Guide - Version 7.1
MailMarshal Exchange can generally apply TextCensor scripts to the text of Microsoft Office documents
and Adobe PDF files, as well as to attached email messages and plain text files.
7.3.8.1 Constructing TextCensor Scripts
The key to creating good TextCensor scripts is to enter exact words and phrases that are not ambiguous.
They must match the content to be blocked. Also, if certain words and phrases are more important, you
should give those words and phrases a higher weighting. For instance, if your organizational Acceptable
Use Policy lists specific terms that are unacceptable, you should give those terms a higher weighting to
reflect the policy.
In creating TextCensor scripts, strike a balance between over-generality and over-specificity. For instance,
suppose you are writing a script to check for sports-related messages. If you enter the words “score” and
“college” alone your script will be ineffective because those words could appear in many messages. The
script will probably trigger too often, potentially blocking general email content.
You could write a better script using the phrases “extreme sports”, “college sports” and “sports scores” as
these phrases are sport specific. However, using only a few very specific terms can result in a script that
does not trigger often enough.
You can strike a good balance using both very specific and more general terms. Again using the example
of sports related content, you could give a low positive weighting to a phrase such as “college sports.”
Within the same script you could give a higher weighting to the initials NBA and NFL, which are very sports
specific.
7.3.8.2 Decreasing Unwanted Triggering
TextCensor scripts sometimes trigger on message content which is not obviously related to the content
types they are intended to match.
To troubleshoot unwanted triggering:
1. Use the problem script in a rule which copies messages and their processing logs to a folder. You
could call this folder “suspected sports messages”.
2. After using this rule for some time, check on the messages that have triggered the script. Review the
message logs to determine exactly which words caused the script to trigger. See “Viewing Messages”
on page 119.
3. Revise the script by changing the weighting, weighting type, or key words, so as to trigger only on the
intended messages.
4. When you are satisfied, modify the rule so as to block messages that trigger the script. You could also
choose to notify the sender and/or the intended recipient.
7.3.9 Testing ScriptsWhen you are working with a TextCensor script in the Configurator, you can test it against a file or pasted
text.
To test a TextCensor Script:
Understanding Email Policy ElementsCopyright © 2015 Trustwave Holdings, Inc. All rights reserved. 94
MailMarshal Exchange (ECM) - User Guide - Version 7.1
1. On the New or Edit TextCensor Script window, click Test.
2. To test using a file, select Test script against file. Enter the name of a file containing the test text (or
browse using the button provided).
3. To test using pasted text, select Test script against text. Type or paste the text to be tested in the
field.
4. Click Test. MailMarshal Exchange will show the result of the test, including details of the items which
triggered and their weights, in the Test Results pane.
7.4 Notifying Users with Message Templates and Message StampsMailMarshal Exchange provides two ways of sending notifications by email.
Message stamps are short blocks of text that can be added to an email message. You can use a stamp to
add a company disclaimer, or to warn the recipient of a message that MailMarshal Exchange has modified
it.
Message templates are complete email messages that can be sent to a user or administrator.
MailMarshal Exchange uses templates for system notifications such as non-delivery reports. You can also
use them to provide auto-responders or other custom notices. MailMarshal Exchange can use special
digest templates to provide users with summary information about quarantined email.
MailMarshal Exchange applies message stamps to both HTML and plain text portions of an email
message. Message templates can also include plain text and HTML bodies.
Variables can be used in both templates and stamps. Variables are specially formatted strings you can
insert in a stamp or template. When MailMarshal Exchange uses the stamp or template, it replaces the
variables with information about the specific message. This facility allows you to provide detailed
information about the actions MailMarshal Exchange has taken on a specific message.
7.4.1 Message TemplatesMessage templates are used when MailMarshal Exchange sends a notification email message based on
the outcome of rule processing. The most common use of notification messages is to notify appropriate
parties when an email message is blocked.
Notifications are a very powerful tool to inform and modify user behavior. When well thought out and
constructed, they can save the administrator a lot of time.
You can also use a notification to set up a general auto responder based on message headers or content.
For instance, MailMarshal Exchange could respond to a message to [email protected] with the
subject “Send Catalog” by returning the product catalog to the sender as an email attachment.
The same rule can send several notification messages. For instance, if MailMarshal Exchange detects a
virus you could choose to send different messages to an email administrator, the external sender, and the
intended internal recipient of the message.
Understanding Email Policy ElementsCopyright © 2015 Trustwave Holdings, Inc. All rights reserved. 95
MailMarshal Exchange (ECM) - User Guide - Version 7.1
You can attach files to a notification. Attachments can include the original message, the
MailMarshal Exchange processing log for the message, and any other file (such as a virus scanner log
file).
You can create a template as plain text, HTML, or both. If you choose to create a template with both HTML
and plain text bodies, you must edit the two bodies separately. If you choose to create a template with
HTML only, MailMarshal Exchange will automatically generate a plain text equivalent of the template with
similar formatting.
You can include links to images in HTML templates. You cannot embed images.
7.4.2 Creating a Message TemplateTo work with templates, select Message Templates in the left pane of the Configurator.
To create a message template:
1. In the left pane of the Configurator, select Message Templates.
2. On the Action menu, select New Message Template to open the Message Template window.
3. By default, MailMarshal Exchange creates a HTML message body. MailMarshal Exchange will
automatically generate a plain text equivalent of the message body when using the template. To
choose a plain text body or edit both types separately, click Options.
4. To see additional address fields, click Options.
5. Enter a name for the template.
6. Enter appropriate information in the Header Details section. For instance, enter the email address to
which replies should be sent in the Return Path field.
7. Enter text in the body section. To view the raw HTML, right-click in the HTML pane and select Edit
Raw HTML. Edit the HTML, or paste HTML source from another editor, then click OK to return to the
message template window.
8. You can attach files to the notification, including the original message, the MailMarshal Exchange
message processing log, and other files. To attach one or more files, select the appropriate box(es)
and enter the file names if necessary.
Note: In addition to rule notification templates, MailMarshal Exchange uses a number of pre-configured templates for administrative notifications (such as delivery failure notifications). For more information about modifying these templates, see “Setting Advanced Options” on page 140.
Tip: The MailMarshal Exchange default configuration includes numerous templates. These are a good source of ideas for the creation of new templates.
Understanding Email Policy ElementsCopyright © 2015 Trustwave Holdings, Inc. All rights reserved. 96

MailMarshal Exchange (ECM) - User Guide - Version 7.1
9. You can use variables marked with braces { }. To see a list of variables available in any field, type { to
open a context menu. You can also enter variable names manually. You can use nested variables. For
details of the variables available in templates, see “Using Variables” on page 101.
7.4.3 Creating Digest TemplatesThe MailMarshal Exchange Array Manager uses digest templates to deliver periodic message digests to
users who self-manage end-user management folders. For details of digesting, see “Setting Up Message
Digests” on page 149.
Digest templates are similar to message templates. The key differences are:
• You cannot attach files to digest templates.
• You must associate each digest template with a message digest. See “Setting Up Message Digests”
on page 149.
Digest templates support variables specific to the digesting function that are not available in message
templates. These variables allow MailMarshal Exchange to provide a list of information about several
messages within the same notification message. The most important of these variables is the HTML digest
table variable $MessageDigestTableHTML.
The following arguments are available to customize the behavior of this variable. All arguments are
optional.
Note: When sending a notification to the original sender of an email message, use the {ReturnPath} variable in the To: field to reduce the chance of looped messages. Do not use the {ReturnPath} variable in the From: field.
Detail Level Results
BRIEF Single line for each message, with From, Subject, Date, and small portion of message body (default level).
COMPACT Two lines for each message; portion of message body starts on second line.
VERBOSE Longer version including up to 200 characters of message body.
Option Results
RELEASE Show the message release link for each message (default option).
NORELEASE Do not show the message release links.
RELEASEURL=url Specify the URL path to the Release webpage used for this digest (see example below). Defaults to the URL of the local MailMarshal Quarantine Management website. A URL could be specified, for instance, in the digests for user groups that cannot browse to the default location.
GROUP Group entries by folder, for digests covering multiple folders.
Understanding Email Policy ElementsCopyright © 2015 Trustwave Holdings, Inc. All rights reserved. 97

MailMarshal Exchange (ECM) - User Guide - Version 7.1
Example:
{$MessageDigestTableHTML=COMPACT,GROUP,SHOWFROM=no,RELEASEURL=http://intranet.example.com/QuarantineConsole}
For details of other variables available in digest templates, see “Using Variables” on page 101.
To create a digest template:
1. In the left pane of the Configurator, select Message Templates.
2. On the Action menu, select New Digest Template to open the Digest Template window.
3. By default, MailMarshal Exchange populates the template with basic information.
MailMarshal Exchange creates separate HTML and plain text message bodies. To choose to use only
one of the two types, click Options.
4. To see additional address fields, click Options.
5. Enter a name for the template.
SHOWFROM=yes|no
Show the sender address. Defaults to yes.
SHOWTO=yes|no Show the recipient address. This option will generally be required when digests for multiple users are sent to the same address. Defaults to no.
Note: To obtain the best results with digest templates, edit the plain text and HTML versions of the template separately using the “Both” option.
Option Results
Understanding Email Policy ElementsCopyright © 2015 Trustwave Holdings, Inc. All rights reserved. 98

MailMarshal Exchange (ECM) - User Guide - Version 7.1
6. Enter appropriate information in the Header Details section. For instance, enter the email address to
which replies should be sent in the Return Path field.
7. Enter text in the body section. To view the raw HTML, right-click in the HTML pane and select Edit
Raw HTML. Edit the HTML, or paste HTML source from another editor, then click OK to return to the
message template window.
8. You can use variables marked with braces { }. To see a list of variables available in any field, type { to
open a context menu. You can also enter variable names manually. You can use nested variables. For
details of the variables available in templates, see “Using Variables” on page 101.
9. Click OK.
7.4.4 Editing TemplatesYou can edit a template, including the address information and the message bodies.
To edit a template:
1. Double-click a template name in the Configurator.
2. Make changes then click OK. If you have created both a plain text and a HTML version of the
template, remember to change both versions.
7.4.5 Duplicating TemplatesYou can make a copy of a template if you want to use it as the starting point for another template.
To copy a template:
1. Right-click a template name in the Configurator.
2. Choose Duplicate from the context menu.
3. After duplicating the template, make changes to the copy.
7.4.6 Deleting TemplatesYou can delete a template if it is not used in any rules.
To delete a template:
1. Select a template in the Configurator.
2. Click the Delete icon in the toolbar.
7.4.7 Working with Message StampsMessage stamps are short blocks of text that MailMarshal Exchange can apply to the top or bottom of an
email message body. MailMarshal Exchange message stamps can include a plain text and an HTML
version. MailMarshal Exchange will apply the appropriate stamp format to the body text of the same type in
the message.
Understanding Email Policy ElementsCopyright © 2015 Trustwave Holdings, Inc. All rights reserved. 99
MailMarshal Exchange (ECM) - User Guide - Version 7.1
Many companies use message stamps to apply disclaimers or advertising on outgoing email.
MailMarshal Exchange can also use a message stamp to notify the recipient that a message has been
processed (for example by having an offending attachment stripped).
To work with message stamps in the Configurator, select Message Stamps in the left pane.
To create a message stamp:
1. In the left pane of the Configurator, select Message Stamps.
2. On the Action menu, select New Message Stamp.
3. Enter a name for the stamp.
4. Select whether the stamp is to appear at the top or the bottom of messages.
5. Enter a plain text version of the message stamp in the Plain Text tab.
6. Enter an HTML version of the stamp in the HTML tab. You can apply various formatting, including
hyperlinks, to the HTML text using the buttons provided.
To view the raw HTML, right-click in the HTML pane and select Edit Raw HTML. Edit the HTML, or
paste HTML source from another editor, then click OK to return to the message stamp window.
7. To add the new stamp to the list of available message stamps, click OK.
Both plain text and HTML message stamps can include the same variables available within email
notification templates.
7.4.7.1 Duplicating Message Stamps
You can make a copy of a stamp if you want to use it as the starting point for another stamp.
To duplicate a message stamp:
1. Right-click the stamp name in the Configurator.
2. Choose Duplicate from the context menu.
3. After duplicating the message stamp, make any required changes to the copy. Remember to make
changes to both the Plain Text stamp and the HTML stamp.
7.4.7.2 Editing Message Stamps
You can make changes to a stamp. Remember to make changes to both the Plain Text stamp and the
HTML stamp.
To edit a message stamp:
1. Double-click the stamp name in the right hand pane of the Configurator.
2. Make the required changes.
Note: If message stamping is enabled for RTF (Microsoft TNEF) messages, the plain text message stamp will be used for these messages. To enable RTF stamping, see the Engine Advanced section of MailMarshal Properties.
Understanding Email Policy ElementsCopyright © 2015 Trustwave Holdings, Inc. All rights reserved. 100

MailMarshal Exchange (ECM) - User Guide - Version 7.1
3. Click OK.
7.4.7.3 Deleting Message StampsYou can delete a message stamp if it is not used in any rules.
To delete a message stamp:
1. Select the stamp in the right hand pane of the Configurator.
2. Click the Delete icon in the toolbar.
7.4.8 Using VariablesWhen you create a message template, digest template, message stamp, or message classification
description, you can use a number of variables. MailMarshal Exchange substitutes the appropriate
information when it uses the template or stamp.
Variables are marked by curly braces { }. You can select from available variables in any field where they
are available in a template, stamp, or classification. To see a list of available variables in a specific field,
type { .
Not all variables are available in all contexts. MailMarshal Exchange may not have the required information
to substitute. If MailMarshal Exchange does not have any data, it will enter empty text into the variable
marker.
The following table lists commonly used variables and their functions:
Variable Data inserted
{$MessageDigestTableHTML=detail[,option,option,...]}
The HTML version of a message digest detail listing. For full information about options, see “Creating Digest Templates” on page 97.
See also the variable {MessageDigestTableText}.
{Administrator} Email address of the administrator as set during post-installation configuration and accessible from the Notifications section of MailMarshal Properties.
{AttachmentName} File name of the attached file that triggered a rule condition.
{Date} The current date. For more information, see “Date Formatting” on page 103.
{DateLastRun} The date of the previous MailMarshal Exchange message digest for a folder.
{Errorlevel} The last error returned by a virus scanner or an external command.
{ExternalCommand} The name of the last External Command used.
{Env=varname} Inserts the value of a Windows environment variable.
{ExternalSender} Returns 'y' or 'n' depending on whether the sender was outside or inside the local domains.
Understanding Email Policy ElementsCopyright © 2015 Trustwave Holdings, Inc. All rights reserved. 101

MailMarshal Exchange (ECM) - User Guide - Version 7.1
{File=fullpath} Inserts a text file within the body of a message (for instance, can be used to insert the MailMarshal Exchange log for a message in a notification email body).
{Folder} The name of the folder that is the subject of a MailMarshal Exchange message digest email.
{FolderRetention} The retention period for a folder that is the subject of a MailMarshal Exchange message digest email.
{From} Email address in the 'From' field of the message.
{HasAttachments} Returns '1' if the message has attachments.
{HelloName} Name given by the remote email server when MailMarshal Exchange received this message.
{Hostname} The host name of the server.
{If variable}...[{else}...]{endif} Allows conditional substitution of text. The condition is true if the variable is not empty. For example: {If VirusName}This message contained the virus {VirusName}.{endif}
The Else clause is optional.
{InitialMessageBody} The first 200 characters of the body of the message.
{Install} The install location of MailMarshal Exchange.
{LastTextCensorRuleTriggered} The name of the TextCensor Script that was run and the phrase that triggered.
{LocalRecipient} The message recipient, if any, within the local domains. Includes multiple recipients and CC recipients.
{LocalSender} The message sender, if any, within the local domains.
{LogName} The name of the Logging Classification used.
{Message-ID} Original SMTP Message ID of the message.
{MessageFullName} Full path to the message file.
{MessageCount} The number of messages quarantined for a user in a specific folder and listed in a message digest email.
{MessageDigestTableText} The plain text version of a message digest detail listing. See also {$MessageDigestTableHTML}.
Note: The plain text version does not use any detail level or option settings.
{MessageName} Filename only of the message.
{MessageSize} The size of the message as originally received.
{PolicyGroupTitle} The title of the policy group containing the rule triggered by the message.
Variable Data inserted
Understanding Email Policy ElementsCopyright © 2015 Trustwave Holdings, Inc. All rights reserved. 102

MailMarshal Exchange (ECM) - User Guide - Version 7.1
7.4.9 Date FormattingWhen you use dates in variables within message templates, message stamps, and logging classifications,
you can include formatted dates. This feature is especially useful to avoid confusion about the order of day,
month, and year in dates.
{RawSubject} Message subject with any encoding included, as originally received. Use this variable to include the subject in the Subject field of notification templates. See also {Subject}.
{Recipient} Message recipient. Includes multiple recipients and CC recipients.
{ReleasePassThrough} Inserts a code recognized by MailMarshal Exchange to release the message applying no further rules. See Trustwave Knowledge Base article Q13956.
{ReleaseProcessRemaining} Inserts a code recognized by MailMarshal Exchange to release the message applying any additional applicable rules. See Trustwave Knowledge Base article Q13956.
{ReplyTo} Email address in the 'Reply to' field of the message.
{ReturnPath} SMTP “Mail From” email address.
{RuleTitle} The title of the rule triggered by the message.
{Sender} Email address of the sender. Uses the address in the “From” field unless it is empty, in which case the “Reply to” address is used.
{ServerAddress} Email address used as the 'From' address for notifications as set during post-installation configuration and accessible from the Notifications section of MailMarshal Properties.
{SsmUrl} The URL of the MailMarshal Exchange Quarantine Management Website. You can change this value on the Administrator tab of the QM website.
{StrippedFiles} The names of any attachment files stripped from the message by rule action.
{Subject} Message subject, decoded if applicable. Use this variable in most cases. See also {RawSubject}.
{ThreadWorking} The MailMarshal Exchange working folder name.
{Time} The current time. See also “Date Formatting” on page 103.
{UnsubscribeUrl} The URL used to unsubscribe from digests. This variable can be used in digest templates. The variable evaluates blank if a user cannot unsubscribe. Suggested usage:{if UnsubscribeUrl}To unsubscribe from this digest, use the following link: {UnsubscribeUrl} {endif}
{VirusName} Name of the virus detected. This information is only available if the virus scanner being used is a DLL based scanner. If a command line scanner reports a virus this variable is set to “Unknown.”
{VirusScanner} Name of the virus scanner used.
Variable Data inserted
Understanding Email Policy ElementsCopyright © 2015 Trustwave Holdings, Inc. All rights reserved. 103

MailMarshal Exchange (ECM) - User Guide - Version 7.1
To use date formatting, include the template variable {date=%%var} where var is one of the sub-variables
from the table below. You can include more than one sub-variable within the same date variable. For
instance {date=%%d %%b %%Y} would return 07 Apr 2004.
The following table lists the available date formatting sub-variables:
7.5 Using Virus ScanningYou can implement virus scanning as an email policy element. For more information, see “Stopping
Viruses” on page 56.
Note: Each sub-variable must be preceded by %%. For example, to ensure that the date is formatted according to the Windows locale, use {date=%%c}.
To use locale-specific settings you must ensure that the Windows locale is applied to the account used by MailMarshal Exchange services. For more information, see Trustwave Knowledge Base article Q12670.
Variable Value inserted
a Abbreviated weekday name
A Full weekday name
b Abbreviated month name
B Full month name
c Date and time representation appropriate for locale
d Day of month as decimal number (01–31)
H Hour in 24-hour format (00–23)
I Hour in 12-hour format (01–12)
j Day of year as decimal number (001–366)
m Month as decimal number (01–12)
M Minute as decimal number (00–59)
p Current locale's A.M./P.M. indicator for 12-hour clock
S Second as decimal number (00–59)
U Week of year as decimal number, with Sunday as first day of week (00–53)
w Weekday as decimal number (0–6; Sunday is 0)
W Week of year as decimal number, with Monday as first day of week (00–53)
x Date representation for current locale
X Time representation for current locale
y Year without century, as decimal number (00–99)
Y Year with century, as decimal number
z Time-zone name or abbreviation; no characters if time zone is unknown
Understanding Email Policy ElementsCopyright © 2015 Trustwave Holdings, Inc. All rights reserved. 104

MailMarshal Exchange (ECM) - User Guide - Version 7.1
7.6 Using Email Folders and Message ClassificationsMailMarshal Exchange uses a Microsoft SQL Server database to log basic information about each
message it has processed. This information includes the sender, recipient, message size, and actions
taken.
If MailMarshal Exchange moves or copies a message to a folder, it logs this event in the database.
Using Message Classifications is another way to add detail to the log records. You can add Message
Classifications by including an action within a MailMarshal Exchange rule. You can search or report on
messages by classification using the Console Message History, Console search results, and reports
generated by Marshal Reporting Console.
You should include at least one logging action (either a folder action or a classification action) in each rule.
MailMarshal Exchange default rules include such actions.
7.6.1 Working with Message ClassificationsMessage classifications are useful for reporting on broad categories, such as viruses or executable files
quarantined. You can also use classifications to record very specific occurrences such as a specific file or
size of file being sent. For example you could answer the question “How many PDF files over 500K in size
are sent by Sales each week?” by creating a rule to log sending of such files. If several rules place
messages in a single MailMarshal Exchange folder, you can use classifications to give additional
granularity for searching and reporting.
To work with Message Classifications in the Configurator, select Message Classifications from the left pane
menu tree.
To create a message classification:
1. On the Action menu, choose New Message Classification.
2. In the window, enter a meaningful name for the classification.
3. Give a brief description of the classification and its purpose. This description will be used in the
Console and Reports, and can contain { } variables as in message stamps and templates.
4. To add the classification, click OK.
7.6.1.1 Editing Message ClassificationsYou can edit the name and description of a classification.
To edit a message classification:
1. Double-click the classification name in the right pane of the Configurator to view its properties.
2. Make any required changes.
Note: To avoid confusion in reporting, MailMarshal Exchange will not allow a folder and a classification with the same name.
If a folder or classification is related to virus activity, you should add it to the appropriate reporting group. For more information about reporting groups, see “Configuring Reporting Groups” on page 153.
Understanding Email Policy ElementsCopyright © 2015 Trustwave Holdings, Inc. All rights reserved. 105

MailMarshal Exchange (ECM) - User Guide - Version 7.1
3. Click OK.
7.6.1.2 Duplicating Message ClassificationsYou can make a copy of a classification if you want to use it as the starting point for another classification.
To duplicate a message classification:
1. Right-click the classification name in the Configurator.
2. Choose Duplicate from the context menu.
3. After duplicating the classification, make any required changes to the copy.
7.6.1.3 Deleting Message Classifications
You can delete a classification if it is not used in any rules.
To delete a message classification:
1. Select the classification name in the right pane of the Configurator.
2. Click the Delete icon in the toolbar.
7.6.2 Working with FoldersMailMarshal Exchange uses folders to store messages that it has quarantined, parked for later delivery, or
archived. You can delete quarantined messages, release them to the recipient, and manage quarantined
messages in other ways.
MailMarshal Exchange also uses special “Dead Letter” folders to store messages that it could not
completely process. You can manage messages in these folders in many of the same ways that you can
manage quarantined messages.
You can configure folders with specific security settings. You can configure folders to be available for end-
user management through the Quarantine Management website. You can configure folders to allow
“fingerprinting” of released messages.
MailMarshal Exchange includes predefined folders that address common email security issues and
automatically categorize quarantined mail. MailMarshal Exchange provides many predefined folder types,
including folders that:
• Hold messages quarantined due to rule action (for instance, messages that are categorized as spam,
are virus infected, contain disallowed attachments, or are blocked for other policy reasons).
• Hold archived messages.
• Hold messages that MailMarshal Exchange cannot process, called dead letters. Dead Letters can
result from bad email addresses, from corrupted data, from differing interpretations of Internet stan-
dards, or when a message is intentionally malformed in an attempt to exploit a security vulnerability.
Predefined and newly-created folders have default properties that you can modify. For example, the
default setting on the Attachment Type-Executables folder does not allow you to save stored messages to
another location.
Understanding Email Policy ElementsCopyright © 2015 Trustwave Holdings, Inc. All rights reserved. 106
MailMarshal Exchange (ECM) - User Guide - Version 7.1
If existing MailMarshal Exchange folders are not appropriate for your needs, modify the properties of an
existing folder or create your own folders.
7.6.3 Creating FoldersYou can create as many folders as your policy requires. You can create the following types of folders:
Standard Folder
Used to quarantine dangerous or suspect mail. You can specify that an administrator or regular user
can manage the folder contents. You can specify that messages released from the folder are eligible
for attachment fingerprinting.
Archive Folder
Used to keep historic copies of delivered mail. MailMarshal Exchange saves messages stored in the
folder for a specific period of time. You cannot manually delete mail stored in an archive folder. You can
specify that messages released from the folder are eligible for attachment fingerprinting.
Parking Folder
Used to delay the delivery of mail. MailMarshal Exchange releases messages stored in the folder
according to a predefined schedule.
To create a folder:
1. In the left pane of the Configurator, expand Configurator Root > MailMarshal Configurator >
Policy Elements > Folders.
2. On the Action menu, click New Folder.
3. Specify the appropriate values. For more information about fields on a window, click Help.
4. Click Finish.
7.6.4 Editing FoldersYou can change the name, security permissions, and most features of a folder. You cannot change the
type of an existing folder. You cannot change the name of dead letter folders.
To edit a folder:
1. In the left pane of the Configurator, expand Configurator Root > MailMarshal Configurator >
Policy Elements > Folders.
2. Select the folder you want to modify.
3. On the Action menu, click Properties.
4. On each tab, specify the appropriate values. For more information about fields on a window, click
Help.
5. Click OK.
Understanding Email Policy ElementsCopyright © 2015 Trustwave Holdings, Inc. All rights reserved. 107

MailMarshal Exchange (ECM) - User Guide - Version 7.1
7.6.4.1 Deleting FoldersYou can delete a folder if it is not used in any rules. You cannot delete dead letter folders.
To delete a folder:
1. in the right pane of the Configurator, select the folder name.
2. Click the Delete icon on the taskpad header or the toolbar.
Deleting a folder in the Configurator deletes only the link to the folder that appears in the Configurator. This
action does not delete the physical folder or any email messages it contains. To delete email messages
use the MailMarshal Exchange Console. To delete the physical folder and its contents use Windows tools.
7.7 Header Matching and RewritingMailMarshal Exchange can perform searches and replace text in email headers using a Regular
Expression engine. You can perform header searches and header replacements within rules.
7.7.1 Using Rules to Find HeadersYou can search email headers using regular expressions using the MailMarshal Exchange rule condition
“Where message contains one or more headers.” This rule condition allows matching based on the
presence of specific email message headers, or specific content within any header.
To create a header match condition, in the rule condition window click New.
To perform more than one header match within a single condition, complete the match rule wizard for each
match
For details of the rule editing processes, see “Using the Header Rewrite Wizard” on page 109.
7.7.2 Using Rules to Change HeadersYou can alter email headers using regular expressions using the MailMarshal Exchange rule action
“Rewrite message headers using expressions.” This rule action allows matching based on the presence of
specific email message headers, or specific content within any header.
To create a header rewrite action, within the rule action window click New.
Caution: Regular Expression matching and substitution provides very powerful capabilities. However, regular expressions are complex and can be difficult to construct. If headers are rewritten incorrectly, you may be unable to determine the sender or intended recipient of affected messages. Use this facility with care.
Note: If more than one header to match is entered within a single rule condition, all expressions must match for the condition to be true (logical AND). To check any of several headers (logical OR), use one rule per header.
Understanding Email Policy ElementsCopyright © 2015 Trustwave Holdings, Inc. All rights reserved. 108

MailMarshal Exchange (ECM) - User Guide - Version 7.1
To perform more than one header rewriting action within a single condition, complete the rule wizard for
each header rewriting action.
For details of the rule editing processes, see “Using the Header Rewrite Wizard.”
7.7.3 Using the Header Rewrite WizardThis wizard allows you to create a header matching or header rewriting rule. The wizard uses regular
expression matching and substitution. For more information about regular expressions, see “Regular
Expressions” on page 155.
The windows of the wizard are as follows:
• An introduction page that gives warning information (shown for Rewriting only).
• A field matching page to select the header or envelope fields to be matched, and the portion of the field
to be modified.
• A substitution options page where matching and substitution expressions are entered.
• A naming and test page for naming the rule and testing the matching and substitution.
You can also change the order of evaluation of header rewriting rules using the arrows at the bottom of the
parent window.
To use the Header Wizard:
1. Select the fields that you want the rule to apply to from the list. You can add or edit a custom header
field name using the buttons provided.
Note: If more than one header to rewrite is entered within a single rule, the order in which rewriting is applied will be significant. Rewriting actions will apply in top down order as they are listed in the rule action window. To change the order, use the arrows in the window.
Understanding Email Policy ElementsCopyright © 2015 Trustwave Holdings, Inc. All rights reserved. 109

MailMarshal Exchange (ECM) - User Guide - Version 7.1
2. Choose a parsing method from the list. Depending on this selection, MailMarshal Exchange will apply
regular expression matching to parts or all of the selected headers.
• If you select the method “Entire Line” MailMarshal Exchange will use the entire text of the header
as the input text for the substitution engine.
• If you select the method “Email Address” MailMarshal Exchange will use each email address
found in the line as the input text.
• If you select the method “Domain” MailMarshal Exchange will use the domain part of each email
address as the input text.
3. Select the check box Match Case to perform a case sensitive search. Clear the check box to make the
search case insensitive.
4. Click Next to proceed to the Field Substitution window.
5. In the Optional Exclusion Filter field, you can enter a regular expression. If this expression is found
in the input text, the search will return “not matched”.
6. In the Field Search Expression field, enter a regular expression that MailMarshal Exchange should
use to select the data for matching or rewriting. If the input text matches this expression, the rule will
match or rewrite it, subject to exceptions based on the exclusion filter.
7. If this is a rewriting rule, choose one of the rewriting methods:
Note: To insert a custom header, use the parsing method “Entire Line.” To match or modify all email addresses, use the method “Email Address”.
Note: To search for email addresses or domains, use a case insensitive search.
Understanding Email Policy ElementsCopyright © 2015 Trustwave Holdings, Inc. All rights reserved. 110

MailMarshal Exchange (ECM) - User Guide - Version 7.1
• Substitute into field using expression replaces the matched data using a sed or Perl-like syn-
tax. You can use sub-expressions generated from the field search here. Refer to the sub-expres-
sions as $1 through $9.
• Map using file provides for substitutions from a file, to allow a level of indirection in resolving what
to substitute into the field. See “Regular Expressions” on page 155.
• Delete the field removes the matching material from the header. When Entire line is selected in
the parsing options, selecting Delete the field removes the entire header line from the message.
• Insert if missing permits you to add a new header if any of the selected headers does not exist.
MailMarshal Exchange will use the text of this field as the value of the new header line. For
instance if you have added the custom header x-MyNewField then you might enter the value
Created by Header Rewrite.
8. Click Next to proceed to the Rule Completion window.
9. Enter a name for the rule.
10. Optionally enter a comment to explain the purpose of the rule.
11. To test the rule, enter an input string in the Source field and click Test. The result will appear in the
Result field. For rewriting actions, the result will be the rewritten string. For matching, the result will be
“matched” or “not matched”.
12. If this is a rewriting rule, select whether the changes will be actually applied and/or logged. Select the
check box Enable field changes to apply this rule to messages. Select the check box Log changes
to write a log of changes to the MailMarshal Exchange logs for the message. If only Log changes is
selected, the logs will show the changes that would have occurred.
Note: If you replace the entire contents of a field, be sure to terminate the text with a CRLF (\r\n). You can insert this value through the arrow to the right of the field. If you enter $0 (the tagged expression containing the entire input line) at the end of the substitution expression, a CRLF will already be included.
Understanding Email Policy ElementsCopyright © 2015 Trustwave Holdings, Inc. All rights reserved. 111

MailMarshal Exchange (ECM) - User Guide - Version 7.1
13. Adjust the order of evaluation using the arrows provided below the list of rules.
7.8 Extending Functionality Using External CommandsAn external command is a custom executable, Windows command, or batch file that can be run by
MailMarshal Exchange. The command can be used to check email messages for a condition, or to perform
an action when a message meets some other condition.
You can use custom executable files or batch files with the rule condition “Where the external command is
triggered.” For instance, you can invoke fgrep.exe for advanced expression matching.
If you want to use an external command to check for a condition, the command must return a standard
return code.
You can also use custom executable files with the rule action “Run the external command.” For instance, a
particular email subject line could trigger a batch file to start or stop a system service, or to send a page or
network notification to an administrator.
MailMarshal Exchange is provided with an external command for message release. For more information
about this command, see Trustwave Knowledge Base article Q13956.
To use an external command in MailMarshal Exchange rules, you must first define it.
To create a new external command definition:
1. In the left pane of the Configurator select External Commands.
Note: If you use several header matching rules within a single rule condition, all must evaluate true for the condition to be true.
If you create several rewriting rules within a single rule action, the order of evaluation will be significant. Rewriting actions will be applied in top-down order as shown on the window.
Understanding Email Policy ElementsCopyright © 2015 Trustwave Holdings, Inc. All rights reserved. 112

MailMarshal Exchange (ECM) - User Guide - Version 7.1
2. On the Action menu, click New External Command to open the External Command window.
3. Enter a name for the external command.
4. Type the path for the executable file. You can also browse for the file by clicking Browse.
5. In the Parameters field, enter any command line parameters necessary for the command. You can
pass specific information about a message to the command using MailMarshal Exchange variables.
6. The Timeout and Timeout per MB values control how long MailMarshal Exchange will wait for a
response before ignoring the external command. The default values are very generous.
7. The Single Thread setting indicates whether the command must operate on one message at a time,
or can be invoked multiple times. In most cases this box should be left selected. You can multi-thread
certain executable files.
8. The Only execute once for each message setting determines whether an external rule condition
command will be run for each component of a message, or only once. For example if you are using
fgrep to perform Regular Expression searches of attached files, this box should be cleared to ensure
that MailMarshal Exchange passes each component of each message to fgrep.exe.
9. If you plan to use the external command as a rule condition, you must set the trigger return code
information. You should find this information in the documentation of the executable.
Note: To use a batch file, you must invoke the command interpreter explicitly as follows:%Systemroot%\system32\cmd.exe /C {batchfile.cmd} [variables...]
Note: If the external command executable uses 10% of the timeout time in actual processing (CPU usage), MailMarshal Exchange will terminate the command, log the event as a runaway process, and place the message in the Dead Letter\Unpacking folder.
Understanding Email Policy ElementsCopyright © 2015 Trustwave Holdings, Inc. All rights reserved. 113
MailMarshal Exchange (ECM) - User Guide - Version 7.1
Two fields allow you to enter trigger values which further specify the meaning of the code returned from the
virus scanner.
• If the code returned matches any value entered in the field Command is triggered if return code is,
MailMarshal Exchange will consider the condition to be satisfied.
• If the code returned matches any value entered in the field Command is not triggered if return code
is, MailMarshal Exchange will consider the condition not to be satisfied.
• If the code returned matches neither field, the file is moved to the Undetermined dead letter folder and
an email notification is sent to the MailMarshal Exchange administrator.
• Entries in both return code fields can be exact numeric values, ranges of values (for example 2-4),
greater than or less than values (for example <5, >10). More than one expression can be entered in
each field, separated by commas (for example 1,4,5,>10).
Understanding Email Policy ElementsCopyright © 2015 Trustwave Holdings, Inc. All rights reserved. 114
MailMarshal Exchange (ECM) - User Guide - Version 7.1
8 Monitoring Email Flow
MailMarshal Exchange provides a number of tools to assist in daily administration of email flow and server
health. These include the Console and Web Console, the Configurator, the Quarantine Management
Website, Windows event logs, the Windows performance monitor, and the text logs generated by each
MailMarshal Exchange service. You can also create reports using Marshal Reporting Console.
You can delegate access to a number of these tools, including the Console functions, reports, and
quarantine management.
If you want to: Use:
View a summary of email traffic and filtering activity for the current day or other period; view details of configuration update status and running MailMarshal Exchange services for each email processing server
The Dashboard page in the Console. See “Viewing Server Statistics” on page 117.
View a history of service alerts (unusual activity) for all MailMarshal Exchange servers
The Alert History in the Console. See “Viewing Alert History” on page 124.
Stop and start MailMarshal Exchange services The Servers and Arrays item in the Configurator. See “Managing Node Services” on page 138.
View details of each message processed The Email History and Folders in the Console. For more information, see “Viewing Email History” on page 122.
Search for details of a specific message The History Search in the Console. For more information, see “Searching Folders and Email History” on page 123.
View, release, redirect, or delete a message in quarantine
The Email History, History Search, and Folders in the Console.
View a graphical display of performance information for the MailMarshal Exchange services
The Windows Performance monitor. For more information, see “Performance Monitor” on page 129.
View detailed debugging information for the MailMarshal Exchange filtering services
The Windows Application log and the MailMarshal Exchange text service logs on each server. For more information, see “Viewing Event History” on page 127 and “Using MailMarshal Exchange Text Logs” on page 129.
Generated detailed reports on email traffic and filtering activity over time
The Marshal Reporting Console application. For more information, see the documentation for this application.
Delegate administrative functions to help desk personnel
Console Security on the MailMarshal Properties window and the folder security options for each folder, all found in the Configurator. For more information, see “Setting Console Security” on page 124.
Delegate management of quarantined messages to email users
The Quarantine Management Website and the properties of folders. For more information, see “Setting Up Quarantine Management Features” on page 147.
Monitoring Email FlowCopyright © 2015 Trustwave Holdings, Inc. All rights reserved. 115

MailMarshal Exchange (ECM) - User Guide - Version 7.1
8.1 Using the MailMarshal Exchange ConsoleThe Console provides summary information on the current state of MailMarshal Exchange, as well as
administrative access to the quarantine folders. The Console also provides access to support news and
updates from Trustwave. You can install the Console on any workstation that can connect to the
MailMarshal Exchange Array Manager on port 19011 (or whatever port you have configured at the Array
Manager).
You can also access nearly all Console features using the MailMarshal Exchange Web Console. The Web
Console installs as a virtual directory under Microsoft IIS and can be accessed from any computer that can
browse to the server where the Web Console is installed. All functions of the Console are also available in
the Web Console unless otherwise noted.
The procedures in this chapter refer to the MailMarshal Exchange Console MMC application. The Web
Console provides the same left pane items, but the Web interface uses different control buttons and
menus. For details of how to perform specific tasks using the Web Console, please see the Help for the
Web Console.
8.1.1 Connecting to MailMarshal Exchange Using the ConsoleYou can connect using the Console from any computer that can connect to the Array Manager computer.
To connect using the Console:
1. Start the MailMarshal Exchange Console from the MailMarshal program group.
2. Choose the name of the Array Manager server from the list, or browse the network for a server by
clicking Browse.
3. If the Array Manager server expects connections on a port other than the default 19011, enter the
correct value. (To change this value at the Array Manager, use the MailMarshal Exchange Server Tool.
See “Working with Array Communications” on page 141.)
4. To connect as a user other than the current Windows user, select the appropriate radio button then
enter the user information.
5. To attempt to connect, click OK.
8.1.2 Connecting to MailMarshal Exchange Using the Web ConsoleYou can connect using the Web Console from any computer that can browse to the Web Console server.
To connect using the Web Console:
1. Open Internet Explorer and browse to the Web Console Website you have configured.
2. On the login page of the Web Console site, enter the connection details for the Array Manager, and a
user name that has permission to connect to the Console.
Note: You can limit access to the Console and to specific folders by granting privileges to specific Windows accounts. For more information see “Setting Console Security” on page 124.
Monitoring Email FlowCopyright © 2015 Trustwave Holdings, Inc. All rights reserved. 116
MailMarshal Exchange (ECM) - User Guide - Version 7.1
8.1.3 Viewing Server StatisticsThe Dashboard page in the Console provides basic information about MailMarshal Exchange at a glance.
To view the Dashboard, in Taskpad View select MailMarshal Exchange Console in the left pane. You can
select the period shown in the graphs using a menu at the top of the page. (To switch to Taskpad View, on
the View menu, click Taskpad View.)
Information available on this page includes the following items:
Server Summary
Lists the MailMarshal Exchange email processing servers, and shows the software version as well as
the last time you committed changes to the configuration and the last time you restarted the services
associated with each server. Also shows any stopped MailMarshal Exchange services and selected
other problems on each server.
Mail Statistics
Shows the number of messages and volume of traffic for a selectable period, divided into inbound and
outbound traffic. Inbound traffic is email addressed to the local domains as configured in
MailMarshal Exchange. Mail Statistics also shows the total number of messages currently in the
MailMarshal Exchange quarantine.
Threats and Malicious Content
Shows the number of messages that MailMarshal Exchange has classified as virus infected. The data
can include one or more folders or message classifications. For more information about how to view or
edit the list of data included, see “Configuring Reporting Groups” on page 153.
Threat Metrics
Shows the number of items that MailMarshal Exchange has scanned for viruses.
Top Quarantine Folders
Shows details about the top five quarantine folders, ranked by the number of messages they contain.
The Percentage of Messages Processed statistic can exceed 100%. MailMarshal Exchange might
classify a message in more than one folder, and count the duplicate copies when generating Top Quar-
antine Folders statistics, resulting in a count that exceeds 100%. You can disable Top Quarantine Fold-
ers statistics from the Reporting section of MailMarshal Properties in the Configurator.
Product Information
Shows MailMarshal Exchange user license information.
The Servers item collects server and service status information for each MailMarshal Exchange email
processing server. To view this item click Servers in the left pane. For each server the Console shows the
server name, version of MailMarshal Exchange installed, whether the configuration is up to date with the
configuration committed at the Array Manager, and whether the services are running.
Monitoring Email FlowCopyright © 2015 Trustwave Holdings, Inc. All rights reserved. 117

MailMarshal Exchange (ECM) - User Guide - Version 7.1
For each server, you can also see details about the associated services and processed messages, as well
as details of free disk space and event logs. For more information see Help.
8.1.4 Viewing Folders and Folder ContentsMailMarshal Exchange message quarantine folders include the archive, parking and standard folders into
which messages are placed through rule action, as well as the Dead Letter folders used for messages that
cannot be processed, and the Mail Recycle Bin used to hold deleted items for a period.
To view a list of MailMarshal Exchange message quarantine folders, expand the menu item Folders.
To view the contents of a folder, select it in the left pane. The contents will be displayed in the right pane,
divided into daily subfolders. Select a daily folder to see its contents. By default no more than 200 items will
be retrieved for each subfolder per screen. You can view the next or previous screen using the Page Up
and Page Down keys. You can adjust the number of items per screen by choosing Preferences from the
Tools menu. You can sort the items on the screen by clicking column headers.
You can also view items in the folders using the Email History view and the Search window.
8.1.5 Working With Email MessagesYou can perform the following actions on an email message located in a MailMarshal Exchange quarantine
folder:
View
Open a new window displaying the message headers, body, attachments, and the
MailMarshal Exchange email processing logs if they are available for the message.
Forward
Send a copy of the message to a specified email address.
Delete
Move the message to the MailMarshal Exchange Mail Recycle Bin, or optionally delete it permanently.
You cannot perform this action for items in Archive folders.
Release
Queue the message for action by other MailMarshal Exchange services. This action is typically used to
deliver a quarantined message to the original recipient. You can choose from several options.
To work with a message, select it in the Email History, the Message Search results, or the Folders view.
8.1.5.1 Forwarding Messages
Use forwarding to send a copy of the message to a specified email address.
Note: The column sorting function only sorts the items on the current screen. If the folder contains more than one screen of items, sorting does not sort over multiple screens. Use the user filter at the top of the listing, or the search function, to retrieve a limited number of items.
Monitoring Email FlowCopyright © 2015 Trustwave Holdings, Inc. All rights reserved. 118

MailMarshal Exchange (ECM) - User Guide - Version 7.1
To forward a message:
1. Select the message.
2. Click the Forward icon on the toolbar, or open the message then choose Forward from the Message
menu.
3. Enter one or more addresses. To forward to multiple addresses, enter them separated by semi-colons
(for instance [email protected]; [email protected]).
4. By default MailMarshal Exchange retains the message when you forward it from a quarantine folder.
To adjust this behavior select or clear the check box. MailMarshal Exchange will not delete messages
from archive folders.
8.1.5.2 Deleting Messages
Deleting a message sends it to the Mail Recycle Bin, or optionally deletes it permanently.
To delete one or more messages:
1. Select the messages. You can use shift and control click to multi-select.
2. Click the Delete icon in the taskpad header. The message(s) will be sent to the Mail Recycle Bin folder.
3. If you want to delete the message(s) permanently, hold down the Shift key while clicking the Delete icon.
8.1.5.3 Restoring Messages
Once MailMarshal Exchange places a message in a quarantine folder, it retains that message for the
period configured in the properties of the folder, unless you choose to delete the message permanently.
The retention period applies even if the message is moved to the Mail Recycle Bin or restored. For
instance, if the Virus folder has a retention period of one week, and MailMarshal Exchange moves a
message to the Virus folder, then you delete it to the Mail Recycle Bin, it will be permanently deleted from
the Mail Recycle Bin one week after it was first received.
Restoring a message retrieves it from the Mail Recycle Bin. MailMarshal Exchange displays it in the folder
where it was originally quarantined.
To restore one or more messages from the Mail Recycle Bin to their original location:
1. Select items in the Mail Recycle Bin.
2. Click the Restore icon.
8.1.5.4 Viewing MessagesView a message to display the message headers, body, attachments, and the MailMarshal Exchange
email processing logs if they are available.
To view a message and its associated processing log in a folder, History, or Search view, double-click the
message.
Monitoring Email FlowCopyright © 2015 Trustwave Holdings, Inc. All rights reserved. 119

MailMarshal Exchange (ECM) - User Guide - Version 7.1
MailMarshal Exchange opens the message in a new window.
The title of the window shows the message subject. The body of the window shows basic information
about the message and any attachments.
The lower portion of the message window includes three tabs: Message, Log, and Details. The Message
and Details tabs restrict access to items that could represent security threats. Large images may be
converted to thumbnails for performance reasons.
Message
Shows the message body in the richest available format (HTML, RTF, or plain text).
Details
Shows a tree view of the components of the message. You can click any item to view it in detail.
Content Analysis Log
Shows the MailMarshal Exchange processing log for the message.
The processing log is retained with the message. You may also be able to retrieve this information
from the main MailMarshal Exchange text logs. The text logs are created by default in the Logging
subfolder of the MailMarshal Exchange installation folder. However by default these logs are only
retained for five days.
You can copy message text to the Clipboard from any of the message tabs. Use the following task to copy
text. MailMarshal Exchange does not support copying with Ctrl-C for this task.
To copy message text to the Clipboard:
1. Open a message.
2. Select the tab from which you want to copy text.
Monitoring Email FlowCopyright © 2015 Trustwave Holdings, Inc. All rights reserved. 120

MailMarshal Exchange (ECM) - User Guide - Version 7.1
3. Select the text you want to copy.
4. Right-click and select Copy.
8.1.5.5 Releasing MessagesReleasing a message queues it for action by other MailMarshal Exchange services.
To release a message, select one or more messages, and then click Release Message(s).
By default the messages will be released for all recipients. By default the messages will be processed
through additional rules, as specified for each message in the rule that placed the message in a folder.
To review the release actions and recipients, on the Release Message window click Show Details. To
hide the additional information, click Hide Details.
To change the release actions:
1. On the Release Message window, click the link Release and Continue Processing (the link text will
be different if you have already changed the action).
2. Choose from the following actions:
Continue processing the message
This option continues processing the messages as specified for each message in the rule that
placed the message in a folder. This is the default action. This action can be used to release a
message from quarantine while testing it for any further violations of policy.
Note: You can also release messages using a specially formatted email message. See Trustwave Knowledge Base article Q13956.
You can add “fingerprints” of attached files into a list that MailMarshal Exchange can use in Rules. For more information, see Trustwave Knowledge Base article Q10543.
Note: If rules change after the message is placed in the folder, MailMarshal Exchange may not be able to perform the requested action. For more details, see Help for this window.
Monitoring Email FlowCopyright © 2015 Trustwave Holdings, Inc. All rights reserved. 121

MailMarshal Exchange (ECM) - User Guide - Version 7.1
Reprocess the message
This option resubmits the message for processing by the current set of MailMarshal Exchange
rules. This option can be useful to resubmit a number of messages after rules have been adjusted.
Pass the message through
This option queues the message for delivery with no further evaluation.
Add attachment fingerprints
The unique “fingerprint” of each attachment will be loaded into the MailMarshal Exchange configu-
ration and will be available on all email processing servers in the array. The list of “valid finger-
prints” can be used in a rule condition.
You can choose to add the fingerprints of all attachments to a message, or only image attach-
ments. MailMarshal Exchange automatically deletes a fingerprint and the associated file if it does
not trigger a condition for six months.
This option is available only if enabled for the folder where the message is stored. For more infor-
mation about enabling the option, see “Editing Folders” on page 107. For more information about
attachment fingerprints, see “Where attachment fingerprint is/is not known” on page 69.
To change the release recipients:
1. On the Release Message window, click the link all recipients (the link text will be different if you have
already selected recipients).
2. The Select Recipients window shows all recipients of the message. To remove a recipient, clear the
box for that recipient.
The following additional option is available:
Keep a copy of the message
Once MailMarshal Exchange has completed the selected actions, by default it deletes the message
from the folder (except archive folders). Check this box to retain the message in the folder
If the message has multiple recipients and you have chosen not to release it for all users,
MailMarshal Exchange removes the users who received the message from the list of message recipi-
ents. In this case, if you select Keep a copy, MailMarshal Exchange keeps all existing users on the
list. MailMarshal Exchange only deletes the message from a folder when it has no remaining recipi-
ents.
8.1.6 Viewing Email HistoryThe Email History view shows each action taken on each message. Actions can include message
classifications, moving to folders, delivery, and delivery failure among others. MailMarshal Exchange
usually creates more than one history record for a specific message. If a history record records a move or
Note: This option is only available when you release a single message.
Monitoring Email FlowCopyright © 2015 Trustwave Holdings, Inc. All rights reserved. 122

MailMarshal Exchange (ECM) - User Guide - Version 7.1
copy to a folder and the message is present in the folder, you can use it to process the message exactly as
you could from the folders view
By default no more than 200 items will be retrieved per screen. You can view the next or previous screen
using the Page Up and Page Down keys. You can adjust the number of items retrieved by choosing
Preferences from the Tools menu. You can sort the items on the screen by clicking column headers.
8.1.7 Searching Folders and Email HistoryYou can limit the items displayed in the folders or email history using the User Filter field at the top of the
listing in Taskpad view. You can use wildcard characters in this field. For more information about syntax,
see “Wildcard Characters” on page 154.
Search the folders or email history by choosing Search from the Action menu. You can choose from a
large number of search criteria including dates, subject, classification, and email addresses. If you want to
see only items that can be viewed and processed, expand Where can the message be found on the
Search for Messages window to search only for items in specific folders.
You can search using any combination of the following options:
What is the Message Name
Allows you to enter a unique name MailMarshal Exchange has assigned to this message.
MailMarshal Exchange includes this information in the headers of each message. You can enter the
name alone (13 characters), or the name and edition (13.12 characters) to identify a specific edition of
the message. You can add the server ID (13.12.4 characters). You cannot combine this option with any
other option.
Where can the message be found
Allows you to select a folder, or “all messages” to search all folders and classifications.
When did the message arrive
Allows you to select the time and date when an action was logged. You can also enter a range of
dates. For instance, you can use this option to search for messages that were sent on a specific day.
What is the email address
Allows you to enter the address the message was sent to, from, or both. You can use wildcard charac-
ters. For more information about wildcard character syntax, see “Wildcard Characters” on page 154.
What text does the subject contain
Allows you to find messages containing certain text in the subject line. You can use wildcard charac-
ters. For more information about wildcard character syntax, see “Wildcard Characters” on page 154.
Note: The column sorting function only sorts the items that have been retrieved. If there is more than one screen of history, sorting does not sort over multiple screens. Use the user filter at the top of the listing, or the search function, to retrieve a limited number of items.
Monitoring Email FlowCopyright © 2015 Trustwave Holdings, Inc. All rights reserved. 123

MailMarshal Exchange (ECM) - User Guide - Version 7.1
How was the message classified
Allows you to select a specific MailMarshal Exchange classification. Classifications include both user
classifications and system classifications such as “Delivered successfully”.
What size is the message
Allows you to specific a size or range of sizes.
Which direction was the message going
Allows you to limit the results to inbound, outbound, or internal messages.
Search history items
Allows you to select whether the search will return message history records including classifications,
system actions, and messages that have been quarantined within the database retention time, or only
show messages currently in folders.
8.1.8 Viewing Alert HistoryMailMarshal Exchange generates alerts for specific events of interest. Some of the events included are
services starting, stopping, or remaining idle for a longer than expected time.
To view a historical list of service alerts, select Alert History in the left pane.
8.1.9 Setting Console SecurityMailMarshal Exchange Console uses the Windows secure remote procedure call (RPC) mechanism to
communicate with the MailMarshal Exchange Array Manager server. A Console user must have an
account and password that the Array Manager Server can validate. If the Console workstation is in a
different domain from the Array Manager server, you can either set up a trust relationship or create local
accounts on the Array Manager server. If the Console and the server are separated by a firewall (for
instance if the server is located in a DMZ), port 19011 must be opened in the firewall to allow remote
Console access.
You can permit or deny access to each feature of the Console for each user or group. You can also set
access to view and act on the contents of each quarantine folder.
8.1.9.1 Configuring Console Access
Set Console access permissions to control which users can use various views available in the
MailMarshal Exchange Console.
To configure access to Console features:
1. Open the MailMarshal Exchange Configurator.
2. On the Tools menu, select MailMarshal Properties.
Note: If the Console workstation is in a different domain from an Array Manager server on a computer running Microsoft Windows 2003, Trustwave recommends that you use a trust relationship, rather than creating local accounts.
Monitoring Email FlowCopyright © 2015 Trustwave Holdings, Inc. All rights reserved. 124

MailMarshal Exchange (ECM) - User Guide - Version 7.1
3. Select Manager Security from the left pane. The display shows a list of users and groups with
permission over the Console features. By default all members of the Windows Administrators group on
the MailMarshal Exchange server or Array Manager are allowed full privilege over the Console.
4. To add users or groups to the list, click Add then enter the names of users or groups. You can select
groups or users clicking browse. Each group or user you add is given full permissions by default.
5. To delete a user or group from the list, select it and click Remove.
6. To change permissions for a group or user, highlight the group or user name in the top pane. The lower
pane shows the current permissions for this user. Set permissions for this user by selecting the
appropriate boxes.
7. Repeat Step 6 for each group or user.
8. To save the changes, click Apply or OK.
9. To apply the changes, click Commit Configuration Changes.
8.1.9.2 Configuring Default Folder Access
You can set the default folder permissions to control user ability to view and manipulate items in most
MailMarshal Exchange folders.
To configure default access permissions for MailMarshal Exchange folders:
1. Open the MailMarshal Exchange Configurator.
2. In the left pane, select Folders.
Monitoring Email FlowCopyright © 2015 Trustwave Holdings, Inc. All rights reserved. 125
MailMarshal Exchange (ECM) - User Guide - Version 7.1
3. On the Action menu, click Properties.
4. This window displays a list of users and groups and shows the permissions they have over the
features of MailMarshal Exchange folders.
5. To add users or groups to the list, click Add then enter the names of users or groups. You can select
groups or users using the Browse Network Users window. Each group or user you add is given full
permissions by default.
6. To delete a user or group from the list, select it and click Remove.
7. To change permissions for a group or user, highlight the group or user name in the top pane. The lower
pane shows the current permissions for this user. Set permissions for this user by selecting the
appropriate boxes.
8. Repeat Step 7 for each group or user.
9. To save the changes, click Apply or OK.
8.1.9.3 Configuring Access for a Specific Folder
Set the permissions on a particular folder to control user ability to view and manipulate items in that folder.
Permissions on a specific folder override the default folder permissions.
To configure access permissions for a specific MailMarshal Exchange folder:
1. Open the MailMarshal Exchange Configurator.
2. In the left pane, expand Folders.
3. In the right pane, click a specific folder. Then click the Properties icon in the toolbar or the taskpad
header.
4. Select the Security tab of the folder properties. This tab displays a list of users and groups with
permission over the features of the folder.
5. To override the default security settings, select the check box Override default folder security.
6. To add users or groups to the list, click Add then enter the names of users or groups. You can select
groups or users using the Browse Network Users window. Each group or user you add is given full
permissions by default.
7. To delete a user or group from the list, select it and click Remove.
8. To change permissions for a group or user, highlight the group or user name in the top pane. The lower
pane shows the current permissions for this user. Set permissions for this user by selecting the
appropriate boxes.
9. Repeat Step 8 for each group or user.
10. To save the changes, click Apply or OK.
Monitoring Email FlowCopyright © 2015 Trustwave Holdings, Inc. All rights reserved. 126

MailMarshal Exchange (ECM) - User Guide - Version 7.1
11. To apply the changes, click the Commit button in the toolbar.
8.1.10 Viewing Event HistoryEach component of MailMarshal Exchange writes messages to the Windows application log. Each event
type is given a unique Event ID number. You can review these events using the Console. You can also use
these events to trigger automatic actions such as pager notifications, service restarts, or popup
notifications via third-party products.
To review the event logs, in the Console select Event History in the left pane. When this node is selected,
the right pane shows a filtered view of the Windows event logs for MailMarshal Exchange on the array
manager and all email processing servers in the installation.
MailMarshal Exchange provides several pre-configured filters you can use to limit the events being
displayed.
You can also customize a filter, or search for a specific event.
You can click any event listed (standard view: double-click) to see the full details.
For more information, see Help.
8.1.11 Finding EventsThe MailMarshal Exchange Event Log view allows you to filter the records you retrieve, or search for
specific records.
Note: Setting access permissions for a folder in MailMarshal Exchange does not affect the Windows file permissions for the folder or items in it. To limit access through Windows, set the Windows access permissions for the MailMarshal Exchange Quarantine folder and all items in that folder on each MailMarshal Exchange email processing server.
To ensure that only the users with MailMarshal Exchange permissions can access these items, give full control of the Quarantine folder to the LocalSystem account or other account used by the MailMarshal Exchange services, and deny access to all other accounts.
Note: You can view information about a specific email processing server by expanding its entry under Servers and selecting the sub-item Event History.
Note: In the taskpad view, all event log controls and information are shown in the right pane of the Console. In the standard view, only the list of events is shown. To access controls while in the standard view, right-click the Event Log node in the Console tree. To change view, right-click the Event Log node and choose View.
Monitoring Email FlowCopyright © 2015 Trustwave Holdings, Inc. All rights reserved. 127
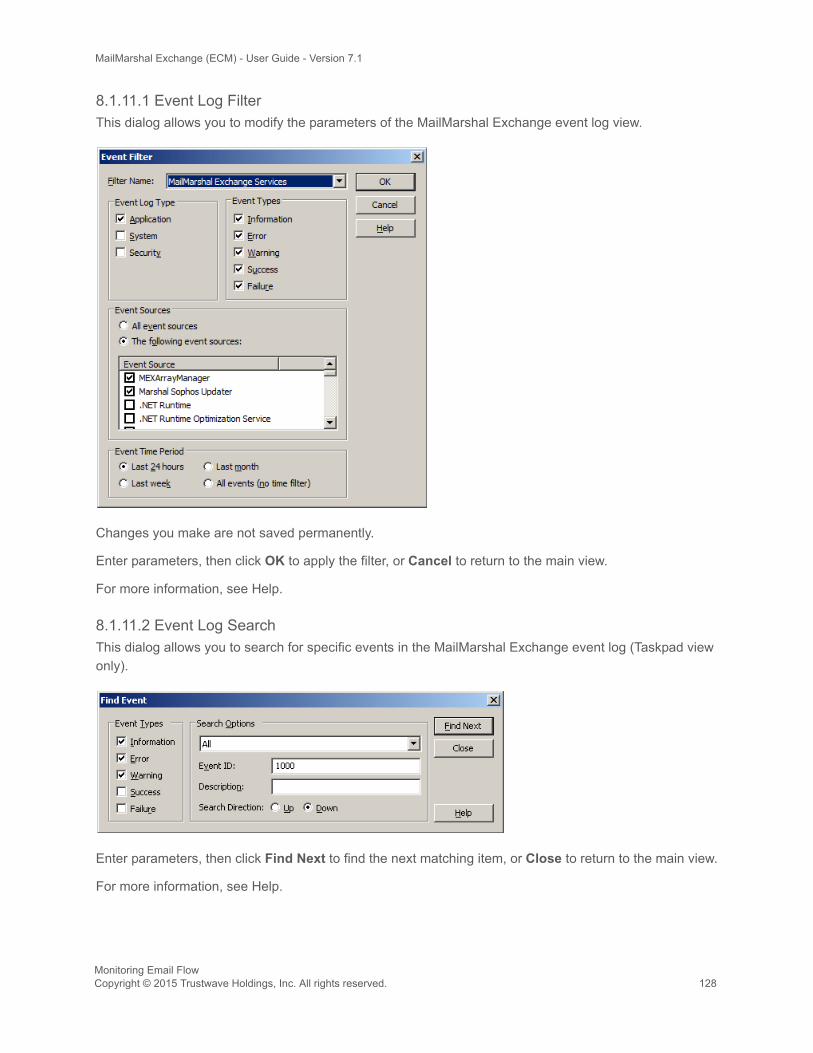
MailMarshal Exchange (ECM) - User Guide - Version 7.1
8.1.11.1 Event Log FilterThis dialog allows you to modify the parameters of the MailMarshal Exchange event log view.
Changes you make are not saved permanently.
Enter parameters, then click OK to apply the filter, or Cancel to return to the main view.
For more information, see Help.
8.1.11.2 Event Log Search
This dialog allows you to search for specific events in the MailMarshal Exchange event log (Taskpad view
only).
Enter parameters, then click Find Next to find the next matching item, or Close to return to the main view.
For more information, see Help.
Monitoring Email FlowCopyright © 2015 Trustwave Holdings, Inc. All rights reserved. 128

MailMarshal Exchange (ECM) - User Guide - Version 7.1
8.1.12 Viewing News From TrustwaveMailMarshal Exchange Console provides access to support news and other information from Trustwave.
To access this information, select Support in the left pane of the Console.
The Console displays the MailMarshal Exchange support page from the Trustwave website. This page
gives you quick access to support resources.
The Console also provides the latest information using RSS news feeds. The Product Updates and
Trustwave Labs Alerts (threat information) feeds are always enabled. New important items display in an
alert window when you open the Console. You can subscribe to additional feeds and adjust settings using
the Console user preferences window (click Tools > Preferences). For more information, see Help.
8.2 Using Windows ToolsMailMarshal Exchange provides information in a standard format through the Windows event log and
performance monitor.
8.2.1 Event LogEach component of MailMarshal Exchange writes messages to the Windows application log. Each event
type is given a unique Event ID number. You can review these events using the Event Viewer. You can also
use these events to trigger automatic actions such as pager notifications, service restarts, or popup
notifications via third-party products. To open a custom view of the Event Log, use the Event History item in
the Console. You can also use the Windows event viewer by selecting Open Event Viewer from the Tools
menu of the Configurator.
8.2.2 Performance MonitorCore services of MailMarshal Exchange (the Engine and Agent) make several counters available to the
Windows Performance Monitor. To open the Performance Monitor while using the MailMarshal Exchange
Configurator, select Open Performance Monitor from the Tools menu.
Please see the documentation for Performance Monitor to learn more about its capabilities, which include
remote monitoring
8.3 Using MailMarshal Exchange Text LogsEach MailMarshal Exchange service creates its own daily log files. These files provide a detailed record of
routine processing and any problems encountered. The most recent information is at the end of the log file.
The files are located in the Logging folder. By default, this folder is within the MailMarshal Exchange
installation folder. MailMarshal Exchange keeps 6 days of log files by default.
Note: To enable the news and alerts feature, ensure the Array Manager has access to the Trustwave website. To set proxy access for the Array Manager, see “Configuring Proxy Settings for Updates” on page 137.
To read articles, ensure you have access to the Trustwave website from the computer where you are using the Console. To set local proxy access use Internet Explorer options.
Monitoring Email FlowCopyright © 2015 Trustwave Holdings, Inc. All rights reserved. 129

MailMarshal Exchange (ECM) - User Guide - Version 7.1
Each message in the quarantine folders includes the portion of the log file that relates to the message. You
can see these message logs when you view a message in the Console. For more information, see
“Working With Email Messages” on page 118.
Monitoring Email FlowCopyright © 2015 Trustwave Holdings, Inc. All rights reserved. 130

MailMarshal Exchange (ECM) - User Guide - Version 7.1
9 Managing MailMarshal Exchange Configuration
This chapter discusses a number of configuration options and tasks that maintain and customize your
MailMarshal Exchange environment.
9.1 Managing Your MailMarshal Exchange LicensesMailMarshal requires a valid license key in order to process email. When you install MailMarshal, the
installation process inserts a temporary license key valid for 30 days from the time of installation. Contact a
Trustwave Sales Representative to purchase the product and receive a full license key, or to request an
extended trial. If you have received a valid permanent key, you can enter it at any time using the procedure
given in “Entering a License Key” on page 132.
Install licenses at the array level. The licenses apply to all MailMarshal Exchange installations in an array.
Permanent MailMarshal license keys may be keyed to a domain or server, or to the list of local domains
you enter. If you change the information that is used to generate the key, then the key will become invalid,
MailMarshal will notify you and generate a temporary key valid for 14 days. You should immediately
request a new key using the procedure given later in this section.
9.1.1 Reviewing Installed LicensesUse the Configurator to view the details of all installed license keys, including the expiry date, number of
users, and any optional features licensed.
To view details of the currently installed license:
1. Select MailMarshal Properties from the Tools menu. Select License from the left pane.
2. You can select how MailMarshal will behave if the license expires or becomes invalid.
• If you select Pass through all email, MailMarshal will not examine any email. The MailMarshal
Engine will continue to run, but will return all email to Exchange without scanning, filtering or pro-
cessing it.
• If you select Halt all processing and hold all email, MailMarshal will not process any email. The
MailMarshal Engine service will stop and the MailMarshal Exchange Transport Agent will not
export any new messages for processing. Message processing and delivery will not resume until
you enter a valid license or change this option to pass through all email. After making a change, if
necessary start the MailMarshal Engine.
3. To apply the selection, click OK then commit the configuration.
9.1.2 Requesting a New License KeyTo include all information required for Trustwave to generate an appropriate key, request the key through
the Configurator.
Note: MailMarshal is licensed according to the number of email users in your organization. If you exceed the licensed number MailMarshal will inform you. This event will not have any effect on email processing.
Managing MailMarshal Exchange ConfigurationCopyright © 2015 Trustwave Holdings, Inc. All rights reserved. 131

MailMarshal Exchange (ECM) - User Guide - Version 7.1
To request a new license key:
1. On the Tools menu, select View License Details.
2. Click Request Key.
3. Complete the required information on the Request License Key window. MailMarshal will append the
information required to generate a unique key.
4. To email the request to Trustwave, click Send Request.
9.1.3 Entering a License KeyWhen you receive a key from Trustwave, use the Configurator to enter it and verify its validity.
To enter a license key:
1. Select View License Details from the Tools menu.
2. Click Enter Key.
3. Enter the key, and select how MailMarshal will behave if the license expires or becomes invalid.
4. Click OK. MailMarshal will report the validity of the key you entered.
5. If your key expired, MailMarshal Exchange might have stopped the Engine service. Verify that all
services are running on all email processing servers by completing the following steps:
a. In the left pane of the Configurator, select Server and Array Configuration.
b. MailMarshal Exchange displays all servers in the array. Select a server and click Server
Properties.
c. If a MailMarshal Exchange service is stopped, click Start.
d. Repeat step c to verify each server service in your array is started.
9.2 Backing Up and Restoring the ConfigurationYou should back up your MailMarshal Exchange configuration at the following times:
• Before and after you make substantial MailMarshal Exchange configuration changes using the Config-
urator.
• Before applying an upgrade.
You can restore the configuration when you want to make the following changes:
• Create a new Array Manager server.
• Return to a previous version of your email policy.
Note: When you click Send Request, MailMarshal also places the additional request information on the Clipboard. You can paste this information to any application if you need to send a request manually.
Managing MailMarshal Exchange ConfigurationCopyright © 2015 Trustwave Holdings, Inc. All rights reserved. 132

MailMarshal Exchange (ECM) - User Guide - Version 7.1
In addition to the following backup and restore procedures, you can back up and restore the configuration
using a command line prompt. For more information see “Using the Configuration Export Tool” on
page 145.
You can import your user and group information using the MailMarshal Exchange Configurator. For more
information see, “Configuring User Groups” on page 85.
You can also import user group information using a command line prompt. For more information see
“Using the Group File Import Tool” on page 143.
For more information about backing up the \Quarantine folders and the MailMarshal Exchange
database, see the Trustwave Knowledge Base.
9.2.1 Backing Up the ConfigurationBacking up the MailMarshal Exchange configuration includes running Backup in the Configurator and
backing up the following additional files:
Where \InstallPath indicates the location where you installed the product. The default install path is
\Program Files\Marshal\MailMarshal.
To back up the MailMarshal Exchange configuration:
1. On the Array Manager computer, run the MailMarshal Exchange Configurator from the MailMarshal
program group.
2. On the Tools menu, select MailMarshal Properties.
3. Select General from the left pane and click Backup.
4. Specify the name of the backup file you want to create. For example, specify
\InstallPath\Backup20050609.xml.
5. Make a note of the backup filename and location.
6. Click OK.
7. If you have created file type rules, back up the filetype.cfg file in the \InstallPath folder.
Computer Folder Files
Array Manager Folder you specify during Backup operation (by default, installpath)
backupconfig.xml (for example, Backup20050607.xml)
Array Manager \InstallPath filetype.cfg
Array Manager (optional)
\InstallPath\Logging *.log
Email processing servers
InstallPath\Quarantine andInstallPath\Quarantine \ValidFingerprints
*.*
Note: The backup does not include the members of groups imported from directory connectors.
Managing MailMarshal Exchange ConfigurationCopyright © 2015 Trustwave Holdings, Inc. All rights reserved. 133

MailMarshal Exchange (ECM) - User Guide - Version 7.1
8. Make a note of each MailMarshal Exchange email processing server computer name.
9. On each MailMarshal Exchange email processing server computer, back up the
\InstallPath\Quarantine and \InstallPath\Quarantine\ValidFingerPrints folders
by following the instructions in Knowledge Base article Q10220.
10. If you are using a MailMarshal Exchange array, repeat Step 10 on every email processing server in the
array.
11. Make a note of the MailMarshal Exchange database computer name.
12. On the database computer, back up the MailMarshal Exchange database by following the instructions
in Knowledge Base article Q10221.
9.2.2 Restoring the ConfigurationRestoring the MailMarshal Exchange configuration requires a number of steps. You can restore the
configuration if you are creating a new Array Manager server, or if you want to return to a previous version
of your email policy.
To restore your MailMarshal Exchange configuration:
1. On the Array Manager computer, run the MailMarshal Exchange Configurator from the MailMarshal
program group.
2. On the Tools menu, click MailMarshal Properties.
3. Select General from the left pane and click Restore.
4. Enter or browse to the backup configuration file. For example, browse to
\InstallPath\Backup20050609.xml.
5. Click OK.
6. If MailMarshal Exchange prompts you, click OK to commit configuration changes.
7. To restore custom file type definitions, copy the backup filetype.cfg file to the \InstallPath
folder on the Array Manager computer.
8. To repopulate users in LDAP and Active Directory user groups with current members:
a. In the left pane of the Configurator, expand MailMarshal Configurator > Policy Elements and
select User Groups.
b. On the Action menu, click Reload User Groups.
9. On each MailMarshal Exchange email processing server computer, restore the
\InstallPath\Quarantine and \InstallPath\Quarantine\ValidFingerPrints folders
by following the instructions in Knowledge Base article Q10220.
Note: The restored data does not include the members of groups imported through directory connectors. To retrieve the group members: After restoring the configuration, in the left pane of the Configurator right-click User Groups and select Reload User Groups.
Managing MailMarshal Exchange ConfigurationCopyright © 2015 Trustwave Holdings, Inc. All rights reserved. 134

MailMarshal Exchange (ECM) - User Guide - Version 7.1
10. If you are using a MailMarshal Exchange array, repeat Step 13 on every email processing server in the
array.
11. On the database computer, restore the MailMarshal Exchange database from the backup copy. For
more information about restoring a database file, see the Microsoft SQL Server or SQL Express
documentation.
12. To connect to a new or existing MailMarshal Exchange database, connect to the database using the
MailMarshal Exchange Server Tool. For more information, see “Joining a Node to an Array” on
page 139 and “Working with Array Communications” on page 141.
9.3 Configuring Local DomainsYou configure a list of local email domains when you install MailMarshal Exchange. This list of domains
allows MailMarshal Exchange to determine which email messages are internal, inbound, or outbound. You
must update this configuration if you change the list of Accepted Domains configured in Exchange Server.
To view the list of configured Local Domains, in the left pane of the Configurator, expand
Configurator Root > MailMarshal Configurator > Server and Array Configuration > Local Domains.
9.3.1 Changing Local Domains InformationYou can change the list of domains MailMarshal Exchange recognizes as local.
To change the list of local domains:
1. In the left pane of the Configurator, expand Configurator Root > MailMarshal Configurator >
Server and Array Configuration > Local Domains.
2. The Local Domains window displays a list of the local domains, and the administrative addresses
associated with each domain.
3. Select the action you want to perform:
Note: The list of local domains configured in MailMarshal Exchange should always match the domains treated as local by the Exchange Server environment.
Managing MailMarshal Exchange ConfigurationCopyright © 2015 Trustwave Holdings, Inc. All rights reserved. 135

MailMarshal Exchange (ECM) - User Guide - Version 7.1
• To create a new local domain listing, click New Local Domain.
• To edit an existing local domain listing, highlight it and then click Local Domain Properties.
• To delete an existing local domain listing, highlight it and then click Delete.
For details of the fields on the Local Domain windows, see Help for each window.
9.4 Configuring Manager SecurityYou can control access to the MailMarshal Exchange Array Manager. To perform some tasks a user must
have an account that the Manager can validate. As of this writing the only permission you can control is
permission to join an email processing server to an array.
To configure access to Array Manager features:
1. Open the MailMarshal Exchange Configurator.
2. On the Tools menu, select MailMarshal Properties.
3. From the left pane select Manager Security. A list of users and groups with permission over the
manager features is displayed. By default all members of the Windows Administrators group on the
MailMarshal Exchange server or Array Manager are allowed full permissions over all items that are
secured through on the window.
4. To add users or groups to the list, click Add then select groups or users using the Browse Network
Users window. Each group or user you add is given full permissions by default.
5. To delete a user or group from the list, select it and click Remove.
6. To change permissions for a group or user, highlight the group or user name in the top pane. The lower
pane shows the current permissions for this user. Set permissions for this user by selecting the
appropriate boxes.
7. Repeat Step 6 for each group or user.
8. To save the changes, click Apply or OK.
9. To apply the changes, commit the configuration.
9.5 Configuring Automatic UpdatesTrustwave provides updates for some Category scripts to all customers with current
MailMarshal Exchange maintenance contracts. The updates are delivered through the Web by HTTP and
HTTPS.
Updates currently include the “Zero Day Threats” category which helps to identify malicious email. This
category is used in the default rule “Block Virus - Zero Day Protection.” The category is updated as
required, not on a regular schedule.
9.5.0.1 Configuring and Checking Automatic Updates
Automatic updating is enabled by default. You can choose to download updates manually or automatically.
Managing MailMarshal Exchange ConfigurationCopyright © 2015 Trustwave Holdings, Inc. All rights reserved. 136

MailMarshal Exchange (ECM) - User Guide - Version 7.1
To monitor and configure automatic updates:
1. In the Configurator, select MailMarshal Properties from the Tools menu.
2. Select Automatic Updates from the left pane. The display shows the time and result of the last update
attempt, and the time of the next attempt.
3. If you do not want automatic updates, clear the check box Enable Automatic Updates.
4. If you want to be notified by email when an automatic update is received, select the check box
Send email to the administrator. MailMarshal Exchange sends an email message to the
administrator address configured on the Notifications page of MailMarshal Properties.
5. If you want to perform a check for updates immediately, click Check for Updates Now.
9.5.0.2 Configuring Proxy Settings for Updates
If the MailMarshal Exchange server(s) Array Manager server does not have direct access to the Web, you
can configure MailMarshal Exchange to use a proxy server to download the updates. This setting is also
used for the RSS feed item in the Console.
To configure proxy settings for the updates:
1. In the Configurator, select MailMarshal Properties from the Tools menu.
2. Select Internet Access from the left pane.
3. If you want MailMarshal Exchange to access the Web directly, select Direct Access.
4. If you want MailMarshal Exchange to use a specific proxy server, select Proxy. Enter a proxy
server name and port. If necessary, enter a user name and password for proxy authentication.
Managing MailMarshal Exchange ConfigurationCopyright © 2015 Trustwave Holdings, Inc. All rights reserved. 137

MailMarshal Exchange (ECM) - User Guide - Version 7.1
5. To apply the proxy settings, click OK to go back to MailMarshal Properties and then commit
MailMarshal Exchange configuration changes.
9.6 Managing Array NodesA MailMarshal Exchange installation consists of an Array Manager and one or more Exchange servers
with the MailMarshal processing services installed (known as email processing servers or array nodes).
9.6.1 Managing Node ServicesYou can view the status of the MailMarshal Exchange services on each email processing node, and stop or
restart the services, from the MailMarshal Exchange Configurator.
To see an overview of the status of services on each node, in the left pane of the Configurator click
MailMarshal Properties.
To see details of the status of services on a particular node, and to stop or restart the services:
1. In the left pane of the Configurator expand Server and Array Configuration. Highlight Servers. The
list shows all servers and a summary of the state of each server. (For more details about the
information listed, see Help.)
2. In the right pane select the server you want and click Properties.
3. Select General from the left pane to see the Services listing and to see the status of each service
installed on the node.
4. To stop one or more services, select them in the list then click Stop.
5. To start one or more services, select them in the list then click Start.
6. To restart all services, click Restart all.
9.6.2 Adding and Deleting NodesYou can add email processing servers (nodes) to a running MailMarshal Exchange installation to add
capacity or redundancy. You can also delete existing nodes from an installation.
9.6.2.1 Adding a Node
You can add a node at any time without affecting other nodes. The MailMarshal Exchange node services
must be installed on an Exchange Server properly configured for Hub Transport.
To add a node to a MailMarshal Exchange installation:
Note: If you stop services from this window, they will remain stopped until you start them. Committing the configuration will not start the services.
Note: Adding a node does not create automatic load balancing.
Managing MailMarshal Exchange ConfigurationCopyright © 2015 Trustwave Holdings, Inc. All rights reserved. 138

MailMarshal Exchange (ECM) - User Guide - Version 7.1
1. Log on to the new Exchange Server using an account that you have granted the permission Join
Array.
2. Install MailMarshal Exchange.
3. During installation, select the option “I want to join an existing array” and enter the name of the existing
Array Manager.
For more information, see “Installing MailMarshal Exchange as an Array” on page 30.
9.6.2.2 Deleting a Node
You should delete a node to cleanly remove it from the MailMarshal Exchange array. To preserve email
security, before deleting a node ensure that the Exchange Server is not processing messages within the
Exchange environment.
To delete a node from a MailMarshal Exchange installation:
1. Stop MailMarshal Exchange services on the node using the MailMarshal Exchange Configurator.
2. If you want to preserve messages from quarantine folders stored on the node, back up the Quarantine
folder in the MailMarshal Exchange installation folder on the node.
3. Uninstall MailMarshal Exchange on the node server using the Add/Remove Programs application in
Control Panel.
4. During the un-installation process, MailMarshal Exchange will attempt to remove the node records
from the array installation. If the logged in user does not have the “can join servers to array”
permission, MailMarshal Exchange will ask for an alternate credential. If you do not remember the
credential, you can still perform the un-install. In this case, remove the node records later using the
Configurator.
5. In the Configurator, an un-installed node will show a status of “not active.” You can highlight the node
and click the delete icon in the toolbar.
9.6.3 Joining a Node to an ArrayYou can join an email processing server (node) to a MailMarshal Exchange array. After joining the array,
the node will retrieve policy configuration from the Array Manager.
To join an existing node to a MailMarshal Exchange installation:
1. Log on to the node server.
2. Run the MailMarshal Exchange Server Tool from the MailMarshal program group.
3. On the Node > Array page, enter the local port, and the port and server name for the Array Manager.
Select Join Array, and then click Apply. Enter the credentials of an account that has the permission
Join Array (granted in the Configurator).
Managing MailMarshal Exchange ConfigurationCopyright © 2015 Trustwave Holdings, Inc. All rights reserved. 139

MailMarshal Exchange (ECM) - User Guide - Version 7.1
9.6.4 Customizing Settings for NodesSince the purpose of a MailMarshal Exchange array is to replicate configuration over a number of
processing servers, most settings will be the same for all nodes. You can configure the following settings
for each node:
Server name and general information
For each email processing server, you can view and change the server name and the description and
location notes.
Exchange Agent State
For each Exchange server in an array, you can specify the status of the Transport Agent that interfaces
with Exchange to retrieve and re-insert messages.
To customize settings for a particular node:
1. In the left pane of the Configurator, expand Server and Array Configuration.
2. Select Servers, and then in the right pane double click the node you wish to configure.
3. To navigate through the available settings for the node, select items in the left pane of the window. For
detailed information about the settings, click Help.
4. When you have configured any changes required, click OK.
9.7 Setting Advanced OptionsMailMarshal Exchange allows you to configure a number of advanced settings. These settings default to
values that are reasonable in the majority of cases. In specific cases you may need to change them.
For more information and warnings about each of these options, click Help in the user interface for the
option.
Address Bypass
Allows you to exempt messages from all processing by MailMarshal Exchange, based on the email
address of the sender or recipient.
Array Security Key
Allows you to reset a code used by MailMarshal Exchange to prevent multiple processing of mes-
sages.
Engine Advanced options
Allows you to set options for RTF stamping and unpacking depth.
Note: Only change the server name here if you have changed the computer name of the email processing server.
Managing MailMarshal Exchange ConfigurationCopyright © 2015 Trustwave Holdings, Inc. All rights reserved. 140

MailMarshal Exchange (ECM) - User Guide - Version 7.1
Templates
Allows you to override the administrative notification messages built in to MailMarshal Exchange.
Commit Scheduling
Allows you to specify times of day when configuration changes should be committed at the
MailMarshal Exchange node processing servers. This functionality is designed to allow deferred com-
mits so as to minimize impact on systems during the business day.
Reporting Groups
Allows you to group folders and categories for reporting on viruses.
To configure advanced server options:
1. On the Tools menu of the Configurator, click MailMarshal Properties.
2. Navigate to the required option, found in the left pane of the window.
3. Specify the appropriate values.
4. Click OK.
9.7.1 Working with Array CommunicationsWhen MailMarshal Exchange is configured as an array of servers with an Array Manager and one or more
other servers as email processing servers, the MailMarshal Exchange servers communicate over TCP/IP.
By default, MailMarshal Exchange uses port 19011. If the Array Manager and email processing services
are installed on the same server, by default the email processing services use port 19012.
You can configure these settings using the MailMarshal Exchange Server Tool, which is installed on each
server. You must configure the settings on each server individually.
9.7.1.1 Changing Array Port SettingsYou can change the TCP ports used by the MailMarshal Exchange services. For instance, you may want to
alter the default port numbers to enhance security.
To change the port settings:
1. Log on to the server using an account with Administrator permissions.
2. Run the MailMarshal Exchange Server Tool from the MailMarshal Exchange Tools group in the
MailMarshal program group.
3. If the server is an email processing server (not an Array Manager or standalone server):
a. On the Node > Array page, you can change the Node Port used by the services to listen for
communications from the Array Manager. When you apply this change and restart the services,
MailMarshal Exchange will report the change to the Array Manager.
Note: Close the MailMarshal Exchange Configurator and Console applications while using the Server Tool.
Managing MailMarshal Exchange ConfigurationCopyright © 2015 Trustwave Holdings, Inc. All rights reserved. 141

MailMarshal Exchange (ECM) - User Guide - Version 7.1
b. You can also change the Array Manager port used by the services to connect to the Array
Manager. This entry must match the port specified at the Array Manager.
4. If the server is an Array Manager: On the Array Manager > Ports page, you can change the port used by
the Array Manager to accept connections from email processing servers, the Console, the
Configurator, and the Web components.
9.7.1.2 Changing the Database LocationYou can change the location of the MailMarshal Exchange database using the Server Tool on the Array
Manager server. Because most configuration information is stored in the database, in general you should
only use this option if you must change the Microsoft SQL Server on which the database is hosted.
When you create a new database, MailMarshal Exchange does not retain Quarantine Management logins
and related data.
To change the database location:
1. Back up the MailMarshal Exchange configuration. See “Backing Up and Restoring the Configuration”
on page 132.
2. Log on to the Array Manager server using an account with Administrator permissions.
3. Run the MailMarshal Exchange Server Tool from the MailMarshal Tools group in the MailMarshal
program group.
4. If you want to move the existing database:
a. Stop all MailMarshal Exchange services.
b. Move the database to the new location using Microsoft SQL Server tools.
5. On the Database page, enter the new SQL Server name and database name. Click Apply. If
necessary, MailMarshal Exchange will present options to use or recreate an existing database. If you
have moved a database and selected it, choose Use and click OK.
6. If the Array Manager also hosts a processing node, MailMarshal will offer to rejoin the node to the
array. You must complete this step either now or later.
7. MailMarshal Exchange will ask to restart services. You must complete this step either now or later.
8. Restore the MailMarshal Exchange configuration. For more information, see “Backing Up and
Restoring the Configuration” on page 132.
9. If the installation is an array with additional processing nodes, use the Server Tool on each email
processing server to rejoin the servers to the array. See “Joining a Node to an Array” on page 139.
Note: If you change this value, to restore full functionality you must also change the corresponding value in several other places. These include each email processing server and the Web components if installed. The Configurator and Console installations will prompt for a new port when they are next opened.
Managing MailMarshal Exchange ConfigurationCopyright © 2015 Trustwave Holdings, Inc. All rights reserved. 142

MailMarshal Exchange (ECM) - User Guide - Version 7.1
9.7.2 Changing Folder LocationsYou can change the default location for MailMarshal Exchange logging, quarantine, message unpacking,
and message queues on each email processing server using the MailMarshal Exchange Server Tool. For
more information about the how these folders are used, see “Understanding MailMarshal Exchange Folder
Locations” on page 25.
To change the locations of folders:
1. Using the MailMarshal Exchange Configurator, stop the MailMarshal Exchange services on the email
processing server where you want to move folders.
2. Log on to the email processing server using an account with Administrator permissions.
3. Run the MailMarshal Exchange Server Tool from the MailMarshal Tools group in the MailMarshal
program group.
4. On the Array Manager > Folders page and/or the Node > Folders page, change the locations. You can
enter a full path relative to a local drive letter, or a partial path relative to the MailMarshal Exchange
installation folder.
5. Click OK. The Server Tool will offer to copy files from the old locations. The Server tool will also offer to
restart the MailMarshal Exchange services.
6. The Server Tool will not delete files from the old locations. You can safely do so using normal Windows
procedures.
9.8 Using the Group File Import ToolThe MailMarshal Exchange Group File Import Tool is a command-line tool you can use to import
information into MailMarshal Exchange user groups.
The preferred method of importing user information is to allow MailMarshal Exchange to populate your
User Groups from Active Directory and optionally from additional LDAP directories. For more information,
see “Configuring Connectors” on page 84 and “Configuring User Groups” on page 85.
Run the GroupFileImport.exe from the MailMarshal Exchange \InstallPath folder. By default, the
installation path is \Program Files (x86)\Marshal\MailMarshal Exchange.
To use the group file import tool:
Caution: If you change the location of the Queues folder, you must grant full control over the new location to the Network Service account. This access is required by the Exchange Agent.
Note: You can change the location of an individual folder. For more information, see “Working with Folders” on page 106.
Caution: When the Group File Import tool is processing an import, MailMarshal Exchange may temporarily block email. Use this tool during off-peak hours.
Managing MailMarshal Exchange ConfigurationCopyright © 2015 Trustwave Holdings, Inc. All rights reserved. 143

MailMarshal Exchange (ECM) - User Guide - Version 7.1
1. Using a text editor such as Notepad, create the input file that contains the names of the groups and
user email addresses you want to import. For more information, see “Group File Import Text File
Format” on page 144.
2. Log onto the Array Manager computer as a member of the local Administrators group or other user
account with permissions to modify the registry.
3. Open a command window and navigate to the folder where you installed MailMarshal Exchange.
4. Type the group file import command with the options you want to specify. For more information, see
“Group File Import Command Format” on page 144.
5. After the users and groups are imported, close the command window.
9.8.0.1 Group File Import Text File Format
To use this tool, create a file using a plain text editor, such as Notepad. The file contains group names
followed by a list of email addresses of the users in each group. You can also use the asterisk (*) wildcard
to allow address matching. The following text illustrates the file format to use:
9.8.0.2 Group File Import Command Format
Use the following syntax and options to issue the command:
GroupFileImport.exe [options] {-f inputfilename}
The following example imports user addresses from mygroups.txt, and merges the addresses into the
group if the group name already exists.
GroupFileImport.exe -m -f mygroups.txt
Element Description
[New Group] Group name
[email protected] Email address
[email protected] Email address
q*@example.com Several email addresses specified using wildcard
Option Use
-h {computer name or identifier} Array Manager name or IP address. Defaults to localhost.
-p {IP Port} Array Manager port (defaults to 19011).
-n {text} Text string prefixed to all group names at import, such as File Group:
Managing MailMarshal Exchange ConfigurationCopyright © 2015 Trustwave Holdings, Inc. All rights reserved. 144
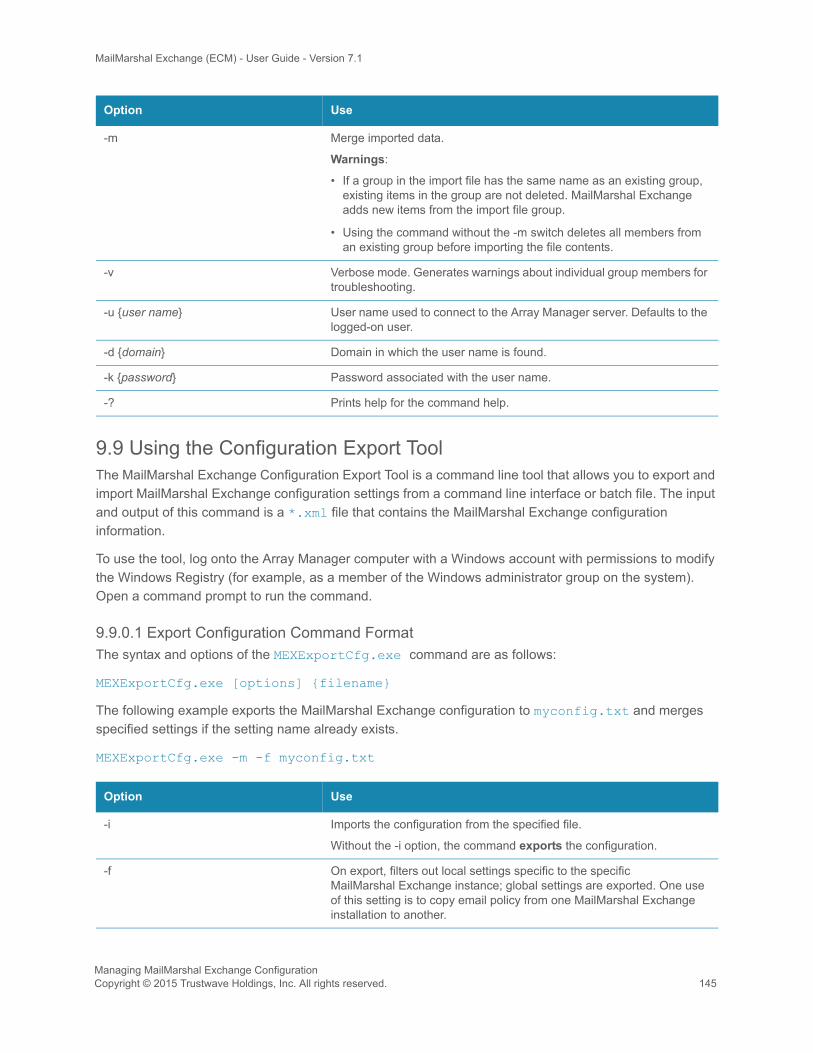
MailMarshal Exchange (ECM) - User Guide - Version 7.1
9.9 Using the Configuration Export ToolThe MailMarshal Exchange Configuration Export Tool is a command line tool that allows you to export and
import MailMarshal Exchange configuration settings from a command line interface or batch file. The input
and output of this command is a *.xml file that contains the MailMarshal Exchange configuration
information.
To use the tool, log onto the Array Manager computer with a Windows account with permissions to modify
the Windows Registry (for example, as a member of the Windows administrator group on the system).
Open a command prompt to run the command.
9.9.0.1 Export Configuration Command FormatThe syntax and options of the MEXExportCfg.exe command are as follows:
MEXExportCfg.exe [options] {filename}
The following example exports the MailMarshal Exchange configuration to myconfig.txt and merges
specified settings if the setting name already exists.
MEXExportCfg.exe -m -f myconfig.txt
-m Merge imported data.
Warnings:
• If a group in the import file has the same name as an existing group, existing items in the group are not deleted. MailMarshal Exchange adds new items from the import file group.
• Using the command without the -m switch deletes all members from an existing group before importing the file contents.
-v Verbose mode. Generates warnings about individual group members for troubleshooting.
-u {user name} User name used to connect to the Array Manager server. Defaults to the logged-on user.
-d {domain} Domain in which the user name is found.
-k {password} Password associated with the user name.
-? Prints help for the command help.
Option Use
-i Imports the configuration from the specified file.
Without the -i option, the command exports the configuration.
-f On export, filters out local settings specific to the specific MailMarshal Exchange instance; global settings are exported. One use of this setting is to copy email policy from one MailMarshal Exchange installation to another.
Option Use
Managing MailMarshal Exchange ConfigurationCopyright © 2015 Trustwave Holdings, Inc. All rights reserved. 145

MailMarshal Exchange (ECM) - User Guide - Version 7.1
9.10 Using the Quarantine Synchronization ToolThe MailMarshal Exchange Quarantine Synchronization Tool (Sync Tool) is designed to ensure that every
email message in the MailMarshal Exchange Quarantine folders has a corresponding record in the
MailMarshal Exchange database. Each message must have a record in the database so that the
MailMarshal Exchange Console can retrieve and process all messages.
The Sync Tool does not delete any records from the database.
Use this tool to repair or recreate the database in case of database corruption, or to assist in re-
synchronizing message records if message files have been moved to a new server.
To run the Sync Tool:
1. Log on to a MailMarshal Exchange email processing node server or standalone server.
2. Run the Sync Tool from the MailMarshal Exchange Tools group in the MailMarshal Exchange program
group.
3. A wizard gathers necessary information. For more details of the required information, click Help.
4. Allow the process to complete.
5. If you have installed an array with more than one email processing node, you may need to complete
Steps 1 to 4 on each email node server.
-m Merge the imported policy. If a setting is not present in the import file, the existing setting remains in place.
Using the command without the -m option clears all settings that are not in the import file.
-c Commit configuration after import.
-s:{computer name or identifier} Array Manager name or IP address. Defaults to localhost
-p:{IP Port} Array Manager port. Defaults to 19011.
Option Use
Managing MailMarshal Exchange ConfigurationCopyright © 2015 Trustwave Holdings, Inc. All rights reserved. 146

MailMarshal Exchange (ECM) - User Guide - Version 7.1
10 Delegating Quarantine Management
In some cases when MailMarshal Exchange quarantines an email message as suspicious, the recipient or
sender wants the message to be released to its destination. If an organization generates a large number of
these cases, the email administrator may not have the time required to review them.
MailMarshal Exchange provides several options that allow the administrator to delegate the responsibility
for reviewing these messages and taking action:
• Departmental administrators or help desk personnel can have permission to process the messages in
selected quarantine folders, using the MailMarshal Exchange Console or Web Console.
• Each email user can receive a daily summary of their incoming messages that have been quarantined,
through MailMarshal Exchange digest emails.
• Each email user can have permission to review and release messages quarantined in one or more
folders, through the MailMarshal Exchange Quarantine Management Website.
10.1 Setting Up Console AccessMailMarshal Exchange controls access to the features of the Console through Access Control Lists (ACLs)
that contain Windows user information
For general information about setting Console security and access, see “Setting Console Security” on
page 124.
To allow a user to use the MailMarshal Exchange Console to release messages from quarantine:
1. Grant the user the Console permission Console and Folder Connect.
2. For each quarantine folder the user is allowed to manage, grant the appropriate permissions.
10.2 Setting Up Quarantine Management FeaturesThe MailMarshal Exchange Quarantine Management system includes a website that allows users to
review and release email quarantined in one or more folders that you specify.
For information about setting up the Quarantine Management Website, see “Installing and Customizing
Web Components” on page 41.
10.2.1 Quarantine Management WindowsThe Quarantine Management Website includes the following pages:
Note: You can grant users or groups, such as a help desk user group, the permissions Read and Release. These permissions allow group members to manage messages without seeing the content of messages.
Delegating Quarantine ManagementCopyright © 2015 Trustwave Holdings, Inc. All rights reserved. 147

MailMarshal Exchange (ECM) - User Guide - Version 7.1
Log In
Allows a user to enter an email address and password to log in to the Quarantine Management Web-
site. Also allows a user to request a login and to request a new password. MailMarshal Exchange only
uses this page if you configure the site to use authentication by email address and password.
Home
Allows a user to view a list of email blocked since their last visit, and summary charts of blocked and
good email (if allowed by the administrative settings).
Blocked Mail
Allows a user to review a list of email quarantined in one or more folders. The user can view, release or
delete each message. If more than one folder is available through this site, the page shows a list of
folders the user can review.
Message Details
Allows a user to view the body and additional details of a message from the list of blocked email. The
user can release the message or delete the message.
User Settings
Allows a user to configure site and address options.
• Set the site look and feel.
• Add or delete entries in a list of email addresses that they can manage using this login (if allowed
by the administrative settings). Before adding a requested address to the list,
MailMarshal Exchange requests confirmation by sending a message to the email address. The
user must click a link in the message and confirm the request.
• Delegate the power to review their blocked email to one or more other users. The delegates can
choose which user’s email to review using a list at the top of the page. Depending on the site
authentication setting, delegation is by email addresses or Windows user names.
• Choose to receive, or not receive, specific digests (if permitted by the global settings of each
digest).
Change Password
Allows a user to change the password associated with their login (email address) for this site.
MailMarshal Exchange only uses this page if you configure the site to use authentication by email
address and password.
Note: Some options can be globally enabled or disabled by the administrator (using options on the Administrator tab of the site).
Delegating Quarantine ManagementCopyright © 2015 Trustwave Holdings, Inc. All rights reserved. 148

MailMarshal Exchange (ECM) - User Guide - Version 7.1
Administrator
Allows Site Administrators to perform configuration and administration functions for the Quarantine
Management site:
• configure site settings
• globally enable and disable use of site features including the charts, email address management,
folder counts, and “all folders” view.
• delete users
• view and act on blocked mail for any user
• edit the delegated and owned email addresses for any user
Help
Each page includes a link to a Help window that provides additional information about fields and func-
tions.
10.2.2 Setting Up Folders and TemplatesYou can configure any MailMarshal Exchange folder to be managed through the Quarantine Management
Website.
To set up folders to manage with the Quarantine Management Website:
1. Create or edit a MailMarshal Exchange folder. See “Using Email Folders and Message Classifications”
on page 105.
2. On the Options tab of the folder properties, choose the setting Enable End-user Management for
this folder.
3. Choose the setting Folder is used to manage messages addressed to a user or Folder is used to
manage messages addressed from a user as appropriate.
4. If you want each user to receive a digested notification of messages that have been quarantined in this
folder, create a message digest that includes the folder. See “Setting Up Message Digests”.
5. Repeat Steps 1 to 4 for each folder you want to set up for Quarantine Management.
10.2.3 Setting Up Message DigestsMailMarshal allows you to send email summaries to users, notifying them about messages addressed to
(or from) them that MailMarshal has quarantined. Users can review and release the messages directly
Tip: When you create rules to quarantine messages in these folders, be sure to direct “messages to” and “messages from” to the correct folders. This setting is used to determine the recipient of the email for digesting and the Quarantine Management website.
• You can use the “messages to a user” setting to allow a user to manage oversize or suspect messages from other users or external sources.
• You can use the “message from a user” setting to require a user to re-confirm certain messages they have sent.
Delegating Quarantine ManagementCopyright © 2015 Trustwave Holdings, Inc. All rights reserved. 149

MailMarshal Exchange (ECM) - User Guide - Version 7.1
from the digest email. Digests are often used for the same folders that are available for end user
management in the QM website, but you can also create digests to allow message releasing for other
folders.
A digest only lists messages that have not been included in a previous digest.
A message digest can
• Include information about messages in one or more folders
• Include or exclude messages from digesting, by checking user groups
• Be generated using one or more schedules. Each schedule causes the digest to be generated at a
specified time on one or more days each week
• Use a specified email template. To learn more about templates, see “Creating Digest Templates” on
page 97.
• Send digest emails to each user with undigested email in the folder, or send all digest emails to a spec-
ified address.
• Allow users to subscribe or unsubscribe from the digest using the QM website or release webpage.
To work with message digests in the Configurator, select Message Digests from the left pane menu tree.
10.2.3.1 Creating Message Digests
You can create as many digests as your policy requires
To create a message digest:
1. On the Action menu, click New Message Digest. to start the New Message Digest Wizard.
2. On each screen in the Wizard, specify the appropriate values. For more information about fields on a
window, click Help.
3. Click Finish.
10.2.3.2 Editing Message Digests
You can edit the name and features of a digest, including the folders digested. You can set advanced
features of the digest by editing it. Advanced features include multiple schedules, selection of email to
digest by user group, and the recipient of digest emails.
To edit a message digest:
1. Double-click the digest name in the right pane of the Configurator to view its properties on a tabbed
window.
2. On each tab, specify the appropriate values. For more information about fields on a tab, click Help.
Note: The New Message Digest Wizard creates a digest using the most common options. Additional advanced options, such as multiple schedules, user group settings, and subscription settings, are not presented in the Wizard. To set advanced options for a Digest, edit the Digest after completing the Wizard.
Delegating Quarantine ManagementCopyright © 2015 Trustwave Holdings, Inc. All rights reserved. 150
MailMarshal Exchange (ECM) - User Guide - Version 7.1
3. Click OK.
10.2.3.3 Deleting Message DigestsYou can delete a digest if you do not want to produce the digest emails.
To delete a message digest:
1. Select the digest name in the right pane of the Configurator.
2. Click the Delete icon in the toolbar.
10.2.4 Setting Up RulesMailMarshal Exchange places email in quarantine folders through rule action.
To set up Quarantine rules:
1. Create MailMarshal Exchange rules to move messages into each folder you have created. If you are
using the default configuration provided with MailMarshal Exchange, rules included in default policy
groups move messages into several folders.
2. When a user releases a message from the QM website, MailMarshal Exchange continue processing
the message as specified in the rule that moved the message to the folder. For more information, see
“Move the message” on page 80.
Delegating Quarantine ManagementCopyright © 2015 Trustwave Holdings, Inc. All rights reserved. 151

MailMarshal Exchange (ECM) - User Guide - Version 7.1
11 Reporting on MailMarshal Exchange Activity
The Marshal Reporting Console application (MRC) allows you to generate reports based on the
information MailMarshal Exchange logs as it processes email messages. You can choose from a wide
range of reports covering email throughput, specific content, and threat information. You can produce both
overall summaries and per-user information.
The information provided in this chapter refers only to options that you can set in the
MailMarshal Exchange Configurator. For information about installing and using Marshal Reporting
Console, see the MRC documentation.
11.1 Data Retention and GroupingThe data available for reports, and grouping of certain data items, is configured through the
MailMarshal Exchange Configurator.
11.1.1 Configuring Data RetentionYou can adjust the length of time MailMarshal Exchange retains logging records. Best practice is to retain
enough data to allow reporting on several months of email traffic. You can also reduce the size of your
MailMarshal Exchange database by reducing the retention time.
If you archive messages for longer than the logging retention time, MailMarshal Exchange will retain basic
database records about each archived message for as long as the archives are retained. This information
is necessary to allow viewing of the messages in the Console. For more information about backing up and
restoring messages in quarantine folders, see the Trustwave Knowledge Base.
To configure your reporting data retention period:
1. Open the MailMarshal Exchange Configurator.
2. On the Tools menu, click MailMarshal Properties.
3. Click Reporting.
4. The General Options area of the Reporting section shows the length of time for which
MailMarshal Exchange will retain logging data.
5. To change the retention time, enter a number of days.
6. To show counts for the top five quarantine folders on the Dashboard page of the Console, check the
box Display Message Count.
7. Click OK.
Tip: You can set up a link from the Configurator to the MRC application. To enter the URL for the link, see MailMarshal Exchange Properties > Reporting.
Note: The structure of the MailMarshal Exchange reporting database, and the reporting queries, have changed significantly in MailMarshal Exchange version 7.X. You cannot use the Marshal Reporting Console to report on data logged by MailMarshal Exchange 5.X.
Reporting on MailMarshal Exchange ActivityCopyright © 2015 Trustwave Holdings, Inc. All rights reserved. 152

MailMarshal Exchange (ECM) - User Guide - Version 7.1
11.1.2 Configuring Reporting GroupsInformation about viruses is likely to be logged in varying classifications and folders. To allow unified
reporting on these categories, MailMarshal Exchange allows you to specify the folders and classifications
you are using for each of these types of content. These groups affect the display in the Virus Overview
report and virus detail reports available in the Marshal Reporting Console.
To configure the reporting groups:
1. Open the MailMarshal Exchange Configurator.
2. On the Tools menu, click MailMarshal Properties.
3. Click Reporting Groups.
4. This section shows the folders and classifications that are included in each reporting group. To change
the items included in a group, click Modify to open the Edit Reporting Group window.
5. Select the items you want to include, then click OK to return to the Reporting section of MailMarshal
Properties.
Note: Ensure that the folders and classifications you select are relevant to the purpose of the group. Otherwise, results based on the group will be meaningless.
Reporting on MailMarshal Exchange ActivityCopyright © 2015 Trustwave Holdings, Inc. All rights reserved. 153

MailMarshal Exchange (ECM) - User Guide - Version 7.1
A Wildcards and Regular Expressions
MailMarshal Exchange supports a simple wildcard syntax when you enter several types of information
including local domains, user groups, and report parameters.
MailMarshal Exchange also uses a full Regular Expression syntax for matching and substitution in Header
Rewrite rules.
A.1 Wildcard Characters
MailMarshal Exchange allows wildcard entries in the following contexts:
• Local domains. See “Running the Configuration Wizard” on page 35.
• User and Group matching for policy groups and rules. See “Understanding User Matching” on
page 64.
• The Console search and filtering options. See “Using the MailMarshal Exchange Console” on
page 116.
In each of these types of entry, MailMarshal Exchange supports this syntax:
The table below gives some examples of results of the wildcard syntax.
Character Function
* Matches any number of characters
? Matches any single character
[abc] Matches a single character from a b c
[!abc] or [^abc] Matches a single character except a b or c
[a!b^c] Matches a single character from a b c ! ^
[a-d] Matches a single character in the range from a to d inclusive
[^a-z] Matches a single character not in the range a to z inclusive
Pattern matches
*.ourcompany.com pop.ourcompany.comhq.ourcompany.cometc.
*.mail[0-9].ourcompany.com mail5.ourcompany.combut not maila.ourcompany.com
mail[!0-9].ourcompany.com mails.ourcompany.combut notmail3.ourcompany.com
Wildcards and Regular ExpressionsCopyright © 2015 Trustwave Holdings, Inc. All rights reserved. 154
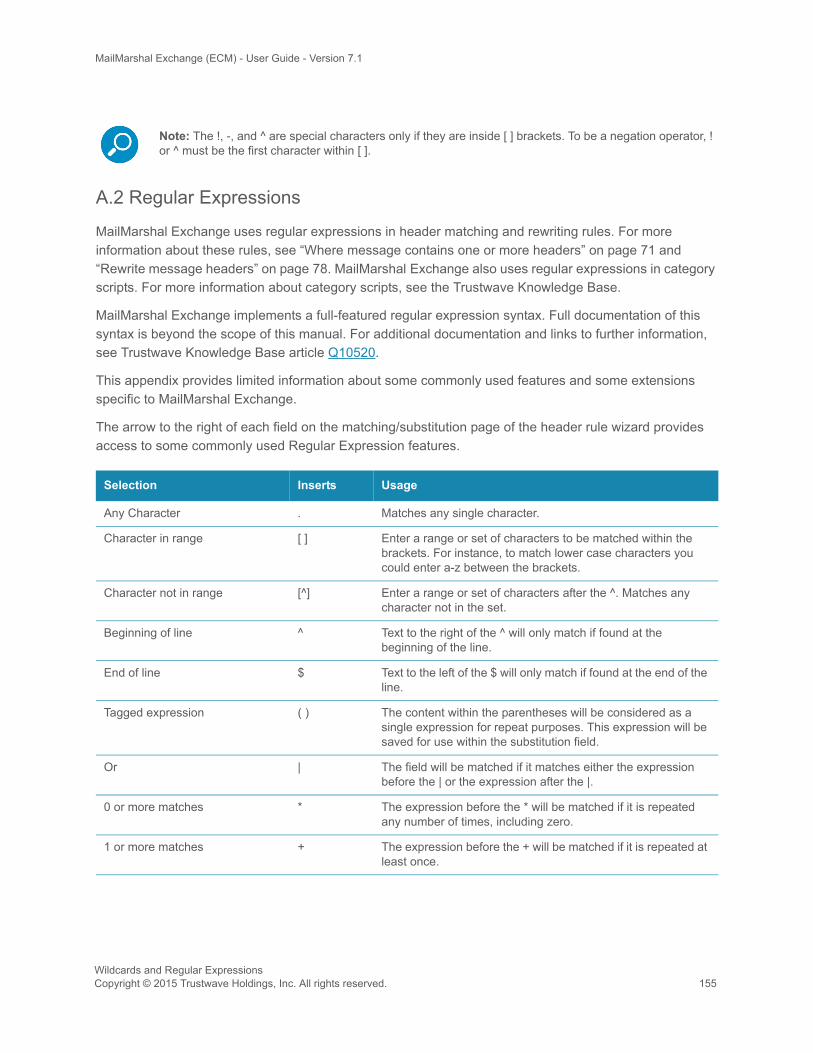
MailMarshal Exchange (ECM) - User Guide - Version 7.1
A.2 Regular Expressions
MailMarshal Exchange uses regular expressions in header matching and rewriting rules. For more
information about these rules, see “Where message contains one or more headers” on page 71 and
“Rewrite message headers” on page 78. MailMarshal Exchange also uses regular expressions in category
scripts. For more information about category scripts, see the Trustwave Knowledge Base.
MailMarshal Exchange implements a full-featured regular expression syntax. Full documentation of this
syntax is beyond the scope of this manual. For additional documentation and links to further information,
see Trustwave Knowledge Base article Q10520.
This appendix provides limited information about some commonly used features and some extensions
specific to MailMarshal Exchange.
The arrow to the right of each field on the matching/substitution page of the header rule wizard provides
access to some commonly used Regular Expression features.
Note: The !, -, and ^ are special characters only if they are inside [ ] brackets. To be a negation operator, ! or ^ must be the first character within [ ].
Selection Inserts Usage
Any Character . Matches any single character.
Character in range [ ] Enter a range or set of characters to be matched within the brackets. For instance, to match lower case characters you could enter a-z between the brackets.
Character not in range [^] Enter a range or set of characters after the ^. Matches any character not in the set.
Beginning of line ^ Text to the right of the ^ will only match if found at the beginning of the line.
End of line $ Text to the left of the $ will only match if found at the end of the line.
Tagged expression ( ) The content within the parentheses will be considered as a single expression for repeat purposes. This expression will be saved for use within the substitution field.
Or | The field will be matched if it matches either the expression before the | or the expression after the |.
0 or more matches * The expression before the * will be matched if it is repeated any number of times, including zero.
1 or more matches + The expression before the + will be matched if it is repeated at least once.
Wildcards and Regular ExpressionsCopyright © 2015 Trustwave Holdings, Inc. All rights reserved. 155

MailMarshal Exchange (ECM) - User Guide - Version 7.1
A.2.1 Reserved Characters
Some characters have special meanings within regular expressions.
A.2.1.1 Operators
The following characters are reserved as regular expression operators:
* . ? + ( ) { } [ ] $ \ | ^
To match any of these characters literally, precede it with \
For example, to match marshal.com enter Marshal\.com
A.2.1.2 Wildcard Character
The dot character (.) matches any single character.
A.2.1.3 Repeat Operators * + ? {}
A repeat is an expression that occurs an arbitrary number of times.
An expression followed by * can be present any number of times, including zero. An expression followed
by + can be present any number of times, but must occur at least once. An expression followed by ? may
occur zero times or once only. You can specify a precise range of repeated occurrences as a comma-
separated pair of numbers within {}. For instance,
ba* will match b, ba, baaa, etc.
ba+ will match ba or baaaa for example but not b.
ba? will match b or ba.
ba{2,4} will match baa, baaa and baaaa.
A.2.1.4 Parentheses ( )
Parentheses serve two purposes:
Repeat { } Enter a number or two numbers separated by a comma within the braces. The expression before the braces will be matched if it is repeated the number of times specified. See “Repeat Operators * + ? {}” on page 156.
Whitespace [[:space:]] Matches a single whitespace character (space, tab, and so on.).
Alphanumeric character [[:alnum:]] Matches a single letter or number character.
Alphabetic character [[:alpha:]] Matches a single letter character.
Decimal digit [[:digit:]] Matches a single number character 0-9.
Selection Inserts Usage
Wildcards and Regular ExpressionsCopyright © 2015 Trustwave Holdings, Inc. All rights reserved. 156
MailMarshal Exchange (ECM) - User Guide - Version 7.1
• To group items together into a sub-expression. You can apply repeat operators to sub-expressions in
order to search for repeated text.
• To mark a sub-expression that generated a match, so it can be used later for substitution.
For example, the expression (ab)* would match all of the string
ababab
The expression “ab” would be available in a variable (tagged expression) with a name in the range $1...$9
(see the matching and substitution examples in following sections).
A.2.1.5 Alternatives
Alternatives occur when the expression can match either one sub-expression or another. In this case, each
alternative is separated by a |. Each alternative is the largest possible previous sub-expression (this is the
opposite to repetition operator behavior).
a(b|c) could match ab or ac
abc|def could match abc or def
A.2.2 Examples
The following sections show examples of matching and substitution strings.
A.2.2.1 Matching
The expression
(.+)@(.+)\.ourcompany\.com$will match a sequence of 1 or more characters followed by an @ followed by another sequence of 1 or
more characters, followed by .ourcompany.com at the end of the field.
That is, it will match [email protected] and [email protected] but
A.2.2.2 Substitution
Using the example given in the preceding section, the substitution expression
$1@$2.co.uk.euwould yield [email protected], [email protected] and
[email protected] respectively. The last result may be somewhat surprising, but data that
does not match part of the regular expression is simply copied across.
A.2.3 Map Files
MailMarshal Exchange allows substitution using regular expressions to search for an entry in text file
known as a map file. Each line in the map file contains two values separated by a comma. If the search
expression matches the first value in a line, MailMarshal Exchange substitutes the second value. If the
search expression does not match the first value in any line, MailMarshal Exchange substitutes the search
expression.
Wildcards and Regular ExpressionsCopyright © 2015 Trustwave Holdings, Inc. All rights reserved. 157

MailMarshal Exchange (ECM) - User Guide - Version 7.1
A typical use of map files is to redirect incoming email to arbitrary addresses. The following simple
example modifies email addresses using a map file.
A.2.3.1 Map file
[email protected], [email protected]@domain.co.uk, [email protected]
A.2.3.2 Search expression
(.+)@domain\.co\.uk$
A.2.3.3 Lookup key
A.2.3.4 Sample results
The following table shows the matching addresses when the sample mapping file above is used.
Input Email Address Result
[email protected] [email protected]
[email protected] [email protected]
[email protected] [email protected]
Wildcards and Regular ExpressionsCopyright © 2015 Trustwave Holdings, Inc. All rights reserved. 158

MailMarshal Exchange (ECM) - User Guide - Version 7.1
B Third Party Extensions
MailMarshal Exchange supports integration with a number of third party products that extend MailMarshal
scanning and filtering capabilities. These products include virus scanning software and image analysis
software.
B.1 Image Analyzer
Image Analyzer is a third party deep image analysis product that has been fully integrated into the
MailMarshal content scanning engine. Integration with Image Analyzer allows MailMarshal to assess the
content of images that pass through the email gateway. For usage details, see “Where the attached image
is/is not/may be inappropriate” on page 73. Trustwave also provides integrated licensing for this product.
Because MailMarshal unpacks the content of a message, extracting the attachments and the content
inside archive files, Microsoft Word documents, and other packed formats, Image Analyzer can scan the
image content from all components of the target message.
The main target content that Image Analyzer attempts to detect is pornographic images. Image Analyzer
uses a variety of techniques in its analysis to make this determination. It is important to note that detection
of this type of content is not an exact science, and the level of technology available today means that there
will be a degree of false-positive and false-negative detections. A number of control settings can be
selected when creating a rule for image analysis, to help tune the results of the analysis.
B.1.1 Why Would I Use Image Analyzer?
The primary goal for organizations deploying image analysis technology is to reduce legal liability and to
ensure that company reputation is not compromised. Image Analyzer allows your organization to utilize
leading technology, and provides evidence of due diligence in protecting your employees from receiving
material that may be offensive or in some cases illegal. Executives in some countries can be held legally
liable for not exercising due diligence in preventing material of this nature from entering or being stored on
their systems.
Many organizations today are blocking all image content entering their organization to ensure that
offensive material cannot enter. However, blocking all images can prevent the transmission of images that
are required for business purposes.
Image Analyzer allows the organization to permit email transfer of legitimate images, and also to meet its
legal obligations of due diligence and its more general moral obligations of protecting its employees from
offensive material being delivered to them over a medium that they have no control over.
B.1.2 What Results Can I Expect From Image Analyzer?
Image Analyzer has tested their technology with a wide range of image content that typically travels the
Internet. The published results of this testing show a false-positive rate (the rate at which non-pornographic
images are detected as inappropriate) of between 2% and 5%. The results also show a false-negative rate
(the rate at which inappropriate images are not reported) of between 17% and 24%. Based on the type of
content entering your organization you may see similar or slightly better results. These results compare
favorably with other products on the market.
Third Party ExtensionsCopyright © 2015 Trustwave Holdings, Inc. All rights reserved. 159
MailMarshal Exchange (ECM) - User Guide - Version 7.1
B.1.3 How Does Image Analyzer Address the Issues?
Although today’s technology does not allow Image Analyzer to provide 100% protection against
inappropriate image content, use of Image Analyzer can help in two ways.
• Use of Image Analyzer can help to reduce liability by showing due diligence in providing an appropriate
environment.
• The policy based functionality of MailMarshal allows social education on this issue within an
organization. Individuals who exchange inappropriate material tend to do so repeatedly. MailMarshal
can send a notification to the sender when it detects inappropriate content. Even if MailMarshal does
not detect every instance of the material, the individuals will be educated that the content of email is
being analyzed and monitored. The risk of action being taken, or social embarrassment, rapidly
increases. Most users will cease to send material that they know is not acceptable under your
organization’s policy.
B.2 Virus Scanning Software
MailMarshal Exchange provides high-throughput DLL interfaces to a number of well-known virus scanning
products. In addition to a DLL interface, MailMarshal also provides integrated licensing and a customized
upgrade component for the McAfee scanner (known as McAfee for Marshal). For usage details, see
“Configuring Antivirus Scanning” on page 39 and “Stopping Viruses” on page 56.
Anti-virus software is considered a basic requirement for secure business networks. Integration of anti-
virus scanning with MailMarshal allows checking for email viruses at the network boundary. This capability
provides an added layer of protection beyond what desktop scanners can provide.
Third Party ExtensionsCopyright © 2015 Trustwave Holdings, Inc. All rights reserved. 160

MailMarshal Exchange (ECM) - User Guide - Version 7.1
Glossary
access control list (ACL). A table that tells a computer operating system which access rights each user has to a particular system object, such as a file directory or individual file.
Acceptable Use Policy (AUP).Rules and regulations governing the use of organizational email and Internet browsing.
Active Directory.The directory service implemented in the Windows 2000 or later environment to store often accessed information. It contains information about users, groups, computers, organizational units, and domains.
alert.An indication of a significant event. Alerts are generated by MailMarshal services.
array.A group of MailMarshal email processing servers that use the same policy.
array manager.A MailMarshal service that controls configuration for all email processing servers and connects to the MailMarshal database. Also, the server running the array manager service.
attribute.Computer characteristic, typically defined by a registry key or value.
blended threatSecurity threat to a network using multiple vectors (for instance, a malicious URL sent by email).
component.Individual part of a MailMarshal implementation that performs a specific function. For example, an email processing server, Array Manager, or database is a MailMarshal component.
computer name.A name that uniquely identifies a computer on a network. The computer name cannot be the same as any other computer or domain name on the network. The network uses the computer name to identify the computer and to allow other users to access the shared resources on that computer.
Configurator.Interface that allows you to edit email policy and configure email delivery and server settings.
Console.Interface that allows you to monitor email traffic and manage quarantined email. Intended to be used by email administrators, managers, and help desk personnel.
GlossaryCopyright © 2015 Trustwave Holdings, Inc. All rights reserved. 161

MailMarshal Exchange (ECM) - User Guide - Version 7.1
Denial of Service Attack (DoS). An attempt to cause the target organization to lose access to common business services, such as email. In an email DoS attack, the attacker floods email servers with messages, causing the email servers to slow down or cease operation.
Directory Harvest Attack (DHA). An attempt to identify valid email addresses by sending randomly-addressed messages to an email server in a corporate network. When a message reaches a recipient without being bounced back, the attacker enters the valid address in a database used for sending spam.
distinguished name.An address format used to locate and access objects in an X.500 directory using the LDAP protocol. This format specifies the complete path to the object through the hierarchy of containers in a domain. Each distinguished name is unique. For example, a user object with the common name J. Doe in the organizational unit container called Users on the domain marshal.com might be represented as follows:CN=JDoe,OU=Users,DC=Marshal,DC=com
DNS.See Domain Name Service (DNS).
DLL.A library of executable functions or data that can be used by a Windows application. Typically, a DLL provides one or more particular functions and a program accesses these functions.
DMZ.A part of a local network that has controlled access both to the Internet and to the internal network of the organization. Servers that provide gateway services for an organization are typically located in a DMZ.
Domain Name Service (DNS).The Internet service that translates domain names into IP addresses.
email processing server.A MailMarshal server that accepts SMTP email messages and takes action as defined in the organizational email policy.
Exchange Transport Agent.A plug-in to Microsoft Exchange that can read and change message contents during Exchange transport events.
Extended Simple Mail Transfer Protocol (ESMTP).A standard that defines optional additions to the SMTP email protocol.
event.Any significant occurrence in the system or application that requires user notification or an entry to be added to an event log.
event log.A record of any event that happens on a server. In Windows, events are stored in the System, Security, or Application log.
GlossaryCopyright © 2015 Trustwave Holdings, Inc. All rights reserved. 162

MailMarshal Exchange (ECM) - User Guide - Version 7.1
Extensible Markup Language (XML).A data tagging language that permits the storage and interchange of structured data.
fault tolerance.The ability of a product to respond to a catastrophic event (fault) that ensures no data is lost and that any work in progress is not corrupted.
firewall.A security system that is placed between the Internet and the private network of an organization, or within a network, and only passes authorized network traffic.
folder classification.An entry indicating a quarantine folder name written to the MailMarshal database when a file is moved to a quarantine folder. MailMarshal creates the database entry automatically.
hyperlink.An emphasized portion of text on a window that, when clicked, opens another document or window.
IIS. See Microsoft Internet Information Services (IIS).
Lightweight Directory Access Protocol (LDAP).A network protocol designed to work on TCP/IP stacks to extract information from a hierarchical directory such as X.500. It is useful for searching through data to find a particular piece of information. An example of an LDAP directory is the Active Directory in Windows 2003 or later. Objects in an LDAP directory are identified by their distinguished names.
local area network (LAN).A group of computers in the same place that are connected and typically have the same network operating system installed. Users on a LAN can share storage devices, printers, applications, data, and other resources.
mailbox.A disk storage space assigned to a user account to receive incoming email messages.
MDAC.See Microsoft Data Access Components (MDAC).
message classificationClassification action defined in a rule as Write log message with x.
Microsoft Data Access Components (MDAC).A set of network libraries and programming interfaces designed to allow client applications to connect to data providers such as SQL Server databases.
Microsoft Internet Information Services (IIS).A Web server application for Windows operating systems.
GlossaryCopyright © 2015 Trustwave Holdings, Inc. All rights reserved. 163

MailMarshal Exchange (ECM) - User Guide - Version 7.1
Microsoft Management Console (MMC).A common interface designed to host administrative tools for networks, computers, services, and other system components.
Multi-Purpose Internet Email Extensions (MIME).A standard that permits transmission of content other than text through SMTP email.
Microsoft SQL Server Desktop Engine (MSDE).A freely distributable limited version of SQL Server 2000. Note that MSDE is no longer supported by MailMarshal Exchange.
permissions.Authorization for a user to perform an action, such as sending email messages for another user or posting items in a public folder.
Post Office Protocol 3 (POP3).The standard protocol used by email client software to retrieve email messages from a mailbox.
queue.A storage structure in which a set of items are held until they can be processed. For example, when MailMarshal receives email messages, the messages are stored in a queue until the MailMarshal Engine can process them.
registry.A database repository for information about the computer configuration. The database is organized in a hierarchical structure of sub trees and their keys, hives, and value entries.
regular expressions.Search criteria for text pattern matching that provide more flexibility than simple wildcard characters.
relaying.Sending an email message to an email server for delivery to another server. See open relay.
remote procedure call (RPC).A standard protocol for client server communication that allows a distributed application to call services available on various computers in a network.
reputation service.A service that provides an automated response that classifies the source of an email message. Reputation services are usually implemented as DNS blacklists.
scalability.Ability to distribute loads across multiple servers, allowing for greater accessibility and balanced traffic.
Sender IDA standard for validation of the source of an email message, based on special DNS records. Typically used for anti-phishing checks.
GlossaryCopyright © 2015 Trustwave Holdings, Inc. All rights reserved. 164
MailMarshal Exchange (ECM) - User Guide - Version 7.1
Sender Policy Framework (SPF)A standard for validation of the source of an email message, based on special DNS records. Typically used for anti-phishing checks.
service account.In Windows NT it is a user account that a service uses to log on to Windows NT. The account must have the specific rights and permissions required by that service.
Simple Mail Transfer Protocol (SMTP).A member of the TCP/IP suite of protocols. The standard governing email delivery over the Internet.
SMTP.See Simple Mail Transfer Protocol (SMTP).
Spam.Unsolicited email messages, usually of a commercial nature.
Quarantine Management Website.Interface that allows a user to review and release their email messages that MailMarshal has quarantined.
split message.A message for multiple recipients that MailMarshal divides into copies. MailMarshal processes each copy differently, according to the rules indicated for a specific recipient.
spoofing.Disguising the sender address of an email message to make it appear as though it is from another person, usually for malicious reasons.
SQL Express.A freely distributable limited version of SQL Server.
SQL Server.The Microsoft enterprise database server software.
Structured Query Language (SQL).A programming language used to retrieve information from a database.
TextCensor.The lexical analysis engine included in MailMarshal. TextCensor allows you to scan email messages and attachments for complex text content, using Boolean and proximity operators and numerical weighting.
Transport Layer Security (TLS). A protocol intended to secure and authenticate communications (such as email) across public networks by using data encryption.
Web Console.Interface that allows you to perform Console functions from any computer that can run Microsoft Internet Explorer. See Console.
GlossaryCopyright © 2015 Trustwave Holdings, Inc. All rights reserved. 165

MailMarshal Exchange (ECM) - User Guide - Version 7.1
wildcard character.A character in a search pattern that represents a number of arbitrary characters within the text being searched.
X.500.A global, hierarchical directory service. For example, a domain controller hosting Active Directory on a network running Windows 2003 or later provides an X.500 directory service.
XML.See Extensible Markup Language (XML).
GlossaryCopyright © 2015 Trustwave Holdings, Inc. All rights reserved. 166

MailMarshal Exchange (ECM) - User Guide - Version 7.1
Index
AAcceptable Use Policy . . . . . . . . . . . . . . . . . . . 56, 94
Accepted Domains . . . . . . . . . . . . . . . . . . . . . . . . 135
Actions. See Rule Actions
Active Directory . . . . . . . . . . . . . . . . . . . 37, 84, 85, 86
Add message users . . . . . . . . . . . . . . . . . . . . . . . . 79
Administrative notifications . . . . . . . . . . . 36, 96, 137
Administrator email addresses . . . . . . . . . . . . . . . 36
Advanced options . . . . . . . . . . . . . . . . . . . . . . . . . 140
Alert History . . . . . . . . . . . . . . . . . . . . . . . . . . . . . . 124
Anti-Virus . . . . . . . . . . . . . . . . . . . . . . . . . . . . . . . . . 58
supported software versions . . . . . . . . . . . . . 26
Archiving . . . . . . . . . . . . . . . . . . . . . . . . . . . . 118, 152
Array Manager . . . . . . . . . . . . . . . . . . . . . 18, 30, 142
Array of servers . . . . . . . . . . . . . . . . . . . . 18, 31, 138
Array options
Managing nodes . . . . . . . . . . . . . . . . . . . . . . 138
Attachment fingerprints . . . . . . . . . . . . . . . . . 69, 107
Attachment parent . . . . . . . . . . . . . . . . . . . . . . . . . 71
Attachment size . . . . . . . . . . . . . . . . . . . . . . . . . . . 71
Attachments
Checking name . . . . . . . . . . . . . . . . . . . . . . . . 70
Checking parent type . . . . . . . . . . . . . . . . . . . 71
Checking size . . . . . . . . . . . . . . . . . . . . . . . . . . 71
Checking text . . . . . . . . . . . . . . . . . . . . . . . . . . 89
Checking type . . . . . . . . . . . . . . . . . . . . . . . . . 69
Counting . . . . . . . . . . . . . . . . . . . . . . . . . . . . . . 72
Scanning for viruses . . . . . . . . . . . . . . . . . . . . 67
Stripping . . . . . . . . . . . . . . . . . . . . . . . . . . . . . . 78
Unpacking depth . . . . . . . . . . . . . . . . . . . . . . 140
Valid fingerprints . . . . . . . . . . . . . . . . . . . . 69, 79
BBack up
Configuration . . . . . . . . . . . . . . . . . . . . . . . . . 132
Folders . . . . . . . . . . . . . . . . . . . . . . . . . . . . . . 152
Messages . . . . . . . . . . . . . . . . . . . . . . . . . . . . 152
TextCensor scripts . . . . . . . . . . . . . . . . . . . . . 93
Bandwidth required . . . . . . . . . . . . . . . . . . . . . . . . 70
BCC . . . . . . . . . . . . . . . . . . . . . . . . . . . . . . . . . . . . . 77
Best practices . . . . . . . . . . . . . . . . . . . . . . . 58, 65, 93
CCategory scripts . . . . . . . . . . . . . . . . . . . . . . . . . . . 72
Classifications . . . . . . . . . . . . . . . . . . . . . . . . .78, 105
Commit configuration . . . . . . . . . . . . . . .52, 117, 138
Scheduling . . . . . . . . . . . . . . . . . . . . . . . .52, 141
Configuration
Back up and restore . . . . . . . . . . . . . . . . . . .132
Importing and exporting . . . . . . . . . . . . . . . .145
MailMarshal properties . . . . . . . . . . . . . . . . . .52
Configurator, MailMarshal . . . . . . . . . . . . . . . . . . .50
Connectors . . . . . . . . . . . . . . . . . . . . . . . . . . . . . . . .84
Console, MailMarshal
Security . . . . . . . . . . . . . . . . . . . . . . . . . . . . . .124
Understanding . . . . . . . . . . . . . . . . . . . . . . . . .52
Web Console . . . . . . . . . . . . . . . . . . . . . . . . . .53
Content Analysis Policy . . . . . . . . . . . . . . . . . . . . .61
Copy the message . . . . . . . . . . . . . . . . . . . . . . . . .77
DDaily administration . . . . . . . . . . . . . . . . . . . . . . .115
Dashboard . . . . . . . . . . . . . . . . . . . . . . . . . . . . . . .117
Data retention . . . . . . . . . . . . . . . . . . . . . . . . . . . .152
Database
Changing location . . . . . . . . . . . . . . . . . . . . .142
Size . . . . . . . . . . . . . . . . . . . . . . . . . . . . . . . . .152
Date formatting . . . . . . . . . . . . . . . . . . . . . . . . . . .103
Dead Letter Policy . . . . . . . . . . . . . . . . . . . . . . . . . .61
Dead Letters
Causes . . . . . . . . . . . . . . . . . . . . .68, 78, 113, 114
Delegating
Console Access . . . . . . . . . . . . . . . . . . . . . . .147
Quarantine management . . . . . . . . . . . . . . .147
Delete message . . . . . . . . . . . . . . . . . . . . . . . . . . .80
Deployment scenarios . . . . . . . . . . . . . . . . . . . . . .18
Digest templates . . . . . . . . . . . . . . . . . . . . . . . . . . .97
Directory . . . . . . . . . . . . . . . . . . . . . . . . . . . . . . . . .143
Directory connectors . . . . . . . . . . . . . . . . . . . . . 37, 84
Disclaimers. See Message stamps
DMZ . . . . . . . . . . . . . . . . . . . . . . . . . . . . . . . . . . . . .124
Eeicar.com . . . . . . . . . . . . . . . . . . . . . . . . . . . . . . . . .39
Email content policies . . . . . . . . . . . . . . . . . . . . . . .56
Email headers
Matching . . . . . . . . . . . . . . . . . . . . . . . . . . . . . .71
Rewriting . . . . . . . . . . . . . . . . . . . . . . . . . . . . . .78
IndexCopyright © 2015 Trustwave Holdings, Inc. All rights reserved. 167
MailMarshal Exchange (ECM) - User Guide - Version 7.1
Email history . . . . . . . . . . . . . . . . . . . . . . . . . . . . . 122
Email messages
Forwarding . . . . . . . . . . . . . . . . . . . . . . . . . . . 119
Processing logs . . . . . . . . . . . . . . . . . . . . . . . 119
Processing manually . . . . . . . . . . . . . . . . . . . 121
Releasing manually . . . . . . . . . . . . . . . . . . . . 121
Retention . . . . . . . . . . . . . . . . . . . . . . . . . . . . 119
Viewing . . . . . . . . . . . . . . . . . . . . . . . . . . . . . . 118
Email policy
Default . . . . . . . . . . . . . . . . . . . . . . . . . . . . . . . . 59
Understanding . . . . . . . . . . . . . . . . . . . . . . . . . 61
Viewing and printing . . . . . . . . . . . . . . . . . . . . 82
Email policy elements . . . . . . . . . . . . . . . . . . . . . . 83
Email processing server
Adding or deleting . . . . . . . . . . . . . . . . . . . . . 138
Changing array port settings . . . . . . . . . . . . 141
Event Log . . . . . . . . . . . . . . . . . . . . . . . . . . . . . . . . 129
Exporting
Configuration . . . . . . . . . . . . . . . . . . . . . . . . . 132
TextCensor scripts . . . . . . . . . . . . . . . . . . . . . 93
External commands
Configuring . . . . . . . . . . . . . . . . . . . . . . . . . . . 112
Rule action . . . . . . . . . . . . . . . . . . . . . . . . . . . . 77
Rule condition . . . . . . . . . . . . . . . . . . . . . . . . . 70
FFalse positives
TextCensor scripts . . . . . . . . . . . . . . . . . . . . . 94
File extension . . . . . . . . . . . . . . . . . . . . . . . . . . . . . 70
File name . . . . . . . . . . . . . . . . . . . . . . . . . . . . . . . . . 70
File type signatures, custom . . . . . . . . . . . . . . . . . 69
File types . . . . . . . . . . . . . . . . . . . . . . . . . . . . . . . . . 69
Filtering email . . . . . . . . . . . . . . . . . . . . . . . . . . . . . 56
Folders
and virus scanning . . . . . . . . . . . . . . . . . . . . . 39
Archive . . . . . . . . . . . . . . . . . . . . . . . . . . . . . . 118
Compression of . . . . . . . . . . . . . . . . . . . . . . . . 25
Dead Letter . . . . . . . . . . . . . . . . . . . . . . . 114, 118
Default permissions . . . . . . . . . . . . . . . . . . . 125
Default security . . . . . . . . . . . . . . . . . . . . . . . 125
Locations . . . . . . . . . . . . . . . . . . . . . . . . . 25, 143
Logging . . . . . . . . . . . . . . . . . . . . . . . . . . . . . . . 25
Permissions . . . . . . . . . . . . . . . . . . . . . . . . . . 126
Quarantine . . . . . . . . . . . . . . . . . . . . . . . . . . . . 25
Queues . . . . . . . . . . . . . . . . . . . . . . . . . . . . . . . 25
Searching . . . . . . . . . . . . . . . . . . . . . . . . . . . . 123
Security . . . . . . . . . . . . . . . . . . . . . . . . . . 124, 126
Setting up Quarantine Management . . . . . .149
Unpacking . . . . . . . . . . . . . . . . . . . . . . . . . . . . .25
Using . . . . . . . . . . . . . . . . . . . . . . . . . . . . . . . .105
Viewing contents . . . . . . . . . . . . . . . . . . . . . .118
GGoto action . . . . . . . . . . . . . . . . . . . . . . . . . . . . . . . .80
HHeader Matching
Map Files . . . . . . . . . . . . . . . . . . . . . . . . . . . . .157
Header matching . . . . . . . . . . . . . . . . . . . . . . . . . . .71
Header rewriting
Map files . . . . . . . . . . . . . . . . . . . . . . . . . . . . .157
Order of evaluation . . . . . . . . . . . . . . . . . . . .112
Rule action . . . . . . . . . . . . . . . . . . . . . . . . . . . .78
Headers, email
Altering . . . . . . . . . . . . . . . . . . . . . . . . . . . . . . .108
Deleting . . . . . . . . . . . . . . . . . . . . . . . . . . . . . .111
Inserting . . . . . . . . . . . . . . . . . . . . . . . . . . . . . .111
Matching . . . . . . . . . . . . . . . . . . . . . . . . . . . . .108
Rewriting . . . . . . . . . . . . . . . . . . . . . . . . . . . . .108
History. See Alert History, Email History
HTTPS . . . . . . . . . . . . . . . . . . . . . . . . . . . . . . . . . .136
IImage Analyzer . . . . . . . . . . . . . . . . . . . . . . . .73, 159
Importing
Configuration . . . . . . . . . . . . . . . . . . . . . . . . .132
TextCensor scripts . . . . . . . . . . . . . . . . . . . . . .93
User Groups . . . . . . . . . . . . . . . . . . . . . . . . . .143
Users . . . . . . . . . . . . . . . . . . . . . . . . . . . . . . . . .37
Installation
Array . . . . . . . . . . . . . . . . . . . . . . . . . . . . . . . . . .31
Standalone server . . . . . . . . . . . . . . . . . . .29, 31
Installation options . . . . . . . . . . . . . . . . . . . . . . . . .18
Introduction . . . . . . . . . . . . . . . . . . . . . . . . . . . . . . . .11
KKeys, MailMarshal license
Entering . . . . . . . . . . . . . . . . . . . . . . . . . . . . . .132
Invalid . . . . . . . . . . . . . . . . . . . . . . . . . . . . . . . .131
Requesting . . . . . . . . . . . . . . . . . . . . . . . . . . .132
Required . . . . . . . . . . . . . . . . . . . . . . . . . . . . .131
Trial . . . . . . . . . . . . . . . . . . . . . . . . . . . . . . . . . .35
LLDAP
Configuring connectors . . . . . . . . . . . . . . . . . .84
IndexCopyright © 2015 Trustwave Holdings, Inc. All rights reserved. 168

MailMarshal Exchange (ECM) - User Guide - Version 7.1
Creating connectors . . . . . . . . . . . . . . . . . . . . 37
Customizing connectors . . . . . . . . . . . . . . . . . 85
User groups . . . . . . . . . . . . . . . . . . . . . . . . . . . 85
License key. See Keys
Licensing . . . . . . . . . . . . . . . . . . . . . . . . . . . . . . . . 131
Managing licenses . . . . . . . . . . . . . . . . . . . . 131
Requesting license keys . . . . . . . . . . . . . . . 131
Reviewing installed licenses . . . . . . . . . . . . 131
Load Balancing . . . . . . . . . . . . . . . . . . . . . . . . . . . 138
Local domains
Configuring . . . . . . . . . . . . . . . . . . . . . . . . 35, 135
User matching . . . . . . . . . . . . . . . . . . . . . . . . . 64
Logging
Classifications . . . . . . . . . . . . . . . . . . . . . . . . . 78
Daily log files . . . . . . . . . . . . . . . . . . . . . . . . . 129
MMail Recycle Bin . . . . . . . . . . . . . . . . . . . . . . 118, 119
Manager security . . . . . . . . . . . . . . . . . . . . . . . . . 136
McAfee for Marshal . . . . . . . . . . . . . . . . . . . . . . . . 57
Message parking . . . . . . . . . . . . . . . . . . . . . . 80, 118
Message size . . . . . . . . . . . . . . . . . . . . . . . . . . . . . 69
Message stamps . . . . . . . . . . . . . . . . . . . . . . . 78, 99
Message templates . . . . . . . . . . . . . . . . . . . . . . . . 95
Move the message . . . . . . . . . . . . . . . . . . . . . . . . . 80
NNode. See Email processing server
Notification message . . . . . . . . . . . . . . . . . . . . . . . 77
Notifications . . . . . . . . . . . . . . . . . . . . . 68, 77, 95, 112
Number of attachments . . . . . . . . . . . . . . . . . . . . . 72
Number of recipients . . . . . . . . . . . . . . . . . . . . . . . 71
OOrder of evaluation . . . . . . . . . . . . . . . . . . . 79, 90, 92
PPass message to rule . . . . . . . . . . . . . . . . . . . . . . 80
Performance Monitor . . . . . . . . . . . . . . . . . . . . . . 129
Policy groups
Creating . . . . . . . . . . . . . . . . . . . . . . . . . . . . . . 62
Order of evaluation . . . . . . . . . . . . . . . . . . . . . 81
Postmaster. See Administrative notifications
Prerequisites . . . . . . . . . . . . . . . . . . . . . . . . . . . . . . 28
Properties configuration . . . . . . . . . . . . . . . . . . . . 52
Properties, MailMarshal . . . . . . . . . . . . . . . . . . . . . 52
Properties, Node . . . . . . . . . . . . . . . . . . . . . . . . . . . 52
Proxy settings . . . . . . . . . . . . . . . . . . . . . . . . . . . .137
QQuarantine . . . . . . . . . . . . . . . . . . . . . . . . . . . . . . .121
Quarantine Management . . . . . . . . . . . . . . . .54, 147
Quarantine rules . . . . . . . . . . . . . . . . . . . . . . . . . .151
RRegular expressions . . . . . . . . . . . . . . . . . . . 108, 155
Release Message . . . . . . . . . . . . . . . . . . . . . . . . .121
Reporting groups . . . . . . . . . . . . . . . . . . . . . . . . . .153
Reports
Classifications . . . . . . . . . . . . . . . . . . . . . . . . . .78
Restore
Configuration . . . . . . . . . . . . . . . . . . . . . . . . .132
RTF message stamping . . . . . . . . . . . . . . . . . . . .100
Rule actions
Content Analysis Policy . . . . . . . . . . . . . . . . .76
Dead Letter Policy . . . . . . . . . . . . . . . . . . . . . .81
Rule conditions
Content Analysis Policy . . . . . . . . . . . . . . . . .66
Dead Letter Policy . . . . . . . . . . . . . . . . . . . . . .76
Rule user matching . . . . . . . . . . . . . . . . . . . 63, 64, 65
Rules
Creating . . . . . . . . . . . . . . . . . . . . . . . . . . . . . . .62
Order of evaluation . . . . . . . . . . . . . . . . . . . . .81
Quarantine . . . . . . . . . . . . . . . . . . . . . . . . . . .151
Standard. See Content Analysis PolicyRulesets. See Policy groups
SSchedules
Folder . . . . . . . . . . . . . . . . . . . . . . . . . . . . . . . . .80
Policy groups . . . . . . . . . . . . . . . . . . . . . . . . . .62
User group reload . . . . . . . . . . . . . . . . . . . . . .38
Searching
Email history . . . . . . . . . . . . . . . . . . . . . . . . . .123
Folders . . . . . . . . . . . . . . . . . . . . . . . . . . . . . . .123
Security
Console . . . . . . . . . . . . . . . . . . . . . . . . . . . . . .124
Manager . . . . . . . . . . . . . . . . . . . . . . . . . . . . .136
Server health . . . . . . . . . . . . . . . . . . . . . . . . . . . . .115
Server name . . . . . . . . . . . . . . . . . . . . . . . . . . . . .140
Server statistics . . . . . . . . . . . . . . . . . . . . . . . . . . .117
Server, Email processing . . . . . . . . . . . . . . . . . . .138
Signatures. See Message stamps
Spam . . . . . . . . . . . . . . . . . . . . . . . . . . . . . . . . . . . . .71
IndexCopyright © 2015 Trustwave Holdings, Inc. All rights reserved. 169

MailMarshal Exchange (ECM) - User Guide - Version 7.1
Spam Quarantine Management . . . . . . . . . . . . . . 41
Stamp message . . . . . . . . . . . . . . . . . . . . . . . . . . . 78
Standalone server . . . . . . . . . . . . . . . . . . . . . . 29, 31
Storage requirements . . . . . . . . . . . . . . . . . . . . . 152
Subject line . . . . . . . . . . . . . . . . . . . . . . . . . 59, 78, 89
TTCP ports
19011 . . . . . . . . . . . . . . . . . . . . . . . . . . . . . . . 116
81 . . . . . . . . . . . . . . . . . . . . . . . . . . . . . . . . . . . . 42
82 . . . . . . . . . . . . . . . . . . . . . . . . . . . . . . . . . . . . 42
Templates
Administrative . . . . . . . . . . . . . . . . . . . . . . . . . 96
Digest . . . . . . . . . . . . . . . . . . . . . . . . . . . . 97, 149
Notification . . . . . . . . . . . . . . . . . . . . . . . . . 77, 96
Terminal actions . . . . . . . . . . . . . . . . . . . . . . . . 76, 80
TextCensor scripts
Editing . . . . . . . . . . . . . . . . . . . . . . . . . . . . . . . . 91
Operators . . . . . . . . . . . . . . . . . . . . . . . . . . . . . 90
Rule condition . . . . . . . . . . . . . . . . . . . . . . . . . 70
Special characters . . . . . . . . . . . . . . . . . . . . . . 90
Syntax . . . . . . . . . . . . . . . . . . . . . . . . . . . . . . . . 92
Testing . . . . . . . . . . . . . . . . . . . . . . . . . . . . . . . 94
Understanding . . . . . . . . . . . . . . . . . . . . . . . . . 88
Weighting . . . . . . . . . . . . . . . . . . . . . . . . . . . . . 91
Tools, MailMarshal . . . . . . . . . . . . . . . . . . . . . . . . . 54
UUnderstanding . . . . . . . . . . . . . . . . . . . . . . . 50, 61, 83
Uninstalling MailMarshal . . . . . . . . . . . . . . . . . . . . 48
Upgrading MailMarshal . . . . . . . . . . . . . . . . . . . . . 45
User groups . . . . . . . . . . . . . . . . . . . . . . . . . . . . 85–88
Reloading . . . . . . . . . . . . . . . . . . . . . . . . . . . . . 86
Users . . . . . . . . . . . . . . . . . . . . . . . . . . . . . . . . . . . . 88
Users, importing . . . . . . . . . . . . . . . . . . . . . . . . . . . 37
VValid fingerprints . . . . . . . . . . . . . . . . . . . . . . . . 69, 79
Variables . . . . . . . . . . . 77, 96, 99, 100, 101, 103, 105
Virus cleaning . . . . . . . . . . . . . . . . . . . . . . . . . . 67, 68
Virus scanners
Appliance . . . . . . . . . . . . . . . . . . . . . . . . . . . . . 39
Configuring . . . . . . . . . . . . . . . . . . . . . . . . . . . . 57
Installing and configuring . . . . . . . . . . . . . . . . 39
Results . . . . . . . . . . . . . . . . . . . . . . . . . . . . . . . 67
Rule condition . . . . . . . . . . . . . . . . . . . . . . . . . 67
Virus scanning . . . . . . . . . . . . . . . . . . . . . . . . . . . . 56
Viruses . . . . . . . . . . . . . . . . . . . . . . . . . . . . . . . . . . . 56
WWeb Console . . . . . . . . . . . . . . . . . . . . . . . . . . .41, 53
Wildcards . . . . . . . . . . . . . . . . . . . . . . . . . . . . .92, 154
Windows event logs
Filters . . . . . . . . . . . . . . . . . . . . . . . . . . . . . . . .127
Windows Firewall . . . . . . . . . . . . . . . . . . . . . . . . . .42
IndexCopyright © 2015 Trustwave Holdings, Inc. All rights reserved. 170

About Trustwave®
Trustwave is a leading provider of compliance, Web, application, network and data security solutions
delivered through the cloud, managed security services, software and appliances. For organizations faced
with today's challenging data security and compliance environment, Trustwave provides a unique
approach with comprehensive solutions that include its TrustKeeper® portal and other proprietary
security solutions. Trustwave has helped hundreds of thousands of organizations—ranging from Fortune
500 businesses and large financial institutions to small and medium‐sized retailers—manage compliance
and secure their network infrastructures, data communications and critical information assets.
Trustwave is headquartered in Chicago with offices worldwide. For more information, visit
https://www.trustwave.com.


