22
Try Snapshots and Clones with Oracle Snap Management Utility for Oracle Database 12c Paul Johnson Principle Software Engineer Sneha Rajendran Senior Product Manager

Try Snapshots and Clones with Oracle Snap Management Utility for Oracle Database 12c Paul Johnson Principle Software Engineer
Sneha Rajendran Senior Product Manager

ORACLE DATABASE SNAPSHOT AND CLONING WITH ORACLE SNAP MANAGEMENT UTILITY
Table of Contents
Introduction 1
Provisioning Oracle Snap Management Utility 2
Log in to the Browser User Interface 2
Add Database Host Account 3
Add Storage Account 4
Provisioning Oracle Database 12c 6
Terminal 6
Initialize the Database 6
Create a New Tablespace 7
Oracle Database 12c Hosted on Oracle ZFS Storage Appliance 8
Import the Database 8
Create a Snap Backup 8
Delete the Tablespace 10
Restore from Snap Backup 11
Verify the Snap Backup 11
Create a Clone 12
Verify Clone Functionality 14
Oracle Database 12c RMAN Backup Hosted on Oracle ZFS Storage Appliance 16
Create an RMAN Backup from Clone 16
Deprovision the Clone 16
Import the RMAN Backup 17

1 | ORACLE DATABASE SNAPSHOT AND CLONING WITH ORACLE SNAP MANAGEMENT UTILITY
Introduction
Oracle Snap Management Utility helps to automate the creation and management of snapshots and
clones for Oracle Databases hosted on Oracle ZFS Storage Appliance. This solution provides
database administrators the flexibility to copy and protect their Oracle Database by efficiently
constructing database clones for production, development, and test environments. This hands-on lab
demonstrates the best practices for using Oracle Snap Management Utility.
The following components are pre-installed:
1. Oracle ZFS Storage Appliance VM Simulator running OS8.6
2. Oracle Linux 6.8 VM
3. Oracle Database 12c binaries installed
4. Oracle Database named hol1523 installed
5. Oracle Snap Management Utility 1.3.1 installed

2 | ORACLE DATABASE SNAPSHOT AND CLONING WITH ORACLE SNAP MANAGEMENT UTILITY
Provisioning Oracle Snap Management Utility Oracle Snap Management Utility (SMU) for Oracle Database is a standalone management tool specifically engineered to work with the Oracle ZFS Storage Appliance. It provides the following:
• A simple, fast, efficient way to create and manage snapshot-based copies and clones of Oracle databases stored on Oracle ZFS Storage Appliance—all through the DBA’s console
• Support for any Oracle 10g, 11g, or 12c database deployed on Oracle ZFS Storage Appliance
• Support for importing RMAN backup images hosted on Oracle ZFS Storage Appliance
• Support for Oracle Solaris, Linux, and Windows clients and database hosts, for databases configured for NAS or SAN storage types
• Support for Oracle Real Application Clusters (RAC)
• Browser interface for easy user accessibility; command line interface for scripting
Oracle Snap Management Utility combines the underlying snapshot, clone, and rollback capabilities of the Oracle ZFS Storage Appliance with standard host-side processing to ensure all operations are consistent. With the Oracle Snap Management Utility, DBAs no longer need to be dependent on IT personnel to backup, restore, recover, or clone databases, allowing both DBAs and storage administrators to focus on their specialty while unburdening IT of time-consuming tasks.
Log in to the Browser User Interface 1. Open a web browser by double-clicking on the Firefox icon on the desktop.
2. Enter https://192.168.56.102:8443/smu into the web browser window.

3 | ORACLE DATABASE SNAPSHOT AND CLONING WITH ORACLE SNAP MANAGEMENT UTILITY
3. In web browser, enter oracle as Username and oow as Password, then press the LOGIN button.
Add Database Host Account 1. Click on Accounts and then click on the green + icon underneath the Application Host Accounts
tab.

4 | ORACLE DATABASE SNAPSHOT AND CLONING WITH ORACLE SNAP MANAGEMENT UTILITY
2. In the window that appears, enter the following details:
a. Account – oow2016-linux
b. Host Name – oow2016-linux
c. Protocol – SSH2
d. Port – 22
e. Delegation – SUDO
f. User – oracle
g. Password – oow
Add Storage Account 1. Click on the Storage Accounts tab and then click on the green + icon.
5 | ORACLE DATABASE SNAPSHOT AND CLONING WITH ORACLE SNAP MANAGEMENT UTILITY
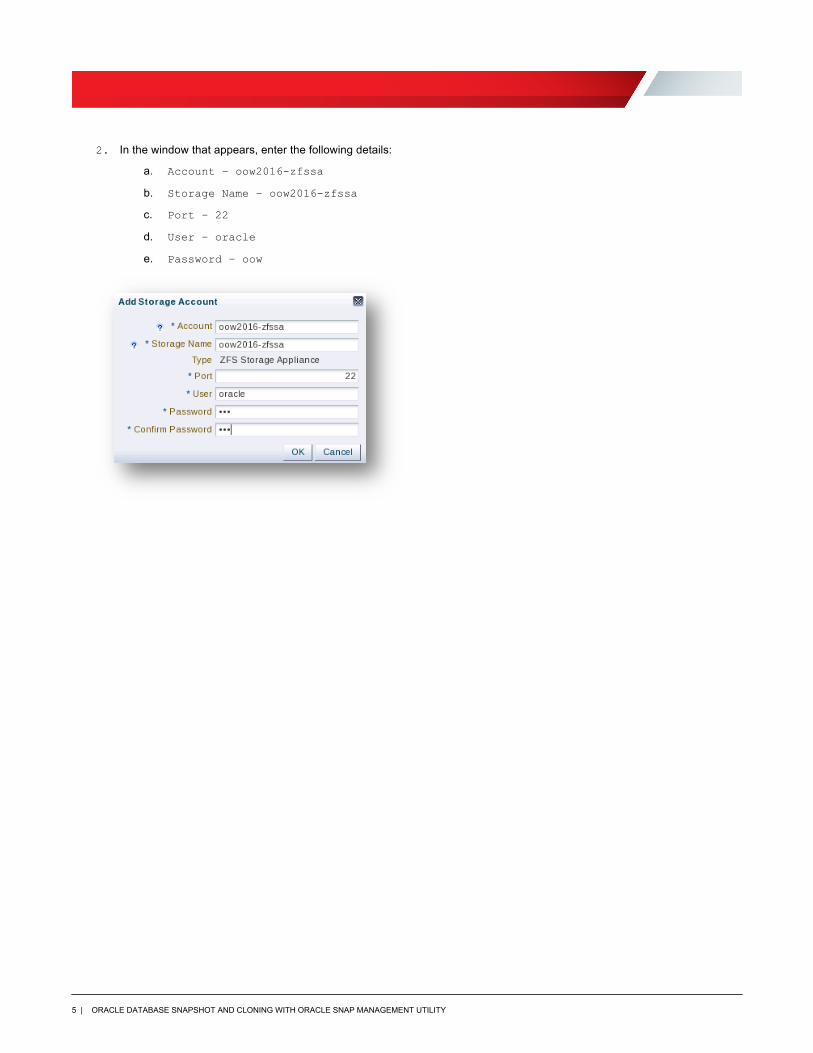
2. In the window that appears, enter the following details:
a. Account – oow2016-zfssa
b. Storage Name – oow2016-zfssa
c. Port – 22
d. User – oracle
e. Password – oow
6 | ORACLE DATABASE SNAPSHOT AND CLONING WITH ORACLE SNAP MANAGEMENT UTILITY
Provisioning Oracle Database 12c A database named hol1523 has already been created on the Oracle Linux VM. For this lab, the database must first be put into archivelog mode in order to do online backups.
Note: the password for this VM is oow.
Terminal
Open a new terminal session by double-clicking on the Terminal icon on the desktop:
Initialize the Database 1. Use SQL*PLUS to interface with Oracle Database 12c.
$ sqlplus / as sysdba SQL*Plus: Release 12.1.0.2.0 Production on Sun Aug 7 09:22:14 2016 Copyright (c) 1982, 2014, Oracle. All rights reserved. Connected to: Oracle Database 12c Enterprise Edition Release 12.1.0.2.0 - 64bit Production With the Partitioning, OLAP, Advanced Analytics and Real Application Testing options
2. Startup the database.
SQL> startup; ORACLE instance started. Total System Global Area 734003200 bytes Fixed Size 2928728 bytes Variable Size 557846440 bytes Database Buffers 167772160 bytes Redo Buffers 5455872 bytes Database mounted. Database opened.
3. Put the database into archivelog mode. Please note that this creates inconsistent backups that allows
the lab to be done using a live database.
SQL> shutdown immediate; Database closed. Database dismounted. ORACLE instance shut down. SQL> startup mount; ORACLE instance started. Total System Global Area 734003200 bytes Fixed Size 2928728 bytes
7 | ORACLE DATABASE SNAPSHOT AND CLONING WITH ORACLE SNAP MANAGEMENT UTILITY
Variable Size 557846440 bytes Database Buffers 167772160 bytes Redo Buffers 5455872 bytes Database mounted. SQL> alter database archivelog; Database altered. SQL> alter database open;
Create a New Tablespace 1. Create a new tablespace called hol1523
SQL> create bigfile tablespace hol1523 datafile '/zfssa/hol1523/datafiles/hol1523.dbf' size 100M; Tablespace created.
2. Verify the tablespace exists.
SQL> select tablespace_name from dba_tablespaces; TABLESPACE_NAME ---------------------------------- SYSTEM SYSAUX UNDOTBS1 TEMP USERS HOL1523
3. Exit SQL*PLUS
SQL> quit

8 | ORACLE DATABASE SNAPSHOT AND CLONING WITH ORACLE SNAP MANAGEMENT UTILITY
Oracle Database 12c Hosted on Oracle ZFS Storage Appliance Oracle Snap Management Utility can work with either an Oracle Database hosted on Oracle ZFS Storage Appliance, or an RMAN image that is residing on Oracle ZFS Storage Appliance. This section walks through the first use case.
Import the Database 1. From within SMU, click on Applications under Workgroup and then click on the green + icon.
2. In the window that appears, enter the following details:
a. Name – hol1523
b. SID/SID Prefix – hol1523
c. Database Unique Name – hol1523
d. Listener Port – 1521
e. Database Configuration – Single Instance
f. Password - oow
g. Host Account – oow2016-linux
h. Storage Account – oow2016-zfssa
Create a Snap Backup 1. Click on the newly created hol1523 account listed under Applications on the left side of the screen.

9 | ORACLE DATABASE SNAPSHOT AND CLONING WITH ORACLE SNAP MANAGEMENT UTILITY
Then click on the green + icon.
2. In the window that appears, enter the following details:
a. Name – hol1523sb
b. Type - Online
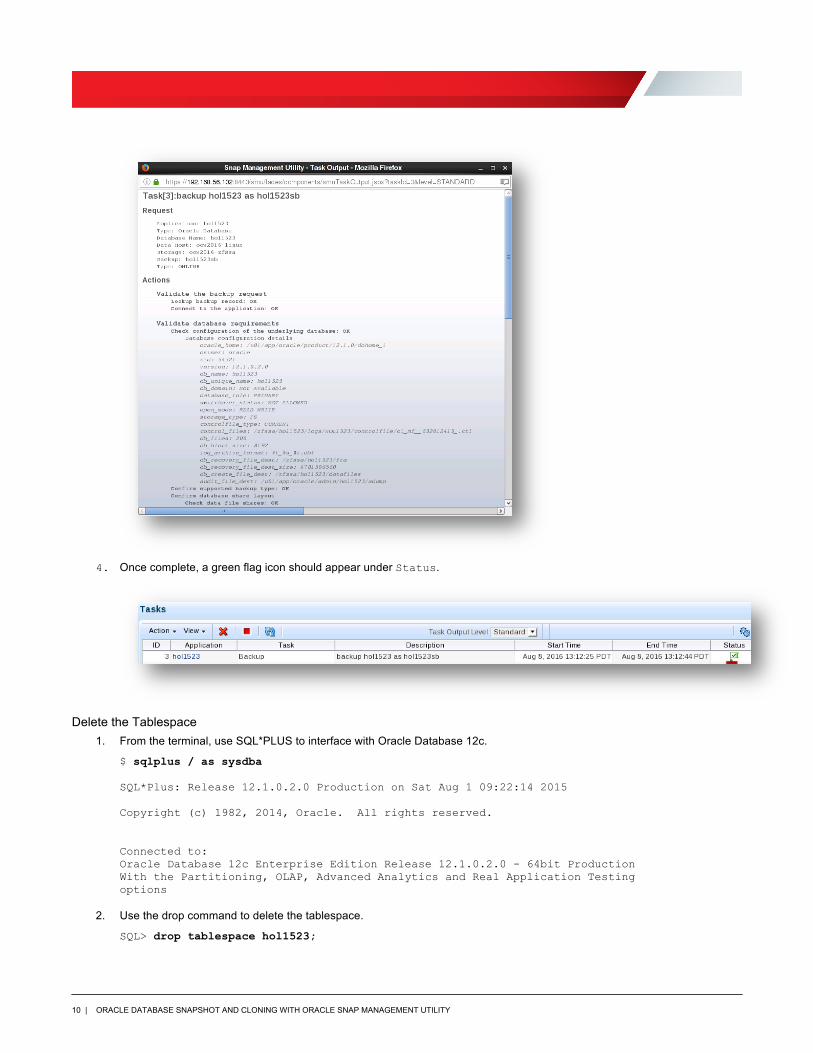
3. The snap backup will begin executing and its status will be shown in the Tasks section at the bottom of the screen. Click on the green checkmark icon to view the Task Output.
10 | ORACLE DATABASE SNAPSHOT AND CLONING WITH ORACLE SNAP MANAGEMENT UTILITY
4. Once complete, a green flag icon should appear under Status.
Delete the Tablespace 1. From the terminal, use SQL*PLUS to interface with Oracle Database 12c.
$ sqlplus / as sysdba SQL*Plus: Release 12.1.0.2.0 Production on Sat Aug 1 09:22:14 2015 Copyright (c) 1982, 2014, Oracle. All rights reserved. Connected to: Oracle Database 12c Enterprise Edition Release 12.1.0.2.0 - 64bit Production With the Partitioning, OLAP, Advanced Analytics and Real Application Testing options
2. Use the drop command to delete the tablespace.
SQL> drop tablespace hol1523;

11 | ORACLE DATABASE SNAPSHOT AND CLONING WITH ORACLE SNAP MANAGEMENT UTILITY
Tablespace dropped.
3. Verify the tablespace has been purged.
SQL> select tablespace_name from dba_tablespaces; TABLESPACE_NAME ---------------------------------- SYSTEM SYSAUX UNDOTBS1 TEMP USERS
4. Exit SQL*PLUS
SQL> quit
Restore from Snap Backup 1. From within SMU, click on the blue half-circular arrow icon to restore the snap backup from hol1523sb
2. Click OK to confirm.
Verify the Snap Backup 1. Use SQL*PLUS to interface with Oracle Database 12c.
$ sqlplus / as sysdba SQL*Plus: Release 12.1.0.2.0 Production on Sat Aug 1 09:22:14 2015 Copyright (c) 1982, 2014, Oracle. All rights reserved. Connected to: Oracle Database 12c Enterprise Edition Release 12.1.0.2.0 - 64bit Production
12 | ORACLE DATABASE SNAPSHOT AND CLONING WITH ORACLE SNAP MANAGEMENT UTILITY
With the Partitioning, OLAP, Advanced Analytics and Real Application Testing options
2. Verify tablespace hol1523 has returned.
SQL> select tablespace_name from dba_tablespaces; TABLESPACE_NAME ---------------------------------- SYSTEM SYSAUX UNDOTBS1 TEMP USERS HOL1523
3. Exit SQL*PLUS
SQL> quit
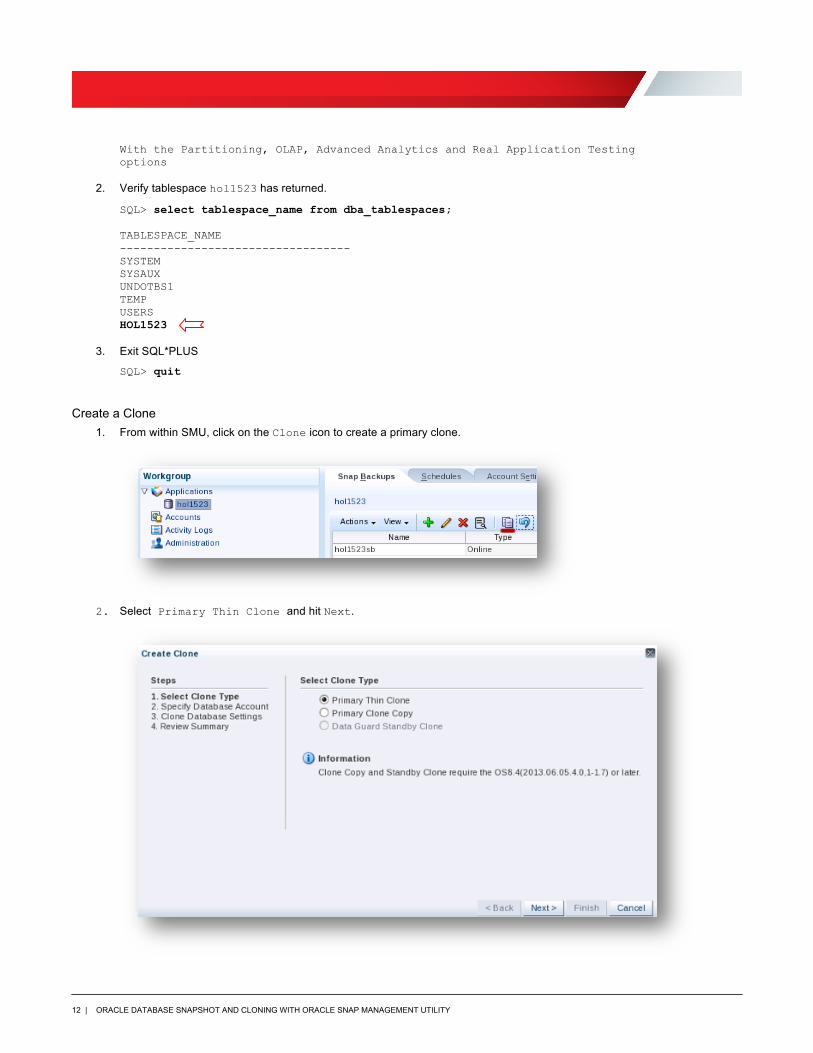
Create a Clone 1. From within SMU, click on the Clone icon to create a primary clone.
2. Select Primary Thin Clone and hit Next.

13 | ORACLE DATABASE SNAPSHOT AND CLONING WITH ORACLE SNAP MANAGEMENT UTILITY
3. Enter the following details, then click Next.
a. Host Account – oow2016-linux
b. Application Name – hol1523c
c. Database Name – hol1523c
d. SID/SID Prefix – hol1523c
e. Database Unique Name – hol1523c
f. Listener Port – 1521
g. Database Configuration – Single Instance
h. Database Home - /u01/app/oracle/product/12.1.0/dbhome_1
i. Password - oow
4. Enter the following details, then click Next.
a. System Global Area – 512M
b. Open Mode – Read Write
c. Log Mode - Archivelog

14 | ORACLE DATABASE SNAPSHOT AND CLONING WITH ORACLE SNAP MANAGEMENT UTILITY
5. Click Finish to confirm.
Verify Clone Functionality 1. From the terminal, switch the ORACLE_SID to the newly created clone.
$ export ORACLE_SID=hol1523c
2. Use SQL*PLUS to interface with Oracle Database 12c.
$ sqlplus / as sysdba

15 | ORACLE DATABASE SNAPSHOT AND CLONING WITH ORACLE SNAP MANAGEMENT UTILITY
SQL*Plus: Release 12.1.0.2.0 Production on Sat Aug 1 09:22:14 2015 Copyright (c) 1982, 2014, Oracle. All rights reserved. Connected to: Oracle Database 12c Enterprise Edition Release 12.1.0.2.0 - 64bit Production With the Partitioning, OLAP, Advanced Analytics and Real Application Testing options
3. List the available tablespaces. SQL> select tablespace_name from dba_tablespaces; TABLESPACE_NAME ---------------------------------- SYSTEM SYSAUX UNDOTBS1 TEMP HOL1523
6. Exit SQL*PLUS
SQL> quit

16 | ORACLE DATABASE SNAPSHOT AND CLONING WITH ORACLE SNAP MANAGEMENT UTILITY
Oracle Database 12c RMAN Backup Hosted on Oracle ZFS Storage Appliance
Create an RMAN Backup from Clone 1. An RMAN backup script has already been created for this lab. It is named imagecopy.rman and can be
found in the /home/oracle directory. Use cat to view its contents.
$ cat imagecopy.rman
configure controlfile autobackup on; run { set nocfau; allocate channel ch01 device type disk format '/zfssa/hol1523/rman01/%U'; allocate channel ch02 device type disk format '/zfssa/hol1523/rman02/%U'; backup as copy database channel ch01 plus archivelog channel ch02; backup as copy current controlfile channel ch01; }
2. Execute this script using the following commands from the terminal.
$ export ORACLE_SID=hol1523c
$ rman target / cmdfile=imagecopy.rman
Deprovision the Clone 1. From within SMU, select the downward arrow next to hol1523 to expose its clone, hol1523c. Select
hol1523c and click on the black X icon to deprovision.
2. Enter the clone name hol1523c and click OK to confirm.
17 | ORACLE DATABASE SNAPSHOT AND CLONING WITH ORACLE SNAP MANAGEMENT UTILITY
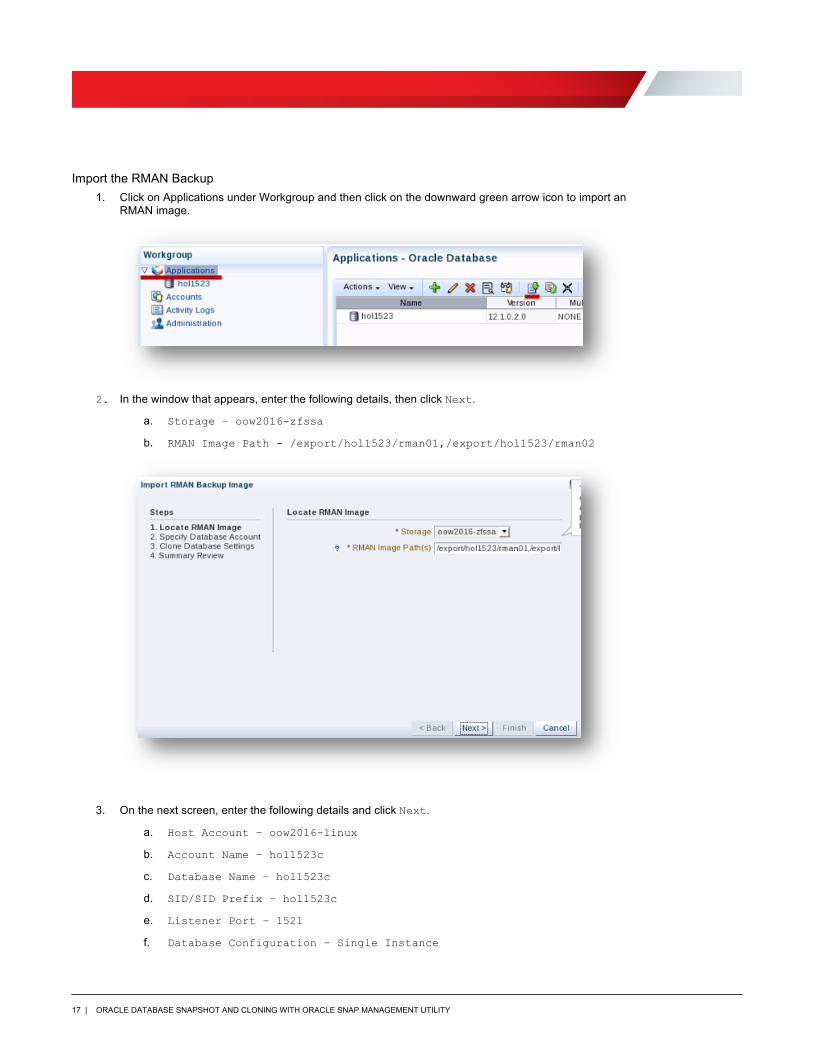
Import the RMAN Backup 1. Click on Applications under Workgroup and then click on the downward green arrow icon to import an
RMAN image.
2. In the window that appears, enter the following details, then click Next.
a. Storage – oow2016-zfssa
b. RMAN Image Path - /export/hol1523/rman01,/export/hol1523/rman02
3. On the next screen, enter the following details and click Next.
a. Host Account – oow2016-linux
b. Account Name – hol1523c
c. Database Name – hol1523c
d. SID/SID Prefix – hol1523c
e. Listener Port – 1521
f. Database Configuration – Single Instance

18 | ORACLE DATABASE SNAPSHOT AND CLONING WITH ORACLE SNAP MANAGEMENT UTILITY
g. Database Home - /u01/app/oracle/product/12.1.0/dbhome_1
h. Password – oow
4. On the next screen, enter the following details and click Next.
a. System Global Area Size – 2G
b. Open Mode – Read Write
c. Log Mode - Archivelog

19 | ORACLE DATABASE SNAPSHOT AND CLONING WITH ORACLE SNAP MANAGEMENT UTILITY
5. Click Finish to complete.
6. The imported RMAN image is now available for snap backups and restores.

Oracle Corporation, World Headquarters 500 Oracle Parkway Redwood Shores, CA 94065, USA
Worldwide Inquiries Phone: +1.650.506.7000 Fax: +1.650.506.7200
Copyright © 2016, Oracle and/or its affiliates. All rights reserved. This document is provided for information purposes only, and the contents hereof are subject to change without notice. This document is not warranted to be error-free, nor subject to any other warranties or conditions, whether expressed orally or implied in law, including implied warranties and conditions of merchantability or fitness for a particular purpose. We specifically disclaim any liability with respect to this document, and no contractual obligations are formed either directly or indirectly by this document. This document may not be reproduced or transmitted in any form or by any means, electronic or mechanical, for any purpose, without our prior written permission. Oracle and Java are registered trademarks of Oracle and/or its affiliates. Other names may be trademarks of their respective owners. Intel and Intel Xeon are trademarks or registered trademarks of Intel Corporation. All SPARC trademarks are used under license and are trademarks or registered trademarks of SPARC International, Inc. AMD, Opteron, the AMD logo, and the AMD Opteron logo are trademarks or registered trademarks of Advanced Micro Devices. UNIX is a registered trademark of The Open Group. 0115 Oracle Database Snapshot and Cloning with Oracle Snap Management Utility September 2016 Author: Paul Johnson
C O N N E C T W I T H U S
blogs.oracle.com/oracle
facebook.com/oracle
twitter.com/oracle
oracle.com


