21
IndexSource and version …………………………………………………………………………3
Steps and prerequisites ………………………….………………………………………4
STEP 1. Tab organization …..…………………………………………………………...5
STEP 2. Open and prepare IDE Remix ………………………………………………5
STEP 3. Copy and paste the contract code ……………………………………...6
STEP 4. Compile the contract ………………………………………………………….7
STEP 5. Access the wallet and create the NFT ………………………………….8
STEP 6. Validate the NFT ……………………………………………………………...11
Reading of our Smart Contract ……………………………………………………..16
Send the NFT to another wallet …………………………………………………….18
Verify NFT transfer …………………………….………………………………………...21
SOURCE AND VERSION
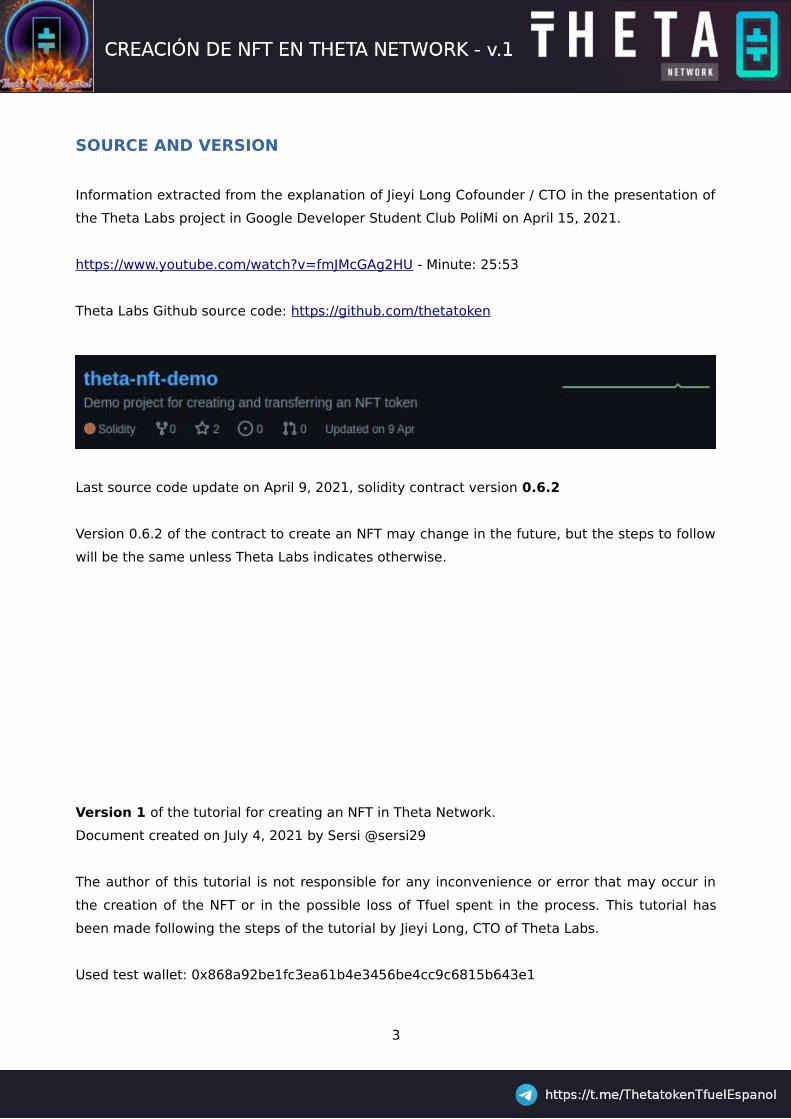
Information extracted from the explanation of Jieyi Long Cofounder / CTO in the presentation of
the Theta Labs project in Google Developer Student Club PoliMi on April 15, 2021.
https://www.youtube.com/watch?v=fmJMcGAg2HU - Minute: 25:53
Theta Labs Github source code: https://github.com/thetatoken
Last source code update on April 9, 2021, solidity contract version 0.6.2
Version 0.6.2 of the contract to create an NFT may change in the future, but the steps to follow
will be the same unless Theta Labs indicates otherwise.
Version 1 of the tutorial for creating an NFT in Theta Network.
Document created on July 4, 2021 by Sersi @sersi29
The author of this tutorial is not responsible for any inconvenience or error that may occur in
the creation of the NFT or in the possible loss of Tfuel spent in the process. This tutorial has
been made following the steps of the tutorial by Jieyi Long, CTO of Theta Labs.
Used test wallet: 0x868a92be1fc3ea61b4e3456be4cc9c6815b643e1
3
STEPS AND PREREQUISITES BEFORE CREATING OUR NFT
For the creation of an NFT we will need:
1. A Theta Wallet, if we do not have one, we create it from the official Theta page Network:
https://wallet.thetatoken.org/
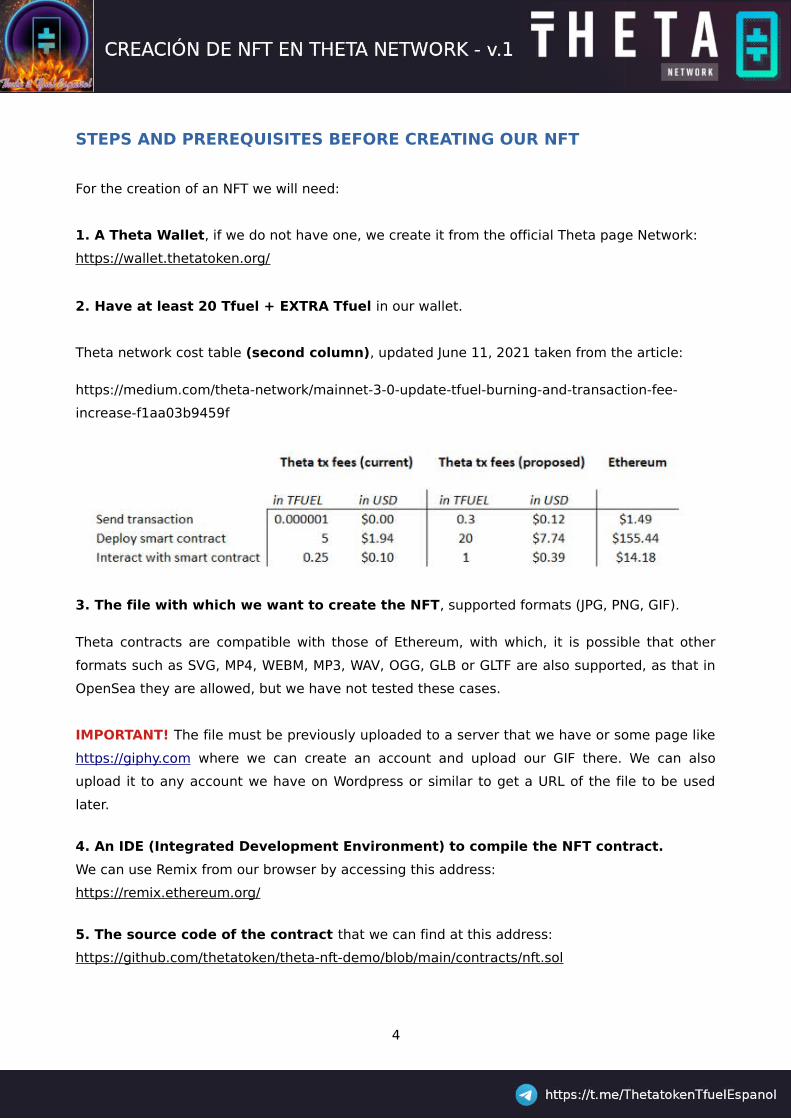
2. Have at least 20 Tfuel + EXTRA Tfuel in our wallet.
Theta network cost table (second column), updated June 11, 2021 taken from the article:
https://medium.com/theta-network/mainnet-3-0-update-tfuel-burning-and-transaction-fee-
increase-f1aa03b9459f
3. The file with which we want to create the NFT, supported formats (JPG, PNG, GIF).
Theta contracts are compatible with those of Ethereum, with which, it is possible that other
formats such as SVG, MP4, WEBM, MP3, WAV, OGG, GLB or GLTF are also supported, as that in
OpenSea they are allowed, but we have not tested these cases.
IMPORTANT! The file must be previously uploaded to a server that we have or some page like
https://giphy.com where we can create an account and upload our GIF there. We can also
upload it to any account we have on Wordpress or similar to get a URL of the file to be used
later.
4. An IDE (Integrated Development Environment) to compile the NFT contract.
We can use Remix from our browser by accessing this address:
https://remix.ethereum.org/
5. The source code of the contract that we can find at this address:
https://github.com/thetatoken/theta-nft-demo/blob/main/contracts/nft.sol
4
If we have a Theta Wallet with more than 20 Tfuel and the URL of our file, can we start.
STEP 1. Tab organization.
We open 5 tabs in our browser with the following URLs:
Tab 1: The URL of our file to create the NFT
Tab 2: https://github.com/thetatoken/theta-nft-demo/blob/main/contracts/nft.sol
Tab 3: https://remix.ethereum.org/
Tab 4: https://wallet.thetatoken.org/
Tab 5: https://explorer.thetatoken.org/
In tab 1 we have our file, in tab 2 the NFT contract, in the tab 3 the IDE Remix, on tab
4 our wallet and on tab 5 the Theta Explorer.
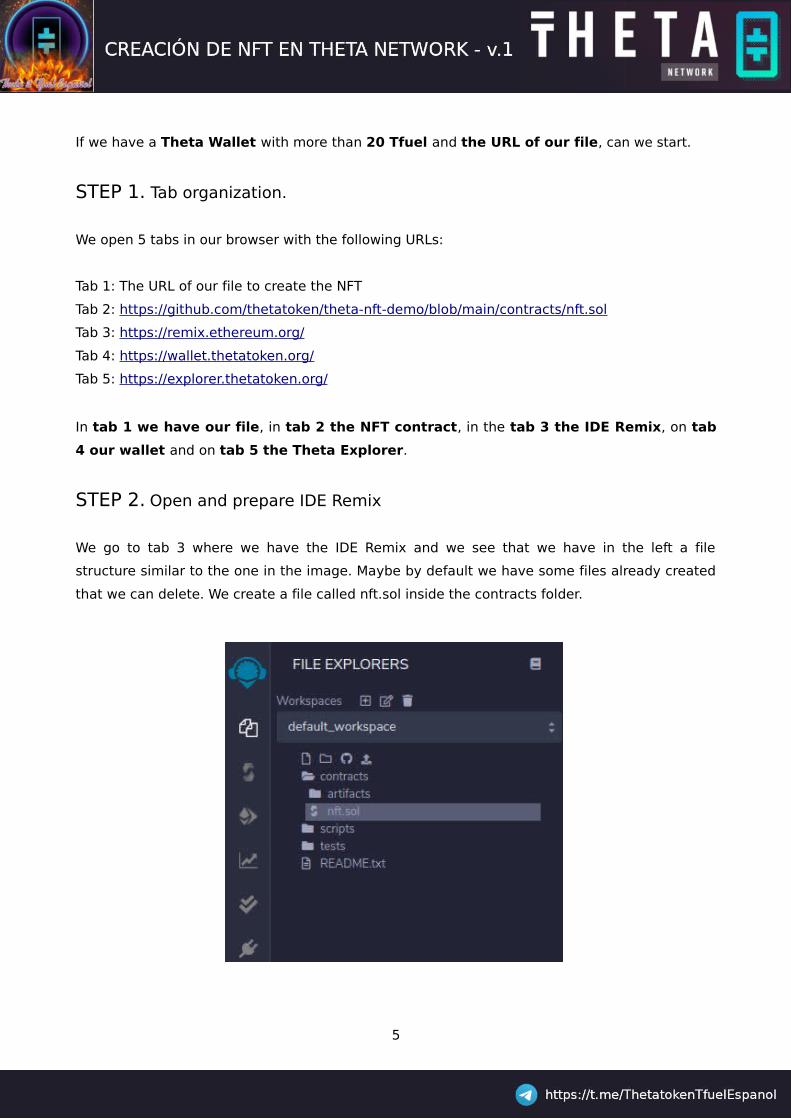
STEP 2. Open and prepare IDE Remix
We go to tab 3 where we have the IDE Remix and we see that we have in the left a file
structure similar to the one in the image. Maybe by default we have some files already created
that we can delete. We create a file called nft.sol inside the contracts folder.
5

STEP 3. Copy and paste de contract code.
We take the source code of the contract from tab 2 and paste it into the nft.sol file of tab 3.
IMPORTANT! Make sure you have selected the code at the end, this version 0.6.2 of the
contract has 702 lines, it may be that in future versions of the code it will have different
number of lines.
6
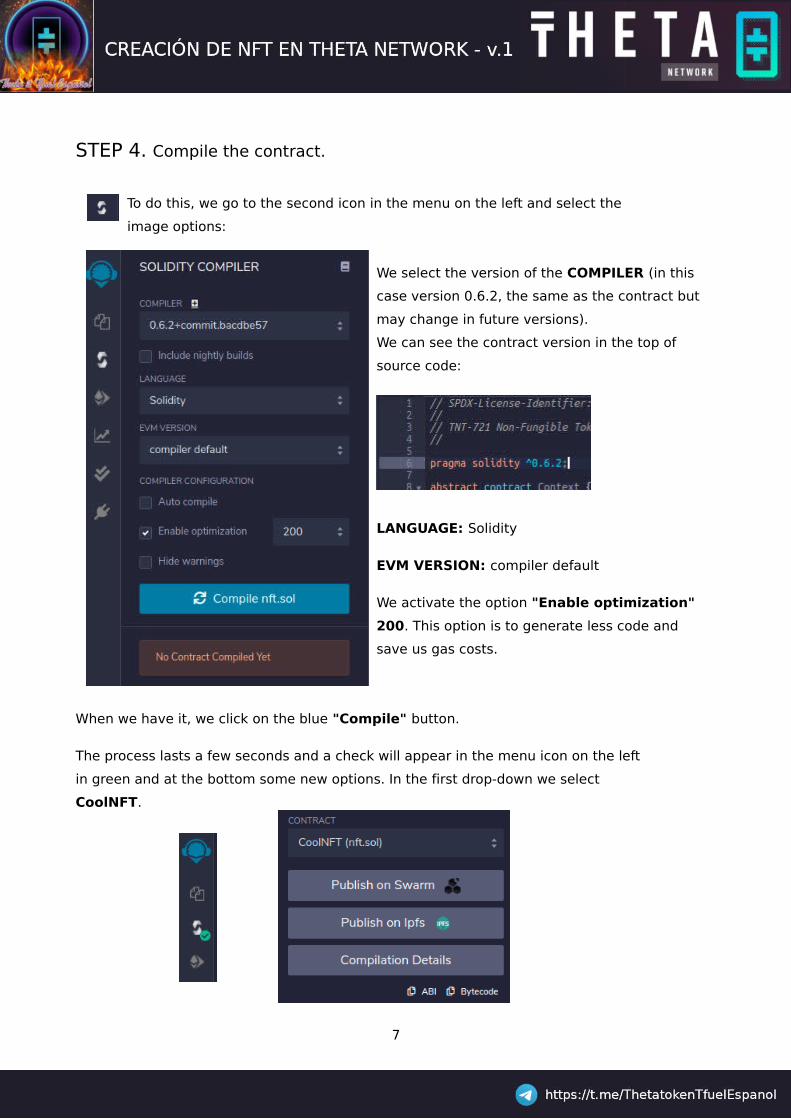
STEP 4. Compile the contract.
To do this, we go to the second icon in the menu on the left and select the
image options:
We select the version of the COMPILER (in this
case version 0.6.2, the same as the contract but
may change in future versions).
We can see the contract version in the top of
source code:
LANGUAGE: Solidity
EVM VERSION: compiler default
We activate the option "Enable optimization"
200. This option is to generate less code and
save us gas costs.
When we have it, we click on the blue "Compile" button.
The process lasts a few seconds and a check will appear in the menu icon on the left
in green and at the bottom some new options. In the first drop-down we select
CoolNFT.
7
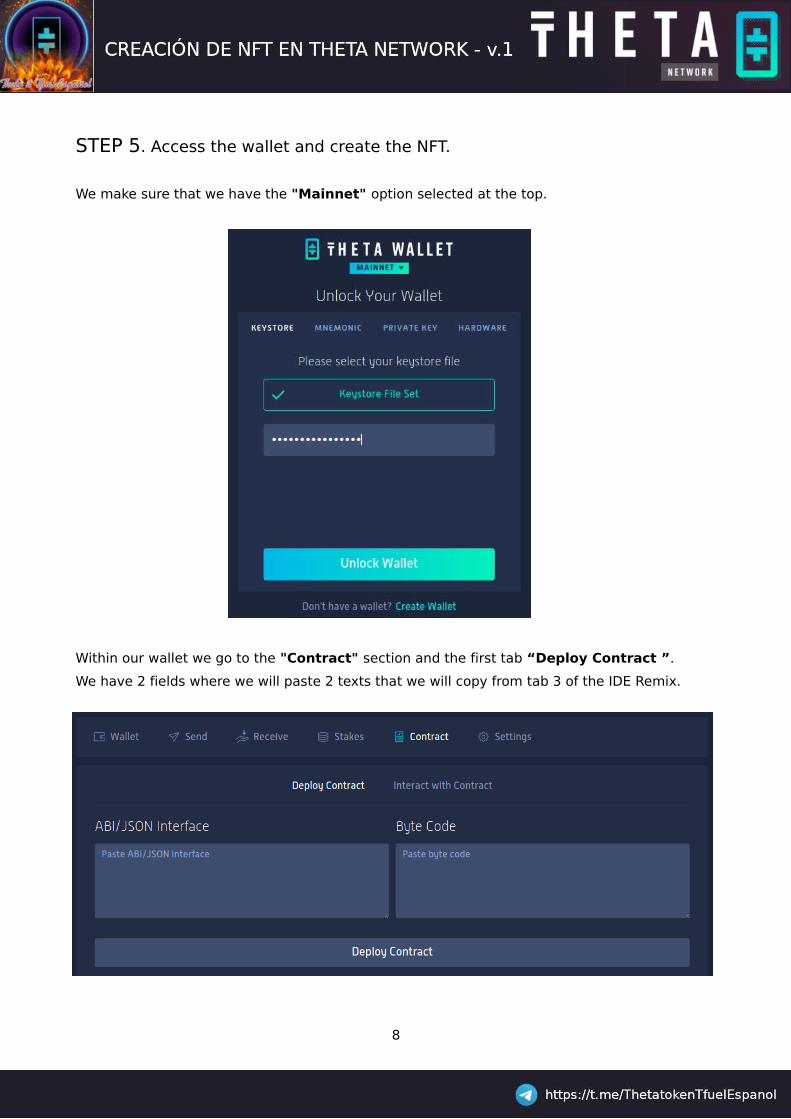
STEP 5. Access the wallet and create the NFT.
We make sure that we have the "Mainnet" option selected at the top.
Within our wallet we go to the "Contract" section and the first tab “Deploy Contract ”.
We have 2 fields where we will paste 2 texts that we will copy from tab 3 of the IDE Remix.
8
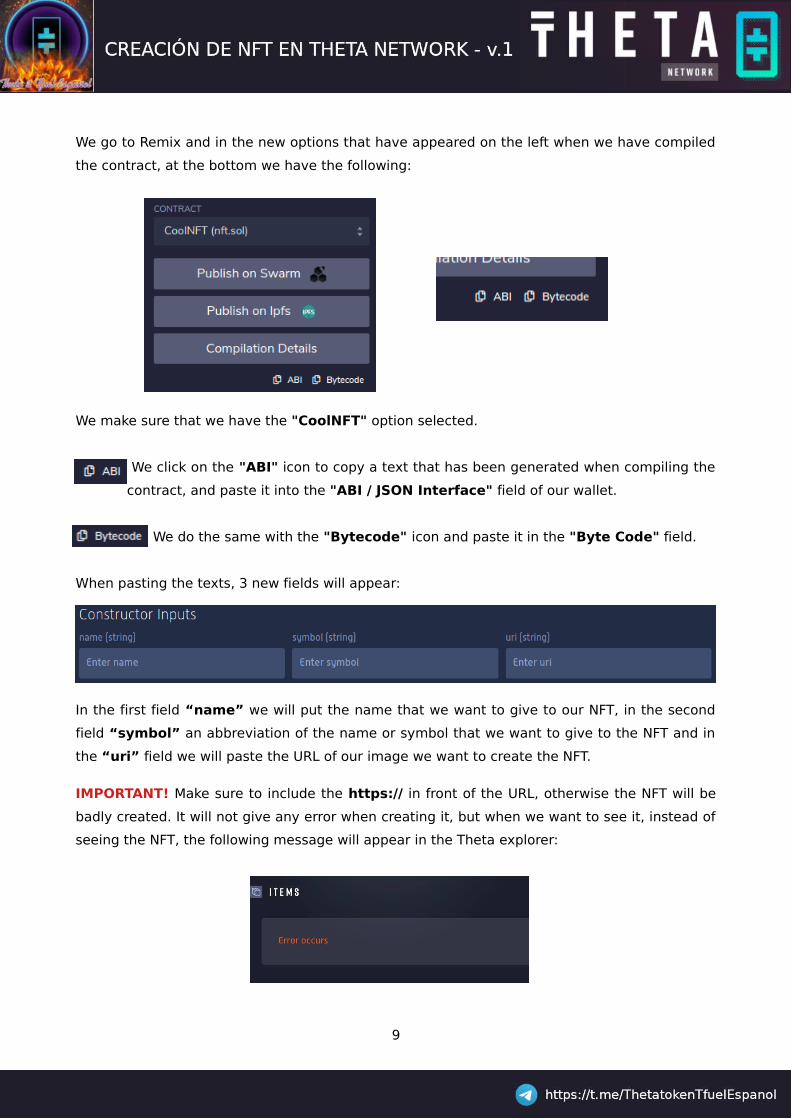
We go to Remix and in the new options that have appeared on the left when we have compiled
the contract, at the bottom we have the following:
We make sure that we have the "CoolNFT" option selected.
We click on the "ABI" icon to copy a text that has been generated when compiling the
contract, and paste it into the "ABI / JSON Interface" field of our wallet.
We do the same with the "Bytecode" icon and paste it in the "Byte Code" field.
When pasting the texts, 3 new fields will appear:
In the first field “name” we will put the name that we want to give to our NFT, in the second
field “symbol” an abbreviation of the name or symbol that we want to give to the NFT and in
the “uri” field we will paste the URL of our image we want to create the NFT.
IMPORTANT! Make sure to include the https:// in front of the URL, otherwise the NFT will be
badly created. It will not give any error when creating it, but when we want to see it, instead of
seeing the NFT, the following message will appear in the Theta explorer:
9
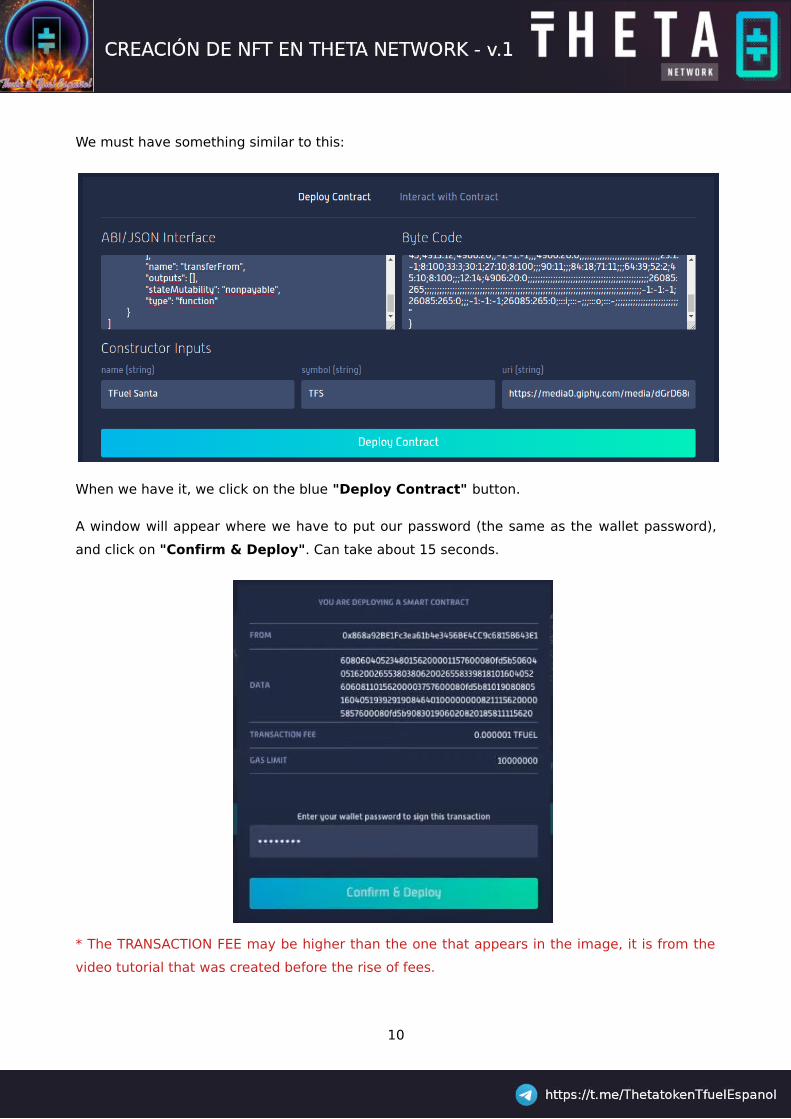
We must have something similar to this:
When we have it, we click on the blue "Deploy Contract" button.
A window will appear where we have to put our password (the same as the wallet password),
and click on "Confirm & Deploy". Can take about 15 seconds.
* The TRANSACTION FEE may be higher than the one that appears in the image, it is from the
video tutorial that was created before the rise of fees.
10
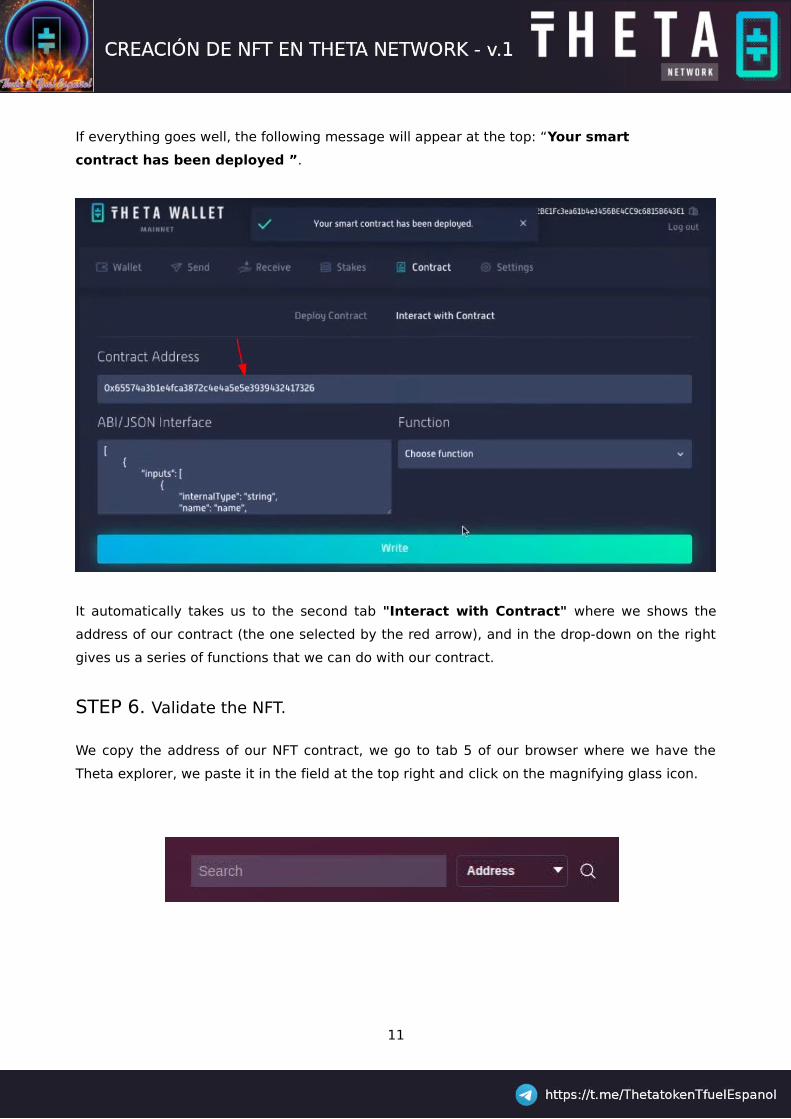
If everything goes well, the following message will appear at the top: “Your smart
contract has been deployed ”.
It automatically takes us to the second tab "Interact with Contract" where we shows the
address of our contract (the one selected by the red arrow), and in the drop-down on the right
gives us a series of functions that we can do with our contract.
STEP 6. Validate the NFT.
We copy the address of our NFT contract, we go to tab 5 of our browser where we have the
Theta explorer, we paste it in the field at the top right and click on the magnifying glass icon.
11
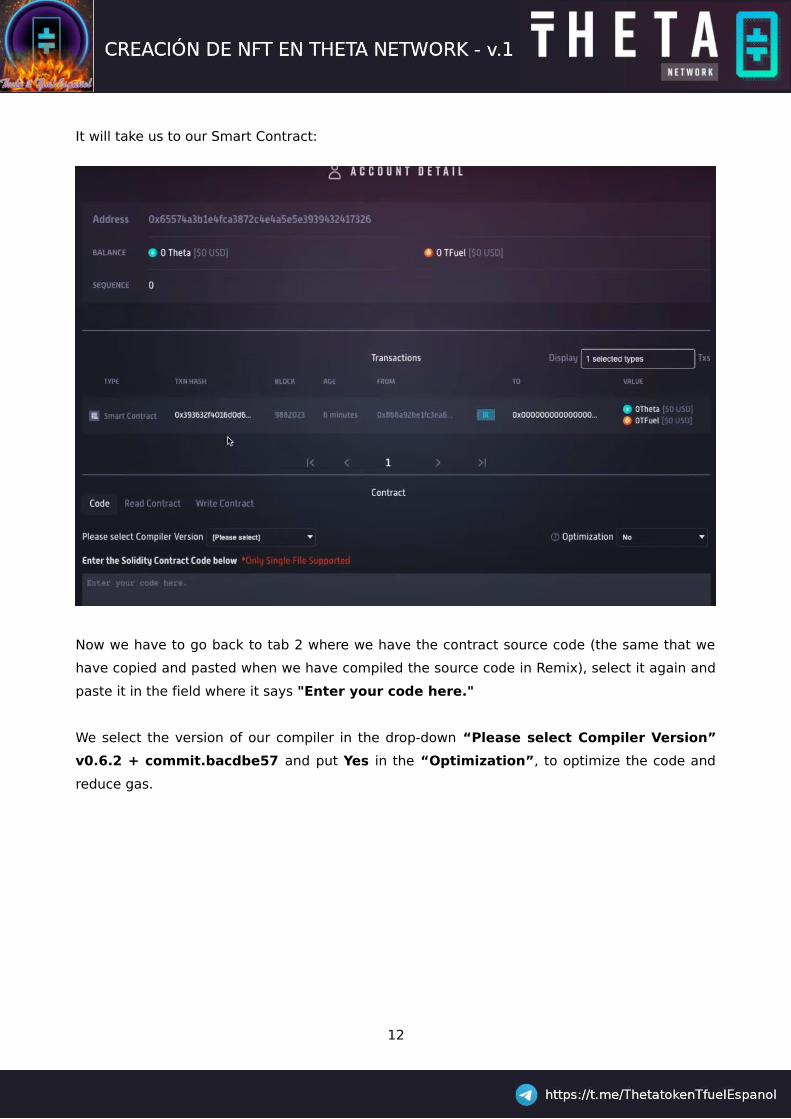
It will take us to our Smart Contract:
Now we have to go back to tab 2 where we have the contract source code (the same that we
have copied and pasted when we have compiled the source code in Remix), select it again and
paste it in the field where it says "Enter your code here."
We select the version of our compiler in the drop-down “Please select Compiler Version”
v0.6.2 + commit.bacdbe57 and put Yes in the “Optimization”, to optimize the code and
reduce gas.
12
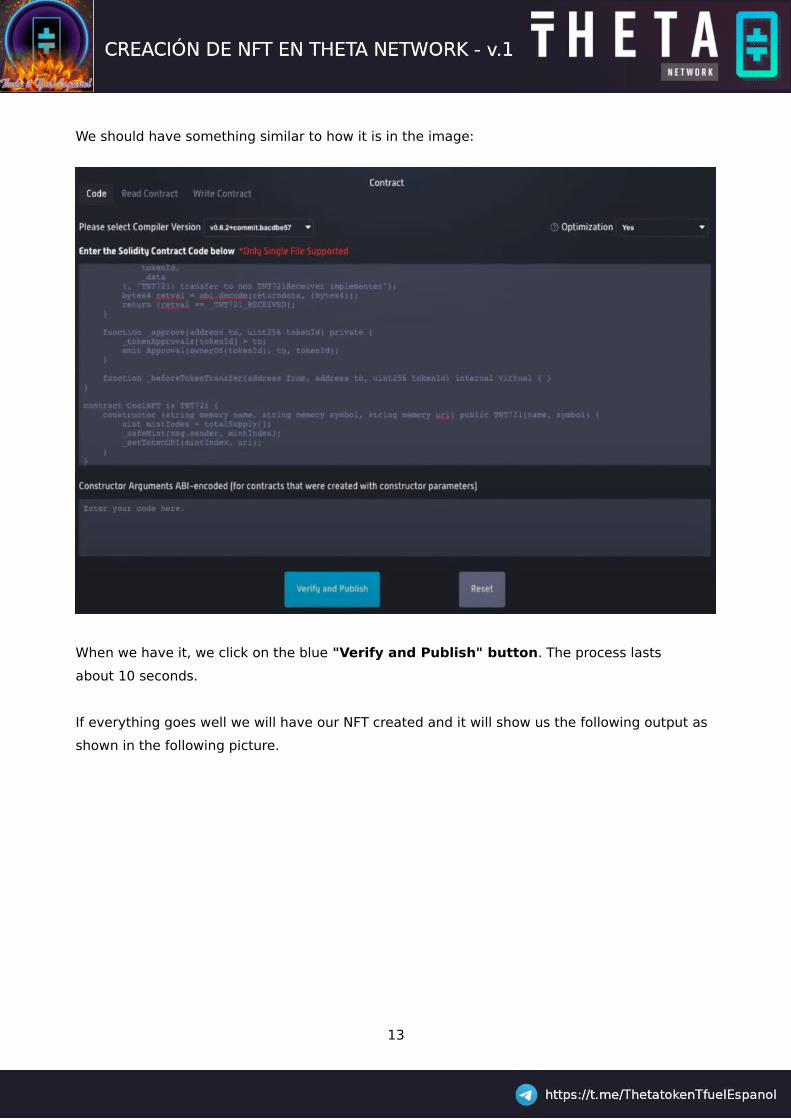
We should have something similar to how it is in the image:
When we have it, we click on the blue "Verify and Publish" button. The process lasts
about 10 seconds.
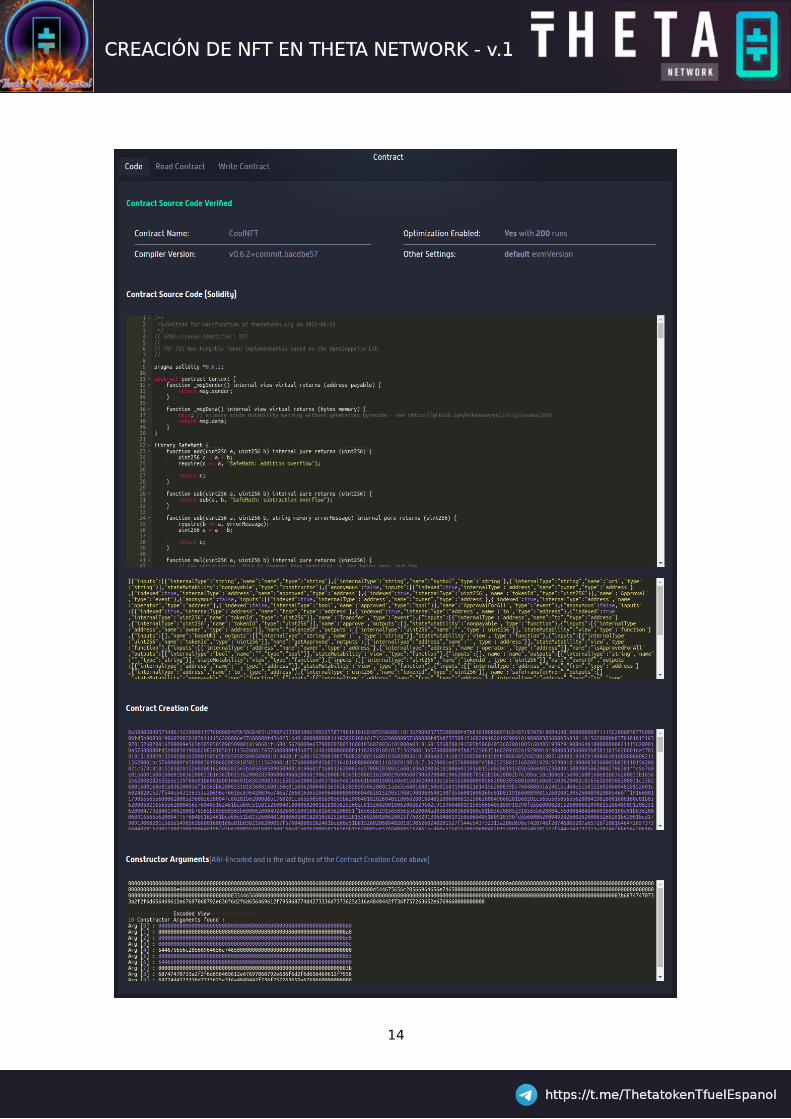
If everything goes well we will have our NFT created and it will show us the following output as
shown in the following picture.
13
14
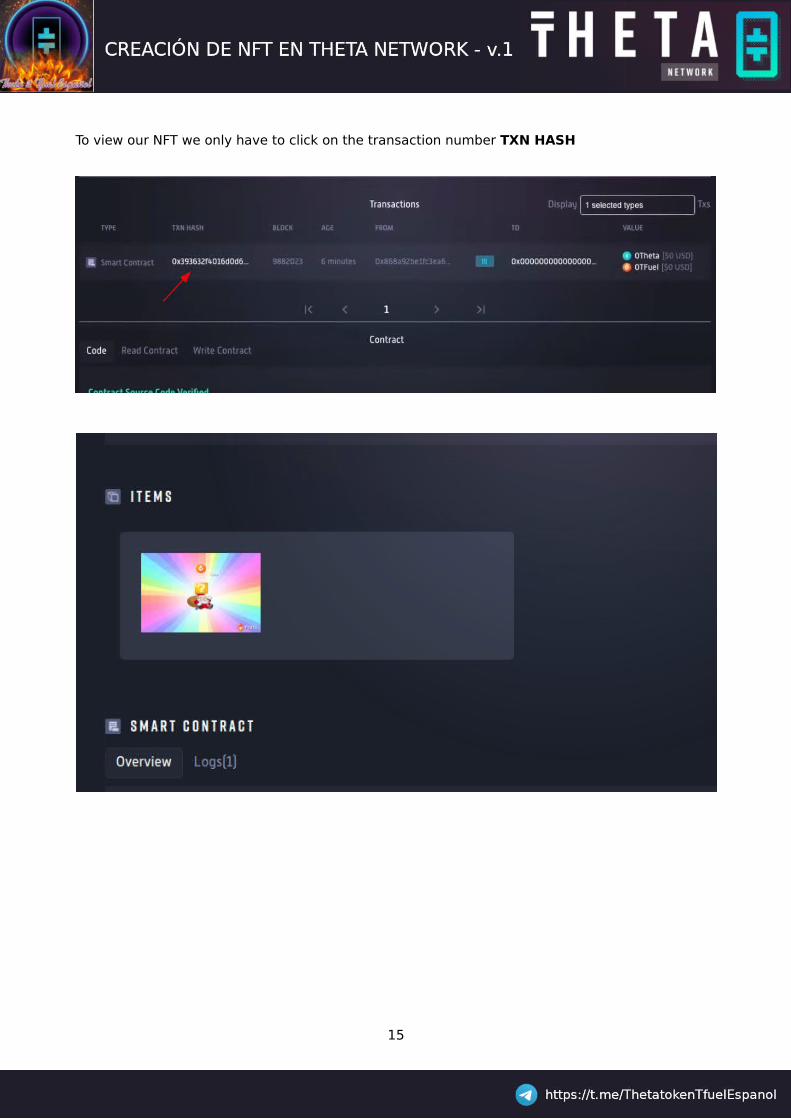
To view our NFT we only have to click on the transaction number TXN HASH
15
READING OF OUR SMART CONTRACT
We can make several queries about our smart contract.
SEE THE NUMBER OF NFTs CREATED
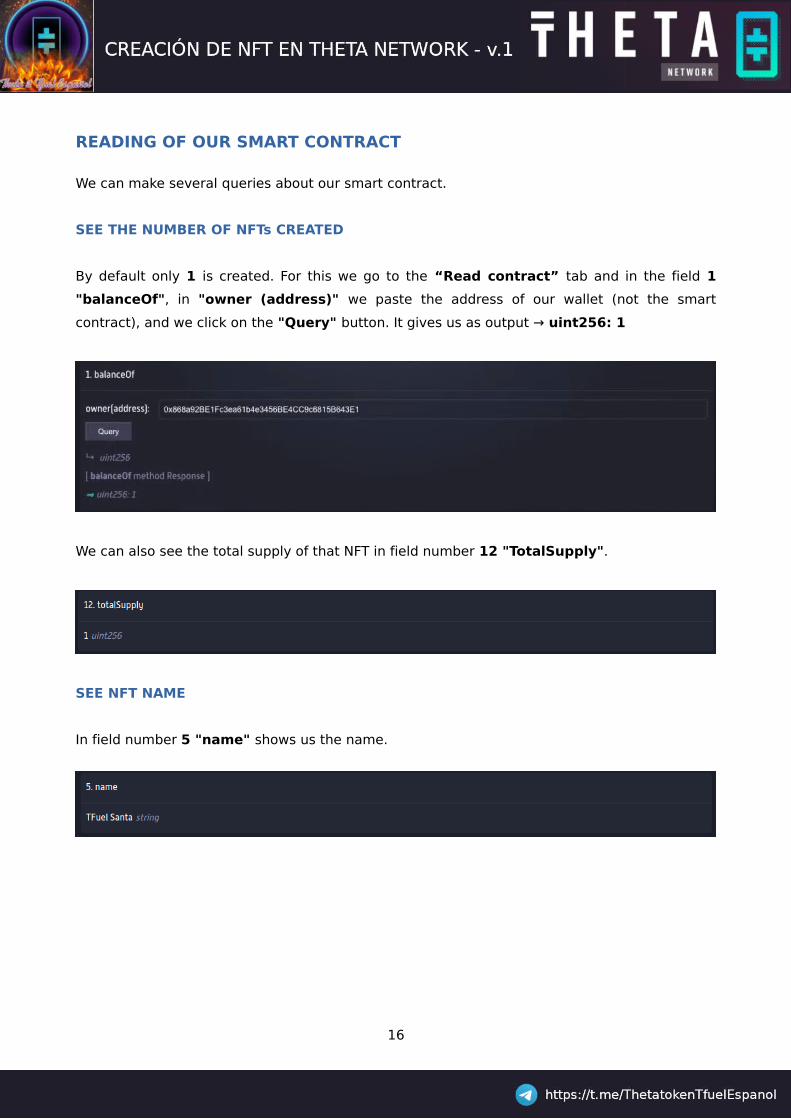
By default only 1 is created. For this we go to the “Read contract” tab and in the field 1
"balanceOf", in "owner (address)" we paste the address of our wallet (not the smart
contract), and we click on the "Query" button. It gives us as output → uint256: 1
We can also see the total supply of that NFT in field number 12 "TotalSupply".
SEE NFT NAME
In field number 5 "name" shows us the name.
16
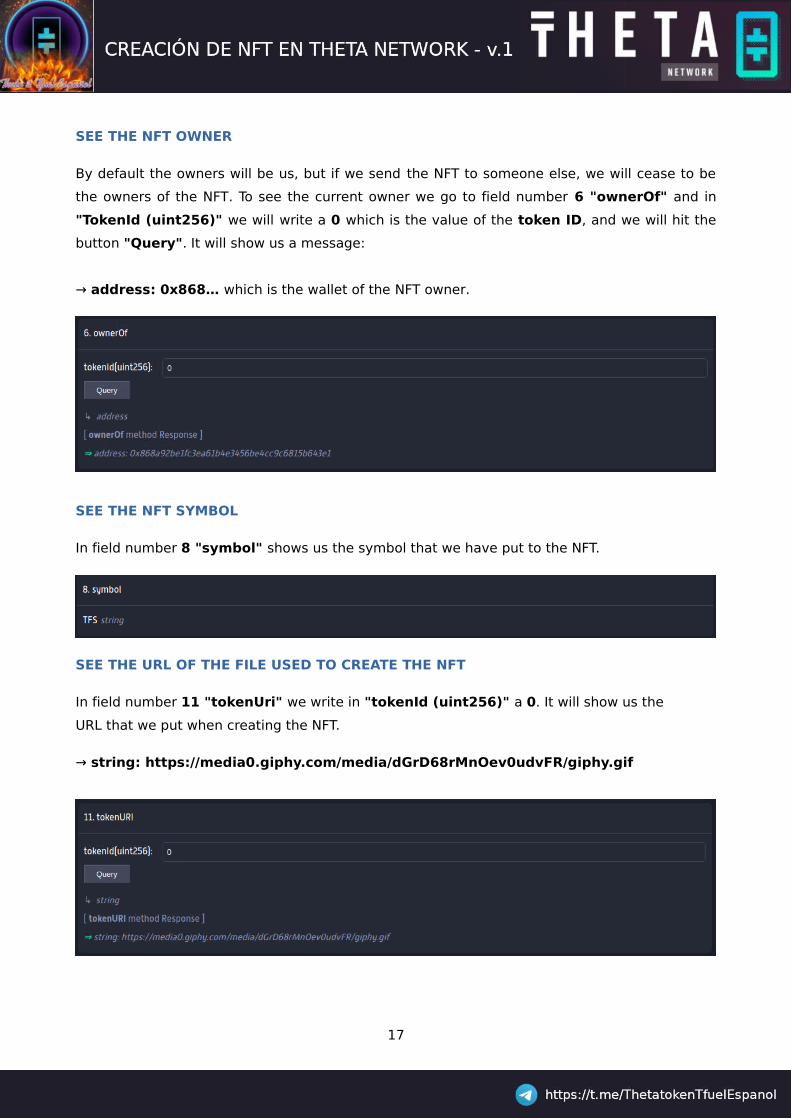
SEE THE NFT OWNER
By default the owners will be us, but if we send the NFT to someone else, we will cease to be
the owners of the NFT. To see the current owner we go to field number 6 "ownerOf" and in
"TokenId (uint256)" we will write a 0 which is the value of the token ID, and we will hit the
button "Query". It will show us a message:
→ address: 0x868… which is the wallet of the NFT owner.
SEE THE NFT SYMBOL
In field number 8 "symbol" shows us the symbol that we have put to the NFT.
SEE THE URL OF THE FILE USED TO CREATE THE NFT
In field number 11 "tokenUri" we write in "tokenId (uint256)" a 0. It will show us the
URL that we put when creating the NFT.
→ string: https://media0.giphy.com/media/dGrD68rMnOev0udvFR/giphy.gif
17
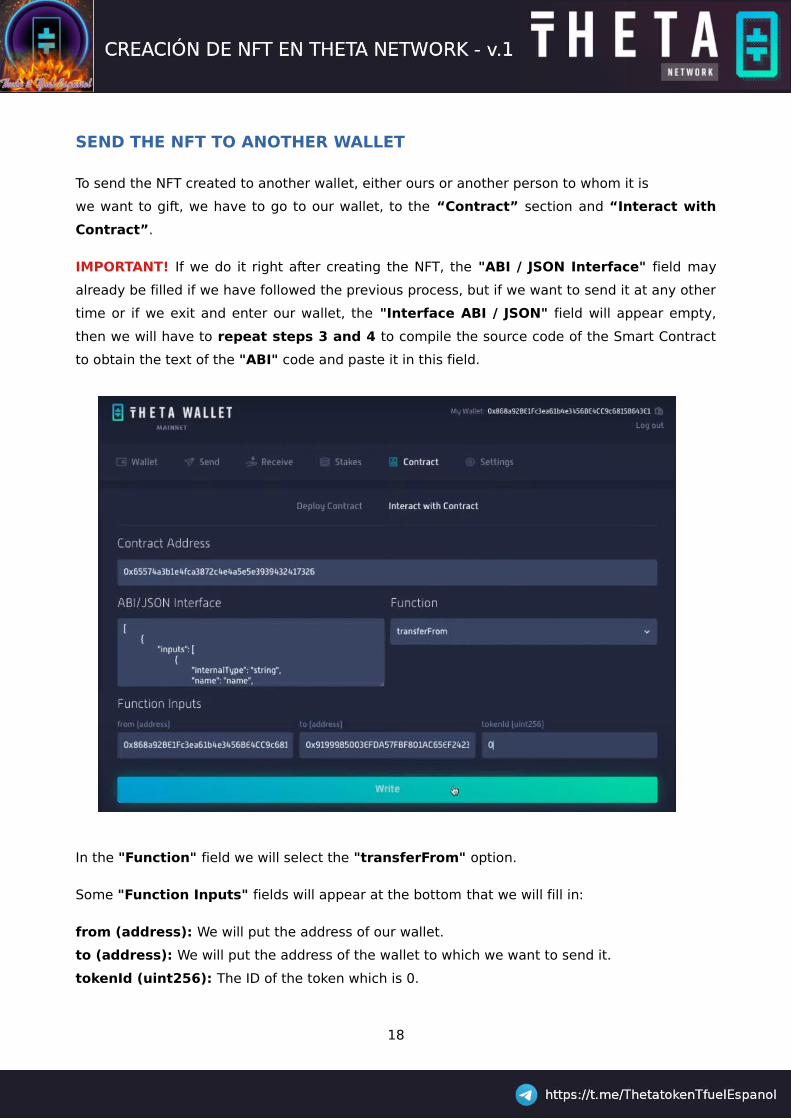
SEND THE NFT TO ANOTHER WALLET
To send the NFT created to another wallet, either ours or another person to whom it is
we want to gift, we have to go to our wallet, to the “Contract” section and “Interact with
Contract”.
IMPORTANT! If we do it right after creating the NFT, the "ABI / JSON Interface" field may
already be filled if we have followed the previous process, but if we want to send it at any other
time or if we exit and enter our wallet, the "Interface ABI / JSON" field will appear empty,
then we will have to repeat steps 3 and 4 to compile the source code of the Smart Contract
to obtain the text of the "ABI" code and paste it in this field.
In the "Function" field we will select the "transferFrom" option.
Some "Function Inputs" fields will appear at the bottom that we will fill in:
from (address): We will put the address of our wallet.
to (address): We will put the address of the wallet to which we want to send it.
tokenId (uint256): The ID of the token which is 0.
18
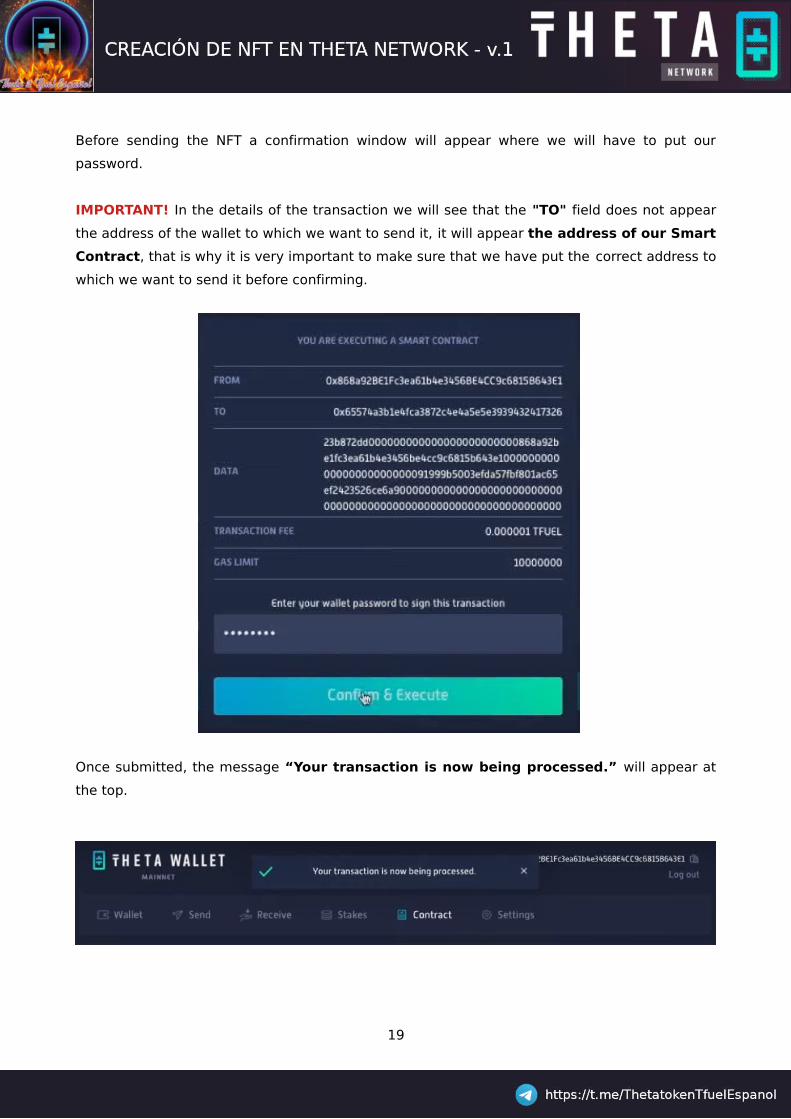
Before sending the NFT a confirmation window will appear where we will have to put our
password.
IMPORTANT! In the details of the transaction we will see that the "TO" field does not appear
the address of the wallet to which we want to send it, it will appear the address of our Smart
Contract, that is why it is very important to make sure that we have put the correct address to
which we want to send it before confirming.
Once submitted, the message “Your transaction is now being processed.” will appear at
the top.
19
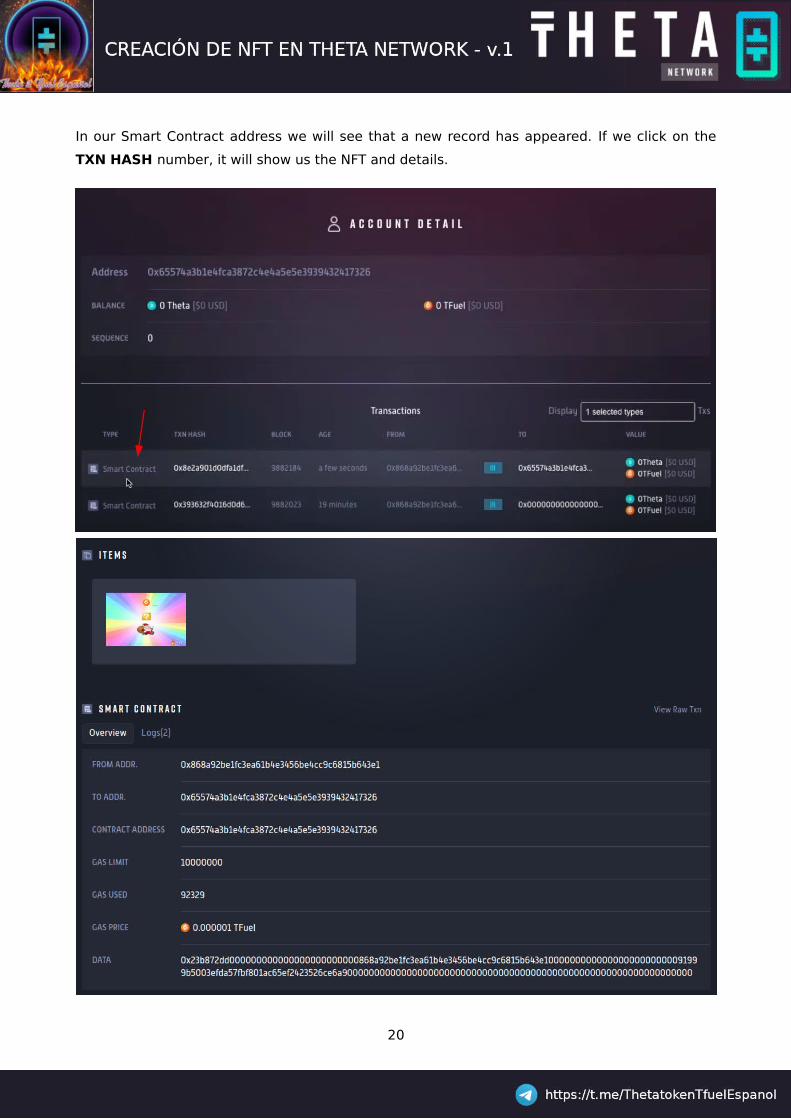
In our Smart Contract address we will see that a new record has appeared. If we click on the
TXN HASH number, it will show us the NFT and details.
20
VERIFY NFT TRANSFER
To check that the NFT has been sent correctly we can do some queries like we did when we
created the NFT.
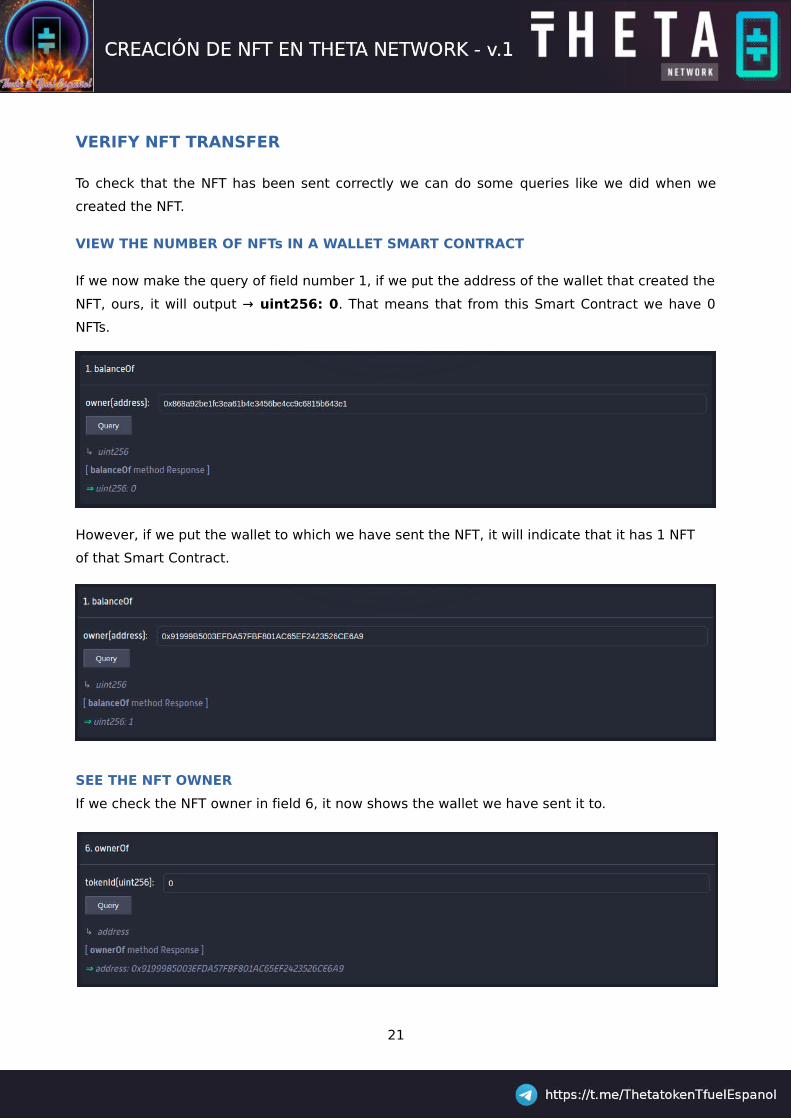
VIEW THE NUMBER OF NFTs IN A WALLET SMART CONTRACT
If we now make the query of field number 1, if we put the address of the wallet that created the
NFT, ours, it will output → uint256: 0. That means that from this Smart Contract we have 0
NFTs.
However, if we put the wallet to which we have sent the NFT, it will indicate that it has 1 NFT
of that Smart Contract.
SEE THE NFT OWNER
If we check the NFT owner in field 6, it now shows the wallet we have sent it to.
21


