23
File Management Utility Tutorial
File ManagementUtility
T u t o r i a l

ContentsSystem Requirements ................................................................................................................................. 2
Preparing Files for Transfer to GlobalMark ............................................................................................... 2
Application Launch ...................................................................................................................................... 2
Printer Setup ................................................................................................................................................. 2
Communication Status ................................................................................................................................ 4
Communication Successful ........................................................................................................................ 4
Communication Failed ................................................................................................................................. 4
Main Screen Options .................................................................................................................................... 5
Transfer Files to Printer ............................................................................................................................... 6
Exercise: How to Export a File from MarkWare ........................................................................................ 8
Templates ............................................................................................................................................. 9
Graphics ........................................................................................................................................................ 11
Fonts .............................................................................................................................................................. 13
Transfer Files from Printer .......................................................................................................................... 15
Label Files ..................................................................................................................................................... 15
Templates ............................................................................................................................................. 16
Manage Printer Files .................................................................................................................................... 18
Upgrade Printer Files ................................................................................................................................... 20
Upgrade Using the File Management Utility .............................................................................................. 21
Upgrade Using a CD-ROM ........................................................................................................................... 21
1
Installation (Rev 3/24/2004)
To install the File Management Utility, complete the following steps:
1. Insert the GlobalMark Utilities CD in to the CD-ROM on the PC
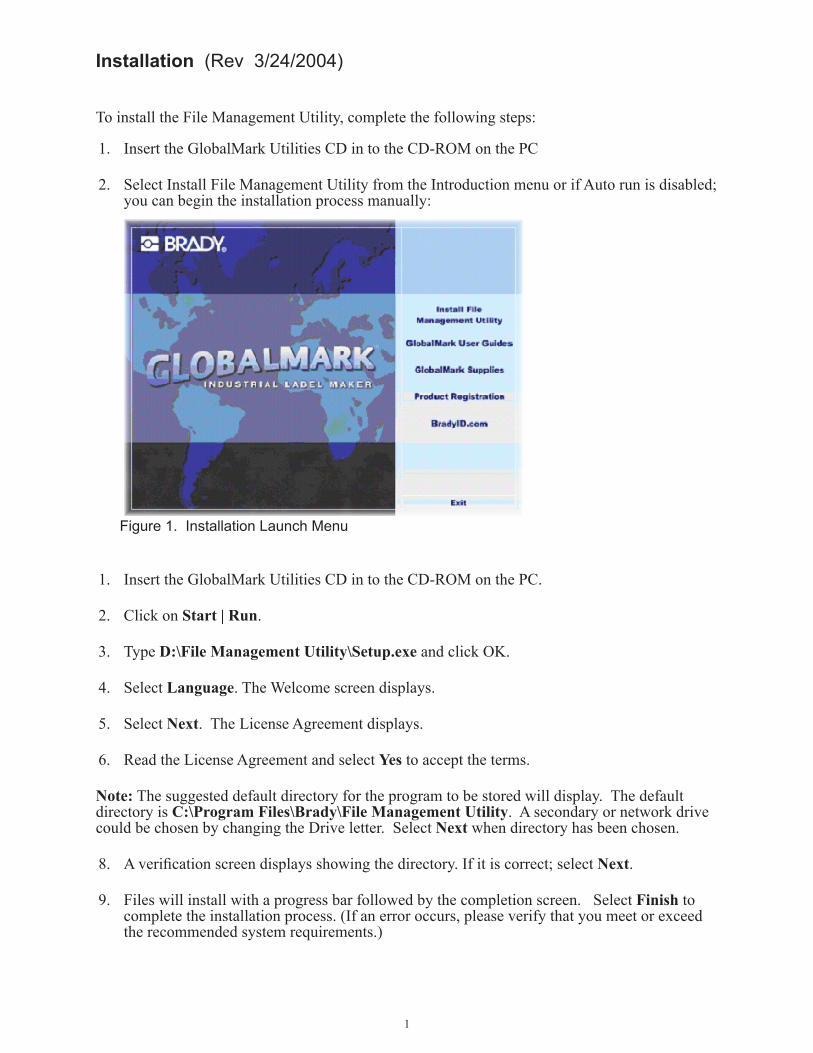
2. Select Install File Management Utility from the Introduction menu or if Auto run is disabled; you can begin the installation process manually:
Figure 1. Installation Launch Menu
1. Insert the GlobalMark Utilities CD in to the CD-ROM on the PC.
2. Click on Start | Run.
3. Type D:\File Management Utility\Setup.exe and click OK.
4. Select Language. The Welcome screen displays.
5. Select Next. The License Agreement displays.
6. Read the License Agreement and select Yes to accept the terms.
Note: The suggested default directory for the program to be stored will display. The default directory is C:\Program Files\Brady\File Management Utility. A secondary or network drive could be chosen by changing the Drive letter. Select Next when directory has been chosen.
8. A verification screen displays showing the directory. If it is correct; select Next.
9. Files will install with a progress bar followed by the completion screen. Select Finish to complete the installation process. (If an error occurs, please verify that you meet or exceed the recommended system requirements.)
2
Processor 486 DX/33 MHz or greater PC running Microsoft® Windows 98 2nd Edition, NT 4.0, 2000, or XP (Pen-tium® recommended)
Display Display size of 640 x 480 at 256 colors (800 x 600 or greater recommended)
Memory 32 MB RAM (128 MB or greater recommended)
Disk space 120 MB or greater available hard disk space (for a complete installation)
Operating System Windows 98 (SE), Windows NT 4 (SP6a), Win-dows 2000 (SP 3), or Windows (XP)
Internet Explorer 5.01 or greater
Printer drivers Shipped with select printers or software
Adobe Acrobat Reader 5.0 or greater recommended (To load the latest version of the Adobe Acrobat Reader, go to /www.adobe.com/)
Table 1. System Requirements
System Requirements
Preparing Files for Transfer to GlobalMarkThe MarkWare application’s Export feature prepares files for use on your label printing system. For the best results, use this function before transferring any document (label) or template files. See page 7 of this document for detailed instructions.
Important! Any file transferred to your GlobalMark printer needs to be placed in very specific folders for standalone use of your GlobalMark. Also the printer must be rebooted after the trans-fer for any changes to be visible.
Application Launch1. To launch the File Management Utility, double-click the utility’s icon on the desktop. The
following icon is used for the File Management Utility:
Figure 2. Application Icon
Printer SetupAt application launch, an automated attempt to establish communication with an attached printer is made, using the default or most recently used port. The printer must be attached with the ap-propriate settings made for this to happen.
The following printer settings needed to communicate to the utility:
• Verify the printer power is on
• Verify the printer is physically attached to the correct port on the PC
• Verify the printer’s online settings under system setup
Select setup and scroll to the right and select the online tab
• Connection Type: USB or Serial
3
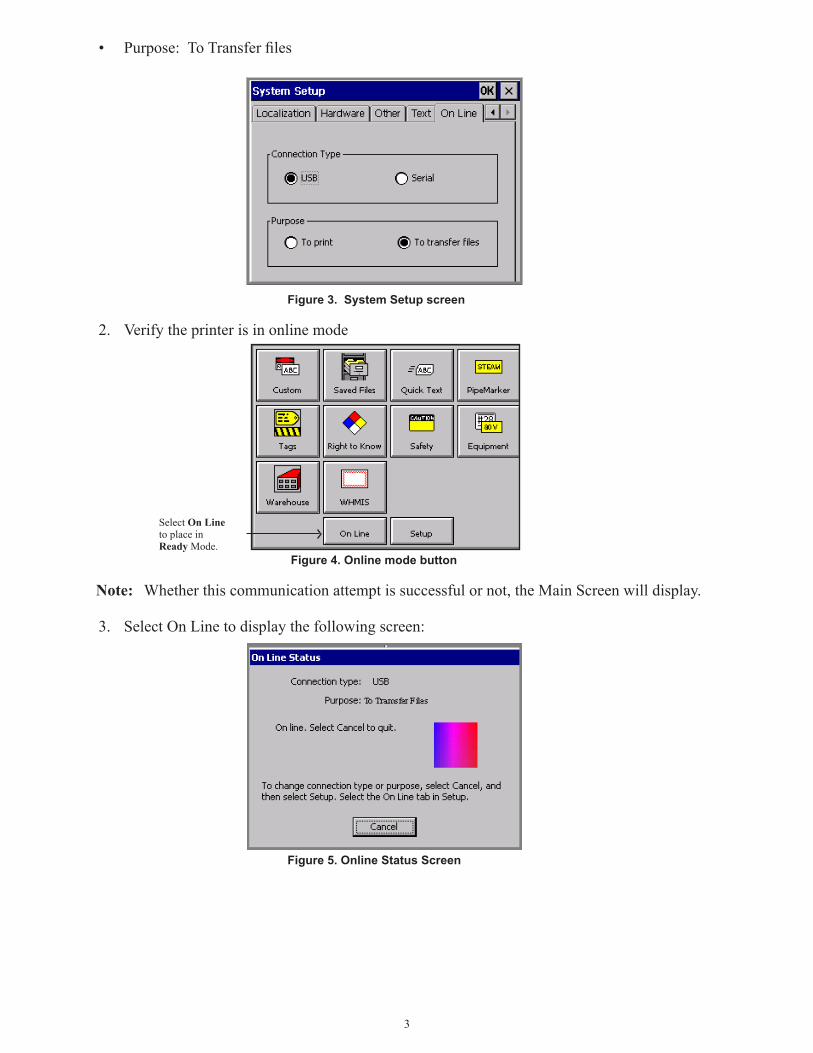
• Purpose: To Transfer files
Figure 3. System Setup screen
2. Verify the printer is in online mode
Figure 4. Online mode button
Note: Whether this communication attempt is successful or not, the Main Screen will display.
3. Select On Line to display the following screen:
Figure 5. Online Status Screen
Select On Line to place in Ready Mode.
4
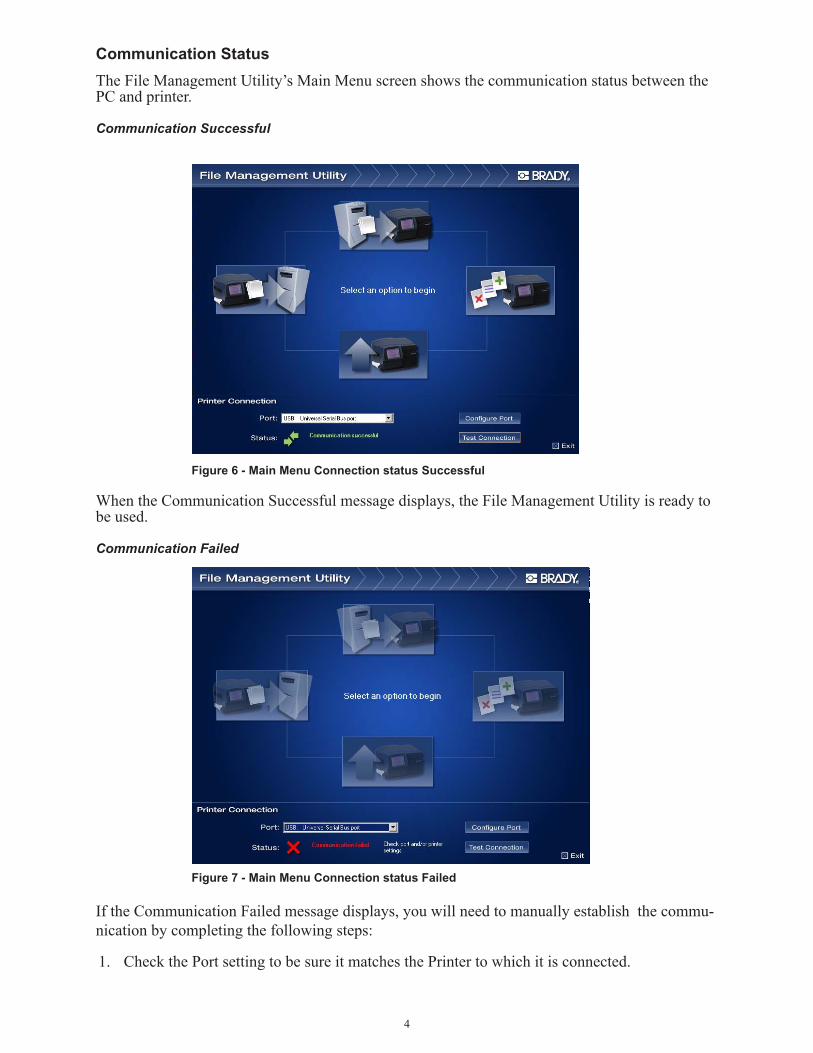
Communication StatusThe File Management Utility’s Main Menu screen shows the communication status between the PC and printer.
Communication Successful
Figure 6 - Main Menu Connection status Successful
When the Communication Successful message displays, the File Management Utility is ready to be used.
Communication Failed
Figure 7 - Main Menu Connection status Failed
If the Communication Failed message displays, you will need to manually establish the commu-nication by completing the following steps:
1. Check the Port setting to be sure it matches the Printer to which it is connected.

5
2. Click the Configure Port button to verify the selected Port’s settings (Baud 115200, Stop bits1, Parity none, data bits 8 and flow control Hardware for COM settings only).
3. Click the Test Connection button after all communication selections are verified, making sure the printer is attached to establish communication.
Note: You may have to repeat this process if the Port or Configure Port selections are incorrect. If a timeout error occurs during use, return to the main menu and reselect the test communica-tions to reestablish the connection.
If communication with a printer is not established, the user must change port and printer settings to establish a connection before moving on (see section on Printer Setup)
Figure 8 - Main Menu
Main Screen OptionsOnce the communication has been established with the GlobalMark Printer the File Management Utility Main Screen enables the following functions:
• Transfer files TO printer - Transfer files from your computer to your GlobalMark printer’s internal memory, or external storage card via a communication cable.
• Transfer files FROM printer - Transfer files from your GlobalMark printer’s internal memory, or external storage card to your computer via a communication cable.
• Manage printer files - Manage files on your GlobalMark printer’s internal memory, or external stor-age card via a communication cable.
• Upgrade printer files - Upgrade files on your printer’s internal memory from an external source (i.e. An ftp site or a CD-ROM) via a communication cable.
To select an option to begin, move your mouse on top of one of the function’s button and Click. Once a selection has been made, the screen corresponding with this selection will follow. These screens are shown and detailed out in the following sections

6
Transfer Files to Printer
Label Files
Figure 9 – Transfer Label *lbl Files To Printer Screen
Lets you transfer Label files residing on your PC to an attached printer via a communication cable. The order of the steps taken to perform the transfer should be as follows:
1. Select the Source File Type
2 Select Label Files from drop down menu
Note: The Source list displays the drives to which you have access (e.g., 3.5” floppy, hard drive, compact disc, etc.).
3. For first time users the default source path is C:\Program Files\Brady\MarkWare 3.*. If the proper Directory does not display you can type in the New Category to transfer the files or browse for it using the drop down menu. In this option for Label Files the Download\Docu-ments folder would be selected.
It is recommended that all Label Files be transferred to either:
• \Internal\SavedFiles\My Documents
• \External\SavedFiles\My Documents

7
If you would like your own personalized category, you can create a New Category (in place of My Documents) to place these files. To create a new category add and create a new folder then give it a name.
If it is necessary to transfer an entire folder of Label Files, you can transfer the entire folder to either:
• \Internal\SavedFiles
• \External\SavedFiles
4. Select the Destination from drop down menu
Note: The default directory is automatically selected and established when the source file is selected. For labels the Saved files My documents. The File Management Utility automati-cally creates missing folders for you. For example, if your Destination is External and you select a Source File Type of Graphics, the FMU creates an External\Graphics\My Graphics folder for you.
5. Select File(s) to be transferred.
6. Select Copy to start the transfer process
Copy is to be used for copying/transferring files from the Source to the Destination. The file will still reside on the Source, and the file will also reside on the Destination.
When the process completes, the status window displays. If the process fails, the operation failed message displays and one of the error messages displays:
• Insufficient Space—Displays if there is not enough memory within the destination to trans-fer the selected files.
• Loss of Communication—Displays if communication is lost between the attached printer and computer. You will need to exit the utility and follow the steps for connecting again.
• Verify Valid Destination—Displays if the entered file destination is incorrect. You will need to enter another destination for the files you have selected.
Note: Select Refresh to update the contents of the file directory structure as needed. (For exam-ple, use this button when you replace one CompactFlash Memory Card with another.)
Move and Delete are not active for this menu set. They are used only in the Manage Printer op-tion.
Label Files
Extension: *.lbl, *.mw
Note: It is recommended that you use MarkWare’s Export function to convert your *.mw file into a *.lbl file. Once transferred to your GlobalMark, this *.lbl file will now be viewable as a *.lbl folder containing a file named “file_001” on your GlobalMark. To transfer *.lbl files back to your computer for use in MarkWare, you will need to transfer this file “file_001”, browse for this file within MarkWare, and then rename it. This renamed file will now be viewable on your computer as a *.mw file.

8
Exercise: How to Export a File from MarkWare
1. Open MarkWare and select Safety and Facility Application and Create new.
2. Choose Category Signs with Signal Words, Sub-category Landscape and select Template op-tion 5.( 1 signal word + 1 text box + 1 graphic.)
3. Select Notice header. (Graphic Category “Signal Word” Subcategory “English”) and select next
4. Type in text “Authorized Personnel Only!”
5. Select Graphic category Prohibition and select graphic.
6. Select Finish. The Label will display on the screen.
7. Select File from the top menu bar and select Export. Note: is not necessary to save the file first unless you want to use it in MarkWare or have it as a backup. The label will automati-cally export to the documents folder in the download directory as an *.lbl file. The path for the file is:
C:\Program Files\Brady\MarkWare3\Download\documents.
The path is important when you are using the File Management Utility when you want to send the file to the GlobalMark.

9
Templates
Figure 10 – Transfer Label *tpl Files To Printer Screen
Lets you transfer Template files residing on your PC to an attached printer via a communication cable. The order of the steps taken to perform the transfer should be as follows:
1. Select the Source File Type.
2. Select Templates from dropdown menu.
3. For first time users the default source path is C:\Program Files\Brady\MarkWare 3.*. If the proper Directory does not display you can type in the New Category to transfer the files or browse for it using the drop down menu. In this option for Templates the Templates folder would be selected.
4. Select the Destination from dropdown menu.
Note: The default directory is automatically selected and established when the source file is se-lected. For Templates it creates a My Templates folder. The File Management Utility automati-cally creates missing folders for you. For example, if your Destination is External and you select a Source File Type of Graphics, the FMU creates an External\Graphics\My Graphics folder for you.

10
Extension: *.tpl
It is recommended that all Template Files be transferred to either:
• \Internal\Applications\My Templates\Templates\General
• \External\Applications\My Templates\Templates\General
If you would like your own personalized category, you can create a New Category (in place of General) to place these files. It is very important that template files be placed in the Applica-tions\My Templates\Templates\ folder.
Example: You need to create a new category for your templates called “Sample Templates”. The following describes how you would do this:
1. Navigate to the Destination \Internal\Applications\My Templates\Templates.
2. Click New Category.
3. At the prompt type “Sample Templates.”
4. Double-click this folder and transfer your templates here.
If it is necessary to transfer an entire folder of Template Files, you can transfer the entire folder to either:
\Internal\Applications\My Templates\Templates
\External\Applications\My Templates\Templates
5. Select File(s) to be transferred.
6. Select Copy to start the transfer process
Copy is to be used for copying/transferring files from the Source to the Destination. The file will still reside on the Source, and the file will also reside on the Destination.
When the process completes, the status window displays. If the process fails, the operation failed message displays and one of the error messages displays:
• Insufficient Space—Displays if there is not enough memory within the destination to trans-fer the selected files.
• Loss of Communication—Displays if communication is lost between the attached printer and computer. You will need to exit the utility and follow the steps for connecting again.
• Verify Valid Destination—Displays if the entered file destination is incorrect. You will need to enter another destination for the files you have selected.
Note: Select Refresh to update the contents of the file directory structure as needed. (For exam-ple, use this button when you replace one CompactFlash Memory Card with another.)
Move and Delete are not active for this menu set. They are used only in the Manage Printer op-tion.

11
Note: The My Templates Directory will not display on the main screen of the GlobalMark’s Main Menu until the system is rebooted.
To access the templates choose My Templates and select the template from the menu.
Graphics
Figure 11 - Transfer Graphic Screen
Lets you transfer Graphic files residing on your PC to an attached printer via a communication cable. The order of the steps taken to perform the transfer should be as follows:
1. Select the Source File Type.
2. Select Graphics from dropdown menu.

12
3. For first time users the default source path is C:\Program Files\Brady\MarkWare 3.*. If the proper Directory does not display you can type in the New Category to transfer the files or browse for it using the drop down menu.
Compatible file extensions: *.bmp, *.wmf
It is recommended that all Graphic Files be transferred to either:
• \Internal\Graphics\My Graphics
• \External\Graphics\My Graphics
If you would like your own personalized category, you can create a New Category (in place of My Graphics) to place these files.
If it is necessary to transfer an entire folder of Graphic Files, you can transfer the entire folder to either:
\Internal\Graphics
\External\Graphics
4. Select the Destination from drop down menu
Note: The default directory is automatically selected and established when the source file is selected. The default directory for Graphics is Internal\Graphics. The File Management Utility automatically creates missing folders for you. For example, if your Destination is External and you select a Source File Type of Graphics, the FMU creates an External\Graphics\My Graphics folder for you.
5. Select File(s) to be transferred.
6. Select Copy to start the transfer process.
Use Copy is to be used for copying/transferring files from the Source to the Destination. The file will still reside on the Source, and the file will also reside on the Destination.
When the process completes, the status window displays. If the process fails, the operation failed message displays and one of the error messages displays:
• Insufficient Space—Displays if there is not enough memory within the destination to trans-fer the selected files.
• Loss of Communication—Displays if communication is lost between the attached printer and computer. You will need to exit the utility and follow the steps for connecting again.
• Verify Valid Destination—Displays if the entered file destination is incorrect. You will need to enter another destination for the files you have selected.
Note: Select Refresh to update the contents of the file directory structure as needed. (For exam-ple, use this button when you replace one CompactFlash Memory Card with another.)
Move and Delete are not active for this set. They are used only in the Manage Printer option.
Important! After transferring Files to the GlobalMark printer, you must restart the printer.

13
Fonts
Figure 12 - Transfer Fonts *ttf
Lets you transfer Font files residing on your PC to an attached printer via a communication cable. The order of the steps taken to perform the transfer should be as follows:
1. Select the Source File Type.
2. Select Fonts from drop down menu.
3. For first time users the default source path is C:\Program Files\Brady\MarkWare 3.*. If the proper Directory does not display you can type in the New Category to transfer the files or browse for it using the drop down menu. In this option for Fonts you must change the direc-tory to the C:\Windows\ Fonts or C:\ WINNT\Fonts directory depending on which Windows version the application is installed on.
4. Select the Destination from the drop down menu.
Font Files
Extension: *.ttf
Note: Typically Font Files are located on your computer in C:\WINDOWS\Fonts or C:\WIN NT\Fonts.It is recommended that all Font Files be transferred to either:• \Internal\Fonts• \External\Fonts

14
Note: The default directory is automatically selected and established when the source file is selected. For Fonts it displays Internal\Fonts folder. The File Management Utility automati-cally creates missing folders for you. For example, if your Destination is External and you select a Source File Type of Graphics, the FMU creates an External\Graphics\My Graphics folder for you. The factory fonts will not be displayed nor can they be removed from the system.
5. Select the font(s) to be copied
Please Note that font names in the directory will display abbreviated in the FMU. For questions and support related to fonts contact Technical Support @ 1-800-643-8766.
6. Select Copy to start the transfer process.
Copy is to be used for copying/transferring files from the Source to the Destination. The file will still reside on the Source, and the file will also reside on the Destination.
When the process completes, the status window displays. If the process fails, the operation failed message displays and one of the error messages displays:
• Insufficient Space—Displays if there is not enough memory within the destination to trans-fer the selected files.
• Loss of Communication—Displays if communication is lost between the attached printer and computer. You will need to exit the utility and follow the steps for connecting again.
• Verify Valid Destination—Displays if the entered file destination is incorrect. You will need to enter another destination for the files you have selected.
Note: Select Refresh to update the contents of the file directory structure as needed. (For exam-ple, use this button when you replace one CompactFlash Memory Card with another.)Move and Delete are not active for this set. They are used only in the Manage Printer option.Important! After transferring Files to the GlobalMark printer, you must restart the printer.
Text List Files
Extension: *.txt
\Internal\SavedList
\External\SavedList

15
Transfer Files from Printer
Figure 13– Main Screen Launch Transfer Files FROM Printer
Label Files
Figure 14. - Uploading Label Files
Lets you transfer Label files residing on the printer to an attached PC via a communication cable. The order of the steps taken to perform the transfer should be as follows:
1. Select the Source File Type
2. Select Label Files from drop down menu
3. For first time users the default source path is \Internal\Saved Files. If the proper Directory does not display you can type in the New Category to transfer the files or browse for it using the drop down menu. If an External card is used the path would need be changed to reflect External instead of Inter-nal.
4. Select the Destination from drop down menu
Note: The default directory is automatically selected and established when the source file is se-lected. The user can change this to another location if they so chose. For Label Files it automati-cally Defaults to C:\Program Files\Brady\MarkWare3.*\. From here chose Documents and select which folder for it to be placed in.
5. Select File(s) to be transferred.

16
6. Select Copy to start the transfer process
Copy is to be used for copying/transferring files from the Source to the Destination. The file will still reside on the Source, and the file will also reside on the Destination.
When the process completes, the status window displays. If the process fails, the operation failed message displays and one of the error messages displays:
• Insufficient Space—Displays if there is not enough memory within the destination to trans-fer the selected files.
• Loss of Communication—Displays if communication is lost between the attached printer and computer. You will need to exit the utility and follow the steps for connecting again.
• Verify Valid Destination—Displays if the entered file destination is incorrect. You will need to enter another destination for the files you have selected.
Note: Select Refresh to update the contents of the file directory structure as needed. (For exam-ple, use this button when you replace one CompactFlash Memory Card with another.)
Move and Delete are not active for this set. They are used only in the Manage Printer option.
Note: In order for Label Files from the printer to be opened in MarkWare The file type must be changed or renamed from *.lbl to *.mw. To do this Right click on the file after it has been trans-ferred and rename it with the new file name ending in .mw.
Templates
Figure 15 – Uploading Template Files

17
Lets you transfer Template files (Extension *.tpl) residing on your attached printer to a PC via a communication cable. The order of the steps taken to perform the transfer should be as follows:
1. Select the Source File Type
2. Select Templates from drop down menu
3. For first time users the default source path is \Internal\Applications\My Templates\Tem-plates\General. If the proper Directory does not display you can type in the New Category to transfer the files or browse for it using the drop down menu. If an External card is used the path would need be changed to reflect External instead of Internal.
4. Select the Destination from drop down menu
Note: The default directory is automatically selected and established when the source file is selected. The user can change this to another location if they so chose. For templates it auto-matically Defaults to C:\Program Files\Brady\MarkWare3.*\Templates. From here chose which folder you wish it to be placed.
5. Select File(s)
6. Select Copy to start the transfer process
Copy is to be used for copying/transferring files from the Source to the Destination. The file will still reside on the Source, and the file will also reside on the Destination.
When the process completes, the status window displays. If the process fails, the operation failed message displays and one of the error messages displays:
• Insufficient Space—Displays if there is not enough memory within the destination to trans-fer the selected files.
• Loss of Communication—Displays if communication is lost between the attached printer and computer. You will need to exit the utility and follow the steps for connecting again.
• Verify Valid Destination—Displays if the entered file destination is incorrect. You will need to enter another destination for the files you have selected.
Note: Select Refresh to update the contents of the file directory structure as needed. (For exam-ple, use this button when you replace one CompactFlash Memory Card with another.)
Move and Delete are not active for this set. They are used only in the Manage Printer option.

18
Manage Printer Files
Figure 16 – Manage printer files Screen

19
Figure 17 – Manage Printer Files Screen
Lets you copy, move, and delete files residing on the printer’s internal memory, or external stor-age card. The order of the steps taken to perform the transfer should be as follows:
1. Select the Source File Type
2. Select the Source from drop down menu
3. Type in the New Category to transfer the files (if necessary)
4. Select the Destination from drop down menu
Note: If you changed your Destination and would like the default folders to be automatically cre-ated for you, reselect your Source File Type.The File Management Utility automatically creates missing folders for you. For example, if your Destination is External and you select a Source File Type of Graphics, the FMU creates an External\Graphics\My Graphics folder for you.
5. Select File(s)
6. Select Copy to start the transfer process
• Copy is to be used for copying/transferring files from the Source to the Destination. The file will still reside on the Source, and the file will also reside on the Destination.
• Move is to be used for moving files from the Source to the Destination. The file will no longer reside on the Source, and will now reside only on the Destination.
• Delete is to be used for deleting files and/or folders from the Source or Destination. You will be prompted for verification before the deletion process is finalized. As soon as you ac-cept, your

20
file will no longer be available on your printer or computer unless you have a saved copy located in another location.
When the process completes, the status window displays. If the process fails, the operation failed message displays and one of the error messages displays:
• Insufficient Space—Displays if there is not enough memory within the destination to trans-fer the selected files.
• Loss of Communication—Displays if communication is lost between the attached printer and computer. You will need to exit the utility and follow the steps for connecting again.
• Verify Valid Destination—Displays if the entered file destination is incorrect. You will need to enter another destination for the files you have selected.
Note: Select Refresh to update the contents of the file directory structure as needed. (For exam-ple, use this button when you replace one CompactFlash Memory Card with another.)
Upgrade Printer Files
Figure 18 – Upgrade Printer Files Screen
Lets you upgrade files residing in the printer’s internal memory via a communication cable using your PC as the interface. These upgrade files will be automatically retrieved from a predefined ftp site.
When new operating systems for your GlobalMark are available, if you have access to a com-puter.

21
Upgrade Using the File Management Utility1. Place your GlobalMark online for transferring files.
2. After establishing a guest connection between your GlobalMark and computer, launch the File Management Utility on your computer.
3. Select Upgrade Printer Files.
4. Establish an Internet connection.
5. Select Upgrade from Internet.
6. Follow the Upgrade prompts.
7. After the upgrade is done, you will need to restart your GlobalMark printer.
8. If no upgrades are available the following will display.
Upgrade Using a CD-ROM1. Place your GlobalMark online for transferring files.
2. After establishing a guest connection between your GlobalMark and computer, launch the Upgrade Utility on the CD-ROM you received.
3. Follow the Upgrade prompts.
4. After the upgrade is done, you will need to restart your GlobalMark printer


![SCANNING TUTORIAL - PARSONS SSCE · SCANNING TUTORIAL. open EPSON scan utility on desktop. select Professional Mode. ... OptiTex Adobe Acrobat Distiller X] Adobe …](https://static.documents.pub/doc/80x56/5b7704017f8b9a515a8c24df/scanning-tutorial-parsons-ssce-scanning-tutorial-open-epson-scan-utility.jpg)


