TvHotPoint Pro User Manual This guide will walk you through the operational features of TvHotPoint server application, including how to register your TvHotPoint player, grouping of players, content upload, making and deploying playlists and overall administration of the setup. For more details please email to [email protected]www.TvHotPoint.com
Transcript
TvHotPoint
Pro User Manual
This guide will walk you through the operational features of TvHotPoint server application, including how to register your TvHotPoint player, grouping of players, content upload, making and deploying playlists and overall administration of the setup. For more details please email to [email protected]
www.TvHotPoint.com
Introduction
TvHotPoint is a lean digital signage player based on the IOT hardware. The complete TvHotPoint ecosystem has two components, viz the TvHotPoint player (hardware & the player software) and the TvHotPoint web application required to manage & administer the platform. (https://TvHotPoint.com)
Deploy to Groups 10 Scheduling Playlists 10 Group Settings 12
Monitor Players 13 Dashboard 14 piShell 14
Installation Settings 155
Reports 155
Hosted Service (TvHotPoint.com)
You can manage TvHotPoint players centrally using a browser by signing up at TvHotPoint.com. This is the recommended way to manage TvHotPoint players and offers many features that complement the player. In addition, hosted service offers various reports.
The work flow for displaying your content on TV is as follows.
1. Sign-up and select the installation name. Default group and playlist are created. 2. Create needed Groups. Players belonging to a group will have same playlists and
settings. 3. Register the players using their IDs displayed on TV. Give a name and select the
group while registering. 4. Under assets tab, using Add button, upload videos, images, html files or add
streaming/web links. 5. Create a playlist, select the layout and arrange assets with duration for play. 6. Under the group, select the playlists to play, schedule them if needed and Deploy.
Sign-up and create needed groups
To get started, create an account by selecting a username which is your installation name. Username is unique to you and all your player licenses are tied to this name. Select a valid email ID as all communication and licenses are mailed to this address. Once you sign -up, Please Contact your service provider or email to [email protected].
Players are assigned to groups. All players belonging to a group have the same settings and assigned the same list of playlists. Upon sign-up, "default" group is created automatically which can be used to assign players. You can create more groups if needed and assign players to these groups.
You can register a player in the players tab using "Register" button. Upon registration, player license is generated which will be downloaded to the player on next boot. You can register a player multiple times without losing any licenses or data.
Details on the screen
1. Enter the player ID displayed on the TV screen 2. Select "Managed" option 3. Select the group to which this player will belong 4. Change the time zone if needed 5. Give a name so that you can identify the player (e.g. Reception) 6. You could specify a city as the location(optional)
Note: If there are no licenses available when the player is registered, please register the player again to generate the license after licenses are bought.
The files (of type - video, image, pdf, html, templates, boot-up video etc.) which are to be shown in the player are to be uploaded first to the server. You can upload multiple files at a time in Assets tab using Add1 button.
The video files which are not in mp4(h.264) format are automatically converted to mp4 format by the server after upload. The server also processes image files for optimum display, extracts metadata, creates thumbnails and validates template files. You can select the categories for the file when the upload is complete.
In a similar way, the links which need to be shown on the player are added in Assets tab using Add1button. TvHotPoint player supports the following url types.
Streaming video and audio using RTSP, RTMP, Shoutcast, UDP YouTube links and other livestreaming links handled by livestreamer program Web Link - urls which are shown in html iframe element Web Page - urls shown in a separate browser window to take care of Cross Origin
Support Media RSS - Displays image and title of RSS feed Message - Display text message formatted by supplied CSS Google Calendar events
Uploaded assets can be renamed4 or deleted2 in Assets Tab. Also an asset can be viewed and categories can be assigned by clicking the asset name 6. Assets can be filtered and viewed based on a category by clicking Categories 5 button.
An asset can be assigned to multiple playlists at a time using Assign 3 button.
Create Playlists
Once the needed assets have been uploaded, playlists can be created at Playlists tab. Either select an already existing playlist or create a new playlist to edit the content.
Tip: You can duplicate an existing playlist and edit the new playlist to save time. Also there is a special playlist TV_OFF which switches off TV while scheduled to play.
Asset selection
Select the assets you want to add to the playlist using checkbox 2 on the right. The duration3 field specifies how long an asset need to be shown. It is pre -filled with video duration for video files and default value specified under Settings tab is used for other media types. Use minimum of 20 seconds for url loading time for streaming, media rss and weblinks.
You can drag7 and re-arrange the assets to decide the order of play. By clicking on the thumbnail6, you can have a quick view of the asset.
For layouts with multiple zones, zones are named as "main", "side", "bottom" (which could be on top as well!) and "zone4", "zone5" and "zone6". Select the "main" zone content in the list and add other zone content as mentioned in the same row 6,7. If main zone content to be shown in full-screen, select the checkbox 8 below the asset name.
Layouts
TvHotPoint comes with many pre-defined layouts with 1,2 or 3 zones to show different content. The layout and dimensions are shown in the layout popup. More detailed layout dimensions are given in the following image. The layouts ending with "p"(2ap,2bp, customp) are for 900 rotated portrait mode. Similarly the layouts ending with "p270"(2ap270,2bp270, customp270) are for 2700 rotated portrait mode. All the assets including video will be aligned to fit inside the zone.
In addition to the standard defined layout templates, custom templates can be uploaded and assigned per playlist. In addition to custom layout files, video position and size need to be defined in the layout popup 8,9. The top left is (0,0) for positioning purposes.
The custom_layout files needs to start "custom_layout" text and end with .html extension (e.g. custom_layout_menu.html). The template file is uploaded like other asset files. Examples of custom layouts are available at TvHotPoint repository.
A scrolling or sliding ticker can be added 4 at the bottom of the screen at playlist level or at group level. The style of the ticker like font-size, color etc. can be changed by specifying CSS attributes. The ticker can have static text message or RSS feed as input.
Advertisement Playlists
A playlist can be converted to advertisement playlist using popup 5. The assets of advert playlists are inserted at regular intervals one at a time. If the adverts need to appear only on non-main zones, select the option in the popup. The layout can be "1" or same as the
regular playlist playing. These playlists need to be added to the Group and they can be scheduled.
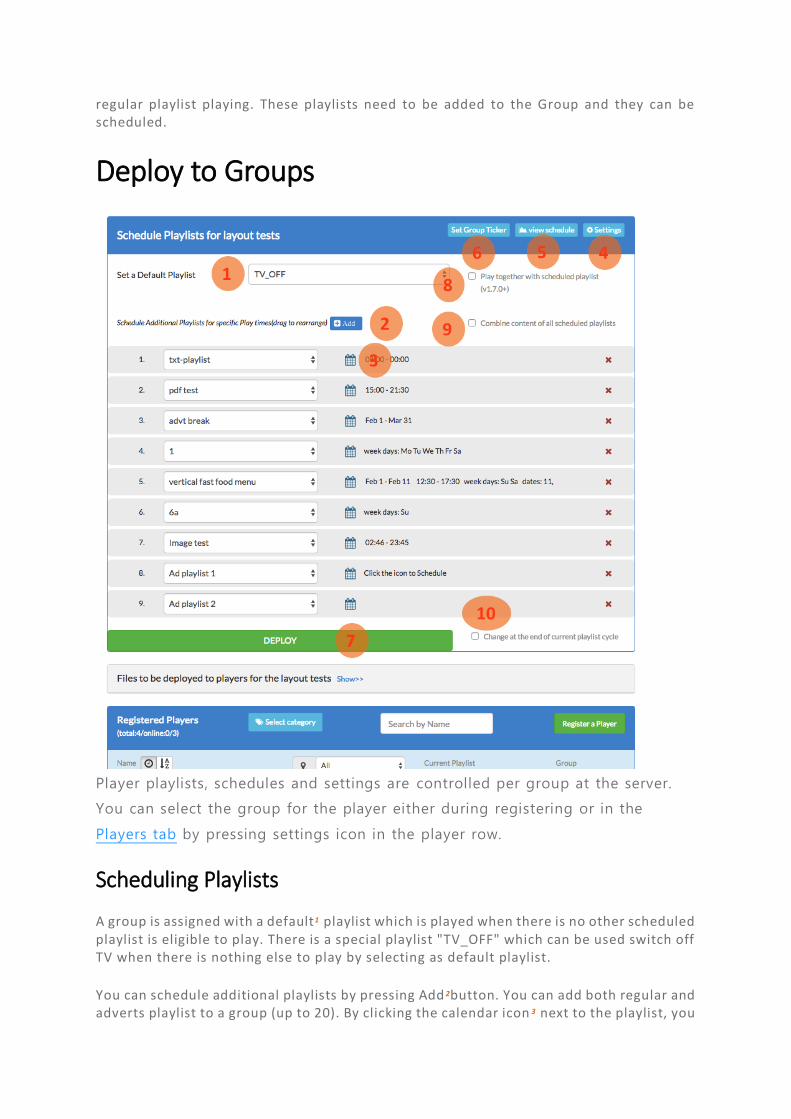
Deploy to Groups
Player playlists, schedules and settings are controlled per group at the server.
You can select the group for the player either during registering or in the
Players tab by pressing settings icon in the player row.
Scheduling Playlists
A group is assigned with a default1 playlist which is played when there is no other scheduled playlist is eligible to play. There is a special playlist "TV_OFF" which can be used switch off TV when there is nothing else to play by selecting as default playlist.
You can schedule additional playlists by pressing Add 2button. You can add both regular and adverts playlist to a group (up to 20). By clicking the calendar icon 3 next to the playlist, you
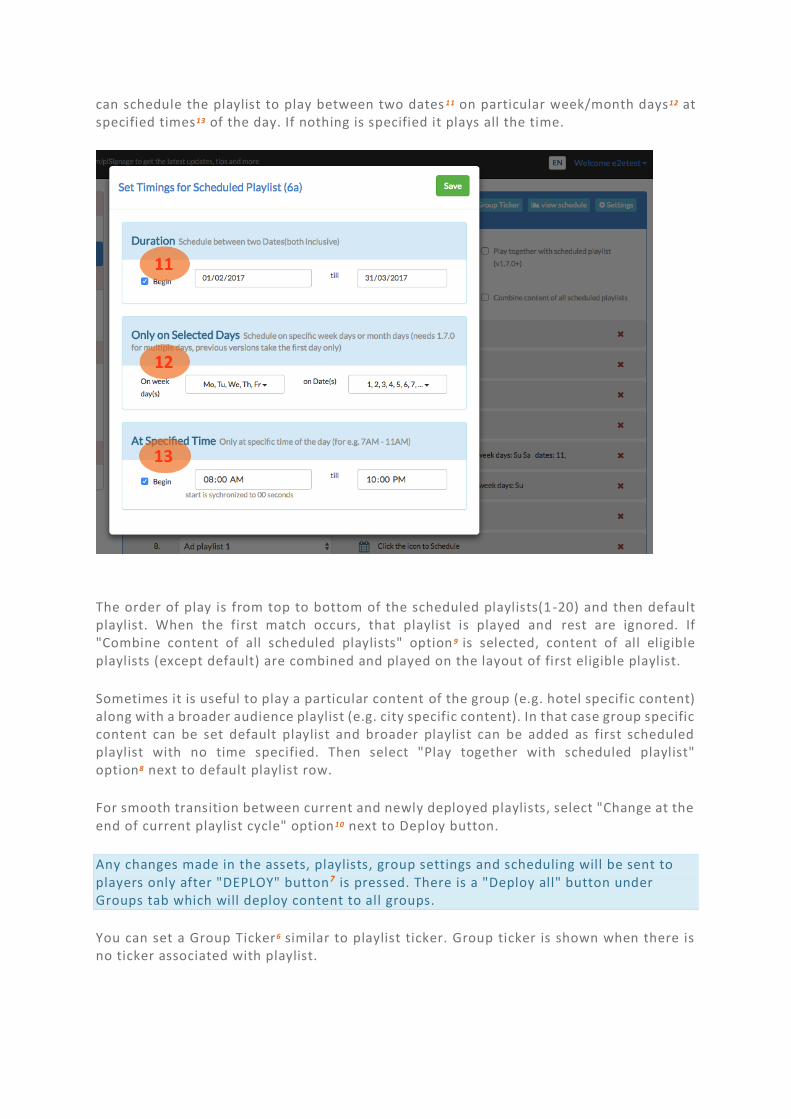
can schedule the playlist to play between two dates 11 on particular week/month days12 at specified times13 of the day. If nothing is specified it plays all the time.
The order of play is from top to bottom of the scheduled playlists(1 -20) and then default playlist. When the first match occurs, that playlist is played and rest are ignored. If "Combine content of all scheduled playlists" option 9 is selected, content of all eligible playlists (except default) are combined and played on the layout of first eligible playlist.
Sometimes it is useful to play a particular content of the group (e.g. hotel specific content) along with a broader audience playlist (e.g. city specific content). In that case group specific content can be set default playlist and broader playlist can be added as first scheduled playlist with no time specified. Then select "Play together with scheduled playlist" option8 next to default playlist row.
For smooth transition between current and newly deployed playlists, select "Change at the end of current playlist cycle" option 10 next to Deploy button.
Any changes made in the assets, playlists, group settings and scheduling will be sent to players only after "DEPLOY" button7 is pressed. There is a "Deploy all" button under Groups tab which will deploy content to all groups.
You can set a Group Ticker6 similar to playlist ticker. Group ticker is shown when there is no ticker associated with playlist.
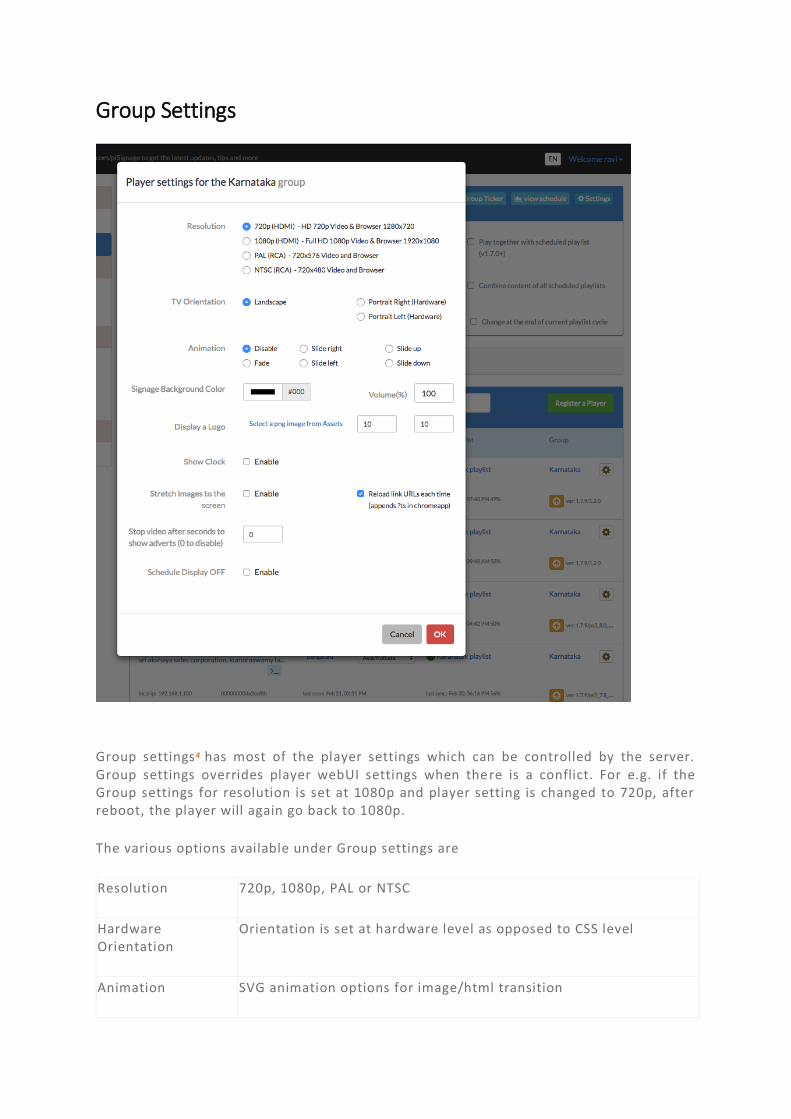
Group Settings
Group settings4 has most of the player settings which can be controlled by the server. Group settings overrides player webUI settings when there is a conflict. For e.g. if the Group settings for resolution is set at 1080p and player setting is changed to 720p, after reboot, the player will again go back to 1080p.
The various options available under Group settings are
Resolution 720p, 1080p, PAL or NTSC
Hardware Orientation
Orientation is set at hardware level as opposed to CSS level
Animation SVG animation options for image/html transition
Signage Background Color
You can change the color of the TV background (default black)
Volume Control Reduce the audio volume (default 100%)
Display a logo all the time
Add a png image of required size to assets and add here
Show Clock A 24 hour clock shown on the bottom right. Enable ticker to show the clock when video is playing.
Stretch images to the screen
Images which are not of screen aspect ratio or of lower resolution are stretched to occupy the full screen
Reload URLs each time
Instead of using the browser cache, load URL very time for urls like dashboard (adds timestamp as query parameter)
Stop video every xx seconds
Video pauses after set seconds so that adverts can be showed
Schedule Display OFF
Powers OFF and ON at set times every day, for finer control use TV_OFF playlist
Monitor Players
Dashboard
The Players tab is a dashboard where all players can be monitored and maintained. The player status (hover the mouse on status icon for more details), last seen, last data sync time, current playlist being played, group it belongs, software version and the location are shown for each player. Location and Time Zone can be changed if needed for the player.
The local IP address 4 for the player and the MAC address (click on IP address to see) are also shown.
Player name can be edited by clicking on the player name itself 3. Player name is shown in yellow if there is no license associated with it.
The player settings icon5 shows a popup screen where player group can be changed. If none option is selected, player can be managed individually. Players can be assigned categories like brand-name to categorize players.
When there is a software update available, a cloud icon 6 will appear next to software version. By clicking that release notes for the new release can be seen and the software can be upgraded to stable or beta version.
A new player can be registered using "Register a Player"1 button. If there is no player license available, you can register the player again to generate a license.
piShell
In case there is a need for player investigation, piShell can be used by pressing terminal(>_) icon2. The snapshot image will be taken and shown if the player is online, otherwise
previous snapshot will be shown. You can take a new snapshot by pressing "Take Snapshot" button.
Installation Settings
Installation level settings are available under Settings tab. Here you could
1. Add collaborators and set their access rights to different tabs. 2. Set user name and password for downloading content to players and webUI
access. 3. Default duration for playlist slides. 4. Custom logo and url to be shown as part of server UI 5. Hide system messages on the screen (e.g. Download in Progress message) 6. Delete the registered players (please write to us at support@ TvHotPoint.com for
license redemption).
Reports
Various reports can be viewed and downloaded at Reports tab. Reports can be generated for various durations and include
1. Monthly reports for Player, Files and Billing stats 2. Events 3. Files played stats 4. Player related stats
Various selection parameters are possible like player, duration for report generation.