Revised 10-006 Twinfire Operating and Installation Instructions Read this manual carefully and save the instructions. Models Basic Classic Elegance Pur Manufactured by: Specht Modulare Ofensysteme GmbH & Co. KG Bahnhofstraße 2 35116 Hatzfeld-Reddighausen DE T.+49 6452 92988-0 [email protected]www.xeoos.de Imported by: PO Box 120 Pound Ridge NY 10576 T.914-764-5679 F.914-764-0465 [email protected]www.wittus.com Tested and Listed by: OMNI-Test Laboratories, Inc. C US Portland Oregon USA
Transcript
Revised 10-006
Twinfire
Operating and Installation Instructions
Read this manual carefully and save the instructions.
Venting: Optional venting outlets top or back vent
Stove pipe: Basic Classic Elegance Pur
Diameter of the
stove pipe
6” (15cm) 6” (15cm) 6” (15cm) 6” (15cm)
Top vent – center of
pipe to stove back
8” (20cm) 8” (20cm) 8” (20cm) 8” (20cm)
Back vent – height
to center of pipe
43” (109cm) 47” (120cm) 45” (115cm) 45.5” (116cm)
Outside air supply: Diameter of the air supply
connector
4” (10cm)
Location of air supply outlet Under the lower firebox at the
center
Revised 10-006 Page 8 of 15
Clearances
The distances of the stove to combustible materials or walls are listed in the table below. These
are the minimum clearances for installation, and any reductions must first be approved by the
regulatory authority. Clearances to noncombustible materials are 2” (5cm), but note that “non-
combustible” must be solid cement or block (not brick or tile over combustible material).
BACK WALL ADJACENT WALL CEILING FLOOR PROTECTOR
** Rear/top vent options FRONT
MIMIMUM CLEARANCES FOR USA/CANADA
Models Basic/Classic/Elegance/Pur Clearances
A. SIDE WALL TO UNIT 15" (38 cm)
B. BACK WALL TO UNIT 13" (33 cm)
C. CORNER WALL TO UNIT 10" (25 cm)
D. SIDE WALL TO CONNECTOR 21" (53 cm)
E. BACK WALL TO CONNECTOR 18" (46 cm)
F. CORNER WALL TO CONNECTOR 19" (48 cm)
CEILING TO APPLIANCE 36" (91 cm)
CEILING TO PIPE 18" (46 cm)
** Not Tested - NFPA Guidelines in the USA, CAN/CSA B365-M91 in Canada Floor protection must be minimum 3/8-inch non-combustible material extending beneath the stove, and to the front and sides from door opening and to the rear as indicated.
Protection of the Floor
Floor protection for Canada: 18" (46 cm) from unit to front of floor protector. Floor protector
must be under connector pipe for a thru-the-wall configuration.
USE FLOOR PLATES UNDER THE STOVE MADE WITH NON-
COMBUSTIBLE FIRE-RESISTANT MATERIALS SUCH AS STEEL, TILE, OR
GLASS. BEFORE INSTALLATION, MAKE SURE THE FLOOR CAN CARRY
THE WEIGHT OF THE STOVE.
SID
E W
ALL
AD
JA
CE
NT
WA
LL
Revised 10-006 Page 9 of 15
Permitted Fuels
Only natural, air-dried firewood may be burned. Under no circumstances should rubbish, other
fuels, and treated or damp wood be burned.
NEVER BURN IMPREGNATED OR PAINTED WOOD, LAMINATED PLASTIC,
PLYWOOD, CHIPBOARD, GARBAGE, FLAMMABLE FLUIDS SUCH AS
GASOLINE, NAPHTHA, ENGINE OIL, REFUSE, MILK CARTONS, OR
PRINTED MATTER. USE OF SUCH MATERIALS WILL INVALIDATE YOUR
WARRANTY, AS THIS MAY EMIT TOXIC, CORROSIVE AND HAZARDOUS
FUMES WHEN BURNED. THEY MAY ALSO CAUSE A BUILD-UP OF THE
TOXIC GAS DIOXIN, WHICH IS DAMAGING TO THE STOVE AND THE
ENVIRONMENT.
We recommend that firewood with less than 20 % moisture
content be burned. Wood is an environmentally friendly and
widely available solid fuel. To ensure that the wood has a mois-
ture content of 20 % or less, store it under a roof or protected
against heavy rain for a year or two. Use of wood with greater
moisture content can cause soot and creosote in the pipe and
chimney. This can lead to chimney fires.
Combustion involves conversion of the fuel from solid form
into gases, water vapor, and charcoal. The heating value is an
expression of the content of combustible gases. All wood has
roughly the same heating value per kilogram. The lighter the
wood, the more that must be used to achieve the same heat
value as the heavier species of wood. Thus, preferred wood
types are maple, elm, beech, oak, and ash.
Initial Use
BEFORE STARTING UP THE STOVE, MAKE SURE TO REMOVE THE
PACKAGING MATERIAL.
Although the Twinfire is carefully cleaned and inspected several times, remainders of the sand
blasting or shavings of the Vermiculite plates in the fireplace can stay. We suggest before use
that you vacuum and wipe clean all surfaces with a soft, dry cloth to avoid baking on film or dust
particles. Please note also that the stove paint will harden during the first few initial fires. This
means that the stove may generate some smoke and an odor of paint, which will dissipate after
about an hour’s operation. It is a good idea to insure effective ventilation during this phase. Also,
avoid touching the stove during the curing process.
Wood type Heat value (kWh/kg)
maple, elm, willow 4.1
poplar, beech 4.2
oak, ash 4.2
birch 4.3
pine, fir 4.4
Revised 10-006 Page 10 of 15
Starting the Fire
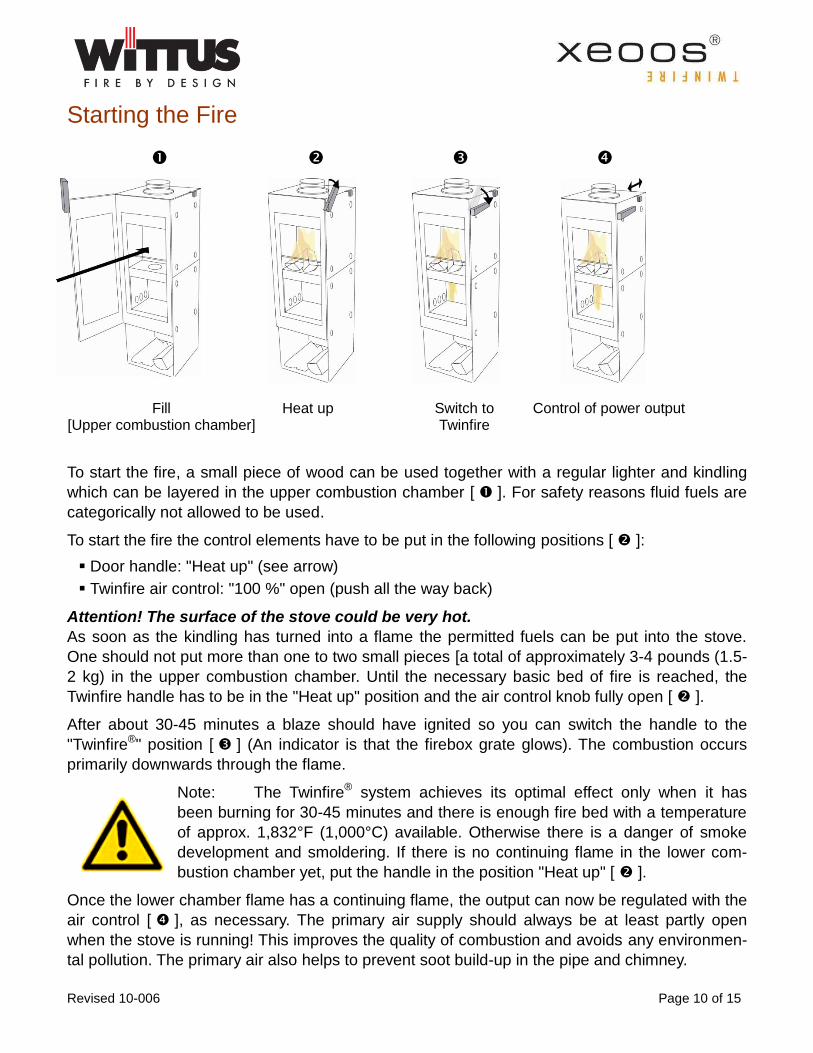
Fill Heat up Switch to Control of power output [Upper combustion chamber] Twinfire
To start the fire, a small piece of wood can be used together with a regular lighter and kindling
which can be layered in the upper combustion chamber [ ]. For safety reasons fluid fuels are
categorically not allowed to be used.
To start the fire the control elements have to be put in the following positions [ ]:
Door handle: "Heat up" (see arrow)
Twinfire air control: "100 %" open (push all the way back)
Attention! The surface of the stove could be very hot.
As soon as the kindling has turned into a flame the permitted fuels can be put into the stove.
One should not put more than one to two small pieces [a total of approximately 3-4 pounds (1.5-
2 kg) in the upper combustion chamber. Until the necessary basic bed of fire is reached, the
Twinfire handle has to be in the "Heat up" position and the air control knob fully open [ ].
After about 30-45 minutes a blaze should have ignited so you can switch the handle to the
"Twinfire®" position [ ] (An indicator is that the firebox grate glows). The combustion occurs
primarily downwards through the flame.
Note: The Twinfire® system achieves its optimal effect only when it has
been burning for 30-45 minutes and there is enough fire bed with a temperature
of approx. 1,832°F (1,000°C) available. Otherwise there is a danger of smoke
development and smoldering. If there is no continuing flame in the lower com-
bustion chamber yet, put the handle in the position "Heat up" [ ].
Once the lower chamber flame has a continuing flame, the output can now be regulated with the
air control [ ], as necessary. The primary air supply should always be at least partly open
when the stove is running! This improves the quality of combustion and avoids any environmen-
tal pollution. The primary air also helps to prevent soot build-up in the pipe and chimney.
Revised 10-006 Page 11 of 15
Operation
For continued operation, additional wood fuel should be added to the fire when the flames in the
upper combustion chamber have died down, but there are still enough hot coals available. Open
the door slowly to prevent the flames and ashes from falling out. When opening the door the
integrated door handle prevents the buildup of excessive smoke into the living space. The first
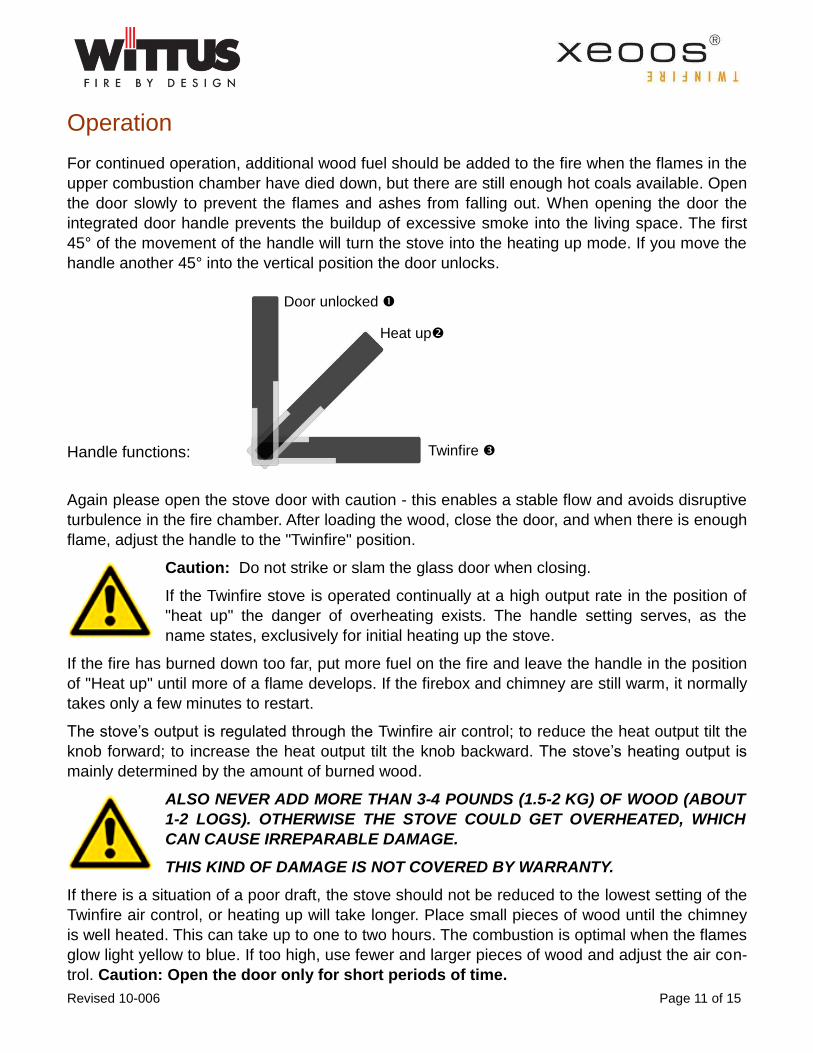
45° of the movement of the handle will turn the stove into the heating up mode. If you move the
handle another 45° into the vertical position the door unlocks.
Handle functions:
Again please open the stove door with caution - this enables a stable flow and avoids disruptive
turbulence in the fire chamber. After loading the wood, close the door, and when there is enough
flame, adjust the handle to the "Twinfire" position.
Caution: Do not strike or slam the glass door when closing.
If the Twinfire stove is operated continually at a high output rate in the position of
"heat up" the danger of overheating exists. The handle setting serves, as the
name states, exclusively for initial heating up the stove.
If the fire has burned down too far, put more fuel on the fire and leave the handle in the position
of "Heat up" until more of a flame develops. If the firebox and chimney are still warm, it normally
takes only a few minutes to restart.
The stove’s output is regulated through the Twinfire air control; to reduce the heat output tilt the
knob forward; to increase the heat output tilt the knob backward. The stove’s heating output is
mainly determined by the amount of burned wood.
ALSO NEVER ADD MORE THAN 3-4 POUNDS (1.5-2 KG) OF WOOD (ABOUT
1-2 LOGS). OTHERWISE THE STOVE COULD GET OVERHEATED, WHICH
CAN CAUSE IRREPARABLE DAMAGE.
THIS KIND OF DAMAGE IS NOT COVERED BY WARRANTY.
If there is a situation of a poor draft, the stove should not be reduced to the lowest setting of the
Twinfire air control, or heating up will take longer. Place small pieces of wood until the chimney
is well heated. This can take up to one to two hours. The combustion is optimal when the flames
glow light yellow to blue. If too high, use fewer and larger pieces of wood and adjust the air con-
trol. Caution: Open the door only for short periods of time.
Heat up
Door unlocked
Twinfire
Revised 10-006 Page 12 of 15
Shutdown and Restart
To shut down the stove, let the fire extinguish and leave the stove closed until it has cooled
down.
If the stove has not been in operation for an extended period, we recommend that you pre-heat
the stove and the chimney by burning a couple of sheets of newspaper first. This improves the
draft of the chimney during the heating up phase. Also insure that the chimney is free of dirt,
birds nest or anything else.
Creosote - Formation and Need for Removal - When wood is burned slowly, it produces tar and other organic vapors, which combine with expelled moisture to form creosote. The creosote vapors condense in the relatively cool chimney flue of a slow-burning fire. As a result, creosote residue accumulates on the flue lining. When ignited, this creosote makes an extremely hot fire. The chim-ney and chimney connector should be inspected at least once every two months during the heating season to determine if a creosote buildup has occurred. If creosote has accumulated, it should be removed to reduce the risk of a chimney fire.
Appropriate Usage
- The surface is hot while in operation. Keep children, clothing and furniture away. Con-tact with the hot surfaces may cause skin burns.
- Do not store solid fuel within space heater installation clearances or within the area for loading and ash removal.
- Never use gasoline, gasoline-type, lantern fuel, kerosene, charcoal lighter fluid, or similar liquids to start or ´freshen up` a fire in this stove. Keep all such liquids well way from the stove while it is in use.
- Do not place candles or other materials in or on the stove, which melt or burn at high temperatures (e.g. paper, plastics). The melted material cannot be removed and can cause permanent odors. Also, the burnt material could cause a house fire.
- DO NOT use a grate or andirons to elevate the fire – build it directly on the hearth.
- Burn a little at the time. Add fuel at regular intervals and run the stove over a period of several hours if possible. The stove should be observed during operation.
- The Twinfire stove is not suitable for cooking food.
- During room-air operation, the opening under the stove has to be free at all times. During operation with external air supply, insure that the air supply is always free and has not been cut off.
- The stove may not be opened with any tools or pokers.
- The ash pan needs to be emptied when the ash reaches the upper limits of the pan.
- Make no adjustments to the stove; otherwise the license and warranty are void.
- To replace broken or damaged parts, purchase authentic items through your dealer.
Revised 10-006 Page 13 of 15
Cleaning and Maintenance
Cleaning the Twinfire stove is periodically necessary. Efficient combustion and optimized air
through ducts can ensure the upkeep of your product. Insure that cleaning and maintenance
have been done correctly and be sure to inspect your fire chamber. Empty the ash pan regularly.
Empty Out Ash Pan
To remove the ashes first let stove cool down. Then open the combustion chamber door and pull
out ash pan. We recommend that you always leave a layer of ash approximately 1 inch (2 cm)
deep in the upper fire chamber, since this allows better combustion during the heating.
Disposal of Ashes - Ashes should be placed in a metal container with a tight fitting lid.
The closed container of ashes should be placed on a noncombustible floor or on
the ground, well away from all combustible materials, pending final disposal. If the
ashes are disposed of by burial in soil or otherwise locally dispersed, they should
be retained in the closed container until all cinders have thoroughly cooled.
Cleaning or Replacing the Glass Pane
The construction of the fire chamber glass makes it necessary to be cleaned after long usage or
when improper fuel is burnt. If there is soot build up, we recommend using a glass cleaner or dip
a damp paper towel into the cool ashes to clean the glass plate. Remember to clean the glass
ONLY when the stove is cold. If the glass breaks, it is necessary to replace the glass (use only
approved Twinfire glass and should be done by an approved professional) and gasket. First
carefully unscrew and remove the top and bottom brackets, remove the old and insert the new
glass and gasket, and replace the brackets.
Do not use any sharp articles or abrasive cleaners to clean the glass plate, in
order not to damage the glass. Do not use aggressive cleaning agents for
cleaning the glass plates, since sometimes they can cause damage to the
gasket around the plate.
Cleaning the Chimney and Baffle Plates
The chimney and basic servicing should be cleaned annually by a qualified Chimney
Sweep. The stove and baffle plates (vermiculite-plates) have to be removed cautiously to avoid
breakage. Also you can easily do the cleaning of the supply air openings in the upper combus-
tion chamber and the smoke gas openings in the lower combustion chamber yourself with a va-
cuum cleaner from time to time. Vacuum the port in the double bottom. Also clean the grate by
knocking off the carbon crusts.
Maintenance Activities
Door-hinges and locks need occasional care. As needed the brass bearing on the door handle
can be greased with heat-resistant graphite or Teflon-grease. Also, you can obtain spray cans
from your dealer to touch-up scratches in the paint.
Revised 10-006 Page 14 of 15
Troubleshooting: Causes and Their Repair
"Snap-Sounds"
This effect is normal for stoves. It arises from the expansion of metal pieces. The tensions which
occur with the heating up and cooling down between the different warm stove pieces adjust
themselves in this process.
Problem Cause Remedy
Wood catches fire very slowly or not at all
- none or too little combustion air
- logs are too thick
- wood is too moist
- blockage in grate
- completely open the air control and put the handle into position "heat up"
- use smaller diameter logs
- use drier wood
- jiggle grate with poker and remove debris
fire goes out or smolders
- none or too little combustion air
- logs are too thick
- wood is too moist
- chimney damper is closed
- completely open the air control and put the handle into position "heat up"
- use smaller diameter logs
- use drier wood
- open the damper in chimney
soot films on the glass plate
- draft of the chimney is too weak
- wood is too moist
- draft of the chimney is too strong
- primary air supply is incorrectly ad-justed
- stove is leaking
- fuel quantity is too small
- air baffle is not mounted properly
- adjust the damper (more open)
- use drier wood
- adjust the damper (more closed)
- adjust the air control system
- contact the dealer
- add fuel (more wood)
- mount the air baffle correctly
wood burns down too quickly
- draft of the chimney is too strong
- primary air supply is incorrectly adjusted
- logs are too small
- adjust the damper (more closed)
- reduce the primary air
- use greater diameter logs
smoke comes out into the room when the door is opened
- damper is closed
- chimney not the right size for the firebox
- other devices (e.g. exhaust fan) produces negative pressure in the area
- open the damper
- contact the dealer
- check other devices / contact the dealer
Revised 10-006 Page 15 of 15
Twinfire Replacement Parts
Vermiculite upper combustion chamber - 8 KW
Vermiculite lower combustion chamber - 8 kW Basic or Pur
Twinfire door glass
Twinfire gasket
High temperature glue for sealing
Twinfire grate
Teflon – lubricant
Spray paint can - anthracite, black, silver, gray
Top plate conversion kit - top vent à back vent (without a hole)
Top plate conversion kit - back vent à top vent (with a hole)
Twinfire Warranty
The Twinfire stoves are built to the highest quality standards. They come with a 5-year warranty,
which covers defects in materials or workmanship.
The warranty does not cover the following:
Incorrect installation of the stove (not according to the Operating and Installation Ma-
nual)
Rust or inappropriate treatment (such as scratches on the stove body, etc.)
Improper operating or mishandling of the stove
Normal wear of parts that are in contact with the fire, e.g. Vermiculite plates and door
gaskets
Costs of transport, assembly and disassembly, and glass breakage or cracks
Any structural changes to the Twinfire stove are not covered by warranty
Damage through the use of fuels which are not mentioned in the operating instruction
Use non-authentic spare parts that are designed for the Twinfire stove.
Use only authentic Twinfire stove spare parts, and contact the dealer with any warranty issues.