Release 2.8.2 tx Gradebook Texas Computer Cooperative 75 Assignment Grades The Assignment Grades page allows you to view and enter assignment grades for students by semester, cycle, and course section. You can view and enter grades for one assignment or all assignments, for one category or all categories, and for one student or all students. Assignments are color-coded according to your category selections on the Administer Categories page. You can enter comments and indicators for each assignment grade (e.g., excluded, late, and redo), and you can print grades by assignment. The page also allows you to accept transfer students into a course and enter a walk-in average for the transfer students. ■ For courses with percentage-based weighting, grades cannot be saved unless category weights are set up and total 100. ■ If the campus has disabled posting of grades for prior cycles, you cannot make changes to assignment grades for previous semesters/cycles. The Save Grades button is disabled. ■ If you have a large number of assignments for the current cycle, it is recommended that you avoid selecting All in the Assignments per Page field, as this can cause the page to load slowly. Notes: ■ For standards-based/skills-referenced courses, see the Assignment Grades (Standards- Based/Skills-Referenced) section of this chapter. ■ For elementary skills-based courses, see the Assignment Grades (Skills-Based) section of this chapter.
Transcript
Release 2.8.2 txGradebook
Texas Computer Cooperative 75
Assignment Grades
The Assignment Grades page allows you to view and enter assignment grades for students by semester, cycle, and course section. You can view and enter grades for one assignment or all assignments, for one category or all categories, and for one student or all students. Assignments are color-coded according to your category selections on the Administer Categories page.
You can enter comments and indicators for each assignment grade (e.g., excluded, late, and redo), and you can print grades by assignment. The page also allows you to accept transfer students into a course and enter a walk-in average for the transfer students.
■ For courses with percentage-based weighting, grades cannot be saved unless category weights are set up and total 100.
■ If the campus has disabled posting of grades for prior cycles, you cannot make changes to assignment grades for previous semesters/cycles. The Save Grades button is disabled.
■ If you have a large number of assignments for the current cycle, it is recommended that you avoid selecting All in the Assignments per Page field, as this can cause the page to load slowly.
Notes:
■ For standards-based/skills-referenced courses, see the Assignment Grades (Standards-Based/Skills-Referenced) section of this chapter.
■ For elementary skills-based courses, see the Assignment Grades (Skills-Based) section of this chapter.
txGradebook Release 2.8.2
76 Texas Computer Cooperative
Grades > Assignment Grades
To enter assignment grades:
1. To enter assignment grades, select the semester, cycle, and course section.
Notes:
● If you marked the course as ready to post on the Cycle Grades page, the message “[Ready]” is displayed in the Course Section drop-down list next to the course.
● If you have created course groups on the Course Grouping page, the groups are listed in the drop down as well as the individual courses. Any group that does not have courses associated with it is not listed in the drop down.
2. Click Retrieve Data.
Note: You only need to click Retrieve Data the first time you retrieve a course section. After the first time, the student list automatically reloads when you change the Semester, Cycle, or Course Section field.
3. Select one or more categories, assignments, or students. You can also type a due date to limit the assignments displayed to those that are due on or after that date.
The assignment grades table displays all students currently enrolled in the course section and the assignments, according to your selections. Students are sorted by last name, unless you have specified a custom sort order on the Arrange Student Order page.
● No Show students are not displayed.
Release 2.8.2 txGradebook
Texas Computer Cooperative 77
● (TxEIS only) The Star of Life icon is displayed for any student who has medical circumstances you should be aware of. To view details, click or the student ID. The Student Information page opens and displays relevant data in the Medical Alerts section.
4. Type the grades in the fields provided.
When you enter or change a grade, the table cell turns gray to indicate that the grade was changed but not yet saved. Once you save the assignment grades, the cell is not gray.
5. Before you leave the page, you must save the data. Any data that was changed since the last time you saved your grades is indicated by gray shading in the table cell.
● Type your PIN, and then click Save Grades.
● If your changes were saved successfully, the page reloads, and a message is displayed indicating that the grades were saved successfully.
Note: Be aware that you may have changed data that is not currently displayed on the page. All changes are saved, including those that are not visible on the page. For example, if you are currently viewing assignment grades for one student, but you previously entered grades for other students, the grades for all students are saved, regardless of what is displayed on the page at the time you save the data.
Notes about entering assignment grades:
■ You can click the student ID to view the student’s profile.
■ Withdrawn students are not automatically displayed. To see withdrawn students in the list, select Show withdrawn. Withdrawn students are displayed in a blue row, and the message “Withdrawn” and the withdrawal date are displayed by the student’s name. To hide withdrawn students, unselect Show withdrawn.
Note: The Show withdrawn field is disabled if you are viewing data for a course group. If any modifications are needed for a withdrawn student, please select the actual course the withdrawn student is in to make those changes.
■ If the course is set up to post alphabetical grades, the Show averages as alpha field is displayed. To display averages as alphabetical grades, select Show averages as alpha. To display the averages as numbers, clear the Show averages as alpha field.
For courses that use alphabetical grades, a cookie is set to remember the setting, and the page always displays averages according to the setting by default. Averages are also displayed on the Cycle Grades page. Courses that use numeric grades always display grades numerically.
■ If the course is set up for alphabetical or ESNU grade posting, you can enter letter grades or numeric grades. If you enter a letter grade, it is automatically converted to a numeric grade for calculating the working cycle average, according to the conversion values set by the campus.
■ The category for each assignment is displayed above the assignment description. The date due and total possible points are also displayed.
txGradebook Release 2.8.2
78 Texas Computer Cooperative
■ If you type an invalid grade, such as a letter grade that does not have a conversion value, the cell is shaded red. You must correct the entry before you can save the grades.
■ Only whole numbers can be entered for numeric grades.
■ Other codes can be entered in place of a grade:
● M - Missing
● I - Incomplete (If you type I for any grade, the student’s working cycle average will be I until a grade is entered.)
● X - Excluded (The X functions the same way as clicking the note icon and selecting Exclude from the Grade Properties dialog box.
Only one shortcut code can be entered.
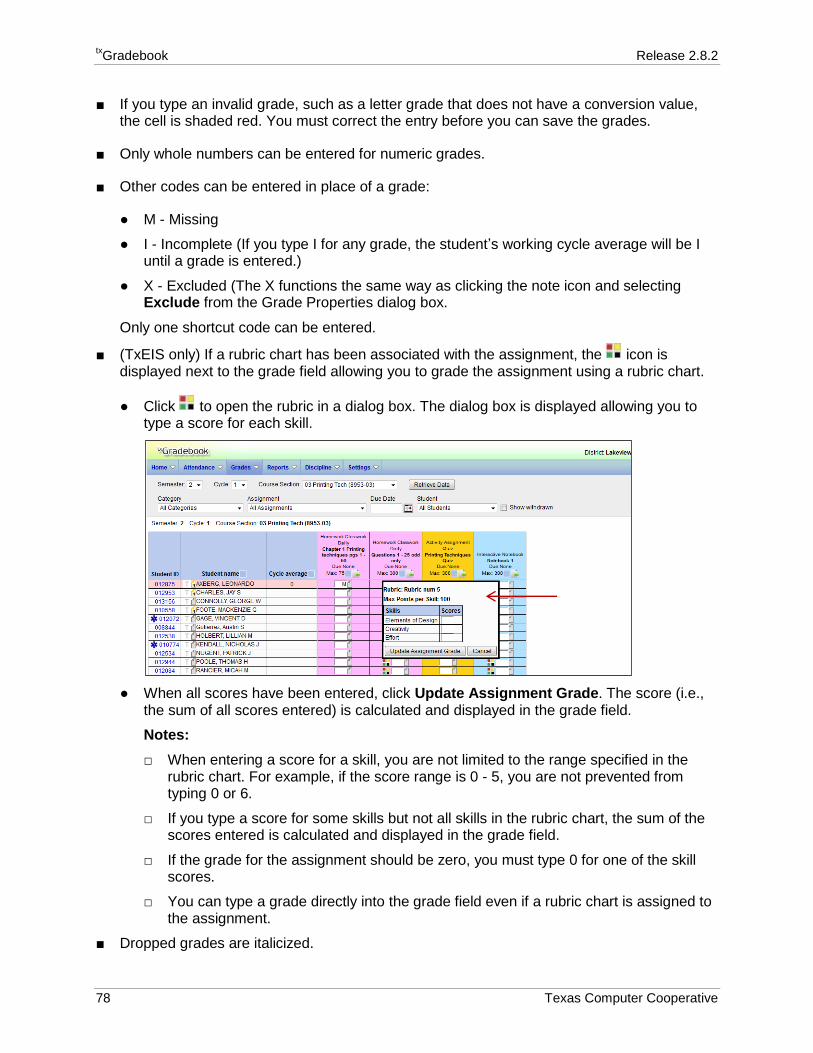
■ (TxEIS only) If a rubric chart has been associated with the assignment, the icon is displayed next to the grade field allowing you to grade the assignment using a rubric chart.
● Click to open the rubric in a dialog box. The dialog box is displayed allowing you to type a score for each skill.
● When all scores have been entered, click Update Assignment Grade. The score (i.e., the sum of all scores entered) is calculated and displayed in the grade field.
Notes:
□ When entering a score for a skill, you are not limited to the range specified in the rubric chart. For example, if the score range is 0 - 5, you are not prevented from typing 0 or 6.
□ If you type a score for some skills but not all skills in the rubric chart, the sum of the scores entered is calculated and displayed in the grade field.
□ If the grade for the assignment should be zero, you must type 0 for one of the skill scores.
□ You can type a grade directly into the grade field even if a rubric chart is assigned to the assignment.
■ Dropped grades are italicized.
Release 2.8.2 txGradebook
Texas Computer Cooperative 79
■ The Cycle average field displays the student’s working cycle average. The average is updated every time you access the page, click Calculate Averages, and/or save grades. If the student does not yet have a working cycle average, the field is blank.
The working cycle average is calculated according to the weighting selected on the Administer Categories page. The working cycle average is rounded to a whole number. If the decimal value is .5 or greater, the grade is rounded up.
If you use percentage-based categories, and you have a category that does not yet have grades (e.g., if it is early in the cycle and you have not administered any tests), the student’s working cycle average is calculated based on the percentages for the categories that have grades.
■ The Overall Averages (i.e., class averages) for the working cycle average and each assignment is displayed in the bottom row of the table. The overall averages are updated every time you click Calculate Averages and every time you save grades.
For more information on working cycle average calculations, view Appendix A - Calculating Averages at the end of this guide.
To add course-specific notes by student:
1. Click to add a course note about the student. The note icon is yellow if a course note already exists for the student. The Student Course Note dialog box opens allowing you to enter or update comments.
Note: These course-specific notes are not displayed to parents.
With no existing note(s):
With existing note:
txGradebook Release 2.8.2
80 Texas Computer Cooperative
The student’s name is displayed. Verify that you are adding/updating the note for the correct student.
2. Under Saved Notes, any notes that already exist for the student are listed. You can view all notes for courses to which you have access. The note category, author, and date last updated are displayed under Cat, Author, and Last Updated.
Note category codes:
● AT - Attendance
● DS - Discipline
● GN - General
● HL - Health
● SP - Supplies
3. Under Note, you can update an existing note. The note can have up to 3269 characters. You can only update a note if you created it.
4. To delete an existing note, select Delete for the note. When you click Ok and then save your changes, the note is deleted. You can only delete a note if you created it, or if you are the teacher of record for the course. For example, the teacher of record can delete a note entered by an assistant teacher for the course.
5. Under New Note, select the category code indicating what the new note is related to, such as AT for attendance.
6. In the text box, type the new note. You can type up to 3269 characters per note.
7. Click Save to save the changes and close the dialog box. Otherwise, click Cancel to close the dialog box without making the changes.
A report of course notes can be run from the Reports menu.
To add comments or indicators to an assignment:
1. To add comments or indicators (e.g., excluded, late, redo, or accommodated) associated
with an assignment, click next to the assignment grade. The Grade Properties dialog box opens allowing you to enter additional information about that student’s assignment.
Release 2.8.2 txGradebook
Texas Computer Cooperative 81
2. Select the appropriate indicator, and enter any comments.
If you want the indicators and/or comments to print on the student’s IPR and displayed in txConnect, select Print comment.
3. Click Ok.
● The following icons are displayed in the grid according to the comments/indicators entered:
□ Indicators:
○ - Excluded
○ - Late (not excluded)
○ - Redo (not excluded)
○ - Accommodated
□ Notes:
○ - Excluded with comments
○ - Late or redo with comments
○ - Comments only
○ - No comments
● If there is no grade for the assignment, it cannot be marked as late or redo.
● If you want the indicators and/or comments to print on the student’s IPR and display in the parent access Web site, txConnect, select Print comment.
● If the assignment grade is excluded (e.g., for a transfer student), the icon is displayed. The grade will continue to be displayed in the field.
Note: If an assignment is excluded for a student, and you have entered a number in the # Drop field on the Administer Categories page (indicating that you want to drop a specified number of assignments for a category), the assignment grade does not count toward the number that will be dropped. Only nonexcluded grades are dropped.
● If the assignment grade is marked as late or redo (but not excluded), the (late) or (redo) icon is displayed.
txGradebook Release 2.8.2
82 Texas Computer Cooperative
● If you mark an assignment as excluded, late, or redo, the note icon next to the grade changes to indicate that grade properties exist. You can click the note icon to change the grade properties.
□ If the assignment grade is marked as excluded, the icon is displayed.
□ If the assignment grade is marked as late or redo, the icon is displayed
□ If the assignment grade has comments but is not marked as excluded, late, or redo,
the icon is displayed.
Note: Your comments and/or selections are not actually saved until you type your PIN and click Save to save all data on the Assignment Grades page. When you click Ok, it only saves your notes until you save all data on the Assignment Grades page.
To mass enter grades:
To mass enter an assignment grade for all students, use the Fill button at the bottom of each assignment grade column.
■ If you entered grades for all students who have turned in the assignment, and want to enter zeros for all other students, type 0 in the Fill field, and then click the Fill button. All blank grade fields for the assignment are changed to 0.
■ To mass replace blank grades with a value (e.g., 100), type the grade in the Fill field, and then click the Fill button. All blank grades for the assignment are changed to the entered grade.
To mass exclude grades:
To mass exclude grades for an assignment for all students, click Exclude All at the bottom of the assignment grade column. The Exclude All button for the column turns red, and all indicator icons are red to indicate that the grade is excluded for the student. To override the exclusion for
a specific student, click , unselect Exclude, and then click Ok.
To mass delete grades:
To change all assignment grades to blanks, delete any data from the Fill field, and then click the Fill button. All grades for the assignment are changed to blank.
Transfer Students
If a student transfers into the course, you must accept the student into the course and enter his walk-in transfer average and weight. The campus, student ID, semester, and cycle must all be the same for the average to transfer.
Note: iTCCS users can transfer an average from another campus within the district if the student ID, course, semester, and cycle are all the same.
1. Beside each student’s name is the transfer icon (i.e., a gray T) indicating that he is not a
transfer student. If a student transfers into the class, the red transfer icon is displayed next to his name.
Release 2.8.2 txGradebook
Texas Computer Cooperative 83
To accept the transfer student into the course section, click the red transfer icon . The Transfer Walk-In Average dialog box opens.
2. The Date field displays the student’s transfer date by default. To enter a different date, type over the date in the MMDDYYYY format, or click to select a valid date from the calendar.
● If there is only one track for the campus displayed, the calendar is color-coded according to the track, and a legend is provided for the colors. If this is a multi-track campus, the calendar is color-coded for multiple tracks.
● If you enter an invalid date according to the calendar, an error message is displayed on the right side of the Date field. You must type or select a valid date.
● You cannot select a date outside the current calendar year. Valid school dates begin with the earliest meeting day for any track at the campus and end with the latest meeting day for any track at the campus.
● To close the calendar, you must click a valid date on the calendar or click the calendar icon.
3. In the From fields, the instructor name, course number, and section are displayed for the course from which the student transferred. This data is only displayed if the student transferred from a different section of the same course and has a transfer average.
4. In the Average field, the student’s transfer average is displayed if available. Otherwise, you can type the student’s walk-in average. This is the student’s average in the class from which he transferred. You can enter a numeric grade or an alphabetical (ABCD or ESNU) grade.
● If a student transferred from a course that posts letter grades to a course that posts numeric grades, and a letter grade is entered for his transfer average, the student’s working cycle average is displayed as a numeric grade.
● See the Transfer Students section of Appendix A - Calculating Averages page for an explanation of calculating averages for transfer students.
5. The Weight field displays a 0 for a transfer student who has not yet been accepted into the class. To accept the student into your class, type the weight you want to apply to the student’s transfer average. For example, if a student transferred three weeks into a six-week cycle, you may want to enter a weight of 50%. The maximum weight you can enter is 99.
Notes:
● The student’s transfer icon remains red until a weight is entered and saved.
● Once you have entered and saved a weight, the student’s transfer icon turns blue . The blue icon remains until the end of the semester.
txGradebook Release 2.8.2
84 Texas Computer Cooperative
● Any course assignments that were due prior to the student’s transfer date are excluded
for the student, and the icon is displayed for the assignments. You can override the exclusion if you want to have the transfer student complete an assignment that was due
prior to his transfer date. To override the exclusion, click , unselect Exclude, and then click Ok.
6. Click Ok to save the student’s transfer data.
If you entered and saved the transfer average data for the student, his walk-in average is calculated in his working cycle average.
To import assignment grades:
For campuses that use curriculum and test taking systems (e.g., eInstruction and Eduphoria),
you can click to import a data file that includes the student’s ID, assignment grade, first name, and last name. The icon appears in the column heading for each assignment.
Note: If the course has any withdrawn students, the import file has a record for the withdrawn students. Therefore, you must select Show withdrawn students on the Assignment Grades page to import the grade for the withdrawn students.
If you do not select Show withdrawn students, the import file will generate errors for the withdrawn students.
1. Click to import grades for the assignment. The Import Assignment Grades dialog box opens allowing you to upload the data file, review the data, and import the file.
Release 2.8.2 txGradebook
Texas Computer Cooperative 85
2. Under Step 1, click Browse to select the data file. The Choose File to Upload dialog box is displayed allowing you to select the file.
Locate the file, and then click Open. The file name is displayed.
Note: Only .csv and .txt files can be imported.
3. Click Upload File. When the upload is complete, the “Success” message is displayed indicating the name of the uploaded file.
4. Under Step 2, you can review the default file format and adjust the columns of your data, if necessary.
● Under Our Column, the default file format is listed. The format is determined according to the type of data found in the uploaded file. For example, a six-digit string of numbers is assumed to be the student ID, and a string of up to three characters is assumed to be an assignment grade.
There are four columns:
□ Student ID
□ Assign Grade
txGradebook Release 2.8.2
86 Texas Computer Cooperative
□ First Name
□ Last Name
● Under Your Column, you can make adjustments as needed. For example, if the default file format has the first name before the last name, and you want the last name before the first name, you can change the columns under Your Column accordingly (i.e., change column 3 to 4, and change column 4 to 3).
Note: The order of the first and last names is not important when uploading this file.
If you assign the same column number to more than one column, the message “duplicate” is displayed by the duplicated column. You must correct this before proceeding.
5. As you make any changes under Step 2, the data displayed under Step 3 changes accordingly. Review the data under Step 3 before importing the file.
● When the data under Step 3 is being refreshed, the message “validating” is displayed. Wait until the message goes away.
● If errors are encountered, the records with errors are displayed in red with a strikethrough. The number of errors found is listed below the grid. Errors may include mismatched or invalid data.
● The file can be imported even if errors exist (unless no valid records exist). The valid records are imported, and the invalid records are not imported.
6. When you are satisfied with the data under Step 3, click Import Now under Step 4. The data is imported, and the assignment grade fields on the Assignment Grades page are populated with data from the import file.
The Import File button is disabled if there are no valid records to import.
7. You can click Cancel at any time to close the dialog box without importing the data.
To print assignment grades:
From the Assignment Grades page, you can print grades for one assignment at a time. If one assignment is selected, the Print button is displayed on the page.
Note: Do not use the Print option in the browser’s File menu. Instead, always use the Print button on the page. The output generated by the Print button contains formatting to handle the features on the Assignment Grades page.
■ To print the assignment grades displayed on the page, click Print. The Print dialog box opens allowing you to select your printer and settings. Click Print to continue.
■ To print assignment grades for all assignments for the course, use the Assignment Grades Report. To access this report, select Assignment Grades Reports from the Reports menu. View the Assignment Grades Report Help page for information about the report.
Release 2.8.2 txGradebook
Texas Computer Cooperative 87
To navigate the page:
■ To temporarily hide the menu and selection options in order to see more students on the page, click Hide Menu. The logo, menu, and selection options disappear from the page. To make the information visible again, click Show Menu.
■ By default, the page displays only the first five assignments. Click in the Assignments per Page field to change the number of assignments displayed.
Note: If you have a large number of assignments for the current cycle, it is recommended that you avoid selecting All in the Assignments per Page field, as this can cause the page to load slowly.
■ If there are more assignments than can be displayed on the page, click Previous and Next to view the other assignments.
■ By default, the assignment grades table has its own scroll bars that work independently of the page. As data is added to the table, you may need to use the scroll bars to view the entire table. The independent scroll bars are displayed or not displayed according to your setting for the Use Independent Scroll Bars on Assignment Grades field on the Update Profile page. If the field is selected, the table will have vertical and horizontal scroll bars that are independent of the page scroll bars. Otherwise, the table will not have independent scroll bars, and you must use the page scroll bars if the data exceeds one screen.
Note: The independent scroll bars are not available on Apple mobile devices.
■ You can use the following keys to navigate the fields:
● Press ENTER after you enter each grade to move down the list to the next student. Press SHIFT+ENTER to move up the list. You can also press the up and down arrow keys to move up and down the list.
● Press TAB to move across the list to the next field. Press SHIFT+TAB to move back to the left.
■ Assignments are displayed left to right in ascending order by the due date. (If there is no due date, they are displayed by the date assigned. Otherwise, the date entered is used.) To change the assignment display order to descending, change the Sort Assignments by Date Due in ( Ascending Descending) order field to Descending.
To sort and rearrange columns:
The columns can be sorted and rearranged according to your preferences. An arrow indicates the column and order by which the table is currently sorted. If a column can be sorted,
a sort box is displayed in the column heading.
■ To resort the list by another column heading, click in the column heading. The column is
sorted in ascending order, as indicated by in the column heading. To sort the column in
descending order, click again. The sort arrow changes direction.
If you sort by the Last name column, the table actually sorts by last name, then first name. If you sort by the First name column, the table actually sorts by first name, then last name.
txGradebook Release 2.8.2
88 Texas Computer Cooperative
■ To rearrange the columns, click on the left side of the column you want to move, and drag the column to the desired location in the table. Before you drop the column in the new location, a red bar appears in the location in which it will drop.
■ For TxEIS users, this page is used for standards-based assignment grades.
■ For iTCCS users, this page is used for skills-referenced assignment grades.
The standards-based/skills-referenced Assignment Grades page is displayed if you select a course section that is using standards-based/skills-referenced grading. The page is automatically displayed instead of the regular Assignment Grades page. The page allows you to view and enter standards-based/skills-referenced scores for students by semester, cycle, and course section.
You can view and enter scores for one assignment or all assignments, for one standard/skill or all standards/skills, and for one student or all students. For each assignment, you can enter scores for all associated standards/skills. Final scores are converted into a standard 100%-based grade for the course.
Grades > Assignment Grades
The Assignment Grades (standards-based/skills-referenced) page is displayed if you retrieve a course that is set up to use the standards-based/skills-referenced assessment type. Otherwise, the regular Assignment Grades page is displayed.
Release 2.8.2 txGradebook
Texas Computer Cooperative 89
To enter scores:
1. To enter scores, select the semester, cycle, and course section.
Note: If you marked the course as ready to post on the Cycle Grades page, the message “[Ready]” is displayed in the Course Section drop-down list next to the course.
2. Click Retrieve Data.
If the course section is set up to use standards-based/skills-referenced grading, the standards-based/skills-referenced Assignment Grades page is displayed. Otherwise, the regular Assignment Grades page is displayed.
Note: You only need to click Retrieve Data the first time you retrieve a course section. After the first time, the student list automatically reloads when you change the Semester, Cycle, or Course Section field.
● The students and assignments are displayed according to your selections in the previous steps.
● If you change between a standards-based/skills-referenced course section and a category-based (i.e., regular) course section, the appropriate page loads.
txGradebook Release 2.8.2
90 Texas Computer Cooperative
● Students are sorted by last name, unless you have specified a custom sort order on the Arrange Student Order page.
● You can click to add a course note about the student. The note icon is yellow if a course note already exists for the student. The Student Course Note dialog box opens allowing you to enter or update comments.
□ The student’s name is displayed. Verify that you are adding/updating the note for the correct student.
□ Under Saved Notes, any notes that already exist for the student are listed. You can view all notes for courses to which you have access. The note category, author, and date last updated are displayed under Cat, Author, and Last Updated.
Note category codes:
AT - Attendance
DS - Discipline
GN - General
HL - Health
SP - Supplies
○ Under Note, you can update an existing note. The note can have up to 3269 characters. You can only update a note if you created it.
○ To delete an existing note, select Del for the note. When you click Ok and then save your changes, the note is deleted. You can only delete a course if you created it, or if you are the teacher of record for the course. For example, the teacher of record can delete a note entered by an assistant teacher for the course.
□ Under New Note, select the category code indicating what the new note is related to, such as AT for attendance.
In the text box, type the new note. You can type up to 3269 characters per note.
□ Click Save to save the changes and close the dialog box. Otherwise, click Cancel to close the dialog box without making the changes.
A report of course notes can be run from the Reports menu.
3. In the Standard/Skill field, select All Standards/All Skills to view all standards/skills associated with each assignment. Or, select a standard/skill to view data for only one standard/skill.
If you filter by a standard/skill, the following applies:
● If an assignment has multiple associated standards/skills, only the selected standard/skill is displayed under the assignment heading.
● If an assignment is not associated with the selected standard/skill, the assignment is not displayed in the table.
4. In the Assignment field, select the assignment for which you want to enter scores. You can select one assignment or all assignments.
Release 2.8.2 txGradebook
Texas Computer Cooperative 91
5. In the Due Date field, type a date (in the MMDDYYYY format) if you want to limit the assignments displayed to those that are due on or after that date. Or, click the calendar icon to select a valid date from the calendar. To close the calendar, you must click a valid date on the calendar.
6. In the Student field, select the student for whom you want to enter scores. You can select one student or all students.
7. The scores table displays all students currently enrolled in the course section and the assignments, according to your selections. Enter the scores in the fields provided.
● To temporarily hide the menu and selection options in order to see more students on the page, click Hide Menu. The logo, menu, and selection options disappear from the page. To make the information visible again, click Show Menu.
● By default, the page displays only the first two assignments. In the Assignments per Page field, you can change the number of assignments displayed.
● If there are more assignments than can be displayed on the page, click << Previous and Next >> to view the other assignments.
● By default, the scores table has its own scroll bars that work independently of the page. As data is added to the table, you may need to use the scroll bars to view the entire table. The independent scroll bars are displayed or not displayed according to your setting for the Use Independent Scroll Bars on Assignment Grades field on the Update Profile page. If the field is selected, the table will have vertical and horizontal scroll bars that are independent of the page scroll bars. Otherwise, the table will not have independent scroll bars, and you must use the page scroll bars if the data exceeds one screen.
Note: The independent scroll bars are not available on mobile devices.
● You can use the following keys to navigate the fields:
□ Press ENTER after you enter each score to move down the list to the next student. You can press SHIFT+ENTER to move up the list. You can also press the up and down arrow keys to move up and down the list.
□ Press TAB to move across the list to the next assignment. You can press SHIFT+TAB to move back to the left.
● The Student ID field displays the student’s ID. You can click the student ID to view the student’s profile.
● The Student name field displays the student’s name. You can click the student name to view the Student Assignment Grades: Standards-Based/Skills-Referenced page for the student, which displays the student’s specific score information. This page is described later in this chapter.
□ Withdrawn students are not automatically displayed. To see withdrawn students in the list, select Show withdrawn. Withdrawn students are displayed in a blue row, and the message “Withdrawn” and the withdrawal date are displayed by the student’s name. The withdrawal date may be the student’s withdrawal date from school or his withdrawal date from the class.
□ To hide withdrawn students, unselect Show withdrawn.
txGradebook Release 2.8.2
92 Texas Computer Cooperative
□ No Show students are not displayed.
● The Current Avg. field displays the overall score for the course section followed by the conversion grade (e.g., 3.6/90, where 3.6 is the student’s total score, and 90 is the student’s converted grade). The average is updated every time you access the page, click Calculate Averages, or save scores. If the student does not yet have a working cycle average, the field is blank.
The overall score displayed is the highest score between the score average and the power law average. If an override score exists, the override score is always displayed.
Note: For iTCCS users, the following applies:
□ A particular skillset may be excluded from grade calculations, based on a district-level option for the skillset. If a skillset has been excluded from grade calculation, any skill scores for the skillset will not be included in the student’s grade average; however, the grades will be displayed.
□ The campus has the option to specify a specific score to use for student grades in all courses that uses skills-referenced grading (Mode and average, Power Law and average, Mode and Power Law, or All). If the campus has specified a specific score, that score is used as the students’ average. If All is selected, the highest of the scores is used.
● When you enter or change a score, the table cell turns gray to indicate that the score was changed but not yet saved. Once you save the scores, the cell is not gray.
● Dropped scores are italicized.
● Assignments are displayed left to right in ascending order by the due date. (If there is no due date, they are displayed by the date assigned. Otherwise, the date entered is used.) To change the assignment display order to descending, change the Sort Assignments by Date Due in ( Ascending Descending) order field to Descending. Other codes can be entered for a score:
□ Only numeric scores can be entered. However, other codes can be entered for a score:
○ I - Incomplete
○ M - Missing
Note: For iTCCS districts, a campus-wide option determines how a grade of M is calculated in the student’s average:
The grade M may be set to equal zero when the student’s average is calculated. If a student receives a grade of M (0), the grade can be changed when the student completes the work.
If grade M is not set to equal 0 when the student’s average is calculated, the grade is bypassed.
□ The following codes can be entered as properties of the score entered:
○ L - Late
○ R - Redo
○ X - Excluded
Only one shortcut code can be entered.
Release 2.8.2 txGradebook
Texas Computer Cooperative 93
□ If you type one or more of these codes for a score, an icon is displayed when you click Save to indicate the properties associated with the score. The icon displays the code (I, L, M, R, or X).
Codes I and M can be updated with a numeric score as needed. However, you cannot remove codes L, R, and X from the score field Instead, you must open the Grade Properties dialog box from the Student Assignment Grades: Standards-Based/Skills-Referenced page, update the properties, and save the changes.
● To mass exclude scores for an assignment for all students, click Exclude All at the bottom of the assignment column. If you select Exclude All for the assignment, the entire assignment and all associated standards/skills are excluded. This is true even if you have filtered the page to view data for one standard/skill (i.e., selected a standard/skill in the Standard/Skill field).
● To mass enter a standard/skill score for all students, use the Fill button at the bottom of each assignment column.
□ To mass replace blank scores with a value, type the score in the field, and then click Fill. All blank scores for the skill are changed to the entered score.
□ To change all scores to blanks, delete any data from the field, and then click Fill. All scores for the standard/skill are changed to blank.
● The Overall Averages (i.e., class averages) for the current average and each assignment are displayed in the bottom row of the table. The overall averages are updated every time you click Calculate Averages and every time you save.
8. Before you leave the page, you must save the data. Any data that has changed since the last time you saved your scores is indicated by gray shading in the table cell.
Note: Be aware that you may have changed data that is not currently displayed on the page. All changes are saved, including those that are not visible on the page. For example, if you are currently viewing scores for one student, but you previously entered scores for other students, the scores for all students are saved, regardless of what is displayed on the page at the time you save the data.
● In the PIN field, type your four-digit PIN. The field is disabled for inquiry-only users.
● Click Save Grades.
□ If your changes were saved successfully, the page reloads, and a message is displayed indicating that the grades were saved successfully.
□ If you typed your PIN incorrectly, the system notifies you that you provided an invalid PIN. You must provide the correct PIN to continue.
● If you change any data on the page and then attempt to leave this page without saving the changes, a warning message is displayed. This includes attempting to change the Semester, Cycle, or Course Section fields before you save changes.
□ Click Continue to leave this page without saving your changes.
□ Click Cancel to return to the page and save your changes.
The Student Assignment Grades: Standards-Based/Skills-Referenced page allows you to view and enter a student’s scores in a particular course section for a semester/cycle.
To access the page:
You can access the page in either of the following ways:
■ Grades > Student Assignment Grades
■ Grades > Assignment Grades
● The standards-based/skills-referenced Assignment Grades page is displayed allowing you to select the course section for which you want to enter scores.
● Retrieve a standards-based/skills-referenced course, and then click a student’s name.
The Student Assignment Grades: Standards-Based/Skills-Referenced page is displayed allowing you to view and enter a student’s data.
1. If you arrived at the page from the standards-based/skills-referenced Assignment Grades page, the Semester, Cycle, Student, and Course Section fields are set to the values entered on the previous page. Otherwise, use the following fields to retrieve the semester, cycle, student, and course section:
Release 2.8.2 txGradebook
Texas Computer Cooperative 95
● The Semester field displays the current semester by default. You can select another semester.
● The Cycle field displays the current cycle by default. You can select another cycle.
● In the Student field, select the student.
● In the Course Section field, select the course section for which you want to enter scores. Only standards-based/skills-referenced courses are listed.
Note: If you marked the course as ready to post on the Cycle Grades page, the message “[READY]” is displayed in the Course Section drop-down list next to the course.
2. Click Retrieve Data. The following data is displayed:
● The student’s data for the semester/cycle is displayed; however, standards/skills and standard sets/skillsets are listed if they were part of any of the student’s assignment during the semester. For example, a standard/skill that was only assigned to an assignment in cycle 1 is displayed in the list for later cycles; however, the assignments and their related scores for previous cycles are not displayed.
● Each assignment for the semester/cycle is displayed in a column. If a standard/skill is assigned to the assignment during the cycle, an input field is displayed. Existing scores are displayed; otherwise, the field is blank. You can add or update the score fields.
The score must be within the range of the rubric grid, as defined by the district. You can enter whole numbers or a number with one decimal place (e.g., 3.5).
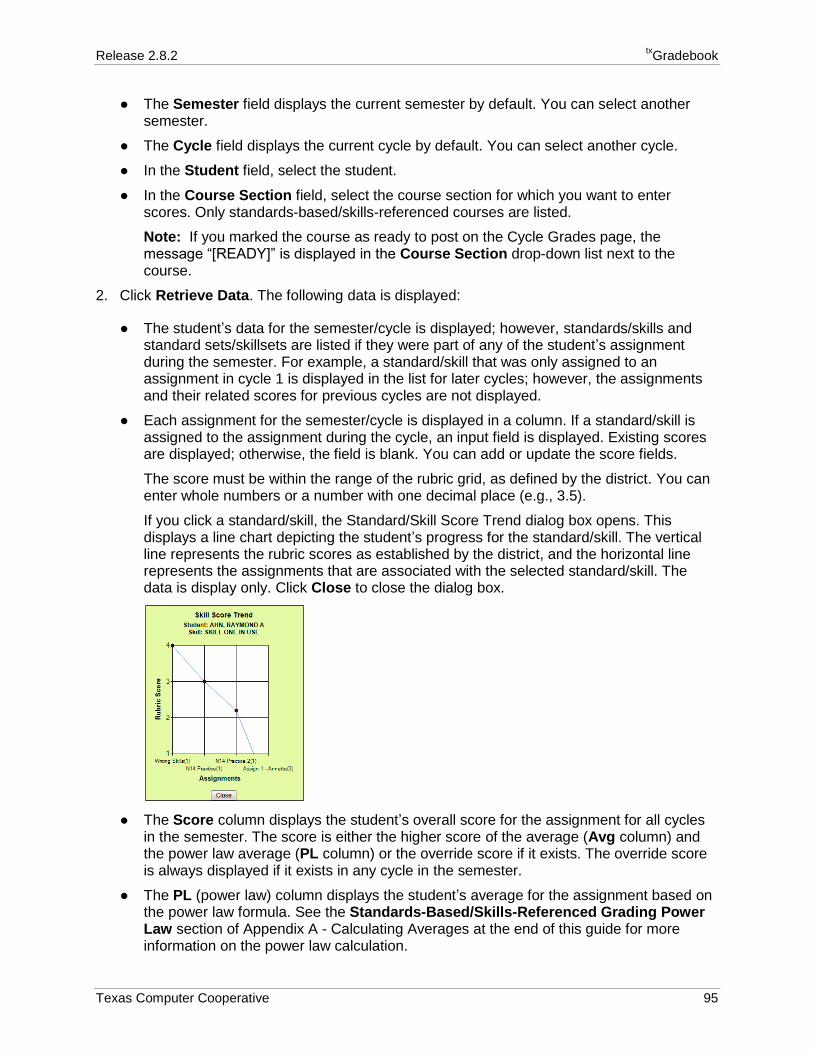
If you click a standard/skill, the Standard/Skill Score Trend dialog box opens. This displays a line chart depicting the student’s progress for the standard/skill. The vertical line represents the rubric scores as established by the district, and the horizontal line represents the assignments that are associated with the selected standard/skill. The data is display only. Click Close to close the dialog box.
● The Score column displays the student’s overall score for the assignment for all cycles in the semester. The score is either the higher score of the average (Avg column) and the power law average (PL column) or the override score if it exists. The override score is always displayed if it exists in any cycle in the semester.
● The PL (power law) column displays the student’s average for the assignment based on the power law formula. See the Standards-Based/Skills-Referenced Grading Power Law section of Appendix A - Calculating Averages at the end of this guide for more information on the power law calculation.
txGradebook Release 2.8.2
96 Texas Computer Cooperative
● The Avg column displays the student’s current average for the standard/skill, which is calculated by adding scores for all assignments associated with the standard/skill, and dividing by the number of assignments.
Note: The average displayed will reflect scores from all assignments associated with the standard/skill, including previous cycles in the semester. For example, if it is currently cycle 3 of the semester, and the standard/skill was associated with assignments in cycles 2 and 3, the average will reflect scores for the entire semester, even though only cycle 3 is displayed.
● The Mode column displays the mode if one exists. The mode is the skill score that appears most often for the semester to date. It is cumulative for the semester, not just the current cycle. There can be more than one mode.
Notes:
□ If two or more scores are tied for most number of occurrences (i.e., bi-modal or multi-modal), all are displayed.
□ If all scores occur the same number of times, there is no mode, and the column is blank.
Examples:
If the student’s skill scores for the semester are 1, 2, 4, 2, the mode is 2.
If the student’s skill scores for the semester are 1, 1, 3, 2, 4, 2, the mode is 1,2.
If the student’s skill scores for the semester are 1, 2, 3, 4, there is no mode.
To update data:
1. In the Override field, you can type an override score for the standard/skill. If an override score is entered, it overrides the scores in the PL and Avg columns, and it will always be displayed in the Score field.
● The override score must be within the range of the rubric grid, as defined by the district. You can enter whole numbers or a number with one decimal place (e.g., 3.5).
● If an override score was entered in a previous cycle in the semester, the score is carried over to the later cycles in the semester. However, if you enter an override score after cycle 1, it only applies to the current and later cycles for the semester.
Note: If you want to dismiss an override grade for the entire semester, it must be cleared in all cycles of the semester.
2. For each standard set/skillset, the Standard/Skill Set Score row displays the average of all overall standard/skill scores for each standard set/skillset.
● The average does not include scores of 0, unless a 0 exists in the rubric grid. It is rounded to one decimal place.
● This average is cumulative for all cycles in the semester.
3. The Total Score row at the bottom of the table displays the average of all Standard/Skill Set Scores.
Release 2.8.2 txGradebook
Texas Computer Cooperative 97
Note: For iTCCS users, the following applies:
● A particular skillset may be excluded from grade calculations, based on a district-level option for the skillset. If a skillset has been excluded from grade calculation, any skill scores for the skillset will not be included in the student’s grade average; however, the grades will be displayed.
● The campus has the option to specify a specific score to use for student grades in all courses that uses skills-referenced grading (Mode and average, Power Law and average, Mode and Power Law, or All). If the campus has specified a specific score, that score is used as the students’ average. If All is selected, the highest of the scores is used.
4. The Conversion Grade row at the bottom of the table displays the standard 100%-based grade, which is a conversion from the Total Score. The conversion scale is determined by the district in the Student system.
5. The averages are updated every time you access the page, click Calculate Averages, or save the scores.
6. To add comments or indicators associated with an assignment (e.g., excluded, late, redo, or
missing), click next to the assignment grade. The Grade Properties dialog box opens allowing you to enter additional information about the student’s assignment.
7. Enter comments and/or select the appropriate indicator(s), and then click Ok.
● If there is no grade for the assignment, it cannot be marked as late or redo.
● If you want the indicators and/or comments to print on the student’s IPR and display in the parent access Web site, txConnect, select Print comment.
● The following icons are displayed in the grid according to the comments/indicators entered:
□ Indicators:
○ - Excluded
○ - Late (not excluded)
○ - Redo (not excluded)
○ - Accommodated
○ - Incomplete
○ - Missing
□ Notes:
○ - Excluded with comments
○ - Late or redo with comments
○ - Comments only
○ - No comments
txGradebook Release 2.8.2
98 Texas Computer Cooperative
● If the assignment grade is excluded (e.g., for a transfer student), the icon is displayed. The grade will continue to be displayed in the field.
Note: If an assignment is excluded for a student, and you have entered a number in the # Drop field on the Administer Categories page (indicating that you want to drop a specified number of assignments for a category), the assignment grade does not count toward the number that will be dropped. Only nonexcluded grades are dropped.
● If the assignment grade is marked as late or redo (but not excluded), the (late) or (redo) icon is displayed.
● If any instructional accommodations were made for the student for the assignment, the (accommodated) icon is displayed.
● If the assignment is incomplete, the icon is displayed.
● If the assignment is missing, the icon is displayed.
● If you mark an assignment as excluded, late, or redo, the note icon next to the grade changes to indicate that grade properties exist. You can click the note icon to change the grade properties.
□ If the assignment grade is marked as excluded, the icon is displayed.
□ If the assignment grade is marked as late or redo, the icon is displayed.
□ If the assignment grade has comments but is not marked as excluded, late, or redo,
the icon is displayed.
Note: Your comments and/or selections are not actually saved until you type your PIN and click Save to save all data on this page. When you click Ok, it only saves your notes until you save all data on this page.
To view the comments or indicators for an assignment, click the icon. The Grade Properties dialog box opens and displays comments and indicators that were previously entered.
● Make any changes if necessary, and then click Ok.
● To close the Grade Properties dialog box without making changes, click Cancel.
8. Before you leave the page, you must save the data. Any data that has changed since the last time you saved your scores is indicated by gray shading in the table cell.
● In the PIN field, type your four-digit PIN. The field is disabled for inquiry-only users.
● Click Save Grades.
□ If your changes were saved successfully, the page reloads, and a message is displayed indicating that the grades were saved successfully.
□ If you typed your PIN incorrectly, the system notifies you that you provided an invalid PIN. You must provide the correct PIN to continue.
● If you change any data on the page and then attempt to leave this page without saving the changes, a warning message is displayed. This includes attempting to change the Semester, Cycle, Student, or Course Section fields before you save changes.
□ Click Continue to leave this page without saving your changes.
□ Click Cancel to return to the page and save your changes.
Release 2.8.2 txGradebook
Texas Computer Cooperative 99
9. You can change the Semester, Cycle, Student, and Course Section fields to retrieve data for another semester/cycle and student.
10. Click Back to the Assignment Grades to return to the standards-based/skills-referenced Assignment Grades page.
Elementary Skills-Based Courses
Assignment Grades (Skills-Based)
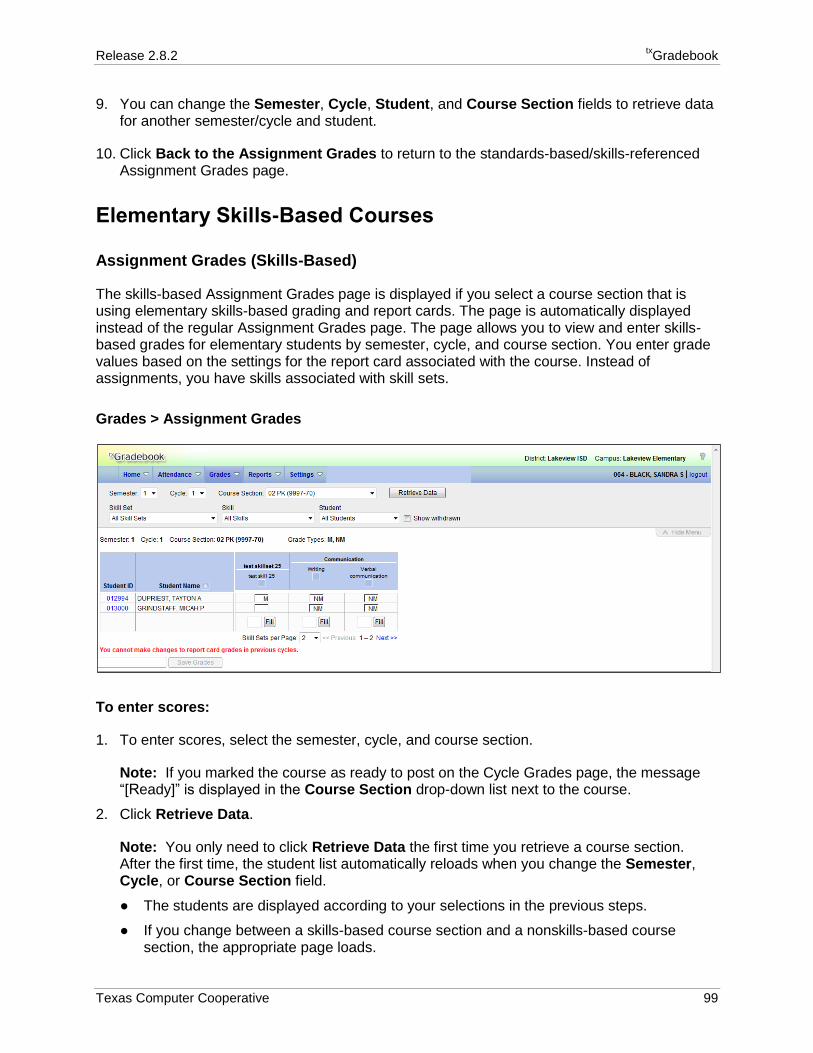
The skills-based Assignment Grades page is displayed if you select a course section that is using elementary skills-based grading and report cards. The page is automatically displayed instead of the regular Assignment Grades page. The page allows you to view and enter skills-based grades for elementary students by semester, cycle, and course section. You enter grade values based on the settings for the report card associated with the course. Instead of assignments, you have skills associated with skill sets.
Grades > Assignment Grades
To enter scores:
1. To enter scores, select the semester, cycle, and course section.
Note: If you marked the course as ready to post on the Cycle Grades page, the message “[Ready]” is displayed in the Course Section drop-down list next to the course.
2. Click Retrieve Data.
Note: You only need to click Retrieve Data the first time you retrieve a course section. After the first time, the student list automatically reloads when you change the Semester, Cycle, or Course Section field.
● The students are displayed according to your selections in the previous steps.
● If you change between a skills-based course section and a nonskills-based course section, the appropriate page loads.
txGradebook Release 2.8.2
100 Texas Computer Cooperative
● Students are sorted by last name, unless you have specified a custom sort order on the Arrange Student Order page.
3. In the Skill Set field, select All Skill Sets to view all skill sets associated with the course. Or, select a skill set to view data for only one skill set.
4. In the Skill field, select All Skills to view all skills associated with the selected skill set. Or, select a skill to view data for only one skill.
If you filter by a skill, the following applies:
● If a skill set has multiple associated skills, only the selected skill is displayed under the skill set heading.
● If a skill set is not associated with the selected skill, the skill set is not displayed in the table.
5. In the Student field, select the student for whom you want to enter grades. You can select one student or all students.
6. The grades table displays all students currently enrolled in the course section and the skill sets and skills, according to your selections. Enter the grades in the fields provided.
● To temporarily hide the menu and selection options in order to see more students on the page, click Hide Menu. The logo, menu, and selection options disappear from the page. To make the information visible again, click Show Menu.
● If you move the cursor over a skill in the grade table heading, the skill description and any notes entered by an administrator are displayed.
● The Grade Types field indicates the grading type set up for the report card that has been associated with the course. If you move the cursor over the field, a description of the grading type is displayed if it has been set up by an administrator.
● By default, the page displays only the first two skill sets. In the Skill Sets per Page field, you can change the number of skill sets displayed.
● If there are more skills than can be displayed on the page, click << Previous and Next >> to view the other skills.
● By default, the grade table has its own scroll bars that work independently of the page. As data is added to the table, you may need to use the scroll bars to view the entire table. The independent scroll bars are displayed or not displayed according to your setting for the Use Independent Scroll Bars on Assignment Grades field on the Update Profile page. If the field is selected, the table will have vertical and horizontal scroll bars that are independent of the page scroll bars. Otherwise, the table will not have independent scroll bars, and you must use the page scroll bars if the data exceeds one screen.
Note: The independent scroll bars are not available on mobile devices.
● You can use the following keys to navigate the fields:
□ Press ENTER after you enter each grade to move down the list to the next student. You can press SHIFT+ENTER to move up the list. You can also press the up and down arrow keys to move up and down the list.
Release 2.8.2 txGradebook
Texas Computer Cooperative 101
□ Press TAB to move across the list to the next skill. You can press SHIFT+TAB to move back to the left.
● The Student ID field displays the student’s ID. You can click the student ID to view the student’s profile.
● The Student Name field displays the student’s name.
□ The Star of Life icon is displayed for any student who has medical circumstances
you should be aware of. To view details, click or the student ID. The student’s profile page opens and displays relevant data in the Medical Alerts section. This feature is available for TxEIS districts only.
□ Withdrawn students are not automatically displayed. To see withdrawn students in the list, select Show withdrawn. Withdrawn students are displayed in a blue row, and the message “Withdrawn” and the withdrawal date are displayed by the student’s name. The withdrawal date may be the student’s withdrawal date from school or his withdrawal date from the class.
□ To hide withdrawn students, unselect Show withdrawn.
□ No Show students are not displayed.
● Dropped grades are italicized.
● To mass enter a skill grade for all students, use the Fill button at the bottom of each skill column.
□ To mass replace blank grades with a value, type the grade in the field, and then click Fill. All blank grades for the skill are changed to the entered grade.
□ To change all grades to blanks, delete any data from the field, and then click Fill. All grades for the skill are changed to blank.
7. Before you leave the page, you must save the data.
Note: Be aware that you may have changed data that is not currently displayed on the page. All changes are saved, including those that are not visible on the page. For example, if you are currently viewing grades for one student, but you previously entered grades for other students, the grades for all students are saved, regardless of what is displayed on the page at the time you save the data.
● In the PIN field, type your four-digit PIN. The field is disabled for inquiry-only users.
● Click Save Grades.
□ If your changes were saved successfully, the page reloads, and a message is displayed indicating that the grades were saved successfully.
□ If you typed your PIN incorrectly, the system notifies you that you provided an invalid PIN. You must provide the correct PIN to continue.
● If you change any data on the page and then attempt to leave this page without saving the changes, a warning message is displayed. This includes attempting to change the Semester, Cycle, or Course Section fields before you save changes.
□ Click Continue to leave this page without saving your changes.
□ Click Cancel to return to the page and save your changes.
txGradebook Release 2.8.2
102 Texas Computer Cooperative
Elementary Letter Skills
The Elementary Letter Skills page allows you to assess whether the student has achieved certain skills related to alphabet letters. This page is only available if the letter skills grid has been selected for inclusion on the report card on the Admin Skills-Based Report Card Setup - Step 1 page.
Grades > Elementary Report Cards > Elementary Letter Skills
To assess a student’s letter skills:
1. In the Course Section field, select the course section for which you want to assess a student.
2. In the Student field, select a student in the selected course.
The student’s name is displayed.
3. Under each letter, select the skill (such as Lowercase) if the selected student has achieved this skill for the letter. You can select Select All if the student has achieved the skill for all letters.
Note: Administrative users can add additional skills by editing the Letters skill set on the txGradebook > Admin > Elementary Skills-Based Setup page.
4. Before you leave the page, you must save the data.
● In the PIN field, type your four-digit PIN.
● Click Save Grades.
□ If your changes were saved successfully, a message is displayed indicating that the skills were saved successfully.
□ If you typed your PIN incorrectly, the system notifies you that you provided an invalid PIN. You must provide the correct PIN before you can continue.
Release 2.8.2 txGradebook
Texas Computer Cooperative 103
Elementary Number Skills
The Elementary Number Skills page allows you to assess whether the student has achieved certain skills related to numbers. This page is only available if the number skills grid has been selected for inclusion on the report card on the Admin Skills-Based Report Card Setup - Step 1 page.
Note: Number skills are a cumulative assessment; they are not stored by semester/cycle.
Grades > Elementary Report Cards > Elementary Number Skills
To assess a student’s number skills:
1. In the Course Section field, select the course section for which you want to assess a student.
2. In the Student field, select a student in the selected course.
The student’s name is displayed.
3. Under each number, select the skill (such as Counts to) if the selected student has achieved this skill for the number. You can select Select All if the student has achieved the skill for all displayed numbers.
Note: Administrative users can add additional skills by editing the Numbers skill set on the txGradebook > Admin > Elementary Skills-Based Setup page.
4. Before you leave the page, you must save the data.
● In the PIN field, type your four-digit PIN.
● Click Save Grades.
□ If your changes were saved successfully, a message is displayed indicating that the skills were saved successfully.
□ If you typed your PIN incorrectly, the system notifies you that you provided an invalid PIN. You must provide the correct PIN before you can continue.