U-Boot and Linux Kernel Debug using CCSv5 In this session we will cover fundamentals necessary to use CCSv5 and a JTAG to debug a TI SDK-based U-Boot and Linux kernel on an EVM platform. July 2012 LAB: http://processors.wiki.ti.com/index.php/Sitara_Linux_Trainin g
Transcript
U-Boot and Linux Kernel Debug using CCSv5
In this session we will cover fundamentals necessary to use CCSv5 and a JTAG to debug a TI SDK-based U-Boot and Linux kernel on an EVM platform.
• JTAG use requires a License– The XDS100v2 can be used without a license– You can use a free 90 day evaluation license for all other emulators
• To get JTAG support the CCS installer needs to be run in root mode using “sudo”
8
EXAMPLE DEVELOPMENT ENVIRONMENT
9
Example AM335x EVM Debug Environment
• Ubuntu 10.04 LTS
• Sitara Linux SDK
• CCSv5.1
• XDS560v2 USB JTAG
• Serial Console
• Ethernet
• SD Card – MLO/U-Boot Pre-builts– Root File System installed
10
AM335x Image Load Addresses
• These addresses are related to the AM335x, other processors will have different addresses, please refer to respective TRMs. The Addresses here are pulled from the AM335x TRM.
11
U-BOOT DEBUG OVERVIEW
12
U-Boot Debug Overview
• Familiarize yourself with the u-boot load address. This can be found in the configuration file (i.e. include/configs/am335x_evm.h) and look for the following variables:– For SPL - CONFIG_SPL_TEXT_BASE– For U-boot - CONFIG_SYS_TEXT_BASE
• Define a CCS project and point to the source tree within the SDK– This will take a couple minutes since CCS will index the u-boot source tree
• Create a target configuration (can specify a gel file)
• Power on the EVM with no SD card installed
• Launch the target configuration
• From CCS connect to the Target, this suspends the target
13
U-Boot Debug Overview - Cont.
• Switch from THUMB2 to ARM mode
• Load the SPL image– Load the binary (bin) image if you are not debugging the SPL on the
persistent storage– If using persistent storage you do not need to load anything
• Load the U-Boot information– Load the ELF image if you are not debugging the u-boot on the persistent
storage (i.e. SD card or NAND)– Load the symbols only if you are using the u-boot from the persistent
storage
• Navigate Source Code and set desired HW Break Point
14
U-Boot Debug Overview - Cont.
• Depending on how code was loaded:– Start target execution from the U-boot load address if your loaded the ELF
image– Perform system reset from CCS if you loaded the symbold for u-boot in the
persistent storage
• These steps will be performed in the Debug Lab and will emphasize that how U-Boot is loaded matters (i.e. whether in SPL context or not)
15
U-BOOT DEBUG LAB
16
U-Boot Debug Lab Overview
• Have to build U-Boot to get an binary SPL and ELF U-Boot image to work with
• Load the SPL which has some knowledge that is needed beforehand
• Halt the SPL to allow loading U-Boot
• Load the U-Boot ELF image
• Open the source browser and set a HW break point
• Run the U-Boot binary and you will hit the HW break point
17
U-Boot Build (Refresher)
• To get an image with Debug Information in it you have to build U-Boot, which is already configured to build with Debug information in it.
18
• Start with clean configuration
• Configure for EVM
• Build for EVM
• U-Boot ELF Image
Changing from Thumb2 to ARM Mode
• ROM Code runs in Thumb2 mode, after loading the SPL binary image and the PC is set to the entry point of SPL, the processor must be set to ARM mode. The reason this has to be done is the ROM code is not being used to jump from ROM to SPL and therefore the BX instruction that the ROM uses to jump to SPL and change the execution mode is not being used.
19
KERNEL DEBUG OVERVIEW
20
Linux Kernel Debug Steps using CCS
• Define a CCS project and point to the source tree within the SDK– This will take several minutes since CCS will index the kernel source tree
• Create a target configuration
• Power on the EVM with an SD card installed that contains MLO and U-Boot, press any key to stop the auto-boot into Linux
• Launch the target configuration
• From CCS connect to the Target, this suspends the target
• Build the Linux kernel to generate the images needed (vmlinux and uImage)
• Copy the arch/arm/boot/uImage image to the tftpboot directory
21
Linux Kernel Debug Steps using CCS (cont)• Load the vmlinux symbols (no code), and now navigate kernel source
and set desired HW Break Point
• From CCS resume target execution
• From the serial console type “boot” to tftp the kernel image and start execution.
• The breakpoint will now be hit if it was set on code that will be executed
• This will be performed in the Lab accompanying this lecture.
22
What expected in a Linux Kernel Debug
• The board developer typically wants to:– Look at code they modified such as the board file– Halt the system and examine system registers
• Will need to be aware of Virtual to Physical addressing requirements
• The board developer will not typically be looking at core kernel functions such as the scheduler– Kernel Optimization will make single stepping hard to follow, kernel is built
with O2.– Many of the core functions make heavy use of inline functions which are not
handled well by CCS
23
KERNEL DEBUG LAB
24
Linux Debug Lab Overview
• The Kernel has to be configured and then built to generate the debug images
• Hardware Breakpoints will be used to stop the kernel during the boot
• While stopped a couple of locations will be examined using the memory browser
• Single stepping will also be performed so the optimization affects can be witnessed.
25
Kernel Build
• Under General Setup in the Kernel Config
• Select Prompt for development and/or incomplete code/drivers
26
Kernel Debug Configuration
• Start a Kernel configuration session, here starting with a default configuration
27
• Locate the Kernel Hacking entry in the configuration menu
• Note: Use the cursor keys to navigate and the space bar to select the desired kernel option.
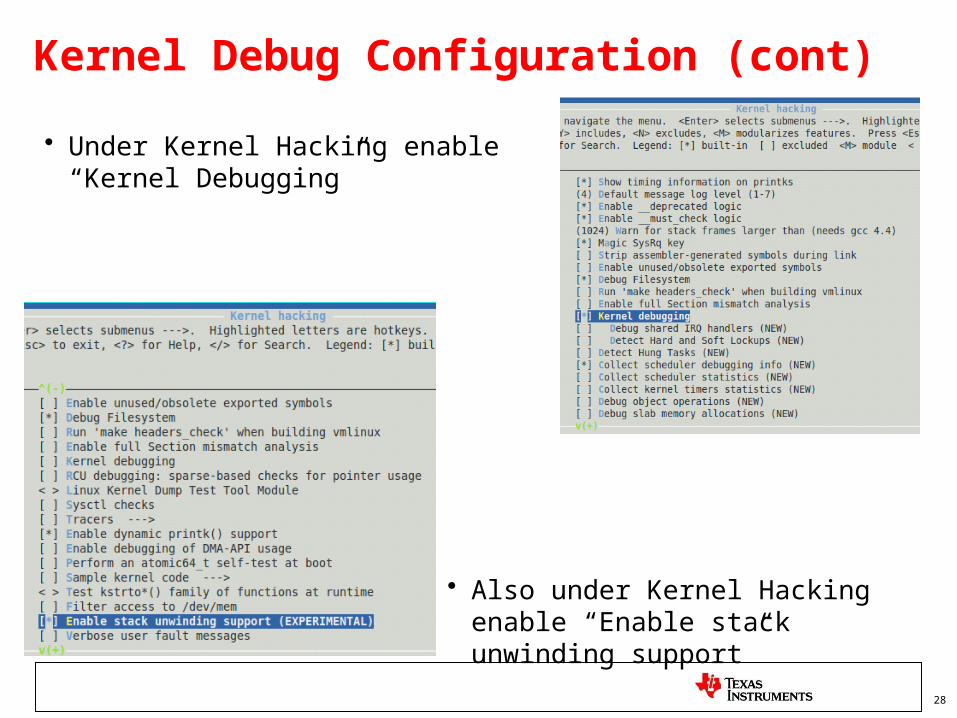
Kernel Debug Configuration (cont)
• Under Kernel Hacking enable “Kernel Debugging”
28
• Also under Kernel Hacking enable “Enable stack unwinding support”
Kernel Debug Configuration (cont) and Build• Be sure to save your configuration,
you will be prompted to do so.
29
• Build the kernel with the following line:
• Since Debug information is being compiled this build will take considerable time.
THANK YOU!
For more Sitara Boot Camp sessions visit: www.ti.com/sitarabootcamp