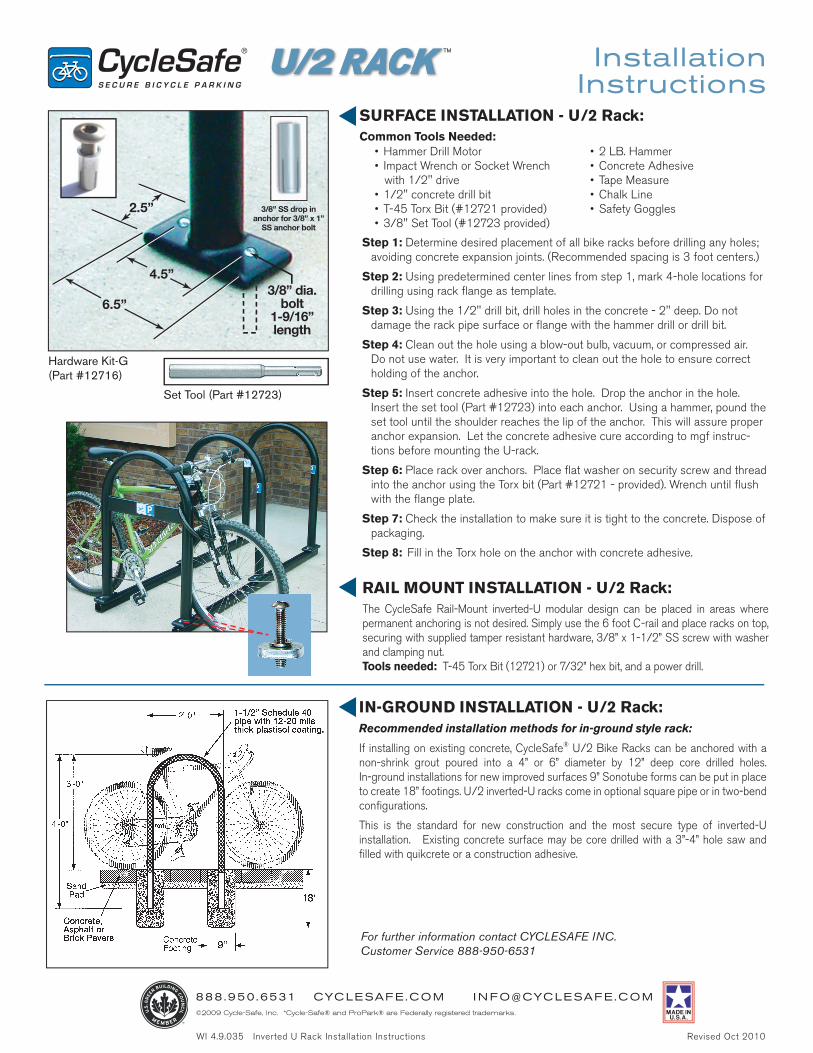
Step 1: Determine desired placement of all bike racks before drilling any holes; avoiding concrete expansion joints. (Recommended spacing is 3 foot centers.)
Step 2: Using predetermined center lines from step 1, mark 4-hole locations for drilling using rack flange as template.
Step 3: Using the 1/2" drill bit, drill holes in the concrete - 2" deep. Do not damage the rack pipe surface or flange with the hammer drill or drill bit.
Step 4: Clean out the hole using a blow-out bulb, vacuum, or compressed air. Do not use water. It is very important to clean out the hole to ensure correct holding of the anchor.
Step 5: Insert concrete adhesive into the hole. Drop the anchor in the hole. Insert the set tool (Part #12723) into each anchor. Using a hammer, pound the set tool until the shoulder reaches the lip of the anchor. This will assure proper anchor expansion. Let the concrete adhesive cure according to mgf instruc-tions before mounting the U-rack.
Step 6: Place rack over anchors. Place flat washer on security screw and thread into the anchor using the Torx bit (Part #12721 - provided). Wrench until flush with the flange plate.
Step 7: Check the installation to make sure it is tight to the concrete. Dispose of packaging.
Step 8: Fill in the Torx hole on the anchor with concrete adhesive.
If installing on existing concrete, CycleSafe® U/2 Bike Racks can be anchored with a non-shrink grout poured into a 4” or 6” diameter by 12” deep core drilled holes. In-ground installations for new improved surfaces 9” Sonotube forms can be put in place to create 18” footings. U/2 inverted-U racks come in optional square pipe or in two-bend configurations. This is the standard for new construction and the most secure type of inverted-U installation. Existing concrete surface may be core drilled with a 3”-4” hole saw and filled with quikcrete or a construction adhesive.
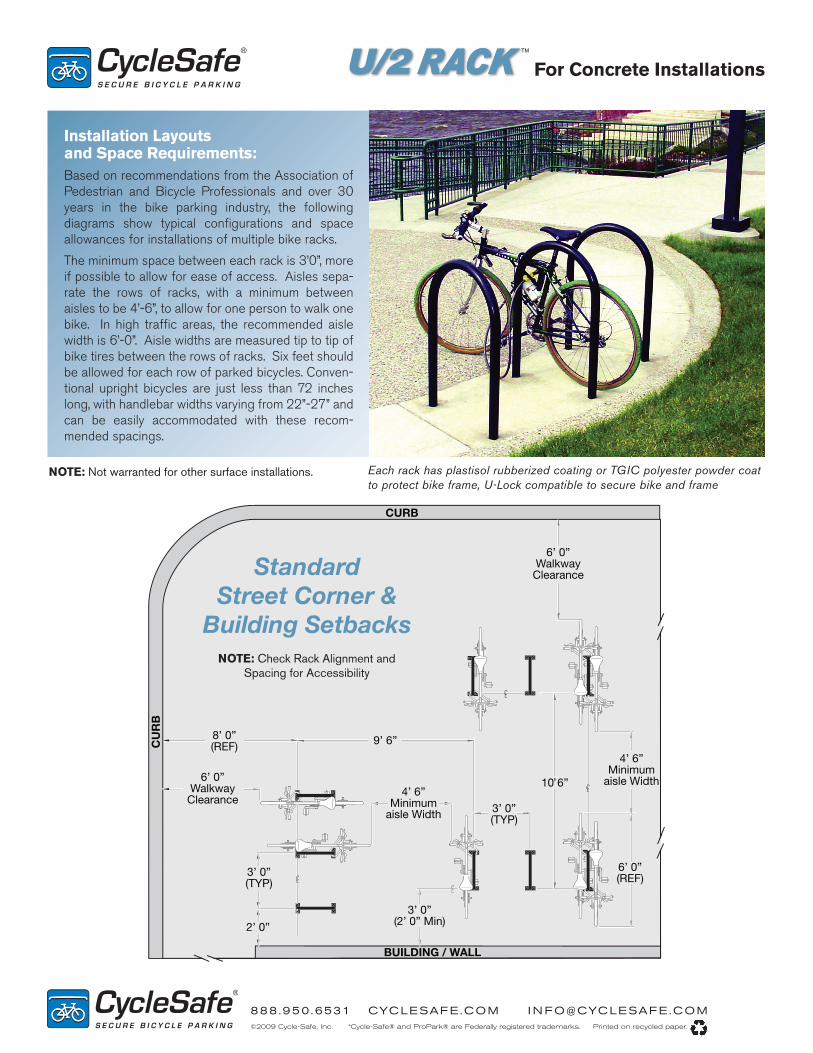
Installation Layouts and Space Requirements:Based on recommendations from the Association of Pedestrian and Bicycle Professionals and over 30 years in the bike parking industry, the following diagrams show typical configurations and space allowances for installations of multiple bike racks.
The minimum space between each rack is 3’0”, more if possible to allow for ease of access. Aisles sepa-rate the rows of racks, with a minimum between aisles to be 4’-6”, to allow for one person to walk one bike. In high traffic areas, the recommended aisle width is 6’-0”. Aisle widths are measured tip to tip of bike tires between the rows of racks. Six feet should be allowed for each row of parked bicycles. Conven-tional upright bicycles are just less than 72 inches long, with handlebar widths varying from 22”-27” and can be easily accommodated with these recom-mended spacings.
6.5”
4.5”
2.5”
3/8” dia. bolt
1-9/16” length
3/8” SS drop in anchor for 3/8” x 1”
SS anchor bolt
For further information contact CYCLESAFE INC. Customer Service 888-950-6531
6’ 0”WalkwayClearance
10’ 6”
3’ 0”(TYP)
4’ 6”Minimum
aisle Width
6’ 0”(REF)
3’ 0”(2’ 0” Min)
4’ 6”Minimum
aisle Width
9’ 6”
2’ 0”
3’ 0”(TYP)
6’ 0”WalkwayClearance
8’ 0”(REF)
CURB
CU
RB
BUILDING / WALL
Standard Street Corner &
Building Setbacks
RAIL MOUNT INSTALLATION - U/2 Rack:The CycleSafe Rail-Mount inverted-U modular design can be placed in areas where permanent anchoring is not desired. Simply use the 6 foot C-rail and place racks on top, securing with supplied tamper resistant hardware, 3/8” x 1-1/2” SS screw with washer and clamping nut. Tools needed: T-45 Torx Bit (12721) or 7/32” hex bit, and a power drill.
For Concrete Installations
NOTE: Not warranted for other surface installations.
NOTE: Check Rack Alignment and Spacing for Accessibility
Hardware Kit-G (Part #12716)
• Hammer Drill Motor• Impact Wrench or Socket Wrench
with 1/2" drive • 1/2" concrete drill bit• T-45 Torx Bit (#12721 provided)• 3/8" Set Tool (#12723 provided)
Step 1: Determine desired placement of all bike racks before drilling any holes; avoiding concrete expansion joints. (Recommended spacing is 3 foot centers.)
Step 2: Using predetermined center lines from step 1, mark 4-hole locations for drilling using rack flange as template.
Step 3: Using the 1/2" drill bit, drill holes in the concrete - 2" deep. Do not damage the rack pipe surface or flange with the hammer drill or drill bit.
Step 4: Clean out the hole using a blow-out bulb, vacuum, or compressed air. Do not use water. It is very important to clean out the hole to ensure correct holding of the anchor.
Step 5: Insert concrete adhesive into the hole. Drop the anchor in the hole. Insert the set tool (Part #12723) into each anchor. Using a hammer, pound the set tool until the shoulder reaches the lip of the anchor. This will assure proper anchor expansion. Let the concrete adhesive cure according to mgf instruc-tions before mounting the U-rack.
Step 6: Place rack over anchors. Place flat washer on security screw and thread into the anchor using the Torx bit (Part #12721 - provided). Wrench until flush with the flange plate.
Step 7: Check the installation to make sure it is tight to the concrete. Dispose of packaging.
Step 8: Fill in the Torx hole on the anchor with concrete adhesive.
If installing on existing concrete, CycleSafe® U/2 Bike Racks can be anchored with a non-shrink grout poured into a 4” or 6” diameter by 12” deep core drilled holes. In-ground installations for new improved surfaces 9” Sonotube forms can be put in place to create 18” footings. U/2 inverted-U racks come in optional square pipe or in two-bend configurations. This is the standard for new construction and the most secure type of inverted-U installation. Existing concrete surface may be core drilled with a 3”-4” hole saw and filled with quikcrete or a construction adhesive.
Installation Layouts and Space Requirements:Based on recommendations from the Association of Pedestrian and Bicycle Professionals and over 30 years in the bike parking industry, the following diagrams show typical configurations and space allowances for installations of multiple bike racks.
The minimum space between each rack is 3’0”, more if possible to allow for ease of access. Aisles sepa-rate the rows of racks, with a minimum between aisles to be 4’-6”, to allow for one person to walk one bike. In high traffic areas, the recommended aisle width is 6’-0”. Aisle widths are measured tip to tip of bike tires between the rows of racks. Six feet should be allowed for each row of parked bicycles. Conven-tional upright bicycles are just less than 72 inches long, with handlebar widths varying from 22”-27” and can be easily accommodated with these recom-mended spacings.
6.5”
4.5”
2.5”
3/8” dia. bolt
1-9/16” length
3/8” SS drop in anchor for 3/8” x 1”
SS anchor bolt
For further information contact CYCLESAFE INC. Customer Service 888-950-6531
6’ 0”WalkwayClearance
10’ 6”
3’ 0”(TYP)
4’ 6”Minimum
aisle Width
6’ 0”(REF)
3’ 0”(2’ 0” Min)
4’ 6”Minimum
aisle Width
9’ 6”
2’ 0”
3’ 0”(TYP)
6’ 0”WalkwayClearance
8’ 0”(REF)
CURB
CU
RB
BUILDING / WALL
Standard Street Corner &
Building Setbacks
RAIL MOUNT INSTALLATION - U/2 Rack:The CycleSafe Rail-Mount inverted-U modular design can be placed in areas where permanent anchoring is not desired. Simply use the 6 foot C-rail and place racks on top, securing with supplied tamper resistant hardware, 3/8” x 1-1/2” SS screw with washer and clamping nut. Tools needed: T-45 Torx Bit (12721) or 7/32” hex bit, and a power drill.
For Concrete Installations
NOTE: Not warranted for other surface installations.
NOTE: Check Rack Alignment and Spacing for Accessibility
Hardware Kit-G (Part #12716)
• Hammer Drill Motor• Impact Wrench or Socket Wrench
with 1/2" drive • 1/2" concrete drill bit• T-45 Torx Bit (#12721 provided)• 3/8" Set Tool (#12723 provided)