28
U|g|CS for DJI Mobile companion application

U|g|CS for DJI
Mobile companion application
Contents
1. Preface .................................................................................................................................................. 3
2. Drone connection and first run ............................................................................................................. 3
2.1. Before you begin ........................................................................................................................... 3
2.2. First run ......................................................................................................................................... 3
2.3. Connecting smartphone to the drone ........................................................................................... 3
2.3.1. For DJI Phantom 3 Standard .................................................................................................. 3
2.3.2. For DJI Phantom 4, Phantom 3, Inspire 1, M100 series ........................................................ 4
2.4. Connecting U|g|CS mobile companion and U|g|CS desktop application .................................... 5
2.5. Creating the route for your drone ................................................................................................. 5
2.6. Operation list of U|g|CS desktop and U|g|CS mobile companion .............................................. 6
3. Mission execution specifics ................................................................................................................... 9
3.1. Failsafe actions ............................................................................................................................ 11
3.2. Command execution specifics ..................................................................................................... 12
3.3. Command availability .................................................................................................................. 13
3.4. Telemetry information specifics .................................................................................................. 13
3.5. Waypoint turn types ................................................................................................................... 13
3.6. Click & Go .................................................................................................................................... 14
4. Using Simulator ................................................................................................................................... 16
4.1. U|g|CS Mobile Companion Simulator ........................................................................................ 16
4.2. DJI Simulator for Matrice 100, Inspire 1, Phantom 3 Professional, Advanced and Standard ..... 18
4.3. DJI Simulator for Phantom 4 ....................................................................................................... 19
5. U|g|CS mobile companion user interface .......................................................................................... 20
5.1. Main screen ................................................................................................................................. 20
5.2. Settings menu .............................................................................................................................. 23
6. Troubleshooting .................................................................................................................................. 26
2

1. Preface
U|g|CS is a fully functional ground control software for your drone which runs on your PC. U|g|CS gives you all the tools required to plan aerial surveys, control your drone directly, monitor telemetry, view and record online video and do post-flight analysis. For more information, please visit www.ugcs.com.
U|g|CS for DJI mobile companion application (U|g|CS mobile companion) is an android application specific to DJI Phantom 4, Phantom 3, Inspire 1 and M100 drone series. It bridges the gap between the drone and full featured U|g|CS desktop application but can also be used standalone.
For DJI Phantom 2 Vision Plus please use U|g|CS for P2V+ application from Googe Play1.
2. Drone connection and first run
2.1. Before you begin
To continue you need the following items:
● One of the following DJI drones: Phantom 4, Phantom 3 (Professional, Advanced or Standard), Inspire 1 (Professional, Raw) or M100;
● U|g|CS for DJI mobile companion – get the latest app from Google Play2 ● U|g|CS desktop application – get the latest version here3. ● Android 4.4+ compatible device (Smartphone). It is recommended to use 4.5’’ display or
larger.
2.2. First run
When launching the application for the first time, your smartphone must be connected to the internet, in order to pass DJI verification. This is an automatic process and does not need any input from the user.
2.3. Connecting smartphone to the drone
Connecting UgCS mobile to your drone depends on the type of drone you are using.
2.3.1. For DJI Phantom 3 Standard The remote controller of DJI Phantom 3 Standard creates Wi-Fi network. Ensure your drone and RC has no obstacles in between. Connect your smartphone to the wireless network provided by this device, then connect your laptop / PC with the installed U|g|CS desktop application to the same network. Launch U|g|CS for DJI application and wait until drone detected.
1 https://play.google.com/store/apps/details?id=com.ugcs.android.vsm.djivp 2 https://play.google.com/store/apps/details?id=com.ugcs.android.vsm.dji 3 http://www.ugcs.com/en/page/products
3

When both mobile application and desktop application are in the same network they should detect each other. Go to 2.4
The drone won’t be detected if you already have any connected applications like DJI GO, Litchi, etc. as multiple connections are not supported. In this case, close active applications and restart U|g|CS for DJI mobile application.
2.3.2. For DJI Phantom 4, Phantom 3, Inspire 1, M100 series Start normally, by connecting your mobile device to the remote controller via the micro USB Cable.
After establishing connection your mobile device proposes you to choose between applications, for example GJI GO or U|g|CS for DJI, please choose U|g|CS for DJI.
If your android device does not give you the application choice, but opens DJI GO application, you will need to clear the defaults for DJI Go (Settings -> Apps -> DJI Go -> Clear Defaults).
The DJI drone type will be automatically recognized by the application.
4

Shortly after that you will be able to see application main screen:
In order to connect U|g|CS desktop application to the mobile companion, the PC and smartphone must be in the same network. You can use your mobile device as Wi-Fi access point or an external network router.
In drone settings tab you can check your drone firmware version. Please keep always your drone up-to-date. If you don’t see your drone firmware, that might mean you are using old firmware!
2.4. Connecting U|g|CS mobile companion and U|g|CS desktop application
Once both devices are on the same network, connection will be established automatically. In the mobile app a green light in the window footer will confirm this.
2.5. Creating the route for your drone
When all previous steps are done and your drone connected to remote control, U|g|CS desktop application and U|g|CS mobile companion are in the same Wi-Fi network you should see your drone available to in U|g|CS desktop software.
5

Installing new UgCS for DJI application, drone serial number may be different to serial number you have seen in old version of UgCS for DJI. This will in U|g|CS you will see two vehicle cards: one for old application and one for new.
You can keep old card in order to review previous flights telemetry data.
Please follow the instructions in UgCS User Manual4 to draw the route for the appropriate drone profile. After drawing the route calculate it and after successful calculation upload it to the drone.
In order to upload the route for Phantom 4 switch on Remote Controller should be in “P” position. For Phantom 3 Standard switch S1 on Remote controller should be in bottom position (position 3).
After uploading the mission press “Auto mode” command in U|g|CS desktop and drone should start the route.
2.6. Operation list of U|g|CS desktop and U|g|CS mobile companion
Below you can find the basic procedures for the flight route:
№ Step Where step is performed Notes
1 Create route
U|g|CS desktop Use U|g|CS desktop client for creating, planning and calculate mission and route.
2 Upload route
U|g|CS desktop Use U|g|CS desktop client to upload route to the drone:
• Calculate route
• Select drone
• Press “Upload” button
4 https://www.ugcs.com/files/PDFs/Manuals/v2.9/user-manual.pdf 6

Also user should be careful where they set a new home point location (see route settings home location source). A home location is valid if it is within 30m of:
• initial take-off location • aircraft's current location • remote controller's current location as shown
by RC GPS • mobile device's current location
Route will not be uploaded if drone have executing the mission. In this case you need to send “hold” or “manual mode” command.
Inspire 1 should be equipped with camera in order to accept mission.
3
Auto – Launch route
U|g|CS desktop OR U|g|CS mobile companion
Use U|g|CS desktop client or U|g|CS mobile companion to launch route. Press “Auto mode” commands for the drone in U|g|CS desktop or button on Android.
If drone finishes the route, “Auto Mode” button is again enabled and user can repeat the route.
For Phantom 3 Standard, ensure RC throttle stick in not locked down!
4 Manual mode
U|g|CS desktop Switches the vehicle to manual mode. User can control vehicle with RC. This command interrupts mission execution and erases it from drone memory. User can upload new route to execute.
5 Hold
U|g|CS desktop OR U|g|CS mobile companion
Puts mission execution on hold. In case of Click & Go flight stops the vehicle and clears current target point.
6 Continue
U|g|CS desktop OR U|g|CS mobile companion
Continues mission execution from point where mission was put on hold.
7

7 Track mission execution
UgCS desktop OR U|g|CS mobile companion
1. Use U|g|CS desktop client for track telemetry information of the vehicle.
2. Use U|g|CS mobile companion for control camera.
3. Use both application for change control mode or failsafe command execution (return to home).
8 Make pictures
U|g|CS mobile companion
Use your remote control or dedicated buttons in U|g|CS mobile companion application to make shot or start/stop video recording.
For photo, user can select between single capture or capture by time interval. Please see „more camera settings”.
Minimal time interval is different for different DJI drones. If the time interval is too shot, you will receive an error msg.
9 Land drone
UgCS desktop OR U|g|CS mobile companion
Phantom 3 and Inspire 1 support Land mission item in U|g|CS Desktop. Or use Return to Home command in U|g|CS mobile companion.
10 Click & Go
UgCS desktop OR U|g|CS mobile companion
Allows you to interactively command the copter to travel to a target location by clicking on a point on the map. See 3.6 Click & Go section for more information.
11 Joystick mode
UgCS desktop
(U|g|CS mobile companion in future releases)
Control vehicle from joystick
8

3. Mission execution specifics Current part of article relates to U|g|CS desktop application and vehicle behavior.
Mission waypoint actions supported by DJI:
Flight plan element / action Support Notes
Takeoff Yes
Land Yes
Camera control Yes
You can set camera tilt angle.
- camera yaw angle will force aircraft to make yaw at given waypoint.
Also you can use RC or UgCS mobile companion to control camera tilt.
For Waypoint mission (all drone types), possible tilt values are [0..90].
For "Set Camera altitude / zoom" action setting camera yaw different from 0.0 will trigger relative "RotateAircraft" for all models.
Camera mode Yes
You can start/stop video recording or make
single shot at given waypoint.
Also you can use your remote control or dedicated buttons in U|g|CS mobile companion application to make shot or start/stop video recording.
Wait Yes Only one wait action per waypoint is allowed.
Yaw Yes
Yaw on DJI drones is a bit of magic - setting yaw on some waypoint means for drone "reach waypoint, start moving to next waypoint and arrive to next waypoint with requested yaw" drone will slowly change yaw during flight to next waypoint.
9

Flight plan element / action Support Notes
Panorama Yes
DJI drones has limits on amount of actions can be executed on each waypoint.
Application may automatically adjust angular step value in order to match this limits.
Parameters angular velocity and per-sector waiting are ignored.
Point of Interest Yes
Camera by time Yes
DJI drone will start continues photo capturing with a time delay till next waypoint. You can add number of photos and a delay before the shot series are started. During mission, user can stop this action execution by pressing “photo/video button” on mobile application.
Minimal time interval is different for different DJI drones. If the time interval is too shot, you will receive
an error message during mission execution. We are recommending always test your mission on simulator before going to the fields.
Camera by distance Yes
DJI drone will start continues photo capturing with a specific distance till next waypoint. You can add number of photos and a delay before the shot series will start. During mission, user can stop this action execution by pressing “photo/video button” on mobile application.
Minimal time interval is different for different DJI drones. If the time interval is too shot, you will
receive an error message during mission execution. We are recommending to always
10

Flight plan element / action Support Notes
test your mission on DJI simulator before going to the fields.
If your route has one or more segments with adaptive bank turn type, all waypoint action will be ignored!
Acceptance radius parameter for waypoint is not supported!
3.1. Failsafe actions
You should configure the behavior of the drone operation in the Failsafe cases with DJI Assistant software.
A point «Home location» is valid if it is within 30m of:
• initial take-off location • aircraft's current location • remote controller's current location as shown by RC GPS or • mobile device's current location
Fail-safe settings in mission properties in UGCS software are ignored!
The default settings in the DJI Assistant software are as follows:
Condition Behavior Notes
On GPS signal loss Land Happens when there are less than 6 satellites visible for more than 20 seconds
On RC signal loss Finish mission if the drone is in auto mode and return to home.
Return home altitude is defined in route settings tab.
On low battery Land See autopilot User Manual for more information.
11

When you create a flight route, please, pay special attention to location of a point «Home location» regarding to the route! Point «Home location» must be specified so that if «Fail-safe» mode is switched on the drone from any point of the route is able to fly in a straight and not face with obstacles (buildings, terrain features).
3.2. Command execution specifics
Current part of article is about vehicle behavior. Some commands you can find in the U|g|CS desktop application, some in the U|g|CS mobile companion. See table below for more information.
Supported commands:
Command Support Application Notes
Arm No
Disarm No
Auto Mode Yes U|g|CS desktop OR U|g|CS mobile companion
Take off and start the mission.
Hold Yes U|g|CS desktop OR U|g|CS mobile comapnion
Pause mission. Vehicle will hover in current position until CONTINUE command issued. Vehicle can be moved along mission path using Remote controller during Hold.
Continue Yes U|g|CS desktop OR U|g|CS mobile companion
Resume mission.
Manual Mode Yes U|g|CS desktop This command interrupts mission execution and erases it from drone memory.
Return Home
Yes U|g|CS desktop OR U|g|CS mobile companion
Vehicle will gain the pre-configured altitude (default is 20m) and return to launch position and land. See warning below.
Take-Off No* U|g|CS desktop Drones can be take off by switching to auto mode.
Land No* U|g|CS desktop Use Land mission item in order to land your drone after mission execution.
Click & Go Yes U|g|CS desktop OR U|g|CS mobile companion
Allows to interactively command the copter to travel to a target location by clicking on a point on the map.
Joystick Mode Yes U|g|CS desktop Joystick input control
12
(U|g|CS mobile companion in future releases)
If within the distance of 20 meters from the home point, you execute GoHome command, the aircraft will directly land in the current location instead of returning back to the home Point!
3.3. Command availability
U|g|CS Desktop can show command buttons in different shades. You can always press all buttons disregarding of shade. Highlighted buttons suggest recommended commands, depending on current status of the vehicle.
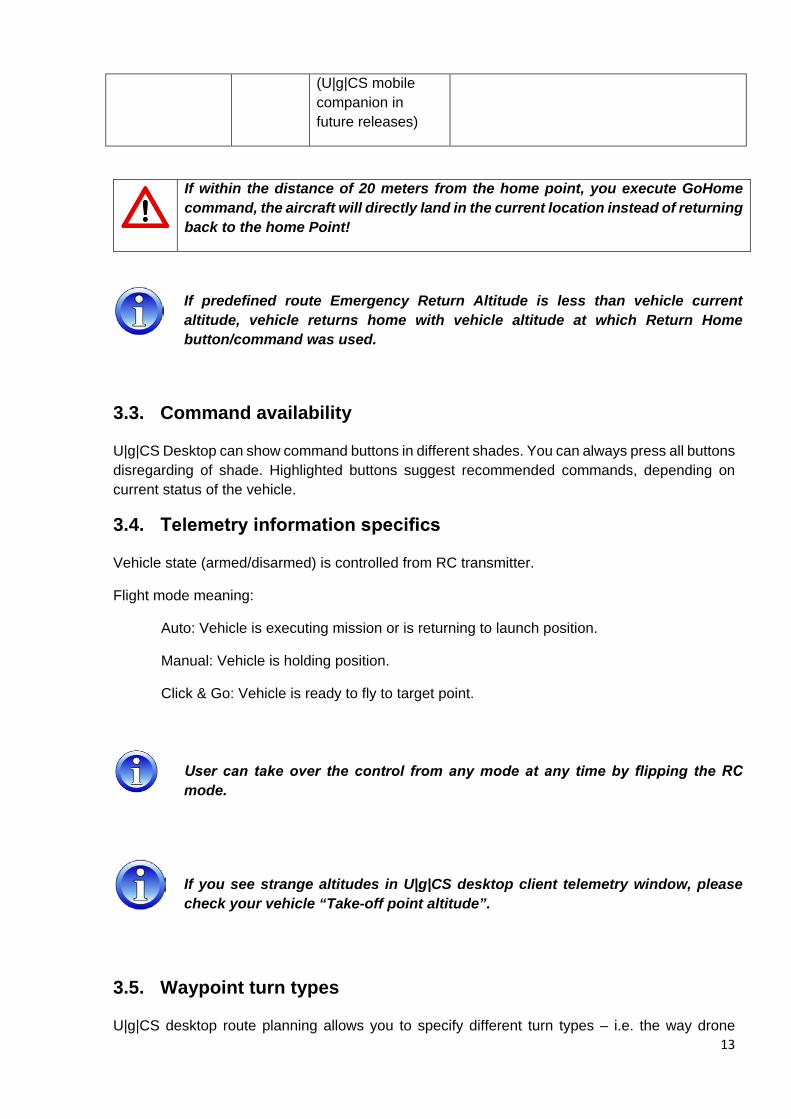
3.4. Telemetry information specifics
Vehicle state (armed/disarmed) is controlled from RC transmitter.
Flight mode meaning:
Auto: Vehicle is executing mission or is returning to launch position.
Manual: Vehicle is holding position.
Click & Go: Vehicle is ready to fly to target point.
User can take over the control from any mode at any time by flipping the RC mode.
If you see strange altitudes in U|g|CS desktop client telemetry window, please check your vehicle “Take-off point altitude”.
3.5. Waypoint turn types
U|g|CS desktop route planning allows you to specify different turn types – i.e. the way drone
If predefined route Emergency Return Altitude is less than vehicle current altitude, vehicle returns home with vehicle altitude at which Return Home button/command was used.
13
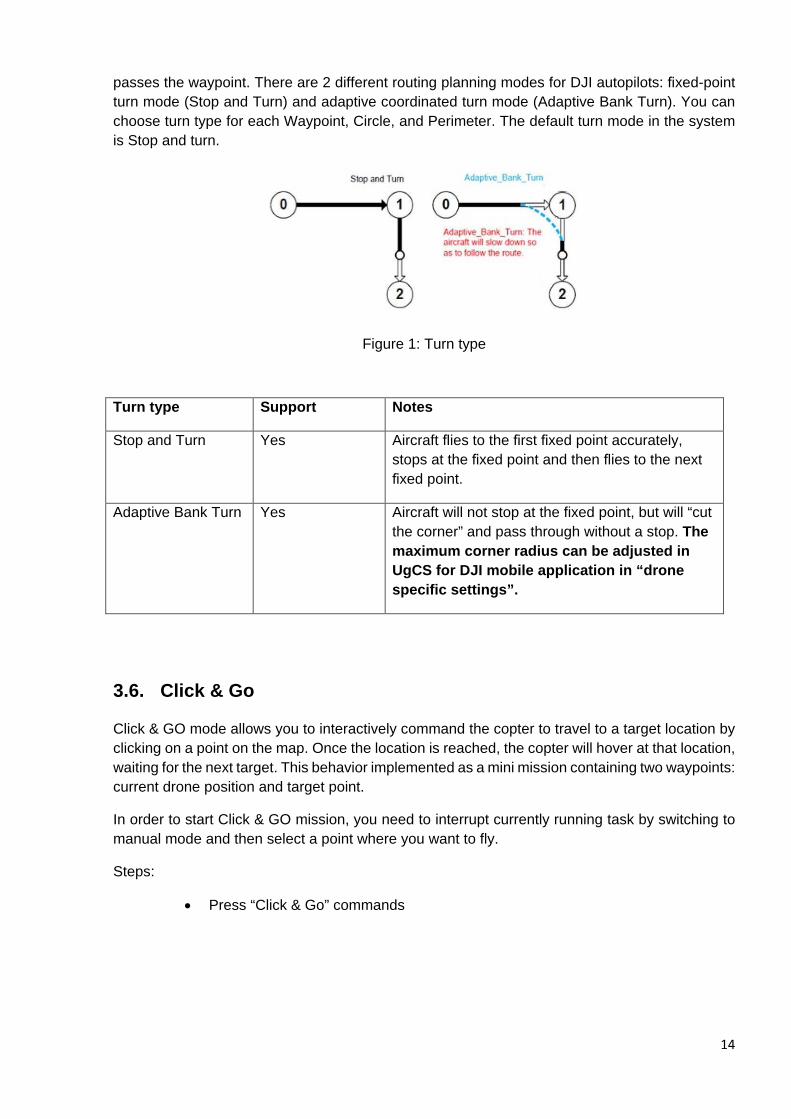
passes the waypoint. There are 2 different routing planning modes for DJI autopilots: fixed-point turn mode (Stop and Turn) and adaptive coordinated turn mode (Adaptive Bank Turn). You can choose turn type for each Waypoint, Circle, and Perimeter. The default turn mode in the system is Stop and turn.
Figure 1: Turn type
Turn type Support Notes
Stop and Turn Yes Aircraft flies to the first fixed point accurately, stops at the fixed point and then flies to the next fixed point.
Adaptive Bank Turn Yes Aircraft will not stop at the fixed point, but will “cut the corner” and pass through without a stop. The maximum corner radius can be adjusted in UgCS for DJI mobile application in “drone specific settings”.
3.6. Click & Go
Click & GO mode allows you to interactively command the copter to travel to a target location by clicking on a point on the map. Once the location is reached, the copter will hover at that location, waiting for the next target. This behavior implemented as a mini mission containing two waypoints: current drone position and target point.
In order to start Click & GO mission, you need to interrupt currently running task by switching to manual mode and then select a point where you want to fly.
Steps:
• Press “Click & Go” commands
14

• Take-off point altitude
• You can click to set value from the current terrain altitude under the vehicle
15
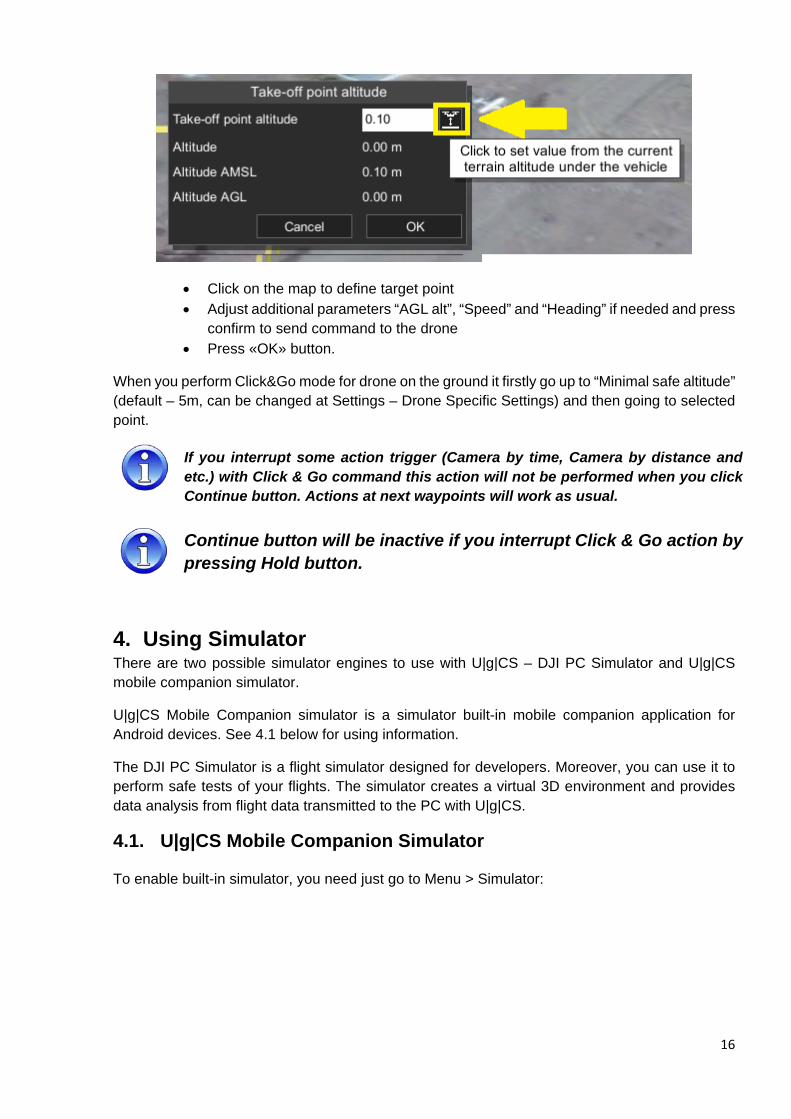
• Click on the map to define target point • Adjust additional parameters “AGL alt”, “Speed” and “Heading” if needed and press
confirm to send command to the drone • Press «OK» button.
When you perform Click&Go mode for drone on the ground it firstly go up to “Minimal safe altitude” (default – 5m, can be changed at Settings – Drone Specific Settings) and then going to selected point.
If you interrupt some action trigger (Camera by time, Camera by distance and etc.) with Click & Go command this action will not be performed when you click Continue button. Actions at next waypoints will work as usual.
Continue button will be inactive if you interrupt Click & Go action by pressing Hold button.
4. Using Simulator There are two possible simulator engines to use with U|g|CS – DJI PC Simulator and U|g|CS mobile companion simulator.
U|g|CS Mobile Companion simulator is a simulator built-in mobile companion application for Android devices. See 4.1 below for using information.
The DJI PC Simulator is a flight simulator designed for developers. Moreover, you can use it to perform safe tests of your flights. The simulator creates a virtual 3D environment and provides data analysis from flight data transmitted to the PC with U|g|CS.
4.1. U|g|CS Mobile Companion Simulator
To enable built-in simulator, you need just go to Menu > Simulator:
16

And check the box:
Next you can specify takeoff coordinates:
17
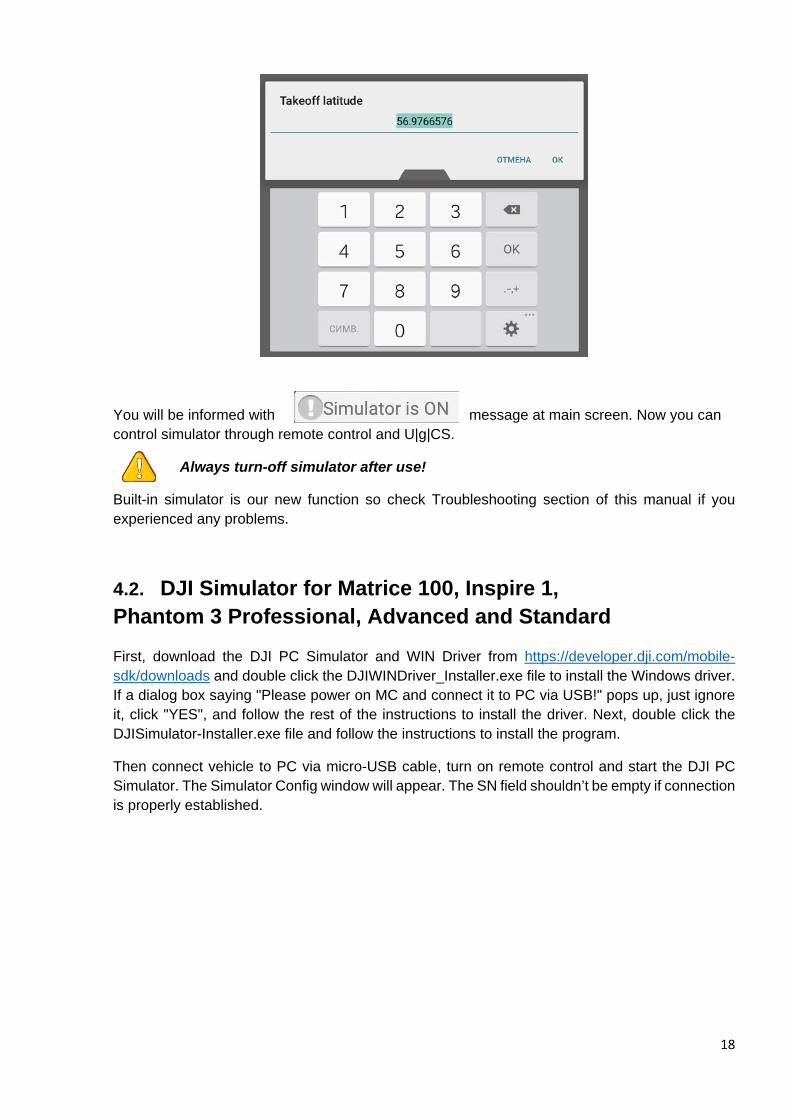
You will be informed with message at main screen. Now you can control simulator through remote control and U|g|CS.
Always turn-off simulator after use!
Built-in simulator is our new function so check Troubleshooting section of this manual if you experienced any problems.
4.2. DJI Simulator for Matrice 100, Inspire 1, Phantom 3 Professional, Advanced and Standard
First, download the DJI PC Simulator and WIN Driver from https://developer.dji.com/mobile-sdk/downloads and double click the DJIWINDriver_Installer.exe file to install the Windows driver. If a dialog box saying "Please power on MC and connect it to PC via USB!" pops up, just ignore it, click "YES", and follow the rest of the instructions to install the driver. Next, double click the DJISimulator-Installer.exe file and follow the instructions to install the program.
Then connect vehicle to PC via micro-USB cable, turn on remote control and start the DJI PC Simulator. The Simulator Config window will appear. The SN field shouldn’t be empty if connection is properly established.
18

After pressing “Start Simulation” you will see the simulator display pop up, as shown below (it will show whatever aircraft you are using):
Now you can control simulator through remote control and U|g|CS.
4.3. DJI Simulator for Phantom 4
For Phantom 4 DJI Simulator available as a part of the DJI Assistant 2 software. You can download it here https://www.dji.com/product/phantom-4/info#downloads. After downloading double click on DJI_Assistant_2_Installer.exe and follow setup process. When installer ask about installing Driver for Phantom 4 you should answer “Yes”.
19
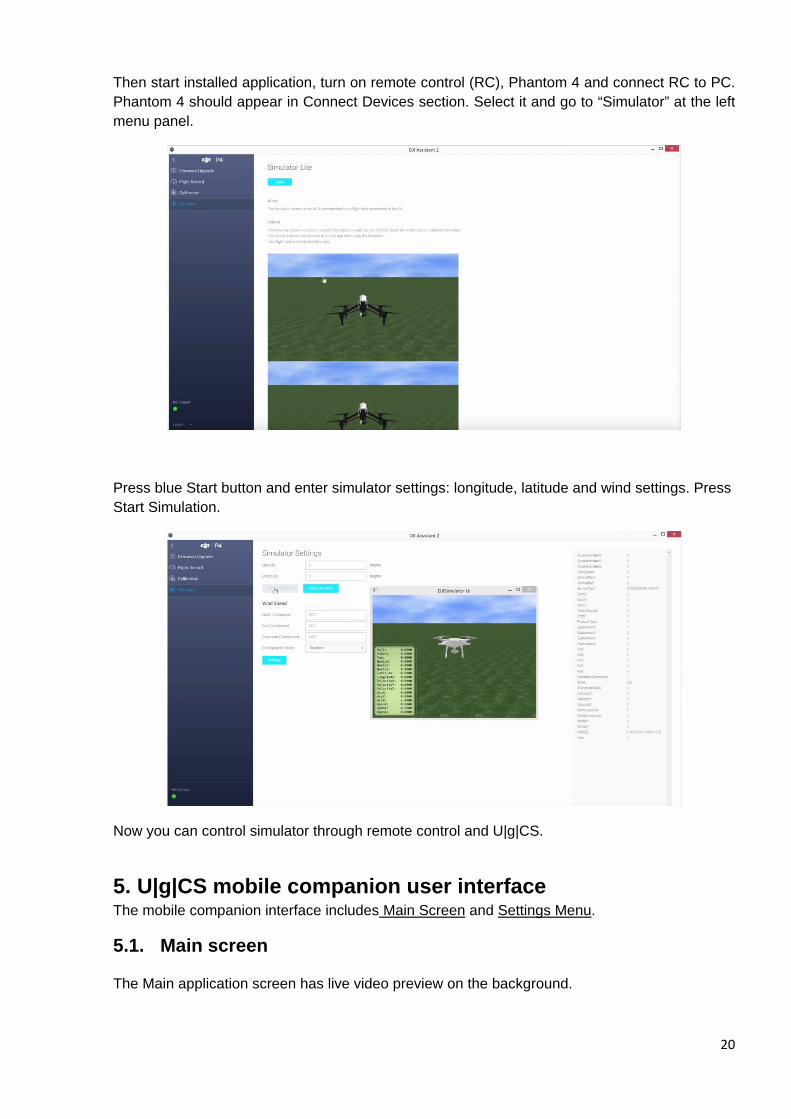
Then start installed application, turn on remote control (RC), Phantom 4 and connect RC to PC. Phantom 4 should appear in Connect Devices section. Select it and go to “Simulator” at the left menu panel.
Press blue Start button and enter simulator settings: longitude, latitude and wind settings. Press Start Simulation.
Now you can control simulator through remote control and U|g|CS.
5. U|g|CS mobile companion user interface The mobile companion interface includes Main Screen and Settings Menu.
5.1. Main screen
The Main application screen has live video preview on the background.
20
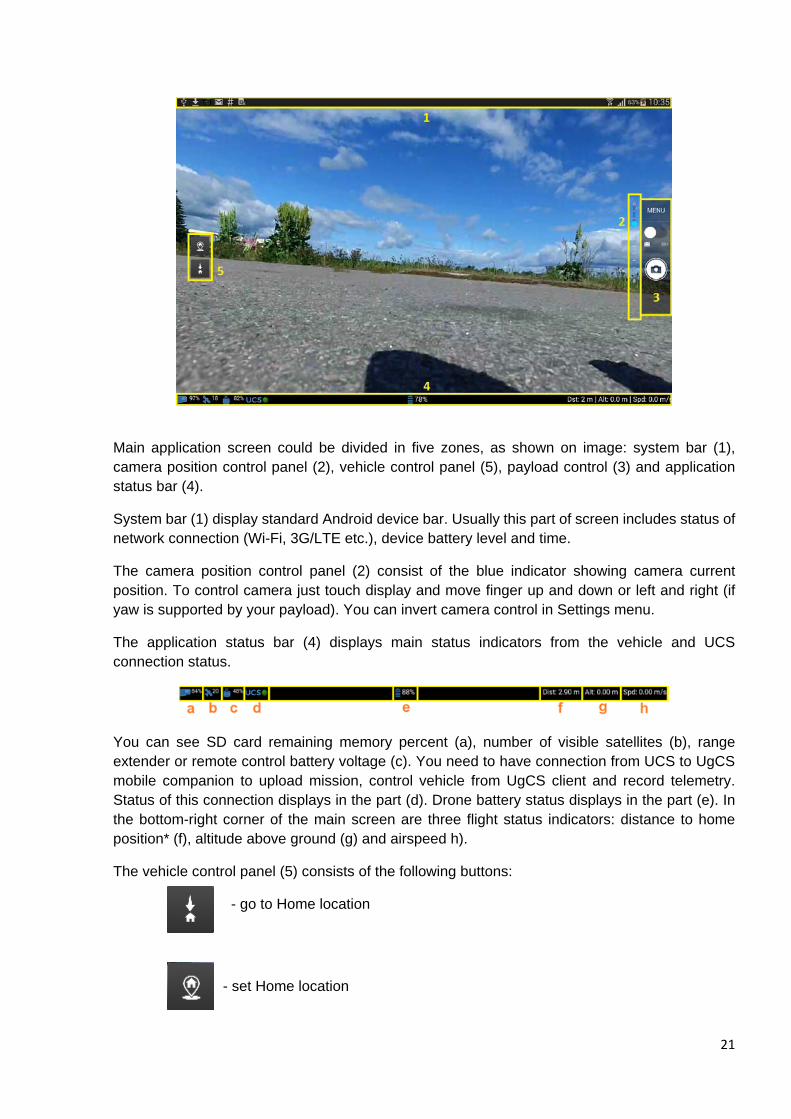
Main application screen could be divided in five zones, as shown on image: system bar (1), camera position control panel (2), vehicle control panel (5), payload control (3) and application status bar (4).
System bar (1) display standard Android device bar. Usually this part of screen includes status of network connection (Wi-Fi, 3G/LTE etc.), device battery level and time.
The camera position control panel (2) consist of the blue indicator showing camera current position. To control camera just touch display and move finger up and down or left and right (if yaw is supported by your payload). You can invert camera control in Settings menu.
The application status bar (4) displays main status indicators from the vehicle and UCS connection status.
You can see SD card remaining memory percent (a), number of visible satellites (b), range extender or remote control battery voltage (c). You need to have connection from UCS to UgCS mobile companion to upload mission, control vehicle from UgCS client and record telemetry. Status of this connection displays in the part (d). Drone battery status displays in the part (e). In the bottom-right corner of the main screen are three flight status indicators: distance to home position* (f), altitude above ground (g) and airspeed h).
The vehicle control panel (5) consists of the following buttons:
- go to Home location
- set Home location
21
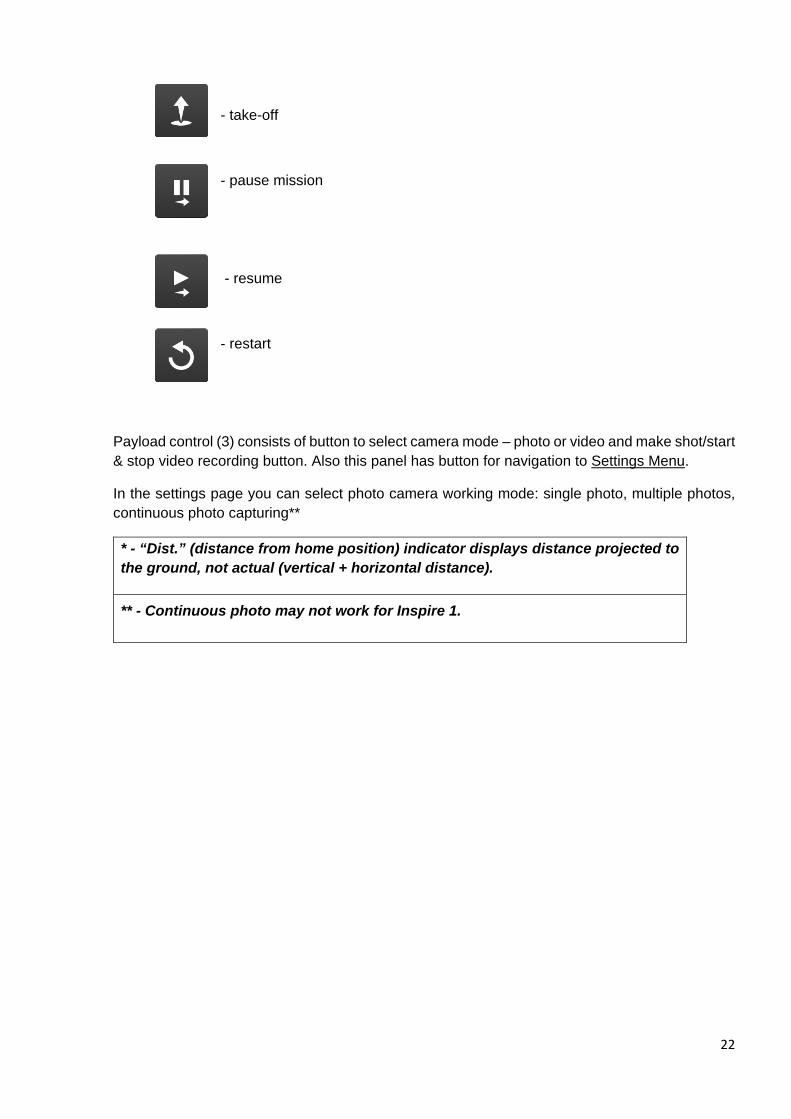
- take-off
- pause mission
- resume
- restart
Payload control (3) consists of button to select camera mode – photo or video and make shot/start & stop video recording button. Also this panel has button for navigation to Settings Menu.
In the settings page you can select photo camera working mode: single photo, multiple photos, continuous photo capturing**
* - “Dist.” (distance from home position) indicator displays distance projected to the ground, not actual (vertical + horizontal distance).
** - Continuous photo may not work for Inspire 1.
22

5.2. Settings menu
Settings Menu has four sections:
• DJI Drone • Camera • App Settings • About area.
“DJI Drone” area includes:
1. First field displays information about connected drone: type, serial number and firmware version.
2. Built-in Simulator option. 3. Drone Specific settings.
23

• Corner radius controls the curvature of the path in case if the route contains Adaptive Bank Turn waypoints.
• Go first waypoint mode has 2 options: Safety and Point to Point. Safety mode will force drone to reach required altitude before moving to 1st waypoint. In Point to Point mode drone will move to 1st waypoint in strait line directly from current location.
“Camera” area includes the following fields:
• Show Preview field allows to enable or disable video streaming in main view; • More Camera Settings – advanced settings based on drone type:
Users can select between Single photo capture and capturing by time interval. In case of Interval, users can set photo count and interval value.
Minimal time interval is different for different DJI drones. If the time interval is too shot, you will receive an error message when pressing photo button. In this case try to increase time interval.
24
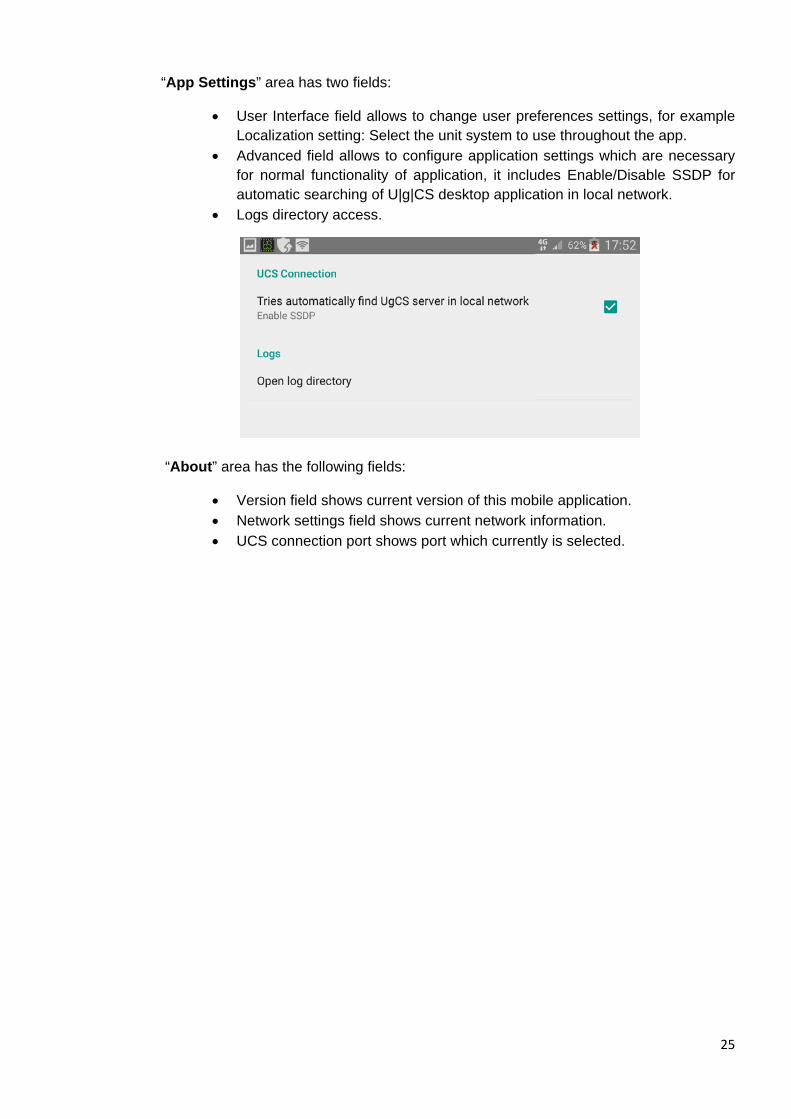
“App Settings” area has two fields:
• User Interface field allows to change user preferences settings, for example Localization setting: Select the unit system to use throughout the app.
• Advanced field allows to configure application settings which are necessary for normal functionality of application, it includes Enable/Disable SSDP for automatic searching of U|g|CS desktop application in local network.
• Logs directory access.
“About” area has the following fields:
• Version field shows current version of this mobile application. • Network settings field shows current network information. • UCS connection port shows port which currently is selected.
25

6. Troubleshooting
Problem Solution
If you can't launch U|g|CS mobile application
It closes just after start, try to restart your mobile device.
Drone reject the flight Difference in altitudes of your route is more than 120 meters
Experience problems with drone connection
Check out native “DJI GO” application is not installed
Your device does not appear on map view screen
Specify your vehicle the in vehicle list:
No connection to the mobile application UGCS between your PC and mobile devices
Try to restart PC U|g|CS
If the U|g|CS mobile application is connected to your drone and shows that U|g|CS desktop application (green light besides UCS text on bottom) is also connected, but you cannot find Your device in PC application.
Try the following steps:
○ Restart PC application (UGCS standalone client).
○ Make sure both device, your smartphone and PC is in same network.
If your receiving “Route upload failed” message like this:
This situation can happen if you are using waypoints with Adaptive bank turn and the distance between two points is too small to perform nice curve. Open Drone Specific settings and decrease damping distance. In case of any issues with the software, please report them to [email protected]. Please send us a detailed description of the problem and your version number which you can find in the settings menu. Please try to provide screenshots and logs together with a description of the issue – Logs can be found in the following locations: Device
26

storage>Android>data>com.ugcs.android.vsm.dji>files>logcat directory.
If your receiving “Route upload failed” message like this:
The user should be careful where they set a new home point location (see route settings home location source) as in some scenarios the product will not be in control of the user when going to this location. A home location is valid if it is within 30m of:
1. initial take-off location 2. aircraft's current location 3. remote controller's current location as shown by
RC GPS 4. mobile device's current location
Your receiving “Route upload failed” when trying to upload route with Circle item
Ensure your route start point is not at the same palace as route end point. You can add one extra WP before or after circle or add takeoff or land command.
You always see “Permission Check Failed” dialog
Check your network connection. Some proxy servers may block verification request.
You need to be connected to the internet when starting your application first time in order to perform DJI verification. You also can try to reinstall application.
Video preview is not shown This issue could happen if you previously changed video resolution in DJI GO application. In order to fix it, please close U|g|CS mobile application, start DJI GO and close it. Now you should be able to see video preview in U|g|CS mobile.
Some waypoint actions are ignored and you receiving message like this:
This warning is related to DJI drones’ waypoint actions limit – you can use maximum 15 action for 1 waypoint. Note: photo panorama uses 2 actions for one segment (rotate aircraft and make photo)
27
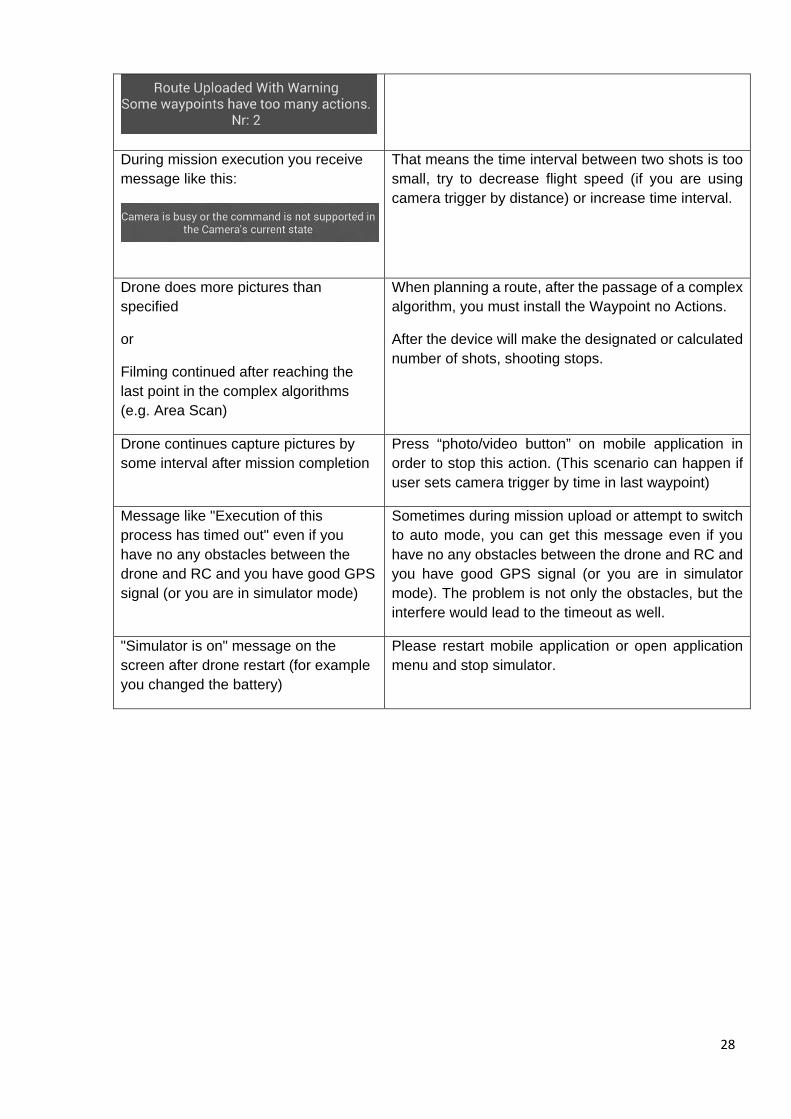
During mission execution you receive message like this:
That means the time interval between two shots is too small, try to decrease flight speed (if you are using camera trigger by distance) or increase time interval.
Drone does more pictures than specified
or
Filming continued after reaching the last point in the complex algorithms (e.g. Area Scan)
When planning a route, after the passage of a complex algorithm, you must install the Waypoint no Actions.
After the device will make the designated or calculated number of shots, shooting stops.
Drone continues capture pictures by some interval after mission completion
Press “photo/video button” on mobile application in order to stop this action. (This scenario can happen if user sets camera trigger by time in last waypoint)
Message like "Execution of this process has timed out" even if you have no any obstacles between the drone and RC and you have good GPS signal (or you are in simulator mode)
Sometimes during mission upload or attempt to switch to auto mode, you can get this message even if you have no any obstacles between the drone and RC and you have good GPS signal (or you are in simulator mode). The problem is not only the obstacles, but the interfere would lead to the timeout as well.
"Simulator is on" message on the screen after drone restart (for example you changed the battery)
Please restart mobile application or open application menu and stop simulator.
28


