Ultimate Business Planner ® User’s Guide Starter & Standard versions Congratulations on choosing Ultimate Business Planner®. It's the fastest and easiest way to write a winning business plan ‐ guaranteed! In fact, over 200,000 successful entrepreneurs have trusted their ideas to Ultimate Business Planner. Stop wasting time and start achieving your goals today. Take the Guesswork Out of Business Planning Not sure where to start? Ultimate Business Planner guides you through each business‐planning step quickly and easily. Developed for entrepreneurs by small‐business experts and small‐business owners, Ultimate Business Planner simplifies the process of writing a business plan and gives you expert advice, tips, and hints based on proven business practices. Overview Ultimate Business Planner is a dynamic, interactive planning tool that takes the drudgery out of complex, time‐consuming financial forecasting and business planning. The easy‐to‐use, step‐by‐step approach breaks down the business planning process into manageable sections: • Welcome • Company • Plan • Review Plus, (standard version only) • Income • Expenses • Interview Interactive dialog walks you through every step with plain‐English instructions, advice, and how‐to hints. It even comes complete with sample business plans you can use to suggest proper wording, or to copy‐and‐paste directly into your business plan. Simply answer the questions and fill‐in the blanks in each section, and Ultimate Business Planner does the rest. Complete the sections in any order you choose. Ultimate Business Planner gives you a fast, easy way to evaluate the viability of your business ideas or strategies.
Transcript
Ultimate Business Planner®
User’s Guide Starter & Standard versions
Congratulations on choosing Ultimate Business Planner®. It's the fastest and easiest way to write a winning business plan ‐ guaranteed! In fact, over 200,000 successful entrepreneurs have trusted their ideas to Ultimate Business Planner. Stop wasting time and start achieving your goals today.
Take the Guesswork Out of Business Planning
Not sure where to start? Ultimate Business Planner guides you through each business‐planning step quickly and easily. Developed for entrepreneurs by small‐business experts and small‐business owners, Ultimate Business Planner simplifies the process of writing a business plan and gives you expert advice, tips, and hints based on proven business practices.
Overview
Ultimate Business Planner is a dynamic, interactive planning tool that takes the drudgery out of complex, time‐consuming financial forecasting and business planning.
The easy‐to‐use, step‐by‐step approach breaks down the business planning process into manageable sections:
• Welcome • Company • Plan • Review
Plus, (standard version only)
• Income • Expenses • Interview
Interactive dialog walks you through every step with plain‐English instructions, advice, and how‐to hints. It even comes complete with sample business plans you can use to suggest proper wording, or to copy‐and‐paste directly into your business plan.
Simply answer the questions and fill‐in the blanks in each section, and Ultimate Business Planner does the rest. Complete the sections in any order you choose.
Ultimate Business Planner gives you a fast, easy way to evaluate the viability of your business ideas or strategies.
2 Ultimate Business Planner
And, for standard version users…
Ultimate Business Planner helps you gather the information you need to lay the financial groundwork of your plan, and create a complete set of financial projections (for up to 60 months) that you can show to bankers and other potential investors to get the financing you need to get your business off the ground.
Once you’ve entered all your information, Ultimate Business Planner produces professional reports and graphs that highlight your business’ potential.
If you’re thinking of expanding an existing business, Ultimate Business Planner can show you how strategies such as hiring additional employees or adding a new product will affect your bottom line. You can make intelligent, informed decisions, and get financing, if needed, to implement your strategy and help ensure your success.
After you’ve completed your initial plan, changing scenarios is easy. Want to know the impact of taking on employees? Want to see what happens when you extend credit to your customers? Ultimate Business Planner allows you to see how your bottom line is affected by an unlimited number of business situations.
What’s New in this Version?
If you have used a previous version, you’ll be pleased to see these new features.
Compatibility
Both Starter and Standard versions are compatible with Windows 7.
New Review Tab
Now with a dedicated tab, you can quickly access your plan for content reviews.
Bullets and Numbering Formatting
Bullet and numbering functionality has been added to the Plan section.
Improved Image File Scaling
All accepted image files, jpeg, .bpm, .gif and .wmf files, can be scaled to fit within your plan.
More Business Plan Examples
There are now five example business plans provided for reference and samples as you build your plan.
Improved Financial Graphing
(standard version only) Now choose either 2‐D or 3‐D formats for the presentation of your financial graphs.
Contents
About this Guide
Installing Ultimate Business Planner
Getting Started
Income Section
Expenses Section
Entering Worksheet Data
Using QuickBooks Data
Viewing Worksheet Data
Interview Section
Viewing and Printing Financials
Plan Section
Glossary
End‐User Agreement
About this Guide
This guide is written for end‐users who will be using Ultimate Business Planner Starter and Standard versions to compile and present business plans. You will want to review each of these sections to easily set up the program and quickly acquaint yourself with its functionality.
Review “Overview” and “What’s New”. These sections provide a description of how the program can help in business planning and financial forecasting, and list new features to look for when building your plans.
Install Ultimate Business Planner. This section explains how to use the Setup program to install Ultimate
Business Planner under Microsoft Windows 2000/XP/Vista. Review “Getting Started”. The section provides simple, step‐by‐step instructions for navigating Ultimate Business Planner and managing your business plan files.
Finally, start using Ultimate Business Planner! When you need more detailed information on completing plans with this program, refer to the remaining sections of this guide.
This user guide assumes you are already familiar with Microsoft Windows 2000/XP/ Vista operating systems. It also assumes you know and understand the basics of operating a mouse. If you need more information about Microsoft Windows 2000/ XP/Vista, or operating a mouse, please refer to their respective manuals.
How this Guide Works
The following conventions are used in this user’s guide:
Alt key combinations are active in Ultimate Business Planner. Simply press the Alt key on your keyboard to see the underlined letters used for the various menu commands. For example, Alt + E displays the Edit menu. Alt + E followed by Alt + C is the Copy command from the Edit menu.
Information of special interest, or Ultimate Business Planner information of which you should make a special note, is set apart in a “Note:” paragraph.
The step‐by‐step process for preparing a business plan is documented here in the most commonly used sequence for compiling information. For users of the Starter version, the Income, Expense, and Interview steps will not apply.
All menu names and commands are identified in the guide and used in step‐by‐step instructions that describe how to use the tools and features of Ultimate Business Planner with numbered lines.
Help Content
When you need help with a specific function, command, or procedure, select Contents in the Help menu. For more information on using Help, refer to your Microsoft Windows User’s Guide. You can also click the Help button when it is displayed on any of the windows you’re using.
Ultimate Business Planner also provides tool tips that are displayed when you pass your cursor over a specific function or button.
Technical Support
If you can’t find the answer to your question, after first consulting this documentation or the Help menu, contact Technical Support via:
• Internet E‐mail support@abs‐usa.com • Online Support http://www.abs‐usa.com • Telephone 1‐701‐235‐5226 (8:00 AM to 5:00 PM, CST, Monday through Friday)
Free Technical Support Period
ABS offers 90 days of free technical support to registered Ultimate Business Planner users. Free technical support starts from your date of purchase. Thereafter, there is a $35 charge per incident. ABS also offers 12‐month, unlimited
Technical Support Plans and Software Enhancement Plans. For just pennies a day, we can help keep your software up and running.
Technical Support Plans
• Unlimited telephone and e‐mail access to ABS Support Technicians • FREE media replacement should your software become lost or damaged • For Technical Support Plan pricing, please call 1‐800‐874‐8801
Software Enhancement Plans
ABS offers 12‐month, Software Enhancement Plan entitling you to FREE upgrades to the next version of Ultimate Business Planner, in addition to everything included in a Technical Support Plan. For Software Enhancement Plan pricing, please call: 1‐800‐874‐8801.
Installing Ultimate Business Planner
This section describes how to install Ultimate Business Planner to run under Windows 2000/XP/Vista, and how to install multi‐user versions of Ultimate Business Planner on a network server or workstations.
What You Need to Run Ultimate Business Planner
The minimum software and system configuration you need to run Ultimate Business Planner includes:
• A personal computer with a Pentium Processor (75+ MHz, and at least 64 MB of memory). • One CD‐ROM drive and a hard disk with at least 20 MB of free disk space for Ultimate Business Planner files, plus
additional disk space for schedule files. • Ultimate Business Planner requires Windows 2000/XP/Vista. • A mouse supported by Microsoft Windows is recommended. • A compatible monitor supported by Microsoft Windows. (Ultimate Business Planner supports VGA and Super VGA
monitors; however, a SVGA monitor is recommended.) • An optional printer supported by Microsoft Windows.
Installing Ultimate Business Planner
For multi‐user versions of Ultimate Business Planner, please refer to the instructions presented after the single‐user instructions described below.
Note1: Close all applications, including screen savers or similar programs, before running the Setup program.
Note2: The Ultimate Business Planner setup program creates a Windows program group named ABS Applications, and inserts the Ultimate Business Planner program icon.
TO INSTALL ULTIMATE BUSINESS PLANNER (WINDOWS 2000 OR HIGHER):
1) Place the Ultimate Business Planner CD in your CD ROM.
2) If the application does not auto‐run, click the Start button and select Run from the Start menu. The Run window is displayed.
3) Type D:\setup.exe in the window (or, use the appropriate drive letter for your CD‐ROM drive). The setup program launches. To continue, click Next.
4) Review the License Agreement and click Next.
5) Ultimate Business Planner displays the Select Destination Directory window. The Setup program will install Ultimate Business Planner software to the directory C:\Program Files\Ultimate Business Planner. It will automatically create the directory on your hard disk, if you haven’t done so already. If you want to install the program to another directory, browse through the folder list and select a destination directory.
4 Ultimate Business Planner
6) Click Next to continue. Ultimate Business Planner starts copying the program files to the designated directory.
7) Ultimate Business Planner is ready to start the installation. Click Next to begin.
When the setup program is finished, Ultimate Business Planner displays the message— “Ultimate Business Planner has been successfully installed.”
8) Click Finish to complete the installation.
The Setup program automatically adds “Ultimate Business Planner” to the ABS Applications group.
Getting Started
This section describes how to use the basic functions of Ultimate Business Planner to acquaint you with using the program.
Note: If you are already familiar with an earlier version of Ultimate Business Planner, you may feel comfortable skipping this section.
Welcome
You’ll use the wizard‐like interface to navigate through the entire business planning process for each of the planning sections: Company, Income, Expenses, Interview, and Plan.
When you start the program, it displays the Welcome screen.
TO START
1) Read the Welcome screen and click the Next button.
2) Continue answering the questions as they appear, then click the Next button to work your way step‐by‐step through the business planning process.
Note: QuickBooks Pro/Premier/Enterprise 2003 (or later) users can import Company, Income, Expense, and Interview information for their business plan using the Import Wizard. To start the wizard, click the Import company information from QuickBooks link of the section’s introductory screen.
You can also use the Step‐By‐Step Guide, located on the Help menu to guide you along the path of writing your business plan. The Step‐By‐Step Guide is always available and opens on top of your Ultimate Business Planner window to provide guidance and support at any point in writing your plan.
Navigating Ultimate Business Planner
The following icons and tools help you through your business plan:
SECTION TABS
Click section tabs at the top of your screen to move from Welcome to Company and so on as you answer the questions for each section and enter plan information.
PREVIOUS & NEXT BUTTONS
Click the Next button or use the shortcut key Alt + N to go to the next screen in a section. Click the Previous button or use the shortcut key Alt + P to go to the previous screen.
COMPLETION BAR
This displays your progression as you complete the Company and Interview sections. The Completion Bar shows the percentage complete at the top right of these section windows.
5 Ultimate Business Planner
INDEX BUTTON
To display a quick index of the questions asked in the Company and Interview sections. You also can use this list to jump to other questions within the sections.
Creating, Opening, and Saving Plans
Each of these actions is completed by accessing the File menu from the main menu bar at the top of your screen. You will also use the File menu to format plans, review plans, and preview/print plans.
• To save your plan, click File on the menu bar and select Save.
Note: Be sure to save your plan frequently. If you have not completed the plan or want to make changes to it, you can return to it at any time and make the necessary changes.
• To create a new plan after you saved a plan, click File and select New.
• To open an existing plan that you created, click File and select Open.
• To open sample business plans, click File and select Sample Plans.
• To close business plans, click File and select Close.
• To save the current plan with a different file name, click File and select Save As.
• To review the current plan, click File and select Review Business Plan.
• To select the format of your business plan, click File and select Plan Format.
• To preview your business plan, click File and select Preview Business Plan.
• To print your business plan, click File and select Print Business Plan.
• To exit the program, click File and select Exit.
Ultimate Business Planner on‐line Resources
The Resources menu gives you access to several resources for developing a business plan. Click Resources on the main menu bar at the top of your screen for selecting:
• Business Resources: a variety of small‐business resources including Internet links for additional information on‐line.
• Business Plan Samples: examples from other business plans, including the quick‐reference index of sample sections and topics, as well as twenty‐five complete sample plans.
• Loan Programs: short descriptions of various Small Business Administration (SBA) loan programs and Internet links for detailed information and on‐line loan applications.
Note: If you don’t have an Internet connection established, your default browser will issue the message "unable to locate server." You will then need to make a connection through your Internet service provider (ISP).
Company Section
The Company section asks various questions about setting up your business:
• company name • contact information • income tax form • customer credit policy • plan start date
Depending on your answers, you may not need to answer all questions.
When you have completed answering all the questions in the Company section, click to the next tab on the Ultimate Business Planner toolbar.
6 Ultimate Business Planner
Remember, if you don’t have all the answers you can continue with another section and complete the Company questions later. Just remember to save your plan. It’s a good idea to save your information frequently; for example, before you move on to the next section.
Note: If you use QuickBooks Pro/Premier/Enterprise 2003 (or later), you can import the information for this section by following the prompts from clicking the Import company information from QuickBooks link at the lower left hand corner. This option only appears on the opening screen of this section.
Your Company Name
Enter your company name as you would like it to appear on your business plan and financial projections. This is your “Doing Business As…” name.
Your Company Contact Information
Enter your company’s contact information, including contact name, street address, city, state, zip code, phone number, and fax number. Also, list your company’s website and email address. This information will appear on your business plan cover page.
For example: John Q. Smith, President Your Company, Inc. 1234 River Lane Flint, MI 48501 (810) 555‐1234 Phone (810) 555‐2345 Fax [email protected]
Your Company Income Tax Form
What income tax form will your company use? Since most company types (Sole Proprietor, Partnership, etc.) tax income at the personal level and not the business level, Ultimate Business Planner will only estimate taxes if you select Form 1120 (C Corporation).
Business types include:
• C Corporation • Limited Liability Company (LLC) • Partnership • S Corporation • Sole Proprietorship
Note: Refer to the glossary for definitions of business types, if needed. We recommend you consult a tax professional to completely assess your tax situation. If you decide to change your company type, simply come back here, select the new tax form, and Ultimate Business Planner will update your business plan.
Your Estimated Corporate Tax Rate
What is your estimated corporate tax rate? When you choose Form 1120 (C Corporation), you’ll need to enter your estimated corporate tax rate. Even though corporate taxes are usually paid quarterly, Ultimate Business Planner allocates monthly cash income tax payments in the month taxes occur. Any net losses will be automatically carried forward to months that have positive net income.
Your corporate tax rate is dependent upon your business’s net income and the state(s) in which you do business. Since state corporate taxes vary, you can choose to define your own tax rate. We’ve included the Tax Income for C Corporations table below to help you calculate the federal portion of your corporate tax rate.
After reviewing your financial projection, you may wish to re‐input a more appropriate tax rate for your situation. Simply return to this screen, input your new combined (federal and state) estimated tax rate, and Ultimate Business Planner will do the rest.
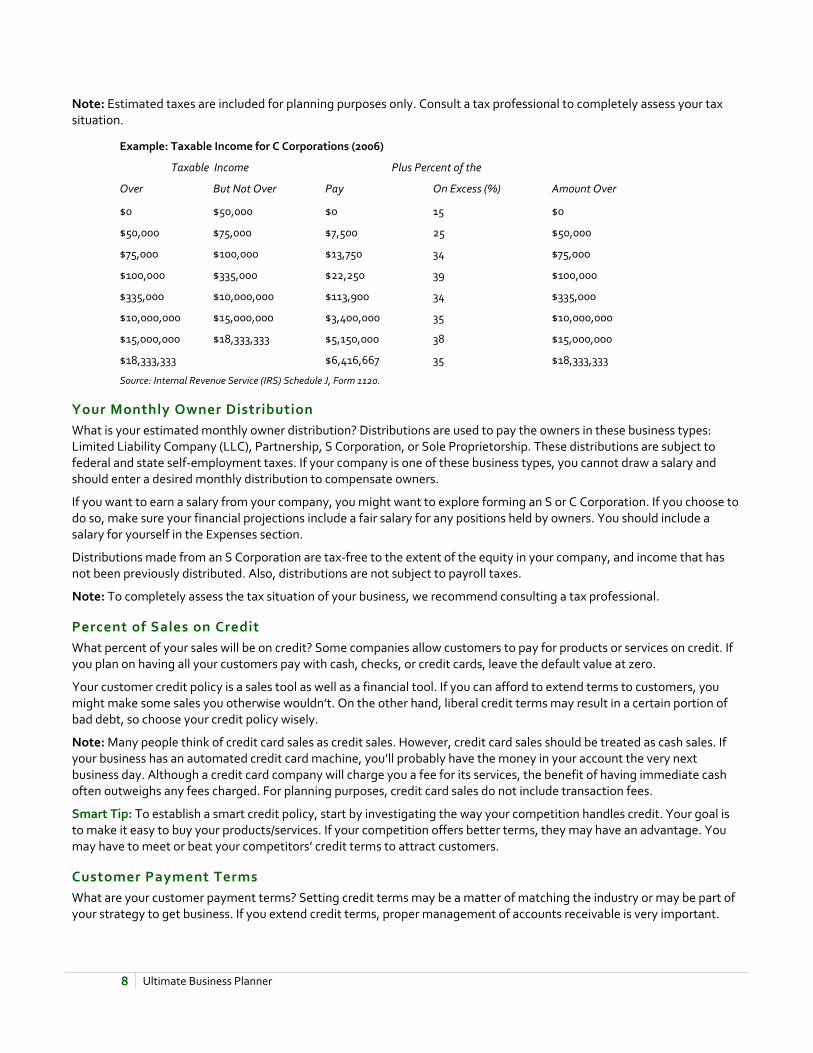
Note: Estimated taxes are included for planning purposes only. Consult a tax professional to completely assess your tax situation.
Example: Taxable Income for C Corporations (2006)
Taxable Income Plus Percent of the
Over But Not Over Pay On Excess (%) Amount Over
$0 $50,000 $0 15 $0
$50,000 $75,000 $7,500 25 $50,000
$75,000 $100,000 $13,750 34 $75,000
$100,000 $335,000 $22,250 39 $100,000
$335,000 $10,000,000 $113,900 34 $335,000
$10,000,000 $15,000,000 $3,400,000 35 $10,000,000
$15,000,000 $18,333,333 $5,150,000 38 $15,000,000
$18,333,333 $6,416,667 35 $18,333,333
Source: Internal Revenue Service (IRS) Schedule J, Form 1120.
Your Monthly Owner Distribution
What is your estimated monthly owner distribution? Distributions are used to pay the owners in these business types: Limited Liability Company (LLC), Partnership, S Corporation, or Sole Proprietorship. These distributions are subject to federal and state self‐employment taxes. If your company is one of these business types, you cannot draw a salary and should enter a desired monthly distribution to compensate owners.
If you want to earn a salary from your company, you might want to explore forming an S or C Corporation. If you choose to do so, make sure your financial projections include a fair salary for any positions held by owners. You should include a salary for yourself in the Expenses section.
Distributions made from an S Corporation are tax‐free to the extent of the equity in your company, and income that has not been previously distributed. Also, distributions are not subject to payroll taxes.
Note: To completely assess the tax situation of your business, we recommend consulting a tax professional.
Percent of Sales on Credit
What percent of your sales will be on credit? Some companies allow customers to pay for products or services on credit. If you plan on having all your customers pay with cash, checks, or credit cards, leave the default value at zero.
Your customer credit policy is a sales tool as well as a financial tool. If you can afford to extend terms to customers, you might make some sales you otherwise wouldn’t. On the other hand, liberal credit terms may result in a certain portion of bad debt, so choose your credit policy wisely.
Note: Many people think of credit card sales as credit sales. However, credit card sales should be treated as cash sales. If your business has an automated credit card machine, you’ll probably have the money in your account the very next business day. Although a credit card company will charge you a fee for its services, the benefit of having immediate cash often outweighs any fees charged. For planning purposes, credit card sales do not include transaction fees.
Smart Tip: To establish a smart credit policy, start by investigating the way your competition handles credit. Your goal is to make it easy to buy your products/services. If your competition offers better terms, they may have an advantage. You may have to meet or beat your competitors’ credit terms to attract customers.
Customer Payment Terms
What are your customer payment terms? Setting credit terms may be a matter of matching the industry or may be part of your strategy to get business. If you extend credit terms, proper management of accounts receivable is very important.
8 Ultimate Business Planner
Percent of Uncollectible Credit Sales
What percent of credit sales will be uncollectible? It’s an unfortunate fact of doing business, but most companies that offer credit terms will incur some bad debt. Since you elected to offer credit terms to your customers, Ultimate Business Planner needs to know what percent of credit sales will be uncollectible to generate an accurate financial projection. This percent will vary based upon your kind of business, to whom you extend credit, and your credit terms.
Not sure what to enter? For planning purposes, Ultimate Business Planner defaults to 2% as a bad debt allocation. This may be high or low depending upon your business and your credit terms.
Your Business Plan Start Date
When do you want your business plan and financial projection to start? You have the power to easily project 60 month’s worth of financial information for your company, so you can see how your decisions and choices will affect your operations in both the short and long term.
Note: If your plans change, you can always come back and change your start date.
Your Company Section is Complete
When you’ve completed the Company section,
• click the Next button • or, click the Income tab
to continue to the Income section of your business plan.
Income Section (standard version only)
The Income worksheet allows you to define income categories and enter your projected monthly income. You can complete your projection using the worksheet functions or if you are currently using QuickBooks Pro/Premier/Enterprise 2003 (or later), you can import historical data to complete your projection.
• Define your income categories before entering monthly amounts. • Enter estimated income for 60 months, especially if you will seek financing. Most lenders require a minimum of 36 to
60 months of projected income. • Because you are estimating your monthly amount, enter only whole numbers.
Remember, if you don’t have all the answers you can continue with another section and complete the Income worksheet later. Just remember to save your plan. It’s a good idea to save your information frequently; for example, before you move on to the next section.
Note: If you use QuickBooks Pro/Premier/Enterprise 2003 (or later), you can import the information for this section by following the prompts from clicking the Import company information from QuickBooks link at the lower left hand corner. This option only appears on the opening screen of this section.
Defining Income Categories & Cost of Goods Sold (COGS)
TO DEFINE OR EDIT INCOME CATEGORIES AND COST OF GOODS SOLD (COGS):
1) Select the row header in the Income Category column. 2) Click the Edit Row Properties button or double‐click on the row header. The Row Properties dialog box appears. 3) Enter a Description of the income category, such as the name of the product or service you are selling. For
example, a Vacuum Shop might enter “Vacuum Sales” for row 01. 4) Enter the Cost of goods sold (COGS) information, if any:
• Material • Labor • Other
9 Ultimate Business Planner
5) Enter the percent of every dollar that pays for these costs. 6) Click the OK button to return to the worksheet and begin entering your monthly income data.
TO SORT YOUR WORKSHEET BY INCOME CATEGORIES:
1) Click the Sort button. 2) Click Description in the Sort By column. 3) Choose Descending or Ascending in the Sort Order column. 4) Click OK.
Entering Your Monthly Income Projection
There are three methods you can use to enter your monthly income data:
• Manual (cell‐by‐cell) • Automatic (using a combination of the worksheet functions) • Import (take existing data from your files if you are currently using QuickBooks Pro/Premier/Enterprise 2003 or later)
TO MANUALLY ENTER YOUR MONTHLY INCOME PROJECTION:
1) Select a cell in the appropriate monthly column. 2) Enter a value in the cell. Because you are building an estimate, use only whole numbers. 3) Press the Enter key, Tab key, or appropriate Arrow key to move to the next column or cell.
TO SORT YOUR WORKSHEET BY INCOME AMOUNTS:
1) Click the Sort button. 2) Click Amount in the Sort By column. 3) Choose Descending or Ascending in the Sort Order column. 4) Click OK.
Your Income Section is Complete
When you’ve completed the Income section,
• click the Next button • or, click the Expenses tab
to continue to the Expenses section of your business plan.
Expenses Section (standard version only)
The Expenses worksheet allows you to define expense categories and enter your projected monthly expenses. You can complete your projection using the worksheet functions or if you are currently using QuickBooks Pro/Premier/Enterprise 2003 (or later), you can import historical data to complete your projection.
• Define your expense categories before entering monthly amounts. • Enter estimated expenses for 60 months, especially if you will seek financing. Most lenders require a minimum of 36 to
60 months of projected expenses. • Because you are estimating your monthly amount, enter only whole numbers.
Remember, if you don’t have all the answers you can continue on with another section and complete the Expenses worksheet later. Just remember to save your plan. It’s a good idea to save your information frequently; for example, before you move on to the next section.
10 Ultimate Business Planner
Note: If you use QuickBooks Pro/Premier/Enterprise 2003 (or later), you can import the information for this section by following the prompts from clicking the Import company information from QuickBooks link at the lower left hand corner. This option only appears on the opening screen of this section.
Defining Expense Categories
TO DEFINE OR EDIT EXPENSE CATEGORIES:
1) Select the row header in the Expense Category column. 2) Click the Edit Row Properties button or double‐click the row header. The Row Properties dialog box appears. 3) Enter a short Description for the expense category, such as Advertising, Insurance, Office Supplies, Rent, or
Repairs and Maintenance. 4) Click the OK button to return to the worksheet and begin entering your monthly expenses.
TO SORT YOUR WORKSHEET BY EXPENSE CATEGORIES:
1) Click the Sort button. 2) Click Description in the Sort By column. 3) Choose Descending or Ascending in the Sort Order column. 4) Click OK.
Entering Your Monthly Expenses Projection
There are three methods you can use to enter your monthly income data:
• Manual (cell‐by‐cell) • Automatic (using a combination of the worksheet functions) • Import (take existing data from your files if you are currently using QuickBooks Pro/Premier/Enterprise 2003 or later)
TO MANUALLY ENTER YOUR MONTHLY EXPENSES PROJECTION:
1) Select a cell in the appropriate monthly column. 2) Enter a value in the cell. Because you are building an estimate, use only whole numbers. 3) Press the Enter key, Tab key, or appropriate Arrow key to move to the next column or cell.
TO SORT YOUR WORKSHEET BY EXPENSE AMOUNTS:
1) Click the Sort button. 2) Click Amount in the Sort By column. 3) Choose Descending or Ascending in the Sort Order column. 4) Click OK.
Your Expenses Section is Complete
When you’ve completed the Expenses section,
• click the Next button • or, click the Interview tab
to continue to the Interview section of your business plan.
11 Ultimate Business Planner
Entering Worksheet Data (standard version only)
Worksheet Basics
TO MAKE A MANUAL ENTRY IN A WORKSHEET:
1) Select a cell in the appropriate monthly column. 2) Enter a value in the cell. Because you are building an estimate, use only whole numbers. 3) Press the Return key, Tab key, or appropriate Arrow key to move to the next column or cell.
Worksheet Functions
Worksheet data can be automatically entered using these functions:
• Repeat Data • Add an Annual Growth Factor • Raise or Lower a Value by a Percentage
TO USE A WORKSHEET FUNCTION:
1) Select the data in a cell, or group of cells, to be changed. To select the entire row, click the row header (i.e., 01). 2) Click the Functions button or right‐click the row and select Functions on the shortcut menu. 3) Select Repeat, Annual Growth Factor, or Raise/Lower. 4) Enter a percentage if you are using Annual Growth Factor, or Raise/Lower. 5) Click the OK button. The cells you selected are automatically changed in your worksheet.
Loan Calculator
Ultimate Business Planner has a built‐in loan calculator to help you enter your loan information and compute unknown values in the Interview section. For example, if you know a Standard Loan's Amount Financed, A.P.R., and Term, Ultimate Business Planner can calculate the Monthly Payment for you.
The Loan Calculator allows you to change a cell, or cells, and then it automatically calculates the new value needed. You’ll see your Calculate button text change to “Recalculate,” as needed.
TO USE THE LOAN CALCULATOR:
1) Click the cells to enter the information you know. 2) Next, click the cell you need calculated. It becomes highlighted and the Calculate button displays the column
value it will compute. 3) Click the Calculate button, and the value will automatically be entered for you.
Automatically Entering Worksheet Data
Worksheet data can be automatically entered using these functions:
• Repeat Data • Add an Annual Growth Factor • Raise or Lower a Value by a Percentage
TO USE A WORKSHEET FUNCTION:
1) Select the data in a cell, or group of cells, to be changed. To select the entire row, click the row header (i.e., 01). 2) Click the Functions button or right‐click the cell and select Functions on the shortcut menu.
12 Ultimate Business Planner
3) Select Repeat, Annual Growth Factor, or Raise/Lower. 4) Enter a percentage if you are using Annual Growth Factor, or Raise/Lower. 5) Click the OK button. The cells you selected are automatically changed in your worksheet.
Copying and Pasting Data
TO COPY AND PASTE WORKSHEET DATA:
1) Select a cell with the value you want to copy. 2) Click the Copy button or right‐click the cell and select Copy on the shortcut menu. 3) Select a cell or range of cells to paste the copied value. 4) Click the Paste button or right‐click the cell and select Paste on the shortcut menu.
Repeating Data
TO USE THE REPEAT FUNCTION:
1) Enter a value in a cell. 2) Click the row header (i.e., 01) to select the entire row. 3) Click the Functions button or right‐click the row and select Functions on the shortcut menu. 4) Select Repeat in the Functions dialog box. 5) Click the OK button. The first value is entered in all the cells within the selected row.
Note: The Repeat function can start on your choice of cells. Simply select the starting cell, enter the amount, and follow steps 2 through 5 above.
Adding an Annual Growth Factor
You can increase your worksheet values with an Annual Growth Factor, or percentage by which income and cost of goods sold (COGS) will increase over a one‐year period. Each cell value is increased cumulatively by the specified annual percentage rate, which is computed monthly.
TO ADD AN ANNUAL GROWTH FACTOR:
1) Select a range of cells in the row you want to increase, or click the row header to select the entire row. 2) Click the Functions button or right‐click the row and select Functions on the shortcut menu. 3) Select Annual Growth. 4) Enter a value in the Percentage text box. For example, “10.” 5) Click the OK button.
Raising or Lowering a Value by a Percentage
Each cell value is increased or decreased by a specified percentage.
TO RAISE OR LOWER A VALUE BY A PERCENTAGE:
1) Select a cell or range of cells in the row you want to increase or decrease by a specified percent, or click the row header to select the entire row.
2) Click the Functions button or right‐click and select Functions on the shortcut menu. 3) Select Raise or Lower. 4) Enter a value in the Percentage text box. For example, “10.” 5) Click the OK button.
Editing Worksheet Data
TO CUT AND PASTE WORKSHEET DATA:
13 Ultimate Business Planner
1) Select a cell with the value you want to cut. 2) Click the Cut button or right‐click the cell and select Cut on the shortcut menu. 3) Select a cell or range of cells to paste the copied value. 4) Click the Paste button or right‐click the cell and select Paste on the shortcut menu.
TO DELETE DATA FROM THE WORKSHEET:
1) Select one or more cells in the worksheet, or click the row header to select the entire row.
2) Press the Delete key, or click the Delete button, or right‐click the cell(s) and select Delete on the shortcut menu.
TO MOVE DATA IN THE WORKSHEET:
1) Select a cell or range of cells in a row that you want to move.
2) Click and drag the selection border to the desired cell.
Using QuickBooks Data
If you are building a plan for an existing business and you are currently using QuickBooks Pro, Premier, or Enterprise 2003 (or later), the import feature can help you complete the Company, Income, Expenses, and Interview sections. Each introduction screen in these sections gives you a prompt to import the information needed.
An Import Wizard helps you identify exactly what information you want to import from your QuickBooks file. By simply answering the questions in the wizard, you will complete the import.
After your information is automatically placed, you still have the option to make changes.
TO USE THE IMPORT WIZARD:
1) Click the “Import from QuickBooks” link. A dialog box will appear requesting permission to access your company file in QuickBooks. Note: Your QuickBooks company file must be open. If you do not have your QuickBooks company file open, you will receive a message prompting you to do so.
2) Select an access option: Yes, this time or Yes, Always. The Import Wizard will be launched. 3) Click the Next button when you are ready to continue importing your QuickBooks data. 4) Select the business plan start date. 5) Select your projection option, if appropriate:
• I want to project manually. • Use the last 12 months of history. • Compute a monthly average from last 12 months.
6) Apply an annual growth percentage, if appropriate. 7) Click the check boxes of the categories you want to import. An unchecked category will not be imported. 8) Click the Finish button to complete the Import Wizard. Your data will appear in the section.
Viewing Worksheet Data (standard version only)
Viewing a Graph
TO VIEW YOUR INCOME OR EXPENSES WORKSHEET PROJECTION IN A GRAPH:
1) Click the View Graph button. The preview window displays your projection graph.
14 Ultimate Business Planner
2) Click the button for the year you would like to view, or click the summary button for a summary of all three years. 3) To display the graph in 3D, click the checkbox in the upper right corner. 4) Click the Print button to print the displayed graph, or click Export to export the displayed graph to Excel. 5) Click the Close button to return to your worksheet.
Viewing a Report
TO VIEW YOUR INCOME OR EXPENSE WORKSHEET PROJECTION IN A REPORT:
1) Click the View Report button. The preview window displays your projection report. 2) Click the button for the year you would like to view, or click the Summary button for a summary of all three years. 3) Click the Print button to print the displayed report, or click Export to export the displayed graph to Excel. 4) Click the Close button to return to your worksheet.
Interview Section (standard version only)
This section features a step‐by‐step interview to gather detailed information about your company’s assets, liabilities, and equity. Ultimate Business Planner automatically calculates the cash required at the beginning of your projection. To determine the cash required, you will answer questions about:
• Beginning account balances • Minimum cash balance • Inventory and supplier terms • Amortization and depreciation • Assets you own or need to buy • Cash available to invest (if required) • Loans to secure funds (if required)
Remember, if you don’t have all the answers you can continue with another section and complete the Interview questions later. Just remember to save your plan. It’s a good idea to save your information frequently; for example, before you move on to the next section.
Note: If you use QuickBooks Pro/Premier/Enterprise 2003 (or later), you can import the information for this section by following the prompts from clicking the Import company information from QuickBooks link at the lower left hand corner. This option only appears on the opening screen of this section.
Beginning Balances for Asset Accounts
Enter your projected beginning balances for the assets listed. The numbers reflect your projected beginning balances for the asset accounts listed.
Note: If you import your account balances from QuickBooks and don’t expect any significant changes between your current account balances and the balances at the beginning of your projection, you don’t have to change the numbers.
Minimum Bank Balance
Enter your minimum bank balance. This is the amount of cash your company must maintain at all times.
Your Company's Inventory
Will your company maintain inventory for the purpose of selling products or services? Select the accounts used for inventory, if any.
Any accounts selected will be used to satisfy your projected material cost of goods sold (COGS) requirement in the Income section.
Inventory Suppliers' Payment Terms
15 Ultimate Business Planner
What payment terms will inventory suppliers extend to you? Enter an averaged amount.
16 Ultimate Business Planner
Fixed Inventory Level
Will your company maintain a fixed inventory level? Ultimate Business Planner has two options for calculating your inventory level: Fixed and Variable.
Fixed: You should use a fixed system if your company needs to keep the same amount of inventory on‐hand at all times. For a fixed system, you’ll need to enter the dollar amount of the inventory you wish to keep on‐hand. Most retail operations maintain a fixed inventory level. As sales increase, your inventory will turn over more often.
Variable: A variable system ties your inventory level to your income projection. For a variable system, you’ll need to enter how many days’ worth of inventory your company needs to keep on‐hand. A variable inventory level assumes inventory can fluctuate infinitely and there is no minimum inventory level.
Inventory On‐hand
As your income projection increases, Ultimate Business Planner will automatically purchase inventory sufficient to meet your projected demand. Similarly, if your income projection decreases, Ultimate Business Planner will purchase only the inventory needed to meet your projected decline.
• How many days’ worth of inventory would you like to keep on‐hand? You will establish inventory on‐hand by days’ worth when you have variable inventory.
• How many dollars’ worth of inventory would you like to keep on‐hand? You will establish inventory on‐hand in a dollar amount when you have fixed inventory.
Annual Amortization for Other Asset Accounts
Enter the estimated annual amortization for the other asset accounts listed on your screen. Enter amounts for the years displayed at the bottom of your screen.
Annual Depreciation for Fixed Assets
Depreciation is nothing more than a reduction of asset value over time. For example, the computer or car you own today is not worth what you purchased it for.
Enter the estimated annual depreciation for each of the fixed assets that are displayed on your screen.
Asset Purchases at Beginning of Projection
Will your company need to purchase assets at the beginning of your projection? If so, enter each one in the New Asset List.
In the worksheet, enter the assets your company will need to purchase at the beginning of your projection, along with the Description, Category, and Total Cost.
Description: The name of the asset or group of assets.
Category: This indicates whether the asset is Land, Building, Equipment, or a Start‐up cost. Assets are automatically depreciated (straight‐line method) based on their selected category and associated life. All Start‐up costs are automatically amortized evenly over a 5‐year (60‐month) period. The chart below will help you classify the assets you need to purchase for your company.
Total Cost: The total amount, inclusive of all taxes, shipping, and any other costs, incurred to acquire the asset. For example, if you need a delivery van that has a price of $18,900, be sure to include all the additional costs you have to pay to drive the vehicle off the lot.
17 Ultimate Business Planner
Asset Classification Table
Category Life Description
Land Non‐depreciable The land where your business resides.
Land ‐ Improvements 15 years Includes sidewalks, driveways, parking lots, fences, and landscaping.
Building 39 years Buildings you own and use for your place of business.
Building ‐ Apartments 29.5 years Property you rent to others as part of your business.
Building ‐ Improvements 39 years Includes remodeling, additions, and renovations to an existing facility.
Building ‐ Signage 15 years Includes permanent displays, such as signs and reader boards.
Equipment ‐ Automobiles 5 years Includes cars used for taxis/limousine services, trucks, and vans.
Equipment ‐ Manufacturing 5 years Includes specialized equipment used to make products.
Equipment ‐ Office/Business 5 years Includes equipment used in the course of business, such as computers and peripherals, fax machines, telephones, copiers, calculators, and cash registers.
Equipment ‐ Office Furniture 7 years Includes desks, chairs, filing cabinets, and shelving.
Equipment ‐ Store Fixtures 7 years Includes shelving, racks, display cases, and counters.
Equipment ‐ Other 5 years Includes any other equipment not elsewhere classified.
Start‐up ‐ Advertising 5 years Includes monies paid to promote your business before opening, such as brochures, business cards, and newspaper /TV/radio ads.
Start‐up ‐ Deposits Non‐depreciable Includes refundable security deposits for rent and utilities.
Start‐up ‐ Legal & Consulting Fees
5 years Includes monies paid to accountants, lawyers, and consultants to help you start your business.
Start‐up – Non‐amortized Non‐depreciable Includes assets such as patents, licenses, trademarks, goodwill, intangibles, or any other item that should not be amortized or depreciated.
Start‐up ‐ Supplies 5 years Includes consumable goods needed to help you start your business, such as paper, staples, pens, pencils, and notepads.
Start‐up ‐ Other 5 years Includes any other start‐up expenses not
18 Ultimate Business Planner
elsewhere classified.
Source: Internal Revenue Service (IRS) Schedule J, Form 1120.
Vendor Financing for Asset Purchases
Will you be using any vendor financing to pay for any of the new assets?
If a vendor’s loan terms are more favorable than your bank’s, you may wish to use vendor financing to purchase assets. For example, a car company may offer you a more competitive financing option on new vehicle purchases than your local bank. Even if the terms are not as favorable, vendor financing may be a better choice because the risk is distributed to multiple partners. Any amount not covered by vendor financing will need to be paid with cash, loan, or line of credit.
If so, enter each in the Vendor Loan List.
In the worksheet, enter your vendor loans, along with the Loan Description, Loan Type, Amount Financed, A.P.R. (Annual Percentage Rate), Monthly Payment, and Term.
Loan Description: The name of loan.
Loan Type: You can enter two different types of loans: Standard and One‐Pay.
A Standard loan is a loan that is formalized with fixed monthly principal and interest payments. Most loans fall into this category.
A One‐pay loan is a loan where you make only interest payments until the principal is due. An example of a One‐pay loan is when an investor loans you $6,000.00 at 10% interest and expects repayment at the end of 2 years (24 months). You would make monthly interest payments of $50.00 for months 1 through 23, and in month 24 you would make a final payment of $6,050.00.
Amount Financed: The principal amount of the loan.
A.P.R.: The Annual Percentage Rate of a loan, usually listed as a loan’s nominal interest rate.
Monthly Payment: The combined amount of principal and interest you pay on the loan each month.
Term: The length of the loans in months.
Smart Tip: Use the Ultimate Business Planner built‐in loan calculator to help you enter your loan information and compute unknown values. For example, if you know a Standard Loan's Amount Financed, A.P.R., and Term, Ultimate Business Planner can calculate the Monthly Payment for you.
The Loan Calculator allows you to change a cell, or cells, and then it automatically calculates the new value needed. You’ll see your Calculate button text change to “Recalculate,” as needed. For a Standard Loan, Ultimate Business Planner needs three values to compute the fourth. If you are entering a One‐pay loan, Ultimate Business Planner requires all three values. There is no monthly principal payment for One‐pay loans.
Beginning Balances for Liability Accounts
Enter your projected beginning balances for the liability accounts:
• Accounts payable • Credit Card • Other current liabilities • Long‐term liabilities
Note: If you import your account balances from QuickBooks and don’t expect any significant changes between your current account balances and the balances at the beginning of your projection, you don’t have to change these numbers. All Other Current Liability account balances will remain constant during the projection except for Line‐of‐Credit accounts.
How much of your current Accounts Payable balance is for inventory you already have on‐hand? Enter this amount, if any. It will be paid in accordance with your inventory supplier terms.
Note: All Other Current Liability account balances will remain constant during the projection.
19 Ultimate Business Planner
Your Line‐of‐Credit Limit
First, you will select accounts used for lines of credit, if any. You will then be asked, What is your total Line‐of‐Credit Limit?
Ultimate Business Planner will combine all of your Credit Card and Line‐of‐Credit accounts into one account. The total limit of all your Line‐of‐Credit accounts is defined by any available credit you have that will be used to cover monthly cash shortfalls, as needed. Additionally, as cash is available, your Line‐of‐Credit account(s) will be automatically repaid. If you exceed your total Line‐of‐Credit Limit, it will be indicated on your Cash Plan.
If you’ve established Line‐of‐Credit accounts, you will also be asked, What is the average interest rate on your Line‐of‐Credit accounts?
Your Long‐term Loans
In the worksheet, enter loan information for your Long Term Liability accounts, along with the Loan Description, Loan Type, Amount Financed, A.P.R. (Annual Percentage Rate), Monthly Payment, and Term.
Loan Description: The name of loan.
Loan Type: You can enter two different types of loans: Standard and One‐Pay.
A Standard loan is a loan that is formalized with fixed monthly principal and interest payments. Most loans fall into this category.
A One‐pay loan is a loan where you only make interest payments until the principal is due. An example of a One‐pay loan is when an investor loans you $6,000.00 at 10% interest and expects re‐payment at the end of 2 years (24 months). You would make monthly interest payments of $50.00 for months 1 through 23, and in month 24 you would make a final payment of $6,050.00.
Remaining Balance: The amount of principal still owed on the loan.
A.P.R.: The Annual Percentage Rate of a loan, usually listed as a loan’s nominal interest rate.
Monthly Payment: The combined amount of principal and interest you pay on the loan each month.
Months Remaining: The number of monthly payments still unpaid.
Note: Do not formalize line of credit amounts if you included this amount in the line of credit balance question. If you entered a line of credit balance, Ultimate Business Planner will automatically calculate your line of credit balance.
Smart Tip: Use the Ultimate Business Planner built‐in loan calculator to help you enter your loan information and compute unknown values. For example, if you know a Standard Loan's Amount Financed, A.P.R., and Term, Ultimate Business Planner can calculate the Monthly Payment for you. The Loan Calculator allows you to change a cell, or cells, and then it automatically calculates the new value needed. You’ll see your Calculate button text change to “Recalculate,” as needed.
Note: For a Standard Loan, Ultimate Business Planner needs three values to compute the fourth. If you are entering a One‐pay loan, Ultimate Business Planner requires all three values. There is no monthly principal payment for One‐pay loans.
Amount of Cash You're Investing
At the beginning of your projection, your company will require $$$$ in the form of a cash investment, additional loans, or both.
What is the total amount of cash you have available to invest?
Depending on your input, your company may require additional funds. If so, don’t worry. The amount shown is what your company needs to get going in the form of cash. Simply enter the amount of cash you have, or are willing to invest. If you enter an amount in excess of what is needed, the excess will show up in Cash on your Beginning Balance Sheet. If there’s a remaining balance your company still needs, you’ll need to secure that amount via a loan or your Line of Credit.
To see what happens if you borrow all the money your company needs, set your cash investment to zero. On the other hand, if you don’t want to borrow money at all, input a cash investment amount that’s equal to the amount shown above.
20 Ultimate Business Planner
Due to cash flow and profitability, your company may require an amount of cash greater than what is required at the beginning of your projection.
Note: If you have not set up a formal line of credit (and for most companies, it is recommended that you do), your credit limit will be set to zero. If you go over your credit limit, Ultimate Business Planner will indicate the month you first exceeded your line of credit limit on your Cash Plan.
Financing Secured for Start‐up Funds
$$$$ will need to be financed. List any specific financing you can arrange to secure this amount.
Ultimate Business Planner will automatically charge any remaining amount to your line of credit.
In the worksheet, enter any loans you will be using to secure funds, along with the Loan Description, Loan Type, Amount Financed, A.P.R. (Annual Percentage Rate), Monthly Payment, and Term.
Any remaining, unsecured amount will be automatically charged to your Line of Credit. Even if you did not enter a line of credit limit and interest rate, Ultimate Business Planner will automatically borrow the money your company needs. If your company requires more cash than is available, or can be borrowed, the month in which you exceeded your line of credit limit will be indicated on your Cash Plan.
The Loan Calculator allows you to change a cell, or cells, and then it automatically calculates the new value needed. You’ll see your Calculate button text change to “Recalculate,” as needed.
Note: For a Standard Loan, Ultimate Business Planner needs three values to compute the fourth. If you are entering a One‐pay loan, Ultimate Business Planner requires all three values. There is no monthly principal payment for One‐pay loans.
Additional Asset Purchases
Will your company need to purchase additional assets during your projection? If so, enter each in the worksheet, along with the Month, Description, Category, and Total Cost.
Additional Loans
If your company needs new assets during the projection period, and the purchases will require additional loans, enter each in the worksheet, along with the Month, Description, Category, and Total Cost.
Month: The month during the projection in which the asset will be purchased.
Description: The name of the item or group of assets.
Category: Indicates whether the asset is Land, Building, Equipment, or a Start‐up cost. Assets are automatically depreciated (straight‐line method) based on their selected category and associated life. All start up costs are automatically amortized evenly over a 5 year (60‐month) period. The chart below will help you classify the assets you need to purchase for your company.
Total Cost: The total amount, inclusive of all taxes, shipping, and any other costs, incurred to acquire the asset. For example, if you need a delivery van that has a sticker price of $18,900, be sure to include all the additional costs you have to pay to drive the vehicle off the lot.
For additional reference, see the Asset Classification Table.
Your Interview Section is Complete
When you’ve completed the Interview section,
• Click the Next button • or, click the Plan tab
to continue to the Plan section of your business plan.
21 Ultimate Business Planner
Note: When you have completed all your Interview section, review your entries for accuracy before beginning your plan. You can do this by reviewing the following reports and graphs: Beginning Balance Sheet, Profit & Loss, Balance Sheet, and Cash Plan.
Viewing and Printing Financials (standard version only)
The financials can be accessed through the Reports and Graphs menus.
Types of Reports
INCOME PROJECTION
The Income Projection report lists revenue by income category. These values are derived from information you entered in the Income worksheet.
EXPENSE PROJECTION
The Expense Projection report lists expenses by category. These values are derived from the information you entered in the Expenses worksheet.
BEGINNING BALANCE SHEET
The Beginning Balance Sheet lists the beginning balances of assets, liabilities, and equity. Following is a description of the Beginning Balance Sheet Report.
Assets: Items of worth to the business. Examples include cash, inventory, land, and equipment.
• Current assets: Assets that are either cash, will turn into cash, or will be used up within one year. • Cash: The amount of cash on‐hand in the business. • Accounts Receivable: (Only when data has been imported from QuickBooks.) • Inventory: Items the business owns and intends to sell to customers. • Other Current Assets: (Only when data has been imported from QuickBooks.) • Total current assets: The sum of all current assets. • Fixed Assets (net): The sum of all property including land, plant, and equipment owned by the business (net of
depreciation). Newly acquired Fixed Assets are automatically depreciated evenly (straight‐line method) based on their selected category and associated life in the Interview section. If the data was imported from QuickBooks, Fixed Assets are depreciated based on the depreciation amounts you entered for year 1, year 2, year 3, year 4 and year 5.
• Other assets (net): Deposits and start‐up costs (net of amortization). Start‐up costs specified in the Interview section are automatically amortized evenly over 60 months. Deposit balances are not amortized. If the data was imported from QuickBooks, Other Assets balances are amortized based on the amortization amounts you entered for year 1, year 2, year 3, year 4 and year 5.
• Total assets: The sum of all assets.
Liabilities: The debt the business owes.
• Current liabilities: The balance of debt the business must pay within one year. • Accounts payable (inventory): The amount owed for inventory purchased on credit terms from suppliers. The
Beginning Balance Sheet may indicate a balance if the business requires inventory, and credit terms of net 30 or longer have been established.
• Line of credit: A short‐term loan that extends the cash available to the business. • Notes payable: Formal loans due in less than one year. • Current maturities of long‐term liabilities: The sum of principal payments from long‐term debt due in less than
one year. The value shown is net of interest expense.
22 Ultimate Business Planner
• Accrued Liabilities: (Only when data has been imported from QuickBooks.) • Total current liabilities: The sum of all current liabilities. • Long‐term liabilities (net): The sum of principal payments from long‐term debt due beyond one year (net of
interest expense). Long‐term liabilities are formal loans where the term of the loan is greater than one year. • Total liabilities: The total amount owed by the business.
Equity: The owner’s investment in the business.
• Contributed cash: The amount of cash contributed to the business. • Assets transferred in: The total current market value of the assets contributed to the business. • Less debt transferred in: The amount of money owed on the assets contributed to the business. • Total equity: The total investment in the business by the owner(s). • Total liabilities and equity: The total investment in the business by the owner(s) and creditor(s). • Debt‐to‐equity ratio: A financial ratio that describes the relationship between total liabilities and total equity.
PROFIT AND LOSS
The Profit & Loss (P&L) report lists income, expenses, and net income. Following is a description of the Profit and Loss Report.
Income: Revenue generated from the sale of products and services to customers. This value is derived from information entered into the Income worksheet.
• Less cost of goods sold: Costs associated with the products and services sold. • Material: The raw material cost of the products and services being sold. • Labor/benefits/taxes: The additional employee costs that will be incurred when products or services are sold. If
you indicated a payroll tax/employee benefits percent in the Company section, Ultimate Business Planner automatically adds this percent to any value input for product/service labor or payroll costs.
• Other costs of goods sold: Any costs of products or services other than material and labor.
Gross profit: Sales minus cost of sales.
• Operating expenses: Any expenses other than cost of sales required to run the business. These values are derived from the Expenses worksheet.
• Bad debt: The portion of credit sales indicated in the Company section that will be uncollectible. • Amortization: The amount of start‐up costs expensed each month. Ultimate Business Planner automatically
expenses the total value of the start‐up costs in the Interview section equally over 5 years. Deposit balances are not amortized. If you imported data from QuickBooks, Other Assets balances are amortized based on the amortization amounts you entered for year 1, year 2, year 3, year 4 and year 5.
• Depreciation: The amount of the property, plant, and equipment costs expensed each month. Ultimate Business Planner automatically expenses (depreciates) the value of the property, plant, and equipment based upon the asset categories selected in the Interview section. If you imported data from QuickBooks, Fixed Assets are depreciated based on the depreciation amounts you entered for year 1, year 2, year 3, year 4 and year 5.
• Total operating expenses: The sum of all operating expenses. • Operating income: Gross profit minus total operating expenses. • Interest expense: The cost of borrowing money. The interest portion of loan payments. • Net income before taxes: The amount gross profit exceeds expenses before estimated taxes (C Corporations
only). • Estimated taxes: The amount of net income estimated to pay federal and state taxes (C Corporations only).
Net income: Operating income minus interest expense and estimated taxes (C Corporations only). For all other business types, net income is operating income minus interest expense.
BALANCE SHEET
The Balance Sheet lists the balances of your assets, liabilities, and equity as of a specific date. Following is a description of the Balance Sheet Report.
23 Ultimate Business Planner
Assets: Items of worth to the business. Examples include cash, inventory, land, and equipment.
• Current assets: Assets that are either cash, will turn into cash, or will be used up within one year. • Cash: The amount of cash on‐hand in the business. • Accounts receivable (net): Money owed to the business by customers for credit sales (net of bad debt). If you
imported data from QuickBooks, this is the sum of all Accounts Receivable accounts. This amount will be received into the projection based on the credit term information you entered in the Company section.
• Inventory: Items the business owns and intends to sell to customers. • Other Current Assets: (Only when data has been imported from QuickBooks.) • Total current assets: The sum of all current assets. • Property, plant and equipment (net): Land, buildings, and equipment owned by the business (net of depreciation).
Land is not depreciated. • Fixed Assets (net): The sum of all property including land, plant, and equipment owned by the business (net of
depreciation). Newly acquired Fixed Assets are automatically depreciated evenly (straight‐line method) based on their selected category and associated life in the Interview section. If the data was imported from QuickBooks, Fixed Assets are depreciated based on the depreciation amounts you entered for year 1, year 2, year 3, year 4 and year 5.
• Other assets (net): Deposits and start‐up costs (net of amortization). Organizational costs are amortized, or expensed, over 5 years. Deposits are not amortized. Other Assets balances imported from QuickBooks are amortized based on the amortization amounts you entered for year 1, year 2, year 3, year 4 and year 5.
• Total assets: The sum of all assets.
Liabilities and Equity: The debt the business owes and the owner’s investment in the business.
• Current liabilities: The balance of debt the business must pay within one year. • Accounts payable: The amount owed for inventory purchased on credit from suppliers. The Balance Sheet may
indicate a balance if the business requires inventory and credit terms of net 30 or longer have been established. • Line of credit: A short‐term loan that extends the cash available to the business. • Notes payable: Formal loans due in less than one year. • Current maturities: The sum of principal payments from long‐term debt due in less than one year. The value
shown is net of interest expense. • Accrued Liabilities: (Only when data has been imported from QuickBooks.) • Total current liabilities: The sum of all current liabilities. • Long‐term liabilities (net): The sum of principal payments from long‐term debt due beyond one year (net of
interest expense). Long‐term liabilities are formal loans where the term of the loan is greater than one year. • Total liabilities: The total amount owed by the business. • Equity: The owner’s investment in the business. • Total liabilities and equity: The total investment in the business by the owner(s) and creditor(s).
CASH PLAN
The Cash Plan lists the cash the business will generate from sales and use for expenses. The Cash Plan also shows how much cash will be left over or how much additional cash the business needs. Following is a description of the Cash Plan Report.
• Cash receipts: The cash received from the sale of products and services. The time the business receives cash may be different from the time the Profit & Loss reports income if you plan on extending credit terms of net 30 or longer to your customers.
• Operating cash expenses: Cash paid for the business’s purchases of inventory, supplies, labor, and all other expenses.
• Inventory purchases: Cash paid for buying inventory. • Other costs of sales: Cash paid for all non‐inventory costs directly related to sales. • Other expenses: Cash paid for all expenses not directly related to sales. These values are derived from the
Expense worksheet. • Estimated taxes: Cash paid for estimated federal and state taxes (C Corporations only).
24 Ultimate Business Planner
• Total operating cash exp.: The sum of all operating cash expenses. • Cash from operations: The subtotal of cash generated by the business, which can be used for paying principal,
interest, and owners. • Principal payments: Cash paid to reduce the principal balance on loans. • Interest payments: Cash paid for interest on loans. • Net cash after debt service: A subtotal showing the cash generated by the business that can be distributed to
owners or reinvested in the business. • Distributions: Cash paid to owners (except C Corporations). • Change in cash: The net increase or decrease in cash from the beginning of the period. • Beginning cash: The cash at the beginning of the period. • Cash before borrowing: The cash balance before considering the need for additional borrowing. • Line of credit activity: The additional cash required by the business. Ultimate Business Planner will automatically
borrow the cash your business needs. As funds become available, your line‐of‐credit loan will be automatically repaid.
• Ending cash: The total cash available at the end of the period. If you indicated a minimum cash balance, ending cash will not be less than the minimum cash balance. Ending cash will not increase above the minimum cash balance until the line‐of‐credit loan has been completely repaid.
Note: If your business failed to generate enough cash to operate your business, a note will appear in red, at the bottom of the report, indicating that you exceeded your line‐of‐credit for the month indicated.
RATIO ANALYSIS
A Ratio Analysis is a series of profitability, liquidity, activity, and leverage ratios. An important part of your forecast is the calculation and interpretation of ratios. A ratio is simply the comparison of one number to another.
For example, if the Balance Sheet shows current assets of $100,000 and current liabilities of $50,000, the current ratio is 2 to 1. Most rating services, such as Dunn & Bradstreet Corporation, Moody’s Investors Service, Inc., Standard & Poor’s, Robert Morris Associates, and others will simply list 2.0 for this ratio. Lenders or investors sometimes require these numbers to see how your business compares to others in the same industry. You may be able to find these rating service reports in your library or on the Internet to see how your business compares to industry averages.
Following is a description of the Ratio Analysis Report:
Profitability ratios: Profitability ratios are used to determine the business’s ability to earn income.
• Gross profit margin: The amount by which income is greater than the cost of goods sold shown as a percentage (or as cents per dollar of income). This is the amount from each sale that the business has for other expenses, such as rent, utilities, phone, and owners. (Gross profit/Income)
• Operating profit margin: The percent by which income is greater than the cost of all expenses, except for interest expense and taxes. This will indicate if the financial plan will generate sufficient returns to pay creditors and owners. (Operating income (Net income + Interest expense + Estimated taxes)/Income)
• Net profit margin: The percent by which net income is greater than the cost of all the expenses, and indicates the planned return to owners for each income dollar. (Net income/Income)
• Return on equity: The relationship between net income and the owner’s stake in the business or the amount of net income earned for every dollar invested. Return on equity should be higher than return on assets. If not, the owners are supporting the lenders instead of the other way around. (Net income/Equity)
• Return on assets: The relationship between net income, adding back interest expense, and the assets in the business. Planned borrowing makes sense when this value is greater than interest rates on loans. (Net income + Interest expense/Average Total assets)
Liquidity ratios: Liquidity ratios are used to determine if the business has adequate current assets to pay current liabilities.
• Current ratio: The relationship of current assets to current liabilities. The current ratio indicates the business has enough current assets to pay its current liabilities. (Total current assets/Total current liabilities)
25 Ultimate Business Planner
• Quick ratio (Acid‐test): The relationship of cash and accounts receivable (net) to total current liabilities. This value helps indicate how easily the business could pay all of its current liabilities if they came due in a very short time. (Cash + Accounts receivable (net)/Total current liabilities)
• Working capital ratio: The relationship of working capital to income. Working capital is defined as total current assets minus total current liabilities. (Total current assets ‐ Total current liabilities)/Income)
• Activity ratios: Activity ratios are used to determine how well the business manages current assets, pays off current liabilities, and uses assets to generate income.
• Accounts receivable days: The number of days’ sales remaining in accounts receivable. (Ending Accounts receivable (net)/Average daily credit sales)
• Inventory days: The number of days’ sales in inventory. (Ending Inventory/Average daily Cost of sales) • Inventory turnover: The number of times inventory is replaced. (Cost of sales/Average Inventory) • Income‐to‐assets: The relationship of income to total assets. (Income/Average Total assets)
Leverage ratios: Leverage ratios are used to determine how the business is financed.
• Debt‐to‐equity: The relationship of total liabilities to equity. (Total liabilities/Equity) • Debt ratio: The relationship of total liabilities to total assets. (Total liabilities/Total assets) • Times‐interest (TI) earned: The number of times operating income can pay interest expense. (Operating
income/Interest expense)
Viewing Reports
TO VIEW A REPORT:
1) Click the Reports menu and select the appropriate report. Ultimate Business Planner displays a selected report for one year at a time.
2) To view a different year or a summary report, click the appropriate button at the top of your screen. 3) When finished, click the Close button.
Printing Reports
TO PRINT A REPORT:
1) Click the Reports menu and select the appropriate report. Ultimate Business Planner displays a selected report for one year at a time.
2) Click the appropriate year or summary button at the top of your screen. 3) Click the File menu and select Print Report, or click the Print button. The Print dialog box is displayed. 4) Select the appropriate print options:
Printer: select the name of the printer from a list of printers displayed.
Orientation: select Best fit, Printer default, Portrait, or Landscape.
Range: select Current page, Years 1, 2, 3, 4, & 5, or All.
Color: This option is not available for report printing. (If you have a color printer, you can print graphs in color.)
Copies: Enter the number of reports you want to print.
Page numbering: Click the checkbox to use page numbering, and enter the page number to start numbering with.
5) Click the Print button.
Graphs Menu
INCOME PROJECTION
The Income projection graph is a graphical representation of the summation of all income categories. Values are derived from the Income worksheet.
26 Ultimate Business Planner
EXPENSE PROJECTION
The Expense Projection graph is a graphical representation of the summation of all expense categories. Values are derived from the Expenses worksheet.
PROFIT AND LOSS
The Profit & Loss (P&L) graph is a graphical representation of income, gross profit, operating income, and net income. Values are derived from the Profit & Loss report.
FINANCIAL POSITION
The Financial Position graph is a graphical representation of assets, liabilities, and equity. Values are derived from the Balance Sheet report.
CASH SUMMARY
The Cash Summary graph is a graphical representation of the business’s change in cash, ending cash balance, and line‐of‐credit loan balance. Values are derived from the Cash Plan and Balance Sheet reports.
BREAK‐EVEN INCOME ANALYSIS
The Break‐Even Income Analysis graph is a graphical representation of income and all expenses (cost of goods sold plus expenses). Values are derived from the Profit and Loss report.
BREAK‐EVEN CASH ANALYSIS
The Break‐Even Cash Analysis graph is a graphical representation of cash and cash required. Values are derived from the Cash Plan report.
INCOME BY CATEGORY
The Income by Category graph is a graphical representation, in either a bar or pie chart, of income by category. Values are derived from the Income worksheet.
EXPENSES BY CATEGORY
The Expenses by Category graph is a graphical representation, in either a bar or pie chart, of expenses by category. In addition to the categories in the Expense worksheet, bad debt, amortization, depreciation, interest, and income taxes are also included where applicable.
Viewing Graphs
TO VIEW A GRAPH:
1) Click the Graphs menu and select the appropriate graph. Ultimate Business Planner displays a selected graph for one year at a time.
2) To view a different year or a summary, click the appropriate button at the top of your screen. 3) To display the graph in 3D, click the checkbox in the upper right corner. 4) When finished, click the Close button.
Printing Graphs
TO PRINT A GRAPH:
27 Ultimate Business Planner
1) Click the Graphs menu and select the appropriate graph. Ultimate Business Planner displays a selected graph for one year at a time.
2) Click the appropriate year or summary button at the top of your screen.
3) To display the graph in 3D, click the checkbox in the upper right corner.
4) Click the File menu and select Print Graph, or click the Print button. The Print dialog box is displayed.
5) Select the appropriate print options:
Printer: select the name of the printer from a list of printers displayed.
Orientation: select Best fit, Printer default, Portrait, or Landscape.
Range: select Current Page, Years 1, 2, 3, 4, & 5, or All.
Color: If you have a color printer, you can print graphs in color by clicking the checkbox.
Copies: Enter the number of graphs you want to print.
Page numbering: Click the checkbox to use page numbering, and enter the page number to start numbering with.
6) Click the Print button.
Plan Section
The Plan section of Ultimate Business Planner enables you to write your business plan—a detailed, written description of what you plan to do and how you plan to do it! You can access the Plan section by clicking on the Plan section tab.
The Plan section of Ultimate Business Planner is uniquely designed to guide you step‐by‐step through the development of your written business plan. Use the plan to convey your vision to potential investors, attract key employees, prospect for new business, deal with suppliers, or to understand how to better manage your company.
The Plan section is divided into three panes to help you navigate through your business plan:
• Outline Pane: On the left side of the Plan section is the Outline pane, which contains a table of contents for a typical business plan. The table of contents is divided into sections and topics, represented by the book and page icons. To move from one section or topic to another, click Next at the bottom of the Outline pane. To go back to a previous section or topic, click Previous. Or, simply click the section title or topic title in the outline pane. Note: Click the plus sign (+) next to the section name to display all the topics within the section. Likewise, click the minus sign (–) to collapse the section topics. To expand the sections and display all the topics within each section, select View from the menu bar, click Outline and select Expand All. To show only the section titles, click Collapse All from the Outline option.
• Topic Guide: On the right side of the Plan section is the pane containing the Topic Guide and Example tabs. The Topic Guide and Example tabs explain what you should include in each topic and give an example of each. Click a Topic title in the Outline pane, or click Next and review the text displayed by the Topic Guide tab. If you need an example of what to include, click the Example tab. See the Resources menu to access samples of written business plans.
• Text Entry Pane: Below the Topic Guide/Example tabs is the Text Entry pane. Use the Text Entry pane as a text editor to enter and edit your own text, or paste text from other sources.
Place the cursor in the Text Entry pane and start writing!
Business Plan Topics
The sections of the business plan include:
• Executive Summary • Company Background • Products • Services
28 Ultimate Business Planner
• The Industry, Competition and Market • Marketing Plan • Operating Plan • Management, Organization and Ownership • Goals and Strategies • Financial Assumptions
All of these sections may not apply to your business. Complete the sections or topics that are appropriate. You can choose not to include specific sections or topics when you preview and print your plan. In addition, you do not have to complete your plan in the order that the sections or topics appear. For example, the Executive Summary is, typically, the last section completed since it presents a summary of the business plan.
Adding, Removing, or Changing Sections or Topics
The Plan section allows you to add, remove, and change the name of sections or topics displayed in the Outline window. You can add a new section or topic to the plan that is not already included. If you don’t like the section or topic titles you can easily change the name. And, if you later decide to remove a section or topic, the program enables you to delete any of the sections or topics that you added; however you cannot remove any of the existing plan sections or topics.
TO CHANGE A PLAN SECTION OR TOPIC:
1) Select a section or topic in the Outline pane.
2) Click Edit on the menu bar.
3) Select the appropriate option:
• Add New Topic (Section) • Remove Topic (Section) • Change Topic (Section) Name
4) Type the new or changed name and press the Enter key. A dialog box is displayed to confirm you want to make your corrections.
5) Click the yes or no button to complete your changes.
Reviewing a Topic
TO REVIEW TOPIC GUIDES AND EXAMPLES:
The top pane of the Plan section contains the Topic Guide and Example tabs. The Topic Guide and Example tabs explain what you should include in each topic and give an example of each.
Click a Topic title in the Outline pane, or click Next, and review the text displayed by the Topic Guide tab. If you need an example of what to include, click the Example tab.
Note: See the Resources menu to access samples of written business plans.
TO PRINT TOPIC GUIDES AND EXAMPLES:
You can print each Topic Guide and Example for use away from your desktop.
1) Click the Print Topic Guide button in the upper right hand corner, or click File and select Print Topic Guide. 2) Make your printing selections. 3) Click Print.
Entering Text into Your Plan
Below the Topic Guide/Example tabs is the Text Entry pane. Use the Text Entry pane as a text editor to enter and edit your own text, or paste text from other sources.
29 Ultimate Business Planner
Simply place the cursor in the Text Entry pane, click, and start writing!
• The tools in the tool bar will help you when composing your plan. • The first four buttons allow you to Cut, Copy, Paste, or Undo as you enter or edit text. • The next buttons are for formatting text: Bold, Italic, and Underline, as well as Bullets and Numbering, and all are
located in the tool bar. • The remaining buttons give you the ability to add pictures, graphs, reports, and example text, as well as, perform a
spell check and preview or print what you see.
Note: You can also insert the Example tab text in the Text Entry pane and edit as necessary, using the Insert Example Text button.
Inserting Example Text
TO INSERT EXAMPLE TEXT:
1) Position the cursor in the Text Entry pane where you want to insert the example text. 2) Click the Insert Example Text button, or click Insert on the menu bar, and select Example Text. 3) The program automatically inserts the text.
Inserting Reports
TO INSERT A REPORT:
1) Position the cursor in the Text Entry pane where you want to insert a report. 2) Click the Insert Summary Report button, or click Insert on the menu bar, and select Summary Report. The
program displays the Insert Summary Report dialog box. 3) Select the report you want included from the Report drop‐down list. 4) Select how you want the report aligned on the page: Left, Center, or Right. 5) Click the OK button. The Text Entry pane displays the report icon and the name of the report.
When you print your plan, the complete report will appear automatically formatted and paginated by Ultimate Business Planner.
Note: The inserted report is dynamically linked with the original report. Thus, any changes made to the summary report will be reflected in the plan.
TO PREVIEW A REPORT:
1) Click the title of the report you wish to preview. 2) Make your report selections, and click the Preview button In the Insert Summary Report dialog box. 3) Click the Close button when you’ve finished reviewing the report. 4) Click Close.
Note: To review the report in your plan format, click the Preview button in the tool bar.
TO REMOVE A REPORT:
1) Click the Report icon or Report title shown in the Text Entry pane. 2) Click Remove in the Insert Summary Report dialog box.
Inserting Graphs
TO INSERT A GRAPH:
1) Position the cursor in the Text Entry pane where you want to insert a graph. 2) Click the Insert Summary Graph button, or click Insert on the menu bar, and select Graph. The Insert Graph dialog
box is displayed.
30 Ultimate Business Planner
3) Select the graph you want included from the Graph drop‐down list. 4) Select how you want the report aligned on the page: Left, Center, or Right. 5) Select which graph period you want to use: Year 1, Year 2, Year 3, Year 4, Year 5, or Summary. 6) To display the graph in 3D, click the checkbox in the upper right corner. 7) Click the OK button. The Text Entry pane displays the graph icon and the name of the graph.
When you print your plan, the complete graph will appear automatically formatted and paginated by Ultimate Business Planner.
Note: The inserted graph is dynamically linked with the original graph. Thus, any changes made to the graph will be reflected in the plan.
TO PREVIEW A GRAPH:
1) Click the title of the graph you wish to preview in your text entry window. 2) Make your graph selections, and click the Preview button In the Insert Graph dialog box. 3) Click the Close button when you’ve finished reviewing the graph. 4) Click Close.
Note: To review the graph in your plan format, click the Preview button in the tool bar.
TO REMOVE A GRAPH:
1) Click the Graph icon or Graph title shown in the Text Entry pane.
2) Click Remove in the Insert Graph dialog box.
Inserting Pictures
You may want to include scanned product photos, CAD drawings, architectural drawings, or schematics into your plan. Ultimate Business Planner accepts any picture that is in one of these formats:
• .bmp • .wmf • .jpg • .gif
TO INSERT PICTURES:
1) Position the cursor in the Text Entry pane in the location you want to insert a picture. 2) Click the Insert Picture button, or click Insert on the menu bar and select Picture. The program displays the Insert
Picture dialog box. 3) To locate the picture file, click the Browse button. 4) Go to the directory where the picture file is located. Select the file and a preview of the image is displayed in the
dialog box. 5) Select how you want the picture aligned on the page: Left, Center, or Right. 6) Select the scale percentage you want the picture sized to in the Scale box. 7) Click the OK button. The Text Entry pane displays the picture icon and the filename.
When you print your plan, the picture is included.
Note: The inserted picture is dynamically linked with the original picture. Thus, any changes made to the picture will be reflected in the plan.
TO REMOVE A PICTURE:
1) Click the Picture icon or Picture title shown in the Text Entry pane. 2) Click Remove in the Insert Picture dialog box.
31 Ultimate Business Planner
Important: The program uses a filename to link your picture with the business plan. It is not embedded into the plan document. As a result, if you later delete the picture file from your hard disk, the picture will not be included in your plan. Likewise, if you transfer the Ultimate Business Planner file (.bp1) to another computer, the pictures will not be included in your plan.
32 Ultimate Business Planner
Inserting Cover Graphics
If you choose to have a large picture or graphic on the cover of your business plan, Ultimate Business Planner creates two opening pages for your business plan.
The first page, or Title Page, displays the company name and any picture or graphic you insert.
The second page displays the company name, contact information, and notice.
Note: Ultimate Business Planner accepts any picture that is in one of these formats: .bmp, .wmf, .jpg, or .gif. You can scale images accordingly to fit.
TO INSERT COVER GRAPHICS:
1) Click the File menu and select Preview Business Plan or Print Business Plan. 2) Click the Title Page Options tab. 3) Click the Browse button to find and select the picture or graphic to insert. The Preview box displays the picture or
graphic you chose. 4) Click Close.
Tracking Plan Completion
Use this feature to help you keep track of sections you’ve completed, sections that still need work, as well as sections ready for printing.
TO TRACK COMPLETED SECTIONS:
Click the Complete checkbox located at the upper right hand corner of the Text Entry pane. A red checkmark is displayed in your Outline to indicate the section is marked Complete.
TO TRACK SECTIONS FOR PRINTING:
Click the Print checkbox located at the upper right hand corner of the Text Entry pane.
Note: You can change the Complete and Print status of any section or topic at any time. Use the Review tab, or access Review Business Plan from the File menu, to see a summary of these selections throughout the sections of your document.
Spell Checking Your Plan
Ultimate Business Planner includes a group of functions to help you check your plan carefully.
TO SPELL CHECK:
1) Click the Spell Check button to check the spelling of words you entered in the Text Entry pane. 2) Ultimate Business Planner begins checking the current topic, and then continues to the end of the plan. 3) When finished, a prompt appears asking if you would like the spell check to continue checking the beginning of
your plan. 4) Click the Yes or No button.
TO FIND:
1) Click the Find button. A dialog box appears. 2) Enter the word you’re searching in the blank text box. 3) Select the option(s) for your search:
• Match case: to match upper and lower case as you’ve entered the word in the text box • Find whole words only: to search for a word only; not groups of the letters you entered
33 Ultimate Business Planner
• Search current topic only: to search one topic instead of the entire business plan
34 Ultimate Business Planner
4) Click the Find Next button. 5) When the word has been found, click the Close button to exit, and make your change in the Text Entry pane.
TO REPLACE:
To automatically make word replacements, use the Replace feature in conjunction with Find.
1) Click the Find button. A dialog box appears. 2) Enter the word you’re searching in the blank text box. 3) Click the Replace tab and new dialog box is displayed. 4) Enter the replacement word in the blank text box. 5) Select the option(s) for your search:
• Match case: to match upper and lower case as you’ve entered the word in the text box • Find whole words only: to search for a word only; not groups of the letters you entered • Search current topic only: to search one topic instead of the entire business plan
6) To begin the Find and Replace, click the appropriate option: • Find Next: to locate the next occurrence of the word you need to replace • Replace: to replace the word after it’s found • Replace All: to automatically replace the word through the entire section or business plan.
A message is displayed when you have completed the Find and Replace. Click the Close button to return to the Text Entry pane.
Reviewing Your Plan
The Review Plan feature checks four areas of your business plan, including:
• Was a spell check completed after changes were made to plan text? • Are any topics not indicated as “complete” checked for printing? • Are there any blank topics checked for printing? • Are there any invalid loan scenarios in the plan financials?
TO REVIEW YOUR PLAN:
1) Click the File menu and select Preview Business Plan or Print Business Plan.
2) Click the checkboxes to select or deselect items to include.
3) Click the Review Plan button.
4) Click Print Review to print a copy of this review, or click Close to return to your plan.
Previewing Your Plan
Using the Preview Business Plan options, you can preview one section, a sample of sections, or the entire plan complete with financial graphs and reports.
TO PREVIEW WITH THE PREVIEW BUTTON:
1) In the tool bar, click the Preview button in the section you are viewing and/or working on. 2) Ultimate Business Planner launches the section in Adobe Acrobat. Use the Acrobat tool bar to navigate and
review. 3) Click Close to return to the section you were viewing and/or working on.
TO PREVIEW WITH THE FILE MENU:
1) Click the File menu and select Preview Business Plan and the Preview Business Plan dialog box is displayed.
35 Ultimate Business Planner
2) On the Contents tab, check or uncheck the sections or topics you want included in your preview.
Note: To exclude an entire section, uncheck a section title. To exclude just a topic, uncheck the appropriate topic title.
3) Check or uncheck items for your preview in Appendix Contents and Additional Documents.
4) Click the Preview button to launch your plan in Adobe Acrobat. Use the Acrobat tool bar to navigate and review.
Note: Status bars are displayed to show you formatting progress. While previewing, you can also choose to Export, Print, or Close your plan.
Your Business Plan is Complete
When you reach this point, you can use the “Click here…” link to preview or print your plan.
Note: You can change the Complete and Print status of any section or topic at any time. Use the Review tab, or access Review Business Plan from the File menu, to see a summary of these selections throughout the sections of your document.
Formatting Your Business Plan
TO FORMAT YOUR BUSINESS PLAN:
1) Click the File menu and select Plan Format. 2) In the Compose to Printer drop down list, select your printer. 3) Click the Print in Color checkbox in Graphs, if desired. 4) In Font, choose your font, size, and line spacing. 5) Click Close.
Printing Your Plan
The program will display a Print Business Plan dialog box so you can select which sections and topics of the plan you want to print and how you want the plan formatted.
TO PRINT YOUR PLAN:
1) Click the Print button, or click the File menu and select Print Business Plan to display the Print Business Plan dialog box.
2) On the Contents tab, check or uncheck the sections or topics you want included in your plan.
3) To exclude an entire section, uncheck a section title. To exclude just a topic, uncheck the appropriate topic title.
Note: If you plan on exporting the file to your word processor, you probably don’t need to include the Table of Contents, since the pagination will change when you perform additional formatting or insert additional text.
4) In Appendix Contents, check or uncheck items to prepare the appendix section of your plan, if necessary. Ultimate Business Planner just needs the title of the information for it to appear in the plan’s table of contents.
Note: The Appendix may contain additional supporting information that you have put together yourself, or you may want to include full reports and graphs, such as Profit and Loss reports, rather than just the summary reports within the body of the plan.
5) After making your selections in each tab, click the Preview button.
Note: To carefully preview your business plan before printing, use the Preview Business Plan feature.
6) When your plan is ready, click the Print button.
7) Make your selections in the Print dialog box, and click OK to begin printing.
Publishing Your Plan
Ultimate Business Planner provides you with the option to publish your business plan as a Portable Document File (.pdf).
36 Ultimate Business Planner
TO PUBLISH AS A PDF FILE:
1) Click File menu, and select Preview Business Plan or Print Business Plan. 2) Click the checkboxes to select or deselect items to include. 3) Click the Preview button in the dialog box. 4) Click the PDF Save button in the preview.
Exporting Your Plan
Ultimate Business Planner gives you two export options:
• Exporting business plan text to Microsoft Word • Exporting financial reports to Microsoft Excel
Exporting financials and text enables you to add information, continue editing, or add data to the appendix. The name of the exported documents will be the same name as your plan, with an .rtf file extension for text or an .xls file extension for financial reports. They will be saved to the My Documents folder.
TO EXPORT FINANCIALS TO EXCEL:
1) Click the View Report button, or click the Reports menu and select a report.
2) Select Current page or Years 1, 2, 3, 4, & 5.
Note: If a report is a single page, there will be one tab in the Excel worksheet. For reports with more than one page, there will be a tab for each page in the worksheet.
3) Click the Export button in the preview.
TO EXPORT TEXT TO WORD:
1) Click File menu, and select Preview Business Plan or Print Business Plan. 2) Click the checkboxes to select or deselect items to include. 3) Click the Preview button in the dialog box. 4) Click the Export button in the preview.
Note: Exporting and saving your plan as an .rtf file embeds all the pictures, charts, and summary reports within the plan, enabling you to copy the plan to another computer, or directory, or to email it to an associate. Your default word processor must be able to read an exported .rtf. Most word processors can do this; however, do not use Windows WordPad as your default word processor.
Glossary
Business Types
SOLE PROPRIETORSHIP A business entity that involves just one individual who owns and operates the enterprise.
S CORPORATION A type of corporation that provides its owners with tax treatment that is similar to a partnership and liability protection similar to a corporation.
PARTNERSHIP A business that is unincorporated and organized by two or more individuals.
LIMITED LIABILITY COMPANY (LLC) A hybrid business structure that combines the tax advantages of a partnership with the liability protection of a corporation.
37 Ultimate Business Planner
C CORPORATION A business structure organized under state law and generally treated as a separate tax entity. The biggest benefit for the small‐business owner is the liability protection.
General Terms
ACCOUNTS PAYABLE Liabilities created by purchases made on credit.
ACCOUNTS RECEIVABLE Claims against customers for credit sales.
AMORTIZATION The periodic expense of an amount paid for an intangible asset over a period of time. New businesses are able to amortize their start‐up expenses over at least a 5‐year period.
ANNUAL GROWTH FACTOR A percentage by which income and cost of goods sold (COGS) will increase over a one‐year period.
ASSET CATEGORY The indication of whether an asset is land, a building, equipment, or a start‐up cost.
ASSET LIFE The number of year's service expected from an asset.
ASSETS Items of worth to the business. Examples include cash, accounts receivable, inventory, and equipment.
ASSUMPTIONS Brief sentences or paragraphs that explain the logic behind the numbers in a financial forecast.
AUDIT An examination of a company's financial records and the accounting systems, controls, and records that produced them.
BAD DEBT EXPENSE The amount of credit sales deemed uncollectible.
BALANCE SHEET A report listing the balances of the assets, liabilities, and equity as of a specific date.
BEGINNING BALANCE SHEET A report listing the beginning balances of assets, liabilities, and equity.
BUSINESS PLAN A written description of your business's future.
BUSINESS TYPE The legal structure of the business. Types include Sole Proprietorship, Partnership, S Corporation, C Corporation, or Limited Liability Company.
CASH Coins and currency, checks, money orders, credit card slips, and deposits in
CASH FLOW The increase or decrease in cash from business operations.
CASH PLAN A report listing the cash the business will generate from income and use for expenses. It also shows how much cash is left over or how much additional cash the business needs.
CASH SALES The portion of sales paid for with cash.
CPA An individual who offers accounting services to the general public, who is licensed by the state, who does audits, and can represent clients before the IRS.
COMMON STOCK Ownership in a corporation resulting from investment. Common stockholder rights usually include a right to vote, share in dividends, purchase additional shares, and share in cash if the corporation is liquidated.
COMPETITIVE ADVANTAGE A distinct characteristic that makes your product or service more appealing than your competitor’s.
38 Ultimate Business Planner
CONSULTANTS Paid professionals that perform a certain job function for your business. Consultants can include attorneys, accountants, and advertising/marketing agencies.
COGS The cost of a product or service sold to customers.
CREDIT SALES The portion of sales sold on credit terms.
CREDIT TERMS The arrangements agreed upon by the buyer and seller as to when payments for products and services are to be made.
CURRENT ASSETS Assets that are either cash, will turn into cash, or will be used up within one year.
CURRENT LIABILITIES Debts the business must pay within one year.
CURRENT MARKET VALUE What someone is willing to pay you for an item should you choose to sell it today.
CUSTOMER CREDIT POLICY The credit terms given to customers.
CUSTOMER PROFILE A written description of your customers. Usual methods for developing customer profiles include demographics, geographics, and psychographics.
DEBT SERVICE The total payment of principal and interest on loans.
DEMOGRAPHICS A means of separating customers into groups by factors such as age, gender, income, or education.
DEPOSITS Cash paid to establish a service such as rent, utilities, and telephone.
DEPRECIATION The reduction in value of an asset over its useful life.
DISTRIBUTIONS Amounts paid to, or withdrawn by, the owners of a Sole Proprietorship, Partnership, S Corporation, or Limited Liability Company.
DIVIDENDS Distributions of money by a corporation to its stockholders.
DOUBLE TAXATION Owners of C Corporations pay income taxes on the business's net income as well as on dividends received from the corporation.
EMPLOYEE BENEFITS Expenses for employees in addition to salaries and wages. Employee benefits include retirement plans, health plans, dental or vision plans, life insurance plans, paid vacations, holidays, or sick leave.
EMPLOYEES Persons employed by the business.
EQUITY The investment in the business by the owner(s).
ESTIMATED CORPORATE TAX RATE The estimated percent of a corporation's income required to cover its federal and state corporate tax liability.
ESTIMATED TAXES The estimated amount a corporation pays to cover its federal and state corporate tax liability.
EXPENSE CATEGORIES Costs, or groups of costs, incurred by the business.
EXPENSE FORECAST An estimate of the business's future costs.
EXPENSES Costs incurred by the business.
FIXED COST OR EXPENSE A cost or expense that remains constant regardless of the level of income.
FIXED INVENTORY A system where the inventory level remains constant.
FRANCHISE An agreement under which the franchiser (owner of the rights) licenses the franchisee (the business owner) the right to sell
FRANCHISE FEES Cash paid to a franchise or for the use of a franchise.
39 Ultimate Business Planner
GENERAL PARTNER A partnership investor who manages the business and assumes responsibility for the partnership's debts and other obligations.
GEOGRAPHICS A means of separating customers into groups by location such as city, county, state, region, or country.
GROSS PROFIT Income minus the cost of goods sold.
INCOME Revenue generated from the sale of products and services.
INCOME CATEGORIES Items, or groups of items, offered by the business.
INCOME FORECAST An estimate of the business's income level and mix.
INCOME MIX The portion of income forecasted between the various products and services being offered.
INDEPENDENT CONTRACTOR Someone who provides services to your business on a non‐employee basis.
INTEREST EXPENSE The cost of borrowing money.
INVENTORY Items the business owns and intends to sell to customers.
LABOR Costs paid to employees directly involved with bringing goods or services to the customer.
LIABILITIES Amounts owed by the business.
LIMITED PARTNER A partnership investor who has no control over the business and is not subject to the same liabilities as the general partners.
LINE‐OF‐CREDIT LIMIT The maximum loan amount of a line‐of‐credit loan.
LINE‐OF‐CREDIT LOAN A current liability that extends the cash available in the business's checking account by the upper limit for the loan
LONG‐TERM LIABILITIES A formal loan where the term of the loan is greater than one year.
MARKETING PLAN A written explanation of how you plan on reaching customers, making sales, and reaching your financial goals.
MINIMUM CASH BALANCE The minimum amount of cash the business needs to keep on‐hand at all times.
MISSION STATEMENT A series of brief sentences or paragraphs that describe the purpose of your business, its products or services, customers, markets, and philosophy.
NET INCOME The amount the business makes when income exceeds all expenses.
NET LOSS The amount the business loses when all expenses exceed income.
NET SALES Sales after discounts and returns.
NET WORTH The owner's equity in the business.
NOTES PAYABLE Formal loans due in less than one year.
OPERATING EXPENSES Selling, general, and administrative expenses that are necessary to run the business. Examples include salaries, insurance, advertising, and rent. Any expenses other than cost of goods sold.
OPERATING INCOME The amount of profit earned during the normal course of operation.
OPERATING PLAN A written explanation of how you run your business. An operating plan should include a description of your business facility, required operating equipment, supplier and vendor relationships, and needed personnel.
ORGANIZATIONAL CHART A diagram of the relationships and responsibilities of individuals or departments of your business.
40 Ultimate Business Planner
ORGANIZATIONAL STRUCTURE The way your business is separated into functional areas. Depending upon the size of your business, individuals or departments may be responsible for certain job functions.
OUTSTANDING LOANS Principal balances the business will repay.
OWNERSHIP STRUCTURE The division of business ownership between individuals or companies.
PAYROLL TAXES The cost of employing someone. Payroll taxes include FICA, federal and state unemployment taxes, worker's compensation, and state short‐term disability programs.
PERSONNEL PLAN A written description of your business’s staffing requirements. It should include a breakdown of your needs by position and the number required.
PREFERRED STOCK Ownership in a corporation resulting from investment. Preferred stock carries certain preferences over common stock, such as a prior claim of dividends. Often preferred stock has no or limited voting rights.
PRODUCT LIFECYCLE A phenomenon where a product experiences rapid growth until it matures and growth slows. Eventually, sales will decline and the product will disappear from the marketplace entirely.
PROFIT & LOSS (P & L) A report listing income, expenses, and net income.
PROMOTIONAL PLAN A written description of the activities you plan on using to promote your products or services. Promotional activities can include advertising, personal selling, public relations, and sales promotion.
PROPERTY, PLANT, & EQUIPMENT Assets that are used in the business, which exist physically, and are not for sale to customers.
PSYCHOGRAPHICS A means of separating customers into groups by lifestyle such as interests, activities, or opinions.
SELF‐EMPLOYMENT TAXES Taxes paid by self‐employed persons for payroll taxes.
START‐UP COSTS Costs a new business incurs before sales efforts begin.
STOCKHOLDERS Those persons holding some share of the business's equity through stock ownership. Also known as shareholders or equity holders.
STRATEGIC ALLIANCE An agreement between two or more companies for the purpose of doing business.
SUPPLIES Items that a business needs to provide products or services, but are not sold to customers.
UNIT COST The cost of a single product or service.
UNIT PRICE The selling price of a single product or service.
VARIABLE COST OR EXPENSE A cost or expense that increases or decreases with the level of income.
VARIABLE INVENTORY A system where the inventory level fluctuates with sales.
VENDOR FINANCING Buying from vendors on credit terms.
VISION STATEMENT A series of brief sentences of paragraphs that describes the “big goals” that your business hopes to achieve over time. It can also present the ultimate heights you believe your business can reach and what you want your business to be after a certain period of time.
WORKING CAPITAL The amount by which current assets exceeds current liabilities.
41 Ultimate Business Planner
End‐User Agreement
PLEASE READ THIS DOCUMENT CAREFULLY BEFORE USING THIS SOFTWARE
By using this computer program ("Software"), you agree to become bound by the terms of this Agreement. If you do not agree to the terms of this Agreement, do not use the Software and promptly return the package within 10 days to the place where you obtained it for a full refund.
This Software is sold to you (owner of the product) by Atlas Business Solutions, Inc. ("ABS"), for use only under the terms of this Agreement, and ABS reserves any rights not expressly granted to you.
1. Uses. This Agreement allows you to:
(a) Use the Software on a single microcomputer at a time, except the Software may be executed from a common disk shared by multiple CPUs provided that one authorized copy of the Software has been purchased from ABS for each CPU executing the Software. ABS does not, however, guarantee that the Software will function properly in your multiple‐CPU, multi‐user environment. The Software may not be used with any gateways, bridges, modems, and/or network extenders that allow the Software to be used on multiple CPUs, unless one authorized copy of the Software has been obtained from ABS for each CPU or terminal executing the Software.
(b) Make one copy of the Software in machine‐readable form solely for backup purposes. The Software is protected by United States copyright law. You must reproduce on each copy the copyright notice and any other proprietary legends that were on the original copy supplied by ABS.
2. Restrictions:
You may not distribute copies of the Software to others or electronically transfer the Software from one computer to another over a network and/or zone. The Software contains trade secrets and to protect them you may not decompile, reverse engineer, disassemble, crossassemble or otherwise change and/or reduce the Software to any other form. You may not modify, adapt, translate, rent, lease, loan, resell for profit, distribute, network or create derivative works based upon the Software or any part thereof.
3. Termination:
This Agreement is effective until terminated. This Agreement will terminate immediately without notice from ABS if you fail to comply with any provision of this Agreement Upon termination you must destroy the Software and all copies thereof. You may terminate this Agreement at any time by destroying the Software and all copies thereof.
4. Export Law Assurance:
You agree that the Software will not be shipped, transferred, or exported directly into any country prohibited by the United States Export Administration Act and the regulations thereunder nor will be used for any purpose prohibited by the Act.
5. Limited Warranty, Disclaimers, Limitation of Remedies and Damages:
ABS' warranty on the media, including any warranty of merchantability or fitness for a particular purpose, is limited in duration to thirty (30) days from the date of the original retail purchase of this product. After that period, if a disk fails to work or if a disk becomes damaged, you may obtain a replacement disk by returning the original disk. Contact ABS for instructions on obtaining replacement disks.
The replacement warranty set forth above is the sole and exclusive remedy against ABS for breach of warranty, express or implied, or for any default whatsoever relating to the condition of the Software. ABS makes no other warranties or representation, either expressed or implied, with respect to this Software or documentation, its quality, merchantability,
42 Ultimate Business Planner
43 Ultimate Business Planner
performance, or fitness for a particular purpose. As a result, this Software is sold with only the limited warranty with respect to diskette replacement as provided above, and you, the owner, are assuming all other risks as to its quality and performance. In no event will ABS or its developers, directors, officers, employees, or affiliates be liable for direct, indirect, special, or consequential damages (including damages for loss of business profits, business interruption, loss of business information and the like) resulting from any defect in this Software or accompanying documentation or arising out of the inability to use the Software or accompanying documentation even if ABS, an authorized ABS representative, or an affiliate has been advised of the possibility of such damage.
No oral or written information or advice given by ABS, its dealers, distributors, agents, affiliates, developers, directors, officers, or employees shall create a warranty or any way increase the scope of this warranty. Some states do not allow the exclusion or limitation of implied warranties or liabilities for incidental or consequential damages, so the above limitation and exclusion may apply to you. This warranty gives you the specific legal rights, and you may also have other rights that vary from state to state.
6. Copyright Notice:
This Software and accompanying manual (or documentation) are copyrighted with all rights reserved by Atlas Business Solutions, Inc. Under United States Copyright Laws, the Software and its accompanying documentation may not be copied in whole or in part, except in normal use of the Software or to make a backup copy for archival purposes only. Any other copying or selling or otherwise distributing this Software is hereby expressly forbidden.
Trademarks
Ultimate Business Planner is a registered trademark of Atlas Business Solutions, Inc. Adobe and Acrobat are registered trademarks of Adobe Systems, Inc. Microsoft Windows and Windows 2000/XP/Vista are registered trademarks of Microsoft Corporation. IBM is a registered trademark of International Business Machines Corporation.
All other product names are copyright and registered trademarks/trade names of their respective owners.