22
Mini Keyboard Controller (CKB-02 series) User Manual

Mini Keyboard Controller (CKB-02 series)
User Manual


Safety Notes
Thank you for choosing our mini keyboard controller!
When you open the box:
1. Check that the packing and the contents are not visibly damaged. Contact the retailer
immediately if any parts are either missing or damaged.
2. Make sure if the contents are all included as per the packing list.
3. Do not attempt to use the device with missing or damaged parts. Send the product back in its
original packing if it is damaged.
[Note] The information contained in the document is subject to change without notice.

Table of Contents
About The Product....................................................................................................1
Introduction ...............................................................................................................1
Features ....................................................................................................................1
Technical Data ..........................................................................................................1
Parts And View .........................................................................................................2
Connections ..............................................................................................................4
operation .....................................................................................................................6
Menu Operation ........................................................................................................6
Camera Setting ........................................................................................................7
Time Setting ..............................................................................................................9
Volume Setting .........................................................................................................9
Backlight Setting .................................................................................................... 10
Sleep Setting .......................................................................................................... 10
Pin Setting ............................................................................................................... 11
Joystick Calib .......................................................................................................... 12
Speed Setting ......................................................................................................... 14
Default Setting ........................................................................................................ 14

Safety Notice---Important!!!
The following important notes must be followed carefully to run the controller and respective
accessories in total safety.
� Power shall be cut immediately when the controller is not working correctly;
� Use DC12V power supply. Wrong power supply may damage the controller;
� To prevent electric shock, do not remove screws or covers of the camera. There are no
self-serviceable parts inside. Refer to qualified service personnel for servicing.
� Do not operate the camera beyond the specified temperature and humidity.


About The Product
Introduction
The mini keyboard controller is a full-function system keyboard. With features of ergonomic design,
multi-function, high reliability and easy operation, it is a perfect controller for rugged PTZ cameras,
video conference cameras, surveillance cameras and so on.
Features
� 4D joystick for pan/tilt/zoom/focus control, ergonomic design and excellent finishing;
� High brightness OLED display;
� Auto backlight keys;
� Batch program cameras in the systems;
� Multi-level protection from illegal operation or setting;
� Multi-baud rate and protocols;
� 256 address;
� Compact design with portable features;
Technical Data
Comm. Interface RS-485/RS-232
Protocol Pelco-D, Pelco-P, VISCA
Baud Rate 2400bps, 4800bps, 9600bps, 19200bps, 38400bps
Address 0~255
Joystick 4-axis (Left/Right, Up /Down, Zoom In/Zoom Out, Focus Near / Focus Far)
Display OLED
Power DC12V
Power Consumption <2W
Working Temperature 0�~40�
Storage Temperature -20�~+50�
Relative Humidity ≤90% (non-condensation)
Dimensions 200mm(L)*120mm(W)*103mm(H)
Net Weight 0.5kg

About The Product
Parts and view
� OLED screen
The OLED screen displays status of current
operation.
� CALL (Call preset)
Input preset number, then press CALL key to
call a preset
� CAMERA (Switch cameras)
Input camera number, then press CAMERA
key to switch to another camera.
� SET (Set / Clear preset)
Input preset number, then press SET key to
set or delete a preset (Short press to “set”;
long press to “clear”).
� SETUP (Enter setup menu)
Press SETUP key to enter menu and program
the keyboard
� MIRROR (Reserved)
This key is reserved.
� BACK LIGHT (BLC)
Used to open / close back light compensation.
� FREEZE (Reserved)
This key is reserved.
� LOCK (Lock the keyboard)
Needs to input password again to unlock.
� ESC (Exit / Delete)
It is a key to EXIT in a menu or DELETE in
other operation.

About The Product
� 0~9 (Numbers)
Those are keys used to input numbers.
Combine with SHIFT key to activate various
functions shown on number keys. For example,
press SHIFT + 1 will turn on DIS function of
the camera.
� ENT (Confirm)
It is used to confirm menu setting.
� BRT- (Decrease brightness)
This key is used to decrease brightness.
� Joystick
This joystick is used to Pan, Tilt, Zoom and
Focus
Non-Menu State:
Left/Right/Up/Down: Pan/Tilt the camera
correspondingly
Twist clockwise: Zoom In,
Twist anti-clockwise: Zoom Out;
Press Zoom/ Focus Switch Key and Twist:
Focus Near/Far
Menu State:
Right: Enter a submenu or Confirm;
Left: Return to previous menu or exit (expect
some not returnable menus);
Up: Move to last option;
Down: Move to next option.
� BRT+ (Increase brightness)
This key is used to increase brightness.
� MENU (Enter Camera Menu)
This key is used to enter camera menu.
� Zoom / Focus Switch Key
This key is used to switch between zoom and
focus function.
Operation: Press this key, the crosshair of
indicator lighter near the joystick will go out,
twist the joystick to zoom in / out; press this
key again, the crisscross of indicator lighter
will be lightened, twist the joystick will adjust
focus value.
� Power
In none-menu status, press this button to turn
on / off the camera.

About The Product
Connections
There are two options of cables. Please see the instruction label at bottom of the device.
Option1: Power + Aux output + RS-485
About The Product
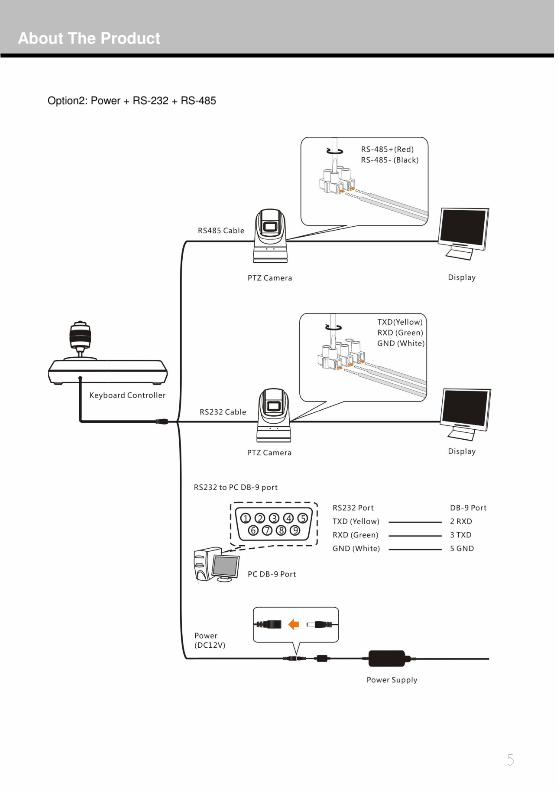
Option2: Power + RS-232 + RS-485

Operation
Menu operation
After powered on, “USER PIN” will show on the controller’s screen. The initial pin is “111111”.
- - - -
Enter “USER PIN” See “PIN SETTING” to set pin.
Pin Error:::: When“USER PIN:ERROR” shows on screen, it indicates wrong pin was input. Enter
correct pin to get to next step
Pin Correct:::: Screen shows“ 1”camera icon and default camera number. If there is no further
operation for long time, screen will display current time automatically. If still no
operations, the controller will enter sleeping mode.
Enter OSD menu
Press SETUP key.
Screen shows “ADMIN PIN:”. Initial admin pin is “111111“.
- - - -
Enter “ADMIN PIN” See “PIN SETTING” to set pin.
∃
∃
CAMERA SETTING
ADMIN PIN:
USER PIN:

Operation
OSD Menu List::::
Camera Setting
Set camera ID (Range from 0~255), corresponding protocol, baud rates and camera address of the
target cameras. Then every camera can be controlled easily by choosing their relative camera ID. ❶ Move up / down the joystick, choose “CAMERA SETTING”.
❷ Right move the joystick or press ENT key to enter menu “
:”. Press number keys to input
camera number (range from 0~255) . If the input number exceeds this range, the system will show
“ERROR”. After the setting is finished, press ENT key to confirm。
- - - -
Define the camera ID (range from 0~255).
CAMERA SETTING

Operation
❸ Protocol Setting. Move up/down the joystick, choose protocol, right move the joystick or press
ENT to confirm.
- - - -
Set protocol. This protocol must be the same as the camera’s protocol.
Available Options:::: PELCO D/PELCO P /VISCA
❹ Baud rate setting. Move up/down the joystick, choose baud rate, and right move the joystick or
press ENT to confirm.
- - - -
Set baud rate. This baud rate must be the same as the camera’s baud rate.
Available Options:::: 2400/4800/9600/19200 /38400
❺ Address Setting. Input number to set camera address (range from 0~255). Press ENT to confirm。
- - - -
Set the controller’s address, this address must be the same as the camera’s address.
Available Options ::::0~255
❻ The controller can also batch program cameras in the system. It will set the same baud rate,
protocol for the 10 cameras next to the current one while the cameras’ address to be increased by
increment number sequentially. After step 5, press SHIFT to enter menu “INCREMENT:” Input a
number within 1~20, press ENT to confirm.
- - - -
The address increment between two sequential cameras. For example, the current camera address is 1 and the increment is 2, then the next camera address is 3.
Available options: 1~20
❼ After the camera setting is finished, the system will automatically return to the main menu。INCREMENT:
ADDRESS:1
BAUD RATE 2400
PROTOCOL PELCO

Operation
Time Setting
Set time in 24 hour format. ❶ Move the joystick up/ down, choose ”TIME SETTING”.
- - - -
Time Setting ❷ Right move the joystick or press ENT to get into time setting menu, “H” hour becomes editable,
input digits from keypad or move joystick up / down to set the “H” (range: 0~23). If input digits by
keypad, after the hour has been set, it will automatically get into “M” minute setting; if set by joystick,
right move the joystick to get into “M” minute setting. Move right / left the joystick to select from “H”,
“M” and “S” settings.
- - - -
Set the time of keyboard (H: M: S).
Available Value: 0~23
❸ “M” minute setting menu. Set the “M” minute and “S” second, refer to “H” hour setting.
- - - -
Set Minute and Second.
Available Value: 00~59
❹ Press ENT to save and return to Main Menu.
Volume Setting
6 levels of volume from low to high are available to choose from. ❶ Move the joystick up/down, select “ VOLUME SETTING”.
20 52 59
10 52 59
TIME SETTING

Operation
- - - -
Volume setting ❷ Right move the joystick or press ENT to get into “ VOLUME SETTING” ; after setting right move
the joystick or press ENT to confirm.
- - - - Available Value: OFF (switch off sound) 1~6 (6 levels from low to high)
Available Value: OFF、1~6
Backlight Setting
Back light mode enables the keys to be clearly presented even at very dark environment. ❶ Move the joystick up/ down, select “ BACKLIGHT MODE”.
- - - -
Backlight setting ❷ Right move the joystick or press ENT to enter “BACKLIGHT MODE”. Move the joystick up/ down
to select backlight options. Right move the joystick or press ENT to confirm.
- - - -
AUTO: Auto backlight; The controller detects lights on the working environment, then turns on / off the backlight mode accordingly ON: open the backlight; OFF: close the backlight.
Available Value: AUTO/ON/OFF
Sleep Setting
Set sleep time of the controller. In non-menu status, the screen will enter the sleep mode if no
operation is performed for a programmable period. ❶ Move the joystick up/ down, select “ SLEEP SETING”.
BACKLIGHT AUTO
BACKLIGHT MODE
VOLUME SETTING
VOLUME SETTING

Operation
- - - -
Sleep setting ❷ Right move the joystick or press ENT to enter “ SLEEP SETTING” . Move the joystick up/ down to
select sleep time. Right move the joystick or press ENT to confirm.
- - - -
Available Value: OFF/ 30S/ 1M/ 5M/10M / 30M/60M.
Available Value: OFF/30S/1M/5M/10M/ 30M/60M
Pin Setting
Set user and admin pins of the controller. ❶ Move the joystick up/ down, select “PIN SETTING”.
- - - -
PIN setting ❷ Right move the joystick or press ENT to enter “PIN SETTING”. Move the joystick up/ down to
select the PIN digits. Right move the joystick or press ENT to confirm.
- - - -
USER:this is the first level pin, correct pin must be input before the controller can be operated. ADMIN:this is the second level pin, correct pin must be input before menu setting and controller setup.
Available Value: USER/ADMIN
❸ Enter the PIN setting menu. “OLD PIN” requires to be input, press ESC to cancel input digit. If
correct Pin is input, it will get into “NEW PIN” menu. If wrong pin is input, “ERROR” will be
displayed.
PIN USER
PIN SETTING υ
SLEEP TIME 30S
SLEEP SETTING

Operation
- - - -
Input “OLD PIN”: Initial USER PIN 111111
Initial ADMIN PIN 111111 ❹ “NEW PIN”
(Digits key)
- - - -
Input “NEW PIN” ❺ “CONFIRM”: after new pin is input, input it again to confirm. If the two pins don’t match, it displays
“PIN NOT MATCH”, menu goes back to “NEW PIN”.
(Digits key)
- - - -
Input “NEW PIN” again to confirm ❻ If the two pins match, it displays “OK!” and new pin will be applicable..
- - - - New pin is set.
To disable “PIN PROTECTION” function, there is no need to input any digit in both “NEW PIN” and
“CONFIRM”, press ENT directly to confirm. To enable “PIN PROTECTION” again, simply set new
pins with digits
During these operations, press key ESC to exit the PIN setting menu.
Joystick Calib
After long-time use, the joystick may require calibration.
【【【【 Note】】】】 In non-menu status, quickly lock function can be realized by simply pressing SHIFT +
ENT . “USER PIN” or “ADMIN PIN” is required for operation the controller again.
OK
CONFIRM:
NEW PIN
OLD PIN

Operation ❶ Move the joystick up/ down, select “JOYSTICK CALIB”.
- - - -
Joystick calibration ❷ Right move the joystick or press ENT to confirm, enter the “JOYSTICK CALIB” menu. “PAN
LEFT” will be displayed, move the joystick to the left limit and hold, then press ENT to finish “PAN
LEFT” calibration. It will enter next menu.
- - - -
Pan Left
Move the joystick to left limit + ENT
❸ Refer to the setting of “PAN LEFT” to calibrate “PAN RIGHT”, “TILT UP” and “TILT DOWN”.
- - - -
Pan Right
Move the joystick to right limit + key ENT
∃
- - - -
Tilt up
Move the joystick to upper limit + key ENT
∃
- - - -
Tilt down
Move the joystick to lower limit + key ENT ❹ “ZOOM TELE” calibrating menu, twist the joystick clockwise until limit position, and press ENT.
- - - -
ZOOM TELE.
Twist the joystick clockwise until limit position +
press ENT
❺ “ZOOM WIDE” calibrating menu, twist the joystick anticlockwise until limit position, and press
ENT .
ZOOM TELE
TILT DOWN
TILT UP
PAN RIGHT
PAN LEFT
JOYSTICK CALIB

Operation
- - - -
Zoom wide.
Twist the joystick anticlockwise until limit
position + press ENT.
❻ “FREE STATE” setting menu, no need any operation, simply press ENT to confirm.
- - - -
No need any operation, press ENT .
❼ Upon completion of the above settings, "<SAVE> CANCEL" will be displayed to save or cancel.
Move the joystick left/ right to choose, and press ENT to confirm.
- - - -
SAVE. CANCEL.
Speed Setting
Set control speed of the joystick. ❶ Turn the joystick up/down, choose"SPEED SETTING".
- - - -
Speed Setting. ❷ Right move the joystick or press ENT to enter "SPEED SETTING" menu. Move the joystick up/
down to switch among speed levels, and right move the joystick or press ENT to confirm.
- - - - HIGH; MIDDLE; LOW;
Available Value: HIGH/MIDDLE/LOW
Default Setting
Restore the keyboard setting to factory default.
SPEED HIGH
SPEED SETTING
<SAVE>
FREE STATE
ZOOM WIDE

Operation ❶ Move the joystick up/ down, choose "DEFAULT SETTING".
- - - -
Default Setting. ❷ Right the joystick or press ENT key, enter "DEFAULT SETTING" menu, move the joystick left/
right, select options"<YES> NO", press ENT to confirm.
- - - - YES:Restore Default Setting;
NO:Cancel Restoring Default Setting. <YES> NO
DEFAULT SETTING


