CHAPTER 23-1 ASA FirePOWER Module User Guide 23 Understanding and Writing Intrusion Rules An intrusion rule is a specified set of keywords and arguments that detects attempts to exploit vulnerabilities on your network by analyzing network traffic to check if it matches the criteria in the rule. The system compares packets against the conditions specified in each rule and, if the packet data matches all the conditions specified in a rule, the rule triggers. If a rule is an alert rule, it generates an intrusion event. If it is a pass rule, it ignores the traffic. You can view and evaluate intrusion events from the ASA FirePOWER module interface. Caution Make sure you use a controlled network environment to test any intrusion rules that you write before you use the rules in a production environment. Poorly written intrusion rules may seriously affect the performance of the system. Note the following: • For a drop rule in an inline deployment, the system drops the packet and generates an event. For more information on drop rules, see Setting Rule States, page 20-19. • Cisco provides two types of intrusion rules: shared object rules and standard text rules. The Cisco Vulnerability Research Team (VRT) can use shared object rules to detect attacks against vulnerabilities in ways that traditional standard text rules cannot. You cannot create shared object rules. When you write your own intrusion rule, you create a standard text rule. You can write custom standard text rules to tune the types of events you are likely to see. Note that while this documentation sometimes discusses rules targeted to detect specific exploits, the most successful rules target traffic that may attempt to exploit known vulnerabilities rather than specific known exploits. By writing rules and specifying the rule’s event message, you can more easily identify traffic that indicates attacks and policy evasions. For more information about evaluating events, see Viewing Events, page 26-1. When you enable a custom standard text rule in a custom intrusion policy, keep in mind that some rule keywords and arguments require that traffic first be decoded or preprocessed in a certain way. This chapter explains the options you must configure in your network analysis policy, which governs preprocessing. Note that if you disable a required preprocessor, the system automatically uses it with its current settings, although the preprocessor remains disabled in the network analysis policy user interface. Note Because preprocessing and intrusion inspection are so closely related, the network analysis and intrusion policies examining a single packet must complement each other. Tailoring preprocessing, especially using multiple custom network analysis policies, is an advanced task. For more information, see Limitations of Custom Policies, page 11-11.
Transcript
C H A P T E R 23
Understanding and Writing Intrusion Rules
An intrusion rule is a specified set of keywords and arguments that detects attempts to exploit vulnerabilities on your network by analyzing network traffic to check if it matches the criteria in the rule. The system compares packets against the conditions specified in each rule and, if the packet data matches all the conditions specified in a rule, the rule triggers. If a rule is an alert rule, it generates an intrusion event. If it is a pass rule, it ignores the traffic. You can view and evaluate intrusion events from the ASA FirePOWER module interface.
Caution Make sure you use a controlled network environment to test any intrusion rules that you write before you use the rules in a production environment. Poorly written intrusion rules may seriously affect the performance of the system.
Note the following:
• For a drop rule in an inline deployment, the system drops the packet and generates an event. For more information on drop rules, see Setting Rule States, page 20-19.
• Cisco provides two types of intrusion rules: shared object rules and standard text rules. The Cisco Vulnerability Research Team (VRT) can use shared object rules to detect attacks against vulnerabilities in ways that traditional standard text rules cannot. You cannot create shared object rules. When you write your own intrusion rule, you create a standard text rule.
You can write custom standard text rules to tune the types of events you are likely to see. Note that while this documentation sometimes discusses rules targeted to detect specific exploits, the most successful rules target traffic that may attempt to exploit known vulnerabilities rather than specific known exploits. By writing rules and specifying the rule’s event message, you can more easily identify traffic that indicates attacks and policy evasions. For more information about evaluating events, see Viewing Events, page 26-1.
When you enable a custom standard text rule in a custom intrusion policy, keep in mind that some rule keywords and arguments require that traffic first be decoded or preprocessed in a certain way. This chapter explains the options you must configure in your network analysis policy, which governs preprocessing. Note that if you disable a required preprocessor, the system automatically uses it with its current settings, although the preprocessor remains disabled in the network analysis policy user interface.
Note Because preprocessing and intrusion inspection are so closely related, the network analysis and intrusion policies examining a single packet must complement each other. Tailoring preprocessing, especially using multiple custom network analysis policies, is an advanced task. For more information, see Limitations of Custom Policies, page 11-11.
23-1ASA FirePOWER Module User Guide
Chapter 23 Understanding and Writing Intrusion Rules Understanding Rule Anatomy
See the following sections for more information:
• Understanding Rule Anatomy, page 23-2 describes the components, including the rule header and rule options, that make up a valid standard text rule.
• Understanding Rule Headers, page 23-3 provides a detailed description of the parts of a rule header.
• Understanding Keywords and Arguments in Rules, page 23-9 explains the usage and syntax of the intrusion rule keywords available in the ASA FirePOWER module.
• Constructing a Rule, page 23-100 explains how to build a new rule using the rule editor.
• Filtering Rules on the Rule Editor Page, page 23-105 explains how to display a subset of rules to help you find specific rules.
Understanding Rule AnatomyLicense: Protection
All standard text rules contain two logical sections: the rule header and the rule options. The rule header contains:
• the rule's action or type
• the protocol
• the source and destination IP addresses and netmasks
• direction indicators showing the flow of traffic from source to destination
• the source and destination ports
The rule options section contains:
• event messages
• keywords and their parameters and arguments
• patterns that a packet’s payload must match to trigger the rule
• specifications of which parts of the packet the rules engine should inspect
The following diagram illustrates the parts of a rule:
Note that the options section of a rule is the section enclosed in parentheses. The rule editor provides an easy-to-use interface to help you build standard text rules.
23-2ASA FirePOWER Module User Guide
Chapter 23 Understanding and Writing Intrusion Rules Understanding Rule Headers
Understanding Rule HeadersLicense: Protection
Every standard text rule and shared object rule has a rule header containing parameters and arguments. The following illustrates parts of a rule header:
The following table describes each part of the rule header shown above.
Note The previous example uses default variables, as do most intrusion rules. See Working with Variable Sets, page 2-13 for more information about variables, what they mean, and how to configure them.
See the following sections for more information about rule header parameters:
• Specifying Rule Actions, page 23-4 describes rule types and explains how to specify the action that occurs when the rule triggers.
• Specifying Protocols, page 23-4 explains how to define the traffic protocol for traffic that the rule should test.
• Specifying IP Addresses In Intrusion Rules, page 23-5 explains how to define the individual IP addresses and IP address blocks in the rule header.
• Defining Ports in Intrusion Rules, page 23-8 explains how to define the individual ports and port ranges in the rule header.
Table 23-1 Rule Header Values
Rule Header Component Example Value This Value...
Action alert Generates an intrusion event when triggered.
Protocol tcp Tests TCP traffic only.
Source IP Address $EXTERNAL_NET Tests traffic coming from any host that is not on your internal network.
Source Ports any Tests traffic coming from any port on the originating host.
Operator -> Tests external traffic (destined for the web servers on your network).
Destination IP Address $HTTP_SERVERS Tests traffic to be delivered to any host specified as a web server on your internal network.
Destination Ports $HTTP_PORTS Tests traffic delivered to an HTTP port on your internal network.
23-3ASA FirePOWER Module User Guide
Chapter 23 Understanding and Writing Intrusion Rules Understanding Rule Headers
• Specifying Direction, page 23-9 describes the available operators and explains how to specify the direction traffic must be traveling to be tested by the rule.
Specifying Rule ActionsLicense: Protection
Each rule header includes a parameter that specifies the action the system takes when a packet triggers a rule. Rules with the action set to alert generate an intrusion event against the packet that triggered the rule and log the details of that packet. Rules with the action set to pass do not generate an event against, or log the details of, the packet that triggered the rule.
Note In an inline deployment, rules with the rule state set to Drop and Generate Events generate an intrusion event against the packet that triggered the rule. Also, if you apply a drop rule in a passive deployment, the rule acts as an alert rule. For more information on drop rules, see Setting Rule States, page 20-19.
By default, pass rules override alert rules. You can create pass rules to prevent packets that meet criteria defined in the pass rule from triggering the alert rule in specific situations, rather than disabling the alert rule. For example, you might want a rule that looks for attempts to log into an FTP server as the user “anonymous” to remain active. However, if your network has one or more legitimate anonymous FTP servers, you could write and activate a pass rule that specifies that, for those specific servers, anonymous users do not trigger the original rule.
Within the rule editor, you select the rule type from the Action list. For more information about the procedures you use to build a rule header using the rule editor, see Constructing a Rule, page 23-100.
Specifying ProtocolsLicense: Protection
In each rule header, you must specify the protocol of the traffic the rule inspects. You can specify the following network protocols for analysis:
• ICMP (Internet Control Message Protocol)
• IP (Internet Protocol)
Note The system ignores port definitions in an intrusion rule header when the protocol is set to ip. For more information, see Defining Ports in Intrusion Rules, page 23-8.
• TCP (Transmission Control Protocol)
• UDP (User Datagram Protocol)
Use IP as the protocol type to examine all protocols assigned by IANA, including TCP, UDP, ICMP, IGMP, and many more. See http://www.iana.org/assignments/protocol-numbers for a full list of IANA-assigned protocols.
Note You cannot currently write rules that match patterns in the next header (for example, the TCP header) in an IP payload. Instead, content matches begin with the last decoded protocol. As a workaround, you can match patterns in TCP headers by using rule options.
Chapter 23 Understanding and Writing Intrusion Rules Understanding Rule Headers
Within the rule editor, you select the protocol type from the Protocol list. See Constructing a Rule, page 23-100 for more information about the procedures you use to build a rule header using the rule editor.
Specifying IP Addresses In Intrusion RulesLicense: Protection
Restricting packet inspection to the packets originating from specific IP addresses or destined to a specific IP address reduces the amount of packet inspection the system must perform. This also reduces false positives by making the rule more specific and removing the possibility of the rule triggering against packets whose source and destination IP addresses do not indicate suspicious behavior.
Tip The system recognizes only IP addresses and does not accept host names for source or destination IP addresses.
Within the rule editor, you specify source and destination IP addresses in the Source IPs and Destination IPs fields. See Constructing a Rule, page 23-100 for more information about the procedures you use to build a rule header using the rule editor.
When writing standard text rules, you can specify IPv4 and IPv6 addresses in a variety of ways, depending on your needs. You can specify a single IP address, any, IP address lists, CIDR notation, prefix lengths, a network variable, or a network object or network object group. Additionally, you can indicate that you want to exclude a specific IP address or set of IP addresses. When specifying IPv6 addresses, you can use any addressing convention defined in RFC 4291.
The following table summarizes the various ways you can specify source and destination IP addresses.
Table 23-2 Source/Destination IP Address Syntax
To Specify... Use... Example
any IP address any any
a specific IP address the IP address
Note that you would not mix IPv4 and IPv6 source and destination addresses in the same rule.
192.168.1.1
2001:db8::abcd
a list of IP addresses brackets ([]) to enclose the IP addresses and commas to separate them
[192.168.1.1,192.168.1.15]
[2001:db8::b3ff, 2001:db8::0202]
a block of IP addresses IPv4 CIDR block or IPv6 address prefix notation 192.168.1.0/24
2001:db8::/32
anything except a specific IP address or set of addresses
the ! character before the IP address or addresses you want to negate
!192.168.1.15
!2001:db8::0202:b3ff:fe1e
anything in a block of IP addresses except one or more specific IP addresses
a block of addresses followed by a list of negated addresses or blocks
[10.0.0/8, !10.2.3.4, !10.1.0.0/16]
[2001:db8::/32, !2001:db8::8329, !2001:db8::0202]
23-5ASA FirePOWER Module User Guide
Chapter 23 Understanding and Writing Intrusion Rules Understanding Rule Headers
See the following sections for more in-depth information about the syntax you can use to specify source and destination IP addresses, and for information about using variables to specify IP addresses:
• IP Address Conventions, page 1-4.
• Working with Variable Sets, page 2-13
• Specifying Any IP Address, page 23-6
• Specifying Multiple IP Addresses, page 23-6
• Specifying Network Objects, page 23-7
• Excluding IP Addresses in Intrusion Rules, page 23-7
Specifying Any IP Address
License: Protection
You can specify the word any as a rule source or destination IP address to indicate any IPv4 or IPv6 address.
For example, the following rule uses the argument any in the Source IPs and Destination IPs fields and evaluates packets with any IPv4 or IPv6 source or destination address:
alert tcp any any -> any any
You can also specify :: to indicate any IPv6 address.
Specifying Multiple IP Addresses
License: Protection
You can list individual IP addresses by separating the IP addresses with commas and, optionally, by surrounding non-negated lists with brackets, as shown in the following example:
IP addresses defined by a network variable
the variable name, in uppercase letters, preceded by $
Note that preprocessor rules can trigger events regardless of the hosts defined by network variables used in intrusion rules. See Working with Variable Sets, page 2-13 for more information.
$HOME_NET
all IP addresses except addresses defined by an IP address variable
the variable name, in uppercase letters, preceded by !$
See Excluding IP Addresses in Intrusion Rules, page 23-7 for more information.
!$HOME_NET
IP addresses defined by a network object or network object group
the object or group name using the format !{object_name}.
See Working with Network Objects, page 2-3 for more information.
${192.168sub16}
all IP addresses except addresses defined by a network object or network object group
the object or group name, in curly braces ({}), preceded by !$.
See Working with Network Objects, page 2-3 for more information.
!${192.168sub16}
Table 23-2 Source/Destination IP Address Syntax (continued)
To Specify... Use... Example
23-6ASA FirePOWER Module User Guide
Chapter 23 Understanding and Writing Intrusion Rules Understanding Rule Headers
[192.168.1.100,192.168.1.103,192.168.1.105]
You can list IPv4 and IPv6 addresses alone or in any combination, as shown in the following example:
[192.168.1.100,2001:db8::1234,192.168.1.105]
Note that surrounding an IP address list with brackets, which was required in earlier software releases, is not required. Note also that, optionally, you can enter lists with a space before or after each comma.
Note You must surround negated lists with brackets. See Excluding IP Addresses in Intrusion Rules, page 23-7 for more information.
You can also use IPv4 Classless Inter-Domain Routing (CIDR) notation or IPv6 prefix lengths to specify address blocks. For example:
• 192.168.1.0/24 specifies the IPv4 addresses in the 192.168.1.0 network with a subnet mask of 255.255.255.0, that is, 192.168.1.0 through 192.168.1.255. For more information, see IP Address Conventions, page 1-4.
• 2001:db8::/32 specifies the IPv6 addresses in the 2001:db8:: network with a prefix length of 32 bits, that is, 2001:db8:: through 2001:db8:ffff:ffff:ffff:ffff:ffff:ffff.
Tip If you need to specify a block of IP addresses but cannot express it using CIDR or prefix length notation alone, you can use CIDR blocks and prefix lengths in an IP address list.
Specifying Network Objects
License: Protection
You can specify a network object or network object group using the syntax:
${object_name | group_name}
where:
• object_name is the name of a network object
• group_name is the name of a network object group
See Working with Network Objects, page 2-3 for information on creating network objects and network object groups.
Consider the case where you have created a network object named 192.168sub16 and a network object group named all_subnets. You could specify the following to identify IP addresses using the network object:
${192.168sub16}
and you could specify the following to use the network object group:
${all_subnets}
You can also use negation with network objects and network object groups. For example:
!${192.168sub16}
See Excluding IP Addresses in Intrusion Rules, page 23-7 for more information.
Excluding IP Addresses in Intrusion Rules
License: Protection
23-7ASA FirePOWER Module User Guide
Chapter 23 Understanding and Writing Intrusion Rules Understanding Rule Headers
You can use an exclamation point (!) to negate a specified IP address. That is, you can match any IP address with the exception of the specified IP address or addresses. For example, !192.168.1.1 specifies any IP address other than 192.168.1.1, and !2001:db8:ca2e::fa4c specifies any IP address other than 2001:db8:ca2e::fa4c.
To negate a list of IP addresses, place ! before a bracketed list of IP addresses. For example, ![192.168.1.1,192.168.1.5] would define any IP address other than 192.168.1.1 or 192.168.1.5.
Note You must use brackets to negate a list of IP addresses.
Be careful when using the negation character with IP address lists. For example, if you use [!192.168.1.1,!192.168.1.5] to match any address that is not 192.168.1.1 or 192.168.1.5, the system interprets this syntax as “anything that is not 192.168.1.1, or anything that is not 192.168.1.5.”
Because 192.168.1.5 is not 192.168.1.1, and 192.168.1.1 is not 192.168.1.5, both IP addresses match the IP address value of [!192.168.1.1,!192.168.1.5], and it is essentially the same as using “any.”
Instead, use ![192.168.1.1,192.168.1.5]. The system interprets this as “not 192.168.1.1 and not 192.168.1.5,” which matches any IP address other than those listed between brackets.
Note that you cannot logically use negation with any which, if negated, would indicate no address.
Defining Ports in Intrusion RulesLicense: Protection
Within the rule editor, you specify source and destination ports in the Source Port and Destination Port fields. See Constructing a Rule, page 23-100 for more information about the procedures you use to build a rule header using the rule editor.
The ASA FirePOWER module uses a specific type of syntax to define the port numbers used in rule headers.
Note The system ignores port definitions in an intrusion rule header when the protocol is set to ip. For more information, see Specifying Protocols, page 23-4.
You can list ports by separating the ports with commas, as shown in the following example:
80, 8080, 8138, 8600-9000, !8650-8675
Optionally, the following example shows how you can surround a port list with brackets, which was required in previous software versions but is no longer required:
[80, 8080, 8138, 8600-9000, !8650-8675]
Note that you must surround negated port lists in brackets, as shown in the following example:
![20, 22, 23]
Note also that a list of source or destination ports in an intrusion rule can include a maximum of 64 characters.
The following table summarizes the syntax you can use:
23-8ASA FirePOWER Module User Guide
Chapter 23 Understanding and Writing Intrusion Rules Understanding Keywords and Arguments in Rules
Specifying DirectionLicense: Protection
Within the rule header, you can specify the direction that the packet must travel for the rule to inspect it. The following table describes these options.
See Constructing a Rule, page 23-100 for more information about the procedures you use to build a rule header using the rule editor.
Understanding Keywords and Arguments in RulesLicense: Protection
Using the rules language, you can specify the behavior of a rule by combining keywords. Keywords and their associated values (called arguments) dictate how the system evaluates packets and packet-related values that the rules engine tests. The ASA FirePOWER module currently supports keywords that allow you to perform inspection functions, such as content matching, protocol-specific pattern matching, and state-specific matching. You can define up to 100 arguments per keyword, and combine any number of compatible keywords to create highly specific rules. This helps decrease the chance of false positives and false negatives and focus the intrusion information you receive.
Table 23-3 Source/Destination Port Syntax
To Specify... Use Example
any port any any
a specific port the port number 80
a range of ports a dash between the first and last port number in the range 80-443
all ports less than or equal to a specific port
a dash before the port number -21
all ports greater than or equal to a specific port
a dash after the port number 80-
all ports except a specific port or range of ports
the ! character before the port, port list, or range of ports you want to negate
Note that you can logically use negation with all port designations except any, which if negated would indicate no port.
!20
all ports defined by a port variable
the variable name, in uppercase letter, preceded by $
See Working with Port Variables, page 2-25 for more information.
$HTTP_PORTS
all ports except ports defined by a port variable
the variable name, in uppercase letter, preceded by !$ !$HTTP_PORTS
Table 23-4 Directional Options in Rule Headers
Use... To Test...
Directional only traffic from the specified source IP address to the specified destination IP address
Bidirectional all traffic traveling between the specified source and destination IP addresses
23-9ASA FirePOWER Module User Guide
Chapter 23 Understanding and Writing Intrusion Rules Understanding Keywords and Arguments in Rules
Note that you can also use adaptive profiles to dynamically adapt active rule processing for specific packets based on rule metadata and host information. For more information, see Tuning Preprocessing in Passive Deployments, page 18-1.
See the following sections for more information:
• Defining Intrusion Event Details, page 23-11 describes the syntax and use of keywords that allow you to define the event’s message, priority information, and references to external information about the exploit the rule detects.
• Searching for Content Matches, page 23-15 describes how to use the content or protected_content keywords to test the content of the packet payload.
• Constraining Content Matches, page 23-17 describes how to use modifying keywords for the content or protected_content keywords.
• Replacing Content in Inline Deployments, page 23-29 describes how to use the replace keyword in inline deployments to replace specified content of equal length.
• Using Byte_Jump and Byte_Test, page 23-30 describes how to use the byte_jump and byte_test keywords to calculate where in a packet the rules engine should begin testing for a content match, and which bytes it should evaluate.
• Searching for Content Using PCRE, page 23-34 describes how to use the pcre keyword to use Perl-compatible regular expressions in rules.
• Adding Metadata to a Rule, page 23-41 describes how to use the metadata keyword to add information to a rule.
• Inspecting IP Header Values, page 23-44 describes the syntax and use of keywords that test values in the packet’s IP header.
• Inspecting ICMP Header Values, page 23-47 describes the syntax and use of keywords that test values in the packet’s ICMP header.
• Inspecting TCP Header Values and Stream Size, page 23-49 describes the syntax and use of keywords that test values in the packet’s TCP header.
• Enabling and Disabling TCP Stream Reassembly, page 23-53 describes how to enable and disable stream reassembly for a single connection when inspected traffic on the connection matches the conditions of the rule.
• Extracting SSL Information from a Session, page 23-53 describes the use and syntax of keywords that extract version and state information from encrypted traffic.
• Reading Packet Data into Keyword Arguments, page 23-81 describes how to read a value from a packet into a variable that you can use later in the same rule to specify the value for arguments in certain other keywords.
• Inspecting Application Layer Protocol Values, page 23-55 describes the use and syntax of keywords that test application layer protocol properties.
• Inspecting Packet Characteristics, page 23-78 describes the use and syntax of the dsize, sameIP, isdataat, fragoffset, and cvs keywords.
• Initiating Active Responses with Rule Keywords, page 23-83 explains how to use the resp keyword to actively close TCP connections or UDP sessions, the react keyword to send an HTML page and then actively close TCP connections, and the config response command to specify the active response interface and the number of TCP resets to attempt in a passive deployment.
• Filtering Events, page 23-86 describes how to prevent a rule from triggering an event unless a specified number packets meet the rule’s detection criteria within a specified time.
23-10ASA FirePOWER Module User Guide
Chapter 23 Understanding and Writing Intrusion Rules Understanding Keywords and Arguments in Rules
• Evaluating Post-Attack Traffic, page 23-88 describes how to log additional traffic for the host or session.
• Detecting Attacks That Span Multiple Packets, page 23-89 describes how to assign state names to packets from attacks that span multiple packets in a single session, then analyze and alert on packets according to their state.
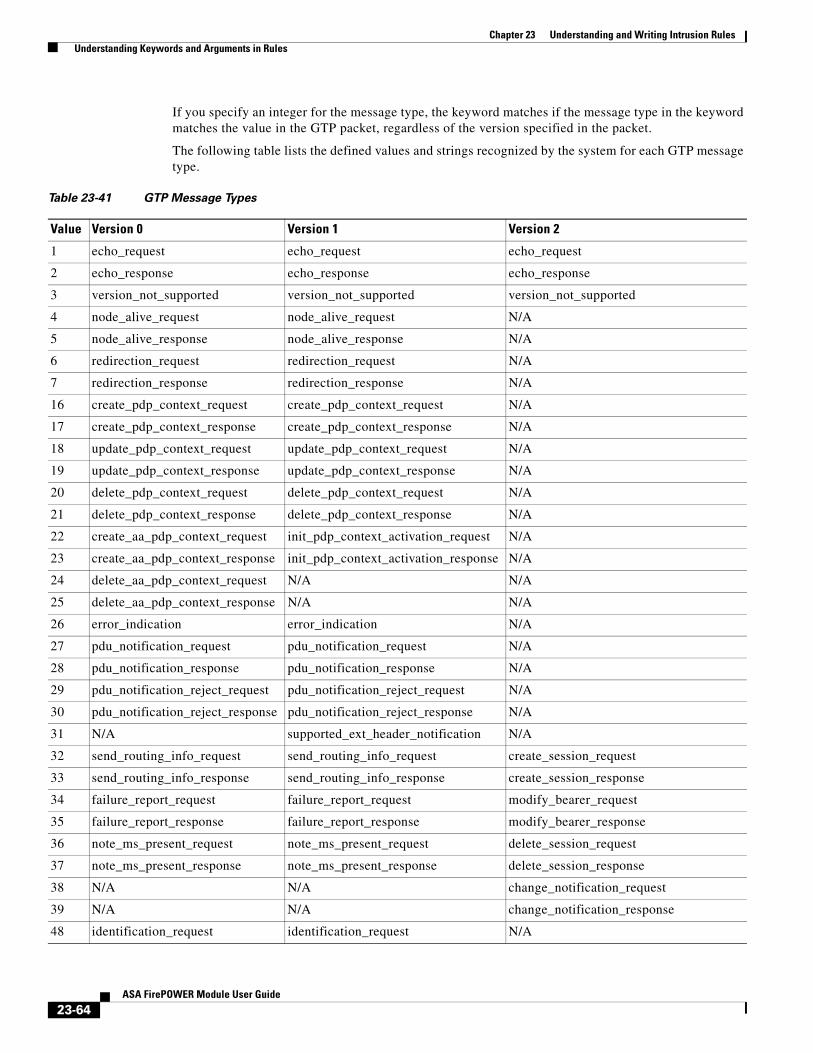
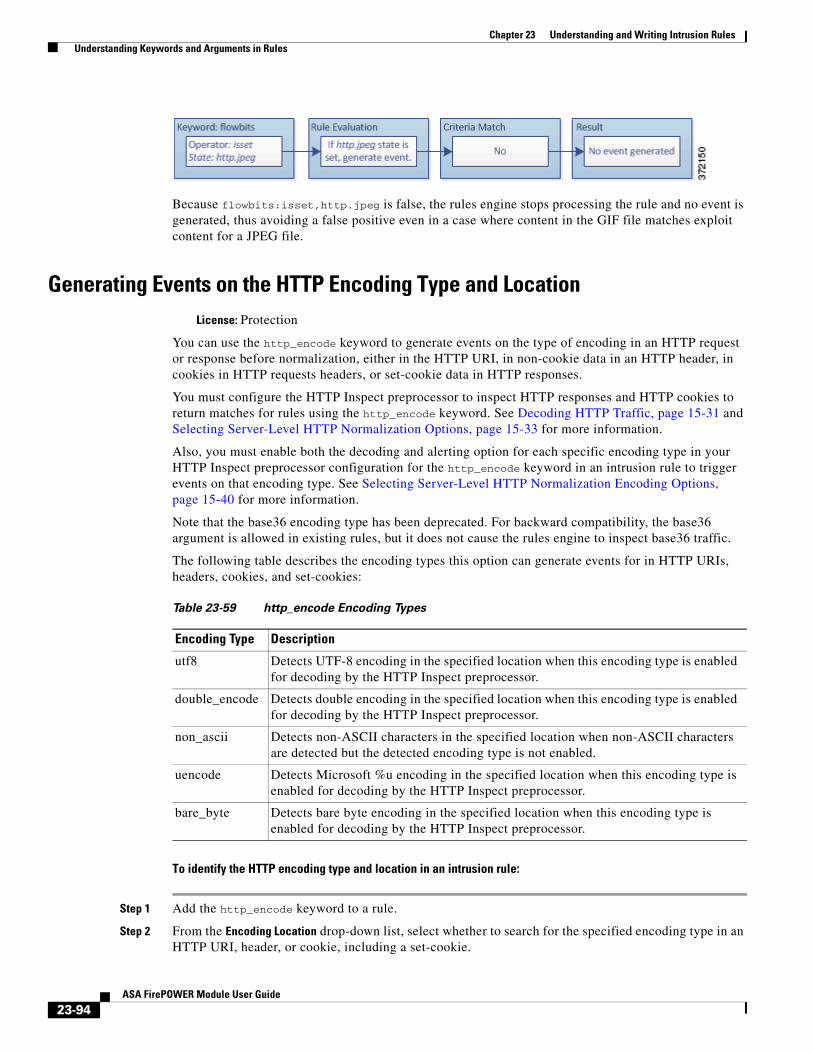
• Generating Events on the HTTP Encoding Type and Location, page 23-94 describes how to generate events on the type of encoding in an HTTP request or response URI, header, or cookie, including set-cookies, before normalization.
• Detecting File Types and Versions, page 23-95 describes how to point to a specific file type or file version using the file_type or file_group keyword.
• Pointing to a Specific Payload Type, page 23-97 describes how to point to the beginning of the HTTP response entity body, SMTP payload, or encoded email attachment.
• Pointing to the Beginning of the Packet Payload, page 23-98 describes how to point to the beginning of the packet payload.
• Decoding and Inspecting Base64 Data, page 23-98 describes how you can use the base64_decode and base64_data keywords to decode and inspect Base64 data, especially in HTTP requests.
As you construct a standard text rule, you can include contextual information that describes the vulnerability that the rule detects attempts to exploit. You can also include external references to vulnerability databases and define the priority that the event holds in your organization. When analysts see the event, they then have information about the priority, exploit, and known mitigation readily available.
See the following sections for more information about event-related keywords:
• Defining the Event Message, page 23-11
• Defining the Event Priority, page 23-12
• Defining the Intrusion Event Classification, page 23-12
• Defining the Event Reference, page 23-14
Defining the Event Message
License: Protection
You can specify meaningful text that appears as a message when the rule triggers. The message gives immediate insight into the nature of the vulnerability that the rule detects attempts to exploit. You can use any printable standard ASCII characters except curly braces ({}). The system strips quotes that completely surround the message.
Tip You must specify a rule message. Also, the message cannot consist of white space only, one or more quotation marks only, one or more apostrophes only, or any combination of just white space, quotation marks, or apostrophes.
To define the event message in the rule editor, enter the event message in the Message field. See Constructing a Rule, page 23-100 for more information about using the rule editor to build rules.
23-11ASA FirePOWER Module User Guide
Chapter 23 Understanding and Writing Intrusion Rules Understanding Keywords and Arguments in Rules
Defining the Event Priority
License: Protection
By default, the priority of a rule derives from the event classification for the rule. However, you can override the classification priority for a rule by adding the priority keyword to the rule.
To specify a priority using the rule editor, select priority from the Detection Options list, and select high, medium, or low from the drop-down list. For example, to assign a high priority for a rule that detects web application attacks, add the priority keyword to the rule and select high as the priority. See Constructing a Rule, page 23-100 for more information about using the rule editor to build rules.
Defining the Intrusion Event Classification
License: Protection
For each rule, you can specify an attack classification that appears in the packet display of the event. The following table lists the name and number for each classification.
Table 23-5 Rule Classifications
Number Classification Name Description
1 not-suspicious Not Suspicious Traffic
2 unknown Unknown Traffic
3 bad-unknown Potentially Bad Traffic
4 attempted-recon Attempted Information Leak
5 successful-recon-limited Information Leak
6 successful-recon-largescale Large Scale Information Leak
7 attempted-dos Attempted Denial of Service
8 successful-dos Denial of Service
9 attempted-user Attempted User Privilege Gain
10 unsuccessful-user Unsuccessful User Privilege Gain
11 successful-user Successful User Privilege Gain
12 attempted-admin Attempted Administrator Privilege Gain
13 successful-admin Successful Administrator Privilege Gain
14 rpc-portmap-decode Decode of an RPC Query
15 shellcode-detect Executable Code was Detected
16 string-detect A Suspicious String was Detected
17 suspicious-filename-detect A Suspicious Filename was Detected
18 suspicious-login An Attempted Login Using a Suspicious Username was Detected
19 system-call-detect A System Call was Detected
20 tcp-connection A TCP Connection was Detected
21 trojan-activity A Network Trojan was Detected
22 unusual-client-port-connection A Client was Using an Unusual Port
23-12ASA FirePOWER Module User Guide
Chapter 23 Understanding and Writing Intrusion Rules Understanding Keywords and Arguments in Rules
To specify a classification in the rule editor, select a classification from the Classification list. See Writing New Rules, page 23-100 for more information on the rule editor.
Adding Custom Classifications
License: Protection
If you want more customized content for the packet display description of the events generated by a rule you define, create a custom classification.
To add classifications to the Classification list:
Step 3 Under the Classification drop-down list, click Edit Classifications.
A pop-up window appears.
Step 4 Type the name of the classification in the Classification Name field.
You can use up to 255 alphanumeric characters, but the page is difficult to read if you use more than 40 characters. The following characters are not supported: <>()\'"&$; and the space character.
Step 5 Type a description of the classification in the Classification Description field.
23 network-scan Detection of a Network Scan
24 denial-of-service Detection of a Denial of Service Attack
25 non-standard-protocol Detection of a Non-Standard Protocol or Event
34 default-login-attempt Attempt to Login By a Default Username and Password
35 sdf Sensitive Data
36 malware-cnc Known malware command and control traffic
37 client-side-exploit Known client side exploit attempt
38 file-format Known malicious file or file based exploit
Table 23-5 Rule Classifications (continued)
Number Classification Name Description
23-13ASA FirePOWER Module User Guide
Chapter 23 Understanding and Writing Intrusion Rules Understanding Keywords and Arguments in Rules
You can use up to 255 alphanumeric characters and spaces. The following characters are not supported: <>()\'"&$;
Step 6 Select a priority from the Priority list.
You can select high, medium, or low.
Step 7 Click Add.
The new classification is added to the list and becomes available for use in the rule editor.
Step 8 Click Done.
Defining the Event Reference
License: Protection
You can use the reference keyword to add references to external web sites and additional information about the event. Adding a reference provides analysts with an immediately available resource to help them identify why the packet triggered a rule. The following table lists some of the external systems that can provide data on known exploits and attacks.
To specify a reference using the rule editor, select reference from the Detection Options list, and enter a value in the corresponding field as follows:
id_system,id
where id_system is the system being used as a prefix, and id is the Bugtraq ID, CVE number, Arachnids ID, or URL (without http://).
For example, to specify the authentication bypass vulnerability on Microsoft Commerce Server 2002 servers documented in Bugtraq ID 17134, enter the following in the reference field:
bugtraq,17134
Note the following when adding references to a rule:
• Do not use a space after the comma.
• Do not use uppercase letters in the system ID.
See Constructing a Rule, page 23-100 for more information about using the rule editor to build rules.
Table 23-6 External Attack Identification Systems
System ID Description Example ID
bugtraq Bugtraq page 8550
cve Common Vulnerabilities and Exposure page
CAN-2003-0702
mcafee McAfee page 98574
url Website reference www.example.com?exploit=14
msb Microsoft security bulletin MS11-082
nessus Nessus page 10039
secure-url Secure Website Reference (https://...)
intranet/exploits/exploit=14
Note that you can use secure-url with any secure website.
23-14ASA FirePOWER Module User Guide
Chapter 23 Understanding and Writing Intrusion Rules Understanding Keywords and Arguments in Rules
Searching for Content MatchesLicense: Protection
Use the content keyword or the protected_content keyword to specify content that you want to detect in a packet. See the following sections for more information:
• Using the content Keyword, page 23-15
• Using the protected_content Keyword, page 23-15
• Configuring Content Matching, page 23-16
Using the content Keyword
When you use the content keyword, the rules engine searches the packet payload or stream for that string. For example, if you enter /bin/sh as the value for one of the content keywords, the rules engine searches the packet payload for the string /bin/sh.
Match content using either an ASCII string, hexadecimal content (binary byte code), or a combination of both. Surround hexadecimal content with pipe characters (|) in the keyword value. For example, you can mix hexadecimal content and ASCII content using something that looks like |90C8 C0FF FFFF|/bin/sh.
You can specify multiple content matches in a single rule. To do this, use additional instances of the content keyword. For each content match, you can indicate that content matches must be found in the packet payload or stream for the rule to trigger.
Using the protected_content Keyword
The protected_content keyword allows you to encode your search content string before configuring the rule argument. The original rule author uses a hash function (SHA-512, SHA-256, or MD5) to encode the string before configuring the keyword.
When you use the protected_content keyword instead of the content keyword, there is no change to how the rules engine searches the packet payload or stream for that string and most of the keyword options function as expected. The following table summarizes the exceptions, where the protected_content keyword options differ from the content keyword options.
Table 23-7 protected_content Option Exceptions
Option Description
Hash Type New option for the protected_content rule keyword. For more information, see Hash Type, page 23-18.
Case Insensitive Not supported
Within Not supported
Depth Not supported
Length New option for the protected_content rule keyword. For more information, see Length, page 23-21.
Use Fast Pattern Matcher Not supported
Fast Pattern Matcher Only Not supported
Fast Pattern Matcher Offset and Length Not supported
23-15ASA FirePOWER Module User Guide
Chapter 23 Understanding and Writing Intrusion Rules Understanding Keywords and Arguments in Rules
Cisco recommends that you include at least one content keyword in rules that include a protected_content keyword to ensure that the rules engine uses the fast pattern matcher, which increases processing speed and improves performance. Position the content keyword before the protected_content keyword in the rule. Note that the rules engine uses the fast pattern matcher when a rule includes at least one content keyword, regardless of whether you enable the content keyword Use Fast Pattern Matcher argument.
Configuring Content Matching
You should almost always follow a content or protected_content keyword by modifiers that indicate where the content should be searched for, whether the search is case sensitive, and other options. See Constraining Content Matches for more information about modifiers to the content and protected_content keywords.
Note that all content matches must be true for the rule to trigger an event, that is, each content match has an AND relationship with the others.
Note also that, in an inline deployment, you can set up rules that match malicious content and then replace it with your own text string of equal length. See Replacing Content in Inline Deployments, page 23-29 for more information.
To enter content to be matched:
Step 1 In the content field, type the content you want to find (for example, |90C8 C0FF FFFF|/bin/sh).
If you want to search for any content that is not the specified content, select the Not check box.
Caution You may invalidate your intrusion policy if you create a rule that includes only one content keyword and that keyword has the Not option selected. For more information, see Not, page 23-19.
Step 2 Optionally, add additional keywords that modify the content keyword or add constraints for the keyword.
For more information on other keywords, see Understanding Keywords and Arguments in Rules, page 23-9. For more information on constraining the content keyword, see Constraining Content Matches, page 23-17.
Step 3 Continue with creating or editing the rule.
See Writing New Rules, page 23-100 or Modifying Existing Rules, page 23-102 for more information.
To enter protected content to be matched:
Step 1 Using a SHA-512, SHA-256, or MD5 hash generator, encode the content you want to find (for example, run the string Sample1 through a SHA-512 hash generator).
The generator outputs a hash for your string.
Step 2 In the protected_content field, type the hash you generated in step 1 (for example, B20AABAF59605118593404BD42FE69BD8D6506EE7F1A71CE6BB470B1DF848C814BC5DBEC2081999F15691A7
1FAECA5FBA4A3F8B8AB56B7F04585DA6D73E5DD15).
If you want to search for any content that is not the specified content, select the Not check box.
23-16ASA FirePOWER Module User Guide
Chapter 23 Understanding and Writing Intrusion Rules Understanding Keywords and Arguments in Rules
Caution You may invalidate your intrusion policy if you create a rule that includes only one protected_content keyword and that keyword has the Not option selected. For more information, see Not, page 23-19.
Step 3 From the Hash Type drop-down list, select the hash function you used in step 1 (for example, SHA-512). Note that the number of bits in the hash entered in step 2 must match the hash type or the system does not save the rule. For more information, see Hash Type, page 23-18.
Tip If you select the Cisco-set Default, the system assumes SHA-512 as the hash function.
Step 4 Type a value in the required Length field. The value must correspond with the length of the original, unhashed string you want to find (for example, the string Sample1 from step 2 has the length 7).
For more information, see Length, page 23-21.
Step 5 Type a value in either the Offset or Distance field. You cannot mix the Offset and Distance options within a single keyword configuration.
For more information, see Using Search Location Options in the protected_content Keyword, page 23-22.
Step 6 Optionally, add additional constraining options that modify the protected_content keyword.
For more information, see Constraining Content Matches, page 23-17.
Step 7 Optionally, add additional keywords that modify the protected_content keyword.
For more information, see Understanding Keywords and Arguments in Rules, page 23-9.
Step 8 Continue with creating or editing the rule.
See Writing New Rules, page 23-100 or Modifying Existing Rules, page 23-102 for more information.
Constraining Content MatchesLicense: Protection
You can constrain the location and case-sensitivity of content searches with parameters that modify the content or protected_content keyword. Configure options that modify the content or protected_content keyword to specify the content for which you want to search.
For more information, see the following sections:
• Case Insensitive, page 23-18
• Hash Type, page 23-18
• Raw Data, page 23-19
• Not, page 23-19
• Search Location Options, page 23-20
• HTTP Content Options, page 23-23
• Use Fast Pattern Matcher, page 23-26
23-17ASA FirePOWER Module User Guide
Chapter 23 Understanding and Writing Intrusion Rules Understanding Keywords and Arguments in Rules
Case Insensitive
License: Protection
Note This option is not supported when configuring the protected_content keyword. For more information, see Using the protected_content Keyword, page 23-15.
You can instruct the rules engine to ignore case when searching for content matches in ASCII strings. To make your search case-insensitive, check Case Insensitive when specifying a content search.
To specify Case Insensitive when doing a content search:
Step 1 Select Case Insensitive for the content keyword you are adding.
Step 2 Continue with creating or editing the rule.
See Constraining Content Matches, Searching for Content Matches, page 23-15, Writing New Rules, page 23-100 or Modifying Existing Rules, page 23-102 for more information.
Hash Type
License: Protection
Note This option is only configurable with the protected_content keyword. For more information, see Using the protected_content Keyword, page 23-15.
Use the Hash Type drop-down to identify the hash function you used to encode your search string. The system supports SHA-512, SHA-256, and MD5 hashing for protected_content search strings. If the length of your hashed content does not match the selected hash type, the system does not save the rule.
The system automatically selects the Cisco-set default value. When Default is selected, no specific hash function is written into the rule and the system assumes SHA-512 for the hash function.
To specify a hash function when doing a protected content search:
Step 1 From the Hash Type drop-down list, select Default, SHA-512, SHA-256, or MD5 as the hash for the protected_content keyword you are adding.
Tip If you select the Cisco-set Default, the system assumes SHA-512 as the hash function. For more information, see Hash Type, page 23-18.
Step 2 Continue with creating or editing the rule. See Constraining Content Matches, Searching for Content Matches, page 23-15, Writing New Rules, page 23-100, or Modifying Existing Rules, page 23-102 for more information.
23-18ASA FirePOWER Module User Guide
Chapter 23 Understanding and Writing Intrusion Rules Understanding Keywords and Arguments in Rules
Raw Data
License: Protection
The Raw Data option instructs the rules engine to analyze the original packet payload before analyzing the normalized payload data (decoded by a network analysis policy) and does not use an argument value. You can use this keyword when analyzing telnet traffic to check the telnet negotiation options in the payload before normalization.
You cannot use the Raw Data option together in the same content or protected_content keyword with any HTTP content option. See HTTP Content Options, page 23-23 for more information.
Tip You can configure the HTTP Inspect preprocessor Client Flow Depth and Server Flow Depth options to determine whether raw data is inspected in HTTP traffic, and how much raw data is inspected. For more information, see Selecting Server-Level HTTP Normalization Options, page 15-33.
To analyze raw data:
Step 1 Select the Raw Data check box for the content or protected_content keyword you are adding.
Step 2 Continue with creating or editing the rule. See Constraining Content Matches, Searching for Content Matches, page 23-15, Writing New Rules, page 23-100, or Modifying Existing Rules, page 23-102 for more information.
Not
License: Protection
Select the Not option to search for content that does not match the specified content. If you create a rule that includes a content or protected_content keyword with the Not option selected, you must also include in the rule at least one other content or protected_content keyword without the Not option selected.
Caution Do not create a rule that includes only one content or protected_content keyword if that keyword has the Not option selected. You may invalidate your intrusion policy.
For example, SMTP rule 1:2541:9 includes three content keywords, one of which has the Not option selected. A custom rule based on this rule would be invalid if you removed all of the content keywords except the one with the Not option selected. Adding such a rule to your intrusion policy could invalidate the policy.
To search for content that does not match the specified content:
Step 1 Select the Not check box for the content or protected_content keyword you are adding.
Tip You cannot select the Not check box and the Use Fast Pattern Matcher check box with the same content keyword.
23-19ASA FirePOWER Module User Guide
Chapter 23 Understanding and Writing Intrusion Rules Understanding Keywords and Arguments in Rules
Step 2 Include in the rule at least one other content or protected_content keyword that does not have the Not option selected.
Step 3 Continue with creating or editing the rule. See Constraining Content Matches, Searching for Content Matches, page 23-15, Writing New Rules, page 23-100, or Modifying Existing Rules, page 23-102 for more information.
Search Location Options
License: Protection
You can use search location options to specify where to begin searching for the specified content and how far to continue searching. For details about each option, see:
• Depth, page 23-20
• Distance, page 23-20
• Length, page 23-21
• Offset, page 23-21
• Within, page 23-21
For information about how to use search location options within the content or protected_content keyword, see:
• Using Search Location Options in the content Keyword, page 23-21
• Using Search Location Options in the protected_content Keyword, page 23-22
Depth
Note This option is only supported when configuring the content keyword. For more information, see Using the content Keyword, page 23-15.
Specifies the maximum content search depth, in bytes, from the beginning of the offset value, or if no offset is configured, from the beginning of the packet payload.
For example, in a rule with a content value of cgi-bin/phf, and offset value of 3, and a depth value of 22, the rule starts searching for a match to the cgi-bin/phf string at byte 3, and stops after processing 22 bytes (byte 25) in packets that meet the parameters specified by the rule header.
You must specify a value that is greater than or equal to the length of the specified content, up to a maximum of 65535 bytes. You cannot specify a value of 0.
The default depth is to search to the end of the packet.
Distance
Instructs the rules engine to identify subsequent content matches that occur a specified number of bytes after the previous successful content match.
Because the distance counter starts at byte 0, specify one less than the number of bytes you want to move forward from the last successful content match. For example, if you specify 4, the search begins at the fifth byte.
23-20ASA FirePOWER Module User Guide
Chapter 23 Understanding and Writing Intrusion Rules Understanding Keywords and Arguments in Rules
You can specify a value of -65535 to 65535 bytes. If you specify a negative Distance value, the byte you start searching on may fall outside the beginning of a packet. Any calculations will take into account the bytes outside the packet, even though the search actually starts on the first byte in the packet. For example, if the current location in the packet is the fifth byte, and the next content rule option specifies a Distance value of -10 and a Within value of 20, the search starts at the beginning of the payload and the Within option is adjusted to 15.
The default distance is 0, meaning the current location in the packet subsequent to the last content match.
Length
Note This option is only supported when configuring the protected_content keyword. For more information, see Using the protected_content Keyword, page 23-15.
The Length protected_content keyword option indicates the length, in bytes, of the unhashed search string.
For example, if you used the content Sample1 to generate a secure hash, use 7 for the Length value. You must enter a value in this field.
Offset
Specifies in bytes where in the packet payload to start searching for content relative to the beginning of the packet payload. You can specify a value of-65535 to 65535 bytes.
Because the offset counter starts at byte 0, specify one less than the number of bytes you want to move forward from the beginning of the packet payload. For example, if you specify 7, the search begins at the eighth byte.
The default offset is 0, meaning the beginning of the packet.
Within
Note This option is only supported when configuring the content keyword. For more information, see Using the content Keyword, page 23-15.
The Within option indicates that, to trigger the rule, the next content match must occur within the specified number of bytes after the end of the last successful content match. For example, if you specify a Within value of 8, the next content match must occur within the next eight bytes of the packet payload or it does not meet the criteria that triggers the rule.
You can specify a value that is greater than or equal to the length of the specified content, up to a maximum of 65535 bytes.
The default for Within is to search to the end of the packet.
Using Search Location Options in the content Keyword
You can use either of two content location pairs to specify where to begin searching for the specified content and how far to continue searching, as follows:
• Use Offset and Depth together to search relative to the beginning of the packet payload.
• Use Distance and Within together to search relative to the current search location.
When you specify only one of a pair, the default for the other option in the pair is assumed.
23-21ASA FirePOWER Module User Guide
Chapter 23 Understanding and Writing Intrusion Rules Understanding Keywords and Arguments in Rules
You cannot mix the Offset and Depth options with the Distance and Within options. For example, you cannot pair Offset and Within. You can use any number of location options in a rule.
When no location is specified, the defaults for Offset and Depth are assumed; that is, the content search starts at the beginning of the packet payload and continues to the end of the packet.
You can also use an existing byte_extract variable to specify the value for a location option. See Reading Packet Data into Keyword Arguments, page 23-81 for more information.
To specify a search location value in a content keyword:
Step 1 Type the value in the field for the content keyword you are adding. You have the following choices:
• Offset
• Depth
• Distance
• Within
You can use any number of location options in a rule.
Step 2 Continue with creating or editing the rule. See Constraining Content Matches, page 23-17, Searching for Content Matches, page 23-15, Writing New Rules, page 23-100 or Modifying Existing Rules, page 23-102 for more information.
Using Search Location Options in the protected_content Keyword
Use the required Length protected_content location option in combination with either the Offset or Distance location option to specify where to begin searching for the specified content and how far to continue searching, as follows:
• Use Length and Offset together to search for the protected string relative to the beginning of the packet payload.
• Use Length and Distance together to search for the protected string relative to the current search location.
Tip You cannot mix the Offset and Distance options within a single keyword configuration, but you can use any number of location options in a rule.
When no location is specified, the defaults are assumed; that is, the content search starts at the beginning of the packet payload and continues to the end of the packet.
You can also use an existing byte_extract variable to specify the value for a location option. For more information, see Reading Packet Data into Keyword Arguments, page 23-81.
To specify a search location value in a protected_content keyword:
Step 1 Type the value in the field for the protected_content keyword you are adding. You have the following choices:
• Length (required)
• Offset
23-22ASA FirePOWER Module User Guide
Chapter 23 Understanding and Writing Intrusion Rules Understanding Keywords and Arguments in Rules
• Distance
You cannot mix the Offset and Distance options within a single protected_content keyword, but you can use any number of location options in a rule.
Step 2 Continue with creating or editing the rule. See Constraining Content Matches, page 23-17, Searching for Content Matches, page 23-15, Writing New Rules, page 23-100 or Modifying Existing Rules, page 23-102 for more information.
HTTP Content Options
License: Protection
HTTP content or protected_content keyword options let you specify where to search for content matches within an HTTP message decoded by the HTTP Inspect preprocessor.
Two options search status fields in HTTP responses:
• HTTP Status Code
• HTTP Status Message
Note that although the rules engine searches the raw, unnormalized status fields, these options are listed here separately to simplify explanation below of the restrictions to consider when combining other raw HTTP fields and normalized HTTP fields.
Five options search normalized fields in HTTP requests, responses, or both, as appropriate (see HTTP Content Options, page 23-23 for more information):
• HTTP URI
• HTTP Method
• HTTP Header
• HTTP Cookie
• HTTP Client Body
Three options search raw (unnormalized) non-status fields in HTTP requests, responses, or both, as appropriate (see HTTP Content Options, page 23-23 for more information):
• HTTP Raw URI
• HTTP Raw Header
• HTTP Raw Cookie
Use the following guidelines when selecting HTTP content options:
• HTTP content options apply only to TCP traffic.
• To avoid a negative impact on performance, select only those parts of the message where the specified content might appear.
For example, when traffic is likely to include large cookies such as those in shopping cart messages, you might search for the specified content in the HTTP header but not in HTTP cookies.
• To take advantage of HTTP Inspect preprocessor normalization, and to improve performance, any HTTP-related rule you create should at a minimum include at least one content or protected_content keyword with an HTTP URI, HTTP Method, HTTP Header, or HTTP Client Body option selected.
• You cannot use the replace keyword in conjunction with HTTP content or protected_content keyword options.
23-23ASA FirePOWER Module User Guide
Chapter 23 Understanding and Writing Intrusion Rules Understanding Keywords and Arguments in Rules
You can specify a single normalized HTTP option or status field, or use normalized HTTP options and status fields in any combination to target a content area to match. However, note the following restrictions when using HTTP field options:
• You cannot use the Raw Data option together in the same content or protected_content keyword with any HTTP option.
• You cannot use a raw HTTP field option (HTTP Raw URI, HTTP Raw Header, or HTTP Raw Cookie) together in the same content or protected_content keyword with its normalized counterpart (HTTP URI, HTTP Header, or HTTP Cookie, respectively).
• You cannot select Use Fast Pattern Matcher in combination with one or more of the following HTTP field options:
HTTP Raw URI, HTTP Raw Header, HTTP Raw Cookie, HTTP Cookie, HTTP Method, HTTP Status Message, or HTTP Status Code
However, you can include the options above in a content or protected_content keyword that also uses the fast pattern matcher to search one of the following normalized fields:
HTTP URI, HTTP Header, or HTTP Client Body
For example, if you select HTTP Cookie, HTTP Header, and Use Fast Pattern Matcher, the rules engine searches for content in both the HTTP cookie and the HTTP header, but the fast pattern matcher is applied only to the HTTP header, not to the HTTP cookie.
• When you combine restricted and unrestricted options, the fast pattern matcher searches only the unrestricted fields you specify to test whether to pass the rule to the rule editor for complete evaluation, including evaluation of the restricted fields. See Use Fast Pattern Matcher, page 23-26 for more information.
The above restrictions are reflected in the description of each option in the following list describing the HTTP content and protected_content keyword options.
HTTP URI
Select this option to search for content matches in the normalized request URI field.
Note that you cannot use this option in combination with the pcre keyword HTTP URI (U) option to search the same content. See the Snort-Specific Post Regular Expression Modifiers table for more information.
Note A pipelined HTTP request packet contains multiple URIs. When HTTP URI is selected and the rules engine detects a pipelined HTTP request packet, the rules engine searches all URIs in the packet for a content match.
HTTP Raw URI
Select this option to search for content matches in the normalized request URI field.
Note that you cannot use this option in combination with the pcre keyword HTTP URI (U) option to search the same content. See the Snort-Specific Post Regular Expression Modifiers table for more information.
Note A pipelined HTTP request packet contains multiple URIs. When HTTP URI is selected and the rules engine detects a pipelined HTTP request packet, the rules engine searches all URIs in the packet for a content match.
23-24ASA FirePOWER Module User Guide
Chapter 23 Understanding and Writing Intrusion Rules Understanding Keywords and Arguments in Rules
HTTP Method
Select this option to search for content matches in the request method field, which identifies the action such as GET and POST to take on the resource identified in the URI.
HTTP Header
Select this option to search for content matches in the normalized header field, except for cookies, in HTTP requests; also in responses when the HTTP Inspect preprocessor Inspect HTTP Responses option is enabled.
Note that you cannot use this option in combination with the pcre keyword HTTP header (H) option to search the same content. See the Snort-Specific Post Regular Expression Modifiers table for more information.
HTTP Raw Header
Select this option to search for content matches in the raw header field, except for cookies, in HTTP requests; also in responses when the HTTP Inspect preprocessor Inspect HTTP Responses option is enabled.
Note that you cannot use this option in combination with the pcre keyword HTTP raw header (D) option to search the same content. See the Snort-Specific Post Regular Expression Modifiers table for more information.
HTTP Cookie
Select this option to search for content matches in any cookie identified in a normalized HTTP client request header; also in response set-cookie data when the HTTP Inspect preprocessor Inspect HTTP Responses option is enabled. Note that the system treats cookies included in the message body as body content.
You must enable the HTTP Inspect preprocessor Inspect HTTP Cookies option to search only the cookie for a match; otherwise, the rules engine searches the entire header, including the cookie. See Selecting Server-Level HTTP Normalization Options, page 15-33 for more information.
Note the following:
– You cannot use this option in combination with the pcre keyword HTTP cookie (C) option to search the same content. See the Snort-Specific Post Regular Expression Modifiers table for more information.
– The Cookie: and Set-Cookie: header names, leading spaces on the header line, and the CRLF that terminates the header line are inspected as part of the header and not as part of the cookie.
HTTP Raw Cookie
Select this option to search for content matches in any cookie identified in a raw HTTP client request header; also in response set-cookie data when the HTTP Inspect preprocessor Inspect HTTP Responses option is enabled; note that the system treats cookies included in the message body as body content.
You must enable the HTTP Inspect preprocessor Inspect HTTP Cookies option to search only the cookie for a match; otherwise, the rules engine searches the entire header, including the cookie. See Selecting Server-Level HTTP Normalization Options, page 15-33 for more information.
Note the following:
– You cannot use this option in combination with the pcre keyword HTTP raw cookie (K) option to search the same content. See the Snort-Specific Post Regular Expression Modifiers table for more information.
23-25ASA FirePOWER Module User Guide
Chapter 23 Understanding and Writing Intrusion Rules Understanding Keywords and Arguments in Rules
– The Cookie: and Set-Cookie: header names, leading spaces on the header line, and the CRLF that terminates the header line are inspected as part of the header and not as part of the cookie.
HTTP Client Body
Select this option to search for content matches in the message body in an HTTP client request.
Note that for this option to function, you must specify a value of 0 to 65535 for the HTTP Inspect preprocessor HTTP Client Body Extraction Depth option. See Selecting Server-Level HTTP Normalization Options, page 15-33 for more information.
HTTP Status Code
Select this option to search for content matches in the 3-digit status code in an HTTP response.
You must enable the HTTP Inspect preprocessor Inspect HTTP Responses option for this option to return a match. See Selecting Server-Level HTTP Normalization Options, page 15-33 for more information.
HTTP Status Message
Select this option to search for content matches in the textual description that accompanies the status code in an HTTP response.
You must enable the HTTP Inspect preprocessor Inspect HTTP Responses option for this option to return a match. See Selecting Server-Level HTTP Normalization Options, page 15-33 for more information.
To specify an HTTP content option when doing a content search of TCP traffic:
Step 1 Optionally, to take advantage of HTTP Inspect preprocessor normalization, and to improve performance, select:
• at least one from among the HTTP URI, HTTP Raw URI, HTTP Method, HTTP Header, HTTP Raw Header, or HTTP Client Body options for the content or protected_content keyword you are adding
• the HTTP Cookie or HTTP Raw Cookie option
Step 2 Continue with creating or editing the rule. See Constraining Content Matches, page 23-17, Searching for Content Matches, page 23-15, Writing New Rules, page 23-100, or Modifying Existing Rules, page 23-102 for more information.
Use Fast Pattern Matcher
License: Protection
Note These options are not supported when configuring the protected_content keyword. For more information, see Using the protected_content Keyword, page 23-15.
The fast pattern matcher quickly determines which rules to evaluate before passing a packet to the rules engine. This initial determination improves performance by significantly reducing the number of rules used in packet evaluation.
23-26ASA FirePOWER Module User Guide
Chapter 23 Understanding and Writing Intrusion Rules Understanding Keywords and Arguments in Rules
By default, the fast pattern matcher searches packets for the longest content specified in a rule; this is to eliminate as much as possible needless evaluation of a rule. Consider the following example rule fragment:
alert tcp any any -> any 80 (msg:"Exploit"; content:"GET";http_method; nocase; content:"/exploit.cgi"; http_uri;nocase;)
Almost all HTTP client requests contain the content GET, but few will contain the content /exploit.cgi. Using GET as the fast pattern content would cause the rules engine to evaluate this rule in most cases and would rarely result in a match. However, most client GET requests would not be evaluated using /exploit.cgi, thus increasing performance.
The rules engine evaluates the packet against the rule only when the fast pattern matcher detects the specified content. For example, if one content keyword in a rule specifies the content short, another specifies longer, and a third specifies longest, the fast pattern matcher will use the content longest and the rule will be evaluated only if the rules engine finds longest in the payload.
You can use the Use Fast Pattern Matcher option to specify a shorter search pattern for the fast pattern matcher to use. Ideally, the pattern you specify is less likely to be found in the packet than the longest pattern and, therefore, more specifically identifies the targeted exploit.
Note the following restrictions when selecting Use Fast Pattern Matcher and other options in the same content keyword:
• You can specify Use Fast Pattern Matcher only one time per rule.
• You cannot use Distance, Within, Offset, or Depth when you select Use Fast Pattern Matcher in combination with Not.
• You cannot select Use Fast Pattern Matcher in combination with any of the following HTTP field options:
HTTP Raw URI, HTTP Raw Header, HTTP Raw Cookie, HTTP Cookie, HTTP Method, HTTP Status Message, or HTTP Status Code
However, you can include the options above in a content keyword that also uses the fast pattern matcher to search one of the following normalized fields:
HTTP URI, HTTP Header, or HTTP Client Body
For example, if you select HTTP Cookie, HTTP Header, and Use Fast Pattern Matcher, the rules engine searches for content in both the HTTP cookie and the HTTP header, but the fast pattern matcher is applied only to the HTTP header, not to the HTTP cookie.
Note that you cannot use a raw HTTP field option (HTTP Raw URI, HTTP Raw Header, or HTTP Raw Cookie) together in the same content keyword with its normalized counterpart (HTTP URI, HTTP Header, or HTTP Cookie, respectively). See HTTP Content Options, page 23-23 for more information.
When you combine restricted and unrestricted options, the fast pattern matcher searches only the unrestricted fields you specify to test whether to pass the packet to the rules engine for complete evaluation, including evaluation of the restricted fields.
• Optionally, when you select Use Fast Pattern Matcher you can also select Fast Pattern Matcher Only or Fast Pattern Matcher Offset and Length, but not both.
• You cannot use the fast pattern matcher when inspecting Base64 data; see Decoding and Inspecting Base64 Data, page 23-98 for more information.
Using the Fast Pattern Matcher Only
The Fast Pattern Matcher Only option allows you to use the content keyword only as a fast pattern matcher option and not as a rule option. You can use this option to conserve resources when rules engine evaluation of the specified content is not necessary. For example, consider a case where a rule requires
23-27ASA FirePOWER Module User Guide
Chapter 23 Understanding and Writing Intrusion Rules Understanding Keywords and Arguments in Rules
only that the content 12345 be anywhere in the payload. When the fast pattern matcher detects the pattern, the packet can be evaluated against additional keywords in the rule. There is no need for the rules engine to reevaluate the packet to determine if it includes the pattern 12345.
You would not use this option when the rule contains other conditions relative to the specified content. For example, you would not use this option to search for the content 1234 if another rule condition sought to determine if abcd occurs before 1234. In this case, the rules engine could not determine the relative location because specifying Fast Pattern Matcher Only instructs the rules engine not to search for the specified content.
Note the following conditions when using this option:
• The specified content is location-independent; that is, it may occur anywhere in the payload; thus, you cannot use positional options (Distance, Within, Offset, Depth, or Fast Pattern Matcher Offset and Length).
• You cannot use this option in combination with Not.
• You cannot use this option in combination with Fast Pattern Matcher Offset and Length.
• The specified content will be treated as case-insensitive, because all patterns are inserted into the fast pattern matcher in a case-insensitive manner; this is handled automatically, so it is not necessary to select Case Insensitive when you select this option.
• You should not immediately follow a content keyword that uses the Fast Pattern Matcher Only option with the following keywords, which set the search location relative to the current search location:
• isdataat
• pcre
• content when Distance or Within is selected
• content when HTTP URI is selected
• asn1
• byte_jump
• byte_test
• byte_extract
• base64_decode
Specifying Fast Pattern Matcher Offset and Length
The Fast Pattern Matcher Offset and Length option allows you to specify a portion of the content to search. This can reduce memory consumption in cases where the pattern is very long and only a portion of the pattern is sufficient to identify the rule as a likely match. When a rule is selected by the fast pattern matcher, the entire pattern is evaluated against the rule.
You determine the portion for the fast pattern matcher to use by specifying in bytes where to begin the search (offset) and how far into the content (length) to search, using the syntax:
offset,length
For example, for the content:
1234567
if you specify the number of offset and length bytes as:
1,5
the fast pattern matcher searches only for the content 23456.
Note that you cannot use this option together with Fast Pattern Matcher Only.
23-28ASA FirePOWER Module User Guide
Chapter 23 Understanding and Writing Intrusion Rules Understanding Keywords and Arguments in Rules
To specify the content searched for by the fast pattern matcher:
Step 1 Select Use Fast Pattern Matcher for the content keyword you are adding.
Step 2 Optionally, select Fast Pattern Matcher Only to determine without rules engine evaluation if the specified pattern exists in the packet.
Evaluation proceeds only if the fast pattern matcher detects the specified content.
Step 3 Optionally, specify in Fast Pattern Matcher Offset and Length a portion of the pattern to search for the content using the syntax:
offset,length
where offset specifies how many bytes from the beginning of the content to begin the search, and length specifies the number of bytes to continue.
Step 4 Continue with creating or editing the rule. See Constraining Content Matches, page 23-17, Searching for Content Using PCRE, page 23-34, Writing New Rules, page 23-100, or Modifying Existing Rules, page 23-102 for more information.
Replacing Content in Inline DeploymentsLicense: Protection
You can use the replace keyword in an inline deployment to replace specified content.
To use the replace keyword, construct a custom standard text rule that uses the content keyword to look for a specific string. Then use the replace keyword to specify a string to replace the content. The replace value and content value must be the same length.
Note You cannot use the replace keyword to replace hashed content in a protected_content keyword. For more information, see Using the protected_content Keyword, page 23-15.
Optionally, you can enclose the replacement string in quotation marks for backward compatibility with previous ASA FirePOWER module software versions. If you do not include quotation marks, they are added to the rule automatically so the rule is syntactically correct. To include a leading or trailing quotation mark as part of the replacement text, you must use a backslash to escape it, as shown in the following example:
"replacement text plus \"quotation\" marks""
A rule can contain multiple replace keywords, but only one per content keyword. Only the first instance of the content found by the rule is replaced.
The following explain example uses of the replace keyword:
• If the system detects an incoming packet that contains an exploit, you can replace the malicious string with a harmless one. Sometimes this technique is more successful than simply dropping the offending packet. In some attack scenarios, the attacker simply resends the dropped packet until it bypasses your network defenses or floods your network. By substituting one string for another rather than dropping the packet, you may trick the attacker into believing that the attack was launched against a target that was not vulnerable.
• If you are concerned about reconnaissance attacks that try to learn whether you are running a vulnerable version of, for example, a web server, then you can detect the outgoing packet and replace the banner with your own text.
23-29ASA FirePOWER Module User Guide
Chapter 23 Understanding and Writing Intrusion Rules Understanding Keywords and Arguments in Rules
Note Make sure that you set the rule state to Generate Events in the inline intrusion policy where you want to use the replace rule; setting the rule to Drop and Generate events would cause the packet to drop, which would prevent replacing the content.
As part of the string replacement process, the system automatically updates the packet checksums so that the destination host can receive the packet without error.
Note that you cannot use the replace keyword in combination with HTTP request message content keyword options. See Searching for Content Matches, page 23-15 and HTTP Content Options, page 23-23 for more information.
To replace content in an inline deployment:
Step 1 On the Create Rule page, select content in the drop-down list and click Add Option.
The content keyword appears.
Step 2 Specify the content you want to detect in the content field and, optionally, select any applicable arguments. Note that you cannot use the HTTP request message content keyword options with the replace keyword.
Step 3 Select replace in the drop-down list and click Add Option.
The replace keyword appears beneath the content keyword.
Step 4 Specify the replacement string for the specified content in the replace: field.
Using Byte_Jump and Byte_TestLicense: Protection
You can use byte_jump and byte_test to calculate where in a packet the rules engine should begin testing for a data match, and which bytes it should evaluate.
You can also use the byte_jump and byte_test DCE/RPC argument to tailor either keyword for traffic processed by the DCE/RPC preprocessor. When you use the DCE/RPC argument, you can also use byte_jump and byte_test in conjunction with other specific DCE/RPC keywords. See Decoding DCE/RPC Traffic, page 15-2 and DCE/RPC Keywords, page 23-58 for more information.
See the following sections for more information:
• byte_jump, page 23-30
• byte_test, page 23-33
byte_jump
License: Protection
The byte_jump keyword calculates the number of bytes defined in a specified byte segment, and then skips that number of bytes within the packet, either forward from the end of the specified byte segment, or from the beginning of the packet payload, depending on the options you specify. This is useful in packets where a specific segment of bytes describe the number of bytes included in variable data within the packet.
23-30ASA FirePOWER Module User Guide
Chapter 23 Understanding and Writing Intrusion Rules Understanding Keywords and Arguments in Rules
The following table describes the arguments required by the byte_jump keyword.
The following table describes options you can use to define how the system interprets the values you specified for the required arguments.
You can specify only one of DCE/RPC, Endian, or Number Type.
If you want to define how the byte_jump keyword calculates the bytes, you can choose from the arguments described in the following table (if neither argument is specified, network byte order is used).
Table 23-8 Required byte_jump Arguments
Argument Description
Bytes The number of bytes to calculate from the packet.
Offset The number of bytes into the payload to start processing. The offset counter starts at byte 0, so calculate the offset value by subtracting 1 from the number of bytes you want to jump forward from the beginning of the packet payload or the last successful content match.
You can also use an existing byte_extract variable to specify the value for this argument. See Reading Packet Data into Keyword Arguments, page 23-81 for more information.
Relative Makes the offset relative to the last pattern found in the last successful content match.
Align Rounds the number of converted bytes up to the next 32-bit boundary.
Multiplier Indicates the value by which the rules engine should multiply the byte_jump value obtained from the packet to get the final byte_jump value.
That is, instead of skipping the number of bytes defined in a specified byte segment, the rules engine skips that number of bytes multiplied by an integer you specify with the Multiplier argument.
Post Jump Offset The number of bytes -63535 through 63535 to skip forward or backward after applying other byte_jump arguments. A positive value skips forward and a negative value skips backward. Leave the field blank or enter 0 to disable.
See the DCE/RPC argument in the Endianness Arguments table for byte_jump arguments that do not apply when you select the DCE/RPC argument.
From Beginning Indicates that the rules engine should skip the specified number of bytes in the payload starting from the beginning of the packet payload, rather than from the end of the byte segment that specifies the number of bytes to skip.
Table 23-10 Endianness Arguments
Argument Description
Big Endian Processes data in big endian byte order, which is the default network byte order.
23-31ASA FirePOWER Module User Guide
Chapter 23 Understanding and Writing Intrusion Rules Understanding Keywords and Arguments in Rules
Define how the system views string data in a packet by using one of the arguments in the following table.
For example, if the values you set for byte_jump are as follows:
• Bytes = 4
• Offset = 12
• Relative enabled
• Align enabled
the rules engine calculates the number described in the four bytes that appear 13 bytes after the last successful content match, and skips ahead that number of bytes in the packet. For instance, if the four calculated bytes in a specific packet were 00 00 00 1F, the rules engine would convert this to 31. Because align is specified (which instructs the engine to move to the next 32-bit boundary), the rules engine skips ahead 32 bytes in the packet.
Alternately, if the values you set for byte_jump are as follows:
• Bytes = 4
• Offset = 12
• From Beginning enabled
• Multiplier = 2
the rules engine calculates the number described in the four bytes that appear 13 bytes after the beginning of the packet. Then, the engine multiplies that number by two to obtain the total number of bytes to skip. For instance, if the four calculated bytes in a specific packet were 00 00 00 1F, the rules engine would convert this to 31, then multiply it by two to get 62. Because From Beginning is enabled, the rules engine skips the first 63 bytes in the packet.
Little Endian Processes data in little endian byte order.
DCE/RPC Specifies a byte_jump keyword for traffic processed by the DCE/RPC preprocessor. See Decoding DCE/RPC Traffic, page 15-2 for more information.
The DCE/RPC preprocessor determines big endian or little endian byte order, and the Number Type, Endian, and From Beginning arguments do not apply.
When you enable this argument, you can also use byte_jump in conjunction with other specific DCE/RPC keywords. See DCE/RPC Keywords, page 23-58 for more information.
Table 23-10 Endianness Arguments (continued)
Argument Description
Table 23-11 Number Type Arguments
Argument Description
Hexadecimal String Represents converted string data in hexadecimal format.
Decimal String Represents converted string data in decimal format.
Octal String Represents converted string data in octal format.
23-32ASA FirePOWER Module User Guide
Chapter 23 Understanding and Writing Intrusion Rules Understanding Keywords and Arguments in Rules
To use byte_jump:
Step 1 Select byte_jump in the drop-down list and click Add Option.
The byte_jump section appears beneath the last keyword you selected.
byte_test
License: Protection
The byte_test keyword calculates the number of bytes in a specified byte segment and compares them, according to the operator and value you specify.
The following table describes the required arguments for the byte_test keyword.
You can further define how the system uses byte_test arguments with the arguments described in the following table.
You can specify only one of DCE/RPC, Endian, or Number Type.
To define how the byte_test keyword calculates the bytes it tests, choose from the arguments in the following table. If neither argument is specified, network byte order is used.
Table 23-12 Required byte_test Arguments
Argument Description
Bytes The number of bytes to calculate from the packet. You can specify 1 to 10 bytes.
Operator and Value Compares the specified value to <, >, =, !, &, ^, !>, !<, !=, !&, or !^.
For example, if you specify !1024, byte_test would convert the specified number, and if it did not equal 1024, it would generate an event (if all other keyword parameters matched).
Note that ! and != are equivalent.
You can also use an existing byte_extract variable to specify the value for this argument. See Reading Packet Data into Keyword Arguments, page 23-81 for more information.
Offset The number of bytes into the payload to start processing. The offset counter starts at byte 0, so calculate the offset value by subtracting 1 from the number of bytes you want to count forward from the beginning of the packet payload or the last successful content match.
You can also use an existing byte_extract variable to specify the value for this argument. See Reading Packet Data into Keyword Arguments, page 23-81 for more information.
Relative Makes the offset relative to the last successful pattern match.
Align Rounds the number of converted bytes up to the next 32-bit boundary.
23-33ASA FirePOWER Module User Guide
Chapter 23 Understanding and Writing Intrusion Rules Understanding Keywords and Arguments in Rules
You can define how the system views string data in a packet by using one of the arguments in the following table.
For example, if the value for byte_test is specified as the following:
• Bytes = 4
• Operator and Value > 128
• Offset = 8
• Relative enabled
the rules engine calculates the number described in the four bytes that appear 9 bytes away from (relative to) the last successful content match, and, if the calculated number is larger than 128 bytes, the rule is triggered.
To use byte_test:
Step 1 On the Create Rule page, select byte_test in the drop-down list and click Add Option.
The byte_test section appears beneath the last keyword you selected.
Searching for Content Using PCRELicense: Protection
Table 23-14 Endianness byte_test Arguments
Argument Description
Big Endian Processes data in big endian byte order, which is the default network byte order.
Little Endian Processes data in little endian byte order.
DCE/RPC Specifies a byte_test keyword for traffic processed by the DCE/RPC preprocessor. See Decoding DCE/RPC Traffic, page 15-2 for more information.
The DCE/RPC preprocessor determines big endian or little endian byte order, and the Number Type and Endian argument do not apply.
When you enable this argument, you can also use byte_test in conjunction with other specific DCE/RPC keywords. See DCE/RPC Keywords, page 23-58 for more information.
Table 23-15 Number Type byte-test Arguments
Argument Description
Hexadecimal String Represents converted string data in hexadecimal format.
Decimal String Represents converted string data in decimal format.
Octal String Represents converted string data in octal format.
23-34ASA FirePOWER Module User Guide
Chapter 23 Understanding and Writing Intrusion Rules Understanding Keywords and Arguments in Rules
The pcre keyword allows you to use Perl-compatible regular expressions (PCRE) to inspect packet payloads for specified content. You can use PCRE to avoid writing multiple rules to match slight variations of the same content.
Regular expressions are useful when searching for content that could be displayed in a variety of ways. The content may have different attributes that you want to account for in your attempt to locate it within a packet’s payload.
Note that the regular expression syntax used in intrusion rules is a subset of the full regular expression library and varies in some ways from the syntax used in commands in the full library. When adding a pcre keyword using the rule editor, enter the full value in the following format:
!/pcre/ ismxAEGRBUIPHDMCKSY
where:
• ! is an optional negation (use this if you want to match patterns that do not match the regular expression).
• /pcre/ is a Perl-compatible regular expression.
• ismxAEGRBUIPHDMCKSY is any combination of modifier options.
Also note that you must escape the characters listed in the following table for the rules engine to interpret them correctly when you use them in a PCRE to search for specific content in a packet payload.
Tip Optionally, you can surround your Perl-compatible regular expression with quote characters, for example, pcre_expression or “pcre_expression“.The option of using quotes accommodates experienced users accustomed to previous versions when quotes were required instead of optional. The rule editor does not display quotation marks when you display a rule after saving it.
You can also use m?regex?, where ? is a delimiter other than /. You may want to use this in situations where you need to match a forward slash within a regular expression and do not want to escape it with a backslash. For example, you might use m?regex? ismxAEGRBUIPHDMCKSY where regex is your Perl-compatible regular expression and ismxAEGRBUIPHDMCKSY is any combination of modifier options. See Perl-Compatible Regular Expression Basics, page 23-36 for more information about regular expression syntax.
The following sections provide more information about building valid values for the pcre keyword:
• Perl-Compatible Regular Expression Basics, page 23-36 describes the common syntax used in Perl-compatible regular expressions.
• PCRE Modifier Options, page 23-37 describes the options you can use to modify your regular expression.
• Example PCRE Keyword Values, page 23-40 gives example usage of the pcre keyword in rules.
Table 23-16 Escaped PCRE Characters
You must escape... with a backslash... or Hex code...
# (hash mark) \# \x23
; (semicolon) \; \x3B
| (vertical bar) \| \x7C
: (colon) \: \x3A
23-35ASA FirePOWER Module User Guide
Chapter 23 Understanding and Writing Intrusion Rules Understanding Keywords and Arguments in Rules
Perl-Compatible Regular Expression Basics
License: Protection
The pcre keyword accepts standard Perl-compatible regular expression (PCRE) syntax. The following sections describe that syntax.
Tip While this section describes the basic syntax you may use for PCRE, you may want to consult an online reference or book dedicated to Perl and PCRE for more advanced information.
Metacharacters
License: Protection
Metacharacters are literal characters that have special meaning within regular expressions. When you use them within a regular expression, you must “escape” them by preceding them with a backslash.
The following table describes the metacharacters you can use with PCRE and gives examples of each.
Table 23-17 PCRE Metacharacters
Metacharacter Description Example
. Matches any character except newlines. If s is used as a modifying option, it also includes newline characters.
abc. matches abcd, abc1, abc#, and so on.
* Matches zero or more occurrences of a character or expression.
abc* matches abc, abcc, abccc, abccccc, and so on.
? Matches zero or one occurrence of a character or expression.
abc? matches abc.
+ Matches one or more occurrences of a character or expression.
abc+ matches abc, abcc, abccc, abccccc, and so on.
() Groups expressions. (abc)+ matches abc, abcabc, abcabcabc and so on.
{} Specifies a limit for the number of matches for a character or expression. If you want to set a lower and upper limit, separate the lower limit and upper limit with a comma.
a{4,6} matches aaaa, aaaaa, or aaaaaa.
(ab){2} matches abab.
[] Allows you to define character classes, and matches any character or combination of characters described in the set.
[abc123] matches a or b or c, and so on.
^ Matches content at the beginning of a string. Also used for negation, if used within a character class.
^in matches the “in” in info, but not in bin. [^a] matches anything that does not contain a.
$ Matches content at the end of a string. ce$ matches the “ce” in announce, but not cent.
| Indicates an OR expression. (MAILTO|HELP) matches MAILTO or HELP.
\ Allows you to use metacharacters as actual characters and is also used to specify a predefined character class.
\. matches a period, \* matches an asterisk, \\ matches a backslash and so on. \d matches the numeric characters, \w matches alphanumeric characters, and so on. See Character Classes, page 23-37 for more information about using character classes in PCRE.
23-36ASA FirePOWER Module User Guide
Chapter 23 Understanding and Writing Intrusion Rules Understanding Keywords and Arguments in Rules
Character Classes
License: Protection
Character classes include alphabetic characters, numeric characters, alphanumeric characters, and white space characters. While you can create your own character classes within brackets (see Metacharacters, page 23-36), you can use the predefined classes as shortcuts for different types of character types. When used without additional qualifiers, a character class matches a single digit or character.
The following table describes and provides examples of the predefined character classes accepted by PCRE.
PCRE Modifier Options
License: Protection
You can use modifying options after you specify regular expression syntax in the pcre keyword’s value. These modifiers perform Perl, PCRE, and Snort-specific processing functions. Modifiers always appear at the end of the PCRE value, and appear in the following format:
/pcre/ismxAEGRBUIPHDMCKSY
where ismxAEGRBUPHMC can include any of the modifying options that appear in the following tables.
Tip Optionally, you can surround the regular expression and any modifying options with quotes, for example, “/pcre/ismxAEGRBUIPHDMCKSY”. The option of using quotes accommodates experienced users accustomed to previous versions when quotes were required instead of optional. The rule editor does not display quotation marks when you display a rule after saving it.
The following table describes options you can use to perform Perl processing functions.
Table 23-18 PCRE Character Classes
Character Class Description Character Class Definition
\d Matches a numeric character (“digit”). [0-9]
\D Matches anything that is not an numeric character. [^0-9]
\w Matches an alphanumeric character (“word”). [a-zA-Z0-9_]
\W Matches anything that is not an alphanumeric character. [^a-zA-Z0-9_]
\s Matches white space characters, including spaces, carriage returns, tabs, newlines, and form feeds.
[ \r\t\n\f]
\S Matches anything that is not a white space character. [^ \r\t\n\f]
Table 23-19 Perl-Related Post Regular Expression Options
Option Description
i Makes the regular expression case-insensitive.
s The dot character (.) describes all characters except the newline or \n character. You can use "s" as an option to override this and have the dot character match all characters, including the newline character.
23-37ASA FirePOWER Module User Guide
Chapter 23 Understanding and Writing Intrusion Rules Understanding Keywords and Arguments in Rules
The following table describes the PCRE modifiers you can use after the regular expression.
The following table describes the Snort-specific modifiers that you can use after the regular expression.
.
m By default, a string is treated as a single line of characters, and ^ and $ match the beginning and ending of a specific string. When you use "m" as an option, ^ and $ match content immediately before or after any newline character in the buffer, as well as at the beginning or end of the buffer.
x Ignores white space data characters that may appear within the pattern, except when escaped (preceded by a backslash) or included inside a character class.
Table 23-19 Perl-Related Post Regular Expression Options (continued)
Option Description
Table 23-20 PCRE-Related Post Regular Expression Options
Option Description
A The pattern must match at the beginning of the string (same as using ^ in a regular expression).
E Sets $ to match only at the end of the subject string. (Without E, $ also matches immediately before the final character if it is a newline, but not before any other newline characters).
G By default, * + and ? are “greedy,” which means that if two or more matches are found, they will choose the longest match. Use the G character to change this so that these characters always choose the first match unless followed by a question mark character (?). For example, *? +? and ?? would be greedy in a construct using the G modifier, and any incidences of *, +, or ? without the additional question mark will not be greedy.
Table 23-21 Snort-Specific Post Regular Expression Modifiers
Option Description
R Searches for matching content relative to the end of the last match found by the rules engine.
B Searches for the content within data before it is decoded by a preprocessor (this option is similar to using the Raw Data argument with the content or protected_content keyword).
U Searches for the content within the URI of a normalized HTTP request message decoded by the HTTP Inspect preprocessor. Note that you cannot use this option in combination with the content or protected_content keyword HTTP URI option to search the same content. See HTTP Content Options, page 23-23 for more information.
Note A pipelined HTTP request packet contains multiple URIs. A PCRE expression that includes the U option causes the rules engine to search for a content match only in the first URI in a pipelined HTTP request packet. To search all URIs in the packet, use the content or protected_content keyword with HTTP URI selected, either with or without an accompanying PCRE expression that uses the U option.
I Searches for the content within the URI of a raw HTTP request message decoded by the HTTP Inspect preprocessor. Note that you cannot use this option in combination with the content or protected_content keyword HTTP Raw URI option to search the same content. See HTTP Content Options, page 23-23 for more information.
P Searches for the content within the body of a normalized HTTP request message decoded by the HTTP Inspect preprocessor. See the content and protected_content keyword HTTP Client Body option in HTTP Content Options, page 23-23 for more information.
23-38ASA FirePOWER Module User Guide
Chapter 23 Understanding and Writing Intrusion Rules Understanding Keywords and Arguments in Rules
Note Do not use the U option in combination with the R option. This could cause performance problems. Also, do not use the U option in combination with any other HTTP content option (I, P, H, D, M, C, K, S, or Y).
H Searches for the content within the header, excluding cookies, of an HTTP request or response message decoded by the HTTP Inspect preprocessor. Note that you cannot use this option in combination with the content or protected_content keyword HTTP Header option to search the same content. See HTTP Content Options, page 23-23 for more information.
D Searches for the content within the header, excluding cookies, of a raw HTTP request or response message decoded by the HTTP Inspect preprocessor. Note that you cannot use this option in combination with the content or protected_content keyword HTTP Raw Header option to search the same content. See HTTP Content Options, page 23-23 for more information.
M Searches for the content within the method field of a normalized HTTP request message decoded by the HTTP Inspect preprocessor; the method field identifies the action such as GET, PUT, CONNECT, and so on to take on the resource identified in the URI. See the content and protected_content keyword HTTP Method option in HTTP Content Options, page 23-23 for more information.
C When the HTTP Inspect preprocessor Inspect HTTP Cookies option is enabled, searches for the normalized content within any cookie in an HTTP request header, and also within any set-cookie in an HTTP response header when the preprocessor Inspect HTTP Responses option is enabled. When Inspect HTTP Cookies is not enabled, searches the entire header, including the cookie or set-cookie data.
Note the following:
• Cookies included in the message body are treated as body content.
• You cannot use this option in combination with the content or protected_content keyword HTTP Cookie option to search the same content. See HTTP Content Options, page 23-23 for more information.
• The Cookie: and Set-Cookie: header names, leading spaces on the header line, and the CRLF that terminates the header line are inspected as part of the header and not as part of the cookie.
K When the HTTP Inspect preprocessor Inspect HTTP Cookies option is enabled, searches for the raw content within any cookie in an HTTP request header, and also within any set-cookie in an HTTP response header when the preprocessor Inspect HTTP Responses option is enabled. When Inspect HTTP Cookies is not enabled, searches the entire header, including the cookie or set-cookie data.
Note the following:
• Cookies included in the message body are treated as body content.
• You cannot use this option in combination with the content or protected_content keyword HTTP Raw Cookie option to search the same content. See HTTP Content Options, page 23-23 for more information.
• The Cookie: and Set-Cookie: header names, leading spaces on the header line, and the CRLF that terminates the header line are inspected as part of the header and not as part of the cookie.
S Searches the 3-digit status code in an HTTP response. See the content and protected_content keyword HTTP Status Code option in HTTP Content Options, page 23-23 for more information.
Y Searches the textual description that accompanies the status code in an HTTP response. See the content and protected_content keyword HTTP Status Message option in HTTP Content Options, page 23-23 for more information.
Table 23-21 Snort-Specific Post Regular Expression Modifiers (continued)
Option Description
23-39ASA FirePOWER Module User Guide
Chapter 23 Understanding and Writing Intrusion Rules Understanding Keywords and Arguments in Rules
Example PCRE Keyword Values
License: Protection
The following examples show values that you could enter for pcre, with descriptions of what each example would match.
• /feedback[(\d{0,1})]?\.cgi/U
This example searches packet payload for feedback, followed by zero or one numeric character, followed by .cgi, and located only in URI data.
This example would match:
• feedback.cgi
• feedback1.cgi
• feedback2.cgi
• feedback3.cgi
This example would not match:
• feedbacka.cgi
• feedback11.cgi
• feedback21.cgi
• feedbackzb.cgi
• /^ez(\w{3,5})\.cgi/iU
This example searches packet payload for ez at the beginning of a string, followed by a word of 3 to 5 letters, followed by .cgi. The search is case-insensitive and only searches URI data.
This example would match:
• EZBoard.cgi
• ezman.cgi
• ezadmin.cgi
• EZAdmin.cgi
This example would not match:
• ezez.cgi
• fez.cgi
• abcezboard.cgi
• ezboardman.cgi
• /mail(file|seek)\.cgi/U
This example searches packet payload for mail, followed by either file or seek, in URI data.
This example would match:
• mailfile.cgi
• mailseek.cgi
This example would not match:
• MailFile.cgi
• mailfilefile.cgi
• m?http\\x3a\x2f\x2f.*(\n|\t)+?U
This example searches packet payload for URI content for a tab or newline character in an HTTP request, after any number of characters. This example uses m?regex? to avoid using http\:\/\/ in the expression. Note that the colon is preceded by a backslash.
This example would match:
23-40ASA FirePOWER Module User Guide
Chapter 23 Understanding and Writing Intrusion Rules Understanding Keywords and Arguments in Rules
This example searches packet payload for a URL with any number of characters, including newlines, followed by an equal sign, and pipe characters that contain any number of characters or white space. This example uses m?regex? to avoid using http\:\/\/ in the expression.
This example searches packet payload for any MAC address. Note that it escapes the colon characters with backslashes.
Adding Metadata to a RuleLicense: Protection
You can use the metadata keyword to add descriptive information to a rule. You can use the information you add to organize or identify rules in ways that suit your needs, and to search for rules.
The system validates metadata based on the format:
key value
where key and value provide a combined description separated by a space. This is the format used by the Cisco VRT for adding metadata to rules provided by Cisco.
Alternatively, you can also use the format:
key=value
For example, you could use the key value format to identify rules by author and date, using a category and sub-category as follows:
author SnortGuru_20050406
You can use multiple metadata keywords in a rule. You can also use commas to separate multiple key value statements in a single metadata keyword, as seen in the following example:
You are not limited to using a key value or key=value format; however, you should be aware of limitations resulting from validation based on these formats.
Avoiding Restricted Characters
License: Protection
Note the following character restrictions:
• Do not use a semicolon (;) or colon (:) in a metadata keyword.
23-41ASA FirePOWER Module User Guide
Chapter 23 Understanding and Writing Intrusion Rules Understanding Keywords and Arguments in Rules
• Be aware when using commas that the system interprets a comma as a separator for multiple key value or key=value statements. For example:
key value, key value, key value
• Be aware when using the equal to (=) character or space character that the system interprets these characters as separators between key and value. For example:
key valuekey=value
All other characters are permitted.
Adding service Metadata
License: Protection
The rules engine applies active rules with service metadata that match the application protocol information for the host in a packet to analyze and process traffic. If it does not match, the system does not apply the rule to the traffic. If a host does not have application protocol information, or if the rule does not have service metadata, the system checks the port in the traffic against the port in the rule to determine whether to apply the rule to the traffic.
The following diagram illustrates matching a rule to traffic based on application information:
23-42ASA FirePOWER Module User Guide
Chapter 23 Understanding and Writing Intrusion Rules Understanding Keywords and Arguments in Rules
To match a rule with an identified application protocol, you must define the metadata keyword and a key value statement, with service as the key and an application for the value. For example, the following key value statement in a metadata keyword associates the rule with HTTP traffic:
service http
The following table describes the most common application values.
Note Contact Support for assistance in defining applications not in the table.
Table 23-22 service Values
Value Description
dcerpc Distributed Computing Environment/Remote Procedure Calls System
dns Domain Name System
23-43ASA FirePOWER Module User Guide
Chapter 23 Understanding and Writing Intrusion Rules Understanding Keywords and Arguments in Rules
Avoiding Reserved Metadata
License: Protection
Avoid using the following words in a metadata keyword, either as a single argument or as the key in a key value statement; these are reserved for use by the VRT:
Note Contact Support for assistance in adding restricted metadata to local rules that might not otherwise function as expected. See Importing Local Rule Files, page 35-14 for more information.
Inspecting IP Header ValuesLicense: Protection
You can use keywords to identify possible attacks or security policy violations in the IP headers of packets. See the following sections for more information:
finger Finger user information protocol
ftp File Transfer Protocol
ftp-data File Transfer Protocol (Data Channel)
http Hypertext Transfer Protocol
imap Internet Message Access Protocol
isakmp Internet Security Association and Key Management Protocol
netbios-dgm NETBIOS Datagram Service
netbios-ns NETBIOS Name Service
netbios-ssn NETBIOS Session Service
nntp Network News Transfer Protocol
oracle Oracle Net Services
pop2 Post Office Protocol, version 2
pop3 Post Office Protocol, version 3
smtp Simple Mail Transfer Protocol
ssh Secure Shell network protocol
telnet Telnet network protocol
tftp Trivial File Transfer Protocol
x11 X Window System
Table 23-22 service Values (continued)
Value Description
23-44ASA FirePOWER Module User Guide
Chapter 23 Understanding and Writing Intrusion Rules Understanding Keywords and Arguments in Rules
• Inspecting Fragments and Reserved Bits, page 23-45
• Inspecting the IP Header Identification Value, page 23-45
• Identifying Specified IP Options, page 23-46
• Identifying Specified IP Protocol Numbers, page 23-46
• Inspecting a Packet’s Type of Service, page 23-46
• Inspecting a Packet’s Time-To-Live Value, page 23-47
Inspecting Fragments and Reserved Bits
License: Protection
The fragbits keyword inspects the fragment and reserved bits in the IP header. You can check each packet for the Reserved Bit, the More Fragments bit, and the Don't Fragment bit in any combination.
To further refine a rule using the fragbits keyword, you can specify any operator described in the following table after the argument value in the rule.
For example, to generate an event against packets that have the Reserved Bit set (and possibly any other bits), use R+ as the fragbits value.
Inspecting the IP Header Identification Value
License: Protection
The id keyword tests the IP header fragment identification field against the value you specify in the keyword’s argument. Some denial-of-service tools and scanners set this field to a specific number that is easy to detect. For example, in SID 630, which detects a Synscan portscan, the id value is set to 39426, the static value used as the ID number in packets transmitted by the scanner.
Note id argument values must be numeric.
Table 23-23 Fragbits Argument Values
Argument Description
R Reserved bit
M More Fragments bit
D Don’t Fragment bit
Table 23-24 Fragbit Operators
Operator Description
plus sign (+) The packet must match against all specified bits.
asterisk (*) The packet can match against any of the specified bits.
exclamation point (!) The packet meets the criteria if none of the specified bits are set.
23-45ASA FirePOWER Module User Guide
Chapter 23 Understanding and Writing Intrusion Rules Understanding Keywords and Arguments in Rules
Identifying Specified IP Options
License: Protection
The IPopts keyword allows you to search packets for specified IP header options. The following table lists the available argument values.
Analysts most frequently watch for strict and loose source routing because these options may be an indication of a spoofed source IP address.
Identifying Specified IP Protocol Numbers
License: Protection
The ip_proto keyword allows you to identify packets with the IP protocol specified as the keyword’s value. You can specify the IP protocols as a number, 0 through 255. You can find the complete list of protocol numbers at http://www.iana.org/assignments/protocol-numbers. You can combine these numbers with the following operators: <, >, or !. For example, to inspect traffic with any protocol that is not ICMP, use !1 as a value to the ip_proto keyword. You can also use the ip_proto keyword multiple times in a single rule; note, however, that the rules engine interprets multiple instances of the keyword as having a Boolean AND relationship. For example, if you create a rule containing ip_proto:!3; ip_proto:!6, the rule ignores traffic using the GGP protocol AND the TCP protocol.
Inspecting a Packet’s Type of Service
License: Protection
Some networks use the type of service (ToS) value to set precedence for packets traveling on that network. The tos keyword allows you to test the packet’s IP header ToS value against the value you specify as the keyword’s argument. Rules using the tos keyword will trigger on packets whose ToS is set to the specified value and that meet the rest of the criteria set forth in the rule.
Note Argument values for tos must be numeric.
The ToS field has been deprecated in the IP header protocol and replaced with the Differentiated Services Code Point (DSCP) field.
Chapter 23 Understanding and Writing Intrusion Rules Understanding Keywords and Arguments in Rules
Inspecting a Packet’s Time-To-Live Value
License: Protection
A packet’s time-to-live (ttl) value indicates how many hops it can make before it is dropped. You can use the ttl keyword to test the packet’s IP header ttl value against the value, or range of values, you specify as the keyword’s argument. It may be helpful to set the ttl keyword parameter to a low value such as 0 or 1, as low time-to-live values are sometimes indicative of a traceroute or intrusion evasion attempt. (Note, though, that the appropriate value for this keyword depends on your device placement and network topology.) Use syntax as follows:
• Use an integer from 0 to 255 to set a specific value for the TTL value. You can also precede the value with an equal (=) sign (for example, you can specify 5 or =5).
• Use a hyphen (-) to specify a range of TTL values (for example, 0-2 specifies all values 0 through 2, -5 specifies all values 0 through 5, and 5- specifies all values 5 through 255).
• Use the greater than (>) sign to specify TTL values greater than a specific value (for example, >3 specifies all values greater than 3).
• Use the greater than and equal to signs (>=) to specify TTL values greater than or equal to a specific value (for example, >=3 specifies all values greater than or equal to 3).
• Use the less than (<) sign to specify TTL values less than a specific value (for example, <3 specifies all values less than 3).
• Use the less than and equal to signs (<=) to specify TTL values less than or equal to a specific value (for example, <=3 specifies all values less than or equal to 3).
Inspecting ICMP Header ValuesLicense: Protection
The ASA FirePOWER module supports keywords that you can use to identify attacks and security policy violations in the headers of ICMP packets. Note, however, that predefined rules exist that detect most ICMP types and codes. Consider enabling an existing rule or creating a local rule based on an existing rule; you may be able to find a rule that meets your needs more quickly than if you build an ICMP rule from scratch.
See the following sections for more information about ICMP-specific keywords:
• Identifying Static ICMP ID and Sequence Values, page 23-47
• Inspecting the ICMP Message Type, page 23-48
• Inspecting the ICMP Message Code, page 23-48
Identifying Static ICMP ID and Sequence Values
License: Protection
The ICMP identification and sequence numbers help associate ICMP replies with ICMP requests. In normal traffic, these values are dynamically assigned to packets. Some covert channel and Distributed Denial of Server (DDoS) programs use static ICMP ID and sequence values. The following keywords allow you to identify ICMP packets with static values.
23-47ASA FirePOWER Module User Guide
Chapter 23 Understanding and Writing Intrusion Rules Understanding Keywords and Arguments in Rules
icmp_id
The icmp_id keyword inspects an ICMP echo request or reply packet's ICMP ID number. Use a numeric value that corresponds with the ICMP ID number as the argument for the icmp_id keyword.
icmp_seq
The icmp_seq keyword inspects an ICMP echo request or reply packet's ICMP sequence. Use a numeric value that corresponds with the ICMP sequence number as the argument for the icmp_seq keyword.
Inspecting the ICMP Message Type
License: Protection
Use the itype keyword to look for packets with specific ICMP message type values. You can specify either a valid ICMP type value (see http://www.iana.org/assignments/icmp-parameters or http://www.faqs.org/rfcs/rfc792.html for a full list of ICMP type numbers) or an invalid ICMP type value to test for different types of traffic. For example, attackers may set ICMP type values out of range to cause denial of service and flooding attacks.
You can specify a range for the itype argument value using less than (<) and greater than (>).
For example:
• <35
• >36
• 3<>55
Tip See http://www.iana.org/assignments/icmp-parameters or http://www.faqs.org/rfcs/rfc792.html for a full list of ICMP type numbers.
Inspecting the ICMP Message Code
License: Protection
ICMP messages sometimes include a code value that provides details when a destination is unreachable. (See the second section in http://www.iana.org/assignments/icmp-parameters for a full list of ICMP message codes correlated with the message types for which they can be used.)
You can use the icode keyword to identify packets with specific ICMP code values. You can choose to specify either a valid ICMP code value or an invalid ICMP code value to test for different types of traffic.
You can specify a range for the icode argument value using less than (<) and greater than (>).
For example:
• to find values less than 35, specify <35.
• to find values greater than 36, specify >36.
• to find values between 3 and 55, specify 3<>55.
Tip You can use the icode and itype keywords together to identify traffic that matches both. For example, to identify ICMP traffic that contains an ICMP Destination Unreachable code type with an ICMP Port Unreachable code type, specify an itype keyword with a value of 3 (for Destination Unreachable) and an icode keyword with a value of 3 (for Port Unreachable).
Chapter 23 Understanding and Writing Intrusion Rules Understanding Keywords and Arguments in Rules
Inspecting TCP Header Values and Stream SizeLicense: Protection
The ASA FirePOWER module supports keywords that are designed to identify attacks attempted using TCP headers of packets and TCP stream size. See the following sections for more information about TCP-specific keywords:
• Inspecting the TCP Acknowledgment Value, page 23-49
• Inspecting TCP Flag Combinations, page 23-49
• Applying Rules to a TCP or UDP Client or Server Flow, page 23-50
• Identifying TCP Windows of a Given Size, page 23-52
• Identifying TCP Streams of a Given Size, page 23-52
Inspecting the TCP Acknowledgment Value
License: Protection
You can use the ack keyword to compare a value against a packet’s TCP acknowledgment number. The rule triggers if a packet’s TCP acknowledgment number matches the value specified for the ack keyword.
Argument values for ack must be numeric.
Inspecting TCP Flag Combinations
License: Protection
You can use the flags keyword to specify any combination of TCP flags that, when set in an inspected packet, cause the rule to trigger.
Note In situations where you would traditionally use A+ as the value for flags, you should instead use the flow keyword with a value of established. Generally, you should use the flow keyword with a value of stateless when using flags to ensure that all combinations of flags are detected. See Applying Rules to a TCP or UDP Client or Server Flow, page 23-50 for more information about the flow keyword.
You can either check for or ignore the values described in the following table for the flag keyword.
Table 23-26 flag Arguments
Argument TCP Flag
Ack Acknowledges data.
Psh Data should be sent in this packet.
Syn A new connection.
Urg Packet contains urgent data.
Fin A closed connection.
Rst An aborted connection.
23-49ASA FirePOWER Module User Guide
Chapter 23 Understanding and Writing Intrusion Rules Understanding Keywords and Arguments in Rules
Tip For more information on Explicit Congestion Notification (ECN), see the information provided at: http://www.faqs.org/rfcs/rfc3168.html.
When using the flags keyword, you can use an operator to indicate how the system performs matches against multiple flags. The following table describes these operators.
Applying Rules to a TCP or UDP Client or Server Flow
License: Protection
You can use the flow keyword to select packets for inspection by a rule based on session characteristics. The flow keyword allows you to specify the direction of the traffic flow to which a rule applies, applying rules to either the client flow or server flow. To specify how the flow keyword inspects your packets, you can set the direction of traffic you want analyzed, the state of packets inspected, and whether the packets are part of a rebuilt stream.
Stateful inspection of packets occurs when rules are processed. If you want a TCP rule to ignore stateless traffic (traffic without an established session context), you must add the flow keyword to the rule and select the Established argument for the keyword. If you want a UDP rule to ignore stateless traffic, you must add the flow keyword to the rule and select either the Established argument or a directional argument, or both. This causes the TCP or UDP rule to perform stateful inspection of a packet.
When you add a directional argument, the rules engine inspects only those packets that have an established state with a flow that matches the direction specified. For example, if you add the flow keyword with the established argument and the From Client argument to a rule that triggers when a TCP or UDP connection is detected, the rules engine only inspects packets that are sent from the client.
Tip For maximum performance, always include a flow keyword in a TCP rule or a UDP session rule.
CWR An ECN congestion window has been reduced. This was formerly the R1 argument, which is still supported for backward compatibility.
ECE ECN echo. This was formerly the R2 argument, which is still supported for backward compatibility.
Table 23-26 flag Arguments (continued)
Argument TCP Flag
Table 23-27 Operators Used with flags
Operator Description Example
all The packet must contain all specified flags.
Select Urg and all to specify that a packet must contain the Urgent flag and may contain any other flags.
any The packet can contain any of the specified flags.
Select Ack, Psh, and any to specify that either or both the Ack and Psh flags must be set to trigger the rule, and that other flags may also be set on a packet.
not The packet must not contain the specified flag set.
Select Urg and not to specify that the Urgent flag is not set on packets that trigger this rule.
Chapter 23 Understanding and Writing Intrusion Rules Understanding Keywords and Arguments in Rules
To specify flow, select the flow keyword from the Detection Options list on the Create Rule page and click Add Option. Next, select the arguments from the list provided for each field.
The following table describes the stream-related arguments you can specify for the flow keyword:
The following table describes the directional options you can specify for the flow keyword:
Notice that From Server and To Client perform the same function, as do To Server and From Client. These options exist to add context and readability to the rule. For example, if you create a rule designed to detect an attack from a server to a client, use From Server. But, if you create a rule designed to detect an attack from the client to the server, use From Client.
The following table describes the stream-related arguments you can specify for the flow keyword:
For example, you can use To Server, Established, Only Stream Traffic as the value for the flow keyword to detect traffic, traveling from a client to the server in an established session, that has been reassembled by the stream preprocessor.
Identifying Static TCP Sequence Numbers
License: Protection
The seq keyword allows you to specify a static sequence number value. Packets whose sequence number matches the specified argument trigger the rule containing the keyword. While this keyword is used rarely, it is helpful in identifying attacks and network scans that use generated packets with static sequence numbers.
Table 23-28 State-Related flow Arguments
Argument Description
Established Triggers on established connections.
Stateless Triggers regardless of the state of the stream processor.
Table 23-29 flow Directional Arguments
Argument Description
To Client Triggers on server responses.
To Server Triggers on client responses.
From Client Triggers on client responses.
From Server Triggers on server responses.
Table 23-30 Stream-Related flow Arguments
Argument Description
Ignore Stream Traffic Does not trigger on rebuilt stream packets.
Only Stream Traffic Triggers only on rebuilt stream packets.
23-51ASA FirePOWER Module User Guide
Chapter 23 Understanding and Writing Intrusion Rules Understanding Keywords and Arguments in Rules
Identifying TCP Windows of a Given Size
License: Protection
You can use the window keyword to specify the TCP window size you are interested in. A rule containing this keyword triggers whenever it encounters a packet with the specified TCP window size. While this keyword is used rarely, it is helpful in identifying attacks and network scans that use generated packets with static TCP window sizes.
Identifying TCP Streams of a Given Size
License: Protection
You can use the stream_size keyword in conjunction with the stream preprocessor to determine the size in bytes of a TCP stream, using the format:
direction,operator,bytes
where bytes is number of bytes. You must separate each option in the argument with a comma (,).
The following table describes the case-insensitive directional options you can specify for the stream_size keyword:
The following table describes the operators you can use with the stream_size keyword:
client triggers on a stream from the client matching the specified stream size.
server triggers on a stream from the server matching the specified stream size.
both triggers on traffic from the client and traffic from the server both matching the specified stream size.
For example, the argument both, >, 200 would trigger when traffic from the client is greater than 200 bytes AND traffic from the server is greater than 200 bytes.
either triggers on traffic from either the client or the server matching the specified stream size, whichever occurs first.
For example, the argument either, >, 200 would trigger when traffic from the client is greater than 200 bytes OR traffic from the server is greater than 200 bytes.
Chapter 23 Understanding and Writing Intrusion Rules Understanding Keywords and Arguments in Rules
For example, you could use client, >=, 5001216 as the argument for the stream_size keyword to detect a TCP stream traveling from a client to a server and greater than or equal to 5001216 bytes.
Enabling and Disabling TCP Stream ReassemblyLicense: Protection
You can use the stream_reassemble keyword to enable or disable TCP stream reassembly for a single connection when inspected traffic on the connection matches the conditions of the rule. Optionally, you can use this keyword multiple times in a rule.
Use the following syntax to enable or disable stream reassembly:
The following table describes the optional arguments you can use with the stream_reassemble keyword.
For example, the following rule disables TCP client-side stream reassembly without generating an event on the connection where a 200 OK status code is detected in an HTTP response:
alert tcp any 80 -> any any (flow:to_client, established; content: “200 OK”; stream_reassemble:disable, client, noalert
To use stream_reassemble:
Step 1 On the Create Rule page, select stream_reassemble in the drop-down list and click Add Option.
The stream_reassemble section appears.
Extracting SSL Information from a SessionLicense: Protection
You can use SSL rule keywords to invoke the Secure Sockets Layer (SSL) preprocessor and extract information about SSL version and session state from packets in an encrypted session.
When a client and server communicate to establish an encrypted session using SSL or Transport Layer Security (TLS), they exchange handshake messages. Although the data transmitted in the session is encrypted, the handshake messages are not.
The SSL preprocessor extracts state and version information from specific handshake fields. Two fields within the handshake indicate the version of SSL or TLS used to encrypt the session and the stage of the handshake.
For more information, see the following sections:
• ssl_state, page 23-54
• ssl_version, page 23-54
Table 23-33 stream_reassemble Optional Arguments
Argument Description
noalert Generate no events regardless of any other detection options specified in the rule.
fastpath Ignore the rest of the connection traffic when there is a match.
23-53ASA FirePOWER Module User Guide
Chapter 23 Understanding and Writing Intrusion Rules Understanding Keywords and Arguments in Rules
ssl_state
License: Protection
The ssl_state keyword can be used to match against state information for an encrypted session. To check for two or more SSL versions used simultaneously, use multiple ssl_version keywords in a rule.
When a rule uses the ssl_state keyword, the rules engine invokes the SSL preprocessor to check traffic for SSL state information.
For example, to detect an attacker’s attempt to cause a buffer overflow on a server by sending a ClientHello message with an overly long challenge length and too much data, you could use the ssl_state keyword with client_hello as an argument then check for abnormally large packets.
Use a comma-separated list to specify multiple arguments for the SSL state. When you list multiple arguments, the system evaluates them using the OR operator. For example, if you specify client_hello and server_hello as arguments, the system evaluates the rule against traffic that has a client_hello OR a server_hello.
You can also negate any argument; for example:
!client_hello, !unknown
To ensure the connection has reached each of a set of states, multiple rules using the ssl_state rule option should be used. The ssl_state keyword takes the following identifiers as arguments:
ssl_version
License: Protection
The ssl_version keyword can be used to match against version information for an encrypted session. When a rule uses the ssl_version keyword, the rules engine invokes the SSL preprocessor to check traffic for SSL version information.
For example, if you know there is a buffer overflow vulnerability in SSL version 2, you could use the ssl_version keyword with the sslv2 argument to identify traffic using that version of SSL.
Use a comma-separated list to specify multiple arguments for the SSL version. When you list multiple arguments, the system evaluates them using the OR operator. For example, if you wanted to identify any encrypted traffic that was not using SSLv2, you could add ssl_version:ssl_v3,tls1.0,tls1.1,tls1.2 to a rule. The rule would evaluate any traffic using SSL Version 3, TLS Version 1.0, TLS Version 1.1, or TLS Version 1.2.
Table 23-34 ssl_state Arguments
Argument Purpose
client_hello Matches against a handshake message with ClientHello as the message type, where the client requests an encrypted session.
server_hello Matches against a handshake message with ServerHello as the message type, where the server responds to the client’s request for an encrypted session.
client_keyx Matches against a handshake message with ClientKeyExchange as the message type, where the client transmits a key to the server to confirm receipt of a key from the server.
server_keyx Matches against a handshake message with ServerKeyExchange as the message type, where the client transmits a key to the server to confirm receipt of a key from the server.
unknown Matches against any handshake message type.
23-54ASA FirePOWER Module User Guide
Chapter 23 Understanding and Writing Intrusion Rules Understanding Keywords and Arguments in Rules
The ssl_version keyword takes the following SSL/TLS version identifiers as arguments:
Although preprocessors perform most of the normalization and inspection of application layer protocol values, you can continue to inspect application layer values using the keywords described in the following sections:
• RPC, page 23-55
• ASN.1, page 23-56
• urilen, page 23-57
• DCE/RPC Keywords, page 23-58
• SIP Keywords, page 23-61
• GTP Keywords, page 23-63
• Modbus Keywords, page 23-73
• DNP3 Keywords, page 23-74
RPC
License: Protection
The rpc keyword identifies Open Network Computing Remote Procedure Call (ONC RPC) services in TCP or UDP packets. This allows you to detect attempts to identify the RPC programs on a host. Intruders can use an RPC portmapper to determine if any of the RPC services running on your network can be exploited. They can also attempt to access other ports running RPC without using portmapper. The following table lists the arguments that the rpc keyword accepts.
To specify the arguments for the rpc keyword, use the following syntax:
Table 23-35 ssl_version Arguments
Argument Purpose
sslv2 Matches against traffic encoded using Secure Sockets Layer (SSL) Version 2.
sslv3 Matches against traffic encoded using Secure Sockets Layer (SSL) Version 3.
tls1.0 Matches against traffic encoded using Transport Layer Security (TLS) Version 1.0.
tls1.1 Matches against traffic encoded using Transport Layer Security (TLS) Version 1.1.
tls1.2 Matches against traffic encoded using Transport Layer Security (TLS) Version 1.2.
Table 23-36 rpc Keyword Arguments
Argument Description
application The RPC application number
procedure The RPC procedure invoked
version The RPC version
23-55ASA FirePOWER Module User Guide
Chapter 23 Understanding and Writing Intrusion Rules Understanding Keywords and Arguments in Rules
application,procedure,version
where application is the RPC application number, procedure is the RPC procedure number, and version is the RPC version number. You must specify all arguments for the rpc keyword — if you are not able to specify one of the arguments, replace it with an asterisk (*).
For example, to search for RPC portmapper (which is the RPC application indicated by the number 100000), with any procedure or version, use 100000,*,* as the arguments.
ASN.1
License: Protection
The asn1 keyword allows you to decode a packet or a portion of a packet, looking for various malicious encodings.
The following table describes the arguments for the asn1 keyword.
For example, there is a known vulnerability in the Microsoft ASN.1 Library that creates a buffer overflow, allowing an attacker to exploit the condition with a specially crafted authentication packet. When the system decodes the asn.1 data, exploit code in the packet could execute on the host with system-level privileges or could cause a DoS condition. The following rule uses the asn1 keyword to detect attempts to exploit this vulnerability:
The above rule generates an event against TCP traffic traveling from any IP address defined in the $EXTERNAL_NET variable, from any port, to any IP address defined in the $HOME_NET variable using port 445. In addition, it only executes the rule on established TCP connections to servers. The rule then tests for specific content in specific locations. Finally, the rule uses the asn1 keyword to detect
Double Overflow Detects a double ASCII encoding that is larger than a standard buffer. This is known to be an exploitable function in Microsoft Windows, but it is unknown at this time which services may be exploitable.
Oversize Length Detects ASN.1 type lengths greater than the supplied argument. For example, if you set the Oversize Length to 500, any ASN.1 type greater than 500 triggers the rule.
Absolute Offset Sets an absolute offset from the beginning of the packet payload. (Remember that the offset counter starts at byte 0.) For example, if you want to decode SNMP packets, set Absolute Offset to 0 and do not set a Relative Offset. Absolute Offset may be positive or negative.
Relative Offset This is the relative offset from the last successful content match, pcre, or byte_jump. To decode an ASN.1 sequence right after the content "foo", set Relative Offset to 0, and do not set an Absolute Offset. Relative Offset may be positive or negative. (Remember that the offset counter starts at 0.)
23-56ASA FirePOWER Module User Guide
Chapter 23 Understanding and Writing Intrusion Rules Understanding Keywords and Arguments in Rules
bitstring encodings and double ASCII encodings and to identify asn.1 type lengths over 100 bytes in length starting 55 bytes from the end of the last successful content match. (Remember that the offset counter starts at byte 0.)
urilen
License: Protection
You can use the urilen keyword in conjunction with the HTTP Inspect preprocessor to inspect HTTP traffic for URIs of a specific length, less than a maximum length, greater than a minimum length, or within a specified range.
After the HTTP Inspect preprocessor normalizes and inspects the packet, the rules engine evaluates the packet against the rule and determines whether the URI matches the length condition specified by the urilen keyword. You can use this keyword to detect exploits that attempt to take advantage of URI length vulnerabilities, for example, by creating a buffer overflow that allows the attacker to cause a DoS condition or execute code on the host with system-level privileges.
Note the following when using the urilen keyword in a rule:
• In practice, you always use the urilen keyword in combination with the flow:established keyword and one or more other keywords.
• The rule protocol is always TCP. See Specifying Protocols, page 23-4 for more information.
• Target ports are always HTTP ports. See Defining Ports in Intrusion Rules, page 23-8 and Optimizing Predefined Default Variables, page 2-14 for more information.
You specify the URI length using a decimal number of bytes, less than (<) and greater than (>).
For example:
• specify 5 to detect a URI 5 bytes long.
• specify < 5 (separated by one space character) to detect a URI less than 5 bytes long.
• specify > 5 (separated by one space character) to detect a URI greater than 5 bytes long.
• specify 3 <> 5 (with one space character before and after <>) to detect a URI between 3 and 5 bytes long inclusive.
For example, there is a known vulnerability in Novell’s server monitoring and diagnostics utility iMonitor version 2.4, which comes with eDirectory version 8.8. A packet containing an excessively long URI creates a buffer overflow, allowing an attacker to exploit the condition with a specially crafted packet that could execute on the host with system-level privileges or could cause a DoS condition. The following rule uses the urilen keyword to detect attempts to exploit this vulnerability:
alert tcp $EXTERNAL_NET any -> $HOME_NET $HTTP_PORTS(msg:"EXPLOIT eDirectory 8.8 Long URI iMonitor bufferoverflow attempt";flow:to_server,established;urilen:> 8192; uricontent:"/nds/"; nocase;classtype:attempted-admin; sid:x; rev:1;)
The above rule generates an event against TCP traffic traveling from any IP address defined in the $EXTERNAL_NET variable, from any port, to any IP address defined in the $HOME_NET variable using the ports defined in the $HTTP_PORTS variable. In addition, packets are evaluated against the rule only on established TCP connections to servers. The rule uses the urilen keyword to detect any URI over 8192 bytes in length. Finally, the rule searches the URI for the specific case-insensitive content /nds/.
23-57ASA FirePOWER Module User Guide
Chapter 23 Understanding and Writing Intrusion Rules Understanding Keywords and Arguments in Rules
DCE/RPC Keywords
License: Protection
The three DCE/RPC keywords described in the following table allow you to monitor DCE/RPC session traffic for exploits. When the system processes rules with these keywords, it invokes the DCE/RPC preprocessor. See Decoding DCE/RPC Traffic, page 15-2 for more information.
Note in the table that you should always precede dce_opnum with dce_iface, and you should always precede dce_stub_data with dce_iface + dce_opnum.
You can also use these DCE/RPC keywords in combination with other rule keywords. Note that for DCE/RPC rules, you use the byte_jump, byte_test, and byte_extract keywords with their DCE/RPC arguments selected. For more information, see Using Byte_Jump and Byte_Test, page 23-30 and Reading Packet Data into Keyword Arguments, page 23-81.
Cisco recommends that you include at least one content keyword in rules that include DCE/RPC keywords to ensure that the rules engine uses the fast pattern matcher, which increases processing speed and improves performance. Note that the rules engine uses the fast pattern matcher when a rule includes at least one content keyword, regardless of whether you enable the content keyword Use Fast Pattern Matcher argument. See Searching for Content Matches, page 23-15 and Use Fast Pattern Matcher, page 23-26 for more information.
You can use the DCE/RPC version and adjoining header information as the matching content in the following cases:
• the rule does not include another content keyword
• the rule contains another content keyword, but the DCE/RPC version and adjoining information represent a more unique pattern than the other content
For example, the DCE/RPC version and adjoining information are more likely to be unique than a single byte of content.
You should end qualifying rules with one of the following version and adjoining information content matches:
• For connection-oriented DCE/RPC rules, use the content |05 00 00| (for major version 05, minor version 00, and the request PDU (protocol data unit) type 00).
• For connectionless DCE/RPC rules, use the content |04 00| (for version 04, and the request PDU type 00).
In either case, position the content keyword for version and adjoining information as the last keyword in the rule to invoke the fast pattern matcher without repeating processing already completed by the DCE/RPC preprocessor. Note that placing the content keyword at the end of the rule applies to version content used as a device to invoke the fast pattern matcher, and not necessarily to other content matches in the rule.
See the following sections for more information:
Table 23-38 DCE/RPC Keywords
Use... In this way... To detect...
dce_iface alone packets identifying a specific DCE/RPC service
dce_opnum preceded by dce_iface packets identifying specific DCE/RPC service operations
dce_stub_data preceded by dce_iface + dce_opnum
stub data defining a specific operation request or response
23-58ASA FirePOWER Module User Guide
Chapter 23 Understanding and Writing Intrusion Rules Understanding Keywords and Arguments in Rules
• dce_iface, page 23-59
• dce_opnum, page 23-60
• dce_stub_data, page 23-60
dce_iface
License: Protection
You can use the dce_iface keyword to identify a specific DCE/RPC service.
Optionally, you can also use dce_iface in combination with the dce_opnum and dce_stub_data keywords to further limit the DCE/RPC traffic to inspect. See dce_opnum, page 23-60 and dce_stub_data, page 23-60 for more information.
A fixed, sixteen-byte Universally Unique Identifier (UUID) identifies the application interface assigned to each DCE/RPC service. For example, the UUID 4b324fc8-670-01d3-1278-5a47bf6ee188 identifies the DCE/RPC lanmanserver service, also known as the srvsvc service, which provides numerous management functions for sharing peer-to-peer printers, files, and SMB named pipes. The DCE/RPC preprocessor uses the UUID and associated header values to track DCE/RPC sessions.
The interface UUID is comprised of five hexadecimal strings separated by hyphens:
You specify the interface by entering the entire UUID including hyphens, as seen in the following UUID for the netlogon interface:
12345678-1234-abcd-ef00-01234567cffb
Note that you must specify the first three strings in the UUID in big endian byte order. Although published interface listings and protocol analyzers typically display UUIDs in the correct byte order, you might encounter a need to rearrange the UUID byte order before entering it. Consider the following messenger service UUID shown as it might sometimes be displayed in raw ASCII text with the first three strings in little endian byte order:
f8 91 7b 5a 00 ff d0 11 a9 b2 00 c0 4f b6 e6 fc
You would specify the same UUID for the dce_iface keyword by inserting hyphens and putting the first three strings in big endian byte order as follows:
5a7b91f8-ff00-11d0-a9b2-00c04fb6e6fc
Although a DCE/RPC session can include requests to multiple interfaces, you should include only one dce_iface keyword in a rule. Create additional rules to detect additional interfaces.
DCE/RPC application interfaces also have interface version numbers. You can optionally specify an interface version with an operator indicating that the version equals, does not equal, is less than, or greater than the specified value.
Both connection-oriented and connectionless DCE/RPC can be fragmented in addition to any TCP segmentation or IP fragmentation. Typically, it is not useful to associate any DCE/RPC fragment other than the first with the specified interface, and doing so may result in a large number of false positives. However, for flexibility you can optionally evaluate all fragments against the specified interface.
The following table summarizes the dce_iface keyword arguments.
23-59ASA FirePOWER Module User Guide
Chapter 23 Understanding and Writing Intrusion Rules Understanding Keywords and Arguments in Rules
dce_opnum
License: Protection
You can use the dce_opnum keyword in conjunction with the DCE/RPC preprocessor to detect packets that identify one or more specific operations that a DCE/RPC service provides.
Client function calls request specific service functions, which are referred to in DCE/RPC specifications as operations. An operation number (opnum) identifies a specific operation in the DCE/RPC header. It is likely that an exploit would target a specific operation.
For example, the UUID 12345678-1234-abcd-ef00-01234567cffb identifies the interface for the netlogon service, which provides several dozen different operations. One of these is operation 6, the NetrServerPasswordSet operation.
You should precede a dce_opnum keyword with a dce_iface keyword to identify the service for the operation. See dce_iface, page 23-59 for more information.
You can specify a single decimal value 0 to 65535 for a specific operation, a range of operations separated by a hyphen, or a comma-separated list of operations and ranges in any order.
Any of the following examples would specify valid netlogon operation numbers:
1515-1815, 18-2015, 20-22, 1715, 18-20, 22, 24-26
dce_stub_data
License: Protection
You can use the dce_stub_data keyword in conjunction with the DCE/RPC preprocessor to specify that the rules engine should start inspection at the beginning of the stub data, regardless of any other rule options. Packet payload rule options that follow the dce_stub_data keyword are applied relative to the stub data buffer.
Table 23-39 dce_iface Arguments
Argument Description
Interface UUID The UUID, including hyphens, that identifies the application interface of the specific service that you want to detect in DCE/RPC traffic. Any request associated with the specified interface would match the interface UUID.
Version Optionally, the application interface version number 0 to 65535 and an operator indicating whether to detect a version greater than (>), less than (<), equal to (=), or not equal to (!) the specified value.
All Fragments Optionally, enable to match against the interface in all associated DCE/RPC fragments and, if specified, on the interface version. This argument is disabled by default, indicating that the keyword matches only if the first fragment or the entire unfragmented packet is associated with the specified interface. Note that enabling this argument may result in false positives.
23-60ASA FirePOWER Module User Guide
Chapter 23 Understanding and Writing Intrusion Rules Understanding Keywords and Arguments in Rules
DCE/RPC stub data provides the interface between a client procedure call and the DCE/RPC run-time system, the mechanism that provides the routines and services central to DCE/RPC. DCE/RPC exploits are identified in the stub data portion of the DCE/RPC packet. Because stub data is associated with a specific operation or function call, you should always precede dce_stub_data with dce_iface and dce_opnum to identify the related service and operation.
The dce_stub_data keyword has no arguments. See dce_iface, page 23-59 and dce_opnum, page 23-60 for more information.
SIP Keywords
License: Protection
Four SIP keywords allow you to monitor SIP session traffic for exploits.
Note that the SIP protocol is vulnerable to denial of service (DoS) attacks. Rules addressing these attacks can benefit from rate-based attack prevention. See Adding Dynamic Rule States, page 20-28 and Preventing Rate-Based Attacks, page 21-9 for more information.
See the following sections for more information:
• sip_header, page 23-61
• sip_body, page 23-61
• sip_method, page 23-61
• sip_stat_code, page 23-62
sip_header
License: Protection
You can use the sip_header keyword to start inspection at the beginning of the extracted SIP request or response header and restrict inspection to header fields.
The sip_header keyword has no arguments. See sip_method, page 23-61 and sip_stat_code, page 23-62 for more information.
The following example rule fragment points to the SIP header and matches the CSeq header field:
alert udp any any -> any 5060 ( sip_header; content:"CSeq"; )
sip_body
License: Protection
You can use the sip_body keyword to start inspection at the beginning of the extracted SIP request or response message body and restrict inspection to the message body.
The sip_body keyword has no arguments.
The following example rule fragment points to the SIP message body and matches a specific IP address in the c (connection information) field in extracted SDP data:
alert udp any any -> any 5060 ( sip_body; content:"c=IN 192.168.12.14"; )
Note that rules are not limited to searching for SDP content. The SIP preprocessor extracts the entire message body and makes it available to the rules engine.
sip_method
License: Protection
23-61ASA FirePOWER Module User Guide
Chapter 23 Understanding and Writing Intrusion Rules Understanding Keywords and Arguments in Rules
A method field in each SIP request identifies the purpose of the request. You can use the sip_method keyword to test SIP requests for specific methods. Separate multiple methods with commas.
You can specify any of the following currently defined SIP methods:
Methods are case-insensitive. You can separate multiple methods with commas.
Because new SIP methods might be defined in the future, you can also specify a custom method, that is, a method that is not a currently defined SIP method. Accepted field values are defined in RFC 2616, which allows all characters except control characters and separators such as =, (, and }. See RFC 2616 for the complete list of excluded separators. When the system encounters a specified custom method in traffic, it will inspect the packet header but not the message.
The system supports up to 32 methods, including the 21 currently defined methods and an additional 11 methods. The system ignores any undefined methods that you might configure. Note that the 32 total methods includes methods specified using the Methods to Check SIP preprocessor option. See Selecting SIP Preprocessor Options, page 15-48 for more information.
You can specify only one method when you use negation. For example:
!invite
Note, however, that multiple sip_method keywords in a rule are linked with an AND operation. For example, to test for all extracted methods except invite and cancel, you would use two negated sip_method keywords:
sip_method: !invitesip_method: !cancel
Cisco recommends that you include at least one content keyword in rules that include the sip_method keyword to ensure that the rules engine uses the fast pattern matcher, which increases processing speed and improves performance. Note that the rules engine uses the fast pattern matcher when a rule includes at least one content keyword, regardless of whether you enable the content keyword Use Fast Pattern Matcher argument. See Searching for Content Matches, page 23-15 and Use Fast Pattern Matcher, page 23-26 for more information.
sip_stat_code
License: Protection
A three-digit status code in each SIP response indicates the outcome of the requested action. You can use the sip_stat_code keyword to test SIP responses for specific status codes.
You can specify a one-digit response-type number 1-9, a specific three-digit number 100-999, or a comma-separated list of any combination of either. A list matches if any single number in the list matches the code in the SIP response.
The following table describes the SIP status code values you can specify.
Table 23-40 sip_stat_code Values
To detect... Specify... For example... Detects...
a specific status code the three-digit status code 189 189
any three-digit code that begins with a specified single digit
the single digit 1 1xx; that is, 100, 101, 102, and so on
a list of values any comma-separated combination of specific codes and single digits
222, 3 222 plus 300, 301, 302, and so on
23-62ASA FirePOWER Module User Guide
Chapter 23 Understanding and Writing Intrusion Rules Understanding Keywords and Arguments in Rules
Note also that the rules engine does not use the fast pattern matcher to search for the value specify using the sip_stat_code keyword, regardless of whether your rule includes a content keyword.
GTP Keywords
License: Protection
Three GSRP Tunneling Protocol (GTP) keywords allow you to inspect the GTP command channel for GTP version, message type, and information elements. You cannot use GTP keywords in combination with other intrusion rule keywords such as content or byte_jump. You must use the gtp_version keyword in each rule that uses the gtp_info or gtp_type keyword.
See the following sections for more information:
• gtp_version, page 23-63
• gtp_type, page 23-63
• gtp_info, page 23-67
gtp_version
You can use the gtp_version keyword to inspect GTP control messages for GTP version 0, 1, or 2.
Because different GTP versions define different message types and information elements, you must use this keyword when you use the gtp_type or gtp_info keyword. You can specify the value 0, 1, or 2.
To specify the GTP version:
Step 1 On the Create Rule page, select gtp_version in the drop-down list and click Add Option.
The gtp_version keyword appears.
Step 2 Specify 0, 1, or 2 to identify the GTP version.
gtp_type
Each GTP message is identified by a message type, which is comprised of both a numeric value and a string. You can use the gtp_type keyword in combination with the gtp_version keyword to inspect traffic for specific GTP message types.
You can specify a defined decimal value for a message type, a defined string, or a comma-separated list of either or both in any combination, as seen in the following example:
10, 11, echo_request
The system uses an OR operation to match each value or string that you list. The order in which you list values and strings does not matter. Any single value or string in the list matches the keyword. You receive an error if you attempt to save a rule that includes an unrecognized string or an out-of-range value.
Note in the table that different GTP versions sometimes use different values for the same message type. For example, the sgsn_context_request message type has a value of 50 in GTPv0 and GTPv1, but a value of 130 in GTPv2.
The gtp_type keyword matches different values depending on the version number in the packet. In the example above, the keyword matches the message type value 50 in a GTPv0 or GTPv1 packet and the value 130 in a GTPv2 packet. The keyword does not match a packet when the message type value in the packet is not a known value for the version specified in the packet.
23-63ASA FirePOWER Module User Guide
Chapter 23 Understanding and Writing Intrusion Rules Understanding Keywords and Arguments in Rules
If you specify an integer for the message type, the keyword matches if the message type in the keyword matches the value in the GTP packet, regardless of the version specified in the packet.
The following table lists the defined values and strings recognized by the system for each GTP message type.
Chapter 23 Understanding and Writing Intrusion Rules Understanding Keywords and Arguments in Rules
To specify GTP message types:
Step 1 On the Create Rule page, select gtp_type in the drop-down list and click Add Option.
The gtp_type keyword appears.
Step 2 Specify a defined decimal value 0 to 255 for the message type, a defined string, or a comma-separated list of either or both in any combination. See the GTP Message Types table for values and strings recognized by the system.
gtp_info
A GTP message can include multiple information elements, each of which is identified by both a defined numeric value and a defined string. You can use the gtp_info keyword in combination with the gtp_version keyword to start inspection at the beginning of a specified information element and restrict inspection to the specified information element.
Chapter 23 Understanding and Writing Intrusion Rules Understanding Keywords and Arguments in Rules
You can specify either the defined decimal value or the defined string for an information element. You can specify a single value or string, and you can use multiple gtp_info keywords in a rule to inspect multiple information elements.
When a message includes multiple information elements of the same type, all are inspected for a match. When information elements occur in an invalid order, only the last instance is inspected.
Note that different GTP versions sometimes use different values for the same information element. For example, the cause information element has a value of 1 in GTPv0 and GTPv1, but a value of 2 in GTPv2.
The gtp_info keyword matches different values depending on the version number in the packet. In the example above, the keyword matches the information element value 1 in a GTPv0 or GTPv1 packet and the value 2 in a GTPv2 packet. The keyword does not match a packet when the information element value in the packet is not a known value for the version specified in the packet.
If you specify an integer for the information element, the keyword matches if the message type in the keyword matches the value in the GTP packet, regardless of the version specified in the packet.
The following table lists the values and strings recognized by the system for each GTP information element.
Table 23-42 GTP Information Elements
Value Version 0 Version 1 Version 2
1 cause cause imsi
2 imsi imsi cause
3 rai rai recovery
4 tlli tlli N/A
5 p_tmsi p_tmsi N/A
6 qos N/A N/A
8 recording_required recording_required N/A
9 authentication authentication N/A
11 map_cause map_cause N/A
12 p_tmsi_sig p_tmsi_sig N/A
13 ms_validated ms_validated N/A
14 recovery recovery N/A
15 selection_mode selection_mode N/A
16 flow_label_data_1 teid_1 N/A
17 flow_label_signalling teid_control N/A
18 flow_label_data_2 teid_2 N/A
19 ms_unreachable teardown_ind N/A
20 N/A nsapi N/A
21 N/A ranap N/A
22 N/A rab_context N/A
23 N/A radio_priority_sms N/A
24 N/A radio_priority N/A
23-68ASA FirePOWER Module User Guide
Chapter 23 Understanding and Writing Intrusion Rules Understanding Keywords and Arguments in Rules
25 N/A packet_flow_id N/A
26 N/A charging_char N/A
27 N/A trace_ref N/A
28 N/A trace_type N/A
29 N/A ms_unreachable N/A
71 N/A N/A apn
72 N/A N/A ambr
73 N/A N/A ebi
74 N/A N/A ip_addr
75 N/A N/A mei
76 N/A N/A msisdn
77 N/A N/A indication
78 N/A N/A pco
79 N/A N/A paa
80 N/A N/A bearer_qos
80 N/A N/A flow_qos
82 N/A N/A rat_type
83 N/A N/A serving_network
84 N/A N/A bearer_tft
85 N/A N/A tad
86 N/A N/A uli
87 N/A N/A f_teid
88 N/A N/A tmsi
89 N/A N/A cn_id
90 N/A N/A s103pdf
91 N/A N/A s1udf
92 N/A N/A delay_value
93 N/A N/A bearer_context
94 N/A N/A charging_id
95 N/A N/A charging_char
96 N/A N/A trace_info
97 N/A N/A bearer_flag
99 N/A N/A pdn_type
100 N/A N/A pti
101 N/A N/A drx_parameter
103 N/A N/A gsm_key_tri
Table 23-42 GTP Information Elements (continued)
Value Version 0 Version 1 Version 2
23-69ASA FirePOWER Module User Guide
Chapter 23 Understanding and Writing Intrusion Rules Understanding Keywords and Arguments in Rules
Chapter 23 Understanding and Writing Intrusion Rules Understanding Keywords and Arguments in Rules
Step 2 Specify a single defined decimal value 0 to 255 for the information element, or a single defined string. See the GTP Information Elements table for values and strings recognized by the system.
Modbus Keywords
License: Protection
You can use Modbus keywords to point to the beginning of the Data field in a Modbus request or response, to match against the Modbus Function Code, and to match against a Modbus Unit ID. You can use Modbus keywords alone or in combination with other keywords such as content and byte_jump.
See the following sections for more information:
• modbus_data, page 23-73
• modbus_func, page 23-73
• modbus_unit, page 23-74
modbus_data
You can use the modbus_data keyword to point to the beginning of the Data field in a Modbus request or response.
To point to the beginning of the Modbus Data field:
Step 1 On the Create Rule page, select modbus_data from the drop-down list and click Add Option.
The modbus_data keyword appears.
The modbus_data keyword has no arguments.
modbus_func
You can use the modbus_func keyword to match against the Function Code field in a Modbus application layer request or response header. You can specify either a single defined decimal value or a single defined string for a Modbus function code.
The following table lists the defined values and strings recognized by the system for Modbus function codes.
Table 23-43 Modbus Function Codes
Value String
1 read_coils
2 read_discrete_inputs
3 read_holding_registers
4 read_input_registers
5 write_single_coil
6 write_single_register
7 read_exception_status
23-73ASA FirePOWER Module User Guide
Chapter 23 Understanding and Writing Intrusion Rules Understanding Keywords and Arguments in Rules
To specify a Modbus function code:
Step 1 On the Create Rule page, select modbus_func in the drop-down list and click Add Option.
The modbus_func keyword appears.
Step 2 Specify a single defined decimal value 0 to 255 for the function code, or a single defined string. See the Modbus Function Codes table for values and strings recognized by the system.
modbus_unit
You can use the modbus_unit keyword to match a single decimal value against the Unit ID field in a Modbus request or response header.
To specify a Modbus unit ID:
Step 1 On the Create Rule page, select modbus_unit in the drop-down list and click Add Option.
The modbus_unit keyword appears.
Step 2 Specify a decimal value 0 through 255.
DNP3 Keywords
License: Protection
You can use DNP3 keywords to point to the beginning of application layer fragments, to match against DNP3 function codes and objects in DNP3 responses and requests, and to match against internal indication flags in DNP3 responses. You can use DNP3 keywords alone or in combination with other keywords such as content and byte_jump.
8 diagnostics
11 get_comm_event_counter
12 get_comm_event_log
15 write_multiple_coils
16 write_multiple_registers
17 report_slave_id
20 read_file_record
21 write_file_record
22 mask_write_register
23 read_write_multiple_registers
24 read_fifo_queue
43 encapsulated_interface_transport
Table 23-43 Modbus Function Codes (continued)
Value String
23-74ASA FirePOWER Module User Guide
Chapter 23 Understanding and Writing Intrusion Rules Understanding Keywords and Arguments in Rules
See the following sections for more information:
• dnp3_data, page 23-75
• dnp3_func, page 23-75
• dnp3_ind, page 23-76
• dnp3_obj, page 23-77
dnp3_data
You can use the dnp3_data keyword to point to the beginning of reassembled DNP3 application layer fragments.
The DNP3 preprocessor reassembles link layer frames into application layer fragments. The dnp3_data keyword points to the beginning of each application layer fragment; other rule options can match against the reassembled data within fragments without separating the data and adding checksums every 16 bytes.
To point to the beginning of reassembled DNP3 fragments:
Step 1 On the Create Rule page, select modbus_data from the drop-down list and click Add Option.
The dnp3_data keyword appears.
The dnp3_data keyword has no arguments.
dnp3_func
You can use the dnp3_func keyword to match against the Function Code field in a DNP3 application layer request or response header. You can specify either a single defined decimal value or a single defined string for a DNP3 function code.
The following table lists the defined values and strings recognized by the system for DNP3 function codes.
Table 23-44 DNP3 Function Codes
Value String
0 confirm
1 read
2 write
3 select
4 operate
5 direct_operate
6 direct_operate_nr
7 immed_freeze
8 immed_freeze_nr
9 freeze_clear
10 freeze_clear_nr
11 freeze_at_time
23-75ASA FirePOWER Module User Guide
Chapter 23 Understanding and Writing Intrusion Rules Understanding Keywords and Arguments in Rules
To specify DNP3 function codes:
Step 1 On the Create Rule page, select dnp3_func in the drop-down list and click Add Option.
The dnp3_func keyword appears.
Step 2 Specify a single defined decimal value 0 to 255 for the function code, or a single defined string. See the DNP3 Function Codes table for values and strings recognized by the system.
dnp3_ind
You can use the dnp3_ind keyword to match against flags in the Internal Indications field in a DNP3 application layer response header.
12 freeze_at_time_nr
13 cold_restart
14 warm_restart
15 initialize_data
16 initialize_appl
17 start_appl
18 stop_appl
19 save_config
20 enable_unsolicited
21 disable_unsolicited
22 assign_class
23 delay_measure
24 record_current_time
25 open_file
26 close_file
27 delete_file
28 get_file_info
29 authenticate_file
30 abort_file
31 activate_config
32 authenticate_req
33 authenticate_err
129 response
130 unsolicited_response
131 authenticate_resp
Table 23-44 DNP3 Function Codes (continued)
Value String
23-76ASA FirePOWER Module User Guide
Chapter 23 Understanding and Writing Intrusion Rules Understanding Keywords and Arguments in Rules
You can specify the string for a single known flag or a comma-separated list of flags, as seen in the following example:
class_1_events, class_2_events
When you specify multiple flags, the keyword matches against any flag in the list. To detect a combination of flags, use the dnp3_ind keyword multiple times in a rule.
The following list provides the string syntax recognized by the system for defined DNP3 internal indications flags.
Step 1 On the Create Rule page, select dnp3_ind in the drop-down list and click Add Option.
The dnp3_ind keyword appears.
Step 2 You can specify the string for a single known flag or a comma-separated list of flags.
dnp3_obj
You can use the dnp3_obj keyword to match against DNP3 object headers in a request or response.
DNP3 data is comprised of a series of DNP3 objects of different types such as analog input, binary input, and so on. Each type is identified with a group such as analog input group, binary input group, and so on, each of which can be identified by a decimal value. The objects in each group are further identified by an object variation such as 16-bit integers, 32-bit integers, short floating point, and so on, each of which specifies the data format of the object. Each type of object variation can also be identified by a decimal value.
You identify object headers by specifying the decimal number for the type of object header group and the decimal number for the type of object variation. The combination of the two defines a specific type of DNP3 object.
To specify a DNP3 object:
Step 1 On the Create Rule page, select dnp3_obj in the drop-down list and click Add Option.
The dnp3_obj keyword appears.
23-77ASA FirePOWER Module User Guide
Chapter 23 Understanding and Writing Intrusion Rules Understanding Keywords and Arguments in Rules
Step 2 Specify a decimal value 0 through 255 to identify a known object group, and another decimal value 0 through 255 to identify a known object variation type.
CIP and ENIP Keywords
License: Protection
You can use the following keywords alone or in combination to create custom intrusion rules that identify attacks against CIP and ENIP traffic detected by the CIP preprocessor. For configurable keywords, specify a single integer within the allowed range. See Configuring the CIP Preprocessor, page 16-5 for more information.
You can write rules that only generate events against packets with specific packet characteristics. The ASA FirePOWER module provides the following keywords to evaluate packet characteristics:
• dsize, page 23-78
• isdataat, page 23-79
• sameip, page 23-80
• fragoffset, page 23-80
• cvs, page 23-80
dsize
License: Protection
The dsize keyword tests the packet payload size. With it, you can use the greater than and less than operators (< and >) to specify a range of values. You can use the following syntax to specify ranges:
Table 23-45 CIP and ENIP Keywords
Keyword Range
cip_attribute 0 - 65535
cip_class 0 - 65535
cip_conn_path_class 0 - 65535
cip_instance 0 - 4284927295
cip_req N/A
cip_rsp N/A
cip_service 0 - 127
cip_status 0 - 255
enip_command 0 - 65535
enip_req N/A
enip_rsp N/A
23-78ASA FirePOWER Module User Guide
Chapter 23 Understanding and Writing Intrusion Rules Understanding Keywords and Arguments in Rules
For example, to indicate a packet size greater than 400 bytes, use >400 as the dtype value. To indicate a packet size of less than 500 bytes, use <500. To specify that the rule trigger against any packet between 400 and 500 bytes inclusive, use 400<>500.
Caution The dsize keyword tests packets before they are decoded by any preprocessors.
isdataat
License: Protection
The isdataat keyword instructs the rules engine to verify that data resides at a specific location in the payload.
The following table lists the arguments you can use with the isdataat keyword.
For example, in a rule searching for the content foo, if the value for isdataat is specified as the following:
• Offset = !10
• Relative = enabled
The system alerts if the rules engine does not detect 10 bytes after foo before the payload ends.
To use isdataat:
Step 1 On the Create Rule page, select isdataat in the drop-down list and click Add Option.
Table 23-46 isdataat Arguments
Argument Type Description
Offset Required The specific location in the payload. For example, to test that data appears at byte 50 in the packet payload, you would specify 50 as the offset value. A ! modifier negates the results of the isdataat test; it alerts if a certain amount of data is not present within the payload.
You can also use an existing byte_extract variable to specify the value for this argument. See Reading Packet Data into Keyword Arguments, page 23-81 for more information.
Relative Optional Makes the location relative to the last successful content match. If you specify a relative location, note that the counter starts at byte 0, so calculate the location by subtracting 1 from the number of bytes you want to move forward from the last successful content match. For example, to specify that the data must appear at the ninth byte after the last successful content match, you would specify a relative offset of 8.
Raw Data Optional Specifies that the data is located in the original packet payload before decoding or application layer normalization by any ASA FirePOWER module preprocessor. You can use this argument with Relative if the previous content match was in the raw packet data.
23-79ASA FirePOWER Module User Guide
Chapter 23 Understanding and Writing Intrusion Rules Understanding Keywords and Arguments in Rules
The isdataat section appears.
sameip
License: Protection
The sameip keyword tests that a packet’s source and destination IP addresses are the same. It does not take an argument.
fragoffset
License: Protection
The fragoffset keyword tests the offset of a fragmented packet. This is useful because some exploits (such as WinNuke denial-of-service attacks) use hand-generated packet fragments that have specific offsets.
For example, to test whether the offset of a fragmented packet is 31337 bytes, specify 31337 as the fragoffset value.
You can use the following operators when specifying arguments for the fragoffset keyword.
Note that you cannot use the not (!) operator in combination with < or >.
cvs
License: Protection
The cvs keyword tests Concurrent Versions System (CVS) traffic for malformed CVS entries. An attacker can use a malformed entry to force a heap overflow and execute malicious code on the CVS server. This keyword can be used to identify attacks against two known CVS vulnerabilities: CVE-2004-0396 (CVS 1.11.x up to 1.11.15, and 1.12.x up to 1.12.7) and CVS-2004-0414 (CVS 1.12.x through 1.12.8, and 1.11.x through 1.11.16). The cvs keyword checks for a well-formed entry, and generates alerts when a malformed entry is detected.
Your rule should include the ports where CVS runs. In addition, any ports where traffic may occur should be added to the list of ports for stream reassembly in your TCP policies so state can be maintained for CVS sessions. The TCP ports 2401 (pserver) and 514 (rsh) are included in the list of client ports where stream reassembly occurs. However, note that if your server runs as an xinetd server (i.e., pserver), it can run on any TCP port. Add any non-standard ports to the stream reassembly Client Ports list. For more information, see Selecting Stream Reassembly Options, page 17-26.
Table 23-47 fragoffset Keyword Argument Operators
Operator Description
! not
> greater than
< less than
23-80ASA FirePOWER Module User Guide
Chapter 23 Understanding and Writing Intrusion Rules Understanding Keywords and Arguments in Rules
To detect malformed CVS entries:
Step 1 Add the cvs option to a rule and type invalid-entry as the keyword argument.
Reading Packet Data into Keyword ArgumentsLicense: Protection
You can use the byte_extract keyword to read a specified number of bytes from a packet into a variable. You can then use the variable later in the same rule as the value for specific arguments in certain other detection keywords.
This is useful, for example, for extracting data size from packets where a specific segment of bytes describes the number of bytes included in data within the packet. For example, a specific segment of bytes might say that subsequent data is comprised of four bytes; you can extract the data size of four bytes to use as your variable value.
You can use byte_extract to create up to two separate variables in a rule concurrently. You can redefine a byte_extract variable any number of times; entering a new byte_extract keyword with the same variable name and a different variable definition overwrites the previous definition of that variable.
The following table describes the arguments required by the byte_extract keyword.
To further define how the system locates the data to extract, you can use the arguments described in the following table.
Table 23-48 Required byte_extract Arguments
Argument Description
Bytes to Extract The number of bytes to extract from the packet. You can specify 1, 2, 3, or 4 bytes.
Offset The number of bytes into the payload to begin extracting data. You can specify -65534 to 65535 bytes. The offset counter starts at byte 0, so calculate the offset value by subtracting 1 from the number of bytes you want to count forward. For example, specify 7 to count forward 8 bytes. The rules engine counts forward from the beginning of the packet payload or, if you also specify Relative, after the last successful content match. Note that you can specify negative numbers only when you also specify Relative; see the Additional Optional byte_extract Arguments table for more information.
Variable Name The variable name to use in arguments for other detection keywords. You can specify an alphanumeric string that must begin with a letter.
Multiplier A multiplier for the value extracted from the packet. You can specify 0 to 65535. If you do not specify a multiplier, the default value is 1.
23-81ASA FirePOWER Module User Guide
Chapter 23 Understanding and Writing Intrusion Rules Understanding Keywords and Arguments in Rules
You can specify only one of DCE/RPC, Endian, or Number Type.
To define how the byte_extract keyword calculates the bytes it tests, you can choose from the arguments in the following table. The rules engine uses big endian byte order if you do not select either argument.
You can specify a number type to read data as an ASCII string. To define how the system views string data in a packet, you can select one of the arguments in the following table.
For example, if the value for byte_extract is specified as the following:
• Bytes to Extract = 4
• Variable Name = var
• Offset = 8
• Relative = enabled
the rules engine reads the number described in the four bytes that appear 9 bytes away from (relative to) the last successful content match into a variable named var, which you can specify later in the rule as the value for certain keyword arguments.
Align Rounds the extracted value to the nearest 2-byte or 4-byte boundary. When you also select Multiplier, the system applies the multiplier before the alignment.
Relative Makes Offset relative to the end of the last successful content match instead of the beginning of the payload. See the Required byte_extract Arguments table for more information.
Big Endian Processes data in big endian byte order, which is the default network byte order.
Little Endian Processes data in little endian byte order.
DCE/RPC Specifies a byte_extract keyword for traffic processed by the DCE/RPC preprocessor. See Decoding DCE/RPC Traffic, page 15-2 for more information.
The DCE/RPC preprocessor determines big endian or little endian byte order, and the Number Type and Endian arguments do not apply.
When you enable this argument, you can also use byte_extract in conjunction with other specific DCE/RPC keywords. See DCE/RPC Keywords, page 23-58 for more information.
Table 23-51 Number Type byte_extract arguments
Argument Description
Hexadecimal String Reads extracted string data in hexadecimal format.
Decimal String Reads extracted string data in decimal format.
Octal String Reads extracted string data in octal format.
23-82ASA FirePOWER Module User Guide
Chapter 23 Understanding and Writing Intrusion Rules Understanding Keywords and Arguments in Rules
The following table lists the keyword arguments where you can specify a variable defined in the byte_extract keyword.
To use byte_extract:
Step 1 On the Create Rule page, select t byte_extract in the drop-down list and click Add Option.
The byte_extract section appears beneath the last keyword you selected.
Initiating Active Responses with Rule KeywordsLicense: Protection
The system can initiate active responses to close TCP connections in response to triggered TCP rules or UDP sessions in response to triggered UDP rules. Two keywords provide you with separate approaches to initiating active responses. When a packet triggers a rule containing either of the keywords, the system initiates a single active response. You can also use the config response command to configure the active response interface to use and the number of TCP resets to attempt in a passive deployment.
Active responses are most effective in inline deployments because resets are more likely to arrive in time to affect the connection or session. For example, in response to the react keyword in an inline deployment, the system inserts a TCP reset (RST) packet directly into the traffic for each end of the connection, which normally should close the connection.
Active responses are not intended to take the place of a firewall for a number of reasons, including that the system cannot insert packets in passive deployments and an attacker may have chosen to ignore or circumvent active responses.
Because active responses can be routed back, the system does not allow TCP resets to initiate TCP resets; this prevents an unending sequence of active responses. The system also does not allow ICMP unreachable packets to initiate ICMP unreachable packets in keeping with standard practice.
You can configure the TCP stream preprocessor to detect additional traffic on a connection or session after an intrusion rule has triggered an active response. When the preprocessor detects additional traffic, it sends additional active responses up to a specified maximum to both ends of the connection or session. See Initiating Active Responses with Intrusion Drop Rules, page 17-2 for more information.
See the following sections for information specific to the keywords you can use to initiate active responses:
• Initiating Active Responses by Type and Direction, page 23-84
• Sending an HTML Page Before a TCP Reset, page 23-85
• Setting the Active Response Reset Attempts and Interface, page 23-86
Table 23-52 Arguments Accepting a byte_extract Variable
Keyword Argument For more information, see...
content Depth, Offset, Distance, Within Constraining Content Matches, page 23-17
byte_jump Offset byte_jump, page 23-30
byte_test Offset, Value byte_test, page 23-33
isdataat Offset isdataat, page 23-79
23-83ASA FirePOWER Module User Guide
Chapter 23 Understanding and Writing Intrusion Rules Understanding Keywords and Arguments in Rules
Initiating Active Responses by Type and Direction
License: Protection
You can use the resp keyword to actively respond to TCP connections or UDP sessions, depending on whether you specify the TCP or UDP protocol in the rule header. See Specifying Protocols, page 23-4 for more information.
Keyword arguments allow you to specify the packet direction and whether to use TCP reset (RST) packets or ICMP unreachable packets as active responses.
You can use any of the TCP reset or ICMP unreachable arguments to close TCP connections. You should use only ICMP unreachable arguments to close UDP sessions.
Different TCP reset arguments also allow you to target active responses to the packet source, destination, or both. All ICMP unreachable arguments target the packet source and allow you to specify whether to use an ICMP network, host, or port unreachable packet, or all three.
The following table lists the arguments you can use with the resp keyword to specify exactly what you want the ASA FirePOWER module to do when the rule triggers.
For example, to configure a rule to reset both sides of a connection when a rule is triggered, use reset_both as the value for the resp keyword.
You can use a comma-separated list to specify multiple arguments as follows:
argument,argument,argument
See Setting the Active Response Reset Attempts and Interface, page 23-86 for information on using the config response command to configure the active response interface to use and the number of TCP resets to attempt in a passive deployment.
Table 23-53 resp Arguments
Argument Description
reset_source Directs a TCP reset packet to the endpoint that sent the packet that triggered the rule. Alternatively, you can specify rst_snd, which is supported for backward compatibility.
reset_dest Directs a TCP reset packet to the intended destination endpoint of the packet that triggered the rule. Alternatively, you can specify rst_rcv, which is supported for backward compatibility.
reset_both Directs a TCP reset packet to both the sending and receiving endpoints. Alternatively, you can specify rst_all, which is supported for backward compatibility.
icmp_net Directs an ICMP network unreachable message to the sender.
icmp_host Directs an ICMP host unreachable message to the sender.
icmp_port Directs an ICMP port unreachable message to the sender. This argument is used to terminate UDP traffic.
icmp_all Directs the following ICMP messages to the sender:
• network unreachable
• host unreachable
• port unreachable
23-84ASA FirePOWER Module User Guide
Chapter 23 Understanding and Writing Intrusion Rules Understanding Keywords and Arguments in Rules
To specify active responses:
Step 1 On the Create Rule page, select resp in the drop-down list and click Add Option.
The resp keyword appears.
Step 2 Specify any of the arguments in the resp Arguments table in the resp field; use a comma-separated list to specify multiple arguments.
Sending an HTML Page Before a TCP Reset
License: Protection
You can use the react keyword to send a default HTML page to the TCP connection client when a packet triggers the rule; after sending the HTML page, the system uses TCP reset packets to initiate active responses to both ends of the connection. The react keyword does not trigger active responses for UDP traffic.
Optionally, you can specify the following argument:
msg
When a packet triggers a react rule that uses the msg argument, the HTML page includes the rule event message. See Understanding Rule Anatomy, page 23-2 for a description of the event message field.
If you do not specify the msg argument, the HTML page includes the following message:
You are attempting to access a forbidden site.Consult your system administrator for details.
Note Because active responses can be routed back, ensure that the HTML response page does not trigger a react rule; this could result in an unending sequence of active responses. Cisco recommends that you test react rules extensively before activating them in a production environment.
See Setting the Active Response Reset Attempts and Interface, page 23-86 for information on using the config response command to configure the active response interface to use and the number of TCP resets to attempt in a passive deployment.
To send an HTML page before initiating an active responses:
Step 1 On the Create Rule page, select react in the drop-down list and click Add Option.
The react keyword appears.
Step 2 You have two choices:
• To send an HTML page that includes the event message configured for the rule to the client before closing a connection, type msg in the react field.
• To send an HTML page that includes the following default message to the client before closing a connection, leave the react field blank:
You are attempting to access a forbidden site.Consult your system administrator for details
23-85ASA FirePOWER Module User Guide
Chapter 23 Understanding and Writing Intrusion Rules Understanding Keywords and Arguments in Rules
Setting the Active Response Reset Attempts and Interface
License: Protection
You can use the config response command to further configure the behavior of TCP resets initiated by resp and react rules. This command also affects the behavior of active responses initiated by drop rules; see Initiating Active Responses with Intrusion Drop Rules, page 17-2 for more information.
You use the config response command by inserting it on a separate line in the USER_CONF advanced variable. See Understanding Advanced Variables, page 2-27 for information on using a USER_CONF variable.
Caution Do not use the USER_CONF advanced variable to configure an intrusion policy feature unless you are instructed to do so in the feature description or by Support. Conflicting or duplicate configurations will halt the system.
To specify active response reset attempts, the active response interface, or both:
Step 1 Depending on whether you want to specify only the number of active responses, only the active response interface, or both, insert a form of the config response command on a separate line in the USER_CONF advanced variable. You have the following choices:
• To specify only the number of active response attempts, insert the command:config response: attempts att
For example: config response: attempts 10
• To specify only the active response interface, insert the command:config response: device dev
For example: config response: device eth0
• To specify both the number of active response attempts and the active response interface, insert the command:config response: attempts att, device dev
For example: config response: attempts 10, device eth0
where:
att is the number 1 to 20 of attempts to land each TCP reset packet within the current connection window so the receiving host accepts the packet. This sequence strafing is useful only in passive deployments; in inline deployments, the system inserts reset packets directly into the stream in place of triggering packets. the system sends only 1 ICMP reachable active response.
dev is an alternate interface where you want the system to send active responses in a passive deployment or insert active responses in an inline deployment.
Filtering EventsLicense: Protection
23-86ASA FirePOWER Module User Guide
Chapter 23 Understanding and Writing Intrusion Rules Understanding Keywords and Arguments in Rules
You can use the detection_filter keyword to prevent a rule from generating events unless a specified number of packets trigger the rule within a specified time. This can stop the rule from prematurely generating events. For example, two or three failed login attempts within a few seconds could be expected behavior, but a large number of attempts within the same time could indicate a brute force attack.
The detection_filter keyword requires arguments that define whether the system tracks the source or destination IP address, the number of times the detection criteria must be met before triggering an event, and how long to continue the count.
Use the following syntax to delay the triggering of events:
The track argument specifies whether to use the packet’s source or destination IP address when counting the number of packets that meet the rule’s detection criteria. Select from the argument values described in the following table to specify how the system tracks event instances.
The count argument specifies the number of packets that must trigger the rule for the specified IP address within the specified time before the rule generates an event.
The seconds argument specifies the number of seconds within which the specified number of packets must trigger the rule before the rule generates an event.
Consider the case of a rule that searches packets for the content foo and uses the detection_filter keyword with the following arguments:
track by_src, count 10, seconds 20
In the example, the rule will not generate an event until it has detected foo in 10 packets within 20 seconds from a given source IP address. If the system detects only 7 packets containing foo within the first 20 seconds, no event is generated. However, if foo occurs 40 times in the first 20 seconds, the rule generates 30 events and the count begins again when 20 seconds have elapsed.
Comparing the threshold and detection_filter Keywords
The detection_filter keyword replaces the deprecated threshold keyword. The threshold keyword is still supported for backward compatibility and operates the same as thresholds that you set within an intrusion policy.
The detection_filter keyword is a detection feature that is applied before a packet triggers a rule. The rule does not generate an event for triggering packets detected before the specified packet count and, in an inline deployment, does not drop those packets if the rule is set to drop packets. Conversely, the rule does generate events for packets that trigger the rule and occur after the specified packet count and, in an inline deployment, drops those packets if the rule is set to drop packets.
Thresholding is an event notification feature that does not result in a detection action. It is applied after a packet triggers an event. In an inline deployment, a rule that is set to drop packets drops all packets that trigger the rule, independent of the rule threshold.
Note that you can use the detection_filter keyword in any combination with the intrusion event thresholding, intrusion event suppression, and rate-based attack prevention features in an intrusion policy. Note also that policy validation fails if you enable an imported local rule that uses the deprecated threshold keyword in combination with the intrusion event thresholding feature in an intrusion policy.
Table 23-54 detection_filter Track Arguments
Argument Description
by_src Detection criteria count by source IP address.
by_dst Detection criteria count by destination IP address.
23-87ASA FirePOWER Module User Guide
Chapter 23 Understanding and Writing Intrusion Rules Understanding Keywords and Arguments in Rules
See Configuring Event Thresholding, page 20-21, Configuring Suppression Per Intrusion Policy, page 20-25, Setting a Dynamic Rule State, page 20-29, and Importing Local Rule Files, page 35-14 for more information.
Evaluating Post-Attack TrafficLicense: Protection
Use the tag keyword to tell the system to log additional traffic for the host or session. Use the following syntax when specifying the type and amount of traffic you want to capture using the tag keyword:
tagging_type, count, metric, optional_direction
The next three tables describe the other available arguments.
You can choose from two types of tagging. The following table describes the two types of tagging. Note that the session tag argument type causes the system to log packets from the same session as if they came from different sessions if you configure only rule header options in the intrusion rule. To group packets from the same session together, configure one or more rule options (such as a flag keyword or content keyword) within the same intrusion rule.
To indicate how much traffic you want to log, use the following argument:
Select the metric you want to use to log by time or volume of traffic from those described in the following table.
Caution High-bandwidth networks can see thousands of packets per second, and tagging a large number of packets may seriously affect performance, so make sure you tune this setting for your network environment.
Table 23-55 Tag Arguments
Argument Description
session Logs packets in the session that triggered the rule.
host Logs packets from the host that sent the packet that triggered the rule. You can add a directional modifier to log only the traffic coming from the host (src) or going to the host (dst).
Table 23-56 Count Argument
Argument Description
count The number of packets or seconds you want to log after the rule triggers.
This unit of measure is specified with the metric argument, which follows the count argument.
Table 23-57 Logging Metrics Arguments
Argument Description
packets Logs the number of packets specified by the count after the rule triggers.
seconds Logs traffic for the number of seconds specified by the count after the rule triggers.
23-88ASA FirePOWER Module User Guide
Chapter 23 Understanding and Writing Intrusion Rules Understanding Keywords and Arguments in Rules
For example, when a rule with the following tag keyword value triggers:
host, 30, seconds, dst
all packets that are transmitted from the client to the host for the next 30 seconds are logged.
Detecting Attacks That Span Multiple PacketsLicense: Protection
Use the flowbits keyword to assign state names to sessions. By analyzing subsequent packets in a session according to the previously named state, the system can detect and alert on exploits that span multiple packets in a single session.
The flowbits state name is a user-defined label assigned to packets in a specific part of a session. You can label packets with state names based on packet content to help distinguish malicious packets from those you do not want to alert on. You can define up to 1024 state names. For example, if you want to alert on malicious packets that you know only occur after a successful login, you can use the flowbits keyword to filter out the packets that constitute an initial login attempt so you can focus only on the malicious packets. You can do this by first creating a rule that labels all packets in the session that have an established login with a logged_in state, then creating a second rule where flowbits checks for packets with the state you set in the first rule and acts only on those packets. See flowbits Example Using state_name, page 23-91 for an example that uses flowbits to determine if a user is logged in.
An optional group name allows you to include a state name in a group of states. A state name can belong to several groups. States not associated with a group are not mutually exclusive, so a rule that triggers and sets a state that is not associated with a group does not affect other currently set states. See flowbits Example Resulting in a False Positive, page 23-91 for an example that illustrates how including a state name in a group can prevent false positives by unsetting another state in the same group.
The following table describes the various combinations of operators, states, and groups available to the flowbits keyword. Note that state names can contain alphanumeric characters, periods (.), underscores (_), and dashes (-).
Table 23-58 flowbits Options
Operator State Option Group Description
set state_name optional Sets the specified state for a packet. Sets the state in the specified group if a group is defined.
state_name&state_name optional Sets the specified states for a packet. Sets the states in the specified group if a group is defined.
setx state_name mandatory Sets the specified state in the specified group for a packet, and unsets all other states in the group.
state_name&state_name mandatory Sets the specified states in the specified group for a packet, and unsets all other states in the group.
unset state_name no group Unsets the specified state for a packet.
state_name&state_name no group Unsets the specified states for a packet.
all mandatory Unsets all the states in the specified group.
23-89ASA FirePOWER Module User Guide
Chapter 23 Understanding and Writing Intrusion Rules Understanding Keywords and Arguments in Rules
Note the following when using the flowbits keyword:
• When using the setx operator, the specified state can only belong to the specified group, and not to any other group.
• You can define the setx operator multiple times, specifying different states and the same group with each instance.
• When you use the setx operator and specify a group, you cannot use the set, toggle, or unset operators on that specified group.
• The isset and isnotset operators evaluate for the specified state regardless of whether the state is in a group.
• During intrusion policy saves, intrusion policy reapplies, and access control policy applies (regardless of whether the access control policy references one intrusion policy or multiple intrusion policies), if you enable a rule that contains the isset or isnotset operator without a specified group, and you do not enable at least one rule that affects flowbits assignment (set, setx, unset, toggle) for the corresponding state name and protocol, all rules that affect flowbits assignment for the corresponding state name are enabled.
• During intrusion policy saves, intrusion policy reapplies, and access control policy applies (regardless of whether the access control policy references one intrusion policy or multiple intrusion policies), if you enable a rule that contains the isset or isnotset operator with a specified group, all rules that affect flowbits assignment (set, setx, unset, toggle) and define a corresponding group name are also enabled.
toggle state_name no group Unsets the specified state if it is set, and sets the specified state if it is unset.
state_name&state_name no group Unsets the specified states if they are set, and sets the specified states if they are unset.
all mandatory Unsets all states set in the specified group, and sets all states unset in the specified group.
isset state_name no group Determines if the specified state is set in the packet.
state_name&state_name no group Determines if the specified states are set in the packet.
state_name|state_name no group Determines if any of the specified states are set in the packet.
any mandatory Determines if any state is set in the specified group.
all mandatory Determines if all states are set in the specified group.
isnotset state_name no group Determines if the specified state is not set in the packet.
state_name&state_name no group Determines if the specified states are not set in the packet.
state_name|state_name no group Determines if any of the specified states is not set in the packet.
any mandatory Determines if any state is not set in the packet.
all mandatory Determines if all states are not set in the packet.
reset (no state) optional Unsets all states for all packets. Unsets all states in a group if a group is specified.
noalert (no state) no group Use this in conjunction with any other operator to suppress event generation.
Table 23-58 flowbits Options (continued)
Operator State Option Group Description
23-90ASA FirePOWER Module User Guide
Chapter 23 Understanding and Writing Intrusion Rules Understanding Keywords and Arguments in Rules
flowbits Example Using state_name
Consider the IMAP vulnerability described in Bugtraq ID #1110. This vulnerability exists in an implementation of IMAP, specifically in the LIST, LSUB, RENAME, FIND, and COPY commands. However, to take advantage of the vulnerability, the attacker must be logged into the IMAP server. Because the LOGIN confirmation from the IMAP server and the exploit that follows are necessarily in different packets, it is difficult to construct non-flow-based rules that catch this exploit. Using the flowbits keyword, you can construct a series of rules that track whether the user is logged into the IMAP server and, if so, generate an event if one of the attacks is detected. If the user is not logged in, the attack cannot exploit the vulnerability and no event is generated.
The two rule fragments that follow illustrate this example. The first rule fragment looks for an IMAP login confirmation from the IMAP server:
alert tcp any 143 -> any any (msg:"IMAP login"; content:"OKLOGIN"; flowbits:set,logged_in; flowbits:noalert;)
The following diagram illustrates the effect of the flowbits keyword in the preceding rule fragment:
Note that flowbits:set sets a state of logged_in, while flowbits:noalert suppresses the alert because you are likely to see many innocuous login sessions on an IMAP server.
The next rule fragment looks for a LIST string, but does not generate an event unless the logged_in state has been set as a result of some previous packet in the session:
alert tcp any any -> any 143 (msg:"IMAP LIST";content:"LIST"; flowbits:isset,logged_in;)
The following diagram illustrates the effect of the flowbits keyword in the preceding rule fragment:
In this case, if a previous packet has caused a rule containing the first fragment to trigger, then a rule containing the second fragment triggers and generates an event.
flowbits Example Resulting in a False Positive
Including different state names that are set in different rules in a group can prevent false positive events that might otherwise occur when content in a subsequent packet matches a rule whose state is no longer valid. The following example illustrates how you can get false positives when you do not include multiple state names in a group.
Consider the case where the following three rule fragments trigger in the order shown during a single session:
The following diagram illustrates the effect of the flowbits keyword in the preceding rule fragment:
23-91ASA FirePOWER Module User Guide
Chapter 23 Understanding and Writing Intrusion Rules Understanding Keywords and Arguments in Rules
The content and pcre keywords in the first rule fragment match a JPEG file download, flowbits:set,http.jpeg sets the http.jpeg flowbits state, and flowbits:noalert stops the rule from generating events. No event is generated because the rule’s purpose is to detect the file download and set the flowbits state so one or more companion rules can test for the state name in combination with malicious content and generate events when malicious content is detected.
The next rule fragment detects a GIF file download subsequent to the JPEG file download above:
The following diagram illustrates the effect of the flowbits keyword in the preceding rule fragment:
The content and pcre keywords in the second rule match the GIF file download, flowbits:set,http.tif sets the http.tif flowbit state, and flowbits:noalert stops the rule from generating an event. Note that the http.jpeg state set by the first rule fragment is still set even though it is no longer needed; this is because the JPEG download must have ended if a subsequent GIF download has been detected.
The third rule fragment is a companion to the first rule fragment:
The following diagram illustrates the effect of the flowbits keyword in the preceding rule fragment:
In the third rule fragment, flowbits:isset,http.jpeg determines that the now-irrelevant http.jpeg state is set, and content and pcre match content that would be malicious in a JPEG file but not in a GIF file. The third rule fragment results in a false positive event for a nonexistent exploit in a JPEG file.
23-92ASA FirePOWER Module User Guide
Chapter 23 Understanding and Writing Intrusion Rules Understanding Keywords and Arguments in Rules
flowbits Example for Preventing False Positives
The following example illustrates how including state names in a group and using the setx operator can prevent false positives.
Consider the same case as the previous example, except that the first two rules now include their two different state names in the same state group.
The following diagram illustrates the effect of the flowbits keyword in the preceding rule fragment:
When the first rule fragment detects a JPEG file download, the flowbits:setx,http.jpeg,image_downloads keyword sets the flowbits state to http.jpeg and includes the state in the image_downloads group.
The next rule then detects a subsequent GIF file download:
The following diagram illustrates the effect of the flowbits keyword in the preceding rule fragment:
When the second rule fragment matches the GIF download, the flowbits:setx,http.tif,image_downloads keyword sets the http.tif flowbits state and unsets http.jpeg, the other state in the group.
The third rule fragment does not result in a false positive:
The following diagram illustrates the effect of the flowbits keyword in the preceding rule fragment:
23-93ASA FirePOWER Module User Guide
Chapter 23 Understanding and Writing Intrusion Rules Understanding Keywords and Arguments in Rules
Because flowbits:isset,http.jpeg is false, the rules engine stops processing the rule and no event is generated, thus avoiding a false positive even in a case where content in the GIF file matches exploit content for a JPEG file.
Generating Events on the HTTP Encoding Type and LocationLicense: Protection
You can use the http_encode keyword to generate events on the type of encoding in an HTTP request or response before normalization, either in the HTTP URI, in non-cookie data in an HTTP header, in cookies in HTTP requests headers, or set-cookie data in HTTP responses.
You must configure the HTTP Inspect preprocessor to inspect HTTP responses and HTTP cookies to return matches for rules using the http_encode keyword. See Decoding HTTP Traffic, page 15-31 and Selecting Server-Level HTTP Normalization Options, page 15-33 for more information.
Also, you must enable both the decoding and alerting option for each specific encoding type in your HTTP Inspect preprocessor configuration for the http_encode keyword in an intrusion rule to trigger events on that encoding type. See Selecting Server-Level HTTP Normalization Encoding Options, page 15-40 for more information.
Note that the base36 encoding type has been deprecated. For backward compatibility, the base36 argument is allowed in existing rules, but it does not cause the rules engine to inspect base36 traffic.
The following table describes the encoding types this option can generate events for in HTTP URIs, headers, cookies, and set-cookies:
To identify the HTTP encoding type and location in an intrusion rule:
Step 1 Add the http_encode keyword to a rule.
Step 2 From the Encoding Location drop-down list, select whether to search for the specified encoding type in an HTTP URI, header, or cookie, including a set-cookie.
Table 23-59 http_encode Encoding Types
Encoding Type Description
utf8 Detects UTF-8 encoding in the specified location when this encoding type is enabled for decoding by the HTTP Inspect preprocessor.
double_encode Detects double encoding in the specified location when this encoding type is enabled for decoding by the HTTP Inspect preprocessor.
non_ascii Detects non-ASCII characters in the specified location when non-ASCII characters are detected but the detected encoding type is not enabled.
uencode Detects Microsoft %u encoding in the specified location when this encoding type is enabled for decoding by the HTTP Inspect preprocessor.
bare_byte Detects bare byte encoding in the specified location when this encoding type is enabled for decoding by the HTTP Inspect preprocessor.
23-94ASA FirePOWER Module User Guide
Chapter 23 Understanding and Writing Intrusion Rules Understanding Keywords and Arguments in Rules
Step 3 Specify one or more encoding types using one of the following formats:
Note that you cannot use the negation (!) and OR (|) operators together.
Step 4 Optionally, add multiple http_encode keywords to the same rule to AND the conditions for each. For example, enter two keywords with the following conditions:
First http_encode keyword:
• Encoding Location: HTTP URI
• Encoding Type: utf8
Additional http_encode keyword:
• Encoding Location: HTTP URI
• Encoding Type: uencode
The example configuration searches the HTTP URI for UTF-8 AND Microsoft IIS %u encoding.
Detecting File Types and VersionsLicense: Protection
The file_type and file_group keywords allow you to detect files transmitted via FTP, HTTP, SMTP, IMAP, POP3, and NetBIOS-ssn (SMB) based on their type and version. Do not use more than one file_type or file_group keyword in a single intrusion rule.
Tip Updating your vulnerability database (VDB) populates the rule editor with the most up-to-date file types, versions, and groups. For more information, see Updating the Vulnerability Database, page 35-8.
You must enable specific preprocessors in order to generate intrusion events for traffic matching your file_type or file_group keywords.
Table 23-60 file_type and file_group Intrusion Event Generation
Transmission Protocol Required Preprocessor or Preprocessor Option
FTP FTP/Telnet preprocessor and the Normalize TCP Payload inline normalization preprocessor option; see Decoding FTP and Telnet Traffic, page 15-18 and Normalizing Inline Traffic, page 17-6.
HTTP HTTP Inspect preprocessor; see Decoding HTTP Traffic, page 15-31.
SMTP SMTP preprocessor; see Decoding SMTP Traffic, page 15-60.
IMAP IMAP preprocessor; see Decoding IMAP Traffic, page 15-53.
POP3 POP preprocessor; see Decoding POP Traffic, page 15-56.
NetBIOS-ssn (SMB) the SMB File Inspection DCE/RPC preprocessor option; see Decoding DCE/RPC Traffic, page 15-2.
23-95ASA FirePOWER Module User Guide
Chapter 23 Understanding and Writing Intrusion Rules Understanding Keywords and Arguments in Rules
For more information, see the following sections:
• file_type, page 23-96
• file_group, page 23-96
file_type
The file_type keyword allows you to specify the file type and version of a file detected in traffic. File type arguments (for example, JPEG and PDF) identify the format of the file you want to find in traffic.
Note Do not use the file_type keyword with another file_type or file_group keyword in the same intrusion rule.
The system selects Any Version by default, but some file types allow you to select version options (for example, PDF version 1.7) to identify specific file type versions you want to find in traffic.
To view and configure the most up-to-date file types and versions, update your VDB. For more information, see Updating the Vulnerability Database, page 35-8.
To select file types and versions in an intrusion rule:
Step 1 On the Create Rule page, select file_type from the drop-down list and click Add Option.
The file_type keyword appears.
Step 2 Select one or more file types from the drop-down list. Selecting a file type automatically adds the argument to the rule.
To remove a file type argument from the rule, click the delete icon ( ) next to the file type you want to remove.
Step 3 Optionally, customize the target versions for each file type. The system selects Any Version by default, but some file types allow you to select individual target versions.
Note Updating your VDB populates the rule editor with the most up-to-date file types and versions. If you select Any Version, the system configures your rule to include new versions when they are added in later VDB updates.
file_group
The file_group keyword allows you to select a Cisco-defined group of similar file types to find in traffic (for example, multimedia or audio). File groups also include Cisco-defined versions for each file type in the group.
Note Do not use the file_group keyword with another file_group or file_type keyword in the same intrusion rule.
To view and configure the most up-to-date file groups, update your VDB. For more information, see Updating the Vulnerability Database, page 35-8.
23-96ASA FirePOWER Module User Guide
Chapter 23 Understanding and Writing Intrusion Rules Understanding Keywords and Arguments in Rules
To select a file group in an intrusion rule:
Step 1 On the Create Rule page, select file_group from the drop-down list and click Add Option.
The file_group keyword appears.
Step 2 Select a file group to add to the rule.
Pointing to a Specific Payload TypeLicense: Protection
The file_data keyword provides a pointer that serves as a reference for the positional arguments available for other keywords such as content, byte_jump, byte_test, and pcre. The detected traffic determines the type of data the file_data keyword points to. You can use the file_data keyword to point to the beginning of the following payload types:
• HTTP response body
To inspect HTTP response packets, the HTTP Inspect preprocessor must be enabled and you must configure the preprocessor to inspect HTTP responses. See Decoding HTTP Traffic, page 15-31 and Inspect HTTP Responses in Selecting Server-Level HTTP Normalization Options, page 15-33 for more information. The file_data keyword matches if the HTTP Inspect preprocessor detects HTTP response body data.
• Uncompressed gzip file data
To inspect uncompressed gzip files in the HTTP response body, the HTTP Inspect preprocessor must be enabled and you must configure the preprocessor to inspect HTTP responses and to decompress gzip-compressed files in the HTTP response body. For more information, see Decoding HTTP Traffic, page 15-31, and the Inspect HTTP Responses and Inspect Compressed Data options in Selecting Server-Level HTTP Normalization Options, page 15-33. The file_data keyword matches if the HTTP Inspect preprocessor detects uncompressed gzip data in the HTTP response body.
• Normalized JavaScript
To inspect normalized JavaScript data, the HTTP Inspect preprocessor must be enabled and you must configure the preprocessor to inspect HTTP responses. See Decoding HTTP Traffic, page 15-31 and Inspect HTTP Responses in Selecting Server-Level HTTP Normalization Options, page 15-33 for more information. The file_data keyword matches if the HTTP Inspect preprocessor detects JavaScript in response body data.
• SMTP payload
To inspect the SMTP payload, the SMTP preprocessor must be enabled. See Configuring SMTP Decoding, page 15-64 for more information. The file_data keyword matches if the SMTP preprocessor detects SMTP data.
• Encoded email attachments in SMTP, POP, or IMAP traffic
To inspect email attachments in SMTP, POP, or IMAP traffic, the SMTP, POP, or IMAP preprocessor, respectively, must be enabled, alone or in any combination. Then, for each enabled preprocessor, you must ensure that the preprocessor is configured to decode each attachment encoding type that you want decoded. The attachment decoding options that you can configure for each preprocessor are: Base64 Decoding Depth, 7-Bit/8-Bit/Binary Decoding Depth, Quoted-Printable Decoding Depth, and Unix-to-Unix Decoding Depth. See Decoding IMAP Traffic, page 15-53, Decoding POP Traffic, page 15-56, and Decoding SMTP Traffic, page 15-60 for more information.
23-97ASA FirePOWER Module User Guide
Chapter 23 Understanding and Writing Intrusion Rules Understanding Keywords and Arguments in Rules
You can use multiple file_data keywords in a rule.
To point to the beginning of a specific payload type:
Step 1 On the Create Rule page, select file_data from the drop-down list and click Add Option.
The file_data keyword appears.
The file_data keyword has no arguments.
Pointing to the Beginning of the Packet PayloadLicense: Protection
The pkt_data keyword provides a pointer that serves as a reference for the positional arguments available for other keywords such as content, byte_jump, byte_test, and pcre.
When normalized FTP, telnet, or SMTP traffic is detected, the pkt_data keyword points to the beginning of the normalized packet payload. When other traffic is detected, the pkt_data keyword points to the beginning of the raw TCP or UDP payload.
The following normalization options must be enabled for the system to normalize the corresponding traffic for inspection by intrusion rules:
• To normalize FTP traffic for inspection, you must enable the FTP and Telnet preprocessor Detect Telnet Escape codes within FTP commands option; see Configuring Server-Level FTP Options, page 15-25.
• To normalize telnet traffic for inspection, you must enable the FTP & Telnet preprocessor Normalize telnet option; see Understanding Telnet Options, page 15-20.
• To normalize SMTP traffic for inspection, you must enable the SMTP preprocessor Normalize option; see Understanding SMTP Decoding, page 15-60.
You can use multiple pkt_data keywords in a rule.
To point to the beginning of the packet payload:
Step 1 On the Create Rule page, select pkt_data from the drop-down list and click Add Option.
The pkt_data keyword appears.
The pkt_data keyword has no arguments.
Decoding and Inspecting Base64 DataLicense: Protection
You can use the base64_decode and base64_data keywords in combination to instruct the rules engine to decode and inspect specified data as Base64 data. This can be useful, for example, for inspecting Base64-encoded HTTP Authentication request headers and Base64-encoded data in HTTP PUT and POST requests.
23-98ASA FirePOWER Module User Guide
Chapter 23 Understanding and Writing Intrusion Rules Understanding Keywords and Arguments in Rules
These keywords are particularly useful for decoding and inspecting Base64 data in HTTP requests. However, you can also use them with any protocol such as SMTP that uses the space and tab characters the same way HTTP uses these characters to extend a lengthy header line over multiple lines. When this line extension, which is known as folding, is not present in a protocol that uses it, inspection ends at any carriage return or line feed that is not followed with a space or tab.
See the following sections for more information:
• base64_decode, page 23-99
• base64_data, page 23-99
base64_decode
License: Protection
The base64_decode keyword instructs the rules engine to decode packet data as Base64 data. Optional arguments let you specify the number of bytes to decode and where in the data to begin decoding.
You can use the base64_decode keyword once in a rule; it must precede at least one instance of the base64_data keyword. See base64_data, page 23-99 for more information.
Before decoding Base64 data, the rules engine unfolds lengthy headers that are folded across multiple lines. Decoding ends when the rules engine encounters any the following:
• the end of a header line
• the specified number of bytes to decode
• the end of the packet
The following table describes the arguments you can use with the base64_decode keyword.
To decode Base64 data:
Step 1 On the Create Rule page, select base64_decode from the drop-down list and click Add Option.
The base64_decode keyword appears.
Step 2 Optionally, select any of the arguments described in the Optional base64_decode Arguments table.
base64_data
License: Protection
Table 23-61 Optional base64_decode Arguments
Argument Description
Bytes Specifies the number of bytes to decode. When not specified, decoding continues to the end of a header line or the end of the packet payload, whichever comes first. You can specify a positive, non-zero value.
Offset Determines the offset relative to the start of the packet payload or, when you also specify Relative, relative to the current inspection location. You can specify a positive, non-zero value.
Relative Specifies inspection relative to the current inspection location.
23-99ASA FirePOWER Module User Guide
Chapter 23 Understanding and Writing Intrusion Rules Constructing a Rule
The base64_data keyword provides a reference for inspecting Base64 data decoded using the base64_decode keyword. The base64_data keyword sets inspection to begin at the start of the decoded Base64 data. Optionally, you can then use the positional arguments available for other keywords such as content or byte_test to further specify the location to inspect.
You must use the base64_data keyword at least once after using the base64_decode keyword; optionally, you can use base64_data multiple times to return to the beginning of the decoded Base64 data.
Note the following when inspecting Base64 data:
• You cannot use the fast pattern matcher; see Use Fast Pattern Matcher, page 23-26 for more information.
• If you interrupt Base64 inspection in a rule with an intervening HTTP content argument, you must insert another base64_data keyword in the rule before further inspecting Base64 data; see HTTP Content Options, page 23-23 for more information.
To inspect decoded Base64 data:
Step 1 On the Create Rule page, select base64_data from the drop-down list and click Add Option.
The base64_data keyword appears.
Constructing a RuleLicense: Protection
Just as you can create your own custom standard text rules, you can also modify existing standard text rules and shared object rule provided by Cisco and save your changes as a new rule. Note that for shared object rules provided by Cisco, you are limited to modifying rule header information such as the source and destination ports and IP addresses. You cannot modify the rule keywords and arguments in a shared object rule.
See the following sections for more information:
• Writing New Rules, page 23-100
• Modifying Existing Rules, page 23-102
• Adding Comments to Rules, page 23-103
• Deleting Custom Rules, page 23-104
Writing New RulesLicense: Protection
You can create your own standard text rules.
In a custom standard text rule, you set the rule header settings and the rule keywords and arguments. Optionally, you can use the rule header settings to focus the rule to only match traffic using a specific protocol and traveling to or from specific IP addresses or ports.
23-100ASA FirePOWER Module User Guide
Chapter 23 Understanding and Writing Intrusion Rules Constructing a Rule
After you create a new rule, you can find it again quickly using the rule number, which has the format GID:SID:Rev. The rule number for all standard text rules starts with 1. The second part of the rule number, the Snort ID (SID) number, indicates whether the rule is a local rule or a rule provided by Cisco. When you create a new rule, the system assigns the rule the next available Snort ID number for a local rule and saves the rule in the local rule category. Snort ID numbers for local rules start at 1,000,000 and the SID for each new local rule is incremented by one. The last part of the rule number is the revision number. For a new rule, the revision number is one. Each time you modify a custom rule the revision number increments by one.
Note The system assigns a new SID to any custom rule in an intrusion policy that you import. For more information, see Importing and Exporting Configurations, page B-1.
To write a custom standard text rule using the rule editor:
Step 3 In the Message field, enter the message you want displayed with the event.
For details on event messages, see Defining the Event Message, page 23-11.
Tip You must specify a rule message. Also, the message cannot consist of white space only, one or more quotation marks only, one or more apostrophes only, or any combination of just white space, quotation marks, or apostrophes.
Step 4 From the Classification list, select a classification to describe the type of event.
For details on available classifications, see Defining the Intrusion Event Classification, page 23-12.
Step 5 From the Action list, select the type of rule you would like to create. You can use one of the following:
• Select alert to create a rule that generates an event when traffic triggers the rule.
• Select pass to create a rule that ignores traffic that triggers the rule.
Step 6 From the Protocol list, select the traffic protocol (tcp, udp, icmp, or ip) of packets you want the rule to inspect.
For more information about selecting a protocol type, see Specifying Protocols, page 23-4.
Step 7 In the Source IPs field, enter the originating IP address or address block for traffic that should trigger the rule. In the Destination IPs field, enter the destination IP address or address block for traffic that should trigger the rule.
For more detailed information about the IP address syntax that the rule editor accepts, see Specifying IP Addresses In Intrusion Rules, page 23-5.
Step 8 In the Source Port field, enter the originating port numbers for traffic that should trigger the rule. In the Destination Port field, enter the receiving port numbers for traffic that should trigger the rule.
Note The system ignores port definitions in an intrusion rule header when the protocol is set to ip.
23-101ASA FirePOWER Module User Guide
Chapter 23 Understanding and Writing Intrusion Rules Constructing a Rule
For more detailed information about the port syntax that the rule editor accepts, see Defining Ports in Intrusion Rules, page 23-8.
Step 9 From the Direction list, select the operator that indicates which direction of traffic you want to trigger the rule. You can use one of the following:
• Directional to match traffic that moves from the source IP address to the destination IP address
• Bidirectional to match traffic that moves in either direction
Step 10 From the Detection Options list, select the keyword that you want to use.
Step 11 Click Add Option.
Step 12 Enter any arguments that you want to specify for the keyword you added. For more information about rule keywords and how to use them, see Understanding Keywords and Arguments in Rules, page 23-9.
When adding keywords and arguments, you can also perform the following:
• To reorder keywords after you add them, click the up or down arrow next to the keyword you want to move.
• To delete a keyword, click the X next to that keyword.
Repeat steps 10 through 12 for each keyword option you want to add.
Step 13 Click Save As New to save the rule.
The system assigns the rule the next available Snort ID (SID) number in the rule number sequence for local rules and saves it in the local rule category.
The system does not begin evaluating traffic against new or changed rules until you enable them within the appropriate intrusion policy, and then apply the intrusion policy as part of an access control policy. See Applying an Access Control Policy, page 4-10 for more information.
Modifying Existing RulesLicense: Protection
You can modify custom standard text rules. You can also modify a standard text rule or shared object rule provided by Cisco and create one or more new instances of the rule by saving it.
Creating a rule or modifying a Cisco rule copies the new rule or revision to the local rule category and assigns the rule the next available Snort ID (SID) greater than 100000.
You can only modify header information for a shared object rule. You cannot modify the rule keywords used in a shared object rule or their arguments. Modifying header information for a shared object rule and saving your changes creates a new instance of the rule with a generator ID (GID) of 3 and the next available SID for a custom rule. The Rule Editor links the new instance of the shared object rule to the reserved soid keyword, which maps the rule you create to the rule created by the VRT. You can delete instances of a shared object rule that you create, but you cannot delete shared object rules provided by Cisco. See Understanding Rule Headers, page 23-3 and Deleting Custom Rules, page 23-104 for more information.
Note Do not modify the protocol for a shared object rule; doing so would render the rule ineffective.
23-102ASA FirePOWER Module User Guide
Chapter 23 Understanding and Writing Intrusion Rules Constructing a Rule
Step 2 Locate the rule or rules you want to modify. You have the following options:
• To locate rules by browsing rule categories, navigate through the folders to the rule you want and click the edit icon ( ) next to the rule.
• To locate a rule or rules by filtering the rules displayed on the page, enter a rule filter in the text box indicated by the filter icon ( ) at the upper left of the rule list. Navigate to the rule you want and click the edit icon ( ) next to the rule. See Filtering Rules on the Rule Editor Page, page 23-105 for more information.
The rule editor opens, displaying the rule you selected.
Note that if you select a shared object rule, the rule editor displays only the rule header information. A shared object rule can be identified on the Rule Editor page by a listing that begins with the number 3 (the GID), for example, 3:1000004.
Step 3 Make any modifications to the rule (see Writing New Rules, page 23-100 for more information about rule options) and click Save As New.
The rule is saved to the local rule category.
Tip If you want to use the local modification of the rule instead of the system rule, deactivate the system rule by using the procedures at Setting Rule States, page 20-19 and activate the local rule.
Step 4 Activate the intrusion policy by applying it as part of an access control policy as described in Applying an Access Control Policy, page 4-10 to apply your changes.
Adding Comments to RulesLicense: Protection
You can add comments to any intrusion rule. This allows you to provide additional context and information about the rule and the exploit or policy violation it identifies.
Step 2 Locate the rule you want to annotate. You have the following options:
• To locate a rule by browsing rule categories, navigate through the folders to the rule you want and click the edit icon ( ) next to the rule.
• To locate a rule by filtering the rules displayed on the page, enter a rule filter in the text box, which is indicated by the filter icon ( ), at the upper left of the rule list. Navigate to the rule you want and click the edit icon ( ) next to the rule. See Filtering Rules on the Rule Editor Page, page 23-105 for more information.
23-103ASA FirePOWER Module User Guide
Chapter 23 Understanding and Writing Intrusion Rules Constructing a Rule
The rule editor appears.
Step 3 Click Rule Comment.
The Rule Comment page appears.
Step 4 Enter your comment in the text box and click Add Comment.
The comment is saved in the comment text box.
Deleting Custom RulesLicense: Protection
You can delete custom rules that are not currently enabled in an intrusion policy. You cannot delete either standard text rules or shared object rules rules provided by Cisco.
The system stores deleted rules in the deleted category, and you can use a deleted rule as the basis for a new rule. See Modifying Existing Rules, page 23-102 for information on editing rules.
The Rules page in an intrusion policy does not display the deleted category, so you cannot enable deleted custom rules.
Note that you can also delete all local rules on the Rule Updates page. See, for example, Using One-Time Rule Updates, page 35-10.
See the following sections for more information:
• For information on creating custom rules, see Writing New Rules, page 23-100.
• For information on importing local rules, see Importing Rule Updates and Local Rule Files, page 35-9.
• For information on setting rule states, see Setting Rule States, page 20-19.
All rules not currently enabled in an intrusion policy whose changes you have saved are deleted from the local rule category and moved to the deleted category.
• Navigate through the folders to the local rule category; click on the local rule category to expand it, then click the delete icon ( ) next to a rule you want to delete.
The rule is deleted from the local rule category and moved to the deleted category.
Note that custom standard text rules have a generator ID (GID) of 1 (for example, 1:1000012) and custom shared object rules have a GID of 3 (for example, 3:1000005).
23-104ASA FirePOWER Module User Guide
Chapter 23 Understanding and Writing Intrusion Rules Filtering Rules on the Rule Editor Page
Tip The system also stores shared object rules that you save with modified header information in the local rule category and lists them with a GID of 3. You can delete your modified version of a shared object rule, but you cannot delete the original shared object rule.
Filtering Rules on the Rule Editor PageLicense: Protection
You can filter the rules on the Rule Editor page to display a subset of rules. This can be useful, for example, when you want to modify a rule or change its state but have difficulty finding it among the thousands of rules available.
When you enter a filter, the page displays any folder that includes at least one matching rule, or a message when no rule matches. Your filter can include special keywords and their arguments, character strings, and literal character strings in quotes, with spaces separating multiple filter conditions. A filter cannot include regular expressions, wild card characters, or any special operator such as a negation character (!), a greater than symbol (>), less than symbol (<), and so on.
All keywords, keyword arguments, and character strings are case-insensitive. Except for the gid and sid keywords, all arguments and strings are treated as partial strings. Arguments for gid and sid return only exact matches.
Optionally, you can expand a folder on the original, unfiltered page and the folder remains expanded when the subsequent filter returns matches in that folder. This can be useful when the rule you want to find is in a folder that contains a large number of rules.
You cannot constrain a filter with a subsequent filter. Any filter you enter searches the entire rules database and returns all matching rules. When you enter a filter while the page still displays the result of a previous filter, the page clears and returns the result of the new filter instead.
You can use the same features with rules in a filtered or unfiltered list. For example, you can edit rules in a filtered or unfiltered list on the Rule Editor page.
See the following sections for more information:
• Using Keywords in a Rule Filter, page 23-105
• Using Character Strings in a Rule Filter, page 23-106
• Combining Keywords and Character Strings in a Rule Filter, page 23-107
• Filtering Rules, page 23-107
Using Keywords in a Rule FilterLicense: Protection
Each rule filter can include one or more keywords in the format:
keyword:argument
where keyword is one of the keywords in the Rule Filter Keywords table and argument is a single, case-insensitive, alphanumeric string to search for in the specific field or fields relevant to the keyword.
23-105ASA FirePOWER Module User Guide
Chapter 23 Understanding and Writing Intrusion Rules Filtering Rules on the Rule Editor Page
Arguments for all keywords except gid and sid are treated as partial strings. For example, the argument 123 returns "12345", "41235", "45123", and so on. The arguments for gid and sid return only exact matches; for example, sid:3080 returns only SID 3080.
Tip You can search for a partial SID by filtering with one or more character strings. See Using Character Strings in a Rule Filter, page 23-106 for more information.
The following table describes the specific filtering keywords and arguments you can use to filter rules.
Using Character Strings in a Rule FilterLicense: Protection
Table 23-62 Rule Filter Keywords
Keyword Description Example
arachnids Returns one or more rules based on all or part of the Arachnids ID in a rule reference. See Defining the Event Reference, page 23-14 for more information.
arachnids:181
bugtraq Returns one or more rules based on all or part of the Bugtraq ID in a rule reference. See Defining the Event Reference, page 23-14 for more information.
bugtraq:2120
cve Returns one or more rules based on all or part of the CVE number in a rule reference. See Defining the Event Reference, page 23-14 for more information.
cve:2003-0109
gid The argument 1 returns standard text rules. The argument 3 returns shared object rules. See Table 20-1 on page 20-2 for more information.
gid:3
mcafee Returns one or more rules based on all or part of the McAfee ID in a rule reference. See Defining the Event Reference, page 23-14 for more information.
mcafee:10566
msg Returns one or more rules based on all or part of the rule Message field, also known as the event message. See Defining the Event Message, page 23-11 for more information.
msg:chat
nessus Returns one or more rules based on all or part of the Nessus ID in a rule reference. See Defining the Event Reference, page 23-14 for more information.
nessus:10737
ref Returns one or more rules based on all or part of a single alphanumeric string in a rule reference or in the rule Message field. See Defining the Event Reference, page 23-14 and Defining the Event Message, page 23-11 for more information.
ref:MS03-039
sid Returns the rule with the exact Signature ID. sid:235
url Returns one or more rules based on all or part of the URL in a rule reference. See Defining the Event Reference, page 23-14 for more information.
url:faqs.org
23-106ASA FirePOWER Module User Guide
Chapter 23 Understanding and Writing Intrusion Rules Filtering Rules on the Rule Editor Page
Each rule filter can include one or more alphanumeric character strings. Character strings search the rule Message field, Signature ID, and Generator ID. For example, the string 123 returns the strings "Lotus123", "123mania", and so on in the rule message, and also returns SID 6123, SID 12375, and so on. For information on the rule Message field, see Defining the Event Message, page 23-11.
All character strings are case-insensitive and are treated as partial strings. For example, any of the strings ADMIN, admin, or Admin return "admin", "CFADMIN", "Administrator" and so on.
You can enclose character strings in quotes to return exact matches. For example, the literal string "overflow attempt" in quotes returns only that exact string, whereas a filter comprised of the two strings overflow and attempt without quotes returns "overflow attempt", "overflow multipacket attempt", "overflow with evasion attempt", and so on.
Combining Keywords and Character Strings in a Rule FilterLicense: Protection
You can narrow filter results by entering any combination of keywords, character strings, or both, separated by spaces. The result includes any rule that matches all the filter conditions.
You can enter multiple filter conditions in any order. For example, each of the following filters returns the same rules:
• url:at login attempt cve:200
• login attempt cve:200 url:at
• login cve:200 attempt url:at
Filtering RulesLicense: Protection
You can filter the rules on the Rule Editor page to display a subset of rules so you can more easily find specific rules. You can then use any of the page features.
Rule filtering can be particularly useful on the Rule Editor page when you want to locate a rule to edit it. See Modifying Existing Rules, page 23-102 for more information.
Step 2 Optionally, select a different grouping method from the Group Rules By list.
Tip Filtering may take significantly longer when the combined total of rules in all sub-groups is large because rules appear in multiple categories, even when the total number of unique rules is much smaller.
Step 3 Optionally, click the folder next to any group that you want to expand.
The folder expands to show the rules in that group. Note that some rule groups have sub-groups that you can also expand.
23-107ASA FirePOWER Module User Guide
Chapter 23 Understanding and Writing Intrusion Rules Filtering Rules on the Rule Editor Page
Note also that expanding a group on the original, unfiltered page can be useful when you expect that a rule might be in that group. The group remains expanded when the subsequent filter results in a match in that folder, and when you return to the original, unfiltered page by clicking on the filter clearing icon ( ).
Step 4 To activate the filter text box, click to the right of the filter icon ( ) that is inside the text box at the upper left of the rule list.
Step 5 Type your filter constraints and press Enter.
Your filter can include keywords and arguments, character strings with or without quotes, and spaces separating multiple conditions. See Filtering Rules on the Rule Editor Page, page 23-105 for more information.
The page refreshes to display any group that contains at least one matching rule.
Step 6 Optionally, open any folder not already opened to display matching rules. You have the following filtering choices:
• To enter a new filter, position your cursor inside the filter text box and click to activate it; type your filter and press Enter.
• To clear the current filtered list and return to the original, unfiltered page, click the filter clearing icon ( ).
Step 7 Optionally, make any changes to the rule that you would normally make on the page. See Modifying Existing Rules, page 23-102.
To put any changes you make into effect, apply the intrusion policy part of an access control policy as described in Applying an Access Control Policy, page 4-10.