108
UniData and UniVerse Add-ins for Visual Studio User Guide U2N-121-UG-UG-1

UniData and UniVerse Add-ins for Visual Studio
User Guide
U2N-121-UG-UG-1
Notices
Edition Publication date: September 2010 Book number: U2N-121-UG-UG-1
Product version: UniData and UniVerse Add-ins for Visual Studio V1.2
Copyright © Rocket Software, Inc. 2006-2010. All Rights Reserved.
Trademarks The following trademarks appear in this publication:
Trademark Trademark Owner
Rocket Software™ Rocket Software, Inc.
Dynamic Connect® Rocket Software, Inc.
RedBack® Rocket Software, Inc.
SystemBuilder™ Rocket Software, Inc.
UniData® Rocket Software, Inc.
UniVerse™ Rocket Software, Inc.
U2™ Rocket Software, Inc.
U2.NET™ Rocket Software, Inc.
U2 Web Development Environment™ Rocket Software, Inc.
wIntegrate® Rocket Software, Inc.
Microsoft® .NET Microsoft Corporation
Microsoft® Office Excel®, Outlook®, Word Microsoft Corporation
Windows® Microsoft Corporation
Windows® 7 Microsoft Corporation
Windows Vista® Microsoft Corporation
Java™ and all Java-based trademarks and logos Sun Microsystems, Inc.
UNIX® X/Open Company Limited
The above trademarks are property of the specified companies in the United States, other countries, or both. All other products or services mentioned in this document may be covered by the trademarks, service marks, or product names as designated by the companies who own or market them.
License agreement
This software and the associated documentation are proprietary and confidential to Rocket Software, Inc., are furnished under license, and may be used and copied only in accordance with the terms of such license and with the inclusion of the copyright notice. This software and any copies thereof may not be provided or otherwise made available to any other person. No title to or ownership of the software and associated documentation is hereby transferred. Any unauthorized use or reproduction of this software or documentation may be subject to civil or criminal liability. The information in the software and documentation is subject to change and should not be construed as a commitment by Rocket Software, Inc.
ii U2.NET User Guide

Restricted rights notice for license to the U.S. Government: Use, reproduction, or disclosure is subject to restrictions as stated in the “Rights in Technical Data-General” clause (alternate III), in FAR section 52.222-14. All title and ownership in this computer software remain with Rocket Software, Inc.
Note
This product may contain encryption technology. Many countries prohibit or restrict the use, import, or export of encryption technologies, and current use, import, and export regulations should be followed when exporting this product.
Please be aware: Any images or indications reflecting ownership or branding of the product(s) documented herein may or may not reflect the current legal ownership of the intellectual property rights associated with such product(s). All right and title to the product(s) documented herein belong solely to Rocket Software, Inc. and its subsidiaries, notwithstanding any notices (including screen captures) or any other indications to the contrary.
Contact information
Rocket Software 275 Grove Street Suite 3-410 Newton, MA 02466-2272 USA Tel: (617) 614-4321 Fax: (617) 630-7100
Web Site: �www.rocketsoftware.com
U2.NET User Guide iii

Table of Contents
Chapter 1 1
Product Overview 1
Feature Overview ........................................................................................... 2 U2.NET User Guide Contents ..................................................................... 3 Software Requirements .............................................................................. 4
Chapter 2 5
Technical Overview 5
The U2.NET Product ....................................................................................... 6 U2.NET Developer ..................................................................................... 7 U2.NET Runtime ........................................................................................ 8 Session Manager Service ............................................................................ 8 Configuration Database ............................................................................. 8 U2 Server Components .............................................................................. 9
Chapter 3 10
Product Installation 10
Installing U2.NET ......................................................................................... 11 U2.NET Developer and U2.NET Runtime Licenses ..................................... 11 Product Installation Files ......................................................................... 11 UniData and UniVerse Add-ins for Visual Studio - Developer1.x.msi Installation File ........................................................................................ 12
One-Click Deployment ................................................................................. 14 Generating the Deployment XML Script .................................................... 15 Customizing the Deployment XML Script ................................................. 19 Running the Deployment XML Script ........................................................ 27
National Language Support (NLS) ................................................................. 30 Application Deployment ............................................................................... 32
Development Environment ....................................................................... 32 Runtime Environments ............................................................................ 32
Chapter 4 39
iv U2.NET User Guide
The Data Manager 39 Using the Data Manager ............................................................................... 40
Running the Add-in Version of the Data Manager .................................... 41 The Configuration Database .................................................................... 41
Explorer Nodes: Overview ............................................................................ 43 Explorer Node: Servers ............................................................................ 43 Explorer Node: {server profile name} ........................................................ 43 Explorer Node: Accounts ......................................................................... 44 Explorer Node: {account profile name} ..................................................... 44 Explorer Node: Logins ............................................................................. 45 Explorer Node: {login profile name} ......................................................... 46 Explorer Node: Session Manager Settings ................................................ 46
U2.NET Profiles ............................................................................................ 47 The Data Manager Profile Wizard ................................................................. 48
Creating a New Server Profile ................................................................... 48 Creating a UniObjects.NET Connection .................................................... 49 Installing the Server Components ............................................................ 50 Installing the U2NETDEMO account .......................................................... 51 Creating an Account Profile ..................................................................... 52 Login Parameters .................................................................................... 53 Session Pooling ....................................................................................... 54 Housekeeping Settings ............................................................................ 55 Other Account Profile Settings ................................................................. 56
Creating a Login Profile ................................................................................ 58 Connecting into an Account ......................................................................... 59
Viewing the List of Available Files ............................................................ 59 Working with Files ................................................................................... 61
The Data Manager Toolbar ........................................................................... 62 Maintaining Schemas ................................................................................... 64
Schema Item Visibility ............................................................................. 64 File Properties .............................................................................................. 65
Maintaining Item Data ............................................................................. 67 Editors Data View .................................................................................... 67 Grid Data View ........................................................................................ 68 Special Keystrokes ................................................................................... 69
Queries ........................................................................................................ 70 Query Overview ....................................................................................... 70 Maintaining Queries ................................................................................ 70 Testing the Query .................................................................................... 74 Parameterized Values .............................................................................. 74
U2.NET User Guide v
Chapter 5 75
Session Manager Service 75
Session Management ................................................................................... 76 What is the Session Manager ................................................................... 76 Configuring Session Management ............................................................ 77 The Session Monitor Application .............................................................. 80 Monitoring a Remote System ................................................................... 81
Chapter 6 82
License Manager Service 82
The License Manager Service ........................................................................ 83 Specifying the License Manager Address .................................................. 83 Licensing Principles ................................................................................. 83 Obtaining a U2.NET Developer License .................................................... 84 The U2.NET Runtime License ................................................................... 85 Viewing Installed Licenses ....................................................................... 87
Chapter 7 88
Extended Dictionary Definitions 88
Extended Dictionary Definitions ................................................................... 89 Maintaining Extended Dictionary Definitions ............................................ 89 Extended vs. Native Dictionary Definitions ............................................... 89 Storage of Native Dictionary Definitions ................................................... 89
Extended Definition Fields ........................................................................... 91 AttrPos (1) ............................................................................................... 91 Title (2) ................................................................................................... 91 Justification (3) ........................................................................................ 91 Width (4) ................................................................................................. 92 DataType (5)............................................................................................ 92 MVType (6) .............................................................................................. 93 MVGroup (7) ............................................................................................ 93 SVGroup (8) ............................................................................................. 93 InputMandatory (9) .................................................................................. 93 InputPrompt (10) ..................................................................................... 93 InputDefault (11) ..................................................................................... 93 InputMin (12) .......................................................................................... 94 InputMax (13) .......................................................................................... 94
vi U2.NET User Guide

U2.NET User Guide vii
InputCasing (14) ...................................................................................... 94 InputOptions (15) .................................................................................... 94 InputInOptions (16) ................................................................................. 94 BooleanTrue (19) ..................................................................................... 94 BooleanFalse (20) .................................................................................... 94 Dependencies (2) ..................................................................................... 94 LinkedFile (22) ......................................................................................... 94 LinkedFileIDField (23) .............................................................................. 95 LinkedFileDescField (24) .......................................................................... 95 Notes (25) ............................................................................................... 95 AdapterColumnName (26) ....................................................................... 95 SysDelimTrans (27) .................................................................................. 95 SysDelimTransVM (28) ............................................................................. 95 SysDelimTransSVM (29) ........................................................................... 95
Chapter 8 96
Sample Applications and Tutorials 96
Application Locations ................................................................................... 97 Core Objects Applications ....................................................................... 97 Binding Objects Applications ................................................................... 97 Binding Objects Web Applications ............................................................ 97 Adapter Objects Applications .................................................................. 98 LINQ Applications .................................................................................... 98
Further Reading 99

Chapter 1 Product Overview
This chapter outlines the components of UniData and UniVerse Add-ins for Visual Studio (U2.NET). It also summarizes the contents of this guide.
1 U2.NET User Guide

Feature Overview The goal of U2.NET is to enable developers to combine U2 technology with the Microsoft .NET environment. The U2.NET product provides a 100% native .NET interface to the UniData and UniVerse database platforms, which allows .NET developers to access all aspects of the U2 systems from within their .NET application. U2.NET integrates easily with Microsoft’s Visual Studio .NET product, allowing the U2 developer to carry out virtually all aspects of application creation from within the Visual Studio .NET environment. The product's key features are as follows:
• Feature-rich, multivalued data-structure-aware data objects authored in 100% managed .NET code that support the native .NET databinding interfaces to promote rapid application development.
• High-performance connections from client to database
server. • Advanced fetch-on-demand and background data retrieval
technology, ensuring maximum application database performance.
• Support for both UniData and UniVerse. • Support for stateless applications, e.g., Web Services,
featuring optimistic locking, automated state retention/reconnection and U2 connection pooling.
• Sophisticated Visual Studio.NET add-in, featuring both
systems management and developer-centric functionality. U2.NET is made up of three components:
• Core Objects provides object-oriented native .NET access to the UniData and UniVerse databases.
U2.NET User Guide 2
• Binding Objects provides high-performance data binding
technology that enables standard .NET controls to become fully multivalued-aware. Binding Objects links with Core Objects to provide its functionality.
• Adapter Objects provides complete implementation of an
ADO.NET managed data provider for UniData and UniVerse, offering a standardized interface to database access.
U2.NET User Guide Contents The contents of this guide are designed to allow a developer to easily install, configure, and use the functionality provided by the U2.NET product. A summary of each chapter follows:
Product Installation This chapter takes you through the process of installing U2.NET on either the developer’s workstation or the middle-tier workstation, and installing the server components on the U2 database server. Technical Overview This chapter lays out, in broad terms, the full breadth of the technology provided by U2.NET. It is intended to be an introduction to the range of features that U2.NET provides. The Data Manager The Data Manager is an important tool for the U2 developer that allows you to access the different U2.NET applications. This chapter takes you through all of the features of the Data Manager. The Session Manager The Session Manager allows you to utilize U2.NET'S session pooling capability. This chapter explains the concepts behind session pooling and takes you through the visual interface of the Session Manager application.
3 U2.NET User Guide

U2.NET User Guide 4
The License Manager The License Manager manages U2.NET runtime licenses. This chapter guides you through the U2.NET Developer and U2.NET Runtime licensing processes. Extended Dictionary Definitions U2.NET supports the concept of extended dictionary definitions – meta data which allows a comprehensive definition of both the structure of data within a file and relationships between files to be created. This chapter explains both the content and relevance of this extended definition data.
Sample Applications and Tutorials Sample applications and tutorials are provided with U2.NET that illustrate the use of many of its features. This chapter takes you through these applications, pointing out and explaining the key aspects of U2.NET that have been used. All of the code examples in this guide use either C# or VB.NET syntax; however, the U2.NET components can be used with any .NET CLR compliant language
Software Requirements The prerequisites for U2.NET 1.2 are as follows:
• UniData 7.1(or later) or UniVerse 10.2 (or later) • Windows XP or Windows 2003 SP2 • .NET Framework 3.5 (and .NET Framework 2.0, if developing and deploying
Visual Studio 2005 applications) • U2.NET Developer only
o Microsoft Visual Studio 2005 or Visual Studio 2008 o ASP.NET AJAX Extensions 1.0 (for VS 2005 only)

Chapter 2 Technical Overview
This chapter provides a technical backdrop to U2.NET. It discusses the main architectural aspects of the product and examines the main components that implement this architecture.
5 U2.NET User Guide
The U2.NET Product The U2.NET architecture is comprised of three separate tiers:
• Client Interface Tier • Windows Services Middle Tier • U2 Data Server Tier
Each of these tiers is capable of residing on physically distinct systems separated by remote connections. However, it may be that some or all tiers run on the same system, depending on the particular requirements of a specific installation. Client Interface Tier: This tier contains all of the .NET programmer visible objects. For example, the programming interface components that the developer works with to produce an application. It is likely that most of your development effort will go into creating the contents of the client interface tier. Typically, the Client Interface Tier consists of the code that you write and U2.NET dll files that provide the client side U2.NET functionality, along with any additional support files or assemblies that your application utilizes. Windows Services Middle Tier: This tier acts as the point of contact for Client Interface Tiers wanting to access one or more remote U2 systems. The Client Interface Tier-to-Windows Services middle-tier communications link utilizes .NET Remoting, which provides a high-performance, loosely coupled connection that allows flexibility in the location of these components. U2 Server Tier: This tier resides within the U2 database system. It is the point of contact for one or more Client Interface/Pooled sessions. The following figure summarizes the interrelationships between these three tiers.
U2.NET User Guide 6

UniObjects.NET
U2.NET Libraries
Inter-process Communications
U2.NET License and U2.NET Session
Manager
Background process
Windows Service
U2.NET Session Cluster
.NET application Windows and Web applications
U2 Server (UniBasic or UniVerse BASIC)
Components
U2.NET Developer The U2.NET Developer product should be installed on any workstation wanting to utilize U2.NET in conjunction with a development environment, such as Visual Studio.NET. It provides the programming interface into the U2.NET technology, along with plug-in extensions to Visual Studio .NET that allow management of many aspects of a U2 system from within the Visual Studio .NET native IDE. The primary feature of U2.NET is a class library that holds the series of classes that allow a developer to connect to and work with a U2 database.
As part of the U2.NET Developer module, a data manager application is provided to allow the maintenance of U2 systems, such as files and dictionaries. The Data Manager provides the following capabilities:
• Maintenance of the Configuration Database (see below) • Account maintenance • File maintenance • Dictionary maintenance • Item data maintenance • Index maintenance
7 U2.NET User Guide

The Data Manager is provided as a Visual Studio .NET add-in, and also as a standalone application.
U2.NET Runtime U2.NET Runtime is required to enable deployment of the U2.NET components necessary to run an application developed using U2.NET Developer. U2.NET Runtime is a sub-set of the U2.NET Developer. Runtime installs the following on your middle-tier server:
• U2.NET middle-tier services • Data Manager Tool • Required assemblies
Note: U2.NET Runtime does not come with any evaluation licenses, so after you install U2.NET Runtime, you must authorize the required runtime licenses using the Data Manager tool.
Session Manager Service The U2.NET Session Manager service provides two key capabilities:
• To provide U2 connection pooling across one or more individual processes or workstations.
• To monitor the presence and activity of an active database session. Connection Pooling is an essential feature for stateless applications, such as Web applications. It allows a database connection to be held open after an application has finished using it, and then reallocates the connection later to another application instance. This saves the time and resources consumed in the initial creation of a database connection. The Session Manager can display a connection window for any active session, allowing the traffic flowing through that session to be monitored.
Configuration Database In order to connect into a U2 system, U2.NET needs to know several things:
• The U2 servers available for connection. • The address of a particular system. • The system login information.
U2.NET User Guide 8

To that end, a configuration database is used to hold all of the following configuration information:
• The list and details of all known local U2 servers (Server Profiles). • The list and details of all known accounts on all known local
servers (Account Profiles). • Session pooling configuration settings.
The configuration database is held as a series of files and folders. The default location of this is: C:\Program Files\U2\U2.NET\Configuration
The Configuration Database's contents are maintained using the Data Manager and setting up the initial contents of this database is one of the first tasks that you will need to do when you begin using U2.NET. Each client application needs access to a Configuration Database. This access is found using either the Session Manager or direct file access. These can either be located onsite or shared centrally over the LAN.
U2 Server Components In order for client-side U2.NET to interact with a U2 database, the server hosting the database must have the U2.NET server components installed. The server components contain the UniBasic or UniVerse BASIC programs that reside on the U2 data servers, and are downloaded onto the U2 data server through the server component installation. The UniBasic or UniVerse BASIC programs are responsible for servicing all client-generated requests and reside in an account typically named U2NETSYS on the U2 systems. To access the data in an application account, the account has to be U2.NET enabled. This process creates a number of VOC pointers into the U2NETSYS account and also catalogs all of the server programs, if necessary. Existing U2 accounts can be enabled by selecting the Enable Account option on the Data manager context menu.
9 U2.NET User Guide

Chapter 3 Product Installation
This chapter outlines how to install the U2.NET product on the developer’s workstation and the server components on the U2 host.
U2.NET User Guide 10
Installing U2.NET The product installation files can be downloaded from the U2 Web site. To ensure that you have the latest version, we advise that you download the installation files from our Web site: http://www.rocketsoftware.com/u2/
U2.NET Developer and U2.NET Runtime Licenses Valid licenses are required to run U2.NET and its components. The U2.NET Developer installation installs evaluation licenses, which include one 60-day U2.NET developer license and two 60-day run time connection licenses. When you purchase a permanent U2.NET Developer license, you will receive a serial number for the developer license and a separate serial number for two never-expiring runtime licenses. Each U2.NET session consumes a U2.NET runtime license. Each license is registered with a specific License Manager. The Session Manager must have access to the License Manager to successfully establish database connections. The License Manager ensures that (as a maximum) only the purchased number of sessions is in effect at any one time. When U2.NET Developer is first installed, it allows, by default, up to two concurrent connections for up to 60 days from the time of installation. Any access licenses applied during this evaluation period override this behavior. After the 60-day evaluation period has expired, access to databases is allowed only if the appropriate runtime license is installed. You can view all installed product licenses using the Help button on the Data Manager menu. Click the Help button, then select About. This brings up a window that displays both the U2.NET Developer and the U2.NET Runtime licenses available. For more information about licensing, please refer to the License Manager section.
Product Installation Files
U2.NET installs integration components for both Visual Studio 2005 and Visual Studio 2008. You can choose to install only integration components for only one version of Visual Studio during the product installation process. When the installation begins, you are prompted to choose either a complete installation, which installs both Visual Studio versions, or a custom installation. If you choose the custom installation, a window appears that asks which version you would like to install. Choose either the Visual Studio
11 U2.NET User Guide
2005 version or the Visual Studio 2008 version and then continue following the prompts to complete the installation. There are two product installation files and one documentation file available: UniData and UniVerse Add-ins for Visual Studio - Developer1.x.msi: The U2.NET Developer installation file, which is used to install the full product. UniData and UniVerse Add-ins for Visual Studio - Runtime1.x.msi: The U2.NET Runtime installation file, which is used for runtime deployments. UniData and UniVerse Add-ins for Visual Studio - Documentation1.x.msi: The U2.NET Documentation installation file. For most developers, simply running the UniData and UniVerse Add-ins for Visual Studio – Developer package is sufficient to install all of the necessary development and runtime components onto your desktop. This also installs the necessary routines to allow you to download the U2 server components onto your database server(s). Note: Firewall settings must allow the following programs to pass through: C:\Program Files\U2\U2.NET\bin\IBMU2.U2NET.LicenseManager.Service.exe C:\Program Files\U2\U2.NET\bin\IBMU2.U2NET.SessionManager.exe
UniData and UniVerse Add-ins for Visual Studio - Developer1.x.msi Installation File The U2.NET Developer installation installs the following components:
• Core Objects class library binaries • U2.NET middle-tier services • Initial Configuration Database structure and content • Server components and U2NETDEMO download files • Data Manager application • Visual Studio.NET integration assemblies
The UniData and UniVerse Add-ins for Visual Studio - Developer1.x.msi installation process requires little intervention by the user. Simply follow the on-screen prompts, then at the end of the installation process start using the product. Follow, the steps listed below to start using U2.NET on your development machine:
U2.NET User Guide 12

1. Use the Data Manager utility to create a server profile within your Configuration Database and then download the server components onto your U2 system.
The Data Manager application (IBMU2.U2NET.DataManager.exe) is installed into: C:\Program Files\U2\U2.NET\VersionX.X\bin
A shortcut to this program is created in the Start\Programs\U2\U2.NET\Version1.x menu.
2. Use the Data Manager utility to create an account profile within your Configuration
Database for each enabled account. At this point you should be able to connect into your account using the Data Manager to view and modify account files.
3. Add a reference to the Core Objects assembly within your .NET application. This
assembly (IBMU2.U2.NET.CoreObjects.dll) can be found in:
C:\Program Files\U2\U2.NET\VersionX.X\bin
13 U2.NET User Guide

One-Click Deployment There are several steps required to create a working U2.NET environment on your workstation. You must first create the configuration database, which includes the server profiles and account profiles. After the configuration database is installed, you have to install the server components and enable the accounts. This can be a very tedious, time-consuming process if done separately for each workstation. One-click deployment solves this problem by allowing you to do the following:
• Select specific server profiles and account profiles for scripting. • Copy the configuration database subset into a script folder. • Create a sample deployment XML file in the script folder. • Modify the deployment XML file for each installation. • Install the U2.NET Developer/Runtime on the client machine. • Execute the deployment installation XML file on individual client machines.
After you create a working U2.NET environment on your workstation, you can use one-click deployment scripting to export a deployment XML file, along with a subset of the configuration database, to a folder. The exported configuration information can be executed on multiple workstations to quickly generate all of the required configuration installations and server setups. You can also customize the XML file to make any changes necessary on the individual workstations.
U2.NET User Guide 14
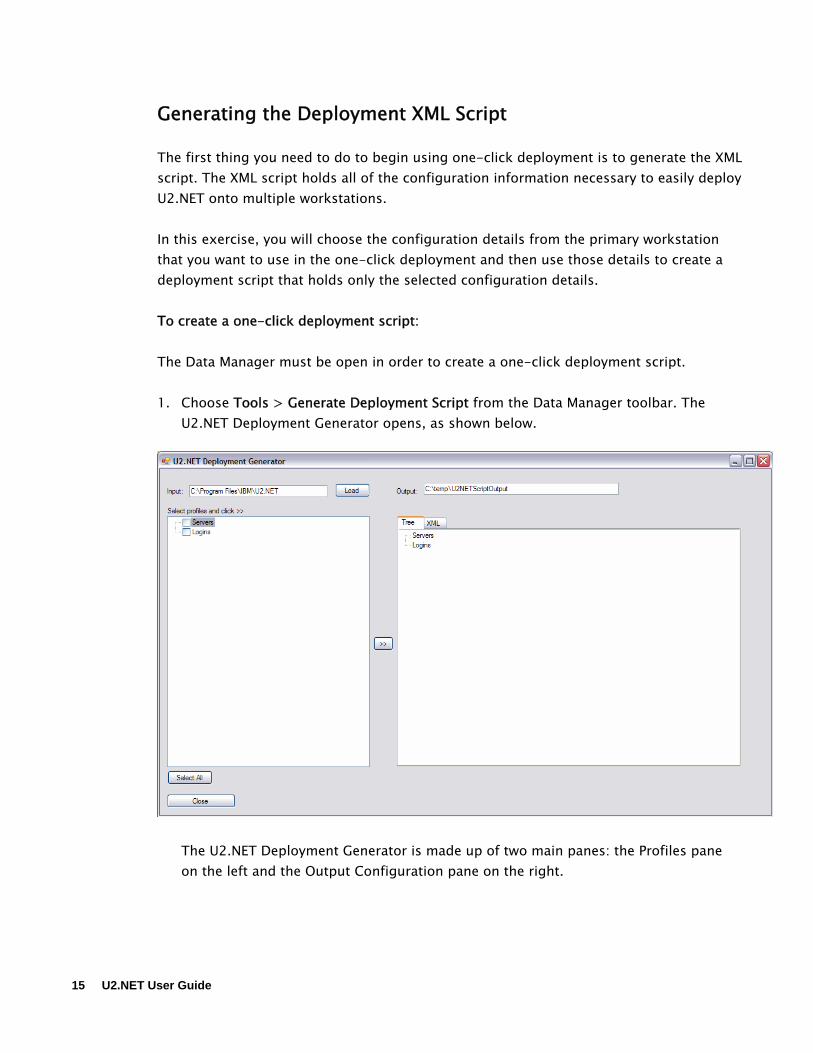
Generating the Deployment XML Script The first thing you need to do to begin using one-click deployment is to generate the XML script. The XML script holds all of the configuration information necessary to easily deploy U2.NET onto multiple workstations. In this exercise, you will choose the configuration details from the primary workstation that you want to use in the one-click deployment and then use those details to create a deployment script that holds only the selected configuration details. To create a one-click deployment script: The Data Manager must be open in order to create a one-click deployment script. 1. Choose Tools > Generate Deployment Script from the Data Manager toolbar. The
U2.NET Deployment Generator opens, as shown below.
The U2.NET Deployment Generator is made up of two main panes: the Profiles pane on the left and the Output Configuration pane on the right.
15 U2.NET User Guide

The Input text box defines the location from which the configuration database is loaded. The tool looks under this path for a Configuration folder that holds the configuration database. The Output text box defines the location in which the exported configuration database and the sample deployment XML file are created.
2. Define the configuration root path in the Input text box. The default path is listed when the Generator opens. Click Load. This populates the available profiles in the Profiles pane.
3. Select the check box for each profile you want to export from the list of available profiles. Click the Select All button if you want to select all of the available profiles. In the image below, only some of the available profiles and profile subsets are selected.
U2.NET User Guide 16

4. After you choose the profiles that you want to copy, define the output folder in the Output text box. The default output folder path is listed when the Generator opens.
Click the button to generate the available profiles in the Output Configuration file. The results display in the Output Configuration pane.
The Output Configuration pane is made up of two views: the Tree view and the XML view. You can access either of these views by selecting the corresponding tab at the top of the Output Configuration pane. Both of the views are shown below.
17 U2.NET User Guide

The generated XML script contains all of the selected profile information, and is saved in the output folder you defined earlier. After you generate the XML script, click Close to close the Deployment Generator and return focus to the Data Manager.
U2.NET User Guide 18
Customizing the Deployment XML Script
In this exercise, you modify the configuration details in the deployment script. You can change the server profile information and the account profile information for each account, and you can choose to install the U2NETSYS and U2NETDEMO accounts or to enable some application accounts.
Opening the XML Script File Open the XML file and customize the contents to meet your deployment needs after you generate the deployment script.
Note: The XML script in the examples below is edited in Visual Studio 2008. To open the XML script: • Navigate to the XML script file and double-click the file to open it. The default
location for the XML script is: C:\ temp\U2NETScriptOutput\deployment_instance.xml
The XML script opens, as shown in the example below:
19 U2.NET User Guide
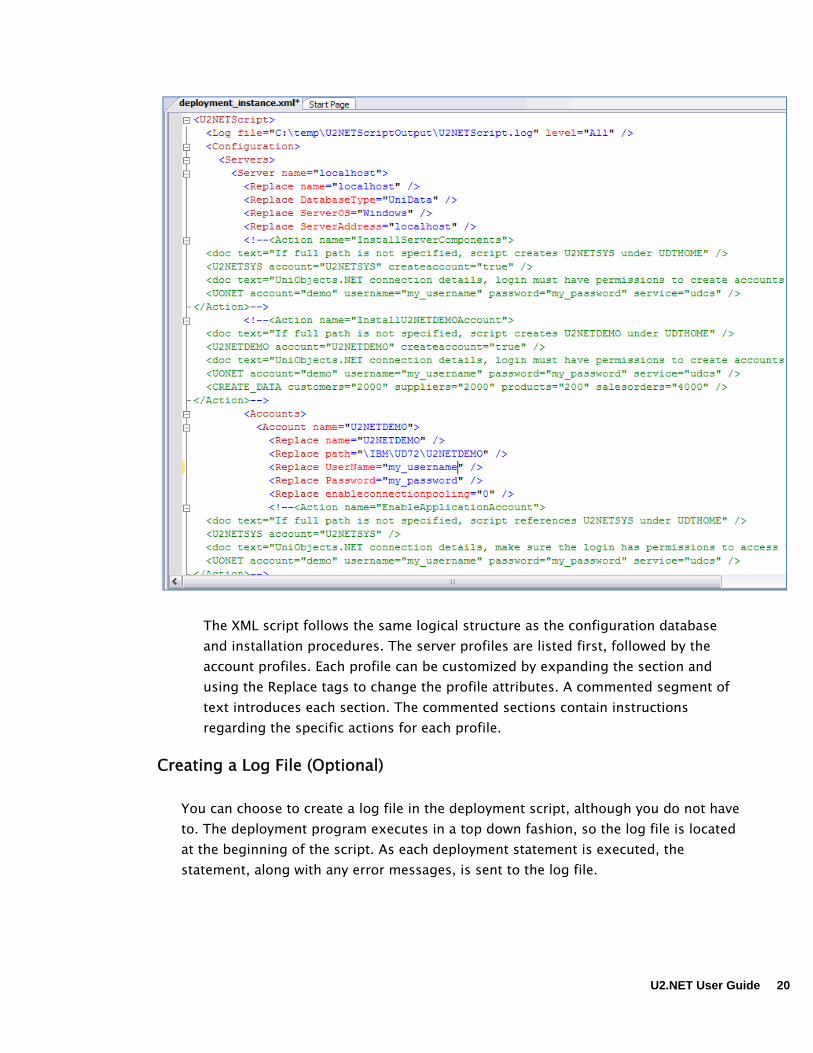
The XML script follows the same logical structure as the configuration database and installation procedures. The server profiles are listed first, followed by the account profiles. Each profile can be customized by expanding the section and using the Replace tags to change the profile attributes. A commented segment of text introduces each section. The commented sections contain instructions regarding the specific actions for each profile.
Creating a Log File (Optional) You can choose to create a log file in the deployment script, although you do not have to. The deployment program executes in a top down fashion, so the log file is located at the beginning of the script. As each deployment statement is executed, the statement, along with any error messages, is sent to the log file.
U2.NET User Guide 20

To create the log file: 1. A log file can be created in the XML script, although it is not required. When the
XML script opens, the first line script contains the log file command line. <Log file="C:\temp\U2NETScriptOutput\U2NETScript.log" level="All" /> To create a log file, use the above line of code and point it to the correct file location. Once you create the log file (if you choose to), you can begin editing the rest of the script to meet your specific deployment needs.
Modifying Server Profiles
The next step is to update the server profile information for each profile in the deployment script.
To modify the server profiles:
1. Use the XML Replace tags to modify the server profile attributes as needed for use
on your particular deployment scenario. An example of the server profile information is shown in the example below:
<Configuration> <Servers> <Server name="developer_server"> <Replace name="live_server" /> <Replace DatabaseType="UniData" /> <Replace ServerOS="Windows" /> <Replace ServerAddress="localhost" /> <!--<Action name="InstallServerComponents">
Note: Do not replace the original server name (shown in the example as developer_server) in the XML script.
Each server profile is listed in the XML script, followed by a commented section that details the optional U2NETSYS and U2NETDEMO installation actions for each server profile, as shown in the example below: <!--<Action name="InstallServerComponents"> <doc text="If full path is not specified, script creates U2NETSYS under UDTHOME" />
21 U2.NET User Guide

<U2NETSYS account="U2NETSYS" createaccount="true" /> <doc text="UniObjects.NET connection details, login must have permissions to create accounts in the location you specified for U2NETSYS account" /> <UONET account="demo" username="my_username" password="my_password" service="udcs" /> </Action>--> <!--<Action name="InstallU2NETDEMOAccount"> <doc text="If full path is not specified, script creates U2NETDEMO under UDTHOME" /> <U2NETDEMO account="U2NETDEMO" createaccount="true" /> <doc text="UniObjects.NET connection details, login must have permissions to create accounts in the location you specified for U2NETDEMO account" /> <UONET account="demo" username="my_username" password="my_password" service="udcs" /> <CREATE_DATA customers="2000" suppliers="2000" products="200" salesorders="4000" /> </Action>-->
2. You can optionally execute these actions for any applicable server profiles. The appropriate command lines are available in the commented code. To execute these actions, remove the comment brackets (<!-- / -->) from each action you want to run. The following example shows this change: <Action name="InstallServerComponents"> <doc text="If full path is not specified, script creates U2NETSYS under UDTHOME" /> <U2NETSYS account="U2NETSYS" createaccount="true" /> <doc text="UniObjects.NET connection details, login must have permissions to create accounts in the location you specified for U2NETSYS account" /> <UONET account="demo" username="my_username" password="my_password" service="udcs" /> </Action>
The above code installs the U2NETSYS account on the server. If the U2NETSYS account already exists on the server, you must delete the account before running the createaccount="true" attribute. You must repeat this process to install the U2NETDEMO account on the server, as shown below: <Action name="InstallU2NETDEMOAccount">
U2.NET User Guide 22

<doc text="If full path is not specified, script creates U2NETDEMO under UDTHOME" /> <U2NETDEMO account="U2NETDEMO" createaccount="true" /> <doc text="UniObjects.NET connection details, login must have permissions to create accounts in the location you specified for U2NETDEMO account" /> <UONET account="demo" username="my_username" password="my_password" service="udcs" /> <CREATE_DATA customers="2000" suppliers="2000" products="200" salesorders="4000" /> </Action>--> <Accounts> <Account name="U2NETDEMO"> <Replace name="U2NETDEMO" /> <Replace path="\U2\UD72\U2NETDEMO" /> <Replace UserName="my_username" /> <Replace Password="my_password" /> <Replace enableconnectionpooling="0" /> Note: If you do not specify the full installation path for the U2NETSYS account, the default installation location is UDTHOME for UniData accounts or UVHOME for UniVerse accounts. <UONET account="demo" username="my_username" password="my_password" service="udcs" />
U2.NET’s server side deployment actions work through a UniObjects.NET connection to the server.The UONET XML fragment above defines the UniObjects.NET connection details. Make sure the credentials you use for this connection has enough privileges to create directories and U2 accounts on the server.
3. When the XML script is generated, much of the profile information is added to the
script. However, user names and passwords are not carried over into the script, and the generated text holds only placeholders for these attributes. You must update the user name and password profile information.
4. For security reasons, U2.NET, by default, does not store plain text passwords in the XML file. Use the Data Manager->Tools->U2.NET Password Tool option to create encrypted versions of your passwords that you can then put in your deployment XML file. To encrypt your password, enter your password into the password field, and then click the Encrypt button. An encrypted version appears, as shown below:
23 U2.NET User Guide

Click the Copy to Clipboard option to save the encrypted password information, and then paste into the appropriate places in the XML script. U2.NET does provide an option that allows you to enter plain text passwords in the deployment XML file by prefixing your password with the string “NOENC_”. For example, if your password is “newpass1”, then store it in the XML file as “NOENC_newpass1”.
You must edit the profiles for each server profile in the application. If you change the server profile name in the server sections, you must also change the server profile name in the Login profile section. The CREATE_DATA command included in the commented text for the InstallU2NETDEMO account action, shown below, populates the data in the U2NETDEMO account. <CREATE_DATA customers="2000" suppliers="2000" products="200" salesorders="4000" /> </Action>-->
You can change any of the numbers in the above code to change the amount of data populated in the U2NETDEMO database. The scripted code above, for example, creates a database with 2000 customers, 2000 suppliers, 200 products, and 4000 sales orders.
Modifying Account Profiles
After you finish working with the server profiles, you can edit the account profiles in the deployment script. The account profile holds several pieces of data that can be used in establishing a connection to the account, along with various pieces of control data that allow the behavior of session pooling and temporary data housekeeping to be controlled.
U2.NET User Guide 24
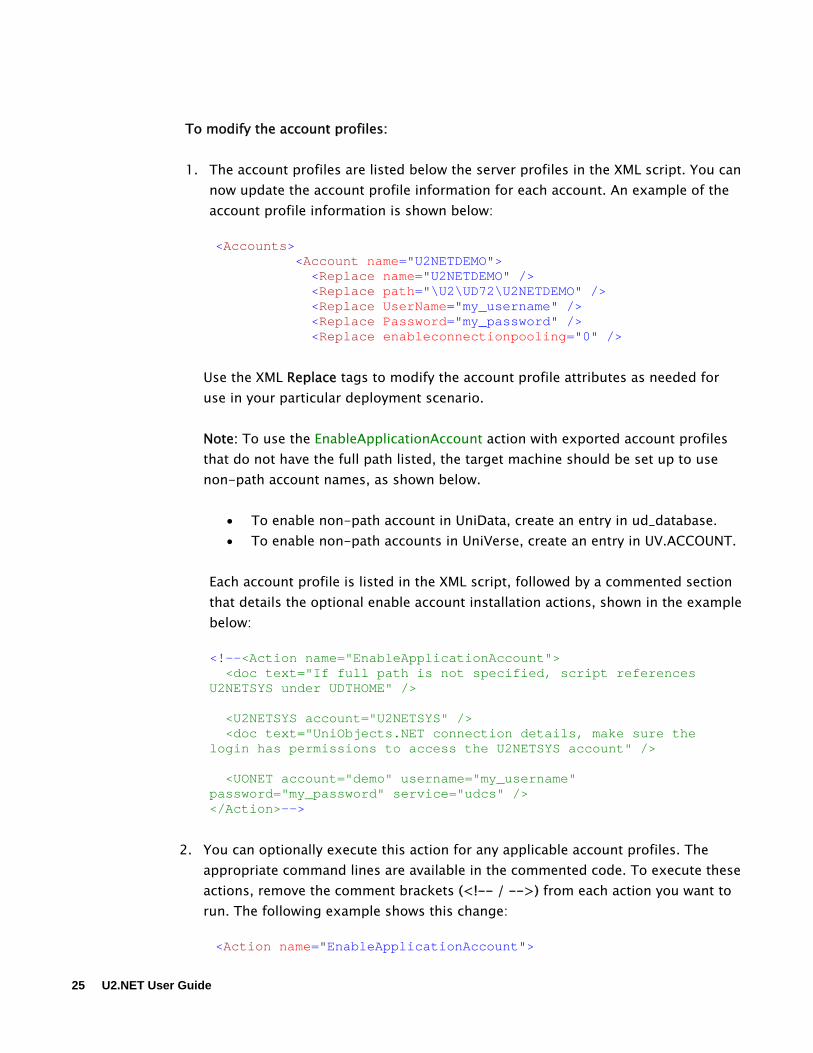
To modify the account profiles: 1. The account profiles are listed below the server profiles in the XML script. You can
now update the account profile information for each account. An example of the account profile information is shown below: <Accounts> <Account name="U2NETDEMO"> <Replace name="U2NETDEMO" /> <Replace path="\U2\UD72\U2NETDEMO" /> <Replace UserName="my_username" /> <Replace Password="my_password" /> <Replace enableconnectionpooling="0" />
Use the XML Replace tags to modify the account profile attributes as needed for use in your particular deployment scenario. Note: To use the EnableApplicationAccount action with exported account profiles that do not have the full path listed, the target machine should be set up to use non-path account names, as shown below.
• To enable non-path account in UniData, create an entry in ud_database. • To enable non-path accounts in UniVerse, create an entry in UV.ACCOUNT.
Each account profile is listed in the XML script, followed by a commented section that details the optional enable account installation actions, shown in the example below:
<!--<Action name="EnableApplicationAccount"> <doc text="If full path is not specified, script references U2NETSYS under UDTHOME" /> <U2NETSYS account="U2NETSYS" /> <doc text="UniObjects.NET connection details, make sure the login has permissions to access the U2NETSYS account" /> <UONET account="demo" username="my_username" password="my_password" service="udcs" /> </Action>-->
2. You can optionally execute this action for any applicable account profiles. The
appropriate command lines are available in the commented code. To execute these actions, remove the comment brackets (<!-- / -->) from each action you want to run. The following example shows this change: <Action name="EnableApplicationAccount">
25 U2.NET User Guide

<doc text="If full path is not specified, script references U2NETSYS under UDTHOME" /> <U2NETSYS account="U2NETSYS" /> <doc text="UniObjects.NET connection details, make sure the login has permissions to access the U2NETSYS account" /> <UONET account="demo" username="my_username" password="my_password" service="udcs" /> </Action>
U2.NET’s server side deployment actions work through a UniObjects.NET connection to the server.The UONET XML fragment above defines the UniObjects.NET connection details. Make sure the credentials you use for this connection has enough privileges to create directories and U2 accounts on the server.
3. When the XML script is generated, much of the account information is added to the script. However, user names and passwords are not carried over into the script and the generated text holds only placeholders for these attributes. You must update the user name and password for each account profile in the application.
Note: When you install the U2NETSYS account and the U2NETDEMO account using the profile wizard, both the accounts and their files are created using the login credentials you provided earlier. If your account profile credentials are different, you must ensure each account profile has the following privileges: U2NETDEMO: Must have Read/Write privileges on all files in the account. U2NETSYS: Must have Write privileges on the following files:
• U2NET.CONNECTS, U2NET.CONTROL, U2NET.READIMAGES This also applies to U2 accounts enabled by users other than the one used to create the U2NETSYS account.
U2.NET User Guide 26

Running the Deployment XML Script After you make all of the necessary changes to the XML script, you can use either the Deployment Tool to run the application on multiple workstations in the Data Manager, or the U2NetDeploy.exe command line application to execute the script in a deployment workstation. To run the command line tool, see the example command line below: "C:\Program Files\U2\U2.NET\Version1.1\bin\IBMU2.U2NET.U2NetDeploy.exe" "C:\temp\U2NETScriptOutput" deployment_instance.xml "C:\Program Files\U2\U2.NET"
The U2NetDeploy.exe takes three command line arguments listed below: • The folder of the deployment configuration and XML script.
• The file name of XML script.
• The target folder where the final deployment configuration should be created.
Please note that if the target configuration already contains data, this will be overwritten.
To run the deployment script from the Data Manager: 1. Select Tools > Run Deployment Tool from the Data Manager toolbar. The U2.NET
Deployment Tool opens, as shown below.
27 U2.NET User Guide
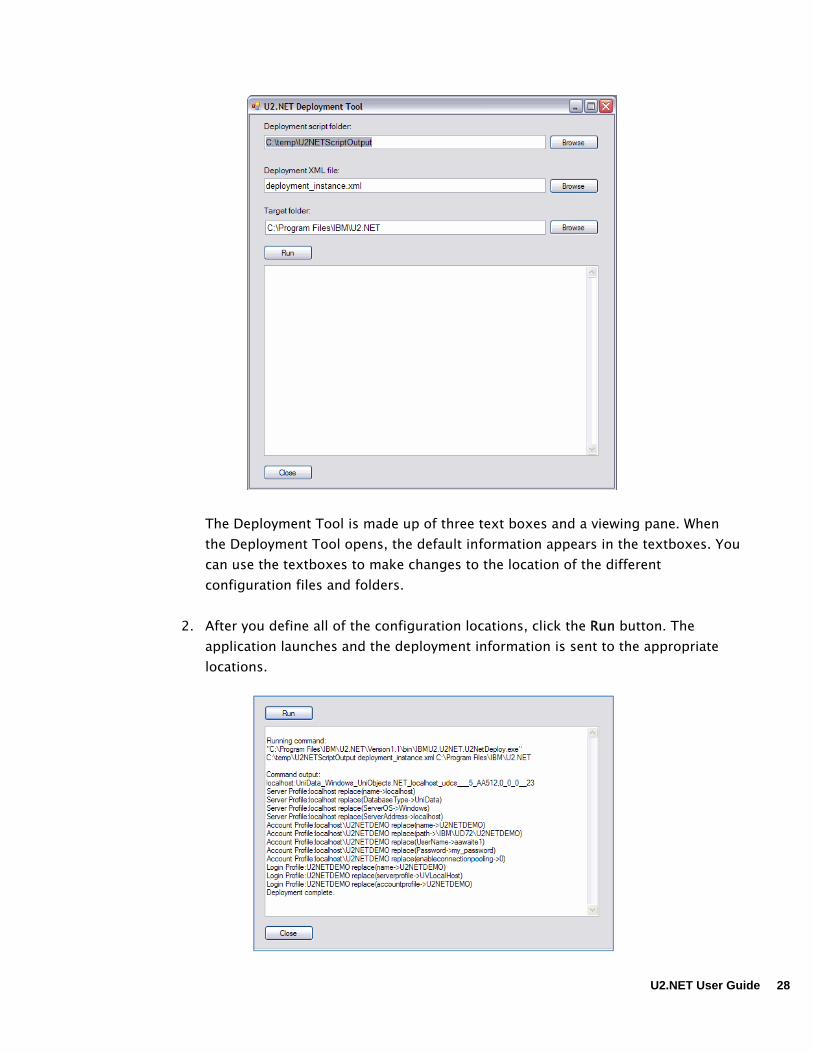
The Deployment Tool is made up of three text boxes and a viewing pane. When the Deployment Tool opens, the default information appears in the textboxes. You can use the textboxes to make changes to the location of the different configuration files and folders.
2. After you define all of the configuration locations, click the Run button. The application launches and the deployment information is sent to the appropriate locations.
U2.NET User Guide 28

3. Click the Close button to exit the Deployment Tool and return focus to the Data
Manager.
Note: If your U2.NET deployment scenario involves a shared U2.NET middle-tier machine used by multiple client machines, then the fastest way to configure such a deployment is to run the deployment only on the middle-tier machine. This step creates the Configuration Database on the middle-tier and also sets up your U2 servers. All you will then need to do on the client machines is to install the U2.NET runtime and then point the client to the middle-tier server using the Data Manager’s Settings > Middle-tier/Config.path option. For further information on setting up the middle-tier, refer to the Configuration Database section.
29 U2.NET User Guide

National Language Support (NLS)
U2.NET 1.2 (or later) can work with NLS-enabled UniVerse, using UTF-8 encoding, to handle Unicode character data. UniVerse has a special mode that offers National Language Support (NLS). With NLS mode enabled, you can use UniVerse in various languages and countries. You can do the following:
• Input data in many character sets (dependent on your local keyboard). • Retrieve data and format it using your own conventions or those of another
country. • Output data to a screen or printer using the character sets and display
conventions of different countries. • Write programs that run in different languages and countries without source
changes or recompilation.
To NLS-enable UniVerse for U2.NET: 1. Stop the UniVerse services.
2. In the UniVerse uvconfig file, set the NLS mode to NLSMODE 1.
3. In UniVerse, run the UVBIN/uvregen command.
4. Re-start the UniVerse services.
U2.NET can store and retrieve Unicode characters in U2 data files when it is working with NLS-enabled UniVerse. The screen shot below shows a Binding Objects Web application displaying data in simplified Chinese.
U2.NET User Guide 30

U2.NET can also display NLS-enabled information in the Data Manager, as shown in the example below:
Refer to the UniVerse NLS Guide for more information on using NLS in UniVerse.
31 U2.NET User Guide
Application Deployment U2.NET allows for flexible deployment situations. You need to decide which type of deployment configuration you want to use to deploy your application.
Development Environment This section describes a typical development scenario and the products needed to run an application.
Products to be installed: • Visual Studio 2008 or Visual Studio 2005 • U2.NET Developer • U2.NET Developer license
• A 60-day evaluation license is installed when you first install U2.NET Developer in your system.
• Access to UniData 7.1 or UniVerse 10.2 or later server. You can install these U2 servers locally on this same development machine.
In a typical application development scenario, U2.NET, along with Visual Studio, is installed on a development machine. Users use the Data Manager tool to create server, account, and login profiles in the U2.NET configuration database. Users can start developing a U2.NET Windows or a Web application on this development machine.
There are two general setup options, as far as the U2 data servers are concerned. You can either use a U2 server that is installed on this development machine, or you can use any UniData (7.1) or UniVerse (10.2 or later) U2 data server elsewhere on your network.
Runtime Environments U2.NET is quite flexible regarding the options available to deploy runtime applications. This section describes some of the Runtime deployment options available. In a typical Windows application deployment, users are running U2.NET applications and are connected to machines that run the U2 data servers. The U2.NET middle-tier is either located on the client machine, a separate machine, or on the data server if it is Windows-based. If the client is a Web browser, the U2.NET middle-tier is located either on the Web server, a dedicated middle-tier server, or on a U2 data server tier.
U2.NET User Guide 32

When you move an application from the development environment to the deployment machine, you need to make sure that you follow all of the necessary steps. The steps involved in several runtime deployment scenarios are described below.
Deploying a U2.NET Windows application In a simple Windows deployment, the application, U2.NET client libraries, as well as U2.NET middle-tier services all are installed on the client machine. The following products must be installed on the client machine before you can run your application:
• U2.NET Runtime • U2.NET Runtime licenses • The U2.NET Windows application • U2.NET configuration database
To deploy a Windows application: 1. Install U2.NET Runtime on the client machine that runs the application. Choose the
default installation options. This installs the client libraries, as well as the U2.NET middle-tier services onto the client machine. When the installation completes, the Data manager tool opens.
2. Use the Data Manager to generate the necessary runtime license configurations codes. Refer to the Runtime License section for more information on licensing.
3. Create the configuration database, including the necessary server, account, and login
profiles used by your application. You can use the Data Manager tool to create these profiles. Refer to the Data Manager section for more information.
4. Install the server components on your data servers, and then enable the accounts
using the Data Manager. 5. (Optional) Users who have a large number of servers and accounts, or users who need
to deploy their applications on a large number of machines, may find it faster to use the U2.NET one-click deployment feature. One-click deployment allows you to package and transport the configuration database to the deployment machine, and execute actions, such as installing server components and enabling accounts, through script-based execution. Use the U2.NET one-click deployment tool to export the Configuration Database into an XML file, which you can then customize and execute. Refer to the One-Click Deployment section for more information.
You are now ready to deploy your applications on your deployment machine.
33 U2.NET User Guide
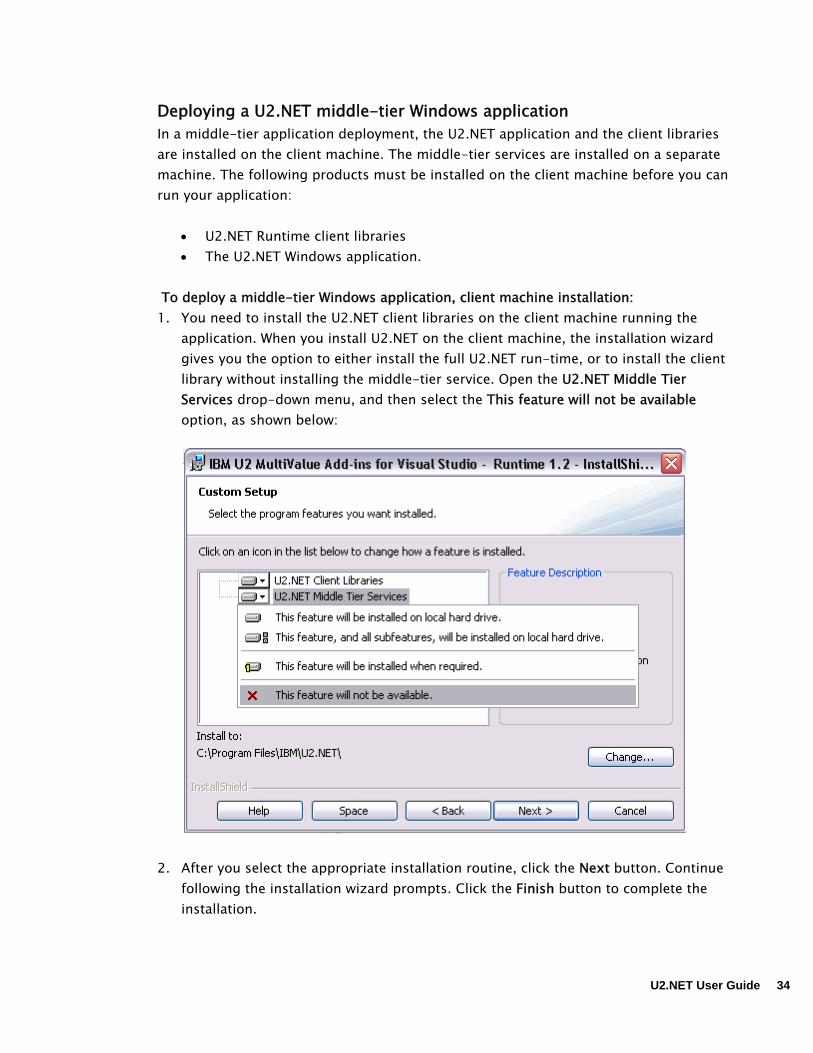
Deploying a U2.NET middle-tier Windows application In a middle-tier application deployment, the U2.NET application and the client libraries are installed on the client machine. The middle-tier services are installed on a separate machine. The following products must be installed on the client machine before you can run your application:
• U2.NET Runtime client libraries • The U2.NET Windows application.
To deploy a middle-tier Windows application, client machine installation: 1. You need to install the U2.NET client libraries on the client machine running the
application. When you install U2.NET on the client machine, the installation wizard gives you the option to either install the full U2.NET run-time, or to install the client library without installing the middle-tier service. Open the U2.NET Middle Tier Services drop-down menu, and then select the This feature will not be available option, as shown below:
2. After you select the appropriate installation routine, click the Next button. Continue following the installation wizard prompts. Click the Finish button to complete the installation.
U2.NET User Guide 34

To deploy a middle-tier Windows application, middle-tier installation: The following products must be installed on the middle-tier machine before you can run your application:
• U2.NET Runtime • U2.NET Runtime licenses • U2.NET configuration database • Access to UniData (7.1 or later) or UniVerse (1.2 or later)
1. Install U2.NET Runtime on the middle-tier machine. Choose the default installation
options. This installs the client libraries, as well as most of the U2.NET middle-tier services onto the client machine. When the installation completes, the Data manager tool opens.
2. Use the Data Manager on the middle-tier to generate the necessary runtime license configurations codes. Refer to the Runtime License section for more information on licensing.
3. Create the configuration database, including the necessary server, account, and login
profiles used by your application. You can use the Data Manager tool on the middle-tier to create these profiles. Refer to the Data Manager section for more information.
4. Install the server components on your data servers, and then enable the accounts
using the Data Manager. 5. (Optional) Users who have a large number of servers and accounts, or users who need
to deploy their applications on a large number of machines, may find it faster to use the U2.NET one-click deployment feature. One-click deployment allows you to package and transport the configuration database to the deployment machine, and execute actions, such as installing server components and enabling accounts, through script-based execution. Use the U2.NET one-click deployment tool to export the Configuration Database into an XML file, which you can then customize and execute. Refer to the One-Click Deployment section for more information.
You are now ready to deploy your applications on your deployment machine.
Deploying a U2.NET Web application In the simplest Web application deployment, the application, U2.NET client libraries, as well as U2.NET middle-tier services all are installed on the Web-server machine. The following products must be installed on the Web-server machine before you can run your application:
35 U2.NET User Guide

• U2.NET Runtime • U2.NET Runtime licenses • The U2.NET Web application • U2.NET configuration database
To deploy a Web application: 1. Install U2.NET Runtime on the Web-server machine that runs the application. Choose
the default installation options. This installs the client libraries, as well as most of the U2.NET middle-tier services onto the Web-server machine. When the installation completes, the Data manager tool opens.
2. Use the Data Manager to generate the necessary runtime license configurations codes. Refer to the Runtime License section for more information on licensing.
3. Create the configuration database, including the necessary server, account, and login
profiles used by your application. You can use the Data Manager tool to create these profiles. Refer to the Data Manager section for more information.
4. Install the server components on your data servers, and then enable the accounts
using the Data Manager. 5. (Optional) Users who have a large number of servers and accounts, or users who need
to deploy their applications on a large number of machines, may find it faster to use the U2.NET one-click deployment feature. One-click deployment allows you to package and transport the configuration database to the deployment machine, and execute actions, such as installing server components and enabling accounts, through script-based execution. Use the U2.NET one-click deployment tool to export the Configuration Database into an XML file, which you can then customize and execute. Refer to the One-Click Deployment section for more information.
You are now ready to deploy your applications on your deployment machine.
Deploying a U2.NET middle-tier Web application In a middle-tier Web application deployment, the U2.NET application and the client libraries are installed on the Web-server machine. The middle-tier services are installed on a separate machine. The following products must be installed on the Web-server machine before you can run your application:
• U2.NET Runtime client libraries • The U2.NET Web application.
U2.NET User Guide 36

To deploy a middle-tier Web application: 1. You need to install the U2.NET client libraries on the Web-server machine running the
application. When you install U2.NET on the Web-server machine, the installation wizard gives you the option to either install the full U2.NET run-time, or to install the client library without installing the middle-tier service. Open the U2.NET Middle Tier Services drop-down menu, and then select the This feature will not be available option, as shown below:
2. After you select the appropriate installation routine, click the Next button. Continue following the installation wizard prompts. Click the Finish button to complete the installation.
Products to be installed on the middle-tier machine: • U2.NET Runtime • U2.NET Runtime licenses • U2.NET configuration database • Access to UniData (7.1 or later) or UniVerse (1.2 or later)
1. Install U2.NET Runtime on the middle-tier machine that runs the application. Choose
the default installation options. This installs the client libraries, as well as most of the
37 U2.NET User Guide

U2.NET User Guide 38
U2.NET middle-tier services onto the middle-tier machine. When the installation completes, the Data manager tool opens.
2. Use the Data Manager on the middle-tier to generate the necessary runtime license configurations codes. Refer to the Runtime License section for more information on licensing.
3. Create the configuration database, including the necessary server, account, and login
profiles used by your application. You can use the Data Manager tool on the middle-tier to create these profiles. Refer to the Data Manager section for more information.
4. Install the server components on your data servers, and then enable the accounts
using the Data Manager. 5. (Optional) Users who have a large number of servers and accounts, or users who need
to deploy their applications on a large number of machines, may find it faster to use the U2.NET one-click deployment feature. One-click deployment allows you to package and transport the configuration database to the deployment machine, and execute actions, such as installing server components and enabling accounts, through script-based execution. Use the U2.NET one-click deployment tool to export the Configuration Database into an XML file, which you can then customize and execute. Refer to the One-Click Deployment section for more information.
You are now ready to deploy your applications on your deployment machine.
Chapter 4 The Data Manager
This Chapter explains each aspect of the Data Manager. The first part of the chapter details the different operations necessary to use U2.NET. The latter part of the chapter covers features designed to improve programmer productivity when designing and developing server-resident data structures and programs.
39 U2.NET User Guide

Using the Data Manager The Data Manager is provided in two different forms:
• Standalone version • Visual Studio .NET add-in version
The U2.NET Developer installation file will place the Data Manager executable (IBMU2.U2NET.DataManager.exe) in the following directory: C:\Program Files\U2\U2.NET\Version1.x\bin
It will also create a shortcut to this program in the Start\Programs\U2\U2.NET\Version1.x menu. When you open the Data Manager, the left hand side of the window displays a treeview list containing a number of entries. This is known as the Data Manager Explorer, shown in this example:
The Explorer tree is used like any normal treeview control, with most of its nodes supporting context sensitive right-click popup menus.
U2.NET User Guide 40
Each of the node types is explained in the following sections.
Running the Add-in Version of the Data Manager The U2.NET Developer installation will also install a version of the Data Manager that runs as an add-in within Visual Studio .NET. This version is functionally identical to the standalone version, except that it also has an additional feature called the Control Assistant, which can be used to speed up the use of data bound controls.
The Configuration Database The Configuration Database (CDB) is a vital aspect of U2.NET. It holds the information that allows U2.NET to be aware of which U2 data servers are available for connection and how to connect into these systems. The CDB is a collection of directories and files which, by default, is located in:
C:\Program Files\U2\U2.NET\Configuration
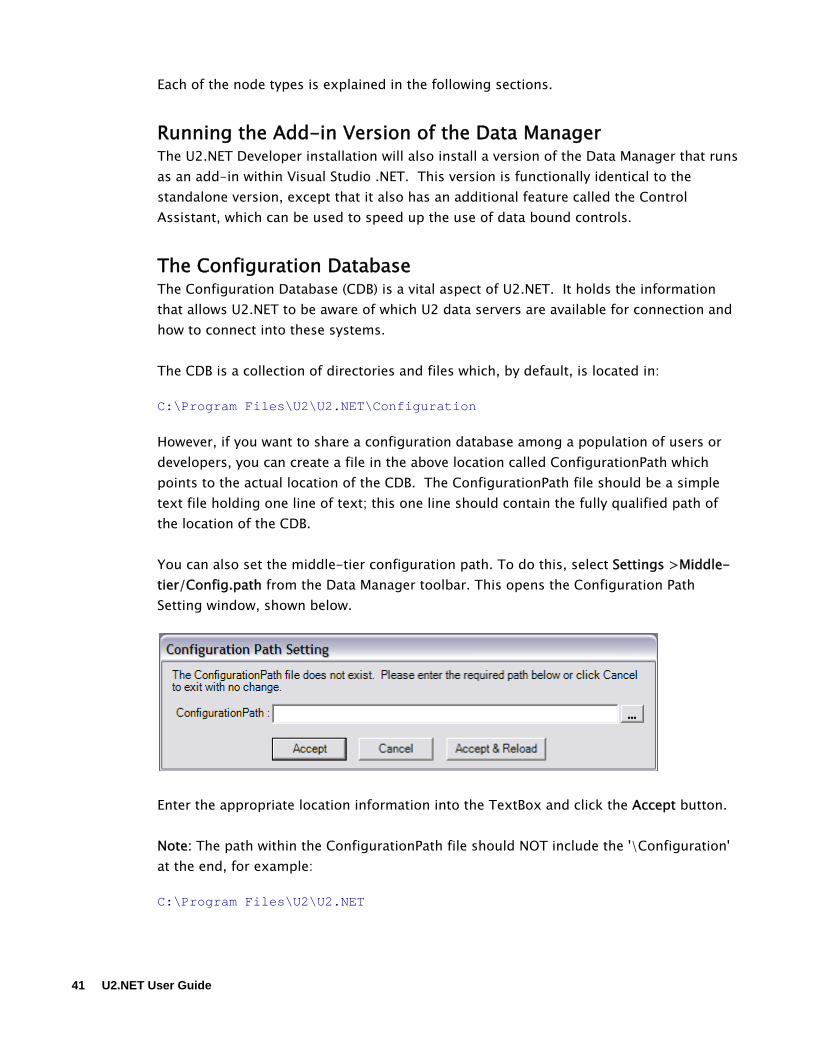
However, if you want to share a configuration database among a population of users or developers, you can create a file in the above location called ConfigurationPath which points to the actual location of the CDB. The ConfigurationPath file should be a simple text file holding one line of text; this one line should contain the fully qualified path of the location of the CDB. You can also set the middle-tier configuration path. To do this, select Settings >Middle-tier/Config.path from the Data Manager toolbar. This opens the Configuration Path Setting window, shown below.
Enter the appropriate location information into the TextBox and click the Accept button. Note: The path within the ConfigurationPath file should NOT include the '\Configuration' at the end, for example: C:\Program Files\U2\U2.NET
41 U2.NET User Guide

Also, note that the constructor of the mvEnvironment class allows you to specify the location of the CDB. For more information on the mvEnvironment class, see the Core Objects Reference. The default location of this file is C:\Program Files\U2\U2.NET\Version x.x\Documentation\Core Objects Reference Guide
An alternative approach to specifying the location of the CDB is to supply the address and port number of the Session Manager. The Session Manager is installed as part of the U2.NET Developer.msi and U2.NET Runtime.msi routines. The syntax of the string which needs to be supplied using either the contents of the ConfigurationPath or the mvEnvironment constructor is: Address:Port e.g., Pluto:20024
Where Address is either the IP address or resolvable system name of the server which is hosting the Session Manager and Port is the port number on which the Session Manager is listening. These settings can be maintained via the Data Manager, see the Configuring Session Management section. Within the CDB, there are four main categories of information:
• Server Profiles • Account Profiles • Login Profiles • Session Management Profiles
These profiles are described in detail in the sections below. The following sections take you through the creation and maintenance of all these profiles.
U2.NET User Guide 42
Explorer Nodes: Overview The higher level nodes of the Explorer tree allow you to maintain the contents of the Configuration Database. As you move down through the hierarchy of the Explorer nodes, you are able to establish database sessions and maintain the contents of U2 databases. The following section explains the Configuration Database in detail. Most of the nodes within the Explorer treeview support right-click popup menus. These allow you to perform a wide variety of tasks. Each of the Explorer node sections below explains the options available within these popup menus.
Explorer Node: Servers The Servers node of the explorer contains one node per server profile. The right-click popup menu of this node contains the following options:
Open Expands the Servers node to allow the list of server profiles to be viewed.
Add Server Profile Allows a new server profile to be created. See section Creating a Server Profile.
Paste Server Profile Allows a new server profile to be created based on a previously copied profile.
Explorer Node: {server profile name} Each Server Profile node of the explorer contains an Accounts node, which contains the list of account profiles defined within this server profile. The right-click popup menu of this node contains the following options:
Open Expands the Server Profile node to allow the list of sub-nodes to be viewed
Edit Server Profile Opens the Server Profile maintenance window.
Rename Server Profile Allows the name of the server profile to be changed.
Copy Server Profile
43 U2.NET User Guide
Places the server profile definition onto the Explorer’s clipboard ready for pasting.
Cut Server Profile Places the server profile definition (in cut mode) onto the Explorer’s clipboard ready for pasting.
Delete Server Profile Removes the server profile from the configuration database, removing all constituent account profile definitions.
Install Server Components Installs the server components. The Server Components are typically installed when you create a new server profile, and choose the Install Server Components option. However, you can choose to install the Server Components separately.
Install U2NETDEMO Account Installs the U2NETDEMO account. The U2NETDEMO account is typically installed when you create a new server profile, and choose the Install U2NETDEMO account. However, you can choose to install the demo account separately.
Explorer Node: Accounts The Accounts node contains a node for each account profile defined within the parent server profile. The right-click popup menu of this node contains the following options:
Open Expands the Accounts node to allow the list of account profiles to be viewed.
Add Account Profile Allows a new account profile to be created. See section Creating an Account Profile.
Paste Account Profile Allows a new account profile to be created based on a previously copied profile.
Explorer Node: {account profile name} Each account profile node of the explorer contains a series of sub-nodes that represent the contents of the associated database account. These sub-nodes can only be displayed once a login session onto the account has been established. The right-click popup menu of this node contains the following options:
U2.NET User Guide 44

Login Initiates a login onto the account. The section Creating a Server Profile contains a description of the login process.
Logout Terminates the currently active database session.
Edit Account Profile Opens the Account Profile maintenance window.
Rename Account Profile Allows the name of the account profile to be changed. You must be logged out of the account to use this option.
Copy Account Profile Places the account profile definition onto the Explorer’s clipboard ready for pasting.
Cut Account Profile Places the account profile definition (in cut mode) onto the Explorer’s clipboard ready for pasting.
Delete Account Profile Removes the account profile from the configuration database. You must be logged out of the account to use this option.
Explorer Node: Logins The Logins node of the explorer contains one node per login profile. The right-click popup menu of this node contains the following options:
Open Expands the logins node to allow the list of login profiles to be viewed.
Add Login Profile Allows a new login profile to be created. See section Creating a Login Profile.
Paste Login Profile Allows a new login profile to be created based on a previously copied profile.
45 U2.NET User Guide

Explorer Node: {login profile name} Each login profile node of the explorer has a right-click popup context menu containing the following options:
Edit Login Profile Open the login profile maintenance window.
Copy Login Profile Places the login profile definition onto the Explorer’s clipboard, ready for pasting.
Cut Login Profile Places the login profile definition (in cut mode) onto the Explorer’s clipboard, ready for pasting.
Delete Login Profile Removes the login profile from the Configuration Database.
Edit Server Profile Allows you to change server profile definitions.
Edit Account Profile Allows you to edit account profile definitions.
Explorer Node: Session Manager Settings This node allows you to maintain the settings of the Session Manager on the system. The right-click popup menu of this node contains the following option:
Open Session Manager Settings Displays a window allowing you to activate or deactivate session management on this system, and also allows you to specify the address of the system that is hosting the session manager service. Please refer to the Session Manager chapter for further details on maintaining these settings.
U2.NET User Guide 46

U2.NET Profiles The Data Manager accesses account information through the different profiles stored in the Configuration Database. Four profile types are stored in the Configuration Database:
• Server Profiles • Account Profiles • Login Profiles • Session Manager Profiles
Server profiles contain most of the information that allows U2.NET to connect into a U2 database server. There should be one server profile for every database installation that you want to access. Account profiles hold several pieces of data that can be used in establishing a connection to the account, along with various pieces of control data that allow you to control the behavior of session pooling and temporary data housekeeping. Within a server profile you may define multiple account profiles; one for each account that you want to access the specified server. Login profiles allow you to associate a logical name with a server/account pairing. This allows you to avoid ‘hard coding’ server/account names into your application.
The Session Manager profile allows you to control the behavior of the Session Manager. See the Session Manager chapter for full details on this topic. Profiles are created using the Server Profile wizard, which opens automatically the first time you open the Data Manager. The wizard combines all of the steps necessary to create a server profile and an account profile. You can also use the wizard to download the server components and the U2NETDEMO account. The steps below walk you through all the steps needed to create a fully functional server profile, and account profile. You can also right-click the Servers node, the Accounts node, or the Logins node in the Data Manager treeview and then select the Add Profile option for any profile.
47 U2.NET User Guide

The Data Manager Profile Wizard When you install U2.NET, the final page of the installation screens asks if you want to start the Data Manager. If you select this option, the Profile Creation wizard opens and asks you to create a new server profile. You can also create a new server profile by right-clicking the Servers node in the Data Manager treeview and then selecting the Add Server Profile option. The Profile Creation wizard starts each time you select the Add Server Profile option.
Creating a New Server Profile 1. Right-click the Servers option from the Data Manager treeview. Select the Add Server
Profile option. The Create Server Profile dialog box appears and prompts you to enter the appropriate profile information.
2. Enter the details of your new profile. The various fields on this form are explained below:
Profile Name: This allows you to specify the name of your sever profile. Database type: This allows you to specify whether you want to use the UniVerse or the UniData database. Service Name: The name of the Database service you are using appears in this box. If you choose UniData as your Database type, then the service name is udcs. If you choose UniVerse as your Database type, then the service name is uvcs.
U2.NET User Guide 48

Server OS: This allows you to specify the operating system running on the server. Server address: This should be set to the address of the server. This can be either an IP address or a resolvable system name. Display connection monitor on startup: If this field is checked, a Connection Monitor window will be automatically displayed when a new connection to this server is established. Note: The Session Monitor window must be open for this to occur. Send keep-alive: This input field allows you to indicate that traffic is to be automatically generated between client and server to avoid session inactivity timeout from occurring. By specifying a non-zero number in this field, a small number of characters will be transmitted from client to host every so often to prevent the communications link from timing out. Install Server Components: If this field is checked, the U2.NET server components are installed. In order for client-side U2.NET to interact with a U2 database, the server hosting the database must have the U2.NET server components installed.
3. Click the Next button. The UniObjects.NET Connection page opens.
Creating a UniObjects.NET Connection You must establish a connection to an account in your U2 data server. To create a connection: 1. Enter the correct account login information. The various fields on the form are
described below:
49 U2.NET User Guide

U2 account: This allows you to enter the path to the U2 account to which you are connecting. User name: This allows you to enter the user name for the U2 account to which you are connecting. Password: This allows you to enter the password for the U2 account to which you are connecting.
2. Click the Test Connection button to test the connection to your U2 account. When U2.NET finds a connection to your U2 account, a window opens and tells you that the test was successful.
3. Click the Next button. The Server Components Installation page opens.
Installing the Server Components In order for client-side U2.NET to interact with a U2 database, the server hosting the database must have the U2.NET server components installed. To install the server components: 1. Enter the correct information in the various fields, which are explained below:
U2NETSYS account (full path): This allows you to enter the correct installation location. The U2NETSYS account must be installed on your system before a client application can communicate with the server. Note: If the U2NETSYS directory already exists on the server, it will be deleted and re-created.
U2.NET User Guide 50
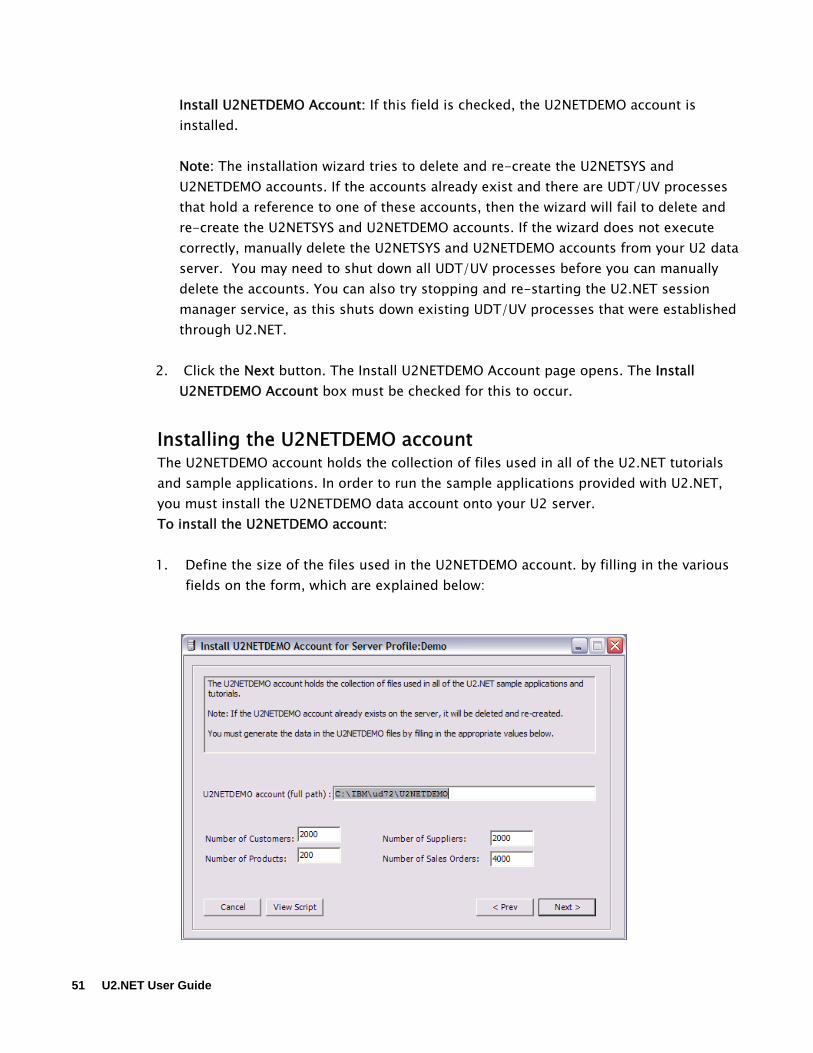
Install U2NETDEMO Account: If this field is checked, the U2NETDEMO account is installed. Note: The installation wizard tries to delete and re-create the U2NETSYS and U2NETDEMO accounts. If the accounts already exist and there are UDT/UV processes that hold a reference to one of these accounts, then the wizard will fail to delete and re-create the U2NETSYS and U2NETDEMO accounts. If the wizard does not execute correctly, manually delete the U2NETSYS and U2NETDEMO accounts from your U2 data server. You may need to shut down all UDT/UV processes before you can manually delete the accounts. You can also try stopping and re-starting the U2.NET session manager service, as this shuts down existing UDT/UV processes that were established through U2.NET.
2. Click the Next button. The Install U2NETDEMO Account page opens. The Install U2NETDEMO Account box must be checked for this to occur.
Installing the U2NETDEMO account The U2NETDEMO account holds the collection of files used in all of the U2.NET tutorials and sample applications. In order to run the sample applications provided with U2.NET, you must install the U2NETDEMO data account onto your U2 server. To install the U2NETDEMO account: 1. Define the size of the files used in the U2NETDEMO account. by filling in the various
fields on the form, which are explained below:
51 U2.NET User Guide

U2NETDEMO account (full path): This allows you to enter the location where the U2NETDEMO account will reside. Number of Customers: This allows you to enter the number of customer records you want in the U2NETDEMO account. Number of Products: This allows you to enter the number of product records you want in the U2NETDEMO account. Number of Suppliers: This allows you to enter the number of supplier records you want in the U2NETDEMO account. Number of Sales Orders: This allows you to enter the number of sales order records you want in the U2NETDEMO account.
2. Click the Next button. The Account Profile dialog box opens.
Creating an Account Profile An account profile provides the means to define two main areas of information: account specific logon settings, and account specific session pooling and housekeeping settings. The account profile holds this information and there may be a number of account profile definitions within a single server profile, each representing a different account or application on the server. Note: When you install the U2NETSYS account and the U2NETDEMO account using the profile wizard, both the accounts and their files are created using the login credentials you provided earlier. If your account profile credentials are different, you must ensure each account profile has the following privileges: U2NETDEMO: Must have Read/Write privileges on all files in the account. U2NETSYS: Must have Write privileges on the following files:
• U2NET.CONNECTS, U2NET.CONTROL, U2NET.READIMAGES This also applies to U2 accounts enabled by users other than the one used to create the U2NETSYS account.
U2.NET User Guide 52

To create an account profile: 1. To create a new account profile from the Data Manager, right-click the Accounts
option from the Data Manager treeview. You can also access this form through the Profile Creation wizard. You can create a new account profile by selecting by right-clicking the Accounts option from the Data Manager treeview. The following dialog box opens to allow you to enter the details of your new profile. The various fields on the form are explained below:
Login Parameters This group of input fields allows you to specify data that can be used to control the U2.NET login process to correctly connect to the required account. These fields, combined with the server profile definition, provide a complete definition to U2.NET of how to connect into a specific account on a specific server. Profile Name: The name of the corresponding account profile displays in this screen.
53 U2.NET User Guide
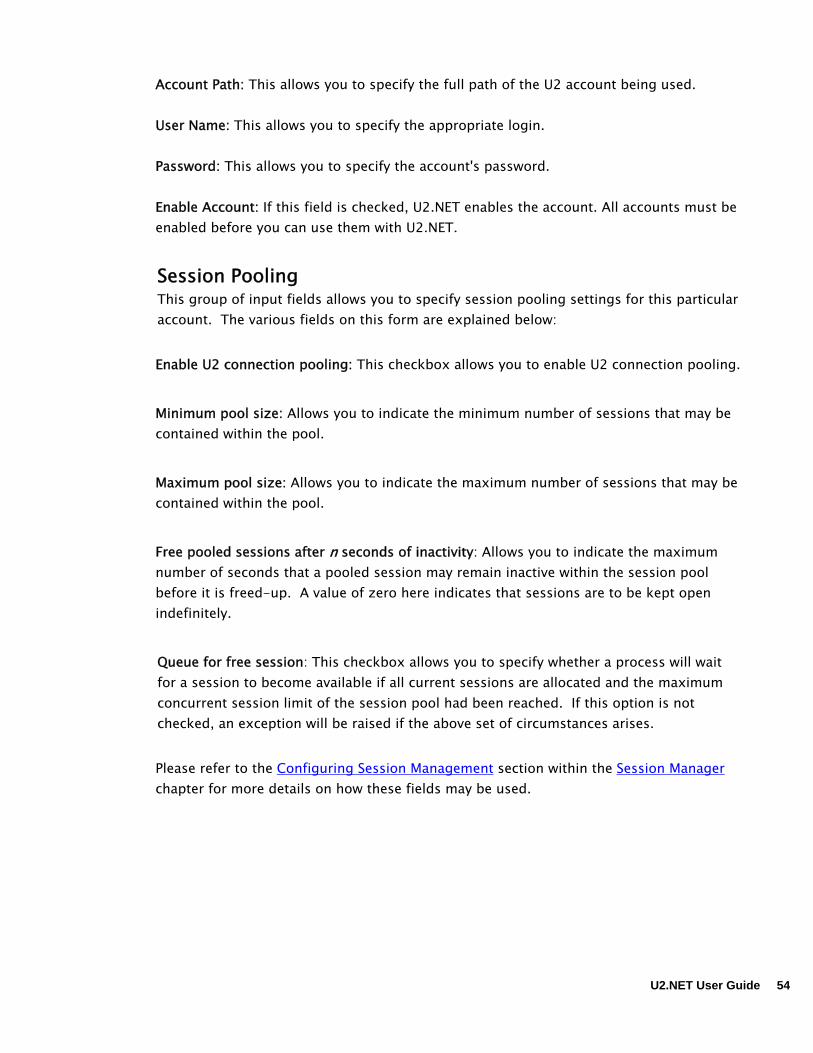
Account Path: This allows you to specify the full path of the U2 account being used. User Name: This allows you to specify the appropriate login. Password: This allows you to specify the account's password. Enable Account: If this field is checked, U2.NET enables the account. All accounts must be enabled before you can use them with U2.NET.
Session Pooling This group of input fields allows you to specify session pooling settings for this particular account. The various fields on this form are explained below:
Enable U2 connection pooling: This checkbox allows you to enable U2 connection pooling.
Minimum pool size: Allows you to indicate the minimum number of sessions that may be contained within the pool.
Maximum pool size: Allows you to indicate the maximum number of sessions that may be contained within the pool.
Free pooled sessions after n seconds of inactivity: Allows you to indicate the maximum number of seconds that a pooled session may remain inactive within the session pool before it is freed-up. A value of zero here indicates that sessions are to be kept open indefinitely.
Queue for free session: This checkbox allows you to specify whether a process will wait for a session to become available if all current sessions are allocated and the maximum concurrent session limit of the session pool had been reached. If this option is not checked, an exception will be raised if the above set of circumstances arises.
Please refer to the Configuring Session Management section within the Session Manager chapter for more details on how these fields may be used.
U2.NET User Guide 54

Housekeeping Settings The second tab on the Account Profile maintenance window allows you to define the server-side housekeeping activities that U2.NET can perform, as shown below:
Temporary file size modulo: The account profile housekeeping settings allow you to control when temporary data on the server is deleted, as well as controlling the default size of temporary files created automatically by U2.NET. Purge select lists: Allows you to define when server-side select lists are deleted. When a select list is created by U2.NET as part of its internal activity, it is given a timestamp. When the housekeeping process executes, it examines the timestamps of all select lists created by U2.NET for this account and will delete any that are older than the age specified within the account profile. Purge read images: Allows you to define when optimistic lock read images taken on the server are to be deleted. When an item is locked in optimistic mode a read-image copy of the current item is placed into the U2NET.READIMAGES file. Each read image is given a timestamp so that when the housekeeping process executes, it examines the timestamps of all read images for this account and will delete any that are older than the age specified within the account profile. Delete temporary session files: Allows you to define when the temporary files for stateless connections are deleted. If an application passes an application GUID (session ID) into the connection request call, a dedicated temporary file is created for that session ID. This information is persisted for that session across invocation boundaries. U2.NET keeps track of when a session ID last contacted the server and if it finds that a session has not contacted the server for a period greater than that specified within the corresponding account profile, the temporary session file will be deleted.
All housekeeping activity is coordinated by the Session Manager and the frequency of housekeeping is set at the Session Manager level. This can be done by double-clicking
55 U2.NET User Guide
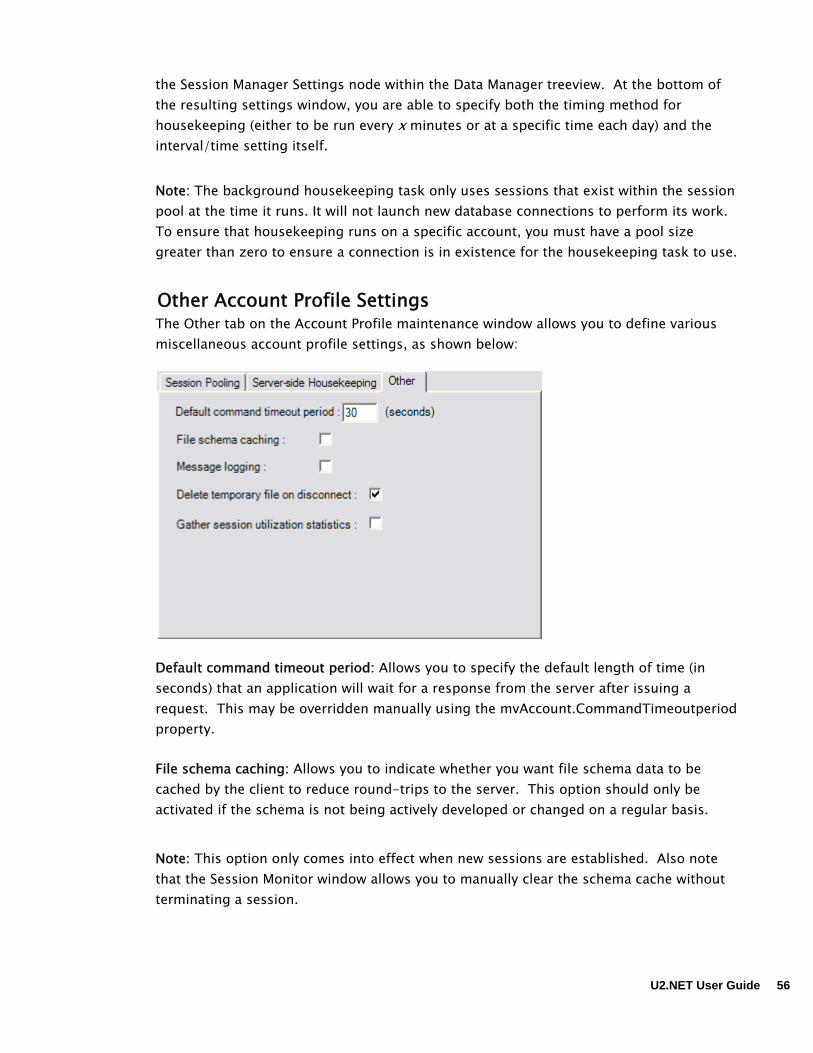
the Session Manager Settings node within the Data Manager treeview. At the bottom of the resulting settings window, you are able to specify both the timing method for housekeeping (either to be run every x minutes or at a specific time each day) and the interval/time setting itself.
Note: The background housekeeping task only uses sessions that exist within the session pool at the time it runs. It will not launch new database connections to perform its work. To ensure that housekeeping runs on a specific account, you must have a pool size greater than zero to ensure a connection is in existence for the housekeeping task to use.
Other Account Profile Settings The Other tab on the Account Profile maintenance window allows you to define various miscellaneous account profile settings, as shown below:
Default command timeout period: Allows you to specify the default length of time (in seconds) that an application will wait for a response from the server after issuing a request. This may be overridden manually using the mvAccount.CommandTimeoutperiod property. File schema caching: Allows you to indicate whether you want file schema data to be cached by the client to reduce round-trips to the server. This option should only be activated if the schema is not being actively developed or changed on a regular basis.
Note: This option only comes into effect when new sessions are established. Also note that the Session Monitor window allows you to manually clear the schema cache without terminating a session.
U2.NET User Guide 56

Message logging: Allows you to activate the logging of all messages passing between client and server for any sessions established using this account profile. Session logs are created in the following folder: Program Files\U2\U2.NET\Monitor\SessionLogs This folder holds one folder-per-session log. The folder name reflects the session id, the profile names used and also the date and time the log was produced. Within each session log folder is a single log file holding all message traffic. Delete temporary file on disconnect: Allows you to indicate whether you want to delete all temporary files when you disconnect. Gather session utilization statistics: Allows you to indicate whether you want to create a log of the session utilization statistics. 2. Click the Finish button. U2.NET installs all of the necessary files and components.
When the installation is complete, a successful installation window opens.
3. Click the Close button. The Data Manager opens and you can begin working with your files.
57 U2.NET User Guide

Creating a Login Profile A login profile allows you to assign a logical name to a server + account profile pairing. Typically, this is done to encourage developers to avoid hard-coding the names of server and account profiles into their application. Use login profiles to identify the database you want to connect to whenever possible. To create a new login profile: 1. Select the Logins node from the Data Manager treeview, and then right-click the Add
Login Profile option. The Login Profile dialog box opens.
2. Select the appropriate values for your system. The various fields on the form are explained below:
Profile name: This allows you to create a name for you login account. Server name: This allows you to select the server that you want your application to access. Account name: This allows you to select the account that you want your application to access.
3. Click the Finish button. The dialog box closes and focus returns to the Data Manager.
U2.NET User Guide 58

Connecting into an Account Once you have created the appropriate profiles in the Data Manager, you are ready to open a session within the Data Manager to view and edit details within that account. To open a database session, double-click an Account Profile node within the explorer tree. This will expand the account node and present the following list of sub-nodes: Master Dictionary: Allows access to the contents of the account's Master Dictionary and
VOC.
Files: Allows the list of files within the account to be viewed, along with subsequent access to these files.
Queries: Allows access to the predefined queries within the account. These queries are defined using the Data Manager.
Viewing the List of Available Files The first time that you expand an account profile's Files node the following window opens:
This window allows you to specify how the Data Manager will assemble the list of file names. The first option results in U2.NET scanning the MD/VOC of the account to try and determine which entries refer to files. U2.NET also scans the dictionary of all such files to try and determine what data levels are present. This can be a time-consuming task and you should only select this option if:
• The MD/VOC size is not excessive.
59 U2.NET User Guide

• The MD/VOC doesn't contain entries to files which are not accessible because that can cause the server process to crash. An example of this might be the presence of remote file pointers to a system which is not available.
The second option allows you to manually enter the names of the files that you want to have listed within the explorer Files node. If you select this option you will be presented with the following screen:
Manual Edit: This tab contains a text box into which you are able to enter file names exactly as needed to open the files within UniBasic or UniVerse BASIC. Checked-List Edit: This tab contains a checked listbox which allows you to select the file names you require. To populate this checked listbox with file names, U2.NET has to scan the MD/VOC; therefore, it will present a prompt asking you to confirm that you want to do this. When you click the Accept button, the file names that you enter or select within this form will be saved in a special file within the account's MD/VOC with an item ID of '{U2NETFILESVISIBLE}'. This is called the Visible Files List (VFL). Whenever Core Objects is asked to provide the list of files within an account, the first thing that it checks for is the presence of the VFL item in the account's MD/VOC. If Core
U2.NET User Guide 60
Objects finds the VFL item, it assumes that it contains the complete list of file names and returns this as the final result. If it doesn't find the VFL item, it will scan the MD/VOC for files. It is important to realize that the VFL item does NOT contain the list of files that may be accessed from with your application. Your application can open and access any file that you can access from command level within the account. What it does contain is the list of files names that will be returned by the FileList method of the mvAccount class, which is what the Data Manager uses to obtain the file list for an account. For more information on the FileList method of the mvAccount class, see the Core Objects Reference. The default location of this file is C:\Program Files\U2\U2.NET\Version x.x\Documentation\Core Objects Reference Guide
If you manually enter a list of files names, you may edit this list at a future point by right-clicking the Files node with the explorer tree and selecting the Maintain Visible Files List option. Core Objects also has a Hidden Files List (HFL) process, which is used to exclude names found during the MD/VOC scanning process if the VFL is not present. The HFL is useful when you are dealing with a very large number of files and only want to hide a few. In this scenario, it is easier to create a hidden file list and specify which files should be hidden, rather than creating a VFL list with a large number of files. The VFL takes precedence over the HFL, and most users will only need to maintain the VFL.
Working with Files Once you have a series of file names listed within the explorer tree, you are able to perform a variety of tasks on these files. All of these possible tasks are either listed on the right-click context menu for a file name or on the context menu for a data portion name within the file. You may view the list of data portions for a file by expanding the relevant file name node within the explorer tree. The following sections cover the more complex of these context menu options.
61 U2.NET User Guide
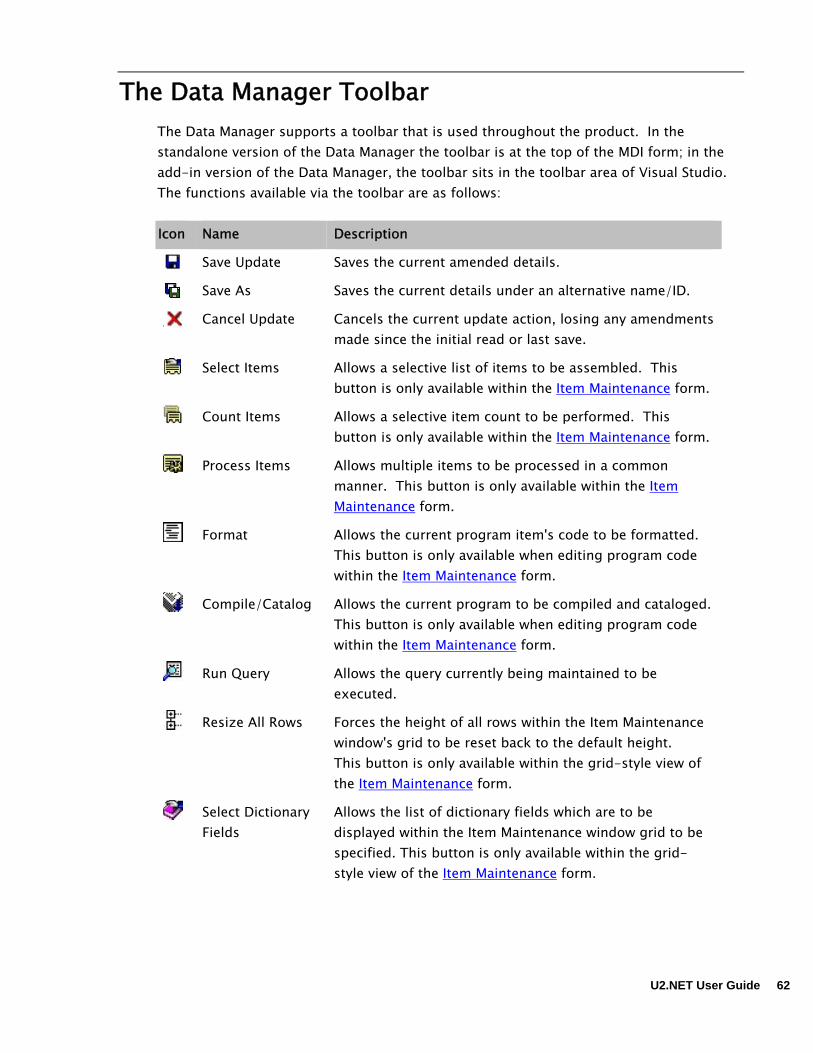
The Data Manager Toolbar The Data Manager supports a toolbar that is used throughout the product. In the standalone version of the Data Manager the toolbar is at the top of the MDI form; in the add-in version of the Data Manager, the toolbar sits in the toolbar area of Visual Studio. The functions available via the toolbar are as follows: Icon Name Description
Save Update Saves the current amended details.
Save As Saves the current details under an alternative name/ID.
Cancel Update Cancels the current update action, losing any amendments made since the initial read or last save.
Select Items Allows a selective list of items to be assembled. This button is only available within the Item Maintenance form.
Count Items Allows a selective item count to be performed. This button is only available within the Item Maintenance form.
Process Items Allows multiple items to be processed in a common manner. This button is only available within the Item Maintenance form.
Format Allows the current program item's code to be formatted. This button is only available when editing program code within the Item Maintenance form.
Compile/Catalog Allows the current program to be compiled and cataloged. This button is only available when editing program code within the Item Maintenance form.
Run Query Allows the query currently being maintained to be executed.
Resize All Rows Forces the height of all rows within the Item Maintenance window's grid to be reset back to the default height. This button is only available within the grid-style view of the Item Maintenance form.
Select Dictionary Fields
Allows the list of dictionary fields which are to be displayed within the Item Maintenance window grid to be specified. This button is only available within the grid-style view of the Item Maintenance form.
U2.NET User Guide 62

Icon Name Description
Show/Hide Dictionary Columns
Allows the display of dictionary fields within the Item Maintenance window's grid to be turned on and off. This button is only available within the grid-style view of the Item Maintenance form.
63 U2.NET User Guide

Maintaining Schemas If you right-click a filename on the Data Manager tree view, you will see the Maintain File Schema option. Click on this option to display the Data Manager's schema maintenance window. This form allows you to maintain the contents of a file's dictionary – both the native dictionary items and the U2.NET's extended definition items. For further information on extended dictionary definitions please refer to the Extended Dictionary Definitions chapter. The schema maintenance window presents a grid that lists all the dictionary names recognized within the dictionary of a file. Below the grid, both the native definitions and the extended definitions for the currently selected dictionary name are shown. Within this maintenance form you may add, amend, or delete schema items as required. The Extended Dictionary Definitions chapter, along with the mvSchemaItem section within the Core Objects Reference, covers the content of extended dictionary definitions in detail.
Schema Item Visibility Within the main grid of the schema maintenance window, there is a column titled Visible. This column allows you to indicate whether a particular dictionary field will be included in the list of schema definitions returned when the file's schema is loaded within Core Objects. Specifically, it allows you to control the contents of the {U2NETDICT} item within the dictionary of the file. When the FileOpen method of the mvAccount class is used, you may specify that the schema of the file is retrieved. Alternatively, the Load method of mvFile.Schema returns a reference to an mvSchema object, which is used to load the schema at a later stage. For more information on the mvAccount class and the mvSchema class, see the Core Objects Reference. The default location of this file is C:\Program Files\U2\U2.NET\Version x.x\Documentation\Core Objects Reference Guide
When a schema is loaded, U2.NET looks in the file's dictionary to see whether a {U2NETDICT} item exists. If it does, it only retrieves the names listed in this item, which can restrict the content of an mvFile.Schema to a subset of items. This is useful if you want to restrict the dictionary names that are presented to the end user. If the {U2NETDICT} item does not exist, all dictionary items within the file are represented in the returned schema.
U2.NET User Guide 64

File Properties Right-click a filename on the Data Manager's explorer tree and select the Properties option. This displays the Data Manager's General Properties maintenance window. From here, you can maintain a range of U2.NET specific properties for the file as whole.
Item content type: Allows you to specify the type of data held within the file: Data, Dictionary or Programs. Automatically prompt…checkbox: Allows you to indicate whether you are automatically prompted for selection criteria when you choose to enter the grid-based data view within the Data Manager's Item Maintenance form. If selected, this prevents the grid view from automatically selecting all items from the file. Use this option if the file contains a large number of items.
65 U2.NET User Guide

Auto Item ID Generation: Allows you to specify how automatic numeric item ID generation for new items within the file is performed. This auto ID feature can be used by both Binding and Adapter Objects. When this option is turned on, the item indicated by the file name, dictionary usage and item ID fields within the properties form is automatically used to store the last number issued. Next item…attribute: Allows a specific attribute position to be used if you want to store multiple auto ID counts in the same item. DataTable name: Allows you to specify the data table name by which the file will be known within the ADO.NET environment and also the names of the normalized tables that are produced as a result of the dynamic normalization process. Multi/Subvalue Group Data Table Names: Each multivalued and subvalued group defined within the U2.NET schema for the file is represented by a row within the Group Data Tables Names grid. You can define the table name of the ADO.NET data table that is created to hold each multivalued/subvalued group data. You can define the name of the column which is created within the DataTable to hold the ordinal multivalued/subvalued position of each individual nested data element. REFORMAT replacement subroutine: Allows you to specify the name of a user-written subroutine that is called by U2.NET to provide the data normally generated using a REFORMAT command. Use this feature if the REFORMAT command is not available for use on a particular file. For example, the distributed files in UniVerse. The REFORMAT replacement subroutine (RRS) must have the following declaration:
SUBROUTINE REFORMAT_DATA_FILEXYZ (ITEMID, DATAITEM, DICTNAMES, RETURNDATA) Where: ITEMID is the ID of a selected item. DATAITEM is the data content of the above item. DICTNAMES is a space delimited list of fields whose values are required. RETURNDATA is an AM delimited list of values corresponding to the list of fields names in the DICTNAMES argument.
If you use this feature, you must implement data generation (within the RRS) for any field which is referenced using the DictionaryList property/argument within Core Objects, or via the Fields segment within the CommandText property of an Adapter Objects mvCommand instance. Note: The values generated by the RRS should be in output format. This is the format that is normally generated by the corresponding dictionary item. You can use a named common area to optimize file opening, and so forth, as required.
U2.NET User Guide 66

Maintaining Item Data When you expand a file name within the explorer tree, a set of sub-nodes is displayed: Dictionary, Data, and Queries. These sub-nodes are used as follows: Dictionary: Allows you to maintain the dictionary items within the file. Data: Allows you to view and manage the data portions of the file. Queries: Allows you maintain queries associated with the file – see Maintaining Queries section. If you right-click the Data sub-node, you are presented with a set of options. The first option, Maintain Items, displays the Data Manager's item maintenance window. When you open the item maintenance window, the screen is split into three fields. The top field Item ID field displays the currently selected Item ID. The available Item IDs are listed within the left-side field. The right-side field is an editor text box, which allows the content of the currently highlighted ID to be edited. At the bottom right of the item maintenance window, the Editor Type field allows you to select an editor type. This value is initially set according to the type setting of the data content in the file's properties. Only change this if you require editor options that are not available with the current settings, e.g., program compile and catalog. You can choose which data view you would like to use by selecting one of the two buttons on the bottom left of the screen. The Editors view is the default selection, displaying one item at a time. Alternatively, the Grid view displays data in a grid, showing one item per row.
Editors Data View When you open the item maintenance form, you are presented with the Editors view. This setting allows you to edit data one item at a time. Initially, only the first 200 items of data are selected from the file. As you scroll down through these items, more data will be retrieved as necessary until the end of file is reached. Using this method, the Data Manager is able to safely open a file and select data irrespective of the number of items within the file. While in the Editors view, you will see two tabs at the bottom of the field: Physical and Dictionary Derived. The Physical tab lets you view and edit data based on the physical contents of a file. The Dictionary Derived tab allows you to view and edit data based on dictionary names. When you select the Dictionary Derived tab, a Refresh button appears. Click the Refresh button to force the file's schema to be reloaded by the client and the
67 U2.NET User Guide

item data to be re-read and redisplayed within the tab. Use the Select Dictionary Fields toolbar button to specify which dictionary fields you want to display in this field. Note: The Dictionary Derived tab will not be available if the Editor type is not set to Data.
Grid Data View You can view the data in Grid view instead of Editors view by clicking the Grid button at the bottom of the screen. If you click the Grid button, you will be presented with a grid showing one row per item. This is a read/write grid. You can manually adjust the height of individual rows by dragging the row divider lines in the column to view more than one line of data. You may want to do this if you are viewing multivalued data, as each multivalue occupies its own line within a row. The Show/Hide Dictionary Columns toolbar button is used to split the grid vertically to allow you to view data based on dictionary-derived values as opposed to the default view of the physical content of items. The Select Dictionary Fields toolbar button may be used to specify which dictionary fields you want to be included in the dictionary derived section of the grid. The height of the header row within the grid may be manually adjusted to view extra definition data. This is done by dragging the row divider line under the header row in the left most column. The format of the header data for the physical data content section of the grid is as follows: Line 1: Column title (if available). Line 2: Attribute position. Line 3: The name of the dictionary item which has been used to interpret the attribute
position. Line 4: The data type. Line 5: The multivalue types. The format of the header data for the dictionary derived section of the grid is the same except that line 2 is omitted. Unlike the Editors style view, the grid view will, by default, select all items from the file. To select a subset of items from the file before entering the grid view, use the Automatically prompt for… setting at the top of the File Properties window. This is recommended if a file contains a large number of items,
U2.NET User Guide 68

Special Keystrokes Within the Item Maintenance form, the keystrokes Ctrl-] or Ctrl-2 will insert a multivalue mark; the keystrokes Ctrl-\ or Ctrl-3 will insert a subvalue mark. Within the grid view, Ctrl-Return will insert a new multivalue position (add a new row) within a cell.
69 U2.NET User Guide
Queries One of the nodes listed beneath a file node is the Queries node. This allows you to maintain queries associated with the file. An alternative way of accessing queries is via the Queries node listed underneath an Account Profile node. This allows you to view the full list of queries for all files within an account.
Query Overview The Data Manager allows you to create predefined queries you can incorporate into your rich client (WinForm) application. This feature can dramatically reduce the time taken to incorporate reporting and ad-hoc querying functionality into your application. For more information on the mvQuery classes used to present query content at runtime, see the Core Objects Reference. The default location of this file is C:\Program Files\U2\U2.NET\Version x.x\Documentation\Core Objects Reference Guide
Also, please refer to the Binding Objects Developer's Guide for details on the mvQuery control that is used to run queries within WinForm components.
Maintaining Queries Double-clicking any query node within explorer tree displays the Data Manager's Query Maintenance form. This form allows you to both define the query and also to view the results of executing the query.
U2.NET User Guide 70

Each field on the above form is explained below. Description: Reference purpose only description of the query.
Data file: Lists the file that will provide data for the query. The Open button next to this field forces the Available Fields list at the bottom right of the form to be repopulated.
Dictionary source: Lists the dictionary which will be used during the execution of the query. This defaults to the dictionary of the Data file but may be changed if necessary to point to an alternate dictionary.
Heading: Lists the heading of the query. This may incorporate parameterized values as seen in the above screen shot. See Parameterized Values section below for more details on this topic.
SELECT filename WITH: This field allows you to enter the selection clause is used to assemble the items to be included in the query results. It accepts standard selection multivalued selection command syntax.
Pre-select subroutine: Lists the name of the subroutine called before the query is executed. This subroutine may serve a variety of purposes, the main one being the creation of the Pre-select save-list referenced by the Pre-select GET-LIST field - see below. The specified subroutine MUST have the following argument signature:
71 U2.NET User Guide
SUBROUTINE EXAMPLESUB (QUERYNAME, ARGUMENTVALS, CANCELQUERY)
QUERYNAME: Is passed into the subroutine and holds the name of the query being executed.
ARGUMENTVALS: Holds an attribute mark separated list of (multivalue mark separated) runtime argument name/value pairs that have been collected just prior to the subroutine being called.
CANCELQUERY: Can be set (to a value of '1') within the subroutine to force cancellation of query execution.
Pre-select GET-LIST: The name of the SAVE-LIST to be used to retrieve the list of item IDs against which to run the selection clause.
Initial expand level: Indicates how multivalues and subvalues are expanded in the initial display of query results.
Use landscape print orientation: Indicates whether a landscape orientation is required when the query results are printed.
Field Specifications: The three field specification lists can have entries added to them by clicking anywhere inside the target field list and then double-clicking the required entry in the Available Fields list. The field box will have a blue border when it is selected.
Each entry in any of the field lists can have further definition information defined for it by highlighting the relevant name and them clicking the Define button, or by right-clicking any field list entry and selecting the Define option.
The ordering of entries in field lists may be amended by highlighting an entry and then clicking the Up/Down buttons
A field list entry may be removed by highlighting an entry and then clicking the Remove button.
Sort Fields: Defines the sort order of the query results. The top most entry represents the highest sort order. A hyphen at the front of a field name designates descending sort order. The sort order of a field may be defined using the Define button.
Display Fields: The list of fields that will be displayed in the query results. The title, width and alignment of each column may be adjusted by highlighting an entry and then clicking the Define button.
Break Fields: The fields whose values are monitored for changes so that subtotaling and other change-of-value calculations may be performed. Note: Only field names that appear in the Sort Fields list can be entered into this list. The definition of a break field is entered by highlighting an entry and then clicking the Define button, at which point the following window is displayed:
U2.NET User Guide 72

Each field in the above form is described below. Sub-total wording: This field specifies the wording to appear alongside the calculated value may be specified. If you want to incorporate values from the last item within the break group, enclose dictionary names inside curly braces, e.g., {NAME} is replaced by the value of the NAME field in the last item in the break group. Wording to appear in column: This input field allows you to specify in which column within the query results to display the sub-total wording. The Sub-Totaling Details area allows you to specify up to six separate calculations you can perform at this break level. Calculation: Allows you to specify the types of calculations that are used. Calculation field: Allows you to specify which field is used to calculate the value. Result display field: Allows you to specify which column is used to display the calculated value. The checkbox at the bottom of the form allows you to indicate whether the display of the result lines which form this break group are hidden on initial display of the query results.
73 U2.NET User Guide
Testing the Query To test the definition of the query, click the Run Query toolbar button. The Results tab is used to display the output. Note: The results tab simply uses an mvQuery control to display the query results.
Parameterized Values The heading and selection definitions of a query may both contain markers that represent the values to be supplied at runtime. The markers should be enclosed within curly braces and result in an 'argument collection' popup window opening at runtime to collect the required value. The prompt text used in the argument collection window is whatever text appears inside the curly braces. Note: If you want to use the same parameterized value in the heading and selection definition, you must ensure that the text inside the curly braces is identical for both instances. If you do this, U2.NET recognizes that you are referring to the same argument and only prompts for its collection once. If you want to force a parameterized value to be of a certain data type, you may place a data type descriptor within parentheses at the end of the curly braced marker. The following data type descriptors are supported: (D) Date (D1) Date, being the first (oldest) date in a pair of dates (D2) Date, being the second (most recent) date in a pair of dates Note: The mvQuery control supports a Validate Arguments event which allows you to either force reentry of argument values or to cancel the execution of the query. Please refer to the Binding Objects Developer's Guide for details on the mvQuery control.
U2.NET User Guide 74

Chapter 5 Session Manager Service
This chapter describes the purpose and function of U2.NET's Session Manager service.
75 U2.NET User Guide

Session Management Session Management in U2.NET is simply the ability to maintain one or more open database connections across application requests for database access. That is, if an application requests a database session during its execution and then releases it upon termination, the session may be kept open and ready for another application to utilize it later without needing to perform a fresh database connection initialization phase. A session pool can be defined as a dynamic, self-adjusting collection of database connections, able to expand and contract between defined bounds according to the demand for database access across a population of application clients. You can control the way your session is managed on a system, which allows you to meet the precise requirements of an installation. This is done by setting a number of control values within the product. See the Configuring Session Management section below. To use U2.NET session pooling, your account profile must be flagged to use U2 connection pooling, and the U2 data server must be licensed for the required number of U2 connection pools. When it creates a database connection, the Session Manager communicates with the License Manager to ensure that the occurrence of database sessions complies with the purchased number of licensed U2.NET runtime connections. Please refer to the License Manager chapter for more details on database license management.
What is the Session Manager The Session Manager is comprised of four executables:
• U2NET.SessionManager.Service.exe • U2NET.SessionManager.exe • U2NET.SessionCluster#n.exe • U2NET.CoreMonitor.exe
These four programs are responsible for overseeing all aspects of session management on a given system. The U2NET.SessionManager.Service.exe runs as a Windows service. It is during the startup of this process that the other processes are launched. The U2NET.SessionManager.exe process is a .NET remoting server responsible for managing session pooling. As part of its duties, this process launches one or more
U2.NET User Guide 76

processes which will host the actual database connections. These processes are known as Session Clusters. Each session cluster may host several database connections, with the precise number controlled by the Session Manager Settings - see Configuring Session Management below. Each cluster has a unique process ID, being of the form U2NET.SessionCluster#n.exe, where n represents the session cluster number. The U2NET.CoreMonitor.exe process is responsible for providing monitoring services across all of the session management executables.
Configuring Session Management Session Manager operations can be controlled in two places: the Session Manager Settings node, and within the account profile definition. Both can be accessed using the Data Manager application. When you open the Session Manager Settings node on the main explorer treeview, the following form will be displayed:
The various fields on this form are explained below:
77 U2.NET User Guide

Max. number of clusters: The maximum number of session cluster processes which may be concurrently active at any one time. Max. sessions per cluster: The maximum number of sessions which may be hosted by a single cluster. Max. concurrent session launches: Allows the maximum number of concurrent session launches within a cluster to be specified. Process Recycling Frequency: In order to allow a comprehensive garbage collection of unused resources, some of the session management processes can be 'recycled'. This means the termination of the existing process and the immediate launch of a replacement. Independent (quick) Database Housekeeping: During its normal course of execution, U2.NET generates a range a temporary data on the server. This input area allows you to indicate when to run the automatic housekeeping of this temporary data. Synchronized (comprehensive) Database Housekeeping: If you want to have all of the database-resident U2.NET temporary data deleted, the U2.NET Session Manager needs to perform a restart. This input area allows you to specify when such a restart should be performed. Select the days and times when service restart should be triggered. Stand-by License Server: U2.NET can be configured to use a stand-by license manager. When a stand-by license manager is defined and is running, U2.NET will fail-over to the stand-by license manager when it detects a failure of the primary license manager. When the primary license manager comes back up, U2.NET will fail-back to the primary license manager. This is useful in high-availability scenarios when you want to avoid service interruption due to license manager failure. The stand-by license manager must be run on a machine other than your middle-tier machine. The easiest way to install a stand-by license manager is to install U2.NET runtime on the stand-by machine. Since only the license manager service on this machine is used, you can shutdown the session manager service on this stand-by machine. The products you need on the stand-by machine are: • U2.NET Runtime • U2.NET Stand-by runtime licenses U2.NET needs to know where to find the License Manager. This can be done using the Session Manager Settings in the Data Manager.
U2.NET User Guide 78

You can also control session management settings within the account profile definitions. Each account has its own series of settings that indicate how the pool of sessions for that specific account is to be operated. To access the Account Profile window, right-click the account name on the explorer treeview, and select Edit Account Profile. When you open the account profile window, the following form will be displayed:
The various fields on this form are explained below:
Enable U2 connection pooling: This checkbox allows you to enable U2 connection pooling.
Minimum pool size: Allows you to indicate the minimum number of sessions that may be contained within the pool.
Maximum pool size: Allows you to indicate the maximum number of sessions that may be contained within the pool.
79 U2.NET User Guide

Free pooled sessions after n seconds of inactivity: Allows you to indicate the maximum number of seconds that a pooled session may remain inactive within the session pool before it is automatically terminated. A value of zero here indicates that sessions are to be kept open indefinitely.
Queue for free session: This checkbox allows you to specify whether a process will wait for a session to become available if all current sessions are allocated and the maximum concurrent session limit of the session pool had been reached. If this option is not checked, an exception will be raised if the above set of circumstances arises. Queuing Poll Interval: This field allows you to define how frequently a process will poll for a free session if it has been placed in a wait queue. A process will poll for a free session n number of times before an exception is raised.
The Session Monitor Application A monitor program is supplied that allows you to view and control the session pools on a system. This program is located in: Program Files\U2\U2.NET\Version1.x\bin\U2NET.SessionMonitor.exe A shortcut to this program is also placed on the Start\Programs\U2.NET menu by the installation routine. Upon invoking this application, the following form is displayed:
The Session Monitor toolbar has several options: Monitor, Schema Caching, and Help. These options work as follows: Monitor: This option allows you to control the monitor refresh interval.
U2.NET User Guide 80

81 U2.NET User Guide
Schema Caching: This option allows you to manually maintain the cache of schema data for a given account profile - see Other Account Profile Settings. Help: This option tells you what version of U2.NET you are using. The Session Monitor form contains two tabs: Active Sessions: Lists all of the sessions and session clusters currently known to the Session Manager. Within the Active Sessions tab, there are right-click context menus which allow a range of maintenance operations to be performed. Message Logging: Allows you to view the messages being generated by the Session Manager and other internal components of the system. The Message Logging tab allows you to view both the messages that have been generated by the current instance of the Session Manager and also those generated by previous instances. At the foot of the Session Monitor window are two buttons which allow the status of the Session Manager service to be controlled. The current status of the service is also shown.
Monitoring a Remote System The Session Monitor application is able to monitor a Session Manager which is hosted on a different system to that on which the monitor is running. In order for the monitor to know where the Session Manager is running, the ConfigurationPath file must contain the address of the Session Manager – see The Configuration Database for more details.
Chapter 6 License Manager Service
This chapter describes the purpose and function of U2.NET's License Manager, along with the basic principles of runtime connection licensing within U2.NET. It also covers the procedure for installing and viewing runtime connection licenses.
U2.NET User Guide 82

The License Manager Service The License Manager service is automatically installed as part of the U2.NET Developer or U2.NET Runtime installation. Each U2.NET session consumes a U2.NET runtime license. Each license is registered with the License Manager. The Session Manager must have access to the License Manager to successfully establish database connections. The License Manager ensures that (as a maximum) only the purchased number of sessions is in effect at any one time.
Specifying the License Manager Address The Session Manager needs to know where to find the License Manager. This is done using the Session Manager Settings node on the Data Manager treeview. If no names or addresses are entered, the Session Manager assumes that the License Manager is found at localhost.
Licensing Principles U2.NET uses two types of licenses: The U2.NET Developer license, and the U2.NET Runtime license. The U2.NET Developer license is installed on the development workstation. One license is required for each workstation on which U2.NET Developer is installed. The U2.NET Runtime license is installed on the workstation that runs the U2.NET License Manager service. Multiple licenses can be installed, and each runtime license permits a limited number of simultaneous connections to U2 servers. The basic concept of connection licensing within U2.NET is that an access license for a set number of concurrent connections needs to be installed into a License Manager. In order for a Session Manager to establish a connection (session) to a U2 database, it must be able to contact a License Manager that has the access license installed. The License Manager checks the number of active sessions against the number of licensed sessions to decide whether the Session Manager is to be allowed to establish a new connection.
83 U2.NET User Guide

Obtaining a U2.NET Developer License To obtain a U2.NET Developer license, open the Data Manager. Once in the Data Manager, click the License option on the toolbar, and then select U2.NET Developer. This opens the Developer License window.
Once you have opened the U2.NET Developer License window, please follow these step-by-step instructions: 1. Enter the U2.NET Developer serial number at the prompt. Click the Save button. 2. Select the correct expiration date information. If you are requesting a 60-day
evaluation developer license, check the 60-day evaluation box. If the box is left unchecked, a request is generated for a permanent U2.NET developer license for this workstation.
U2.NET User Guide 84

3. Click the Generate Configuration Code button. A code will appear in the U2.NET Developer-Configuration Code box. Click the Copy to Clipboard button to copy this Configuration code.
4. At this point, you must obtain an authorization code. To obtain this code, go to:
https://u2tc.rocketsoftware.com/authentry.asp
Follow the instructions on the Web site to obtain your authorization code. 5. Once you have obtained your authorization code, copy the code and return to
the U2.NET Developer License window. Use the Paste to Clipboard button to paste the authorization code into the U2.NET Developer-Authorization Code box.
6. Click the Activate button. Once the license has been activated, the license
expiration date appears under the serial number, and the Activated box is checked.
7. Click the Close button to exit the U2.NET Developer License window.
The U2.NET Runtime License To obtain a U2.NET Runtime license, you must open the Data Manager. Once in the Data Manager, click the License option on the menu bar, and then select U2.NET Runtime. This opens the Runtime License window. Available U2.NET Runtime licenses appear in the Runtime License window. Note: Runtime licenses apply to the local machine where the data manager is running. If you are using a three-tier U2.NET deployment, you must use the data manager in the middle-tier machine to create runtime connection licenses for that machine
85 U2.NET User Guide
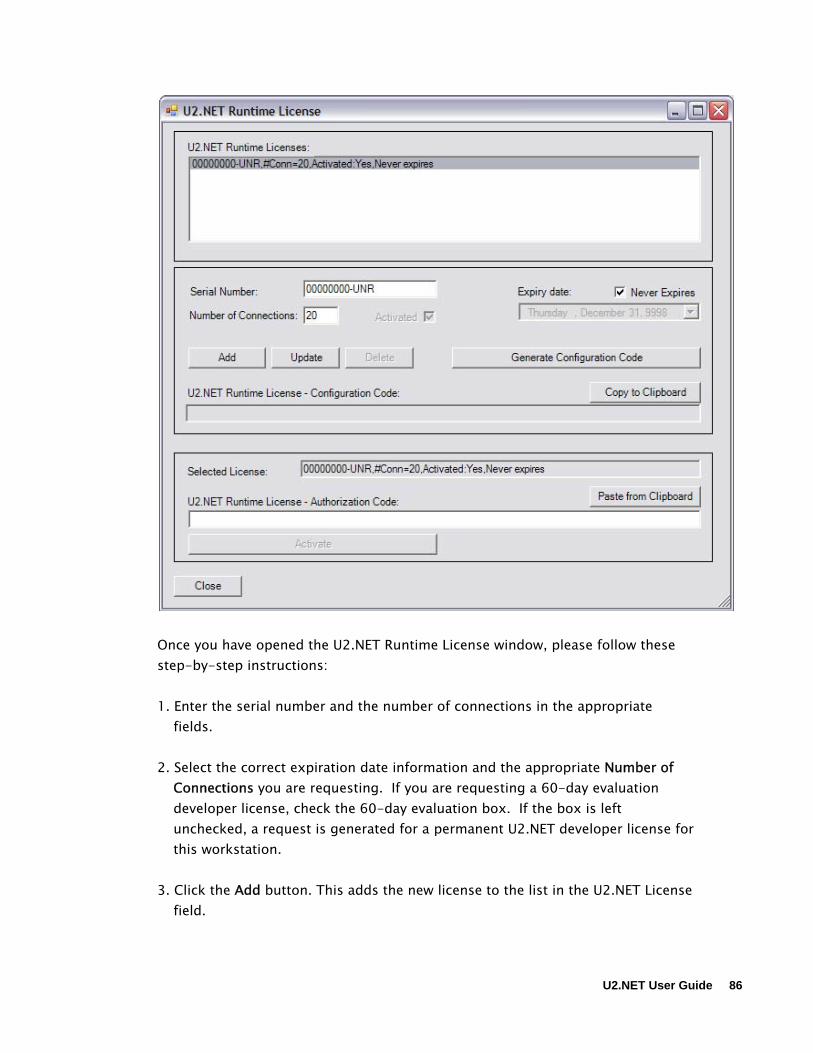
Once you have opened the U2.NET Runtime License window, please follow these step-by-step instructions: 1. Enter the serial number and the number of connections in the appropriate
fields. 2. Select the correct expiration date information and the appropriate Number of
Connections you are requesting. If you are requesting a 60-day evaluation developer license, check the 60-day evaluation box. If the box is left unchecked, a request is generated for a permanent U2.NET developer license for this workstation.
3. Click the Add button. This adds the new license to the list in the U2.NET License
field.
U2.NET User Guide 86
87 U2.NET User Guide
Note: If you want to use the information already in the license list, do not enter new information. Instead, just highlight the license you want to use. 4. Click the Generate Configuration Code button. A code will appear in the U2.NET
Developer-Configuration Code box. Click the Copy to Clipboard button to copy this Configuration code.
5. At this point, you must obtain an authorization code. To obtain this code, go to:
https://u2tc.rocketsoftware.com/authentry.asp Click the Authorize option, and then follow the instructions on the Web site to obtain your authorization code.
6. Once you have obtained your authorization code, copy the code and return to
the U2.NET Runtime License window. Use the Paste to Clipboard button to paste the authorization code into the U2.NET Runtime-Authorization Code box.
7. Click the Activate button. Once the license has been activated, the updated
information will appear in the list in the U2.NET License field as Activated: Yes. 8. Click the Close button to exit the U2.NET Runtime License window.
Viewing Installed Licenses Use the Data Manager to view the licenses currently installed within the License Manager. To access license information in the Data Manager, click the License button on the toolbar. You can also view all installed product licenses using the Help button on the Data Manager menu. Click the Help button, then select About. This brings up a window that displays both the U2.NET Developer and the U2.NET Runtime licenses currently available on the workstation. Note: These licenses apply to the local machine where the Data Manager is running. If you are using a three-tier U2.NET deployment, you must use the data manager in the middle-tier machine to create runtime connection licenses for that machine.

Chapter 7 Extended Dictionary Definitions
This chapter covers U2.NET's extended dictionary definitions. This is an important topic for the developer, especially if you intend to useU2.Net's Binding Objects or Adapter Objects products.
U2.NET User Guide 88
Extended Dictionary Definitions U2 databases support dictionary items, which describe the data content of items within a file. There are a number of places within U2.NET where a U2 specific definition of a file's schema is required. For this reason, you are able to create extended dictionary definitions to contain this extra schema data. The extra definition data within extended definitions allows various aspects of U2.NET to better understand the structure and type of data within an item, and the relationships between attributes of data within the same item and also between items of data across different files.
Maintaining Extended Dictionary Definitions The easiest way to maintain the extended dictionary items for a file is to use the Data Manager utility. Please refer to the schema maintenance section for more details on this. Alternatively, you can maintain extended dictionary definitions manually using the mvSchema and mvSchemaItem classes of the Core Objects class library. For more information on these classes, see the Core Objects Reference. The default location of this file is C:\Program Files\U2\U2.NET\Version x.x\Documentation\Core Objects Reference Guide
Extended vs. Native Dictionary Definitions It is important to note that the native dictionary definitions of the U2 database are still important to U2.NET, as these are used extensively to obtain information from the database. The extended dictionary definitions of U2.NET augment the native definitions and the term 'schema' is used within any of U2.NET to describe the combination of both the native and extended dictionary definitions of a file.
Storage of Native Dictionary Definitions U2.NET stores its extended dictionary definitions in the dictionary of the relevant file. If extended definitions are created by the developer, there is one extended definition item in the MD for each native dictionary item that has been extended. The item ID of an extended definition item takes the form: {xyz}, where xyz is the name of the native dictionary item. For example, extended dictionary items have
89 U2.NET User Guide

the same item IDs as the native items to which they relate, but they are enclosed within curly braces.
U2.NET User Guide 90

Extended Definition Fields You must define the fields for the native dictionary items relevant to your application development requirements. You may do this preemptively all at once, or you may do it on an as-required basis. The following sections cover all of the available extended definition fields and also describe where each field is used by Core Objects, Binding Objects and Adapter Objects. The extended dictionary field name used as the title of each of the following sections is the same as the corresponding property name of the mvSchema class. For more information, see the Core Objects Reference. The default location of this file is C:\Program Files\U2\U2.NET\Version x.x\Documentation\Core Objects Reference Guide
Note: In the following sections, the number in brackets that follows the name of the extended field represents the attribute number that the extended field data is stored in within the extended item.
AttrPos (1) The attribute position of the field. If no extended definition exists for a dictionary item, this extended field is set to the attribute position as indicated by the native dictionary item. The AttrPos field is used to extract data based on the name from within data items, and is used throughout U2.NET for this purpose.
Title (2) The descriptive title of the field. If no extended definition exists for a dictionary item, this extended field is set to the Title text as indicated by the native dictionary item. The Title field is used by Binding Objects when a field is referenced in columnar display/input formats, such as within grids or queries.
Justification (3) The default display/input justification of the field. If no extended definition exists for a dictionary item, this extended field is set to the justification setting indicated by the native dictionary item.
91 U2.NET User Guide
This definition field is used in the same way as the Title field.
Width (4) The default display/input width of the field. The unit of measure here is character count. The appropriate conversion of this to pixels is performed automatically by Binding Objects. If no extended definition exists for a dictionary item, this extended field is set to the width value indicated by the native dictionary item. This definition field is used in the same way as the Title field.
DataType (5) The fundamental data type of the field. This may be one of the following:
• DataAlphaNumeric • DataNumeric1 • DataNumeric2 • DataNumeric3 • DataNumeric4 • DataNumeric5 • DataNumeric6 • DataNumeric7 • DataNumeric8 • DataNumeric9 • DataInteger • DataNumericEmbedded • DataDate • DataTime • DataBoolean
The DataAlphaNumeric setting indicates a free text field. The DataNumericn settings indicate a numeric field of n decimal places which is stored on the database with no decimal point. The DataNumericEmbedded setting indicates a numeric field with its decimal point stored within the database. This definition field is used in numerous places in the U2.Net tools. It is typically used in the data validation process and when deciding which visual controls to use in the representation of data on forms.
U2.NET User Guide 92
MVType (6) This field indicates whether the field is multivalued or subvalued. It may be set to one of the following values:
• Singular • Multivalued • Subvalued
In Binding Objects, this definition field is used to determine the visual control that will be used to show data on a form. Both Binding and Adapter Object use this field to control relationships between data.
MVGroup (7) The name of the multivalue grouping which this field belongs to. This logical name is assigned by the developer, but all fields that belong to the same group must have their MVGroup set to the same name. Core Objects, Binding Objects and Adapter Objects all use this field to automatically keep all multivalue groupings in step when multivalue positions are added or deleted. Adapter Objects also uses this definition to control its Dynamic Normalization process - see Adapter Objects Developer's Guide for more details.
SVGroup (8) The name of the subvalue grouping to which this field belongs.
InputMandatory (9) Indicates whether the input of this field is mandatory. This is used by Binding Objects' input validation process.
InputPrompt (10) The default prompt text for a field. This is used by Binding Objects' databound control creation wizard.
InputDefault (11) The default value for this field. This is used by Binding Objects' to initial populate a databound control with data when new items are created.
93 U2.NET User Guide
InputMin (12) The minimum valid value for a field. This is used by Binding Objects' input validation process.
InputMax (13) The maximum valid value for a field. This is used by Binding Objects' input validation process.
InputCasing (14) Indicates how the upper/lower casing of a field during the input process is controlled. This is used by Binding Objects' input validation process.
InputOptions (15) The list of valid options for a field. This can be used by Binding Objects to populate the options list of ComboBoxes and other controls.
InputInOptions (16) This indicates whether a field's value has to be within the InputOptions list. This is used by Binding Objects' input validation process.
BooleanTrue (19) The string value that represents a Boolean value of True. This field is only relevant for extended fields with a data type setting of Boolean.
BooleanFalse (20) The string value that represents a Boolean value of False. This field is only relevant for extended fields with a data type setting of Boolean.
Dependencies (2) The fields that are used to calculate the value of a field. This is used by both Core Objects and Binding Objects to automatically detect when the value of a calculated field needs to be regenerated.
LinkedFile (22) The name of the file to which a field is a foreign key. This is used by Binding Object' input validation process and also by Adapter Objects to AutoLink DataTables.
U2.NET User Guide 94

95 U2.NET User Guide
LinkedFileIDField (23) The name of the item ID field within the LinkedFile.
LinkedFileDescField (24) The name of the primary descriptive field within the LinkedFile.
Notes (25) Allows general programmer/data usage notes to be stored with a definition. This field is for programmer reference only.
AdapterColumnName (26) This is only used by Adapter Objects and represents the name of the DataColumn created to hold the value of a field within an ADO.NET DataTable.
SysDelimTrans (27) This setting allows system delimiter translation to be turned on for a particular data field. This feature is only relevant for calculated fields representing multivalued/subvalued data. The calculated values have VM/SVM characters automatically replaced by space characters. This setting allows the developer to indicate how these space (or other) characters are to be converted back into VM/SVM characters.
SysDelimTransVM (28) Allows the character within calculated field values that represents a value mark to be defined.
SysDelimTransSVM (29) Allows the character within calculated field values that represents a subvalue mark to be defined.
Chapter 8 Sample Applications and Tutorials
This chapter describes the sample applications and tutorials installed as part of the UniData and UniVerse Add-ins for Visual Studio product.
U2.NET User Guide 96
Application Locations The Visual Studio 2005 sample applications are installed into:
C:\Program Files\U2\U2.NET\Version1.x\Examples.VS2005
The Visual Studio 2008 sample applications are installed into:
C:\Program Files\U2\U2.NET\Version1.x\Examples.VS2008
Core Objects Applications These applications illustrate the use of many of the Core Objects classes, namely:
• Accessing the Configuration Database manually • Establishing a database connection • Opening a data file • Reading, writing and deleting data items • Accessing item data • Selecting items • Utilizing btree indexes • Calling UniBasic or UniVerse BASIC subroutines
Binding Objects Applications These sample applications illustrate the use of many of the features within the Binding Objects module. Please refer to the Binding Objects Developer's Guide and the Binding Objects Tutorial for more details of this sample application and Binding Objects in general. The Binding Objects Tutorials are installed into:
C:\Program Files\U2\U2.NET\Version1.x\Examples\Binding Objects\Tutorials
Binding Objects Web Applications These sample applications illustrate the use of many of the features within the Binding Objects Web module. Please refer to the Binding Objects Developer's Guide and the Binding Objects Web Tutorial for more details of this sample application and Binding Objects in general.
97 U2.NET User Guide
The Binding Objects Web Tutorials are installed into:
C:\Program Files\U2\U2.NET\Version1.x\Examples\Binding Objects Web\Tutorials
Adapter Objects Applications These sample applications illustrate the use of many of the features within the Adapter Objects module. Use of both the visual and non-visual aspects of the ADO.NET data provider is illustrated. Please refer to the Adapter Objects Developer's Guide for more details of this sample application and Adapter Objects in general. The Adapter Objects Tutorial is installed into: C:\Program Files\U2\U2.NET\Version1.x\Examples\Adapter Objects\Tutorials
LINQ Applications These sample applications illustrate how to use Core Objects and the Language Integrated Query (LINQ) component of the .NET Framework to build a U2.NET application in Visual Studio. The LINQ Tutorials are installed into:
C:\Program Files\U2\U2.NET\Version1.x\Examples.VS2008\LINQ
U2.NET User Guide 98
Further Reading For more information about U2.NET or any of its components, refer to the following documents:
U2.NET User Guide This guide provides an overview of the U2.NET product. It discusses information about topics such as product installation, licensing, the Data Manager, and extended dictionary definitions. U2.NET Adapter Objects Developer's Guide This guide provides an overview of U2.NET's Adapter Objects component. Information about topics such as ADO.NET, the mvConnection class, the mvCommand class, dynamic normalization, and that Data Adapter wizard are all included in this guide. U2.NET Adapter Objects Tutorial This tutorial takes you through all the steps necessary to create a working application using Adapter Objects and the Data Manager. U2.NET Binding Objects Developer's Guide This guide provides an overview of U2.NET's Binding Objects component. Topics such as databinding, the PrimaryDataSource control, the SecondaryDataSource control, the mvNavigate control, the mvQuery control, and the Control Assistant are covered in this guide. U2.NET Binding Objects Tutorial This tutorial takes you through the steps necessary to create a working application using Binding Objects in the Microsoft Visual Studio environment. U2.NET Binding Objects Web Tutorial This tutorial helps you learn all the steps necessary to create a working AJAX-enabled Web application using Binding Objects in the Microsoft Visual Studio environment. U2.NET LINQ Tutorial This tutorial takes you through the steps involved in using Core Objects and the Language Integrated Query (LINQ) component of the .NET Framework to build a U2.NET application in Visual Studio.
99 U2.NET User Guide

U2.NET User Guide 100
U2.NET Getting Started Guide This guide provides a quick overview of the steps needed to begin using U2.NET, including installing and licensing the product.


