TrademarksThe following trademarks appear in this publication:
Trademark Trademark Owner
Rocket Software™ Rocket Software, Inc.
Dynamic Connect® Rocket Software, Inc.
RedBack® Rocket Software, Inc.
SystemBuilder™ Rocket Software, Inc.
UniData® Rocket Software, Inc.
UniVerse™ Rocket Software, Inc.
U2™ Rocket Software, Inc.
U2.NET™ Rocket Software, Inc.
U2 Web Development Environment™ Rocket Software, Inc.
wIntegrate® Rocket Software, Inc.
Microsoft® .NET Microsoft Corporation
Microsoft® Office Excel®, Outlook®, Word Microsoft Corporation
Windows® Microsoft Corporation
Windows® 7 Microsoft Corporation
Windows Vista® Microsoft Corporation
Java™ and all Java-based trademarks and logos Sun Microsystems, Inc.
UNIX® X/Open Company Limited
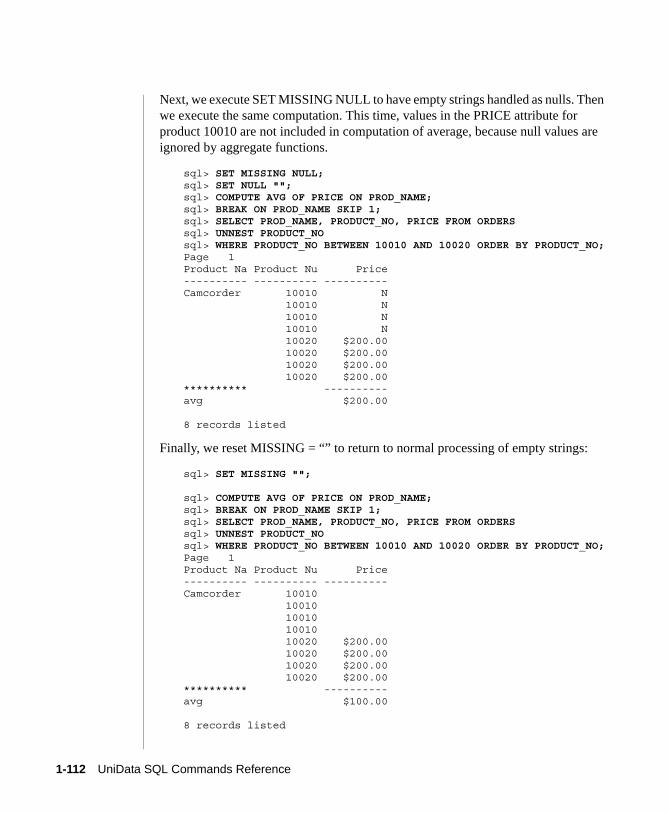
mands Reference
The above trademarks are property of the specified companies in the United States, other countries, or both. All other products or services mentioned in this document may be covered by the trademarks, service marks, or product names as designated by the companies who own or market them.
License agreementThis software and the associated documentation are proprietary and confidential to Rocket Software, Inc., are furnished under license, and may be used and copied only in accordance with the terms of such license and with the inclusion of the copyright notice. This software and any copies thereof may not be provided or otherwise made available to any other person. No title to or ownership of the software and associated documentation is hereby transferred. Any unauthorized use or reproduction of this software or documentation may be subject to civil or criminal liability. The information in the software and documentation is subject to change and should not be construed as a commitment by Rocket Software, Inc.
Restricted rights notice for license to the U.S. Government: Use, reproduction, or disclosure is subject to restrictions as stated in the “Rights in Technical Data-General” clause (alternate III), in FAR section 52.222-14. All title and ownership in this computer software remain with Rocket Software, Inc.
NoteThis product may contain encryption technology. Many countries prohibit or restrict the use, import, or export of encryption technologies, and current use, import, and export regulations should be followed when exporting this product.
Please be aware: Any images or indications reflecting ownership or branding of the product(s) documented herein may or may not reflect the current legal ownership of the intellectual property rights associated with such product(s). All right and title to the product(s) documented herein belong solely to Rocket Software, Inc. and its subsidiaries, notwithstanding any notices (including screen captures) or any other indications to the contrary.
Contact informationRocket Software275 Grove Street Suite 3-410Newton, MA 02466-2272 USA Tel: (617) 614-4321 Fax: (617) 630-7100Web Site: www.rocketsoftware.com
UniData SQL CommandsThis chapter provides complete descriptions of all commands in the UniData imple-mentation of Structured Query Language (SQL).
UniData SQL commands can be entered from the sql prompt or by encoding a series of SQL statements in an ASCII text file (UniData SQL script) with your system editor. You can then execute the script from the operating system prompt. This provides the capability of reusing a series of UniData SQL statements.
1-1
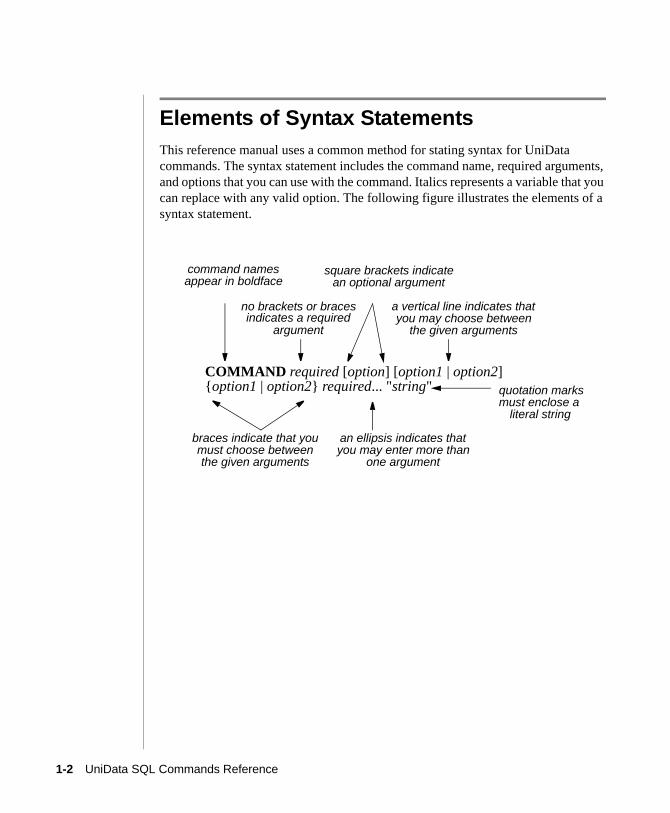
Elements of Syntax StatementsThis reference manual uses a common method for stating syntax for UniData commands. The syntax statement includes the command name, required arguments, and options that you can use with the command. Italics represents a variable that you can replace with any valid option. The following figure illustrates the elements of a syntax statement.
subqueryNOTIS [NOT] NULL[NOT] BETWEEN[NOT] IN[NOT] INTERSECT[NOT] LIKE
%, _, ..., nA, nN, nX
GROUP BYHAVING
UNIONORDER BYTOINTOLPTR
1-6 UniData SQL Commands Reference
UniData SQL LimitationsIn a SELECT statement, you cannot select more than 1000 attributes.All identifiers in UniData SQL, such as table_name, view_name, attribute_name, table_label, and all variables in OLD/NEW_VALUE of the COLUMN statement can be no longer than 30 characters.A UniData SQL statement cannot exceed 49 lines. The length of a single line of a UniData SQL statement, when used interactively, cannot exceed 272 characters.A single association cannot exceed 64 attributes.A table can contain a maximum of 12 associations.SELECT statement or clause cannot contain more than 255 virtual attributes.The IN predicate cannot contain more than five operators. Each operator must be a constant. The length of each constant cannot exceed 95 characters.Within a WHERE clause, the total number of predicates and Boolean operators cannot exceed 255.The ORDER BY clause can contain no more than nine elements (attribute names, expressions, and ordinal positions).The number of tables in the FROM clause of a SELECT statement is limited to 16. However, when performing a join, a new temporary table is created internally for every two joined tables in the FROM clause. Therefore, a join can contain no more than eight join tables, whereas a nested subquery with exactly one table at every level may contain up to 16 levels.The UNNEST clause can process 10,240 values in a multivalued or multi-subvalued attribute, or in all associations for the unnested record.The number of elements (column names, expressions, and functions) in a select list cannot exceed 1000.
DescriptionUse the ALTER TABLE command to add, modify, or delete attribute definitions in a table or to change the modulo for a table.
You cannot modify subtables with ALTER TABLE; you must delete and re-create them.
Note: attribute_definition syntax is fully described in Appendix A, “Defining Attri-butes.” When you use ALTER TABLE to modify or delete attribute_location, UniData SQL changes the dictionary entry for the attribute, which may make one or more attributes inaccessible (changing attribute location, for example). If you later add back the attribute at the same location, the data again becomes accessible.
You must update/reindex if you modify an indexed attribute.
KeywordsThe following table describes keywords you can use with ALTER TABLE.
Keyword Description
ADD Add an attribute definition to a table.
ALTER TABLE Keywords
1-8 UniData SQL Commands Reference
The parameters for ALTER TABLE are described under CREATE TABLE. Excep-tions and additions to these descriptions are noted in the following sections.
ALTER TABLE ADD
The ADD keyword creates a new attribute definition or alias. If no location is specified, the new attribute is assigned the next available location.
Syntax:
ALTER TABLE table_name ADD (attribute_definition [, attribute_definition]...)
Parameters
table_name is the name of the table to be modified. For a description of attribute_definition, see Appendix A, “Defining Attributes.”
Example: ALTER TABLE ADDsql> ALTER TABLE ORDERS ADDsql> (CATEGORY CHAR(10)); 1 attribute(s) added.
ALTER TABLE MODIFYThe MODIFY keyword modifies only the characteristics of the attribute you specify; other characteristics of the attribute remain the same. Note that UniData may update associations affected by the changes you make. The attribute you specify in the MODIFY clause must already exist in the dictionary; if it does not, UniData SQL displays an error message.
MODIFY Change the definition of an attribute in a table.
DELETE Delete an attribute definition from a table.
MODULO Change the modulo size/block size of a table. Controls the size of the table by assigning block size and number of blocks to store the data.
Keyword Description
ALTER TABLE Keywords (continued)
1-9
You can modify any characteristic of an attribute definition except the location of the @ID attribute.
Syntax:
ALTER TABLE table_name MODIFY (attribute_definition [, attribute_definition]...)
table_name is the name of the table to be modified. For a description of attribute_definition, see Appendix A, “Defining Attributes.” Data type in attribute_definition is optional for ALTER TABLE MODIFY.
Parameters
For a description of table_name, see CREATE TABLE. For a description of attribute_definition, see Appendix A, “Defining Attributes.”
Modifying Association Names
When you modify the association name of an attribute, UniData SQL makes corre-sponding changes to the PH attribute.
If you add a new association name to an attribute definition, UniData SQL creates a phrase attribute for that name and puts the related attribute name into the phrase of the PH attribute.If you add an existing association name to an attribute definition, UniData SQL adds the attribute name to the phrase of the PH attribute.If you remove the association name from an attribute definition, UniData SQL deletes that attribute name from the phrase of the associated PH attribute. If you remove the association name and it is not used in any other attribute definitions, UniData SQL deletes the association attribute (PH) from the dictionary.
Example: ALTER TABLE MODIFY
The following example demonstrates modifying the ORDERS table by adding a display name for the CLIENT_NO attribute:
The DELETE keyword deletes an attribute definition or alias. You cannot delete the @ID of the table unless it has at least one alias.
Syntax:
ALTER TABLE table_ spec DELETE (attribute_name[, attribute_name]...)
ALTER TABLE DELETE deletes the attribute definition, making the data inacces-sible. If you later add an attribute at the same location, the data again becomes accessible.
table_name is the name of the table to be modified. For a description of attribute_definition, see Appendix A, “Defining Attributes.”
Examples: ALTER TABLE DELETE
This example demonstrates deleting PRICE from the ORDERS table:
sql> ALTER TABLE ORDERS DELETE (PRICE); 1 attribute(s) deleted.
In the following example, the @ID is deleted from the ORDERS table, making the data in that attribute inaccessible. Notice that the @ID can be deleted because an alias exists in the ORDERS file for this attribute; the data are still accessible through this alias.
sql> ALTER TABLE ORDERS DELETE (@ID); 1 attribute(s) deleted.sql> SELECT @ID FROM ORDERS;@ID is not a field name.Transaction aborted.
1-11
Then, when the @ID is added back at the same location, the data is again accessible through that attribute name.
sql> ALTER TABLE ORDERS ADD (@ID NUMBER LOC(0)); 1 attribute(s) added.sql> SELECT @ID FROM ORDERS;Page 1 @ID---------- 912 801 941 805 830 970...
ALTER TABLE MODULO
The MODULO keyword resizes a static table. Disk space is reallocated based on the new MODULO. Assigning a new modulo physically rebuilds the file.
Syntax:
ALTER TABLE table_name MODULO m [,n]
Parameters
table_name is the name of the table to be modified. For instructions on setting MODULO, see CREATE TABLE.
Examplesql> ALTER TABLE CLIENTS MODULO 23;CLIENTS RESIZED from 19 to 23
1-12 UniData SQL Commands Reference
AUTO COMMIT
SyntaxAUTO COMMIT [ ON | OFF ]
DescriptionAUTO COMMIT ON causes each statement to commit immediately. AUTO COMMIT gives application developers and users enhanced transaction control capabilities.
ParametersThe following table describes each parameter of the syntax.
AUTO COMMIT Parameters
Parameter Description
ON Each UniData SQL statement is immediately committed, releasing all locks.
OFF Several statements can be combined into one transaction.Use the OFF parameter if you want to be able to commit or roll back a set of statements as a single unit.
no option Displays the current setting of AUTO COMMIT.
Note: Unlike SET TRANSACTION, which sets options that apply to the next transaction only, AUTO COMMIT affects all subsequent transactions until UniData SQL encounters another AUTO COMMIT statement.
1-13
ExampleThe following example demonstrates the use of AUTO COMMIT to display or change its status:
sql> AUTO COMMIT;Transaction auto commit option is ON.sql> AUTO COMMIT OFF;sql> AUTO COMMIT;Transaction auto commit option is OFF.
DescriptionThe BREAK command activates actions established by the COLUMN and COMPUTE commands, and adds printer directives to take place at the break.
Both BREAK and COMPUTE must specify the same “ON” level, such as “ON REPORT” or “ON fld1.”
A break may be associated with any of the following:
A change in value of a specified attributeThe end of a recordThe end of a report
BREAK actions include the following:
Skip a number of linesExecute a page breakPrint out messages
Note: Only one break command can be in effect at one time. The last break command overrides the preceding one.
1-15
ParametersThe following table describes each parameter of the syntax.
BREAK Options
Parameter Description
ON Breaks when the value of the attribute or expression changes.
attribute_name An attribute name on which to execute break commands.
expression Any combination of attribute names, constants, arithmetic operators, and UniData SQL functions that together select data. Expressions must be enclosed in quotation marks, and keywords must be entered in uppercase.
“text” Displays text at break. text must be enclosed in quotation marks.
VALUE Displays the value of attribute_name or expression.
NODUP Default. Prints only unique values.
DUPL Prints duplicate values.
ROW Breaks after every record.
REPORT Breaks at the end of the report.
BSKIP n Skips n lines before printing the break line.
SKIP n Skips n lines after printing the break line.
SKIP PAGE Skips to a new page after printing the break line. The keyword SKIP is optional.
no parameter Displays the current break definition.
1-16 UniData SQL Commands Reference
ExampleThe following example demonstrates the BREAK ON command, used to separate report information into a readable format. The break is set on PROD_NAME. Notice that the rows are also ordered by PROD_NAME so that all products of the same name are listed together.
sql> BREAK ON PROD_NAME SKIP 1;sql> SELECT PROD_NAME, FEATURES, COLOR, ID FROM INVENTORYsql> UNNEST LINE_ITEMSsql> ORDER BY PROD_NAME, FEATURES;Page 1Product ProductName Features Color Number---------- ------------------------------ ---------- ----------Adapter A/C Adapter for notebook N/A 10007 computers Ethernet LC Card N/A 13001 Workgroup Hub N/A 13002
CD Player Personal Model, Bass Boost Gray 39500 Portable Model Black 39400 Portable Model Gray 39400
...
1-17
BTITLE
SyntaxBTITLE [ print_clause | OFF | ON]
print_clause syntax:
{COL [n] | LEFT | CENTER | RIGHT} [ “text”] [FORMAT format | [TAB [n] ] old_val | “text”]...
DescriptionThe BTITLE command establishes a footer for printed and displayed reports created by SELECT statements. You can specify any number of constants and variables. These parameters are executed in the order in which they are defined. You can apply any number of BTITLE options to one or more attributes. If more than one BTITLE command is applied to the same attribute, the last command supersedes all previous commands.
Note: Execute the SHOW BTITLE command to display the current setting of BTITLE.
1-18 UniData SQL Commands Reference
ParametersThe following table describes each parameter of the syntax.
BTITLE Parameters
Parameter Description
print_clause Sets the following:Skip columns.Skip lines.Align title data left, center or right.Format "text" for display.For print_clause options, see the next table.
ON Turns the footer on, causing "text" to be printed.
OFF Turns the footer off.You do not have to redefine "text" to turn footers back on.
no parameter Displays BTITLE current settings.SHOW BTITLE also displays current settings.
print_clause ParametersThe following table describes each parameter of print_clause.
Clause Description
COL n Skips to the nth column before displaying the header. The first column is numbered 0.
SKIP n Skips n lines before printing out the text. The default is 1.
LEFT, CENTER, RIGHT
Aligns the title data on the current line. The data item (variable or text) is aligned as a group to the end of the statement, or to the next LEFT, CENTER, or RIGHT, or to the next COL, SKIP, or TAB. CENTER and RIGHT are calculated based on the LINESIZE option of the SET statement.
Print Clause Parameters
1-19
format Optionsformat specifies the display format for values in the footer. format must be enclosed in quotation marks, and can be one of the following:
Character Format Options – The format for a character string is An where n is the column width. The default is the length specified in the dictionary definition of the attribute.Date Format Options – You may not specify format options for date attri-butes; the formatting specified in the dictionary definition of the attribute is used.
FORMAT format Specifies a format model for the following data item. FORMAT is effective until the end of the statement or until another FORMAT clause is encountered in the same statement. format options are discussed following this table.
old_val Displays the current value of the variable old_val, set by OLD_VALUE in the previously executed COLUMN statement.
"text" Displays a two-line footer. The first line contains the date at the left and the page number on the right; the second line contains the center-aligned text. You can include any number of the following heading options enclosed in single quotation marks:C[n] – Centers heading or footing text within a line of n width.D – Inserts the current system date.L – Inserts a blank line.N – Suppresses the default prompt, “Enter new line to continue...”, that appears at the bottom of each screen page. Pages scroll without stopping until the report is finished. (The prompt displays only in inter-active mode.)P or S – Inserts the current page number.T – Inserts the time and date when report generation began.
TAB n Skips n columns from the current position.
Clause Description
Print Clause Parameters (continued)
1-20 UniData SQL Commands Reference
Numeric Format Options – Use the options in the following table to build a display mask for formatting numeric values.
format Numeric Options
Option Explanation Example
9 Determines number of digits displayed. 9999
0 Display leading zeros. 0999
$ Prefix displayed value with a dollar sign. $9999
B Print leading zeros as blank. B999
MI Display minus sign (-) after a negative value. 9999MI
PR Display a negative value in angle brackets 9999PR
. Align on the decimal point. 99.99
, Insert a comma every three digits. 99,999
V Multiply the value by the n power of 10, where n is the number of 9s after V.
999V99
EEEE Display the scientific notation (the format must contain four Es).
9.99EEEE
ExamplesThe following example demonstrates using the BTITLE command to learn its status. The preceding COLUMN command establishes the variable old_val, which is displayed in the BTITLE setting.
sql> COLUMN PROD_NAME OLD_VALUE old_val; sql> BTITLE SKIP 2 COL 0 "Product:" TAB 15 old_val;sql> BTITLE ON; sql> BTITLE;Btitle is ONBtitle skip 2 col 0 'Product:' tab 15oldval
1-21
The next example demonstrates creating a header and footer, then displaying them by executing a SELECT statement. The SET PAGESIZE command causes the display page to be 10 lines long; SET LINESIZE establishes a 40-character-wide display area.
sql> SET PAGESIZE 10;sql> SET LINESIZE 40;sql> TTITLE "Page TOP Title";sql> BTITLE "Page BOTTOM Title";sql> TTITLE ON;sql> BTITLE ON;sql> SELECT ID FROM ORDERS;
The following is output from the preceding commands:
Jun 17 1996 Page 1 Page TOP Title Order Number---------- 912 801 Page BOTTOM TitleEnter <New line> to continue...Q
The next example demonstrates the following:
SET LINESIZE – to set the report width to 40 charactersCOLUMN...NEW_VALUE...OLD_VALUE – to save the current and old value of PROD_NAME (from the INVENTORY table)TTITLE settings:
SKIP 2 – to skip two lines before displaying the report title (Product Prices)CENTER – to center the report title (Product Prices)SKIP 2 – to skip two lines before displaying the next title line (Product)TAB 2 – to skip two spaces before printing the new value of PROD_NAMEON – to turn the header on
1-22 UniData SQL Commands Reference
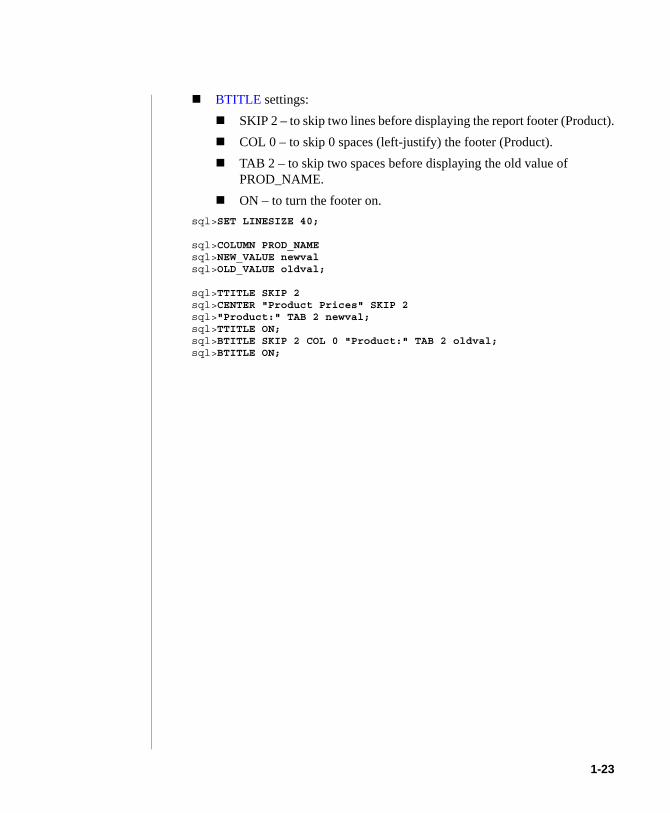
BTITLE settings:SKIP 2 – to skip two lines before displaying the report footer (Product).COL 0 – to skip 0 spaces (left-justify) the footer (Product).TAB 2 – to skip two spaces before displaying the old value of PROD_NAME.ON – to turn the footer on.
The following SELECT statement displays output formatted by the above commands. Notice that the first header does not display a product name after “Product:” because the variable old_val has not yet been assigned a value.
sql>SELECT ID, PROD_NAME, PRICE FROM INVENTORY ORDER BY PROD_NAME; Product Prices
Product: Product Product Number Name Price---------- ---------- ---------- 10007 Adapter $129.95 13001 Adapter $94.00 13002 Adapter $150.00 39400 CD Player $89.87 $89.87... 30000 CD System $99.96 1 $99.96 37000 CD System $199.92 10 Product: CD System 10 Product Prices Product: CD System 11 Product Product Number Name Price---------- ---------- ---------- 38000 CD System $159.87 11 39000 CD System $249.96 12 $249.96...
For more examples, see TTITLE.
1-24 UniData SQL Commands Reference
CLEAR
SyntaxCLEAR {BREAK | COLUMN | COMPUTE}
DescriptionThe CLEAR command erases the current definition for the specified option.
ParametersThe following table describes each parameter of the syntax.
CLEAR Parameters
Parameter Description
BREAK Clears the break definition specified by the BREAK command.
COLUMN Clears column definitions defined by the COLUMN command.
COMPUTE Clears computation definitions set by COMPUTE commands.
DescriptionThe COLUMN command associates display formats for column headings with specified attributes. If more than one COLUMN command is applied to the same attribute, the last overrides all previous settings.
Tip: The COLUMN command formats all displayed attributes of the same name in all tables. When selecting columns of the same name from multiple tables, avoid confusion by assigning an attribute label to at least one of them in the SELECT statement that uses the COLUMN setting.
1-26 UniData SQL Commands Reference
ParametersThe following table describes each parameter of the syntax.
Parameter Description
attribute_name Specifies the attribute to format.
expression Any combination of attribute names, constants, arithmetic operators, and UniData SQL functions that together select attri-butes to be associated with display formats. Expressions that contain spaces must be enclosed in quotation marks. expression must be defined the same way as in the SELECT statement. Keywords must be entered uppercase even if they were lowercase in the SELECT statement.
ALIAS alias Assigns an alias to expression or attribute_spec. You may use this alias in expression or attribute_spec anywhere in the statement; however, alias must be defined for each statement.
CLEAR Removes the column definition for expression or attribute_spec.
DEFAULT Resets the column definition to default settings, including PRINT ON and WRAP ON.
FORMAT column_format
Formats values displayed in this column. For information on these options, see “column_format Options” following this table.
HEADING "text" Assigns a column heading. The default column heading is the attribute name or the expression itself. Enclose text within quotation marks if it contains spaces or special characters. If the text contains HEADSEP, the column heading is displayed over multiple lines.
JUSTIFY Aligns the column heading. HEADING must be specified to use JUSTIFY.LEFT – Left-align column heading.CENTER – Center column heading.RIGHT – Align column heading at right column margin.
LIKE “expression”LIKE attribute_label
Copies the COLUMN specification of another column, or as defined in expression. LIKE attribute_label copies the display name of an attribute.
COLUMN Parameters
1-27
column_format Options
column_format specifies the display format for values in the column. column_format must be enclosed in quotation marks, and can be one of the following:
NEWLINE With SET WRAP HORI, starts a new line before displaying the value of a column. With SET WRAP DEF, switches to vertical format.
NEW_VALUE new_val
Saves the current value of an attribute for use in TTITLE statements to print a header that reflects current attribute values.
NOPRINT PRINT
Turns on or off printing column text. The default is PRINT.
NULL "text" With null value handling on, the text variable specifies text to be displayed for the null value. This text overrides the default text specified in the NULL clause of the SET command, if any. If you do not specify text for the null value in either the COLUMN command or the SET command, the null value is represented by an empty string.With null value handling off, this keyword has no effect.
OFF ON
Turns COLUMN settings off or on without affecting the settings. The default is ON.
OLD_VALUE old_val Saves the current value of an attribute for use in BTITLE statements to print a footer that reflects current attribute values.
SPACE n Places the next column n spaces to the right of the current position. Defaults to the position established by the SET command (SET SPACE n).
WRAPPED WORD_WRAPPED TRUNCATED
Specifies wrapping or truncating of column text when text is wider than the column.WRAPPED wraps text to the next line; default.WORD_WRAPPED wraps text without breaking words.TRUNCATED deletes text that does not fit in the column.
no option Displays current column definitions.
Parameter Description
COLUMN Parameters (continued)
1-28 UniData SQL Commands Reference
Character Format Options – The format for a character string is An where n is the column width. The default is the length specified in the dictionary definition of the attribute.Date Format Options – You cannot specify format options for date attri-butes; the formatting specified in the dictionary definition of the attribute is used.Numeric Format Options – Use the options in the following table to build a display mask for formatting numeric values.
column_format Numeric Options
Option ExplanationExample of Mask
9 Represents one numeric display position. 9999
0 Display leading zeros. 0999
$ Prefix a dollar sign before the displayed value. $9999
B Print leading zeros as blank. B999
MI Display minus sign (-) after a negative value. 9999MI
PR Display a negative value in angle brackets 9999PR
. Align on the decimal point. 99.99
, Insert a comma where placed in the mask. 99,999
V Multiply the value by the n power of 10, where n is the number of 9s after V.
999V99
EEEE Display the scientific notation (the format must contain four Es).
9.99EEEE
ExamplesThe following COLUMN statement skips a line after ORD_TIME is displayed, and presents the data in vertical format:
sql> COLUMN ORD_TIME NEWLINE;
1-29
The following output is produced when you select ORD_TIME after executing the above COLUMN command:
sql> SELECT ORD_DATE, ORD_TIME FROM ORDERS;Page 1Order Date 01/13/1996Order Time 12:30PM Order Date 09/28/1995Order Time 04:34PM Order Date 01/14/1996Order Time 03:00PM...Enter <New line> to continue...Q
Next, we clear the COLUMN setting and execute the same SELECT statement:
sql> CLEAR COLUMN;columns clearedsql> SELECT ORD_DATE, ORD_TIME FROM ORDERS;
The same attributes are displayed as in the preceding example, but no lines are skipped:
Page 1 Order Order Date Time---------- -------01/13/1996 12:30PM09/28/1995 04:34PM01/14/1996 03:00PM10/05/1995 11:11AM01/24/1996 03:09PM01/15/1996 10:00AM12/04/1995 09:45AM01/24/1996 03:27PM12/13/1995 12:51PM...Enter <New line> to continue...Q
1-30 UniData SQL Commands Reference
COMMIT
SyntaxCOMMIT [WORK]
DescriptionThe UniData SQL COMMIT command concludes an active transaction. The optional keyword WORK is provided for backward compatibility.
If a COMMIT command executes without an active transaction, UniData SQL displays the following error message:
Invalid transaction termination: no active transaction.
The system performs the following steps during a transaction commit:
Disables the break key.Writes all updates.Releases all locks acquired within the transaction.Enables the break key.
If the transaction cannot commit, the system performs the following steps:
Aborts the transaction.Releases all locks acquired within the transaction.
1-31
UniBasic STATUS Function Return Values
The UniBasic STATUS function returns the values in the following table if executed immediately after the UniData SQL COMMIT command.
UniBasic STATUS Return Values
Value Description
0 The commit completed successfully.
1 Transaction not started.
3 Transaction cannot commit.
1-32 UniData SQL Commands Reference
COMO
SyntaxCOMO option filename
DescriptionThe COMO command saves the history of a user session. When you open a COMO file, UniData SQL stores all terminal input and output in the UniData SQL DIR-type table, _PH_, in the file O_filename (O_filename is a UNIX sequential file).
To specify a COMO file name that is not SQL compliant, enclose the file name in quotation marks, as shown in the following statement: COMO ON “file.name”.
Tip: COMO files grow very quickly. IBM recommends that you periodically review and delete unused COMO files.
option ValuesThe following options are valid for use with COMO.
COMO Options
Option Description
ON Opens a new COMO output file. If filename exists, contents are overwritten.
OFF Closes the COMO file and stops capturing terminal display.
SPOOL Sends a copy of a selected COMO file to the printer.
DELETE Deletes the specified COMO file from the _PH_ table.
LIST Lists all the COMO files in the _PH_ table.
APPEND Appends terminal display to an existing COMO file.
1-33
ExamplesNote: The following examples show the COMO file name as it appears in UniData for UNIX. If you are using UniData for Windows Platforms, you would see the full path for the COMO file (such as D:\UniData72\demo\_PH_\O_SAVESQL).
The following example demonstrates creating a COMO file, executing a command, and closing the COMO file:
sql> COMO ON SAVESQL;/usr/ud72/_PH_/O_SAVESQL establishedsql> SELECT * FROM INVENTORY;Page 1INVENTORY 53050Inventory Date 01/09/1996Inventory Time 08:00AMProduct Name PhotocopierFeatures Personal PhotocopierColor Quanti Price Reorde---------- ------ ---------- ------Beige 785 $369.95 50 INVENTORY 56060Inventory Date 01/11/1996Inventory Time 12:00PMProduct Name TrackballFeatures Super Deluxe ModelColor Quanti Price Reorde---------- ------ ---------- ------Gray 494 $98.99 70 INVENTORY 57030Inventory Date 12/15/1995Inventory Time 05:34PMProduct Name ScannerEnter <New line> to continue...Qsql> COMO OFF SAVESQL;_PH_/O_SAVESQL closed
1-34 UniData SQL Commands Reference
The next example shows the contents of the COMO file SAVESQL.
/usr/ud72/_PH_/O_SAVESQL establishedsql> SELECT * FROM INVENTORY;Page 1INVENTORY 53050Inventory Date 01/09/1996Inventory Time 08:00AMProduct Name PhotocopierFeatures Personal PhotocopierColor Quanti Price Reorde---------- ------ ---------- ------Beige 785 $369.95 50 INVENTORY 56060Inventory Date 01/11/1996Inventory Time 12:00PMProduct Name TrackballFeatures Super Deluxe ModelColor Quanti Price Reorde---------- ------ ---------- ------Gray 494 $98.99 70 INVENTORY 57030Inventory Date 12/15/1995Inventory Time 05:34PMProduct Name ScannerEnter <New line> to continue...Qsql> COMO OFF SAVESQL;
1-35
COMPUTE
SyntaxCOMPUTE {AVG | COUNT | MAX | MIN | NUMBER | STD | SUM | VARIANCE...} OF {expression | attribute_name}... ON {expression | attribute_ name | REPORT | ROW...}
DescriptionThe COMPUTE command performs computations on groups of data selected by a SELECT statement. You may apply multiple COMPUTE commands to the same column.
To activate options set with COMPUTE, you must subsequently execute the BREAK command and specify the same ‘ON’ condition as in the COMPUTE statement. You must also display the BREAK attribute for COMPUTE to take effect. When the break (change in data value) occurs, UniData SQL performs the calculations specified by the COMPUTE statement.
Tip: Use ORDER BY in the SELECT statement that uses the COMPUTE settings to order the rows in the correct sequence.
ParametersThe following table describes each parameter of the syntax.
Parameter Description
AVG Computes the average value. Valid for numeric data.
COUNT Counts the number of values in a row. Valid for all data types. UniData SQL does not count the null value.
MAX Finds the largest value. Valid for numeric and character type data.
MIN Finds the smallest value. Valid for numeric and character type data.
COMPUTE Parameters
1-36 UniData SQL Commands Reference
NUMBER Counts the number of records in a table. Valid for all data types and the null value.
STD Computes the standard deviation. Valid for numeric data.
SUM Computes the sum of the values. Valid for numeric data.
VARIANCE Computes the variance. Valid for numeric data.
OF expression attribute_name
Specifies expression or attribute_name to use in computations. Settings made in the COMPUTE statement execute when you select this specified attribute or expression in subsequent SELECT statements.To perform computations using an attribute without printing the result, execute the NOPRINT option in the COLUMN command against that attribute_name.
ON expression attribute_name
Specifies expression or attribute_name to compute on. For a compu-tation and break to occur on an attribute, you must also specify attribute_name in a BREAK command. When the break (change in data value) occurs, UniData SQL executes COMPUTE command computations.
REPORT Prints the result of computations at the end of the report.
ROW Prints the result of computations and restart the computation for each row.
Parameter Description
COMPUTE Parameters (continued)
1-37
ExamplesThe following example demonstrates the use of COMPUTE to obtain the average price of all items in the ORDERS file:
sql> COMPUTE AVG OF PRICE ON REPORT;sql> BREAK ON PRICE ON REPORT;sql> SELECT PRICE FROM ORDERS;Page 1 Price---------- $129.95 $1,799.00 $1,399.99 $149.97 $429.94 $29.97 $48.82 $34.97 $8.99 $24.99...---------- $735.92
The next example demonstrates using the COMPUTE command to obtain daily sales totals:
sql> BREAK ON ORD_DATE SKIP 1;sql> COLUMN ORD_DATE HEADING "Order|Placed On:" JUSTIFY CENTER;sql> COMPUTE SUM OF PRICE ON ORD_DATE;sql> SELECT ORD_DATE, @ID, CLIENT_NO, PRODUCT_NO, QTY, PRICE FROM ORDERSsql> ORDER BY ORD_DATE;
The final example shows a partial listing of the output produced by these statements:
Page 1 Order ClientPlaced On: ORDERS Number Product Nu Qty Price---------- ---------- ---------- ---------- ------ ----------01/01/1968 804 9967 11100 1 $139.86 11120 2 $14.97 11130 1 $49.97 11140 1 $149.97 10050 1 $29.97********** ----------sum $384.74
SyntaxCREATE INDEX index_name ON table_name (attribute_name)
DescriptionThe UniData SQL CREATE INDEX command creates an alternate key index on attribute_name in the table specified by table_name. The UniData SQL CREATE INDEX command also builds the index with data from the table being indexed.
Note: The UniData SQL CREATE INDEX command performs the functions of both ECL commands CREATE.INDEX and BUILD.INDEX.
The greater the number of records, the more an index reduces access time. In a table containing a large number of records, an index significantly reduces the amount of time required for a SELECT to display data (providing the SELECT statement has a search condition that takes advantage of the index).
The alternate key attribute, designated by attribute_name, may be any D-type singl-evalued or multivalued attribute, virtual attribute, or may be a phrase that contains only one attribute. For indexes based on virtual attributes, index_name must be the same as attribute_name. You can create indexes on different attributes in one data table; however, you cannot create more than one index on a single attribute.
When you create the first index for a table, UniData SQL prompts you to enter a length for the alternate key.
Note: CREATE INDEX does not check the data for duplicate records. To check for duplicate records when creating an index, use the ECL command CREATE.INDEX.
Allocate a length that will accommodate the longest value in all attributes to be indexed. An adequate key length makes the index efficient but does not prevent it from accepting longer values. Maximum key length is 1020 plus the number you assign. The default key length is 20.
1-40 UniData SQL Commands Reference
ExamplesThe following example demonstrate creating an alternate key index for the INVENTORY table on the attribute PROD_NAME. The new index is named PROD_IDX. Because this is the first index to be created on INVENTORY, the user is prompted for alternate key length.
sql> CREATE INDEX PROD_IDX ON INVENTORY (PROD_NAME);Alternate key length (default 20): 50"PRODUCT" createdOne "*" represents 1000 records
Building "PROD_IDX" ...
175 record(s) processed.
The next example demonstrates creating an index, then using it to decrease the length of time required to access data when a SELECT is performed on the indexed field. Without an index on CLIENT_NO, the same SELECT statement might take several times longer to retrieve the data.
sql> CREATE INDEX CLIENT_ORDS ON ORDERS(CLIENT_NO);"CLIENT_ORDS" createdOne "*" represents 1000 records
DescriptionThe CREATE SUBTABLE command creates a UniData SQL view that presents values from the base table in such a way that those values can be viewed and updated using 1NF ANSI-standard SQL Data Manipulation Language (DML) commands. This enables you to update data in UniData SQL base tables using desktop tools that access these subtables through UniData ODBC.
Representing Multivalues and Multi-Subvalues
You must unnest multivalued and multi-subvalued attributes in the SELECT clause that is a part of the CREATE SUBTABLE statement. If you do not, the system displays an error message and does not create the subtable.
Subtable Requirements
To represent the three nested levels of data within UniData SQL tables (singlevalued, multivalued, and multi-subvalued), you must create three subtables: one for each nested level. The nested levels are referred to as NL0, NL1, and NL2.
NL0 subtable represents singlevalued attributes.NL1 subtable represents multivalued attributes. All multivalued attributes must be in the same association.NL2 subtable represents multi-subvalued attributes. All multi-subvalued attributes must be in the same association.
1-42 UniData SQL Commands Reference
These subtables are linked through primary and foreign keys.
Note: You cannot create a single subtable that contains attributes from different associations or that combine more than one value type—such as combining multivalued and multi-subvalued attributes. If you do, UniData returns an error message indicating the type of error, such as: a subtable cannot contain both ‘MV’ and ‘MS’ attributes. (Note that the foreign key, which is the primary key of the subtable or table at the next-higher level, is the only exception to this rule.)
Primary and Foreign Keys
The NL0 subtable defines the primary key. The purpose of a primary key is to specify one or more attributes whose data values are unique among all values for that record. UniData SQL does not allow a record to be added to a subtable with a duplicate key value.
The primary key of the NL0 subtable becomes the foreign key in the NL1 subtable. To enable UniData SQL to locate the primary key, you name the NL0 subtable in the REFERENCES clause of the CREATE SUBTABLE statement that creates the NL1 subtable.
To create an NL2 subtable, use the NL1 subtable’s primary key as the NL2 table’s foreign key, and list the NL1 subtable name in the REFERENCES clause. No primary key is required when you create an NL2 subtable, because no lower-level subtable will reference this (NL2) subtable. However, you may want to define a primary key for NL2 subtables to ensure the uniqueness of the data. The primary and foreign keys accomplish the same data relationships in subtables as associations do in UniData SQL base tables.
The following table summarizes the number and value type of attributes required to create primary and foreign keys in subtables.
Primary and Foreign Keys for Subtables
Key Subtable
Type NL0 NL1 NL2
Primary 1 S 1 S, 1 MV 1 S, 1 MV, 1 MS
Foreign n/a 1 S 1 S, 1 MV
1-43
Note: If you create an NL1 subtable without a primary key and later decide you want to create an NL2 subtable, you must drop the NL1 subtable and create an NL1 subtable with a primary key. After this, you can create an NL2 subtable that references the primary key in the NL1 subtable.
Unique and Generated Keys
You create one of the following types of primary or foreign keys for each subtable:
Unique keys, in which the uniqueness of the key value depends on the data itself. In this case, actual attribute names are used in the PRIMARY KEY or FOREIGN KEY clauses.Generated keys, in which UniData SQL assigns a number to be part of each key value, so that the key value is unique even when the data itself is not. In this case, use NL1_KEY or NL2_KEY in the SELECT statement, rename the selected values, and use these new names in the PRIMARY KEY or FOREIGN KEY clause. The concept of unique and generated keys applies to both primary and foreign keys, because the foreign key of the referencing subtable is the primary key of the referenced subtable.
1-44 UniData SQL Commands Reference
ParametersThe following table describes each parameter of the syntax.
CREATE SUBTABLE Parameters
Parameter Description
subtable_name Specifies the name of the new subtable. Subtable names can contain alphabetic characters, numbers, or the underscore character. ODBC prohibits the use of other special characters.The following restrictions apply to subtable names:The first character of the name cannot be a number.The subtable name must be unique among tables, subtables, and views in the database.The maximum length of a subtable name is 30 characters.
attribute_subtable_name The name to be used for the attribute in this subtable. If you rename one attribute, you must list all attributes, even if you use the attribute name from the base table. You must rename attri-butes when an expression is included in query_spec.
AS SELECT query_spec Selects data to include in the subtable. query_spec is defined in the SELECT statement section of this manual.You must unnest nested attributes to create a subtable through which you can update the base table.The SELECT clause cannot contain more than 255 virtual attributes.
PRIMARY KEY attribute_name
One or more attributes to use as the primary key for this subtable. If you rename an attribute (see the preceding description for attribute_subtable_name), you must use the new name here.
FOREIGN KEY attribute_name
One or more attributes to use as the foreign key for this subtable. The foreign key refers to the primary key of a subtable one nested level higher. If you rename an attribute (see renamed_attribute, above), you must use the new name here.
REFERENCES subtable_name
The corresponding subtable name, one nested level higher. The subtable name contains, as a primary key, the attribute_names listed in the FOREIGN KEY clause of this statement.
1-45
Examples
Unique Key Subtable
The following statement creates an NL0 subtable that specifies a unique primary key. It does not rename any attributes, but uses attribute names from the dictionary of the CLIENTS table. Notice that the alias ID is used instead of @ID so that the subtable is ODBC accessible. Also, this NL0 subtable contains only singlevalued attributes from the CLIENTS base table.
sql> CREATE SUBTABLE CLIENTS_NL0 ASsql> SELECT ID, FNAME, LNAME, COMPANY,sql> CITY, STATE, ZIP_CODE, COUNTRYsql> FROM CLIENTSsql> PRIMARY KEY ID;
Subtable CLIENTS_NL0 created.
The following SELECT statement lists the contents of this subtable:
sql> SELECT * FROM CLIENTS_NL0 ORDER BY ID;Page 1Client # 9965First Name GaryLast Name PhillipsCompany Name Bank and TrustCity New YorkState/Territory NYPostal Code 00213Country USA
Client # 9966First Name PhilLast Name BeckerCompany Name Travelbooks, Inc.City HawthornState/Territory Vict. ...
1-46 UniData SQL Commands Reference
Unnesting
The following statement creates an NL1 subtable that is associated by foreign key to CLIENTS_NL0, which we just created:
The following statement displays the contents of CLIENTS_NL1:
sql> SELECT * FROM CLIENTS_NL1 ORDER BY ID, PHONE_TYPE;Page 1 Client # Phone Cate Phone Number---------- ---------- -------------- 9965 Fax 2125556162 9965 Work 2125556161 9966 Fax 0398171799 9966 Work 0398171788 9967 Fax 2045158892 9967 Work 2045154562...
Unnesting NL1 and NL2
The next series of examples demonstrates creating NL0, NL1, and NL2 subtables that are linked by primary and foreign keys. This first statement creates the NL0 subtable. Notice that this statement does not rename the attributes, but uses the attribute names from the CLIENTS table dictionary. The new subtable contains unique primary keys; no foreign key is allowed, because this is the top (NL0) level subtable.
sql> CREATE SUBTABLE ORDER_NL0 sql> AS SELECT ID, CLIENT_NO, ORD_DATE, ORD_TIMEsql> FROM ORDERSsql> PRIMARY KEY ID;
Subtable ORDER_NL0 created.
1-47
The following SELECT statement lists the contents of this new subtable:
sql> SELECT * FROM ORDER_NL0;Page 1 Order Client Order Order Number Number Date Time---------- ---------- ---------- ------- 912 9984 01/13/1996 12:30PM 801 10018 09/28/1995 04:34PM 941 10009 01/14/1996 03:00PM 805 9987 10/05/1995 11:11AM 830 10013 01/24/1996 03:09PM 970 9988 01/15/1996 10:00AM 863 10006 12/04/1995 09:45AM... 834 10004 01/24/1996 03:27PM 922 10021 01/13/1996 09:39AM 811 10023 10/02/1995 10:10PM193 records listed
The next example demonstrates creating the NL1 subtable. Notice that multivalued attributes are selected and unnested in the subtable.
sql> CREATE SUBTABLE ORDER_NL1sql> AS SELECT ID, PRODUCT_NO, PROD_NAMEsql> FROM ORDERSsql> UNNEST PRODUCT_NO, PROD_NAMEsql> PRIMARY KEY ID, PRODUCT_NOsql> FOREIGN KEY ID REFERENCES ORDER_NL0;
1-48 UniData SQL Commands Reference
The following SELECT statement displays the (unnested) multivalued table, ORDER_NL1:
sql> SELECT * FROM ORDER_NL1;Page 1 Order Number Product Nu Product Na---------- ---------- ---------- 912 53000 Printer Cartridge 801 11000 Computer 941 50000 Computer... 818 14001 Memory 818 14002 Memory 818 14003 Memory 818 13004 Hard Drive 818 13005 Hard Drive 818 13006 Hard Drive 818 54030 Hard Drive 818 54060 Hard Drive 818 54080 Disk Drive...Page 32 Order Number Product Nu Product Na---------- ---------- ---------- 811 13002 Adapter 811 15001 Modem487 records listed
The next example demonsrates creating the NL2 subtable, which unnests the multi-subvalued attributes:
DescriptionThe CREATE TABLE command performs two functions:
Creates a new base table in your database.Stores the attribute definitions in the table’s dictionary.
UniData SQL automatically creates the singlevalued attribute @ID at location 0; the display name is the name of the table, the format is 10L, indicating a character attribute 10 characters long, and it is left-justified.
attribute_definition is explained in Appendix A, “Defining Attributes.”
Note: If quotation marks are included in the definition, use single quotation marks in embedded definitions; for example: “TRANS(‘clients’, client_nbr, ‘client’, ‘X’)”
1-51
The following table describes each parameter of the syntax:
Parameter Description
table_name Specifies the name of the new table. Valid table names can contain alphabetic characters, numbers, and the following special characters: “_”, “@”, “#”, and “$”.If you plan to access the data in a table, subtable, or view via ODBC, do not use @, #, or $ anywhere in the table name, and do not use an underscore (_) as the first character.The following restrictions apply to table names:The table name cannot be longer than 30 characters.The first character of the name cannot be a number.The table name must be unique among tables, subtables, and views in the database.The table name cannot be a UniData SQL reserved word.
attribute_definition The following elements make up attribute_definition. You must include data type immediately after each attribute name you define. The other elements are optional and can be entered in any order.Attribute name (required)Data type (required)Location relative to the beginning of the recordVirtual attribute definitionDisplay nameFormat descriptionValue type specification (Default is singlevalued – S)Association nameSystem default format and conversion are assigned based on data type when neither is specified. These defaults are provided in the data type sections of Appendix A, “Defining Attributes.”
MODULO no_blocks[, block_size]
Controls the size of the table by assigning block size and number of blocks to store the data.This syntax is explained in the following section, “Assigning Modulo.”
CREATE TABLE Parameters
1-52 UniData SQL Commands Reference
Assigning Modulo
UniData SQL reserves space on the disk to be used for the table based on the modulo number, which determines the size of the table by assigning a specific number of blocks to store the data as well as the size of the blocks. The default modulo is 1 for static files, and 3 for dynamic files.
Setting the modulo properly minimizes system overhead in the future. The purpose of deciding on the “best” modulo number is to cause UniData SQL to allocate the appropriate number of blocks of disk space when the table is created.
If you set modulo too small and the table becomes very large, the system has to handle the overflow of newly inserted data at that time, which is very inefficient. Table access (SELECT, UPDATE, and so forth) will be slower than if the table had been properly sized.
There are two kinds of overflow: Level-1 and Level-2. Static hashed tables created with too small of a modulo experience Level-2 overflow as they become larger, and ALTER TABLE MODULO can correct the problem. Dynamic tables adjust their own modulo automatically as the table expands and contracts. For further infor-mation on UniData SQL file types, see Administering UniData.
DYNAMIC Creates a dynamic table. For further information on dynamic tables, see Administering UniData.
KEYONLY Used only with the DYNAMIC keyword. Sets the split/merge type for a dynamic file to KEYONLY, meaning that the load factor in each group is based on keys and pointers only. This is the default split/merge type.
KEYDATA Used only with DYNAMIC keyword. Sets the split/merge type for a dynamic file to KEYDATA, meaning that the load factor in each group is based on keys and pointers plus data.For further information about split/merge types, see the UniData Commands Reference manual.
TRANSACTION RECOVERABLE
Creates a recoverable table. TRANSACTION and RECOV-ERABLE are synonyms. For further information on recoverable tables, see Administering the Recoverable File System.
Parameter Description
CREATE TABLE Parameters (continued)
1-53
Syntax:
MODULO no_blocks[, block_size]
Parameters
The following table describes each parameter of the syntax.
MODULO Parameters
Parameter Description
no_blocks Numbers of blocks required to store the data; must be a prime number. (Also controls data hashing.)
, block_size_multiplier A number, 1–16, multiplied by 1024, indicating block size (or 0, indicating a block size of 512). Default block size is usually 1024 bytes, although it may be configured. For further infor-mation, see your system administrator .0 – UniData SQL assigns the smallest block size, 512 bytes.>16 – UniData SQL interprets as 16.<1 – UniData SQL interprets as 0.
The Procedure
Follow the steps outlined below to determine MODULO setting:
1. Determine the block size. Choose a larger block size for tables that store very long records or a large number of records.
2. Calculate the average number of records stored in one block.records per block=(block_size - 32)/(avg. record length + 9)avg. record length is the estimated average length of the records you plan to store in the table.Tip: The FILE.STAT command reports the average number of bytes in a record.
3. Divide the estimated number of records you plan to store in the table by the records per block number.no. of records/records per block
1-54 UniData SQL Commands Reference
4. Round up the results to the closest prime number. This is no_blocks, the minimum number of blocks your table must have.Tip: Use the ECL command PRIMENUMBER to obtain the prime number closest to the number you calculate.
ExamplesThe following statement creates a table, NEW_TAB, that has three attributes: one character and two numeric. The numeric attribute MONEY_FLD contains a conversion code that formats dollars with two decimal places, preceding negative numbers with a minus sign (-).
The following example lists the dictionary entry for this table:
sql> LISTDICT NEW_TAB;
Page 1@ID TYP LOC CONV NAME FORMAT SM ASSOC--------------- --- ------------- ---- --------------- ------ -- ----------@ID D 0 NEW_TAB 10L SNUM_FLD D 1 10R SCHAR_FLD D 2 10L SMONEY_FLD D 3 MD2$ 10R S ,-4 records listed
The next statement creates a table that has the following attributes:
CHAR_FLD – data type character, length of 5DATE_FLD – data type date, formatted as mm/dd/yyNUM_FLD – data type numeric, formatted with preceding dollar sign; including two decimal places
1-55
CHAR2_FLD – data type character, length of 12, centered within a column 25 characters wide
sql> LISTDICT NEW_TAB;Page 1@ID TYP LOC CONV NAME FORMAT SM ASSOC--------------- --- ------------- ---- --------------- ------ -- ----------@ID D 0 NEW_TAB 10L SNUM_FLD D 1 10R SCHAR_FLD D 2 10L SMONEY_FLD D 3 MD2$ 10R S ,-VIRT_FLD V NUM_FLD * MON 10R S EY_FLD5 records listed
1-56 UniData SQL Commands Reference
CREATE VIEW
SyntaxCREATE VIEW view_name [(view_attribute_name [,view_attribute_name...])] AS SELECT query_spec
DescriptionThe CREATE VIEW command defines a view of base tables or existing views. You can update a base table through a view in UniData SQL unless the view was created by a join.
1-57
ParametersThe following table describes each parameter of the syntax.
CREATE VIEW Parameters
Parameter Description
view_name Specifies the name of the new view. View names may contain alphabetic characters, numbers and the underscore character. ODBC prohibits the use of other special characters.The following restrictions apply to view names:The first character of the name may not be a number.The view name must be unique among tables, subtables, and views in the database.The maximum length of the view name is 30 characters.
view_attribute_name Specifies a name for the attribute in the new view. The first character must be an alphabetic character or underscore (_). Consists of the following elements:Alphabetic charactersNumbersThe number of attribute_names in CREATE VIEW must be the same as the number of attribute_names or expressions in the SELECT clause.
AS SELECT query_spec
Selects data to include in the view. query_spec is defined in the SELECT statement section of this manual.
1-58 UniData SQL Commands Reference
ExampleThe following example creates a view that includes all products of colors that begin with the letter B. The subsequent SELECT statement displays part of the data retrieved by that view.
sql> CREATE VIEW NEW_VIEWsql> AS SELECT * FROM INVENTORYsql> WHERE COLOR LIKE “B%”;
View NEW_VIEW created.
sql> SELECT ID, PROD_NAME, COLOR sql> FROM NEW_VIEWsql> UNNEST COLORsql> ORDER BY PROD_NAME;
Page 1 Product Product Number Name Color---------- ---------- ---------- 39400 CD Player Black 30000 CD System Black 1 37000 CD System Black 10 38000 CD System Black 11 39000 CD System Blue 12 31000 CD System Black 2... Brown 10040 Camcorder Black Bag Brown... 58040 Monitor Beige 58050 Monitor Beige 56070 Mouse Pad Blue 40008 Telephone Burgundy Black...96 records listed
1-59
DELETE
SyntaxDELETE FROM table_spec [table_label] [ID_list] [WHERE search_condition]
DescriptionThe DELETE command eliminates records from a table, subtable, or view. If no search_condition is specified, but an ID_list is present, all records in the ID_list are deleted.
Warning: If search_condition and ID_list are not specified, all records in the table are deleted.
ParametersThe following table describes each parameter of the syntax.
Parameter Description
FROM table_spec Specifies the table, subtable, or view from which records are to be deleted.
DELETE Parameters
1-60 UniData SQL Commands Reference
ExamplesThe following example shows how to delete single and multiple attributes:
sql> DELETE FROM CLIENTS WHERE ID = 9729;1 record(s) deleted or updated.
The following statement deletes all records from the CLIENTS table:
sql> DELETE FROM CLIENTS; 129 record(s) deleted or updated.
table_label Specifies an alias for a table from which records are to be deleted.
ID_list Limits search_condition to only those records whose ID or key is listed in ID_list. ID_list may be applied to a base table only, not to a view or subtable.
WHERE search_condition
Selects records to delete. If search_condition is applied to:A singlevalued attribute, UniData SQL deletes the entire record.A multivalued attribute, UniData SQL deletes all values that meet the criteria. However, even if all values in the multivalued attribute are deleted, values in singlevalued attributes of the same record remain.A multi-subvalued attribute, UniData SQL deletes all values that meet the criteria. However, even if all values in the multi-subvalued attribute are deleted, values in multivalued attributes in the same record remain.You can delete a record based on WHERE virtual_fld = value.Within a WHERE clause, the sum total of the individual condi-tions and the Boolean operators cannot exceed 127.For information on writing WHERE clauses, see Using UniData SQL.
Parameter Description
DELETE Parameters (continued)
1-61
The following example displays the data in the multivalued attribute COLOR before a record is deleted:
sql> SELECT ID, PROD_NAME, COLOR, QTY, PRICEsql> FROM INVENTORYsql> UNNEST NL_ALL LINE_ITEMSsql> WHERE PROD_NAME LIKE “Wrist%”sql> ORDER BY PROD_NAME;Page 1 Product Product Number Name Color Quanti Price---------- ---------- ---------- ------ ---------- 56090 Wrist Rest Blue 500 $12.99 56090 Wrist Rest Gray 500 $12.99 56090 Wrist Rest Green 500 $12.99 56090 Wrist Rest Red 500 $12.99 56090 Wrist Rest Rose 499 $12.995 records listed
Next, the record containing the Rose-colored wrist rest is deleted:
sql> DELETE FROM INVENTORYsql> WHERE PROD_NAME LIKE "Wrist%" AND COLOR = "Rose";1 record(s) deleted or updated.
Finally, we execute the same SELECT statement as it was executed before the deletion to demonstrate the deletion:
sql> SELECT ID, PROD_NAME, COLOR, QTY, PRICEsql> FROM INVENTORYsql> UNNEST NL_ALL LINE_ITEMSsql> WHERE PROD_NAME LIKE "Wrist%"sql> ORDER BY PROD_NAME;Page 1 Product Product Number Name Color Quanti Price---------- ---------- ---------- ------ ---------- 56090 Wrist Rest Blue 500 $12.99 56090 Wrist Rest Gray 500 $12.99 56090 Wrist Rest Green 500 $12.99 56090 Wrist Rest Red 500 $12.994 records listed
1-62 UniData SQL Commands Reference
DROP INDEX
SyntaxDROP INDEX index_name FROM table_name
DescriptionThe DROP INDEX command deletes the index specified by index_name for table_name. The index must have been created by:
UniData SQL CREATE INDEX command.ECL CREATE. INDEX command.
Note: Only the owner of a table may drop an index from that table.
ExampleThe following example demonstrates creating and dropping an index:
sql> CREATE INDEX ORDER_IDX ON ORDERS(CLIENT_NO);"ORDER_IDX" createdOne "*" represents 1000 records
Building "ORDER_IDX" ...
193 record(s) processed.
sql> DROP INDEX ORDER_IDX FROM ORDERS;"ORDER_IDX" deleted
1-63
DROP SUBTABLE
SyntaxDROP SUBTABLE subtable_name;
DescriptionThe DROP SUBTABLE command drops a subtable that was created by a CREATE SUBTABLE statement. It also drops all views created on the subtable, but it does not affect the base table.
Dropping a high-level subtable makes invalid all subtables that reference it. So, before you drop a subtable, be sure to drop all subtables that reference it.
ExampleThe following example demonstrates creating and dropping a SUBTABLE:
DescriptionThe DROP TABLE command removes a base table from the database, deletes the table definition, and deletes all subtables and views that are based on the table. Only the person who created a table can drop it. UniData SQL prompts for confirmation before dropping the table.
Warning: You cannot recover a dropped table.
1-65
ExampleThe following example demonstrates creating a table, listing its dictionary, and deleting the table:
LISTDICT NEW_TAB;Page 1@ID TYP LOC CONV NAME FORMAT SM ASSOC--------------- --- ------------- ---- --------------- ------ -- ----------@ID D 0 NEW_TAB 10L SNUM_FLD D 1 10R SCHAR_FLD D 2 10L SMONEY_FLD D 3 MD2$ 10R S ,-4 records listed
sql> DROP TABLE NEW_TAB;Do you really want to delete file NEW_TAB?(Y/N):yDeleting file D_NEW_TAB.Deleting file NEW_TAB.
1-66 UniData SQL Commands Reference
DROP VIEW
SyntaxDROP VIEW view_name
DescriptionThe DROP VIEW command removes a view from the database. This command automatically drops any views that are subordinate to the dropped view. Only the owner of a view can drop it.
1-67
ExampleThe following example demonstrates creating a view, using it, deleting it, and then attempting to use it after it has been deleted:
sql> CREATE VIEW NEW_VIEWsql> AS SELECT * FROM INVENTORYsql> WHERE COLOR LIKE "B%";
View NEW_VIEW created.
sql> SELECT ID, PROD_NAME, COLORsql> FROM NEW_VIEWsql> UNNEST COLORsql> WHERE PROD_NAME LIKE "Wrist%"sql> ORDER BY PROD_NAME;Page 1 Product Product Number Name Color---------- ---------- ---------- 56090 Wrist Rest Blue1 records listed
sql> DROP VIEW NEW_VIEW; View NEW_VIEW has been dropped.
sql> SELECT ID, PROD_NAME, COLORsql> FROM NEW_VIEWsql> WHERE PROD_NAME LIKE "Wrist%"sql> ORDER BY PROD_NAME;No privilege on file NEW_VIEW! Transaction aborted.
1-68 UniData SQL Commands Reference
EXIT
SyntaxEXIT
DescriptionThe EXIT command quits UniData SQL and returns the cursor to the environment from which you entered UniData SQL. The EXIT command performs the same function as QUIT. Note that you do not conclude the EXIT or QUIT command with a semicolon.
Note: If you entered UniData SQL from the ECL prompt, EXIT returns you to the ECL prompt. When you return to UniData SQL in the same session, your UniData SQL statement stack is restored. If you entered UniData SQL from the operating system prompt, when you issue the EXIT command, you return to the operating system prompt and all statement stack contents are lost.
Examplessql> EXIT:
1-69
GRANT
SyntaxGRANT {ALL PRIVILEGES | privilege[,privilege]... ON table_spec TO {PUBLIC | user_name [,user_name]...} [WITH GRANT OPTION]
DescriptionThe GRANT command specifies access privileges on tables, subtables, and views.
When a user creates a UniData SQL table, subtable, or view, the user owns the object. The owner is initially the only user who can access the object. If other users need to use the table, subtable, or view, the owner must grant them rights to access it. These access rights are called privileges. The owner can add, change, and view privileges for other users.
If the owner grants privileges to another user with grant option, that user can grant any of the same privileges for the table, subtable, or view to other users.
If you attempt to grant privileges on a table, view, or subtable for which you do not have privileges, or on an object that does not exist, the following error message appears:
Sorry, you have no privilege on this file!
Only the owner can drop tables, subtables, or views, and create and drop indexes.
Tip: To learn who is the owner of a table, execute the UNIX command ls -l filename at the UNIX prompt. You can also check the contents of the privilege table by executing the following: select * from privilege;
1-70 UniData SQL Commands Reference
ParametersThe following table describes each parameter in the syntax.
GRANT Parameters
Parameter Description
ALL PRIVILEGES Grants all privileges the user of the command is allowed to grant.If the user is the owner of the object, all privileges are DELETE, INSERT, SELECT, and UPDATE.If the user is not the owner of the object, the user can grant only those privileges acquired with grant option.
privilege Specifies privilege(s) to grant the user(s):DELETE – Privilege to delete rows from a table, subtable, or view.INSERT – Privilege to insert rows in a table, subtable, or view.SELECT – Privilege to select data in a table, subtable, or view.UPDATE – Privilege to change values in a table, subtable, or view.
ON table_spec Specifies the table, subtable, or view on which to grant privileges.
TO PUBLIC Grants privilege to all users who have access to the server machine.
TO user_name Grants access to the user specified by user_name.
WITH GRANT OPTION
Gives the recipient(s) permission to grant the privileges they acquired on this table, subtable, or view.The value of the grant-op attribute of the privilege file can be either of the following:0 = No grant option specified1 = Grant option specified
Note: UniData SQL does not display a confirmation message when you grant or revoke privileges.
1-71
ExamplesThe following example creates a view on the INVENTORY table, then grants all privileges to everyone:
sql> CREATE VIEW NEW_VIEWsql> AS SELECT * FROM INVENTORYsql> WHERE COLOR LIKE "B%";
View NEW_VIEW created.
sql> GRANT ALL PRIVILEGES ON NEW_VIEW TO PUBLIC;
The following statement grants UPDATE privilege to user samh:
sql> GRANT UPDATE ON NEW_VIEW TO samh;
1-72 UniData SQL Commands Reference
INSERT
SyntaxINSERT INTO table_spec [(attribute_name [, attribute_name...])] VALUES (const_value [,const_value...])
INSERT INTO table_spec [(attribute_name [, attribute_name...])] query_spec
DescriptionThe INSERT command adds rows to an existing table. Rows can be inserted into an empty table or into a table that already contains data. You cannot insert duplicate values in the @ID attribute.
If conflicting aliases exist for a location of the target table, you must specify attribute_name. Conflicting aliases have different formats, conversion codes, and so on.
To insert literal numeric or string values, use the first form of the syntax, enclosing string values in quotation marks. To select data from another table and insert it into a table, use the second form of the syntax. query_spec is described under SELECT.
If no attribute_names are specified, the query_spec or VALUES list must contain one value for each data location in the dictionary for that table. The data values are inserted in order of location.
Warning: If two subtables map to the same association, but specify different primary keys, UniData SQL has no way of ensuring that primary keys are unique. This could result in duplicate values being added through UPDATE or INSERT, or in more than one row being updated by UPDATE.
Forms of INSERT
A value for @ID is always required. The INSERT statement has two forms:
1-73
An INSERT statement with a VALUES clause inserts one row into a table:If attribute_name(s) are specified, the number and data type of attribute_name(s) and const_value(s) must match.The sequence and data type of const_values must match those of the target attributes.If an attribute is character or date data type, you enclose the value to be inserted in quotation marks.If you include attribute_name(s), @ID or its alias must be included in the list of attribute_name(s).If the NULL_FLAG is set to 0 (off), the NULL keyword inserts an empty string ("").If the NULL_FLAG is set to1 (on), the following rules apply:You can use the NULL keyword with the INSERT or UPDATE com-mand to insert the null value into a singlevalued attribute.You can use the NULL keyword with the INSERT or UPDATE com-mand to insert the null value into a multivalued or multi-subvalued attribute if it is the only value.You cannot use the INSERT or UPDATE command to add the null value along with other values into a multivalued or multi-subvalued attribute. This is because UniData SQL cannot recognize the keyword NULL embedded in a quoted string such as “D|NULL|I”. You must first create the record, then use the UPDATE command to change exist-ing values to null or to append null values.The null value is not valid for @ID.Regardless of whether null value handling is on or off, you can insert a missing value by omitting an attribute’s value in a value list.
An INSERT statement with a query_spec clause inserts a set of attribute values from one or more tables into another table:
The values to be inserted are determined by query_spec.If attribute_name(s) are specified, the number and data types must be the same as in query_spec.You cannot insert into the table from which you are selecting attributes in query_spec.
1-74 UniData SQL Commands Reference
ParametersThe following table describes each parameter of the syntax.
INSERT Parameters
Parameter Description
INTO Required keyword for inserting into a table.
table_spec Specifies the table, subtable, or view to receive inserted data.
attribute_name Specifies the attribute(s) to receive inserted data. If you specify attribute_names, you must include the @ID or its alias. attribute_names may be listed in any order; but the values included in the VALUES list must be listed in the same order.No duplicate locations or virtual attributes may be included.
VALUES const_value Specifies a constant value to be inserted. Character, date, and time strings must be enclosed in quotation marks. Enter integer and decimal values without quotation marks.May be singlevalued, multivalued, multi-subvalued, or the null value. A singlevalued constant may be a number or an alphanu-meric string. You cannot add multivalues and multi-subvalues in the same string.To insert more than one value in a multivalued or multi-subvalued attribute, you must enclose them in quotation marks even if the data values are numeric; you must also include the correct delimiter.
query_spec For a complete description of query_spec, see the SELECT command.You cannot include a phrase in the expression included in query_spec. Doing so results in a UniData SQL error.You can include subqueries in query_spec.
1-75
ExamplesThe following statement inserts a new inventory item into the INVENTORY table. A value must be included for each attribute because no attribute_name list is included.
The following example inserts a new record, 19999, into the INVENTORY table. No value is entered for PROD_NAME, INV_DATE, or INV_TIME, so these attributes are assigned no values.
sql> SELECT * FROM INVENTORY WHERE ID = "19999";Page 1INVENTORY 19999Inventory Date Inventory Time Product Name Features 133 MHz CPU, 25-in. SVGA Monitor, Keyboard, Mouse, Microsoft OfficeColor Quanti Price Reorde---------- ------ ---------- ------Black 50 $1,000.00 10 1 records listed
1-76 UniData SQL Commands Reference
LISTDICT
SyntaxLISTDICT table_spec
DescriptionThe LISTDICT command lists the dictionary of a UniData SQL table. table_spec specifies the table, subtable, or view for which to list the dictionary.
ExampleThe following example lists the dictionary for the CLIENTS table:
sql> LISTDICT;Page 1@ID TYP LOC CONV NAME FORMAT SM ASSOC--------------- --- ------------- ---- --------------- ------ -- ----------@ID D 0 CLIENTS 10L SID D 0 Client # 10R SFNAME D 1 First Name 15T SLNAME D 2 Last Name 15T SCOMPANY D 3 Company Name 30T SADDRESS D 4 Address 25T MVCITY D 5 City 15T SSTATE D 6 State/Territory 15T SZIP_CODE D 7 Postal Code 10R SCOUNTRY D 8 Country 15T SPHONE_NUM D 9 Phone Number 14R MV PHONE_ITEM SPHONE_TYPE D 10 Phone Category 10T MV PHONE_ITEM S@UQ PH NAME COMPANY ADDRESS CITY STATE ZIP COU NTRY PHONE PH ONE_TYPEPHONE_ITEMS PH PHONE_NUM PHOEnter <New line> to continue...Q
1-77
LOCK TABLE
SyntaxLOCK TABLE table_name [,table_name...] IN {SHARE | EXCLUSIVE} MODE [NOWAIT]
DescriptionLOCK TABLE overrides UniData’s automatic locking system, providing a means of explicitly controlling the locking of tables. LOCK TABLE is the only UniData SQL command that explicitly locks tables. For an explanation of the UniData locking scheme, see Administering UniData.
Examples of situations in which you should use LOCK TABLE:
A transaction accesses many files, but you need to isolate only one key file from other transactions. LOCK TABLE allows you to specify a lower-level isolation (such as RC) for a transaction, while locking a file at a higher level.An application may eventually lock almost all records in a file. UniData SQL locks records as they are needed, then converts to a file lock when the maximum number of record locks is reached. This can result in a deadlock. To avoid this, use LOCK TABLE to lock the file at the beginning of the application.A batch process that updates records.
When LOCK TABLE is issued and no transaction is active, UniData SQL starts a new transaction. Upon termination of the transaction, all locks are released.
When an application requests a file lock against records that are already locked by another user, the application waits until the locks are released. This can appear to be a system or terminal hang to the user. Include the NOWAIT keyword to avoid this.
UniData SQL allows a maximum of 128 files to be locked within a transaction, including system-imposed locks as well as those you set explicitly.
1-78 UniData SQL Commands Reference
ParametersThe following table describes each parameter of the syntax.
LOCK TABLE Parameters
Parameter Description
table_name Specifies the table to be locked.
IN SHARE MODE Indicates that a shared lock is to be placed on the table.
IN EXCLUSIVE MODE
Indicates that an exclusive lock is to be placed on the table.
NOWAIT Directs UniData SQL to abort the transaction rather than wait for a lock to be released.Note - If you do specify NOWAIT and include several files in single LOCK TABLE command, and any one of the files is already locked, the command fails.
1-79
QUIT
SyntaxQUIT
DescriptionThe QUIT command exits UniData SQL unconditionally and returns the user to the environment from which that user entered UniData SQL. QUIT performs the same function as EXIT. Notice that the EXIT and QUIT commands do not include semicolons.
Note: If you enter UniData SQL from the ECL prompt, QUIT returns you to the ECL prompt. If you return to UniData SQL in the same session, your UniData SQL statement stack is saved. If you enter SQL from the operating system prompt, QUIT returns you to the operating system prompt, and the UniData SQL statement stack is lost.
Examplesql> QUIT:
1-80 UniData SQL Commands Reference
REVOKE
SyntaxREVOKE {ALL PRIVILEGES | privilege[,privilege]...} ON table_spec FROM {PUBLIC | user_name[, user_name]...}
DescriptionThe REVOKE command removes access to tables, subtables, or views for which privilege was granted with the GRANT command. The REVOKE command enables you to revoke privileges for specific users or for all users.
Note: If you want to revoke only the ability to grant options, you must REVOKE the privilege first, then grant the privilege without grant option.
Cascading of REVOKE
When you revoke privileges for a user, any assignment that user has made is also revoked, as illustrated by the following scenario:
User A owns TABLE_A and grants SELECT privilege (with grant option) on TABLE A to user B. Then, user B grants SELECT privilege on the table to user C. If user A revokes the SELECT privilege on TABLE_A from user B, it is automatically revoked for user C.
1-81
ParametersThe following table describes each parameter of the syntax.
REVOKE Parameters
Parameter Description
ALL PRIVILEGES Revokes all privileges the user of the command possesses.If the user is the owner of the object, all privileges are DELETE, INSERT, SELECT, and UPDATE.
privilege Specifies privilege(s) to revoke:DELETE – Privilege to delete rows from a table or subtable.INSERT – Privilege to insert rows in a table or subtable.SELECT – Privilege to select data in a table, subtable, or view.UPDATE – Privilege to change values in a table or subtable.
ON table_spec Specifies the table, subtable, or view for which privileges are to be revoked.
FROM Identifies the user for whom privileges are to be revoked.
PUBLIC Revokes specified privileges for all users with access to the server machine.
user_name Revokes specified privileges for the user indicated by user_name.
Examplesql> REVOKE ALL PRIVILIEGES ON NEW_VIEW FROM PUBLIC;
Note: UniData SQL does not display a confirmation message when you grant or revoke privileges.
1-82 UniData SQL Commands Reference
ROLLBACK
SyntaxROLLBACK [WORK]
DescriptionThe UniData SQL ROLLBACK command cancels an active transaction. UniData SQL discards pending writes and releases all locks acquired during the transaction. The optional keyword WORK is provided for backward compatibility with legacy systems.
With the ROLLBACK command, UniData undoes all commands issued from the beginning of the transaction and does not make any updates for the transaction.
Not all rollbacks are user-initiated. In addition to your ability to explicity execute the ROLLBACK command in an application program, UniData can automatically roll back a transaction when it encounters any of the following conditions:
File-access errors (such as no privilege or violation of operation system–level security).Locking errors, such as deadlocks.Invalid command or invalid command syntax.
DescriptionThe SELECT command retrieves data from the database. A select statement (select_stmt) consists of a query specification (query_spec), plus (optionally) one or more UNION clauses, ORDER BY clauses and/or one of the following: TO, INTO, or LPTR. select_stmt and query_spec are also clauses in some other statements, including CREATE SUBTABLE, CREATE VIEW, and INSERT.
The keywords SELECT and FROM are required; all other keywords are optional. All keywords must be used in the order they are listed in the above syntax. The required clauses provide the following information:
The SELECT clause tells UniData SQL what information to retrieve.The FROM clause tells UniData SQL where to find the information to retrieve.
In a SELECT statement, you cannot select more than 1000 attributes and expressions.
A SELECT statement or clause cannot contain more than 255 virtual attributes.
query_spec ParametersThe following table describes each parameter of the syntax.
Parameter Description
ALL Default. Returns every row selected by query_spec, including duplicate rows.
DISTINCT Returns every unique row selected by query_spec. Duplicates are filtered out.
* Selects all D-type attributes. Does not retrieve virtual fields. You may not include attribute_name or expression with *. May be qualified by a table name or table label by preceding the attribute name with the table name/label and a period, as follows:table_name.*table_label.*
query_spec Parameters
1-85
attribute_spec Specifies one or more attributes to retrieve. May be qualified by preceding the attribute name with the table name/label and a period, as follows:table_name.attribute_nametable_label.attribute_nameTo select virtual fields, you must explicitly name them.
expression Any combination of attribute names, constants, arithmetic operators, and UniData SQL functions that together select data. Expressions that contain spaces must be enclosed in quotation marks.For information on writing expressions, including the operators and functions you can use, see Using UniData SQL.
attribute_label Specifies the display name for an attribute. Display names are used as column headers.
FROM Directs UniData SQL to the tables where the attribute_names are stored. The FROM clause is a required element of the SELECT statement. UniData SQL allows you to query multiple tables and views in a single statement.
table_spec Specifies the table, subtable, or view from which data values are selected.
table_label Specifies an alias for a table.
ID_list Restricts record selection to records with record IDs in ID_list.
INNER Use in conjunction with the JOIN keyword. Performs an inner join of the tables included in the FROM clause. Retrieves only rows that meet the join condition. Therefore, rows in the result set have matching values in the attributes on which the join is based.
Parameter Description
query_spec Parameters (continued)
1-86 UniData SQL Commands Reference
{LEFT | RIGHT | FULL} [OUTER]
Use in conjunction with the JOIN keyword. Performs an outer join of the tables included in the FROM clause.Retrieves all rows that meet the join criteria, but it also retrieves additional unmatched rows based on whether it is a left or right outer join. These additional rows come from the left (the table preceding the JOIN keyword), right (the table following the JOIN keyword), or both tables. The keywords refer to the following:LEFT – A left outer join retrieves all rows from the left table (the table preceding the JOIN keyword), including those for which no matching value exists in the joined table. In addition, it includes rows for which values in the attributes match (these are the same rows included in the inner join). Finally, it places null values in all columns of the result table that come from the right table for all unmatched rows.RIGHT – A right outer join retrieves all rows from the right table (the table preceding the JOIN keyword), including those for which no matching value exists in the joined table. In addition, it includes rows for which values in the attributes match (these are the same rows included in the inner join.) Finally, it places null values in all columns of the result table that come from the left table for all unmatched rows.FULL – A full outer join retrieves all rows from both tables listed in the JOIN clause, combining the results from the left and right outer joins. Therefore, all rows from both tables are included, and those for which the attributes match are combined. Finally, it places null values in all columns of the result table for all unmatched rows.OUTER – Optional keyword to specify an outer join (LEFT, RIGHT, and FULL keywords produce outer joins).For examples of LEFT RIGHT and FULL OUTER joins, see Using UniData SQL.
JOIN Indicates that a table or tables are being joined. If you include JOIN, you must also include ON or USING.A join uses data from one attribute to obtain data from another. For instructions on joining tables, see Using UniData SQL.
ON search_condition
Use in conjunction with the JOIN keyword. The conditional test that selects records for the join.If you mention more than one table in a SELECT statement, but don’t include a join condition, a Cartesian product results.
Parameter Description
query_spec Parameters (continued)
1-87
USING (attribute_name)
Use in conjunction with the JOIN keyword. Specifies the attribute on which the join is based. Records are selected when values in the joined attribute from both tables are equal. USING (attribute_name) produces the same effect as ON table1.attrib_name = table2.attrib_name.
UNNEST NL1 | NL2 | NL_ALL
Unnests data stored in multivalued and multi-subvalued attributes. Unnesting repeats the values in the associated attribute one level up. The optional keywords NL1, NL2, or NL_ALL provide different levels of unnesting. For a description of these options, see the “UNNEST Options” table in the next section.The UNNEST clause can process 10,240 values in a multivalued or multi-subvalued attribute, or in all associations for the unnested record.
attribute_name Specifies an attribute to unnest.
association_name
Specifies an association to unnest. Unnests all associated attributes that are selected from the named association.
Parameter Description
query_spec Parameters (continued)
1-88 UniData SQL Commands Reference
WHERE search_condition
Returns values that meet the criteria specified in search_condition. WHERE evaluates multivalues and multi- subvalues individually, as if they had been unnested. search_condition takes the form:attribute_name/expression rel_op attribute_name/expressionThe following keywords and operators can be used in the WHERE clause: =, !=, <, <=, >, >=, <>, !<, !> ALL EVERY subquery NOT IS [ NOT ] NULL [ NOT ] BETWEEN [ NOT ] IN [ NOT ] INTERSECT [ NOT ] LIKE %, _, ..., nA, nN, nXAND ORFor examples that demonstrate the use of these elements, see Using UniData SQL.Within a WHERE clause, the total number of predicates and Boolean operators cannot exceed 127.
GROUP BY attribute_spec expression
Groups information according to attribute_spec or expression in prepa-ration for computing, breaking, and summarizing by categories.
HAVING condition
Additional criteria that qualifies using aggregate functions. search_condition. condition takes the form:attribute_name/expression rel_op attribute_name/expressionFor example:HAVING fld1 = fld2 + 5
rel_op may also be a Boolean operator (AND, OR).
Parameter Description
query_spec Parameters (continued)
1-89
UNNEST Options
All of the multivalued attributes and multi-subvalued attributes included in a single UNNEST clause must belong to the same association. Executing an UNNEST on unassociated attributes results in a Cartesian product. UNNEST with no option specified unnests all specified associated attributes.
The following table describes the options for the keyword UNNEST.
UNNEST Options
Option Description
NL1 Specify NL1 to unnest associated multivalued attributes. Repeats the values in singlevalued attributes.
NL2 Specify NL2 to unnest associated multi-subvalued attributes. Repeats the values in the associated multivalued attribute.
NL_ALL Specify NL_ALL to unnest all associated multivalued and multi-subvalued attributes. Singlevalued attributes are repeated for each multivalued attribute, and multivalued attributes are repeated for each multi-subvalued attribute.NL_ALL has the effect of both NL1 and NL2 combined.
mv_attribute Name of the multivalued attribute to be unnested.
ms_attribute Name of the multi-subvalued attribute to be unnested.
association_name Name of the association to be unnested.
1-90 UniData SQL Commands Reference
Guide to Unnesting
The following table provides the syntax to unnest to each level. The level of unnesting is determined by a combination of the UNNEST option and the type of value (S, MV, or MS) of the attributes involved:
Guide to Unnesting
To Unnest This Level Use this Syntax
Multivalue only UNNEST mv_attribute UNNEST NL1 association UNNEST NL1 mv_attribute UNNEST NL1 ms_attribute UNNEST NL1 mv_attribute, ms_attribute UNNEST NL_ALL mv_attribute
Multi-subvalue only UNNEST ms_attribute UNNEST NL2 association_name UNNEST NL2 ms_attribute UNNEST NL2 mv_attribute, ms_attribute (UNNEST NL2 mv_attribute is invalid)
select_stmt ParametersThe following table describes each parameter of the select_stmt syntax.
Parameter Description
query_spec query_spec is the first required element in the SELECT statement. query_spec parameters are described in the first table in this section.
UNION query_spec Combines the results of two query_spec statements into a single result set. The number of selected items in both queries must be the same; and the corresponding attributes must be of the same data type.When results of all query_spec statements are combined, duplicate records are discarded.
ORDER BY attribute_spec | ordinal_position
Arranges rows in sorted order based on attribute value or ordinal position. Explanations for attribute_spec and ordinal_position follow.The ORDER BY clause may contain no more than nine attribute names or ordinal positions.
attribute_spec Specifies an attribute to use as a sort field. May be an individual attribute name preceded by the table name/label and a period, as follows:table_name.attribute_nametable_label.attribute_nameTo sort virtual fields, you must explicitly name them.
ordinal_position Arranges rows by the attribute(s) you indicate. Ordinal position is determined by the order in which attributes and expressions are listed in query_spec. The first attribute or expression is in ordinal position 1.For example, in the following statement:SELECT ID, PRODUCT_NO, QTY FROM ORDERS UNNEST PRODUCT_NO ORDER BY ID, PRODUCT_NO;
the ORDER BY clause could also be written as follows to obtain the same results:ORDER BY 1,2
select_stmt Parameters
1-92 UniData SQL Commands Reference
expression Any combination of attribute names, constants, arithmetic operators, and UniData SQL functions that together return a value that determines how data will be ordered. Expressions that contain spaces must be enclosed in quotation marks.You may set an attribute to the null value with an expression like this: attribute_name = NULL.
ASC Orders data in ascending order—lowest value to highest value. This is the default order.
DESC Orders data in descending order—highest value to lowest value.
EXP Unnests multivalues and multi-subvalues before ordering.
TO filename Places results of the SELECT in a sequential file.
INTO temp_table Places results of the SELECT in a temporary table.
LPTR Prints results of the SELECT on the system printer.
Parameter Description
select_stmt Parameters (continued)
1-93
Examples
Simple Statements
The following example selects all attributes from the CLIENTS table:
sql> SELECT * FROM CLIENTS;Page 1CLIENTS 9999First Name PaulLast Name CastiglioneCompany Name Chez PaulAddress 45, rue de RivoliCity ParisState/Territory Postal Code 75008Country France Phone Number Phone Cate-------------- ---------- 3342425544 Work 3342664857 Fax CLIENTS 10034First Name FredrickLast Name AndersonCompany Name Otis ConcreteAddress 854, rue de RivoliCity ParisState/Territory Postal Code 75008Page 2Country France Phone Number Phone Cate-------------- ---------- 3342482815 Work 3342481924 Fax CLIENTS 9980First Name BeverlyLast Name OstrovichCompany Name Riley ArchitectsAddress 7925 S. Blake St.City SydneyState/Territory NSWPostal Code 0207Country Australia Phone Number Phone Cate-------------- ---------- 6124168875 Work 6124168879 Fax ...
1-94 UniData SQL Commands Reference
130 records listedThe following statement selects the D-type attribute PROD_NAME and the virtual attribute LINE_ITEMS from the demo table INVENTORY, limiting the selection to cameras:sql> SELECT ALL PROD_NAME, LINE_ITEMS FROM INVENTORYsql> WHERE PROD_NAME = "Camera";Page 1Product ReordeName Color Price Quanti Point Differ---------- ---------- ---------- ------ ------ ------Camera Black $129.97 12000 50 11950 Silver $129.97 149 50 99Camera Black $48.82 800 60 740 Silver $48.82 14985 60 14925Camera Black $199.97 4998 40 4958 Gray $199.97 3912 40 3872Camera Black $34.97 8934 40 8894 Silver $34.97 6999 40 6959...Grouping
The following statement selects all rows containing the product name “Camera” from the INVENTORY table. The query requests the price of the most expensive camera and the total number of cameras of that color in the database, as well as counting the number of rows containing each color of camera.
The following examples demonstrate execution of SELECT statements with and without unnesting. Two records that contain multi-subvalues are used.
1-95
Note: More examples of unnesting are provided in Appendix B, “Unnesting Attributes.”
Nestedsql> select ID, CLIENT_NO, PRODUCT_NO, COLOR, QTY, PRICE from ORDERSwhere ID = 805;Page 1 Order Client Number Number Product Nu Color Qty Price---------- ---------- ---------- ---------- ------ ---------- 805 9987 11140 Gray 5 $149.97 10120 Standard 25 $429.94 10050 Yellow 13 $29.97 10150 Silver 15 $48.82 10070 Silver 999 $34.971 records listed
UNNEST Association – No Option
In this example, the association LINE_ITEMS is unnested. This unnests all associated multivalues and multi-subvalues; therefore, for each multi-subvalue, the singlevalued attributes are repeated, as is the (associated) multivalue, PRODUCT_NO.
sql> select ID, CLIENT_NO, PRODUCT_NO, COLOR, QTY, PRICE from ORDERSunnest LINE_ITEMSwhere ID = 949 or ID = 969;Page 1 Order Client Number Number Product Nu Color Qty Price---------- ---------- ---------- ---------- ------ ---------- 949 9990 56090 Red 3 $12.99 949 9990 56090 Blue 3 $12.99 949 9990 56090 Gray 3 $12.99 949 9990 56070 Red 3 $12.99 949 9990 56070 Blue 3 $12.99 949 9990 56070 Gray 3 $14.99 969 9988 56080 Black 50 $3.99 969 9988 56080 Red 50 $3.99 969 9988 56080 Blue 50 $3.999 records listed
1-96 UniData SQL Commands Reference
UNNEST NL1 Association
In this example, the UNNEST keyword is used with option NL1, and the association LINE_ITEMS is listed in the UNNEST clause. This unnests the associated multi-value, PRODUCT_NO; therefore, for each multivalue, all singlevalued attributes are repeated.
sql> select ID, CLIENT_NO, PRODUCT_NO, COLOR, QTY, PRICE from ORDERSunnest NL1 LINE_ITEMSwhere ID = 949 or ID = 969;Page 1 Order Client Number Number Product Nu Color Qty Price---------- ---------- ---------- ---------- ------ ---------- 949 9990 56090 Red 3 $12.99 Blue 3 $12.99 Gray 3 $12.99 949 9990 56070 Red 3 $12.99 Blue 3 $12.99 949 9990 56070 Gray 3 $14.99 969 9988 56080 Black 50 $3.99 Red 50 $3.99 Blue 50 $3.994 records listed
1-97
UNNEST NL2 Association
In this example, the UNNEST keyword is used with option NL2, and the association LINE_ITEMS is listed in the UNNEST clause. This unnests associated multi-subvalues only; therefore, for each multi-subvalue, the associated multivalue, PRODUCT_NO, is repeated.
sql> select ID, CLIENT_NO, PRODUCT_NO, COLOR, QTY, PRICE from ORDERSunnest NL2 LINE_ITEMSwhere ID = 949 or ID = 969;Page 1 Order Client Number Number Product Nu Color Qty Price---------- ---------- ---------- ---------- ------ ---------- 949 9990 56090 Red 3 $12.99 56090 Blue 3 $12.99 56090 Gray 3 $12.99 56070 Red 3 $12.99 56070 Blue 3 $12.99 56070 Gray 3 $14.99 969 9988 56080 Black 50 $3.99 56080 Red 50 $3.99 56080 Blue 50 $3.992 records listed
UNNEST NL_ALL Association
In this example, the UNNEST keyword is used with option NL_ALL, and the associ-ation LINE_ITEMS is listed in the UNNEST clause. This unnests all associated multivalues and multi-subvalues; therefore, for each multi-subvalue, the singl-evalued attributes are repeated, as is the (associated) multivalue, PRODUCT_NO.
1-98 UniData SQL Commands Reference
Note: This syntax has the same effect as UNNEST with no option and UNNEST NL_ALL association.
sql> select ID, CLIENT_NO, PRODUCT_NO, COLOR, QTY, PRICE from ORDERSunnest NL_ALL LINE_ITEMSwhere ID = 949 or ID = 969;Page 1 Order Client Number Number Product Nu Color Qty Price---------- ---------- ---------- ---------- ------ ---------- 949 9990 56090 Red 3 $12.99 949 9990 56090 Blue 3 $12.99 949 9990 56090 Gray 3 $12.99 949 9990 56070 Red 3 $12.99 949 9990 56070 Blue 3 $12.99 949 9990 56070 Gray 3 $14.99 969 9988 56080 Black 50 $3.99 969 9988 56080 Red 50 $3.99 969 9988 56080 Blue 50 $3.999 records listed
In this example, the UNNEST keyword is used with option NL1; and the associated attributes PRODUCT_NO (multivalued) and PRICE (multi-subvalued) are listed in the UNNEST clause. The NL1 keyword limits unnesting to the associated multivalue (PRODUCT_NO); therefore, for each multivalue, all singlevalued attributes are repeated.
This syntax has the same effect as UNNEST NL1 Association.
sql> select ID, CLIENT_NO, PRODUCT_NO, COLOR, QTY, PRICE from ORDERSunnest NL1 PRODUCT_NO,PRICEwhere ID = 949 or ID = 969;Page 1 Order Client Number Number Product Nu Color Qty Price---------- ---------- ---------- ---------- ------ ---------- 949 9990 56090 Red 3 $12.99 Blue 3 $12.99 Gray 3 $12.99 949 9990 56070 Red 3 $12.99 Blue 3 $12.99 949 9990 56070 Gray 3 $14.99 969 9988 56080 Black 50 $3.99 Red 50 $3.99 Blue 50 $3.994 records listed
In this example, the UNNEST keyword is used with option NL2; and the associated attributes PRODUCT_NO (multivalued) and PRICE (multi-subvalued) are listed in the UNNEST clause. Option NL2 limits the unnesting to the associated multi-subvalue, PRODUCT_NO; therefore, for each multi-subvalue, the multivalue is repeated.
Note: This syntax has the same effect as UNNEST NL2 Association.
sql> select ID, CLIENT_NO, PRODUCT_NO, COLOR, QTY, PRICE from ORDERSunnest NL2 PRODUCT_NO,PRICEwhere ID = 949 or ID = 969;Page 1 Order Client Number Number Product Nu Color Qty Price---------- ---------- ---------- ---------- ------ ---------- 949 9990 56090 Red 3 $12.99 56090 Blue 3 $12.99 56090 Gray 3 $12.99 56070 Red 3 $12.99 56070 Blue 3 $12.99 56070 Gray 3 $14.99 969 9988 56080 Black 50 $3.99 56080 Red 50 $3.99 56080 Blue 50 $3.992 records listed
UNNEST NL_ALL Associated Multivalued Attribute
In this example, the UNNEST keyword is used with option NL2; and the associated attributes PRODUCT_NO (multivalued) and PRICE (multi-subvalued) are listed in the UNNEST clause. This unnests all associated multivalues and multi-subvalues; therefore, for each multi-subvalue, the singlevalued attributes are repeated, as is the (associated) multivalue, PRODUCT_NO.
1-100 UniData SQL Commands Reference
Note: This syntax has the same effect as UNNEST with no option and UNNEST NL_ALL association.
sql> select ID, CLIENT_NO, PRODUCT_NO, COLOR, QTY, PRICE from ORDERSsql> unnest NL_ALL PRICEsql> where ID = 949 or ID = 969;Page 1 Order Client Number Number Product Nu Color Qty Price---------- ---------- ---------- ---------- ------ ---------- 949 9990 56090 Red 3 $12.99 949 9990 56090 Blue 3 $12.99 949 9990 56090 Gray 3 $12.99 949 9990 56070 Red 3 $12.99 949 9990 56070 Blue 3 $12.99 949 9990 56070 Gray 3 $14.99 969 9988 56080 Black 50 $3.99 969 9988 56080 Red 50 $3.99 969 9988 56080 Blue 50 $3.999 records listed
1-101
SET
SyntaxSET {HEADING {OFF | ON} | LINESIZE n | MARGIN n | MISSING {NULL | “string”} NEWPAGE n | NULL “text” | PAGESIZE n | PAUSE {ON | OFF} | SPACE n | WRAP {VERT | HORI | DEF} UNDERLINE{“char” | OFF | ON} DISPLAY TPMESSAGE {ON | OFF} TRANSACTION {READ ONLY | READ WRITE |ISOLATION LEVEL {READ UNCOMMITTED | READ COMMITTED | REPEATABLE READ | SERIALIZABLE}
DescriptionThe SET statement sets a system variable’s value. UniData SQL system variables affect the way query results or reports are displayed. You may use the SET statement to override the system defaults or to restore them later.
1-102 UniData SQL Commands Reference
ParametersThe following table describes each parameter of the syntax.
Parameter Description
HEADING ON HEADING OFF
Enables or suppresses printing of column headings in reports. The default is ON.
LINESIZE n Sets the width of the report line. The default is 80.
MARGIN n Sets the left margin of the display or report and allows you to align the display. The default is 1.
MISSING {NULL | “string”}
With MISSING NULL set, and null value handling on, missing values are treated as nulls; with any other string set, missing values are NOT treated as nulls, and the string represents missing values in display.This setting makes UniData SQL operate the same way as desktop tools, which access UniData SQL through ODBC. For further information on UniData null value handling, see Using UniData.NULL_FLAG =1 in udtconfig turns on null value handling.
NEWPAGE n Sets a number of blank lines to be printed between the bottom title of each page and the top title of the next page. If n is 0, UniData SQL issues a form feed between pages. The default is 1.
NULL “text” Sets the text to represent the null value in display.
PAGESIZE n Sets the number of lines per page for display of the results of query_spec or SELECT statements. The default is 23. This option remains in effect if you return to UniData when you exit UniData SQL.
PAUSE ON | OFF
In interactive mode, when PAUSE is ON, display stops at the end of each page and displays the prompt Enter <New line> to continue.... The next page displays when the user presses ENTER.The default in interactive mode is ON; PAUSE ON has no effect in UniData SQL scripts.
SPACE Sets the number of spaces between the columns in a report. The default is 1.
SET Parameters
1-103
WRAP Determines how UniData SQL displays columns in results of query_spec or SELECT statements:VERT – Displays each column on a new line; column headings and column values may wrap on several lines.HORI – Displays columns across the line, wrapping when LINESIZE is exceeded.DEF–Follows UniData conventions: when a whole row fits on one line, UniData SQL displays it horizontally; when it does not, UniData SQL displays it vertically.For examples of the different WRAP types, see the “Examples” section.
Parameter Description
SET Parameters (continued)
1-104 UniData SQL Commands Reference
UNDERLINE char ON | OFF
Sets the character used to underline headings. Standard characters are '-' and '='.
DISPLAY TPMESSAGE ON | OFF
DISPLAY TPMESSAGE ON turns on the display of notification messages for transaction processing (TP) commands.UniData SQL always displays “Transaction aborted” when a transaction is rolled back, regardless of the TPMESSAGE setting.DISPLAY TPMESSAGE ON traces transaction processing (TP) commands. The Recoverable File System (RFS) must be in use for transaction processing to work. In the absence of RFS, TP commands are ignored.
TRANSACTION READ ONLY | READ WRITE | ISOLATION LEVEL
Specifies the access mode and isolation level of the next trans-action. Does not start a new transaction, and cannot be executed within an active transaction. Default settings are restored upon completion of the transaction.The combination of isolation level and access mode determines the access mode and file or record locks set.READ ONLY – The next transaction is read-only.READ WRITE – Default. The next transaction is read-write.ISOLATION LEVEL – For further information, see the “Isolation Levels” table in the next section. Choose from:READ UNCOMMITTEDREAD COMMITTED (the default)REPEATABLE READSERIALIZABLEYou can set the level of isolation for your environment by setting the UniData environment variable DEFAULT_ISO_LEVEL.For further information on transaction processing and isolation levels, see Using UniData SQL.
Parameter Description
SET Parameters (continued)
1-105
Isolation Levels
Your selection of isolation level may affect the access mode and locks set for the next transaction.
Isolation Levels
Level Access Mode Locks
READ UNCOMMITTED
Read only None
READ COMMITTED Choose read-only or read/write access; defaults to read/write.
UPDATE, INSERT DELETE – exclusive record locks (regardless of isolation level)
REPEATABLE READ Choose read-only or read/write access; defaults to read/write.
SELECT– shared record locksUPDATE, INSERT, DELETE – exclusive record locks (regardless of isolation level)
SERIALIZABLE Choose read-only or read/write access; defaults to read/write.
If the target record @ID is supplied – Shared locks on records being read, and exclusive locks on records being updated.If the target record @ID is not supplied – File-level shared locks on tables being read, or a record-level exclusive lock on records being updated.
ExamplesThe following example demonstrates the PAGESIZE clause to set the display page to 10 lines, and the LINESIZE clause to establish a 40-character-wide display area. Report headers and footers are included to show where “pages” begin and end.
sql> SET PAGESIZE 10;sql> SET LINESIZE 40;sql> TTITLE "Page TOP Title";sql> BTITLE "Page BOTTOM Title";sql> TTITLE ON;sql> BTITLE ON;sql> SELECT ID FROM ORDERS;
1-106 UniData SQL Commands Reference
The following example shows output from the above commands:
Jun 17 1996 Page 1 Page TOP Title Order Number---------- 912 801 Page BOTTOM TitleEnter <New line> to continue...Q
The next set of examples demonstrates the SET DISPLAY TPMESSAGE ON command, which turns on the display of transaction processing (TP) commands.
Note: The Recoverable File System (RFS) must be in use for transaction processing to work. In the absence of RFS, TP commands are ignored. UniData for Windows Platforms does not support RFS.
This example demonstrates turning on display of transaction start and transaction commit messages:
sql> SET DISPLAY TPMESSAGE ON;
1-107
After the preceding SET DISPLAY TPMESSAGE ON statement is executed, any statement that creates, updates, or deletes a table generates Transaction started and Transaction committed messages, as in the following example:
sql> SELECT * FROM INVENTORY WHERE ID = "99999"; Transaction started.Page 1INVENTORY 99999Inventory Date Inventory Time Product Name Features 133 MHz CPU, 25-in. SVGA Monitor, Keyboard, Mouse,Microsoft OfficeColor Quanti Price Reorde---------- ------ ---------- ------Black 50 $1,000.00 10 1 records listed
Transaction committed.
1-108 UniData SQL Commands Reference
The transaction in the following example is set to read-only with an isolation level of READ UNCOMMITTED. Therefore, the attempt to add a value is not allowed. The SELECT statement displays the record to show that the new value was not added.
sql> SET TRANSACTION ISOLATION LEVEL READ UNCOMMITTED;
sql> UPDATE CLIENTS "9999"sql> ADD VALUE PHONE_NUM = "3032940000";Transaction access conflict: update in READ ONLY transaction. sql> SELECT * FROM CLIENTS WHERE ID='9999';Page 1CLIENTS 9999First Name PaulLast Name CastiglioneCompany Name Chez PaulAddress 45, reu de RivoliCity ParisState/Territory Postal Code 75008Country France Phone Number Phone Cate-------------- ---------- 3342425544 Work 3342664857 Fax 1 records listed
1-109
The following example demonstrates the HORI and DEF settings for WRAP. HORI forces UniData SQL to print column text horizontally, wrapping when LINESIZE is exceeded; DEF switches the display to vertical because the report line does not fit on one line.
sql> SET WRAP HORI;SELECT * FROM CLIENTS WHERE ID = 10015;Page 1 CLIENTS First Name Last Name Company Name---------- --------------- --------------- ------------------------------Address City State/Territory Postal Cod------------------------- --------------- --------------- ----------Country Phone Number Phone Cate--------------- -------------- ---------- 10015 Cal di Grigorio Regina Flooring913 Montreal Ave. Regina Saskatchewan S4P3V7Canada 3067881245 Work 3065487569 Fax1 records listedsql> SET WRAP DEF;sql> SELECT * FROM CLIENTS WHERE ID = 10015;Page 1CLIENTS 10015First Name CalLast Name di GrigorioCompany Name Regina FlooringAddress 913 Montreal Ave.City ReginaState/Territory SaskatchewanPostal Code S4P3V7Country Canada Phone Number Phone Cate-------------- ---------- 3067881245 Work 3065487569 Fax 1 records listed
The following series of examples demonstrates the effects of SET MISSING NULL, which causes UniData SQL to mimic ODBC’s handling of empty strings, by converting them to the null value.
Note: NULL_FLAG in udtconfig must be ON for SET MISSING to take effect.
1-110 UniData SQL Commands Reference
This first statement converts PRICE to empty strings in product 10010:
sql> UPDATE ORDERS SET PRICE = "" WHERE PRODUCT_NO = 10010;4 record(s) updated.
This example computes the average of PRICE for products 10010 and 10020. Values in the PRICE attribute for product 10010 are empty strings, and are therefore included in the computation:
sql> COMPUTE AVG OF PRICE ON PROD_NAME;sql> BREAK ON PROD_NAME SKIP 1;sql> SELECT PROD_NAME, PRODUCT_NO, PRICE FROM ORDERSsql> UNNEST PRODUCT_NOsql> WHERE PRODUCT_NO BETWEEN 10010 AND 10020 ORDER BY PRODUCT_NO;Page 1Product Na Product Nu Price---------- ---------- ----------Camcorder 10010 10010 10010 10010 10020 $200.00 10020 $200.00 10020 $200.00 10020 $200.00********** ----------avg $100.00 8 records listed
1-111
Next, we execute SET MISSING NULL to have empty strings handled as nulls. Then we execute the same computation. This time, values in the PRICE attribute for product 10010 are not included in computation of average, because null values are ignored by aggregate functions.
sql> SET MISSING NULL;sql> SET NULL "";sql> COMPUTE AVG OF PRICE ON PROD_NAME;sql> BREAK ON PROD_NAME SKIP 1;sql> SELECT PROD_NAME, PRODUCT_NO, PRICE FROM ORDERSsql> UNNEST PRODUCT_NOsql> WHERE PRODUCT_NO BETWEEN 10010 AND 10020 ORDER BY PRODUCT_NO;Page 1Product Na Product Nu Price---------- ---------- ----------Camcorder 10010 N 10010 N 10010 N 10010 N 10020 $200.00 10020 $200.00 10020 $200.00 10020 $200.00********** ----------avg $200.00 8 records listed
Finally, we reset MISSING = “” to return to normal processing of empty strings:
sql> SET MISSING ""; sql> COMPUTE AVG OF PRICE ON PROD_NAME;sql> BREAK ON PROD_NAME SKIP 1;sql> SELECT PROD_NAME, PRODUCT_NO, PRICE FROM ORDERSsql> UNNEST PRODUCT_NOsql> WHERE PRODUCT_NO BETWEEN 10010 AND 10020 ORDER BY PRODUCT_NO;Page 1Product Na Product Nu Price---------- ---------- ----------Camcorder 10010 10010 10010 10010 10020 $200.00 10020 $200.00 10020 $200.00 10020 $200.00********** ----------avg $100.00 8 records listed
1-112 UniData SQL Commands Reference
SHOW
SyntaxSHOW {ALL | BTITLE | TTITLE | set_option}
DescriptionThe SHOW statement displays the values of UniData SQL system variables.
ParametersThe following table describes each parameter of the syntax.
SHOW Parameters
Parameter Description
ALL Displays the settings of all SHOW options.
BTITLE Displays the BTITLE definition
TTITLE Displays the TTITLE definition.
set_option Displays the current setting of any SET option listed below. See SET for descriptions of the following options:HEADINGHEADSEPLINESIZEMARGINNEWPAGENULLPAGESIZEPAUSESPACEWRAPUNDERLINE
1-113
ExamplesThe following example displays the current setting of the PAGESIZE parameter, which is defined by the SET command:
sql> SHOW PAGESIZE;Page size is 66
The next example uses the SHOW ALL command to display the default settings for the environment variables set by the SET command:
sql> SHOW ALL;HEADSEP is '|'UNDERLINE is '-'Line size is 80Newpage is 0Null is Number format is Number width is 10Page size is 23Left margin is 0Pause text is Enter <New line> to continue...Space is 1Heading is ONUnderline is ONPause is ONReport is in default formSample is OFF.Head seperate character is on Header no supress
The final example uses the SET command to assign the letter “N” to represent the null value in display and print:
sql> SET NULL “N”;sql> SHOW NULL;Null text is N
1-114 UniData SQL Commands Reference
SQL
Syntaxsql
DescriptionThe ECL command sql initiates an interactive UniData SQL session. You can execute this command from the operating system level or from udt.
Note: For instructions on exiting from an interactive UniData SQL session, see EXIT and QUIT.
1-115
TTITLE
SyntaxTTITLE [“text”]
TTITLE [ print_clause | OFF | ON]
print_clause syntax:
{SKIP [n] | [COL [n] | [ LEFT | CENTER | RIGHT] } [ “text”] [FORMAT format | [TAB [n] ] [new_val] ]...
DescriptionTTITLE establishes a header for printed and displayed reports. You can specify any number of constants and variables. These parameters are executed in the order in which you define them. You can apply any number of TTITLE commands to one or more attributes. If more than one TTITLE command is applied to the same attribute, the last command supersedes all previous commands.
Note: Execute the SHOW TTITLE command to display the current setting of TTITLE.
1-116 UniData SQL Commands Reference
ParametersThe following table describes each parameter of the syntax.
TTITLE Parameters
Option Description
"text" Displays a two-line header. The first line contains the date at the left and the page number on the right; the second line contains the center-aligned text. You can include any number of the following heading options enclosed in single quotation marks:C[n] – Centers heading or footing text within a line of n width.D – Inserts the current system date.L – Inserts a blank line.N – Suppresses the default prompt, “Enter new line to continue...”, which appears at the bottom of each screen page. Pages scroll without stopping until the report is finished. (The prompt displays only in interactive mode.)P or S – Inserts the current page number.T – Inserts the time and date when report generation began.
print_clause print_clause has the following syntax:{COL n | SKIP [n] | [LEFT | CENTER | RIGHT]...} [FORMAT format] {variable | "text"}] [TAB [n] {variable | "text"}...]For descriptions of print_clause parameters, see the next table.
OFF ON
Turns the header off or on without affecting the heading text. The default is OFF.
no parameter Displays TTITLE current settings.SHOW TTITLE also displays current settings.
1-117
print_clause ParametersThe following table describes each parameter of print_clause:
Print Clause Parameters
Clause Description
COL n Skips to the nth column of the current line (see LINESIZE option of SET command). The space is required.
SKIP n Skips n lines before printing out the text. The default is 1. You must include a space after the keyword SKIP.
LEFT, CENTER, RIGHT
Aligns the title data on the current line. The following data item (variable or text) is aligned as a group to the end of the statement, or to the next LEFT, CENTER, or RIGHT, or to the next COL, SKIP, or TAB. CENTER and RIGHT are calculated based on the LINESIZE option of the SET statement.
FORMAT format Specifies a format model for the following data item. FORMAT is effective until the end of the statement or until another FORMAT clause is encountered in the same statement. format options are discussed following this table.
new_val Displays the current value of the variable new_val, set by NEW_VALUE in a previously executed COLUMN statement.
"text" Displays a two-line header. The first line contains the date on the left and the page number on the right; the second line contains the center-aligned text. In addition to literal text, you can include any number of the following heading options:C[n] – Centers heading text within a line of n width.D – Inserts the current system date in the heading.L – Executes a new line.N – Suppresses the default prompt, “Enter new line to continue...”, which appears at the bottom of each screen page. Pages scroll without stopping until the report is finished.P or S – Inserts the current page number.T – Inserts the time and date when report generation began.
TAB n Skips n columns from the current position. The space is optional.
1-118 UniData SQL Commands Reference
format Options
format specifies the display format for values in the header. format must be enclosed in quotation marks, and can be one of the following:
Character Format Options – The format for a character string is An where n is the column width. The default is the length specified in the dictionary definition of the attribute.Date Format Options– You may not specify format options for date attri-butes; the formatting specified in the dictionary definition of the attribute is used.Numeric Format Options – Use the options in the following table to build a display mask for formatting numeric values.
format Numeric Options
Option Explanation Example
9 Determines number of digits displayed. 9999
0 Display leading zeros. 0999
$ Prefix displayed value with a dollar sign. $9999
B Print leading zeros as blank. B999
MI Display minus sign (-) after a negative value. 9999MI
PR Display a negative value in angle brackets 9999PR
. Align on the decimal point. 99.99
, Insert a comma every three digits. 99,999
V Multiply the value by the n power of 10, where n is the number of 9s after V.
999V99
EEEE Display the scientific notation (the format must contain four Es).
9.99EEEE
Note: If the format is not applicable to the data type of a particular data item, FORMAT has no effect on that item, and the default format is used. The format specified in the FORMAT clause is the same as described in the COLUMN statement. For further information, see COLUMN.
1-119
ExamplesThe following example defines a centered title of “Open Orders.” The SELECT statement displays the title.
sql> TTITLE CENTER "Open Orders" SKIP 3;sql> TTITLE ON;sql> SELECT CLIENT_NO, PRODUCT_NO, QTY, PRICE FROM ORDERSsql> UNNEST LINE_ITEMSsql> ORDER BY CLIENT_NO;
The next example uses the variables old and new, that are set by the COLUMN command. These variables, added to TTITLE and BTITLE, include in the header and footer current and old values in the CLIENT_NO attribute:
sql> COLUMN CLIENT_NO OLD_VALUE old NEW_VALUE new;sql> BREAK ON CLIENT_NO SKIP PAGE; sql> TTITLE LEFT "Client: "TAB 5 new;sql> TTITLE ON; sql> BTITLE COL 15 "Client: "TAB 5 old;sql> BTITLE ON;sql> BREAK ON CLIENT_NO;
DescriptionThe UPDATE statement changes values stored in one or more attributes of a table.
You cannot update @ID with the UPDATE command. To update @ID, you must delete and reinsert the record. For further information, see the DELETE and INSERT commands in this manual.
Warning: If two subtables map to the same association, but specify different primary keys, UniData SQL has no way of ensuring that primary keys are unique. This could result in duplicate values being added through UPDATE or INSERT, or by more than one row being updated by UPDATE.
An UPDATE statement with no WHERE clause updates all rows in the table.
1-123
ParametersThe following table describes each parameter of the syntax.
Parameter Description
table_spec Name of the table, view, or subtable to be updated.
ID_list Limits update to only those records whose ID is listed in ID_list. ID_list may be applied to a base table only, not to a view or subtable.
SET Replaces the values in one or more attributes of records satis-fying WHERE search_condition. You may not include delimiters to set multivalues or multi-subvalues.
ADD VALUE ADD SUBVALUE
Appends values to the end of an existing multivalued or multi-subvalued attribute specified by attribute_name for the rows satisfying the WHERE clause. More information is provided on this subject following this table, as well as in Using UniData.
UPDATE Parameters
1-124 UniData SQL Commands Reference
Adding Multivalues and Multi-SubvaluesTo add multivalues or multi-subvalues to an attribute, use an ADD VALUE or ADD SUBVALUE clause. These clauses insert the value or subvalue into a record as follows:
ADD VALUE appends the value to the end of a multivalued or multi-subvalued attribute, after satisfying the conditions specified by the WHERE clause. Separate multivalues with value marks ( } ), and multi-subvalues with subvalue marks ( | ).
attribute_name Specifies an attribute to update. May be an individual attribute name; may be qualified by preceding the attribute name with the table name/label and a period, as follows:table_name.attribute_nametable_label.attribute_name
expression Any combination of attribute names, constants, arithmetic operators, and UniData SQL functions that together return a value that determines the value to store in the attribute.You may set an attribute to the null value with an expression like this: attribute_name = NULL.
WHERE search_condition
Updates attribute values that meet the criteria specified in search_condition. WHERE evaluates multivalues and multi- subvalues as if they have been unnested. search_condition takes the form:attribute_name/expression rel_op attribute_name/expressionFor example: WHERE fld1 BETWEEN 100 AND 500.rel_op may also be a Boolean operator (AND, OR).If no WHERE clause or ID list is included, ALL rows of the table are updated.Within a WHERE clause, the sum total of the individual condi-tions and the Boolean operators cannot exceed 127.For information on writing WHERE clauses, see Using UniData.
Parameter Description
UPDATE Parameters (continued)
1-125
ADD SUBVALUE appends the subvalue to the end of the group of multi-subvalues after satisfying the conditions specified by the WHERE clause.A multivalued constant cannot contain the right brace (}) as data. UniData SQL interprets this as a value mark.You cannot include value marks in a string constant with the ADD SUBVALUE keywords. Use ADD VALUE to add multivalues, and ADD SUBVALUE to add multi-subvalues.
Null Value Handling
Remember the following points when using the keyword NULL:
You cannot use INSERT or UPDATE command to add the null value, along with other values, into a multivalued or multi-subvalued attribute. This is because UniData SQL cannot recognize the keyword NULL embedded in a quoted string such as “D|NULL|I”. You must first create the record, then use the UPDATE command to change existing values to null, or to append null values.With null value handling turned off, the keyword NULL inserts an empty string.The null value is not valid for @ID.
1-126 UniData SQL Commands Reference
ExamplesThe following example updates the address for CLIENTS record 9982:
sql> UPDATE CLIENTS "9982"sql> SET ADDRESS = "10318 West Bend Ave.";1 record(s) updated.
sql> SELECT * FROM CLIENTSsql> WHERE ID = 9982;Page 1CLIENTS 9982First Name MarcLast Name WilletteCompany Name Regal OilAddress 10318 West Bend Ave.City Los AngelesState/Territory CAPostal Code 85694Country USA Phone Number Phone Cate-------------- ---------- 3102584569 Work 3102584568 Fax 1 records listed
The next example adds two new multivalues for PHONE_NUM and PHONE_TYPE. First, we display the record to be updated.
sql> SELECT * FROM CLIENTSsql> WHERE ID = 9982;Page 1CLIENTS 9982First Name MarcLast Name WilletteCompany Name Regal OilAddress 10318 West Bend Ave.City Los AngelesState/Territory CAPostal Code 85694Country USA Phone Number Phone Cate-------------- ---------- 3102584569 Work 3102584568 Fax1 records listed
1-127
Then, we add the new multivalues and display the record again.
sql> UPDATE CLIENTS "9982"sql> ADD VALUE PHONE_NUM = "7197789615}7197789509",sql> PHONE_TYPE = "Mobile}Pager";1 record(s) updated.sql> SELECT * FROM CLIENTSsql> WHERE ID = 9982;Page 1CLIENTS 9982First Name MarcLast Name WilletteCompany Name Regal OilAddress 10318 West Bend Ave.City Los AngelesState/Territory CAPostal Code 85694Country USA Phone Number Phone Cate-------------- ---------- 3102584569 Work 3102584568 Fax 7197789615 Mobile 7197789509 Pager 1 records listed
1-128 UniData SQL Commands Reference
AAppendix
Defining Attributes
You define attributes when you create or alter a table by using CREATE TABLE and ALTER TABLE. Follow the instructions in this appendix to define an attribute when the UniData SQL syntax indicates attribute_definition.
Attribute definitions consist of the following elements. Attribute name and data type are required and must be entered first and second; the other elements are optional and can be entered in any order. The elements are described in the following sections of this appendix:
Attribute name (required)Data type (required)Location Virtual attribute descriptionDisplay name FormatValue code specificationAssociation description
Default Format and Conversion CodesWhen you define an attribute using CREATE TABLE or ALTER TABLE, the following default formats and conversion codes are applied if none is explicitly specified. These formats and conversions determine how attribute values are displayed. Conversion is applied first, then format.
Default Attribute Display Format
Data TypeDefault Format
Default Conversion What is Displayed
character xL none x characters wide, left-justified
date 10L D2/ 10 characters wide, left-justified, MM/DD/YY
Attribute NameYou must assign an attribute name when you define a new attribute. Valid attribute names can contain the following types of characters:
Alphabetic charactersNumbersSpecial characters: “_”, “@”, “#”, and “$”
The following restrictions apply to attribute names:
The first character of an attribute name must be an alphabetic character, underscore (_), or at symbol (@).
Note: If you plan to access the data in a table, subtable, or view via ODBC, do not use @, #, or $ anywhere in the attribute name, and do not use an underscore (_) as the first character.
An attribute name can be no longer than 30 characters.The name cannot be a UniData SQL reserved word.The name must be unique among attribute names within the table, subtable, or view.
A-3
Data TypeData type describes the type of values that the attribute contains. You can specify four data types:
You can enter any type of data into any attribute; however, be careful when you store a different type of data in an attribute than is indicated by the data type of that attribute. If a conversion is specified, it may produce results that differ from your expectations. Also, be aware that changing the data type for an attribute in some cases appears to alter the data.
You can also establish a FORMAT or conversion code that contradicts the data type. If the format or conversion is inappropriate for the data values contained in the attribute, it is ignored.
Note: Data type is optional for ALTER TABLE MODIFY.
CHARThe CHAR data type tells UniData SQL that a particular attribute contains character string data.
Syntax:
CHAR(length[,“conv_code”])
length is the length of the character string in display format, including the mask. Length is a required parameter.
For valid conv_code options, see “Conversion Codes” on page A-8.
A-4 UniData SQL Commands Reference
Note: You must enclose literal values in quotation marks. If you enter a number without quotation marks, UniData stores it as numeric data type regardless of the data type indicated for that attribute.
DATEUse the DATE specification to tell UniData SQL that the attribute contains either date or time values. UniData stores a date as a single integer with 0 representing December 31, 1967, and 1 representing January 1, 1968, and so on. Negative numbers represent dates before December 31, 1967. UniData stores time as an integer between 0 and 86400 (seconds since midnight). Some points to remember about DATE data type:
Time – To specify time data type, use the DATE data type and conv_code MT. Negative input and numbers greater than 86400 are invalid for time data-type attributes. Data Entry – Unless the date or time is enclosed in quotation marks, UniData assumes that it is an integer being entered in internal format.Defaults – The default format for a DATE data-type attribute is 10 characters, left-justified. Default conversion is “D2/”.
Syntax:
DATE[(“date_conv”)]
See “Conversion Codes” on page A-8, for an explanation of date_conv.
NUMBERThe NUMBER specification tells UniData SQL how to convert input numeric values to the internal format and how to display the numeric values on output. When entering data, do not enclose data to be stored in numeric attributes in quotation marks.
Syntax:
NUMBER[({length | length,n | *} [,conv_code])]
A-5
Note: If you define an attribute as NUMBER or LONG, but specify a format of 10L (which implies CHAR data type) the attribute is considered to be CHAR, and attempts to perform arithmetic functions on that attribute result in the error “Invalid function on character field.”
Parameters
The following table describes each parameter of the syntax.
NUMBER Parameters
Parameter Description
length Length of the number value in display format, including the mask.
n Specifies the number of decimal places to include in the formatted number.
* Directs UniData SQL to use the default length of 10 digits.
,conv_code See “Conversion Codes” on page A-8, in this appendix, for an explanation of date_conv.
Warning: Be aware that altering the num_conv or format for a numeric attribute could affect the values when they are displayed. For example, if you remove an MD2 formatting code, the decimal is no longer inserted when the data is retrieved,effectively multiplying the value by 100.
LONGLONG describes an attribute that can hold numeric data. Although UniData SQL does not limit the size of an attribute, some systems do. The LONG description is provided for compatibility with other systems. The LONG data type has no options. When entering data, do not enclose data to be stored in numeric attributes in quotation marks.
The default format for a LONG data-type attribute is 10 digits, right-justified. No default conversion is performed on numbers.
Syntax:
LONG
A-6 UniData SQL Commands Reference
Warning: Be aware that altering the format for a numeric attribute could affect the values stored. For example, if you remove an MD formatting code, the decimal is no longer insterted when the data is retrieved, effectively multiplying the value by 100.
A-7
Conversion CodesYou may specify any of the conversions in the following table in conv_code or date_conv for any attribute. However, if an inappropriate conversion is applied, UniData disregards the conversion, storing or extracting the data without converting it. The data is converted into internal format when stored in the attribute, and into display format when extracted from the attribute.
Warning: Be aware that altering the conv_code or format for a numeric attribute could affect the values when they are displayed. For example, if you remove an MD formatting code, the decimal is no longer inserted when the data is retrieved, effectively multiplying the displayed value by 100.
The conversion codes in this table are described in the UniBasic Commands Reference in the section on OCONV.
Code Conversion
D Date.
G Extracts one or more strings separated by a delimiter.
L Length.
MB Binary.
MC Masked character.
MD Masked decimal.
ML Left justify.
MO Octal.
MP Packed decimal.
MP1 Convert to packed decimal without truncating at the first CHAR(0) or altering this character.
MR Right justify.
MT Time.
MX Hexadecimal.
Conversion Codes
A-8 UniData SQL Commands Reference
P Pattern match.
R Range.
S SOUNDEX
T Text extraction
Code Conversion
Conversion Codes (continued)
A-9
Virtual Attributes (IDESC or VIRTUAL)A virtual attribute is a dictionary record definition that relies on a formula to derive its value.
Syntax:
[IDESC | VIRTUAL] (“virt_definition”)
The IDESC or VIRTUAL keyword follows the data type keyword. The formula may be an expression, function, or UniBasic subroutine. For instructions on writing virtual attributes, see Using UniData.
You must enclose virtual attribute descriptions in quotation marks.
A-10 UniData SQL Commands Reference
Location (LOC)LOC places the attribute at position n relative to the beginning of the record. If you do not specify LOC, UniData SQL assumes the input order to be the relative position of each attribute. If two attributes share the same location, they are considered to be aliases. @ID is at location 0.
Syntax:
LOC(n)
A-11
Display Name (DISP)DISP provides a name for the attribute to be used as a column header. Generally, attribute_name is not suitable for display purposes because it is abbreviated or is not meaningful.
Tip: Use the SET command with the HEADSEP option to set a character to print between columns. The default is ‘|’. Include the HEADSEP character in string.expr to make the header wrap to a new line and print the HEADSEP character between columns. Use the FORMAT and COLUMN keywords to add additional formatting characteristics to header and column text.
Syntax:
DISP (“string.expr”)
string.expr must be enclosed in quotation marks.
A-12 UniData SQL Commands Reference
FORMATFORMAT stores a display format in the table dictionary. UniData SQL first applies the conversion codes specified in data type (using the CHAR, DATE, and NUMBER keywords) if they are present before applying FORMAT codes. If no conversion code or display format is coded, UniData SQL uses the system default for that data type.
Syntax:
FORMAT(“length[f.char]{L | R | T | C}[n][$][,][Z][mask]”)
Display Format OptionsThe following table shows the display format options.
Option Description
length An integer specifying the width of the output value.
f.char A character used to fill the formatted string, if necessary. If a number is used in place of a character, you precede it with a “\” to clearly indicate that it is f.char.
L Specifies left-justification in a column of length spaces. If the text is longer than length, it is broken in length intervals.
R Specifies right-justification in a column of length spaces.
T Specifies text justification. If data must be broken to fit in a column, it is broken between words.
C Specifies centered text in the column of length spaces.
n Sets the maximum number of decimal places allowed, rounding if necessary. If you enter 0 as n, the number is rounded to an integer.
$ Precedes the output number with a dollar sign.
Display Format Options
A-13
, Separates the number every three digits.
Z Suppresses leading zeros
mask Specifies a pattern mask composed of numbers and other characters. UniData SQL sequentially places numeric data in the mask before justification. To create the mask, enter one # for each character; enter special characters (such as comma and decimal point) where you want them to appear in the printed string (e.g. enter ###,###.## to insert commas and the decimal point in the output string).
Option Description
Display Format Options (continued)
A-14 UniData SQL Commands Reference
Value Code Specification
SMSM specifies the value type.
Syntax:
SM(“{S | MV | MS}”)
Valid types are:
Value Codes
Type Explanation
MV Multivalued attribute
MS Multi-subvalued attribute
S Singlevalued attribute (default)
A-15
Associating AttributesAn association is the mechanism UniData uses to establish a relationship among attri-butes. Within an association, multivalued attributes and multi-subvalued attributes are related to, or associated with, each other.
An example of related information that would be stored in a UniData database as an association is the following: A company's inventory consists of parts that are sold in different colors; each part is identified by a different part number and price, and a quantity on hand is recorded for each color of each part number. You do not want the price for one part getting mistaken for that of another, and you want the correct colors to be related to the correct part number.
The information can be stored, retrieved and manipulated based on the relationships established by the association; and you may unnest all associated attributes by unnesting the association.
The keyword ASSOC and assoc_name are stored in the definition of each associated multivalued and multi-subvalued attribute.
Syntax:
ASSOC(“assoc_name”)
A-16 UniData SQL Commands Reference
BAppendix
Unnesting Attributes
This appendix explains use of the levels of unnesting using the SELECT statement and all combinations of the keywords UNNEST, NL1, NL2, and NL_ALL. The appendix is divided into two sections:
Unnesting Associated AttributesThe levels of attributes included in the UNNEST clause determine the level of unnesting. The options listed below further modify this determination:
NL1 – Restricts unnesting to level 1, even if a lower-level attribute is listed. Unnests associated multivalued attributes, repeating the values in the associated singlevalued attribute.NL2 – Restricts unnesting to level 2, even if a higher-level attribute is listed. Unnests associated multi-subvalued attributes, repeating the values in the associated multivalued attribute.NL_ALL – Unnests all levels of all attributes listed. If only multivalued attributes are listed, repeats the values in singlevalued attributes. If only multi-subvalued attributes are listed, repeats the values in singlevalued and multivalued attributes.No Option – Unnesting level is determined by the attribute(s) listed in the UNNEST clause.
Tip: You can use any combination of fields selected and fields unnested, with the exception that you cannot use the NL2 keyword when only a multivalued attribute is listed. Here is an example of this invalid syntax: select s_fld, mv_fld from tab1 unnest NL2 mv_fld;
Sample Table for Unnesting ExamplesThis first example creates a table to use in the unnesting examples:
This example displays the dictionary of the table using the UniData SQL LISTDICT command:
sql> listdict tab1;Page 1@ID TYP LOC CONV NAME FORMAT SM ASSOC--------------- --- ------------- ---- --------------- ------ -- ----------@ID D 0 tab1 10L Ss_fld D 1 5L Smv1_fld D 2 5L MV a_1mv2_fld D 3 5L MV a_1ms1_fld D 4 5L MS a_1ms2_fld D 5 5L MS a_1a_1 PH ms2_fld ms1_f ld mv2_fld mv 1_fld7 records listed
Finally, the following INSERT statements populate the table with data that will help demonstrate unnesting:
Unnesting Associated Multivalued AttributesThe following UNNEST clause syntax unnests multivalued attributes; all of the example UniData SQL statements produce the same results:
UNNEST NL1 association_name for example: select * from tab1 unnest NL1 a_1;UNNEST multivalued_attribute for example: select * from tab1 unnest mv1_fld;UNNEST NL1 multivalued_attribute for example: select * from tab1 unnest NL1 mv1_fld;UNNEST NL1 multivalued_attribute, multi-subvalued_attribute for example: select * from tab1 unnest NL1 mv1_fld,ms1_fld;UNNEST NL_ALL multivalued_attribute for example: select * from tab1 unnest NL_ALL mv1_fld;
Note: When you unnest associated multivalued attributes, values in the associated singlevalued attributes are repeated.
B-4 UniData SQL Commands Reference
The following displays the results that are obtained when you execute any of the example statements:
Page 1tab1 s_fld mv1_f mv2_f ms1_f ms2_f---------- ----- ----- ----- ----- -----1 A A1 a1 A1-1 a1-1 A1-2 a1-21 A A2 a2 A2-1 A2-2 A2-31 A A3 A3-12 B B1 b1 B1-1 b1-1 b1-2 b1-32 B B2 b2 B2-12 B B3 b3 B3-12 B b42 B b53 C C1 c1 C1-1 c1-1 C1-2 c1-2 C1-33 C c210 records listed
Unnesting Associated Multi-Subvalued AttributesThe following UNNEST clause syntax unnests multi-subvalued attributes only. All of the example UniData SQL statements produce the same results.
UNNEST multi-subvalued_attribute for example: select * from tab1 unnest ms1_fld;UNNEST NL2 association_name for example: select * from tab1 unnest NL2 a_1;UNNEST NL2 multi-subvalued_attribute for example: select * from tab1 unnest NL2 ms1_fld;UNNEST NL2 multivalued_attribute, multi-subvalued_attribute for example: select * from tab1 unnest NL2 mv1_fld,ms1_fld;
Note: When you unnest associated multi-subvalued attributes, values in the associated multivalued attributes are repeated, but singlevalued attributes are not repeated.
B-5
The following example shows the results when you execute any of the example statements:
Unnesting All Attributes in an AssociationThe following UNNEST clause syntax unnests multivalued and multi-subvalued attributes of the same association:
UNNEST association_name for example: select * from tab1 unnest a_1;UNNEST multivalued_attribute, multi-subvalued attribute for example: select * from tab1 unnest mv1_fld,ms1_fld;UNNEST NL_ALL multi-subvalued_attribute for example: select * from tab1 unnest NL_ALL ms1_fld;UNNEST NL_ALL association_name for example: select * from tab1 unnest NL_ALL a_1;UNNEST NL_ALL multivalued attribute, multi-subvalued_attribute for example: select * from tab1 unnest NL_ALL mv1_fld,ms1_fld;
Note: When you unnest all attributes in an association, all singlevalued and multivalued attributes are repeated.
B-6 UniData SQL Commands Reference
The following displays the results that are obtained when you execute any of the example statements:
Page 1tab1 s_fld mv1_f mv2_f ms1_f ms2_f---------- ----- ----- ----- ----- -----1 A A1 a1 A1-1 a1-11 A A1 a1 A1-2 a1-21 A A2 a2 A2-11 A A2 a2 A2-21 A A2 a2 A2-31 A A3 A3-12 B B1 b1 B1-1 b1-12 B B1 b1 b1-22 B B1 b1 b1-32 B B2 b2 B2-12 B B3 b3 B3-12 B b42 B b53 C C1 c1 C1-1 c1-13 C C1 c1 C1-2 c1-23 C C1 c1 C1-33 C c217 records listed
B-7
Unnesting Unassociated AttributesUnnesting unassociated attributes results in a Cartesian product: every multivalue is listed with every multi-subvalue, as the following example demonstrates. In this example, we create a table containing unassociated multivalues and multi-subvalues for demonstration purposes.
Here is the structure of the table created above, as displayed with the LISTDICT command:
sql> listdict tab1;Page 1@ID TYP LOC CONV NAME FORMAT SM ASSOC--------------- --- ------------- ---- --------------- ------ -- ----------@ID D 0 tab1 10L Sunassoc_MV D 1 7L MVunassoc_MS D 2 7L MS3 records listed
sql> SELECT * FROM tab1;Page 1tab1 unassoc unassoc---------- ------- -------1 a a11 a a1 b a2 c b1 b2 b3 c12 AA A1 A2 B1 B2 B3 C12 records listed
B-9
Selecting unassociated attributes results in a Cartesian product, as illustrated in the following example:
sql>SELECT * FROM tab1sql>UNNEST unassoc_MV, unassoc_MS;Page 1tab1 unassoc unassoc---------- ------- -------1 a a11 a a21 a b11 a b21 a b31 a c11 b a11 b a21 b b11 b b21 b b31 b c11 c a11 c a21 c b11 c b21 c b31 c c12 AA A12 AA A2Page 2tab1 unassoc unassoc---------- ------- -------2 AA B12 AA B22 AA B32 AA C124 records listed
B-10 UniData SQL Commands Reference
CAppendix
Creating Subtables
This appendix contains examples of all CREATE SUBTABLE state-ments you can write, including creating unique and generated primary and foreign keys.
Note: Subtables are updatable views you can access through 1NF commands.
This appendix is divided into the following sections:
Base TablesDictionary listings of the tables from which the subtables are created.CREATE SUBTABLE ExamplesExamples of all CREATE SUBTABLE statements.
Base TablesThe following tables are used in the CREATE SUBTABLE examples in this appendix.
C-2 UniData SQL Commands Reference
T_CLIENTSlistdict T_CLIENTS;Page 1@ID TYP LOC CONV NAME FORMAT SM ASSOC--------------- --- ------------- ---- --------------- ------ -- ----------@ID D 0 T_CLIENTS 10L SID D 0 Client # 10R SID1 D 0 T_CLIENTS 10L SFNAME D 1 First Name 15T SLNAME D 2 Last Name 15T SCOMPANY D 3 Company Name 30T SADDRESS D 4 Address 25T MVCITY D 5 City 15T SSTATE D 6 State/Territory 15T SZIP_CODE D 7 Postal Code 10R SCOUNTRY D 8 Country 15T SPHONE_NUM D 9 Phone Number 14R MV PHONE_ITEM SPHONE_TYPE D 10 Phone Category 10T MV PHONE_ITEM S@UQ PH NAME COMPANY ADDRESS CITY STATE ZIP COU NTRY PHONE PH ONE_TYPEPHONE_ITEMS PH PHONE PHONE_T YPE@ORIGINAL SQ @ID@SYNONYM SQ ID1NAME V FNAME:" ":LNA Name 30T S MEPHONE V SUBR("PHONE_F Phone Number 20R MV PHONE_ITEM MT",PHONE_NUM S ,COUNTRY)ZIP V SUBR("PSTLCOD Postal Code 10R S E_FMT",@RECOR D)NEXT_CLI_NO X 10096 Next Client #21 records listed
C-3
T_INVENTORYsql> listdict T_INVENTORY;Page 1@ID TYP LOC CONV NAME FORMAT SM ASSOC--------------- --- ------------- ---- --------------- ------ -- ----------@ID D 0 T_INVENTORY 10L SID D 0 Product Number 10R SID1 D 0 T_INVENTORY 10L SINV_DATE D 1 D4/ Inventory Date 10R SINV_TIME D 2 MTH Inventory Time 5R SPROD_NAME D 3 Product Name 10T SFEATURES D 4 Features 30T SCOLOR D 5 Color 10T MV LINE_ITEMSQTY D 6 Quantity 6R MV LINE_ITEMSPRICE D 7 MD2, Price 10R MV LINE_ITEMS $REORDER D 8 Reorder Point 6R MV LINE_ITEMS@UQ PH INV_DATE INV_ TIME PROD_NAM E FEATURES LI NE_ITEMSLINE_ITEMS PH COLOR PRICE Q TY REORDER DI FF@ORIGINAL SQ @ID@SYNONYM SQ ID1DIFF V QTY - REORDER Difference 6R MV LINE_ITEMSNEXT_INV_NO X 58051 Next Inventory #17 records listed
C-4 UniData SQL Commands Reference
T_ORDERSsql> listdict T_ORDERS;Page 1@ID TYP LOC CONV NAME FORMAT SM ASSOC--------------- --- ------------- ---- --------------- ------ -- ----------@ID D 0 T_ORDERS 10L SID D 0 Order Number 10R SID1 D 0 T_ORDERS 10L SORD_DATE D 1 D4/ Order Date 10R SORD_TIME D 2 MTH Order Time 7R SCLIENT_NO D 3 Client Number 10R SPRODNO D 4 PRODNO 10L MV LINE_ITEMSPRODUCT_NO D 4 Product Number 10R MV LINE_ITEMSCOLOR D 5 Color 10T MS LINE_ITEMSQTY D 6 Qty 6R MS LINE_ITEMSPRICE D 7 MD2, Price 10R MS LINE_ITEMS $@UQ PH ORD_DATE ORD_ TIME CLIENT_N O NAME COMPAN Y ADDRESS CIT Y STATE ZIP C OUNTRY PHONE_ ITEMS LINE_IT EMS GRAND_TOT ALLINE_ITEMS PH PRODUCT_NO PR OD_NAME FEATU RES COLOR QTY PRICE EPRICEPHONE_ITEMS PH PHONE PHONE_T YPE@ORIGINAL SQ @ID@SYNONYM SQ ID1ADDRESS V TRANS('CLIENT Address 25T MV S',CLIENT_NO, 'ADDRESS','X' )CITY V TRANS('CLIENT City 15T S S',CLIENT_NO, 'CITY','X')COMPANY V TRANS('CLIENT Company 15T S S',CLIENT_NO, 'COMPANY','X' )COUNTRY V TRANS('CLIENT Country 10T S
C-5
S',CLIENT_NO, 'COUNTRY','X' )EPRICE V PRICE*QTY MD2, Extended Price 12R MS LINE_ITEMS $FEATURES V TRANS('INVENT Features 30T MV LINE_ITEMS ORY',PRODUCT_ NO,'FEATURES' ,'X')GRAND_TOTAL V PRICE*QTY; SU MD2, Grand Total 14R S M(SUM(@1)) $NAME V TRANS('CLIENT Name 25T S S',CLIENT_NO, 'FNAME','X'): " ": TRANS(' CLIENTS',CLIE NT_NO,'LNAME' ,'X')PHONE V TRANS('CLIENT Phone Number 20R MV PHONE_ITEM S',CLIENT_NO, S 'PHONE_NUM',' X'); TRANS('C LIENTS',CLIEN T_NO,'COUNTRY ','X'); SUBR( "PHONE_FMT",@ 1,@2)PHONE_TYPE V TRANS('CLIENT Phone Type 10T MV PHONE_ITEM S',CLIENT_NO, S 'PHONE_TYPE', 'X')PROD_NAME V TRANS('INVENT Product Name 10T MV LINE_ITEMS ORY',PRODUCT_ NO,'PROD_NAME ','X')STATE V TRANS('CLIENT State 15T S S',CLIENT_NO, 'STATE','X')ZIP V TRANS('CLIENT Postal Code 10R S S',CLIENT_NO, -1,'X'); SUB R("PSTLCODE_F MT",@1)NEXT_ORD_NO X 983 Next Order #30 records listed
C-6 UniData SQL Commands Reference
CREATE SUBTABLE ExamplesThe following sample SQL scripts create subtables from the base tables T_CLIENTS, T_INVENTORY, and T_ORDER. to produce NL0, NL1, and NL2 subtables with names like "XXXnyy", where:
XXX = CLI, INV or ORDn = nesting level: 0, 1 or 2
yy = sequential number within XXXn group
T_CLIENTS NL0 Subtables
CLI001: NL0 Subtable, UNIQUE PKEY, all Single-value D-fields
create subtable CLI001 (pkID1,FNAME,LNAME,COMPANY, CITY,STATE,ZIP_CODE,COUNTRY) as select ID1,FNAME,LNAME,COMPANY, CITY,STATE,ZIP_CODE,COUNTRY from T_CLIENTS primary key pkID1;
CLI002: NL0 Subtable, UNIQUE PKEY, Partial viewcreate subtable CLI002 (pkID1,FNAME,LNAME) as select ID1,FNAME,LNAME from T_CLIENTS primary key pkID1;
CLI003: NL0 Subtable w/Virtual fld, UNIQUE PKEYcreate subtable CLI003 (pkID1,FNAME,LNAME,COMPANY, CITY,STATE,ZIP_CODE,COUNTRY,vNAME,vZIP) as select ID1,FNAME,LNAME,COMPANY, CITY,STATE,ZIP_CODE,COUNTRY,NAME,ZIP from T_CLIENTS primary key pkID1;
create subtable ORD241 (pkID1,pkPRODNO,pkCOLOR,QTY,PRICE,vEPRICE) as select ID1,PRODNO,COLOR,QTY,PRICE,EPRICE from T_ORDERS unnest PRODNO,COLOR primary key pkID1,pkPRODNO,pkCOLOR foreign key pkID1,pkPRODNO references ORD101;
C-26 UniData SQL Commands Reference
DAppendix
Arithmetic Functions and Operators
Arithmetic functions and operators, along with constants and attribute names, make up UniData SQL expressions. The following commands include expressions in their syntax:
Commands that Accept Expressions
UniData SQL Commands
BREAK COMPUTE CREATE TABLE SELECT
COLUMN CREATE SUBTABLE
INSERT UPDATE
For further information on writing expressions, see Using UniData SQL.
Note: UniData SQL expressions are made up of attribute names, constants, arithmetic functions, and arithmetic operators.
Arithmetic FunctionsYou can include the following UniData functions in expressions.
Arithmetic Functions
Arithmetic Function Description
ABS (nvalue) Absolute value of nvalue.
ACOS (nvalue) Trigonometric arc-cosine of nvalue. The result is expressed as the degree of the arc-cosine of the nvalue, which ranges from 0 to 180.
ASIN (nvalue) Trigonometric arc-sine of nvalue. The result is expressed as the degree of the arc-sin of the nvalue, which ranges from -90 to 90.
ATAN (nvalue) Trigonometric arc-tangent of nvalue.
COS (nvalue) Cosine of nvalue. nvalue is expressed as degree.
EXP (nvalue) Raises ”e” (natural exponential) by the value of nvalue.
INT (x) Integer value of x.
LN (nvalue) Natural log of nvalue.
MOD (nvalue, m) Remainder of nvalue divided by m.
POWER(nvalue, e) Raises the numeric value to the power e.
ROUND(nvalue, e) Rounds the nvalue to the number of decimal places specified by e.
SIGN(nvalue) Returns +1 if the nvalue is greater than zero, 0 if the nvalue is equal to zero, -1 if the nvalue is less than zero.
SIN (nvalue) Sine of nvalue. nvalue is expressed as degree.
SQRT (nvalue) Square root of nvalue; if nvalue is 0, returns 0.
TAN (nvalue) Tangent of nvalue. nvalue is expressed as degree.
TRUNC Truncates the nvalue to ddigits right of (nvalue{,d}) the decimal place. The default is 0.
D-2 UniData SQL Commands Reference
Arithmetic OperatorsThe following arithmetic operators can be combined with attribute names and constants to make up arithmetic expressions. Arithmetic expressions can also be combined with arithmetic functions within UniData SQL expressions: