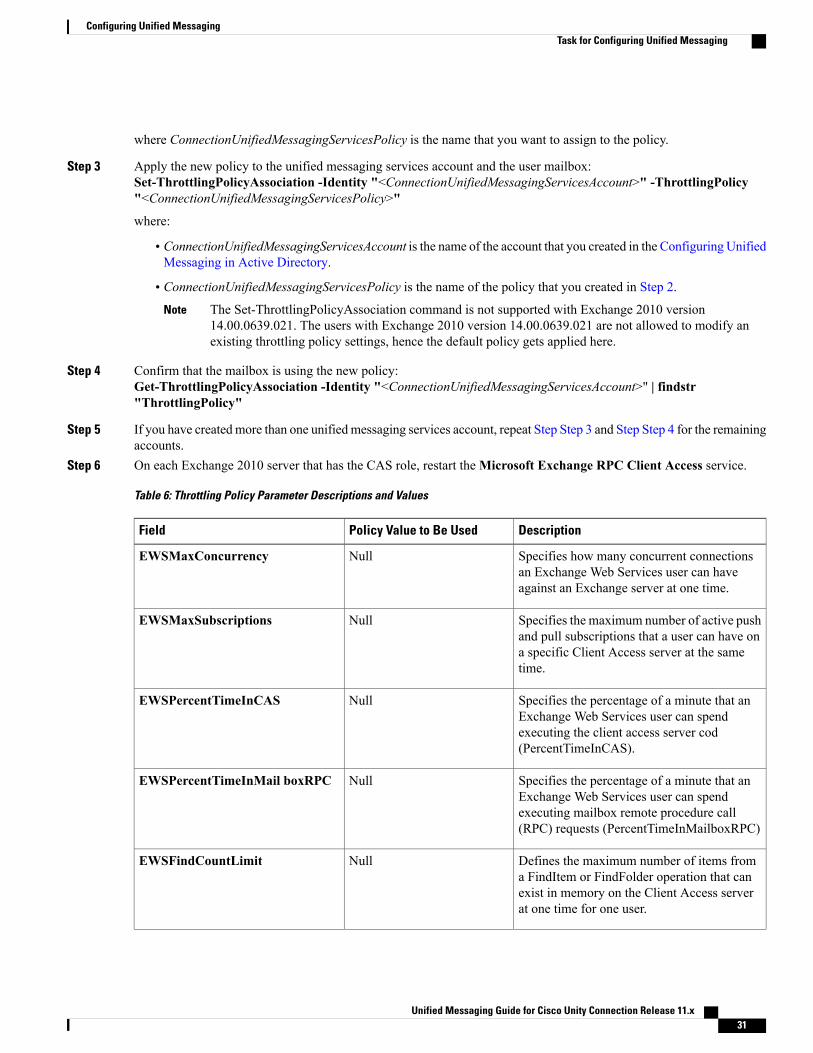
Unified Messaging Guide for Cisco Unity Connection Release 11.x First Published: -- Last Modified: -- Americas Headquarters Cisco Systems, Inc. 170 West Tasman Drive San Jose, CA 95134-1706 USA http://www.cisco.com Tel: 408 526-4000 800 553-NETS (6387) Fax: 408 527-0883
C H A P T E R 1 Introduction to Unified Messaging 1
Overview 1
Single Inbox 2
Storing Voicemails for Single Inbox Configuration 2
Single Inbox with ViewMail for Outlook 2
Single Inbox without ViewMail for Outlook or with Other Email Clients 3
Accessing Secure Voicemails in the Exchange/ Office 365 Mailbox 3
Transcription of Voicemails Synchronized Between Unity Connection and Exchange/ Office
365 Mailbox 3
Transcription of Voicemails in Secure and Private Messages 6
Synchronization with Outlook Folders 6
Enabling the Sent Items Folder Synchronization 6
Location for Deleted Messages 7
Types of Messages Not Synchronized with Exchange/ Office 365 8
Affect of Disabling and Re-enabling Single Inbox 8
Synchronization of Read/Heard Receipts, Delivery Receipts, and Non-delivery Receipts 9
Text-to-Speech 10
Calendar and Contact Integration 11
About Calendar Integration 11
About Contact Integrations 12
C H A P T E R 2 Configuring Unified Messaging 13
Configuring Unified Messaging 13
Overview of Unity Connection Communication with Exchange Server 13
Prerequisites for Configuring Unified Messaging 17
Task List for Configuring Unified Messaging 18
Task List for Configuring Unified Messaging with Exchange 2013 or Exchange 2016 18
Task List for Configuring Unified Messaging with Exchange 2010 19
Unified Messaging Guide for Cisco Unity Connection Release 11.x iii
Task List for Configuring Unified Messaging with Office 365 20
Task for Configuring Unified Messaging 22
Configuring Unified Messaging in Active Directory 22
Granting Permissions 23
Granting Permissions for Exchange 2013 or Exchange 2016 23
Granting Permissions for Exchange 2010 23
Confirming Authentication and SSL Settings 24
Confirming Exchange 2013 or Exchange 2016 Authentication and SSL
Settings 25
Confirming Exchange 2010 Authentication and SSL Settings 26
Configuring Paged View Functionality in Unity Connection for Exchange 2013 or
Exchange 2016 28
Configuring EWS Limits for Exchange 2010 28
Configuring EWS Limits on Exchange 2010 SP2 RU4 and Later 28
Configuring EWS Limits for Unified Messaging Users 29
Configuring EWS Limits on Exchange 2010 SP2 RU3 and Earlier Releases 30
Removing EWS Limits for Unified Messaging Users (Exchange 2010 SP2
RU3 and Earlier Releases) 30
Accessing Office 365 Using Remote Exchange Management Power Shell 32
Assigning Application Impersonation Role for Office 365 33
Creating a Unified Messaging Service to Access Mail Server 33
Creating Unified Messaging Services in Unity Connection 34
Uploading CA Public Certificates for Exchange and Active Directory 34
Saving the Public Certificate forMicrosoft Certificate Services or Active Directory
Certificate Services to a File 35
Uploading the Public Certificates to the Unity Connection Server 36
Uploading Certificates for Office 365 and Cisco Unity Connection 36
Settings Configured on Unity Connection Users 37
Unified Messaging Account for Users 37
Unified Messaging Accounts and User Accounts Related for Unity
Connection 37
Creating Unified Messaging Accounts for Users 38
Test Unified Messaging Configuration 38
View the Summary of Unified Messaging Configuration 38
Unified Messaging Guide for Cisco Unity Connection Release 11.xiv
Contents
Viewing a Summary of Configuration of Unified Messaging Accounts for Unity
Connection 39
Testing System Configuration and Unified Messaging with Exchange and Unity
Connection 39
Testing Access to Calendars for Unity Connection 40
Resolving SMTP Domain Name Configuration Issues 40
C H A P T E R 3 Configuring Text-to-Speech 43
Configuring Text-to-Speech 43
Overview 43
Task List for Configuring Text-to-Speech 43
Configuring the Text-to-Speech Feature 43
Configuring TTS on Office 365, Exchange 2013 or Exchange 2010 44
C H A P T E R 4 Configuring Calendar and Contact Integration 45
Configuring Calendar and Contact Integration 45
Overview 45
Configuring Calendar and Contact Integration with Exchange or Office 365 Servers 45
Configuring Office 365, Exchange 2013, Exchange 2010, or Exchange 2007 for Calendar
and Contact Integration 46
Configuring Exchange 2013, Exchange 2010 for Calendar and Contact Integration 46
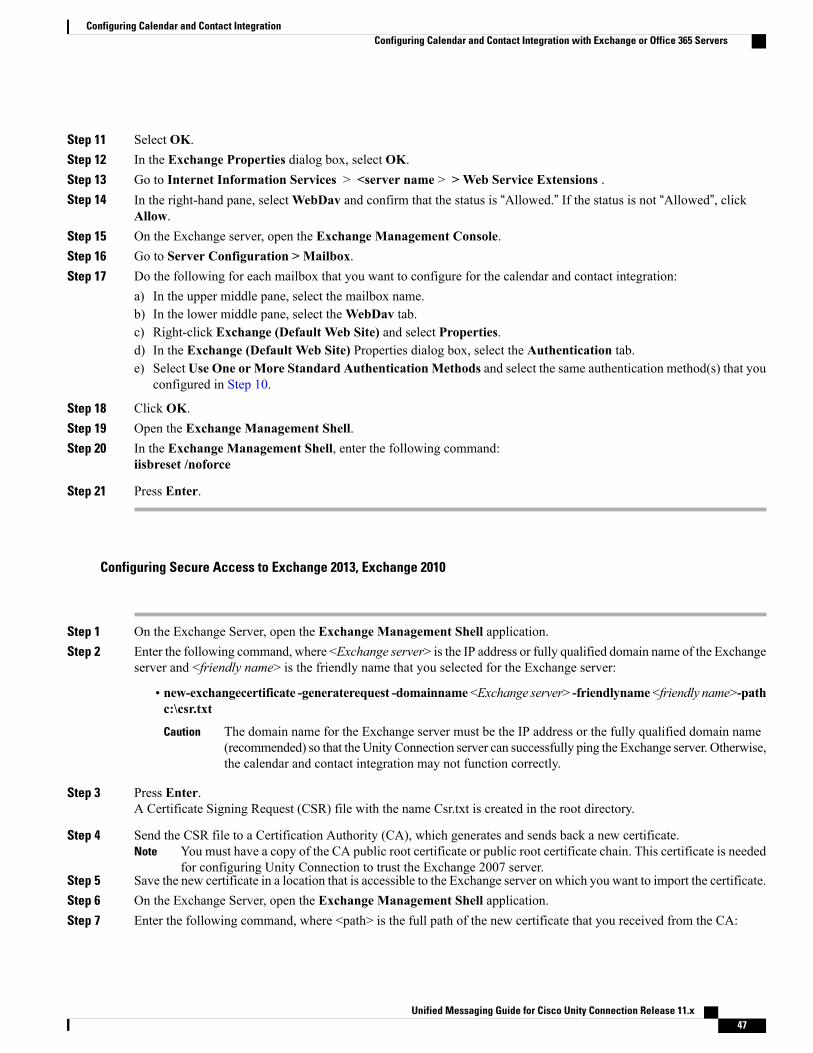
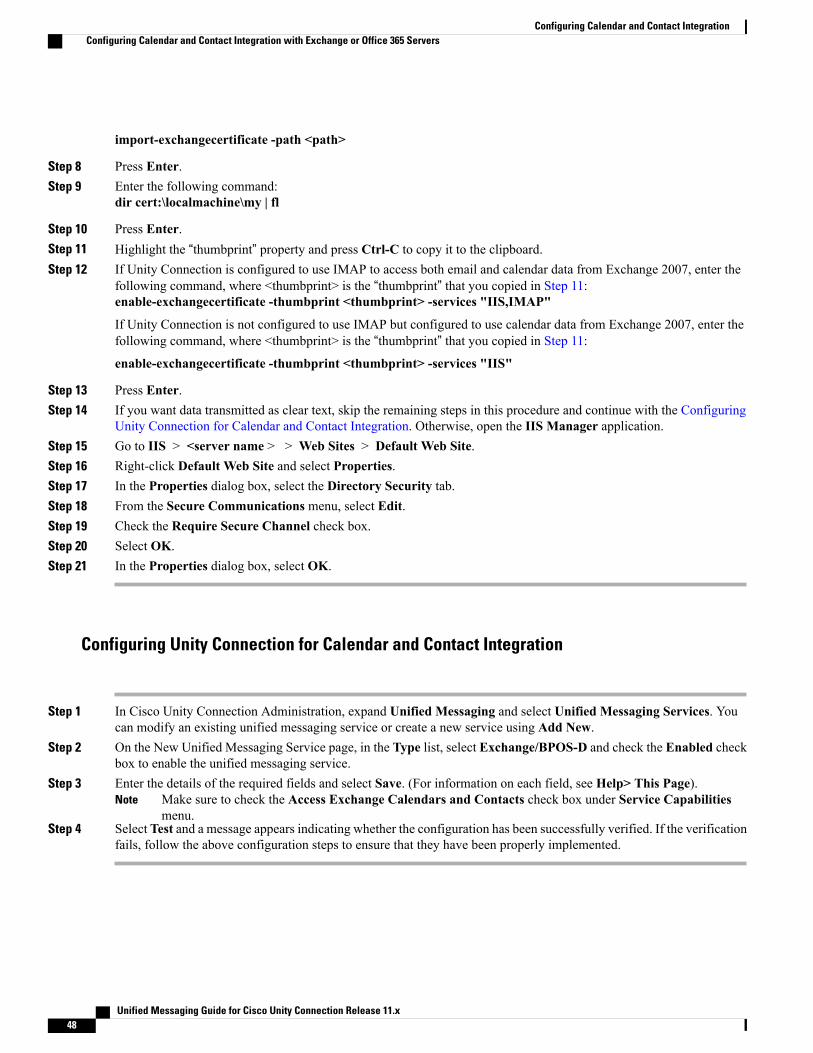
Configuring Secure Access to Exchange 2013, Exchange 2010 47
Configuring Unity Connection for Calendar and Contact Integration 48
Configuring Unity Connection Users for Calendar and Contact Integration 49
Testing Calendar Integration with Exchange or Office 365 Servers 49
Configuring Calendar and Contact Integration with Cisco Unified MeetingPlace or Cisco
Unified MeetingPlace Express 50
Configuring Cisco Unified MeetingPlace for Calendar Integration 50
Configuring Cisco Unified MeetingPlace Express for Calendar Integration 51
Configuring Unity Connection for Calendar Integration 52
Configuring Unity Connection Users for Calendar Integration 53
Testing Calendar Integration with Cisco Unified MeetingPlace or Cisco Unified
MeetingPlace Express 53
C H A P T E R 5 Moving and Restoring Exchange Mailboxes 55
Unified Messaging Guide for Cisco Unity Connection Release 11.x v
Contents
Moving and Restoring Exchange Mailboxes 55
Overview 55
Updating User Settings After Moving Exchange Mailboxes 55
Moving Exchange Mailboxes to a New Exchange Server 56
Replacing Unity Connection Unified Messaging Accounts After Moving Exchange
Mailboxes 56
Restoring Exchange Mailboxes 57
Task List for Restoring Microsoft Exchange Mailboxes 57
Disabling Single Inbox Before Restoring Exchange Mailboxes 58
Behavior of Synchronization Cache when Single Inbox is Disabled 58
Behavior of Synchronization Cache when Single Inbox is Enabled 59
Disabling Single Inbox for Unity Connection 59
Restoring Exchange Mailboxes for a Small Number of Users 59
Restoring Exchange Mailboxes for All the Unified Messaging Users or When
Unity Connection Functionality is Not a Concern 59
RestoringExchangeMailboxes for SomeUsersAssociatedwith aUnifiedMessaging
Service When Unity Connection Functionality is a Concern 60
Disable Single Inbox for Individual Users 60
Disable Single Inbox for All Users 60
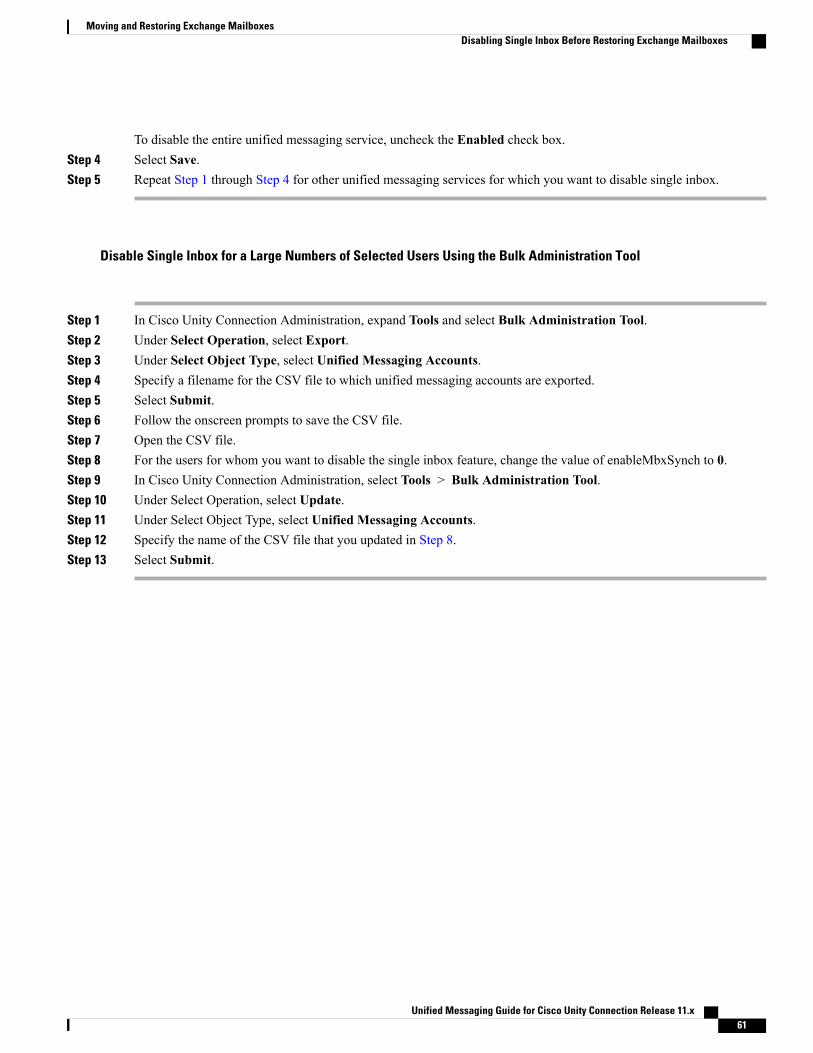
Disable Single Inbox for a Large Numbers of Selected Users Using the Bulk
Administration Tool 61
Unified Messaging Guide for Cisco Unity Connection Release 11.xvi
Contents
C H A P T E R 1Introduction to Unified Messaging
• Overview, page 1
• Single Inbox, page 2
• Text-to-Speech, page 10
• Calendar and Contact Integration, page 11
OverviewThe unified messaging feature provides a single storage for different types of messages, such as voicemailsand emails that are accessible from a variety of devices. For example, a user can access a voicemail eitherfrom the email inbox using computer speakers or directly from the phone interface.
The following are the supported mail server with which you can integrate Unity Connection to enable unifiedmessaging:
• Microsoft Exchange (2010 and 2013) servers
• Microsoft Office 365
• Cisco Unified MeetingPlace
Integrating Unity Connection with an Exchange or Office 365 server provides the following functionalities:
• Synchronization of voicemails between Unity Connection and Exchange/ Office 365 mailboxes.
• Text-to-speech (TTS) access to Exchange/ Office 365 email.
• Access to Exchange/ Office 365 calendars that allows users to do meeting-related tasks by phone, suchas, hear a list of upcoming meetings and accept or decline meeting invitations.
• Access to Exchange/ Office 365 contacts that allows users to import Exchange/ Office 365 contacts anduse the contact information in personal call transfer rules and when placing outgoing calls using voicecommands.
• Transcription of Unity Connection voicemails.
Integrating Unity Connection with Cisco Unified MeetingPlace provides the following functionalities:
Unified Messaging Guide for Cisco Unity Connection Release 11.x 1
• Join a meeting that is in progress.
• Hear a list of the participants for a meeting.
• Send a message to the meeting organizer and meeting participants.
• Set up immediate meetings.
• Cancel a meeting (applied to meeting organizers only).
Single InboxThe synchronization of user messages between Unity Connection and Exchange/Office 365 mailboxes isknown as single inbox. When the single inbox feature is enabled on Unity Connection, voice mails are firstdelivered to the user mailbox in Unity Connection and then the mails are replicated to the user mailbox onExchange/ Office 365 server. For information on configuring the single inbox or unified messaging featurein Unity Connection, see the “Configuring Unified Messaging” chapter.
Note • The single inbox feature is supported with both IPv4 and IPv6 addresses. However, single inboxover IPv6 is supported only with Office 365 and Exchange 2007, 2010, and 2013 servers.
• When the single inbox feature is enabled for a user, the Outlook rules may or may not work forsingle inbox messages.
• Unity Connection 9.1(2) and later supports maximum of 8000 Office 365 users. For more informationsee the section “Specification for Virtual Platform Overlays” of the Cisco Unity Connection 11.xSupported PlatformList at https://www.cisco.com/c/en/us/td/docs/voice_ip_comm/connection/11x/supported_platforms/b_11xcucspl.html .
Storing Voicemails for Single Inbox ConfigurationAll Unity Connection voicemails, including those sent from Cisco ViewMail for Microsoft Outlook, are firststored in Unity Connection and are immediately replicated to the Exchange/ Office 365 mailbox for therecipient.
Single Inbox with ViewMail for OutlookConsider the following points if you want to use Outlook for sending, replying, and forwarding voicemailsand to synchronize the messages with Unity Connection:
• Install ViewMail for Outlook on user workstations. If ViewMail for Outlook is not installed, thevoicemails that are sent by Outlook are treated as .wav file attachments by Unity Connection. For moreinformation on installing ViewMail for Outlook, see the Release Notes for Cisco ViewMail for MicrosoftOutlook for the latest release at http://www.cisco.com/en/US/products/ps6509/prod_release_notes_list.html.
Unified Messaging Guide for Cisco Unity Connection Release 11.x2
• Make sure to add SMTP proxy addresses for unified messaging users in Unity Connection. The SMTPproxy address of a user specified in Cisco Unity Connection Administration must match the Exchange/Office 365 email address specified in the unified messaging account in which single inbox is enabled.
• Associate an email account of each user in the organization with a Unity Connection server domain.
The Outlook Inbox folder contains both voicemails and the other messages stored in Exchange/ Office 365.The voicemails also appear in the Web Inbox of a user.
A single inbox user has a Voice Outbox folder added to the Outlook mailbox. Unity Connection voicemailssent from Outlook do not appear in the Sent Items folder.
Private messages cannot be forwarded.Note
Single Inbox without ViewMail for Outlook or with Other Email ClientsIf you do not install ViewMail for Outlook or use another email client to access Unity Connection voicemailsin Exchange/ Office 365:
• The email client treats voicemails as emails with .wav file attachments.
• When a user replies to or forwards a voicemail, the reply or forward also is treated as an email even ifthe user attaches a .wav file. Message routing is handled by Exchange/ Office 365, not by UnityConnection, so the message is never sent to the Unity Connection mailbox for the recipient.
• Users cannot listen to secure voicemails.
• It may be possible to forward private voicemails. (ViewMail for Outlook prevents private messagesfrom being forwarded).
Accessing Secure Voicemails in the Exchange/ Office 365 MailboxTo play secure voicemails in the Exchange/ Office 365 mailbox, users must use Microsoft Outlook and CiscoViewMail for Microsoft Outlook. If ViewMail for Outlook is not installed, users accessing secure voicemailssee only text in the body of a decoy message which briefly explains the secure messages.
Transcription of Voicemails Synchronized Between Unity Connection andExchange/ Office 365 Mailbox
A system administrator can enable the single inbox transcription functionality by configuring the unifiedmessaging services and the SpeechView transcription services on Unity Connection.
For information on configuring unified messaging services in Unity Connection, see the Creating a UnifiedMessaging Service to Access Mail Server section.
For information on configuring SpeechView transcription service, see the “SpeechView” chapter of the SystemAdministration Guide for Cisco Unity Connection, Release 12.x, available at https://www.cisco.com/c/en/us/td/docs/voice_ip_comm/connection/12x/administration/guide/b_12xcucsag.html.
Unified Messaging Guide for Cisco Unity Connection Release 11.x 3
Introduction to Unified MessagingSingle Inbox without ViewMail for Outlook or with Other Email Clients
“Synchronization of multiple forward messages” service is not supported with Unity Connection, if configuredwith single inbox:
In single inbox, the transcription of voicemails is synchronized with Exchange in the following ways:
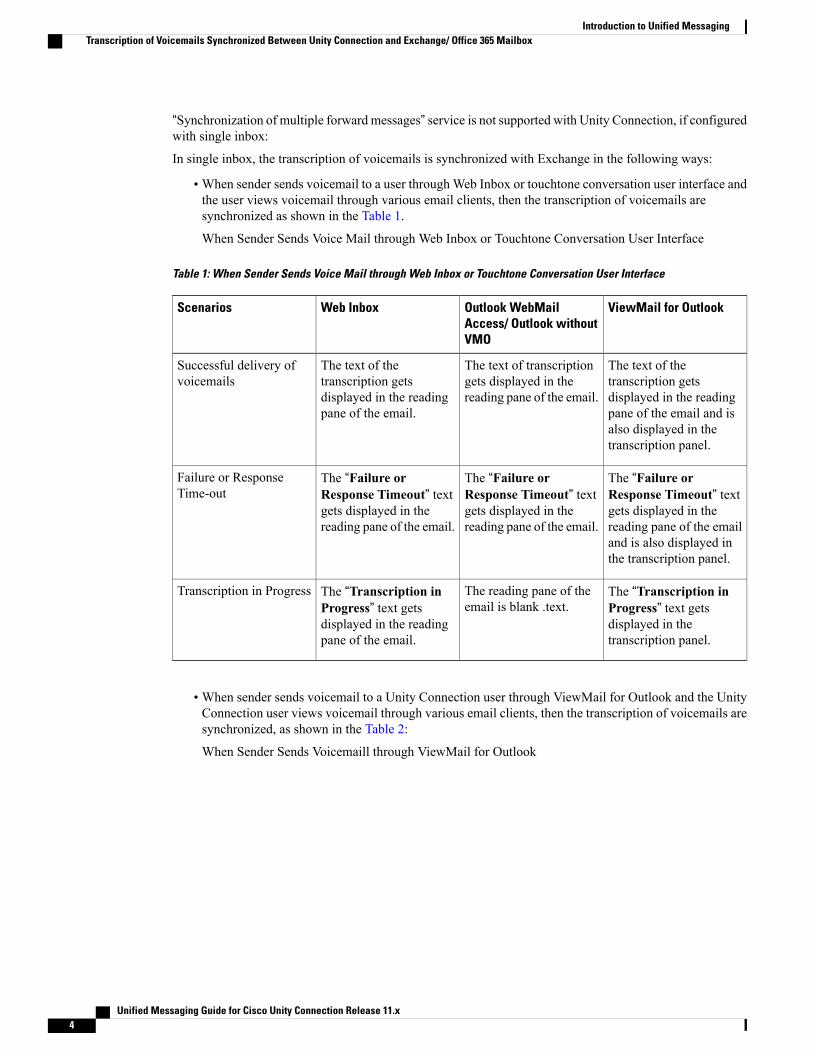
• When sender sends voicemail to a user throughWeb Inbox or touchtone conversation user interface andthe user views voicemail through various email clients, then the transcription of voicemails aresynchronized as shown in the Table 1.
When Sender Sends Voice Mail through Web Inbox or Touchtone Conversation User Interface
Table 1: When Sender Sends Voice Mail through Web Inbox or Touchtone Conversation User Interface
ViewMail for OutlookOutlook WebMailAccess/ Outlook withoutVMO
Web InboxScenarios
The text of thetranscription getsdisplayed in the readingpane of the email and isalso displayed in thetranscription panel.
The text of transcriptiongets displayed in thereading pane of the email.
The text of thetranscription getsdisplayed in the readingpane of the email.
Successful delivery ofvoicemails
The “Failure orResponse Timeout” textgets displayed in thereading pane of the emailand is also displayed inthe transcription panel.
The “Failure orResponse Timeout” textgets displayed in thereading pane of the email.
The “Failure orResponse Timeout” textgets displayed in thereading pane of the email.
Failure or ResponseTime-out
The “Transcription inProgress” text getsdisplayed in thetranscription panel.
The reading pane of theemail is blank .text.
The “Transcription inProgress” text getsdisplayed in the readingpane of the email.
Transcription in Progress
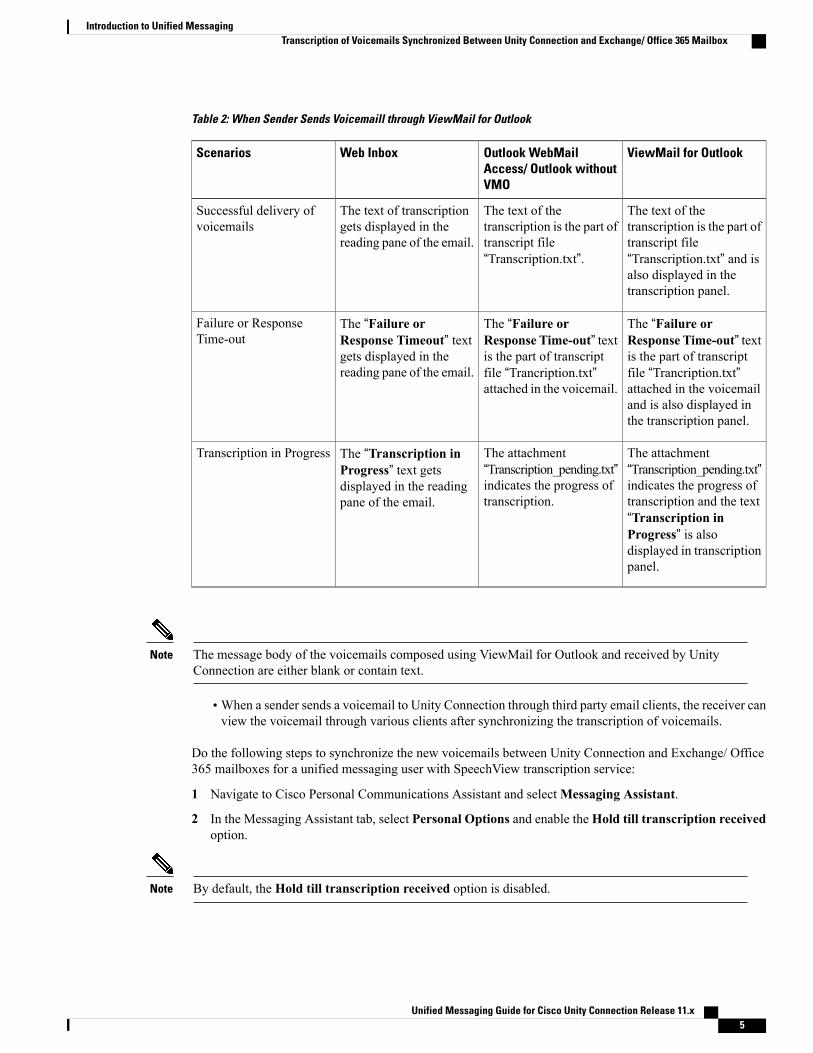
• When sender sends voicemail to a Unity Connection user through ViewMail for Outlook and the UnityConnection user views voicemail through various email clients, then the transcription of voicemails aresynchronized, as shown in the Table 2:
When Sender Sends Voicemaill through ViewMail for Outlook
Unified Messaging Guide for Cisco Unity Connection Release 11.x4
Introduction to Unified MessagingTranscription of Voicemails Synchronized Between Unity Connection and Exchange/ Office 365 Mailbox
Table 2: When Sender Sends Voicemaill through ViewMail for Outlook
ViewMail for OutlookOutlook WebMailAccess/ Outlook withoutVMO
Web InboxScenarios
The text of thetranscription is the part oftranscript file“Transcription.txt” and isalso displayed in thetranscription panel.
The text of thetranscription is the part oftranscript file“Transcription.txt”.
The text of transcriptiongets displayed in thereading pane of the email.
Successful delivery ofvoicemails
The “Failure orResponse Time-out” textis the part of transcriptfile “Trancription.txt”attached in the voicemailand is also displayed inthe transcription panel.
The “Failure orResponse Time-out” textis the part of transcriptfile “Trancription.txt”attached in the voicemail.
The “Failure orResponse Timeout” textgets displayed in thereading pane of the email.
Failure or ResponseTime-out
The attachment“Transcription_pending.txt”indicates the progress oftranscription and the text“Transcription inProgress” is alsodisplayed in transcriptionpanel.
The attachment“Transcription_pending.txt”indicates the progress oftranscription.
The “Transcription inProgress” text getsdisplayed in the readingpane of the email.
Transcription in Progress
The message body of the voicemails composed using ViewMail for Outlook and received by UnityConnection are either blank or contain text.
Note
• When a sender sends a voicemail to Unity Connection through third party email clients, the receiver canview the voicemail through various clients after synchronizing the transcription of voicemails.
Do the following steps to synchronize the new voicemails between Unity Connection and Exchange/ Office365 mailboxes for a unified messaging user with SpeechView transcription service:
1 Navigate to Cisco Personal Communications Assistant and selectMessaging Assistant.
2 In the Messaging Assistant tab, select Personal Options and enable theHold till transcription receivedoption.
By default, the Hold till transcription received option is disabled.Note
Unified Messaging Guide for Cisco Unity Connection Release 11.x 5
Introduction to Unified MessagingTranscription of Voicemails Synchronized Between Unity Connection and Exchange/ Office 365 Mailbox
3 The Hold till transcription received option enables the synchronization of voicemail between UnityConnection and Exchange only when Unity Connection receives time-out/ failure transcription responsefrom the third party external service.
Transcription of Voicemails in Secure and Private Messages• SecureMessages: The secure messages are stored only on the Unity Connection server. Secure messagesare transcribed only if the user belongs to a class of service for which the Allow Transcriptions ofSecure Messages option are enabled. This option, however, does not allow the synchronization oftranscribed secure messages on the Exchange server integrated with the Unity Connection server.
• Private Messages: The transcription of private messages is not supported.
Synchronization with Outlook FoldersThe voicemails of a user are visible in the Outlook Inbox folder. Unity Connection synchronizes voicemailsin the following Outlook folders with the Unity Connection Inbox folder for the user:
• Subfolders under the Outlook Inbox folder
• Subfolders under the Outlook Deleted Items folder
• The Outlook Junk Email folder
Messages in the Outlook Deleted Items folder appear in the Unity Connection Deleted Items folder. If theuser moves voicemails (except secure voicemails) into Outlook folders that are not under the Inbox folder,the messages are moved to the deleted items folder in Unity Connection. However, the messages can still beplayed using ViewMail for Outlook because a copy of the message still exists in the Outlook folder. If theuser moves the messages back into the Outlook Inbox folder or into an Outlook folder that is synchronizedwith the Unity Connection Inbox folder, and:
• If the message is in the deleted items folder in Unity Connection, the message is synchronized back intothe Unity Connection Inbox for that user.
• If the message is not in the deleted items folder in Unity Connection, the message is still playable inOutlook but not resynchronized into Unity Connection.
Unity Connection synchronizes voicemails in the Sent Items folder of Outlook with the Exchange/ Office 365Sent Items folder for the user. However, the changes to the subject line, the priority, and the status (for example,from unread to read) are replicated from Unity Connection to Exchange/ Office 365 only on an hourlybasis.When a user sends a voicemail from Unity Connection to Exchange/ Office 365 or vice versa, thevoicemail in the Unity Connection Sent Items folder remains unread and the voicemail in the Exchange/ Office365 Sent Items folder is marked as read.
By default, the synchronization of voicemails in the Exchange/ Office 365 Sent Items folder with the UnityConnection Sent Items folder is not enabled.
Enabling the Sent Items Folder SynchronizationSecure voicemails behave differently. When Unity Connection replicates a secure voicemail to Exchange/Office 365 mailbox, it replicates only a decoy message that briefly explains secure messages; only a copy of
Unified Messaging Guide for Cisco Unity Connection Release 11.x6
Introduction to Unified MessagingSynchronization with Outlook Folders
the voicemail remains on the Unity Connection server. When a user plays a secure message using ViewMailfor Outlook, ViewMail retrieves the message from the Unity Connection server and plays it without everstoring the message in Exchange/ Office 365 or on the computer of the user.
If a user moves a secure message to an Outlook folder that is not synchronized with the Unity ConnectionInbox folder, only the copy of the voicemail is moved to the Deleted Items folder in Unity Connection. Suchsecure messages cannot be played in Outlook. If the user moves the message back into the Outlook Inboxfolder or into an Outlook folder that is synchronized with the Unity Connection Inbox folder, and:
• If the message exists in the Deleted items folder in Unity Connection, the message is synchronized backinto the Unity Connection Inbox of the user and the message becomes playable again in Outlook.
• If the message does not exisit in the Deleted items folder in Unity Connection, the message is notresynchronized into Unity Connection and can no longer be played in Outlook.
Step 1 In Cisco Unity Connection Administration, expand System Settings > Advanced, select Messaging.Step 2 On the Messaging Configuration page, enter a value greater than zero in the Sent Messages: Retention Period (in Days)
field.Step 3 Select Save.
When a user sends the voicemail to the Exchange/ Office 365 voice mailbox, the voicemail is not synchronizedwith the Sent Items folder in Exchange/ Office 365 server. The voicemail remains in the Unity Connection SentItems folder.
Note
Location for Deleted MessagesBy default, when a user deletes a voicemail in Unity Connection, the message is sent to the Unity Connectiondeleted items folder and synchronized with the Outlook Deleted Items folder. When the message is deletedfrom the Unity Connection Deleted Items folder (you can either do this manually or configure message agingto do it automatically), it is also deleted from the Outlook Deleted Items folder.
When a user deletes a voicemail from any Outlook folder, the message is not permanently deleted but it ismoved to the Deleted Items folder. No operation in Outlook causes a message to be permanently deleted inUnity Connection.
To permanently delete messages using Web Inbox or Unity Connection phone interface, you must configureUnity Connection to permanently delete messages without saving them in the Deleted Items folder.
When Unity Connection synchronizes with Exchange/ Office 365, the message is moved to the UnityConnection Deleted items folder but not permanently deleted.
We can also permanently delete messages from the Unity Connection Deleted Items folder using WebInbox.
Note
To permanently delete messages from the Unity Connection Deleted Items folder, do either or both of thefollowing steps:
• Configure message aging to permanently delete messages in the Unity Connection Deleted Items folder.
Unified Messaging Guide for Cisco Unity Connection Release 11.x 7
Introduction to Unified MessagingLocation for Deleted Messages
• Configure message quotas so that Unity Connection prompts users to delete messages when theirmailboxes approach a specified size.
Types of Messages Not Synchronized with Exchange/ Office 365The following types of Unity Connection messages are not synchronized:
• Draft messages
• Messages configured for future delivery but not yet delivered
• Broadcast messages
• Unaccepted dispatch messages
When a dispatch message is accepted by a recipient, it becomes a normal message andis synchronized with Exchange/ Office 365 for the user who accepted it and deleted forall other recipients. Until someone in the distribution list accepts a dispatch message,the message waiting indicator for everyone in the distribution list remains on, even whenusers have no other unread messages.
Note
Affect of Disabling and Re-enabling Single InboxWhen you configure unified messaging, you can create one or more unified messaging services. Each unifiedmessaging service has a set of specific unified messaging features enabled. You can create only one unifiedmessaging account for each user and associate it with a unified messaging service.
Single inbox can be disabled in the following three ways:
• Entirely disable a unified messaging service in which single inbox is enabled. This disables all enabledunified messaging features (including single inbox) for all users that are associated with the service.
• Disable only the single inbox feature for a unified messaging service, which disables only the singleinbox feature for all users that are associated with that service.
• Disable single inbox for a unified messaging account, which disables single inbox only for the associateduser.
If you disable and later re-enable single inbox using any of these methods, Unity Connection resynchronizesthe Unity Connection and Exchange/ Office 365 mailboxes for the affected users. Note the following:
• If users delete messages in Exchange/ Office 365 but do not delete the corresponding messages in UnityConnection while single inbox is disabled, the messages gets resynchronized into the Exchange mailboxwhen single inbox is re-enabled.
• If messages are hard deleted from Exchange/ Office 365 (deleted from the Deleted Items folder) beforesingle inbox is disabled, the corresponding messages that are still in the deleted items folder in UnityConnection when single inbox is re-enabled are resynchronized into the Exchange/ Office 365 DeletedItems folder.
Unified Messaging Guide for Cisco Unity Connection Release 11.x8
Introduction to Unified MessagingTypes of Messages Not Synchronized with Exchange/ Office 365
• If users hard delete the messages in Unity Connection but do not delete the corresponding messages inExchange/ Office 365 while single inbox is disabled, the messages remain in Exchange/ Office 365when single inbox is re-enabled. Users must delete the messages from Exchange/ Office 365 manually.
• If users change the status of messages in Exchange/ Office 365 (for example, from unread to read) whilesingle inbox is disabled, the status of Exchange/ Office 365 messages is changed to the current statusof the corresponding Unity Connection messages when single inbox is re-enabled.
• When you re-enable single inbox, depending on the number of users associated with the service and thesize of their Unity Connection and Exchange/ Office 365 mailboxes, resynchronization for existingmessages may affect synchronization performance for new messages.
• When you re-enable single inbox, depending on the number of users associated with the service and thesize of their Unity Connection and Exchange/ Office 365 mailboxes, resynchronization for existingmessages may affect synchronization performance for new messages.
Synchronization of Read/Heard Receipts, Delivery Receipts, and Non-deliveryReceipts
Unity Connection can send read/heardreceipts, delivery receipts, and non-delivery receipts to Unity Connectionusers who send voicemails. If the sender of a voicemail is configured for single inbox, the applicable receiptis sent to the Unity Connection mailbox of the sender. The receipt is then synchronized into the Exchange/Office 365 mailbox of the sender.
Note the following.
• Read/heard receipts:When sending a voicemail, a sender can request a read/heard receipt.
Do the following steps to prevent Unity Connection to respond to requests for read receipts:
◦In Unity Connection Administration, either expand Users and select Users, or expand Templatesand select User Templates.
◦If you selected Users, then select an applicable user and open the Edit User Basics page. If youselected User Templates, then select an applicable template and open the Edit User TemplateBasics page.
◦On the Edit User Basics page or the Edit User Template Basics page, select Edit >Mailbox.
◦On the Edit Mailbox page, uncheck the Respond to Requests for Read Receipts check box.
• Delivery receipts:A sender can request a delivery receipt only when sending a voicemail fromViewMailfor Outlook. You cannot prevent Unity Connection from responding to a request for a delivery receipt.
• Non-delivery receipts (NDR): A sender receives an NDR when a voicemail cannot be delivered.
Do the following steps to prevent Unity Connection to send an NDR when a message is not delivered:
◦In Unity Connection Administration, either expand Users and select Users, or expand Templatesand select User Templates.
◦If you selected Users, then select an applicable user and open the Edit User Basics page. If youselected User Templates, then select an applicable template and open the Edit User TemplateBasics page.
Unified Messaging Guide for Cisco Unity Connection Release 11.x 9
Introduction to Unified MessagingSynchronization of Read/Heard Receipts, Delivery Receipts, and Non-delivery Receipts
◦On the Edit User Basics page or the Edit User Template Basics page, uncheck theSendNon-Delivery Receipts for Message Failed Delivery check box and select Save.
Note • When the sender accesses Unity Connection using the TUI, the NDR includes the original voicemailthat allows the sender to resend the message at a later time or to a different recipient.
• When the sender accesses Unity Connection using Web Inbox, the NDR includes the originalvoicemail but the sender cannot resend it.
• When the sender uses ViewMail for Outlook to access Unity Connection voicemails that have beensynchronized into Exchange, the NDR is a receipt that contains only an error code, not the originalvoicemail, so the sender cannot resend the voicemail.
• When the sender is an outside caller, NDRs are sent to Unity Connection users on the UndeliverableMessages distribution list. Verify that the Undeliverable Messages distribution list includes one ormore users who regularly monitors and reroutes undelivered messages.
Text-to-SpeechThe Text-to-Speech feature allows the unified messaging users to listen to their emails when they sign in toUnity Connection using phone.
Unity Connection supports text-to-speech feature with the following mailbox stores:
• Office 365
• Exchange 2013
• Exchange 2010
Text-to-Speech over Office 365, Exchange 2016, Exchange 2013, and Exchange 2010supports both the IPv4 and IPv6 addresses. However, the IPv6 address works only whenUnity Connection platform is compatible and configured in dual (IPv4/IPv6) mode.
Note
Unity Connection can be configured to deliver transcriptions to an SMS device as a text message or to anSMTP address as an email message. The fields to turn on transcription delivery are located on the SMTP andSMS Notification Device pages where you set up message notification. For more information on notificationdevices, see the “Configuring Notification Devices” section in the “Notification” chapter of the SystemAdministration Guide for Cisco Unity Connection, Release 12.x, available at https://www.cisco.com/c/en/us/td/docs/voice_ip_comm/connection/12x/administration/guide/b_12xcucsag.html.
Following are the considerations for effective use of transcription delivery:
• In the From field, enter the number you dial to reach Unity Connection when you are not dialing fromthe desk phone. If you have a text-compatible mobile phone, can initiate a callback to Unity Connectionin the event that you want to listen to the message.
Unified Messaging Guide for Cisco Unity Connection Release 11.x10
• You must check the Include Message Information in Message Text check box to include callinformation, such as caller name, caller ID (if available), and the time that the message was received. Ifthe check box is unchecked, the message received does not indicate the call information.
In addition, if you have a text-compatible mobile phone, you can initiate a callback when the caller ID isincluded with the transcription.
• In the Notify Me Of section, if you turn on notification for voice or dispatch messages, you are notifiedwhen a message arrives and the transcription soon follows. If you do not want notification before thetranscription arrives, do not select the voice or dispatch message options.
• Email messages that contain transcriptions have a subject line that is identical to notification messages.So, if you have notification for voice or dispatch messages turned on, you have to open the messages todetermine which one contains the transcription.
For information on configuring the text-to-speech feature in Unity Connection, see the“Configuring Text-to-Speech” chapter.
Note
Calendar and Contact Integration
For information on configuring calendar and contact integration in Unity Connection, see the “ConfiguringCalendar and Contact Integration” chapter.
Note
About Calendar IntegrationThe calendar integration feature enables the unified messaging users to do the following tasks over phone:
• Hear a list of upcoming meetings (Outlook meetings only).
• Join a meeting that is in progress (MeetingPlace and MeetingPlace Express meetings only).
• Hear a list of the participants for a meeting.
• Send a message to the meeting organizer.
• Send a message to the meeting participants.
• Accept or decline meeting invitations (Outlook meetings only).
• Set up immediate meetings (MeetingPlace and MeetingPlace Express meetings only).
• Cancel a meeting (meeting organizers only).
Unity Connection supports calendar applications when integrated with the following mail servers:
• Office 365
• Exchange 2016
Unified Messaging Guide for Cisco Unity Connection Release 11.x 11
Introduction to Unified MessagingCalendar and Contact Integration
For listing, joining, and scheduling meetings, see the “Cisco Unity Connection Phone Menus and VoiceCommands” chapter of theUser Guide for the Cisco Unity Connection Phone Interface, Release 12.x, availableat http://www.cisco.com/en/US/docs/voice_ip_comm/connection/12x/user/guide/phone/b_12xcucugphone.html.
For using Personal Call Transfer Rules, see the User Guide for the Cisco Unity Connection Personal CallTransfer Rules Web Tool, Release 12.x, available at http://www.cisco.com/en/US/docs/voice_ip_comm/connection/12x/user/guide/pctr/b_12xcucugpctr.html.
About Contact IntegrationsUnity Connection allows users to import Exchange contacts and use the contact information in Personal CallTransfer Rules and when placing outgoing calls using voice commands. Unity Connection supports contactapplications when integrated with the following mail servers:
• Office 365
• Exchange 2016
• Exchange 2013
• Exchange 2010
For importing Exchange contacts, see the “Managing Your Contacts” chapter of the User Guide for theCisco Unity Connection Messaging Assistant Web Tool, Release 11.x, available at https://www.cisco.com/c/en/us/td/docs/voice_ip_comm/connection/12x/user/guide/assistant/b_12xcucugasst.html.
Unified Messaging Guide for Cisco Unity Connection Release 11.x12
Introduction to Unified MessagingAbout Contact Integrations
Cisco Unity Connection can be integrated withMicrosoft Exchange 2016, 2013, 2010, Office 365, and CiscoUnified MeetingPlace to deploy the unified messaging feature.
• Configuring Unified Messaging, page 13
Configuring Unified MessagingCisco Unity Connection can be integrated with Microsoft Exchange 2016, 2013, 2010, Office 365, and CiscoUnified MeetingPlace to deploy the unified messaging feature.
Overview of Unity Connection Communication with Exchange ServerWhen you add a unified messaging service that defines the communication between Unity Connection andExchange, you can select whether youwant Unity Connection to communicate directly with a specific Exchangeserver or you want Unity Connection to search for Exchange servers.
The choice you make determines which Exchange mailboxes Unity Connection can access:
• If you select a specific Exchange 2010 client access server, Unity Connection can access Exchange 2010mailboxes in the Exchange organization, but cannot access Exchange 2013mailboxes or Exchange 2016mailboxes.
• If you select a specific Exchange 2013 client access server, Unity Connection can access all Exchange2013, Exchange 2010 mailboxes in the Exchange organization, but cannot access Exchange 2016mailboxes.
• If you allow Unity Connection to search for Exchange servers, you need to give permissions to theExchange servers. See the following sections to grant permissions to the applicable Exchange server:
◦Granting Permissions for Exchange 2013 or Exchange 2016
◦Granting Permissions for Exchange 2010
Unified Messaging Guide for Cisco Unity Connection Release 11.x 13
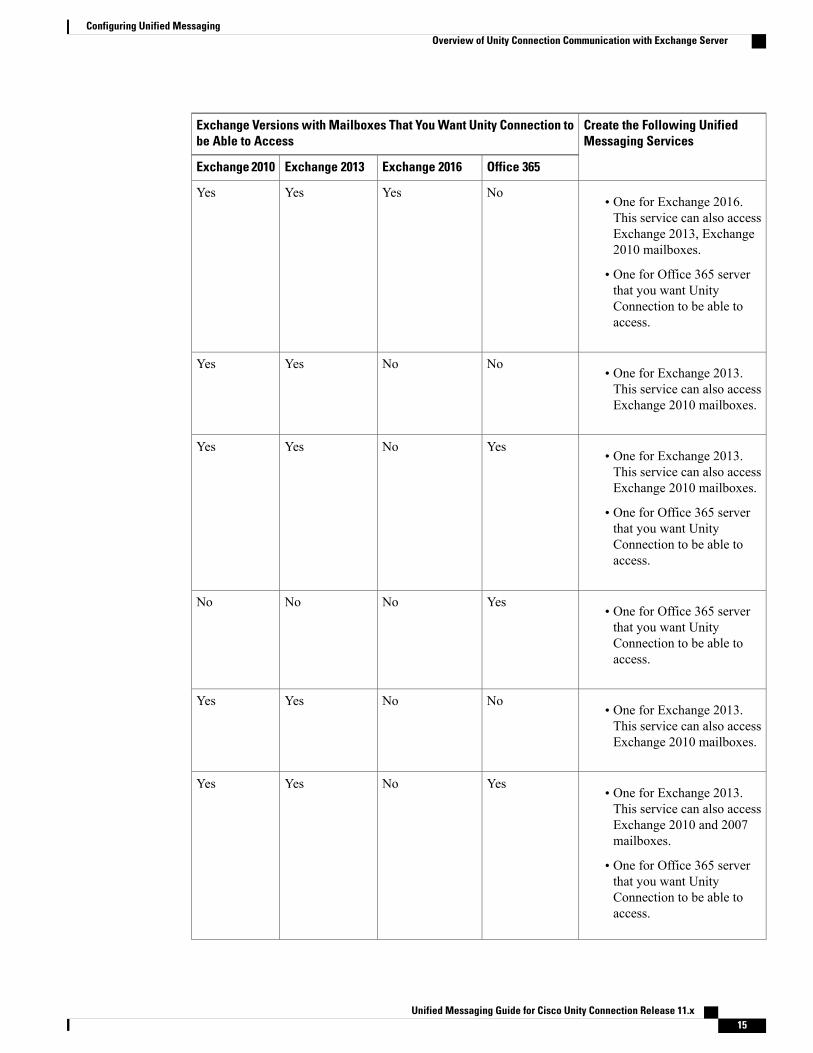
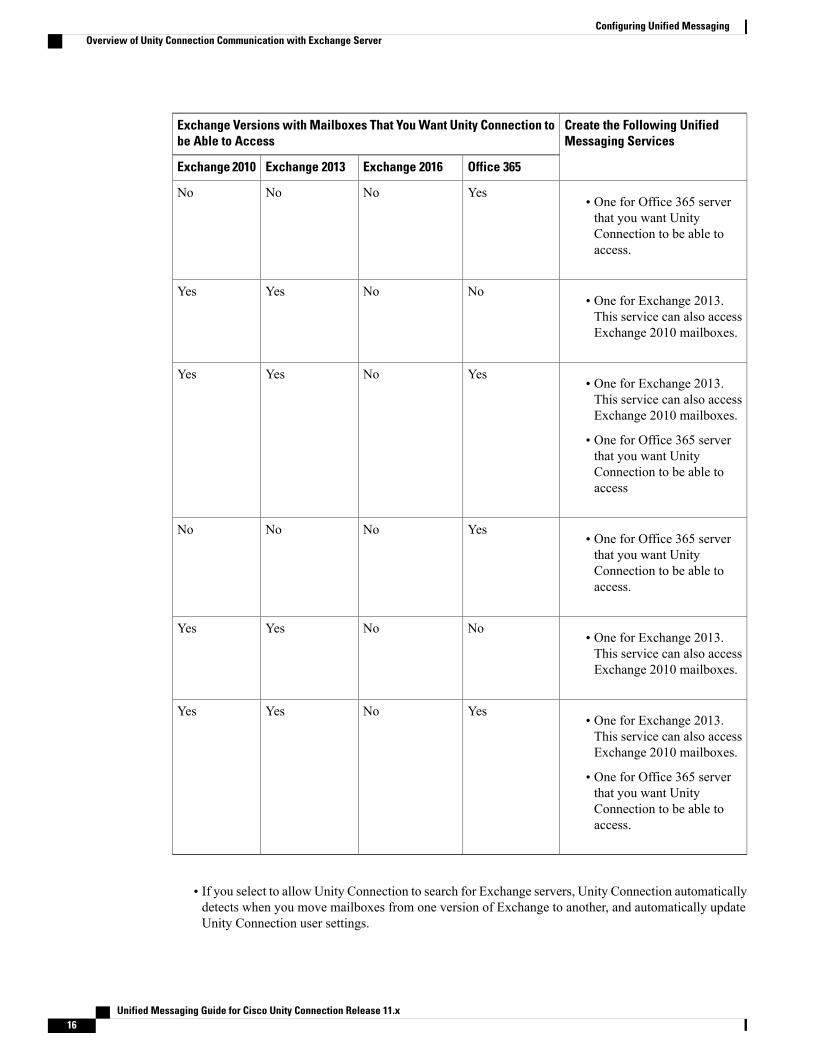
If you want to select a specific Exchange server when you add a unified messagingservice, you may need to add more than one unified messaging service to allow UnityConnection to access all mailboxes in the Exchange organization. Table 3: AddingUnified Messaging Services Based on Versions of Exchange explains when you needto add more than one unified messaging service.
Note
Table 3: Adding Unified Messaging Services Based on Versions of Exchange
Create the Following UnifiedMessaging Services
Exchange Versions with Mailboxes That You Want Unity Connection tobe Able to Access
Office 365Exchange 2016Exchange 2013Exchange 2010
• One for Office 365 serverthat you want UnityConnection to be able toaccess.
YesNoNoNo
• One for Exchange 2016.
• One for Office 365 serverthat you want UnityConnection to be able toaccess.
YesYesNoNo
• One for Exchange 2016.This service can also accessExchange 2013 mailboxes.
• One for Office 365 serverthat you want UnityConnection to be able toaccess.
NoYesYesNo
• One for Exchange 2016.This service can also accessExchange 2013 andExchange 2010 mailboxes.
• One for Office 365 serverthat you want UnityConnection to be able toaccess.
NoYesYesYes
Unified Messaging Guide for Cisco Unity Connection Release 11.x14
Configuring Unified MessagingOverview of Unity Connection Communication with Exchange Server
Create the Following UnifiedMessaging Services
Exchange Versions with Mailboxes That You Want Unity Connection tobe Able to Access
Office 365Exchange 2016Exchange 2013Exchange 2010
• One for Exchange 2016.This service can also accessExchange 2013, Exchange2010 mailboxes.
• One for Office 365 serverthat you want UnityConnection to be able toaccess.
NoYesYesYes
• One for Exchange 2013.This service can also accessExchange 2010 mailboxes.
NoNoYesYes
• One for Exchange 2013.This service can also accessExchange 2010 mailboxes.
• One for Office 365 serverthat you want UnityConnection to be able toaccess.
YesNoYesYes
• One for Office 365 serverthat you want UnityConnection to be able toaccess.
YesNoNoNo
• One for Exchange 2013.This service can also accessExchange 2010 mailboxes.
NoNoYesYes
• One for Exchange 2013.This service can also accessExchange 2010 and 2007mailboxes.
• One for Office 365 serverthat you want UnityConnection to be able toaccess.
YesNoYesYes
Unified Messaging Guide for Cisco Unity Connection Release 11.x 15
Configuring Unified MessagingOverview of Unity Connection Communication with Exchange Server
Create the Following UnifiedMessaging Services
Exchange Versions with Mailboxes That You Want Unity Connection tobe Able to Access
Office 365Exchange 2016Exchange 2013Exchange 2010
• One for Office 365 serverthat you want UnityConnection to be able toaccess.
YesNoNoNo
• One for Exchange 2013.This service can also accessExchange 2010 mailboxes.
NoNoYesYes
• One for Exchange 2013.This service can also accessExchange 2010 mailboxes.
• One for Office 365 serverthat you want UnityConnection to be able toaccess
YesNoYesYes
• One for Office 365 serverthat you want UnityConnection to be able toaccess.
YesNoNoNo
• One for Exchange 2013.This service can also accessExchange 2010 mailboxes.
NoNoYesYes
• One for Exchange 2013.This service can also accessExchange 2010 mailboxes.
• One for Office 365 serverthat you want UnityConnection to be able toaccess.
YesNoYesYes
• If you select to allow Unity Connection to search for Exchange servers, Unity Connection automaticallydetects when you move mailboxes from one version of Exchange to another, and automatically updateUnity Connection user settings.
Unified Messaging Guide for Cisco Unity Connection Release 11.x16
Configuring Unified MessagingOverview of Unity Connection Communication with Exchange Server
• If you select a specific Exchange server, Unity Connection sometimes detects when you move mailboxesfrom one Exchange server to another, and automatically access the Exchange mailbox in new location.When Unity Connection cannot detect the new mailbox, you must manually update unified messagingservices or unified messaging accounts:
◦If you moved all the Exchange mailboxes accessed by a unified messaging service: Update theunified messaging service to access a different Exchange server.
◦If you moved only some of the Exchange mailboxes accessed by a unified messaging service:Updateunified messaging account settings to use a unified messaging service that accesses mailboxes inthe new location.
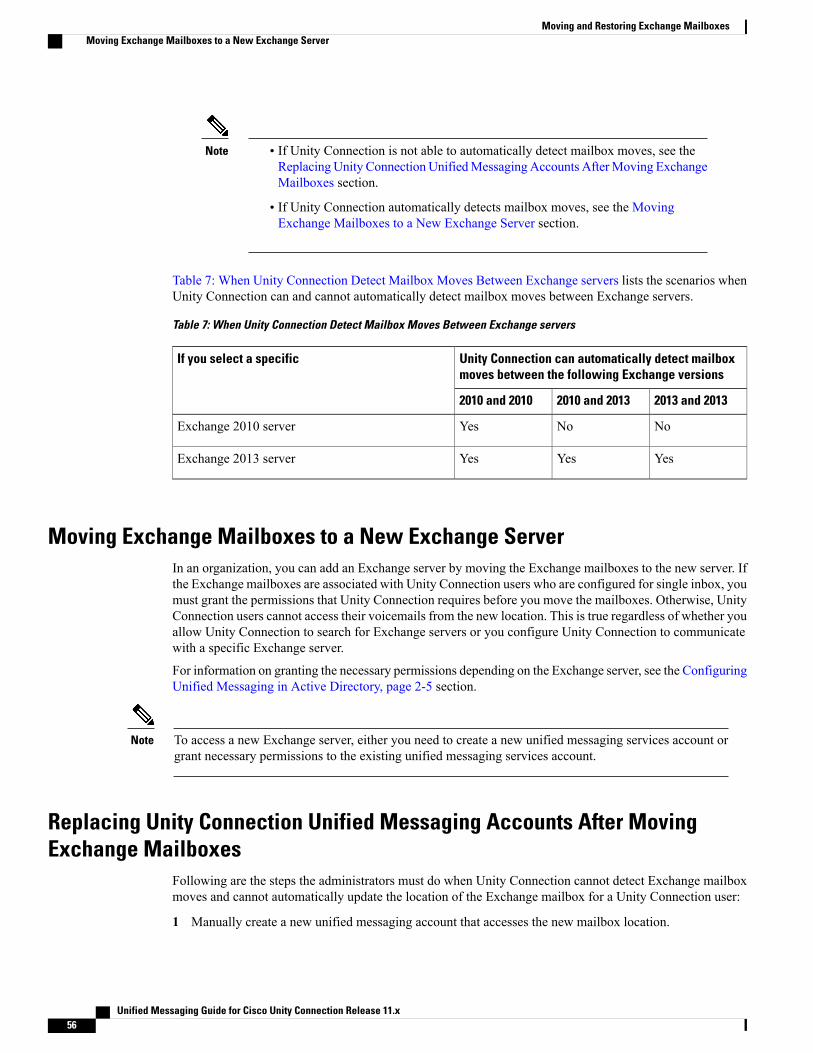
Table 4: Choosing a Specific Exchange Server: When Unity Connection Detect Moving a Mailbox BetweenExchange Servers identifies when Unity Connection automatically detect mailbox moves between Exchangeservers. For information on updating Unity Connection user settings when Unity Connection cannot detectmailbox moves, see the “Moving and Restoring Exchange Mailboxes” chapter.
Table 4: Choosing a Specific Exchange Server: When Unity Connection Detect Moving a Mailbox Between ExchangeServers
Unity Connection can automatically detect mailbox moves between the followingExchange versions
If you select a specific
2016 and 20162013 and2016
2013 and2013
2010 and2016
2010 and2013
2010 and2010
NoNoNoNoNoYesExchange 2010 server
NoNoYesNoYesYesExchange 2013 server
YesYesYesYesYesYesExchange 2016 server
• If Unity Connection is not configured to use DNS, you must select a specific Exchange server. If thisdoes not allow you to access all the Exchange mailboxes in the organization as described earlier in thissection, you must create more than one unified messaging service.
If you select a specific Exchange server and that server stops functioning, Unity Connection cannot accessany Exchange mailboxes. If you select to allow Unity Connection to search for Exchange servers and if theExchange server that Unity Connection is currently communicating with stops functioning, Unity Connectionsearches for another Exchange server and begins accessing mailboxes through that server.
Prerequisites for Configuring Unified MessagingFollowing prerequisites should be met before configuring unified messaging with any supported mail servers:
1 Review the “Requirements for Using Unified Messaging Features” section in the System Requirements forCiscoUnity Connection Release 12.x at https://www.cisco.com/c/en/us/td/docs/voice_ip_comm/connection/12x/requirements/b_12xcucsysreqs.html.
2 Ensure that you have sufficient licenses for the voicemail users:
Unified Messaging Guide for Cisco Unity Connection Release 11.x 17
Configuring Unified MessagingPrerequisites for Configuring Unified Messaging
a Navigate to Cisco Unity Connection Administration, expand System Settings and select Licenses.
b On the Licenses page, in the License Usage section, check Total number of Voicemail Users.
3 If Unity Connection is integrated with an LDAP directory: Navigate to Cisco Unity ConnectionAdministration and verify the following:
• Expand System Settings and select LDAP Directory Configuration. Select the applicable LDAPdirectory configuration. On the LDAP Directory Configuration page, make sure theMail ID fieldin Cisco Unified Communications Manager User Fields is synchronized with the mail in LDAPAttribute.
This causes values in the LDAP mail field to appear in the Corporate Email Address field of theLDAP imported user.
• Expand Users and select Users. Select the applicable user. On the Edit User Basics page, enter theCorporate Email Address.
• SelectEdit on the user page and then selectUnifiedMessaging Account. On the UnifiedMessagingAccount page of the user, make sure value in the Email Address field is specified.
Task List for Configuring Unified Messaging
Task List for Configuring Unified Messaging with Exchange 2013 or Exchange 2016
Step 1 Make sure that you have met the prerequisites before configuring unified messaging. See the Prerequisites for ConfiguringUnified Messaging section.
Step 2 Create an Active Directory account for unified messaging users to communicate with Exchange 2013 or Exchange 2016.For more information on creating unified messaging services account in Active Directory and granting permissions, seethe Configuring Unified Messaging in Active Directory section.
Step 3 Decide whether you want Unity Connection to be able to search for and communicate with different Exchange 2013 orExchange 2016 server, or you want Unity Connection to communicate with a specific Exchange 2013 or Exchange 2016server in case the hostname or the IP Address of the specific server is known. Do the following steps:a) Granting Permissions for Exchange 2013 or Exchange 2016b) (Optional) Confirming Exchange 2013 or Exchange 2016 Authentication and SSL Settingsc) Task List for Configuring Unified Messaging with Exchange 2010
Unity Connection determines whether to use the HTTP or HTTPS protocol and whether to validate certificatesbased on settings specified in the associated unified messaging service.
Note
Step 4 If Unity Connection is not configured to use DNS, use the following CLI commands to configure DNS:
• set network dns
• set network dns optionsWe recommend that you configure Unity Connection to use the same DNS environment in which theActive Directory environment is publishing its records.
Note
For more information on the CLI commands, see the applicable Command Line Interface Reference Guide for CiscoUnified Communications Solutions at http://www.cisco.com/en/US/products/ps6509/prod_maintenance_guides_list.html.
Unified Messaging Guide for Cisco Unity Connection Release 11.x18
Configuring Unified MessagingTask List for Configuring Unified Messaging
Step 5 (Selected configurations only): In either or both of the following conditions, you need to upload SSL certificates on theUnity Connection server to encrypt communication between Unity Connection and Exchange and between UnityConnection and Active Directory:
• If you have configured Exchange to use HTTPS in Step 3 b, configure unified messaging services to validatecertificates for Exchange servers.
• If you have configured Unity Connection to search for and communicate with different Exchange servers, to useLDAPS to communicate with domain controllers, and to validate certificates for domain controllers.
When you allow Unity Connection to search for and communicate with different Exchange servers, UnityConnection communicates with Active Directory servers using Basic authentication. By default, the usernameand password of the unified messaging services account and all other communication between the UnityConnection and Active Directory servers is sent in clear text. If you want this data to be encrypted, you mustconfigure unified messaging services to communicate with Active Directory domain controllers using thesecure LDAP (LDAPS) protocol.
Caution
For more information, see the Uploading CA Public Certificates for Exchange and Active Directory section.
Step 6 Configure one ormore unifiedmessaging services onUnity Connection. Formore information, see theGranting Permissionssection.
Step 7 Update the settings for unified messaging users. For more information, see the Settings Configured on Unity ConnectionUsers section.
Step 8 Configure one or more unified messaging accounts to link the Unity Connection users with the mail server with whichthey are communicating. For more information, see the Unified Messaging Account for Users section.
Step 9 Test unified messaging configuration. For more information, see the Test Unified Messaging Configuration section.
Task List for Configuring Unified Messaging with Exchange 2010
Step 1 Make sure that you have met the prerequisites before configuring unified messaging. See the Prerequisites for ConfiguringUnified Messaging section.
Step 2 Create an Active Directory account to be used by Unity Connection unified messaging users to communicate withExchange 2010. For more information on creating unified messaging services account in Active Directory and grantingpermissions, see the Configuring Unified Messaging in Active Directory section.
Step 3 Decide whether you want Unity Connection to be able to search for and communicate with different Exchange 2010server, or you want Unity Connection to communicate with a specific Exchange 2010 server in case the hostname or theIP Address of the specific server is known. Follow the given steps:a) Granting Permissions for Exchange 2010b) (Optional) Confirming Exchange 2010 Authentication and SSL Settingsc) Depending on applicable version:
• Configuring EWS Limits on Exchange 2010 SP2 RU4 and Later
• Configuring EWS Limits on Exchange 2010 SP2 RU3 and Earlier Releases
Unity Connection determines whether to use the HTTP or HTTPS protocol and whether to validatecertificates based on settings specified in the associated unified messaging service.
Note
Unified Messaging Guide for Cisco Unity Connection Release 11.x 19
Configuring Unified MessagingTask List for Configuring Unified Messaging
Step 4 If Unity Connection is not already configured to use DNS, use the following CLI commands to configure DNS:
• set network dns
• set network dns optionsWe recommend that you configure Unity Connection to use the same DNS environment in which theActive Directory environment is publishing its records.
Note
For more information on the CLI commands, see the applicable Command Line Interface Reference Guide for CiscoUnified Communications Solutions at http://www.cisco.com/en/US/products/ps6509/prod_maintenance_guides_list.html.
Step 5 (Selected configurations only): In either or both of the following conditions, you need to upload SSL certificates on theUnity Connection server to encrypt communication between Unity Connection and Exchange and between UnityConnection and Active Directory:
• If you have configured Exchange to use HTTPS in Step 3b., configure unified messaging services to validatecertificates for Exchange servers in Step Step 6.
• If you configured Unity Connection to search for and communicate with different Exchange servers, to use LDAPSto communicate with domain controllers, and to validate certificates for domain controllers in Step Step 6.
When you allow Unity Connection to search for and communicate with different Exchange servers,Unity Connection communicates with Active Directory servers using Basic authentication. By default,the username and password of the unified messaging services account and all other communicationbetween the Unity Connection and Active Directory servers is sent in clear text. If you want this datato be encrypted, in Step Step 6 you must configure unified messaging services to communicate withActive Directory domain controllers using the secure LDAP (LDAPS) protocol.
Caution
For more information, see the Uploading CA Public Certificates for Exchange and Active Directory section.
Step 6 Configure one or more unified messaging services on Unity Connection. For more information, see the GrantingPermissions section.
Step 7 Update the settings for unified messaging users. For more information, see the Settings Configured on Unity ConnectionUsers section.
Step 8 Configure one or more unified messaging accounts to link the Unity Connection users with the mail server with whichthey are communicating. For more information, see the Unified Messaging Account for Users section.
Step 9 Test unified messaging configuration. For more information, see the Test Unified Messaging Configuration section.
Task List for Configuring Unified Messaging with Office 365
Step 1 Make sure that you have met the prerequisites before configuring unified messaging. See the Prerequisites for ConfiguringUnified Messaging section.
Step 2 Create an Active Directory account to be used by Unity Connection unified messaging users to communicate with Office365. For more information on creating unified messaging services account in Active Directory and granting permissions,see the Configuring Unified Messaging in Active Directory section.
Step 3 Decide and select the type of authentication that you want Unity Connection to use to sign in to Office 365 client accessservers. To do this, navigate to Unified Messaging > Unified Messaging Services on Cisco Unity Connection
Unified Messaging Guide for Cisco Unity Connection Release 11.x20
Configuring Unified MessagingTask List for Configuring Unified Messaging
Administration and select Add New. On the New Unified Messaging Service page, select either of the following fromWeb-Based Authentication Mode field:
• Basic: Default authentication mode.
• NTLM: Before switching to NTLM authenticationmode, make sure that the samemode is configured on the Office365 server.
For existing Unified Messaging Service, select the above settings on Edit Unified Messaging Service page.Step 4 Do the following tasks on the Office 365 server to enable Auto Discovery functionality that enables Unity Connection
to search for and communicate with different Office 365 servers:a) Accessing Office 365 Using Remote Exchange Management Power Shellb) Assigning Application Impersonation Role for Office 365
Unity Connection uses the HTTPS protocol to validate certificates based on the settings in the applicableunified messaging service.
Note
Step 5 Synchronization threads configuration should be done based on latency between Unity Connection and Office 365 server.For more information, see the "Latency" section of the “Single Inbox” chapter in the Design Guide for Cisco UnityConnection, Release 12.x, available at:https://www.cisco.com/c/en/us/td/docs/voice_ip_comm/connection/12x/design/guide/b_12xcucdg.html
Step 6 Run the following CLI commands to configure DNS:
• set network dns
• set network dns optionsWe recommend that you configure Unity Connection to use the same DNS environment in which theActive Directory environment is publishing its records.
Note
For more information on the CLI commands, see the applicable Command Line Interface Reference Guide for CiscoUnified Communications Solutions at http://www.cisco.com/en/US/products/ps6509/prod_maintenance_guides_list.html.
Step 7 (Selected configurations only): Upload SSL certificates on the Unity Connection server to encrypt the communicationbetween Unity Connection and Office 365. Uploading certificates allows you to:
• Validate the certificates for Exchange Servers. To do this, check the Validate Certificates for Exchange Serverscheck box on Unity Connection Administration.
• Secure communication when you have configured Unity Connection to search for and communicate with Office365 servers.
For more information, see the Uploading the Public Certificates to the Unity Connection Server and Uploading Certificatesfor Office 365 and Cisco Unity Connection
Step 8 Configure one or more unified messaging services on Unity Connection. For more information, see the GrantingPermissions section.
You can configure up to 1800 users with a single Office 365 Unified Messaging Service. For creating morethan 1800 users with Office 365, you need to create more Unified Messaging services.
Note
Step 9 Update the settings for unified messaging users. For more information, see the Settings Configured on Unity ConnectionUsers section.
Step 10 Configure one or more unified messaging accounts to link the Unity Connection users with the mail server with whichthey are communicating. For more information, see the Unified Messaging Account for Users section.
Step 11 Test the unified messaging service. For more information, see the Test Unified Messaging Configuration
Unified Messaging Guide for Cisco Unity Connection Release 11.x 21
Configuring Unified MessagingTask List for Configuring Unified Messaging
Configuring Unified Messaging in Active DirectoryUnity Connection accesses Exchange or Office 365 mailboxes using an Active Directory account called theunified messaging services account. After you create the account, you grant it the rights necessary for UnityConnection to perform operations on behalf of the user.
For Office 365, Exchange 2016, Exchange 2013, and Exchange 2010, operations are performed throughExchange Web Services (EWS). Uploading messages into Exchange mailboxes
• Tracking changes to messages in Exchange
• Updating messages with changes made in Unity Connection
• Deleting messages in Exchange when the messages are deleted in Unity Connection, and so on.
You need to create one or more domain user accounts in the Active Directory forest that includes the Exchangeservers with which you want Unity Connection to communicate.
Note the following points while configuring Unified Messaging in active directory:
• Give the account a name that identifies it as the unified messaging services account for Unity Connection.
• Do not create a mailbox for the domain user account. If you create a mailbox for the account, unifiedmessaging does not function properly.
• Do not add the account to any administrator group.
• Do not disable the account or Unity Connection cannot use it to access Exchange or Office 365mailboxes.
• Specify a password that satisfies the password-security requirements of your company.
The password is encrypted with AES 128-bit encryption and stored in the UnityConnection database. The key that is used to encrypt the password is accessible onlywith root access, and root access is available only with assistance from Cisco TAC.
Note
• When you are configuring unified messaging for a cluster, Unity Connection automatically uses thesame unified messaging services account for both Unity Connection servers.
• When you are configuring unified messaging for intersite networking or for intrasite networking, youcan use the same unified messaging services account for more than one Unity Connection servers.However, this is not a requirement and does not affect functionality or performance.
Unified Messaging Guide for Cisco Unity Connection Release 11.x22
Configuring Unified MessagingTask for Configuring Unified Messaging
Granting Permissions
Granting Permissions for Exchange 2013 or Exchange 2016
Step 1 Sign in to a server on which Exchange Management Shell is installed using either an account that is a member of theEnterprise Admins group or an account that can grant permissions on Exchange objects in the configuration container.
Step 2 Run the following command in Exchange Management Shell to assign the Application Impersonation management roleto the unified messaging services account for Exchange 2013 or Exchange 2016:New-ManagementRoleAssignment -Name: <RoleName> -Role:ApplicationImpersonation -User:' <Account>,where:
• RoleName is the name that you want to give the assignment, for example, Unity ConnectionUMServicesAcct. Thename that you enter for RoleName appears when you run get-ManagementRoleAssignment.
• Account is the name of the unified messaging services account in domain\alias format.
If you have created more than one unified messaging services account, repeat Step Step 2 for the remaining accounts.Specify a different value for RoleName for each unified messaging services account.
When configuring unified messaging service account for Exchange 2013 or Exchange 2016, you need to assignthe Application Impersonation management role to the unified messaging service account.
Note
Granting Permissions for Exchange 2010
Step 1 Sign in to a server on which Exchange Management Shell is installed using either an account that is a member of theEnterprise Admins group or an account that can grant permissions on Exchange objects in the configuration container.
Step 2 Run the following command in Exchange Management Shell to assign the Application Impersonation management roleto the unified messaging services account for Exchange 2010:New-ManagementRoleAssignment -Name: <RoleName> -Role:ApplicationImpersonation -User:' <Account>,where:
• RoleName is the name that you want to give the assignment, for example, Unity ConnectionUMServicesAcct. Thename that you enter for RoleName appears when you run get-ManagementRoleAssignment.
• Account is the name of the unified messaging services account in domain\alias format.
If you have created more than one unified messaging services account, repeat Step Step 2 for the remaining accounts.Specify a different value for RoleName for each unified messaging services account.
When configuring unifiedmessaging service account for Exchange 2010, you need to assign the Application Impersonationmanagement role to the unified messaging service account.
For more information on the CLI commands, see the applicable Command Line Interface Reference Guide for CiscoUnified Communications Solutionse at http://www.cisco.com/en/US/products/ps6509/prod_maintenance_guides_list.html.
Unified Messaging Guide for Cisco Unity Connection Release 11.x 23
Configuring Unified MessagingTask for Configuring Unified Messaging
Step 3 (Selected configurations only): In either or both of the following conditions, you need to upload SSL certificates on theUnity Connection server to encrypt communication between Unity Connection and Exchange and between UnityConnection and Active Directory:
• If you configured Exchange to use HTTPS in Step 3b , configure unified messaging services to validate certificatesfor Exchange servers.
• If you configured Unity Connection to search for and communicate with different Exchange servers, to use LDAPSto communicate with domain controllers, and to validate certificates for domain controllers.
When you allow Unity Connection to search for and communicate with different Exchange servers,Unity Connection communicates with Active Directory servers using Basic authentication. By default,the username and password of the unified messaging services account and all other communicationbetween the Unity Connection and Active Directory servers is sent in clear text. If you want this datato be encrypted, you must configure unified messaging services to communicate with Active Directorydomain controllers using the secure LDAP (LDAPS) protocol.
Caution
For more information, see the Uploading CA Public Certificates for Exchange and Active Directory section.
Step 4 Configure one or more unified messaging services on Unity Connection. For more information, see the Creating a UnifiedMessaging Service to Access Mail Server section.
Step 5 Update the settings for unified messaging users. For more information, see the Settings Configured on Unity ConnectionUsers section.Configure one or more unified messaging accounts to link the Unity Connection users with the mail server with whichthey are communicating. For more information, see the Unified Messaging Account for Users section.
Confirming Authentication and SSL SettingsAfter choosing the Exchange server accessed by Unity Connection for unified messaging, confirm that theExchange servers are configured to use the desired authentication mode (Basic, Digest, or NTLM) andweb-based protocol (HTTPS or HTTP).
Unity Connection supports NTLMv2 based authentication when a user selects NTLM authentication modefor configuring unified messaging.
After configuring the authentication mode and web-based protocols on Exchange servers, create one or moreUnity Connection unified messaging services. Select the same authentication mode and web-based protocolthat you specify in the servers.
Unified Messaging Guide for Cisco Unity Connection Release 11.x24
Configuring Unified MessagingTask for Configuring Unified Messaging
Confirming Exchange 2013 or Exchange 2016 Authentication and SSL Settings
Step 1 Decide the type of authentication (Basic or NTLM) you want Unity Connection to use to sign in to Exchange 2013 orExchange 2016 client access servers. You must configure all Exchange 2013 or Exchange 2016 client access servers touse the same type of authentication.
Step 2 Decide whether you want the communication between Unity Connection and Exchange 2013 or Exchange 2016 clientaccess servers to be SSL encrypted. If so, you must specify the same SSL setting on all the Exchange 2013 or Exchange2016 client access servers.
Step 3 Sign in to a server that has access to the same Exchange 2013 client servers that is accessed by the Unity Connection.Use an account that is a member of the Local Administrators group.
Step 4 On the Windows Start menu, select Programs > Administrative Tools > Internet Information Services (IIS)Manager.
Step 5 For the first Exchange 2013 or Exchange 2016 client access server for which you want to confirm settings, in the leftpane, expand <servername> > Sites > Default Website>. You need to verify the authentication settings for both EWSand Autodiscover.
Step 6 Under Default Website, select Autodiscover:a) In the middle pane, in the IIS section, double-click Authentication.
Confirm that the Status column says Enabled for the type of authentication that you want the unified messagingservices account to use to sign in to Exchange client access servers.
When you create a unified messaging services account, you configure Unity Connection to use the same type ofauthentication. Unity Connection supports only the following types of authentication:
• Basic
• NTLM
b) If you have changed any settings, in the right pane, select Apply.c) In the left pane, select Autodiscover again.d) In the middle pane, double-click SSL Settings.e) On the SSL Settings page, if the Require SSL check box is checked:
• You must select HTTPS for the web-based protocol while creating a unified messaging service in UnityConnection.
• Youmust download SSL certificates from the Exchange server and install them on the Unity Connection server.
f) If you changed any settings, in the right pane, select Apply.
Step 7 Under Default Website, select EWS:a) In the middle pane, in the IIS section, double-click Authentication.
Confirm that the Status column displays Enabled for the type of authentication that you want the unified messagingservices account to use to sign in to Exchange mailboxes. When you create a unified messaging services account,you configure Unity Connection to use the same type of authentication.
The unified messaging services account must use the same type of authentication for EWS that youspecified for autodiscover.
Caution
b) If you changed any settings, in the right pane, select Apply.c) In the left pane, select EWS again.
Unified Messaging Guide for Cisco Unity Connection Release 11.x 25
Configuring Unified MessagingTask for Configuring Unified Messaging
d) In the middle pane, double-click SSL Settings.e) If the Require SSL check box is checked:
• You must select HTTPS for the web-based protocol when you create a unified messaging service in UnityConnection.
• Youmust download SSL certificates from the Exchange server and install them on the Unity Connection server.
The unified messaging services account must use the same SSL settings for EWS that you specifiedfor autodiscover in Step e.
Caution
f) If you have changed any settings, in the right pane, select Apply.
Step 8 Repeat Step Step 5 through Step Step 7 for the other Exchange 2013 or Exchange 2016 client access servers that UnityConnection can access.
Step 9 Close IIS Manager.
Confirming Exchange 2010 Authentication and SSL Settings
Step 1 Decide the type of authentication (Basic, Digest, or NTLM) you want Unity Connection to use to sign in to Exchange2010 client access servers. You must configure the following servers to use the same type of authentication:
• All Exchange 2010 client access servers.
Step 2 Decide whether you want the communication between Unity Connection and Exchange 2010 client access servers to beSSL encrypted. If so, you must specify the same SSL setting on the following servers:
• All Exchange 2010 client access servers.
Step 3 Sign in to a server that has access to the same Exchange 2010 client access servers that Unity Connection has. Use anaccount that is a member of the local Administrators group.
Step 4 On the Windows Start menu, select Programs > Administrative Tools > Internet Information Services (IIS)Manager.
Step 5 For the first Exchange 2010 client access server for which you want to confirm settings, in the left pane, expand<servername> > Sites > Default Website. You need to verify the authentication settings for both Autodiscover andEWS.
Step 6 Under Default Website, select Autodiscover:a) In the middle pane, in the IIS section, double-click Authentication.
Confirm that the Status column states Enabled for the type of authentication that you want the unified messagingservices account to use to sign in to Exchange client access servers. When you create a unified messaging servicesaccount, you configure Unity Connection to use the same type of authentication.
Unity Connection supports the following types of authentication:
• Basic
• Digest
Unified Messaging Guide for Cisco Unity Connection Release 11.x26
Configuring Unified MessagingTask for Configuring Unified Messaging
• NTLM
b) If you changed any settings, in the right pane, select Apply.c) In the left pane, select Autodiscover again.d) In the middle pane, double-click SSL Settings.e) If the Require SSL check box is checked:
• When you create a unified messaging service in Unity Connection, you must select HTTPS for the web-basedprotocol.
• Youmust download SSL certificates from the Exchange server and install them on the Unity Connection server.
f) If you changed any settings, in the right pane, select Apply.
Step 7 Under Default Website, select EWS:a) In the middle pane, in the IIS section, double-click Authentication.
Confirm that the Status column says Enabled for the type of authentication that you want the unified messagingservices account to use to sign in to Exchange mailboxes. When you create a unified messaging services account,you configure Unity Connection to use the same type of authentication.
The unified messaging services account must use the same type of authentication for EWS that youspecified for autodiscover in.
Caution
b) If you changed any settings, in the right pane, select Apply.c) In the left pane, select EWS again.d) In the middle pane, double-click SSL Settings.e) If the Require SSL check box is checked:
• You must select HTTPS for the web-based protocol when you create a unified messaging service in UnityConnection.
• Youmust download SSL certificates from the Exchange server and install them on the Unity Connection server.
The unified messaging services account must use the same SSL settings for EWS that you specifiedfor autodiscover in Step e..
Caution
f) If you changed any settings, in the right pane, select Apply.g) If you have installed Exchange 2010 Service Pack 1 or later, skip to Step 8.
If you have not installed Exchange 2010 Service Pack 1 or later, edit the Exchange web.config files for EWS and forautodiscovery to match the settings in IIS Manager:
• For EWS, see “Enable or Disable SSL on Exchange Web Services Virtual Directories” on the Microsoft Technetwebsite.
• No comparable document exists for autodiscovery, but you can use the applicable procedure in the EWSdocument to edit the web.config file in the \Exchange Server\V14\ClientAccess\Autodiscover directory.
Step 8 Repeat Step Step 5 through Step Step 7 for the other Exchange 2010 client access servers that Unity Connection canaccess.
Step 9 Close IIS Manager.
Unified Messaging Guide for Cisco Unity Connection Release 11.x 27
Configuring Unified MessagingTask for Configuring Unified Messaging
Configuring Paged View Functionality in Unity Connection for Exchange 2013 or Exchange2016
If any unified user Exchange mailboxes have more than 1000 messages including voicemails and receipts,then enable the EWS paged view search functionality in Unity Connection server.
To enable the paged view functionality for messages, you must set the value of the'System.Messaging.MbxSynch.MbxSynchUsePaging' parameter to 1.
Do the following to configure paged view functionality:
Step 1 Run the following CLI command:
run cuc dbquery unitydirdb execute procedurecsp_ConfigurationModifyBool(pFullName='System.Messaging.MbxSynch.MbxSynchUsePaging',pvalue=1)
When a Unity Connection cluster is configured, you can run the command on publisher or subscriber server.Note
Step 2 To set the maximum limit of voicemails items that can be managed by Unity Connection with the Paged view searchfunctionality, run the following CLI command:
run cuc dbquery unitydirdb execute procedurecsp_ConfigurationModify(pFullName='System.Messaging.MbxSynch.MbxSynchVoiceMailCountLimit',pvalue="newvalue")
where new value specifies the value of the voicemails count limit that you can view after the paging parameter is enabled.Unity Connection by default manages the first 25000 voicemails per mailbox which avoids any delay in messagesynchronization between Unity Connection and Exchange server. This voicemail count limit can be increased maximumup to 75000.
By default, the value of the parameter ‘System.Messaging.MbxSynch.MbxSynchUsePaging' parameter is setto 1.
Note
Configuring EWS Limits for Exchange 2010
Configuring EWS Limits on Exchange 2010 SP2 RU4 and Later
Microsoft has enabled the client throttling policy feature by default. If there is no throttling policy alreadyconfigured, Microsoft Exchange applies a default policy to all users. The default throttling policy is tailoredfor end user's load and not for an enterprise application like, Unity Connection using impersonation. If anyUnity Connection users who are configured for unifiedmessaging havemailboxes in Exchange 2010, configurethe Exchange 2010 EWS limits for the unified messaging users mailbox by creating and applying a newmailbox policy to the unified messaging user mailbox account. If you do not configure EWS limits, messagesmay not be synchronized, and status changes (for example, from unread to read), changes to the subject line,and changes to the priority may not be replicated. In addition, attempts to access Exchange calendars andcontacts may fail.
Unified Messaging Guide for Cisco Unity Connection Release 11.x28
Configuring Unified MessagingTask for Configuring Unified Messaging
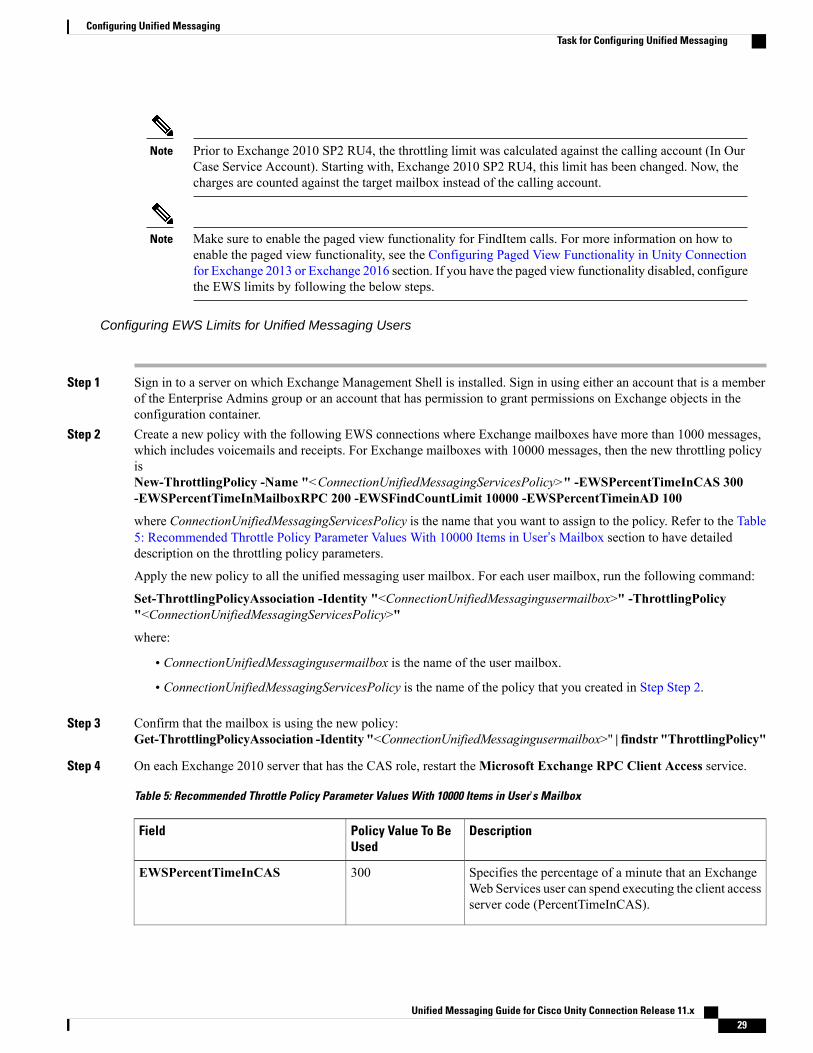
Prior to Exchange 2010 SP2 RU4, the throttling limit was calculated against the calling account (In OurCase Service Account). Starting with, Exchange 2010 SP2 RU4, this limit has been changed. Now, thecharges are counted against the target mailbox instead of the calling account.
Note
Make sure to enable the paged view functionality for FindItem calls. For more information on how toenable the paged view functionality, see the Configuring Paged View Functionality in Unity Connectionfor Exchange 2013 or Exchange 2016 section. If you have the paged view functionality disabled, configurethe EWS limits by following the below steps.
Note
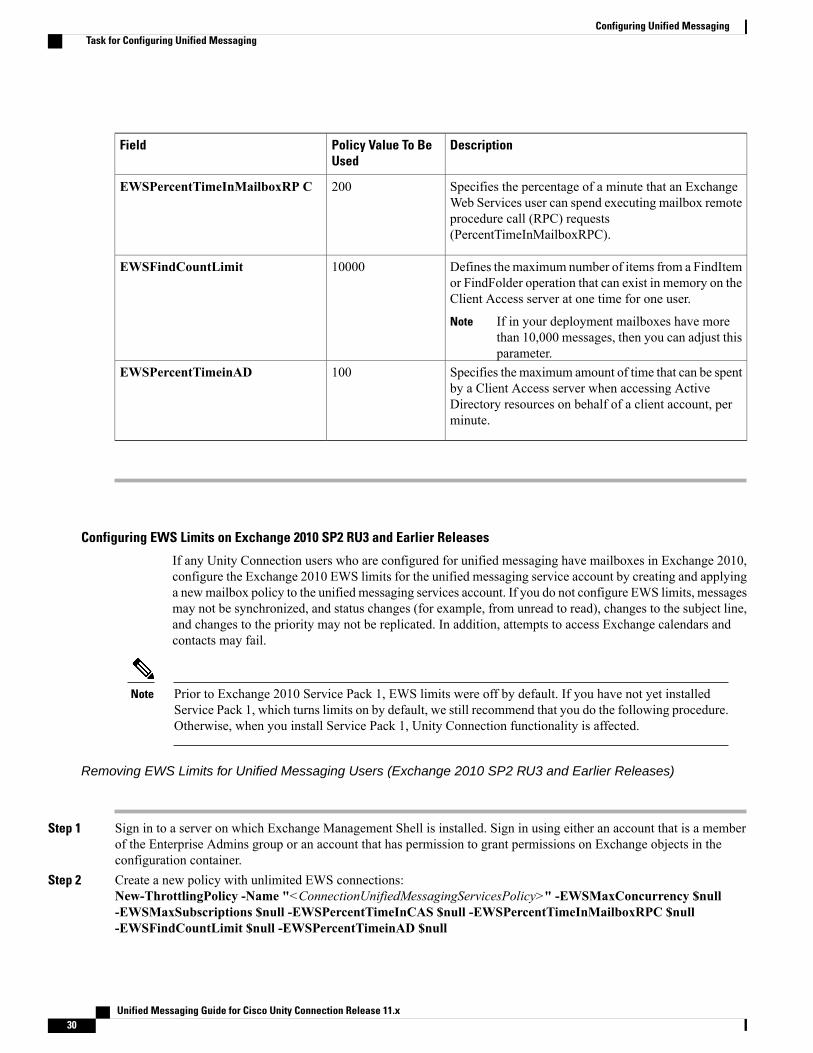
Configuring EWS Limits for Unified Messaging Users
Step 1 Sign in to a server on which Exchange Management Shell is installed. Sign in using either an account that is a memberof the Enterprise Admins group or an account that has permission to grant permissions on Exchange objects in theconfiguration container.
Step 2 Create a new policy with the following EWS connections where Exchange mailboxes have more than 1000 messages,which includes voicemails and receipts. For Exchange mailboxes with 10000 messages, then the new throttling policyisNew-ThrottlingPolicy -Name "<ConnectionUnifiedMessagingServicesPolicy>" -EWSPercentTimeInCAS 300-EWSPercentTimeInMailboxRPC 200 -EWSFindCountLimit 10000 -EWSPercentTimeinAD 100
where ConnectionUnifiedMessagingServicesPolicy is the name that you want to assign to the policy. Refer to the Table5: Recommended Throttle Policy Parameter Values With 10000 Items in User’s Mailbox section to have detaileddescription on the throttling policy parameters.
Apply the new policy to all the unified messaging user mailbox. For each user mailbox, run the following command:
• ConnectionUnifiedMessagingusermailbox is the name of the user mailbox.
• ConnectionUnifiedMessagingServicesPolicy is the name of the policy that you created in Step Step 2.
Step 3 Confirm that the mailbox is using the new policy:Get-ThrottlingPolicyAssociation -Identity "<ConnectionUnifiedMessagingusermailbox>" | findstr "ThrottlingPolicy"
Step 4 On each Exchange 2010 server that has the CAS role, restart theMicrosoft Exchange RPC Client Access service.
Table 5: Recommended Throttle Policy Parameter Values With 10000 Items in User’s Mailbox
DescriptionPolicy Value To BeUsed
Field
Specifies the percentage of a minute that an ExchangeWeb Services user can spend executing the client accessserver code (PercentTimeInCAS).
300EWSPercentTimeInCAS
Unified Messaging Guide for Cisco Unity Connection Release 11.x 29
Configuring Unified MessagingTask for Configuring Unified Messaging
DescriptionPolicy Value To BeUsed
Field
Specifies the percentage of a minute that an ExchangeWeb Services user can spend executing mailbox remoteprocedure call (RPC) requests(PercentTimeInMailboxRPC).
200EWSPercentTimeInMailboxRP C
Defines the maximum number of items from a FindItemor FindFolder operation that can exist in memory on theClient Access server at one time for one user.
If in your deployment mailboxes have morethan 10,000 messages, then you can adjust thisparameter.
Note
10000EWSFindCountLimit
Specifies the maximum amount of time that can be spentby a Client Access server when accessing ActiveDirectory resources on behalf of a client account, perminute.
100EWSPercentTimeinAD
Configuring EWS Limits on Exchange 2010 SP2 RU3 and Earlier Releases
If any Unity Connection users who are configured for unified messaging have mailboxes in Exchange 2010,configure the Exchange 2010 EWS limits for the unified messaging service account by creating and applyinga newmailbox policy to the unified messaging services account. If you do not configure EWS limits, messagesmay not be synchronized, and status changes (for example, from unread to read), changes to the subject line,and changes to the priority may not be replicated. In addition, attempts to access Exchange calendars andcontacts may fail.
Prior to Exchange 2010 Service Pack 1, EWS limits were off by default. If you have not yet installedService Pack 1, which turns limits on by default, we still recommend that you do the following procedure.Otherwise, when you install Service Pack 1, Unity Connection functionality is affected.
Note
Removing EWS Limits for Unified Messaging Users (Exchange 2010 SP2 RU3 and Earlier Releases)
Step 1 Sign in to a server on which Exchange Management Shell is installed. Sign in using either an account that is a memberof the Enterprise Admins group or an account that has permission to grant permissions on Exchange objects in theconfiguration container.
Step 2 Create a new policy with unlimited EWS connections:New-ThrottlingPolicy -Name "<ConnectionUnifiedMessagingServicesPolicy>" -EWSMaxConcurrency $null-EWSMaxSubscriptions $null -EWSPercentTimeInCAS $null -EWSPercentTimeInMailboxRPC $null-EWSFindCountLimit $null -EWSPercentTimeinAD $null
Unified Messaging Guide for Cisco Unity Connection Release 11.x30
Configuring Unified MessagingTask for Configuring Unified Messaging
where ConnectionUnifiedMessagingServicesPolicy is the name that you want to assign to the policy.
Step 3 Apply the new policy to the unified messaging services account and the user mailbox:Set-ThrottlingPolicyAssociation -Identity "<ConnectionUnifiedMessagingServicesAccount>" -ThrottlingPolicy"<ConnectionUnifiedMessagingServicesPolicy>"
where:
• ConnectionUnifiedMessagingServicesAccount is the name of the account that you created in the Configuring UnifiedMessaging in Active Directory.
• ConnectionUnifiedMessagingServicesPolicy is the name of the policy that you created in Step 2.
The Set-ThrottlingPolicyAssociation command is not supported with Exchange 2010 version14.00.0639.021. The users with Exchange 2010 version 14.00.0639.021 are not allowed to modify anexisting throttling policy settings, hence the default policy gets applied here.
Note
Step 4 Confirm that the mailbox is using the new policy:Get-ThrottlingPolicyAssociation -Identity "<ConnectionUnifiedMessagingServicesAccount>" | findstr"ThrottlingPolicy"
Step 5 If you have createdmore than one unified messaging services account, repeat Step Step 3 and Step Step 4 for the remainingaccounts.
Step 6 On each Exchange 2010 server that has the CAS role, restart theMicrosoft Exchange RPC Client Access service.
Table 6: Throttling Policy Parameter Descriptions and Values
DescriptionPolicy Value to Be UsedField
Specifies how many concurrent connectionsan Exchange Web Services user can haveagainst an Exchange server at one time.
NullEWSMaxConcurrency
Specifies the maximum number of active pushand pull subscriptions that a user can have ona specific Client Access server at the sametime.
NullEWSMaxSubscriptions
Specifies the percentage of a minute that anExchange Web Services user can spendexecuting the client access server cod(PercentTimeInCAS).
NullEWSPercentTimeInCAS
Specifies the percentage of a minute that anExchange Web Services user can spendexecuting mailbox remote procedure call(RPC) requests (PercentTimeInMailboxRPC)
NullEWSPercentTimeInMail boxRPC
Defines the maximum number of items froma FindItem or FindFolder operation that canexist in memory on the Client Access serverat one time for one user.
NullEWSFindCountLimit
Unified Messaging Guide for Cisco Unity Connection Release 11.x 31
Configuring Unified MessagingTask for Configuring Unified Messaging
DescriptionPolicy Value to Be UsedField
Specifies the maximum amount of time thatcan be spent by a Client Access server whenaccessing Active Directory resources on behalfof a client account, per minute.
NullEWSPercentTimeinAD
Accessing Office 365 Using Remote Exchange Management Power Shell
Step 1 Run Windows PowerShell as administrator and run the following command.Set-ExecutionPolicy Unrestricted
Step 2 On a Windows PowerShell endpoint, run the following command and enter the Office 365 administrator accountcredentials for authentication in the popup window.$LiveCred = Get-Credential
Step 3 To establish a remote Windows PowerShell session with Office 365, use the New-PSSession Windows PowerShellcmdlet to connect with the generic remote Windows PowerShell endpoint at http://ps.outlook.com/powershell. Run thefollowing command to create Remote Exchange Shell Session.$Session = New-PSSession -ConfigurationName Microsoft.Exchange -ConnectionUrihttps://ps.outlook.com/powershell/ -Credential $LiveCred -Authentication Basic -AllowRedirection
The user account you use to connect to Office 365 Exchange Online must be enabled for remote shell.Note
Step 4 Run the following command to import all Remote Exchange Shell commands to the local client side session:Import-PSSession $Session
If it fails with an error message we may need to set the Execution policy to allow running remote PowerShell scripts.RunGet-ExecutionPolicy. If the value returned is anything other than RemoteSigned, you need to change the value toRemoteSigned running Set-ExecutionPolicy RemoteSigned
To use Import-PSSession, the execution policy in the current session cannot be Restricted or All signed, because thetemporary module that Import-PSSession creates contains unsigned script files that are prohibited by these policies. Touse Import-PSSession without changing the execution policy for the local computer, use the Scope parameter ofSet-ExecutionPolicy to set a less restrictive execution policy for a single process.
Assigning Application Impersonation Role for Office 365
Step 1 To configure impersonation in Office 365, you must run a Windows PowerShell script.Step 2 You must have the permission to run the New-ManagementRoleAssignment cmdlet. By default the administrators have
this permission.Use "New-ManagementRoleAssignment" Exchange Management Shell cmdlet to grant the service account permissionto impersonate all the users in the organization.
• Name parameter specifies the name of the new role assignment, for example, ConnectionUMServicesAcct. Thename that you enter for RoleName appears when you run get-ManagementRoleAssignment.
• Role parameter indicates that the ApplicationImpersonation role is assigned to the user specified by the Userparameter.
• User is the name of the unified messaging services account in alias@domain format.
Step 3 If you created more than one unified messaging services account, repeat Step Step 2 for the remaining accounts. Specifya different value for RoleName for each unified messaging services account.
If you have activated the Active Directory Synchronization feature and migrating from local Exchange serverto Office 365, then the further user management is done through the on-premises Active Directory Servicesand it gets synchronized with Office 365 automatically. You must make sure the Application ImpersonationManagement role is given to your Office 365 server.
Caution
Creating a Unified Messaging Service to Access Mail ServerDo the following procedure to create one or more unified messaging services in Unity Connection to accessthe supported mail server.
If you configured the supported mail server to use HTTPS, you need to configure the unified messagingservices to validate certificates for the mail servers. You need to upload certificates from the certificationauthority that issued the SSL certificates for mail server to both Tomcat-trust and Unity Connection-trustlocations. For information on uploading SSL certificates, see the “Using SSL to Secure Client/ServerConnections” chapter of the Security Guide for Cisco Unity Connection Release 12.x, available at https://www.cisco.com/c/en/us/td/docs/voice_ip_comm/connection/12x/security/b_12xcucsecx.html.
Note
Unified Messaging Guide for Cisco Unity Connection Release 11.x 33
Configuring Unified MessagingTask for Configuring Unified Messaging
Creating Unified Messaging Services in Unity Connection
If you are configuring Unity Connection to communicate with individual mail servers, you need to configureunified messaging services for each mail server.
Step 1 In Cisco Unity Connection Administration, expand Unified Messaging and select Unified Messaging Services.Step 2 On the Search Unified Messaging Services page, select Add New to create a new unified messaging services. You may
also select an already created unified messaging services and modify its settings. The New Unified Messaging Servicespage or Edit Unified Messaging services page appears.
Step 3 Enter the values of the required fields to configure unified messaging services and select Save (For information on eachfield, see Help> This Page depending on the mail server you selected).If you are configuring Unity Connection to communicate with individual mail servers, you need to configure unifiedmessaging services for each mail server.
Uploading CA Public Certificates for Exchange and Active DirectoryAt the time of creating unified messaging services, if you selected to validate certificates for Exchange serversor for Active Directory domain controllers (DCs), you must upload the public certificates from the certificationauthority (CA) that signed the certificates on the Exchange servers and DCs.
The public certificates allow Unity Connection to communicate with Exchange servers or DCs and unifiedmessaging functions properly.
1 If you selected the option to validate certificates for Exchange servers, and if SSL certificates are notalready installed on all of the following servers: Get and install certificates:
In addition, if you selected the option to validate certificates for Active Directory domain controllers, andif SSL certificates are not already installed on your DCs, get and install certificates.
2 If you used an external CA (for example, Verisign) to issue the SSL certificates installed on the serverslisted, and if you have the public certificates for the CA in .pem format: Save the files to a network locationaccessible to the Unity Connection server. Then skip to Task 6.
3 If you used Microsoft Certificate Services or Active Directory Certificate Services to issue the SSLcertificates, or if you used an external CA and you do not have the public certificate for the CA in .pemformat: Download and install OpenSSL or another application that can convert public certificates to .pemformat. Unity Connection cannot upload public certificates in other formats.
4 If you used Microsoft Certificate Services to issue the SSL certificates:Do the Saving the Public Certificatefor Microsoft Certificate Services or Active Directory Certificate Services to a File.
5 If you used Microsoft Certificate Services, Active Directory Certificate Services, or an external CA, andif you do not have public certificates in .pem format: Use the application that you have downloaded toconvert the public certificate to .pem format, and save the file to a network location accessible to the UnityConnection server.
Unified Messaging Guide for Cisco Unity Connection Release 11.x34
Configuring Unified MessagingTask for Configuring Unified Messaging
6 Upload the public certificates to the Unity Connection server. For more information, see the Uploadingthe Public Certificates to the Unity Connection Server. and Uploading Certificates for Office 365 andCisco Unity Connection
Saving the Public Certificate for Microsoft Certificate Services or Active Directory Certificate Services to a File
Step 1 Sign in to the server on which you installed Microsoft Certificate Services and issued SSL certificates for the followingservers:
• Active Directory domain controllers that the Unity Connection server might access.
Step 2 On the Windows Start menu, select Programs > Administrative Tools > Certification Authority.Step 3 In the left pane of the Certification Authority MMC, right-click the server name, and select Properties.Step 4 In the <servername> Properties dialog box, on the General tab, select View Certificate.Step 5 In the Certificate dialog box, select the Details tab.Step 6 On the Details tab, select Copy to File.Step 7 On the Welcome to the Certificate Export Wizard page, select Next.Step 8 On the Export File Format page, select Next to accept the default value of DER Encoded Binary X.509 (.CER).Step 9 On the File to Export page, specify the full path of the public certificate, including a location that is accessible to the
Unity Connection server, and a file name.Step 10 Select Next.Step 11 On the Completing the Certificate Export Wizard page, select Finish.Step 12 Select OK three times to close a message box and two dialog boxes.Step 13 Close the Certification Authority MMC.Step 14 If you issued SSL certificates for all of the servers listed in Step Step 1 using the same installation of Microsoft Certificate
Services, you are finished with this procedure. Return to the task list for this section.If you issued SSL certificates for all of the servers listed in Step Step 1 using different installations ofMicrosoft CertificateServices, repeat Step Step 1 through Step 13 to get one public certificate for each instance of Microsoft CertificateServices. Then return to the task list for this section.
Unified Messaging Guide for Cisco Unity Connection Release 11.x 35
Configuring Unified MessagingTask for Configuring Unified Messaging
Uploading the Public Certificates to the Unity Connection Server
Step 1 In Cisco Unified Operating System Administration, expand Security and select Certificate Management.Step 2 On the Certificate Management page, select Upload Certificate.Step 3 In the Certificate Name list, select tomcat-trust.Step 4 (Optional) Enter a description in the Description field and select Browse.Step 5 Browse to the location where you saved the public certificates in .pem format, and select one of the converted certificates.Step 6 Select Upload File.Step 7 Repeat Step Step 2 through Step 6, but select Unity Connection-trust in the Certificate Name list.Step 8 If you have public certificates from more than one certification authority, repeat Step Step 2 through Step 7 for the
remaining certificates.
Uploading Certificates for Office 365 and Cisco Unity ConnectionAt the time of creating unified messaging services, if you select "Validate Certificates for Exchange Servers"for Office 365, you must perform the following steps to upload Office 365 root certificate to the tomcat-trustof Cisco Unity Connection.
Step 1 Select the Office 365 EWS endpoint URL https://outlook.office365.com/EWS/Exchange.ASMX and download theOffice 365 root certificate.
Step 2 In Cisco Unified Operating System Administration, expand Security and select Certificate Management.Step 3 On the Certificate Management page, select Upload Certificate.Step 4 In the Certificate Name list, select tomcat-trust.Step 5 (Optional) Enter a description in the Description field and select BrowseStep 6 Browse to the location where you saved the Office 365 root certificate, and select the certificate.Step 7 Select Upload File.
If Office 365 EWS endpoint URL communicates with Cisco Unity Connection through a different rootcertificate, the same must be uploaded to the tomcat-trust of Cisco Unity Connection.
Caution
Unified Messaging Guide for Cisco Unity Connection Release 11.x36
Configuring Unified MessagingTask for Configuring Unified Messaging
Step 1 In Cisco Unity Connection Administration, expand Class of Service and select Class of Service. On the Search Classof Service page, select the class of service assigned to users in which you want to configure unified messaging. (Forinformation on each field, see Help> This Page).
Step 2 On the Edit Class of Service page, in the Licensed Features section, check theAllow Users to Access Voicemail Usingan IMAP Client and/ or Single Inbox check box.
Step 3 You must configure message aging or message quotas. For more information, see the “Message Storage” chapter of theSystem Administration Guide for Cisco Unity Connection, Release 12.x, available at https://www.cisco.com/c/en/us/td/docs/voice_ip_comm/connection/12x/administration/guide/b_12xcucsag.html.
If you want to permanently delete the messages from Web Inbox, check the Delete Messages Without Savingto Deleted Items Folder check box in theMessage Options section.
Note
Step 4 (for Text-to-Speech feature only): In the Licensed Features section, check the Allow Access to Advanced Featuresand the Allow Access to Exchange Email by Using Text to Speech (TTS) check boxes.
Step 5 Select Save.
Unified Messaging Account for Users
Unified Messaging Accounts and User Accounts Related for Unity Connection
Unified messaging accounts connect Unity Connection users to unified messaging services. Unified messagingaccounts are separate objects from user accounts:
• When you create a user account, Unity Connection does not automatically create a unified messagingaccount for that user.
• You can create more than one unified messaging account for a user, but a user’s unified messagingaccounts cannot have overlapping features. For example, you cannot create two unified messagingaccounts for the same user that both enable single inbox.
• Creating multiple unified messaging accounts for a user is one way to control access to unified messagingfeatures. For example, if you want all users to have single inbox but only a few users to have text-to-speechaccess to Exchange email, you can create two unified messaging services. One activates single inboxand the other activates TTS. You then create unified messaging accounts for all users to give them accessto single inbox, and you create a second unified messaging account for the users who you want to haveTTS.
• When you add a unified messaging account, the associated user account is updated with a reference tothe unifiedmessaging account. The user account does not contain the information on the unifiedmessagingaccount.
• When you delete a user account, all unified messaging accounts for that user are also deleted. However,when you delete a unified messaging account, the corresponding user account is not deleted. The useraccount is updated only to remove the reference to the unified messaging account.
Unified Messaging Guide for Cisco Unity Connection Release 11.x 37
Configuring Unified MessagingTask for Configuring Unified Messaging
You can create a large number of unified messaging accounts using Bulk Administration Tool. For informationon creating, updating, or deleting unified messaging accounts using BAT tool, see the “Bulk AdministrationTool” section of the “Tools” chapter of the System Administration Guide for Cisco Unity Connection, Release12.x, available at https://www.cisco.com/c/en/us/td/docs/voice_ip_comm/connection/12x/administration/guide/b_12xcucsag.html.
For information on synchronization behavior if you later disable single inbox in a unified messaging account,see the “Moving and Restoring Exchange Mailboxes” chapter.
Step 1 In Cisco Unity Connection Administration, expand Users and select Users. On the Search Users page, select Add Newto create a new user or select an applicable user for which you want to create a unified messaging account.
Step 2 Configure unified messaging account (For information on each field, see Help> This Page):a) In the Edit menu, select Unified Messaging Accounts.b) On the Unified Messaging Accounts page, select Add New.c) On the New Unified Messaging Accounts page, enter the values of the required fields and select Save.
Step 3 To check the configuration for the user, select Test. The Task Execution Results window appears with the test results.If any part of the test fails, verify the configuration for the mail server, Active Directory, Unity Connection, and theUnity Connection user.
Test Unified Messaging Configuration
View the Summary of Unified Messaging Configuration
You can view a summary of the configuration for all of the unified messaging accounts on a Unity Connectionserver, including:
• Current status of Unity Connection configuration settings for each unified messaging account thatindicates whether consistency problems with Unity Connection settings prevent unified messaging fromfunctioning correctly. When you select the status icon for a unified messaging account, the UnifiedMessaging Account page appears, and the status area of the page lists both problems and possibleproblems, if any.
• You can also test whether a unified messaging account has connectivity with other servers using theTest Connectivity button on the Unified Messaging Account page.
• The alias of the user associated with the account. When you select the alias for a unified messagingaccount, the Edit UnifiedMessaging Account page appears, and the status area of the page lists problemsand possible problems, if any.
• The display name of the user associated with the unified messaging account.
• The name of the unified messaging service that is associated with the unified messaging account. Whenyou select the service name, the Unified Messaging Services page appears with the settings for theservice.
Unified Messaging Guide for Cisco Unity Connection Release 11.x38
Configuring Unified MessagingTask for Configuring Unified Messaging
• The current unified messaging settings for each unified messaging account.
Viewing a Summary of Configuration of Unified Messaging Accounts for Unity Connection
Step 1 In Cisco Unity Connection Administration, expandUnifiedMessaging and selectUnifiedMessaging Accounts Status.Step 2 To sort by the values in a column in ascending order, select the heading for the column. To sort in descending order,
select the heading again.Step 3 View the following settings:
• To display the Unified Messaging Accounts page for an account, select the icon or the value of the Alias columnin the applicable row.
• To display the Unified Messaging Services page for an account, select the value of the UM Services column inthe applicable row.
Testing System Configuration and Unified Messaging with Exchange and Unity Connection
You can run a Unity Connection system test that includes tests of the unified messaging configuration andthat provides summary data on configuration problems, if any, for example, the number of accounts assignedto a specified unified messaging service that has configuration problems.
Do the following to check the system configuration and unified messaging configuration:
Step 1 In Cisco Unity Connection Administration, expand Tools and select Task Management.Step 2 On the Task Definitions page, select Check System Configuration and select Run Now.Step 3 Select Refresh to display links to the latest results.Step 4 Review the results, resolve problems, if any, and re-run the Check System Configuration task until no more problems
are found.
Unified Messaging Guide for Cisco Unity Connection Release 11.x 39
Configuring Unified MessagingTask for Configuring Unified Messaging
Testing Access to Calendars for Unity Connection
If you configured Unity Connection to calendars, do the following procedure to test the access to calendars.
Step 1 Sign in to Outlook.Step 2 On the Go menu, select Calendar.Step 3 On the File menu, select New> Meeting Request.Step 4 Enter values in the required fields to schedule a new meeting for the current time and invite a user who has an account
on Unity Connection. Select Send.Step 5 Sign in to the Unity Connection mailbox of the user that you invited to the Outlook meeting in Step 4.Step 6 If the user account is configured for speech access, say Play Meetings.
If the user account is not configured for speech access, press 6 and follow the prompts to list meetings. Unity Connectionreads the information about the meeting.
Resolving SMTP Domain Name Configuration Issues
When a single inbox user receives a voicemail, it is synchronized from Unity Connection to a mail server.The email address of sender/recipient hasUnity Connection domain name, for example, [email protected] to this, email clients like Microsoft Outlook or IBM Lotus Notes adds the Unity Connection address as“recent contacts” in the address book. When a user replies to an email or adds recipient while composing anemail, the user can enter/select the Unity Connection address, which may lead to NDR. You must follow thesteps further if you want the email address of sender/recipient to be displayed as the corporate email address,for example, userid@corp-hostname, when the voicemail is synchronized for single inbox users from UnityConnection to the mail server.
Do the following procedure to resolve SMTP domain name configuration issues:
Step 1 In Cisco Unity Connection Administration, expand System Settings > SMTP Configuration and select Smart Host.Step 2 On the Smart Host page, enter the values of the required fields and select Save (For information on each field, seeHelp>
This Page).Microsoft Exchange server can be used as a smarthost.
Note
Step 3 Configure corporate email address of a user:a) In Cisco Unity Connection Administration, expand Users and select Users. On the Search Users page, select an
applicable user.b) On the Edit User Basics page, enter value in the Corporate Email Address field and select Save.
Step 4 In Cisco Unity Connection Administration, expand System Settings and select General Configuration.Step 5 On the General Configuration page, in theWhen a recipient cannot be found list, selectRelay message to smart host
so that if the Recipient is not found, the message is sent to the smart host and select Save.Step 6 Configure message action for a user:
a) In Cisco Unity Connection Administration, expand Users and select Users. On the Search Users Basics page, selectan applicable user.
Unified Messaging Guide for Cisco Unity Connection Release 11.x40
Configuring Unified MessagingTask for Configuring Unified Messaging
b) On the Edit User Basics page, in the Edit menu, selectMessage Actions. On the Edit Message Actions page, selectthe Accept the Message option from the Voicemail drop- down list.
Make sure to select the Relay the Message option from the Email, Fax, and receipt drop -downlists.
Note
Step 7 Setup a recipient policy on the mail server so that the Unity Connection alias resolves to the Corporate Email AddressID:
• For Exchange 2016, Exchange 2013 or Exchange 2010, see the following link:http://technet.microsoft.com/en-us/library/bb232171.aspx
Unified Messaging Guide for Cisco Unity Connection Release 11.x 41
Configuring Unified MessagingTask for Configuring Unified Messaging
Unified Messaging Guide for Cisco Unity Connection Release 11.x42
Configuring Unified MessagingTask for Configuring Unified Messaging
C H A P T E R 3Configuring Text-to-Speech
• Configuring Text-to-Speech, page 43
Configuring Text-to-Speech
OverviewThe Text-to-Speech (TTS) feature allows the unified messaging users to listen to their emails when they signin to Unity Connection using phone. For more information on text-to-speech, see the Text-to-Speech, page 1-10section.
Task List for Configuring Text-to-SpeechWith text-to-speech feature enabled in Unity Connection, you can play the emails through phone that areaccessible either through Exchange or Office 365.
Configuring the Text-to-Speech Feature
Step 1 Follow the steps depending on the version of Exchange server accessed by unified messaging users:
• Configuring TTS on Office 365, Exchange 2013 or Exchange 2010
Step 2 Enable text-to-speech in Unity Connection on an existing or a new unified messaging service. Configure a unifiedmessaging service following the steps as mentioned in the Creating a Unified Messaging Service to Access Mail Server,page 2-27 section.
Make sure the Access Exchange Email Using Text-to-Speech (TTS) check box under Service Capabilities ischecked.
Note
Unified Messaging Guide for Cisco Unity Connection Release 11.x 43
Configuring TTS on Office 365, Exchange 2013 or Exchange 2010Create and install an SSL certificate on each Exchange server that unified messaging users want to accessfollowing the given steps:
1 Open the Exchange Management Shell on the Exchange server.
where <Exchange server> is the IP address or host name of the Exchange server and <friendly name> isthe friendly name that you select for the Exchange server
The domain name for the Exchange server must be the IP address or the fully qualified DNS name(recommended) so that the Unity Connection server can successfully ping the Exchange server. Otherwise,users may not be able to access their emails in the external message store.
3 Press the Enter key and a Certificate Signing Request (CSR) file with the name Csr.txt is created in theroot directory.
4 Send the CSR file to a Certification Authority (CA) that generates and sends back a new certificate.
You must have a copy of the CA public root certificate or public root certificate chain. This certificate isneeded for configuring Unity Connection to trust the Exchange 2013, or Exchange 2010 server.
Note
5 Enter the following command:
import-exchangecertificate -path <path>
where <path> is the location of the directory where the CA saves the new server certificate
6 Press the Enter key and enter the following command:
dir cert:\localmachine\my | fl
7 Press the Enter key and highlight the “thumbprint” property and copy it to the clipboard.
8 Perform either of the following actions:
• If the class of service for unified messaging users is configured to access email and use calendar datafrom an external email server using IMAP, enter the following command:
• If the class of service for unified messaging users is not configured to access calendar data fromexternal email server using IMAP, enter the following command:
To use TTS over Office 365, you are not required to do any specific configuration.Note
Unified Messaging Guide for Cisco Unity Connection Release 11.x44
Configuring Text-to-SpeechTask List for Configuring Text-to-Speech
C H A P T E R 4Configuring Calendar and Contact Integration
• Configuring Calendar and Contact Integration, page 45
Configuring Calendar and Contact Integration
OverviewYou can configure calendar and contact integration on Unity Connection with Exchange, Office 365, or CiscoUnified MeetingPlace servers. For more information on calendar and contact integration, see the Calendarand Contact Integration, page 1-11 section.
Configuring Calendar and Contact Integration with Exchange or Office 365Servers
1 Review the system requirements to ensure that all the requirements for Exchange 2013, Exchange 2010,and Office 365 are met. For more information see the sections “Requirements for Accessing CalendarInformation for Meetings” and “Requirements for Accessing Exchange Contact Information” of SystemRequirements for Cisco Unity Connection, Release 12.x at https://www.cisco.com/c/en/us/td/docs/voice_ip_comm/connection/12x/requirements/b_12xcucsysreqs.html.
2 Configure the Exchange server with which Unity Connection is integrated for calendar and contactintegration. See the following sections:
• Configuring Office 365, Exchange 2013, Exchange 2010, or Exchange 2007 for Calendar and ContactIntegration.
• Configuring Unity Connection for Calendar and Contact Integration
3 Configure Unity Connection for calendar and contact integration. See the Configuring Unity Connectionfor Calendar and Contact Integration.
4 (When enabling Personal Call Transfer Rules only) Verify that the users or templates are assigned to aclass of service that enables them to use the personal call transfer rules feature.
Unified Messaging Guide for Cisco Unity Connection Release 11.x 45
5 Configure the Unity Connection users for calendar and contact integration. See the Configuring UnityConnection Users for Calendar and Contact Integration.
6 Test the calendar integration. See the Testing Calendar Integration with Exchange or Office 365 Servers.
Configuring Office 365, Exchange 2013, Exchange 2010, or Exchange 2007 for Calendar andContact Integration
Do the following tasks to configure Exchange 2013, Exchange 2010 for the calendar and contact integration:
1 Confirm that Client Access role has been enabled on Exchange 2013, Exchange 2010 server.
2 Do the Configuring Exchange 2013, Exchange 2010 for Calendar and Contact Integration.
3 (Optional) If you are using SSL for secure access to the Exchange server, follow the steps mentioned inthe section Configuring Secure Access to Exchange 2013, Exchange 2010.
If you have already configured secure IMAP with SSL on Exchange server and enabled the certificate forboth IMAP and IIS, then follow the section Configuring Exchange 2013, Exchange 2010 for Calendarand Contact Integration.
Note
Configuring Exchange 2013, Exchange 2010 for Calendar and Contact Integration
Step 1 On the Exchange server, open the Internet Services (IIS) Manager application.Step 2 Go to Internet Information Services > <Exchange server name> > Web Sites > Default Web Site.Step 3 Right-click Exchange and select Properties.Step 4 In the Exchange Properties dialog box, select the Virtual Directory tab.Step 5 From the Content For This Resource Should Come From menu, select A Directory Located On This Computer .Step 6 Confirm the Local Path is set to \\.\BackOfficeStorage\<your-domain.com>\MBX.Step 7 Select the Read check box.Step 8 Select the Directory Security tab.Step 9 From the Authentication and Access Control menu, select Edit.Step 10 In the Authenticated Access section of the Authentication Methods dialog box, check the check boxes for one or
more of the following options:
• Integrated Windows authentication (sometimes referred to as NTLM)
• Basic Authentication
• Digest Authentication for Windows Domain Servers
Unified Messaging Guide for Cisco Unity Connection Release 11.x46
Configuring Calendar and Contact IntegrationConfiguring Calendar and Contact Integration with Exchange or Office 365 Servers
Step 11 Select OK.Step 12 In the Exchange Properties dialog box, select OK.Step 13 Go to Internet Information Services > <server name > > Web Service Extensions .Step 14 In the right-hand pane, selectWebDav and confirm that the status is “Allowed.” If the status is not “Allowed”, click
Allow.Step 15 On the Exchange server, open the Exchange Management Console.Step 16 Go to Server Configuration > Mailbox.Step 17 Do the following for each mailbox that you want to configure for the calendar and contact integration:
a) In the upper middle pane, select the mailbox name.b) In the lower middle pane, select theWebDav tab.c) Right-click Exchange (Default Web Site) and select Properties.d) In the Exchange (Default Web Site) Properties dialog box, select the Authentication tab.e) SelectUse One or More Standard Authentication Methods and select the same authentication method(s) that you
configured in Step 10.
Step 18 Click OK.Step 19 Open the Exchange Management Shell.Step 20 In the Exchange Management Shell, enter the following command:
iisbreset /noforce
Step 21 Press Enter.
Configuring Secure Access to Exchange 2013, Exchange 2010
Step 1 On the Exchange Server, open the Exchange Management Shell application.Step 2 Enter the following command, where <Exchange server> is the IP address or fully qualified domain name of the Exchange
server and <friendly name> is the friendly name that you selected for the Exchange server:
The domain name for the Exchange server must be the IP address or the fully qualified domain name(recommended) so that the Unity Connection server can successfully ping the Exchange server. Otherwise,the calendar and contact integration may not function correctly.
Caution
Step 3 Press Enter.A Certificate Signing Request (CSR) file with the name Csr.txt is created in the root directory.
Step 4 Send the CSR file to a Certification Authority (CA), which generates and sends back a new certificate.You must have a copy of the CA public root certificate or public root certificate chain. This certificate is neededfor configuring Unity Connection to trust the Exchange 2007 server.
Note
Step 5 Save the new certificate in a location that is accessible to the Exchange server on which you want to import the certificate.Step 6 On the Exchange Server, open the Exchange Management Shell application.Step 7 Enter the following command, where <path> is the full path of the new certificate that you received from the CA:
Unified Messaging Guide for Cisco Unity Connection Release 11.x 47
Configuring Calendar and Contact IntegrationConfiguring Calendar and Contact Integration with Exchange or Office 365 Servers
import-exchangecertificate -path <path>
Step 8 Press Enter.Step 9 Enter the following command:
dir cert:\localmachine\my | fl
Step 10 Press Enter.Step 11 Highlight the “thumbprint” property and press Ctrl-C to copy it to the clipboard.Step 12 If Unity Connection is configured to use IMAP to access both email and calendar data from Exchange 2007, enter the
following command, where <thumbprint> is the “thumbprint” that you copied in Step 11:enable-exchangecertificate -thumbprint <thumbprint> -services "IIS,IMAP"
If Unity Connection is not configured to use IMAP but configured to use calendar data from Exchange 2007, enter thefollowing command, where <thumbprint> is the “thumbprint” that you copied in Step 11:enable-exchangecertificate -thumbprint <thumbprint> -services "IIS"
Step 13 Press Enter.Step 14 If you want data transmitted as clear text, skip the remaining steps in this procedure and continue with the Configuring
Unity Connection for Calendar and Contact Integration. Otherwise, open the IIS Manager application.Step 15 Go to IIS > <server name > > Web Sites > Default Web Site.Step 16 Right-click Default Web Site and select Properties.Step 17 In the Properties dialog box, select the Directory Security tab.Step 18 From the Secure Communications menu, select Edit.Step 19 Check the Require Secure Channel check box.Step 20 Select OK.Step 21 In the Properties dialog box, select OK.
Configuring Unity Connection for Calendar and Contact Integration
Step 1 In Cisco Unity Connection Administration, expand Unified Messaging and select Unified Messaging Services. Youcan modify an existing unified messaging service or create a new service using Add New.
Step 2 On the New Unified Messaging Service page, in the Type list, select Exchange/BPOS-D and check the Enabled checkbox to enable the unified messaging service.
Step 3 Enter the details of the required fields and select Save. (For information on each field, see Help> This Page).Make sure to check the Access Exchange Calendars and Contacts check box under Service Capabilitiesmenu.
Note
Step 4 SelectTest and a message appears indicating whether the configuration has been successfully verified. If the verificationfails, follow the above configuration steps to ensure that they have been properly implemented.
Unified Messaging Guide for Cisco Unity Connection Release 11.x48
Configuring Calendar and Contact IntegrationConfiguring Calendar and Contact Integration with Exchange or Office 365 Servers
Configuring Unity Connection Users for Calendar and Contact IntegrationAfter configuring the Unity Connection server for calendar and contact integration, you can configure theapplicable users.
There must be a user account in Active Directory for each Unity Connection user configured for unifiedmessaging. Also, there must be a corresponding mailbox for each user account in Exchange 2013,Exchange2010 that communicates with the Unity Connection server.
Note
Step 1 In Cisco Unity Connection Administration, expand Users and select Users. Select an applicable user.Step 2 On the Edit User Basics page, in the Edit menu, select Unified Messaging Accounts.Step 3 On the Unified Messaging Accounts page, select Add New.
Make sure that a unified messaging service is configured before creating unified messaging accounts.Note
Step 4 On the New Unified Messaging Accounts page, select the following details:
• In Unified Messaging Service drop-down, select the unified messaging service created in the sectionConfiguringUnity Connection for Calendar and Contact Integration.
• From the Account Informationmenu, in the Use This Email Address field, enter the Exchange email address inActive Directory for the user.
Step 5 In the Service Capabilities menu, check the Access Exchange Calendar and Contacts check box and select Save.Step 6 Check the calendar and contact configuration for the user, selecting Test. The Task Execution Results window appears
with the test results.If any part of the test fails, verify the configuration for Exchange 2013, Exchange 2010, or Exchange2007, Active Directory, Unity Connection, and the user.
Step 7 Repeat Step 2 through Step 6 for all remaining users.
Testing Calendar Integration with Exchange or Office 365 Servers
Step 1 Sign in to Outlook.Step 2 On the Go menu, select Calendar.Step 3 On the File menu, select New > Meeting Request.Step 4 Enter values in the required fields to schedule a new meeting for the current time, and invite a user who has an account
on Unity Connection. Select Send.Step 5 Sign in to the Unity Connection mailbox of the user that you invited to the Outlook meeting:
• If the user account is configured for speech access, say Play Meetings.
• If the user account is not configured for speech access, press 6, and then follow the prompts to list meetings.
Unity Connection reads the information about the Exchange 2013, 2010 meetings.
Unified Messaging Guide for Cisco Unity Connection Release 11.x 49
Configuring Calendar and Contact IntegrationConfiguring Calendar and Contact Integration with Exchange or Office 365 Servers
Configuring Calendar and Contact Integration with Cisco Unified MeetingPlaceor Cisco Unified MeetingPlace Express
1 Review the system requirements to confirm that all requirements for Cisco Unified MeetingPlace and theUnity Connection server have been met. See the “Requirements for Accessing Calendar Information forMeetings” section of System Requirements for Cisco Unity Connection Release 12.x at https://www.cisco.com/c/en/us/td/docs/voice_ip_comm/connection/12x/requirements/b_12xcucsysreqs.html.
2 Configure Cisco UnifiedMeetingPlace or Cisco UnifiedMeetingPlace Express. See the following sections:
• Configuring Cisco Unified MeetingPlace for Calendar Integration
• Configuring Cisco Unified MeetingPlace Express for Calendar Integration
3 Configure Unity Connection. See the Configuring Unity Connection for Calendar Integration section.
4 If you configured Cisco Unified MeetingPlace to use HTTPS in step 2., and configured unified messagingservices to validate certificates for MeetingPlace servers in step 3.: on the Unity Connection server, inCisco Unified Communications Operating System, upload certificates from the certification authority thatissued the SSL certificates for MeetingPlace servers to both tomcat-trust and Unity Connection-trustlocations. For more information on SSL instructions, see the “Using SSL to Secure Client/ServerConnections” chapter of the Security Guide for Cisco Unity Connection, Release 12.x , available at https://www.cisco.com/c/en/us/td/docs/voice_ip_comm/connection/12x/security/b_12xcucsecx.html.
5 Configure the Unity Connection users. See the ConfiguringUnity ConnectionUsers for Calendar Integrationsection.
6 Test the calendar integration. See the Testing Calendar Integration with Cisco Unified MeetingPlace orCisco Unified MeetingPlace Express section.
7 To teach users how to list, join, and schedule meetings, see the “Phone Menus and Voice Commands”chapter of the User Guide for the Cisco Unity Connection Phone Interface (Release 12.x) at http://www.cisco.com/c/en/us/td/docs/voice_ip_comm/connection/12x/user/guide/phone/b_12xcucugphone.html.
Configuring Cisco Unified MeetingPlace for Calendar Integration
Step 1 Sign in to the Cisco Unified MeetingPlace Application Server as an administrator.Step 2 Select User Configuration > User Profiles.Step 3 Select Add New.Step 4 Enter the following values in the required fields to create a privileged service account:
Leave this field blank.First Name
Enter Cisco Unity Connection.Last Name
Unified Messaging Guide for Cisco Unity Connection Release 11.x50
Configuring Calendar and Contact IntegrationConfiguring Calendar and Contact Integration with Cisco Unified MeetingPlace or Cisco Unified MeetingPlaceExpress
Enter cucsvc or another user ID that you want.User ID
Enter the applicable password.User Password
Enter the applicable profile number.Profile Number
Enter the applicable profile password.Profile Password
Select System Administrator.Type of User
The values that you enter for the User ID, User Password, Profile Number, and Profile Password fields areused in the Configuring Unity Connection for Calendar Integration.
Note
Step 5 Select Save.Step 6 Sign out of Cisco Unified MeetingPlace.Step 7 In the Address field of a web browser, if SSL is not enabled, enter the following URL (where <server> is the IP address
or host name of the Cisco Unified MeetingPlace server):http://<server>/webservices/services/meetingservice?wsdl
Step 8 Press Enter.Step 9 When prompted to sign in, enter the user ID and password for the privileged service account.
The Cisco Unified MeetingPlace Web Services Description Language (WSDL) download page appears with the title“XFire Services”.
Configuring Cisco Unified MeetingPlace Express for Calendar Integration
Step 1 Sign in to Cisco Unified MeetingPlace Express and select Administration.Step 2 Select User Configuration > User Profile Management.Step 3 Select Add New.Step 4 Enter the following values in the required fields to create an API user:
Leave this field blank.First Name
Enter Cisco Unity Connection.Last Name
Enter cucsvc or another user ID that you want.User ID
Enter the applicable password.User Password
Enter the applicable profile number.Profile Number
Unified Messaging Guide for Cisco Unity Connection Release 11.x 51
Configuring Calendar and Contact IntegrationConfiguring Calendar and Contact Integration with Cisco Unified MeetingPlace or Cisco Unified MeetingPlace
Express
Select API User.Type of User
The values that you enter for theUser ID, User Password, andProfile Number fields are used in the ConfiguringUnity Connection Users for Calendar Integration.
Note
Step 5 Select Save.Step 6 Sign out of Cisco Unified MeetingPlace Express.
If you do not sign out of Cisco Unified MeetingPlace Express, the test fails in the Testing Calendar Integration withCisco Unified MeetingPlace or Cisco Unified MeetingPlace Express.
Step 7 In the Address field of a web browser:
• if SSL is not enabled, enter the following URL (where <server> is the IP address or host name of the Cisco UnifiedMeetingPlace Express server):
Step 8 Press Enter.Step 9 When prompted to sign in, enter the user ID and password for the API user.
The Cisco Unified MeetingPlace Express WSDL download page appears with the title “XFire Services.”
Configuring Unity Connection for Calendar Integration
Step 1 In Cisco Unity Connection Administration, expand Unified Messaging and select Unified Messaging Services.Step 2 Modify an existing unified messaging service or create a new service by selecting Add New.Step 3 On the New Unified Messaging Service page, in the Type list, selectMeetingPlace 8.x and check the Enabled check
box to enable unified messaging with Cisco Unified MeetingPlace server.Step 4 Enter the values of the required fields and select Save. (For information on each field, see Help> This Page).
Make sure to check theUserMeetingPlaceMeetings andMeetingPlace Scheduling and Joining check boxesunder Service Capabilities menu.
Note
Step 5 To check the integration with Cisco Unified MeetingPlace, select Test. The Task Execution Results window appearswith the test results. If any part of the test fails, verify the configuration for Cisco Unified MeetingPlace and UnityConnection.
Unified Messaging Guide for Cisco Unity Connection Release 11.x52
Configuring Calendar and Contact IntegrationConfiguring Calendar and Contact Integration with Cisco Unified MeetingPlace or Cisco Unified MeetingPlaceExpress
Configuring Unity Connection Users for Calendar Integration
Cisco UnifiedMeetingPlacemust have an end user for each Unity Connection user that you are configuring.Caution
Step 1 In Cisco Unity Connection Administration, expand Users and select Users. Select an applicable user.Step 2 On the Edit User Basics page, on the Edit menu, select Unified Messaging Accounts.Step 3 On the Unified Messaging Accounts page, select Add New. The New Unified Messaging Account page appears.Step 4 On the New Unified Messaging Account page, select the Unified Messaging Service for Cisco Unified MeetingPlace.
Enter the values of the required fields and select Save. (For information on each field, see Help> This Page).Make sure to check theMeetingPlace Scheduling and Joining and Primary Meeting Service check boxesunder the Service Capabilities menu.
Note
Step 5 To check the calendar configuration for the user, select Test. The Task Execution Results window appears with thetest results.If any part of the test fails, verify the configuration for Cisco Unified MeetingPlace, Unity Connection, andthe user.
Step 6 Repeat Step 2 through Step 5 for all remaining users.
Testing Calendar Integration with Cisco Unified MeetingPlace or Cisco Unified MeetingPlaceExpress
Step 1 Sign in to Cisco Unified MeetingPlace as an end user.Step 2 Select Schedule.Step 3 Enter values in the required fields to schedule a new meeting for the current time, and invite a user who has an account
on Unity Connection.Step 4 Sign in to the Unity Connectionmailbox of the user that you invited to the Cisco UnifiedMeetingPlacemeeting in Step 3.Step 5 If the user account is configured for speech access, say Play Meetings.
If the user account is not configured for speech access, press 6, and then follow the prompts to list meetings.
Step 6 When you hear the system announce the Cisco Unified MeetingPlace meeting that you just scheduled, either say Join,or press the applicable keys on the phone keypad to join the meeting.
Unified Messaging Guide for Cisco Unity Connection Release 11.x 53
Configuring Calendar and Contact IntegrationConfiguring Calendar and Contact Integration with Cisco Unified MeetingPlace or Cisco Unified MeetingPlace
Express
Unified Messaging Guide for Cisco Unity Connection Release 11.x54
Configuring Calendar and Contact IntegrationConfiguring Calendar and Contact Integration with Cisco Unified MeetingPlace or Cisco Unified MeetingPlaceExpress
C H A P T E R 5Moving and Restoring Exchange Mailboxes
• Moving and Restoring Exchange Mailboxes, page 55
Moving and Restoring Exchange Mailboxes
OverviewThe mailboxes for unified messaging users in Cisco Unity Connection can be moved from one Exchangeserver to another. You may want to move the mailboxes from one Exchange server to another due to anyreason. Consider an instance in which after adding the latest supported version of Exchange server to theexisting Exchange environment of your organization, you want to move the user mailboxes to the latest version.
To move the user mailboxes from one version of Exchange to another, you need to update some specificsettings for the Unity Connection users. This enables Unity Connection to automatically detect the migrationof user mailboxes automatically. If Unity Connection fails to detect the migration of mailboxes, you need tomanually replace the existing mailboxes of unified messaging users with new mailboxes on the migratedExchange server.
Updating User Settings After Moving Exchange MailboxesAs covered in the “Configuring UnifiedMessaging” chapter, the administrators can create one or more unifiedmessaging services with Exchange. Following are the two settings that identify howUnity Connectionmanuallyupdates user settings after the Exchange mailboxes are moved:
• Unity Connection searches for Exchange servers: If you select to allow Unity Connection to search forExchange servers, Unity Connection automatically detects when youmovemailboxes to another versionof Exchange and automatically updates Unity Connection user settings.
• Unity Connection selects a specific Exchange server: If you select a specific Exchange server, eitherUnity Connection detects mailbox move from one Exchange server to another or it fails to detect. Theadministrator needs to manually replace the old unified messaging account with a new unified messagingaccount to access the specific Exchange server.
Unified Messaging Guide for Cisco Unity Connection Release 11.x 55
Note • If Unity Connection is not able to automatically detect mailbox moves, see theReplacingUnity ConnectionUnifiedMessagingAccounts AfterMoving ExchangeMailboxes section.
• If Unity Connection automatically detects mailbox moves, see the MovingExchange Mailboxes to a New Exchange Server section.
Table 7: When Unity Connection Detect Mailbox Moves Between Exchange servers lists the scenarios whenUnity Connection can and cannot automatically detect mailbox moves between Exchange servers.
Table 7: When Unity Connection Detect Mailbox Moves Between Exchange servers
Unity Connection can automatically detect mailboxmoves between the following Exchange versions
If you select a specific
2013 and 20132010 and 20132010 and 2010
NoNoYesExchange 2010 server
YesYesYesExchange 2013 server
Moving Exchange Mailboxes to a New Exchange ServerIn an organization, you can add an Exchange server by moving the Exchange mailboxes to the new server. Ifthe Exchange mailboxes are associated with Unity Connection users who are configured for single inbox, youmust grant the permissions that Unity Connection requires before you move the mailboxes. Otherwise, UnityConnection users cannot access their voicemails from the new location. This is true regardless of whether youallow Unity Connection to search for Exchange servers or you configure Unity Connection to communicatewith a specific Exchange server.
For information on granting the necessary permissions depending on the Exchange server, see the ConfiguringUnified Messaging in Active Directory, page 2-5 section.
To access a new Exchange server, either you need to create a new unified messaging services account orgrant necessary permissions to the existing unified messaging services account.
Note
Replacing Unity Connection Unified Messaging Accounts After MovingExchange Mailboxes
Following are the steps the administrators must do when Unity Connection cannot detect Exchange mailboxmoves and cannot automatically update the location of the Exchange mailbox for a Unity Connection user:
1 Manually create a new unified messaging account that accesses the new mailbox location.
Unified Messaging Guide for Cisco Unity Connection Release 11.x56
Moving and Restoring Exchange MailboxesMoving Exchange Mailboxes to a New Exchange Server
2 Delete the unified messaging account that accessed the old mailbox location.
Unity Connection does not synchronize voicemails with the corresponding Exchange mailboxes duringthe time you move the Exchange mailboxes and update Unity Connection settings for the affected users.
Caution
Do the following procedure to replace Unity Connection unified messaging accounts after moving exchangemailboxes:
Step 1 Review the Updating User Settings After Moving Exchange Mailboxes to determine whether Unity Connection canautomatically detect mailbox moves for your Exchange configuration.
Step 2 Do either of the following steps:
• If Unity Connection can detect mailbox moves, skip the rest of this procedure.
• If Unity Connection cannot detect mailbox moves, continue with Step 3.
Step 3 If you moved the Exchange mailbox to an Exchange server for which there is currently no unified messaging service inUnity Connection, create the service. For more information, see the Creating a Unified Messaging Service to AccessMail Server, page 2-27 section.
Step 4 Create a new unifiedmessaging account for the user and select a unifiedmessaging service that accesses the new Exchangeserver to which the mailbox was moved. For more information, see the Unified Messaging Account for Users, page 2-30section.
Step 5 Delete the unified messaging account that accessed the old Exchange server from where the mailbox was moved:a) In Cisco Unity Connection Administration, expand Users and select Users.b) On the Search Users page, select the alias of a user.c) On the Edit User Basics page, from the Edit menu, select Unified Messaging Accounts.d) On the Unified Messaging Accounts page, check the check box to the left of the unified messaging account that you
want to delete. Select Delete Selected.
Step 6 Repeat Step 3 through Step 5 for the other users whose Exchange mailboxes you moved.
Restoring Exchange MailboxesRestoring exchange mailboxes in Unity Connection requires you to take the backup of the current unifiedmessaging accounts of the users. The following section shows how to restore unified messaging capabilitiesfor individual users or multiple users. The most important aspect while restoring is to disable single inbox tostop the synchronization between Exchange and Unity Connection.
Task List for Restoring Microsoft Exchange Mailboxes1 Disable single inbox for selected users or for a unified messaging service. See the Disabling Single Inbox
for Unity Connection section.
2 Restore Exchange mailboxes. For more information, see the applicable Microsoft documentation.
Unified Messaging Guide for Cisco Unity Connection Release 11.x 57
Moving and Restoring Exchange MailboxesRestoring Exchange Mailboxes
3 Re-enable single inbox selecting the applicable option:
• If you disabled single inbox for individual users using Unity Connection\\ Administration, repeatthe Disable Single Inbox for Individual Users section, but check the Synchronize Unity Connectionand Exchange Mailboxes (Single Inbox) check box.
• If you disabled single inbox for a unified messaging service, repeat the Disable Single Inbox for AllUsers, but check either the Synchronize Connection and Exchange Mailboxes (Single Inbox)check box or the Enabled check box, as applicable.
• If you disabled single inbox for individual users using the Bulk Administration Tool, repeat theDisable Single Inbox for a Large Numbers of Selected Users Using the Bulk Administration Tool,but change the value of enableMbxSynch to 1.
Disabling Single Inbox Before Restoring Exchange MailboxesYou must disable single inbox for the Unity Connection users whose Exchange mailboxes and other unifiedmessaging service capabilities are being restored. If single inbox is not disabled, Unity Connection is unableto synchronize voicemails received from the time the backup initiates till the restore completes.
Behavior of Synchronization Cache when Single Inbox is DisabledUnity Connectionmaintains a synchronization cache that tracks the voicemails already forwarded to Exchange.When you disable single inbox, the synchronization cache is automatically cleared.
Do the following steps to understand the behaviour of synchronization cache when single inbox is disabled:
1 You take the backup of the Exchange server.
2 A new voicemail arrives.
3 Unity Connection synchronizes the voicemail with the Exchange mailbox associated with the UnityConnection user.
4 Unity Connection updates the synchronization cache for the user to indicate that the message has beensynchronized with Exchange.
5 A hard disk in the Exchange server fails.
6 You disable single inbox for the Unity Connection user whose Exchange mailbox was on the failed harddisk.
7 Unity Connection clears the synchronization cache for that user.
8 You replace the hard disk and restore Exchange from the backup that you made in step1.
9 You re-enable single inbox for the user.
10 Unity Connection performs a periodic comparison of the synchronization cache with the voicemailscurrently in Exchange.
11 Because the cache is empty, Unity Connection concludes that voicemails that are in the Unity Connectionmailbox but not in the Exchange mailbox have not yet been synchronized with Exchange.
12 Unity Connection resynchronizes the Unity Connection mailbox with the Exchange mailbox and rebuildsthe synchronization cache.
Unified Messaging Guide for Cisco Unity Connection Release 11.x58
Moving and Restoring Exchange MailboxesDisabling Single Inbox Before Restoring Exchange Mailboxes
Behavior of Synchronization Cache when Single Inbox is EnabledIf you restore Exchange mailboxes without disabling single inbox for the Unity Connection users, UnityConnection deletes all voicemails received after the backup from which you are restoring. Do the followingsteps to understand the behaviour of synchronization cache with single inbox:
1 You can take the backup of the Exchange server.
2 A new voicemail arrives.
3 Unity Connection synchronizes the voicemail with the Exchange mailbox associated with the UnityConnection user.
4 Unity Connection updates the synchronization cache for the user to indicate that the message has beensynchronized with Exchange.
5 A hard disk in the Exchange server fails.
6 You replace the hard disk and restore Exchange from the backup that you made in 1.
7 Unity Connection performs a periodic comparison of the synchronization cache with the voicemailscurrently in Exchange. The voicemail that arrived in 2. is not in the Exchange mailbox for the associatedUnity Connection user.
8 Unity Connection concludes that the voicemail has already been synchronized with Exchange and doesnot resynchronize the message into the Exchange mailbox.
Disabling Single Inbox for Unity ConnectionThe first step in restoring Exchangemailboxes is to disable single inbox. Depending on the number of Exchangeservers that you are restoring or the effect of restore on Unity Connection functionality, you can disable singleinbox in either of the following ways:
Restoring Exchange Mailboxes for a Small Number of Users
If you are restoring Exchangemailboxes for a small number of users, you can disable single inbox on individualuser accounts using Unity Connection\\ Administration. See the Disable Single Inbox for Individual Users.
Restoring Exchange Mailboxes for All the Unified Messaging Users or When Unity Connection Functionality is Not aConcern
You can disable the single inbox functionality of all unified messaging users in either of the followingconditions:
• While you are restoring mailboxes for all of the users associated with a unified messaging service.
• While you are restoring mailboxes for selected users associated with a unified messaging service duringnon-business hours when interrupting single inbox functionality has less impact on users.
There are two ways to disable single inbox for a unified messaging service:
• Disable only single inbox for a unified messaging service: If you disable only single inbox, the UnityConnection conversation continues to play the options for the other unified messaging features. If a user
Unified Messaging Guide for Cisco Unity Connection Release 11.x 59
Moving and Restoring Exchange MailboxesDisabling Single Inbox Before Restoring Exchange Mailboxes
selects one of these features while Exchange is unavailable, the Unity Connection conversation announcesthat access to messages is unavailable at this time.
• Disable the entire unifiedmessaging service: If the unifiedmessaging service has other unifiedmessagingfeatures enabled, such as text-to-speech or contact integration, and you disable the service, UnityConnection conversation stops playing the options for those features until the unified messaging serviceis re-enabled, which could be confusing for users.
For more information, see the Disable Single Inbox for All Users.
Restoring Exchange Mailboxes for Some Users Associated with a Unified Messaging Service When Unity ConnectionFunctionality is a Concern
When you are restoring Exchange mailboxes for a large number of users associated with a unified messagingservice, you can use the Bulk Administration Tool to disable single inbox for individual users, if both thefollowing conditions are true:
• The unified messaging service also includes users whose mailboxes you are not restoring.
• You are restoring the mailboxes during business hours, when you want to minimize the impact on userswhose mailboxes you are not restoring.
Disable Single Inbox for Individual Users
Step 1 In Cisco Unity Connection Administration, expand Users and select Users. On the Search Users page, select the aliasof the user account that you want to modify.
Step 2 On the Edit Users page, in the Edit menu, select Unified Messaging Accounts. Select the unified messaging accountthat enables single inbox for the user.
Step 3 Uncheck the Synchronize Unity Connection and Exchange Mailboxes (Single Inbox) check box.Step 4 Select Save.Step 5 Repeat Step 1 through Step 4 for the remaining users.
Disable Single Inbox for All Users
To disable the entire unified messaging service, uncheck the Enabled check box.
Step 1 In Unity Connection Administration, expand Unified Messaging and select Unified Messaging Services.Step 2 On the Search UnifiedMessaging Services page, select the alias of the unified messaging service that you want to modify.Step 3 To disable single inbox for the users associated with this unified messaging service, uncheck the Synchronize Connection
and Exchange Mailboxes (Single Inbox) check box.
Unified Messaging Guide for Cisco Unity Connection Release 11.x60
Moving and Restoring Exchange MailboxesDisabling Single Inbox Before Restoring Exchange Mailboxes
To disable the entire unified messaging service, uncheck the Enabled check box.Step 4 Select Save.Step 5 Repeat Step 1 through Step 4 for other unified messaging services for which you want to disable single inbox.
Disable Single Inbox for a Large Numbers of Selected Users Using the Bulk Administration Tool
Step 1 In Cisco Unity Connection Administration, expand Tools and select Bulk Administration Tool.Step 2 Under Select Operation, select Export.Step 3 Under Select Object Type, select Unified Messaging Accounts.Step 4 Specify a filename for the CSV file to which unified messaging accounts are exported.Step 5 Select Submit.Step 6 Follow the onscreen prompts to save the CSV file.Step 7 Open the CSV file.Step 8 For the users for whom you want to disable the single inbox feature, change the value of enableMbxSynch to 0.Step 9 In Cisco Unity Connection Administration, select Tools > Bulk Administration Tool.Step 10 Under Select Operation, select Update.Step 11 Under Select Object Type, select Unified Messaging Accounts.Step 12 Specify the name of the CSV file that you updated in Step 8.Step 13 Select Submit.
Unified Messaging Guide for Cisco Unity Connection Release 11.x 61
Moving and Restoring Exchange MailboxesDisabling Single Inbox Before Restoring Exchange Mailboxes
Unified Messaging Guide for Cisco Unity Connection Release 11.x62
Moving and Restoring Exchange MailboxesDisabling Single Inbox Before Restoring Exchange Mailboxes
I N D E X
C
concept 55
E
Exchange 13determining which servers you want Connection tocommunicate with 13
Unified Messaging Guide for Cisco Unity Connection Release 11.x IN-1
Unified Messaging Guide for Cisco Unity Connection Release 11.xIN-2