Unit 23: Perimeter 92 Objectives By the end of this unit, each pupil should be able to: • Discover that different rectangles with the same area have different perimeters. Perimeter Unit 23 Suggested resources centimetre grid sheets; paper squares; measuring tapes Frequently asked questions Q What do pupils need to understand? A The concepts of rectangle perimeters and areas are not the same, but they are clearly linked, as they both involve the width and height of the rectangle. If the area is fixed, then the ‘rectangle closest to a square’ will have the smallest perimeter. If the perimeter is fixed, then the ‘rectangle closest to a square’ will have the largest area. Q What mathematical skills are needed? A Pupils should be able to use the appropriate formulae, and have some problem solving skills (mainly trial and error) and persistence. Common errors that pupils make Pupils link the size of area and perimeter in the wrong way. Many pupils become convinced that a rectangle that is ‘bigger’ in one way (area or perimeter) than another must also be bigger in the other way (perimeter or area). This lesson aims to correct that idea. Evaluation guide Pupils to: 1. Calculate perimeter of rectangles with equal areas but with different lengths and breadths. Lesson 1 Pupil’s Book page 169; Workbook page 40 Preparation You will need to have: Pupil’s Book; Workbook; cm grid paper; paper squares. Starter activity Revise the three formulae for perimeter of a rectangle. Revise the formula for area of a rectangle. (Note: the terms ‘width’ and ‘height’ are used here for the sides of the rectangle. You or the pupils might prefer ‘length’ but this can be confusing. Both sides are lengths, in contrast to areas. ‘Height’ clearly refers to ‘up the page’ in a diagram.) Lesson focus Hands-on activity with rectangles Each group needs about 20 cut-out paper squares. Ask the group to make at least three different ‘filled-in’ rectangles with 12 squares. For each they should find the perimeter. They record their answers on the centimetre grid page. Conclusion: if area stays the same, the perimeter can be different. For rectangles with the same area, the closer the rectangle is to a square, the smaller is its perimeter. Now ask the group to make at least three different rectangles with a perimeter of 12 units. For each they should find the area. They record their answers on the centimetre grid page. Conclusion: If perimeter stays the same, the area can be different. For rectangles with the same
Transcript
Unit 23: Perimeter 92
ObjectivesBy the end of this unit, each pupil should be able to:• Discover that different rectangles with the same area have different perimeters.
Perimeter Unit 23
Suggested resourcescentimetre grid sheets; paper squares; measuring tapes
Frequently asked questionsQ What do pupils need to understand?A The concepts of rectangle perimeters and areas
are not the same, but they are clearly linked, as they both involve the width and height of the rectangle. If the area is fixed, then the ‘rectangle closest to a square’ will have the smallest perimeter. If the perimeter is fixed, then the ‘rectangle closest to a square’ will have the largest area.
Q What mathematical skills are needed?A Pupils should be able to use the appropriate
formulae, and have some problem solving skills (mainly trial and error) and persistence.
Common errors that pupils makePupils link the size of area and perimeter in the wrong way.Many pupils become convinced that a rectangle that is ‘bigger’ in one way (area or perimeter) than another must also be bigger in the other way (perimeter or area). This lesson aims to correct that idea.
Evaluation guidePupils to:1. Calculate perimeter of rectangles with equal
areas but with different lengths and breadths.
Lesson 1 Pupil’s Book page 169; Workbook page 40
PreparationYou will need to have: Pupil’s Book; Workbook; cm grid paper; paper squares.
Starter activityRevise the three formulae for perimeter of a rectangle.Revise the formula for area of a rectangle.(Note: the terms ‘width’ and ‘height’ are used here for the sides of the rectangle. You or the pupils might prefer ‘length’ but this can be confusing. Both sides are lengths, in contrast to areas. ‘Height’ clearly refers to ‘up the page’ in a diagram.)
Lesson focus
Hands-on activity with rectanglesEach group needs about 20 cut-out paper squares.Ask the group to make at least three different ‘filled-in’ rectangles with 12 squares. For each they should find the perimeter. They record their answers on the centimetre grid page.Conclusion: if area stays the same, the perimeter can be different. For rectangles with the same area, the closer the rectangle is to a square, the smaller is its perimeter.Now ask the group to make at least three different rectangles with a perimeter of 12 units. For each they should find the area. They record their answers on the centimetre grid page.Conclusion: If perimeter stays the same, the area can be different. For rectangles with the same
Unit 23: Perimeter 93
perimeter, the closer the rectangle is to a square the larger its area.Repeat the activities with 20 squares instead of 12.Make two rectangles so that one of them has a larger perimeter and the smaller area, and the other has the smaller perimeter and the larger area. They record their answers on the centimetre grid page.
Hands-on activity with non-rectanglesStart with a rectangle 3 × 4.Find its perimeter and area.Remove one square but keep the perimeter the same.Now remove another square but increase the perimeter. Can you do it one more time?Make the shape have the largest perimeter you can with the smallest area at the same time.With 9 squares what is the largest perimeter you can make? What is the smallest perimeter you can make?Repeat with other numbers of squares.
Answers
Exercise 1
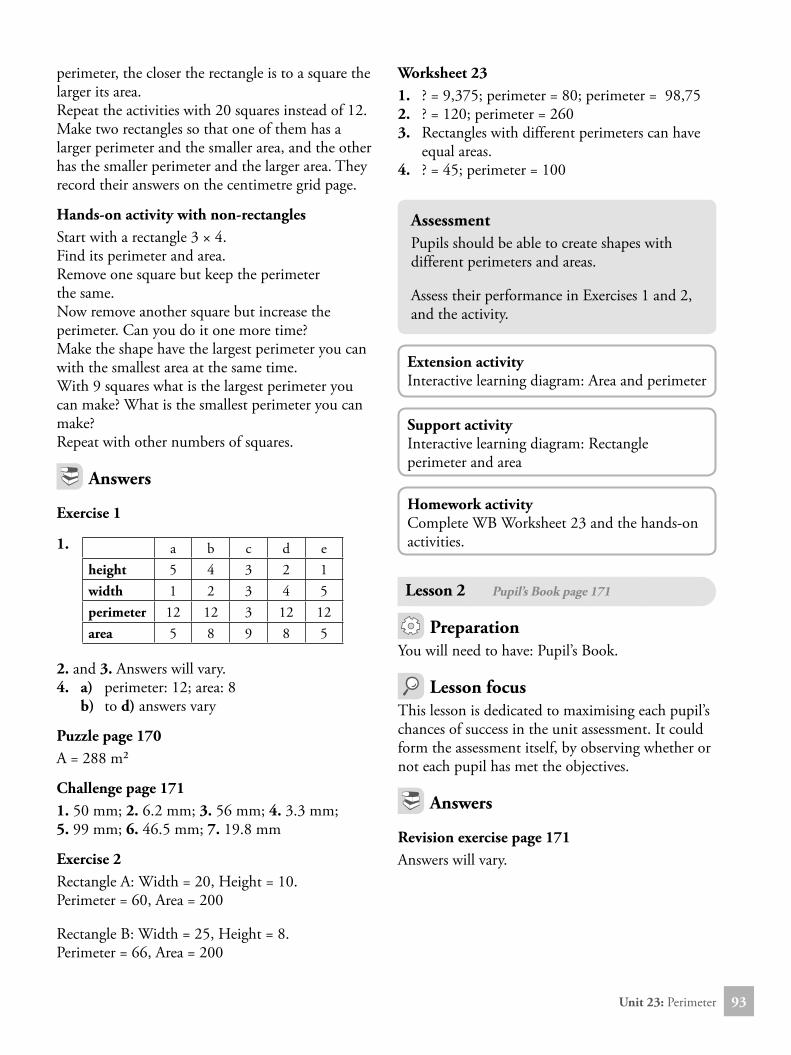
1. a b c d eheight 5 4 3 2 1width 1 2 3 4 5perimeter 12 12 3 12 12area 5 8 9 8 5
2. and 3. Answers will vary.4. a) perimeter: 12; area: 8 b) to d) answers vary
Worksheet 231. ? = 9,375; perimeter = 80; perimeter = 98,752. ? = 120; perimeter = 2603. Rectangles with different perimeters can have
equal areas.4. ? = 45; perimeter = 100
AssessmentPupils should be able to create shapes with different perimeters and areas.
Assess their performance in Exercises 1 and 2, and the activity.
Extension activityInteractive learning diagram: Area and perimeter
Support activityInteractive learning diagram: Rectangle perimeter and area
Homework activityComplete WB Worksheet 23 and the hands-on activities.
Lesson 2 Pupil’s Book page 171
PreparationYou will need to have: Pupil’s Book.
Lesson focusThis lesson is dedicated to maximising each pupil’s chances of success in the unit assessment. It could form the assessment itself, by observing whether or not each pupil has met the objectives.
ObjectivesBy the end of this unit, each pupil should be able to:• Calculate the areas of figures which can be
divided into rectangles and or triangles
• Calculate land areas in hectares
AreaUnit 24
Suggested resourcesplain white paper; sticky tape; sticks to mark the vertices of triangles on grass – three per group; long metric tapes (10 m, 20 m or even 50 m); examples of land areas measured in hectares (ha)
Frequently asked questionsQ What should pupils understand? A Although there is a formula for the area of
triangles and each of the quadrilaterals, instead of just memorising these, pupils should understand where the formulas come from.
Evaluation guidePupils to:1. Find areas of figures which can be divided into
rectangles and triangles.2. Calculate the areas of the given shapes or
figures.3. Calculate given areas in square metres and
convert to hectares.
Lesson 1 Pupil’s Book page 172
PreparationYou will need to have: Pupil’s Book; paper; measuring tape; sticks (or pegs).
Starter activity
Demonstration and practical workShow how you can take a rectangle, draw a diagonal and cut along it. Show that the two
triangles fit on top of each other. They have the same area. So the area of the triangles is half the area of the rectangle from which they came.Pupils repeat the same activity (called Right-angled triangles on page 172 in the PB). They measure the base and the perpendicular height and find the area in square centimetres (m2).
Lesson focus
Paper triangles – group workPupils repeat the other two activities (with acute-angled triangles and obtuse-angled triangles). They measure the base and the perpendicular height and find the area in square centimetres (m2).Because they all come from halving the area of the A4 sheet, they will all have the same area. This is the point on the top of page 173.
Answers
Exercise 11. Practical activity; 2. Answers will vary.3. a) 20 b) 6 c) 4 d) 24. a) 20 b) 6 c) 8 d) 2
Unit 24: Area 95
AssessmentPupils should be able to explain why the area of a triangle is half the base times the perpendicular height.
Assess their performance in Exercise 1.
Extension activityInteractive learning diagram: Area of polygonLet pupils attempt the challenge on page 174.
Challenge page 1741. A = 187 cm2. The shape is divided into 2 rectangles;
1 square and 2 triangles. It could be further divided into 8 triangles.
Support activityInteractive learning diagram: Triangle area
Homework activityComplete Exercise 1.
Lesson 2 Pupil’s Book page 174; Workbook page 41
PreparationYou will need to have: Pupil’s Book; Workbook; paper.
Starter activityDemonstrate how to find the area of the parallelogram, by folding an A4 sheet to a parallelogram.
Lesson focus
Group workGroups of pupils should now find the areas of the rhombus and the kite using the instructions on page 175. To make the rhombus, they fold an A4 sheet in half both ways to make four thicknesses. Then they cut off one triangle that does not include any folds.
To make the kite, use the diagram on page 175. The kite has only one line of symmetry.The important idea is for pupils to realise that the areas of the rhombus and the kite are just the sum of two triangles. This leads to the formulas given.
Outdoor quadrilateral areaUse the teaching note on page 177 of the PB as a practical activity.
AssessmentPupils should be able to find the areas of quadrilaterals and other shapes made from rectangles and triangles.Assess their performance in Exercise 2.
Extension activityInteractive learning diagram: Quadrilateral areasPupils may attempt the puzzle on page 176.
Puzzle page 176(Pupils will use trial and error for these, so each will have different working out.)1. She could use an equilateral triangle with
each side = 4 m She could use a square with each side = 3 m She could use a rectangle with length = 6 m
each and width = 2 m each2. The rectangle would give her the largest
area.
Support activityInteractive learning diagram: Some areas
Homework activityComplete WB Worksheet 24, Questions 1 to 4.
Lesson 3 Pupil’s Book page 177; Workbook page 42
PreparationYou will need to have: Pupil’s Book; Workbook; newspaper articles showing land area.
Starter activityDiscuss the use of a larger area unit – the hectare. Provide examples of this from newspapers etc.
Lesson focus
Outdoor measurement On a suitable space pupils measure out a square 100 m × 100 m using long metric tapes.If such an area is not available, find an equivalent area (if possible). Examples are 50 m × 200 m or 20 m × 500 m.If these are far too big for your school space, choose a smaller square. For example, 50 m × 100 m is half of a hectare (0.5 hectare) or 50 m × 50 m is a quarter of a hectare (0.25 hectare).The important message is that 1 hectare = 10 000 square metres.
Answers
Exercise 31. Area = 5 hectares.2. Square with each side being 100 m Rectangle with one pair of sides being 20 m
and the other pair being 500 m Rectangle with one pair of sides being 10 m
and the other pair being 1000 m Rectangle with one pair of sides being 1 m and
the other pair being 10 000 m 3. 400 m4. base = 200 m height = 400 m base = 100 m height = 800 m base = 10 m height = 8000 m base = 1 m height = 80 000 m5. 24 hectares
Worksheet 245 a) Park: 1,65725 ha
b) Play garden: 0,068 ha = 680 m2
c) Park without play garden: 15 847,5 m2
d) Cost = N 1 505 512,506. 2,595 ha7. Answers will vary.
AssessmentPupils should be able to say what area is meant by 1 hectare.
Assess their performance in the outdoor activity and Exercise 3.
Extension activityInteractive learning diagram: Land areas parts 2 and 3
Support activityInteractive learning diagram: Land areas part 1
Homework activityComplete WB Worksheet 24 Questions 5 to 7.
Lesson 4 Pupil’s Book page 178
PreparationYou will need to have: Pupil’s Book.
Lesson focusThis lesson is dedicated to maximising each pupil’s chances of success in the unit assessment. It could form the assessment itself, by observing whether or not each pupil has met the objectives.
Revision exercise page 1781. a) 50 cm2; b) 600 cm2; c) 1 600 cm2; d) 18 cm2
2. a) 8 cm; b) 6 cm; c) 4 cm; d) 2 cm3. a) 4 cm; b) 6 cm; c) 8 cm; d) 2 cm4. height = 8, base = 6 (example)5.–6. To be done in class, pupils’ work will vary.
ObjectivesBy the end of this unit, each pupil should be able to:• Use standard units for capacity• Solve word problems involving litres
• Calculate volume of prisms, cylinders and spheres
• Solve some quantitative aptitude problems on volumes of prisms, cylinders and spheres.
Volume and capacityUnit 25
Suggested resourcesmeasuring jugs for water – at least up to 1 litre (one for each group, maybe brought from home by pupils); water supply – maybe a bucket If water is a problem you may use sand, dried maize seeds or rice); rice, grain. seeds to measure capacity; many empty watertight containers, possibly brought from home by pupils; measuring tape; boxes; set of unit cubes for a visible demonstration (24); copies of net of triangular prism – page 20; copies of net of rhombic prism – page 20; scissors; sticky tape; A4 paper, drink cans and other cylinders; small ball or orange, can of water and measuring cylinder
Common errors that pupils makePupils confuse volume and capacity. This is not helped when we say volume, and use litres. A capacity is used when we have a container. Only containers have capacity. Volume is the space taken up by something, including the liquid in the container.
Evaluation guidePupils to:1. Calculate volumes of given triangular prisms,
cylinders and spheres.2. Find the capacities of common containers.3. Solve word problems on capacities.
Lesson 1 Pupil’s Book page 179
PreparationYou will need to have: Pupil’s Book; measuring jugs; water; empty watertight containers.
Starter activityDiscuss the volume of solids, and capacity in containers. Discuss the units of capacity (on pages 179 to 181 of the PB) and conversion between them.
Lesson focus
Practical workOrganise pupils into groups. They will use water, measuring jugs and empty watertight containers to work on Exercise 1.
Answers
Exercise 1To be completed in class, answers will vary
AssessmentPupils should be able to understand capacity, measure it and convert cuboid volumes to capacities.
Support activityPupils should look at home at any cooking utensils. Cups and measuring spoons and jugs will be marked in millilitres and litres. This is because they are containers. Some recipes use units of capacity, such as ‘100 ml of water’, or ‘1 tbsp (tablespoon) of flour’.
Lesson 2 Pupil’s Book page 180; Workbook page 44
PreparationYou will need to have: Pupil’s Book; Workbook; measuring tape; boxes.
Starter activityDemonstrate that the volume of the cuboid is the area of its base multiplied by its height.Make a layer of cubes 3 × 2, 1 unit high for the base. The volume of this cuboid is simple 2 × 3 × 1.Add another layer: the volume is 2 × 3 × 2.Add another layer: the volume is 2 × 3 × 3.Add another layer: the volume is 2 × 3 × 4.The volume is area of base × height.
Lesson focusPractical workGroups of pupils work on these tasks.1. Measure cuboid containers (e.g. boxes) to find
their volumes.2. Measure the dimensions of the classroom, or
other large volume, and find its capacity. Use suitable units. Note a hollow 1 cubic metre (1 m3) has a capacity of 1 kilolitre (1 000 litre).
AnswersChallenge page 181Volume is the measure of the space taken up by something whereas capacity is the amount a container can hold.
Starter activityMake a triangular prism from a net. Use it to show the pupils a prism that is not rectangular. Discuss the general formula: Volume = area of base × height.
Lesson focus
Practical workGroups of pupils work on these tasks.1. Make a triangular prism from its net and find
its volume.2. Make a rhombic prism from its net and find its
volume.
Answers
Exercise 31. a) 64 cm3; b) 4 096 cm3; c) 614.125 cm3
2. a) 105 cm3; b) 1 233.75 cm3
3. 420 cm3; 4. 300 m3 and 300 kilolitres
Worksheet 251. 600 cm3
AssessmentPupils should be able to measure and calculate the volume of a non-rectangular prism.
Assess their performance in hands-on activities and Exercise 3.
Support activityInteractive learning diagram: Prisms
PreparationYou will need to have: Pupil’s Book; Workbook; rice, grain, seeds for measurement; scissors; sticky tape; A4 paper; grid paper; cold drink cans and other cylinders.
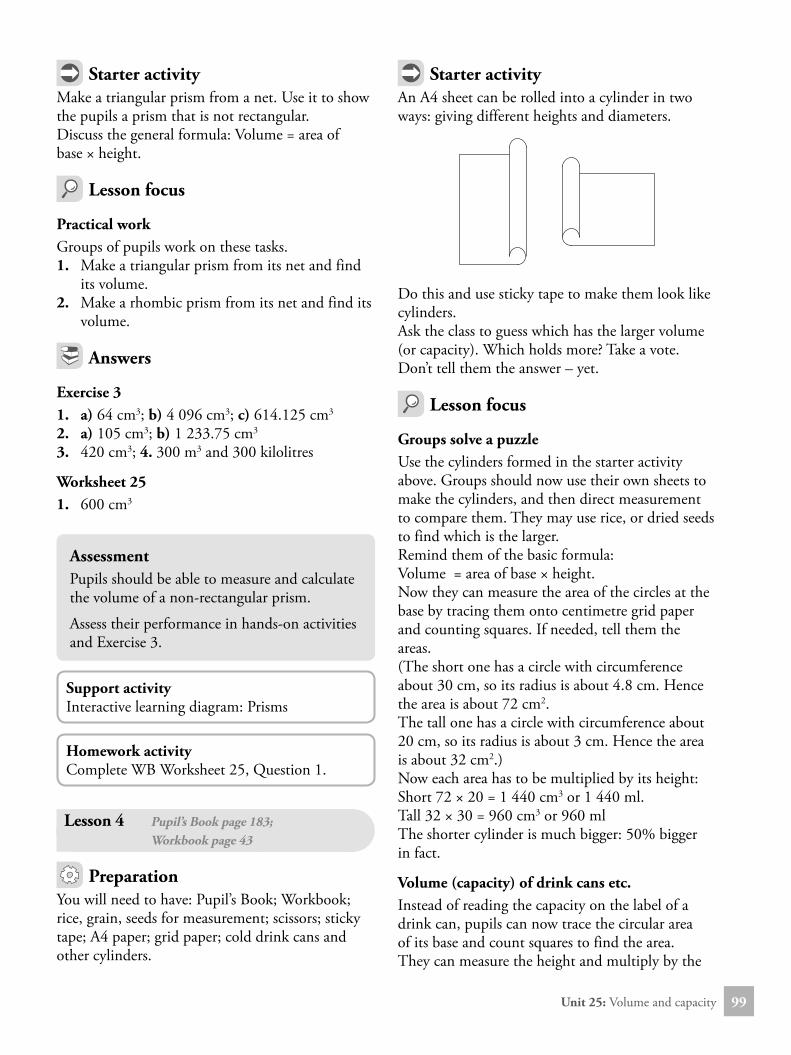
Starter activityAn A4 sheet can be rolled into a cylinder in two ways: giving different heights and diameters.
Do this and use sticky tape to make them look like cylinders.Ask the class to guess which has the larger volume (or capacity). Which holds more? Take a vote. Don’t tell them the answer – yet.
Lesson focus
Groups solve a puzzleUse the cylinders formed in the starter activity above. Groups should now use their own sheets to make the cylinders, and then direct measurement to compare them. They may use rice, or dried seeds to find which is the larger.Remind them of the basic formula: Volume = area of base × height.Now they can measure the area of the circles at the base by tracing them onto centimetre grid paper and counting squares. If needed, tell them the areas.(The short one has a circle with circumference about 30 cm, so its radius is about 4.8 cm. Hence the area is about 72 cm2.The tall one has a circle with circumference about 20 cm, so its radius is about 3 cm. Hence the area is about 32 cm2.)Now each area has to be multiplied by its height:Short 72 × 20 = 1 440 cm3 or 1 440 ml.Tall 32 × 30 = 960 cm3 or 960 mlThe shorter cylinder is much bigger: 50% bigger in fact.
Volume (capacity) of drink cans etc.Instead of reading the capacity on the label of a drink can, pupils can now trace the circular area of its base and count squares to find the area. They can measure the height and multiply by the
PreparationYou will need to have: Pupil’s Book; Workbook; scissors; sticky tape; A4 paper; cold drink cans and other cylinders; measuring jug; watertight containers; water; small ball or orange.
Starter activityA sphere is the mathematical name for a ball-shape. Pupils can name some objects that are spheres or parts of spheres.
Lesson focus
Practical demonstration The teacher can directly measure the volume of a sphere (or any other object) by displacement of water.Here is how it is done:You need a small ball, orange or other small spherical object.You need a container that can be completely filled with water. This is placed inside another container that can catch any water that comes out of the smaller container as the ball goes into it.
Then you carefully push the sphere under the water, displacing water as you do it. Do not displace more than the volume of the sphere.Pour the displaced water into the measuring jug. This will tell you the volume of the sphere. It will use millilitres, and these are also cm3.
Introduce the formulaExplain the use of the formula by using the example on page 184.Then pupils should use the formula with the sphere used above. First we find the diameter.
Place the ball between two books. Measure the distance between the books. This is the diameter. The formula uses the radius, so we must divide the diameter by 2. Use this number – instead of 2 – for the radius in the formula as in the example.Check that it is at least close to the answer measured by displacement of water.
AnswersExercise 51. a) 36 22 __ 7 cm3 b) 440 ___ 21 cm3 c) 352 ___ 21
AssessmentPupils should be able to understand what is meant by ‘the volume of a sphere’, and compute it given the formula and the radius.
Assess their performance in Exercise 5.
Extension activityFind the volume of one drop of water. Get a slowly dripping tap and count the number of drops that make up an amount you can measure. Divide that volume by the number of drops to find the volume of one drop. (It is about one tenth of a millilitre.)
Homework activityComplete WB Worksheet 25, Questions 4 and 5.
Lesson 6 Pupil’s Book page 185
PreparationYou will need to have: Pupil’s Book.
Lesson focusThis lesson is dedicated to maximising each pupil’s chances of success in the unit assessment. It could form the assessment itself, by observing whether or not each pupil has met the objectives.
Revision exercise page 1851. a) 0.4 ℓ b) 0.8 ℓ c) 0.15 ℓ2. 4 × 5 = 20 bottles3. Height = 2, width = 4, depth = 9 (example)4. a) 100 cm2; b) 100 × 3 000 = 300 000 cm3
Unit 26: Speed and athletics time102
ObjectivesBy the end of this unit, each pupil should be able to:• Calculate average speed
• Solve quantitative aptitude problems on time and speed
• Estimate time to complete races.
Speed and athletics timeUnit 26
Suggested resourcesmeasuring tape (10 m, 20 m or 50 m); stopwatch
Frequently asked questionsQ What are the important concepts?A There are three relationships that are closely
related: distance = time × speed distance _____ time = speed distance _____
speed = time
Many people remember only the first. They can then divide distance by time to get speed, and divide distance by speed to get time.
Evaluation guidePupils to:1. Calculate speed when time and distance
are given.2. Estimate the time a person will take to run
100 m.
Lesson 1 Pupil’s Book page 186; Workbook page 45
PreparationYou will need to have: Pupil’s Book; Workbook; measuring tape (10 m, 20 m or 50 m); stopwatch.
Starter activity
Outdoor activity In this activity we measure a speed using a tape for the distance, and a stopwatch for the time.Take the pupils outdoors.
Ask a pupil to walk steadily for five seconds, timed using a watch.Measure the distance. The speed will be distance divided by 5, the number of seconds, and it will be in metres per second.Ask these questions, which use proportion: If the pupil walked for 10 seconds, how far would he/she go? How far in a minute? (Multiply by 60)How far in an hour? (Multiply by 60.) Then convert the distance (metres) to kilometres by dividing by 1 000. You now have the speed in kilometres per hour – km/h.)
Lesson focus
Practical speed measurementIf possible, groups of pupils should now repeat the activity. They will all need their own tapes and watches.Alternatively, measure a 10-metre length. They can then walk or run this distance, and find their speeds by dividing 10 by the number of seconds. (This can be done on a calculator.) They can now find the distance they would go in 10 seconds, 1 minute (60 seconds), and 1 hour (60 minutes). They convert this to km/h.
2. a) 1:35.8 b) 1:44.93. a) 2.9 min/km b) 3.2 min/km4. 52 sec; 5. 54 sec; 6. 1:48.1; 7. 3:30:59; 8. 4.4 min/km
AssessmentPupils should be able to calculate speed in metres per second and convert this to kilometres per hour.
Assess their performance in practical activities and Exercises 1 and 2.
Extension activityInteractive learning diagram: Distance, time, speed
Speed in metres per second can be converted to kilometres per hour by multiplying by 3.6. This is a good example of the need for multiplying by decimals.
Support activityInteractive learning diagram: Dist-time-speed
Homework activityComplete WB Worksheet 26, Questions 1 to 8.
Lesson 2 Pupil’s Book page 188; Workbook page 47
PreparationYou will need to have: Pupil’s Book; Workbook.
Starter activityDiscuss the fastest runners in the world. All the names on page 188 are African, or Afro-American (Michael Johnson). Other records held by Africans are: Men: For every distance from 800 m to the marathon the world record is held by an African.Women: 5 km, 15 km, one hour, 20 km to 30 km.
Lesson focusFor Exercise 3 (questions 3 and 4) pupils should use a calculator.Pupils might like to find the speeds (in km/h) of different record races.
Lesson focusThis lesson is dedicated to maximising each pupil’s chances of success in the unit assessment. It could form the assessment itself, by observing whether or not each pupil has met the objectives.
Answers
Revision exercise page 1891. 50 km/h2. 1.5 hours3. a) 60 km b) 3 hours c) 20 km/h4. 14.79 km/h5. a) 6.6 m/s b) 6.34 m/s
ObjectivesBy the end of this unit, each pupil should be able to:• Identify the basic properties of plane figures such as a rectangle and a square.
Shapes with right anglesUnit 27
Suggested resourcesA4 paper
Frequently asked questionsQ What do pupils need to know about symmetry?A The two types of symmetry are a simple way to
understand many of the properties of shapes. Rectangles have two perpendicular lines of symmetry and half-turn symmetry. This shows the properties of equal opposite sides and angles. Squares have four lines of symmetry, and quarter-turn symmetry (because they look the same after a quarter turn). This shows the properties of all equal sides and angles.
Evaluation guidePupils to:1. State properties of a square and a rectangle.
Lesson 1 Pupil’s Book page 190; Workbook page 50
PreparationYou will need to have: Pupil’s Book; Workbook; paper; playing cards.
Starter activity
Symmetry by folding and tearing paperPupils fold a sheet of paper in half. The two halves will match. They can do this in two ways, thus showing that a rectangle has two lines of symmetry. Ask them to fold the paper along a diagonal, and see that the two halves do not match, so the diagonal is not a line of symmetry.
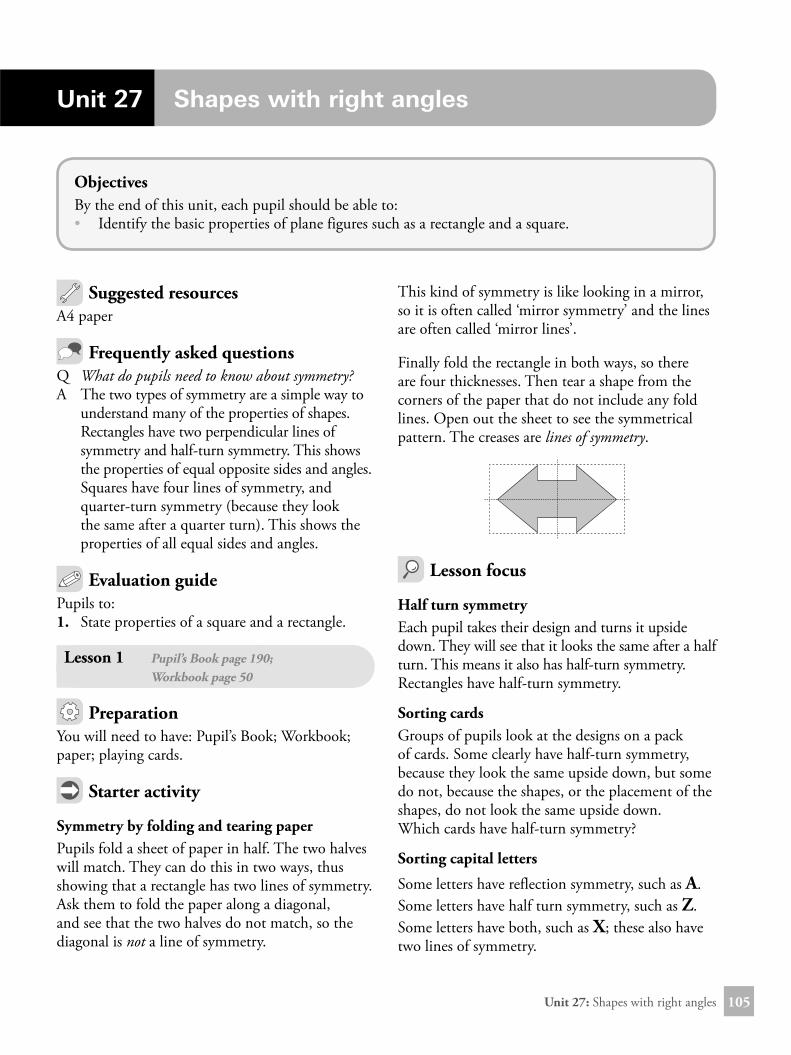
This kind of symmetry is like looking in a mirror, so it is often called ‘mirror symmetry’ and the lines are often called ‘mirror lines’.
Finally fold the rectangle in both ways, so there are four thicknesses. Then tear a shape from the corners of the paper that do not include any fold lines. Open out the sheet to see the symmetrical pattern. The creases are lines of symmetry.
Lesson focus
Half turn symmetryEach pupil takes their design and turns it upside down. They will see that it looks the same after a half turn. This means it also has half-turn symmetry. Rectangles have half-turn symmetry.
Sorting cardsGroups of pupils look at the designs on a pack of cards. Some clearly have half-turn symmetry, because they look the same upside down, but some do not, because the shapes, or the placement of the shapes, do not look the same upside down. Which cards have half-turn symmetry?
Sorting capital letters
Some letters have reflection symmetry, such as A.Some letters have half turn symmetry, such as Z.Some letters have both, such as X; these also have two lines of symmetry.
Unit 27: Shapes with right angles106
Some letters have no symmetry, such as F.Groups of pupils decide which letters fit into each category.
Answers
Worksheet 276.
1 line of symmetry 1 line of symmetry
AssessmentPupils should be able to use symmetry to find properties of rectangles and the addition properties of squares.
Assess their performance in hands-on activities.
Extension activityInteractive learning diagram: Rotating, Two reflections
Support activityInteractive learning diagram: Reflection symmetry, Turn symmetry
PreparationYou will need to have: Pupil’s Book; Workbook; paper.
Starter activity
Symmetry of squaresShow pupils how to make a square from a rectangle.
Fold one corner of a rectangular piece of paper over to meet the longer side. This will make the two sides equal. Cut off the extra paper. How many lines of symmetry does a square have? (There are four; this time the diagonals are also mirror lines.)After what fraction of a turn does the square ‘look the same’? (A quarter turn or 90°?)
Lesson focus
Properties of rectangles Groups of pupils use sheets of A4 paper and discuss the symmetry of rectangles. To help them to recognise the facts below, ask “Because of the symmetry, which sides and which angles of the rectangle are equal?”
a b
c d
• Opposite sides are equal (due to reflection symmetry and also half-turn symmetry).
• Adjacent angles are equal (due to reflection symmetry). a = b, c = d, a = d, b = c
• Opposite angles are equal (due to half turn symmetry). a = c, b = d
Properties of squares Groups of pupils use sheets of A4 paper to make squares and discuss their symmetry. To help them to recognise the facts below, ask “Because of the symmetry, which sides and which angles of the square are equal?”
a b
c d
• All sides are equal (due to quarter-turn symmetry)• All angles are equal (due to quarter turn
Lesson focusThis lesson is dedicated to maximising each pupil’s chances of success in the unit assessment. It could form the assessment itself, by observing whether or not each pupil has met the objectives.
Answers
Revision exercise page 1921. a) Four lines of symmetry, has half turn
symmetry and quarter turn symmetry b) Has only one line of symmetry, down the
middle. c) Two lines of symmetry and has half turn
ObjectivesBy the end of this unit, each pupil should be able to:• Measure angles in a plane
• Describe an angle as an amount of turning• Measure angles in degrees• Draw angles using a protractor.
AnglesUnit 28
Suggested resourcesrulers; cardboard clock with movable hands; demonstration protractor; protractors – pupils should have their own
Frequently asked questionsQ What should pupils understand?A Many pupils get confused about the difference
between what an angle is (two arms meeting at a vertex) and what it measures (the amount of turning from one arm to the other). Be careful in your language, particularly at this stage.
Evaluation guidePupils to:1. Measure given angles from a diagram.2. Draw various plane shapes and measure
resulting angles to the nearest degree.3. Identify the edges of vertices and faces of three
dimensional shapes.
Lesson 1 Pupil’s Book page 193
PreparationYou will need to have: Pupil’s Book; cardboard clock with movable hands.
Starter activityTalk about things that turn. For example a wheel turns; it has a centre (or vertex) and the arms of the angle are the spokes in the wheel.Have the pupils stand and go through each of the activities in Exercise 1 with them.
Lesson focusUse a large paper/cardboard clock – preferably with a moveable minute hand, to introduce the idea of relating number of minutes to fractions of a turn of the minute hand.Allow pupils to work in groups to complete Exercise 2.
Answers
Exercise 21. 3 _ 4 of a whole turn. This is 270°2.
Starter activityPupils can turn the cover of their book to show the different sizes of angles: acute, right, obtuse, straight and reflex.
Lesson focus
Drawing trianglesPupils should draw these triangles, or where it is not possible, they should say so.a triangle with three acute anglesb triangle with only two acute anglesc triangle with one right-angled triangle with two right anglese triangle with one obtuse anglef triangle with two obtuse anglesg triangle with one reflex angle.
Sum of the angles in any triangleEach pupil should draw a triangle. As far as possible they should all be different.
Pupils should mark the angles of their triangle with dots. Each pupil tears off two of the angles of their triangle, and puts them next to the third angle.They will all find that they make a straight angle of 180°. The angle sum for any triangle is 180°.This will help them explain why some triangles (d, f, g) above are not possible.
Answers
Exercise 31. a) Purple: AVN and VNA Red: OHT and HTO b) Purple: VAN Red: TOH2. Answers will vary.
AssessmentPupils should be able to draw any of the five types of angles.
Assess their performance in Exercise 3 and hands-on activities.
Support activityInteractive learning diagram: Types of triangles
Lesson 3 Pupil’s Book page 196; Workbook page 51
PreparationYou will need to have: Pupil’s Book; Workbook; protractor; ruler.
Starter activityShow pupils how to use a protractor. The best method is this:Firstly, decide whether the angle is acute or obtuse, and estimate the number of degrees.Secondly, put the zero line on top of one arm of the angle, then count around the edge until you reach the other arm. Read the correct number, either less than 90° or over 90°. See the diagram on page 197.If you are measuring, you have the answer. If you are drawing, put a small mark there and draw the second arm of the angle.
Lesson focusPupils use their ruler and protractor to answer Exercise 4. The angles in the shapes they draw must be large enough for them to use the protractor successfully. They should be at least as long as the radius of the protractor’s semicircle. If the shape is not large enough – as in the revision exercise – they may lightly draw the extensions of the sides until they are long enough.This will reinforce a basic idea from lesson 2 that the angle sum of a triangle is 180°. However you should expect some measurement errors.
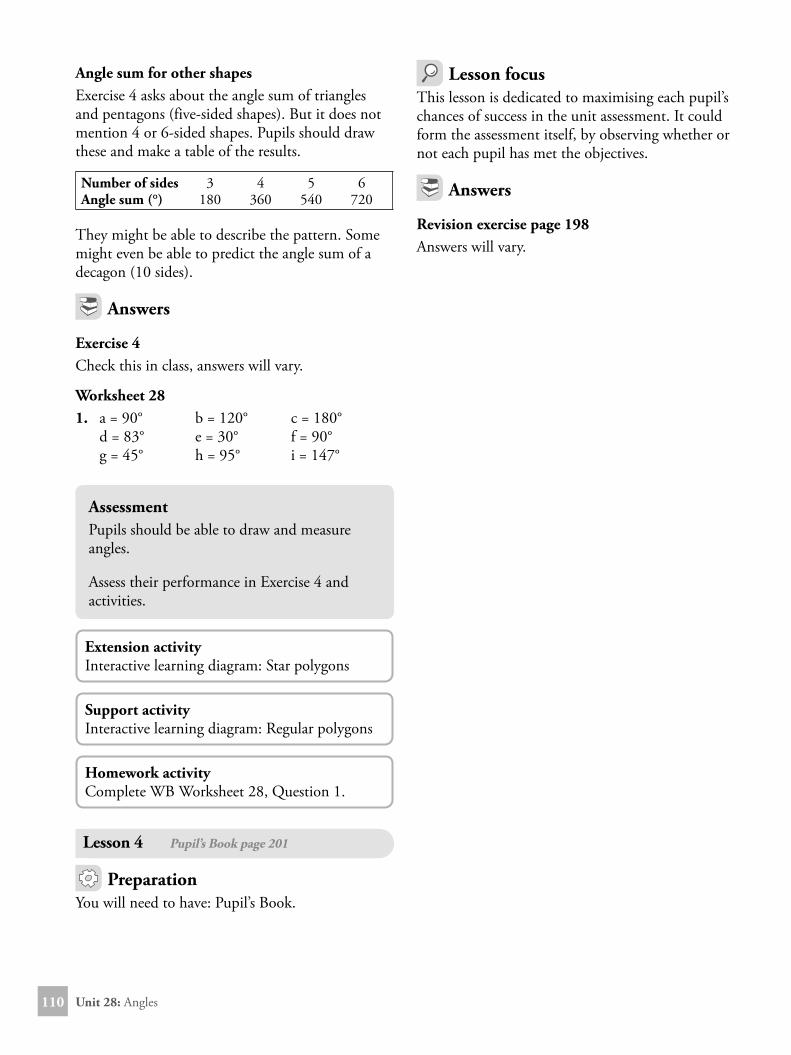
Angle sum for other shapesExercise 4 asks about the angle sum of triangles and pentagons (five-sided shapes). But it does not mention 4 or 6-sided shapes. Pupils should draw these and make a table of the results.
Number of sides 3 4 5 6Angle sum (°) 180 360 540 720
They might be able to describe the pattern. Some might even be able to predict the angle sum of a decagon (10 sides).
Answers
Exercise 4Check this in class, answers will vary.
Worksheet 281. a = 90° b = 120° c = 180° d = 83° e = 30° f = 90° g = 45° h = 95° i = 147°
AssessmentPupils should be able to draw and measure angles.
Assess their performance in Exercise 4 and activities.
Extension activityInteractive learning diagram: Star polygons
Support activityInteractive learning diagram: Regular polygons
Lesson focusThis lesson is dedicated to maximising each pupil’s chances of success in the unit assessment. It could form the assessment itself, by observing whether or not each pupil has met the objectives.
Frequently asked questionsQ What do pupils need to understand?A Estimation, unit conversion and indirect
measurement (with isosceles triangles and ratios) are used in this unit.
Q What mathematical skills are needed?A Pupils should improve their estimation, and
measurement skills.
Evaluation guidePupils to:1. Measure and obtain the dimensions of
classroom, house, play grounds, halls etc. as a project.
Lesson 1 Pupil’s Book page 199
PreparationYou will need to have: Pupil’s Book; number slide; chalk; stones; measuring tape.
Starter activityDiscuss the units of length. Remind them of the number slide for multiplication or division by 10, 100, 1000. Discuss conversion of the units.
÷10
×10
÷100
×100
÷1 000
×1 000
mm cm m km
Lesson focus
Estimate and measureEach group draws a chalk line on the ground. They then toss a stone some distance from the line, say 2 to 4 metres away.Each person estimates the distance of the stone from the line – for example 3.45 m.Two pupils in the group measure the distance and tell the others. Each person works out the size of their error – the difference between their estimate and the real distance.After doing this several times, the person with the lowest total error is the winner. Pupils should find that as their estimates get better so their errors get smaller.Groups work on Exercise 1. The teaching note on the bottom of page 199 has more. ideas if you have time.
Answers
Exercise 1Class activities.
AssessmentPupils should be able to estimate distances and convert length units.
Assess their performance in hands-on activities and Exercise 1.
Support activityInteractive learning diagram: Length conversions
Lesson 2 Pupil’s Book page 200; Workbook page 53
PreparationYou will need to have: Pupil’s Book; Workbook; measuring tapes; rulers.
Starter activityGo over the way each of the two activities (Exercises 2 and 3) work. Exercise 2 involves isosceles triangles of different sizes.Exercise 3 involves a ratio.
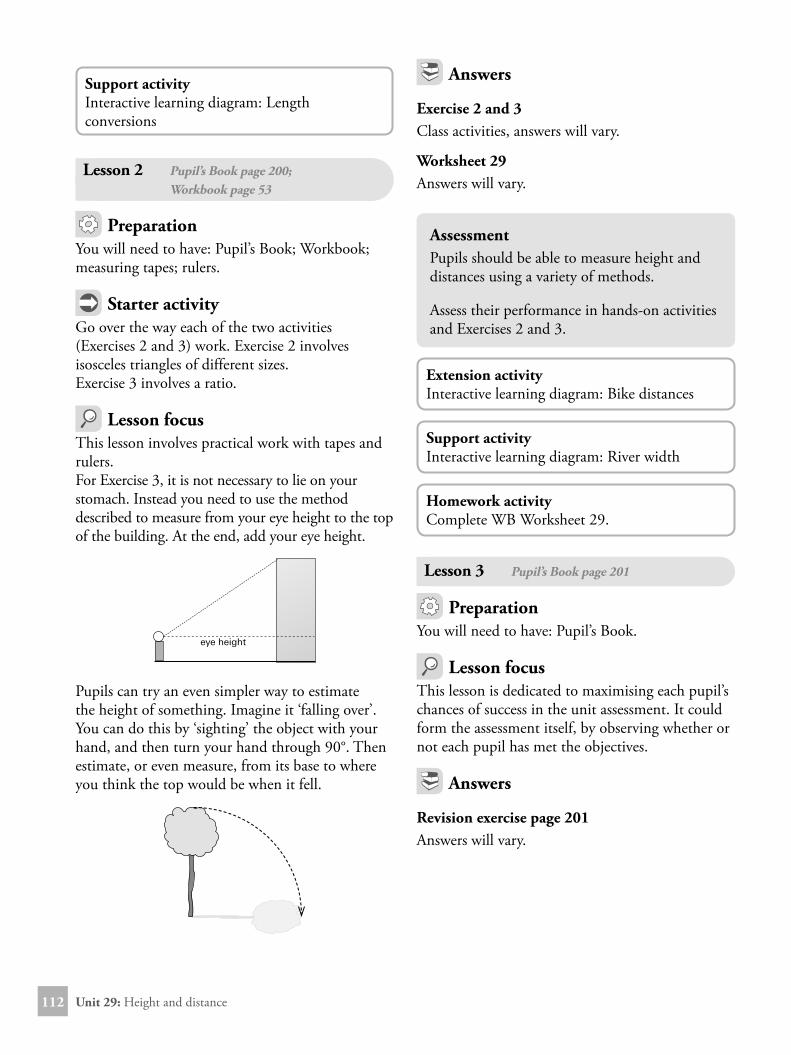
Lesson focusThis lesson involves practical work with tapes and rulers. For Exercise 3, it is not necessary to lie on your stomach. Instead you need to use the method described to measure from your eye height to the top of the building. At the end, add your eye height.
eye height
Pupils can try an even simpler way to estimate the height of something. Imagine it ‘falling over’. You can do this by ‘sighting’ the object with your hand, and then turn your hand through 90°. Then estimate, or even measure, from its base to where you think the top would be when it fell.
Answers
Exercise 2 and 3Class activities, answers will vary.
Worksheet 29Answers will vary.
AssessmentPupils should be able to measure height and distances using a variety of methods.
Assess their performance in hands-on activities and Exercises 2 and 3.
Extension activityInteractive learning diagram: Bike distances
Support activityInteractive learning diagram: River width
Homework activityComplete WB Worksheet 29.
Lesson 3 Pupil’s Book page 201
PreparationYou will need to have: Pupil’s Book.
Lesson focusThis lesson is dedicated to maximising each pupil’s chances of success in the unit assessment. It could form the assessment itself, by observing whether or not each pupil has met the objectives.
ObjectivesBy the end of this unit, each pupil should be able to:• Solve more problems on two-dimensional
and three dimensional shapes
• Identify vertices, faces and edges of three dimensional shapes
• Solve problems on the volumes of cylinders.
Polygons Unit 30
Suggested resourcesA4 paper; tangram puzzle sheets; three-piece puzzles; skewers (or match-sticks or toothpicks) and clay (or equivalent); sheet of triangles and squares; scissors and sticky tape; cans and other cylinders
Frequently asked questionsQ This unit includes both 2D and 3D shapes. What
is the D?A The D stands for dimension. A line has only
one dimension, but a square or any flat shape has two dimensions, often called width and length. The third dimension is height and is required for solid objects. Of course the flat faces of 3D shapes (polyhedra) can be thought of as 2D and the edges of a solid shape are just 1D.
Evaluation guidePupils to complete a chart to indicate:1. Number of lines of symmetry.2. Number of sides.3. Number of angles contained in given shape.
Lesson 1 Pupil’s Book page 202; Workbook page 49
PreparationYou will need to have: Pupil’s Book; Workbook; A4 paper.
Starter activityDraw examples of different types of triangles. Discuss their symmetry.
Lesson focus
Two-way classification of trianglesPupils try to fill all the cells in this table. They explain why it cannot be done.
(Equilateral triangles have only 60° angles. They are acute-angled, but cannot be right-angled or obtuse-angled.)
Fold equilateral triangle from A4Use these steps to fold a rectangle of paper into an equilateral triangle.• Fold the sheet in half vertically. Crease the
paper and open it out. This will be a line of symmetry of the triangle. The shorter side will be the base of the triangle.
• Now fold one base corner over so that it touches the crease, and the new crease also goes through the other base corner. (The new crease will also be a line of symmetry.) The top point will be the top of the triangle.
Use a ruler to draw the sides of the equilateral triangle to the bottom corners of the sheet. Cut it out.
Unit 30: Polygons 114
Pupils can now fold the lines of symmetry, and check that all the sides and angles are equal.
Answers
Puzzle 1 page 203This is a trick question. You cannot have one side equal, because what is it equal to?
Puzzle 2 page 203An equilateral triangle is dependent on the angle size as that depicts the length of the sides; therefore there is only one type of equilateral triangle.
Exercise 11. 2.
3. 4.
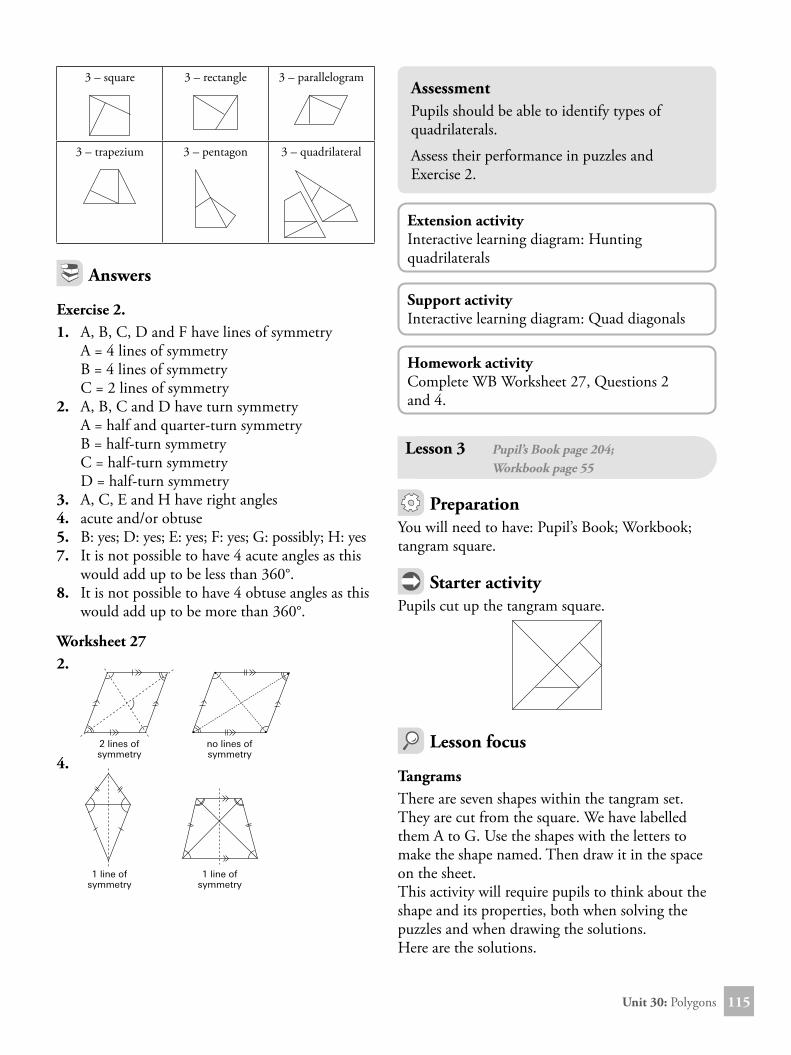
Worksheet 273.
60° 60°
60°
3 lines of symmetry
1 line of symmetry
AssessmentPupils should be able to sort triangles by number of equal sides or the size of their largest angle.
Assess their performance in hands-on activities and Exercise 1.
PreparationYou will need to have: Pupil’s Book; Workbook; three-piece puzzle sheet.
Starter activityPupils cut out the three shapes from the Three-piece puzzle sheet.
Lesson focus
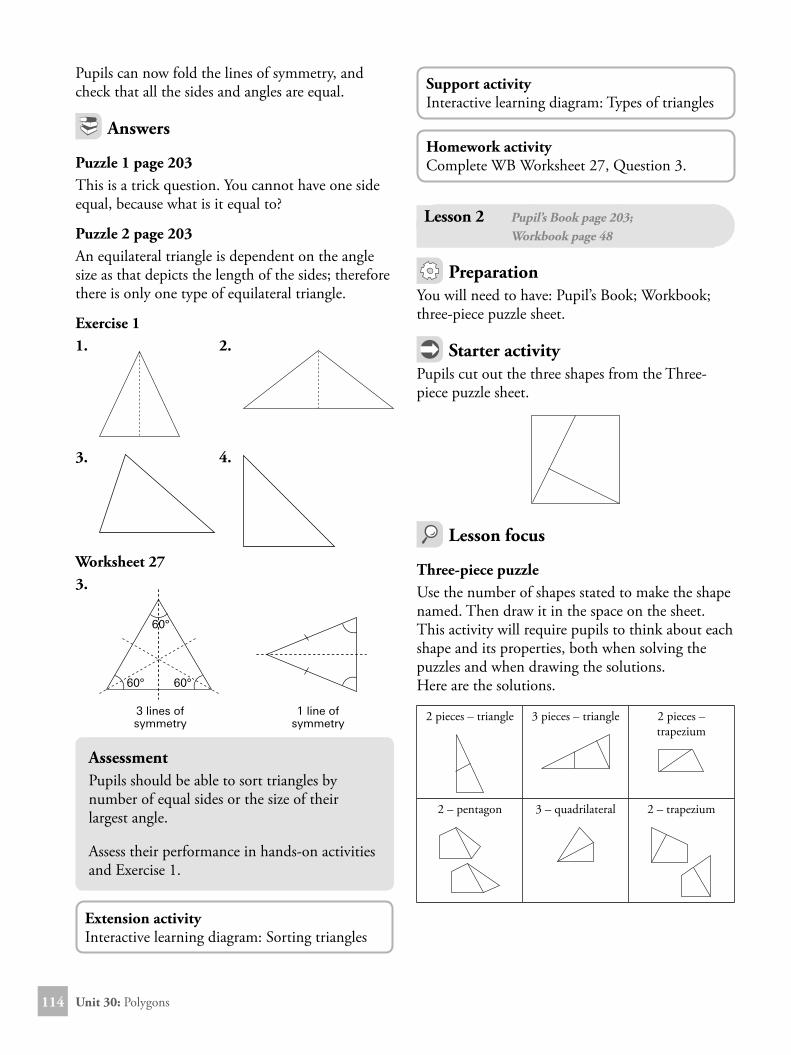
Three-piece puzzle Use the number of shapes stated to make the shape named. Then draw it in the space on the sheet.This activity will require pupils to think about each shape and its properties, both when solving the puzzles and when drawing the solutions.Here are the solutions.
Exercise 2.1. A, B, C, D and F have lines of symmetry A = 4 lines of symmetry B = 4 lines of symmetry C = 2 lines of symmetry2. A, B, C and D have turn symmetry A = half and quarter-turn symmetry B = half-turn symmetry C = half-turn symmetry D = half-turn symmetry3. A, C, E and H have right angles4. acute and/or obtuse5. B: yes; D: yes; E: yes; F: yes; G: possibly; H: yes7. It is not possible to have 4 acute angles as this
would add up to be less than 360°.8. It is not possible to have 4 obtuse angles as this
would add up to be more than 360°.
Worksheet 272.
2 lines of symmetry
no lines of symmetry
4.
1 line of symmetry
1 line of symmetry
AssessmentPupils should be able to identify types of quadrilaterals.
Assess their performance in puzzles and Exercise 2.
Support activityInteractive learning diagram: Quad diagonals
Homework activityComplete WB Worksheet 27, Questions 2 and 4.
Lesson 3 Pupil’s Book page 204; Workbook page 55
PreparationYou will need to have: Pupil’s Book; Workbook; tangram square.
Starter activityPupils cut up the tangram square.
Lesson focus
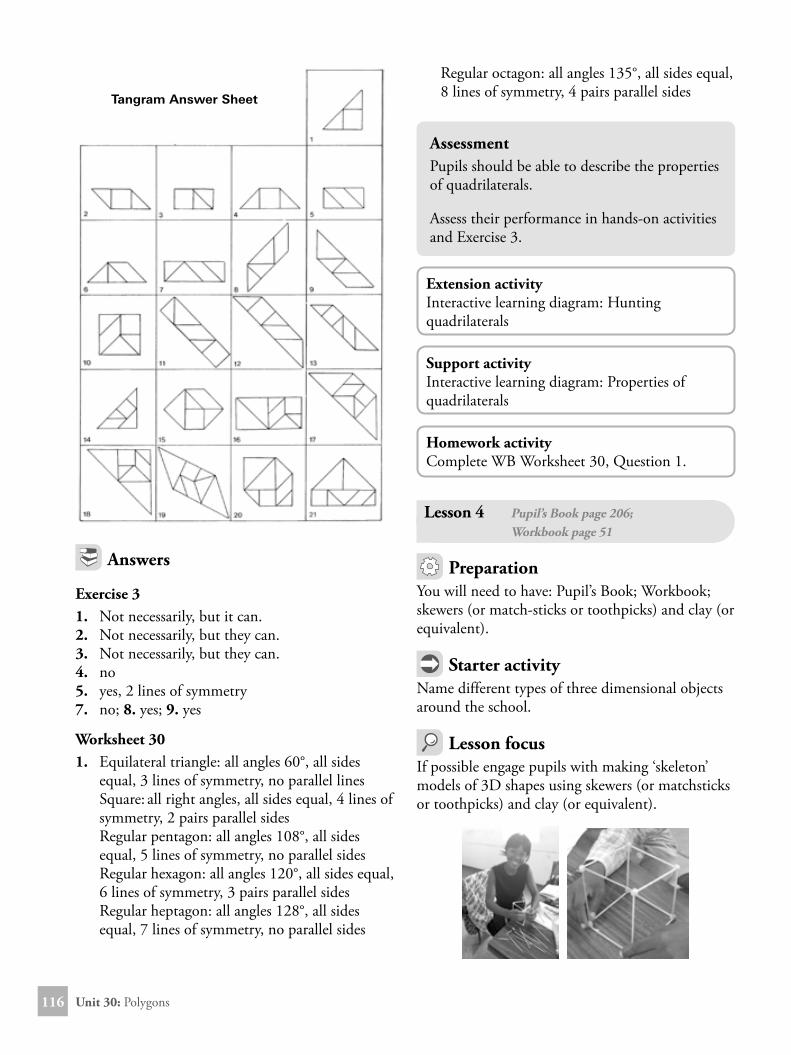
Tangrams There are seven shapes within the tangram set. They are cut from the square. We have labelled them A to G. Use the shapes with the letters to make the shape named. Then draw it in the space on the sheet.This activity will require pupils to think about the shape and its properties, both when solving the puzzles and when drawing the solutions.Here are the solutions.
Exercise 31. Not necessarily, but it can.2. Not necessarily, but they can.3. Not necessarily, but they can.4. no5. yes, 2 lines of symmetry7. no; 8. yes; 9. yes
Worksheet 301. Equilateral triangle: all angles 60°, all sides
equal, 3 lines of symmetry, no parallel lines Square: all right angles, all sides equal, 4 lines of symmetry, 2 pairs parallel sides Regular pentagon: all angles 108°, all sides equal, 5 lines of symmetry, no parallel sides Regular hexagon: all angles 120°, all sides equal, 6 lines of symmetry, 3 pairs parallel sides Regular heptagon: all angles 128°, all sides equal, 7 lines of symmetry, no parallel sides
Regular octagon: all angles 135°, all sides equal, 8 lines of symmetry, 4 pairs parallel sides
AssessmentPupils should be able to describe the properties of quadrilaterals.
Assess their performance in hands-on activities and Exercise 3.
PreparationYou will need to have: Pupil’s Book; Workbook; skewers (or match-sticks or toothpicks) and clay (or equivalent).
Starter activityName different types of three dimensional objects around the school.
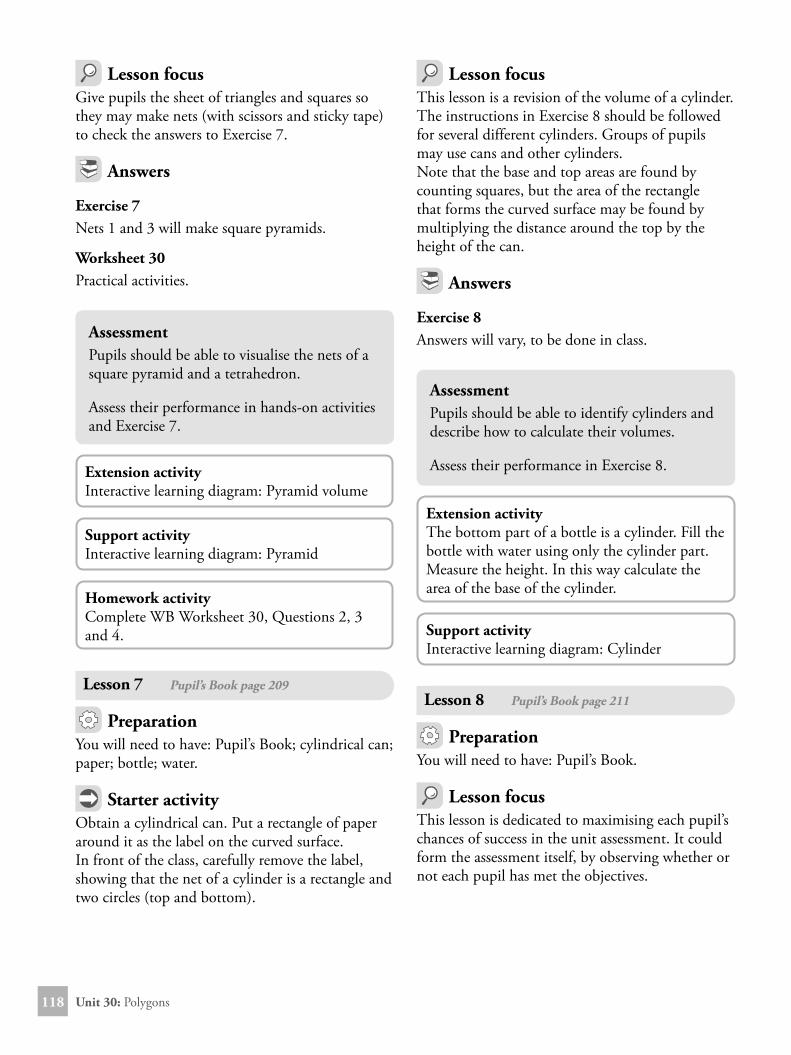
Lesson focusIf possible engage pupils with making ‘skeleton’ models of 3D shapes using skewers (or matchsticks or toothpicks) and clay (or equivalent).
Support activityInteractive learning diagram: Boxes
Homework activityComplete WB Worksheet 28.
Lesson 5 Pupil’s Book page 207
PreparationYou will need to have: Pupil’s Book; triangular prism net; sheet of triangles and squares; scissors; sticky tape.
Starter activityUse the net on page 208 to make a triangular prism.
Lesson focusGive pupils the sheet of triangles and squares so they may make nets (with scissors and sticky tape) to check the answers to Exercise 5.
Answers
Exercise 5Class activity.
AssessmentPupils should be able to visualise the net of a triangular prism.
Assess their performance in Exercise 5.
Extension activityInteractive learning diagram: Plans and elevations
Support activityInteractive learning diagram: Prisms
Homework activityComplete Exercise 6.
Lesson 6 Pupil’s Book page 208; Workbook page 57
PreparationYou will need to have: Pupil’s Book; Workbook; cardboard model of tetrahedron; four paper equilateral triangles; sheet of triangles and squares; scissors; sticky tape; tangram square.
Starter activityProvide a large cardboard model of a tetrahedron, so pupils can know what it looks like.Give pupils four equilateral triangles, and ask pupils to use them to make a net that folds to a tetrahedron – a triangular pyramid made from four equilateral triangles.
Support activityInteractive learning diagram: Pyramid
Homework activityComplete WB Worksheet 30, Questions 2, 3 and 4.
Lesson 7 Pupil’s Book page 209
PreparationYou will need to have: Pupil’s Book; cylindrical can; paper; bottle; water.
Starter activityObtain a cylindrical can. Put a rectangle of paper around it as the label on the curved surface.In front of the class, carefully remove the label, showing that the net of a cylinder is a rectangle and two circles (top and bottom).
Lesson focusThis lesson is a revision of the volume of a cylinder. The instructions in Exercise 8 should be followed for several different cylinders. Groups of pupils may use cans and other cylinders.Note that the base and top areas are found by counting squares, but the area of the rectangle that forms the curved surface may be found by multiplying the distance around the top by the height of the can.
Answers
Exercise 8Answers will vary, to be done in class.
AssessmentPupils should be able to identify cylinders and describe how to calculate their volumes.
Assess their performance in Exercise 8.
Extension activityThe bottom part of a bottle is a cylinder. Fill the bottle with water using only the cylinder part. Measure the height. In this way calculate the area of the base of the cylinder.
Support activityInteractive learning diagram: Cylinder
Lesson 8 Pupil’s Book page 211
PreparationYou will need to have: Pupil’s Book.
Lesson focusThis lesson is dedicated to maximising each pupil’s chances of success in the unit assessment. It could form the assessment itself, by observing whether or not each pupil has met the objectives.
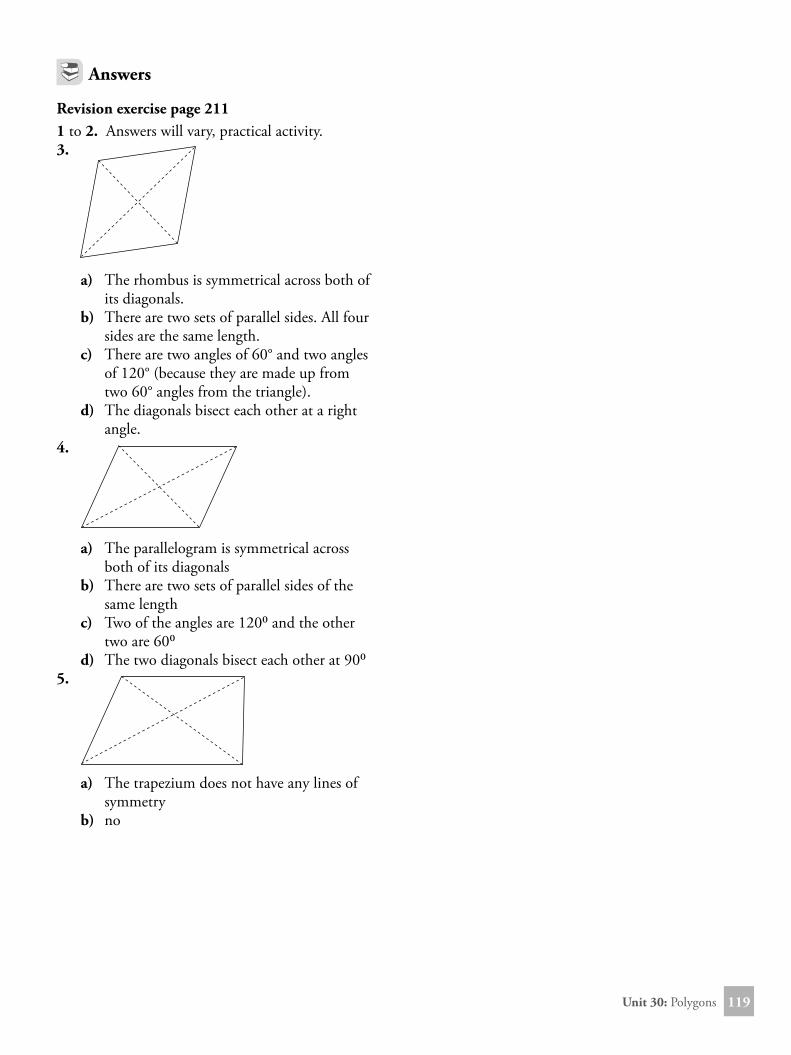
Revision exercise page 2111 to 2. Answers will vary, practical activity.3.
a) The rhombus is symmetrical across both of its diagonals.
b) There are two sets of parallel sides. All four sides are the same length.
c) There are two angles of 60° and two angles of 120° (because they are made up from two 60° angles from the triangle).
d) The diagonals bisect each other at a right angle.
4.
a) The parallelogram is symmetrical across both of its diagonals
b) There are two sets of parallel sides of the same length
c) Two of the angles are 120⁰ and the other two are 60⁰
d) The two diagonals bisect each other at 90⁰5.
a) The trapezium does not have any lines of symmetry
b) no
Unit 31: Scale drawing120
ObjectivesBy the end of this unit, each pupil should be able to:• Draw plans according to a given scale
• Apply and use scale drawing in converting lengths and distances of objects in his/her environment to any scale.
Scale drawingUnit 31
Suggested resourcesmeasuring tapes; rulers; plain paper; photos; house plans; maps
Common errors that pupils makePupils choose a scale that is too complex and difficult to use. Keep the scale to powers of ten or times 1, 2 and 5. Even professional architects use simple scales.
Evaluation guidePupils to:1. Convert given lengths and distances to a given
scale.2. Draw to scale school farms, play grounds etc.
with their dimensions given.3. Convert scale plans to real dimensions.
Lesson 1 Pupil’s Book page 212; Workbook page 58
PreparationYou will need to have: Pupil’s Book; Workbook; measuring tapes; A4 paper.
Starter activityMeasure the length and width of the classroom.
Lesson focusMake a sketch plan first.Draw a good plan of the classroom.Start by drawing a plan of the walls to scale. You need to take the measurements, and then choose a scale so that the plan will fit onto your A4 paper.
You should choose from one of these scales:1 m = 1 cm, 1 m = 2 cm, 1 m = 5 cm, 1 m = 10 cm.
For example, if the room is 6 m on its longer side, and the paper is 18 cm wide, you need these lengths for each suggested scale:1 m = 1 cm 2 cm 5 cm 10 cmfor 6 m 6 cm 12 cm 30 cm 60 cmThis means that we will use 2 cm = 1 m, and 6 m will be a line 12 cm long. (We double the number and change the units to cm.)Fill in details through measuring.
Answers
Exercise 1This is a practical activity.
Worksheet 312. Practical activity, answers will vary.
AssessmentPupils should be able to make a good sketch of a room.
Assess their performance in the drawing they produce.
Extension activityUsing the drawing they have made, these pupils could predict a length they have not previously measured, and check if it is correct.
Unit 31: Scale drawing 121
Support activityChoose a simple rectangular shape to draw, and use a simple scale (1 cm = 10 cm, or 1 cm = 1 m).
PreparationYou will need to have: Pupil’s Book; pictures/photos of people.
Starter activityShow the class a photograph of a person from a newspaper. Assume that the person is 165 cm tall.Measure the height of the person in the photograph. Then find the scale by dividing the photo height by 165.
For example the photo is 12 cm high.The scale is 12 cm = 165 cm. Divide by 12, to get 1 cm = 13.75 cm. Every centimetre on the photo shows 13.75 cm on the person.
Lesson focusUse the example on page 214 to show how to do this with drawings that are ‘to scale’.Groups of pupils find the scales for photos of people, cars etc.
AssessmentPupils should be able to use a known distance to find the scale on a scale drawing.
Assess their performance in activities.
Extension activityFind house plans or aerial photos of locations from magazines or the internet. Estimate the scale factors.
Support activityPupils can find photos of people, and estimate the scale of the photo (as reductions) by dividing. For example, if a 150 cm tall person is reduced to 3 cm in a photo the reduction is 1 __ 50 (or 0.02).
Lesson 4 Pupil’s Book page 215; Workbook page 57
PreparationYou will need to have: Pupil’s Book; Workbook.
Starter activityHelp pupils to find the scale for the map using the scale line in the bottom right corner.Measure the length of the line: it is 16 mm. So 16 mm shows 200 km. Using proportion we can find other scales:mm 16 8 4 2 1 10km 200 100 50 25 12.5 125So 10 mm (1 cm) shows 125 cm.
‘Edge of paper’ methodShow pupils how to use the ‘edge of paper’ method to use a map scale.You use the edge of a sheet of paper to make copies of the small scale in the bottom right corner.It looks like this:
0 100 200 300 400 500
You continue it along the edge of the paper as far as you wish.You may now put this edge of paper on the map between two places and read off the distance in km.
‘Use a known distance’ methodQuestion 1 in Exercise 2 uses the method introduced in the last lesson. Now you have three methods to find a distance on a map. Use all three methods for question 2, and compare the answers.
Answers
Exercise 2Answers will vary.
Worksheet 313. and 4. Answers will vary.
AssessmentPupils should be able to use a scale on a map to find distances from the map.
Lesson focusThis lesson is dedicated to maximising each pupil’s chances of success in the unit assessment. It could form the assessment itself, by observing whether or not each pupil has met the objectives.
ObjectivesBy the end of this unit, each pupil should be able to:• Interpret pictograms and bar graphs
• Use pictograms and bar graphs in representing population of people or data.
PopulationsUnit 32
Suggested resourcespupils’ data
Frequently asked questionsQ What are the mathematical understandings?A Pictograms, bar and column graphs represent
frequencies – the number of cases of a particular result. A pictogram may involve rounded numbers.
Evaluation guidePupils to:1. Prepare a given population data on pictogram
or bar graph.
Lesson 1 Pupil’s Book page 218; Workbook page 61
PreparationYou will need to have: Pupil’s Book; Workbook.
Starter activityCollect data from each pupil: their age, their birth month, their height to the nearest centimetre
Lesson focus
Pictogram of agesThe first step is to choose a suitable icon. The second is to choose a suitable ratio. Presuming you have a large class, you will want to have at least 2 to 10 people shown on each icon. (This depends on the number at each age.)
Immediately the difficulty with pictograms becomes clear; there may not be a suitable common factor of all the numbers, so you many have to round some of the numbers to the nearest (such as the nearest 5.).
Answers
Exercise 1Class activity.
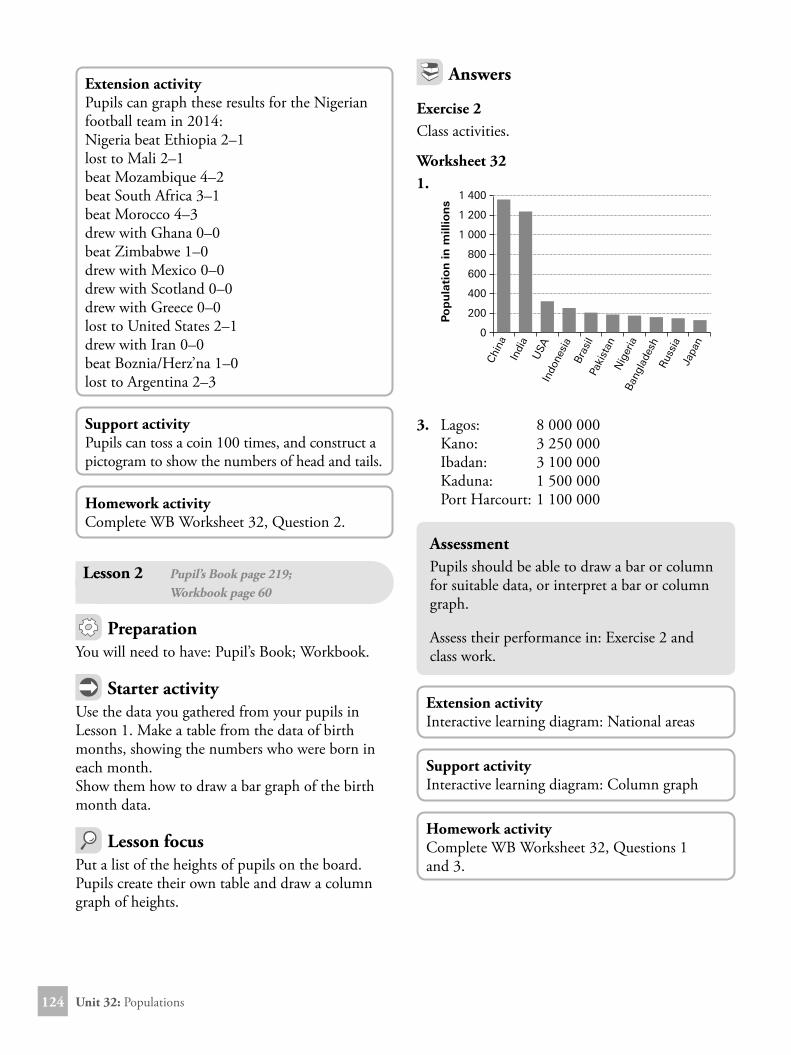
Worksheet 322.
0 1 2 3 4 5 6 7 8 9 10 11 12 13 14
Bangladesh
Nigeria
Pakistan
Brasil
Indonesia
USA
India
China
Population: Each man represents 100 million
AssessmentPupils should be able to draw a pictogram for suitable data, or interpret a pictogram.
Assess their performance in Exercise 1 and class work.
Unit 32: Populations124
Extension activityPupils can graph these results for the Nigerian football team in 2014:Nigeria beat Ethiopia 2–1lost to Mali 2–1beat Mozambique 4–2beat South Africa 3–1beat Morocco 4–3drew with Ghana 0–0beat Zimbabwe 1–0drew with Mexico 0–0drew with Scotland 0–0drew with Greece 0–0lost to United States 2–1drew with Iran 0–0beat Boznia/Herz’na 1–0lost to Argentina 2–3
Support activityPupils can toss a coin 100 times, and construct a pictogram to show the numbers of head and tails.
PreparationYou will need to have: Pupil’s Book; Workbook.
Starter activityUse the data you gathered from your pupils in Lesson 1. Make a table from the data of birth months, showing the numbers who were born in each month.Show them how to draw a bar graph of the birth month data.
Lesson focusPut a list of the heights of pupils on the board. Pupils create their own table and draw a column graph of heights.
Lesson focusThis lesson is dedicated to maximising each pupil’s chances of success in the unit assessment. It could form the assessment itself, by observing whether or not each pupil has met the objectives.
Answers
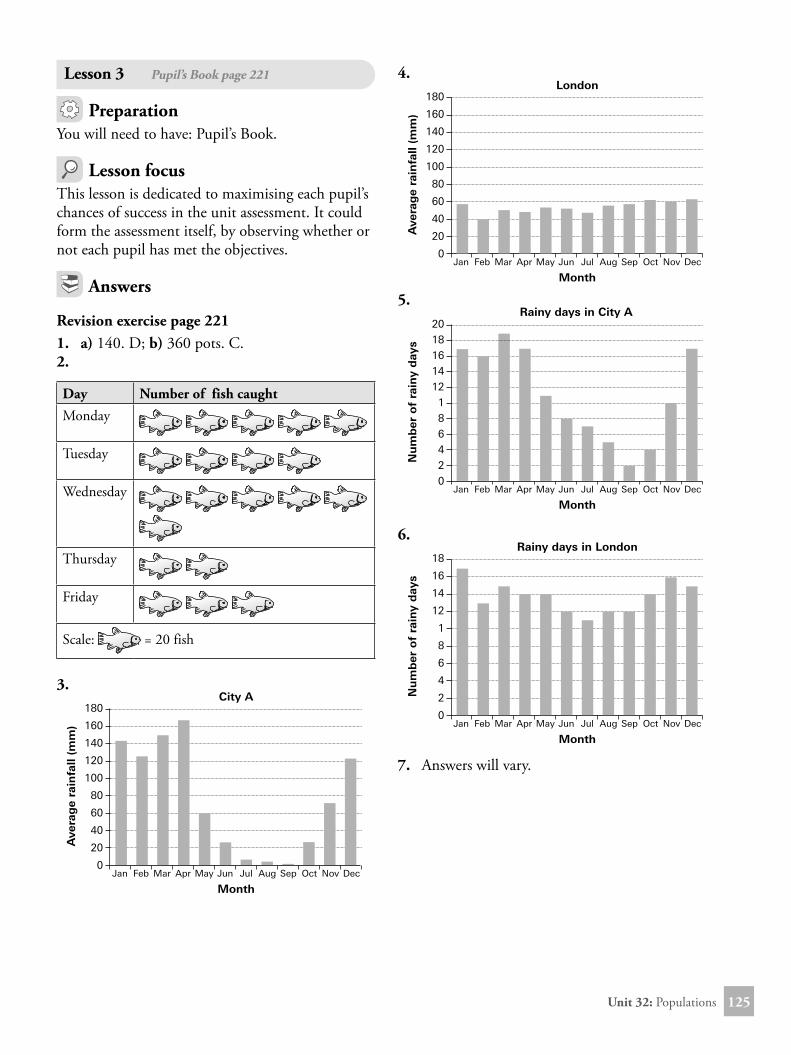
Revision exercise page 2211. a) 140. D; b) 360 pots. C.2.
Day Number of fish caughtMonday
Tuesday
Wednesday
Thursday
Friday
Scale: = 20 fish
3. City A
Ave
rag
e ra
infa
ll (m
m)
MonthJan Feb Mar Apr May Jun Jul Aug Sep Oct Nov Dec
180
160
140
120
100
80
60
40
20
0
4. London
Ave
rag
e ra
infa
ll (m
m)
MonthJan Feb Mar Apr May Jun Jul Aug Sep Oct Nov Dec
180
160
140
120
100
80
60
40
20
0
5. Rainy days in City A
Nu
mb
er o
f ra
iny
day
s
MonthJan Feb Mar Apr May Jun Jul Aug Sep Oct Nov Dec
2018161412
186420
6. Rainy days in London
Nu
mb
er o
f ra
iny
day
s
MonthJan Feb Mar Apr May Jun Jul Aug Sep Oct Nov Dec
18
16
14
12
1
8
6
4
2
0
7. Answers will vary.
Unit 33: Measures of central tendency126
ObjectivesBy the end of this unit, each pupil should be able to:• Find the mode of data
• Calculate the mean of given data.
Measures of central tendencyUnit 33
Suggested resourcesplaying cards; age data from Unit 32; frequency data from Unit 32
Common errors that pupils makePupils will be surprised when there is no mode – when no one number is more common than any others.
Evaluation guidePupils to:1. Organise a given data and find the mode.2. Organise a given data and calculate the mean.
Lesson 1 Pupil’s Book page 223; Workbook page 62
PreparationYou will need to have: Pupil’s Book; Workbook; age data from Unit 32; frequency data from unit 32.
Starter activityUse the age data collected in the previous unit.Show the ages in a table. It will be clear which age(s) is/are the most common.
Lesson focusIn the last unit we used the frequency table of birth month and height (to the nearest cm). Using these, pupils determine the most common birth month and height.
AssessmentPupils should be able to collect data and find the mode from a frequency table.
Assess their performance in Exercise 1 and class work.
Homework activityComplete WB Worksheet 33, Questions 1 and 2.
Lesson 2 Pupil’s Book page 223; Workbook page 63
PreparationYou will need to have: Pupil’s Book; Workbook; playing cards.
Unit 33: Measures of central tendency 127
Starter activity
Silent sharingEach group needs a pack of cards.Give five people these numbers of cards: 6, 3, 16, 10, 5. Put the rest aside.These people should then share them silently until all have the same number. There should be no talking, asking or taking, only giving.When everyone has the same number (8) this will be the mean (or average). Average (mean) means having equal shares.
Lesson focusDetermine the mean of age, birth month and height (nearest cm).
Card game – Mean and modeUse the numbers 0 to 10, and let the picture cards all show 0. Shuffle the cards.Deal each player five cards. (We use five so the averages will be simple terminating decimals.)Each player finds the mean of their own cards. The biggest mean gets one point.Each player finds the mode of their cards if there is one. There may be none or many. The biggest mode gets one point.Then deal out another five cards to all players and repeat.
Answers
Exercise 2Class activities.
Worksheet 333. mode = 10, mean = 9 1 _ 3
It would suggest that size 9 and 10 are the best sellers.
4. mean = 9 1 _ 3 , mode = 105. 3 373 7406. own data7. The mean is calculated as the mathematical
average of values. Therefore it can’t be applied to names but can be used for a number of items like the nuts.
AssessmentPupils should be able to find and interpret the mean of data.
Assess their performance in Exercise 2 and class work.
Extension activityInteractive learning diagram: Estimating means 0–100
Support activityInteractive learning diagram: Estimating averages 0–10
Lesson focusThis lesson is dedicated to maximising each pupil’s chances of success in the unit assessment. It could form the assessment itself, by observing whether or not each pupil has met the objectives.
Revision exercise page 2261. a) 25 children b) 151 people
c) 6 d) 62. a) 17 b) 143. a) 11 days b) 13.75 days4. a) March b) January5. a) September b) July6. a) 75.92 b) 54.33
ObjectivesThis project requires pupils to work with perimeter and area, and applications of these concepts in the world. They also make a neat scale drawing of a room.
Project – Scale drawingTerm 3
GuidelinesYou will need to have the following resources: Pupil’s Book, scissors, a big piece of paper or card and glue.
Pupils need to follow the steps, as mentioned on page 227 of the PB.
For the first part of this project pupils need to convert all the measurements of the rough drawing to millimetres. 60 cm = 600 mm50 cm = 500 mm50 cm² = 25 000 mm²150 cm = 1 500 mm1.9 cm = 19 mm95 cm = 950 mm1.2 m = 1 200 mm
For the next part of this investigation, pupils must choose a suitable scale and make rough drawings of all the components in the drawing.
Remind pupils that the scale factor is: reduced length/real length.
Pupils must then cut out the scale drawings of the furniture and arrange the pieces on the drawing of the room to make sure that the layout given is the best layout. If the layout is not suitable, pupils must change it to suit their ideas. Remind pupils that the cupboard will be a built-in cupboard.
Pupils then make a neat scale drawing of the room with the (new) layout of the furniture.
For the next part of this investigation, pupils calculate the perimeter of the room to find the length of the skirting board that will be needed. Remind pupils that the skirting board will not be needed where the door is positioned. Pupils then calculate the area of the floor that will be covered in carpet.
Remind pupils of the following:Perimeter is the distance around the edge of a shape.
There are three formulae that can be applied for working out the perimeter of something: P = W + W + H + H P = 2 × W + 2 × H P = 2 × (W + H)
Area is the space inside the edges of the shape.
Pupils’ work must be neat and as accurate as possible, especially when working with their rough scale drawings. Assist pupils where necessary, especially in terms of rearranging the furniture and positioning things; some pupils may struggle with this part of the project.
AssessmentBecause the pupils’ findings will be different, assess pupils on:• drawing plans according to a given scale• applying and using scale drawing in
converting lengths and distances of objects to any scale.
Term 3: Investigation – Three dimensional shapes 129
Pupil’s Book page 228
ObjectivesFor this investigation pupils are required to work with three-dimensional objects and their different properties.
Investigation – Three dimensional shapes Term 3
GuidelinesYou will need to have the following resource: Pupil’s Book.Pupils work on their own, and answer the questions of the Investigation on page 228 of the PB.
Pupils must represent their answers in tables like the ones provided above. Remind pupils that they need to work neatly and as accurately as possible.
AssessmentBecause the pupils’ findings will be different, assess pupils on:• solving problems with two-dimensional
shapes• identifying faces and bases of three-
dimensional shapes• solving problems on three-dimensional
shapes.
Term 3: Assessment130
Pupil’s Book page 229
AssessmentTerm 3
GuidelinesPupils must work through the questions on their own. However, observing pupils while they are completing the assessment provides further information about each pupil and his or her level of understanding.
Answers1. a)
Length Breadth Area Perimeter
A 12 2 24 28
B 8 3 24 22
C 6 4 24 20
b)
Length Breadth Area Perimeter
A 16 1 16 34
B 8 2 16 20
C 4 4 16 16
c) The rectangle that measures 4 by 4 2. a) 22; b) 34; c) 56 3. a) 125; b) 964. a) 1 000 litres; b) 20 square metres5. a) 90 km/hr; b) 720 km
6. a)
Property Rectangle Square
Two pairs equal sides P
Two pairs parallel sides P P
All four sides equal P
All four angles right angles P P
Diagonals are equal P P
Diagonals bisect each other P P
b) Yes, because both have two pairs of equal sides, as well as two sets of parallel lines. Furthermore, both have four right angles.
7. a) 80°; b) 100°8. a = 52°; b = 90°; c = 80°; d = 180°; e = 140°; f = 110°; g = 65°; h =74°9.
ObjectivesThis assessment is a summative assessment of work that pupils have covered in Units 23 to 33. It has been designed to assess the pupils’ mathematical understanding. It is also important that it is completed by individuals and not with the support of other pupils as this would not uncover any difficulties a pupil may be having with particular concepts.
Term 3: Assessment 131
10. a)
London
2010 2011 2012 2013
800
700
600
500
400
300
200
100
0
boysgirls
b) 560; c) 201211. a) 12; b) 5; c) 7.58 d) It tells you the average of all the data by
adding together all of the data points and dividing this by the total number of scores.
AssessmentOn completion of the assessment, teachers should look for correct answers and mistakes made by pupils. They should also check to see if there is a pattern in terms of any particular question causing a significant number of pupils’ difficulties. By analysing the results of an assessment, they can identify weaknesses in individuals and provide the necessary support, and also strengths of individuals and provide them with more challenging activities. They will also be able to identify any weaknesses in their teaching programme and make adjustments where, or if, necessary.
Term 3: End-of-year Practice Examination132
ObjectivesThis practice examination is a summative assessment of work covered throughout the year.
It is important that it is completed by individuals and not with the support of other pupils as this would not uncover any difficulties a learner may be having with particular concepts.
Encourage pupils to not spend too much time on one problem. They should rather move onto the next problem and return to the difficult ones if they have time at the end of the examination.
End-of-year Practice ExaminationTerm 3
GuidelinesSimulate examination conditions: tell the pupils that they have to work on their own and may not discuss questions or answers with other pupils; ensure quiet in the classroom while pupils work; write the start and end time of the examination on the board, with 10 minute intervals – cross out the time interval as the session progresses to help pupils keep track on time.
Complete the practice examination over two class sessions. Complete questions 1–12 in session 1 and then questions 13–26 in session 2.
Have pupils write their answers and workings out on loose sheets of paper so that you can take them in for marking.
2. a) 96: 25 × 3 = 128:23 23: This is a prime number; it is not possible to write this in index form 67: This is a prime number; it is not possible to write this in index form
b) 1 541; c) 163. a) 2 _ 3 ; .05; .03; 2 _ 9 ; .01 b) 2.6; 5 _ 3 ; 1.4; 7 _ 5 ;
14 __ 10 4. a) (( 7 _ 9 ÷ 2 _ 9 ) × 8) + 5 = 33 b) It is not possible to make this equation true.5. a) 512; b) 640; c) 48; d) 44.4%6. a) 1 602 g; b) 1.602 kg 7. a) 18; b) 2:3; c) 2:5; d) 3:58. 15:229. a) 2:3; b) 5; c) 33 10. a) 86 191 000; b) 89 709 000 11. a) 80%; b) 73%; c) 70%12. a) 7 __ 10 ; b) 1 _ 4 ; c) 13 __ 20 13. 2.3%; 14. 5%; 15. 24 357 000 16. a) TV stand: N20 000 Bed: N132 640 Bedside table: N16 960 Sofa: N400 000 Dining room set: N515 20 Microwave: N88 000
c) 31.73%17. QR = 5; 18. 10.99 kg19. a) 4:45; b) 7:30; c) 7:20; d) 3:10 e) 2:45; f ) 12:5720. a) 4.9 km; b) 1 425 000 m2; c) 142.5 ha21. 48.6 min22. a) 73 584 kl; b) 292 kl23. a) hexagon b)
c) Right Angle Triangle: Has one right angle
24. a) 96 b) Triangle: Three equal sides Three equal angles Rectangle: Four right angles Two pairs of parallel lines25. a) if 1 cm = 4 m ∴ Width = 4 cm; Length = 6 cm
4 cm
6 cm
7 cm
b) See drawing; c) 28 m
26. a) Population variation
Town A Town B Town C Town D
900 000
800 000
700 000
600 000
500 000
400 000
300 000
200 000
100 000
0
b) 502 331c) There is no mode, as each town has a
unique population size.
AssessmentOn completion of the assessment, teachers should look for correct answers and mistakes made by pupils. They should also check to see if there is a pattern in terms of any particular question causing a significant number of pupils’ difficulties. By analysing the results of an assessment, they can identify weaknesses in individuals and provide the necessary support, and also strengths of individuals and provide them with more challenging activities. They will also be able to identify any weaknesses in their teaching programme and make adjustments where, or if, necessary.