UNIVERSIDAD POLITÉCNICA DE MADRID ESCUELA TÉCNICA SUPERIOR DE INGENIEROS INFORMÁTICOS MÁSTER UNIVERSITARIO EN INGENIERÍA DEL SOFTWARE – EUROPEAN MASTER IN SOFTWARE ENGINEERING Development of a Tool for Designing Tests based on Statistics and Metadata Master Thesis Jesús Barba Malagón Madrid, June 2016
Transcript
UNIVERSIDAD POLITÉCNICA DE MADRID
ESCUELA TÉCNICA SUPERIOR DE INGENIEROS INFORMÁTICOS
MÁSTER UNIVERSITARIO EN INGENIERÍA DEL SOFTWARE – EUROPEAN MASTER IN SOFTWARE ENGINEERING
Development of a Tool for Designing Tests based on Statistics and Metadata
Master Thesis
Jesús Barba Malagón
Madrid, June 2016
This thesis is submitted to the ETSI Informáticos at Universidad Politécnica de Madrid in partial fulfillment of the requirements for the degree of Master of Science in Software Engineering.
Master Thesis Master Universitario en Ingeniería del Software – European Master in Software Engineering Thesis Title: Development of a Tool for Designing Tests based on Statistics and Metadata Thesis no: EMSE-2016-01 June 2016
Author: Jesús Barba Malagón Student Universidad Politécnica de Madrid
Supervisor:
Jaime Ramírez Rodríguez Professor Universidad Politécnica de Madrid
Lenguajes y Sistemas Informáticos e Ingeniería de Software Escuela Técnica Superior de Ingenieros Informáticos Universidad Politécnica de Madrid
ETSI Informáticos Universidad Politécnica de Madrid Campus de Montegancedo, s/n 28660 Boadilla del Monte (Madrid) Spain
3
Abstract
Background: This project’s idea arose derived of the need of the professors of the department “Computer Languages and Systems and Software Engineering (DLSIIS)” to develop exams with multiple choice questions in a more productive and comfortable way than the one they are currently using. The goal of this project is to develop an application that can be easily used by the professors of the DLSIIS when they need to create a new exam. The main problems of the previous creation process were the difficulty in searching for a question that meets some specific conditions in the previous exam files; and the difficulty for editing exams because of the format of the employed text files.
Result: The results shown in this document allow the reader to understand how the final application works and how it addresses successfully every customer need. The elements that will help the reader to understand the application are the structure of the application, the design of the different components, diagrams that show the workflow of the application and some selected fragments of code.
Conclusions: The goals stated in the application requirements are finally met. In addition, there are some thoughts about the work performed during the development of the application and how it improved the author skills in web development.
Annex 1: Exam in TST format ..................................................................................................... 107
Annex 2: Statistic file in STS format ......................................................................................... 117
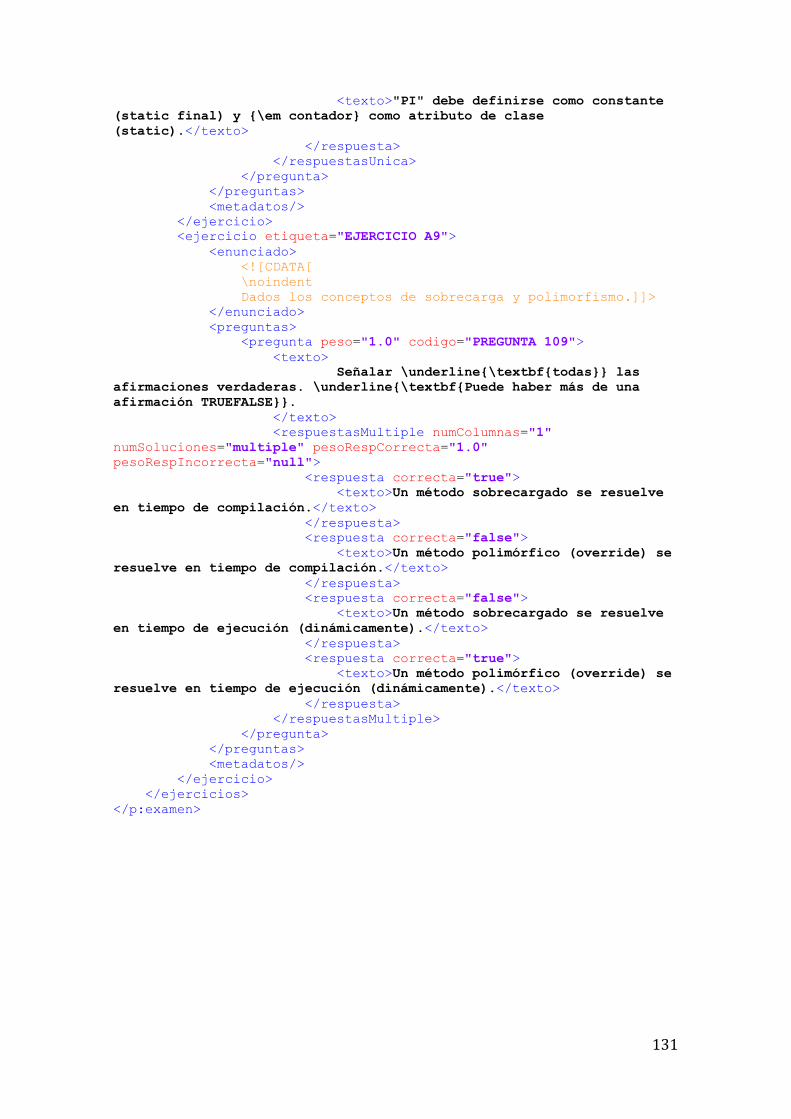
Annex 3: XML extracted from Annex 1 TST file .................................................................. 120
Annex 4: Method that updates exam’s XML ......................................................................... 132
6
1. - Introduction
First of all, this master thesis idea arose derived of the need of the professors of the department “Computer Languages and Systems and Software Engineering (DLSIIS)” to develop exams with multiple choice questions in a more productive and comfortable way than the one they are currently using.
So far, exams are elaborated by creating a text file in TST or XML format that contains information about their questions and their answers. TST and XML format are marked languages whose features make the editing process prone to errors. In addition, editing process become even more tedious to perform with time, because the number of previous exams increases and typically professors need to search for previous questions or whole exams to reuse for creating a new one.
Here is where this master thesis comes to action and will propose a solution for this problem. First of all, we will need a web application in order to manage all the information about new exams that will be created. However, there is another problem, what happens with legacy exams? Obviously, our web application will be less useful if we have to create new exams from scratch. Thus, basically, this master thesis will address the development of the following two software components:
1. A web application that will allow professors to manage all existing exams using a user-friendly interface. In addition, this application will run on a server, so it could be used by different professors working together in an exam, and without having to wait for the others to send the updated document, then fix the document to follow the specified format, etc. This application aims to simplify the creation and modification of exams and will provide the XML file for the whole exam that professors are now using for generating the target document. Moreover, the web application will not only improve the creation and modification of exams, but also it will make much easier to read the exam information. Using a database based in objects, the application can easily show user tables, buttons and links that will make the task of looking for some exam information faster than just searching for it in a text file in TST or XML format. In addition, the application will have more advantages as it allows the user to search questions in the application (using metadata or search based text) and to know the estimated difficulty of an already used question or exam, extracted from the statistics of the exam’s evaluation (STS file).
2. A converter, which will be a Java parser that will take as input the text files (.tst and .sts) related to legacy exams and convert them into Java objects that will be stored in the database accessed by the web application. In this way, professors will be able to take advantage of the questions of these legacy exams as elaborating a new exam.
7
To sum up, this master thesis aims to give the professors of DLSIIS a tool that, on one hand, will make their lives easier when they are preparing exams; and on the other hand, will allow them to handle all the information that have been stored in text files for years more efficiently.
This document will cover the development of both the web application and the converter. The structure of the remaining document is as follows:
Related Work: In this section, all the technologies that have been used in the development of the project will be explained, and they will be related to each other by addressing how they work together to form the final application.
Specification of Software Requirements: All the requirements of the web application and the converter are listed here. They were taken by multiple interviews and videoconferences with the customer (Professor Jaime Ramírez).
Development of the proposed solution: The solution is explained taking into account the architecture of the application, the design of the converter, the design of the web application and all the diagrams and models that have been developed in order to obtain the design of the web application.
Testing: In this section, the testing that have been done for ensuring the correct behavior of the application is explained.
Conclusions and future work: Finally, this section comprises my personal opinion about what I learnt from this project, whether objectives were achieved or not as well as some possible ways of improving the application.
8
2. – Related Work
In this section, the different technologies to be adopted in the development of the project will be explained.
2.1. – Development Environment
The Development Environment that has been used is Eclipse Indigo, because we have more experience working with this environment than with others.
One of the most interesting features of Eclipse is that it has an easy way of installing plugins in order to use different tools in the same workspace. The list of tools/plugins used in this project are:
Spring MVC Plugin (JSP pages integrated, Configuration XMLs …) Hibernate & JPA Maven Tomcat Server, JBoss in deployment phase Git repository MySQL (out of the development Environment)
The only tool that we will mention here is Maven because, honestly, it does not deserve a whole section because of its simplicity. Maven is just a dependency manager that allows us to import any library we need to our project by only typing a few lines in the pom.xml file.
With this dependency management, we can easily bring all the Spring, Hibernate, JPA and Apache dependencies that we will need during the development of the project and they will automatically be imported and will be ready to be used.
2.2. – Spring MVC
The main technology used in this project is the “Spring Framework”. This tool is a helpful framework that is used to develop web applications that follows a variation of the MVC pattern specially intended for developing web applications. This variation is practically the same, but it doesn’t have observers which will reload the page when something changes in the model. In this case, those reloads must be done by user.
Anyways, this is a minor issue for this project, because it’s not as real time dependent as other possible systems (Critical Software Systems for example depend on real time stimulus in order to react to them and avoid safety risks).
One of the main reasons of using Spring is that it is based on Java programming language. This helps a lot since Java is the language that we have been using since we started programming in college and, although we know other programming languages (C and Python), it was preferred to develop the thesis without having to
9
worry about learning a new programming language from the basics and focus into learning the framework technology and applying it directly.
Also, we have learnt the basics of Spring in a subject in college, so we have the basic theory to start with and a Helloworld project which can be used to understand better the structure of Spring. We had a lot of things to do and research to accomplish the goals that the customer wants for this thesis but it is easier to do it with something that we know a little about than doing it from scratch with another technology that may or may not be able to accomplish the final goals of the project.
Spring has a lot of features that will make our life easier when developing a web application:
It is clearly separated in:
o Controllers: They are the classes that manage the changes in the domain model and then send the orders to the client web browser to reload a specific view. They are one of the most important elements in this kind of applications because they are the responsible classes for creating elements, deleting elements, modifying elements and providing to the views the elements to show. In addition, since they are Java classes, it is easy to code the necessary methods that we will need on the road, call methods from other classes, create auxiliary objects, etc.
o Converters: The converters are Java classes that help Spring to transform the plain text object that we introduce in the web application (i.e. in a form to create an exam) into Java objects. Furthermore, they can work the other way round, because they also can transform the Java object into plain text objects in order to be able to render them in the web application. These converters are really important since they establish the relationship between the controllers (which use Java objects) and the views (which, at the end, only use plain text). For each object, we have a String to Object converter and an Object to String converter and one of them will be used at a time, depending on the current needs of the system.
o Security: This package contains all the Java classes that are used for security purposes. These Java classes are:
UserAccount: This class is used to define the attributes of a user in the system. This user will have:
Username Password Authorities
Authority and Credentials: They are classes that specify the different authorities (ADMIN and CUSTOMER) and establish
10
the user and password attributes for the userAccount class respectively.
LoginClasses: The classes that start with “Login” are used for defining all the login steps, database checking, password encoding and anything that has something to do with login security.
To sum up, this folder contains all the classes that allow our application to have different users and the login/logout feature. As we will explain later in this section, the application will behave differently if the user is logged in or not and, in case he/she is logged in, if the person is ADMIN or CUSTOMER.
o Repositories: These Java interfaces are the link between the web
application and the database (Hibernate and MySQL technologies will be explained later in this section). The repositories have some general methods like save, delete, findOne, findAll, etc. However, they are not the only methods that we can use in our application. We can create new methods in the repositories according to our needs. For this new methods we use JPQL (Java Persistent Query Language). JPQL is a language used to perform queries on persistent data without having into account which platform they are stored in. So, whether we are using Oracle, MySQL, mongoDB or any other database supported by Hibernate, JPLQ engine will perform the queries correctly in every environment. These methods will specify a query (in JPQL as said before), a return type, which can be any kind of object or void. Besides, if we need to pass some parameters to the method, we can add them. For example, here in Figure 2.1 there is a method where we bring all the answers inside a given question:
Figure 2.2.1
The method returns a list of Answers that are related to a question where question’s id is the one passed by parameter. In case there were more than one parameter, we can address them in the query by using the order in which they appear. This way, a method with two parameters would use “?1” for the first parameter and “?2” for the second one.
o Domain: The domain is formed by the set of classes that appear in the “Domain Model” (later in the design section of this document). This classes are representing the objects that the application will use like exams, exercises, questions, answers and so on. In addition they specify the relationships between the different objects. For example,
11
the exam has a “one to many” relationship with exercise objects. So, in the exam domain class we will have a Collection of exercises and in exercise domain class there will be an exam attribute. These domain classes and relationships are used later by Hibernate to generate the full database. This will be explained later in this section on Hibernate technology.
o Web content: The web content is distributed among several folders. One of the most important folder is the “view” folder. In this folder the pages that will be displayed to the final customer in the web browser are stored and listed. These views are JSP files and its technology will be explained later in this section. All the folders of this web content are:
Scripts: Javascript files that will be used later in the JSP pages. Images: Store images that will be used in the web application. Styles: The CSS for the web application is stored here. In this
case, a Bootstrap template has been used and slightly modified in order to make the page look better with user-friendly elements.
Views: As explained before, it’s one of the most important elements in this folder and they contains the JSP pages, two XML files that will define the id that will be used by the Controllers to call the views and two property files that will be used for internationalization. There are two copies of each XML and properties file, one for Spanish and one for English. The XML files are called “Tiles” and contain the necessary information to register the view in the context of the application. This information contains:
Name: Code that will be assigned to the view (must be unique)
Extends (parent): Parent view in case we need to use some general layout.
Attributes: Title of the view and Body. It is important that in the body we must specify the JSP file that represents and renders that view.
In Figure 2.2 we can see an example of a Tiles definition:
Figure 2.2.2
To finish with the view folder, the property files (messages.properties) will be explained. Inside these files we just define some properties that will be used in the JSP files instead of plain text. The goal of this is to be able to write the
12
message code and, depending on the language setting on the client side, the text will appear in Spanish or in English. One example of both Spanish (Figure 2.3) and English (Figure 2.4) messages appears below:
Figure 2.2.3 Figure 2.2.4
The configuration files for Spring is located in a separate folder inside the eclipse workspace. This helps the developer to know exactly where he/she should go in case something about Spring configuration has to be changed because otherwise, maybe we need to go into a system folder, and change the files using any text editor, etc. This folder is located in the project src/main/resources folder. The configuration files and folders are the following ones:
o META-INF folder: It contains the persistence.xml file, which has the necessary information for JPA and Hibernate to connect with the database. More information will be given about these technologies later in this section.
o Spring folder: All the XML files that are part of the application configuration are contained in this folder. The files contained here are:
Cache.xml: The settings about the cache gathering of the application during a client session will be stored in this file.
Converters.xml: This file is used by Spring in order to know where the converters of the application are. These converters were explained before in this section.
Data.xml: In this XML, the configuration that appears in the META-INF folder explained before is given again, but with more detail. For example, here we have also the repositories folder and some JPA properties that were not set in the persistence.xml file.
I18n-l10n.xml: This file is the one in charge of giving the information about the different language files in the workspace. Basically, it has the final directory of all the
13
messages.properties files that we detailed in the Views folder explanation. With this information, Spring will know where to check the message codes and will use (depending on the system variable LANG) the correct final language. Next we can see both Spanish (Figure 2.5) and English (Figure 2.6) version of the web application:
Figure 2.2.5
Figure 2.2.6
Packages.xml: In this file we list all the packages that exist on our workspace in order for Spring to build internally the same structure. Otherwise Spring could use another structure internally and this may lead to a dirty server folder when the application resets or runs for a long time.
Security.xml: Spring uses this XML file when the application is running in order to know if a given user can access or not to a specific resource (URL) of the application. For this reason, we specify here all the URL that we registered in our application and we set them to an authority role that can access the given URL:
permitALL: Allows any user to access the URL
14
isAuthenticated(): Only if the user has logged in can access the URL that are marked with this annotation.
hasRole(‘ROLEHERE’): In this last case, the URL will be accessible to the user only if the role of that user matches the role that we pass on the parameter of this expression (ADMIN or CUSTOMER for this application).
Tiles.xml: As said before in this document, the tiles are the files that specify the information needed to identify every view of the application at any moment. This file is in charge of listing all the different directories where there are tiles files so that Spring will be able to know where to look for them when a controller requests the render of a specific view.
Datasource.xml: This file is used to provide more information about the database connection. In this case, we do not need to provide the same information as in the previous files (URL, user, pass …). Instead, we need to provide more internal application configuration parameters such as the entityManagerFactory settings, the transactionManager settings and the JPA vendor adapter settings. All those objects are used by Spring as intermediaries in order to finally connect to the database and be able to use its items as objects.
Servlet.xml: This file is the one in charge of setting all of the previous files together and specify any additional setting to each one of them. In this file, the only thing that is done is to import all of the previous files, set their directories and add, if needed, more attributes to the files that are needed for Spring.
As final main feature, Spring uses beans to generate Objects that can be used in any Java class of the application only by using the annotation “Autowired”. This allows us to have initialized objects stored in memory and we can use them to fetch items from databases, to execute operation in a given Object and so on. The main application of this feature is the use of Repositories. These repositories are only instantiated once during the runtime (i.e. we don’t have 4 instances of ExamRepository, we have only one) and they are used by the entire application whenever they are needed. The same thing is done by a lot of classes like Controllers, Domain entities and almost all of the internal Spring classes. They are stored as a single object (which uses only a little amount of the total memory size) and, this way, they can be accessed easily by the application in order to validate objects (if they match the attributes), instantiate new non-persistent objects and, in conclusion, have a more agile internal set of operation that will be very efficient and provide results in a short time. With this, Spring section is closed and next, the components integrated in this project with Spring will be detailed.
15
2.3. – Hibernate & JPA
Hibernate and JPA (Java Persistence API) are the elements in charge of establishing the connection to the database and make the transformation between database rows and Java Objects.
First of all JPA is not an implementation. It is just an API that can be used by different framework implementations like Hibernate, Eclipse Link, etc. This API guides the way to be able to access a Database and retrieve entities (tables) and rows (Objects). Since it is not an implementation, it cannot be used alone and the function of JPA is to establish a correct connection to a database.
To perform this connection what we mainly need is in the persistence.xml file. This file defines the JPA settings and is able to test and establish a database connection. In this application, we can see the persistence file in Figure 2.3.1:
Figure 2.3.1
As we can see above, all the parameters needed by JPA to establish the database connection are set. Since we use Hibernate as an implementation, we also need to add the last two properties.
This is the case of this application, where we only use one database. In other applications maybe we need more than one database to store different things, but that is not a problem with JPA, because we just need to specify a different persistence unit and add it to the rest of configuration files.
One of the main and strongest advantages of using JPA is that it can be used in a lot of databases, without needing to make specific changes in the code for each type of database. In the thesis application, the database used is MySQL. So, to configure it, as we can see in the image above, the only thing that we have to specify is the mysql driver downloaded by Maven dependencies and the parameters for the connection with the database.
As mentioned above, the most important advantage of this API is that, if at any moment, the customer needs to change the database from MySQL to Oracle, there will not be any necessary changes in the code of the application (which will lead to
16
a lot of extra work). Instead, the only thing that has to be changed is the driver we are using for accessing the database. In this example, we will need to import the Oracle driver manually to our maven repository1. Once the driver is incorporated as a dependency to the maven local repository, we just have to write the necessary information to import that dependency and then, we just have to reload the application to generate the whole data model in the new database.
So, this is what JPA is designed for, but it is still just a specification (an API) and therefore it is not operative by itself. For this reason, it is needed to use an implementation of JPA and in this case Hibernate has been the one selected to do the job.
Hibernate has been chosen because, after doing some research about Spring in the Internet, we concluded that Hibernate is the data/object framework that has the biggest amount of information. Finally, the remaining question is, what is Hibernate for?
Hibernate makes all the necessary steps in order to convert the Java objects that we define in the application to database persistent data and vice versa.
In order to do that, Hibernate uses some configuration files as we explained in the previous section, the data.xml and datasource.xml files. Moreover, it is also needed to use annotations in order for Hibernate to know how to map the Java domain objects into database entities.
Hibernate has two major Java elements that are used for implementing JPA. Those elements are:
Entities: The entities are the Java domain objects required to convert our class diagram into code. These entities can be defined at first as normal Java classes (if it is easier for us to do it) as long as Hibernate annotations are also added to specify the mappings with database data. For example, we have an Exam Java class. This class has some attributes according to the class diagram:
o Name o Date o XML o …
One important thing that must not be forgot is that it is needed to explicitly define the class diagram with relationship based attributes. They are the attributes derived from any relationship between two classes. For this example, the relationship based attributes would be:
__________________________________
1 It is needed to do it manually because Oracle only let us download that driver from the official page, there is no Maven dependency set for this driver in the Internet and we need to set it locally.
17
o Collection of Exercises from a relationship “one to many” with the class Exercise
o Collection of Users from the relationship “many to many” between exams and users (owners of the exam)
Once we have all the attributes defined, it is time to annotate the objects. Those annotations are necessary for Hibernate to map the objects and their relationships into the database. Every class must be defined at the beginning as an Entity, meaning that there will be a table that will contain the objects of that class and their attributes. After that, the constructor and the getters and setters for the object must be generated and then, the only thing left is to annotate the getters with any important database attributes. For example, the date attribute for the exam is annotated as we can see in Figure 2.3.2:
Figure 2.3.2
For the relationship based attributes, it is needed to provide additional information about the relationship they establish. Further information about this will be given in section “Development of the proposed solution” but before that let us present an example of a ManyToMany and OneToMany relationships:
The first example (ManyToMany) can be seen in Figure 2.3.3 and it only has the annotations in the Exam class, because it is a unidirectional relationship and there is no need to specify the Exam as an attribute in the User class:
Figure 2.3.3
18
The second example has both Exam (Figure 2.3.4) and Exercise (Figure 2.3.5) getters:
The one for the exam, which establishes that in the related class, there will be an attribute called “exam” that address this relationship. In addition it specifies “CascadeType ALL” which means that, if an exam is deleted, all the associated exercises will be deleted too.
Figure 2.3.4
And the getter for the Exercise related class:
Figure 2.3.5
After implementing all the classes like this, Hibernate will be able to generate the data model from scratch in the database using the PopulateDatabase utility that will be explained in the section “Development of the Proposed Solution”.
As said before, Hibernate will create the tables, attributes and relationships in the database depending on the database management system specified in the configuration. That means that for MySQL, Hibernate will establish some different tables or relationships than it would do it for another database management system.
Furthermore, if at some point of the project, the customer asks us to change the database from MySQL to another type, we just need to specify again the new database in the configuration and run the PopulateDatabase utility to generate all the tables.
After that, the only thing left to know is how the application can interact with database data, apart from creating the tables and relationships that define them.
For that purpose, Hibernate uses a Java interface called Repository. Those repositories have some basic methods that can be used for the objects of the database. The methods of the repository are divided into fetch methods, which bring data from the database and convert them into Java objects.
19
These methods are findOne and findAll. In addition, there are also methods to convert Java objects into persistent data in the database. These methods are save and delete.
So, to define a new Repository, we just need to declare a new interface like this:
Figure 2.3.6
With this definition, the application is able to perform the previous simple methods in the Exam object. Besides, if we need more specific methods like fetching an exam whose name is “examname1”, we can add it as we explained before in the Spring section for the repositories.
It is worth mentioning that repositories can be used by any Java class in the application. They are usually used by Controllers and services, because they are the only classes that need to operate with database objects but, as we said, the usage of repositories is not limited to this set of classes.
Finally, if JPA and Hibernate are successfully integrated in our Spring application, it will be possible to fetch objects from database, store them into the database and even generate the data model from scratch. No need to say that, since the domain definition specifies the way the database is built, every domain change will need at least a regeneration of the database and will be very costly, above all, if the change happens at the last stages of the project.
2.4. – Apache Tomcat and JBoss
There are different containers for the application depending on the final environment in which they are deployed.
For development environment, Apache Tomcat is what has been used because it is much simpler to install, deploy, etc. Tomcat is just an application container that has compatibility with Java Server Pages and servlet based applications. The only thing that Tomcat allows us is to deploy applications in .war format. It is a very simple program and it allows us to quickly and easily deploy web applications.
However, maybe, for deployment environment the professors of the department need to use more features than just deploying this application in the future. For this reason, we have developed a JBoss configuration that will be given as an option just in case the customer wants to use JBoss in the final environment.
20
This is up to the customer once he/she checks how the application is working and it is marked as “Future Work” that will be done if finally needed.
The main advantage of using JBoss is that it is not only an application container, but also an application server. In contrast to an application container, an application server manages the deployment of the application and its data access (URL, user and pass of the database are stored in JBoss, not in the application), property files access, etc.
After testing both the technologies and checking their CPU and RAM usage, we concluded that JBoss is not really good for this application since it is a really simple app and the only thing that could be an advantage is the possibility of defining the datasource in the JBoss configuration instead of doing it inside the application.
Apart from that (which is not anything important in my opinion) JBoss is meant to be a server of multiple and more complex applications because it supports the management of several applications that may use the same or different databases, may use some properties defined for a group or need some kind of group permission in order to be able to use more or less RAM memory.
Since our application is much simpler than that, we decided that Tomcat is the only necessary technology for this project (because it lowers the RAM and CPU usage aswell).
Anyways, we have prepared a JBoss server with the configuration needed just in case in the future the customer will need an application server instead of a simple container.
2.5. – Git Repository
One of the most important things in every project is to have some kind of version control. In this case, a github repository has been used in order to establish the version control in the project.
Version control is important because it allows the developers to work without having the fear of changing something that breaks the application and then, not being able of reverting that fatal change; and to work without having the project stored in a just one computer that may crash and make us lose all the code, etc.
Git works with branches where the code is stored. Those branches can be updated by performing a commit of the changes, so that both the new updated branch and the old branch will be stored in the git repository as different versions separated by a commit.
There can be infinite number of branches and the managing of that branches is in charge of the version control manager. In most of the projects we have carried out using Git previously, there was a branch for each developer (each one had different tasks) and then, once finished all the tasks the branches were merged into one. In this case, since there is only one person developing the project, there are no
21
benefits resulting of using the merging feature of git. In other cases it is a really helpful tool because it makes the conflicts between different versions of code really easy to locate and fix.
So, since the goal of using Git for this project was only to store the changes having a version control and to make the professor able to download those changes inside his development environment, there were no need to create further branches or anything. We only use one branch of the repository and the developer is the only one with permissions to write into it.
To set up the Git repository in my development environment we had to first create a github project:
https://github.com/jesusbm92/thesisjbm
After that, Git is needed to be configured properly in Eclipse in order not to commit useless content or content that may affect the correct behavior of the application. So, after creating a new local repository that will use as remote repository the previous link with my user and password, the git repository view in Eclipse is shown as we can see in Figure 2.5.1:
Figure 2.5.1
Nevertheless, that is not all, because some steps have to be performed in order not to commit the Target folder or eclipse internal files that could lead to errors when other people download the code.
To do that, we have to create a .gitignore file inside the project root folder that will have all the “not commiting” directories and will be as follows:
Once that simple file is already created, the only thing left to do is to restart eclipse so that it reloads the Git configuration from the new .gitignore file.
After that, we will already have our repository ready to start working in the project. The only thing we have to remember from now on is to commit every time that a new feature is developed, every time that an older featured is fixed or updated and also include an explanatory (but not very long) commit message in order to know which part of the code were changed in every moment.
2.6. – MySQL Workbench
MySQL Workbench is the final database application used for this project. The main reason of choosing MySQL is that we have only a little experience with MySQL, since Spring is a really big thing to study and master, we preferred to choose a database that we had experience with.
So, the main problem was to choose a database between MySQL and Oracle. After working a little with both databases, we finally ended selecting MySQL because of its simplicity and efficiency in simple applications.
Oracle offers more management options such as users’ quota, tablespaces for each table and a lot of settings that allow the database manager to change the behavior of the database. This seems really nice but it is better for complex applications that have to be integrated with another applications, need to have strict tablespaces sizes, need user management in order for the user to be able to access only a few tables, etc.
After researching and studying the possibilities, MySQL has been selected because it offers good security settings, good user management and its official interface is free. It is used for simpler applications that do not need special database settings and it offers a simpler and better working interface than Oracle.
Next, now we will explain the main characteristics of the MySQL interface and how it was configured:
23
First we have created a new server (Figure 2.6.1) and a new connection (Figure 2.6.2) to that server:
Figure 2.6.1
Figure 2.6.2
In the server administration page, we can use a lot of options for managing the server database as we can see in Figure 2.6.3. In this case, the only options needed are Startup and Shutdown option, which lets us start and stop the database instance and Users and Privileges option, which allows us to create, modify, delete users and change their permissions:
Figure 2.6.3
24
The part to mention here is the Users and Privileges tab, because here we have defined two users for the database of the application:
Acme-manager: This user is used by the application in order to generate the schema, create the different tables and, if needed, insert some initial data. It is used by the Converter and the PopulateDatabase utility to generate the database and the exams with all the permissions, in order to avoid any possible error.
Acme-user: The second and last user represents the application. It only has four permissions (Insert, Update, Delete and Select) and it is used by the web application in any operation with the database.
The main reason for using two users is to keep separate roles, which increases order and security. With this settings, if someone is able to “hack” the web application and try to delete a table, it will not be possible since the web application module only uses an user without that kind of privileges. Moreover, in general, it is more useful to have a super user and a normal user in order to have the things more ordered.
The two users and their privileges (not the full list for the manager) are shown in Figure 2.6.4 and Figure 2.6.5:
Figure 2.6.4
Figure 2.6.5
After this, the connection page will be explained. In this page, we have several options to manage and define queries for the database server that we instantiated in the previous paragraphs. Some of the tasks that can be performed here are creating a new schema, open a new query editor to directly execute queries against the database, export sql scripts that can be used in our database, etc.
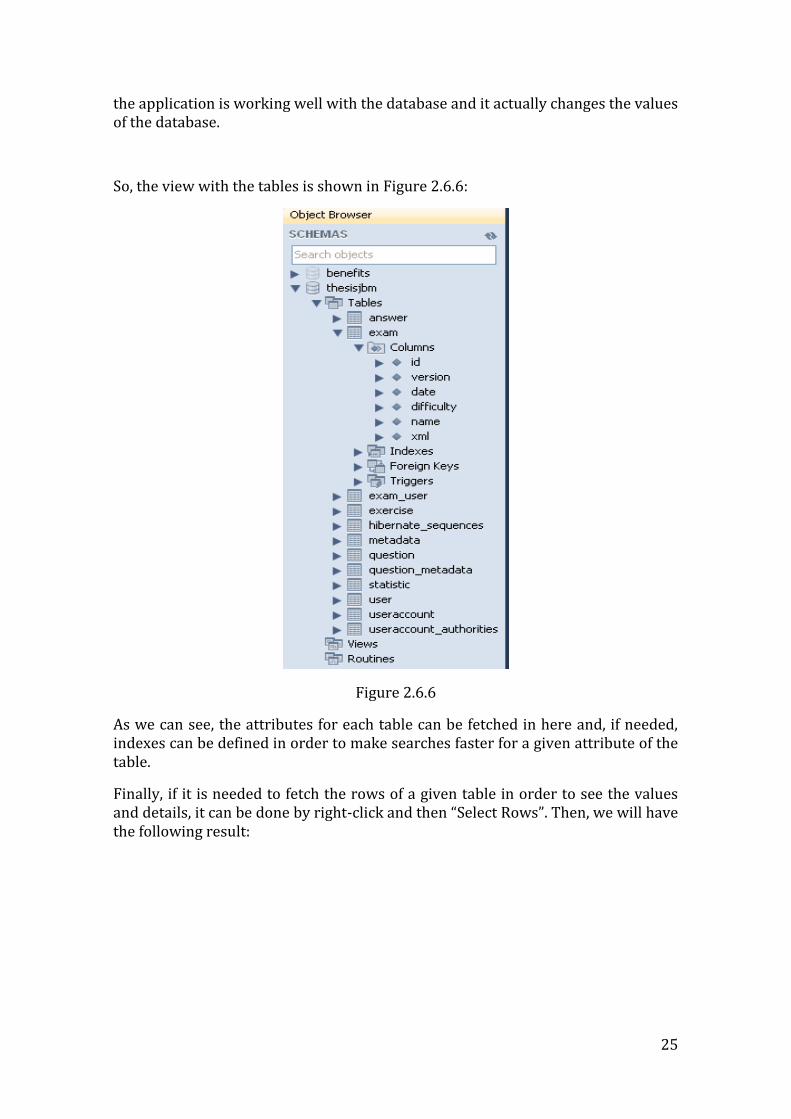
The main functionality here is that it is possible to see the schema structure, with its tables, attributes and so on. For this reason, this can be used to check whether
25
the application is working well with the database and it actually changes the values of the database.
So, the view with the tables is shown in Figure 2.6.6:
Figure 2.6.6
As we can see, the attributes for each table can be fetched in here and, if needed, indexes can be defined in order to make searches faster for a given attribute of the table.
Finally, if it is needed to fetch the rows of a given table in order to see the values and details, it can be done by right-click and then “Select Rows”. Then, we will have the following result:
26
Figure 2.6.7
2.7. – JSP
Java Server Pages (JSP) is a technology developed in order to make the life of the developers easier when they want to implement dynamic web pages based in HTML. JSP is very similar to PHP but it is based on Java.
JSP is usually used in Servlet applications because it uses the servlet to render the final web page in the client browser. Luckily, our application is Servlet based so JSP can be used easily and with maximum efficiency.
These pages combine three different elements (after the enumeration it will be shown a simple example with the three elements):
Plain HTML: It is used as the common HTML, defining tables, rows, columns, buttons and any other HTML element that can come to our minds. In addition, this HTML is used to define forms that will be submitted to our application and then managed by our controllers.
Java Code: The Java code can be inserted into the HTML elements in order to print or use some variable when rendering the web page. For this purpose, we can either use “<% %>” annotations between our Java code or we can use the recommended way, which consists in using ${ } between our Java code to print or check any variable value that has been passed to the page.
Spring Messages: As this application supports internationalization, there are some spring messages codes inside the HTML code. These Spring messages codes relate to the properties written into the message properties files (explained before in this document). Once a page is rendered, it consults the message property file with the language that matches the current user’s language. If it does not find any Spring message code written in the web page, it will raise an error, but if it finds the message code, it will render the web page in the desired language.
Next let us show an example in Figure 2.7.1 in which the Java code is marked red, the Spring message code is marked blue and the rest is plain HTML:
27
Figure 2.7.1
28
3. – Specification of Software Requirements
In this section, the requirements for both the Converter and the Web Application will be detailed. In order to gather all these requirements, several meetings have been needed. Most of the requirements were listed in the first two meetings but, after that, a requirement refining was performed.
This means that in the following set of meetings, the requirements maintained their structure, but changed the details that were wrong. By doing this, both the developer and the customer finally agreed on the final version of the requirements and the development of the application could start.
Requirements will be presented following the standard template for requirements IEEE 830 but, since there are many sections of the IEEE 830 template that are already explained in this document or do not make sense in this project, they will not be outlined below.
3.1. – Requirements for the Converter
The converter, as explained before in the Introduction, is a tool that allows the professors to change the format of the old exams to the new database format in order to keep the information and be able to apply already employed questions and exams in the new exams that will be created by means of the web application.
Code CONV-001
Name Convert exam files
Description The converter must be able to transform the old exam files in “.tst” format (see Annex 1 at the end of the document) to database data, keeping the original existing attributes and relationships.
Inputs (if any) File in “.tst” format that contains the information about an exam
Outputs Database objects and relationships created
Notes
These .tst files contain information about an exam (Exam, exercises, questions and answers). If some values that should appear in the “.tst” files are not present, then create the database objects without that values and ignore that they are not in the “.tst” file
29
Code CONV-002
Name Convert statistic files
Description The converter must transform the statistic files stored in “.sts” format (see Annex 2 at the end of the document) and add that information to the correct object in the database
Inputs (if any) File in “.sts” format that contains statistic information about an specific exam
Outputs Database object related in the .sts file updated successfully
Notes The .sts files are related to only one .tst file. The conversion made in this requirement must update the database object that is referenced by the .tst file.
Code CONV-003
Name Generate XML
Description The converter must take the information of the “.tst” file and be able to extract an XML that represents the exam stored in that file. This XML is shown in the Annex 3 of this document.
Inputs (if any) File in “.tst” format that contains the information about an exam
Outputs XML that represents the exam stored in the “.tst” file
Notes The information about the structure of that XML has been given by the customer and it is not contained in the “.tst” nor in the “.sts” files
Code CONV-004
Name Converter in the web application
Description The converter must be able to be accessed by the web application and the user must be able to provide all necessary data to make the converter work correctly
Inputs (if any) -
Outputs The database objects created by the converter
Notes In order to offer more comfort to the user, the converter must be accessible from the web application
30
3.2. – Requirements for the Web Application
The Web application requirements are divided into three different categories:
1. Requirements that are not related to the user that is currently logged in (general requirements)
2. Requirements related to any normal user of the web application
3. Requirements related to the administrator of the web application
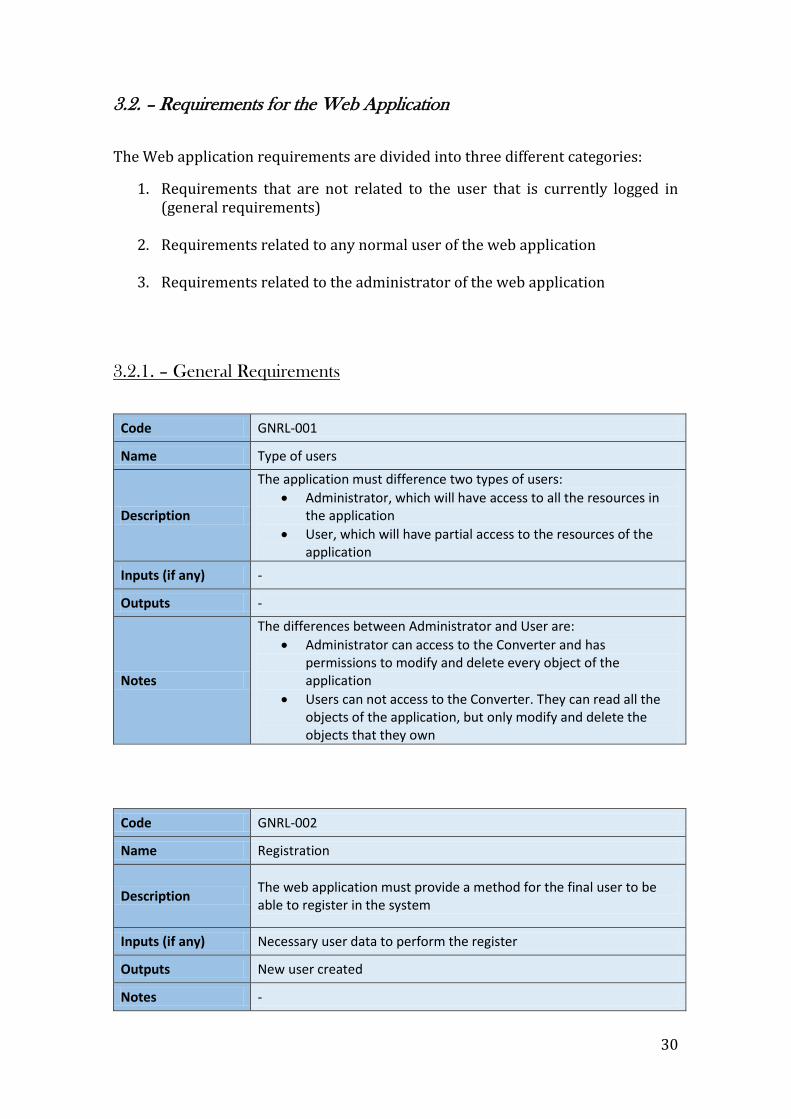
3.2.1. – General Requirements
Code GNRL-001
Name Type of users
Description
The application must difference two types of users:
Administrator, which will have access to all the resources in the application
User, which will have partial access to the resources of the application
Inputs (if any) -
Outputs -
Notes
The differences between Administrator and User are:
Administrator can access to the Converter and has permissions to modify and delete every object of the application
Users can not access to the Converter. They can read all the objects of the application, but only modify and delete the objects that they own
Code GNRL-002
Name Registration
Description The web application must provide a method for the final user to be able to register in the system
Inputs (if any) Necessary user data to perform the register
Outputs New user created
Notes -
31
Code GNRL-003
Name Login
Description Every user (and the admin) registered in the web application must be able to access the application by providing their login information
Inputs (if any) Username and password of a registered user
Outputs -
Notes -
3.2.2. – Web Application User Requirements
The requirements that are going to be explained here are related to what the user can achieve once he/she is logged in into the web application. Before starting listing the requirements, we should clarify that a user is the owner of the objects that he/she created and only that user can modify or delete those objects. In addition, we have to say that the collaborators are users that have permissions over an exam but did not create that exam (so they are not owners)
Code USR-001
Name List Exams
Description
The user must be able to list all the exams that exist in the system and see information about them. The information that must be provided is:
Name
Date of last modification
Difficulty
XML
Exercises of that exam
Inputs (if any) -
Outputs The list of all the exams stored in the application
Notes The difficulty of the exam is derived from the difficulty of all the questions that compose that exam.
32
Code USR-002
Name Create Exam
Description The user must be able to create a new exam
Inputs (if any)
Needed information for creating an exam that must be:
Name of the exam
Collaborators
Outputs The new exam is created in the application
Notes The collaborators are other users that are considered owners of the exam, even if they did not create it
Code USR-003
Name Modify or Delete Exam
Description The user must be able to modify the attributes and the exercises of an exam or delete the exam only if the user is owner or collaborator of that exam
Inputs (if any) Exam modified or deleted
Outputs Exam is updated in the database or deleted
Notes -
Code USR-004
Name List of Exercises of an Exam
Description
The user must be able to list the exercises contained in a given exam and the information about those exercises. That information for each exercise is:
Name
Text
Questions of that exercise
Inputs (if any) Exam that contains the exercises to list
Outputs List of exercises of that exam
Notes -
33
Code USR-005
Name Create new Exercise
Description
The user must be able to create a new Exercise, providing the necessary information. That information is:
Name
Text
Inputs (if any) Information of that new exercise
Outputs New exercise is created in the application
Notes -
Code USR-006
Name Create Exercise from parent
Description The user must be able to create a new exercise that will be a copy of an existing exercise stored in the application.
Inputs (if any) Exercise to be copied
Outputs New exercise is created in the application
Notes -
Code USR-007
Name Modify or delete Exercise
Description The user must be able to modify the attributes of an exercise (Name and Text) or delete the exercise only if the user is owner or collaborator of the exam that contains that exercise
Inputs (if any) Modified or deleted Exercise
Outputs The Exercise is updated or deleted
Notes -
34
Code USR-008
Name List of Questions of an Exercise
Description
The user must be able to list the questions contained in a given exercise and the information about those questions. That information is:
Name
Text
XML
Difficulty
Weight
Weight of fail
Metadata of that question
Answers of that question
Inputs (if any) Exercise which contains the questions to list
Outputs List of questions of that exercise
Notes -
Code USR-009
Name Create new Question
Description
The user must be able to create a new Question, providing the necessary information. That information for each question is:
Name
Text
Weight
Weight of fail
Metadata
Inputs (if any) Information of that new question
Outputs New question is created in the application
Notes -
Code USR-010
Name Create Question from parent
Description The user must be able to create a new question that will be a copy of an existing question stored in the application.
Inputs (if any) Information of that new question
Outputs New question is created in the application
Notes -
35
Code USR-011
Name Modify or delete Question
Description The user must be able to modify the attributes of a question or delete the question only if the user is the owner of that question
Inputs (if any) Modified or deleted Question
Outputs The Question is updated or deleted
Notes The question has different ownership from the exam. Only the creator of the question can modify it and its attributes and there is no possibility of collaborations
Code USR-012
Name List Answers of a Question
Description
The user must be able to list the answers contained in a given question and the information about those answers. That information is:
Name
Text
Correctness
Penalty
Inputs (if any) Question that contains the answers to list
Outputs List of answers of a given question
Notes -
Code USR-013
Name Create new Answer
Description
The user must be able to create a new Answer, providing the necessary information. That information is:
Name
Text
Correctness
Penalty
Inputs (if any) Information of that new answer
Outputs New answer is created in the application
Notes -
36
Code USR-014
Name Modify or delete Answer
Description The user must be able to modify the attributes of an answer or delete the answer only if the user is the owner of the question that contains that answer
Inputs (if any) Modified or deleted Answer
Outputs The Answer is updated or deleted
Notes -
Code USR-015
Name List Metadata
Description
The user must be able to list all the metadata that exist in the application. The information that must be provided for each metadata is:
Name
Inputs (if any) -
Outputs List of all the metadata which exist in the application
Notes -
Code USR-016
Name Create Metadata
Description The user must be able to create a new Metadata, providing the necessary information. That information is:
Name
Inputs (if any) Necessary information of the new metadata
Outputs New metadata created
Notes -
37
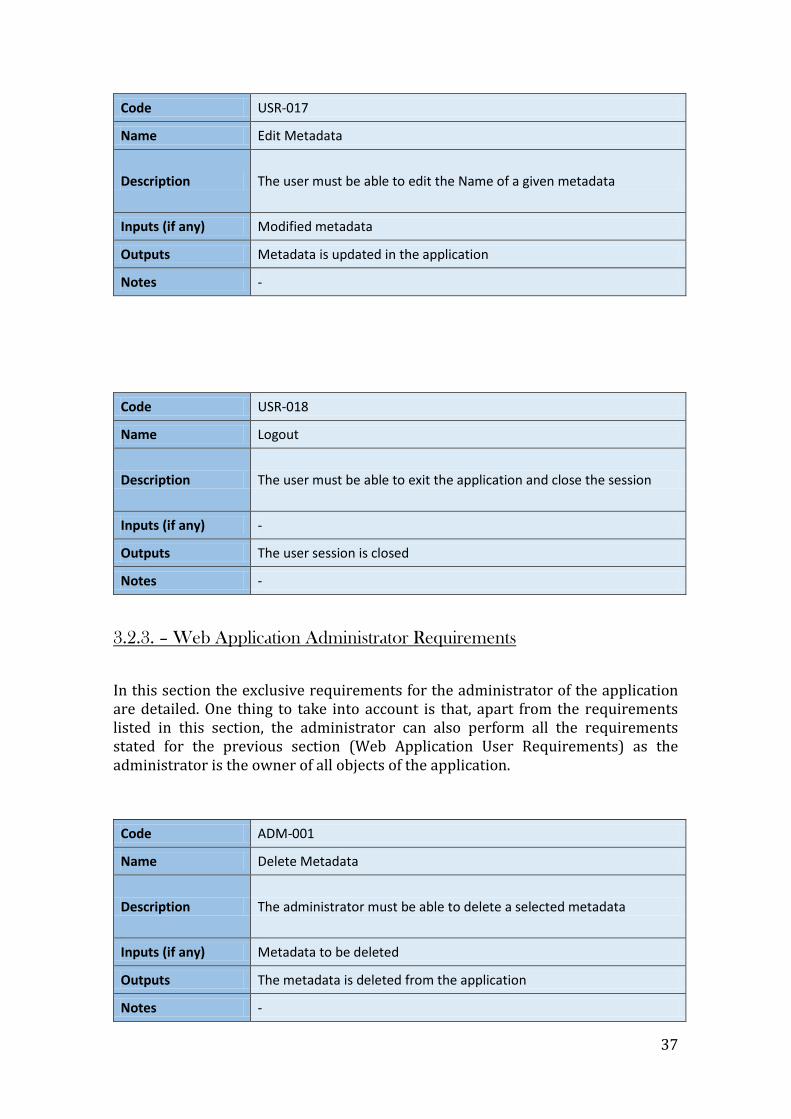
Code USR-017
Name Edit Metadata
Description The user must be able to edit the Name of a given metadata
Inputs (if any) Modified metadata
Outputs Metadata is updated in the application
Notes -
Code USR-018
Name Logout
Description The user must be able to exit the application and close the session
Inputs (if any) -
Outputs The user session is closed
Notes -
3.2.3. – Web Application Administrator Requirements
In this section the exclusive requirements for the administrator of the application are detailed. One thing to take into account is that, apart from the requirements listed in this section, the administrator can also perform all the requirements stated for the previous section (Web Application User Requirements) as the administrator is the owner of all objects of the application.
Code ADM-001
Name Delete Metadata
Description The administrator must be able to delete a selected metadata
Inputs (if any) Metadata to be deleted
Outputs The metadata is deleted from the application
Notes -
38
Code ADM-002
Name Convert Exam File
Description The administrator must be able to execute the converter selecting the “.tst” file to be converted
Inputs (if any) Directory to the tst file
Outputs The objects created by the converter
Notes -
3.3. – Use Cases
In this section, the requirements will be expressed as Use Cases, so they will be easier to understand and easier to put into a context. First, the Use Case diagram will be shown in order to have a global overview of the solution. After that, each use case will be detailed in order to understand the behavior of the application the better way possible. There are different roles and they inherit all the use cases from the lower level roles. In this case, a collaborator inherits all the use case operations from the regular user, an owner inherits the methods from the collaborator (and at the same time from the regular user due to the inheritance definition) and finally, the administrator inherits the methods from the owner. For this reason, the diagrams will only reference the use cases from the lower permission lever users that are involved in a relationship. The rest will not be detailed again since it would be repetitive. The use case diagram will be separated in:
Diagram for User (Figure 3.3.1) Diagram for Collaborator (Figure 3.3.2) Diagram for Owner (Figure 3.3.3) Diagram for administrator (Figure 3.3.4)
39
Figure 3.3.1
40
Figure 3.3.2
Figure 3.3.3
41
Figure 3.3.4
42
After showing diagrams, we will detail each use case as follows:
Name UC000 - Exam Details
Description The user wants to see the details of an exam
Pre-condition The user must be logged in the system
Normal Path 1. The final user selects the option to show the details of an exam 2. The system retrieves the exam and shows it to the user
Alternative Path -
Post condition The exam is shown to the user
Inputs (if any) -
Name UC001 - Create Exam
Description The user wants to create a new exam in the system
Pre-condition The user must be logged in the system
Normal Path
1. The final user selects the option to create a new exam 2. The system asks the user to fill the data needed to create a new
exam 3. The user fills and sends the data to create a new exam 4. The system creates the new exam and notifies the user
Alternative Path a) If the introduced input “Name” is blank, the system will return
an error
Post condition The exam is now created in the system
Inputs (if any) Name
Collaborators
Name UC002 - Metadata Details
Description The user wants to see the details of a metadata
Pre-condition The user must be logged in the system
Normal Path 1. The final user selects the option to show the details of a
metadata 2. The system retrieves the metadata and shows it to the user
Alternative Path -
Post condition The metadata is shown to the user
Inputs (if any) -
43
Name UC003 - Modify metadata
Description The user wants to edit a metadata stored in the system
Pre-condition The user must be logged in the system
Normal Path
1. The final user selects the option to edit a metadata 2. The system shows the user the data of that metadata that can
be modified 3. The user modifies the data. 4. The user selects the option to save and send the data to the
system 5. The system saves the metadata with the new data
Alternative Path a) If any introduced input is blank, the system will return an error
Post condition The metadata is updated
Inputs (if any) Name
Name UC004 - Exercise Details
Description The user wants to see the details of an exam
Pre-condition The user must be logged in the system
Normal Path
1. The use case UC000 - Exam Details is performed (Extend clause) 2. The final user selects the option to show the details of an
exercise 3. The system retrieves the exercise and show it to the user
Alternative Path -
Post condition The exercise is shown to the user
Inputs (if any) -
Name UC005 - Question Details
Description The user wants to see the details of a question
Pre-condition The user must be logged in the system
Normal Path
1. The use case UC004 - Exercise Details is performed (Extend clause)
2. The final user selects the option to show the details of a question
3. The system retrieves the question and show it to the user
Alternative Path -
Post condition The question is shown to the user
Inputs (if any) -
44
Name UC006 - Answer Details
Description The user wants to see the details of an answer
Pre-condition The user must be logged in the system
Normal Path
1. The use case UC005 - Question Details is performed (Extend clause)
2. The final user selects the option to show the details of an answer
3. The system retrieves the answer and shows it to the user
Alternative Path -
Post condition The answer is shown to the user
Inputs (if any) -
Name UC007 - Create metadata
Description The user wants to create a new metadata
Pre-condition The user must be logged in the system
Normal Path
1. The user selects the option to create a new metadata 2. The system asks the user the necessary information in order to
create a new metadata 3. The user fills the data and send it to the system 4. The system creates the new metadata
Alternative Path a) If there is any blank value in the input data, the system will raise
an error
Post condition The metadata is now created in the system
Inputs (if any) Name
Name UC008 - Modify or delete exam
Description The user wants to edit or delete an exam stored in the system
Pre-condition The user must be logged in the system and be a collaborator (or owner) of the given exam
Normal Path
1. The use case UC000 - Exam Details is performed (Extends) 2. The final user selects the option to edit an exam 3. The system shows the user the data of that exam that can be
modified 4. If the user chooses to delete the exam, go to step 6. If the user
wants to edit it, go to step 5. 5. The user modifies the data. 6. The user selects the option to save (if editing) or to delete (if
deleting) the exam 7. The system performs the selected option and notifies the user
Alternative Path a) If the introduced input “Name” is blank, the system will return
an error
Post condition The exam is updated or deleted in the system
Inputs (if any) Name
Collaborators
45
Name UC009 - Modify or delete exercise
Description The user wants to edit or delete an exercise stored in the system
Pre-condition The user must be logged in the system and be a collaborator (or owner) of the exam that contains that exercise
Normal Path
1. The use case UC004 - Exercise Details is performed (Extends) 2. The final user selects the option to edit an exercise 3. The system shows the user the data of that exercise that can be
modified 4. If the user chooses to delete the exercise, go to step 5. If the
user wants to edit it, go to step 4. 5. The user modifies the data. 6. The user selects the option to save and send the data to the
system(if editing) or to delete (if deleting) the exercise 7. The system performs the selected option and notifies the user
Alternative Path a) If any introduced input is blank, the system will return an error
Post condition The exercise is updated or deleted in the system
Inputs (if any) Name
Text
Name UC010 - Create Exercise
Description The user wants to create an exercise inside an exam
Pre-condition The user must be logged in the system, the exam must exist and the user must be a collaborator (or owner) of that exam
Normal Path
1. The user selects the option to create a new exercise for a given exam
2. The system asks the user the necessary information in order to create a new exercise for that exam
3. The user fills the data and send it to the system 4. The system creates the new exercise and make the association
with that exam
Alternative Path
a) Step 1: If the user wants to create an exercise that will be copied from another, the steps are as follows: 1. The user selects the option to create a new exercise from a parent
inside a given exam 2. The system retrieves the list of all the stored exercises and shows
it to the user 3. The user now can filter the exercises by Name, Text or Metadata 4. The user selects the exercise that he/she wants to copy 5. The system creates a copy of the selected exercise inside the given
exam
b) If there is any blank value in the input data, the system will raise an error
c) If the selected exam does not exist, the system will raise an error
Post condition The exercise is now created in the system and associated with the given exam
Inputs (if any) Exam
Name
Text
46
Name UC011 - Create Question
Description The user wants to create a question inside an exam
Pre-condition The user must be logged in the system, the exam must exist and the user must be a collaborator (or owner) of that exam
Normal Path
1. The user selects the option to create a new question for a given exam
2. The system asks the user the necessary information in order to create a new question for that exam
3. The user fills the data and send it to the system 4. The system creates the new question and make the association
with that exam
Alternative Path
d) Step 1: If the user wants to create a question that will be copied from another, the steps are as follows: 6. The user selects the option to create a new question from a parent
inside a given exam 7. The system retrieves the list of all the stored questions and shows
it to the user 8. The user selects the question that he/she wants to copy 9. The system creates a copy of the selected question inside the
given exam
e) If there is any blank value in the input data, the system will raise an error
f) If the selected exam does not exist, the system will raise an error
Post condition The question is now created in the system and associated with the given exam
Inputs (if any)
Exam
Exercise
Name
Text
Weight
Weight of fail
Metadata
47
Name UC012 - Modify or delete question
Description The user wants to edit or delete a question stored in the system
Pre-condition The user must be logged in the system and be the owner of the question
Normal Path
1. The use case UC005 - Question Details is performed (Extends) 2. The final user selects the option to edit a question 3. The system shows the user the data of that question that can be
modified 4. If the user chooses to delete the question, go to step 5. If the
user wants to edit it, go to step 4. 5. The user modifies the data. 6. The user selects the option to save and send the data to the
system(if editing) or to delete (if deleting) the question 7. The system performs the selected option and notifies the user
Alternative Path a) If any introduced input is blank, the system will return an error
Post condition The question is updated or deleted in the system
Inputs (if any)
Name
Text
Weight
Weight of fail
Metadata
Name UC013 - Modify or delete answer
Description The user wants to edit or delete an answer stored in the system
Pre-condition The user must be logged in the system and be the owner of the question that contains that answer
Normal Path
1. The use case UC006 - Answer Details is performed (Extends) 2. The final user selects the option to edit an answer 3. The system shows the user the data of that answer that can be
modified 4. If the user chooses to delete the answer, go to step 5. If the user
wants to edit it, go to step 4. 5. The user modifies the data. 6. The user selects the option to save and send the data to the
system(if editing) or to delete (if deleting) the answer 7. The system performs the selected option and notifies the user
Alternative Path b) If any introduced input is blank, the system will return an error
Post condition The answer is updated or deleted in the system
Inputs (if any)
Name
Text
Correctness
Penalty
48
Name UC014 - Create answer
Description The user wants to create an answer inside a question
Pre-condition The user must be logged in the system, the question must exist and the user must be the owner of that question
Normal Path
1. The user selects the option to create a new answer for a given question
2. The system asks the user the necessary information in order to create a new answer
3. The user fills the data and send it to the system 4. The system creates the new answer and makes the association
with the question
Alternative Path
a) If there is any blank value in the input data, the system will raise an error
b) If the selected question does not exist, the system will raise an error
Post condition The answer is now created in the system and associated with the given question
Inputs (if any)
Question
Name
Text
Correctness
Penalty
Name UC015 - Convert exam file
Description The administrator wants to transform a “.tst” file into objects of the system
Pre-condition The user must be logged in the system and have the role of Administrator
Normal Path
1. The final user selects the option to convert an exam file 2. The system asks the user for the directory where the exam file is 3. The user enters the directory and sends it to the system 4. The system executes the converter and notifies the user with
the result
Alternative Path
a) If any introduced input is blank, the system will return an error b) If the file has a wrong format, the system will return an error c) If the directory does not contain a file in tst exam format, the
system will raise an error
Post condition The exam is converted from the file into system objects
Inputs (if any) Path to exam file
49
Name UC016 - Delete metadata
Description The user wants to delete a metadata stored in the system
Pre-condition The user must be logged in the system and have the role of Administrator
Normal Path
1. The use case UC002 - Metadata Details is performed (Extends) 2. The final user selects the option to edit a metadata 3. The system shows the user the metadata that can be modified 4. The user selects the option to delete the metadata 5. The system deletes the selected metadata
Alternative Path -
Post condition The metadata is deleted
Inputs (if any) The name of the metadata to be deleted
50
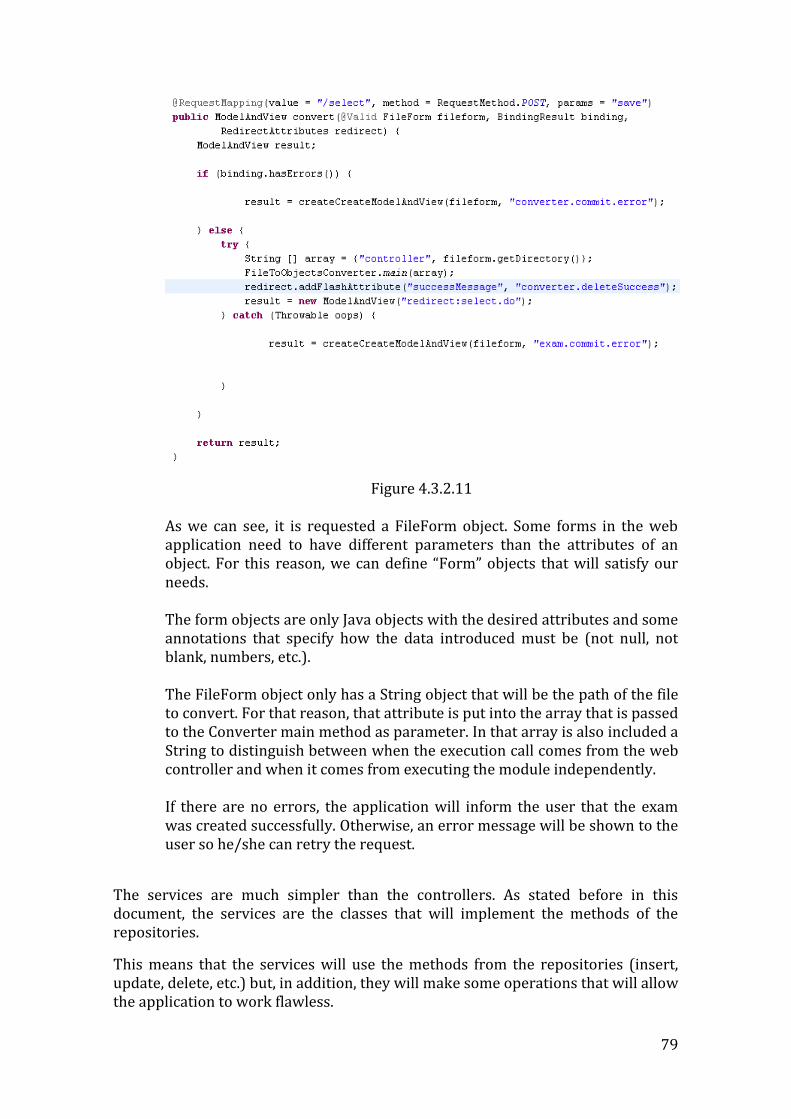
4. – Development of the Proposed Solution As explained before, this application aims to solve a specific problem. Professors have some difficulties to create new exams because they typically need to review preview exams in text files for reusing previous questions. After that, they have to create a new text file for the new exam from all the gathered information. This task is consuming more and more time since the number of text files with exams is increasing across years. For that reason, the goal of this application is to help the professors with this task. That means that the application will make this task much easier, user friendly and the time to perform it will be reduced significantly. In addition, legacy exams should not be lost. For that reason, there is a separate module in the application that imports exams in a text file format called .tst, and in this way supports the processing and visualization of this material in the web application. In this section the development of this application will be detailed. That means that there will be an explanation about:
Architecture: In this section, the components of the application and their connections will be explained and detailed in order to know how the application works internally and communicate with the different external components such as the database.
Design of the converter: The converter, as said before, is a separate module from the web application (although is used by the application itself). For this reason, there will be a section to explain the design of the converter and how it parses the files and translates the contents of these files into objects.
Design of the web application: Here, the whole web application design is explained. There are some diagrams that have to be stated here in order to finally understand the working process of the application:
o Navigation diagram o Controllers description o Class diagram o Database diagram o Sequence diagrams
After this brief introduction about the structure of the section, the architecture will be explained.
51
4.1 – Architecture of the application
First of all, the architecture diagram will be shown in Figure 4.1.1 and then each of its components will be explained in order to clarify the final architecture of the application.
Figure 4.1.1
52
The components will be explained following the normal operation process:
1. The database tables have to be populated if the database is not initialized. 2. The domain generates the repositories that will access the database. 3. The client web browser makes a request to the application.
Populate Database: This is a utility class that is used to generate the database tables from the Domain (That will be explained after this). In order to generate the tables, this class uses a XML file that contains the information about the domain objects that will be persisted into the database on creation.
If this XML is empty, nothing will be uploaded to the database after the tables’ creation. However, in this case, since the application has users that have to log in the system in order to perform tasks, some users should be created. In Figure 4.1.2 we can see the definition of the users in the XML file:
Figure 4.1.2
With this, the Populate Database utility will generate the tables of the database (that will be seen in the database table diagram later in this document). Now the domain is the following issue to explain according to the order stated above.
Domain: The domain is the set of classes represented in the class diagram (will be seen later in this document). These classes in the global architecture are used to generate the data model and repositories.
53
More details about the domain will be provided in the design section. In this case, the only issues that we need to know about the domain are:
It is used to generate the database model with the help of the Populate database utility class.
It generates the model for the repositories, which will use the domain classes and annotations to validate every object to be stored in the database.
After the domain, the repositories are the next issue to explain.
Repositories: The repositories, as was explained before in this document, make the application able to fetch items from the database and/or persist them. In this context, persisting means every operation that updates an entry in the database. This update can be either save, modify or delete the entry.
As mentioned before, the repositories are interfaces that always have the structure shown in Figure 4.1.3:
Figure 4.1.3
Inside the interface, we can define any method we need (we will not explain it because it was stated before in section 2.2 of this document). The novelty about this section is that, in order to use repositories in every persistent class, we have to import them using the “Autowired” annotation. As a result of this, the repository will be correctly imported and it will enable its correct usage.
Since repositories are only Java interfaces, they cannot implement the methods that they define. For example, they specify the “Delete” method and the only thing that this method does is to specify the database query with a “DELETE FROM tablename WHERE id=’parameter’”. Interfaces do not implement any method, they just define the query that must be performed during the execution.
This is not a very scalable feature since sometimes it is needed to check or modify some parameters to perform a method. For this reason, the only place where the repositories are imported are in the “Services”. These classes will be explained later in this section but they are basically the classes that allow us to implement the methods of the repositories.
After explaining the process of populating the database at the beginning and how the domain and the repositories are used in the application, it is time to know a usual dataflow in the application, starting from the client browser request and finishing with the new (or same) view rendered on the client browser, with the result of the performed by the application.
54
In this example, we are going to imagine that the user is in a random view of the system and he/she wants to see the list with all the exams in the system. In order to do that, the client will select the option to go to the exam list page and the following sequence begins:
1. First, the client web browser tries to access a new URL (given by the option selected in the web page) and it passes the request to the Tomcat server.
2. The server uses its resources to check which web application is the one requested by the browser. In order to do that, the Tomcat server will check the following highlighted value (which must be unique in the Tomcat deployment unit) and compare to its registered applications:
http://server-ip/ThesisJBM/** Once this has been checked, the server will send the request to the specific application.
3. When the application receives the request, it first uses the Dispatcher Servlet and the Handler mapping: Handler Mapping: First, the handler mapping is just a simple tool used by Spring. This tool has stored the controllers’ mapping, which means the base URL associated to each controller. Dispatcher Servlet: It is the tool that is used by Spring in order to send the requests to the different controllers that the application has. When it receives a request, it first consults the handler mapping (explained above) and this handler answers with the controller that is registered for that URL.
4. Then, the request is sent to the specified controller, which is in charge of performing all the necessary tasks in order to get the final goal, which is to show the user the view with the list of exams. Then, the controller will first retrieve the list of exams that has to be shown to the user. In order to do that, the use of the Service class is needed. As said before, the Service class is the one that implements the repositories and therefore, it can be used to access the database. This service class initializes the repository using the “Autowired” annotation explained before:
Figure 4.1.4
So, the controller can rely on the service class in order to call the repository methods. In this case, we need the full list of exams so it needs to call is the method of the service class shown in Figure 4.1.5:
55
Figure 4.1.5
In this example, the findAll method does not have any further implementation, so the only thing to do inside the method is to call the repository’s same method. In other cases, it will be necessary to check some variables or remove elements from the parameters.
Once the controller has all the elements that it needs, it will proceed to call the view that is in charge of showing the list of exams and will include the retrieved list in that call.
5. Now, the view receives the controller request (which have the list of exam inside) and will render the HTML content. The views were explained before in section 2.2.
6. To finish, the view will return the response to the client web browser. This response will be the “list of exams” view rendered.
7. The application now waits for another request and will repeat the same process.
It is worthy pointing out that the controller is related to the exam converter somehow. This connection does not mean that all the controllers are using the Converter, but it rather means that there is one controller (the controller that is in charge of the converter view) that uses it.
This controller will take the directory of the file from the user input in the web application and then, will call the Converter module to perform the conversion of that file. If there are no errors, a success message is shown to the user and the task is finished.
To sum up, this relationship is represented in figure 4.1.1 to show that the web application is fully integrated with the Convert module.
4.2. – Design of the converter
Before explaining this section, it is needed to remind that there are two kind of files that store exams:
TST and STS files, which contains the majority of the exams (see Annex 1 for TST file example and Annex 2 for STS file example).
XML, which is a recent new format for exams and is only employed for a few exams.
56
The converter is the part of the project that allows the final user to convert the text files that contain exams into database data that can be used by the application, solving the problem of losing all legacy exams when adopting the new web application system.
The converter was first developed with the idea of being a totally independent module. That means that the converter could only be used outside the web application, running a standalone Java program.
Nevertheless, after several meetings where the improvements of the application were shown to the customer, the requirement of using directly the converter inside the web application appeared.
So, when this final requirement were stated and correctly defined, the converter was successfully integrated with the web application and now, the administrator can convert files only by providing the path of that file. Then, the controller will call the method of the converter, passing the path as a parameter.
Once the converter finishes the method, the controller will return the success/failure of the task and, if it is successful, the new exam will be created in the database.
The converter will transform the text file into:
One exam with: o Name o Date o XML o Difficulty o Exercises
Each exercise has the following attributes: o Name o Text o Questions
Each question has the following attributes: o Name o Text o XML o Difficulty o Weight o Weight of fail (optional) o Metadata (optional) o Answers
Each answer has the following attributes: o Name o Text o Correct o Penalty (optional)
Statistics for each question. Each question has a Statistic object associated that comes from the STS file related to the exam. This file has the final statistics about each question that is:
57
o Percentage of people who answered correctly the associated question. (Optional)
There are some elements marked as optional for a reason. This reason is that these elements that never appear in the TST and STS files, but only in the more recent XML format, which just has been used for a pair of exams.
So, for almost all legacy exams, the optional values will be put as blank. The main advantage of using the web application is that these values can be modified later in an easy way through the GUI.
Before explaining the workflow of the converter, a diagram of how it works will be shown in Figure 4.2.1:
Figure 4.2.1
58
Let us will explain with more detail the different phases of the converter program:
Phase one: The converter fetches the TST file into memory using the path provided by the final user. After fetching this file correctly (if there is an error, the converter will throw an exception), there are some attributes of the exam that are set at the beginning. These attributes are:
o Name: The name of the exam will be the name of the file without the extension.
o Date: The date for the exam will be taken from the file’s last modification date and will be set with that value.
o Beginning of XML: Since the converter is reading the file line by line, the XML of the exam must be completed part by part by concatenating the previous parts to the next one. For this reason, the first part of the XML of the exam is set here in the beginning.
Phase two: After that, the converter start reading the lines of the file, taking into account the format of the TST files. So, when a line that defines an exercise, question or answer is read, the converter will create the object and set the attributes according to the data read from the line. As the file is processed, the relationships between the objects already created will be defined.
Phase three: Then, the STS file will be fetch into memory. In order to do that automatically, the previous path (of TST file) will be replaced by the same directory and file, but changing the extension of the file for “.STS”. Once the STS file is loaded, we can now set the rest of properties. Every time one question is saved in memory, the converter searches the STS file for the question name. When it finds it, it creates a new Statistic object that will be used to set the question difficulty and the exam difficulty (which is the average of all the questions’ difficulty).
Phase four: Finally, the converter opens a Hibernate session and persists the objects that have been created during the execution into the database. After persisting all the objects, the converter closes the session and finishes its execution, leaving the new objects in the database available to be accessed by any registered user in the web application.
59
4.3. – Design of web application
4.3.1. – Navigation diagram
The navigation diagram for the web application is shown in Figure 4.3.1.1:
Figure 4.3.1.1
60
In order not to overload the diagram with lines, there are some lines that have not been drawn. These lines are:
Every user can access from any page: o Exam List o Create Exam o Metadata List o Create Metadata o Login (through logout option)
The administrator can access from any page the “Convert File to Exam” page.
These pages can always be accessed because there are a basic menu that remains in all pages of the application which have the options to redirect to the pages stated before. So, since drawing all those lines will make the diagram much less understandable, the lines have not been drawn.
Also, apart from that there is another view which is not related to any user. It is the registration page used to create a new user (N020 – Registration) shown in Figure 4.3.1.2:
Figure 4.3.1.2
Now, the final web pages will be shown in order to know the aspect of each page specified in the navigation diagram.
61
N000 – Login
N001 – Exam List
62
N002 – Create exam
N003 – Modify or delete exam
63
N004 – Exercise List
N005 – Create exercise
64
N006 – Modify or delete exercise
N007 – Create exercise from parent
65
N008 – Question List
N009 – Create question
66
N010 – Modify or delete question
N011 – Create question from parent
67
N012 – Answer List
N013 – Create answer
68
N014 – Modify or delete answer
N015 – Metadata List
69
N016 – Create metadata
N017 – Edit metadata
70
N018 – Delete metadata
N019 – Convert File to Exam
71
N020 – Register
4.3.2. – Description of controllers and services
The controllers, as explained before, are the heart of the web application. They manage all the requests and make the views able to show information of the data model. There is a controller for each domain class and they are in charge of receiving the client web browser request, executing the necessary steps to satisfy that request (fetching items from the database, modify them, etc.).
In this section the different functions of the controllers (edit, save, delete, etc.) will be explained. To start, the list of all controllers in the system is given in Figure 4.3.2.1:
72
Figure 4.3.2.1
Apart from those controllers, there is another controller that is used to login in the application. Since that login controller is one that was found as a template for login, it is placed in a different package and it will not be explained since it is not a creation of mine.
First, we start with the abstract controller. This controller is used in order to control all the exceptions that may appear in the web application and show an error message in screen. The code for that controller is the simplest one and appears in Figure 4.3.2.2:
Figure 4.3.2.2
After that, the rest of methods used by the controllers are more or less similar. So, in order to explain each method we will give an example with code for each method that appears in the controllers. First, one thing has to be explained. Every controller has a mapping which means that every URL that starts with that mapping will be associated with that controller. For the example of exam controller, we can see the next code in Figure 4.3.2.3:
73
Figure 4.3.2.3
So, with that RequestMapping annotation, every request which URL starts with /exam/** will be sent to the exam controller.
Also, the controllers import the necessary services (explained before in this document) in order to be able to operate with the database. These services in the case of the exam controller are:
Figure 4.3.2.4
Now, the different methods that appears in the controllers are explained:
Listing: The controllers have a listing method in order to show to the final user the list of exams, questions, exercises, answers or metadata. For example, for the exam controller, we need to list all the exams stored in the system. First, we have the controller method that is mapped to the list URL in Figure 4.3.2.5:
Figure 4.3.2.5
74
So, what happens here is that, when a request URL is like “exam/list”, this controller method is triggered. What is doing here is to retrieve the list of all the exams that exist on the database with the help of the exam service. Then, the result is generated by using the createListModelAndView method, stated below in Figure 4.3.2.6:
Figure 4.3.2.6
This method creates a new model and view using the URI “exam/list”. This URI will be compared with the different Tiles (explained in the section 2.2 of this document) and will choose the view that is associated with that URI. Once this is done, the exams and the request URI are added to the view in order for the JSP file to be able to operate with those objects. Also, since the exam view must check if the current user is (or not) the owner of the exams, the current user is passed as a parameter. This is only done if the user is not an admin, because an admin will always be able to modify or delete whatever he/she wants. After that, the JSP view will be rendered and the list of exams will be shown to the user.
Show XML: The requirements state that the exams (and questions) must be shown with its XML attribute. This attribute has been agreed to be auto generated every time the final user clicks on the link for watching the XML. For this reason, the XML method will loop the exam items and update the exam xml attribute. Once this is done, the attribute is set and the view will be rendered in a similar way than the listing method. The only difference is that the URI to check which view will it use will be different (in this case it will be used the one for showing the XML) and the exam passed will have now the updated XML. Now, the method that updates the exam XML is shown in Annex 4 of this document.
75
Create method: The create method is the one used in order to show the user the necessary information that have to be filled in order to create a new object. This means that this method is not in charge of saving the object, just showing the parameters that have to be set by the user (See the create screens in the previous section). So, the first thing is the same as the other methods, execute the method that is pointing to the requested mapping. We are going to see the exam method like in the previous cases (Figure 4.3.2.6):
Figure 4.3.2.6
This method also specifies that is a GET method. That means that, if there were any parameters, they will be given by the URL like:
1. http://server-ip/ThesisJBM/exam/create?parameter=value Since this is not the case for the create method, it will be shown in the edit method with more detail. So, the method to render the creation view is the following:
Figure 4.3.2.7
76
Let us go through some of the values required by the view. First, the list of users (except the administrator) is fetched. Then, the current user is removed since this list will be used to set the collaborators and the current user will always be the owner (this is set in the creation method of the service).
The exercises are not used for this method. The create value set to true is used by the view in order to know which elements should be shown or not. The exam is the new empty exam that has to be filled in by the user and, finally, the current user is passed because almost all the views need to verify if the current user is the owner or not of a given exam.
Then the result is returned and the view with tiles name “exam/create” is rendered.
Edit method: This method is very similar to the create method, but instead of creating a new exam, this method fetches one from the database to be edited (so the fields to fill will not be empty). The way it works is the same as the creation method and will not be explained. The only different issue is that here, the method needs a parameter in the URL in order to know which exam must be fetched. The edit main method is shown in Figure 4.3.2.8:
Figure 4.3.2.8
Once the exam is fetched, the process is the same as in the creation method, but this time the exam passed to the view will be the exam fetched from the database. Then, save and delete methods will be explained in order to finish with the explanation of a normal workflow when editing/creating.
Save method: This is the method used by the controllers to persist an object into a database. This object has probably been modified by the user in the web application, so there is a method to receive when the user is saving an object. As in the previous examples, the exam save method will be explained because it is one of the simplest methods. In the other cases there will have
77
to explain more things about the code and will not be as useful to understand the controller functioning. The method used for saving is shown in Figure 4.3.2.9:
Figure 4.3.2.9
Here there are some points that have to be clarified:
1. First, this method uses the same edit mapping because the application will not move to another URL to save the exam.
2. As we can see in the method header, this is a POST method that will be activated once a POST request comes into the “edit” mapping with the submit name “save”.
3. Once this is done, the method must receive a valid Exam object. That means that if the object is malformed (null attributes for example) the binding parameter will contain errors and they will be shown to the user instead of saving the exam.
4. If everything is correct, the exam attributes that are derived from others and cannot be known yet are set to default values (XML and Difficulty). Since the final exam date is the last modification date, every time an exam is saved, the date will be updated.
78
5. After that the exam is saved, the user will be returned to the exam list.
6. If any errors appeared, the user will be informed. Delete method: The delete method is really similar to the save. Below in
Figure 4.3.2.10 we have the coded method for this task:
Figure 4.3.2.10
The difference here is that the new view will have a flash message informing that the exam has been successfully deleted.
Converter method: The converter method is really simple at the end, since the modifications were made in the converter module in order to make easy the integration with the web application. The first step is the same as the creation and edition methods and the only action that will be done is to show the view with the required parameters (the file path in this case). So, in this method, an URL will be received and there will be another POST method to receive the file path to convert. This method can be seen in Figure 4.3.2.11:
79
Figure 4.3.2.11
As we can see, it is requested a FileForm object. Some forms in the web application need to have different parameters than the attributes of an object. For this reason, we can define “Form” objects that will satisfy our needs. The form objects are only Java objects with the desired attributes and some annotations that specify how the data introduced must be (not null, not blank, numbers, etc.). The FileForm object only has a String object that will be the path of the file to convert. For that reason, that attribute is put into the array that is passed to the Converter main method as parameter. In that array is also included a String to distinguish between when the execution call comes from the web controller and when it comes from executing the module independently. If there are no errors, the application will inform the user that the exam was created successfully. Otherwise, an error message will be shown to the user so he/she can retry the request.
The services are much simpler than the controllers. As stated before in this document, the services are the classes that will implement the methods of the repositories.
This means that the services will use the methods from the repositories (insert, update, delete, etc.) but, in addition, they will make some operations that will allow the application to work flawless.
80
After this explanation, we are going to see an example for a service and its methods in order to understand better this section. Since the services are really simple classes, they will not be explained at the same level of detail as the controllers.
First, in order to create a service, we must define a class with the annotations “Transactional” and “Service”. The first one is used by Spring to allow Hibernate to perform all the database connection operations without having to specify them manually. The second one is just an annotation used to tell Spring that the current class is going to be a Service. The code for this can be seen in Figure 4.3.2.12:
Figure 4.3.2.12
Then, we need to specify the service the repository we are going to use for implementing its methods:
Figure 4.3.2.13
With that, we are ready to implements the necessary methods in the service. For this example, we are going to show the “delete” method for an exercise because the rest of methods are simpler and the only thing they usually do is to call the repository method.
The delete method for an exercise can be seen in Figure 4.3.2.14 and it first checks if the parameter is not null (because otherwise it would raise an error) and after that, it removes the necessary relationships in order not to have problems when deleting the selected exercise.
Figure 4.3.2.14
81
4.3.3. – Domain Description
In this section we are going to show the class diagram first and the database diagram after.
In the class diagram the domain classes and relationships are shown. This diagram had been developed by hand first and, once it is implemented as Java objects, the eclipse plugin ObjectAID has been used. Using this plugin is really easy to develop a domain diagram. The only thing that we need to create a new diagram in the plugin window of Eclipse and then, adding all the classes that we are going to use to generate that diagram.
The plugin creates all the relationships and classes as we can see in Figure 4.3.3.1:
Figure 4.3.3.1
82
In addition, the methods that compose those classes are just the constructors for each class and the getters and setters for each attribute of each class. Apart from that, there are no other methods that have been implemented in the domain classes.
The diagram of tables for the database is shown in Figure 4.3.4.1. This tables are generated by Hibernate from the Java classes in the domain:
Figure 4.3.4.1
83
4.3.4. – Sequence diagrams
Sequence diagrams are meant to give a better understanding about the internal workflow of the application once a request arrives. This has been explained superficially in the Architecture section but in this section the diagrams for each operation (List, Create, Create from parent, Editing/deleting and Converter) will be shown.
There will only be an example of each type, since the procedure is the same regardless we are treating exams, exercises, etc.
Sequence diagrams will be shown rotated and fullpaged because otherwise it would be impossible to appreciate the values written in the diagrams. Moreover, the first diagram will have the dispatcher and handler mapping components, but after that they will skip them because they will be considered implicit in the diagram in order to save space.
The name of each diagram will be put in the top left corner of each image. Next, they are presented in the next order:
1. Listing exams 2. Create Question 3. Create exercise from parent 4. Edit/delete answer 5. Convert file to exam
84
85
86
87
88
89
5. – Testing
In order to ensure that the application is doing its work correctly, several tests have been applied. These tests are divided in:
Unit Tests: These tests are simple tests whose goal is to ensure that all the simplest parts of the project are working properly separately. This part is less important since unit tests are only a double check for the code. Anyway, they help to know that the developed code is correct and they help to find the way to fix new errors faster.
Acceptance Testing: These tests are the most important. They consist of:
1. Checking every URL of the web application in order to look for additional hidden errors. This technique will help us to have all the possible application paths covered without any error, which will reduce the amount of errors that will be found by the final user.
2. The application has been shown to the customer in periodical meetings in order to ensure that the application functionality is satisfying the customer needs and the requirements.
Once these two steps passed, the application will be considered finished and the only task left to do is to offer support for any kind of problem that might come up when the application is running.
Then, the two types of tests will be explained.
5.1. – Unit Testing
Unit testing section will consist of a short description about how the unit tests have been developed and which technology has been used for it.
There will not be a lower level explanation because the only task that the unit tests are doing is to ensure that the service methods are working properly and their results are the results expected by the application at the end.
For these type of tests, the technology that has been used is JUnit. JUnit is a framework that allows us to test any Java program using the same Java language. The tests are defined easily because:
They are written in Java language. They use annotations to define the attributes of the tests.
90
These annotations provide a lot of possibilities for testing purposes because they can be used to define tests, define expected exception for tests that must raise errors, etc.
So, in order to develop the basic unit tests for the application, a “GlobalTest” class has been developed. This class is shown in Figure 5.1.1 and contains login methods in order to allow tests to emulate that a given user (customer or admin) is logged in the system. The class is composed by:
Figure 5.1.1
The tests that are going to be explained are the tests for the example of Exam, as it has been done for the previous examples. Below, an example of a test for making sure that the administrator can create a new exam is given in Figure 5.1.2:
Figure 5.1.2
91
After running the whole test case for the exam, we can see in Figure 5.1.3 that the results are positive:
Figure 5.1.3
This has been done for every domain object and these tests will ensure the correct functioning of the service methods, which are the most important methods because they operate the database, making possible that the application works correctly.
In total, there are 20 different test cases that have been passed correctly in the application.
5.2. – Acceptance Testing
Acceptance tests, as we mentioned before, consist in ensuring the correct working of all the possible navigation paths of the application as well as carrying out the customer validation of the delivered product.
For this reason, acceptance tests are the most important tests in this project, since they ensures that the application works properly and that it satisfies all the customer needs and requirements.
For this section, we will present the tests that show that the most complex requirements of the application are met. These tests will consist in navigating through several screens performing a desired action. After performing the action, results will be checked to see if everything worked correctly.
The tests that cover the most complex requirements of the application are the following:
1. Creating an exam with collaborators. Then check that the collaborators can create items inside the exam.
2. Creating a question inside an exam. Then check that only the user that created the question can modify it.
3. Editing the question created and then, deleting it. 4. Creating an exercise from a parent, using the full text filter. 5. Using the file to exam converter.
Next, these tests will be shown in order and the screenshots will be explained if needed, although most of them are really easy to understand.
92
5.2.1. – Creating an exam with collaborators
First, we select the option to create a new exam (Figure 5.2.1.1). This option is accessible for everyone logged in the system. Then we introduce the exam attributes and set the Customer2 as collaborator, then we press save (Figure 5.2.1.2).
Figure 5.2.1.1
Figure 5.2.1.2
After that we test that we are able to edit and create exercises inside the exam with the current user and with customer 2:
93
Current User:
Figure 5.2.1.3
Figure 5.2.1.4
94
Customer 2:
Figure 5.2.1.5
Figure 5.2.1.6
5.2.2. – Creating a question and checking ownership
For this test we will use the same exam that we created before. An exercise is created for containing the questions and in this scenario, the customer (owner of the exam) will create a new question inside it. Then the customer 2 will try to edit that question and will not be able to do it (requirements specify that this is the way to handle ownership for questions).
Inside the list of questions for the exercise of the exam (Figure 5.2.2.1), we select the Create new question option and fill in the data (Figure 5.2.2.2):
95
Figure 5.2.2.1
Figure 5.2.2.2
The question is now created and the customer that created the question is able to edit it as we can see in Figure 5.2.2.3:
Figure 5.2.2.3
96
Now, it has to be proven (in Figure 5.2.2.4) that the customer 2 cannot edit the question although he is a collaborator of the exam:
Figure 5.2.2.4
5.2.3. – Editing and deleting a question
Now the question created above will be edited, saved, and deleted after. For that purpose, we have to select the edit button on the question table (Figure 5.2.2.3) and introduce the new values (Figure 5.2.3.1) and finally we save:
Figure 5.2.3.1
The question is now modified:
Figure 5.2.3.2
97
Now we go into the edit view again and use the button to delete the question. After that, we can see a success message (Figure 5.2.3.3) and that the list of questions is now empty:
Figure 5.2.3.3
5.2.4. – Creating an exercise from parent with filter
To perform this test, the first action to do is to select the option to create an exercise (Figure 5.2.4.1) from parent in the exercises view:
Figure 5.2.4.1
98
The next view appears (Figure 5.2.4.2) and we have to select an exercise to be copied:
Figure 5.2.4.2
The problem is that there are a lot of exercises and the only issue that we can remember about the exercise was that it mentioned “clases” (the exams are in Spanish).
So we filter the Exercise by knowing that it contains “clases” in its text in Figure 5.2.4.3:
Figure 5.2.4.3
99
Now there are only two possible exercises and we select the second one and the exercise will be created for the exam. The final result is shown in Figure 5.2.4.4:
Figure 5.2.4.4
This exercise has all the attributes copied from the parent, including the questions (Figure 5.2.4.5) and answers (Figure 5.2.4.6):
Figure 5.2.4.5
Figure 5.2.4.6
100
5.2.5. – Creating an exam using the Converter
Now the last test consists in creating a new exam using the file to exam converter functionality. In order to do that (we need to be administrator) we select the Converter option on the menu shown in Figure 5.2.5.1:
Figure 5.2.5.1
After that, we have to introduce the path of the file that we want to convert (Figure 5.2.5.2). In this case is the exam registered on June 14th and then we select the option to convert the file:
Figure 5.2.5.2
101
After the conversion, the system will send a notification of the success (Figure 5.2.5.3) of the operation and we will be able to see the new exam created with the name testJun11pII (Figure 5.2.5.4):
Figure 5.2.5.3
Figure 5.2.5.4
102
6. – Conclusions and Future Work
6.1. – Conclusions
First of all, I have to say that developing this application made me learn a lot about developing web applications especially in an agile way. This is because, at the beginning of the project I knew nothing about how the project will be developed or how the customer will want me to develop the final application.
After several meetings and changes into the application, a final version was agreed and the project could be closed. This is not an easy task because sometimes there are things that are not clear at first sight. For that reason, there are several issues that later must be changed in the application. Depending on the context of those issues, the changes that have to be performed in the application may be really huge.
From that, I learned that the strongest parts of a software project are the requirements and the customer needs. Once you have developed that strongly enough so you can know that nothing is likely to change in the requirements, you can move then to the next step.
This does not mean that the application must be detailed 100% before starting the development and then stop the requirement tasks. That would not be agile at all and, at the end, it will cause problems because maybe the requirements at the beginning were not well understood. For this reason, in this application both the professor and I followed a more agile requirement-development workflow.
Before doing anything, both the customer and I agreed on the general aspects of the application in order to have a general view and which operations it will perform. Once that has been done, the next task to do is to detail each requirement in order to satisfy both the requirement and the customer needs ensuring that the requirement details are totally agreed and will not be likely to change. What I did to achieve that level of detail, and what I think is the best way of doing it in general, is:
1. Have a meeting with the customer and talk about a specific set of requirements (i.e. exam creation, deletion, modification and listing).
2. After agreeing how the application will behave with that specific requirements (we cannot talk about other non-related requirements in that session), all the points are reviewed and checked in order not to leave anything behind.
3. Once the specific set of requirements is reviewed, the development phase
starts (only for that requirements).
4. When the development of those requirements finishes, the customer will validate the results and will request (if necessary) for changes.
103
5. Those requirements will be closed since the customer has validated the results and they have a very low probability of changing.
6. Repeat the process with other requirements.
Following that process provided me a safety and comfort zone because I had already validated work, so I would not have to go back and change it unless something strange happens.
According to that experience, I have learnt that agile processes and the development of small parts of working code are a very good way to develop a web application project since it offers a more relaxing work environment for the developers and the customer is always aware of the work that is done.
Apart from that, I have to say that it feels very good to learn how to develop a fully functional web application. Since most of the times, developing web applications or any kind of system is not taught during the bachelor or master it is something that has to be done by yourself.
Learning how to properly develop a web application in Spring is not easy at all, because you have to take into account a lot of possible configurations and you have to find the one that best works. One advantage of using Spring is that there is a lot of information on the internet about almost every problem that you may face.
The real problem is that it is hard to find a guide that gives you something else than developing a HelloWorld project or solving specific errors. For that reason, I did a favor to myself and, after I made the application work with the login process and some simple controllers, I stored a template for new projects in case I need to (or I want to) develop a new application in the future.
If we do not take into account the beginning of the web application (which was really hard to develop and to make it work), it is really amusing to learn Spring because:
1. It is really intuitive because it uses a simple MVC pattern. That means that you always find out easily where to change something in order to fix errors (Errors related to views, to controllers, configuration files …)
2. It uses Java, which for me is an advantage since it is the programming language I have been learning since I started the bachelor.
3. And finally, as I said before, is Java based, so it will be supported in every platform.
After finishing the web application, I have to say that I learnt a lot of useful things that I am sure I will be able to use in my future job and I encourage everyone to learn Spring (or other web application framework) because at the end, you feel very nice after creating something that will be helpful and useful for the end user.
In addition, I think that it would have been nice to have some subject about developing web applications. The reason of this is that, in my opinion, I think that developing a web application does not only give you experience in a specific framework, it gives you experience in requirement gathering, deal with the
104
customer, team work (if you are working in groups), the current language used by the framework and many things that, in the end, will make you assimilate all the theory about software projects learnt in the bachelor and master.
6.2. – Future Work
Although the application is finished, there are some features that can be added to this application in the future. These features could not be done due to the lack of experience and time, but I think they would improve the quality of the application:
Improve the converter in the web application. At the end, since there was only one week to integrate it, the converter in the web application takes as an input the plain text of the final directory of the file in the system. This can be a usability problem since you have to go to the file path by yourself and copy the path of the file. For this reason, I tried to investigate how to implement it in a way that the user will only have to select the file in the system. The problem was that there is no way of doing that in native HTML + JSP. ActiveX or Flash would have to be used and, since I do not have any experience working with them and the time to develop the feature was short, I agreed with the customer in doing it using a string. So, this is the first point to take into account for any future work in the application.
Since I am not an expert in CSS or web design, maybe many aspects of the design of the final web application may be improved. As I said, I am not an expert and I just used a Bootstrap template in order to have a pretty web page, but maybe there are web elements that may be placed in different ways or removed. The future work for this point would be to consider the opinion of a web designer and make changes to improve the usability and appeareance of the final web application.
If in the future a new feature is required, it will be easy to implement since (if the feature is really new and not modifying an old one) Spring applies the Model View Controller pattern, therefore the only task that will be needed to be done is to create a new controller, view, etc. for the new feature. Furthermore, nowadays the application works both in English and Spanish. New languages can be added just by adding the properties files and the new language in the Spring configuration files. Because of the use of Spring messages on the views, this can be done without having to modify anything on the views or in the Java code.
105
Those are the issues that, in my opinion, compose the set of most important future work features of the application.
To finish with the conclusions, I have to say that, personally, it was a very good experience because I was able to help with this application and it makes me feel good that this application will be useful for the professor. In addition, I think that this thesis was a very good proposal by the professor and it was very useful to me because I learnt a lot from it and now I have another merit to add to my CV, which is always good.