44
University of Miami Centricity® RIS-IC 10.5 Training for Transcriptionist University of Miami Clinical Enterprise Technologies (UMCET) University of Miami Miller School of Medicine
| Date post: | 02-Apr-2018 |
| Category: |
Documents |
| Upload: | nguyendang |
| View: | 227 times |
| Download: | 2 times |

University of Miami
Centricity® RIS-IC 10.5
Training for Transcriptionist
University of Miami Clinical Enterprise Technologies (UMCET)
University of Miami Miller School of Medicine

University of Miami Centricity® RIS-IC 10.5 Training for Transcriptionists
Page 2 of 44
Contact Information Please send any inquiries or feedback about this document to:
University of Miami, Training Division 1150 NW 14th Street Professional Arts Center, Suite 106 Miami, Florida 33136 [email protected]
Copyright Notice Copyright © 2008 – 2009 IDX Systems Corporation. All rights reserved. Confidentiality and Proprietary Rights The information contained in this document is the confidential property of IDX Systems Corporation (IDX). It is furnished under an agreement with IDX and may only be used in accordance with the terms of that agreement. The use of this document is restricted to customers of IDX and their employees. The user of this document agrees to protect IDX’s proprietary rights as expressed herein. The user further agrees not to permit access to this document by any person for any purpose other than as an aid in the use of the associated application software (“System”). In no case will this document be examined for the purpose of copying any portion of the System or to design another system to accomplish similar results. No part of this document may be reproduced in any form, by photostat, microfilm, xerography, or any other means, or incorporated into any information retrieval system, electronic or mechanical, without the written permission of the copyright owner. The information in this document is subject to change without notice, and should not be construed as a commitment by IDX. Though every effort has been taken to ensure the validity and usefulness of its contents, IDX assumes no responsibility for errors that may appear in this document. Inquiries regarding permission for use of material contained in this document should be addressed to: IDX Systems Corporation 40 IDX Drive P.O. Box 1070 Burlington, VT 05402 IDX would like to remind its customers that there may be legal, ethical, and moral obligations for medical care providers to protect sensitive patient information when dealing with vendors such as IDX. Before customers allow IDX to access confidential patient information from the customers’ data processing systems, they must obtain the written consent of the patient. In addition before disclosing confidential information to IDX, customers should obtain the explicit written consent of IDX. Please direct any questions concerning these matters to the IDX Legal Department. Trademarks IDX
®, Centricity® RIS-IC™, IDXrad™, IDXConnectR™, Mammography
Administration Module™, and MAM™ are trademarks or registered trademarks of IDX Investment Corporation. All other brand and product names are trademarks or registered trademarks of their respective companies.

University of Miami Centricity® RIS-IC 10.5 Training for Transcriptionists
Page 3 of 44
Contents Getting Oriented ........................................................................................................................ 5
Logging In to and Out of the Centricity® RIS-IC System ® ................................................ 6 Changing Your Password ...................................................................................................... 9 Important Keys and Controls............................................................................................... 10 Using the Help ..................................................................................................................... 12 Accessing the Help .............................................................................................................. 12 Parts of the Centricity® RIS-IC Window............................................................................ 15 Using the Module and Option Toolbars .............................................................................. 17
Common Tasks ........................................................................................................................ 20 Performing a Patient or Exam Lookup ................................................................................ 20 Identifying a Patient............................................................................................................. 22 Identifying an Exam............................................................................................................. 23 Working with the Patient Exam List Window..................................................................... 24 Accessing the Patient Exam List Window........................................................................... 25 Viewing a Patient Record .................................................................................................... 26 Patient Record Inquiries in Search Results Lists ................................................................. 27
Overview of the Results Module ............................................................................................. 28 Understanding Exam Statuses ............................................................................................. 28 Understanding Result Statuses ............................................................................................ 29 Understanding Keyboard Shortcuts in the Results Module................................................. 30
Transcribing Diagnostic Reports ............................................................................................. 31 Transcribing and Editing a Diagnostic Report .................................................................... 32 Entering a Provider .............................................................................................................. 33 Editing a Preliminary Diagnostic Report............................................................................. 34 Entering a Standard Report.................................................................................................. 34 Placing a Report on Hold..................................................................................................... 35 Diagnostic Report Lock ....................................................................................................... 35 Associating Exams While Transcribing .............................................................................. 36 Creating a Diagnostic Report Addendum............................................................................ 37

University of Miami Centricity® RIS-IC 10.5 Training for Transcriptionists
Page 4 of 44
Associating and Disassociating Exams.................................................................................... 38 Associating and Disassociating Exams.................................................................................... 39
Associating Exams with a Diagnostic Report...................................................................... 40 Disassociating Associated Exams........................................................................................ 41
Using the Radiologist Worklist ............................................................................................... 42 Accessing the Worklist ........................................................................................................ 43 Filtering the Radiologist Worklist ....................................................................................... 43

University of Miami Centricity® RIS-IC 10.5 Training for Transcriptionists
Page 5 of 44
Getting Oriented Welcome to the Centricity® RIS-IC system. The purpose of this chapter is to help you access the system application and become familiar with the Centricity® RIS-IC environment.
Objectives Upon completing this chapter, you will be able to: • Understand the Centricity® RIS-IC workflow • Log in to and out of the Centricity® RIS-IC system • Change your password • Work with the Centricity® RIS-IC windows • Access functions from the main menu / sub-menus • Use the patient banner • Use important keys and controls on Centricity® RIS-IC windows • Set user preferences • Sort tables/lists • Use the Help

University of Miami Centricity® RIS-IC 10.5 Training for Transcriptionists
Page 6 of 44
Logging In to and Out of the Centricity® RIS-IC System ® This section describes the steps necessary to log in to and out of the Centricity® RIS-IC system.
Logging in When you log in to the Centricity® RIS-IC system, you can perform various tasks in the Centricity® RIS-IC system. The functions available are determined by your security level. NOTE: To avoid unauthorized access to patients’ medical information, do not leave a computer unattended while the Centricity® RIS-IC system is running. As a user, you assume responsibility for unauthorized access as long as you are logged in to the program. Before leaving a computer, you should log out the system. Logging in to the Centricity® RIS-IC system involves entering your user ID (user identification) and a password on the login window. Your user ID is the name you enter when logging in to the system. Your password is a private code that gives you access to the system. The user ID is usually the first letter of you first name followed by your last name. (This is usually the same as your Medical Domain name.) If multiple users have the same first initial and last name a number will be added to your user ID. Your user ID will never change. For future reference, enter your user ID in the space provided below. User ID
Your initial system password will be your user ID. After logging in, you will be prompted to change your system password. Always keep your password secure and do not share it with other users. Refer to page 8 for password restrictions.

University of Miami Centricity® RIS-IC 10.5 Training for Transcriptionists
Page 7 of 44
Logging In 1. In the User ID field on the login window, type your user name and press the TAB KEY. 2. In the Password field, type your password.
Note: To help keep your password secure, the Centricity® RIS-IC system, like most applications, does not display the password as you type it. 3. Click login. The system validates your user ID and password and determines your privileges from the security database. If you have previously logged in to the Centricity® RIS-IC system, you can begin performing tasks. The following is a sample of the Centricity® RIS-IC window for a user who has all privileges - that is, access to all modules.
University of Miami Centricity® RIS-IC 10.5 Training for Transcriptionists
Page 8 of 44
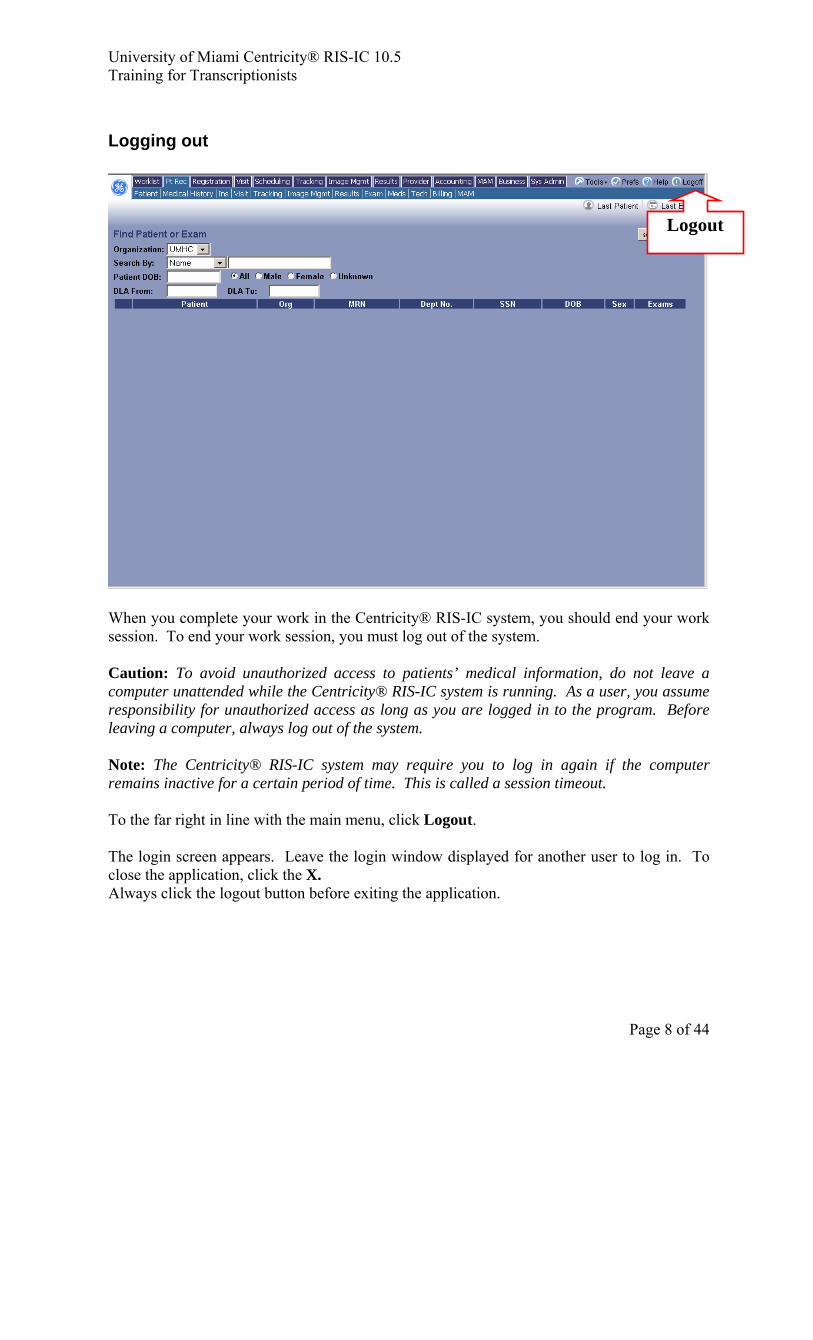
Logging out
When you complete your work in the Centricity® RIS-IC system, you should end your work session. To end your work session, you must log out of the system. Caution: To avoid unauthorized access to patients’ medical information, do not leave a computer unattended while the Centricity® RIS-IC system is running. As a user, you assume responsibility for unauthorized access as long as you are logged in to the program. Before leaving a computer, always log out of the system. Note: The Centricity® RIS-IC system may require you to log in again if the computer remains inactive for a certain period of time. This is called a session timeout. To the far right in line with the main menu, click Logout. The login screen appears. Leave the login window displayed for another user to log in. To close the application, click the X. Always click the logout button before exiting the application.
Logout
University of Miami Centricity® RIS-IC 10.5 Training for Transcriptionists
Page 9 of 44
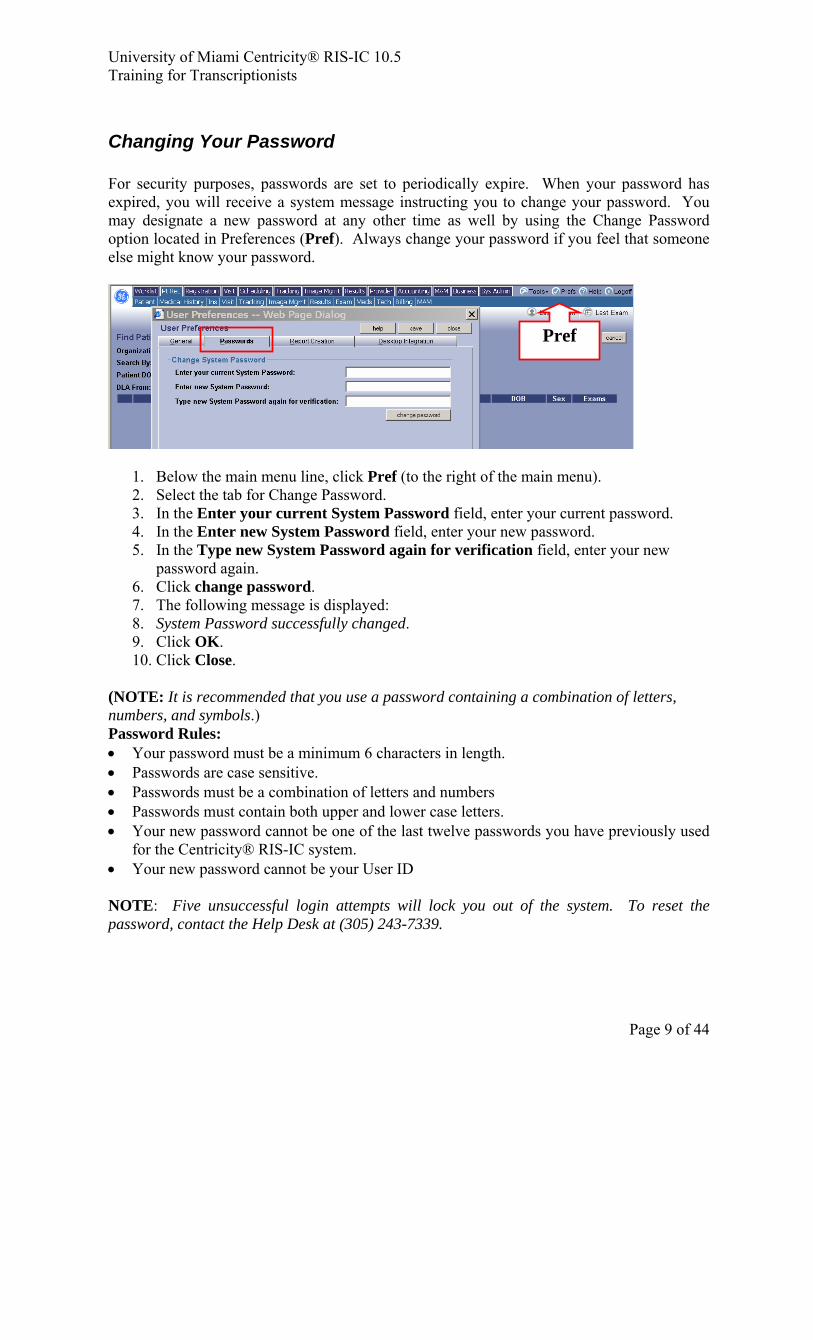
Changing Your Password For security purposes, passwords are set to periodically expire. When your password has expired, you will receive a system message instructing you to change your password. You may designate a new password at any other time as well by using the Change Password option located in Preferences (Pref). Always change your password if you feel that someone else might know your password.
1. Below the main menu line, click Pref (to the right of the main menu). 2. Select the tab for Change Password. 3. In the Enter your current System Password field, enter your current password. 4. In the Enter new System Password field, enter your new password. 5. In the Type new System Password again for verification field, enter your new
password again. 6. Click change password. 7. The following message is displayed: 8. System Password successfully changed. 9. Click OK. 10. Click Close.
(NOTE: It is recommended that you use a password containing a combination of letters, numbers, and symbols.) Password Rules: • Your password must be a minimum 6 characters in length. • Passwords are case sensitive. • Passwords must be a combination of letters and numbers • Passwords must contain both upper and lower case letters. • Your new password cannot be one of the last twelve passwords you have previously used
for the Centricity® RIS-IC system. • Your new password cannot be your User ID NOTE: Five unsuccessful login attempts will lock you out of the system. To reset the password, contact the Help Desk at (305) 243-7339.
Pref

University of Miami Centricity® RIS-IC 10.5 Training for Transcriptionists
Page 10 of 44
Important Keys and Controls To navigate through the Centricity® RIS-IC there are buttons and keyboard actions. The following table identifies some of the keys and controls used to perform tasks in the system. There are the commons buttons utilized by many jib roles. Other buttons which are specific to a job function are covered in the documentation for the function.
Centricity® RIS-IC Controls Add New: Opens a window to add a new record
Add/Edit: Allow the entry of a new or revision of an existing entry
Apply to All: Applies a selection to or performs a task on all items in a list or all items (ex. Exams) involved in a task
Audit: Displays an audit trail of Cancel: Closes the window without saving data
Close: Closes a window
Continue: Opens the next step in a process
Deselect All: All items that were selected form a list or table are no longer selected
Details: Expands the screen to display additional details
Edit: Allows the selected information to be edited / revised
OK: Does one of the following Saves information and closes the window Closes an error message window and places the cursor in the field where the error occurred
Print: Opens the window for printer selection Pt Appt List: Shows future appointments for exams and
medical appointments Pt Exam List: Shows exam list (past and future)
Refresh: Searches the system and updates the information in a list
Remove: removes a selected entry from a list of selections
Save/Clear: Saves information and reset the window for entry of new data
Save/Close: Saves information and closes the window Save: Saves information without clearing the window
Search: Begins the search function based upon the data entered
Select All: Selects all of the items in a list or table
Drop-down List: Click arrow to display list of entries for the field

University of Miami Centricity® RIS-IC 10.5 Training for Transcriptionists
Page 11 of 44
Centricity® RIS-IC Controls Sort Indicator: Appears in the column header of a table to
indicate that the table may be sorted by this column Sort Indicator: Appears in the column header of a table to
indicate that the table is currently sorted by this selected column in ascending order
Sort Indicator: Appears in the column header of a table to indicate that the table is currently sorted by this selected column in descending order
Check Box: Allows the selection of multiple entries. Click the check box to select or deselect the item
Radio Button: Allows selection of a single item. Click the radio button to select or deselect the item
Indicates the number of pages in a table or list. Click a number to display that page
Displays the next page of entries in a table or list
Displays the next or last page of entries in a table or list
Displays the previous page of entries in a table or list
Displays the previous or last page of entries in a table or list
Ellipsis: Displays a list from which you can select an entry
Keys and Controls
TAB Tab: Moves the cursor to the next field, button or control SHIFT+TAB Shift+Tab: Moves the cursor to the previous field SPACEBAR Spacebar: Slected the highlighted item in a list and confirms
system messages ENTER Enter: Does one of the following
Selects the highlighted entry from a list Selects the default (highlighted) button on a window if all required fields are complete. If information is missing or incorrect, an error message displays
ARROW KEYS Moves the highlighted selection in a list up or down T or t (today Ina date field, enters the current date N or n (now) Ina time field, enters the current time + (plus) and – (minus) Combined with T or N, enters a past or future date or time
N+30 enters 30 minutes in the future from the current time N-30 enter 30 minutes in the past from the current time T+3 enters 3 days in the future from the current date T_2 enters 2 days in the past from the current date

University of Miami Centricity® RIS-IC 10.5 Training for Transcriptionists
Page 12 of 44
Using the Help While working with the Centricity® RIS-IC system, you can access the Help system to get information. The Help contains: • Information about procedures (step-by-step instructions for completing tasks in the
Centricity® RIS-IC system) • Conceptual information (essential concepts for the application)
Accessing the Help To access the Help: Click Help to the right of the Module Toolbar. The following window is displayed
The four methods of using the Help function are described on the following pages.

University of Miami Centricity® RIS-IC 10.5 Training for Transcriptionists
Page 13 of 44
The Search Tab • Enter one or more word in the Search
For field. • For an exact match, enclose the phrase
in double quotation marks • Use the Category drop-down list to
limit the search to a specific topic. • In the Match field, ANY Word will
returns all topics containing one of the searched for words.
• ALL Words returns only the topics containing all the specified words or phrases.
The Contents Tab • Click a book to display topics • Depending upon the book selected,
there may be subtopic books. • Continue to open books until the
desired topic is found. • Click the topic to open

University of Miami Centricity® RIS-IC 10.5 Training for Transcriptionists
Page 14 of 44
The Index Tab • In the field “Type in the keyword to
find:, type the keyword. As you type, the list moves alphabetically to display topics
• To open a topic either double-click and entry or single click and click display at the bottom of the list
• If a topic cannot be found by keyword, use the Search tab
The Favorites Tab • Each Centricity RIS-IC user may save
their favorite help topics • To add a Favorite, open the topic.
• Then click the Add to Favorites • Favorites can be organized with the
Organize Favorites icon . • Favorites may be deleted from
Favorites, renamed or organized into folders

University of Miami Centricity® RIS-IC 10.5 Training for Transcriptionists
Page 15 of 44
Parts of the Centricity® RIS-IC Window When you log in to the Centricity® RIS-IC system, the Centricity® RIS-IC window appears. The Centricity® RIS-IC window consists of the following main areas: Module Toolbar – Located at the top of the window, this contains the main menu functions available based upon your security. This allows you to access the various modules necessary to perform your tasks Option Toolbar - Located below the Module Toolbar; this allows you to access the various options within a module necessary to perform your tasks (appears when you select a Module Toolbar option) Patient banner - Located below the Option Toolbar, this light blue field displays patient and exam information for the patient record with which you are currently working. If the selected patient has documents scanned into Document Management, a paperclip icon ( ) displays on the right side of the Patient Banner. Tool Area – Located to the right of the Module Toolbar, the Tool Area consists of Tools, Preferences, Help and the Logout. Tools ( ) is used to access Document Management, and a link to iSite (the PACS system).
Preferences (Pref) ( ) is used to set individual user settings. This is also where a password may be reset.
Help ( ) accesses the online Help. Logout ( ) closes out of the Centricity® RIS-IC system. The following page contains a graphic of the Centricity RIS-IC Window

University of Miami Centricity® RIS-IC 10.5 Training for Transcriptionists
Page 16 of 44
Centricity RIS-IC Window
Workspace
Module Toolbar
Options Toolbar
Tool Area
Patient Banner

University of Miami Centricity® RIS-IC 10.5 Training for Transcriptionists
Page 17 of 44
Using the Module and Option Toolbars The Module and Option Toolbars allow you to access the various modules and options necessary to perform your tasks. When you log in to the Centricity® RIS-IC system, the Centricity® RIS-IC window appears and the system displays the Module Toolbar (above the workspace and Patient Banner). The Module Toolbar contains the modules that are available to you. To access a module, click the module name on the Module Toolbar. Once you select a module on the Module Toolbar, the Option Toolbar for that module appears (between the Module Toolbar and the patient banner). To access a specific option, click the option name on the Option Toolbar.
The Patient Banner When you log in to the Centricity® RIS-IC system, an empty light blue field appears above the workspace. This is the patient identification banner, or Patient Banner. When you are using a module that requires you to select a patient, the specified patient’s name and demographic information appear in the patient banner at the top of the Centricity® RIS-IC window. If you leave one module and open another without clearing the patient banner, the specified patient remains selected, allowing you to work with that patient without searching for his or her record again. The patient banner has the following options that allow you to control which patient's information appears in the banner: The patient banner displays the following patient information: • Patient name • Medical record number (MRN) • Date of birth (DOB) • Social Security Number (SSN) • Primary care provider (PCP) • Age • Sex • Allergy indicator Refer to graphic below

University of Miami Centricity® RIS-IC 10.5 Training for Transcriptionists
Page 18 of 44
When you are using an option that requires you to select an exam, the following exam information also appears in the patient banner: • Accession number (ACC) • Exam description • Exam status • Date and time of exam • Requesting provider • Report status • Signs and symptoms Refer to the following graphic
The patient name and accession number appear as “hyperlinks” (underlined text) in the patient banner. You can click the patient name to display the Patient Inquiry window from which you can view patient demographic information. You can also click the accession number (ACC) to display the Exam Inquiry window and view exam-specific information. The Patient Banner has options which control which patient’s information appears in the banner.
Clear - deselects the current patient and allows you to select another patient. This button is only available when the patient banner contains patient information
Last patient – recalls the last patient with which you worked into the patient banner and allows you to work with that patient record. This function applies to the current login session only. This button is only available when the patient banner is cleared Last exam – recalls the last exam and patient with which you worked into the patient banner and allows you to work with that patient and exam record. This function applies to the current login session only. This button is only available when the patient banner is cleared

University of Miami Centricity® RIS-IC 10.5 Training for Transcriptionists
Page 19 of 44
Viewing Information in the Patient Banner The following example shows you how to access patient information for display using the Patient Record module. 1. On the Module Toolbar, click Pt. Record. 2. On the Find Patient or Exam window, identify and select a patient. The patient’s information is displayed in the patient banner. Refer to the graphic below.
3. On the Module Toolbar, click Exam. 4. In the ACC field, identify an exam. (An Accession Number is a unique identifier assigned to an exam). Enter the ACC number if known, or click the ellipsis and choose the exam from the displayed list.
The exam’s information is displayed in the patient banner. Refer to the graphic below.
5. With patient information populated in that banner, any module and option selected will reference the selected patient. To close the selected patient, click Clear.
University of Miami Centricity® RIS-IC 10.5 Training for Transcriptionists
Page 20 of 44
Common Tasks Certain tasks and functions are repeatedly performed throughout the Centricity® RIS-IC system. Although these tasks and functions are performed at various times, the procedures for completing them remain the same. The purpose of this chapter is to help you perform various common tasks and illustrate some of the activities that are common to many, if not all, modules. NOTE: For training purposes, the activities described in this chapter reference specific modules and options; however, these activities are part of a larger workflow and are not specific to any one module. Upon completing this chapter, you will be able to: • Perform a patient lookup • Select an exam • View a patient record
Performing a Patient or Exam Lookup For most Module Options, a patient and/or exam must be selected. Use the Find Patient or Exam window to identify a patient or exam. The search may be limited to a specific organization, or the Centricity® RIS-IC system can search all organizations available based on user privileges. The search may be selected by specific criteria such as patient name, date of birth, Social Security Number, accession number, etc. NOTE: To narrow the search, include the date of birth or sex. When you search for a patient or an exam, all of the records in the system that match your search criteria are displayed in a search results list. From the search results list, you can select the patient or exam with which you want to work. When you search based on criteria other than an accession number, the search results list includes the following information for records that match your search criteria: • Patient name • “+” sign shows to the left of the patient name if the patient is associated with more than
one organization. • Organization with which the record is associated • Medical record number (MRN) • Department number • Social Security Number (SSN) • Date of birth (DOB) • Patient's gender • Exam indicator displays in the right column if the patient has exam activity (scheduled
or previously done)

University of Miami Centricity® RIS-IC 10.5 Training for Transcriptionists
Page 21 of 44
The following image illustrates the search results list for patients whose name matches the search criteria Test,A.
Click the + to the left of the patient name to display the MRN for all organizations where the patient is associated. Click the icon in the Exams column to view all exams associated with the patient. When the search is based on an accession number, the search results list includes the following information for records that match your search criteria: • Accession number • Patient name • Organization associated with the record • Medical record number (MRN) • Department number • Exam code • Exam (report) status • Date and time of the exam
The following image illustrates search results based on an accession number search.
1. The patient's name in the Patient column of the search results list is a hyperlink. Click a Patient's name to view display-only patient demographic information. (Click Cancel to return to the search results list.)
2. The accession number in the Acc column of the search results list is a hyperlink. Click the accession number to view display-only exam information. (Click Cancel to return to the search results list.)
Refer to the graphic below

University of Miami Centricity® RIS-IC 10.5 Training for Transcriptionists
Page 22 of 44
Identifying a Patient 1. On the Module Toolbar, click PT Record. 2. On the Option Toolbar, click Patient. The Find Patient or Exam window appears
3. (Optional) In the Organization field, click and select the organization you want the Centricity® RIS-IC system to search, or select (All) to have the system search all Organizations available to you based on your user privileges. 4. In the Search By field, click and select one of the search criteria.
The most commonly used search criteria are Name, Medical record Number (MRN), and Accession number (ACC).
5. (Optional) In the Patient DOB field, enter the date of birth (format MMDDYYYY) 6. (Optional) The search can be limited by gender: Male, Female or Unknown
7. (Optional) DLA refers to the Date of Last Activity. Entering a date range in the DLA From and DLA To fields limits the date range by which Centricity® RIS-IC system searches for exam activity. Note: The DLA From and DLA To fields are not available when you select MRN, Dept. No., ACC, SSN, Visit No., or MFID as your search criterion. 8. Click search. If the Centricity® RIS-IC system finds one or more patients that meet your search criteria, the system displays a search results list. 9. In the search results list, click the radio button next to the patient you want to work with. The patient’s information is displayed in the patient banner.

University of Miami Centricity® RIS-IC 10.5 Training for Transcriptionists
Page 23 of 44
Identifying an Exam Some options require you to identify an exam before you can work in the selected option. There are two ways you can identify an exam. First, you can identify a patient and use the Patient Exam List Window, or if you know the accession number of the exam you want to work with, use the Find Patient or Exam window to identify an exam as follows: 1. On the Module Toolbar, click Pt Record 2. On the Option Toolbar, click Exam. The Find Patient or Exam window appears. 3. (Optional) In the Organization field, click and select the organization you want to search, or select (All) to search all of the organizations available to you based on your user privileges. 4. In the Search By field, click and select ACC. 5. In the second Search By field, enter the accession number of the exam with which you want to work. 6. Click search. 7. In the search results list, click on the Radio Button next to the exam with which you want to work.
1
3
2
4
5

University of Miami Centricity® RIS-IC 10.5 Training for Transcriptionists
Page 24 of 44
Working with the Patient Exam List Window Use the Patient Exam List window to identify an exam after identifying a patient. The Patient Exam List window displays the patient’s exams for a specific organization and date range. You can also specify whether it lists all of the patient’s exams or exams in selected exam (report) statuses. When you search on the specified criteria, the Centricity® RIS-IC system displays the exams that match your search criteria in a search results list that displays the following information: • Organization at which the exam is scheduled • Exam code • Exam description • Date and time for which the exam is scheduled to occur • Resource • Exam status • Accession number • Report status The following image illustrates a search results list on the Exam Lookup window.

University of Miami Centricity® RIS-IC 10.5 Training for Transcriptionists
Page 25 of 44
Accessing the Patient Exam List Window 1. On the Module Toolbar, click Pt Record 2. On the Option Toolbar, click Exam. 3. Identify a patient.
4 On the Exam Inquiry window, click the ellipsis next to the Accession Number Search field. The Patient Exam List window is displayed.
5. The search may be limited by one or more of the following:
a) In the Organization field, click and select a single organization or select (All) to search all of the organizations available to you based on your user privileges.
b) In the Date From and Date To fields, enter the date range for which you want to search for exams.
c) In the Search For field, the search may be restricted to specific Exam Statuses or Report Statuses.
d) Click Search 6. Select the exam with which you want to work. 7. Click continue.

University of Miami Centricity® RIS-IC 10.5 Training for Transcriptionists
Page 26 of 44
Viewing a Patient Record The Centricity® RIS-IC system creates a patient record (comprehensive information regarding a specific patient and the patient’s exams) for each patient in the system. Once a patient record is created, the patient record is available for viewing and editing. You cannot edit information through the Patient Record module. The Patient Record module is used for inquiries only. Information contained in a patient record is accumulated through a number of modules.
Patient Record Display 1. On the Module Toolbar, click Pt Record. 2. .Identify a patient and/or an exam.
The patient banner is populated with the selected patient/exam information. 3. On the Option Toolbar, click one of the following options: (The options available are
determined by security levels) o Patient - Patient demographic information o Medical History – Allergies, Patient History, Continuous Medications, miscellaneous
data and risk factors and Family History o Tracking - Tracking information o Image Mgmt - Film folder and loan information o Results - Diagnostic report information o Exam - Exam information o Meds – Medications Inquiry – Medications recorded as part of an exam o Tech - Technical factor and film information
The patient record information pertaining to the option selected is displayed.

University of Miami Centricity® RIS-IC 10.5 Training for Transcriptionists
Page 27 of 44
Patient Record Inquiries in Search Results Lists You can also view patient demographic and exam information via the patient banner, the Patient Exam List window, and the Find Patient or Exam window. Refer to the following table.
Search Result In the … Click… To view… Patient Patient name Patient demographic
information Patient banner Accession number Exam related information Find Patient or Exam window
Patient Name (in the name column of search results
Patient demographic information
Find Patient or Exam window
Icon in Exams column Opens exam list. Click on Accession number for exam detail and results

University of Miami Centricity® RIS-IC 10.5 Training for Transcriptionists
Page 28 of 44
Overview of the Results Module The Results module allows you to transcribe and manage diagnostic reports. You can inquire about reports and exams and generate various reports concerning diagnostic reporting activities. You can perform the following tasks in the Results module: • Transcribe diagnostic reports • Create addendums to finalized reports • Edit exam data • Associate exams with a diagnostic report • Disassociate one or more exams from a report
Objective Upon completing this chapter, you will be able to: • Identify the exam statuses that apply to diagnostic reporting activities. • Identify the report status that apply to diagnostic reporting activities
Understanding Exam Statuses The Exam Status determines if an exam can be used in the Results Module. The following table describes the exam (report) statuses that are relevant to the Results module.
Exam Status Description C Complete The exam is completed by the technologist. It is pending the
radiologist review and interpretation. D Dictated The radiologist has used a dictation system to dictate a report for the
exam. It is pending transcription. P Preliminary The dictated report has been transcribed. It is pending review and
signature by the radiologist. F Finalized The diagnostic report has been signed by the attending radiologist.
No changes can be made to the report. A Addended An addendum has been added to the report. It is pending signature
by the radiologist. When signed, the status will again be F (Finalized).
University of Miami Centricity® RIS-IC 10.5 Training for Transcriptionists
Page 29 of 44
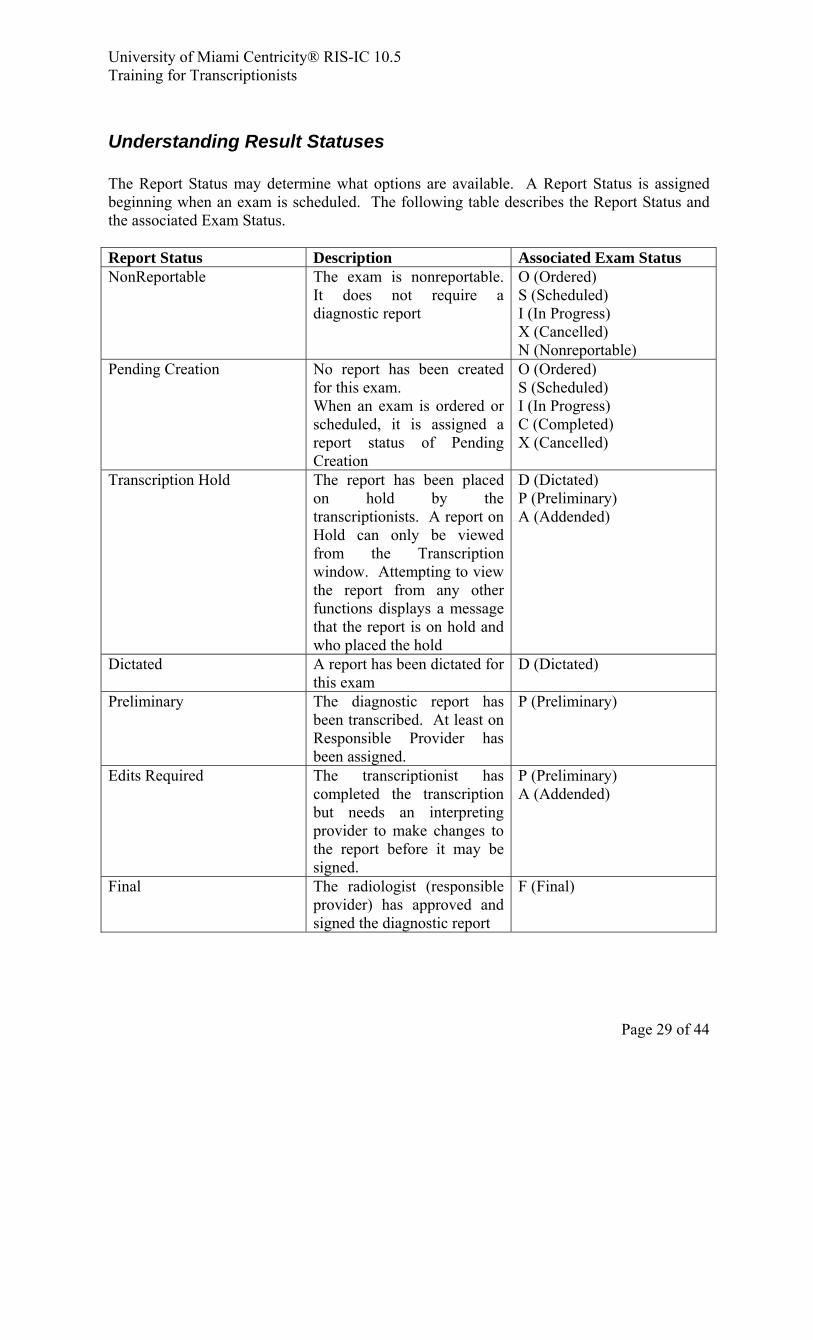
Understanding Result Statuses The Report Status may determine what options are available. A Report Status is assigned beginning when an exam is scheduled. The following table describes the Report Status and the associated Exam Status. Report Status Description Associated Exam Status NonReportable The exam is nonreportable.
It does not require a diagnostic report
O (Ordered) S (Scheduled) I (In Progress) X (Cancelled) N (Nonreportable)
Pending Creation No report has been created for this exam. When an exam is ordered or scheduled, it is assigned a report status of Pending Creation
O (Ordered) S (Scheduled) I (In Progress) C (Completed) X (Cancelled)
Transcription Hold The report has been placed on hold by the transcriptionists. A report on Hold can only be viewed from the Transcription window. Attempting to view the report from any other functions displays a message that the report is on hold and who placed the hold
D (Dictated) P (Preliminary) A (Addended)
Dictated A report has been dictated for this exam
D (Dictated)
Preliminary The diagnostic report has been transcribed. At least on Responsible Provider has been assigned.
P (Preliminary)
Edits Required The transcriptionist has completed the transcription but needs an interpreting provider to make changes to the report before it may be signed.
P (Preliminary) A (Addended)
Final The radiologist (responsible provider) has approved and signed the diagnostic report
F (Final)

University of Miami Centricity® RIS-IC 10.5 Training for Transcriptionists
Page 30 of 44
Understanding Keyboard Shortcuts in the Results Module Several shortcut keys are available in the Results module. These shortcut keys are available when you are working with the Transcription option. The following list identifies the results module shortcut keys. Shortcut Key Description Corresponding Button in RIS ALT+E Opens the diagnostic report in
Microsoft Word Enter/Edit
ALT+S (Word)
While transcribing in Microsoft Word saves the document. Word remains open for continued transcription
ALT+TAB Moves between application windows without using a mouse. Closes Microsoft Word and returns to the Results / Transcribe window
ALT+S Saves transcription information and resets the window to allow transcription of another exam.
Save/Clear

University of Miami Centricity® RIS-IC 10.5 Training for Transcriptionists
Page 31 of 44
Transcribing Diagnostic Reports The Transcription option allows you to transcribe and work with diagnostic reports in the Centricity® RIS-IC system. You can enter text dictated by an interpreting provider or (if set up at the facility) use a standard report to create a diagnostic report. To transcribe a diagnostic report in the Centricity® RIS-IC system, the exam must be in D (Dictated) exam (report) status. Objectives Upon completing this chapter, you will be able to: • Transcribe a report • Edit a preliminary report • Enter a standard report • Place a report on hold • Lock a report • Associate exams with a diagnostic report • Create an addendum for a report • Edit exam data

University of Miami Centricity® RIS-IC 10.5 Training for Transcriptionists
Page 32 of 44
Transcribing and Editing a Diagnostic Report Use the Transcription option to transcribe diagnostic reports for exams in D (Dictated) exam (report) status. The Transcription option also allows you to edit the diagnostic report in P (Preliminary) exam (report) status and to add an addendum to a report in F (Final) status.
Transcribing a Diagnostic Report
1. On the Module Toolbar, click Results. 2. On the Option Toolbar, click Transcription. 3. Identify an exam, or identify a patient and then select an exam. 4. Click Search. 5. The Transcription window is displayed
6. Enter the following information as appropriate:
Providers: Refer to detailed information on page 32. Dx/Pr Codes (Diagnosis and procedure codes) Interesting Case – use the check box to indicate whether to index the exam as an Assessment Code if dictated by radiologist
7. Click Enter/Edit. The keyboard shortcut for Enter/Edit is ALT + E. The Centricity® RIS-IC system opens Microsoft Word.

University of Miami Centricity® RIS-IC 10.5 Training for Transcriptionists
Page 33 of 44
Note: On the title bar of the Microsoft Word window, the document name is assigned as TR preceding the exam accession number and followed by .HTM. For example: TR267.HTM.
8. Transcribe the diagnostic report in Microsoft Word. Save the Microsoft Word document then close the document. The keyboard shortcuts with Microsoft Word are ATL + S to save and ALT + TAB to close Microsoft Word and return to the transcription window.
9. On the Transcription window, click Save or Save/Clear. The keyboard shortcut to Save/Clear is ALT + S.
Entering a Provider There are three provider types.
a) The Performing Provider is the Radiology Technologist who performed the exam. This is entered by the technologist.
b) A Contributing Provider is a resident or fellow. There may not be a Contributing Provider. The Contributing Provider is entered by the transcriptionists.
c) An Interpreting Provider is the attending radiologist. There is always an Interpreting Provider. The Interpreting Provider is entered by the transcriptionists
1. Click where indicated by the instructions “click to add new row” 2. In the provider box, enter the last name or partial last name. 3. Click the ellipsis. 4. A Provider Lookup window opens. Select the appropriate provider by clicking on the
name 5. To delete an incorrect entry, click the X on the incorrect provider line.
5 4
3 2 1

University of Miami Centricity® RIS-IC 10.5 Training for Transcriptionists
Page 34 of 44
Editing a Preliminary Diagnostic Report
1. On the Module Toolbar, click Results. 2. On the Option Toolbar, click Transcription. 3. Identify an exam in P (Preliminary) status, or identify a patient and then select an
exam in P status. 4. Click enter/edit to open Microsoft Word. 5. Edit the diagnostic report as appropriate. Save and close Microsoft Word. 6. On the Transcription window, click save or save/clear.
Entering a Standard Report A standard report is a prewritten diagnostic report that the interpreting providers in your department have approved for use with certain exams and for certain outcomes. Use a standard report to expedite the diagnostic reporting process for certain exams. NOTE: The individual organizations and departments will determine if Standard Reports are to be used. 1. On the Module Toolbar, click Results. 2. On the Option Toolbar, click Transcription. 3. Identify an exam, or identify a patient and then select an exam. 4. Enter the following information as appropriate:
Provider Diagnosis and procedure codes Assessment code (if applicable) Whether to index the exam as an interesting case
5. In the Standard Reports field, click the ellipsis, identify and select the standard report(s)
you want to use. Note: To remove a standard diagnostic report, click the X next to the standard report you want to delete from the exam. 6. On the Transcription window, click Save or Save/Clear.
5

University of Miami Centricity® RIS-IC 10.5 Training for Transcriptionists
Page 35 of 44
Placing a Report on Hold You can place diagnostic reports on hold. When you place a diagnostic report on hold, you can transcribe the report, but the report is retained in transcription and the exam (report) status does not change to P (Preliminary)—that is, the report is not available to the interpreting providers until it is taken off hold and saved in the system. To take a report off hold, edit the report in the Transcription option. Note: You can only place reports on hold that are in D (Dictated) exam (report) status. Caution: If a report remains on hold, the report cannot be finalized by the interpreting provider(s), which may result in delayed treatment of the patient. Your organization is responsible for developing a procedure to ensure that reports are not inadvertently left on hold.
Placing a Diagnostic Report on Hold 1. On the Module Toolbar, click Results 2. On the Option Toolbar, click Transcription. 3. Identify an exam, or identify a patient and then select an exam. 4. Transcribe the report. 5. In the Report Status field, click and select Hold. 6. Click Save or Save/Clear.
Diagnostic Report Lock You can retain a diagnostic report for which more information is required; this is considered locking a diagnostic report. When a report is locked, the report is displayed on the interpreting providers' signature queues, but prevents the providers from signing the report without first editing the report. NOTE: Only lock reports in D (Dictated), or A (Addended) status. • The ability to lock a report depends on how the Centricity® RIS-IC system is defined at
your site. For more information, contact your Centricity® RIS-IC application manager. • Your organization can determine how you should mark the section of the report that
requires edits. For example, your organization can use a string of asterisks or question marks to indicate where edits are needed.
When a provider accesses a locked report, a message is displayed stating that a transcriptionist locked the report and edits are required. Either a provider or a transcriptionist can edit a report to unlock it. Message displayed below.

University of Miami Centricity® RIS-IC 10.5 Training for Transcriptionists
Page 36 of 44
Locking a Diagnostic Report 1. On the Module Toolbar, click Results 2. On the Option Toolbar, click Transcription. 3. Identify an exam, or identify a patient and then select an exam. 4. Transcribe the report. 5. In the Report Status field, click and select Edits Required. 6. Click save or save/clear.
Associating Exams While Transcribing The Transcription option allows you to associate multiple exams with a diagnostic report. This enables one diagnostic report to serve as the diagnostic report for several exams. When you associate exams with a diagnostic report, you must specify a primary exam - this is the exam whose diagnostic report applies to the primary exam and to any associated (secondary) exams. Exams can serve as primary exams if they have an exam (report) status of D (Dictated), P (Preliminary), A (Addended). Exams can serve as secondary exams only if they have an exam (report) status of C (Completed) or D (Dictated). NOTE: • Secondary exams are not displayed on a provider’s signature queue; only the primary
exam appears for review and signature. Associated exams are listed on the Reporting Activities window. When the primary exam’s report is finalized, the exam (report) status of both the primary and secondary exams changes to F (Finalized).
• On the Transcription window, the primary exam is displayed as the first exam in the list of associated exams.
• You can also associate an exam with a diagnostic report that has already been transcribed using the Associate option. For more information, refer to the Associating and Disassociating Exams chapter of the IDX Centricity® RIS-IC Core Functionality Training Guide.
• For more information about disassociating exams, refer to the Associating and Disassociating Exams chapter of the IDX Centricity® RIS-IC Core Functionality Training Guide.

University of Miami Centricity® RIS-IC 10.5 Training for Transcriptionists
Page 37 of 44
Associating Exams with a Diagnostic Report
1 On the Module Toolbar, click Results. 2. On the Option Toolbar, click Transcription. 3. Identify the exam you want to serve as the primary exam or identify a patient and then
select the primary exam. 4. Transcribe the exam 5. On the Transcription window, click the associate button. NOTE: Do not click Associate on the Options Toolbar 6. The Associate Exams window opens. Click the check box to select the secondary
exam(s) to be associated. Click the OK button. 7. The Associated Exams window list the primary exam followed by the secondary exam(s). 8. On the Transcription window, click save or save/clear.
Creating a Diagnostic Report Addendum When a report has been finalized, no changes can be made to that report. However, additional information can be added in a separate transcription - this is considered creating a report addendum. To create a report addendum the exam’s status must be in F (Finalized) status.. Creating an addendum for a report changes the exam (report) status from F (Finalized) to A (Addended). Addended reports must then be re-finalized. Providers can re-finalize reports in the same manner that they finalize any preliminary report (that is, in the Provider module).
5
7

University of Miami Centricity® RIS-IC 10.5 Training for Transcriptionists
Page 38 of 44
Creating a Report Addendum 1. On the Module Toolbar, click Results. 2. On the Option Toolbar, click Transcription. 3. Identify an exam in F (Finalized) status. 4. When a Finalized report is opened in the Transcription Option, the Enter/Edit is button is
replaced with an Addend button. Click addend to open Microsoft Word. 5. Two sessions of Microsoft Word are opened. • The Finalized report displays as a read-only document. • An addendum window opens for the transcription of the additional report information.
The document name assigned is the original document name followed by _Addend. For example, TR267_Addend.HTM.
7. Enter the report addendum. 8. Save and close word 9. On the transcription window click Save or Save/Clear
3
4

University of Miami Centricity® RIS-IC 10.5 Training for Transcriptionists
Page 39 of 44
Associating and Disassociating Exams You can associate multiple exams with an individual diagnostic report. This enables one diagnostic report to serve as the diagnostic report for several exams. You can also disassociate an exam from a report if the association is no longer necessary or was performed in error. When you associate exams with a diagnostic report, you must specify a primary exam - this is the exam whose diagnostic report serves as the diagnostic report for the primary exam and any associated (secondary) exams. Secondary exams are not displayed on a provider’s signature queue; only the primary exam appears for review and signing. When the primary exam’s report is finalized, the exam (report) status of the primary and secondary exam(s) changes to F (Finalized).
Objectives Upon completing this chapter, you will be able to: • Associate one or more exams with a report after the report has been transcribed and saved • Disassociate one or more exams from a report that has been transcribed and saved

University of Miami Centricity® RIS-IC 10.5 Training for Transcriptionists
Page 40 of 44
Associating After the Report has been Transcribed You can use the Associate option to associate exams with a diagnostic report that has already been transcribed in the Centricity® RIS-IC system. Exams can serve as primary exams if they have an exam (report) status of P (Preliminary), A (Addended). Exams can serve as secondary exams only if they have an exam (report) status of C (Completed) or D (Dictated) NOTE: If a diagnostic report has not been transcribed, and you want to associate exams when you transcribe the report, use the Transcription option to associate the exams. For more information, refer to page 35 of this manual
Associating Exams with a Diagnostic Report 1. On the Module Toolbar, click Results. 2. On the Option Toolbar, click Associate. 3. Identify an exam, or identify a patient and then identify the primary exam. 4. Click the + button for a list of exams which can be secondary exams to the selected
primary exam. 5. From the Associate Exams window click the check box for the secondary exam(s). 6. Click ok. 7. Click save.
1
2
3
4
5
6
7

University of Miami Centricity® RIS-IC 10.5 Training for Transcriptionists
Page 41 of 44
Disassociating Associated Exams You can remove one or more exams from a group of exams associated with a diagnostic report. You can disassociate exams that are no longer needed or have been associated with an exam in error. You cannot disassociate an exam in F (Finalized) exam (report) status. When you remove an exam from a report, the status changes back to D (Dictated), and you must transcribe a new report for the disassociated exam. NOTE: You can only disassociate secondary exams from a diagnostic report; you cannot disassociate a primary exam.
Disassociating Exams from a Diagnostic Report 1. On the Module Toolbar, click Results. 2. On the Option Toolbar, click Associate. 3. Identify the primary exam, or identify a patient and then select the primary exam. 4. Click the radio button next to the secondary exam(s) you want to disassociate. 5. Click the X to disassociate the exam(s) 6. Click save.
5
4
6

University of Miami Centricity® RIS-IC 10.5 Training for Transcriptionists
Page 42 of 44
Using the Radiologist Worklist The Worklist is used by interpreting providers and technologists to display exams that are either scheduled to be performed or are in progress at a specified performing resource. For the Transcriptionist the Worklist would be set up to display exams in D (Dictated) and P (Preliminary) status. Objectives Upon completing this chapter, you should be able to: • Access the Worklist • Filter the worklist to display exams

University of Miami Centricity® RIS-IC 10.5 Training for Transcriptionists
Page 43 of 44
Accessing the Worklist 1. On the Module Toolbar, click Worklist. 2. On the Option Toolbar, click Radiologist. 3. The Radiologist Worklist window appears
Filtering the Radiologist Worklist Filters are used to determine what types of exams are included in the worklist. For example, you could limit the worklist to include only MR exams that will be performed today. The first time a user accessing the worklist option, the following message window displays. Clicking OK opens the Radiology Worklist Filter window.
The Radiology Worklist Filter window can be opened at any time to edit an existing worklist or to create additional worklists.

University of Miami Centricity® RIS-IC 10.5 Training for Transcriptionists
Page 44 of 44
Filtering the Technologist Worklist 1. On the Module Toolbar, click Worklist. 2. On the Option Toolbar, click Radiologist. 3. Click filters. The Build Radiologist Worklist window appears
4. Select the filter settings according to how you want your worklist to appear.
The following are recommended by the University of Miami for Transcriptionists: • Date Range: Most exams on the worklist will be very recent, set for 7 or 30 days • Exams: Set to All Exams. Images are not required for the transcription functions • Exam Status: Check only Dictated and Preliminary.
5. Click save. 6. A filter name window opens . Assign a name for the worklist (e.g. UM Reports) 7. Click OK 8. The worklist is refreshed with the new filter.


