27
Department of Endodontics CLINICAL ENDODONTICS INTRODUCTION FOR STUDENTS University of Oslo Faculty of Dentistry 2013-provisional 2013.09.19 English translation by Dr Iman Saleh

Department of Endodontics
CLINICAL ENDODONTICS
INTRODUCTION FOR STUDENTS
University of Oslo
Faculty of Dentistry
2013-provisional
2013.09.19 English translation by Dr Iman Saleh

2
The aim of this manual is to make the Erasmus student familiar with the routines
followed at the Department and the principles of root canal treatment. This manual has
to be read before the clinical demonstration in endodontics and has to be used at the
clinic. BE WELL PREPARED before each patient session.
SYSTEMATIC ENDODONTIC TREATMENT
This implies that you go through the following steps, for each case. All steps should be
immediately written in Salud and each step should be approved and authorized by an
instructor.
A. Preparation of the patient and unit
B. Journal: examination, diagnosis and treatment plan
1. Case history: medical and dental
Salud: EDR Summary: Questionnaire
Salud: Endodontic Examination: Prelim Assessment
2. Examination: clinical and radiological
Salud: Endodontic Examination: Prelim Assessment, Clinical Findings Clinical
and Clinical Findings X-Ray
3. Diagnosis
Salud: Baseline Restorative Charting/ Endodontic/ Diagnoses
4. Treatment plan
Salud: Baseline Restorative Charting/ Endodontic/ Treatment Planning
5. Inform the patient about the findings, diagnosis and treatment plan
C. Tooth preparation
6. Event. tooth build-up, anaesthesia, rubber dam
Salud: Progress Notes
D. Aseptic treatment
7. Preparation and obturation of the root canal(s)
Salud: Progress Notes
E. Closing: temporary/permanent restoration
8. Coronal obturation; prognosis and postoperative control
Salud: Sluttgodkjenning

3
This booklet includes the two commonly performed treatment procedures in
endodontics: vital pulp therapy (pulpectomy) and nonvital pulp therapy (treatment of
necrotic tooth).
The red text indicates the check points for students; the blue text is when you have to
show the instructor for approval before proceeding further. The instructor must also
authorize the diagnosis, treatment plan and the progress notes in Salud.
The 8 points for a systematic root canal treatment are marked in red in the following
text.
A. Preparation for treatment
The dental unit is disinfected (wiped off) and made ready with all the instruments and
materials necessary for the treatment.
This will be shown in the clinical demonstration given before starting with patient
treatment.

4
15-17% EDTA for
root canal irrigation
Ready-mixed Ca(OH)2
paste in syringe
0.5% chlorhexidin in 70% ethanol for disinfection of the tooth & rubber dam
1% sodium hypochlorite for root canal irrigation
Eugenol for use in treatment of acute cases
IRM, temporary filling material
Frame Paper points, syringes & tips, exam.set Endocassette
Bur & clamp
Clamp holder
Hole puncher
Rubber dam
Suction tip
High suction
Three-in-one syringe
Parallell-holder
Endo-Ray-holder
IRM is mixed at the chair using a spatula and a glass slab + Cavit-G, which is used in the canal orifices, in between visits
5
B. Journal: examination, diagnosis and treatment plan
This is provided that the main journal and a chair ordered for you are registered in Salud
(talk event. with the secretary at the department). Now you take the patient in and start
taking the journal in Salud.
(1) Taking the case history: medical and dental.
First of all you ask the patient about any changes in his/her health condition since the
last case history was taken. (New patients should always fill out a medical consent form
in the general part of Salud)
Let the patient describe the symptoms with his/her own words. Leading questions may
be proposed, if necessary, for complementary information.
The patient symptoms and other information are ticked in in Salud: Endodontic
Examination: Prelim Assessment.
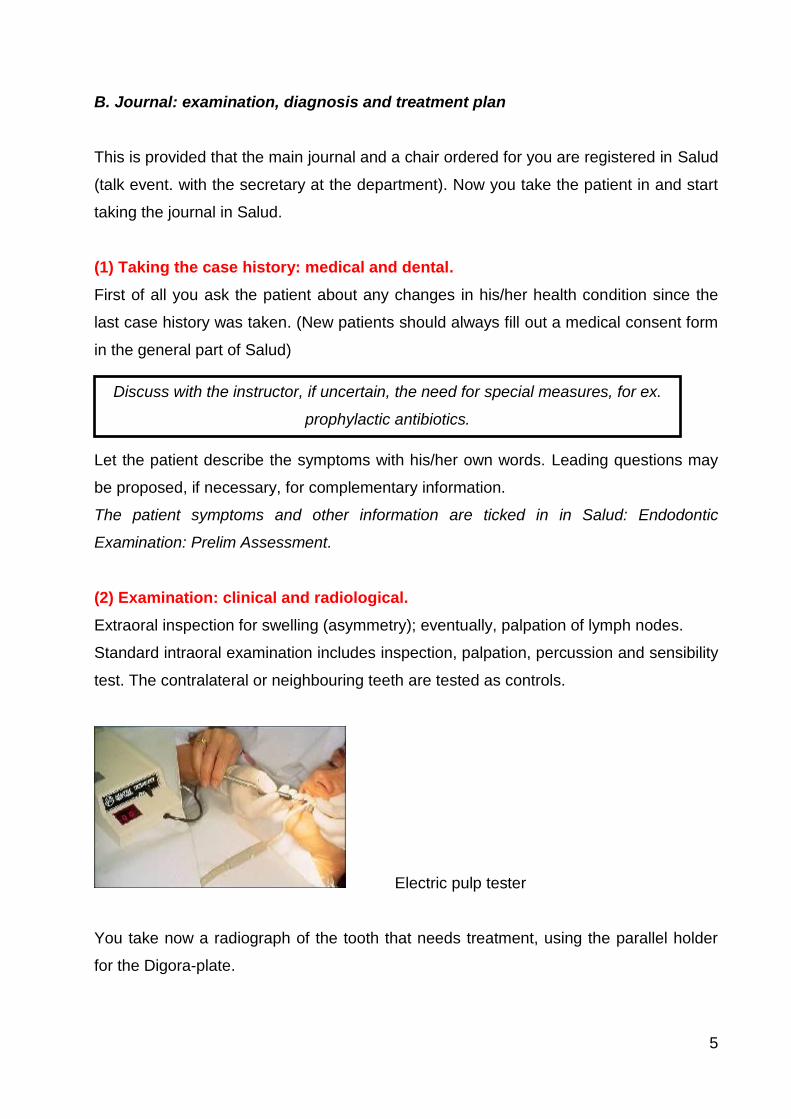
(2) Examination: clinical and radiological.
Extraoral inspection for swelling (asymmetry); eventually, palpation of lymph nodes.
Standard intraoral examination includes inspection, palpation, percussion and sensibility
test. The contralateral or neighbouring teeth are tested as controls.
Electric pulp tester
You take now a radiograph of the tooth that needs treatment, using the parallel holder
for the Digora-plate.
Irrigasjonssprøyte
Discuss with the instructor, if uncertain, the need for special measures, for ex.
prophylactic antibiotics.

6
Parallel technique
After sending the radiograph to PACS, you can open it in Salud by pressing on the X-ray
button, and then choosing the radiograph. Drag it over to the big window to view it.
You now make a
(3) Diagnosis
The findings gathered from the case history, as well as the clinical and radiological
examination, are registered accurately in Salud: Endodontic Examination: Prelim
Assessment, Clinical Findings Clinical & Clinical Findings X-Ray.
This will lead to diagnosis, which is not marked in ”Endodontic Examination:
Diagnosis”, but in Salud: Baseline Restorative Charting/ Endodontic/ Diagnoses.

7
(4) Treatment Plan
According to the diagnosis a treatment plan is chosen. This is also marked in the
journal in Salud: Baseline Restorative Charting/ Endodontic/ Treatment Planning.
The diagnoses of the different forms of pulpitis indicates pulpektomi, but for non-vital
teeth or apical periodontitis it will be nekrosebehandling
An instructor should be called for approval of the journal and the treatment plan
and the authorization in Salud.
(5) You give now the patient the following information:
C. Tooth preparation
(6) Access and isolation
These procedures are to be followed in all appointments. Eventually, put anaesthesia.
Then, you do the drilling and cavity preparation using a long round bur for turbine and
contra-angle. Measure the distance from the crown/a cusp tip to the floor of the pulp
chamber on the radiograph, in order to avoid perforation. Check that all the carious
tooth structure is removed.
An instructor is called for approval of the cavity preparation.
In some cases you may need to build up the tooth to avoid salivary contamination during
treatment. The rubber dam is then mounted. It has to be tight to avoid leakage
throughout the whole appointment.
In the other appointments, the rubber dam is mounted before removing the temporary
filling and re-establishing the cavity and the canal orifices.
An instructor is called for approval of the rubber dam.
D. Aseptic treatment
”We have now, according to your symptoms and to the examination done, come to
the decision that the tooth is infected/inflamed and that it needs a root canal
treatment. This may take one or more visits and will cost you kr. xxx,-(check the
price list). If the treatment is not done now, the prognosis for the tooth will be poor
and you may risk it will have to be taken out on the long run.”

8
(7) a. The root canal treatment.
Cover the patient’s clothes with a nylon sheath to protect it from sodium hypochlorite.
Protect the patient’s eyes and face by covering it with protecting glasses. Use yourself
protecting glasses. Disinfect the working area with a chlorhexidin (0,5%/70%)-
moistened gauze for a minimum of 2 minutes. Remove the outer (blue) paper of the
endodontic cassette. Keep the inner paper (green) over the bracket table, without
blocking the trash holder. Open the endodontic cassette and put the medicament dish,
mirror, probe, tweezers and foam box in the cover of the cassette using the bur
tweezers. Fill the medicament dish with NaOCl (1%) solution.
Endodontic cassette: note how the
mirror, probe and tweezers are put on
the right edge and not inside the cover.
The endodontic cassette should never
look like that!

9
A 10 ml disposable syringe is filled with 1% NaOCl from the medicament dish, the tip is
slightly bent against the sterile paper inside the cover, and NaOCl (CHX) is injected in
the pulp cavity.
You will now take a tooth length radiograph (indikatorbilde).
Measure the length of the tooth on the radiograph in PACS. Right click on the mouse,
menu: distance = ”Avstand”.
Note the approximate tooth length from the apex to a cusp tip and deduct from it first
10% and then 1 mm. This is to compensate for eventual miscalculations and to avoid
overinstrumentation.
For example:
If the distance you registered on the preoperative radiograph was 20mm, then the length
on the file you are going to take the tooth length radiograph with will be: (20mm – 10%)
– 1mm = 17mm.
Adjust the rubber stopper on the file to this length and insert the file into the canal. The
highest point of the crown is your reference. A K-file that fits into the canal apically is
used. Nr 015 is the minimum size that can be properly seen on the radiograph.

10
Using the Endo-Ray film holder
The tooth length radiograph must be approved by an instructor.
The procedure to be followed is the same as that for a preoperative radiograph, but
using the Endo-Ray film holder that allows a paralleling technique while the clamp is in
place.
Any required length adjustments are to be done now. Measure the distance from the file
tip to the root apex and calculate how many mm you have to add on (or evt deduct from)
so that the tooth length is 1-1.5 mm from the apex. If the distance from the file tip to the
root apex was to long (>5mm), then adjust the length and take a new radiograph.
Upon agreement with your instructor on the tooth length, you can prepare the canal to
the required size.

11
Reciproc – see separate handout
Avoid over- and under-instrumentation.
After finishing the preparation, irrigate the canal thoroughly with EDTA 15% and dry it
with paper points. The instructor must approve the canal preparation.
Checklist for the usage of machine instrumentation:
1. The cavity preparation should be done so that a straight line access to all the
canals is achieved.
2. Never apply force on the hand piece or file. Do not press the file into the canal
when resistance is met.
3. Extremely curved or s-shaped canals and other atypical morphologies should be
hand instrumented to a dimension larger than nr 20 both apically and coronally
before rotary instrumentation.
4. Through away the file if you suspect any damage.
5. Use rotary instrumentation on all but extremely difficult cases – practice your
technique!
6. Rotary instrumentation SHOULD NOT be used to by-pass a step in the canal!
7. Avoid ”start-and-stop”. The file should be in motion on its way in, is held in the
canal with minimum pressure, and is taken out again while still moving.
8. Always watch the length so as not to instrument beyond the apex.
(7) b. Intermediary dressing
If the tooth is not filled at this appointment, then a calcium hydroxide is applied as a
temporary antibacterial dressing. It is applied either with a lentulo spiral or with a
Pulpectomy: The working length is 1-2 mm from the radiographic apex.
Non-vital pulp therapy: We try to reach the full length to get the most effect of instruments and medicaments. The working length is 1 mm from the radiographic apex. Avoid overinstrumentation!!

12
reamer, refer to demo. The calcium hydroxide is applied for a minimum of one week and
a maximum of 3 months.
If there is enough space, Cavit-G (gray) is applied over the canal orifices, ca. 2 mm
thick. An IRM filling is applied again over it. It should not be too high. The instructor
must approve it.
When the patient comes back, the tooth is made ready for aseptic treatment again:
NB! The rubber dam is mounted first, the working area is disinfected with
chlorhexidine/alcohol and the temporary filling is removed. The disinfection procedure is
repeated after opening to the pulp cavity. The calcium hydroxide is removed by
instrumentation and irrigation with NaOCl, and at the end the canals are thoroughly
irrigated with EDTA 15%, and dried with paper points.
Remember to register all the phases of the treatment in Salud: Progress Notes:
NB: Remember to obtain authorization from the instructor whenever it is required!!!
Non-vital pulp therapy: There should always be a dressing of calcium hydroxide or calcium hydroxide with chlorhexidine in case of non-vital pulp therapy. When the conditions allow it, the teeth can be root filled in one visit, if the tooth is not necrotic/infected.

13
(7) c. Root filling
A gutta percha master-point, of the same dimension as the last instrument used
apically is fitted. A mark is made with tweezers on the point at the right length before
inserting it into the canal.
Gutta-percha point marked at the right length
A Reciproc point of corresponding dimension is selected.
A radiograph (masterpointbilde) is taken with an Endo-Ray holder to control that the
gutta percha point is in place.
The radiograph is shown to an instructor for approval.
Pulpectomy: If the tooth is completely instrumented at the first visit and it has been symptom-free before the start of the treatment, then it can be root filled in one visit.
Non-vital pulp therapy: This is always at the 2. visit or later. You have to check whether the tooth is still tender to percussion or palpation: A minimum requirement for obturation of the tooth is that it is symptom-free. It is your responsibility to control that. Another prerequisite is that the canals are dry, i.e., absence of any exudation, an indication that the periapical inflammation is gone.

14
When the instructor approves the masterpoint-radiograph, you can fill the canal.
The canal is filled with gutta percha and sealer, following the principles for the standard
technique: AH+ sealer is mixed (equal length from each tube). The master-point is
covered with sealer and is inserted into place in the canal. Finger spreader B or C is
used to make place for the accessory points (size B or C respectively) that are also
covered with sealer before they are inserted into the canal.
A control radiogragh is taken and is shown to the instructor before excess gutta percha
is removed.
E. Conclusion of treatment
(8) a. Top filling.
After the application of calcium hydroxide in the canal, Cavit is applied over the canal
orifices before the IRM top filling. After root filling the gutta-percha and sealer are
removed to just below the canal orifice(s). The sealer is removed from the cavity using a
cotton pellet dampened with chlorhexidine. The temporary filling (IRM) is placed in
contact with the root filling ca. 2 mm into the canal orifices. A permanent filling may
occasionally be placed during this session, with Cavit over the canal orifices. Then the
rubber dam is taken off and
a postoperative radiograph (sluttbilde) is taken with a parallel holder and is
approved by an instructor.
15
(8) c. Prognosis
You have to inform the patient on the prognosis for treatment now, and that first at the
one-year control, it is possible to assess the final result with certainty. A written recall
will be sent for this investigation, which is important for the patient and for the quality
assurance within the field of endodontics.
The treatment has to be immediately approved by the instructor. Check that all
required items are authorized by the instructor.
Be ready for a discussion of the treatment and the prognosis.
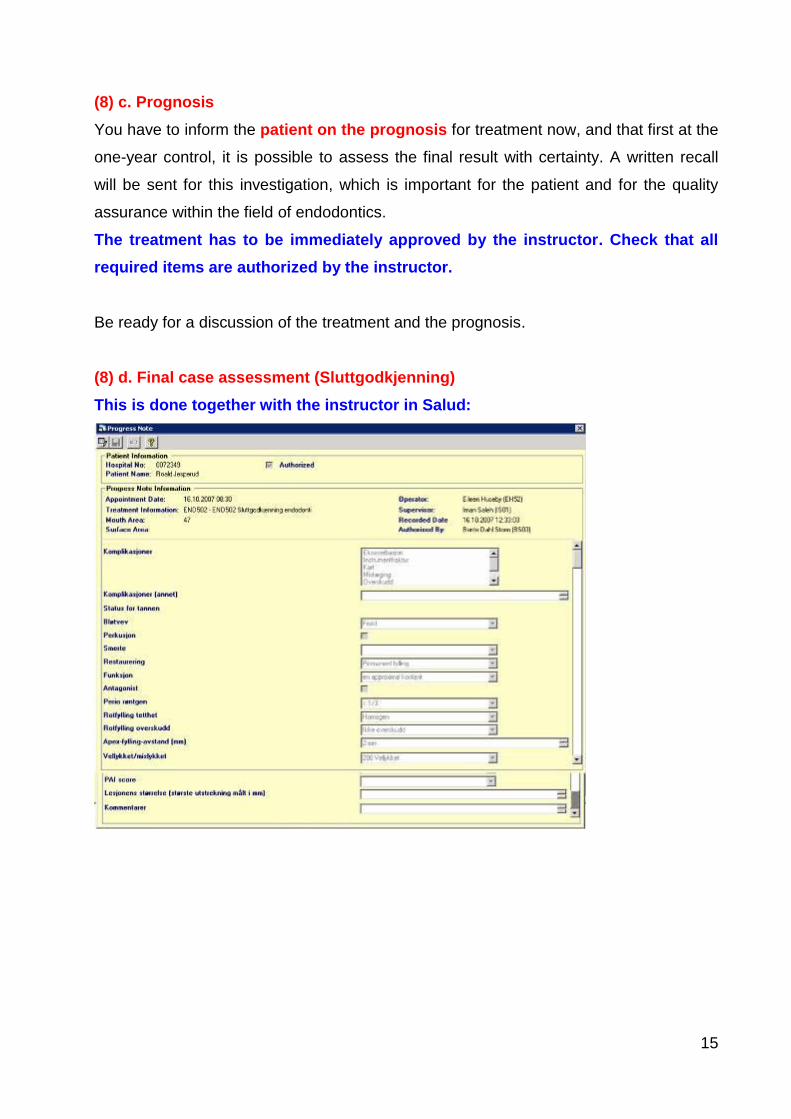
(8) d. Final case assessment (Sluttgodkjenning)
This is done together with the instructor in Salud:

16
Notes on retreatment
It is called retreatment when the tooth has been previously root filled. The principles for
treatment are the same as for non-vital pulp therapy, but the old root filling can make
some practical problems: It has to be removed to be able to disinfect the pulp space
effectively. The Reciproc system can be used for gutta-percha removal. Gates-Glidden
burs (see picture) can be used as supplement. It breaks easily, but it is designed so that
the breakage occurs at the shaft, which makes it easy to remove the broken fragment.
GG-burs (small dimensions, red or blue marking line) are used from the coronal pulp
and for few mm down the straight part of the root filled canal. In this way the H-files can
later easily find their way along the root filling. If the root filling is tight and well
condensed, a drop of chloroform can be applied carefully into the canal orifice.
Chloroform dissolves gutta-percha, so that the files get a better hold. With some
patience (and refill as the chloroform evaporates quickly) most of the old root fillings
could be removed completely. NB! Chloroform dissolves also rubber dam and gloves,
and can affect clothes having plastic components.

17
ROTKANALANATOMI – FRONTTENNER
Anatomi: 1 kanal 80%, 2 kanaler 20%
Varianter: Apikal bøy i 30%. Kan ha bifid rot
Anatomi: 1 kanal 60%, 2->1 40%
Varianter: Apikal bøy i 30%
Anatomi: 1 kanal 100%
Varianter: Apikal bøy i 60%
Anatomi: 1 kanal 100%
Varianter: Apikal bøy i 50%
Anatomi: 1 kanal 100%
Varianter: -

18
ROTKANALANATOMI – PREMOLARER OG MOLARER
Anatomi: 3 kanaler 80%, 2 i 15%, 4 i 5%
Varianter: Apikal bøy M rot 70%. M standardisering vanskelig
Anatomi: 1 kanal 90%, 2 i 10%
Varianter: Apikal bøy i 50%.
Anatomi: 1 kanal 80%, 2 i 20%
Varianter: Apikal bøy i 40%.
Anatomi: 3 kanaler 20-40%, 4 i 80-60%
Varianter: Apikal bøy MB rot 80%
Anatomi: 1 kanal 60%, 2 i 40%
Varianter: Apikal bøy i 60%.
Anatomi: 2 kanaler 75%, 1 i 15%, 2->1 i 10%
Varianter: Apikal bøy i 35%. Vanskelig standardisering

19
GUIDELINES FOR FILLING OUT THE ENDODONTIC PART IN SALUD
Three screens in Salud give access to history, examination, diagnosis, and treatment
plan.
Generell anamnese – sykdommer General history--diseases
This scheme should be filled out beforehand.
I Journal/EDR Summary use first Endodontic, then Restorative.

20
Endodontic
Prelim Assessment is analogous to General Dental History
Type
Pain: Every pain that has affected the patient. Not the occasional discomfort, but something that has annoyed
him/her.
Swelling: Now or earlier.
Sensitivity: Annoying, subjective sensitivity to hot or cold.
Discoloration: Of the tooth in question (eg, blue, brown or trauma)
Chronology
Consistant: Pain/discomfort all the time versus every now and then
Momentory: Obvious pain at stimulus, but disappears quickly
Inception: What triggers the pain? Ex: Hot food, ice cream, chewing.
Lingering: The pain lingers after the stimulus has gone.
Intermittant: The pain comes and goes with or without stimulus
Quality:
Enlarging: The pain increases in intensity after onset.
Intensity: Use the patient’s own words; try, as well, to use a VAS-scale: 0 is no pain, 10 is the ever worst.
Affected By
Here it should be no room for doubt on the questions.
Location
Area: Write the tooth number; evt two-three teeth, evt jaw; evt side.
Referred: The pain has its origin in an area separate from where the patient feels it. Indicate from where you
believe it is coming.

21
Clinical Findings Clinical reflects the clinical examination
Soft Tissue
Normal: The colour of the mucosa is just as otherwise in the mouth
Sinus tract. (=fistula)
Lymphadenopathy: Swollen or tender lymph nodes
TMJD: Temporomandibular joint dysfunction
Increased PPD: Periodontal probing depth: Pockets deeper than 3 mm are registered. One recording (the
deepest) for the actual tooth.
Tooth:
Prior access: It has been opened to the pulp cavity and occasionally done some instrumentation previously.
Abutment: For a bridge or a partial prosthesis
Rinsed canals: Describe shortly if some canals (which one) has been instrumented completely.
Special Tests
Test the tooth in question and at least one control (neighbouring) tooth
EPT: Electric Pulp Tester
Heat: is not used here
Biting/chewing: Take a cotton roll, put it on the tooth to be tested, let the patient bite, and ask if it is tender.

22
Clinical Findings X-Ray. You should have at least one periapical radiograph of the
tooth with the roots freely exposed.
Tooth:
Normal: “Yes” in most of the cases unless for example ”fused tooth”, hypoplastic enamel, abrasion/attrition and
crown fracture that is ”No”. Root filled teeth are considered as ”normal”.
Calcification: Abnormal obliteration of the pulp.
Resorption: When internal resorption is suspected, 2 radiographs are taken at different horizontal angles.
Fracture: Indication on the radiograph of a fracture, vertical or horizontal.
Perforation/Deviation: A trace of instrumentation that has (nearly) resulted in a perforation to the PDL
Prior RCT: Prior root canal treatment. Root filling material in the canals.
Separated Instrument: A file fragment in a root canal.
Canal Obstruction: Yes: in case of Calcification or Separated instrument.
Open Apex: A tooth with an incompletely formed root; eventually a trace of previous over instrumentation.
Furcation Involvement: Bone loss in the furcation area.
Curved Root Canal: Unusual curvature. More than ca 30 degrees
Branched Root Canal: The radiogragh indicates 2->1 canal or 1->2 canals
Attachment Apparatus:
PDL: Periodontal ligament: Normal: ”No” if there is a lesion or the lamina dura is diffuse.
PDL Widened: If the PDL is more than double its thickness where the pulp exits as compared to the supporting
PDL.
Alveolar Bone Normal: In most of the cases you will write ”Yes”, if there is no atypical pockets or unusual mineral
content.
Hypercementosis: The root gets the shape of a club from cementum deposition.
Osteosclerosis: It is an increase of the mineral concentration in an area around or at a root.
Perio: The radiographic judgement of the periodontal status in the area, particularly the tooth in question: In case
of doubt: if more than 2/3 of the root has bone support gives ”No”.

23
Diagnosis: Should be filled out, but has to be supplemented in Restorative.
Diagnosis Pulp
Diagnosis Periapical
Acute Apical Periodontitis: Clinical symptoms of acute inflammation in the periodontium apically; no radiographic
signs
Acute Apical Abscess: Swelling and/or obvious rubor in the mucosa/skin over the tooth in question
Chronic periapical inflammation: Radiographic sign of apical lesion and negative sens-test of the pulp.
Phoenix Abscess: Acute clinical symptoms + radiographic sign of apical lesion.
Osteosclerosis: Condensing apical periodontitis: Negative sens-test or an old amputation of the pulp together
with bone condensation apically.
Etiology:
Idiopathic: = unknown
Periodontal: We believe that a periodontitis has led to the pulp space infection.
Prior RCTx: Yes if a poor root filling is evident: too short/long/poorly condensed.
Intentional: Yes if we will do the root filling for a prosthetic reason.
Systemic: Yes if it is part of oral clean-up prior to cardiovascular surgery.
Treatment Recommendations: Skip it.
Prognosis: IMPORTANT
Endodontic: Your belief that the apical periodontitis can be prevented or eliminated.
Periodontal: A bone loss of less than 1/3 of the root length is considered doubtful.
Restorative: A badly broken down coronal part or tooth, that is going to be a part of a big prosthetic restoration,
should be evaluated.
Treatment Plan: THIS IS NOT FILLED OUT during history taking-

24
Baseline Restorative Charting – Filter Endodonti; Diagnoses
The established diagnosis is taken from the previous form into the tooth in question
here.
Baseline Restorative Charting – Filter Endodonti; Treatment Planning
The accepted treatment is entered here for the tooth in question. You shall first
enter the type of treatment for the tooth (pulpectomy END610, disinfection END611,
retreatment END612), and then the type of the tooth (front tooth, premolar, molar). You
fill out the Progress Notes for the type of the tooth (END 620, 630, or 640), not for the
type of treatment.

25
RADIOGRAPHS
In order to scan the Digora-plate you have to send an order to the scanner. This is done
via the “Radiology”-button in the EDR-Summary display.
Then you choose the type of the X-ray, intraoral for endodontics (IO), and which
scanner you will to use. For endo it will be 6ET_VOKSEN.
Save the order and go to the scanner to get the radiograph in PACS and SECTRA.

26
After having sent the picture to PACS, you can open it in Salud by clicking on the X-ray
button, and then choose the order. Drag the radiograph over to the big window to view
it.

27
Medicaments for patients who need endocarditis prophylaxis Procedures where endocarditis prophylaxis is recommended: Dental treatment: extraction, removal of calculus, manipulation of root canals, all dental treatment where bleeding is expected. Surgical procedures and biopsies in the mouth cavity Recommended antibiotic prophylaxis Standard per oral antibiotic prophylaxis gives a satisfactory security for all the patients (and those at high risk as well) at all the operations that are done If a patient was using an antibiotic before a procedure, then prophylaxis is given with another antibiotic.
Standard antibiotic prophylaxis: Per oral: amoxicillin 500 mg, 4 tablets 1 hour preoperative. Alternatively: intravenous: ampicillin 2 g 30 min. preoperative. In case of penicillin-allergy: Per oral: clindamycin 600 mg capsules 1 hour preoperative Alternatively: intravenous clindamycin 600 mg 30 min preoperative. Taken from Hjertemedisinsk avdeling, Thoraxkirurgisk avdeling, Anestesiavdelingen & Hjerteseseksjonen at Barneavdelingen, Rikshospitalet. Last revision: 15. January, 2007 http://www.rikshospitalet.no/iKnowBase/Content/406388/antibiotikaprofylakse.doc
Medicaments for patients who have undergone a surgical operation in the oral cavity:
Analgesic/antiinflammatory tablets: 400 mg ibuprofen (Ibux, Brufen) 2 tablets 3 x daily for antiinflammatory effect 500 mg paracetamol (Paracet, Pinex) 1-2 tablets 3 x day) Double dose at start; up to 4x per day Evt paracet/codein (500/30mg) up to 4x daily for very strong pain (elderly)
Antibiotics (when indicated): First choice: Penicillin V phenoxymethylpenicillin (Apocillin) 660mg / 1 tablet 5 x daily for 7 days In case of penicillin allergy: Clindamycin (Dalacin) 300 mg, 2 capsules 2 x daily for 5 days. Alternatives: Metronidazol (Flagyl) 400mg, 1 tablet x 3 pr day for 7 days (not for pregnancy and lactation); narrow spectrum, not aerobes and fac. anaerobes; resistance development); Erythromycin (Ery-Max) 250 mg, 2 capsules 2 x daily (every 12. hour) for 7 days; ineffective against anaerobes. (Doses for adult patients.)


