CAUTION: "RISK OF BURNS" DO NOT OPERATE HEATER WITHOUT INSTALLING THE PROTECTIVE GUARD OR GRILL. 1. REMOVE THE HEATER AND ALL PACKING MATERIALS FROM THE BOX. (Fig.2) NOTE : Save the shipping carton and packing materials for future storage. 8 UNPACKING AND ASSEMBLY Heater. Top guard. Handle. Top plate 2 “C” cell batteries. Siphon pump. Bag of screws for top grill assembly. Owner's manual. Safety Tips Manual. 2. ASSEMBLING. A) Remove all packing materials from heater: (Fig.3) B) MOUNTING TOP PLATE: (Fig.4) Align the arrow marking on the top plate with the carrying handle hole on the cabinet and place the top plate on the cabinet. C) INSTALLING FRONT AND REAR GUARDS: (Fig.5A and Fig.5B) Hang the upper portion of the front guard (notched to allow for the igniter door) on the Upper Grill brackets with the downward hooked grill rods. (Fig.5A) Snap the lower portion of the front guard into the holes in the Lower Grill brackets with the inward hooked grill rods. (Fig.5B) Install the rear guard in the same way. Top plate Carrying handle Top guard Batteries Rear guard Front guard Siphon Pump Top guard Screws Fig.2 Fig.4 Fig.3 Fig.5B Fig.5A arrow marking carrying handle hole NEVER LEAVE THE HEATER UNATTENDED WHILE BURNING!
Transcript
CAUTION: "RISK OF BURNS"
DO NOT OPERATE HEATER WITHOUT INSTALLING THE PROTECTIVE GUARD OR GRILL.
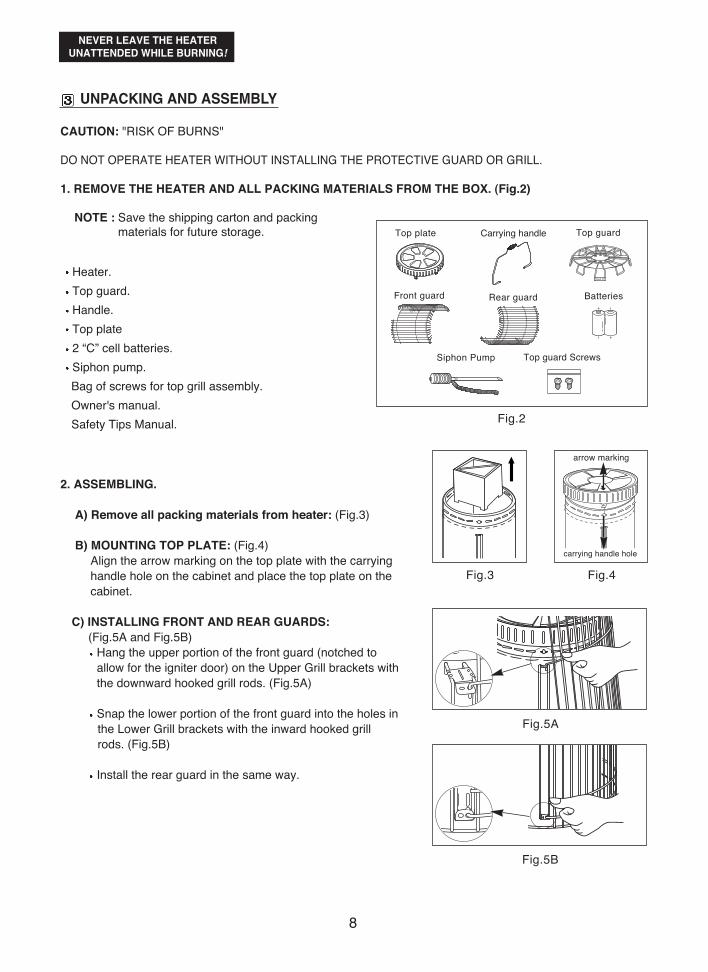
1. REMOVE THE HEATER AND ALL PACKING MATERIALS FROM THE BOX. (Fig.2)
NOTE : Save the shipping carton and packingmaterials for future storage.
8
UNPACKING AND ASSEMBLY
Heater.Top guard.Handle.Top plate2 “C” cell batteries.Siphon pump.Bag of screws for top grill assembly.Owner's manual.Safety Tips Manual.
2. ASSEMBLING.
A) Remove all packing materials from heater: (Fig.3)
B) MOUNTING TOP PLATE: (Fig.4)Align the arrow marking on the top plate with the carryinghandle hole on the cabinet and place the top plate on thecabinet.
C) INSTALLING FRONT AND REAR GUARDS:(Fig.5A and Fig.5B)
Hang the upper portion of the front guard (notched toallow for the igniter door) on the Upper Grill brackets withthe downward hooked grill rods. (Fig.5A)
Snap the lower portion of the front guard into the holes inthe Lower Grill brackets with the inward hooked grill rods. (Fig.5B)
Install the rear guard in the same way.
Top plate Carrying handle Top guard
BatteriesRear guardFront guard
Siphon Pump Top guard Screws
Fig.2
Fig.4Fig.3
Fig.5B
Fig.5A
arrow marking
carrying handle hole
NEVER LEAVE THE HEATERUNATTENDED WHILE BURNING!
NEVER LEAVE THE HEATERUNATTENDED WHILE BURNING!
NEVER LEAVE THE HEATERUNATTENDED WHILE BURNING!
9
KEROSENE SHOULD ONLY BE STORED IN A BLUE CONTAINER THAT IS CLEARLY MARKED"KEROSENE". NEVER STORE KEROSENE IN A RED CONTAINER. Red containers are associated with gasoline.
NEVER store kerosene in the living space. Kerosene should be stored in a well ventilated place outside theliving area.
NEVER use any fuel other than 1-K kerosene.NEVER use fuel such as gasoline, benzene, alcohol, white gas, camp stove fuel, paint thinners, or other oil
compounds in this heater. These are volatile fuels that can cause explosion or uncontrolled flames.
The best way to purchase kerosene is in a pre-packaged, metal or plastic, blue colored container.The second choice would be to buy it from a dealer who stores it in a 55 gallon drum. The third choice is tobuy kerosene from a dealer who stores it in a large underground (or above ground) tank. Kerosene that iscontaminated with even a small amount of water will prevent a kerosene heater from functioning properly. As you move from the first choice in purchasing kerosene (pre-packaged container) to the third choice (largestorage tank), the likelihood of water being present from condensation increases.If you purchase kerosene in bulk, know your dealer.
It is EXTREMELY IMPORTANT to the operation of this heater that you usethe proper grade of kerosene. The proper grade of kerosene is identified as1-K Kerosene. DO NOT OPERATE THIS HEATER WITH ANY FUELOTHER THAN 1-K KEROSENE! 1-K Kerosene has been refined tovirtually eliminate contaminants such as sulfur, which can cause a rottenegg odor during operation of the heater.Due to IRS regulations 1-K kerosene is now dyed red in many areas.
D) INSTALLING CARRYING HANDLE: (Fig.6)Insert the carrying handle into the holes on the cabinetby aligning holes on brackets of top plate.
E) INSTALLING TOP GUARD: (Fig.7)Align the 2 brackets on the top guard with the 2 mountingbrackets on the front and rear guards.Secure each bracket with a screw. Make sure that thebrackets on the top guard are positioned outside themounting brackets on the front and rear guards.
F) INSTALLING BATTERIES: (Fig.8)Battery holder is located on the back of the heater.Open the battery cover from the battery case.Insert two(2) “C” cell batteries according to the plus(+) and minus(-) markings inside of the holder.Replace the battery cover to the heater.
G) Now your heater is completely assembled: (Fig.9)
KEROSENE (1-K ONLY)Fig.8
Fig.9
Fig.6
Fig.7Top Grill Screw
NEVER LEAVE THE HEATERUNATTENDED WHILE BURNING!
10
It is normal for a kerosene heater to give off a slight odor upon start-up and shut-down.After 5-10 minutes of operation, the heater should have reached its normal operating temperature and anyodor should be very slight.
NEVER store kerosene in direct sunlight or near a source of heat.NEVER use kerosene that has been stored from one season to the next.
Kerosene deteriorates over time. "OLD KEROSENE" WILL NOT BURN PROPERLY IN THIS HEATER.
A variety of problems can result from using poor quality kerosene --- smoke, odor, low flame, difficult ignition,difficult shut-down, flame flickers and dies, excessive burning down of the wick, reduced wick life, wick adjuster sticking, excessive deposits on the wick, etc.. If you encounter any of the problems listed above,check your kerosene. If you discover that the kerosene is the problem, get a fresh supply of 1-K KEROSENEbefore using your heater again.
FUELING YOUR HEATER
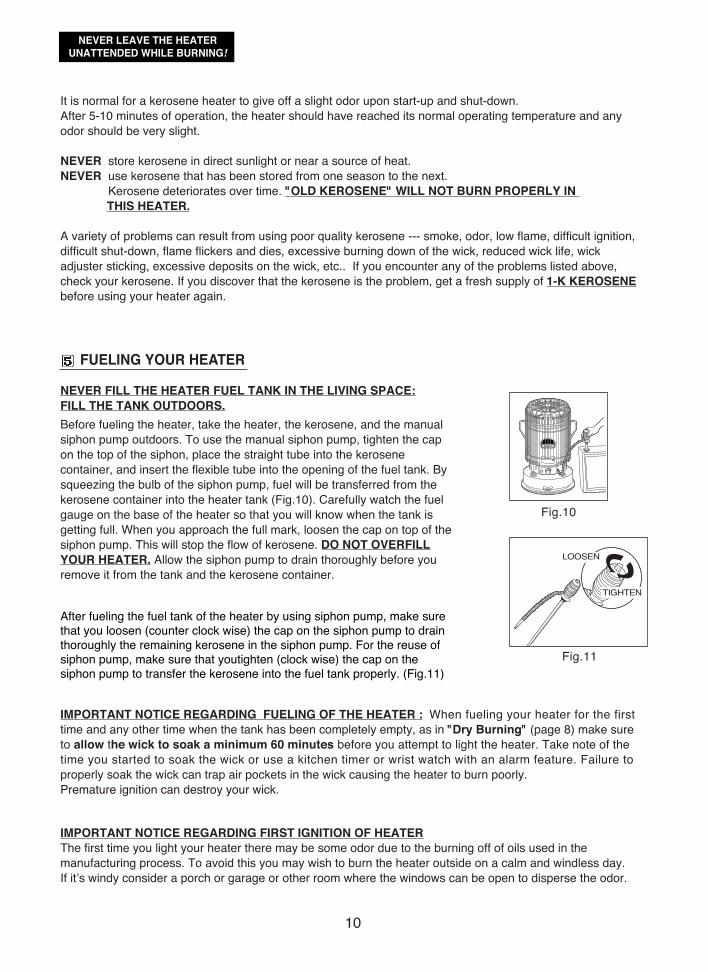
NEVER FILL THE HEATER FUEL TANK IN THE LIVING SPACE:FILL THE TANK OUTDOORS.Before fueling the heater, take the heater, the kerosene, and the manualsiphon pump outdoors. To use the manual siphon pump, tighten the capon the top of the siphon, place the straight tube into the kerosenecontainer, and insert the flexible tube into the opening of the fuel tank. Bysqueezing the bulb of the siphon pump, fuel will be transferred from thekerosene container into the heater tank (Fig.10). Carefully watch the fuelgauge on the base of the heater so that you will know when the tank isgetting full. When you approach the full mark, loosen the cap on top of thesiphon pump. This will stop the flow of kerosene. DO NOT OVERFILLYOUR HEATER. Allow the siphon pump to drain thoroughly before youremove it from the tank and the kerosene container.
Fig.10
Fig.11
LOOSEN
TIGHTEN
After fueling the fuel tank of the heater by using siphon pump, make surethat you loosen (counter clock wise) the cap on the siphon pump to drainthoroughly the remaining kerosene in the siphon pump. For the reuse of siphon pump, make sure that youtighten (clock wise) the cap on the siphon pump to transfer the kerosene into the fuel tank properly. (Fig.11)
IMPORTANT NOTICE REGARDING FUELING OF THE HEATER : When fueling your heater for the firsttime and any other time when the tank has been completely empty, as in "Dry Burning" (page 8) make sureto allow the wick to soak a minimum 60 minutes before you attempt to light the heater. Take note of thetime you started to soak the wick or use a kitchen timer or wrist watch with an alarm feature. Failure toproperly soak the wick can trap air pockets in the wick causing the heater to burn poorly.Premature ignition can destroy your wick.
IMPORTANT NOTICE REGARDING FIRST IGNITION OF HEATERThe first time you light your heater there may be some odor due to the burning off of oils used in themanufacturing process. To avoid this you may wish to burn the heater outside on a calm and windless day.If it’s windy consider a porch or garage or other room where the windows can be open to disperse the odor.
NEVER LEAVE THE HEATERUNATTENDED WHILE BURNING!
11
31.giF21.giF
AUTOMATIC IGNITION SYSTEM
For safety and convenience, this heater features an automatic ignition system.2 "C" cell batteries, included with the heater, provide the power for the igniter which lights the wick once it hasbeen raised to its maximum height.To use the automatic ignition system:
Make sure the batteries have been installed.Turn the wick adjuster knob clockwise until the wick has been raised to its maximum height. (Fig.12)Push the ignition lever (Fig.13) to bring the glowing igniter into contact with the wick.This will cause ignition to occur.As soon as you see that the wick has been lit, release the ignition lever. This will automatically lowerthe burn chamber back down over the wick.Rotate the burner knob from side to side a few times to make sure that the burner is positionedproperly on the wick adjuster.Then begin following the steps outlined in "Adjusting the wick" (page 7)
IGNITION VIA MATCH
If you encounter a problem with the ignition mechanism, or if you have deadbatteries, it is possible to light the heater with a match. (Fig.14)
The procedure is as follows:Turn the wick adjuster knob clockwise until the wick has beenraised to its maximum height.Lift the burn chamber by using the burner knob.Touch a lighted match to the exposed top edge of the wick.Once you see that the wick has been lit, lower the burn chamber back down over the wick.Rotate the burner knob from side to side a few times to make sure that the burner is positionedproperly on the wick adjuster.Then begin following the steps outlined in "Adjusting the wick" (page 7)
CAUTION : Make sure that you do not leave the match, or any portion of it (match head, etc.) in the burnerarea. Debris left from the match can cause an uneven alignment of the burner and may result insmoke, incomplete combustion, odor, or fire.
Fig.14
Match
WICKFlLAMENT
IGNITER1~2mm
8
DESEMPACAMIENTO Y MONTAJE
ADVERTENCIA: "RIESGO DE QUEMADURAS."
NO USE EL CALENTADOR SIN INSTALAR LA CERCA PROTECTORA (LA VERJA)
1. SAQUE EL CALENTADOR Y TODOS LOS MATERIALES DE EMBALAJE DE LA CAJA. (Ilu. 2)
NOTA: Guarde el cartón del envío y los materialesde embalaje para el almacenamiento futuro.
• Calentador • Verja de la cima • Asa • Plato de la cima • 2 pilas “C”• Bomba sifón • La bolsa de tornillos para armar la verja de cima • El Manual del dueño • Manual de consejos para la seguridad
2. ARMAR
A) Quite todos los materiales de embalaje del calentador: (Ilu. 3)
B) MONTAR PLATO DE LA CIMA: (Ilu. 4)
Alinee la flecha de la placa superior con el orificio del mango del compartimento.A continuación, coloque la placa superior en el compartimento.
C) INSTALACION DE PROTECTORES DELANTEROSY POSTERIORES: (Ilu. 5A, Ilu. 5B)
• Ponga la parte superior de la cubierta frontal (con unaranura para permitir el paso de la puerta del encendedor)en los soportes de la parrilla superior con las barrasenganchadas hacia abajo (Ilu. 5A).
• Introduzca la parte inferior de la cubierta frontal en los orifi-cios de la parte inferior.Soportes de la parrilla con las barras enganchadas haciadentro (Ilu. 5B).
• Instale el protector posterior de la misma manera
3
Plato de la cima Asa La verja de la cima
PilasLa verja traseraLa verja delantera
Bomba sifón tornillos para montaje de la cima
Ilustración 2
Ilustración 4Ilustración 3
flecha
orificio del mango
Ilustración 5B
Ilustración 5A
9
D) INSTALAR EL ASA PARA LLEVAR ASA: (Ilu. 6)Inserte el asa en los agujeros en el gabinete por alinear los agujeros en los puntales del plato de la cima.
E) INSTALAR LA VERJA DE LA CIMA: (Ilu. 7)Alinee los 2 puntales de la verja de la cima con los 2 puntales demontar en las verjas delanteras y traseras. Afiance cada puntal conun tornillo. Asegúrese que se posicionan los puntales en la verja dela cima dentro de los puntales de monta en las verjas delanteras ytraseras.
F) INSTALAR LAS PILAS: (Ilu. 8)
• La caja de la pila se localiza en la parte de atrás del calentador.
• Abra la tapa de la caja de pilas. • Inserte dos (2) pilas “C” según los marcos para el positivo (+) y
negativo (-) dentro de la caja. • Reemplace la tapa de la caja al calentador.
G) Ahora su calentador está completamente armado. (Ilu. 9)
QUEROSÉN (1-K Sólo)
Es SUMAMENTE IMPORTANTE al funcionamiento de este calentador que usted use la calidad correcta de querosén. La calidad correcta de querosén se identifica como 1-KQuerosén. ¡No USE ESTE CALENTADOR CON CUALQUIER otro COMBUSTIBLE que 1-K QUEROSÉN! Se ha refinado 1-K querosén para eliminar práctimente toda contaminacion como azufre que puede causar un olor del huevo podrido durante elfuncionamiento del calentador. Debido a regulaciones de IRS Queroseno de l K ahora es teñido rojo en muchas áreas.
SOLO DEBE GUARDARSE EL QUEROSÉN EN UN RECIPIENTE AZUL QUE ES CLARAMENTE MARCADO"QUEROSÉN." NUNCA GUARDE EL QUEROSÉN EN UN RECIPIENTE ROJO. Los recipientes rojos son asociados congasolina.
NUNCA guarde el querosén en el espacio de vivir. Debe guardarse querosén en un lugar bien ventilado fuera del área de vivir.
NUNCA use cualquier otro combustible que 1-K querosén.
NUNCA use combustible como gasolina, benceno, alcohol, gas blanco, combustible de estufa de campamento, aguarrás de la pintura, u otros compuestos de aceite en este calentador. Éstos son combustibles volátiles que pueden causar explosión o las llamas desenfrenadas.
La manera mejor de comprar querosén es en un recipiente pre-empaquetado, metal o plástico, de color azul. La segundaopción sería comprarlo de un distribuidor que lo guarda en un bidón de 55 galónes. La tercera opción es comprar querosén deun distribuidor que lo guarda en un tanque grande en el subsuelo (o sobre tierra). Querosén que se contamina con incluso unacantidad pequeña de agua impedirá a un calentador de querosén funcionar correctamente. Cuando usted cambia de la primeraopción de comprar querosén (recipiente pre-empaquetado ) a la tercera opción (tanque grande de almacenamiento), la probabilidad de que agua esté presente de la condensación es más. Si usted compra querosén a granel, conozca a su distribuidor.
4
Ilustración 8
Ilustración 9
Ilustración 6
Ilustración 7Tornillo de la parrilla superior
10
Es normal para un calentador de querosén emitir un olor ligero al encender y apagar. Después de 5-10 minutos de funcionamiento, el calentador debe de haber alcanzado su temperatura de funcionar normal ycualquier olor debe ser muy poco.
NUNCA guarde el querosén en luz del sol directa o cerca de una fuente de calor.
NUNCA use querosén que se ha guardado de una estación del año a la próxima. El querosén se deteriora con el tiempo. "QUEROSÉN VIEJO" no QUEMARÁ CORRECTAMENTE EN ESTE CALENTADOR.
Una variedad de problemas pueden ser el resultado de usar querosén de calidad pobre--- humo, olor, llama baja, la ignicióndifícil, el apagar difícil, la llama vacila y se muere, el quemar excesivo de la mecha, la vida reducida de la mecha , ajustador dela mecha se traba, depósitos excesivos en la mecha, etc. Si usted encuentra cualquiera de los problemas listados, averigüe lacalidad de su querosén. Si usted descubre que el querosén es el problema, consigue un suministro fresco de 1-K QUEROSÉNantes de usar su calentador de nuevo.
ALIMENTAR SU CALENTADOR NUNCA LLENE EL TANQUE de COMBUSTIBLE de CALENTADOR EN EL ESPACIO DE VIVIR. LLENE EL TANQUE AFUERA AL AIRE LIBRE. Antes del alimentar el calentador, tome el calentador, el querosén, y la bombasifón manual al aire libre. Para usar la bomba sifón manual, apriete la tapa enla cabeza del sifón, ponga el tubo recto en el recipiente de querosén, y inserteel tubo flexible en la apertura del tanque de combustible. Por apretar la bombillade la bomba sifón, se transferirá combustible del recipiente de querosén altanque del calentador (Ilu. 10). Cuidadosamente mira el indicador de com-bustible en la base del calentador para que usted sepa cuando el tanque estáponiéndose lleno. Cuando usted se acerca a la marca llena, suelte la tapa enci-ma de la bomba sifón. Esto detendrá el flujo de querosén. NO SOBRELLENESU CALENTADOR. Permita la bomba sifón escurrirse completamente antes deque usted lo quite del tanque y el recipiente de querosén.
Después del alimentar el tanque de combustible del calentador por usar labomba sifón, asegurese que usted suelta (en sentido contravio al de lasagujas del reloj) la tapa en la bomba sifón para vertir el querosén restantecompletamente de la bomba sifón. Para usar de nuevo la bomba sifón, ase-gurese que usted aprieta (en el sentido de las agujas del reloj) la tapa en labomba sifón para transferir el querosén correctamente en el tanque decombustible. (Ilu. 11)
AVISO IMPORTANTE CON RESPECTO A LA PRIMERA ALIMENTACIÓN DEL CALENTADOR Cuando primero usa su calentador, asegurese que usted deje un mínimo de 60 minutos (cuidadosamente mire el tiempo)después de llenar el tanque antes de que usted intente encender el calentador. Esto da tiempo que la mecha se sature.
AVISO IMPORTANTE CON RESPECTO A LA PRIMERA IGNICION DE CALENTADOR La primera vez usted enciende el calentador, debe hacerse afuera, al aire libre. Esto permite que los aceites, etc., usados en lafabricación del calentador se quemen afuera en lugar de dentro de su casa.
AVISO IMPORTANTE: NUNCA el re llene el tanque del calentador con combustible cuando el calentador todavía está en uso o caliente.
5
Ilustración 10
Ilustración 11
suelte
apriétese
11
SISTEMA DE IGNICION AUTOMATICO
Para la seguridad y comodidad, este calentador ofrece un sistema de ignición automático, 2 pilas "C", incluidas con el calenta-dor, mantienen el poder del mechero que enciende la mecha cuando ésta se ha subido a su altura máxima. Para usar el sistema de ignición automático:
- Asegúrese que las pilas se han instalado. - Gire el ajustador de mecha en el sentido de las agujas del reloj hasta que la mecha se ha subido
a su altura máxima. (Ilu. 12)- Tire en la palanca de ignición (Ilu. 13) para traer el mechero resplandeciente en contacto con la mecha.
Esto causará la ignición. - En cuanto usted vea que la mecha se ha encendido, suelte la palanca de la ignición. Esto bajará la cámara de
quemar automáticamente sobre la mecha. - Gire el bulto del quemador de un lado al otro unas veces para asegurarse que el quemador se posiciona
correctamente en el ajustador de la mecha. - Entonces empiece seguir los pasos dados en "ajustar la mecha" (página 7)
IGNICION POR FOSFORO
Si usted encuentra un problema con el mecanismo de la ignición, o si usted tiene pilas gas-tadas, es posible encender el calentador con un fósforo (Ilu. 14).
El procedimiento es el siguiente:
- Gire ajustador de mecha en el sentido de las agujas del reloj hasta que la mecha se haya levantado a su altura máxima.
- Levante la cámara de quemar por usar el bulto del quemador. - Ponga un fósforo encendido al borde de la cima expuesto de la mecha. - Una vez que usted vea que la mecha se ha encendido, baje la cámara de la quemar sobre la mecha. - Gire el bulto del quemador de un lado al otro unas veces para asegurarse que el quemador se
posiciona correctamente en el ajustador de la mecha. - Entonces empiece siguir los pasos dados en "Ajustar la mecha" (página 7)
CUATELA: Asegurese que usted no deja el fósforo, o cualquier parte de él (cabeza del fósforo, etc.) en el área del quemador. Ruinas del fósforo pueden causar una alineación desigual del quemador y pueden producir humo, combustión incompleta, olor, o fuego.