12
WWW . FORMATOP . COM UNSURPASSED QUALITY IN COUNTERTOPS &W ORKSURFACES

W W W . F O R M A T O P . C O M
UNSURPASSED QUALITY IN COUNTERTOPS & WORKSURFACES
THE FORMATOP WARRANTY
We warrant our countertops to be free from defectsin material and/or workmanship under normalresidential usage to the original purchaser for a periodof two (2) years from the date of purchase.
This is a parts warranty only and excludes labour for removal or replacement of defective parts. Ourobligation under this warranty shall be limited to therepair or replacement of any part or parts that mayprove defective under normal residential usage asdetermined by our examination.
This warranty is expressly in lieu of any and all otherwarranties, expressed or implied, including warrantiesof merchantability and of fitness for a particularpurpose. This warranty shall not apply to ourcountertops or parts of our countertops that havebeen subjected to alteration, misuse, negligence,abuse, improper installation, storage and handling.
For more information talk to your authorizedFormatop dealer or contact Formatop at:
1548 Strasburg Road, Kitchener, Ontario N2R 1E9
Phone: (519) 748-4928Fax: (519) 748-4579
Toll-free: 1-888-237-0037www.formatop.com
Your authorized Formatop dealer:
Copyright 2016. All rights reserved.

Formatop countertops are very durable, but like anyproduct they can be damaged by abuse, neglect orcarelessness. When used and cared for properly, yourFormatop countertop will give you years of satisfaction.
GUIDELINES
Water DamageWater that is allowed to sit on the countertop for anylength of time, especially near mitre joints, can penetrateand cause the core to swell and eventually delaminate.Be very careful in areas where sinks, dishwashers, coffeemakers or kettles are located on or near a mitre joint. Wipeoff water or other liquids immediately.
Normal CleaningIn the majority of cases you can clean your Formatop countertop with a clean, damp, non-abrasive cotton clothand a mild liquid detergent or household cleaner.
- Rinse with clean water but do not use excess water, especially near mitre joints.
- Dry the surface with a clean, soft, non-abrasive cloth.
Special CleaningFor matte or sculptured finishes.
- Use a nylon-bristled hand or vegetable brush along witha mild liquid detergent and water solution, or householdcleaner.
- Clean the countertop with a rotating motion.
- Rinse and dry the top with a clean, soft, cotton cloth.
If streaks remain after cleaning use a mild glass cleaner andthen wipe dry with a soft, non-abrasive, cotton cloth.
GLUE REMOVAL: Any contact adhesive residue on thecountertop should be removed by using a reputable, non-flammable, contact adhesive solvent and a non-abrasive,cotton cloth. Use solvent sparingly. Read and follow allinstructions and warnings before use.
PAINT AND VARNISH REMOVAL: Use a suitablesolvent but use it sparingly. Excessive amounts candelaminate surface. Follow all warnings and instructions.For water-based paints use an ammoniated householdcleaner. For stubborn spots use a plastic, non-metallic, non-abrasive pad. Use it gently. NEVER USE steel wool orother abrasive scouring pads. These will scratch the surfaceof the laminate.
CARING FORYOUR COUNTERTOPS
STAINS: To remove or minimize stains use a mild, all-purpose, household cleaner and allow it to drawout stain. Blot with clean, damp, non-abrasive, cottoncloth and rinse with cold water. Read and follow allinstructions carefully.
Some things can permanently stain the laminate.Newsprint, marking pens, hair dyes, wood stains and otherstaining agents should be kept away from the countertop.These stains may be reduced by using a paste of baking sodaand water to pull out stain. Do not rub. Wipe up paste withclean, damp, non-abrasive, cotton cloth, then rinse and dry.
Periodic application of a self-cleaning wax can helpminimize future staining.
CAUTION:Never use cleaners containing acid, alkali, or sodiumhypochlorite on the laminate surface. These will mar, etch,corrode and permanently discolour the laminate. Do notplace bottles or items containing these cleaners on the laminate surface. Examples: drain cleaners, oven cleaners,ceramic cleaners, coffee pot cleaners, tub and tile cleaners,chlorine bleach, lime scale removers and more.
Scratch and Impact ProtectionUnder normal use your countertop is very durable, but careshould be taken to minimize certain conditions.
Use cutting boards, chopping blocks or other protective elements when working on the countertop. DO NOTchop, slice, pound or hammer directly on the laminatesurface. Knives or other sharp utensils can slice or scratchsurface. Heavy blows from a hammer or meat tenderizercan crack or gouge surface.
Ceramics and abrasive objects can scratch the surface. Useplacemats, doilies or trivets to protect surface.
DO NOT use abrasive cleaners, powders, steel wool, sandpaper or scouring pads on the laminate surface.
HOT OBJECTS: Do not place hot objects directly on thecountertop. Electric skillets, waffle irons, curling irons, hotrollers etc. can damage the surface. Do not iron or placeiron on laminate surface. Avoid cigarette contact.
Prolonged exposure to temperatures of 140 degrees F (60degrees C) or higher may cause the laminate to separatefrom the core material.
Choice of SurfaceConsider the type of use the countertop will receive.Rough textured surfaces have certain advantages oversmooth surfaces in high usage areas. High gloss finishes arenot recommended for high use areas.
2 11
Build-up or Non Build-upTo allow doors or drawers to openproperly the countertop may haveto be raised to allow clearance (diagram 1). Blocks of wood 11/16"high may be added under the counter-top where it sits on the frame.
End Treatment OptionsAll end treatments must be taken into consideration whenmeasuring for new or replacement countertops.
Finished EndFor exposed countertop ends (thosenot ending against a wall) allowapproximately 1" overhang past cabinets. END CAP KITS areavailable from your Formatop dealer.
Appliance Finished EndFor exposed countertop ends buttingup to appliances, a 1" overhang maynot be possible or desirable. Forappliance finished ends 1/8" to 1/4"is the recommended overhangdepending on size of applianceopening. Appliance Finished Endscan only be used with NON Build-up countertops.
Radius Finished EndThese can be either single or doubleradius and must be specified as such.The edge butting a wall would nothave a radius end. Radius ends requiresufficient overhang past cabinets.
PRELIMINARY CONSIDERATIONSBefore ordering or measuring for your new or replacementcountertops there are some decisions to be made beyondthe colour and texture.
Style of Countertop:Countertops come in twobasic styles, Postform orStraight Edge.
Postform is the mostpopular of all countertopstyles. The laminate topsurface is cemented to aparticle board core whichhas the front and backedges shaped to a requestedprofile. The laminate is then one continuous form from theleading edge to the back of the countertop. This no-seamconstruction prevents moisture from entering. Postformalso offers a variety of front edge profiles. Check with yourFormatop dealer for the many profiles that are available.
Straight Edge or SelfEdge appears just as itsounds. All horizontal andvertical surfaces are at rightangles. This style has seamswhere the different surfacesmeet, so care must be takento prevent moisture fromgetting into joints. Solidsurface materials or woodedge treatments can beapplied to the edges insteadof laminate.
2
POSTFORM
STRAIGHT EDGE
ORDERING YOURFORMATOP
DIAGRAM 1
FINISHED END DIA. 2
APPLIANCE FINISHED END DIA. 3
RADIUS FINISHED END DIA.4
NEW OR REPLACEMENTCOUNTERTOP

End SplashThis is an optional piece usedwhen the countertop end meetsa wall. If you wish an end splashincorporated in your countertopdesign please specify. Formatopwill incorporate this into theoverall countertop measurementyou supply. END SPLASH KITS can be supplied withcountertop if specified. Refer to installation instructionscontained in End Splash Kit.
Bar Sweep Finished EndA symmetrical arc used for Bartops and free-standing Islands.The radius must be includedin the overall length of thecountertop. This design requiressufficient overhang past thecabinets. A laminate edge isapplied to finish the sweep.
Angle Finished EndThese can be either single ordouble. Size must be specifiedin final measurements. Allowfor sufficient overhang pastthe cabinets.
Banjo TopCabinet depth isimportant. Allow anextra 1 1/2" on thebanjo or wide sideof the cabinet. Thisdesign is used primarilyfor bathroom counter-tops where there is ashelf running behind toilet. Check with your Formatopdealer if there are any questions about measuringor specifications.
FORMATOP MITRECOLLECTIONFormatop offers a wide variety of countertop configurations.Shown on the right are some of the mitre designs that areavailable in various dimensions. Mitred sections are requiredfor various segments of the countertop construction where,because of laminate size restrictions and corner angles, thecountertop must be made in pieces. Sizes under 7 ft. x 7 ft.can be delivered fully assembled by Formatop. Sizes beyondthis are restricted because of delivery truck dimensions andhome interior limitations, i.e. doorways.
FORMATOP MITRE COLLECTION
BANJO TOP DIA. 8
END SPLASH DIA. 5
BAR SWEEP FINISHED END DIA. 6
ANGLE FINISHED EDGE DIA. 7
10To prevent water infiltration apply a small quantity of latex silicone to the mitred edges. Completely
wipe off excess. Use silicone to seal edge betweencountertop backsplash and wall. Smooth with wet fingerand wipe off excess caulking.
11Hook up sinks and other appliances.
If you have concerns about installation, contact yourFormatop dealer.
8From inside ofthe cabinets
and underneaththe countertop,install the take-up mitre bolts (supplied with countertop).Install as shown in diagram 11. Tighten only slightly at thispoint. Check top of countertop, and with a hammer and apiece of wood, tap the mitre joint lightly to obtain asmooth joint. Tighten mitre bolts firmly.
NOTE: For mitred sections 7 ft. x 7 ft. and under,Formatop can supply as a completely assembled unit. Largerunits are shipped in sections due to transport and homeinterior size restrictions.
9Fix the countertop to the cabinets. Be sure to usethe right length of screw so as not to puncture
laminate surface. Screw through brackets or wood stripsinto countertop.
DIAGRAM 11
10 3

9
5Check where countertopmeets the wall. If you
can see gaps, then yourwalls may not be straightand even. Open a compassat a point in the largest gapbetween the wall and thecountertop. With the pointof the compass alwaystouching the wall, movethe compass down the edge, scribing a line along the edgeof the countertop backsplash. Remove the countertop, andusing a belt sander, grind the backsplash to the scribed line.
4Attach 3/4" brackets to the cabinet with 1/2" screws.If there is a horizontal strip of wood on the front and
back of the cabinet you may not have to attach brackets.
6Place new countertopon cabinets, making
sure of the alignment.Establish position of sinkor cooktop. To mark cut-out for self-rimming sink,position the sink upsidedown on the countertop
and trace the outline. Using a straight edge draw a cuttingline 1/2" inside the already scribed outline. Drill a pilothole just inside the cutting line, large enough toaccommodate the blade of the jigsaw. Cut along thecutting line with a fine tooth blade and make the cornersof the cutout slightly rounded.
NOTE: It is wise to support the cutout area fromunderneath to prevent damage. Removing the countertopfrom the cabinets before cutting will eliminate possibledamage to the cabinets.
When installing the sink, it is recommended to putwaterproof silicone under the rim of the sink to preventwater penetration. The same applies to cooktops.
7When the counter-top is in position on
the cabinets apply abead of waterproofadhesive such as siliconealong any mitred edges.Carefully align thecountertop pieces andpush together tightly.Verify the countertopalignment both frontand back.
use a back and forth motion to adhere the laminate. Usinga small, smooth wood block, rub the end cap to ensureproper adhesion. When cool (use a wet cloth) file off theexcess laminate with a medium wood file. Be carefulwhen filing. Place the file almost parallel to the top ofthe countertop and file in a single-direction motion.If requested, the end caps can be applied by Formatop.
If the countertops are being replaced without any changesto the layout, then you can simply measure the existingcountertops (see diagram above).
1Measure the total length of each piece of thecountertop along the back where the countertop
meets the wall. Measure the width of each piece ofcountertop. Include any backsplash dimensions withinyour measurements. Measure each additional piece ofcountertop, taking care to measure to the nearest 1/8".
2FOR ISLANDS AND BARTOPS. For islandsmeasure the length and width of the countertop and
indicate square, radius or diagonal corners. For bartopsmeasure the width and the length from the wall to the endof the bartop. Indicate size of sweep or radius if required(see diagram 6).
Verify 90 degreecornersWhere two walls meetbehind countertop, it isimportant to verify thatthey are at a 90 degreeangle (diagram 9). On
one wall measure 3 ft. from the corner and on the adjoiningwall measure 4 ft. from the corner. Mark these positionscarefully. Measure the diagonal between the two points.This distance should be 5 ft. (60") for a 90 degree corner. Ifyour measurement is less than 59 3/4" or more than 60 1/4"make sure you note this on your measurements.
For Diagonal CornersMeasure dimensionsA-B and C-D. Makesure that you includethe backsplash depth (see diagram 10). Alsoinclude measurements1-2, 3-4, 5-6, 2-7.
When measuring for new or replacementcountertops, it is imperative that the dimensionsbe as accurate as possible. Details such as wallsquareness, end treatments, and end splash shouldbe noted carefully.
Your Formatop dealer can help you with anymitre or dimension questions. Use the enclosedmeasurement guide on page 6 to help you calculateyour countertop design.
4
MEASURING FOR NEW OR REPLACEMENT COUNTERTOPS
REPLACING EXISTING COUNTERTOPS
DIAGRAM 10
DIAGRAM 9
End FinishesSpecify the type of end finish(see diagrams 2 to 7) includingnecessary radius or angledimensions.
NOTE: Indicate whetherthe countertop requiresBuild-up (see diagram 1).

DIAGRAM 4
COUNTERTOPSFOR NEW CABINETS
SPECIAL MEASUREMENTS AND CONFIGURATIONS PLUS SERIOUSLY OUT-OF-SQUARE WALLS SHOULD BE
DISCUSSED WITH YOUR FORMATOP DEALER.
Formatop countertops come in stock lengths andwidths and can be cut to your finished sizes. Pre-mitred countertops are also available through yourFormatop dealer. For exposed or appliance endsFormatop supplies kits that contain preshapedlaminate strips.
REQUIRED TOOLS ANDMATERIALS
Tools: • Tape Measure • Pencil • Straight Edge • Level • Framing Square • Caulking Gun • Belt Sander • Screwdriver • Jigsaw • Compass • Iron • Wrench• Medium Wood File • Drill • Clamps • Hammer
Materials:• Formatop Countertop • Latex Silicone • MitreBolts • 1/2" Wood Screws • End Cap Kit
Standard Postform CountertopsFormatop offers a standard range of countertop depths.• Kitchen countertops 25 1/2" will accommodate standard
24" cabinet depth.• Bartop standard sizes 26 1/2" - 27", depending on model.
Also available in 33", 36", 39" and 42".• Vanities available in standard sizes 22 1/2" and 23 1/4".
8 5
INSTALLING YOUR FORMATOP COUNTERTOPS
2Place new countertop sections on cabinets and checkfit and dimensions. The countertop front should be
parallel to the front of the cabinets. Make sure there isclearance to open the cabinet doors or drawers. If thecountertop needs to be raised up to allow clearance (seeBuild-up), fix 11/16" wood blocks under countertop atpoints where it sits on the frame of the cabinets. Check tosee that the countertop is level. If not this may necessitateusing wood shims to level countertop.
End CapComponents
3Prior to finishinginstallation, apply
included end caps. Attach the particle strips included inthe End Cap Kit (see diagram above). Apply end caplaminate by holding against countertop end, allowing forslight overlap of edges. To activate the glue on the end caplaminate, use an iron set at maximum heat. It is preferableto use a damp cloth between the iron and the laminate and
1When a Formatop standard length countertop ispurchased from your dealer, it may not be the exact size
you require and will have to be cut to fit. Accuratelymeasure to establish your length requirements. Mark therequired cutting line, using a framing square, on theunderside surface of the countertop. Using a jigsaw, cut offthe countertop on your prescribed line. Use a clampedstraight edge as an accurate guide. Cut carefully to avoidchipping laminate surface.
When measuring for completely new countertops it isextremely important that you know the exact dimensionsof the new cabinets. Measure the total length of eachcabinet section along the back wall (see diagram below,example dimensions 130", 36", 36"). Measure the depth ofthe cabinets excluding the thickness of the doors. Standardkitchen cabinet depth is 24". For countertop depth allowfor overhang past cabinet (standard overhang is 1 1/2").The depth of the countertop would then be 24" + 1 1/2"=251/2". This is Formatop’s standard countertop depth.
For end treatment measure-ments and options, viewdiagrams 2, 3, 4, 5, 6, 7.
Verify that all corners are 90degrees (see diagram 9).
For free-standing Islandcabinets measure the widthand the length (example36" and 84"). The countertopdimensions should allow foroverhang on all four sides.Allow for a minimum of 1 1/2"overhang on all sides. If thereis to be a seating area on oneor more sides of the island,then the dimension of theoverhang will have to beincreased. Overhangs largerthan 12" will require additionalsupport from the cabinet.
Use the dimensiongraphic on page 6 to lay outyour new countertop dimensions. Be sure to indicate whethercountertop requires Build-up. Specify countertop dimensions,NOT cabinet sizes.
Vanity and Ba rtopsMeasure the width and length of the new cabinets.Indicate location of walls and any end treatment options.See diagram 8 for banjo-top cut around toilet.

CAUTION: Be sure to turn off all water at shut-offvalves, then disconnect and remove all plumbing fixturesbefore removing countertop. If you arenot sure, check with your plumber.Move all appliances out of the wayso they won’t be scratched ordamaged.
2Caulking beads along the backsplash, countertop edgesand mitre joints should be cut with a sharp utility knife.
Any trim around the countertop edge should be removed.
4Some old countertops are made of ceramic tile set in amasonry base. To remove the tile, chip it away from the
base using a masonry chisel and hammer. To preventinjury wear protective glasses. Cut the remaining mortarbed into pieces using a circular saw with a masonry cuttingblade. If any damage occurs to cabinets during this process,be sure to repair them and check the level.
3Lift the countertop awayfrom the base cabinets
with a pry bar. Take carenot to damage the cabinets.Mitred countertops shouldcome up in sections. If thecountertop resists beingpried up, it may be necessaryto cut the top in pieces. Using a coarse wood cuttingblade in a jigsaw or reciprocating saw, cut the top intoeasily removable sections. Take great care not to cutinto the cabinets.
REMOVING OLD COUNTERTOPS
1Remove all bracketsor braces holding
countertop to cabinetframe. In mitred areasunscrew and remove any mitre bolts (see installation).
6 7
YOUR NEW COUNTERTOPShown below is a handy measurement guide to usein configuring your new or replacement countertop.Outline your countertop according to the dimensionalscales. Specify countertop NOT cabinet sizes. Be sure toindicate wall locations.
Indicate end treatments and mitres as shown in previousdiagrams. Please fill out the necessary information at thebottom of the page pertaining to colour choice, modeland finish. Your Formatop dealer can assist you with anyquestions you may have.
NAME
ADDRESS
CITY POSTAL CODE
TEL: (HOME) (BUS.)
DATE ORDERED
COLOUR
MODEL
FINISH
PLAN CHECKED BY
Formatop Manufacturing Company Ltd.UNSURPASSED QUALITY IN COUNTERTOPS & WORKSURFACES
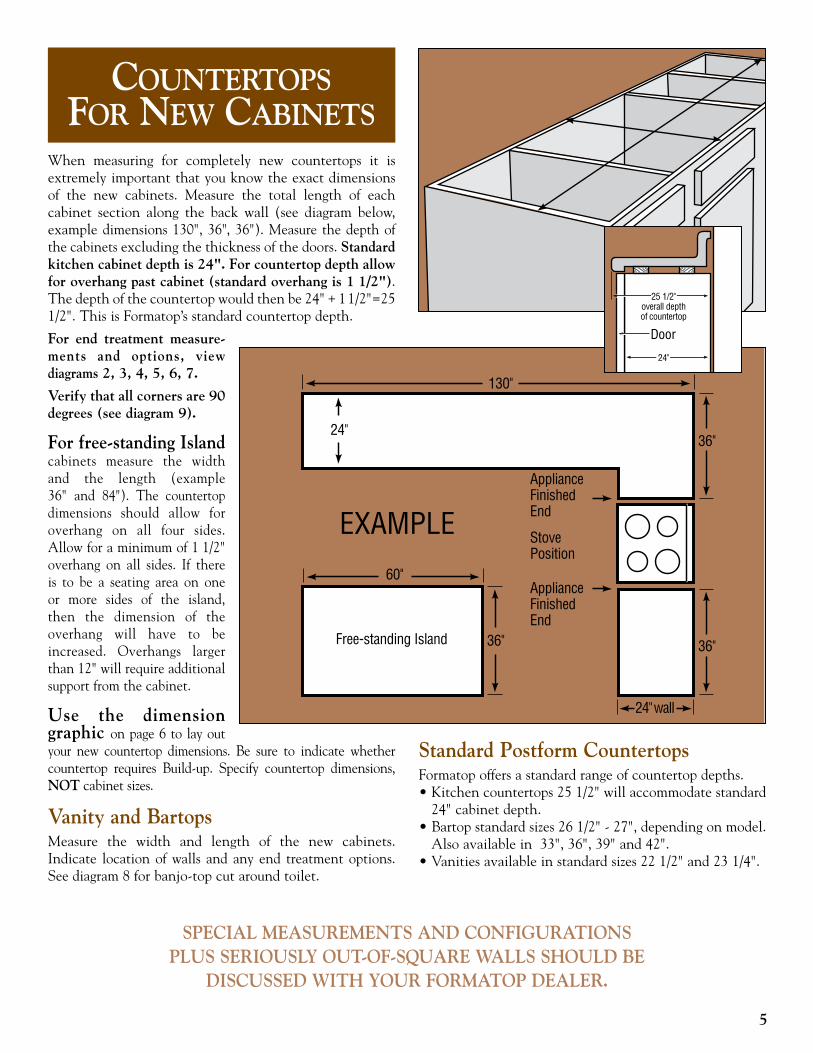
DIAGRAM 4
COUNTERTOPSFOR NEW CABINETS
SPECIAL MEASUREMENTS AND CONFIGURATIONS PLUS SERIOUSLY OUT-OF-SQUARE WALLS SHOULD BE
DISCUSSED WITH YOUR FORMATOP DEALER.
Formatop countertops come in stock lengths andwidths and can be cut to your finished sizes. Pre-mitred countertops are also available through yourFormatop dealer. For exposed or appliance endsFormatop supplies kits that contain preshapedlaminate strips.
REQUIRED TOOLS ANDMATERIALS
Tools: • Tape Measure • Pencil • Straight Edge • Level • Framing Square • Caulking Gun • Belt Sander • Screwdriver • Jigsaw • Compass • Iron • Wrench• Medium Wood File • Drill • Clamps • Hammer
Materials:• Formatop Countertop • Latex Silicone • MitreBolts • 1/2" Wood Screws • End Cap Kit
Standard Postform CountertopsFormatop offers a standard range of countertop depths.• Kitchen countertops 25 1/2" will accommodate standard
24" cabinet depth.• Bartop standard sizes 26 1/2" - 27", depending on model.
Also available in 33", 36", 39" and 42".• Vanities available in standard sizes 22 1/2" and 23 1/4".
8 5
INSTALLING YOUR FORMATOP COUNTERTOPS
2Place new countertop sections on cabinets and checkfit and dimensions. The countertop front should be
parallel to the front of the cabinets. Make sure there isclearance to open the cabinet doors or drawers. If thecountertop needs to be raised up to allow clearance (seeBuild-up), fix 11/16" wood blocks under countertop atpoints where it sits on the frame of the cabinets. Check tosee that the countertop is level. If not this may necessitateusing wood shims to level countertop.
End CapComponents
3Prior to finishinginstallation, apply
included end caps. Attach the particle strips included inthe End Cap Kit (see diagram above). Apply end caplaminate by holding against countertop end, allowing forslight overlap of edges. To activate the glue on the end caplaminate, use an iron set at maximum heat. It is preferableto use a damp cloth between the iron and the laminate and
1When a Formatop standard length countertop ispurchased from your dealer, it may not be the exact size
you require and will have to be cut to fit. Accuratelymeasure to establish your length requirements. Mark therequired cutting line, using a framing square, on theunderside surface of the countertop. Using a jigsaw, cut offthe countertop on your prescribed line. Use a clampedstraight edge as an accurate guide. Cut carefully to avoidchipping laminate surface.
When measuring for completely new countertops it isextremely important that you know the exact dimensionsof the new cabinets. Measure the total length of eachcabinet section along the back wall (see diagram below,example dimensions 130", 36", 36"). Measure the depth ofthe cabinets excluding the thickness of the doors. Standardkitchen cabinet depth is 24". For countertop depth allowfor overhang past cabinet (standard overhang is 1 1/2").The depth of the countertop would then be 24" + 1 1/2"=251/2". This is Formatop’s standard countertop depth.
For end treatment measure-ments and options, viewdiagrams 2, 3, 4, 5, 6, 7.
Verify that all corners are 90degrees (see diagram 9).
For free-standing Islandcabinets measure the widthand the length (example36" and 84"). The countertopdimensions should allow foroverhang on all four sides.Allow for a minimum of 1 1/2"overhang on all sides. If thereis to be a seating area on oneor more sides of the island,then the dimension of theoverhang will have to beincreased. Overhangs largerthan 12" will require additionalsupport from the cabinet.
Use the dimensiongraphic on page 6 to lay outyour new countertop dimensions. Be sure to indicate whethercountertop requires Build-up. Specify countertop dimensions,NOT cabinet sizes.
Vanity and Ba rtopsMeasure the width and length of the new cabinets.Indicate location of walls and any end treatment options.See diagram 8 for banjo-top cut around toilet.

9
5Check where countertopmeets the wall. If you
can see gaps, then yourwalls may not be straightand even. Open a compassat a point in the largest gapbetween the wall and thecountertop. With the pointof the compass alwaystouching the wall, movethe compass down the edge, scribing a line along the edgeof the countertop backsplash. Remove the countertop, andusing a belt sander, grind the backsplash to the scribed line.
4Attach 3/4" brackets to the cabinet with 1/2" screws.If there is a horizontal strip of wood on the front and
back of the cabinet you may not have to attach brackets.
6Place new countertopon cabinets, making
sure of the alignment.Establish position of sinkor cooktop. To mark cut-out for self-rimming sink,position the sink upsidedown on the countertop
and trace the outline. Using a straight edge draw a cuttingline 1/2" inside the already scribed outline. Drill a pilothole just inside the cutting line, large enough toaccommodate the blade of the jigsaw. Cut along thecutting line with a fine tooth blade and make the cornersof the cutout slightly rounded.
NOTE: It is wise to support the cutout area fromunderneath to prevent damage. Removing the countertopfrom the cabinets before cutting will eliminate possibledamage to the cabinets.
When installing the sink, it is recommended to putwaterproof silicone under the rim of the sink to preventwater penetration. The same applies to cooktops.
7When the counter-top is in position on
the cabinets apply abead of waterproofadhesive such as siliconealong any mitred edges.Carefully align thecountertop pieces andpush together tightly.Verify the countertopalignment both frontand back.
use a back and forth motion to adhere the laminate. Usinga small, smooth wood block, rub the end cap to ensureproper adhesion. When cool (use a wet cloth) file off theexcess laminate with a medium wood file. Be carefulwhen filing. Place the file almost parallel to the top ofthe countertop and file in a single-direction motion.If requested, the end caps can be applied by Formatop.
If the countertops are being replaced without any changesto the layout, then you can simply measure the existingcountertops (see diagram above).
1Measure the total length of each piece of thecountertop along the back where the countertop
meets the wall. Measure the width of each piece ofcountertop. Include any backsplash dimensions withinyour measurements. Measure each additional piece ofcountertop, taking care to measure to the nearest 1/8".
2FOR ISLANDS AND BARTOPS. For islandsmeasure the length and width of the countertop and
indicate square, radius or diagonal corners. For bartopsmeasure the width and the length from the wall to the endof the bartop. Indicate size of sweep or radius if required(see diagram 6).
Verify 90 degreecornersWhere two walls meetbehind countertop, it isimportant to verify thatthey are at a 90 degreeangle (diagram 9). On
one wall measure 3 ft. from the corner and on the adjoiningwall measure 4 ft. from the corner. Mark these positionscarefully. Measure the diagonal between the two points.This distance should be 5 ft. (60") for a 90 degree corner. Ifyour measurement is less than 59 3/4" or more than 60 1/4"make sure you note this on your measurements.
For Diagonal CornersMeasure dimensionsA-B and C-D. Makesure that you includethe backsplash depth (see diagram 10). Alsoinclude measurements1-2, 3-4, 5-6, 2-7.
When measuring for new or replacementcountertops, it is imperative that the dimensionsbe as accurate as possible. Details such as wallsquareness, end treatments, and end splash shouldbe noted carefully.
Your Formatop dealer can help you with anymitre or dimension questions. Use the enclosedmeasurement guide on page 6 to help you calculateyour countertop design.
4
MEASURING FOR NEW OR REPLACEMENT COUNTERTOPS
REPLACING EXISTING COUNTERTOPS
DIAGRAM 10
DIAGRAM 9
End FinishesSpecify the type of end finish(see diagrams 2 to 7) includingnecessary radius or angledimensions.
NOTE: Indicate whetherthe countertop requiresBuild-up (see diagram 1).

End SplashThis is an optional piece usedwhen the countertop end meetsa wall. If you wish an end splashincorporated in your countertopdesign please specify. Formatopwill incorporate this into theoverall countertop measurementyou supply. END SPLASH KITS can be supplied withcountertop if specified. Refer to installation instructionscontained in End Splash Kit.
Bar Sweep Finished EndA symmetrical arc used for Bartops and free-standing Islands.The radius must be includedin the overall length of thecountertop. This design requiressufficient overhang past thecabinets. A laminate edge isapplied to finish the sweep.
Angle Finished EndThese can be either single ordouble. Size must be specifiedin final measurements. Allowfor sufficient overhang pastthe cabinets.
Banjo TopCabinet depth isimportant. Allow anextra 1 1/2" on thebanjo or wide sideof the cabinet. Thisdesign is used primarilyfor bathroom counter-tops where there is ashelf running behind toilet. Check with your Formatopdealer if there are any questions about measuringor specifications.
FORMATOP MITRECOLLECTIONFormatop offers a wide variety of countertop configurations.Shown on the right are some of the mitre designs that areavailable in various dimensions. Mitred sections are requiredfor various segments of the countertop construction where,because of laminate size restrictions and corner angles, thecountertop must be made in pieces. Sizes under 7 ft. x 7 ft.can be delivered fully assembled by Formatop. Sizes beyondthis are restricted because of delivery truck dimensions andhome interior limitations, i.e. doorways.
FORMATOP MITRE COLLECTION
BANJO TOP DIA. 8
END SPLASH DIA. 5
BAR SWEEP FINISHED END DIA. 6
ANGLE FINISHED EDGE DIA. 7
10To prevent water infiltration apply a small quantity of latex silicone to the mitred edges. Completely
wipe off excess. Use silicone to seal edge betweencountertop backsplash and wall. Smooth with wet fingerand wipe off excess caulking.
11Hook up sinks and other appliances.
If you have concerns about installation, contact yourFormatop dealer.
8From inside ofthe cabinets
and underneaththe countertop,install the take-up mitre bolts (supplied with countertop).Install as shown in diagram 11. Tighten only slightly at thispoint. Check top of countertop, and with a hammer and apiece of wood, tap the mitre joint lightly to obtain asmooth joint. Tighten mitre bolts firmly.
NOTE: For mitred sections 7 ft. x 7 ft. and under,Formatop can supply as a completely assembled unit. Largerunits are shipped in sections due to transport and homeinterior size restrictions.
9Fix the countertop to the cabinets. Be sure to usethe right length of screw so as not to puncture
laminate surface. Screw through brackets or wood stripsinto countertop.
DIAGRAM 11
10 3

Formatop countertops are very durable, but like anyproduct they can be damaged by abuse, neglect orcarelessness. When used and cared for properly, yourFormatop countertop will give you years of satisfaction.
GUIDELINES
Water DamageWater that is allowed to sit on the countertop for anylength of time, especially near mitre joints, can penetrateand cause the core to swell and eventually delaminate.Be very careful in areas where sinks, dishwashers, coffeemakers or kettles are located on or near a mitre joint. Wipeoff water or other liquids immediately.
Normal CleaningIn the majority of cases you can clean your Formatop countertop with a clean, damp, non-abrasive cotton clothand a mild liquid detergent or household cleaner.
- Rinse with clean water but do not use excess water, especially near mitre joints.
- Dry the surface with a clean, soft, non-abrasive cloth.
Special CleaningFor matte or sculptured finishes.
- Use a nylon-bristled hand or vegetable brush along witha mild liquid detergent and water solution, or householdcleaner.
- Clean the countertop with a rotating motion.
- Rinse and dry the top with a clean, soft, cotton cloth.
If streaks remain after cleaning use a mild glass cleaner andthen wipe dry with a soft, non-abrasive, cotton cloth.
GLUE REMOVAL: Any contact adhesive residue on thecountertop should be removed by using a reputable, non-flammable, contact adhesive solvent and a non-abrasive,cotton cloth. Use solvent sparingly. Read and follow allinstructions and warnings before use.
PAINT AND VARNISH REMOVAL: Use a suitablesolvent but use it sparingly. Excessive amounts candelaminate surface. Follow all warnings and instructions.For water-based paints use an ammoniated householdcleaner. For stubborn spots use a plastic, non-metallic, non-abrasive pad. Use it gently. NEVER USE steel wool orother abrasive scouring pads. These will scratch the surfaceof the laminate.
CARING FORYOUR COUNTERTOPS
STAINS: To remove or minimize stains use a mild, all-purpose, household cleaner and allow it to drawout stain. Blot with clean, damp, non-abrasive, cottoncloth and rinse with cold water. Read and follow allinstructions carefully.
Some things can permanently stain the laminate.Newsprint, marking pens, hair dyes, wood stains and otherstaining agents should be kept away from the countertop.These stains may be reduced by using a paste of baking sodaand water to pull out stain. Do not rub. Wipe up paste withclean, damp, non-abrasive, cotton cloth, then rinse and dry.
Periodic application of a self-cleaning wax can helpminimize future staining.
CAUTION:Never use cleaners containing acid, alkali, or sodiumhypochlorite on the laminate surface. These will mar, etch,corrode and permanently discolour the laminate. Do notplace bottles or items containing these cleaners on the laminate surface. Examples: drain cleaners, oven cleaners,ceramic cleaners, coffee pot cleaners, tub and tile cleaners,chlorine bleach, lime scale removers and more.
Scratch and Impact ProtectionUnder normal use your countertop is very durable, but careshould be taken to minimize certain conditions.
Use cutting boards, chopping blocks or other protective elements when working on the countertop. DO NOTchop, slice, pound or hammer directly on the laminatesurface. Knives or other sharp utensils can slice or scratchsurface. Heavy blows from a hammer or meat tenderizercan crack or gouge surface.
Ceramics and abrasive objects can scratch the surface. Useplacemats, doilies or trivets to protect surface.
DO NOT use abrasive cleaners, powders, steel wool, sandpaper or scouring pads on the laminate surface.
HOT OBJECTS: Do not place hot objects directly on thecountertop. Electric skillets, waffle irons, curling irons, hotrollers etc. can damage the surface. Do not iron or placeiron on laminate surface. Avoid cigarette contact.
Prolonged exposure to temperatures of 140 degrees F (60degrees C) or higher may cause the laminate to separatefrom the core material.
Choice of SurfaceConsider the type of use the countertop will receive.Rough textured surfaces have certain advantages oversmooth surfaces in high usage areas. High gloss finishes arenot recommended for high use areas.
2 11
Build-up or Non Build-upTo allow doors or drawers to openproperly the countertop may haveto be raised to allow clearance (diagram 1). Blocks of wood 11/16"high may be added under the counter-top where it sits on the frame.
End Treatment OptionsAll end treatments must be taken into consideration whenmeasuring for new or replacement countertops.
Finished EndFor exposed countertop ends (thosenot ending against a wall) allowapproximately 1" overhang past cabinets. END CAP KITS areavailable from your Formatop dealer.
Appliance Finished EndFor exposed countertop ends buttingup to appliances, a 1" overhang maynot be possible or desirable. Forappliance finished ends 1/8" to 1/4"is the recommended overhangdepending on size of applianceopening. Appliance Finished Endscan only be used with NON Build-up countertops.
Radius Finished EndThese can be either single or doubleradius and must be specified as such.The edge butting a wall would nothave a radius end. Radius ends requiresufficient overhang past cabinets.
PRELIMINARY CONSIDERATIONSBefore ordering or measuring for your new or replacementcountertops there are some decisions to be made beyondthe colour and texture.
Style of Countertop:Countertops come in twobasic styles, Postform orStraight Edge.
Postform is the mostpopular of all countertopstyles. The laminate topsurface is cemented to aparticle board core whichhas the front and backedges shaped to a requestedprofile. The laminate is then one continuous form from theleading edge to the back of the countertop. This no-seamconstruction prevents moisture from entering. Postformalso offers a variety of front edge profiles. Check with yourFormatop dealer for the many profiles that are available.
Straight Edge or SelfEdge appears just as itsounds. All horizontal andvertical surfaces are at rightangles. This style has seamswhere the different surfacesmeet, so care must be takento prevent moisture fromgetting into joints. Solidsurface materials or woodedge treatments can beapplied to the edges insteadof laminate.
2
POSTFORM
STRAIGHT EDGE
ORDERING YOURFORMATOP
DIAGRAM 1
FINISHED END DIA. 2
APPLIANCE FINISHED END DIA. 3
RADIUS FINISHED END DIA.4
NEW OR REPLACEMENTCOUNTERTOP

W W W . F O R M A T O P . C O M
UNSURPASSED QUALITY IN COUNTERTOPS & WORKSURFACES
THE FORMATOP WARRANTY
We warrant our countertops to be free from defectsin material and/or workmanship under normalresidential usage to the original purchaser for a periodof two (2) years from the date of purchase.
This is a parts warranty only and excludes labour for removal or replacement of defective parts. Ourobligation under this warranty shall be limited to therepair or replacement of any part or parts that mayprove defective under normal residential usage asdetermined by our examination.
This warranty is expressly in lieu of any and all otherwarranties, expressed or implied, including warrantiesof merchantability and of fitness for a particularpurpose. This warranty shall not apply to ourcountertops or parts of our countertops that havebeen subjected to alteration, misuse, negligence,abuse, improper installation, storage and handling.
For more information talk to your authorizedFormatop dealer or contact Formatop at:
1530 & 1548 Strasburg Road, Kitchener, Ontario N2R 1E9 Phone: (519) 748-4928 Fax:
(519) 748-4579Toll-free: 1-888-237-0037
www.formatop.com
Your authorized Formatop dealer:
Copyright 2016. All rights reserved.


