uRADMonitor USB Manual for serial port configuration Introduc)on The USB interface can be used for convenient, onsite configuration, debug and data access, while offering an alternative option to power the device with a standard 5V supply. The USB connector is a standard micro-USB female plug, so common USB data cables can be used. The feature was introduced on the uRADMonitor INDUSTRIAL HW105 (fifth iteration) and the uRADMonitor A3 HW106 (sixth iteration) to answer the need for a convenient device configuration option. 1 Magnasci SRL Romania, For more information visit https://www.uradmonitor.com
Transcript
uRADMonitor USB Manual
for serial port configuration
Introduc)onThe USB interface can be used for convenient, onsite configuration, debug and data access, while offering an alternative option to power the device with a standard 5V supply.The USB connector is a standard micro-USB female plug, so common USB data cables can be used.The feature was introduced on the uRADMonitor INDUSTRIAL HW105 (fifth iteration) and the uRADMonitor A3 HW106 (sixth iteration) to answer the need for a convenient device configuration option.
1Magnasci SRL Romania, For more information visit https://www.uradmonitor.com
uRADMonitor USB Manual
for serial port configuration
Summary
1 uRADMonitor devices with USB support 3
2 Serial connection setup 4
3 Commands 5
4 Configuration example 7
5 Debugging example 7
6 Firmware upgrade 7
7 Technical support 7
2Magnasci SRL Romania, For more information visit https://www.uradmonitor.com
uRADMonitor USB Manual
for serial port configuration
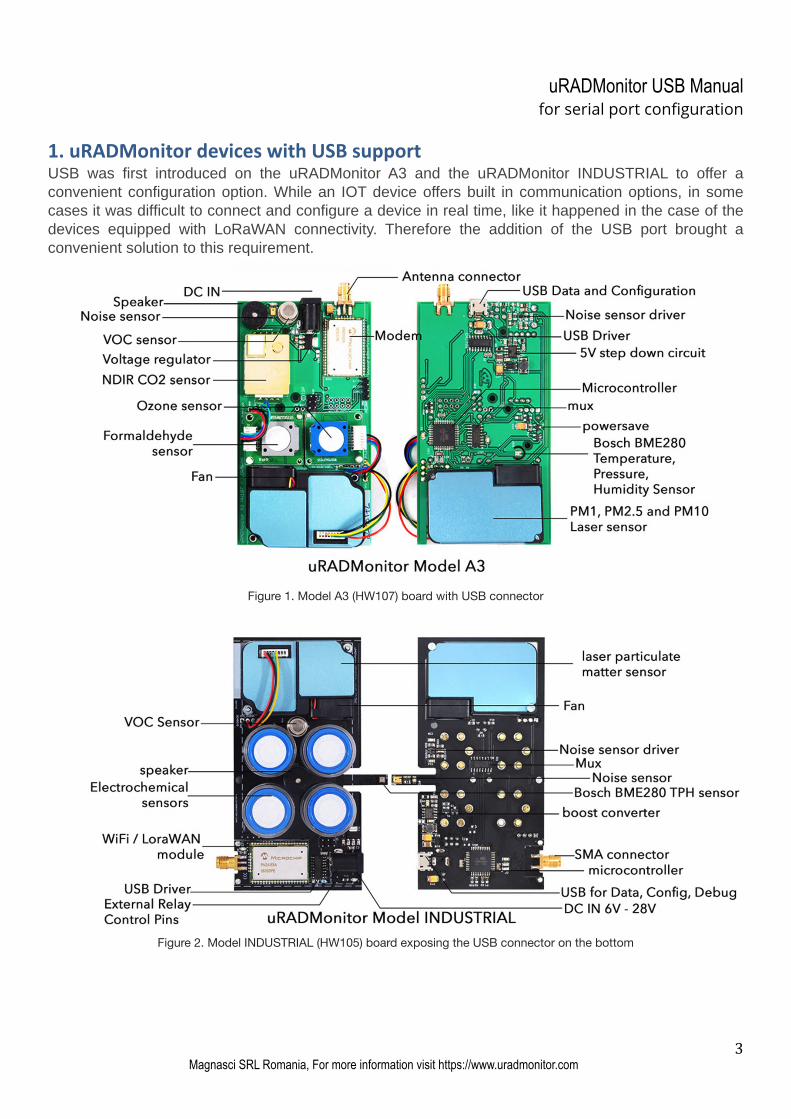
1.uRADMonitordeviceswithUSBsupportUSB was first introduced on the uRADMonitor A3 and the uRADMonitor INDUSTRIAL to offer a convenient configuration option. While an IOT device offers built in communication options, in some cases it was difficult to connect and configure a device in real time, like it happened in the case of the devices equipped with LoRaWAN connectivity. Therefore the addition of the USB port brought a convenient solution to this requirement.
Figure 1. Model A3 (HW107) board with USB connector
Figure 2. Model INDUSTRIAL (HW105) board exposing the USB connector on the bottom
3Magnasci SRL Romania, For more information visit https://www.uradmonitor.com
uRADMonitor USB Manual
for serial port configuration
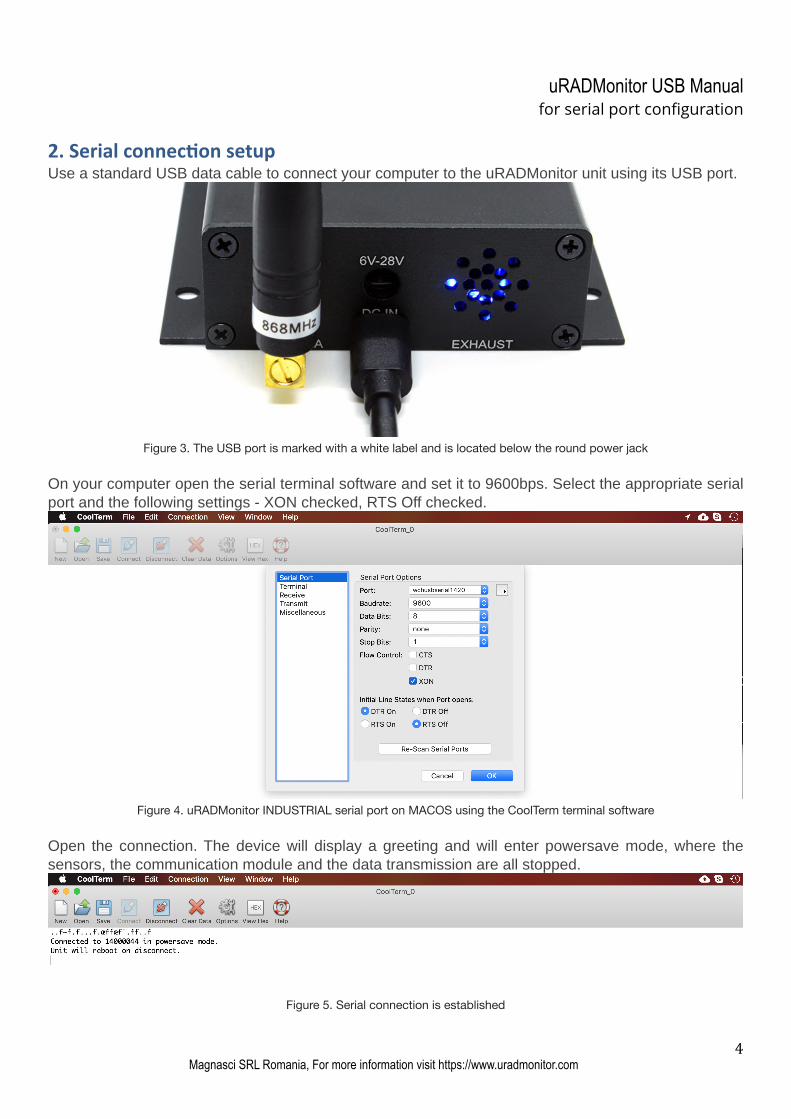
2.Serialconnec)onsetupUse a standard USB data cable to connect your computer to the uRADMonitor unit using its USB port.
Figure 3. The USB port is marked with a white label and is located below the round power jack
On your computer open the serial terminal software and set it to 9600bps. Select the appropriate serial port and the following settings - XON checked, RTS Off checked.
Figure 4. uRADMonitor INDUSTRIAL serial port on MACOS using the CoolTerm terminal software
Open the connection. The device will display a greeting and will enter powersave mode, where the sensors, the communication module and the data transmission are all stopped.
Figure 5. Serial connection is established
4Magnasci SRL Romania, For more information visit https://www.uradmonitor.com
uRADMonitor USB Manual
for serial port configuration
Now the device is ready to take commands over the serial link.
3.CommandsThe current firmware implements commands for configuration, debugging and data access. Each command must be issued between double quotation marks and any following parameters are separated by a comma. No spacing should be added between the elements in double quotation marks and the comma. This format was derived from machine to machine communication (server to device) and it is therefore rigid and inflexible in regards to any typos. However simple commands with no parameters can be send without the double quotation marks. First command you should start to is "help" (or simply just help):
• help , returns a brief list of the supported commands
Figure 6. Device response to the help command, showing the list of supported commands
setidFormat: "setid","id" Call example: "setid","14000045" Description: changes the devide ID to the new specified ID. This command is restricted and cannot be used in normal operation.
sendint Format: "sendint","interval" Call example: "sendint","300"Description: sets the data reporting frequency, in seconds. By default, Ethernet, Wifi and GSM units report the measurements every minute, while LoRaWAN units send every 5minutes.
encryptFormat: "encrypt","1|0"Call example: "encrypt","1"Description: toggles the payload encryption on (1) or off (0). If the device talks to the uRADMonitor data server the payload must be encrypted (default option). Instead if you want to access the payloads via a proprietary LoRaWAN Network Server, you need to disable encryption.
morseFormat: "morse","message"Call example: "morse","alert"Description: uses the internal speaker to transmit the message as audible morse encoded.
resetFormat: "reset"Call example: "reset"Description: will reboot the uRADMonitor device
setmuteFormat: "setmute","1|0"Call example: "setmute","1"Description: toggles the speaker on (0) or off (1). Default value is 0, so the speaker is active by default.
powersaveFormat: "powersave","1|0"Call example: "powersave","1"Description: toggles the powersave mode on (1) or off (0). Default is off. If enabled, the d e v i c e w i l l s e n d measurements data then go to sleep immediately, for the "sendint" interval, to conserve power. A LoRaWAN INDUSTRIAL device comes about 500mW in normal mode and an average of 10mW with sleep mode enabled. This feature is useful when running on limited power.
key1Format: "key1","value"Call example: "key2","WLAN-SSID"Description: this is a multipurpose parameter depending on uRADMonitor device type:
• WIFI: it holds the SSID of the Wifi network the device should connect to.
• LoRaWAN with ABP join: it holds the DEVADDR.• GSM: it holds the GPRS APN .
This command allows you to configure the key1 value. Maximum key length is 64 characters.
5Magnasci SRL Romania, For more information visit https://www.uradmonitor.com
uRADMonitor USB Manual
for serial port configuration
key2Format: "key2","value"Call example: "key2","WLAN-KEY"Description: this is a multipurpose parameter depending on uRADMonitor device type:
• WIFI: it holds the key of the Wifi network the device should connect to.
• LoRaWAN with ABP join: it holds the NWKSKEY.• LoRaWAN with OTAA join: it holds the APPEUI.• GSM: it holds the GPRS user (if any).
This command allows you to configure the key2 value. Maximum key length is 64 characters.
key3Format: "key3","value"Call example: "key3","APPSKEY"Description: this is a multipurpose parameter depending on uRADMonitor device type:
• LoRaWAN with ABP join: it holds the APPSKEY.• LoRaWAN with OTAA join: it holds the APPKEY.• GSM: it holds the GPRS password (if any) .
This command allows you to configure the key3 value. Maximum key length is 64 characters.
key4Format: "key4","value"Call example: "key4","PINCODE"Description: this is a multipurpose parameter depending on uRADMonitor device type. Currently it is only used by GSM devices, where the value represents the SIM CARD PIN code (if any).This command allows you to configure the key4 value. Maximum key length is 64 characters.
serverFormat: "server","value"Call example: "server","data.uradmonitor.com"Description: on devices with Ethernet, WIFI or GSM, this command sets the server the payload should be sent to. This powerful command allows to redirect payloads to other destinations then the default uRADMonitor data server. Please do not change unless you know what you are doing.Maximum length is 64 characters.
scriptFormat: "script","value"Call example: "script","/api/v1/upload/e7/"Description: on devices with Ethernet, WIFI or GSM, this command sets the script the payload should be sent to. This powerful command allows to redirect payloads to other destinations then the default uRADMonitor data server. Please do not change unless you know what you are doing.Maximum length is 64 characters.
rx1delayFormat: "rx1delay","value"Call example: "rx1delay","4000"Description: sets the LoRaWAN RX1 window, in miliseconds. RX2 will be automatically set to RX1 + 1000ms.
lorajoin Format: "lorajoin","1|2"Call example: "lorajoin","1"Description: sets the LoRaWAN JOIN mode, where 1 is OTAA and 2 is ABP.
loradrFormat: "loradr","value|255"Call example: "loradr","0"Description: sets the LoRaWAN data rate at device startup. Use 255 for no change (DR remains on previous setting). Value interval is from 5 (SF7) to 0 (SF12).
loraadrFormat: "loraadr","value"Call example: "loradr","0|1|255"Description: Toggles the LoRaWAN adaptive data rate at device startup, 1 to enable ADR, 0 to disable ADR. Use 255 for no change (ADR remains on previous setting).
loraupctrFormat: "loraupctr","value"Call example: "loraupctr","1055"Description: Sets the UP Counter used with LoRaWAN ABP. the next message sent to the Gateway will have the counter value+1.
beepFormat: "beep"Call example: "beep" or beepDescription: if mute is off, will produce a short beep on the speaker
alarmFormat: "alarm"Call example: "alarm"Description: if mute is off, will activate the sound alarm for about a minute or until the command is called the second time.
6Magnasci SRL Romania, For more information visit https://www.uradmonitor.com
uRADMonitor USB Manual
for serial port configuration
Figure 7. Use getsettings command to check current device configuration
4.Configura)onexampleFor a simple example, let's see how we can configure an INDUSTRIAL WLAN unit to connect to the WIFI network. For WIFI we only need to set key1 (the SSID) and key2 (the Network key) and the device will connect automatically. The keys will be saved to non volatile memory, so this step needs to be performed only once. The WLAN configuration can also be done via the device's internal hotspot and webpage (connect to uRADMonitor-XX, key device ID and open 192.168.4.1, for details see the manual or the quick guide).
Figure 8. Sequence of commands used to configure WIFI
4.DebuggingexampleFor most of the times, the getsettings command will pinpoint any possible issues, often related to wrong credentials. In some cases you might need to check the sensor output too, and here the "getdata" command becomes very useful:
getsettingsFormat: "getsettings"Call example: "getsettings" or getsettingsDescription: returns the device configuration in JSON format
getdataFormat: "getdata"Call example: "getdata" or getdataDescription: returns the last device data in JSON format. Please note that while USB is connected, the device is in powersave mode and all sensors are disabled.
7Magnasci SRL Romania, For more information visit https://www.uradmonitor.com
uRADMonitor USB Manual
for serial port configuration
Figure 9. Getdata returns last recorded sensor values
This example shows an error in the temperature+humidiy+pressure readings, they are all zero. This can happen due to the USB connection putting the device in powersave mode (sensors are stopped), or due to a failure in the electronic sensor measuring these parameters. The USB commands can offer precious insight in understanding the device performance.
4.FirmwareupgradeThe USB connection will soon be used for firmware upgrades. This section will be detailed once the feature becomes available.
4.TechnicalsupportFor any questions, issues or for additional help, contact us at [email protected]
8Magnasci SRL Romania, For more information visit https://www.uradmonitor.com